


BOSCH KSK38423, KSR30425, KSK38464, KSR38425, KSR34425 User Manual [fr]
...Montageanleitung |
de |
||
Installation |
instructions |
en |
|
Notice |
de montage |
fr |
|
Istruzioni per |
I'installazione |
it |
|
Installatievoorschrift |
nl |
||
Monteringsvejledning |
da |
||
Monteringsveiledning |
no |
||
Monteringsanvisning |
sv |
||
|
Asennusohje |
fi |
|
Instrucciones |
de montaje |
es |
|
Instruções |
de montagem |
pt |
|
OдзгЯет |
фoрoиЭфзузт |
el |
|
Montaj |
talimatlarž |
tr |
|
191 521 (8607)
9000

de Inhaltsverzeichnis
Side by Side. . . . . . . . . . . . . .5 . . .Aufstellen. . . . .. .. . . . . . . . . . . . . .6 . . .
Wechsel des Türgriffs. . . . . . . . . . .6 . .Gerät. . ausrichten. . . . . . . . . . . . 6. . .
Wechsel des Türanschlages. . . . . . . . 6. .
en Index
Side by Side. . . . . . . . . . . . . . .7 . .Installation. . . . .. . . . . . . . . . . . . . . 8. . .
Changing the door handle. . . . . . . . . 8. .Aligning the appliance. . . . . . . . . . .8 . . Changing over the door hinges. . . . . . . 8
fr Table des matières
Side by Side. . . . . . . . . . . . . . .9 . .Inversion. . . . du. . sens d'ouverture |
de |
porte. |
10 |
|||
Changement du sens d'ouverture |
Installation . . . . . . . . . . |
. |
. |
. |
.10. . . |
|
de porte. . . . . . . . . . . . . . . .9 . . . . . . . . . . |
. . |
. |
. |
.10. . . |
||
|
Ajuster l'appareil . . . . . . . |
|||||
|
|
|
|
|
|
|
|
|
|
|
|
|
|
it Istruzioni per l'uso
Side by Side. . . . . . . . . . . . . |
. 11. . .Installazione. . . . . .. . . . . . . . . . . . . 12. . . . |
||
Inversione della maniglia della porta. . . . |
|
11 Livellare l'apparecchio. . . . . . . . . .12. . . |
|
Reversibilità della porta. . . . . . . . . |
.12. . . . |
|
|
|
|
|
|
|
|
|
|
nl Inhoud
Side by Side. . . . . . . . . . . . . . 13. . .Plaatsen. . . . van. . het apparaat. . . . . . . . .14. .
Verwisselen |
van |
de deurgreep. . . . . . |
.13. |
Apparaat horizontaal zetten. . . . . . . .14. . |
Verwisselen |
van |
de deurophanging. . . . |
14 |
|

da Inholdsfortegnelse
Side by Side. . . . . . . . . . . . . . 15. . .Opstilling. . . . . . . . . . . . . . . . . . . . 16. . . .
Flytning af dørgreb. . . . . . . . . . . 15. . .Justering. . . af skabet. . . . . . . . . . . 16. . .
Flytning af dørhængsler. . . . . . . . . 16. . . .
no Bruksanvisning
Side by Side. . . . . . . . . . . . . . 17. . .Plassering. . . . .. .. . . . . . . . . . . . .18. . .
Veksling av dørhåndtaket. . . . . . . . .17. . Innretting. av apparatet. . . . . . . . . .18. . Omhengsling av døren. . . . . . . . . .18. . . .
sv Bruksanvisning
Side |
by |
Side. . . . . . . . . . |
. |
. . |
. 19. . |
.Uppställning. . . . . . . . . . . |
. |
. . |
. |
. |
. |
. |
. 20. . . . |
|||
Flytta dörrhandtaget. . . . . . . |
. |
. |
. 19. . |
. Ställa. . . upp skåpet. . . |
. |
. . |
. |
. |
. |
. |
. . 20. . . |
|||||
Hänga om dörrarna. . . . . . . |
. |
. . |
. 20. . . . . . |
|
|
|
|
|
|
|
|
|||||
|
|
|
|
|
|
|
|
|
|
|
|
|
|
|
||
|
fi Käyttöohje |
|
|
|
|
|
|
|
|
|
|
|
|
|
||
|
|
|
|
|
|
|
|
|
|
|
|
|
|
|||
Side |
by |
Side. . . . . . . . . . |
. |
. . |
. 21. . |
.Sijoitus. . . . . . . . . . . . . |
. |
. . |
. |
. |
. |
. |
. 22. . . . |
|||
Ovikahvan vaihto. . . . . . . . . . . .21. . .Laitteen. . . .suoristaminen. . . . . . . . . 22. . .
Oven kätisyyden vaihto. . . . . . . . . .22. . . .
es Índice
Side by Side. . . . . . . . . . . . . . 23. . .Emplazamiento. . . . . . de la unidad. . . . . . . . 25. .
Cambiar de |
posición |
las |
manillas |
|
|
Nivelar el aparato. . . . . . . . . . . . 25. . . |
||
de |
la |
puerta. . . . . . . . . . . . |
. |
. 24. . . . . . . . . |
||||
Cambio |
del |
sentido |
de |
apertura |
|
|
|
|
de |
la |
puerta. . . . . . |
. . . . . |
. |
. |
. 24. . . . . . . . . |
||

pt Indicacões
Side by Side. . . . . . . . . . . . . . .26. . Instalação. . . . . . . . . . . . . . . . . . . . .27. . .
Mudança do puxador da porta. . . . . . . .27 Alinhar o aparelho. . . . . . . . . . . . 28. . .
Alteração |
do |
sentido |
de |
abertura |
|
|
|
|
|
|
|
|
|
da porta. . . . . . |
. . . . . . . . . |
.27. . . . . . . . . . |
|
|
|
|
|||||||
|
|
|
|
|
|
|
|
|
|||||
|
|
|
|
|
|
|
|
|
|
|
|
|
|
el Ресйечьменб |
|
|
|
|
|
|
|
|
|||||
Side |
by |
Side. . . . |
. . . . . . . . . 29. . .ФпрпиЭфзуз. . . . . . . . . . . . . . . . . . 31. . . . |
||||||||||
БллбгЮ |
ôçò |
лбвЮт |
ôçò |
рьсфбт. . . . |
. |
|
30 |
ЕхихгсЬммйуз фзт |
ухукехЮт. . |
. . |
. . 31. |
||
БллбгЮ |
ôçò |
цпсЬт |
ôçò |
рьсфбт. . . . |
. |
|
30 |
|
|
|
|
|
|
|
|
|
|
|
|
|
|
|
|
||||
|
|
|
|
|
|
|
|
|
|
|
|
|
|
tr ŽçŽndekiler |
|
|
|
|
|
|
|
|
|
||||
Side |
by |
Side. . . . |
. . . . . . . . . |
.32. |
. |
Kurulmasž. . . . . .. . . . . |
. . . . . |
. . . |
.33. . . |
||||
Kapž kolunun de•iåtirilmesi. . . . . . . .32. . Cihazžn düzgün yerleåtirilmesi. . . . . . 33. Kapž menteåelerinin de•iåtirilmesi. . . . 33
de
|
|
Side |
by |
|
Side |
|
|
||||
|
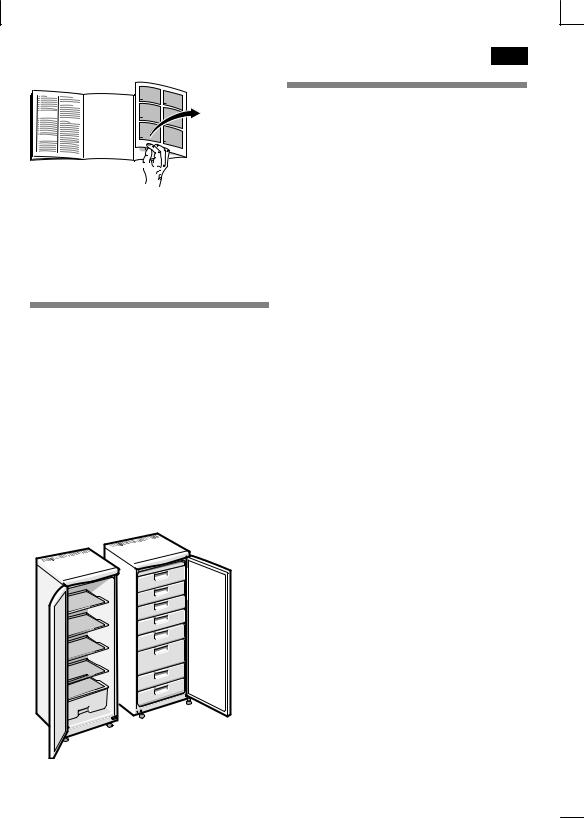
|
Anordnung |
|
der |
Geräte |
|
|||||
|
|
beachten |
|
|
|
|
|
|
|
||
|
|
(nicht bei allen |
|
Modellen) |
|
|
|||||
|
|
Für |
eine |
Side |
by |
Side |
Anordnung |
wird d |
|||
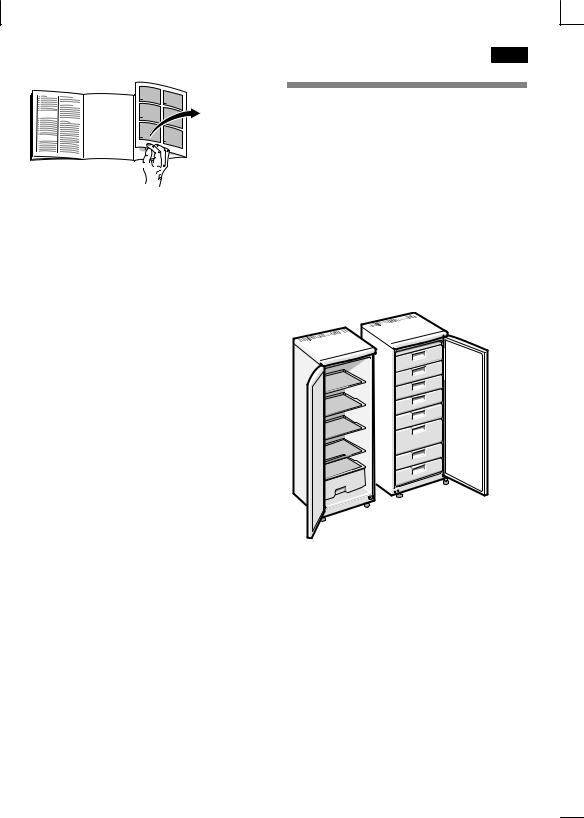
Bitte klappen Sie die letzte Seite mit den |
|
|
|
|
|
|
|
|
|
||
Abbildungen aus. |
Diese |
Seitenwand |
des |
Kühlgerätes |
leicht |
|
|||||
Montageanleitung |
gilt für mehrere |
beheizt. |
Dies |
verhindert |
die |
Bildung |
von |
||||
Modelle. |
|
Schwitzwasser |
beim Zusammenstellen |
||||||||
|
|
der |
Geräte. |
|
|
|
|
|
|
|
|
Abweichungen bei den Abbildungen sind |
|
|
|
|
|
|
|
|
|
||
möglich. |
|
Für |
die |
Anordnung |
deshalb |
immer |
den |
||||
|
|
Kühlschrank |
auf |
dielinke Seite |
stellen. |
|
|||||
5
de
Wechsel des Türgriffs Wechsel des Türanschlages
(falls erforderlich)
Bild 5
Bevor der Türanschlag gewechselt werden kann, muss vorher der Türgriff umgesetzt werden.
Montage in Reihenfolge der Zahlen.
Bild 3 |
|
|
|
|
|
Aufstellen |
|
|
|
|
|
||||
S 1 Griff |
auf der linken |
Seite |
Bild 6 |
|
|
|
|
|
|
||||||
abschrauben. |
|
|
|
|
|
|
|
|
|
||||||
|
|
|
Zum Aufstellen eignet sich ein trockener, |
||||||||||||
S Abdeckstopfen 2 gegenüber dem |
|||||||||||||||
belüftbarer Raum. Der Aufstellplatz sollte |
|||||||||||||||
Türgriff mit Hilfe von zwei Messern |
nicht |
direkter |
Sonnenbestrahlung |
|
|||||||||||
abheben. |
|
|
|
|
ausgesetzt und nicht in der Nähe einer |
||||||||||
S Griff |
in Pfeilrichtung3 bis |
zum |
Wärmequelle |
wie |
Herd, |
Heizkörper |
etc. |
||||||||
sein. |
Wenn |
das |
Aufstellen |
neben |
einer |
||||||||||
Anschlag |
ziehen. |
|
|
||||||||||||
|
|
Wärmequelle |
unvermeidbar |
ist, |
|
||||||||||
S Griff vorsichtig in Pfeilrichtung4 ziehen, |
|
||||||||||||||
verwenden Sie eine |
geeignete |
|
|||||||||||||
Griff |
löst |
sich |
aus |
Mittenbefestigung. |
Isolierplatte oder |
halten |
Sie |
folgende |
|||||||
S Griff |
aus |
Mittenbefestigung |
Mindestabstände |
zur |
Wärmequelle |
ein: |
|||||||||
|
|
|
|
|
|
|
|
|
|||||||
herausziehen 5. |
|
|
|
Zu |
Elektroherden |
3 |
cm. |
|
|
||||||
S Griff |
umsetzen |
und |
in |
|
Zu |
Öl; oder |
Kohleanstellherden 30 |
cm. |
|||||||
Mittenbefestigung |
|
|
|
|
|
|
|
|
|||||||
wieder einsetzen6.
S Griff in Pfeilrichtung7 bis zum Anschlag schieben.
S Griff 8 auf der rechten Seite anschrauben .
S Abdeckstopfen gegenüber einsetzen 9.
Winkelgriffe
Bild 4
Montage in Reihenfolge der Zahlen.
6
|
|
|
|
|
en |
|
Side |
by |
Side |
|
|
|
Observe |
position |
of the |
||
|
appliances |
|
|||
|
(not all models) |
|
|||
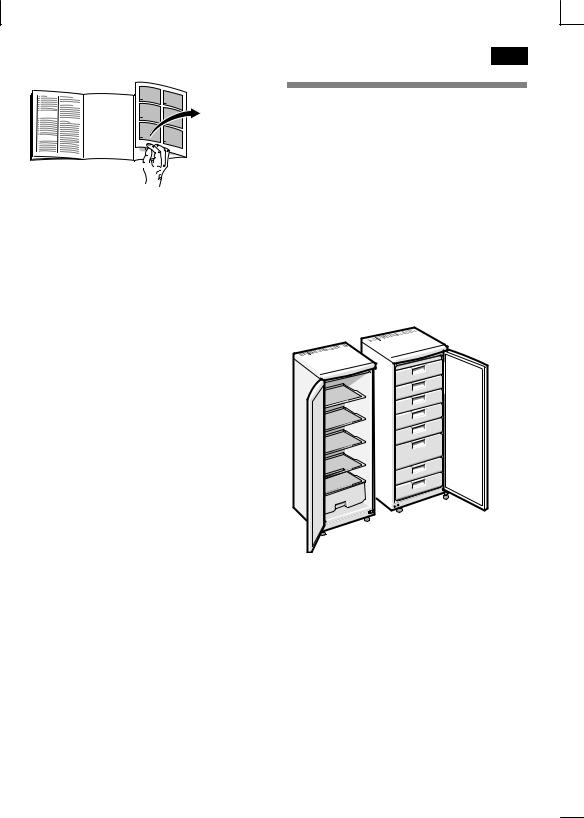
Please fold out the illustrated last page.The side |
panel of the refrigerator is heated |
||||
These installation instructions refer |
slightly for |
a |
side by side arrangement. |
||
to several models. |
This prevents |
the formation of |
|||
The illustrations may differ. |
condensation when the appliances are |
||||
placed together. |
|
||||
|
|
||||
|
Therefore, |
always place |
the refrigerator |
||
|
on the left |
side for a side by side |
|||
|
arrangement. |
|
|
|
|
7
Changing over the doo hinges
(If required)
Figure 5
Before changing over the door hinges, reposition the door handle.
Installation in numerical sequence.
Installation
Bail |
|
handles |
|
|
|
|
|
|
|
Figure 6 |
|
|
|
|
|
|
|
|
|
|
|
|
|
||||
Figure 3 |
|
|
|
|
|
|
|
|
|
|
Install |
the |
appliance |
in a |
dry, |
well |
|
||||||||||
|
|
|
|
|
|
|
|
|
|
ventilated |
room. |
The |
installation |
location |
|||||||||||||
S 1 Unscrew |
the |
handle |
on the |
left |
|
||||||||||||||||||||||
side. |
|
|
|
|
be |
exposed |
to |
direct |
|
||||||||||||||||||
|
|
|
|
|
|
|
|
|
|
|
|
|
should neither |
|
|||||||||||||
S Lift off the caps2 opposite the door |
|
sunlight |
nor near a heat source, e.g. |
||||||||||||||||||||||||
handle with |
the |
aid |
of |
|
two |
knives. |
|
a cooker, |
radiator, |
etc. If |
installation |
next |
|||||||||||||||
S Pull |
the |
handle |
all |
the |
|
way |
in |
|
|
to a |
heat |
source |
is |
unavoidable, |
use |
||||||||||||
|
|
|
a suitable |
insulating |
plate |
or |
observe |
|
|||||||||||||||||||
the direction |
of the |
arrow3. |
|
|
|
|
|||||||||||||||||||||
|
|
|
the following |
|
minimum |
distances |
|
to |
a |
heat |
|||||||||||||||||
S Carefully |
pull |
the handle |
in |
the |
|
|
source: |
|
|
|
|
|
|
|
|
|
|
|
|
|
|||||||
direction |
|
|
|
|
|
|
|
|
|
|
|
|
|
|
|||||||||||||
of the arrow4, the handle disengages |
3 cm |
to |
an |
electric |
cooker. |
|
|
|
|
|
|||||||||||||||||
from |
|
the |
|
centre |
attachment. |
|
|
from |
an |
oil |
or |
|
solid0fuel |
cooker |
30 cm. |
||||||||||||
|
|
|
|
|
|
|
|
|
|
|
|
|
|
||||||||||||||
S Pull |
the |
handle |
out |
of |
|
the centre |
|
Appliances |
with |
|
fitted |
handles |
must |
be |
|||||||||||||
attachment 5. |
|
|
|
|
|
|
|
|
|||||||||||||||||||
|
|
|
|
|
|
|
situated |
at |
least |
55 mm |
from |
the |
wall |
||||||||||||||
|
|
|
|
|
|
|
|
|
|
|
|
|
|||||||||||||||
S Reposition |
the handle |
and |
re0insert |
|
on the hinge side so that the door can |
||||||||||||||||||||||
into |
|
|
by |
90°. |
|
|
|
|
|
|
|
|
|||||||||||||||
the |
centre |
attachment6. |
|
|
|
|
be opened |
|
|
|
|
|
|
|
|
||||||||||||
|
|
|
|
|
|
|
|
|
|
|
|
|
|
|
|
|
|
|
|||||||||
S Push |
the |
|
handle |
all |
the |
way in |
|
|
|
|
|
|
|
|
|
|
|
|
|
|
|
|
|
||||
the direction |
of the |
arrow7. |
|
|
|
|
|
|
|
|
|
|
|
|
|
|
|
|
|
|
|||||||
S Screw |
the |
handle8 on |
the |
right |
.side |
Aligning the appliance |
|||||||||||||||||||||
S Insert |
the |
caps |
opposite9. |
|
|
|
Figure 7 |
|
|
|
|
|
|
|
|
|
|
|
|
|
|||||||
Angular |
|
handles |
|
|
|
|
|
Place the appliance in the designated |
|||||||||||||||||||
|
|
|
|
|
|
location |
and |
align. |
|
|
|
|
|
|
|
|
|||||||||||
Figure 4 |
|
|
|
|
|
|
|
|
|
|
Adjust |
the |
height0adjustable |
feet |
with |
|
|||||||||||
|
|
|
|
|
|
|
|
|
|
a screwdriver. |
|
|
|
|
|
|
|
|
|
|
|
||||||
Installation |
in |
numerical |
sequence. |
|
|
|
|
|
|
|
|
|
|
|
|
|
|||||||||||
|
|
|
|
|
|
|
|
|
|
|
|
|
|
|
|
|
|||||||||||
8
|
|
|
|
|
|
|
|
|
|
|
fr |
|
|
|
|
|
|
Changement |
du |
sens |
|||
|
|
|
|
|
|
d'ouverture |
de |
porte |
|||
|
|
|
|
|
|
(si nécessaire) |
|
|
|
||
|
|
|
|
|
|
Poignées leviers |
|
||||
Veuillez |
déplier |
la dernière page, |
illustrée, |
|
|
|
le modèle) |
||||
de la notice. Cette notice de montage |
Fig. 1 ouFig. 2, selon |
||||||||||
Effectuez |
le |
montage |
dans |
l'ordre des |
|||||||
vaut pour |
plusieurs |
modèles. |
|
chiffres. |
|
|
|
|
|
||
|
|
|
|
|
|
|
|
|
|
|
|
Selon |
le |
modèle, l'appareil peut |
différer |
Attention |
! |
Couchez prudemment |
|||||
du contenu des |
illustrations. |
|
l'appareil |
sur le côté. |
|
|
|||||
|
|
|
|
|
|
|
|
||||
Side |
by |
Side |
|
Poignée étrier |
|
|
|
||||
|
Fig. 3 |
|
|
|
|
|
|||||
Respecter |
l'agencement |
S 1 Dévisser la poignée située du côté |
|||||||||
gauche. |
|
|
|
|
|
||||||
des |
appareils |
|
|
S A l'aide de deux couteaux, soulevez le |
|||||||
|
|
|
|
|
|
||||||
(selon |
le |
modèle) |
|
|
bouchon.coiffe 2 situé en face de la |
||||||
|
|
|
|
|
|
poignée |
de porte. |
|
|
||
Pour une disposition côte à côte, la paroi |
|
|
|
|
|
||||||
latérale du réfrigérateur est légèrement |
S Tirez la poignée dans le sens de la |
||||||||||
chauffée. |
Ceci |
évite |
l'apparition |
d'eau de flèche 3 jusqu'à |
la |
butée. |
|||||
condensation pour |
un montage |
adjacent. |
|
|
|
|
|
||||
|
|
|
|
|
|
S Tirez la poignée prudemment dans le |
|||||
Pour cette raison, vous devez toujours |
sens de la flèche4 la |
poignée se défait |
|||||||||
placer le côtégauche du réfrigérateur |
hors de |
sa fixation |
centrale. |
||||||||
contre |
le |
second appareil. |
|
S Extrayez la poignée de sa fixation |
|||||||
|
|
|
|
|
|
||||||
|
|
|
|
|
|
centrale 5. |
|
|
|
||
|
|
|
|
|
|
S Replacez la poignée de l'autre côté pui |
|||||
|
|
|
|
|
|
remettez.la en place dans la fixation |
|||||
|
|
|
|
|
|
médiane 6. |
|
|
|
||
|
|
|
|
|
|
S Poussez la poignée dans le sens de la |
|||||
|
|
|
|
|
|
flèche 7 jusqu'à |
la |
butée. |
|||
|
|
|
|
|
|
S Vissez |
la |
poignée8 sur le |
côté droit. |
||
|
|
|
|
|
|
S Mettez |
le |
bouchon.coiffe en face9. |
|||
Poignées cornière
Fig. 4
Effectuez le montage dans l'ordre des chiffres.
9
Inversion du |
sens |
Ajuster |
l'appareil |
||
d'ouverture de porte |
Fig. 7 |
|
|
||
(si nécessaire) |
|
Amenez l'appareil sur |
l'emplacement |
||
|
prévu |
puis |
ajustez0le |
pour qu'il se retrouv |
|
Fig. 5 |
|
||||
|
bien |
d'aplomb. |
|
||
Avant de changer le sens d'ouverture |
dePour modifier le réglage des pieds à vis, |
||||
porte, il faut d'abord |
transférer la poignéeservez0vous |
d'une clé |
à fourche. |
||
de porte de l'autre côté.
Effectuez le montage dans l'ordre des chiffres.
Installation
Fig. 6
Un local sec et aérable convient pour installer l'appareil. Evitez de placer l'appareil à un endroit directement exposé aux rayons solaires ou à proximité d'une source de chaleur telle une cuisinière, un radiateur, etc. Si l'installation près d'une
source |
de |
chaleur |
est inévitable, utilisez |
|
une plaque isolante appropriée ou |
||||
respectez |
les distances |
minimales |
||
suivantes: |
|
|
|
|
3 cm |
par |
rapport |
à une |
cuisinière |
électrique,
30 cm par rapport à un appareil de chauffage au fuel ou au charbon.
Les appareils à poignée saillante requièrent, sur le côté où la porte bute
contre |
le mur, |
un |
espace |
d'au |
moins |
|
55 mm |
par rapport |
à |
ce |
dernier |
afin que |
|
la porte |
puisse |
s'ouvrir |
à |
90º. |
|
|
10

it
Inversione della maniglia della porta
(se necessario)
Aprire |
l'ultima pagina |
con le figure. |
Il presente manuale di |
montaggio vale |
|
per più |
modelli. |
|
Maniglie a leva
Figura 1 oFigura 2 (in base al modello). Passi di lavoro nell'ordine numerico.
|
Attenzione! |
Deporre l'apparecchio con |
Nelle figure sono possibili differenze nelle |
lato posteriore. |
|
figure. |
cautela sul |
|
|
|
|
|
|
|
|
|
|
|
Maniglie |
a |
staffa |
|
|
|||
Side |
by |
Side |
|
Figura 3 |
|
|
|
|
|
|
||||
|
S 1 Svitare |
la |
maniglia sul lato sinistro. |
|||||||||||
|
|
|
|
|
|
|
||||||||
Osservare |
la |
disposizione |
S Staccare |
con |
l'aiuto di |
due coltelli |
||||||||
degli |
apparecchi |
|
il tappo |
|
di |
copertura2 sul lato |
opposto |
|||||||
|
alla maniglia. |
|
|
|
||||||||||
|
|
|
|
|
|
|
|
|
|
|||||
(non |
in |
tutti i |
modelli) |
|
|
S Estrarre la maniglia nel |
senso |
della |
||||||
|
|
|
|
|
|
|
||||||||
Per |
una |
disposizione |
affiancata, la parete freccia 3 fino |
all'arresto. |
|
|||||||||
laterale |
del frigorifero |
viene |
leggermente |
S Tirare |
con |
precauzione |
la maniglia nel |
|||||||
riscaldata. Ciò |
impedisce la |
formazione |
||||||||||||
di condensa fra |
i frigoriferi |
affiancati. |
senso |
della |
freccia4, la |
maniglia |
||||||||
si stacca |
dal |
fissaggio |
centrale. |
|
||||||||||
|
|
|
|
|
|
|
|
|||||||
Per |
la disposizione |
mettere |
perciò |
S Estrarre |
la |
maniglia dal |
fissaggio |
|||||||
il frigorifero sempre |
sul |
latosinistro. |
||||||||||||
centrale |
5. |
|
|
|
|
|||||||||
|
|
|
|
|
|
|
|
|
|
|
||||
S |
Avvitare |
la |
maniglia8 sul lato destro. |
S |
Inserire |
il |
tappo di copertura9 sul lato |
|
opposto. |
|
|
Maniglie a squadra
Figura 4
Passi di lavoro nell'ordine numerico.
11

it
Reversibilità della porta
(se necessario)
Figura 5
Prima di cambiare la battuta porta, procedere alla spostamento della maniglia.
Passi di lavoro nell'ordine numerico.
Livellare l'apparecchio
Figura 7
Disporre e livellare l'apparecchio nel luogo previsto.
Per regolare i piedini a vite utilizzare un cacciavite.
Installazione
Figura 6
Per l'installazione è idoneo un ambiente
asciutto, |
ventilabile. |
Il |
luogo |
|
d'installazione |
||||||
non deve essere esposto all'irradiazione |
|||||||||||
solare |
diretta |
e |
non essere vicino ad una |
||||||||
fonte di |
calore, |
come stufa, |
calorifero |
ecc. |
|||||||
Se |
è |
inevitabile |
l'installazione |
accanto |
ad |
||||||
una fonte di calore, utilizzare un idoneo |
|||||||||||
pannello isolante, oppure rispettate le |
|
||||||||||
seguenti |
distanze |
minime dalla |
fonte |
|
|||||||
di calore. |
|
|
|
|
|
|
|
|
|
||
Da |
stufe |
elettriche |
3 cm. |
|
|
|
|
||||
Da |
stufe |
ad |
olio combustibile |
o carbone |
|||||||
30 cm. |
|
|
|
|
|
|
|
|
|
|
|
Gli |
apparecchi |
con |
maniglie |
|
sovrapposte |
||||||
sul |
lato |
cerniere |
richiedono |
almeno 55 |
|
||||||
mm |
di |
distanza |
dal |
muro, |
per |
aprire |
|
||||
la porta |
a 90°. |
|
|
|
|
|
|
|
|||
12
 Loading...