

Bosch HMV9305, HMV9302 User Manual
Over-the-Range Microwave
9000568351
-
Use and Care Manual
For Models: HMV9302, HMV9303, HMV9305, HMV9306, HMV9307
PLEASE READ ENTIRE INSTRUCTIONS BEFORE PROCEEDING
IMPORTANT: Save these instructions for the local electrical inspector’s use.
INSTALLER: Please leave these Installation Instructions with this unit for the owner.
OWNER: Please retain these instructions for future reference.
Printed in Korea
P/No.: 3828W5A4656
Household Appliances

TABLE OF CONTENTS
SAFETY ................................................................ 3-5
Precautions To Avoid Possible Exposure
To Excessive Microwave Energy............................... 3
Important Safety Instructions ................................. 4-5
Grounding Instructions ............................................. 5
UNDERSTANDING YOUR
MICROWAVE OVEN............................................. 6-9
Cookware Guide...................................................... 6
Tips For Microwave Cooking.................................... 7
Cleaning................................................................... 7
Parts And Accessories ............................................. 8
Control Panel ........................................................ 8-9
USING YOUR MICROWAVE OVEN ................ 10-29
Learn About Your Microwave Oven ........................ 10
Help ....................................................................... 10
Clock ..................................................................... 10
Kitchen Timer ......................................................... 10
Control Set-Up....................................................... 10
Vent HI/LO/Off....................................................... 11
T/Table On/Off ....................................................... 11
Child Lock.............................................................. 11
Light HI/LO/Off...................................................... 11
Light Timer............................................................. 11
Easy Cook ............................................................. 12
Hold Warm............................................................. 12
Favorite Recipe ...................................................... 12
+/– (More/Less) ..................................................... 12
Cooking At High Power Level ................................ 13
Cooking At Lower Power Level.............................. 13
Cooking With More Than One Cook Cycle ............ 13
Cooking Guide For Lower Power Level ................. 14
Sensor Operating Instructions................................ 15
Sensor Cooking Guide........................................... 15
Adding Or Subtracting Sensor Cook Time ............. 15
Popcorn ................................................................. 15
Pizza ...................................................................... 16
Potato .................................................................... 16
Vegetable ................................................................16
Cook...................................................................... 17
Reheat ................................................................... 17
Auto Defrost........................................................... 18
Weight Conversion Chart....................................... 18
Defrosting Tips....................................................... 18
Auto Defrost Chart............................................ 19-20
Time Defrost ......................................................... 21
Quick Defrost......................................................... 21
Use Of The Two Position Metal Rack ..................... 21
Time Defrost Chart................................................. 22
Getting The Best Cooking Results ......................... 22
Fish And Shellfish .................................................. 23
Fish And Shellfish Cooking Table ........................... 23
Appetizers/Sauces/Soups ...................................... 24
Meat....................................................................... 24
Meat Cooking Table ............................................... 25
Poultry.................................................................... 26
Poultry Cooking Table ............................................ 26
Pasta And Rice ...................................................... 27
Pasta Cooking Table .............................................. 27
Rice Cooking Table ................................................ 27
Care And Cleaning..................................................28
Metal Rack ..............................................................28
Cleaning The Grease Filter......................................28
Charcoal Filter Replacement ...................................28
Cooktop Light replacement .....................................29
Oven Light replacement ..........................................29
TROUBLE SHOOTING...................................... 30-31
Before Calling For Service ..................................... 30
Questions And Answers......................................... 31
2

SAFETY
PRECAUTIONS TO AVOID POSSIBLE
EXPOSURE TO EXCESSIVE
MICROWAVE ENERGY
(a) Do not attempt to operate this oven with the
door open since open-door operation can result
in harmful exposure to microwave
energy. It is important not to defeat or tamper
with the safety interlocks.
(b) Do not place any object between the oven front
face and the door or allow soil or cleaner
residue to accumulate on sealing surfaces.
(c) Do not operate the oven if it is damaged. It is
particularly important that the oven door closes
properly and that there is no damage to the:
(1) Door (bent),
(2) Hinges and latches (broken or loosened),
(3) Door seals and sealing surfaces.
(d) The oven should not be adjusted or repaired by
anyone except properly qualified service personnel.
FEDERAL COMMUNICATIONS COMMISSION RADIO FREQUENCY INTERFERENCE STATEMENT ( U.S.A. ONLY)
WARNING:
This equipment generates and uses ISM frequency
energy and if not installed and used properly, that is in
strict accordance with the manufacturer's instructions,
may cause interference to radio and television reception. It has been type tested and found to comply with
limits for ISM Equipment pursuant to part 18 of FCC
Rules, which are designed to provide reasonable protection against such interference in a residential installation.
However, there is no guarantee that interference will
not occur in a particular installation. If this equipment
does cause interference to radio or television reception, which can be determined by turning the equipment off and on, the user is encouraged to try to correct the interference by one or more of the following:
• Clean door and sealing surface of the oven.
• Reorient the receiving antenna of the radio or
television.
• Relocate the Microwave Oven with respect to the
receiver.
• Move the microwave oven away from the receiver.
• Plug the microwave oven into a different outlet so
that the microwave oven and the receiver are on different branch circuits.
The manufacturer is not responsible for any radio or
TV interference caused by unauthorized modifica-
tion to this microwave oven. It is the responsibility of
the user to correct such interference.
3

SAFETY
IMPORTANT SAFETY INSTRUCTIONS
The safety instructions below will tell you how to use your oven and avoid harm to yourself or
damage to your oven.
WARNING - To reduce the risk of burns, elec-
tric shock, fire, injury to persons, or exposure to excessive
microwave energy:
• Read all the instructions before using your oven.
• Do not allow children to use this oven without
close supervision.
• Read and follow the specific
AVOID POSSIBLE EXPOSURE TO EXCESSIVE MICROWAVE ENERGY found on page 3.
• Do not use corrosive chemicals or vapors, such as
sulfide and chloride, in this appliance. This type of oven is
specifically designed to heat, cook, or dry food. It is not
designed for industrial or laboratory use.
• Do not use or store this appliance outdoors. Do not
use this product near water (for example, near a kitchen
sink, in a wet basement near a swimming pool, or similar
location.)
• Do not use the cavity for storage purposes. Do not
leave paper products, cooking utensils or food in the
cavity when not in use.
• Clean the ventilating hood frequently. Do not allow
grease to accumulate on the hood or the filters.
• Use care when cleaning the vent hood filters. Corrosive
cleaning agents such as lye-based oven cleaners may
damage the filters.
• Do not tamper with the built-in safety switches on
the oven door. The oven has several built-in safety
switches to make sure the power is off when the door is
open.
• Always turn fan on HIGH when cooking foods that might
flame up, or any time flames occur on the cooktop.
• Suitable for use above both gas and electric cooking
equipment 36 inches wide or less.
• Do not use this oven for commercial purposes. It
is made for household use only.
• When cleaning the door and the surfaces that
touch the door, use only mild, non-abrasive soaps or
detergents and a sponge or soft cloth.
• If your oven is dropped or damaged, have it
thoroughly checked by a qualified service technician
before using it again.
• To avoid a fire hazard:
- Do not severely overcook food. Severely
overcooked foods can start a fire in the oven. Watch the
oven carefully, especially when you have paper,
plastic, or other combustibles in the oven.
PRECAUTIONS TO
- Do not store combustible items (bread, cookies,
etc.) in the oven, because if lightning strikes the
power lines it may cause the oven to turn on.
- Do not use wire twist-ties in the oven. Be sure to
inspect purchased items for wire twist-ties and remove
them before placing the item in the oven.
• If a fire should start inside the oven:
- Keep the oven door closed.
- Turn the oven off.
- Disconnect the power cord or shut off the power
at the fuse or circuit breaker panel.
• To avoid electric shock:
- This appliance must be grounded. Connect the
oven only to a properly grounded outlet. See the
electrical GROUNDING INSTRUCTIONS on page 5.
- Do not operate this appliance if it has a damaged cord or plug, if it is not working properly, or if it
has been damaged or dropped.
- Do not immerse the electrical cord or plug in
water.
- Keep the cord away from heated surfaces.
• To avoid improperly cooking some foods:
- Do not heat any types of baby bottles or baby
food. Uneven heating may occur and possibly cause
personal injury.
- Do not heat small-necked containers, such as
syrup bottles.
- Do not deep-fat fry in your microwave oven.
- Do not attempt home canning in your microwave
oven.
- Do not heat the following items in the microwave
oven: whole eggs in the shell, water with oil or fat,
sealed containers, or closed glass jars. These items
may explode.
• Do not cover or block any openings in the oven.
• Use your oven only for the operations described in this
manual.
• Do not run the oven empty, without food in it.
• Do not let cord hang over edge of table or counter.
• Preserve the oven floor:
- Do not heat the oven floor excessively.
- Do not allow the gray film on special microwave-cook-
ing packages to touch the oven floor. Put the package
on a microwavable dish.
4
SAFETY
Ensure proper ground
exists before use
- Do not cook anything directly on the oven floor or
turntable. Use a microwavable dish.
3
- Keep a browning dish at least
Carefully read and follow the instructions for the browning dish. If you use a browning dish incorrectly, you
could damage the oven floor.
• Install or locate this appliance only in accordance with the
provided installation instructions.
• This appliance should be serviced only by qualified
service personnel. Contact the nearest authorized service
facility for examination, repair or adjustment.
• Liquids such as water, coffee, or tea are able to be over-
heated beyond the boiling point without appearing to be
boiling. Visible bubbling or boiling when the
container is removed from the microwave oven is not
/16 inch above floor.
SAVE THESE INSTRUCTIONS
Electrical requirements
Observe all governing codes and
ordinances. A 120 Volt, 60 Hz, AC only,
15 or 20 amp fused electrical supply is
required. (A time-delay fuse is recommended.)
It is recommended that a separate circuit
serving only this appliance be provided.
always present. THIS COULD RESULT IN VERY HOT
LIQUIDS SUDDENLY BOILING OVER WHEN THE
CONTAINER IS DISTURBED OR A SPOON OR
OTHER UTENSIL IS INSERTED INTO THE LIQUID.
To reduce the risk of injury to persons:
- Stir the liquid both before and halfway through
heating it.
- Use extreme care when inserting a spoon or other utensil into the container once heating has begun.
- Do not use straight-sided containers with narrow necks.
- After heating, allow the container to stand in the
microwave oven for a short time before removing the
container.
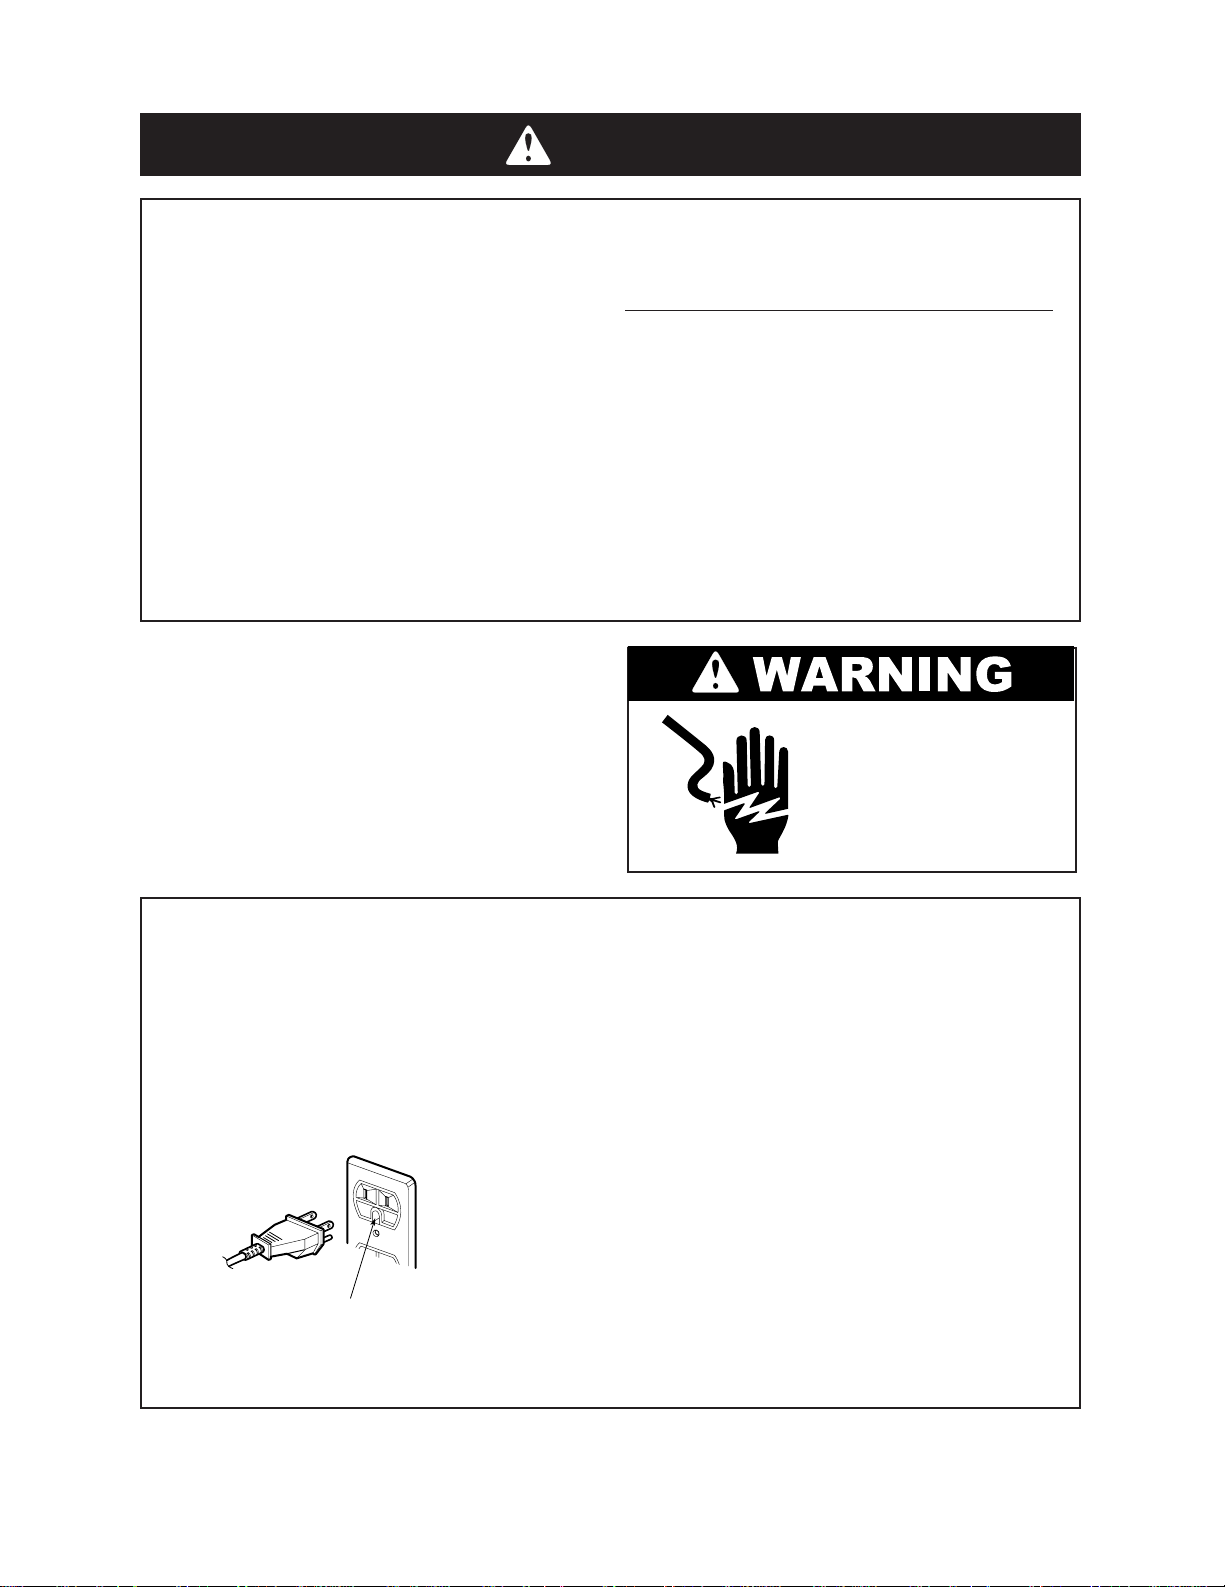
ELECTRICAL SHOCK HAZARD
Plug into a grounded 3 prong
outlet. Do not remove ground
prong. Do not use an adapter.
Do not use an extension cord.
Failure to follow these
instructions can result in death,
fire, or electrical shock.
GROUNDING INSTRUCTIONS
• For all cord connected appliances:
The microwave oven must be grounded. In the event of an
electrical short circuit, grounding reduces the risk of electric shock by providing an escape wire for the electric current. The microwave oven is equipped with a cord having a
grounding wire with a grounding plug. The plug must be
plugged into an outlet that is properly installed and grounded.
SAVE THESE INSTRUCTIONS
WARNING: Improper use of the grounding can result in a
risk of electric shock.
Consult a qualified electrician or serviceman if the ground-
ing instructions are not completely understood, or if doubt
exists as to whether the microwave oven is
properly grounded. Do not use an extension cord. If the
power supply cord is too short, have a qualified
electrician or serviceman install an outlet near the
microwave oven.
• For a permanently connected appliance:
The microwave oven must be connected to a grounded,
metallic, permanent wiring system, or an equipment
grounding conductor should be run with the circuit
conductors and connected to the equipment grounding terminal or lead on the microwave oven.
5

UNDERSTANDING YOUR MICROWAVE OVEN
COOKWARE GUIDE
Most heat-resistant, non-metallic cookware is safe for use in your microwave oven. However, to test cookware before
using, follow these steps:
1. Place the empty cookware in the microwave oven.
2. Measure 1 cup of water in a glass measuring cup and place it in the oven beside the cookware.
3. Microwave on 100% power for 1 minute. If the dish is warm, it should not be used for microwave cooking.
USE
Ovenproof Glass
• Glass treated for use in high-intensity heat includes utility dishes, bread dishes, pie plates, cake plates, liquid
measuring cups, casseroles, and bowls without metallic trim.
China
• Bowls, cups, serving plates, and platters without metallic trim can be used in your oven.
Plastic
• When using plastic wrap as a cover, make sure that
the dish is deep enough so the plastic wrap does not
touch the food. As the food heats, it may melt the plastic wrap wherever the wrap touches the food.
• Place plastic wrap loosely over the top of the dish and
secure it by pressing the wrap to the sides of the dish.
• Vent by turning back one corner of the plastic wrap. This
will allow excess steam to escape.
• Use plastic dishes, cups, semi-rigid freezer
containers, and plastic bags only for short time
cooking. Use these with care because the plastic may soften from the heat of the food.
Paper
• Microwave-safe paper towels, waxed paper, paper
napkins, and paper plates with no metallic trim or
design can be used in your oven.
DO NOT USE
Metal Utensils
• Metal shields food from microwave energy and
produces uneven cooking. Avoid metal skewers, thermometers, or foil trays.
• Metal utensils can cause arcing, which is a
discharge of electric current. Arcing can damage your
microwave oven.
Metal Decoration
• Do not use metal-trimmed or metal-banded
dinnerware, casserole dishes, etc.
Centura™ Tableware
• The Corning Company recommends that you do not
use Centura tableware and some Corelle™ closed-
handle cups for microwave cooking.
Aluminum Foil
• Avoid large sheets of aluminum foil because they hinder cooking and may cause arcing.
• Use small pieces of foil to shield poultry legs and
wings.
• Keep all aluminum foil at least 1 inch from the walls
and door of the oven.
Wood
• Wooden bowls, boards, and baskets will dry out and
may split or crack when you use them in the
microwave oven.
Tightly Closed Containers
• Tightly closed cookware can explode. Be sure to leave
an opening for steam to escape from covered cookware.
Brown Paper
• Avoid using brown paper bags. They absorb heat and
could burn.
Metal Twist Ties
• Always remove metal twist ties as they can become hot
and cause a fire.
6

UNDERSTANDING YOUR MICROWAVE OVEN
TIPS FOR MICROWAVE COOKING
BROWNING
Meat and poultry with high fat content will brown lightly
when cooked for 10 or 15 minutes or longer. Foods
cooked a shorter time can be brushed with a browning
agent, such as Worcestershire sauce, soy sauce, or
barbecue sauce.
COVERING
A cover traps heat and steam and causes the food to
cook more quickly. Use a lid or microwave-safe plastic
wrap with one corner folded back to vent the excess
steam. Lids on glass casseroles can become hot
during cooking. Handle carefully. Waxed paper will
prevent the food from splattering in the oven and help
retain heat. When warming bread items, use waxed
paper, napkins, or paper towels. To absorb extra
moisture, wrap sandwiches and fatty foods in paper
towels.
SPACING
Arrange individual foods, such as baked potatoes,
cupcakes, and hors d’oeuvres in a circle and at least
1 inch apart. This will help the food cook more evenly.
STIRRING
Stirring blends flavors and redistributes the heat in
foods. Always stir from the outside toward the center
of the dish. Food at the outside of the dish heats first.
TURNING
Large foods, such as roasts and whole poultry, should
be turned during cooking so that the top and bottom cook
evenly. Also turn over chicken pieces and chops.
ARRANGEMENT
Do not stack food. Arrange in a single layer in the dish
for more even cooking. Because dense foods cook
more slowly, place thicker portions of meat, poultry, fish,
and vegetables toward the outside of the dish.
TESTING FOR DONENESS
Because foods cook quickly in a microwave oven, you
need to test frequently for doneness.
STANDING TIME
Food often needs to stand from 2 to 15 minutes after
cooking inside as well as outside the oven. Usually, you
need to cover food during standing time to retain heat.
Stop the cooking when they are slightly undercooked and
they will finish cooking during standing time. The internal
temperature of food will rise about 10 °F during standing
time.
SHIELDING
To prevent some portions of food in rectangular or square
dishes from overcooking, you may need to cover the dish
with small strips of aluminum foil to block the
microwaves. You can also cover poultry legs and
wing tips with foil to keep them from overcooking.
Always keep foil at least 1 inch from oven walls
to prevent arcing.
PIERCING
Pierce the shell, skin, or membrane of foods before
cooking to prevent them from bursting. Foods that
require piercing include yolks and whites of eggs, hot
dogs, clams, oysters, and whole vegetables such as
potatoes and squash.
CLEANING
Wipe the oven inside and outside with a soft cloth and
a mild detergent solution. Then rinse and wipe dry.
This should be done weekly or more often, if needed.
Never use cleaning powders or rough pads. Excessive oil
splatters on the inside top will be difficult to remove if left
for many days. Wipe splatters with a wet paper towel,
especially after cooking chicken or bacon.
REMOVABLE PARTS
The turntable and turntable roller rest are removable.
They should be hand-washed in warm (not hot) water
with a mild detergent and a soft cloth. Once they are
clean, rinse well and dry with a soft cloth. Never use
cleaning powders, steel wool, or rough pads.
• The turntable may be cleaned in the sink. Be careful not
to chip or scratch the edges as this may cause the
turntable to break during use.
• The turntable roller rest should be cleaned regularly.
SPECIAL CARE
For best performance and safety, the inner door panel
and the oven front frame should be free of food or
grease buildup. Wipe often with a mild detergent; then
rinse and wipe dry. Never use cleaning powders or
rough pads.
After cleaning the control panel, touch STOP/CLEAR
to clear any entries that might have been entered
accidentally while cleaning the panel.
7
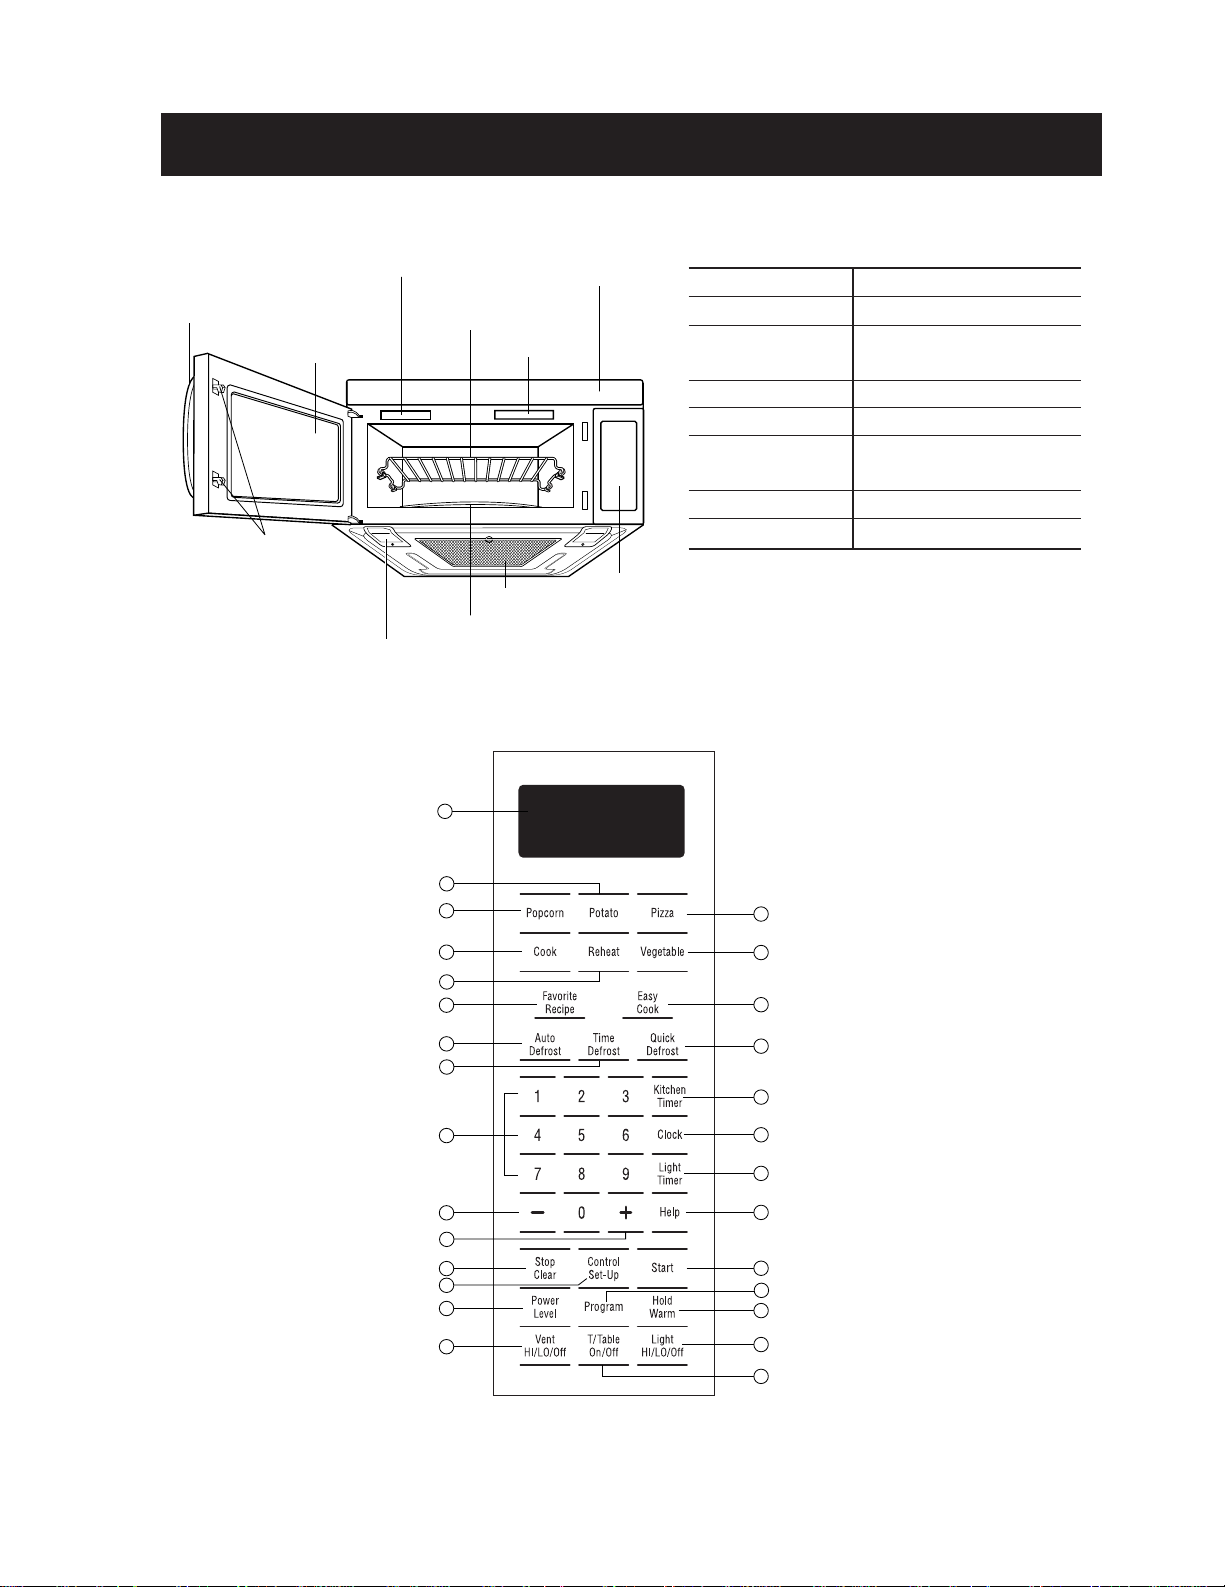
Door Handle
Window with
Metal Shield
Oven Control
Panel
Cooktop/Countertop Light
Grease Filter
Door Safety
Lock System
Model and Serial
Number Plate
Cooking Guide
Vent Grill
Metal Rack
Glass Turntable
3
6
1
23
4
7
9
12
14
15
16
19
21
24
26
28
2
5
8
10
17
20
22
25
27
11
18
13
UNDERSTANDING YOUR MICROWAVE OVEN
PARTS AND ACCESSORIES
OVEN SPECIFICATIONS
Power Supply
Input Power
Cooking Power
Frequency
Rated Current
Outer Dimensions
Cavity Volume
Net Weight
120 VAC, 60 Hz
1,500 W
1,000 W
(IEC 60705 Standard)
2,450 MHz
13 A
(WxHxD)
2915⁄
16" x 16
1.8 Cu. Ft.
60 lbs.
7
⁄
16"x 15
5
⁄
8"
CONTROL PANEL
• See page 9 for control panel features.
8

UNDERSTANDING YOUR MICROWAVE OVEN
CONTROL PANEL FEATURES
NOTE: Styling and features vary by model.
1. Display: The Display includes a clock and
indicators to tell you time of day, cooking time
settings and cooking functions selected.
2. Popcorn: Touch this pad when popping popcorn in
your microwave oven. The oven’s sensor will tell the
oven how long to cook depending on the amount of
humidity it detects from the popcorn. See page 15
for more information.
3. Potato: Touch this pad to cook potatoes. The
oven’s sensor will tell the oven how long to cook
depending on the amount of humidity it detects from
the potato. See page 16 for more
information.
4. Pizza: Touch this pad to reheat pizza. The oven’s
sensor will tell the oven how long to cook
depending on the amount of humidity it detects from
the pizza. See page 16 for more information.
5. Cook: Touch this pad to cook frozen entrees,
casserole and rice. The oven’s sensor will tell the
oven how long to cook depending on the amount of
humidity coming from the food. See page 17 for
more information.
6. Reheat: Touch this pad to reheat casseroles,
dinner plates and soup or sauce. The oven’s sensor
will tell the oven how long to cook depending on the
amount of humidity coming from the food. See page
17 for more information.
7. Vegetable: Touch this pad to cook vegetables. The
oven’s sensor will tell the oven how long to cook
depending on the amount of humidity it detects from
the vegetables. See page 16 for more information.
8. Favorite Recipe: Touch this pad to recall one
cooking instruction previously programmed into
memory. See page 12 for information.
9. Easy Cook: Touch this pad to set and start
quickly at 100% power level. See page 12 for more
information.
10. Auto Defrost: Meat, poultry, fish. Touch this pad
to select food type and defrost food by weight.
See page 18 for more information.
11. Time Defrost: Touch this pad to defrost most
other frozen foods. See page 21 for more
information.
12. Quick Defrost: This pad provides Quick defrost-
ing for 1.0 pound of frozen foods. See page 21 for
more information.
13. Numbers: Touch number pads to enter cooking
time, power level, quantities, or weights.
14. Kitchen Timer: Touch this pad to set the kitchen
timer. See page 10 for more information.
15. Clock: Touch this pad to enter the time of day.
See page 10 for more information.
16. Light Timer: Touch this pad to set the light timer.
See page 11 for more information.
17. – (Less): Touch this pad to subtract ten
seconds of cooking time each time you press it.
See page 12 for more information.
18. + (More): Touch this pad to add ten seconds of
cooking time each time you press it. See page 12
for more information.
19. Help: Touch this pad to learn how to use each
oven function. See page 10 for more information.
20. Stop/Clear: Touch this pad to stop the oven or to
clear all entries.
21. Start: Touch this pad to start a function. If you
open the door after oven begins to cook, touch
START again.
22. Power Level: Touch this pad to select a cooking
power level. See page 13 for more information.
23. Program: Touch this pad to set a cooking time.
See page 13 for more information.
24. Hold Warm: Touch this pad to keep hot, cooked
foods warm in your microwave oven for up to 99
minutes and 59 seconds. See page 12 for more
information.
25. Control Set-Up: Touch this pad to change the
oven’s default settings for sound, clock, display
speed and defrost weight from Lbs to Kg.
See page 10 for more information.
26. T/Table On/Off: Touch this pad to turn off the
turntable. OFF will appear in the display. See page
11 for more information.
NOTE: This option not available in sensor
cook and defrost modes.
27. Vent HI/LO/Off: Touch this pad to turn the fan on
or off. See page 11 for more information.
28. Light HI/LO/Off: Touch this pad to turn on the
cooktop/countertop light. See page 11 for more
information.
9
USING YOUR MICROWAVE OVEN
LEARN ABOUT YOUR
MICROWAVE OVEN
This section discusses the concepts behind microwave
cooking and introduces you to the basics you need to
know to operate your microwave oven. Please read this
information before use.
CAUTION
• To avoid risk of personal injury or property
damage, do not run oven empty.
• To avoid risk of personal injury or property
damage, do not use stoneware, aluminum foil,
metal utensils, or metal trimmed utensils in the
oven. See page 6 for details.
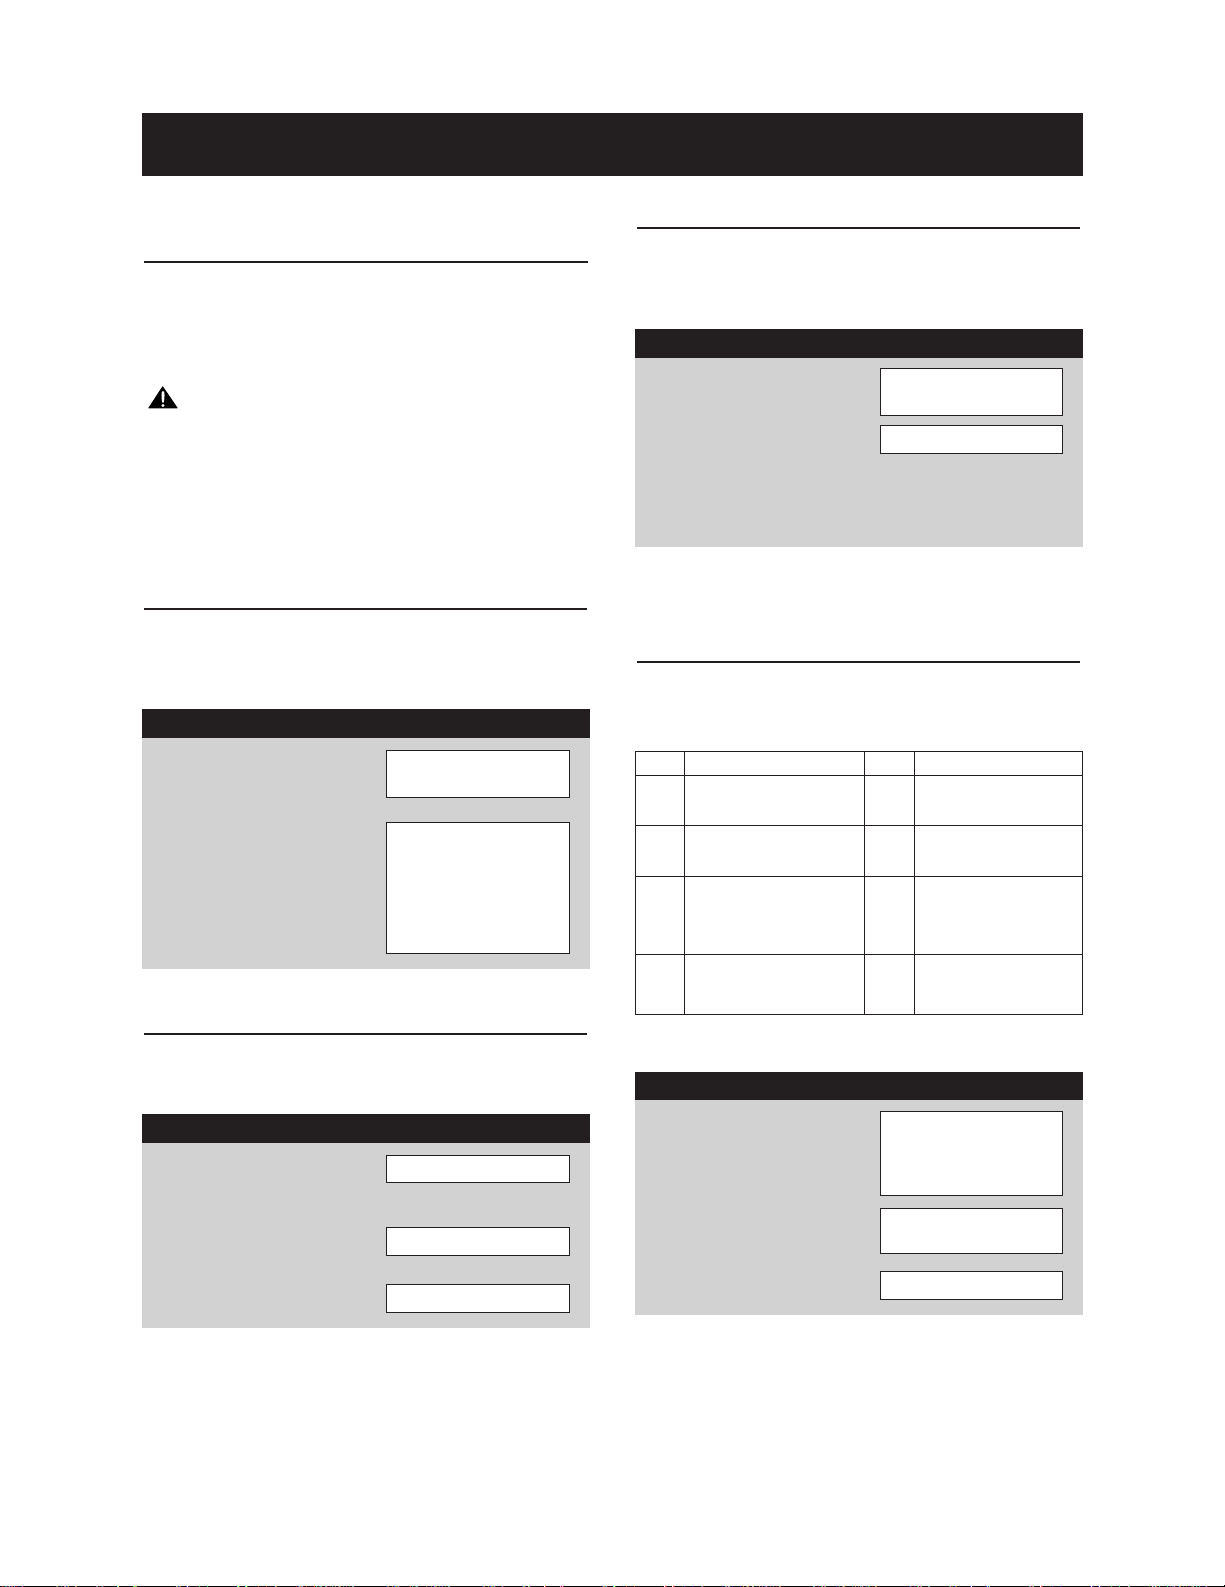
HELP
The Help pad displays feature information and
helpful hints. Press Help, then select a key pad.
Example: To learn about the Popcorn feature.
PROCEDURE DISPLAY
Touch Help pad.
1.
Touch Popcorn pad.
2.
touch this keypad then
the desired feature
touch this keypad to
pop microwave popcorn
the display will show
sensing until remaining
cook time has been
calculated
CLOCK
This oven includes a 12-hour clock.
Example: To set 8:00 AM.
PROCEDURE DISPLAY
Touch Clock pad.
1.
(Press once for AM,
twice for PM)
Touch number keypad
2.
[8], [0] and [0].
Touch Start pad.
3.
am enter time of day
8 : 00 touch start
8 : 00
KITCHEN TIMER
You can use your microwave oven as a timer. Use the
Timer for timing up to 99 minutes and 59 seconds.
Example: To time 3 minutes.
PROCEDURE DISPLAY
Touch Kitchen Timer
1.
pad.
Touch number keypad
2.
[3], [0] and [0].
Touch Start pad.
3.
• When the time is over, you will hear seven beeps and
END will display.
enter time in min
and sec
3 : 00 touch start
Timer and time
counting down.
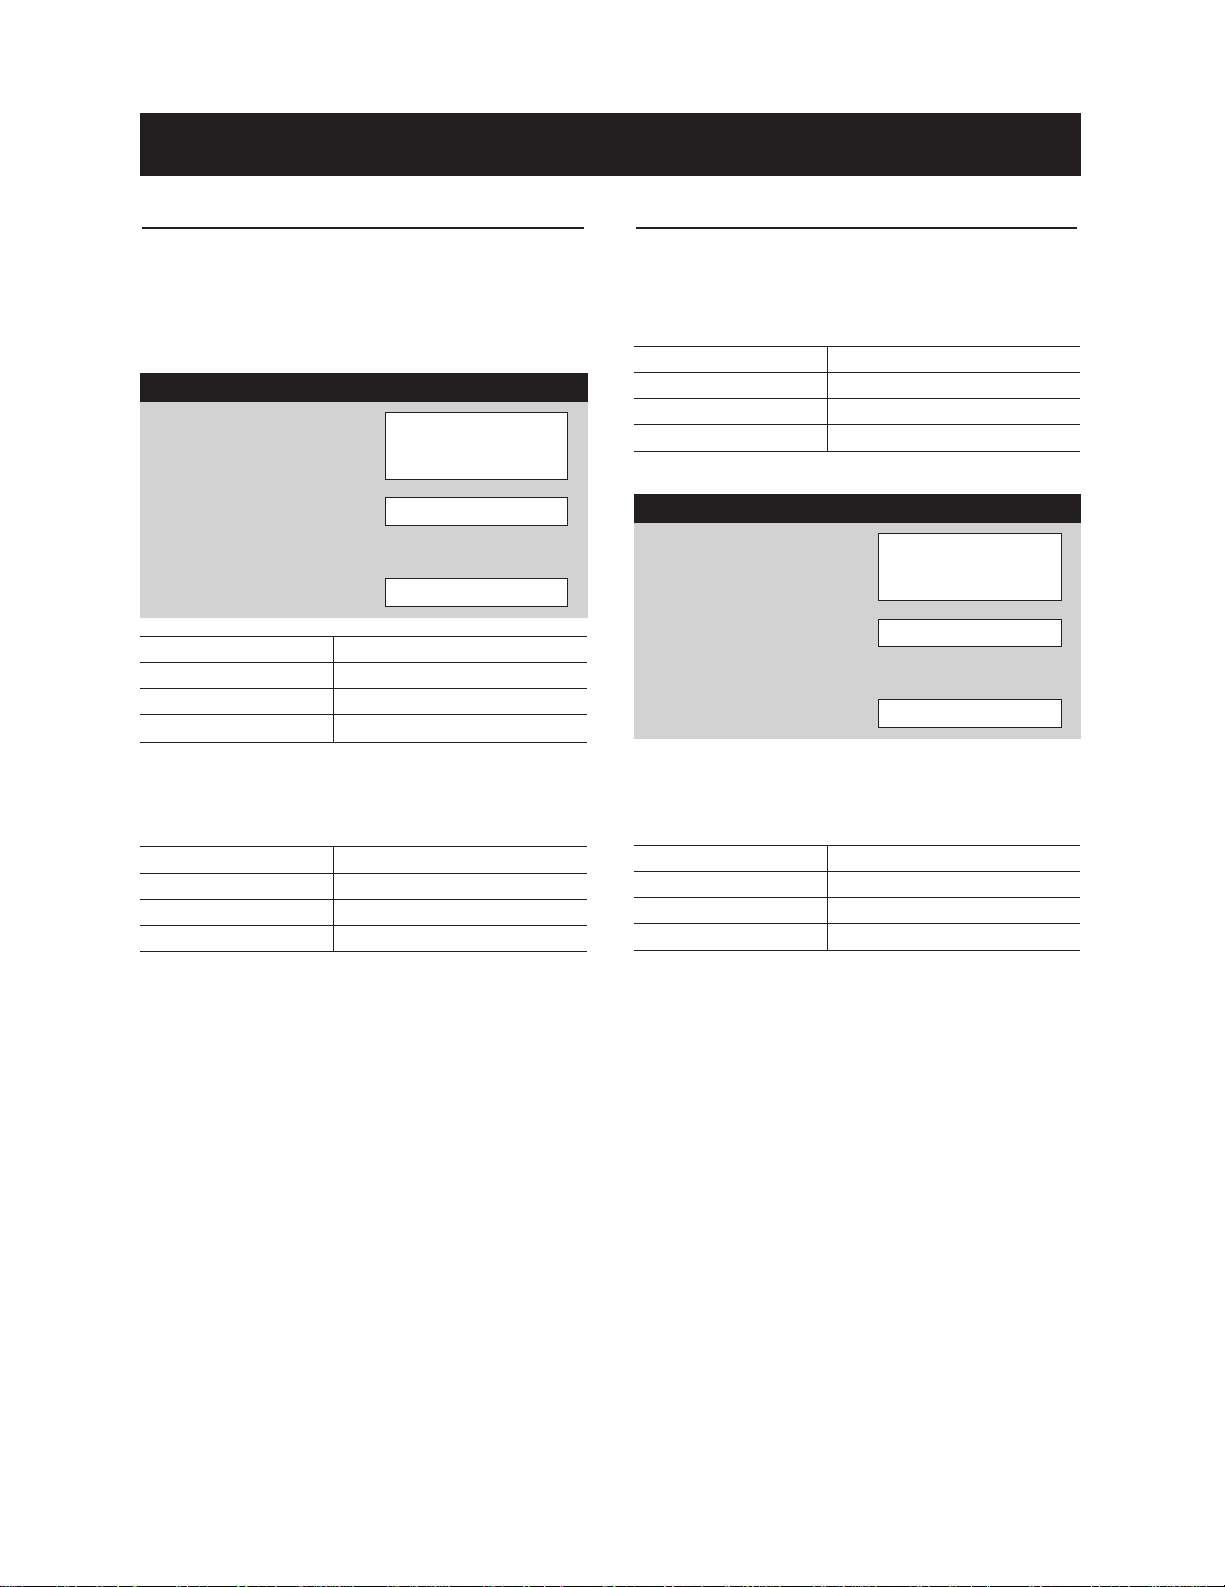
CONTROL SET-UP
You can change the default values for beep sound,
clock, display speed and defrost weight (LBS/KG).
See following chart for more information.
No. Function No. Result
1 Sound ON/OFF 1 Sound ON
control 2 Sound OFF
2 Clock ON/OFF 1 Clock ON
control 2 Clock OFF
3 Scroll Speed 1 Slow speed
control 2 Normal speed
3 Fast speed
4 LBS/KG choice 1 Lbs.
control 2 Kg.
Example: To change defrost weight mode from
Lbs to Kg.
PROCEDURE DISPLAY
Touch Control Set-
1.
Up pad.
Touch number [4] pad.
2.
Touch number [2] pad.
3.
sound on/off touch 1
clock on/off touch 2
scroll speed touch 3
lbs/kg choice touch 4
lbs touch 1
kg touch 2
kg
10

USING YOUR MICROWAVE OVEN
VENT HI/LO/OFF
The Vent moves steam and other vapors from the cooking
surface. From the off position, the first touch of the vent
pad turn the vent on High speed. Touch the pad again to
turn the vent on Low speed, and a third time to turn the fan
back off.
NOTE: If the temperature gets too hot around the
microwave oven, the fan in the vent hood will automatically
turn on at the LOW setting. It may stay on for up to an
hour. When this occurs, you cannot turn the vent fan
off. Wait until it turns off automatically.
T/TABLE ON/OFF
For best cooking results, leave the turntable on. It can be
turned off for large dishes. Press T/TABLE ON/OFF pad
to turn the turntable on or off.
NOTE:
• The T/Table On/Off feature does not operate with the
DEFROST or SENSOR cooking modes.
• Sometimes the turntable can become hot to touch. Be
careful touching the turntable during and after cooking.
• Do not run the oven empty.
CHILD LOCK
Child Lock is a safety feature used to lock the control
panel so that so that it cannot be operated. To set Child
Lock, touch STOP/CLEAR once. Touch and hold 0 pad
more than four seconds LOCKED will appear in the display window and you hear two beeps.
To cancel child lock, touch and hold 0 more than four
seconds. LOCKED will disapper and you hear two
beeps.
LIGHT HI/LO/OFF
Touch Light pad once for bright light, again for low light
and a third time to turn the light back off.
LIGHT TIMER
You can set the Lo Light to turn on and off automatically
at any time. The light will come on at the low setting the
same time every day and turn off at a set time until reset.
Example: Turn on 2:00 AM, turn off 7:00 AM.
PROCEDURE DISPLAY
Touch Light Timer
1.
pad. (Press once for
AM, twice for PM.)
Enter the time you
2.
want the Light to turn
on. Touch number keypad [2], [0] and [0].
Touch Light Timer
3.
pad again. (Press once
for AM, twice for PM.)
Enter the time you
4.
want the Light to turn
off. Touch number keypad [7], [0] and [0].
Touch Start pad.
5.
NOTE:
• To reset the time to turn on and off the Light, repeat
steps 1 to 5.
Example: To cancel the Light Timer.
PROCEDURE DISPLAY
am enter light on time
or touch clear to
reset the timer
2 : 00 touch light timer
am enter light off time
7 : 00 touch start
Time of day.
Touch Light Timer
1.
pad.
Touch Stop/Clear
2.
pad.
NOTE:
• If you want to cancel the Light Timer in operation,
touch Light HI/LO/Off the pad.
am enter light on time
or touch clear to
reset the timer
Time of day.
11

USING YOUR MICROWAVE OVEN
EASY COOK
A timesaving pad, this simplified control lets you quickly
set and start microwave cooking without the need to
touch Start pad. This feature cooks for 30 seconds on
HI each time you press the pad.
Example: To set Easy Cook for 2 minutes.
PROCEDURE DISPLAY
Touch Easy Cook
1.
pad 4 times.
NOTE:
• Easy Cook will add 30 seconds up to 3 minutes. After
3 minutes, every touch will add 1 minute up to 99 min-
utes and 59 seconds.
Time counting down
and power 100.
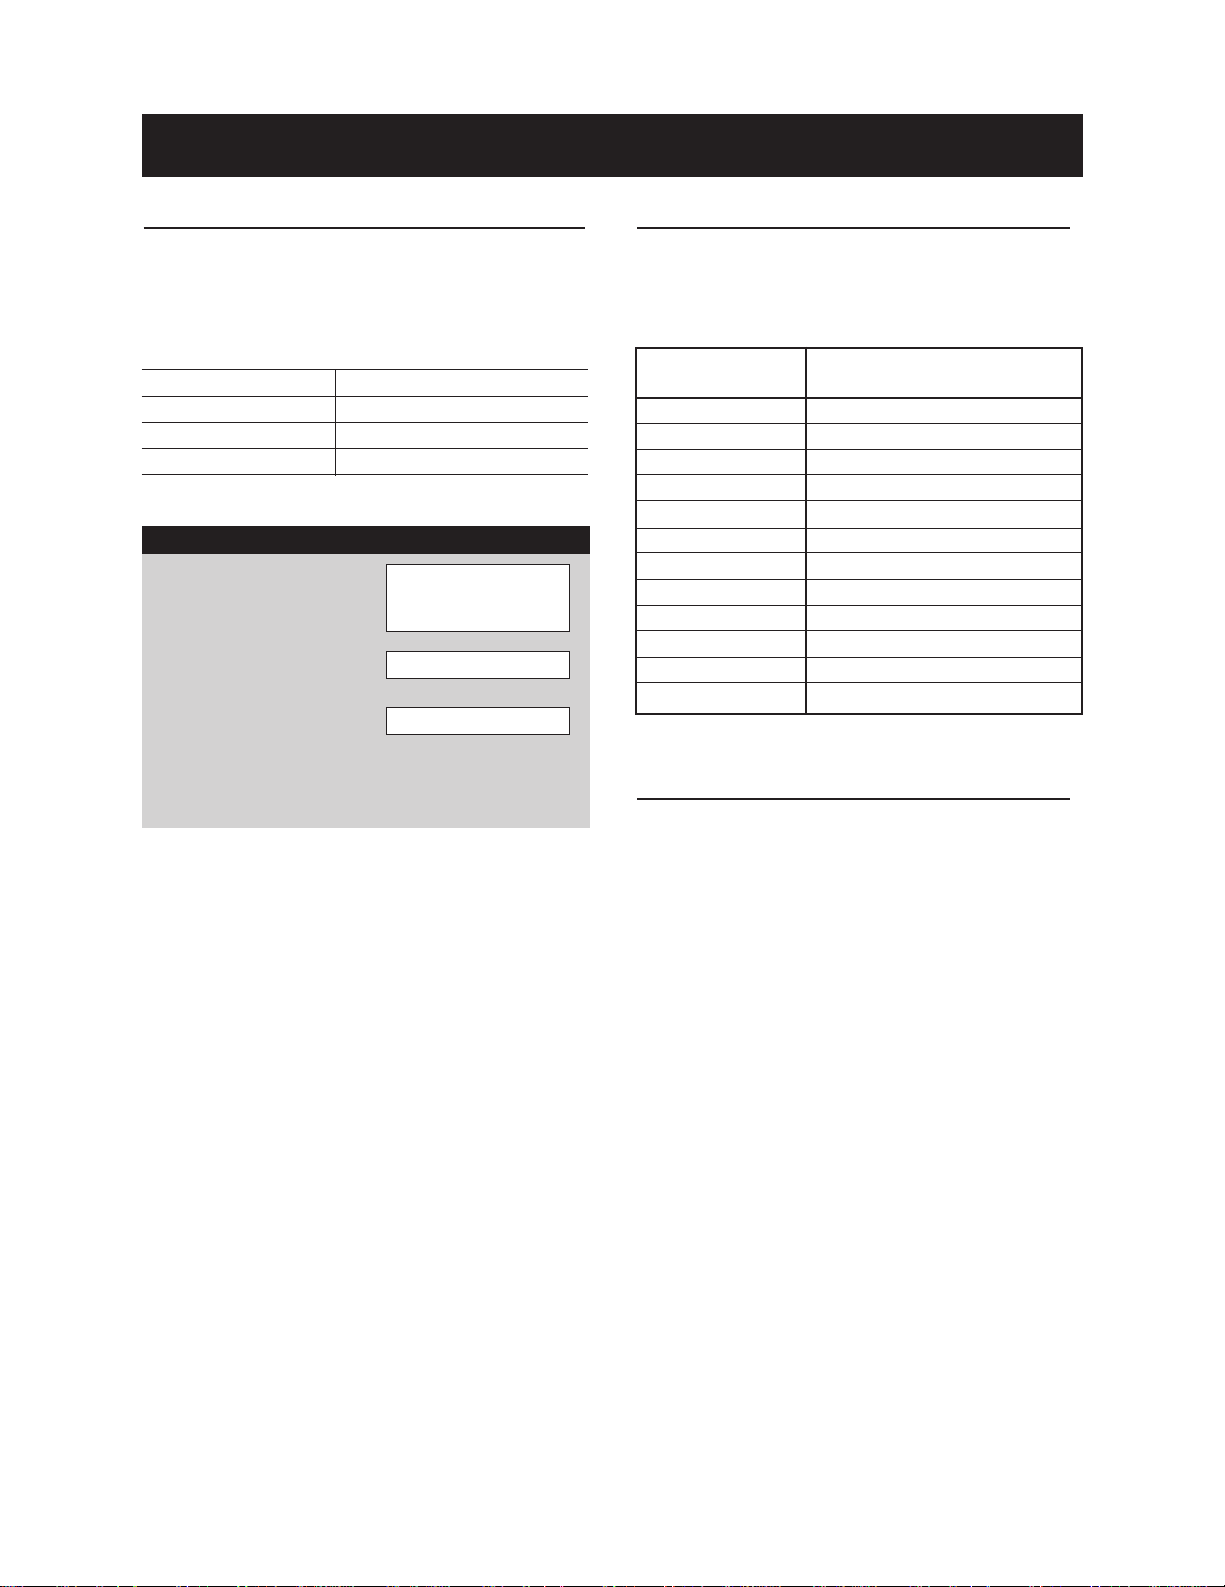
HOLD WARM
You can keep cooked food warm in your microwave
oven for up to 99 minutes and 59 seconds. You can use
Hold Warm by itself or to follow a cooking cycle automatically.
Example: To use Hold Warm.
FAVORITE RECIPE
Favorite Recipe lets you recall one cooking instruction
previously placed in memory and begin cooking quickly.
Example: To program cooking for 2 minutes.
PROCEDURE DISPLAY
Touch Favorite
1.
Recipe pad.
Enter the cook time.
2.
Touch number keypad
[2], [0] and [0].
Touch Start pad.
3.
Example: To recall the custom recipe.
PROCEDURE DISPLAY
Touch Favorite
1.
Recipe pad.
Touch Start pad.
2.
• When the cook time is over, you will hear four beeps and
END will display.
1 : 30 touch start or
enter new time
2 : 00 touch start or
power
Time counting down.
2 : 00 touch start or
power
Time counting down.
PROCEDURE DISPLAY
Touch Hold Warm
1.
pad.
Touch Start pad.
2.
Food Type Recommended Quantity
Liquid 1-2 cups
Dry 5-10 ozs.
To make Hold Warm automatically follow
another cycle:
• While you are programming the cooking instructions,
touch Hold Warm before touching Start.
• When the last cooking cycle is over, you will hear two
tones and “WARM” will appear in the oven display.
• You can set Hold Warm to follow Auto Defrost, or multicycle cooking.
NOTE:
• HOLD WARM operates for up to 99 minutes 59 sec-
onds.
• Food cooked covered should remain covered during
Hold Warm.
• Pastry items (pies, turnovers, etc.) should be uncov-
ered during Hold Warm.
• Complete meals kept warm on a dinner plate can
be covered during Hold Warm.
hold warm touch start
warm
NOTE: Power level will default to Hi, but this setting in
modifiable.
+/– (MORE/LESS)
By using the + or – keys, all of the pre-programmed
cook and time cook features can be adjusted to cook
food for a longer or shorter time.
Pressing + will add 10 seconds of cooking time each
time you press it. Pressing – will subtract 10
seconds of cooking time each time you press it.
NOTE: This feature cannot be used during cooking, only
when setting the initial cook time.
12

USING YOUR MICROWAVE OVEN
COOKING AT HIGH POWER
LEVEL
Example: To cook food for 8 minutes,
30 seconds at 100% power.
PROCEDURE DISPLAY
Enter the cook time.
1.
Touch number keypad
[8], [3] and [0].
Touch Start pad.
2.
• When the cook time is over, you will hear four beeps and
END will display.
8 : 30 touch start or
power
Time counting down,
power 100.
COOKING AT LOWER POWER
LEVEL
HIGH power cooking does not always give you the best
results with foods that need slower cooking, such as
roasts, baked goods, or custards. Your oven has 10
power settings in addition to HIGH.
See cooking guide for power levels, page 14.
Example: To cook food for 7 minutes,
30 seconds at 70% power
PROCEDURE DISPLAY
Enter the cook time.
1.
Touch number keypad
[7], [3] and [0].
Touch Power Level
2.
pad.
7 : 30 touch start or
power
enter power level
1 to 10
COOKING WITH MORE THAN
ONE COOK CYCLE
For best results, some recipes call for one Power Level
for a certain length of time, and another Power Level for
another length of time. Your oven can be set to change
from one to another automatically for up to three cycles,
if the first heating cycle is defrost or the last at 0%
power.
Example: To cook food for 3 minutes at 100%
power and then 70% power for
7 minutes 30 seconds.
PROCEDURE DISPLAY
1.
Enter the cook time.
Touch number keypad
[3], [0] and [0].
2.
Touch Program pad.
3.
Enter the second cook
time. Touch number
keypad [7], [3] and
[0].
4.
Touch Power Level
pad.
5.
Enter the power level.
Touch number [7] pad.
6.
Touch Start pad.
• When the cook time is over, you will hear four beeps and
END will display.
3 : 00 touch start or
power
enter cooking time
7 : 30 touch start or
power
enter power level
1 to 10
p-70 touch start
Time counting down.
Enter the power level.
3.
Touch number [7] pad.
Touch Start pad.
4.
• When the cook time is over, you will hear four beeps and
END will display.
p-70 touch start
Time counting down
and power 70.
13

USING YOUR MICROWAVE OVEN
COOKING GUIDE FOR LOWER POWER LEVEL
The 10 power levels in addition to HIGH allow you to choose the best power level for the food you are cooking. The
power levels are listed below, with examples of foods best cooked at each level and the amount of microwave power
output you are using at each Level.
POWER LEVEL
10 HIGH
9
8
7
6
5
MICROWAVE OUTPUT
100%
90%
80%
70%
60%
50%
USE
• Boil water
• Cook ground beef
• Make candy
• Cook fresh fruits and vegetables
• Cook fish and poultry
• Preheat browning dish
• Reheat beverages
• Bacon slices
• Reheat meat slices quickly
• Saute onions, celery, and green pepper
• All reheating
• Cook scrambled eggs
• Cook breads and cereal products
• Cook cheese dishes or veal
• Cook cakes, muffins, brownies or cupcakes
• Cook pasta
• Cook meats or whole poultry
• Cook custard
• Cook whole chicken, turkey, spare ribs, rib roast or sirloin roast
4
3
2
1
0
40%
30%
20%
10%
0%
• Cook less tender cuts of meat
• Reheat frozen convenience foods
• Thawing meat, poultry or seafood
• Cooking small quantities of food
• Finish cooking casserole, stew, and some sauces
• Soften butter or cream cheese
• Heating small amounts of food
• Soften ice cream
• Raise yeast dough
• Standing time (no power output)
14

USING YOUR MICROWAVE OVEN
SENSOR OPERATING
INSTRUCTIONS
Sensor Cook allows you to cook most of your favorite
foods without selecting cooking times and power levels.
The oven automatically determines required cooking time
for each food item. The display will indicate SENSING
during the initial sensing period. When the internal sensor detects a certain amount of humidity coming from
the food, it will tell the oven how much longer to heat.
The display will show the remaining heating time. For
best results for cooking by Sensor, following these recommendations:
Food cooked with the sensor system should be at
1.
normal storage temperature.
Glass TURNTABLE and outside of container
2.
should be dry to assure best cooking results.
Foods should always be covered loosely with
3.
microwavable plastic wrap, waxed paper or a lid.
Do not open the door or touch the Stop/Clear pad
4.
during the sensing time. When sensing time is
over, the oven beeps twice and the remaining
cooking time will appear in the display window. At
this time you can open the door to stir, turn, or
rearrange the food.
ADDING OR SUBTRACTING
SENSOR COOK TIME
If the SENSOR function is too long or too short, you can
increase or decrease the cook time by 10 seconds after
choosing the function. You can only increase or decrease
cook time when sensor is displayed.
Example: If you want to add to the Sensor Cook
casserole cooking time.
PROCEDURE DISPLAY
Touch Cook pad.
1.
Choose food category.
2.
Touch number [2] pad.
Touch number [9] pad.
3.
Cook Time Touch Pad Number
Less 7
Normal 8
More 9
select menu 1 to 3
- - see cooking guide
behind door
casserole
(Display once)
¤b
sensing
more
SENSOR COOKING GUIDE
Appropriate containers and coverings help assure good
Sensor cooking results.
Always use microwavable containers and cover
1.
them with lids or vented plastic wrap.
Never use tight-sealing plastic covers. They can
2.
prevent steam from escaping and cause food to
overcook.
Match the amount to the size of the container. Fill
3.
containers at least half full for best results.
Be sure the outside of the cooking container and
4.
the inside of the microwave oven are dry before
placing food in the oven. Beads of moisture
turning into steam can mislead the sensor.
POPCORN (SENSOR)
POPCORN lets you pop 3.0 and 3.5 ounce bags of
commercially packaged microwave popcorn. Pop only
one package at a time. If you are using a microwave
popcorn popper, follow manufacturer’s instructions.
Example: To pop popcorn.
PROCEDURE DISPLAY
Touch Popcorn pad.
1.
• When the cook time is over, you will hear four beeps and
END will display.
CAUTION
• DO NOT leave microwave oven unattended while
popping corn.
popcorn
(Display once)
¤b
sensing
15

USING YOUR MICROWAVE OVEN
PIZZA (SENSOR)
PIZZA lets you reheat one or several slices of pizza without selecting cooking times and power level.
Example: To reheat 2 slices of pizza.
PROCEDURE DISPLAY
Touch Pizza pad.
1.
• When the reheat time is over, you will hear four beeps
and END will display.
• Recommended amounts: 1-3 slices
pizza
(Display once)
¤b
sensing
(about 5 ozs. each)
POTATO (SENSOR)
POTATO lets you bake one or several potatoes without
selecting cooking times and power levels.
Example: To cook 2 potatoes.
PROCEDURE DISPLAY
VEGETABLE (SENSOR)
VEGETABLE has preset cook powers for 3 food
categories: Fresh, Frozen and Canned.
Example: To cook frozen vegetables.
PROCEDURE DISPLAY
Touch Vegetable pad.
1.
Choose food category.
2.
Touch number [2] pad.
• When the cook time is over, you will hear four beeps and
END will display.
NOTE:
• Place the canned vegetable in a microwavable bowl or
casserole. Cover with plastic wrap and vent. Let stand
5 minutes.
• Recommended amounts: 1-4 cups
• Recommended 1/4”-1/2” venting of cover.
fresh touch 1
frozen touch 2
canned touch 3
frozen vegetable
(Display once)
¤b
sensing
Touch Potato pad.
1.
• When the cook time is over, you will hear four beeps and
END will display.
• Recommended amounts: 1-4 potatoes
NOTE:
• Before baking, pierce potato with fork several times.
• After baking, let stand for 5 minutes.
potato
(Display once)
¤b
sensing
(about 8-10 ozs. each)
16
USING YOUR MICROWAVE OVEN
COOK (SENSOR)
COOK lets you heat common microwave-prepared
foods without needing to program times and Power
Levels. COOK has preset power for 3 food categories:
Frozen Entree, Casserole and Rice.
Example: To cook rice.
PROCEDURE DISPLAY
Touch Cook pad.
1.
Choose food category.
2.
Touch number [3] pad.
Category Touch Pad Number
Frozen Entree 1
Casserole 2
Rice 3
• When the cook time is over, you will hear four beeps and
END will display.
select menu 1 to 3
- - see cooking guide
behind door
rice
(Display once)
¤b
sensing
REHEAT (SENSOR)
Reheat lets you heat foods without needing to program
times and Power Levels.
Reheat has preset Power Levels for 3 categories:
Casserole, Dinner Plate and Soup/Sauce.
Category Touch Pad Number
Casserole 1
Dinner Plate 2
Soup/Sauce 3
Example: To reheat Casserole.
PROCEDURE DISPLAY
Touch Reheat pad.
1.
Choose food category.
2.
Touch number [1] pad.
• When the cook time is over, you will hear four beeps and
END will display.
select menu 1 to 3
- - see cooking guide
behind door
casserole
(Display once)
¤b
sensing
• Recommended amounts:
Category Quantities
Frozen Entree 10-21 ozs.
Casserole 1-4 cups
Rice
NOTE:
Use only long grain rice with sensor cook program.
See page 27 to cook other types of rice.
1
⁄
2 -2 cups
• Recommended amounts:
Category Quantities
Casserole 1-4 cups
Dinner Plate 1-2 servings
Soup/Sauce 1-4 cups
17
USING YOUR MICROWAVE OVEN
AUTO DEFROST
Your microwave oven is preset with three defrost
sequences. Using AUTO DEFROST is the best way to
defrost frozen foods. The Auto Defrost Chart on pages
19 - 20 provides some basic guidelines for using the
three defrost sequences.
Category Touch Pad Number
Meat 1
Poultry 2
Fish 3
Example: To defrost 1.2 lbs. of ground beef.
PROCEDURE DISPLAY
Touch Auto Defrost
1.
pad.
Choose food category.
2.
Touch number [1] pad.
Enter the weight by
3.
touching pad [1] and
[2].
Touch Start pad.
4.
NOTE:
When you touch the START pad, the display changes to
defrost time count down. The oven will beep during the
DEFROST cycle. At this time, open the door and turn,
separate, or rearrange the food.
Remove any portions that have thawed.
Return frozen portions to the oven and touch START to
resume the defrost cycle.
meat touch 1
poultry touch 2
fish touch 3
enter weight
1.2 lbs touch start
Time counting down
and DEFROST.
WEIGHT CONVERSION CHART
To enter food weight in Auto Defrost, you must specify
pounds and tenths of a pound. If the weight on the food
package is in fractions of a pound, you can use the following chart to convert the weight to decimals.
Equivalent
Ounce Weight
1.6 .10
3.2 .20
4.0 .25 (One-Quarter Pounds)
4.8 .30
6.4 .40
8.0 .50 (One-Half Pounds)
9.6 .60
11.2 .70
12.0 .75 (Three-Quarter Pounds)
12.8 .80
14.4 .90
16.0 1.00 (One Pound)
Pounds
DEFROSTING TIPS
• When using Auto Defrost, the weight to be entered is
the net weight in pounds and tenths of pounds (the
weight of the food minus the container).
• Use Auto Defrost only for raw food. Auto Defrost gives
best results when food to be thawed is a
minimum of 0°F (taken directly from a freezer). If food
has been stored in a refrigerator-freezer that does not
maintain a temperature of 5°F or below, always program a lower food weight (for a shorter defrosting time)
to prevent cooking the food.
• If the food is stored outside the freezer for up to 20
minutes, enter a lower food weight.
• The shape of the package alters the defrosting time.
Shallow rectangular packets defrost more quickly than
a deep block.
• Separate pieces as they begin to defrost. Separated
pieces defrost more easily.
• You can use small pieces of aluminum foil to shield
foods like chicken wings, leg tips, and fish tails, but the
foil must not touch the side of the oven. Foil
causes arcing, which can damage the oven lining.
See page 6.
• Shield areas of food with small pieces of foil if they
start to cook too fast.
• For better results, a preset standing time is included in
the defrosting time.
• For best results, elevate food to be defrosted on a
microwave safe roasting rack. This prevents the
possibility of warm meat juices cooking food during
defrost.
18
USING YOUR MICROWAVE OVEN
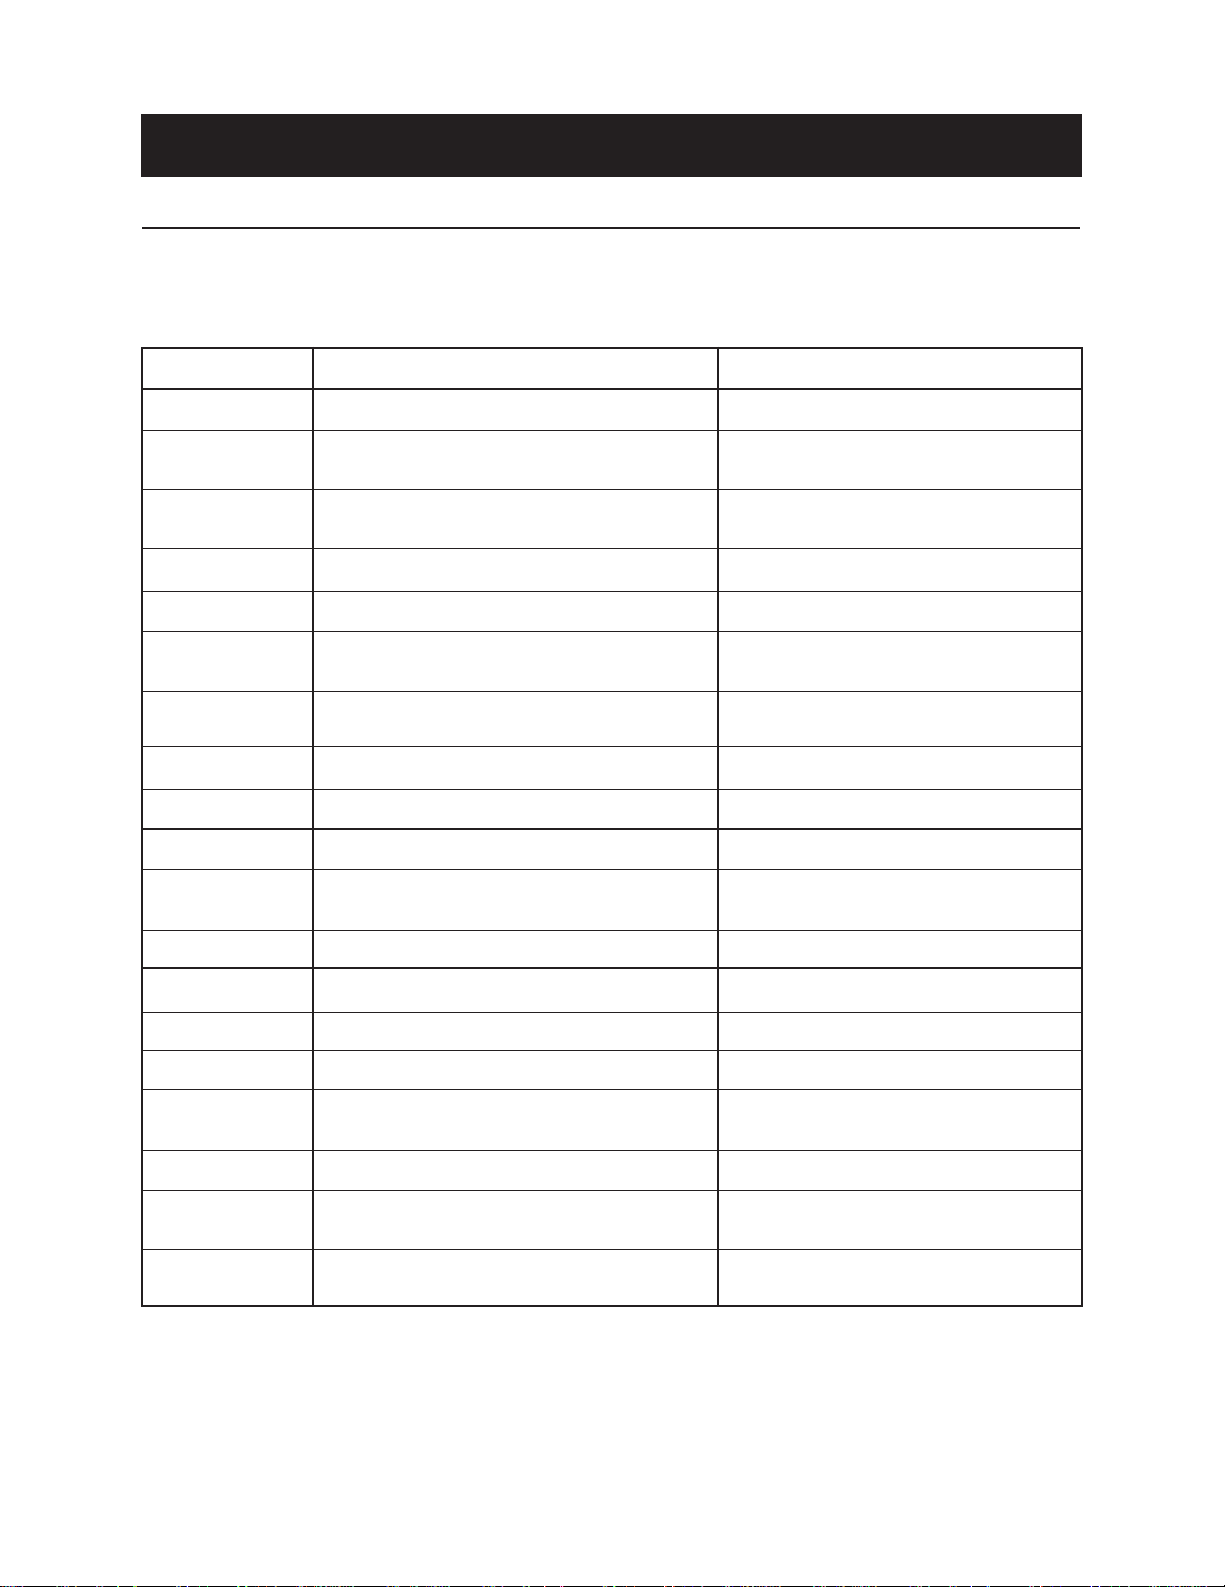
AUTO DEFROST CHART
Meat Setting
Meat of irregular shape and large, fatty cuts of meat should have the narrow or fatty areas shielded with foil at the
beginning of a defrost sequence.
FOOD
BEEF
Ground Beef, Bulk
Ground Beef, Patties
Round Steak
Tenderloin Steak
Stew Beef
Pot Roast,
Chuck Roast
Rib Roast
Rolled Rump Roast
LAMB
Cubes for Stew
AT BEEP
Remove thawed portions with fork.
Turn over. Return remainder to oven.
Separate and rearrange.
Turn over. Cover warm areas with aluminum foil.
Turn over. Cover warm areas with aluminum foil.
Remove thawed portions with fork.
Separate remainder and return to oven.
Turn over. Cover warm areas with aluminum foil.
Turn over. Cover warm areas with aluminum foil.
Turn over. Cover warm areas with aluminum foil.
Remove thawed portions with fork.
Return remainder to oven.
SPECIAL INSTRUCTIONS
Do not defrost less than
Freeze in doughnut shape.
Do not defrost less than 2 oz. patties.
Depress center when freezing.
Place on a microwavable roasting rack.
Place on a microwavable roasting rack.
Place in a microwavable baking dish.
Place on a microwavable roasting rack.
Place on a microwavable roasting rack.
Place on a microwavable roasting rack.
Place in a microwavable baking dish.
1
⁄4 lb.
Chops(1 inch thick)
PORK
1
Chops(
⁄2 inch thick)
Hot Dogs
Spareribs
Country-style Ribs
Sausage, Links
Sausage, Bulk
Loin Roast,
Boneless
Separate and rearrange.
Separate and rearrange.
Separate and rearrange.
Turn over. Cover warm areas with aluminum foil.
Separate and rearrange.
Remove thawed portions with fork.
Turn over. Return remainder to oven.
Turn over.
Cover warm areas with aluminum foil.
19
Place on a microwavable roasting rack.
Place on a microwavable roasting rack.
Place on a microwavable roasting rack.
Place on a microwavable roasting rack.
Place on a microwavable roasting rack.
Place in a microwavable baking dish.
Place on a microwavable roasting rack.
 Loading...