

Page 1
Use and Care Manual
Mode d’emploi et d’Entretien
Instrucciones para usar y Cuidar
Electric Ranges with European Convection
fr Cuisinière Électriq ues avec Convection e Europénne
es Cocina Electrica con Convección Europea
Page 2

Table of Contents
About This Manual . . . . . . . . . . . . . . . . . . . . . . . . . . . . . . . . . . . . . . . . . . . 1
How This Manual Is Organized . . . . . . . . . . . . . . . . . . . . . . . . . . . . . . . . . . . . . . . . . . . . . . . . . . .1
Safety . . . . . . . . . . . . . . . . . . . . . . . . . . . . . . . . . . . . . . . . . . . . . . . . . . . . . 1
Important Safety Instructions . . . . . . . . . . . . . . . . . . . . . . . . . . . . . . . . . . . . . . . . . . . . . . . . . . . . .1
Getting Started . . . . . . . . . . . . . . . . . . . . . . . . . . . . . . . . . . . . . . . . . . . . . .5
Parts and Accessories . . . . . . . . . . . . . . . . . . . . . . . . . . . . . . . . . . . . . . . . . . . . . . . . . . . . . . . . . .5
Before Using the Appliance for the First Time . . . . . . . . . . . . . . . . . . . . . . . . . . . . . . . . . . . . . . . 14
Operation - Cooktop . . . . . . . . . . . . . . . . . . . . . . . . . . . . . . . . . . . . . . . . . 14
About the Cooktop . . . . . . . . . . . . . . . . . . . . . . . . . . . . . . . . . . . . . . . . . . . . . . . . . . . . . . . . . . . .14
Operation . . . . . . . . . . . . . . . . . . . . . . . . . . . . . . . . . . . . . . . . . . . . . . . . . . . . . . . . . . . . . . . . . . . 15
Operation - Oven . . . . . . . . . . . . . . . . . . . . . . . . . . . . . . . . . . . . . . . . . . . . 16
About the Oven . . . . . . . . . . . . . . . . . . . . . . . . . . . . . . . . . . . . . . . . . . . . . . . . . . . . . . . . . . . . . . . 16
Operation . . . . . . . . . . . . . . . . . . . . . . . . . . . . . . . . . . . . . . . . . . . . . . . . . . . . . . . . . . . . . . . . . . . 17
Operation - Warming Drawer (some models) . . . . . . . . . . . . . . . . . . . . . . 20
About the Warming Drawer . . . . . . . . . . . . . . . . . . . . . . . . . . . . . . . . . . . . . . . . . . . . . . . . . . . . .20
Operation . . . . . . . . . . . . . . . . . . . . . . . . . . . . . . . . . . . . . . . . . . . . . . . . . . . . . . . . . . . . . . . . . . . 21
Getting the Most Out of Your Appliance . . . . . . . . . . . . . . . . . . . . . . . . . . 22
Getting the Most Out of Your Cooktop . . . . . . . . . . . . . . . . . . . . . . . . . . . . . . . . . . . . . . . . . . . . .22
Getting the Most Out of Your Oven . . . . . . . . . . . . . . . . . . . . . . . . . . . . . . . . . . . . . . . . . . . . . . .24
Getting the Most Out of Your Warming Drawer . . . . . . . . . . . . . . . . . . . . . . . . . . . . . . . . . . . . . . 30
Cleaning and Maintenance . . . . . . . . . . . . . . . . . . . . . . . . . . . . . . . . . . . . 31
Care and Cleaning . . . . . . . . . . . . . . . . . . . . . . . . . . . . . . . . . . . . . . . . . . . . . . . . . . . . . . . . . . . . 31
Maintenance . . . . . . . . . . . . . . . . . . . . . . . . . . . . . . . . . . . . . . . . . . . . . . . . . . . . . . . . . . . . . . . . .36
Service . . . . . . . . . . . . . . . . . . . . . . . . . . . . . . . . . . . . . . . . . . . . . . . . . . . 37
Self Help . . . . . . . . . . . . . . . . . . . . . . . . . . . . . . . . . . . . . . . . . . . . . . . . . . . . . . . . . . . . . . . . . . . .37
Warranty . . . . . . . . . . . . . . . . . . . . . . . . . . . . . . . . . . . . . . . . . . . . . . . . . . . . . . . . . . . . . . . . . . . .39
Questions?
1-800-944-2904
www.boschappliances.com
5551 McFadden Ave.
Huntington Beach, CA 92649
We look forward to hearing from you!
Page 3

About This Manual
How This Manual Is Organized
This manual contains several sections:
•The Overview section describes the features and functionality of the range,
including a description of how to set up the range and operate the range’s
control panel.
•The three Operations sections describe how to operate and get the best performance out of each range component: the cooktop, oven, and warming
drawer.
•The Cleaning and Maintenance section describes how to clean and maintain
your range.
•The Service section includes troubleshooting tips and your Warranty.
Before using your range, be sure to read this manual. Pay special attention to the
Important Safety Instructions located at the beginning of the manual.
Safety
Important Safety Instructions
READ AND SAVE THESE INSTRUCTIONS
Important Safety Instructions
Fire Safety • Do not use aluminum foil or protective liners to line any part of an appliance,
especially surface unit drip bowls or oven bottom. Installation of these liners
may result in a risk of electric shock or fire.
• If materials inside an oven or warming drawer should ignite, keep door closed.
Turn off the appliance and disconnect the circuit at the circuit breaker box.
• Use this appliance only for its intended use as described in this manual. For
example, never use the appliance for warming or heating the room. Never use
the appliance for storage.
• Do not allow aluminum foil, plastic, paper or cloth to come in contact with a
hot burner or grate. Do not allow pans to boil dry.
• If the cooktop is near a window, forced air vent, or fan, be certain that flammable materials such as window coverings do not blow over or near the burners
or elements. They could catch on fire.
• Always have a working smoke detector near the kitchen.
• Never leave the cooktop unattended when in use. Boilovers cause smoking
and greasy spillovers may ignite.
• WARNING – TO REDUCE THE RISK OF A RANGE TOP GREASE FIRE:
English 1
Page 4

Safety
1) Never leave surface units unattended at high settings. Boilovers cause
smoking and greasy spillovers that may ignite. Heat oils slowly on low or
medium settings.
2) Always turn hood ON when cooking at high heat or when flambéing food
(i.e. Crepes Suzette, Cherries Jubilee, Peppercorn Beef Flambe’).
3) Clean ventilating fans frequently. Grease should not be allowed to accu-
mulate on fan or filter.
4) Use proper pan size. Always use cookware appropriate for the size of the
surface element.
• In the event that personal clothing or hair catches fire, drop and roll immediately to extinguish flames.
• Smother flames from food fires other than grease fires with baking soda.
Never use water on cooking fires.
• WARNING – TO REDUCE THE RISK OF INJURY TO PERSONS IN THE
EVENT OF A RANGE TOP GREASE FIRE, OBSERVE THE FOLLOWING:
1) SMOTHER FLAMES with a close-fitting lid, cookie sheet, or metal tray,
then turn off the burner. BE CAREFUL TO PREVENT BURNS. If the
flames do not go out immediately, EVACUATE AND CALL THE FIRE
DEPARTMENT.
2) NEVER PICK UP A FLAMING PAN – You may be burned.
3) DO NOT USE WATER, including wet dishcloths or towels – a violent
steam explosion will result.
• Use an extinguisher ONLY if:
1) You know you have a Class ABC extinguisher, and you already know how
to operate it.
2) The fire is small and contained in the area where it started.
3) The fire department is being called.
4) Use an extinguisher ONLY if:
• Whenever possible, do not operate the ventilation system during a cooktop
fire. However, do not reach through fire to turn it off.
Burn Prevention • DO NOT TOUCH SURFACE UNITS OR AREAS NEAR UNITS - Surface
units may be hot even though they are dark in color. Areas near surface units
may become hot enough to cause burns. During and after use, do not touch,
or let clothing, potholders, or other flammable materials contact surface units
or areas near units until they have had sufficient time to cool. Among these
areas are the cooktop and areas facing the cooktop.
• DO NOT TOUCH HEATING ELEMENTS OR INTERIOR SURFACES OF
OVEN - Heating elements may be hot even though they are dark in color.
Interior surfaces of an oven become hot enough to cause burns. During and
after use, do not touch, or let clothing, potholders, or other flammable materials contact heating elements or interior surfaces of oven until they have had
sufficient time to cool. Other surfaces of the appliance may become hot
enough to cause burns. Among these surfaces are oven vent openings, surfaces near these openings and oven doors.
• Exercise caution when opening the appliance. Standing to the side, open the
door (or drawer) slowly and slightly to let hot air and/or steam escape. Keep
your face clear of the opening and make sure there are no children or pets
near the unit. After the release of hot air and/or steam, proceed with your
cooking. Keep doors shut unless necessary for cooking or cleaning purposes.
Do not leave open doors unattended.
• Do not heat or warm unopened food containers. Build-up of pressure may
cause the container to burst and cause injury.
• Always place oven racks in desired location while oven is cool. If a rack must
be moved while oven is hot, do not let potholder contact the heating elements.
• Always use dry potholders. Moist or damp potholders on hot surfaces may
result in burns from steam. Do not let potholder touch hot heating elements.
Do not use a towel or other bulky cloth.
• Always turn hood ON when cooking at high heat or when flambéing food (i.e.
Crepes Suzette, Cherries Jubilee, Peppercorn Beef Flambe’).
English 2
Page 5

Safety
• Use high heat settings on the cooktop only when necessary. To avoid bubbling and splattering, heat oil slowly on no more than a low-medium setting.
Hot oil is capable of causing extreme burns and injury.
• Never move a pan of hot oil, especially a deep fat fryer. Wait until it is cool.
• Secure all loose garments, etc. before beginning. Tie long hair so that it does
not hang loose, and do not wear loose fitting clothing or hanging garments,
such as ties, scarves, jewelry, or dangling sleeves.
• Avoid reaching or leaning over the appliance. Be aware that certain clothing
and hair sprays may contain flammable chemicals that could be ignited if
brought in contact with hot surface units or heating elements and may cause
severe burns.
• Do not touch interior surface of the drawer while it is in use. The interior of the
drawer could become hot enough to cause burns. Allow drawer and rack (if
equipped) to cool before handling.
• WARNING: To prevent burns, do not remove drawer while hot. Be sure
drawer is empty before removing.
Child Safety • When children become old enough to use the appliance, it is the legal respon-
sibility of the parents or legal guardians to ensure that they are instructed in
safe practices by qualified persons.
• Do not allow anyone to climb, stand, lean, sit, or hang on any part of an appliance, especially a door, warming drawer, or storage drawer. This can damage
the appliance, and the unit may tip over, potentially causing severe injury.
• Do not allow children to use this appliance unless closely supervised by an
adult. Children and pets should not be left alone or unattended in the area
where the appliance is in use. They should never be allowed to play in its
vicinity, whether or not the appliance is in use.
• CAUTION - Items of interest to children should not be stored in an appliance,
in cabinets above an appliance or on the backsplash. Children climbing on an
appliance to reach items could be seriously injured.
Cleaning Safety • IMPORTANT SAFETY NOTICE: The California Safe Drinking and Toxic
Enforcement Act requires the Governor of California to publish a list of substances known to the state to cause cancer, birth defects or other reproductive harm, and requires businesses to warn customers of potential exposure
to such substances. The burning of gas cooking fuel and the elimination of
soil during self-cleaning can generate small amounts of Carbon Monoxide.The fiberglass insulation in self-clean ovens gives off very small amounts
of formaldehyde during the first several cleaning cycles. California lists formaldehyde as a potential cause of cancer. Carbon Monoxide is a potential
cause of reproductive toxicity.Exposure to these substances can be minimized by:
1) Providing good ventilation when cooking with gas.
2) Providing good ventilation during and immediately after self cleaning the
oven.
3) Operating the unit according to the instructions in this manual.
• Do not clean the appliance while it is still hot. Some cleaners produce noxious
fumes when applied to a hot surface. Wet cloths or sponges can cause burns
from steam.
• When self-cleaning, confirm that the door locks and will not open. If the door
does not lock, do not run Self-Clean. Contact service.
• Birds have very sensitive respiratory systems. Keep pet birds out of the
kitchen or other rooms where kitchen fumes could reach them. During self
clean, fumes are released that may be harmful to birds. Other kitchen fumes
such as overheating margarines and cooking oils may also be harmful.
• Keep oven free from grease build up.
Cookware Safety • Do not place food directly on oven bottom.
• Follow the manufacturer’s directions when using cooking or roasting bags.
English 3
Page 6
Safety
• Hold the handle of the pan when stirring or turning food. This helps prevent
spills and movement of the pan.
• Use Proper Pan Size. The use of undersized cookware will expose a portion
of the heating element or burner to direct contact and may result in ignition of
clothing. Select cookware having flat bottoms large enough to cover the surface heating unit. This appliance is equipped with one or more surface units of
different size. Proper relationship of cookware to heating element or burner
will also improve efficiency.
• Cookware not approved for use with glass ceramic cooktops may break with
sudden temperature changes. Use only pans that are appropriate for glass
ceramic cooktops (only certain types of glass, heatproof glass, ceramic,
earthenware, or other glazed utensils are suitable). See Cookware Selection
Guide for further details.
• Always position handles of utensils inward so they do not extend over adjacent work areas, burners, or the edge of the cooktop. This reduces the risk of
fires, spills and burns.
• CAUTION: Plastic containers or plastic wrap can melt if in direct contact with
the drawer or a hot utensil. If it melts onto the drawer, it may not be removable.
Proper Installation and Maintenance • WARNING: When properly cared for, your new appliance has been designed
to be safe and reliable. Read all instructions carefully before use. These precautions will reduce the risk of burns, electric shock, fire, and injury to persons. When using kitchen appliances, basic safety precautions must be
followed, including those in the following pages.
• Have the installer show you the location of the circuit breaker or fuse. Mark it
for easy reference.
• This appliance must be properly installed and grounded by a qualified technician. Connect only to a properly grounded outlet. Refer to Installation Instructions for details.
• All ranges can tip. Injury to persons could result. Install anti-tip device packaged with range. Verify that the anti-tip devices are engaged. See installation
instructions.
English 4
Figure 1: Tipping Precautions
• This appliance is intended for normal family household use only. It is not
approved for outdoor use. See the Warranty. If you have any questions, contact the manufacturer.
• Do not store or use corrosive chemicals, vapors, flammables or nonfood products in or near this appliance. It is specifically designed for use when heating
or cooking food. The use of corrosive chemicals in heating or cleaning will
damage the appliance and could result in injury.
• Do not operate this appliance if it is not working properly, or if it has been
damaged. Contact an authorized servicer.
• Do not cook on a broken cooktop. Cleaning solutions and spillovers may create a risk of electric shock.
• Do not obstruct oven vents.
• Do not repair or replace any part of the appliance unless specifically recommended in this manual. Refer all servicing to a factory authorized service center.
Page 7
• In the event of an error the display flashes and beeps continuously. If this
happens during self-clean, disconnect appliance from the power supply and
call a qualified technician.
• In the event of an error the display flashes and beeps continuously. Disconnect appliance from the power supply and call a qualified technician.
Food Safety • CAUTION: To maintain food safety, follow these guidelines:
1) DO NOT use a warming drawer to heat cold food (exception: it is safe to
use the drawer to crisp crackers, chips or dry cereal and to warm plates.
2) Be sure to maintain proper food temperature. The USDA recommends
holding hot food at 140°F or warmer.
3) DO NOT warm food for longer than one hour.
Getting Started
Parts and Accessories
Safety
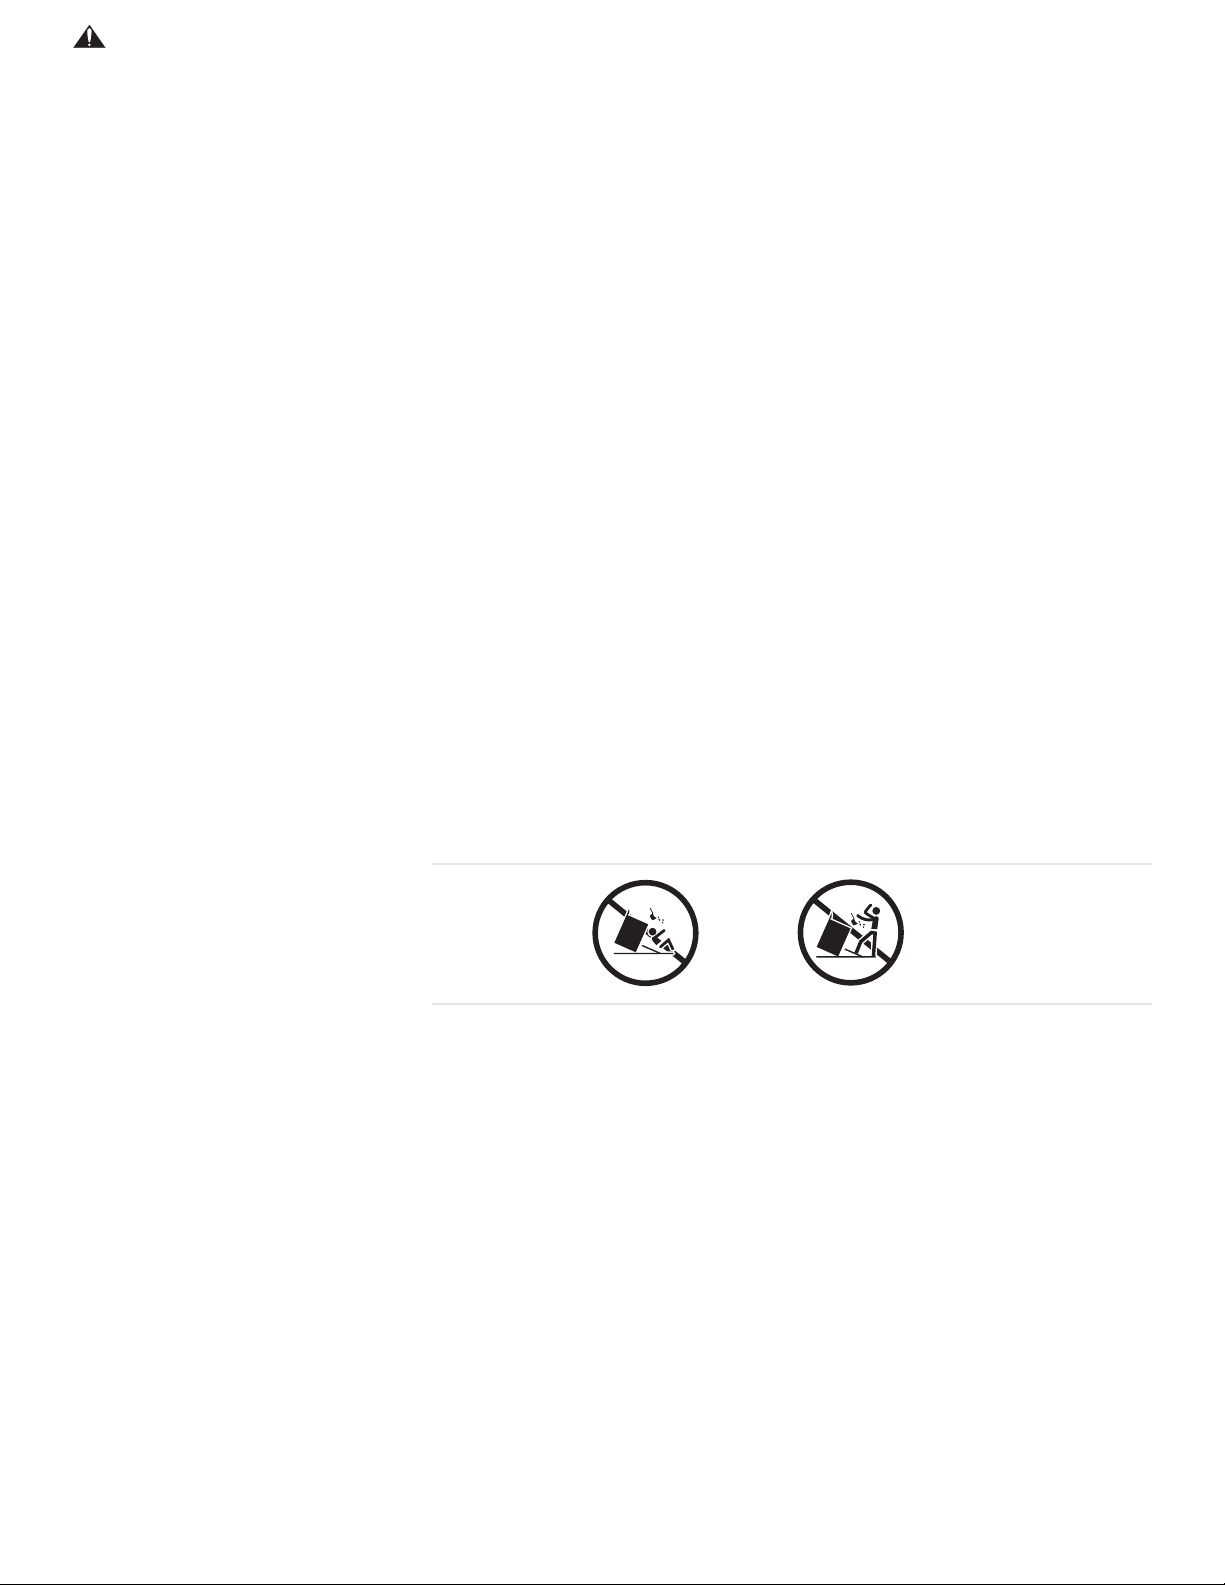
Free-Standing Models
10
9
1
7 or 8
(model dependent)
Slide-In Models
2
3
4
5
6
10
9
7 or 8
(model dependent)
Figure 2: Parts and Accessories
1
2
3
4
5
6
Table 1: Parts and Accessories Key
# Part # Part
1 Oven Control Panel and Knob 12 Cooktop Scraper (not shown)
2 Cooktop Control Knob 13
Weiman Cook Top® (glass ceramic cooktop cleaner)
(not shown)
3 Probe Receptacle 14 Broiler Pan (not shown)
4 Rack Positions/ Rack Guides 15 Oven Rack, Half (some models) (not shown)
5 Oven Racks, Flat (2 or 3; varies by model) 16 Oven Rack, Full Extension (some models) (not shown)
6 Oven Door Gasket 17 Literature Package (not shown)
7
Storage Drawer (some models)
a
18 Oven Lights (2) (oven back wall) (not shown)
English 5
Page 8

Getting Started
Table 1: Parts and Accessories Key
# Part # Part
8
9 Model # and Serial # Plate 20 Broil Element (top of oven interior) (not shown)
10 Oven Vent 21 Oven Door Lock (not visible) (not shown)
11 Anti-Tip Bracket (not shown)
Warming Drawer (some models)
a
19 Convection Fan and Element (oven back wall; not
shown)
a. Depending on the model, your appliance has either a storage drawer or a warming drawer.
Radiant Element The radiant element uses a wire ribbon located under the glass ceramic surface to
provide the heat for cooking. The radiant element will cycle on and off by design
(see Temperature Limiter).
Dual Element The dual element consists of two radiant ribbon elements within the same heating
area. Either the small inner element or both the inner and outer elements may be
selected for use, in order to better match the size of cookware.
Triple Element The triple element consists of three (small, medium and large) radiant ribbon ele-
ments within the same heating area. Either the small element, the small and
medium element or all three elements may be selected for use, in order to better
match the size of cookware.
Bridge Element (some models) The bridge element joins the front single element and the back single element to
create one long oblong element. It is designed for use with large cookware such
as long griddles and roasters.
Retained Heat The glass cooking surface retains heat and stays hot after the element(s) have
been turned off. The retained heat may be used to hold foods at serving temperatures for a short time. If a hot surface light is on, use caution when working or
cleaning around the cooktop as the cooktop is still hot.
Temperature Limiter Each radiant heating element has its own sensor to protect the glass cooking sur-
face from extreme high temperatures. The limiters will operate automatically by
cycling the element off regardless of the cook setting.
Although cycling is normal, any one of the following conditions can activate the
limiter and cause it to cycle on and off more than usual:
• The base of the pan is not making full contact with the heating surface (due to
a warped or uneven base).
• The pan is too small for the element.
• The pan has boiled dry.
• The material or shape of the pan is slow to transfer the heat.
Hot Surface Indicator The cooktop displays a hot indicator light to show when the cooking surface is too
hot to touch. If a hot surface light is on, use caution when working or cleaning
around the cooktop as the cooktop is still hot.
Oven Racks Depending on model, the range is equipped with one of the following combina-
tions:
• Three flat racks
• Two flat racks and one full extension rack
• Two flat racks and one half rack
Flat Oven Racks The racks are designed with a stop so they will stop before coming completely out
of the oven and not tilt.
English 6
Page 9

Getting Started
CAUTION
To avoid burns, place oven racks in desired positions before turning
oven on. Always use oven mitts when the oven is warm.If a rack must
be moved while the oven is hot, do not let oven mitts contact hot heating elements.
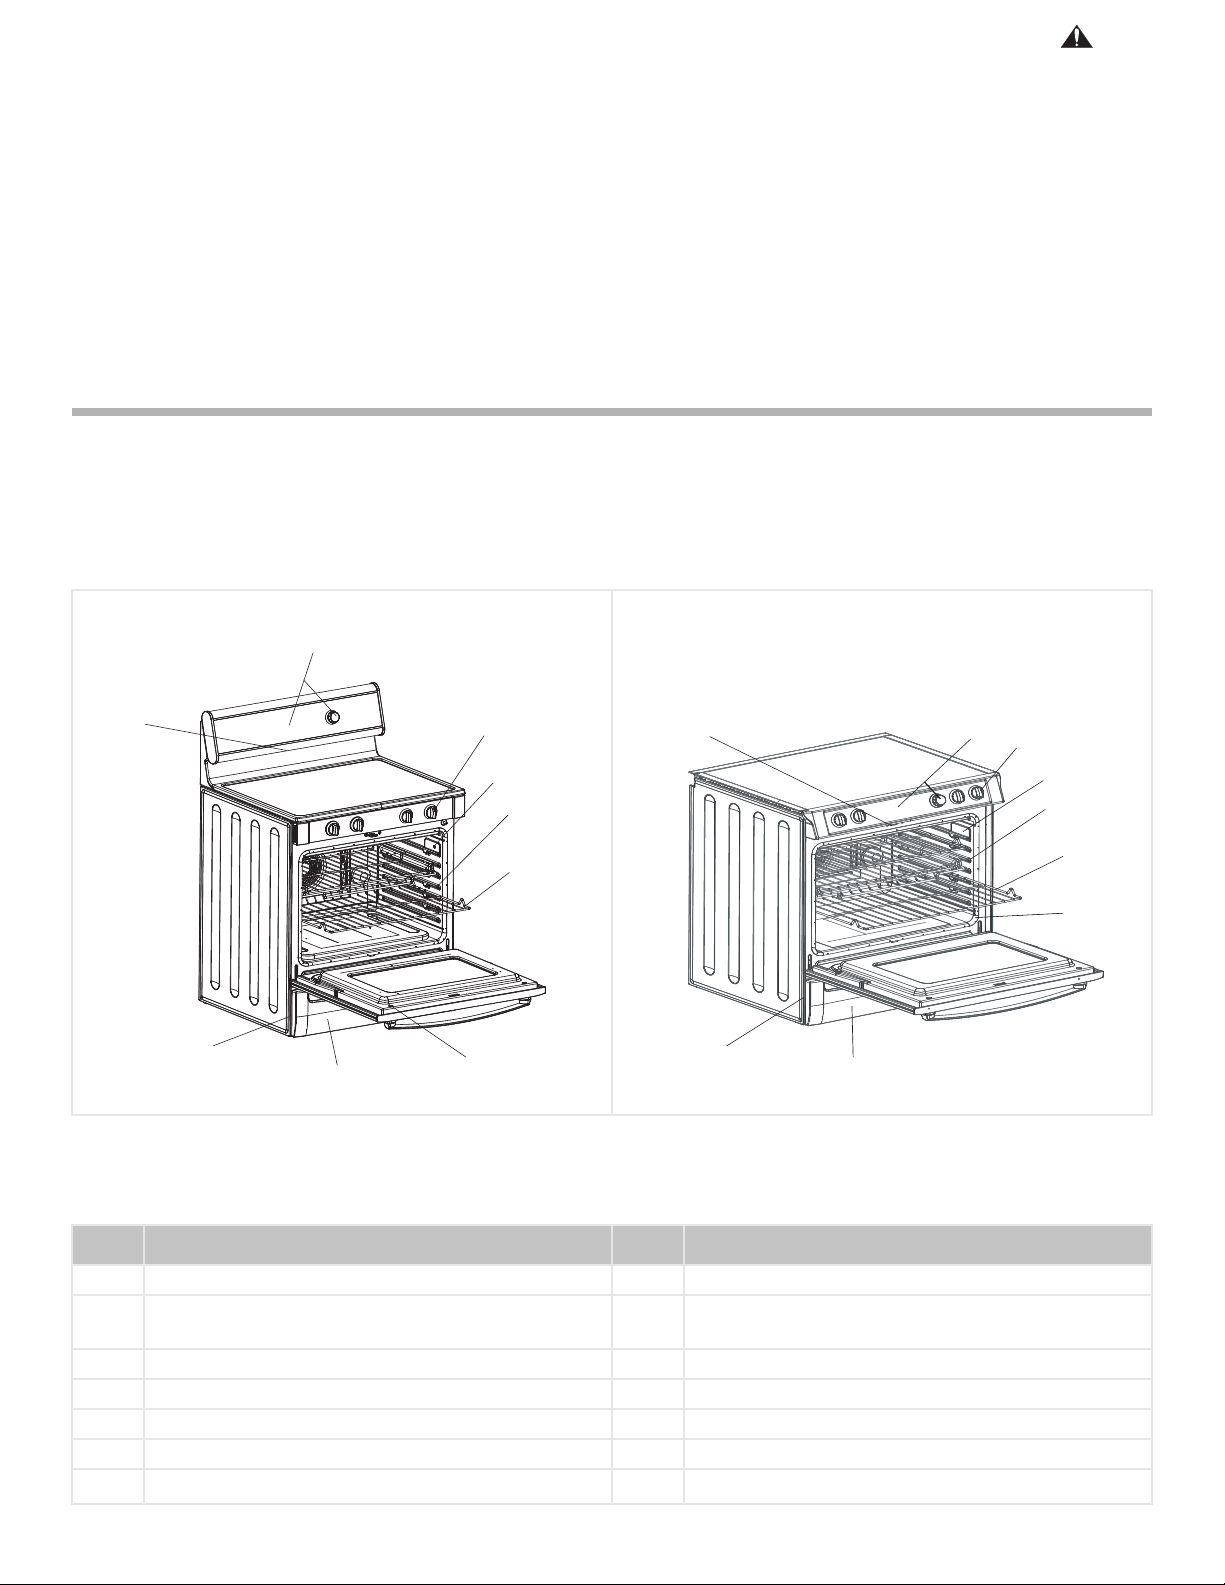
Inserting Racks Into Oven
1. Grasp rack firmly on both sides.
2. Tilt rack up to allow stop into rack guide.
3. Bring rack to a horizontal position and press the rest of the way in. Rack should be straight and flat, not crooked.
Back of rack
Front of rack
Insert rack with the back of the rack
toward the back wall of the range.
Extension Oven Rack (some models)
Figure 3: Inserting a Rack
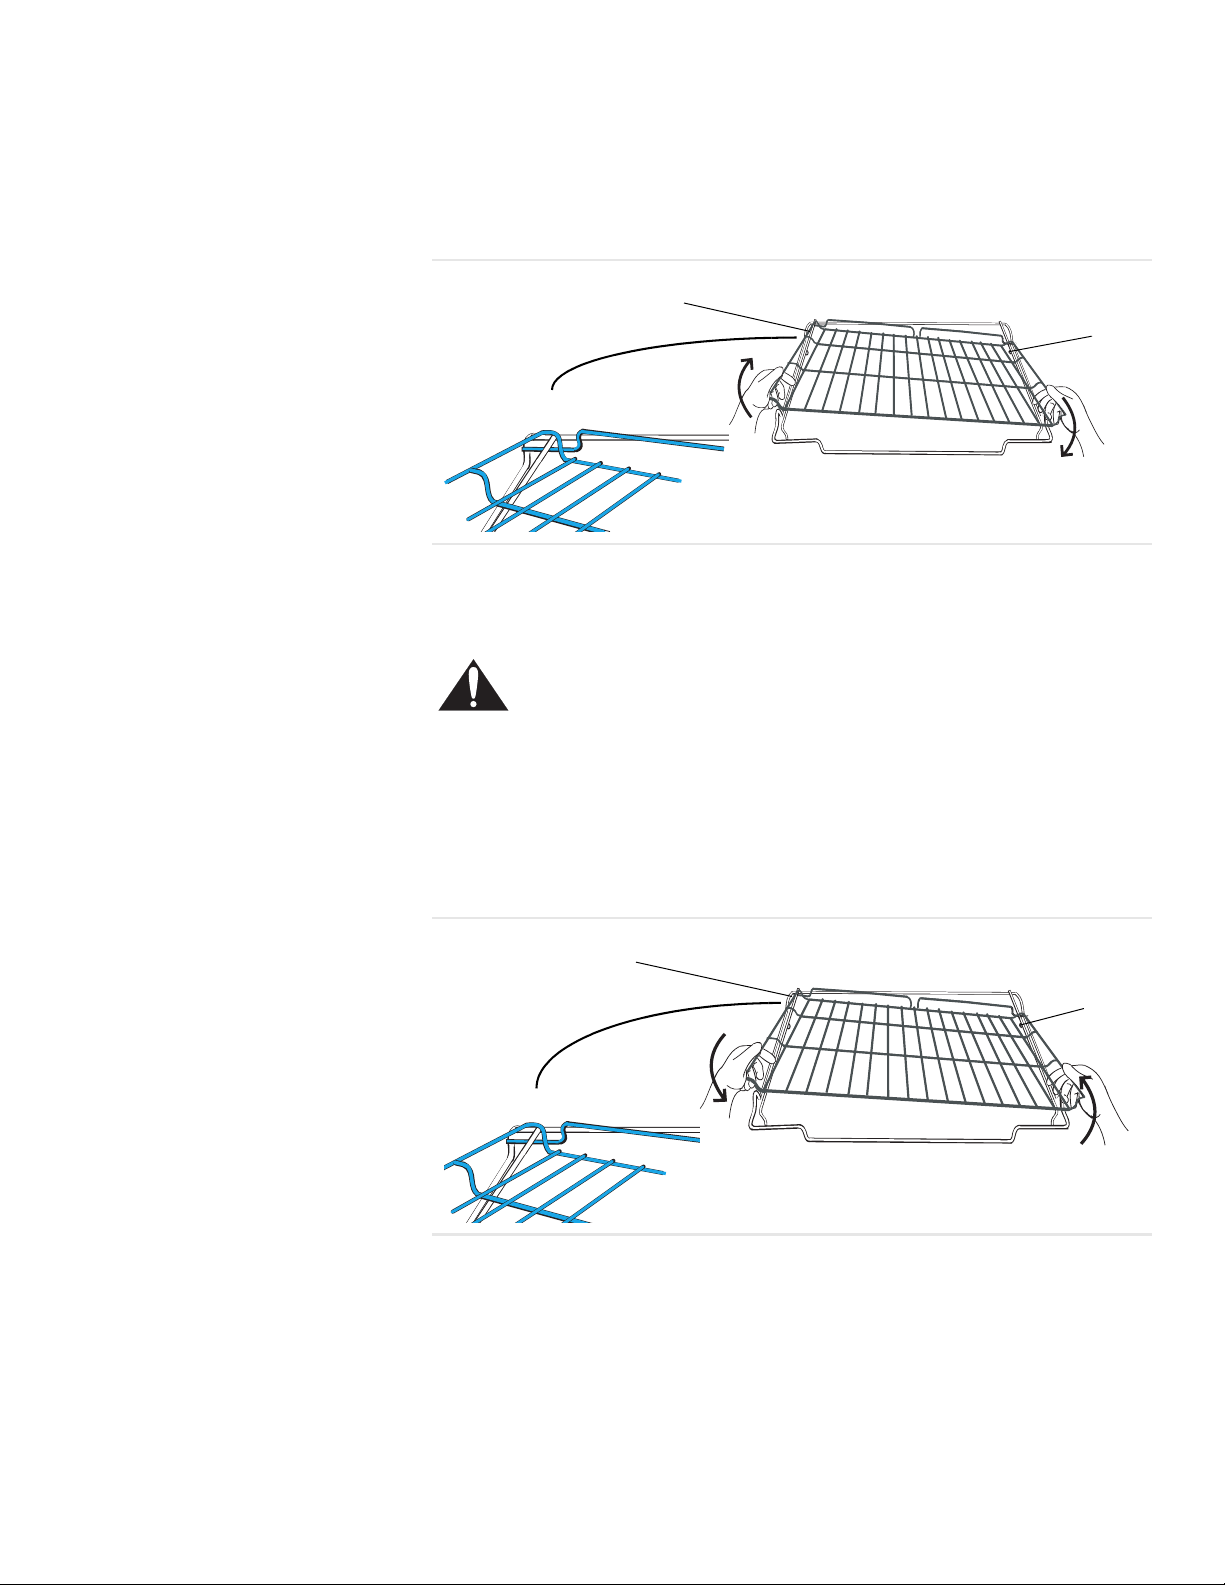
Removing Flat Racks From Oven
1. Grasp rack firmly on both sides and pull rack toward you.
2. When the stop is reached, tilt rack up and pull the rest of the way out.
The Full Extension Rack allows for easier access to cooking foods. The bottom
section extends as far as the standard flat rack. However, the top section extends
beyond the bottom section bringing the food closer to the user. To order a full
extension rack, contact Service or a dealer near you.
Back of Rack
Pan Stops
Top Rack
Top Rack
Stop (Ball)
Bottom
Rack
Stops
Rack Guide
Top Rack Rest
Front of Rack
Figure 4: Full Extension Rack
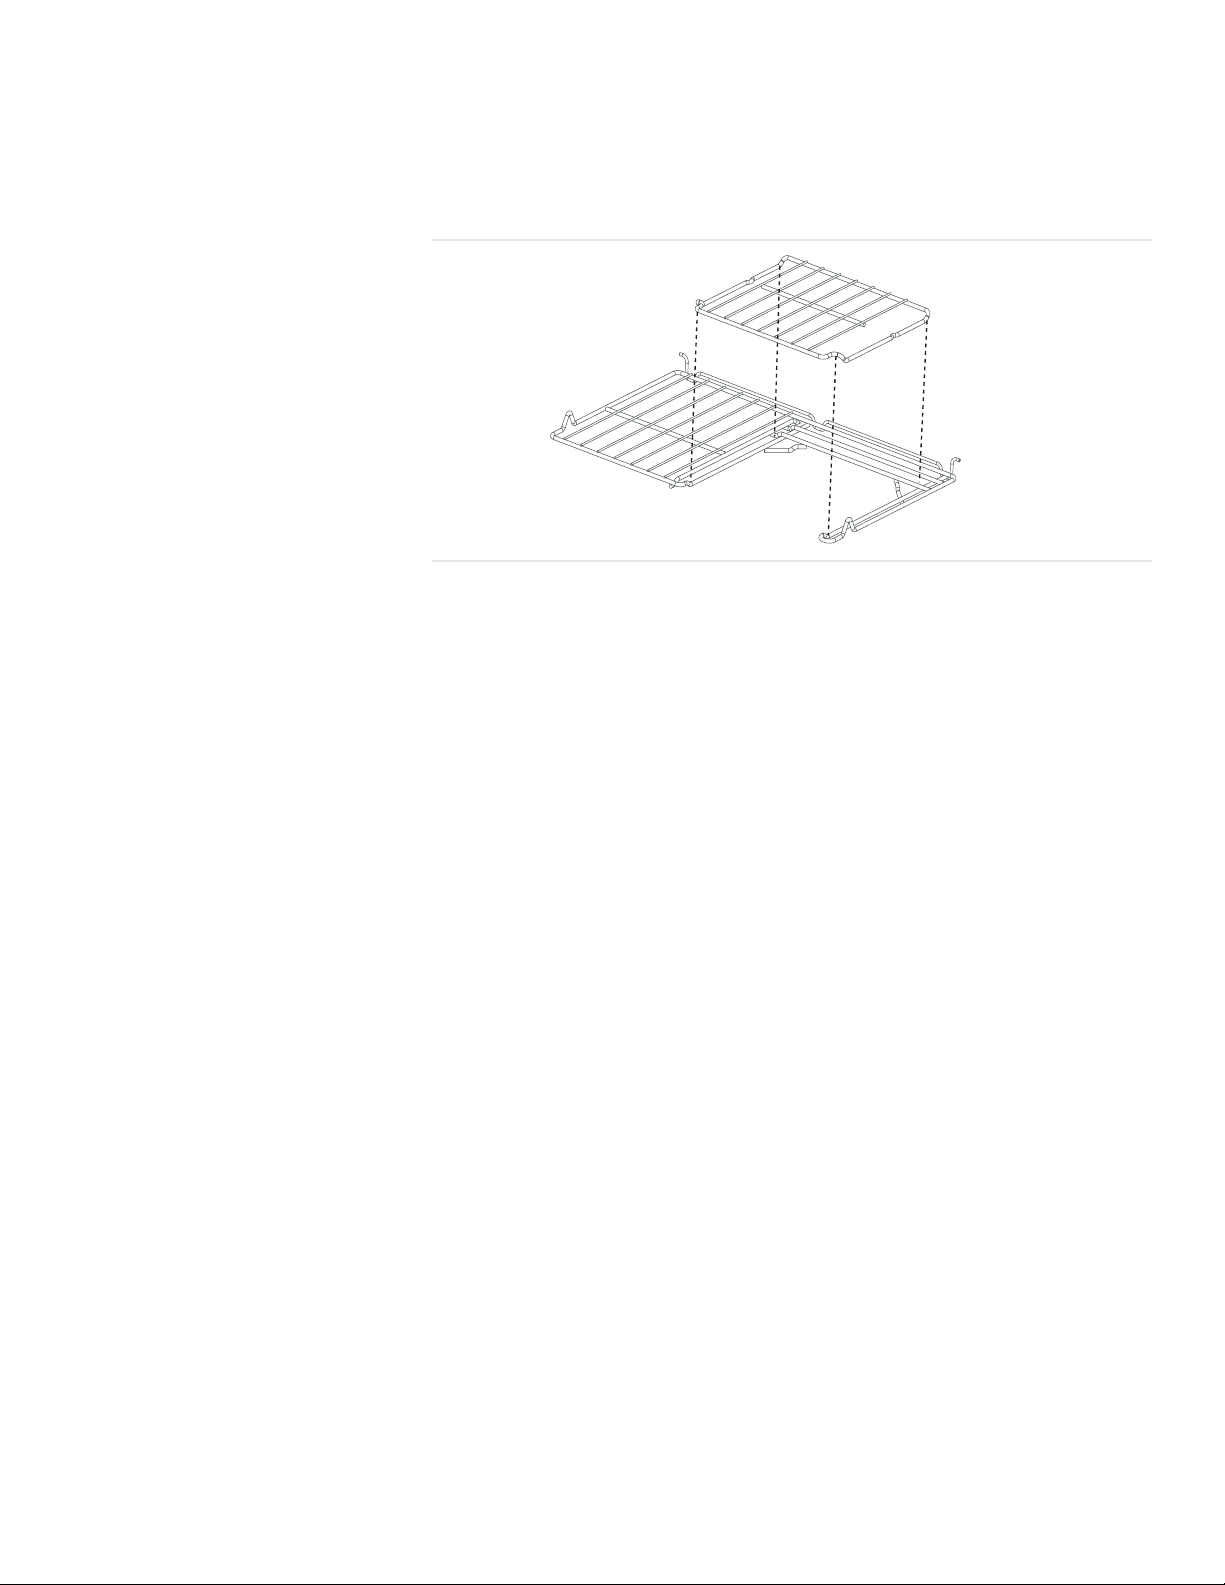
Removing and Replacing
Note: The full extension rack must be in the closed position when removing and
replacing. Grasp the entire rack (both sections).
1. Grasp the bottom section and pull straight out.
2. Once the stop is reached, grasp the top section and pull straight out until the second stop is reached. If the top rack will not extend fully, it is not installed correctly. Reinstall it so that the pan stop is in the back of the oven.
English 7
Page 10
Getting Started
Disassembly (for cleaning)
The two sections of the rack are designed to come apart for easier cleaning.
1. Place rack on flat surface in the closed position top side up.
2. Rotate one side of top rack towards you until it is past the stop (ball).
3. Pull the rack up and out, rotated side first.
Closed Position
Reassembly
Back of Rack
Stop (Ball)
Front of Rack
Figure 5: Disassembly
CAUTION
Always verify that top rack is installed correctly after reassembly. The
back edges of the top rack must be under the rack guide on the bottom
rack. DO NOT simply rest the top rack on top of the bottom one.
1. To reassemble rack, hold top rack diagonally across bottom rack.
2. Insert one side of top rack to closed position.
3. Rotate the other side toward the back of the rack until it passes the stop (ball).
4. Push top rack the rest of the way in (See Figure 3).
Closed Position
Cleaning
Clean rack with hot sudsy water. Dry thoroughly. For stubborn dirt, use a soap
filled steel wool pad. DO NOT clean the rack in the self-cleaning oven.
Half Oven Rack (Some Models) The half oven rack can be used as a simple flat rack or as a half-sized rack. With
the right half of the rack removed, you can place a tall item (such as a turkey) on
one side of the rack below and a shorter item (such as a casserole) on the other
Back of Rack
Stop (Ball)
Front of Rack
Figure 6: Reassembly
English 8
Page 11
Getting Started
side. A second shorter item can then be placed on the half rack (above the first
shorter item). This allows for easier access to all items and better utilization of the
oven cavity.
Tip: The removable section can also be used outside of the oven as a trivet or
cooling rack.
Figure 7: Half Oven Rack
Oven Bottom Do not place food directly on oven bottom. Do not use aluminum foil or protective
liners to line any part of an appliance, especially surface unit drip bowls or oven
bottom. Installation of these liners may result in a risk of electric shock or fire.
Oven Vent Free-standing Models:
The oven vent is located below the display above the rear left cooktop element. It
is normal to see steam escaping from the vent and condensation may collect on
the backguard and cooktop. This area may become hot when the oven is in use.
Do not block the vent as it is important for air circulation.
Slide-in Models:
The oven vent is located above the oven door handle. Warm air may be released
from the vent before, during and after cooking. It is normal to see steam escaping
from the vent and condensation may collect in this area. This area may be warm
when the oven is in use. Do not block the vent as it is important for air circulation.
Automatic Shutoff The oven will automatically shut off after 12 hours (24 hours if the time format is
set for 24 hour in the Select Function section).
Self-Cleaning The oven features a self-cleaning function that eliminates the manual labor
involved with cleaning your oven.
Indicators and Other Features Beep - Signals that more information must be entered or confirms the receipt of
an entry. A Beep also signals the end of a program or an oven error.
End-of-Cycle Indicator - To indicate when a mode is finished, 3 consecutive
beeps will sound.
Default Settings - The cooking modes automatically select the default temperature. These can be changed when a different one is needed.
Flashing Symbol or Number - Signals an incomplete setting and calls for
another step or START to be pressed.
F Number Codes -These codes display when there is a problem with the range.
English 9
Page 12
Getting Started
Cooling Fan (Slide-in models only) The cooling fan runs during all oven modes. It may run during heavy cooktop use
as well. You may hear it running and you may feel warm air as it is released from
the oven vent. This is normal.
Convection Fan The convection fan operates during any convection mode. When the oven is oper-
ating in the convection mode, the fan will turn off automatically when the door is
opened. The convection fan does run during self-clean, although not at the beginning of the mode.
Note: On some models, the convection fan also runs during preheat for the bake
mode.
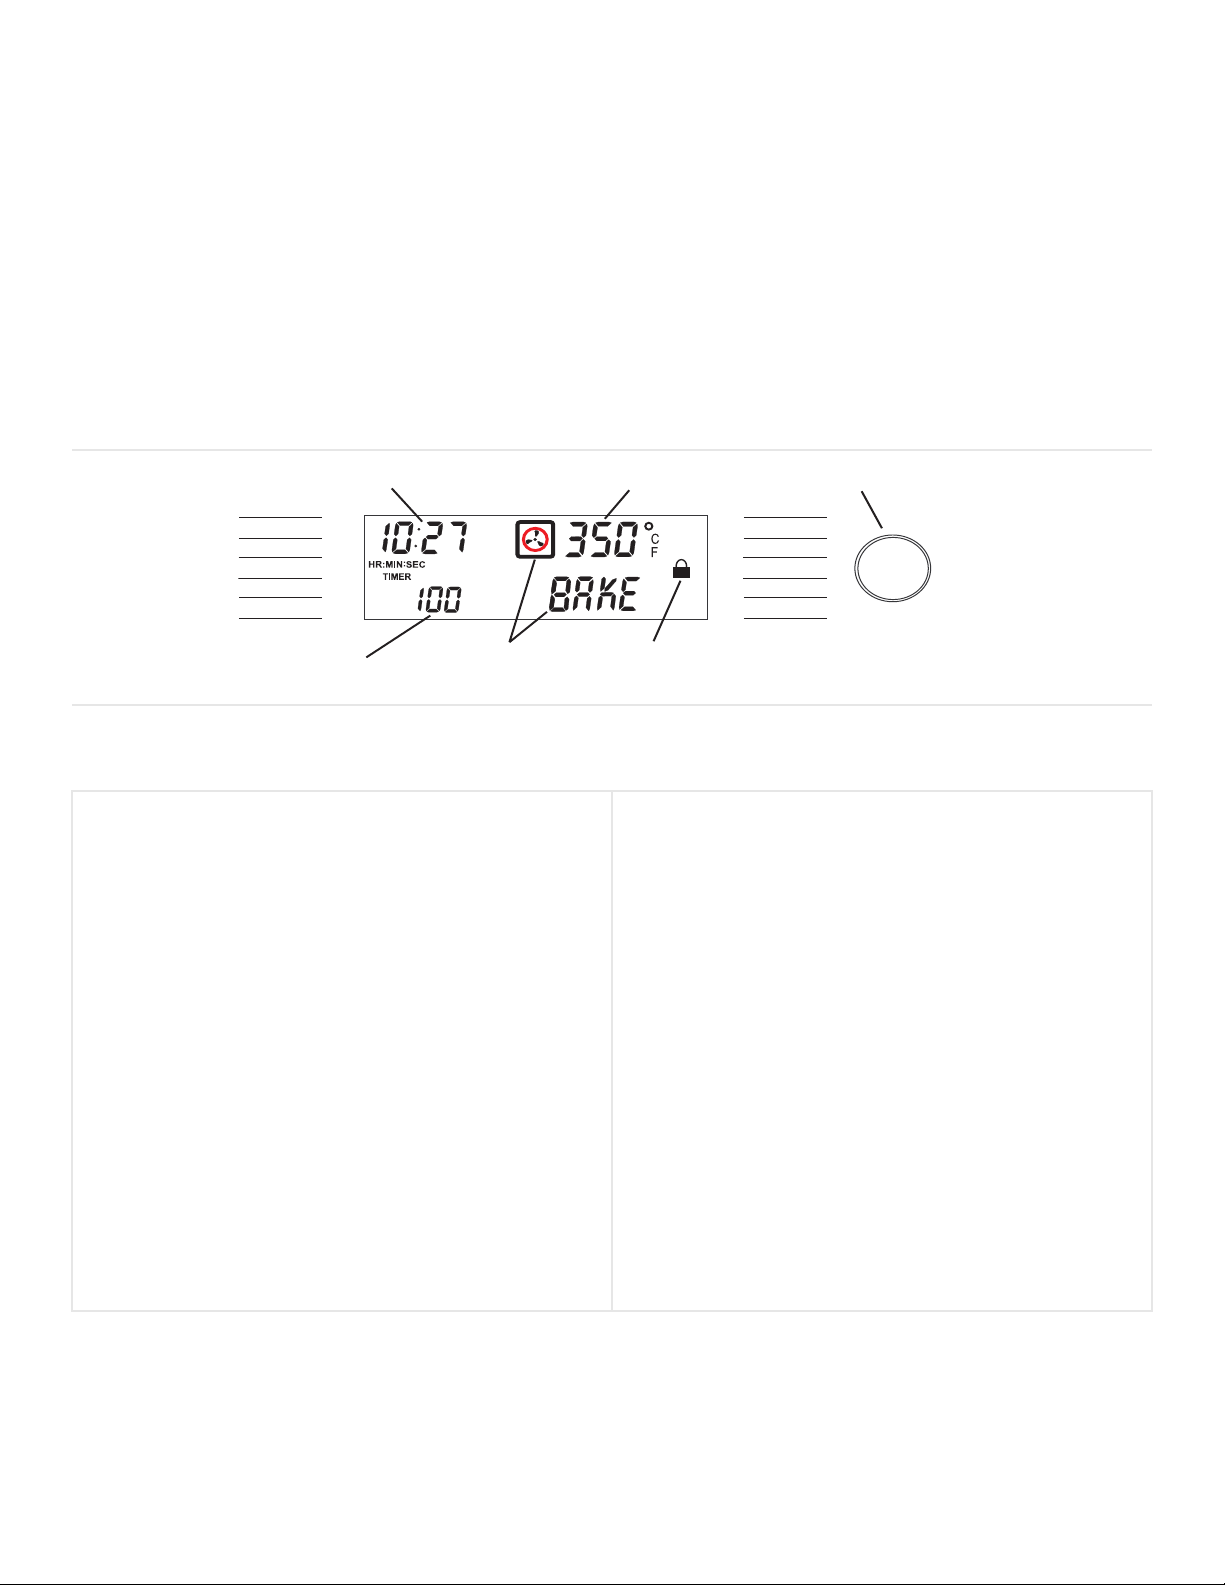
Control (Panel)
Oven Control Panel
Clock
Light
Time
Off
Preheat Temperature
AM
PM
Cooking
Mode Indicator
Table 2: Oven Control Panel
Clock– Shows the time of day with a 12 or 24 hour option.
Also displays the timer and times associated with delayed
cooking and cleaning modes. Turn the control knob to toggle between timer and clock display. Press Time and turn
the control knob to change the time of day or the
timer.
Cooking Mode - Press pad to display cooking mode.
Cooking Mode Icon – Shows the cooking elements that
are active for the mode that is selected. The icon will also
display a fan if the convection fan is utilized in the selected
mode.
Control Knob - Used to set the clock, timers, select cooking mode and temperature. Turn clockwise to increase and
turn counterclockwise to decrease.
Light - Press pad to turn oven light on or off.
Door Locking Indicator - Icon is displayed during the
self-clean mode when the door is locked. DO NOT attempt
to open the door until the lock symbol is no longer present.
Oven Temperature
Lock Indicator
Control Knob
Cooking Mode
Temperature
Start
Figure 8: Oven Control Panel
Off - Press pad to turn off oven and/or warming drawer.
Oven Temperature - Shows the oven temperature.
Preheat Tem perature - Displays temperature of oven dur-
ing preheat mode.
Probe Indicator (some models) - Indicates that the probe
is properly inserted into the probe receptacle in the oven.
Start - Press pad to complete an entry.
Temperature - Press pad to select cooking temperature.
Time - Press pad to set or change the time of day or the
timer.
Timer – There are two timers - TIMER 1 AND TIMER 2;
Each counts down the time in hours and minutes. With
less than 60 minutes remaining, the timer also displays
seconds. Press Time to access the timers.
Warming Drawer Indicator - Indicates that the warming
drawer (some models) is on. Also displays the warming
drawer setting.
English 10
You control the operation of the range by using the touch pads and dial on the
backguard and the knobs on the front panel.
The backguard touchpads, in conjunction with the dial on the backguard, are used
to select an oven mode, set the oven temperature, set the time(s) and to set up
your range. To use the touchpad, press the center part of the pad with the flat part
Page 13
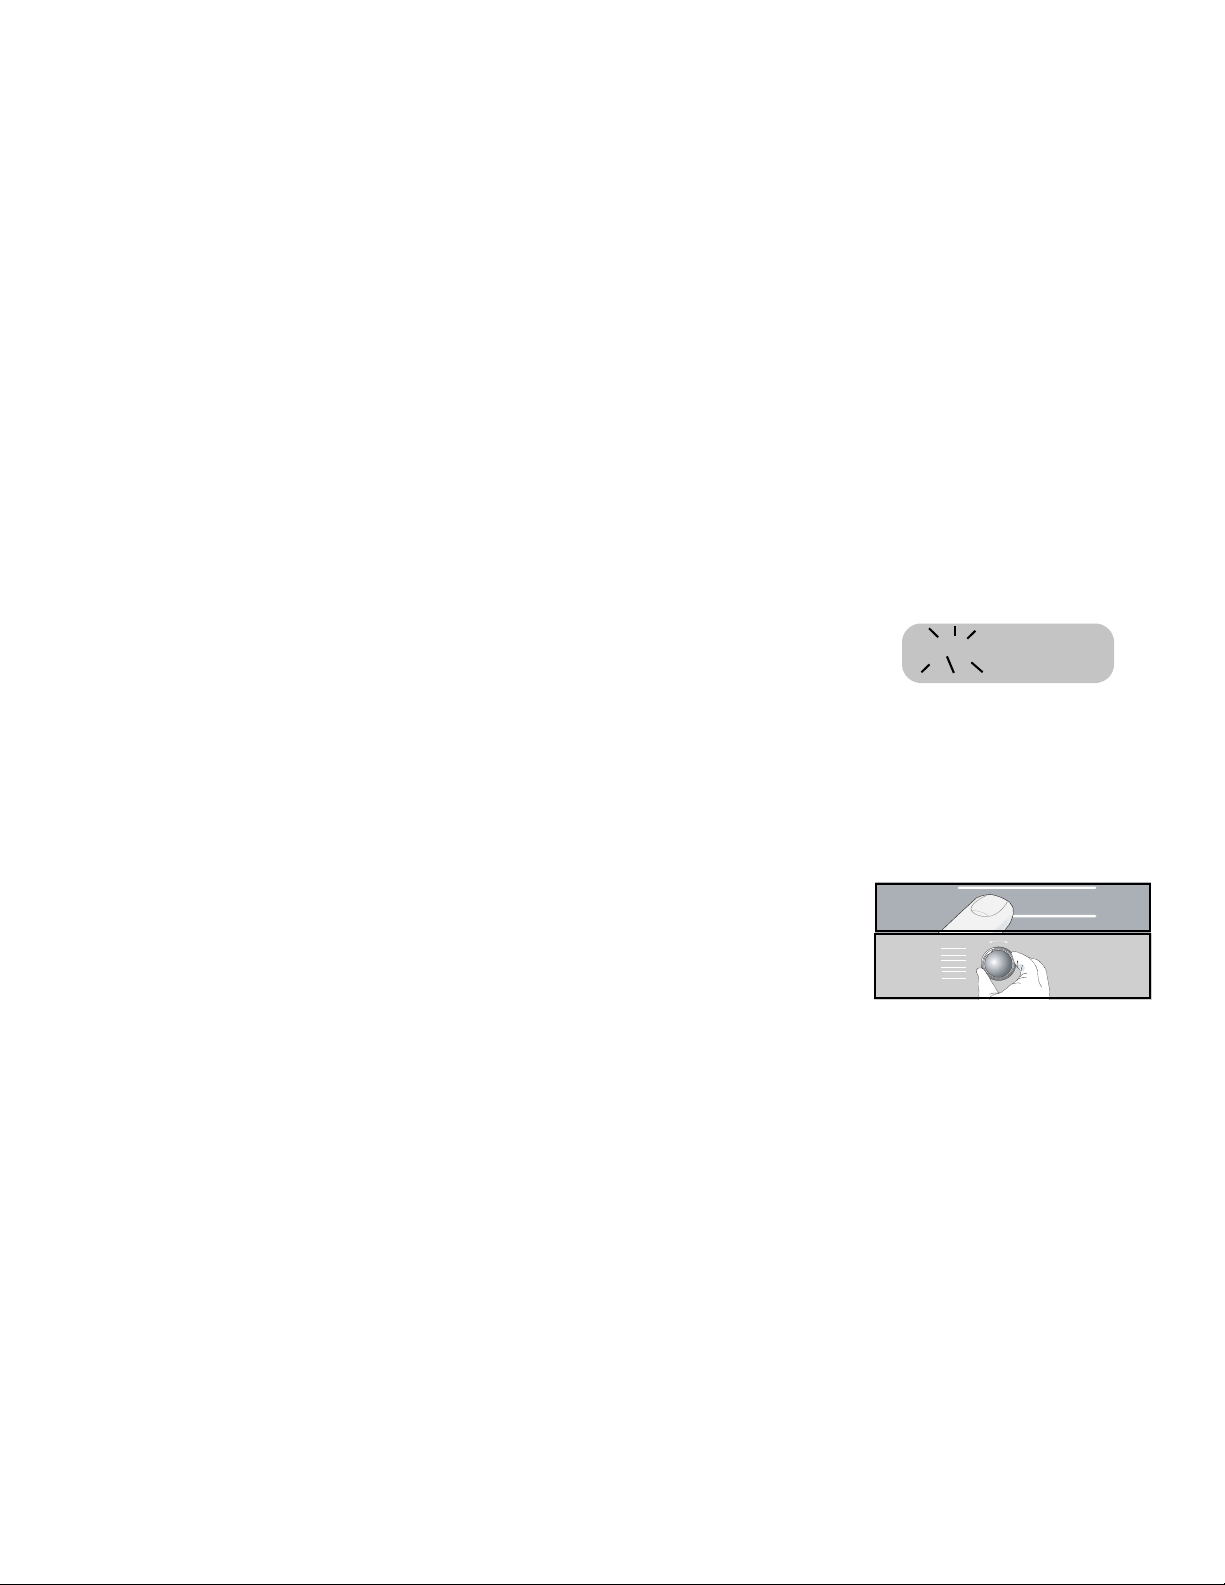
Getting Started
of your fingertip. A beep will sound to indicate that the selection has been made.
Turn the dial on the backguard to the desired setting and press start.
The knobs on the front panel of the range are used to control the heat level of the
elements. Push down and turn to the desired temperature.
See the sections on Using the Cooktop, Using the Oven and Using the Warming
Drawer for detailed instructions.
The Clock
About the Clock • Always set the clock after installation or after a power failure. Once power
returns to the oven, the clock defaults to 12:00 am.
• The time of day is displayed in hours and minutes.
• The clock time will appear during all oven operations except when the timer is
running.
• The oven is preset to a 12 hour clock and indicates AM and PM. To switch to
a 24 hour clock, see "Select Function” section.
• If you do not complete the operation of setting the clock, the oven will beep
periodically as a reminder to set the clock time. Press OFF to stop the beeping.
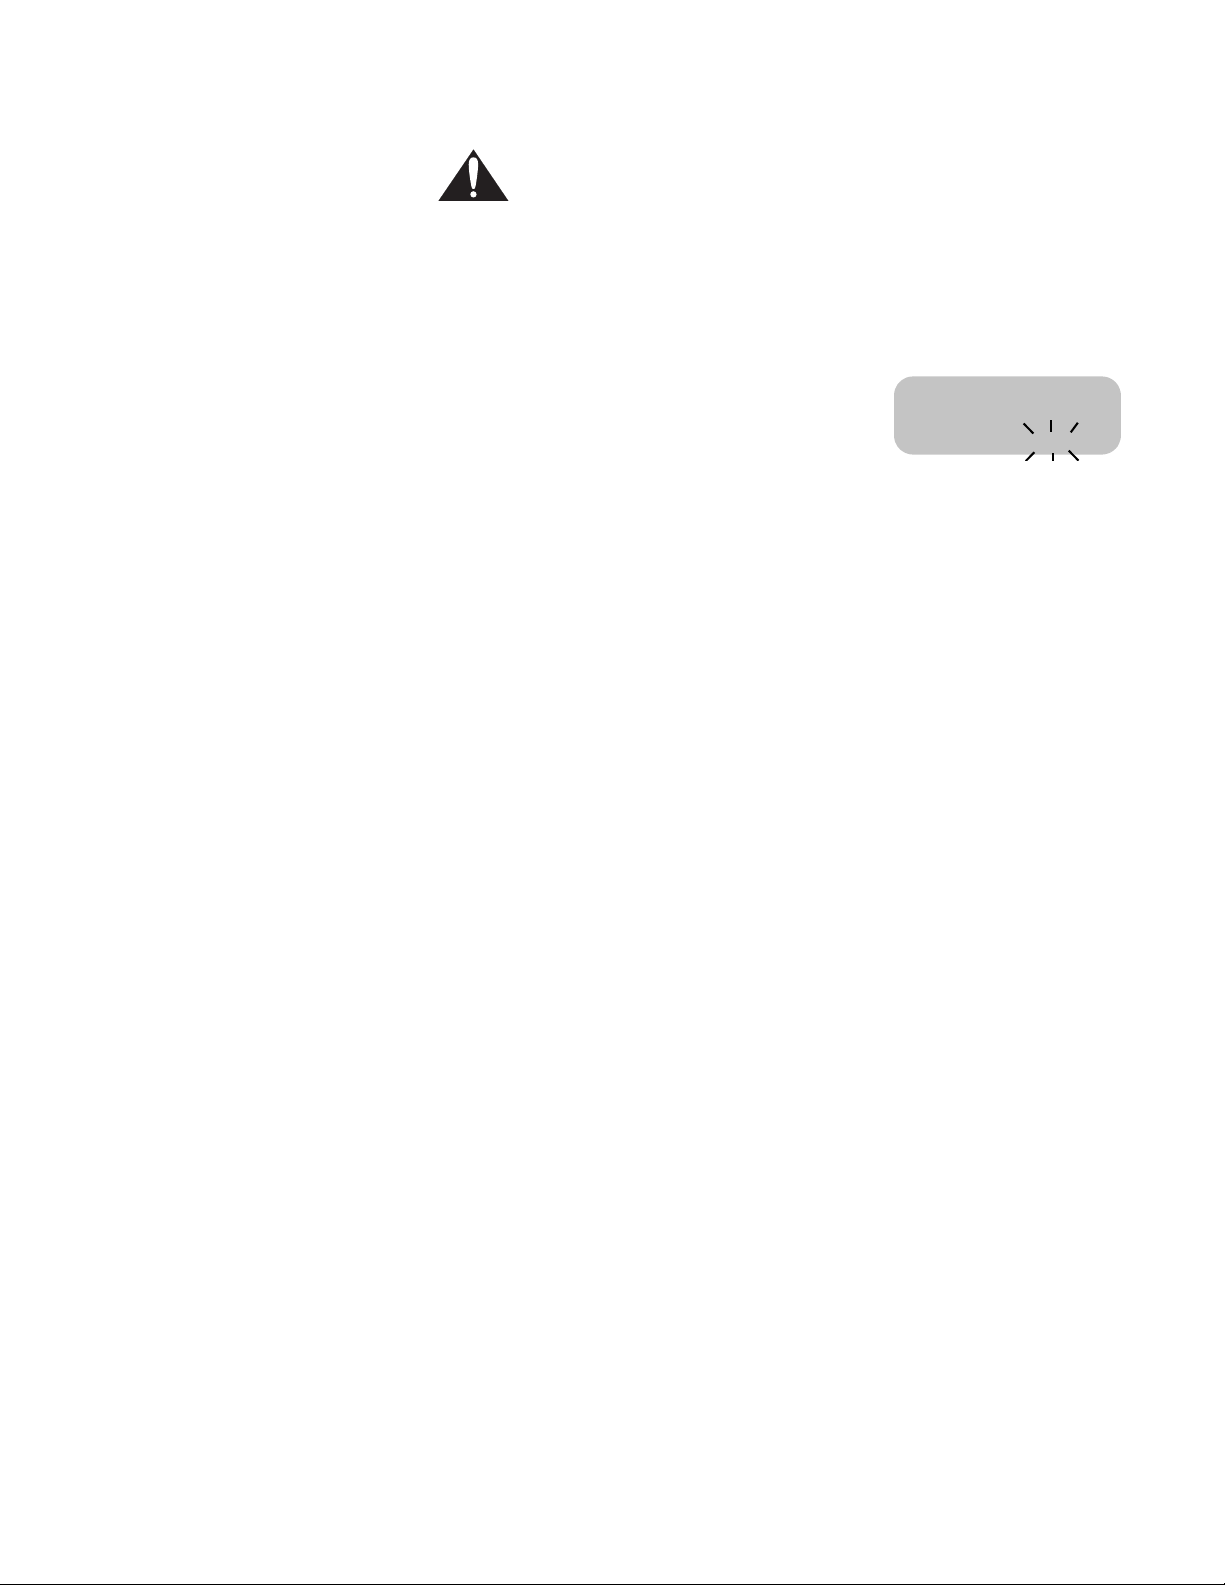
Setting the Clock 1. CLOCK will be displayed and the hour digits
will flash. Turn knob to select hour and AM or
PM.
2. Press Time. CLOCK will still be displayed and the minute digits will flash.
3. Turn knob. Set minutes.
4. Press Time and the clock is now set.
Note: If operation is not completed, the oven will beep periodically as a reminder
to set clock time. Press OFF.
Changing the Clock 1. Press Time. TIMER 1 flashes in display.
2. Turn knob to select CLOCK.
3. Press Time and hour digits flash.
4. Turn knob to change hours.
5. Press Time again and minute digits flash.
6. Turn knob to change minutes.
7. Press Time again and the clock is set.
Note: To cancel the TIME selection when setting the clock, press OFF at any time
while in the clock mode.
The Select Functions Menu
SELECT FUNCTIONS is the section of the menu where you can set or change
the range features listed below.
1
2
12: 00
Cooking Mode
Temperature
Start
AM
CLOCK
Time
To access the SELECT FUNCTION menu
1. Press and hold COOKING MODE press pad for five (5) seconds. SELECT FUNCTION is displayed.
2. Turn knob slowly to desired feature. There will be a slight delay before each message (or feature) can be seen in the display. Turn knob slowly and wait approximately one second for display to show next feature.
3. Press START to choose the function.
4. Turn knob to desired setting and press START. When all settings for the function are complete, SELECT FUNCTION flashes again.
5. Press OFF to exit the Select Functions Menu.
English 11
Page 14
Getting Started
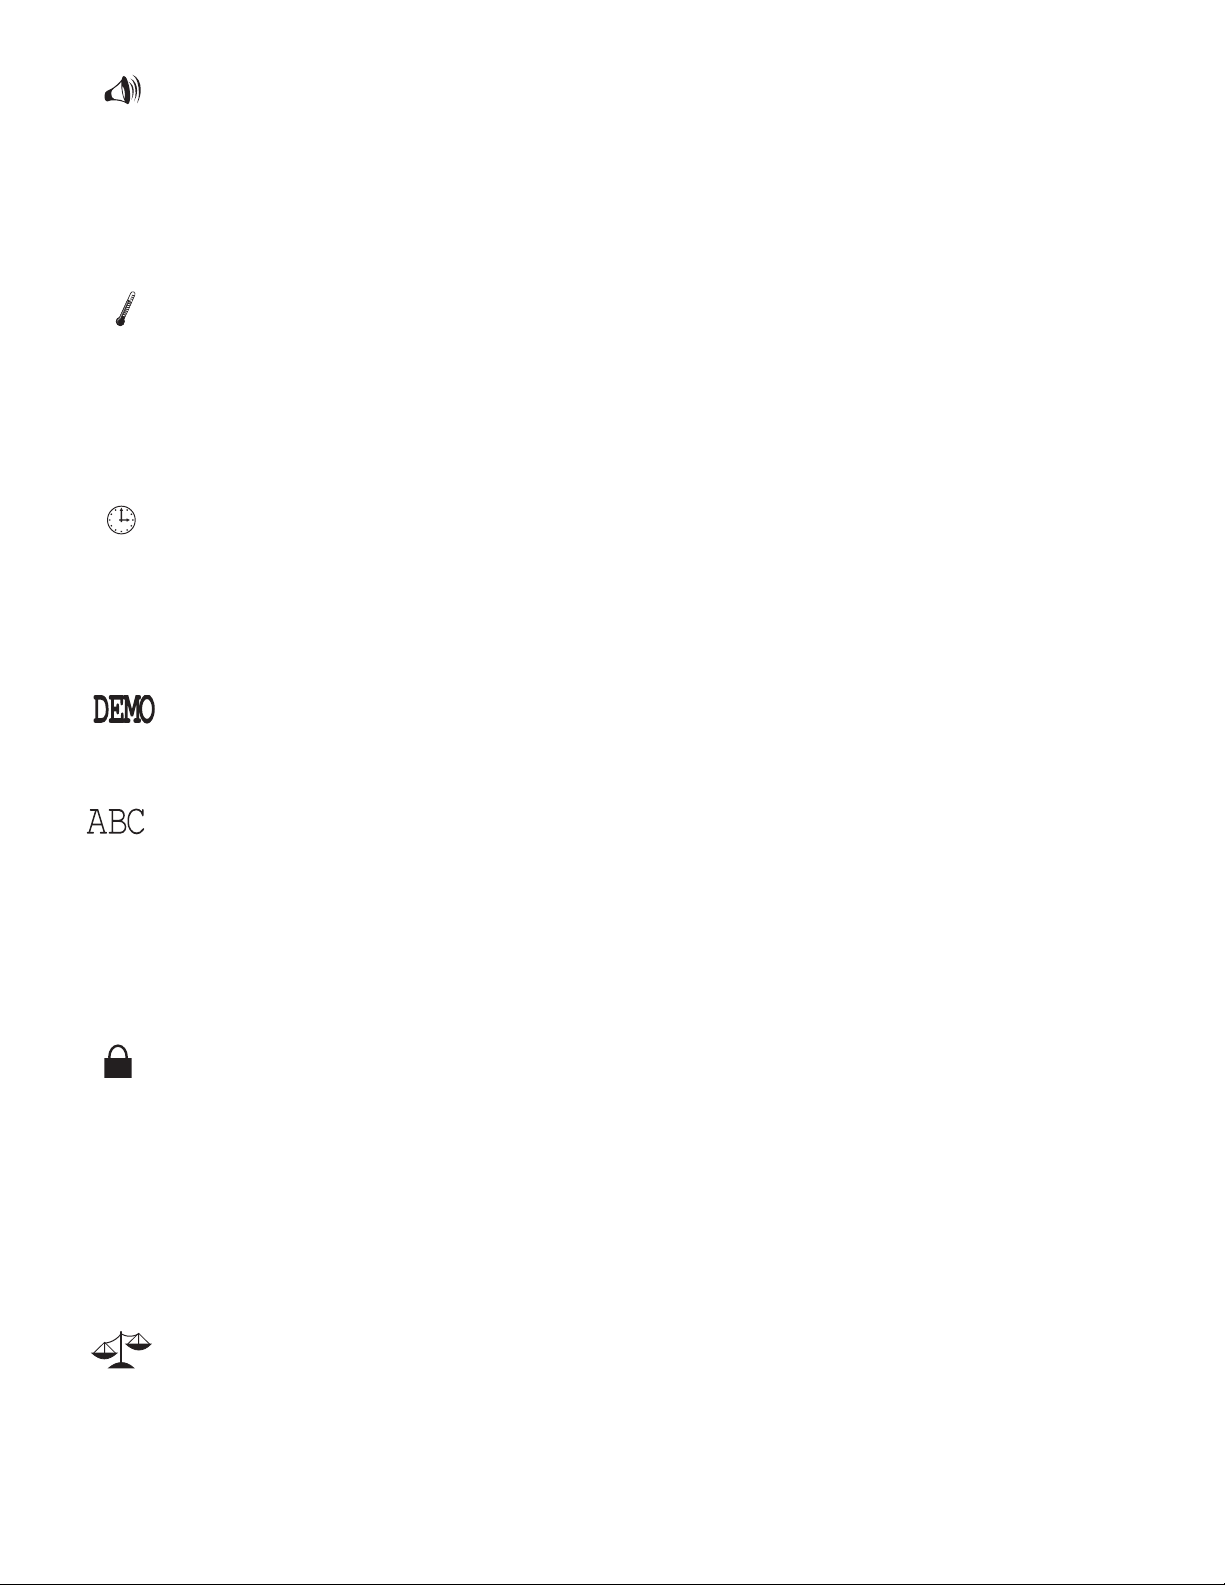
Change the Beep Volume
Change the Temperature Scale
Turn Clock Display ON or OFF
The volume of the control beep can be changed from LOW (softest) to HIGH
(loudest). The control default for beep volume is Medium.
1. Access SELECT FUNCTIONS Menu.
2. Turn knob clockwise until VOLUME is displayed.
3. Press Start.
4. Turn knob to select volume level Low, Medium or High.
5. Press Start.
The oven has been preset to the Fahrenheit temperature scale. The feature
allows you to switch between Fahrenheit and Celsius temperature.
1. Access SELECT FUNCTIONS Menu.
2. Turn knob clockwise until SELECT TEMP F-C is displayed.
3. Press Start.
4. Turn knob to select Fahrenheit (F) or Celsius (C).
5. Press Start to accept new selection.
Clock time display can be turned off. The default display is on.
1. Access SELECT FUNCTIONS Menu.
2. Turn knob clockwise until CLOCK DISPLAY is displayed.
3. Press START.
4. Turn knob to select ON or OFF
5. Press START to accept new selection.
Access Demo Mode The demo mode is for appliance store use only.
Change the Display Language
Lock / Unlock the Oven Control Panel
Language choices are English, Spanish, and French. English is the default language. Note: The SELECT FUNCTIONS menu is displayed in English only,
regardless of which language is selected.
1. Access SELECT FUNCTIONS Menu.
2. Turn knob clockwise until desired language is displayed.
3. Press Start.
4. Turn knob clockwise to select a different language.
5. Press Start to accept a language change.
The oven keypad can be locked for safety purposes. This feature can be used to
prevent changes to the oven function. This function DOES NOT lock
door.
1. Access SELECT FUNCTIONS Menu.
2. Turn knob clockwise until LOCK KEYS is flashing.
3. Press Start. KEY PAD LOCKED is displayed. The display will beep if a key is pressed to indicate that the keypad is locked.
4. To unlock keypads, press Cooking Mode and hold for 5 seconds. Display will read UNLOCKING KEY PAD.
5. When unlocked, the clock will again appear in the display.
the oven
English 12
Change the Oven Temperature Offset
This feature allows the adjustment of the oven temperature if food is consistently
too brown or too light.
1. Access SELECT FUNCTIONS Menu.
2. Turn knob clockwise until OVEN TEMP OFFSET is displayed.
3. Press START. 0° F is displayed.
Page 15

Getting Started
4. Turn the knob to the right to increase temperature to +25° F and to the left to
decrease to -25° F. The temperature changes by 5° F increments.
5. Press START to accept a temperature change.
Reset the Factory Settings
Set the Sabbath Feature About the Sabbath Feature
This feature is used to change all the “Select Functions” settings back to the original factory settings (or defaults).
1. Access SELECT FUNCTIONS Menu.
2. Turn knob clockwise until RESET DEFAULTS is displayed.
3. Press START. Display reads SELECT FUNCTIONS.
The Sabbath Feature is for religious faiths with “no work” requirements on the
Sabbath.
• The oven will bake for 73 hours before automatically turning off.
• While baking in Sabbath mode, the display will show SABBATH and the
BAKE icon will be displayed. The clock will be off and no temperature will
show in the display.
• During the Sabbath mode, only the OFF key will operate. Press OFF at any
time during the Sabbath mode to end the mode and turn off the oven.
• At the end of 73 hours, the oven will turn off automatically and the display will
show SABBATH END. Press Off to return to time of day.
• The warming drawer does not operate with the Sabbath feature unless the
feature is also activated in the oven.
• The probe CANNOT be used during the Sabbath mode.
Setting the Sabbath Feature for the Oven Only
1. Verify that the oven is turned off.
1. Access SELECT FUNCTIONS Menu.
2. Turn knob clockwise until SABBATH OPTION appears.
3. Press START. BAKE will show in display and temperature will flash.
4. Turn knob to set oven temperature.
5. Turn oven light on if desired (press LIGHT).
Note: The light cannot be changed after this point. It will stay on or off, as
selected, during the entire Sabbath mode.
6. Press START. Oven starts after 5 seconds.
The oven operates for 73 hours and then turns off automatically.
Setting the Sabbath Feature for both the Warming Drawer and the Oven.
Note: warming drawer does not operate with the Sabbath feature unless the fea-
ture is also activated in the oven.
1. Turn the warming drawer on to the desired heat setting. See “Turning on the Warming Drawer” on page 21.
2. Verify that the oven is turned off.
3. Access SELECT FUNCTIONS Menu.
4. Turn knob clockwise until SABBATH OPTION appears.
5. Press START. BAKE will show in display and temperature will flash.
6. Turn knob to set oven temperature.
7. Turn oven light on if desired (press LIGHT).
Note: The light cannot be changed after this point. It will stay on or off, as
selected, during the entire Sabbath mode.
English 13
Page 16

8. Press START. Oven starts after 5 seconds. Sabbath Feature is activated for both the warming drawer and the oven.
The oven and warming drawer operates for 73 hours and then turn off automatically.
Setting the Sabbath Feature for the Warming Drawer Only
The warming drawer does not operate with the Sabbath feature unless the feature
is also activated in the oven. See “Setting the Sabbath Feature for both the Warming Drawer and the Oven.” on page 13.
Change the Time Format
Turn Automatic Convec-
0.0
tion Conversion ON or
OFF
The clock can be set to a 12 hour or 24 hour format. The default for clock format is
12 hour.
1. Access SELECT FUNCTIONS Menu.
2. Turn knob clockwise until TIME FORMAT is displayed.
3. Press Start.
4. Turn knob to select 12 hour or 24 hour format.
5. Press Start to accept new selection.
This feature automatically converts package or recipe temperatures for use with
the convection bake mode. The default setting is “on”.
1. Access SELECT FUNCTIONS Menu.
2. Turn knob clockwise until AUTO CONVECT BAKE is displayed.
3. Press Start.
4. Turn knob to select ON or OFF.
5. Press Start to accept new selection.
Before Using the Appliance for the First Time
• Remove all packing materials and labels from range. Remove packing materials from inside the oven and inside the drawer.
• While cool, wipe with a clean, damp sponge and dry.
• Apply the glass ceramic cooktop cleaner to the glass ceramic cooktop. Buff
with a clean cloth. See Care and Cleaning Section.
• There may be a slight odor during first uses; this is normal and will disappear.
• Optimum cooking results depend on proper cookware being used.
• The cooking surface will hold the heat and remain hot up to 30 minutes after
the elements have been turned off.
• Read and understand all safety precautions and Use and Care Manual information prior to operating.
Operation - Cooktop
This section explains how to operate the cooktop. See “Getting the Most Out of
Your Cooktop” on page 22 for guidelines to improve cooktop results.
About the Cooktop
Use the cooktop for surface cooking applications such as boiling, frying, simmering, steaming and sauteing.
English 14
Page 17
Operation - Cooktop
Operation
CAUTION
• Foods packaged in aluminum foil should not be placed directly on
the glass ceramic surface for cooking. Aluminum foil can melt and
cause permanent damage.
• Plastic, paper and cloth can melt or burn when in contact with a
hot surface. Do not let these items come in contact with the hot
glass ceramic surface.
• Do not allow pans to boil dry. This can permanently damage the
pan, the element and the cooktop glass.
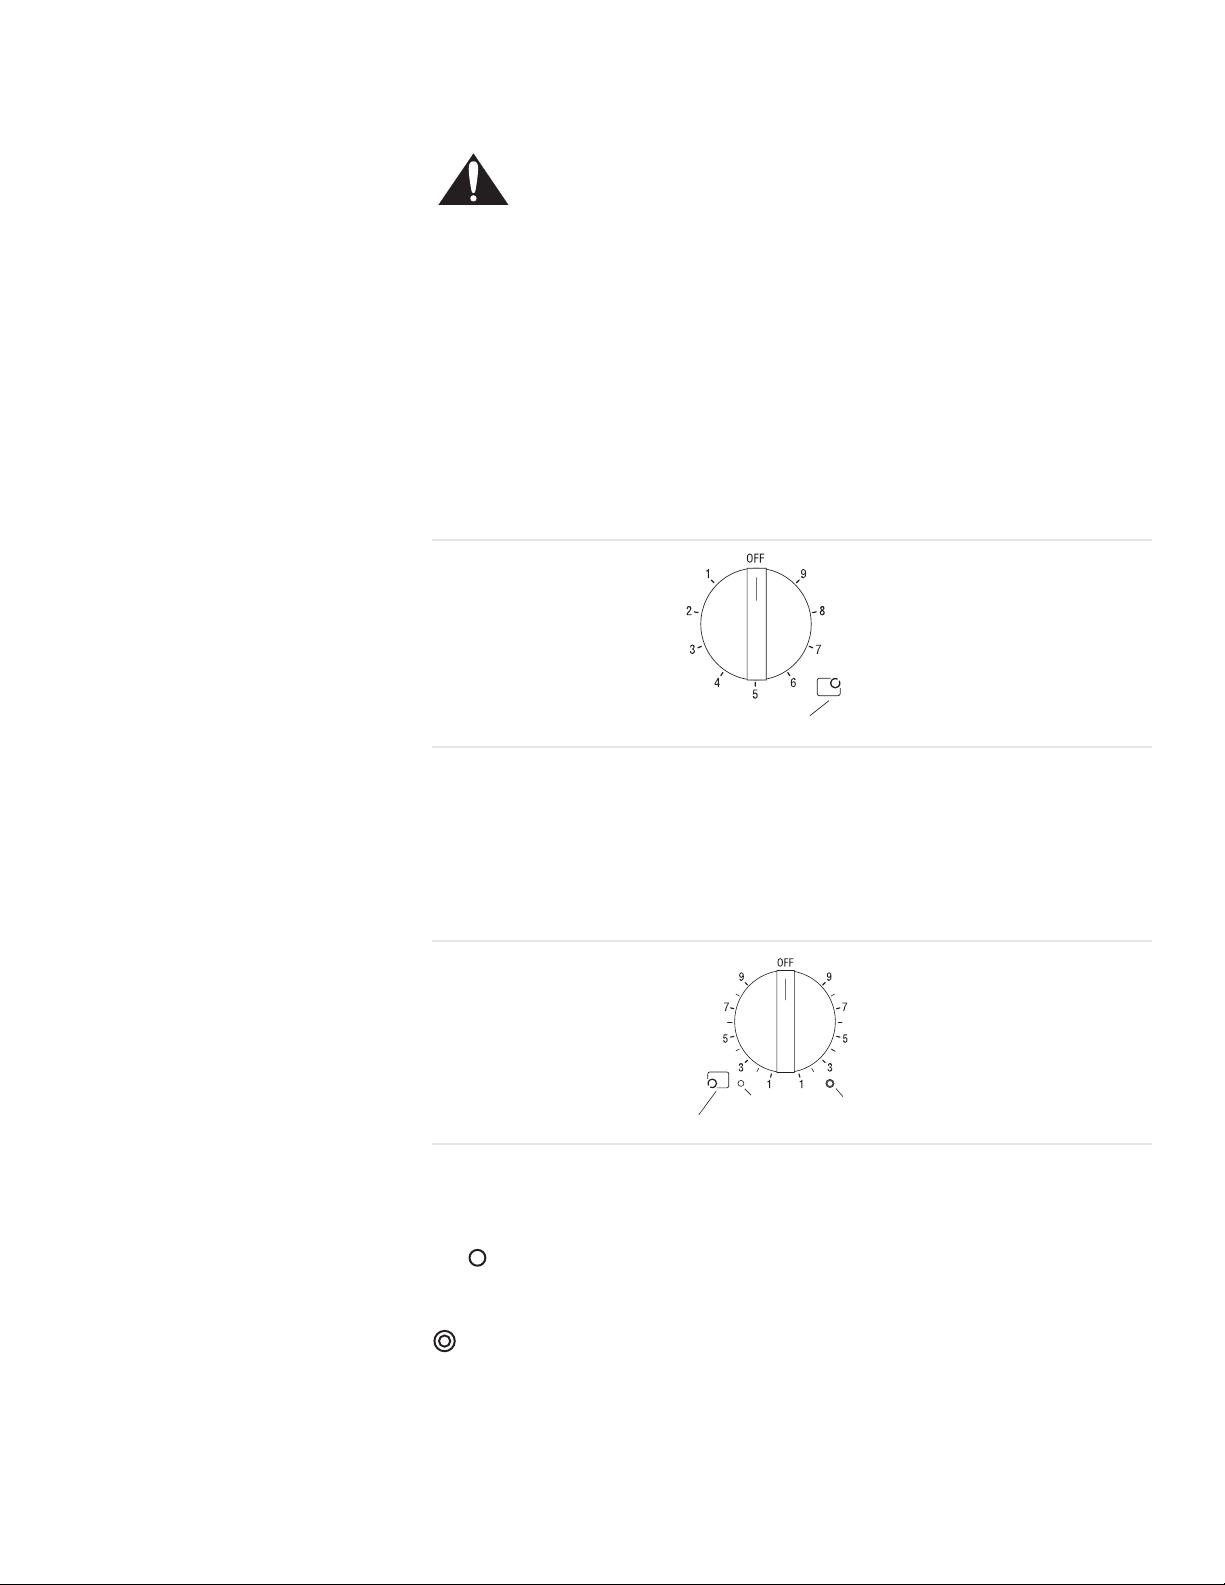
Setting the Burner Heat Level
Single Element Control Knob To turn on a single element, push in on the control knob and turn in either direc-
tion to the desired heat setting.
Element Location
Figure 9: Single Element Burner Knob
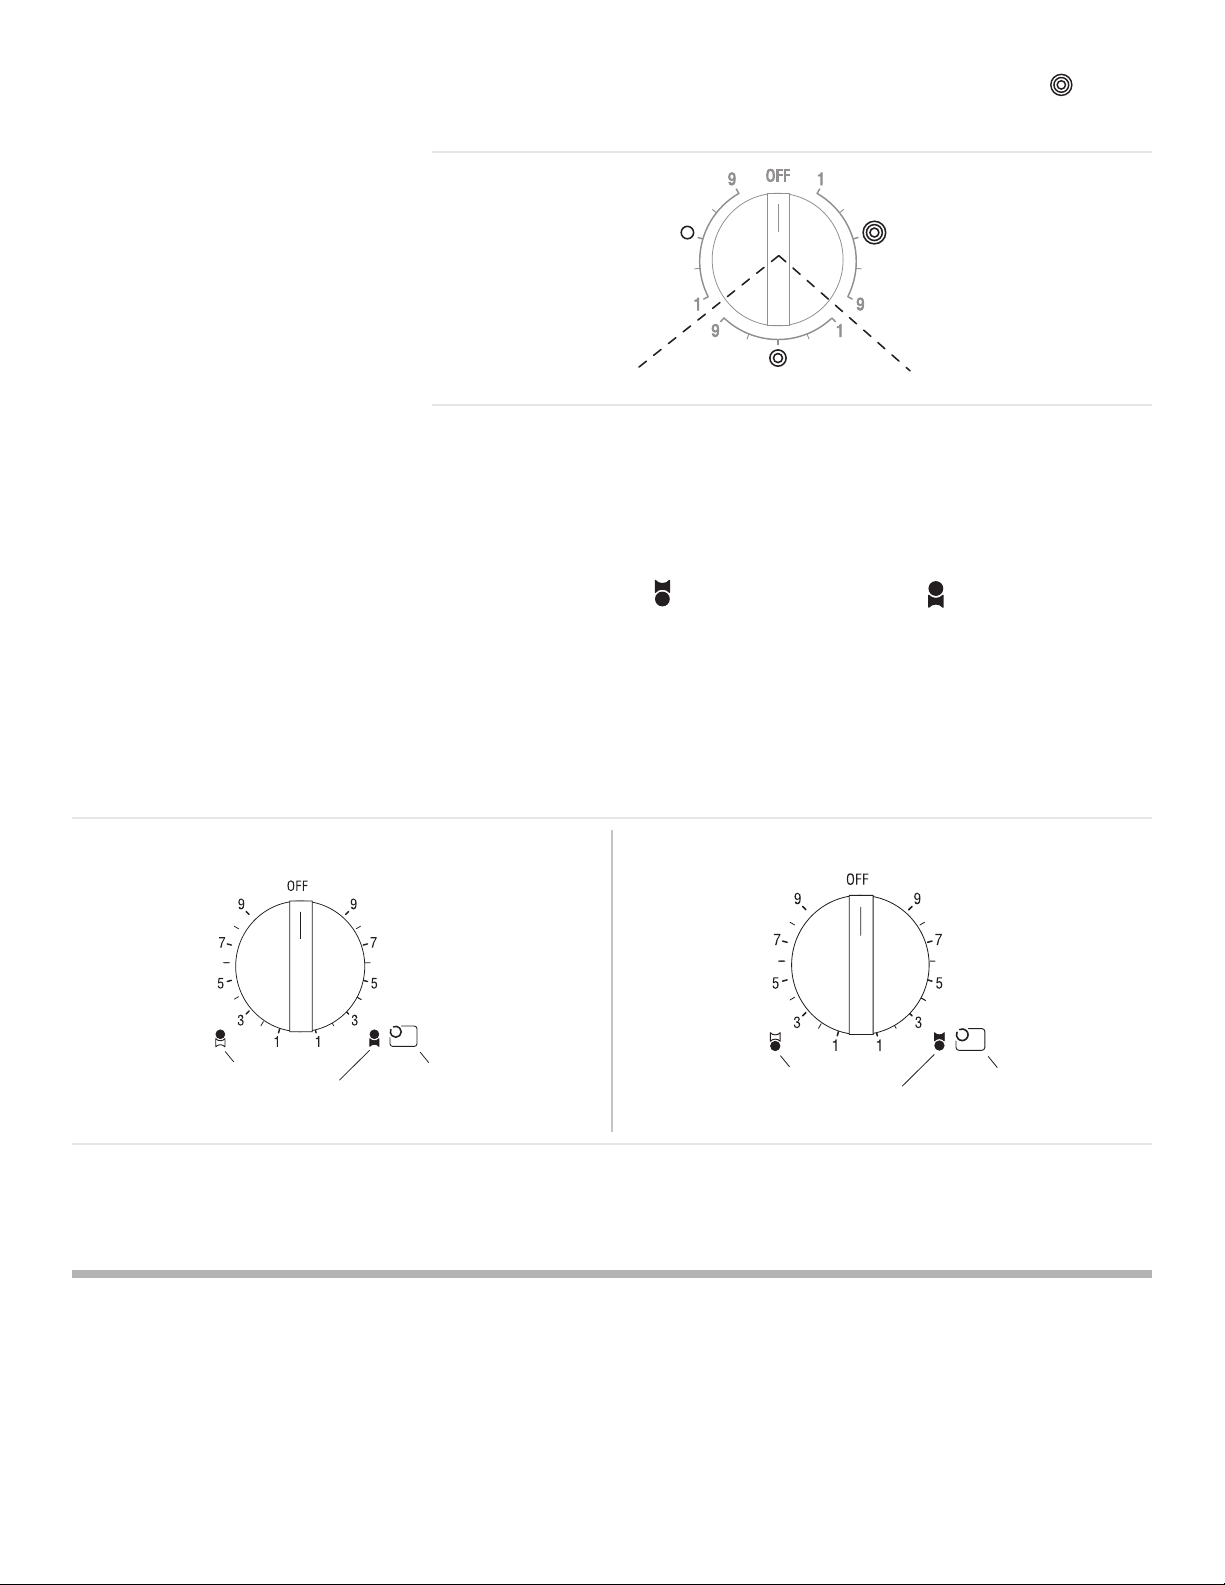
Dual Element Control Knob To turn ON the small, inner element, push in on the control knob and turn it coun-
terclockwise. Set to desired heat level.
To turn ON both the inner and outer elements together, push in on the control
knob and turn it clockwise to the desired setting.
Triple Element Control Knob (some models)
Inner Element
Element Location
To turn on the small inner element only, push in on the control knob and turn it to
the symbol (counterclockwise). Turn knob left or right to set the heat level.
Outer Element
Figure 10: Dual Element Burner Knob
To turn on the inner and middle elements, push in and turn the control knob to the
symbol. Turn knob left or right to set the heat level.
English 15
Page 18
To turn on all three elements, Push in and turn the control knob to the icon.
Turn knob left or right to set the heat level.
Bridge Element Control Knob (some models)
Inner
Element
Only
Inner and Middle Element
All Three
Elements
Figure 11: Triple Element Knob
The bridge element connects two single elements to create one long cooking surface.
Depending on the model, the bridge element is either activated in conjunction with
the front single element ( ) or the rear single element ( ). Refer to the control
knob on your appliance to determine your configuration.
Turn ON the bridge element and the small element together
1. Push in on the control knob and turn clockwise to the desired heat setting.
Tip: To complete the connection and create an even longer cooking surface ,
turn ON the other single element, too.
To use the single element without bridge
1. Turn the knob counterclockwise.
Bridge element activated with
front single element:
Rear Single Element
Bridge Element with
Rear Single Element
Element Location
Operation - Oven
This section explains how to operate the oven. See “Getting the Most Out of Your
Oven” on page 24 for guidelines to improve oven results.
Bridge element activated with
rear single element:
Front Single Element
Bridge Element with
Front Single Element
Figure 12: Bridge Element Knob
Element Location
About the Oven
English 16
Page 19
Operation
Operation - Oven
CAUTION
Do not use aluminum foil or protective liners to line any part of an appliance, especially surface unit drip bowls or oven bottom. Installation of
these liners may result in a risk of electric shock or fire.
Setting the Cooking Mode and Temperature
Automatic Convection Conversion (models with convection bake)
Note: To back out of a current mode, press OFF. (Selecting OFF when not setting
the cooking mode will turn the oven off.)
1. Press COOKING MODE.
2. BAKE will flash in the display.
3. If no change is made within 5 seconds, control will beep and flash. If this occurs, press START.
4. To change the cooking mode, turn knob.
5. Press START.
6. The selected mode will appear in the display, along with the default temperature for that mode, which will be blinking.
7. To select a different temperature, turn knob to the right or left (in 5° increments) to desired temperature.
8. Press START. If not pressed, oven automatically turns on in 5 seconds.
9. The display alternates between the cooking mode and preheat.
The preheated temperature is displayed, starting at 100ºF. The actual temperature increases until set temperature is reached, at which point the oven will beep.
10. To change temperature during cooking, press Temperature. Turn the knob to select new temperature and press START.
11. Once cooking has been completed, press OFF to turn off oven.
In the convection bake mode, the temperature is automatically reduced 25° F
from the package or recipe temperature. Simply enter the package or recipe temperature when setting the mode and the range calculates the correct temperature.
6: 35
PM
380
BAKE100
The Automatic Convection Conversion feature can be turned off to allow for manual temperature adjustment. See “Turn Automatic Convection Conversion ON or
OFF” on page 14 for details.
When the Automatic Convection Conversion feature is activated, the display will
read AUTO CONV BAKE. When the feature is turned off, it will read CONV BAKE.
Hot Oven Indicator After the oven has been turned off, HOT appears in the display where the cooking
mode was to indicate that the oven is off but still hot. When the oven temperature
drops below 176° F, HOT is no longer seen in the display.
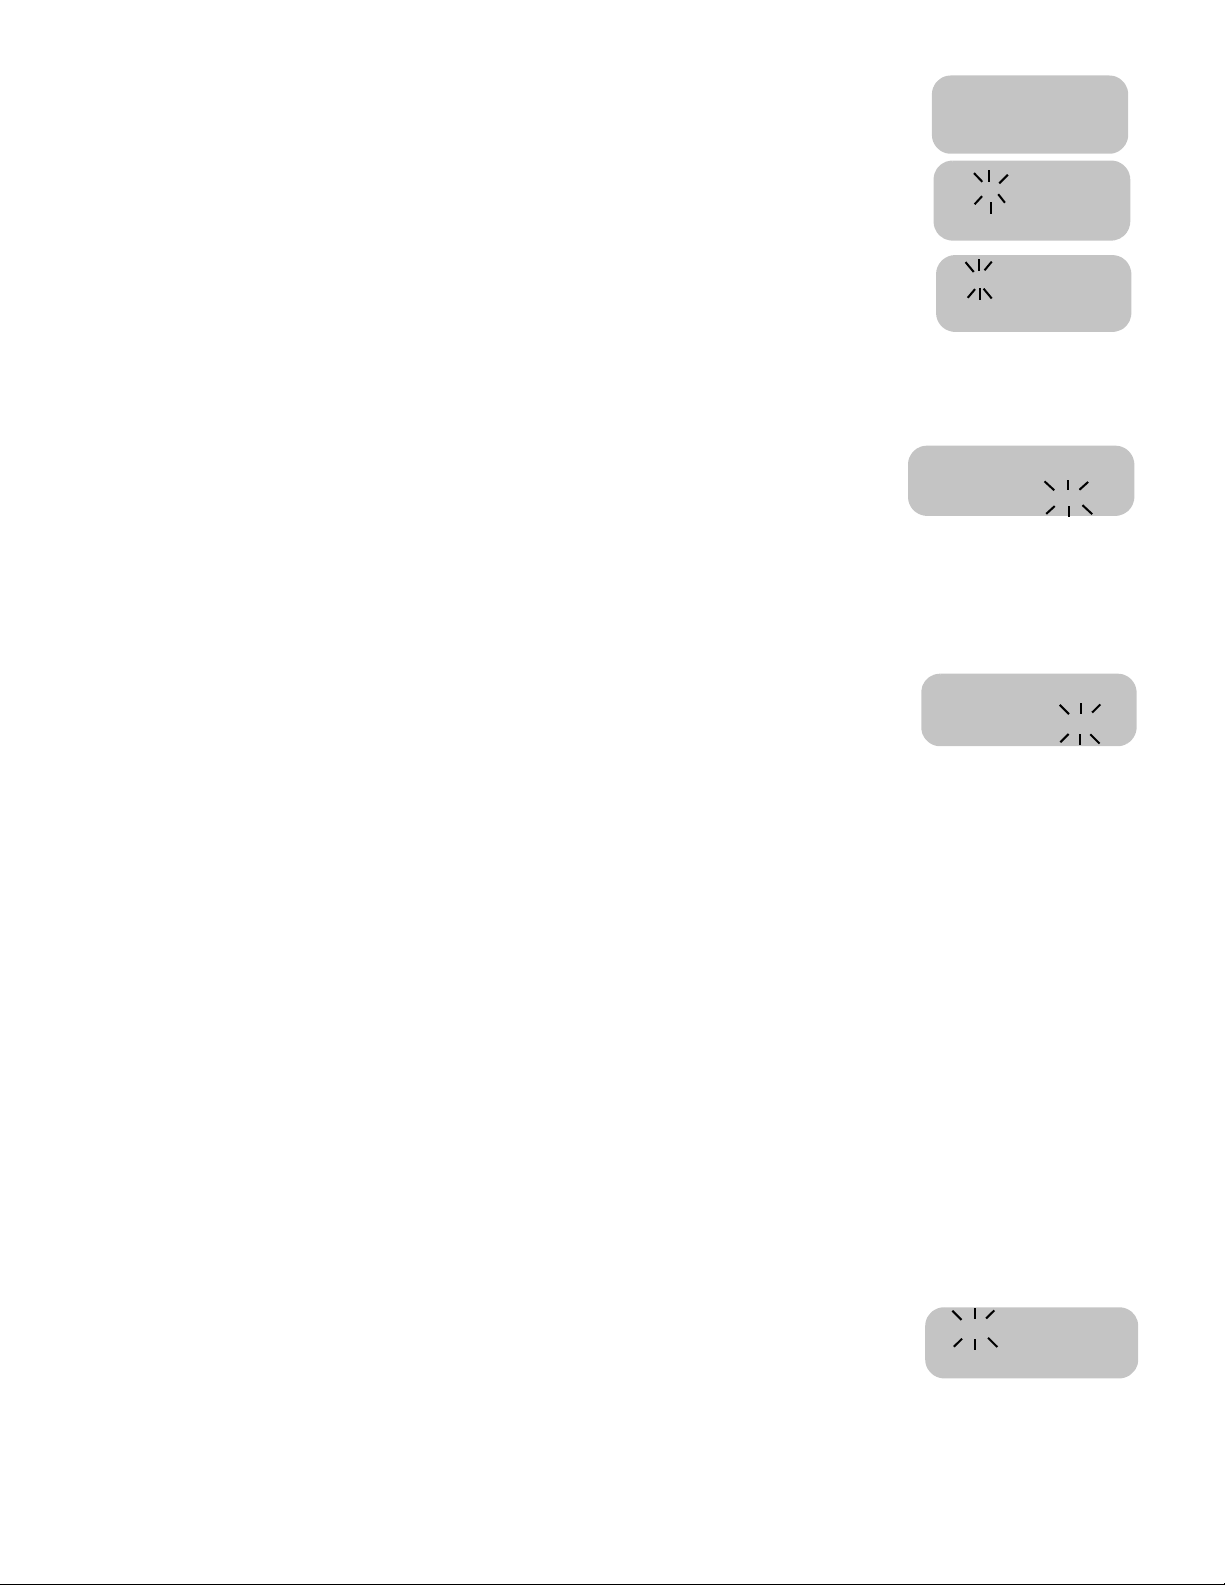
Using the Timer Notes:
• If you do not finish setting the timer, the oven will beep periodically as a
reminder to set the time. Press OFF to exit the TIMER mode. (Selecting OFF
when not setting the timer will turn the oven off.)
• Turn the knob to display the time of day or further information about the oven
mode when the timers are in use.
To set the timer:
English 17
Page 20
Operation - Oven
1. Press TIME and TIMER 1 will flash in display.
0: 00
TIMER 1
Turn clockwise and TIMER 2 will be displayed.
Select TIMER 1 or 2, then press TIME. SET
TIMER 1 (2) appears in display. Minutes flash.
2. Turn knob to set minutes. If setting only minutes, press START. Otherwise, continue to step 4.
3. Press TIME again and the hours will flash.
4. Turn knob to set hours.
5. Press TIME again. The TIMER is now set.
6. If TIME or START is not pressed, oven will begin beeping and timer display will begin flashing.
1 : 00
HR:MIN
2: 02
HR:MIN
Set TIMER 2
Pm
Set TIMER 2
Changing the Timer/s 1. Press TIME. TIMER 1 will appear in display.
Select either TIMER 1 or 2.
2. Press TIME. RESET TIMER 1 (2) appears in the display. Minute digits flash.
3. Turn knob clockwise or counterclockwise to change minutes.
4. Press TIME again and hour digits will flash.
5. Turn knob clockwise or counterclockwise to change hours.
6. Press TIME and new time is set.
Clearing the Timer/s 1. Press TIME once. TIMER 1 flashes.
2. Turn knob to select CLEAR TIMER 1(2). Press TIME.
3. If Time pad is not pressed, range will beep and display will continue flashing.
4. Press TIME to return to the main screen.
Cancelling If operation is not completed, the oven will beep periodically as a reminder to set
time. Press OFF to exit the Timer mode. Selecting OFF when not in a setting
mode will turn off the oven.
Using Timed or Delayed Cook
The TIMED COOK feature sets the oven to a cooking mode for a set period of
time and then turns it off. The TIMED COOK feature is available for each of the
following oven modes: Bake, Convection Bake and Convection Roast.
• Be sure that the time-of-day clock displays the correct time before beginning.
See “Changing the Clock” on page 11 to adjust the time.
• At end of the programmed cooking time, the oven will automatically turn off.
• Delayed cooking is not recommended for foods that need to rise (i.e.; cookies,
cakes, breads, souffles, etc.)
0: 00
AM
0: 00
CLEAR TIMER 1
TIMER 1
Setting a Timed Mode 1. Press COOKING MODE.
2. BAKE will be displayed. To select a different cooking mode, turn the knob.
3. Press START.
4. Turn knob to select desired temperature.
Note: Time required for the oven to reach temperature must be included in
the set cooking time.
5. Press TIME. TIMED BAKE appears.
6. Press TIME. SET BAKE TIME appears in the display and minutes flash.
7. Set minutes. Press TIME.
8. Hours Flash. Set hours. Press START.
9. TIMED BAKE appears in display and the oven begins to preheat.
After cooking is complete, display flashes TIME COOK END and reminder beeps
will sound. Press OFF to clear.
English 18
1: 20
HR:MIN
F
350°
TIMED BAKE
Page 21

Delaying the Start of a Timed Mode 1. Follow steps 1 through 5 above.
2. Turn knob until DELAYED BAKE appears.
3. Press Time. SET BAKE TIME appears in display and minutes flash.
4. Set minutes and then press TIME. Hours Flash.
5. Set hours and then press TIME. SET BAKE END appears in the display.
6. Press TIME.
7. Use knob to enter the time of day the oven will stop cooking or turn off.
8. Set hours and then press TIME.
9. Set minutes and then press TIME.
Note: The clock automatically calculates time of day at which cooking mode
starts and stops. The displayed cooking time counts down by the minute.
10. At the end of the programmed cooking time, the oven will automatically turn off. Display will show TIME COOK END and reminder beeps will sound. Press OFF to clear.
Note: Remove food from oven immediately after cycle has finished to prevent
overcooking. Food left in the oven will cook even after the cycle is complete.
5: 00
HR:MIN
Operation - Oven
o
PM
400
F
DELAYED BAKE
To Check the Cooking Time and Stop Time After a Delay Has Been Set
Setting the Sabbath Feature See “Set the Sabbath Feature” on page 13.
Using the Probe (some models)
Setting the Probe 1. Prepare meat and place in roasting pan (or on rack in roasting pan as recipe
1. Press Time.
2. Turn knob to BAKE END or BAKE TIME.
3. Press Time.
This section explains how to operate the probe. See “The Probe (some models)”
on page 25 for guidelines, tips and suggestions.
The probe can be used to determine the internal doneness or the “END” temperature of many foods,especially meats and poultry.
The temperature range for the probe is 135°F to 200°F (57°C to 93°C). Oven temperature can be set for 100°F up to 450°F (38°C up to 232°C).
specifies). Insert the probe into the meat. Make sure the probe is not touching
gristle, fat, bone, the roast rack or the pan. See “Inserting the Probe” on
page 25 for detailed instructions.
Note: Do not connect to probe receptacle until probe tip is properly inserted into
meat.
2. Place roasting pan with meat in cold oven on recommended oven rack. Plug probe into the probe receptacle. The probe symbol will appear in display.
Note: The probe temperature can only be set when the probe is installed in the
oven.
3. Press COOKING MODE and select BAKE, CONVECTION BAKE or CONVECTION ROAST.
4. Press START. The default oven temperature will appear.
5. Turn knob to change oven temperature if necessary.
6. Touch START.
7. Turn knob to set the probe temperature (desired end temperature of the food).
8. Press START.
The chosen oven temperature is displayed in the upper right hand corner of the
display.
English 19
Page 22
The probe temperature is displayed in the center to the left of the cooking mode. It
starts at 80 degrees and increases in 5°F increments until the chosen probe temperature is reached.
The oven is preheated when the beep signals once.
When the set probe temperature is reached, END appears in display and oven
turns off.
Changing the Oven Temperature When Using the Probe
Changing the Probe Temperature 1. Touch TEMPERATURE. The oven temperature will flash.
1. Touch TEMPERATURE. Oven temp will flash in the display.
2. Turn the knob to desired temperature and press START twice.
2. Press start and PROBE TEMP will flash.
3. Turn the knob to desired temperature and press START again.
Note: Always remove probe from oven when cooking is complete. The probe
symbol will remain in the display until the probe is removed. Do not leave probe
attachment in oven during self-clean. Oven will not self-clean with the probe
installed in the oven
Operation - Warming Drawer (some models)
This section explains how to operate the warming drawer. See “Getting the Most
Out of Your Warming Drawer” on page 30 for guidelines to improve warming
drawer results.
About the Warming Drawer
Warming Drawer Specifications
The warming drawer will keep hot, cooked foods at serving temperature. Warming
drawer settings are Low, Medium, and High.
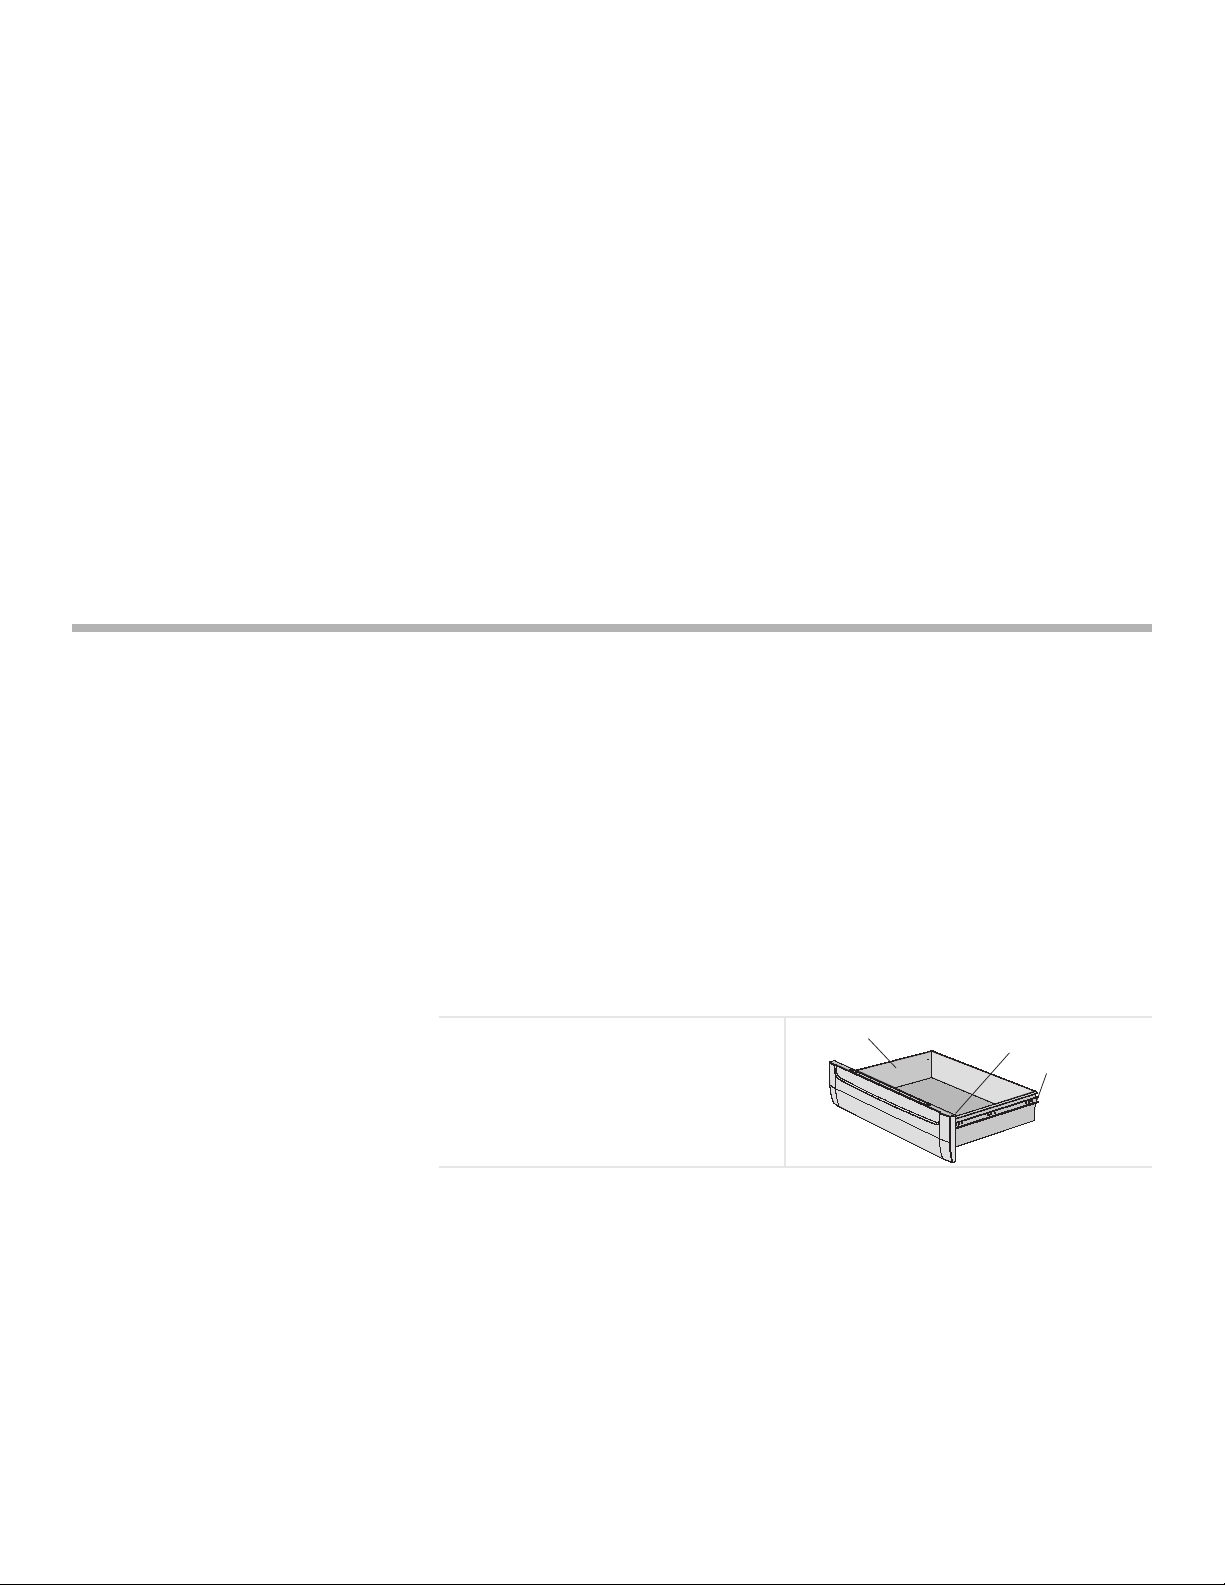
Parts Key:
1
1. Stainless Steel Drawer Interior
2. Gasket
3. Rail Lock
Figure 13: Warming Drawer Parts
Drawer Interior: 25" W x 17" D x 5" H
Dish sizes:
• 2 -9 x 13" Pyrex 3-quart dishes, side by side.
• 2 -9 1/2 x 15" Pyrex 4-quart dishes, side by side.
• 4 -10 1/2" plates, single or stacked
• 3 -11" plates, single or stacked
2
3
English 20
Page 23
Operation - Warming Drawer (some models)
Operation
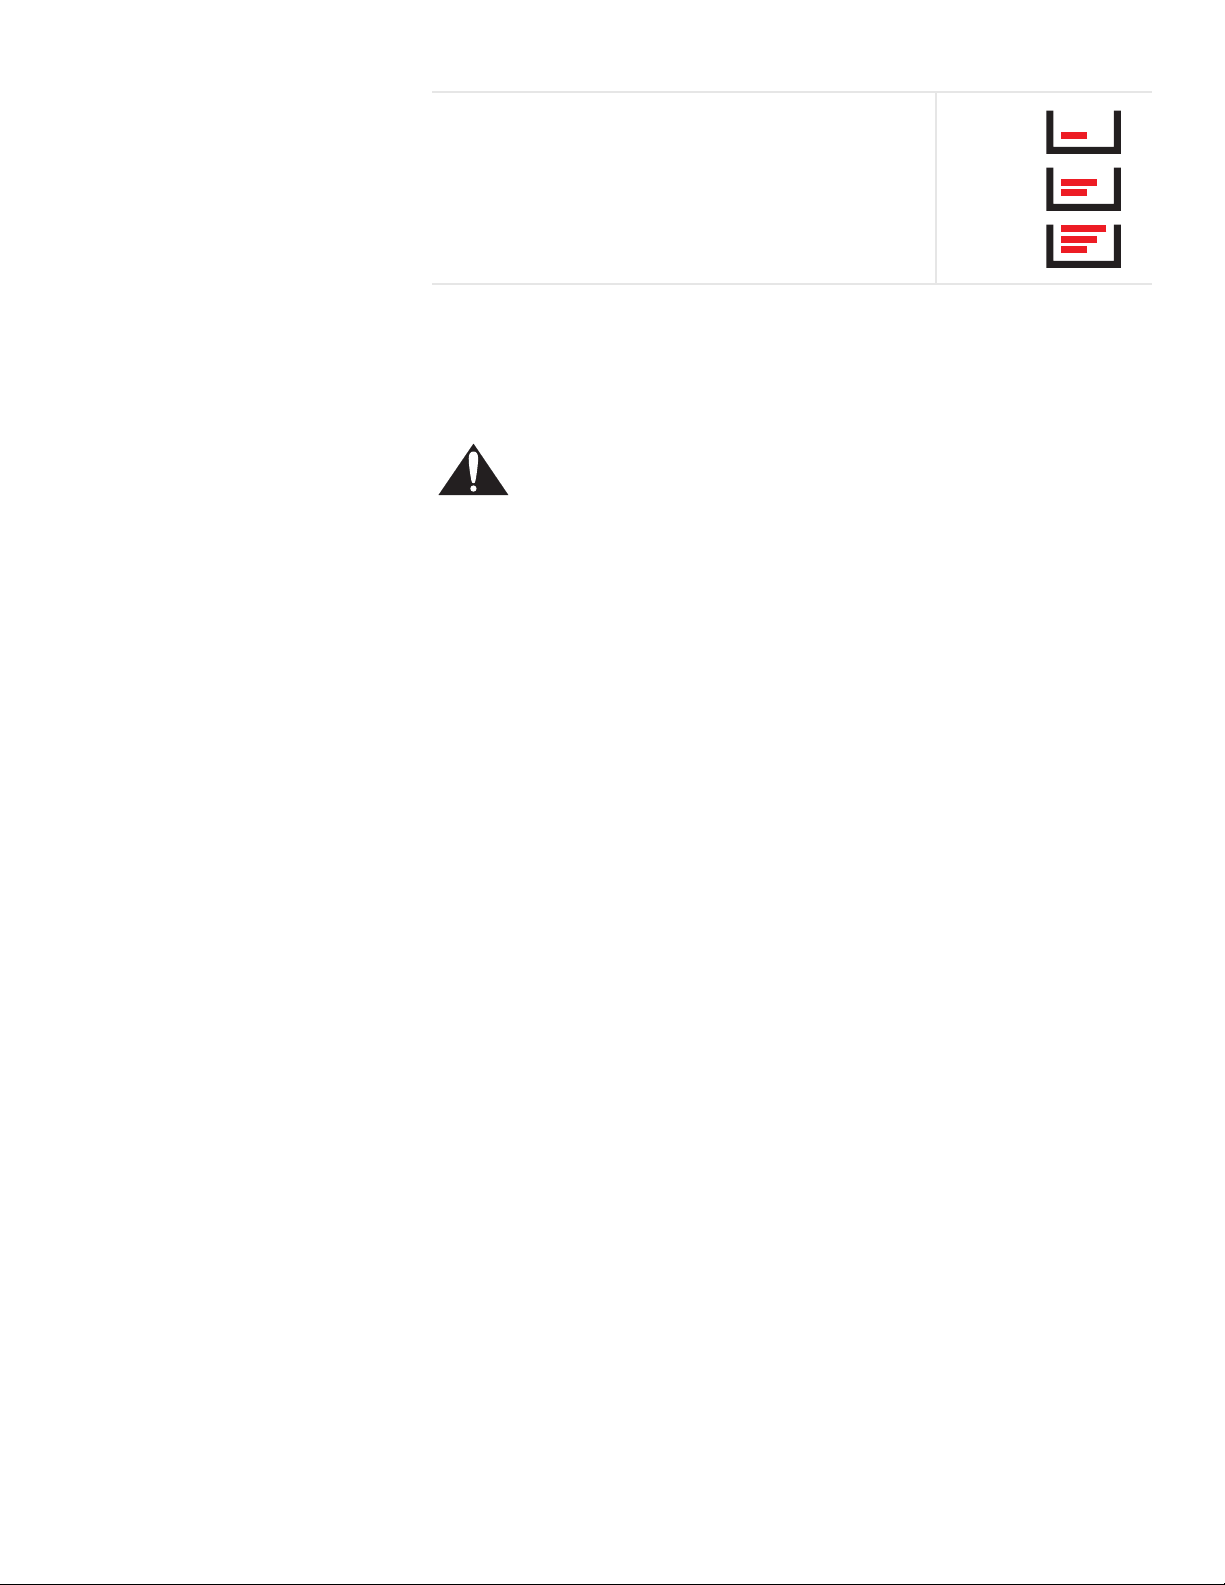
Warming Drawer Settings: The warming drawer has three
settings: Low, Medium and High. The icons below are seen
in the display when the corresponding setting is selected:
Figure 14: Warming Drawer Settings
CAUTION
To maintain food safety, follow these guidelines:
• DO NOT use the warming drawer to heat cold food (exception: it
is safe to use the drawer to crisp crackers, chips or dry cereal and
to warm plates).
• Be sure to maintain proper food temperature. The USDA recommends holding hot food at 140°F or warmer.
• DO NOT warm food for longer than one hour.
• Plastic containers, plastic wrap or aluminum foil can melt if in
direct contact with the drawer or a hot cooking container. If it
melts onto the drawer, it may not be removable.
Low
Medium
High
Preheating For best results, preheat the warming drawer when warming food.
Preheat Times: • Low: 10 minutes
• Medium: 15 minutes
• High: 20 minutes
Turning on the Warming Drawer
When Only Using the Warming Drawer
When Also Using The Oven 1. Press COOKING MODE.
Setting the Sabbath Feature Note: The warming drawer does not operate with the Sabbath feature unless the
1. Press COOKING MODE.
2. Turn knob to select WARMING DRAWER.
3. Press START.
4. Turn knob to select heat setting.
5. Press START.
2. Press START to select WARMING DRAWER.
3. Turn knob to select heat setting.
4. Press START.
feature is also activated in the oven. See “Setting the Sabbath Feature for both
the Warming Drawer and the Oven.” on page 13.
1. Turn the warming drawer on the desired heat level.
2. Activate the Sabbath Feature. See “Set the Sabbath Feature” on page 13.
English 21
Page 24

Turning Off the Warming Drawer
When Only Using the Warming Drawer
When Using the Warming Drawer and the Oven
1. Press OFF.
1. Press OFF.
2. Turn knob to select CANCEL DRWR, CANCEL OVEN, or CANCEL BOTH.
3. Press OFF.
Crisping Stale Items • Place food in low sided dishes or pans.
• Preheat on Low.
• Check crispness after 45 minutes. Add time as needed.
Warming Empty Serving Bowls and Plates
• Use only heat-safe dishes.
• Warm on setting appropriate for cooking container.
• Check dish temperature during warming period.
• Place empty plates or dishes in a cold warming drawer. Do not preheat
drawer prior to placing dishes.
Getting the Most Out of Your Appliance
Getting the Most Out of Your Cooktop
Cooktop Cooking Guide
Boiling Water Time to boil can vary greatly depending on environmental conditions. Try the fol-
lowing tips to decrease boil time:
• Use a lid.
• Use a pan that is appropriately sized for the amount of water and the size of
the element.
• Select a pan with a flat base (See “Cookware Selection Guide” on page 23 for
details).
• Choose a medium-weight pan (rather than a heavy-weight one).
• Make sure that the pan is positioned so that the entire base is in contact with
the element.
• Start with water that is already warm.
• Boil the smallest amount of water necessary. Smaller volumes will boil faster
than larger volumes.
Recommended Settings Use this chart as a guide for heat settings. A range of heat settings are listed
because the actual setting depends on:
• type and quality of pan (See “Selecting Cookware”),
• type, quantity and temperature of the food,
• element used and
• the cook’s preference.
English 22
The Heat Settings recommended are based on a 240 volt power source. If your
cooktop is connected to 208 volts, the same heat settings apply but foods may
Page 25
Getting the Most Out of Your Appliance
take a little longer to finish cooking.
Table 3: Cooking Guide
Uses Heat Settings
Bringing water to boil 9 - High
Pan frying, sautéing, browning meat, deep fat frying 6-8 - Med-High
Most frying, eggs, pancakes, slow boil 4-5 - Med
Simmering, finish cooking, covered foods, steaming 2-3 - Med Low
Melting butter and chocolate 1 - Low
Bridge Element Tips (some models) • Use the bridge elements with only one single element for medium sized grid-
dles and oval pots.
• For even heat distribution when using all three elements, start with the back
element at a slightly higher setting than the front and bridge elements.
Observe cooking performance and adjust accordingly.
• When using a pan that spans all three elements, set the back element at a different heat level than the front and bridge elements to keep prepared food
warm or to prepare two different foods at one time.
Cookware Selection Guide
Cookware Characteristics Pan selection directly affects cooking speed and uniformity. For best results select
pans with flat bases. When a pan is hot, the base (pan bottom) should rest evenly
on the surface without wobbling (rocking). Flat, medium-to-heavy-weight pans are
best.
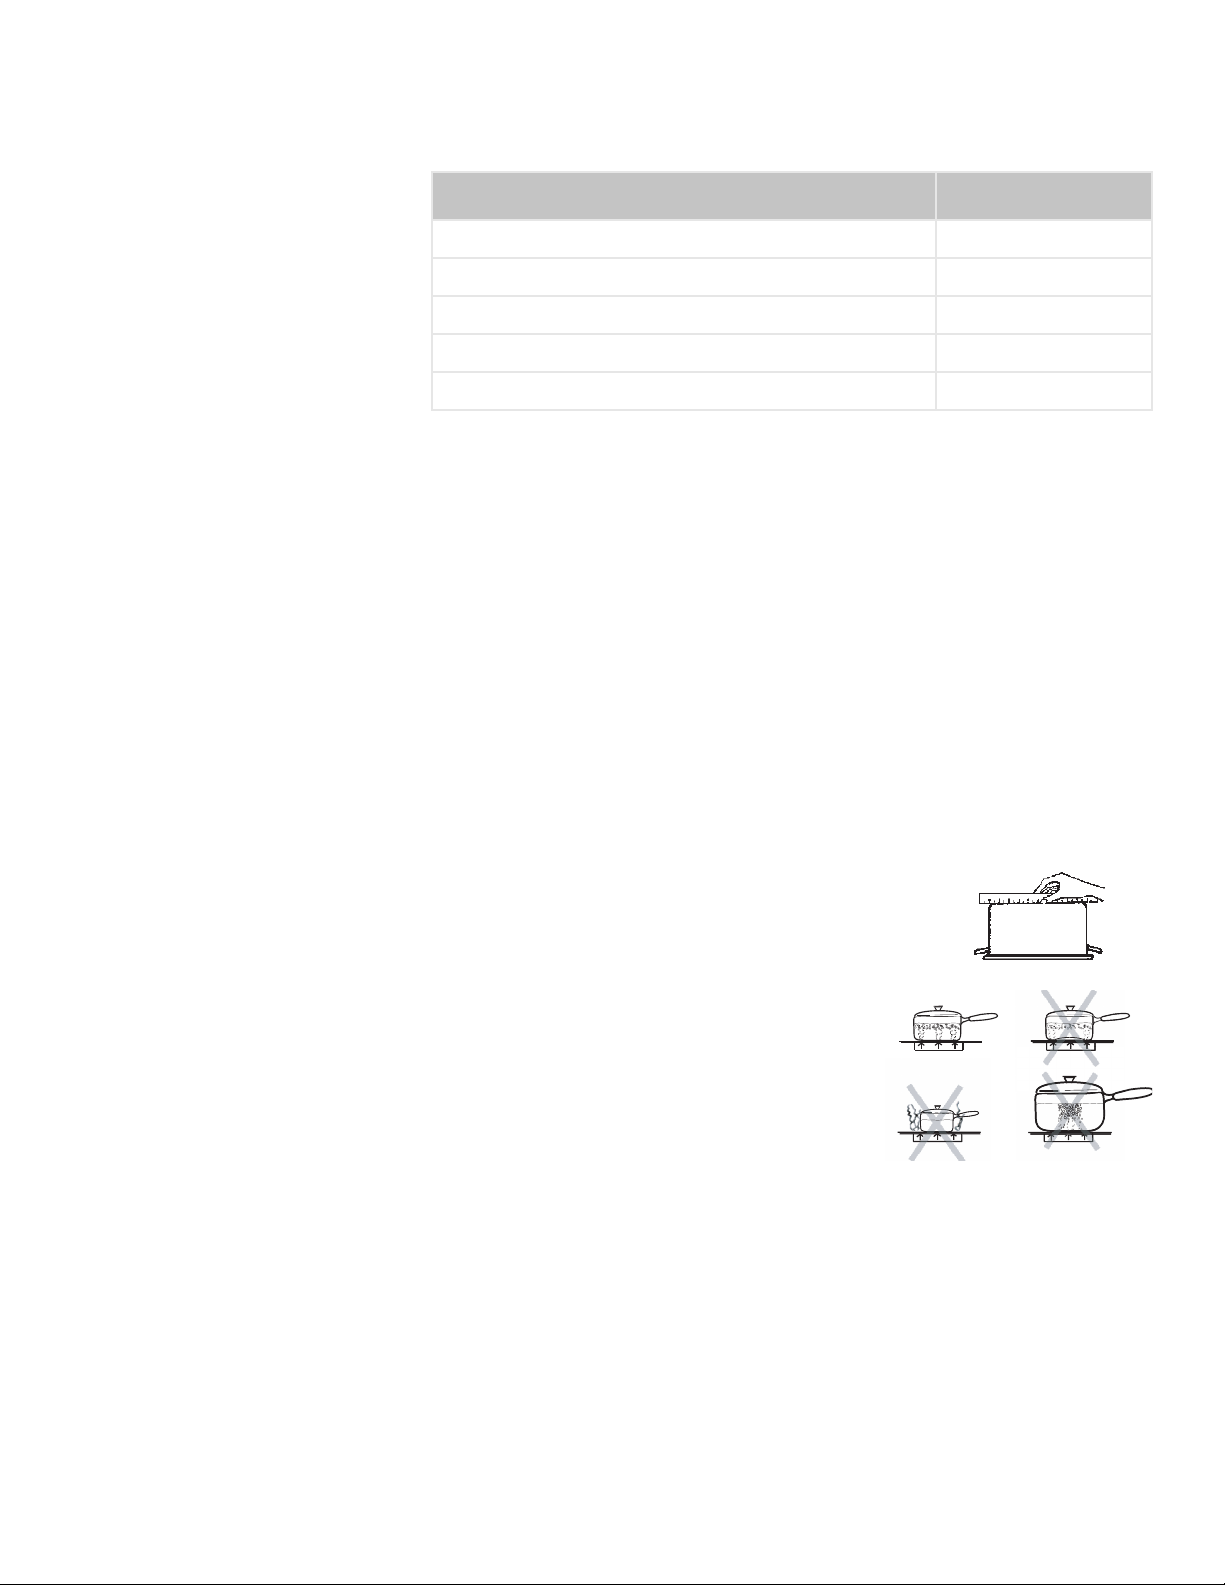
To Test the Flatness of Your Pans Turn the pan upside down on the countertop and place a
ruler flat against the bottom of the pan. The bottom of the
pan and the straight edge of the ruler should be flush
against each other.
Another simple test to determine even heat distribution across the cookware bottom is to place 1”
(25.4 mm) of water in the pan. Bring the water to a
boil and observe the location of the bubbles as the
water starts to boil. Good, flat cookware will have
an even distribution of bubbles over the bottom
surface area.
Matching Diameters – The base of the pan should cover or match the diameter
of the element being used. Pans may overhang the element area by 1" (25.4 mm)
all around.
Tight Fitting Lids – A lid shortens cooking/boiling time by holding heat inside the
pot.
Cookware Tips • Use of pots and pans with rounded (either concave or convex) warped or
dented bottoms should be avoided. See drawings below.
• Make sure the bottom of the pot or pan being used is clean and dry.
• Use pots and pans with thick, smooth metal bottoms.
• Do not slide metal pots across the cooktop. Pans may leave marks which
need to be removed immediately. See Care and Cleaning Section.
English 23
Page 26
Getting the Most Out of Your Appliance
• Do not use glass pans as they may scratch the surface.
Specialty Pans Specialty pans such as griddles, roasters, pressure cookers, woks, water bath
canners and pressure canners must have the same features as described above.
Use only a flat-bottomed wok. Never place a support ring, such as a wok ring or
trivet, on the cooking surface.
Getting the Most Out of Your Oven
Oven Cooking Guide
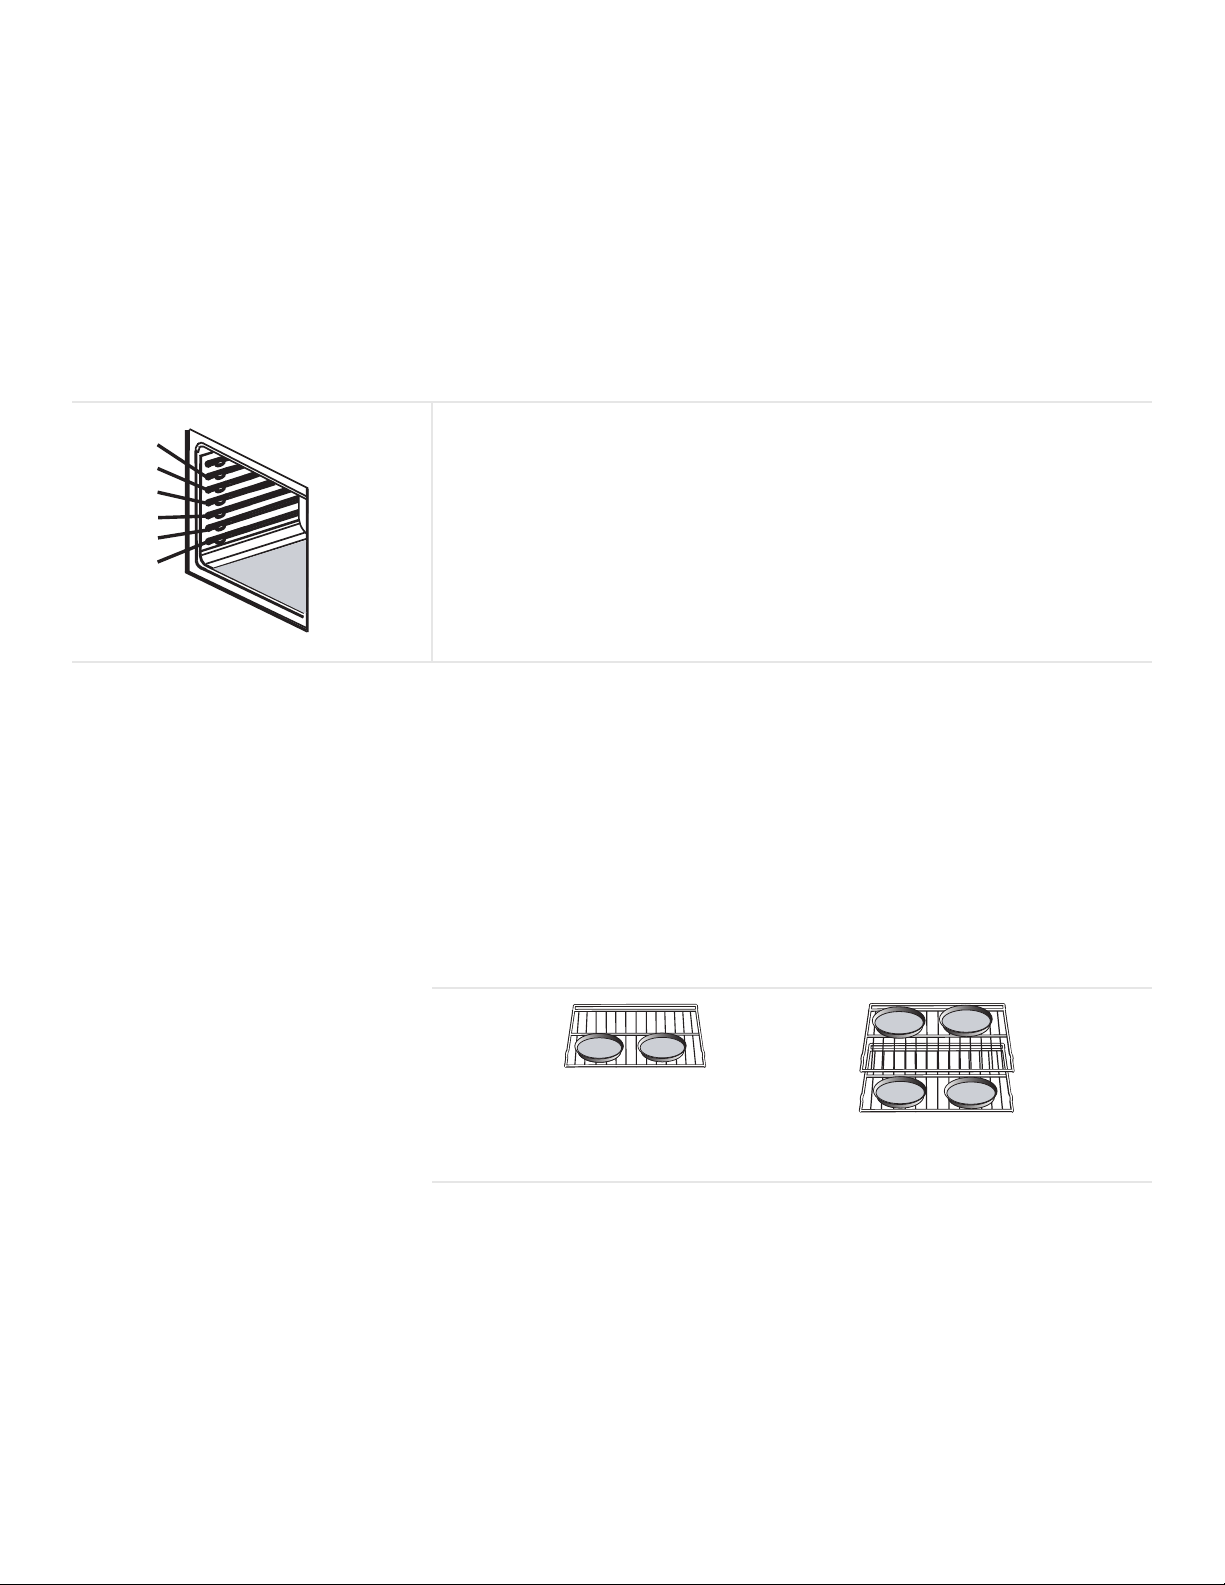
Rack Position
• RACK POSITION 6 (highest position) – melting cheese, broiling thin foods
6
5
4
3
2
1
• RACK POSITION 5 – broiling most meats, toasting bread
• RACK POSITION 4 – broiling thicker meats
• RACK POSITION 3 – most baked goods when baking on one rack, such as
on cookie sheet or baking pan, cakes, frozen foods, biscuits, brownies,
muffins
• RACK POSITION 2 – Used for pies, casseroles, breads, bundt or pound
cakes, small roasts or poultry.
• RACK POSITION 1 (lowest position) – Use for angel food cake, large
roasts, turkey.
Figure 15: Rack Positions
Multiple Rack Cooking When using multiple racks, follow the placement recommendations below.
• Two r ack: Use rack positions 2 and 5.
• Three rack: (for convection bake): Use positions 1, 3 and 6. The rack in posi-
tion 3 can be extension rack if desired.
Pan Placement Baking results are better if pans are placed in the center of the oven. If baking
more than one pan on a rack, allow at least 1" to 1 ½” of air space around the pan.
When baking four cake layers at the same time, stagger pans on two racks so that
one pan is not directly above the other. To allow for best baking results stagger
pans as shown in the graphic below.
Pan placement on
one rack
Pan placement on
two racks
Figure 16: Pan Placement
Baking Pans Here are some tips for cooking with baking pans:
English 24
• Glass baking dishes absorb heat, therefore reduce oven temperature 25°F
when baking in glass.
• Shiny, smooth metal reflects heat resulting in lighter, more delicate browning.
• Dark, rough or dull pans will absorb heat resulting in browner, crisper crust.
Some manufacturers recommend reducing temperature 25° F when using
these pans. Follow manufacturer recommendations.
• Use glass or dark metal pans for pies.
• Insulated baking pans may increase the recommended baking time.
Page 27
Getting the Most Out of Your Appliance
Preheating the Oven Preheat the oven if the recipe recommends it. Preheating is necessary for good
results when baking cakes, cookies, pastry and breads. Setting a higher temperature does not shorten preheat time. Place oven racks in proper position before
preheating. A beep will confirm that oven is preheated and selected oven temperature will be displayed.
Note: Preheating the oven is not recommended when using the probe (some
models). A hot oven will impair your ability to easily connect the probe to the
receptacle and to insert it into the meat.
The Probe (some models) • The oven is well insulated and the retained heat will continue to cook the meat
after the oven has shut off. For this reason, remove the meat from the oven as
soon as the control beeps.
• Since meat continues to cook after being removed from the oven, set the
internal (probe) temperature 5 - 10 degrees below the desired final internal
temperature (exception: poultry). Allow standing time (10 -20 minutes) before
carving the meat.
• Always use the handle of the probe for inserting and removing. Use a
potholder to remove since the probe becomes hot.
• Remove the probe from the oven when it is not being used.
• The probe cannot be used with frozen meats. For best results, completely
thaw meats before using the probe.
Oven Cooking Modes
Bake, Proof and Warm
Inserting the Probe
• For meats, insert the probe tip into the thickest part and do not touch bone,
fat, or gristle.
• For large poultry products and turkeys, insert the probe in the thickest part of
the inner thigh.
• For other foods, such as a meatloaf, the probe tip should be located in the
center of the thickest part of the food.
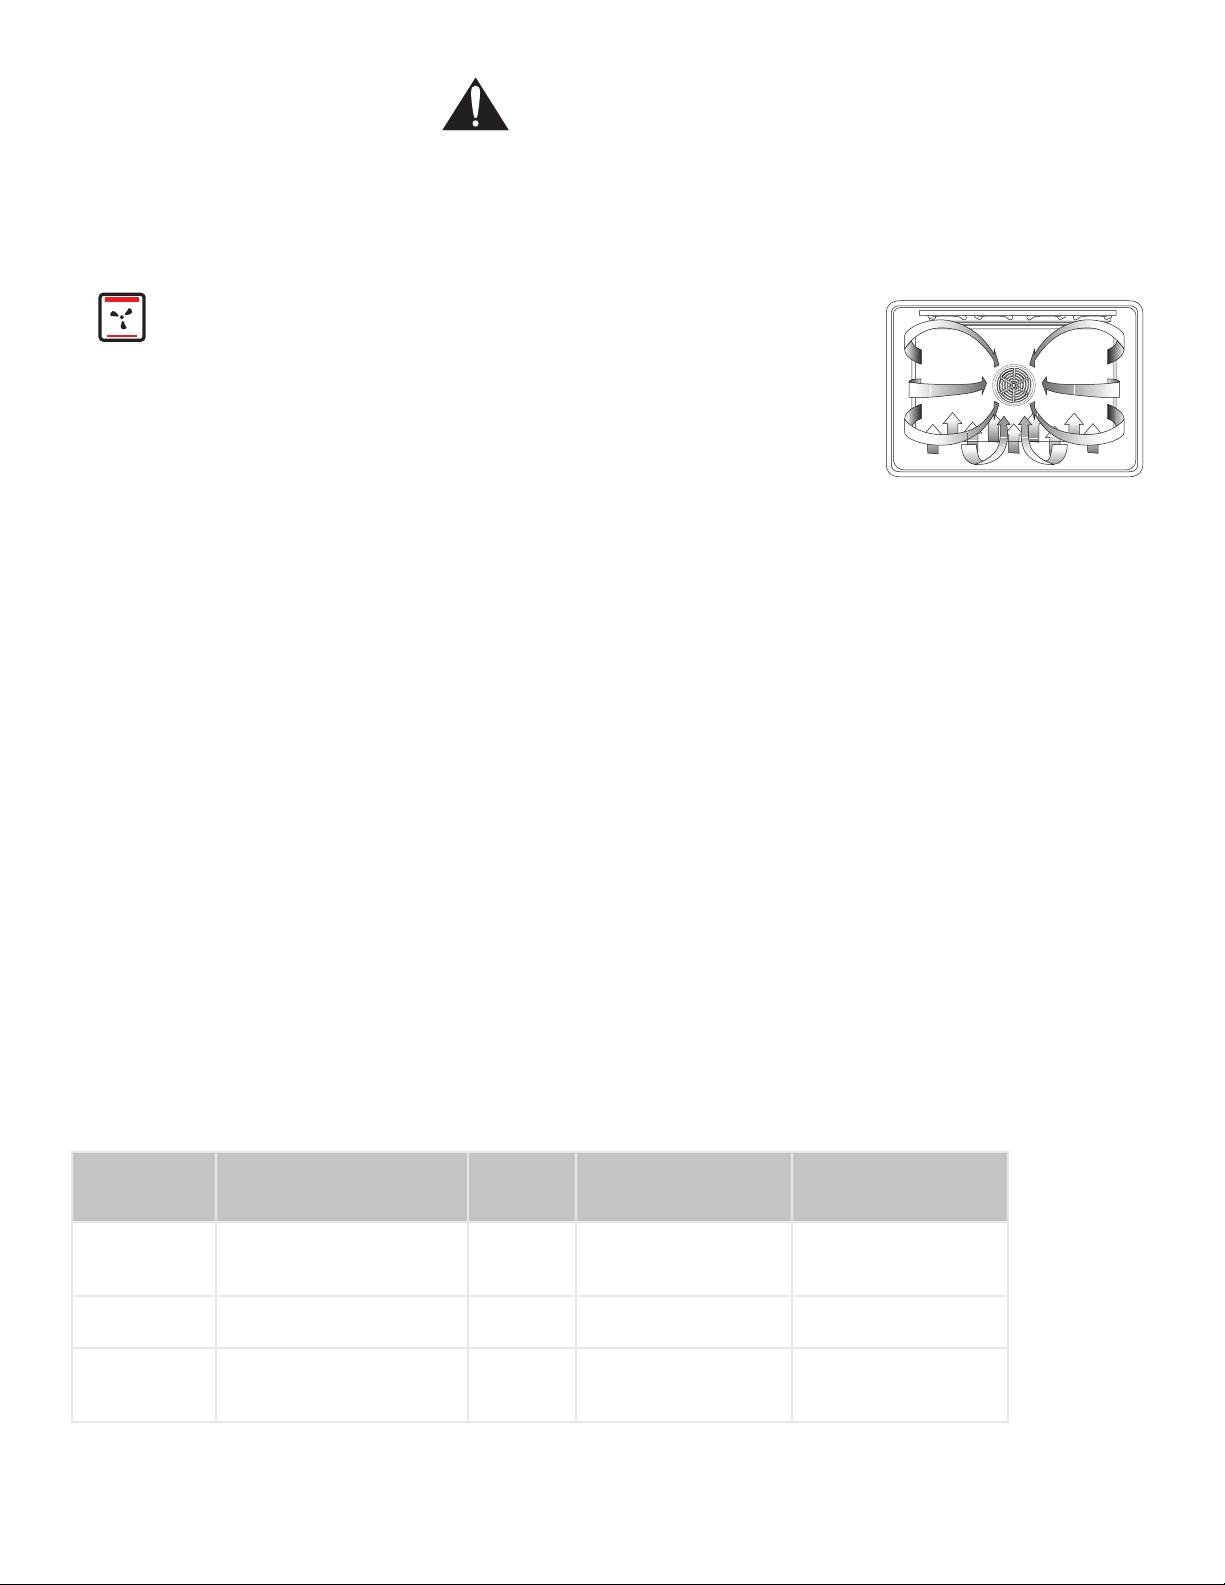
Baking is cooking with dry, heated air. Both the
upper and lower element cycle to maintain the oven
temperature. Bake mode can be used to prepare
foods like pastries and casseroles as well as to
roast meats.
Note: Depending on the model, you may hear the
convection fan while the oven is preheating for the
bake mode. This is normal.
In the Proofing mode, the oven will use the upper and lower element to maintain a
low temperature to proof bread.
• Proofing is the rising of a yeast dough.
• The Proofing mode temperatures are 85° to 110° F. The default temperature
is 100° F.
• Loosely cover the bowl or pan and use any rack that accommodates the size
of the container.
• Keep the door closed and use the oven light to check the rising of the dough.
In Warming mode, the upper and lower elements maintain a low temperature in
the oven cavity in order to keep food at serving temperature.
• Use the Warming setting on the oven to keep foods hot until ready to serve.
• Warming mode temperatures are 140° - 220° F. Default temperature is 170°.
• Foods that must be kept moist should be covered with a lid or aluminum foil.
English 25
Page 28
Getting the Most Out of Your Appliance
Convection Bake
CAUTION
When using Warm mode, follow these guidelines:
• Do not use the Warm Mode to heat cold food.
• Be sure to maintain proper food temperature. The USDA recommends holding hot food at 140°F or warmer.
• DO NOT warm food for longer than one hour.
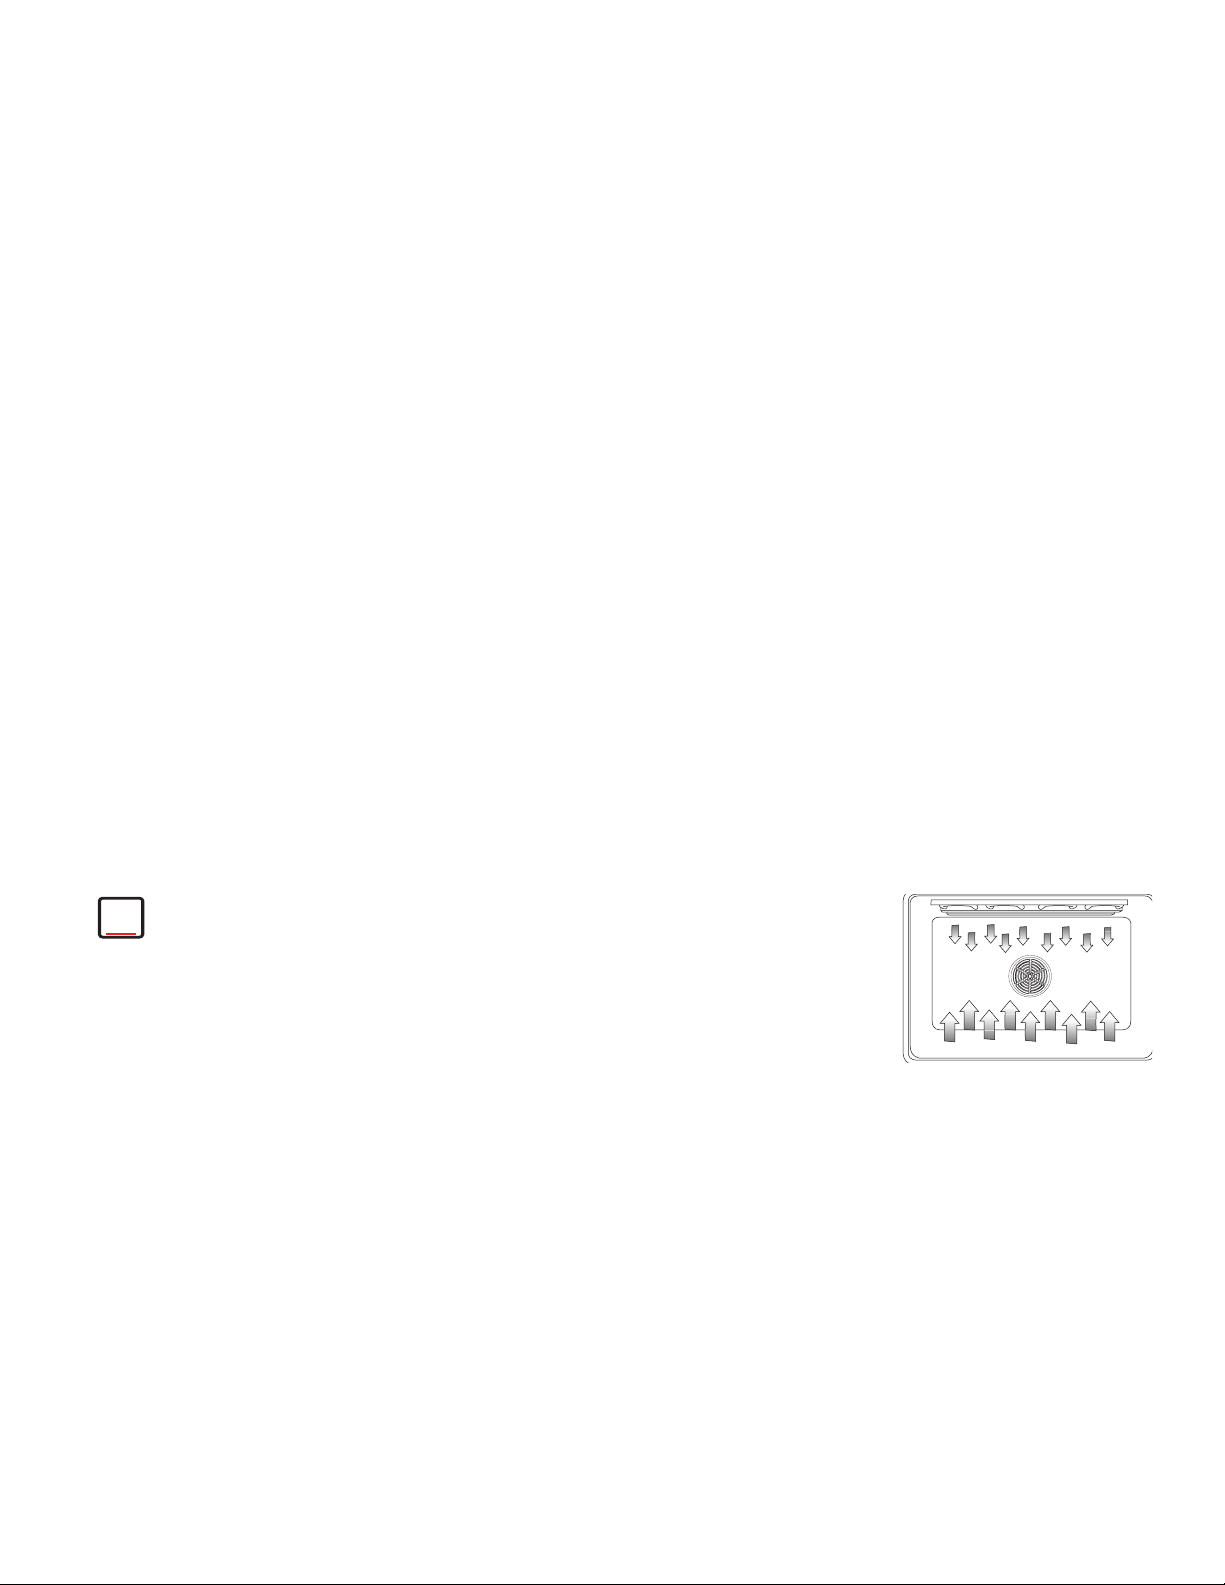
Convection baking is similar to baking. Heat
comes from the lower heating element and a
third element behind the backwall. The main difference in convection baking is that the heat is
circulated throughout the oven by the convection
fan.
The Convection Bake mode is well-suited for
baking large quantities of food on multiple racks.
It can be used to prepare cookies, pies, cupcakes, pastries, breads, snack foods
and appetizers among other items.
The benefits of Convection Baking include:
• Slight decrease in cooking time
• Three rack cooking (more even browning)
• Higher Volume (yeast items rise higher)
• Ability to cook more items at once
For Best Results:
• Reduce recipe temperature by 25° F. Refer to Convection Baking chart.
• Place food in low-sided, uncovered pans such as cookie sheets without sides.
• Center baking pans side to side on the oven rack
Automatic Convection Conversion In the convection bake mode, the temperature is automatically reduced 25° F
from the package or recipe temperature. Simply enter the package or recipe temperature when setting the mode and the range calculates the correct temperature.
The Automatic Convection Conversion feature can be turned off to allow for manual temperature adjustment. See “Turn Automatic Convection Conversion ON or
OFF” on page 14 for details
When the Automatic Convection Conversion feature is activated, the display will
read AUTO CONV BAKE. When the feature is turned off, it will read CONV BAKE.
Table 4: Convection Baking Chart
Food Item
Cake Cupcakes
Bundt Cake
Angel Food
Pie 2 Crust, fresh, 9”
2 Crust, frozen fruit, 9”
Cookies Sugar
Chocolate Chip
Brownie
Rack
Position
3
2
1
2
2
3
3
3
Temp. (oF)
(preheated oven)
350
350
350
375-425
375
350-475
350-375
350
Convection Bake Time
a
17-19
37-43
35-39
45-55
68-78
6-11
8-13
29-36
(min.)
b
English 26
Page 29
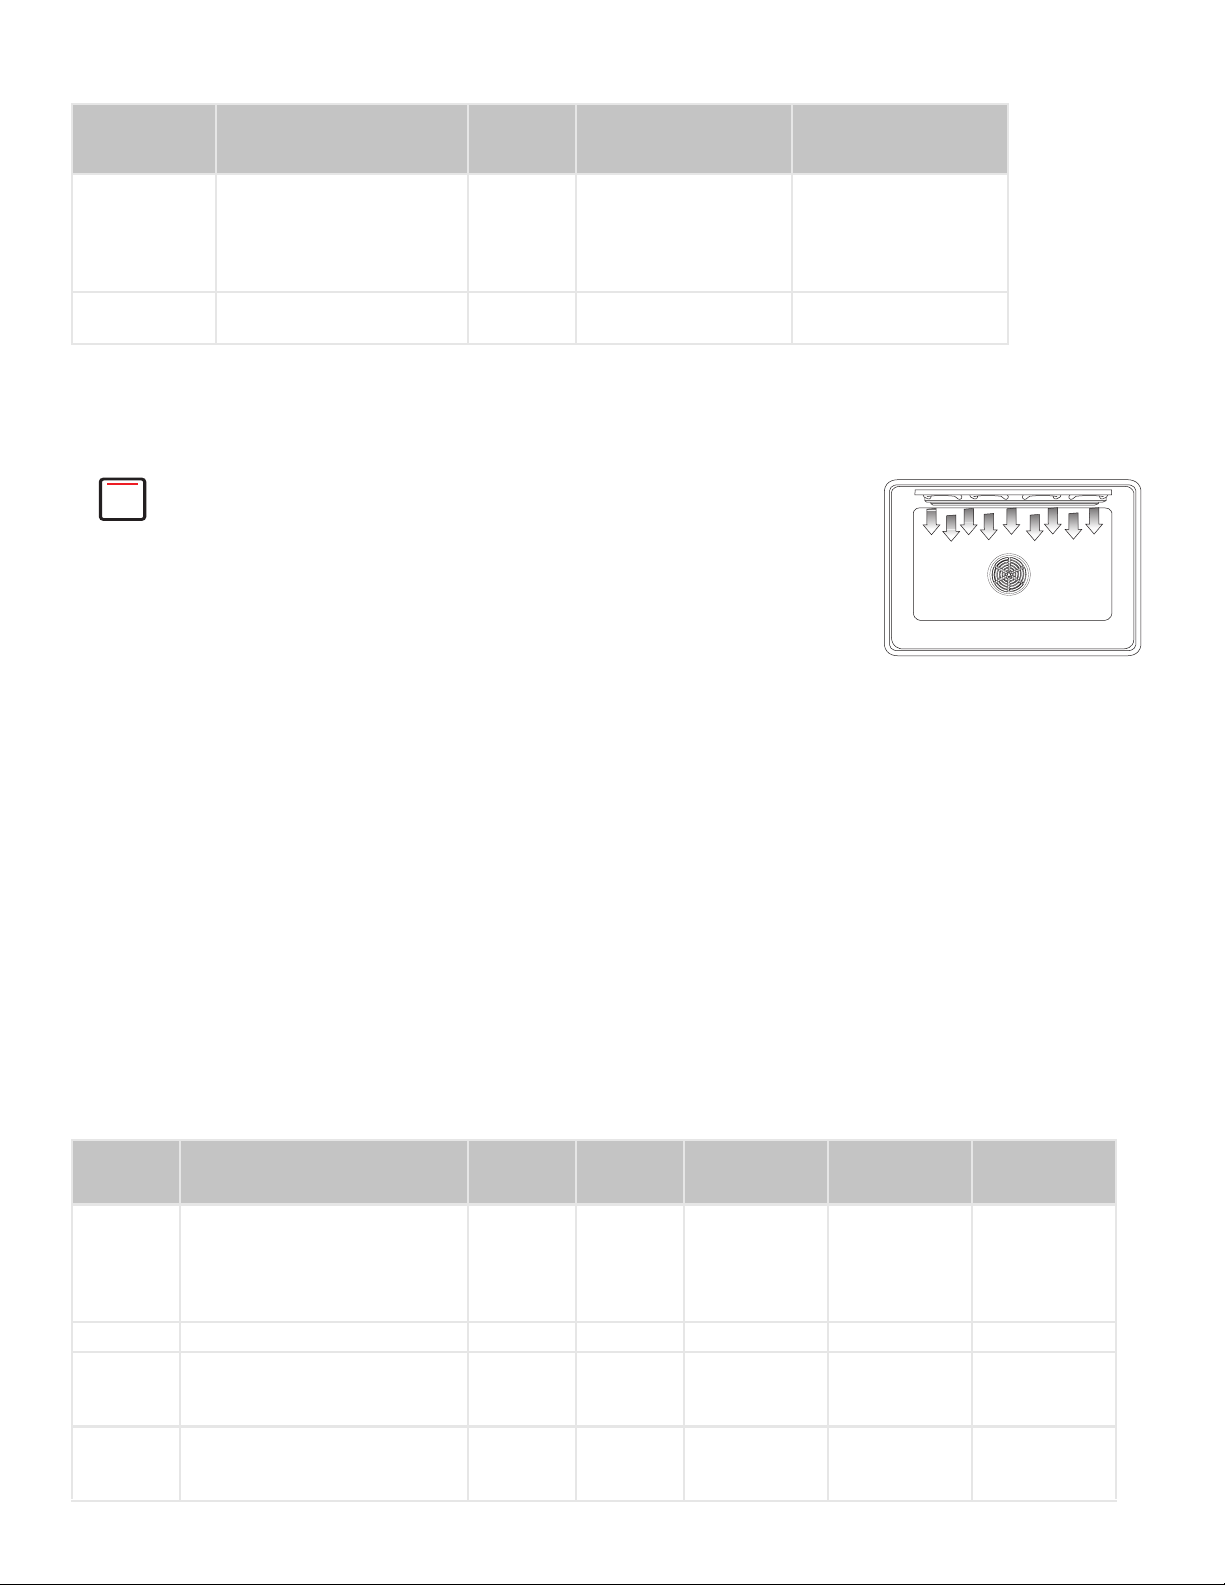
Table 4: Convection Baking Chart
Getting the Most Out of Your Appliance
Food Item
Breads Yeast bread, loaf, 9x5
Yeast rolls
Quick bread, loaf, 8x4
Biscuits
Muffins
Pizza Frozen
Fresh
Rack
Position
2
3
2
3
3
3
3
Temp. (oF)
(preheated oven)
375
375-400
350-375
375-400
425
400-450
425-450
Convection Bake Time
a
18-22
12-15
45-55
11-1 5
15-19
23-26
12-15
(min.)
a. This temperature must be manually reduced by 25° F if the Automatic Convection Conversion
feature has been turned off.
b. This chart is a guide. Actual times depend on the mixes or recipes baked. Follow recipe or
package directions.
Broiling uses intense heat radiated from the
Broil
upper element. The Broil mode is best suited to
cooking thin, tender cuts of meat (1” or less),
poultry and fish. It can also be used to brown
breads and casseroles. Always broil with the
door closed.
The benefits of Broiling include:
• Fast and efficient cooking
• Cooking without the addition of fats or liquids
• Browning as the food cooks
b
For Best Results:
• Preheat oven 3-4 minutes. Do not preheat for more than 5 minutes.
• Steaks and Chops should be at least 3/4” thick
• Brush fish and poultry with butter or oil to prevent sticking
• Use the broil pan and grid included with your range
• Do not cover the broiler grid with foil. It is designed to drain fats and oils away
from the cooking surface to prevent smoking and spattering
• Turn meats once halfway through the recommended cooking time (see Broil
Chart for examples).
• When top browning casseroles, use only metal or glass ceramic dishes such
as Corningware®.
• Never use heat-proof glass (Pyrex®); they can’t tolerate the high temperature.
Table 5: Broiling Chart
Food Item / Thickness
Beef Steak (3/4”-1”)
Medium Rare
Medium
Well
Hamburgers (3/4”-1”) - Well
Poultry Breast (bone in) 4 low 170 21-23 18-20
Pork Pork chops (1”)
Sausage - fresh
Ham slice (1/2”)
Seafood Fish filets (3/4”-1”) buttered 5 low Cook until
Rack
Position
5
5
5
4
4
3
5
Broil
Setting
high
high
high
high
high
high
high
Internal
Temp. (oF)
145
160
170
160
160
160
160
opaque and
flakes easily
Time Side 1
5-7
6-8
7-9
7-9
6-8
5-7
2-4
9-11 Do Not Turn
(min.)
a
4-6
5-7
6-8
8-10
4-6
4-6
2-3
Time Side 2
(min.)
a
English 27
Page 30
Getting the Most Out of Your Appliance
Table 5: Broiling Chart
Food Item / Thickness
Lamb Chops (1”)
Medium rare
Medium
Well
Bread Garlic bread slices (1”) 5 high N/A 2-4 Do Not Turn
Rack
Position
5
5
5
Broil
Setting
high
high
high
Internal
Temp. (oF)
145
160
170
Time Side 1
(min.)
4-6
5-7
6-8
a
Time Side 2
2-4
4-6
5-7
(min.)
a
a. Broiling times are approximate and may vary slightly, Times are based on cooking with a preheated broil
element.
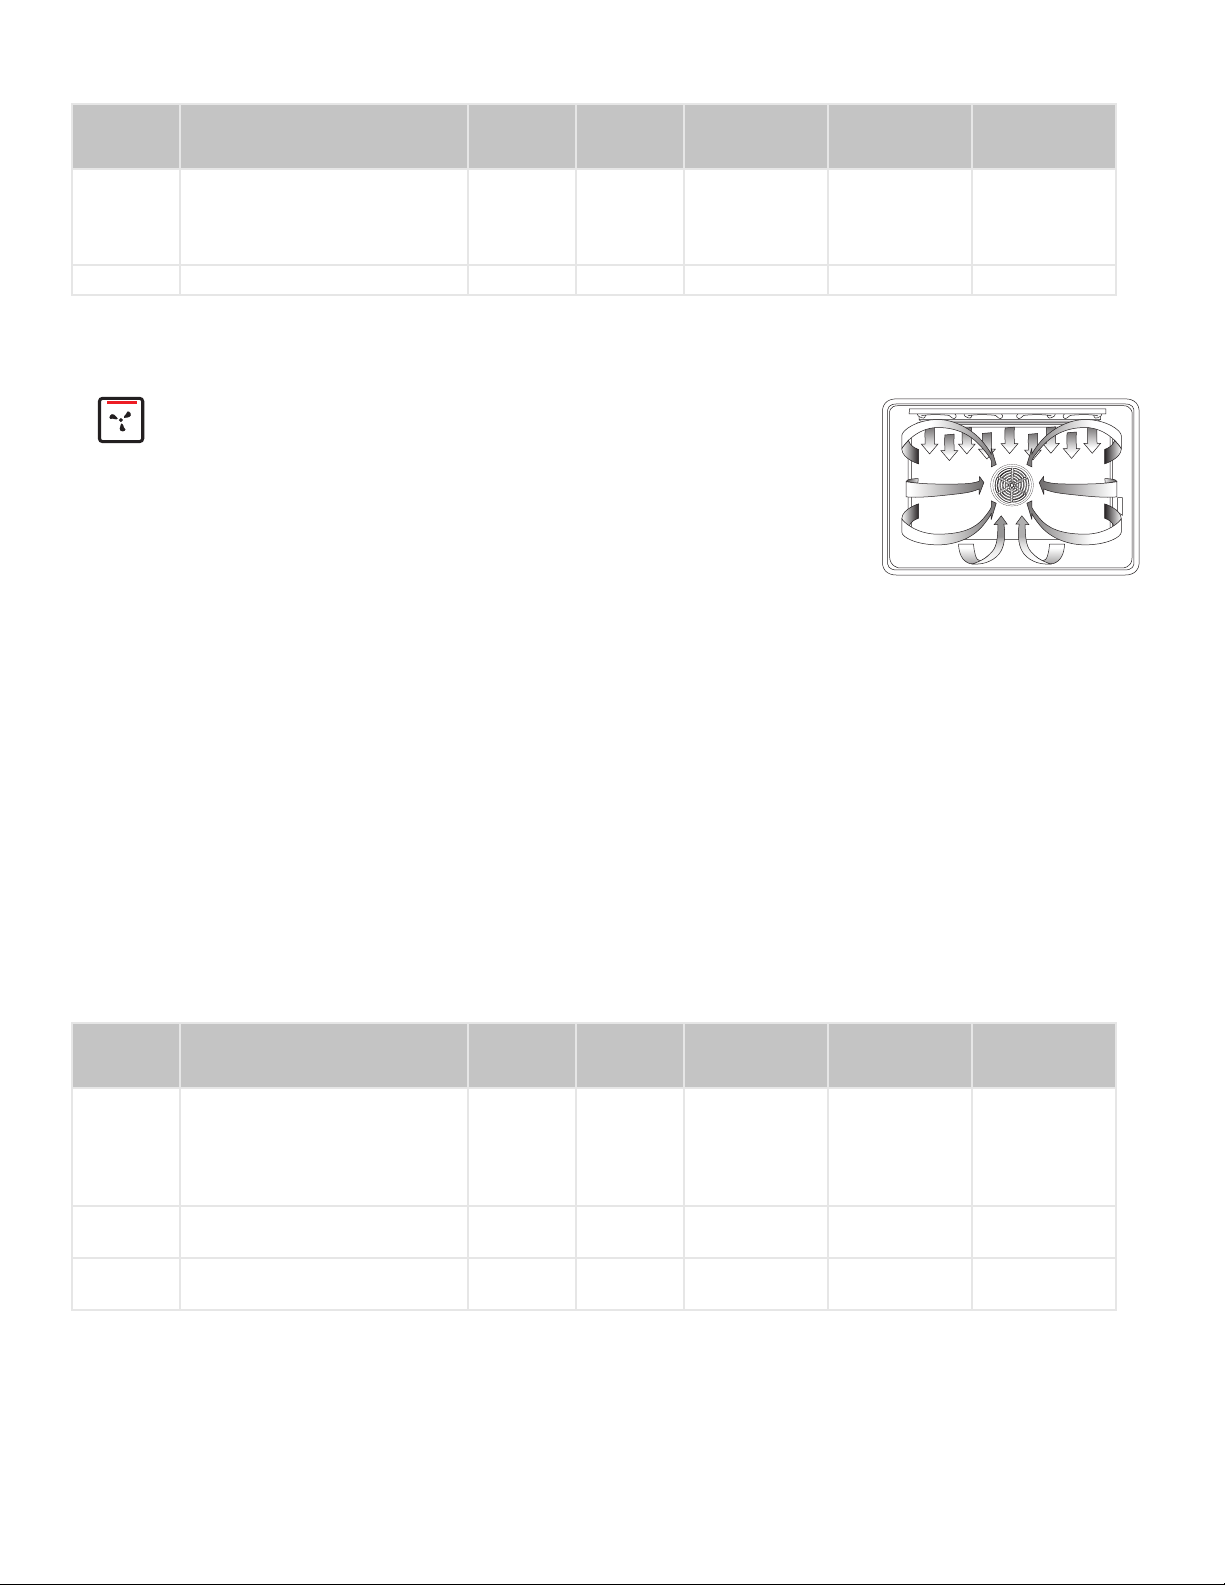
Convection Broil is similar to Broil. It combines
Convection Broil (some models)
intense heat from the upper element with heat
circulated by a convection fan. The Convection
Broil mode is well suited for cooking thick, tender
cuts of meat, poultry and fish. Convection Broil is
typically not recommended for browning breads,
casseroles and other foods.
Always convection broil with the door closed. In
addition to the benefits of standard broiling, convection broiling is faster than standard Broiling.
Note: The only heat setting for the Convection Broil mode is High.
Table 6: Convection Broiling Chart
Food Item / Thickness
Beef Steak (1 1/2” or more)
Medium Rare
Medium
Well
Hamburger (more than 1”) - Well
Poultry Chicken quarters
Pork Pork chops (1 1/4” or more)
Sausage - fresh
For Best Results:
• Preheat oven 3-4 minutes. Do not preheat more that 5 minutes.
• Meats should be at least 1 1/2” thick.
• Turn meats once halfway through the cooking time (See Convection Broil
Chart for examples).
• Use the broil pan and grid included with your range.
• Do not cover the broiler grid with foil. It is designed to drain fats and oils away
from the cooking surface to prevent smoking and spattering.
• Salt after cooking.
Rack
Position
3
3
3
4
4 high 180 - thigh
4
4
Broil
Setting
high
high
high
high
high
high
Internal
Temp. (oF)
145
160
170
160
170 - breast
160
160
Time Side 1
11-13
13-15
15-17
11-13
14-16 12-14
7-9
5-7
(min.)
a
Time Side 2
9-11
11-13
13-15
8-10
6-8
3-5
(min.)
a
a. Convection broiling times are approximate and may vary slightly. Times are based on cooking with a pre-
heated broil element.
English 28
Page 31

Convection Roast
Getting the Most Out of Your Appliance
Convection Roast uses heat from the top and
bottom elements as well as heat circulated by the
convection fan. The Convection Roast mode is
well suited to preparing tender cuts of meat and
poultry.
The benefits of Convection Roasting, include:
• As much as 25% faster cooking than standard Roasting/ Baking
• Rich, golden browning
For Best Results:
• Use the same temperature as indicated in the recipe.
• Check doneness early as roasting time may decrease by as much as 25%.
Refer to Convection Roast Chart for examples.
• Do not cover meat or use cooking bags.
• Use the broil pan and grid provided with the range for roasting. A low-sided,
uncovered pan can also be used.
• Use a meat thermometer to determine the internal temperature of the meat.
• If the meat is browned to your liking, but is not yet done, a small strip of foil
can be placed over the meat to prevent overbrowning.
• Let meat stand covered with foil 10-15 minutes after removing from the oven.
Table 7: Convection Roast Chart
Meats Item
Beef Rib roast
Rib eye roast (boneless)
Rump, eye, tip, sirloin (boneless)
Tenderloin roast
Pork Loin roast (boneless or bone in)
Shoulder
Poultry Chicken - whole
Turkey - unstuffed**
Turkey - unstuffed**
Turkey - unstuffed**
Turkey breast
Cornish hen
Lamb Half leg
Whole leg
Weight
(lbs.)
4-6
4-6
3-6
2-3
5-8
3-6
3-4
12-15
16-20
21-25
3-8
1-1 1/2
3-4
6-8
Oven Temp.*
(oF)
325
325
325
425
350
350
375
325
325
325
325
350
325
325
Roasting Time*
(min. per lb.)
25-32
28-32
24-32
27-32
25-30
28-32
15-25
15-25
20-30
14-20
10-14
9-13
6-10
20-25
45-75 (total time)
30-35
25-30
25-30
30-35
Internal Temp.
(oF)
145 (med/rare)
160 (medium)
145 (med/rare)
160 (medium)
145 (med/rare)
160 (medium)
145 (med/rare)
160
160
180
180
180
180
170
180
160 (medium)
170 (well)
160 (medium)
170 (well)
* Roasting times are approximate and may vary depending on shape of the meat.
** Stuffed turkey requires additional roasting time. The minimum safe temperature for stuffing in poultry is 165°F.
Dehydrate (some models)
The dehydrate mode dries with heat from a third
element behind the back wall of the oven. The
heat is circulated throughout the oven by the
convection fan. Use dehydrate to dry and/or preserve foods such as fruits, vegetables and herbs.
This mode holds an optimum low temperature
(100° F - 160° F) while circulating the heated air
to slowly remove moisture. The oven will stay on
for 48 hours before shutting off automatically.
English 29
Page 32

Getting the Most Out of Your Appliance
For Best Results:
• Dry most fruits and vegetables at 140° F. Dry herbs at 100° F. (Refer to the
Dehydrate Chart for examples).
• Drying times vary depending on the moisture and sugar content of the food,
the size of the pieces, the amount being dried and the humidity in the air.
Check food at the minimum drying time.
• Multiple racks (not included) can be used simultaneously. Contact your dealer
to order drying racks.
• Treat fruits with antioxidants to avoid discoloration.
• Consult a food preservation book, county Cooperative Extension Office or
library for additional information.
Table 8: Dehydrate Chart
Food Item Preparation
Approx. Drying
Time* (hours) Test for Doneness
Fruit Apples
Bananas
Cherries
Orange peels/
slices
Pineapple rings
Strawberries
Vegetables Peppers
Mushrooms
Tomatoes
Herbs Oregano, sage,
parsley, thyme,
fennel
Basil
Dipped in 1/4 cup lemon juice and 2 cups
water; 1/4” slices
Dipped in 1/4 cup lemon juice and 2 cups
water; 1/4” slices
Wash, towel dry. Fresh cherries, remove pits.
1/4” slices of orange; orange part of skin thinly
peeled from oranges
Towel dried.
Wash and towel dry. Sliced 1/2” thick, skin
(outside) down on rack
Wash and towel dry. Remove membrane of
peppers, coarsely chopped about 1” pieces
Wash and towel dry. Cut stem end off. Cut
into 1/8” slices.
Wash and towel dry. Cut thin slices, 1/8” thick,
drain well.
Rinse and dry with paper towel
Use basil leaves 3 to 4 inches from top. Spray
with water, shake off moisture and pat dry.
11- 15
10-15
10-15
Peels: 2-4
Slices: 12-16
Canned: 9-13
Fresh: 8-12
12-17
16-20
7-12
16-23
Dry at 100°F for
3-5 hours
Dry at 100°F for
3-5 hours
Slightly pliable
Soft, pliable
Pliable, leathery, chewable
Orange peel: dry and brittle.
Orange slices: skins are dry,
brittle, fruit is slightly moist
Soft and pliable
Dry and brittle
Leathery with no moisture
inside
Tough and leathery, dry
Dry, brick red color
Crisp and brittle
Crisp and brittle
Getting the Most Out of Your Warming Drawer
General Tips Refer to the Warming Drawer Chart for recommended settings.
• To keep several different foods hot, set the temperature for the food needing
the highest setting.
• Place items needing the highest setting toward the side of the drawer and
items needing less heat in the center of the drawer.
• Food should be at serving temperature (above 140° F) before being placed in
the warming drawer. DO NOT use to heat cold food other than crisping crackers, chips, and dry cereal, or warming dishes or plates.
• Preheat empty serving dish while preheating drawer if desired.
• Place cooked, hot food in warming drawer in its original cooking container or
in a heat-safe serving dish.
English 30
Page 33

• Aluminum foil may be used to cover food; However, DO NOT line the warming
drawer with aluminum foil.
• Do not use the warming drawer for storage.
Table 9: Warming Drawer Chart
Food Temperature
Bacon Hi Uncovered
Beef, Medium and well done Med Covered
Beef, rare Med Covered
Bread, hard rolls Med Uncovered
Bread, soft rolls, coffee cakes Med Covered
Biscuits Med Covered
Casseroles Med Covered
Eggs Med Covered
Fish, seafood Med Covered
Fried foods Hi Uncovered
Gravy, cream sauces Med Covered
Ham Med Covered
Pancakes Hi Covered
Pies, one crust Med Covered
Pies, two crusts Med Uncovered
Pizza Hi Covered
Pork Med Covered
Potatoes, baked Hi Covered
Potatoes, mashed Med Covered
Poultry, roasted Med Covered
Vegetables Med Covered
Plates Low Uncovered
Plate of food Med Covered
Covered /
Uncovered
Cleaning and Maintenance
Care and Cleaning
Care and Cleaning the Cooktop
Precautions for Long Life and Good Appearance of the Surface
• Regular, daily care using the glass ceramic cooktop cleaner will protect the
• The glass ceramic cooking surface is a durable material resistant to impact
• Never cook food directly on the glass.
CAUTION
Do not use any cleaner on the glass while the surface is hot; use only
the razor blade scraper. The resulting fumes can be hazardous to your
health. Heated cleaner can chemically attack and damage surface.
surface and make it easier to remove food soil and water spots.
but not unbreakable if a pan or other object is dropped on it.
English 31
Page 34

Cleaning and Maintenance
• Avoid placing a wok support ring, trivet or other metal stand on glass surface.
• Do not use the glass surface as a cutting board.
• Do not slide cookware across the cooking surface; it may scratch the glass.
• Do not place wet pans on the glass surface.
Before Use Care Care is easy when preventative steps are taken. For example, apply a small
amount of glass ceramic cooktop cleaner (packaged with range) on a daily basis.
This provides a protective film that makes it easy to remove water spots or food
spatters. The temperature of the cooking surface reduces the protective qualities
of this cleaner. It must be reapplied before each use. Use a clean cloth and apply
glass ceramic cooktop cleaner before each use to remove dust or metal marks
that can occur on the counter level surface between uses.
Daily Cleaning Techniques 1. Clean the surface when completely cool with the glass ceramic cooktop
cleaner.
Exception: Remove dry sugar, sugar syrup, tomato products and milk immediately with the razor blade scraper (See Cooktop Care Chart, next page).
2. Wipe off spatters with a clean, damp sponge or paper towel. Rinse and dry. Use white vinegar if smudge remains; rinse.
3. Apply a small amount of the glass ceramic cooktop cleaner. When dry, buff surface with a clean paper towel or cloth.
Using the Razor Blade Scraper Use the scraper to remove dried or baked on foods. Hold the scraper at a 30°
angle. Move it over the soil to lift it off of the cooktop. Finish with a clean, damp
sponge or paper towel. Apply white vinegar if smudge remains and rinse.
Figure 17: Scraper
Cleaning the Control Knobs 1. Pull out and off to remove both knob. Wipe with hot, soapy cloth, rinse and
dry. Do not soak.
2. To replace, push knob straight onto shaft.
Do Not Use the Following Cleaners • Glass cleaners which contain ammonia or chlorine bleach. These ingredients
may permanently etch or stain the cooktop.
• Caustic Cleaners
• Oven cleaners such as Easy Off® may etch the cooktop surface.
• Abrasive Cleaners
• Metal scouring pads and scrub sponges such as Scotch Brite® can scratch
and/ or leave metal marks.
• Soap-filled scouring pads such as SOS® can scratch the surface.
• Powdery cleaners containing chlorine bleach can permanently stain cooktop.
• Flammable cleaners such as lighter fluid or WD-40.
Table 10: Cooktop Care Chart
Type of Soil Possible Solution
Dry sugar, sugar syrup, milk or tomato spills.
Melted plastic film or foil. All these items require
immediate removal. Remove only these types of
spills while the surface is hot using the razor blade
scraper. Be sure to use a new, sharp razor in your
scraper.
Remove pan and turn off the element.
Wearing an oven mitt, hold scraper at 30
scratch the glass. Push soil off the heated area.
After the surface has cooled, remove the residue and apply the glass ceramic
cooktop cleaner.
o
angle, using care not to gouge or
English 32
Page 35

Table 10: Cooktop Care Chart
Type of Soil Possible Solution
Cleaning and Maintenance
Burned-on food soil, dark streaks, and
specks
Greasy spatters
Metal marks: Iridescent stain
Hard Water Spots - Hot cooking liquids dripped
on surface
Surface scratches - Small scratches are to be
expected on the glass surface, but do not affect
cooking. In time, small scratches will become
smoother and much less noticeable with daily use
of the glass ceramic cooktop cleaner.
Soften by laying a damp paper towel or sponge on top of soil for about 30 minutes.
Use a plastic scrubber and glass ceramic cooktop cleaner or use the razor
blade scraper. Rinse and dry.
Use a soapy sponge or cloth to remove grease; rinse thoroughly and dry. Apply
glass ceramic cooktop cleaner.
Pans with aluminum, copper or stainless steel bases may leave marks. Treat
immediately after surface has cooled with glass ceramic cooktop cleaner. If this
does not remove the marks, try a mild abrasive (Bon Ami®, Soft Scrub® without bleach) with a dampened paper towel. Rinse and reapply creme. Failure to
remove metal marks before the next heating makes removal very difficult.
The minerals in some water can be transferred onto the surface and cause
stains. Use undiluted white vinegar, rinse and dry. Recondition with glass
ceramic cooktop cleaner.
Apply Cleaning Creme before using to remove sand-like grains and grit such
as salt and seasoning.
Can be reduced by using pans with bases that are smooth, clean, and dry
before use. Use recommended glass ceramic cooktop cleaner daily on the
cooktop.
Care and Cleaning - Oven
Self Cleaning the Oven Our ovens feature a self-cleaning function that eliminates the manual labor
involved with cleaning your oven. During self-cleaning, the oven uses a very high
temperature to burn away food soil and grease.
Preparing the Oven for Self Clean
• Do not clean parts or accessories in the self-clean oven.
• It is common to see smoke and/or an occasional flame-up during the SelfClean cycle, depending on the content and amount of soil remaining in the
oven. If a flame persists, turn off the oven and allow it to cool before opening
the door to wipe up the excessive food soil.
• The oven door locks at the beginning of the self-clean cycle.
• The oven light does not operate during this mode.
• During Self-Clean, the kitchen should be well ventilated to help eliminate
odors associated with Self-Clean. Odors will lessen with use.
• Four hours is the preset length of cleaning. The range can also be set to clean
for 3 or 5 hours.
• The mode automatically stops at the end of the clean hours.
• When the oven cools after cleaning, the automatic door lock will release and
the door can be opened.
• To cancel or stop while the mode is operating, press OFF.
• The door will not unlock until the oven reaches a safe temperature.
WARNING
A flexible door gasket is necessary for a good seal. Do not clean, rub,
damage or move the gasket.
1. Remove all utensils and bakeware.
2. Remove oven racks. If oven racks are left in the oven during the self-clean
cycle, they will permanently lose the shiny finish and change to a dull dark finish. See Oven Cleaning Chart for proper care.
English 33
Page 36

Cleaning and Maintenance
3. Wipe up excessive soil, spills and grease before self-cleaning the oven.
Excess grease will cause flames and smoke inside the oven during self-cleaning.
Do hand-clean 1 1/2 inches from
rack guides to front of oven cavity.
Do not hand-clean
the gasket.
Do hand-clean frame
area outside the gasket.
Do hand-clean door
area outside the gasket.
Figure 18: Cleaning Guidelines
4. Review illustration above. Some areas of the oven must be cleaned by hand
before the cycle begins. Use a soapy sponge or plastic scrubber or a detergent-filled S.O.S.® pad. Hand-clean the oven door edge, oven front frame
and up to 1-1/2 inches inside the frame with detergent and hot water. Do not
clean or rub the gasket on the oven. The gasket is designed to hold in heat
during the self-clean cycle. Rinse all areas thoroughly then dry.
5. Be sure oven light is turned off and the light bulbs and lens covers are in place. Do not operate oven without light bulb and cover in place.
Important: Do not use Commercial Oven Cleaners on the self-clean oven or any
part because they will damage the finish or part.
Setting the Self-Clean Mode 1. Press COOKING MODE.
2. Turn knob until SELF CLEAN mode appears. Press START.
3. The default cleaning time is 4 hours. To change cleaning time, turn knob to change number of hours. Otherwise, continue to step 4.
4. Press START. SELF CLEAN flashes. Press START.
5. REMOVE RACKS appears in the display as a reminder to remove oven racks.
6. Press START again to begin the selfclean.
Note: The door locks at the beginning of the
cycle; The door lock symbol will appear in the display at this point. If door does not
lock, press OFF and do not self-clean; phone service.
Delaying the Start of the Self-Clean
Note: The time of day must be correctly set for this option to work properly. See
section “Setting the Clock” in “Setting Up Your Range”.
1. Press COOKING MODE.
2. Turn knob until SELF CLEAN mode appears. Press START.
3. The default cleaning time is 4 hours. To change cleaning time, turn knob to change number of hours. Otherwise, continue to step 4.
4. Press START.
4: 00
3: 00
REMOVE RACKS
SELF CLEAN
3
SELF CLEAN
English 34
Page 37

Cleaning and Maintenance
5. Turn knob until DELAYED CLEAN mode appears. Press START.
3: 00
SELF CLEAN
Delayed CLEAN
6. SELF CLEAN END appears in the display.
7. Turn knob to enter the time of day you want
the self-clean to end: Set hours, press time,
5: 45
set minutes.
8. Press START. The display will remind you to remove oven racks.
9. Press START. The display shows DELAYED CLEAN. The self-clean will automatically start at the appropriate time.
Note: In the Delayed Self-Clean Mode, the door latch automatically activates at
the beginning of the cycle. The door lock symbol will appear in the display.
Note: The oven lights do not operate in the Self-Clean mode.
After Self-Cleaning 1. At the end of the programmed cleaning time, the oven will automatically turn
off. SELF CLEAN END appears in the display. Press OFF to clear.
Note: The door will not unlock until the oven reaches a safe temperature.
2. The self-clean mode may produce ash which will settle in the bottom of the oven. If this happens, remove ash with a damp cloth before using the oven.
3. Wipe rack edges with cooking oil to allow for proper glide. Wipe off excess.
SELF CLEAN
SELF CLEAN END
After self-cleaning, the entire oven can be safely cleaned with a soapy sponge,
rinsed and dried. If stubborn soil remains, follow the guidelines on this page.
• Always use the mildest cleaner that will remove the soil.
• Rub metal finishes in the direction of the grain.
• Use clean, soft cloths, sponges or paper towels.
• Rinse thoroughly with a minimum of water so it does not drip into door slots.
• Dry to avoid water marks.
• Do not use caustic cleaners such as Easy Off®. They may etch the surface.
The cleaners listed below indicate types of products to use and are not being
endorsed. Use all products according to package directions.
Cleaning Guide
Table 11: Cleaning Guide
Part Recommendations
Racks Wash with hot sudsy water. Rinse thoroughly and dry, or gently rub with cleansing powder or soap filled
pads as directed. If racks are cleaned in the oven during the self-clean mode, they will lose their shiny finish and may not glide smoothly. If this happens, wipe the rack edges with a small amount of vegetable oil,
then wipe off excess.
Fiberglass Gasket DO NOT HAND CLEAN GASKET.
Glass (other than cook-
top)
Painted Surfaces Clean with hot sudsy water or apply Fantastik® or Formula 409® to a clean sponge or paper towel and
Porcelain Surfaces Immediately wipe up acid spills like fruit juice, milk and tomatoes with a dry towel. Do not use a moistened
Wash with soap and water or glass cleaner. Use Fantastik® or Formula 409® to remove grease spatters
and stubborn stains. See “Cooktop Care Chart” on page 32 for cooktop cleaning instructions.
wipe clean. Avoid using powdered cleansers, steel wool pads and oven cleaners.
sponge/towel on hot porcelain. When cool, clean with hot sudsy water or apply Bon-Ami® or Soft Scrub®
to a damp sponge. Rinse and dry. For stubborn stains, use soap filled pads. It is normal for porcelain to
show fine lines with age due to exposure to heat and food soil.
English 35
Page 38

Cleaning and Maintenance
Table 11: Cleaning Guide
Part Recommendations
Stainless Surfaces Always wipe or rub with grain. Clean with a soapy sponge then rinse and dry, or wipe with Fantastik® or
Formula 409® sprayed onto a paper towel. Protect and polish with Stainless Steel Magic® and a soft
cloth. Remove water spots with a cloth dampened with white vinegar. Use Bar Keeper’s Friend® to
remove heat discoloration.
Knobs & Controls When cool, clean with soapy water, rinse and dry.
Drawers
Wash with hot soapy water, rinse and dry.
(Storage or Warming)
Maintenance
Oven Maintenance
Removing the Door
WARNING
When removing the door:
• Make sure oven is cool and power to the oven has been turned off before removing the door. Failure to do so
could result in electrical shock or burns.
• The oven door is heavy and fragile. Use both hands to remove the oven door. The door front is glass. Handle
carefully to avoid breaking.
• Grasp only the sides of the oven door. Do not grasp the handle as it may swing in your hand and cause damage or injury.
• Failure to grasp the oven door firmly and properly could result in personal injury or product damage.
• To avoid injury from hinge bracket snapping closed, be sure that both levers are securely in place before
removing door. Also, do not force door open or closed - the hinge could be damaged and injury could result.
1. Be sure to read the above WARNING before attempting to remove oven door.
2. Open the door completely.
3. Flip lever on hinge toward you.
Figure 19: Hinge Positions
4. Close the door to approximately halfway open.
5. Holding the door firmly on both sides using both hands, pull the door straight out of the hinge slots. Hold firmly, the door is heavy.
6. Place the door in a convenient and stable location for cleaning.
Replacing the Oven Door 1. Holding the door firmly in both hands, place hinges in hinge slots.
English 36
Page 39

2. Open door all the way to expose hinges and slots. Push lever (one on each hinge) away from you (back toward range).
3. After moving the hinge brackets back down into position, be sure to close and open the door slowly to assure that it is correctly and securely in place.
4. Door should be straight, not crooked.
Replacing an Oven Light Each light assembly consists of a removable lens, a light bulb and a light socket
housing that is fixed in place.
WARNING
• Make sure the appliance and lights are cool and power to the appliance
has been turned off before replacing the light bulb(s). Failure to do so
could result in electrical shock or burns.
• The lenses (if equipped) must be in place when using the appliance.
• The lenses (if equipped) serve to protect the light bulb from breaking.
• The lenses (if equipped) are made of glass. Handle carefully to avoid
breaking. Broken glass could cause an injury.
• Light socket is live when door is open
1. Read the WARNING above.
2. Turn off power at the main power supply (fuse or breaker box).
3. Remove the lens by unscrewing it.
4. Remove the light bulb from its socket by unscrewing it.
5. Replace the bulb with a new 40 watt appliance bulb. Avoid touching the bulb with fingers, as oils from hands can damage the bulb when it becomes hot.
6. Screw the lens back on.
7. Turn power back on at the main power supply (fuse or breaker box).
Service
Self Help
The Cooktop Use these suggestions before calling for service to avoid service charges.
Table 12: Cooktop Troubleshooting Chart
Cooktop Problem Possible Causes and Suggested Solutions
Element cycles more than usual Pan base is warped and not making full contact with heating surface.
Base diameter of pan is too small for the size of the element.
Pan ingredients have boiled dry.
Material of pan is a poor heat conductor; heat transfers too slowly
A slight odor is noticeable when
an element is turned on
Cooktop controls will not turn on Range is not receiving power. Check the power source to see if a fuse has blown or if the circuit
Scraper is not working properly. The scraper blade is dull. The scraper is packaged with single-edge, stainless steel blades.
Cooking results are not what was
expected.
This is normal with new cooktops and will disappear after several uses
breaker tripped. Check cord to see if it is inserted completely into outlet.
Cooktop panel is locked. Press and hold PANEL LOCK until indicator light turns off.
Replace with a standard single-edge blade.
The cooktop is not level. Adjust leveling legs on bottom of range.
Cooking pan is not the appropriate size or type. See “Cookware Selection Guide”.
English 37
Page 40

Service
Table 12: Cooktop Troubleshooting Chart
Cooktop Problem Possible Causes and Suggested Solutions
Element cycles on the highest
setting
Water takes too long to boil Time to boil can vary greatly depending on environmental conditions. See “Boiling Water” on
White cooktop appears to have a
green tint
This is normal. The temperature limiter operates automatically to protect the glass ceramic surface from extreme high temperature damage.
page 22 for tips to decrease time to boil.
The white cooktop may have a green tint while cooling down. This is normal. The cooktop will
return to its original color when the glass has cooled.
The Oven
Table 13: Oven Troubleshooting Chart
Oven Problem
The oven mode or temperature selected
or the numbers selected do not appear in
The knob was turned too rapidly. Turn knob slower until correct wording or temperature appears. Review manual instructions when setting clock, timer, or Self-Clean.
the display
Oven door is locked and will not release, even
after cooling
Oven is not heating Check circuit breaker or fuse box to your house. Make sure there is proper electri-
Oven is not cooking evenly Adjust oven calibration if necessary (see “Change the Oven Temperature Offset” on
Baking results are not as expected Refer to cooking charts for recommended rack position. Check “Getting the Most
Food takes longer to cook than expected The oven is carefully calibrated to provide accurate results. However, the tempera-
Food is overcooked The oven is carefully calibrated to provide accurate results. However, the tempera-
Convection Bake Results are not as Expected If the Automatic Convection Conversion Feature is turned off, the temperature must
Oven temperature is too hot or too cold The oven thermostat needs adjustment. See Oven Temperature Offset.
Oven light is not working properly Replace or reinsert the light bulb if loose or defective. Touching the bulb with fin-
Turn the oven off at the circuit breaker and wait 5 minutes. Turn breaker back on.
The oven should reset itself and will be operable.
cal power to the oven. Be sure oven temperature has been selected.
page 12). Refer to cooking charts for recommended rack position.
Out of Your Oven” on page 24 for tips and suggestions. Adjust oven calibration if
necessary (see “Change the Oven Temperature Offset” on page 12).
ture can be offset if food is consistently too brown or too light. See “Change the
Oven Temperature Offset” on page 12.
ture can be offset if food is consistently too brown or too light. See “Change the
Oven Temperature Offset” on page 12.
be manually reduced by 25°F. If the feature is active, the temperature is automatically adjusted. See “Turn Automatic Convection Conversion ON or OFF” on
page 14 for more information. Refer to cooking charts and tips for rack positions,
cooking times and pan selection. Adjust oven calibration if necessary. See“Change
the Oven Temperature Offset” on page 12.
gers may cause the bulb to burn out.
Oven light will not turn off Check for obstruction in oven door. Check to see if hinge is bent. When the
Sabbath feature is activated, the oven light will stay on or off (as selected
during set-up) during the entire Sabbath mode.
Cannot remove lens cover on light There may be soil build-up around the lens cover. Wipe lens cover area
with a clean dry towel prior to attempting to remove the lens cover.
Oven will not Self-Clean properly Allow the oven to cool before running Self-Clean. Always wipe out loose soils or
heavy spillovers before running Self-Clean. If oven is badly soiled, set oven for a
five-hour Self-Clean. See Preparing the Oven to Self-Clean.
Clock and timer are not working properly Make sure there is electrical power to oven. See Clock and Timer sections.
Porcelain chips When oven racks are removed and replaced, always tilt racks upward and do not
force them to avoid chipping the porcelain.
Possible Causes and
Suggested Solutions
English 38
Page 41

Table 13: Oven Troubleshooting Chart
Service
Oven Problem
“F” and a number appears in display and control beeps
With a new range there is a strong odor when
oven is turned on
Control does not react when the pad is
touched
Fan is running during modes that don’t use
convection
Warm air or steam escapes from oven vent It is normal to see or feel steam or warm air escaping from the oven vent. Do not
This is a fault code. Press Off to clear the display and stop beeping. Reset oven if
necessary. If fault code remains and beep continues, record fault code, cancel oven
and call authorized service technician.
This is normal with a new range and will disappear after a few uses. Operating the
self-clean cycle will also “burn-off” the smell more quickly.
Be sure that pad is clean. Touch the center of the touchpad. Use the flat part of your
finger.
On some models, the convection fan will run while the oven is preheating for the
bake mode. This is normal.
Slide-in models also have a cooling fan that runs during every cooking mode.
block the vent.
Possible Causes and
Suggested Solutions
Warranty
General Information The warranties provided by BSH Home Appliances Corp. in this Statement of Limited War-
ranty apply only to the BSH Electric Freestanding Range ("Range") sold to you, the first
using purchaser, provided that the Range was purchased (1) for your use and not for resale
and (2) in the United States or Canada and is located in the country of purchase. As used
in this Statement of Limited Warranty, the term "Date of Installation" shall refer to the earlier
of the date the Range is installed or ten (10) business days after the date the Range is sold
to the first using purchaser, the warranties stated herein apply only to the first using purchaser and are not transferable.
Standard Limited Warranty
Other Conditions of the Limited Warranties
How to Obtain Warranty Service
BSH warrants that its Range is free from defects in materials and workmanship for a period
of twelve (12) months from the Date of Installation. During the warranty period, BSH or its
authorized service center will repair or replace, at its sole option, any Range that proves to
have been defective under conditions of normal use without charge. All removed parts and
components shall become the property of BSH, at BSH's option. All replaced and/or
repaired parts shall assume the identity of the original part for purposes of this warranty
and this warranty shall not be extended with respect to such parts.
The warranties provided in this Statement of Limited Warranty exclude defects or damage
resulting from (1) use of the Range in other than its normal and customary manner (commercial use of the Range shall not be deemed normal or customary), (2) misuse, abuse,
accidents or neglect, (3) improper operation, maintenance, installation or unauthorized service, (4) adjustment or alteration or modification of any kind, (5) a failure to comply with
applicable state, local, city, and county electrical and/or building codes, (6) spills of food or
liquid, and (7) external forces such as floods, fires, acts of God or other circumstances
beyond BSH's control. Also excluded from this warranty are scratches and damages on
external surfaces and exposed parts of Range on which the serial numbers have been
altered, defaced of removed.
To the extent allowed by law, this warranty sets out your exclusive remedies with respect to
products covered by it, whether the claim arises in contract or tort (including strict liability
and negligence) or otherwise. BSH will not be liable for consequential or incidental damages, losses, or expenses. THIS WARRANTY IS IN LIEU OF ALL OTHER EXPRESS
WARRANTIES. ANY WARRANTY IMPLIED BY LAW, WHETHER FOR MERCHANTABILITY OR FITNESS FOR A PARTICULAR PURPOSE OR OTHERWISE, SHALL BE EFFECTIVE ONLY FOR THE PERIOD THAT THIS EXPRESS WARRANTY IS EFFECTIVE. No
attempt to alter, modify, or amend this warranty shall be effective unless authorized in writing by an officer of BSH.
To obtain warranty service for the Range, you should contact the nearest BSH authorized
service center or the BSH Customer Support Call Center, 5551 McFadden Avenue, Huntington Beach, CA 92649, 800/944-2904.
Notice To California Owners
If your Range needs warranty service and there is no authorized BSH service center reasonably close to you, you may notify the BSH reseller from whom you purchased the
Range. If the BSH reseller fails to repair or replace the defective parts, or partially refund
your purchase price (where applicable), you may have the Range repaired at any large
appliance repair shop or center and you will be reimbursed for all reasonable expenses
provided the costs are substantiated in writing and the work performed is covered by this
warranty. BSH shall not reimburse any repair costs hereunder which exceed the depreciated value of range.
English 39
Page 42

Table des matières
Concernant ce guide . . . . . . . . . . . . . . . . . . . . . . . . . . . . . . . . . . . . . . . . . 1
Présentation de ce guide . . . . . . . . . . . . . . . . . . . . . . . . . . . . . . . . . . . . . . . . . . . . . . . . . . . . . . . .1
Sécurité . . . . . . . . . . . . . . . . . . . . . . . . . . . . . . . . . . . . . . . . . . . . . . . . . . . 1
Instructions de sécurité importantes . . . . . . . . . . . . . . . . . . . . . . . . . . . . . . . . . . . . . . . . . . . . . . . .1
Mise en œuvre . . . . . . . . . . . . . . . . . . . . . . . . . . . . . . . . . . . . . . . . . . . . . . 5
Pièces et accessoires . . . . . . . . . . . . . . . . . . . . . . . . . . . . . . . . . . . . . . . . . . . . . . . . . . . . . . . . . . . 5
Avant d'utiliser l'appareil la première fois . . . . . . . . . . . . . . . . . . . . . . . . . . . . . . . . . . . . . . . . . . .14
Fonctionnement - surface de cuisson . . . . . . . . . . . . . . . . . . . . . . . . . . . . 15
Concernant la surface de cuisson . . . . . . . . . . . . . . . . . . . . . . . . . . . . . . . . . . . . . . . . . . . . . . . .15
Fonctionnement . . . . . . . . . . . . . . . . . . . . . . . . . . . . . . . . . . . . . . . . . . . . . . . . . . . . . . . . . . . . . .15
Fonctionnement - four . . . . . . . . . . . . . . . . . . . . . . . . . . . . . . . . . . . . . . . 17
Concernant le four . . . . . . . . . . . . . . . . . . . . . . . . . . . . . . . . . . . . . . . . . . . . . . . . . . . . . . . . . . . .17
Fonctionnement . . . . . . . . . . . . . . . . . . . . . . . . . . . . . . . . . . . . . . . . . . . . . . . . . . . . . . . . . . . . . .17
Fonctionnement - tiroir réchaud (certains modèles) . . . . . . . . . . . . . . . . . 21
Concernant le tiroir réchaud . . . . . . . . . . . . . . . . . . . . . . . . . . . . . . . . . . . . . . . . . . . . . . . . . . . . .21
Fonctionnement . . . . . . . . . . . . . . . . . . . . . . . . . . . . . . . . . . . . . . . . . . . . . . . . . . . . . . . . . . . . . .21
Tirer pleinement avantage de l'appareil . . . . . . . . . . . . . . . . . . . . . . . . . . . 23
Tirer pleinement avantage de la surface de cuisson . . . . . . . . . . . . . . . . . . . . . . . . . . . . . . . . . . 23
Tirer pleinement avantage du four . . . . . . . . . . . . . . . . . . . . . . . . . . . . . . . . . . . . . . . . . . . . . . . .24
Tirer pleinement avantage du tiroir réchaud . . . . . . . . . . . . . . . . . . . . . . . . . . . . . . . . . . . . . . . . .31
Nettoyage et entretien . . . . . . . . . . . . . . . . . . . . . . . . . . . . . . . . . . . . . . . 32
Entretien et nettoyage . . . . . . . . . . . . . . . . . . . . . . . . . . . . . . . . . . . . . . . . . . . . . . . . . . . . . . . . .32
Entretien . . . . . . . . . . . . . . . . . . . . . . . . . . . . . . . . . . . . . . . . . . . . . . . . . . . . . . . . . . . . . . . . . . . .37
Service . . . . . . . . . . . . . . . . . . . . . . . . . . . . . . . . . . . . . . . . . . . . . . . . . . . 38
Aide . . . . . . . . . . . . . . . . . . . . . . . . . . . . . . . . . . . . . . . . . . . . . . . . . . . . . . . . . . . . . . . . . . . . . . . 38
Garantie . . . . . . . . . . . . . . . . . . . . . . . . . . . . . . . . . . . . . . . . . . . . . . . . . . . . . . . . . . . . . . . . . . . . 40
Questions?
1-800-944-2904
www.boschappliances.com
5551 McFadden Ave.
Huntington Beach, CA 92649
Nous attendons de vos nouvelles !
Page 43

Concernant ce guide
Présentation de ce guide
Ce guide comprend plusieurs sections
• La section généralités qui décrit les caractéristiques et les fonctions de l'appareil incluant une description sur le réglage de la cuisinière et le fonctionnement du panneau de contrôles.
• Les trois sections fonctionnement décrivent comment actionner et obtenir le
meilleur rendement de la surface de cuisson, du four et du tiroir réchaud.
• La section nettoyage et entretien décrit comment nettoyer et entretenir l'appareil.
• La section service comprend le guide de dépannage et la garantie.
Avant d'utiliser la cuisinière, lire ce guide. Porter une attention spéciale aux
Instructions de sécurité importantes au début de ce guide.
Sécurité
Instructions de sécurité importantes
LIRE ET CONSERVER CES INSTRUCTIONS
Instructions de sécurité
importantes
Sécurité pour le feu • Ne pas utiliser de papier aluminium ou de doublure de protection pour doubler
toute partie de l'appareil, spécialement les bols d'égouttement ou le fond de
l'appareil. Ceci peut causer un risque de choc électrique ou un incendie.
• Si des matériaux à l'intérieur du four ou du tiroir réchaud s'enflamment, laisser
la porte fermer. Mettre l'appareil hors circuit et débrancher le circuit du coupecircuit.
• Utiliser cet appareil seulement de la façon décrite dans ce guide. Par exemple, ne pas utiliser cet appareil pour chauffer ou réchauffer une pièce. Ne
jamais utiliser pour le rangement.
• Ne pas laisser de l'aluminium, plastique, papier ou chiffon entrer en contact
avec une grille ou un brûleur chaud. Ne pas laisser les casseroles chauffer à
sec.
• Si la surface de cuisson est près d'une fenêtre, d'un évent à air forcé ou d'un
ventilateur, s'assurer que les matériaux inflammables tels tentures/rideaux ne
flottent pas au-dessus ou près des brûleurs ou éléments ; ils peuvent
s'enflammer.
• Toujours avoir un détecteur de fumée près de la cuisine.
• Ne jamais laisser la surface de cuisson sans surveillance. Les déversements
causent de la fumée et la graisse peut s'enflammer.
• AVERTISSEMENT - POUR RÉDUIRE LE RISQUE D'UN FEU DE GRAISSE
Français 1
Page 44

Sécurité
1) Ne jamais laisser l'appareil sans surveillance pendant l'utilisation à des
réglages élevés. Chauffer l'huile lentement à un réglage de bas à moyen.
2) Toujours mettre la hotte EN CIRCUIT pour la cuisson à réglage élevé ou
pour flamber des aliments (ex. : crêpes Suzette, cerises jubilées, etc.)
3) Nettoyer le ventilateur fréquemment. La graisse ne doit pas s'accumuler
sur le ventilateur ou les filtres.
4) Utiliser une casserole appropriée pour le format de l'élément de surface.
• Si les cheveux ou les vêtements s'enflamment, se laisser tomber au sol et
rouler immédiatement pour éteindre les flammes.
• Étouffer les flammes d'un feu l'aliments autre qu'un feu de graisse avec du
bicarbonate de soude. Ne jamais utiliser d'eau.
• AVERTISSEMENT - POUR RÉDUIRE LE RISQUE DE BLESSURES EN
CAS D'UN FEU DE GRAISSE, OBSERVER CE QUI SUIT :
1) ÉTOUFFER LES FLAMMES avec un couvercle hermétique, une tôle à
biscuits ou un plateau en métal. Fermer le brûleur. ATTENTION À NE
PAS SE BRÛLER. Si les flammes ne s'éteignent pas immédiatement,
ÉVACUER ET TÉLÉPHONER AU SERVICE DES INCENDIES.
2) NE JAMAIS PRENDRE UNE CASSEROLE EN FEU ; risque de brûlures.
3) NE PAS UTILISER D'EAU, incluant un chiffon ou serviette humide ; il
peut en résulter une violente explosion de vapeur. Utiliser un extincteur
seulement si :
1) L'on possède un extincteur de classe ABC et que l'on sait comment
s'en servir.
2) Le feu est petit et contenu dans la zone où il a commencé
3) Le service des incendies a été appelé.
4) L'on peut combattre le feu en ayant le dos vers la sortie. Avoir un
extincteur approprié à proximité, visible et facile d'accès près du four.
• Lorsque possible, ne pas faire fonctionner le système de ventilation pendant
un feu de surface. Toutefois, ne pas passer par dessus le feu pour mettre
hors circuit le système de ventilation hors circuit.
Prévention de brûlures • NE PAS TOUCHER AUX SURFACES OU ZONES ADJACENTES DE
L'APPAREIL - les surfaces peuvent être chaudes même si elles sont foncées.
Les zones peuvent aussi être suffisamment chaudes pour causer des
brûlures. Pendant et après l'utilisation, ne pas toucher, ni laisser vêtements,
tire-plats ou autres matériaux inflammables entrer en contact avec ces surfaces tant qu'elles n'ont pas refroidi ; cela comprend la surface de cuisson et
la zone face à la surface de cuisson.
• NE PAS TOUCHER AUX ÉLÉMENTS OU SURFACES INTÉRIEURES DU
FOUR - les éléments chauffants peuvent être très chauds même s'ils sont de
couleur foncée. Les surfaces intérieures peuvent aussi être suffisamment
chaudes pour causer des brûlures. Pendant et après l'utilisation, ne pas
toucher, ni laisser vêtements, tire-plats ou autres matériaux inflammables
entrer en contact avec ces zones tant qu'elles n'ont pas suffisamment refroidi
; cela comprend les évents, surfaces près des ouvertures et les portes de
fours.
• Faire attention en ouvrant la porte. Se tenir sur le côté, ouvrir la porte ou le
tiroir lentement et légèrement pour laisser l'air chaud et la vapeur s'échapper.
Éloigner le visage et s'assurer que les enfants et animaux sont loin de l'appareil. Une fois la vapeur et l'air chaud échappés, continuer la cuisson. Garder
la porte fermée sauf pour la cuisson ou le nettoyage. Ne pas laisser la porte
ouverte sans surveillance.
• Ne pas chauffer ou réchauffer des contenants d'aliments non ouverts. L'accumulation de pression peut faire exploser le contenant et causer des
blessures.
• Toujours placer les grilles en position désirée lorsque le four est froid. Si une
grille doit être déplacée pendant que le four est chaud, les moufles de four ne
doivent pas toucher aux éléments chauffants.
• Toujours utiliser des tire-plats secs ; mouillés ou humides sur des surfaces
chaudes, cela peut causer des brûlures par vapeur. Ils ne doivent pas entrer
Français 2
Page 45

Sécurité
en contact avec les éléments chauffants. Ne pas utiliser de serviette ni de
chiffon.
• Toujours mette la hotte EN CIRCUIT pour la cuisson à chaleur élevée ou pour
flamber des aliments (ex. : (crêpes Suzette, cerises jubilées, etc.)
• Utiliser les réglages élevés de la surface de cuisson seulement lorsque
nécessaire. Pour éviter le bouillonnement ou les éclaboussures, chauffer
l'huile lentement à un réglage bas à moyen. L'huile chaude peut causer des
blessures sérieuses.
• Ne jamais déplacer une casserole d'huile chaude, surtout une friteuse, attendre qu'elle ait refroidi.
• Attacher les vêtements lâches, cheveux et ne pas porter de vêtements pendants, des manches pendantes, cravates, foulards, bijoux, etc.
• Éviter de passer par dessus l'appareil ni de s'y appuyer. Faire attention à certains vêtements et fixatifs à cheveux qui peuvent contenir des produits
chimiques inflammables pouvant s'enflammer lorsqu'en contact avec des surfaces chaudes ou les éléments chauffants. Risque de brûlures sérieuses.
• NE pas toucher la surface intérieure du tiroir pendant l'utilisation, elle peut
devenir assez chaude pour causer des blessures. Laisser le tiroir et la grille
(si équipé) refroidir avant de manipuler.
• AVERTISSEMENT : pour éviter les brûlures, ne pas enlever le tiroir réchaud.
S'assurer que le tiroir est vide avant de l'enlever.
Sécurité pour les enfants • Lorsque les enfants sont assez âgés pour utiliser l'appareil, il incombe aux
parents ou tuteurs légaux d'enseigner les pratiques sécuritaires quant à l'utilisation de l'appareil.
• Ne laisser personne grimper, se tenir debout, s'appuyer, s'asseoir ou se pendre à toute pièce de l'appareil, spécialement la porte, le tiroir ou le tiroir
réchaud. Ceci peut endommager l'appareil, le faire basculer et causer des
blessures sérieuses.
• Ne pas laisser les enfants utiliser cet appareil sans surveillance d'un adulte.
Enfants et animaux ne doivent pas être laissés sans surveillance lorsque
l'appareil est utilisé. Ne pas laisser les enfants jouer à proximité de l'appareil
utilisé ou non.
• ATTENTION - les articles d'intérêt pour les enfants ne doivent pas être
rangés dans l'appareil, dans les armoires au-dessus ou sur le dosseret. Un
enfant qui grimpe sur l'appareil pour prendre ces objets peut se blesser
sérieusement.
Sécurité pour le nettoyage • NOTE DE SÉCURITÉ IMPORTANTE : la loi sur les produits toxiques et l'eau
potable de Californie requiert que le gouverneur de la Californie publie une
liste de substances connues de l'état comme pouvant causer le cancer, malformation ou autres problèmes de reproduction et exige que les compagnies
avisent les clients de l'exposition potentielle à de telles substances. La combustion de combustible à cuisson à gaz et l'élimination de résidus pendant
l'autonettoyage peut générer de petites quantités de monoxyde de carbone.
L'isolation en fibre de verre d'un four autonettoyant génère de petites quantités de formaldéhyde pendant les premiers cycles. La Californie liste le formaldéhyde comme une cause potentielle du cancer. Le monoxyde de carbone
est une cause potentielle de toxicité pour la reproduction. L'exposition à ces
substances peut être minimisée en :
1) assurant une bonne ventilation pendant la cuisson à gaz.
2) assurant une bonne ventilation pendant et immédiatement après
l'autonettoyage du four.
3) actionnant l'appareil selon les instructions données dans ce guide.
• Ne pas nettoyer l'appareil pendant qu'il est chaud. Certains nettoyants produisent des émanations nocives lorsqu'ils sont appliqués sur une surface
chaude. Chiffons ou éponges humides peuvent causer des brûlures par
vapeur.
Français 3
Page 46

Sécurité
• Pendant l'autonettoyage, s'assurer que la porte est bien verrouillée. Si elle ne
se verrouille pas, ne pas actionner l'autonettoyage et communiquer avec un
centre de service.
• Les oiseaux ont un système respiratoire sensible. Les éloigner de la cuisine
ou des pièces où la fumée peut les atteindre. Pendant l'autonettoyage, les
émanations sont nocives aux oiseaux. D'autres émanations telles la margarine surchauffée et les huiles de cuisson sont nocives.
• Il ne doit pas y avoir d'accumulation de graisse.
Sécurité pour les casseroles • Ne pas placer les aliments directement au fond du four.
• Observer les instructions du fabricant pour utiliser des sacs de cuisson ou de
rôtissage.
• Tenir la poignée de la casserole pour brasser ou tourner des aliments afin
d'éviter les déversements ou le mouvement de la casserole.
• Utiliser un format approprié de casserole ; si trop petit, cela expose une portion de l'élément ou du brûleur causant ainsi l'ignition des vêtements. Choisir
des casseroles à fond plat assez large pour couvrir la surface. Cet appareil
est doté d'éléments de différents formats. Un bon rapport format de casserole
et d'élément/brûleur améliore l'efficacité.
• Les casseroles non approuvées pour les surfaces de cuisson en céramique
vitrifiée peuvent briser par les soudains changements de température. Utiliser
seulement des casseroles pour ce type de surfaces (seuls certains types de
verre, verre à l'épreuve de la chaleur, céramique, faïence, etc. conviennent).
Voir la rubrique sélection de casseroles pour plus de détails.
• Toujours positionner la poignée vers l'intérieur de façon à ne pas dépasser
les zones adjacentes, brûleurs ou bord de l'appareil. Ceci réduit le risque
d'incendie, de déversements et de brûlures.
• ATTENTION : les contenant en plastique ou pellicule plastique peuvent fondre au contact direct avec le tiroir ou un ustensile chaud. S'ils fondent dans le
tiroir, ils peuvent ne pas s'enlever.
Installation et entretien • AVERTISSEMENT : avec un bon entretien, cet appareil a été conçu pour la
sécurité et la fiabilité. Lire toutes les instructions attentivement avant d'utiliser.
Ces précautions réduisent le risque de brûlures, de choc électrique,
d'incendie et de blessures, incluant ce qui est indiqué aux pages suivantes.
• Demander à l'installateur de montrer l'emplacement du coupe-circuit ou fusible. Le noter à des fins de références.
• Cet appareil doit être adéquatement installé et mis à la terre par un électricien
qualifié. Brancher seulement sur une prise adéquatement mise à la terre. Voir
les instructions d'installation pour plus de détails.
• Toutes les cuisinières peuvent basculer et causer des blessures. Installer le
dispositif anti bascule compris avec l'appareil. S'assurer que le dispositif anti
bascule est bien enclenché. Voir les instructions d'installation.
Figure 1 : Attention à ne pas faire basculer
• Cet appareil est destiné un usage domestique normal seulement. Non
approuvé pour une utilisation à l'extérieur. Pour toute question, communiquer
avec le fabricant.
• Ne pas ranger ni utiliser de produits chimiques corrosifs, vapeurs, produits
inflammables ou non alimentaires près ou dans cet appareil, lequel est spécifiquement conçu pour cuire et chauffer des aliments. L'utilisation de produits
Français 4
Page 47

chimiques corrosifs pour le chauffage ou le nettoyage peut endommager
l'appareil et causer des blessures.
• Ne pas actionner l'appareil s'il ne fonctionne pas adéquatement ou s'il est
endommagé. Communiquer avec un centre de service autorisé.
• Ne pas cuisiner sur une surface de cuisson brisée. Les nettoyants et les
déversements peuvent causer un risque de choc électrique.
• Ne pas obstruer les évents du four.
• Ne pas réparer ni remplacer des pièces de l'appareil à moins que cela ne soit
spécifiquement recommandé dans ce guide. Référer tout service à un centre
de service autorisé.
• Dans le cas d'une erreur, l'affichage clignote et il y a une tonalité continuelle.
Si cela se produit pendant l'autonettoyage, débrancher l'appareil de l'alimentation et téléphoner à un technicien qualifié.
• Dans le cas d'une erreur, l'affichage clignote et il y a une tonalité continuelle.
Si cela se produit, débrancher l'appareil de l'alimentation et téléphoner à un
technicien qualifié.
Sécurité pour les aliments • ATTENTION : pour conserver la sécurité alimentaire, observer ce qui suit :
1) NE PAS utiliser le tiroir réchaud pour chauffer des aliments froids (sauf
craquelins, croustilles ou céréales sèches et réchauffer des assiettes).
2) S'assurer de maintenir la température des aliments appropriée. La USDA
recommande de garder les aliments chauds à 140 °F ou plus.
3) NE PAS réchauffer des aliments plus d'une heure.
Mise en œuvre
Pièces et accessoires
Modèle amovible
1
10
9
7 ou 8
(Certains modèles)
2
3
4
5
6
Modèle encastré
10
9
7 ou 8
(Certains modèles)
1
2
3
4
5
6
Figure 2: Pièces et accessoires
Tableau 1: Pièces et accessoires
# Pièce # Pièce
1 Panneau de contrôles et boutons 11 Grattoir de surface (non illustré)
Français 5
Page 48

Mise en œuvre
Tableau 1: Pièces et accessoires
# Pièce # Pièce
2 Bouton de contrôle de la surface de cuisson 12 Weiman Cook Top® (nettoyant de surface en
céramique vitrifiée (non illustré)
3 Prise de sonde 13 Lèchefrite (non illustrée)
4 Positions des grilles et guides 14 Grille de four, demie (certains modèles) (non illustrée)
5 Grilles de four, plates (2 ou 3 selon le modèle) 15 Grille de four, pleine rallonge (certains modèles) (non
illustrée)
6 Joint de porte du four 16 Nécessaire de documentation (non illustré)
7
7
8 Plaque signalétique 19 Élément gril (haut intérieur du four) (non illustré)
9 Évent du four 20 Verrouillage de porte du four (non visible) (non illustré)
10 Fixation anti bascule (non illustrée)
Tiroir de rangement (certains modèles)
Tiroir réchaud (certains modèles)
a
a
17 Éclairage de four (2) (paroi arrière du four) (non illustré)
18 Ventilateur à convection et élément (paroi arrière du
four) (non illustré)
a. Selon le modèle, l'appareil est doté d'un tiroir ou d'un tiroir réchaud.
Élément radiant Cet élément utilise un fil ruban situé sous la surface en céramique vitrifiée et
donne la chaleur pour la cuisson. L'élément radiant est conçu pour faire un cycle
marche-arrêt (voir limiteur de température).
Élément jumelé Comprend deux éléments rubans radiants dans la même zone chauffante. Le
petit élément ou les éléments intérieur et extérieur peuvent être choisis pour
mieux correspondre au format des casseroles.
Élément triple Comprend trois éléments (petit, moyen, grand) rubans radiants dans la même
zone chauffante. Le petit et le moyen ou les trois éléments peuvent être choisis
pour mieux correspondre au format des casseroles.
Élément pont (certains modèles) Cet élément uni l'élément simple avant et arrière pour en former un oblong. Il est
conçu pour une utilisation avec de grandes casseroles comme des rôtissoires.
Chaleur conservée La surface de cuisson en verre conserve la chaleur et demeure chaude une fois
les éléments hors circuit. Cette chaleur peut être utilisée pour garder les aliments
chauds à une température de service pendant une courte période. Si un voyant
de surface chaude est allumé, faire attention en cuisinant ou en nettoyant, la surface est encore chaude.
Limiteur de température Chaque élément radiant est doté de son capteur pour protéger la surface en verre
des températures élevées extrêmes. Les limiteurs fonctionnent automatiquement
en faisant un cycle marche-arrêt, quel que soit le réglage de cuisson.
Quoique le cycle est normal, une des conditions suivantes peut activer le limiteur
et effectuer un cycle marche-arrêt plus souvent.
• La base de la casserole n'est pas entièrement en contact avec la surface
chauffante (à cause de voilage ou base non uniforme).
• La casserole est trop petite pour l'élément.
• La casserole a chauffé à sec.
• Le matériau ou la forme de la casserole est lent à transférer la chaleur.
Voyant de surface chaude La surface de cuisson est dotée d'un voyant qui indique lorsque la surface est trop
chaude au toucher. Si un voyant de surface chaude est allumé, faire attention en
cuisinant ou en nettoyant, la surface est encore chaude.
Grilles de four Selon le modèle, l'appareil est doté d'une des conditions suivantes :
Français 6
Page 49

Mise en œuvre
• Trois grilles plates
• Deux grilles plates et une grille rallonge
• Deux grilles plates et une demie grille
Grilles plates Ces grilles sont conçues avec une butée afin qu'elles ne sortent pas complète-
ment du four et ne s'inclinent pas.
ATTENTION
Pour éviter les brûlures, placer les grilles en position désirée avant de
mettre le four en circuit. Toujours utiliser des moufles à four si ce dernier est chaud. Si une grille doit être déplacée pendant que le four est
chaud, les moufles ne doivent pas entrer en contact avec les éléments
chauffants.
Mise en place des grilles
1. Saisir fermement la grille par les côtés.
2. Incliner la grille vers le haut pour mettre la butée dans le guide.
3. Amener la grille en position horizontale et pousser au fond. La grille doit être à plat, droite et non croche.
Arrière de la grille
Devant de la grille
Insérer la grille pour que l’arrière
soit vers la paroi arrière du four
Figure 3: Insérer la grille
Retrait de la grille plate
1. Saisir fermement la grille par les côtés.
2. Lorsque la butée est atteinte, incliner vers le haut et tirer complètement.
Grille rallonge (certains modèles) Cette grille permet un accès aisé aux aliments. La portion inférieure s'allonge
aussi loin qu'une grille plate standard. Toutefois, la section supérieure s'allonge
plus loin que la section inférieure afin de rapprocher les aliments. Pour commander une grille rallonge, communiquer avec le service ou le marchand.
Arrière de la grille
Butée
Grille
supérieure
Butée de grille
supérieure (bille)
Grille
inférieure
Butées
Guide de grille
Repose-grille
supérieure
Devant de grille
Figure 4: Grille pleine rallonge
Retrait et remise en place
Remarque : la grille rallonge doit être en position fermée pour l'enlever et la
remettre. Saisir les deux sections.
Français 7
Page 50

Mise en œuvre
1. Saisir les deux sections et tirer.
2. Une fois la butée atteinte, saisir la section supérieure et tirer jusqu'à la seconde butée. Si la grille supérieure ne s'étire pas complètement, elle est mal
installée. La réinstaller afin que la butée soit à l'arrière du four.
Désassemblage (pour nettoyer)
Les deux sections de la grille sont conçues pour se séparer, facilitant le nettoyage.
1. Placer la grille sur une surface plate, en position fermée vers le haut.
2. Tourner un côté de la grille supérieure vers soi jusqu'à ce qu'elle passe la butée (bille).
3. Tirer la grille vers le haut et sortir. Tourner le côté d'abord.
Position fermée
Réassemblage
Arrière de la grille
Devant de la grille
Figure 5: Démontage
Butée
(bille)
ATTENTION
Toujours s'assurer que la grille supérieure est installée correctement
après l'assemblage. Les bords arrière de la grille supérieure doivent
être sous le guide de grille de la grille inférieur. NE PAS simplement
déposer la grille supérieure sur celle du bas.
1.Pour réassembler, tenir la grille diagonalement au-dessus de la grille
inférieure.
2. Insérer un côté de la grille supérieure en position fermée.
3. Tourner l'autre côté vers l'arrière de la grille jusqu'à ce qu'il passe la butée (bille).
4. Pousser complètement la grille supérieure (figure 3).
Français 8
Nettoyage
Position fermée
Arrière de la grille
Butée
(bille)
Devant de la grille
Figure 6: Réassemblage
Page 51

Mise en œuvre
Nettoyer la grille avec de l'eau chaude savonneuse. Bien assécher. Pour les
taches tenaces, utiliser un tampon en laine d'acier savonneux. NE PAS nettoyer
dans le four autonettoyant.
Demie grille (certains modèles) Cette grille peut être utilisée comme grille plate simple ou demie grille. Avec le
côté droit enlevé, l'on peut placer une grand article, tel une dinde d'un côté de la
grille inférieure et un moins gros (comme une casserole) de l'autre côté. Un plus
petit article peut être placé sur la demie grille (au-dessus de l'autre). Ceci permet
un accès facile à tous les articles et une meilleure utilisation de la cavité du four.
Conseil : la section amovible peut être utilisée à l'extérieur du four..
Figure 7: Demie grille
Fond du four Ne rien placer directement dans le fond du four. Ne pas utiliser de papier alumin-
ium ni de doublure protectrice sur les pièces de l'appareil, surtout sur les égouttoirs et le fond du four. Cela peut causer un risque de choc électrique ou un
incendie.
Event de four Modèle amovible :
L'évent est situé sous l'affichage, au-dessus de l'élément arrière gauche. Il est
normal de voir de la vapeur s'échapper et de la condensation se former sur le
dosseret et la surface de cuisson. Cette zone peut devenir chaude lorsque le four
est utilisé. Ne pas obstruer l'évent, il est nécessaire à la circulation d'air.
Modèle encastré :
L'évent est situé au-dessus de la poignée du four. L'air chaud peut s'échapper de
l'évent avant, pendant et après la cuisson. Il est normal de voir de la vapeur
s'échapper et de la condensation se former. Cette zone peut devenir chaude lorsque le four est utilisé. Ne pas obstruer l'évent, il est nécessaire à la circulation
d'air.
Arrêt automatique Le four s'arrête automatiquement après 12 h (24 h, si l'heure est en format 24 h à
la section sélection de fonctions).
Autonettoyage Le four est doté d'une fonction autonettoyage qui élimine le travail manuel de net-
toyage.
Voyants et autres caractéristiques Bip - indique que plus d'information doit être entrée ou confirme l'entrée d'une
donnée. Indique aussi la fin d'un programme ou une erreur du four.
Voyant de fin de cycle - indique la fin d'un cycle, 3 bips consécutifs.
Réglages par défaut - les modes de cuisson sélectionnent automatiquement la
température par défaut, qui peut être changée au besoin.
Chiffre ou symbole clignotant - indique un réglage incomplet et demande une
autre étape ou il faut presser MARCHE.
Codes F - ces codes figurent lorsqu'il y a un problème avec l'appareil.
Français 9
Page 52

Mise en œuvre
Ventilateur de refroidissement (modèle à encastrer seulement)
Le ventilateur de refroidissement fonctionne pendant tous les modes du four ; il
peut aussi fonctionner pendant l'utilisation de la surface de cuisson. L'on peut
l'entendre et sentir l'air chaud dégagé par l'évent. Ceci est normal.
Ventilateur à convection Ce ventilateur fonctionne pendant le mode à convection. Lorsque le four est en
mode convection, le ventilateur se met automatiquement hors circuit lorsque la
porte est ouverte. Il ne fonctionne pas pendant l'autonettoyage, quoique par au
début du mode.
Remarque : sur certains modèles, le ventilateur à convection fonctionne pendant
le préchauffage en mode cuisson.
Panneau de contrôles
Panneau de contrôles du four
Pendule
Light
Time
Off
Température préchauffage
AM
PM
Mode cuisson
Température du four
Voyant verrouillage
Bouton de contrôle
Cooking Mode
Temperature
Start
Tableau 2: Panneau de contrôles du four
Pendule - indique l'heure du jour en format 12 ou 24 h.
Indique aussi la minuterie et les durées associées avec les
modes nettoyage et cuisson différés. Tourner le bouton
pour alterner entre la minuterie et la pendule. Presser
heure et tourner le bouton de contrôle pour changer
l'heure du jour ou la minuterie.
Mode cuisson - presser la touche pour afficher le mode
cuisson.
Icone mode de cuisson - indique les éléments de cuisson actifs pour le mode choisi. L'icone affiche un ventilateur si ce le ventilateur à convection est utilisé pour le
mode choisi.
Bouton de contrôle - utiliser pour régler la pendule, minuterie, sélection du mode de cuisson et température.
Tourner dans le sens horaire pour augmenter et contre
horaire pour diminuer.
Éclairage - presser pour mettre l'éclairage du four en ou
hors circuit.
Voyant verrouillage de porte - l'icone figure pendant le
mode autonettoyage lorsque la porte est verrouillée. NE
Pas tenter d'ouvrir la porte tant que le symbole de verrouillage figure.
Figure 8: Panneau de contrôles du four
Arrêt - presser pour mettre le four et/ou le tiroir réchaud
hors circuit.
Température de four - indique la température du four.
Température de préchauffage - indique la température
pendant le mode préchauffage.
Voyant de sonde (certains modèles) - indique que la
sonde est bien insérée dans la prise du four.
Marche - presser pour compléter une donnée.
Température - presser pour choisir une température.
Heure - presser pour régler ou changer l'heure du jour ou
la minuterie.
Minuterie - il y a deux minuteries : MINUTERIE 1 et 2.
Chacune compte à rebours en heure et minutes. Avec
moins de 60 minutes, la minuterie affiche les secondes.
Presser heure pour accéder aux minuteries.
Voyant tiroir réchaud - indique que le tiroir réchaud (certains modèles) est en circuit. Affiche aussi son réglage.
Français 10
L'on contrôle le fonctionnement de la cuisinière à l'aide des touches et du cadran
sur le dosseret et les boutons du panneau avant.
Les touches du dosseret, avec le cadran, sont utilisées pour choisir un mode de
cuisson, régler la température du four, régler la(les) minuterie(s) et régler la cuisinière. Pour utiliser la touche, presser le centre avec le plat du doigt. Un bip
retentit indiquant que la sélection est faite. Tourner le cadran sur le dosseret au
réglage désiré et presser marche.
Page 53

Mise en œuvre
Les boutons du panneau avant servent à contrôler le niveau de chaleur des éléments. Pousser et tourner à la température désirée.
Voir les sections : utilisation de la surface de cuisson, celle du four et celle du tiroir
réchaud pour plus de détails.
La pendule
Concernant la pendule • Toujours régler la pendule après l'installation ou une panne de courant. Une
fois le courant rétabli, la pendule indique par défaut 12 : 00.
• L'heure du jour figure en heure et minutes.
• L'heure de la pendule figure à toutes les fonctions du four sauf lorsque la
minuterie fonctionne.
• Le four est préréglé à 12 h avec AM et PM. Pour passer en format 24 h, voir
Sélection de fonctions.
• Si le réglage de la pendule n'est pas complété, le four émet un bip périodiquement pour rappeler de la régler. Presser ARRÊT pour arrêter le bip.
Réglage de la pendule 1. PENDULE s'affiche et les chiffres de l'heure
clignotent. Tourner le bouton pour choisir
l'heure et AM ou PM.
2. Presser heure. PENDULE figure et les chiffres de minutes clignotent.
3. Tourner le bouton. Régler les minutes.
4. Presser heure et la pendule est réglée.
12: 00
AM
CLOCK
Remarque : si le fonctionnement n'est pas complété, le four émet un bip périodiquement pour rappeler de la régler. Presser ARRÊT.
Changer la pendule 1. Presser heure. MINUTERIE 1 clignote à
l'affichage.
2. Tourner le bouton pour choisir PENDULE.
3. Presser heure et les chiffres de l'heure clignotent.
4. Tourner le bouton pour changer les heures.
5. Presser heure de nouveau et les minutes clignotent.
6. Tourner le bouton pour changer les minutes.
7. Presser heure de nouveau et la pendule est réglée.
Remarque : pour annuler la fonction HEURE en réglant la pendule, presser
ARRÊT en tout temps en mode pendule.
Menu sélection de fonctions
Voici la section du menu où l'on peut régler ou changer les caractéristiques
indiquées ci-dessous.
Pour accéder au menu SÉLECTION FONCTIONS
1. Presser et maintenir MODE CUISSON, presser pendant 5 secondes. SÉLECTION FONCTIONS figure.
2. Tourner le bouton lentement à la caractéristique désirée. Il y a un léger délai avant chaque message (ou caractéristique) figurant à l'affichage. Tourner le bouton lentement et attendre environ 1 seconde afin que figure la fonction suivante.
3. Presser MARCHE pour choisir une fonction.
4. Tourner un bouton au réglage désiré et presser MARCHE. Lorsque tous les réglages pour la fonction sont complétés, SÉLECTION FONCTIONS clignote de nouveau.
5. Presser ARRÊT pour quitter le menu.
1
2
Cooking Mode
Temperature
Start
Time
Français 11
Page 54

Mise en œuvre
Changer le volume du bip Le volume du bip peut être changé de BAS (faible) à ÉLEVÉ (fort). Par défaut :
moyen.
1. Accéder au menu SÉLECTION FONCTIONS.
2. Tourner le bouton dans le sens horaire jusqu'à ce que VOLUME figure.
3. Presser marche.
4. Tourner le bouton pour choisir bas, moyen ou élevé.
5. Presser marche.
Changer la gamme de température
Affichage pendule marche ou arrêt
Accès mode démo Le mode démo s'applique à l'utilisation par les magasins seulement.
Changer la langue d'affichage
Le four est préréglé en Fahrenheit, l'on peut alterner entre Fahrenheit et Celsius.
1. Accéder au menu SÉLECTION FONCTIONS.
2. Tourner le bouton dans le sens horaire jusqu'à ce que SELECT TEMP F-C figure.
3. Presser marche.
4. Tourner le bouton pour choisir Fahrenheit (F) ou Celsius (C).
5. Presser marche pour accepter le choix.
L'affichage de la pendule peut être mis hors circuit. Par défaut : marche.
1. Accéder au menu SÉLECTION FONCTIONS.
2. Tourner le bouton dans le sens horaire jusqu'à ce que AFFICHAGE PENDULE figure.
3. Presser marche.
4. Tourner le bouton pour choisir marche ou arrêt.
5. Presser marche pour accepter le choix.
Les langues sont anglais, espagnol et français. Par défaut : anglais. Remarque :
le menu SÉLECTION FONCTIONS figure en anglais seulement, quelle que soit la
langue sélectionnée.
1. Accéder au menu SÉLECTION FONCTIONS.
2. Tourner le bouton dans le sens horaire jusqu'à ce que la langue désirée figure.
3. Presser marche.
4. Tourner le bouton pour choisir une autre langue.
5. Presser marche pour accepter le choix.
Français 12
Verrouillage/déverrouillage du panneau de contrôle du four
Changer le décalage température du four
Le clavier du four peut être verrouillé à des fins de sécurité. Cette fonction peut
être utilisée pour empêcher le changement de fonction du four. Cette fonction NE
VERROUILLE PAS la porte du four.
1. Accéder au menu SÉLECTION FONCTIONS.
2. Tourner le bouton dans le sens horaire jusqu'à ce que VERROUILLAGE TOUCHES figure.
3. Presser marche. TOUCHES VERROUILLÉES figure. L'affichage émet un bip si une touche est pressée pour indiquer qu'elle est verrouillée.
4. Pour déverrouiller, presser mode cuisson et maintenir 5 secondes. L'affichage indique TOUCHE DÉVERROUILLÉE.
5. Lorsque déverrouillé, la pendule figure de nouveau à l'affichage.
Permet de régler la température du four si les aliments sont trop bruns ou trop
pâles.
1. Accéder au menu SÉLECTION FONCTIONS.
2. Tourner le bouton dans le sens horaire jusqu'à ce que DÉCALATE TEMPÉRATURE FOUR figure.
3. Presser marche. 0 °F figure.
Page 55

Mise en œuvre
4. Tourner le bouton à droite pour changer la température à +25 °F et à la
gauche pour diminuer à -25 °F. La température augmenter en tranches de 5
°F.
5. Presser marche pour accepter le choix.
Remise aux réglages en usine
Réglage fonction Sabbat
Utiliser pour remettre les réglages de SÉLECTION DE FONCTIONS aux réglages
en usine d'origine (par défaut)
1. Accéder au menu SÉLECTION FONCTIONS.
2. Tourner le bouton dans le sens horaire jusqu'à ce que REMISE PAR DÉFAUT figure.
3. Presser marche. L'affichage indique REMISE PAR DÉFAUT.
Concernant la fonction Sabbat
Cette fonction s'applique aux croyances religieuses avec les exigences " sans travail " pour le Sabbat.
• Le four cuit pendant 73 heures avant la mise hors circuit automatique.
• En mode Sabbat, l'affichage indique SABBAT et l'icone CUISSON figure. La
pendule est hors circuit et la température n'est pas affichée.
• En mode Sabbat, seule la touche ARRÊT fonctionne. Presser ARRÊT en tout
temps pour mettre fin au mode et mettre le four hors circuit.
• À la fin des 73 heures, le four se met automatiquement hors circuit et
l'affichage indique FIN SABBAT. Presser arrêt pour rétablir l'heure.
• Le tiroir réchaud ne fonctionne pas avec le mode Sabbat à moins que la fonction ne soit activée au four.
• La sonde NE peut PAS être utilisée en mode Sabbat.
Régler le mode Sabbat pour le four seulement
1. S'assurer que le four est hors circuit.
2. Accéder au menu SÉLECTION FONCTIONS.
3. Tourner le bouton dans le sens horaire jusqu'à OPTION SABBAT.
4. Presser MARCHE. CUISSON figure à l'affichage et la température clignote.
5. Tourner le bouton pour régler la température du four.
6. Mettre l'éclairage en circuit, si désiré (presser ÉCLAIRAGE).
Remarque : l'éclairage ne peut être modifié par la suite. Il demeure en ou hors
circuit pendant tout le mode Sabbat.
7. Presser MARCHE. Le four s'active après 5 secondes.
Le four fonctionne pendant 73 heures, puis se met automatiquement hors circuit.
Régler le mode Sabbat pour le tiroir réchaud et le four
Remarque : Le tiroir réchaud ne fonctionne pas avec le mode Sabbat à moins que
la fonction ne soit activée au four.
1. Mettre le tiroir réchaud en circuit au réglage de chaleur désirée. Voir “Mise en circuit du tiroir réchaud” à la page 22.
2. S'assurer que le four est hors circuit.
3. Accéder au menu SÉLECTION FONCTIONS.
4. Tourner le bouton dans le sens horaire jusqu'à OPTION SABBAT.
5. Presser MARCHE. CUISSON figure à l'affichage et la température clignote.
6. Tourner le bouton pour régler la température.
7. Mettre l'éclairage en circuit, si désiré (presser ÉCLAIRAGE).
Remarque : l'éclairage ne peut être modifié par la suite. Il demeure en ou hors circuit pendant tout le mode Sabbat.
Français 13
Page 56

Mise en œuvre
Changer le format heure La pendule peut être réglée en format 12 ou 24 heures. Par défaut : 12 heures.
8. Presser MARCHE. Le four s'active après 5 secondes. Le mode Sabbat est activé pour le tiroir réchaud et le four.
Le four et le tiroir réchaud fonctionnent pendant 73 heures, puis se mettent
automatiquement hors circuit.
Régler le mode Sabbat pour le tiroir réchaud seulement
Le tiroir réchaud ne fonctionne pas avec le mode Sabbat à moins que la fonction
ne soit activée au four. Voir “Régler le mode Sabbat pour le tiroir réchaud et le
four” à la page 13.
1. Accéder au menu SÉLECTION FONCTIONS.
2. Tourner le bouton dans le sens horaire jusqu'à ce que FORMAT HEURE figure.
3. Presser marche.
4. Tourner le bouton pour choisir le format 12 ou 24 heures
5. Presser marche pour accepter le choix.
Mettre la conversion con-
0.0
vection automatique en
ou hors circuit
Cette fonction convertit automatiquement les températures d'emballage ou de
recettes pour une utilisation avec le mode cuisson à convection. Par défaut :
MARCHE.
1. Accéder au menu SÉLECTION FONCTIONS.
2. Tourner le bouton dans le sens horaire jusqu'à ce que CUISSON CONVECTION AUTO figure.
3. Presser marche.
4. Tourner le bouton pour choisir marche ou arrêt
5. Presser marche pour accepter le choix.
Avant d'utiliser l'appareil la première fois
• Enlever tout matériau d'emballage et étiquette du four, ainsi qu'à l'intérieur du
four et du tiroir.
• Pendant que le four est froid, essuyer avec un chiffon propre. Assécher.
• Appliquer le nettoyant à surface en céramique vitrifiée. Frotter avec un chiffon
propre. Voir “Entretien et nettoyage”.
• Il peut y avoir une légère odeur aux premières utilisations. Ceci est normal et
disparaîtra.
• Les résultats de cuisson optimaux dépendent des casseroles appropriées utilisées.
• La surface de cuisson conserve la chaleur et demeure chaude jusqu'à 30
minutes une fois les éléments hors circuit.
• Lire et comprendre toutes les précautions de sécurité et le guide d'utilisation
et d'entretien avant d'actionner l'appareil.
Français 14
Page 57

Fonctionnement - surface de cuisson
Cette section explique comment faire fonctionner la surface de cuisson. Voir
“Tirer pleinement avantage de la surface de cuisson” à la page 23 pour plus de
détails.
Concernant la surface de cuisson
Utiliser la surface de cuisson pour faire bouillir, frire, mijoter et sauter des aliments.
Fonctionnement
ATTENTION
• Les aliments emballés dans du papier aluminium ne doivent pas être
placés directement sur la surface de cuisson. L'aluminium peut fondre et causer des dommages permanents.
• Le plastique, papier et chiffon peuvent fondre ou prendre feu lorsqu'en contact avec la surface chaude ; ne pas les laisser entrer en
contact avec la surface chaude.
• Ne pas laisser les casseroles chauffer à sec ; cela peut endommager
de façon permanente la casserole, l'élément et la surface de cuisson.
Régler le niveau de chaleur du brûleur
Bouton de contrôle d'élément simple
Bouton de contrôle d'élément jumelé
Pour mettre un élément simple en circuit, pousser le bouton de contrôle et le
tourner dans un sens ou l'autre au réglage de chaleur désiré.
Emplacement élément
Figure 9: Bouton de contrôle d'élément simple
Pour mettre le petit élément intérieur en circuit, pousser le bouton de contrôle et le
tourner dans le sens contre horaire. Régler au niveau désiré.
Français 15
Page 58

Fonctionnement - surface de cuisson
Pour mettre les deux éléments intérieur et extérieur en circuit, pousser le bouton
de contrôle et le tourner dans le sens horaire au réglage désiré..
Bouton de contrôle d'élément triple (certains modèles)
Élément intérieur
Emplacement élément
Figure 10: Bouton de contrôle d'élément jumelé
Élément extérieur
Pour mettre le petit élément intérieur en circuit, pousser le bouton de contrôle
jusqu'au symbole (sens contre horaire). Tourner vers la gauche ou la droite
pour le réglage désiré.
Pour mettre les éléments intérieur et central en circuit, pousser et tourner le bou-
ton jusqu'au symbole . Tourner vers la gauche ou la droite pour le réglage
désiré.
Pour mettre l'élément triple en circuit, pousser et tourner le bouton de contrôle
jusqu'au symbole . Tourner vers la gauche ou la droite pour le réglage désiré.
Élément
intérieur
Les 3 éléments
seulement
Contrôle de l'élément pont (certains modèles)
Éléments intérieur et central
Figure 11: Bouton pour élément triple
L'élément pont relie deux éléments simples pour créer une surface oblongue.
Selon le modèle, l'élément pont est actif de concert avec l'élément simple avant
( ) ou l'élément simple arrière ( ).Voir le bouton de contrôle sur l'appareil pour
déterminer la configuration.
Mettre l'élément pont en circuit et le petit élément ensemble
1. 1. Pousser le bouton de contrôle et tourner dans le sens horaire au réglage désiré.
2. Conseil : pour compléter la connexion et créer une plus grande surface de cuisson, mettre l'autre élément simple en circuit.
Pour utiliser l'élément simple sans le pont
1. Tourner le bouton dans le sens contre horaire.
Français 16
Page 59

2. Élément pont avec élément simple arrièreÉlément pont avec élément simple avant.
L'élément pont activé avec
l'élément simple avant
Front Single Element
Bridge Element with
Front Single Element
Element Location
Fonctionnement - four
Cette section explique comment actionner le four. Voir “Tirer pleinement avantage
du four” à la page 24 pour plus de détails.
L'élément pont activé avec
l'élément simple arrière
Élément simple arrière
Élément pont avec
élément simple avant
Figure 12: Bouton d'élément pon
Emplacement élément
Concernant le four
Fonctionnement
Régler le mode cuisson et la température
ATTENTION
Ne pas utiliser de papier aluminium ni de doublure protectrice sur les
pièces de l'appareil, spécialement sur les égouttoirs et le fond du four ;
ceci peut causer un risque de choc électrique ou d'incendie.
Remarque : pour quitter un mode en cours, presser ARRÊT. (En choisissant
ARRÊT sans régler un mode de cuisson, cela met le four hors circuit).
1. Presser MODE CUISSON.
2. CUISSON clignote à l'affichage.
3. Si aucun changement n'est fait en 5 secondes, il y a un bip et un clignotement. Si
cela se produit, presser MARCHE.
4. Pour changer le mode cuisson, tourner le bouton.
5. Presser MARCHE.
6. Le mode choisi figure à l'affichage avec la température par défaut pour ce mode qui clignote.
7. Pour choisir une autre température, tourner le bouton vers la droite ou la
gauche (en tranches de 5°) à la température désirée.
8. Presser MARCHE, sinon le four se met automatiquement en circuit en 5 secondes.
9. L'affichage alterne entre le mode de cuisson et préchauffage.
6: 35
PM
100
380
BAKE
La température de préchauffage figure, commençant à 100 °F. La température
réelle augmente jusqu'à celle choisie, à ce moment le four émet un bip.
Français 17
Page 60

Fonctionnement - four
10. Pour changer la température pendant la cuisson, presser température. Tourner le bouton pour choisir une nouvelle température et presser MARCHE.
11. Une fois la cuisson complétée, presser ARRÊT pour mettre le four hors circuit.
Conversion convection automatique (modèles avec cuisson à convection)
Voyant four chaud Lorsque le four est mis hors circuit, CHAUD figure à l'affichage à la place du mode
En mode cuisson à convection, la température est automatiquement réduite de 25
°F de celle indiquée sur les emballages et les recettes. Simplement entrer la
température indiquée au moment de régler le mode et l'appareil calcule la
température appropriée.
Cette fonction peut être mise hors circuit pour permettre le changement manuel.
Voir “Conversion convection automatique (modèles avec cuisson à convection)” à
la page 18 pour plus de détails.
Lorsque cette fonction est activée, l'affichage indique CUISSON CONV. AUTO ;
désactivée, CUISSON CONV. figure.
de cuisson pour indiquer que le four est hors circuit, mais toujours chaud. Lorsque
la température descend en dessous de 176 °F, CHAUD disparaît.
Utilisation de la minuterie Remarques :
• Si l'on n'a pas terminé de régler la minuterie, le four émet périodiquement un
bip comme rappel de la régler. Presser ARRÊT pour quitter le mode minuterie. (En choisissant ARRÊT sans régler la minuterie met le four hors circuit.)
• Tourner le bouton pour afficher l'heure du jour ou d'autres informations concernant le mode lorsque les minuteries sont utilisées.
Pour régler la minuterie :
1. Presser MINUTERIE et MINUTERIE 1 clignote.
0: 00
TIMER 1
Tourner dans le sens contre horaire et MINUTERIE 2 figure. Choisir MINUTERIE 1 ou 2, puis
presser HEURE. RÉGLER MINUTERIE 1 (2) figure à l'affichage ; les minutes clignotent..
1 : 00
HR:MIN
Set TIMER 2
2. Tourner le bouton pour régler les minutes. Si seules les minutes sont réglées, presser MARCHE. Autrement, passer à l'étape 4.
3. 3. Presser HEURE de nouveau et les heures clignotent.
4. 4. Tourner le bouton pour régler les heures.
5. 5. Presser HEURE. La MINUTERIE est réglée.
6. 6. Si HEURE ou MARCHE n'est pas pressée, le four émet un bip et la minuterie clignote.
Changer les minuteries 1. .Presser MINUTERIE et MINUTERIE 1 cli-
gnote. Choisir MINUTERIE 1 ou 2.
2. Presser HEURE. REMISE MINUTERIE 1 (2) figure. Les minutes clignotent.
3. Tourner le bouton dans le sens horaire ou contre horaire pour changer les minutes.
4. Presser HEURE de nouveau et l'heure clignote.
5. Tourner le bouton dans le sens horaire ou contre horaire pour changer les heures.
6. Presser HEURE et l'heure est réglée.
Effacer les minuteries 1. Presser HEURE une fois. MINUTERIE 1 clignote.
Français 18
2: 02
HR:MIN
0: 00
Pm
Set TIMER 2
AM
TIMER 1
Page 61

Fonctionnement - four
2. Tourner le bouton pour choisir EFFACER MINUTERIE 1 (2). Presser HEURE.
3. Si la touche heure n'est pas pressée, le four émet un bip et l'affichage clignote.
4. 4. Presser HEURE pour revenir à l'écran principal.
Annulation Si la fonction n'est pas complétée, le four émet périodiquement un bip comme
rappel de régler l'heure. Presser ARRÊT pour quitter le mode minuterie. En
choisissant ARRÊT sans régler la minuterie met le four hors circuit.
Utilisation de la cuisson minutée ou différée
Régler un mode minuté 1. Presser MODE CUISSON
Cette fonction règle le four à un mode de cuisson pendant une durée déterminée,
puis le met hors circuit. Cette fonction est disponible pour chacun des modes de
cuisson : cuisson, cuisson à convection et rôtissage à convection.
• S'assurer que l'heure du jour est correcte avant de commencer, voir “Changer
la pendule” à la page 11 pour régler la pendule.
• À la fin de la durée de cuisson programmée, le four se met automatiquement
hors circuit.
• La cuisson différée n'est pas recommandée pour les aliments qui doivent
lever (biscuits, gâteaux, pain, soufflés, etc.).
2. CUISSON figure. Pour choisir un mode différent, tourner le bouton.
3. Presser MARCHE.
4. Tourner le bouton pour choisir la température désiré.e
0: 00
CLEAR TIMER 1
Différer la mise en marche du mode minuté
Remarque : la durée requise pour que le four atteigne la température doit être
comprise dans la durée de cuisson réglée.
5. Presser HEURE. CUISSON MINUTÉE figure.
6. Presser HEURE. RÉGLER DURÉE CUISSON figure et les minutes clignotent.
7. Régler les minutes. Presser HEURE.
8. Les heures clignotent. Régler les heures. Presser MARCHE.
9. CUISSON MINUTÉE figure et le four commence à préchauffer.
Une fois la cuisson complétée, l'affichage clignote FIN
CUISSON MINUTÉE et le bip retentit. Presser
ARRÊT pour effacer.
1. Suivre les étapes 1 à 5 ci-dessus.
2. Tourner le bouton jusqu'à CUISSON DIFFÉRÉE..
3. Presser heure. RÉGLER DURÉE CUISSON figure et les minutes clignotent.
4. Régler les minutes et presser HEURE. Les heures clignotent.
5. Régler les heures, presser HEURE. RÉGLER FIN CUISSON figure.
6. Presser HEURE.
7. Utiliser le bouton pour entrer l'heure du jour où le four doit arrêter la cuisson ou se mettre hors circuit.
8. Régler les heures, presser HEURE.
9. Régler les minutes et presser HEURE.
1: 20
HR:MIN
5: 00
HR:MIN
PM
350°
F
TIMED BAKE
o
400
DELAYED BAKE
F
Remarque : la pendule calcule automatiquement l'heure du jour où le mode cuisson commence et s'arrête. L'affichage de la durée de cuisson compte à rebours
en minutes.
10. À la fin de la durée de cuisson programmée, le four se met automatiquement
hors circuit. L'affichage indique FIN CUISSON MINUTÉE et un bip retentit.
Presser ARRÊT pour effacer.
Remarque : retirer immédiatement les aliments du four lorsque le cycle est terminé pour empêcher la surcuisson. Les aliments continuent à cuire même lorsque
le cycle est complété.
Français 19
Page 62

Fonctionnement - four
Pour vérifier la durée de cuisson et arrêter la durée après que le différé est réglé
Régler la fonction Sabbat Voir “Régler la fonction Sabbat” à la page 20.
Utilisation de la sonde (certains modèles)
Réglage de la sonde 1. Préparer la viande et la placer dans la rôtissoire (ou sur un grille dans la rôtis-
1. Presser heure
2. Tourner le bouton à FIN CUISSON ou DURÉE CUISSON
3. Presser heure.
Cette section traite du fonctionnement de la sonde, voir « La sonde (certains
modèles) » à la page 2 pour des conseils et des suggestions.
La sonde peut être utilisée pour déterminer la cuisson interne ou la température
finale de plusieurs aliments dont la viande et la volaille.
La gamme de températures pour la sonde est 135 °F à 200 °F (57 °C à 93 °C). La
température du four peut être réglée de 100 °F à 450 °F (38 °C à 232 °C).
soire selon la recette). Insérer la sonde dans la viande en s’assurant qu’elle
ne touche pas au gras, os, grille ou rôtissoire. Voir « Insérer la sonde », page
2 pour plus de détails.
Remarque : ne pas brancher la sonde sur la prise tant que la pointe n’est pas
insérée dans la viande.
2. Placer la rôtissoire avec la viande dans un four froid sur la grille recommandée. Brancher la sonde sur la prise. Le symbole de sonde figure à
l’affichage.
Changer la température du four avec utilisation de la sonde
Remarque : la température de la sonde peut être réglée seulement lorsque la
sonde est branchée.
3. Presser MODE CUISSON et choisir CUISSON, CUISSON À CONVECTION ou RÔTISSAGE À CONVECTION.
4. Presser MARCHE. La température par défaut s’affiche.
5. Tourner le bouton pour changer la température du four, au besoin.
6. Presser MARCHE.
7. Tourner le bouton pour régler la température de la sonde (température finale désirée de l’aliment).
8. Presser MARCHE.
La température de four choisie figure dans le coin supérieur droit de l’affichage.
La température de la sonde figure au centre à la gauche du mode cuisson. Elle
commence à 80° et augmente en tranches de 5 °F jusqu’à ce que la température
de sonde choisie est atteinte.
Le four est préchauffé lorsque le signal sonore retentit une fois.
Lorsque la température de sonde réglée est atteinte. FIN figure à l’affichage et le
four se met hors circuit.
1. Presser TEMPÉRATURE. La température du four clignote à l’affichage.
2. Tourner le bouton à la température désirée et presser MARCHE deux fois.
Changer la température de la sonde 1. Presser TEMPÉRATURE. La température du four clignote à l’affichage.
2. Presser marche et TEMP. SONDE clignote.
3. Tourner le bouton à la température désirée et presser MARCHE de nouveau.
Remarque : toujours enlever la sonde du four lorsque la cuisson est complétée.
Le symbole de sonde demeure à l’affichage jusqu’à ce que la sonde soit enlevée.
Français 20
Page 63

Ne pas laisser la sonde dans le four pendant l’autonettoyage. Le four ne
s’autonettoie pas si la sonde est branchée.
Fonctionnement - tiroir réchaud (certains
modèles)
Cette section explique le fonctionnement du tiroir réchaud. Voir “Tirer pleinement
avantage du tiroir réchaud” à la page 31 pour plus de détails.
Concernant le tiroir réchaud
Le tiroir réchaud garde chaud les aliments cuits chauds à une température de service. Les réglages sont bas, moyen et élevé.
Données techniques du tiroir réchaud
Pièces :
1. Intérieur en acier inoxydable
2. Joint
3. Verrouillage de guide
1
2
3
Fonctionnement
Figure 13: Pièces du tiroir réchaud
Intérieur : 25 x 17 x 5 po (L x P x H)
Format plat :
• 2 plats de 3 pintes en Pyrex 9 x 13 po, côte à côte
• 2 plats de 4 pintes Pyrex 9 ½ x 15 po, côte à côte
• 4 plats 10 ½ po, simples ou empilés
• 3 assiettes 11 po, simples ou empilées
Réglages du tiroir réchaud : il y a trois réglages : bas,
moyen et élevé. Les icones à l'affichage indiquent le réglage
correspondant.
Figure 14: Réglages du tiroir réchaud
ATTENTION
Pour maintenir la sécurité des aliments, observer ce qui suit :
• NE PAS utiliser le tiroir réchaud pour chauffer des aliments froids
(sauf s'ils sont sécuritaires dans le tiroir comme des craquelins,
croustilles ou céréales sèches et des assiettes).
Bas
Moyen
Élevé
Français 21
Page 64

Fonctionnement - tiroir réchaud (certains modèles)
• S'assurer de maintenir une température appropriée. La USDA
recommande de maintenir les aliments à une température de 140
°F.
• NE PAS réchauffer des aliments plus d'une heure.
• Contenants en plastique, pellicule plastique ou aluminium peuvent fondre en contact direct avec le tiroir ou un contenant chaud.
Ils peuvent fondre et être impossible à enlever.
Préchauffer Pour de meilleurs résultats, préchauffer le tiroir réchaud lorsque les aliments sont
chauds.
Durées de préchauffage : • Bas : 10 minutes
• Moyen : 15 minutes
• Élevé : 20 minutes
Mise en circuit du tiroir réchaud
Tiroir réchaud seulement 1. Presser MODE CUISSON.
2. Tourner le bouton pour choisir TIROIR RÉCHAUD.
3. Presser MARCHE.
4. Tourner le bouton pour le réglage de chaleur.
5. Presser MARCHE.
Avec le four 1. Presser MODE CUISSON.
2. Presser MARCHE pour choisir TIROIR RÉCHAUD.
3. Tourner le bouton pour le réglage de chaleur.
4. Presser MARCHE.
Régler le mode Sabbat Remarque : le tiroir réchaud ne fonctionne pas avec le mode Sabbat à moins que
la fonction ne soit activée avec le four. Voir “Régler le mode Sabbat pour le tiroir
réchaud et le four” à la page 13.
1. Mettre le tiroir réchaud au niveau de chaleur désirée.
2. Actionner le mode Sabbat. Voir “Régler le mode Sabbat” à la page 22.
Mise hors circuit du tiroir réchaud
Tiroir réchaud seulement 1. Presser ARRÊT.
Tiroir réchaud et four 1. Presser ARRÊT
2. Tourner le bouton pour choisir ANNULATION TIROIR, ANNULATION FOUR ou ANNULATION LES DEUX.
3. Presser ARRÊT.
Pour rendre croustillant • Placer les aliments dans un plat peu profond.
• Préchauffer à bas.
• Vérifier après 45 minutes. Ajouter du temps au besoin.
Réchauffer des bols ou assiettes vides
• Utiliser des plats/assiettes résistants à la chaleur.
• Réchauffer au réglage approprié pour le plat.
• Vérifier la température pendant la période de réchauffement.
• Placer les plats/assiettes vides dans un tiroir froid. Ne pas préchauffer.
Français 22
Page 65

Tirer pleinement avantage de l'appareil
Tirer pleinement avantage de la surface de cuisson
Guide de cuisson pour la surface de cuisson
Bouillir l'eau La durée pour faire bouillir dépend des conditions environnantes. Essayer ce qui
Réglages recommandés Utiliser ce tableau comme guide pour les réglages de chaleur. Une gamme de
suit pour diminuer la durée
• Utiliser un couvercle,
• Utiliser un plat de format approprié pour la quantité d'eau et l'élément.
• Choisir un plat à fond plat (voir “Guide de sélection de casserole” à la page 24
pour plus de détails).
• Choisir un contenant de poids moyen plutôt que lourd.
• S'assurer que la casserole est positionnée de façon à ce que la base entre en
contact avec l'élément.
• Commencer avec de l'eau déjà chaude.
• Faire bouillir la plus petite quantité nécessaire, ce qui boue plus rapidement.
réglages est donnée car les réglages réels dépendent :
• Du type et de la qualité des casseroles (voir “Guide de sélection de casserole”).
• Du type, qualité et température des aliments.
• De l'élément utilisé
• Des préférences du cuisinier.
Les réglages de chaleur recommandés sont en fonction d'une source d'alimentation de 240 volts. Si l'appareil est branché sur le 208 volts, les mêmes réglages
s'appliquent mais les aliments peuvent prendre plus de temps à cuire.
Tableau 3: Guide de cuisson
Conseils pour l'élément pont (certains modèles)
Utilisation Réglage de chaleur
Amener l'eau à ébullition 9 - élevé
Frire, sauter, brunir, grande friture 6-8 - moyen-élevé
Frire des oeufs, crêpes, bouillir lentement 4-5 - moyen
Mijoter, terminer la cuisson, aliments couverts, à la vapeur 2-3 - moyen-bas
Fondre le beurre et le chocolat 1 - bas
• Utiliser l'élément pont avec un seul élément simple pour les grilles de format
moyen et les rôtissoires.
• Pour une distribution uniforme de la chaleur en cuisant avec les trois éléments, commencer par l'élément arrière à un réglage légèrement plus élevé
que ceux avant et pont. Observer le rendement de cuisson et régler au
besoin.
• Avec une casserole qui couvre les trois éléments, régler celui à l'arrière à un
niveau de chaleur différent que ceux avant et pont pour garder les aliments
préparés chauds ou deux aliments différents à la fois.
Français 23
Page 66

Tirer pleinement avantage de l'appareil
Guide de sélection de casserole
Caractéristiques Le choix des casseroles peut modifier la vitesse et l'uniformité de la cuisson. Pour
de meilleurs résultats, choisir des casseroles à fond plat. Lorsqu'une casserole
est chaude, la base (fond) doit reposer uniformément sur la surface sans ballotter.
Choisir des modèles à fond plat, de poids moyen à lourd.
Pour vérifier le plat des casseroles Mettre la casserole à l'envers sur le plan de travail et
placer une règle contre le fond. Le bord de la règle et le
fond doivent être un contre l'autre.
Une autre façon de déterminer la distribution de
chaleur uniforme est de mettre environ 1 po (25,4
mm) d'eau dans la casserole. Amener l'eau à ébullition et observer l'emplacement des bulles lorsque
l'eau boue. La distribution sera uniforme si la casserole a un fond plat.
Diamètres correspondants - la base de la casserole doit couvrir ou correspondre au diamètre de
l'élément utilisé. Elle peut dépasser d'environ 1 po (25,4 mm) autour.
Couvercles hermétiques - ils réduisent la durée de cuisson en conservant la
chaleur dans la casserole.
Conseils pour casseroles • L'utilisation de casseroles à fond rond (concave ou convexe) voilé ou brisé
doit être évitée. Voir les desseins ci-dessus.
• S'assurer que le fond de la casserole utilisée est propre et sec.
• Ne pas faire glisser les casseroles de métal sur la surface de cuisson.
• Elles peuvent laisser des marques qu'il faut enlever immédiatement. Voir la
section sur l'entretien et le nettoyage.
• Ne pas utiliser des casseroles en verre ; elles égratignent la surface.
Casseroles spécialisées Principalement grilles, rôtissoires, woks, cuiseurs, bain-marie, etc. doivent avoir
les mêmes caractéristiques que celles décrites ci-dessus. Utiliser seulement des
woks à fond plat. Ne jamais utiliser d'anneau support sur la surface de cuisson.
Tirer pleinement avantage du four
Guide de cuisson avec le four
Position de grilles
6
5
4
3
2
1
• POSITION 6 - (plus élevée) - pour fondre le fromage, griller des aliments
minces
• POSITION 5 - griller la plupart des viandes, griller le pain
• POSITION 4 - griller des viandes épaisses
• POSITION 3 - pour la plupart des cuissons sur une grille, comme sur une
tôle à biscuits, gâteaux, aliments surgelés, muffins, etc.
• POSITION 2 - utiliser pour les tartes, casseroles, pains, petits rôtis ou volaille
• POSITION 1 - (plus basse) - utiliser pour gâteau des anges, gros rôtis,
dinde.
Figure 15: Position de grilles
Cuisson sur plusieurs grilles Pour cuisiner avec plusieurs grilles, suivre les recommandations ci-dessous.
Français 24
Page 67

Tirer pleinement avantage de l'appareil
• Deux grilles : utiliser les positions 2 et 5
• Trois grilles : (cuisson à convection). Utiliser les positions 1,3 et 6. La posi-
tion 3 peut être la grille rallonge, si désiré.
Emplacement des plats Les résultats de cuisson sont mieux si les plats sont placés au centre du four. Si
l'on cuisine sur plus d'une grille, laisser au moins 1 à 1 ½ po d'espace autour des
moules. Pour un gâteau à 4 étages en même temps, placer les moules sur deux
grilles en quinconce. Voir le graphique ci-dessous.
Emplacement sur
une grille
Emplacement sur
deux grilles
Figure 16: Emplacement des plats
Plats à cuisson Voici quelques conseils pour la cuisson
• Les plats en verre absorbent la chaleur, il faut donc réduire la température de
25 °F avec ces plats.
• Le métal lisse réfléchit la chaleur donnant un brunissage plus pâle et délicat.
• Les plats foncés, rugueux ou mat absorbent la chaleur donnant un brunissage
plus foncé et des croûtes plus croustillantes. Certains fabricants recommandent de réduire la température de 25 °F. Suivre leurs recommandations.
• Utiliser des plats en verre ou en métal foncé pour les tartes.
• Les plats isolés peuvent augmenter la durée de cuisson recommandée.
Préchauffer le four Préchauffer le four tel qu'il est recommandé dans la recette. Le préchauffage est
nécessaire pour les gâteaux, biscuits, pâtisserie et pain. Augmenter la température ne réduit pas la durée de préchauffage. Placer les grilles en position appropriée avant de préchauffer. Un bip confirme que le four a préchauffé et la
température choisie figure à l'affichage.
Remarque : le préchauffage du four n’est pas recommandé en utilisant la sonde
(certains modèles). Un four chaud nuira à brancher correctement la sonde sur la
prise et à l’insérer dans la viande
La sonde (certains modèles) • Le four est bien isolé et conserve la chaleur pour poursuivre la cuisson une
fois le four hors circuit. Pour cette raison, retirer la viande du four dès que le
signal sonore retentit.
• Puisque la viande continue à cuire une fois retirée du four, régler la température (sonde) interne de 5 à 10 degrés sous la température interne finale
désirée (sauf la volaille). Laisser reposer de 10 à 20 minutes avant de
dépecer la viande.
• Toujours utiliser la poignée de la sonde pour l’insérer ou l’enlever. Utiliser un
tire-plat pour enlever la sonde puisqu’elle devient chaude.
• Retirer la sonde du four lorsqu’elle n’est pas utilisée
• La sonde ne peut être utilisée avec de la viande surgelée. Pour de meilleurs
résultats, décongeler complètement la viande avant d’utiliser la sonde.
Insérer la sonde
• Pour la viande, insérer la pointe de la sonde dans la partie épaisse sans
toucher à un os, gras ou cartilage.
• Pour la volaille et la dinde, insérer la sonde dans la partie épaisse de
l’intérieur de la cuisse.
• Pour les autres aliments, tels pains de viande, placer la pointe dans le centre
de la partie épaisse.
Français 25
Page 68

Tirer pleinement avantage de l'appareil
Modes de cuisson du four
Cuisson, levage, réchaud
La cuisson est cuire avec de l'air chaud et sec. Les
éléments supérieur et inférieur effectuent un cycle
pour maintenir la température. Utiliser pour des aliments préparés comme pâtisseries et casseroles et
rôtir les viandes.
Remarque : selon le modèle, l'on peut entendre le
ventilateur à convection pendant que le four
préchauffe en mode cuisson. Ceci est normal.
• Le levage est pour lever les pâtes.
• La température du levage est de 85 à 110 °F. Par défaut : 100 °F.
• Couvrir de façon lâche le bol ou le plat et utiliser une grille accommodant le
format du contenant.
• Laisser la porte fermer et utiliser l'éclairage du four pour vérifier si la pâte
lève.
En mode réchaud, les éléments supérieur et inférieur maintiennent une basse
température dans la cavité afin de garder les aliments à une température de service.
• Utiliser le réchaud pour garder les aliments chauds jusqu'au service.
• La température est de 140 à 220 °F. Par défaut : 170 °F.
• Les aliments qui doivent être humides doivent être couverts avec un couvercle ou du papier aluminium.
Cuisson à convection
ATTENTION
En utilisant le mode réchaud, observer ce qui suit :
• Ne pas utiliser le mode réchaud pour chauffer des
aliments froids
• S'assurer de maintenir la température appropriée
pour les aliments. La USDA recommande de
garder les aliments chauds à 140 °F.
• NE PAS réchauffer les aliments plus d'une heure.
La cuisson à convection est semblable à la cuisson.
La chaleur provient de l'élément chauffant inférieur et
du troisième situé derrière la paroi arrière. La principale différence est que l'air chaud circule dans la cavité par le ventilateur à convection.
Ce mode est idéal pour cuisiner de grandes quantités
d'aliments sur plusieurs grilles. Cuire biscuits, tartes,
petits gâteaux, pâtisseries, etc. Avantages :
• Diminue légèrement la durée de cuisson
• Cuisson sur trois grilles (brunissage plus uniforme)
• Volume plus élevé (aliments à levure levant plus)
• Cuisson de plusieurs aliments à la fois
Pour de meilleurs résultats :
• Réduire la température de 25 °F. Voir “Tableau de cuisson à convection”
• Placer les aliments dans un plat peu profond, non couvert comme une tôle à
biscuits
• Centrer les plats d'un côté à l'autre sur la grille.
Conversion convection automatique En mode cuisson à convection, la température est automatiquement réduite de 25
°F de l'emballage ou de la recette. Simplement entrer celle indiquée sur l'emballage ou dans la recette et l'appareil calcule la température appropriée.
Français 26
Page 69

Cette fonction peut être mise hors circuit pour régler manuellement la température. Voir “Conversion convection automatique (modèles avec cuisson à convection)” à la page 18 pour plus de détails.
Lorsque cette fonction est activée, l'affichage indique CUISSON CONV. AUTO ;
désactivée, CUISSON CONV. figure..
Tableau 4: Tableau de cuisson à convection
Tirer pleinement avantage de l'appareil
Aliments Articles
Gâteaux Petits gâteaux
Gâteaux Bundt
Des anges
Tartes 2 croûtes, fraîche, 9 po
2 croûtes, fruits surgelés, 9
po
Biscuits Sucre
Brisures de chocolat
Brownie
Pains À la levure, pain, 9 x 5
Petits pains à la levure
Pain rapide, 8 x 4
Biscuits
Muffins
Pizza Surgelée
Fraîche
Position
grille
3
2
1
2
2
3
3
3
2
3
2
3
3
3
3
Temp. (oF)
(four préchauffé)
350
350
350
375-425
375
350-375
350-375
350
375
375-400
350-375
375-400
400
400-450
400-425
a
Durée cuisson à
convection (min.)
17-19
37-43
35-39
45-55
68-78
6-11
8-13
29-36
18-22
12-15
45-55
11-15
15-19
23-26
12-15
a. La température doit être réduite manuellement de 25 °F si la conversion convection automa-
tique est désactivée.
b. Ce tableau est un guide. Les durées réelles dépendent des mélanges ou des recettes. Suivre la
recette ou les directives sur l'emballage.
b
Gril
Utilise une chaleur intense radiée de l'élément
supérieur. Idéal pour cuire de minces coupes de
viande (1 po ou moins), volaille et poisson. Utiliser
aussi pour brunir le pain et les casseroles. Toujours
fermer la porte. .
Avantages :
• Cuisson rapide et efficace
• Cuisson sans ajout de gras ou de liquides
• Brunissage pendant la cuisson
Pour de meilleurs résultats :
• Préchauffer le four 3 à 4 minutes. Ne pas préchauffer plus de 5 minutes.
• Steaks et côtelettes doivent avoir au moins ¾ po d'épaisseur.
• Badigeonner poisson et volaille avec du beurre ou de l'huile pour empêcher
de coller
• Utiliser la lèchefrite comprise avec la cuisinière
• Ne pas couvrir la grille à gril avec de l'aluminium. Elle est conçue pour drainer
le gras et le jus de la surface de cuisson afin d'empêcher la fumée et les
éclaboussures.
• Tourner la viande à mi cuisson selon les recommandations (voir le tableau de
gril)
• Pour brunir des casseroles, utiliser seulement des plats en métal ou en
céramique vitrifiée comme Corningware®
Français 27
Page 70

Tirer pleinement avantage de l'appareil
Tableau 5: Gril
• Ne jamais utiliser du verre à l'épreuve de la chaleur (Pyrex®), il ne tolère pas
les températures élevées.
Aliments Article / épaisseur
Boeuf Steak (3/4”-1po)
Médium saignant
Médium
Bien cuit
Galettes (3/4 à 1po) - bien cuites
Volaille Poitrine (avec os) 4 Bas 170 21-23 18-20
Porc Côtelettes 1 po
Saucisses - fraîches
Tranches jambon ½ po
Fruits de
mer
Agneau Côtelettes 1 po
Pain Tranches de pain à l'ail 1 po 5 Élevé N/A 2-4 Ne pas tourner
Filets de poisson ¾ à 1 po, beurrés
Médium saigant
Médium
Bien cuit
Position
gril
5
5
5
4
4
3
5
5 Bas Cuire jusqu'à
5
5
5
Réglage
Gril
Élevé
Élevé
Élevé
Élevé
Élevé
Élevé
Élevé
Élevé
Élevé
Élevé
Temp. interne
(oF)
145
160
170
160
160
160
160
opacité et en
flocons
145
160
170
Durée côté 1
5-7
6-8
7-9
7-9
6-8
5-7
2-4
9-11 Ne pas tourner
4-6
5-7
6-8
(min.)
a
Durée côté 2
4-6
5-7
6-8
8-10
4-6
4-6
2-3
2-4
4-6
5-7
(min.)
a
a. Les durées de gril sont approximatives et peuvent varier légèrement. Elles sont en fonction d'une cuisson
avec élément gril préchauffé.
Gril à convection (certains modèles
Est semblable au gril. Combine la chaleur intense de
l'élément supérieur avec la chaleur circulée par le ventilateur à convection. Ce mode est idéal pour cuire des
coupes de viande épaisses et tendres, volaille et poisson. Non recommandé pour brunir le pain, casseroles
et autres aliments.
Toujours fermer la porte. En plus des avantages du gril
standard, le gril à convection est plus rapide.
Remarque : le seul réglage de chaleur en mode gril à convection est élevé.
Pour de meilleurs résultats :
• Préchauffer le four 3 à 4 minutes et pas plus de 5 minutes.
• La viande doit avoir au moins 1 ½ po d'épaisseur
• Tourner la viande à mi chemin du temps de cuisson (voir le tableau de gril à
convection).
• Utiliser la lèchefrite comprise avec la cuisinière.
• Ne pas couvrir la grille à gril avec de l'aluminium. Elle est conçue pour drainer
le gras et le jus de la surface de cuisson afin d'empêcher la fumée et les
éclaboussures.
Français 28
Page 71

Tableau 6: gril à convection
Tirer pleinement avantage de l'appareil
• Saler après la cuisson
Aliments Article / épaisseur
Boeuf Steak ¾ à 1 po
Médium saignant
Médium
Bien cuit
Galettes ¾ à 1 po, bien cuites
Volaille Quartiers de poulet
Porc Côtelettes 1 ¼ po ou plus
Saucisses - fraîches
Position
gril
3
3
3
4
4 Élevé 180 - cuisses
4
4
Réglage
Gril
Élevé
Élevé
Élevé
Élevé
Élevé
Élevé
Temp. interne
(oF)
145
160
170
160
170 - poitrines
160
160
Durée côté 1
11-13
13-15
15-17
11-13
14-16 12-14
7-9
5-7
(min.)
a
Durée côté 2
9-11
11-13
13-15
8-10
6-8
3-5
a. Les durées de gril à convection sont approximatives et peuvent varier légèrement. Elles sont en fonction
d'une cuisson avec élément gril préchauffé.
Le rôtissage à convection utilise les éléments
Rôtissage à convection
supérieur et inférieur ainsi que l'air circulé par le ventilateur à convection. Idéal pour les coupes tendres
préparées de viande et volaille.
Avantages
• Près de 25 % plus rapide que le rôtissage/cuisson standard
• Brunissage riche et doré
(min.)
a
Tableau 7: Convection Roast Chart
Viande Article
Boeuf Côte de boeuf
Faux filet (sans os)
Surlonge, point (sans os)
Filet, rôti
Porc Filet (avec ou sans os)
Épaule
Pour de meilleurs résultats :
• Utiliser la même température que celle indiquée dans la recette
• Vérifier la cuisson plus tôt car la durée de rôtissage peut être diminuée de 25
%. Voir le tableau de rôtissage à convection.
• Ne pas couvrir la viande ni utiliser des sacs à cuisson.
• Utiliser la lèchefrite fournie avec la cuisinière.
• Un plat peu profond non couvert peut aussi être utilisé.
• Si la viande est brunie à son goût, mais non encore cuite, de petites bandes
d'aluminium peuvent être placées sur la viande pour éviter de trop brunir.
• Laisser la viande reposer couverte d'aluminium pendant 10 à 15 minutes une
fois retirée du four.
Poids
(lb.)
4-6
4-63
3-6
2-3
5-8
3-6
Temp. du
four* (oF)
325
325
325
425
350
350
Durée rôtissage*
(min par lb)
25-32
28-32
24-32
27-32
25-30
28-32
15-25
15-25
20-30
Temp. interne
(oF)
145 (méd./saignant)
160 (médium)
145 (méd./saignant)
160 (médium)
145 (méd./saignant)
160 (médium)
145 (méd./saignant)
160
160
Français 29
Page 72

Tirer pleinement avantage de l'appareil
Tableau 7: Convection Roast Chart
Viande Article
Volaille Poulet entier
Dinde - non farcie**
Dinde - non farcie**
Dinde - non farcie**
Poitrine dinde
Poulet de Cornouaille
Agneau Demi gigot
Gigot entier
Déshydratation (certains modèles)
Poids
(lb.)
3-4
12-15
16-20
21-25
3-8
1-1 1/2
3-4
6-8
Temp. du
four* (oF)
375
325
325
325
325
350
325
325
Durée rôtissage*
(min par lb)
14-20
10-14
9-13
6-10
20-25
45-75 (Durée totale)
30-35
25-30
25-30
30-35
Temp. interne
(oF)
180
180
180
180
170
180
160 (médium)
170 (bien cuit)
160 (médium)
170 (bien cuit)
* Les durées de rôtissage sont approximatives et varient selon la forme de la
viande.
** La dinde farcie requiert une durée additionnelle de rôtissage. La température
minimale sécuritaire pour la farce dans la volaille est de 165 °F.
Ce mode permet de sécher avec la chaleur du
troisième élément situé derrière la paroi arrière. La
chaleur est circulée dans la cavité par le ventilateur à
convection. Utiliser pour sécher et/ou préparer des aliments tels fruits, légumes et fines herbes. Ce mode
maintient une température basse optimale (100 à 160
°F) tout en faisant circuler l'air lentement pour enlever
l'humidité. Le four reste en circuit pendant 48 heures
avant la mise hors circuit automatique.
.
Pour de meilleurs résultats :
• Sécher la plupart des fruits et légumes à 140 °F ; les fines herbes à 100 °F
(voir le tableau de déshydratation).
• Les durées de séchage varient selon l'humidité et le sucre contenus dans les
aliments, le format et la quantité ainsi que l'humidité dans l'air. Vérifier au minimum de la durée de séchage.
• Les grilles multiples (non comprises) peuvent être utilisées simultanément.
Communiquer avec le marchand pour commander des grilles de séchage.
• Traiter les fruits avec un antioxydant pour éviter la décoloration.
• Consulter les livres sur la conservation des aliments, la bibliothèque pour plus
de détails.
Français 30
Page 73

Tableau 8: Déshydratation
Aliment Article Préparation
Tirer pleinement avantage de l'appareil
Durée séchage
approx.*
(heures)
Vérifier la cuisson
Fruit Pommes
Banane
Cerises
Pelures/tranches
d’oranges
Anneau ananas
Fraises
Légumes Poivrons
Champignons
To ma t es
Fines
Herbes
Origan, sauge,
persil, thym,
fenouil
Basilic
Mettre dans ¼ tasse de jus de citron et 2 t.
d'eau, tranches ¼ po
Mettre dans ¼ tasse de jus de citron et 2 t.
d'eau, tranches ¼ po
Laver, assécher. Cerises fraîches, enlever le
noyau
Tranches ¼ po ; pelure finement pelée
Sécher à la serviette
Laver et assécher. Tranches ½ po, pelure
(extérieure) sur la grille
Laver et assécher. Enlever la membrane,
couper en morceaux de 1 po
Laver et assécher. Couper la queue.
Tranches 1/8 po
Laver et assécher. Tranches de 1/8 po, bien
drainer
Rincer et assécher avec un essuie-tout
Utiliser les feuilles à 3 ou 4 po du haut de la
tige. Vaporiser d'eau, secouer et assécher
11- 15
10-15
10-15
Pelures: 2-4
Tranches: 12-16
En boîte: 9-13
Frais: 8-12
12-17
16-20
7-12
16-23
Sécher à 100 °F
pendant 3 à 5
heures
Sécher à 100 °F
pendant 3 à 5
heures
Légèrement pliables
Souples, pliables
Pliables, croquables
Pelure : sèche, cassantes
Tranches : sèche, cassantes, fruit légèrement
humide
Souples, pliables
Sèches, cassantes
Souples sans humidité à
l'intérieur
Secs, pas trop souples
Sèches, couleur rouge
brique
Croustillants et cassants
Croustillants et cassants
Tirer pleinement avantage du tiroir réchaud
Conseils généraux Voir le tableau pour le tiroir réchaud concernant les réglages recommandés.
• Pour garder différents aliments chauds, régler la température pour l'aliment
qui requiert le réglage le plus élevé.
• Placer les aliments nécessitant un réglage élevé vers le côté du tiroir et les
autres au centre.
• Les aliment doivent être à une température de service (supérieure à 140 °F)
avant d'être placés dans le tiroir. NE PAS utiliser pour chauffer des aliments
froids autres que des croustilles, craquelins et céréale sèche ou réchauffer
des assiettes ou plats.
• Préchauffer des assiettes vides pendant que le tiroir réchauffe, si désiré.
• Placer les aliments cuits chauds dans le tiroir dans son contenant de cuisson
ou dans un plat de service.
• L'on peut utiliser de l'aluminium pour couvrir les aliments. Toutefois, NE PAS
doubler le fond du tiroir avec l'aluminium.
• Ne pas utiliser le tiroir à des fins de rangement.
Français 31
Page 74

Tableau 9: Tiroir réchaud
Aliments Témperature
Bacon Élevé Non couvert
Boeuf, médium et bien cuit Moyen Couvert
Boeuf, saignant Moyen Couvert
Pains, petits Moyen Non couvert
Pains, petits, gâteaux à café Moyen Couvert
Biscuits Moyen Couvert
Casseroles Moyen Couvert
Oeufs Moyen Couvert
Poisson, fruits de mer Moyen Couvert
Aliments frits Élevé Non couvert
Sauce, crème Moyen Couvert
Jambon Moyen Couvert
Crêpes Élevé Couvert
Tartes, une croûte Moyen Couvert
Tartes, deux croûtes Moyen Non couvert
Pizza Élevé Couvert
Porc Moyen Couvert
Pommes de terre, cuites Élevé Couvert
Pommes de terre, purée Moyen Couvert
Volaille rôtie Moyen Couvert
Légumes Moyen Couvert
Assiettes Bas Non couvert
Assiettes avec aliments Moyen Couvert
Couvert / non
couvert
Nettoyage et entretien
Entretien et nettoyage
Entretien et nettoyage de la surface de cuisson
Précautions pour une longue durée et une belle apparence
Français 32
• Un entretien quotidien avec le nettoyant pour surface en céramique vitrifiée
• La surface en céramique vitrifiée est un matériau durable et résistant aux
• Ne jamais cuire directement sur le verre.
• Éviter de placer un anneau pour wok ou tout autre support en métal sur la sur-
• Ne pas utiliser la surface en verre comme planche à découper.
• Ne pas faire glisser les casseroles sur la surface ; cela égratigne le verre.
ATTENTION
Ne pas utiliser de nettoyant sur la surface en verre pendant qu'elle est
chaude ; utiliser seulement le grattoir à lame. Il peut en résulter des
émanations nocives pour la santé. Les nettoyants chauffés endommage la surface.
protège la surface et facilite le retrait des aliments et les taches d'eau.
impacts, mais elle n'est pas incassable si l'on échappe une casserole ou un
objet dessus.
face en verre.
Page 75

Nettoyage et entretien
• Ne pas placer de casseroles mouillées sur la surface en verre.
Avant l'entretien L'entretien est aisé lorsque les étapes préventives sont prises. Par exemple,
appliquer une petite quantité de nettoyant à surface en céramique vitrifiée (fournie
avec la cuisinière) quotidiennement. Ceci assure un film protecteur qui facilite le
retrait des taches ou des éclaboussures d'aliments. La température de la surface
de cuisson réduit les qualités protectrices du nettoyant. Il doit être appliqué avant
chaque utilisation. Utiliser un chiffon propre pour appliquer le nettoyant sur la surface afin d'enlever poussière et marques de métal.
Techniques de nettoyage quotidien 1. Nettoyer la surface complètement refroidie avec le nettoyant à surface en
céramique vitrifiée.
Sauf : enlever immédiatement sucre, sirop, produits avec tomate et lait avec le
grattoir à lame (pour le tableau d'entretien à la page suivante).
2. Essuyer les éclaboussures avec un essuie-tout ou une éponge propre et humide. Rincer et assécher. Utiliser du vinaigre blanc pour les taches tenaces ; rincer.
3. Appliquer une petite quantité de nettoyant à surface en céramique vitrifiée. Lorsque sec, essuyer la surface avec un chiffon ou un essuie-tout propre.
Utilisation du grattoir à lame Utiliser le grattoir pour enlever les aliments cuits ou séchés. Maintenir le grattoir à
un angle de 30°. Gratter la tache. Terminer avec un chiffon propre humide ou un
essuie-tout. Appliquer du vinaigre blanc si la tache est tenace et rincer.
Figure 17: Grattoir
Nettoyage des boutons de contrôle 1. Tirer et enlever les boutons. Essuyer avec un chiffon savonneux chaud, rincer
et sécher. Ne pas faire tremper.
2. Pour remettre, pousser le bouton sur la tige.
Ne pas utiliser les nettoyants suivants
• Nettoyants à vitre qui contiennent de l'ammoniaque ou du chlore. Ils endommagent de façon permanent la surface.
• Nettoyants caustiques
• Nettoyant à four tel Easy Off® qui égratigne la surface.
• Nettoyant abrasif
• Tampon à récurer en métal et éponge à récurer comme Scotch Brite®
égratigne et/ou laisse des marques.
• Tampon à récurer savonneux comme SOS® égratigne la surface
• Nettoyant en poudre contenant un agent chloré de blanchiment endommage
la surface.
• Nettoyant inflammable comme du liquide à briquet ou WD-40
Tableau 10: Entretien de la surface de cuisson
Type de saleté Solution possible
Sucre séché, sirop, lait ou éclaboussure avec
tomate. Pellicule plastique ou aluminium fondu. Il
faut enlever immédiatement. Enlever ces types de
déversements seulement pendant que la surface
est chaude avec le grattoir à lame. S'assurer d'utiliser une nouvelle lame.
• Retirer la casserole et fermer l'élément.
• Porter une moufle à four, tenir le grattoir à un angle de 30°, faire attention
à ne pas égratigner le verre. Pousser les saletés loin de la zone chaude.
• Une fois la surface refroidie, enlever les résidus et appliquer le nettoyant à
surface en céramique vitrifiée.
Français 33
Page 76

Nettoyage et entretien
Tableau 10: Entretien de la surface de cuisson
Type de saleté Solution possible
Aliments brûlés, collés, rayures foncées et
taches
Éclaboussures de graisse • Utiliser une éponge ou un chiffon humide pour enlever la graisse, bien
Marques de métal ; taches irisées • Les casseroles avec base en aluminium, cuivre ou acier inoxydable peu-
Taches d'eau calcaire - liquides chauds de cuisson
Égratignures sur la surface - il peut y avoir de
petites égratignures sur la surface qui ne dérangent
en rien la cuisson. Avec le temps, elles deviendront
plus lisses et moins évidentes avec le nettoyant à
surface en céramique vitrifiée
• Ramollir avec un essuie-tout ou une éponge humide pendant 30 minutes.
• Utiliser un tampon en plastique ou le nettoyant pour surface en céramique
vitrifiée ou le grattoir. Rincer et assécher.
rincer et assécher ; appliquer le nettoyant à surface en céramique vitrifiée.
vent laisser des marques. Traiter immédiatement une fois la surface refroidie avec le nettoyant pour surface en céramique vitrifiée. Si cela n'enlève
pas les marques, essayer un abrasif doux (Bon Ami®, Soft Scrub® sans
javellisant) avec un essuie-tout humide. Rincer et appliquer la crème. Si
ces taches ne sont pas enlevées avant la prochaine utilisation, elles
seront plus difficiles à enlever.
• Les minéraux dans l'eau peuvent se transférer sur la surface et faire des
taches. Utiliser du vinaigre blanc non dilué, rincer et assécher ; appliquer
le nettoyant à surface en céramique vitrifiée
• Appliquer le nettoyant à surface en céramique vitrifiée pour enlever
poussière, assaisonnement, etc.
• Utiliser des casseroles à fond lisse, propre et sec. Utiliser le nettoyant à
surface en céramique vitrifiée
Entretien et nettoyage four
Autonettoyage du four Le four est doté de la fonction autonettoyage qui élimine le travail manuel de net-
toyage. Pendant l'autonettoyage, le four utilise une température très élevée pour
brûler les résidus d'aliments et la graisse.
• Ne pas nettoyer les pièces et accessoires dans le four autonettoyant.
• Il est habituel de voir de la fumée et/ou des flammes pendant l'autonettoyage,
selon le contenu et la quantité de résidus. Si les flammes persistent, mettre le
four hors circuit et laisser refroidir avant d'ouvrir la porte et essuyer l'excédent
d'aliments.
• La porte du four se verrouille au début du cycle d'autonettoyage.
• L'éclairage ne fonctionne pas pendant l'autonettoyage.
• Pendant l'autonettoyage, la cuisine doit être bien aérée afin d'aider à éliminer
les odeurs associées à l'autonettoyage. Elles diminuent avec l'utilisation.
• La durée préréglée est de 4 heures. L'autonettoyage peut être réglé à 3 ou 5
heures.
• Le mode s'arrête automatiquement à la fin du nettoyage.
• Lorsque le four refroidit après le nettoyage, le verrouillage de porte se dégage
et l'on peut ouvrir la porte.
• Pour annuler ou arrêter le mode en cours, presser ARRÊT.
• La porte ne se verrouille pas tant que le four n'a pas atteint une température
sécuritaire.
Préparation pour l'autonettoyage
AVERTISSEMENT
Le joint de porte flexible est nécessaire pour une bonne étanchéité.
Ne pas nettoyer, ni frotter, endommager ou enlever le joint.
Français 34
1. Retirer tout ustensile et casseroles.
2. Retirer les grilles du four, si elles sont en place pendant l'autonettoyage, elles perdront de façon permanente leur fini et deviendront foncées. Voir le tableau d'entretien du four.
Page 77

Nettoyage et entretien
3. Essuyer l'excédant de résidus, saletés et de graisse avant l'autonettoyage.
Nettoyer à la main 1 1/2 po
depuis les guides de grille vers
l'avant de la cavité du four
Ne pas nettoyer
le joint à la main
Nettoyer à la main le
cadre à l’extérieur du joint
Nettoyer à la main la
porte à l’extérieur du joint
Figure 18: Directives de nettoyage
4. Voir l'illustration ci-dessus. Certaines zones du four doivent être nettoyées à
la main avant le début du cycle. Utiliser une éponge savonneuse ou un tampon en plastique ou un tampon S.O.S.®. Nettoyer à la main le bord de la
porte du four, cadre avant du four et jusqu'à 1 ½ po à l'intérieur du cadre avec
du détergent et de l'eau chaude. Ne pas nettoyer ni frotter le joint du four. Le
joint est conçu pour conserver la chaleur pendant l'autonettoyage. Rincer
toutes les zones et assécher.
5. S'assurer que l'éclairage est hors circuit et que l'ampoule et le couvercle sont en place. Ne pas actionner le four si l'ampoule ou le couvercle n'est pas en place.
Important : ne pas utiliser de nettoyant de type commercial dans le four autonettoyant ou sur toute autre partie, cela endommagera le fini ou la pièce.
Réglage du mode autonettoyage 1. Presser MODE CUISSON.
2. Tourner le bouton pour afficher AUTONETTOYAGE. Presser MARCHE.
3. Durée par défaut : 4 heures. Pour changer la
3: 00
SELF CLEAN
3
durée, tourner le bouton pour changer les heures. Sinon, passer à l'étape 4.
4. Presser MARCHE. AUTONETTOYAGE clignote. Presser MARCHE.
5. ENLEVER GRILLES figure à l'affichage pour rappeler d'enlever les grilles.
6. Presser MARCHE de nouveau pour commencer l'autonettoyage.
Remarque : la porte se verrouille au début du
4: 00
SELF CLEAN
REMOVE RACKS
cycle. Le symbole de porte verrouillée figure à
l'affichage. Si la porte n'est pas verrouillée, presser ARRÊT et ne pas actionner
l'autonettoyage. Téléphoner pour un service.
Différer l'autonettoyage Remarque : l'heure du jour doit être correcte pour régler cette option adéquate-
ment. Voir “Réglage de la pendule” à la page 11.
1. Presser MODE CUISSON.
2. Tourner le bouton pour afficher AUTONETTOYAGE. Presser MARCHE.
3. Durée par défaut : 4 heures. Pour changer la
3: 00
SELF CLEAN
Delayed CLEAN
durée, tourner le bouton pour changer les heures. Sinon, passer à l'étape 4.
4. Presser MARCHE.
5. Tourner le bouton pour que figure AUTONETTOYAGE DIFFÉRÉ. Presser MARCHE.
Français 35
Page 78

Nettoyage et entretien
6. FIN AUTONETTOYAGE figure à l'affichage.
7. Tourner le bouton pour entrer l'heure du jour à laquelle l'autonettoyage prend fin. Régler les heures, presser heure, régler les minutes.
8. Presser MARCHE. L'affichage rappel d'enlever les grilles.
9. Presser MARCHE. L'affichage indique AUTONETTOYAGE DIFFÉRÉ. L'autonettoyage commence automatiquement à l'heure choisie.
Remarque : en mode autonettoyage différé, la porte se verrouille automatiquement au début du cycle. Le symbole de porte verrouillée figure à l'affichage.
Remarque : l'éclairage du four ne fonctionne pas en mode autonettoyage.
Après l'autonettoyage 1. À la fin de l'heure programmée, le four se met automatiquement hors circuit.
FIN AUTONETTOYAGE figure. Presser ARRÊT pour effacer.
Remarque : la porte ne se verrouille pas tant que le four n'a pas atteint une
température sécuritaire.
2. Le mode autonettoyage peut produire de la cendre au fond du four. Si cela se produit, essuyer avec un chiffon humide avant d'utiliser le four.
3. Essuyer les bords de grilles avec de l'huile. Essuyer l'excès.
Après l'autonettoyage, le four peut être nettoyé avec une éponge savonneuse,
rincé et asséché. S'il y a des taches tenaces, observer ce qui suit :
• Toujours utiliser le nettoyant le plus doux pour enlever la tache.
• Frotter les finis métalliques dans le sens du grain.
• Utiliser chiffons, éponges ou essuie-tout propres.
• Bien rincer avec un minimum d'eau afin qu'elle ne dégoutte pas dans les
fentes de la porte.
• Assécher pour éviter les marques d'eau.
• Ne pas utiliser de nettoyants caustiques comme Easy OFF®. Ils égratignent
la surface.
5: 45
SELF CLEAN
SELF CLEAN END
Les nettoyants indiqués ci-dessous ne représentent qu'un type et ne sont pas
endossés. Utiliser les produits selon les directives sur l'emballage.
Guide de nettoyage
Table 11: Nettoyage du four
Pièce Recommandations
Grilles Laver à l’eau chaude savonneuse. Rincer et assécher ou frotter délicatement avec
une poudre ou tampon savonneux tel qu’indiqué. Si les grilles sont nettoyées dans
le four pendant l’autonettoyage, elles perdront leur fini et peuvent ne pas glisser en
douceur. Si cela se produit, essuyer les bords avec un peut d’huile végétale,
enlever l’excès.
Joint en fibre de verre NE PAS NETTOYER À LA MAIN LE JOINT.
Verre (autre que surface de
cuisson)
Surfaces peintes Nettoyer avec de l’eau savonneuse chaude ou appliquer Fantastik® ou Formula
Laver avec du savon et de l’eau ou nettoyant à vitre. Utiliser Fantastik® ou Formula
409® pour enlever la graisse et les taches tenaces.
409® sur une éponge ou un essuie-tout propre. Éviter nettoyant en poudre, tampons en laine d’acier et nettoyants pour four
Français 36
Page 79

Nettoyage et entretien
Table 11: Nettoyage du four
Pièce Recommandations
Surfaces en porcelaine Essuyer immédiatement les déversements acides tels jus de fruits, lait, tomates
avec une serviette sèche. Ne pas utiliser d’éponge/essuie-tout humide sur la porcelaine. Lorsque refroidie, essuyer avec de l’eau savonneuse chaude ou appliquer
Bon-Ami® ou Soft Scrub® sur une éponge humide. Rincer et assécher. Pour les
taches tenaces, utiliser un tampon savonneux. Il est normal que de fines lignes
apparaissent à cause de chaleur et des taches
Surfaces en acier inoxydable Toujours essuyer dans sens du grain. Nettoyer avec éponge savonneuse, rincer et
assécher ou essuyer avec Fantastik® pour acier ou Formula 409® vaporisé sur un
essuie-tout. Protéger et polir avec Stainless Steel Magic® et un chiffon propre.
Enlever taches d’eau avec un chiffon humide de vinaigre blanc. Utiliser Bar
Keeper’s Friend® pour enlever décoloration.
Boutons et contrôles Lorsque refroidis, nettoyer avec de l’eau savonneuse, rincer et assécher.
Tiroirs (réchaud ou de rangement) Nettoyer avec de l'eau savonneuse chaude, rincer et assécher.
Entretien
Entretien du four
Retrait de la porte
AVERTISSEMENT
Au moment d’enlever la porte :
• S'assurer que le four est froid et que l'alimentation a été mise hors circuit avant d'enlever la porte. Sinon il
peut en résulter un choc électrique ou des brûlures.
• La porte du four est lourde et fragile. Utiliser les deux mains pour l'enlever. Le devant de la porte est en verre.
Manipuler avec soin pour éviter le bris.
• Saisir les côtés seulement de la porte. Ne pas prendre la poignée car elle peut basculer et causer des dommages ou des blessures.
• Si la porte n'est pas prise fermement et adéquatement il peut en résulter des dommages ou des blessures.
• Pour éviter toute blessure par l'enclenchement de la charnière, s'assurer que les deux leviers sont bien en
place avant d'enlever la porte. Ne pas forcer la porte pour ouvrir ou fermer - la charnière peut s'endommage et
causer des blessures.
1. S'assurer de lire l'AVERTISSEMENT ci-dessus avant d'enlever la porte.
2. Ouvrir la porte complètement.
3. Basculer le levier de la charnière vers soi.
Figure 19: Positions de charnières
Français 37
Page 80

4. Fermer la porte à environ mi chemin.
5. Tenir fermement la porte par les côtés avec les deux mains, tirer la porte droit hors des fentes de charnières. Maintenir fermement, la porte est lourde.
6. Placer la porte dans un endroit stable pour le nettoyage.
Installation de la porte 1. Tenir fermement la porte avec les deux mains. Placer les charnières dans les
fentes.
2. Ouvrir la porte complètement pour exposer charnières et fentes. Pousser le levier (un sur chaque charnière) loin de soi (vers l'appareil).
3. Après avoir placer les fixations de charnières en position, fermer et ouvrir la porte lentement pour s'assurer qu'elle est correcte et bien en place.
4. La porte doit être droite, non croche.
Remplacer les ampoules du four Chaque assemblage comprend une lentille amovible, une ampoule, boîtier de
douille fixe en place.
AVERTISSEMENT
• S'assurer que l'appareil et les ampoules sont froids et que l'alimentation à l'appareil est hors circuit avant de remplacer les ampoules. Sinon
il peut en résulter un choc électrique ou des brûlures.
• Les lentilles (si équipé) doivent être en place pour utiliser l'appareil.
• Les lentilles (si équipé) servent à protéger les ampoules du bris.
• Les lentilles (si équipé) sont en verre. Manipuler avec soin pour éviter
tout bris ; risque de blessures.
• La douille est sous tension lorsque la porte est ouverte.
Service
Aide
1. Lire l'AVERTISSEMENT ci-dessus.
2. Mettre hors circuit à l'alimentation principale (fusible ou coupe-circuit).
3. Dévisser la lentille pour l'enlever.
4. Dévisser l'ampoule de la douille.
5. Remplacer l'ampoule par une nouvelle ampoule d'électroménagers 40 watts. Éviter de toucher l'ampoule avec les doigts, car les huiles de la main peuvent l'endommager lorsqu'elle devient chaude.
6. Visser l'ampoule.
7. Remettre en circuit à l'alimentation principale (fusible ou coupe-circuit).
Français 38
Page 81

Service
La surface de cuisson Consulter ces suggestions avant d'effectuer un appel de service et éviter des frais
de service.
Tableau 12: Guide de dépannage pour la surface de cuisson
Problème de cuisson Causes possibles et solutions suggérées
Élément faisant plus de cycle
que la normale
Légère odeur lorsqu'un élément
est mis en circuit
Contrôles de la surface de cuisson ne se mettent pas en circuit
Grattoir ne fonctionne pas
adéquatement.
Résultats de cuisson inattendus • Surface de cuisson non de niveau. Régler les pieds niveleurs au bas de la cuisinière.
Élément faisant un cycle au
réglage le plus haut
L'eau prend du temps à bouillir • La durée pour bouillir varie grandement selon les conditions environnementales. Voir “Bouil-
La surface de cuisson blanche
semble prendre une teinte verdâtre
• Fond de casserole voilé et non en contact avec la surface chauffante.
• Diamètre du fond de casserole trop petit pour l'élément choisi.
• Casserole chauffée à sec.
• Matériau de casserole faible conducteur, chaleur transférant trop lentement.
• Ceci est normal et disparaîtra avec le temps.
• L'appareil n'est pas alimenté. Vérifier la source d'alimentation si un fusible est grillé ou le
coupe-circuit déclenché. Vérifier si le cordon est bien inséré sur la prise.
• Panneau verrouillé. Presser et maintenir PANEL LOCK jusqu'à ce que le voyant s'éteigne.
• Lame émoussée. Le grattoir est doté d'une lame à un côté, en acier inoxydable. Remplacer
par une lame standard à un côté.
• Format et type de casserole non appropriés. Voir “Guide de sélection de casserole” à la
page 24.
• Ceci est normal. Le limiteur de température fonctionne automatiquement pour protéger la
surface en céramique vitrifiée des dommages par une température élevée extrême.
lir l'eau” à la page 23 pour les conseils sur la façon de diminuer la durée.
• Elle peut avoir une teinte verdâtre pendant le refroidissement. Ceci est normal. Elle reprendra sa couleur d'origine lorsque le verre aura refroidi.
Le four
Tableau 13: Guide de dépannage du four
Problème du four Causes possibles et solutions suggérées
Le mode four ou la température choisie ou
les chiffres choisis ne figurent pas à
l'affichage
Porte verrouillée et ne se déclenche pas,
même après le refroidissement
Four ne chauffant pas
Four ne cuisant pas uniformément
Résultats de cuisson inattendus
Aliments prenant plus de temps à cuire
• Bouton tourné trop rapidement. Le tourner plus lentement jusqu'à ce que la
température ou le mot approprié figure. Revoir les instructions de réglage de la
pendule, minuterie ou autonettoyage.
• Mettre le four hors circuit au coupe-circuit et attendre 5 minutes. Remettre en
circuit. Le four devrait se réinitialiser et être fonctionnel.
• Vérifier le coupe-circuit ou fusible de la résidence. S'assurer que l'alimentation
électrique est adéquate. S'assurer que la température du four a été sélectionnée.
• Au besoin, régler la calibration du four (voir “Changer le décalage température
du four” à la page 12). Consulter les tableaux de cuisson pour les positions de
grilles.
• Voir les tableaux de cuisson pour les positions de grilles recommandées. Vérifier “Tirer pleinement avantage du four” à la page 24. Régler la calibration du
four au besoin (voir “Changer le décalage température du four” à la page 12).
• Le four est adéquatement calibré pour offrir des résultats précis. Toutefois, la
température peut être décalée si les aliments sont trop bruns ou trop pâles, de
façon constante. Voir “Changer le décalage température du four” à la page 12.
Français 39
Page 82

Service
Tableau 13: Guide de dépannage du four
Problème du four Causes possibles et solutions suggérées
Aliments trop cuits
Résultats de la cuisson à convection inattendus
Température du four trop froide ou trop
chaude
Éclairage ne fonctionnant pas adéquatement
Éclairage restant en circuit
Couvercle de lentille d'ampoule ne pouvant être enlevée
Le four ne s'autonettoie pas adéquatement
• Le four est adéquatement calibré pour offrir des résultats précis. Toutefois, la
température peut être décalée si les aliments sont trop bruns ou trop pâles, de
façon constante. Voir “Changer le décalage température du four” à la page 12.
• Si la fonction conversion convection automatique est hors circuit, la température doit être réduite manuellement de 25 °F. Si elle est active, la température
est automatiquement réglée. Voir “Conversion convection automatique
(modèles avec cuisson à convection)” à la page 18. Voir les tableaux de cuisson et les conseils pour les positions de grilles, durées de cuisson et choix de
casseroles. Régler la calibration du four au besoin. Voir “Changer le décalage
température du four” à la page 12.
• Le thermostat nécessite un réglage. Voir “Changer le décalage température du
four”.
• Remplacer ou réinsérer l'ampoule lâche ou défectueuse. Toucher l'ampoule
avec les doigts peut la faire griller.
• Vérifier s'il y a obstruction de la porte du four. Vérifier si la charnière est pliée.
Si le mode Sabbat est actif, l'éclairage demeure en ou hors circuit (comme
sélectionné) pendant tout le mode Sabbat.
• Il peut y avoir une accumulation de saleté autour du couvercle. Essuyer la
zone avec une serviette propre et sèche avant d'enlever le couvercle.
• Laisser le four refroidir avant l'autonettoyage. Toujours essuyer les saletés et
les déversements avant l'autonettoyage. Si le four est très sale, régler
l'autonettoyage à 5 heures. Voir “Préparation pour l'autonettoyage” à la
page 34.
Pendule et minuterie ne fonctionnant pas
adéquatement
Porcelaine écaillée
" F " et un numéro figurent à l'affichage et
il y a un bip
Avec une nouvelle cuisinière, il y a une
forte odeur à la mise en circuit
Le contrôle ne réagit pas lorsque la touche est pressée
Le ventilateur fonctionne pendant les
modes qui n'utilisent pas la convection
De l'air chaud s'échappe de l'évent du
four
Garantie
• S'assurer que l'alimentation électrique est fournie au four. Voir les rubriques
Pendule et Minuterie.
• Lorsque les grilles sont enlevées ou insérées, les incliner vers le haut et ne pas
les forcer pour éviter d'écailler la porcelaine.
• Ceci est un code d'erreur. Presser OFF pour effacer l'affichage et arrêter le bip.
Réinitialiser au besoin. Si le code demeure et le bip continue, noter le code
d'erreur, fermer le four et téléphoner à un technicien qualifié.
• Ceci est normal et disparaîtra après quelques utilisations. Actionner le cycle
autonettoyage éliminera l'odeur plus rapidement.
• S'assurer que la touche est propre. Presser le centre avec le plat du doigt.
• Sur certains modèles, le ventilateur à convection fonctionne lorsque le four
préchauffe pour le mode cuisson. Ceci est normal.
• Les modèles à encastrer sont aussi dotés d'un ventilateur de refroidissement
qui fonctionne pendant le mode cuisson.
• Il est normal de voir ou sentir la vapeur ou l'air chaud s'échapper de l'évent. Ne
pas obstruer l'évent.
Généralités Les garanties fournies par BSH Home Appliances Corp. dans cet énoncé de garantie lim-
itée s'appliquent seulement cuisinières électriques amovibles BSH (" cuisinière ") vendues
au client, le premier acheteur utilisateur, en autant que le produit ait été acheté : (1) pour
une utilisation domestique et non pour la revente; et (2) aux États-Unis ou au Canada et
est, en tout temps, demeuré dans le pays de l'achat d'origine. Comme utilisé dans cet
énoncé de garantie limitée, l'expression " date d'installation " réfère à la date la plus tôt où
la cuisinière est installée ou dix (10) jours ouvrables après la date de vente de la cuisinière
Français 40
Page 83

Service
au premier acheteur utilisateur, les garanties énoncées dans la présente s'appliquent
seulement au premier acheteur utilisateur et n'est pas transférable.
Garantie limitée standard BSH garantit que la cuisinière ne présente pas de défaut de matériaux et de fabrication
pendant une période de douze (12) mois depuis la date d'installation. Pendant la période
de garantie, BSH ou son centre de service autorisé réparera ou remplacement, à sa discrétion, toute cuisinière présentant un défaut dans des conditions d'utilisation normale sans
frais. Toute pièce remplacée et/ou réparée devra prendre l'identité de la pièce d'origine à
des fins de cette garantie et cette garantie ne sera pas prolongée en regard de telles
pièces.
Autres conditions des garanties limitées
Comment obtenir un service sous garantie
Les garanties fournies dans cet énoncé de garantie limitée excluent les défauts ou les
dommages résultant de (1) l'utilisation de la cuisinière d'une manière autre qu'une utilisation normale et habituelle (utilisation commerciale de la cuisinière n'est pas considérée
comme normale ou habituelle), (2) mauvaise utilisation, abus, accident ou négligence, (3)
fonctionnement, entretien, installation inadéquats ou service non autorisé, (4) réglage ou
modification ou altération de toute sorte, (5) manquement à se conformer aux codes d'état/
province, locaux, municipaux pour l'électricité et/ou la construction, (6) déversement d'aliments ou de liquides et (7) forces externes tel que inondations, incendie, actes de Dieu ou
toute autre circonstance hors du contrôle de BSH. Également exclus de cette garantie sont
les égratignures et dommages aux surfaces externes et pièces exposées de la cuisinière
sur laquelle le numéro de série a été modifié, effacé ou enlevé.
Selon ce qui est permis par la loi, cette garantie donne des solutions possible en regard
des produits couverts, par réclamation par contrat ou tort (incluant la responsabilité stricte
ou négligence) ou autre. BSH ne sera pas tenu responsable des dommages accessoires
ou indirects, pertes ou dépenses. CETTE GARANTIE EST EN LIEU DE TOUTE AUTRE
GARANTIE EXPRESSE. TOUTE GARANTIE IMPICIPE PAR LOI, POUR COMMERCIALISATION OU À DES FINS PARTICULIÈRES OU AUTRE, SERA EN VIGUEUR SEULEMENT POUR LA PÉRIODE EFFECTIVE DE LA GARANTIE EXPRESSE. Aucune tentative
de modifier, altérer ou amender cette garantie ne peut être en vigueur à moins d'une autorisation écrite par un responsable de BSH.
Pour obtenir un service sous garantie, communiquer avec le centre de service autorisé
BSH de la région ou Service à la clientèle BSH, 5551 McFadden Avenue, Huntington
Beach, CA 92649, 800.944.2904
Avis aux propriétaires en Californie
Si la cuisinière requiert un service et qu'il n'y a pas de centre de service raisonnablement
près, aviser le marchand BSH où l'appareil a été acheté. Si le marchand BSH ne peut
réparer ou remplacer les pièces défectueuses ou partiellement remboursé le prix d'achat
(là où applicable), il est possible de faire réparer la cuisinière dans un centre de service et
le propriétaire sera remboursé pour des frais raisonnables en autant que le coût est donné
par écrit et que le travail effectué est couvert par la garantie. BSH ne remboursera pas les
coûts de réparation qui excèdent la valeur de dépréciation de la cuisinière.
Français 41
Page 84

Contenidos
Acerca de este manual . . . . . . . . . . . . . . . . . . . . . . . . . . . . . . . . . . . . . . . . . . . 1
Cómo está organizado este manual . . . . . . . . . . . . . . . . . . . . . . . . . . . . . . . . . . . . . . . . . . . . . . . . . . . . . . 1
Seguridad . . . . . . . . . . . . . . . . . . . . . . . . . . . . . . . . . . . . . . . . . . . . . . . . . . . . . . 1
Instrucciones Importantes de Seguridad . . . . . . . . . . . . . . . . . . . . . . . . . . . . . . . . . . . . . . . . . . . . . . . . . . 1
Comenzar . . . . . . . . . . . . . . . . . . . . . . . . . . . . . . . . . . . . . . . . . . . . . . . . . . . . . . 6
Partes y accesorios . . . . . . . . . . . . . . . . . . . . . . . . . . . . . . . . . . . . . . . . . . . . . . . . . . . . . . . . . . . . . . . . . . 6
Antes de usar el aparato por primera vez . . . . . . . . . . . . . . . . . . . . . . . . . . . . . . . . . . . . . . . . . . . . . . . . 15
Funcionamiento - Parrilla . . . . . . . . . . . . . . . . . . . . . . . . . . . . . . . . . . . . . . . . . 16
Acerca de la parrilla . . . . . . . . . . . . . . . . . . . . . . . . . . . . . . . . . . . . . . . . . . . . . . . . . . . . . . . . . . . . . . . . . 16
Funcionamiento . . . . . . . . . . . . . . . . . . . . . . . . . . . . . . . . . . . . . . . . . . . . . . . . . . . . . . . . . . . . . . . . . . . . 16
Funcionamiento - Horno . . . . . . . . . . . . . . . . . . . . . . . . . . . . . . . . . . . . . . . . . . 18
Acerca del horno . . . . . . . . . . . . . . . . . . . . . . . . . . . . . . . . . . . . . . . . . . . . . . . . . . . . . . . . . . . . . . . . . . . 18
Funcionamiento . . . . . . . . . . . . . . . . . . . . . . . . . . . . . . . . . . . . . . . . . . . . . . . . . . . . . . . . . . . . . . . . . . . . 18
Funcionamiento - Cajón Calentador (algunos modelos) . . . . . . . . . . . . . . . . . . 22
Acerca del cajón calentador . . . . . . . . . . . . . . . . . . . . . . . . . . . . . . . . . . . . . . . . . . . . . . . . . . . . . . . . . . . 22
Funcionamiento . . . . . . . . . . . . . . . . . . . . . . . . . . . . . . . . . . . . . . . . . . . . . . . . . . . . . . . . . . . . . . . . . . . . 23
Sacar el mayor provecho de su aparato . . . . . . . . . . . . . . . . . . . . . . . . . . . . . 24
Sacar el mayor provecho de su aparato . . . . . . . . . . . . . . . . . . . . . . . . . . . . . . . . . . . . . . . . . . . . . . . . . . 24
Sacar el mayor provecho de su horno . . . . . . . . . . . . . . . . . . . . . . . . . . . . . . . . . . . . . . . . . . . . . . . . . . . 26
Sacar el mayor provecho de su cajón calentador . . . . . . . . . . . . . . . . . . . . . . . . . . . . . . . . . . . . . . . . . . 33
Limpieza y Mantenimiento . . . . . . . . . . . . . . . . . . . . . . . . . . . . . . . . . . . . . . . . 34
Cuidado y Limpieza . . . . . . . . . . . . . . . . . . . . . . . . . . . . . . . . . . . . . . . . . . . . . . . . . . . . . . . . . . . . . . . . . 34
Mantenimiento . . . . . . . . . . . . . . . . . . . . . . . . . . . . . . . . . . . . . . . . . . . . . . . . . . . . . . . . . . . . . . . . . . . . . 39
Servicio . . . . . . . . . . . . . . . . . . . . . . . . . . . . . . . . . . . . . . . . . . . . . . . . . . . . . . . 41
Autoayuda . . . . . . . . . . . . . . . . . . . . . . . . . . . . . . . . . . . . . . . . . . . . . . . . . . . . . . . . . . . . . . . . . . . . . . . . 41
Garantía . . . . . . . . . . . . . . . . . . . . . . . . . . . . . . . . . . . . . . . . . . . . . . . . . . . . . . . . . . . . . . . . . . . . . . . . . . 43
¿Preguntas?
1-800-944-2904
www.boschappliances.com
5551 McFadden Ave.
Huntington Beach, CA 92649
¡Estámos a sus órdenes!
Page 85

Acerca de este manual
Cómo está organizado este manual
Este manual contiene varias secciones:
• La sección del Panorama General describe las características y el funcionamiento de la estufa, incluyendo una descripción de cómo configurar la estufa y
operar el panel de control de la estufa.
• Las tres secciones de Operaciones describen cómo operar y sacar el mayor
provecho de cada uno de los componentes de la estufa, la parrilla, el horno, y el
cajón calentador.
• La sección de Limpieza y Mantenimiento describe cómo limpiar y cuidar su
estufa.
• La sección de Servicio incluye consejos para resolver problemas y su garantía.
Antes de usar su estufa, asegúrese de leer este manual. Ponga especial atención a
las Instrucciones Importantes de Seguridad al principio del manual
.
Seguridad
Instrucciones Importantes de Seguridad
LEA Y GUARDE ESTAS INSTRUCCIONES
Instrucciones Importantes
de Seguridad
Seguridad contra incendios • No use papel de aluminio o forros de protección para forrar ninguna parte de
un aparato, sobre todo bandejas de goteo de las unidades superficiales o los
pisos de los hornos. La instalación de estos forros puede causar una descarga eléctrica o un fuego.
• Si los materiales adentro de un horno o un cajón calentador llegan a encenderse, mantenga la puerta cerrada. Apague el aparato y desconecte el circuito en la caja de cortacircuitos.
•
Use este aparato sólo para el uso intencionado como se describe en este manual. Por ejemplo, nunca use el aparato para calentar una habitación. Nunca use
el aparato para almacenar cosas.
• No permita que el papel de aluminio, plástico, papel o tela tenga contacto con
un quemador o rejilla caliente. No permita que las ollas hiervan hasta quedar
secas.
• Si la estufa está cerca de una ventana, conducto de aire a presión o ventilador, asegúrese que los materiales inflamables como cortinas no alcancen los
quemadores de la estufa ya que se podrían encender.
•
Siempre tenga un detector de humo que funcione cerca de la cocina.
• Nunca deje la estufa sin atención. Los derrames pueden causar humo y grasa
derramada puede encenderse.
Español 1
Page 86

Seguridad
• ADVERTENCIA – PARA REDUCIR EL RIESGO DE UN INCENDIO DE
GRASA EN LA PARRILLA:
1) Nunca deje las parrillas sin atención cuando cocina a temperaturas altas.
Los derrames pueden causar
humo y grasa derramada puede encenderse.
Caliente aceites lentamente a un calor bajo o mediano.
2) Siempre prenda la campana cuando cocina con alto calor o cuando flamee ali-
mentos (i.e. Crepas Suzette, Cherries Jubilee, Filete de Pimienta Flameado).
3) Limpie los ventiladores frecuentemente. No permita que se acumule
grasa en el ventilador o el filtro.
4)
Use el tamaño apropiado de ollas. Siempre use utensilios de cocina que
sean apropiados para el tamaño del elemento superficial.
• En el caso de encenderse la ropa o el cabello, échese al piso y dése vueltas de
inmediato para apagar las llamas.
• Apague las llamas de incendios alimenticios que no sean incendios de grasa con
bicarbonato de sodio. Nunca use agua con incendios de alimentos.
• ADVERTENCIA – OBSERVE LO SIGUIENTE PARA REDUCIR EL RIESGO
DE SUFRIR LESIONES EN CASO DE UN INCENDIO DE GRASA EN LA
PARRILLA:
1)
APAGUE LAS LLAMAS con una tapa ajustada, bandeja de horno u otra
bandeja de metal, luego trate de apagar el quemador. TENGA CUIDADO Y
EVITE QUEMADURAS. Si las llamas no se apagan de inmediato, EVACÚE
EL LUGAR Y LLAME A LOS BOMBEROS
.
2) NUNCA LEVANTE UNA OLLA EN LLAMAS – Se puede quemar usted.
3) NO USE AGUA, incluyendo trapos o toallas húmedas – de lo contrario
podrá causar una explosión fuerte de vapor.Use un extinguidor de fuego
SOLAMENTE cuando:
1) Usted sepa que tiene un extinguidor de fuego de la Clase ABC, y sabe
cómo manejarlo.
2) El incendio es pequeño y está contenido en el área donde comenzó.
3) Se está llamando a los bomberos
4) Usted puede combatir el fuego con su espalda hacia una salida. Tenga
disponible un extinguidor de fuego apropiado, a la mano, altamente visible y con fácil acceso cerca del horno.
• Cuando sea posible, no opere el sistema de ventilación durante un incendio
en la parrilla. Sin embargo, nunca meta la mano al fuego para apagarlo.
Prevención de quemaduras • NO TOQUE LAS UNIDADES SUPERFICIALES O LAS ÁREAS CERCA DE
ESTAS UNIDADES - Las unidades superficiales pueden estar calientes, a
pesar de su color oscuro. Las áreas cercanas a las unidades superficiales
pueden calentarse suficientemente para causar quemaduras. Durante y
después del uso, no toque o permit
materiales inflamables tengan contacto con las unidades superficiales o con
áreas cercas de las unidades hasta que se hayan enfriado. Entre estas superfi-
a que la ropa, agarraderas de ollas u otros
cies están la parrilla y las áreas encarando la parrilla.
• NO TOQUE LOS ELEMENTOS DE CALENTAMIENTO O LAS SUPERFICIES ADENTRO DEL HORNO - Los elementos de calentamiento pueden
estar calientes, a pesar de su color oscuro. Las superficies internas de un
horno pueden calentarse suficientemente para causar quemaduras. Durante
y después del uso, no toque o permit
materiales inflamables tengan contacto con los elementos de calentamiento o con
las superficies internas del horno hasta que se hayan enfriado. Otras superficies
a que la ropa, agarraderas de ollas u otros
del aparato pueden calentarse suficientemente para causar quemaduras.
Entre estas superficies están las aberturas de ventilación del horno, superficies cercanas a estas aberturas y las puertas del horno.
•
Tenga cuidado cuando abra la puerta del horno. Estando parado a un lado, abra
la puerta (o el cajón) lenta y ligeramente para dejar escapar el aire caliente y/o
vapor. Aleje su cara de la apertura y asegúrese que no haya niños o mascotas
cerca de la unidad. Después de sacar el aire caliente, siga cocinando. Mantenga
las puertas cerradas a menos que sea necesario dejarlas abiertas para los
propósitos de cocinar o limpiar. No deje las puertas abiertas sin atención.
Español 2
Page 87

Seguridad
• No caliente o recaliente contenedores de alimentos cerrados. La presión acumu-
lada puede causar la ruptura del contenedor y causar lesiones.
• Siempre coloque las rejillas del horno en el lugar deseado cuando el horno está
frío. Cuando deba mover una rejilla mientras que el horno esté caliente, evite el
contacto de la agarradera de la olla con los elementos calientes.
• Siempre use agarraderas secas para ollas. Agarraderas mojadas o húmedas
pueden causar quemaduras por vapor. No permita que las agarraderas de ollas
tengan contacto con los elementos calientes. No use una toalla u otro trapo estorboso
.
• Siempre prenda la campana cuando cocina con alto calor o cuando flamee ali-
mentos (i.e. Crepas Suzette, Cherries Jubilee, Filete de Pimienta Flameado).
• Cocine con calor alto en la parrilla sólo cuando sea necesario. Caliente aceite len-
tamente con un calor bajo a mediano para evitar la formación de burbujas y salpicaduras. El aceite caliente puede causar quemaduras y lesiones severas.
• Nunca mueva una olla con aceite caliente, sobre todo un sartén profundo. Espere
hasta que esté frío.
• Antes de comenzar, sujete la ropa suelta, etc. Recoja el cabello largo y no use
ropa holgada o prendas que cuelguen flojas como corbatas, bufandas, joyas o
mangas largas
.
• No trate de alcanzar cosas arriba o atrás de la estufa o recostarse sobre ésta.
Sepa que cierta ropa y fijador de cabello pueden contener químicos inflamables
que se pueden encender al tener contacto con superficies calientes o los elementos calentadores y pueden causar quemaduras severas
.
• No toque la superficie interna del cajón cuando se está usando. El interior del
cajón puede calentarse suficientemente para causar quemaduras. Permita
que el cajón y la rejilla (si se incluye) se enfríen antes de tocarlos.
• ADVERTENCIA: Para evitar quemaduras, no saque el cajón mientras esté
caliente. Asegúrese que el cajón esté vacío antes de sacarlo.
Seguridad para niños • Cuando los niños llegan a una edad suficiente para operar el aparato, es la
responsabilidad legal de los padres o de los tutores legales asegurar que personas calificadas los instruyan sobre prácticas seguras.
•
No permita que alguien se suba, que esté parado, recostado, sentado sobre o
colgado de cualquier parte de un aparato, especialmente una puerta, cajón calentador o cajón de almacenamiento. Esto puede dañar el aparato, causar su volcadura y lesiones severas.
• No permita que niños utilicen este aparato a menos que estén supervisados por
un adulto. Nunca se deben dejar solos a los niños y mascotas en el área donde
se usa el aparato. Nunca se les debe permitir jugar cerca del aparato, sin importar
si se usa el aparato o no
.
• PRECAUCIÓN - No almacene cosas de interés para los niños en el aparato, en
los gabinetes arriba del aparato o en la parte trasera de éste. Cuando los niños se
suben en un aparato para alcanzar estas cosas, pueden sufrir heridas serias
Seguridad durante la limpieza • AVISO IMPORTANTE DE SEGURIAD:
Agua Potable y Tóxicos requiere que el Gobernador de California publique una
lista de substancias conocidas que causan cáncer, defectos de nacimiento u
otros daños reproductivos, y requiere que las empresas adviertan a sus clientes
de la exposición potencial ante tales substancias. La combustión de gas como
combustible para cocinar y la eliminación de residuos durante la autolimpieza
pueden generar cantidades pequeñas de Monóxido de Carbono.El aislamiento de
fibra de vidrio en los hornos de autolimpieza despide una pequeña cantidad de
Formaldehído durante los primeros ciclos de limpieza. California lista el Formaldehído como una causa potencial del cáncer. El Monóxido de Carbono es una
causa potencial de la toxicidad reproductiva
estas substancias al:
La Ley del Estado de California para
. Se puede minimizar la exposición a
.
1) Proporcionar una buena ventilación al cocinar con gas.
2) Proporcionar una buena ventilación durante e inmediatamente después de
autolimpiar el horno.
3) Operar la unidad de acuerdo a las instrucciones en este manual.
Español 3
Page 88

Seguridad
• No limpie la estufa cuando esté caliente. Algunos detergentes producen vapores
nocivos cuando son aplicados a una superficie caliente. Trapos húmedos o
esponjas pueden causar quemaduras de vapor.
• Confirme que se cierra la puerta y que no se abrirá cuando use el modo de
autolimpieza. Si la puerta no se cierra, no ejecute la autolimpieza. Contacte al
servicio.
• Pájaros tienen sistemas respiratorios muy sensibles. Mantenga los pájaros fuera
de la cocina u otras habitaciones donde los puedan alcanzar los vapores de la
cocina. Durante la autolimpieza, se liberan humos que pueden ser nocivos para
pájaros. Otros vapores de la cocina, como el sobrecalentar margarina y aceites
para cocinar pueden ser nocivos también.
• Evite la acumulación de grasa en el horno.
Seguridad de los utensilios de cocinar
• No coloque los alimentos directamente sobre el piso del horno.
•
Siga las instrucciones del fabricante cuando use bolsas para cocinar u hornear.
• Agarre la olla cuando agite o voltee alimentos. Esto ayuda a evitar derrames
y el movimiento de la olla.
• Use ollas de tamaño apropiado. El uso de utensilios demasiado pequeños
expondrá una parte del elemento caliente o del quemador al contacto directo
y puede causar que se encienda la ropa.
planos que cubran toda la unidad superficial. Este aparato incluye una o más
unidades superficiales de tamaños diferentes. La relación correcta entre el utensilio de cocinar y el elemento caliente o el quemador mejora además la eficiencia.
Seleccione utensilios con fondos
• Otros tipos de utensilios no aprobados para el uso con parrillas de cerámica
pueden romperse con cambios rápidos de la temperatura. Use sólo ollas apropiadas para el uso en una parrilla de cerámica (solamente ciertos tipos de utensi-
lios de vidrio, vidrio cerámico refractario, cerámica, barro u otros vidriados
son apropiados). Vea la Guía de selección de utensilios de cocina para más
detalles.
• Siempre posicione las agarraderas de ollas hacia adentro de modo que no se
extiendan sobre las áreas de trabajo cercanas, quemadores o borde de la parrilla.
Esto reduce el riesgo de incendios, derrames y quemaduras.
• PRECAUCIÓN: Los contenedores de plástico o las envolturas de plástico
pueden derretirse cuando tienen contacto directo con el cajón o un utensilio
caliente. Si se derrite sobre el cajón, tal vez ya no se puede quitar después.
Instalación y Mantenimiento correcto • ADVERTENCIA: Con el cuidado apropiado, su aparato está diseñado para
un funcionamiento seguro y confiable. Lea todas las instrucciones cuidadosamente antes de usarlo. Estas precauciones reducen el riesgo de sufrir quemaduras, una descarga eléctrica, fuego y lesiones. Cuando usa aparatos de
cocina, se deben observar precauciones básicas de seguridad, incluyendo
las que aparecen en las siguientes páginas.
•
Pídale al instalador que le muestre el lugar del cortacircuito o del fusible.
Márquelo para referencias en el futuro.
• Este aparato debe ser instalado y aterrizado correctamente por un técnico califi-
cado. Conecte sólo a una toma de corriente aterrizada. Consulte las instrucciones
de instalación para detalles.
• Se pueden volcar todas las estufas. Esto puede causar lesiones. Instale disposi-
tivo antivolcadura que se incluye con la estufa. Verifique que los dispositivos antivolcadura estén enganchados. Vea instrucciones de instalación
.
Español 4
Figura 1: Precauciones de volcadura
Page 89

Seguridad
• Este aparato es solamente para uso residencial normal. No está aprobada para el
uso en exteriores. Vea la garantía. Si usted tiene alguna pregunta, contacte al
fabricante.
• No guarde o use químicos corrosivos, vapores, inflamables o productos no ali-
menticios en o cerca de este aparato. Está diseñado específicamente para calentar o cocinar alimentos. El uso de químicos corrosivos cuando calienta o limpia el
horno dañará el aparato y podría causar lesiones
.
• No opere este aparato si no funciona bien o si fue dañado. Contacte a un
proveedor de servicio autorizado.
• No cocine con una parrilla rota. Las soluciones de limpieza y los derrames de ali-
mentos pueden crear el riesgo de una descarga eléctrica.
• No obstruya las aberturas de ventilación del horno.
• No repare o reemplace ninguna parte del aparato a menos que fue recomendado
específicamente en este manual. Consulte a un centro de servicio autorizado
por la fábrica para cualquier servicio que necesite.
• En el caso de un error, la pantalla parpadea y emite pitidos contínuamente. Si
esto sucede durante la autolimpieza, desconecte el aparato de la corriente y
llame a un técnico calificado.
• En el caso de un error, la pantalla parpadea y emite pitidos contínuamente.
Desconecte el aparato de la corriente y llame a un técnico calificado.
Seguridad de los alimentos • PRECAUCIÓN: Siga estas pautas para asegurar la seguridad de los alimen-
tos:
1) NO use el cajón calentador para calentar alimentos fríos (excepción: se
puede usar el cajón calentador para dorar galletas, papas fritas o cereal
seco y para calentar platos).
2) Asegúrese de mantener una temperatura apropiada para los alimentos.
La USDA recomienda mantener calientes los alimentos a una temperatura de 140°F (60°C) o más.
3) NO caliente los alimentos por más de una hora.
Español 5
Page 90

Comenzar
Partes y accesorios
Modelos autoestables
10
9
1
7 o 8
(depende del modelo)
2
3
4
5
6
Modelos deslizables
10
9
(depende del modelo)
7 o 8
1
2
3
4
5
6
Figura 2: Partes y accesorios
Tabla 1: Llave para partes y accesorios
# Parte # Parte
1 Panel de control y perilla del horno 12 Raspador para la parrilla (no se muestra)
2 Perilla de control de la parrilla 12
3 Receptáculo para termómetro 13 Bandeja del asador (no se muestra)
4 Posiciones de rejillas/guías para rejillas 14 Rejilla del horno, Media (algunos modelos) (no se
5 Rejillas del horno, Plano (2 o 3; varía por modelo) 15
6 Empaque de la puerta del horno 16
7
8
Cajón de almacenamiento (algunos modelos)
Cajón calentador (algunos modelos)
a
a
17 Luces del horno (2) (pared trasera del horno) (no se
18 Ventilador y elemento de convección (pared trasera del
9 Placa con No. de Serie y No. de Modelo 19 Elemento para asar (parte superior del interior del
10 Abertura del horno 20 Bloqueo de la puerta del horno (no visible) (no se mues-
11 Antivolcadura (no se muestra)
Weiman Cook Top® (limpiador para parrilla de
cerámica) (no se muestra)
muestra)
Rejilla del horno, Extensión Completa (algunos
modelos) (no se muestra)
Juego de Literatura (no se muestra)
muestra)
horno; no se muestra)
horno) (no se muestra)
tra)
a. Dependiendo del modelo, su aparato viene con un cajón de almacenamiento o con un cajón calentador.
Elemento radiante El elemento radiante usa una cinta de alambre ubicada debajo de la superficie de
vidrio cerámico que genera el calor para cocinar. Los elementos radiantes están
diseñados para prender y apagarse cíclicamente
(vea Regulador de temperatura
Español 6
).
Page 91

Comenzar
Elemento doble El elemento doble consiste en dos elementos radiantes de cinta dentro de la
misma área para calentar. Se puede seleccionar ya sea el elemento interior o
ambos elementos, el interior y el exterior para ser utilizados, dependiendo del
tamaño de los utensilios de cocina.
Elemento triple El elemento triple consiste en tres (pequeño, mediano y grande) elementos radi-
antes de cinta dentro de la misma área para calentar. Se puede seleccionar ya
sea el elemento pequeño, el elemento pequeño y el mediano o los tres elementos
juntos para ser utilizados, dependiendo del tamaño de los utensilios de cocina.
Elemento puente (algunos modelos) El elemento puente une el elemento delantero sencillo y el elemento trasero sen-
cillo para formar un solo elemento alargado. Está diseñado para usarse con utensilios muy grandes como asadores y tostadores largos.
Calor retenido La superficie de vidrio para cocinar retiene el calor y permanece caliente después
de apagar el elemento(s). Se puede usar el calor retenido para conservar calientes los alimentos a temperaturas de servir por un breve período de tiempo.
Cuando se prende una luz de superficie caliente, tenga cuidado al trabajar o limpiar alrededor de la parrilla, ya que ésta aún puede estar muy caliente.
Regulador de temperatura Cada elemento radiante tiene su propio sensor para proteger la superficie de vid-
rio contra temperaturas extremas. Los reguladores funcionan automáticamente al
prender y apagar el elemento sin importar el ajuste para cocinar.
Aunque el ciclo de prender y apagar es normal, cualquiera de las siguientes
condiciones puede activar el regulador y causar que se prenda y se apague el
elemento más de lo normal:
• La base de la olla no hace contacto completo con la superficie caliente
(debido a una base deformada o poco uniforme).
• La olla está muy pequeña para el tamaño del elemento.
• La olla se secó hirviendo.
• El material o la forma de la olla transfiere el calor lentamente.
Indicador de superficie caliente La parrilla viene con una luz indicadora de superficie caliente para indicar cuando
la superficie de cocinar está demasiado caliente para poder tocarla. Cuando se
prende una luz de superficie caliente, tenga cuidado al trabajar o limpiar alrededor de la parrilla, ya que ésta aún puede estar muy caliente.
Rejillas del horno Dependiendo del modelo, la estufa viene equipada con una de las siguientes
combinaciones:
• Tres rejillas planas
• Dos rejillas planas y una rejilla de extensión completa
• Dos rejillas planas y una rejilla media
Rejillas planas del horno Las rejillas están diseñadas con un tope para detenerse antes de salir completa-
mente y para no caerse.
PRECAUCIÓN
Para evitar quemaduras, coloque las rejillas del horno en las posiciones deseadas antes de prender el horno. Siempre use guantes
cuando el horno está caliente. Si debe sacar una rejilla cuando el
horno esté caliente, no toque los elementos calentadores con los
guantes.
Insertar las rejillas en el horno
1. Agarre la rejilla firmemente en ambos lados.
2. Incline la rejilla hacia arriba para encajar el tope en el portarejillas.
Español 7
Page 92

Comenzar
3. Cambie la rejilla a una posición horizontal y empújela completamente. La rejilla debe estar recta y plana, no torcida.
Fonde de la rejilla
Frente de la rejilla
Inserte la rejilla con el fondo de la rejilla
hacia la pared trasera de la estufa.
Figura 3: Insertar una rejilla
Sacar las rejillas del horno
1. Agarre la rejilla firmemente en ambos lados y jálela hacia usted.
2. Al llegar al tope, incline la rejilla hacia arriba y jálela completamente.
Rejilla de extensión (algunos modelos)
La rejilla de extensión completa permite un acceso más fácil para cocinar alimentos. La sección inferior se extiende igual que la rejilla plana estándar. Sin
embargo, la sección superior se extiende más allá de la sección inferior, de este
modo acercando los alimentos al usuario. Para pedir una rejilla de extensión completa, contacte a Servicio o a un distribuidor cerca de su casa.
Fondo de la rejilla
Tope de
rejilla
Rejilla
superior
Tope de
rejilla supe-
Rejilla
inferior
Topes
Guía de rejilla
Descanso de la
rejilla superior
Frente de la rejilla
Figura 4: Rejilla de extensión completa
Quitar y Reemplazar
Nota: La rejilla de extensión completa debe estar en la posición cerrada cuando
la quiera quitar y reemplazar. Agarre la rejilla completa (ambas secciones).
Español 8
1. Agarre la sección inferior y jálela hacia usted.
2. Una vez que llegue al tope, agarre la sección superior y jálela hacia usted
hasta llegar al segundo tope. Si la rejilla superior no se extiende completamente, no se instaló correctamente. Vuelva a instalarla de modo que el tope
de ollas quede en el fondo del horno.
Desmontaje (para limpieza)
Las dos secciones de la rejilla se desarman para facilitar la limpieza.
1. Coloque la rejilla sobre una superficie plana en la posición cerrada con el lado superior hacia arriba.
2. Gire un lado de la rejilla superior hacia usted hasta que salga del tope (bola).
Page 93

3. Jale la rejilla y sáquela con el lado girado primero.
Comenzar
Posición cerrada
Reensamblado
Fondo de la
Tope
(Bola)
Frente de
Figura 5: Desmontaje
PRECAUCIÓN
Siempre verifique que se instale correctamente la rejilla superior
después del reensamblado. Los bordes traseros de la rejilla superior
deben quedar abajo de la guía en la rejilla inferior. NO descanse simplemente la rejilla superior sobre la inferior.
1. Para reensamblar la rejilla, sostenga la rejilla superior diagonalmente sobre la rejilla inferior.
2. Inserte un lado de la rejilla superior a la posición cerrada.
3. Gire el otro lado hacia el fondo de la rejilla hasta que rebase el tope (bola).
4. Empuje la rejilla completamente hacia adentro (Vea Figura 3).
Posición cerrada
Limpieza
Limpie las rejillas con agua jabonosa caliente. Séquelas bien. Para suciedades
persistentes, use una esponjilla de fibra metálica con jabón. NO limpie las rejillas
en el horno de autolimpieza.
Rejilla media (algunos modelos) Se puede usar la rejilla media del horno como rejilla plana sencilla o como rejilla
de tamaño medio. Con la parte derecha de la rejilla removida, usted puede colocar un artículo alto (como un pavo) en un lado de la rejilla abajo y un artículo más
corto (como una cazuela) en el otro lado. Luego se puede colocar un segundo
artículo corto en la rejilla media (arriba del primer artículo más corto). Esto permite tener un acceso más fácil a los artículos grandes y se aprovecha mejor la
cavidad del horno.
Fondo de la rejilla
Tope (Bola)
Frente de la
Figura 6: Reensamblado
Español 9
Page 94

Comenzar
Consejo: Se puede también usar la sección removible afuera del horno como un
trébedes o una rejilla de enfriamiento.
Figura 7: Rejilla media del horno
Piso del horno No coloque los alimentos directamente sobre el piso del horno. No use papel de alu-
minio o forros de protección para forrar ninguna parte de un aparato, sobre todo
bandejas de goteo de las unidades superficiales o los pisos de los hornos. La
instalación de estos forros puede causar una descarga eléctrica o un fuego.
Abertura de ventilación del horno Modelos autoestables:
La abertura de ventilación del horno se encuentra debajo de la pantalla arriba del
elemento izquierdo trasero. Es normal ver que se salga vapor de la abertura y
que se acumule condensación en la consola trasera y la parrilla. Esta área se
puede calentar cuando se usa el horno. No tape la abertura de ventilación ya que
es importante para circular el aire.
Modelos deslizables:
La abertura de ventilación del horno se encuentra arriba de la manija de la puerta.
Antes, durante y después de cocinar la abertura puede liberar aire caliente. Es
normal ver que se salga vapor de la abertura y que se acumule condensación en
esta área. Esta área se puede calentar cuando se usa el horno. No tape la abertura de ventilación ya que es importante para circular el aire.
Apagón automático El horno se apagará automáticamente después de 12 horas (24 horas si el for-
mato de la hora está ajustado para 24 horas en la sección Seleccionar Función
(Select Function).
Autolimpieza El horno incluye una función de autolimpieza que elimina la labor manual de lim-
piar su horno.
Indicadores y otras características Pitido - Señala que se debe ingresar más información o confirma la recepción de
una entrada. Un pitido señala además el fin de una función o una falla del horno.
Indicador del fin de ciclo - Se escuchan 3 pitidos consecutivos para indicar
cuando termina un modo.
Español 10
Configuraciones por default - Los modos de cocinar automáticamente seleccionan una temperatura adecuada. Cuando se necesita una temperatura diferente,
se puede cambiar ésta.
Símbolo o Número que Parpadea - Señala una configuración incompleta y
solicita otro paso o que se Oprima Start.
Códigos de Números F -Estos códigos aparecen cuando existe un problema
con la estufa.
Page 95

Comenzar
Ventilador de enfriamiento (Sólo los modelos deslizables)
El ventilador de enfriamiento está en marcha durante todos los modos del horno.
Puede funcionar también durante el uso pesado de la parrilla. Tal vez usted lo
puede escuchar y sentir aire caliente que es expulsado de la abertura de ventilación del horno. Esto es normal.
Ventilador de convección El ventilador de convección opera durante cualquier modo de convección.
Cuando el horno opera en el modo de convección, el ventilador se apaga
automáticamente al abrir la puerta. El ventilador de convección sí funciona
durante la autolimpieza. aunque no al comienzo del modo.
Nota: En algunos modelos, el ventilador de convección funciona también durante
el precalentamiento para el modo de hornear.
Panel de Control
Panel de control del horno
Luz
Hora
Apagar
Reloj
Temperatura del Horno
AM
PM
Perilla de Control
Modo Cocinar
Temperatura
Inicio
Temperatura de
Precalentar
Modo de Cocinar
Tabla 2: Panel de control del horno
Reloj – Muestra la hora del día con opción del reloj para
12 horas o para 24 horas. También muestra el cronómetro
y los tiempos asociados con los modos retardados de
cocinar y limpiar. Gire la perilla de control para alternar
entre el cronómetro y el reloj. Oprima Time y gire la
perilla de control para cambiar la hora del día o el
cronómetro.
Modo de cocinar - Oprima el botón para indicar el modo
de cocinar.
Icono del modo de cocinar – Muestra los elementos de
cocinar que están activos para el modo seleccionado. El
icono indicará además un ventilador cuando se usa el
ventilador de convección en el modo seleccionado.
Perilla de control - Se usa para fijar el reloj, los
cronómetros, seleccionar un modo de cocinar y la temperatura. Gire en sentido de las manecillas del reloj para
aumentar y en sentido opuesto para disminuir.
Luz - Oprima el botón para prender y apagar la luz del
horno.
Indicador de puerta bloqueada - El icono aparece
durante el modo de autolimpieza cuando la puerta está
cerrada. NO trate de abrir la puerta hasta que desaparezca el símbolo de bloqueo.
Indicador de Puerta
Bloqueada
Figura 8: Panel de control del horno
Off (Apagar) - Oprima el botón para apagar el horno y/o el
cajón calentador.
Temperatura del horno - Indica la temperatura del horno.
Temperatura de precalentar - Indica la temperatura del
horno durante el modo de precalentar.
Indicador de termómetro (algunos modelos) - Indica que
se insertó correctamente el termómetro en el receptáculo
en el horno.
Start (Inicio) - Oprima el botón para completar un
comando.
Temperatura - Oprima el botón para seleccionar la temperatura de cocinar.
Time (Hora) - Oprima el botón para seleccionar o cambiar
la hora del día o el cronómetro.
Timer (Reloj/Cronómetro) – Hay dos cronómetros TIMER 1 Y TIMER 2 (RELOJ 1 y RELOJ 2); Cada uno
cuenta en forma regresiva las horas y minutos. Con
menos de 60 minutos restantes, el cronómetro muestra
también los segundos. Oprima Time para acceder a los
cronómetros.
Indicador del cajón calentador - Indica que el cajón
calentador (algunos modelos) está prendido. También
muestra el ajuste del cajón calentador.
Español 11
Page 96

Comenzar
Usted controla el funcionamiento de la estufa utilizando los botones y la perilla en
la consola trasera y las perillas en el panel delantero.
Se usan los botones en la consola trasera, junto con la perilla en la consola para
seleccionar un modo del horno, fijar la temperatura del horno, poner la hora y
para configurar su estufa. Para usar un botón, oprima la parte central de ésta con
la punta plana de su dedo. Se escuchará un pitido para indicar que se aceptó la
selección. Gire la perilla en la consola trasera a la posición deseada y oprima
Start.
Se usan las perillas en el panel delantero de la estufa para controlar la temperatura de los elementos. Empuje hacia abajo y gírela a la temperatura deseada.
Vea las secciones sobre Usar la Parrilla, Usar el Horno y Usar el Cajón Calentador para instrucciones detalladas.
El reloj
Acerca del reloj • Siempre ponga el reloj después de la instalación o de una falla de luz. Una
vez que regresa la corriente eléctrica al horno, el reloj regresa por default a
12:00 am.
• La hora del día aparece en horas y minutos.
• La hora del reloj aparece durante todas las operaciones del horno, excepto
cuando está funcionando el cronómetro.
• El horno está preconfigurado a un reloj de 12 horas e indica AM y PM. Para
cambiar a un reloj de 24 horas, vea la sección "Select Function” (Seleccionar
Función).
• Si no se termina la operación de poner la hora, el horno emitirá pitidos
periódicos como recordatorio para poner la hora del reloj. Oprima OFF para
apagar los pitidos.
Poner el reloj 1. Aparecerá CLOCK (Reloj) y los dígitos de la
hora parpadean. Gire la perilla para seleccionar la hora y am o pm.
2. Oprima TIME (Hora). Aún aparece CLOCK y los dígitos de minutos parpadearán.
3. Gire la perilla. Ajuste los minutos.
4. Oprima TIME y el reloj queda configurado.
Nota: Si no se termina la operación, el horno emitirá pitidos periódicos como
recordatorio para poner la hora del reloj. Oprima OFF (Apagar).
Cambiar el reloj 1. Oprima TIME (Hora). TIMER 1 (Cronómetro)
parpadeará en la pantalla.
2. Gire la perilla para seleccionar CLOCK.
3. Oprima TIME y parpadearán los dígitos de la hora.
4. Gire la perilla para cambiar las horas.
5. Oprima TIME nuevamente y parpadearán los dígitos de minutos.
6. Gire la perilla para cambiar los minutos.
7. Oprima TIME nuevamente y el reloj quedará configurado.
Nota: Para cancelar la selección de la HORA al poner el reloj, oprima OFF (Apagar) en cualquier momento estando en el modo del reloj.
12: 00
0: 00
HR:MIN
AM
AM
CLOCK
RELOJ 1
El Menú Select Functions (Seleccionar Funciones)
Español 12
SELECCIONAR FUNCIONES es la sección del menú donde ud. puede configurar
o cambiar las siguientes opciones de su estufa.
Para acceder al menú SELECT FUNCTION (Seleccionar Función)
Page 97

Comenzar
1. Mantenga oprimido el botón MODO DE COCINAR (COOKING MODE) por cinco (5) segundos. SELECT FUNCTION aparece en la pantalla.
2. Gire la perilla lentamente a la opción deseada. Habrá un ligero retardo antes
de poder ver cada mensaje (u opción) en la pantalla. Gire la perilla lentamente y espere aproximadamente un segundo para ver la siguiente opción
en la pantalla.
3. Oprima START para seleccionar la función.
4. Gire la perilla al ajuste deseado y oprima START. Cuando se han completado todos los ajustes para la función, SELECT FUNCTION vuelve a parpadear.
5. Oprima OFF para salir del menú Seleccionar Función.
Cambiar el volumen del pitido
Cambiar la escala de la temperatura
Prender y apagar el reloj Se puede apagar el reloj en la pantalla. Por default el reloj aparece en la pantalla.
Se puede cambiar el volumen del pitido de control de LOW (Bajo) a HIGH (Alto).
El volumen por default es Mediano.
1. Acceda al menú SELECT FUNCTION.
2. Gire la perilla en sentido del reloj hasta que aparezca VOLUME (Volumen).
3. Oprima START.
4. Gire la perilla para seleccionar el nivel de volumen, Bajo, Mediano o Alto.
5. Oprima START.
El horno ha sido preconfigurado a la escala de temperatura en grados Fahrenheit.
La opción le permite cambiar entre grados Fahrenheit y grados Celsio.
1. Acceda al menú SELECT FUNCTION.
2. Gire la perilla en sentido del reloj que aparezca SELECC TEMP F-C.
3. Oprima Start.
4. Gire la perilla para seleccionar grados Fahrenheit (F) o Celsio (C).
5. Oprima Start para aceptar la nueva seleción.
1. Acceda al menú SELECT FUNCTION.
2. Gire la perilla en sentido del reloj hasta que aparezca CLOCK DISPLAY.
3. Oprima START.
4. Gire la perilla para seleccionar ON (Prender) u OFF (Apagar).
5. Oprima START para aceptar la nueva selección.
Acceder al modo de demostración
Cambiar el idioma en la pantalla
Bloquear/desbloquear el panel de control del horno
El modo de demostración es para uso exclusivo de tiendas que venden aparatos
electrodomésticos.
Los idiomas posibles son Inglés, Español y Francés. El idioma por default es el
Inglés. Nota: El menú SELECT FUNCTION (SELECCIONAR FUNCIONES)
aparece solamente en inglés, sin importar el idioma seleccionado.
1. Acceda al menú SELECT FUNCTION.
2. Gire la perilla en sentido del reloj hasta que aparezca el idioma deseado.
3. Oprima START.
4. Gire la perilla en sentido del reloj para seleccionar un idioma diferente.
5. Oprima START para aceptar el idioma nuevo.
Se puede bloquear el teclado por cuestión de seguridad. Se puede usar esta
opción para prevenir cambios a las funciones del horno. Esta función NO bloquea
la puerta del horno.
1. Acceda al menú SELECT FUNCTION.
2. Gire la perilla en sentido del reloj hasta que parpadee LOCK KEYS.
3. Oprima Start. Aparece KEY PAD LOCKED. La pantalla emite un pitido cuando se oprime una tecla para indicar que el teclado está bloqueado.
Español 13
Page 98

Comenzar
4. Para desbloquear los teclados, oprima COOKING MODE (Modo de Cocinar) y mantenga oprimido por 5 segundos. La pantalla indicará UNLOCKING KEY PAD.
5. Cuando está desbloqueado, el reloj volverá a aparecer en la pantalla.
Cambiar la compensación de la temperatura del horno
Restablecer los ajustes de fábrica
Poner la opción Sabatina
Esta opción permite ajustar la temperatura del horno cuando los alimentos salen
consistentemente muy dorados o muy poco dorados.
1. Acceda al menú SELECT FUNCTION.
2. Gire la perilla en sentido del reloj hasta que aparezca COMP HORN TEMP.
3. Oprima START. Aparece 0° F.
4. Gire la perilla a la derecha para aumentar la temperatura a +25°F y a la
izquierda para disminuir a -25°F. La temperatura cambia en incrementos de
5°F.
5. Oprima START para aceptar el cambio de la temperatura.
Se usa esta opción para regresar todas las opciones modificadas del menú
“Select Functions” a los parámetros originales de fábrica (o de default).
1. Acceda al menú SELECT FUNCTION.
2. Gire la perilla en sentido del reloj hasta que aparezca RESET DEFAULTS.
3. Oprima START. La pantalla muestra SELECT FUNCTION.
Acerca de la opción Sabatina
La opción Sabatina es para religiones que no permiten “trabajar” los Sábados o
los Domingos.
• El horno horneará por 73 horas antes de apagarse automáticamente.
• Mientras hornea en el modo Sabatino, la pantalla indicará SABBATH
(Sábado) y el icono de BAKE (Hornear). El reloj estará apagado y no aparece
ninguna temperatura en la pantalla.
• Durante el modo Sabatino, sólo el botón OFF (Apagar) funcionará. Oprima
OFF en cualquier momento durante el modo Sabatino para terminar el modo
y apagar el horno.
• Al final de las 73 horas, el horno se apagará automáticamente y la pantalla
indicará SABBATH END. Oprima OFF para regresar a la hora de día.
• El cajón calentador no funciona con la opción Sabatina a menos que la
opción es activada también en el horno.
• NO se puede usar el termómetro para carne durante el modo Sabatino.
Español 14
Poner la opción sabatina solamente para el horno
1. Verifique que el horno esté apagado.
2. Acceda al menú SELECT FUNCTION.
3. Gire la perilla en sentido del reloj hasta que aparezca SABBATH OPTION.
4. Oprima START. La pantalla indicará BAKE (Hornear) y la temperatura empieza a parpadear.
5. Gire la perilla para fijar la temperatura del horno.
6. Prenda la luz del horno si así lo desea (oprima LIGHT) (Luz).
Nota: No se puede cambiar la luz después de este punto. Se quedará prendida o
apagada durante todo el modo Sabatino.
7. Oprima START. El horno comienza después de 5 segundos.
El horno funciona durante 73 horas y luego se apaga automáticamente.
Poner la opción sabatina para el horno y el cajón calentador.
Nota: El cajón calentador no funciona con la opción Sabatina a menos que la
opción es activada también en el horno.
Page 99

Comenzar
1. Cambie el cajón calentador al ajuste de calor deseado. Vea “Prender el cajón calentador” en la página 23
2. Verifique que el horno esté apagado.
3. Acceda al menú SELECT FUNCTION.
4. Gire la perilla en sentido del reloj hasta que aparezca SABBATH OPTION.
5. Oprima Start. La pantalla indicará BAKE (Hornear) y la temperatura empieza a parpadear.
6. Gire la perilla para fijar la temperatura del horno.
7. Prenda la luz del horno si así lo desea (oprima LIGHT) (Luz).
Nota: No se puede cambiar la luz después de este punto. Se quedará prendida o
apagada durante todo el modo Sabatino.
8. Oprima Start. El horno comienza después de 5 segundos. La opción Sabatina es activada para el cajón calentador y el horno.
El horno y el cajón calentador funcionan durante 73 horas y luego se apagan
automáticamente.
Poner la opción sabatina solamente para el cajón calentador
El cajón calentador no funciona con la opción Sabatina a menos que la opción es
activada también en el horno. Vea “Poner la opción sabatina para el horno y el
cajón calentador.” en la página 14.
Cambiar el formato de la hora
Prender o Apagar la
0.0
conversión automática
al modo de convección
Se puede configurar el reloj a un formato de 12 horas o de 24 horas. Por default
el reloj del horno tiene el formato de 12 horas.
1. Acceda al menú SELECT FUNCTION.
2. Gire la perilla en sentido del reloj hasta que aparezca TIME FORMAT.
3. Oprima Start.
4. Gire la perilla para seleccionar el formato de 12 horas o de 24 horas.
5. Oprima Start para aceptar la nueva seleción.
Esta opción convierte automáticamente las temperaturas en empaques o recetas
para el uso con el modo de hornear por convección. Por default está “prendido”.
1. Acceda al menú SELECT FUNCTION.
2. Gire la perilla en sentido del reloj hasta que aparezca AUTO CONVECT BAKE.
3. Oprima Start.
4. Gire la perilla para seleccionar ON u OFF (Prender o Apagar)
5. Oprima Start para aceptar la nueva selección.
Antes de usar el aparato por primera vez
• Quite todo el material de empaque y las etiquetas de la estufa. Asegúrese de
quitar los materiales de empaque en el interior del horno y del cajón calentador.
• Estando fría, límpie el aparato con una esponja limpia, húmeda y séquelo.
• Aplique la crema de limpieza para la parrilla de cerámica que se incluye.
Saque brillo con un trapo limpio. Consulte la sección de Cuidado y Limpieza.
• Durante los primeros usos puede haber un ligero mal olor; esto es normal y
desaparecerá.
• Resultados óptimos de cocinar dependen de seleccionar y usar los utensilios
correctos.
• La superficie de cocinar retiene el calor y permanece caliente hasta por 30
minutos después de apagar los elementos.
• Lea todas las precauciones de seguridad y la información en el manual de
uso y cuidado antes de operar el aparato.
Español 15
Page 100

Funcionamiento - Parrilla
Esta sección explica cómo operar la parrilla. Vea “Sacar el mayor provecho de su
aparato” en la página 24 para indicaciones de cómo mejorar los resultados con la
parrilla.
Acerca de la parrilla
Use la parrilla para aplicaciones superficiales de cocina como hervir, freir, hervir a
fuego lento, cocer al vapor y sofreir.
Funcionamiento
PRECAUCIÓN
• Nunca coloque alimentos envueltos con papel de aluminio
directamente en la superficie de vidrio cerámico para cocerlos. El
papel de aluminio puede derretirse y quemarse y causar daños
permanentes.
• Plástico, papel y tela pueden derretirse o quemarse cuando
tienen contacto con una superficie caliente. No permita que estas
cosas tengan contacto con la superficie de cerámica caliente.
• No permita que las ollas hiervan hasta quedar secas. Esto puede
dañar la olla, el elemento y el vidrio de la parrilla permanentemente.
Ajustar la temperatura de los quemadores
Perilla de control para un elemento sencillo
Perilla de control para el elemento doble
Para prender un elemento sencillo, presione la perilla de control y gírela en cualquier dirección al ajuste de calor deseado.
Localización del Elemento
Figura 9: Perilla de control de un elemento sencillo
Para prender el pequeño elemento interior, presione la perilla de control y gírela
en sentido contrario del reloj. Ajústela al nivel de calor deseado.
Español 16
 Loading...