

Page 1
BOSCH 5000 SERIES WALL OVENS
Useand Care ManuaJ
'OUR LIFE, OUR NSPIRATION
Page 2
Tabme of Contents
Impo_ant Safety Instructions ..................... 1
Getting Started
To Set the Clock:............................................... 2
To Use the Oven Lights: ..................................... 2
Oven Parts and Accessories: .............................. 3
Oven Control Panel............................................ 4
Command buttons ............................................. 4
Display ............................................................. 4
Knobs............................................................... 4
Other Features .................................................. 4
Genera_ Oven Tips
Suggestions for Use........................................... 5
Advantages of Convection Cooking ..................... 5
About Convection Cooking* ............................... 5
Convection Broil ................................................ 10
Convection Roast .............................................. 11
Dehydrate ......................................................... 12
Self-Cleaning ..................................................... 13
Maintenance
To Replace a Light Bulb ..................................... 15
Cleaning ........................................................... 15
Removing the Oven Door ................................... 16
Do-][t-Yourseff Procedures
To Activate Sabbath Mode .................................. 17
To Change Clock Format .................................... 17
To Change Temperature Format ........................ 17
To Change Temperature Calibration .................... 17
To Change Operating Voltage ............................. 17
Oven Operation Overview: ................................. 5
Preheating the Oven .......................................... 5
Bakeware ......................................................... 5
Oven Racks....................................................... 6
Selecting the Rack Position ................................ 6
Using Multiple Racks.......................................... 6
Condensation .................................................... 7
Temperature Sensor .......................................... 7
High Altitude Baking .......................................... 7
Food Serving Temperature Guidelines ................. 7
Setting the Oven
To Set the Cooking Mode: .................................. 8
To Set the Timer: .............................................. 8
To Set the Cooking Mode using Fast Preheat: ...... 8
Serf HeLp
Baking .............................................................. 18
Operation ......................................................... 19
Problem Solving Steps ....................................... 19
Service Data Record .......................................... 20
Obtaining Service .............................................. 19
Warranty .......................................................... 20
Timed Cooking Modes ....................................... 8
To Set the Timed Mode: ..................................... 8
To Set the Delayed Mode: .................................. 8
Oven Modes
Bake ................................................................ 9
Convection Bake ............................................... 9
Broil ................................................................. 10
Page 3
Important Safety Instructions
Please read all instructions before using this appliance.
When properly cared for, your new Bosch oven
has been designed to be a safe, reliable appliance,
Read all instructions carefully before using this
oven. These precautions will reduce the risk of
burns_ electric sheck, fire and injury to persons.
When using kitchen appiiances_ basic safety
precautions must be followed_ including the
following:
This appliance must be properly installed and
grounded by a qualified technician, Connect only to
properly grounded outlet. See electric preparation
and connection instructions in the Installation
Instructions.
This appliance should be serviced only by a
qualified service technician. Contact the nearest
authorized service center for examination, repair or
adjustment.
Do not repair or replace any part of the oven
unless spedfically recommended. Refer service to
an authorized service center.
Do not operate this appliance if it is not working
properly or if it has been damaged, until an
authorized technician has examined it.
Install or locate this appliance only in accordance
with the Installation Instructions.
Use this oven only as intended by the
manufacturer. If you have any questions, contact
the manufacturer.
Do not cover or block any openings on this
appliance.
Use this appliance only for its intended use as
described in this manual. Do not use corrosive
chemicals, vapors, or nonfood products in this
appliance. This type of oven is specifically designed
to heat or cook. It is not designed for industrial or
laboratory use. The use of corrosive chemicals in
heating or cleaning will damage the appliance.
In the event that personal clothing or hair catches
fire, DROP AND ROLL IMMEDIATELY to extinguish
flames.
This oven is intended for residential use only. It is
not approved for outdoor use.
REGARDING PET BIRDS
Birds have very sensitive respiratory systems. Keep
pet birds out of the kitchen or other rooms where
kitchen fumes could reach them. During Self=
Clean mode, fumes that may be harmful to birds
are released. Other kitchen fumes, such as from
overheating margarines and cooking oils, may also
be harmful.
Do not allow children to use this appliance unless
closely supervised by an adult. Children and pets
should not be left alone or unattended in the area
where the appliance is in use. Never allow children
to sit or stand on any part of the oven.
Do not store items of interest to children above the
oven. If children should climb onto the appliance to
reach these items, they could be seriously injured.
To reduce the risk of fire in the oven cavity:
!. Do not store flammable materials in or near the
oven.
2. Do not use water on a grease fire. Smother fire or
use a dry chemical or foam=type extinguisher.
3. Have a fire extinguisher readily available and highly
visible next to any cooking appliance. Be sure you
know how to use it.
zk Do not overcook food. Carefully attend oven if
paper, plastic or other combustible materials are
placed inside the oven.
5. Do not use the cavity for storage purposes. Do not
leave paper products, cooking utensils or food in
the cavity when not being used.
6. If materials inside the oven should ignite, keep
oven door closed. Turn oven off and disconnect the
circuit at the circuit breaker box.
7. Do not block any vent openings.
8. Be sure the blower fan runs when the oven is in
operation. If the fan does not operate, do not use
the oven. Call an authorized service center.
9. Never use the oven to warm or heat a room. This
can damage the oven parts.
!0. For personal safety, wear proper clothing. Loose
fitting garments or garments with hanging sleeves
should never be worn while using this appliance.
WARNING
The California Safe Drinking Water and Toxic
Enforcement Act requires businesses to warn
customers of potential exposure to substances
which are known by the State of California to
cause cancer or reproductive harm.
The elimination of soil during self-cleaning
generates some by=products which are on this list
of substances.
To minimize exposure to these substances, always
operate this oven according to the instructions in
this manual and provide good ventilation to the
room during and immediately after self-cleaning
the oven.
Continued on next page
English _ !
Page 4
Important Safety Instructions
Please read all instructions before using this appliance.
SAFETY PRECAUTIONS
• Tie long hair so that it doesn't hang loose.
The heating elements may" be hot even though
they are dark in color. Interior surfaces of an oven
become hot enough to cause burns.
During and after use, do not press or let clothing
or other flammable materials contact the heating
elements or the interior surfaces of the oven until
they have had sufficient time to cool.
The trim on the top and sides of the oven door
may"become hot enough to cause burns.
Use care when opening the door. Open the door
slightly to let hot air or steam escape before
removing or replacing food.
Do not heat unopened food containers. Buildup
of pressure may cause the container to burst and
result in injury,
Always place oven racks in desired location while
oven is cool, If a rack must be moved while oven
is hot, do not let potholder contact the heating
elements.
Use only dry potholders. Hoist or damp potholders
on hot surfaces may result in burns from steam. Do
not let potholders touch hot heating elements. Do
not use a towel or other bulky cloth.
SAFETY PRECAUTIONS WITH SELF-CLEANING
OVEN
Confirm that the door locks and will not open
once the door lock icon appears. If door does not
lock, press OVEN OFF and do not run Self-Clean.
Phone 800-944-2904 for service (see page 19 for
obtaining service).
Note: During a normal SelfiClean and a Delayed
Self-Clean cycle, the door locks within 25 to 30
seconds after start is pressed.
Do not clean the door gasket. It is essential for
a good seal. Care should be taken not to rub,
damage, move or remove the door gasket.
Do not use commercial oven cleaners or oven liner
protective coatings of any kind in or around any
part of the oven.
Clean only oven parts listed in this manual.
Before selfideaning the oven, remove the
broiler pan, aH oven racks, other utensils and
excess soft spillage,
Listen for fan. If no fan is heard, call for service.
See page !9.
6etting Started
To Set the Clock=
$. Press SET CLOCK. The hours flash and CLOCK
appears in the display.
2. Press + or oto set hour.
3. Press SET CLOCK. The minutes flash.
4. Press + or o to set minutes.
5. Press SET CLOCK
The dock appears in the display at all times except
when the timer or a timed cooking operation is run-
ning.
To Use the Oven Lights:
!. Press LIGHT to turn the oven lights on or off.
In double ovens, the lights in both ovens will turn
on or off together. To control the lights in one oven
only:
1. Press UPPER/LOWER to select the oven
2. Press LIGHT to turn lights on or off.
Oven lights turn on automatically when:
o the door is opened.
o the oven is turned on.
Oven lights will turn off automatically when:
o the oven is turned off.
o the oven mode is cancelled.
The lights do not operate in the SelfiClean mode.
2 • English
Page 5
Getting Started
/
/
\
/
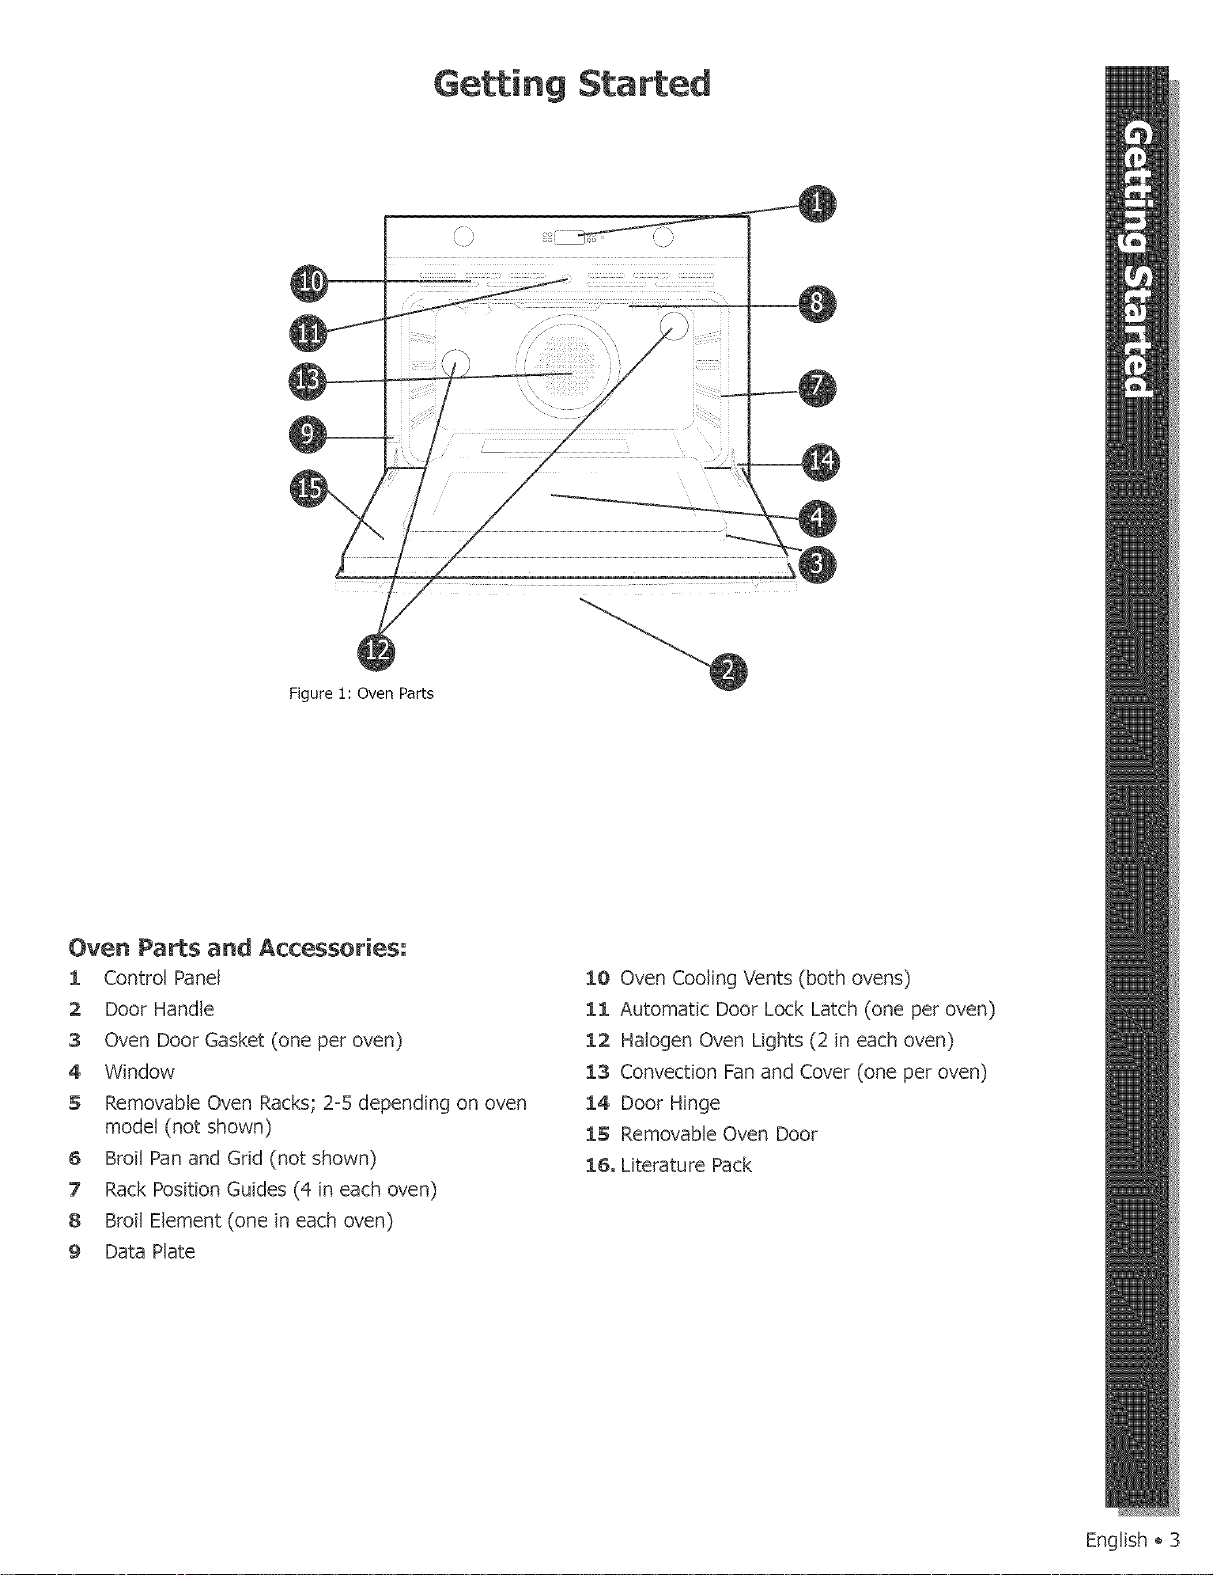
Figure 1: Oven Parts
Oven Parts and Accessories:
1 Control Panel
2 Door Handle
3 Oven Door Gasket (one per oven)
4 Window
5 Removable Oven Racks; 2-5 depending on oven
model (not shown)
6 Broil Pan and Grid (not shown)
7 Rack Position Guides (4 in each oven)
8 Broit Element (one in each oven)
9 Data Plate
10 Oven Cooling Vents (both ovens)
11 Automatic Door Lock Latch (one per oven)
12 Halogen Oven Lights (2 in each oven)
13 Convection Fan and Cover (one per oven)
14 Door Hinge
15 Removable Oven Door
16. Literature Pack
English _B
Page 6
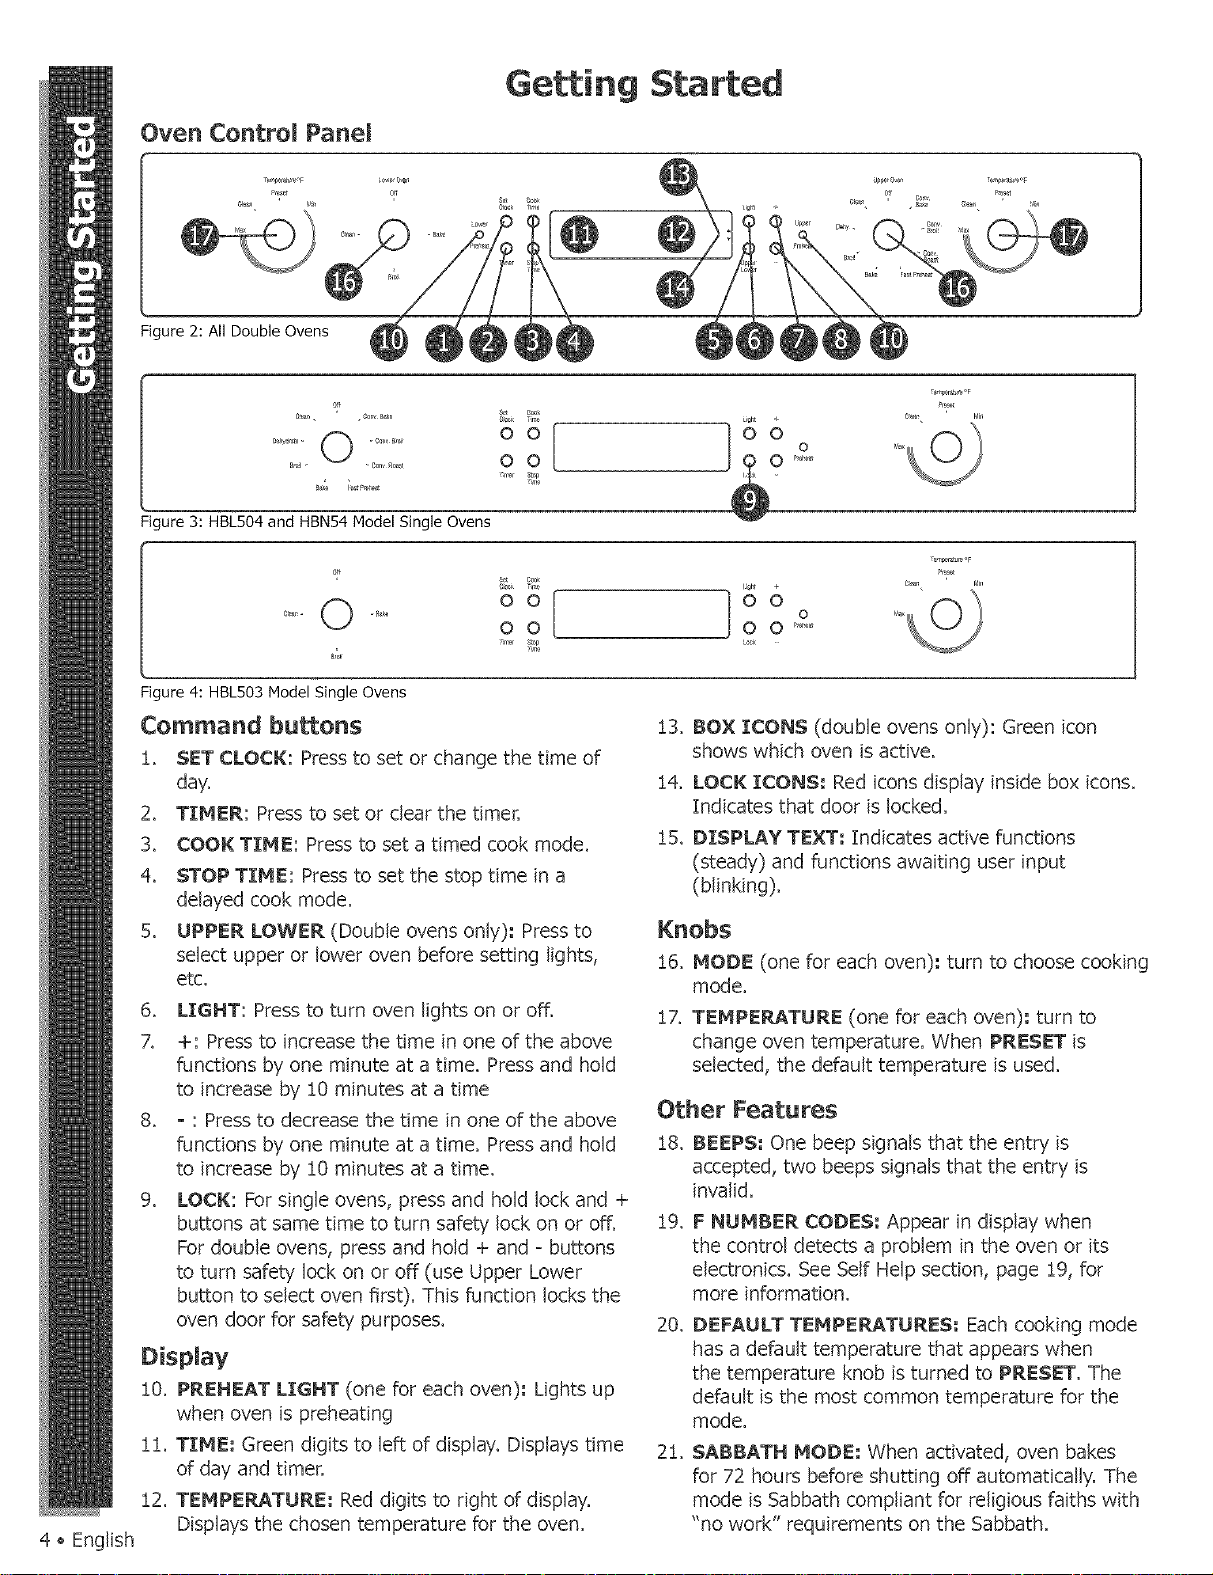
Figure 2: All Double Ovens
Figure 3:HBL504 and HBN54 Model Single Ovens
Getting Started
ol_k
u_ht
4 _ English
O B_
Figure 4:HBL503 Model Single Ovens
o o
Command b ttons
:[. SET CLOCK: Press to set or change the time of
day.
2. TI_ER: Press to set or clear the timer.
3. COO!(TIME: Press to set a timed cook mode.
4. STOP TI_E: Press to set the stop time in a
delayed cook mode.
5. UPPER LOWER (Double ovens only): Press to
select upper or lower oven before setting lights,
etc.
6. LIGHT: Press to turn oven lights on or off.
7. +: Press to increase the time in one of the above
functions by one minute at a time. Press and hold
to increase by :[0 minutes at a time
8. o : Press to decrease the time in one of the above
functions by one minute at a time. Press and hold
to increase by :[0 minutes at a time.
9. LOCK: For single ovens, press and hold lock and +
buttons at same time to turn safety lock on or off.
For double ovens, press and hold + and - buttons
to turn safety lock on or off (use Upper Lower
button to select oven first). This function locks the
oven dOOrfor safety purposes.
Display
:[0. PREHEAT LIGHT (one for each oven): Lights up
when oven is preheating
:[:[. TIHE: Green digits to left of display. Displays time
of day and timer.
:[2. TEMPERATURE; Red digits to right of display.
Displays the chosen temperature for the oven.
o o
OO o
O O ......
to,
:[3. BOX ICONS (double ovens only): Green icon
shows which oven is active.
:[4. LOCK ICONS: Red icons display inside box icons.
Indicates that door is locked.
:[5. DISPLAY TEXT: Indicates active functions
(steady) and functions awaiting user input
(blinking).
Knobs
:[6. _OD_ (one for each oven): turn to choose cooking
mode.
:[7. TEMPERATURE (one for each oven); turn to
change oven temperature. When PRESET is
selected, the default temperature is used.
Other Features
:[8. BEEPS: One beep signals that the entry is
accepted, two beeps signals that the entry is
invalid,
:[9. F HU_B_R COD_S; Appear in display when
the control detects a problem in the oven or its
electronics. See Self Help section, page :[9, for
more information.
20. DEFAULT TEMPERATURES: Each cooking mode
has a default temperature that appears when
the temperature knob is turned to PRESET. The
default is the most common temperature for the
mode.
2:[. SABBATH MODE: When activated, oven bakes
for 72 hours before shutting off automatically. The
mode is Sabbath compliant for religious faiths with
"no work" requirements on the Sabbath.
Page 7
General Oven Tips
Suggestions for Use
• Use the cooking charts as a guide.
• Do not set pans on an open oven door.
Use the interior oven light to view the food through
the oven door window rather than opening the
door frequently.
• Place pans in center of oven.
Advantages of Convection Cooking
Even baking.
• Juices and flavors are sealed in.
• Air=leavened foods such as cream puffs, souffles,
meringues and yeast breads are higher and lighter.
Multiple rack cooking with no flavor transfer.
• No special bakeware required.
Broiling thicker cuts of meat is possible with
convection broil.
• Saves time and energy.
About Convection Cooking
Standard cooking modes (bake, broil, etc.) use heat
radiated from one or more elements to cook food.
Convection modes use both heat from the elements
and a fan in the back of the oven to continuously
circulate the heated air throughout the oven.
The result is faster, more even cooking. Convection
modes seal in natural moisture and flavors and can also
save time and energy since most foods can be cooked
at lower temperatures and in less time (never reduce
temperature when cooking meat).
Cook time is also reduced because multiple racks can
be used at one time. Cook several sheets of cookies or
several different dishes at the same time.
The oven also uses convection to dehydrate. The low
heat from the elements is circulated through the oven
by the convection fan to slowly remove moisture.
Refer to "Oven Modes" in this manual for further
information on each convection mode.
Preheating the Oven
Preheat the oven when using the bake and
convection bake modes unless the recipe
recommends otherwise.
Use fast preheat mode to shorten preheat time.
Selecting a higher temperature does not shorten
the preheat time.
Preheating is necessary" for good results when
baking cakes, cookies, pastries and breads.
• Place oven racks in their proper position before
preheating.
During preheat, the selected cooking temperature
is displayed.
A beep will confirm that the oven is preheated and
the preheat light will turn off.
When operating on 208 V, preheat time may" be
slightly" Iongen
Bakeware
Glass baking dishes absorb heat. Reduce oven
temperature 25° F when baking in glass.
Use pans that give the desired browning. The type
of finish on the pan will help determine the amount
of browning that will occur.
Shiny, smooth metal or light nonstick/anodized
pans reflect heat, resulting in lighter, more delicate
browning. Cakes and cookies require this type of
bakeware.
Dark, rough or dull pans will absorb heat resulting
in a browner, crisper crust. Use this type for pies.
For brown, crisp crusts, use dark nonstickianodized
or dark, dull metal utensils or glass bakeware
Insulated baking pans may increase the length of
cooking time.
Do not cook with the empty broiler pan in the oven
as this could change cooking performance. Store
the broil pan outside of the oven.
Use baking sheets that are 19"x14" or smaller for
best results.
Oven Operation Overview:
Operation of the oven is through knobs and
command buttons on the control panel.
Single oven models have one mode knob. Double
oven models have two mode knobs (one for each
oven).
Single oven models have one temperature knob.
Double oven models have two temperature knobs.
*HBL503 models do not have convection features.
The command buttons allow you to set the clock, the
timer, the cook time (for timed and delayed cooking),
the stop time (for delayed cooking) the oven lights and
the child safety lock.
See the Control Panel/Display and Oven Operation
sections for further details.
English o5
Page 8

General Oven Tips
Oven Racks
• The oven has rack guides at four levels as shown in
the illustration on page 7
Rack positions are numbered from the bottom rack
guide (#i) to the top (#4).
Check cooking charts for best rack positions to use
when cooking.
Make sure that the racks are level once they are in
position.
• The racks are designed to stop when pulled
forward to their limit.
CAUTION! Never use aluminum foil to cover the
oven racks or to line the oven. Heat trapped under
the foil can cause damage to the oven liner.
CAUTION: To avoid possible burns,
place oven racks in desired positions before turning
the oven on. Always use oven mitts when the oven is
warm.
Removing from oven: Grasp rack firmly on both sides
and pull rack toward you. When the stop is reached,
tilt rack up and pull the rest of the way out.
Replacing in oven: Grasp rack firmly on both sides.
Tilt rack up to allow stop into rack holder. Bring rack to
a horizontal position and press the rest of the way in.
Rack should be straight and fiat, not crooked.
r_6_ _._g69 Back of Rack
e_ X__ -"-:' .... .....
Figure 5: The Flat Rack
SeLecting the Rack Position
See graphic at right.
Rack 4 = Highest position. Use for melting cheese
quickly.
Rack 3 = Use for broiling most meats and for toasting
bread.
Rack 2 =Use for pies, casseroles, breads, bundt or
pound cakes, small roasts or poultry. Also use for
broiling thicker cuts of meat.
Rack 1 =Lowest Position. Use for angel food cake,
large roasts and turkey.
Using Multiple Racks
2 Rack baking: Use positions ! and 3.
3 rack baking: Use positions 2, 3 and 4.
When baking four cake layers at the same time,
stagger pans so that one pan is not directly above
another. For best results, place cakes on front of upper
rack and back of lower rack (See graphic at right).
Allow 1" -! 1/2" air space around pans.
4
3
2
1
Figure 6: Rack Positions
Rack 3
Rack 1
6 • English
Figure 7: Multiple Rack Pan Placement
Page 9

General Oven Tips
Condensation
The oven vent is located above the oven door. It is
normal to see steam escaping from the vent and
condensation may collect on areas above the vent such
as the display.
Temperature Sensor
Your new oven has an electronic temperature sensor
that accurately maintains the temperature selected.
Your previous oven may have had a mechanical
thermostat that drifted gradually to a higher
temperature. As a result, you may need to adjust your
favorite recipes when cooking in your new oven.
High Altitude Baking
When cooking at high altitude, recipes and cooking
time will vary from the standard. For accurate
information, write the Extension Service, Colorado
State University, Fort Collins, Colorado 80521. There
may be a charge for the bulletins.
Table 1: Food Temperature Guidelines
Food Serving Temperature Guidelines from FS][S
(USDA Food Safety & Inspection Service)
!40 ° F (60 ° C)
Ham, precooked (to reheat)
!45 ° F (63 ° C)
Fresh Beef, Veal, Lamb (medium rare)
!60 ° F (7! ° C)
Ground Heat & Heat Hixtures (Beef, Pork, Veal,
Lamb)
Fresh Beef, Veal, Lamb (medium)
Fresh Pork (medium)
Fresh Ham (raw)
Egg Dishes
Note: Eggs (alone, not used in a recipe) - cook until yolk & white are firm.
!65 ° F (74 ° C)
Ground Meat & Meat Mixtures (Turkey, Chicken)
Stuffing (cooked alone or in bird)
Leftovers & Casseroles
!70 ° F (77 ° C)
Fresh Beef, Veal, Lamb (well done)
Poultry breasts
Fresh Pork (well done)
180° F (82 ° C)
Chicken and Turkey, (whole)
Poultry (thighs and wings)
Duck and Goose
English _ 7
Page 10

Setting the Oven
To
Set the Cooking Mode:
1,
Turn mode knob to selectcookingmode.
2,
Turn temperature knob to select temperature,
Select PRESETto use the default temperature.
Red preheat light, oven light and oven fan turn on
as oven preheats. When the preheat temperature
is reached, the red preheat light goes out and the
oven beeps,
To Set the Timer:
!, Press TIMER. TIMER appears in the display,
2, Press TIMER again, The hours flash.
3, Press + or ° to set hours.
4, Press TIMER, The minutes flash,
5, Press + or ° to set minutes,
6, Press TIMER.
Beeps sound when the time ends,
Timed Cooking Modes
Use timed cook to turn the oven off automatically
after cooking. Delayed cook also turns the oven on
automatically.
In double oven models, both ovens can be set to
operate on independant timed modes.
• The dock is set to the correct time of day.
The timed mode turns off the oven at the end of
the cook time.
To Set the Timed Mode:
!, Turn knobs to select the mode and temperature,
2, Press COOK TIME twice, The hours flash.
3, Press + or ° to set number of hours.
Note: Time required for the oven to reach
temperature must be included in the set cooking
time.
4, Press COOK TIME again, Minutes flash,
5, Press + or -to change the number of minutes,
6, Press COOK TIME to confirm cooking time,
At the end of the programmed cooking time, the
oven wiUautomaticaUy turn off,
To Set the Delayed Mode:
To Set the Cooking Mode using Fast
Preheat:
!, Turn mode knob to FAST PREHEAT,
2, Turn temperature knob to select temperature.
Red preheat light, oven light and oven fan turn on
as oven preheats. When the preheat temperature
is reached, the red preheat light goes out and the
oven beeps,
3, Turn knob to selectcooking mode,
4. Place food in oven.
.......... REMI ------ .................... turnSReminderOff.DisplaYbeeossoundS_q°WSandENDcoKoKandtheTiMEovenflashes.beeps.
When using fast preheat, you must select the
cookin_
I in the oven. J TIP:
mode afterpreheatand beforeplacingfoodI
!, FoUow steps ! through 6,
2, Press STOP TIME twice. DELAY appears in the
display, STOP TIME and the I_eurs flash,
3, Press + or ° to change the hours.
4, Press STOP TIME again. Minutes flash.
5. Press + or -to change the minutes.
6. Press STOP TIME to confirm stop time.
The oven automatically calculates the time of day
to start.
At the end of the programmed cooking time, the oven
Press COOK TIME to view timed mode
information.
Press STOP TIME to view delayed mode
information.
Press TIMER to view timer,
8 • English
Page 11

Oven
Modes
Bake
Baking is cooking with dry, heated air. Both the upper
and lower elements cycle to maintain the oven tem-
perature:
Figure 8: Bake
The bake mode can be used to prepare a variety of
food items, from pastries to casseroles. It can also be
used to roast meats,
For Best Results:
When baking on two or more racks, use convection
bake instea&
Convertingfrom standard bake
to convection bake
Reduce recipe temperature by 25° R
Check food for doneness early:
If recipe calls for .::
1 = 15 min. 3 min. early
16 - 30 min. 5 min. early
31 min. = 1 hr. 10 min. early
Convection Bake
Convection baking is similar to baking. In this case,
heat comes from a third element behind the backwall.
The main difference in convection baking is that the
heat is circulated throughout the oven by the convec-
tion fan:
Figure 9: Convection Bake
The convection bake mode is well-suited for baking
large quantities of food on multiple racks. It can be
used to prepare cookies, pastries, breads, snack foods
and appetizers among other items. DO NOT use con-
vection bake for meats. Use convection roast instead.
The benefits of convection baking include:
Slight decrease in cooking time
o Three rack cooking
Higher volume (yeast items rise higher)
Nore items cooked at once
For Best Results:
o Reduce recipe temperature by 25° F. Refer to the
convection baking chart for examples.
Place food in low-sided, uncovered pans such as
cookie sheets without sides.
Center baking pans side to side on the oven rack.
Do not use convection bake for custards, quiches,
pumpkin pie, or cheesecakes. These items do not
benefit from the convection-heating process. Use
standard bake instead.
Table 2: Convection Bake Chart
* The convection bake temperature is 25° F less than
recommended on packages or recipes. The tern
perature in this chart has been reduced 25° F.
_* This chart is a guide. Actual times depend on the
mixes or recipes baked. Follow recipe or package
directions and reduce temperature appropriately.
*** When convection baking on two racks, use posi
tions one and three. When using three racks, use
positions two, three and four.
Cake
Cupcakes 2 325 17-19
Bundt Cake 1 325 37-43
Angel Food 1 325 35-39
Pie
2 crust, fresh, 9" 2 350 - 400 45-55
2 crust, frozen fruit, 9" 2 350 68-78
Cookies
Sugar 2 325 - 350 6-11
Chocolate Chip 2 325 - 350 8-13
Brownies 2 325 29-36
Breads
Yeast bread, loaf, 9x5 2 350
Yeast rolls 2 350 - 375 18-22
Quick Bread, loaf, 2 325 - 350 12-15
8x4 2 45-55
Biscuits 2 350 - 375 11-15
Muffins 2 400 15-19
Pizza
Frozen 2 375 - 425 23-26
Fresh 2 400 - 425 12-15
English _9
Page 12

Oven Modes
Broil
Broiling uses intense heat radiated from the upper eleo
ment: ,-S_
Fi ure 10: Broil
The broil mode is best suited to cooking thin, tender
cuts of meat (1" or less), poultry and fish. It can also
be used to brown breads and casseroles.
The benefits of Broiling include:
, Fast and efficient cooking.
, Cooking without the addition of fats or liquids.
, Browning as the food cooks.
For Best Results:
Do not preheat oven.
Steaks and chops should be at least Bi4" thick.
Brush fish and poultry with butter or oil to prevent
sticking.
Use the broil pan and grid included with your oven.
Do not cover the broiler grid with foil. It is
designed to drain fats and oils away from the
cooking surface to prevent smoking and spattering.
, Turn meats once halfway through the recommend
ed cooking time (see broil chart for examples).
When top browning casseroles, use only metal or
glass ceramic dishes such as Corningware®.
Never use heat-proof glass (Pyrex®); it cannot
tolerate the high temperature.
ALWAYS BROIL WITH THE DOOR CLOSED
Table 3: Broil Chart
Convection Broil
Convection broil is similar to broil. It combines the in-
tense heat from the upper element with heat circulated
by the convection fan:
Figure 11: Convection Broil
The convection broil mode is well suited for cooking
thicker, tender cuts of meat, poultry and fish. Convec-
tion Broil is typically not recommended for browning
breads, casseroles and other foods.
The benefits of Convection Broiling, in addition to the
benefits of standard broiling, include:
, Faster cooking than standard Broiling.
For Best Results:
. Do not preheat oven.
, Meats should be at least 1 1/2"thick.
, Turn meats once halfway through the cooking time
(See Convection Broil Chart for examples).
, Use the broil pan and grid included with your oven.
Do not cover the broiler grid with foil. It is
designed to drain fats and oils away from the
cooking surface to prevent smoking and spattering.
, Salt after cooking.
ALVv_,YSCONVECTION BROIL WITH THE EFOORCLOSED
Table 4: Convection Broil Chart
_iiiii///li/i_i_
10 • English
Beef
Steak (3/4" - 1 ")
Mediurq Rare 3 5 I45 6-7 4-6
Medium 3 5 160 6-8 5-7
We}l 3 5 170 8-10 7-9
Hamburgers
(3/4"- 1")
Well 3 5 160 7-9 5-7
Poultry
Breast (bone-i_) 3 3 I70 14-16 14-16
Thigh 3 3 180 14-16 11-13
Pork
Pork Chops (1") 3 5 I60 7-9 5W
Sausage - fresh 3 5 160 5-7 3-5
Ham Site (I/2") 3 5 160 3-5 4-6
Seafood Cook
Fish Filets 1" 3 4 until 10-14 Do not
Buttered opaque turn
Lamb
Chop_ (1")
Medium Rare 3 5 I45 5-7 4u6
Medium 3 5 160 6-8 5-7
Wel} 3 5 170 8-10 7-9
Bread
Garlic Bread, 1"
slices
& flakes
easily
with fork
4-6
Beef
Steak (1-½" or more)
Medium Rare
Medium
Well
Hamburgers (more
than 1")
Well
Poultry
Chicken Quarters
Chicken Breasts
Pork
Pork Chops (1½" or
more)
Sausage - fresh
*Broiling and convection broiling times are approximate and may
vary slightly,
145
160
170
160
180
(thigh)
170
160
160 4-6
12-1
15-1
18-2
11-1:
13-1
14-1
12-1
11-13
13-15
18-17
8-10
10-12
12-14
13-15
3-5
Page 13

Oven
Convection Roast
Convection roast uses heat from the top and bottom
elements as well as heat circulated by the convection
fan:
Figure 12: Convection Roast
The convection roast mode is well suited to preparing
tender cuts of meat and poultry.
The benefits of convection roasting, include:
As much as 25% faster cooking than standard
Roasting! Baking
Rich, golden browning
For Best Results:
Use the same temperature as indicated in the
recipe,
Check doneness early as roasting time may
decrease by as much as 25%. Refer to convection
roast chart for examples.
Do not cover meat or use cooking bags.
Use the broil pan and grid provided with the oven
for roasting. A low=sided, uncovered pan can also
be used.
• Use a meat thermometer to determine the internal
temperature of the meat.
If the meat is browned to your liking, but is not yet
done, a small strip of foil can be placed over the
meat to prevent overbrowning.
Let meat stand covered with foil 10=!5 minutes
after removing from the oven.
Modes
Table5:ConvectionRoast Chart
: Beef
Rib Roast
: Rib Eye Roast,
:(boneless)
Rump, Eye,
:]]p, Sirloin
:(boneless)
Tenderloin 2 - 3
: Roast
Pork
: Loin Roast 5 - 8
(boneless or
: bone-in)
: Shoulder 3 - 6
: Poultry
: Chicken - 3 - 4
wlTale
: Turkey,; 12-15 325
unstuffed**
: Turkey, 16-20 325
: unstuffed**
: Turkey, 21-25 325
: unstuffed**
: Turkey Breast 3 - 8 325 1
Cornish Hen 1 - 1 ½ 350 2
:Lamb
HalfLeg 3-4 325 25-30 160 (medium)
: Whole Leg 6 - 8 325 1 25-30 160 (medium)
XRoasting times are approximate and may vary depending on the
shape of the meat, They are based on thawed meats,
_Stuffed turkey requires additional roasting time, The minimum safe
temperature for stuffing in poultry is 165 ° F
4 - 6 325
4 - 8 325
3 - 6 325
425 2 15-25 145 (med rare'
350 2 20-30 160 (medium)
350 2 25-35 160 (medium)
375 2 12-18 180
2
2
2
1
1
24-30 145 (med rare]
27-33 160 (medium)
22-30 145 (med rareI
27-33 160 (medium)
22-28 145 (reed rare'
27-33 160 (medium)
10-14 180
9-11 180
6-10 180
15-20 170
45-75total 180
30-35 170 (well)
30-35 170 (well)
Quick and Easv Cooking Tipso
Converting from standard bake
to convection roast
DO NOT change recipe temperature.
Use roasting times in chart at right.
English _ 11
Page 14

Oven Modes
Dehydrate
Dehydrate dries foods with heat from a third element
behind the back wall of the oven, The heat is circulated
throughout the oven by the convection fan,
Fi ure 13: Dehydrate
Dehydrating is used to dry and!or preserve foods such
as fruits, vegetables and herbs, This mode holds an
optimum low temperature (120° F - 160° F) while ciP
culating the heated air to slowly remove moisture,
For Best Results:
Dry herbs at 120° F.Dry most fruits and vegetables
at 140° F. (Refer to the dehydrate chart for
examples).
Drying times vary depending on the moisture and
sugar content of the food, the size of the pieces,
the amount being dried and the humidity in the
air. Check food at the minimum drying time,
Multiple racks can be used simultaneously,
Contact your Bosch dealer for drying racks,
Treat fruits with antioxidants to avoid
discoloration,
Consult a food preservation book, county
Cooperative Extension Office or library for
additional information,
Table 6: Dehydrate Chart
Fruit
Apples
Bananas
Cherries
Orange Peels
and slices
Pineapple
rings
Strawberries
Dipped in 1¼cup
lemon juice and 2
cups water; W'
Dipped in 1/4cup
lemon juice and 2
cups water; W'
Wash and towel dry.
For fresh cherries,
remove pits
W' slices of orange;
orange part of skin
thinly peeled from
oranges
Toweldried
Wash and towel dry.
Sliced _" thick, skin
(outside) down on
VegetaMes
Peppers
Mushrooms
Tomatoes
Herbs
Oregano,
sage parsley
and thyme,
and fennel
Basil
Wash and towel dry.
Remove membrane
of peppers, coarsely
chopped about 1"
Wash and towel dry
Cut off stem end.
Cut into 1/8" slices
Wash and towel dry.
Cut thin slices, 1/8"
thick, drain well
Rinse and dry with
paper towel
Use basil leaves 3
to 4 inches from top.
Spray with water,
shake off moisture
and pat dry
slices
slices
rack
pieces
11-15 Slightly pliable
11-15 Slightly pliable
10-15 Pliable, leathery,
Peels: 24 Orange peel: dry
Slices: 12-16 Orange slices:
Canned: 9-13 Soft and pliable
Fresh: 8-12
12-17 Dry. brittle
16-20 Leathery with no
7-12 Tough and
16-23 Dry, brick red
Dry at 120°F Crisp and brittle
3-5 hrs
Dry at 120°F Crisp and brittle
3-5 hrs
chewy
and brittle.
skins are dry
and brittle, fruit
is slightly moist
moisture inside
leathery, dry
color
12 _ English
Oven will stay on for 48 hours before shutting off automatically,
Page 15

Self-Cleaning
During self-clean, the oven uses a very high
temperature to burn away food soil and grease,
• As a safety feature, the oven door locks during
self-clean to protect from very high temperatures,
Do not try to open the oven during self=clean
mode,
Only one oven can be self=cleaned at a time. The
second oven can be used while the other is self=
cleaning.
o It is common to see smoke and/or an occasional
flame=up during the self-clean mode, depending
on the content and amount of soil remaining in
the oven. If a flame persists, turn off the oven and
allow it to cool before opening the door to wipe up
the excessive food soil.
The oven light does not operate when the oven is
in the self-dean mode.
Do not use commercial oven cleaners as they" may"
damage finish or parts.
Heat and odors are normal during the self-clean
cycle. Keep the kitchen well ventilated.
NOTE: Due to the high temperatures used for
selfldeaning, fine lines or surface roughness may
develop in oven cavity. This is a common condition
and does not affect either the cooking or the
cleaning performance of the oven.
Before You Self-Clean
i. Hand clean the oven door edge, window, oven
front frame and oven cavity edges (see figures
below). They do not get hot enough during the
cleaning cycle for soil to burn away. Use a soapy
sponge, plastic scrubber or S.O.S._ pad. DO NOT
RUB THE GASKET.
2. Wipe up large overspills and grease with paper
towels.
3. Remove broiler pan, all utensils and bakeware.
4. Remove oven racks. If the oven racks are left in
the oven during a self-cleaning cycle, they will lose
their shiny finish and will not glide smoothly in the
rack guides. See "Cleaning Oven Surfaces, page 15
for proper care.
5. Be sure the light is turned off on the control panel
and the bulb and glass cover are in place.
After Self°Clean
The self=clean mode may produce ash which will
settle in the oven. If this happens, remove ash with
a damp cloth before using the oven.
Wipe rack edges with cooking oil to allow for
proper glide. Wipe off excess.
Hand clean front frame
IMPORTANT: Be sure to
let the inside window
glass in the oven door cool
completely before wiping up
any ash left from the clean
cycle.
Hand clean !=!/2" from rack
/ support to front of oven cavity
/
DO NOT
J
m
hand clean gasket
._Hand clean door and frame
\
Figure 14: Before Self-Cleaning
English ,, !3
Page 16

Self-Cleaning
To Set the Semf°CMeanMode:
!. Remove oven racks and close oven door,
2, Turn both knobs to CLEAN,
NOTE:
Tfthe door is open when the self-dean mode is
selected, the lock symbol will continue to flash, Self-
clean will not start until the door is closed,
CLEAN and TIME appear in the display.
The oven will clean for three hours, At the end of the
programmed cleaning time the oven will automatically
turn off.
END will appear on the display. CLEAN and TIHE will
flash until any"button is pressed or the knob is turned
to OFF.
To Change the Clean Time
The preset clean time is three hours. For light soil, use
two hours, for heaw soil use four hours.
!. Set self-dean mode as explained above.
2. Press COOKTIHE,
3. Press + or o to change the number of hours.
4. Press COOKTIME twice.
About the Door Lock:
Do not attempt to open the door while the door is
locking.
Lock symbol will flash until the door is locked. When
the lock symbol is displayed, the door cannot be
opened.
Check that the door has been locked and will not open
before starting self<lean mode.
If door does not lock, turn the mode knob to OFF
position and do not start self-clean; phone 800-944-
To Delay the Start of the Clean
Note: The time of day must be accurate for the delay
function to work properly.
!. Set self-dean mode as explained above.
2. Change clean time as explained above (if desired).
3. Set the time the oven will start self-cleaning:
Press STOP TIME twice.
Press + or oto set hours.
Press STOP TIHE.
Press + or oto set minutes.
Press STOP TIME,
The oven door locks and DELAY appears in the
display,
4. When the delay time ends, self-clean starts.
At the end of the programmed cleaning time, the
oven will automatically turn off.
END will appear on the display. CLEAN and TIME
will flash until any" button is pressed or the knob is
turned to OFF.
TIP:
To check the delayed clean time press COOK
TIME,
To check the time remaining before the delayed
mode starts, press STOP TIME,
14 _ English
TO CANCEL:
To cancel the self-clean, turn knob to OFF.The oven
door will remain locked until the oven has reached a
safe temperature.
Page 17

Table 7: Oven Surface Cleaning
Surface
Cleaning
Methods
Cleaning Method
Oven Surfaces
Racks
pow(Oven)
mode,
rack
Fiberglass Knit
(Gasket)
Gmass
(Window, Display')
Painted
paper (Exterior)
Porcelain
(Interior)
Stainless Steel
(Exterior)
Wash with hot sudsy water. Rinse thoroughly and dry, or gently rub with cleansing
der or soap filled pads as directed. If racks are cleaned in the oven during the selfodean
they will lose their shiny finish and may not glide smoothly. If this happens, wipe the
edges with a small amount of vegetable oil, then wipe off excess.
DO NOT HAND CLEAN GASKET.
Wash with soap and water or glass cleaner. Use Fantastik® or Formula 409(R)to remove
grease spatters and stubborn stains.
Clean with hot sudsy water or apply Fantastik (R)or Formula 409(_ to a clean sponge or
towel and wipe clean. Avoid using powdered cleansers, steel wool pads and oven clean
ers,
Immediately wipe up acid spills like fruit juice, milk and tomatoes with a dry towel. Do
not use a moistened sponge/towel on hot porcelain. When cool, clean with hot sudsy
water or apply Bon-Ami _>or Soft Scrub® to a damp sponge. Rinse and dry- For stubborn
stains, gently use soap filled pads. It is normal for porcelain to craze (fine lines) with age
due to exposure from heat and food soil.
Always wipe or rub with grain. Clean with a soapy sponge then rinse and dry, or wipe
with Fantastik® or Formula 409_)sprayed onto a paper towel. Protect and polish with
Stainless Steel Magic® and a soft cloth. Remove water spots with a cloth dampened with
white vinegar. Use Bar Keeper's Friend® to remove heat discoloration.
Ptastic
(Knobs, Controls)
When cool, clean with soapy water, rinse and dry.
Replacing the Oven Light
Each oven is equipped with two halogen lights located in the back wall of the oven.
The lights are switched on when the door is opened or when the oven is in a cooking cycle.
The oven lights do not operate during self-dean.
Each light assembly consists of a removable lens, a light bulb and a light socket housing that is fixed in place
(see Figure 17, next page).
To replace a light bulb (seefigure :[7,nextpage):
:[. Read WARNING on this page.
2. Turn off power at the main power supply (fuse or
breaker box).
3. Unscrew lens and remove.
4. Pull straight out on light bulb to remove from
socket.
5. Replace the bulb with a new one. Avoid pressing
the bulb with fingers; Oils from hands can damage
the bulb when it becomes hot
6. The bulb is halogen :[2V - 20W.
7. Screw the lens back on.
8. Replace the fan cover (if applicable).
9. Turn power back on at the main power supply
(fuse or breaker box).
Hake sure the oven and lights are cool and
power to the oven has been turned off before
repladng the light bulb(s). Failure to do so
could result in electrical shock or burns.
The lenses must be in place when using the
oven.
The lenses serve to protect the light bulb from
breaking.
The lenses are made of glass. Handle carefully
to avoid breaking. Broken glass could cause an
injury.
WARNING
English _ :[5
Page 18

Removing the Oven Door
WARNING
Hake sure oven is cool and power to the oven
has been turned off before removing the door.
Failure to do so could result in electrical shock
or burns.
The oven door is heavy and fragile. Use both
hands to remove the oven door. The door front
is glass. Handle cardully to avoid breaking.
Grasp only the sides of the oven door. Do not
grasp the handle as it may swing in your hand
and cause damage or injury.
Faihre to grasp the oven door firmly and
properly could result in personal injury or
product damage.
To Remove The Oven Door:
!. Be sure to read the above WARNING before
attempting to remove oven door.
2. Open door completely.
3. Lift hinge brackets (one on each side) into slots
(see Figure 15).
4. dose door slightly until hinge brackets lock into
place.
5. Close door about halfway (until it stops).
6. Grasp firmly on both sides.
7. Pull out and up. Place door in a stable location.
WARNING
To avoid injury from hinge brackets snapping
dosed, be sure that both levers are securely in
place before removing door. Also, do not force door
open or closed =the hinge could be damaged and
injury" could result.
Figure 15: Hinge Bracket Locked Into Place
To Reinstall the Oven Door:
!. Holding door firmly on both sides, drop hinges
down and into hinge slots.
2. Open door completely so that hinge brackets (one
on each side) release.
3. Open and dose the door slowly and completely to
test the installation.
The door should close easily and be straight, not
crooked.
Bulb socket
(fixed in place)
_gen Bulb
Figure 16: Hinge Bracket Released
oooooooo
oooooooo
L \
:[6 _ English
Figure 17: Oven Light
Page 19

Do-It-Yourself Procedures
To Activate Sabbath Mode:
When activated, oven bakes for 72 hours before
shutting off automatically. The mode is Sabbath
compliant for religious faiths with "no work"
requirements on the Sabbath.
i. Touch and hold BET CLOCK and TIMER until
SELE dEG is shown.
2. Press + or - until BAh appears.
3. Press SET CLOCK.
4. Press + or °toselectformat(chooseON to
activateSabbath mode; chooseOFF toturnitoff),
5. HemalBET CLOCK untilclockappearsindisplay.
There is a five minute delay in which the following
can be set:
6. Turn knob to BAKE,
7. Turn knob to set TEMPERATURE,
8. Press LIGHT to turn oven lights on or off.
9. Repeat steps 8=!0 for second oven if desired
(double ovens only).
After 5 minutes, the Sabbath mode is activated.
The temperature no longer shows in the display.
Only the time, "BAh" and the oven icon(s) are
present. The preheat lights and all beeps are also
disabled.
The oven lights cannot be changed after the
Sabbath mode starts.
The Sabbath mode automatically cancels after 72
hours. To cancel the Sabbath mode early, turn the
mode knob to OFF.
To Change Temperature Calibration:
The electronic thermostat has been carefully calibrated;
However, if the browning results are too light or too
dark for your preferences, you can raise or lower the
setting.
1. Touch and hold BET CLOCK and TIMER until
BELE dEG is shown.
2. Press + or ° until OFB appears.
3. Press SET CLOCK.
4. Press UPPER LOWER to select oven (double
ovens only).
5. Press + or ° to set the number of degrees
difference.
6. Hold BET CLOCK until clock appears in display.
NOTE: The available temperature offset range +
or o 35°R A change in the calibration affects all
modes.
To Change Operating Voltage
The oven is preset for use with 240 VAC. If your
residence has 208 VAC, the oven voltage can be
changed.
208 V conversion must be done by a qualified
technician. Contact your local appliance dealer or Bosch
Sewice: 800-944-2904.
To Change Clock Format
The oven is preset with a !2ohour clock format;
However, it can also display a 24-hour clock.
!. Touch and hold gET CLOCK and TIMER until
BELE dEG is shown.
2. Press + or - until Hr appears.
3. Press BET CLOCK.
4. Press + or - to select format (choose !2 for !2-
hour format; choose 24 for 24-hour format).
5. Hold BET CLOCK until clock appears in display.
To Change Temperature Format:
The oven has been preset to a Fahrenheit temperature
format; However, it can also use a Celsius temperature
format.
!. Touch and hold SET CLOCK and TIMER until
BELE dEG appears.
2. Press SET CLOCK.
3. Press + or - to select format (choose °C for
Celsius; choose °F for Farenheit).
4. Hold BET CLOCK until clock appears in display.
English _ 17
Page 20

Self Help -
Check the chart below for causes of the most common baking problems. Since the size, shape and material of
baking utensils directly affect the baking results, the best solution may be to replace old baking utensils that have
darkened and warped with age and use. Also check the convection baking chart on page 9, the rack position and
the baking time.
Table 8: Self Help - Baking
Bakin_ Problem Cause
Food browns unevenly - Oven not preheated
- Aluminum foil on oven rack or oven bottom
- Baking utensil too large for recipe
- Pans touching each other or oven walls
Food too brown on bottom - Oven not preheated
- Using glass, dull or darkened metal pans
- Incorrect rack position
- Pans touching each other or oven walls
Food is dry or has shrunk - Oven temperature too high
excessively - Baking time too long
- Oven door opened frequently
- Pan size too large
Food is baking or roasting too - Oven temperature too low
slowly - Oven not preheated
- Oven door opened frequently
- Tightly sealed with aluminum foil
- Pan size too small
Pie crusts do not brown on - Baking time not long enough
bottom or have soggy crust - Using shiny steel pans
- Incorrect rack position
- Oven temperature is too low
Cakes pale, fiat and may not be
done inside
Cakes high in middle with crack
on top
Pie crust edges too brown
- Oven temperature too low
- Incorrect baking time
- Cake tested too soon
- Oven door opened too often
- Pan size too large
- Baking temperature too high
- Baking time too long
- Pans touching each other or oven wails
- Incorrect rack position
- Pan size too small
- Oven temperature too high
- Edges of crust too thin
!8 • English
Page 21

Self Help - Operation
Before calling for service, check the following:
Table 9: Self Help - Operation
Oven ProbNem ProbNem SoMng Steps
F03 or F04 Error appear in the A problem with the lock occured. Turn power off and turn it back on again
display window, after a few seconds. The oven should run a latch auto-test. If condition
persists, note the code number and call an authorized sewicer,
Other F Error appears in the Turn power off and turn it back on again after a few seconds. If condition
display window, persists, note the code number and call an authorized sewicer,
Cooling fan continues to run This is normal. The fan turns off automatically when the electronic
after oven is turned off components have cooled sufficiently.
Oven door is locked and will not Turn the oven off at the circuit breaker and wait a few seconds. Turn breaker
release, even after cooling back on. The oven should reset itself and will be operable.
Oven is not heating Hake sure the oven temperature has been selected.C beck the circuit
breaker or fuse box to your house. Hake sure there is proper electrical
power to the oven.
Oven is not cooking evenly Check oven calibration. Adjust calibration if necessary (see Oven Offset,
Page !7). Refer to cooking charts for recommended rack position. Always
reduce recipe temperature by 25°F when baking with convention bake
mode.
Oven temperature is too hot or The oven thermostat needs adjustment. See Calibrating Oven Temperature,
too cold Page !7.
Oven light is not working Replace or reinsert the light bulb if loose or defective. See Page 15. Touching
properly the bulb with fingers may cause the bulb to burn out.
Oven light stays on Oven light comes on automatically when oven begins heating.Press LIGHT to
turn oven light off. If oven is off, check for obstruction in oven door or check
to see if hinge is bent.
Cannot remove lens cover on There may be soil build-up around the lens cover. Wipe lens cover area with
light a clean dry towel prior to attempting to remove the lens cover,
Oven will not self=clean properly Allow the oven to cool before running self=dean. Always wipe out loose soil
or heavy spill-over before running self<lean. If oven is badly soiled, set
oven for a four=hour Self=Clean. See Self=Cleaning, Page 13.
Clock and timer are not Hake sure there is proper electrical power to the oven. Seethe Clock and
working properly Timer sections on Pages 2 and 8.
Excessive moisture When using bake mode, preheat the oven first. Convection bake will
eliminate any moisture in oven (this is one of the advantages of convection).
Porcelain chips When oven racks are removed and replaced, always tilt racks upward and do
not force them to avoid chipping the porcelain.
HOW TO OBTAIN SERVICE
For authorized service or parts information call 8OO/944o2904,
We want you to remain a satisfied customer, If a problem occurs that is not resolved to your satisfaction,
write to Bosch Customer Support, 5551 HcFadden Avenue, Huntington Beach CA, 92649 OFphone 800-944-
2904.
Please include the Hodel Number, Serial Number and date of original purchase and installation.
English • 19
Page 22

Statement of Limited Warranty
The warranties provided by BSH Home Appliances ("Bosch") in this Statement of Limited Warranty apply only to
the Bosch Electric Built-In Ovens ("Built-In Oven") sold to you, the first using purchaser, provided that the Built-In
Oven was purchased (!) for your use and not for resale and (2) in the United States or Canada and is located in
the country of purchase. As used in this Statement of Limited Warranty, the term "Date of Installation" shall refer
to the earlier of the date the Built-In Oven is installed or ten (!0) business days after the date the Built-In Oven is
sold to the first using purchaser, The warranties stated herein apply only to the first using purchaser and are not
transferable.
Standard Limited Warranty
Bosch warrants that its Built=In Oven is free from defects in materials and workmanship for a period of twelve
(!2) months from the Date of installation. During the warranty period, Bosch or its authorized service center will
repair or replace, at its sole option, any Built=In Oven that proves to have been defective under conditions of
normal use without charge. All removed parts and components shall become the property of Bosch, at Bosch's
option. All replaced and!or repaired parts shall assume the identity of the original part for purposes of this
warranty and this warranty shall not be extended with respect to such parts.
Other Conditions of the Limited WarraBties
The warranties provided in this Statement of Limited Warranty exclude defects or damage resulting from (!)
use of the Built=In Oven in other than its normal and customary manner (commercial use of the Built=In Oven
shall not be deemed normal or customary), (2) misuse, abuse, accidents or neglect, (3) improper operation,
maintenance, installation or unauthorized service, (4) adjustment or alteration or modification of any kind, (5) a
failure to comply with applicable state, local, city, and county electrical and/or building codes, (6) spills of food or
liquid, and (7) external forces such as floods, fires, acts of God or other circumstances beyond Bosch's control.
Also excluded from this warranty are scratches and damages on external surfaces and exposed parts or Built=In
Ovens on which the serial numbers have been altered, defaced or remove&
To the extent allowed by law, this warranty sets out your exclusive remedies with respect to products covered by
it, whether the claim arises in contract or tort (including strict liability, and negligence) or otherwise. Bosch will
not be liable for consequential or incidental damages, losses, or expenses.
THIS WARRANTY IS IN LIEU OF ALL OTHER EXPRESSWARRANTIES. ANY WARRANTY IMPLIED BY LAW,
WHETHER FOR MERCHANTABILITY OR FITNESS FORA PARTICULAR PURPOSEOR OTHERWISE, SHALL BE
EFFECTIVE ONLY FOR THE PERIOD THAT THIS EXPRESSWARRANTY IS EFFECTIVE. No attempt to alter, modify
or amend this warranty shall be effective unless authorized in writing by an officer of BSH.
20 • English
How to Obtain Warranty Service
To obtain warranty service for the Built-In Oven, you should contact the nearest Bosch authorized service center.
BSH Home Appliances • 555! McFadden Avenue, Huntington Beach, CA 92649. 800=944=2904.
$eP¢ice Data Record
The location of the serial tag on the product can be seen when the oven door is opened. It is located on the left
side, centered vertically just inside the oven cavity. See page 3. Now is a good time to write this information in
the space provided below. Keep your invoice for warranty validation. To obtain service see page !9.
Model number:
Serial Number:
Date of Installation or Occupancy:
Page 23

BSH reserves the right to change specifications or design without notice. Some models are certified for use in Canada. BSH is not responsible
for products which are transported from the United States for use in Canada. Check with your IocaFCanadian distributor or deaFer. BSH Home
Appliances, Corporation, 5551 McFadden Avenue, Huntington Beach, CA 92649.
For the most up to date criticaF installation dimensions by fax, use your fax handset and calf 702-833-3600. Use code #8030.
YOUR LFE, OUR INSP RATION,
5551 McFadden Avenue, Huntington Beach, CA 92649 * 800-944-2904
9000053250 • 10018 Rev. B _ 02/05 © BSH Home AppFiances Corporation 2005. Litho U.S.A.
 Loading...