

Bosch HBA21B2.2J Instructions Manual
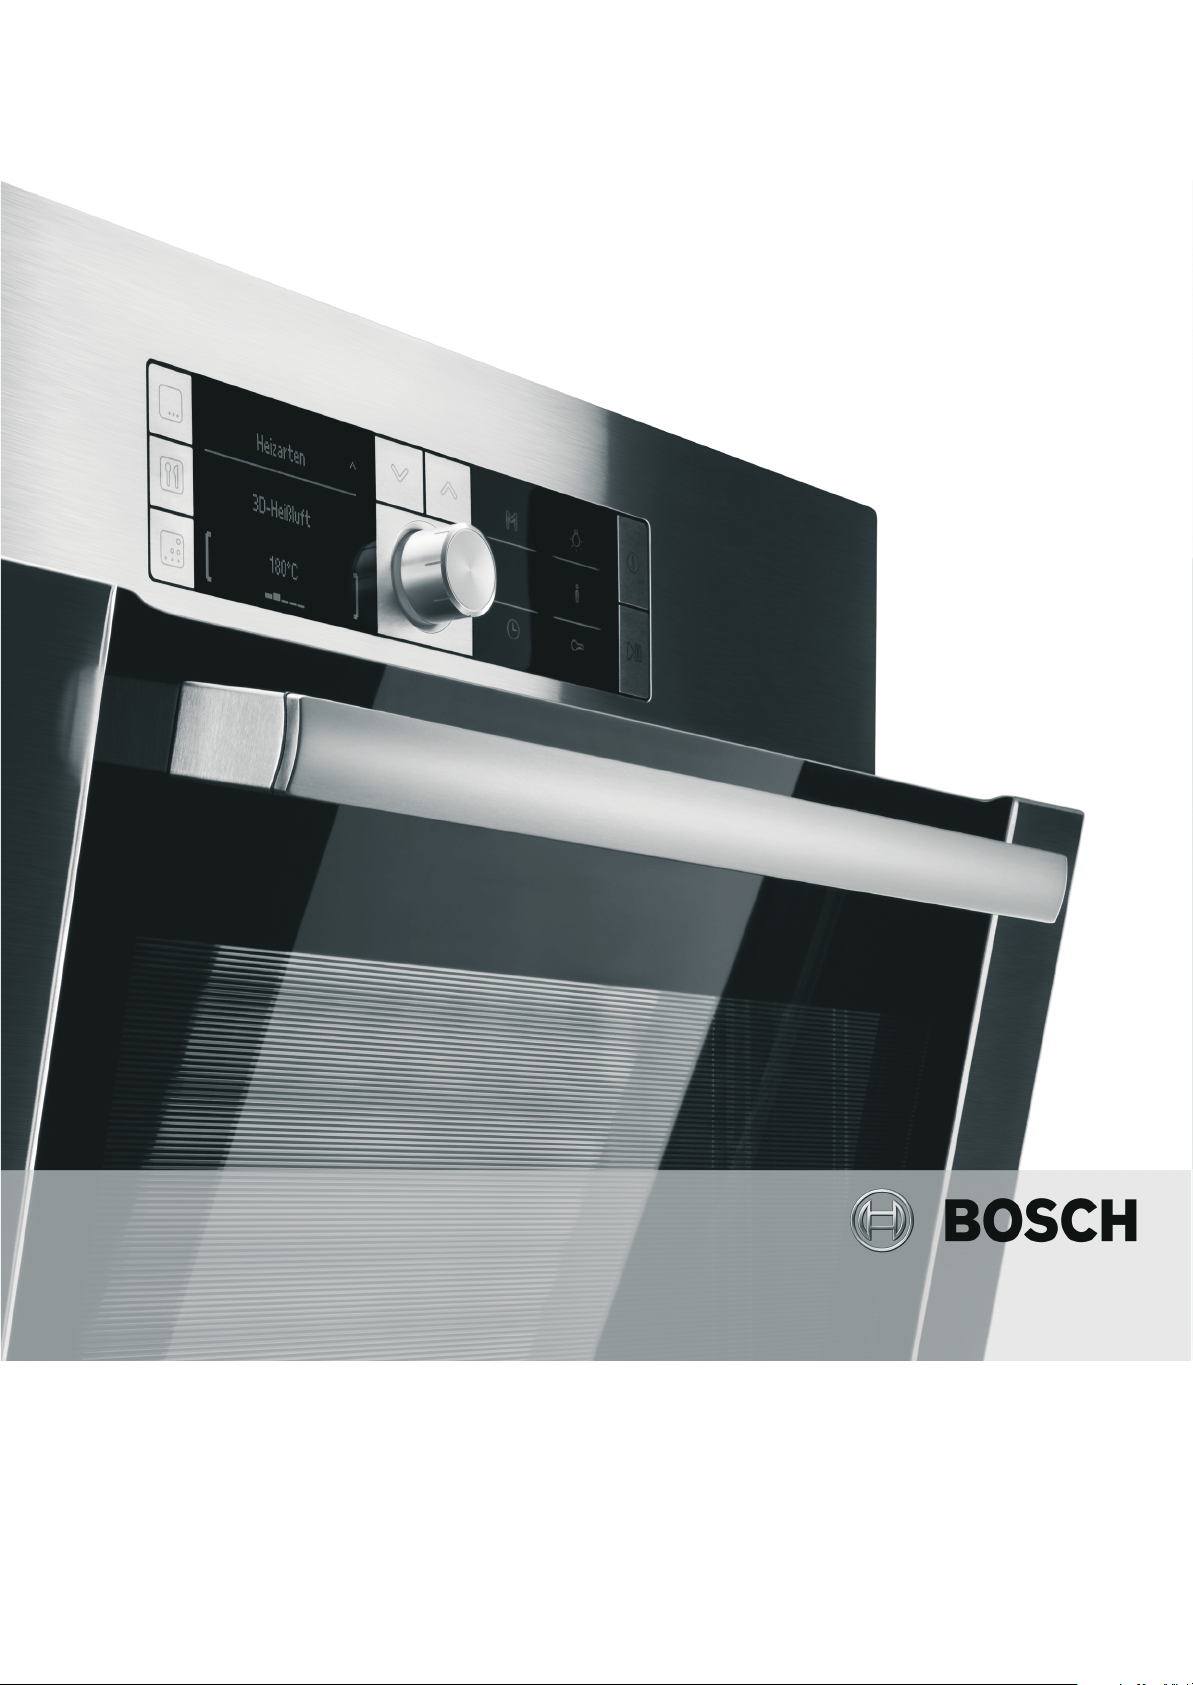
Built-in oven HBA21B2.2J
[en] Instruction manual


Ú Table of contents
Safety advice and information .................................................. 4
Before installation ............................................................................... 4
Safety advice and information ..........................................................4
Items that may damage the appliance ...........................................4
Your new oven ............................................................................5
Control panel .......................................................................................5
Function selector.................................................................................5
Timer with automatic shut-off function ............................................5
Temperature selector .........................................................................6
Inside the oven ....................................................................................6
Accessories .........................................................................................6
Before using the oven for the first time ................................... 8
Heating the oven.................................................................................8
Cleaning the accessories..................................................................8
Setting the oven.......................................................................... 8
Type of heating and temperature ....................................................8
Cooking time .......................................................................................8
Rapid heating ......................................................................................9
Care and cleaning ...................................................................... 9
Cleaning agents ..................................................................................9
Detaching and refitting the rails .................................................... 10
Detaching and attaching the oven door ...................................... 10
Removing and installing the door panels ................................... 10
Troubleshooting .......................................................................11
Troubleshooting table ..................................................................... 11
Changing the oven bulb................................................................. 11
Protective glass panels................................................................... 11
After-sales service ................................................................... 11
E number and FD number ............................................................. 11
Energy and environment tips .................................................. 12
Saving energy................................................................................... 12
Environmentally-friendly disposal of waste ................................. 12
Tested for you in our cooking studio ..................................... 12
Cakes and pastries ......................................................................... 12
Baking tips ........................................................................................ 14
Meat, poultry, fish............................................................................. 15
Tips for roasting and grilling .......................................................... 17
Bakes, gratins, toast with toppings .............................................. 18
Convenience products.................................................................... 18
Special dishes .................................................................................. 19
Defrost................................................................................................ 19
Drying................................................................................................. 19
Preserving ......................................................................................... 19
Acrylamide in foodstuffs ......................................................... 20
Test dishes................................................................................ 21
Baking ................................................................................................ 21
Grilling ................................................................................................ 21
[en]Instruction manual
Produktinfo
Additional information on products, accessories, replacement
parts and services can be found at www.bosch-home.com and
in the online shop www.bosch-eshop.com
3

Safety advice and information
Read the instructions in this manual carefully. Keep the
operation and installation instructions. The corresponding
manual must be passed on to any subsequent owner.
This instruction manual is for use with both stand-alone ovens and oven-hob combinations. Read the instruction manual supplied with the hobs of oven-hob combinations to find out how their hob controls work.
Before installation
Transport damage
Check the appliance after removing it from its packaging. If the
appliance has been damaged in transit, do not connect it to the
mains; contact the technical support service and note the
damage in writing, otherwise you may lose your rights to
compensation.
Electrical connection
Only an authorised technician may connect the appliance. The
warranty is void if any damage is caused by incorrect
connection.
Before using the appliance for the first time, ensure that your
domestic electrical system is earthed and meets all the current
safety regulations. An authorised technician should install and
connect your appliance. Use of this appliance without an earth
connection or incorrectly installed can cause serious injuries
(personal injuries or electrocution), although this is very rare.
The manufacturer accepts no responsibility for any malfunction
or damage which is caused by improper electrical installations.
Safety advice and information
This appliance has been designed exclusively for domestic use.
Only use the appliance for preparing food.
Children and young adults should not use the appliance without
supervision
■ because they may suffer either physical or mentally injuries,
or
■ may not have the knowledge and experience to use it
correctly
Never allow children to play with the appliance.
Oven door.
The oven door must remain closed when the oven is switched
on. For safety reasons, we recommend keeping the oven door
closed, even when the oven is not being used.
Do not lean on, sit on or play with the oven door, even when it
is closed.
Hot oven interior
: Risk of burns.!
■ Never touch the oven's inner surfaces or heater elements
when they are hot. Always carefully open the oven door. The
oven may let out steam. Keep children away from the oven.
■ Do not pour water into a hot oven. This can produce
extremely hot water vapour.
■ Do not use the oven to prepare dishes with large quantities of
strong alcoholic liquor. Alcohol vapour can ignite inside the
oven. Only use strong alcoholic liquors in small doses and
take care opening the oven door.
: Risk of fire!!
■ Never put flammable objects into the oven. Never open the
door if smoke is coming from the appliance. Turn it off.
Remove the plug from the mains or disconnect the fuse/
circuit breaker in the fuse box.
■ Ensure that the greaseproof paper is securely fixed to the
accessories when pre-heating the appliance. An air current
occurs when the appliance door is opened. The greaseproof
paper could touch the heating elements and burn. Always
secure the greaseproof paper with a pan or baking tin. Only
cover the required surface with greaseproof paper. The
greaseproof paper must fit the accessory perfectly.
: Danger of short-circuits!
Never put the electric cables of electric appliances around the
door of the oven. The cable insulation could be damaged.
Hot accessories and pans/dishes
: Risk of burns.!
Never remove accessories or hot dishes from the oven without
using grippers.
Inappropriate repairs
: Risk of electrical discharge and the resulting shock.!
Incorrect repairs can be dangerous. Repairs can only be
carried out by qualified personnel from the Technical
Assistance Service. If the appliance is faulty, unplug from the
mains or remove the fuse/turn off the trip switch of the fuse
box. Notify the Technical Assistance Service.
Items that may damage the appliance
Caution!
■ Accessories, pans, film, greaseproof paper or aluminium foil
on the oven floor: Do not place any accessory on the oven
floor. Do not cover the oven floor with any type of film or
paper. Do not place any cookware on the oven floor if the
temperature is set at more than 50 ºC. It will get too hot.
Oven and cooking times will be inaccurate and the enamel
will be damaged.
■ Water in a hot oven Do not pour hot water into a hot oven.
Steam will be produced. The resulting changes in
temperature may damage the enamel and/or accessories.
■ Liquid foods: Do not keep liquid foods for too long inside the
oven with the door closed. This would damage the enamel.
■ Fruit juices: Do not overfill the tray when baking pies
containing juicy fruits. Fruit juice spilling from the tray will
cause stains that will be impossible to remove. Use the deep
enamel tray whenever possible.
■ Leaving the door open when the oven is cooling down The
oven must only be left to cool with the door closed. Even if
the oven door is left only slightly open, the fronts of nearby
kitchen units may be damaged over time.
■ Dirty oven seal A very dirty oven seal will prevent the oven
door from remaining properly closed during operation. The
fronts of nearby kitchen units may be damaged. Keep the
oven door seal clean at all times.
■ The oven door as a support surface: Do not rest or sit on the
oven door when it is open. Do not place any cookware or
accessory on the oven door.
4
■ Transporting the appliance: Do not use the door handle to
move or secure the appliance. The handle cannot take the
weight of the appliance and may break. The glass panel of
the oven door might move, causing misalignment between
the front panel and the glass panel.
Your new oven
■ Grilling: When grilling, do not place the universal deep tray or
the flat oven tray at a height of more than 3. Due to the
extreme heat, it could be deformed and cause damage to the
enamel when it is removed. Use level 4 and 5 only for direct
grilling.
We will now describe your new oven. This chapter explains the
functions of the control panel and its individual elements.
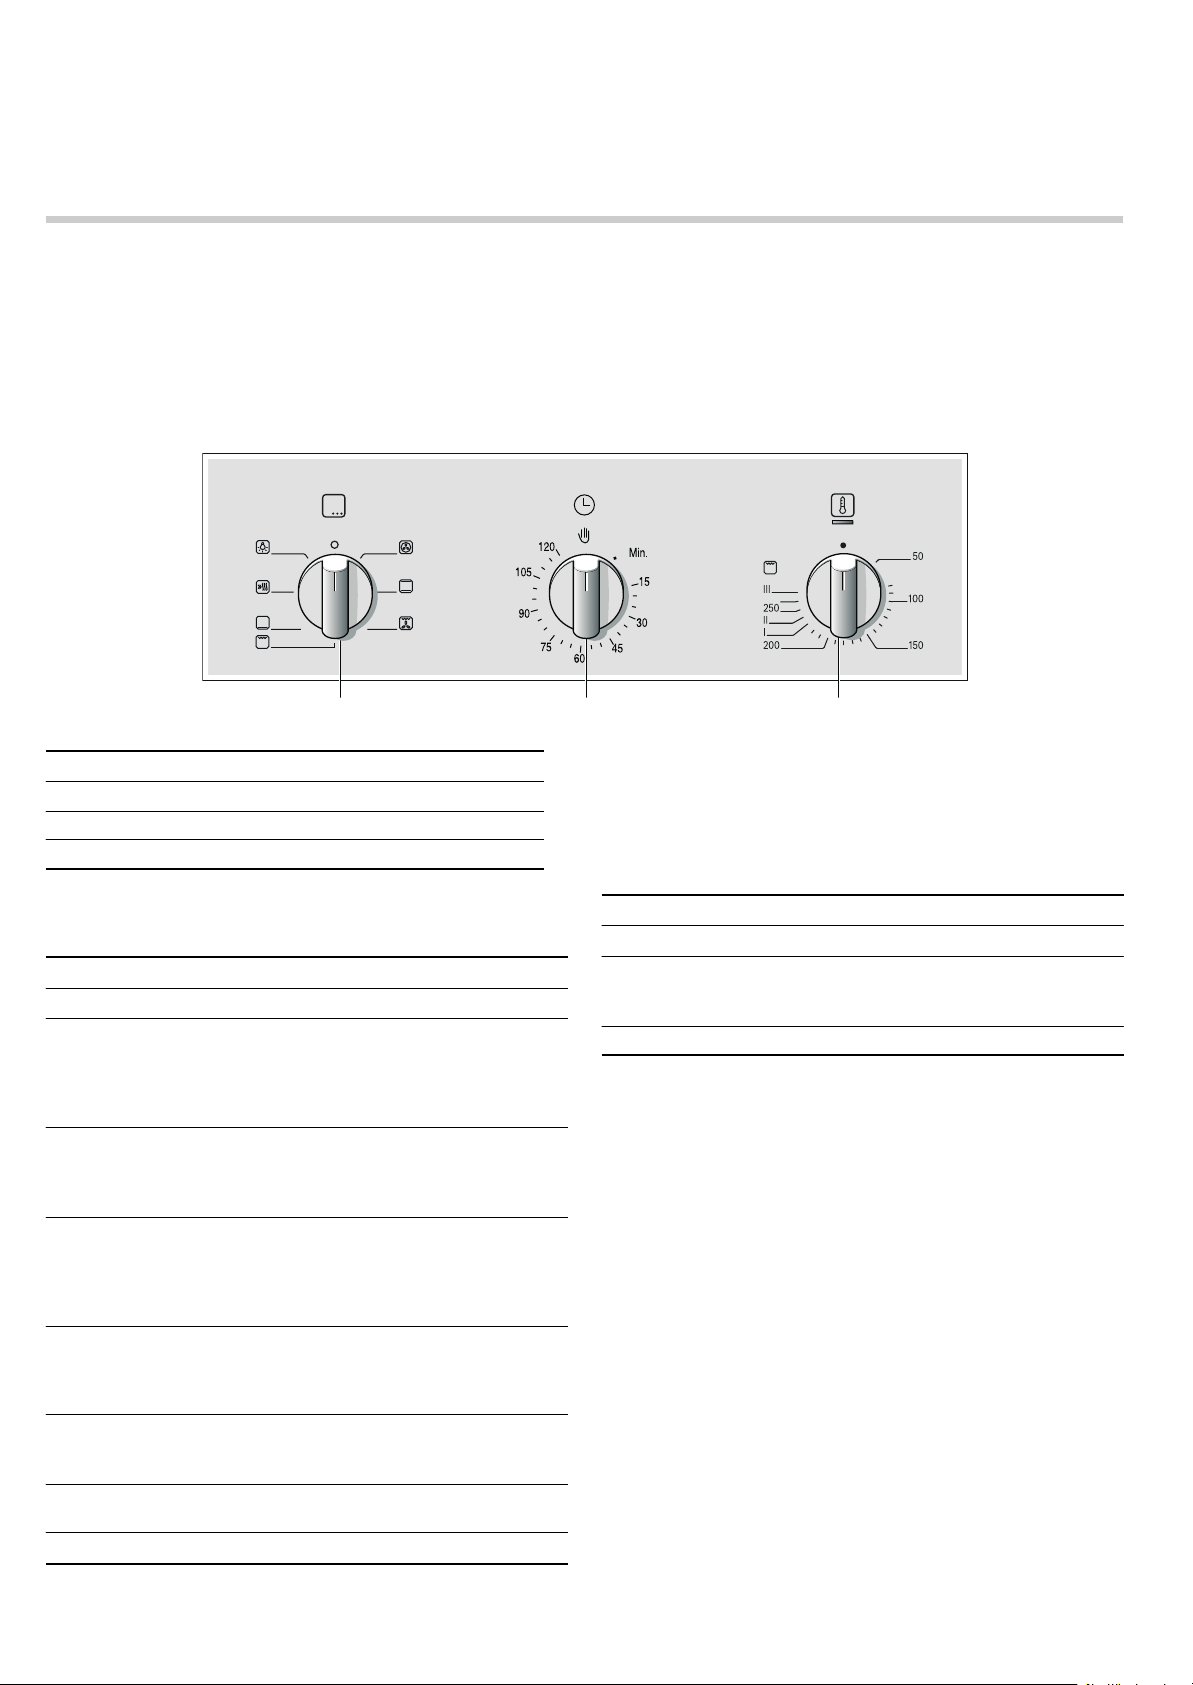
Control panel
Below is a general overview of the control panel. Elements may
vary according to the model.
Explanations
1 Function control knob
2Timer
3 Temperature control knob
Information is also provided about the oven's accessories and
internal components.
When you make settings, the oven light in the cooking
compartment switches on.
Timer with automatic shut-off function
With the timer, you can set a time of up 120 minutes and
schedule the oven to turn off automatically.
Function selector
Use the function selector to set the type of heating.
Setting Use
Off position The oven switches off.
Û
3D hot air* For cakes and pastries on one to
<
Top/bottom heating For cakes, bakes and lean joints of
%
Hot air grilling For roasting meat, poultry and
7
Grill, large area For grilling steaks, sausages,
(
Bottom heating For preserving, browning and final
$
Rapid heating For rapid preheating of the oven
I
Oven light Switches on the oven light.
^
* Type of heating used to determine the energy efficiency class
in accordance with EN50304.
three levels. The fan distributes the
heat from the heating ring in the
back panel evenly around the
cooking compartment.
meat (e.g. beef or game) on one
level. Heat is emitted evenly from
the top and bottom.
whole fish. The grill element and
the fan switch on and off alternately. The fan causes the hot air
to circulate around the dish.
bread and pieces of fish. The
whole area below the grill heating
element becomes hot.
baking stage. The heat is emitted
from below.
without accessories.
Setting Meaning
>
Ú Min.
15 - 120 Scale in minutes Time ranges
The equipment is programmed as follows
Turn the timer to the right until the desired time is reached.
A limit stop is located after 120 min. Do not turn the knob any
further.
Once the time has elapsed
A beep will sound and the oven will be turned off.
Turn the control knob to the
Note: If the cooking time to be set is less than 30 minutes, first
turn the knob to the 30 setting and then back up to the desired
time.
Zero setting The timer is off.
End of pro-
grammed time
Light that appears when the
time programmed on the timer
has elapsed.
> setting.
5
Temperature selector
The temperature selector is used to set the temperature or grill
setting.
Setting Meaning
Ú
50-270 Temperature
I, II, III Grill settings The grill settings for "Grill, large
When the oven is heating, the indicator lamp above the
temperature selector lights up. It goes out during heating
pauses.
Off position The oven does not heat up.
The temperature in the cooking
range
compartment in °C.
area"
(.
I = setting 1, low
II = setting 2, medium
III = setting 3, high
Inside the oven
There is a light inside the oven. A fan prevents the oven from overheating.
Light
The oven light remains on while the oven is working.
However, the light can be turned on without the oven being on
by setting the function control knob to
Fan
The fan can be turned on and off as necessary. The hot air escapes through the top of the door. Warning! Do not cover the vent. The oven could overheat.
^.
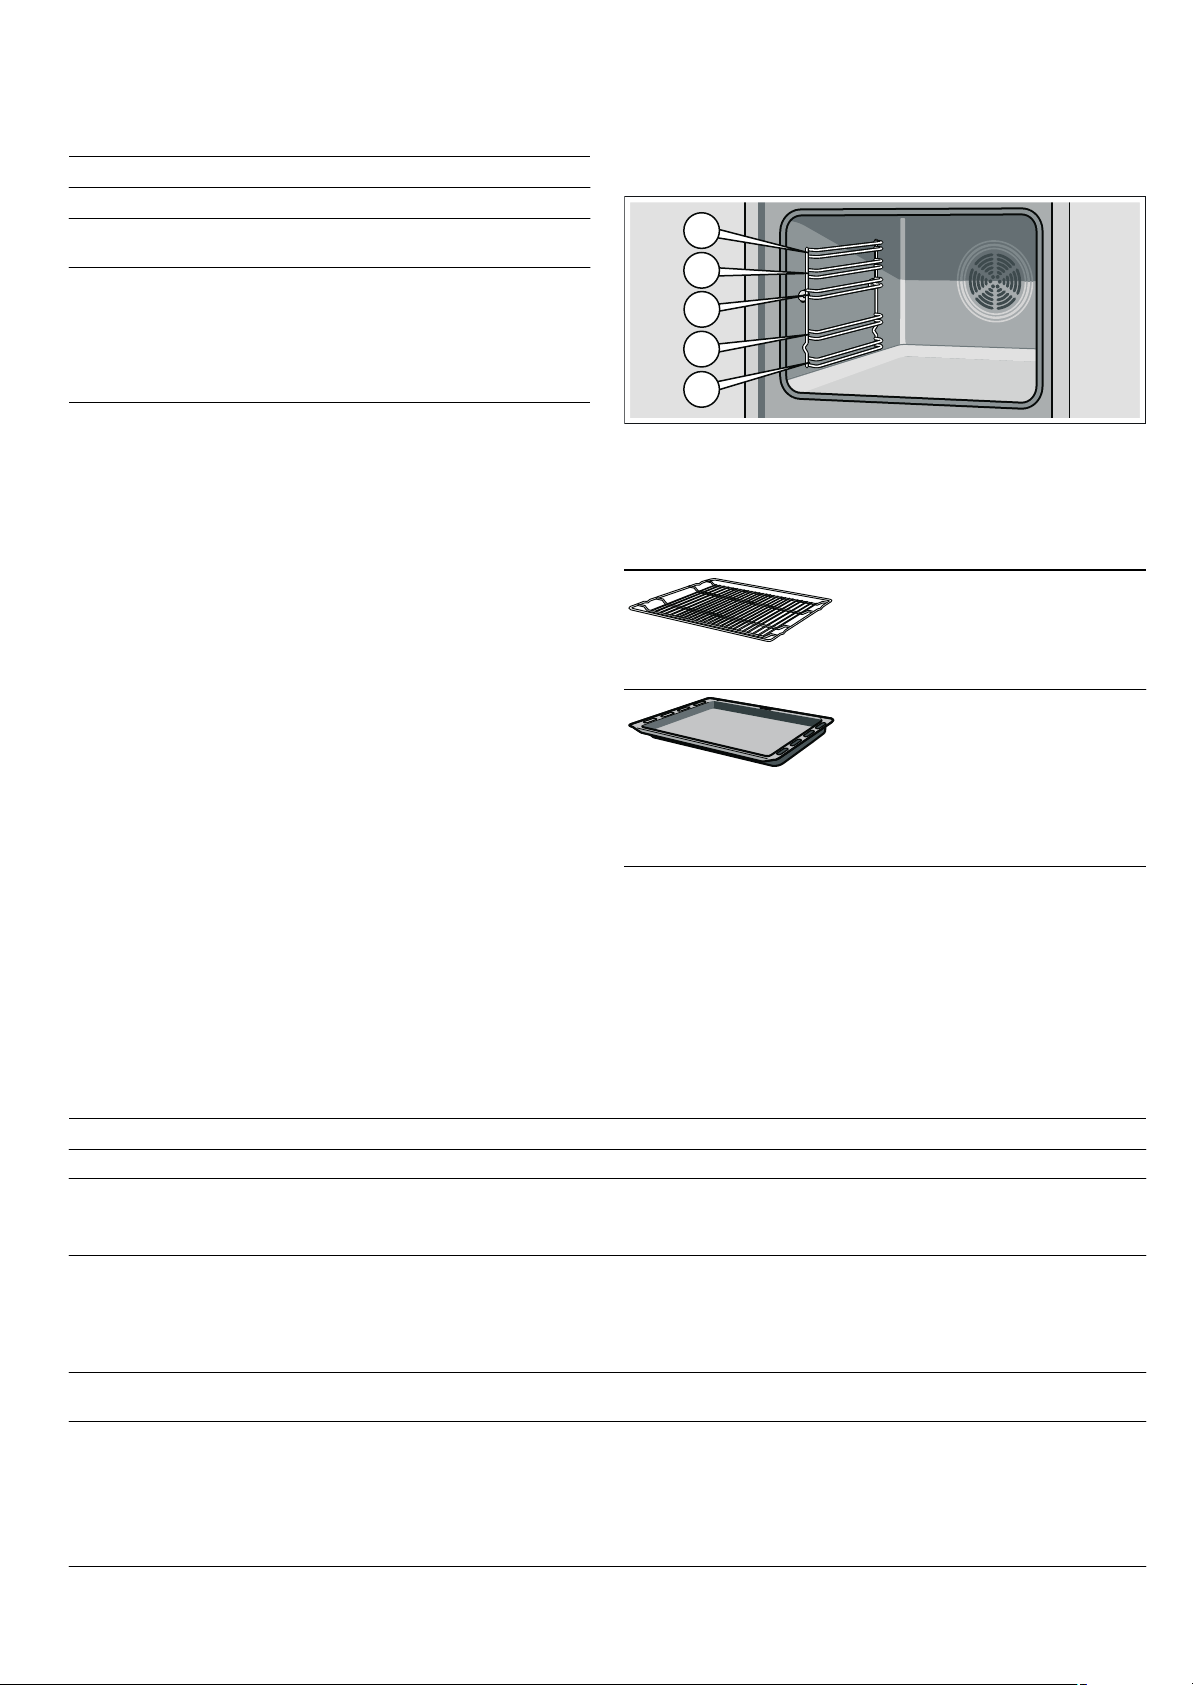
Accessories
The accessories can be inserted into the oven at 5 different
levels.
You can pull out the accessories two thirds of the way without
them tipping. This allows dishes to be removed easily.
The accessories can become deformed when they get hot. As soon as they have cooled down, the deformation disappears with no effect on the function.
You can buy accessories from the after-sales service, from specialist retailers or online. Please specify the HEZ number.
Wire rack
For ovenware, cake tins, joints,
grilled items and frozen meals.
Insert the wire rack with the curvature pointing downward
Universal pan
For moist cakes, pastries, frozen
meals and large joints. It can also
be used to catch dripping fat when
grilling directly on the wire rack.
Slide the universal pan into the oven
with the sloping edge facing the
oven door.
¾.
Special accessories
You can purchase special accessories from the after-sales
service or specialist retailers. You will find a comprehensive
range of products for your oven in our brochures and on the
Internet. The availability of special accessories and whether it is
possible to order them online may vary depending on your
country. Please see the sales brochures for more details.
Not all optional accessories are suitable for every appliance.
When purchasing, please always quote the exact designation
(E-no.) of your appliance.
Special accessories HEZ number Use
Wire rack HEZ334000 For ovenware, cake tins, joints, grilled items and frozen meals.
Enamel baking tray HEZ331000 For cakes and biscuits.
Slide the baking tray into the oven with the sloping edge facing
towards the oven door.
Universal pan HEZ332000 For moist cakes, pastries, frozen meals and large joints. It can
also be used to catch dripping fat when you are grilling directly
on the wire rack.
Slide the universal pan into the oven with the sloping edge facing the oven door.
Wire insert HEZ324000 For roasting. Always place the wire rack in the universal pan.
This ensures that dripping fat and meat juices are collected.
Grill tray HEZ325000 Use for grilling instead of the wire rack or as a splatter guard,
so that the oven does not become very dirty. Only use the grill
tray in the universal pan.
Glass pan HEZ336000 A deep baking tray made of glass. Can also be used as a serv-
6
Grilling on the grill tray: only use at shelf height 1, 2 and 3.
Using the grill tray as a splatter guard: insert the universal pan
with the grill tray under the wire rack.
ing dish.

Special accessories HEZ number Use
Pizza tray HEZ317000 Ideal for pizza, frozen products or large round cakes. You can
use the pizza tray instead of the universal pan. Place the baking tray on the wire rack and proceed according to the details
in the tables.
Bakestone HEZ327000 The bakestone is perfect for preparing home-made bread,
bread rolls and pizzas which require a crispy base. The bakestone must always be preheated to the recommended temperature.
Enamel baking tray with non-stick coating HEZ331010 Cakes and biscuits can be removed more easily from the bak-
Universal pan with non-stick coating HEZ332010 Moist cakes, pastries, frozen meals and large joints can be
Profi extra-deep pan with wire insert HEZ333000 Ideally suited for preparing large amounts.
Lid for the Profi extra-deep pan HEZ333001 The lid converts the Profi extra-deep pan into the Profi roasting
Glass roasting dish HEZ915001 The glass roasting dish is suitable for stews and bakes that are
Telescopic shelves
2-level HEZ338250 The pull-out rails at levels 2 and 3 allow you to pull accessories
3-level HEZ338352 The pull-out rails at levels 1, 2 and 3 allow you to pull accesso-
3-level complete pull-out HEZ338356 The pull-out rails at levels 1, 2 and 3 allow you to pull accesso-
3-level complete pull-out with stop function HEZ338357 The pull-out rails at levels 1, 2 and 3 allow you to pull accesso-
Self-cleaning side walls
Appliance with one oven light HEZ339020 You can retrofit side walls so that the cooking compartment
Appliances with one oven light and automatic
roasting
Self-cleaning oven ceiling and side walls
Appliances with one oven light and a folding
grill element
Appliances with two oven lights and a folding
grill element
Appliances with one oven light, a folding grill
element and a meat thermometer
Steam filter HEZ329000 You can retrofit this in your oven. The steam filter filters out
System steamer HEZ24D300 For easy preparation of vegetables and fish.
HEZ339020 You can retrofit side walls so that the cooking compartment
HEZ329020 You can retrofit the ceiling and side walls so that the cooking
HEZ329022 You can retrofit the ceiling and side walls so that the cooking
HEZ329027 You can retrofit the ceiling and side walls so that the cooking
ing tray. Slide the baking tray into the oven with the sloping
edge facing towards the oven door.
removed more easily from the universal pan. Slide the universal pan into the oven with the sloping edge facing the oven
door.
dish.
cooked in the oven. It is ideally suited to automatic programmes or automatic roasting.
out further without them tipping.
ries out further without them tipping.
The 3-level pull-out is not suitable for appliances that have a
rotary spit.
ries out fully without them tipping.
The 3-level complete pull-out is not suitable for appliances that
have a rotary spit.
ries out fully without them tipping. The pull-out rails lock in position allowing accessories to be easily placed on top.
The 3-level complete pull-out with stop function is not suitable
for appliances that have a rotary spit.
automatically cleans itself during operation.
automatically cleans itself during operation.
compartment automatically cleans itself during operation.
compartment automatically cleans itself during operation.
compartment automatically cleans itself during operation.
grease particles from the exhaust air, thereby reducing odours.
Only for appliances with a 6, 7 or 8 as the second digit in the
E-no. (e.g. HBA38
B750).
7
After-sales service products
You can obtain suitable care and cleaning agents and other
accessories for your domestic appliances from the after-sales
Cleaning cloths for stainless-steel surfaces Product no. 311134 Reduces the build-up of dirt. Impregnated with a special oil for
Oven and grill cleaning gel Product no. 463582 For cleaning the cooking compartment. The gel is odourless.
Microfibre cloth with honeycomb structure Product no. 460770 Especially suitable for cleaning delicate surfaces, such
Door lock Product no. 612594 To prevent children from opening the oven door. The locks on
service, specialist retailers or (in some countries) online via the
eShop. Please specify the relevant product number.
perfect maintenance of your appliance's stainless-steel surfaces.
as glass, glass ceramic, stainless steel or aluminium. The
microfibre cloth removes liquid and grease deposits in one go.
different types of appliance door are screwed in differently.
See the information sheet supplied with the door lock.
Before using the oven for the first time
In this section, you can find out what you must do before using your oven to prepare food for the first time. First read the section on Safety information.
Heating the oven
To remove the "new" smell, heat the oven empty with the door
closed. The most effective option is to heat the oven for one
hour with the top and bottom heating elements
240 ºC. Check that no packaging has been left inside the oven.
% set at
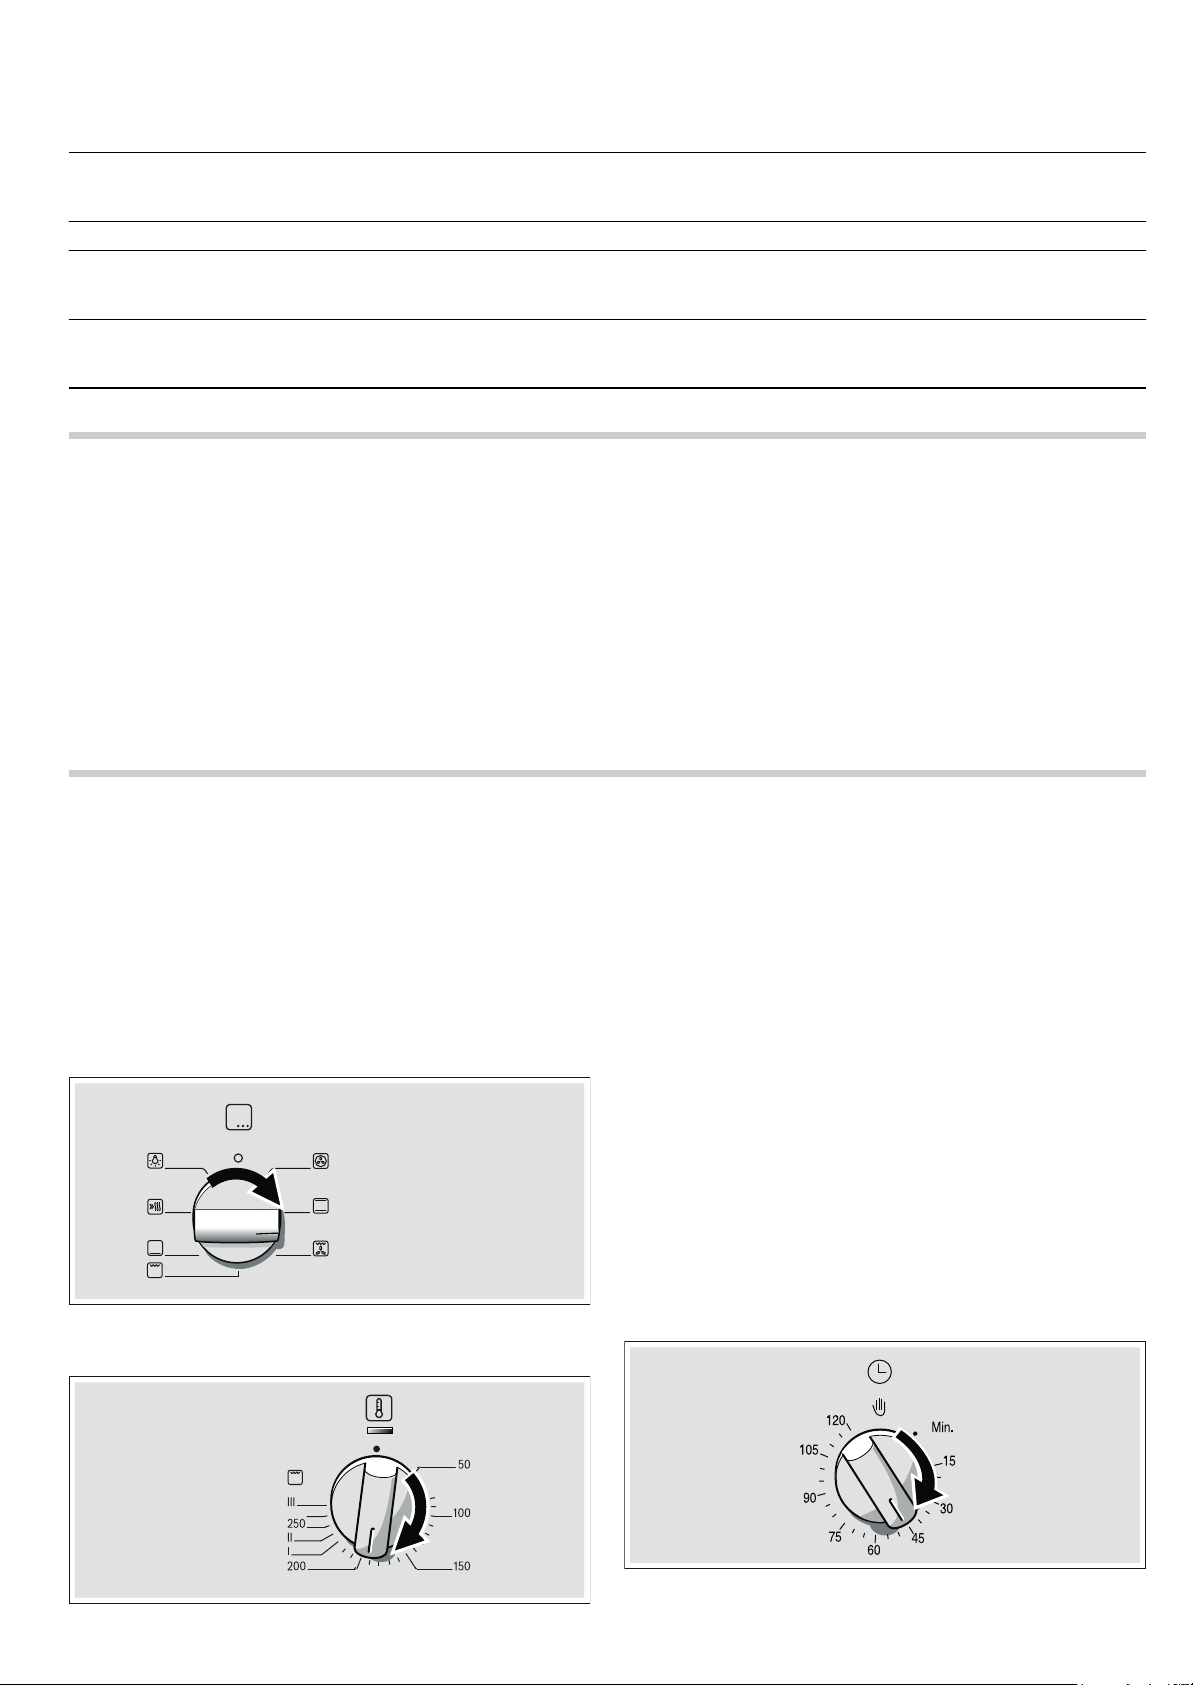
Setting the oven
There are various ways in which you can set your oven. Here
we will explain how you can select the desired type of heating
and temperature or grill setting.
Note: We recommend preheating the oven before inserting the
food in order to avoid condensation on the oven glass.
Type of heating and temperature
Example in the picture: top and bottom heat % at 190 ºC.
1.Select the type of heating using the function control knob.
2.Select the temperature or grill power level with the
temperature control knob.
1.Select top and bottom heating % using the function control
knob.
2.Select 240 ºC with the temperature control knob.
Turn the oven off after one hour. To do this, turn the function
control knob to zero.
Cleaning the accessories
Before using the accessories for the first time, clean them thoroughly using a cloth, hot water and a little soap.
The oven will begin to heat up.
Switching off the oven
Turn the function selector to the off position.
Changing the settings
The type of heating and temperature or grill setting can be changed at any time using their respective selectors.
Cooking time
The oven allows you to set the cooking time for each type of
food. The oven switches off automatically when the cooking
time has finished. This avoids interrupting other tasks to switch
the oven off or exceeding the cooking time by mistake.
Example in the picture: Cooking time: 45 minutes.
1.Select the type of heating using the function control knob.
2.Select the temperature or grill power level with the
temperature control knob.
3.Turn the timer to the right until the desired time is reached. A
limit stop is located after 120 min. Do not turn the knob any
further.
8
 Loading...