

Bosch HBA13B150A, HBA13B150APVS675FB1E User Manual
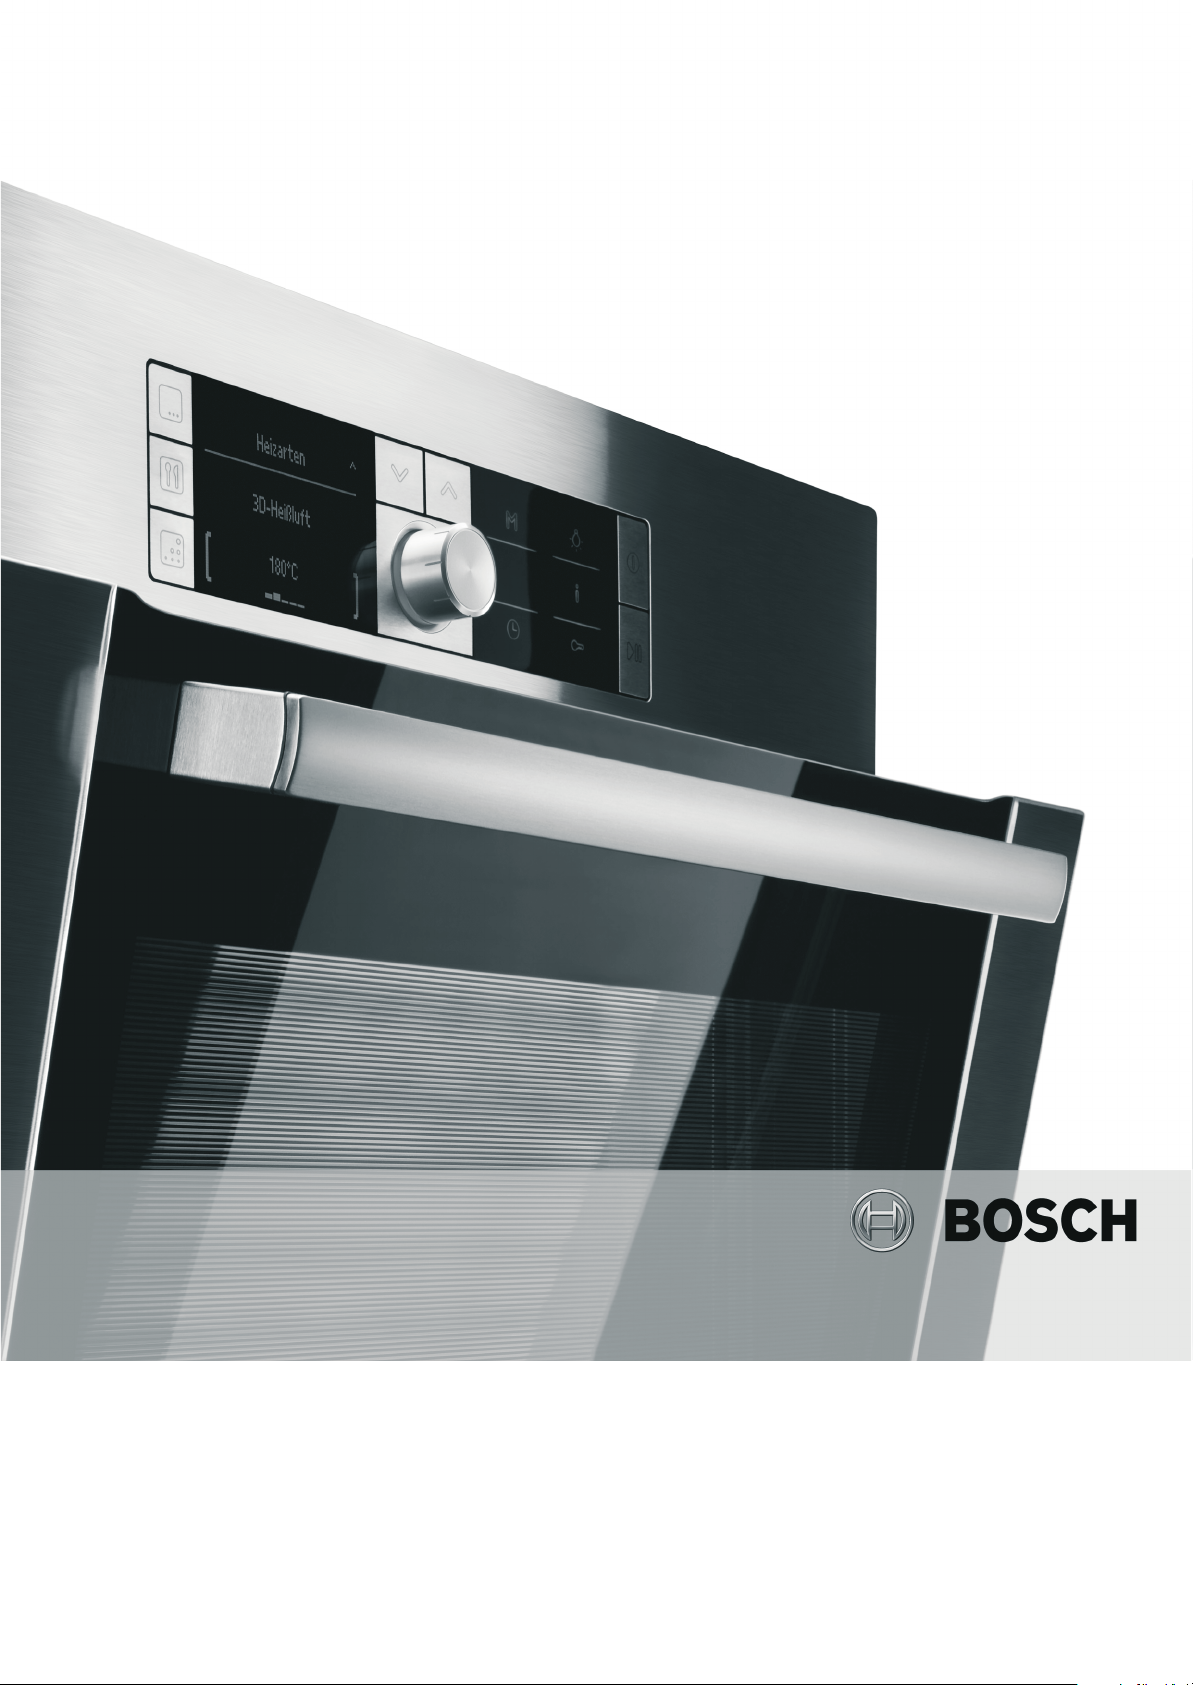
Built-in oven HB.13B...
[en] Instruction manual

Ú Table of contents
[en]Instruction manual
Important safety information .................................................... 2
Causes of damage .............................................................................3
Your new oven............................................................................ 4
Control panel .......................................................................................4
Function control knob ........................................................................4
Control buttons and display panel ..................................................4
Temperature control knob.................................................................5
Inside the oven ....................................................................................5
Your accessories ....................................................................... 5
inserting the accessories ..................................................................5
Special accessories ...........................................................................6
Before using the oven for the first time................................... 6
Setting the time ...................................................................................6
Heating the oven.................................................................................6
Cleaning the accessories..................................................................6
Programming the oven.............................................................. 6
Type of heating and temperature ....................................................6
Setting the time functions......................................................... 7
Timer .....................................................................................................7
Cooking time .......................................................................................7
End time................................................................................................8
Time.......................................................................................................8
Childproof lock........................................................................... 8
Changing the basic settings ..................................................... 9
Care and cleaning ...................................................................... 9
Cleaning products ..............................................................................9
Light.................................................................................................... 10
Removing and refitting the wire shelves or left and right hand
side rails ............................................................................................ 10
Unhooking and hanging the oven door ...................................... 10
Removing and installing the door panels ................................... 11
Troubleshooting........................................................................12
Troubleshooting table ..................................................................... 12
Changing the oven bulb................................................................. 12
Protective glass panels .................................................................. 12
After-sales service....................................................................12
E number and FD number ............................................................. 12
Energy and environment tips ..................................................13
Saving energy................................................................................... 13
Environmentally-friendly disposal of waste ................................. 13
Tested for you in our cooking studio......................................13
Cakes and pastries ......................................................................... 13
Suggestions and practical advice for baking............................. 15
Meat, poultry, fish ............................................................................ 16
Tips for roasting and grilling.......................................................... 18
Au gratin dishes, soufflés, toast.................................................... 18
Ready-made products .................................................................... 18
Special dishes .................................................................................. 19
Defrosting .......................................................................................... 19
Drying................................................................................................. 19
Acrylamide in food ...................................................................20
Test dishes ................................................................................20
Baking ................................................................................................ 20
Grilling................................................................................................ 20
Produktinfo
Additional information on products, accessories, replacement
parts and services can be found at www.bosch-home.com and
in the online shop www.bosch-eshop.com
: Important safety information
Read these instructions carefully. Only then will you be able to operate your appliance safely and correctly. Retain the instruction manual and installation instructions for future use or for subsequent owners.
This appliance is only intended to be fully fitted in a kitchen. Observe the special installation instructions.
Check the appliance for damage after unpacking it. Do not connect the appliance if it has been damaged in transport.
Only a licensed professional may connect appliances without plugs. Damage caused by incorrect connection is not covered under warranty.
This appliance is intended for domestic use only. The appliance must only be used for the preparation of food and drink. The appliance must be supervised during operation. Only use this appliance indoors.
This appliance may be used by children
over the age of 8 years old and by persons
with reduced physical, sensory or mental
capacity or by persons with a lack of
experience or knowledge if they are
supervised or are instructed by a person
responsible for their safety how to use the
appliance safely and have understood the
associated hazards.
Children must not play with the appliance. Children must not clean the appliance or carry out general maintenance unless they are at least 8 years old and are being supervised.
Keep children below the age of 8 years old at a safe distance from the appliance and power cable.
Always slide accessories into the cooking compartment correctly. See "Description of accessories in the instruction manual.
2

Risk of fire!
■
Combustible items stored in the cooking
compartment may catch fire. Never store
combustible items in the cooking
compartment. Never open the appliance
door if there is smoke inside. Switch off
the appliance and unplug it from the
mains or switch off the circuit breaker in
the fuse box.
Risk of fire!
■
A draught is created when the appliance
door is opened. Greaseproof paper may
come into contact with the heating
element and catch fire. Do not place
greaseproof paper loosely over
accessories during preheating. Always
weight down the greaseproof paper with a
dish or a baking tin. Only cover the
surface required with greaseproof paper.
Greaseproof paper must not protrude over
the accessories.
Risk of burns!
■
The appliance becomes very hot. Never
touch the interior surfaces of the cooking
compartment or the heating elements.
Always allow the appliance to cool down.
Keep children at a safe distance.
Risk of burns!
■
Accessories and ovenware become very
hot. Always use oven gloves to remove
accessories or ovenware from the cooking
compartment.
Risk of burns!
■
Alcoholic vapours may catch fire in the hot
cooking compartment. Never prepare food
containing large quantities of drinks with a
high alcohol content. Only use small
quantities of drinks with a high alcohol
content. Open the appliance door with
care.
Risk of scalding!
■
The accessible parts become hot during
operation. Never touch the hot parts. Keep
children at a safe distance.
Risk of scalding!
■
When you open the appliance door, hot
steam may escape. Open the appliance
door with care. Keep children at a safe
distance.
Risk of scalding!
■
Water in a hot cooking compartment may
create hot steam. Never pour water into
the hot cooking compartment.
Risk of injury!
Scratched glass in the appliance door may develop into a crack. Do not use a glass scraper, or sharp or abrasive cleaning aids or detergents.
Risk of electric shock!
■
Incorrect repairs are dangerous. Repairs
may only be carried out by one of our
trained after-sales engineers. If the
appliance is faulty, unplug the mains plug
or switch off the fuse in the fuse box.
Contact the after-sales service.
Risk of electric shock!
■
The cable insulation on electrical
appliances may melt when touching hot
parts of the appliance. Never bring
electrical appliance cables into contact
with hot parts of the appliance.
Risk of electric shock!
■
Penetrating moisture may cause an
electric shock. Do not use any highpressure cleaners or steam cleaners.
Risk of electric shock!
■
When replacing the cooking compartment
bulb, the bulb socket contacts are live.
Before replacing the bulb, unplug the
appliance from the mains or switch off the
circuit breaker in the fuse box.
Risk of electric shock!
■
A defective appliance may cause electric
shock. Never switch on a defective
appliance. Unplug the appliance from the
mains or switch off the circuit breaker in
the fuse box. Contact the after-sales
service.
Causes of damage
Caution!
■ Accessories, foil, greaseproof paper or ovenware on the
cooking compartment floor: do not place accessories on the
cooking compartment floor. Do not cover the cooking
compartment floor with any sort of foil or greaseproof paper.
Do not place ovenware on the cooking compartment floor if a
temperature of over 50 ºC has been set. This will cause heat
to accumulate. The baking and roasting times will no longer
be correct and the enamel will be damaged.
■ Water in a hot cooking compartment: do not pour water into
the cooking compartment when it is hot. This will cause
steam. The temperature change can cause damage to the
enamel.
■ Moist food: do not store moist food in the cooking
compartment when it is closed for prolonged periods This will
damage the enamel.
■ Fruit juice: when baking particularly juicy fruit pies, do not
pack the baking tray too generously. Fruit juice dripping from
the baking tray leaves stains that cannot be removed. If
possible, use the deeper universal pan.
■ Cooling with the appliance door open: only allow the cooking
compartment to cool when it is closed. Even if the appliance
door is only open a little, front panels of adjacent units could
be damaged over time.
3
■ Very dirty door seal: If the door seal is very dirty, the
)XQFWLRQ
FRQWURONQRE
7HPSHUDWXUH
FRQWURONQRE
&RQWUROEXWWRQV
DQGGLVSOD\SDQHO
appliance door will no longer close properly when the
appliance is in use. The fronts of adjacent units could be
damaged.Always keep the door seal clean.
■ Appliance door as a seat, shelf or worktop: Do not sit on the
appliance door, or place or hang anything on it. Do not place
any cookware or accessories on the appliance door.
Your new oven
We will now describe your new oven. This chapter explains the
functions of the control panel and its individual elements.
Information is also provided about the oven's accessories and
internal components.
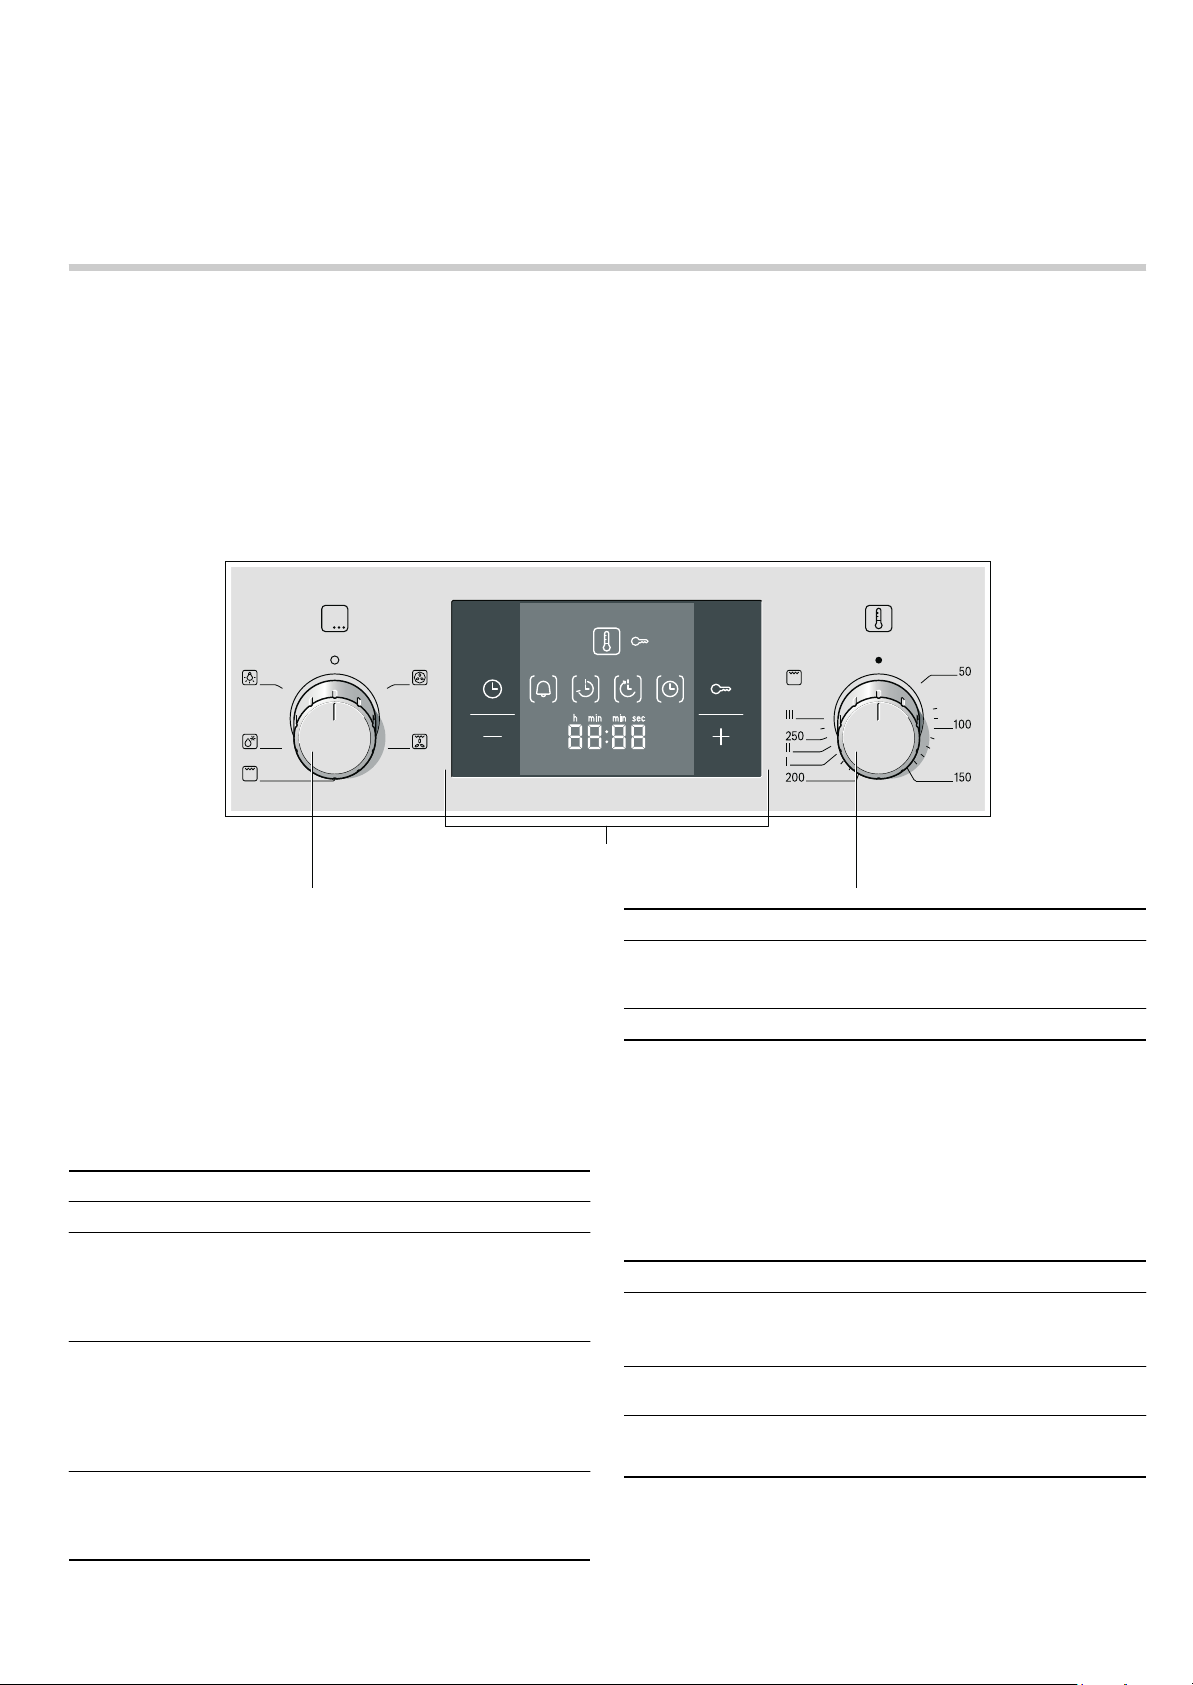
Control panel
Below is a general overview of the control panel. The display
panel cannot show all the symbols at the same time. Elements
may vary depending on the model.
■ Inserting accessories: depending on the appliance model,
accessories can scratch the door panel when closing the
appliance door. Always insert the accessories into the
cooking compartment as far as they will go.
■ Carrying the appliance: do not carry or hold the appliance by
the door handle. The door handle cannot support the weight
of the appliance and could break.
Retractable control knobs
In some ovens, the control knobs are retractable. The control
knob is retracted or returned by pressing it when at the zero
setting.
Buttons
There are sensors under each button. Do not press hard on the
buttons. Only press the relevant symbol.
Function control knob
The function control knob is used to select the type of heating.
Setting Use
Zero setting The oven is off.
Û
3D hot air* For cakes and pastries. You can
<
Grill with hot air For roasting joints of meat, poultry
7
Large surface grill For grilling steaks, sausages, fish
(
* Type of heating used to determine the appliance's energy effi-
ciency rating according to EN60350.
bake cakes and pastries on three
levels. A fan located on the rear
wall of the oven disperses the heat
evenly.
and fish. The grill heating element
and the fan switch on and off alternately. The fan circulates the heat
generated by the grill around the
food.
and toasting bread. The entire surface below the grill heating element is heated.
Setting Use
Defrosting Defrosting, e.g. meat, poultry,
B
Light For turning on the oven light.
^
* Type of heating used to determine the appliance's energy effi-
ciency rating according to EN60350.
Once a type of heating has been selected the oven light is
turned on.
bread and cakes. The fan circulates the hot air around the food.
Control buttons and display panel
The buttons are used to set different additional functions. The
set values are shown on the display panel.
Button Use
Time functions
0
Childproof lock Blocks and unblocks the control
D
Minus
A
Plus
@
On the display panel, the brackets [ ] indicate the symbol for
the time function selected.
Select the timer
time
r, the end time p and the
0.
time
panel.
Reduces programmed values.
Increases programmed values.
U, the cooking
4
Temperature control knob
The temperature control knob is used to select the temperature
or the grill power level.
Inside the oven
There is a light inside the oven. A fan prevents the oven from
overheating.
Setting Meaning
Ú
50-270 Temperature
I, II and
III
When the oven is heating, the
display panel. This light goes off when heating is paused. The
symbol does not come on with the light function
defrost function
Note: If grilling for more than 15 minutes, turn the temperature
control knob to the low setting.
Zero setting The oven fails to heat up.
The oven temperature in ºC.
range
Grill power The different levels for the large
surface grill
I = level 1, low
II = level 2, medium
III = level 3, high
(.
t symbol lights up on the
^ or the
B.
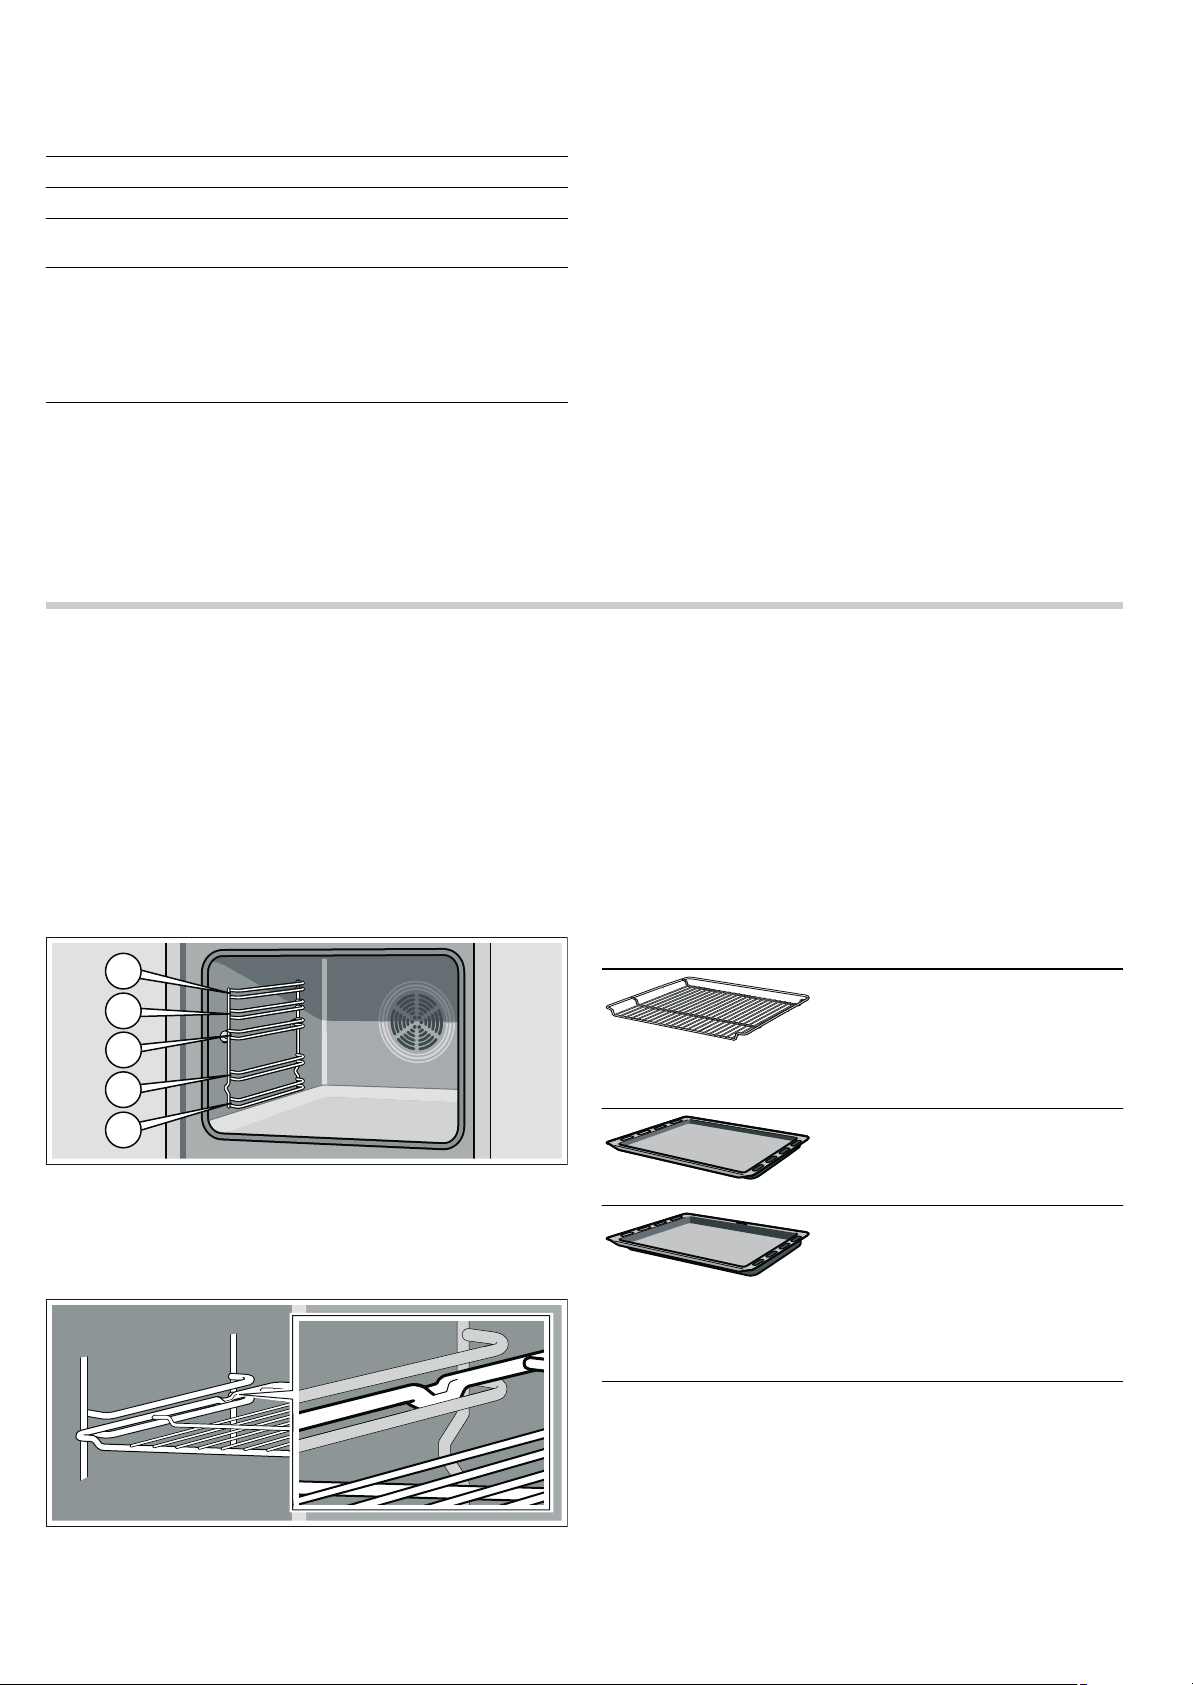
Your accessories
The accessories supplied with your appliance are suitable for
making many meals. Ensure that you always insert the
accessories into the cooking compartment the right way round.
There is also a selection of optional accessories, with which
you can improve on some of your favourite dishes, or simply to
make working with your oven more convenient.
inserting the accessories
The accessories can be placed inside the oven on 5 different
levels. Always insert them as far as possible so that the
accessories do not touch the door glass.
Fan
The fan can be turned on and off as necessary. The hot air
escapes through the top of the door. Warning! Do not cover the
vent. The oven could overheat.
The fan remains on for a certain length of time after the oven
has been switched off so that it can cool down more quickly.
Light
The oven light remains on while the oven is working. However,
the light can be turned on without the oven being on by setting
the function control knob to
Depending on the equipment, if the appliance has guide rails,
these will interlock slightly when fully removed. This means the
accessory can be easily inserted. To unlock, reinsert the guide
rails in the oven exerting slight pressure.
Note: Accessories may deform as they heat up. This
deformation will disappear when they cool. This does not affect
the normal operation.
Your oven is supplied with only some of the following
accessories.
Accessories may be purchased from the Technical Assistance
Service, from specialist retailers or on the Internet. Enter
the HEZ number.
^.
The accessories can be removed halfway until they are
secured. This makes it easy to remove food.
When inserting an accessory in the oven, make sure the
curvature is at the rear. This is the only way to ensure it fits
perfectly.
Wire shelf
For cookware, baking tins, roasts,
grilled items and frozen meals.
Insert the wire shelf with the open
end facing the oven door and the
curvature downwards
Flat enamel oven tray
For cakes, pastries and biscuits.
Place the tray in the oven with its
raised lip facing the door.
Universal deep enamel tray
For juicy cakes, pastries, frozen
meals and large joints for roasting.
This can also be used as a tray to
collect the fat when roasting directly
on the wire shelf.
Place the tray in the oven with its
raised lip facing the door.
¾.
5
Special accessories
Accessories may be purchased from the Technical Assistance
Service or from specialist retailers. There is a wide range of
accessories available for the oven in our catalogues and on the
Internet. Ordering online and the availability of special
Special accessories HEZ number Use
Flat enamel oven tray HEZ361000 For cakes, pastries and biscuits.
Universal deep enamel tray HEZ362000 For juicy pies, pastries, frozen meals and large joints for roasting. This can also
be used as a tray to collect the fat when roasting directly on the wire shelf.
Wire shelf HEZ364000 For cookware, baking tins, roasts, items placed directly on a wire shelf and fro-
zen meals.
Pizza tray HEZ317000 Ideal for pizza, frozen foods, or large round cakes. The pizza tray can be used
instead of the universal deep tray. Place the tray on the wire shelf and follow
the indications in the tables.
Glass casserole dish HEZ915001 The glass casserole dish is ideal for preparing stews and foods that need
browning in the oven. It is especially suitable for automatic programmes and
automatic roasting.
Triple removable guide rails HEZ368301 The triple guide rails at heights 1, 2 and 3 ensure that accessories can be fully
removed without them tipping over.
accessories changes from country to country. Consult your
purchase documentation.
Not all of the special accessories are suitable for all appliances.
When purchasing, always give the exact name (E-Nr.) of your
appliance.
Before using the oven for the first time
In this section, you can find out what you must do before using
your oven to prepare food for the first time. First read the
section on Safety information.
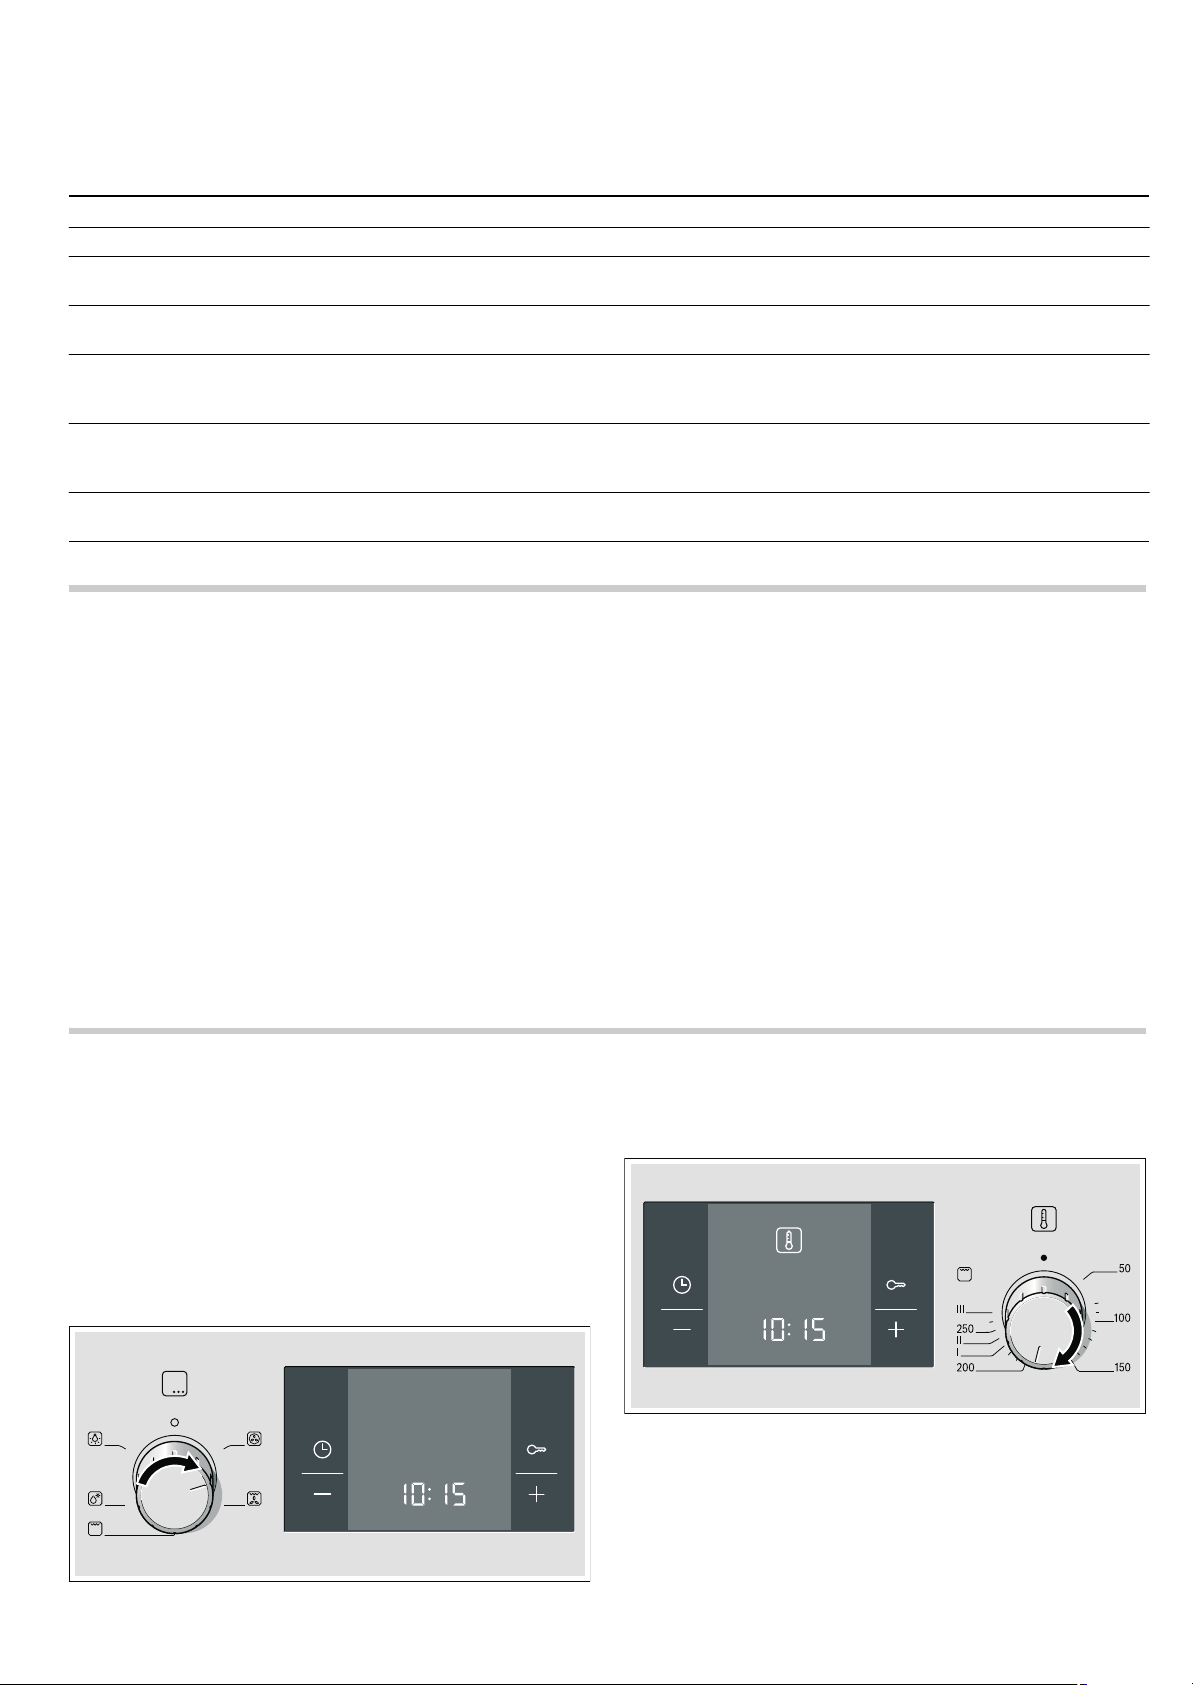
Setting the time
Once the oven has been connected, the 0 symbol and four
zeros are shown flashing on the display panel. Set the time.
1.Press the 0 button.
The display shows the time
2.Set the time with the buttons @ or A.
The programmed time is displayed after a few seconds.
‚ƒ:‹‹.
Programming the oven
There are different ways to programme the oven. Programming
the type of heating, temperature or grill power. The oven can be
programmed with the cooking time (duration) and the end time
for each dish. For more information, see the chapter Setting the
time functions.
Type of heating and temperature
Example in the picture: 3D < hot air at 190 ºC.
1.Select the type of heating using the function control knob.
Heating the oven
To remove the "new" smell, heat the oven empty with the door
closed. The most effective option is to heat the oven for one
hour with 3D
has been left in the oven first.
1.Use the function control knob to select 3D < hot air.
2.Select 240 ºC with the temperature control knob.
Turn the oven off after one hour. To do this, turn the control
knob to zero.
< hot air at 240 ºC. Make sure that no packaging
Cleaning the accessories
Before using the accessories for the first time, clean them
thoroughly using a cloth, hot water and a little soap.
2.Select the temperature or grill power level with the
temperature control knob.
The oven will begin to heat up.
Switching off the oven
Turn the function selector to the off position.
Changing the settings
The type of heating and temperature or grill setting can be
changed at any time using their respective selectors.
6
Setting the time functions
This oven has various time functions. The 0 sensor activates
the menu and moves through the different functions. The time
symbols remain lit up while settings are programmed. The
square brackets [ ] indicate the time function selected. You can
modify an already programmed time function directly with the
sensors
square brackets [ ].
@ or A, provided the time symbol is situated between
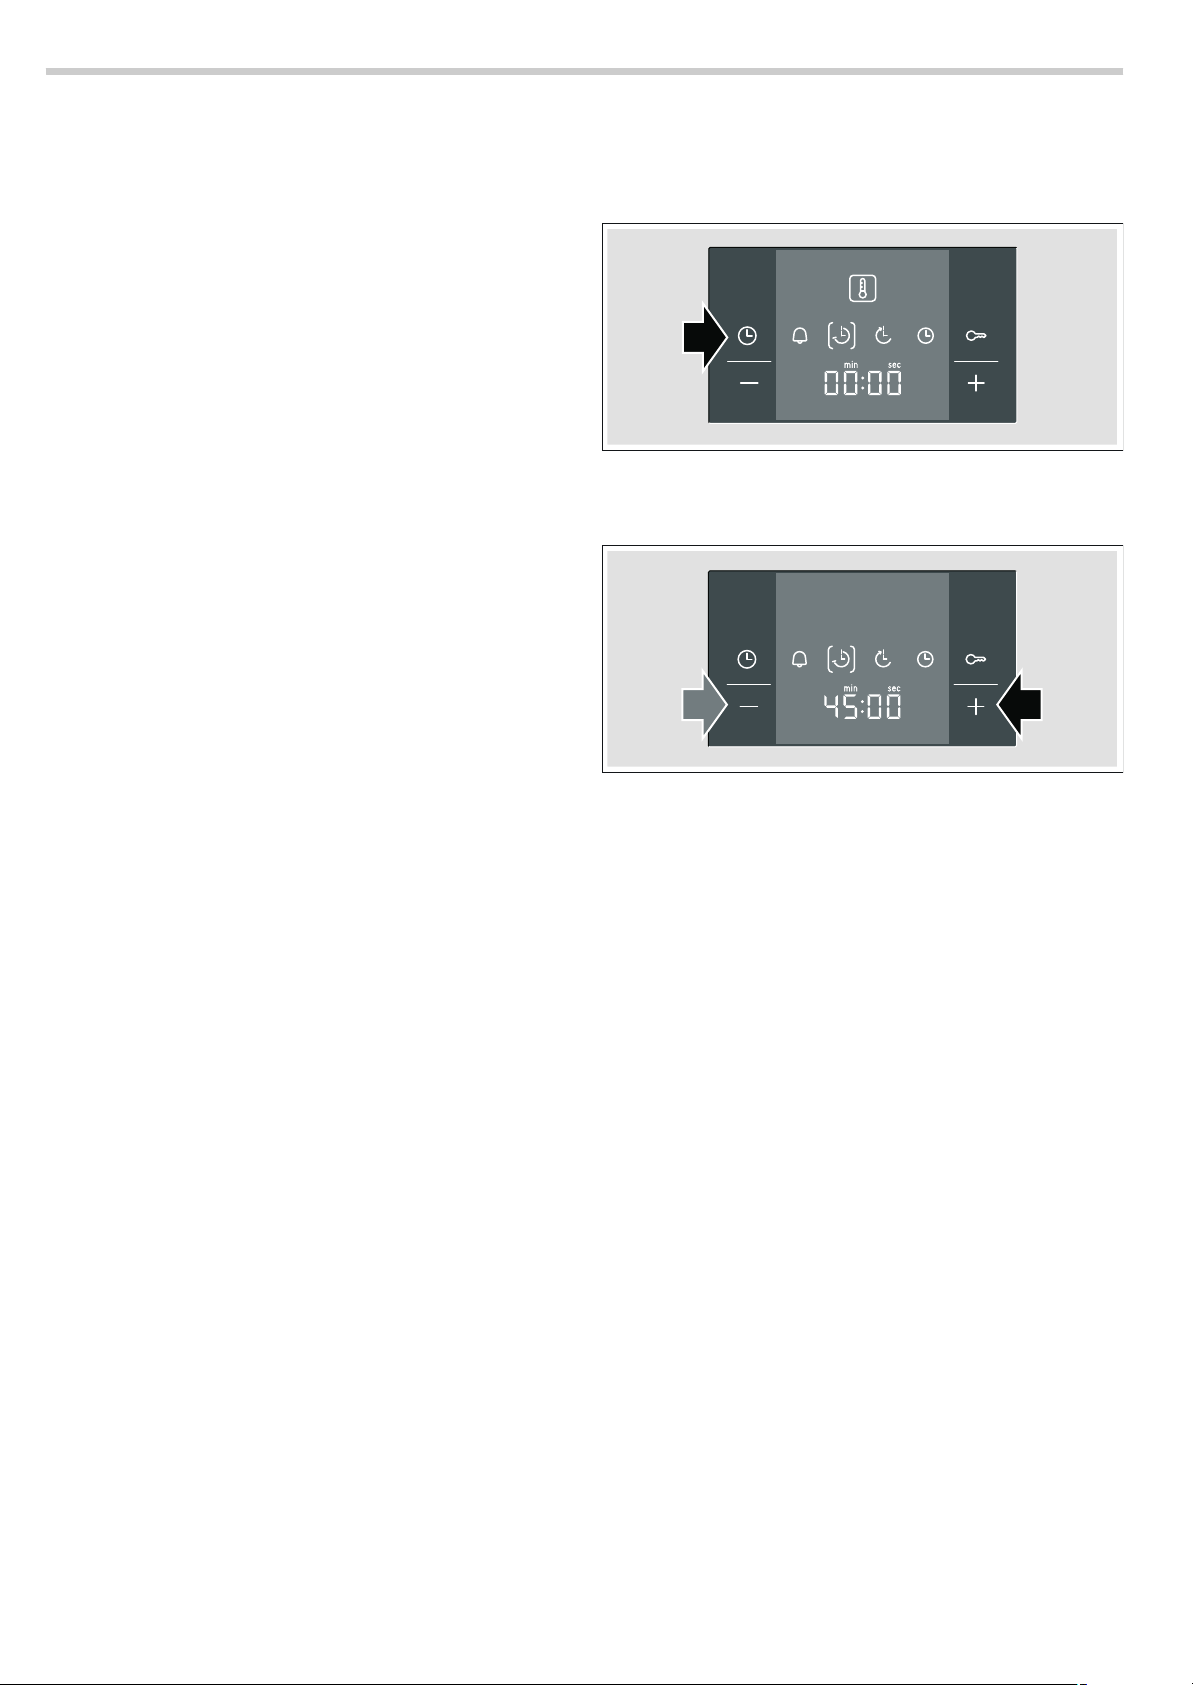
Timer
The timer works independently of the oven. The timer has its
own beep. This can be used to distinguish whether the time set
for the timer or the automatic oven shut-off have finished
(cooking time).
1. Press the button once 0.
The time symbols light up on the display panel, the square
brackets are next to
2. Set the timer using the @ or A buttons.
Value suggested for the
Value suggested for the
The programmed time is shown after a few seconds. The time
set for the timer starts to count down. The symbol [
on the display panel and the timer's progress is shown. The
other time symbols switch off.
The time set for the timer has elapsed
A beep will sound. The display panel will show
off the timer using the
U.
@ button = 10 minutes.
A button = 5 minutes.
U] lights up
‹‹:‹‹. Switch
0 button.
3. Press the 0 button twice.
The display panel will show
up, the square brackets are next to
4. Set the cooking time with the @ or A buttons.
Value suggested for the
Value suggested for the
‹‹:‹‹. The time symbols light
r.
@ button = 30 minutes
A button = 10 minutes
Changing the time on the timer.
Change the time set for the timer using the
new time is shown after a few seconds.
Cancelling the timer
Resetting the timer to
is shown after a few seconds. The timer switches off.
Viewing the time settings
If several time functions are programmed, the corresponding
symbols light up on the display panel. The symbol for the time
function in the foreground is in brackets.
To view the timer
the actual time
brackets are around the required symbol. The corresponding
value will be shown for a few seconds on the display panel.
‹‹:‹‹ with the button A. The new time
U, the cooking time r, the end time p or
0, press the 0 sensor repeatedly until the
@ or A buttons. The
Cooking time
The oven allows you to set the cooking time for each type of
food. The oven switches off automatically when the cooking
time has finished. This avoids interrupting other tasks to switch
the oven off or exceeding the cooking time by mistake.
Example in the picture: cooking time: 45 minutes.
1. Select the type of heating using the function control knob.
2. Select the temperature or grill power level with the
temperature control knob.
The oven will switch on after a few seconds. The display panel
shows the cooking time elapsed and the [
on. The other time symbols switch off.
The cooking time has finished
A beep will sound. The oven will stop heating. The display
panel will show
cooking time with the
twice and turn the function control knob to the zero setting. The
oven is off.
Changing the cooking time
Change the cooking time with the
time is shown after a few seconds. If the timer has been
programmed, first press the
Cancelling the cooking time
Reset the cooking time to
time is shown after a few seconds. The time has been
cancelled. If the timer has been programmed, first press the
button.
Viewing the time settings
If several time functions are programmed, the corresponding
symbols light up on the display panel. The symbol for the time
function in the foreground is in brackets.
To view the timer
the actual time
brackets are around the required symbol. The corresponding
value will be shown for a few seconds on the display panel.
‹‹:‹‹. Press the 0 button. Programme a new
@ or A buttons. Or press the 0 button
@ or A buttons. The new
0 button.
‹‹:‹‹ with the button A. The new
U, the cooking time r, the end time p or
0, press the 0 sensor repeatedly until the
r] symbol comes
0
7
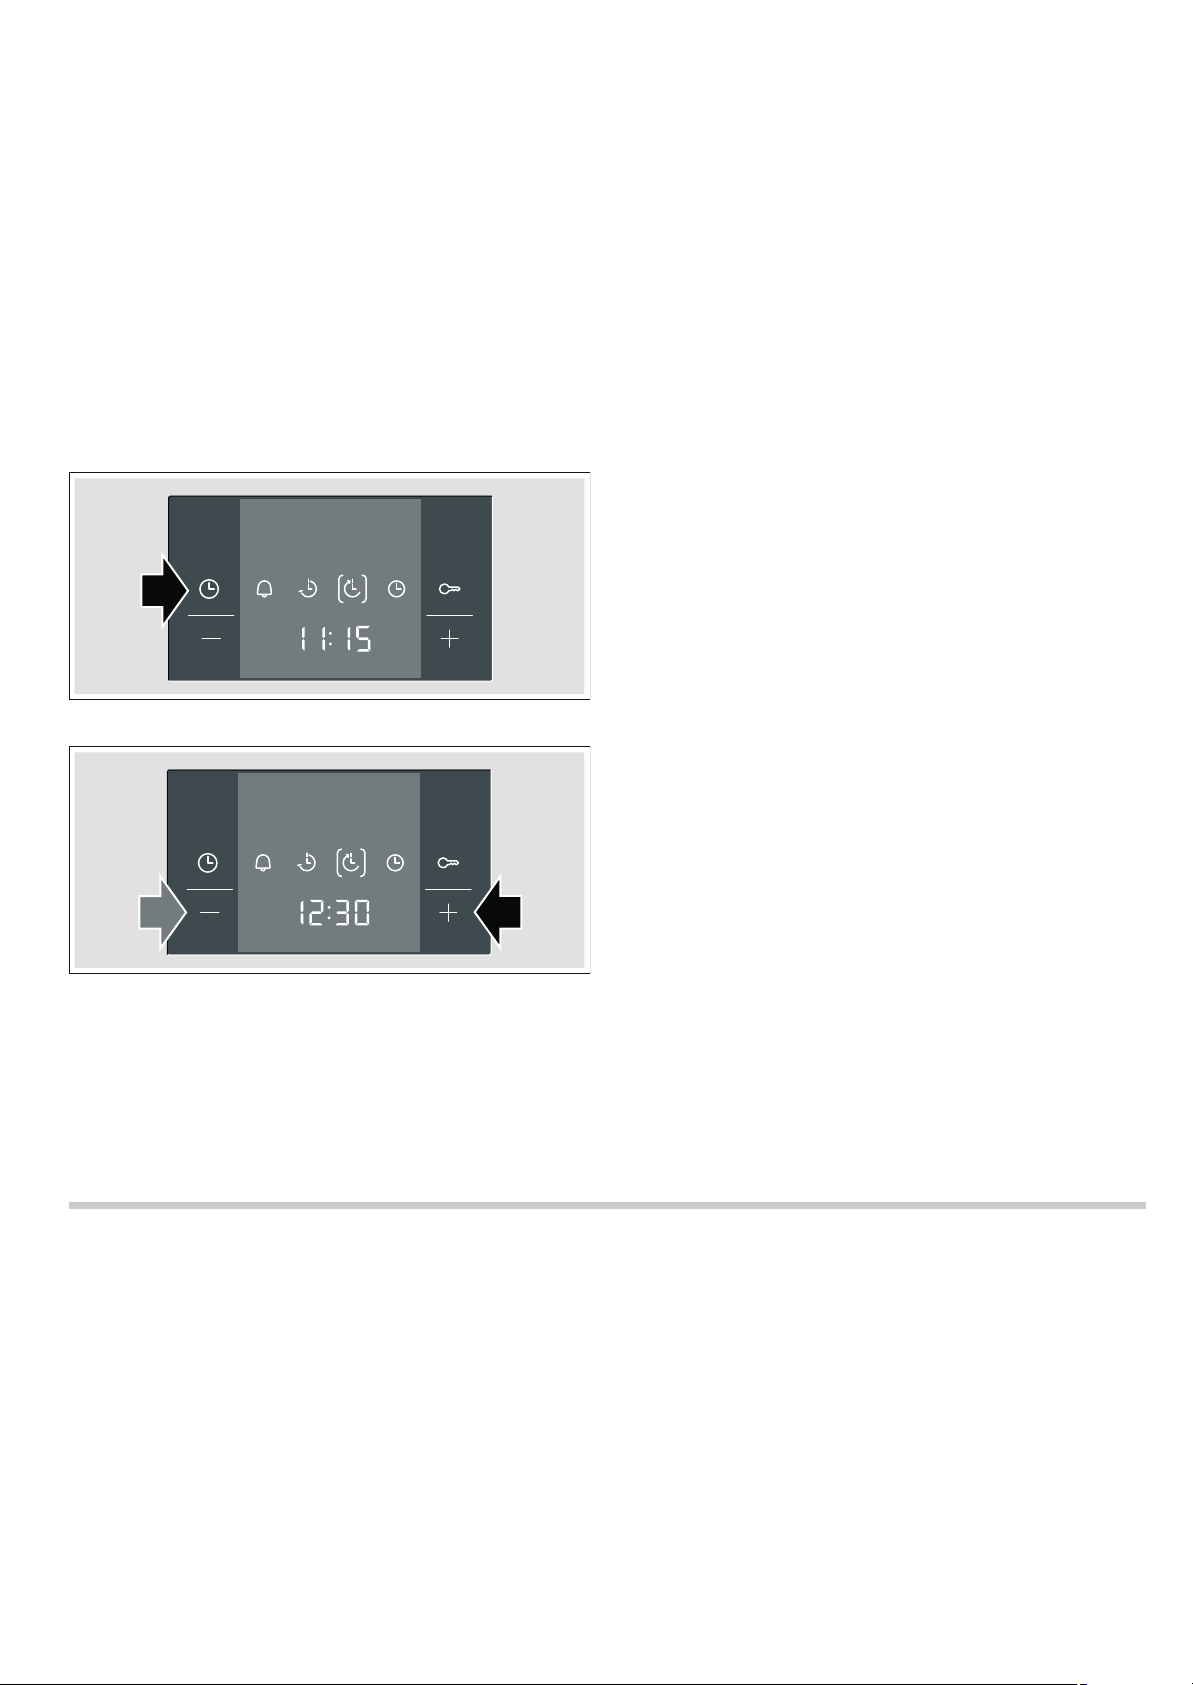
End time
The oven allows you to set the time when you want the food
ready. The oven switches on automatically and switches off at
the set time. For example, the food may be placed in the oven
in the morning and the oven set so that it is ready at midday.
Ensure that the food will not go off if it is in the oven for too
long.
Example in the picture: It is now 10:30 am, the cooking time is
45 minutes and the oven should switch off at 12:30 pm.
1.Set the function control knob.
2.Set the temperature control knob.
3.Press the 0 button twice.
4.Set the cooking time with the @ or A buttons.
5.Press the 0 button.
The square brackets are shown next to
will be ready is displayed.
p. The time the dish
The cooking time has finished
A beep will sound. The oven will stop heating. The display
panel will show
cooking time with the
twice and turn the function control knob to the zero setting. The
oven is off.
Changing the end time
Change the end time using the buttons
shown after a few seconds. If the timer has been programmed,
first press the
cooking time has already started to count down. The final result
may not be the same.
Cancelling the end time
Reset the end time to the current time by pressing
time is shown after a few seconds. The oven switches on. If the
timer has been programmed, first press the
Viewing the time settings
If several time functions are programmed, the corresponding
symbols light up on the display panel. The symbol for the time
function in the foreground is in brackets.
To view the timer
the actual time
brackets are around the required symbol. The corresponding
value will be shown for a few seconds on the display panel.
‹‹:‹‹. Press the 0 button. Programme a new
@ or A buttons. Or press the 0 button
@ or A. The new time is
0button twice. Do not change the end time if the
A. The new
0 button twice.
U, the cooking time r, the end time p or
0, press the 0 sensor repeatedly until the
6.Delay the end time using the @ or A buttons.
The oven displays the programmed time after a few seconds
and is set to standby. The time when the dish will be ready is
displayed and the end time
brackets. The symbols
turned on, cooking time progress is shown and the symbol
appears in square brackets. The symbol
p symbol will be shown in square
U and 0 turn off. When the oven is
r
p is turned off.
Childproof lock
Time
Once the oven has been connected or after a power cut, a
flashing
panel. Set the time.
1.Press the 0 button.
2.Set the time with the buttons @ or A.
The programmed time is displayed after a few seconds.
Changing the time
No other time function can be programmed.
1.Press the 0 button four times.
2.Adjust the time with the buttons @ or A.
The programmed time is displayed after a few seconds.
Hiding the clock
You can hide the clock. For more information, please refer to
the section Changing the basic settings.
0 symbol and four zeros are shown on the display
The display panel displays the time
The time symbols light up on the display panel, the brackets
are located next to
0.
‚ƒ.‹‹.
The oven includes a childproof lock to prevent it being turned
on accidentally.
The oven does not react to any setting. The timer and time can
be programmed when the childproof lock is on.
When the heating type and temperature or grill level are
programmed, the childproof lock turns off the heating.
Activating the childproof lock
No cooking time or end time should already be set.
Press the D button for approximately four seconds.
The display panel shows the symbol
now activated.
8
D. The childproof lock is
Turning off the childproof lock
Press the
The
lock is now deactivated.
D button for approximately four seconds.
D symbol in the display panel goes off. The childproof
 Loading...