

Page 1

Built-in oven HBA13B1.0B
[en] Instruction manual
Page 2

Page 3

Ú Table of contents
[en]Instruction manual
Safety precautions ..................................................................... 4
Before installation ............................................................................... 4
Safety notes .........................................................................................4
Causes of damage .............................................................................4
Your new oven ............................................................................5
Control panel ....................................................................................... 5
Buttons and display............................................................................5
Function selector.................................................................................5
Temperature selector .........................................................................5
Cooking compartment .......................................................................6
Accessories .........................................................................................6
Before using the oven for the first time ................................... 8
Setting the clock .................................................................................8
Heating up the oven ...........................................................................8
Cleaning the accessories..................................................................8
Setting the oven.......................................................................... 8
Type of heating and temperature ....................................................8
Setting the time-setting options................................................ 9
Timer .....................................................................................................9
Cooking time .......................................................................................9
End time ............................................................................................ 10
Clock .................................................................................................. 10
Childproof lock ......................................................................... 10
Changing the basic settings ...................................................11
Care and cleaning .................................................................... 11
Cleaning agents ............................................................................... 11
Detaching and refitting the rails .................................................... 12
Detaching and attaching the oven door ...................................... 12
Removing the door cover............................................................... 12
Removing and installing the door panels ................................... 13
Troubleshooting .......................................................................13
Malfunction table.............................................................................. 13
Replacing the bulb in the oven ceiling light ............................... 14
Glass cover ....................................................................................... 14
After-sales service ................................................................... 14
E number and FD number ............................................................. 14
Energy and environment tips .................................................. 14
Saving energy................................................................................... 14
Environmentally-friendly disposal.................................................. 14
Tested for you in our cooking studio ..................................... 15
Cakes and pastries ......................................................................... 15
Baking tips ........................................................................................ 16
Meat, poultry, fish............................................................................. 17
Tips for roasting and grilling .......................................................... 19
Preprepared products ..................................................................... 19
Special dishes .................................................................................. 20
Defrost................................................................................................ 20
Drying................................................................................................. 21
Preserving ......................................................................................... 21
Acrylamide in foodstuffs ......................................................... 22
Test dishes................................................................................ 22
Baking ................................................................................................ 22
Grilling ................................................................................................ 23
Additional information on products, accessories, replacement
parts and services can be found at www.bosch-home.com and
in the online shop www.bosch-eshop.com
Produktinfo
3
Page 4

ã=Safety precautions
Please read this instruction manual carefully. Please keep the instruction and installation manuals in a safe place. Please pass on these manuals to the new owner if you sell the appliance.
Before installation
Damage during transport
Check the appliance for damage after unpacking it. Do not
connect the appliance if it has been damaged in transit.
Electrical connection
Only a licensed expert may connect the appliance. You will lose
your warranty entitlement in the event of any damage caused
by incorrect connection.
Safety notes
This appliance is intended for domestic use only. This
appliance must only be used for food preparation.
Adults and children must not operate the appliance without
supervision,
■ if they are physically or mentally incapable of doing so or
■ if they have insufficient knowledge or experience.
Never let children play with the appliance.
Hot cooking compartment
Risk of burns!
■ Never touch the interior surfaces of the cooking compartment
or the heating elements. Open the appliance door carefully.
Hot steam may escape. Small children must be kept at a safe
distance from the appliance.
■ Never prepare food containing large quantities of drinks with
a high alcohol content. Alcoholic vapours can catch fire in the
cooking compartment. Only use small quantities of drinks
with a high alcohol content and open the appliance door
carefully.
Risk of fire!
■ Never store combustible items in the cooking compartment.
Never open the appliance door if there is smoke inside.
Switch off the appliance. Pull out the mains plug or switch off
the circuit breaker in the fuse box.
■ Do not place greaseproof paper loosely over accessories
during preheating. A draught is created when the appliance
door is opened. The greaseproof paper may come into
contact with the heating element and catch fire. Always
weight down the greaseproof paper with a dish or a baking
tin. Only cover the surface required with greaseproof paper.
The greaseproof paper must not protrude over the
accessories.
Risk of short circuit!
Never trap connecting cables of electrical appliances in the hot
appliance door. The cable insulation could melt.
Risk of scalding!
Never pour water into the hot cooking compartment. This will
produce hot steam.
Hot accessories and ovenware
Risk of burns!
Never remove ovenware or accessories from the cooking
compartment without an oven cloth or oven gloves.
Improper repairs
Risk of electric shock!
Improper repairs are dangerous. Repairs may only be carried
out by one of our trained after-sales engineers. If the appliance
is defective, pull out the mains plug or switch off the appliance
at the circuit breaker in the fuse box. Call the aftersales
service.
Causes of damage
Caution!
■ Accessories, foil, greaseproof paper or ovenware on the
cooking compartment floor: do not place accessories on the
cooking compartment floor. Do not cover the cooking
compartment floor with any sort of foil or greaseproof paper.
Do not place ovenware on the cooking compartment floor if a
temperature of over 50 ºC has been set. This will cause heat
to accumulate. The baking and roasting times will no longer
be correct and the enamel will be damaged.
■ Water in a hot cooking compartment: do not pour water into
the cooking compartment when it is hot. This will cause
steam. The temperature change can cause damage to the
enamel.
■ Moist food: do not store moist food in the cooking
compartment when it is closed for prolonged periods This will
damage the enamel.
■ Fruit juice: when baking particularly juicy fruit pies, do not
pack the baking tray too generously. Fruit juice dripping from
the baking tray leaves stains that cannot be removed. If
possible, use the deeper universal pan.
■ Cooling with the appliance door open: only allow the cooking
compartment to cool when it is closed. Even if the appliance
door is only open a little, front panels of adjacent units could
be damaged over time.
■ Heavily soiled oven seal: if the oven seal is heavily soiled, the
oven door will no longer close properly when the oven is in
operation. The fronts of adjacent units could be damaged.
Always keep the oven seal clean.
■ Oven door as a bearing surface: do not stand or place
objects on the oven door when it is open. Do not place
ovenware or accessories on the oven door.
■ Carrying the appliance: do not carry or hold the appliance by
the door handle. The door handle cannot support the weight
of the appliance and could break.
4
Page 5
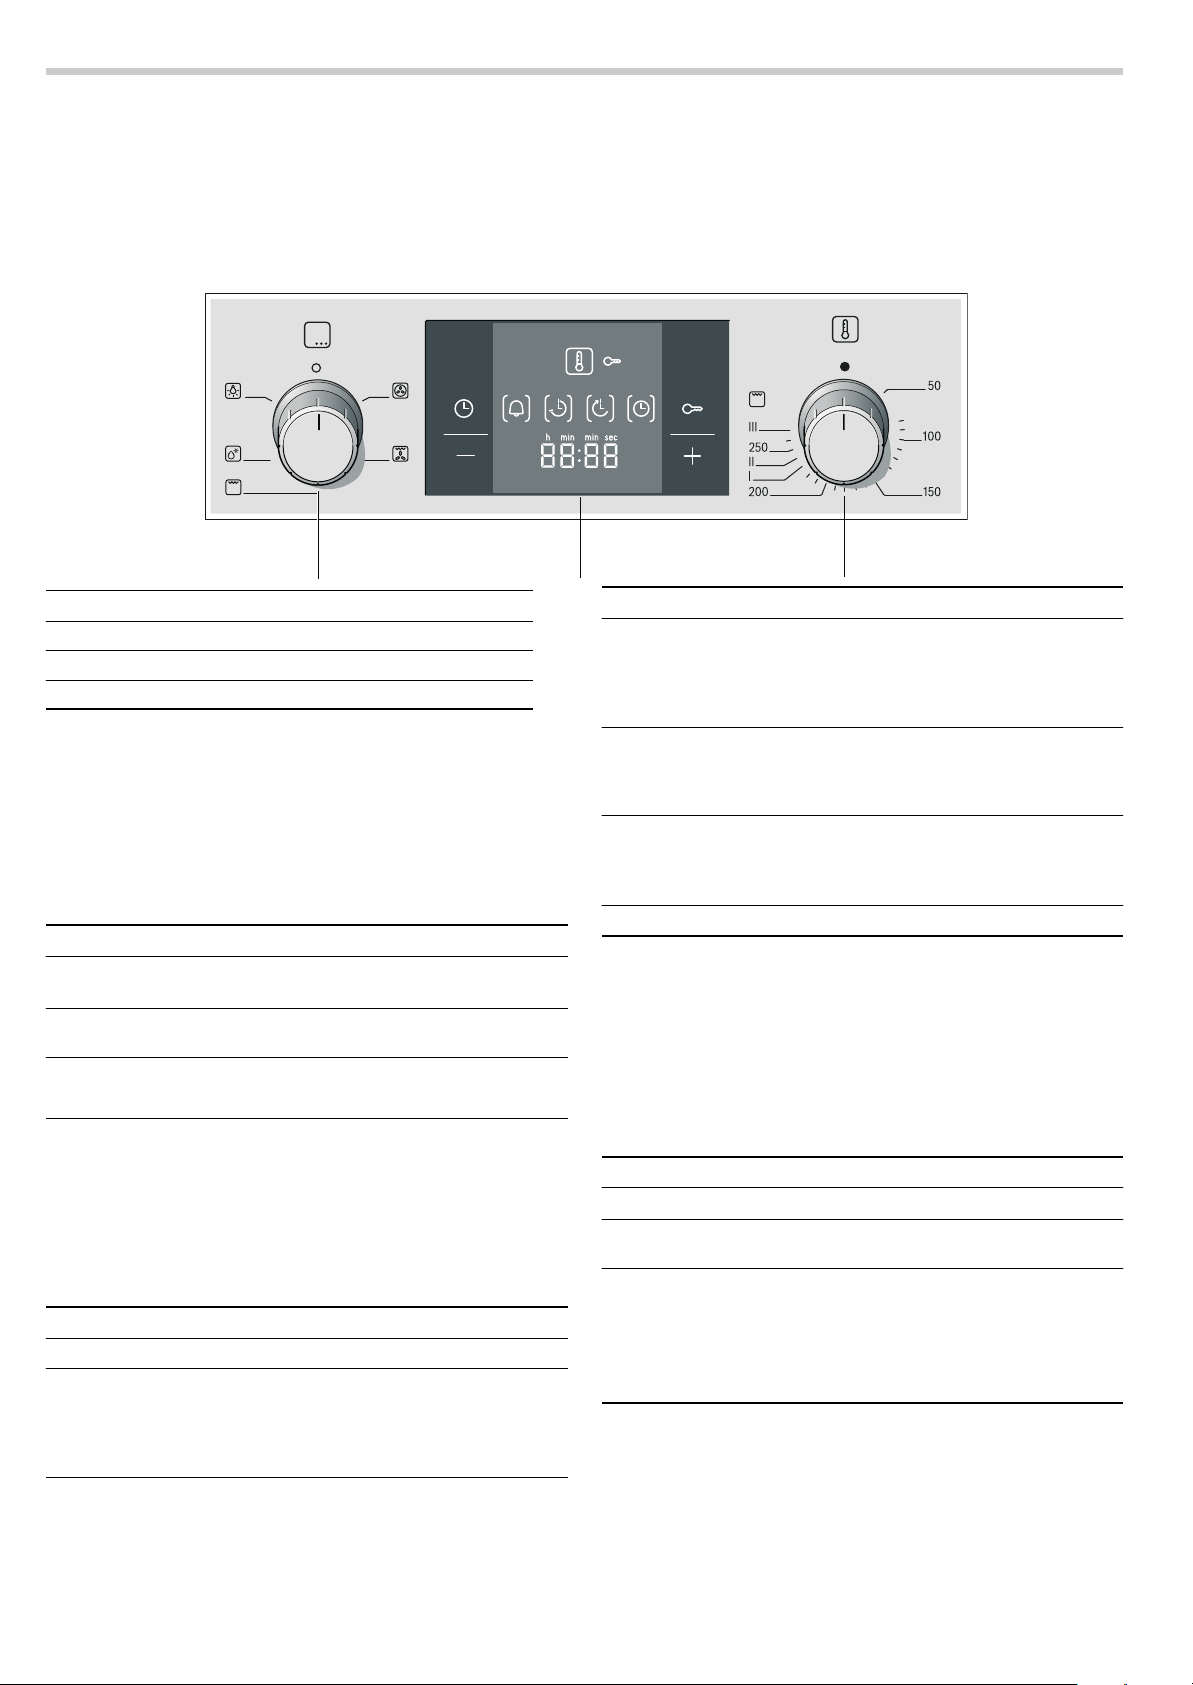
Your new oven
Here you will learn about your new oven. The control panel and
the individual operating controls are explained. You will find
information on the cooking compartment and the accessories.
Επεξήγηση
1 Fuction selector
2 Buttons and display
3Temperature selector
Buttons
The sensors are located under the individual buttons. They
must not be pressed too firmly. Only touch the corresponding
symbol.
Buttons and display
You can use the buttons to set various additional functions. You
can read the values that you have set in the display.
Button Use
Time-setting options
0
Childproof lock Locks and unlocks the control
D
Minus
A
Plus
@
The time-setting option that is currently selected in the display
is indicated by the brackets [ ] around the corresponding
symbol. Exception: for the clock, the
when you are making changes.
Selects the timer
time
r, end time p and clock 0.
panel.
Decreases the set values.
Increases the set values.
0 symbol only lights up
U, cooking
Function selector
Use the function selector to set the type of heating.
Setting Use
Off position The oven switches off.
Û
3D hot air* For cakes and pastries on one to
<
* Type of heating used to determine the energy efficiency class
in accordance with EN50304.
three levels. The fan distributes the
heat from the heating ring in the
back panel evenly around the
cooking compartment.
Control panel
Here, you will see an overview of the control panel. All of the
symbols never appear in the display at the same time. Ανάλογα
Depending on the appliance model, individual details may
differ.
Setting Use
Hot air grilling For roasting meat, poultry and
7
Grill, large area For grilling steaks, sausages,
(
Defrost For defrosting, e.g. meat, poultry,
B
Oven light Switches on the oven light.
^
* Type of heating used to determine the energy efficiency class
in accordance with EN50304.
When you make settings, the oven light in the cooking
compartment switches on.
whole fish. The grill element and
the fan switch on and off alternately. The fan causes the hot air
to circulate around the dish.
bread and pieces of fish. The
whole area below the grill heating
element becomes hot.
bread and cakes. The fan causes
the warm air to circulate around
the dish.
Temperature selector
The temperature selector is used to set the temperature or grill
setting.
Setting Meaning
Ú
50-270 Temperature
I, II, III Grill settings The grill settings for "Grill, large
When the oven is heating, the
display. It goes out during pauses in the heating. For the
Defrost
Off position The oven does not heat up.
The temperature in the cooking
range
compartment in °C.
area"
(.
I = setting 1, low
II = setting 2, medium
III = setting 3, high
t symbol lights up in the
B type of heating, the symbol does not light up.
5
Page 6
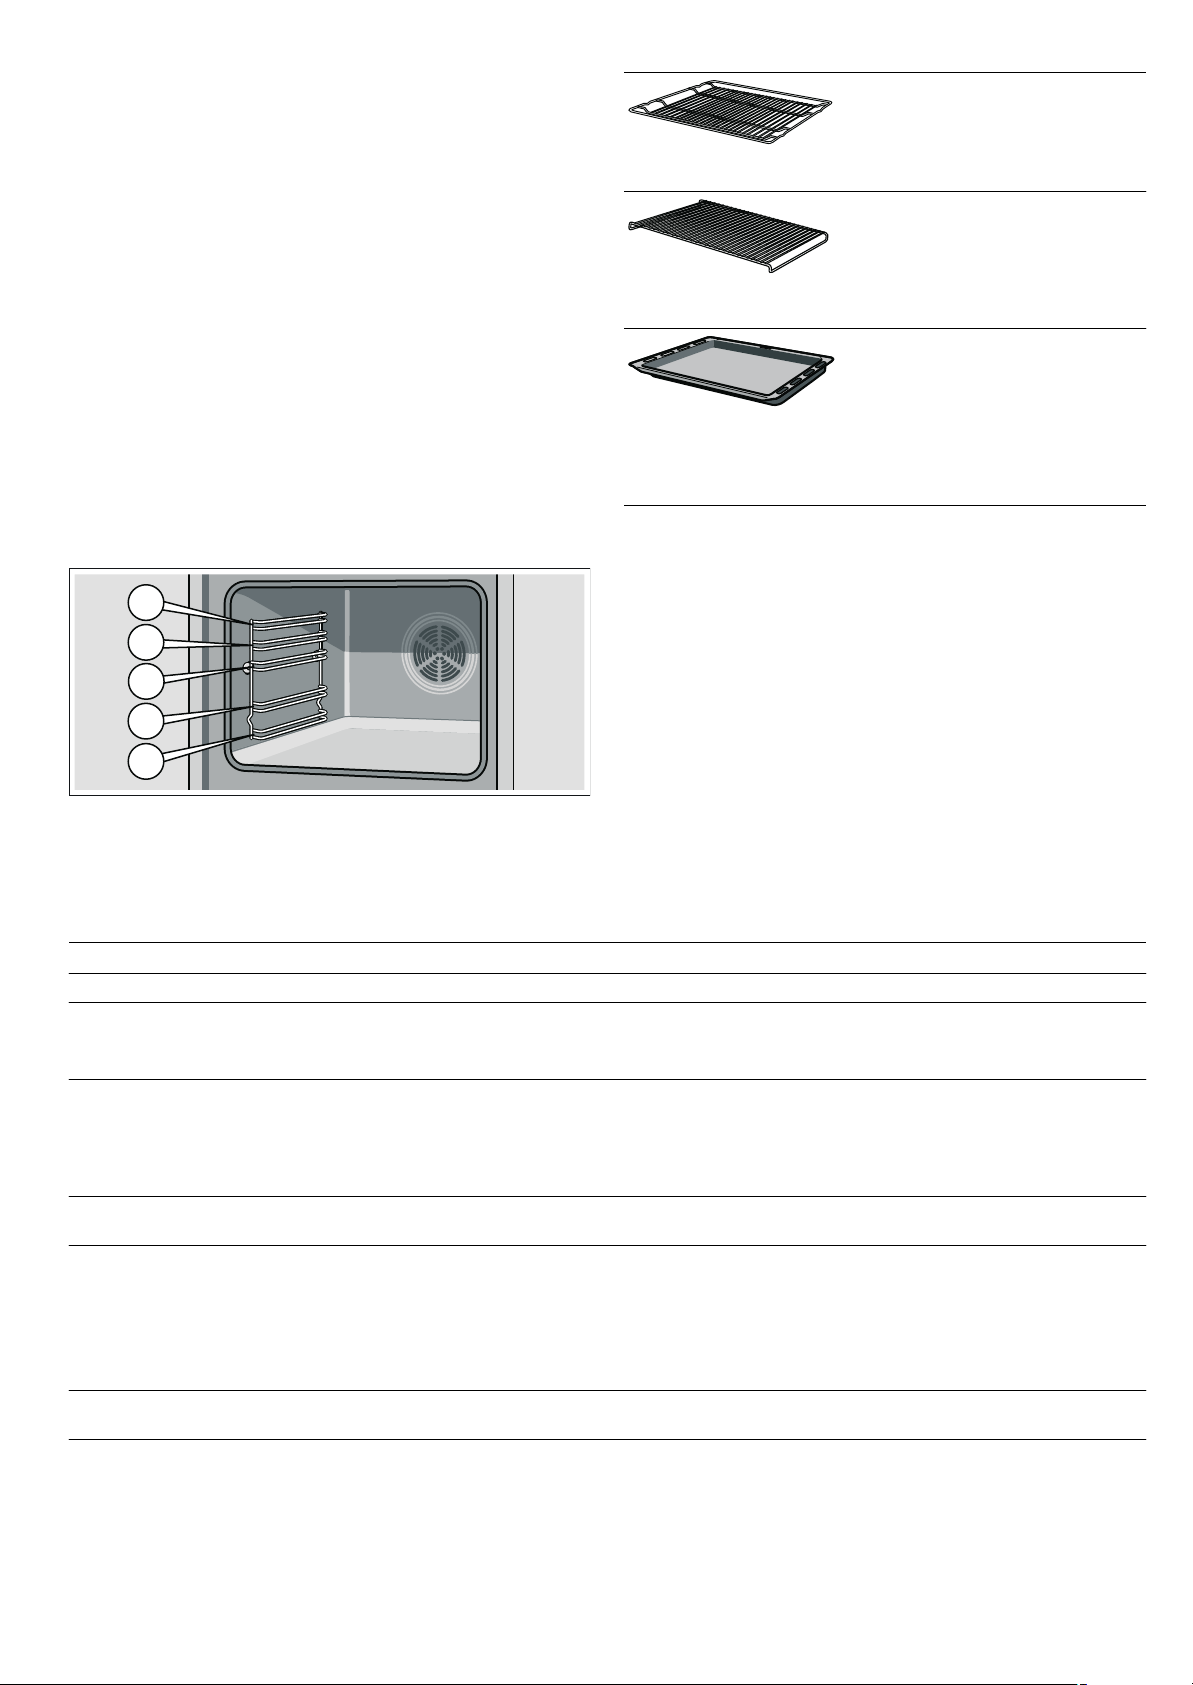
Cooking compartment
The oven light is located in the cooking compartment. A cooling
fan protects the oven from overheating.
Oven light
During operation, the oven light in the cooking compartment is
on. The
switch on the light without heating the oven.
Cooling fan
The cooling fan switches on and off as required. The hot air
escapes above the door. Caution: do not cover the ventilation
slots. Otherwise the oven will overheat.
So that the cooking compartment cools down more quickly
after operation, the cooling fan continues to run for a certain
period afterwards.
^ setting on the function selector can be used to
Accessories
The accessories can be inserted into the oven at 5 different
levels.
You can pull out the accessories two thirds of the way without
them tipping. This allows dishes to be removed easily.
Wire rack
For ovenware, cake tins, joints,
grilled items and frozen meals.
Insert the wire rack with the curvature pointing downward
Insert grid
For roasting.
Always place the insert grid in the
universal pan. This ensures that
dripping fat and meat juices are collected.
Universal pan
For moist cakes, pastries, frozen
meals and large joints. It can also
be used to catch dripping fat when
grilling directly on the wire rack.
Slide the universal pan into the oven
with the sloping edge facing the
oven door.
Special accessories
You can purchase special accessories from the after-sales
service or specialist retailers. You will find a comprehensive
range of products for your oven in our brochures and on the
Internet. The availability of special accessories and whether it is
possible to order them online may vary depending on your
country. Please see the sales brochures for more details.
Not all optional accessories are suitable for every appliance.
When purchasing, please always quote the exact designation
(E-no.) of your appliance.
¾.
The accessories can become deformed when they get hot. As
soon as they have cooled down, the deformation disappears
with no effect on the function.
You can buy accessories from the after-sales service, from
specialist retailers or online. Please specify the HEZ number.
Special accessories HEZ number Use
Wire rack HEZ334000 For ovenware, cake tins, joints, grilled items and frozen meals.
Enamel baking tray HEZ331000 For cakes and biscuits.
Slide the baking tray into the oven with the sloping edge facing
towards the oven door.
Universal pan HEZ332000 For moist cakes, pastries, frozen meals and large joints. It can
Wire insert HEZ324000 For roasting. Always place the wire rack in the universal pan.
Grill tray HEZ325000 Use for grilling instead of the wire rack or as a splatter guard,
Glass pan HEZ336000 A deep baking tray made of glass. Can also be used as a serv-
Pizza tray HEZ317000 Ideal for pizza, frozen products or large round cakes. You can
also be used to catch dripping fat when you are grilling directly
on the wire rack.
Slide the universal pan into the oven with the sloping edge facing the oven door.
This ensures that dripping fat and meat juices are collected.
so that the oven does not become very dirty. Only use the grill
tray in the universal pan.
Grilling on the grill tray: only use at shelf height 1, 2 and 3.
Using the grill tray as a splatter guard: insert the universal pan
with the grill tray under the wire rack.
ing dish.
use the pizza tray instead of the universal pan. Place the baking tray on the wire rack and proceed according to the details
in the tables.
6
Page 7

Special accessories HEZ number Use
Bakestone HEZ327000 The bakestone is perfect for preparing home-made bread,
bread rolls and pizzas which require a crispy base. The bakestone must always be preheated to the recommended temperature.
Enamel baking tray with non-stick coating HEZ331010 Cakes and biscuits can be removed more easily from the bak-
ing tray. Slide the baking tray into the oven with the sloping
edge facing towards the oven door.
Universal pan with non-stick coating HEZ332010 Moist cakes, pastries, frozen meals and large joints can be
removed more easily from the universal pan. Slide the universal pan into the oven with the sloping edge facing the oven
door.
Profi extra-deep pan with wire insert HEZ333000 Ideally suited for preparing large amounts.
Lid for the Profi extra-deep pan HEZ333001 The lid converts the Profi extra-deep pan into the Profi roasting
dish.
Glass roasting dish HEZ915001 The glass roasting dish is suitable for stews and bakes that are
cooked in the oven. It is ideally suited to automatic pro-
grammes or automatic roasting.
Telescopic shelves
2-level HEZ338250 The pull-out rails at levels 2 and 3 allow you to pull accessories
out further without them tipping.
3-level HEZ338352 The pull-out rails at levels 1, 2 and 3 allow you to pull accesso-
ries out further without them tipping.
The 3-level pull-out is not suitable for appliances that have a
rotary spit.
3-level complete pull-out HEZ338356 The pull-out rails at levels 1, 2 and 3 allow you to pull accesso-
ries out fully without them tipping.
The 3-level complete pull-out is not suitable for appliances that
have a rotary spit.
3-level complete pull-out with stop function HEZ338357 The pull-out rails at levels 1, 2 and 3 allow you to pull accesso-
Self-cleaning side walls
Appliance with one oven light HEZ339020 You can retrofit side walls so that the cooking compartment
Appliances with one oven light and automatic
roasting
Self-cleaning oven ceiling and side walls
Appliances with one oven light and a folding
grill element
Appliances with two oven lights and a folding
grill element
Appliances with one oven light, a folding grill
element and a meat thermometer
Steam filter HEZ329000 You can retrofit this in your oven. The steam filter filters out
System steamer HEZ24D300 For easy preparation of vegetables and fish.
HEZ339020 You can retrofit side walls so that the cooking compartment
HEZ329020 You can retrofit the ceiling and side walls so that the cooking
HEZ329022 You can retrofit the ceiling and side walls so that the cooking
HEZ329027 You can retrofit the ceiling and side walls so that the cooking
ries out fully without them tipping. The pull-out rails lock in posi-
tion allowing accessories to be easily placed on top.
The 3-level complete pull-out with stop function is not suitable
for appliances that have a rotary spit.
automatically cleans itself during operation.
automatically cleans itself during operation.
compartment automatically cleans itself during operation.
compartment automatically cleans itself during operation.
compartment automatically cleans itself during operation.
grease particles from the exhaust air, thereby reducing odours.
Only for appliances with a 6, 7 or 8 as the second digit in the
E-no. (e.g. HBA38
B750).
7
Page 8
After-sales service products
You can obtain suitable care and cleaning agents and other
accessories for your domestic appliances from the after-sales
Cleaning cloths for stainless-steel surfaces Product no. 311134 Reduces the build-up of dirt. Impregnated with a special oil for
Oven and grill cleaning gel Product no. 463582 For cleaning the cooking compartment. The gel is odourless.
Microfibre cloth with honeycomb structure Product no. 460770 Especially suitable for cleaning delicate surfaces, such
Door lock Product no. 612594 To prevent children from opening the oven door. The locks on
service, specialist retailers or (in some countries) online via the
eShop. Please specify the relevant product number.
perfect maintenance of your appliance's stainless-steel surfaces.
as glass, glass ceramic, stainless steel or aluminium. The
microfibre cloth removes liquid and grease deposits in one go.
different types of appliance door are screwed in differently.
See the information sheet supplied with the door lock.
Before using the oven for the first time
In this section, you can find out what you must do before using
your oven to prepare food for the first time. First read the
section on Safety information.
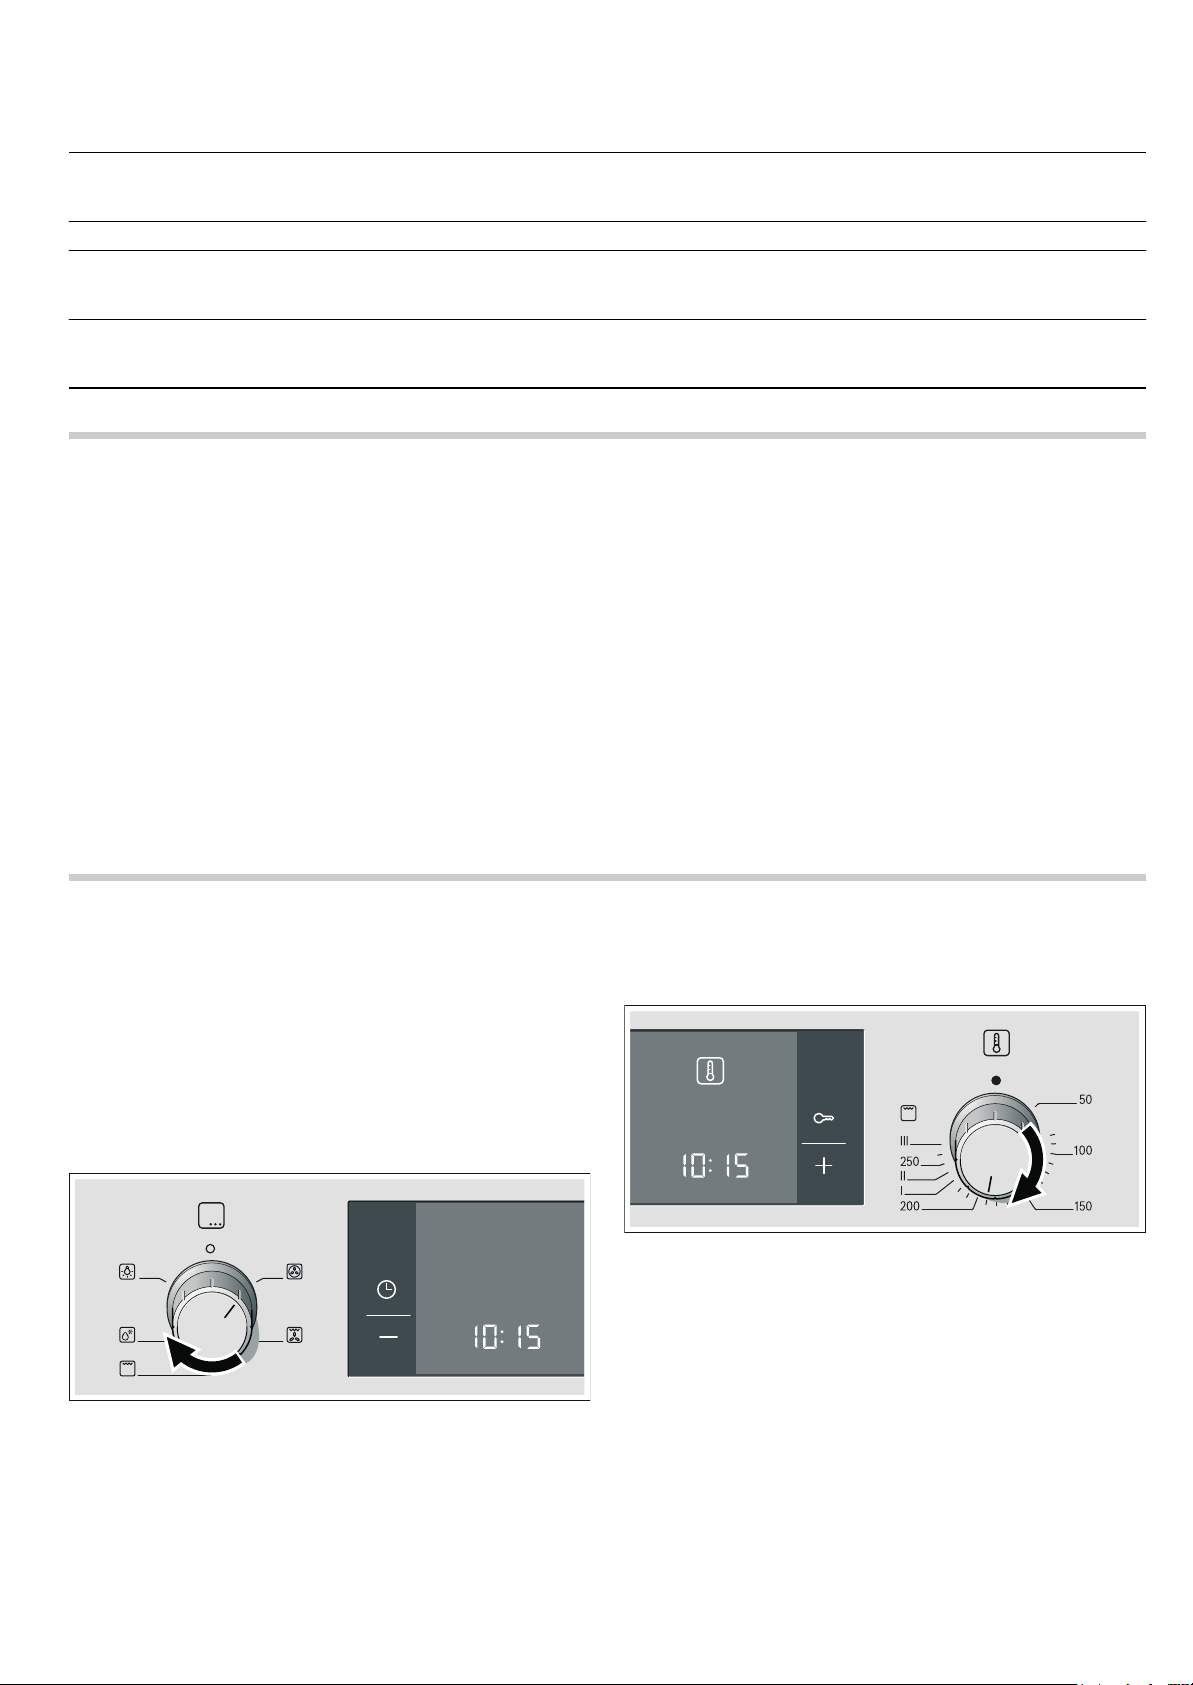
Setting the clock
After the appliance has been connected, the 0 symbol and
four zeros light up in the display. Set the clock.
1.Press the 0 button.
The time 12:00 is shown in the display.
2.Use the @ or A button to set the clock.
After a few seconds, the time that has been set is adopted.
Setting the oven
There are various ways in which you can set your oven. Here
we will explain how you can select the desired type of heating
and temperature or grill setting. You can select the oven
cooking time and end time for your dish. Please refer to the
section on Setting the time-setting options.
Type of heating and temperature
Example in the picture: < 3D hot air at 190 °C.
1.Use the function selector to set the type of heating.
Heating up the oven
To remove the new cooker smell, heat up the oven when it is
empty and closed. An hour of
for this purpose. Ensure that no packaging remnants have been
left in the cooking compartment.
1.Use the function selector to set < 3D hot air.
2.Set the temperature selector to 240 °C.
After an hour, switch off the oven. To do so, turn the function
selector to the off position.
<3D hot air at 240 °C is ideal
Cleaning the accessories
Before you use the accessories for the first time, clean them
thoroughly with hot soapy water and a soft dish cloth.
2.Set the temperature or grill setting using the temperature
selector.
The oven begins to heat up.
Switching off the oven
Turn the function selector to the off position.
Changing the settings
The type of heating and temperature or grill setting can be
changed at any time using their respective selectors.
8
Page 9

Setting the time-setting options
Your oven has various time-setting options. You can use the 0
button to call up the menu and switch between the individual
functions. All the time symbols are lit when you can make
settings. The brackets [ ] show you which time-setting option
you have currently selected. A time-setting option which has
already been set can be changed directly with the
button when the relevant time symbol is in brackets.
@ or A
Timer
You can use the timer as a kitchen timer. It runs independently
of the oven. The timer has its own signal. In this way, you can
tell whether it is the timer or a cooking time which has elapsed.
1. Press the 0 button once.
The time symbols light up in the display and the brackets are
around
2. Use the @ or A button to set the timer duration.
Default value for
Default value for
After a few seconds, the time setting is adopted. The timer
starts. The [
duration counts down. The other time symbols go out.
The timer duration has elapsed
A signal sounds. 00:00 is shown in the display. Use the
button to switch off the timer.
U.
@button = 10 minutes
Abutton = 5 minutes
U] symbol lights up in the display and the timer
0
3. Press the 0 button twice.
00:00 is shown in the display. The time symbols light up and
the brackets are around
4. Use the @ or A button to set the cooking time.
Default value for
Default value for
@ button = 30 minutes
A button = 10 minutes
r.
Changing the timer duration
Use the
seconds, the change is adopted.
Cancelling the timer duration
Use the
change will be adopted after a few seconds. The timer is
switched off.
Checking the time settings
If several time-setting options are set, the relevant symbols are
illuminated on the display. The symbol for the time-setting
option that is visible in the display is shown in brackets.
To call up the
clock, press the
around the relevant symbol. The display shows the value for a
few seconds.
@ or A button to change the timer duration. After a few
A button to reset the timer duration to 00:00. The
U timer, r cooking time, p end time or 0
0 button repeatedly until the brackets are
Cooking time
The cooking time for your dish can be set on the oven. When
the cooking time has elapsed, the oven switches itself off
automatically. This means that you do not have to interrupt
other work to switch off the oven. The cooking time cannot be
accidentally exceeded.
Example in the picture: cooking time 45 minutes.
1. Use the function selector to set the type of heating.
2. Set the temperature or grill setting using the temperature
selector.
The oven will start up after a few seconds. The cooking time
counts down in the display and the [
other time symbols go out.
The cooking time has elapsed
A signal sounds. The oven stops heating. 00:00 is shown in the
display. Press the
using the
the function selector to the off position. The oven switches off.
Changing the cooking time
Use the
seconds, the change is adopted. If the timer has been set,
press the
Cancelling the cooking time
Use the
seconds, the change is adopted. The cooking time is
cancelled. If the timer has been set, press the
beforehand.
Checking the time settings
If several time-setting options are set, the relevant symbols are
illuminated on the display. The symbol for the time-setting
option that is visible in the display is shown in brackets.
To call up the
clock, press the
around the relevant symbol. The display shows the value for a
few seconds.
@ or A button. Or press the 0 button twice and turn
@ or A button to change the cooking time. After a few
0 button beforehand.
A button to reset the cooking time to 00:00. After a few
0 button. You can set a new cooking time
U timer, r cooking time, p end time or 0
0 button repeatedly until the brackets are
r] symbol lights up. The
0 button
9
Page 10

End time
You can change the time at which you wish your dish to be
ready. The oven starts automatically and finishes at the desired
time. You can, for example, put your dish in the cooking
compartment in the morning and set the cooking time so that it
is ready at lunch time.
Ensure that food is not left in the cooking compartment for too
long as it may spoil.
Example in the picture: it is 10:30 am, the cooking time is
45 minutes and the oven is required to finish cooking at
12:30 pm.
1.Adjust the function selector.
2.Set the temperature selector.
3.Press the 0 button twice.
4.Use the @ or A button to set the cooking time.
5.Press the 0 button.
The brackets are around
ready is displayed.
6.Use the @ or A button to set a later end time.
p. The time when the dish will be
The cooking time has elapsed
A signal sounds. The oven stops heating. 00:00 is shown in the
display. Press the
using the
the function selector to the off position. The oven switches off.
Changing the end time
Use the
seconds, the change is adopted. If the timer has been set, first
press the
cooking time has already started to elapse. The cooking result
would no longer be correct.
Cancelling the end time
Use the
a few seconds, the change is adopted. The oven starts. If the
timer has been set, first press the
Checking the time settings
If several time-setting options are set, the relevant symbols are
illuminated on the display. The symbol for the time-setting
option that is visible in the display is shown in brackets.
To call up the
clock, press the
around the relevant symbol. The display shows the value for a
few seconds.
@ or A button. Or press the 0 button twice and turn
@ or A button to change the end time. After a few
0 button twice. Do not change the end time if the
A button to reset the end time to the current time. After
0 button. You can set a new cooking time
0 button twice.
U timer, r cooking time, p end time or 0
0 button repeatedly until the brackets are
Clock
After the appliance is connected or following a power cut,
the
0 symbol and four zeros light up in the display. Set the
clock.
1.Press the 0 button.
The time 12:00 is shown in the display.
2.Use the @ or A button to set the clock.
After a few seconds, the time that has been set is adopted.
After a few seconds, the oven adopts the settings and switches
to standby position. The time at which the dish will be ready is
shown in the display and the
and
0 symbols go out. When the oven starts, you can see the
cooking time counting down in the display and the
in brackets. The
p symbol goes out.
p symbol is in brackets. The U
r symbol is
Childproof lock
The oven has a childproof lock to prevent children switching it
on accidentally.
The oven will not react to any settings. The timer and clock can
also be set when the childproof lock has been activated.
If the type of heating and temperature or grill setting have been
set, the childproof lock interrupts the heating.
Changing the clock
No other time-setting option should have been set.
1.Press the 0 button four times.
The time symbols light up in the display and the brackets are
around
2.Use the @ or A button to change the clock.
After a few seconds, the time that has been set is adopted.
Hiding the clock
You can hide the clock. For more information, please refer to
the section Changing the basic settings.
Activating the childproof lock
No cooking time or end time should have been set.
Press and hold the
The
activated.
Deactivating the childproof lock
Press and hold the
The
deactivated.
0.
D button for approx. four seconds.
D symbol appears in the display. The childproof lock is
D button for approx. four seconds.
D symbol goes out in the display. The childproof lock is
10
Page 11

Changing the basic settings
Your oven has various basic settings. These settings can be
customised to suit your requirements.
Basic setting Selection 1 Selection 2 Selection 3
c1 Clock display always* only with
0 but-
the
ton
c2 Signal duration upon
completion of a
cooking time or
timer period
c3 Waiting time until a
setting is applied
* Factory setting
No other time-setting option should have been set.
approx.
10 second
s
approx.
2seconds
approx.
2 minutes*
approx.
5seconds*
-
approx.
5 minutes
approx.
10 second
s
Care and cleaning
With good care and cleaning, your oven will remain clean and
fully-functioning for a long time to come. Here we will explain
how to maintain and clean your oven correctly.
Notes
■ Slight differences in the colours on the front of the oven are
caused by the use of different materials, such as glass,
plastic and metal.
■ Shadows on the door panel which look like streaks, are
caused by reflections made by the oven light.
■ Enamel is baked on at very high temperatures. This can
cause some slight colour variations. This is normal and does
not affect their function. The edges of thin trays cannot be
completely enamelled. As a result, these edges can be
rough. This will not impair the anti-corrosion protection.
Cleaning agents
To ensure that the different surfaces are not damaged by using
the wrong cleaning agent, observe the information in the table.
Do not use
■ sharp or abrasive cleaning agents,
■ cleaning agents with a high concentration of alcohol,
■ hard scouring pads or sponges,
■ high-pressure cleaners or steam cleaners.
Wash new sponge cloths thoroughly before use.
Area Cleaning agents
Oven front Hot soapy water:
Clean with a dish cloth and dry with a
soft cloth. Do not use glass cleaners or
glass scrapers.
1. Press and hold the 0 button for approx. 4 seconds.
The current basic setting for the clock display is shown in the
display, e.g. c1 1 for selection 1.
2. Use the @ or A button to change the basic setting.
3. Confirm by pressing the 0 button.
The next basic setting appears in the display. You can scroll
through all levels with the
with the
4. To finish, press and hold the 0 button for approx. 4 seconds.
All basic settings are applied.
You may change the basic settings at any time.
Area Cleaning agents
Stainless steel Hot soapy water:
Door panels Glass cleaner:
Door cover Stainless steel cleaning agents (available
Cooking compartment
Glass cover for the
oven light
Shelves Hot soapy water:
Telescopic shelves Hot soapy water:
@ or A button.
0 button and change the setting
Clean with a dish cloth and dry with a
soft cloth. Remove flecks of limescale,
grease, starch and albumin (e.g. egg
white) immediately. Corrosion can form
under such residues.
Special stainless steel cleaning products suitable for warm surfaces are available from our after-sales service or from
specialist retailers. Apply a thin layer of
the cleaning product with a soft cloth.
Clean with a soft cloth. Do not use a
glass scraper.
from our after-sales service or from specialist retailers):
Please observe the manufacturer's
instructions.
Hot soapy water or a vinegar solution:
Clean with a dish cloth.
If there are heavy deposits of dirt, use a
stainless steel scouring pad or oven
cleaner. Only use when the cooking
compartment is cold.
It is best to use the self-cleaning function.
Observe the instructions in the Self-clean-
ing section when doing so.
Hot soapy water:
Clean with a dish cloth.
Soak and clean with a dish cloth or
brush.
Clean with a dish cloth or a brush.
Do not soak. Clean in the dishwasher, or
in the oven as part of the self-cleaning
programme. The rails may be damaged
causing them to jam.
11
Page 12

Area Cleaning agents
%
$
%
$
%
$
%
$
&
Accessories Hot soapy water:
Soak and clean with a dish cloth or
brush.
ã=Risk of injury!
Whenever the hinges are not locked, they snap shut with great
force. Ensure that the locking levers are always fully closed or,
when detaching the oven door, fully open.
Detaching and refitting the rails
The rails can be removed for cleaning. The oven must have
cooled down.
Detaching the rails
1.Lift up the front of the rail
2.and unhook it (figure A).
3.Then pull the whole rail forward
4.and remove it (Fig. B).
$
Clean the rails with cleaning agent and a sponge. For stubborn
deposits of dirt, use a brush.
Refitting the rails
1.First insert the rail into the rear socket, press it to the back
slightly (figure A),
2.and then hook it into the front socket (figure B).
%
Detaching the door
1.Open the oven door fully.
2.Fold up the two locking levers on the left and right (figure A).
3.Close the oven door as far as the limit stop. With both hands,
grip the door on the left and right-hand sides. Close the door
a little further and pull it out (figure B).
Attaching the door
Reattach the oven door in the reverse sequence to removal.
1.When attaching the oven door, ensure that both hinges are
inserted straight into the opening (figure A).
2.The notch on the hinge must engage on both sides (figure B).
The rails fit both the left and right sides. The kinked section
must always be at the bottom.
Detaching and attaching the oven door
For cleaning purposes and to remove the door panels, you can
detach the oven door.
The oven door hinges each have a locking lever. When the
locking levers are closed (figure A), the oven door is secured in
place. It cannot be detached. When the locking levers are open
in order to detach the oven door (Fig. B), the hinges are locked.
They cannot snap shut.
3.Fold back both locking levers (figure C). Close the oven
door.
ã=Risk of injury!
If the oven door falls out accidentally or a hinge snaps shut, do
not reach into the hinge. Call the aftersales service.
Removing the door cover
The oven door cover can become discoloured. To carry out
thorough cleaning, you can remove the cover.
1.Open the oven door fully.
2.Unscrew the oven door cover. To do this, undo the left and
right screws (figure A).
12
Page 13

3. Remove the cover (figure B).
%
$
%
$
&
$
Make sure that the oven door is not closed while the cover is removed. The inner panel may be damaged.
Clean the cover with a stainless-steel cleaning agent.
4. Replace the cover and secure it in position.
5. Close the oven door.
Removing and installing the door panels
To facilitate cleaning, you can remove the glass panels from the
oven door.
Removal
1. Detach the oven door and lay it on a cloth with the handle
facing down.
2. Unscrew the cover at the top of the oven door. To do this,
undo the left and right screws (fig. A).
3. Lift the top panel up and out (fig. B).
4. Unscrew the retaining clips on the right and left. Lift the panel
and remove the brackets from the panel (fig. C). Take out the
panel.
Clean the panels with glass cleaner and a soft cloth.
Do not use sharp or abrasive materials or a glass scraper. This
may damage the glass.
Fitting
When fitting, make sure that the lettering "right above" is upside
down at the bottom left.
1. Insert the panel diagonally towards the back (fig. A).
2. Stick the retaining clips onto the right and left-hand sides of
the panel, aligning them so that the carriers are over the
screw holes, and then screw in place (fig. B).
%
Troubleshooting
Malfunctions often have simple explanations. Refer to the table
before calling the after-sales service as you may be able to
remedy the fault yourself.
Malfunction table
If a dish doesn't turn out as well as you had hoped, refer to the
section Tested for you in our cooking studio, where you will
find plenty of cooking tips and tricks.
Problem Possible cause Remedy/information
The oven does
not work.
0 and zeros
light up in the
display.
The circuit
breaker is
defective.
Power cut Check whether the kitchen
Power cut Reset the clock.
Look in the fuse box and
check that the circuit
breaker is in working order.
light or other kitchen appliances are working.
3. Insert the uppermost panel diagonally towards the back. The
smooth surface must face outwards.
4. Put the cover back in place and screw it on.
5. Attach the oven door.
Do not use the oven again until the panels have been
correctly fitted.
Problem Possible cause Remedy/information
The oven does
not heat up.
Error messages
If an error message with
message disappears. A time function that has been set is
cleared. If the error message does not disappear, please
contact the after-sales service.
You can take remedial action yourself if the following error
message is displayed.
Error message Possible cause Remedy/information
“‹‚‚
There is dust on
the contacts.
Turn the control knobs back
and forth several times.
“ appears, press the 0 button. The
A button was
depressed for
too long or is
covered up.
Press all buttons individually. Check whether any buttons are jammed, covered
up or soiled.
13
Page 14

ã=Risk of electric shock!
Incorrect repairs are dangerous. Repairs may only be carried
out by one of our trained after-sales engineers.
Replacing the bulb in the oven ceiling light
If the bulb in the oven light fails, it must be replaced. Heatresistant, 40 watt spare bulbs can be obtained from our aftersales service or a specialist retailer. Only use these bulbs.
ã=Risk of electric shock!
Switch off the circuit breaker in the fuse box.
2.Unscrew the glass cover by turning it anti-clockwise.
1.Place a tea towel in the oven when it is cold to prevent
damage.
After-sales service
Our after-sales service is there for you if your appliance needs
to be repaired. We will always find the right solution in order to
avoid unnecessary visits from a service technician.
E number and FD number
When calling us, please give the product number (E no.) and
the production number (FD no.) so that we can provide you with
the correct advice. The rating plate containing these numbers
can be found on the right-hand side of the oven door. You can
make a note of the numbers of your appliance and the
telephone number of the after-sales service in the space below
to save time should it be required.
E no.
FD no.
3.Replace the bulb with one of the same type.
4.Screw the glass cover back in.
5.Remove the tea towel and switch on the circuit breaker.
Glass cover
You must replace a damaged glass cover. Suitable glass
covers may be obtained from the after-sales service. Please
specify the E number and FD number of your appliance.
After-sales service O
Please note that there will be a fee for a visit by a service
technician in the event of a malfunction, even during the
warranty period.
Please find the contact data of all countries in the enclosed
customer service list.
To book an engineer visit and product advice
GB 0844 8928979
Calls from a BT landline will be charged at up to 3
pence per minute. A call set-up fee of up to 6 pence may
apply.
IE 01450 2655
Trust the expertise of the manufacturer, and rest assured that
the repair will be carried out by trained service technicians
using original spare parts for your domestic appliance.
Energy and environment tips
Here you can find tips on how to save energy when baking and
roasting and how to dispose of your appliance properly.
Saving energy
■ Only preheat the oven if this is specified in the recipe or in
the operating instruction tables.
■ Use dark, black lacquered or enamelled baking tins. They
absorb the heat particularly well.
■ Open the oven door as infrequently as possible while you are
cooking, baking or roasting.
■ It is best to bake several cakes one after the other. The oven
is still warm. This reduces the baking time for the second
cake. You can also place two loaf tins next to each other.
■ For longer cooking times, you can switch the oven off
10 minutes before the end of the cooking time and use the
residual heat to finish cooking.
14
Environmentally-friendly disposal
Dispose of packaging in an environmentally-friendly manner.
This appliance complies with European Directive
2002/96/EC on Waste Electrical and Electronic
Equipment (WEEE). The directive gives a framework for
the collection and recycling of old appliances, which is
valid across the EU.
Page 15

Tested for you in our cooking studio
Here you will find a selection of dishes and the ideal settings for
them. We will show you which type of heating and which
temperature are best suited for your dish. You can find
information about suitable accessories and the height at which
they should be inserted. There are also tips about cookware
and preparation methods.
Notes
■ Whether you should preheat or place food into a cold oven, is
indicated in the respective tables.
Do not line the accessories with greaseproof paper until after
they have been preheated.
■ The times specified in the tables are guidelines only. They will
depend on the quality and composition of the food.
■ Use the accessories supplied. Additional accessories may be
obtained as special accessories from specialist retailers or
from the after-sales service.
Before using the oven, remove any unnecessary accessories
and ovenware from the cooking compartment.
■ Always use oven gloves when taking hot accessories or
ovenware out of the cooking compartment.
Cakes and pastries
Baking on one level
When baking with
for the accessory:
■ Cakes in tins: level 2
■ Cakes on trays: level 3
Baking on two or more levels
Use
: 3D hot air.
Baking on 2 levels
■ Wire rack or universal pan at shelf position 3
■ Wire rack at shelf position 1.
Baking on 3 levels:
■ Wire rack at shelf position 5
■ Universal pan at shelf position 3
■ Wire rack at shelf position 1.
: 3D hot air, use the following shelf heights
Baking trays that are placed in the oven at the same time will
not necessarily be ready at the same time.
The tables show numerous suggestions for your dishes.
If you have 2 small, round cake tins, place them on one level
next to each other on the wire rack.
If you have 4 small, round cake tins, place 2 next to each other
on each wire rack. Slide in the wire racks one above the other.
If you are baking with 3 loaf tins at the same time, place these
on the wire racks as indicated in the picture.
Baking tins
It is best to use dark-coloured metal baking tins.
Baking times are increased when light-coloured baking tins
made of thin metal or glass dishes are used, and cakes do not
brown so evenly.
If you wish to use silicone baking tins, use the information and
recipes provided by the manufacturer as a guide. Silicone
baking tins are often smaller than normal tins. The amount of
mixture and recipe instructions may differ.
Table s
The tables show the ideal type of heating for the various cakes
and pastries. The temperature and baking time depend on the
amount and composition of the mixture. This is why
temperature ranges are given in the tables. You should try the
lower temperature first, since a lower temperature results in
more even browning. You can increase the temperature next
time if necessary.
Additional information can be found in the Baking tips section
following the tables.
Food Dish Shelf
position
Victoria sandwich Wire rack + 2 x Ø 20 cm tins 3
Light fruit cake Wire rack + high Ø 20 cm tin 2
Rich fruit cake Wire rack + Ø 23 cm high round tin or 20 cm
2
square tin
Fruit crumble Wire rack + flat glass dish 3
Sponge cake (fatless) Wire rack + baking tin (dark coated) 2
Swiss roll Universal pan + swiss roll tin 3
Tart Universal pan + Ø 20 cm plate or pie tin 3
Quiche Wire rack + quiche tin (dark coated) 3
(White) Bread Wire rack + loaf tin (1 x 900 g or 2 x 450 g) 3
Scones Universal pan 3
Biscuits Universal pan 3
Small cakes Wire rack + 12-cup tin 3
Jam tarts Wire rack + 12-cup tin 2
*Preheat.
** Preheat at higher temperature, then reduce and insert food.
Type of
heating
:*
:*
:*
:*
:*
:*
:*
:*
:*
:*
:*
:*
:*
Temperature
in °C
Time
in minutes
160-170 20-25
150-160 80-90
130-140 180-190
160-170 40-45
160-170 30-40
170-180 10-12
180-190 50-60
180-190 40-45
190-200 25-30
180-190 15-20
160-170 15-20
150-160 15-20
180-190 15-20
15
Page 16

Food Dish Shelf
position
Meringues Universal pan 3
Pavlova Universal pan 3
Soufflé Wire rack + 1,2 l soufflé dish 2
Pie Wire rack + pie dish 3
Yorkshire pudding Universal pan + 12-cup tin 3
Jacket potatoes Universal pan 3
Pizza (homemade) Universal pan 3
*Preheat.
** Preheat at higher temperature, then reduce and insert food.
Type of
heating
:*
:**
:*
:*
:*
:*
:*
Temperature
in °C
80-90 100-150
150** + 100 100-150
160-170 45-50
180-190 45-50
190-200 15-20
160-170 60-70
210-220 20-25
Time
in minutes
Food Dish Shelf
Victoria sandwich, 2 levels 2 wire racks + 4 x Ø 20 cm tins 3+1
Scones, 2 levels Universal pan + wire rack with baking tray 3+1
Biscuits, 2 levels Universal pan + wire rack with baking tray 3+1
Biscuits, 3 levels Universal pan + 2 wire racks with baking trays 5+3+1
Small cakes, 2 levels 2 wire racks + 2 x 12-cup tins 3+1
Meringues, 2 levels Universal pan + wire rack with baking tray 3+1
Jacket potatoes, 2 levels 2 wire racks 3+1
(White) Bread, 2 levels 2 wire racks + loaf tins (2 x 900 g or 4 x
450 g)
Pizza (homemade),
2 levels
*Preheat.
Universal pan + wire rack with baking tray 3+1
position
3+1
Type of
heating
:*
:*
:*
:*
:*
:*
:*
:*
:*
Temperature
in °C
160-170 30-35
170-180 20-25
150-160 20-25
140-150 25-35
150-160 25-30
80-90 100-150
160-170 60-75
180-190 35-40
180-190 40-45
Time
in minutes
Baking tips
You wish to bake according to your own
recipe.
How to establish whether sponge cake
is baked through.
The cake collapses. Use less fluid next time or set the oven temperature 10 degrees lower. Observe the
The cake has risen in the middle but is
lower around the edge.
The cake goes too dark on top. Place it lower in the oven, select a lower temperature and bake the cake for a little
The cake is too dry. When it is done, make small holes in the cake using a cocktail stick. Then drizzle fruit
The bread or cake (e.g. cheesecake)
looks good, but is soggy on the inside
(sticky, streaked with water).
The cake is unevenly browned. Select a slightly lower temperature to ensure that the cake is baked more evenly. Pro-
The bottom of a fruit cake is too light. Place the cake one level lower the next time.
The fruit juice overflows. Next time, use the deeper universal pan, if you have one.
Small baked items made out of yeast
dough stick to one another when baking.
You were baking on several levels. The
items on the top baking tray are darker
than that on the bottom baking tray.
Use similar items in the baking tables as a guide.
Approximately 10 minutes before the end of the baking time specified in the recipe, stick
a cocktail stick into the cake at the highest point. If the cocktail stick comes out clean,
the cake is ready.
specified mixing times in the recipe.
Do not grease the sides of the springform cake tin. After baking, loosen the cake care-
fully with a knife.
longer.
juice or an alcoholic beverage over it. Next time, select a temperature 10 degrees higher
and reduce the baking time.
Use slightly less fluid next time and bake for slightly longer at a lower temperature. For
cakes with a moist topping, bake the base first. Sprinkle it with almonds or bread crumbs
and then place the topping on top. Please follow the recipe and baking times.
truding greaseproof paper can affect the air circulation. For this reason, always cut
greaseproof paper to fit the baking tray.
There should be a gap of approx. 2 cm around each item. This gives enough space for
the baked items to expand well and turn brown on all sides.
Always use
the oven at the same time will not necessarily be ready at the same time.
: 3D hot air to bake on more than one level. Baking trays that are placed in
16
Page 17

Condensation forms when you bake
moist cakes.
Baking may result in the formation of water vapour, which escapes above the door. The
steam may settle and form water droplets on the control panel or on the fronts of adjacent units. This is a natural process.
Meat, poultry, fish
Ovenware
The universal pan with insert wire rack is suitable for large
roasts. You may also use any heat-resistant ovenware.
Glass ovenware is the most suitable. Ensure that the lid of the
roasting dish fits well and closes properly.
Add a little more liquid when using enamelled roasting dishes.
With roasting dishes made of stainless steel, browning is not so
intense and the meat may be somewhat less well cooked.
Increase the cooking times.
Always place the ovenware in the centre of the wire rack.
Place hot glass ovenware on a dry mat after cooking. The glass
could crack if placed on a cold or wet surface.
Roasting
The information in the table applies to food placed in a cold
oven and for meat taken directly from the refrigerator.
Food Dish Shelf
Beef
Slow roast joint Universal pan with wire insert 1
Top side, top rump Universal pan with wire insert 1
The joints of meat should weigh between 500 g and 2 kg.
Ensure that you always use the lower temperature, if the weight
of the joint you wish to roast is high.
If there are several pieces of meat, calculate the roasting time
using the weight of the heaviest piece of meat. The individual
pieces of meat should be approximately the same size.
Meat
When using the
grilling types of heating, turn the pieces of meat halfway
through the cooking time.
When the roast is ready, turn off the oven and allow it to rest for
10 minutes. This allows better distribution of the meat juices.
When roasting joints of pork with a rind, make cuts in the rind
crossways and if it is to be turned, first place the joint with the
rind side down in the dish.
position
% Top/bottom heating and 4 Circulated air
Type of
heating
:
:
Temperature
in °C
130-140 40 + 40
160-170 30 + 25
Time, min. per
500 g + add.
time
Lamb
Leg Universal pan with wire insert 1
Shoulder (bone in) Universal pan with wire insert 1
Shoulder (boned and rolled) Universal pan with wire insert 1
Rack of lamb Universal pan with wire insert 1
Pork
Roast joint Universal pan with wire insert 1
Loin joint Universal pan with wire insert 1
Belly Universal pan with wire insert 1
Gammon joint Universal pan with wire insert 1
Poultry
Chicken Universal pan with wire insert 1
Chicken, portion (200-250 g each) Universal pan with wire insert 1
Chicken, quarter (450 g each) Universal pan with wire insert 1
Duck Universal pan with wire insert 1
Turkey, crown Universal pan with wire insert 1
Turkey, whole (up to 12 kg) Universal pan with wire insert 1
Casserole
Diced meat (beef, pork, lamb) Wire rack + glass roasting dish
with lid
Braising steaks Wire rack + glass roasting dish
with lid
Chicken Wire rack + glass roasting dish
with lid
:
:
:
:
:
:
:
:
:
:
:
:
:
:
2
2
2
:
:
:
160-170 30 + 25
160-170 25 + 20
170-180 25 + 25
180-190 25 + 25
180-190 35 + 35
170-180 30 + 30
160-170 30 + 25
160-170 30 + 30
170-180 25 + 25
190-200 20 + 25
180-190 20 + 25
180-190 20 + 20
160-170 15 + 15
160-170 12 + 12
140 120-150 (total
time)
140 120-150 (total
time)
140 60-90
Complete meal
17
Page 18

Food Dish Shelf
position
With beef Wire rack + universal pan with
wire insert
With chicken Wire rack + universal pan with
wire insert
4+1
4+1
Type of
heating
:
:
Temperature
in °C
160, then 200
(yorkshire pudding)
180 weight of
Time, min. per
500 g + add.
time
weight of meat
(see table
above) + 15-25
for yorkshire
pudding
chicken (see
table above)
Food Dish Shelf
Lamb
Leg Universal pan with wire insert 1
Rack of lamb Universal pan with wire insert 1
Pork
Roast joint Universal pan with wire insert 1
Belly Universal pan with wire insert 1
Poultry
Chicken Universal pan with wire insert 1
Chicken, portion (200-250 g each) Universal pan with wire insert 3
Chicken, quarter (450 g each) Universal pan with wire insert 2
Duck Universal pan with wire insert 1
Grilling
When grilling, preheat the oven for approx. 3 minutes, before
putting the food in.
Always grill with the oven door closed.
As far as possible, the pieces of food you are grilling should be
of equal thickness. This will allow them to brown evenly and
remain succulent and juicy.
Turn grilled items after the specified time.
Whole fish does not need to be turned. Place the whole fish in
the oven in the swimming position with the dorsal fin pointing
upwards. Placing a scored potato or a small oven-proof
container in the stomach cavity of the fish will provide stability.
position
Do not add salt to steaks until they have been grilled.
Place the food to be grilled directly on the wire rack. If you are
grilling a single piece, the best results are achieved by placing
it in the centre of the wire rack.
The universal pan should also be inserted underneath. To
prevent a high degree of smoke from forming, do not insert the
pan higher than level 3. The meat juices are collected in the
pan and the oven is kept cleaner.
Do not insert the baking tray or universal pan at level 4 or 5.
The high heat distorts it and the cooking compartment can be
damaged when removing it.
The grill element switches on and off continually. This is normal.
The grill setting determines how frequently this will happen.
Type of
heating
4
4
4
4
4
4
4
4
Temperature
in °C
150-170 30 + 35
180-200 25 + 25
180-200 35 + 40
220-240 25 + 40
200-220 25 + 15
210-230 25 + 25
220-240 20 + 25
190-210 20 + 20
Time, min. per
500 g + add.
time
Food Dish Shelf posi-
tion
Beef
Steaks, height 2-3 cm Wire rack + universal pan 5+3
Burgers, height 1-2 cm Wire rack + universal pan 5+3
Lamb
Steaks, height 2-3 cm Wire rack + universal pan 5+3
Chops, height 2-3 cm Wire rack + universal pan 5+3
Pork
Steaks, height 1-2 cm Wire rack + universal pan 5+3
Chops, height 2-3 cm Wire rack + universal pan 4+3
Burgers, height 1-2 cm Wire rack + universal pan 5+3
18
Type of
heating
(
(
(
(
(
(
(
Grill setting Time
in minutes
31.side4-5,
2. side 4-5
31.side6-8,
2. side 4-6
31.side6-7,
2. side 6-7
31.side5-6,
2. side 5-6
31.side6-7,
2. side 6-7
3 1. side 10-12,
2. side 9-10
31.side6-8,
2. side 4-6
Page 19

Food Dish Shelf posi-
tion
Sausages, thickness 2-4 cm Wire rack + universal pan 4+3
Gammon
Steaks, height 1-3 cm Wire rack + universal pan 5+3
Chicken
Drumsticks, 150 g each Wire rack + universal pan 3+2
Breast (boneless), 150 g each Wire rack + universal pan 3+2
Fish
Whole trout, 300 g each Wire rack + universal pan 2+1
Fillets, 150 g each Wire rack + universal pan 4+3
Tips for roasting and grilling
Type of
heating
(
(
(
(
(
(
Grill setting Time
in minutes
3 10-15, turn
occasionally
31.side4-5,
2. side 3-4
3 1. side 17,
2. side 8
3 1. side 20,
2. side 10
2 20-25
31.side5-7,
2. side 5-7
The table does not contain information
for the weight of the joint.
How to tell when the roast is ready. Use a meat thermometer (available from specialist shops) or carry out a “spoon test”.
The roast is too dark and the crackling
is partly burnt.
The roast looks good but the juices are
burnt.
The roast looks good but the juices are
too clear and watery.
Steam rises from the roast when basted. This is normal and due to the laws of physics. The majority of the steam escapes through
Preprepared products
Observe the instructions on the packaging.
If you line the accessories with greaseproof paper, make sure
that the paper is suitable for these temperatures. Make sure the
paper is a suitable size for the dish to be cooked.
Food Dish Shelf posi-
Select the next lowest weight from the instructions and extend the time.
Press down on the roast with a spoon. If it feels firm, it is ready. If the spoon can be
pressed in, it needs to be cooked for a little longer.
Check the shelf height and temperature.
Next time, use a smaller roasting dish or add more liquid.
Next time, use a larger roasting dish and use less liquid.
the steam outlet. It may settle and form condensation on the cooler switch panel or on
the fronts of adjacent units.
The cooking result greatly depends on the quality of the food.
Pre-browning and unevenness can sometimes even be found
on the raw product.
Leave a little space between bread rolls when crisping them up.
Do not place too many bread rolls on the accessories.
Sprinkle grated cheese over the top of your lasagne to give it a
beautiful and evenly browned finish.
tion
Type of
heating
Temperature
in °C
Time
in minutes
Pizza, frozen
Pizza with a thin base Universal pan 3
Universal pan + wire rack 3+1
Pizza with a thick base Universal pan 3
Universal pan + wire rack 3+1
Pizza-Baguette Universal pan 3
Pizza, chilled
Pizza Universal pan 3
Potato products, frozen
Chips Universal pan 3
Universal pan + baking tray 3+1
Duchess potatoes Universal pan 3
Hash browns (fried potatoes) Universal pan 3
*Preheat.
:*
:*
:*
:*
:*
:*
:*
:*
:*
:*
200-210 10-15
170-180 20-25
200-210 15-20
170-180 20-25
170-180 25-30
200-210 10-15
210-220 20-25
180-190 30-35
200-210 15-20
200-210 15-20
19
Page 20

Food Dish Shelf posi-
tion
Potato wedges Universal pan 3
Baked goods, frozen
Rolls, baguettes Universal pan 3
Baked goods, prebaked
Part baked white bread Universal pan 3
Universal pan + wire rack 3+1
Fried foods, frozen
Fish fingers Universal pan 3
Chicken nuggets Universal pan 3
Lasagne, frozen
Lasagne, 400 g Wire rack 2
Lasagne, 1200 g Wire rack 2
Lasagne, chilled
Lasagne, 400 g Wire rack 2
Lasagne, 1200 g Wire rack 2
*Preheat.
Type of
heating
:*
:*
:*
:*
:*
:*
:*
:*
:*
:*
Temperature
in °C
190-210 20-25
180-190 10-15
180-190 15-20
160-170 20-25
200-210 15-20
170-180 20-25
180-190 35-40
180-190 40-50
170-180 25-30
170-180 30-35
Time
in minutes
Special dishes
At low temperatures, : 3D hot air is equally useful for
producing creamy yoghurt as it is for proving light yeast dough.
First, remove accessories, hook-in racks or telescopic shelves
from the cooking compartment.
Preparing yoghurt
1.Bring 1 litre of milk (3.5 % fat) to the boil and cool down to
40 °C.
2.Stir in 150 g of yoghurt (at refrigerator temperature).
3.Pour into cups or small screw-top jars and cover with cling
film.
Dish Ovenware Type of
Yoghurt Cups or screw-top
jars
Proving dough Heat-resistant dish on the cooking
on the cooking
compartment floor
compartment floor
Defrost
The defrosting time will depend on the type and quantity of the
food.
4.Preheat the cooking compartment as indicated.
5.Place the cups or jars on the cooking compartment floor and
incubate as indicated.
Proving dough
1.Prepare the dough as usual, place it in a heat-resistant
ceramic dish and cover.
2.Preheat the cooking compartment as indicated.
3.Switch off the oven and place the dough in the cooking
compartment and leave it to prove.
heating
:
:
Observe the instructions on the packaging.
Take frozen food out of its packaging and place in a suitable
dish on the wire rack.
Place poultry on a plate with the breast side facing down.
Temperature Cooking time
50 °C Preheat
50 °C
50 °C Preheat
Switch off the appliance and
place the yeast dough in the
cooking compartment
5mins
8hrs
5-10 mins
20-30 mins
Frozen food Accessories Level Type of
heating
e.g. cream cakes, buttercream cakes, gateaux with chocolate or
sugar icing, fruit, chicken, sausage and meat, bread and bread
rolls, cakes and other baked items
20
Wire rack 1
@
Temperature
The temperature selector
remains switched off
Page 21

Drying
With : 3D hot air, you can dry foods brilliantly.
Use unblemished fruit and vegetables only and wash them
thoroughly.
Drain off the excess water, then dry them.
Line the universal pan and the wire rack with greaseproof or
parchment paper.
Turn very juicy fruit or vegetables several times.
Remove fruit and vegetables from the paper as soon as they
have dried.
Fruit and herbs Accessories Level Type of
heating
600 g apple rings Universal pan + rack 3+1
800 g pear slices Universal pan + rack 3+1
1.5 kg damsons or plums Universal pan + rack 3+1
200 g herbs, washed Universal pan + rack 3+1
Preserving
For preserving, the jars and rubber seals must be clean and
intact. If possible, use jars of the same size. The information in
the table is for round, one-litre jars.
Caution!
Do not use jars that are larger or taller than this. The lids could
crack.
Only use fruit and vegetables in good condition. Wash them
thoroughly.
The times given in the tables are a guide only. The time will
depend on the room temperature, number of jars, and the
quantity and temperature of the contents. Before you switch off
the appliance or change the cooking mode, check whether the
contents of the jars are bubbling as they should.
Preparation
1. Fill the jars, but not to the top.
2. Wipe the rims of the jars, as they must be clean.
3. Place a damp rubber seal and a lid on each jar.
4. Seal the jars with the clips.
Place no more than six jars in the cooking compartment.
Making settings
1. Insert the universal pan at level 2. Arrange the jars on it so
2. Pour ½ litre of hot water (approx. 80 °C) into the universal
3. Close the oven door.
4. Set $ Bottom heating.
5. Set the temperature to between 170 and 180 °C.
Preserving
Fruit
After approx. 40 to 50 minutes, small bubbles begin to form at
short intervals. Switch off the oven.
After 25 to 35 minutes of residual heat, remove the preserving
jars from the cooking compartment. If they are allowed to cool
for longer in the cooking compartment, germs could multiply,
promoting acidification of the preserved fruit.
that they do not touch each other.
pan.
:
:
:
:
Temperature Cooking time
80 °C 5 hrs (approx.)
80 °C 8 hrs (approx.)
80 °C 8-10 hrs
(approx.)
80 °C 1½ hrs (approx.)
Fruit in one-litre jars When it starts to bubble Residual heat
Apples, redcurrants, strawberries Switch off approx. 25 minutes
Cherries, apricots, peaches, gooseberries Switch off approx. 30 minutes
Apple purée, pears, plums Switch off approx. 35 minutes
Vegetables
As soon as bubbles begin to form in the jars, set the
temperature back to between 120 and 140 °C. Depending on
Vegetables with cold cooking water in one-litre jars When it starts to bubble Residual heat
Gherkins - approx. 35 minutes
Beetroot approx. 35 minutes approx. 30 minutes
Brussels sprouts approx. 45 minutes approx. 30 minutes
Beans, kohlrabi, red cabbage approx. 60 minutes approx. 30 minutes
Peas approx. 70 minutes approx. 30 minutes
Taking out the jars
After preserving, remove the jars from the cooking
compartment.
Caution!
Do not place the hot jars on a cold or wet surface. They could
suddenly burst.
the type of vegetable, heat for approx. 35 to 70 minutes. Switch
off the oven after this time and use the residual heat.
21
Page 22

Acrylamide in foodstuffs
Acrylamide is mainly produced in grain and potato products
prepared at high temperatures, such as potato crisps, chips,
Tips for keeping acrylamide to a minimum when preparing food
General
Baking With top/bottom heating max. 200 °C.
Biscuits With top/bottom heating max. 190 °C.
Oven chips Spread evenly over the baking tray, in a single layer. Bake at least 400 g per baking tray
■ Keep cooking times to a minimum.
■ Cook meals until they are golden brown, but not too dark.
■ Large, thick pieces of food contain less acrylamide.
With 3D hot air or hot air max.180 °C.
With 3D hot air or hot air max. 170 °C.
Egg or egg yolk reduces the production of acrylamide.
so that the chips do not dry out
toast, bread rolls, bread or fine baked goods (biscuits,
gingerbread, cookies).
Test dishes
These tables have been produced for test institutes to facilitate
the inspection and testing of the various appliances.
In accordance with EN 50304/EN 60350 (2009) and IEC
60350.
Baking
Baking on 2 levels:
Always insert the universal pan above the baking tray.
Baking on 3 levels:
Insert the universal pan in the middle.
Viennese whirls:
Baking trays that are placed in the oven at the same time will
not necessarily be ready at the same time.
Apple pie on 1 level:
Place dark springform cake tins next to each other diagonally
on the same level.
Apple pie on 2 levels:
Place dark springform cake tins next to each other (see
illustration).
Dish Accessories and tins Level Type of
Viennese whirls (preheat) Baking tray 3
Universal pan + baking
tray
2 baking trays + universal
pan
Small cakes (preheat) Baking tray 3
Universal pan + baking
tray
2 baking trays + universal
pan
Hot water sponge cake Springform cake tin on the
wire rack
Apple pie Wire rack+ 2 springform
cake tins, dia. 20 cm
2 wire racks + 2 spring-
form cake tins, dia. 20 cm
3+1
5+3+1
3+1
5+3+1
2
3
3+1
heating
:
:
:
:
:
:
:
:
:
Temperature
in °C
140-150 30-40
140-150 30-45
130-140 40-55
150-170 20-35
140-160 30-45
130-150 35-55
160-170 25-40
160-180 75-95
170-190 70-100
Cooking time
in minutes
22
Page 23

Grilling
If you are grilling food directly on the wire rack, the universal
pan should also be inserted at level 1. The liquid is then
collected, keeping the oven cleaner.
Dish Accessories Level Type of
heating
Toast
Preheat for 10 minutes
Beefburgers, 12 pieces*
do not preheat
* turn over after
Z of the cooking time.
Wire rack 5
Wire rack + universal pan 4+1
(
(
Grill setting Cooking time
in minutes
3½-2
3 25-30
23
Page 24

Robert Bosch Hausgeräte GmbH
Carl-Wery-Straße 34
81739 München
Germany
www.bosch-home.com
*9000704691*
9000704691
910912
 Loading...