

Bosch GSB 10 Professional, GSB 10 RE Professional, GSB 13 Professional, GSB 13 RE Professional, GSB 16 Professional User guide [ml]
...Page 1
OBJ_DOKU-929-005.fm Page 1 Tuesday, June 28, 2011 2:38 PM
Robert Bosch GmbH
Power Tools Division
70745 Leinfelden-Echterdingen
Germany
www.bosch-pt.com
1 609 929 M43 (2011.06) O / 54 ASIA
GSB Professional
10 | 10 RE | 13 | 13 RE | 16 | 16 RE
en Original instructions
cn 正本使用说明书
tw 正本使用說明書
ko 사용 설명서 원본
th หนังสือคูมือการใชงานฉบับตนแบบ
id Petunjuk-Petunjuk untuk
Penggunaan Orisinal
vi BΩng hõëng dÿn nguy›n bΩn
fr Notice originale
ar
fa
Ϡλ έΎ ίήσ ΎϤϨϫέ
ΕΎϤϴϠόΗϞϴϐθΘϟΔϴϠλϷ
Page 2

v
v
OBJ_BUCH-61-006.book Page 2 Tuesday, June 28, 2011 2:41 PM
2 |
English . . . . . . . . . . . . . . . . . . . . . . . . . . . . . . . . . . . . . . . . . . Page 6
中文 . . . . . . . . . . . . . . . . . . . . . . . . . . . . . . . . . . . . . . . . . . . . 页 11
中文 . . . . . . . . . . . . . . . . . . . . . . . . . . . . . . . . . . . . . . . . . . . . 頁 15
한국어 . . . . . . . . . . . . . . . . . . . . . . . . . . . . . . . . . . . . . 면 19
ภาษาไทย . . . . . . . . . . . . . . . . . . . . . . . . . . . . . . . . . . . . . . . . หนา 23
Bahasa Indonesia . . . . . . . . . . . . . . . . . . . . . . . . . . . . . . Halaman 29
Tiøng Vi·t . . . . . . . . . . . . . . . . . . . . . . . . . . . . . Trang 34
Français . . . . . . . . . . . . . . . . . . . . . . . . . . . . . . . . . . . . . . . . . Page 39
v
v
cccc
. . . . . . . . . . . . . . . . . . . . . . . . . . . . . . . . . . . . 48
vÝ—U
. . . . . . . . . . . . . . . . . . . . . . . . . . . . . . . . . . . 53
ΔΤϔλ
ϪΤϔλ
1 609 929 M43 | (28.6.11) Bosch Power Tools
Page 3
OBJ_BUCH-61-006.book Page 3 Tuesday, June 28, 2011 2:41 PM
GSB 16 RE:
2 608 180 009
(DP 500)
GSB 16 RE:
2 608 030 053
(MS 65)
2 608 030 055
(MS 80)
| 3
1 607 950 045
2 602 025 094
GSB 10/GSB 10 RE:
2 608 571 078
GSB 13/GSB 13 RE/
2 603 001 009
GSB 16/GSB 16 (RE):
2 608 571 079
GSB 13/GSB 13 RE/
GSB 16/GSB 16 (RE):
2 608 571 080
2 607 990 050
2 609 160 112
Bosch Power Tools 1 609 929 M43 | (28.6.11)
(S 41)
Page 4
OBJ_BUCH-61-006.book Page 4 Tuesday, June 28, 2011 2:41 PM
4 |
12
GSB 16 RE
Professional
10
11
4
5
6
7
8
9
13
11
1
3
2
A
X
12
1 609 929 M43 | (28.6.11) Bosch Power Tools
910
11
B
3
2
Page 5
OBJ_BUCH-61-006.book Page 5 Tuesday, June 28, 2011 2:41 PM
| 5
E
14
DC
16
17
15
F
11918
119 18
HG
8
Bosch Power Tools 1 609 929 M43 | (28.6.11)
8
Page 6
OBJ_BUCH-61-006.book Page 6 Tuesday, June 28, 2011 2:41 PM
6 | English
f Prevent unintentional starting. Ensure the switch is in
English
Safety Notes
General Power Tool Safety Warnings
WARNING
and instructions may result in electric shock, fire and/or serious injury.
Save all warnings and instructions for future reference.
The term “power tool” in the warnings refers to your mainsoperated (corded) power tool or battery-operated (cordless)
power tool.
Work area safety
f Keep work area clean and well lit. Cluttered or dark areas
invite accidents.
f Do not operate power tools in explosive atmospheres,
such as in the presence of flammable liquids, gases or
dust. Power tools create sparks which may ignite the dust
or fumes.
f Keep children and bystanders away while operating a
power tool. Distractions can cause you to lose control.
Electrical safety
f Power tool plugs must match the outlet. Never modify
the plug in any way. Do not use any adapter plugs with
earthed (grounded) power tools. Unmodified plugs and
matching outlets will reduce risk of electric shock.
f Avoid body contact with earthed or grounded surfaces,
such as pipes, radiators, ranges and refrigerators.
There is an increased risk of electric shock if your body is
earthed or grounded.
f Do not expose power tools to rain or wet conditions.
Water entering a power tool will increase the risk of electric
shock.
f Do not abuse the cord. Never use the cord for carrying,
pulling or unplugging the power tool. Keep cord away
from heat, oil, sharp edges and moving parts. Damaged
or entangled cords increase the risk of electric shock.
f When operating a power tool outdoors, use an exten-
sion cord suitable for outdoor use. Use of a cord suitable
for outdoor use reduces the risk of electric shock.
f If operating a power tool in a damp location is unavoid-
able, use a residual current device (RCD) protected
supply. Use of an RCD reduces the risk of electric shock.
Personal safety
f Stay alert, watch what you are doing and use common
sense when operating a power tool. Do not use a power
tool while you are tired or under the influence of drugs,
alcohol or medication. A moment of inattention while op-
erating power tools may result in serious personal injury.
f Use personal protective equipment. Always wear eye
protection. Protective equipment such as dust mask,
non-skid safety shoes, hard hat, or hearing protection
used for appropriate conditions will reduce personal injuries.
1 609 929 M43 | (28.6.11) Bosch Power Tools
Read all safety warnings and all instructions. Failure to follow the warnings
the off-position before connecting to power source
and/or battery pack, picking up or carrying the tool.
Carrying power tools with your finger on the switch or energising power tools that have the switch on invites accidents.
f Remove any adjusting key or wrench before turning
the power tool on. A wrench or a key left attached to a ro-
tating part of the power tool may result in personal injury.
f Do not overreach. Keep proper footing and balance at
all times. This enables better control of the power tool in
unexpected situations.
f Dress properly. Do not wear loose clothing or jewel-
lery. Keep your hair, clothing and gloves away from
moving parts. Loose clothes, jewellery or long hair can be
caught in moving parts.
f If devices are provided for the connection of dust ex-
traction and collection facilities, ensure these are connected and properly used. Use of dust collection can re-
duce dust-related hazards.
Power tool use and care
f Do not force the power tool. Use the correct power tool
for your application. The correct power tool will do the
job better and safer at the rate for which it was designed.
f Do not use the power tool if the switch does not turn it
on and off. Any power tool that cannot be controlled with
the switch is dangerous and must be repaired.
f Disconnect the plug from the power source and/or the
battery pack from the power tool before making any
adjustments, changing accessories, or storing power
tools. Such preventive safety measures reduce the risk of
starting the power tool accidentally.
f Store idle power tools out of the reach of children and
do not allow persons unfamiliar with the power tool or
these instructions to operate the power tool. Power
tools are dangerous in the hands of untrained users.
f Maintain power tools. Check for misalignment or bind-
ing of moving parts, breakage of parts and any other
condition that may affect the power tool’s operation. If
damaged, have the power tool repaired before use.
Many accidents are caused by poorly maintained power
tools.
f Keep cutting tools sharp and clean. Properly maintained
cutting tools with sharp cutting edges are less likely to bind
and are easier to control.
f Use the power tool, accessories and tool bits etc. in ac-
cordance with these instructions, taking into account
the working conditions and the work to be performed.
Use of the power tool for operations different from those
intended could result in a hazardous situation.
Service
f Have your power tool serviced by a qualified repair per-
son using only identical replacement parts. This will en-
sure that the safety of the power tool is maintained.
Page 7
OBJ_BUCH-61-006.book Page 7 Tuesday, June 28, 2011 2:41 PM
English | 7
Safety Warnings for Drills
GSB 13/ GSB 13 RE/ GSB 16/ GSB 16 RE
f Use auxiliary handle(s), if supplied with the tool. Loss
of control can cause personal injury.
f When working with the machine, always hold it firmly
with both hands and provide for a secure stance. The
power tool is guided more secure with both hands.
GSB 10/ GSB 10 RE/ GSB 13/GSB 13 RE /GSB 16 /
GSB 16 RE
f Wear ear protectors when impact drilling. Exposure to
noise can cause hearing loss.
f Hold power tool by insulated gripping surfaces, when
performing an operation where the cutting accessory
may contact hidden wiring or its own cord. Cutting ac-
cessory contacting a “live” wire may make exposed metal
parts of the power tool “live” and could give the operator an
electric shock.
f Use suitable detectors to determine if utility lines are
hidden in the work area or call the local utility company
for assistance. Contact with electric lines can lead to fire
and electric shock. Damaging a gas line can lead to explosion. Penetrating a water line causes property damage or
may cause an electric shock.
f Switch off the power tool immediately when the tool in-
sert jams. Be prepared for high reaction torque that
can cause kickback. The tool insert jams when:
— the power tool is subject to overload or
— it becomes wedged in the workpiece.
f Secure the workpiece. A workpiece clamped with clamp-
ing devices or in a vice is held more secure than by hand.
f Always wait until the machine has come to a complete
stop before placing it down. The tool insert can jam and
lead to loss of control over the power tool.
Products sold in GB only: Your product is fitted with a
BS 1363/A approved electric plug with internal fuse (ASTA
approved to BS 1362).
If the plug is not suitable for your socket outlets, it should be
cut off and an appropriate plug fitted in its place by an authorised customer service agent. The replacement plug should
have the same fuse rating as the original plug.
The severed plug must be disposed of to avoid a possible
shock hazard and should never be inserted into a mains socket elsewhere.
Products sold in AUS and NZ only: Use a residual current device (RCD) with a rated residual current of 30 mA or less.
Product Description and
Specifications
Read all safety warnings and all instructions. Failure to follow the warnings and in-
structions may result in electric shock, fire
and/or serious injury.
Intended Use
The machine is intended for impact drilling in brick, concrete
and stone as well as for drilling in wood, metal and plastic. Ma chines with electronic control and right/left rotation are also
suitable for screwdriving and thread-cutting.
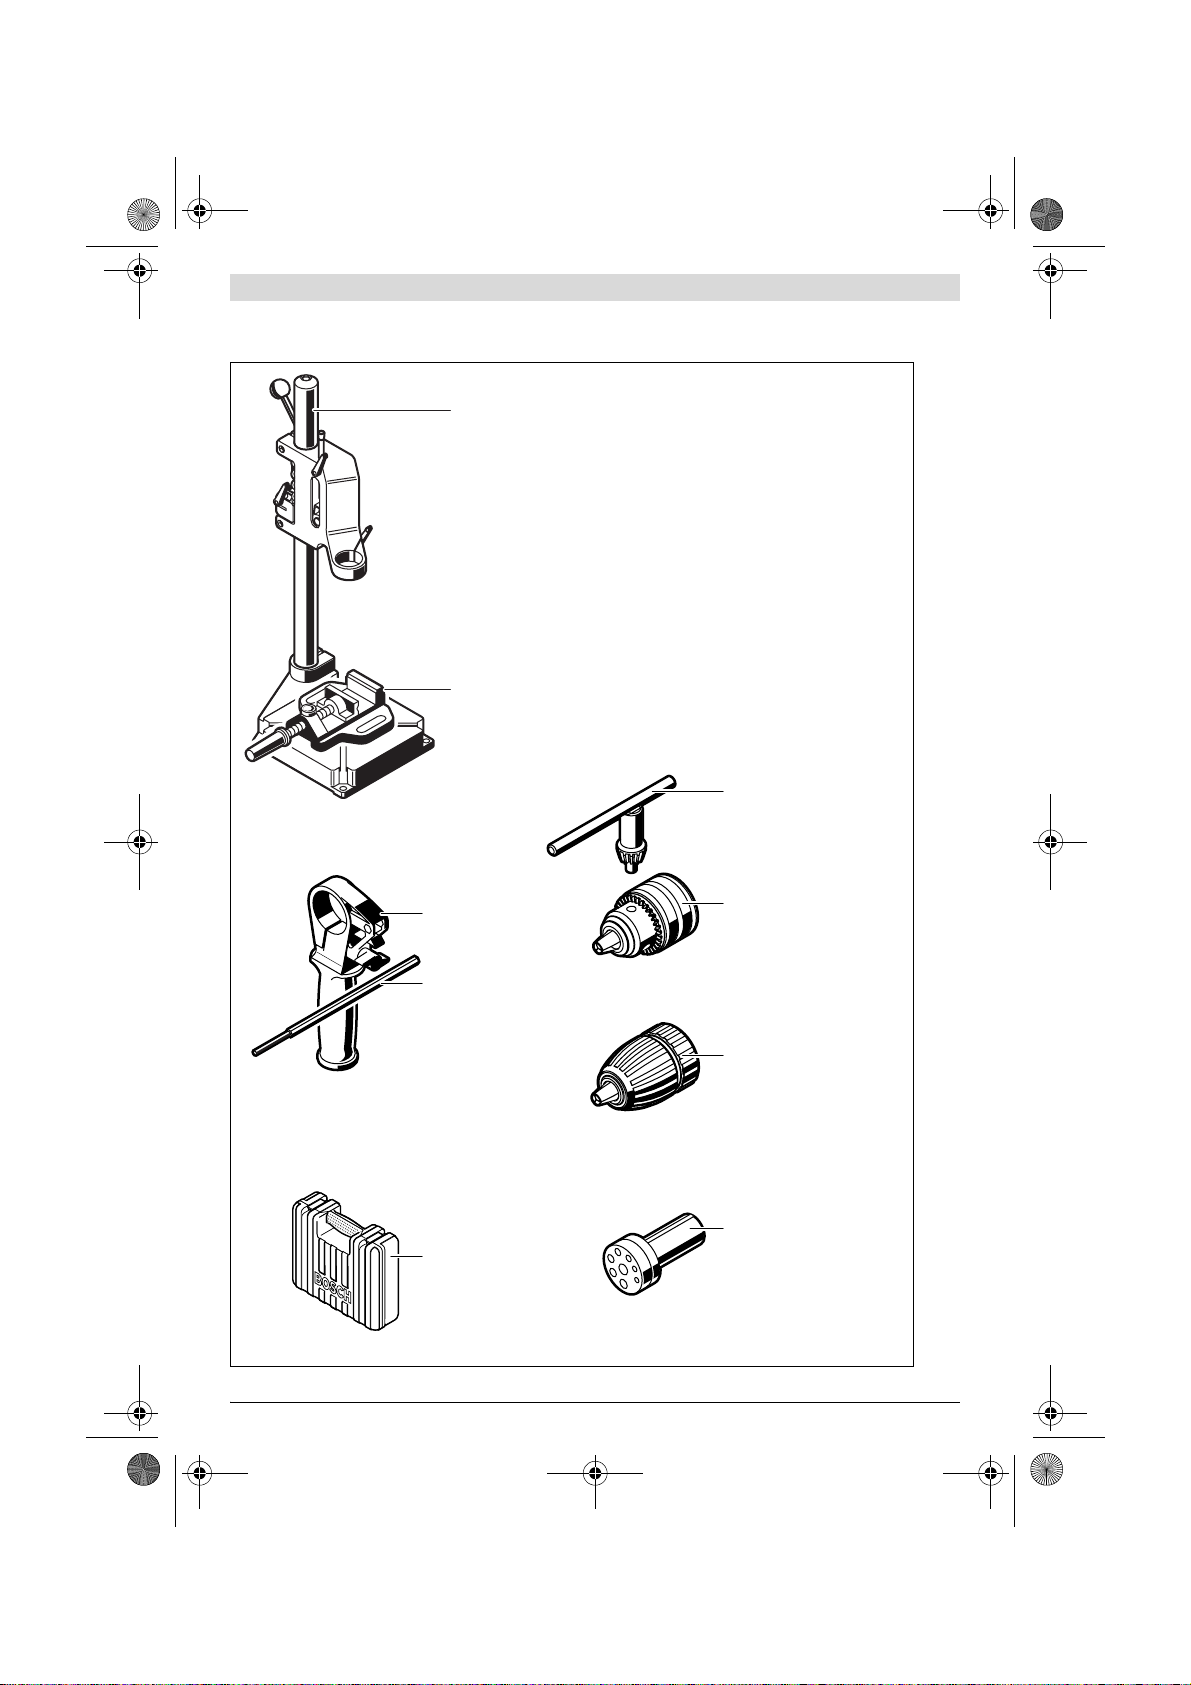
Product Features
The numbering of the product features refers to the illustration of the machine on the graphics page.
1 Keyless chuck*
2 Front sleeve
3 Rear sleeve
4 “Drilling/Impact Drilling” selector switch
5 Lock-on button for On/Off switch
6 On/Off switch
7 Thumbwheel for speed preselection (GSB 16 RE)
8 Rotational direction switch
(GSB 10 RE/GSB 13 RE /GSB 16 RE)
9 Button for depth stop adjustment*
10 Wing bolt for adjustment of auxiliary handle*
11 Auxiliary handle (insulated gripping surface)*
12 Depth stop*
13 Handle (insulated gripping surface)
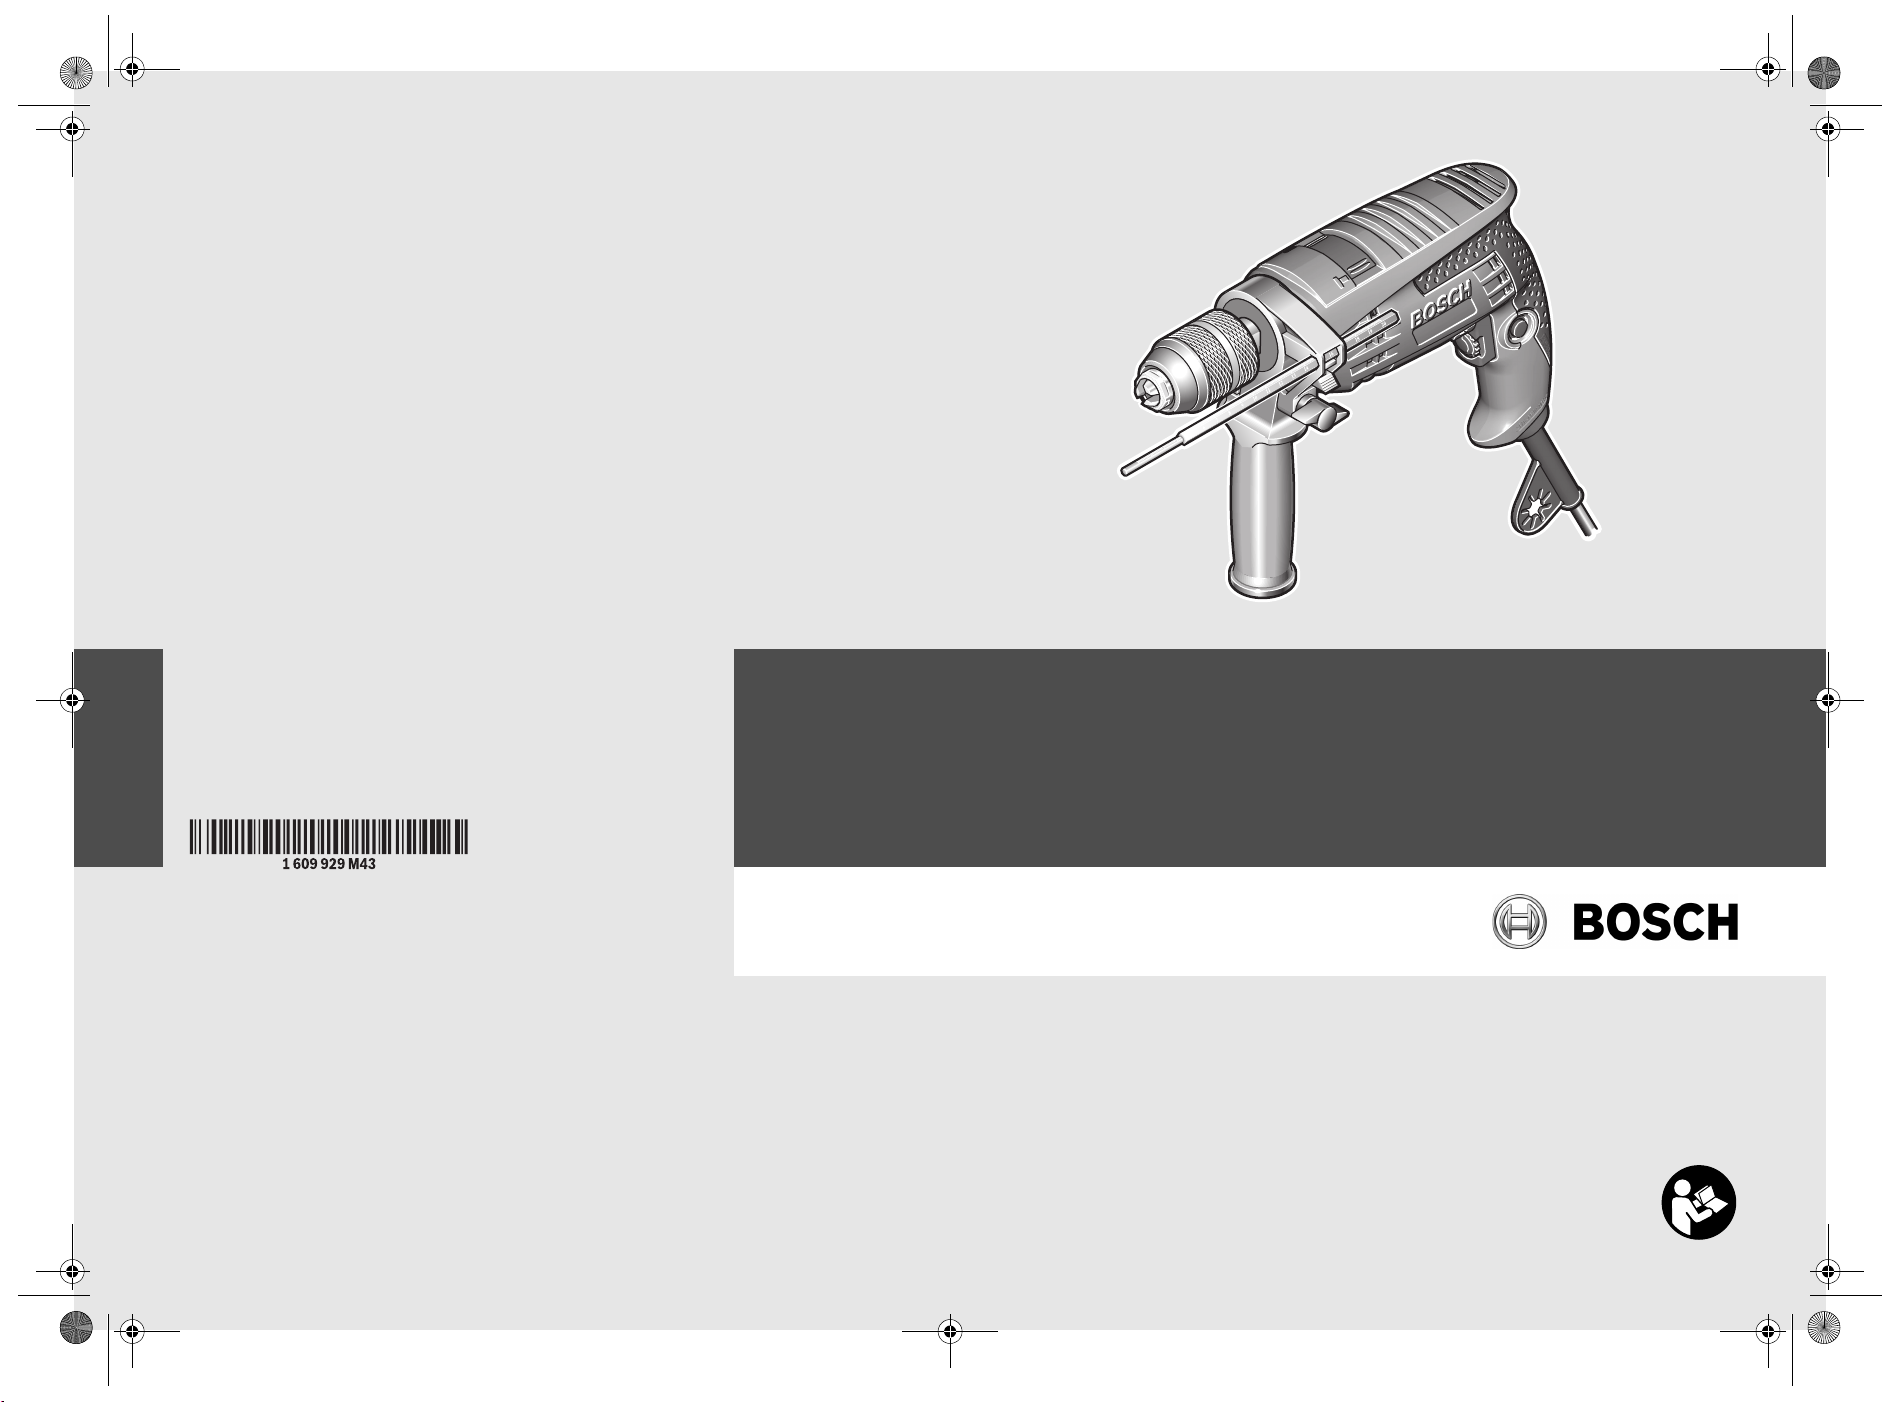
14 Chuck key*
15 Key type drill chuck*
16 Universal bit holder*
17 Screwdriver bit *
18 Allen key**
19 Open-end spanner **
*Accesso ries shown or described are not part of the standard delivery scope of the product. A complete overview of accessories
can be found in our accessories program.
**Commer cially available (not included in the delivery scope)
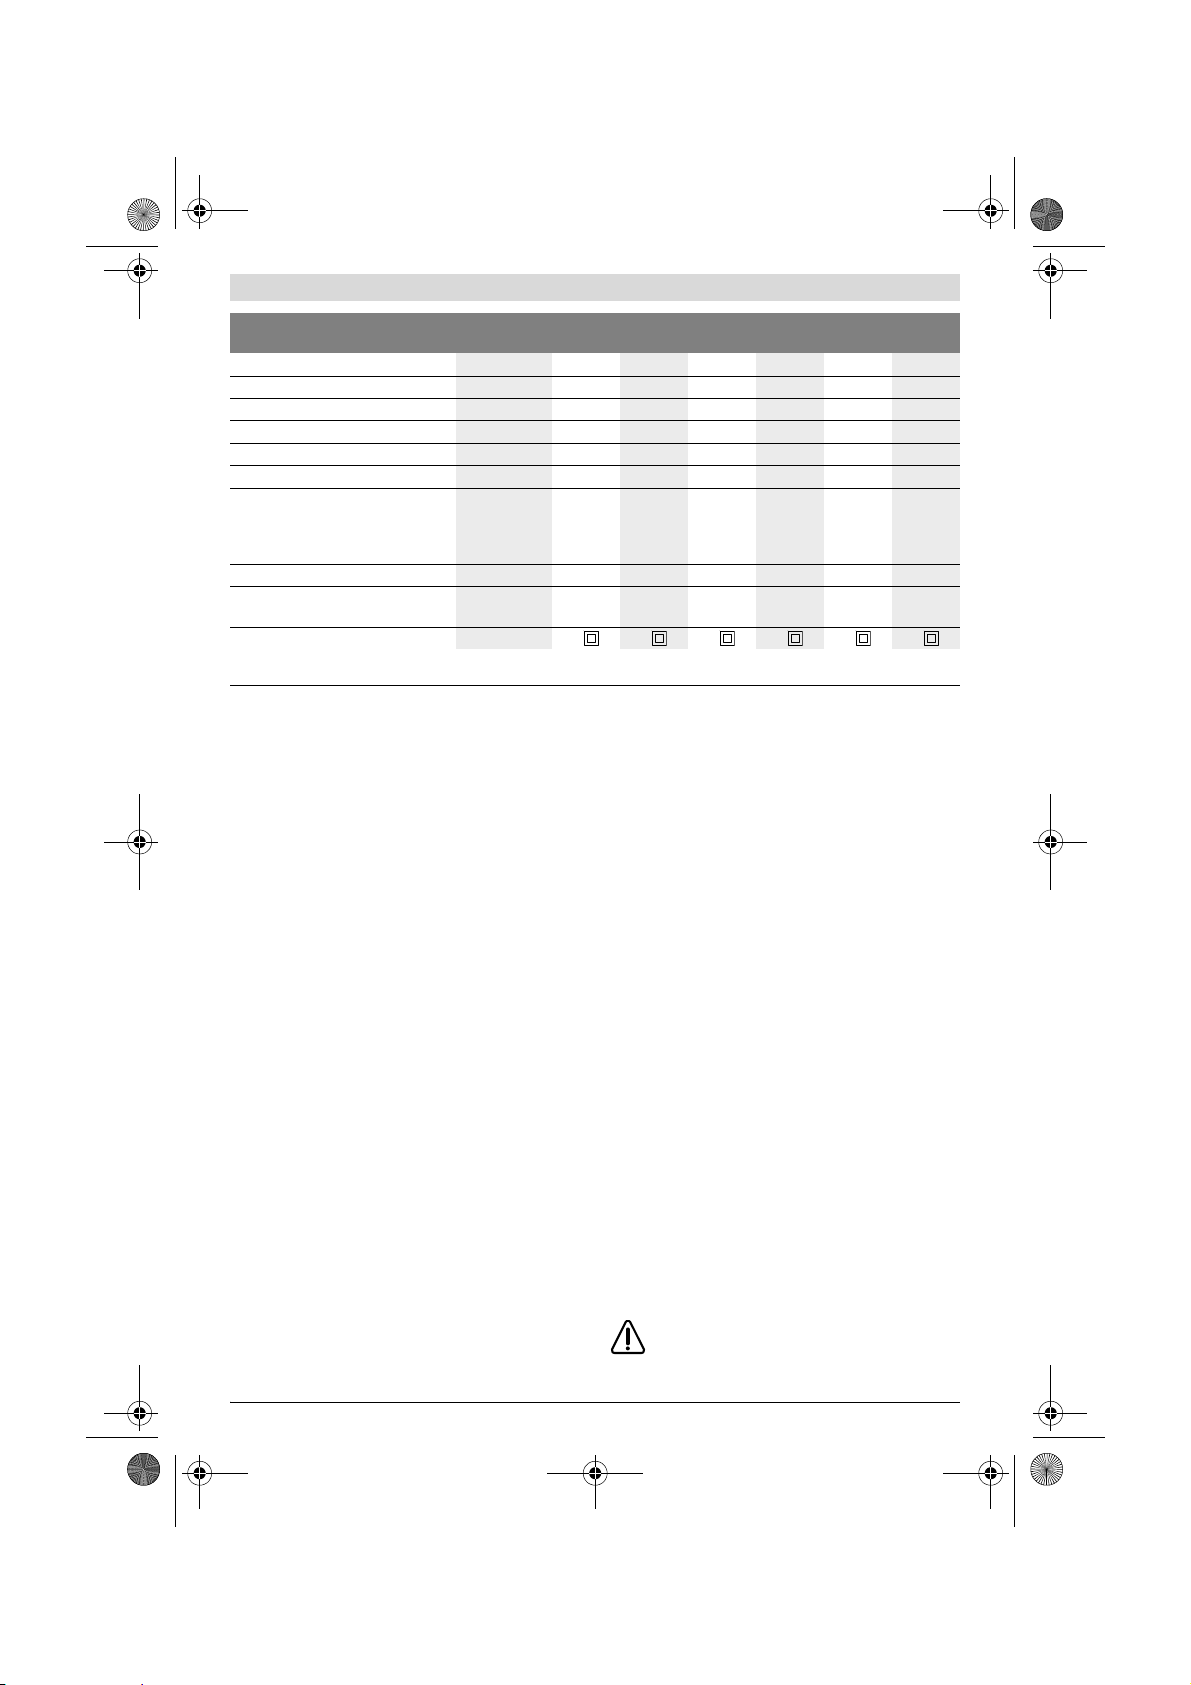
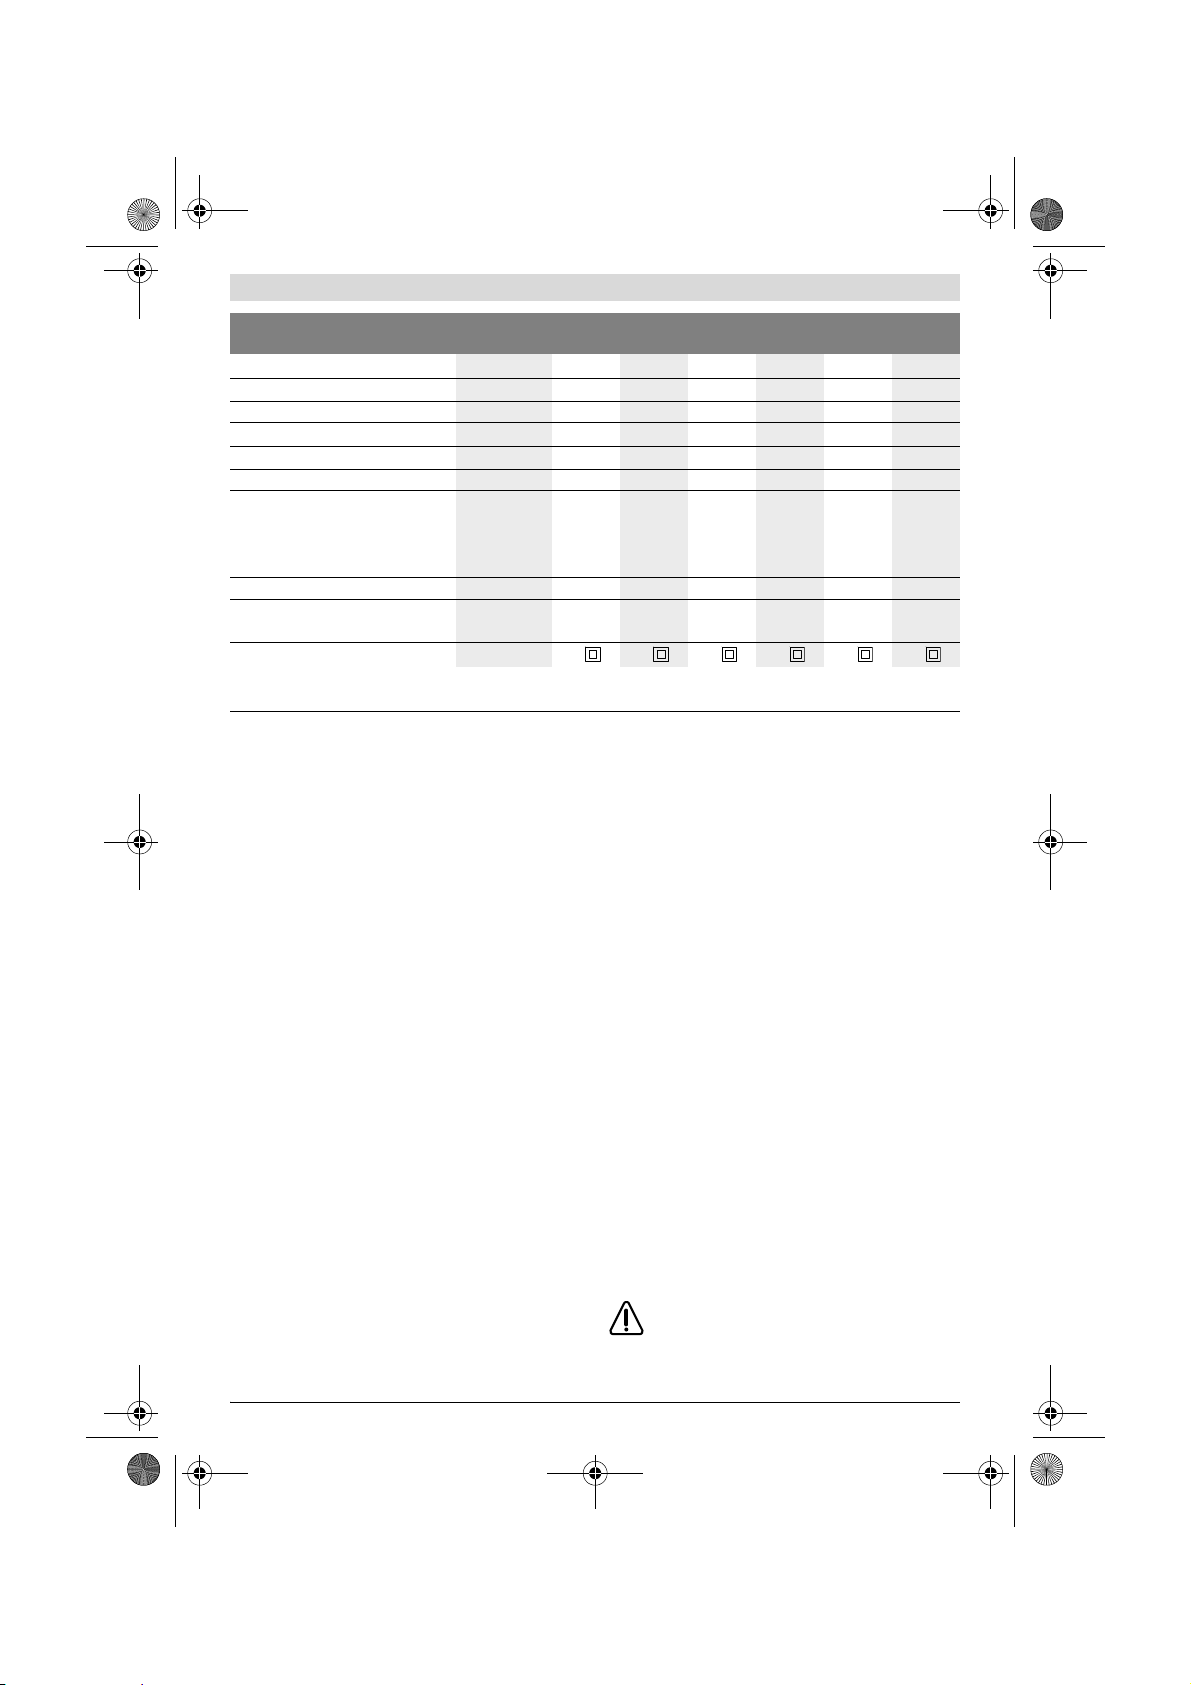
Technical Data
Impact Drill GSB ...
Article number 3 601 ... B16 0.. B16 1.. B17 0.. B17 1.. B18 0.. B18 1..
Rated power input
Output power
No-load speed
The values given are valid for a nominal voltage [U] of 230 V. For different voltages and models for specific countries, these values can vary.
Please observe the article number on the type plate of your machine. The trade names of the individual machines may vary.
Professional
min
W 500 500 600 600 701 701
W 250 250 301 301 351 351
-1
10 10 RE 13 13 RE 16 16 RE
2600 0 – 2600 2800 0 – 2800 30 00 0–3000
Bosch Power Tools 1 609 929 M43 | (28.6.11)
Page 8
OBJ_BUCH-61-006.book Page 8 Tuesday, June 28, 2011 2:41 PM
8 | English
Impact Drill GSB ...
Rotational speed under load, max.
Impact rate
Rated torque
Speed preselection
Right/left rotation
Spindle collar dia.
Max. drilling dia.
– Concrete
– Steel
– Wood
Chuck clamping range
Weight according to EPTA-Procedure
01/2003
Protection class
The values given are valid for a nominal voltage [U] of 230 V. For different voltages and models for specific countries, these values can vary.
Please observe the article number on the type plate of your machine. The trade names of the individual machines may vary.
Professional
-1
min
min-125 700 25700 25070 25 070 26 270 26 270
Nm 1.5 1.5 1.8 1.8 2.0 2.0
mm 43 43 43 43 43 43
mm
mm
mm
mm 1.5 – 10 1.5 – 10 1.5 – 13 1.5 – 13 1.5 – 13 1.5 – 13
kg 1.5 1.5 1.7 1.7 1.9 1.9
Assembly
f Before any work on the machine itself, pull the mains
plug.
Auxiliary Handle (see figure A)
(GSB 13/GSB 13 RE/GSB 16/ GSB 16 RE)
f Operate your machine only with the auxiliary handle
11.
The auxiliary handle 11 can be set to any position for a secure
and low-fatigue working posture.
Turn the wing bolt for adjustment of the auxiliary handle 10 in
anticlockwise direction and set the auxiliary handle 11 to the
required position. Then tighten the wing bolt 10 again in
clockwise direction.
Adjusting the Drilling Depth (see figure A)
The required drilling depth X can be set with the depth stop
12.
Press the button for the depth stop adjustment 9 and insert
the depth stop into the auxiliary handle 11.
Pull out the depth stop until the distance between the tip of
the drill bit and the tip of the depth stop correspond with the
desired drilling depth X.
Changing the Tool
Keyless Chuck (see figure B)
Hold the rear sleeve 3 of the keyless chuck 1 tight and turn the
front sleeve 2 in rotation direction n, until the tool can be inserted. Insert the tool.
Hold the rear sleeve 3 of the keyless chuck 1 tight and firmly
turn the front sleeve 2 in rotation direction o by hand until
the locking action is no longer heard. This automatically locks
the drill chuck.
The locking is released again to remove the tool when the
front sleeve 2 is turned in the opposite direction.
10 10 RE 13 13 RE 16 16 RE
1610 1610 1570 1 570 1 640 1640
– ––––z
– z – z – z
10
8
20
/II / II /II / II /II / II
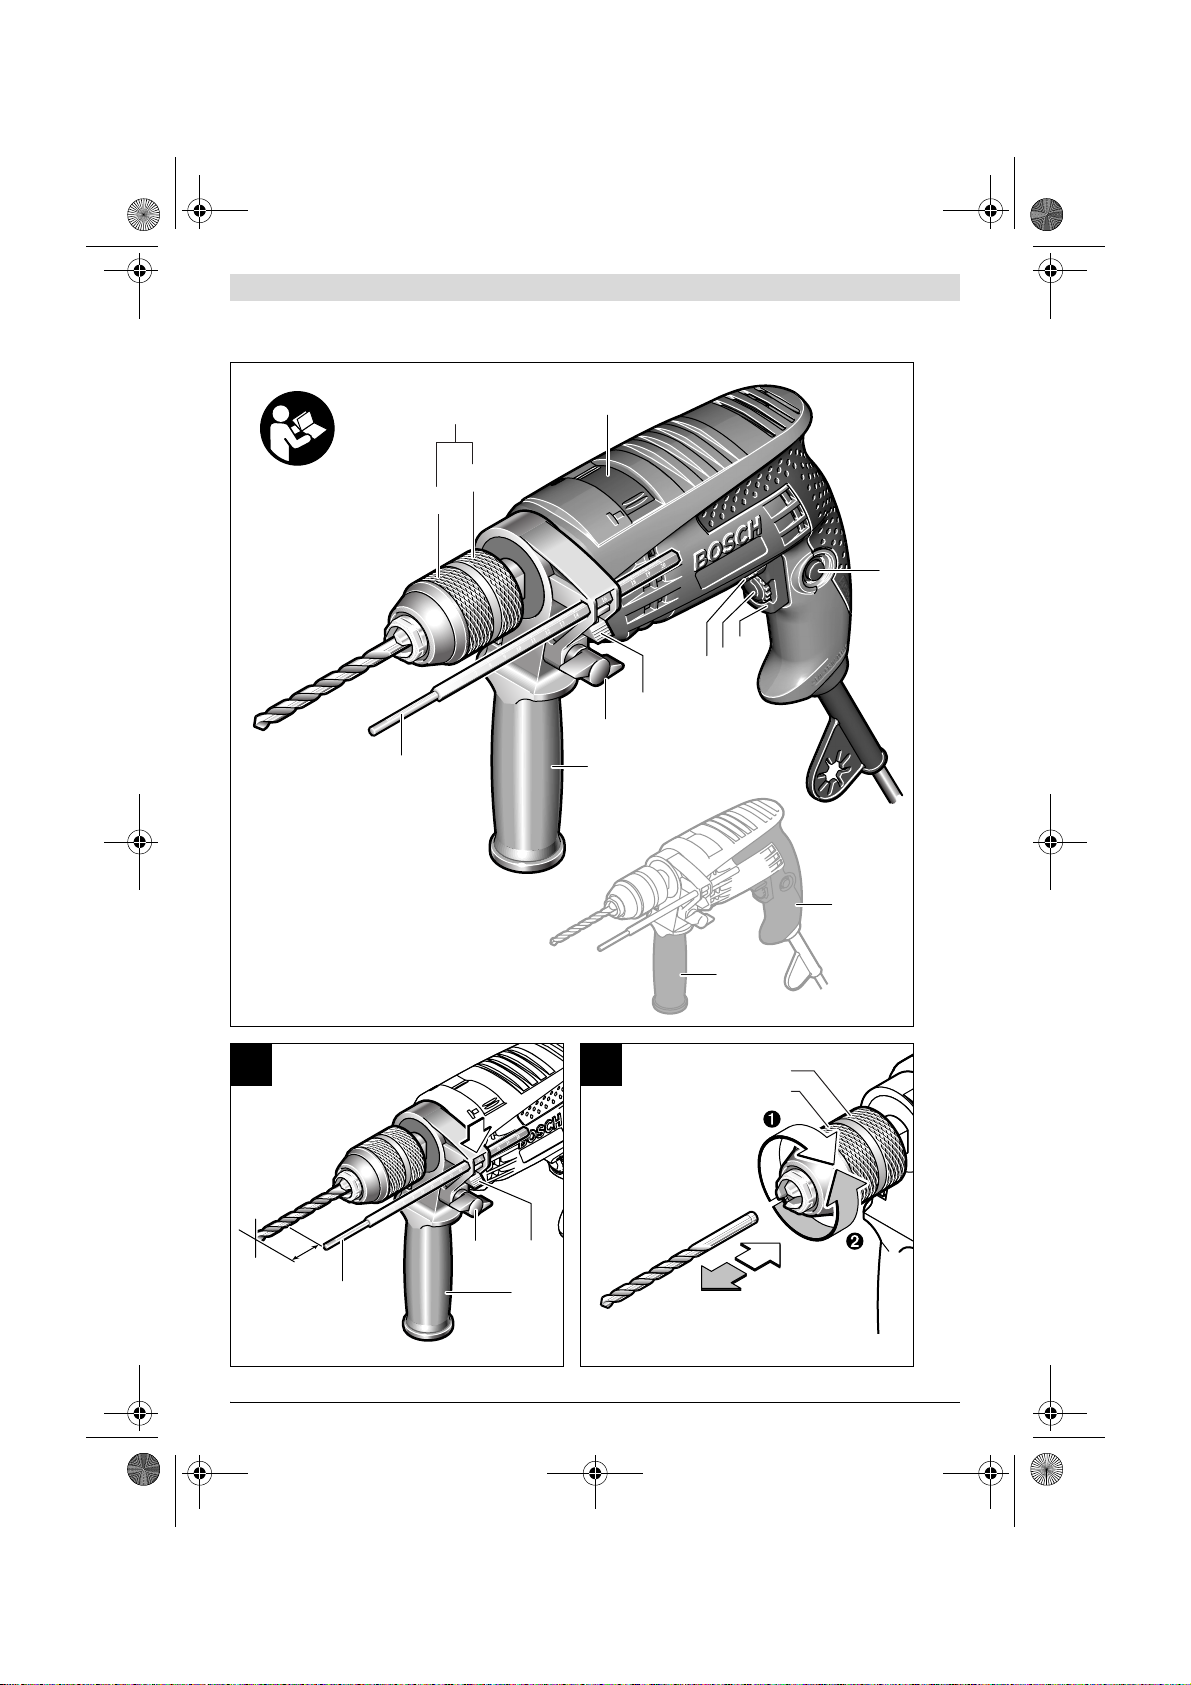
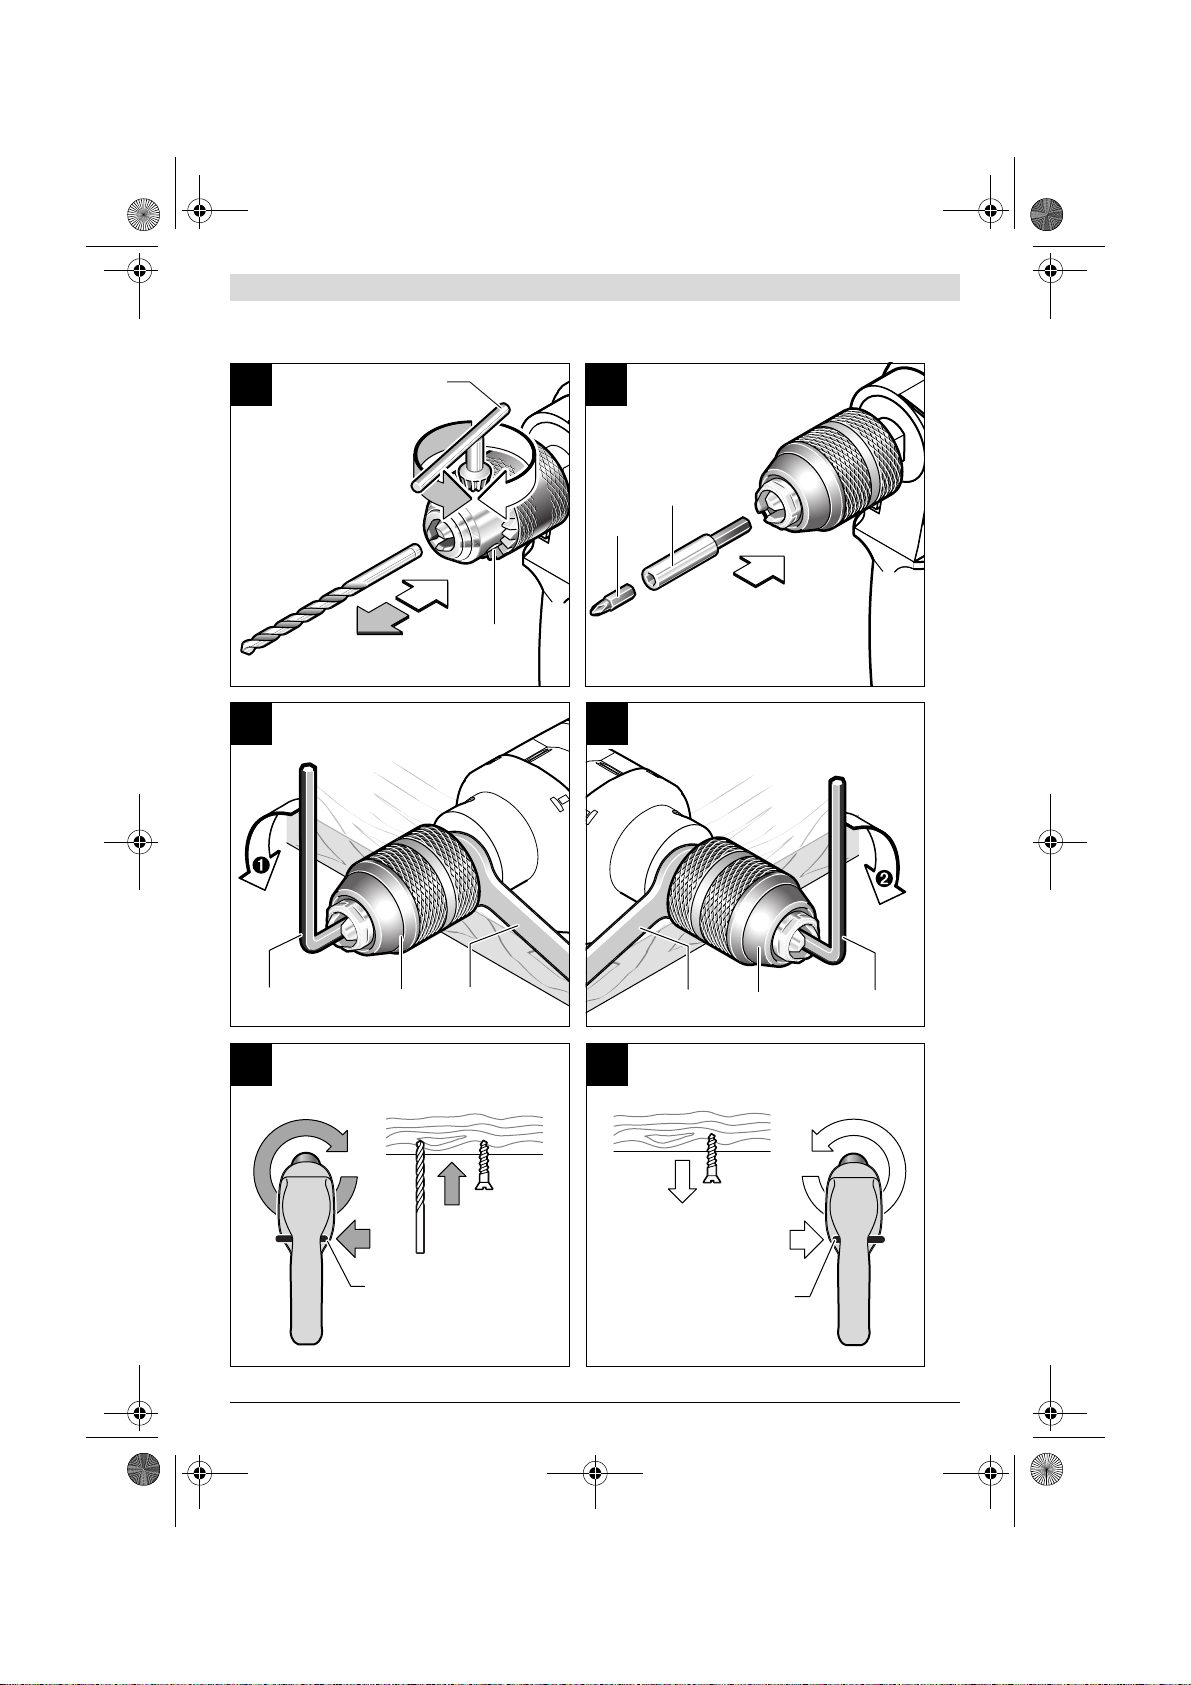
Key Type Drill Chuck (see figure C)
f Wear protective gloves when changing the tool. The
Open the key type drill chuck 15 by turning un til the tool can
be inserted. Insert the tool.
Insert the chuck key 14 into the corresponding holes of the
key type drill chuck 15 and clamp the tool uniformly.
Screwdriver Tools (see figure D)
When working with screwdriver bits 17, a universal bit holder
16 should always be used. Use only screwdriver bits that fit
the screw head.
For driving screws, always position the “Drilling/Impact Drill-
ing” selector switch 4 to the “Drilling” symbol.
10
20
drill chuck can become very hot during longer work periods.
13
8
10
25
13
10
25
16
12
30
Replacing the Drill Chuck
Removing the Drill Chuck (see figure E)
To dismount the keyless chuck 1, clamp an Allen key 18 into
the keyless chuck 1 and position an open-end spanner 19
(size 12 mm) against the spanner flats of the drive spindle.
Place the machine on a firm support, e.g., a workbench. Hold
the open-end spanner 19 firmly and loosen the keyless chuck
1 by turning the Allen key 18 in rotation direction n. Loosen
a tight seated keyless chuck by giving the long end of the Allen
key 18 a blow. Remove the Allen key from the keyless chuck
and completely unscrew the keyless chuck.
The key type drill chuck 15 is removed in the same manner as
the keyless chuck.
Mounting the Drill Chuck (see figure F)
The keyless chuck/key type drill chuck is mounted in reverse
order.
The drill chuck must be tightened with a tightening
torque of approx. 30 –35 Nm.
16
12
30
1 609 929 M43 | (28.6.11) Bosch Power Tools
Page 9
OBJ_BUCH-61-006.book Page 9 Tuesday, June 28, 2011 2:41 PM
Dust/Chip Extraction
f Dusts from materials such as lead-containing coatings,
some wood types, minerals and metal can be harmful to
one’s health. Touching or breathing-in the dusts can cause
allergic reactions and/or lead to respiratory infections of
the user or bystanders.
Certain dusts, such as oak or beech dust, are considered
as carcinogenic, especially in connection with wood-treatment additives (chromate, wood preservative). Materials
containing asbestos may only be worked by specialists.
– Provide for good ventilation of the working place.
– It is recommended to wear a P2 filter-class respirator.
Observe the relevant regulations in your country for the
materials to be worked.
f Prevent dust accumulation at the workplace. Dusts can
easily ignite.
Operation
Starting Operation
f Observe correct mains voltage! The voltage of the pow-
er source must agree with the voltage specified on the
nameplate of the machine. Power tools marked with
230 V can also be operated with 220 V.
Reversing the Rotational Direction (see figures G –H)
(GSB 10 RE/ GSB 13 RE/ GSB 16 RE)
The rotational direction switch 8 is used to reverse the rotational direction of the machine. However, this is not possible
with the On/Off switch 6 actuated.
Right Rotation: For drilling and driving in screws, push the
rotational direction switch 8 left to the stop.
Left Rotation: For loosening and unscrewing screws and
nuts, press the rotational direction switch 8 through to the
right stop.
Setting the Operating Mode
Drilling and Screwdriving
Set the selector switch 4 to the “Drilling” symbol.
Impact Drilling
Set the selector switch 4 to the “Impact drilling”
symbol.
The selector switch 4 engages noticeably and can also be actuated with the machine running.
Switching On and Off
To start the machine, press the On/Off switch 6 and keep it
pressed.
To lock the pressed On/Off switch 6, press the lock-on button
5.
To switch off the machine, release the On/Off switch 6 or
when it is locked with the lock-on button 5, briefly press the
On/Off switch 6 and then release it.
English | 9
Adjusting the Speed/Impact Frequency
(GSB 10 RE/ GSB 13 RE/ GSB 16 RE)
The speed/impact rate of the switched on power tool can be
variably adjusted, depending on how far the On/Off switch 6
is pressed.
Light pressure on the On/Off switch 6 results in low speed/impact rate. Further pressure on the switch increases the
speed/impact rate.
Preselecting the Speed/Impact Frequency ( GSB 16 RE)
With the thumbwheel for speed preselection 7, the required
speed/impact frequency can be preselected even during operation.
The required speed/impact frequency depends on the material and the working conditions, and can be determined
through practical testing.
Working Advice
f Apply the power tool to the screw/nut only when it is
switched off. Rotating tool inserts can slip off.
After longer periods of working at low speed, allow the machine to cool down by running it for approx. 3 minutes at maximum speed with no load.
For drilling in tiles, set the selector switch 4 to the “Drilling”
symbol. Do not switch over to the symbol “Impact Drilling” or
work with impact until after drilling through the tile.
Use carbide tipped drill bits when working in concrete, masonry and brick wall.
For drilling in metal, use only perfectly sharpened HSS drill
bits (HSS =high-speed steel). The appropriate quality is gua ranteed by the Bosch accessories program.
Twist drills from 2.5 –10 mm can easily be sharpened with
the drill bit sharpener (see accessories).
GSB 16 RE
We recommend the use of a drill stand (see accessories) for
work where greater precision is particularly required.
The machine vice, which is available as an accessory, enables
secure clamping of workpieces. This prevents the workpiece
from turning and any accidents this would cause.
Maintenance and Service
Maintenance and Cleaning
f Before any work on the machine itself, pull the mains
plug.
f For safe and proper working, always keep the machine
and ventilation slots clean.
If the machine should fail despite the care taken in manufacturing and testing procedures, repair should be carried out by
an after-sales service centre for Bosch power tools.
In all correspondence and spare parts order, please always include the 10-digit article number given on the type plate of
the machine.
Bosch Power Tools 1 609 929 M43 | (28.6.11)
Page 10
OBJ_BUCH-61-006.book Page 10 Tuesday, June 28, 2011 2:41 PM
10 | English
After-sales Service and Customer Assistance
Our after-sales service responds to your questions concerning maintenance and repair of your product as well as spare
parts. Exploded views and information on spare parts can also be found under:
www.bosch-pt.com
Our customer service representatives can answer your questions concerning possible applications and adjustment of
products and accessories.
People’s Republic of China
China Mainland
Bosch Power Tools (China) Co., Ltd.
567, Bin Kang Road
Bin Jiang District 310052
Hangzhou, P.R. China
Service Hotline: 400 826 8484
Fax: +86 571 8777 4502
E-Mail: contact.ptcn@cn.bosch.com
www.bosch-pt.com.cn
HK and Macau Special Administrative Regions
Robert Bosch Hong Kong Co. Ltd.
21st Floor, 625 King’s Road
North Point, Hong Kong
Customer Service Hotline: +852 (21) 02 02 35
Fax: +852 (25) 90 97 62
E-Mail: info@hk.bosch.com
www.bosch-pt.com.hk
Indonesia
PT. Multi Mayaka
Kawasan Industri Pulogadung
Jalan Rawa Gelam III No. 2
Jakarta 13930
Indonesia
Tel.: +62 (21) 46 83 25 22
Fax: +62 (21) 46 82 86 45 /68 23
E-Mail: sales@multimayaka.co.id
www.bosch-pt.co.id
Philippines
Robert Bosch, Inc.
28th Floor Fort Legend Towers,
3rd Avenue corner 31st Street,
Fort Bonifacio Global City,
1634 Taguig City, Philippines
Tel.: +63 (2) 870 3871
Fax: +63 (2) 870 3870
matheus.contiero@ph.bosch.com
www.bosch-pt.com.ph
Bosch Service Center:
9725-27 Kamagong Street
San Antonio Village
Makati City, Philippines
Tel.: +63 (2) 899 9091
Fax: +63 (2) 897 6432
rosalie.dagdagan@ph.bosch.com
Malaysia
Robert Bosch (S.E.A.) Pte. Ltd.
No. 8A, Jalan 13/6
G.P.O. Box 10818
46200 Petaling Jaya
Selangor, Malaysia
Tel.: +60 (3) 7966 3194
Fax: +60 (3) 7958 3838
cheehoe.on@my.bosch.com
Toll-Free: 1800 880 188
www.bosch-pt.com.my
Thailand
Robert Bosch Ltd.
Liberty Square Building
No. 287, 11 Floor
Silom Road, Bangrak
Bangkok 10500
Tel.: +66 (2) 6 31 18 79 – 18 88 (10 lines)
Fax: +66 (2) 2 38 47 83
Robert Bosch Ltd., P. O. Box 2054
Bangkok 10501, Thailand
Bosch Service – Training Centre
2869-2869/1 Soi Ban Kluay
Rama IV Road (near old Paknam Railway)
Prakanong District
10110 Bangkok
Thailand
Tel.: +66 (2) 6 71 78 00 – 4
Fax: +66 (2) 2 49 42 96
Fax: +66 (2) 2 49 52 99
Singapore
Robert Bosch (SEA) Pte. Ltd.
11 Bishan Street 21
Singapore 573943
Tel.: +65 6571 2772
Fax: +65 6350 5315
leongheng.leow@sg.bosch.com
Toll-Free: 1800 333 8333
www.bosch-pt.com.sg
Vietnam
Robert Bosch Vietnam Co. Ltd
10/F, 194 Golden Building
473 Dien Bien Phu Street
Ward 25, Binh Thanh District
84 Ho Chi Minh City
Vietnam
Tel.: +84 (8) 6258 3690 ext. 413
Fax: +84 (8) 6258 3692
hieu.lagia@vn.bosch.com
www.bosch-pt.com
1 609 929 M43 | (28.6.11) Bosch Power Tools
Page 11
OBJ_BUCH-61-006.book Page 11 Tuesday, June 28, 2011 2:41 PM
Australia, New Zealand and Pacific Islands
Robert Bosch Australia Pty. Ltd.
Power Tools
Locked Bag 66
Clayton South VIC 3169
Customer Contact Center
Inside Australia:
Phone: +61 (01300) 307 044
Fax: + 61 (01300) 307 045
Inside New Zealand:
Phone: +64 (0800) 543 353
Fax: +64 (0800) 428 570
Outside AU and NZ:
Phone: +61 (03) 9541 5555
www.bosch.com.au
Disposal
The machine, accessories and packaging should be sorted for
environmental-friendly recycling.
Do not dispose of power tools into household waste!
Subject to change without notice.
中文
安全规章
电动工具通用安全警告
阅读所有警告和所有说明 ! 不遵照以下警告
和说明会导致电击、着火和/或严重伤害。
保存所有警告和说明书以备查阅。
在所有下列的警告中术语 " 电动工具 " 指市电驱动 (有
线)电动工具或电池驱动 (无线)电动工具。
工作场地的安全
f 保持工作场地清洁和明亮。 混乱和黑暗的场地会引发
事故。
f 不要在易爆环境,如有易燃液体、气体或粉尘的环境
下操作电动工具。 电动工具产生的火花会点燃粉尘或
气体。
f 让儿童和旁观者离开后操作电动工具。 注意力不集中
会使你失去对工具的控制。
电气安全
f 电动工具插头必须与插座相配。绝不能以任何方式改
装插头。 需接地的电动工具不能使用任何转换插头。
未经改装的插头和相配的插座将减少电击危险。
f 避免人体接触接地表面,如管道、散热片和冰箱。 如
果你身体接地会增加电击危险。
f 不得将电动工具暴露在雨中或潮湿环境中。 水进入电
动工具将增加电击危险。
中文 | 11
f 不得滥用电线。绝不能用电线搬运、拉动电动工具或
拔出其插头。使电线远离热源、油、锐边或运动部
件。 受损或缠绕的软线会增加电击危险。
f 当在户外使用电动工具时,使用适合户外使用的外接
软线。 适合户外使用的软线将减少电击危险。
f 如果在潮湿环境下操作电动工具是不可避免的,应使
用剩余电流动作保护器 (RCD)。 使用 RCD 可减小
电击危险。
人身安全
f 保持警觉,当操作电动工具时关注所从事的操作并保
持清醒。当你感到疲倦,或在有药物、酒精或治疗反
应时,不要操作电动工具。 在操作电动工具时瞬间的
疏忽会导致严重人身伤害。
f 使用个人防护装置。始终佩戴护目镜。 安全装置,诸
如适当条件下使用防尘面具、防滑安全鞋、安全帽、
听力防护等装置能减少人身伤害。
f 防止意外起动。确保开关在连接电源和 / 或电池盒、
拿起或搬运工具时处于关断位置。 手指放在已接通电
源的开关上或开关处于接通时插入插头可能会导致危
险。
f 在电动工具接通之前,拿掉所有调节钥匙或扳手。 遗
留在电动工具旋转零件上的扳手或钥匙会导致人身伤
害。
f 手不要伸展得太长。时刻注意立足点和身体平衡。 这
样在意外情况下能很好地控制电动工具。
f 着装适当。不要穿宽松衣服或佩戴饰品。让你的衣
服、手套和头发远离运动部件。 宽松衣服、佩饰或长
发可能会卷入运动部件中。
f 如果提供了与排屑、集尘设备连接用的装置,要确保
他们连接完好且使用得当。 使用这些装置可减少尘屑
引起的危险。
电动工具使用和注意事项
f 不要滥用电动工具,根据用途使用适当的电动工具。
选用适当设计的电动工具会使你工作更有效、更安
全。
f 如果开关不能接通或关断工具电源,则不能使用该电
动工具。 不能用开关来控制的电动工具是危险的且必
须进行修理。
f 在进行任何调节、更换附件或贮存电动工具之前,必
须从电源上拔掉插头和/或使电池盒与工具脱开。 这
种防护性措施将减少工具意外起动的危险。
f 将闲置不用的电动工具贮存在儿童所及范围之外,并
且不要让不熟悉电动工具或对这些说明不了解的人操
作电动工具。 电动工具在未经培训的用户手中是危险
的。
f 保养电动工具。检查运动件是否调整到位或卡住,检
查零件破损情况和影响电动工具运行的其他状况。如
有损坏,电动工具应在使用前修理好。 许多事故由维
护不良的电动工具引发。
Bosch Power Tools 1 609 929 M43 | (28.6.11)
Page 12
OBJ_BUCH-61-006.book Page 12 Tuesday, June 28, 2011 2:41 PM
12 | 中文
f 保持切削刀具锋利和清洁。 保养良好的有锋利切削刃
的刀具不易卡住而且容易控制。
f 按照使用说明书,考虑作业条件和进行的作业来使用
电动工具、附件和工具的刀头等。 将电动工具用于那
些与其用途不符的操作可能会导致危险。
维修
f 将你的电动工具送交专业维修人员,使用同样的备件
进行修理。 这样将确保所维修的电动工具的安全性。
针对电钻的安全规章
GSB 13/ GSB 13 RE / GSB 16 / GSB 16 RE
f 如果电动工具提供了辅助手柄便要使用它。 操作时失
控可能导致伤害。
f 工作时必须用双手握紧电动工具,並且要确保立足稳
固。 使用双手比较能够握稳电动工具。
GSB 10/ GSB 10 RE / GSB 13 / GSB 13 RE/GSB 16/
GSB 16 RE
f 使用冲击电钻时要戴好耳罩。 暴露在噪声中会引起听
力损伤。
f 工作时如果安装在电动工具上的工具可能割断隐藏的
电线或电动工具本身的电源线,一定要握住绝缘手柄
操作电动工具。 安装在电动工具上的工具如果接触了
带电的线路,电动工具上的金属部件会导电,可能造
成操作者触电。
f 使用合适的侦测装置侦察隐藏的电线,或者向当地的
相关单位寻求支援。 接触电线可能引起火灾並让操作
者触电。损坏了瓦斯管会引起爆炸。凿穿水管不仅会
造成严重的财物损失,也可能导致触电。
f 如果安装在机器上的工具被夹住了,必须马上关闭电
动工具並保持镇静。此时机器会产生极高的反应力
矩,並进而造成回击。 安装在机器上的工具容易被夹
住如果:
– 电动工具超荷了,或者
– 安装在机器上的工具在工件中歪斜了。
f 固定好工件。 使用固定装置或老虎钳固定工件,会比
用手持握工件更牢固。
f 等待电动工具完全静止后才能够放下机器。 机器上的
工具可能在工作中被夹住,而令您无法控制电动工
具。
产品和功率描述
阅读所有的警告提示和指示。 如未确实遵
循警告提示和指示,可能导致电击、火灾
並且 / 或其他的严重伤害。
按照规定使用机器
本机器适合在砖块、混凝土和石材上进行冲击钻。另外
也可以在木材、金属、陶瓷和塑料上钻孔。配备电子调
速装备和正 / 逆转功能的机型,也能够鬆 / 紧螺丝和攻
牙。
插图上的机件
机件的编号和电动工具详解图上的编号一致。
1 快速夹头*
2 前套筒
3 后套筒
4 " 正常钻 / 冲击钻 " 的转换开关
5 起停开关的锁紧键
6 起停开关
7 设定转速的指拨轮 ( GSB 16 RE)
8 正逆转开关 (GSB 10 RE / GSB 13 RE /GSB 16 RE)
9 调整深度尺的按键*
10 调整辅助手柄的蝶翼螺丝*
11 辅助手柄 (绝缘握柄)*
12 深度尺*
13 手柄 (绝缘握柄)
14 夹头扳手*
15 齿环夹头*
16 通用批嘴连杆*
17 螺丝批嘴*
18 内六角扳手**
19 开口扳手**
*图表或说明上提到的附件,并不包含在基本的供货范围中。
本公司的附件清单中有完整的附件供应项目。
**可以在市面上购得 (不包含在供货范围中)。
技术数据
冲击电钻
物品代码
额定输入功率
输出功率
无负载转速
本说明书提供的参数是以 230 V 为依据,於低电压地区,此数据有可能不同。
请认清电动工具铭牌上的物品代码。电动工具在销售市场上没有统一的商品名称。
1 609 929 M43 | (28.6.11) Bosch Power Tools
GSB ...
Professional
3 601 ... B16 0.. B16 1.. B17 0.. B17 1.. B18 0.. B18 1..
瓦
瓦
次 / 分 2600 0 –2600 2800 0–2800 3000 0–3000
10 10 RE 13 13 RE 16 16 RE
500
250
500 600 600 701 701
250 301 301 351 351
Page 13
OBJ_BUCH-61-006.book Page 13 Tuesday, June 28, 2011 2:41 PM
冲击电钻
最大负载转速
冲击次数
额定扭力
设定转速
正 / 逆转功能
主轴颈直径
最大钻孔直径
– 混凝土
– 钢
– 木材
夹头的夹紧范围 毫米
重量符合 EPTA-Procedure
01/2003
绝缘等级
本说明书提供的参数是以 230 V 为依据,於低电压地区,此数据有可能不同。
请认清电动工具铭牌上的物品代码。电动工具在销售市场上没有统一的商品名称。
GSB ...
Professional
次 / 分 1610 1610 1570 1570 1640 1640
次 / 分 25 700 25 700 25070 25070 26270 26 270
牛頓米
毫米
毫米
毫米
毫米
公斤
10 10 RE 13 13 RE 16 16 RE
1,5
– ––––z
– z – z – z
43
10
8
20
1,5 – 10
1,5
/II /II /II /II /II /II
中文 | 13
1,5 1,8 1,8 2,0 2,0
43 43 43 43 43
10
20
1,5 – 10 1,5 –13 1,5 –13 1,5 – 13 1,5 –13
1,5 1,7 1,7 1,9 1,9
13
8
10
25
13
10
25
16
12
30
16
12
30
安装
f 维修电动工具或换装零、配件之前,务必从插座上拔
出插头。
辅助手柄 (参考插图 A)
(GSB 13/GSB 13 RE / GSB 16/GSB 16 RE)
f 操作电动工具时务必使用辅助手柄 11.
您可以根据需要改变辅助手柄 11 的位置,以提高工作
安全和增加工作的舒适性。
朝着逆时钟的方向拧转调整辅助手柄的蝶翼螺丝 10, 把
辅助手柄 11 摆动到需要的位置上, 接著再顺着时钟的
转向拧紧调整辅助手柄的蝶翼螺丝 10。
调整钻深 (参考插图 A)
使用深度尺 12 可以设定需要的钻深 X。
按下调整深度尺的按键 9,再把深度尺装入辅助手柄 11
中。
适当调整深度尺,从钻咀尖端到深度尺尖端的距离必须
和需要的钻深 X 一致。
更换工具
快速夹头 (参考插图 B)
握紧快速夹头 1 的后套筒 3,朝 着 n 的方向拧转前套筒
2, 必须拧转至能够装入工具为止。安装好工具。
握牢快速夹头 1 上的后套筒 3, 接著再朝着转向 o 用力
地拧转前套筒 2,必须拧转至不再听见齿轮滑开的磨擦
声为止。此时夹头已经 自动锁定。
当您在拆卸工具时,反向拧转前套筒 2,锁定便自动解
除。
齿环夹头 (参考插图 C)
f 更换工具时必须佩戴手套。 长期工作之后夹头会变得
十分炽热。
转动齿环夹头 15 至能够装入工具为止,安装好工具。
把夹头扳手 14 插入夹头 15 上的收紧孔中,並正确地夹
紧工具。
起子机的工具 (参考插图 D)
以螺丝批嘴 17 作业时,一定要使用通用批嘴连杆 16。
只能选用能够配合螺丝头的螺丝批嘴。
旋转螺丝时必须把"正常钻 / 冲击钻"的转换开关 4 调
整到"正常钻"的符号上。
更换夹头
拆卸夹头 (参考插图 E)
拆卸快速夹头 1 时必须把内六角扳手 18 固定在快速夹
头 1 上。 并且把开口扳手 19 (开口 12 毫米)固定在
主轴上的扳手安装位置。把电动工具放在稳固的底座
上,例如工作台。 握牢开口扳手 19,朝着转向 n 拧转
内六角扳手 18 便可以放松快速夹头 1。 如果快速夹头卡
住了,轻敲内六角扳手 18 的长端便可以放松夹头。 从
快速夹头上拔出内六角扳手,接著再拧转取出快速夹
头。
採用拆卸快速夹头的方式,拆卸齿环夹头 15 。
安装夹头 (参考插图 F)
以相反的步骤安装快速夹头 / 齿环夹头。
使用约 30–35 牛顿米的拉紧扭力拧紧夹头。
Bosch Power Tools 1 609 929 M43 | (28.6.11)
Page 14

OBJ_BUCH-61-006.book Page 14 Tuesday, June 28, 2011 2:41 PM
14 | 中文
吸锯尘 / 吸锯屑
f 含铅的颜料以及某些木材、矿物和金属的加工废尘有
害健康。 机器操作者或者工地附近的人如果接触、吸
入这些废尘,可能会有 过敏反应或者感染呼吸道疾
病。
某些尘埃 (例如加工橡木或山毛榉的废尘)可能致
癌,特别是和处理 木材的添加剂 (例如木材的防腐
剂等)结合之后。 只有经过专业训练的人才能够加工
含石棉的物料。
– 工作场所要保持空气流通。
– 最好佩戴 P2 滤网等级的口罩。
请留心并遵守贵国和加工物料有关的法规。
f 避免让工作场所堆积过多的尘垢。 尘埃容易被点燃。
操作
操作机器
f 注意电源的电压!电源的电压必须和电动工具铭牌上
标示的电压一致。
改变转向 (参考插图 G – H)
(GSB 10 RE/GSB 13 RE/GSB 16 RE)
使用正逆转开关 8 可以改变机器的转向。如果按住了起
停开关 6,则无法改变转向。
正转: 适用於正常钻和转紧螺丝时,把正逆转开关 8 向
左推到底。
逆转: 适用於放鬆 / 转出螺丝和螺母,把正逆转开关 8
向右推到底。
设定操作模式
正常钻和旋转螺丝
把转换开关 4 调整到"正常钻"的符号上。
冲击钻
把转换开关 4 设定在"冲击钻"的符号上。
调整转速 / 冲击次数
(GSB 10 RE/GSB 13 RE/GSB 16 RE)
随著在起停开关 6 上施压大小,可以无级式地提高或降
低转速 / 冲击次数。
轻按起停开关 6,机器以低转速
施加在起停开关上的压力,可以提高机器的转速 / 冲击
次数。
设定转速 / 冲击次数 (GSB 16RE)
使用指拨轮 7 可以设定需要的转速 / 冲击次数。即使在
机器运作中也可以改变转速 / 冲击次数。
正确的转速 / 冲击次数必须视加工物料和工作状况而
定,唯有实际操作才能够得到最合适的结果。
/ 冲击次数运作。增强
有关操作方式的指点
f 先关闭电动工具,然后再把工具放置在螺母/螺丝上。
安装在接头上的工具如果仍继续转动,容易从螺丝头
上滑开。
在机器以低转速长期运作之后,可让机器在空载的状况
下,以最高转速旋转 3 分钟,以加速冷却。
在瓷砖上钻孔时,必须把转换开关 4 调整在"正常钻"
的符号上。待穿透瓷砖后,再把转换开关调整在
"冲击钻"的符号上,並以冲击钻的功能继续作业。
在混凝土、石材和砖墙上钻孔时,必须使用硬金属钻
头。
在金属上钻孔时只能使用完好,经过研磨的 HSS 钻头
(HSS = 高效率高速钢)。在博世的附件产品系列中,
有符合 这个品质等级的产品。
使用钻头研磨器 (参考附件),可轻易地补磨
2,5–10 毫米的麻花钻头。
GSB 16 RE
进行精密的钻孔工作时,最好使用钻床架 (参考附
件)。
机器台钳属於附件,能够牢牢地夹住工件。它可以避免
工件滑动,並能够防止因为工件走滑而发生的意外。
在设定的过程中,可以明显地感觉到转换开关 4 齿合。
机器运作中也可以进行调整。
开动 / 关闭
操作电动工具 时先按下电动工具的起停开关 6,並持续
按著。
按下锁紧键 5 即可锁定被按住的起停开关 6。
放开起停开关 6 即可关闭电动工具。如果起停开关被锁
紧键 5 固定了,先按下起停开关 6 並随即将其放开。
1 609 929 M43 | (28.6.11) Bosch Power Tools
维修和服务
维修和清洁
f 维修电动工具或换装零、配件之前,务必从插座上拔
出插头。
f 电动工具和通风间隙都必须保持清洁,这样才能够提
高工作品质和安全性。
本公司生产的电动工具都经过严密的品质检验,如果机
器仍然发生故障,请将机器交给博世电动工具公司授权
的顾客服务处修理。
询问和订购备件时,务必提供机器铭牌上标示的 10 位
数物品代码。
Page 15
OBJ_BUCH-61-006.book Page 15 Tuesday, June 28, 2011 2:41 PM
顾客服务处和顾客咨询中心
本公司顾客服务处负责回答有关本公司产品的修理,维
护和备件的问题。以下的网页中有爆炸图和备件的资
料:
www.bosch-pt.com
博世顾客咨询团队非常乐意为您解答有关购买,使用和
设定本公司产品及附件的问题。
有关保证,维修或更换零件事宜,请向合格的经销商查
询。
中国大陆
博世电动工具 (中国)有限公司
中国 浙江省 杭州市
滨江区滨康路 567 号
邮政编码:310052
免费服务热线: 400 826 8484
传真:+86 571 8777 4502
电邮:contact.ptcn@cn.bosch.com
www.bosch-pt.com.cn
羅伯特 x 博世有限公司
香港北角英皇道 625 號 21 樓
客戶服務熱線:+852 (21) 02 02 35
傳真:+852 (25) 90 97 62
電郵:info@hk.bosch.com
網站:www.bosch-pt.com.hk
制造商地址:
罗伯特博世有限公司
营业范围电动工具
邮箱号码 100156
70745 Leinfelden-Echterdingen (莱菲登 - 艾希德登)
Deutschland (德国)
处理废弃物
必须以符合环保的方式,回收再利用损坏的机器、附件
和废弃的包装材料。
不可以把电动工具丢入家庭垃圾中 !
保留修改权。
中文
安全規章
電動工具通用安全警告
閱讀所有警告和所有說明。 不遵照以下警告
和說明會導致電擊、著火和/或嚴重傷害。
保存所有警告和說明書以備查閱。
在所有下列的警告中術語 " 電動工具 " 指市電驅動 (有
線)電動工具或電池驅動 (無線)電動工具。
中文 | 15
工作場地的安全
f 保持工作場地清潔和明亮。 混亂和黑暗的場地會引發
事故。
f 不要在易爆環境,如有易燃液體、氣體或粉塵的環境
下操作電動工具。 電動工具產生的火花會點燃粉塵或
氣體。
f 讓兒童和旁觀者離開後操作電動工具。 注意力不集中
會使你失去對工具的控制。
電氣安全
f 電動工具插頭必須與插座相配。絕不能以任何方式改
裝插頭。 需接地的電動工具不能使用任何轉換插頭。
未經改裝的插頭和相配的插座將減少電擊危險。
f 避免人體接觸接地表面,如管道、散熱片和冰箱。 如
果你身體接地會增加電擊危險。
f 不得將電動工具暴露在雨中或潮濕環境中。 水進入電
動工具將增加電擊危險。
f 不得濫用電線。絕不能用電線搬運、拉動電動工具或
拔出其插頭。使電線遠離熱源、油、銳邊或運動部
件。 受損或纏繞的軟線會增加電擊危險。
f 當在戶外使用電動工具時 , 使用適合戶外使用的外接
軟線。 適合戶外使用的軟線,將減少電擊危險。
f 如果在潮濕環境下操作電動工具是不可避免的,應使
用剩餘電流動作保護器 (RCD)。 使用 RCD 可減小
電擊危險。
人身安全
f 保持警覺,當操作電動工具時關注所從事的操作並保
持清醒。當你感到疲倦,或在有藥物、酒精或治療反
應時,不要操作電動工具。 在操作電動工具時瞬間的
疏忽會導致嚴重人身傷害。
f 使用個人防護裝置。始終佩戴護目鏡。 安全裝置,諸
如適當條件下使用防塵面具、防滑安全鞋、安全帽、
聽力防護等裝置能減少人身傷害。
f 防止意外起動。確保開關在連接電源和 / 或電池盒、
拿起或搬運工具時處於關斷位置。 手指放在已接通電
源的開關上或開關處於接通時插入插頭可能會導致危
險。
f 在電動工具接通之前,拿掉所有調節鑰匙或扳手。 遺
留在電動工具旋轉零件上的扳手或鑰匙會導致人身傷
害。
f 手不要伸展得太長。時刻注意立足點和身體平衡。 這
樣在意外情況下能很好地控制電動工具。
f 著裝適當。不要穿寬鬆衣服或佩戴飾品。讓你的衣
服、手套和頭髮遠離運動部件。 寬鬆衣服、佩飾或長
髮可能會捲入運動部件中。
f 如果提供了與排屑、集塵設備連接用的裝置,要確保
他們連接完好且使用得當。 使用這些裝置可減少塵屑
引起的危險。
Bosch Power Tools 1 609 929 M43 | (28.6.11)
Page 16

OBJ_BUCH-61-006.book Page 16 Tuesday, June 28, 2011 2:41 PM
16 | 中文
電動工具使用和注意事項
f 不要濫用電動工具,根據用途使用適當的電動工具。
選用適當設計的電動工具會使你工作更有效、更安
全。
f 如果開關不能接通或關斷工具電源,則不能使用該電
動工具。 不能用開關來控制的電動工具是危險的且必
須進行修理。
f 在進行任何調節、更換附件或貯存電動工具之前,必
須從電源上拔掉插頭和/或使電池盒與工具脫開。 這
種防護性措施將減少工具意外起動的危險。
f 將閒置不用的電動工具貯存在兒童所及範圍之外,並
且不要讓不熟悉電動工具或對這些說明不瞭解的人操
作電動工具。 電動工具在未經培訓的用戶手中是危險
的。
f 保養電動工具。檢查運動件是否調整到位或卡住,檢
查零件破損情況和影響電動工具運行的其他狀況。如
有損壞,電動工具應在使用前修理好。 許多事故由維
護不良的電動工具引發。
f 保持切削刀具鋒利和清潔。 保養良好的有鋒利切削刃
的刀具不易卡住而且容易控制。
f 按照使用說明書,考慮作業條件和進行的作業來使用
電動工具、附件和工具的刀頭等。 將電動工具用於那
些與其用途不符的操作可能會導致危險。
檢修
f 將你的電動工具送交專業維修人員,必須使用同樣的
備件進行更換。 這樣將確保所維修的電動工具的安全
性。
針對電鑽的安全規章
GSB 13/ GSB 13 RE / GSB 16 / GSB 16 RE
f 如果電動工具提供了輔助手柄便要使用它。 操作時失
控可能導致傷害。
f 工作時必須用雙手握緊電動工具,並且要確保立足穩
固。 使用雙手比較能夠握穩電動工具。
GSB 10/ GSB 10 RE / GSB 13 / GSB 13 RE/GSB 16/
GSB 16 RE
f 使用衝擊電鑽時要戴好耳罩。 暴露在噪聲中會引起聽
力損傷。
f 工作時如果安裝在電動工具上的工具可能割斷隱藏的
電線或電動工具本身的電源線,一定要握住絕緣手柄
操作電動工具。 安裝在電動工具上的工具如果接觸了
帶電的線路,電動工具上的金屬部件會導電,可能造
成操作者觸電。
f 使用合適的偵測裝置偵察隱藏的電線,或者向當地的
相關單位尋求支援。 接觸電線可能引起火災並讓操作
者觸電。損壞了瓦斯管會引起爆炸。鑿穿水管不僅會
造成嚴重的財物損失,也可能導致觸電。
f 如果安裝在機器上的工具被夾住了,必須馬上關閉電
動工具並保持鎮靜。此時機器會產生極高的反應力
矩,並進而造成回擊。 安裝在機器上的工具容易被夾
住如果﹕
– 電動工具超荷了,或者
– 安裝在機器上的工具在工件中歪斜了。
f 固定好工件。 使用固定裝置或老虎鉗固定工件,會比
用手持握工件更牢固。
f 等待電動工具完全靜止後才能夠放下機器。 機器上的
工具可能在工作中被夾住,而令您無法控制電動工
具。
產品和功率描述
閱讀所有的警告提示和指示。 如未確實遵
循警告提示和指示,可能導致電擊、火災
並且 / 或其他的嚴重傷害。
按照規定使用機器
本機器適合在磚塊、混凝土和石材上進行沖擊鑽。另外
也可以在木材、金屬、陶瓷和塑料上鑽孔。配備電子調
速裝備和正 / 逆轉功能的機型,也能夠鬆 / 緊螺絲和攻
牙。
插圖上的機件
機件的編號和電動工具詳解圖上的編號一致。
1 快速夾頭*
2 前套筒
3 後套筒
4 " 正常鑽 / 沖擊鑽 " 的轉換開關
5 起停開關的鎖緊鍵
6 起停開關
7 設定轉速的指撥輪 ( GSB 16 RE)
8 正逆轉開關 (GSB 10 RE / GSB 13 RE /GSB 16 RE)
9 調整深度尺的按鍵*
10 調整輔助手柄的蝶翼螺絲*
11 輔助手柄 (絕緣握柄)*
12 深度尺*
13 手柄 (絕緣握柄)
14 夾頭扳手*
15 齒環夾頭*
16 通用批嘴連桿*
17 螺絲批嘴*
18 內六角扳手**
19 開口扳手**
*圖表或說明上提到的附件,並不包含在基本的供貨範圍中。
本公司的附件清單中有完整的附件供應項目。
**可以在市面上購得 (不包含在供貨範圍中)。
1 609 929 M43 | (28.6.11) Bosch Power Tools
Page 17

OBJ_BUCH-61-006.book Page 17 Tuesday, June 28, 2011 2:41 PM
技術性數據
沖擊電鑽
物品代碼
額定輸入功率
輸出功率 瓦
無負載轉速
最大負載轉速
沖擊次數
額定扭力
設定轉速
正 / 逆轉功能
主軸頸直徑 毫米
最大鑽孔直徑
– 混凝土
– 鋼
– 木材
夾頭的夾緊範圍
重量符合 EPTA-Procedure
01/2003
絕緣等級
本說明書提供的參數是以 230 伏特為依據,於低電壓地區,此數據有可能不同。
請認清電動工具銘牌上的物品代碼。電動工具在銷售市場上沒有 統一的商品名稱。
GSB ...
Professional
3 601 ... B16 0.. B16 1.. B17 0.. B17 1.. B18 0.. B18 1..
瓦
次 / 分 2600 0 –2600 2800 0–2800 3000 0–3000
次 / 分 1610 1610 1570 1570 1640 1640
次 / 分 25 700 25 700 25070 25070 26270 26 270
牛頓米 1,5 1,5 1,8 1,8 2,0 2,0
毫米
毫米
毫米
毫米
公斤
10 10 RE 13 13 RE 16 16 RE
500
250
– ––––z
– z – z – z
43
10
8
20
1,5 – 10
1,5
/II /II /II /II /II /II
中文 | 17
500 600 600 701 701
250 301 301 351 351
43 43 43 43 43
10
20
1,5 – 10 1,5 –13 1,5 –13 1,5 – 13 1,5 –13
1,5 1,7 1,7 1,9 1,9
13
8
10
25
13
10
25
16
12
30
16
12
30
安裝
f 維修電動工具或換裝零、配件之前,務必從插座上拔
出插頭。
輔助手柄 (參考插圖 A)
(GSB 13/GSB 13 RE / GSB 16/GSB 16 RE)
f 操作電動工具時務必使用輔助手柄 11。
您可以根據需要改變輔助手柄 11 的位置,以提高工作
安全和增加工作的舒適性。
朝著逆時鐘的方向擰轉調整輔助手柄的蝶翼螺絲 10, 把
輔助手柄 11 擺動到需要的位置上, 接著再順著時鐘的
轉向擰緊調整輔助手柄的蝶翼螺絲 10。
調整鑽深 (參考插圖 A)
使用深度尺 12 可以設定需要的鑽深 X。
按下調整深度尺的按鍵 9,再把深度尺裝入輔助手柄 11
中。
適當調整深度尺,從鑽咀尖端到深度尺尖端的距離必須
和需要的鑽深 X 一致。
Bosch Power Tools 1 609 929 M43 | (28.6.11)
更換工具
快速夾頭 (參考插圖 B)
握緊快速夾頭 1 的後套筒 3,朝 著 n 的方向擰轉前套筒
2, 必須擰轉至能夠裝入工具為止。安裝好工具。
握牢快速夾頭 1 上的後套筒 3,接著再朝著轉向 o 用力
地擰轉前套筒 2,必須擰轉至不再聽見齒輪滑開的磨擦
聲為止。此時夾頭已經 自動鎖定。
當您在拆卸工具時,反向擰轉前套筒 2,鎖定便自動解
除。
齒環夾頭 (參考插圖 C)
f 更換工具時必須佩戴手套。 長期工作之後夾頭會變得
十分熾熱。
轉動齒環夾頭 15 至能夠裝入工具為止,安裝好工具。
把夾頭扳手 14 插入夾頭 15 上的收緊孔中,並正確地夾
緊工具。
起子機的工具 (參考插圖 D)
以螺絲批嘴 17 作業時,一定要使用通用批嘴連桿 16。
只能選用能夠配合螺絲頭的螺絲批嘴。
旋轉螺絲時必須把 〝正常鑽 / 沖擊鑽〞的轉換開關 4 調
整到 〝正常鑽〞的符號上。
Page 18

OBJ_BUCH-61-006.book Page 18 Tuesday, June 28, 2011 2:41 PM
18 | 中文
更換夾頭
拆卸夾頭 (參考插圖 E)
拆卸快速夾頭 1 時必須把內六角扳手 18 固定在快速夾
頭 1 上。 並且把開口扳手 19 (開口 12 毫米)固定在
主軸上的扳手安裝位置。把電動工具放在穩固的底座
上,例如工作台。 握牢開口扳手 19,朝著轉向 n 擰轉
內六角扳手 18 便可以放松快速夾頭 1。 如果快速夾頭卡
住了,輕敲內六角扳手 18 的長端便可以放松夾頭。 從
快速夾頭上拔出內六角扳手,接著再擰轉取出快速夾
頭。
採用拆卸快速夾頭的方式,拆卸齒環夾頭 15。
安裝夾頭 (參考插圖 F)
以相反的步驟安裝快速夾頭 / 齒環夾頭。
使用約 30–35 牛頓米的拉緊扭力擰緊夾頭。
吸鋸塵 / 吸鋸屑
f 含鉛的顏料以及某些木材、礦物和金屬的加工廢塵有
害健康。 機器操作者或者工地附近的人如果接觸、吸
入這些廢塵,可能會有 過敏反應或者感染呼吸道疾
病。
某些塵埃 (例如加工橡木或山毛櫸的廢塵)可能致
癌,特別是和處理 木材的添加劑 (例如木材的防腐
劑等)結合之後。 只有經過專業訓練的人才能夠加工
含石棉的物料。
– 工作場所要保持空氣流通。
– 最好佩戴 P2 濾網等級的口罩。
請留心並遵守貴國和加工物料有關的法規。
f 避免讓工作場所堆積過多的塵垢。 塵埃容易被點燃。
操作
操作機器
f 注意電源的電壓!電源的電壓必須和電動工具銘牌上
標示的電壓一致。
改變轉向 (參考插圖 G– H)
(GSB 10 RE/GSB 13 RE/GSB 16 RE)
使用正逆轉開關 8 可以改變機器的轉向。如果按住了起
停開關 6,則無法改變轉向。
正轉﹕ 適用於正常鑽和轉緊螺絲時,把正逆轉開關 8 向
左推到底。
逆轉﹕ 適用於放鬆 / 轉出螺絲和螺母,把正逆轉開關 8
向右推到底。
1 609 929 M43 | (28.6.11) Bosch Power Tools
設定操作模式
正常鑽和旋轉螺絲
把轉換開關 4 調整到 〝正常鑽〞的符號上。
沖擊鑽
把轉換開關 4 設定在 〝沖擊鑽〞的符號上。
在設定的過程中,可以明顯地感覺到轉換開關 4 齒合。
機器運作中也可以進行調整。
開動 / 關閉
操作電動工具時先按下電動工具的 起停開關 6,並持續
按著。
按下鎖緊鍵 5 即可鎖定被按住的起停開關 6。
放開起停開關 6 即可關閉電動工具。如果起停開關被鎖
緊鍵 5 固定了,先按下起停開關 6 並隨即將其放開。
調整轉速 / 沖擊次數
(GSB 10 RE/GSB 13 RE/GSB 16 RE)
隨著在起停開關 6 上施壓大小,可以無級式地提高或降
低轉速 / 沖擊次數。
輕按起停開關 6
施加在起停開關上的壓力,可以提高機器的轉速 / 沖擊
次數。
設定轉速 / 沖擊次數 (GSB16 RE)
使用指撥輪 7, 可以設定需要的轉速 / 沖擊次數。即使在
機器運作中也可以改變轉速 / 沖擊次數。
正確的轉速 / 沖擊次數必須視加工物料和工作狀況而
定,唯有實際操作才能夠得到最合適的結果。
,機器以低轉速 / 沖擊次數運作。增強
有關操作方式的指點
f 先關閉電動工具,然后再把工具放置在螺母 / 螺絲上。
安裝在接頭上的工具如果仍繼續轉動,容易從螺絲頭
上滑開。
在機器以低轉速長期運作之後,可讓機器在空載的狀況
下,以最高轉速旋轉 3 分鐘,以加速冷卻。
在瓷磚上鑽孔時,必須把轉換開關 4 調整在 〝正常鑽〞
的符號上。待穿透瓷磚後,再把轉換開關調整在 〝沖擊
鑽〞的符號上,並以沖擊鑽的功能繼續作業。
在混凝土、石材和磚牆上鑽孔時,必須使用硬金屬鑽
頭。
在金屬上鑽孔時只能使用完好,經過研磨的 HSS 鑽頭
(HSS = 高效率高速鋼)。在博世的附件產品系列中,
有符合這個品質等級的產品。
使用鑽頭研磨器 (參考附件),可輕易地補磨
2,5–10 毫米的麻花鑽頭。
GSB 16 RE
進行精密的鑽孔工作時,最好使用鑽床架 (參考附
件)。
機器台鉗屬於附件,能夠牢牢地夾住工件。它可以避免
工件滑動,並能夠防止因為工件走滑而發生的意外。
Page 19

OBJ_BUCH-61-006.book Page 19 Tuesday, June 28, 2011 2:41 PM
한국어 | 19
維修和服務
維修和清潔
f 維修電動工具或換裝零、配件之前,務必從插座上拔
出插頭。
f 電動工具和通風間隙都必須保持清潔,這樣才能夠提
高工作品質和安全性。
本公司生產的電動工具都經過嚴密的品質檢驗,如果機
器仍然發生故障,請將機器交給博世電動工具公司授權
的顧客服務處修理。
詢問和訂購備件時,務必提供機器銘牌上標示的 10 位
數物品代碼。
顧客服務處和顧客咨詢中心
本公司顧客服務處負責回答有關本公司產品的修理,維
護和備件的問題。以下的網頁中有爆炸圖和備件的資料 :
www.bosch-pt.com
博世顧客咨詢團隊非常樂意為您解答有關購買,使用和
設定本公司產品及附件的問題。
台灣
台灣羅伯特博世股份有限公司
建國北路一段 90 號 6 樓
台北市 10491
電話 : +886 (2) 2515 5388
傳真 : +886 (2) 2516 1176
www.bosch-pt.com.tw
制造商地址 :
羅伯特博世有限公司
營業範圍電動工具
郵箱號碼 100156
70745 Leinfelden-Echterdingen (萊菲登 - 艾希德登)
Deutschland (德國)
處理廢棄物
必須以符合環保的方式,回收再利用損壞的機器、附件
和廢棄的包裝材料。
不可以把電動工具丟入家庭垃圾中。
保留修改權。
앞으로의 참고를 위해 이 안전수칙과 사용 설명서를 잘 보관
하십시오 .
다음에서 사용되는 “전동공구” 라는 개념은 전원에 연결하여
사용하는 전동 기기 ( 전선이 있는 ) 나 배터리를 사용하는 전
동 기기
( 전선이 없는 ) 를 의미합니다 .
작업장 안전
f 작업장을 항상 깨끗이 하고 조명을 밝게 하십시오 .
작업장 환경이 어수선하거나 어두우면 사고를 초래할 수
있습니다 .
f 가연성 유체 , 가스 또는 분진이 있어 폭발 위험이 있는 환
경에서 전동공구를 사용하지 마십시오 . 전동공구는 분진
이나 증기에 점화하는 불꽃을 일으킬 수 있습니다 .
f 전동공구를 사용할 때 구경꾼이나 어린이 혹은 다른 사람
이 작업장에 접근하지 못하게 하십시오 . 다른 사람이 주의
를 산만하게 하면 기기에 대한 통제를 잃기 쉽습니다 .
전기에 관한 안전
f 전동공구의 전원 플러그가 전원 콘센트에 잘 맞아야 합니
다 . 플러그를 조금이라도 변경시켜서는 안됩니다. 접지된
전동공구를 사용할 때 어댑터 플러그를 사용하지 마십시
오 . 변형되지 않은 플러그와 잘 맞는 콘센트를 사용하면
감전의 위험을 감소할 수 있습니다 .
f 파이프 관 , 라디에이터 , 레인지 , 냉장고와 같은 접지 표면
에 몸이 닿지 않도록 하십시오 . 몸에 닿을 경우 감전될 위
험이 높습니다 .
f 전동공구를 비에 맞지 않게 하고 습기 있는 곳에 두지 마십
시오 . 전동공구에 물이 들어가면 감전될 위험이 높습니다.
f 전원 코드를 잡고 전동공구를 운반하거나 걸어 놓아서는
안되며 , 콘센트에서 전원 플러그를 뽑을 때 전원 코드를
잡아 당겨서는 절대로 안됩니다. 전원 코드가 열과 오일에
접촉하는 것을 피하고 , 날카로운 모서리나 기기의 가동 부
위에 닿지 않도록 주의하십시오 . 손상되거나 엉킨 전원 코
드는 감전을 유발할 수 있습니다 .
f 실외에서 전동공구로 작업할 때는 실외용으로 적당한 연
장 전원 코드만을 사용하십시오. 실외용 연장 전원 코드를
사용하면 감전의 위험을 줄일 수 있습니다 .
f 전동공구를 습기 찬 곳에서 사용해야 할 경우에는 누전 차
단기를 사용하십시오 . 누전 차단기를 사용하면 감전 위험
을 줄일 수 있습니다 .
사용자 안전
f 신중하게 작업하십시오. 작업을 할 때 주의를 하며, 전동공
한국어
안전 수칙
구를 사용할 때 경솔하게 행동하지 마십시오 . 피로한 상태
이거나 약물 복용 및 음주한 후에는 전동공구를 사용하지
마십시오. 전동공구를 사용할 때 잠시라도 주의가 산만해
지면 중상을 입을 수 있습니다 .
f 작업자 안전을 위한 장치를 사용하십시오 . 항상 보안경을
전동공구용 일반 안전수칙
모든 안전수칙과 지시 사항을 상세히 읽고 지켜
야 합니다 . 다음의 안전수칙과 지시 사항을 준
수하지 않으면 화재 위험이 있으며 감전 혹은 중상을 입을 수
있습니다 .
Bosch Power Tools 1 609 929 M43 | (28.6.11)
착용하십시오 . 전동공구의 종류와 사용에 따라 먼지 보호
마스크 , 미끄러지지 않는 안전한 신발 , 안전모 또는 귀마
개 등의 안전한 복장을 하면 상해의 위험을 줄일 수 있습니
다 .
Page 20

OBJ_BUCH-61-006.book Page 20 Tuesday, June 28, 2011 2:41 PM
20 | 한국어
f 실수로 기기가 작동되지 않도록 주의하십시오 . 전동공구
를 전원에 연결하거나 배터리를 끼우기 전에, 혹은 기기를
들거나 운반하기 전에 , 전원 스위치가 꺼져 있는 지 다시
확인하십시오 . 전동공구를 운반할 때 전원 스위치에 손가
락을 대거나 전원 스위치가 켜진 상태에서 전원을 연결하
면 사고 위험이 높습니다 .
f 전동공구를 사용하기 전에 조절하는 툴이나 나사 키 등을
빼 놓으십시오 . 회전하는 부위에 있는 툴이나 나사 키로
인해 상처를 입을 수 있습니다 .
f 자신을 과신하지 마십시오 . 불안정한 자세를 피하고 항상
평형을 이룬 상태로 작업하십시오. 안정된 자세와 평형한
상태로 작업해야만이 의외의 상황에서도 전동공구를 안
전하게 사용할 수 있습니다 .
f 알맞은 작업복을 입으십시오 . 헐렁한 복장을 하거나 장신
구를 착용하지 마십시오 . 머리나 옷 또는 장갑이 가동하는
기기 부위에 가까이 닿지 않도록 주의하십시오 . 헐렁한 복
장 , 장신구 혹은 긴 머리는 가동 부위에 말려 사고를 초래
할 수 있습니다 .
f 분진 추출장치나 수거장치의 조립이 가능한 경우 , 이 장치
가 연결되어 있는 지 , 제대로 작동이 되는 지 확인하십시
오. 이러한 분진 추출장치를 사용하면 분진으로 인한 사고
위험을 줄일 수 있습니다 .
전동공구의 올바른 사용과 취급
f 기기를 과부하 상태에서 사용하지 마십시오 . 작업을 하는
데 이에 적당한 전동공구를 사용하십시오 . 알맞은 전동공
구를 사용하면 지정된 성능 한도 내에서 더 효율적으로 안
전하게 작업할 수 있습니다 .
f 전원 스위치가 고장 난 전동공구를 사용하지 마십시오 . 전
원 스위치가 작동되지 않는 전동공구는 위험하므로 , 반드
시 수리를 해야 합니다 .
f 기기에 세팅을 하거나 액세서리 부품을 교환하거나 혹은
기기를 보관할 때 , 항상 전원 콘센트에서 플러그를 미리
빼어 놓으십시오 . 이러한 조치는 실수로 전동공구가 작동
하게 되는 것을 예방합니다 .
f 사용하지 않는 전동공구는 어린이 손이 닿지 않는 곳에 보
관하고, 전동공구 사용에 익숙지 않거나 이 사용 설명서를
읽지 않은 사람은 기기를 사용해서는 안됩니다 . 경험이 없
는 사람이 전동공구를 사용하면 위험합니다 .
f 전동공구를 조심스럽게 관리하십시오 . 가동 부위가 하자
없이 정상적인 기능을 하는지 , 걸리는 부위가 있는지 , 혹
은 전동공구의 기능에 중요한 부품이 손상되지 않았는지
확인하십시오 . 손상된 기기의 부품은 전동공구를 다시 사
용하기 전에 반드시 수리를 맡기십시오 . 제대로 관리하지
않은 전동공구의 경우 많은 사고를 유발합니다 .
f 절단 공구를 날카롭고 깨끗하게 관리하십시오 . 날카로운
절단면이 있고 잘 관리된 절단공구는 걸리는 경우가 드물
고 조절하기도 쉽습니다 .
f 전동공구 , 액세서리, 장착하는 공구 등을 사용할 때 , 이 지
시 사항과 특별히 기종 별로 나와있는 사용 방법을 준수하
십시오 . 이때 작업 조건과 실시하려는 작업 내용을 고려하
십시오 . 원래 사용 분야가 아닌 다른 작업에 전동공구를
사용할 경우 위험한 상황을 초래할 수 있습니다 .
1 609 929 M43 | (28.6.11) Bosch Power Tools
서비스
f 전동공구 수리는 반드시 전문 인력에게 맡기고 , 수리 정비
시 보쉬 순정 부품만을 사용하십시오 . 그렇게 함으로서 기
기의 안전성을 오래 유지할 수 있습니다 .
드릴 머신용 안전 수칙
GSB 13/ GSB 13 RE/GSB 16 / GSB 16 RE
f 보조 손잡이가 전동공구와 함께 공급되는 경우 이를 사용
하십시오 . 통제를 잃게되면 상해를 입을 수 있습니다 .
f 전동공구를 두 손으로 꽉 잡고 안전한 자세로 작업하십시
오 . 전동공구는 두 손으로 사용하면 더 안전합니다 .
GSB 10/ GSB 10 RE/GSB 13 / GSB 13 RE/ GSB 16 /
GSB 16 RE
f 임팩트 드릴작업을 할 때 귀마개를 착용하십시오 . 소음으
로 인해 청각을 상실할 수 있습니다 .
f 작업할 때 톱날이 이지 않는 전선이나 기기 자체의 코드에
닿을 위험이 있으면 전동공구의 절연된 손잡이 면을 잡으
십시오. 톱날이 전류가 흐르는 전선에 접하게 되면 기기의
금속 부위에 전기가 통해 감전될 위험이 있습니다 .
f 보이지 않는 배관 설비를 확인하려면 적당한 탐지기를 사
용하거나 담당 에너지 공급회사에 문의하십시오 . 전선에
접하게 되면 화재나 전기 충격을 야기할 수 있습니다 . 가
스관을 손상시키면 폭발 위험이 있습니다 . 수도관을 파손
하게 되면 재산 피해를 유발하거나 전기 충격을 야기할 수
있습니다 .
f 툴 홀더에 끼워진 비트가 물리면 즉시 전동공구 스위치를
끄십시오 . 반동을 유발할 수 있는 강한 반동력이 생길 수
있습니다 . 툴 홀더에 끼워진 비트는 다음의 경우 물립니
다 :
— 전동공구가 과부하된 상태이거나
— 작업하려는 소재에 걸렸을 경우 물립니다 .
f 작업물을 잘 고정하십시오 . 고정장치나 기계 바이스에 끼
워서 작업하면 손으로 잡는 것보다 더 안전합니다 .
f 전동공구를 내려놓기 전에 기기가 완전히 멈추었는지를
확인하십시오 . 펀치가 걸리거나 전동공구에 대한 통제가
어려워질 수 있습니다 .
제품 및 성능 소개
모든 안전수칙과 지시 사항을 상세히 읽고 지
켜야 합니다 . 다음의 안전수칙과 지시 사항
을 준수하지 않으면 화재 위험이 있으며 감전
혹은 중상을 입을 수 있습니다 .
규정에 따른 사용
본 기기는 벽돌 콘크리트 석재에 임팩트 드릴작업 , 목재 금속
플라스틱에 드릴작업을 하는 데 사용해야 합니다 . 전자 제어
장치와 회전방향 선택 장치가 있는 모델은 스크류작업이나
나사산 절삭작업 ( 태핑작업 ) 도 가능합니다 .
Page 21

OBJ_BUCH-61-006.book Page 21 Tuesday, June 28, 2011 2:41 PM
제품의 주요 명칭
제품의 주요 명칭에 표기되어 있는 번호는 기기 그림이 나와
있는 면을 참고하십시오 .
1 키레스 척*
2 슬리브 앞부분
3 슬리브 뒷부분
4 “드릴 / 임팩트 드릴작업” 선택 스위치
5 전원 스위치 잠금 버튼
6 전원 스위치
7 속도 조절 다이얼 ( GSB 16 RE)
8 회전방향 선택 스위치
(GSB 10 RE/GSB 13 RE/GSB 16 RE)
9 깊이 조절자 조절용 버튼*
10 보조 손잡이 조절용 날개 나사*
11 보조 손잡이 ( 절연된
12 깊이 조절자*
13 손잡이 ( 절연된 손잡이 부위 )
14 드릴 척 키*
15 키 타입 척*
16 유니버설 비트 홀더*
17 스크류 드라이버 비트*
18 육각 키**
19 양구 스패너**
*도면이나 설명서에 나와있는 액세서리는 표준 공급부품에 속하지 않
습니다 . 전체 액세서리는 저희 액세서리 프로그램을 참고하십시오 .
**시중에서 구매 가능 ( 표준 공급 부품에 포함되지 않음 )
손잡이 부위 )*
제품 사양
임팩트 드릴
제품 번호
소비 전력
출력
무부하 속도
부하 시 최대 속도
타격률
정격 토크
속도 설정
역회전 기능
스핀들 칼라 직경
드릴 직경 , 최대
– 콘크리트
– 철재
– 목재
드릴 척 클램핑 범위
EPTA 공정 01/2003 에 따른 중량
안전 등급
자료는 정격 전압 [U] 230 V 를 기준으로 한 것입니다 . 전압이 낮거나 각국의 특수한 모델에 따라 달라질 수 있습니다 .
전동공구의 명판에 표시된 제품 번호를 확인하십시오 . 각 전동공구의 명칭이 시중에서 상이하게 사용될 수 있습니다 .
GSB ...
Professional
3 601 ... B16 0.. B16 1.. B17 0.. B17 1.. B18 0.. B18 1..
W 500 500 600 600 701 701
W 250 250 301 301 351 351
rpm 2600 0 – 2 600 2800 0 –2 800 3 000 0 –3000
rpm 1610 1 610 1 570 1570 1640 1640
min-125700 25 700 25 070 25070 26270 26 270
Nm 1.5 1.5 1.8 1.8 2.0 2.0
mm 43 43 43 43 43 43
mm
mm
mm
mm 1.5 – 10 1.5 – 10 1.5– 13 1.5 – 13 1.5 –13 1.5–13
kg 1.5 1.5 1.7 1.7 1.9 1.9
10 10 RE 13 13 RE 16 16 RE
– ––––z
– z – z – z
10
20
/II /II /II /II /II /II
10
8
20
13
8
10
25
13
10
25
한국어 | 21
16
12
30
16
12
30
조립
f 전동공구를 보수 정비하기 전에 반드시 콘센트에서 전원
플러그를 빼십시오 .
보조 손잡이 ( 그림 A 참조 )
(GSB 13/GSB 13 RE/GSB 16/GSB 16 RE)
f 반드시 보조 손잡이 11 을 장착하여 전동공구를 사용하십
시오 .
보조 손잡이 11 은 안전하고 피로가 적은 자세로 작업할 수 있
도록 모든 위치로 움직여 조립할 수 있습니다 .
Bosch Power Tools 1 609 929 M43 | (28.6.11)
보조 손잡이 조절용 날개 나사 10 을 시계 반대 방향으로 돌
리고 보조 손잡이 11 을 원하는 위치로 움직입니다 . 그리고
나서 날개 나사 10 을 시계 방향으로 돌려
천공 깊이 조절하기 ( 그림 A 참조 )
원하는 천공 깊이 X 는 깊이 조절자 12 로 조절할 수 있습니
다 .
깊이 조절자 조절용 버튼 9 를 누르고 깊이 조절자를 보조 손
잡이 11 안으로 밀어 넣습니다 .
드릴 비트의 끝과 깊이 조절자의 끝 부위의 간격이 원하는 천
공 깊이 X 가 될 때까지 깊이 조절자를
다시 조입니다 .
잡아 당깁니다 .
Page 22

OBJ_BUCH-61-006.book Page 22 Tuesday, June 28, 2011 2:41 PM
22 | 한국어
액세서리의 교환
키레스 척 ( 그림 B 참조 )
키레스 척 1 의 슬리브 뒷부분 3 을 꽉 잡고 비트가 끼워질 정
도까지 슬리브 앞부분 2 를 n 회전 방향으로 돌립니다 . 비트
를 끼우십시오 .
키레스 척 1 의 슬리브 뒷부분 3 을 꽉 잡고 슬리브 앞부분 2
를 더 이상 걸리는 소리가 나지 않을 때까지 손으로 힘껏 o
방향으로
돌리십시오 . 이렇게 하면 드릴 척이 자동으로 잠기
게 됩니다 .
비트를 탈착하기 위해 슬리브 앞부분 2 를 반대 방향으로 돌
리면 잠금 상태가 다시 해제됩니다 .
키 타입 척 ( 그림 C 참조 )
f 비트를 교환할 때 보호 장갑을 착용하십시오 . 장시간 작업
을 하면 드릴 척이 과열될 수 있습니다 .
키 타입 척 15 를 비트가 끼워질 수 있을 정도 까지 돌려 열어
준 다음에 비트를 끼웁니다 .
척 키 14 를 해당하는 키 타입 척 15 의 구멍에 끼우고 비트를
일정하게 고정합니다 .
스크류 드라이버 비트 ( 그림 D 참조 )
드라이버 비트 17 로 작업할 때 , 반드시 유니버설 비
스크류
트 홀더 16 을 사용해야 합니다 . 나사못 머리에 맞는 스크류
드라이버 비트만을 사용하십시오 .
스크류작업을 하려면 “드릴 / 임팩트 드릴작업” 선택 스위
치 4 가 반드시 “드릴작업” 위치에 있어야 합니다 .
드릴 척 교환하기
드릴 척 분해하기 ( 그림 E 참조 )
키레스 척 1 을 탈착하려면 육각 키 18 을 키레스 척 1 안으로
끼우고 양구 스패너 19 (SW 12) 을 구동 스핀들의 키 대는 면
에 대십시오 . 전동공구를 작업대와 같은 단단한 바닥에 놓으
십시오 . 양구 스패너 19 를 꽉 잡고 육각 키 18 을 n 방향으
로 돌려 키레스 척 1 을
육각 키 18 의 긴 쪽을 가볍게 두드려 주면 풀어 집니다 . 육각
키를 키레스 척에서 뺀 후 키레스 척을 돌려 완전히 빼십시오.
키 타입 척 15 도 키레스 척과 같은 방법으로 분해하면 됩니
다 .
드릴 척 조립하기 ( 그림 F 참조 )
키레스 척 / 키 타입 척 조립은 반대
드릴 척은 약 30– 35 Nm 의 고정 토크로 조여야 합니
다 .
풀어 줍니다 . 꽉 끼워진 키레스 척은
순서로 하면 됩니다 .
분진 및 톱밥 추출장치
f 납 성분을 포함한 페인트나 몇몇 나무 종류 , 또는 광물 성
분 그리고 철과 같은 재료의 분진은 건강을 해칠 수 있습니
다 . 이 분진을 만지거나 호흡할 경우 , 사용자나 주변 사람
들은 알레르기 반응이나 호흡기 장애를 일으킬 수 있습니
다 .
떡갈나무나 너도밤나무와 같은 특정한 분진은 암을 유발
시키며 , 특히 목재 처리용으로 사용되는 부가 원료 ( 크로
마트 , 목재 보호제 ) 와 혼합되면 암을 유발시키게 됩니다 .
석면 성분을 포함한 재료는 오직 전문가가 작업을 해야 합
니다 .
– 작업장의 통풍이 잘 되도록 하십시오 .
– 필터등급 P2 가 장착된 호흡 마스크를 사용하십시오 .
작업용 재료에 관해 국가가 지정한 규정을 고려 하십시오 .
f 작업장에 분진이 쌓이지 않도록 하십시오 . 분진이 쉽게 발
화할 수 있습니다 .
작동
기계 시동
f 공공 배전 전압에 주의 ! 공급되는 전원의 전압은 전동공구
의 명판에 표기된 전압과 동일해야 합니다 .
회전방향 설정하기 ( 그림 G–H 참조 )
(GSB 10 RE / GSB 13 RE /GSB 16 RE)
회전방향 선택 스위치 8 로 기기의 회전 방향을 선택할 수 있
습니다 . 그러나 전원 스위치 6 이 눌려진 상태에서는 작동이
불가능합니다 .
정회전 : 드릴작업이나 스크류작업을 하려면 회전방향 선택
스위치 8 을 왼쪽으로 끝까지 밉니다 .
나사못이나 너트를 느슨하게 하거나 푸는 작업을 하
역회전 :
려면 , 회전방향 선택 스위치 8 을 오른쪽 끝까지 밉니다 .
작동 모드 설정하기
드릴작업 및 스크류작업
선택 스위치 4 를 “드릴작업” 표시에 맞추십시
오 .
임팩트 드릴작업
선택 스위치 4 를 “임팩트 드릴작업” 표시에 맞
춥니다 .
선택 스위치 4 는 걸리는 소리가 확실히나며 , 기기가 작동 중
에도 선택이 가능합니다 .
전원 스위치 작동
전동공구를 작동하려면 전원 스위치 6 을 누르고 누른 상태
를 유지하십시오 .
전원 스위치 6 을 누른 상태로 유지하려면 , 잠금 버튼 5 를 누
르십시오 .
전동공구의 스위치를 끄려면 전원 스위치 6 을 놓거나 잠금
버튼 5 로 고정된 경우 전원 스위치 6 을 살짝 눌렀다가 다시
놓습니다 .
속도 / 타격률 조절하기
(GSB 10 RE / GSB 13 RE /GSB 16 RE)
전원 스위치 6 에 가하는 힘의
공구의 속도 / 타격률을 무단으로 조절할 수 있습니다 .
전원 스위치 6 을 살짝 누르면 낮은 속도 / 타격률로 작동합니
다 . 좀 더 세게 누르면 속도 / 타격률이 증가합니다 .
강약에 따라 작동 중에도 전동
1 609 929 M43 | (28.6.11) Bosch Power Tools
Page 23

OBJ_BUCH-61-006.book Page 23 Tuesday, June 28, 2011 2:41 PM
ภาษาไทย | 23
속도 / 타격률 설정하기 (GSB16RE)
속도 조절 다이얼 7 로 원하는 속도 / 타격률을 작동 중에도
선택할 수 있습니다 .
필요한 속도 / 타격률은 소재와 작업 조건에 따라 달라지므로
실제 시험을 통해 결정할 수 있습니다 .
사용방법
f 전동공구의 스위치가 꺼진 상태에서만 나사못에 대십시
오 . 회전하는 드릴 비트가 미끄러질 수 있습니다 .
낮은 속도로 장기간 연속 작업을 했을 경우 , 기기를 약 3 분
간 무부하 상태로 최고 속도로 운전한 후 식히십시오 .
타일에 드릴작업을 하려면 선택 스위치 4 를 “드릴작업”
표시에 맞춥니다 . 타일에 구멍을 완전히 뚫을 때 까지는 스위
치를 “임팩트 드릴작업” 표시로 바꾸거나
면 안 됩니다 .
콘크리트 석재 벽돌 등에 작업할 때는 경금속 드릴 비트를 사
용하십시오 .
금속에 드릴작업을 할 때 항상 하자가 없는 날카로운 HSS 드
릴 비트 (HSS = 하이 스피드 스틸 ) 만을 사용하십시오 . 보쉬
액세서리 프로그램은 이에 상응하는 품질을 보증합니다 .
드릴 비트 연마기 ( 별매 액세서리 ) 로 직경이 2.5– 10 mm 인
트위스트 드릴 비트를 쉽게
GSB 16 RE
특히 정밀한 작업을 할 때는 드릴 스탠드 ( 별매 액세서리 ) 를
사용하십시오 .
액세서리로 구입이 가능한 기계 바이스를 사용하면 작업물을
안전하게 고정할 수 있어 작업물이 흔들리거나 이로 인해 생
길 수 있는 사고를 방지할 수 있습니다 .
연마할 수 있습니다 .
임팩트작업을 하
한국로버트보쉬기전주식회사
Robert Bosch Korea Mechanics and Electronics Ltd.
전동공구 사업부
경기도 용인시 기흥구 보정동 298 번지
전화 : +82 31 270
팩스 : +82 31 270
고객지원본부
전화 : +82 31 270
팩스 : +82 31 270
E-Mail: Bosch-pt.hotline@kr.bosch.com
Internet: www.bosch-pt.co.kr
– 4143 /4148/ 4620
– 4144
– 4680 /4681/ 4682
– 4686
처리
기기와 액세서리 및 포장 등은 환경 친화적인 방법으로 재생
할 수 있도록 분류하십시오 .
전동공구를 가정용 쓰레기로 처리하지 마십시오 !
위 사항은 사전 예고 없이 변경될 수도 있습니다 .
ภาษาไทย
กฎระเบียบเพื่อความปลอดภัย
คําเตือนทั่วไปเพื่อความปลอดภัย
ในการใชเครื่องมือไฟฟา
ตองอานคําเตือนเพื่อความปลอดภัยและ
보수 정비 및 서비스
보수 정비 및 유지
f 전동공구를 보수 정비하기 전에 반드시 콘센트에서 전원
플러그를 빼십시오 .
f 안전하고 올바른 작동을 위하여 전동공구와 전동공구의
통풍구를상 깨끗이 하십시오 .
세심한 제작과 검사에도 불구하고 전동공구가 불량한 경우가
있다면 보쉬 고객 지원본부나 가까운 보쉬 지정 전동공구 서
비스 센터에 수리를 의뢰하십시오 .
문의 사항이 있거나 스패어 부품을 주문할 때 반드시 전동공
구의 타입 표시판에 적힌 10 자리의 제품 번호를 알려 주십시
오 .
AS 센터 및 고객 상담
AS 센터에서는 귀하 제품의 수리 및 보수정비 , 그리고 부품
에 관한 문의를 받고 있습니다 . 제품의 분해도 및 부품에 관
한 정보는 다음의 주소에서도 보실 수 있습니다 :
www.bosch-pt.com
보쉬 AS 센터 팀은 제품과 액세서리의 구매 , 사용법 및 설정
에 관해 상담해 드립니다 .
Bosch Power Tools 1 609 929 M43 | (28.6.11)
คําสั่งอาจเปนสาเหตุใหถูกไฟฟาดูด เกิดไฟไหม และ/หรือไดรับ
บาดเจ็บอยางรายแรง
เก็บรักษาคําเตือนและคําสั่งทั้งหมดสําหรับเปดอานใน
ภายหลัง
คําวา "เครื่องมือไฟฟา" ในคําเตือนหมายถึง เครื่องมือไฟฟาของทาน
ที่ทํางานดวยพลังงานไฟฟาที่ตอจากเตาเส
เครื่องมือไฟฟาที่ทํางานดวยพลังงานไฟฟาจากแบตเตอรี่ (ไรสาย)
ความปลอดภัยในสถานที่ทํางาน
f รักษาสถานที่ทํางานใหสะอาดและมีไฟสองสวางดี
สถานที่ที่มืดหรือรกรุงรังนํามาซึ่งอุบัติเหตุ
f อยาใชเครื่องมือไฟฟาในสภาพแวดลอมที่เสี่ยงตอ
การติดระเบิดได เชน ในที่ที่มีของเหลว แกซ หรือ
ฝุนที่ติดไฟได เมื่อใชเครื่องมือไฟฟาจะเกิดประกายไฟซึ่ง
อาจจุดฝุนหรือไอใหลุกเปนไฟได
f ขณะใชเครื่องมือไฟฟาทํางาน ตองกันเด็กและผูยืนดู
ใหออกหาง การหันเหความสนใจอาจทําใหทานขาดการ
ควบคุมเครื่องได
คําสั่งทั้งหมด การไมปฏิบัติตามคําเตือนและ
ียบ (มีสายไฟฟา) และ
Page 24

OBJ_BUCH-61-006.book Page 24 Tuesday, June 28, 2011 2:41 PM
24 | ภาษาไทย
ความปลอดภัยเกี่ยวกับไฟฟา
f ปลั๊กของเครื่องมือไฟฟาตองมีขนาดพอดีกับเตาเสียบ
อยาดัดแปลงหรือแกไขตัวปลั๊กอยางเด็ดขาด อยาตอ
ปลั๊กตอใดๆ เขากับเครื่องมือไฟฟาที่มีสายดิน ปลั๊กที่
ไมดัดแปลงและเตาเสียบที่เขากันชวยลดความเสี่ยงจาก
การถูกไฟฟาดูด
f หลีกเลี่ยงไมใหรางกายสัมผัสกับพื้นผิวของสิ่งของที่
ตอสายดินไว เชน ทอ เครื่องทําความรอน เตา และ
ตูเย็น จะเสี่ยงอันตรายจากการถูกไฟฟาดูดมากขึ้นหาก
กระแสไฟฟาวิ่งผานรางกายของทานลงดิน
f อยาวางเครื่องมือไฟฟาตากฝนหรือทิ้งไวในที่ชื้นแฉะ
หากน้ําเขาในเครื่องมือไฟฟา จะเพิ่มความเสี่ยงจากการถูก
ไฟฟาดูด
f อยาใชสายไฟฟาอยางผิดๆ อยาถือเครื่องมือไฟฟา
ที่สาย อยาใชสายแขวนเครื่อง หรืออยาดึงสายไฟฟา
เพื่อถอดปลั๊กออกจากเตาเสียบ กันสายไฟฟาออก
หางจากความรอน น้ํามัน ขอบแหลมคม หรือสวนของ
เครื่องที่กําลังเคลื่อนไหว สายไฟฟาที่ชํารุดหรือพันกันยุง
เพิ่มความเสี่ยงจากการถูกไฟฟาดูด
f เมื่อใชเครื่องมือไฟฟาทํางานกลางแจง ใหใชสายไฟ
ตอที่ไดรับการรับรองใหใชตอในที่กลางแจงเทานั้น
การใชสายไฟตอที่เหมาะสมสําหรับงานกลางแจงชวยลด
อันตรายจากการถูกไฟฟาดูด
f หากไมสามารถหลีกเลี่ยงการใชเครื่องมือไฟฟาทํางาน
ในสถานที่เปยกชื้นได ใหใชสวิทชตัดวงจรเมื่อเกิดการ
รั่วไหลของไฟฟาจากสายดิน การใชสวิทชตัดวงจรเมื่อ
เกิดการรั่วไหลของไฟฟาจากสายดินชวยลดความเสี่ยงตอ
การถูกไฟฟาดูด
ความปลอดภัยของบุคคล
f ทานตองอยูในสภาพเตรียมพรอม ระมัดระวังในสิ่งที่
กําลังทําอยู และมีสติขณะใชเครื่องมือไฟฟาทํางาน
อยาใชเครื่องมือไฟฟาขณะที่ทานกําลังเหนื่อย หรือ
อยูภายใตการครอบงําของฤทธิ์ของยาเสพติด
แอลกอฮอล และยา เมื่อใชเครื่องมือไฟฟาทํางาน ในชั่ว
นาทีที่ทานขาดความเอาใจใสอาจทําใหบุคคลบาดเจ็บอยาง
รุนแรงได
f ใชอุปกรณปกปองรางกาย สวมแวนตาปองกันเสมอ
อุปกรณปกปอง เชน หนากากกันฝุน รองเทากันลื่น หมวก
แข็ง หรือประกบหูกันเสียงดัง ที่เลือกใชตามความเหมาะสม
กับสภาพการทํางาน สามารถลดอันตรายตอบุคคลได
f ปองกันการติดเครื่องโดยไมตั้งใจ ตองดูใหแนใจวา
สวิทชอยูในตําแหนงปดกอนเสียบปลั๊กไฟเขาใน
เตาเสียบ และ/หรือใสแทงแบตเตอรี่ ยกขึ้นหรือ
ถือเครื่องมือ การถือเครื่องโดยใชนิ้วหิ้วที่สวิทช หรือ
เสียบพลังไฟฟาขณะสวิทชเปดอยู อาจนําไปสูอุบัติเหตุที่
รายแรงได
f เอาเครื่องมือปรับแตงหรือประแจปากตายออกจาก
เครื่องมือไฟฟากอนเปดสวิทช เครื่องมือหรือประแจ
ปากตายที่วางอยูกับสวนของเครื่องที่กําลังหมุนจะทําให
บุคคลบาดเจ็บได
f หลีกเลี่ยงการตั้งทาที่ผิดปกติ ตั้งทายืนที่มั่นคงและ
วางน้ําหนักใหสมดุลตลอดเวลา ในลักษณะนี้ทาน
สามารถควบคุมเครื่องมือไฟฟาในสถานการณที่ไมคาดคิด
ไดดีกวา
f ใสเสื้อผาที่เหมาะสม อยาใสเสื้อผาหลวมหรือสวม
เครื่องประดับ เอาผม เสื้อผา และถุงมือออกหางสวน
ของเครื่องที่กําลังหมุน เสื้อผาหลวม เครื่องประดับ
และผมยาวอาจเขาไปติดในสวนของเครื่องที่กําลังหมุนได
f หากตองตอเครื่องมือไฟฟาเขากับเครื่องดูดฝุนหรือ
เครื่องเก็บผง ดูใหแนใจวาการเชื่อมตอและการใชงาน
เปนไปอยางถูกตอง การใชอุปกรณดูดฝุนชวยลดอันตราย
ที่เกิดจากฝุนได
การใชและการดูแลรักษาเครื่องมือไฟฟา
f อยาใชเครื่องมือไฟฟาอยางหักโหม ใชเครื่องมือไฟฟา
ที่ถูกตองตรงตามลักษณะงาน เครื่องมือไฟฟาที่ถูกตอง
จะทํางานไดดีกวาและปลอดภัยกวาในระดับสมรรถภาพที่
ออกแบบไว
f อยาใชเครื่องมือไฟฟาที่สวิทชเปดปดเสีย เครื่องมือ
ไฟฟาที่ไมสามารถควบคุมการเปดปดดวยสวิทชได เปน
เครื่องมือไฟฟาที่ไมปลอดภัยและตองสงซอมแซม
f กอนปรับแตงเครื่อง เปลี่ยนอุปกรณประกอบ หรือ
เก็บเครื่องเขาที่ ตองถอดปลั๊กไฟออกจากเตาเสียบ
และ/หรือถอดแทงแบตเตอรี่ออกจากเครื่องมือไฟฟา
มาตรการปองกันเพื่อความปลอดภัยนี้ชวยลดความเสี่ยง
จากการติดเครื่องโดยไมไดตั้งใจ
f เมื่อเลิกใชงานเครื่องมือไฟฟา ใหเก็บเครื่องไวในที่ที่
เด็กหยิบไมถึง และไมอนุญาตใหบุคคลที่ไมคุนเคย
กับเครื่องหรือบุคคลที่ไมไดอานคําแนะนํานี้ใชเครื่อง
เครื่องมือไฟฟาเปนของอันตรายหากตกอยูในมือของผูใชที่
ไมไดรับการฝกฝน
f เอาใจใสดูแลรักษาเครื่อง ตรวจหาสวนที่เคลื่อนไหว
ไดของเครื่องวาวางอยูตรงแนวหรือติดขัดหรือไม
ตรวจหาการแตกหักของชิ้นสวนและสภาพอื่นใดที่
อาจมีผลตอการทํางานของเครื่องมือไฟฟา หากชํารุด
ตองสงเครื่องมือไฟฟาซอมแซมกอนใชงาน อุบัติเหตุ
หลายอยางเกิดขึ้นเนื่องจากดูแลรักษาเครื่องไมดีพอ
1 609 929 M43 | (28.6.11) Bosch Power Tools
Page 25

OBJ_BUCH-61-006.book Page 25 Tuesday, June 28, 2011 2:41 PM
ภาษาไทย | 25
f รักษาเครื่องมือตัดใหคมและสะอาด หากบํารุงรักษา
เครื่องมือที่มีขอบตัดแหลมคมอยางถูกตอง จะสามารถตัด
ไดลื่นไมติดขัดและควบคุมไดงายกวา
f ใชเครื่องมือไฟฟา อุปกรณประกอบ เครื่องมือ และ
อุปกรณอื่นๆ ใหตรงตามคําแนะนํานี้ และในลักษณะ
ตามที่เครื่องมือไฟฟาประเภทนั้นๆ กําหนดไว โดยตอง
คํานึงถึงเงื่อนไขการทํางานและงานที่จะทําดวย การใช
เครื่องมือไฟฟาทํางานที่ตางไปจากวัตถุประสงคการใช
งานของเครื่อง อาจนําไปสูสถานการณที่เปนอันตรายได
การบริการ
f สงเครื่องมือไฟฟาใหชางผูเชี่ยวชาญตรวจซอมและใช
อะไหลเปลี่ยนของแทเทานั้น ในลักษณะนี้ทานจะแนใจ
ไดวาเครื่องมือไฟฟาอยูในสภาพที่ปลอดภัย
f กอนวางเครื่องลงบนพื้นทุกครั้ง ตองรอใหเครื่องหยุดนิ่ง
อยูกับที่เสมอ มิฉะนั้นเครื่องมือที่ใสอยูอาจติดขัดและนําไปสู
การสูญเสียการควบคุมเครื่องมือไฟฟา
รายละเอียดผลิตภัณฑและขอมูลจําเพาะ
ตองอานคําเตือนเพื่อความปลอดภัยและคําสั่ง
ทั้งหมด การไมปฏิบัติตามคําเตือนและคําสั่งอาจ
เปนสาเหตุใหถูกไฟฟาดูด เกิดไฟไหม และ/หรือ
ไดรับบาดเจ็บอยางรายแรง
ประโยชนการใชงานของเครื่อง
เครื่องนี้ใชสําหรับเจาะกระแทกในอิฐ คอนกรีต และหิน นอกจากนี้
ยังใชเจาะในไม โลหะ และพลาสติค เครื่องที่มีระบบควบคุม
อิเล็กทรอนิกสและการหมุนซาย/ขวาสามารถใชขันสกรูและ
คําแนะนําเพื่อความปลอดภัยสําหรับสวาน
GSB13/GSB13RE/GSB16/GSB16RE
f หากดามจับเพิ่มจัดสงมาพรอมกับเครื่อง ใหใชดามจับเพิ่ม
รวมดวย การสูญเสียการควบคุมอาจทําใหบุคคลบาดเจ็บได
f เมื่อใชเครื่องทํางาน ตองใชมือทั้งสองจับเครื่องใหแนน
และตั้งทายืนที่มั่นคงเสมอ เครื่องมือไฟฟาสามารถเคลื่อนนํา
ไดมั่นคงกวาเมื่อใชมือทั้งสองขางจับ
GSB 10/GSB 10 RE / GSB 13 / GSB 13 RE/ GSB 16/
GSB 16 RE
f สวมอุปกรณปองกันหูเมื่อเจาะกระแทก การไดรับเสียงดัง
อาจทําใหสูญเสียการไดยิน
f เมื่อทํางานในบริเวณที่อุปกรณตัดอาจสัมผัสกับสายไฟฟา
ที่ซอนอยูหรือสายไฟฟาของเครื่อง ตองจับเครื่องมือไฟฟา
ตรงดามจับที่หุมฉนวน หากอุปกรณตัดสัมผัสกับสายที่มี
กระแสไฟฟาไหลผานจะทําใหสวนที่เปนโลหะของเครื่องมือ
ไฟฟาเกิดมีกระแสไฟฟาดวย และสงผลใหผูใชเครื่องถูกไฟฟา
ดูดได
f ใชเครื่องตรวจที่เหมาะสมตรวจหาทอ สายไฟฟา หรือสาย
โทรศัพท ที่อาจซอนอยูในบริเวณที่ทํางาน หรือขอความ
ชวยเหลือจากบริษัทสาธารณูปโภคในทองถิ่น การสัมผัสกับ
สายไฟฟาอาจทําใหเกิดไฟไหมหรือถูกไฟฟาดูด การทําให
ทอแกซเสียหายอาจทําใหเกิดระเบิด การเจาะเขาในทอน้ํา
ทําใหทรัพยสินเสียหาย หรืออาจเปนเหตุใหถูกไฟฟาดูดได
f ปดเครื่องมือไฟฟาทันทีที่เครื่องมือที่ใสอยูเกิดติดขัด
เตรียมตัวรับแรงบิดสะทอนสูงที่ทําใหเกิดการตีกลับ
เครื่องมือที่ใสอยูติดขัดเนื่องจาก:
– เครื่องมือไฟฟาถูกใชงานเกินกําลังปกติ หรือ
– เครื่องมือทิ่มเอียงอยูในชิ้นงาน
f ยึดชิ้นงานใหแนน การยึดชิ้นงานดวยเครื่องหนีบหรือแทนจับ
จะมั่นคงกวาการยึดดวยมือ
Bosch Power Tools 1 609 929 M43 | (28.6.11)
ตัดเกลียวไดดวย
สวนประกอบผลิตภัณฑ
ลําดับเลขของสวนประกอบผลิตภัณฑอางถึงสวนประกอบของเครื่อง
ที่แสดงในหนาภาพประกอบ
1 หัวจับดอกชนิดจับเร็ว*
2 ปลอกหนา
3 ปลอกหลัง
4 สวิทชปรับ “เจาะ/เจาะกระแทก”
5 ปุมล็อคสวิทชเปด-ปด
6 สวิทชเปด-ปด
7 ปุมตั้งความเร็วรอบลวงหนา (GSB16RE)
8 สวิทชเปลี่ยนทิศทางการหมุน
(GSB 10 RE/GSB 13 RE / GSB 16 RE)
9 ปุมปรับกานวัดความลึก*
10 นอตปกสําหรับปรับดามจั
11 ดามจับเพิ่ม (พื้นผิวจับหุมฉนวน)*
12 กานวัดความลึก*
13 ดามจับ (พื้นผิวจับหุมฉนวน)
14 ประแจหัวจับดอก*
15 หัวจับดอกชนิดมีเฟองใน*
16 ดามจับดอกทั่วไป*
17 ดอกไขควง*
18 ประแจขันหกเหลี่ยม**
19 ประแจปากตาย**
*อุปกรณประกอบที่แสดงหรือระบุไมรวมอยูในการจัดสงมาตรฐาน
กรุณาดูอุปกรณประกอบทั้งหมดในรายการแสดงอุปกรณประกอบ
ของเรา
**หาซื้อไดทั่วไป (ไมรวมอยูในขอบเขตการจัดสง)
บเพิ่ม*
Page 26

OBJ_BUCH-61-006.book Page 26 Tuesday, June 28, 2011 2:41 PM
26 | ภาษาไทย
ขอมูลทางเทคนิค
สวานเจาะกระแทก GSB ...
10 10 RE 13 13 RE 16 16 RE
Professional
หมายเลขสินคา 3 601 ... B16 0.. B16 1.. B17 0.. B17 1.. B18 0.. B18 1..
กําลังไฟฟาเขากําหนด
กําลังไฟฟาออก
ความเร็วรอบเดินตัวเปลา
ความเร็วรอบขณะใชงาน สูงสุด
อัตรากระแทก
กําลังบิดกําหนด
การตั้งความเร็วรอบลวงหนา
การหมุนซาย/ขวา
เสนผาศูนยกลางปลอกแกน
Ø-การเจาะ สูงสุด
– คอนกรีต
– เหล็ก
– ไม
วงหนีบหัวจับดอก
น้ําหนักตามระเบียบการ-
EPTA-Procedure 01/2003
ระดับความปลอดภัย
คาที่ใหนี้ใชไดกับแรงดันไฟฟาระบุ [U] 230 โวลท คาเหลานี้อาจผิดแผกไปสําหรับแรงดันไฟฟาที่ต่ํากวา และโมเดลที่สรางสําหรับเฉพาะประเทศ
เครื่องแตละเครื่องอาจมีชื่อทางการคาแตกตางกัน ดังนั้นกรุณาสังเกตหมายเลขสินคาบนแผนปายรุนของเครื่องของทาน
การประกอบ
f ดึงปลั๊กไฟออกจากเตาเสียบกอนปรับแตงเครื่อง
ดามจับเพิ่ม (ดูภาพประกอบ A)
(GSB 13/ GSB 13 RE /GSB 16/ GSB 16 RE)
f ใหใชเครื่องมือไฟฟาพรอมกับดามจับเพิ่ม 11 เสมอ
ทานสามารถจับดามจับเพิ่ม 11 หันไปยังตําแหนงใดก็ได เพื่อจะได
ทาทํางานที่มั่นคงและเหนื่อยนอย
หมุนนอตปกสําหรับปรับดามจับเพิ่ม 10 ไปในทิศทวนเข็ม
นาฬิกา และตั้งดามจับเพิ่ม 11 ไปยังตําแหนงที่ตองการ จากนั้น
จึงขันนอตปก 10
การปรับความลึกรูเจาะ (ดูภาพประกอบ A)
ความลึกรูเจาะที่ตองการ X สามารถตั้งไดดวยกานวัดความลึก 12
กดปุมปรับกานวัดความลึก 9 และสอดกานวัดความลึกเขาใน
ดามจับเพิ่ม 11
ดันกานวัดความลึกออกมาจนระยะหางระหวางปลายดอกสวาน
และปลายกานวัดความลึกเทากับความลึกรูเจาะที่ตองการ X
ไปในทิศตามเข็มนาฬิกากลับเขาใหแนน
วัตต 500 500 600 600 701 701
วัตต 250 250 301 301 351 351
รอบ/นาที 2600 0 – 2600 2800 0 – 2800 3000 0 – 3000
รอบ/นาที 1610 1610 1 570 1 570 1 640 1 640
/นาที 25700 25700 25070 25070 26270 26270
Nm 1,5 1,5 1,8 1,8 2,0 2,0
– ––––z
– z – z – z
มม.4343 43 43 43 43
มม.
มม.
มม.
10
8
20
10
8
20
13
10
25
13
10
25
16
12
30
มม.1,5– 10 1,5 – 10 1,5 – 13 1,5 –13 1,5 – 13 1,5 – 13
กก.1,51,5 1,7 1,7 1,9 1,9
/II /II /II / II / II /II
การเปลี่ยนเครื่องมือ
หัวจับดอกชนิดจับเร็ว (ดูภาพประกอบ B)
จับปลอกทาย 3 ของหัวจับดอกชนิดจับเร็ว 1 ใหแนน และหมุน
ปลอกหนา 2 ไปในทิศทางหมุน
จับเครื่องมือใสเขาไป
จับปลอกหลัง 3 ของหัวจับดอกชนิดจับเร็ว 1 ใหแนนและใชมือ
หมุนปลอกหนา 2 ไปตามทิศ
ในลักษณะนี้หัวจับดอกสวานจะล็อคโดยอัตโนมัติ
เมื่อตองการถอดเครื่องมือออก ตองปลดล็อคอีกครั้งโดยหมุน
ปลอกหนา 2 ไปในทิศตรงกันขาม
หัวจับดอกชนิดมีเฟองใน (ดูภาพประกอบ C)
f ใสถุงมือปองกันอันตรายเมื่อเปลี่ยนเครื่องมือ หัวจับดอก
จะรอนจัดขึ้นไดเมื่อใชเครื่องทํางานนานๆ
เปดหัวจับดอกชนิดมีเฟองใน 15 โดยการหมุนจนสามารถใส
เครื่องมือได จับเครื่องมือใสเขาไป
สอดประแจหัวจับดอก 14 เขาในรูที่ลงรอยกันบนหัวจับดอกชนิด
มีเฟองใน 15 และหนีบเครื่องมือเขาเสมอกัน
n จนสามารถสอดเครื่องมือได
o จนไมไดยินเสียงลงล็อคอีกตอไป
16
12
30
1 609 929 M43 | (28.6.11) Bosch Power Tools
Page 27

OBJ_BUCH-61-006.book Page 27 Tuesday, June 28, 2011 2:41 PM
เครื่องมือขัน (ดูภาพประกอบ D)
เมื่อใชดอกไขควง 17 ควรใชดามจับดอกทั่วไป 16 ดวยเสมอ ตองใช
ไขควงที่มีขนาดพอดีกับหัวสกรู
เมื่อตองการขันสกรู ใหสับสวิทชปรับ "เจาะ/เจาะกระแทก" 4 ไปที่
สัญลักษณ "เจาะ” เสมอ
การเปลี่ยนหัวจับดอก
การถอดหัวจับดอก (ดูภาพประกอบ E)
เมื่อตองการถอดหัวจับดอกชนิดจับเร็ว 1 ออก ใหหนีบประแจขัน
หกเหลี่ยม 18 เขาในหัวจับดอกชนิดจับเร็ว 1 และวางประแจ
ปากตาย 19 (ขนาด 12 มม.) เขากับพื้นที่ราบสําหรับประแจบน
แกนขับ วางเครื่องลงบนที่ค้ํายันที่มั่นคง ต.ย. เชน โตะทํางานของ
ชาง จับประแจปากตาย 19 อยางมั่นคง และคลายหัวจั
บดอกชนิด
จับเร็ว 1 ออกโดยหมุนประแจขันหกเหลี่ยม 18 ไปในทิศการหมุน n
คลายหัวจับดอกชนิดจับเร็วที่ติดแนนออกโดยเคาะที่ปลายดานยาว
ของประแจขันหกเหลี่ยม 18 เอาประแจขันหกเหลี่ยมออกจากหัวจับ
ดอกชนิดจับเร็ว และขันหัวจับดอกชนิดจับเร็วออกจนสุด
การถอดหัวจับดอกชนิดมีเฟองใน 15 ออกใหทําในลักษณะเดียวกับ
การถอดหัวจับดอกชนิดจับเร็ว
การประกอบหัวจับดอก (ดูภาพประกอบ F)
การประกอบหั
วจับดอกชนิดจับเร็ว/หัวจับดอกชนิดมีเฟองในเขา
ใหทําตามลําดับยอนหลัง
ตองขันหัวจับดอกเขาใหแนนดวยกําลังบิดการขัน
ประมาณ
30–35 Nm
การดูดฝุน/ขี้เลื่อย
f ฝุนที่ไดจากวัสดุ เชน เคลือบผิวที่มีสารตะกั่ว ไมบางประเภท
แรธาตุ และโลหะ อาจเปนอันตรายตอสุขภาพ การสัมผัสหรือ
การหายใจเอาฝุนเขาไปอาจทําใหเกิดปฏิกิริยาแพฝุน และ/
หรือนํามาซึ่งโรคติดเชื้อระบบหายใจแกผูใชเครื่องหรือผูที่ยืนอยู
ใกลเคียง
ฝุนบางประเภท เชน ฝุนไมโอก หรือไมบีช นับเป
มะเร็ง โดยเฉพาะอยางยิ่งเมื่อผสมกับสารเติมแตงเพื่อบําบัดไม
(โครเมต ผลิตภัณฑรักษาเนื้อไม) สําหรับวัสดุที่มีแอสเบสทอส
ตองใหผูเชี่ยวชาญทํางานเทานั้น
– จัดสถานที่ทํางานใหมีการระบายอากาศที่ดี
– ขอแนะนําใหสวมหนากากปองกันการติดเชื้อที่มีระดับ-
ไสกรอง P2
ปฏิบัติตามกฎขอบังคับสําคัญอื่นๆ ที่เกี
ที่บังคับใชในประเทศของทาน
f ปองกันการสะสมของฝุนในสถานที่ทํางาน ฝุนสามารถ
ลุกไหมอยางงายดาย
นสารที่ทําใหเกิด
่ยวกับวัสดุชิ้นงาน
ภาษาไทย | 27
การปฏิบัติงาน
เริ่มตนปฏิบัติงาน
f ใหสังเกตแรงดันไฟฟา! แรงดันไฟฟาจากแหลงจายไฟฟา
ตองมีคาตรงกับคาแรงดันไฟฟาที่ระบุไวบนแผนปายพิกัด
เครื่อง
การกลับทิศทางการหมุน (ดูภาพประกอบ G
(GSB 10 RE / GSB 13 RE /GSB 16 RE)
สวิทชเปลี่ยนทิศทางการหมุน 8 ใชสําหรับกลับทิศทางการหมุน
ของเครื่อง อยางไรก็ดี หากกดสวิทชเปด-ปด 6 อยู จะกลับทิศทาง
การหมุนไมได
การหมุนทางขวา: สําหรับการเจาะและขันสกรูเขา ใหสับสวิทช
เปลี่ยนทิศทางการหมุน 8 ไปทางซายจนสุด
การหมุนทางซาย: สําหรับการคลายและขันสกรูและนอตออก
ใหกดสวิทชเปลี
่ยนทิศทางการหมุน 8 ไปทางขวาจนสุด
การตั้งวิธีการปฏิบัติงาน
เจาะ และ ขันสกรู
สับสวิทชปรับ 4 ไปที่สัญลักษณ "เจาะ"
เจาะกระแทก
สับสวิทชปรับ 4 ไปที่สัญลักษณ “เจาะกระแทก”
สวิทชปรับ 4 จะลงสลักอยางเห็นไดชัด และสามารถสับขณะเครื่อง
กําลังเดินอยู
การเปด-ปดเครื่อง
เปดเครื่องทํางานโดยกดสวิทช
เปด-ปด 6 และกดคางไว
ล็อคสวิทชเปด-ปด 6 ที่กดคางไว โดยกดปุมล็อคสวิทชเปด-ปด 5
ปดเครื่องโดยปลอยนิ้วจากสวิทชเปด-ปด 6 หรือในกรณีที่ถูกล็อค
ดวยปุมล็อค 5 อยู ใหกดสวิทชเปด-ปด 6 สั้นๆ และปลอยนิ้ว
การปรับความเร็วรอบ/กระแทก
(GSB 10 RE / GSB 13 RE /GSB 16 RE)
ทานสามารถปรับอัตราความเร็วรอบ/กระแทกของเครื่องมือไฟฟา
ที่เปดสวิทชทํางานไดอยางตอเนื่อง ทั้งนี้ขึ้นอยูกับแรงที่กดลงบน
สวิทชเปด-ปด 6
กดสวิทชเปด-ปด 6 เบาจะไดอัตราความเร็วรอบ/กระแทกต่ํา
กดสวิทชแรงขึ้นอัตราความเร็วรอบ/กระแทกจะเพิ่มขึ้น
การตั้งความเร็วรอบ/กระแทกลวงหนา (GSB16RE)
ความเร็วรอบ/กระแทกที่ตองการสามารถตั้งลวงหนาได
ความเร็วรอบลวงหนา 7 และตั้งไดแมขณะเครื่องกําลังเดินอยู
ความเร็วรอบ/กระแทกที่ตองใชขึ้นอยูกับประเภทวัสดุและเงื่อนไข
การทํางาน และสามารถกําหนดไดจากการทดลองฝกปฏิบัติ
– H)
ดวยปุมตั้ง
Bosch Power Tools 1 609 929 M43 | (28.6.11)
Page 28

OBJ_BUCH-61-006.book Page 28 Tuesday, June 28, 2011 2:41 PM
28 | ภาษาไทย
ขอแนะนําในการทํางาน
f จับเครื่องมือไฟฟาเขาบนหัวสกรู/นอตเมื่อเครื่องปดอยู
เทานั้น เครื่องมือที่หมุนอยูอาจลื่นไถล
หลังจากใชเครื่องดวยความเร็วต่ําเปนเวลานาน ตองทําใหเครื่อง
เย็นลงโดยปลอยใหเครื่องเดินตัวเปลาที่ความเร็วสูงสุดนานประมาณ
3 นาที
เมื่อตองการเจาะกระเบื้อง ใหสับสวิทชปรับ 4 ไปที่สัญลักษณ
"เจาะ" อย
าสับสวิทชไปที่สัญลักษณ "เจาะกระแทก" หรือเจาะโดยการ
กระแทก จนกวาจะไดเจาะกระเบื้องทะลุแลว
เมื่อตองการเจาะคอนกรีต หิน และกําแพงอิฐ ตองใชดอกสวานที่
ทําจากโลหะแข็ง
ใหใชเฉพาะดอกสวาน HSS (HSS = high-speed steel) ที่ลับคม
อยางดีสําหรับเจาะโลหะ ดอกสวานที่เปนอุปกรณประกอบของแท
ของ บอช รับประกันคุณภาพการเจาะ
ดอกสวานเกลียวบิดขนาดตั้งแต
2,5– 10 มม สามารถลับไดอยาง
งายดายดวยที่ลับดอกสวาน (ดูอุปกรณประกอบ)
GSB 16 RE
เราขอแนะนําใหใชแทนเจาะ (ดูอุปกรณประกอบ) เมื่อตองทํางาน
ที่ใชความเที่ยงตรงสูง
ปากกาสําหรับจับวัตถุเปนอุปกรณประกอบ ใชสําหรับยึดชิ้นงาน
ใหแนนอยูกับที่ ชวยไมใหชิ้นงานหมุนไปมา และปองกัน อันตราย
ที่อาจจะเกิดข
ึ้นดวย
การบํารุงรักษาและการบริการ
การบํารุงรักษาและการทําความสะอาด
f ดึงปลั๊กไฟออกจากเตาเสียบกอนปรับแตงเครื่อง
f เพื่อใหทํางานไดอยางถูกตองและปลอดภัย ตองรักษา
เครื่องและชองระบายอากาศใหสะอาดอยูเสมอ
เครื่องมือไฟฟานี้ผานกรรมวิธีการผลิตและตรวจสอบอยางละเอียด
ถี่ถวนมาแลว ถึงกระนั้น หากเครื่องเกิดขัดของ ตองสงเครื่องใหศูนย
บริการหลังการขายสําหรับเครื่องมือไฟฟา บอช ซอมแซม
เมื่อตองการสอบถามและสั่งซื้ออะไหล กรุณาแจงหมายเลขสินคา
สิบหลักบนแผนป
ายรุนของเครื่องทุกครั้ง
การบริการหลังการขายและการใหคําแนะนําลูกคา
ศูนยบริการหลังการขายของเรายินดีตอบคําถามของทานที่
เกี่ยวกับการบํารุงรักษาและการซอมแซมผลิตภัณฑรวมทั้งเรื่อง
อะไหล ภาพขยายและขอมูลเกี่ยวกับอะไหล กรุณาดูใน:
www.bosch-pt.com
แผนกใหคําปรึกษาลูกคาของเราพรอมใหคําแนะนําที่ดีที่สุดแกทาน
ในเรื่องการซื้อผลิตภัณฑ การใชงานและการปรับแตงผลิตภัณฑ
และอุปกรณประกอบตางๆ
ในกรณีประกัน ซอมแซม หร
กรุณาติดตอผูขายที่ไดรับแตงตั้งเทานั้น
ประเทศไทย
สํานักงาน
บริษัท โรเบิรต บอช จํากัด
ชั้น 11 ตึกลิเบอรตี้ สแควร
287 ถนนสีลม
กรุงเทพฯ 10500
โทรศัพท +66 (0)2 / 6 31 18 79 – 18 88 (10 หมายเลข)
โทรสาร +66 (0)2 / 2 38 47 83
www.bosch.co.th
ตูไปรษณีย
บริษัท โรเบิรต บอช จํากัด
แผนกเครื่องมือไฟฟา
ตู
ปณ. 20 54
กรุงเทพฯ 10501
ประเทศไทย
ศูนยบริการซอมและฝกอบรม
ศูนยบริการซอมและฝกอบรมบอช
2869 – 2869/1 ซอยบานกลวย
ถนนพระรามที่ 4 (ใกลทางรถไฟสายปากน้ําเกา)
พระโขนง
กรุงเทพฯ 10110
ประเทศไทย
โทรศัพท +66 (0)2 / 6 71 78 00 – 4
โทรสาร +66 (0)2 / 2 49 42 96
โทรสาร +66 (0)2 / 2 49 52 99
ือซื้อชิ้นสวนมาเปลี่ยน
การกําจัดขยะ
เครื่องมือ อุปกรณประกอบ และหีบหอ ตองนําไปแยกประเภทวัสดุ
เพื่อนํากลับมาใชใหมโดยไมทําลายสภาพแวดลอม
อยาทิ้งเครื่องมือไฟฟาลงในขยะบาน!
ขอสงวนสิทธิ์ในการเปลี่ยนแปลงโดยไมตองแจงลวงหนา
1 609 929 M43 | (28.6.11) Bosch Power Tools
Page 29

OBJ_BUCH-61-006.book Page 29 Tuesday, June 28, 2011 2:41 PM
Bahasa Indonesia | 29
f Jika Anda menggunakan perkakas listrik di luar
Bahasa Indonesia
Petunjuk-Petunjuk untuk
Keselamatan Kerja
Petunjuk-Petunjuk Umum untuk Perkakas Listrik
PERHATIKANLAH
kerja dan petunjuk-petunjuk untuk penggunaan.
Kesalahan dalam menjalankan petunjuk-petunjuk untuk
keselamatan kerja dan petunjuk-petunjuk untuk penggunaan
dapat mengakibatkan kontak listrik, kebakaran dan/atau lukaluka yang berat.
Simpanlah semua petunjuk-petunjuk untuk keselamatan
kerja dan petunjuk-petunjuk lainnya untuk penggunaan di
masa depan.
Kata „perkakas listrik“ yang disebutkan di dalam petunjukpetunjuk untuk keselamatan kerja adalah sebutan untuk
perkakas listrik pakai listrik jaringan (dengan kabel) dan
untuk perkakas listrik tenaga baterai (tanpa kabel listrik).
Keselamatan kerja di tempat kerja
f Jagalah supaya tempat kerja selalu bersih dan terang.
Tempat kerja yang tidak rapi atau tidak terang dapat
mengakibatkan terjadinya kecelakaan.
f Janganlah menggunakan perkakas listrik di tempat di
mana dapat terjadi ledakan, di mana ada cairan, gas
atau debu yang mudah terbakar. Perkakas listrik dapat
memancarkan bunga api yang lalu mengakibatkan debu
atau uap terbakar.
f Selama menggunakan perkakas listrik, jauhkan anak-
anak dan orang-orang lain dari tempat kerja. Jika
konsentrasi terganggu, bisa jadi Anda tidak bisa mengendalikan perkakas listrik tersebut.
Keamanan listrik
f Steker dari perkakas listrik harus cocok pada
stopkontak. Janganlah sekali-kali merubah steker.
Janganlah menggunakan steker perantara bersama
dengan perkakas listrik yang mempunyai hubungan
arde. Steker yang tidak dirubah dan stopkontak yang
cocok mengurangi bahaya terjadinya kontak listrik.
f Jagalah supaya badan Anda tidak bersentuhan dengan
permukaan yang mempunyai hubungan arde, misalnya
pipa-pipa, radiator pemanas ruangan, kompor listrik
dan lemari es. Ada risiko besar terjadi kontak listrik, jika
badan Anda mempunyai hubungan arde.
f Jagalah supaya perkakas listrik tidak kena hujan atau
menjadi basah. Air yang masuk ke dalam perkakas listrik
menambah risiko terjadinya kontak listrik.
f Janganlah menyalah gunakan kabel listrik untuk
mengangkat dan menggantungkan perkakas listrik
atau untuk menarik steker dari stopkontak. Jagalah
supaya kabel listrik tidak kena panas, minyak,
pinggiran yang tajam atau bagian-bagian perkakas
yang bergerak. Kabel listrik yang rusak atau tersangkut
menambah risiko terjadinya kontak listrik.
Bosch Power Tools 1 609 929 M43 | (28.6.11)
Bacalah semua petunjukpetunjuk untuk keselamatan
gedung, gunakanlah hanya kabel sambungan yang juga
cocok untuk pemakaian di luar gedung. Penggunaan
kabel sambungan yang cocok untuk pemakaian di luar
gedung mengurangi risiko terjadinya kontak listrik.
f Jika penggunaan perkakas listrik di tempat yang basah
tidak bisa dihindarkan, gunakanlah sakelar pengaman
terhadap arus penyimpangan. Penggunaan sakelar
pengaman terhadap arus penyimpangan mengurangi
risiko terjadinya kontak listrik.
Keselamatan kerja
f Berhati-hatilah selalu, perhatikanlah apa yang Anda
kerjakan dan bekerjalah dengan seksama jika
menggunakan perkakas listrik. Janganlah menggunakan perkakas listrik, jika Anda capai atau berada di
bawah pengaruh narkoba, minuman keras atau obat.
Jika Anda sekejap mata saja tidak berhati-hati sewaktu
menggunakan perkakas listrik, dapat terjadi luka-luka
berat.
f Pakailah pakaian dan sarana pelindung dan pakailah
selalu kaca mata pelindung. Dengan memakai pakaian
dan sarana pelindung, misalnya kedok anti debu (masker),
sepatu tertutup yang tidak licin, helm pelindung atau
pemalut telinga sesuai dengan pekerjaan yang dilakukan
dengan perkakas listrik, bahaya terjadinya luka-luka dapat
dikurangi.
f Jagalah supaya perkakas listrik tidak dihidupkan
secara tidak disengaja. Perhatikan bahwa perkakas
listrik dalam penyetelan mati, jika steker
disambungkan pada pengadaan listrik dan/atau aki,
jika perkakas listrik diangkat atau dibawa. Jika selama
mengangkat perkakas listrik jari Anda berada pada tombol
untuk menghidupkan dan mematikan atau perkakas listrik
yang dalam penyetelan hidup disambungkan pada listrik,
dapat terjadi kecelakaan.
f Lepaskan semua perkakas-perkakas penyetelan atau
kunci-kunci pas sebelum perkakas listrik dihidupkan.
Perkakas atau kunci yang berada di dalam bagian yang
berputar dapat mengakibatkan terjadinya luka-luka.
f Aturkan badan sedemikian sehingga Anda bisa bekerja
dengan aman. Berdirilah secara mantap dan jagalah
selalu keseimbangan. Dengan demikian Anda bisa
mengendalikan perkakas listrik dengan lebih baik, jika
terjadi sesuatu dengan tiba-tiba.
f Pakailah pakaian yang cocok. Janganlah memakai
pakaian yang longgar atau perhiasan. Jagalah supaya
rambut, pakaian dan sarung tangan tidak masuk dalam
bagian-bagian perkakas yang bergerak. Pakaian yang
longgar, rambut panjang atau perhiasan dapat tersangkut
dalam bagian perkakas yang bergerak.
f Jika ada kemungkinan untuk memasangkan sarana
penghisapan dan penampungan debu, perhatikan
bahwa sarana-sarana ini telah dipasangkan dan
digunakan dengan betul. Penggunaan sarana penghisa-
pan bisa mengurangi bahaya yang disebabkan debu.
Page 30

OBJ_BUCH-61-006.book Page 30 Tuesday, June 28, 2011 2:41 PM
30 | Bahasa Indonesia
Penggunaan dan penanganan perkakas listrik dengan
seksama
f Janganlah membebankan perkakas listrik terlalu
berat. Gunakan selalu perkakas listrik yang cocok
untuk pekerjaan yang dilakukan. Dengan perkakas listrik
yang cocok Anda bekerja lebih baik dan lebih aman dalam
batas-batas kemampuan yang ditentukan.
f Janganlah menggunakan perkakas listrik yang
tombolnya rusak. Perkakas listrik yang tidak bisa
dihidupkan atau dimatikan, berbahaya dan harus
direparasikan.
f Tariklah steker dari stopkontak dan/atau keluarkan
aki, sebelum Anda melakukan penyetelan pada perkakas listrik, mengganti alat-alat kerja atau sebelum
menyimpan perkakas listrik. Tindakan keselamatan
kerja ini mengurangi bahaya perkakas listrik hidup secara
tidak disengaja.
f Simpanlah perkakas listrik yang tidak digunakan di
luar jangkauan anak-anak. Janganlah mengizinkan
orang-orang yang tidak mengenal perkakas listrik ini
atau yang belum membaca petunjuk-petunjuk ini,
menggunakan perkakas listrik ini. Perkakas listrik bisa
menjadi berbahaya, jika digunakan oleh orang-orang yang
tidak mengenalnya.
f Rawatlah perkakas listrik dengan seksama. Periksalah,
apakah bagian-bagian perkakas listrik yang bergerak
berfungsi dengan baik dan tidak tersangkut, apakah
ada bagian-bagian yang patah atau rusak sedemikian,
sehingga dapat mempengaruhi jalannya perkakas
listrik. Biarkan bagian-bagian perkakas yang rusak
direparasikan, sebelum Anda mulai menggunakan
perkakas listrik. Banyak kecelakaan terjadi karena
perkakas listrik tidak dirawat dengan seksama.
f Perhatikan supaya alat-alat pemotong selalu tajam dan
bersih. Alat-alat pemotong dengan mata-mata pemotong
yang tajam dan dirawat dengan seksama tidak mudah
tersangkut dan lebih mudah dikendalikan.
f Gunakanlah semua perkakas listrik, aksesori, alat-alat
kerja dsb. sesuai dengan petunjuk-petunjuk.
Perhatikan syarat-syarat kerja dan macam pekerjaan
yang dilakukan. Penggunaan perkakas listrik untuk
macam pekerjaan yang tidak cocok dengan kegunaannya
bisa mengakibatkan keadaan yang berbahaya.
Servis
f Biarkan perkakas listrik Anda direparasikan hanya
oleh orang-orang ahli yang berpengalaman dan hanya
dengan menggunakan suku cadang yang asli. Dengan
demikian terjamin keselamatan kerja dengan perkakas
listrik ini secara sinambung.
Petunjuk-petunjuk untuk keselamatan kerja
untuk mesin bor
GSB 13/ GSB 13 RE/ GSB 16/ GSB 16 RE
f Gunakanlah gagang tambahan-gagang tambahan, jika
ini dipasok bersama dengan perkakas listrik. Perkakas
listrik yang tidak bisa dikendalikan bisa mengakibatkan
terjadinya luka-luka.
f Selama digunakan, peganglah perkakas listrik dengan
kedua belah tangan dan perhatikanlah supaya Anda
berdiri secara teguh. Perkakas listrik bisa dikendalikan
lebih baik jika dipegang dengan kedua belah tangan.
GSB 10/ GSB 10 RE/ GSB 13/GSB 13 RE /GSB 16 /
GSB 16 RE
f Pakailah pemalut telinga selama membor dengan
getaran. Jika Anda mendengar suara bising, daya
pendengaran bisa berkurang.
f Peganglah perkakas listrik hanya pada pegangan yang
terisolir, jika Anda melakukan pekerjaan di mana alat
kerjanya bisa terkena pada saluran listrik yang tidak
terlihat atau kabelnya sendiri. Sentuhan pada kabel
yang bertegangan dapat mengakibatkan bagian-bagian
logam dari perkakas listrik juga bertegangan dan lalu
mengakibatkan kontak listrik.
f Gunakanlah alat detektor logam yang cocok untuk
mencari kabel dan pipa yang tidak terlihat atau hubungi perusahaan pengadaan setempat. Sentuhan de-
ngan kabel-kabel listrik dapat mengakibatkan api dan
kontak listrik. Pipa gas yang dirusak dapat mengakibatkan
ledakan. Pipa air yang dirusak mengakibatkan kerusakan
barang-barang atau dapat mengakibatkan kontak listrik.
f Matikanlah segera perkakas listrik, jika alat kerjanya
memblok. Berwaspadalah akan terjadinya momen
reaksi yang besar yang mengakibatkan bantingan. Alat
kerja memblok jika:
— perkakas listrik dibebankan terlalu berat atau
— alat kerja tersangkut dalam benda yang dikerjakan.
f Usahakan supaya benda yang dikerjakan tidak goyang.
Benda yang ditahan dalam alat pemegang atau bais lebih
mantap daripada benda yang dipegang dengan tangan.
f Sebelum meletakkan perkakas listrik, tunggulah
sampai perkakas berhenti memutar. Alat kerja bisa
tersangkut dan membuat perkakas listrik tidak bisa
dikendalikan.
Penjelasan tentang produk dan daya
Bacalah semua petunjuk-petunjuk untuk
keselamatan kerja dan petunjuk-petunjuk
untuk penggunaan. Kesalahan dalam
menjalankan petunjuk-petunjuk untuk
keselamatan kerja dan petunjuk-petunjuk
untuk penggunaan dapat mengakibatkan
kontak listrik, kebakaran dan/atau luka-luka yang berat.
Penggunaan perkakas listrik
Mesin ini cocok untuk membor dengan getaran pada batu
bata, beton dan batu-batuan serta untuk membor tanpa
getaran pada kayu, logam, keramik dan bahan sintetik. Mesinmesin dengan pengendalian secara elektronika dan arah
putaran ke kanan /kiri juga cocok untuk menyekrup dan
mentap.
1 609 929 M43 | (28.6.11) Bosch Power Tools
Page 31

OBJ_BUCH-61-006.book Page 31 Tuesday, June 28, 2011 2:41 PM
Bahasa Indonesia | 31
Bagian-bagian pada gambar
Nomor-nomor dari bagian-bagian perkakas pada gambar
sesuai dengan gambar perkakas listrik pada halaman
bergambar.
1 Cekaman mata bor yang dikunci dan dibuka dengan
tangan *
2 Selubung depan
3 Selubung belakang
4 Sakelar untuk menyetel „tanpa getaran/dengan getaran“
5 Tombol pengunci untuk tombol untuk menghidupkan
dan mematikan mesin
6 Tombol untuk menghidupkan dan mematikan
7 Roda untuk penyetelan pendahuluan kecepatan putaran
(GSB 16RE)
8 Omsakelar arah putaran
(GSB 10 RE/GSB 13 RE/GSB 16 RE)
9 Tombol untuk mengganti penyetelan pembatas
kedalaman lubang*
10 Baut kupu-kupu untuk penyetelan gagang tambahan*
11 Gagang tambahan (genggaman terisolir) *
12 Pembatas kedalaman *
13 Pegangan (genggaman terisolir)
14 Kunci cekaman mata bor*
15 Cekaman mata bor pakai kunci bergigi *
16 Pemegang mata obeng bit*
17 Mata obeng bit*
18 Kunci mur dalam**
19 Kunci pas**
*Ak sesori yang ada pada gambar atau yang dijelaskan, tidak
termasuk pasokan standar. Semua aks esori yang ada bisa Anda
lihat dalam program aksesori Bosch.
**dijual s ecara umum (tidak termasuk perkakas listrik yang
dipasok)
Data teknis
Mesin bor getaran GSB ...
Professional
Nomor model 3 601 ... B16 0.. B16 1.. B17 0.. B17 1.. B18 0.. B18 1..
Masukan nominal
Daya
Kecepatan putaran tanpa beban
Kecepatan putaran maks. selama
dibebani
Banyaknya getaran
Momen putar nominal
W 500 500 600 600 701 701
W 250 250 301 301 351 351
-1
min
-1
min
min-125 700 25700 25070 25 070 26 270 26 270
Nm 1,5 1,5 1,8 1,8 2,0 2,0
Penyetelan pendahuluan kecepatan
putaran – ––––z
Putaran ke kanan/kiri
Leher poros Ø
mm 43 43 43 43 43 43
Ø mata bor maks.
–Beton
–Baja
–Kayu
mm
mm
mm
Kepala cekam yang bisa memegang
mata bor
mm 1,5 – 10 1,5 – 10 1,5 – 13 1,5 – 13 1,5 – 13 1,5 – 13
Berat sesuai dengan EPTA-Procedure
01/2003
kg 1,5 1,5 1,7 1,7 1,9 1,9
Klasifikasi keamanan
Data-data berlaku untuk tegangan nominal [U] 230 V. Pada tegangan yang lebih renda h dan pada model khusus mancanegara data-data in i bisa berlainan.
Perhatikanlah nomor model perkakas listrik Anda yang tercantum pada label tipe mesin. Nam a dagang dari beberapa perkakas listrik bisa berbeda.
10 10 RE 13 13 RE 16 16 RE
2600 0 – 2600 2800 0 – 2800 30 00 0–3000
1610 1610 1570 1 570 1 640 1640
– z – z – z
10
8
20
10
20
13
8
10
25
13
10
25
16
12
30
/II / II / II / II / II / II
16
12
30
Cara memasang
f Sebelum mulai dengan pekerjaan pada perkakas
listrik, tariklah steker dari stopkontak.
Gagang tambahan (lihat gambar A)
(GSB 13/GSB 13 RE/GSB 16/ GSB 16 RE)
f Gunakanlah perkakas listrik hanya dengan gagang
tambahan 11.
Bosch Power Tools 1 609 929 M43 | (28.6.11)
Anda bisa memutarkan gagang tambahan 11 ke kedudukan
yang cocok dengan macam pekerjaan, supaya posisi kerja
mantap dan tidak begitu melelahkan.
Putarkan baut kupu-kupu untuk penyetelan gagang tambahan
10 dalam arah yang berlawanan dengan jalannya jarum jam
dan putarkan gagang tambahan 11 ke kedudukan yang
diperlukan. Setelah itu baut kupu-kupu 10 diputarkan dalam
arah jalannya jarum jam untuk mengencangkannya kembali.
Page 32

OBJ_BUCH-61-006.book Page 32 Tuesday, June 28, 2011 2:41 PM
32 | Bahasa Indonesia
Menyetel kedalaman pemboran (lihat gambar A)
Dengan pembatas kedalaman lubang 12 kedalaman
pemboran X bisa disetelkan.
Tekan tombol untuk men gganti penyetelan pembatas
kedalaman lubang 9 dan pasangkan pembatas kedalaman
lubang pada gagang tambahan 11.
Tarik pembatas kedalaman lubang sedemikian, sampai jarak
antara pucuk mata bor dan pucuk pembatas kedalaman
lubang adalah kedalaman pemboran X yang dikehendaki.
Mengganti alat kerja
Cekaman mata bor yang dikunci dan dibuka dengan
tangan (lihat gambar B)
Pegangkan selubung belakang 3 dari cekaman mata bor yang
dikunci dan dibuka dengan tangan 1 dan putarkan selubung
depan 2 dalam arah putaran n, sampai alat kerja bisa
dimasukkan. Pasangkan alat kerja.
Peganglah selubung bagian belakang 3 dari cekaman mata
bor yang dkunci dan dibuka dengan tangan 1 dengan betul
dan putarkan selubung bagian depan 2 dalam arah putaran o
keras-keras dengan tangan sampai menutup, sampai tidak
terdengar bunyi ceklek. Dengan demikian cekaman mata bor
dikunci secara otomatis.
Penguncian terbuka kembali, jika pada waktu mengeluarkan
alat kerja, selubung depan 2 diputarkan dalam arah yang
berlawanan.
Cekaman mata bor pakai kunci bergigi (lihat gambar C)
f Pakailah sarung tangan pelindung pada waktu
mengganti alat kerja. Cekaman mata bor bisa menjadi
sangat panas jika digunakan untuk waktu yang lama.
Bukakan cekaman mata bor pakai kunci bergigi 15 dengan
cara memutarkannya, sampai alat kerja bisa dipasangkan.
Pasangkan alat kerja.
Masukkan kunci cekaman mata bor 14 ke dalam lubanglubang dari cekaman mata bor pakai kunci bergigi 15 dan
kencangkan alat kerja secara rata.
Alat kerja untuk menyekrup (lihat gambar D)
Jika digunakan mata obeng bit 17, gunakan selalu pemegang
mata obeng bit 16. Gunakanlah hanya mata obeng bit yang
cocok pada kepala sekrup.
Untuk menyekrup, sakelar untuk menyetel „tanpa
getaran/dengan getaran“ 4 selalu harus disetelkan pada
simbol „membor (tanpa getaran)“.
Mengganti cekaman mata bor
Melepaskan cekaman mata bor (lihat gambar E)
Untuk melepaskan cekaman mata bor yang dikunci dan
dibuka dengan tangan 1, masukkan satu kunci mur dalam 18
ke dalam cekaman mata bor yang dikunci dan dibuka dengan
tangan 1 dan pasangkan satu kunci pas 19 (ukuran mulut 12)
pada pipi untuk kunci pas pada poros mesin. Letakkan
perkakas listrik pada alas yang stabil, misalnya meja kerja.
Tahankan kunci pas 19 dan lepaskan cekaman mata bor yang
dikunci dan dibuka dengan tangan 1 dengan cara memutar
kunci mur dalam 18 dalam arah putar n. Cekaman mata bor
yang dikunci dan dibuka dengan tangan yang terlalu kencang
duduknya dilepaskan dengan cara memukul secara ringan
pada gagang panjang dari kunci mur dalam 18. Singkirkan
kunci mur dalam dari cekaman mata bor yang dikunci dan
dibuka dengan tangan dan putarkan cekaman mata bor yang
dikunci dan dibuka dengan tangan sampai lepas sama sekali.
Cara melepaskan cekaman mata bor pakai kunci bergigi 15
sama dengan cara melepaskan cekaman mata bor yang
dikunci dan dibuka dengan tangan.
Memasang cekaman mata bor (lihat gambar F)
Cara memasang cekaman mata bor yang dikunci dan dibuka
dengan tangan/pakai kunci bergigi adalah seperti di atas
tetapi dalam urutan terbalik.
Cekaman mata bor harus dikencangkan dengan
momen kunci baut sebesar kira-kira 30– 35 Nm.
Penghisapan debu/serbuk
f Debu dari bahan-bahan seperti misalnya cat yang
mengandung timbel (timah hitam), beberapa jenis kayu,
bahan mineral dan logam bisa berbahaya bagi kesehatan.
Menyentuh atau menghirup debu-debu ini bisa
mengakibatkan reaksi alergi dan/atau penyakit saluran
pernafasan dari orang yang menggunakan mesin atau
orang yang berada di dekatnya.
Beberapa debu tertentu seperti misalnya debu kayu pohon
quercus atau pohon fagus silvatica dianggap bisa
mengakibatkan penyakit kanker, terutama dalam
campuran dengan bahan-bahan tambahan untuk
pengolahan kayu (kromat, obat pengawet kayu). Bahanbahan yang mengandung asbes hanya boleh dikerjakan
oleh orang-orang yang ahli.
– Perhatikanlah supaya ada pertukaran udara di tempat
kerja.
– Kami anjurkan supaya Anda memakai kedok anti debu
dengan saringan (filter) kelas P2.
Taatilah peraturan-peraturan untuk bahan-bahan yang
dikerjakan yang berlaku di negara Anda.
f Hindarkan debu yang banyak terkumpul di tempat
kerja. Debu dapat menyulut dengan mudahnya.
Penggunaan
Cara penggunaan
f Perhatikan tegangan jaringan listrik! Tegangan
jaringan listrik harus sesuai dengan tegangan listrik
yang tercantum pada label tipe perkakas listrik.
Menyetel arah putaran (lihat gambar-gambar G– H)
(GSB 10 RE/ GSB 13 RE/ GSB 16 RE)
Dengan omsakelar arah putaran 8 Anda bisa merubah arah
putaran dari perkakas listrik. Akan tetapi ini tidak mungkin
jika tombol untuk menghidupkan dan mematikan mesin 6
sedang ditekan.
Arah putaran ke kanan: untuk membor dan memutar masuk
sekrup, tekan omsakelar arah putaran 8 ke kiri sampai batas.
Arah putaran ke kiri: untuk melepaskan atau memutar ke
luar sekrup dan mur, tekan omsakelar arah putaran 8 ke
kanan sampai batas.
1 609 929 M43 | (28.6.11) Bosch Power Tools
Page 33

OBJ_BUCH-61-006.book Page 33 Tuesday, June 28, 2011 2:41 PM
Menyetel macam pekerjaan
Membor dan menyekrup
Setelkan sakelar untuk menyetel „tanpa
getaran/dengan getaran“ 4 pada simbol „membor
tanpa getaran“.
Membor dengan getaran
Setelkan sakelar untuk menyetel „tanpa
getaran/dengan getaran“ 4 pada simbol „membor
dengan getaran“.
Sakelar untuk menyetel „tanpa getaran/dengan getaran“ 4
terasa mengancing dan bisa digerakkan juga selama motor
perkakas listrik sedang hidup.
Menghidupkan/mematikan perkakas listrik
Untuk menghidupkan, tekan tombol untuk menghidupkan
dan mematikan 6 dan tahan tekanan.
Untuk mengunci tombol untuk menghidupkan dan
mematikan 6 yang tertekan, tekan tombol pengunci 5.
Untuk mematikan, lepaskan tombol untuk menghidupkan
dan mematikan 6 atau jika dikunci dengan tombol pengunci 5,
tekan sebentar tombol 6 dan lepaskan.
Menyetel kecepatan putaran/banyaknya getaran
(GSB 10 RE/ GSB 13 RE/ GSB 16 RE)
Anda bisa mengatur kecepatan putaran/ banyaknya getaran
pada perkakas listrik yang sedang berjalan tanpa tingkatan,
dengan cara menambah atau mengurangi tekanan pada
tombol untuk menghidupkan dan mematikan 6.
Tekanan yang ringan pada tombol untuk menghidupkan dan
mematikan 6 mengakibatkan kecepatan putaran yang
rendah/banyaknya getaran yang sedikit. Jika tekanan
ditambah, kecepatan putaran/banyaknya getaran bertambah
pula.
Penyetelan pendahuluan kecepatan putaran/banyaknya
getaran (GSB 16 RE)
Dengan roda untuk penyetelan pendahuluan kecepatan
putaran 7, Anda bisa menyetelkan kecepatan
putaran/banyaknya getaran yang dibutuhkan, juga selama
perkakas listrik sedang berputar.
Kecepatan putaran/banyaknya getaran yang dibutuhkan
tergantung dari bahan yang dikerjakan dan macam pekerjaan
dan bisa didapatkan dengan melakukan uji coba sebelumnya.
Petunjuk-petunjuk untuk pemakaian
f Pasangkan perkakas listrik pada mur/sekrup hanya
jika perkakas listrik dalam keadaan mati. Alat kerja-alat
kerja yang berputar bisa meleset.
Setelah perkakas listrik digunakan untuk waktu yang lama
dengan kecepatan putaran yang rendah, perkakas listrik
didinginkan dengan cara membiarkan perkakas listrik
berputar tanpa beban pada kecepatan putaran maksimum
kira-kira selama 3 menit.
Untuk membor batu ubin/tegel, setelkan sakelar 4 pada
simbol „membor“ (tanpa getaran). Baru setelah ubin tembus,
sakelar disetelkan pada simbol „membor dengan getaran“
dan lanjutkan perkerjaan dengan getaran.
Bahasa Indonesia | 33
Jika mengerjakan beton, batu-batuan dan tembok, pakailah
mata bor baja intan.
Untuk pemboran dalam logam, gunakanlah hanya mata bor
HSS (HSS = High Speed Steel, baja cepat) yang mulus dan
telah diasah. Mutu ini dipenuhi oleh program aksesori dari
Bosch.
Dengan alat pengasah mata bor (aksesori), Anda bisa
mengasah mata bor spiral dengan garis tengah 2,5 –10 mm
tanpa kesulitan.
GSB 16 RE
Untuk pekerjaan yang memerlukan ketelitian, gunakanlah
standar mesin bor (aksesori).
Dengan bais mesin yang bisa dibeli sebagai aksesori, benda
yang dikerjakan bisa dipegang dengan aman. Dengan
demikian benda yang dikerjakan tidak memutar dan tidak
terjadi kecelakaan karenanya.
Rawatan dan servis
Rawatan dan kebersihan
f Sebelum mulai dengan pekerjaan pada perkakas
listrik, tariklah steker dari stopkontak.
f Perkakas listrik dan lubang ventilasi harus selalu
dibersihkan supaya perkakas bisa digunakan dengan
baik dan aman.
Jika pada suatu waktu perkakas listrik ini tidak bisa berjalan
meskipun telah diproduksikan dan diperiksa dengan
seksama, maka reparasinya harus dilakukan oleh Service
Center perkakas listrik Bosch yang resmi.
Jika Anda hendak menanyakan sesuatu atau memesan suku
cadang, sebutkan selalu nomo r model yang terdiri dari 10
angka dan tercantum pada label tipe pekakas.
Layanan pasca beli dan konsultasi bagi pelanggan
Layanan pasca beli Bosch menjawab semua pertanyaan Anda
tentang reparasi dan perawatan serta tentang suku cadang
produk ini. Gambar tiga dimensi dan informasi tentang suku
cadang bisa Anda lihat di:
www.bosch-pt.com
Tim konsultan Bosch dengan senang hati membantu Anda
pada pembelian, penggunaan dan penyetelan produk ini dan
aksesorinya.
Indonesia
PT. Multi Mayaka
Kawasan Industri Pulogadung
Jalan Rawa Gelam III No. 2
Jakarta 13930
Indonesia
Tel.: +62 (21) 46 83 25 22
Fax: +62 (21) 46 82 86 45 /68 23
E-Mail: sales@multimayaka.co.id
www.bosch-pt.co.id
Bosch Power Tools 1 609 929 M43 | (28.6.11)
Page 34

OBJ_BUCH-61-006.book Page 34 Tuesday, June 28, 2011 2:41 PM
34 | Tiøng Vi·t
Cara membuang
Perkakas listrik, aksesori dan kemasan sebaiknya didaur
ulangkan sesuai dengan upaya untuk melindungi lingkungan
hidup.
Janganlah membuang perkakas listrik dalam sampah rumah
tangga!
Perubahan adalah hak Bosch.
Tiøng Vi·t
C¯c Nguy›n TÄc An Toμn
CΩnh b¯o tçng qu¯t c¯ch s¥ dông an toμn
dông cô {i·n c÷m tay
C~NH B|O
cΩnh b¯o vμ hõëng dÿn {õïc li·t k› dõëi {Éy cß thÚ
bÔ {i·n giút, gÉy ch¯y vμ/ hay bÔ thõêng tŸt nghi›m
trãng.
H’y giù t`t cΩ tμi li·u vÖ cΩnh b¯o vμ hõëng dÿn
{Ú tham khΩo vÖ sau.
ThuŸt ngù “dông cô {i·n c÷m tay” trong ph÷n cΩnh
b¯o lμ {Ö cŸp {øn sú s¥ dông dông cô {i·n c÷m tay
còa b”n, lo”i s¥ dông {i·n ngu≥n (cß dÉy cÄm {i·n)
hay vŸn hμnh bÅng pin (khäng dÉy cÄm {i·n).
Khu vúc lμm vi·c an toμn
f Giù nêi lμm vi·c s”ch vμ {ò ¯nh s¯ng. Nêi lμm
vi·c b»a bén vμ tåi tæm dÆ gÉy ra tai n”n.
f Khäng vŸn hμnh dông cô {i·n c÷m tay trong
mäi trõìng dÆ gÉy nç, ch≠ng h”n nhõ nêi cß
ch`t láng dÆ ch¯y, khfl {åt hay r¯c. Dông cô
{i·n c÷m tay t”o ra c¯c tia l¥a n›n cß thÚ lμm r¯c
b⁄n ch¯y hay båc khßi.
f Khäng {Ú trÑ em hay ngõìi {øn xem {öng g÷n
khi vŸn hμnh dông cô {i·n c÷m tay. Sú phÉn
tÉm cß thÚ gÉy ra sú m`t {iÖu khiÚn.
An toμn vÖ {i·n
f Phflch cÄm còa dông cô {i·n c÷m tay phΩi thflch
hïp vëi ç cÄm. Khäng bao giì {õïc cΩi biøn
l”i phflch cÄm dõëi mãi h‡nh thöc. Khäng {õïc
s¥ dông phflch tiøp hïp nåi tiøp {`t (dÉy m¯t).
Phflch cÄm nguy›n bΩn vμ ç c Äm {Ï ng lo” i sfi lμm
giΩm nguy cê bÔ {i·n giút.
f Tr¯nh khäng {Ú thÉn thÚ tiøp xÏc vëi {`t hay
c¯c vŸt cß bÖ m◊t tiøp {`t nhõ {õìng ång, là
sõíi, hμng rμo vμ tò l”nh. Cß nhiÖu nguy cê bÔ
{i·n giút hên nøu cê thÚ b”n bÔ tiøp hay nåi {`t.
f Khäng {õïc {Ú dông cô {i·n c÷m tay ngoμi
mõa hay í t‡nh tr”ng ¤m õët. Nõëc vμo m¯y sfi
lμm tæng nguy cê bÔ {i·n giút.
1 609 929 M43 | (28.6.11) Bosch Power Tools
[ãc kþ mãi cΩnh b¯o an toμn vμ
hõëng dÿn. Khäng tuÉn thò mãi
f Khäng {õïc l”m dông dÉy dÿn {i·n. Khäng
bao giì {õïc nÄm dÉy dÿn {Ú x¯ch, k⁄o hay
rÏt phflch cÄm dông cô {i·n c÷m tay. Khäng {Ú
dÉy g÷n nêi cß nhi·t {é cao, d÷u nhët, vŸt
nhãn b⁄n hay bé phŸn chuyÚn {éng. Lμm háng
hay cuén råi dÉy dÿn lμm tæng nguy cê bÔ {i·n
giút.
f Khi s¥ dông dông cô {i·n c÷m tay ngoμi trìi,
dñng dÉy nåi thflch hïp cho vi·c s¥ dông ngoμi
trìi. S¥ dông dÉy nåi thflch hïp cho vi·c s¥ dông
ngoμi trìi lμm giΩm nguy cê bÔ {i·n giút.
f Nøu vi·c s¥ dông dông cô {i·n c÷m tay í nêi
¤m õët lμ khäng thÚ tr¯nh {õïc, dñng thiøt bÔ
ngÄt m”ch tú {éng (RCD) bΩo v· ngu≥n. S¥
dông thiøt bÔ thiøt bÔ ngÄt m”ch tú {éng RCD lμm
Ωm nguy cê bÔ {i·n giút.
gi
An toμn c¯ nhÉn
f H’y tÜnh t¯o, biøt râ m‡nh {ang lμm g‡ vμ h’y
s¥ dông û thöc khi vŸn hμnh dông cô {i·n c÷m
tay. Khäng s¥ dông dông cô {i·n c÷m tay khi
{ang m·t mái hay {ang bÔ t¯c {éng do ch`t gÉy
nghi·n, rõïu hay dõïc ph¤m gÉy ra. Mét
tho¯ng m`t tŸp trung khi {ang vŸn hμnh dông cô
{i·n c÷m tay cß thÚ gÉy thõêng tflch nghi›m trãng
cho bΩn thÉn.
f S¥ dông trang bÔ bΩo hé c¯ nhÉn. Luän luän
{eo kflnh bΩo v· mÄt. Trang bÔ bΩo hé nhõ kh¤u
trang, giμy chång trït, nßn bΩo hé, hay dông cô
bΩo v· tai khi {õïc s¥ dông {Ïng nêi {Ïng chè
sfi lμm giΩm nguy cê thõêng tŸt cho bΩn thÉn.
f Phàng tr¯nh m¯y khíi {éng b`t ngì. BΩo {Ωm
cäng tÄc m¯y í vÔ trfl tÄt trõëc khi cÄm vμo
ngu≥n {i·n vμ/hay lÄp pin vμo, khi nh`c m¯y
l›n hay khi mang x¯ch m¯y. Ng¯ng ngßn tay
vμo cäng tÄc m¯y {Ú x¯ch hay kflch ho”t dông cô
{i·n c÷m tay khi cäng tÄc í vÔ trfl mí dÆ dÿn {øn
tai n”n.
f L`y mãi ch‡a hay khßa {iÖu chÜnh ra trõëc khi
mí {i·n dông cô {i·n c÷m tay. Khßa hay ch‡a
càn gÄn dflnh vμo bé phŸn quay còa dông cô {i·n
c÷m tay cß thÚ gÉy thõêng tflch cho bΩn thÉn.
f Khäng rõën ngõìi. Luän luän giù tõ thø {öng
flch hïp vμ thæng bÅng. [iÖu nμy t”o cho vi·c
th
{iÖu khiÚn dông cô {i·n c÷m tay tåt hên trong
mãi t‡nh huång b`t ngì.
f Trang phôc thflch hïp. Khäng m◊c qu÷n ¯o
réng lñng thñng hay mang trang söc. Giù tßc,
qu÷n ¯o vμ gæng tay xa khái c¯c bé phŸn
chuyÚn {éng. Qu÷n ¯o réng lñng thñng, {≥ trang
söc hay tßc dμi cß thÚ bÔ cuån vμo c¯c bé phŸn
chuyÚn {éng.
Page 35

OBJ_BUCH-61-006.book Page 35 Tuesday, June 28, 2011 2:41 PM
f Nøu cß c¯c thiøt bÔ {i kÎm {Ú nåi m¯y hÏt bôi
vμ c¯c phô ki·n kh¯c, bΩo {Ωm c¯c thiøt bÔ nμy
{õïc nåi vμ s¥ dông tåt. Vi·c s¥ dông c¯c thiøt
bÔ gom hÏt bôi cß thÚ lμm giΩm c¯c {éc h”i li›n
quan {øn bôi gÉy ra.
S¥ dông vμ bΩo dõîng dông cô {i·n c÷m tay
f Khäng {õïc ⁄p m¯y. S¥ dông dông cô {i·n
c÷m tay {Ïng lo”i theo {Ïng öng dông còa
b”n. Dông cô {i·n c÷m tay {Ïng chöc næng sfi
lμm vi·c tåt vμ an toμn hên theo {Ïng tiøn {é mμ
m¯y {õïc thiøt kø.
f Khäng s¥ dông dông cô {i·n c÷m tay nøu nhõ
cäng tÄc khäng tÄt vμ mí {õïc. B`t kü dông cô
{i·n c÷m tay nμo mμ khäng thÚ {iÖu khiÚn {õïc
bÅng cäng tÄc lμ nguy hiÚm vμ phΩi {õïc s¥a
chùa.
f RÏt phflch cÄm ra khái ngu≥n {i·n vμ/hay pin ra
khái dông cô {i·n c÷m tay trõëc khi tiøn hμnh
b`t kü {iÖu chÜnh nμo, thay phô ki·n, hay c`t
dông cô {i·n c÷m tay. C¯c bi·n ph¯p ngæn ng»a
nhõ vŸy lμm giΩm nguy cê dông cô {i·n c÷m tay
khíi {éng b`t ngì.
f C`t giù dông cô {i·n c÷m tay khäng dñng tëi
nêi trÑ em khäng l`y {õïc vμ khäng cho
ngõìi chõa t»ng biøt dông cô {i·n c÷m tay
hay c¯c hõëng dÿn nμy s¥ dông dông cô {i·n
c÷m tay. Dông cô {i·n c÷m tay nguy hiÚm khi í
trong tay ngõìi chõa {õïc chÜ c¯ch s¥ dông.
o quΩn dông cô {i·n c÷m tay. KiÚm tra xem
f BΩ
c¯c bé phŸn chuyÚn {éng cß bÔ sai l·ch hay
k‹t, c¯c bé phŸn bÔ r”n nöt vμ c¯c t‡nh tr”ng
kh¯c cß thÚ Ωnh hõíng {øn sú vŸn hμnh còa
m¯y. Nøu bÔ hõ háng, phΩi s¥a chùa m¯y
trõëc khi s¥ dông. NhiÖu tai n”n xΩy ra do bΩo
quΩn dông cô {i·n c÷m tay t≥i.
f Giù c¯c dông cô cÄt b⁄n vμ s”ch. BΩo quΩn
{Ïng c¯ch c¯c dông cô cÄt cß c”nh cÄt b⁄n lμm
giΩm khΩ næng bÔ k‹t vμ dÆ {iÖu khiÚn hên.
f S¥ dông dông cô {i·n c÷m tay, phô ki·n, {÷u
cμi v. v., {Ïng theo c¯c chÜ dÿn nμy, h’y lõu û
{øn {iÖu ki·n lμm vi·c vμ cäng vi·c phΩi thúc
hi·n. S¥ sú dông dông cô {i·n c÷m tay kh¯c vëi
môc {flch thiøt kø cß thÚ t”o n›n t‡nh huång nguy
hiÚm.
BΩo dõîng
f [õa dông cô {i·n c÷m tay còa b”n {øn thï
chuy›n män {Ú bΩo dõîng, chÜ s¥ dông phô
tñng {Ïng chòng lo”i {Ú thay. [iÖu nμy sfi {Ωm
bΩo sú an toμn còa m¯y {õïc giù nguy›n.
Tiøng Vi·t | 35
CΩnh B¯o An Toμn Vi·c S¥ Dông Khoan
GSB 13/GSB 13 RE / GSB 16 /GSB 16 RE
f H’y s¥ dông tay nÄm phô, nøu nhõ {õïc giao
kÎm vëi dông cô. Sú m`t {iÖu khiÚn cß thÚ gÉy
thõêng tflch cho bΩn thÉn.
f Khi s¥ dông m¯y, luän luän giù ch◊t m¯y bÅng
cΩ hai tay vμ t”o tõ thø {öng vùng ch’i. Dông
cô {i·n c÷m tay vŸn hμnh an toμn hên khi dñng
cΩ hai tay.
GSB 10/GSB 10 RE / GSB 13 /GSB 13 RE/
GSB 16/GSB 16 RE
f H’y mang dông cô bΩo v· tai khi khoan vëi chø
{é {Ÿp. Phêi nhiÆm tiøng ≥n cß thÚ lμm cho tai bÔ
{iøc.
f NÄm giù dông cô {i·n nêi ph÷n nÄm c¯ch {i·n
khi thúc hi·n vi·c gia cäng nêi dông cô cÄt cß
thÚ ch”m vμo dÉy {i·n khäng nh‡n th`y {õïc
hay chflnh dÉy còa m¯y. Dông cô cÄt ch”m vμo
dÉy “cß {i·n” cß thÚ lμm cho c¯c bé phŸn kim lo”i
khäng {õïc bao bãc còa dông cô {i·n “cß {i·n”
vμ cß khΩ næng gÉy cho ngõìi s¥ dông m¯y bÔ
{i·n giút.
f Dñng thiøt bÔ dà t‡m thflch hïp {Ú x¯c {Ônh nøu
cß c¯c cäng tr‡nh cäng céng lÄp {◊t ng÷m
trong khu vúc lμm vi·c hay li›n h· vëi Cty
cäng tr‡nh Cäng céng {Ôa phõêng {Ú nhì hè
trï. [ông ch”m {õìng dÿn {i·n cß thÚ gÉy ra
háa ho”n vμ {i·n giút. Lμm hõ h”i {õìng dÿn khfl
ga cß thÚ gÉy nç. Lμm thòng {õìng dÿn nõëc
gÉy hõ háng tμi sΩn hay cß khΩ
giút.
f TÄt m¯y ngay lŸp töc khi dông cô lÄp vμo m¯y
{ét nhi›n bÔ nghfin ch◊t. [Ö phàng lúc v◊n
m”nh cß thÚ {õïc t”o ra do sú giŸt ngõïc.
Dông cô lÄp vμo cß thÚ bÔ nghfin ch◊t khi:
— dông cô {i·n c÷m tay bÔ qu¯ tΩi hay
— bÔ chÎn ch◊t trong vŸt gia cäng.
f K‹p ch◊t vŸt gia cäng. VŸt gia cäng {õïc k‹p
bÅng mét thiøt bÔ k‹p hay bÅng ›tä th‡ vùng chÄc
hên giù bÅng tay.
f Luän luän {ïi cho m¯y hoμn toμn ng»ng h≠n
trõëc khi {◊t xuång. Dông cô lÄp vμo m¯y cß
thÚ bÔ k‹p ch◊t dÿn {øn vi·c dông cô {i·n c÷m tay
bÔ m`t {iÖu khiÚn.
næng gÉy ra {i·n
Bosch Power Tools 1 609 929 M43 | (28.6.11)
Page 36

OBJ_BUCH-61-006.book Page 36 Tuesday, June 28, 2011 2:41 PM
36 | Tiøng Vi·t
Mä TΩ SΩn Ph¤m vμ [◊c Tflnh
Kþ ThuŸt
[ãc kþ mãi cΩnh b¯o an toμn vμ mãi
hõëng dÿn. Khäng tuÉn thò mãi cΩnh
b¯o vμ hõëng dÿn {õïc li·t k› dõëi
{Éy cß thÚ bÔ {i·n giút, gÉy ch¯y
vμ/hay bÔ thõêng tŸt nghi›m trãng.
Dμnh s¥ dông cho
M¯y khoan cß chöc næng {Ÿp {õïc thiøt kø {Ú
khoan g”ch, b›-täng vμ {¯ cóng nhõ {Ú khoan gè,
kim lo”i vμ nhúa. M¯y cß trang bÔ bé phŸn {iÖu khiÚn
{i·n t¥ vμ quay {õïc chiÖu phΩi/tr¯i cóng thflch hïp
cho vi·c bÄt vflt hay bÄt ren.
BiÚu trõng còa sΩn ph¤m
Sú {¯nh så c¯c biÚu trõng còa sΩn ph¤m lμ {Ú tham
khΩo h‡nh minh hãa còa m¯y tr›n trang h‡nh Ωnh.
1 MÉm c◊p khäng dñng ch‡a*
2 Khëp vàng ngoμi
3 Khëp vàng trong
4 G”c chãn chöc næng "Khoan thõìng/Khoan
{Ÿp"
5 NÏt kho¯ giù chø {é tú-ch”y còa cäng tÄc
TÄt/Mí
6 Cäng tÄc TÄt/Mí
7 NÏm xoay {Ú chãn trõëc tåc {é (GSB 16 RE)
8 G”c v◊n chuyÚn {çi chiÖu quay
(GSB 10 RE/GSB 13 RE/GSB 16 RE)
9 NÏt {iÖu chÜnh cho cî {Ônh {é sÉu*
10 Vflt tai chu≥n {Ú {iÖu chÜnh tay nÄm phô*
11 Tay nÄm phô (cß bÖ m◊t nÄm c¯ch {i·n)*
12 Cî {Ônh {é sÉu*
13 Tay nÄm (bÖ m◊t nÄm c¯ch {i·n)
14 Khßa còa mÉm c◊p*
15 MÉm c◊p khoan lo”i dñng ch‡a*
16 [÷u nåi phç thäng*
17 [÷u vflt*
18 Khßa lôc gi¯c **
19 Cì-l› mí mi·ng**
*Phô tñng {õïc tr‡nh bμy hay mä tΩ khäng phΩi lμ mét
ph÷n còa ti›u chu¤n hμng hßa {õïc giao kÎm theo sΩn
ph¤m. B”n cß thÚ tham khΩo tçng thÚ c¯c lo”i phô tñng,
phô ki·n trong chõêng tr‡nh phô tñng còa chÏng täi.
**Cß b¯n tr›n thÔ trõìng (khäng nÅm trong ph”m vi
{õïc kÎm theo m¯y khi giao hμng)
Thäng så kþ thuŸt
Khoan [Ÿp GSB ...
Professional
M’ så m¯y
Cäng su`t vμo danh {Ônh
Cäng su`t ra
Tåc {é khäng tΩi
Tåc {é quay chÔu tΩi, tåi {a.
T÷n su`t {Ÿp
Lúc v◊n danh {Ônh
Chãn Trõëc Tåc [é
Quay PhΩi/Tr¯i
[õìng kflnh cç trôc
[õìng kflnh khoan tåi {a
– B›-täng
– Th⁄p
– Gè
Ph”m vi mÉm c◊p k‹p {õïc
Trãng lõïng theo Qui tr‡nh
EPTA-Procedure 01/2003
(chu¤n EPTA 01/2003)
C`p {é bΩo v·
C¯c gi¯ trÔ {’ cho cß hi·u lúc cho {i·n thø danh {Ônh \U] 230 V. [åi vëi {i·n thø th`p hên vμ c¯c lo”i m¯y dμnh ri›ng cho mét
så quåc gia, c¯c gi¯ trÔ nμy cß thÚ thay {çi.
Xin vui làng xem kþ m’ så m¯y tr›n nh’n m¯y còa b”n. T›n thõêng m’i còa t»ng m¯y cß thÚ kh¯c nhau.
3 601 ... B16 0.. B16 1.. B17 0.. B17 1.. B18 0.. B18 1..
W500500 600 600 701 701
W250250 301 301 351 351
v/p 2600 0 –2600 2800 0 –2800 3000 0 – 3000
v/p 1610 1610 1570 1570 1640 1640
bpm 25700 25700 25 070 25070 26270 26 270
Nm 1,5 1,5 1,8 1,8 2,0 2,0
mm 43 43 43 43 43 43
mm
mm
mm
mm 1,5 – 10 1,5 –10 1,5 – 13 1,5 –13 1,5 –13 1,5– 13
kg 1,5 1,5 1,7 1,7 1,9 1,9
10 10 RE 13 13 RE 16 16 RE
– ––––z
– z – z – z
10
8
20
/II /II / II /II / II /II
10
20
13
8
10
25
13
10
25
16
12
30
16
12
30
1 609 929 M43 | (28.6.11) Bosch Power Tools
Page 37

OBJ_BUCH-61-006.book Page 37 Tuesday, June 28, 2011 2:41 PM
Sú lÄp vμo
f Trõëc khi tiøn hμnh b`t cö vi·c g‡ tr›n m¯y,
k⁄o phflch cÄm {i·n ngu≥n ra.
Tay nÄm phô (xem h‡nh A)
(GSB 13/GSB 13 RE/GSB 16/ GSB 16 RE)
f ChÜ vŸn hμnh m¯y còa b”n khi {’ gÄn tay nÄm
phô 11.
Tay nÄm phô 11 cß thÚ chÜnh {◊t í b`t cö vÔ trfl nμo
mμ t”o ra {õïc sú an toμn vμ tõ thø lμm vi·c tháa
m¯i nh`t.
V◊n bu-long tai h≥ng {iÖu chÜnh tay nÄm phô 10
theo chiÖu ngõïc chiÖu {≥ng h≥ vμ chÜnh {◊t tay
nÄm phô 11 í vμo vÔ trfl theo y›u c÷u. Sau {ß siøt
ch◊t bu-long tai h≥ng 10 l”i theo chiÖu {≥ng h≥.
[iÖu ChÜnh Cî SÉu Khoan (xem h‡nh A)
Cî sÉu muån khoan X cß thÚ chÜnh {◊t bÅng cî
{Ônh {é sÉu 12.
Nh`n nÏt chÜnh {◊t cî {Ônh {é sÉu 9 vμ lÄp cî {Ônh
{é sÉu vμo tay nÄm phô 11.
K⁄o cî {Ônh {é sÉu ra cho {øn khi khoΩng c¯ch giùa
{÷u mói khoan vμ {÷u cî {Ônh {é sÉu thflch öng vëi
chiÖu sÉu lç khoan muån cß X.
Thay Dông Cô
MÉm C◊p Khäng Dñng Khßa (xem h‡nh B)
Giù ch◊t khëp vàng trong 3 còa mÉm c◊p khäng
dñng ch‡a 1 vμ v◊n khëp vàng ngoμi 2 theo chiÖu
quay n, cho {øn khi cß thÚ lÄp dông cô vμo. LÄp
dông cô vμo.
KÖm giù vàng trong 3 còa mÉm c◊p khäng dñng
ch‡a 1 thŸt chÄc vμ v◊n m”nh vàng ngoμi 2 theo
chiÖu quay o bÅng tay cho {øn khi khäng càn nghe
th`y tiøng còa {éng t¯c khßa nùa. Thao t¯c nμy tú
{éng khßa mÉm c◊p khoan l”i.
[éng t¯c kho¯ {õïc gi’i phßng {Ú l`y dông cô ra
khi khëp vàng ngoμi 2 {õïc v◊n theo chiÖu ngõïc
l”i.
MÉm C◊p Khoan Dñng Khßa (xem h‡nh C)
f Mang gæng tay bΩo hé khi thay dông cô. MÉm
c◊p cß thÚ trí n›n r`t nßng trong suåt thìi gian
dμi li›n tôc ho”t {éng.
Mí mÉm c◊p khoan dñng khßa 15 bÅng c¯ch v◊n
cho {øn khi dông cô cß thÚ lÄp vμo {õïc. LÄp dông
cô vμo.
Tra khßa mÉm c◊p vμo 14 trong c¯c lè tõêng öng
còa mÉm c◊p khoan dñng khßa 15
dông cô l”i mét c¯ch {≥ng bé.
vμ v◊n {Ú k‹p
Tiøng Vi·t | 37
Dông Cô BÄt Vflt (xem h‡nh D)
Khi lμm vi·c vëi c¯c mói vflt 17, luän luän n›n s¥
dông 16 lo”i {÷u nåi phç thäng. ChÜ dñng mói vflt
v»a khëp vëi {÷u vflt.
[Ú bÄt vflt vμo, luän luän {◊t vÔ trfl g”c chãn "Khoan
thõìng/Khoan [Ÿp" 4 vÖ biÚu tõïng "Khoan
thõìng".
Thay MÉm C◊p Khoan
L`y MÉm C◊p Khoan Ra (xem h‡nh E)
[Ú th¯o mÉm c◊p khäng dñng ch‡a 1, tra ch‡a v◊n
s¯u c”nh 18 vμo trong mÉm c◊p khäng dñng ch‡a {Ú
kÖm ch◊t l”i 1, vμ tra ch‡a v◊n mí mi·ng 19 (cî
12 mm) ¯p s¯t vμo ph÷n m¯ d‹t còa trôc truyÖn
{éng. [◊t m¯y l›n tr›n mét m◊t k› {î vùng chÄc,
vd., bμn thï. Giù ch‡a v◊n mí mi·ng 19 thŸt chÄc vμ
th¯o láng mÉm c◊p khäng dñng ch‡a 1 bÅng c¯ch
v◊n ch‡a v◊n s¯u c”nh 18 theo chiÖu quay n. Lμm
long mÉm c◊p khäng dñng ch‡a {ang dflnh s¯t ra
bÅng c¯ch {Ÿp l›n ph÷n chuäi dμi còa ch‡a v◊n s¯u
c”nh 18. Th¯o ch‡a v◊n s¯u c”nh ra khái mÉm c◊p
khoan khäng dñng ch‡a vμ th¯o mÉm c◊p khoan ra
h≠n.
MÉm c◊p khoan dñng khßa 15 {õïc th¯o ra nhõ
c¯ch còa mÉm c◊p khoan khäng dñng khßa.
GÄn MÉm C◊p Khoan vμo (xem h‡nh F)
p khoan khäng dñng khßa/mÉm c◊p dñng
MÉm c◊
khßa {õïc lÄp vμo theo tr‡nh tú ngõïc l”i.
MÉm c◊p khoan phΩi {õïc siøt ch◊t vëi
lúc v◊n vμo khoΩng 30– 35 Nm.
HÏt Dæm/Bôi
f M”t bôi t» c¯c vŸt li·u {õïc sên phò ngoμi cß
chöa ch‡ tr›n mét så lo”i gè, kho¯ng vŸt vμ kim
lo”i cß thÚ gÉy nguy h”i {øn söc khoÑ con ngõìi.
[ông ch”m hay hflt thí c¯c bôi nμy cß thÚ lμm
ngõìi s¥ dông hay {öng g÷n bÔ dÔ öng vμ/ho◊c
gÉy nhiÆm trñng h· hä h`p.
Mét så m”t bôi cô thÚ, vfl dô nhõ bôi gè s≥i hay
{`u, {õïc xem lμ ch`t gÉy ung thõ, {◊c bi·t lμ cß
li›n quan {øn c¯c ch`t phô gia dñng x¥ lû gè
(ch`t cromat, ch`t bΩo quΩn gè). Cß thÚ chÜ n›n
{Ú thï chuy›n män gia cäng c¯c lo”i vŸt li·u cß
chöa amiæng.
– T”o khäng khfl thäng tho¯ng nêi lμm vi·c.
– Khuyøn nghÔ n›n mang m◊t n” phàng {éc cß
bé lãc c`p P2.
TuÉn thò c¯c qui {Ônh còa quåc gia b”n li›n quan
{øn lo”i vŸt li·u gia cäng.
f Tr¯nh khäng {Ú r¯c tflch tô t”i nêi lμm vi·c. R¯c
cß thÚ dÆ dμng bÄt l¥a.
Bosch Power Tools 1 609 929 M43 | (28.6.11)
Page 38

OBJ_BUCH-61-006.book Page 38 Tuesday, June 28, 2011 2:41 PM
38 | Tiøng Vi·t
VŸn Hμnh
BÄt [÷u VŸn Hμnh
f TuÉn thò theo {Ïng {i·n thø! [i·n thø ngu≥n
phΩi {Ïng vëi {i·n thø {’ ghi râ tr›n nh’n m¯y.
[Ωo ChiÖu Quay (xem h‡nh G– H)
(GSB 10 RE/ GSB 13 RE / GSB 16 RE)
G”c chuyÚn {çi chiÖu quay 8 {õïc s¥ dông {Ú {Ωo
l”i chiÖu quay còa m¯y. Tuy nhi›n, vi·c nμy khäng
thÚ thúc hi·n {õïc cñng lÏc vëi cäng tÄc TÄt/Mí 6
{ang ho”t {éng.
ChiÖu Quay PhΩi: [Ú khoan hay bÄt vflt vμo, {¤y
g”c chuyÚn {çi chiÖu quay 8 vÖ høt b›n tr¯i.
ChiÖu Quay Tr¯i: [Ú nëi hay lμ th¯o vflt hay lμ {ai
åc, nh`n g”c chuyÚn {çi` chiÖu quay 8 qua høt b›n
phΩi.
ChÜnh [◊t Phõêng Thöc Ho”t [éng
Khoan Thõìng vμ V◊n Vflt
ChÜnh {◊t g”c chãn 4 vÖ biÚu tõïng
"Khoan thõìng".
Khoan [Ÿp
ChÜnh {◊t g”c chãn chöc næng 4 vÖ biÚu
tõïng "Khoan [Ÿp".
G”c chãn chöc næng 4 æn khëp vμo gu≥ng m¯y cß
thÚ nhŸn biøt {õïc vμ cóng cß thÚ kflch ho”t {õïc
cΩ khi m¯y {ang ch”y.
BŸt Mí vμ TÄt
[Ú khíi {éng m¯y, nh`n cäng tÄc TÄt/Mí 6 vμ nh`n
giù xuång.
[Ú khßa, nh`n
tú-ch”y 5 vμo.
[Ú tÄt m¯y, nhΩ cäng tÄt TÄt/Mí 6 ra hay khi cäng
tÄc {’ {õïc khßa bÅng nÏt khßa tú-ch”y 5, nh`n
nhanh cäng tÄc TÄt/Mí 6 vμ r≥i nhΩ ra.
[iÖu chÜnh Tåc [é/T÷n su`t [Ÿp
(GSB 10 RE/ GSB 13 RE / GSB 16 RE)
Cß thÚ {iÖu chÜnh thay {çi tåc {é/t÷n su`t {Ÿp còa
dông cô {i·n {ang ho”t {éng, tñy theo möc {é cäng
tÄc TÄt/Mí 6 {õïc bßp vμo.
Lúc ¯p nh‹ l›n cäng tÄc TÄt/Mí 6 t”o ra tåc {é
th`p/t÷n su`t {Ÿp thõa. Lúc ¯p m”nh hên l›n cäng
tÄc lμm tæng tåc {é vμ t÷n su`t {Ÿp.
Chãn trõëc Tåc {é/T÷n su`t [Ÿp (GSB 16 RE)
bÅng nÏm xoay chãn trõëc tåc {é 7, tåc {é/t÷n su`t
{Ÿp mμ ta muån cß, cß thÚ {Ônh trõëc {õïc ngay cΩ
khi {ang vŸn hμnh m¯y.
cäng tÄc TÄt/Mí 6, nh`n nÏt khßa
Tåc {é c÷n cß/t÷n su`t {Ÿp tñy thuéc vμo vŸt li·u vμ
c¯c {iÖu ki·n lμm vi·c, vμ cß thÚ x¯c {Ônh {õïc
thäng qua vi·c ch”y th¥ nghi·m thúc tø.
Hõëng Dÿn S¥ Dông
f Tra dông cô {i·n c÷m tay vμo vflt/{ai åc chÜ khi
{’ tÄt cäng tÄc. Dông cô gÄn trong m¯y {ang
xoay cß thÚ trõït ra ngoμi.
Sau thìi gian dμi vŸn hμnh m¯y li›n tôc í tåc {é
th`p, {Ú lμm m¯y nguéi xuång, cho m¯y ch”y khäng
tΩi vëi tåc {é tåi {a trong khoΩng 3 phÏt.
[Ú khoan ngßi, chÜnh {◊t g”c chãn 4 vÖ biÚu tõïng
"Khoan thõìng". Khäng {õïc g”c sang biÚu tõïng
"Khoan [Ÿp" hay thao t¯c vëi chø {é {Ÿp cho {øn
khi {’ khoan xuy›n qua ngßi.
Dñng mói khoan {÷u cacbua khi khoan b›-täng, nêi
cß køt c`u nÖ vμ tõìng g”ch.
[Ú khoan kim lo”i, chÜ n›n dñng mói khoan th⁄p giß
HSS thŸt sÄc b⁄n (HSS = th⁄p tåc {é cao). Ch`t
lõïng {¯p öng chu¤n {õïc {Ωm bΩo trong chõêng
tr‡nh phô ki·n còa Bosch.
Mói khoan xoÄn åc t» 2,5–10 mm cß thÚ dÆ dμng
mμi b⁄n l”i bÅng dông cô mμi mói khoan (xem ph÷n
phô ki·n).
GSB 16 RE
ChÏng täi khuy›n n›n s¥ dông gi¯ khoan (xem
ph÷n phô ki·n) cho c¯c cäng vi·c {◊t bi·t y›u c÷u
c÷n cß {é chflnh x¯c cao.
Bμn k‹p m¯y, phô ki·n lo”i cß thÚ mua {õïc, {Ωm
bΩo sú k‹p vŸt gia cäng {õïc chÄc chÄn. [iÖu nμy
ngæn khäng lμm cho vŸt gia cäng bÔ xoay vμ khäng
bÔ tai n”n cß thÚ xΩy ra do sú cå nμy.
BΩo Dõîng vμ BΩo QuΩn
BΩo Dõîng Vμ Lμm S”ch
f Trõëc khi tiøn hμnh b`t cö vi·c g‡ tr›n m¯y,
k⁄o phflch cÄm {i·n ngu≥n ra.
f [Ú {õïc an toμn vμ m¯y ho”t {éng {Ïng chöc
næng, luän luän giù m¯y vμ c¯c khe thäng giß
{õïc s”ch.
Nøu giΩ nhõ m¯y bÔ trôc tr◊c dñ {’ {õïc theo dâi
c¤n thŸn trong qu¯ tr‡nh sΩn xu`t vμ {’ qua ch”y
kiÚm tra, sú s¥a chùa phΩi do trung tÉm bΩo
hμnh-bΩo tr‡ dông cô {i·n c÷m tay Bosch thúc hi·n.
Trong mãi thõ t» giao dÔch vμ {ên {◊t hμng phô
tñ ng, xin vu i làng l uän viø t {ò 10 con så { ’ {õïc g hi
tr›n nh’n m¯y.
1 609 929 M43 | (28.6.11) Bosch Power Tools
Page 39

OBJ_BUCH-61-006.book Page 39 Tuesday, June 28, 2011 2:41 PM
DÔch vô hè trï kh¯ch hμng vμ bΩo
hμnh-bΩo tr‡
Bé phŸn phôc vô hμng sau khi b¯n còa chÏng täi trΩ
lìi c¯c cÉu hái li›n quan {øn vi·c bΩo dõîng vμ s¥a
chùa c¯c sΩn ph¤m cóng nhõ phô tñng thay thø còa
b”n. Sê {≥ mä tΩ vμ thäng tin vÖ phô tñng thay thø
cóng cß thÚ tra cöu theo dõëi {Éy:
www.bosch-pt.com
C¯c nhÉn vi›n tõ v`n kh¯ch hμng còa chÏng täi trΩ
lìi c¯c cÉu hái còa b”n li›n quan {øn vi·c mua sΩn
ph¤m nμo lμ tåt nh`t, c¯ch öng dông vμ {iÖu chÜnh
sΩn ph¤m vμ c¯c phô ki·n.
Vi·t Nam
Cäng ty Tr¯ch Nhi·m Hùu H”n Robert Bosch
Vi·t Nam, PT/SVN
T÷ng 10,194 Golden Building
473 [i·n Bi›n Phò
Phõìng 25, QuŸn B‡nh Th”nh
Thμnh Phå H≥ Chfl Minh
Vi·t Nam
Tel.: +84 (8) 6258 3690 Ext 413
Fax: +84 (8) 6258 3692
hieu.lagia@vn.bosch.com
www.bosch-pt.com
ThΩi bá
M¯y, linh ki·n vμ bao b‡ phΩi {õïc phÉn lo”i {Ú t¯i
chø theo hõëng thÉn thi·n vëi mäi trõìng.
Khäng {õïc thΩi bá dông cô {i·n vμo chung vëi r¯c
sinh ho”t!
[õïc quyÖn thay {çi néi dung mμ khäng phΩi thäng b¯o
trõëc.
Français
Avertissements de sécurité
Avertissements de sécurité généraux pour l’outil
AVERTISSEMENT
tructions. Ne pas suivre les avertissements et instructions
peut donner lieu à un choc électrique, un incendie et/ou une
blessure sérieuse.
Conserver tous les avertissements et toutes les instructions pour pouvoir s’y reporter ultérieurement.
Le terme « outil » dans les avertissements fait référence à votre outil électrique alimenté par le secteur (avec cordon d’alimentation) ou votre outil fonctionnant sur batterie (sans cordon d’alimentation).
Lire tous les avertissements
de sécurité et toutes les ins-
Français | 39
Sécurité de la zone de travail
f Conserver la zone de travail propre et bien éclairée. Les
zones en désordre ou sombres sont propices aux accidents.
f Ne pas faire fonctionner les outils électriques en at-
mosphère explosive, par exemple en présence de liquides inflammables, de gaz ou de poussières. Les outils
électriques produisent des étincelles qui peuvent enflammer les poussières ou les fumées.
f Maintenir les enfants et les personnes présentes à
l’écart pendant l’utilisation de l’outil. Les distractions
peuvent vous faire perdre le contrôle de l’outil.
Sécurité électrique
f Il faut que les fiches de l’outil électrique soient adaptées
au socle. Ne jamais modifier la fiche de quelque façon
que ce soit. Ne pas utiliser d’adaptate urs avec des outils
à branchement de terre. Des fiches non modifiées et des
socles adaptés réduiront le risque de choc électrique.
f Eviter tout contact du corps avec des surfaces reliées à
la terre telles que les tuyaux, les radiateurs, les cuisinières et les réfrigérateurs. Il existe un risque accru de
choc électrique si votre corps est relié à la terre.
f Ne pas exposer les outils à la pluie ou à des conditions
humides. La pénétration d’eau à l’intérieur d’un outil aug-
mentera le risque de choc électrique.
f Ne pas maltraiter le cordon. Ne jamais utiliser le cordon
pour porter, tirer ou débrancher l’outil. Maintenir le
cordon à l’écart de la chaleur, du lubrifiant, des arêtes
ou des parties en mouvement. Les cordons endommagés
ou emmêlés augmentent le risque de choc électrique.
f Lorsqu’on utilise un outil à l’extérieur, utiliser un pro-
longateur adapté à l’utilisation extérieure. L’utilisation
d’un cordon adapté à l’utilisation extérieure réduit le risque
de choc électrique.
f Si l’usage d’un outil dans un emplacement humide est
inévitable, utiliser une alimentation protégée par un
dispositif à courant différentiel résiduel (RCD). L’usage
d’un RCD réduit le risque de choc électrique.
Sécurité des personnes
f Rester vigilant, regard er ce que vous êtes en train de
faire et faire preuve de bon se ns dans l’utilisation de
l’outil. Ne pas utiliser un outil lor sque vous êtes fatigué
ou sous l’emprise de drogues, d’alcool ou de médicaments. Un moment d’inattention en cours d’utilisation d’un
outil peut entraîner des blessures graves des personnes.
f Utiliser un équipement de sécurité. Toujours porter
une protection pour les yeux. Les équipements de sécu-
rité tels que les masques contre les poussières, les chaussures de sécurité antidérapantes, les casques ou les protections acoustiques utilisés pour les conditions
appropriées réduiront les blessures des personnes.
f Eviter tout démarrage intempestif. S’assurer que l’in-
terrupteur est en position arrêt avant de brancher
l’outil au secteur et/ou au bloc de batteries, de le ramasser ou de le porter. Porter les outils en ayant le doigt
sur l’interrupteur ou brancher des outils dont l’interrupteur
est en position marche est source d’accidents.
Bosch Power Tools 1 609 929 M43 | (28.6.11)
Page 40

OBJ_BUCH-61-006.book Page 40 Tuesday, June 28, 2011 2:41 PM
40 | Français
f Retirer toute clé de réglage avant de mettre l’outil en
marche. Une clé laissée fixée sur une partie tournante de
l’outil peut donner lieu à des blessures de personnes.
f Ne pas se précipiter. Garder une position et un équili-
bre adaptés à tout moment. Cela permet un meilleur con-
trôle de l’outil dans des situations inattendues.
f S’habiller de manière adaptée. Ne pas porter de vête-
ments amples ou de bijoux. Garder les cheveux, les vêtements et les gants à distance des parties en mouvement. Des vêtements amples, des bijoux ou les cheveux
longs peuvent être pris dans des parties en mouvement.
f Si des dispositifs sont fournis pour le raccordement
d’équipements pour l’extraction et la récupération des
poussières, s’assurer qu’ils sont connectés et correctement utilisés. Utiliser des collecteurs de poussière peut
réduire les risques dus aux poussières.
Utilisation et entretien de l’outil
f Ne pas forcer l’outil. Utiliser l’outil adapté à votre appli-
cation. L’outil adapté réalisera mieux le travail et de maniè-
re plus sûre au régime pour lequel il a été construit.
f Ne pas utiliser l’outil si l’interrupteur ne permet pas de
passer de l’état de marche à arrêt et vice versa. Tout
outil qui ne peut pas être commandé par l’interrupteur est
dangereux et il faut le faire réparer.
f Débrancher la fiche de la source d’alimentati on en cou-
rant et/ou le bloc de batteries de l’outil avant tout réglage, changement d’accessoires ou avant de ranger
l’outil. De telles mesures de sécurité préventives rédui-
sent le risque de démarrage accidentel de l’outil.
f Conserver les outils à l’arrêt hors de la portée des en-
fants et ne pas permettre à des personnes ne connaissant pas l’outil ou les présentes instructions de le faire
fonctionner. Les outils sont dangereux entre les mains
d’utilisateurs novices.
f Observer la maintenance de l’outil. Vérifier qu’il n’y a
pas de mauvais alignement ou de blocage des parties
mobiles, des pièces cassées ou toute autre condition
pouvant affecter le fonctionnement de l’outil. En cas de
dommages, faire réparer l’outil avant de l’utiliser. De
nombreux accidents sont dus à des outils mal entretenus.
f Garder affûtés et propres les outils permettant de cou-
per. Des outils destinés à couper correctement entretenus
avec des pièces coupantes tranchantes son t moins susceptibles de bloquer et sont plus faciles à contrôler.
f Utiliser l’outil, les accessoires et les lames etc., confor-
mément à ces instructions, en tenant compte des conditions de travail et du travail à réaliser. L’utilisation de
l’outil pour des opérations différentes de celles prévues
pourrait donner lieu à des situations dangereuses.
Maintenance et entretien
f Faire entretenir l’outil par un réparateur qualifié utili-
sant uniquement des pièces de rechange identiques.
Cela assurera que la sécurité de l’outil est maintenue.
1 609 929 M43 | (28.6.11) Bosch Power Tools
Avertissements de sécurité pour la perceuse
GSB 13/ GSB 13 RE/ GSB 16/ GSB 16 RE
f Utiliser la(les) poignée(s) auxiliaire(s) fournie(s) avec
l’outil. La perte de contrôle peut provoquer des blessures.
f Toujours bien tenir l’outil électroportatif des deux
mains et veiller à toujours garder une position de travail stable. Avec les deux mains, l’outil électroportatif est
guidé de manière plus sûre.
GSB 10/ GSB 10 RE/ GSB 13/GSB 13 RE /GSB 16 /
GSB 16 RE
f Porter des protecteurs d’oreilles lors du perçage avec
des perceuses à percussion. L’exposition aux bruits peut
provoquer une perte de l’audition.
f Tenir l’outil par les surfaces de préhension isolantes,
pendant les opérations au cours desquelles l’accessoire coupant peut être en contact avec des conducteurs
cachés ou avec son propre câble. Le contact avec un fil
« sous tension » peut également mettre « sous tension » les
parties métalliques exposées de l’outil électrique et provoquer un choc électrique sur l’opérateur.
f Utiliser des détecteurs appropriés afin de déceler des
conduites cachées ou consulter les entreprises d’approvisionnement locales. Un contact avec des lignes
électriques peut provoquer un incendie ou un choc électrique. Un endommagement d’une conduite de gaz peut provoquer une explosion. La perforation d’une conduite d’eau
provoque des dégâts matériels et peut provoquer un choc
électrique.
f Arrêtez immédiatement l’appareil électrique lorsque
l’outil coince. Attendez-vous à des couples de réaction
importants causant un contrecoup. L’outil se bloque
lorsque :
– l’appareil électrique est surchargé ou
– lorsqu’il coince dans la pièce à travailler.
f Bloquer la pièce à travailler. Une pièc e à travailler serrée
par des dispositifs de serrage appropriés ou dans un étau
est fixée de manière plus sûre que tenue dans les mains.
f Avant de déposer l’outil électroportatif, attendre que
celui-ci soit complètement à l’arrêt. L’outil risque de se
coincer, ce qui entraînerait une perte de contrôle de l’outil
électroportatif.
Description et performances du produit
Il est impératif de lire toutes les consignes
de sécurité et toutes les instructions. Le
non-respect des avertissements et instructions indiqués ci-après peut conduire à une
électrocution, un incendie et/ou de graves
blessures.
Utilisation conforme
L’appareil est conçu pour le perçage à percussion dans la brique, le béton et dans la pierre naturelle ainsi que pour le perçage dans le bois, le métal, la céramique et les matières plastiques. Les appareils avec réglage électronique et rotation
droite/gauche sont également appropriés pour le vissage et le
filetage.
Page 41

OBJ_BUCH-61-006.book Page 41 Tuesday, June 28, 2011 2:41 PM
Français | 41
Eléments de l’appareil
La numérotation des éléments de l’appareil se réfère à la représentation de l’outil électroportatif sur la page graphique.
1 Mandrin automatique*
2 Douille avant
3 Douille arrière
4 Commutateur « Perçage/Perçage à percussion »
5 Bouton de blocage de l’interrupteur Marche /Arrêt
6 Interrupteur Marche/Arrêt
7 Molette de présélection de la vitesse ( GSB 16 RE)
8 Commutateur du sens de rotation
(GSB 10 RE/GSB 13 RE/GSB 16 RE)
9 Touche pour réglage de la butée de profondeur *
10 Vis papillon pour déplacer la poignée supplémentaire *
11 Poignée supplémentaire (surface de préhension isolan-
te) *
12 Butée de profondeur*
13 Poignée (surface de préhension isolante)
14 Clé de mandrin *
15 Mandrin à couronne dentée *
16 Porte-embout universel*
17 Embout de réglage*
18 Clé mâle coudée pour vis à six pans creux **
19 Clé plate**
*Les accesso ires décrits ou illustrés ne sont pas tous compris dans
la fourniture. Vous trouverez les accessoires complets dans notre
programme d’accessoires.
**dispon ible dans le commerce (non fourni avec l’appareil)
Caractéristiques techniques
Perceuse à percussion GSB ...
Professional
N° d’article 3 601 ... B16 0.. B16 1.. B17 0.. B17 1.. B18 0.. B18 1..
Puissance nominale absorbée
Puissance utile débitée
Vitesse à vide
Vitesse de rotation max. sous charge
Nombre de chocs
Couple nominal
W 500 500 600 600 701 701
W 250 250 301 301 351 351
tr/min 2600 0– 2600 2800 0 – 2800 3 000 0–3000
tr/min 1610 1610 1570 1 570 1640 1640
tr/min 25 700 25 700 25070 25 070 26 270 26 270
Nm 1,5 1,5 1,8 1,8 2,0 2,0
Préréglage de la vitesse de rotation
Rotation droite/gauche
Ø collet de broche
mm 43 43 43 43 43 43
Ø perçage max.
–Béton
– Acier
–Bois
Plage de serrage du mandrin
mm
mm
mm
mm 1,5 – 10 1,5 – 10 1,5 – 13 1,5 – 13 1,5 – 13 1,5 – 13
Poids suivant EPTA-Procedure
01/2003
kg 1,5 1,5 1,7 1,7 1,9 1,9
Classe de protection
Ces indications sont valables pou r une tension nominale de [U] 230 V. Ces indic ations peuvent varier pour des tensions plus basses ainsi qu e pour des
versions spécifiques à certains pays.
Respectez impérativement le numéro d’article se trouvant sur la plaque signalétique de l’outil électroportatif. Les désignations commerciales des différents outils électroportatifs peuvent varier.
10 10 RE 13 13 RE 16 16 RE
– ––––z
– z – z – z
10
8
20
10
20
13
8
10
25
13
10
25
16
12
30
/II / II / II / II / II / II
16
12
30
Montage
f Avant d’effectuer des travaux sur l’outil électroporta-
tif, retirez la fiche de la prise de courant.
Poignée supplémentaire (voir figure A)
(GSB 13/GSB 13 RE/GSB 16/ GSB 16 RE)
f N’utilisez l’outil électroportatif qu’avec la poignée sup-
plémentaire 11.
La poignée supplémentaire 11 peut être basculée dans n’importe quelle position, afin d’obtenir une position de travail sûre et peu fatigante.
Pour régler la poignée supplémentaire, tournez la vis papillon
tourner la poignée supplémentaire 11 dans la position souhaitée. Ensuite, resserrez la vis papillon 10 dans le sens des
aiguilles d’une montre.
Réglage de la profondeur de perçage (voir figure A)
La butée de profondeur 12 permet de déterminer la profondeur de perçage souhaitée X.
Appuyez sur la touche de réglage de la butée de profondeur 9
et placez la butée de profondeur dans la poignée supplémentaire 11.
Sortez la butée de profondeur ju squ’à ce que la distance entre
la pointe du foret et la pointe de la butée de profondeur corresponde à la profondeur de perçage souhaitée X.
10 dans le sens inverse des aiguilles d’une montre et faites
Bosch Power Tools 1 609 929 M43 | (28.6.11)
Page 42

OBJ_BUCH-61-006.book Page 42 Tuesday, June 28, 2011 2:41 PM
42 | Français
Changement d’outil
Mandrin automatique (voir figure B)
Tenez la douille arrière 3 du mandrin automatique 1 et ouvrez
la douille avant 2 dans le sens de rotation n jusqu’à ce que
l’outil puisse être monté. Mettez en place l’outil.
Tenez la douille arrière 3 du mandrin automatique 1 et tournez manuellement à fond la douille avant 2 dans le sens de rotation o jusqu’à ce qu’aucun clic ne se fasse entendre. Le
mandrin de perçage se trouve alors verrouillé automatiquement.
Le verrouillage peut être desserré lorsqu’on tourne la douille
avant 2 en sens inverse afin d’enlever l’outil.
Mandrin à couronne dentée (voir figure C)
f Portez des gants de protection lors du changement
d’outil. En cas de travaux assez longs, le mandrin de per-
çage risque de s’échauffer fortement.
Ouvrez le mandrin à clé à couronne dentée 15 par un mouvement de rotation jusqu’à ce que l’outil puisse être monté.
Montez l’outil.
Introduisez la clé de mandrin 14 dans les orifices correspondants du mandrin à clé à couronne dentée 15 et verouillez
l’outil de manière régulière.
Outils de vissage (voir figure D)
Lorsque des embouts sont utilisés 17, il est recommandé
d’utiliser un porte-embout universel 16. N’utilisez que des
embouts appropriés à la tête de vis.
Pour visser, mettez toujours le commutateur « Perçage/Perçage à percussion » 4 sur le symbole « Perçage ».
Changement du mandrin de perçage
Démontage du mandrin de perçage (voir figure E)
Pour démonter le mandrin automatique 1, serrer une clé pour
vis à six pans creux 18 dans le mandrin automatique 1 et pla-
cer une clé à fourche 19 (ouverture 12) sur la face de clé de la
broche d’entraînement. Poser l’outil électroportatif sur un
support stable, p. ex. un établi. Maintenir la clé à fourche 19
et desserrer le mandrin automatique 1 en tournant la clé pour
vis à six pans creux 18 dans le sens de rotation n. Au cas où
le mandrin automatique serait coincé, il suffit de donner un
coup léger sur le bout long de la clé pour vis à six pans creux
18 afin de le desserrer. Enlever la clé pour vis à six pans creux
du mandrin automatique et desserrer complètement le mandrin automatique.
Le démontage du mandrin à couronne dentée 15 se fait de la
même manière que pour le mandrin automatique.
Montage du mandrin de perçage (voir figure F)
Le montage du mandrin automatique/du mandrin à couronne
dentrée s’effectue dans l’ordre inverse.
Le mandrin de perçage doit être serré avec un couple de serrage de 30– 35 Nm environ.
Aspiration de poussières/de copeaux
f Les poussières de matériaux tels que peintures contenant
du plomb, certains bois, minéraux ou métaux, peuvent être
nuisibles à la santé. Entrer en contact ou aspirer les pous-
sières peut entraîner des réactions allergiques et/ou des
maladies respiratoires auprès de l’utilisateur ou de personnes se trouvant à proximité.
Certaines poussières telles que les poussières de chêne ou
de hêtre sont considérées comme cancérigènes, surtout
en association avec des additifs pour le traitement du bois
(chromate, lazure). Les matériaux contenant de l’amiante
ne doivent être travaillés que par des personnes qualifiées.
– Veillez à bien aérer la zone de travail.
– Il est recommandé de porter un masque respiratoire
avec un niveau de filtration de classe P2.
Respectez les règlements spécifiques aux matériaux à traiter en vigueur dans votre pays.
f Evitez toute accumulation de poussières à l’emplace-
ment de travail. Les poussières peuvent facilement s’en-
flammer.
Mise en marche
Mise en service
f Tenez compte de la tension du réseau ! La tension de la
source de courant doit correspondre aux indications se
trouvant sur la plaque signalétique de l’outil électroportatif. Les outils électroportatifs marqués 230 V
peuvent également fonctionner sur 220 V.
Sélection du sens de rotation (voir images G –H)
(GSB 10 RE/ GSB 13 RE/ GSB 16 RE)
Le commutateur de sens de rotation 8 permet d’inverser le
sens de rotation de l’outil électroportatif. Ceci n’est cependant pas possible, quand l’interrupteur Marche/Arrêt 6 est en
fonction.
Rotation droite : Pour percer et visser, tournez le commutateur du sens de rotation 8 à fond vers la gauche.
Rotation gauche : Pour desserrer ou dévisser des vis et des
écrous, tournez le commutateur du sens de rotation 8 à fond
vers la droite.
Réglage du mode de fonctionnement
Visser et percer
Positionnez le commutateur 4 sur le symbole
«Perçage».
Perçage à percussion
Positionnez le commutateur 4 sur le symbole
« Perçage à percussion ».
Le commutateur 4 s’encliquette de façon perceptible et peut
être actionné même pendant que le moteur est en marche.
Mise en Marche/Arrêt
Pour mettre l’outil électroportatif en marche, appuyez sur
l’interrupteur Marche/Arrêt 6 et maintenez-le appuyé.
Pour bloquer l’interrupteur Marche/Arrêt en fonction 6, appuyez sur le bouton de blocage 5.
Pour arrêter l’appareil électroportatif, relâchez l’inte rrupteur
Marche/Arrêt 6 ou, s’il est bloqué par le bouton de blocage 5,
appuyez brièvement sur l’interrupteur Marche/Arrêt 6, puis
relâchez-le.
1 609 929 M43 | (28.6.11) Bosch Power Tools
Page 43

OBJ_BUCH-61-006.book Page 43 Tuesday, June 28, 2011 2:41 PM
Réglage de la vitesse de rotation/de la fréquence de frappe (GSB 10 RE/GSB 13 RE /GSB 16 RE)
Vous pouvez régler en continu la vitesse de rotation/ la fréquence de frappe de l’outil électroportatif en fonction de la
pression exercée sur l’interrupteur de Marche/Arrêt 6.
Une légère pression sur l’interrupteur Marche/Arrêt 6 entraî-
ne une faible vitesse de rotation/fréquence de frappe. Plus la
pression augmente, plus la vitesse de rotation/la fréquence
de frappe est élevée.
Préréglage de la vitesse de rotation/de la fréquence de
frappe (GSB 16 RE)
La molette de présélection de la vitesse de rotation 7 permet
de présélectionner la vitesse de rotation/la fréquence de frappe nécessaire (même durant l’utilisation de l’appareil).
La vitesse de rotation/la fréquence de frappe dépend du matériau à travailler et des conditions de travail et peut être déterminée par des essais pratiques.
Instructions d’utilisation
f Posez l’outil électroportatif sur la vis/sur l’écrou seule-
ment lorsque l’appareil est arrêté. Les outils de travail en
rotation peuvent glisser.
Après avoir travaillé à une vitesse de rotation faible pendant
une période relativement longue, faites travailler l’outil électroportatif à vide à la vitesse de rotation maximale pendant
une durée de 3 minutes environ afin de le laisser se refroidir.
Pour percer dans des carreaux de faïence, positionnez le
commutateur 4 sur le symbole « Perçage ». Une fois le carreau
de faïence percé, positionnez le commutateur sur le symbole
« Perçage à percussion » et travaillez avec frappe.
Pour les travaux de perçage dans le béton, la pierre et la maçonnerie, utilisez des forets en carbure.
Pour percer dans le métal, n’utilisez que des forets HSS aiguisés et en parfait état (HSS = aciers super rapides). La gamme
d’accessoires Bosch vous assure la qualité nécessaire.
Avec l’appareil d’affûtage de forets (accessoire), il est possible d’aiguiser sans problèmes des forets hélicoïdaux d’un diamètre de 2,5– 10 mm.
GSB 16 RE
Pour les travaux de très haute précision, utilisez un support
de perçage (accessoire).
L’étau disponible comme accessoire permet de serrer l’outil
fermement. Ceci empêche l’outil de bouger et de par là, prévient les accidents.
Français | 43
Entretien et Service Après-Vente
Nettoyage et entretien
f Avant d’effectuer des travaux sur l’outil électroporta-
tif, retirez la fiche de la prise de courant.
f Veillez à ce que l’outil électroportatif ainsi que les ouïes
de ventilation soient toujours propres afin d’obtenir un
travail impeccable et sûr.
Si, malgré tous les soins apportés à la fabrication et au contrôle de l’appareil, celui-ci présentait un défaut, la réparation ne
doit être confiée qu’à une station de Service Après-Vente
agréée pour outillage Bosch.
Pour toute demande de renseignement ou commande de pièces de rechange, précisez-nous impérativement le numéro
d’article à dix chiffres de l’outil électroportatif indiqué sur la
plaque signalétique.
Service Après-Vente et Assistance Des Clients
Notre Service Après-Vente répond à vos questions concernant la réparation et l’entretien de votre produit et les pièces
de rechange. Vous trouverez des vues éclatées ainsi que des
informations concernant les pièces de rechange également
sous :
www.bosch-pt.com
Les conseillers techniques Bosch sont à votre disposition
pour répondre à vos questions concernant l’achat, l’utilisation
et le réglage de vos produits et de leurs accessoires.
Pour avoir des renseignements concernant la garantie, les travaux d’entretien ou de réparation ou les pièces de rechange,
veuillez contacter votre détaillant spécialisé.
Elimination des déchets
Les outils électroportatifs, ainsi que leurs accessoires et emballages, doivent pouvoir suivre chacun une voie de recyclage
appropriée.
Ne jetez pas les outils électroportatifs avec les ordures
ménagères !
Sous réserve de modifications.
Bosch Power Tools 1 609 929 M43 | (28.6.11)
Page 44

44
|
ﻲﺑﺮﻋ
1 609 929 M43 | (28.6.11) Bosch Power Tools
ﻦﺋﺎﺑﺰﻟﺍ ﺓﺭﻮﺸﻣﻭ ﺔﻣﺪﺧ
ﺞﹶﺘﻨﳌﺍ ﺔﻧﺎﻴﺻﻭ ﺢﻴﻠﺼﺗ ﺩﺪﺼﺑ ﺔﺣﻭﺮﻄﳌﺍ ﺔﻠﺌﺳﻷﺍ ﯽﻠﻋ ﻦﺋﺎﺑﺰﻟﺍ ﺔﻣﺪﺧ ﺰﻛﺮﻣ ﺐﻴﳚ
ﻊﻄﻗ ﻦﻋ ﺕﺎﻣﻮﻠﻌﳌﺍﻭ ﺓﺩﺪﻤﳌﺍ ﻡﻮﺳﺮﻟﺍ ﺪﺠﺘﺳ .ﺭﺎﻴﻐﻟﺍ ﻊﻄﻗ ﺺﳜ ﲈﺑﹰﺎﻀﻳﺃﻭ
:ﻊﻗﻮﻤﺑ ﺭﺎﻴﻐﻟﺍ
www.bosch-pt.com
ﺔﺣﻭﺮﻄﳌﺍ ﺔﻠﺌﺳﻷﺍ ﯽﻠﻋ ﺔﺑﺎﺟﻹﺎﺑ ﺵﻮﺑ ﻦﺋﺎﺑﺯ ﻱﺭﺎﺸﺘﺳﺍ ﻖﻳﺮﻓ ﻙﺪﻋﺎﺴﻴﺳ
.ﺎﻬﻌﺑﺍﻮﺗﻭ ﺕﺎﺠﹶﺘﻨﳌﺍ ﻂﺒﺿﻭ ،ﻡﺍﺪﺨﺘﺳﺍ ،ﺀﺍﴍ ﺩﺪﺼﺑ
ﲔﻣﺄﺗﻭ ﺢﻴﻠﺼﺘﻟﺍﻭ ﻥﲈﻀﻟﺍ ﺭﻮﻣﺄﺑ ﻖﹼﻠﻌﺘﻳ ﲈﺑ ﺺﺘﺨﳌﺍ ﺮﺟﺎﺘﻟﺍ ﯽﻟﺇ ﻪﺟﻮﺘﻟﺍ ﯽﺟﺮﻳ
.ﺭﺎﻴﻐﻟﺍ ﻊﻄﻗ
ﺔﻴﺋﺎﺑﺮﻬﻜﻟﺍ ﺓﺪﻌﻟﺍ ﻦﻣ ﺺﻠﺨﺘﻟﺍ
ﺔﺌﻴﺒﻠﻟ ﺔﻔﺼﻨﻣ ﺔﻘﻳﺮﻄﺑ ﻑﻼﻐﻟﺍﻭ ﻊﺑﺍﻮﺘﻟﺍﻭ ﺔﻴﺋﺎﺑﺮﻬﻜﻟﺍ ﺩﺪﻌﻟﺍ ﻦﻣ ﺺﻠﺨﺘﻟﺍ ﻲﻐﺒﻨﻳ
.ﻊﻴﻨﺼﺘﻟﺍ ﺓﺩﺎﻋﻹ ﺔﻠﺑﺎﻘﻟﺍ ﺕﺎﻳﺎﻔﻨﻟﺍ ﻖﻳﺮﻃ ﻦﻋ
!ﺔﻴﻟﺰﻨﳌﺍ ﺕﺎﻳﺎﻔﻨﻟﺍ ﰲ ﺔﻴﺋﺎﺑﺮﻬﻜﻟﺍ ﺩﺪﻌﻟﺍ ﻡﺮﺗ ﻻ
.ﺕﻼﻳﺪﻌﺘﻟﺍ ﻝﺎﺧﺩﺇ ﻖﺤﺑ ﻆﻔﺘﺤﻧ
Page 45

ﻲﺑﺮﻋ
|
45
Bosch Power Tools 1 609 929 M43 | (28.6.11)
ﺓﺭﺎﺸﻨﻟﺍ/ﺭﺎﺒﻐﻟﺍ ﻂﻔﺷ
ﺾﻌﺑﻭ ،ﺹﺎﺻﺮﻟﺍ ﯽﻠﻋ ﻱﻮﺘﳛ ﻱﺬﻟﺍ ﺀﻼﻄﻟﺎﻛ ﺩﺍﻮﳌﺍ ﺾﻌﺑ ﺓﱪﻏﺃ ﻥﺇ
◀
ﺔﺴﻣﻼﻣ ﻥﺇ .ﺔﺤﺼﻟﺎﺑ ﺓﴬﻣ ﻥﻮﻜﺗ ﺪﻗ ،ﻥﺩﺎﻌﳌﺍﻭ ﺕﺍﺰﻠﻔﻟﺍﻭ ﺐﺸﳋﺍ ﻉﺍﻮﻧﺃ
ﯽﻟﺇ ﻭﺃ/ﻭ ﺔﻴﺳﺎﺴﳊﺍ ﺓﺪﺋﺍﺯ ﻞﻌﻓ ﺩﻭﺩﺭ ﯽﻟﺇ ﻱﺩﺆﻳ ﺪﻗ ﺓﱪﻏﻷﺍ ﻕﺎﺸﻨﺘﺳﺍ ﻭﺃ
ﻦﻳﺪﺟﺍﻮﺘﳌﺍ ﺹﺎﺨﺷﻷﺍ یﺪﻟ ﻭﺃ ﻡﺪﺨﺘﺴﳌﺍ یﺪﻟ ﺔﻴﺴﻔﻨﺘﻟﺍ ﻱﺭﺎﺠﳌﺍ ﺽﺍﺮﻣﺃ
.ﻥﺎﻜﳌﺍ ﻦﻣ ﺔﺑﺮﻘﻣ ﯽﻠﻋ
،ﻥﺎﻃﴪﻠﻟ ﺔﺒﺒﺴﻣ ﺎﳖﺄﺑ ﻥﺍﺰﻟﺍﻭ ﻁﻮﻠﺒﻟﺍ ﺓﱪﻏﺄﻛ ،ﺔﻨﻴﻌﳌﺍ ﺓﱪﻏﻷﺍ ﺾﻌﺑ ﱪﺘﻌﺗ
ﺾﻣﺎﺣ ﺢﻠﻣ) ﺐﺸﳋﺍ ﺔﳉﺎﻌﳌ ﺔﻴﻓﺎﺿﻹﺍ ﺩﺍﻮﳌﺍ ﻊﻣ ﻝﺎﺼﺗﻻﺎﺑ ﲈﻴﺳ ﻻﻭ
ﻱﻮﺘﲢ ﻲﺘﻟﺍ ﺩﺍﻮﳌﺍ ﺔﳉﺎﻌﻣ ﻢﺘﻳ ﻥﺃ ﺯﻮﳚ .(ﺐﺸﺨﻠﻟ ﺔﻈﻓﺎﳊﺍ ﺩﺍﻮﳌﺍ ،ﻚﻴﻣﻭﺮﻜﻟﺍ
.ﻢﻫﲑﻏ ﻥﻭﺩ ﻂﻘﻓ ﲔﺼﺼﺨﺘﳌﺍ ﻝﲈﻌﻟﺍ ﻞﺒﻗ ﻦﻣ ﺱﻮﺘﺴﺒﺳﻷﺍ ﯽﻠﻋ
.ﺪﻴﺟ ﻞﻜﺸﺑ ﻞﻐﺸﻟﺍ ﻥﺎﻜﻣ ﺔﻳﻮﲥ ﯽﻠﻋ ﻆﻓﺎﺣ
–
.P2 ﺢﺷﺮﳌﺍ ﺔﺌﻔﺑ ﺲﻔﻨﺘﻠﻟ ﺔﻳﺎﻗﻭ ﻉﺎﻨﻗ ﺀﺍﺪﺗﺭﺎﺑ ﺢﺼﻨﻳ –
.ﺎﻬﺘﳉﺎﻌﻣ ﺏﻮﻏﺮﳌﺍ ﺩﺍﻮﻤﻠﻟ ﺔﺒﺴﻨﻟﺎﺑ ﻢﻛﺪﻠﺑ ﰲ ﺔﻳﺭﺎﺴﻟﺍ ﻡﺎﻜﺣﻷﺍ ﯽﻋﺍﺮﺗ
.ﺔﻟﻮﻬﺴﺑ ﺓﱪﻏﻷﺍ ﻞﻌﺘﺸﺗ ﻥﺃ ﺯﻮﳚ .ﻞﻤﻌﻟﺍ ﻥﺎﻜﻤﺑ ﺭﺎﺒﻐﻟﺍ ﻢﻛﺍﺮﺗ ﺐﻨﲡ
◀
ﻞﻴﻐﺸﺘﻟﺍ
ﻞﻴﻐﺸﺘﻟﺍ ﺀﺪﺑ
ﻊﻣ ﺭﺎﻴﺘﻟﺍ ﻊﺒﻨﻣ ﺪﻬﺟ ﻖﺑﺎﻄﺘﻳ ﻥﺃ ﺐﳚ !ﺔﻴﺋﺎﺑﺮﻬﻜﻟﺍ ﺔﻜﺒﺸﻟﺍ ﺪﻬﺟ ﯽﻟﺇ ﻪﺒﺘﻧﺍ
◀
ﺩﺪﻌﻟﺍ ﻞﻴﻐﺸﺗ ﻢﺘﻳ ﻥﺃ ﻦﻜﻤﻳ .ﺯﺎﻬﳉﺍ ﺯﺍﺮﻃ ﺔﺤﺋﻻ ﯽﻠﻋ ﺓﺭﻮﻛﺬﳌﺍ ﺕﺎﻣﻮﻠﻌﳌﺍ
.ﺎﻀﻳﺃ ﻂﻟﻮﻓ 220 ـﺑ ﻂﻟﻮﻓ 230 ـﺑ ﺓﺩﺪﺤﳌﺍ ﺔﻴﺋﺎﺑﺮﻬﻜﻟﺍ
(H – G ﺭﻮﺼﻟﺍ ﻊﺟﺍﺭ) ﻥﺍﺭﻭﺪﻟﺍ ﻩﺎﲡﺍ ﻂﺒﺿ
(GSB 10 RE / GSB 13 RE / GSB 16 RE)
ﻥﺍﺭﻭﺩ ﻩﺎﲡﺍ ﲑﻴﻐﺘﺑ ﻡﻮﻘﺗ ﻥﺃ 8 ﻥﺍﺭﻭﺪﻟﺍ ﻩﺎﲡﺍ ﻞﻳﻮﲢ ﺡﺎﺘﻔﻣ ﺔﻄﺳﺍﻮﺑ ﻚﻨﻜﻤﻳ
ﻞﻴﻐﺸﺘﻟﺍ ﺡﺎﺘﻔﻣ ﻥﻮﻜﻳ ﺎﻣﺪﻨﻋ ﻚﻟﺫ ﺬﻴﻔﻨﺗ ﻦﻜﻤﻳ ﻻ ﻦﻜﻟﻭ .ﺔﻴﺋﺎﺑﺮﻬﻜﻟﺍ ﺓﺪﻌﻟﺍ
.ﻞﻴﻐﺸﺘﻟﺍ ﺪﻴﻗ 6 ﺀﺎﻔﻃﻹﺍﻭ
ﻩﺎﲡﺍ ﻞﻳﻮﲢ ﺡﺎﺘﻔﻣ ﻂﻐﻀﻳ ﺐﻟﺍﻮﻠﻟﺍ ﻂﺑﺭﻭ ﺐﻴﻘﺜﺘﻟﺍ ﻝﲈﻋﺃ ﺀﺍﺮﺟﻹ :ﻲﻨﻴﻤﻳ ﻥﺍﺭﻭﺩ
.ﻡﺩﺎﺼﺘﻟﺍ ﺪﺣ ﯽﻟﺇ ﺭﺎﺴﻴﻟﺍ ﯽﻟﺇ
8 ﻥﺍﺭﻭﺪﻟﺍ
ﻩﺎﲡﺍ ﻞﻳﻮﲢ ﺡﺎﺘﻔﻣ ﻂﻐﻀﻳ ﻞﻴﻣﺍﻮﺼﻟﺍﻭ ﺐﻟﺍﻮﻠﻟﺍ ﻉﺰﻧ ﻭﺃﹼﻞﳊ :ﻱﺭﺎﺴﻳ ﻥﺍﺭﻭﺩ
.ﻡﺩﺎﺼﺘﻟﺍ ﺪﺣ ﯽﻟﺇ ﲔﻤﻴﻟﺍ ﯽﻟﺇ
8 ﻥﺍﺭﻭﺪﻟﺍ
ﻞﻴﻐﺸﺘﻟﺍ ﻉﻮﻧ ﻂﺒﺿ
ﺐﻟﺍﻮﻠﻟﺍ ﻂﺑﺭﻭ ﺐﻴﻘﺜﺘﻟﺍ
.“ﺐﻘﺜﻟﺍ” ﺰﻣﺭ ﯽﻠﻋ 4 ﻞﻳﻮﺤﺘﻟﺍ ﺡﺎﺘﻔﻣ ﺰﻛﺭ
ﻕﺮﻄﻟﺎﺑ ﻖﻓﺮﳌﺍ ﺐﻴﻘﺜﺘﻟﺍ
.“ﻕﺮﻄﻟﺎﺑ ﻖﻓﺮﳌﺍ ﺐﻴﻘﺜﺘﻟﺍ ” ﺰﻣﺭ ﯽﻠﻋ 4 ﻞﻳﻮﺤﺘﻟﺍ ﺡﺎﺘﻔﻣ ﻂﺒﺿﺍ
ﺀﺎﻨﺛﺃ ﯽﺘﺣ ﻪﻠﻳﻮﲢ ﻦﻜﻤﻳﻭ ﻉﻮﻤﺴﻣ ﺕﻮﺼﺑ ﻖﺷﺎﻌﺘﻳ
4 ﻞﻳﻮﺤﺘﻟﺍ ﺡﺎﺘﻔﻣ ﻥﺇ
.ﻙﺮﺤﳌﺍ ﻥﺍﺭﻭﺩ
ﺀﺎﻔﻃﻹﺍﻭ ﻞﻴﻐﺸﺘﻟﺍ
6 ﺀﺎﻔﻃﻹﺍﻭ ﻞﻴﻐﺸﺘﻟﺍ ﺡﺎﺘﻔﻣ ﯽﻠﻋ ﺔﻴﺋﺎﺑﺮﻬﻜﻟﺍ ﺓﺪﻌﻟﺍ ﻞﻴﻐﺸﺗ ﻞﺟﺃ ﻦﻣ ﻂﻐﺿﺍ
.ﹰﺎﻃﻮﻐﻀﻣ ﻪﺋﺎﻘﺑﺇ ﯽﻠﻋ ﻆﻓﺎﺣﻭ
ﺭﺯ ﻂﻐﻀﻳ ،ﻁﺎﻐﻀﻧﻻﺍ ﺔﻟﺎﺣ ﰲ ﻮﻫﻭ
6 ﺀﺎﻔﻃﻹﺍﻭ ﻞﻴﻐﺸﺘﻟﺍ ﺡﺎﺘﻔﻣ ﺖﻴﺒﺜﺘﻟ
.5 ﺖﻴﺒﺜﺘﻟﺍ
ﻥﺎﻛ ﻥﺇ ﻭﺃ
6 ﺀﺎﻔﻃﻹﺍﻭ ﻞﻴﻐﺸﺘﻟﺍ ﺡﺎﺘﻔﻣ ﻙﱰﻳ ﺔﻴﺋﺎﺑﺮﻬﻜﻟﺍ ﺓﺪﻌﻟﺍ ﺀﺎﻔﻃﺇ ﻞﺟﺃ ﻦﻣ
6 ﺀﺎﻔﻃﻹﺍﻭ ﻞﻴﻐﺸﺘﻟﺍ ﺡﺎﺘﻔﻣ ﻂﻐﻀﻴﻓ 5 ﺖﻴﺒﺜﺘﻟﺍ ﺡﺎﺘﻔﻣ ﺔﻄﺳﺍﻮﺑ ﻪﺘﻴﺒﺜﺗﹼﻢﺗ ﺪﻗ
.ﻚﻟﺫ ﺪﻌﺑ ﻙﱰﻳ ﻢﺛ ﺔﻈﺤﻠﻟ
ﻕﺮﻄﻟﺍ ﺩﺪﻋ/ﻥﺍﺭﻭﺪﻟﺍ ﺩﺪﻋ ﻂﺒﺿ
(GSB 10 RE / GSB 13 RE / GSB 16 RE)
ﻥﻭﺩ ﻞﻴﻐﺸﺘﻟﺍ ﺪﻴﻗ ﺔﻴﺋﺎﺑﺮﻬﻜﻟﺍ ﺓﺪﻌﻟﺍ ﻕﺮﻃ/ﻥﺍﺭﻭﺩ ﺩﺪﻋ ﻂﺒﻀﺗ ﻥﺃ ﻚﻨﻜﻤﻳ
.6 ﺀﺎﻔﻃﻹﺍﻭ ﻞﻴﻐﺸﺘﻟﺍ ﺡﺎﺘﻔﻣ ﯽﻠﻋ ﻂﻐﻀﻟﺍ یﺪﻣ ﺐﺴﺣ ،ﺞﻳﺭﺪﺗ
ﺩﺪﻋ/ﻥﺍﺭﻭﺩ ﺩﺪﻋ ﯽﻟﺇ
6 ﺀﺎﻔﻃﻹﺍﻭ ﻞﻴﻐﺸﺘﻟﺍ ﺡﺎﺘﻔﻣ ﯽﻠﻋ ﻒﻴﻔﳋﺍ ﻂﻐﻀﻟﺍ ﻱﺩﺆﻳ
.ﻂﻐﻀﻟﺍ ﺓﺩﺎﻳﺰﺑ ﻕﺮﻄﻟﺍ ﺩﺪﻋ/ﻥﺍﺭﻭﺪﻟﺍ ﺩﺪﻋ ﻊﻔﺗﺮﻳﻭ .ﺾﻔﺨﻨﻣ ﻕﺮﻃ
(GSB 16 RE)
ﹰ
ﺎﻘﺒﺴﻣ ﻕﺮﻄﻟﺍ ﺩﺪﻋ/ﻥﺍﺭﻭﺪﻟﺍ ﺩﺪﻋ ﻂﺒﺿ
ﺩﺪﻋ ﻂﺒﻀﺗ ﻥﺃ
7
ﹰ
ﺎﻘﺒﺴﻣ ﻥﺍﺭﻭﺪﻟﺍ ﺩﺪﻋ ﻂﺒﺿ ﺔﻠﺠﻋ ﺔﻄﺳﺍﻮﺑ ﻚﻨﻜﻤﻳ
.ﻞﻴﻐﺸﺘﻟﺍ ﺀﺎﻨﺛﺃ ﯽﺘﺣﹰﺎﻘﺒﺴﻣ ﺏﻮﻠﻄﳌﺍ ﻕﺮﻄﻟﺍ ﺩﺪﻋ/ﻥﺍﺭﻭﺪﻟﺍ
ﻞﻤﻌﻟﺍ ﻑﻭﺮﻈﺑﻭ ﻞﻐﺸﻟﺍ ﺓﺩﲈﺑ ﺏﻮﻠﻄﳌﺍ ﻕﺮﻄﻟﺍ ﺩﺪﻋ/ﻥﺍﺭﻭﺪﻟﺍ ﺩﺪﻋ ﻖﻠﻌﺘﻳ
.ﺔﻴﻠﻤﻌﻟﺍ ﺔﺑﺮﺠﺘﻟﺍ ﻖﻳﺮﻃ ﻦﻋ ﻪﻴﻟﺇ ﻞﺻﻮﺘﻟﺍ ﻦﻜﻤﻳﻭ
ﻞﻐﺷ ﺕﺎﻈﺣﻼﻣ
.ﺓﺄﻔﻄﻣ ﻥﻮﻜﺗ ﺎﻣﺪﻨﻋ ﻂﻘﻓ ﺔﻟﻮﻣﺎﺼﻟﺍ/ﺐﻟﻮﻠﻟﺍ ﯽﻠﻋ ﺔﻴﺋﺎﺑﺮﻬﻜﻟﺍ ﺓﺪﻌﻟﺍ ﺰﻛﺭ
◀
.ﻖﻟﺰﻨﺗ ﺪﻗ ﺓﺭﺍﻭﺪﻟﺍ ﻞﻐﺸﻟﺍ ﺩﺪﻋ ﻥﺇ
ﯽﻠﻋ ﺯﺎﻬﳉﺍ ﻞﻴﻐﺸﺗ ﻲﻐﺒﻨﻳ ﲑﻐﺻ ﻥﺍﺭﻭﺩ ﺩﺪﻌﺑ ﺔﻠﻳﻮﻃ ﺓﱰﻔﻟ ﻝﲈﻋﻷﺍ ﺬﻴﻔﻨﺗ ﺪﻌﺑ
.ﻩﺪﻳﱪﺗ ﻞﺟﺃ ﻦﻣ ﯽﺼﻗﻷﺍ ﻥﺍﺭﻭﺪﻟﺍ ﺩﺪﻌﺑﹰﺎﺒﻳﺮﻘﺗ ﻖﺋﺎﻗﺩ ﺙﻼﺛ ﺓﺪﳌ ﴈﺎﻔﻟﺍ
ﺔﻃﻼﺒﻟﺍ ﻕﺍﱰﺧﺍ ﺪﻌﺑ .
“ﺐﻘﺜﻟﺍ” ﺰﻣﺭ ﯽﻠﻋ 4 ﻞﻳﻮﺤﺘﻟﺍ ﺡﺎﺘﻔﻣ ﺰﻛﺮﻳ ﻁﻼﺒﻟﺍ ﺐﻘﺜﻟ
ﻞﻐﺸﻟﺍ ﻊﺑﺎﺘﻳﻭ “ﻕﺮﻄﻟﺎﺑ ﻖﻓﺮﳌﺍ ﺐﻴﻘﺜﺘﻟﺍ” ﺰﻣﺭ ﯽﻠﻋ ﻞﻳﻮﺤﺘﻟﺍ ﺡﺎﺘﻔﻣ ﺰﻛﺮﻳ
.ﻕﺮﻄﻟﺎﺑ ﻖﻓﺮﳌﺍ ﺐﻴﻘﺜﺘﻟﺎﺑ
ﰲ ﻝﺎﻐﺷﻷﺍ ﺀﺍﺮﺟﺇ ﺪﻨﻋ ﺪﻠﺼﻟﺍ ﻥﺪﻌﳌﺍ ﻦﻣ ﺔﻋﻮﻨﺼﳌﺍ ﺐﻴﻘﺜﺘﻟﺍ ﻢﻘﻟ ﻡﺪﺨﺘﺳﺍ
.ﻥﺍﺭﺪﳉﺍﻭ ﺮﺠﳊﺍﻭ ﺔﻧﺎﺳﺮﳋﺍ
ﺓﺭﺪﻘﻟﺍ ﱄﺎﻌﻟﺍ ﺫﻻﻮﻔﻟﺍ
= HSS) ﺐﻴﻘﺜﺘﻟﺍ ﻢﻘﻟ ﻂﻘﻓ ﻥﺩﺎﻌﳌﺍ ﺐﻴﻘﺜﺗ ﺪﻨﻋ ﻡﺪﺨﺘﺳﺍ
.ﺔﺒﺳﺎﻨﳌﺍ ﺓﺩﻮﳉﺍ ﺵﻮﺑ ﻊﺑﺍﻮﺗ ﺞﻣﺎﻧﺮﺑ ﻦﻤﻀﻳ (ﻊﻄﻘﻟﺍ ﻊﻳﴪﻟﺍﻭ
ﺐﻴﻘﺜﺘﻟﺍ ﻢﻘﻟ ﺬﺤﺸﺗ ﻥﺃ (ﻊﺑﺍﻮﺗ) ﺐﻴﻘﺜﺘﻟﺍ ﻢﻘﻟ ﺬﺤﺷ ﺯﺎﻬﺟ ﺔﻄﺳﺍﻮﺑ ﻚﻨﻜﻤﻳ
.ﺀﺎﻨﻋ ﻥﻭﺩ ﻢﻣ
10 – 2,5 ﻩﺭﺪﻗ ﺮﻄﻘﺑ ﺔﻴﺋﺍﻮﺘﻟﻻﺍ
GSB 16 RE
.ﺔﻗﺪﻟﺍ ﺓﺪﻳﺪﺸﻟﺍ ﻝﺎﻐﺷﻷﺍ ﺬﻴﻔﻨﺘﻟ (ﻊﺑﺍﻮﺗ) ﺐﻴﻘﺜﺘﻟﺍ ﻞﻣﺎﺣ ﻡﺪﺨﺘﺳﺍ
ﻞﻜﺸﺑ ﻞﻐﺸﻟﺍ ﺔﻌﻄﻗ ﺪﺸﺑ ﻊﺑﺍﻮﺘﻟﺍ ﺞﻣﺎﻧﺮﺑ ﻦﻤﺿ ﺓﺮﻓﻮﺘﳌﺍ ﺕﻻﻵﺍ ﺔﻣﺰﻠﻣ ﺢﻤﺴﺗﻭ
.ﻚﻟﺫ ﻦﻋ ﺔﲡﺎﻨﻟﺍ ﺙﺩﺍﻮﳊﺍﻭ ﻞﻐﺸﻟﺍ ﺔﻌﻄﻗ ﻡﺍﱪﻧﺍ ﻚﻟﺫ ﻊﻨﻤﻳﻭ .ﻦﻣﺁ
ﺔﻣﺪﳋﺍﻭ ﺔﻧﺎﻴﺼﻟﺍ
ﻒﻴﻈﻨﺘﻟﺍﻭ ﺔﻧﺎﻴﺼﻟﺍ
ﯽﻠﻋ ﻞﻤﻋ ﻱﺃ ﺀﺍﺮﺟﺇ ﻞﺒﻗ ﺔﻴﺋﺎﺑﺮﻬﻜﻟﺍ ﺔﻜﺒﺸﻟﺍ ﺲﺒﻘﻣ ﻦﻣ ﺲﺑﺎﻘﻟﺍ ﺐﺤﺳﺍ
◀
.ﺔﻴﺋﺎﺑﺮﻬﻜﻟﺍ ﺓﺪﻌﻟﺍ
ﺪﻴﺟ ﻞﻜﺸﺑ ﻞﻤﻌﻠﻟ ﺔﻳﻮﻬﺘﻟﺍ ﻕﻮﻘﺷﻭ ﺔﻴﺋﺎﺑﺮﻬﻜﻟﺍ ﺓﺪﻌﻟﺍ ﺔﻓﺎﻈﻧ ﯽﻠﻋﹰﲈﺋﺍﺩ ﻆﻓﺎﺣ
◀
.ﻦﻣﺁﻭ
ﺔﻘﺋﺎﻓ ﺔﻳﺎﻨﻌﺑ ﺖﻌﻨﺻ ﺪﻗ ﺎﳖﺃ ﻦﻣ ﻢﻏﺮﻟﺎﺑ ﺔﻴﺋﺎﺑﺮﻬﻜﻟﺍ ﺓﺪﻌﻟﺎﺑ ﻞﻠﺧ ﻱﺃ ﺙﻭﺪﺣ ﺪﻨﻋ
ﺵﻮﺑ ﺩﺪﻋ ﺔﻟﺎﻛﻭ ﺔﻣﺪﺧ ﺰﻛﺮﻣ ﰲ ﺎﻬﺣﻼﺻﺇ ﺐﺟﻮﺗ ﺓﺪﻳﺪﻋ ﺕﺍﺭﺎﺒﺘﺧﺍ ﺕﺯﺎﺘﺟﺍﻭ
.ﺔﻴﺋﺎﺑﺮﻬﻜﻟﺍ
ﺔﻴﺋﺎﺑﺮﻬﻜﻟﺍ ﺓﺪﻌﻟﺍ ﺯﺍﺮﻃ ﺔﺤﺋﻻ ﺐﺴﺣ ﴩﻌﻟﺍ ﺐﺗﺍﺮﳌﺎﺑ ﻒﻨﺼﻟﺍ ﻢﻗﺭ ﺮﻛﺫ ﯽﺟﺮﻳ
.ﺭﺎﻴﻐﻟﺍ ﻊﻄﻗ ﺕﺎﻴﺒﻠﻃ ﻝﺎﺳﺭﺇ ﺪﻨﻋﻭ ﺓﺭﺎﺸﺘﺳﻻﺍ ﺪﻨﻋ ﻱﺭﻭﴐ ﻞﻜﺸﺑ
Page 46

46
|
ﻲﺑﺮﻋ
1 609 929 M43 | (28.6.11) Bosch Power Tools
ﺐﻴﻛﱰﻟﺍ
ﯽﻠﻋ ﻞﻤﻋ ﻱﺃ ﺀﺍﺮﺟﺇ ﻞﺒﻗ ﺔﻴﺋﺎﺑﺮﻬﻜﻟﺍ ﺔﻜﺒﺸﻟﺍ ﺲﺒﻘﻣ ﻦﻣ ﺲﺑﺎﻘﻟﺍ ﺐﺤﺳﺍ
◀
.ﺔﻴﺋﺎﺑﺮﻬﻜﻟﺍ ﺓﺪﻌﻟﺍ
(A ﺓﺭﻮﺼﻟﺍ ﻊﺟﺍﺮﺗ) ﰲﺎﺿﻹﺍ ﺾﺒﻘﳌﺍ
(GSB 13 / GSB 13 RE / GSB 16 / GSB 16 RE)
.11 ﰲﺎﺿﻹﺍ ﺾﺒﻘﳌﺍ ﻊﻣ ﻂﻘﻓ ﺔﻴﺋﺎﺑﺮﻬﻜﻟﺍ ﻚﺗﺪﻋ ﻞﻤﻌﺘﺳﺍ
◀
ﻞﺻﻮﺘﺗ ﻲﻜﻟ ﻚﺘﺒﻏﺭ ﺐﺴﺣ 11 ﰲﺎﺿﻹﺍ ﺾﺒﻘﳌﺍ ﺔﺤﺟﺭﺄﺑ ﻡﻮﻘﺗ ﻥﺃ ﻚﻨﻜﻤﻳ
.ﺩﺎﻬﺟﻹﺍ ﻞﻴﻠﻗﻭ ﻦﻣﺁ ﻞﻤﻋ ﻒﻗﻮﻣ ﯽﻟﺇ
ﺏﺭﺎﻘﻋ ﺔﻛﺮﺣ ﻩﺎﲡﺍ ﺲﻜﻌﺑ
10 ﰲﺎﺿﻹﺍ ﺾﺒﻘﳌﺍ ﻂﺒﻀﻟ ﺢﻨﺠﳌﺍ ﺐﻟﻮﻠﻟﺍ ﻞﺘﻓﺍ
ﺢﻨﺠﳌﺍ ﺐﻟﻮﻠﻟﺍ ﻞﺘﻓﺍ .ﺏﻮﻏﺮﳌﺍ ﻊﺿﻮﻟﺍ ﯽﻟﺇ 11 ﰲﺎﺿﻹﺍ ﺾﺒﻘﳌﺍ ﻡﺮﺑﺍﻭ ﺔﻋﺎﺴﻟﺍ
.ﻡﺎﻜﺣﺈﺑ ﺔﻋﺎﺴﻟﺍ ﺏﺭﺎﻘﻋ ﺔﻛﺮﺣ ﻩﺎﲡﺎﺑ ﻚﻟﺫ ﺪﻌﺑ 10
(A ﺓﺭﻮﺼﻟﺍ ﻊﺟﺍﺮﺗ) ﺐﻴﻘﺜﺘﻟﺍ ﻖﻤﻋ ﻂﺒﺿ
.ﺏﻮﻏﺮﳌﺍ X ﺐﻴﻘﺜﺘﻟﺍ ﻖﻤﻋ ﺩﺪﲢ ﻥﺃ 12 ﺐﻴﻘﺜﺘﻟﺍ ﻖﻤﻋ ﺩﺪﳏ ﺔﻄﺳﺍﻮﺑ ﻚﻨﻜﻤﻳ
ﰲﺎﺿﻹﺍ ﺾﺒﻘﳌﺍ ﰲ ﻖﻤﻌﻟﺍ ﺩﺪﳏ ﺐﻛﺭﻭ
9 ﻖﻤﻌﻟﺍ ﺩﺪﳏ ﻂﺒﺿ ﺭﺯ ﯽﻠﻋ ﻂﻐﺿﺍ
.11
ﺔﻤﻘﻟ ﺱﺃﺭ ﲔﺑ ﺪﻌﺒﻟﺍ ﺔﻓﺎﺴﻣ ﻖﻓﺍﻮﺘﺗ ﻥﺃ ﯽﻟﺇ ﺝﺭﺎﳋﺍ ﯽﻟﺇ ﻖﻤﻌﻟﺍ ﺩﺪﳏ ﺐﺤﺳﺍ
.ﺏﻮﻏﺮﳌﺍ X ﺐﻴﻘﺜﺘﻟﺍ ﻖﻤﻋ ﻊﻣ ﻖﻤﻌﻟﺍ ﺩﺪﳏ ﺱﺃﺭﻭ ﺐﻴﻘﺜﺘﻟﺍ
ﺩﺪﻌﻟﺍ ﻝﺍﺪﺒﺘﺳﺍ
(B ﺓﺭﻮﺼﻟﺍ ﻊﺟﺍﺮﺗ) ﺪﺸﻟﺍ ﻊﻳﴪﻟﺍ ﺏﺎﻘﺜﳌﺍ ﻑﺮﻇ
ﺔﺴﻴﺒﻠﻟﺍ ﻞﺘﻓﺍﻭ ﻡﺎﻜﺣﺈﺑ
1 ﺪﺸﻟﺍ ﻊﻳﴪﻟﺍ ﺏﺎﻘﺜﳌﺍ ﻑﺮﻈﺑ 3 ﺔﻴﻔﻠﳋﺍ ﺔﺴﻴﺒﻠﻟﺍ ﻚﺴﻣﺍ
ﺐﻛﺭ .ﺓﺪﻌﻟﺍ ﺐﻴﻛﱰﺑ ﺢﻤﺴﻳ ﻱﺬﻟﺍ ﺪﳊﺍ ﯽﻟﺇ ➊ ﻥﺍﺭﻭﺪﻟﺍ ﻩﺎﲡﺍ ﻮﺤﻧ 2 ﺔﻴﻣﺎﻣﻷﺍ
.ﺓﺪﻌﻟﺍ
ﻖﻠﻏﺍﻭ ﻡﺎﻜﺣﺈﺑ
1 ﺪﺸﻟﺍ ﻊﻳﴪﻟﺍ ﺏﺎﻘﺜﳌﺍ ﻑﺮﻈﺑ 3 ﺔﻴﻔﻠﳋﺍ ﺔﺴﻴﺒﻠﻟﺍ ﯽﻠﻋ ﺾﺒﻗﺍ
ﻡﺪﻋ ﺪﺣ ﯽﻟﺇ ،ﺓﻮﻘﺑ ﺪﻴﻟﺍ ﺔﻄﺳﺍﻮﺑ ➋ ﻥﺍﺭﻭﺪﻟﺍ ﻩﺎﲡﺎﺑ ﺎﻬﻠﺘﻔﺑ 2 ﺔﻴﻣﺎﻣﻷﺍ ﺔﺴﻴﺒﻠﻟﺍ
.ﱄﺁ ﻞﻜﺸﺑ ﻚﻟﺬﺑ ﺏﺎﻘﺜﳌﺍ ﻑﺮﻇ ﻝﺎﻔﻗﺇ ﻢﺘﻳ .ﰊﻼﻜﻟﺍ ﺾﺑﺎﻘﻟﺍ ﺕﻮﺻ ﻉﲈﺳ
ﻉﺰﻧ ﻞﺟﺃ ﻦﻣ ﺲﻛﺎﻌﳌﺍ ﻩﺎﲡﻻﺎﺑ
2 ﺔﻴﻣﺎﻣﻷﺍ ﺔﺴﻴﺒﻠﻟﺍ ﻞﺘﻓ ﺪﻨﻋ ﻝﺎﻔﻗﻹﺍ ﻚﻓ ﻢﺘﻳ
.ﺓﺪﻌﻟﺍ
(C ﺓﺭﻮﺼﻟﺍ ﻊﺟﺍﺮﺗ) ﻕﻮﻄﻟﺍ ﻦﻨﺴﳌﺍ ﺏﺎﻘﺜﳌﺍ ﻑﺮﻇ
ﺪﻨﻋ ﺓﺪﺸﺑ ﺏﺎﻘﺜﳌﺍ ﻑﺮﻇ ﯽﻤﳛ ﺪﻗ .ﺓﺪﻌﻟﺍ ﻝﺍﺪﺒﺘﺳﺍ ﺪﻨﻋ ﺔﻴﻗﺍﻭ ﺕﺍﺯﺎﻔﻗ ﺪﺗﺭﺍ
◀
.ﺔﻠﻳﻮﻃ ﺓﱰﻔﻟ ﻞﻤﻌﻟﺍ ﺕﺍﺀﺍﺮﺟﺇ ﺬﻴﻔﻨﺗ
ﻢﻴﻘﻠﺗ ﻦﻣ ﻦﻜﻤﺘﺗ ﻥﺃ ﯽﻟﺇ ﻪﻠﺘﻓ ﻝﻼﺧ ﻦﻣ
15 ﻕﻮﻄﻟﺍ ﻦﻨﺴﳌﺍ ﺏﺎﻘﺜﳌﺍ ﻑﺮﻇ ﺢﺘﻓﺍ
.ﺓﺪﻌﻟﺍ ﺐﻛﺭ .ﺓﺪﻌﻟﺍ
ﻦﻨﺴﳌﺍ ﺏﺎﻘﺜﳌﺍ ﻑﺮﻈﺑ ﺔﺼﺼﺨﳌﺍ ﺕﺍﻮﺠﻔﻟﺍ ﰲ
14 ﺏﺎﻘﺜﳌﺍ ﻑﺮﻇ ﺡﺎﺘﻔﻣ ﺯﺮﻏﺍ
.ﻢﻈﺘﻨﻣ ﻞﻜﺸﺑ ﺓﺪﻌﻟﺍﹼﺪﺷ ﻢﻜﺣﺍﻭ 15 ﻕﻮﻄﻟﺍ
(D ﺓﺭﻮﺼﻟﺍ ﻊﺟﺍﺮﺗ) ﺐﻟﺍﻮﻠﻟﺍ ﻂﺑﺭ ﺩﺪﻋ
ﻡﺎﻋ ﻢﻘﻟ ﻞﻣﺎﺣﹰﲈﺋﺍﺩ ﻞﻤﻌﺘﺴﺗ ﻥﺃ ﻲﻐﺒﻨﻳ
17 ﺐﻟﺍﻮﻠﻟﺍ ﻂﺑﺭ ﻢﻘﻟ ﻡﺪﺨﺘﺴﺗ ﺎﻣﺪﻨﻋ
.ﺐﻟﻮﻠﻟﺍ ﺱﺃﺭ ﻢﺋﻼﺗ ﻲﺘﻟﺍ ﺐﻟﺍﻮﻠﻟﺍ ﻂﺑﺭ ﻢﻘﻟ ﻂﻘﻓ ﻡﺪﺨﺘﺳﺍ .16
“ﻕﺮﻄﻟﺎﺑ ﻖﻓﺮﳌﺍ ﺐﻴﻘﺜﺘﻟﺍ/ﺐﻴﻘﺜﺘﻟﺍ” ﻞﻳﻮﺤﺘﻟﺍ ﺡﺎﺘﻔﻣ ﺰﻛﺮﻳ ﺐﻟﺍﻮﻠﻟﺍ ﻂﺑﺭ ﻞﺟﺃ ﻦﻣ
.“ﺐﻘﺜﻟﺍ” ﺰﻣﺭ ﯽﻠﻋﹰﲈﺋﺍﺩ 4
ﺏﺎﻘﺜﳌﺍ ﻑﺮﻇ ﻝﺍﺪﺒﺘﺳﺍ
(E ﺓﺭﻮﺼﻟﺍ ﻊﺟﺍﺮﺗ) ﺏﺎﻘﺜﳌﺍ ﻑﺮﻇ ﻚﻓ
ﳼﺍﺪﺳ ﻂﺑﺭ ﺡﺎﺘﻔﻣ ﺪﺸﻳﻭ ﻢﻘﻠﻳ
1 ﺪﺸﻟﺍ ﻊﻳﴪﻟﺍ ﺏﺎﻘﺜﳌﺍ ﻑﺮﻇ ﻚﻓ ﻞﺟﺃ ﻦﻣ
ﺡﻮﺘﻔﻣ ﻂﺑﺭ ﺡﺎﺘﻔﻣ ﺰﻛﺮﻳﻭ 1 ﺪﺸﻟﺍ ﻊﻳﴪﻟﺍ ﺏﺎﻘﺜﳌﺍ ﻑﺮﻇ ﰲ 18
ﹰ
ﺎﻴﻠﺧﺍﺩ ﻑﺍﻮﳊﺍ
ﻊﺿ .ﻥﺍﺭﻭﺪﻟﺍ ﺭﻮﺤﻤﺑ ﺡﺎﺘﻔﳌﺍ ﺰﻴﻛﺮﺗ ﺢﻄﺳ ﯽﻠﻋ (
12 ﺡﺎﺘﻔﳌﺍ ﺽﺮﻋ) 19 ﻚﻔﻟﺍ
ﻂﺑﺮﻟﺍ ﺡﺎﺘﻔﻣ ﻚﺴﻣﺍ .ﹰﻼﺜﻣ ﻞﻐﺷ ﺓﺪﻀﻨﻤﻛ ،ﺔﻨﻴﺘﻣ ﺓﺪﻋﺎﻗ ﯽﻠﻋ ﺔﻴﺋﺎﺑﺮﻬﻜﻟﺍ ﺓﺪﻌﻟﺍ
ﻝﻼﺧ ﻦﻣ 1 ﺪﺸﻟﺍ ﻊﻳﴪﻟﺍ ﺏﺎﻘﺜﳌﺍ ﻑﺮﻇ ﻞﺣﻭ ﻡﺎﻜﺣﺈﺑ 19 ﻚﻔﻟﺍ ﺡﻮﺘﻔﳌﺍ
ﻞﺣ ﻢﺘﻳ .➊ ﻥﺍﺭﻭﺪﻟﺍ ﻩﺎﲡﺎﺑ 18
ﹰ
ﺎﻴﻠﺧﺍﺩ ﻑﺍﻮﳊﺍ ﳼﺍﺪﺴﻟﺍ ﻂﺑﺮﻟﺍ ﺡﺎﺘﻔﻣ ﻞﺘﻓ
ﯽﻠﻋ ﺔﻔﻴﻔﺧ ﺔﻗﺮﻃ ﻝﻼﺧ ﻦﻣ ﻪﺋﺎﺼﻌﺘﺳﺍ ﻝﺎﺣ ﰲ ﺪﺸﻟﺍ ﻊﻳﴪﻟﺍ ﺏﺎﻘﺜﳌﺍ ﻑﺮﻇ
ﻂﺑﺮﻟﺍ ﺡﺎﺘﻔﻣ ﻉﺰﻧﺍ .
18
ﹰ
ﺎﻴﻠﺧﺍﺩ ﻑﺍﻮﳊﺍ ﳼﺍﺪﺴﻟﺍ ﻂﺑﺮﻟﺍ ﺡﺎﺘﻔﻤﺑ ﺔﻠﻳﻮﻄﻟﺍ ﻕﺎﺴﻟﺍ
ﺏﺎﻘﺜﳌﺍ ﻑﺮﻇ ﻚﻓﻭ ﺪﺸﻟﺍ ﻊﻳﴪﻟﺍ ﺏﺎﻘﺜﳌﺍ ﻑﺮﻇ ﻦﻋﹰﺎﻴﻠﺧﺍﺩ ﻑﺍﻮﳊﺍ ﳼﺍﺪﺴﻟﺍ
.ﻪﻠﺘﻓ ﻝﻼﺧ ﻦﻣﹰﺎﻣﺎﲤ ﺪﺸﻟﺍ ﻊﻳﴪﻟﺍ
ﻑﺮﻈﻟ ﺔﻓﻮﺻﻮﳌﺍ ﺔﻘﻳﺮﻄﻟﺍ ﺲﻔﻨﺑ
15 ﻕﻮﻄﻟﺍ ﻦﻨﺴﳌﺍ ﺏﺎﻘﺜﳌﺍ ﻑﺮﻇ ﻚﻓ
ﹼ
ﻢﺘﻳ
.ﺪﺸﻟﺍ ﻊﻳﴪﻟﺍ ﺏﺎﻘﺜﳌﺍ
(F ﺓﺭﻮﺼﻟﺍ ﻊﺟﺍﺮﺗ) ﺏﺎﻘﺜﳌﺍ ﻑﺮﻇ ﺐﻴﻛﺮﺗ
.ﺲﻛﺎﻌﳌﺍ ﻞﺴﻠﺴﺘﻟﺎﺑ ﻕﻮﻄﻟﺍ ﻦﻨﺴﳌﺍ/ﺪﺸﻟﺍ ﻊﻳﴪﻟﺍ ﺏﺎﻘﺜﳌﺍ ﻑﺮﻇ ﺐﻴﻛﺮﺗ ﹼﻢﺘﻳ
35 – 30 ﻦﻣ ﺡﻭﺍﱰﻳﹼﺪﺷ ﻥﺍﺭﻭﺩ ﻡﺰﻌﺑ ﺏﺎﻘﺜﳌﺍ ﻑﺮﻇﹼﺪﺷﹼﻢﺘﻳ ﻥﺃ ﺐﳚ
.ﹰﺎﺒﻳﺮﻘﺗ ﱰﻣ ﻦﺗﻮﻴﻧ
16 RE 16 13 RE 13 10 RE 10 GSB...
Professional
ﻕﺮﻄﻟﺎﺑ ﻖﻓﺮﻣ ﺐﻴﻘﺜﺗ ﺔﻟﺁ
●
–
●
–
●
–
ﻱﺭﺎﺴﻳ/ﻲﻨﻴﻤﻳ ﻥﺍﺭﻭﺩ
43 43 43 43 43 43
ﻢﻣ
ﻥﺍﺭﻭﺪﻟﺍ ﺭﻮﳏ ﻖﻨﻋ
Ø
16
12
30
16
12
30
13
10
25
13
10
25
10
8
20
10
8
20
ﻢﻣ
ﻢﻣ
ﻢﻣ
ﯽﺼﻗﻷﺍ ﺐﻴﻘﺜﺘﻟﺍ Ø
ﺔﻧﺎﺳﺮﳋﺍ –
ﺫﻻﻮﻓ –
ﺐﺸﺧ –
1,5 – 13 1,5 – 13 1,5 – 13 1,5 – 13 1,5 – 10 1,5 – 10
ﻢﻣ
ﺏﺎﻘﺜﳌﺍ ﻑﺮﻇ ﺪﺷ ﻝﺎﳎ
1,9 1,9 1,7 1,7 1,5 1,5 ﻎﻛ EPTA-Procedure 01/2003 ﺐﺴﺣ ﻥﺯﻮﻟﺍ
II/ II/ II/ II/ II/ II/
ﺔﻳﺎﻗﻮﻟﺍ ﺔﺌﻓ
.ﺔﻨﻴﻌﻣ ﻥﺍﺪﻠﺒﺑ ﺔﺻﺎﺧ ﺕﺍﺯﺍﺮﻄﺑ ﻭﺃ ﻚﻟﺫ ﻦﻋ ﺪﻬﳉﺍ ﻒﻠﺘﳜ ﺎﻣﺪﻨﻋ ﻢﻴﻘﻟﺍ ﻩﺬﻫ ﺕﻭﺎﻔﺘﺗ ﺪﻗ .ﻂﻟﻮﻓ 230 ﺭﺍﺪﻘﻤﺑ [U] ﻲﻤﺳﺍ ﺪﻬﳉ ﻝﻮﻌﻔﳌﺍ ﺔﻳﺭﺎﺳ ﻢﻴﻘﻟﺍ
.ﺓﺩﺮﻔﳌﺍ ﺔﻴﺋﺎﺑﺮﻬﻜﻟﺍ ﺩﺪﻌﻟﺍ ﺾﻌﺒﻟ ﺔﻳﺭﺎﺠﺘﻟﺍ ﺕﺎﻴﻤﺴﺘﻟﺍ ﻒﻠﺘﲣ ﺪﻗ .ﺔﻴﺋﺎﺑﺮﻬﻜﻟﺍ ﻚﺗﺪﻋ ﺯﺍﺮﻃ ﺔﺘﻓﻻ ﯽﻠﻋ ﻒﻨﺼﻟﺍ ﻢﻗﺭ ﺓﺎﻋﺍﺮﻣ ﯽﺟﺮﻳ
Page 47

ﻲﺑﺮﻋ
|
47
Bosch Power Tools 1 609 929 M43 | (28.6.11)
ﺐﻗﺎﺜﻤﻠﻟ ﻥﺎﻣﻷﺍ ﺕﲈﻴﻠﻌﺗ
GSB 13 / GSB 13 RE / GSB 16 / GSB 16 RE
ﻢﻜﺤﺘﻟﺍ ﻥﺍﺪﻘﻓ ﻥﺇ .ﺔﻴﺋﺎﺑﺮﻬﻜﻟﺍ ﺓﺪﻌﻟﺎﺑ ﺖﻘﻓﺭﹸﺃ ﻥﺇ ﺔﻴﻓﺎﺿﻹﺍ ﺾﺑﺎﻘﳌﺍ ﻡﺪﺨﺘﺳﺍ
◀
.ﺡﻭﺮﺠﺑ ﺔﺑﺎﺻﻹﺍ ﯽﻟﺇ ﻱﺩﺆﻳ ﺪﻗ
.ﺕﺎﺒﺜﺑ ﻒﻗﻭ ﻡﺎﻜﺣﺈﺑ ﻦﻳﺪﻴﻟﺍ ﺎﺘﻠﻜﺑ ﻞﻐﺸﻟﺍ ﺀﺎﻨﺛﺃ ﺔﻴﺋﺎﺑﺮﻬﻜﻟﺍ ﺓﺪﻌﻟﺍ ﯽﻠﻋ ﺾﺒﻗﺍ
◀
.ﱪﻛﺃ ﻥﺎﻣﺄﺑ ﻦﻳﺪﻴﻟﺍ ﺎﺘﻠﻜﺑ ﺔﻴﺋﺎﺑﺮﻬﻜﻟﺍ ﺓﺪﻌﻟﺍ ﻪﻴﺟﻮﺗ ﹼﻢﺘﻳ
GSB 10 / GSB 10 RE / GSB 13 / GSB 13 RE / GSB 16 / GSB 16 RE
ﺞﻴﺠﻀﻟﺍ ﲑﺛﺄﺗ ﻥﺇ .ﻕﺮﻄﻟﺎﺑ ﻖﻓﺮﳌﺍ ﺐﻘﺜﻟﺍ ﻝﲈﻋﺃ ﺀﺍﺮﺟﺇ ﺪﻨﻋ ﻊﻤﺳ ﺔﻴﻗﺍﻭ ﺪﺗﺭﺍ
◀
.ﻊﻤﺴﻟﺍ ﺓﺭﺪﻗ ﻥﺍﺪﻘﻓ ﯽﻟﺇ ﻱﺩﺆﻳ ﺪﻗ
ﺀﺍﺮﺟﺇ ﺪﻨﻋ ﺔﻟﻭﺰﻌﳌﺍ ﺾﺒﻘﻟﺍ ﺡﻮﻄﺳ ﻞﺒﻗ ﻦﻣ ﺔﻴﺋﺎﺑﺮﻬﻜﻟﺍ ﺓﺪﻌﻟﺎﺑ ﻚﺴﻣﺍ
◀
ﺔﻴﻔﺨﳌﺍ ﺔﻴﺋﺎﺑﺮﻬﻜﻟﺍ ﻁﻮﻄﳋﺍ ﻞﻐﺸﻟﺍ ﺓﺪﻋ ﺎﲠ ﺐﻴﺼﺗ ﻥﺃ ﺰﺋﺎﳉﺍ ﻦﻣ ﻲﺘﻟﺍ ﻝﲈﻋﻷﺍ
ﻪﺑ ﻱﴪﻳ ﻂﺧ ﺔﺴﻣﻼﻣ ﻥﺇ .ﺔﻴﺋﺎﺑﺮﻬﻜﻟﺍ ﺓﺪﻌﻟﺎﺑ ﺹﺎﳋﺍ ﻲﺋﺎﺑﺮﻬﻜﻟﺍ ﻞﺑﺎﻜﻟﺍ ﻭﺃ
ﻱﺩﺆﺘﻓ ،ﺔﻴﺋﺎﺑﺮﻬﻜﻟﺍ ﺓﺪﻌﻟﺎﺑ ﺔﻴﻧﺪﻌﻣ ﺀﺍﺰﺟﺃ ﺎﻀﻳﺃ ﺏﺮﻬﻜﺗ ﺪﻗ ﻲﺋﺎﺑﺮﻬﻛ ﺪﻬﺟ
.ﺔﻴﺋﺎﺑﺮﻬﻛ ﺔﻣﺪﺻ ﯽﻟﺇ
ﻭﺃ ﺔﻴﻔﺨﳌﺍ ﺩﺍﺪﻣﻻﺍ ﻁﻮﻄﺧ ﯽﻠﻋ ﺭﻮﺜﻌﻠﻟ ﺔﻤﺋﻼﻣ ﺐﻴﻘﻨﺗ ﺓﺰﻬﺟﺃ ﻡﺪﺨﺘﺳﺍ
◀
ﻱﺩﺆﻳ ﺪﻗ ﺔﻴﺋﺎﺑﺮﻬﻜﻟﺍ ﻁﻮﻄﳋﺍ ﺔﺴﻣﻼﻣ ﻥﺇ .ﺔﻴﻠﺤﳌﺍ ﺩﺍﺪﻣﻻﺍ ﺔﻛﴩﺑ ﻦﻌﺘﺳﺍ
ﻱﺩﺆﻳ ﺪﻗ ﺯﺎﻐﻟﺍ ﻂﺧ ﻑﻼﺗﺇ .ﺔﻴﺋﺎﺑﺮﻬﻜﻟﺍ ﺕﺎﻣﺪﺼﻟﺍ ﯽﻟﺇﻭ ﺭﺎﻨﻟﺍ ﻉﻻﺪﻧﺍ ﯽﻟﺇ
ﯽﻟﺇ ﻱﺩﺆﻳ ﺪﻗ ﻭﺃ ﺔﻳﺩﺎﳌﺍ ﺭﺍﴐﻷﺍ ﻞﻜﺸﻳ ﺀﺎﳌﺍ ﻂﺧ ﻕﺍﱰﺧﺍ .ﺕﺍﺭﺎﺠﻔﻧﻻﺍ ﯽﻟﺇ
.ﺔﻴﺋﺎﺑﺮﻬﻜﻟﺍ ﺕﺎﻣﺪﺼﻟﺍ
ﺔﲠﺎﺠﳌ ﺪﻌﺘﺳﺍ .ﻞﻐﺸﻟﺍ ﺓﺪﻋ ﺀﺎﺼﻌﺘﺳﺍ ﺪﻨﻋﹰﺍﺭﻮﻓ ﺔﻴﺋﺎﺑﺮﻬﻜﻟﺍ ﺓﺪﻌﻟﺍ ﺊﻔﻃﺍ
◀
ﺓﺪﻋ ﴢﻌﺘﺴﺗ .ﺔﻳﺩﺍﺪﺗﺭﻻﺍ ﺕﺎﻣﺪﺼﻟﺍ ﺐﺒﺴﺗ ﻲﺘﻟﺍ ﺔﻴﻟﺎﻌﻟﺍ ﻞﻌﻔﻟﺍ ﺩﺭ ﻡﻭﺰﻋ
:ﺎﻣﺪﻨﻋ ﻞﻐﺸﻟﺍ
ﻭﺃ ﺔﻴﺋﺎﺑﺮﻬﻜﻟﺍ ﺓﺪﻌﻟﺍ ﻞﻴﻤﲢ ﻁﺮﻓﹼﻢﺘﻳ –
.ﺎﻬﺘﳉﺎﻌﻣ ﺏﻮﻏﺮﳌﺍ ﻞﻐﺸﻟﺍ ﺔﻌﻄﻗ ﰲ ﻑﺮﺤﻨﺗ ﺎﻣﺪﻨﻋ –
ﺔﻄﺳﺍﻮﺑ ﺎﻬﺘﻴﺒﺜﺗﹼﻢﺗ ﻲﺘﻟﺍ ﻞﻐﺸﻟﺍ ﺔﻌﻄﻗ ﯽﻠﻋ ﺾﺒﻘﻟﺍﹼﻢﺘﻳ .ﻞﻐﺸﻟﺍ ﺔﻌﻄﻗ ﻦﻣﺃ
◀
.ﻙﺪﻳ ﺔﻄﺳﺍﻮﺑ ﺎﲠ ﻚﺴﳌﺍ ﻢﺗ ﻮﻟ ﺎﳑ ﱪﻛﺃ ﻥﺎﻣﺄﺑ ﺔﻣﺰﻠﳌﺍ ﺔﻄﺳﺍﻮﺑ ﻭﺃ ﹼﺪﺷ ﺓﺰﻴﻬﲡ
.ﹰﺎﺒﻧﺎﺟ ﺎﻬﻌﻀﺗ ﻥﺃ ﻞﺒﻗ ﺔﻛﺮﳊﺍ ﻦﻋ ﺔﻴﺋﺎﺑﺮﻬﻜﻟﺍ ﺓﺪﻌﻟﺍ ﻒﻗﻮﺘﺗ ﻥﺃ ﯽﻟﺇ ﺮﻈﺘﻧﺍ
◀
.ﺔﻴﺋﺎﺑﺮﻬﻜﻟﺍ ﺓﺪﻌﻟﺍ ﯽﻠﻋ ﺓﺮﻄﻴﺴﻟﺍ ﻥﺍﺪﻘﻓ ﯽﻟﺇ ﻱﺩﺆﺘﻓ ﻞﻐﺸﻟﺍ ﺓﺪﻋ ﺐﻠﻜﺘﺗ ﺪﻗ
ﺀﺍﺩﻷﺍﻭ ﺞﹶﺘﻨﳌﺍ ﻒﺻﻭ
ﺏﺎﻜﺗﺭﺍ ﻥﺇ .ﺕﲈﻴﻠﻌﺘﻟﺍﻭ ﺔﻳﺮﻳﺬﺤﺘﻟﺍ ﺕﺎﻈﺣﻼﳌﺍ ﻊﻴﲨ ﺃﺮﻗﺍ
ﺕﲈﻴﻠﻌﺘﻟﺍﻭ ﺔﻳﺮﻳﺬﺤﺘﻟﺍ ﺕﺎﻈﺣﻼﳌﺍ ﻖﻴﺒﻄﺗ ﺪﻨﻋ ﺀﺎﻄﺧﻷﺍ
ﻖﺋﺍﺮﳊﺍ ﺏﻮﺸﻧ ﯽﻟﺇ ،ﺔﻴﺋﺎﺑﺮﻬﻜﻟﺍ ﺕﺎﻣﺪﺼﻟﺍ ﯽﻟﺇ ﻱﺩﺆﻳ ﺪﻗ
.ﺓﲑﻄﺧ ﺡﻭﺮﺠﺑ ﺔﺑﺎﺻﻹﺍ ﻭﺃ/ﻭ
ﺺﺼﺨﳌﺍ ﻝﲈﻌﺘﺳﻻﺍ
ﹰ
ﺎﻀﻳﺃﻭ ﺮﺠﳊﺍﻭ ﺔﻧﺎﺳﺮﳋﺍﻭ ﺏﻮﻄﻟﺍ ﰲ ﻕﺮﻄﻟﺎﺑ ﻖﻓﺮﳌﺍ ﺐﻴﻘﺜﺘﻠﻟ ﺺﺼﳐ ﺯﺎﻬﳉﺍ
ﻢﻜﺤﺘﺑ ﺓﺩﻭﺰﳌﺍ ﺓﺰﻬﺟﻷﺍ ﺢﻠﺼﺗﻭ .ﻦﺋﺍﺪﻠﻟﺍﻭ ﻑﺰﳋﺍﻭ ﻥﺩﺎﻌﳌﺍ ﻭ ﺐﺸﳋﺍ ﺐﻴﻘﺜﺘﻟ
.ﹰﺎﻀﻳﺃ ﺐﻟﺍﻮﻠﻟﺍ ﻥﺎﻨﺳﺃ ﺺﻘﻟﻭ ﺐﻟﺍﻮﻠﻟﺍ ﻂﺑﺮﻟ ﻱﺭﺎﺴﻳ/ﻲﻨﻴﻤﻳ ﻥﺍﺭﻭﺩﻭ ﲏﻭﱰﻜﻟﺍ
ﺓﺭﻮﺼﳌﺍ ﺀﺍﺰﺟﻷﺍ
ﺔﺤﻔﺻ ﰲ ﺓﺩﻮﺟﻮﳌﺍ ﺔﻴﺋﺎﺑﺮﻬﻜﻟﺍ ﺓﺪﻌﻟﺍ ﻡﻮﺳﺭ ﯽﻟﺇ ﺓﺭﻮﺼﳌﺍ ﺀﺍﺰﺟﻷﺍ ﻢﻴﻗﺮﺗ ﺪﻨﺘﺴﻳ
.ﺔﻴﻄﻴﻄﺨﺘﻟﺍ ﻡﻮﺳﺮﻟﺍ
* ﺪﺸﻟﺍ ﻊﻳﴪﻟﺍ ﺏﺎﻘﺜﳌﺍ ﻑﺮﻇ 1
ﺔﻴﻣﺎﻣﻷﺍ ﺔﺴﻴﺒﻠﻟﺍ 2
ﺔﻴﻔﻠﳋﺍ ﺔﺴﻴﺒﻠﻟﺍ 3
“ﻕﺮﻄﻟﺎﺑ ﻖﻓﺮﳌﺍ ﺐﻴﻘﺜﺘﻟﺍ/ﺐﻴﻘﺜﺘﻟﺍ” ﻞﻳﻮﲢ ﺡﺎﺘﻔﻣ 4
ﺀﺎﻔﻃﻹﺍﻭ ﻞﻴﻐﺸﺘﻟﺍ ﺡﺎﺘﻔﻣ ﺖﻴﺒﺜﺗ ﺭﺯ 5
ﺀﺎﻔﻃﻹﺍﻭ ﻞﻴﻐﺸﺘﻟﺍ ﺡﺎﺘﻔﻣ 6
(GSB 16 RE)
ﹰ
ﺎﻘﺒﺴﻣ ﻥﺍﺭﻭﺪﻟﺍ ﺩﺪﻋ ﻂﺒﺿ ﺔﻠﺠﻋ
7
(GSB 10 RE / GSB 13 RE / GSB 16 RE)
ﻥﺍﺭﻭﺪﻟﺍ ﻩﺎﲡﺍ ﻞﻳﻮﲢ ﺡﺎﺘﻔﻣ 8
* ﻖﻤﻌﻟﺍ ﺩﺪﳏ ﻂﺒﺿ ﺭﺯ 9
* ﰲﺎﺿﻹﺍ ﺾﺒﻘﳌﺍ ﻂﺒﻀﻟ ﺢﻨﳎ ﺐﻟﻮﻟ 10
* (ﻝﻭﺰﻌﻣ ﺾﺒﻘﻟﺍ ﺢﻄﺳ) ﰲﺎﺿﺇ ﺾﺒﻘﻣ 11
*ﻖﻤﻌﻟﺍ ﺩﺪﳏ 12
(ﻝﻭﺰﻌﻣ ﺾﺒﻘﻟﺍ ﺢﻄﺳ) ﻱﻭﺪﻳ ﺾﺒﻘﻣ 13
*ﺏﺎﻘﺜﳌﺍ ﻑﺮﻇ ﺡﺎﺘﻔﻣ 14
* ﻕﻮﻄﻟﺍ ﻦﻨﺴﳌﺍ ﺏﺎﻘﺜﳌﺍ ﻑﺮﻇ 15
* ﻡﺎﻌﻟﺍ ﻢﻘﻠﻟﺍ ﻞﻣﺎﺣ 16
* ﻲﻏﺍﺮﺑ ﻚﻔﻣ ﺔﻤﻘﻟ 17
**
ﹰ
ﺎﻴﻠﺧﺍﺩ ﻑﺍﻮﳊﺍ ﳼﺍﺪﺳ ﻂﺑﺭ ﺡﺎﺘﻔﻣ
18
**
ﹰ
ﻚﻔﻟﺍ ﺡﻮﺘﻔﻣ ﻂﺑﺭ ﺡﺎﺘﻔﻣ
19
ﻊﺑﺍﻮﺘﻟﺍ ﯽﻠﻋ ﺮﺜﻌﻳ .ﺔﻓﻮﺻﻮﳌﺍ ﻭﺃ ﺓﺭﻮﺼﳌﺍ ﻊﺑﺍﻮﺘﻟﺍ ﻱﺩﺎﻴﺘﻋﻻﺍ ﺪﻳﺭﻮﺘﻟﺍ ﺭﺎﻃﺇ ﻦﻤﻀﺘﻳ ﻻ *
.ﻊﺑﺍﻮﺘﻠﻟ ﺎﻨﳎﺎﻧﺮﺑ ﰲ ﺔﻠﻣﺎﻜﻟﺍ
(ﻢﻴﻠﺴﺘﻟﺍ ﻕﺎﻄﻨﺑ ﺔﻘﻓﺮﻣ ﲑﻏ) ﺔﻟﻭﺍﺪﺘﻣ
**
ﺔﻴﻨﻔﻟﺍ ﺕﺎﻧﺎﻴﺒﻟﺍ
16 RE 16 13 RE 13 10 RE 10 GSB...
Professional
ﻕﺮﻄﻟﺎﺑ ﻖﻓﺮﻣ ﺐﻴﻘﺜﺗ ﺔﻟﺁ
B18 1.. B18 0.. B17 1.. B17 0.. B16 1.. B16 0.. 3 601 ...
ﻒﻨﺼﻟﺍ ﻢﻗﺭ
701 701 600 600 500 500
ﻁﺍﻭ ﺔﻴﻨﻘﳌﺍ ﺔﻴﻤﺳﻻﺍ ﺓﺭﺪﻘﻟﺍ
351 351 301 301 250 250
ﻁﺍﻭ ﺓﺎﻄﻌﳌﺍ ﺓﺭﺪﻘﻟﺍ
0 – 3 000 3 000 0 – 2 800 2 800 0 – 2 600 2 600
1-
ﺔﻘﻴﻗﺩ
ﲇﲪﻼﻟﺍ ﻥﺍﺭﻭﺪﻟﺍ ﺩﺪﻋ
1 640 1 640 1 570 1 570 1 610 1 610
1-
ﺔﻘﻴﻗﺩ
ﲇﻤﳊﺍ ﻥﺍﺭﻭﺪﻟﺍ ﺩﺪﻋ ﯽﺼﻗﺃ
26 270 26 270 25 070 25 070 25 700 25 700
1-
ﺔﻘﻴﻗﺩ
ﻕﺮﻄﻟﺍ ﺩﺪﻋ
2,0 2,0 1,8 1,8 1,5 1,5
ﱰﻣ ﻦﺗﻮﻴﻧ ﻲﻤﺳﻻﺍ ﻥﺍﺭﻭﺪﻟﺍ ﻡﺰﻋ
●
– – – – –
ﹰ
ﺎﻘﺒﺴﻣ ﻥﺍﺭﻭﺪﻟﺍ ﺩﺪﻋ ﻂﺒﺿ
Page 48

48
|
ﻲﺑﺮﻋ
1 609 929 M43 | (28.6.11) Bosch Power Tools
ﰊﺮﻋ
ﻥﺎﻣﻷﺍ ﺕﲈﻴﻠﻌﺗ
ﺔﻴﺋﺎﺑﺮﻬﻜﻟﺍ ﺩﺪﻌﻠﻟ ﺔﻣﺎﻋ ﺔﻳﺮﻳﺬﲢ ﺕﺎﻈﺣﻼﻣ
ﺏﺎﻜﺗﺭﺍ ﻥﺇ .ﺕﲈﻴﻠﻌﺘﻟﺍﻭ ﺔﻳﺮﻳﺬﺤﺘﻟﺍ ﺕﺎﻈﺣﻼﳌﺍ ﻊﻴﲨ ﺃﺮﻗﺍ
ﺪﻗ ﺕﲈﻴﻠﻌﺘﻟﺍﻭ ﺔﻳﺮﻳﺬﺤﺘﻟﺍ ﺕﺎﻈﺣﻼﳌﺍ ﻖﻴﺒﻄﺗ ﺪﻨﻋ ﺀﺎﻄﺧﻷﺍ
ﺡﻭﺮﺠﺑ ﺔﺑﺎﺻﻹﺍ ﻭﺃ/ﻭ ﻖﺋﺍﺮﳊﺍ ﺏﻮﺸﻧ ﯽﻟﺇ ،ﺔﻴﺋﺎﺑﺮﻬﻜﻟﺍ ﺕﺎﻣﺪﺼﻟﺍ ﯽﻟﺇ ﻱﺩﺆﻳ
.ﺓﲑﻄﺧ
.ﻞﺒﻘﺘﺴﻤﻠﻟ ﺕﲈﻴﻠﻌﺘﻟﺍﻭ ﺔﻳﺮﻳﺬﺤﺘﻟﺍ ﺕﺎﻈﺣﻼﳌﺍ ﻊﻴﻤﺠﺑ ﻆﻔﺘﺣﺍ
،ﺔﻳﺮﻳﺬﺤﺘﻟﺍ ﺕﺎﻈﺣﻼﳌﺍ ﰲ ﻡﺪﺨﺘﺴﳌﺍ
“ﺔﻴﺋﺎﺑﺮﻬﻜﻟﺍ ﺓﺪﻌﻟﺍ” ﺢﻠﻄﺼﻤﺑ ﺪﺼﻘﻳ
ﺔﻜﺒﺸﻟﺍ ﻞﺑﺎﻛ ﺔﻄﺳﺍﻮﺑ) ﺔﻴﺋﺎﺑﺮﻬﻜﻟﺍ ﺔﻜﺒﺸﻟﺎﺑ ﺔﻟﻮﺻﻮﳌﺍ ﺔﻴﺋﺎﺑﺮﻬﻜﻟﺍ ﺩﺪﻌﻟﺍ
ﺔﻜﺒﺸﻟﺍ ﻞﺑﺎﻛ ﻥﻭﺩ) ﻢﻛﺮﻤﺑ ﺓﺩﻭﺰﳌﺍ ﺔﻴﺋﺎﺑﺮﻬﻜﻟﺍ ﺩﺪﻌﻟﺍﹰﺎﻀﻳﺃﻭ (ﺔﻴﺋﺎﺑﺮﻬﻜﻟﺍ
.(ﺔﻴﺋﺎﺑﺮﻬﻜﻟﺍ
ﻞﻐﺸﻟﺍ ﻥﺎﻜﻤﺑ ﻥﺎﻣﻷﺍ
ﻞﻐﺸﻟﺍ ﻥﺎﻜﻣ ﰲ ﯽﺿﻮﻔﻟﺍ .ﻚﻠﻐﺷ ﻥﺎﻜﻣ ﺓﺀﺎﺿﺇ ﻦﺴﺣﻭ ﺔﻓﺎﻈﻧ ﯽﻠﻋ ﻆﻓﺎﺣ
◀
.ﺙﺩﺍﻮﳊﺍ ﺙﻭﺪﺣ ﯽﻟﺇ ﻱﺩﺆﺗ ﺪﻗ ﺓﺀﺎﻀﻣ ﲑﻐﻟﺍ ﻞﻤﻌﻟﺍ ﺕﻻﺎﳎﻭ
ﺮﻓﻮﺘﺗ ﻱﺬﻟﺍﻭ ﺭﺎﺠﻔﻧﻻﺍ ﺮﻄﳋ ﺽﺮﻌﻣ ﻂﻴﳏ ﰲ ﺔﻴﺋﺎﺑﺮﻬﻜﻟﺍ ﺓﺪﻌﻟﺎﺑ ﻞﻐﺘﺸﺗ ﻻ
◀
ﺔﻴﺋﺎﺑﺮﻬﻜﻟﺍ ﺩﺪﻌﻟﺍ .ﻝﺎﻌﺘﺷﻼﻟ ﺔﻠﺑﺎﻘﻟﺍ ﺓﱪﻏﻷﺍ ﻭﺃ ﺕﺍﺯﺎﻐﻟﺍ ﻭﺃ ﻞﺋﺍﻮﺴﻟﺍ ﻪﻴﻓ
.ﺓﺮﺨﺑﻷﺍﻭ ﺓﱪﻏﻷﺍ ﻞﻌﺸﻴﻓ ،ﺮﻳﺎﻄﺘﻳ ﺪﻗ ﻱﺬﻟﺍ ﺭﴩﻟﺍ ﻞﻜﺸﺗ
ﻞﻤﻌﺘﺴﺗ ﺎﻣﺪﻨﻋ ﺪﻌﺑ ﯽﻠﻋ ﺹﺎﺨﺷﻷﺍ ﻦﻣ ﻢﻫﲑﻏﻭ ﻝﺎﻔﻃﻷﺍ ﺀﺎﻘﺑ ﯽﻠﻋ ﻆﻓﺎﺣ
◀
.ﻲﻬﻠﺘﻟﺍ ﺪﻨﻋ ﺯﺎﻬﳉﺍ ﯽﻠﻋ ﺓﺮﻄﻴﺴﻟﺍ ﺪﻘﻔﺗ ﺪﻗ .ﺔﻴﺋﺎﺑﺮﻬﻜﻟﺍ ﺓﺪﻌﻟﺍ
ﻲﺋﺎﺑﺮﻬﻜﻟﺍ ﻥﺎﻣﻷﺍ
ﲑﻴﻐﺗ ﺯﻮﳚ ﻻ .ﺲﺒﻘﳌﺍ ﻊﻣ ﺔﻴﺋﺎﺑﺮﻬﻜﻟﺍ ﺓﺪﻌﻟﺍ ﻞﺻﻭ ﺲﺑﺎﻗ ﻢﺋﻼﺘﻳ ﻥﺃ ﺐﳚ
◀
ﺩﺪﻌﻟﺍ ﻊﻣ ﺔﺌﻳﺎﻬﳌﺍ ﺲﺑﺍﻮﻘﻟﺍ ﻞﻤﻌﺘﺴﺗ ﻻ .ﻝﺍﻮﺣﻷﺍ ﻦﻣ ﻝﺎﺣ ﻱﺄﺑ ﺲﺑﺎﻘﻟﺍ
ﺎﻫﲑﻴﻐﺗﹼﻢﺘﻳ ﱂ ﻲﺘﻟﺍ ﺲﺑﺍﻮﻘﻟﺍ ﺾﹼﻔﲣ .ﻲﺋﺎﻗﻭ ﺾﻳﺭﺄﺗ ﺔﺿﺭﺆﳌﺍ ﺔﻴﺋﺎﺑﺮﻬﻜﻟﺍ
.ﺔﻴﺋﺎﺑﺮﻬﻜﻟﺍ ﺕﺎﻣﺪﺼﻟﺍ ﺮﻄﺧ ﻦﻣ ﺔﻤﺋﻼﳌﺍ ﺲﺑﺎﻘﳌﺍﻭ
ﺊﻓﺍﺪﳌﺍﻭ ﺔﺌﻓﺪﺘﻟﺍ ﺕﺍﺭﻮﺗﺎﻳﺩﺍﺭﻭ ﺐﻴﺑﺎﻧﻷﺎﻛ ﺔﺿﺭﺆﳌﺍ ﺡﻮﻄﺴﻟﺍ ﺔﺴﻣﻼﻣ ﺐﻨﲡ
◀
ﺎﻣﺪﻨﻋ ﺔﻴﺋﺎﺑﺮﻬﻜﻟﺍ ﺕﺎﻣﺪﺼﻟﺍ ﺮﻄﺧ ﺩﺍﺩﺰﻳ .ﻚﻤﺴﺟ ﺔﻄﺳﺍﻮﺑ ﺕﺍﺩﺍﱪﻟﺍ ﻭﺃ
.ﺽﺭﺆﻣ ﻚﻤﺴﺟ ﻥﻮﻜﻳ
ﺕﺎﻣﺪﺼﻟﺍ ﺮﻄﺧ ﺩﺍﺩﺰﻳ .ﺔﺑﻮﻃﺮﻟﺍ ﻭﺃ ﺭﺎﻄﻣﻷﺍ ﻦﻋ ﺔﻴﺋﺎﺑﺮﻬﻜﻟﺍ ﺓﺪﻌﻟﺍ ﺪﻌﺑﺃ
◀
.ﺔﻴﺋﺎﺑﺮﻬﻜﻟﺍ ﺓﺪﻌﻟﺍ ﻞﺧﺍﺩ ﯽﻟﺇ ﺀﺎﳌﺍ ﺏﴪﺗ ﻥﺇ ﺔﻴﺋﺎﺑﺮﻬﻜﻟﺍ
ﺐﺤﺴﻟ ﻭﺃ ﺎﻬﻘﻴﻠﻌﺘﻟ ﻭﺃ ﺔﻴﺋﺎﺑﺮﻬﻜﻟﺍ ﺓﺪﻌﻟﺍ ﻞﻤﳊ ﻞﺑﺎﻜﻟﺍ ﻝﲈﻌﺘﺳﺍ ﺀﴘﺗ ﻻ
◀
ﻑﺍﻮﳊﺍﻭ ﺖﻳﺰﻟﺍﻭ ﺓﺭﺍﺮﳊﺍ ﻦﻋ ﻞﺑﺎﻜﻟﺍ ﺩﺎﻌﺑﺇ ﯽﻠﻋ ﻆﻓﺎﺣ .ﺲﺒﻘﳌﺍ ﻦﻣ ﺲﺑﺎﻘﻟﺍ
ﻦﻣ ﺔﻜﺑﺎﺸﺘﳌﺍ ﻭﺃ ﺔﻔﻟﺎﺘﻟﺍ ﺕﻼﺑﺎﻜﻟﺍ ﺪﻳﺰﺗ .ﺔﻛﺮﺤﺘﳌﺍ ﺯﺎﻬﳉﺍ ﺀﺍﺰﺟﺃ ﻦﻋ ﻭﺃ ﺓﺩﺎﳊﺍ
.ﺔﻴﺋﺎﺑﺮﻬﻜﻟﺍ ﺕﺎﻣﺪﺼﻟﺍ ﺮﻄﺧ
ﺎﻣﺪﻨﻋﹰﺎﻀﻳﺃ ﻲﺟﺭﺎﳋﺍ ﻝﲈﻌﺘﺳﻼﻟ ﺔﳊﺎﺼﻟﺍ ﺪﻳﺪﻤﺘﻟﺍ ﺕﻼﺑﺎﻛ ﻂﻘﻓ ﻡﺪﺨﺘﺳﺍ
◀
ﺺﺼﳐ ﺪﻳﺪﲤ ﻞﺑﺎﻛ ﻝﲈﻌﺘﺳﺍ ﺾﻔﳜ .ﺀﻼﳋﺍ ﰲ ﺔﻴﺋﺎﺑﺮﻬﻜﻟﺍ ﺓﺪﻌﻟﺎﺑ ﻞﻐﺘﺸﺗ
.ﺔﻴﺋﺎﺑﺮﻬﻜﻟﺍ ﺕﺎﻣﺪﺼﻟﺍ ﺮﻄﺧ ﻦﻣ ﻲﺟﺭﺎﳋﺍ ﻝﲈﻌﺘﺳﻼﻟ
،ﺔﺒﻃﺮﻟﺍ ﺀﺍﻮﺟﻷﺍ ﰲ ﺔﻴﺋﺎﺑﺮﻬﻜﻟﺍ ﺓﺪﻌﻟﺍ ﻞﻴﻐﺸﺗ ﺐﻨﲡ ﻥﺎﻜﻣﻹﺎﺑ ﻦﻜﻳ ﱂ ﻥﺇ
◀
ﻦﻣ ﺔﻳﺎﻗﻮﻠﻟ ﺡﺎﺘﻔﻣ ﻡﺍﺪﺨﺘﺳﺍ ﻥﺇ .ﻒﻠﺨﺘﳌﺍ ﺭﺎﻴﺘﻟﺍ ﻦﻣ ﺔﻳﺎﻗﻮﻠﻟ ﺡﺎﺘﻔﻣ ﻡﺪﺨﺘﺳﺎﻓ
.ﺔﻴﺋﺎﺑﺮﻬﻜﻟﺍ ﺕﺎﻣﺪﺼﻟﺍ ﺮﻄﺧ ﻞﻠﻘﻳ ﻒﻠﺨﺘﳌﺍ ﺭﺎﻴﺘﻟﺍ
ﺹﺎﺨﺷﻷﺍ ﻥﺎﻣﺃ
.ﻞﻘﻌﺘﺑ ﺔﻴﺋﺎﺑﺮﻬﻜﻟﺍ ﺓﺪﻌﻟﺍ ﺔﻄﺳﺍﻮﺑ ﻞﻤﻌﻟﺎﺑ ﻢﻗﻭ ﻪﻠﻌﻔﺗ ﺎﻣ ﯽﻟﺇ ﻪﺒﺘﻧﺍﻭﹰﺎﻈﻘﻳ ﻦﻛ
◀
ﲑﺛﺄﺗ ﺖﲢ ﻥﻮﻜﺗ ﺎﻣﺪﻨﻋ ﻭﺃ ﺐﻌﺘﻣ ﻥﻮﻜﺗ ﺎﻣﺪﻨﻋ ﺔﻴﺋﺎﺑﺮﻬﻛ ﺓﺪﻋ ﻡﺪﺨﺘﺴﺗ ﻻ
ﺪﻨﻋ ﺓﺪﺣﺍﻭ ﺔﻈﺤﻠﻟ ﻩﺎﺒﺘﻧﻻﺍ ﻡﺪﻋ .ﺔﻳﻭﺩﻷﺍ ﻭﺃ ﻝﻮﺤﻜﻟﺍ ﻭﺃ ﺕﺍﺭﺪﺨﳌﺍ
.ﺓﲑﻄﺧ ﺕﺎﺑﺎﺻﺇ ﯽﻟﺇ ﻱﺩﺆﻳ ﺪﻗ ﺔﻴﺋﺎﺑﺮﻬﻜﻟﺍ ﺓﺪﻌﻟﺍ ﻡﺍﺪﺨﺘﺳﺍ
ﺔﻳﺎﻗﻮﻟﺍ ﺩﺎﺘﻋ ﺀﺍﺪﺗﺭﺍ ﺪﳛ .ﺔﻴﻗﺍﻭ ﺕﺍﺭﺎﻈﻧﹰﲈﺋﺍﺩ ﺪﺗﺭﺍﻭ ﺹﺎﳋﺍ ﺔﻳﺎﻗﻮﻟﺍ ﺩﺎﺘﻋ ﺪﺗﺭﺍ
◀
ﻕﻻﺰﻧﻻﺍ ﻦﻣ ﺔﻴﻗﺍﻮﻟﺍ ﻥﺎﻣﻷﺍ ﺔﻳﺬﺣﺃﻭ ﺭﺎﺒﻐﻟﺍ ﻦﻣ ﺔﻳﺎﻗﻮﻟﺍ ﻉﺎﻨﻘﻛ ،ﺹﺎﳋﺍ
ﺮﻄﺧ ﻦﻣ ،ﺔﻴﺋﺎﺑﺮﻬﻜﻟﺍ ﺓﺪﻌﻟﺍ ﻝﲈﻌﺘﺳﺍﻭ ﻉﻮﻧ ﺐﺴﺣ ،ﲔﻧﺫﻷﺍ ﺔﻴﻗﺍﻭ ﻭﺃ ﺫﻮﳋﺍﻭ
.ﺡﻭﺮﺠﺑ ﺔﺑﺎﺻﻹﺍ
ﺓﺄﻔﻄﻣ ﺔﻴﺋﺎﺑﺮﻬﻜﻟﺍ ﺓﺪﻌﻟﺍ ﻥﻮﻛ ﻦﻣ ﺪﻛﺄﺗ .ﺩﻮﺼﻘﻣ ﲑﻏ ﻞﻜﺸﺑ ﻞﻴﻐﺸﺘﻟﺍ ﺐﻨﲡ
◀
.ﺎﻬﻠﲪ ﻭﺃ ﺎﻬﻌﻓﺭ ﻞﺒﻗﻭ ،ﻢﻛﺮﳌﺎﺑ ﻭﺃ/ﻭ ﻲﺋﺎﺑﺮﻬﻜﻟﺍ ﺭﺎﻴﺘﻟﺍ ﺩﺍﺪﻣﺈﺑ ﺎﻬﻠﺻﻭ ﻞﺒﻗ
ﻥﺇ ﻭﺃ ﺔﻴﺋﺎﺑﺮﻬﻜﻟﺍ ﺓﺪﻌﻟﺍ ﻞﲪ ﺀﺎﻨﺛﺃ ﺡﺎﺘﻔﳌﺍ ﯽﻠﻋ ﻚﻌﺒﺻﺇ ﻊﻀﺗ ﺖﻨﻛ ﻥﺇ
ﻱﺩﺆﻳ ﺪﻘﻓ ،ﻞﻴﻐﺸﺘﻟﺍ ﺪﻴﻗ ﻥﻮﻜﻳ ﺎﻣﺪﻨﻋ ﺔﻴﺋﺎﺑﺮﻬﻜﻟﺍ ﺔﻜﺒﺸﻟﺎﺑ ﺯﺎﻬﳉﺍ ﺖﻠﺻﻭ
.ﺙﺩﺍﻮﳊﺍ ﺙﻭﺪﺣ ﯽﻟﺇ ﻚﻟﺫ
ﻱﺩﺆﺗ ﺪﻗ .ﺔﻴﺋﺎﺑﺮﻬﻜﻟﺍ ﺓﺪﻌﻟﺍ ﻞﻴﻐﺸﺗ ﻞﺒﻗ ﻂﺑﺮﻟﺍ ﺡﺎﺘﻔﻣ ﻭﺃ ﻂﺒﻀﻟﺍ ﺩﺪﻋ ﻉﺰﻧﺍ
◀
.ﺡﻭﺮﺠﺑ ﺔﺑﺎﺻﻹﺍ ﯽﻟﺇ ﺯﺎﻬﳉﺍ ﻦﻣ ﺭﺍﻭﺩ ﺀﺰﺟ ﰲ ﺪﺟﺍﻮﺘﳌﺍ ﺡﺎﺘﻔﳌﺍ ﻭﺃ ﺓﺪﻌﻟﺍ
.ﹰﲈﺋﺍﺩ ﻚﻧﺯﺍﻮﺗ ﯽﻠﻋ ﻆﻓﺎﺣﻭ ﻥﺎﻣﺄﺑ ﻒﻗ .ﺔﻴﻌﻴﺒﻃ ﲑﻐﻟﺍ ﺪﺴﳉﺍ ﻉﺎﺿﻭﺃ ﺐﻨﲡ
◀
ﲑﻐﻟﺍ ﻒﻗﺍﻮﳌﺍ ﰲ ﻞﻀﻓﺃ ﻞﻜﺸﺑ ﺯﺎﻬﳉﺍ ﯽﻠﻋ ﺓﺮﻄﻴﺴﻟﺍ ﻦﻣ ﻚﻟﺫ ﻚﻟ ﺢﻤﺴﻴﺳ
.ﺔﻌﻗﻮﺘﻣ
ﺀﺎﻘﺑﺇ ﯽﻠﻋ ﻆﻓﺎﺣ .ﯽﻠﳊﺍ ﻭﺃ ﺔﺿﺎﻔﻀﻔﻟﺍ ﺏﺎﻴﺜﻟﺍ ﺪﺗﺮﺗ ﻻ .ﺔﺒﺳﺎﻨﻣ ﺏﺎﻴﺛ ﺪﺗﺭﺍ
◀
.ﺔﻛﺮﺤﺘﳌﺍ ﺯﺎﻬﳉﺍ ﺀﺍﺰﺟﺃ ﻦﻋ ﺪﻌﺑ ﯽﻠﻋ ﺕﺍﺯﺎﻔﻘﻟﺍﻭ ﺏﺎﻴﺜﻟﺍﻭ ﺮﻌﺸﻟﺍ
.ﺔﻛﺮﺤﺘﳌﺍ ﺀﺍﺰﺟﻷﺎﺑ ﻞﻳﻮﻄﻟﺍ ﺮﻌﺸﻟﺍﻭ ﯽﻠﳊﺍﻭ ﺔﺿﺎﻔﻀﻔﻟﺍ ﺏﺎﻴﺜﻟﺍ ﻚﺑﺎﺸﺘﺗ ﺪﻗ
ﻪﻧﺄﺑﻭ ﺔﻟﻮﺻﻮﻣ ﺎﳖﺃ ﻦﻣ ﺪﻛﺄﺘﻓ ،ﺭﺎﺒﻐﻟﺍ ﻊﻴﻤﲡﻭ ﻂﻔﺷ ﺕﺍﺰﻴﻬﲡ ﺐﻴﻛﺮﺗ ﺯﺎﺟ ﻥﺇ
◀
ﺓﱪﻏﻷﺍ ﻂﻔﺸﻟ ﺕﺍﺰﻴﻬﲡ ﻡﺍﺪﺨﺘﺳﺍ ﻞﻠﻘﻳ ﺪﻗ .ﻢﻴﻠﺳ ﻞﻜﺸﺑ ﺎﻬﻣﺍﺪﺨﺘﺳﺍﹼﻢﺘﻳ
.ﺓﱪﻏﻷﺍ ﻦﻋ ﺔﲡﺎﻨﻟﺍ ﺮﻃﺎﺨﳌﺍ ﻦﻣ
ﺔﻴﺋﺎﺑﺮﻬﻜﻟﺍ ﺩﺪﻌﻟﺍ ﻡﺍﺪﺨﺘﺳﺍﻭ ﺔﻠﻣﺎﻌﻣ ﻦﺴﺣ
ﺔﻴﺋﺎﺑﺮﻬﻜﻟﺍ ﺓﺪﻌﻟﺍ ﻚﻟﺎﻐﺷﺃ ﺬﻴﻔﻨﺘﻟ ﻡﺪﺨﺘﺳﺍ .ﺯﺎﻬﳉﺍ ﻞﻴﻤﺤﺘﺑ ﻁﺮﻔﺗ ﻻ
◀
ﺓﺪﻌﻟﺍ ﺔﻄﺳﺍﻮﺑ ﹰﺎﻧﺎﻣﺃ ﺮﺜﻛﺃﻭ ﻞﻀﻓﺃ ﻞﻜﺸﺑ ﻞﻤﻌﺗ ﻚﻧﺇ .ﻚﻟﺬﻟ ﺔﺼﺼﺨﳌﺍ
.ﺭﻮﻛﺬﳌﺍ ﺀﺍﺩﻷﺍ ﻝﺎﳎ ﰲ ﺔﻤﺋﻼﳌﺍ ﺔﻴﺋﺎﺑﺮﻬﻜﻟﺍ
ﺔﻴﺋﺎﺑﺮﻬﻜﻟﺍ ﺓﺪﻌﻟﺍ .ﻒﻟﺎﺗ ﺎﻬﻠﻴﻐﺸﺗ ﺡﺎﺘﻔﻣ ﻥﺎﻛ ﻥﺇ ﺔﻴﺋﺎﺑﺮﻬﻜﻟﺍ ﺓﺪﻌﻟﺍ ﻡﺪﺨﺘﺴﺗ ﻻ
◀
.ﺎﻬﺤﻴﻠﺼﺗﹼﻢﺘﻳ ﻥﺃ ﺐﳚﻭ ﺓﲑﻄﺧ ﺎﻬﺋﺎﻔﻃﺈﺑ ﻭﺃ ﺎﻬﻠﻴﻐﺸﺘﺑ ﺢﻤﺴﺗ ﺪﻌﺗ ﱂ ﻲﺘﻟﺍ
ﻞﺒﻗﻭ ﺯﺎﻬﳉﺍ ﻂﺒﺿ ﻞﺒﻗ ﻢﻛﺮﳌﺍ ﻉﺰﻧﺍ ﻭﺃ/ﻭ ﺲﺒﻘﳌﺍ ﻦﻣ ﺲﺑﺎﻘﻟﺍ ﺐﺤﺳﺍ
◀
ﻁﺎﻴﺘﺣﻻﺍ ﺕﺍﺀﺍﺮﺟﺇ ﻊﻨﲤ .ﹰﺎﺒﻧﺎﺟ ﺯﺎﻬﳉﺍ ﻊﺿﻭ ﻞﺒﻗ ﻭﺃ ﻊﺑﺍﻮﺘﻟﺍ ﻊﻄﻗ ﻝﺍﺪﺒﺘﺳﺍ
.ﺩﻮﺼﻘﻣ ﲑﻏ ﻞﻜﺸﺑ ﺔﻴﺋﺎﺑﺮﻬﻜﻟﺍ ﺓﺪﻌﻟﺍ ﻞﻴﻐﺸﺗ ﻩﺬﻫ
.ﻝﺎﻔﻃﻷﺍ ﻝﺎﻨﻣ ﻦﻋﹰﺍﺪﻴﻌﺑ ﺎﻬﻣﺍﺪﺨﺘﺳﺍﹼﻢﺘﻳ ﻻ ﻲﺘﻟﺍ ﺔﻴﺋﺎﺑﺮﻬﻜﻟﺍ ﺩﺪﻌﻟﺎﺑ ﻆﻔﺘﺣﺍ
◀
ﻚﻠﺗ ﺃﺮﻘﻳ ﱂ ﻦﳌ ﻭﺃ ﺎﲠ ﻪﻟ ﺓﱪﺧ ﻻ ﻦﳌ ﺔﻴﺋﺎﺑﺮﻬﻜﻟﺍ ﺓﺪﻌﻟﺍ ﻡﺍﺪﺨﺘﺳﺎﺑ ﺢﻤﺴﺗ ﻻ
ﺹﺎﺨﺷﺃ ﻞﺒﻗ ﻦﻣ ﺎﻬﻣﺍﺪﺨﺘﺳﺍﹼﻢﺗ ﻥﺇ ﺓﲑﻄﺧ ﺔﻴﺋﺎﺑﺮﻬﻜﻟﺍ ﺩﺪﻌﻟﺍ .ﺕﲈﻴﻠﻌﺘﻟﺍ
.ﺓﱪﺧ ﻥﻭﺩ
ﺯﺎﻬﳉﺍ ﺀﺍﺰﺟﺃ ﺖﻧﺎﻛ ﺍﺫﺇ ﲈﻋ ﺺﺤﻔﺗ .ﺪﻴﺟ ﻞﻜﺸﺑ ﺔﻴﺋﺎﺑﺮﻬﻜﻟﺍ ﺓﺪﻌﻟﺎﺑ ﻦﺘﻋﺍ
◀
ﺖﻧﺎﻛ ﻥﺇ ﻭﺃ ﺔﻛﺮﳊﺍ ﻦﻋ ﺔﻴﺼﻌﺘﺴﻣ ﲑﻏ ﺎﳖﺄﺑﻭ ﻢﻴﻠﺳ ﻞﻜﺸﺑ ﻞﻤﻌﺗ ﺔﻛﺮﺤﺘﳌﺍ
ﺓﺪﻌﻟﺍ ﺀﺍﺩﺃ ﻦﺴﺣ ﯽﻠﻋ ﺎﻬﻴﻓ ﺮﺛﺆﺗ ﺔﺟﺭﺪﻟ ﺔﻔﻟﺎﺗ ﻭﺃ ﺓﺭﻮﺴﻜﻣ ﺀﺍﺰﺟﺃ ﻙﺎﻨﻫ
.ﺯﺎﻬﳉﺍ ﻞﻴﻐﺸﺗ ﺓﺩﺎﻋﺇ ﻞﺒﻗ ﺔﻔﻟﺎﺘﻟﺍ ﺀﺍﺰﺟﻷﺍ ﻩﺬﻫ ﺢﻴﻠﺼﺗ ﻲﻐﺒﻨﻳ .ﺔﻴﺋﺎﺑﺮﻬﻜﻟﺍ
ﻞﻜﺸﺑ ﺎﻬﺘﻧﺎﻴﺻﹼﻢﺗ ﻲﺘﻟﺍ ﺔﻴﺋﺎﺑﺮﻬﻜﻟﺍ ﺩﺪﻌﻟﺍ ﺎﻫﺭﺪﺼﻣ ﺙﺩﺍﻮﳊﺍ ﻦﻣ ﲑﺜﻜﻟﺍ
.ﺀﻱﺩﺭ
ﻑﺍﻮﺣ ﺕﺍﺫ ﻊﻄﻘﻟﺍ ﺩﺪﻋ ﻥﺇ .ﺓﺩﺎﺣﻭ ﺔﻔﻴﻈﻧ ﻊﻄﻘﻟﺍ ﺩﺪﻋ ﺀﺎﻘﺑﺇ ﯽﻠﻋ ﻆﻓﺎﺣ
◀
ﺎﻬﻬﻴﺟﻮﺗ ﻦﻜﻤﻳﻭ ﻞﻗﺃ ﻞﻜﺸﺑ ﺐﻠﻜﺘﺗ ﺔﻳﺎﻨﻌﺑ ﺎﻬﺘﻧﺎﻴﺻﹼﻢﺗ ﻲﺘﻟﺍ ﺓﺩﺎﳊﺍ ﻊﻄﻘﻟﺍ
.ﴪﻳﺃ ﻞﻜﺸﺑ
ﻩﺬﻫ ﺐﺴﺣ .ﺦﻟﺇﻭ ﻞﻐﺸﻟﺍ ﺩﺪﻋﻭ ﻊﺑﺍﻮﺘﻟﺍﻭ ﺔﻴﺋﺎﺑﺮﻬﻜﻟﺍ ﺩﺪﻌﻟﺍ ﻡﺪﺨﺘﺳﺍ
◀
ﻡﺍﺪﺨﺘﺳﺍ .ﻩﺬﻴﻔﻨﺗ ﺩﺍﺮﳌﺍ ﻞﻤﻌﻟﺍﻭ ﻞﻐﺸﻟﺍ ﻁﻭﴍ ﻚﻟﺫ ﺀﺎﻨﺛﺃ ﯽﻋﺍﺮﺗ .ﺕﲈﻴﻠﻌﺘﻟﺍ
ﺙﻭﺪﺣ ﯽﻟﺇ ﻱﺩﺆﻳ ﺪﻗ ﺎﻬﻠﺟﻷ ﺔﺼﺼﺨﳌﺍ ﻝﺎﻐﺷﻷﺍ ﲑﻐﻟ ﺔﻴﺋﺎﺑﺮﻬﻜﻟﺍ ﺩﺪﻌﻟﺍ
.ﺓﲑﻄﳋﺍ ﺕﻻﺎﳊﺍ
ﺔﻣﺪﳋﺍ
ﻂﻘﻓﻭ ﲔﺼﺼﺨﺘﳌﺍ ﻝﲈﻌﻟﺍ ﻞﺒﻗ ﻦﻣ ﻂﻘﻓ ﺔﻴﺋﺎﺑﺮﻬﻜﻟﺍ ﻚﺗﺪﻋ ﺢﻴﻠﺼﺘﺑ ﺢﻤﺳﺍ
◀
.ﺯﺎﻬﳉﺍ ﻥﺎﻣﺃ ﯽﻠﻋ ﺔﻈﻓﺎﺤﳌﺍ ﻚﻟﺫ ﻦﻣﺆﻳ .ﺔﻴﻠﺻﻷﺍ ﺭﺎﻴﻐﻟﺍ ﻊﻄﻗ ﻝﲈﻌﺘﺳﺎﺑ
Page 49

ﯽﺳﺭﺎﻓ
|
49
Bosch Power Tools 1 609 929 M43 | (28.6.11)
ﺎﻫ ﻪﺑﺮﺿ ﺩﺍﺪﻌﺗ ﻭ ﺖﻋﺮﺳ ﻢﯿﻈﻨﺗ ﻩﻮﺤﻧ
(GSB 10 RE / GSB 13 RE / GSB 16 RE)
ﯽﻗﺮﺑ ﺭﺍﺰﺑﺍ ﻥﺩﻮﺑ ﻦﺷﻭﺭ ﺖﻟﺎﺣ ﺭﺩ ﺍﺭ ﻪﺑﺮﺿ ﺩﺍﺪﻌﺗ/ﺖﻋﺮﺳ ﺪﯿﻧﺍﻮﺘﯿﻣ ﺎﻤﺷ
ﺭﺎﺸﻓ ﺍﺭ 6 ﻞﺻﻭ ﻭ ﻊﻄﻗ ﺪﯿﻠﮐ ﺪﺣ ﻪﭼ ﺎﺗ ﻪﮑﻨﯾﺍ ﺐﺴﺣ ﺮﺑ یﺪﻨﺑ ﻪﺟﺭﺩ ﻥﻭﺪﺑ
.ﺪﯿﻨﮐ ﻢﯿﻈﻨﺗ ،ﺪﯿﻫﺪﺑ
ﺎﻫ ﻪﺑﺮﺿ ﺩﺍﺪﻌﺗ ﻭ ﺭﻮﺗﻮﻣ ﺭﻭﺩ ﺕﺪﺷ
6 ﻞﺻﻭ ﻭ ﻊﻄﻗ ﺪﯿﻠﮐ یﻭﺭ ﻡﺍﺭﺁ ﺭﺎﺸﻓ
ﺎﻫ ﻪﺑﺮﺿ ﺩﺍﺪﻌﺗ ﻭ ﺖﻋﺮﺳ ﺶﯾﺍﺰﻓﺍ ﺚﻋﺎﺑ ﺭﺎﺸﻓ ﺶﯾﺍﺰﻓﺍ .ﺪﻫﺪﯿﻣ ﺶﻫﺎﮐ ﺍﺭ
.ﺩﻮﺸﯿﻣ
(GSB 16 RE) ﺎﻫ ﻪﺑﺮﺿ ﺩﺍﺪﻌﺗ ﻭ ﺖﻋﺮﺳ ﺏﺎﺨﺘﻧﺍ ﻩﻮﺤﻧ
ﻥﺍﻮﺘﯿﻣ ،ﺖﻋﺮﺳ ﺏﺎﺨﺘﻧﺍ ﻭ ﻢﯿﻈﻨﺗ یﺍﺮﺑ
7 ﺶﺧﺮﭼ ﻞﺑﺎﻗ ﺪﯿﻠﮐ ﻪﻠﯿﺳﻮﺑ
ﺰﯿﻧ (ﺩﺮﮐﺭﺎﮐ) ﻩﺎﮕﺘﺳﺩ ﺖﮐﺮﺣ ﻝﺎﺣﺭﺩ ﺍﺭ ﻡﺯﻻ یﺎﻫ ﻪﺑﺮﺿ ﺩﺍﺪﻌﺗ ﻭ ﺖﻋﺮﺳ
.ﺩﺮﮐ ﻢﯿﻈﻨﺗ
ﺭﺎﮐ ﻂﯾﺍﺮﺷ ﻭ ﺭﺎﮐ ﻪﻌﻄﻗ ﺲﻨﺟ ﻪﺑ ﺎﻫ ﻪﺑﺮﺿ ﺩﺍﺪﻌﺗ ﻭ ﺖﻋﺮﺳ ﻥﺍﺰﯿﻣ
.ﺪﯾﺁ ﯽﻣ ﺖﺳﺪﺑ ﯽﻠﻤﻋ ﮧﺑﺮﲡ ﻖﺒﻃ ﻭ ﻪﺘﺷﺍﺩ ﯽﮕﺘﺴﺑ
ﯽﻠﻤﻋ یﺎﻫ ﯽﺋﺎﻤﻨﻫﺍﺭ
.ﺪﯿﻫﺩ ﺭﺍﺮﻗ ﻩﺮﻬﻣ ﺎﯾ ﻭ ﭻﯿﭘ یﻭﺭ ﺵﻮﻣﺎﺧ ﺖﻟﺎﺣ ﺭﺩ ﺎﻬﻨﺗ ﺍﺭ ﯽﻗﺮﺑ ﺭﺍﺰﺑﺍ
◀
.ﺩﺭﺍﺩ ﺩﻮﺟﻭ ﺶﺧﺮﭼ ﻝﺎﺣ ﺭﺩ ﺭﺍﺰﺑﺍ ﺵﺰﻐﻟ ﻥﺎﮑﻣﺍ
ﻥﺪﺷ ﮏﻨﺧ یﺍﺮﺑ ﺍﺭ ﯽﻗﺮﺑ ﺭﺍﺰﺑﺍ ﯽﺘﺴﯾﺎﺑ ،ﻢﮐ ﺖﻋﺮﺳ ﺖﲢ ﺭﺎﮐ ﯽﺗﺪﻣ ﺯﺍ ﺲﭘ
.ﺪﯾﺯﺍﺪﻧﺍ ﺭﺎﮑﺑ ﺩﺍﺯﺁ ﺖﻟﺎﺣ ﺭﺩ ﺖﻋﺮﺳ ﺮﺜﮐﺍﺪﺣ ﺎﺑ ﻪﻘﯿﻗﺩ
3
ﹰ
ﺎﺒﯾﺮﻘﺗ ﺕﺪﻣ ﻪﺑ
ﺖﻣﻼﻋ یﻭﺭ ﺍﺭ 4 ﺩﺮﮑﻠﻤﻋ ﻉﻮﻧ ﺮﯿﯿﻐﺗ ﺪﯿﻠﮐ ﯽﺷﺎﮐ ﻥﺩﺮﮐ ﺥﺍﺭﻮﺳ یﺍﺮﺑ
ﻉﻮﻧ ﺮﯿﯿﻐﺗ ﺪﯿﻠﮐ ﯽﺷﺎﮐ ﻥﺩﺮﮐ ﺥﺍﺭﻮﺳ ﺯﺍ ﺲﭘ .ﺪﯿﻫﺪﺑ ﺭﺍﺮﻗ «یﺭﺎﮐ ﺥﺍﺭﻮﺳ»
ﺭﺎﮐ ﻪﺑﺮﺿ ﺎﺑ ﻭ ﻩﺩﺍﺩ ﺭﺍﺮﻗ «یﺍ ﻪﺑﺮﺿ یﺭﺎﮐ ﻞﯾﺭﺩ» ﺖﻣﻼﻋ یﻭﺭ ﺍﺭ ﺩﺮﮑﻠﻤﻋ
.ﺪﯿﻨﮐ
ﺖﺨﺳ ﺰﻠﻓ یﺎﻫ ﻪﺘﻣ ﺯﺍ یﺮﺟﺁ ﺕﺎﻌﻄﻗ ﻭ ﯽﮕﻨﺳ ﺩﺍﻮﻣ ،ﱳﺑ یﻭﺭ ﺭﺎﮐ یﺍﺮﺑ
.ﺪﯿﻨﮐ ﻩﺩﺎﻔﺘﺳﺍ
،HSS ﺲﻨﺟ ﺯﺍ ﺰﯿﺗ ﻭ ﻢﻟﺎﺳ یﺎﻫ ﻪﺘﻣ ﺯﺍ ﻂﻘﻓ ﺕﺍﺰﻠﻓ ﺭﺩ یﺭﺎﮐ ﻪﺘﻣ یﺍﺮﺑ
ﺖﮐﺮﺷ ﺕﺎﻘﻠﻌﺘﻣ ﻭ ﺭﺍﺰﺑﺍ ﺖﺴﯿﻟ .ﺪﯿﻨﮐ ﻩﺩﺎﻔﺘﺳﺍ (HSS = ﻊﯾﺮﺳ یﻮﻗ ﺩﻻﻮﻓ)
.ﺪﺷﺎﺒﯿﻣ ﺭﺍﺰﺑﺍ ﺖﯿﻔﯿﮐ ﻦﯾﺮﺘﻬﺑ ﻩﺪﻨﻨﮐ ﻦﯿﻤﻀﺗ ﺵﻮﺑ
ﺮﻄﻗ ﺎﺑ ﯽﯾﺎﻫ ﻪﺘﻣ ﺪﯿﻧﺍﻮﺘﯿﻣ (ﺕﺎﻘﻠﻌﺘﻣ) ﻪﺘﻣ ﻥﺩﺮﮐ ﺰﯿﺗ ﺭﺍﺰﺑﺍ ﻪﻠﯿﺳﻮﺑ
.ﺪﯿﻨﮐ ﺰﯿﺗ ﯽﺘﺣﺍﺭ ﻪﺑ ﺍﺭ ﺮﺘﻤﯿﻠﯿﻣ 2,5 – 10
GSB 16 RE
(ﺕﺎﻘﻠﻌﺘﻣ) ﻪﺘﻣ ﻪﯾﺎﭘ ﮏﯾ ﺯﺍ ،ﯽﺻﺎﺧ ﻭ ﻖﯿﻗﺩ یﺎﻫﺭﺎﮐ ﺯﺍ ﯽﺧﺮﺑ ﻡﺎﳒﺍ یﺍﺮﺑ
.ﺪﯿﻨﮐ ﻩﺩﺎﻔﺘﺳﺍ
ﻪﻌﻄﻗ ﻥﺍﻮﺘﯿﻣ ،ﺩﻮﺸﯿﻣ ﻪﺿﺮﻋ ﻪﻧﺎﮔﺍﺪﺟ ﺭﻮﻄﺑ ﻪﮐ ﻩﺎﮕﺘﺳﺩ ﻝﺎﺼﺗﺍ ﻩﺮﯿﮔ ﺎﺑ
ﺢﻧﺍﻮﺳ ﻭ ﻪﻌﻄﻗ ﻥﺪﺷ ﺞﮐ ﺯﺍ ﻦﯾﺍ .ﺩﻮﳕ ﺭﺎﻬﻣ ﻢﮑﺤﻣ ﻦﺌﻤﻄﻣ ﺭﻮﻄﺑ ﺍﺭ ﺭﺎﮐ
.ﺩﺭﻭﺁ ﯽﻣ ﻞﻤﻌﺑ یﺮﯿﮔﻮﻠﺟ ﯽﻟﺎﻤﺘﺣﺍ
ﺲﯾﻭﺮﺳ ﻭ ﺖﺒﻗﺍﺮﻣ
ﻩﺎﮕﺘﺳﺩ ﻥﺩﺮﮐ ﺰﯿﲤ ﻭ ﺮﯿﻤﻌﺗ ،ﺖﺒﻗﺍﺮﻣ
ﻝﺎﺼﺗﺍ ﻪﺧﺎﺷﻭﺩ ،ﯽﮑﯾﺮﺘﮑﻟﺍ ﺭﺍﺰﺑﺍ یﻭﺭ ﺮﺑ یﺭﺎﮐ ﻪﻧﻮﮔﺮﻫ ﻡﺎﳒﺍ ﺯﺍ ﺶﯿﭘ
◀
.ﺪﯿﺸﮑﺑ ﻥﻭﺮﯿﺑ ﻕﺮﺑ ﺰﯾﺮﭘ ﻞﺧﺍﺩ ﺯﺍ ﺍﺮﻧﺁ
ﯽﻨﻤﯾﺍ ﺎﺗ ،ﺪﯾﺭﺍﺩ ﻩﺎﮕﻧ ﺰﯿﲤ ﺍﺮﻧﺁ ﻪﯾﻮﻬﺗ یﺎﻫﺭﺎﯿﺷ ﻭ ﯽﮑﯾﺮﺘﮑﻟﺍ ﺭﺍﺰﺑﺍ
◀
.ﺩﺩﺮﮔ ﻦﯿﻤﻀﺗ ﺭﺎﮐ ﺭﺩ ﺎﻤﺷ
ﻞﺣﺍﺮﻣ ﺭﺩ ﻪﮐ یﺭﺎﯿﺴﺑ ﺖﻗﺩ ﺩﻮﺟﻭ ﺎﺑ ،ﯽﮑﯾﺮﺘﮑﻟﺍ ﺭﺍﺰﺑﺍ ﻥﺩﺎﺘﻓﺍ ﺭﺎﮐ ﺯﺍ ﺕﺭﻮﺻﺭﺩ
ﺯﺍ ﯽﮑﯾ ﻪﺑ ﻥﺁ ﺮﯿﻤﻌﺗ یﺍﺮﺑ ﺪﯾﺎﺑ ،ﺖﺳﺍ ﻪﺘﻓﺮﮔ ﺕﺭﻮﺻ ﻥﺁ ﺶﯾﺎﻣﺯﺁ ﻭ ﺪﯿﻟﻮﺗ
ﻪﻌﺟﺍﺮﻣ ﺵﻮﺑ ﯽﻗﺮﺑ ﺕﻻﺁﺭﺍﺰﺑﺍ ﺵﻭﺮﻓ ﺯﺍ ﺲﭘ ﺕﺎﻣﺪﺧ ﻭ ﺯﺎﺠﻣ یﺎﻫ ﻩﺎﮔﺮﯿﻤﻌﺗ
.ﺪﯿﻨﮐ
ﻩﺭﺎﻤﺷﹰﺎﻤﺘﺣ ،ﺕﺎﻘﻠﻌﺘﻣ ﻭ ﯽﮐﺪﯾ ﺭﺍﺰﺑﺍ ﺵﺭﺎﻔﺳ ﺎﯾ ﻭ ﻝﺍﻮﺌﺳ ﻪﻧﻮﮔﺮﻫ یﺍﺮﺑ
.ﺪﯿﻫﺩ ﻉﻼﻃﺍ ﯽﻗﺮﺑ ﺭﺍﺰﺑﺍ یﻭﺭ ﺐﺴﭼﺮﺑ ﻖﺑﺎﻄﻣ ﺍﺭ ﻻﺎﮐ ﯽﻤﻗﺭ ﻩﺩ ﯽﻨﻓ
ﻥﺎﯾﺮﺘﺸﻣ ﺎﺑ ﻩﺭﻭﺎﺸﻣ ﻭ ﺵﻭﺮﻓ ﺯﺍ ﺲﭘ ﺕﺎﻣﺪﺧ
ﻭ ﺲﯾﻭﺮﺳ ،ﺕﺍﺮﯿﻤﻌﺗ ﻩﺭﺎﺑ ﺭﺩ ﺎﻤﺷ ﺕﻻﺍﻮﺌﺳ ﻪﺑ ﺵﻭﺮﻓ ﺯﺍ ﺲﭘ ﺕﺎﻣﺪﺧ ﺮﺘﻓﺩ
ﺕﺎﻋﻼﻃﺍ ﻭ ﺮﯾﻭﺎﺼﺗ .ﺩﺍﺩ ﺪﻫﺍﻮﺧ ﺦﺳﺎﭘ ﺕﺎﻘﻠﻌﺘﻣ ﻭ ﯽﮐﺪﯾ ﺕﺎﻌﻄﻗ ﻦﯿﻨﭽﻤﻫ
ﻞﯾﺫ ﻩﺩﺮﺒﻣﺎﻧ ﺖﯾﺎﺳ ﺭﺩ ﺪﯿﻧﺍﻮﺘﯿﻣ ﺍﺭ ﺕﺎﻘﻠﻌﺘﻣ ﻭ ﯽﮐﺪﯾ ﺕﺎﻌﻄﻗ ﻩﺭﺎﺑ ﺭﺩ
:ﺪﯿﯾﺎﳕ ﻮﺠﺘﺴﺟ
www.bosch-pt.com
ﺕﻻﺍﻮﺌﺳ ﻪﺑ ﻞﯿﻣ ﻝﺎﻤﮐ ﺎﺑ ﺵﻮﺑ ﺖﮐﺮﺷ ﺵﻭﺮﻓ ﺯﺍ ﺲﭘ ﺕﺎﻣﺪﺧ ﺭﻭﺎﺸﻣ ﻢﯿﺗ
ﺦﺳﺎﭘ ﺕﺎﻘﻠﻌﺘﻣ ﻭ ﺕﻻﻮﺼﺤﻣ ﻢﯿﻈﻨﺗ ﻭ ﻩﺩﺎﻔﺘﺳﺍ ﺯﺮﻃ ،ﺪﯾﺮﺧ ﻩﺭﺎﺑ ﺭﺩ ﺎﻤﺷ
.ﺪﻫﺪﯿﻣ
ﺩﺍﺮﻓﺍ ﻪﺑ ﻂﻘﻓ ﯽﻛﺪﻳ ﺭﺍﺰﺑﺍ ﻪﻴﻬﺗ ﻭ ﻩﺎﮕﺘﺳﺩ ﺮﻴﻤﻌﺗ ،ﯽﺘﻧﺍﺭﺎﮔ ﺯﺍ ﻩﺩﺎﻔﺘﺳﺍ یﺍﺮﺑ
.ﺪﻴﻨﻛ ﻪﻌﺟﺍﺮﻣ ﺺﺼﺨﺘﻣ
ﻩﺎﮕﺘﺳﺩ ﻥﺩﺮﮐ ﺝﺭﺎﺧ ﻩﺩﺭ ﺯﺍ
ﻂﯿﺤﻣ ﻆﻔﺣ ﺕﺍﺭﺮﻘﻣ ﻖﺒﻃ ﺪﯾﺎﺑ ،ﻥﺁ یﺪﻨﺑ ﻪﺘﺴﺑ ﻭ ﺕﺎﻘﻠﻌﺘﻣ ،ﯽﻗﺮﺑ ﺭﺍﺰﺑﺍ
.ﺪﻧﻮﺷ ﺖﻓﺎﯾﺯﺎﺑ ﻭ ﺝﺭﺎﺧ ﻩﺩﺭ ﺯﺍ ﺖﺴﯾﺯ
!ﺪﯾﺯﺍﺪﻧﺎﯿﻧ ﯽﮕﻧﺎﺧ ﻥﺍﺩ ﻪﻟﺎﺑﺯ ﻞﺧﺍﺩ ﺍﺭ ﯽﻗﺮﺑ یﺎﻫﺭﺍﺰﺑﺍ
.ﺖﺳﺍ ﻅﻮﻔﺤﻣ یﺮﯿﯿﻐﺗ ﻪﻧﻮﮔﺮﻫ ﻖﺣ
Page 50

50 |
ﯽﺳﺭﺎﻓ
1 609 929 M43 | (28.6.11) Bosch Power Tools
(C ﺮﯾﻮﺼﺗ ﻪﺑ ﺩﻮﺷ ﻉﻮﺟﺭ) (یﺍ ﻪﻧﺍﺪﻧﺩ) ﯽﻟﻮﻤﻌﻣ ﻡﺎﻈﻧ ﻪﺳ
ﻡﺎﻈﻧ ﻪﺳ .ﺪﯿﻨﮐ ﻩﺩﺎﻔﺘﺳﺍ ﯽﻨﻤﯾﺍ ﺶﮑﺘﺳﺩ ﺯﺍ ﺭﺍﺰﺑﺍ ﺾﯾﻮﻌﺗ یﺍﺮﺑ
◀
.ﺩﻮﺷ ﻡﺮﮔ ﺪﺣ ﺯﺍ ﺶﯿﺑ ﯽﻧﻻﻮﻃ ﺭﺎﮐ ﺮﺛﺍ ﺭﺩ ﺖﺳﺍ ﻦﮑﳑ
ﻪﮐ ﺪﯿﻨﮐ ﺯﺎﺑ یﺪﺣ ﺎﺗ ﻥﺁ ﻥﺪﻧﺎﺧﺮﭼ ﺎﺑ ﺍﺭ
15 (یﺍ ﻪﻧﺍﺪﻧﺩ) ﯽﻟﻮﻤﻌﻣ ﻡﺎﻈﻧ ﻪﺳ
.ﺪﯿﻫﺩ ﺭﺍﺮﻗ ﺍﺭ ﺭﺍﺰﺑﺍ .ﺩﺍﺩ ﺭﺍﺮﻗ ﻥﺁ ﻞﺧﺍﺩ ﺍﺭ ﺭﺍﺰﺑﺍ ﻥﺍﻮﺘﺑ
ﯽﻟﻮﻤﻌﻣ ﻡﺎﻈﻧ ﻪﺳ ﻪﻃﻮﺑﺮﻣ یﺎﻬﺧﺍﺭﻮﺳ ﻞﺧﺍﺩ ﺍﺭ
14 ﻡﺎﻈﻧ ﻪﺳ ﺭﺎﭼﺁ
.ﺪﯿﻨﮐ ﺭﺎﻬﻣ ﺖﺧﺍﻮﻨﮑﯾ ﺭﻮﻄﺑ ﺍﺭ ﺭﺍﺰﺑﺍ ﻭ ﺪﯿﻫﺪﺑ ﺭﺍﺮﻗ 15 (یﺍ ﻪﻧﺍﺪﻧﺩ)
(D ﺮﯾﻮﺼﺗ ﻪﺑ ﺩﻮﺷ ﻉﻮﺟﺭ) یﺭﺎﮑﭽﯿﭘ یﺍﺮﺑ ﺭﺍﺰﺑﺍ
ﮏﯾ ﺯﺍ ﻪﺸﯿﻤﻫ ﺪﯾﺎﺑ
17 یﺎﻫ ﯽﺘﺷﻮﮕﭽﯿﭘﺮﺳ ﺯﺍ ﻩﺩﺎﻔﺘﺳﺍ ﻡﺎﮕﻨﻫ
ہﺪﻧﺭﺍﺪﻬﮕﻧ) ﺎﻫ ﯽﺘﺷﻮﮕﭽﯿﭘ ﺮﺳ ﻉﺍﻮﻧﺍ یﺍﺮﺑ 16 ﯽﺘﺷﻮﮕﭽﯿﭘﺮﺳ ﻂﺑﺍﺭ
ﺪﯿﻨﮐ ﻩﺩﺎﻔﺘﺳﺍ ﯽﯾﺎﻫ ﯽﺘﺷﻮﮕﭽﯿﭘ ﺮﺳ ﺯﺍ ﺎﻬﻨﺗ .ﺪﯿﻨﮐ ﻩﺩﺎﻔﺘﺳﺍ (ﻝﺎﺳﺭﻮﯿﻧﻮﯾ
.ﺪﻨﺷﺎﺑ ﺐﺳﺎﻨﺘﻣ (ﭻﯿﭘ ﻞﮔ) ﭻﯿﭘﺮﺳ ہﺯﺍﺪﻧﺍ ﺎﺑ ﻪﮐ
ﺥﺍﺭﻮﺳ» یﺍﺮﺑ
4 ﺩﺮﮑﻠﻤﻋ ﻉﻮﻧ ﺏﺎﺨﺘﻧﺍ ﺪﯿﻠﮐ ،یﺭﺎﮑﭽﯿﭘ ﺕﺎﯿﻠﻤﻋ ﻡﺎﳒﺍ یﺍﺮﺑ
ﺭﺍﺮﻗ «یﺭﺎﮐ ﺥﺍﺭﻮﺳ» ﺖﻣﻼﻋ یﻭﺭ ﺮﺑ ﻩﺭﺍﻮﻤﻫ ﺍﺭ «یﺍ ﻪﺑﺮﺿ یﺭﺎﮐ ﻞﯾﺭﺩ/یﺭﺎﮐ
.ﺪﯿﻫﺪﺑ
ﻡﺎﻈﻧ ﻪﺳ ﺾﯾﻮﻌﺗ ﻩﻮﺤﻧ
(E ﺮﯾﻮﺼﺗ ﻪﺑ ﺩﻮﺷ ﻉﻮﺟﺭ) ﻡﺎﻈﻧ ﻪﺳ ﱳﺷﺍﺩﺮﺑ ﻩﻮﺤﻧ
ﺭﺩ ﺍﺭ 18 ﺵﻮﮔ ﺶﺷ ﻦﻟﺁ ﺭﺎﭼﺁ ﮏﯾ ،1 ﮏﯿﺗﺎﻣﻮﺗﺍ ﻡﺎﻈﻧ ﻪﺳ ﻥﺩﺮﮐ ﺯﺎﺑ یﺍﺮﺑ
12 ﺭﺎﭼﺁ ﻪﻧﺎﻫﺩ) 19 ﺖﺨﺗ ﺭﺎﭼﺁ ﮏﯾ ﻭ ﺪﯿﻫﺪﺑ ﺭﺍﺮﻗ 1 ﮏﯿﺗﺎﻣﻮﺗﺍ ﻡﺎﻈﻧ ﻪﺳ
ﯽﻗﺮﺑ ﺭﺍﺰﺑﺍ .ﺪﯿﻫﺪﺑ ﺭﺍﺮﻗ کﺮﺤﻣ ﺭﻮﺤﻣ ﺭﺩ ﺭﺎﭼﺁ ﻩﺎﮔﺭﺍﺮﻗ ﻞﺤﻣ ﺭﺩ ﺍﺭ (ﺮﺘﻤﯿﻠﯿﻣ
ﺭﺍﺮﻗ ﺭﺎﮐ ﺰﯿﻣ ﮏﯾ یﻭﺭ ﺮﺑ ﻝﺎﺜﻣ ﺭﻮﻄﺑ ،ﻢﮑﺤﻣ ﻭ ﺖﺑﺎﺛ ﺢﻄﺳ ﮏﯾ یﻭﺭ ﺮﺑ ﺍﺭ
ﺍﺭ 1 ﮏﯿﺗﺎﻣﻮﺗﺍ ﻡﺎﻈﻧ ﻪﺳ ﻭ ﺪﯾﺭﺍﺪﻬﮕﻧ ﻢﮑﺤﻣ ﺍﺭ 19 ﺖﺨﺗ ﺭﺎﭼﺁ .ﺪﯿﻫﺪﺑ
ﯽﻤﮐ ➊ ﺶﺧﺮﭼ ﺖﻬﺟ ﺭﺩ 18 ﺵﻮﮔ ﺶﺷ ﻦﻟﺁ ﺭﺎﭼﺁ ﻥﺪﻧﺎﺧﺮﭼ ﻖﯾﺮﻃ ﺯﺍ
،ﮏﯿﺗﺎﻣﻮﺗﺍ ﻡﺎﻈﻧ ﻪﺳ ﻥﺩﻮﺑ ﻢﮑﺤﻣ ﻭ ﻥﺩﺮﮐ ﺮﯿﮔ ﺕﺭﻮﺻ ﺭﺩ .ﺪﯿﻨﮐ (ﻞﺷ) ﺯﺎﺑ
ﻦﻟﺁ ﺭﺎﭼﺁ ﺪﻨﻠﺑ (ﺖﻔﺷ) ﻪﻠﯿﻣ یﻭﺭ ﺮﺑ ﻪﺘﺴﻫﺁ ﻪﺑﺮﺿ ﮏﯾ ﻪﻠﯿﺳﻮﺑ ﻥﺍﻮﺘﯿﻣ
ﻡﺎﻈﻧ ﻪﺳ ﻭ ﺪﯾﺭﺍﺩﺮﺑ ﮏﯿﺗﺎﻣﻮﺗﺍ ﻡﺎﻈﻧ ﻪﺳ ﺯﺍ ﺍﺭ ﻦﻟﺁ ﺭﺎﭼﺁ .ﺩﺮﮐ ﺩﺍﺯﺁ ﺍﺮﻧﺁ ،18
.ﺪﯿﻨﮐ ﺯﺎﺑ ﻞﻣﺎﮐ ﺭﻮﻄﺑ ﺍﺭ ﮏﯿﺗﺎﻣﻮﺗﺍ
ﻥﺩﺮﮐ ﺯﺎﺑ ﻩﻮﺤﻧ ﺪﻨﻧﺎﻣ ﺰﯿﻧ
15 (یﺍ ﻪﻧﺍﺪﻧﺩ) ﯽﻟﻮﻤﻌﻣ ﻡﺎﻈﻧ ﻪﺳ ﻥﺩﺮﮐ ﺯﺎﺑ یﺍﺮﺑ
.ﺪﯿﻨﮐ ﻞﻤﻋ ﮏﯿﺗﺎﻣﻮﺗﺍ ﻡﺎﻈﻧ ﻪﺳ
(F ﺮﯾﻮﺼﺗ ﻪﺑ ﺩﻮﺷ ﻉﻮﺟﺭ) ﻡﺎﻈﻧ ﻪﺳ ﺐﺼﻧ
ﺪﯾﺎﺑ (یﺍ ﻪﻧﺍﺪﻧﺩ) ﯽﻟﻮﻤﻌﻣ ﻡﺎﻈﻧ ﻪﺳ ﻭ ﮏﯿﺗﺎﻣﻮﺗﺍ ﻡﺎﻈﻧ ﻪﺳ ﺐﺼﻧ یﺍﺮﺑ
.ﺪﯿﻨﮐ ﺀﺍﺮﺟﺍ ﺱﻮﮑﻌﻣ ﺭﻮﻄﺑ ﺍﺭ ﻕﻮﻓ ﺐﺗﺍﺮﻣ ﻪﻠﺴﻠﺳ
ﯽﺒﯾﺮﻘﺗ ﺭﺎﻬﻣ ﺭﻭﺎﺘﺸﮔ ﺎﺑ ﺪﯾﺎﺑ ﻩﺎﮕﺘﺳﺩ ﻡﺎﻈﻧ ﻪﺳ
.ﺩﻮﺷ ﻢﮑﺤﻣ (ﺮﺘﻣ ﻦﺗﻮﯿﻧ) 30 – 35 Nm
ﻪﺷﺍﺮﺗ ﻭ ﻩﺩﺍﺮﺑ ،ﺩﺮﮔ ﺶﮑﻣ
،ﺎﻫ ﺏﻮﭼ ﺯﺍ ﯽﻀﻌﺑ ،ﺏﺮﺳ یﺍﺭﺍﺩ یﺎﻫ ﮓﻧﺭ ﺪﻨﻧﺎﻣ یﺩﺍﻮﻣ ﺭﺎﺒﻏ ﻭ ﺩﺮﮔ
◀
ﻥﺩﺯ ﺖﺳﺩ .ﺪﻨﺷﺎﺑ ﺮﻀﻣ ﯽﺘﻣﻼﺳ یﺍﺮﺑ ﺪﻨﻧﺍﻮﺘﯿﻣ ﺕﺍﺰﻠﻓ ﻭ ﯽﻧﺪﻌﻣ ﺩﺍﻮﻣ
یﺭﺎﻤﯿﺑ ﺎﯾ ﻭ یژﺮﻟﺁ ﺯﻭﺮﺑ ﺚﻋﺎﺑ ﺖﺳﺍ ﻦﮑﳑ ﺭﺎﺒﻏ ﻭ ﺩﺮﮔ ﻥﺩﺮﮐ ﺲﻔﻨﺗ ﺎﯾ ﻭ
ﯽﮑﯾﺩﺰﻧ ﻥﺁ ﺭﺩ ﻪﮐ یﺩﺍﺮﻓﺍ ﺎﯾ ﻭ ﻩﺪﻨﻨﮐ ﻩﺩﺎﻔﺘﺳﺍ ﺺﺨﺷ ﯽﺴﻔﻨﺗ یﺭﺎﺠﻣ
.ﺩﻮﺸﺑ ،ﺪﻨﺷﺎﺒﯿﻣ
ﺖﺧﺭﺩ ﺎﯾ ﻭ ﻁﻮﻠﺑ ﺖﺧﺭﺩ ﺭﺎﺒﻏ ﻭ ﺩﺮﮔ ﺪﻨﻧﺎﻣ ﯽﺻﻮﺼﺨﻣ یﺎﻫﺭﺎﺒﻏ ﻭ ﺩﺮﮔ
ﻪﮐ یﺩﺍﻮﻣ ﺮﯾﺎﺳ ﺎﺑ ﺎﻬﻧﺁ ﺐﯿﮐﺮﺗ ﺹﻮﺼﺨﺑ .ﺪﻨﺘﺴﻫ ﺍﺯ ﻥﺎﻃﺮﺳ ﺵﺍﺭ
ﻩﺩﺮﺑ ﺭﺎﮑﺑ (ﺏﻮﭼ ﺯﺍ ﺖﻈﻓﺎﺤﻣ یﺍﺮﺑ ﺩﺍﻮﻣ ،ﺕﺎﻣﻭﺮﮐ) ﺏﻮﭼ یﻭﺭ ﺮﺑ ﺭﺎﮐ یﺍﺮﺑ
ﺖﺴﺑﺯﺁ یﺍﺭﺍﺩ ﻪﮐ یﺩﺍﻮﻣ ﺎﺑ ﺪﻧﺯﺎﺠﻣ ﺺﺼﺨﺘﻣ ﺩﺍﺮﻓﺍ ﻂﻘﻓ .ﺪﻧﻮﺸﯿﻣ
.ﺪﻨﻨﮐ ﺭﺎﮐ ﺪﻨﺷﺎﺒﯿﻣ
ﯽﻓﺎﮐ یﺍﻮﻫ ﻪﯾﻮﻬﺗ ﺯﺍ ﺎﻤﺷ ﺭﺎﮐ ﻞﺤﻣ ﻪﮐ ﺪﯿﺷﺎﺑ ﻪﺘﺷﺍﺩ ﻪﺟﻮﺗ
–
.ﺪﺷﺎﺑ ﺭﺍﺩﺭﻮﺧﺮﺑ –
ﻩﺩﺎﻔﺘﺳﺍ P2 ﺮﺘﻠﯿﻓ ﻪﺟﺭﺩ ﺎﺑ ﯽﻨﻤﯾﺍ ﯽﺴﻔﻨﺗ ﮏﺳﺎﻣ ﺯﺍ ﺩﻮﺸﯿﻣ ﻪﯿﺻﻮﺗ –
.ﺪﯿﻨﮐ –
ﻭ ﺩﺍﻮﻣ ﺯﺍ ﻩﺩﺎﻔﺘﺳﺍ ﺎﺑ ﻪﻄﺑﺍﺭ ﺭﺩ ﺩﻮﺧ ﺭﻮﺸﮐ ﺭﺩ ﺮﺒﺘﻌﻣ ﺕﺍﺭﺮﻘﻣ ﻭ ﻦﯿﻧﺍﻮﻗ ﻪﺑ
.ﺪﯿﻨﮐ ﻪﺟﻮﺗ یﺭﺎﮐ ﺕﺎﻌﻄﻗ
ﻭ ﺩﺮﮔ .ﺪﯾﺭﻭﺁ ﻞﻤﻌﺑ یﺮﯿﮔﻮﻠﺟ ﺩﻮﺧ ﺭﺎﮐ ﻞﺤﻣ ﺭﺩ ﺭﺎﺒﻏ ﻭ ﺩﺮﮔ ﻊﻤﲡ ﺯﺍ
◀
.ﺪﻧﻮﺷ ﻞﻌﺘﺸﻣ ﯽﻧﺎﺳﺁ ﻪﺑ ﺪﻨﻧﺍﻮﺗ ﯽﻣ ﺭﺎﺒﻏ
ﻩﺎﮕﺘﺳﺩ ﺎﺑ ﺭﺎﮐ ﺯﺮﻃ
ﻩﺎﮕﺘﺳﺩ ﺩﺮﺑﺭﺎﮐ ﻩﻮﺤﻧ ﻭ یﺯﺍﺪﻧﺍ ﻩﺍﺭ
ﺎﺑ ﺪﯾﺎﺑ ﻕﺮﺑ ﻥﺎﯾﺮﺟ ﻊﺒﻨﻣ ژﺎﺘﻟﻭ !ﺪﯿﻨﮐ ﻪﺟﻮﺗ ﻪﮑﺒﺷ ﻕﺮﺑ ژﺎﺘﻟﻭ ﻪﺑ
◀
ﻪﺘﺷﺍﺩ ﺖﻘﺑﺎﻄﻣ ﯽﮑﯾﺮﺘﮑﻟﺍ ﺭﺍﺰﺑﺍ ﺐﺴﭼﺮﺑ یﻭﺭ ﺮﺑ ﺩﻮﺟﻮﻣ ﺮﯾﺩﺎﻘﻣ
،ﺪﻧﺍ ﻩﺪﺷ ﺺﺨﺸﻣ ﺖﻟﻭ 230 V ژﺎﺘﻟﻭ ﺎﺑ ﻪﮐ ﺍﺭ ﯽﻗﺮﺑ یﺎﻫﺭﺍﺰﺑﺍ .ﺪﺷﺎﺑ
.ﺩﺮﺑ ﺭﺎﮑﺑ ﺰﯿﻧ ﺖﻟﻭ 220 V ژﺎﺘﻟﻭ ﺖﲢ ﻥﺍﻮﺗ ﯽﻣ
(H – G ﺮﯾﻭﺎﺼﺗ ﻪﺑ ﺩﻮﺷ ﻉﻮﺟﺭ) ﺶﺧﺮﭼ ﺖﻬﺟ ﻢﯿﻈﻨﺗ
(GSB 10 RE / GSB 13 RE / GSB 16 RE)
ﯽﻗﺮﺑ ﺭﺍﺰﺑﺍ ﺶﺧﺮﭼ ﺖﻬﺟ ﺪﯿﻧﺍﻮﺘﯿﻣ 8 ﺶﺧﺮﭼ ﺖﻬﺟ ﺮﯿﯿﻐﺗ ﺪﯿﻠﮐ ﮏﻤﮐ ﺎﺑ
،ﺪﺷﺎﺑ ﻩﺩﺮﺸﻓ 6 ﻞﺻﻭ ﻭ ﻊﻄﻗ ﺪﯿﻠﮐ ﻪﮐ ﯽﺘﻟﺎﺣ ﺭﺩ ﻞﻤﻋ ﻦﯾﺍ .ﺪﯿﻫﺩ ﺮﯿﯿﻐﺗ ﺍﺭ
.ﺖﺴﯿﻧ ﺮﯾﺬﭘ ﻥﺎﮑﻣﺍ
ﺮﯿﯿﻐﺗ ﺪﯿﻠﮐ ،ﭻﯿﭘ ﱳﺴﺑ یﺍﺮﺑ ﻭ یﺭﺎﮐ ﺥﺍﺭﻮﺳ یﺍﺮﺑ
:ﺩﺮﮔ ﺖﺳﺍﺭ ﺶﺧﺮﭼ
.ﺪﯿﻫﺩ ﺭﺎﺸﻓ ﭗﭼ ﺖﻤﺳ ﻪﺑ ﺖﺴﯾﺍ ﻪﻄﻘﻧ ﺎﺗ ﺍﺭ 8 ﺶﺧﺮﭼ ﺖﻬﺟ
ﺪﯿﻠﮐ ،ﺎﻫ ﻩﺮﻬﻣ ﻭ ﺎﻫ ﭻﯿﭘ ﻥﺩﺭﻭﺁ ﻥﻭﺮﯿﺑ ﻭ ﻥﺩﺮﮐ ﺯﺎﺑ یﺍﺮﺑ
:ﺩﺮﮔ ﭗﭼ ﺶﺧﺮﭼ
.ﺪﯿﻫﺪﺑ ﺭﺎﺸﻓ ﺖﺳﺍﺭ ﺖﻤﺳ ﻪﺑ ﺖﺴﯾﺍ ﻪﻄﻘﻧ ﺎﺗ ﺍﺭ 8 ﺶﺧﺮﭼ ﺖﻬﺟ ﺮﯿﯿﻐﺗ
ﺭﺎﮐ ﻉﻮﻧ ﺏﺎﺨﺘﻧﺍ ﻩﻮﺤﻧ
یﺭﺎﮑﭽﯿﭘ ﻭ یﺭﺎﮐ ﺥﺍﺭﻮﺳ
ﺥﺍﺭﻮﺳ» ﺖﻣﻼﻋ یﻭﺭ ﺮﺑ ﺍﺭ
4 ﺩﺮﮑﻠﻤﻋ ﻉﻮﻧ ﺏﺎﺨﺘﻧﺍ ﺪﯿﻠﮐ
.ﺪﯿﻫﺪﺑ ﺭﺍﺮﻗ «یﺭﺎﮐ
یﺍ ﻪﺑﺮﺿ یﺭﺎﮐ ﻞﯾﺭﺩ
یﺭﺎﮐ ﻞﯾﺭﺩ» ﺖﻣﻼﻋ یﻭﺭ ﺮﺑ ﺍﺭ
4 ﺩﺮﮑﻠﻤﻋ ﻉﻮﻧ ﺏﺎﺨﺘﻧﺍ ﺪﯿﻠﮐ
.ﺪﯿﻫﺪﺑ ﺭﺍﺮﻗ «یﺍ ﻪﺑﺮﺿ
ﺪﻧﺍﻮﺘﯿﻣ ﻭ ﺪﺘﻓﺍ ﯽﻣ ﺎﺟ ﯽﺳﻮﺴﺤﻣ ﺭﻮﻄﺑ
4 ﺩﺮﮑﻠﻤﻋ ﻉﻮﻧ ﺏﺎﺨﺘﻧﺍ ﺪﯿﻠﮐ
.ﺩﻮﺷ ﻝﺎﻌﻓ ﺰﯿﻧ ﻩﺎﮕﺘﺳﺩ ﺖﮐﺮﺣ ﻝﺎﺣﺭﺩ
ﻥﺩﺮﮐ ﺵﻮﻣﺎﺧ ﻭ ﻦﺷﻭﺭ ﻩﻮﺤﻧ
ﺍﺮﻧﺁ ﻭ ﻩﺩﺍﺩ ﺭﺎﺸﻓ ﺍﺭ 6 ﻞﺻﻭ ﻭ ﻊﻄﻗ ﺪﯿﻠﮐ ،ﯽﻗﺮﺑ ﺭﺍﺰﺑﺍ ﻥﺩﺮﮐ ﻦﺷﻭﺭ یﺍﺮﺑ
.ﺪﯾﺭﺍﺪﻬﮕﻧ ﻩﺩﺮﺸﻓ ﺖﻟﺎﺣﺭﺩ
ﻩﺩﺮﺸﻓ ﻞﺧﺍﺩ ﻪﺑ ﻪﮐ ﯽﻟﺎﺣ ﺭﺩ
6 ﻞﺻﻭ ﻭ ﻊﻄﻗ ﺪﯿﻠﮐ ﺖﯿﺒﺜﺗ ﻭ ﻞﻔﻗ یﺍﺮﺑ
.ﺪﯿﻫﺪﺑ ﺭﺎﺸﻓ ﺍﺭ 5 ﺖﯿﺒﺜﺗ ﻪﻤﮐﺩ ،ﺪﺷﺎﺑ
ﺮﮔﺍ ﻭ ﺪﯿﻨﮐ ﺎﻫﺭ ﺍﺭ
6 ﻞﺻﻭ ﻭ ﻊﻄﻗ ﺪﯿﻠﮐ ،ﯽﻗﺮﺑ ﺭﺍﺰﺑﺍ ﻥﺩﺮﮐ ﺵﻮﻣﺎﺧ یﺍﺮﺑ
ﻊﻄﻗ ﺪﯿﻠﮐ ،ﺪﺷﺎﺑ ﻩﺪﻧﺎﻣ ﺖﺑﺎﺛ 5 ﺖﯿﺒﺜﺗ ﻪﻤﮐﺩ ﻪﻠﯿﺳﻮﺑ ﻞﺻﻭ ﻭ ﻊﻄﻗ ﺪﯿﻠﮐ
.ﺪﯿﻨﮐ ﺎﻫﺭ ﻩﺭﺎﺑﻭﺩ ﺍﺮﻧﺁ ﻭ ﻩﺩﺍﺩ ﺭﺎﺸﻓ ﯽﻤﮐ ﺍﺭ 6 ﻞﺻﻭ ﻭ
Page 51

ﯽﺳﺭﺎﻓ
|
51
Bosch Power Tools 1 609 929 M43 | (28.6.11)
ﺐﺼﻧ
ﻝﺎﺼﺗﺍ ﻪﺧﺎﺷﻭﺩ ،ﯽﮑﯾﺮﺘﮑﻟﺍ ﺭﺍﺰﺑﺍ یﻭﺭ ﺮﺑ یﺭﺎﮐ ﻪﻧﻮﮔﺮﻫ ﻡﺎﳒﺍ ﺯﺍ ﺶﯿﭘ
◀
.ﺪﯿﺸﮑﺑ ﻥﻭﺮﯿﺑ ﻕﺮﺑ ﺰﯾﺮﭘ ﻞﺧﺍﺩ ﺯﺍ ﺍﺮﻧﺁ
(A ﺮﯾﻮﺼﺗ ﻪﺑ ﺩﻮﺷ ﻉﻮﺟﺭ) ﯽﮑﻤﮐ ﻪﺘﺳﺩ
(GSB 13 / GSB 13 RE / GSB 16 / GSB 16 RE)
.ﺪﯿﻨﮐ ﻩﺩﺎﻔﺘﺳﺍ 11 ﯽﮑﻤﮐ ﻪﺘﺳﺩ ﺎﺑ ﻩﺍﺮﻤﻫ ﻂﻘﻓ ﺩﻮﺧ ﯽﻗﺮﺑ ﺭﺍﺰﺑﺍ ﺯﺍ
◀
ﻪﮑﯾﺭﻮﻄﺑ ،ﺪﯿﻧﺎﺧﺮﭽﺑ ﻩﺍﻮﳋﺩ ہﺯﺍﺪﻧﺍ ﻪﺑ ﺍﺭ 11 ﯽﮑﻤﮐ ﻪﺘﺳﺩ ﺪﯿﻧﺍﻮﺘﯿﻣ ﺎﻤﺷ
.ﺪﯾﻮﺷ ﻪﺘﺴﺧ ﺮﺘﻤﮐ ﻭ ﻩﺩﺮﮐ ﺭﺎﮐ ﯽﺑﻮﺨﺑ
ﺖﮐﺮﺣ ﺖﻬﺟ ﻑﻼﺧ ﺮﺑ ﺍﺭ ﯽﮑﻤﮐ ﻪﺘﺳﺩ ﻢﯿﻈﻨﺗ یﺍﺮﺑ
10 ﯽﮑﺳﻭﺮﺧ ﭻﯿﭘ
ﺖﻟﺎﺣ ﺭﺩ ﺍﺮﻧﺁ ،11 ﯽﮑﻤﮐ ﻪﺘﺳﺩ ﻥﺪﻧﺎﺧﺮﭼ ﺎﺑ ﻭ ﺪﯿﻧﺎﺧﺮﭽﺑ ﺖﻋﺎﺳ ﻪﺑﺮﻘﻋ
ﺖﻬﺟ ﺭﺩ ﻥﺁ ﻥﺪﻧﺎﺧﺮﭼ ﺎﺑ ﺍﺭ 10 ﯽﮑﺳﻭﺮﺧ ﭻﯿﭘ ﺲﭙﺳ .ﺪﯿﻫﺪﺑ ﺭﺍﺮﻗ ﻩﺍﻮﳋﺩ
.ﺪﯿﻨﮐ ﻢﮑﺤﻣ ﺍﺩﺪﺠﻣ ،ﺖﻋﺎﺳ ﻪﺑﺮﻘﻋ ﺖﮐﺮﺣ
(A ﺮﯾﻮﺼﺗ ﻪﺑ ﺩﻮﺷ ﻉﻮﺟﺭ) ﺥﺍﺭﻮﺳ ﻖﻤﻋ ﻢﯿﻈﻨﺗ ﻩﻮﺤﻧ
ﻖﻤﻋ ﻥﺍﻮﺘﯿﻣ ،ﻡﺯﻻ یﺭﺎﮐ ﺥﺍﺭﻮﺳ ﻖﻤﻋ ﻦﯿﯿﻌﺗ ﺖﻬﺟ
12 ﺶﮐ ﻂﺧ ﻪﻠﯿﺳﻮﺑ
.ﺩﺮﮐ ﻦﯿﯿﻌﺗ ﺍﺭ ﺥﺍﺭﻮﺳ X ﺏﻮﻠﻄﻣ
ﺶﮐ ﻂﺧ ﻭ ﻩﺩﺍﺩ ﺭﺎﺸﻓ ﺍﺭ ﺥﺍﺭﻮﺳ ﻖﻤﻋ ﻢﯿﻈﻨﺗ ﻭ ﻦﯿﯿﻌﺗ یﺍﺮﺑ
9 ﮧﻤﮐﺩ
.ﺪﯿﻫﺩ ﺭﺍﺮﻗ 11 ﯽﮑﻤﮐ ﻪﺘﺳﺩ ﺭﺩ ﺍﺭ ﺥﺍﺭﻮﺳ ﻖﻤﻋ ﻩﺪﻨﻨﮐ ﻢﯿﻈﻨﺗ
ﮧﻠﺻﺎﻓ ﻪﮐ ﺪﯾﺭﻭﺁ ﻥﻭﺮﯿﺑ یﺭﺍﺪﻘﻣ ﺎﺗ ﺍﺭ ﺥﺍﺭﻮﺳ ﻖﻤﻋ ہﺪﻨﻨﮐ ﻦﯿﯿﻌﺗ ﺶﮐ ﻂﺧ
ﺩﺭﻮﻣ X ﻖﻤﻋ ﺎﺑ ،ﺥﺍﺭﻮﺳ ﻖﻤﻋ ہﺪﻨﻨﮐ ﻦﯿﯿﻌﺗ ﺶﮐ ﻂﺧ ﺮﺳ ﻭ ﻪﺘﻣ ﺮﺳ ﻦﯿﺑ
.ﺪﺷﺎﺑ ﻪﺘﺷﺍﺩ ﺖﻘﺑﺎﻄﻣ ،ﺥﺍﺭﻮﺳ ﺮﻈﻧ
ﺭﺍﺰﺑﺍ ﺾﯾﻮﻌﺗ
(B ﺮﯾﻮﺼﺗ ﻪﺑ ﺩﻮﺷ ﻉﻮﺟﺭ) ﮏﯿﺗﺎﻣﻮﺗﺍ ﻡﺎﻈﻧ ﻪﺳ
ﻩﺎﮕﻧ ﻢﮑﺤﻣ ﺍﺭ
1 ﮏﯿﺗﺎﻣﻮﺗﺍ ﻡﺎﻈﻧ ﻪﺳ 3 ﯽﺒﻘﻋ (ﺭﻮﺘﭘﺍﺩﺁ) ﻩﺮﻬﻣ ﺶﺷﻮﭘ
ﻥﺍﻮﺘﺑ ﺎﺗ ﺪﯿﻧﺎﺧﺮﭽﺑ ➊ ﺶﺧﺮﭼ ﺖﻬﺟ ﺭﺩ ﺍﺭ 2 ﯽﺋﻮﻠﺟ (ﺭﻮﺘﭘﺍﺩﺁ) ﻩﺮﻬﻣ ﻭ ﺪﯾﺭﺍﺩ
.ﺪﯿﻨﮐ یﺭﺍﺬﮔ ﺎﺟ ﺍﺭ ﺭﺍﺰﺑﺍ .ﺩﺍﺩ ﺭﺍﺮﻗ ﺮﯿﮔﺭﺍﺰﺑﺍ ﻞﺧﺍﺩ ﺍﺭ ﺭﺍﺰﺑﺍ
ﻭ ﺪﯾﺭﺍﺩ ﻩﺎﮕﻧ ﻢﮑﺤﻣ ﺍﺭ
1 ﮏﯿﺗﺎﻣﻮﺗﺍ ﻡﺎﻈﻧ ﻪﺳ 3 ﯽﺒﻘﻋ (ﻩﺮﻬﻣ) ﺵﻮﭘﺮﺳ
ﺶﺧﺮﭼ ﺖﻤﺳ ﻪﺑ ﻢﮑﺤﻣ ﺖﺳﺩ ﻪﻠﯿﺳﻮﺑ ﺍﺭ 2 ﯽﺋﻮﻠﺟ (ﻩﺮﻬﻣ) ﺵﻮﭘﺮﺳ
ﻥﺪﯿﻨﺷ ﻞﺑﺎﻗ (ﮏﯿﻠﮐ یﺍﺪﺻ) ﻥﺁ ﻥﺪﺷ ﻞﻔﻗ یﺍﺪﺻ ﺮﮕﯾﺩ ﺎﺗ ﺪﯿﻧﺎﺧﺮﭽﺑ ➋
.ﺩﻮﺸﯿﻣ ﻞﻔﻗ ﮏﯿﺗﺎﻣﻮﺗﺍ ﺭﻮﻄﺑ ﻖﯾﺮﻃ ﻦﯾﺍ ﺯﺍ ﻡﺎﻈﻧ ﻪﺳ .ﺪﺷﺎﺒﻧ
2 ﯽﺋﻮﻠﺟ (ﺭﻮﺘﭘﺍﺩﺁ) ﻩﺮﻬﻣ ﺶﺷﻮﭘ ،ﺭﺍﺰﺑﺍ ﻥﺩﺭﻭﺁ ﻥﻭﺮﯿﺑ ﻭ ﻞﻔﻗ ﻥﺩﺮﮐ ﺯﺎﺑ ﺖﻬﺟ
.ﺪﯿﻧﺎﺧﺮﭽﺑ ﻒﻟﺎﺨﻣ ﺖﻬﺟ ﺭﺩ ﺍﺭ
ﯽﻨﻓ ﺕﺎﺼﺨﺸﻣ
16 RE 16 13 RE 13 10 RE 10 GSB...
Professional
یﺍ ﻪﺑﺮﺿ ﯽﺘﺷﻮﮔ ﭻﯿﭘ/ﻞﯾﺭﺩ
B18 1.. B18 0.. B17 1.. B17 0.. B16 1.. B16 0.. 3 601 ...
ﯽﻨﻓ ﻩﺭﺎﻤﺷ
701 701 600 600 500 500 W
ﯽﻣﺎﻧ یﺩﻭﺭﻭ ﺕﺭﺪﻗ
351 351 301 301 250 250 W
ﯽﺟﻭﺮﺧ ﺕﺭﺪﻗ
0 – 3 000 3 000 0 – 2 800 2 800 0 – 2 600 2 600 min
-1
ﺩﺍﺯﺁ ﺖﻟﺎﺣ ﺭﺩ ﺖﻋﺮﺳ
1 640 1 640 1 570 1 570 1 610 1 610 min
-1
ﺭﺎﺸﻓ ﺖﲢ ﺶﺧﺮﭼ ﺖﻋﺮﺳ ﺮﺜﮐﺍﺪﺣ
(ﺩﺮﮑﻠﻤﻋ ﻦﯿﺣ ﺭﺩ)
26 270 26 270 25 070 25 070 25 700 25 700 min
-1
ﻪﺑﺮﺿ ﺩﺍﺪﻌﺗ
2,0 2,0 1,8 1,8 1,5 1,5 Nm
ﯽﻣﺎﻧ ﺭﻭﺎﺘﺸﮔ
●
– – – – –
ﺖﻋﺮﺳ ﺏﺎﺨﺘﻧﺍ
●
–
●
–
●
–
ﺩﺮﮔ ﭗﭼ /ﺩﺮﮔ ﺖﺳﺍﺭ ﺶﺧﺮﭼ
43 43 43 43 43 43 mm
Ø ﯽﺋﻮﻠﮔ ﺭﻮﺤﻣ ﺮﻄﻗ
16
12
30
16
12
30
13
10
25
13
10
25
10
8
20
10
8
20
mm
mm
mm
Ø یﺭﺎﮐ ﺥﺍﺭﻮﺳ ﺮﻄﻗ ﺮﺜﮐﺍﺪﺣ
ﱳﺑ –
ﺩﻻﻮﻓ –
ﺏﻮﭼ –
1,5 – 13 1,5 – 13 1,5 – 13 1,5 – 13 1,5 – 10 1,5 – 10
mm
ﻡﺎﻈﻧ ﻪﺳ ﺭﺎﻬﻣ ﻪﻨﻣﺍﺩ
1,9 1,9 1,7 1,7 1,5 1,5 kg
ﺩﺭﺍﺪﻧﺎﺘﺳﺍ ﻖﺑﺎﻄﻣ ﻥﺯﻭ
EPTA-Procedure 01/2003
II/ II/ II/ II/ II/ II/
ﯽﻨﻤﯾﺍ ﺱﻼﮐ
.ﺪﻨﻨﮐ ﺮﯿﯿﻐﺗ ﺪﻨﻧﺍﻮﺗ ﯽﻣ ﺮﮕﯾﺩ یﺎﻫﺭﻮﺸﮐ ﺭﺩ ﺎﯾ ﻭ ژﺎﺘﻟﻭ ﺮﯿﯿﻐﺗ ﺕﺭﻮﺻ ﺭﺩ ﻭ ﺪﻨﺷﺎﺑ ﯽﻣ ﺖﻟﻭ 230 V [U] ﯽﻣﺎﻧ ژﺎﺘﻟﻭ یﺍﺮﺑ ﺕﺎﻋﻼﻃﺍ ﻦﯾﺍ
.ﺪﻨﺷﺎﺑ ﺕﻭﺎﻔﺘﻣ ﺖﺳﺍ ﻦﮑﳑ ﯽﻗﺮﺑ یﺎﻫﺭﺍﺰﺑﺍ یﺭﺎﲡ یﺎﻬﻣﺎﻧ .ﺪﯿﻨﮐ ﻪﺟﻮﺗ ﺩﻮﺧ ﯽﻗﺮﺑ ﺭﺍﺰﺑﺍ ﺐﺴﭼﺮﺑ یﻭﺭ ﯽﻨﻓ ﻩﺭﺎﻤﺷ ﻪﺑﹰﺎﻔﻄﻟ
Page 52

52 |
ﯽﺳﺭﺎﻓ
1 609 929 M43 | (28.6.11) Bosch Power Tools
ﺖﻤﺴﻗ ﻪﮐ ﺪﯿﺷﺎﺑ ﺐﻇﺍﻮﻣ .ﺪﯿﻨﮐ ﺖﺒﻗﺍﺮﻣ ﺏﻮﺧ ﯽﮑﯾﺮﺘﮑﻟﺍ ﺭﺍﺰﺑﺍ ﺯﺍ
◀
ﻦﯿﻨﭽﻤﻫ .ﺪﻨﮑﻧ ﺮﯿﮔ ﻭ ﻩﺩﺮﮐ ﺭﺎﮐ ﺏﻮﺧ ﻩﺎﮕﺘﺳﺩ کﺮﺤﺘﻣ یﺎﻫ
ﺐﯿﺳﺁ ﺎﯾ ﻭ ﻪﺘﺴﮑﺷ ﯽﮑﯾﺮﺘﮑﻟﺍ ﺭﺍﺰﺑﺍ ﺕﺎﻌﻄﻗ ﻪﮐ ﺪﯿﻨﮐ ﺖﻗﺩ
ﺮﯿﻤﻌﺗ ﺭﺎﮐ ﻪﺑ ﻉﻭﺮﺷ ﺯﺍ ﻞﺒﻗ ﺍﺭ ﻩﺪﯾﺩ ﺐﯿﺳﺁ ﺕﺎﻌﻄﻗ .ﺪﻨﺷﺎﺒﻧ ﻩﺪﯾﺩ
یﺎﻫﺭﺍﺰﺑﺍ ﺯﺍ ﻞﻣﺎﮐ ﺖﺒﻗﺍﺮﻣ ﻡﺪﻋ ،یﺭﺎﮐ ﺢﻧﺍﻮﺳ ﺯﺍ یﺭﺎﯿﺴﺑ ﺖﻠﻋ .ﺪﯿﻨﮐ
.ﺪﺷﺎﺑ ﯽﻣ ﯽﮑﯾﺮﺘﮑﻟﺍ
ﻩﺪﺷ ﺖﺒﻗﺍﺮﻣ ﺏﻮﺧ ﻪﮐ ﯽﺷﺮﺑ ﺭﺍﺰﺑﺍ .ﺪﯾﺭﺍﺪﻬﮕﻧ ﺰﯿﲤ ﻭ ﺰﯿﺗ ﺍﺭ ﺵﺮﺑ ﺭﺍﺰﺑﺍ
◀
ﻞﺑﺎﻗ ﺮﺘﻬﺑ ﻭ ﻩﺩﺮﮐ ﺮﯿﮔ ﺭﺎﮐ ﻪﻌﻄﻗﺭﺩ ﺮﺘﻤﮐ ،ﺪﻧﺭﺍﺩﺭﻮﺧﺮﺑ ﺰﯿﺗ یﺎﻫ ﻪﺒﻟ ﺯﺍ ﻭ
.ﺪﻨﺷﺎﺑ ﯽﻣ ﺖﯾﺍﺪﻫ
ﺐﺼﻧ ﻩﺎﮕﺘﺳﺩ یﻭﺭ ﻪﮐ یﺭﺍﺰﺑﺍ ،ﺕﺎﻘﻠﻌﺘﻣ ،ﯽﮑﯾﺮﺘﮑﻟﺍ یﺎﻫﺭﺍﺰﺑﺍ
◀
ﺭﺎﮐ ﻪﺑ یﺭﻮﻃ ﺎﻤﻨﻫﺍﺭ ﻩﻭﺰﺟ ﻦﯾﺍ ﺕﺍﺭﻮﺘﺳﺩ ﻖﺑﺎﻄﻣ ﺍﺭ ﻩﺮﯿﻏ ﻭ ﺪﻧﻮﺷ ﯽﻣ
ﻦﯿﻨﭽﻤﻫ .ﺪﻨﺷﺎﺑ ﻪﺘﺷﺍﺩ ﺐﺳﺎﻨﺗ ﻩﺎﮕﺘﺳﺩ ﻦﯾﺍ ﻝﺪﻣ ﺎﺑ ﻪﮐ ﺪﯾﺮﯿﮔ
یﺍﺮﺑ ﯽﻗﺮﺑ ﺭﺍﺰﺑﺍ ﺩﺮﺑﺭﺎﮐ .ﺪﯿﻨﮐ ﻪﺟﻮﺗ ﺭﺎﮐ ﻉﻮﻧ ﻭ یﺭﺎﮐ ﻂﯾﺍﺮﺷ ﻪﺑ
ﻂﯾﺍﺮﺷ ﺪﻧﺍﻮﺘﯿﻣ ،ﺖﺳﺍ ﻩﺪﺸﻧ ﻪﺘﻓﺮﮔ ﺮﻈﻧﺭﺩ ﻥﺁ یﺍﺮﺑ ﻪﮐ یﺭﺎﮐ ﺩﺭﺍﻮﻣ
.ﺩﻮﺷ ﺮﺠﻨﻣ ﺍﺭ ﯽﮐﺎﻧﺮﻄﺧ
ﺲﯾﻭﺮﺳ
ﻉﻮﺟﺭ یﺍ ﻪﻓﺮﺣ ﻦﯿﺼﺼﺨﺘﻣ ﻪﺑ ﻂﻘﻓ ﯽﮑﯾﺮﺘﮑﻟﺍ ﺭﺍﺰﺑﺍ ﺮﯿﻤﻌﺗ یﺍﺮﺑ
◀
ﺪﺷ ﺪﻫﺍﻮﺧ ﺚﻋﺎﺑ ﻦﯾﺍ .ﺪﯿﻨﮐ ﻩﺩﺎﻔﺘﺳﺍ ﻞﺻﺍ ﯽﮐﺪﯾ ﻞﺋﺎﺳﻭ ﺯﺍ ﻭ ﻩﺩﺮﮐ
.ﺩﺩﺮﮔ ﻦﯿﻤﻀﺗ ﺎﻤﺷ ﻩﺎﮕﺘﺳﺩ ﯽﻨﻤﯾﺍ ﻪﮐ
ﺎﻫ ﻞﯾﺭﺩ ﺯﺍ ﻩﺩﺎﻔﺘﺳﺍ یﺍﺮﺑ ﯽﻨﻤﯾﺍ ﺕﺎﮑﻧ
GSB 13 / GSB 13 RE / GSB 16 / GSB 16 RE
ﯽﻗﺮﺑ ﺭﺍﺰﺑﺍ ﻩﺍﺮﻤﻫ ﻪﺑ ﻪﭽﻧﺎﻨﭼ ،ﺪﯿﻨﮐ ﻩﺩﺎﻔﺘﺳﺍ ﯽﮑﻤﮐ ﻪﺘﺳﺩ ﺯﺍ
◀
ﻪﺑ ﺪﻧﺍﻮﺗ ﯽﻣ ﯽﻗﺮﺑ ﺭﺍﺰﺑﺍ ﺮﺑ ﻝﺮﺘﻨﮐ ﻥﺩﺍﺩ ﺖﺳﺩ ﺯﺍ .ﺪﺷﺎﺑ ﻩﺪﺷ ﻝﺎﺳﺭﺍ
.ﺪﻧﺎﺳﺮﺑ ﺐﯿﺳﺁ ﺮﺑﺭﺎﮐ
ﻭ ﻪﺘﻓﺮﮔ ﻢﮑﺤﻣ ﺖﺳﺩ ﻭﺩ ﺮﻫ ﺎﺑ ،ﺭﺎﮐ ﻡﺎﮕﻨﻫ ﺍﺭ ﯽﮑﯾﺮﺘﮑﻟﺍ ﺭﺍﺰﺑﺍ
◀
ﻭﺩ ﺎﺑ ﻥﺍﻮﺘﯿﻣ ﺍﺭ ﯽﻗﺮﺑ ﺭﺍﺰﺑﺍ .ﺪﯿﻨﮐ ﺏﺎﺨﺘﻧﺍ ﺩﻮﺧ یﺍﺮﺑ ﯽﻨﺌﻤﻄﻣ ﻩﺎﮕﯾﺎﺟ
.ﺩﺮﮐ ﺖﯾﺍﺪﻫ ﺍﺮﻧﺁ ﻭ ﺖﻓﺮﮔ ﺭﺎﮑﺑ ﺮﺗ ﻦﺌﻤﻄﻣ ﻭ ﺮﺘﻬﺑ ﺖﺳﺩ
GSB 10 / GSB 10 RE / GSB 13 / GSB 13 RE / GSB 16 / GSB 16 RE
.ﺪﯿﻨﮐ ﻩﺩﺎﻔﺘﺳﺍ ﯽﻨﻤﯾﺍ ﯽﺷﻮﮔ ﺯﺍ یﺍ ﻪﺑﺮﺿ ﻞﯾﺭﺩ ﺎﺑ ﺭﺎﮐ ﻡﺎﮕﻨﻫ ﻪﺑ
◀
ﺐﯿﺳﺁ ﺎﻤﺷ ﯽﺋﺍﻮﻨﺷ ﻪﺑ ﺪﻧﺍﻮﺗ ﯽﻣ ،ﱳﻓﺮﮔ ﺭﺍﺮﻗ ﺍﺪﺻ ﻭ ﺮﺳ ﺮﯿﺛﺄﺗ ﺖﲢ
.ﺪﻧﺎﺳﺮﺑ
ﺎﺑ ﺭﺍﺰﺑﺍ ﺕﺎﻘﻠﻌﺘﻣ ﺱﺎﲤ ﻥﺎﻜﻣﺍ ،ﺩﻮﺧ ﺭﺎﻛ ﻉﻮﻧ ﻪﺑ ﻪﺘﺴﺑ ﻪﭽﻧﺎﻨﭼ
◀
ﻞﺑﺎﻛ ﺎﯾ ﻭ ﺪﻨﺘﺴﯿﻧ ﺖﯾﺅﺭ ﻞﺑﺎﻗ ﻪﻛ (ﻥﺎﻤﺘﺧﺎﺳ ﻞﺧﺍﺩ) ﻕﺮﺑ یﺎﻫ ﻞﺑﺎﻛ
ﻞﺤﻣ ﺯﺍ ﺍﺭ ﯽﻗﺮﺑ ﺭﺍﺰﺑﺍ ﯽﺘﺴﯾﺎﺑ ،ﺪﺷﺎﺑ ﻪﺘﺷﺍﺩ ﺩﻮﺟﻭ ﯽﻗﺮﺑ ﺭﺍﺰﺑﺍ ﺩﻮﺧ
ﻭ ﻢﯿﺳ ﺎﺑ ﺭﺍﺰﺑﺍ ﺱﺎﲤ .ﺪﯾﺮﯿﮕﺑ ﺖﺳﺩ ﺭﺩ ﻥﺁ ﺭﺍﺩ ﻖﯾﺎﻋ ﺡﻮﻄﺳ ﻭ ﻪﺘﺳﺩ
یﺎﻫ ﺶﺨﺑ ﻪﺑ ﺍﺭ ﻕﺮﺑ ﻥﺎﯾﺮﺟ ﺪﻧﺍﻮﺗ ﯽﻣ ،ﺖﺳﺍ ﻕﺮﺑ ﻥﺎﯾﺮﺟ یﺩﺎﻫ ﻪﻛ ﯽﻠﺑﺎﻛ
.ﺩﻮﺷ ﯽﮕﺘﻓﺮﮔ ﻕﺮﺑ ﺚﻋﺎﺑ ﻭ ﺪﻫﺩ ﻝﺎﻘﺘﻧﺍ ﺰﯿﻧ ﯽﻗﺮﺑ ﺭﺍﺰﺑﺍ یﺰﻠﻓ
ﺯﺍ ،ﺕﺎﺴﯿﺳﺄﺗ ﻥﺎﻬﻨﭘ ﻕﺮﺑ یﺎﻬﻤﯿﺳ ﻭ ﺎﻫ ﻪﻟﻮﻟ ﱳﻓﺎﯾ یﺍﺮﺑ
◀
ﺎﺑ ﺯﺎﯿﻧ ﺕﺭﻮﺻﺭﺩ ﻭ ﺪﯿﻨﮐ ﻩﺩﺎﻔﺘﺳﺍ ﻥﺁ ﺐﺳﺎﻨﻣ ﺏﺎﯾﺩﺭ یﺎﻫ ﻩﺎﮕﺘﺳﺩ
.ﺪﯾﺮﯿﮕﺑ ﺱﺎﲤ ﻞﺤﻣ ﻥﺎﻤﺘﺧﺎﺳ ﺕﺎﺴﯿﺳﺄﺗ یﺎﻫﺭﺎﮐ یﺎﻫ ﺖﮐﺮﺷ
ﯽﮕﺘﻓﺮﮔ ﻕﺮﺑ ﺎﯾ ﻭ یﺯﻮﺳ ﺶﺗﺁ ﺚﻋﺎﺑ ﺪﻧﺍﻮﺘﯿﻣ ﻕﺮﺑ یﺎﻫ ﻢﯿﺳ ﺎﺑ ﺱﺎﲤ
ﺥﺍﺭﻮﺳ .ﺩﻮﺷ ﺭﺎﺠﻔﻧﺍ ﺩﺎﺠﯾﺍ ﺚﻋﺎﺑ ﺪﻧﺍﻮﺗ ﯽﻣ ﺯﺎﮔ ﻪﻟﻮﻟ ﻥﺪﯾﺩ ﺐﯿﺳﺁ .ﺩﻮﺷ
.ﺩﻮﺸﯿﻣ ﯽﮕﺘﻓﺮﮔ ﻕﺮﺑ ﺎﯾ ﻭ ﺕﺭﺎﺴﺧ ﺚﻋﺎﺑ ،ﺏﺁ ﻪﻟﻮﻟ ﻥﺪﺷ
ﹰﺍﺭﻮﻓ ﺍﺭ (ﻩﺎﮕﺘﺳﺩ) ﯽﻗﺮﺑ ﺭﺍﺰﺑﺍ ،ﺭﺍﺰﺑﺍ ﻥﺪﺷ ﻪﮐﻮﻠﺑ ﻭ ﻥﺩﺮﮐ ﺮﯿﮔ ﺕﺭﻮﺻﺭﺩ
◀
ﺭﻭﺎﺘﺸﮔ ﺪﯾﺪﺷ یﺎﻫ ﺶﻨﮐﺍﻭ ﺐﻇﺍﻮﻣ ﺖﻟﺎﺣ ﻦﯾﺍﺭﺩ .ﺪﯿﻨﮐ ﺵﻮﻣﺎﺧ
ﺭﺎﮐ ﺭﺍﺰﺑﺍ .ﺩﻮﺸﯿﻣ ﻩﺎﮕﺘﺳﺩ (ﻥﺩﺯ ﻪﺑﺮﺿ) ﻥﺩﺯ ﺲﭘ ﺚﻋﺎﺑ ﻪﮐ ﺪﯿﺷﺎﺑ
:ﺪﻨﻨﮐ ﺮﯿﮔ ﺕﻻﺎﺣ ﻦﯾﺍﺭﺩ ﺖﺳﺍ ﻦﮑﳑ
ﺎﯾ ﻭ ﺩﻮﺷ ﺩﺭﺍﻭ ﺪﺣ ﺯﺍ ﺶﯿﺑ ﺭﺎﺸﻓ ﯽﻗﺮﺑ ﺭﺍﺰﺑﺍ ﻪﺑ ﻪﮑﯿﺗﺭﻮﺻﺭﺩ –
.ﺪﻨﮐ ﺮﯿﮔ ﺭﺎﮐ ﻪﻌﻄﻗ ﻪﺑ ﺭﺍﺰﺑﺍ –
ﻪﻠﯿﺳﻭ ﻪﺑ ﺭﺎﮐ ﻪﻌﻄﻗ ﻪﮑﯿﺗﺭﻮﺻﺭﺩ .ﺪﯿﻨﮐ ﻢﮑﺤﻣ ﺍﺭ ﺭﺎﮐ ﻪﻌﻄﻗ
◀
ﺭﺎﮐ ﻪﻌﻄﻗ ،ﺪﺷﺎﺑ ﻩﺪﺷ ﻢﮑﺤﻣ ﻩﺮﯿﮔ ﻪﻠﯿﺳﻮﺑ ﺎﯾ ﻭ ﻩﺪﻧﺭﺍﺪﻬﮕﻧ ﺕﺍﺰﯿﻬﲡ
ﻪﺘﺷﺍﺪﻬﮕﻧ ﺖﺳﺩ ﻪﻠﯿﺳﻮﺑ ﻪﮑﻨﯾﺍ ﺎﺗ ،ﺩﻮﺸﯿﻣ ﻪﺘﺷﺍﺩ ﻪﮕﻧ ﺮﺗ ﻦﺌﻤﻄﻣ
.ﺩﻮﺷ
ﻞﻣﺎﮐ ﺭﻮﻄﺑ ﻩﺎﮕﺘﺳﺩ ﺎﺗ ﺪﯿﻨﮐ ﺮﺒﺻ ﯽﻗﺮﺑ ﺭﺍﺰﺑﺍ ﱳﺷﺍﺬﮔ ﺭﺎﻨﮐ ﺯﺍ ﻞﺒﻗ
◀
ﻪﺑ ﺖﺳﺍ ﻦﮑﳑ ﻩﺎﮕﺘﺳﺩ ﺕﺎﻘﺤﻠﻣ ﻭ ﺭﺍﺰﺑﺍ .ﺪﺘﺴﯾﺎﺑ ﺖﮐﺮﺣ ﻭ ﺭﺎﮐ ﺯﺍ
.ﺩﻮﺷ ﺝﺭﺎﺧ ﺎﻤﺷ ﺖﺳﺩ ﺯﺍ ﯽﻗﺮﺑ ﺭﺍﺰﺑﺍ ﻝﺮﺘﻨﮐ ﻭ ﻩﺩﺮﮐﺮﯿﮔ ﺭﺎﮐ ﻪﻌﻄﻗ
ﻥﺁ ﺩﺮﮑﻠﻤﻋ ﻭ ﻩﺎﮕﺘﺳﺩ ﺢﯾﺮﺸﺗ
ﻪﻌﻟﺎﻄﻣ ﺍﺭ ﺎﻫ ﯽﺋﺎﻤﻨﻫﺍﺭ ﻭ ﯽﻨﻤﯾﺍ ﺕﺍﺭﻮﺘﺳﺩ ﻪﯿﻠﮐ
ﺕﺍﺭﻮﺘﺳﺩ ﻦﯾﺍ ﺖﯾﺎﻋﺭ ﻡﺪﻋ ﺯﺍ ﯽﺷﺎﻧ ﺕﺎﻫﺎﺒﺘﺷﺍ .ﺪﯿﻨﮐ
ﺎﯾ ﻭ ﯽﮕﺘﺧﻮﺳ ،ﯽﮕﺘﻓﺮﮔ ﻕﺮﺑ ﺚﻋﺎﺑ ﺖﺳﺍ ﻦﮑﳑ ﯽﻨﻤﯾﺍ
.ﺩﻮﺷ ﺪﯾﺪﺷ یﺎﻫ ﺖﺣﺍﺮﺟ ﺮﯾﺎﺳ
ﻩﺎﮕﺘﺳﺩ ﺯﺍ ﻩﺩﺎﻔﺘﺳﺍ ﺩﺭﺍﻮﻣ
ﻦﯿﻨﭽﻤﻫ ﻭ ،ﮓﻨﺳ ،ﱳﺑ ،ﺮﺟﺁ ﺭﺩ یﺍ ﻪﺑﺮﺿ یﺭﺎﮐ ﻞﯾﺭﺩ یﺍﺮﺑ ﯽﻗﺮﺑ ﺭﺍﺰﺑﺍ ﻦﯾﺍ
.ﺖﺳﺍ ﺐﺳﺎﻨﻣ ﯽﮑﯿﺘﺳﻼﭘ ﺩﺍﻮﻣ ﻭ ﮏﯿﻣﺍﺮﺳ ،ﺕﺍﺰﻠﻓ ،ﺏﻮﭼ ﺭﺩ یﺭﺎﮐ ﺥﺍﺭﻮﺳ
ﺩﺮﮔ ﺖﺳﺍﺭ ﺶﺧﺮﭼ ﺖﯿﻠﺑﺎﻗ ﻭ ﯽﮑﯿﻧﻭﺮﺘﮑﻟﺍ ﻝﺮﺘﻨﮐ ﻪﺑ ﺰﻬﺠﻣ یﺎﻬﻫﺎﮕﺘﺳﺩ
.ﺪﻨﺷﺎﺒﯿﻣ ﺐﺳﺎﻨﻣ ﺰﯿﻧ یﺭﺎﮐ ﺰﯾﻭﻼﻗ ﻭ یﺭﺎﮐ ﯽﺘﺷﻮﮔ ﭻﯿﭘ یﺍﺮﺑ ﺩﺮﮔ ﭗﭼ ﻭ
ﻩﺎﮕﺘﺳﺩ ﺀﺍﺰﺟﺍ
ﻪﺑ ﻁﻮﺑﺮﻣ ،ﺩﻮﺸﯿﻣ ﻩﺪﻫﺎﺸﻣ ﺮﯾﻮﺼﺗ ﺭﺩ ﻪﮐ ﻩﺎﮕﺘﺳﺩ ﺀﺍﺰﺟﺍ یﺎﻫ ﻩﺭﺎﻤﺷ
.ﺖﺳﺍ ﻩﺪﻣﺁ ﻪﭼﺮﺘﻓﺩ ﻦﯾﺍ ﺭﺩ ﻥﺁ ﺮﯾﻮﺼﺗ ﻪﮐ ﺪﺷﺎﺑ ﯽﻣ ﯽﻗﺮﺑ ﺭﺍﺰﺑﺍ ﺡﺮﺷ
* ﮏﯿﺗﺎﻣﻮﺗﺍ ﻡﺎﻈﻧ ﻪﺳ 1
ﯽﺋﻮﻠﺟ (ﺭﻮﺘﭘﺍﺩﺁ) ﻩﺮﻬﻣ ﺶﺷﻮﭘ 2
ﯽﺒﻘﻋ (ﺭﻮﺘﭘﺍﺩﺁ) ﻩﺮﻬﻣ ﺶﺷﻮﭘ 3
یﺭﺎﮐ ﻞﯾﺭﺩ/(یﺭﺎﮐ ﺥﺍﺭﻮﺳ) یﺭﺎﮐ ﻞﯾﺭﺩ» ﺩﺮﮑﻠﻤﻋ ﻉﻮﻧ ﺏﺎﺨﺘﻧﺍ ﺪﯿﻠﮐ 4
«یﺍ ﻪﺑﺮﺿ
ﻩﺎﮕﺘﺳﺩ ﻞﺻﻭ ﻭ ﻊﻄﻗ ﺪﯿﻠﮐ ﺖﯿﺒﺜﺗ ﻭ ﻞﻔﻗ ﻪﻤﮐﺩ
5
ﻞﺻﻭ ﻭ ﻊﻄﻗ ﺪﯿﻠﮐ 6
(GSB 16 RE) (ﺮ
ﹺ
ﻤﯾﺩ ﺪﯿﻠﮐ) ﺖﻋﺮﺳ ﺏﺎﺨﺘﻧﺍ ﻭ ﻢﯿﻈﻨﺗ ﺪﯿﻠﮐ 7
(GSB 10 RE / GSB 13 RE / GSB 16 RE)
ﺶﺧﺮﭼ ﺖﻬﺟ ﺮﯿﯿﻐﺗ ﺪﯿﻠﮐ 8
* ﺥﺍﺭﻮﺳ ﻖﻤﻋ ﻢﯿﻈﻨﺗ ﻭ ﻦﯿﯿﻌﺗ یﺍﺮﺑ ﻪﻤﮐﺩ 9
* ﯽﮑﻤﮐ ﻪﺘﺳﺩ ﻢﯿﻈﻨﺗ یﺍﺮﺑ ﯽﮑﺳﻭﺮﺧ ﭻﯿﭘ 10
* (ﺭﺍﺩ ﻖﯾﺎﻋ ﺶﮐﻭﺭ ﺎﺑ) ﯽﮑﻤﮐ ﻪﺘﺳﺩ 11
* ﻖﻤﻋ ﻩﺪﻨﻨﮐ ﻢﯿﻈﻨﺗ 12
(ﺭﺍﺩ ﻖﯾﺎﻋ ﺶﮐﻭﺭ ﺎﺑ) ﻪﺘﺳﺩ 13
* ﻡﺎﻈﻧ ﻪﺳ ﺭﺎﭼﺁ 14
* (یﺍ ﻪﻧﺍﺪﻧﺩ) ﯽﻟﻮﻤﻌﻣ ﻡﺎﻈﻧ ﻪﺳ 15
ﻉﺍﻮﻧﺍ یﺍﺮﺑ ﯽﺘﺷﻮﮕﭽﯿﭘﺮﺳ ﻂﺑﺍﺭ/ﻝﺎﺳﺭﻮﯿﻧﻮﯾ ﻩﺪﻧﺭﺍﺪﻬﮕﻧ 16
* ﺎﻫ ﯽﺘﺷﻮﮕﭽﯿﭘﺮﺳ
* ﯽﺘﺷﻮﮕﭽﯿﭘﺮﺳ 17
** ﺵﻮﮔ ﺶﺷ ﻦﻟﺁ ﺭﺎﭼﺁ 18
** ﺖﺨﺗ ﺭﺎﭼﺁ 19
ﻩﺍﺮﻤﻫ ﻝﻮﻤﻌﻣ ﺭﻮﻄﺑ ،ﺖﺳﺍ ﻩﺪﻣﺁ ﱳﻣ ﺭﺩ ﺎﯾ ﻭ ﺮﯾﻮﺼﺗ ﺭﺩ ﻪﮐ ﯽﺗﺎﻘﻠﻌﺘﻣ ﻪﯿﻠﮐ *
ﻪﻣﺎﻧﺮﺑ ﺖﺳﺮﻬﻓ ﺯﺍ ﺍﺭ ﺕﺎﻘﻠﻌﺘﻣ ﻞﻣﺎﮐ ﺖﺴﯿﻟ ﹰﺎﻔﻄﻟ .ﺩﻮﺷ ﯽﳕ ﻪﺋﺍﺭﺍ ﻩﺎﮕﺘﺳﺩ
.ﺪﯿﺋﺎﳕ ﺱﺎﺒﺘﻗﺍ ﺕﺎﻘﻠﻌﺘﻣ
(ﺩﻮﺸﯿﳕ ﻪﺿﺮﻋ ﻩﺎﮕﺘﺳﺩ ﺎﺑ ﻩﺍﺮﻤﻫ) ﺭﺍﺯﺎﺑ ﺭﺩ ﺪﯾﺮﺧ ﻞﺑﺎﻗ
**
Page 53

ﯽﺳﺭﺎﻓ
|
53
Bosch Power Tools 1 609 929 M43 | (28.6.11)
ﯽﺳﺭﺎﻓ
ﯽﻨﻤﯾﺍ یﺎﻫ ﯽﺋﺎﻤﻨﻫﺍﺭ
ﯽﮑﯾﺮﺘﮑﻟﺍ یﺎﻫﺭﺍﺰﺑﺍ یﺍﺮﺑ ﯽﻣﻮﻤﻋ ﯽﻨﻤﯾﺍ یﺎﻫ ﯽﺋﺎﻤﻨﻫﺍﺭ
.ﺪﯿﻧﺍﻮﺨﺑ ﺍﺭ ﺎﻫ ﯽﺋﺎﻤﻨﻫﺍﺭ ﻭ ﯽﻨﻤﯾﺍ ﺕﺍﺭﻮﺘﺳﺩ ﻪﻤﻫ
ﯽﻨﻤﯾﺍ ﺕﺍﺭﻮﺘﺳﺩ ﻦﯾﺍ ﺖﯾﺎﻋﺭ ﻡﺪﻋ ﺯﺍ ﯽﺷﺎﻧ ﺕﺎﻫﺎﺒﺘﺷﺍ
ﺪﯾﺪﺷ یﺎﻫ ﺖﺣﺍﺮﺟ ﺮﯾﺎﺳ ﺎﯾ ﻭ ﯽﮕﺘﺧﻮﺳ ،ﯽﮕﺘﻓﺮﮔ ﻕﺮﺑ ﺚﻋﺎﺑ ﺖﺳﺍ ﻦﮑﳑ
.ﺩﻮﺷ
یﺭﺍﺪﻬﮕﻧ ﺏﻮﺧ ﻩﺪﻨﯾﺁ یﺍﺮﺑ ﺍﺭ ﺎﻫ ﯽﺋﺎﻤﻨﻫﺍﺭ ﻭ ﯽﻨﻤﯾﺍ یﺎﻫ ﺭﺍﺪﺸﻫ ﻪﻤﻫ
.ﺪﯿﻨﮐ
یﺎﻫﺭﺍﺰﺑﺍ ﺭﻮﻈﻨﻣ ،ﺩﻮﺸﯿﻣ ﺖﺒﺤﺻ «ﯽﮑﯾﺮﺘﮑﻟﺍ ﺭﺍﺰﺑﺍ» ﺯﺍ ﺎﻤﻨﻫﺍﺭ ﻦﯾﺍ ﺭﺩ ﺎﺟﺮﻫ
ﻢﯿﺳ ﻥﻭﺪﺑ) ﺭﺍﺩ یﺮﻃﺎﺑ ﯽﮑﯾﺮﺘﮑﻟﺍ یﺎﻫﺭﺍﺰﺑﺍ ﺎﯾ ﻭ (ﻕﺮﺑ ﻢﯿﺳ ﺎﺑ) ﯽﮑﯾﺮﺘﮑﻟﺍ
.ﺪﺷﺎﺑ ﯽﻣ (ﻕﺮﺑ
ﺭﺎﮐ ﻞﺤﻣ ﯽﻨﻤﯾﺍ
.ﺪﯾﺭﺍﺪﻬﮕﻧ ﯽﻓﺎﮐ ﺭﻮﻧ ﻪﺑ ﺰﻬﺠﻣ ﻭ ﺐﺗﺮﻣ ،ﺰﯿﲤ ﺍﺭ ﺩﻮﺧ ﺭﺎﮐ ﻞﺤﻣ
◀
.ﺩﻮﺷ یﺭﺎﮐ ﺢﻧﺍﻮﺳ ﺚﻋﺎﺑ ﺪﻧﺍﻮﺘﯿﻣ ﺭﻮﻧ ﻢﮐ ﻭ ﺐﺗﺮﻣﺎﻧ ﺭﺎﮐ ﻂﯿﺤﻣ
ﺩﻮﺟﻭ ﺭﺎﺠﻔﻧﺍ ﺮﻄﺧ ﻥﺁ ﺭﺩ ﻪﮐ ﯽﯾﺎﻫ ﻂﯿﺤﻣ ﺭﺩ ﯽﮑﯾﺮﺘﮑﻟﺍ ﺭﺍﺰﺑﺍ ﺎﺑ
◀
ﺭﺎﮐ ،ﺪﺷﺎﺑ ﻪﻗﺮﺘﺤﻣ یﺎﻫﺭﺎﺨﺑ ﻭ ﺎﻫﺯﺎﮔ ،ﺕﺎﻌﯾﺎﻣ یﻭﺎﺣ ﻭ ﻪﺘﺷﺍﺩ
ﺪﻨﻧﺍﻮﺗ ﯽﻣ ﻪﮐ ﺪﻨﻨﮐ ﯽﻣ ﺩﺎﺠﯾﺍ ﯽﯾﺎﻫ ﻪﻗﺮﺟ ﯽﮑﯾﺮﺘﮑﻟﺍ یﺎﻫ ﺭﺍﺰﺑﺍ .ﺪﯿﻨﮑﻧ
.ﺪﻧﻮﺷ ﺍﻮﻫ ﺭﺩ ﺩﻮﺟﻮﻣ یﺎﻫﺭﺎﺒﻏ ﻭ ﺩﺮﮔ ﱳﻓﺮﮔ ﺶﺗﺁ ﺚﻋﺎﺑ
ﻩﺎﮕﺘﺳﺩ ﺯﺍ ﺍﺭ ﺩﺍﺮﻓﺍ ﺮﯾﺎﺳ ﻭ ﻥﺎﮐﺩﻮﮐ ،ﯽﮑﯾﺮﺘﮑﻟﺍ ﺭﺍﺰﺑﺍ ﺎﺑ ﺭﺎﮐ ﻡﺎﮕﻨﻫ
◀
ﻝﺮﺘﻨﮐ ﺖﺳﺍ ﻦﮑﳑ ،ﺩﻮﺷ ﺕﺮﭘ ﺎﻤﺷ ﺱﺍﻮﺣ ﻪﮑﯿﺗﺭﻮﺻﺭﺩ .ﺪﯾﺭﺍﺪﻬﮕﻧ ﺭﻭﺩ
.ﺩﻮﺷ ﺝﺭﺎﺧ ﺎﻤﺷ ﺖﺳﺩ ﺯﺍ ﻩﺎﮕﺘﺳﺩ
ﯽﮑﯾﺮﺘﮑﻟﺍ ﯽﻨﻤﯾﺍ
.ﺪﺷﺎﺑ ﻪﺘﺷﺍﺩ ﺐﺳﺎﻨﺗ ﻕﺮﺑ ﺰﯾﺮﭘ ﺎﺑ ﺪﯾﺎﺑ ﯽﮑﯾﺮﺘﮑﻟﺍ ﺭﺍﺰﺑﺍ ﻪﺧﺎﺷﻭﺩ
◀
ﻩﺍﺮﻤﻫ ﺪﯾﺎﺒﻧ ﻪﺧﺎﺷﻭﺩ ﻝﺪﺒﻣ .ﺪﯿﻫﺪﻧ ﻪﺧﺎﺷﻭﺩ ﺭﺩ یﺮﯿﯿﻐﺗ ﻪﻧﻮﮕﭽﯿﻫ
یﺎﻫ ﻪﺧﺎﺷﻭﺩ .ﺩﻮﺷ ﻩﺩﺎﻔﺘﺳﺍ ﻦﯿﻣﺯ ﻪﺑ ﻝﺎﺼﺗﺍ یﺍﺭﺍﺩ ﯽﮑﯾﺮﺘﮑﻟﺍ ﺭﺍﺰﺑﺍ ﺎﺑ
ﻭ ﯽﮑﯾﺮﺘﮑﻟﺍ کﻮﺷ ﺮﻄﺧ ،ﺐﺳﺎﻨﻣ یﺎﻫﺰﯾﺮﭘ ﻭ ﻩﺪﺸﻧ ﻩﺩﺍﺩ ﺮﯿﯿﻐﺗ ﻭ ﻞﺻﺍ
.ﺪﻨﻨﮐ ﯽﻣ ﻢﮐ ﺍﺭ ﯽﮕﺘﻓﺮﮔ ﻕﺮﺑ
ﺪﻨﻧﺎﻣ ﻦﯿﻣﺯ ﻪﺑ ﻝﺎﺼﺗﺍ ﻢﯿﺳ ﻪﺑ ﻞﺼﺘﻣ ﺕﺎﻌﻄﻗ ﺎﺑ ﯽﻧﺪﺑ ﺱﺎﲤ ﺯﺍ
◀
ﺱﺎﲤ ﺕﺭﻮﺻ ﺭﺩ .ﺪﯿﻨﮐ یﺭﺍﺩ ﺩﻮﺧ ﻝﺎﭽﺨﯾ ﻭ ﯽﻗﺮﺑ ﻕﺎﺟﺍ ،ژﺎﻓﻮﺷ ،ﻪﻟﻮﻟ
ﺎﻤﺷ ﺱﺎﲤ ﻦﯿﻨﭽﻤﻫ ﻭ ﻦﯿﻣﺯ ﻪﺑ ﻝﺎﺼﺗﺍ یﺍﺭﺍﺩ ﺕﺎﻌﻄﻗ ﻭ ﺡﻮﻄﺳ ﺎﺑ ﯽﻧﺪﺑ
.ﺪﺑﺎﯾ ﯽﻣ ﺶﯾﺍﺰﻓﺍ ﯽﮕﺘﻓﺮﮔ ﻕﺮﺑ ﺮﻄﺧ ،ﻦﯿﻣﺯ ﺎﺑ
ﺭﺍﺰﺑﺍ ﻪﺑ ﺏﺁ ﺫﻮﻔﻧ .ﺪﯾﺭﺍﺪﻬﮕﻧ ﺭﻭﺩ ﺖﺑﻮﻃﺭ ﻭ ﻥﺍﺭﺎﺑ ﺯﺍ ﺍﺭ ﻩﺎﮕﺘﺳﺩ
◀
.ﺪﻫﺪﯿﻣ ﺶﯾﺍﺰﻓﺍ ﺍﺭ ﯽﮑﯾﺮﺘﮑﻟﺍ کﻮﺷ ﺮﻄﺧ ،ﯽﮑﯾﺮﺘﮑﻟﺍ
ﻥﺍﺰﯾﻭﺁ ،ﯽﮑﯾﺮﺘﮑﻟﺍ ﺭﺍﺰﺑﺍ ﻞﻤﺣ ﻥﻮﭼ ﯽﺋﺎﻫﺭﺎﮐ یﺍﺮﺑ ﻩﺎﮕﺘﺳﺩ ﻢﯿﺳ ﺯﺍ
◀
ﻞﺑﺎﮐ .ﺪﯿﻨﮑﻧ ﻩﺩﺎﻔﺘﺳﺍ ﻕﺮﺑ ﺯﺍ ﻪﺧﺎﺷﻭﺩ ﻥﺩﺮﮐ ﺝﺭﺎﺧ ﺎﯾ ﻭ ﻥﺁ ﻥﺩﺮﮐ
یﺎﻫ ﺶﺨﺑ ﻭ ﺰﯿﺗ یﺎﻫ ﻪﺒﻟ ،ﻦﻏﻭﺭ ،ﺕﺭﺍﺮﺣ ﻞﺑﺎﻘﻣ ﺭﺩ ﺍﺭ ﻩﺎﮕﺘﺳﺩ
ﻩﺮﮔ ﺎﯾ ﻭ ﻩﺪﯾﺩ ﺐﯿﺳﺁ یﺎﻫ ﻞﺑﺎﮐ .ﺪﯾﺭﺍﺪﻬﮕﻧ ﺭﻭﺩ ﻩﺎﮕﺘﺳﺩ کﺮﺤﺘﻣ
.ﺪﻨﻫﺪﯿﻣ ﺶﯾﺍﺰﻓﺍ ﺍﺭ ﯽﮑﯾﺮﺘﮑﻟﺍ کﻮﺷ ﺮﻄﺧ ﻩﺩﺭﻮﺧ
ﺯﺍ ﺎﻬﻨﺗ ،ﺪﯿﻨﮑﯿﻣ ﺭﺎﮐ ﺯﺎﺑ ﻂﯿﺤﻣ ﺭﺩ ﯽﮑﯾﺮﺘﮑﻟﺍ ﺭﺍﺰﺑﺍ ﺎﺑ ﻪﮑﯿﺗﺭﻮﺻﺭﺩ
◀
.ﺪﺷﺎﺑ ﺐﺳﺎﻨﻣ ﺰﯿﻧ ﺯﺎﺑ ﻂﯿﺤﻣ یﺍﺮﺑ ﻪﮐ ﺪﯿﻨﮐ ﻩﺩﺎﻔﺘﺳﺍ ﯽﻄﺑﺍﺭ ﻞﺑﺎﮐ
ﯽﻣ ﻢﮐ ﺍﺭ ﯽﮕﺘﻓﺮﮔ ﻕﺮﺑ ﺮﻄﺧ ،ﺯﺎﺑ ﻂﯿﺤﻣ یﺍﺮﺑ ﺐﺳﺎﻨﻣ ﻂﺑﺍﺭ یﺎﻫ ﻞﺑﺎﮐ
.ﺪﻨﻨﮐ
ﺯﺍ ﺪﯾﺎﺑ ،ﺏﻮﻃﺮﻣ ﻦﮐﺎﻣﺍ ﻭ ﻂﯿﺤﻣ ﺭﺩ ﯽﻗﺮﺑ ﺭﺍﺰﺑﺍ ﺎﺑ ﺭﺎﮐ ﻡﻭﺰﻟ ﺕﺭﻮﺻ ﺭﺩ
◀
ﻩﺪﻨﻨﮐ ﻊﻄﻗ ﺪﯿﻠﮐ) ﻦﯿﻣﺯ ﯽﺘﺸﻧ ﻭ ﺎﻄﺧ ﻥﺎﯾﺮﺟ ﯽﺘﻇﺎﻔﺣ ﺪﯿﻠﮐ ﮏﯾ
ﻥﺎﯾﺮﺟ ﯽﺘﻇﺎﻔﺣ ﺪﯿﻠﮐ ﺯﺍ ﻩﺩﺎﻔﺘﺳﺍ .ﺪﯿﻨﮐ ﻩﺩﺎﻔﺘﺳﺍ (ﻦﯿﻣﺯ ﺎﺑ ﻝﺎﺼﺗﺍ
.ﺪﻫﺩ ﯽﻣ ﻞﯿﻠﻘﺗ ﺍﺭ ﯽﮕﺘﻓﺮﮔ ﻕﺮﺑ ﺮﻄﺧ ﻦﯿﻣﺯ ﯽﺘﺸﻧ ﻭ ﺎﻄﺧ
ﺹﺎﺨﺷﺍ ﯽﻨﻤﯾﺍ ﺖﯾﺎﻋﺭ
ﺮﮑﻓ ﺎﺑ ﻭ ﺪﯿﻨﮐ ﺖﻗﺩ ﺩﻮﺧ ﺭﺎﮐ ﻪﺑ ،ﺪﯿﻨﮐ ﻊﻤﺟ ﺏﻮﺧ ﺍﺭ ﺩﻮﺧ ﺱﺍﻮﺣ
◀
ﻭ ﯽﮕﺘﺴﺧ ﺕﺭﻮﺻﺭﺩ .ﺪﯿﻨﮐ ﺭﺎﮐ ﯽﮑﯾﺮﺘﮑﻟﺍ ﺭﺍﺰﺑﺍ ﺎﺑ ﻞﻣﺎﮐ ﺵﻮﻫ ﻭ
ﺭﺍﺰﺑﺍ ﺎﺑ ،ﺪﯾﺍ ﻩﺩﺮﮐ ﻩﺩﺎﻔﺘﺳﺍ ﻭﺭﺍﺩ ﻭ ﻞﮑﻟﺍ ،ﺭﺪﺨﻣ ﺩﺍﻮﻣ ﻪﮑﯿﺗﺭﻮﺻ ﺭﺩ ﺎﯾ
ﺭﺍﺰﺑﺍ ﺎﺑ ﺭﺎﮐ ﻡﺎﮕﻨﻫ ﯽﻬﺟﻮﺗ ﯽﺑ ﻪﻈﳊ ﮏﯾ .ﺪﯿﻨﮑﻧ ﺭﺎﮐ ﯽﮑﯾﺮﺘﮑﻟﺍ
.ﺪﺷﺎﺑ ﻪﺘﺷﺍﺩ ﻩﺍﺮﻤﻫ ﻪﺑ یﺪﯾﺪﺷ یﺎﻫ ﺖﺣﺍﺮﺟ ﺪﻧﺍﻮﺘﯿﻣ ،ﯽﮑﯾﺮﺘﮑﻟﺍ
ﻩﺩﺎﻔﺘﺳﺍ ﻩﺭﺍﻮﻤﻫ ﯽﻨﻤﯾﺍ ﮏﻨﯿﻋ ﺯﺍ ﻭ ﯽﺼﺨﺷ ﯽﻨﻤﯾﺍ ﺕﺍﺰﯿﻬﲡ ﺯﺍ
◀
یﺎﻫ ﺶﻔﮐ ،ﯽﻨﻤﯾﺍ ﮏﺳﺎﻣ ﺪﻨﻧﺎﻣ ﯽﻨﻤﯾﺍ ﺕﺍﺰﯿﻬﲡ ﺯﺍ ﻩﺩﺎﻔﺘﺳﺍ .ﺪﯿﻨﮐ
ﺎﺑ ﺭﺎﮐ ﻉﻮﻧ ﺎﺑ ﺐﺳﺎﻨﺘﻣ ﯽﻨﻤﯾﺍ ﯽﺷﻮﮔ ﻭ ﯽﻨﻤﯾﺍ ﻩﻼﮐ ،ﺵﺰﻐﻟ ﺪﺿ ﯽﻨﻤﯾﺍ
.ﺪﻫﺪﻴﻣ ﺶﻫﺎﮐ ﺍﺭ ﻥﺪﺷ ﺡﻭﺮﺠﻣ ﺮﻄﺧ ،ﯽﮑﯾﺮﺘﮑﻟﺍ ﺭﺍﺰﺑﺍ
.ﺪﺘﻔﯿﻧ ﺭﺎﮑﺑ ﻪﺘﺳﺍﻮﺧﺎﻧ ﺭﻮﻄﺑ ﯽﮑﯾﺮﺘﮑﻟﺍ ﺭﺍﺰﺑﺍ ﻪﮐ ﺪﯿﺷﺎﺑ ﺐﻇﺍﻮﻣ
◀
،یﺮﻃﺎﺑ ﻪﺑ ﻥﺁ ﻝﺎﺼﺗﺍ ،ﻕﺮﺑ ﺰﯾﺮﭘ ﺭﺩ ﻩﺎﮕﺘﺳﺩ ﻪﺧﺎﺷﻭﺩ ﻥﺩﺮﮐ ﺩﺭﺍﻭ ﺯﺍ ﻞﺒﻗ
ﯽﮑﯾﺮﺘﮑﻟﺍ ﺭﺍﺰﺑﺍ ﻪﮐ ﺪﯿﻨﮐ ﺖﻗﺩ ﺪﯾﺎﺑ ،ﻩﺎﮕﺘﺳﺩ ﻞﻤﺣ ﺎﯾ ﻭ ﻥﺁ ﱳﺷﺍﺩﺮﺑ
یﻭﺭ ﺎﻤﺷ ﺖﺸﮕﻧﺍ ﻩﺎﮕﺘﺳﺩ ﻞﻤﺣ ﻡﺎﮕﻨﻫ ﻪﮑﯿﺗﺭﻮﺻﺭﺩ .ﺪﺷﺎﺑ ﺵﻮﻣﺎﺧ
،ﺪﯿﻧﺰﺑ ﻕﺮﺑ ﻪﺑ ﻦﺷﻭﺭ ﺖﻟﺎﺣ ﺭﺩ ﺍﺭ ﻩﺎﮕﺘﺳﺩ ﺎﯾ ﻭ ﺪﺷﺎﺑ ﻞﺻﻭ ﻭ ﻊﻄﻗ ﻪﻤﮐﺩ
.ﺪﯾﺁ ﺶﯿﭘ یﺭﺎﮐ ﺢﻧﺍﻮﺳ ﺖﺳﺍ ﻦﮑﳑ
ﻢﯿﻈﻨﺗ یﺎﻫﺭﺍﺰﺑﺍ ﻪﻤﻫ ﺪﯾﺎﺑ ،ﯽﮑﯾﺮﺘﮑﻟﺍ ﺭﺍﺰﺑﺍ ﻥﺩﺮﮐ ﻦﺷﻭﺭ ﺯﺍ ﻞﺒﻗ
◀
یﻭﺭ ﻪﮐ ﯽﺋﺎﻫﺭﺎﭼﺁ ﻭ ﺭﺍﺰﺑﺍ .ﺪﯾﺭﺍﺩﺮﺑ ﻩﺎﮕﺘﺳﺩ یﻭﺭ ﺯﺍ ﺍﺭ ﺎﻫ ﺭﺎﭼﺁ ﻭ ﻩﺪﻨﻨﮐ
ﺖﺣﺍﺮﺟ ﺩﺎﺠﯾﺍ ﺚﻋﺎﺑ ﺪﻨﻧﺍﻮﺘﯿﻣ ،ﺪﻧﺭﺍﺩ ﺭﺍﺮﻗ ﻩﺎﮕﺘﺳﺩ ﻩﺪﻨﺧﺮﭼ یﺎﻫ ﺶﺨﺑ
.ﺪﻧﻮﺷ
ﺭﺎﮐ یﺍﺮﺑ .ﺪﺷﺎﺑ ﻪﺘﺷﺍﺩ ﺭﺍﺮﻗ یﺩﺎﻋ ﺖﻟﺎﺣ ﺭﺩ ﺪﯾﺎﺑ ﺎﻤﺷ ﻥﺪﺑ ﺖﯿﻌﺿﻭ
◀
ﻆﻔﺣ ﻩﺭﺍﻮﻤﻫ ﺍﺭ ﺩﻮﺧ ﻝﺩﺎﻌﺗ ﻭ ﻩﺩﺮﮐ ﺏﺎﺨﺘﻧﺍ ﺩﻮﺧ یﺍﺮﺑ ﯽﻨﺌﻤﻄﻣ یﺎﺟ
ﺮﯿﻏ یﺎﻫ ﺖﯿﻌﺿﻭ ﺭﺩ ﺍﺭ ﯽﮑﯾﺮﺘﮑﻟﺍ ﺭﺍﺰﺑﺍ ﺪﯿﻧﺍﻮﺗ ﯽﻣ ﺐﯿﺗﺮﺗ ﻦﯾﺍ ﻪﺑ .ﺪﯿﻨﮐ
.ﺪﯿﺷﺎﺑ ﻪﺘﺷﺍﺩ ﻝﺮﺘﻨﮐ ﺖﲢ ﺮﺘﻬﺑ ﻩﺮﻈﺘﻨﻣ
ﺖﻨﯾﺯ ﻞﻤﺣ ﻭ ﺩﺎﺸﮔ یﺎﻫ ﺱﺎﺒﻟ ﻥﺪﯿﺷﻮﭘ ﺯﺍ .ﺪﯿﺷﻮﭙﺑ ﺐﺳﺎﻨﻣ ﺱﺎﺒﻟ
◀
یﺎﻫ ﺶﺨﺑ ﺯﺍ ﺍﺭ ﺎﻫ ﺶﮑﺘﺳﺩ ﻭ ﺱﺎﺒﻟ ،ﺎﻫﻮﻣ .ﺪﯿﻨﮐ یﺭﺍﺩ ﺩﻮﺧ ﺕﻻﺁ
ﺪﻨﻠﺑ یﻮﻣ ،ﺩﺎﺸﮔ یﺎﻫ ﺱﺎﺒﻟ .ﺪﯾﺭﺍﺪﻬﮕﻧ ﺭﻭﺩ ﻩﺎﮕﺘﺳﺩ ﺶﺧﺮﭼ ﻝﺎﺣﺭﺩ
ﺮﯿﮔ ﻩﺎﮕﺘﺳﺩ ﺶﺧﺮﭼ ﻝﺎﺣﺭﺩ یﺎﻫ ﺖﻤﺴﻗ ﺭﺩ ﺖﺳﺍ ﻦﮑﳑ ﺕﻻﺁ ﺖﻨﯾﺯ ﻭ
.ﺪﻨﻨﮐ
ﻊﻤﺟ ﻪﻠﯿﺳﻭ ﺎﯾ ﻭ ﺭﺎﺒﻏ ﻭ ﺩﺮﮔ ﺶﮑﻣ ﻞﺋﺎﺳﻭ ﺪﯿﻧﺍﻮﺘﯿﻣ ﻪﮑﯿﺗﺭﻮﺻﺭﺩ
◀
ﺪﯾﻮﺷ ﻦﺌﻤﻄﻣ ﺪﯾﺎﺑ ،ﺪﯿﻨﮐ ﺐﺼﻧ ﻩﺎﮕﺘﺳﺩ ﻪﺑ ﺍﺭ ﺭﺎﺒﻏ ﻭ ﺩﺮﮔ ﻩﺪﻨﻨﮐ
ﺯﺍ ﻩﺩﺎﻔﺘﺳﺍ .ﺪﻧﻮﺷ ﯽﻣ ﻩﺩﺎﻔﺘﺳﺍ ﺖﺳﺭﺩ ﻭ ﺐﺼﻧ ﻞﺋﺎﺳﻭ ﻦﯾﺍ ﻪﮐ
ﺮﺗ ﺩﺎﯾﺯ ﺭﺎﺒﻏ ﻭ ﺩﺮﮔ ﺮﺑﺍﺮﺑ ﺭﺩ ﺍﺭ ﺎﻤﺷ ﺖﯿﻧﻮﺼﻣ ﺭﺎﺒﻏ ﻭ ﺩﺮﮔ ﺶﮑﻣ ﻞﺋﺎﺳﻭ
.ﺪﻨﮑﯿﻣ
ﻥﺁ ﺯﺍ ﺖﺒﻗﺍﺮﻣ ﻭ ﯽﮑﯾﺮﺘﮑﻟﺍ ﺭﺍﺰﺑﺍ ﺯﺍ ﺢﯿﺤﺻ ﻩﺩﺎﻔﺘﺳﺍ
،یﺭﺎﮐ ﺮﻫ یﺍﺮﺑ .ﺪﯿﻨﮐ یﺭﺍﺩ ﺩﻮﺧ ﻩﺎﮕﺘﺳﺩ یﻭﺭ ﺩﺎﯾﺯ ﺭﺎﺸﻓ ﻥﺩﺮﮐ ﺩﺭﺍﻭ ﺯﺍ
◀
ﺭﺍﺰﺑﺍ ﱳﻓﺮﮔ ﺭﺎﮑﺑ .ﺪﯿﻨﮐ ﻩﺩﺎﻔﺘﺳﺍ ﻥﺁ ﺎﺑ ﺐﺳﺎﻨﻣ ﯽﮑﯾﺮﺘﮑﻟﺍ ﺭﺍﺰﺑﺍ ﺯﺍ
ﺎﺑ ﻭ ﺮﺘﻬﺑ ﻩﺎﮕﺘﺳﺩ ﻥﺍﻮﺗ ﺯﺍ ﺪﯿﻧﺍﻮﺘﺑ ﻪﮐ ﺩﻮﺸﯿﻣ ﺚﻋﺎﺑ ﺐﺳﺎﻨﻣ ﯽﮑﯾﺮﺘﮑﻟﺍ
.ﺪﯿﻨﮐ ﻩﺩﺎﻔﺘﺳﺍ ﺮﺘﺸﯿﺑ ﻥﺎﻨﯿﻤﻃﺍ
ﻩﺩﺎﻔﺘﺳﺍ ﻩﺎﮕﺘﺳﺩ ﺯﺍ ،ﯽﻗﺮﺑ ﺭﺍﺰﺑﺍ ﻞﺻﻭ ﻭ ﻊﻄﻗ ﺪﯿﻠﮐ ﺭﺩ ﺩﺍﺮﯾﺍ ﺕﺭﻮﺻ ﺭﺩ
◀
کﺎﻧﺮﻄﺧ ،ﺩﺮﮐ ﻞﺻﻭ ﻭ ﻊﻄﻗ ﺍﺭ ﺎﻬﻧﺁ ﻥﺍﻮﺗ ﯽﳕ ﻪﮐ ﯽﮑﯾﺮﺘﮑﻟﺍ ﺭﺍﺰﺑﺍ .ﺪﯿﻨﮑﻧ
.ﺪﻧﻮﺷ ﺮﯿﻤﻌﺗ ﺪﯾﺎﺑ ﻭ ﻩﺩﻮﺑ
ﱳﺷﺍﺬﮔ ﺭﺎﻨﮐ ﺎﯾ ﻭ ﺕﺎﻘﻠﻌﺘﻣ ﺾﯾﻮﻌﺗ ،ﯽﮑﯾﺮﺘﮑﻟﺍ ﺭﺍﺰﺑﺍ ﻢﯿﻈﻨﺗ ﺯﺍ ﻞﺒﻗ
◀
ﺖﯾﺎﻋﺭ .ﺪﯿﻨﮐ ﺝﺭﺎﺧ ﺍﺮﻧﺁ یﺮﺗﺎﺑ ﺎﯾ ﻭ ﻩﺪﯿﺸﮐ ﻕﺮﺑ ﺯﺍ ﺍﺭ ﻪﺧﺎﺷﻭﺩ ،ﻥﺁ
ﯽﮑﯾﺮﺘﮑﻟﺍ ﺭﺍﺰﺑﺍ ﻪﺘﺳﺍﻮﺧﺎﻧ ﻥﺩﺎﺘﻓﺍ ﻩﺍﺭ ﺯﺍ ﯽﻨﻤﯾﺍ یﺮﯿﮕﺸﯿﭘ ﺕﺎﻣﺍﺪﻗﺍ ﻦﯾﺍ
.ﺪﻨﮐ ﯽﻣ یﺮﯿﮔﻮﻠﺟ
ﺭﻭﺩ ﻥﺎﮐﺩﻮﮐ ﺱﺮﺘﺳﺩ ﺯﺍ ،ﻩﺩﺎﻔﺘﺳﺍ ﻡﺪﻋ ﺕﺭﻮﺻﺭﺩ ﺍﺭ ﯽﮑﯾﺮﺘﮑﻟﺍ ﺭﺍﺰﺑﺍ
◀
ﻦﯾﺍ ﻪﮐ ﯽﺻﺎﺨﺷﺍ ﺎﯾ ﻭ ﺩﺭﺍﻭ ﺎﻧ ﺩﺍﺮﻓﺍ ﻪﮐ ﺪﯿﻫﺪﻧ ﻩﺯﺎﺟﺍ .ﺪﯾﺭﺍﺪﻬﮕﻧ
ﱳﻓﺮﮔ ﺭﺍﺮﻗ .ﺪﻨﻨﮐ ﺭﺎﮐ ﻩﺎﮕﺘﺳﺩ ﻦﯾﺍ ﺎﺑ ،ﺪﻧﺍ ﻩﺪﻧﺍﻮﺨﻧ ﺍﺭ ﺎﻤﻨﻫﺍﺭ ﻪﭼﺮﺘﻓﺩ
.ﺖﺳﺍ کﺎﻧﺮﻄﺧ ﻪﺑﺮﲡ ﯽﺑ ﻭ ﺩﺭﺍﻭﺎﻧ ﺩﺍﺮﻓﺍ ﺖﺳﺩ ﺭﺩ ﯽﮑﯾﺮﺘﮑﻟﺍ ﺭﺍﺰﺑﺍ
 Loading...