

Bosch EHP 6.5 AA Operation Manual
1
ENGLISH
SPLIT AIR/AIR HEAT PUMP
OPERATION MANUAL
"Plasmacluster" and "Device of a
cluster of grapes" are registered
trademarks or trademarks of Sharp
Corporation.
SUOMI NORSK SVENSKA DANSK
SPLIT LUFT/
LUFT VARMEPUMPE
BRUKSANVISNING
ILMALÄMPÖPUMPPU
KÄYTTÖOHJE
LUFTVÄRMEPUMP
ANVÄNDARHANDLEDNING
SPLIT LUFT /
LUFT VARMEPUMPE
BETJENINGSVEJLEDNING
EHP 6.5 AA
EHP6.5_AA_multi_TINSEA825JBRZ.indd 1 2013/7/6 13:35:31

Attention: Your product is
marked with this symbol.
It means that used
electrical and electronic
products should not
be mixed with general
household waste. There
is a separate collection
system for these
products.
A. Information on Disposal for Users (private households)
1. In the European Union
Attention: If you want to dispose of this equipment, please do not use the ordinary
dust bin!
Used electrical and electronic equipment must be treated separately and in
accordance with legislation that requires proper treatment, recovery and recycling of
used electrical and electronic equipment.
Following the implementation by member states, private households within the
EU states may return their used electrical and electronic equipment to designated
collection facilities free of charge*. In some countries* your local retailer may also
take back your old product free of charge if you purchase a similar new one.
*) Please contact your local authority for further details.
If your used electrical or electronic equipment has batteries or accumulators, please
dispose of these separately beforehand according to local requirements.
By disposing of this product correctly you will help ensure that the waste undergoes
the necessary treatment, recovery and recycling and thus prevent potential negative
effects on the environment and human health which could otherwise arise due to
inappropriate waste handling.
2. In other Countries outside the EU
If you wish to discard this product, please contact your local authorities and ask for
the correct method of disposal.
For Switzerland: Used electrical or electronic equipment can be returned free of
charge to the dealer, even if you don’t purchase a new product. Further collection
facilities are listed on the homepage of www.swico.ch or www.sens.ch.
B. Information on Disposal for Business Users.
1. In the European Union
If the product is used for business purposes and you want to discard it:
Please contact your BOSCH dealer who will inform you about the take-back of the
product. You might be charged for the costs arising from take-back and recycling.
Small products (and small amounts) might be taken back by your local collection facilities.
For Spain: Please contact the established collection system or your local authority
for take-back of your used products.
2. In other Countries outside the EU
If you wish to discard of this product, please contact your local authorities and ask for
the correct method of disposal.
The battery supplied with this product contains traces of Lead.
For EU: The crossed-out wheeled bin implies that used batteries should not be put
to the general household waste! There is a separate collection system for used
batteries, to allow proper treatment and recycling in accordance with legislation.
Please contact your local authority for details on the collection and recycling schemes.
For Switzerland: The used battery is to be returned to the selling point.
For other non-EU countries: Please contact your local authority for correct method of
disposal of the used battery.
GB
Contains fluorinated greenhouse gases covered by the Kyoto Protocol R410A
(Global warming potential 1975)
Pb
BUILDING REGULATIONS
This appliance must be installed and serviced only by a competent person in accordance with the current: IEE
Regulations, Building Regulation, Building Standards (Scotland) (Consolidation), Building Regulations (Northern
Ireland), local water by-laws, Health & Safety Document 63S (The Electricity at Work Regulations 1989), IS 813
(Eire) and other local requirements.
The relevant Standards should be followed, including:
BS EN 14511: Requirements heat pumps for space heating and cooling
BS EN 378: Safety and environmental requirements for heat pumps
BS EN 14324 Brazing
BS 1306 Specication for copper & copper Alloy pressure piping system
The Health and Safety at Work Act 1974
The Management of Health and Safety at Work Regulations 1999
The Construction (Health, Safety and Welfare) Regulations 1996
The Construction (Design and Management) Regulations 1994
The Lifting Operations and Lifting Equipment Regulations 1998
Where no specic instructions is given, reference should be made to the relevant codes of Practice.
EHP6.5_AA_multi_TINSEA825JBRZ.indd 2 2013/7/6 13:35:31
GB-1
ENGLISH
WARNING
• Do not pull or deform the power supply cord.
Pulling and misuse of the power supply cord can
result in damage to the unit and cause electrical
shock.
• Be careful not to expose your body directly to
the outlet air for a long time. It may affect your
physical conditions.
• When using the air conditioner for infants,
children, elderly, bedridden, or disabled people
make sure the room temperature is suitable for
those in the room.
• Never insert objects into the unit. Inserting objects
can result in injury due to the high speed rotation
of internal fans.
• Ground the air conditioner without fail. Do not
connect the grounding wire to gas pipe, water
pipe, lightning rod or telephone grounding wire.
Incomplete grounding may cause electric shock.
• If anything is abnormal with the air conditioner (ex.
a burning smell), stop the operation immediately
and turn the circuit breaker OFF.
• The appliance shall be installed in accordance
with national wiring regulations. Improper cable
connection can cause the power supply cord,
plug and the electrical outlet to overheat and
cause re.
• If the supply cord is damaged, it must be replaced by
the manufacturer or its service agent or a similarly
qualied person in order to avoid a hazard. Use only
the manufacture-specied power cord for replacement.
• Do not splash or pour water directly on the unit. Water
can cause electrical shock or equipment damage.
• Do not attempt to install/remove/repair the unit by
yourself. Incorrect work will cause electric shock,
water leak, fire etc. Consult your dealer or other
qualied service personnel for the installation/removal/
repair of the unit.
CAUTION
• Open a window or door periodically to ventilate
the room, especially when using gas appliances.
Insufcient ventilation may cause oxygen shortage.
• Do not operate the buttons with wet hand. It may
cause electric shock.
• For safety, turn the circuit breaker off when not using
the unit for an extended period of time.
• Check the outdoor unit mounting rack periodically for
wear and to make sure it is rmly in place.
• Do not put anything on the outdoor unit nor step on
it. The object or the person may fall down or drop,
causing injury.
• This unit is designed for residential use. Do not use for
other applications such as in a kennel or greenhouse
to raise animals or grow plants.
• Do not place a vessel with water on the unit. If water
penetrates into the unit, electrical insulations may
deteriorate and cause electric shock.
• Do not block the air inlets nor outlets of the unit. It
may cause insufcient performance or troubles.
• Be sure to stop the operation and turn the circuit
breaker off before performing any maintenance or
cleaning. A fan is rotating inside the unit and you may
get injured.
• Make sure to connect the air conditioner to power
supply of the rated voltage and frequency. Use of a
power supply with improper voltage and frequency
can result in equipment damage and possible re.
• Do not install the unit in a place where inammable
gas may leak. It may cause re.
Install the unit in a place with minimal dust, fumes and
moisture in the air.
• Arrange the drain hose to ensure smooth drainage.
Insufcient drainage may cause wetting of the room,
furniture etc.
• Make sure a leak breaker or a circuit breaker is
installed, depending on the installation location, to
avoid electrical shock.
• SAFETY PRECAUTIONS .............................GB-1
• PART NAMES ............................................... GB-2
• USING THE REMOTE CONTROL ................GB-4
• SETTING AIR PURIFYING FILTER .............GB-5
• TIPS ON SAVING ENERGY ......................... GB-5
• BASIC OPERATION ..................................... GB-6
• TIPS ABOUT INDICATOR PANEL ................ GB-7
• FULL POWER OPERATION ......................... GB-7
•
ADJUSTING THE AIR FLOW DIRECTION
.............GB-8
• PLASMACLUSTER OPERATION .................GB-9
• SELF CLEAN OPERATION .......................... GB-9
• ONE-HOUR OFF TIMER ............................ GB-10
• TIMER OPERATION ................................... GB-10
• 10°C OPERATION ...................................... GB-12
• AUXILIARY MODE......................................GB-12
• MAINTENANCE ..........................................GB-13
• ADDITIONAL NOTES ON OPERATION ..... GB-14
• BEFORE CALLING FOR SERVICE ...........GB-15
ENGLISH
Please read this manual carefully before using the product. This
manual should be kept in a safe place for handy reference.
CONTENTS
SAFETY PRECAUTIONS
This appliance can be used by children aged from 8 years and above and
persons with reduced physical, sensory or mental capabilities or lack of
experience and knowledge if they have been given supervision or instruction
concerning use of the appliance in a safe way and understand the hazards
involved. Children shall not play with the appliance. Cleaning and user
maintenance shall not be made by children without supervision.
EHP6.5_AA_multi_TINSEA825JBRZ.indd 1 2013/7/6 13:35:31

GB-2
PART NAMES
1 Inlet (Air)
2 Filter cover
3 Air Filter
4 Air Purifying Filter
5 Receiver Window
6 AUX Button
7 Release Button
8 Horizontal Airow Louvre
9 Outlet (Air)
10 Open Panel
11
Receiver Window
12 TEMPERATURE Indicator
13 OUTDOOR Temp. Lamp (green
)
14 FULL POWER Lamp (green
)
15 TIMER Lamp (orange
)
16 OPERATION Lamp (red
)
17 PLASMACLUSTER Lamp
(blue
)
18 Inlet (Air)
19 Refrigerant pipe and
Interconnecting Cord
20 Drainage Hose
21 Outlet (Air)
1
2
3
4
5
6
7
8
9
10
11
12
13
14
15
16
17
18
19
20
21
OUTDOOR UNIT
NOTE:
Actual units might vary slightly
from those shown above.
INDOOR UNIT
EHP6.5_AA_multi_TINSEA825JBRZ.indd 2 2013/7/6 13:35:32
GB-3
ENGLISH
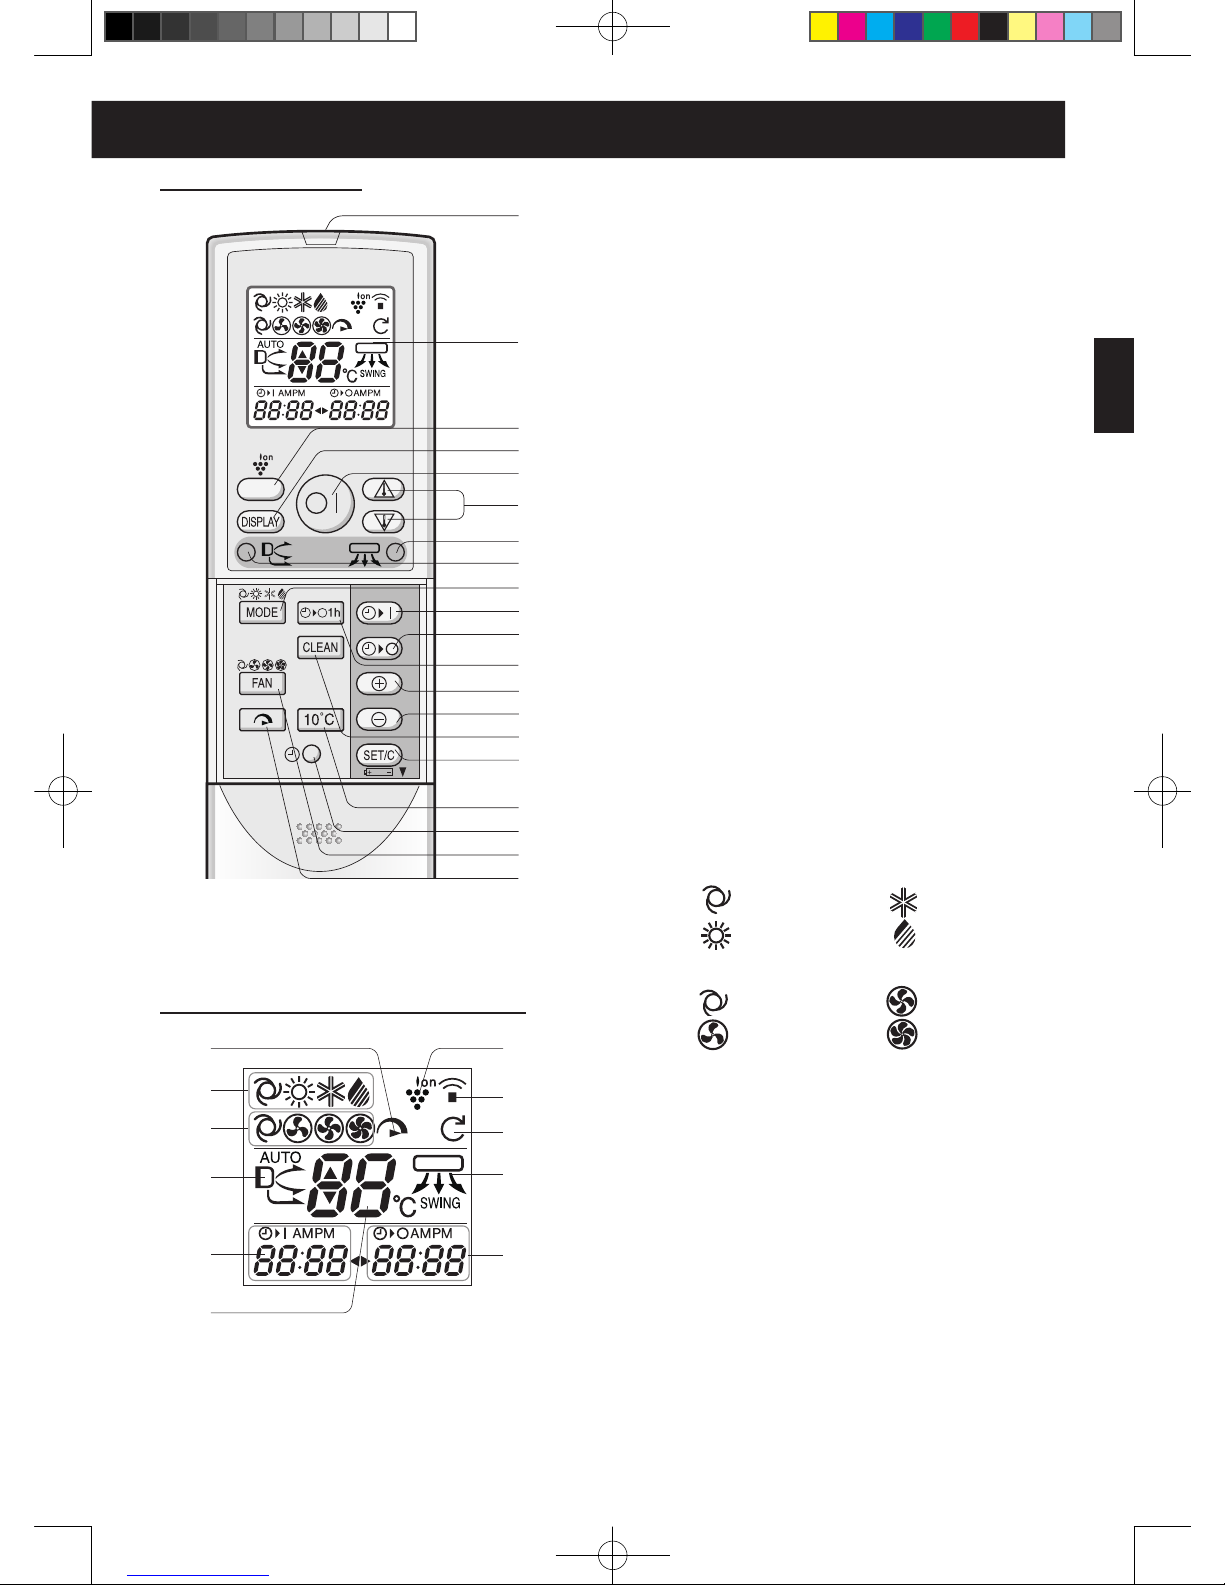
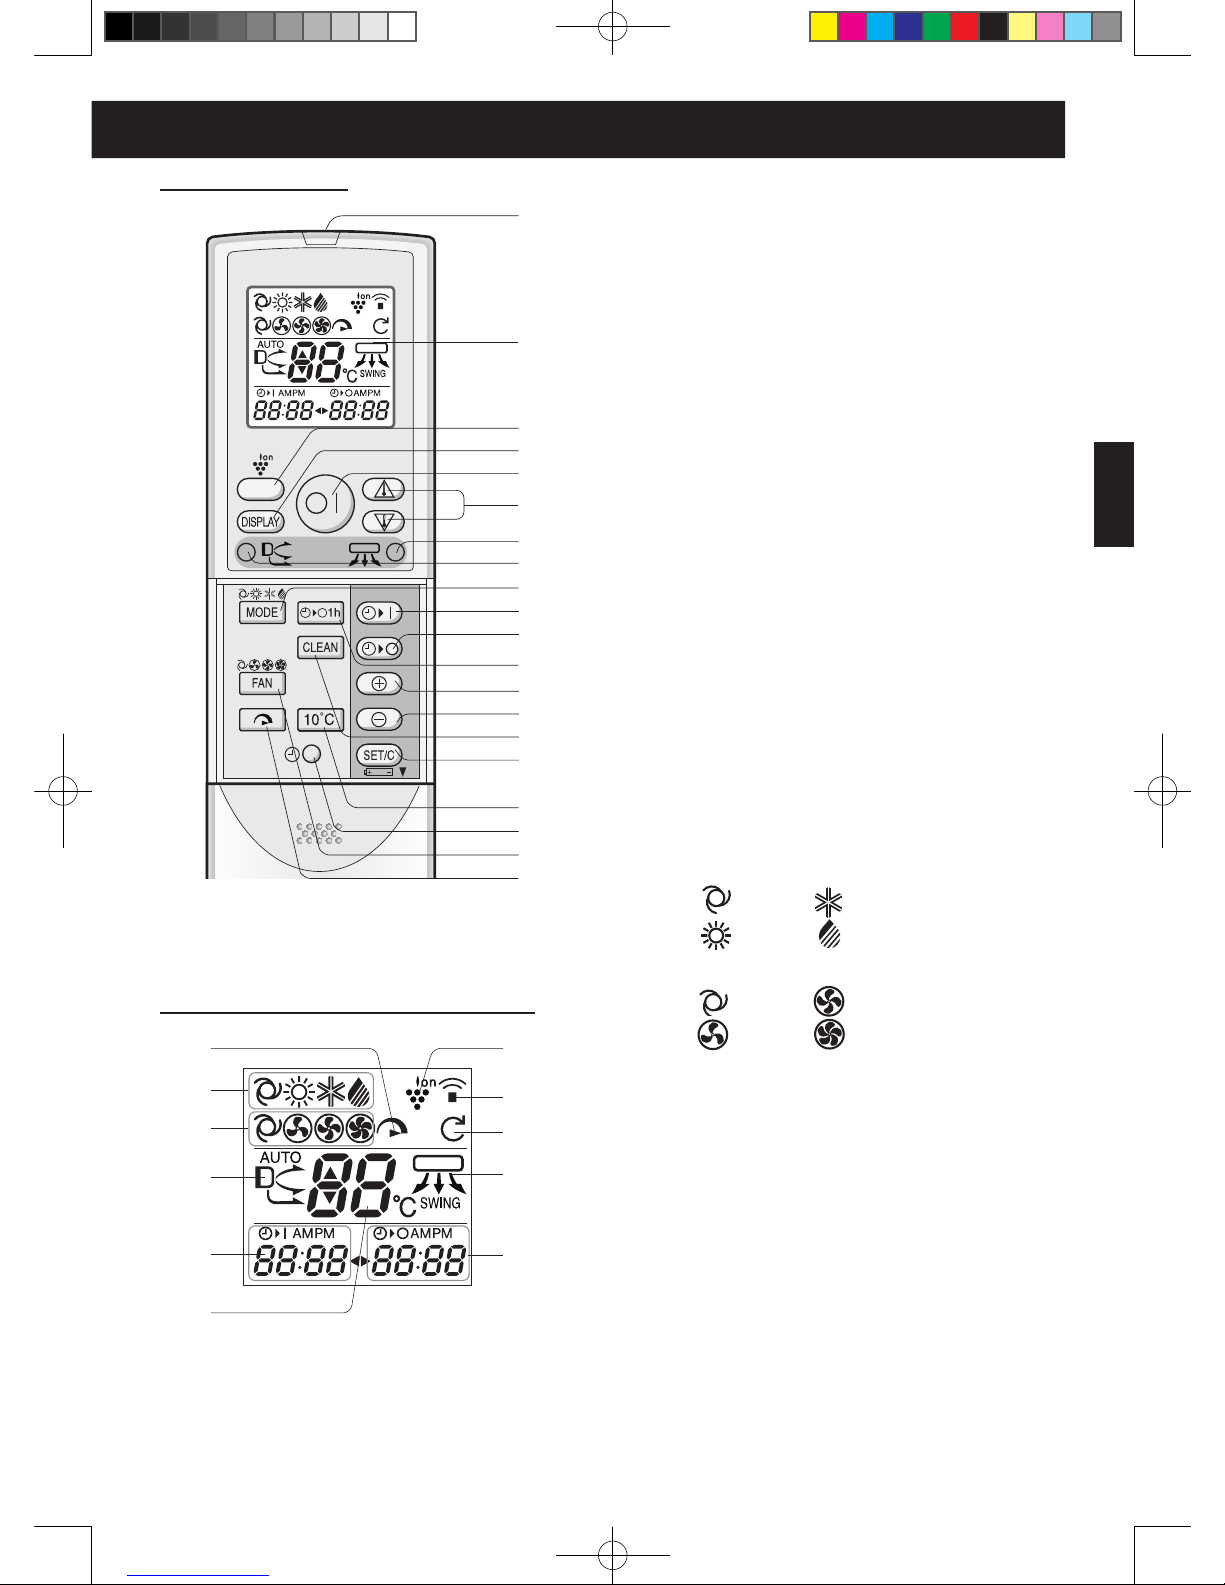
REMOTE CONTROL
1 TRANSMITTER
2 DISPLAY
3 PLASMACLUSTER Button
4 DISPLAY Button
5 ON/OFF Button
6 THERMOSTAT Button
7 HORIZONTAL AIR FLOW Button
8 VERTICAL AIR FLOW Button
9 MODE Button
10 TIMER ON Button
11 TIMER OFF Button
12 ONE-HOUR OFF TIMER Button
13 TIME ADVANCE Button
14 TIME REVERSE Button
15 SELF CLEAN Button
16 TIMER SET/CANCEL Button
17 10˚C Button
18 CLOCK Button
19 FAN Button
20 FULL POWER Button
L.C.D. REMOTE CONTROL DISPLAY
21 FULL POWER Symbol
22 MODE Symbols
: AUTO : COOL
: HEAT : DRY
23 FAN SPEED Symbols
: AUTO : LOW
: SOFT : HIGH
24 VERTICAL AIR FLOW Symbol
25 TIMER ON Indicator/CLOCK
Indicates the on timer preset time or
current time.
26 TEMPERATURE Indicator
27 PLASMACLUSTER Symbol
28 TRANSMITTING Symbol
29 SELF CLEAN Symbol
30 HORIZONTAL AIR FLOW Symbol
31 TIMER OFF Indicator
Indicates the preset time for off timer or
one-hour off timer.
1
2
3
4
5
6
7
8
9
10
11
12
13
14
15
16
17
18
19
20
21
22
23
24
25
26
27
28
29
30
31
EHP6.5_AA_multi_TINSEA825JBRZ.indd 3 2013/7/6 13:35:32
GB-4
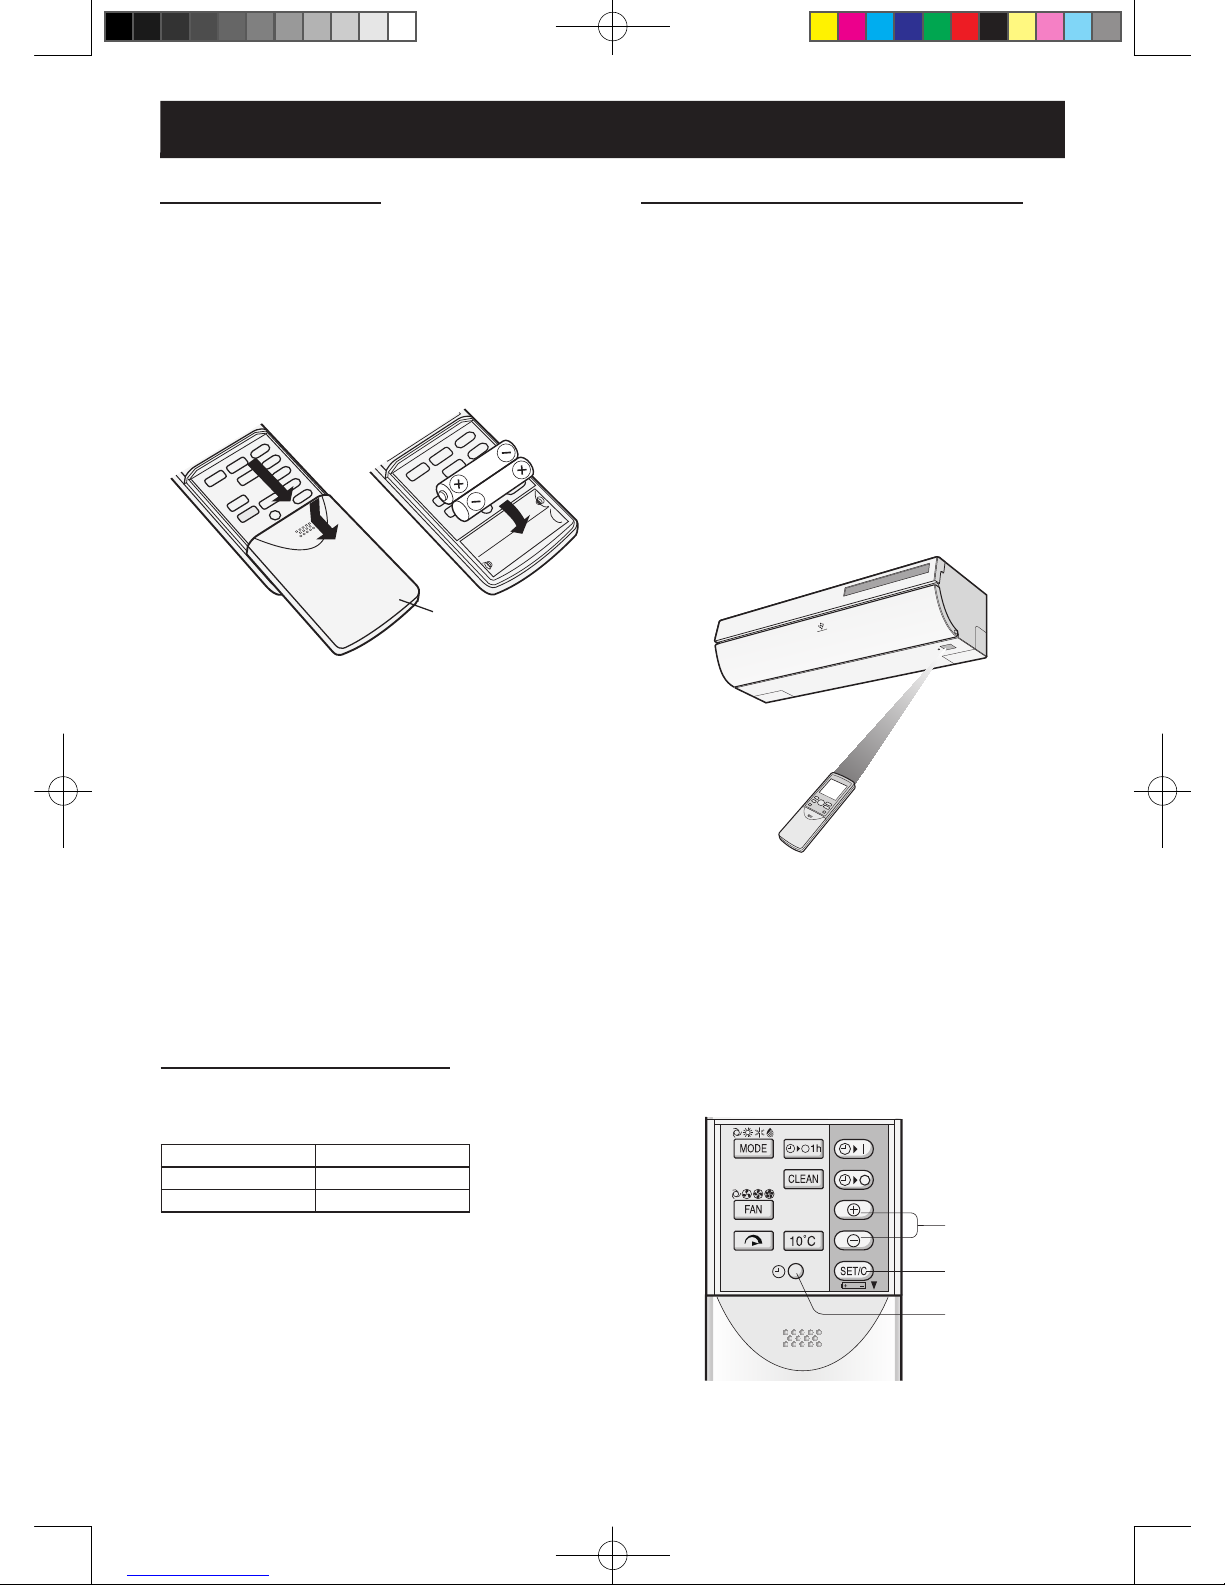
LOADING BATTERIES
Use two size-AAA (R03) batteries.
1
Remove the remote control cover.
2
Insert batteries, making sure the (+) and
(-) polarities are correctly a lign ed.
• The display indicates “AM 6:00” when batteries
are properly installed.
3
Reinstall the cover.
USING THE REMOTE CONTROL
HOW TO USE THE REMOTE CONTROL
Point the remote control towards the unit’s signal
receiver window and press the desired button. The unit
generates a beep when it receives the signal.
• Make sure there is no object between the remote
control and the unit.
• The signal effective distance is 7m.
CAUTION:
• Do not expose the receiver window to direct sunlight.
This may adversely affect its operation.
• Use of certain uorescent lamp in the same room
may interfere with transmission of the signal.
• Do not leave the remote control in direct sunlight or
near a heater. Protect the unit and remote control
from moisture and shock.
• The current time cannot be set when the timer is
operating.
Remote
control cover
SET CURRENT CLOCK TIME
There are two clock modes: 12-hour mode and 24-hour
mode.
Example:5 o’clock in the afternoon
Clock Display
12-hour mode PM 5:00
24-hour mode 17:00
1
To set to the 12-hour mode, press the
CLOCK button once.
To set to the 24-hour mode, press the
CLOCK button twice.
2
Press the TIME ADVANCE or REVERSE
button to set the current time.
• Keep the button pressed to advance or reverse
the time display quickly.
3
Press the SET/C button.
• The colon (:) blinks to indicate that the clock is
functioning.
NOTE:
• The battery life is approximately one year in normal
use.
• When you replace the batteries, always change both
batteries, and make sure they are the same type.
• If the remote control does not operate properly after
replacing the batteries, take out the batteries and
reinstall them again after 30 seconds.
• If you will not be using the unit for a long time, remove
the batteries from the remote control.
2
3
1
NOTE:
• The current time cannot be set when the timer is
operating.
EHP6.5_AA_multi_TINSEA825JBRZ.indd 4 2013/7/6 13:35:32
GB-5
ENGLISH
The air purifying lters are packed as accessory
of this unit. During operation of the air
conditioner, the lters remove dust and tobacco
smoke from the air and discharges clean air.
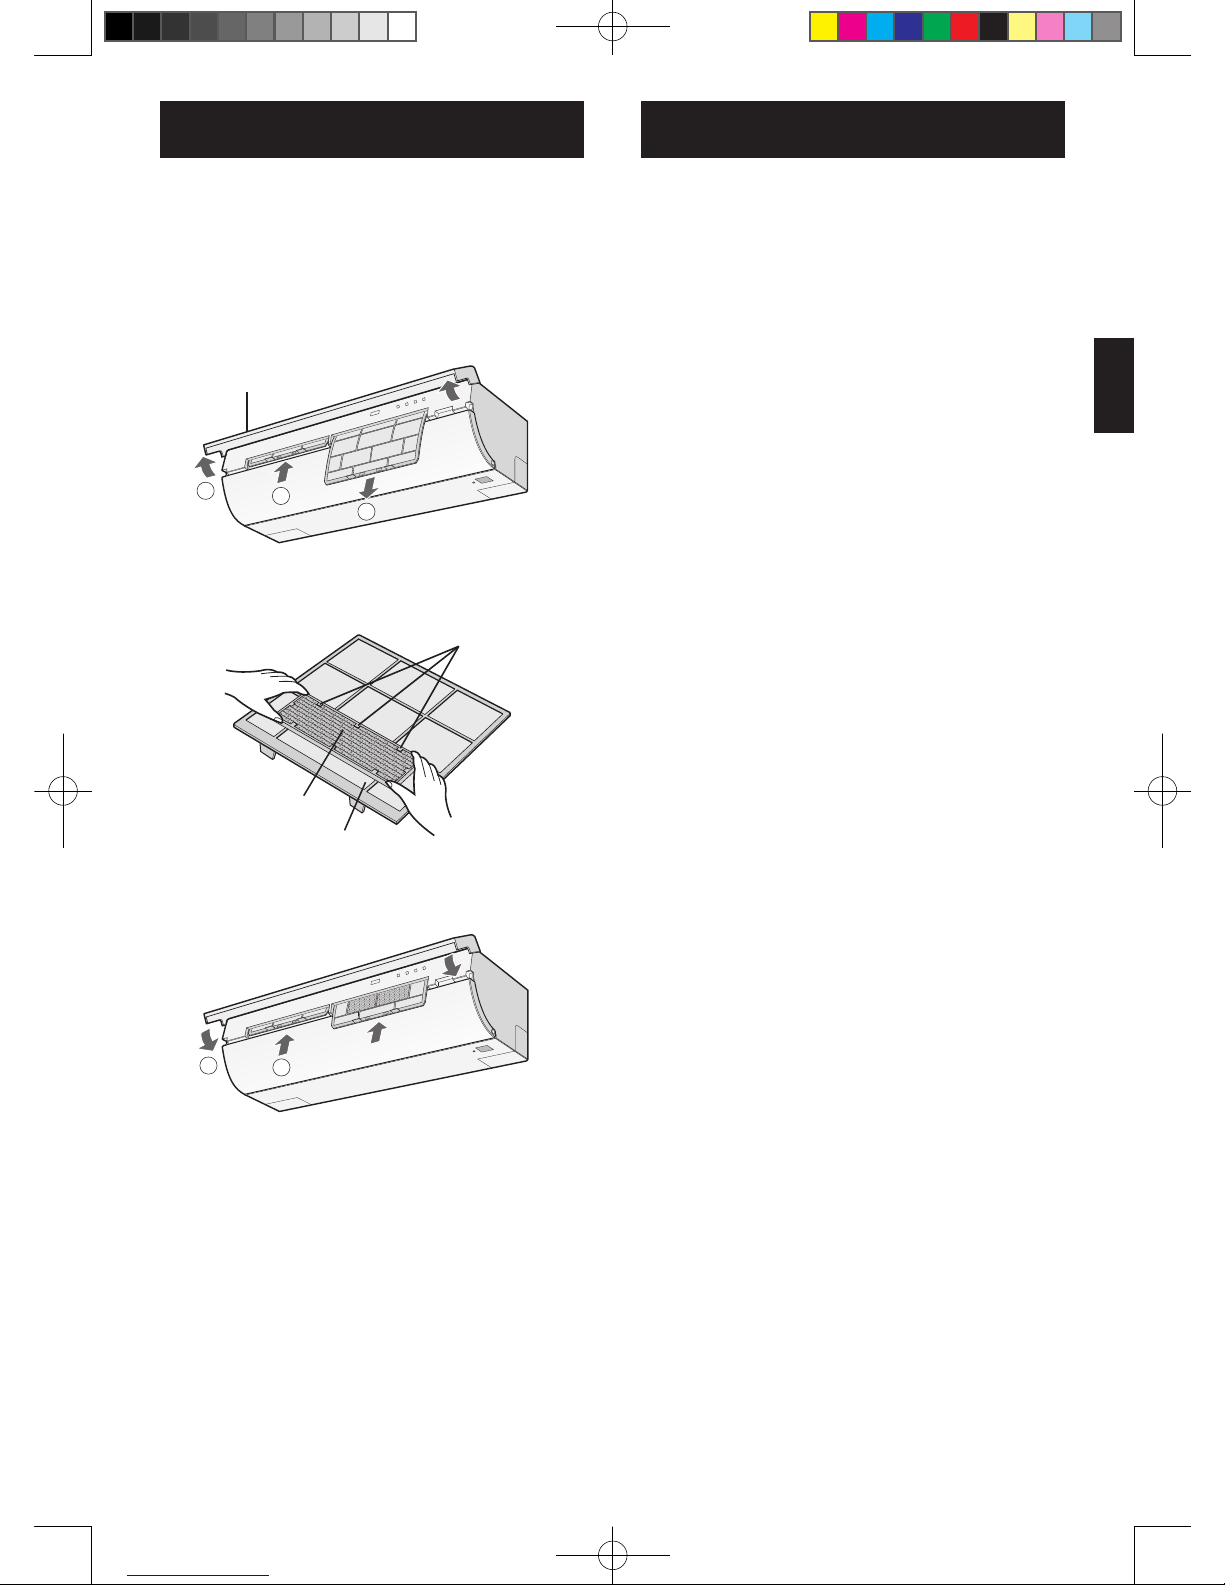
1
Take out the air lters.
1 Open the lter cover.
2 Push the air lters up slightly to unlock them.
3 Pull the air lters down to remove them.
2
Set the air purifying lter under the lter
stoppers located on the air lter.
3
Reinstall the air lters.
1 Reinstall the air lters in the original positions.
2 Close the lter cover.
Precautions:
• The lters are sealed in a plastic bag to keep their
dust collection effect.
• Do not open the bag until using the lters. (Otherwise
the lters life may get shorter.)
• Do not expose the lters to direct sunlight. (Otherwise
they may deteriorate.)
TIPS ON SAVING ENERGY
Below are some simple ways to save energy
when you use your air conditioner.
SET THE PROPER TEMPERATURE
• Setting to higher-(lower-)than-necessary temperature
point will result in increased power consumption.
BLOCK DIRECT SUNLIGHT AND PREVENT DRAFTS
• Blocking direct sunlight during cooling operation will
reduce power consumption.
• Close the windows and doors during cooling and
heating operations.
SET PROPER AIR FLOW DIRECTION TO OBTAIN
THE BEST AIR CIRCULATION
KEEP FILTER CLEAN TO ENSURE THE MOST
EFFICIENT OPERATION
MAKE MOST OF THE TIMER OFF FUNCTION
TURN OFF THE CIRCUIT BREAKER WHEN THE
UNIT IS NOT USED FOR AN EXTENDED PERIOD
OF TIME
• The unit still consumes a small amount of power
when it is not operating.
SETTING AIR PURIFYING FILTER
Filter stopper
Air purifying lter
Air lter
1
2
3
2
1
Filter cover
EHP6.5_AA_multi_TINSEA825JBRZ.indd 5 2013/7/6 13:35:32
GB-6
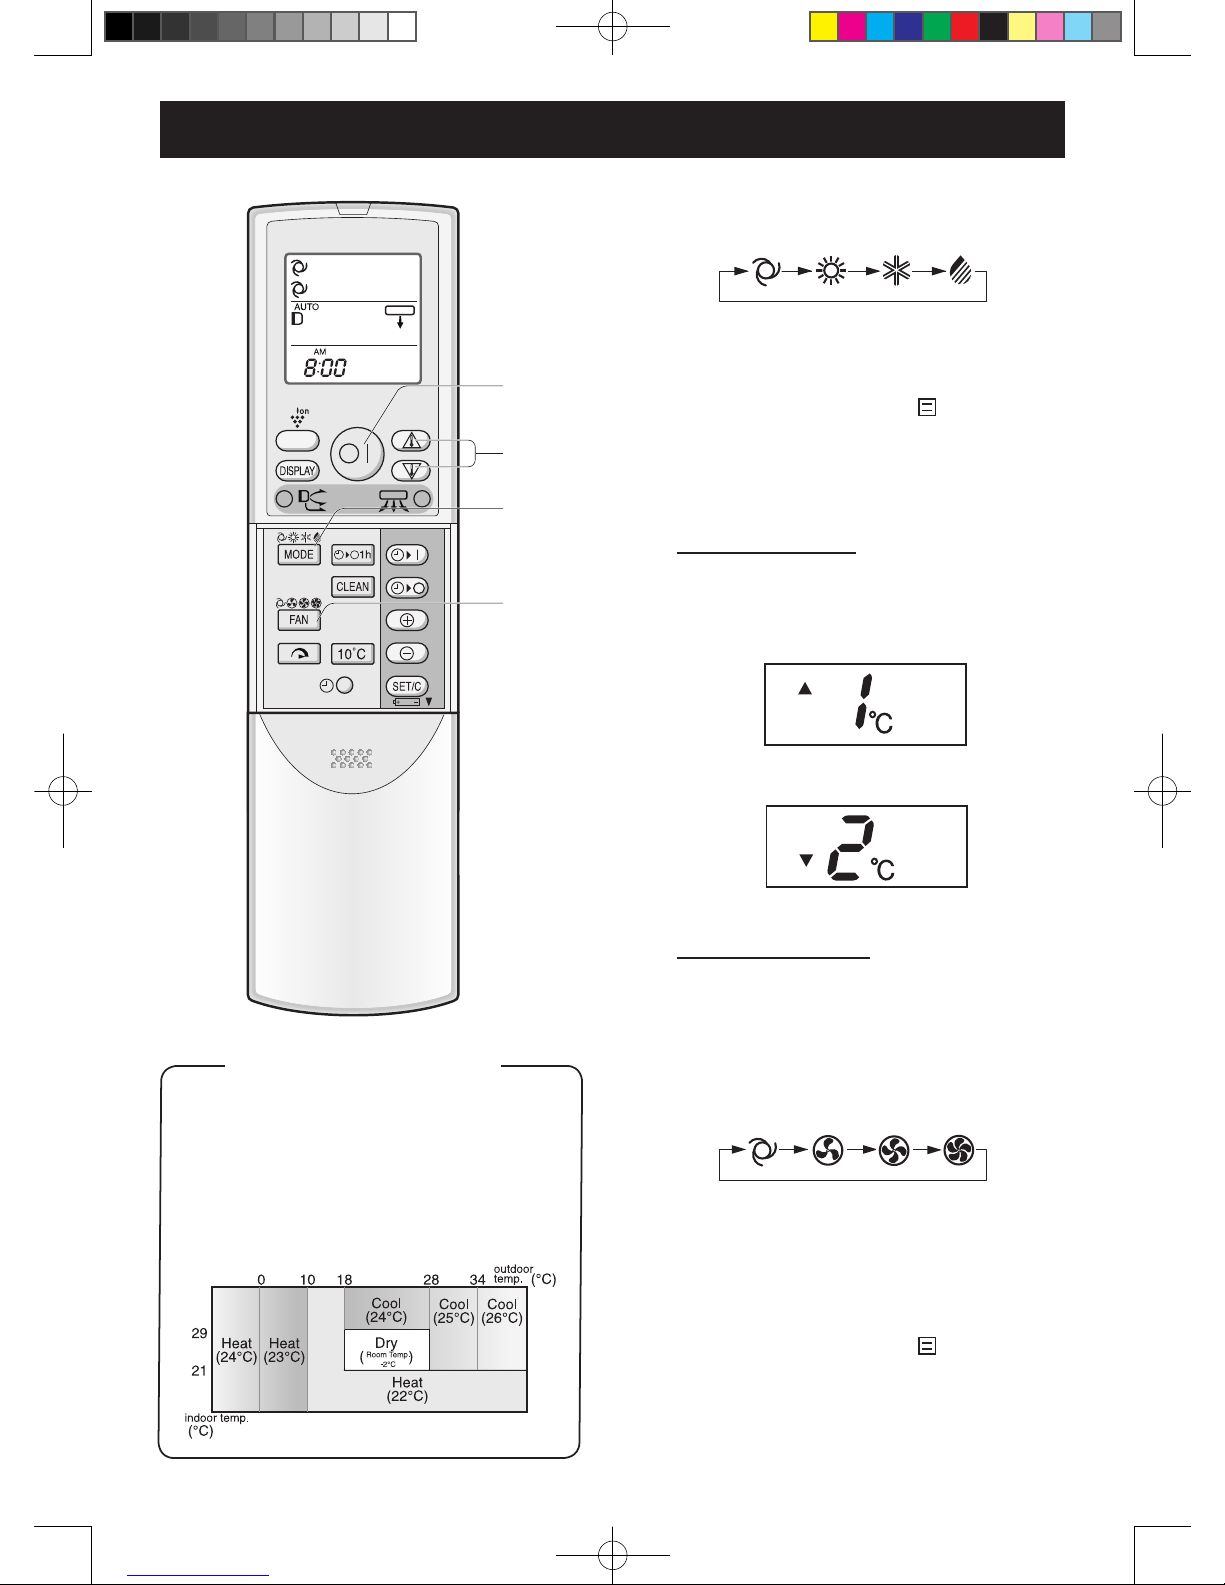
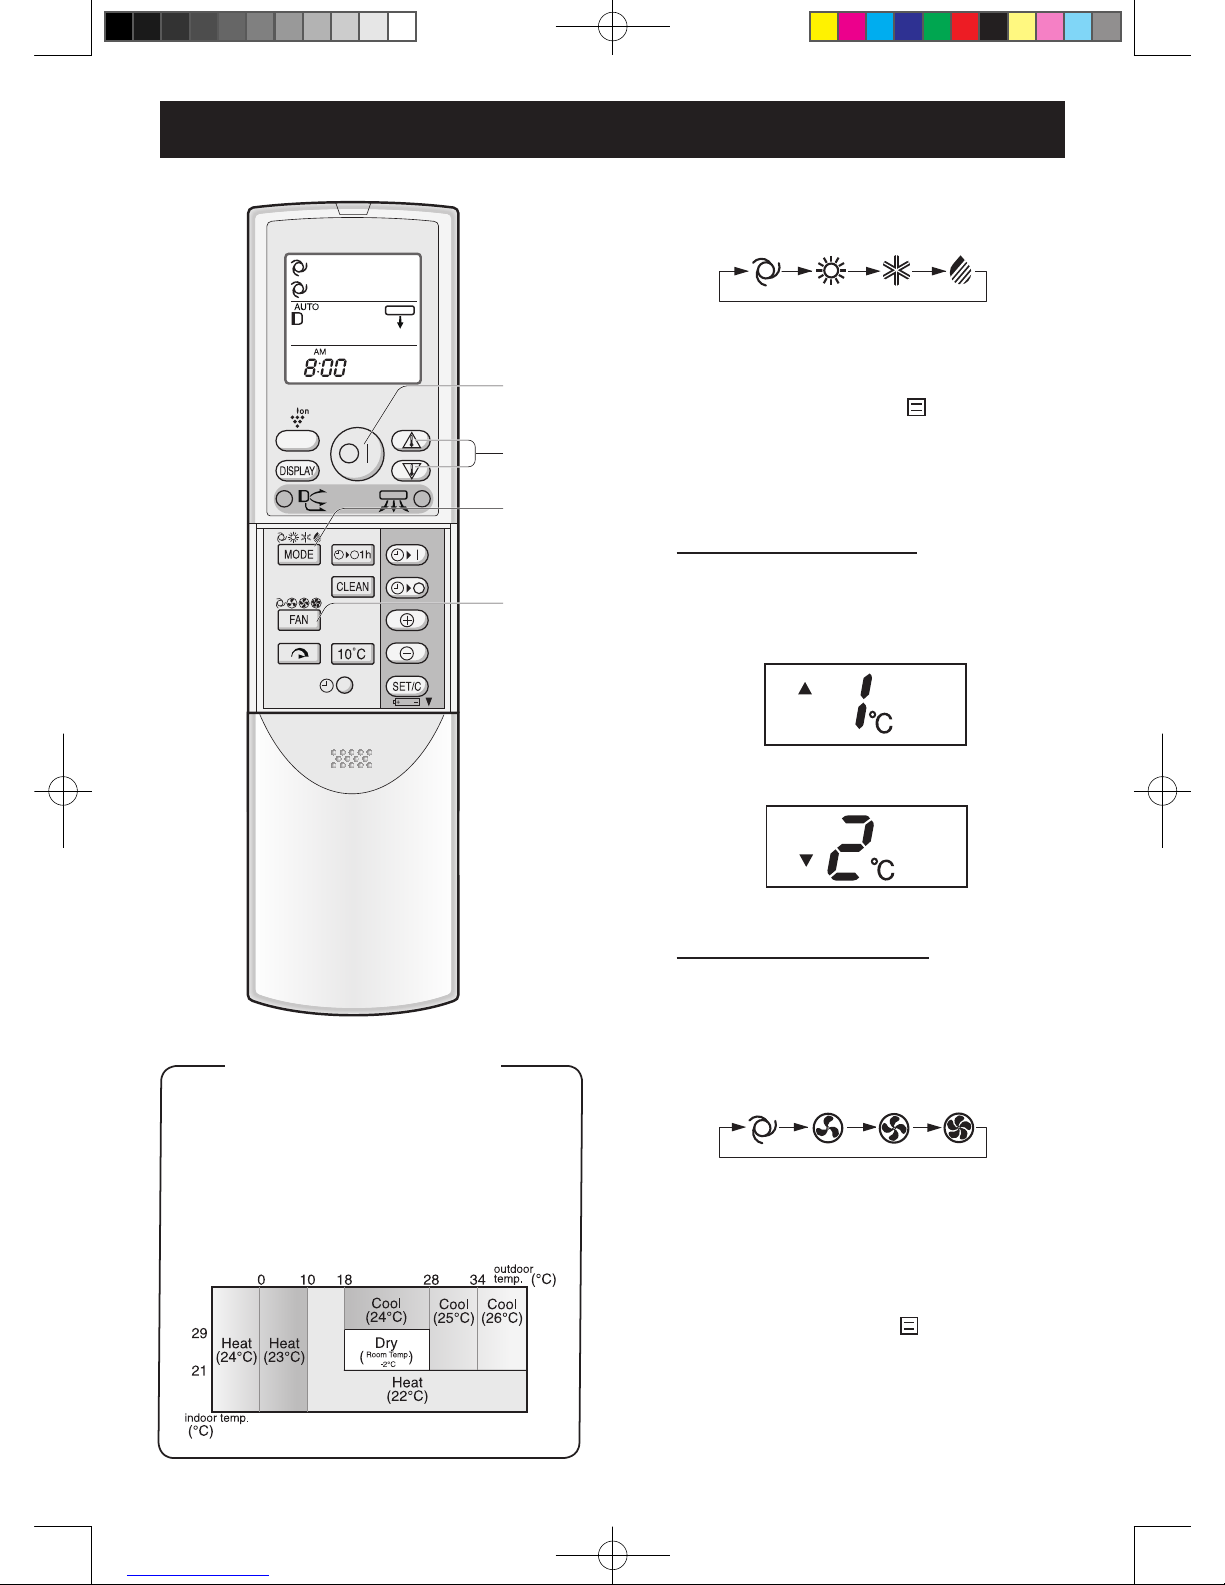
1
Press the MODE button to select the
operation mode.
AUTO HEAT COOL DRY
2
Press the ON/OFF button to start
operation.
• The red OPERATION lamp ( ) on the unit
will light.
3
Press the THERMOSTAT button to set
the desired temperature.
AUTO/DRY MODE
• The temperature can be changed up to 2°C
above or below the temperature automatically
determined by the air conditioner.
COOL/HEAT MODE
• The temperature can be set within the range
of 18 to 32°C.
4
Press the FAN button to set the desired
fan speed.
AUTO SOFT LOW HIGH
• In the DRY mode, the fan speed is preset to
AUTO and cannot be changed.
5
To turn off the unit, press the ON/OFF
button again.
• The red OPERATION lamp ( ) on the unit
will turn off.
BASIC OPERATION
(Example: 1°C higher)
(Example: 2°C lower)
2
5
3
1
4
TIPS ABOUT AUTO MODE
In the AUTO mode, the temperature setting and
mode are automatically selected according to
the room temperature and outdoor temperature
when the unit is turned on.
• During operation, if the outdoor temperature
changes, the temperature settings will automatically slide as shown in the chart.
Modes and Temperature Settings
The gures in ( ) are temperature settings
EHP6.5_AA_multi_TINSEA825JBRZ.indd 6 2013/7/6 13:35:33

GB-7
ENGLISH
TIPS ABOUT INDICATOR PANEL
The indicator panel will change each time you
press the DISPLAY button in the following manner.
NOTE:
• The displayed temperatures are rough estimates and
may vary from the actual temperatures.
•
is displayed until the temperatures are being
detected.
• Only the room temperature can be displayed for 5
seconds when the unit is not in operation.
• During SELF CLEAN operation, the indicator panel
will display remaining time of the operation. Room
and outdoor temperature will not be displayed even if
you press the DISPLAY button.
• Temperature display ranges
Room temperature
Temperature Indicator Room temperature
Above 40˚C
0˚C~40˚C
Below 0˚C
Outdoor temperature
Temperature Indicator Outdoor temperature
Above 45˚C
-19˚C~45˚C
-25˚C~-20˚C
Below -25˚C
*The minus symbol "-" is not displayed.
Outdoor Temp.Lamp lights up
The room
temperature is
displayed
.
The outdoor
temperature is
displayed.
No display.
Display button
The blue PLASMACLUSTER lamp and
the green FULL POWER lamp will also
go off.
In this operation, the air conditioner works at the
maximum power to makes the room cool or warm
rapidly.
1
Press the FULL POWER button during
operation.
• The remote control will display “ ”.
• The temperature display will go off.
• The green FULL POWER lamp (
) on
the unit will light up.
TO CANCEL
Press the FULL POWER button again.
• The green FULL POWER lamp ( ) on the unit
will turn off.
NOTE:
• You can not set the temperature or fan speed during
the FULL POWER operation.
• FULL POWER operation will be automatically
cancelled in one hour, and the unit return to the
original settings. The green FULL POWER lamp
(
) on the unit will turn off.
FULL POWER OPERATION
1
*
EHP6.5_AA_multi_TINSEA825JBRZ.indd 7 2013/7/6 13:35:33
GB-8
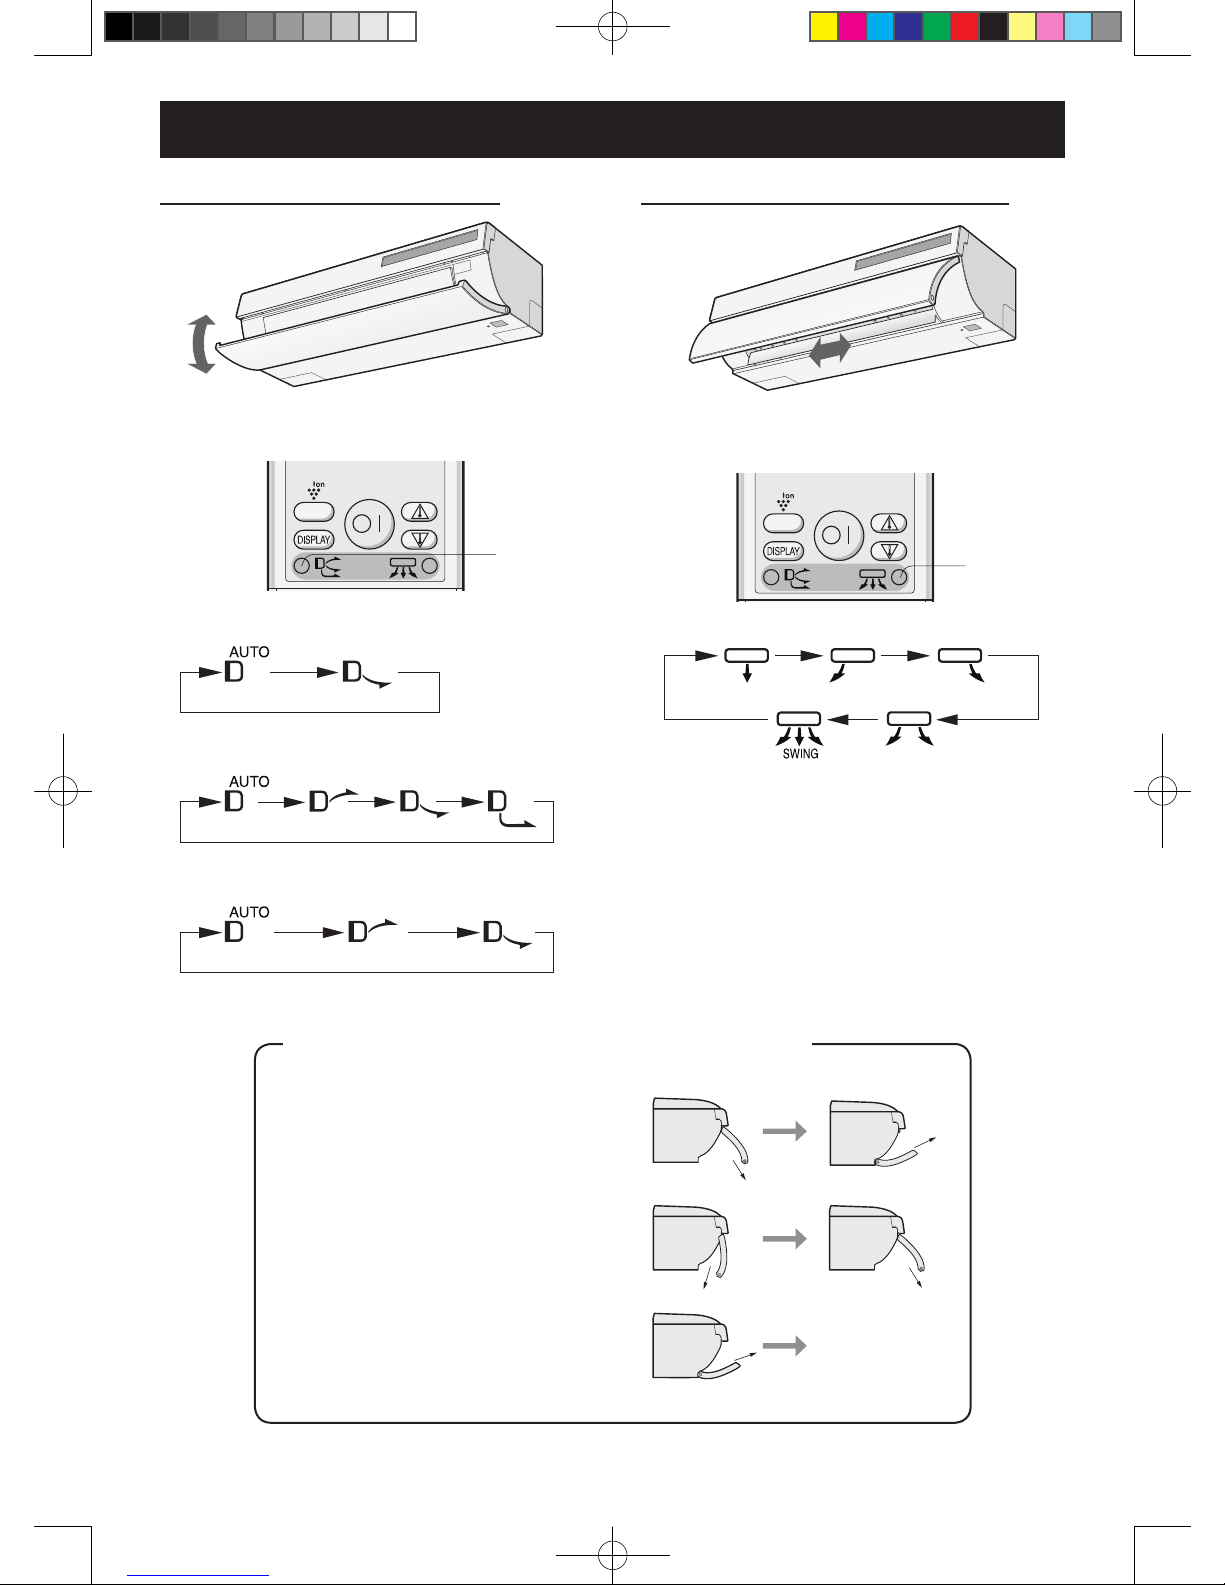
HORIZONTAL AIR FLOW DIRECTION
1
Press the HORIZONTAL AIR FLOW but-
ton to set the desired air ow direction.
CAUTION:
Never attempt to adjust the open panel and the louvres
manually.
• Manual adjustment of the open panel and the
louvres can cause the unit to malfunction.
1
ADJUSTING THE AIR FLOW DIRECTION
1
TIPS ABOUT AIR FLOW DIRECTION “AUTO“
COOL mode
The open panel will be set obliquely downward for 10 minutes, and then shift to
obliquely upward to deliver cool air to the
ceiling.
HEAT mode
The open panel will be set obliquely
backward when outlet air temperature is
low, and then shift to obliquely downward
when outlet air becomes warm.
DRY mode
The open panel will be set obliquely upward.
10 minutes later
VERTICAL AIR FLOW DIRECTION
1
Press the VERTICAL AIR FLOW button
to set the desired air ow direction.
AUTO mode
AUTO
obliquely downward
HEAT mode
AUTO obliquely upward obliquely downward downward
COOL/DRY mode
AUTO
obliquely upward obliquely downward
When outlet air
temperature is low
When outlet air
becomes warm
EHP6.5_AA_multi_TINSEA825JBRZ.indd 8 2013/7/6 13:35:33
GB-9
ENGLISH
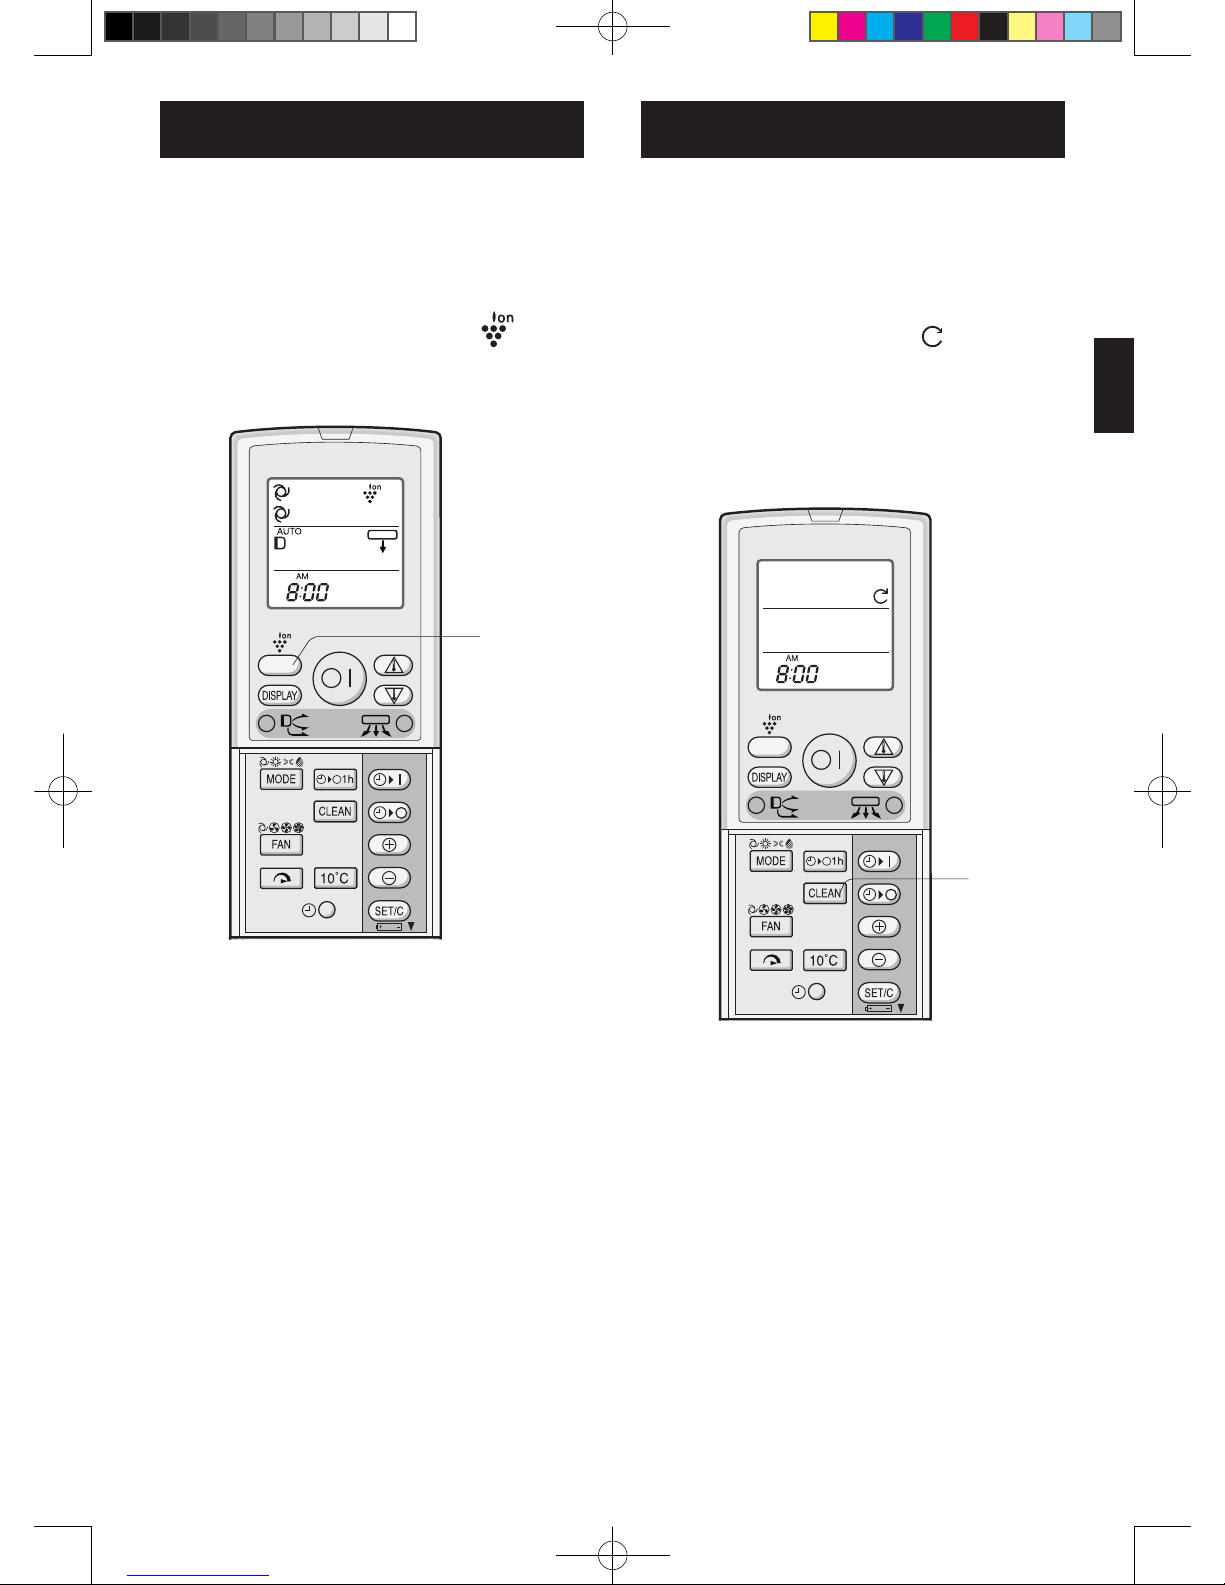
1
During operation, press the
PLASMACLUSTER button.
• The remote control will display “ ”.
• The blue PLASMACLUSTER lamp on the
unit will light up.
TO CANCEL
Press the PLASMACLUSTER button again.
• The PLASMACLUSTER lamp on the unit will turn
off.
NOTE:
• Use of the PLASMACLUSTER operation will be
memorized, and it will be activated the next time you
turn on the air conditioner.
• To perform the PLASMACLUSTER operation in fan
only mode, press the PLASMACLUSTER button
while the unit is not operating. The mode symbol of
the remote control will go off and the fan speed can
not be set AUTO.
SELF CLEAN operation will reduce the growth
mold fungus with Plasmacluster ions and dry
inside of the air conditioner unit. Utilize the
operation at seasonal change over terms.
1
Press the SELF CLEAN button when the
unit is not operating.
•
The remote control displays “ ”.
• The blue PLASMACLUSTER lamp on the unit
will light up.
• The unit will stop operation after forty minutes.
• The remaining operation time will be indicated
on the TEMPERATURE INDICATOR of the
indoor unit in minute decrements.
TO CANCEL
Press the SELF CLEAN button.
• The blue PLASMACLUSTER lamp on the unit will
turn off.
NOTE:
• You cannot set the temperature, fan speed, air ow
direction or timer setting during the SELF CLEAN
operation.
• Mold fungus already grown can not be eliminated by
this operation.
PLASMACLUSTER OPERATION
Plasmacluster ions released into the room are
effective against airborne contaminants, such as
mold, viruses, and allergens.
SELF CLEAN OPERATION
1
1
EHP6.5_AA_multi_TINSEA825JBRZ.indd 9 2013/7/6 13:35:33
GB-10
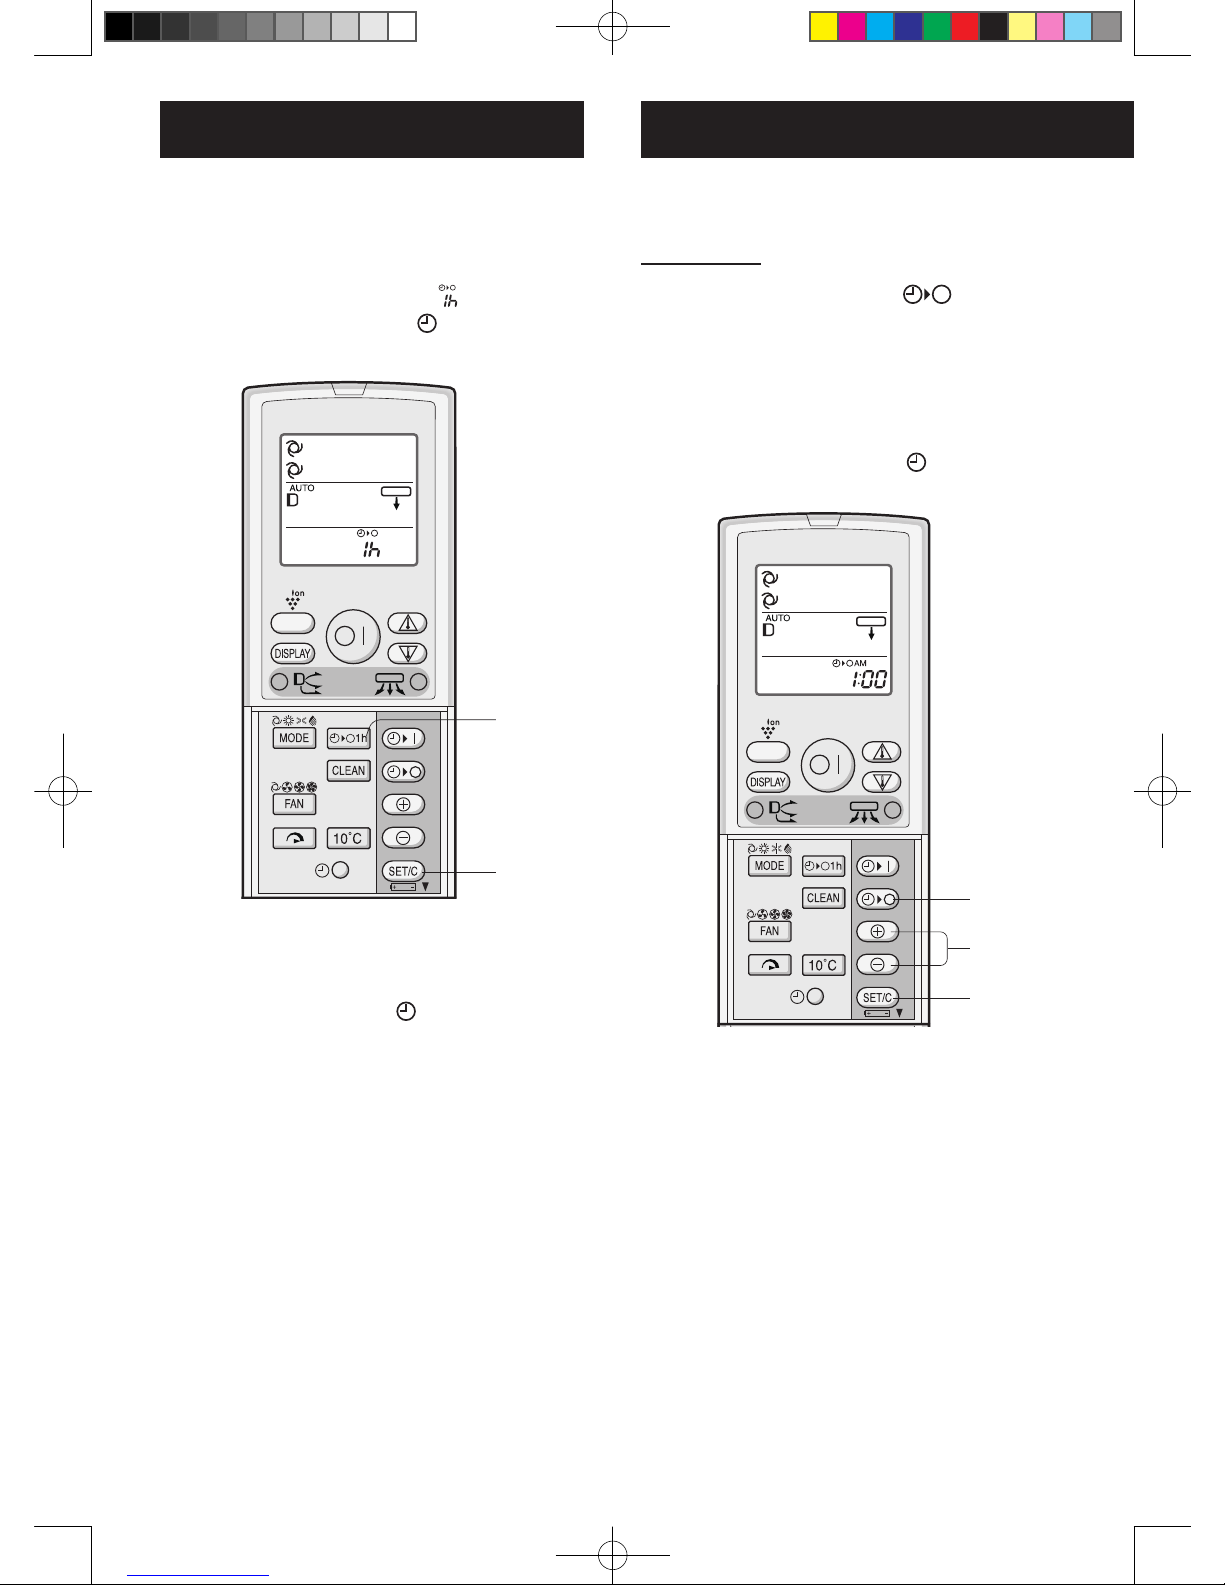
ONE-HOUR OFF TIMER
When the ONE-HOUR OFF TIMER is set, the unit
will automatically turn off after one hour.
1
Press the ONE-HOUR OFF TIMER
button.
• The remote control displays “ ”.
• The orange TIMER lamp (
) on the unit will
light up.
TO CANCEL
Press the TIMER CANCEL (SET/C) button.
• The orange TIMER lamp (
) on the unit will
turn off.
NOTE:
• The ONE-HOUR OFF TIMER operation has priority
over TIMER ON and TIMER OFF operations.
• If the ONE-HOUR OFF TIMER is set while the unit is
not operating, the unit will operate for an hour at the
formerly set condition.
• If you wish to operate the unit for another hour before
the ONE-HOUR OFF TIMER is activated, press
the ONE-HOUR OFF TIMER button again during
operation.
• If TIMER ON and/or TIMER OFF are set, TIMER
CANCEL button cancels every setting.
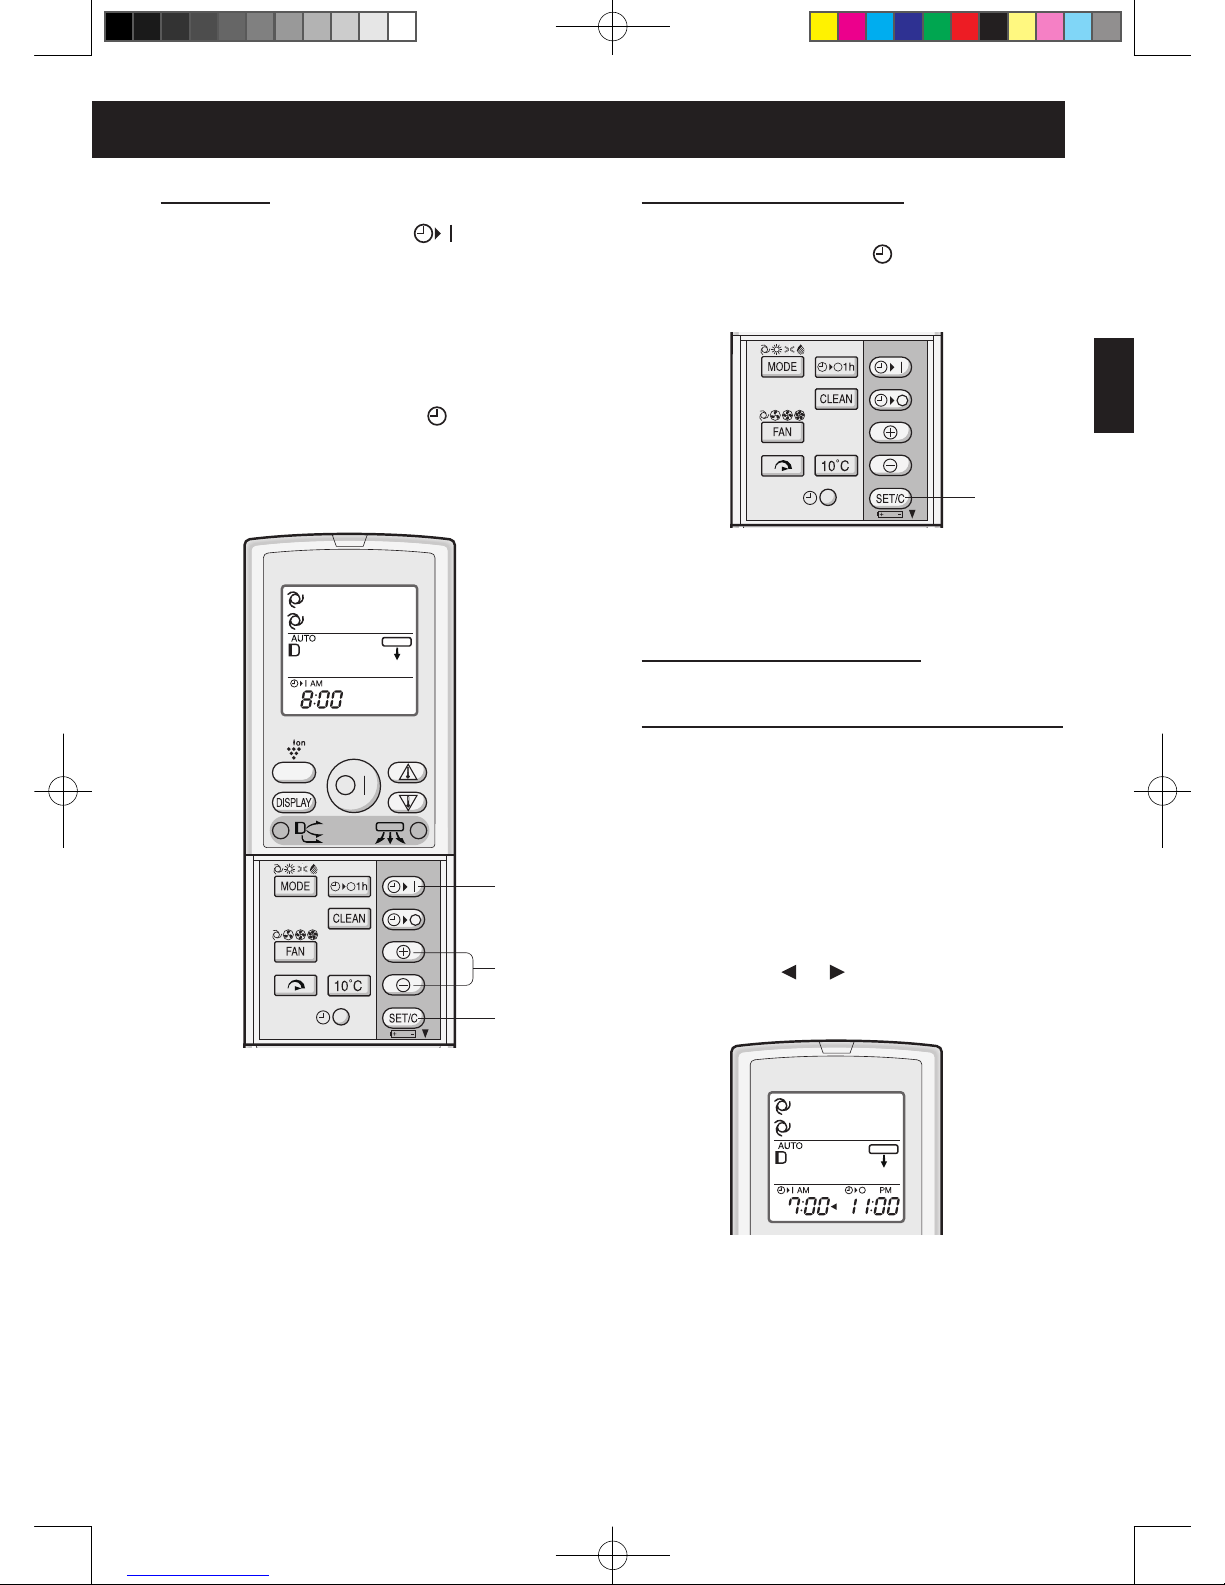
TIMER OPERATION
TIMER OFF
1
Press the TIMER OFF ( ) button.
2
The TIMER OFF indicator will blink;
press the TIME ADVANCE or REVERSE
button to set the desired time.
(The time can be set in 10-minute increments.)
3
Press the TIMER SET (SET/C) button.
• The orange TIMER lamp ( ) on the unit will
light.
TIPS ABOUT TIMER OFF OPERATION
When the TIMER OFF mode is set, the temperature
setting is automatically adjusted to prevent the room
from be coming excessively warm or cool, for example
while you sleep. (Auto Sleep function)
COOL/DRY MODE:
• One hour after the time operation begins, the
temperature setting rises 1°C higher than the original
temperature setting.
HEAT MODE:
• One hour after the timer operation begins, the
temperature setting drops 3°C lower than the original
temperature setting.
1
2
3
1
CANCEL
Before setting the timer,make sure the clock is
properly set with the current time.
EHP6.5_AA_multi_TINSEA825JBRZ.indd 10 2013/7/6 13:35:34
GB-11
ENGLISH
TIMER ON
1
Press the TIMER ON ( ) button.
2
The TIMER ON indicator will blink;
press the TIME ADVANCE or REVERSE
button to set the desired time
.
(The time can be set in 10-minute increments.)
3
Press the TIMER SET (SET/C) button.
• The orange TIMER lamp ( ) on the unit will
light.
4
Select the operation condition.
NOTE:
• The unit will turn on prior to the set time to allow
the room to reach the desired temperature by the
programmed time. (Awaking function)
COMBINED USE OF ON AND OFF TIMERS
You can use the ON and OFF timers in
combination.
Example:
To stop operation at 11:00 p.m. and resume operation
to bring the room temperature to the desired level by
7:00 a.m.
1
Set the TIMER OFF to 11:00 p.m. during
operation.
2
Set the TIMER ON to 7:00 a.m.
The arrow ( or ) between the TIMER ON
indicator and the TIMER OFF indicator shows
which timer will activate rst.
NOTE:
• You cannot programmed the ON-TIMER and OFFTIMER to operate the unit at different temperatures
or other settings.
• Either timer can be programmed to activate prior the
other.
TO CANCEL TIMER MODE
Press the TIMER CANCEL (SET/C) button.
• The orange TIMER lamp ( ) on the unit will turn
off.
•
The current clock time will be displayed on the remote
control.
NOTE:
• If any TIMER ON, TIMER OFF and ONE-HOUR OFF
TIMER are set, the TIMER CANCEL button cancels
all settings.
TO CHANGE TIME SETTING
Cancel the TIMER setting rst, then set it again.
1
2
3
CANCEL
EHP6.5_AA_multi_TINSEA825JBRZ.indd 11 2013/7/6 13:35:34

GB-12
10˚C OPERATION
Heating operation with 10˚C set temperature will be
performed.
1
Press the MODE button and select HEAT
mode.
2
Press the ON/OFF button to start HEAT
operation.
3
Press the 10˚C button.
• The remote control will display “ 10˚C ”.
TO CANCEL
Press the 10˚C button again.
NOTE:
• 10˚C operation will not be available with heating
operation automatically selected by AUTO mode.
1
2
3
AUXILIARY MODE
Use this mode when the remote control is not
available.
TO TURN ON
Press the AUX button.
• The red OPERATION lamp ( ) on the unit will light
and the unit will start operating in the AUTO mode.
• The fan speed and temperature setting are set to
AUTO.
TO TURN OFF
Press the AUX button again.
• The red OPERATION lamp ( ) on the unit will turn
off.
AUX
EHP6.5_AA_multi_TINSEA825JBRZ.indd 12 2013/7/6 13:35:34
GB-13
ENGLISH
CLEANING THE UNIT AND THE REMOTE
CONTROL
• Wipe them with a soft cloth.
• Do not directly splash or pour water on them. It can
cause electrical shock or equipment damage.
• Do not use hot water, thinner, abrasive powders or
strong solvents.
MAINTENANCE
BEFORE PERFORMING MAINTENANCE
Be sure to turn off the circuit breaker before performing
any maintenance.
1
Turn off the unit.
2
Wait 15 seconds or more after the open
panel is completely closed, and turn off
the circuit breaker.
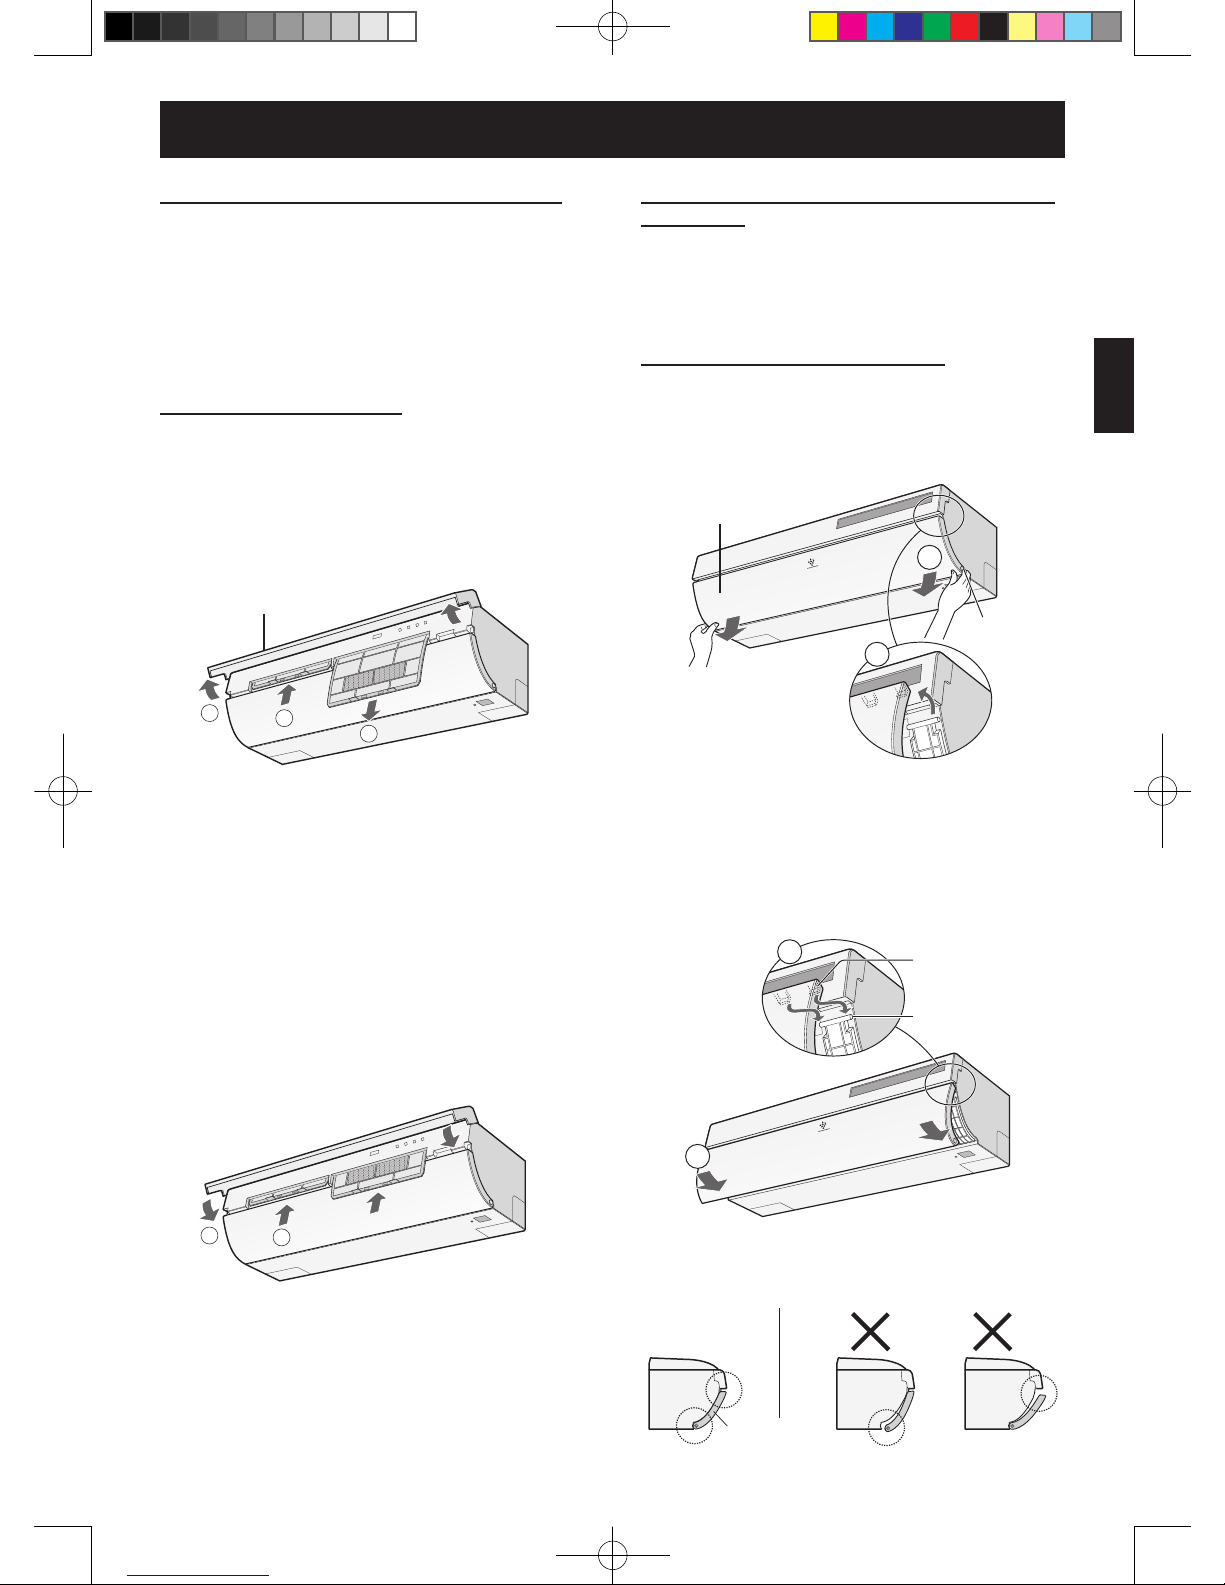
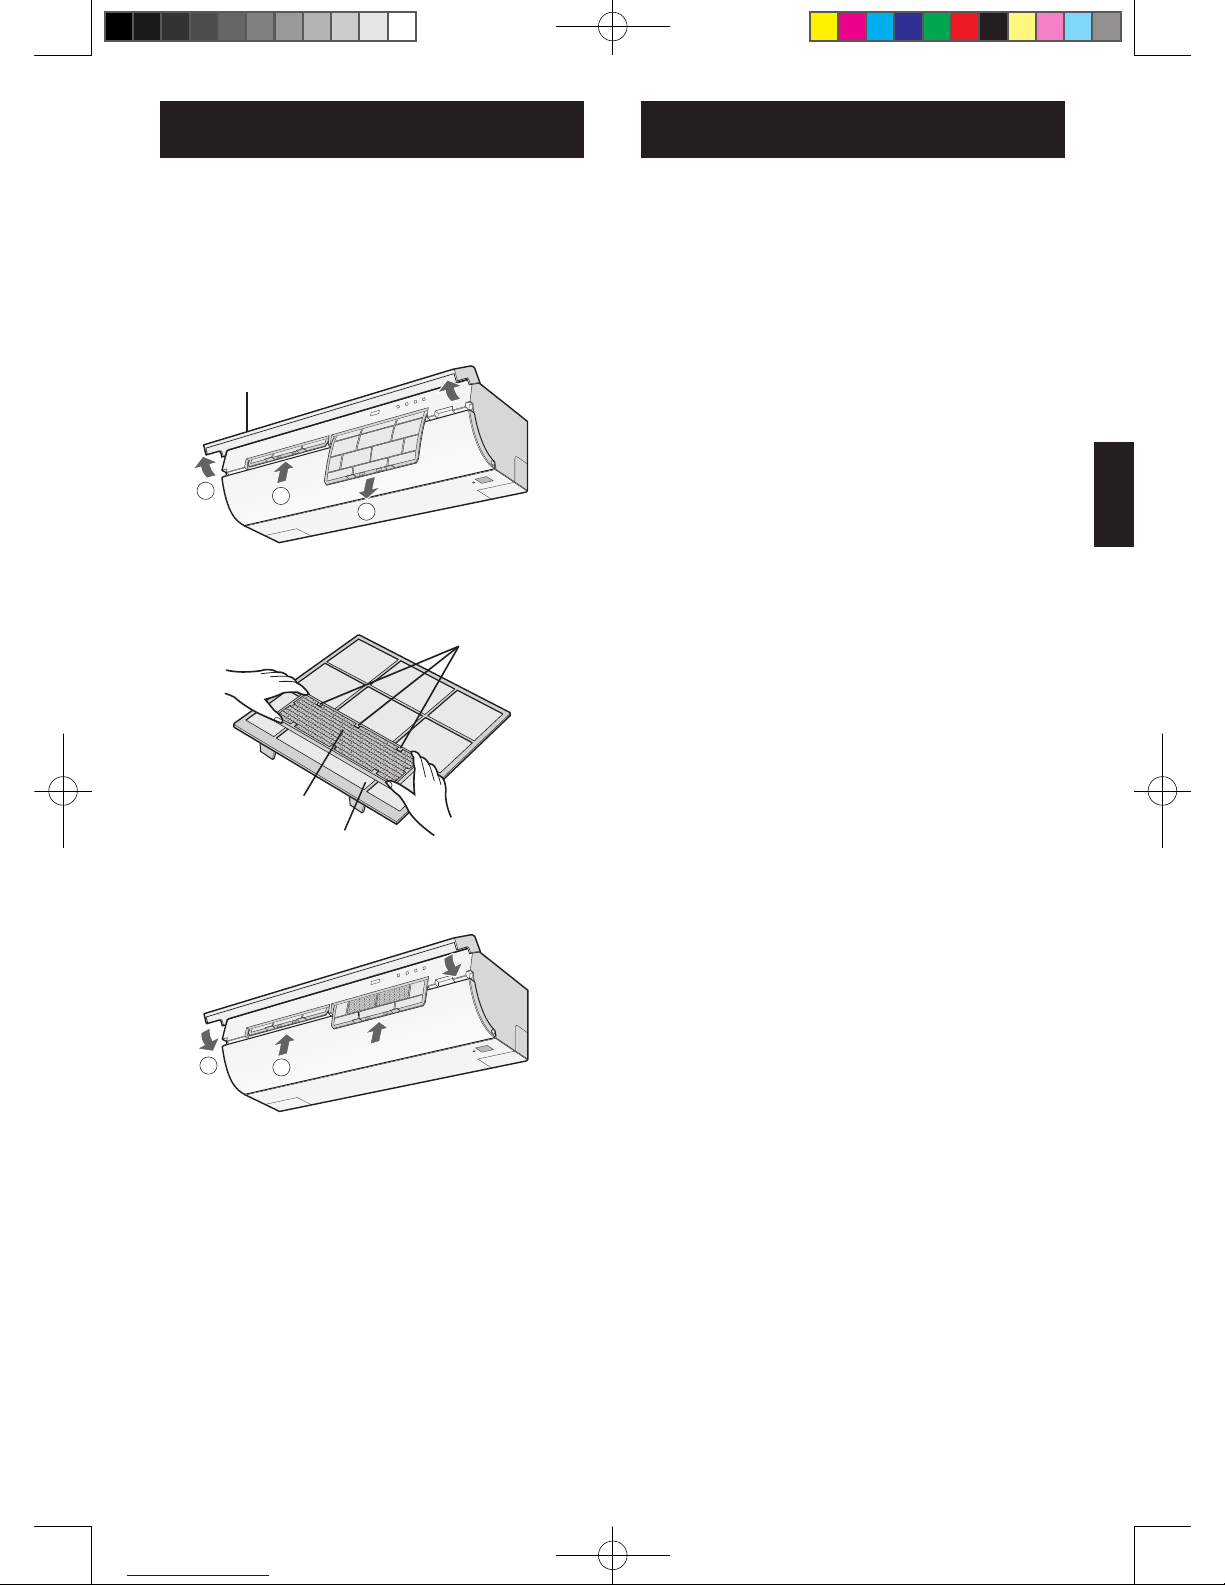
CLEANING THE FILTERS
The air lters should be cleaned every two weeks.
1
Turn off the unit.
2
Remove the lters.
1 Lift the lter cover.
2 Push the air lters up slightly to unlock them.
3 Pull the air lters down to remove them.
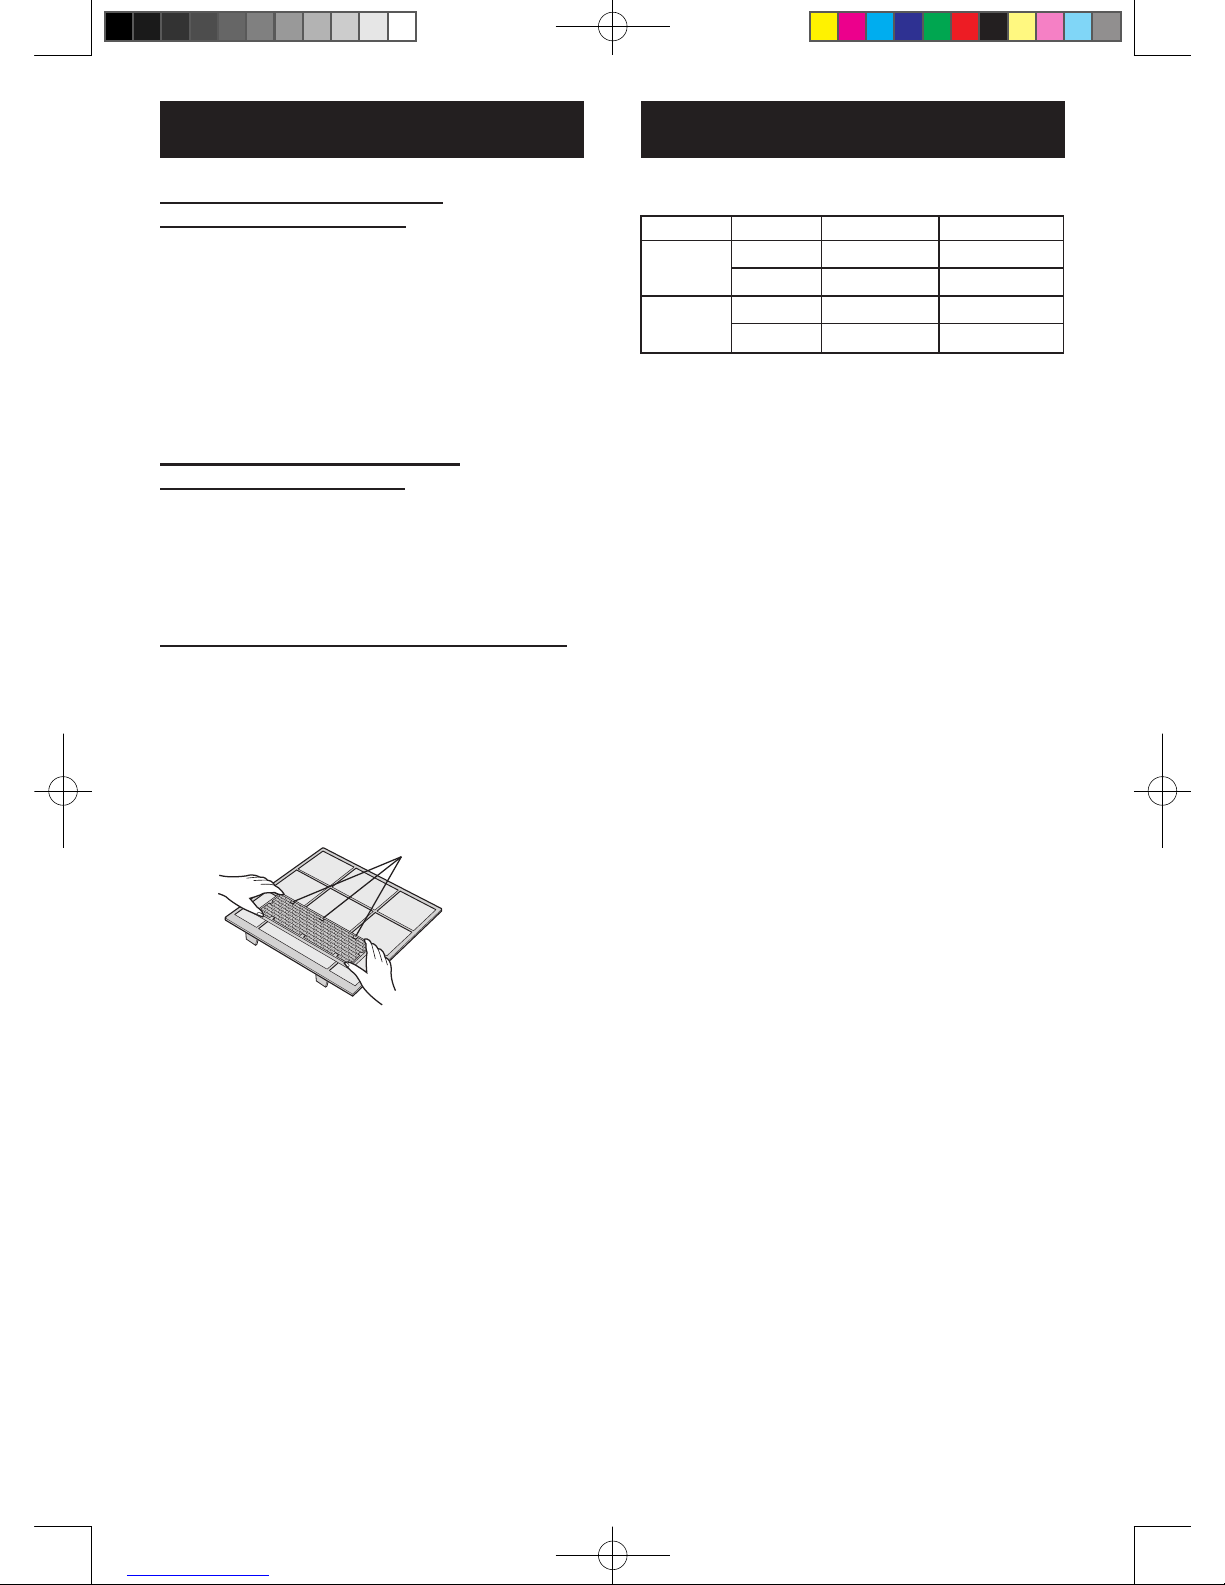
3
Take off the air purifying lters from the
air lters.
4
Clean the lters.
Use a vacuum cleaner to remove dust. If the
lters are dirty, wash them with warm water and
a mild detergent. Dry lters in the shade before
reinstalling.
5
Reinstall the air purifying lters.
6
Reinstall the lters.
1 Reinstall the lters in the original positions.
2 Close the lter cover.
2
1
1
2
3
2
1
1
2
Filter cover
Open panel
REMOVING THE OPEN PANEL
The open panel can be removed for cleaning.
1
Push the release button and open the
lower part of the open panel.
2
Lift the open panel up slightly and
remove it.
ATTACHMENT
1
Hook both tabs on the shaft.
There is a shaft on each end of the unit.
2
Close the open panel.
Push the arrow-marked points on the open
panel until it clicks.
After attachment, be sure to close the open panel
rmly.
Tab
Shaft
Open panel
Release
button
Acceptable
Unacceptable
EHP6.5_AA_multi_TINSEA825JBRZ.indd 13 2013/7/6 13:35:34
GB-14
INDOOR TEMP. OUTDOOR TEMP.
COOLING
upper limit 32˚C 43˚C
lower limit 21˚C –10˚C
HEATING
upper limit 27˚C 24˚C
lower limit – –20˚C
• The built-in protective device may prevent the unit
from operating when used out of this range.
• Condensation may form on the air outlet if the unit
operates continuously in the COOL or DRY mode
when humidity is over 80 percent.
WHEN POWER FAILURE OCCURS
This air conditioner has a memory function to store
settings when a power failure occurs.
After power recovery, the unit will automatically
re-start in the same settings which were active before
the power failure, except for timer settings.
If the timers were set before a power failure, they will
need to be re-set after power recovery.
PREHEATING FUNCTION
In the HEAT operation, the indoor fan may not start for
two to ve minutes after the unit is turned on to prevent
cold air from blowing out of the unit.
DE-ICING FUNCTION
• When ice forms on the heat exchanger in the outdoor
unit during the HEAT operation, an automatic de-icer
provides heat for about 5 to 10 minutes to remove
the ice. During de-icing, the inside and outside fans
stop operating.
• After de-icing is completed, the unit automatically
resumes operation in the HEAT mode.
HEATING EFFICIENCY
• The unit employs a heat pump that draws heat from
the outside air and releases it into the room. The
outside air temperature therefore greatly affects the
heating efciency.
• If the heating efciency is reduced due to low outside
temperatures, use an additional heater.
• It takes time to warm up and heat the entire room
because of the forced air circulation system.
ADDITIONAL NOTES ON OPERATION
OPERATING TEMPERATURE RANGE
MAINTENANCE
MAINTENANCE AFTER AIR
CONDITIONER SEASON
1
Operate the unit in the SELF CLEAN
operation to allow the mechanism to
thoroughly dry.
2
Stop the operation and unplug the unit.
Turn off the circuit breaker, if you have
one exclusively for the air conditioner.
3
Clean the lters, then reinstall them.
MAINTENANCE BEFORE AIR
CONDITIONER SEASON
1
Make sure that the air filters are not
dirty.
2
Make sure that nothing obstructs the air
inlet or outlet.
CHANGING THE AIR PURIFYING FILTER
The lters should be changed every 3 ~ 6 months.
1
Remove the air lters.
2
Change the air purifying lters.
1 Take off the old air purifying lters from the air
lters.
2 Set the new air purifying lters, under the lter
stoppers located on the air lters.
3
Reinstall the air lters.
NOTE:
• The dirty air purifying lters are not washable for
reuse. The new lters are available at your nearest
dealer.
Disposal of Filters
Please dispose of replaced lters according to the local
disposal laws and regulations.
AIR PURIFYING lter materials
Filter:Polypropylene
Frame:Polyester
Filter stopper
EHP6.5_AA_multi_TINSEA825JBRZ.indd 14 2013/7/6 13:35:34
GB-15
ENGLISH
BEFORE CALLING FOR SERVICE
The following conditions do not denote equipment malfunctions
UNIT DOES NOT OPERATE
The unit will not operate if it is turned on immediately
after it is turned off. The unit will not operate
immediately after the mode is changed. This is to
protect the unit. Wait 3 minutes before operating the
unit.
UNIT DOES NOT SEND OUT WARM AIR
The unit is preheating or de-icing.
ODORS
Carpet and furniture odors that entered into the unit
may be sent out from the unit.
CRACKING NOISE
This sound is generated by the friction of the unit
expanding or connecting due to a temperature change.
A LOW BUZZING NOISE
This is a sound of the unit generating Plasmacluster
ions
.
SWISHING NOISE
The soft, swishing noise is the sound of the refrigerant
owing inside the unit.
MIST SEEN AT INDOOR AIR OUTLET
In cooling operation, this is caused by the difference
between the room air temperature and the air
discharged.
WATER VAPOUR
In heating operation, water vapour may ow out of the
outdoor unit during de-icing.
THE OUTDOOR UNIT DOES NOT STOP
After stopping the operation, the outdoor unit will rotate
its' fan for about a minute to cool down the unit.
ODOR EMITTED FROM THE PLASMACLUSTER
AIR OUTLET
This is the smell of ozone generated from the
Plasmacluster Ion generator. The ozone concentration
is very small, posing no adverse effect on your health.
The ozone discharged into the air rapidly decomposes,
and its density in the room will not increase.
Check the following points before calling for
service.
IF THE UNIT FAILS TO OPERATE
Check if the circuit breaker has tripped or the fuse has
blown.
IF THE UNIT FAILS TO HEAT (OR COOL) THE
ROOM EFFECTIVELY
• Check the lters. If dirty, clean them.
• Check the outdoor unit to make sure nothing is
blocking the air inlet or outlet.
• Check the thermostat is proper setting.
• Make sure windows and doors are closed tightly.
IF THE UNIT FAILS TO RECEIVE THE REMOTE
CONTROL SIGNAL
• Check whether the remote control batteries have
become old and weak.
• Try to send the signal again with the remote control
pointed properly towards the unit’s signal receiver
window.
• Check whether the remote control batteries are
installed properly.
Please call for service when TEMPERATURE
INDICATOR on the indicator panel blink.
The Nordic ECO Label
N
O
R
D
I
C
E
C
O
L
A
B
E
L
359001
The heat pump is tested and approved for Swan label
in zone 1-2 (climate zones with an annual mean temperature of <15 ° C) in Europe.
EHP6.5_AA_multi_TINSEA825JBRZ.indd 15 2013/7/6 13:35:34
Merk: Produktet ditt
er merket med dette
symbolet. Det betyr at
brukte elektriske og
elektroniske produkter
ikke skal blandes med
vanlig husholdningsav
fall. Det nnes et separat innsamlingssystem
for disse produktene.
A. Informasjon om Avfallsinnsamling for brukere (private husholdninger)
1. Innenfor EU
Merk: Hvis du ønsker å kaste dette utstyret skal det ikke gjøres sammen med det
vanlige husholdningsavfallet!
Brukt elektrisk og elektronisk utstyr skal behandles separat og i henhold til lovgivning
som krever riktig behandling, gjenvinning og gjenbruk av brukt elektrisk og elektronisk utstyr.
Etter at det er implementert av medlemsstater, kan private husholdninger i EU-landene levere inn brukt elektrisk og elektronisk utstyr til etablerte oppsamlingsplasser
uten kostnad*. I enkelte land* vil forhandleren din ta ditt gamle produkt i retur uten
kostnad hvis du kjøper et tilsvarende nytt produkt.
*) Ta kontakt med dine lokale myndigheter for ere detaljer.
Hvis det brukte elektriske eller elektroniske utstyret har batterier eller akkumulatorer
skal disse leveres inn separat i henhold til lokale regelverk.
Ved å avfallssortere dette produktet på riktig måte hjelper du oss å sikre at avfallet
blir gjenstand for den nødvendige behandling, gjenvinning og gjenbruk. Og på den
måten forhindres potensielle negative effekter på miljøet og folks helse som ellers
ville kunne inntreffe som følge av feilaktig avfallsbehandling.
2. I andre land utenfor EU
Hvis du ønsker å kvitte deg med produktet ber vi deg ta kontakt med dine lokale
myndigheter, for å få informasjon om hvordan dette gjøres på riktig måte.
For Sveits: Brukt elektrisk eller elektronisk utstyr kan returneres gratis til forhandleren, selv om du ikke kjøper et nytt produkt. Andre oppsamlingsanlegg er listet opp på
hjemmesiden til www.swico.ch eller www.sens.ch.
B. Informasjon om Avfallsinnsamling for Næringslivsbrukere.
1. Innenfor EU
Hvis produktet brukes i næringsvirksomhet og du ønsker å kaste det:
Ta kontakt med din BOSCH-forhandler for informasjon om tilbakelevering av produk-
tet. Du kan bli belastet for en mindre kostnad knyttet til tilbakelevering og resirkulering.
Små produkter (og små mengder) kan bli levert inn til ett av dine lokale innsamlings-
anlegg.
For Spania: Ta kontakt med det etablerte innsamlingssystemet eller med dine lokale
myndigheter for innlevering av brukte produkter.
2. I andre land utenfor EU
Hvis du ønsker å kvitte deg med produktet ber vi deg ta kontakt med dine lokale
myndigheter for å få informasjon om hvordan dette gjøres på riktig måte.
Batteriet som leveres med dette produktet inneholder spor av bly.
For EU: Søppeldunken med kryss over betyr at brukte batterier ikke skal kastes
sammen med vanlig husholdningsavfall! Det er et eget innsamlingssystem for brukte
batterier, som sørger for riktig behandling og resirkulering i henhold til gjeldende
lovgivning.
Ta kontakt med myndighetene på stedet for detaljer om innsamlings- og
resirkuleringsrutiner.
For Sveits: Det brukte batteriet skal returneres til utsalgsstedet.
For andre land utenfor EU: Ta kontakt med lokale myndigheter for riktig fremgangs-
måte ved kasting av det brukte batteriet.
Inneholder fluoriserte drivhusgasser som er dekket av Kyoto-protokollen R410A
(Globalt oppvarmingspotensial 1975)
Pb
BYGNINGSBESTEMMELSER
Dette utstyret skal installeres og gis service av en kompetent person i samsvar med gjeldende: IEE Regulations,
Building Regulation, Building Standards (Skottland) (Consolidation), Building Regulations (Nord-Irland), lokale
vannvedtekter, Health & Safety Document 63S (The Electricity at Work Regulations 1989), IS 813 (Irland) og andre lokale bestemmelser.
De relevante Standardene skal følges, herunder:
BS EN 14511: Krav til varmepumper for oppvarming og kjøling av lokaler
BS EN 378: Safety and environmental requirements for heat pumps (sikkerhets- og miljøkrav til varmepumper)
BS EN 14324 Brazing (hardlodding)
BS 1306 Specication for copper & copper Alloy pressure piping system (spesikasjon for kobber og kobberlegeringer i trykkrørsystemer)
The Health and Safety at Work Act 1974 (helse og sikkerhet i arbeidet)
The Management of Health and Safety at Work Regulations 1999 (helse og sikkerhet i arbeidet)
The Construction (Health, Safety and Welfare) Regulations 1996 (helse og sikkerhet i arbeidet)
The Construction (Design and Management) Regulations 1994 (konstruksjon (design og ledelse))
The Lifting Operations and Lifting Equipment Regulations 1998 (løfting og løfteredskaper)
Der hvor det ikke er gitt noen spesikke instruksjoner skal det henvises til relevante instrukser.
NO
EHP6.5_AA_multi_TINSEA825JBRZ.indd 16 2013/7/6 13:35:35
NO-1
NORSK
ADVARSEL
• Ikke trekk i eller lag knekk på strømforsyningskabelen. Hvis det trekkes i strømforsyningskabelen
eller den brukes på feil måte kan det resultere i
skade på enheten og forårsake elektrisk støt.
• Vær forsiktig slik at kroppen ikke utsettes for
direkte utløpsluft over en lang periode. Dette kan
påvirke helsetilstanden din.
• Når luftkondisjoneringen brukes i rom med spedbarn, barn, eldre, sengeliggende eller funksjonshemmede personer, kontroller at romtemperaturen
er den riktige for dem som benner seg i rommet.
• Før aldri noen gjenstander inn i enheten. Innføring
av gjenstander kan resultere i personskade som
følge av at de innvendige viftene roterer med høy
hastighet.
• Sørg for feilfri jording av luftkondisjoneringen.
Jordingsledningen skal ikke kobles til vannrør,
gassrør, lynavleder eller telefonjording.
Ufullstendig jording kan føre til elektrisk støt.
• Hvis det er noe unormalt med luftkondisjoneringen
(f.eks. brent lukt), skal den stoppes umiddelbart
og strømforsyningen skal slås AV (OFF).
• Apparatet skal installeres i samsvar med nasjonale regler for elektriske installasjoner. Feilaktig
kabeltilkobling kan føre til at strømforsyningskabelen, støpselet og stikkontakten overopphetes
og kan forårsake brann.
• Hvis strømforsyningskabelen er skadet må den skiftes
av produsenten eller dennes serviceleverandør, eller
en tilsvarende, kvalisert person, for å unngå en farlig
situasjon. Skift aldri ut med annet enn produsentspe-
sisert strømforsyningskabel.
• Ikke spyl eller hell vann direkte på enheten. Vann kan
føre til elektrisk støt eller skade på utstyret.
• Ikke gjør forsøk på å installere/demontere/reparere
enheten selv. Feilaktig arbeid kan føre til elektrisk
støt, vannlekkasje, brann osv. Ta kontakt med din
installatør eller annen kvalisert servicepersonell for
installasjon/demontering/reparasjon av enheten.
ADVARSEL
• Åpne vindu eller en dør med jevne mellomrom for å
lufte ut rommet, spesielt når gassapparater er i bruk.
Utilstrekkelig ventilasjon kan føre til oksygenmangel.
• Ikke betjen knappene med våte hender. Det kan føre
til elektrisk støt.
• For sikkerhets skyld, slå av hovedstrømbryter når
enheten ikke er i bruk over lengre tid.
• Kontroller fra tid til annen monteringshyllen for
uteenheten for slitasje og for å kontrollere at den sitter
godt festet.
• Ikke plasser noe oppe på uteenheten eller tråkk på
denne. Gjenstanden eller personen kan falle ned og
skade kan oppstå.
• Enheten er konstruert for bruk i boliger. Ikke bruk den
for andre formål, slik som i en kennel eller et veksthus,
for dyreoppdrett eller dyrking av planter.
• Ikke plasser en beholder med vann på enheten. Hvis
vannet trenger inn i enheten kan elektronikken inne i
utstyret bli ødelagt samt forårsake elektrisk støt.
• Ikke blokker enhetens luftinntak eller -utløp. Det kan
føre til redusert effekt eller driftsproblemer.
• Husk å stoppe enheten og slå av hovedstrømbryteren
før det foretas noen form for vedlikehold eller
rengjøring. Du kan bli skadet av viften som roterer
inne i enheten.
• Rengjøring og brukervedlikehold av utstyret bør ikke
utføres av barn, med mindre de er under tilsyn.
• Kontroller at luftkondisjoneringen kobles til strømforsyning med korrekt merkespenning og frekvens.
Bruk av strømforsyning med feil spenning og frekvens
kan føre til skade på utstyret og eventuelt brann.
• Ikke installer enheten på et sted hvor det kan lekke ut
brennbar gass. Det kan føre til brann.
Installer enheten på et sted med minst mulig støv,
røykgasser eller fuktighet i luften.
• Legg drenasjeslangen slik at dreneringen blir effektiv.
Utilstrekkelig drenasje kan føre til fuktighet i rom, på
møbler osv.
• Kontroller at det er montert jordfeilbryter samt sikring,
i forhold til gjeldene elektroforskrifter for å forhindre
elektrisk støt.
NORSK
Vi ber deg lese denne bruksanvisningen grundig før du tar produktet i bruk.
Oppbevar bruksanvisningen på et trygt sted slik at den alltid er tilgjengelig.
INNHOLD
SIKKERHETSREGLER
• SIKKERHETSREGLER ...................................... 1
• NAVN PÅ DELER ............................................... 2
• BRUK AV FJERNKONTOLLEN .......................... 4
• INNSTILLING AV VENTILATORFILTER ............ 5
• TIPS OM ENERGISPARING .............................. 5
• GENERELL DRIFT .............................................6
• TIPS OM INDIKATORPANEL..............................7
• DRIFT MED FULL EFFEKT ................................ 7
•
JUSTERING AV LUFTSTRØMMENS RETNING
........... 8
• PLASMACLUSTER-DRIFT ................................. 9
• SELVRENSINGSPROSEDYRE .......................... 9
• TIMER FOR AVSTENGING ETTER 1 TIME ....... 10
• TIMER-DRIFT ................................................... 10
• 10°C DRIFT ......................................................12
• HJELPEMODUS ............................................... 12
• VEDLIKEHOLD ................................................. 13
• TILLEGGSANMERKNINGER OM DRIFT ......... 14
• FØR DU RINGER ETTER SERVICE ................ 15
Utstyret kan brukes av barn fra 8 år og oppover og personer med reduserte
fysiske, sanselige eller mentale evner ,mangel på erfaring eller kunnskap. Dette
forutsetter tilsyn eller er blitt gitt instruksjon i sikker bruk av utstyret og forstår
faremomentene det innebærer.
EHP6.5_AA_multi_TINSEA825JBRZ.indd 1 2013/7/6 13:35:35

NO-2
NAVN PÅ DELER
1 Inntak (Luft)
2 Filterdeksel
3 Luftlter
4 Ventilatorlter
5 Mottakervindu
6 AUX-knapp
7 Utløserknapp
8 Horisontalt luftspjeld
9 Utløp (Luft)
10 Åpningspanel
11
Mottakervindu
12 TEMPERATUR-indikator
13 UTENDØRS-temp. Lampe (grønn
)
14 FULL EFFEKT-lampe (grønn
)
15 TIMER-lampe (oransje
)
16 DRIFT-lampe (rød
)
17 PLASMACLUSTER-lampe
(blå
)
18 Inntak (Luft)
19 Kuldemediarør og
forbindelsesledning
20 Drenasjeslange
21 Utløp (Luft)
1
2
3
4
5
6
7
8
9
10
11
12
13
14
15
16
17
18
19
20
21
UTEENHET
MERK:
Aktuelle enheter kan variere noe
fra de som er vist over.
INNEENHET
EHP6.5_AA_multi_TINSEA825JBRZ.indd 2 2013/7/6 13:35:35
NO-3
NORSK
FJERNKONTROLL
1 SENDER
2 SKJERM
3 PLASMACLUSTER-knapp
4 VISNING-knapp
5 PÅ/AV-knapp
6 TERMOSTAT-knapp
7 HORISONTAL LUFTSTRØMNING-knapp
8 VERTIKAL LUFTSTRØMNING-knapp
9 MODUS-knapp
10 TIMER PÅ-knapp
11 TIMER AV-knapp
12 TIMER FOR AVSTENGING ETTER 1 TIME-knapp
13 TID FREMOVER-knapp
14 TID BAKOVER-knapp
15 SELVRENSING-knapp
16 STILLE INN/AVBRYTE TIMER-knapp
17 10˚C -knapp
18 KLOKKE-knapp
19 VIFTE-knapp
20 FULL EFFEKT-knapp
LCD- SKJERM PÅ FJERNKONTROLL
21 FULL EFFEKT-symbol
22 MODUS-symboler
: AUTO : KJØLE
: VARME : TØRKE
23 VIFTEHASTIGHET-symboler
: AUTO : LAV
: MYK : HØY
24 VERTIKAL LUFTSTRØMNING-symbol
25 TIMER PÅ-indikator/KLOKKE
Indikerer forhåndsinnstilt tid eller aktuelt
klokkeslett for timer som er slått på.
26 TEMPERATUR-indikator
27 PLASMACLUSTER-symbol
28 SENDE-symbol
29 SELVRENSING-symbol
30 HORISONTAL LUFTSTRØMNING-
symbol
31 TIMER AV-indikator
Indikerer forhåndsinnstilt tid for timer for
avstenging eller timer for avstenging et
-
ter 1 time.
1
2
3
4
5
6
7
8
9
10
11
12
13
14
15
16
17
18
19
20
21
22
23
24
25
26
27
28
29
30
31
EHP6.5_AA_multi_TINSEA825JBRZ.indd 3 2013/7/6 13:35:35

NO-4
INNSETTING AV BATTERIER
Bruk to AAA (R03) -batterier.
1
Ta av dekselet på fjernkontrollen.
2
Sett inn batteriene, og påse at de instal-
leres i samsvar med (+) og (-) polaritetene.
• Skjermen indikerer “AM 6:00” når batteriene er
riktig installert.
3
Sett lokket på plass igjen.
BRUK AV FJERNKONTOLLEN
SLIK BRUKER DU FJERNKONTROLLEN
Rett fjernkontrollen mot enhetens signalmottakervindu,
og trykk på ønsket knapp. Enheten avgir et lydsignal (pip)
når den mottar signalet.
• Påse at det ikke finnes noen gjenstander mellom
fjernkontrollen og enheten.
• Signalet har en rekkevidde på 7 m.
ADVARSEL:
• Ikke utsett mottakervinduet for direkte sollys. Dette
kan påvirke funksjonen på en negativ måte.
• Bruk av visse uorescerende lamper i samme rom
kan forstyrre signaloverføringen.
• Ikke la fjernkontrollen ligge i direkte sollys eller nær
en varmeovn. Beskytt enheten og fjernkontrollen mot
fuktighet og støt.
• Klokkeslettet kan ikke stilles inn når timeren er i drift.
Deksel for
fjernkontroll
STILL INN AKTUELT KLOKKSESLETT
Det nnes to klokkemodi: 12-timers modus og 24-timers modus.
Eksempel: kl. 5 (17.00) om ettermiddagen
Klokke Skjerm
12-timers modus PM 5:00
24-timers modus 17:00
1
For å stille inn 12-timers modus, trykk én
gang på KLOKKE-knappen.
For å stille inn 24-timers modus, trykk to
ganger på KLOKKE-knappen.
2
Trykk på TID FREMOVER- eller TID BAKOVER-knappen for å stille inn aktuelt klokkeslett.
• Hold inne knappen for å endre klokkeslettet på
skjermen raskt fremover eller bakover.
3
Trykk på SET/C-knappen.
• Kolon (:) blinker for å indikere at klokken fungerer.
MERK:
• Batteriets levetid er ca. ett år ved normal bruk.
• Når du skifter ut batteriene må du alltid skifte ut begge
batteriene, og påse at de er av samme type.
• Hvis fjernkontrollen ikke fungerer på riktig måte etter
utskiftingen av batteriene, må du ta ut batteriene og
sette dem inn på nytt etter 30 sekunder.
• Hvis du ikke skal bruke enheten på lang tid bør batteriene tas ut av fjernkontrollen.
2
3
1
MERK:
• Klokkeslettet kan ikke stilles inn når timeren er i drift.
EHP6.5_AA_multi_TINSEA825JBRZ.indd 4 2013/7/6 13:35:35
NO-5
NORSK
Ventilatorltrene er pakket som tilbehør for
denne enheten. Under drift av luftkondisjone-
ringen fjerner ltrene støv og tobakksrøyk fra
luften, og avgir ren luft.
1
Ta ut luftltrene.
1 Åpne lterdekselet.
2 Skyv luftltrene litt opp for å åpne dem.
3 Trekk luftltrene ned for å fjerne dem.
2
Plasser ventilatorlteret under lterstop-
perne på luftlteret.
3
Sett inn luftltrene på nytt.
1 Sett inn luftltrene på nytt i de opprinnelige po-
sisjonene.
2 Lukk lterdekselet.
Forholdsregler:
• Filtrene er forseglet i en plastpose for å effektiv støvoppsamling.
• Du må ikke åpne posen før ltrene skal brukes. (Dette
kan forkorte ltrenes levetid.)
• Ikke utsett ltrene for direkte sollys. (Dette kan forringe ltrene.)
TIPS OM ENERGISPARING
Nedenfor er det vist noen enkle eksempler på
hvordan du kan spare energi når du bruker luftkondisjoneringen.
STILL INN RIKTIG TEMPERATUR
• Innstilling til høyere (lavere) temperatur enn nødvendig vil føre til høyere strømforbruk.
BLOKKER DIREKTE SOLLYS OG UNNGÅ TREKK
• Blokkering av direkte sollys ved kjøledrift vil redusere
strømforbruket.
• Lukk vinduene og dørene under kjøling og oppvarming.
STILL INN RIKTIG LUFTSTRØMNINGSRETNING
FOR Å OPPNÅ BEST MULIG LUFTSIRKULASJON
SØRG FOR AT FILTRENE ER RENE FOR Å OPPNÅ
BEST MULIG EFFEKTIV DRIFT
GJØR DET BESTE UT AV TIMER-AV-FUNKSJONEN
SLÅ AV HOVEDSTRØMBRYTEREN NÅR ENHETEN
IKKE SKAL BRUKES OVER EN LENGRE TIDSPERIODE
• Enheten bruker noe strøm selv når den ikke er i drift.
INNSTILLING AV VENTILATOR
Filterstopper
Ventilatorlter
Luftlter
1
2
3
2
1
Filterdeksel
EHP6.5_AA_multi_TINSEA825JBRZ.indd 5 2013/7/6 13:35:36
NO-6
1
Trykk på MODUS-knappen for å velge
driftsmodus.
AUTO VARME KJØLE TØRKE
2
Trykk på PÅ/AV-knappen for å starte
driften.
• Den røde DRIFT-lampen ( ) på enheten blir
tent.
3
Trykk på TERMOSTAT-knappen for å
velge ønsket temperatur.
(AUTO/TØRKE-MODUS)
• Temperaturen kan endres opptil 2°C over eller
under temperaturen som automatisk fastsettes
av luftkondisjoneringen.
(KJØLE/VARME-MODUS)
• Temperaturen kan stilles inn mellom 18 til 32 °C.
4
Trykk på VIFTE-knappen for å velge øn-
sket viftehastighet.
AUTO MYK LAV HØY
• I TØRKE-modus er viftehastigheten forhåndsinnstilt til AUTO og kan ikke endres.
5
Slå av enheten ved å trykke PÅ/AV-
knappen på nytt.
• Den røde DRIFT-lampen ( ) på enheten
slås av.
GENERELL DRIFT
(Eksempel: 1 °C høyere)
(Eksempel: 2 °C lavere)
2
5
3
1
4
TIPS OM AUTOMODUS
I AUTO-modus blir temperaturinnstillingen og
modusen automatisk valgt i henhold til romtemperaturen og utetemperaturen når enheten blir
slått på.
• Under drift vil temperaturinnstillingene automatisk forskyves som vist i diagrammet hvis
utetemperaturen endrer seg.
Modi og temperaturinnstillinger
Figurene i ( ) er temperaturinnstillinger
EHP6.5_AA_multi_TINSEA825JBRZ.indd 6 2013/7/6 13:35:36

NO-7
NORSK
TIPS OM INDIKATORPANEL
Indikatorpanelet vil endres hver gang du trykker
på VISNING-knappen på følgende måte.
MERK:
• De viste temperaturene er omtrentlige estimater, og
kan variere fra de aktuelle temperaturene.
•
vises inntil temperaturene registreres.
• Kun romtemperaturen kan vises i 5 sekunder når enheten ikke er i drift.
• Under SELVRENSING-drift, vil indikatorpanelet vise
gjenstående driftstid. Rom- og utetemperatur vil ikke
vises selv om du trykker på VISNING-knappen
• Temperaturvisningsområder
Romtemperatur
Temperaturindikator Romtemperatur
Over 40 ˚C
0 ˚C~40 ˚C
Under 0 ˚C
Utetemperatur
Temperaturindikator Utetemperatur
Over 45 ˚C
-19 ˚C~45 ˚C
-25 ˚C~-20 ˚C
Under -25 ˚C
*Minussymbolet "-" vises ikke.
Outdoor Temp.Lamp lights up
Romtemperaturen vises
.
Utetemperaturen vises.
Ingen visning.
Visning-knapp
Den blå PLASMACLUSTER-lampen og
den grønne FULL EFFEKT-lampen vil
også slå seg av.
I denne driften arbeider luftkondisjoneringen på
maksimum effekt for å gjøre rommet kjølig eller
varmt på kort tid.
1
Trykk på FULL EFFEKT-knappen under
drift.
• Fjernkontrollen vil vise “ ”.
• Temperaturdisplayet slukkes.
• Den grønne FULL EFFEKT-lampen (
) på
enheten vil lyse.
FOR Å AVBRYTE
Trykk på FULL EFFEKT-knappen igjen.
• Den grønne FULL EFFEKT-lampen ( ) på enheten slås av.
MERK:
• Du kan ikke stille inn temperaturen eller viftehastigheten under FULL EFFEKT-drift.
• FULL EFFEKT-drift vil bli avbrutt automatisk etter
1 time, og enheten går tilbake til de opprinnelige
innstillingene. Den grønne FULL EFFEKT-lampen
(
) på enheten slås av.
DRIFT MED FULL EFFEKT
1
*
EHP6.5_AA_multi_TINSEA825JBRZ.indd 7 2013/7/6 13:35:36

NO-8
HORISONTAL LUFTSTRØMNINGSRETNING
1
Trykk på HORISONTAL LUFTSTRØM-
NING-knappen for å stille inn ønsket
luftstrømningsretning.
ADVARSEL:
Du må aldri forsøke å justere åpningspanelet og spjeldene manuelt.
• Manuell justering av åpningspanelet og spjeldene
kan føre til funksjonsfeil i enheten.
1
JUSTERING AV LUFTSTRØMMENS RETNING
1
TIPS OM LUFTSTRØMNINGSRETNING
"AUTO"
KJØLE-modus
Åpningspanelet vil stilles inn kryssvist ned
i 10 minutter, og skift deretter til kryssvist
opp for å føre kald luft til taket.
VARME-modus
Åpningspanelet vil stilles inn kryssvist
bakover når utløpslufttemperaturen er
lav, og skift deretter til kryssvist ned når
utløpsluften blir varm.
TØRKE-modus
Åpningspanelet vil stilles inn kryssvist opp.
10 minutter senere
VERTIKAL LUFTSTRØMNINGSRETNING
1
Trykk på VERTIKAL LUFTSTRØMNING-
knappen for å stille inn ønsket luftstrømningsretning.
AUTO-modus
AUTO
kryssvist ned
VARME-modus
AUTO kryssvist opp kryssvist ned ned
(AUTO/TØRKE-modus)
AUTO
kryssvist opp kryssvist ned
Når utløpsluft
temperaturen er lav
Når utløpsluften
blir varm
EHP6.5_AA_multi_TINSEA825JBRZ.indd 8 2013/7/6 13:35:36
 Loading...