

Page 1
INSTALLATION MANUAL
DiBos
610–4.998.137.176
Version: A5
Date: 11–2004
Page 2

Installation Manual for DiBos Video System
A5/11–2004610–4.998.137.176 – 2 –
Page 3

Installation Manual for DiBos Video System
Safety instructions
Important Safeguards
1. Read, Follow, and Retain Instructions – All safety and operating instructions should be read
and followed before operating the unit. Retain instructions for future reference.
2. Heed Warnings – Adhere to all warnings on the unit and in the operating instructions.
3. Attachments – Attachments not recommended by the product manufacturer should not be
used, as they may cause hazards.
4. Installation Cautions – Do not place this unit on an unstable stand, tripod, bracket, or mount.
The unit may fall, causing serious injury to a person and serious damage to the unit. Use only
manufacturer–recommended accessories, or those sold with the product. Mount the unit per the
manufacturer’s instructions. Appliance and cart combination should be moved with care. Quick
stops, excessive force, or uneven surfaces may cause the appliance and cart combination to
overturn.
5. Cleaning – Unplug the unit from the outlet before cleaning. Follow any instructions provided with
the unit. Generally, using a damp cloth for cleaning is sufficient. Do not use liquid cleaners or
aerosol cleaners.
6. Servicing – Do not attempt to service this unit yourself. Opening or removing covers may expose
you to dangerous voltage or other hazards. Refer all servicing to qualified service personnel.
7. Damage Requiring Service – Unplug the unit from the main AC power source and refer servicing to qualified service personnel under the following conditions:
When the power supply cord or plug is damaged.
If liquid has been spilled or an object has fallen into the unit.
If the unit has been exposed to water and/or inclement weather (rain, snow, etc.).
If the unit does not operate normally, when following the operating instructions. Adjust only
those controls specified in the operating instructions. Improper adjustment of other controls
may result in damage, and require extensive work by a qualified technician to restore the unit
to normal operation.
If the unit has been dropped or the cabinet damaged.
If the unit exhibits a distinct change in performance, this indicates that service is needed.
8. Replacement Parts – When replacement parts are required, the service technician should use
replacement parts specified by the manufacturer, or that have the same characteristics as the
original part. Unauthorized substitutions may result in fire, electrical shock, or other hazards.
9. Safety Check – Upon completion of servicing or repairs to the unit, ask the service technician to
perform safety checks to ensure proper operating condition
10. Power Sources – Operate the unit only from the type of power source indicated on the label. If
unsure of the type of power supply to use, contact your dealer or local power company.
For units intended to operate from battery power, refer to the operating instructions.
For units intended to operate with External Power Supplies, use only the recommended ap-
proved power supplies.
For units intended to operate with a limited power source, this power source must comply with
EN60950. Substitutions may damage the unit or cause fire or shock.
For units intended to operate at 24 VAC, normal input voltage is 24 VAC. Voltage applied to the
unit’s power input should not exceed 30 VAC. User–supplied wiring, from the 24 VAC supply
to unit, must be in compliance with electrical codes (Class 2 power levels). Do not ground the
24 VAC supply at the terminals or at the unit’s power supply terminals.
11. Coax Grounding – If an outside cable system is connected to the unit, ensure that the cable
system is grounded. U.S.A. models only––Section 810 of the National Electrical Code, ANSI/
NFPA No.70, provides information regarding proper grounding of the mount and supporting
structure, grounding of the coax to a discharge unit, size of grounding conductors, location of
discharge unit, connection to grounding electrodes, and requirements for the grounding electrode.
A5/11–2004610–4.998.137.176 – 3 –
Page 4

Installation Manual for DiBos Video System
Safety instructions (continued)
12. Grounding or Polarization – This unit may be equipped with a polarized alternating current line
plug (a plug with one blade wider than the other). This safety feature allows the plug to fit into the
power outlet in only one way. If unable to insert the plug fully into the outlet, try reversing the plug.
If the plug still fails to fit, contact an electrician to arrange replacement of the obsolete outlet. Do
not defeat the safety purpose of the polarized plug.
Alternately, this unit may be equipped with a 3–wire grounding plug (a plug with a third pin, for
grounding). This safety feature allows the plug to fit into a grounding power outlet only. If unable to
insert the plug into the outlet, contact an electrician to arrange replacement of the obsolete outlet.
Do not defeat the safety purpose of the grounding plug.
13. Lightning – For added protection during a lightning storm, or when this unit is left unattended
and unused for long periods of time, unplug the unit from the wall outlet and disconnect the cable
system. This will prevent damage to the unit due to lightning and power line surges.
14. Restricted Access Locations are required for the installation.
FCC & ICES Information
(U.S.A. and Canadian Models Only)
This device complies with part 15 of the FCC Rules. Operation issubject to the following two
conditions:
(1) This device may not cause harmful interference, and
(2) This device must accept any interference received, including interference that may cause
undesired operation.
NOTE: This equipment has been tested and found to comply with the limits for a Class B digital de-
vice, pursuant to Part 15 of the FCC Rules and ICES–003 of Industry Canada. These limits are designed to provide reasonable protection against harmful interference when the equipment is operated in a residential installation. This equipment generates, uses and can radiate radio frequency
energy, and if not installed and used in accordance with the instructions, may cause harmful interference to radio communications. However, there is no guarantee that interference will not occur in a
particular installation. If this equipment does cause harmful interference to radio or television reception, which can be determined by turning the equipment off and on, the user is encouraged to try to
correct the interference by one or more of the following measures:
Reorient or relocate the receiving antenna.
Increase the separation between the equipment and receiver.
Connect the equipment into an outlet on a circuit different from that to which the receiver is con-
nected.
Consult the dealer, or an experienced radio/TV technician for help.
Intentional or unintentional changes or modifications, not expressly approved by the party responsible for compliance, shall not be made. Any such changes or modifications could void the user’s authority to operate the equipment.
The user may find the following booklet, prepared by the Federal Communications Commission,
helpful: How to Identify and Resolve Radio–TV Interference Problems. This booklet is available from
the U.S. Government Printing Office, Washington, DC 20402, Stock No. 004–000–00345–4.
A5/11–2004610–4.998.137.176 – 4 –
Page 5
Installation Manual for DiBos Video System
Safety instructions (continued)
For Indoor Product
1.
Water and Moisture – Do not use this unit near water – for example, in a wet basement, in
an unprotected outdoor installation, or in any area classified as a wet location.
2. Object and Liquid Entry – Never push objects of any kind into this unit through openings, as
they may touch dangerous voltage points or short out parts that could result in a fire or electrical
shock. Never spill liquid of any kind on the unit.
3. Power Cord and Power Cord Protection – For units intended to operate with 230VAC, 50Hz,
the input and output power cord must comply with the latest versions of IEC Publication 227
or IEC Publication 245.
Power supply cords should be routed so they are not likely to be walked on or pinched. Pay
particular attention to location of cords and plugs, convenience receptacles, and the point of
exit from the appliance.
4. Overloading – Do not overload outlets and extension cords; this can result in a risk of fire or
electrical shock.
For Rack–Mount Product
1. Ventilation – This unit should not be placed in a built–in installation or rack, unless proper ventilation is provided, or the manufacturer’s instructions have been adhered to. The equipment
must not exceed its maximum operating temperature requirements.
2. Mechanical Loading – Mounting of the equipment in a rack shall be such that a hazardous
condition is not achieved due to uneven mechanical loading.
WARNING: Electrostatic–sensitive device. Use proper CMOS/MOSFET handling precautions to avoid electrostatic discharge.
NOTE: Grounded wrist straps must be worn and proper ESD safety precautions observed when handling the electrostatic–sensitive printed circuit boards.
CAUTION: Lithium Battery
Danger of explosion if battery is incorrect replaced. Replace only with the same
or equivalent type recommended by the manufacturer.
Dispose of used batteries according to the battery manufacturer’s instructions.
Cover Removal
WARNING: Removal of the cover should only be performed by qualified service
personnel – not user serviceable. The unit should always be unplugged before removing the cover and remain unplugged while the is removed.
A5/11–2004610–4.998.137.176 – 5 –
Page 6

Installation Manual for DiBos Video System
Safety instructions (continued)
Safety Precautions
CAUTION
RISK OF ELECTRIC SHOCK.
DO NOT OPEN!
CAUTION: TO REDUCE THE RISK OF ELECTRIC SHOCK, DO NOT REMOVE COVER (OR
BACK). NO USER SERVICEABLE PARTS INSIDE. REFER SERVICING TO QUALIFIED SERVICE PERSONNEL.
This symbol indicates the presence of uninsulated ”dangerous voltage” within the
product’s enclosure. This may constitute a risk of electric shock.
The user should consult the operating an maintenance (servicing) instructions in
the literature accompanying the appliance.
Attention: Installation should be performed by qualified service personnel only
in accordance with the National Electrical Code or applicable local codes.
Power Disconnect. Units with or without ON–OFF switches have power supplied
to the unit whenever the power cord is inserted into the power source; however,
the unit is operational only when the ON–OFF switch is in the ON position. The
power cord is the main power disconnect for all units.
A5/11–2004610–4.998.137.176 – 6 –
Page 7

Installation Manual for DiBos Video System
TABLE OF CONTENTS
Section Page
1 Introduction 9. . . . . . . . . . . . . . . . . . . . . . . . . . . . . . . . . . . . . . . . . . . . . . . .
1.1 System Description 9. . . . . . . . . . . . . . . . . . . . . . . . . . . . . . . . . . . . . . . . . . .
1.2 Uninterruptible Power Supply 9. . . . . . . . . . . . . . . . . . . . . . . . . . . . . . . . . .
1.3 Recommended Virus Scanners/Firewalls 10. . . . . . . . . . . . . . . . . . . . . . .
1.4 Component Overview 11. . . . . . . . . . . . . . . . . . . . . . . . . . . . . . . . . . . . . . . .
1.5 Laws/Norms/Guidelines 12. . . . . . . . . . . . . . . . . . . . . . . . . . . . . . . . . . . . . .
2 Computer Slots 13. . . . . . . . . . . . . . . . . . . . . . . . . . . . . . . . . . . . . . . . . . . .
3 Quick installation 14. . . . . . . . . . . . . . . . . . . . . . . . . . . . . . . . . . . . . . . . . .
4 Connections 22. . . . . . . . . . . . . . . . . . . . . . . . . . . . . . . . . . . . . . . . . . . . . . .
4.1 Grabber Card MVTitan 23. . . . . . . . . . . . . . . . . . . . . . . . . . . . . . . . . . . . . . .
4.2 Grabber Card MVSigma 25. . . . . . . . . . . . . . . . . . . . . . . . . . . . . . . . . . . . .
4.3 Connecting to a Token Ring or Ethernet Network 26. . . . . . . . . . . . . . . .
4.4 Connecting the ISDN Controller 28. . . . . . . . . . . . . . . . . . . . . . . . . . . . . . .
4.5 Connecting the VSCom 200 H (Interface Expansion) 29. . . . . . . . . . . .
4.6 Connecting External Hard Disks 29. . . . . . . . . . . . . . . . . . . . . . . . . . . . . . .
4.7 Connecting the Cameras 30. . . . . . . . . . . . . . . . . . . . . . . . . . . . . . . . . . . . .
4.8 Connecting the V–DOG and Tamper Contact 31. . . . . . . . . . . . . . . . . . .
4.9 Connecting the Software Dongle and the Printer 32. . . . . . . . . . . . . . . .
4.10 Connecting a Fault Indicator 32. . . . . . . . . . . . . . . . . . . . . . . . . . . . . . . . . .
4.11 Connecting the ATM via the Interface Processor (Serial) 33. . . . . . . . .
4.12 Connecting the Barcode Reader 36. . . . . . . . . . . . . . . . . . . . . . . . . . . . . .
4.13 Connecting Foyer Card Reader MINITER RS 485 38. . . . . . . . . . . . . . .
4.14 Connecting Radio Clock DCF 77 41. . . . . . . . . . . . . . . . . . . . . . . . . . . . . .
4.15 Web Connection for Access Via Browser 43. . . . . . . . . . . . . . . . . . . . . . .
4.16 Connecting a Modem 44. . . . . . . . . . . . . . . . . . . . . . . . . . . . . . . . . . . . . . . .
4.17 Connecting AutoDome/SAE–Dome 46. . . . . . . . . . . . . . . . . . . . . . . . . . . .
4.18 Connecting a Security System 48. . . . . . . . . . . . . . . . . . . . . . . . . . . . . . . .
4.18.1 General remarks 48. . . . . . . . . . . . . . . . . . . . . . . . . . . . . . . . . . . . . . . . . . . .
4.18.2 Connecting to NZ 500 (20 mA) 50. . . . . . . . . . . . . . . . . . . . . . . . . . . . . . . .
4.18.3 Connecting to BZ 500 (20 mA) 50. . . . . . . . . . . . . . . . . . . . . . . . . . . . . . . .
4.18.4 Connecting to AZ 1010/NZ 1008 51. . . . . . . . . . . . . . . . . . . . . . . . . . . . . .
4.18.5 Connecting to NZ 1012 52. . . . . . . . . . . . . . . . . . . . . . . . . . . . . . . . . . . . . .
4.18.6 Connecting to BZ 1012 (20 mA) 53. . . . . . . . . . . . . . . . . . . . . . . . . . . . . . .
4.18.7 Connecting to NZ 1060 54. . . . . . . . . . . . . . . . . . . . . . . . . . . . . . . . . . . . . .
4.18.8 Connecting to BZ 1060 (20 mA) 55. . . . . . . . . . . . . . . . . . . . . . . . . . . . . . .
4.18.9 Connecting to UEZ 1000 (20 mA) 56. . . . . . . . . . . . . . . . . . . . . . . . . . . . .
4.18.10 Connecting to UEZ 2000 (20 mA) 56. . . . . . . . . . . . . . . . . . . . . . . . . . . . .
4.18.11 Connecting to UGM 2020 57. . . . . . . . . . . . . . . . . . . . . . . . . . . . . . . . . . . .
4.18.12 Connecting to Bosch D9000 Series 58. . . . . . . . . . . . . . . . . . . . . . . . . . . .
A5/11–2004610–4.998.137.176 – 7 –
Page 8

Installation Manual for DiBos Video System
Table of Contents (continued)
Section Page
5 XP Administration 59. . . . . . . . . . . . . . . . . . . . . . . . . . . . . . . . . . . . . . . . . .
5.1 Changing from video system to XP administrator level 59. . . . . . . . . . .
5.2 Log on as Windows XP user 59. . . . . . . . . . . . . . . . . . . . . . . . . . . . . . . . .
6 Configuration 60. . . . . . . . . . . . . . . . . . . . . . . . . . . . . . . . . . . . . . . . . . . . . .
6.1 Basic configuration 60. . . . . . . . . . . . . . . . . . . . . . . . . . . . . . . . . . . . . . . . . .
6.2 Standard configuration (expert configuration) 61. . . . . . . . . . . . . . . . . . .
7 Startup 124. . . . . . . . . . . . . . . . . . . . . . . . . . . . . . . . . . . . . . . . . . . . . . . . . . .
7.1 Connecting the System Components 125. . . . . . . . . . . . . . . . . . . . . . . . .
7.2 Activating External Hard Disks 125. . . . . . . . . . . . . . . . . . . . . . . . . . . . . . .
7.3 Switching On the PC (Startup) 125. . . . . . . . . . . . . . . . . . . . . . . . . . . . . . .
7.4 Checking the Optional ISDN Connection 125. . . . . . . . . . . . . . . . . . . . . .
7.5 Checking the Optional Network Connection 126. . . . . . . . . . . . . . . . . . . .
7.6 Checking the Grabber Driver 127. . . . . . . . . . . . . . . . . . . . . . . . . . . . . . . .
7.7 Changing the Computer Name 127. . . . . . . . . . . . . . . . . . . . . . . . . . . . . . .
7.8 Checking the Optional ATM Connection 128. . . . . . . . . . . . . . . . . . . . . . .
7.9 Checking the Optional Web Connection 129. . . . . . . . . . . . . . . . . . . . . . .
7.10 System Test 129. . . . . . . . . . . . . . . . . . . . . . . . . . . . . . . . . . . . . . . . . . . . . . .
7.11 Storing Reference Images 129. . . . . . . . . . . . . . . . . . . . . . . . . . . . . . . . . . .
7.12 Log off 129. . . . . . . . . . . . . . . . . . . . . . . . . . . . . . . . . . . . . . . . . . . . . . . . . . . .
8 Fault Indication/Correction 130. . . . . . . . . . . . . . . . . . . . . . . . . . . . . . . .
9 Maintenance and Service 131. . . . . . . . . . . . . . . . . . . . . . . . . . . . . . . . . .
9.1 Maintenance Tasks to be Carried Out 131. . . . . . . . . . . . . . . . . . . . . . . . .
9.2 Software Update 132. . . . . . . . . . . . . . . . . . . . . . . . . . . . . . . . . . . . . . . . . . .
9.3 Error forwarding 133. . . . . . . . . . . . . . . . . . . . . . . . . . . . . . . . . . . . . . . . . . . .
9.4 Troubleshooting 135. . . . . . . . . . . . . . . . . . . . . . . . . . . . . . . . . . . . . . . . . . . .
10 Technical Data 136. . . . . . . . . . . . . . . . . . . . . . . . . . . . . . . . . . . . . . . . . . . .
11 End user license agreement (EULA) 138. . . . . . . . . . . . . . . . . . . . . . . .
A5/11–2004610–4.998.137.176 – 8 –
Page 9

Installation Manual for DiBos Video System
1 Introduction
1.1 System Description
The video system is a digital monitoring system with which video images
can be saved on location in order to transmit and evaluate them anyplace
you designate regardless of distance and location.
The image data delivered by the video system also permits statements
about the size of the danger and developments before and after the event.
1.2 Uninterruptible Power Supply
As an electronic device, the video system reacts sensitively to suddenly–
occurring voltage spikes, voltage drops, and voltage failure.
To avoid damage to the electronic components, to avoid data loss,
and to ensure proper operation, the installation of an uninterruptible power supply UPS is recommended.
Depending on the stability of the mains, the following UPS types are recommended:
Mains with voltage spikes and voltage failure:
the use of an offline UPS is sufficient.
Mains with voltage spikes, voltage failure, and voltage drops:
the use of an online UPS is recommended.
For 1 DiBos, a UPS with at least 300 VA is required. If additional devices
(e.g. monitors, subsystems) are also protected, the performance of the
UPS must be increased accordingly.
A5/11–2004610–4.998.137.176 – 9 –
Page 10

Installation Manual for DiBos Video System
Introduction (continued)
1.3 Recommended Virus Scanners/Firewalls
Windows XP embedded is the operating system of the video system.
The use of a virus scanner and a firewall is recommended.
Virus Scanners
The following virus scanners are approved for the video system. They are
organized according to their capability.
1. Trend Micro PC–cillin Internet Security 5.1
2. Norton AntiVirus 2004
3. McAfee VirusScan 8.0
Note:
Always use the most current virus update.
The real–time virus scanner must be activated. Only thus can suffi-
cient protection against viruses be achieved. This has no effect on
the system’s performance.
All partitions on the hard disk that contain saved images must be ex-
cluded from the scanning procedure.
Scanning of the C drive, with the exception of the partitions that con-
tain the images, should occur time–controlled. During the scanning
of the C drive, the system’s performance is reduced noticeably and
thus the image repeat and image storage rates.
The loss of individual images cannot be ruled out.
Firewall
The firewall integrated into Windows XP embedded is not activated by
default. It can be activated if necessary.
With the virus scanners listed above, only Trend Micro PC–cillin Internet
Security includes an integrated firewall. With Norton AntiVirus 2004 and
McAfee VirusScan 8.0, you must purchase the firewall separately.
The following open ports are required:
Port 80: only for Web servers
Port 1147: only for network connection DiBos–DiBos
Port 1148: only for network connection DiBos–DiBos and encrypted
data transmission
Note:
always use the most current version of the firewall.
A5/11–2004610–4.998.137.176 – 10 –
Page 11
Installation Manual for DiBos Video System
Introduction (continued)
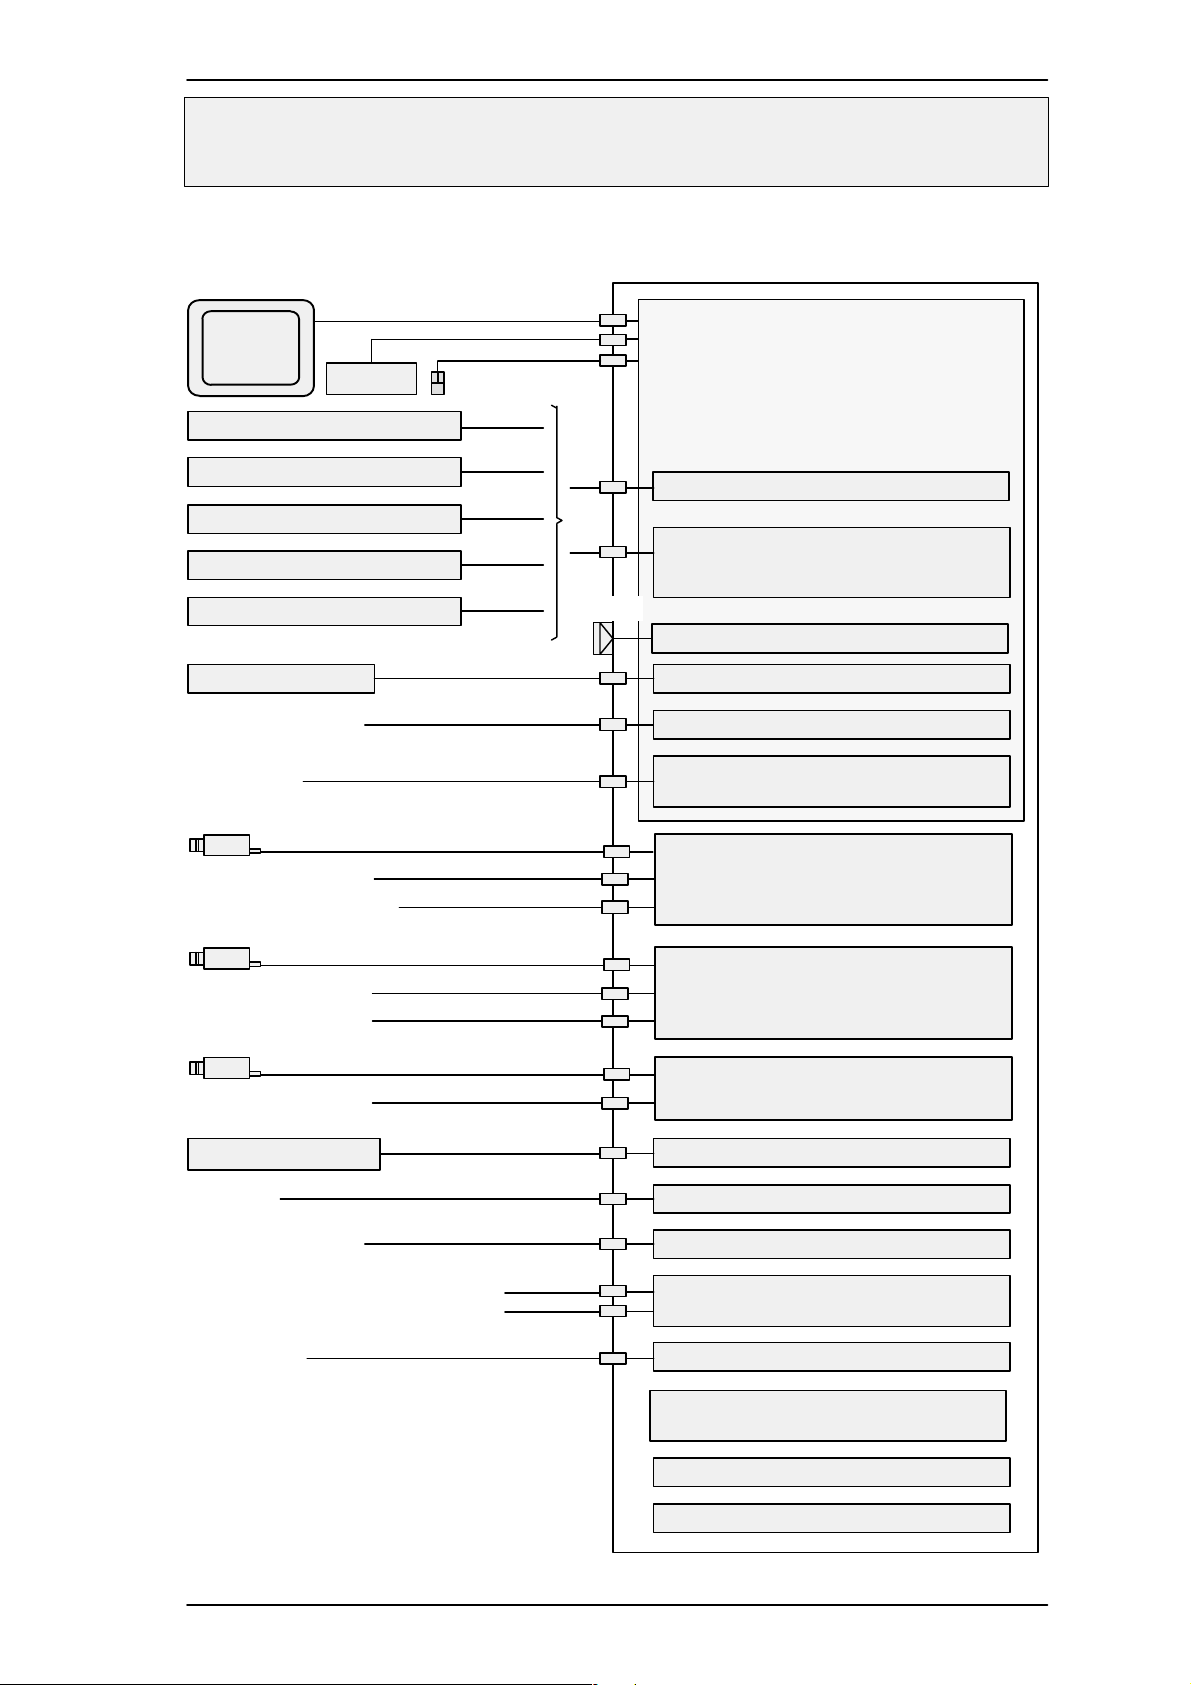
1.4 Component Overview
VGA
System board
monitor
Security System
Interface processor ATM
Foyer card reader
Barcode reader
Radio clock
Local network Ethernet
Headset
16 contact inputs
8 relay outputs or
7 relay outputs + 1 fault indicator
16 contact inputs
8 relay outputs
Key pad
16 cameras max.
16 cameras max.
Mouse
1 max.
(serial)
1 max.
(serial)
4 max.
(serial)
1 max.
(serial)
1 max.
(serial)
Serial interface (COM1)
Serial interface COM2
(placed in a free slot)
Dongle
Parallel interface (PRN)
4x USBPrinter
Sound
(microphone in – speaker out – line in)
1. Grabber card MVTitan *
2. Grabber card MVTitan *
(only if first MVTitan is present)
4 cameras max.
5 contact inputs
ISDN–S
2x RS 232, if more than 2 serial
interfaces are required
Video monitor
* A system can contain either the MVTitan
0
grabber card or the MVSigma grabber card.
MVSigma grabber card *
SCSI controllerExternal hard disks
ISDN controller
Token ring cardLocal network
Serial interface expansion
card VSCom 200 H
additional graphics card with video output
Hard disk with Windows XP operating
system and video system software
Hard disk expansion
Power supply
A5/11–2004610–4.998.137.176 – 11 –
Page 12
Installation Manual for DiBos Video System
Introduction (continued)
1.5 Laws/Norms/Guidelines
Electromagnetic compatibility (EMC)
Electrical security USA UL listed (E183863–A1–UL–2)
Climate check Germany VdS guideline 2110
Monetary institutions
(Banks)
Guarantee
Duration 3 years
USA FCC Part 15, Class B
EU EMC directive 89/336/EWG
– Fault broadcast EN 61000–6–3
– Interference immunity DIN EN 50130–4
To fulfill DIN EN 50130–4, DiBos
must be operated with a UPS.
EU EN 60950–1
Germany Accident prevention “cash register”
regulations (BGV C9)
Note during the installation/configuration of the system according to accident prevention “cash register” regulations the SP9.7/5 ”Installation Notes for
Optical Room Monitoring Systems”
(ORÜA).
A5/11–2004610–4.998.137.176 – 12 –
Page 13
Installation Manual for DiBos Video System
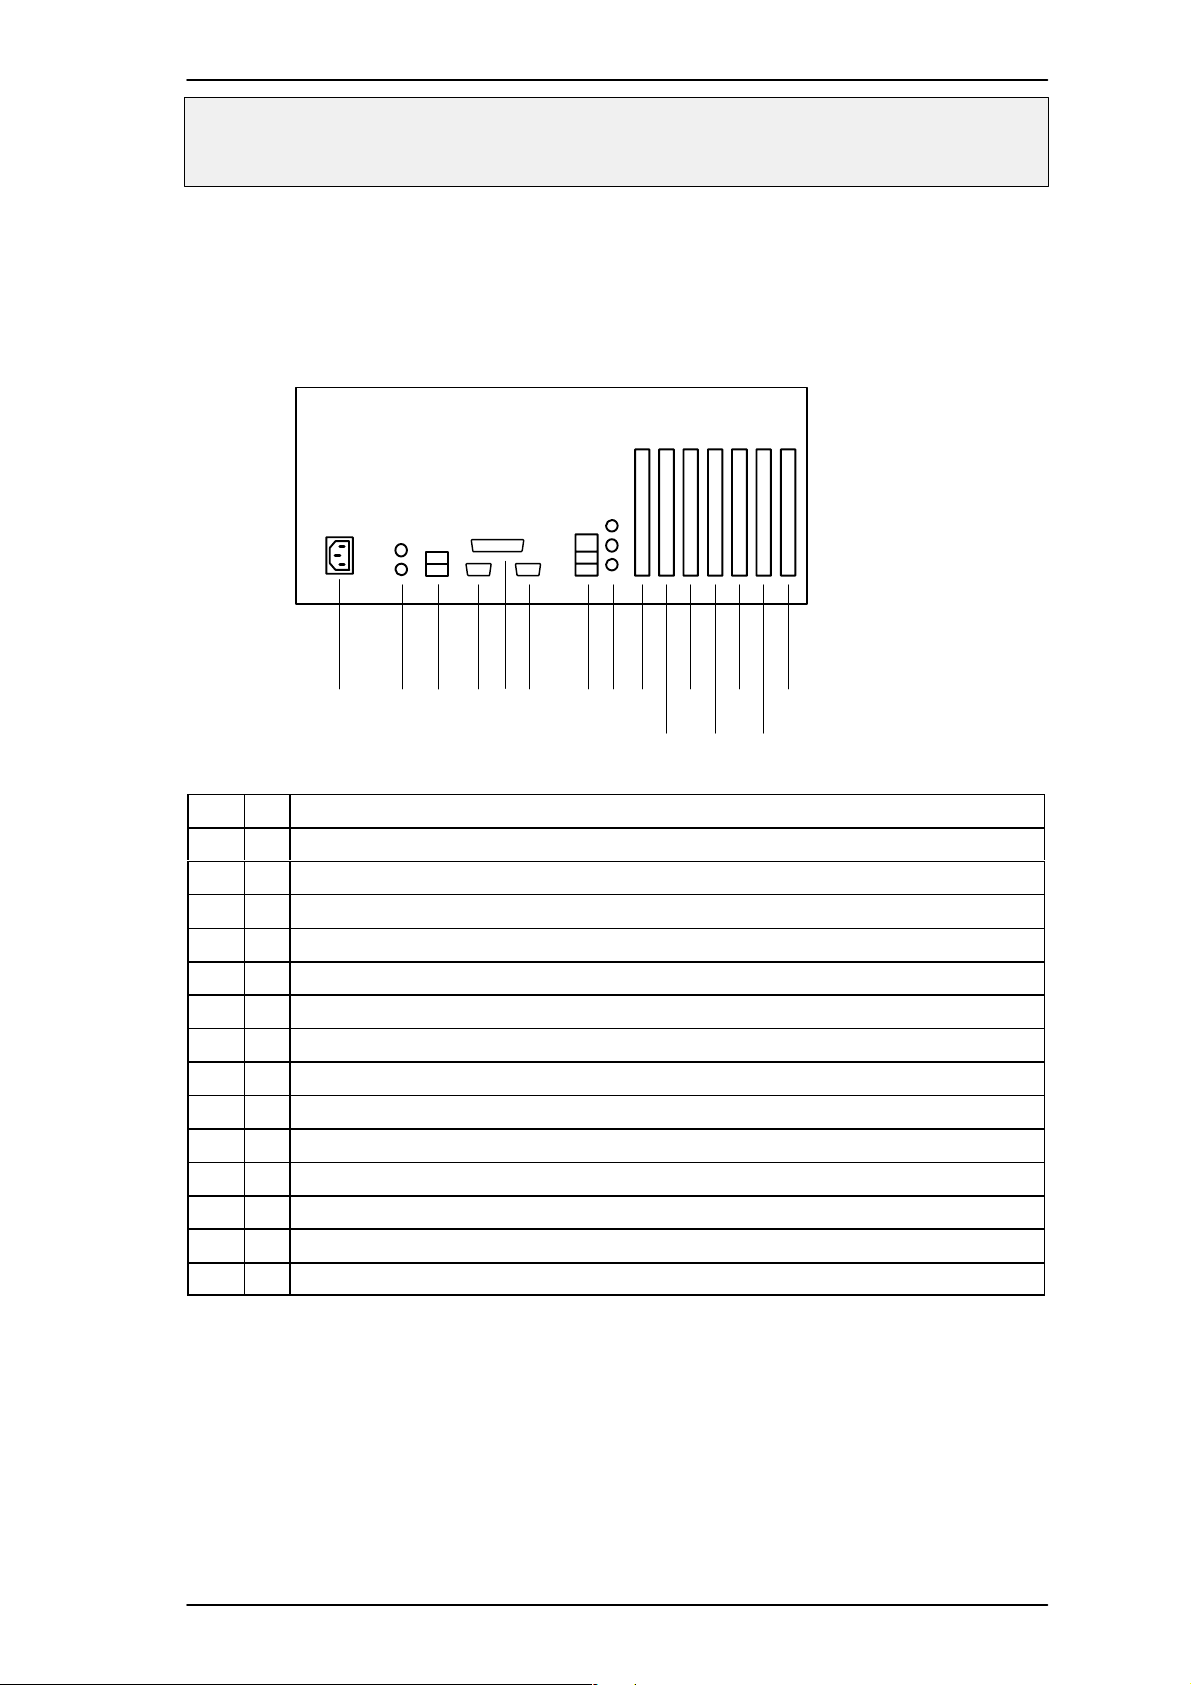
2 Computer Slots
Installation of the internal hardware components of the computer may only be performed by the video system manufacturer. Any field configuration changes to the
internal hardware will void the system warranty.
Rear view:
145689
151372 3
101112 14
1 = Power supply
2 = Keyboard – mouse
3 = 2x USB 2.0
4 = Serial interface COM1 (COM2 in another empty slot)
5 = Parallel interface (PRN)
6 = Monitor
7 = USB 2.0 – USB 2.0 – Ethernet (RJ45)
8 = Microphone in (mono) – speaker out – line in
9 = Additional graphics card with TV output
10 = 1. MVTitan or MVSigma grabber card
11 = 2. MVTitan grabber card (only if first grabber card is present)
12 = SCSI controller
13 = ISDN card or modem 56 k
14 = Token ring network card
15 = Interface expansion card VSCom 200 H or watchdog V–DOG
Note:
if necessary, the interface card VSCom 200 H should be placed in a free slot.
A5/11–2004610–4.998.137.176 – 13 –
Page 14
Installation Manual for DiBos Video System
3 Quick installation
For information about the device connections, please see Chapter 2.
1. Connect the mouse and keyboard (put ferrite on the cables).
2. Plug the 26–pin D–sub plug of the grabber cable on the corresponding plug of the
grabber card.
3. Connect the cameras to the grabber cable. On each cable there is a plastic ring with a
printed number. This number stands for the video input, e.g. “1” for video input 1.
4. Connect the contact inputs (alarm inputs) and relay outputs to the grabber cable.
5. Switch all connected devices on.
6. Plug the network cable into the video system.
7. Switch the video system on. The switch is on the back side. The system will then boot
up automatically and stop at the setup assistant.
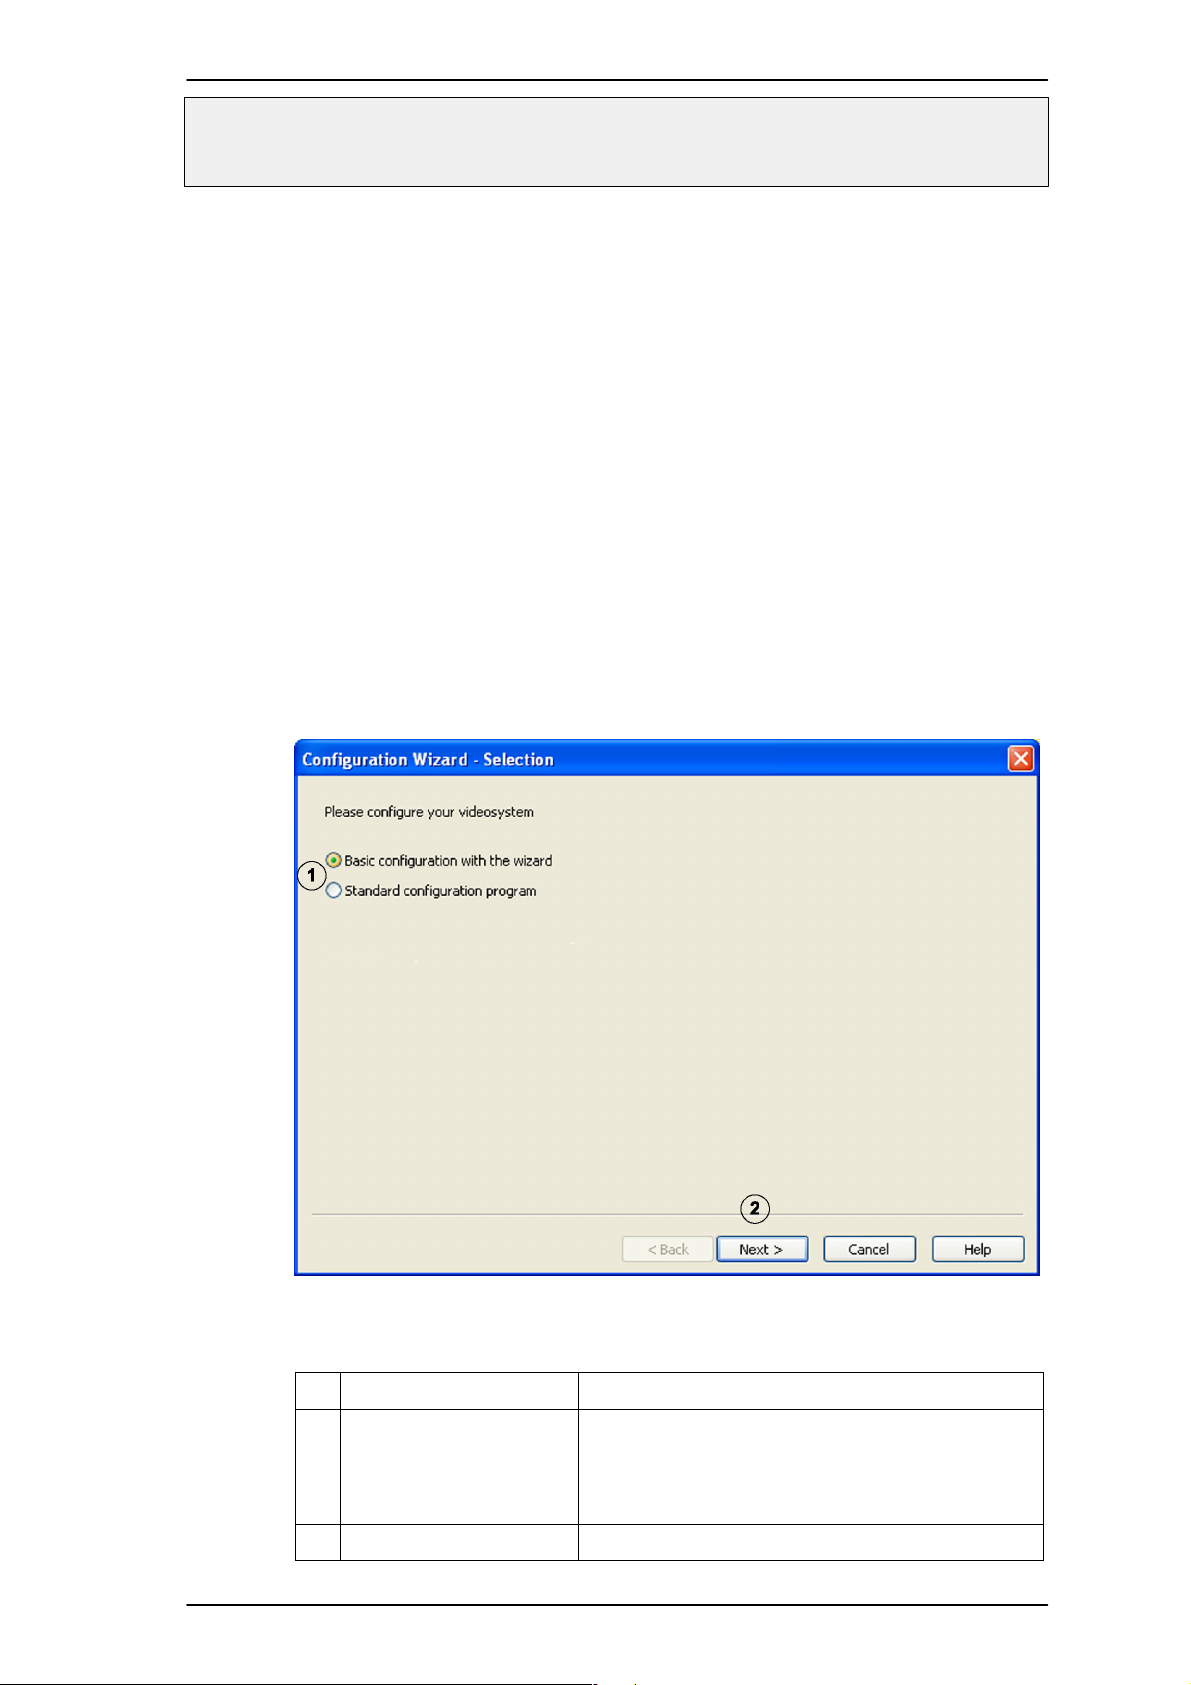
8. If you do not yet have experience with the system, select the “Create basic configuration with help of the assistant” option. With a few clicks of the mouse, you will have a
basic configuration. The system automatically recognizes the connected video hardware (cameras, grabber).
Note: after the basic configuration, expansions must be executed in the standard
(expert) configuration (see Chapter 6.2).
Carry out your selection as follows:
No. Name Description
1 Basic configuration with
the wizard
Standard configuration
program
2 Next Click on Next to continue.
Select this function to start the Assistant.
With this function, you start Expert Configuration
(see Chapter 6.2).
A5/11–2004610–4.998.137.176 – 14 –
Page 15
Installation Manual for DiBos Video System
Quick installation (continued)
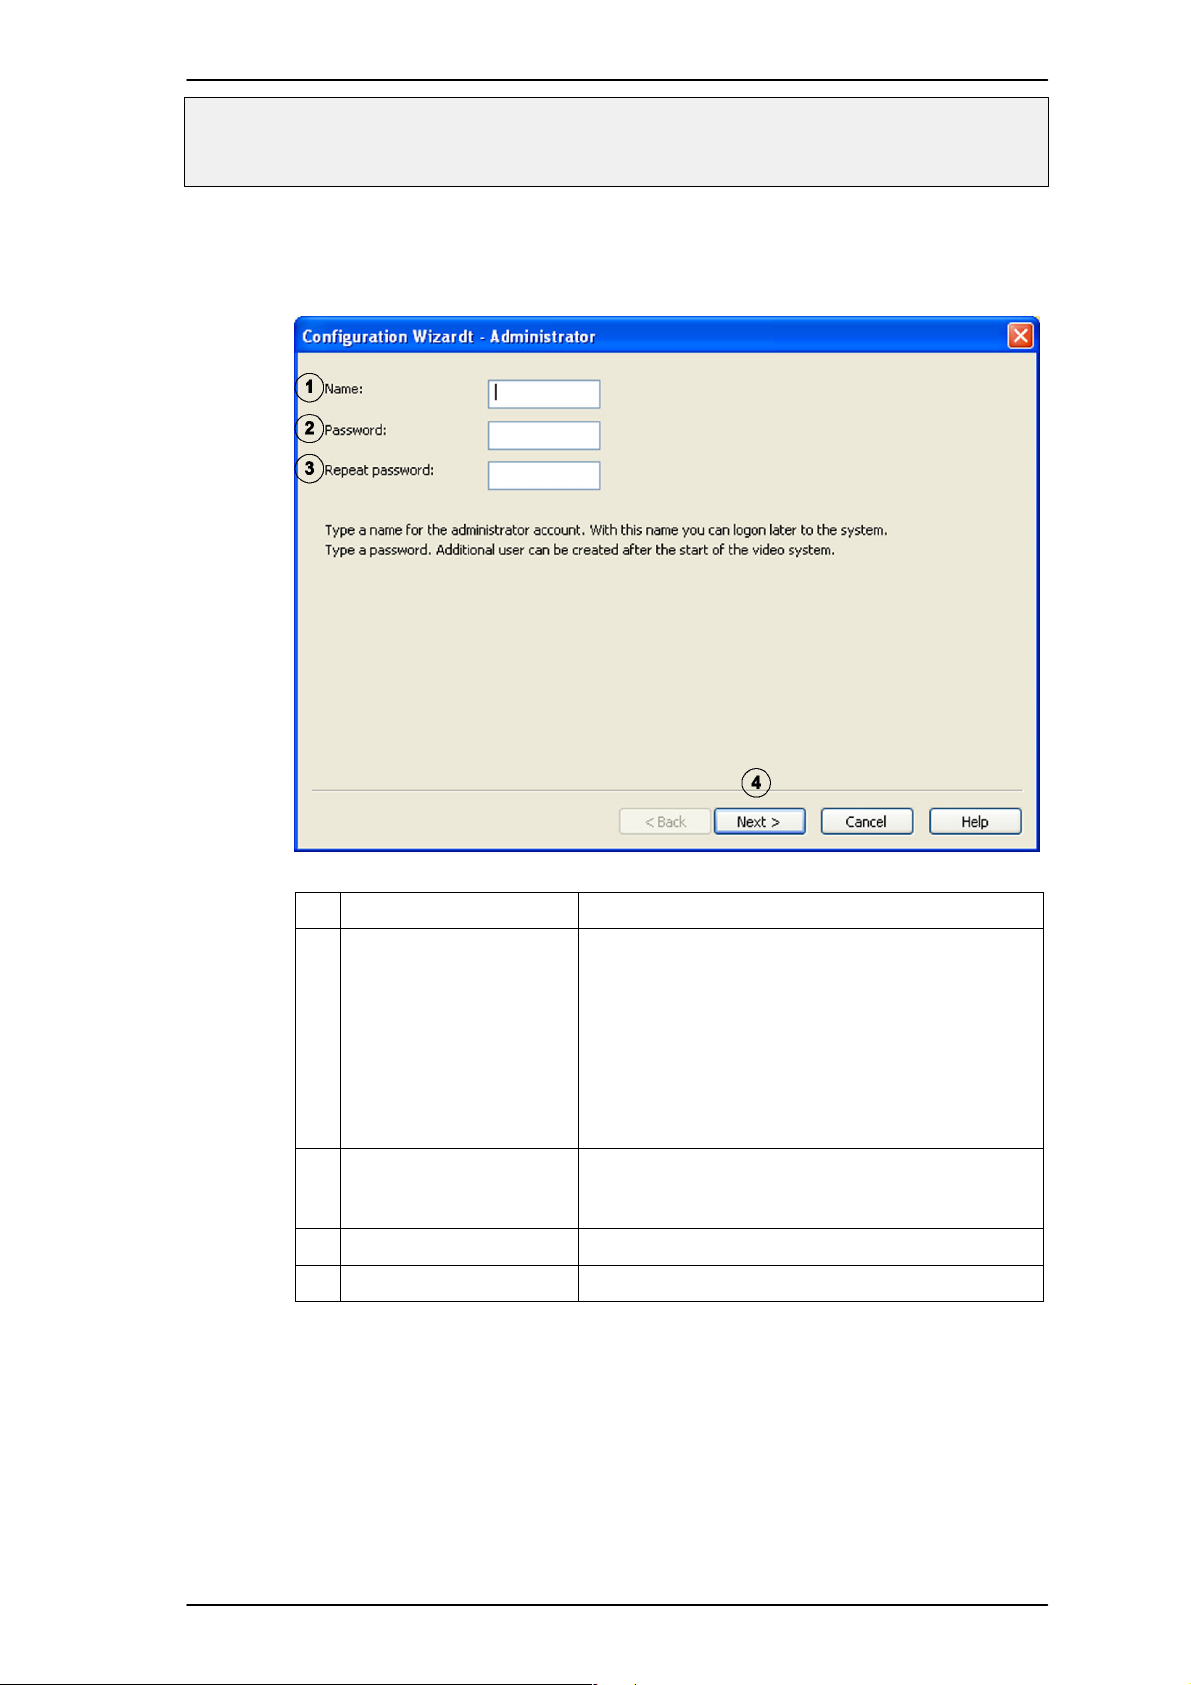
Logon as administrator
No. Name Description
1 Name Enter the name here. You have to logon in the
video system with this name in the future to operate the system.
The user given here receives administrator rights,
i.e. rights with which she/he can perform all system functions.
However, the name can be changed later. Please
take note of the following information for instructions on how to do this:
2 Password Enter the password here. Entering a password is
optional. This is recommended, however, to pre-
vent unauthorized access by others.
3 Repeat password Enter the password again for security purposes.
4 Next Click on Next to continue.
Note: You will enter Expert Configuration as follows after successfully con-
cluding Basic Configuration.
– Start the system. This will take you to the live image.
– In Live Image, select the System/Configuration menu. This will
then take you to Expert Configuration.
– Select the User management/user menu in the configuration.
The name and password can be changed here. You can also
specify additional users here.
A5/11–2004610–4.998.137.176 – 15 –
Page 16
Installation Manual for DiBos Video System
Quick installation (continued)
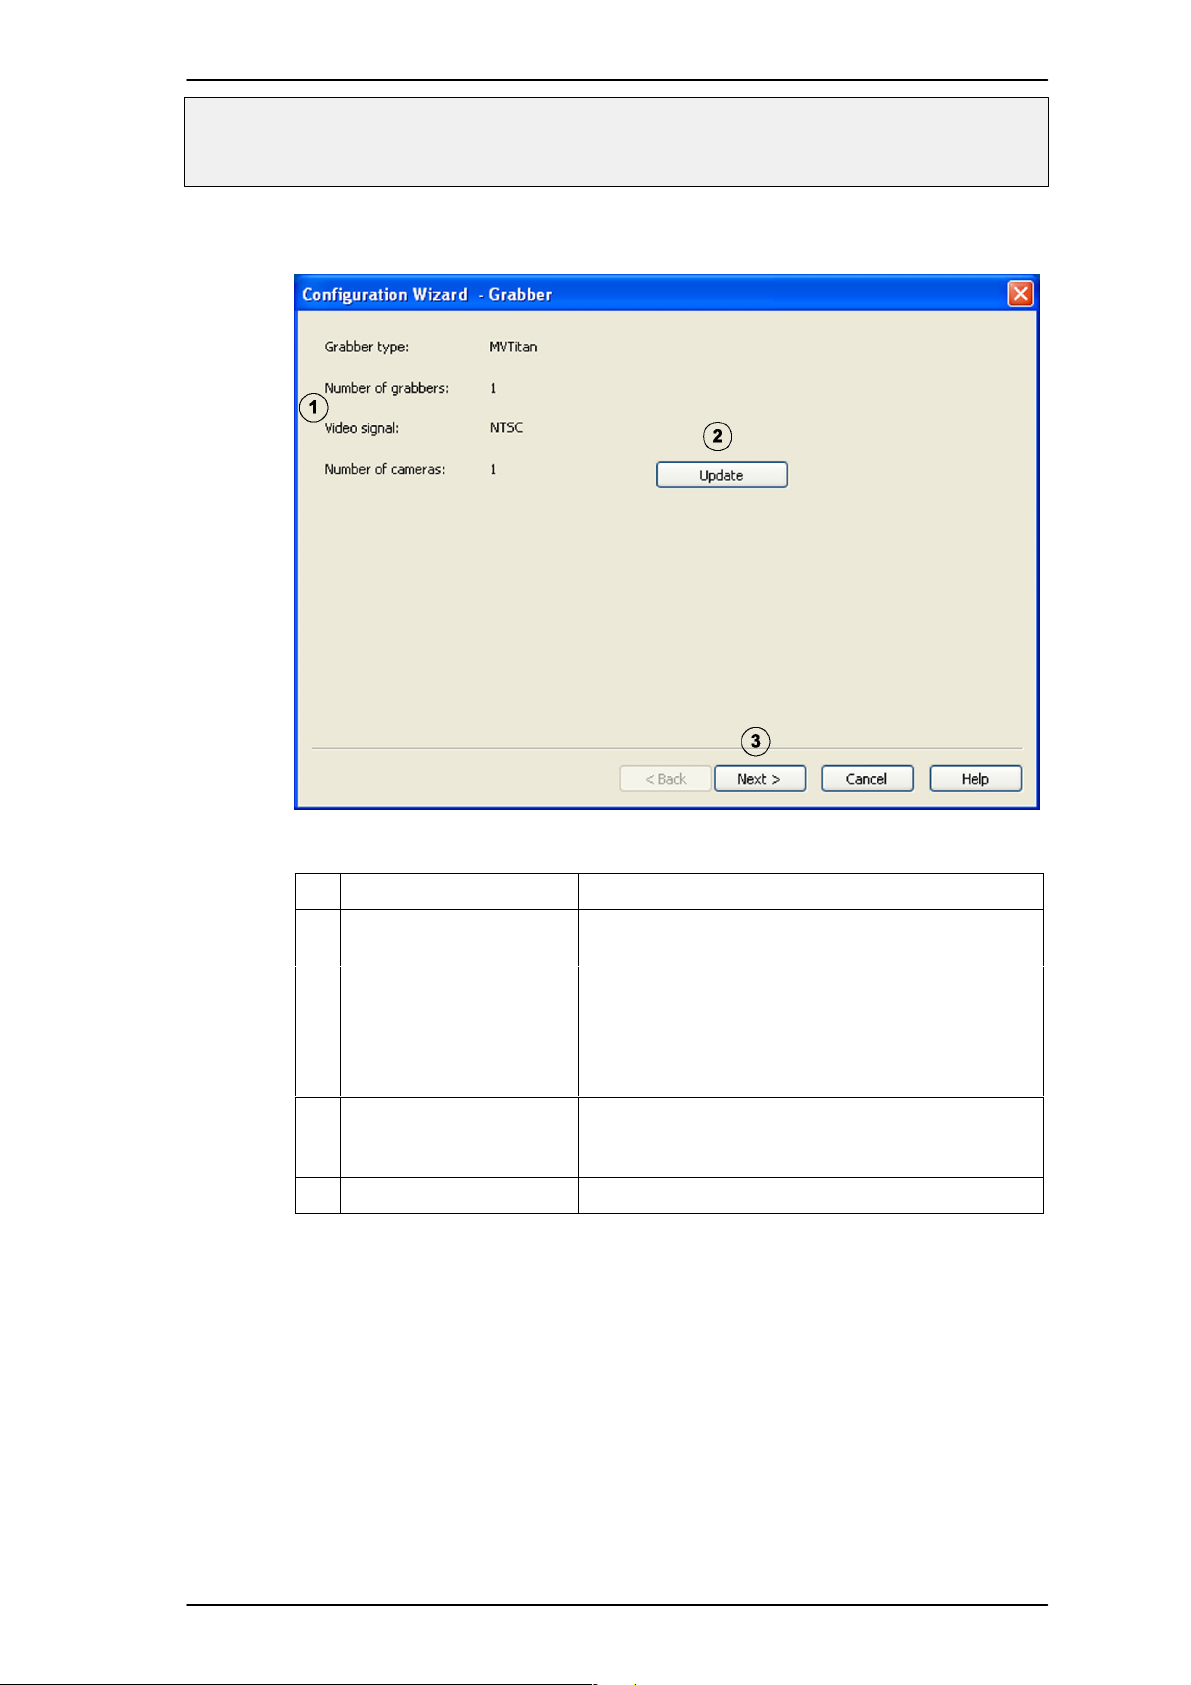
Display of the existing hardware
The existing video hardware is displayed in this dialog box.
No. Name Description
1 Grabber type: The built–in grabber type is displayed. Either
MVTitan or MVSigma.
Number of grabbers: The number of built–in grabbers is displayed.
Video signal: The video norm used by the connected cameras
is displayed automatically.
Number of cameras: The number of connected cameras is displayed.
2 Update If a camera is put into operation after Basic Con-
figuration has been started, this can be included
by clicking on Update.
3 Next Click on Next to continue.
A5/11–2004610–4.998.137.176 – 16 –
Page 17
Installation Manual for DiBos Video System
Quick installation (continued)
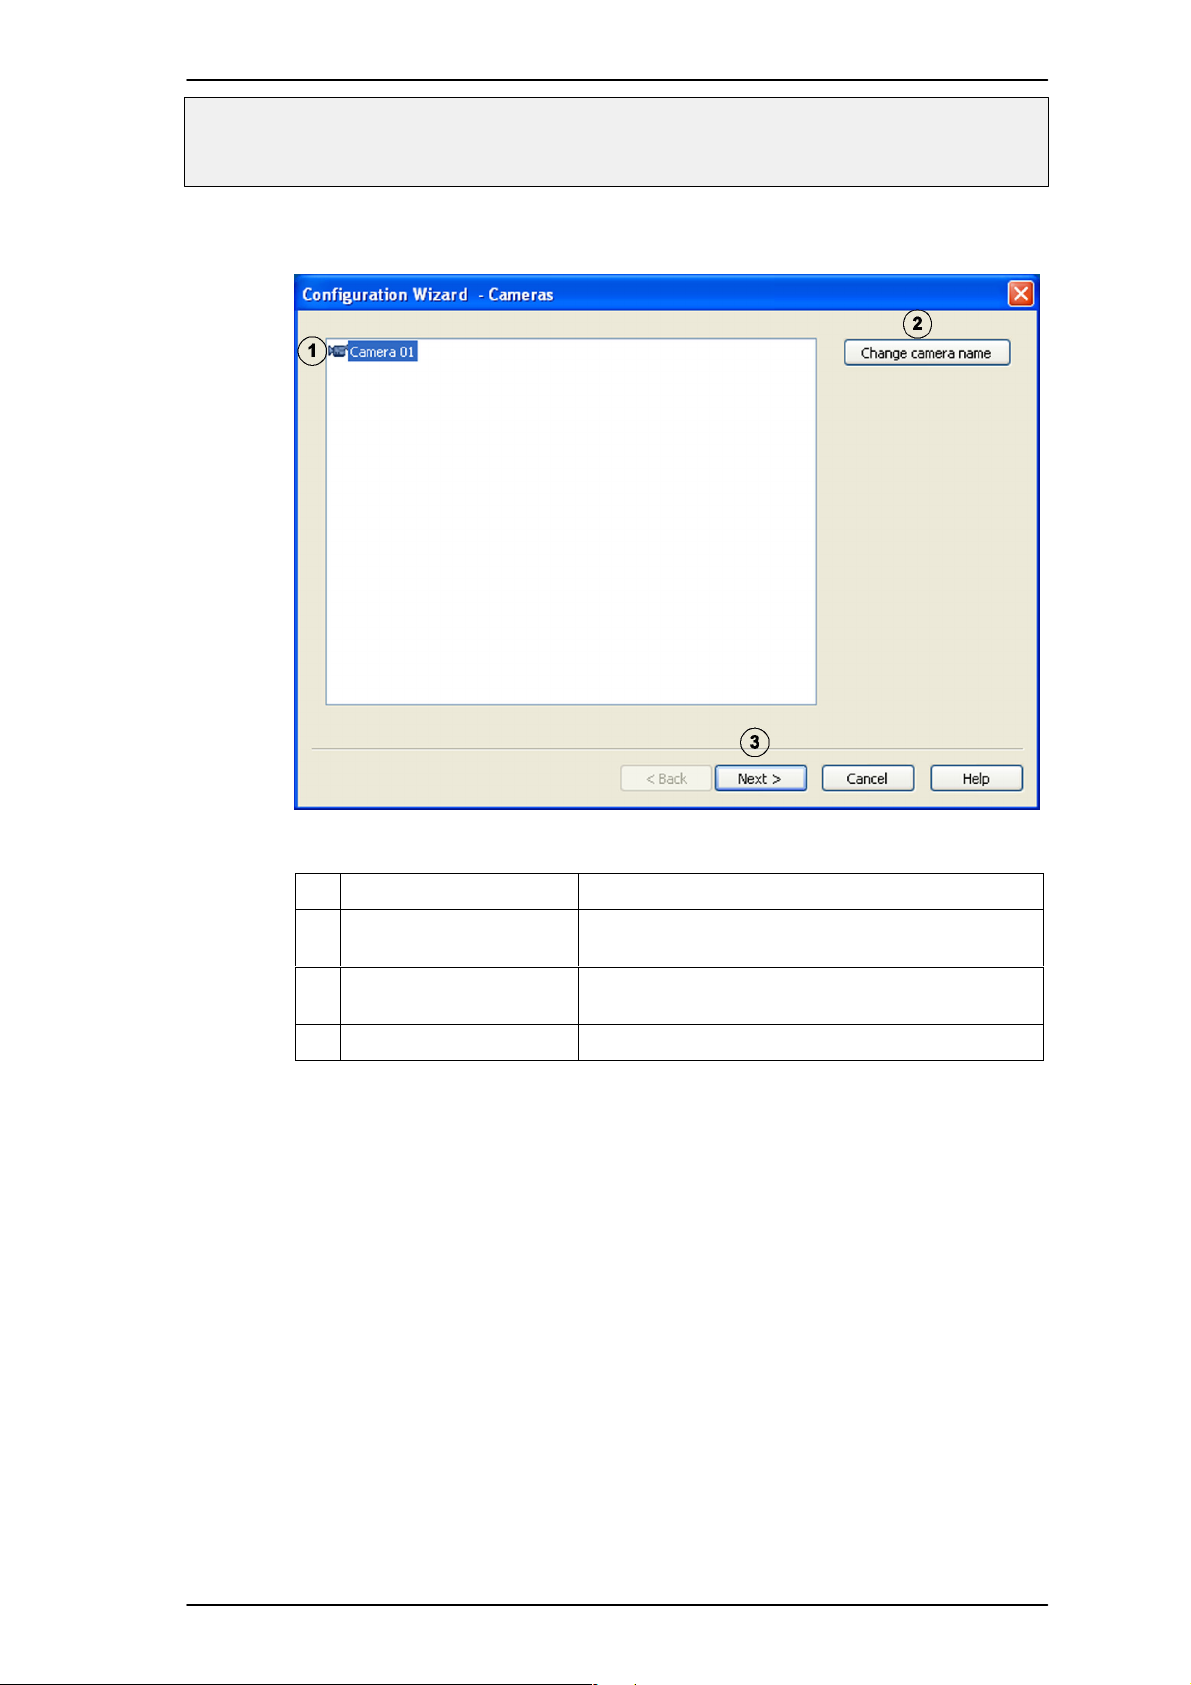
Changing the camera name
You can change the camera name in this dialog box.
No. Name Description
1 Click on the camera whose name you wish to
change. The selection is displayed in color.
2 Change camera name Click on Change camera name. You can now
change the name of the selected camera.
3 Next Click on Next to continue.
A5/11–2004610–4.998.137.176 – 17 –
Page 18
Installation Manual for DiBos Video System
Quick installation (continued)
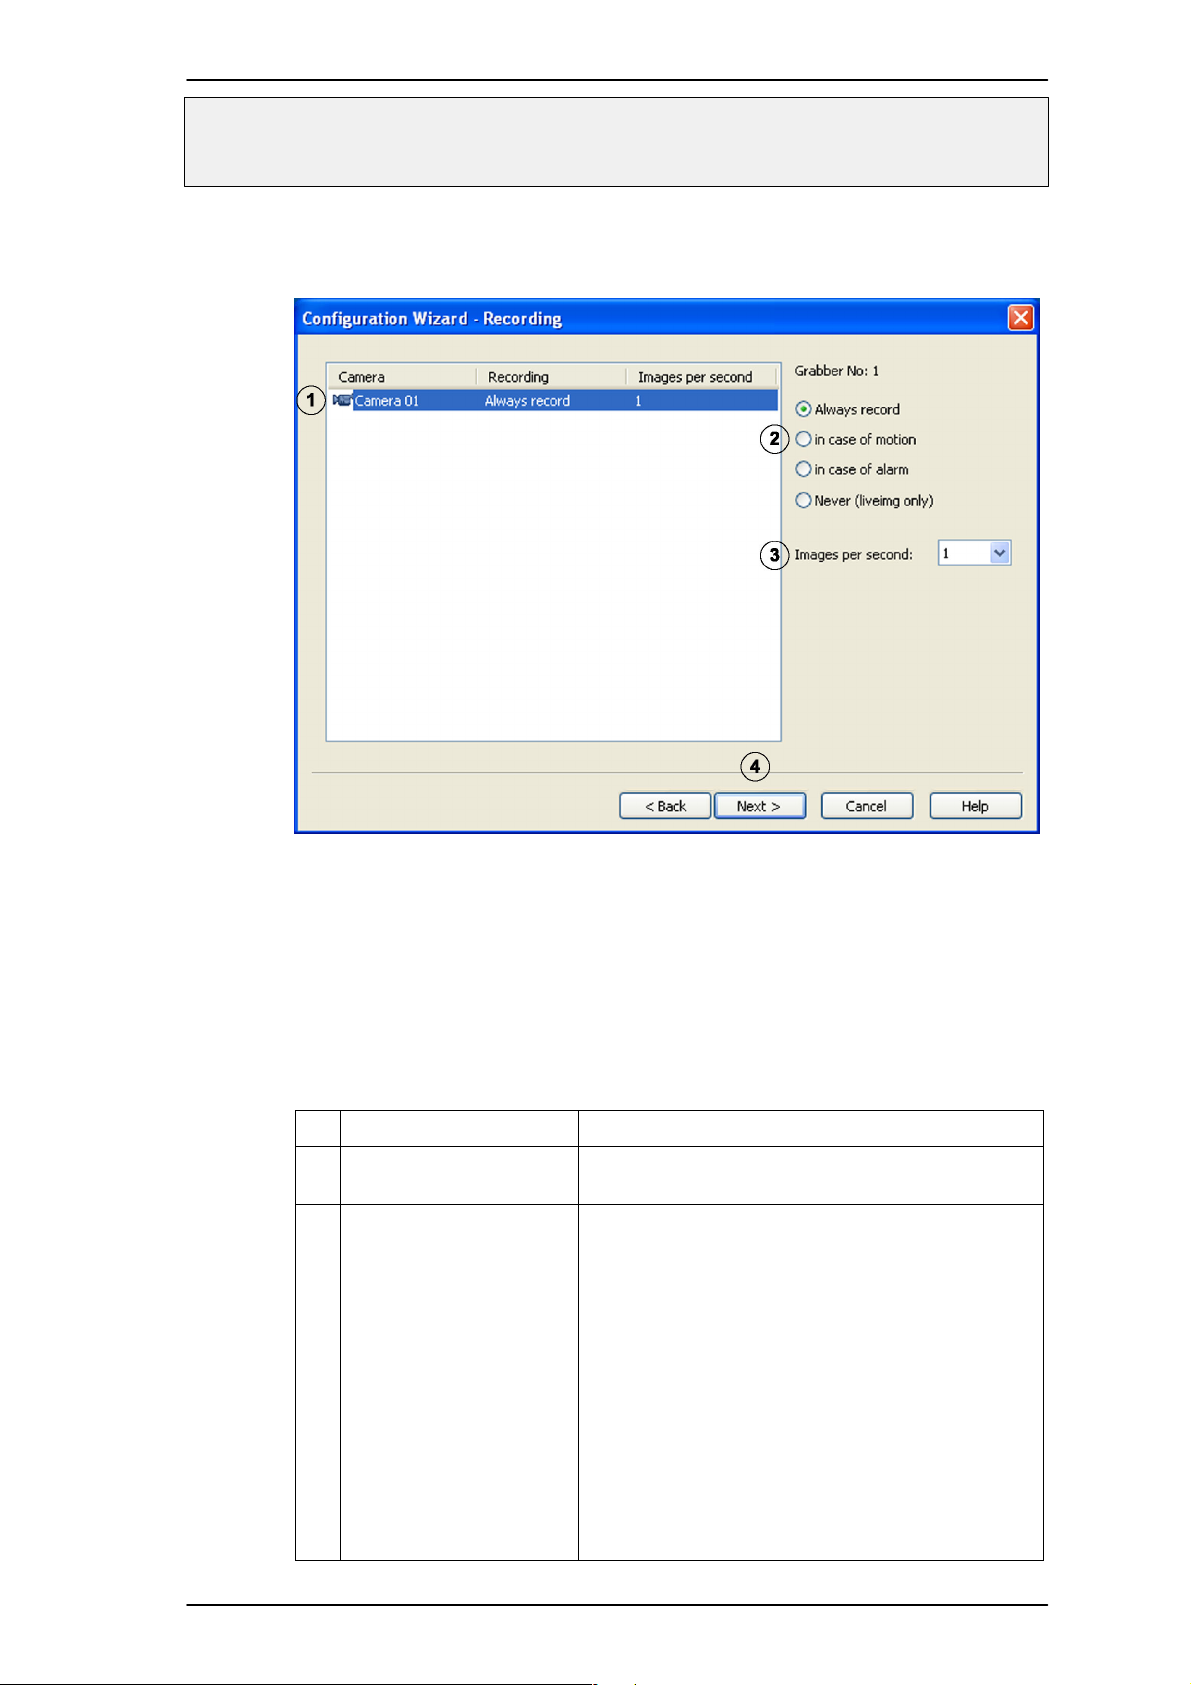
Select storage method
You can determine the following for each camera in this dialog box:
if a recording (storage of images) should take place and
how many images per camera should be displayed.
The system automatically determines the type of recording for each camera.
The system will thus create a storage job with the following settings:
Recording: Always record
Images per second: 1
You can change this standard setting as follows:
No. Name Description
1 Click on the camera whose setting you wish to
change. The selection is displayed in color.
2 Grabber no.: x Select when a recording should occur for each
camera.
Always record The camera always records.
In case of motion The camera starts recording as soon as a move-
ment occurs. The area of the camera image to be
monitored can be drawn in Expert Configuration
(menu Hardware/Framegrabber/Cameras,
Setup buttons).
In case of alarm The camera records as soon as the correspond-
ing alarm input of the frame grabber triggers (e.g.
Camera 1 corresponds to Detector 1).
Never (liveimg only) No recording occurs. Only a camera live image is
displayed.
A5/11–2004610–4.998.137.176 – 18 –
Page 19

Installation Manual for DiBos Video System
Quick installation (continued)
3 Images per second Enter the number of images per second that are
to be recorded in the Images per second box.
Note:
The system checks the plausibility of the config-
ured recording rate here.
4 Next Click on Next to continue.
Note:
If a second MVTitan grabber is available, the dia-
log box for the second grabber will be displayed
again after confirming with Next . Change the
standard settings here as well if necessary.
A5/11–2004610–4.998.137.176 – 19 –
Page 20
Installation Manual for DiBos Video System
Quick installation (continued)
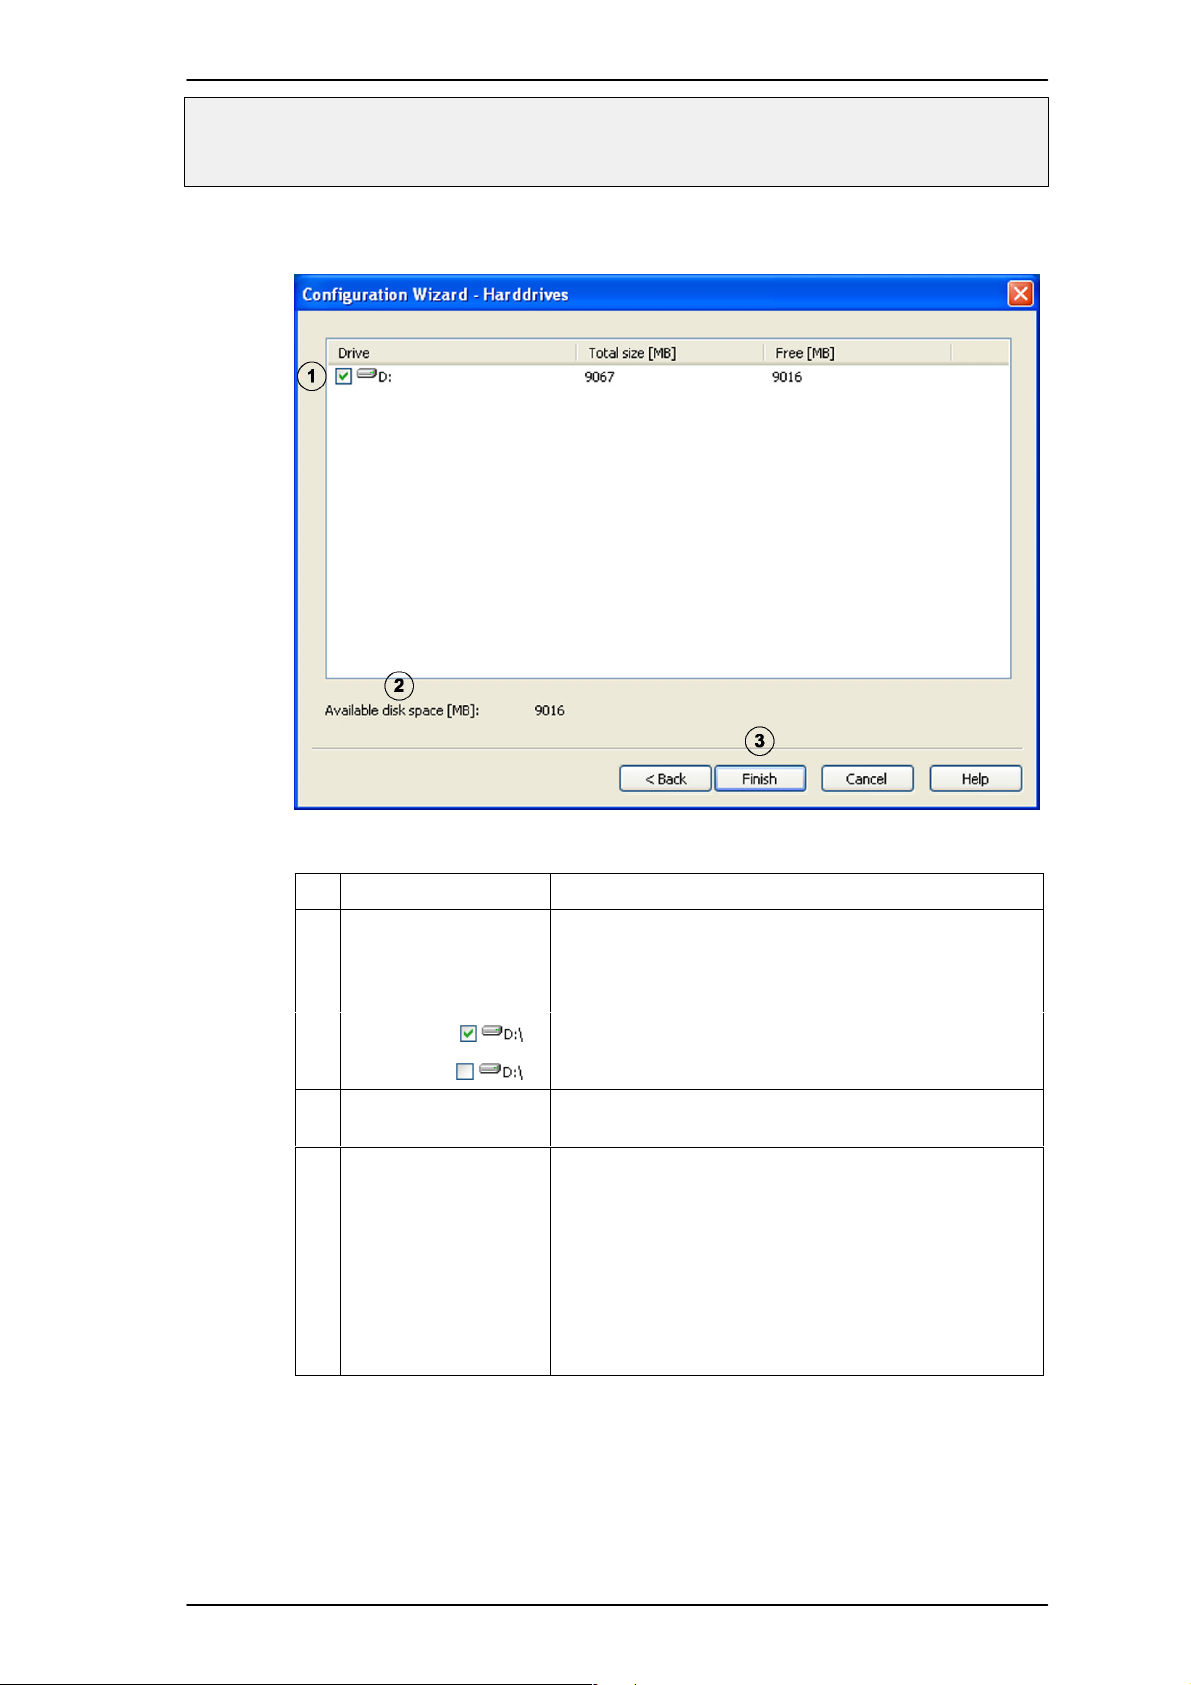
Select the drive for storage and finish Basic Configuration.
In this dialog box, select the drive for storage of the image data.
No. Name Description
1 The List field contains all hard drives and network
drives known to the system at the start of Basic Configuration. Both the total size and free storage capacity in MByte is shown.
The drive is activated.
The drive is not activated.
2 Available disk space
(MB):
3 Finish Click on Finish to accept the entries and finish Basic
The total size of the memory capacity for the activated drives is displayed in Mbytes.
Configuration.
The video system is subsequently started.
Log on with your user name and password and
make further modifications in Expert Configuration if
necessary.
Note:
At least 1 drive must be selected so that the configuration can be finished.
A5/11–2004610–4.998.137.176 – 20 –
Page 21

Installation Manual for DiBos Video System
Quick installation (continued)
Note:
When finishing Basic Configuration, the system proceeds according to the following convention:
A ring archive is created for each camera (this can be overwritten).
The size of the archives is generated according to the formula “avail-
able disk space: total number of cameras”. All selected system partitions are used for the available memory capacity, with the exception
of system partition (C:).
A storage job with x number of images per second is created for each
camera.
If the trigger is the result of movement, the entire contents of the
image are evaluated as an area to be monitored.
A5/11–2004610–4.998.137.176 – 21 –
Page 22

Installation Manual for DiBos Video System
4 Connections
This section describes the following connections/installation:
Grabber card MVTitan/MVSigma
Ethernet/token ring
ISDN controller
Interface expansion card VSCom 200 H
SCSI controller
Monitor, keyboard, mouse
External hard disks
B&W, CCVS and Y/C cameras
V–DOG and tamper contact
Software dongle and printer
Fault indicator
Automatic teller machine
Bar code reader
Programming the foyer card reader MINITER RS 485
Radio clock DCF 77
Web Connection for Access Via Browser
Modem
Security systems:
– NZ 500/BZ 500
– BZ 500
– AZ 1010/NZ 1008
– NZ 1012/BZ 1012
– BZ 1012
– NZ 1060
– BZ 1060
– UEZ 1000
– UEZ 2000
– UGM 2020
– Bosch D9000
A5/11–2004610–4.998.137.176 – 22 –
Page 23
Installation Manual for DiBos Video System
Connections (continued)
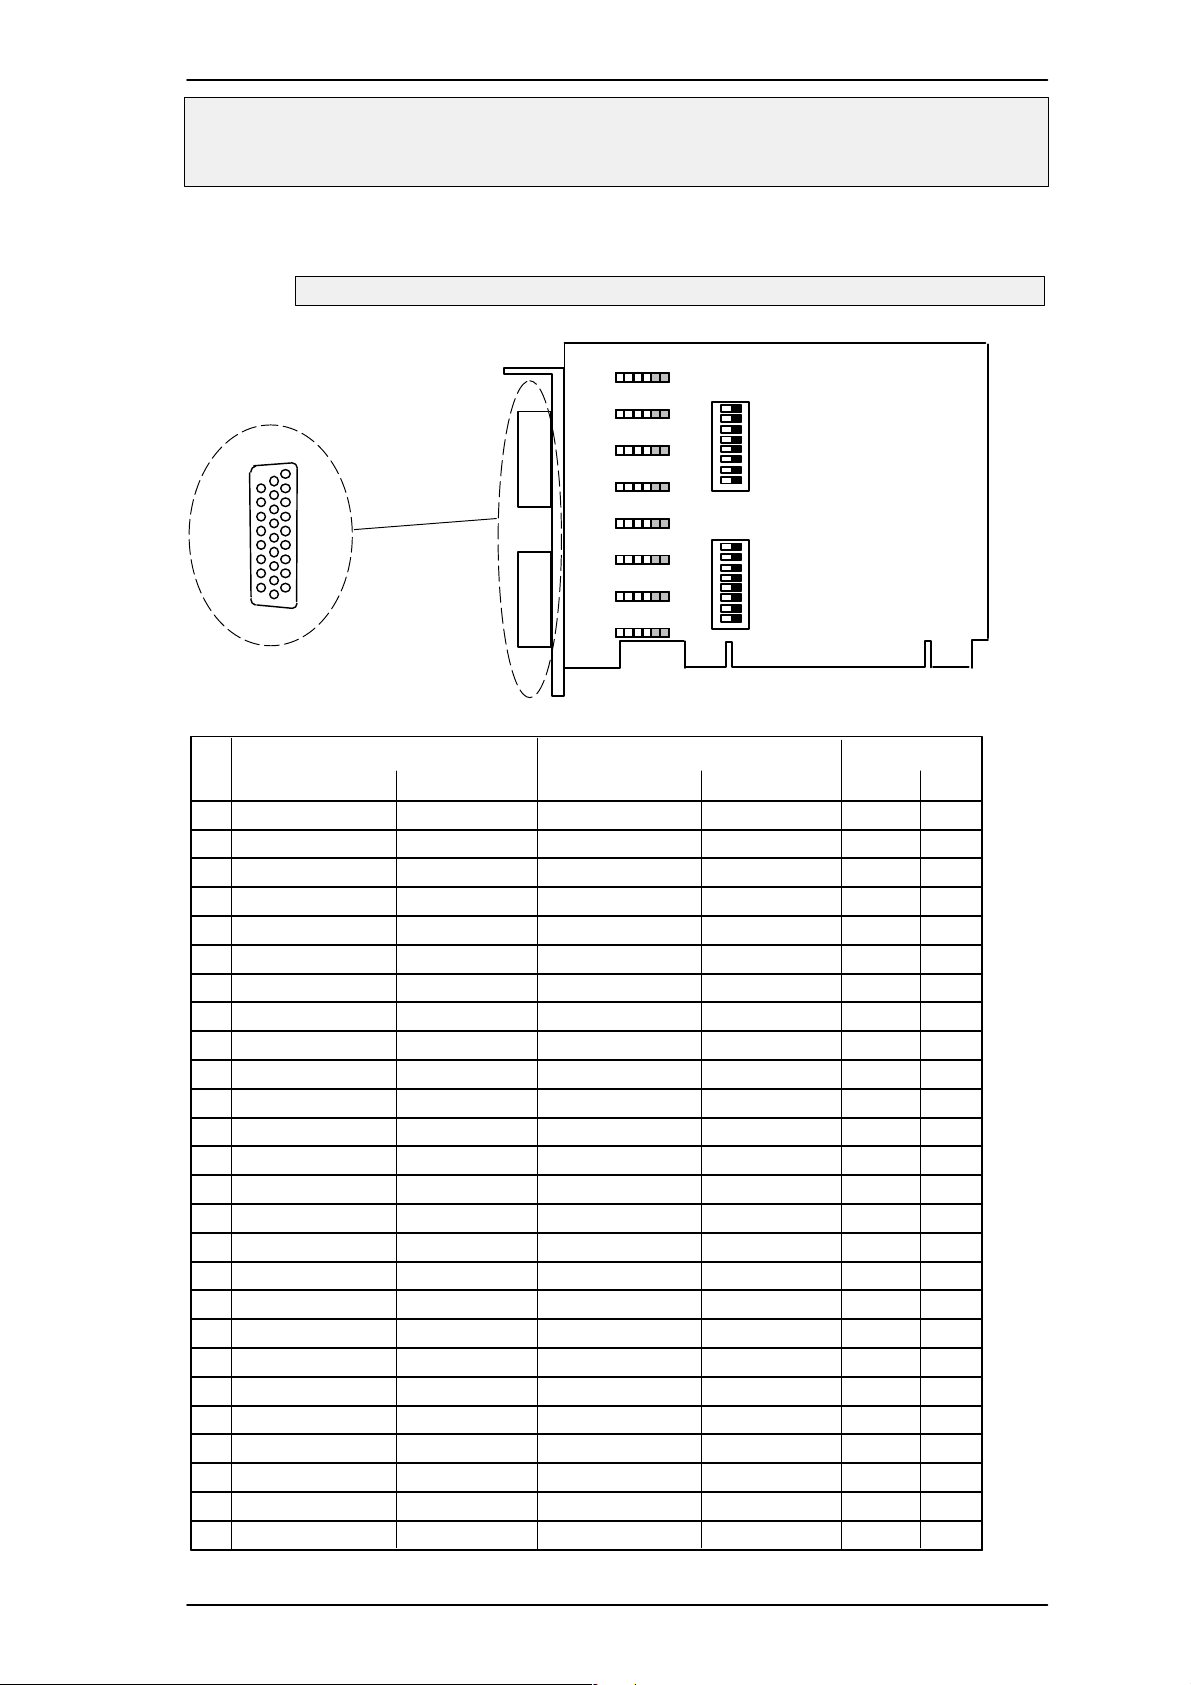
4.1 Grabber Card MVTitan (max. 2)
May only be executed by authorized trained personnel!
26
19
18
10
9
Connector J11
1
Connector J9
J8
J7
J6
J5
J4
J3
J2
J1
ON
1
1
8
S2
1
1
1
1
1
1
11
ON
1
Grabberkarte
MVTitan
8
S1
1
Pin Assignment connector J9/J11
Connector J11 Connector J9 J11/J9
Assignment
Pin
1 +12 V – w –
2 Video input 1 S1–1 – V1
3 Video input 2 S1–2 – V2
4 Video input 3 S1–3 – V3
5 Video input 4 S1–4 – V4
6 Alarm input 1 – br –
7 Alarm input 2 – gn –
8 Relay 3a J3 yw –
9 Relay 4a J4 gr –
10 GND – pk –
11 Alarm input 5 – blu –
12 Alarm input 6 – rd –
13 Alarm input 7 – bk –
14 Alarm input 8 – vio –
15 Relay 1b – gr/pk –
16 Relay 2b – rd/blu –
17 Relay 3b – w/gn –
18 Relay 4b – br/gn –
19 Alarm input 3 – w/yw –
20 Alarm input 4 – yw/br –
21 Video input 5 S1–5 – V5
22 Video input 6 S1–6 – V6
23 Video input 7 S1–7 – V7
24 Video input 8 S1–8 – V8
25 Relay 1a J1 w/gr –
26 Relay 2a J2 gr/bn –
Setting Color
Assignment Setting
+12 V
Video input 9
Video input 10
Video input 11
Video input 12
Alarm input 9
Alarm input 10
Relay 7a
Relay 8a
GND
Alarm input 13
Alarm input 14
Alarm input 15
Alarm input 16
Relay 5b
Relay 6b
Relay 7b
Relay 8b
Alarm input 11
Alarm input 12
Video input 13
Video input 14
Video input 15
Video input 16
Relay 5a
Relay 6a
–
S2–1
S2–2
S2–3
S2–4
–
–
J7
J8
–
–
–
–
–
–
–
–
–
–
–
S2–5
S2–6
S2–7
S2–8
J5
J6
BNC
A5/11–2004610–4.998.137.176 – 23 –
Page 24
Installation Manual for DiBos Video System
Connections (continued)
Relay output
J1 to J8
Position 1 –2 Relay contact
N/O contact
Position 2 –3 Relay contact
N/C contact
Position 4 –5
Position 5 – 6 not occupied
Common
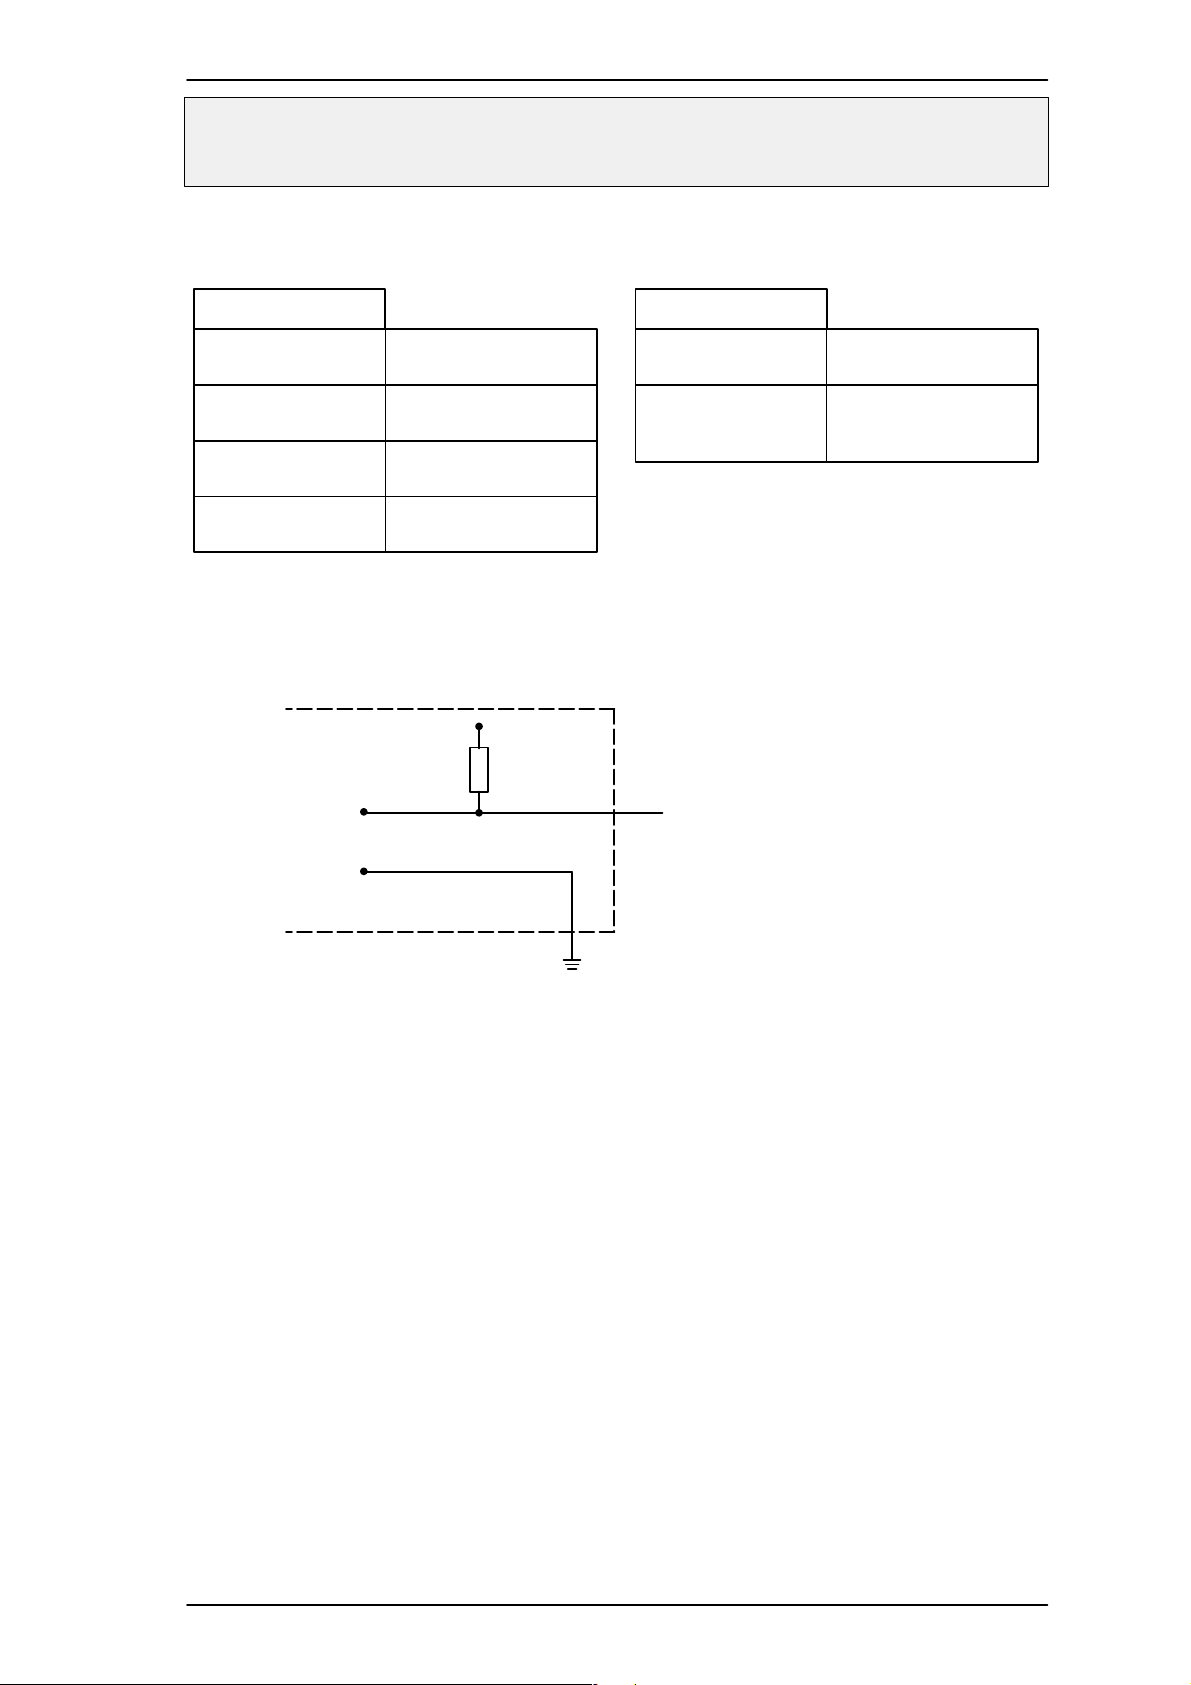
Alarm input connection:
J9/J11
5 V
Alarm input x
Video input termination
S1, S2
off Input not
terminated
on Terminated with
75 Ohm (delivery state)
5 kOhm
TTL
PIN 10
Relay load = 60 V/2 A
Note:
Video input 1 – 16
– 1 input per B&W and CCVS camera
– 2 inputs per Y/C camera
A5/11–2004610–4.998.137.176 – 24 –
Page 25
Installation Manual for DiBos Video System
Connections (continued)
4.2 Grabber Card MVSigma
May only be executed by authorized trained personnel!
18
26
9
18
ON
S1
MVSigma grabber card
19
1
10
Pin assignment
26–pin connector
Pin
1
2
3
4
5
6
7
8
9
10
11
12
13
14
15
16
17
18
19
20
21
22
23
24
25
26
Assignment Color BNC
+12 V DC w –
Video input 1 – V1
Video input 2 – V2
Video input 3 – V3
Video input 4 – V4
Used – –
Used – –
Alarm input 1 yw –
Alarm input 2 gr –
Used – –
Alarm input 3 blu –
Used – –
Used – –
Used – –
Used – –
Alarm input 4 rd/blu –
Earth alarm inputs w/gn –
Alarm input 5 br/gn –
Not used – –
Not used – –
Not used – –
Not used – –
Not used – –
Not used – –
Not used – –
Not used – –
Video input termination
S1–1, S1–2,
S1–3, S1–4
off Input not
terminated
on Terminated with
75 Ohm (delivery state)
A5/11–2004610–4.998.137.176 – 25 –
Page 26

Installation Manual for DiBos Video System
Connections (continued)
4.3 Connection to a Token Ring or Ethernet Network
May only be executed by authorized trained personnel!
In addition to the Ethernet connection on–board, there is an optional token ring card available.
Note:
Only the card type Madge Token Ring Smart 16/4 PCI Ring Node may
be used.
Installation and configuration of the token ring card
1. Switch off the computer and disconnect the network plug.
2. Install the network card in the appropriate computer slot (see Section 2).
3. Switch the computer on. The network card will be recognized and
installed automatically by the system.
Integration into a customer network with dynamic assignment of IP
addresses (for Ethernet and token ring)
In the delivery state, DHCP is activated. If, however, you have switched
over to a fixed IP address and you would like to return to a dynamic distribution of the IP addresses (DHCP), then activate DHCP as follows.
1. Log on as the Administrator.
2. Adapt the TCP/IP address as follows:
Select ”Start → Control Panel→ Network Connections.”
Double–click on ”Local Area Connection → General”.
On the following dialog box, select the ”Internet Protocol (TCP/
IP)” option and click the ”Properties” button.
Activate the ”Obtain IP address automatically“ option button and
confirm by clicking ”OK”.
3. Adapt the computer names as follows:
Select ”Start → Control Panel → Performance and Maintenance→
System→ Computer Name→ Change” and make the following entries for
”Computer name: <Computer name><Computer number>”
”Workgroup: <Computer name>_NETWORK”
4. Confirm your entries by clicking ”OK”.
5. Restart the computer.
A5/11–2004610–4.998.137.176 – 26 –
Page 27

Installation Manual for DiBos Video System
Connections (continued)
Integration into a customer network with static assignment of IP addresses (for Ethernet and token ring)
Ask the system administrator for the IP and subnet address and proceed
as follows:
1. Log on as the Administrator.
2. Adapt the TCP/IP address as follows:
Select ”Start → Control Panel→ Network and Internet Connec-
tions”.
Double–click on ”Local Area Connection”.
On the following dialog box, select the ”Internet Protocol (TCP/
IP)” option and click the ”Properties” button.
Activate the ”Use the following IP addresses“ option button and
enter the IP and subnet mask:
”IP address: x . y . z . computer number”
x: like other computers
y: like other computers
z: last two digits of the dongle number
Computer number: consecutive number of the
computer
”SubNet address: e.g. 255 . 255 . 0 . 0” (remains the same)
Confirm by clicking ”OK”.
3. Adapt the computer name as follows:
Select ”Start → Control Panel →Performance and Maintenance→
System→ Computer Name→ Change” and make the following entries for
”Computer name: <Computer name><Computer number>”
”Workgroup: <Computer name>_NETWORK”
4. Confirm your entries by clicking ”OK”.
5. Restart the computer.
A5/11–2004610–4.998.137.176 – 27 –
Page 28
Installation Manual for DiBos Video System
Connections (continued)
4.4 Connecting the ISDN Controller
May only be executed by authorized trained personnel!
The ISDN connection is established via a supplied adapter cable (with
Western connector) to the S
Note:
Only use the card type Fritz! Card PCI V2.0.
interface of the computer.
o
video
system
ISDN
controller
(transmitter
or receiver)
ISDN adapter
card socket
Ferrite core
Supplied adapter
cable
Western
connector
Only necessary for TAE socket
(not supplied as standard)
Adapter
connecto
ISDN
connectio
r
n
Network
network
For installation of the ISDN card the computer must have an ISDN connection and the card must be installed in the computer. Use the drivers
provided.
For data transfer the connection must support the EURO ISDN (DSS1)
protocol. For So connections in PABXs this must be enabled first in the
PABX. Also, the data service must be enabled in incoming and outgoing
direction. The video system is configured for EURO ISDN as standard
when supplied. For further details, see section 7.4.
ISDN socket TAE 8 to So interface of the video system
(9–pin Sub–D socket)
Sub–D socket TAE 8 Connector Function
1–
– 4 (b1) Transmitter wire2 – SR1–
– 3 (a1) Transmitter wire3 – SR2+
– 6 (a2)
Receiver wire4 – SX1–
Receiver wire– 5 (b2)5 – SX2–
ISDN socket IAE (RJ 45) to So interface of the video system
(9–pin Sub–D socket)
Sub–D socket IAE connector
1–
– 5 (b1) Transmitter wire2 – SR1–
– 4 (a1) Transmitter wire3 – SR2+
– 3 (a2) Receiver wire4 – SX1–
– 6 (b2) Receiver wire5 – SX2–
Function
A5/11–2004610–4.998.137.176 – 28 –
Page 29

Installation Manual for DiBos Video System
Connections (continued)
4.5 Connecting the VSCom 200 H (Interface Expansion)
May only be executed by authorized trained personnel!
Note:
only use the VSCom 200 H PCI card.
The interface expansion card is retrofitted as follows.
1. Switch off the computer and install the interface expansion card in
the appropriate computer slot (see Section 2).
2. Reboot the computer.
3. Log on as the Administrator.
4. The system recognizes the interface expansion card automatically.
4.6 Connecting External Hard Disks
A SCSI controller must be installed in order to connect the external hard
disk housing.
For information about the type and number of hard disks that may be connected, see the price list.
Note:
The Adaptec SCSI card 29160 may be used as the SCSI controller or the
LSI Logic 160 MB Ultra Wide 68 PIN HD SYM 21040.
A5/11–2004610–4.998.137.176 – 29 –
Page 30
Installation Manual for DiBos Video System
g
Connections (continued)
4.7 Connecting the Cameras
Note that one input is needed per B&W and CCVS camera and two inputs
per Y/C camera.
video system video system
MVTitan
MVTitan
Connection of Connector J11 Connector J9
B&W and CCVS
cameras
Y/C cameras Camera 1 – V1/V5
26–pin connector
plug
V1
V2
V8
MVTitan
Camera 1 – V1
Camera 2 – V2
I I
Camera 8 – V8
Camera 2 – V2/V6
Camera 3 – V3/V7
Camera 4 – V4/V8
MVSigma
Camera 9 – V1
Camera 10 – V2
I I
Camera 16 – V8
Camera 5 – V1/V5
Camera 6 – V2/V6
Camera 7 – V3/V7
Camera 8 – V4/V8
26–pin connector
plug
V1
V2
V4
MVSigma
Camera 1 – V1
I I
Camera 4 – V4
––
MVTitan: Maximum number of cameras per plug (J11 or J9) for mixture
B&W or CCVS Y/C
8 ––
6 1
4 2
2 3
–– 4
Note:
Switch off the computer to connect the cameras.
A5/11–2004610–4.998.137.176 – 30 –
Page 31

Installation Manual for DiBos Video System
Connections (continued)
4.8 Connecting the V–DOG and Tamper Contact
May only be executed by authorized trained personnel!
The module is used to monitor the tamper contact and power supply of
the power unit. For signaling, a sounder can be connected.
V–DOG
Connection
WD
connection
RE1
C2
15–pin Sub–D
for connecting
sounders
Outgoing to
power supply
C1
Installation:
A 15–pin MIDI extension cable is provided to connect a sounder to a C2
connector.
If necessary, remove the female connector from the MIDI cable and isolate the cable ends.
1
8
C2
9
15
RE1
RE1
C2
C2
C2
C2
C2
C2
1
2
3
4
5
6
Brown
Red
Orange
Pink
Yellow
Green
1
2
3
4
5
6
7
8
9
MIDI cable assignmentC2 connector assignment
Brown
Red
Orange
Pink
Yellow
Green
not
occupied
10
11
12
13
14
15
not
occupied
PC switched off
(disconnected
from power)
A5/11–2004610–4.998.137.176 – 31 –
Page 32

Installation Manual for DiBos Video System
Connections (continued)
4.9 Connecting the Software Dongle and
the Printer
The programs are protected against unauthorized use by a dongle. The
system cannot be operated without this dongle. The dongle must be connected to the PRN interface (LPT1) on the system board and remains
there throughout operation. The dongle must be plugged in before
switching the system on.
A printer must be connected via the USB interface so as not to hinder the
reading out of program information from the dongle.
4.10 Connecting a Fault Indicator
A fault indicator (sounder) can be connected to relay 4 of the 1st MVTitan
grabber card (must be activated in the configuration under Hardware/
Connections).
The following events will be signaled by the fault indicator:
Images may be lost because the alarm archive is full
The free disk space is not sufficient for the programmed total size of
the archives
The camera is not transmitting a video signal
The database server could not record all images
The grabber process does not answer in the prescribed time (timeout)
The programmed holidays/special days are not released in the hard-
lock
The programming for the serially–connected security system has
been deleted by a software update
System overload
The directory could not be deleted from the database server
Cannot create and write logbook
The images could not be recorded by the database server
The backup medium is full
A timed backup could not be executed because a search macro was
not found
The programmed number of grabbers does not match the actual
hardware configuration
5% of the hard disk is not free
The database server is not started
A5/11–2004610–4.998.137.176 – 32 –
Page 33

Installation Manual for DiBos Video System
Connections (continued)
4.11 Connecting the ATM via the Interface Processor (Serial)
A maximum of 4 automatic teller machines or three automatic teller machines and 1 access control system can be connected to the video system via an interface processor.
The following ATM interfacing variants are available:
Method 1:
Problem:
The automatic teller machines (ATMs) are not located far from the
video system. The distance between the video system and interface
processor and between the interface processor and an ATM should
be less than 15 m.
Solution:
The individual ATMs are linked directly to the interface processor by
specific interfaces.
The distance between the video system and the interface processor
and the interface processor and the ATMs is max. 15 meters.
Connection
principle:
video system
max. 15 m
Detailed connection:
video system
COM x
Interface
processor
Interface processor
9–pin connection cable
max. 15 m
ATM1 – ATM4
ATM1
ATM4
I4I3 PCI2I1
A5/11–2004610–4.998.137.176 – 33 –
Page 34

Installation Manual for DiBos Video System
Connections (continued)
Method 2:
Problem:
The automatic teller machines (ATMs) are located further away from the video
system. The distance between the video system and interface processor and between the interface processor and an ATM cannot be less than 15 m.
However, the ATMs are close enough to one another for them all to be connected
to the interface processor so that the distance between the interface processor
and each ATM is less than 15 m.
Solution:
The individual ATMs are linked directly to the interface processor by specific
interfaces. Two OVS are required between the video system and the interface
processor to increase the range.
Connection
principle:
video system
max. max. max.
15 m 1000 m 15 m
OVS
Detailed connection:
video
system
9 pin 9 pin
COM x
For jumpering,
see below
9–pin connection cable
Order no. 4.998.079.686
(connection 1:1)
OVS 1
V24
(C3)
OPTO
1
5
9
6
max. 1,000 m
OVS
OVS 2
9
6
1
5
V24
(C3)
OPTO
For jumpering,
see below
max.
15 m
Interface
processor
ATM1 – ATM4
I4I3 PCI2I1
Interface
processor
9–pin connection cable
Order no. 4.998.079.686
(connection 1:1)
ATM1
ATM4
Jumpering of OVS 1:
J2 J1
1
1
2
3
For assignment of OVS see Section 4.18.1
Note:
By changing jumper J1 and J2 in the OVS it is
possible to mix up the transmitter and receiver lines (see above).
C3:
2
Pin 2 = transmitter line
Pin 3 = receiver line
3
Jumpering of OVS 2:
J2 J1
1
1
2
3
For assignment of OVS see Section 4.18.1
C3:
2
Pin 2 = receiver line
Pin 3 = transmitter line
3
A5/11–2004610–4.998.137.176 – 34 –
Page 35

Installation Manual for DiBos Video System
Connections (continued)
Method 3:
Problem:
The automatic teller machines (ATMs) are located further away from the video
system. The distance between the video system and interface processor and between the interface processor and an ATM cannot be less than 15 m.
However, the ATMs are not close enough to one another for them all to be connected to the interface processor so that the distance between the interface processor and each ATM is less than 15 m.
Solution:
The interface processor is connected directly to the video system.
To increase the range, two OVS units are required between the interface
processor and each ATM.
Connection
principle:
video system
max.
15 m
Detailed connection:
I4I3 PCI2I1
Interface
processor
max. max.max.
15 m 15 m1000 m
Interface
processor
Like ATM1
Like ATM1
Like ATM1
OVS 1
V24
9 pin 9 pin
(C3)
OPTO
For jumpering,
see below
9–pin connection cable
Order no. 4.998.079.686
(connection 1:1)
1
5
9
6
OVS OVS
OVS
OVS 2
9
6
1
5
Range
max. 1000 m
ATM–specific cable
connection or adapter
OPTO
For jumpering,
see below
OVS ATM4
V24
(C3)
ATM1
To ATM4
(or AC system)
To ATM3
To ATM2
ATM1
Connection cable
to the video system
(COM x)
Note:
By changing jumper J1 and J2 in the OVS it is possible to mix up the transmitter and receiver
lines.
Jumpering of OVS 1:
J2 J1
1
1
2
3
For assignment of OVS see Section 4.18.1
C3:
2
Pin 2 = transmitter line
Pin 3 = receiver line
3
Jumpering of OVS 2:
Corresponding ATM
A5/11–2004610–4.998.137.176 – 35 –
Page 36

Installation Manual for DiBos Video System
Connections (continued)
4.12 Connecting the Barcode Reader
4.12.1 Barcode Reader V3300–N
Only the barcode readers listed below should be used. With other types
of barcode readers, you must check whether their protocol matches that
of the video system.
video system
COM x
V3300–N
COM1
Connection cable
9–pin – 25–pin
Note:
Two OVS are required for distances > 20 m.
(See Connecting the ATM, Method 2)
COM2
COM3
Barcode
scanner
COM1/2/3
To operate the VS3300–N, you must change some settings. A preconfigured hyperterminal program, which can be called up from the diskette
under Windows XP by typing in ”VISOLUX SCANNER.ht,“ is used as
the program editor for the V3300–N.
Programming the V3300–N
The V3300–N can only be programmed on its internal COM2 or COM3
interface; this must be done before calling up the video system program.
Connect the V3300–N to the COM2 interface of the video system as follows.
video system
Hyper terminal
COM2
Connection cable
9–pin – 25–pin
V3300–N
COM2/3
Certain settings are necessary on the V3300–N itself in order to program
it. The following list gives you a brief summary. For more details, please
refer to the listed sections of the V3300–N manual.
Activating programming mode
→ see ”Setup Mode” Section
Setting the baud rate, number of data bits, number of stop bits, and
parity
→ see ”Changing Baud Rate”, ”Changing Number of Data Bits”,
”Changing Stop Bits” and ”Changing Parity” Sections
A5/11–2004610–4.998.137.176 – 36 –
Page 37

Installation Manual for DiBos Video System
Connections (continued)
Selecting communication protocol
Use the default protocol.
→ see ”Communications Protocol” Section
Hide own device address
The device address must not be transmitted because it is not evaluated
in the video system and unnecessarily reduces the available memory
capacity for the barcode reader data to be saved in live image.
→ see ”Transmitting own device address” Section
Hiding sequence ID
The sequence ID must not be transmitted for the same reasons as
above.
→ see ”Transmitting Sequence ID” Section
Deactivating the beeper
The beeper must be deactivated because high scan frequencies
cause data transfer errors when it is activated.
→ see ”Activating beeper after receiving data” Section
Defining transmit header
Set STX as the header.
→ See ”Defining Transmit Header” Section
Defining transmit trailer
Set CR, LF as trailers.
→ See ”Defining Transmit Trailer” Section
Enabling interface
Enable the interface used by the V3300–N.
→ see ”Enabling/Disabling Interface” Section
Enabling codes
Enable the codes that are used. The maximum code length is 17
characters.
→ see ”Enabling/Disabling Codes” Section
Saving programming
Before finishing the programming, you must store the set parameters using the ”Save” command and then press ”ESC”. The V3300–N
then exits programming mode and restarts automatically. The device
is ready to operate when ”READY TO READ” appears on the display.
4.12.2 Barcode reader DOUBLE–X–LR
Contact Product Service Video of the video system manufacturer for connection of a barcode reader DOUBLE–X–LR.
A5/11–2004610–4.998.137.176 – 37 –
Page 38

Installation Manual for DiBos Video System
Connections (continued)
4.13 Connecting Foyer Card Reader MINITER RS 485
The foyer card reader MINITER RS 485 is connected via a serial interface. A maximum of four foyer card readers can be connected in series.
The foyer card reader LS23M and the foyer card reader MINITER RS 485
can be operated on the same serial bus. Please note that the foyer card
reader LS23M should preferably be installed as the last bus element.
video system Interface converter
W&T 86000
4.998.053.926
10
22
11
23
COM x
Connection cable
9–pin – 25–pin
Note:
The distance between the interface converter and the last foyer card reader
RS232
5 V DC
19
21
13
25
14
2 x 0.6 mm per wire
must not exceed 1000 m (installation cable J–Y(St) Y 2 x 2 x 0,6 mm).
Ensure the foyer card reader is correctly grounded.
Shielding may only be applied on one side.
The foyer card readers must only be connected
via the card reader connectors.
If the last foyer card reader on the RS 485 bus is a MINITER,
then for termination of the RS 485 bus, a terminal resistance of
250 ohms is always required (resistance is included in the scope
of delivery)
To enable the foyer card reader to read the cards, the back square
at the rear of the inner housing must be cut out.
For additional information about interface converter functions,
please refer to the description for the W&T Interface Model 86000.
Foyer card reader 1
(MINITER RS 485)
4.998.098.769/
4.998.098.767
4
5
4
5
J2
inserted
Foyer card
reader 4
(LS23M)
MINITER RS 485 contact assignment
Tamper switch
0 V DC Input, GND (PIN 1)
M door opener Output (PIN 2)
RK/AK door opener Output (PIN 3)
Signal RS 485– (PIN 4)
Signal RS 485+ (PIN 5)
+ 12 V DC Input (PIN 6)
Fuse
A5/11–2004610–4.998.137.176 – 38 –
Page 39

Installation Manual for DiBos Video System
Connections (continued)
Programming the foyer card reader MINITER RS 485
Programming is carried out using MINITER RS 485 software. This can be
installed on a service laptop or on a video system.
Proceed as follows:
1. Start the programming software and select RS 485 operation.
2. Select the COM port to which the foyer card readers are connected
via the “Interface” menu item.
Even if several foyer card readers MINITER RS 485 are to be programmed for the first time, only one foyer card reader should be connected during programming. This is because the foyer card reader
will assign all the card readers with the same bus address by default.
3. Select the “MINITER → Read/Identify Miniter” menu and click “Identification of all activ addresses”.
“Address: 48” and “Protocol: Bosch” is displayed.
4. Select foyer card reader number 48 and confirm your selection with
”OK”.
5. Click “Read Miniter” and enter “Password: 991357”. Confirm with
”OK”.
6. The foyer card reader addresses must be specified as follows:
Foyer card reader no. 1 = address 48
Foyer card reader no. 2 = address 49
Foyer card reader no. 3 = address 50
Foyer card reader no. 4 = address 51
For operation, the other parameters must be set as follows:
– Door opening time: optional
– Door opener with buzzer: optional
– Door opener interval tone: optional
– Monitoring module: no
– Password: 991357
– Signal chipcard: no
– Send start character: no
– Data on display: no
– Evaluate track 2: yes
– Evaluate track 3 or 1: yes
– Open door on fault: no
– Protocol: Bosch
– Bloc list: optional
– Data length track 2: 18 (for credit cards)
– Data length track 3/1: 26 (for EC cards)
A5/11–2004610–4.998.137.176 – 39 –
Page 40

Installation Manual for DiBos Video System
Connections (continued)
7. Set different authorization for credit cards (track 2) and EC cards
(track 3), so that access can be gained to the foyer card reader if the
connection between the video system and the Miniter is interrupted
(see operating instructions for Miniter RS 485).
Otherwise in normal operation the video system takes over access
authorizations.
8. Save the file via the “File → Save as” menu under the name “DiBos_foyer_card_reader_x” (x = 1 .. 4).
9. Select “File → Exit”.
10. Select the “MINITER → Write Miniter” menu and select and open the
“DiBos_foyer_card_reader_x” file.
The new and current address of the foyer card reader is displayed.
11. Confirm the address with “OK”.
12. Click “Write file in Miniter” and confirm this by entering the old password.
System confirmation is given when programming has been completed successfully.
A5/11–2004610–4.998.137.176 – 40 –
Page 41

Installation Manual for DiBos Video System
Connections (continued)
4.14 Connecting Radio Clock DCF 77
May only be executed by authorized trained personnel!
The connection must be made to a serial interface.
Note:
Only the radio clock NeoClock DCF 77 should be used.
video system
DCF 77
COM x
Radio clock
Radio clock
The interface expansion card is retrofitted as follows.
Use the supplied installation CD.
1. Connect the radio clock to the serial interface.
2. Log on as the Administrator.
3. Enter the settings for the interface in use.
Baud: 2400
Data bits: 8
Parity: None
Stop bits: 2
Protocol: None
4. Insert the installation CD.
5. Call up ”Setup.exe” in the Windows XP Explorer.
6. Select ”Install server” and click ”Next”.
7. Select the destination directory for the programs.
Click ”Next”, if you want to use the default path or click ”Browse” to
select another one.
8. Follow the on–screen instructions.
9. Once installed, configure the ”Time Synchronization” program.
Select ”Start → Control Panel →System”.
Select the ”Hardware” tab and click ”Device Manager”.
In the tree structure, open the entry ”Ports” with a double click and
select the ”Port settings” tab.
Double–click on the appropriate interface, e.g. ”COM 1”, to open
its properties field.
A5/11–2004610–4.998.137.176 – 41 –
Page 42

Installation Manual for DiBos Video System
Connections (continued)
10. Make the following settings in the configuration menu:
Language: ”German”
Port: ”COM x” (interface in use)
Synchronization: ”Automatic”.
Time lag: Select ”0” (hours) and ”Daylight saving time”
License: Enter serial number and activation code
(Please note these entries are case sensitive)
Click ”Save”.
11. Click ”Yes” in the information window to start the ”Time Synchronization” service.
Note:
A timer appears in the Windows XP task bar (at the bottom edge of
the screen). This confirms that the ”Time Synchronization” program
has started.
The color of the timer depends on the status of the receiver.
Yellow: Program starting (takes up to three minutes)
Red: No synchronization or installation error
Green: The system timer is synchronized correctly with the
receiver.
12. End the ”NeoClock Time Server” service as follows:
Select ”Control Panel → Administrative Tools→ Services”.
Select the ”NeoClock Time Server” service and click ”Close” to
exit the service.
Deactivate the service by selecting the start type ”Deactivated”
and confirm with ”OK”.
Confirm with ”OK” and close the ”Services” dialog box and the
Control Panel.
13. Reboot the PC.
14. The ”NeoClock Time Server” program must not be configured;
instead TARDIS should be used. (Program used to synchronize
video systems in a network; contact Product Service Video of the
video system manufacturer.)
15. Follow the operating instructions for NeoClock XP to position the
clock (available as a PDF file on the CD).
A5/11–2004610–4.998.137.176 – 42 –
Page 43

Installation Manual for DiBos Video System
Connections (continued)
4.15 Web Connection for Access Via Browser
May only be executed by authorized trained personnel!
The master disk contains the preinstalled Web application for accessing
the image archive via the browser. The Web application needs port 80
and is activated by default. Should access via http be hindered, the World
Wide Web Publishing service must be deactivated.
Activating/deactivating the Web application:
You must have administrator rights to carry out the following steps:
1. Log on as the Administrator.
2. Select ”Start → Control Panel”.
3. Double–click the ”Administrative Tools” icon.
4. Double–click the ”Internet Information Services” icon.
5. Open the tree structure under ”Internet Information Services” until
you see the entry ”Default Web Site”.
6. Select the entry ”Default Web Site”.
7. Start the service with the button ” ”
or
stop the service with the button ” ”.
A5/11–2004610–4.998.137.176 – 43 –
Page 44

Installation Manual for DiBos Video System
Connections (continued)
4.16 Connecting a Modem
May only be executed by authorized trained personnel!
You must have administrator rights to carry out the following steps:
4.16.1 Selecting and Installing the Modem
Notes for selecting the modem:
Internal PCI modems, serially–connected modems, and modems
connected via USB can be used as long as they are supported by
Windows XP.
Protocols V.90 and V.34 must be supported.
Regulations of the relevant country must be observed (particularly
with regard to operation in the telephone network, interference suppression, electrical safety and fire prevention).
Compatible with the features of the national telephone networks.
The special characteristics of company private telephone systems
must be observed (e.g. deactivating dial tone recognition, tone or
pulse dialing).
Installing the modem
Install the modem according to the supplied manufacturer documentation. Under Windows XP, many modem types are recognized automatically. Nevertheless, you should take the special features of the installation into consideration (example: if the modem does not recognize a
telephone system’s dial tone, the option ”Wait for dial tone before dial”
must be selected.
Decrease Timeout Value for Outgoing Connections
1. From the Windows XP desktop, select ”Start → Control Panel”.
2. From the ”Control Panel” folder, select the ”Phone and Modem Options” icon.
3. On the ”Phone and Modem Options” dialog field, click the ”Modems”
tab.
4. From the list box, select the installed modem and click the ”Properties” button.
5. On the ” ... Properties” dialog, click the “Advanced” tab and then click
the “Change Default Preferences ...” button.
6. On the “General” page, under “Cancel the call if not connected within
.. seconds,” change the value from “60” to “15.”
7. Confirm the open dialog fields with ”OK”.
A5/11–2004610–4.998.137.176 – 44 –
Page 45

Installation Manual for DiBos Video System
Connections (continued)
Enable dial–in (if incoming calls should be accepted)
1. From the Windows XP desktop, select ”Start → Control Panel”.
2. From the ”Control Panel” folder, select the ”Network Connections”
icon.
3. In the ”Network Connections” folder, under ”Network Tasks”, click the
”Create a new connection” icon.
4. On the ”New Connection Wizard” dialog box, click the ”Next” button.
5. On the ”Network Connection Type” wizard page, select the option
”Set up an advanced connection” and click the ”Next” button.
6. On the ”Advanced Connection Options” wizard page, select the ”Accept incoming connections” option and click the ”Next” button.
7. On the ”Devices for Incoming Connections” wizard page under ”Connection Devices”, select the previously–installed modem and place a
checkmark next to this entry. Click the “Next” button
8. On the ”Incoming VPN Connection” wizard page, activate the ”Do not
allow virtual private connections” option and click the ”Next” button.
9. Create the new user as follows:
On the ”User Permissions” wizard page, click the ”Add” button
and enter the following on the ”New User” dialog box:
User name: ‘RasUser8B19’
Full name: leave empty
Password: Enter password (can be changed later via the DiBos
interface)
Confirm password: Enter the password again
Confirm with ”OK”.
On the wizard page, make sure that there is a checkmark next to
the newly–created user ”RasUser8B19”.
Click the “Next” button.
10. Set the settings for the network protocol as follows:
On the ”Networking Software” wizard page, select the ”Internet
protocol (TCP/IP)” entry from the list box and make sure that
there is a checkmark next to this entry.
Click on ”Properties” and make sure that in the ”Incoming TCP/
IP–Properties” dialog box, the option ”Allow callers to access my
local area network” is not selected and that the option ”Assign
TCP/IP addresses automatically using DHCP” is selected. Confirm with ”OK”.
Click the “Next” button on the wizard page.
11. On the ”Completing the New Connection Wizard” wizard page, click
”Finish”.
A5/11–2004610–4.998.137.176 – 45 –
Page 46

Installation Manual for DiBos Video System
Connections (continued)
4.17 Connecting AutoDome/SAE–Dome
Connecting AutoDome
video system
LTC 8780
or
LTC 8786
COM x
RS 232
RS 232/BiPhase
converter
BiPhase
code merger
LTC 8569
or
LTC 8570
AutoDome
BiPhase
LTC matrix
BiPhase
Note: Additionally a code merger LTC 8569 or LTC 8570 is needed, if a
PTZ shall be controlled from the video system and a Bosch LTC matrix.
Connecting AutoDome via matrix
Videosystem
COM x
LTC 8x00
Console
Port
Allegiant Console cable
LTC8506/00
BiPhase
AutoDome
Hinweis: Valid CCL commands can be configured in the DiBos. Then you can
send these pre–configured commands manually to the Allegiant matrix
A5/11–2004610–4.998.137.176 – 46 –
Page 47

Installation Manual for DiBos Video System
Connections (continued)
Connecting SAE Dome directly
video system
RS 232
COM x
RS 232/RS 485 converter
i.e.
LNL–108 A
SAE Dome
RS 485
Connecting SAE Dome with V3032 Biphase interface
video system
COM x
LTC matrix
LTC 8780
or
LTC 8786
RS 232
code merger
RS 232/BiPhase
converter
BiPhase
LTC 8569
LTC 8570
BiPhase
or
V3032
BiPhase
Protocol
converter SAE
SAE Dome
RS 485
Note: Additionally a code merger LTC 8569 or LTC 8570 is needed, if a
PTZ shall be controlled from the video system and a Bosch LTC matrix.
A5/11–2004610–4.998.137.176 – 47 –
Page 48

Installation Manual for DiBos Video System
Connections (continued)
4.18 Connecting a Security System
4.18.1 General remarks
The video system is connected to a SecSys via an RS 232 interface at
COM x, e. g. by connecting an interface converter OVS in between.
video
system
COM x
RS 232
interface
OVS
OPTOC3
Interface
converter
Bosch
SecSys
No specific alarm modifications are necessary on the security system for
connection to the video system. A suitable interface module is required.
All settings are made via the video system user interface:
Data transmission must be enabled in the SecSys and the SecSys must
be equipped with a suitable interface module (see Connections).
With the OVS it is possible to compensate any differences in the transmitter and receiver line assignments of the devices on the V.24 side of the
link. To do this change the jumpers J1 and J2.
A5/11–2004610–4.998.137.176 – 48 –
Page 49

Installation Manual for DiBos Video System
Connections (continued)
Jumper assignment for interface converter OVS
J4
OVS
C11
Connection 12 V/24 V
2
J6
1
J2 J1
1
2
3
C3
OPTO V.24
3
2
1
J5
3
2
1
1
2
3
Attention:
Remove the OVS
network plug before opening
the device !
–
For power supply of 12 V/24 V
+
J4
3
2
1
For a power supply of 230 V
J4
3
2
1
J5
3
2
1
J5
3
2
1
J6
2
1
J6
2
1
Replacing transmitter and receiver lines
Variant 1:
J2 J1 J2 J1
1
1
2
3
C3:
2
Pin 2 = transmitter line
Pin 3 = receiver line
3
Connector assignment for OPTO
Direction Connection Direction Connection
Input – 1
Input + 6
Output + 5
Output – 9
Note:
Telecommunications cable type J–Y(St)Y 2x2x0,6 is recommended for cabling.
Ground the cable shield at the center end to prevent earth currents.
Variant 2:
1
2
3
1
C3:
2
Pin 2 = receiver line
Pin 3 = transmitter line
3
Connector assignment for V.24 (C3)
Transmitter/Receiver *
Receiver/Transmitter *
0 V
* Depends on J1/J2
2
3
5
A5/11–2004610–4.998.137.176 – 49 –
Page 50

Installation Manual for DiBos Video System
Connections (continued)
4.18.2 Connecting to NZ 500 (20 mA)
video system
OVS
COM x
C3 OPTO
Only connect shield to NZ 500.
Installation cable J–Y (St) Y 2x2x0,6
NZ 500
SU 500
Range
9
5
6
1
max. 1000 m
SDI+
SDI–
SDO+
SDO–
SU 500:
J1 inserted (1200 bit/s)
4.18.3 Connecting to BZ 500 (20 mA)
video system
OVS
COM x
C3 OPTO
Only connect shield to BZ 500.
Installation cable J–Y (St) Y 2x2x0,6
Range
max. 1000 m
9
5
6
1
BZ 500 LSN
ANNE 10
SM 20
SDI+
SDI–
SDO+
SDO–
Note:
COM 2 and COM 3 only with
ERSE 10 interface module
RXD
0V
TXD
+
DIR
COM 1 to COM 3
A5/11–2004610–4.998.137.176 – 50 –
Page 51

Installation Manual for DiBos Video System
Connections (continued)
4.18.4 Connecting to AZ 1010/NZ 1008
V.24 Connection to AZ 1010/NZ 1008
video system
2
COM x
SMA
20 mA connection to AZ 1010/NZ 1008
3
5
B2
B1
S 3A S 3B
max. 25 m
Connection to the AZ 1010/NZ 1008 must
be programmed at the center
V1
1
2
3
Jumper assignment (V) on the SMA
Jumper V1 set to 2/3
Level for V.24 interface
AZ 1010/NZ 1008
SMA
SDI
0 V
SDO
video system
OVS
COM x
C3 OPTO
Jumper assignment (V) on the SMA
Jumper V1 set to 1/2
Level for V.24 interface
AZ 1010/NZ 1008
Range
max. 1000 m
9
5
6
1
Only connect shield to AZ 1010/NZ 1008.
Installation cable J–Y (St) Y 2x2x0,6
GOM
+UV
SDI–
SDI+
SDO+
SDO–
SDO
SDI
LNA
+12V
SDO
SDI
A5/11–2004610–4.998.137.176 – 51 –
Page 52

Installation Manual for DiBos Video System
Connections (continued)
4.18.5 Connecting to NZ 1012
V.24 connection to NZ 1012
video system
EAN SSM ZSN
3
COM x
Dip–Fix switches (S) and jumpers (V) on SSM
Interface 1:
S0 On: 1200 baud
S1 Off: Video system
S2 On: Transmit priority for NZ 1012
S3 On: Device is connected
V2, V4 Inserted: V.24 interface
2
5
max. 25 m
SDI
0 V
SDO
Interface 2:
S4 On: 1200 baud
S5 Off: Video system
S6 On: Device is connected
S7 On: Transmit priority for NZ 1012
V12, V14 Inserted: V.24 interface
Note: Connection to interface 2 is possible.
NZ 1012
S3
S2
S0
V4
V2
Software versions:
18508.0 A8.1
18508.1 A8.1
20 mA connection to NZ 1012
video system
OVS
COM x
C3 OPTO
Range
max. 1000 m
9
5
6
1
NZ 1012
GOM
+UV
SDI–
SDI+
SDO+
SDO–
Insert SSM jumpers at ”20 mA”.
SDO
SDI
EAN
+U1
SDO
SDI
A5/11–2004610–4.998.137.176 – 52 –
Page 53

Installation Manual for DiBos Video System
Connections (continued)
4.18.6 Connecting to BZ 1012 (20 mA)
video system
COM x
OVS
C3 OPTO
Range
max. 1000 m
9
5
6
1
BZ 1012
GOM
+UV
SDI–
SDI+
SDO+
SDO–
Insert SSM jumpers at ”20 mA”.
SDO
SDI
EAB
+24V
SDO
SDI
A5/11–2004610–4.998.137.176 – 53 –
Page 54

Installation Manual for DiBos Video System
Connections (continued)
4.18.7 Connecting to NZ 1060
V.24 connection to NZ 1060
video system
NZ 1060
ZAN SIE ZVE
Software versions:
2
COM x
Note:
It is preferable to use interfaces 6 through 9, but connection to interfaces 2
through 5 is also possible depending on the project.
Program the appropriate interface to AUX (1200 baud), insert jumpers on SIE (V1,
V3) for V.24 interface.
3
5
max. 25 m
SDO
0 V
SDI
V1
18033.0 A6.2
18033.2 A6.2
18033.3 A6.2V3
20 mA connection to NZ 1060
video system
NZ 1060
ZAN
+12V
OVS
COM x
C3 OPTO
It is preferable to use interfaces 6 through 9, but connection to interfaces 2 through 5 is also
possible depending on the project.
Program the appropriate interface to AUX (1200 baud), insert jumpers on SIE (V2, V4) for 20 mA
interface.
Range
max. 1000 m
9
5
6
1
GOM
+UV
SDI–
SDI+
SDO+
SDO–
SDO
SDI
SDO
SDI
A5/11–2004610–4.998.137.176 – 54 –
Page 55

Installation Manual for DiBos Video System
Connections (continued)
4.18.8 Connecting to BZ 1060 (20 mA)
video system
BZ 1060
ZAB
+24V
OVS
COM x
C3 OPTO
It is preferable to use interfaces 6 through 9, but connection to interfaces 2 through 5 is also
possible depending on the project.
Program the appropriate interface to AUX (1200 baud), insert jumpers on SIE (V2, V4) for 20
mA interface.
Range
max. 1000 m
9
5
6
1
GOM
+UV
SDI–
SDI+
SDO+
SDO–
SDO
SDI
SDO
SDI
A5/11–2004610–4.998.137.176 – 55 –
Page 56

Installation Manual for DiBos Video System
Connections (continued)
4.18.9 Connecting to UEZ 1000 (20 mA)
video system
OVS
COM x
C3 OPTO
Only connect shield to UEZ 1000.
Installation cable J–Y (St) Y 2x2x0,6
UEZ 1000
AVK
Range
9
5
6
1
max. 1000 m
SDI+
SDI–
SDO+
SDO–
20 mA–1 to 20 mA–3
4.18.10 Connecting to UEZ 2000 (20 mA)
video system
OVS
COM x
C3 OPTO
Only connect shield to UEZ 2000.
Installation cable J–Y (St) Y 2x2x0,6
Range
max. 1000 m
9
5
6
1
UEZ 2000 LSN
AVM 100
SM 20
SDI+
SDI–
SDO+
SDO–
Note:
COM 4 and COM 5 only with
SEMO1 interface module
RXD
0V
TXD
+
DIR
COM 1 to COM 5
A5/11–2004610–4.998.137.176 – 56 –
Page 57

Installation Manual for DiBos Video System
Connections (continued)
4.18.11 Connecting to UGM 2020
20 mA connection to UGM 2020 or TESP (by telephony)
video system
OVS
1
6
COM x
C3 OPTO
20 mA connection to UGM 2020 via UESS
9
5
Range
max. 1000 m
Jumper 1 – 4 open
UGM 2020
TESP SGK EPC/EPC2
DLA0
DLB0
DLA1
DLB1
Software versions:
SGKUGM
from EAPS–4
EAPS–5
video system
COM x
OVS
C3 OPTO
Range
max. 1000 m
UGM 2020
ÜSS SGK EPC/EPC2
6
1
5
9
A0
B0
A1
B1
Software versions:
SGKUGM
from EAPS–4
EAPS–5
A5/11–2004610–4.998.137.176 – 57 –
Page 58

Installation Manual for DiBos Video System
Connections (continued)
4.18.12 Connecting to Bosch D9000 Series
video system
D9133
Power +
* See Note 3
COM x
The video system is triggering in case of
– Unacknowledged alarm point status
– Unacknowledged supervised point status
– Unacknowledged trouble point status
SDI–A
SDI–B
Common
* See Note 2
Bosch D9000
* See Note 1
32
Power +
31
SDI–A
30
SDI–B
29
Common
Note:
1. Panel firmware must be version 6.3 or higher. Refer to panel installation instructions for additional
information. Some panel programming is required (see section on SDI Automation).
2. D9133 (not included) module must be set for adress 80. Only one D9133 per panel is allowed.
Refer to D9133 installation instructions for additional information.
3. Connection of D9133 to DiBos is accomplished using a null modem cable ”DB9F” (not included).
Additional programming is required in the DiBos to use the alarm panel for job activation. Refer to
the installation instructions for DiBos, under the Section for Configuration of Security System inputs.
A5/11–2004610–4.998.137.176 – 58 –
Page 59

Installation Manual for DiBos Video System
5 XP Administration
5.1 Changing from video system to XP administrator level
May only be executed by authorized personnel!
Proceed as follows in order to change from the video system to the XP
administrator level.
1. End the operating procedure in the video system
( ”System → Exit system” menus).
2. In Windows XP click the ”Start → Log Off” menu. The Windows log-
off dialog will appear.
3. Press the right Shift key and click the Log Off button. Here, hold the
right Shift key down until the Windows logon screen appears.
4. Log on with the following user name.
AdministratorDe for the German version of the operating system
AdministratorEn for the English version of the operating system
AdministratorEs for the Spanish version of the operating system
AdministratorFr for the French version of the operating system
Please do not use the user Administrator any longer!
For security reasons, you must ask the “Product Service Video” of
the video system manufacturer for the password. Then, for security
reasons, change this password.
5.2 Log on as Windows XP user
To log on in Windows XP as a user of the operating system, proceed as
follows.
1. In Windows XP click the ”Start → Log Off” menu. The Windows log-
off dialog will appear.
2. The system will log on automatically as DiBos user.
dibosDe for the German version of the operating system
dibosEn for the English version of the operating system
dibosEs for the Spanish version of the operating system
dibosFr for the French version of the operating system
For security reasons, you must ask the “Product Service Video” of
the video system manufacturer for the password. Then, for security
reasons, change this password.
Warning:
an automatic start, e.g. after a power failure, only occurs as preset user.
A5/11–2004610–4.998.137.176 – 59 –
Page 60

Installation Manual for DiBos Video System
6 Configuration
If you are starting the video system for the first time, a dialog box appears
with the following configuration possibility:
Basic configuration with the wizard
The basic configuration is intended for inexperienced users. With the help
of a setup assistant, you will create a basic configuration of the system with
a few clicks of the mouse. The system automatically recognizes the connected video hardware (cameras, grabber).
If more extensive configuration is necessary, this occurs with the help of
the standard (expert) configuration since the basic configuration is only
called automatically on the first start of the system. If later you would like to
go from the standard configuration to the basic configuration, this is only
possible with a loss of the configuration data and the saved video images.
Use standard configuration program
The standard configuration (expert configuration) is intended for users
who have a certain amount of experience with the system. If you select the
standard configuration, you will see a dialog box “Setup Assistant Administrator” in which you must enter your name and password (you must use this
name/password to log onto the system for the first time). After confirmation
of your entries, you will reach the standard configuration.
Proceed as described above by clicking the individual menu items and
making the corresponding settings.
You will find operating instructions for both types of configurationonline, that is, directly in the system. For this call up the online help
by pressing the “F1” key or clicking the “Help” button.
6.1 Basic configuration
For more information on this, please see Section 3.
A5/11–2004610–4.998.137.176 – 60 –
Page 61

Installation Manual for DiBos Video System
Configuration (continued)
6.2 Standard configuration (expert configuration)
6.2.1 Configuration Drives
(Database/drives menu)
This dialog box shows you an overview of the hard drives and network drives
available.
No. Name Description
1 The list box contains all hard drives and network
drives that are known to the system at the start of
configuration. The total size, the free memory capacity and the occupied memory capacity are shown in
Mbytes.
The drives that are listed can be activated or deactivated.
The drive is activated.
The drive is not activated.
2 Update If an additional drive is activated during the configu-
ration, it can be accepted into the list box by clicking
update.
3 Selected drives The total size of the memory capacity, the free
memory capacity and the occupied memory capacity
are shown in Mbytes for the activated drives.
4 Accept Click on Accept. If you have made incorrect inputs,
click on Reject and start over.
A5/11–2004610–4.998.137.176 – 61 –
Page 62

Installation Manual for DiBos Video System
Configuration (continued)
Note: Several drives can be made available for archives. In this case,
the archive images are evenly distributed amongst the activated drives.
Note: The external SCSI drives must be activated before starting up
the PC.
A5/11–2004610–4.998.137.176 – 62 –
Page 63

Installation Manual for DiBos Video System
Configuration (continued)
6.2.2 Configuration Archives
(Database/archives menu)
The archives presented in the overview box are located on the activated drives.
The archives partition the drives into individual areas so that the saved images
can be found more quickly during image searches. Images and search results
are stored in the archives.
No. Name Description
Creates a new archive.
1 New
2 Delete
3 Copy Copies an existing archive.
4 Archive
Number
Click on New and designate the name of the archive
in the input box Name (5)
Deletes an existing archive.
Choose an archive in the list box and click on Delete.
The archive is deleted when you confirm the warning
message.
Choose an archive in the list box and click on Copy.
The archive is copied and can be adapted quickly.
The system assigns a (system) number to the archive. It is used for internal identification in case
there are archives with the same name. Each archive receives the next highest number or the next
number in the sequence if an archive is deleted.
Search results always have the number 255.
5 Archive
Name Displays the name of the archive (can be changed).
A5/11–2004610–4.998.137.176 – 63 –
Page 64

Installation Manual for DiBos Video System
Configuration (continued)
6 Type Select an archive type.
For most applications, it is advisable to set up a
separate archive for each camera. This enables a
fast search in the image archive later.
Ring archive Ring archive: The images are saved one after the
other. If the ring archive is full, the storage process
begins all over again. The oldest images are overwritten. A history ring can be assigned to a ring archive so that the images that triggered the alarm are
also saved.
Alarm archive Alarm archive: The alarm archive contains the im-
ages recorded after triggering of the alarm. The
alarm archive is not overwritten. A history ring can
be assigned to an alarm archive so that the images
that triggered the alarm are also saved.
History ring History ring: The images are saved one after the
other. If the history ring is full, the storage process
begins all over again. The oldest images are overwritten. A history ring must be assigned to a ring or
alarm archive. Because of the way the history ring
works, no rapidly repeating triggers may be allocated
to it, as is the case for example with sensor cameras, PIR movement detectors and door contacts.
The usage of pre–alarm images is recommended for
rapidly repeating triggers. Pre–alarm images can be
set–up in Job macros/save.
History ring for archive x:
Assign complete
history ring
only assign x history ring images
7 Memory manage-
ment
Delete images after x days
Total size Total size of the archive in MB. The used and free
Select the archive to which the history ring should be
assigned.
The history ring will be assigned completely to an
alarm or ring archive.
Only the number of images entered will be assigned
to an alarm or ring archive.
Notes:
The purpose of the history ring is to save a detec-
tor’s images only when at rest. If a significant event
occurs, e.g. a hold–up alarm, the images from the
history ring are copied into the assigned alarm or
ring archive. This process enables a quick reconstruction of the event because the alarm archive assigned contains the images that triggered the alarm
as well as the images after the hold–up.
If necessary, activate function and input number of
days. Deletion always occurs at midnight. “1” means
that the saved images will still be deleted at midnight
on that same day.
memory space in the archive is immediately shown
underneath.
A5/11–2004610–4.998.137.176 – 64 –
Page 65

Installation Manual for DiBos Video System
Configuration (continued)
Used The available memory is indicated. If the total of all
configured archives exceeds 90% of the entire available memory, a message appears. A reserve of at
least 10% must be remain.
8 Memory capacity System memory available
9 Accept Click on Accept. If you have made incorrect inputs,
click on Reject and start over.
A5/11–2004610–4.998.137.176 – 65 –
Page 66

Installation Manual for DiBos Video System
Configuration (continued)
6.2.3 Configuration of hardware connections
(Hardware/connections menu)
You can set–up numerous hardware options in this dialog box. Select the hardware either by clicking on the arrow pointing downwards and making the selection or by activating—clicking—the relevant control box in front of the hardware.
Click once more for deactivation.
Control box is activated. Hardware is selected.
Control box is not activated. Hardware is not selected.
The settings on this hardware page should not normally be changed unless
there are expansions. If changes are actually required, they can only be carried
out by authorized persons or after consultation with the technical support department.
No. Name Description
1 Framegrabber 1 MVTitan: The system contains one MVTitan
Grabber.
2 MVTitan: The system contains two MVTitan
Grabbers.
1 Sigma: The system contains one MVSigma
Grabber.
2 Video signal PAL or NTSC
3 IP cameras * A maximum of 16 network cameras can be con-
nected.
* See section 6.2.15 for additional information. Contact Bosch Security
for an IP camera compatibility list.
A5/11–2004610–4.998.137.176 – 66 –
Page 67

Installation Manual for DiBos Video System
Configuration (continued)
4 ISDN* When connecting to other systems of this type via
ISDN
5 Network When connecting to other systems of this type via
a network
6 Modem* For modem connections A RAS capable modem
must be connected and RAS service must be
installed.
7 Simulation Support for four alarm inputs that can be simu-
lated for triggering test alarms or for the application of a job such as “burning a CD” for example.
8 Virtual detector The virtual detectors offer the same functionalities
as the other detectors in the system. They provide
inputs that can be used to carry out jobs in the
video system. In contrast to other units, virtual
detectors are not physical hardware. Virtual detectors can be used by other software programs to
communicate with the video system. A maximum
of 32 virtual detectors are available.
9 Fault indicator For internal error identifier. The fault indicator al-
ways uses relay 4 of the 1st MVTitan. The events
that lead to triggering of the fault indicator can be
found in chapter 4.10.
10 Automatic teller ma-
chine*
11 Foyer card reader* Connection of a maximum of 4 foyer card read-
12 Barcode reader* Connection of one barcode reader.
13 SecSys * Connection of a security system.
14 Accept Click on Accept. If you have made incorrect in-
Connection of a maximum of 4 automatic teller
machines each with 2 alarm inputs.
ers.
puts, click on Reject and start over.
* Option
A5/11–2004610–4.998.137.176 – 67 –
Page 68

Installation Manual for DiBos Video System
Configuration (continued)
6.2.4 Configuration of automatic teller machine (option)
(Hardware/automatic teller machine menu)
A maximum of 4 automatic teller machines each with 2 alarm inputs can be connected (must be activated under Hardware/Connections). These inputs, which
have to be supported by the video system, must be configured as detectors.
No. Name Description
1 Input Click on the relevant ATM input. The selected line
is activated.
2 Type Click on the arrow pointing downwards in the
Type column and select whether a detector (contact) should be configured or not.
Input is interpreted.
Input is not interpreted.
Assignment of the inputs:
Input 1 + 2 = automatic teller machine 1
Input 3 +4 = automatic teller machine 2
Input 5 +6 = automatic teller machine 3
Input 7 +8 = automatic teller machine 4
Inputs 1, 3, 5, 7 normally activate the portrait
camera and inputs 2, 4, 6, 8 activate the money
withdrawal camera.
3 Name Place the cursor in the Name column and enter the
name. Any name can be chosen. The alarm input
is now known to the system under this name.
4 Accept Click on Accept. If you have made incorrect in-
puts, click on Reject and start over.
A5/11–2004610–4.998.137.176 – 68 –
Page 69

Installation Manual for DiBos Video System
Configuration (continued)
6.2.5 Configuration of the foyer card reader inputs (option)
(Hardware/foyer card reader/inputs menu)
A maximum of 4 foyer card readers can be connected, with each foyer card reader
supporting one alarm input (must be activated under Hardware/Connections).
These inputs need to be configured as detectors.
The number of foyer card readers configured must match the number of foyer
card readers connected.
No. Name Description
1 Input Click on the corresponding input. The selected
line is activated.
2 Type Click on the arrow pointing downwards in the
Type column and select whether the foyer card
reader should be activated or not.
A foyer card reader will be connected to the input.
No foyer card reader will be connected to the input.
3 Name Place the cursor in the Name column and enter
the name. Any name can be chosen. The input is
now known to the system under this name.
4 Time management
Setup
Click on Setup in the Time management column
if you want to enter time management information
for the foyer card reader. If not, then continue
with item 9.
Note:
Only possible if a time period was specified on
the Time periods menu.
A5/11–2004610–4.998.137.176 – 69 –
Page 70

Installation Manual for DiBos Video System
Configuration (continued)
5 Foyer card reader time
controlled
6 Default setting Click on the arrow pointing downwards in the De-
Foyer card reader
open
Foyer card reader automatic
Foyer card reader
closed
7 You have determined the default setting of the
8 Time period Enter the time period within which the time limita-
9 Accept Click on Accept. If you have made incorrect in-
Activate Foyer card reader time controlled and
implement the following settings.
fault setting list box and select the default setting the foyer card reader should have.
– The foyer is always open.
– Access is only valid with an EC card or credit
card. Cards from specified banks can be
locked out here.
– The foyer is always closed.
foyer card reader in the preceding item. If necessary, activate the corresponding item as well if
this default setting needs to be time–limited.
tion is to be in effect (q. v. configuring Time periods).
puts, click on Reject and start over.
A5/11–2004610–4.998.137.176 – 70 –
Page 71

Installation Manual for DiBos Video System
Configuration (continued)
6.2.6 Configuration of the foyer–card reader lockouts (option)
(Hardware/foyer card reader/lockouts menu)
In this dialog box it is possible to lockout certain bank routing codes, i.e. EC
cards that correspond to the locked out entries have no access authorization.
Access is denied by the foyer–card reader. The basic setting of the foyer–card
reader must be set to “Foyer–card reader automatic.”
Entering lockouts
No
.
1 New Click on New.
2 Locked bank reference
numbers
5 Accept Click on Accept. If you have made incorrect in-
Name Description
Enter the bank reference number to be locked in
the text box.
It is possible to use wildcards (? or *) in any combination. For this, heed the following note and the
examples.
Once entered, the bank reference number is included in the list field (3).
puts, click on Reject and start over.
A5/11–2004610–4.998.137.176 – 71 –
Page 72

Installation Manual for DiBos Video System
Deleting lockouts
Configuration (continued)
No
.
3 Locked bank reference
numbers
4 Delete Click on Delete. The lockout is deleted.
5 Accept Click on Accept. If you have made incorrect in-
Name Description
Select the lockout you wish to delete from the list
box.
puts, click on Reject and start over.
Note:
With the wildcards, you must heed the following meanings:
? Any character or no character may appear at the exact position of the ques-
tion mark.
* A sequence of any characters (one character and more) or no character may
appear at the exact position of the asterisk.
Example:
12?78*4 locks the bank reference code 1217834 or
1207812345667 4 or
128784 (if for * no character)
etc.
43* Locks out the bank reference code 43 or
436574 or
etc.
Exception:
* locks all bank reference codes
A5/11–2004610–4.998.137.176 – 72 –
Page 73

Installation Manual for DiBos Video System
Configuration (continued)
6.2.7 Configuration of barcode reader (option)
(Hardware/barcode reader menu)
You can connect a barcode reader (must be activated under Hardware/Connections). The barcode reader supports the output of a scanner. This input,
which is supported by the video system, needs to be configured as a detector.
No
.
1 Input Click the input of the barcode reader. The line is
2 Type Click on the arrow pointing downwards in the
3 Name Place the cursor in the Name column and enter
4 relevant places
from – Enter the position of the barcode number here
Name Description
activated.
Type column and select whether the barcode
reader should be activated or not.
A barcode reader will be connected to the input.
No barcode reader will be connected to the input.
the name. Any name can be chosen. The input is
now known to the system under this name.
from where the barcode reader is to begin
checking (counting starts from the left).
Number – Enter the number of places to be checked.
5 Accept Click on Accept. If you have made incorrect in-
puts, click on Reject and start over.
A5/11–2004610–4.998.137.176 – 73 –
Page 74

Installation Manual for DiBos Video System
Configuration (continued)
6.2.8 Configuration of security system inputs for Bosch D9000 Series
(option)
(Hardware/SecSys inputs menu)
The serial connection of a Bosch D9000 Series SecSys allows for many SecSys inputs to be assigned to each video system input.
Note: Function must be activated under Hardware/Connections.
No. Name Description
1 Input Click on the corresponding input. The selected
line is activated.
2 Type Click on the arrow pointing downwards in the
Type column and select whether the input should
be configured or not.
Input is interpreted.
Input is not interpreted.
3 Name Place the cursor in the Name column and enter
the name. Any name can be chosen. The input is
now known to the system under this name.
4 Addresses
Assign
Click on Assignin the column Addresses if you
would like to assign certain SecSys addresses to
the input.
A5/11–2004610–4.998.137.176 – 74 –
Page 75

Installation Manual for DiBos Video System
Configuration (continued)
5 “Assignment of ad-
dresses” dialog box
6 Accept Click on Accept. If you have made incorrect in-
Select the SecSys addresses that you would like
to assign to the input and click OK.
The address is assigned to the input.
The address is not assigned to the input.
puts, click on Reject and start over.
A5/11–2004610–4.998.137.176 – 75 –
Page 76

Installation Manual for DiBos Video System
Configuration (continued)
6.2.9 Configuration of security system inputs for Bosch alarm systems
– excluding D9000 Series (option)
(Hardware/SecSys inputs menu)
The serial connection of a SecSys allows up to 16 input types to be defined
which, when they occur, trigger an alarm in the system.
Each input type is assigned line statuses as the default, but these can be
adapted for specific projects in LSN security systems. In addition, security system addresses can also be assigned to any input type.
Note: Function must be activated under Hardware/Connections.
LSN security systems are not yet available in the United States.
No. Name Description
1 Input Click on the corresponding input. The selected
line is activated.
2 Type Click on the arrow pointing downwards in the
Type column and select the input type.
The input type, e.g. hold–up, is activated.
The input type is not activated.
Note:
Certain line statuses are assigned to each input
as the default. This assignment can be changed
for LSN security systems.
3 Name Place the cursor in the Name column and enter
the name. Any name can be chosen. The input is
now known to the system under this name.
A5/11–2004610–4.998.137.176 – 76 –
Page 77

Installation Manual for DiBos Video System
Configuration (continued)
4 Line status Click on Assign, in the Line status column if you
would like to change or view the standard assignment of the line status (only for LSN security systems).
5 “Assignment of line sta-
tuses” dialog box
6 Addresses Click on Assignin the column Addresses if you
7 “Assignment of ad-
dresses” dialog box
8 Accept Click on Accept. If you have made incorrect in-
To add line statuses, select the line status on the
right and click on Add.
To remove line statuses, select the line status on
the left and click on Remove.
Confirm with Close. The line statuses on the left
are assigned to the SecSys input.
would like to assign certain SecSys addresses to
the input.
To add addresses, put the addresses into the input boxes from group ... detectors .. and to
group .. detectors .. and click on Add.
To remove addresses, select the addresses to be
removed on the left and click on Remove.
Confirm with Close. The addresses on the left
are assigned to the SecSys input.
puts, click on Reject and start over.
A5/11–2004610–4.998.137.176 – 77 –
Page 78

Installation Manual for DiBos Video System
Configuration (continued)
6.2.10 Configuration of alarm simulation
(Hardware/alarm simulation menu)
The video system supports 4 alarm inputs, which can be simulated for triggering
test alarms.
Note: Function must be activated under Hardware/Connections.
No. Name Description
1 Input Click on the corresponding input. The selected
line is activated.
Please ensure that input 1 corresponds to the
button Alarm 1, input 2 corresponds to the button
Alarm 2, etc.
2 Type Click on the arrow pointing downwards in the
Type column and select whether the test alarm
input should be configured or not.
The input should be used for alarm simulation.
The input should not be used for alarm simulation.
3 Name Place the cursor in the Name column and enter
the name. Any name can be chosen.
4 Accept Click on Accept. If you have made incorrect in-
puts, click on Reject and start over.
A5/11–2004610–4.998.137.176 – 78 –
Page 79

Installation Manual for DiBos Video System
Configuration (continued)
6.2.11 Configuration of virtual detectors
(Hardware/virtual detector menu)
The virtual detectors offer the same functionalities as the other detectors in the
system. They provide inputs that can be used to carry out jobs in the video system. In contrast to other units, virtual detectors are not physical hardware.
Virtual detectors can be used by other software programs to communicate with
the video system. A maximum of 32 virtual detectors is available.
Note: Function must be activated under Hardware/Connections.
No. Name Description
1 Input Click on the corresponding input. The selected
line is activated.
2 Type Click on the arrow pointing downwards in the
Type column and select whether the input should
be configured or not.
The input is to be used as a virtual detector.
The input is not to be used as a virtual detector.
3 Name Place the cursor in the Name column and enter
the name. Any name can be chosen.
4 Accept Click on Accept. If you have made incorrect in-
puts, click on Reject and start over.
A5/11–2004610–4.998.137.176 – 79 –
Page 80

Installation Manual for DiBos Video System
Configuration (continued)
Note: External software can communicate with the virtual detectors via a
COM interface (COM stands for Component Object Model).
For a simple connection, please see a type library (VirtualInputs.tlb)
in the installation directory of the video system.
The COM interface provides the following functions:
HRESULT SwitchOn(SHORT inputNr);
HRESULT SwitchOnWithData(SHORT inputNr,VARIANT vZeit, VARIANT vTransactionNr, VARIANT vATMNr,
VARIANT vBankCode, VARIANT vAccountNr, VARIANT vAmount, VARIANT
vAlarmId);
HRESULT SwitchOnWithAlarmId(SHORT inputNr, VARIANT vAlarmId);
HRESULT SwitchOff(SHORT inputNr);
The data types have the following format:
Name Type Length Application
inputNr SHORT Detector number whose
status is to be changed.
vZeit VARIANT (String/number) 4 Indicates the time from
unsynchronized external
systems (e.g. GAA).
(hh:mm)
vTransactionNr VARIANT (String/number) 4 Transaction number
vATMNr VARIANT (String/number) 6 Automated teller machine
number
vBankCode VARIANT (String/number) 8 Bank routing number
vAccountNr VARIANT (String/number) 10 Account number
vAmount VARIANT (String/number) 4 Amount (entire number)
vAlarmId VARIANT (String/number) 8 Alarm Id
Searches for these boxes can be done using the browser interface or the
search dialog in the image archive.
Example: Virtual detector via Web browser
http://”IP adress”/VirtualInputSrv.asp?inputNr=”x”&action=on
A5/11–2004610–4.998.137.176 – 80 –
Page 81

Installation Manual for DiBos Video System
Configuration (continued)
6.2.12 Configuration of detector inputs
(Hardware/Frame grabber/Detector menu
With this dialog box you can activate and deactivate the contact inputs of the
grabber card and select the stable state. A maximum of 8 or 16 contact inputs
can be connected to each MVTitan grabber card and a maximum of 5 contact
inputs can be connected to each MVSigma grabber card. A maximum of 2
MVTitan or a maximum of 1 MVSigma can be installed.
Note: If a sensor camera is configured, the associated detector input is
used as a sensor input. The detector input is no longer available as
an alarm input.
No. Name Description
1 Input Click on the corresponding input. The selected
line is activated.
2 Type Click on the arrow pointing downwards in the
Type column and select whether the input should
be configured or not.
Input is interpreted as an alarm input.
Input is not interpreted as an alarm input.
3 Name Place the cursor in the Name column and enter
the name. Any name can be chosen.
A5/11–2004610–4.998.137.176 – 81 –
Page 82

Installation Manual for DiBos Video System
Configuration (continued)
4 Open contact Determine whether the alarm input should be an
open or closed contact.
The input is an open contact.
The input is a closed contact.
5 Accept Click on Accept. If you have made incorrect
inputs, click on Reject and start over.
A5/11–2004610–4.998.137.176 – 82 –
Page 83

Installation Manual for DiBos Video System
Configuration (continued)
6.2.13 Configuration of cameras
(Hardware/Frame grabber/camera menu)
With this dialog box you can select which camera you would like to activate and
which camera type it should be.
A maximum of 8 or 16 cameras can be connected to each MVTitan grabber card
and a maximum of 4 cameras can be connected to each MVSigma grabber
card. A maximum of 2 MVTitan or a maximum of 1 MVSigma can be installed.
No. Name Description
1 Input Click on the corresponding camera input. The
selected line is activated.
2 Type Click on the arrow pointing downwards in the
Type column and select the camera type.
You can choose from: PAL camera, SVHS
camera, sensor camera, or dome camera.
Information regarding the SVHS cameras:
Each SVHS camera uses 2 inputs. The layout of
the inputs can be seen in chapter 4.1.
Information concerning sensor cameras:
Each sensor camera uses one detector input in
the Frame grabber/detector menu; e.g. detector
input 2 is automatically used when the sensor
camera has been configured to input 2. This
means that when all cameras are configured as
sensor cameras, physical contact is no longer
available.
3 Name Place the cursor in the Name column and enter
the name. Any name can be chosen.
A5/11–2004610–4.998.137.176 – 83 –
Page 84

Installation Manual for DiBos Video System
Configuration (continued)
4 Setup These settings can be set individually for each
camera. They will remain saved until a change is
carried out.
Click on Setup to do the following:
– change the image settings such as brightness,
contrast, color and compression for all camera
types;
– in addition with sensor cameras the areas to be
monitored must be drawn in and the sensitivity
set
– and implement the interface settings, camera
positions and camera controls for dome
cameras.
The individual setup settings are explained in a
subsequent section.
5 Accept Click on Accept. If you have made incorrect
inputs, click on Reject and start over.
A5/11–2004610–4.998.137.176 – 84 –
Page 85

Installation Manual for DiBos Video System
Configuration (continued)
Image settings for all camera types
Implement the setting for each camera as required.
No. Name Description
1 Image settings Click on Image settings.
2 Image properties Set the brightness, contrast and color. You can
view the result of the setting in the camera image
next to it.
3 Compression Set the compression here. Values between 1 and
5 are possible, whereby 1 is the lowest
compression (that is, the best image quality) and
5 the highest compression (that is, the worst
image quality).
4 Image format Set the resolution. You can choose between fine
and coarse.
Only every second pixel (quarter image) is used
for coarse resolution.
5 Image size The image size is displayed here. It is dependent
on the previously selected settings.
6 Use default Click on Use default when you would like to call
up the default settings.
Default: Average for brightness, contrast and
color. 1 (low) for compression. Fine for image
format.
7 OK Click OK to confirm the entries.
A5/11–2004610–4.998.137.176 – 85 –
Page 86

Installation Manual for DiBos Video System
Configuration (continued)
Set the monitoring area for the sensor camera (movement detection)
Implement the setting for each camera as required.
No. Name Description
1 Motion detection Click on Motion detection. The entire image
content within the blue area is sensitive at first;
i.e. content is monitored for movement. If you
want to limit the area to be monitored, carry out
the next step.
2 Within the blue area
Clicking with the left
mouse button or
Dragging an area with
the left mouse button
pressed down
Clicking with the right
mouse button or
Dragging an area with
the right mouse button
pressed down
3 Alarm overshoot time Enter the time for which the detector input is to
A minus sign appears next to the mouse cursor,
which indicates that the selected area is not
sensitive and thus not evaluated upon movement
detection. Non–sensitive areas are shown
shaded.
A plus sign appears next to the mouse cursor,
which indicates that the selected area is sensitive
again and that evaluation will occur upon
movement detection. Sensitive areas are shown
not shaded.
stay in alarm status after an alarm occurs.
Note:
A recording job must be linked to the detector input.
A5/11–2004610–4.998.137.176 – 86 –
Page 87

Installation Manual for DiBos Video System
Configuration (continued)
4 Sensitivity Change the sensitivity if the results of the
movement detection are not satisfactory.
high The sensitivity is higher; i.e. smaller texture
changes (outlines, brightness, movement) are
necessary to trigger an alarm.
low The sensitivity is reduced; i.e. bigger texture
changes (outlines, brightness, movement) are
necessary to trigger an alarm.
5 Grid When Grid is activated, an image is blended into
the grid. The size of the sensitive/not sensitive
areas displayed is based on the grid.
6 Accept Click on Accept. If you have made incorrect
inputs, click on Reject and start over.
A5/11–2004610–4.998.137.176 – 87 –
Page 88

Installation Manual for DiBos Video System
Configuration (continued)
Set dome cameras
Implement the setting for each camera as required.
No. Name Description
1 Dome settings Click on the Dome settings tab.
Creating interface settings
2 Interface The settings for the interfaces have to be carried
out first. Additional dome setting can only be set
after this.
Connection Click on the arrow pointing downwards and select
the interface.
Settings Click on settings and then enter the setting for
the COM interface (bits per second, data bits,
stop bits, parity, camera log). The settings
depend on the camera type. Please see the
manual for the matrix for more information.
Camera Protocol The entry occurs automatically if you have
previously entered the settings.
Camera Give the address of the camera. The address is
setup in the camera.
A5/11–2004610–4.998.137.176 – 88 –
Page 89

Installation Manual for DiBos Video System
Configuration (continued)
Saving camera positions
You can set the positions of dome cameras to which you can automatically
swivel time and time again. Users can quickly select these positions in the live
image, provided they are authorized to do this.
3 This is how you control
the camera. This is how you swivel the camera:
Move the mouse cursor into the camera image
until the direction arrow points in the direction in
which you want to swivel the camera. Then press
the left mouse button. The camera swivels in the
direction of the arrow with the speed increasing
the further you move the arrow outwards (with the
mouse button held down).
This is how you zoom:
Move the mouse cursor into the center of the
camera image until the magnifying glass appears
with a plus or minus sign. You can zoom the
camera by clicking the left mouse button.
The camera moves closer to the object.
The camera moves away from the object.
4 Camera settings Implement the following settings.
Focus Sharpness of the image and
Aperture Brightness
5 Positions saved
ID Name Click on the arrow pointing downwards in the ID
name text box and select a number that has not
been used if you want to save a position or select a
previously saved position if you want to change it.
Note:
A previously saved camera position can be
displayed by selecting it in the ID Name text
box and clicking on Display .
The saved position is deleted via Delete .
Save Click on Save , enter a logical name in the open
dialog box, and confirm it. A message appears
that the scene has been saved. The name is
imported into the ID Nametext box. When this
name is selected, the camera automatically
moves to this camera position.
A5/11–2004610–4.998.137.176 – 89 –
Page 90

Installation Manual for DiBos Video System
Configuration (continued)
Entering control commands via the command line
Here using the command line you can specify different settings for dome
cameras or matrixes that you can call up automatically again and again. For
more information about which commands are possible, see the operating
instructions for the camera or matrix in question. The operator can select these
commands quickly in the live image if these have been released for the
operator’s authorization.
6 Camera command line
Click on the arrow pointing downwards in the
Camera command line option group and select
a number that has not been used if you want to
save a position or select a previously saved
position if you want to change it.
Enter the command in the command line (via the
line with the down arrow).
Note:
You can perform a command for checking by
clicking on Transmit .
The saved command is deleted via Delete .
Save Click on Save, enter a logical name in the open
dialog box, and confirm it. A message appears
that the command has been saved. The name is
imported. Selecting this name causes the camera
to automatically carry out the command.
Accepting entries
7 OK Click OK to confirm your entries.
Example: Matrix: CCL command
LCM+ 2 1
(that is, switch Camera 2 to Monitor 1)
A5/11–2004610–4.998.137.176 – 90 –
Page 91

Installation Manual for DiBos Video System
Configuration (continued)
6.2.14 Configuring relays
(Hardware/Frame grabber/Relays menu)
A maximum of 4 or 8 relay outputs can be connected to each MVTitan grabber
card. With the MVSigma grabber card, no relays can be connected. A maximum
of 2 MVTitan can be installed.
The relays can be activated locally using a remote station or via a browser.
No. Name Description
1 Input Click on the corresponding relay output. The
selected line is activated.
Please be aware that relay output 4 might already
be in use. This is the case when a fault indicator
has been selected in the Connections menu. In
this case, the system automatically uses relay
output 4 of the 1st MVTitan with the fault
indicator.
2 Type Click on the arrow pointing downwards in the
Type column and select whether the relay output
should be activated or not.
The relay output is activated.
The relay output is not activated.
3 Name Place the cursor in the Name column and enter
the name. Any name can be chosen.
4 Accept Click on Accept. If you have made incorrect
inputs, click on Reject and start over.
A5/11–2004610–4.998.137.176 – 91 –
Page 92

Installation Manual for DiBos Video System
Configuration (continued)
6.2.15 Configuring IP cameras
(Hardware/IP cameras menu)
A maximum of 16 IP cameras (network cameras) can be connected. The IP
cameras can also be connected to the available cameras through Frame
grabber.
Only those cameras with which JPEG images can be called up via the http
protocol can be used as IP cameras.
Note: Function must be activated under Hardware/Connections.
No. Name Description
1 Input Click on the corresponding output. The selected
line is activated.
2 Type Click on the arrow pointing downwards in the
Type column and select whether the output
should be used by an IP camera or not.
The output is being used by an IP camera.
The output is not being used.
3 Name Place the cursor in the Name column and enter
the name. Any name can be chosen.
A5/11–2004610–4.998.137.176 – 92 –
Page 93

Installation Manual for DiBos Video System
Configuration (continued)
4 Setup Click on Setup and implement the settings for
each camera.
Enter the following
– Address (URL) of the camera under which
JPEG images can be called up.
Note:
If you click on Display , you can check to see
whether the URL entered is correct. In this case
the camera image appears.
Note:
Axis: http://”IP–address”/jpg/image.jpg
Mobotix: http://”IP–address”/record/current.jpg
– User name and password for the cameras;
these are required for registration (e.g. Mobotix
banking camera)
– Activate images per second
Note:
This function should always be activated when
the camera delivers the same image repeatedly
upon repeated requests, even though no new
image was grabbed. Thus the network load can
be minimized during live image display.
5 Accept Click on Accept. If you have made incorrect
inputs, click on Reject and start over.
A5/11–2004610–4.998.137.176 – 93 –
Page 94

Installation Manual for DiBos Video System
Configuration (continued)
6.2.16 Configuring time periods
(Time periods menu)
To ensure that jobs are activated at specific times, you can define different
times for specific events, such as triggering a save job at certain times.
No. Name Description
Creates a time period.
1 New
2 Delete
3 Time intervals Choose the day and continue with steps 4 and 5.
Weekdays – Monday through Sunday
Holidays – Holidays. Holidays can be adapted for particular
Special dates – Days that can be selected at will.
Click on New and enter the actual name in the
Name input box.
Deletes a time period.
In the overview (in the right side of the dialog box),
select the time period that you wish to delete and
click on Delete.
countries (see Administration Menu).
Warning: The system evaluates the entries
according to priority. If entries assigned to a
particular day are contradictory, the entry with the
higher priority is always in effect.
– Special dates (highest priority)
– Holidays (average priority)
– Weekdays (lowest priority)
A5/11–2004610–4.998.137.176 – 94 –
Page 95

Installation Manual for DiBos Video System
Configuration (continued)
4 Time interval The times (from ... to) for the selected weekdays,
holidays and special dates can be entered here.
New A new time can be entered.
Edit An existing time can be changed.
Delete Deletes the time periods of the selected day.
5 Day The holidays and special dates are selected here.
Note:
Activation only occurs on the selected day if a
time interval is assigned. If there is no time
interval, no activation occurs.
New A new day can be selected.
Edit An existing day can be changed.
Delete Deletes the selected day.
6 Accept Click on Accept. If you have made incorrect
inputs, click on Reject and start over.
Note:
You have to assign a time period to a job in the Job Activations menu.
A5/11–2004610–4.998.137.176 – 95 –
Page 96

Installation Manual for DiBos Video System
Configuration (continued)
6.2.17 Configuration of the ISDN connections (option)
(Connections/ISDN menu)
In this menu, define your own user station (local computer) and the remote
stations so that you are able to establish a connection to a remote station when
continuing the configuration process and/or to allow a connection to your own
user station.
Note: Function must be activated under Hardware/Connections.
No. Name Description
1 Name Enter the locale computer name in Name of the
options group Own user station.
Note:
In the live image, the local computer name is
displayed in the last line of the Connection
menu.
2 Own number Enter the complete telephone number of your own
user station into the entry box Own number. In the
case of PABXs, which make an assignment to the
number called, it is easier to just enter an “A”.
3 Number of B channels Enter the number of B channels in the entry box
Number of B channels.
4 Own number Activate the corresponding option
.. Check incoming
connections
.. do not check – if the system should not check whether the
–if the system is to check whether the number
entered matches your own number. The
connection is only made if they match.
number entered matches your own number.
Can be selected if there is only one additional
connection. In this case, your own number does
not have to be entered.
A5/11–2004610–4.998.137.176 – 96 –
Page 97

Installation Manual for DiBos Video System
Configuration (continued)
5 Incoming calls Activate the corresponding option
.. only accept if in list
of remote stations
.. do not check –if the system is not to perform any check.
6 New
7 Delete
8 Number Enter the complete telephone number of the remote
9 Licensed remote station Activate Licensed remote station for projects
10 Accept Click on Accept. If you have made incorrect
–if the system should check whether the calls are
coming from a configured remote station. The
connection is only made if they match.
Creates a new connection to a remote ISDN
remote station.
Click on New and enter the actual name of the
remote station (the computer name) in the Name
input box.
Deletes the connection to a remote ISDN remote
station.
In the overview (in the lower portion of the dialog
box), select the remote station that you wish to
delete and click on Delete.
station in the entry box Number . If your own user
station is located at a PABX, you must enter a digit
(usually a “0”) before the number of the remote
station in order to reach the outside line.
that require this, e.g. for a Rubin K1 as a remote
station (optional).
inputs, click on Reject and start over.
A5/11–2004610–4.998.137.176 – 97 –
Page 98

Installation Manual for DiBos Video System
Configuration (continued)
6.2.18 Configuring network connections
(Connections/network menu)
In this dialog box you can determine the video systems to which—via the
network—a two–way connection should be connected.
Note: Function must be activated under Hardware/Connections.
No. Name Description
Creates a new connection to a remote network
remote station.
1 New
2 Delete
3 Address Enter the TCP/IP address of the remote station or
4 Licensed remote station Activate Licensed remote station for projects
Click on New and enter the actual name of the
remote station (the computer name) in the Name
input box.
Deletes the connection to a remote network
remote station.
In the overview (in the lower portion of the dialog
box), select the remote station that you wish to
delete and click on Delete.
the computer name (e.g. for DHCP) in the
Address input box.
that require this, e.g. for a Rubin K1 as a remote
station (optional).
A5/11–2004610–4.998.137.176 – 98 –
Page 99

Installation Manual for DiBos Video System
Configuration (continued)
5 Incoming calls Activate the corresponding option
.. only accept if in list
of remote stations
.. do not check – if the system is not to perform any check.
6 Accept Click on Accept. If you have made incorrect
– if the system should check whether the calls are
coming from a configured remote station. The
connection is only made if they match.
inputs, click on Reject and start over.
Note: The number of accessible remote stations can be viewed in the
dongle. For manual connection setup, only the number of released
connections is offered
.
A5/11–2004610–4.998.137.176 – 99 –
Page 100

Installation Manual for DiBos Video System
Configuration (continued)
6.2.19 Configuring modem connections
(Connections/modem menu)
In this dialog box you can determine the video systems to which—via the
modem—a two–way connection should be connected.
In order to ensure that a configuration can be performed, an RAS–capable
modem* must be connected and RAS service must be installed. If no
RAS–capable modem is connected or no RAS service is installed, the following
note symbol and a button with additional information appear.
Note: Function must be activated under Hardware/Connections.
No. Name Description
Creates a new connection to a remote modem
remote station.
1 New
2 Delete
3 Number Enter the complete telephone number of the
Click on New and enter the actual name of the
remote station (the computer name) in the Name
input box.
Deletes the connection to a remote modem
remote station.
In the overview (in the lower portion of the dialog
box), select the remote station that you wish to
delete and click on Delete.
remote station in the entry box Number . If your
own user station is connected to a PABX, you
must enter a digit (usually a “0”) before the
number of the remote station in order to obtain
the exchange line.
* See Section 4.16.1 for additional information.
A5/11–2004610–4.998.137.176 – 100 –
 Loading...