

Page 1

3FHJTUFS
\RXU
QHZGHYLFHRQ
0\%RVFKQRZDQG
JHWIUHHEHQHILWV
CPTDIIPNFDPN
XFMDPNF
Extractor hood
ةرﺧﺑﻷا طﺎﻔﺷ
DHU665CGB9, DHU965CGB9
[en] Instruction manual
لﺎﻣﻌﺗﺳﻻا لﯾﻟد
[ar]
Extractor hood
ةرﺧﺑﻷا طﺎﻔﺷ
Page 2

Page 3

Table of contents
[en]I n st r u ct i on manual Ext r ac t or hood
8 Intended use . . . . . . . . . . . . . . . . . . . . . . . . . . . . . 3
en
8Intended use
( Important safety information . . . . . . . . . . . . . . . 4
7 Environmental protection . . . . . . . . . . . . . . . . . . 5
Saving energy . . . . . . . . . . . . . . . . . . . . . . . . . . . . . . . 5
Environmentally-friendly disposal . . . . . . . . . . . . . . . . . 5
Ç Operating modes . . . . . . . . . . . . . . . . . . . . . . . . . 6
Exhaust air mode . . . . . . . . . . . . . . . . . . . . . . . . . . . . . 6
Air recirculation . . . . . . . . . . . . . . . . . . . . . . . . . . . . . . 6
1 Operating the appliance . . . . . . . . . . . . . . . . . . . 6
Setting the fan . . . . . . . . . . . . . . . . . . . . . . . . . . . . . . . 6
Lighting . . . . . . . . . . . . . . . . . . . . . . . . . . . . . . . . . . . . 6
2 Cleaning and maintenance . . . . . . . . . . . . . . . . . 7
Cleaning agents . . . . . . . . . . . . . . . . . . . . . . . . . . . . . . 7
3 Trouble shooting . . . . . . . . . . . . . . . . . . . . . . . . . 9
4 Customer service . . . . . . . . . . . . . . . . . . . . . . . . . 9
Produktinfo
Additional information on products, accessories,
replacement parts and services can be found at
www.bosch-home.com and in the online shop
www.bosch-eshop.com
Intended use
Read these instructions carefully. Only then
will you be able to operate your appliance
safely and correctly. Retain the instruction
manual and installation instructions for future
use or for subsequent owners.
The appliance can only be used safely if it is
correctly installed according to the safety
instructions. The installer is responsible for
ensuring that the appliance works perfectly at
its installation location.
This appliance is intended for domestic use
and the household environment only. The
appliance is not intended for use outside. Do
not leave the appliance unattended during
operation. The manufacturer is not liable for
damage which is caused by improper use or
incorrect operation.
This appliance is intended for use up to a
maximum height of 2000 metres above sea
level.
This appliance may be used by children over
the age of 8 years old and by persons with
reduced physical, sensory or mental
capabilities or by persons with a lack of
experience or knowledge if they are
supervised or are instructed by a person
responsible for their safety how to use the
appliance safely and have understood the
associated hazards.
Children must not play with, on, or around the
appliance. Children must not clean the
appliance or carry out general maintenance
unless they are at least 15 years old and are
being supervised.
Keep children below the age of 8 years old at
a safe distance from the appliance and power
cable.
Check the appliance for damage after
unpacking it. Do not connect the appliance if it
has been damaged in transport.
This appliance is not intended for operation
with an external clock timer or a remote
control.
3
Page 4
en Important safety information
(Important safety
information
Impor t ant saf ety informat i on
:Warning – Danger of suffocation!
Packaging material is dangerous to children.
Never allow children to play with packaging
material.
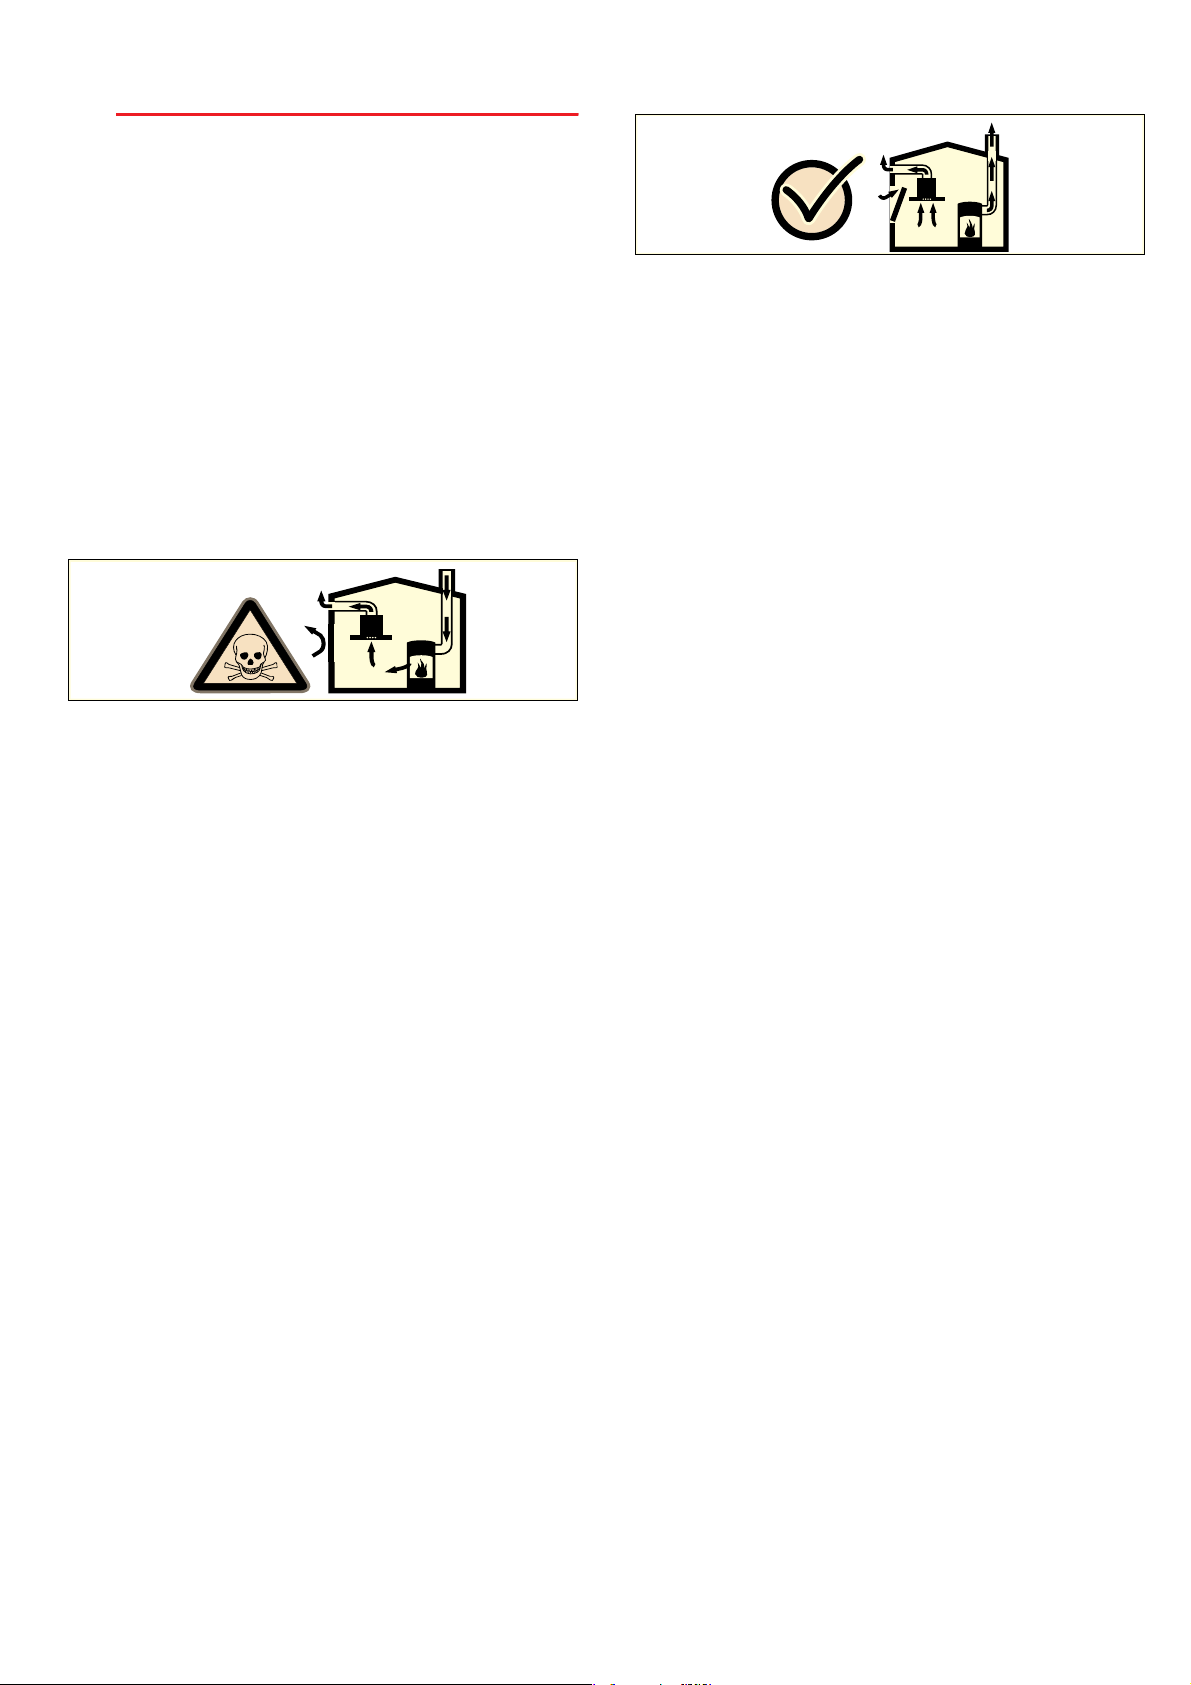
:Warning – Danger of death!
Risk of poisoning from flue gases that are
drawn back in.
Always ensure adequate fresh air in the room
if the appliance is being operated in exhaust
air mode at the same time as room airdependent heat-producing appliance is being
operated.
Room air-dependent heat-producing
appliances (e.g. gas, oil, wood or coaloperated heaters, continuous flow heaters or
water heaters) obtain combustion air from the
room in which they are installed and discharge
the exhaust gases into the open air through an
exhaust gas system (e.g. a chimney).
In combination with an activated vapour
extractor hood, room air is extracted from the
kitchen and neighbouring rooms - a partial
vacuum is produced if not enough fresh air is
supplied. Toxic gases from the chimney or the
extraction shaft are sucked back into the living
space.
■ Adequate incoming air must therefore
always be ensured.
■ An incoming/exhaust air wall box alone will
not ensure compliance with the limit.
Safe operation is possible only when the
partial vacuum in the place where the heatproducing appliance is installed does not
exceed 4 Pa (0.04 mbar). This can be
achieved when the air needed for combustion
is able to enter through openings that cannot
be sealed, for example in doors, windows,
incoming/exhaust air wall boxes or by other
technical means.
In any case, consult your responsible Master
Chimney Sweep. He is able to assess the
house's entire ventilation setup and will
suggest the suitable ventilation measures to
you.
Unrestricted operation is possible if the vapour
extractor hood is operated exclusively in the
circulating-air mode.
:Warning – Risk of fire!
■ Grease deposits in the grease filter may
catch fire.
Clean the grease filter at least every
2 months.
Never operate the appliance without the
grease filter.
Risk of fire!
■ Grease deposits in the grease filter may
catch fire. Never work with naked flames
close to the appliance (e.g. flambéing). Do
not install the appliance near a heatproducing appliance for solid fuel (e.g.
wood or coal) unless a closed, nonremovable cover is available. There must
be no flying sparks.
Risk of fire!
■ Hot oil and fat can ignite very quickly. Never
leave hot fat or oil unattended. Never use
water to put out burning oil or fat. Switch off
the hotplate. Extinguish flames carefully
using a lid, fire blanket or something similar.
Risk of fire!
■ When gas burners are in operation without
any cookware placed on them, they can
build up a lot of heat. A ventilation
appliance installed above the cooker may
become damaged or catch fire. Only
operate the gas burners with cookware on
them.
Risk of fire!
■ Operating several gas burners at the same
time gives rise to a great deal of heat. A
ventilation appliance installed above the
cooker may become damaged or catch fire.
Never operate two gas burners
simultaneously on the highest flame for
longer than 15 minutes. One large burner of
more than 5 kW (wok) is equivalent to the
power of two gas burners.
:Warning – Risk of burns!
The accessible parts become very hot when in
operation. Never touch hot parts. Keep
children at a safe distance.
4
Page 5
Environmental protection en
:Warning – Risk of injury!
■ Components inside the appliance may have
sharp edges. Wear protective gloves.
Risk of injury!
■ Items placed on the appliance may fall
down. Do not place any objects on the
appliance.
:Warning – Risk of electric shock!
■ A defective appliance may cause electric
shock. Never switch on a defective
appliance. Unplug the appliance from the
mains or switch off the circuit breaker in the
fuse box. Contact the after-sales service.
Risk of electric shock!
■ Incorrect repairs are dangerous. Repairs
may only be carried out and damaged
power cables replaced by one of our
trained after-sales technicians. If the
appliance is defective, unplug the appliance
from the mains or switch off the circuit
breaker in the fuse box. Contact the aftersales service.
Risk of electric shock!
■ Do not use any high-pressure cleaners or
steam cleaners, which can result in an
electric shock.
Causes of damage
7Environmental protection
Env i r on ment al pr ot ect i on
Your new appliance is particularly energy-efficient.
Here you can find tips on how to save even more
energy when using the appliance, and how to dispose
of your appliance properly.
Saving energy
■ During cooking, ensure that there is a sufficient
supply of air to enable the extractor hood to work
efficiently and with a low level of operating noise.
■ Adjust the fan speed to the amount of steam
produced during cooking. Only use intensive mode
when required. The lower the fan speed, the less
energy is consumed.
■ If cooking produces large amounts of steam, select
a higher fan speed in good time. If the cooking
steam has already spread around the kitchen, the
extractor hood will need to be operated for longer.
■ Switch off the extractor hood if you no longer require
it.
■ Switch off the lighting if you no longer require it.
■ Clean and (if required) replace the filter at regular
intervals in order to increase the effectiveness of the
ventilation system and to prevent the risk of fire.
■ Put the lid on to reduce cooking steam and
condensation.
Caution!
Risk of damage due to corrosion. Always
switch on the appliance while cooking to avoid
condensation. Condensate can produce
corrosion damage.
Always replace faulty bulbs to prevent the
remaining bulbs from overloading.
Risk of damage due to ingress of humidity into
the electronic circuitry. Never clean operator
controls with a wet cloth.
Surface damage due to incorrect cleaning.
Clean stainless steel surfaces in the direction
of the grain only. Do not use any stainless
steel cleaners for operator controls.
Surface damage due to strong or abrasive
cleaning agents. Never use strong and
abrasive cleaning agents.
Risk of damage from returning condensate.
Install the exhaust duct in such a way that it
falls away from the appliance slightly
(1° slope).
Environmentally-friendly disposal
Dispose of packaging in an environmentally-friendly
manner.
This appliance is labelled in accordance with
European Directive 2012/19/EU concerning
used electrical and electronic appliances
(waste electrical and electronic equipment WEEE). The guideline determines the
framework for the return and recycling of used
appliances as applicable throughout the EU.
5
Page 6

en Operating modes
ÇOperating modes
Operat i ng modes
Exhaust air mode
The air which is drawn in is cleaned
by the grease filters and conveyed to
the exterior by a pipe system.
Note: The air must not be discharged into a flue that is
used for exhausting fumes from appliances burning gas
or other fuels (not applicable to appliances that only
discharge the air back into the room).
■ Before conveying the exhaust air into a non-
functioning smoke or exhaust gas flue, obtain the
consent of the heating engineer responsible.
■ If the exhaust air is conveyed through the outer wall,
a telescopic wall box should be used.
Air recirculation
The air which is drawn in is cleaned by
the grease filters and an activated
carbon filter, and is conveyed back into
the kitchen.
1Operating the appliance
Operat i ng the appl i ance
Note: Switch on the extractor hood when you start
cooking and switch it off again several minutes after you
have finished cooking. This is the most effective way of
removing the kitchen fumes.
Note: Fold the glass cover forwards. This increases the
extraction area.
Control panel
Explanation
$ LED display for fan speed
; Switches fan level 1 on/off
2 Switches fan level 2 on
3 Switches fan level 3 on
< Switches the lighting on/off
Setting the fan
Note: To bind odours in air recirculation mode, you
must install an activated carbon filter. The different
options for operating the appliance in air recirculation
mode can be found in the brochure. Alternatively, ask
your dealer. The required accessories are available
from specialist retailers, from customer service or from
the Online Shop.
Note: Always adjust the fan strength to meet current
conditions. If there is a large build-up of steam or
fumes, select a high fan setting.
Switching on
1. Press the ; button.
The fan starts at level 1.
2. Press the 2 or 3 buttons to set a different fan level.
Switching off the appliance
Press the ; button.
Lighting
The lighting can be switched on and off independently
of the ventilation.
Press the < button.
6
Page 7

Cleaning and maintenance en
2Cleaning and maintenance
Cleani ng and mai nt enance
:Warning – Risk of burns!
The appliance becomes hot during operation. Allow the
appliance to cool down before cleaning.
:Warning – Risk of electric shock!
Penetrating moisture may result in an electric shock.
Clean the appliance using a damp cloth only. Before
cleaning, pull out the mains plug or switch off the circuit
breaker in the fuse box.
:Warning – Risk of electric shock!
Do not use any high-pressure cleaners or steam
cleaners, which can result in an electric shock.
:Warning – Risk of injury!
Components inside the appliance may have sharp
edges. Wear protective gloves.
Cleaning agents
To ensure that the different surfaces are not damaged
by using the wrong cleaning agent, observe the
information in the table. Do not use any of the following:
■ Harsh or abrasive cleaning agents,
■ Cleaning agents with a high alcohol content,
■ Hard scouring pads or cleaning sponges,
■ High-pressure cleaners or steam cleaners.
Wash new sponge cloths thoroughly before use.
Follow all instructions and warnings included with the
cleaning agents.
Area Cleaning agent
Stainless steel Hot soapy water:
Clean with a dish cloth and then dry with a
soft cloth.
Clean stainless steel surfaces in the grind
direction only.
Special stainless steel cleaning products are
available from our after-sales service or from
specialist retailers. Apply a very thin layer of
the cleaning product with a soft cloth.
Painted surfaces Hot soapy water:
Clean using a damp dish cloth and dry with a
soft cloth/towel.
Do not use any stainless steel cleaners.
Aluminium and plastic Glass cleaner:
Clean with a soft cloth.
Area Cleaning agent
Glass Glass cleaner:
Clean with a soft cloth. Do not use a glass
scraper.
Controls Hot soapy water:
Clean using a damp dish cloth and dry with a
soft cloth/towel.
Risk of electric shock caused by penetrating
moisture.
Risk of damage to the electronics from penetrating moisture. Never clean operating controls with a wet cloth.
Do not use any stainless steel cleaners.
Cleaning the metal mesh grease filters
These instructions apply to several appliance variants. It
is possible that individual features are described which
do not apply to your appliance.
:Warning – Risk of fire!
Grease deposits in the grease filter may catch fire.
Clean the grease filter at least every 2 months.
Never operate the appliance without the grease filter.
Notes
■ Do not use any aggressive, acidic or alkaline
cleaning agents.
■ When cleaning the metal mesh grease filters, also
clean the holder for the metal mesh grease filters in
the appliance using a damp cloth.
■ The metal mesh grease filters can be cleaned in the
dishwasher or by hand.
By hand:
Note: You can use a special grease solvent for
stubborn dirt. It can be ordered via the Online Shop.
■ Soak the metal mesh grease filters in a hot soapy
solution.
■ Clean the filters with a brush and then rinse them
thoroughly.
■ Leave the metal mesh grease filters to drain.
In the dishwasher:
Note: If the metal mesh grease filters are cleaned in the
dishwasher, slight discolouration may occur. This has
no effect on the function of the metal mesh grease
filters.
■ Do not clean heavily soiled metal mesh grease filters
together with utensils.
■ Place the metal mesh grease filters loosely in the
dishwasher. The metal mesh grease filters must not
be wedged in.
7
Page 8

en Cleaning and maintenance
Removing metal grease filter
1. Push the lock and then push the metal grease filter
back and pull it down.
While doing this, place your other hand under the
metal grease filter.
Note: To avoid causing damage, do not bend the
metal grease filter.
2. Take the metal grease filter out of the holder.
Note: Grease may accumulate in the bottom of the
metal grease filter. Hold the metal grease filter level
to prevent grease from dripping out.
3. After removing the metal grease filters, clean the
inside of the appliance.
4. Clean the metal grease filters and let them dry
before re-fitting them.
Changing the activated charcoal filter (only
in circulating-air mode)
In order to guarantee efficient odour filtration, the filter
must be serviced regularly.
The activated charcoal filters must be replaced at least
every 3 months.
Notes
■ The activated charcoal filters are not included in the
delivery. The activated charcoal filters can be
obtained from specialist retailers, from our aftersales service or from the Online Shop.
■ The activated charcoal filters cannot be cleaned or
reactivated.
1. Remove the metal grease filter, see the chapter
Removing the metal grease filter.
2. Remove the milled screw from the middle of the
activated carbon filter cover.
While doing this, place your other hand under the
activated carbon filter to hold it steady.
Installing the metal mesh grease filter
1. Insert the two metal grease filters under the filter
cover with the lock facing downwards.
Insert the metal grease filters on the underside of the
appliance.
2. Fold the metal grease filters inwards, locking them in
place.
3. Lower the activated carbon filter cover.
4. Turn the activated carbon filter in an anti-clockwise
direction and remove it.
5. Install the new activated carbon filter.
6. Install the metal grease filter, see the chapter
Installing the metal grease filter.
8
Page 9

Trouble shooting en
3Trouble shooting
Troubl e shooti ng
Malfunctions often have simple explanations. Please
read the following notes before calling the after-sales
service.
:Warning – Risk of electric shock!
Incorrect repairs are dangerous. Repairs may only be
carried out and damaged power cables replaced by
one of our trained after-sales technicians. If the
appliance is defective, unplug the appliance from the
mains or switch off the circuit breaker in the fuse box.
Contact the after-sales service.
Malfunction table
Problem Possible cause Solution
The appliance
does not work
The button illumination does not
work.
The lighting does
not work.
--------
The plug is not
plugged in.
Power cut Check whether other kitchen
Faulty fuse Check in the fuse box to make
The control unit is
faulty.
The bulbs are
faulty.
Connect the appliance to the
electricity supply
appliances are working
sure that the fuse for the appliance is OK
Call the aftersales service.
For information on changing
the bulbs, see the "Replacing
Bulbs" section.
4Customer service
Cus t o mer ser vi ce
When calling us, please give the product number (E
no.) and the production number (FD no.) so that we can
provide you with the correct advice. The rating plate
with these numbers can be found inside the appliance
(remove the metal mesh grease filter to gain access).
You can make a note of the numbers of your appliance
and the telephone number of the after-sales service in
the space below to save time should it be required.
E no. FD no.
After-sales serviceO
Please be aware that a visit by an after-sales engineer
will be charged if a problem turns out to be the result of
operator error, even during the warranty period.
Please find the contact data of all countries in the
enclosed customer service list.
To book an engineer visit and product advice
GB 0344 892 8979
Calls charged at local or mobile rate.
IE 01450 2655
0.03 € per minute at peak. Off peak 0.0088 €
per minute.
Rely on the professionalism of the manufacturer. You
can therefore be sure that the repair is carried out by
trained service technicians who carry original spare
parts for your appliances.
Replacing bulbs
:Warning – Risk of electric shock!
When changing the bulbs, the bulb socket contacts are
live. Before changing the bulb, unplug the appliance
from the mains or switch off the circuit breaker in the
fuse box.
Important! Only use bulbs of the same type and
wattage.
Replacing filament bulbs
1. Remove the metal grease filter.
2. Replace the old bulb with a new bulb of the same
type.
3. Insert the metal grease filter.
Replace the bulb with one of the same type:
Voltage: 230 V
Power: Max. 40 W
Base: E14
9
Page 10

6
Page 11

6
Page 12

؟لﻣﻌﻟا ﺎﻣ ،تﻻﻼﺗﺧﻻاar
4ءﻼﻣﻌﻟا ﺔﻣدﺧ
ﺞﺗﻧﻣﻟا مﻗر رﻛذ ﻰﺟرﯾ ﺔﻣدﺧﻟا زﻛرﻣﺑ لﺎﺻﺗﻻا دﻧﻋ)E-Nr. ( ﻊﻧﺻﻟا مﻗرو
كﻓ مزﻠﯾ ﺎﮭﯾﻟإ لوﺻوﻠﻟ) زﺎﮭﺟﻟﺎﺑ ﻲﻠﺧادﻟا زﯾﺣﻟا ﻲﻓ مﺎﻗرﻷا ﻰﻠﻋ ﺔﯾوﺗﺣﻣﻟا
.(ﻲﻧدﻌﻣﻟا نوھدﻟا رﺗﻠﻓ
رطﺿﺗ ﻻ ﻲﻛ ،ءﻼﻣﻌﻟا ﺔﻣدﺧ فﺗﺎھ مﻗرو كزﺎﮭﺟ تﺎﻧﺎﯾﺑ نﯾودﺗ ﺎﻧھ كﻧﻛﻣﯾ
.تﺎﻧﺎﯾﺑﻟا هذھ ﻰﻟإ جﺎﯾﺗﺣﻻا دﻧﻋ لﯾوط تﻗوﻟ ثﺣﺑﻠﻟ
ﺞﺗﻧﻣﻟا مﻗرE-Nr. ﻊﻧﺻﻟا مﻗرFD-Nr.
ءﻼﻣﻌﻟا ﺔﻣدﺧO
لﺎﻣﻌﺗﺳﻻا ﺔﻟﺎﺣ ﻲﻓ نﺎﺟﻣﻟﺎﺑ تﺳﯾﻟ ءﻼﻣﻌﻟا ﺔﻣدﺧ ﻲﻧﻓ ةرﺎﯾز نأ ﻰﻋارﯾ
.نﺎﻣﺿﻟا ةرﺗﻓ ءﺎﻧﺛأ ﻰﺗﺣ ﺊطﺎﺧﻟا
برﻗﺄﺑ لﺎﺻﺗﻻا تﺎﻧﺎﯾﺑ ءﻼﻣﻌﻟا ﺔﻣدﺧ زﻛارﻣﻟ ﻖﻓرﻣﻟا لﯾﻟدﻟا ﻲﻓ وأ ﺎﻧھ دﺟﺗ
.نادﻠﺑﻟا ﻊﯾﻣﺟ ﻲﻓ ءﻼﻣﻌﻟا ﺔﻣدﺧﻟ زﻛرﻣ
ﺔﻓرﻌﻣﺑ مﺗﯾ فوﺳ حﻼﺻﻹا نأ دﻛﺄﺗو .ﺔﻌﻧﺎﺻﻟا ﺔﮭﺟﻟا ةرﺑﺧو ةءﺎﻔﻛ ﻲﻓ ﻖﺛ
.كزﺎﮭﺟﻟ ﺔﯾﻠﺻﻷا رﺎﯾﻐﻟا ﻊطﻗ مﮭﯾدﻟو نﯾﺑردﻣ ﺔﻣدﺧ ﻲﯾﻧﻓ
3؟لﻣﻌﻟا ﺎﻣ ،تﻻﻼﺗﺧﻻا
ءﻼﻣﻌﻟا ﺔﻣدﺧ
)FD-Nr. ( ﻊﻧﺻﻟا ﺔﺣوﻟ دﺟﺗ .ﺔﺣﯾﺣﺻﻟا ةروﺷﻣﻟا كﻟ مدﻘﻧ نأ ﻊﯾطﺗﺳﻧ ﻰﺗﺣ
لﺻﺗﺗ نأ لﺑﻗ .أرطﺗ ﻲﺗﻟا تﻻﻼﺗﺧﻻا ﻰﻠﻋ ﺔﻟوﮭﺳﺑ بﻠﻐﺗﻟا ﺎﺑﻟﺎﻏ كﻧﻛﻣﯾ
.ﺔﯾﻟﺎﺗﻟا تادﺎﺷرﻹا ةﺎﻋارﻣ ﻰﻠﻋ صرﺣا ءﻼﻣﻌﻟا ﺔﻣدﺧﺑ
لﺎﻣﻋأ ذﯾﻔﻧﺗ زوﺟﯾ ﻻ .رﺎطﺧأ ﻰﻠﻋ ﺎﯾﻧﻓ ﺔﻣﯾﻠﺳﻟا رﯾﻏ حﻼﺻﻹا لﺎﻣﻋأ يوطﻧﺗ
ءﻼﻣﻋ ﺔﻣدﺧ ﻲﻧﻓ ﺔﻓرﻌﻣﺑ ﻻإ ةررﺿﺗﻣﻟا ءﺎﺑرﮭﻛﻟا تﻼﯾﺻوﺗ رﯾﯾﻐﺗو حﻼﺻﻹا
نﻣ ﻲﺋﺎﺑرﮭﻛﻟا سﺑﺎﻘﻟا عزﻧﺎﻓ ،زﺎﮭﺟﻟﺎﺑ لطﻋ كﺎﻧھ نﺎﻛ اذإ .ﺎﻧﻠﺑِﻗ نﻣ بردﻣ
ﺔﻣدﺧﺑ لﺻﺗا .رھﺎﺻﻣﻟا قودﻧﺻ ﻲﻓ دوﺟوﻣﻟا رﮭﺻﻣﻟا لﺻﻓا وأ سﺑﻘﻣﻟا
تﻻﻼﺗﺧﻻا لودﺟ
لﻣﺗﺣﻣﻟا بﺑﺳﻟالﺣﻟا
ﺔﻛﺑﺷﻟﺎﺑ زﺎﮭﺟﻟا لﯾﺻوﺗﺑ مﻗ
ﺔﯾﺋﺎﺑرﮭﻛﻟا
ةزﮭﺟأ كﺎﻧھ تﻧﺎﻛ اذإ ﺎﻣﻣ ﻖﻘﺣﺗ
ﺔﻠﻐﺷﻣ ىرﺧأ ﺦﺑطﻣ
مارﯾ ﺎﻣ ﻰﻠﻋ رھﺎﺻﻣﻟا قودﻧﺻ
.ءﻼﻣﻌﻟا ﺔﻣدﺧﺑ لﺻﺗا
.«تﺎﺑﻣﻠﻟا رﯾﯾﻐﺗ»
رﯾﻏ سﺑﺎﻘﻟا
ﻲﻓ عوﺿوﻣ
ﻲﺋﺎﺑرﮭﻛﻟا سﺑﻘﻣﻟا
رﺎﯾﺗﻟا عﺎطﻘﻧا
ﻲﺋﺎﺑرﮭﻛﻟا
فﻟﺎﺗ رﮭﺻﻣﻟا ﻲﻓ زﺎﮭﺟﻟا رﮭﺻﻣ نأ ﻖﻘﺣﺗ
مﻛﺣﺗﻟا ةدﺣو
.ﺔﻠطﻌﻣ
.ﺔﻔﻟﺎﺗ تﺎﺑﻣﻠﻟا لﺻﻓ رظﻧا ،تﺎﺑﻣﻠﻟا رﯾﯾﻐﺗﺑ مﻗ
لﻣﻌﯾ ﻻ زﺎﮭﺟﻟا
رارزﻷا ةءﺎﺿإ
.لﻣﻌﺗ ﻻ ةءﺎﺿﻹا
؟لﻣﻌﻟا ﺎﻣ ،تﻻﻼﺗﺧﻻا
:رﯾذﺣﺗ – !ﻲﺋﺎﺑرﮭﻛﻟا ﻖﻌﺻﻟا رطﺧ
.ءﻼﻣﻌﻟا
لﻠﺧﻟا
ﻻ.لﻣﻌﺗ
--------
تﺎﺑﻣﻠﻟا رﯾﯾﻐﺗ
:رﯾذﺣﺗ – !ﻲﺋﺎﺑرﮭﻛﻟا ﻖﻌﺻﻟا رطﺧ
رﯾﯾﻐﺗ لﺑﻗ .ﻲﺋﺎﺑرﮭﻛ رﺎﯾﺗ ﺔﺑﻣﻠﻟا ةاود تﺎﺳﻣﻼﻣ ﻲﻓ يرﺳﯾ تﺎﺑﻣﻠﻟا رﯾﯾﻐﺗ دﻧﻋ
ﻲﻓ دوﺟوﻣﻟا رﮭﺻﻣﻟا لﺻﻓا وأ سﺑﻘﻣﻟا نﻣ ﻲﺋﺎﺑرﮭﻛﻟا سﺑﺎﻘﻟا عزﻧا ،ﺔﺑﻣﻠﻟا
.رھﺎﺻﻣﻟا قودﻧﺻ
!مﺎھ.ةردﻘﻟا سﻔﻧﺑو عوﻧﻟا سﻔﻧ نﻣ ﺔﺑﻣﻟ مادﺧﺗﺳا ﻰﻠﻋ رﺻﺗﻗا
تﺎﺑﻣﻠﻟا رﯾﯾﻐﺗ
.ﺔﯾﻧدﻌﻣﻟا نوھدﻟا رﺗﻼﻓ بﯾﻛرﺗﺑ مﻗ .3
1..ﺔﯾﻧدﻌﻣﻟا نوھدﻟا رﺗﻼﻓ كﻔﺑ مﻗ
2..عوﻧﻟا سﻔﻧ نﻣ ةدﯾدﺟ ىرﺧﺄﺑ ﺔﻣﯾدﻘﻟا ةءﺎﺿﻹا ﺔﺑﻣﻟ لدﺑﺗﺳا
:عوﻧﻟا سﻔﻧ نﻣ ىرﺧﺄﺑ ﺔﺑﻣﻠﻟا لادﺑﺗﺳا
:ةردﻘﻟا طﻠﻓ 230 :ﻲﺋﺎﺑرﮭﻛﻟا دﮭﺟﻟا
طاو 40 ﻰﺻﻗأ دﺣﺑ
E14 :ةدﻋﺎﻘﻟا
9
Page 13

arﺔﻧﺎﯾﺻﻟاو فﯾظﻧﺗﻟا
(ءاوﮭﻟا رﯾودﺗ ﺔﻘﯾرط ﻊﻣ طﻘﻓ) طﺷﻧﻟا نوﺑرﻛﻟا رﺗﻠﻓ رﯾﯾﻐﺗ
ﺔﻔﺻﺑ رﺗﻠﻔﻟا ﺔﻧﺎﯾﺻ بﺟﯾ ﺔﺛﻌﺑﻧﻣﻟا ﺢﺋاورﻟا لﺻﻓ نﻣ ﺔﯾﻟﺎﻋ ﺔﺟرد نﺎﻣﺿﻟ
.ﺔﻣظﺗﻧﻣ
لﻛ طﺷﻧﻟا نوﺑرﻛﻟا رﺗﻼﻓ رﯾﯾﻐﺗ بﺟﯾو
3.لﻗﻷا ﻰﻠﻋ روﮭﺷ
تﺎظﺣﻼﻣ
وأ صﺻﺧﺗﻣﻟا رﺟﺗﻣﻟا ىدﻟ طﺷﻧﻟا نوﺑرﻛﻟا رﺗﻼﻓ ﻰﻠﻋ لوﺻﺣﻟا كﻧﻛﻣﯾو
.ﻲﻧورﺗﻛﻟﻹا رﺟﺗﻣﻟا رﺑﻋ وأ ءﻼﻣﻌﻟا ﺔﻣدﺧ ىدﻟ
ﺔﯾﻧدﻌﻣﻟا نوھدﻟا رﺗﻼﻓ كﻓ
.
.طﺷﻧﻟا
.طﺷﻧﻟا نوﺑرﻛﻟا رﺗﻠﻓ ءﺎطﻏ لﻔﺳأ ىرﺧﻷا كدﯾ لﺧدأ كﻟذ ءﺎﻧﺛأو
ﺔﯾﻧدﻌﻣﻟا نوھدﻟا رﺗﻼﻓ كﻓ
1. ﻰﻟإ ﮫﺑﺣﺳاو فﻠﺧﻟا ﻰﻟإ ﻲﻧدﻌﻣﻟا نوھدﻟا رﺗﻠﻓ طﻐﺿاو لﻔﻘﻟا ﻰﻠﻋ طﻐﺿا
.لﻔﺳأ
.ىرﺧﻷا دﯾﻟﺎﺑ لﻔﺳأ نﻣ ﻲﻧدﻌﻣﻟا نوھدﻟا رﺗﻠﻓ كﺳﻣأ ءﺎﻧﺛﻷا كﻠﺗ ﻲﻓ
:ﺔظﺣﻼﻣ.ﮫﺑ رارﺿأ ثودﺣ بﻧﺟﺗﻟ ،ﻲﻧدﻌﻣﻟا نوھدﻟا رﺗﻠﻓ ﻲﻧﺛﺑ مﻘﺗ ﻻ
■ .ةدروﻣﻟا تازﯾﮭﺟﺗﻟا ﺔﻋوﻣﺟﻣ نﻣﺿ لﺧدﺗ ﻻ طﺷﻧﻟا نوﺑرﻛﻟا رﺗﻼﻓ
■.طﺷﻧﻟا نوﺑرﻛﻟا رﺗﻼﻓ طﯾﺷﻧﺗ ةدﺎﻋإ وأ فﯾظﻧﺗ نﻛﻣﯾ ﻻ
1. لﺻﻓ رظﻧا ،ﺔﯾﻧدﻌﻣﻟا نوھدﻟا رﺗﻼﻓ كﻓ
2. نوﺑرﻛﻟا رﺗﻠﻓ ءﺎطﻏ فﺻﺗﻧﻣ ﻲﻓ دوﺟوﻣﻟا ززﺣﻣﻟا ﻲﻏرﺑﻟا لﺣﺑ مﻗ
2..لﻣﺎﺣﻟا نﻣ ﻲﻧدﻌﻣﻟا نوھدﻟا رﺗﻠﻓ جرﺧأ
:ﺔظﺣﻼﻣ .لﻔﺳأ نﻣ ﻲﻧدﻌﻣﻟا نوھدﻟا رﺗﻠﻓ ﻲﻓ نوھدﻟا مﻛارﺗﺗ نأ نﻛﻣﯾ
.ﮫﻧﻣ نوھدﻟا رطﺎﻘﺗ بﻧﺟﺗﻟ ﻲﻘﻓأ ﻊﺿو ﻲﻓ ﻲﻧدﻌﻣﻟا نوھدﻟا رﺗﻠﻓ كﺳﻣأ
3..لﺧادﻟا نﻣ زﺎﮭﺟﻟا فﯾظﻧﺗﺑ مﻗ ﺔﯾﻧدﻌﻣﻟا نوھدﻟا رﺗﻼﻓ كﻓ دﻌﺑ
4..ﺎﮭﺑﯾﻛرﺗ لﺑﻗ فﺟﺗ ﺎﮭﻛرﺗاو ﺔﯾﻧدﻌﻣﻟا نوھدﻟا رﺗﻼﻓ فﯾظﻧﺗﺑ مﻗ
ﻲﻧدﻌﻣﻟا نوھدﻟا رﺗﻠﻓ بﯾﻛرﺗ
نوھدﻟا رﺗﻼﻓ كﻓ
.
ﺔﯾﻧدﻌﻣﻟا
1. لﻔﻘﻟا ﺎﻣﻧﯾﺑ رﺗﻼﻔﻟا ءﺎطﻏ لﻔﺳأ نﯾﯾﻧدﻌﻣﻟا نوھدﻟا يرﺗﻠﻓ بﯾﻛرﺗﺑ مﻗ
3..لﻔﺳﻷ ﮫﺑﺣﺳﺑ طﺷﻧﻟا نوﺑرﻛﻟا رﺗﻠﻓ ءﺎطﻏ ﻊﻠﺧا
4..ﮫﻌﻠﺧاو ﺔﻋﺎﺳﻟا برﺎﻘﻋ ﺔﻛرﺣ هﺎﺟﺗا سﻛﻋ طﺷﻧﻟا نوﺑرﻛﻟا رﺗﻠﻓ ردأ
5..دﯾدﺟﻟا طﺷﻧﻟا نوﺑرﻛﻟا رﺗﻠﻓ بﯾﻛرﺗﺑ مﻗ
6. لﺻﻓ رظﻧا ،ﺔﯾﻧدﻌﻣﻟا نوھدﻟا رﺗﻼﻓ بﯾﻛرﺗﺑ مﻗ
.زﺎﮭﺟﻠﻟ ﺔﯾﻠﻔﺳﻟا ﺔﮭﺟﻟﺎﺑ ﻲﻧدﻌﻣﻟا نوھدﻟا رﺗﻠﻓ بﯾﻛرﺗﺑ مﻗ
.لﻔﺳﻷ ﮫﺟوﻣ
2..لﻔﻘﻟا نﯾﻣﺄﺗﺑ مﻗو لﺧادﻠﻟ ﺔﯾﻧدﻌﻣﻟا نوھدﻟا رﺗﻼﻓ وطا
8
Page 14

ﺔﻧﺎﯾﺻﻟاو فﯾظﻧﺗﻟاar
قﺎطﻧﻟاتﺎﻔظﻧﻣﻟا
جﺎﺟزﻟا :جﺎﺟزﻟا تﺎﻔظﻧﻣ
مدﺧﺗﺳﺗ ﻻ .مﻋﺎﻧ لﯾدﻧﻣ مادﺧﺗﺳﺎﺑ فﯾظﻧﺗﻟﺎﺑ مﻗ
.جﺎﺟز ﺔطﺷﺎﻛ
لﺎﻣﻌﺗﺳﻻا رﺻﺎﻧﻋ :نﺧﺎﺳ ﻲﻧوﺑﺎﺻ لوﻠﺣﻣ
مﻗ مﺛ ،ﺔﻠﻠﺑﻣ فﯾظﻧﺗ ﺔطوﻔﺑ فﯾظﻧﺗﻟﺎﺑ مﻗ
.مﻋﺎﻧ لﯾدﻧﻣ مادﺧﺗﺳﺎﺑ كﻟذ دﻌﺑ فﯾﻔﺟﺗﻟﺎﺑ
لﻏوﺗ ءارﺟ نﻣ ﻲﺋﺎﺑرﮭﻛﻟا ﻖﻌﺻﻟا رطﺧ
.ﺔﺑوطرﻟا
نﻣ ﺔﯾﻧورﺗﻛﻟﻹا ةدﺣوﻟﺎﺑ رارﺿأ ثودﺣ رطﺧ
فﯾظﺗﺑ ادﺑأ مﻘﺗ ﻻ .ﺎﮭﻠﺧاد ﺔﺑوطرﻟا لﻏوﺗ ءارﺟ
لﺎﻣﻌﺗﺳﻻا رﺻﺎﻧﻋ.لﻠﺑﻣ لﯾدﻧﻣ ﺔطﺳاوﺑ
.لﯾﺗﺳ سﻠﻧﺎﺗﺳﻻا تﺎﻔظﻧﻣ مدﺧﺗﺳﺗ ﻻ
ﺔﯾﻧدﻌﻣﻟا نوھدﻟا رﺗﻼﻓ فﯾظﻧﺗ
نوﻛﯾ نأ دراوﻟا نﻣو .زﺎﮭﺟﻟا تﻼﯾدوﻣ نﻣ دﯾدﻌﻟا ﻰﻠﻋ لﯾﻟدﻟا اذھ يرﺳﯾ
.كزﺎﮭﺟﺑ رﻓوﺗﺗ ﻻ ﺔﻧﯾﻌﻣ زﯾﮭﺟﺗ صﺋﺎﺻﺧﻟ حرﺷ كﺎﻧھ
.لﻌﺗﺷﺗ نأ نﻛﻣﯾ نوھدﻟا رﺗﻠﻓ ﻲﻓ ةدوﺟوﻣﻟا ﺔﯾﻧھدﻟا تﺎﻣﻛارﺗﻟا
.نوھدﻟا رﺗﻠﻓ نودﺑ زﺎﮭﺟﻟا لﯾﻐﺷﺗﺑ ادﺑأ مﻘﺗ ﻻو
تﺎظﺣﻼﻣ
.لﻠﺑﻣ لﯾدﻧﻣ مادﺧﺗﺳﺎﺑ زﺎﮭﺟﻟا ﻲﻓ ﺔﯾﻧدﻌﻣﻟا
2ﺔﻧﺎﯾﺻﻟاو فﯾظﻧﺗﻟا
ﺔﻧﺎﯾﺻﻟاو فﯾظﻧﺗﻟا
:رﯾذﺣﺗ – !قورﺣﺑ ﺔﺑﺎﺻﻹا رطﺧ
.فﯾظﻧﺗﻟا لﺑﻗ درﺑﯾ زﺎﮭﺟﻟا كرﺗا .لﯾﻐﺷﺗﻟا ءﺎﻧﺛأ نﺧﺳﯾ زﺎﮭﺟﻟا
:رﯾذﺣﺗ – !ﻲﺋﺎﺑرﮭﻛﻟا ﻖﻌﺻﻟا رطﺧ
.ﻲﺋﺎﺑرﮭﻛ ﻖﻌﺻ ثودﺣ ﻲﻓ بﺑﺳﺗﺗ دﻗ زﺎﮭﺟﻟا ﻲﻓ لﻏوﺗﺗ ﻲﺗﻟا ﺔﺑوطرﻟا
سﺑﺎﻘﻟا عزﻧا فﯾظﻧﺗﻟا لﺑﻗو .لﻠﺑﻣ لﯾدﻧﻣ مادﺧﺗﺳﺎﺑ طﻘﻓ زﺎﮭﺟﻟا فﯾظﻧﺗﺑ مﻗ
.رھﺎﺻﻣﻟا قودﻧﺻ ﻲﻓ دوﺟوﻣﻟا رﮭﺻﻣﻟا لﺻﻓا وأ سﺑﻘﻣﻟا نﻣ ﻲﺋﺎﺑرﮭﻛﻟا
:رﯾذﺣﺗ – !ﻲﺋﺎﺑرﮭﻛﻟا ﻖﻌﺻﻟا رطﺧ
.ﻲﺋﺎﺑرﮭﻛ ﻖﻌﺻ ثودﺣ ﻲﻓ بﺑﺳﺗﺗ دﻗ زﺎﮭﺟﻟا ﻲﻓ لﻏوﺗﺗ ﻲﺗﻟا ﺔﺑوطرﻟا
ﻻ.رﺎﺧﺑﻟﺎﺑ فﯾظﻧﺗ ةزﮭﺟأ وأ ﻲﻟﺎﻌﻟا طﻐﺿﻟﺎﺑ فﯾظﻧﺗ ةزﮭﺟأ ﺔﯾأ مدﺧﺗﺳﺗ
:رﯾذﺣﺗ – !ﺔﺑﺎﺻﻹا رطﺧ
ءادﺗرا ﻰﻠﻋ صرﺣا .فاوﺣﻟا ةدﺎﺣ نوﻛﺗ دﻗ زﺎﮭﺟﻟا لﺧاد ﺔﯾﺑﯾﻛرﺗﻟا ءازﺟﻷا
.ﺔﯾﻗاو تازﺎﻔﻗ
تﺎﻔظﻧﻣﻟا
:رﯾذﺣﺗ – !ﻖﯾرﺣﻟا رطﺧ
مﻗفﯾظﻧﺗﺑ.لﻗﻷا ﻰﻠﻋ نﯾرﮭﺷ لﻛ نوھدﻟا رﺗﻠﻓ
■.ﺔﯾوﻠﻗ وأ ﺔﯾﺿﻣﺣ وأ ﺔﻟﺎﻛأ تﺎﻔظﻧﻣ ﺔﯾأ مدﺧﺗﺳﺗ ﻻ
■ نوھدﻟا رﺗﻼﻓ لﻣﺎﺣ فﯾظﻧﺗﺑ ﺎﺿﯾأ مﻗ ﺔﯾﻧدﻌﻣﻟا نوھدﻟا رﺗﻼﻓ فﯾظﻧﺗ دﻧﻋ
■.ﺎﯾودﯾ وأ ﻲﻧاوﻷا ﺔﻟﺎﺳﻏ ﻲﻓ ﺔﯾﻧدﻌﻣﻟا نوھدﻟا رﺗﻼﻓ فﯾظﻧﺗ كﻧﻛﻣﯾ
رﯾﻏ تﺎﻔظﻧﻣ مادﺧﺗﺳا لﻌﻔﺑ ررﺿﻠﻟ ﺔﻔﻠﺗﺧﻣﻟا ﺢطﺳﻷا ضرﻌﺗﺗ ﻻ ﻲﻛ
مدﺧﺗﺳﺗ ﻻ .لودﺟﻟا ﻲﻓ ةدراوﻟا تﺎﻣﯾﻠﻌﺗﻟا ﻰﻋارﺗ ،ﺔﺑﺳﺎﻧﻣ
■،ﺔﺷدﺎﺧ وأ ﺔﻧﺷﺧ تﺎﻔظﻧﻣ ﺔﯾأ
■،لوﺣﻛﻟا نﻣ ﺔﯾﻟﺎﻋ ﺔﺑﺳﻧ ﻰﻠﻋ يوﺗﺣﺗ تﺎﻔظﻧﻣ ﺔﯾأ
■،ﺔﻧﺷﺧ فﯾظﻧﺗ تﺎﺟﻧﻔﺳإ وأ تﺎﻔﯾﻟ ﺔﯾأ
■.رﺎﺧﺑﻟﺎﺑ وأ ﻲﻟﺎﻌﻟا طﻐﺿﻟﺎﺑ فﯾظﻧﺗ ةزﮭﺟأ ﺔﯾأ
.ﺎﮭﻣادﺧﺗﺳا لﺑﻗ ًادﯾﺟ ةدﯾدﺟﻟا ﺔﯾﺟﻧﻔﺳﻹا طوﻔﻟا لﺳﻏا
.تﺎﻔظﻧﻣﻟا ﻊﻣ ﺔﻘﻓرﻣﻟا تارﯾذﺣﺗﻟاو تﺎﻣﯾﻠﻌﺗﻟا ﻊﯾﻣﺟ ةﺎﻋارﻣ ﻰﻠﻋ صرﺣا
:ﺎﯾودﯾ
:ﺔظﺣﻼﻣ .صﺎﺧ نوھد بﯾذﻣ مادﺧﺗﺳا كﻧﻛﻣﯾ ةدﯾﻧﻌﻟا تﺎﺧﺎﺳﺗﻻا ﺔﻟﺎﺣ ﻲﻓ
.ﻲﻧورﺗﻛﻟﻹا رﺟﺗﻣﻟا ﻖﯾرط نﻋ ﮫﺑﻠط نﻛﻣﯾو
:ﻲﻧاوﻷا ﺔﻟﺎﺳﻏ ﻲﻓ
:ﺔظﺣﻼﻣ ﺔطﯾﺳﺑ تارﯾﻐﺗ ثدﺣﺗ نأ نﻛﻣﯾ ﻲﻧاوﻷا ﺔﻟﺎﺳﻏ ﻲﻓ فﯾظﻧﺗﻟا دﻧﻋ
.ﺔﯾﻧدﻌﻣﻟا نوھدﻟا رﺗﻼﻓ ﺔﻔﯾظو ﻰﻠﻋ رﯾﺛﺄﺗ يأ كﻟذﻟ سﯾﻟو .نوﻠﻟا ﻲﻓ
.رﺎﺻﺣﻧﻼﻟ ﺔﯾﻧدﻌﻣﻟا نوھدﻟا رﺗﻼﻓ ضرﻌﺗﺗ ﻻأ
قﺎطﻧﻟاتﺎﻔظﻧﻣﻟا
لﯾﺗﺳ سﻠﻧﺎﺗﺳﻻا :نﺧﺎﺳ ﻲﻧوﺑﺎﺻ لوﻠﺣﻣ
دﻌﺑ فﯾﻔﺟﺗﻟﺎﺑ مﻗ مﺛ ،فﯾظﻧﺗ ﺔطوﻔﺑ فﯾظﻧﺗﻟﺎﺑ مﻗ
.مﻋﺎﻧ لﯾدﻧﻣ مادﺧﺗﺳﺎﺑ كﻟذ
■ ﻲﻓ ﺔﯾﻧدﻌﻣﻟا نوھدﻟا رﺗﻼﻓ ﻊﻘﻧاﻲﻧوﺑﺎﺻ لوﻠﺣﻣ .نﺧﺎﺳ
■.ادﯾﺟ كﻟذ دﻌﺑ رﺗﻼﻔﻟا فطﺷاو فﯾظﻧﺗﻟا ضرﻐﻟ ةﺎﺷرﻓ مدﺧﺗﺳا
■.فﺟﺗ ﻰﺗﺣ ﺔﯾﻧدﻌﻣﻟا نوھدﻟا رﺗﻼﻓ نﻣ رطﺎﻘﺗﯾ ءﺎﻣﻟا كرﺗا
هﺎﺟﺗا ﻲﻓ لﯾﺗﺳ سﻠﻧﺎﺗﺳﻻا ﺢطﺳأ فﯾظﻧﺗﺑ مﻗ
.طﻘﻓ ﺦﯾﻠﺟﺗﻟا
صﺻﺧﺗﻣﻟا رﺟﺗﻣﻟا وأ ءﻼﻣﻌﻟا ﺔﻣدﺧ ىدﻟ رﻓوﺗﺗ
ﺔﻘﺑط ﻊﺿ .لﯾﺗﺳ سﻠﻧﺎﺗﺳﻼﻟ ﺔﺻﺎﺧ ﺔﯾﺎﻧﻋ داوﻣ
.ﺔﻣﻋﺎﻧ ﺔطوﻓ ﺔطﺳاوﺑ ﺔﯾﺎﻧﻌﻟا ةدﺎﻣ نﻣ ﺔﻘﯾﻗر
ﺔﯾﻠطﻣﻟا ﺢطﺳﻷا :نﺧﺎﺳ ﻲﻧوﺑﺎﺻ لوﻠﺣﻣ
مﻗ مﺛ ،ﺔﻠﻠﺑﻣ فﯾظﻧﺗ ﺔطوﻔﺑ فﯾظﻧﺗﻟﺎﺑ مﻗ
■.ﻲﻧاوﻷا ﻊﻣ خﺎﺳﺗﻻا ةدﯾدﺷ ﺔﯾﻧدﻌﻣﻟا نوھدﻟا رﺗﻼﻓ فﯾظﻧﺗﺑ مﻘﺗ ﻻ
■ ﻲﻐﺑﻧﯾ ثﯾﺣ .ﻲﻧاوﻷا ﺔﻟﺎﺳﻏ ﻲﻓ رﺣ لﻛﺷﺑ ﺔﯾﻧدﻌﻣﻟا نوھدﻟا رﺗﻼﻓ ﻊﺿ
.مﻋﺎﻧ لﯾدﻧﻣ مادﺧﺗﺳﺎﺑ كﻟذ دﻌﺑ فﯾﻔﺟﺗﻟﺎﺑ
.لﯾﺗﺳ سﻠﻧﺎﺗﺳﻻا تﺎﻔظﻧﻣ مدﺧﺗﺳﺗ ﻻ
كﯾﺗﺳﻼﺑﻟاو موﯾﻧﻣوﻟﻷا :جﺎﺟزﻟا تﺎﻔظﻧﻣ
.مﻋﺎﻧ لﯾدﻧﻣ مادﺧﺗﺳﺎﺑ فﯾظﻧﺗﻟﺎﺑ مﻗ
7
Page 15

arلﯾﻐﺷﺗﻟا قرط
1زﺎﮭﺟﻟا لﺎﻣﻌﺗﺳا
:ﺔظﺣﻼﻣ ةرﻣ ﮫﻓﺎﻘﯾﺈﺑ مﻘﺗ ﻻو ﻲﮭطﻟا ﻲﻓ ءدﺑﻟا دﻧﻋ ةرﺧﺑﻷا طﺎﻔﺷ لﯾﻐﺷﺗﺑ مﻗ
زﺎﮭﺟﻟا لﺎﻣﻌﺗﺳا
ءاوﮭﻟا فﯾرﺻﺗ ﺔﻘﯾرط
Çلﯾﻐﺷﺗﻟا قرط
لﯾﻐﺷﺗﻟا قرط
صﻠﺧﺗﻠﻟ ﺔﯾﻟﺎﻌﻓ قرطﻟا رﺛﻛأ ﻲھ هذھو .ﻖﺋﺎﻗد ةدﻌﺑ ﻲﮭطﻟا ﺔﯾﺎﮭﻧ دﻌﺑ ﻻإ ىرﺧأ
.ﺦﺑطﻣﻟا ةرﺧﺑأ نﻣ
نوھدﻟا رﺗﻼﻓ لﻼﺧ نﻣ طوﻔﺷﻣﻟا ءاوﮭﻟا فﯾظﻧﺗ مﺗﯾ
.رﯾﺳاوﻣ مﺎظﻧ رﺑﻋ جرﺎﺧﻟا ﻰﻟإ ﮫﻠﻘﻧو
:ﺔظﺣﻼﻣ.طﻔﺷﻟا قﺎطﻧ ﻊﯾﺳوﺗ مﺗﯾ كﻟذﺑو .مﺎﻣﻷا ﻰﻟإ ﻲﺟﺎﺟزﻟا ءﺎطﻐﻟا وطا
لﺎﻣﻌﺗﺳﻻا قﺎطﻧ
:ﺔظﺣﻼﻣ مداوﻋ فﯾرﺻﺗﻟ مدﺧﺗﺳﺗ ﺔﻧﺧدﻣ ﻲﻓ ءاوﮭﻟا فﯾرﺻﺗ زوﺟﯾ ﻻ
ﻰﻠﻋ اذھ يرﺳﯾ ﻻ) ىرﺧﻷا دوﻗوﻟا فﺎﻧﺻأ وأ زﺎﻐﻟﺎﺑ لﻣﻌﺗ ﻲﺗﻟا ةزﮭﺟﻷا
.(ءاوﮭﻟا رﯾودﺗ ةزﮭﺟأ
■ وأ ﺔﻧﺧدﻷا فﯾرﺻﺗﻟ ﺔﻧﺧدﻣ لﺧاد فرﺻﻟا ءاوھ لﻘﻧ ﻲﻓ ﺔﺑﻏرﻟا دﻧﻋ
فﯾظﻧﺗ لوؤﺳﻣ ﺔﻘﻓاوﻣ ﻰﻠﻋ لوﺻﺣﻟا بﺟﯾ ﮫﻧﺈﻓ ،ﺔﻠﻐﺷﻣ تﺳﯾﻟ مداوﻌﻟا
.ﺔﻧﺧدﻣﻟا
■ طﺎﻔﺷ مادﺧﺗﺳا ﻲﻐﺑﻧﯾ ﻲﺟرﺎﺧﻟا رادﺟﻟا رﺑﻋ فرﺻﻟا ءاوھ لﻘﻧ ﺔﻟﺎﺣ ﻲﻓ
.ﻲﺑوﻛﺳﯾﻠﺗ يرادﺟ
ءاوﮭﻟا رﯾودﺗ ﺔﻘﯾرط
نوھدﻟا رﺗﻼﻓ لﻼﺧ نﻣ طوﻔﺷﻣﻟا ءاوﮭﻟا فﯾظﻧﺗ مﺗﯾ
ﺔﺣورﻣﻟا ﺔﺟرد فﺎﻘﯾإ/لﯾﻐﺷﺗ1
ﺔﺣورﻣﻟا ﺔﺟرد لﯾﻐﺷﺗ2
ﺔﺣورﻣﻟا ﺔﺟرد لﯾﻐﺷﺗ3
ةءﺎﺿﻹا ءﺎﻔطإ/لﯾﻐﺷﺗ
حرﺷﻟا
نﯾﺑﻣLEDﺔﺣورﻣﻟا ﺔﺟردﺑ صﺎﺧﻟا
$
;
2
3
<
.ﺦﺑطﻣﻟا ﻰﻟإ ﮫﻋﺎﺟرإ مﺗﯾ مﺛ ،طﺷﻧ نوﺑرﻛ رﺗﻠﻓو
ﺔﺣورﻣﻟا طﺑﺿ
:ﺔظﺣﻼﻣ .ﺔطﯾﺣﻣﻟا فورظﻟا ﻊﻣ ﺔﺣورﻣﻟا ﺔﻋرﺳ ﺔﺟرد ﺔﻣءاوﻣﺑ ﺎﻣﺋاد مﻗ
.ﺔﺣورﻣﻠﻟ ﺔﯾﻟﺎﻋ ﺔﻋرﺳ ﺔﺟرد ﺎﺿﯾأ رﺗﺧا ةرﺧﺑﻸﻟ دﯾدﺷﻟا ثﺎﻌﺑﻧﻻا دﻧﻌﻓ
لﯾﻐﺷﺗﻟا
1.
ﺔﺟردﻟا ﻰﻠﻋ لﻣﻌﻟا ﺔﺣورﻣﻟا أدﺑﺗ
فﺎﻘﯾﻹا
;.
رزﻟا ﻰﻠﻋ طﻐﺿا
ةءﺎﺿﻹا
.ﺔﯾوﮭﺗﻟﺎﺑ طﺎﺑﺗرﻻا نود ةءﺎﺿﻹا ءﺎﻔطإو لﯾﻐﺷﺗ كﻧﻛﻣﯾ
رزﻟا ﻰﻠﻋ طﻐﺿا
<.
:ﺔظﺣﻼﻣ بﯾﻛرﺗ بﺟﯾ ،ءاوﮭﻟا رﯾودﺗ ﺔﻘﯾرط ﻲﻓ ﺔﺛﻌﺑﻧﻣﻟا ﺢﺋاورﻟا نﻣ دﺣﻠﻟ
ﺔﻘﯾرط ﻲﻓ زﺎﮭﺟﻠﻟ ﺔﻔﻠﺗﺧﻣﻟا لﯾﻐﺷﺗﻟا تﺎﯾﻧﺎﻛﻣإ مادﺧﺗﺳﻻ .طﺷﻧ نوﺑرﻛ رﺗﻠﻓ
1. رزﻟا ﻰﻠﻋ طﻐﺿا;.
لﻣﺎﻌﺗﺗ يذﻟا صﺻﺧﺗﻣﻟا رﺟﺎﺗﻟا لﺄﺳا وأ بﯾﺗﻛﻟا ﻰﻠﻋ ﻊﻠطا ،ءاوﮭﻟا رﯾودﺗ
صﺻﺧﺗﻣﻟا رﺟﺗﻣﻟا ىدﻟ كﻟذﻟ ﺔﻣزﻼﻟا تﺎﯾﻟﺎﻣﻛﻟا ﻰﻠﻋ لوﺻﺣﻟا كﻧﻛﻣﯾو .ﮫﻌﻣ
2. رارزﻷا ﻰﻠﻋ طﻐﺿا2 وأ 3.ﺔﺣورﻣﻠﻟ ىرﺧأ ﺔﻋرﺳ ﺔﺟرد طﺑﺿﻟ
.ﻲﻧورﺗﻛﻟﻹا رﺟﺗﻣﻟا رﺑﻋ وأ ءﻼﻣﻌﻟا ﺔﻣدﺧ ىدﻟ وأ
6
Page 16

ﺔﺋﯾﺑﻟا ﺔﯾﺎﻣﺣar
7ﺔﺋﯾﺑﻟا ﺔﯾﺎﻣﺣ
ﺢﺋﺎﺻﻧ ﺎﻧھ دﺟﺗ .ﺔﻗﺎطﻟا كﻼﮭﺗﺳا ﻲﻓ ﺔﺻﺎﺧ ةءﺎﻔﻛو ﺔﯾﻟﺎﻌﻓ وذ دﯾدﺟﻟا كزﺎﮭﺟ
زﺎﮭﺟﻟا نﻣ صﻠﺧﺗﻟا ﺔﯾﻔﯾﻛو ﺔﻗﺎطﻟا ﻲﻓ رﯾﻓوﺗﻟاو كزﺎﮭﺟ ﻊﻣ لﻣﺎﻌﺗﻟا ﺔﯾﻔﯾﻛ لوﺣ
.ﺔﻣﯾﻠﺳ ﺔﻘﯾرطﺑ
ﺔﻗﺎطﻟا رﯾﻓوﺗ
.لﯾﻐﺷﺗﻟا ءﺎﻧﺛأ ءﺎﺿوﺿﻟا لدﻌﻣ لﯾﻠﻘﺗﻟو ةءﺎﻔﻛﺑ ةرﺧﺑﻷا
.ﺔﻗﺎطﻟا كﻼﮭﺗﺳا لﯾﻠﻘﺗ ﻲﻧﻌﺗ لﻗﻷا ﺔﺣورﻣﻟا ﺔﺟرد .ﺔﺟﺎﺣﻟا دﻧﻋ ﻻإ ﺔﻔﺛﻛﻣﻟا
.ةرﺧﺑﻷا طﺎﻔﺷ لﯾﻐﺷﺗ ةرﺗﻓ ﺔﻟﺎطإ مزﻠﺗﺳﯾ ﺦﺑطﻣﻟا ﻲﻓ ﻲﮭطﻟا ةرﺧﺑأ
.ﻖﯾرﺣ بوﺷﻧ رطﺧ بﻧﺟﺗو
.فﺛﻛﺗﻣﻟا
ﺔﺋﯾﺑﻟﺎﺑ رﺿﺗ ﻻ ﺔﻘﯾرطﺑ تﺎﻔﻠﺧﻣﻟا نﻣ صﻠﺧﺗﻟا
:رﯾذﺣﺗ – !ﺔﺑﺎﺻﻹا رطﺧ
■ .فاوﺣﻟا ةدﺎﺣ نوﻛﺗ دﻗ زﺎﮭﺟﻟا لﺧاد ﺔﯾﺑﯾﻛرﺗﻟا ءازﺟﻷا
ﺔﺋﯾﺑﻟا ﺔﯾﺎﻣﺣ
.ﺔﯾﻗاو تازﺎﻔﻗ ءادﺗرا ﻰﻠﻋ صرﺣا
■ .طوﻘﺳﻠﻟ ضرﻌﺗﺗ نأ نﻛﻣﯾ زﺎﮭﺟﻟا ﻰﻠﻋ ﺔﻋوﺿوﻣﻟا ءﺎﯾﺷﻷا
ﻻ.زﺎﮭﺟﻟا ﻰﻠﻋ ءﺎﯾﺷأ ﺔﯾأ ﻊﺿﺗ
:رﯾذﺣﺗ – !ﻲﺋﺎﺑرﮭﻛﻟا ﻖﻌﺻﻟا رطﺧ
■ مﻘﺗ ﻻ .ﻲﺋﺎﺑرﮭﻛ ﻖﻌﺻ ثودﺣ ﻲﻓ بﺑﺳﺗﯾ دﻗ لطﻌﻣﻟا زﺎﮭﺟﻟا
■ طﺎﻔﺷ لﻣﻌﯾ ﻰﺗﺣ كﻟذو ،ﺔﯾﻓﺎﻛ ﺔﯾوﮭﺗ رﻓاوﺗ نﻣ ﻖﻘﺣﺗﻟا ﻲﮭطﻟا ءﺎﻧﺛأ بﺟﯾ
■ ﺔﺟردﻟا مدﺧﺗﺳﺗ ﻻ .ﻲﮭطﻟا ةرﺧﺑأ ﺔﻓﺎﺛﻛ ﻊﻣ ﺔﺣورﻣﻟا ﺔﺟرد ﺔﻣءاوﻣﺑ مﻗ
■ رﺎﺷﺗﻧا .رﻛﺑﻣ تﻗو ﻲﻓ ﻰﻠﻋأ ﺔﺣورﻣ ﺔﺟرد رﺗﺧا ﺔﻔﯾﺛﻛﻟا ﻲﮭطﻟا ةرﺧﺑأ ﻊﻣ
■.ﮫﯾﻟإ ﺔﺟﺎﺣﻟا مدﻋ دﻧﻋ ةرﺧﺑﻷا طﺎﻔﺷ فﻗوأ
■.ﺎﮭﯾﻟإ ﺔﺟﺎﺣﻟا مدﻋ دﻧﻋ ةءﺎﺿﻹا ﺊﻔطأ
■ ﺔﯾوﮭﺗﻟا ﺔﯾﻟﺎﻌﻓ ةدﺎﯾزﻟ ةررﻘﻣﻟا دﯾﻋاوﻣﻟا ﻲﻓ هرﯾﯾﻐﺗ وأ رﺗﻠﻔﻟا فﯾظﻧﺗﺑ مﻗ
■ ءﺎﻣﻟاو ﻲﮭطﻟا ةرﺧﺑأ ثﺎﻌﺑﻧا بﻧﺟﺗﻟ ﻲﮭطﻟا ءﺎﻧإ ﻰﻠﻋ ءﺎطﻐﻟا ﻊﺿ
سﺑﻘﻣﻟا نﻣ ﻲﺋﺎﺑرﮭﻛﻟا سﺑﺎﻘﻟا عزﻧا .لطﻌﻣ زﺎﮭﺟ لﯾﻐﺷﺗﺑ ادﺑأ
لﺻﺗا .رھﺎﺻﻣﻟا قودﻧﺻ ﻲﻓ دوﺟوﻣﻟا رﮭﺻﻣﻟا لﺻﻓا وأ
.ءﻼﻣﻌﻟا ﺔﻣدﺧﺑ
■ .رﺎطﺧأ ﻰﻠﻋ ﺎﯾﻧﻓ ﺔﻣﯾﻠﺳﻟا رﯾﻏ حﻼﺻﻹا لﺎﻣﻋأ يوطﻧﺗ
ﻻ ءﺎﺑرﮭﻛﻟا تﻼﯾﺻوﺗ رﯾﯾﻐﺗو حﻼﺻﻹا لﺎﻣﻋأ ذﯾﻔﻧﺗ زوﺟﯾ
اذإ .ﺎﻧﻠﺑِﻗ نﻣ بردﻣ ءﻼﻣﻋ ﺔﻣدﺧ ﻲﻧﻓ ﺔﻓرﻌﻣﺑ ﻻإ ةررﺿﺗﻣﻟا
سﺑﻘﻣﻟا نﻣ ﻲﺋﺎﺑرﮭﻛﻟا سﺑﺎﻘﻟا عزﻧﺎﻓ ،زﺎﮭﺟﻟﺎﺑ لطﻋ كﺎﻧھ نﺎﻛ وأ
ﺔﻣدﺧﺑ لﺻﺗا .رھﺎﺻﻣﻟا قودﻧﺻ ﻲﻓ دوﺟوﻣﻟا رﮭﺻﻣﻟا لﺻﻓا
.ءﻼﻣﻌﻟا
■ ﻖﻌﺻ ثودﺣ ﻲﻓ بﺑﺳﺗﺗ دﻗ زﺎﮭﺟﻟا ﻲﻓ لﻏوﺗﺗ ﻲﺗﻟا ﺔﺑوطرﻟا
وأ ﻲﻟﺎﻌﻟا طﻐﺿﻟﺎﺑ فﯾظﻧﺗ ةزﮭﺟأ ﺔﯾأ مدﺧﺗﺳﺗ ﻻ .ﻲﺋﺎﺑرﮭﻛ
.رﺎﺧﺑﻟﺎﺑ فﯾظﻧﺗ ةزﮭﺟأ
.ﺔﺋﯾﺑﻟﺎﺑ رﺿﺗ ﻻ ﺔﻘﯾرطﺑ فﯾﻠﻐﺗﻟا داوﻣ نﻣ صﻠﺧﺗ
2012/19/EU
دﺎﺣﺗﻻا لود لﺧاد يرﺎﺳﻟا مﺎﻌﻟا رﺎطﻹا ﺔﻔﺻاوﻣﻟا هذھ ددﺣﺗو
.ﺎﮭﻟﻼﻐﺗﺳا ةدﺎﻋإو ﺔﻣﯾدﻘﻟا ةزﮭﺟﻷا دادرﺗﺳا ﺔﯾﻠﻣﻌﻟ ﻲﺑوروﻷا
ﺔﯾﺑوروﻷا ﺔﻔﺻاوﻣﻠﻟ ﺎﻘﺑط زﯾﻣﻣ زﺎﮭﺟﻟا اذھ
ﺎﻣﯾﻓ ﺔﻣﯾدﻘﻟا ﺔﯾﻧورﺗﻛﻟﻹاو ﺔﯾﺋﺎﺑرﮭﻛﻟا ةزﮭﺟﻷﺎﺑ ﻖﻠﻌﺗﯾ
رارﺿﻷا بﺎﺑﺳأ
)waste electrical and electronic equipment - WEEE(.
ﮫﯾﺑﻧﺗ!
زﺎﮭﺟﻟا لﯾﻐﺷﺗﺑ ﺎﻣﺋاد مﻗ .أدﺻﻟا ءارﺟ نﻣ رارﺿأ ثودﺣ رطﺧ
ءﺎﻣﻟا يدؤﯾ نأ نﻛﻣﯾ ثﯾﺣ .فﺛﻛﺗﻣ ءﺎﻣ نوﻛﺗ بﻧﺟﺗﻟ ﻲﮭطﻟا دﻧﻋ
.أدﺻ رارﺿأ ثودﺣ ﻰﻟإ فﺛﻛﺗﻣﻟا
لﯾﻣﺣﺗﻟا ةدﺎﯾز بﻧﺟﺗﻟ روﻔﻟا ﻰﻠﻋ ﺔﻔﻟﺎﺗﻟا تﺎﺑﻣﻠﻟا رﯾﯾﻐﺗﺑ ﺎﻣﺋاد مﻗ
.تﺎﺑﻣﻠﻟا ﺔﯾﻘﺑ ﻰﻠﻋ
ةدﺣوﻟا ﻰﻟإ ﺔﺑوطرﻟا لﻏوﺗ ءارﺟ نﻣ رارﺿأ ثودﺣ رطﺧ
ﺔطﺳاوﺑ لﺎﻣﻌﺗﺳﻻا رﺻﺎﻧﻋ فﯾظﻧﺗﺑ ادﺑأ مﻘﺗ ﻻ .ﺔﯾﻧورﺗﻛﻟﻹا
.لﻠﺑﻣ لﯾدﻧﻣ
.ﺊطﺎﺧﻟا فﯾظﻧﺗﻟا ءارﺟ نﻣ ﻲﺟرﺎﺧﻟا ﺢطﺳﻟﺎﺑ ررﺿ ثودﺣ
.طﻘﻓ ﺦﯾﻠﺟﺗﻟا هﺎﺟﺗا ﻲﻓ لﯾﺗﺳ سﻠﻧﺎﺗﺳﻻا ﺢطﺳأ فﯾظﻧﺗﺑ مﻗ
ﻻو.لﺎﻣﻌﺗﺳﻻا رﺻﺎﻧﻋ ﻊﻣ لﯾﺗﺳ سﻠﻧﺎﺗﺳﻻا تﺎﻔظﻧﻣ مدﺧﺗﺳﺗ
وأ ﺔﻧﺷﺧﻟا تﺎﻔظﻧﻣﻟا ءارﺟ نﻣ ﻲﺟرﺎﺧﻟا ﺢطﺳﻟﺎﺑ ررﺿ ثودﺣ
.ﺔﺷدﺎﺧ وأ ﺔﻧﺷﺧ تﺎﻔظﻧﻣ ادﺑأ مدﺧﺗﺳﺗ ﻻ .ﺔﺷدﺎﺧﻟا
بﯾﻛرﺗﺑ مﻗ .فﺛﻛﺗﻣﻟا ءﺎﻣﻟا عوﺟر ءارﺟ نﻣ ررﺿ ثودﺣ رطﺧ
ﻼﯾﻠﻗ ردﺣﻧﻣ ﻊﺿو ﻲﻓ زﺎﮭﺟﻟا نﻣ ﺔﺟرﺎﺧﻟا ءاوﮭﻟا فﯾرﺻﺗ ةﺎﻧﻗ
ﺔﯾوازﺑ رادﺣﻧا)
1°.(
5
Page 17

مﯾﯾﻘﺗ ﮫﻧﻛﻣﯾ ثﯾﺣ ،ﺔﻧﺧدﻣﻟا فﯾظﻧﺗ لوؤﺳﻣ رﺷﺗﺳا لﺎﺣ ﺔﯾأ ﻰﻠﻋو
ﺔﯾوﮭﺗﻟا ءارﺟإ كﻟ حرﺗﻘﯾ فوﺳو لﻣﺎﻛﻟﺎﺑ لزﻧﻣﻟا ﺔﯾوﮭﺗ مﺎظﻧ
.بﺳﺎﻧﻣﻟا
رﯾودﺗ ﺔﻘﯾرطﺑ ةرﺧﺑﻷا طﺎﻔﺷ مادﺧﺗﺳا ﻰﻠﻋ رﺎﺻﺗﻗﻻا ﺔﻟﺎﺣ ﻲﻓ
.دوﯾﻗ نود لﯾﻐﺷﺗﻟا مﺗﯾ نأ نﻛﻣﯾ ءاوﮭﻟا
:رﯾذﺣﺗ – !ﻖﯾرﺣﻟا رطﺧ
.لﻗﻷا ﻰﻠﻋ نﯾرﮭﺷ لﻛ نوھدﻟا رﺗﻠﻓ فﯾظﻧﺗﺑ مﻗ
.نوھدﻟا رﺗﻠﻓ نودﺑ زﺎﮭﺟﻟا لﯾﻐﺷﺗﺑ ادﺑأ مﻘﺗ ﻻو
لﺎﻌﺷإ ﻼﺛﻣ) زﺎﮭﺟﻟا نﻣ برﻘﻟﺎﺑ فوﺷﻛﻣ بﮭﻠﺑ ادﺑأ لﻣﻌﺗ ﻻ
ﺔﺋﻓدﺗ زﺎﮭﺟ نﻣ برﻘﻟﺎﺑ زﺎﮭﺟﻟا بﯾﻛرﺗﺑ مﻘﺗ ﻻ .(مﺎﻌطﻟا ﺢطﺳ
ﺔﻟﺎﺣ ﻲﻓ ﻻإ ،(مﺣﻔﻟا وأ بﺷﺧﻟا ﻼﺛﻣ) ﺔﺑﻠﺻ لﺎﻌﺗﺷا ةدﺎﻣﺑ لﻣﺎﻋ
كﺎﻧھ نوﻛﯾ ﻻأ ﻲﻐﺑﻧﯾ ثﯾﺣ .ﻊﻠﺧﻠﻟ لﺑﺎﻗ رﯾﻏو ﻖﻠﻐﻣ ءﺎطﻏ دوﺟو
.رﯾﺎطﺗﻣ ررﺷ
ءﺎﻣﻟا مادﺧﺗﺳﺎﺑ ًادﺑأ مﻘﺗ ﻻو .ﺔﺑﻗارﻣ نود ادﺑأ ﺔﻧﺧﺎﺳﻟا توﯾزﻟا
بﮭﻠﻟا ءﺎﻔطﺈﺑ مﻗ .ﻲﮭطﻟا ﻊﺿوﻣ ءﺎﻔطﺈﺑ مﻗو .ﻖﯾرﺣﻟا ءﺎﻔطإ ﻲﻓ
.ﮫﺑﺎﺷ ﺎﻣ وأ ﻖﯾرﺣﻟا ءﺎﻔطﻹ ﺔﯾﻧﺎطﺑ وأ ءﺎطﻏ مادﺧﺗﺳﺎﺑ صرﺣﺑ
ضرﻌﺗﯾ نأ نﻛﻣﯾو .لﯾﻐﺷﺗﻟا ءﺎﻧﺛأ ةدﯾدﺷ ﺔﻧوﺧﺳ دﻟوﺗ ﻰﻟإ يدؤﯾ
مﻘﺗ ﻻ .ﮫﺑ ﻖﯾرﺣ بوﺷﻧ وأ ررﺿﻠﻟ ﺎﮭﻗوﻓ بﻛرﻣﻟا ﺔﯾوﮭﺗﻟا زﺎﮭﺟ
.ﺎﮭﯾﻠﻋ ﻲﮭط ﻲﻧاوأ ﻊﺿو ﻊﻣ ﻻإ ﺔﯾزﺎﻐﻟا ﻲﮭطﻟا ﻊﺿاوﻣ لﯾﻐﺷﺗﺑ
ﺔﯾوﮭﺗﻟا زﺎﮭﺟ ضرﻌﺗﯾ نأ نﻛﻣﯾو .ةدﯾدﺷ ﺔﻧوﺧﺳ دﻟوﺗﺗ دﺣاو
لﯾﻐﺷﺗﺑ ادﺑأ مﻘﺗ ﻻ .ﮫﺑ ﻖﯾرﺣ بوﺷﻧ وأ ررﺿﻠﻟ ﺎﮭﻗوﻓ بﻛرﻣﻟا
بﮭﻠﻟ ىوﺗﺳﻣ ﻰﺻﻗﺄﺑ دﺣاو تﻗو ﻲﻓ نﯾﯾزﺎﻏ ﻲﮭط ﻲﻌﺿوﻣ
ﻰﻠﻋ دﯾزﺗ ةدﻣﻟ
15 ﻰﻠﻋ ﺎﮭﺗردﻗ دﯾزﺗ ﻲﺗﻟا ةرﯾﺑﻛﻟا ﺔﻠﻌﺷﻟا .ﺔﻘﯾﻗد
5طاووﻠﯾﻛ .نﯾﺗﯾزﺎﻏ نﯾﺗﻠﻌﺷ ةردﻗ لﺛﺎﻣﺗ (كوو)
:رﯾذﺣﺗ – !قورﺣﺑ ﺔﺑﺎﺻﻹا رطﺧ
سﻣﻠﺗ ﻻ .لﯾﻐﺷﺗﻟا ءﺎﻧﺛأ نﺧﺳﺗ ﺎﮭﯾﻟإ لوﺻوﻟا نﻛﻣﯾ ﻲﺗﻟا ءازﺟﻷا
.زﺎﮭﺟﻟا نﻋ لﺎﻔطﻷا دﻌﺑأو .ﺔﻧﺧﺎﺳﻟا ءازﺟﻷا ادﺑأ
arﺔﻣﮭﻣﻟا نﺎﻣﻷا تادﺎﺷرإ
(ﺔﻣﮭﻣﻟا نﺎﻣﻷا تادﺎﺷرإ
ﺔﻣﮭﻣﻟ ا نﺎﻣﻷ ا تادﺎﺷرإ
:رﯾذﺣﺗ – !قﺎﻧﺗﺧﻻا رطﺧ
ادﺑأ لﺎﻔطﻸﻟ ﺢﻣﺳﺗ ﻼﻓ .لﺎﻔطﻷا ﻰﻠﻋ ارطﺧ فﯾﻠﻐﺗﻟا داوﻣ لﺛﻣﺗ
.فﯾﻠﻐﺗﻟا داوﻣﺑ بﻌﻠﻟﺎﺑ
:رﯾذﺣﺗ – !ةﺎﯾﺣﻟا ﻰﻠﻋ رطﺧ
ثودﺣ ﻰﻟإ يدؤﺗ نأ نﻛﻣﯾ ﺎﮭطﻔﺷ دﺎﻌُﻣﻟا قارﺗﺣﻻا تازﺎﻏ
.مﻣﺳﺗ تﻻﺎﺣ
ﺔﻟﺎﺣ ﻲﻓ فﺎﻛ لﻛﺷﺑ ددﺟﺗﻣ ءاوھ رﯾﻓوﺗ ﻰﻠﻋ ﺎﻣﺋاد صرﺣا
لﯾﻐﺷﺗ ﻊﻣ نﻣازﺗﻟﺎﺑ ءاوﮭﻟا فﯾرﺻﺗ ﺔﻘﯾرطﺑ زﺎﮭﺟﻟا مادﺧﺗﺳا
.ةرﺟﺣﻟا ءاوﮭﺑ ﺎطﺎﺑﺗرا ﺔﺋﻓدﺗ زﺎﮭﺟ
■.لﻌﺗﺷﺗ نأ نﻛﻣﯾ نوھدﻟا رﺗﻠﻓ ﻲﻓ ةدوﺟوﻣﻟا ﺔﯾﻧھدﻟا تﺎﻣﻛارﺗﻟا
■ .لﻌﺗﺷﺗ نأ نﻛﻣﯾ نوھدﻟا رﺗﻠﻓ ﻲﻓ ةدوﺟوﻣﻟا ﺔﯾﻧھدﻟا تﺎﻣﻛارﺗﻟا
لﺎﺛﻣﻟا لﯾﺑﺳ ﻰﻠﻋ) ةرﺟﺣﻟا ءاوﮭﺑ ﺎطﺎﺑﺗرا ﺔﺋﻓدﺗﻟا ةزﮭﺟأ نإ ثﯾﺣ
،مﺣﻔﻟا وأ بﺷﺧﻟا وأ تﯾزﻟا وأ زﺎﻐﻟﺎﺑ ﺔﻠﻐﺷﻣﻟا ﺔﺋﻓدﺗﻟا ةزﮭﺟأ
قارﺗﺣﻻا ءاوھ صﺗﻣﺗ (ءﺎﻣﻟا تﺎﻧﺎﺧﺳ ،يرﺎﺟﻟا ءﺎﻣﻟا تﺎﻧﺎﺧﺳ
■ وأ نوھدﻟا كرﺗﺗ ﻻ .ﺔﻋرﺳﺑ لﻌﺗﺷﺗ ﺔﻧﺧﺎﺳﻟا نوھدﻟاو توﯾزﻟا
■ ﺎﮭﻗوﻓ ﻲﮭط ﻲﻧاوأ ﻊﺿو نود ﺔﯾزﺎﻐﻟا ﻲﮭطﻟا ﻊﺿاوﻣ مادﺧﺗﺳا
■ تﻗو ﻲﻓ ﺔﯾزﺎﻐﻟا ﻲﮭطﻟا ﻊﺿاوﻣ نﻣ دﯾدﻌﻟا لﯾﻐﺷﺗ ﺔﻟﺎﺣ ﻲﻓ
نﻣ جرﺎﺧﻠﻟ مدﺎﻌﻟا تازﺎﻏ فﯾرﺻﺗﺑ موﻘﺗ مﺛ بﯾﻛرﺗﻟا ةرﺟﺣ نﻣ
.(ﺔﻧﺧدﻣﻟا ﻼﺛﻣ) مدﺎﻌﻟا تازﺎﻏ ﺔﻋوﻣﺟﻣ لﻼﺧ
ﻲﻠﺧادﻟا ءاوﮭﻟا طﻔﺷ مﺗﯾ لﻐﺷﻣﻟا ةرﺧﺑﻷا طﺎﻔﺷ ﻊﻣ طﺎﺑﺗرﻻﺎﺑو
ﺔﯾﻣﻛﺑ دادﻣﻹا مدﻋ ﺔﻟﺎﺣ ﻲﻓو - ةروﺎﺟﻣﻟا تارﺟﺣﻟاو ﺦﺑطﻣﻟا نﻣ
صﺎﺻﺗﻣا دﺎﻌُﯾو .ضﻔﺧﻧﻣ طﻐﺿ ﺄﺷﻧﯾ ددﺟﺗﻣﻟا ءاوﮭﻟا نﻣ ﺔﯾﻓﺎﻛ
نﻛﺎﻣأ ﻰﻟإ فﯾرﺻﺗﻟا دوﻣﻋ وأ ﺔﻧﺧدﻣﻟا نﻣ ﺔﻣﺎﺳﻟا تازﺎﻐﻟا
.ﺔﺷﯾﻌﻣﻟا
.ﺔﯾدﺣﻟا ﺔﻣﯾﻘﻟﺎﺑ مازﺗﻟﻻا
ضﻔﺧﻧﻣﻟا طﻐﺿﻟا نوﻛﯾ ﺎﻣدﻧﻋ ﻻإ نﻣﻵا لﯾﻐﺷﺗﻟا نﺎﻣﺿ نﻛﻣﯾ ﻻ
زوﺎﺟﺗﯾ ﻻ ﺔﺋﻓدﺗﻟا زﺎﮭﺟ بﯾﻛرﺗ ةرﺟﺣ ﻲﻓ
4) لﺎﻛﺳﺎﺑ 0,04 ﻲﻠﻠﻣ
قارﺗﺣﻼﻟ مزﻼﻟا ءاوﮭﻟا نوﻛﯾ ﺎﻣدﻧﻋ كﻟذ ﻖﯾﻘﺣﺗ نﻛﻣﯾو .(رﺎﺑ
لﯾﺑﺳ ﻰﻠﻋ ،ﺎھدﺳ نﻛﻣﯾ ﻻ تﺎﺣﺗﻓ رﺑﻋ لوﺧدﻟا ﻰﻠﻋ اردﺎﻗ
ﺔﯾرادﺟﻟا تﺎطﺎﻔﺷﻟا ﻊﻣ طﺎﺑﺗرﻻﺎﺑ ،ذﻓاوﻧﻟاو باوﺑﻷا ﻲﻓ لﺎﺛﻣﻟا
.ىرﺧﻷا ﺔﯾﻧﻔﻟا لﺋﺎﺳوﻟا لﻼﺧ نﻣ وأ ءاوﮭﻟا فﯾرﺻﺗ/لﺎﺧدﻹ
■.ددﺟﺗﻣﻟا ءاوﮭﻟا نﻣ ﺔﯾﻓﺎﻛ ﺔﯾﻣﻛ لوﺧد نﺎﻣﺿ ﺎﻣﺋاد بﺟﯾ كﻟذﻟ
■ هدﺣو نﻣﺿﯾ ﻻ ءاوﮭﻟا فﯾرﺻﺗ/لﺎﺧدﻹ يرادﺟﻟا طﺎﻔﺷﻟا
4
Page 18

ar
تﺎﯾوﺗﺣﻣﻟا سرﮭﻓ
ﻻا لﯾﻟدلﺎﻣﻌﺗ ﺳﻷا طﺎﻔﺷةرﺧﺑ
]ar[
8تﺎﻣﯾﻠﻌﺗﻠﻟ ﻖﺑﺎطﻣﻟا لﺎﻣﻌﺗﺳﻻا
لﻛﺷﺑ زﺎﮭﺟﻟا مادﺧﺗﺳا كﻧﻛﻣﯾﺳ طﻘﻓ ذﺋدﻧﻋ .ﺔﯾﺎﻧﻌﺑ لﯾﻟدﻟا اذھ أرﻗا
ﺎﻘﺣﻻ ﮫﻣادﺧﺗﺳﻻ بﯾﻛرﺗﻟاو لﺎﻣﻌﺗﺳﻻا لﯾﻟدﺑ ظﻔﺗﺣا .نﻣآو ﺢﯾﺣﺻ
.دﯾدﺟﻟا كﻟﺎﻣﻠﻟ ﮫﻣﯾﻠﺳﺗﻟ وأ
يذﻟا طﻘﻓ وھ بﯾﻛرﺗﻟا لﯾﻟدﻟ ًﺎﻘﻓو مﯾﻠﺳ لﻛﺷﺑ زﺎﮭﺟﻟا بﯾﻛرﺗﻓ
لوؤﺳﻣﻟا وھ بﯾﻛرﺗﻟا ﻲﻧﻓ .مادﺧﺗﺳﻻا ءﺎﻧﺛأ نﺎﻣﻷا كﻟ نﻣﺿﯾ
.بﯾﻛرﺗﻟا ﻊﻗوﻣ ﻲﻓ زﺎﮭﺟﻠﻟ مﯾﻠﺳﻟا ﻲﻔﯾظوﻟا ءادﻷا نﻋ
ﻲﻠﺧادﻟا قﺎطﻧﻟا ﻲﻓو ﻲﻟزﻧﻣﻟا مادﺧﺗﺳﻼﻟ صﺻﺧﻣ زﺎﮭﺟﻟا اذھ
.ﺔﯾﺟرﺎﺧﻟا تﺎﻗﺎطﻧﻟا ﻲﻓ لﯾﻐﺷﺗﻠﻟ صﺻﺧﻣ رﯾﻏ زﺎﮭﺟﻟﺎﻓ .طﻘﻓ
ﺔﻌﻧﺎﺻﻟا ﺔﮭﺟﻟا لﻣﺣﺗﺗ ﻻ .لﯾﻐﺷﺗﻟا ءﺎﻧﺛأ زﺎﮭﺟﻟا ﺔﺑﻗارﻣ نﯾﻌﺗﯾو
وأ مﯾﻠﺳﻟا رﯾﻏ مادﺧﺗﺳﻻا نﻋ ﺔﻣﺟﺎﻧﻟا رارﺿﻷا نﻋ ﺔﯾﻟوؤﺳﻣ ﺔﯾأ
.ﺊطﺎﺧﻟا لﺎﻣﻌﺗﺳﻻا
2000 قوﻓ رﺗﻣ
ﻰﺗﺣ عﺎﻔﺗرا ﻰﻠﻋ مادﺧﺗﺳﻼﻟ بﺳﺎﻧﻣ زﺎﮭﺟﻟا اذھ
.ﻰﺻﻗأ دﺣﻛ رﺣﺑﻟا ﺢطﺳ ىوﺗﺳﻣ
8 وأ تاوﻧﺳ
رﻣﻋ نﻣ لﺎﻔطﻷا لَﺑِﻗ نﻣ زﺎﮭﺟﻟا اذھ مادﺧﺗﺳا نﻛﻣﯾ
ﺔﯾﺳﺣﻟا وأ ﺔﯾدﺳﺟﻟا تاردﻘﻟا ﻲﻓ صﻘﻧ نﻣ نوﻧﺎﻌﯾ نﯾذﻟا صﺎﺧﺷﻷا
ﺔﻓرﻌﻣﻟا وأ ةرﺑﺧﻟا ﻲﻓ روﺻﻗ مﮭﯾدﻟ نﯾذﻟا صﺎﺧﺷﻷا وأ ﺔﯾﻠﻘﻌﻟا وأ
وأ مﮭﯾﻠﻋ فارﺷﻹﺎﺑ مﮭﺗﻣﻼﺳ نﻋ لوؤﺳﻣ صﺧﺷ موﻘﯾ نأ ﺔطﯾرﺷ
نﻣ دﻛﺄﺗﻟا ﻊﻣ زﺎﮭﺟﻠﻟ نﻣﻵا مادﺧﺗﺳﻻا ﺔﯾﻔﯾﻛ ﻰﻟإ مﮭﮭﯾﺟوﺗ مﮭﻛاردإ
.كﻟذﺑ ﺔطﺑﺗرﻣﻟا رﺎطﺧﻸﻟ
8تﺎﻣﯾﻠﻌﺗﻠﻟ ﻖﺑﺎطﻣﻟا لﺎﻣﻌﺗﺳﻻا . . . . . . . . . . . . . . . . . . . .3
تﺎﻣﯾﻠﻌﺗﻠﻟ ﻖﺑﺎطﻣﻟا لﺎﻣﻌﺗﺳﻻا
(ﺔﻣﮭﻣﻟا نﺎﻣﻷا تادﺎﺷرإ . . . . . . . . . . . . . . . . . . . . . . .4
7ﺔﺋﯾﺑﻟا ﺔﯾﺎﻣﺣ . . . . . . . . . . . . . . . . . . . . . . . . . . . . .5
ﺔﻗﺎطﻟا رﯾﻓوﺗ . . . . . . . . . . . . . . . . . . . . . . . . . . . . . . . . . 5
ﺔﺋﯾﺑﻟﺎﺑ رﺿﺗ ﻻ ﺔﻘﯾرطﺑ تﺎﻔﻠﺧﻣﻟا نﻣ صﻠﺧﺗﻟا . . . . . . . . . . . . . . .5
Çلﯾﻐﺷﺗﻟا قرط . . . . . . . . . . . . . . . . . . . . . . . . . . . . 6
ءاوﮭﻟا فﯾرﺻﺗ ﺔﻘﯾرط . . . . . . . . . . . . . . . . . . . . . . . . . . . 6
ءاوﮭﻟا رﯾودﺗ ﺔﻘﯾرط . . . . . . . . . . . . . . . . . . . . . . . . . . . . .6
1زﺎﮭﺟﻟا لﺎﻣﻌﺗﺳا . . . . . . . . . . . . . . . . . . . . . . . . . . .6
ﺔﺣورﻣﻟا طﺑﺿ . . . . . . . . . . . . . . . . . . . . . . . . . . . . . . . .6
ةءﺎﺿﻹا . . . . . . . . . . . . . . . . . . . . . . . . . . . . . . . . . . . 6
2ﺔﻧﺎﯾﺻﻟاو فﯾظﻧﺗﻟا . . . . . . . . . . . . . . . . . . . . . . . . . 7
تﺎﻔظﻧﻣﻟا . . . . . . . . . . . . . . . . . . . . . . . . . . . . . . . . . . .7
3؟لﻣﻌﻟا ﺎﻣ ،تﻻﻼﺗﺧﻻا . . . . . . . . . . . . . . . . . . . . . . . .9
4ءﻼﻣﻌﻟا ﺔﻣدﺧ . . . . . . . . . . . . . . . . . . . . . . . . . . . . 9
زﺎﮭﺟﻟا فﯾظﻧﺗ لﺎﻔطﻸﻟ زوﺟﯾ ﻻ .زﺎﮭﺟﻟﺎﺑ ثﺑﻌﻟا لﺎﻔطﻸﻟ زوﺟﯾ ﻻ
نﺳ ﻲﻓ اوﻧوﻛﯾ مﻟ ﺎﻣ مدﺧﺗﺳﻣﻟﺎﺑ ﺔطوﻧﻣﻟا ﺔﻧﺎﯾﺻﻟا لﺎﻣﻋأ ءارﺟإ وأ
15.كﻟذ ءﺎﻧﺛأ مﮭﺗﺑﻗارﻣ مﺗﯾ نأ ﻰﻠﻋ ،رﺛﻛأ وأ ﺔﻧﺳ
8 لﺑﺎﻛو زﺎﮭﺟﻟا نﻋ مھدﺎﻌﺑإ بﺟﯾ تاوﻧﺳ
نﺳ نود لﺎﻔطﻷا
.لﯾﺻوﺗﻟا
لﯾﺻوﺗﺑ مﻘﺗ ﻻو .فﯾﻠﻐﺗﻟا داوﻣ نﻣ ﮫﺟارﺧإ دﻌﺑ زﺎﮭﺟﻟا صﺣﻓا
.لﻘﻧﻟا ﺔﯾﻠﻣﻋ نﻋ ﺔﺟﺗﺎﻧ رارﺿأ دوﺟو ﺔﻟﺎﺣ ﻲﻓ زﺎﮭﺟﻟا
ﺔطﺳاوﺑ وأ ﻲﺟرﺎﺧ ﻲﺗﺎﻘﯾﻣ ﻊﻣ لﯾﻐﺷﺗﻠﻟ ﺎﻣﻣﺻﻣ سﯾﻟ زﺎﮭﺟﻟا اذھ
.دﻌﺑ نﻋ لﯾﻐﺷﺗ زﺎﮭﺟ
تﺎﺟﺗﻧﻣﻟا تﺎﻣوﻠﻌﻣ
تﺎﻣدﺧﻟاو رﺎﯾﻐﻟا ﻊطﻗو تﺎﯾﻟﺎﻣﻛﻟاو تﺎﺟﺗﻧﻣﻟا لوﺣ تﺎﻣوﻠﻌﻣﻟا نﻣ دﯾزﻣﻟا دﺟﺗ
www.bosch-home.comﻲﻧورﺗﻛﻟﻹا رﺟﺗﻣﻟا ﻲﻓو
www.bosch-eshop.com
ﻰﻠﻋ ةزﮭﺟﻷا تﺎﻣادﺧﺗﺳاو تﺎﻘﯾﺑطﺗﺑ ﻖﻠﻌﺗﯾ ﺎﻣﯾﻓ مﻛﺗارﺎﺳﻔﺗﺳا ﻰﻠﻋ درﻟاو مﻗر
:تﻧرﺗﻧﻹا ﻊﻗوﻣ ﻰﻠﻋ
:تﻧرﺗﻧﻹا ﻊﻗوﻣ ﻰﻠﻋ
089 69 339 339 ﺔﻋﺎﺳﻟا نﻣ :ﺔﻌﻣﺟﻟا ﻰﻟإ نﯾﻧﺛﻻا نﻣ كﻟذو)
رﺳﯾشوﺑ تﺎﻣﻼﻌﺗﺳا ﻖﯾرﻓﺔﻣزﻼﻟا تﺎﺟﺗﻧﻣﻟا تﺎﻣوﻠﻌﻣو ةروﺷﻣﻟا كﻟ مدﻘﯾ نأ
:فﺗﺎھ
8.00 ﺔﻋﺎﺳﻟا ﻰﻟإ 18.00.ﺎﯾﻧﺎﻣﻟأ ﻰﻠﻋ طﻘﻓ يرﺳﯾ (
3
Page 19

Page 20

5IBOLZPVGPSCVZJOHB
#PTDI)PNF"QQMJBODF
5HJLVWHU\RXUQHZGHYLFHRQ0\%RVFKQRZDQGSURILWGLUHFWO\IURP
t&YQFSUUJQTUSJDLTGPSZPVSBQQMJBODF
t8BSSBOUZFYUFOTJPOPQUJPOT
t%JTDPVOUTGPSBDDFTTPSJFTTQBSFQBSUT
t%JHJUBMNBOVBMBOEBMMBQQMJBODFEBUBBUIBOE
t&BTZBDDFTTUP#PTDI)PNF"QQMJBODFT4FSWJDF
)UHHDQGHDV\UHJLVWUDWLRQ²DOVRRQPRELOHSKRQHV
XXXCPTDIIPNFDPNXFMDPNF
-PPLJOHGPSIFMQ
:PV}MMGJOEJUIFSF
([SHUWDGYLFHIRU\RXU%RVFKKRPHDSSOLDQFHVQHHGKHOSZLWKSUREOHPV
RUDUHSDLUIURP%RVFKH[SHUWV
)LQGRXWHYHU\WKLQJDERXWWKHPDQ\ZD\V%RVFKFDQVXSSRUW\RX
XXXCPTDIIPNFDPNTFSWJDF
$POUBDUEBUBPGBMMDPVOUSJFTBSFMJTUFEJOUIFBUUBDIFETFSWJDFEJSFDUPSZ
3PCFSU#PTDI)BVTHFSÉUF(NC)
&DUO:HU\6WUDH
0QFKHQ
*HUPDQ\
XXXCPTDIIPNFDPN
*9001406525*
9001406525
980711
 Loading...