

Bosch DCU 100 Operating Instructions Manual
DCU 100
de
Betriebsanleitung
Tablet-PC
es
Instrucciones de Funcionamiento
Tablet PC
nl
Bedieningshandleiding
Tablet-pc
da
Driftsinstruktioner
Tablet-pc
cs
Návod k použití
Τabletový počítač
en
Operating instructions
Tablet PC
it
Istruzioni d‘uso
Tablet PC
pt
Instruções de funcionamento
Tablet PC
no
Driftsanvisning
Tablet PC
tr
Çalıştırma talimatları
Tablet PC
fr
Consignes d‘utilisation
Tablette PC
sv
Bruksanvisning
Pekdator
fi
Käyttöohjeet
Tablet PC
pl
Instrukcje obsługi
Tablet

| DCU 100 | 3 de
Inhaltsverzeichnis Deutsch 4
Contents English 14
Sommaire français 24
Índice español 34
Indice italiano 44
Innehållsförteckning svenska 54
Inhoud Nederlands 64
Índice português 74
Sisällysluettelo Suomi 84
Indholdsfortegnelse Dansk 94
Innholdsfortegnelse norsk 104
Spis treści po polsku 114
Obsah česky 124
İçindekiler Türkçe 134
1 689 989 174 2015-03-25| Robert Bosch GmbH

4 | DCU 100 | de
Inhaltsverzeichnis Deutsch
1. Verwendete Symbolik 5
1.1 In der Dokumentation 5
1.1.1 Warnhinweise – Aufbau und Bedeutung 5
1.1.2 Symbole – Benennung und Bedeutung 5
1.2 Auf dem Produkt 5
2. Benutzerhinweise 5
2.1 Wichtige Hinweise 5
2.2 Sicherheitshinweise 5
2.3 Elektromagnetische Verträglichkeit (EMV) 5
2.4 R&TTE-Richtlinie 5
2.5 Drahtlose Funkverbindung 6
2.5.1 Wichtige Hinweise zu
WLAN und Bluetooth 6
2.5.2 Hinweise Access Point (WLAN) 6
3. Produktbeschreibung 7
3.1 Bestimmungsgemäße Verwendung 7
3.2 Lieferumfang 7
3.3 Transport 7
3.4 Gerätebeschreibung 7
3.4.1 Schnittstellen 7
3.4.2 Funktion Ein-/Aus-Taste mit LED 8
3.4.3 Funktionstaste ƒ 8
3.5 Touchscreen 8
3.6 Externes DVD-Laufwerk 8
4. Erstinbetriebnahme 9
4.1 Akku einsetzen 9
4.2 Anschluss 9
4.3 Konfiguration Betriebssystem 9
4.4 Software installieren 9
5. Bedienung 9
5.1 Einschalten 9
5.2 Ausschalten 9
5.3 Einstellung Energieoptionen 9
5.4 Spannungsversorgung 10
5.5 Akkubetrieb 10
5.6 Touchscreen mit Taststift 10
5.7 Virtuelle Bildschirmtastatur 10
5.8 Systemeinstellungen 10
5.8.1 Lautstärkeanpassung 10
5.8.2 Touchscreen kalibrieren 10
5.8.3 Windows-Aktualisierung 11
5.9 Drucken 11
5.10 Externes DVD-Laufwerk 11
5.10.1 Anschluss 11
5.10.2 Richtiger Umgang mit DVD-ROMs 11
5.10.3 Einlegen/Entnehmen der DVD-ROM 11
5.11 Hinweise bei Störungen 11
6. Instandhaltung 12
6.1 Reinigung 12
6.1.1 DCU 100 12
6.1.2 Datenträger 12
6.1.3 DVD-Laufwerk 12
6.2 Akkuwechsel 12
6.3 Recovery-Prozess 12
6.4 Ersatz- und Verschleißteile 12
7. Außerbetriebnahme 13
7.1 Ortswechsel 13
7.2 Entsorgung und Verschrottung 13
8. Technische Daten 13
8.1 Temperatur und Luftfeuchtigkeit 13
8.2 DCU 100 13
8.3 Netzteil 13
8.4 Bluetooth Class 1 13
1 689 989 174 2015-03-25| Robert Bosch GmbH
Verwendete Symbolik | DCU 100 | 5 de
1. Verwendete Symbolik
1.1 In der Dokumentation
1.1.1 Warnhinweise – Aufbau und Bedeutung
Warnhinweise warnen vor Gefahren für den Benutzer oder
umstehende Personen. Zusätzlich beschreiben Warnhinweise die Folgen der Gefahr und die Maßnahmen zur Vermeidung. Warnhinweise haben folgenden Aufbau:
Warnsymbol
Das Signalwort zeigt die Eintrittswahrscheinlichkeit sowie
die Schwere der Gefahr bei Missachtung:
Signalwort Eintrittswahr-
GEFAHR Unmittelbar drohende
WARNUNG Mögliche drohende
VORSICHT Mögliche gefährliche
1.1.2 Symbole – Benennung und Bedeutung
Symbol Benennung Bedeutung
!
i
1.
2.
e
"
SIGNALWORT – Art und Quelle der Gefahr!
Folgen der Gefahr bei Missachtung der aufgeführten Maßnahmen und Hinweise.
¶ Maßnahmen und Hinweise zur Vermeidung
der Gefahr.
scheinlichkeit
Gefahr
Gefahr
Situation
Achtung Warnt vor möglichen Sachschäden.
Information Anwendungshinweise und andere
Mehrschrittige
Handlung
Einschrittige
Handlung
Zwischenergebnis
Endergebnis Am Ende einer Handlungsaufforderung
nützliche Informationen.
Aus mehreren Schritten bestehende
Handlungsaufforderung.
Aus einem Schritt bestehende
Handlungsaufforderung.
Innerhalb einer Handlungsaufforderung
wird ein Zwischenergebnis sichtbar.
wird das Endergebnis sichtbar.
Schwere der Gefahr
bei Missachtung
Tod oder schwere
Körperverletzung
Tod oder schwere
Körperverletzung
Leichte
Körperverletzung
2. Benutzerhinweise
2.1 Wichtige Hinweise
Wichtige Hinweise zur Vereinbarung über Urheberrecht,
Haftung und Gewährleistung, über die Benutzergruppe
und über die Verpflichtung des Unternehmens finden
Sie in der separaten Anleitung "Wichtige Hinweise und
Sicherheitshinweise zu Bosch Test Equipment".
Diese sind vor Inbetriebnahme, Anschluss und Bedienung von DCU 100 sorgfältig durchzulesen und zwingend zu beachten.
2.2 Sicherheitshinweise
Alle Sicherheitshinweise finden Sie in der separaten
Anleitung "Wichtige Hinweise und Sicherheitshinweise
zu Bosch Test Equipment". Diese sind vor Inbetriebnahme, Anschluss und Bedienung von DCU 100 sorgfältig
durchzulesen und zwingend zu beachten.
2.3 Elektromagnetische Verträglichkeit (EMV)
DCU 100 erfüllt die Kriterien nach EMV-Richtlinie
2014/30/EU.
DCU 100 ist ein Erzeugnis der Klasse B nach EN 55 020.
2.4 R&TTE-Richtlinie
DCU 100 ist ein Funkgerät der Geräteklasse2
(R&TTE1999/55/EG) und für den Betrieb innerhalb
Europas zugelassen. DCU 100 darf in Frankreich nur in
geschlossenen Räumen benutzt werden.
i In Ländern außerhalb Europas müssen die jeweiligen
länderspezifischen Vorschriften zum Betrieb von
Funkgeräten im Frequenzbereich 2,4 GHz beachtet
werden (z. B. WLAN oder Bluetooth).
1.2 Auf dem Produkt
! Alle Warnzeichen auf den Produkten beachten und in
lesbarem Zustand halten.
VORSICHT – Verletzungsgefahr durch Auslösen des Airbags bei eingehängtem DCU 100!
Verletzungen durch unbeabsichtigtes Auslösen des Airbags bei Befestigung (z. B. Einhängen) von DCU 100 am Lenkrad.
¶ DCU 100 nicht am Lenkrad befestigen.
1 689 989 174 2015-03-25| Robert Bosch GmbH

6 | DCU 100 | Benutzerhinweisede
2.5 Drahtlose Funkverbindung
! Der Betreiber des DCU 100 hat dafür zu sorgen, dass
die Richtlinien und Einschränkungen des jeweiligen
Landes eingehalten werden.
2.5.1 Wichtige Hinweise zu WLAN und Bluetooth
WLAN (Wireless Local Area Network) bezeichnet ein
drahtloses, lokales Funknetz. Bei WLAN handelt es sich,
wie bei Bluetooth, um eine Funkverbindung im freien
2,4 GHz-ISM-Band (ISM: Industrial, Scientific, Medical).
Dieser Frequenzbereich unterliegt staatlichen Regulierungen, darf jedoch in den meisten Ländern lizenzfrei
genutzt werden. Dies hat jedoch zur Folge, dass viele
Anwendungen und Geräte auf diesem Frequenzband
senden. Es kann zu Frequenzüberlagerungen und somit
zu Störungen kommen.
Je nach Umweltbedingungen können deshalb Beeinträchtigungen der WLAN-Verbindung auftreten, z.B.
bei Bluetooth-Verbindungen, kabellosen Telefonen,
Funk-Thermometern, Funk-Garagentüröffnern, FunkLichtschaltern oder Funk-Alarmanlagen.
i Beim Tragen von Herzschrittmachern oder anderen
lebenswichtigen elektronischen Geräten sollte man
bei Gebrauch von Funktechnik allgemein Vorsicht
walten lassen, da eine Beeinträchtigung nicht ausgeschlossen werden kann.
R Wir empfehlen die Netzwerkinfrastruktur von einem Netz-
werkspezialisten installieren und betreuen zu lassen.
R Bewahren Sie die SSID und die Schlüssel für die
Funkstrecke an einem sichern Ort auf. Stellen Sie sicher, dass diese Daten im Störungsfall griffbereit sind.
R Wir empfehlen Ihnen bei der Inbetriebnahme eine
genaue Begehung Ihres Standortes: Stellen Sie
sicher, wo in Ihrem Gebäude DCU 100 funktioniert
und wo die funktechnischen Grenzen liegen.
R Wird DCU 100 innerhalb eines Fahrzeugs verwendet
(Faradayscher Käfig), kann der Funkverkehr stark
eingeschränkt sein.
R Die Funkstrecke unterliegt den Witterungsbedingun-
gen. Somit kann das Empfangssignal variieren.
R Bei Fragen wenden Sie sich bitte an Ihren Netzwerk-
spezialisten.
2.5.2 Hinweise Access Point (WLAN)
Ein Access Point ist ein elektronisches Gerät, das als
Schnittstelle zwischen einem Funknetz und einem kabelgebundenen Rechnernetz fungiert. Auf diese Weise
können DCU 100, PC und Laptop sowie ein Drucker
kabellos miteinander verbunden werden.
i Wir empfehlen für den Access Point WLAN-Standard
IEEE 802.11n (Datenübertragungsrate maximal
600Mbps) zu verwenden. Die Funktion "extended
range" wird nicht unterstützt.
Achten Sie auf folgende Punkte um eine möglichst gute
Verbindung zu erreichen:
R Das WLAN-Funksignal sucht stets den direkten Weg.
PC/Laptop und Access Point (siehe Kap. 2.5.2) so
aufstellen, dass möglichst wenige Hindernisse, wie
z.B. Stahltüren und Betonwände, das Funksignal von
und zum DCU 100 stören können.
R Zudem ist die Reichweite des WLAN innerhalb von
Gebäuden stark von deren Bausubstanz abhängig.
Herkömmliches Mauerwerk, Holz- und verschiedene Trockenbauwände dämpfen die Ausbreitung von
Funkwellen wenig. Schwierig sind dünne Gipswände,
denn in Gips kann sich reichlich Luftfeuchtigkeit
sammeln und zur Absorption von Funksignalen führen. Metallische Wände oder Beton (insbesondere
Stahlbeton) blocken Funkwellen stark ab. Kellerdecken sind in vielen Fällen undurchdringbar. Generell
sind Wände, in denen viel Metall verbaut ist (z.B.
Rohre, Leitungen etc.) für Funkwellen hinderlich.
R Den Funkempfang stören auch größere Metallkörper,
wie Heizkörper und Fensterrahmen sowie aktive
Störquellen wie z. B. Funk-Telefone, Bewegungsmelder und Mikrowellenöfen.
R Auch der Mensch beeinträchtigt die Funkübertra-
gung. Deshalb immer darauf achten, dass sich keine
Menschen zwischen Sender und Empfänger stellen.
i Die jeweilige WLAN-Konfiguration ist abhängig von
der Konfiguration des zur Verfügung stehenden
Access Points.
Folgendes ist zu beachten:
R Access Point möglichst zentral und hoch anbringen,
am besten unter der Raumdecke. Der Access Point
darf nicht hinter einem metallischen Körper, wie
z.B. einem Heizkörper oder in einem Metall-Schaltschrank verbaut werden.
R Bei nur einer Access Point-Antenne sollte sie nach
unten, in Richtung Fußboden zeigen. Hat ein Access
Point mehrere Antennen sollten die Antennen dreidimensional ausgerichtet sein.
R Sichtkontakt zwischen DCU 100 und Access Point
bringen immer die besten und höchsten Übertragungsraten.
R Bei einer schlechten Verbindung kann es sinnvoll
sein, den eingestellten Kanal am Access Point zu
wechseln. Wenn möglich, keine benachbarten Kanäle
von schon verwendeten Kanälen verwenden.
R Wir empfehlen, dass am Access Point eine Verschlüsse-
lung des Funkverkehrs konfiguriert wird.
1 689 989 174 2015-03-25| Robert Bosch GmbH
Produktbeschreibung | DCU 100 | 7 de
3. Produktbeschreibung
3.1 Bestimmungsgemäße Verwendung
DCU 100 ist ein Tablet-PC für den Werkstattbereich für
die Bosch Diagnose-Software"ESI[tronic] 2.0" oder die
Bosch Emissions Analyse-Software "BEA-PC".
! Werden auf DCU 100 ESI[tronic]2.0 und BEA-PC ins-
talliert, so darf immer nur eines der beiden Programme
geöffnet sein. D. h. bevor BEA-PC gestartet wird, muss
ESI[tronic] 2.0 geschlossen werden (und umgekehrt).
! Zusätzliche Software, die auf DCU 100 installiert
wird, kann unter Umständen dazu führen, dass die
Systemleistung des DCU 100 verschlechtert wird und
DCU 100 insgesamt langsamer wird. Dies kann insbesondere bei Virenscanner-Programmen auftreten.
! DCU 100 darf nicht Hitzeeinflüssen (z. B. direkte
Sonneneinstrahlung), Stößen oder Vibrationen, magnetischen Feldern und übermäßiger Verschmutzung
ausgesetzt werden.
i Es ist das Betriebssystem
Windows Embedded POSReady 7 (32-bit) installiert.
! Auf dem Desktop finden Sie die "END-USER LICENSE
AGREEMENT (EULA) FOR MICROSOFT SOFTWARE"
(EULA.XPS). Bitte beachten Sie die dort enthaltenen
Hinweise.
3.2 Lieferumfang
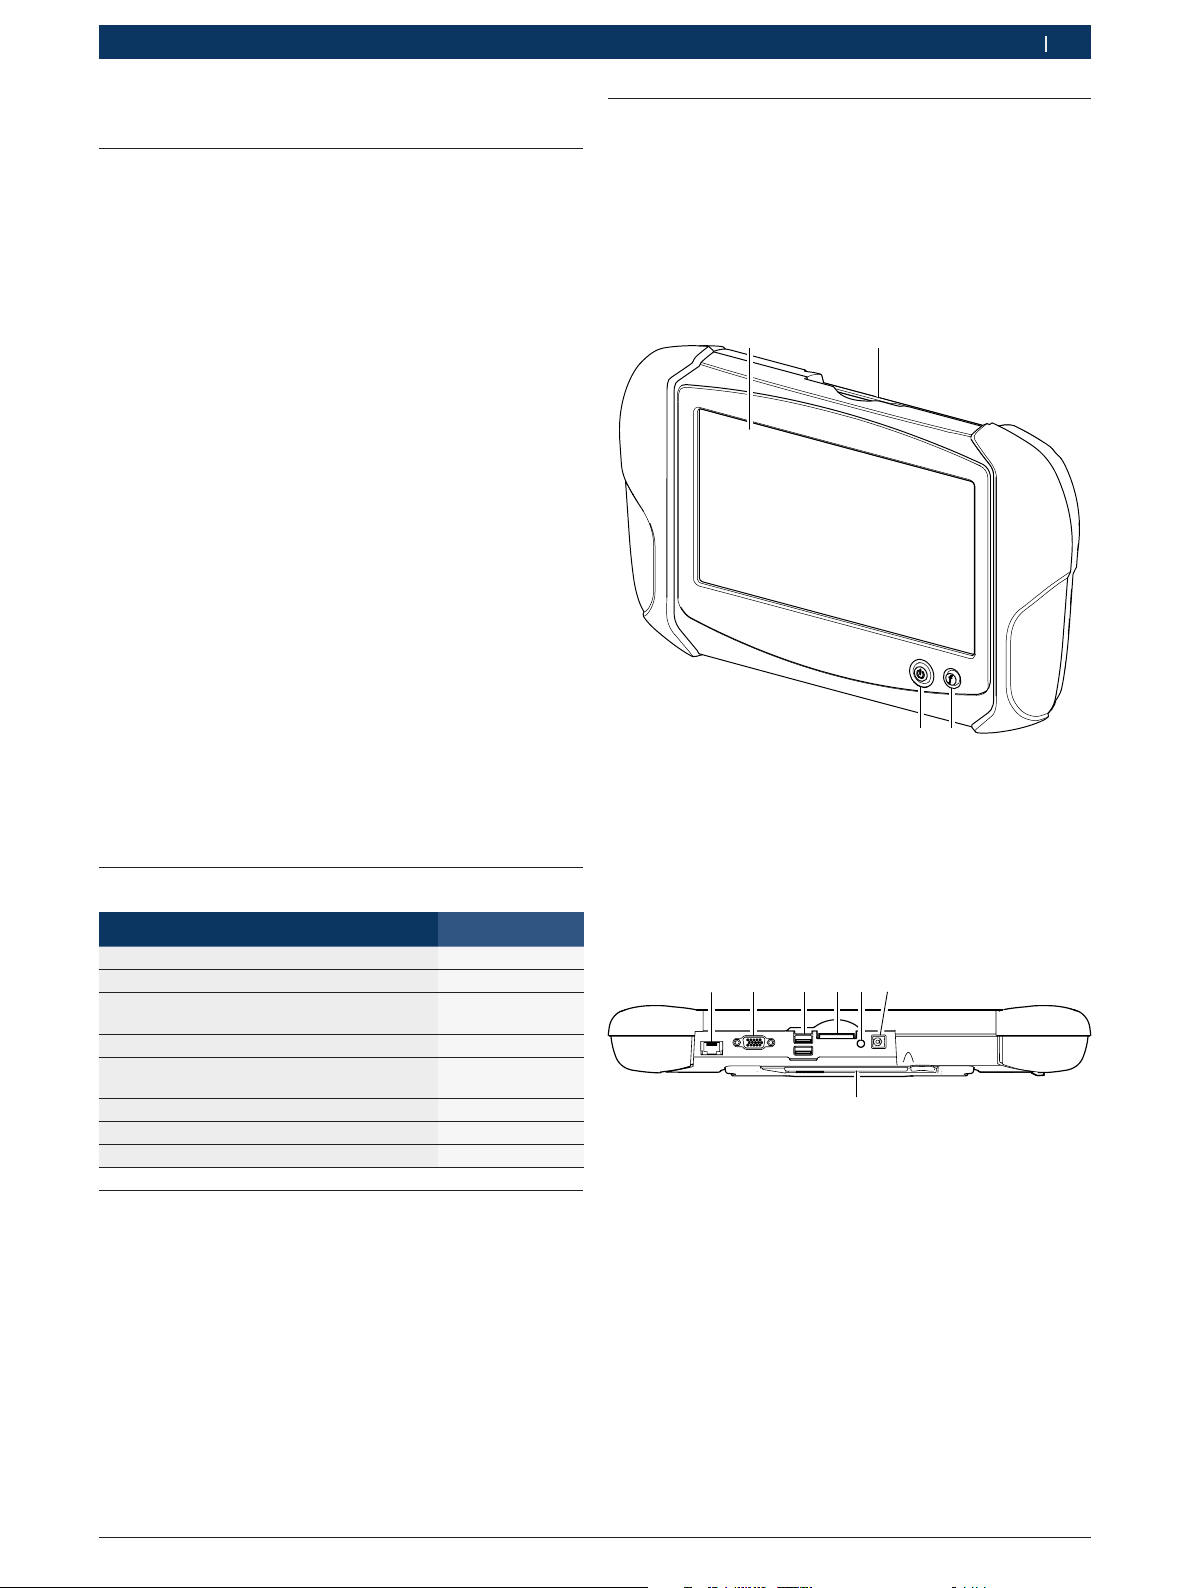
3.4 Gerätebeschreibung
DCU 100 ist ein tragbarer, ortsunabhängiger Tablet-PC
für den Werkstattbereich. Die Bedienung erfolgt mit einem Taststift (für den LCD-Touchscreen) und einer virtuellen Tastatur. Der Ausdruck der Daten und Messwerte kann über die USB-Schnittstelle mit einem externen
Drucker (Sonderzubehör) erfolgen. DCU 100 und das
Zubehör sind in einem Koffer geschützt untergebracht.
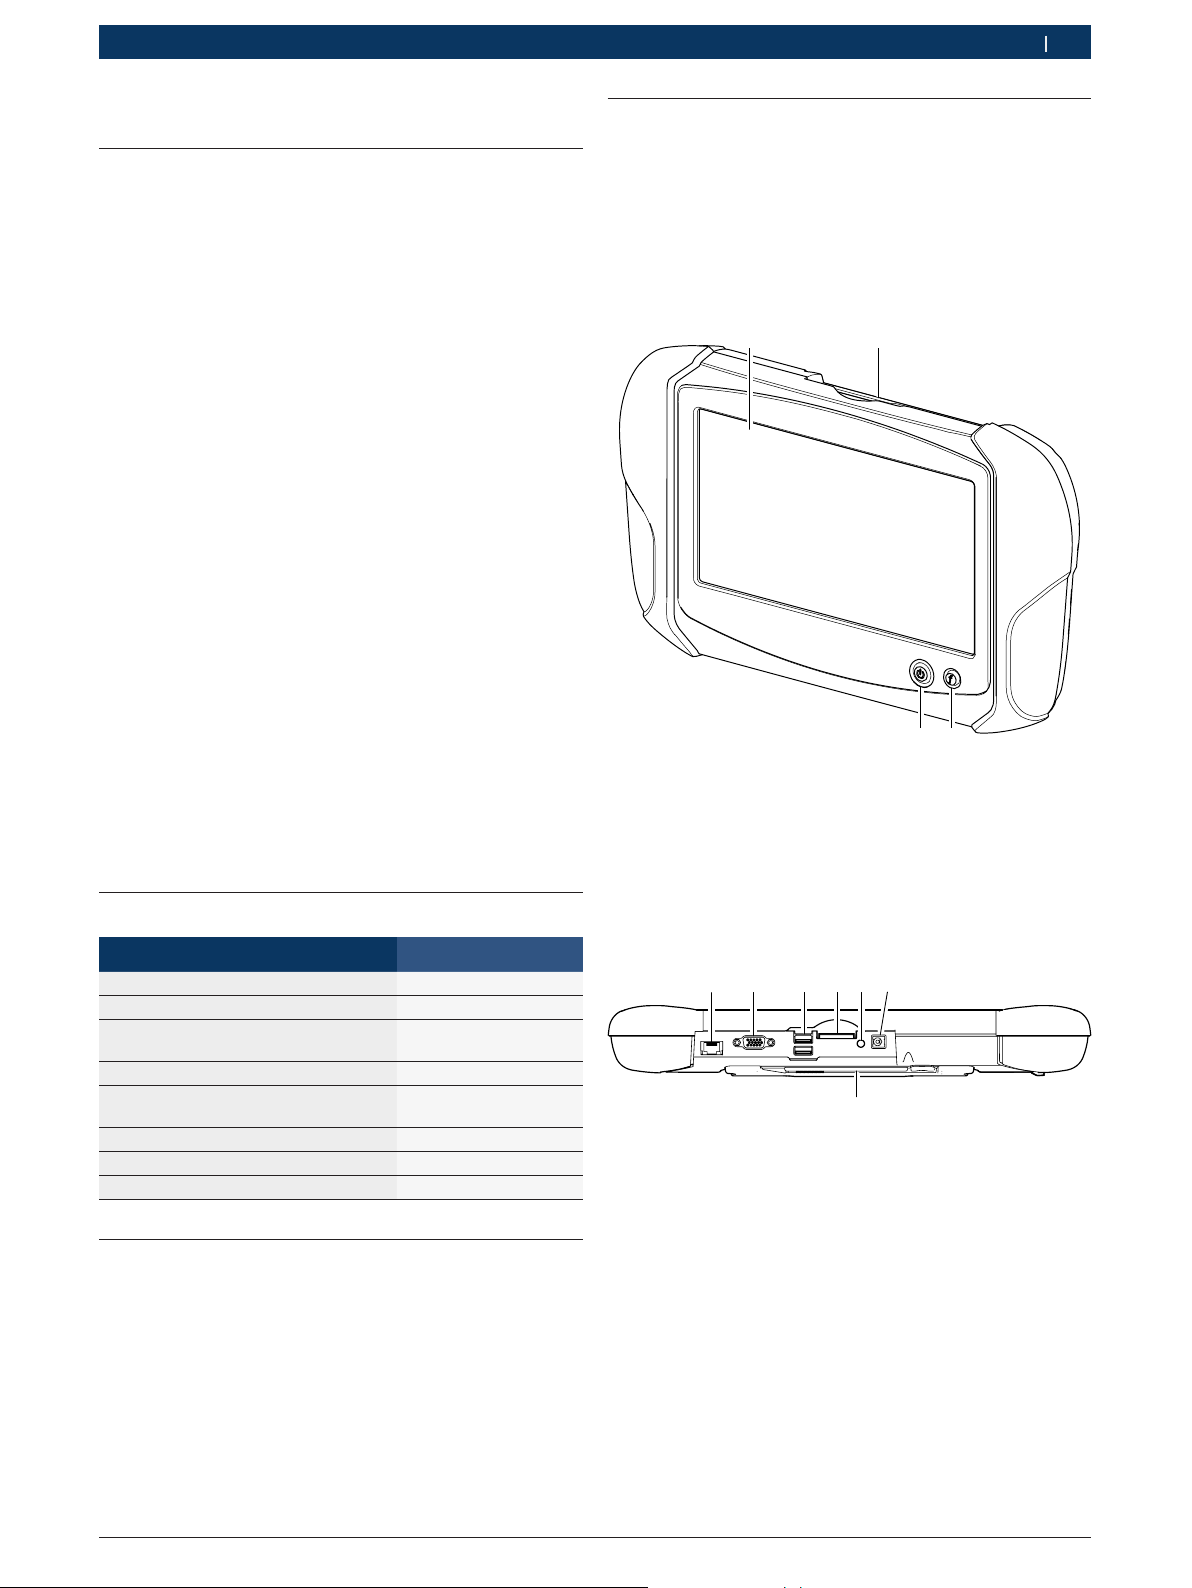
1
459953-02_Ko
Fig. 1: DCU 100
1 LCD-Anzeige mit Touchscreen
2 Schnittstellen
3 Funktionstaste ƒ
4 Ein-/Aus-Taste
2
4
3
Bezeichnung Bestellnummer
DCU 100 –
Akku 1 687 335 042
Externes DVD-ROM Laufwerk mit
USB-Verbindungsleitung (0,6 m)
Koffer 1 685 438 649
Netzteil mit
Netzanschlussleitung
Touchstift (1 Stück) –
Recovery DVD 1 687 005 100
Originalbetriebsanleitung 1 689 989 174
1 687 023 698
1 687 023 697
1 684 461 186
3.3 Transport
Zu Transportzwecken müssen die Anschlussleitungen
des DCU 100 abgezogen werden. Ferner sollte der
DCU 100 nur im mitgelieferten Koffer transportiert und
aufbewahrt werden. Das DVD-Laufwerk sollte zudem in
der Originalverpackung im Koffer aufbewahrt und transportiert werden.
3.4.1 Schnittstellen
2
1
5
4
3
6
7
Fig. 2: DCU 100 Schnittstellenansicht
1 Netzwerkanschluss RJ-45 (LAN)
2 Monitoranschluss
3 USB-Anschluss (2x), USB 2.0, max. 1 A
4 Speicherkarten-Steckplatz (SD-Card)
5 Kopfhöreranschluss
6 Netzteilanschluss (12 Volt DC)
7 Taststifthalterung
459953-01_Ko
1 689 989 174 2015-03-25| Robert Bosch GmbH
8 | DCU 100 | Produktbeschreibungde
2
1
459953-03_Ko
3
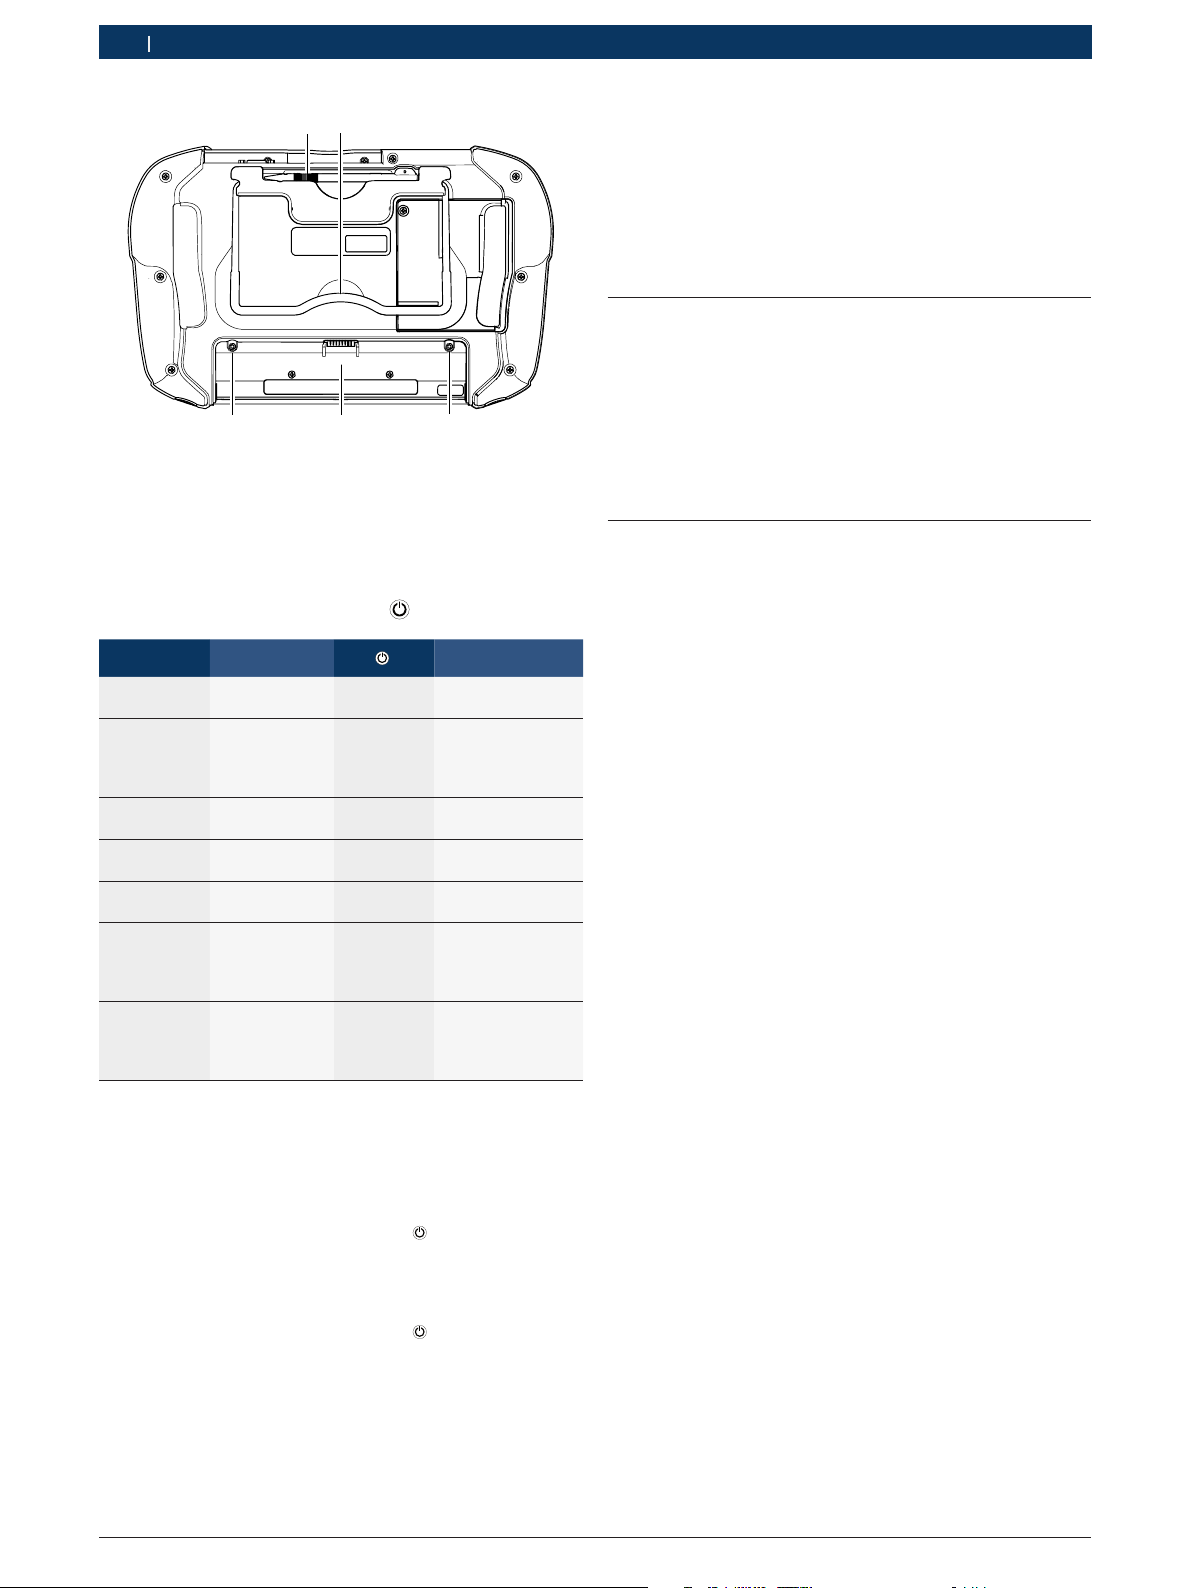
Fig. 3: DCU 100 Unterseite
1 Taststift
2 Aufstellbügel
3 Akkubefestigungshülsen
4 Akkufach
4
3
3.4.2 Funktion Ein-/Aus-Taste mit LED
3.4.3 Funktionstaste ƒ
Funktionstaste ƒ drücken: Startmenü und Taskleiste von
Win 7 werden geöffnet oder wieder geschlossen.
i Durch Drücken der Funktionstaste ƒ >2 Sekunden
wird die virtuelle Tastatur geöffnet oder wieder geschlossen.
3.5 Touchscreen
Der Touchscreen wird mit dem Finger oder mit einem
Taststift bedient. Tippen Sie mit dem Finger oder mit
dem Taststift auf die Stelle auf dem Touchscreen, an
der eine Aktion erfolgen soll.
i Die Touchscreen-Kalibrierung ist im Kapitel 5.8.2
beschrieben.
3.6 Externes DVD-Laufwerk
Die Bedienung des DVD-Laufwerkes ist im Kapitel 5.11
beschrieben.
DCU 100 Netzteil
Aus Nicht ange-
Aus Angeschlossen Leuchtet
Ein und LCDAnzeige an
Ein und LCDAnzeige aus
Ein und LCDAnzeige aus
Ein, LCD-Anzeige aus, im
Energiesparmodus
Ein, LCD-Anzeige aus, im
Energiesparmodus
schlossen
Angeschlossen Aus Akku wird geladen
Nicht angeschlossen
Nicht angeschlossen
Nicht angeschlossen
Nicht angeschlossen
LED
Aus –
grün
Leuchtet
gelb
Leuchtet
grün
Blinkt rot Ladezustand des
Blinkt grün Ladezustand des
Blinkt rot Ladezustand des
Status
Ladezustand des
Akkus ≥80%
Ladezustand des
Akkus <80%
Ladezustand des
Akkus ≥10%
Akkus <10%
Akkus ≥10%
Akkus <10%
i Durch kurzes Drücken der Ein-/Aus-Taste geht
DCU 100 in den Standby-Mode oder der StandbyMode wird wieder verlassen.
i Durch Drücken der Ein-/Aus-Taste >2 Sekunden
wird das Windows-Betriebssystem heruntergefahren
und DCU 100 ausgeschaltet.
i Durch Drücken der Ein-/Aus-Taste >12 Sekunden
wird DCU 100, ohne dass das Betriebssystem zuvor
herunterfährt, ausgeschaltet. Diesen Modus nur
anwenden, wenn kein Herunterfahren des WindowsBetriebssystems möglich ist.
1 689 989 174 2015-03-25| Robert Bosch GmbH
Erstinbetriebnahme | DCU 100 | 9 de
4. Erstinbetriebnahme
¶ Aus dem Koffer DCU 100, Akku, Netzteil mit Netz-
anschlussleitung und das DVD-Laufwerk mit USBVerbindungsleitung entnehmen.
4.1 Akku einsetzen
¶ Akku ins Akkufach einschieben und mit den zwei
am Akku befindlichen Schrauben befestigen (siehe
Fig.3, Pos. 3).
i Wir empfehlen, die Akkus mindestens drei Stunden
zu laden, bevor DCU 100 im Akkubetrieb eingesetzt
wird.
4.2 Anschluss
Stellen Sie sicher, dass vor der Erstinbetriebnahme die
Spannung des Netzes mit der am Netzteil angegebenen
Spannung übereinstimmt (beiliegende Netzanschlussleitung verwenden).
4.3 Konfiguration Betriebssystem
1. DCU 100 über Netzteil mit Spannung versorgen.
2. DCU 100 einschalten.
3. Nach dem ersten Einschalten über das Sprachaus-
wahl-Menü die Sprache des Windows-Betriebssystems wählen und den Bildschirmanweisungen folgen.
i Ein nachträgliches Ändern der Windows-Betriebssys-
temsprache ist nicht vorgesehen. Sollte dies dennoch
erforderlich sein, so kann das Sprachauswahlmenü
erneut unter "Start >> Alle Programme >> Tools >>
Localization" gestartet werden.
4.4 Software installieren
i Bei einer Software-Installation DCU 100 immer über
Netzteil mit Spannung versorgen.
i Weitere Informationen zur Installation und zum
Update der Software siehe Installationshinweise der
jeweiligen Software.
5. Bedienung
5.1 Einschalten
! Zur Vermeidung der Bildung von Kondenswasser darf
DCU 100 erst eingeschaltet werden, nachdem sich
DCU 100 der Umgebungstemperatur angeglichen hat!
1. DCU 100 durch Drücken der Ein-/Aus-Taste ein-
schalten.
Nach dem Hochfahren des Windows-Betriebssys-
tems wird das Startbild angezeigt.
2. Mit dem Taststift die Anwendung antippen, mit der
Sie arbeiten wollen.
VORSICHT – Verletzungsgefahr durch
Auslösen des Airbags bei eingehängtem
DCU 100!
Verletzungen durch unbeabsichtigtes Auslösen des Airbags bei Befestigung (z. B. Einhängen) von DCU 100 am Lenkrad.
¶ DCU 100 nicht am Lenkrad befestigen.
5.2 Ausschalten
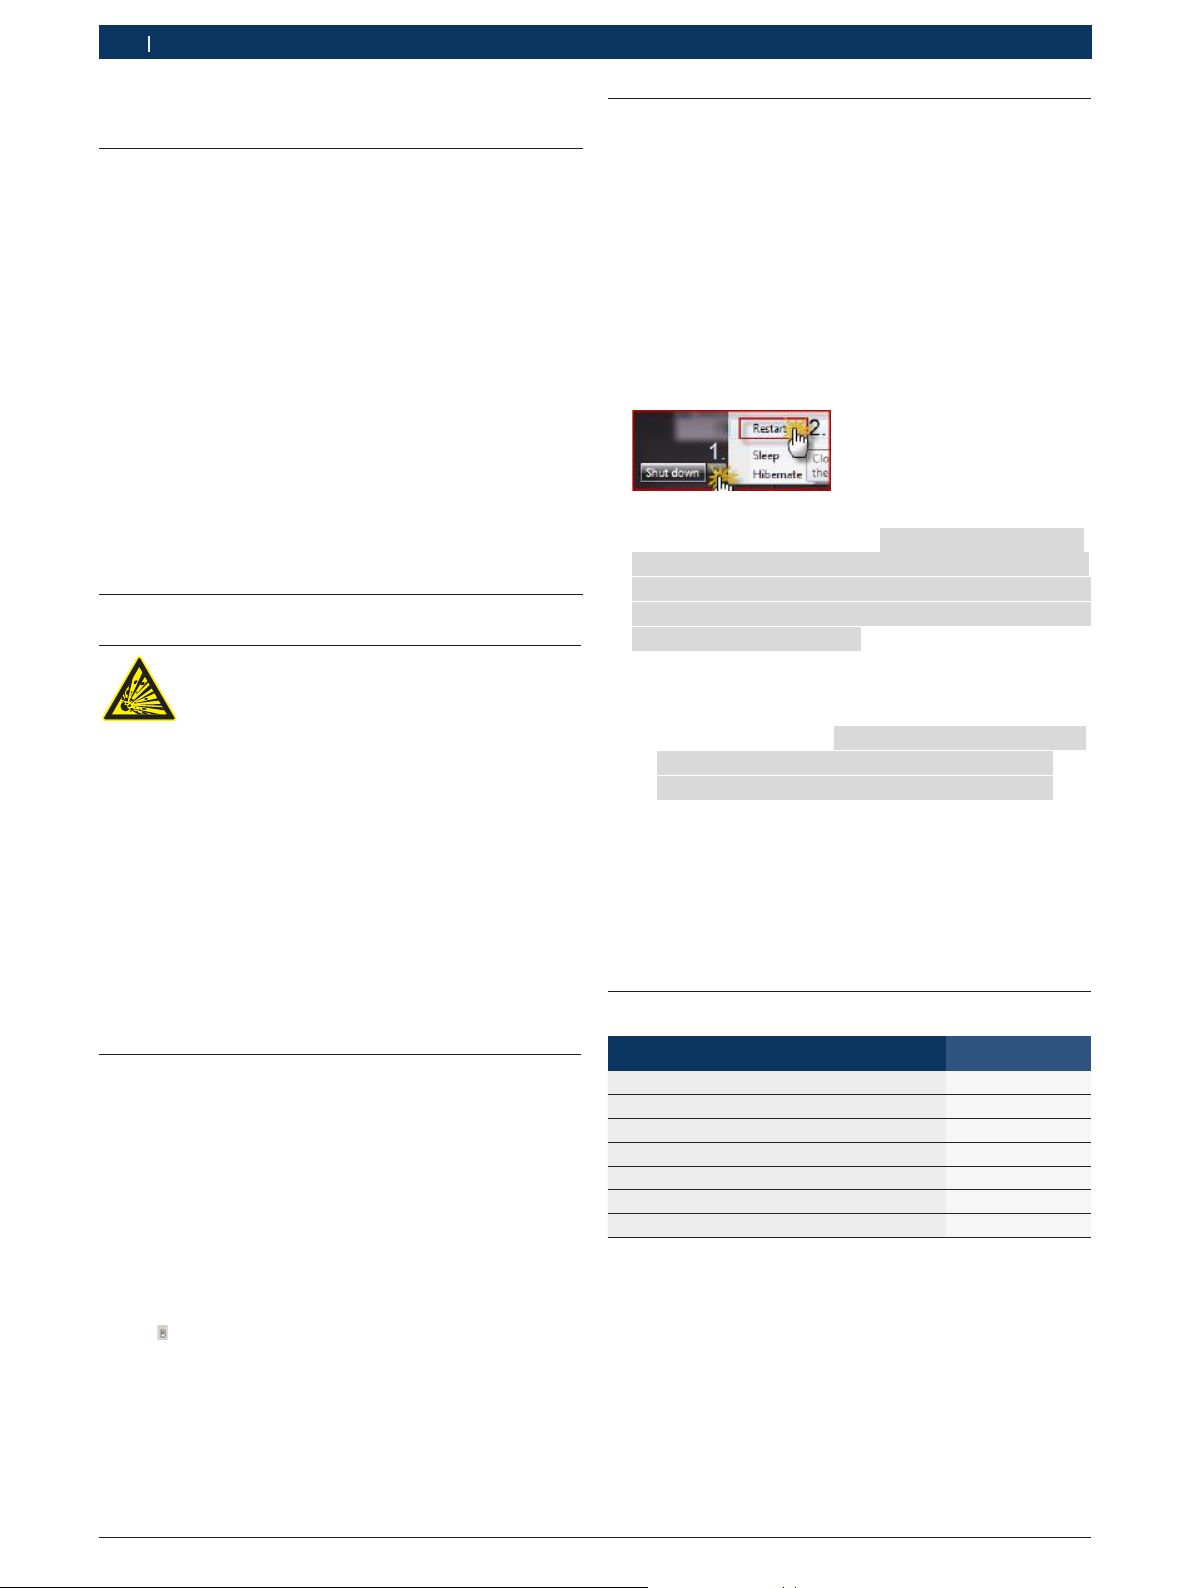
1. Funktionstaste ƒ drücken.
Startmenü und Taskleiste werden geöffnet.
2. Im Startmenü <Herunterfahren> wählen.
Windows wird heruntergefahren.
"DCU 100 schaltet sich aus.
i Durch Drücken der Ein-/Aus-Taste >2 Sekunden
wird das Windows-Betriebssystem heruntergefahren
und DCU 100 ausgeschaltet.
i Durch Drücken der Ein-/Aus-Taste >12 Sekunden
wird DCU 100, ohne dass das Betriebssystem zuvor
herunterfährt, ausgeschaltet. Diesen Modus nur
anwenden, wenn kein Herunterfahren des WindowsBetriebssystems möglich ist.
5.3 Einstellung Energieoptionen
Im Menü "Start >> Systemsteuerung >> Energieoptionen" kann der Energiesparplan ausgewählt und verän-
dert werden (z. B. die Zeit für das Abschalten des Monitors oder die Anpassung der Anzeigehelligkeit).
1 689 989 174 2015-03-25| Robert Bosch GmbH

10 | DCU 100 | Bedienungde
5.4 Spannungsversorgung
DCU 100 kann mit folgenden Spannungsversorgungen
betrieben werden:
R Akku
R Netzteil
! Nur das im Lieferumfang beiliegende Netzteil benutzen!
5.5 Akkubetrieb
DCU 100 verfügt über einen Akku, welcher DCU 100 mit
Strom versorgt.
i Der Akku wird bei Netzbetrieb automatisch geladen.
Der vollgeladene Akku des DCU 100 ist ausgelegt, um einen ca. 2-stündigen autonomen Betrieb zu gewährleisten.
i Ist die Akkuladung kleiner 10 %, blinkt die LED der
Ein-/Aus-Taste rot. Schließen Sie in diesem Falle
das Netzteil an, um den Akku wieder aufzuladen.
i Durch Anklicken des Icons in der Taskleiste kann
jederzeit der Ladezustand des Akkus abgelesen
werden.
5.6 Touchscreen mit Taststift
Der Touchscreen des DCU 100 wird mit einem Taststift
bedient. Der Taststift hat im Wesentlichen die gleichen
Funktionen wie eine Maus:
R Das einmalige Anklicken mit der linken Maustaste
entspricht z. B. dem einmaligen Antippen eines Icons
oder dem Positionieren des Cursors in einem Eingabefeld.
R Das Antippen und Halten des Taststiftes auf einem
Icon entspricht dem einmaligen Anklicken des Icons
mit der rechten Maustaste.
R Ein Doppelklick mit der linken Maustaste entspricht
einem zweimaligen Antippen des Taststiftes auf dem
Touchscreen. Damit wird z. B. ein Anwendungsprogramm gestartet.
i Hinweise zur Kalibrierung des Touchscreens, siehe
Kapitel 5.8.2.
5.7 Virtuelle Bildschirmtastatur
DCU 100 stellt Ihnen eine virtuelle Tastatur zur Verfügung. Durch Drücken des Icons in der Taskleiste oder
durch Drücken der Funktionstaste ƒ >2 Sekunden wird
die virtuelle Bildschirmtastatur geöffnet beziehungsweise wieder geschlossen.
Die virtuelle Bildschirmtastatur verhält sich wie eine
herkömmliche Tastatur. Die virtuelle Bildschirmtastatur
hat folgende Einstellmöglichkeiten:
Sollen Funktionen aufgerufen werden, für die auf einer
Standardtastatur zwei Tasten gleichzeitig zu betätigen
sind (z. B. <Alt> + <F4>), so sind diese Tasten der virtuellen Bildschirmtastatur nacheinander zu betätigen,
wobei die Sondertasten <Shift>, <Alt> und <Strg> immer zuerst betätigt werden müssen.
! Bedingt durch Unterschiede bei der Programmierung
verschiedenster Software kann nicht gewährleistet
werden, dass die virtuelle Bildschirmtastatur mit
jeder Software zusammenarbeitet.
5.8 Systemeinstellungen
Unter "Start >> Systemsteuerung >> Energieoptionen"
oder durch längeres Drücken des Icons mit dem Taststift können die Energiesparplaneinstellungen und die
Bildschirmhelligkeit verändert werden.
5.8.1 Lautstärkeanpassung
Durch Anklicken des Icons in der Taskleiste mit dem
Taststift kann die Lautstärke des DCU 100 verändert
werden.
5.8.2 Touchscreen kalibrieren
Die Anwendung "HIDeGalaxTouch" dient dazu, die Kalibrierung des Touchscreens in der jeweiligen Ansicht
(horizontal oder vertikal) durchzuführen.
1. Auf dem Touchscreen "HIDeGalaxTouch" mit Doppelklick starten.
2. <4-Punkte Kalibrierung> oder <9-Punkte Linearisie-
rung> wählen.
i Wir empfehlen die 9-Punkte Linearisierung durchzu-
führen, um eine ausreichend hohe Genauigkeit bei
der Kalibrierung des Touchscreens zu erreichen.
3. Kalibrier- oder Linearpunkte mit dem Taststift berüh-
ren und so lange halten bis das OK-Symbol erscheint.
i Um Fehler zu vermeiden, müssen Sie sich mit den
Augen senkrecht über dem Kalibrierpunkt befinden.
Klicken Sie den Kalibrierpunkt möglichst genau an.
4. Nach erfolgter Kalibrierung die Anwendung mit <OK>
beenden.
"Kalibrierung ist beendet.
1 689 989 174 2015-03-25| Robert Bosch GmbH

Bedienung | DCU 100 | 11 de
5.8.3 Windows-Aktualisierung
Um das Arbeiten mit DCU 100 nicht zu behindern,
wurde die automatische Windows-Aktualisierung deaktiviert.
Wird DCU 100 mit Zugang zum Internet betrieben,
spätestens alle 3 Monate eine Windows-Aktualisierung
durchführen, um Sicherheitsupdates zu installieren.
Vorgehensweise:
1. Unter "Start >> Programme >> Windows Update"
die Schaltfläche Nach Updates suchen wählen.
Vorhandene Updates werden angezeigt.
2. Gewünschte Updates installieren.
5.9 Drucken
Sie können einen Drucker (z. B. PDR 377) über die
USB-Schnittstelle von DCU 100 anschließen.
i Hinweise zu Druckertreibern und zur Installation
siehe Hinweise des Druckerherstellers.
i Hinweise zum Drucken finden Sie in der Online-Hilfe
der Bosch-Anwendungen.
5.10 Externes DVD-Laufwerk
i Das externe DVD-Laufwerk ist ein CLASS 1 LASER
PRODUCT.
5.10.1 Anschluss
1. DCU 100 über Netzteil mit Spannung versorgen.
2. DVD-Laufwerk nur über die beiliegende USB-Ver-
bindungsleitung (0,6 m) an einer der beiden USBSchnittstellen (Fig. 2, Pos. 3) am DCU 100 anschließen.
Der Treiber für das DVD-Laufwerk wird automa-
tisch installiert.
"DVD-Laufwerk kann verwendet werden.
i Das DVD-Laufwerk wird über die USB-Verbindungs-
leitung (max. 0,6 m) durch DCU 100 mit Spannung
versorgt. Ein Netzteil darf nicht verwendet werden.
5.10.2 Richtiger Umgang mit DVD-ROMs
¶ Einlegen der DVD-ROM in das DVD-Laufwerk nur mit
sauberen und fettfreien Händen!
¶ Nicht die unbedruckte Seite der DVD berühren.
¶ DVD nicht beschriften und nicht mit Etiketten bekleben.
¶ Zum Reinigen einer verschmutzten DVD niemals Lö-
sungsmittel wie Benzin oder Farbverdünner, Schallplattenreiniger oder Antistatikmittel verwenden.
¶ Fingerabdrücke oder Staub nur vorsichtig mit einem
weichen Tuch von innen nach außen abwischen.
¶ Die DVD keinen hohen Temperaturen oder direkter
Sonnenbestrahlung aussetzen.
5.10.3 Einlegen/Entnehmen der DVD-ROM
1. Mit der Taste "DVD-Auswurf" am DVD-Laufwerk eine
eventuell eingelegte DVD ausfahren und entnehmen.
2. Die DVD mit dem Aufdruck nach oben vorsichtig
einschieben oder einlegen.
5.11 Hinweise bei Störungen
Störung Hinweis
DCU 100 lässt sich nicht einschalten und
die Anzeige bleibt dunkel.
DCU 100 reagiert auf keinen
Tastenbefehl.
Der Mauszeiger wird nach dem Anklicken
mit dem Taststift auf dem Touchscreen
nicht an der gleichen Stelle angezeigt
Die Bedienung ist über Taststift und
Touchscreen nicht mehr möglich.
Probleme beim Verschieben der
ESI[tronic]-Schaltpläne.
Die Kapazität des internen Akkus reicht nicht aus, um DCU 100 zu starten.
Schließen Sie das externe Netzteil an.
1. EIN Taste 10 Sekunden gedrückt halten.
2. DCU 100 erneut einschalten.
Führen Sie dieses Ausschalten nur durch, wenn DCU 100 auf keinen Tastendruck mehr reagiert. Dieser Ausschaltvorgang kann unter Umständen zu Datenverlust auf der Festplatte führen, sofern er während eines regulären Betriebes durchgeführt wird. Daten die innerhalb dieser Diagnoseanwendung erstellt wurden, müssen unter Umständen neu eingegeben werden.
Sie müssen eine Touchscreen-Kalibrierung vornehmen.
Rufen Sie in der Startleiste unter "START >> Programme >> HIDeGalaxTouch" das Menü
"HIDeGalaxTouch" auf, siehe Kap. 5.8.2
Sie müssen eine Touchscreen-Kalibrierung vornehmen. Maus oder Tastatur anschließen.
Rufen Sie in der Startleiste unter "START >> Systemsteuerung" das Menü "HIDeGalax-
Touch" auf, siehe Kap. 5.8.2
Einstellungen der virtuellen Tastatur prüfen. Registerkarte Tools wählen und Menüpunkt
"Options" wählen. Im Feld Choose where to show the Input Panel icons and tab darf nur
die Option Show the icon on the taskbar gewählt sein.
i Das DVD-Laufwerk regelmäßig mit einem Reinigungs-
datenträger für das CD-ROM- oder DVD-Laufwerk
reinigen (siehe auch Kap. 6.1.3).
1 689 989 174 2015-03-25| Robert Bosch GmbH

12 | DCU 100 | Instandhaltungde
Explosionsgefahr bei unsachgemäßem Laden
6. Instandhaltung
6.1 Reinigung
6.1.1 DCU 100
Das Gehäuse und die Anzeige von DCU 100 dürfen nur
mit weichen Tüchern und neutralen Reinigungsmitteln
gesäubert werden. Keine scheuernden Reinigungsmittel
und keine groben Werkstattputzlappen verwenden!
6.1.2 Datenträger
CD-ROM oder DVD-ROM mit einem Datenträger- Reinigungskit reinigen oder wischen Sie die silberne Seite
des Datenträgers vorsichtig mit einem weichen, fusselfreien Baumwolltuch ab. Verwenden Sie kein Papiertuch, da dies Kratzer zur Folge haben kann.
6.1.3 DVD-Laufwerk
Das DVD-Laufwerk regelmäßig mit einem Reinigungsdatenträger für das CD-ROM- oder DVD-Laufwerk reinigen. Diese Reinigungsdatenträger sind in den meisten
Computer- oder Unterhaltungselektronikgeschäften
erhältlich.
6.2 Akkuwechsel
WARNUNG - Explosionsgefahr beim Laden
des Akkus!
des Akkus führt zu Verbrennungen und Verletzungen!
¶ Nur den für DCU 100 vorgeschriebenen
Akku verwenden.
¶ Nur das für DCU 100 vorgeschriebene
Netzteil verwenden.
¶ Hinweise zur Entsorgung beachten.
¶ Akku nicht erhitzen, verbrennen, kurz-
schließen, mechanisch beschädigen und
nicht mit überhöhten Strömen laden bzw.
umgepolt laden!
¶ Geeignete Löschmittel: Wasser, CO
Sand.
,
2
i Wir empfehlen, die Akkus mindestens drei Stunden
zu laden, bevor DCU 100 im Akkubetrieb eingesetzt
wird.
6.3 Recovery-Prozess
! Alle Daten und Anwendungen auf der Festplatte wer-
den während des Recovery-Prozesses gelöscht!
1. DCU 100 mit Netzteil verbinden.
2. DCU 100 einschalten.
3. Externes DVD-Laufwerk über USB-Verbindungslei-
tung (0,6m) an DCU 100 anschließen.
4. Recovery DVD 1 687 005 100 in DVD-Laufwerk einlegen.
5. Windows neu starten mit “START >> NEU STARTEN“.
Windows wird gestartet.
6. Dialogfenster ”Would you really want to re-
cover your System? WARNING! ALL DATA ON
HARD DISK DRIVE C: WILL BE LOST. Please
be patient while recovery process is
running.“ mit <Yes> bestätigen.
DCU 100 Recovery wird gestartet – Dauer ca.
25Minuten.
Nach erfolgtem Recovery Vorgang startet Win-
dows neu
Dialogfenster ”Please remove the recovery
media from the device and click "OK"
to reboot the computer" erscheint.
7. Recovery-DVD aus dem DVD-Laufwerk entnehmen.
8. Das externe DVD-Laufwerk entfernen.
9. Mit <OK< bestätigen.
"Recovery-Prozess beendet.
i Installieren Sie anschließend ESI[tronic] 2.0 neu.
6.4 Ersatz- und Verschleißteile
1. DCU 100 ausschalten.
2. Schrauben am Akku auf der Rückseite von DCU 100
lösen (siehe Fig. 3, Pos. 3).
3. Akku entfernen.
4. Neuen Akku ins Akkufach einschieben und mit den
zwei am Akku befindlichen Schrauben befestigen
(siehe Fig.3, Pos. 3).
5. DCU 100 einschalten.
i Die Akku-Ladeanzeige kann über das Icon abge-
fragt werden.
"Die Akku-Ladeanzeige zeigt auf einer Skala von 0 % bis
100 % den aktuellen Akku-Ladestand an.
1 689 989 174 2015-03-25| Robert Bosch GmbH
Bezeichnung Bestellnummer
DCU 100 Tablet-PC (grün) 1 687 023 687
DCU 100 Tablet-PC (anthrazit) 1 687 023 688
<)
Akku
Externes DVD-ROM-Laufwerk 1 687 023 698
Netzteil 1 687 023 697
Netzanschlussleitung 1 684 461 186
Touchstift (3 Stück) 1 687 010 403
<)
Verschleißteil
1 687 335 042

Außerbetriebnahme | DCU 100 | 13 de
7. Außerbetriebnahme
7.1 Ortswechsel
¶ Bei Weitergabe von DCU 100 die im Lieferumfang vor-
handene Dokumentation vollständig mit übergeben.
¶ DCU 100 nur in Originalverpackung oder gleichwerti-
ger Verpackung transportieren.
¶ Hinweise zur Erstinbetriebnahme beachten.
¶ Elektrischen Anschluss trennen.
7.2 Entsorgung und Verschrottung
1. DCU 100 vom Stromnetz trennen und Netzanschlussleitung entfernen.
2. DCU 100 zerlegen, nach Material sortieren und gemäß den geltenden Vorschriften entsorgen.
DCU 100 unterliegt der europäischen Richtlinie 2012/19/EU (WEEE).
Elektro- und Elektronik-Altgeräte einschließlich Leitungen und Zubehör sowie Akkus und
Batterien müssen getrennt vom Hausmüll
entsorgt werden.
¶ Nutzen Sie zur Entsorgung die zur Verfügung
stehenden Rückgabesysteme und Sammelsysteme.
¶ Mit der ordnungsgemäßen Entsorgung von
DCU 100 vermeiden Sie Umweltschäden
und eine Gefährdung der persönlichen
Gesundheit.
8. Technische Daten
8.1 Temperatur und Luftfeuchtigkeit
Benennung Wert/Bereich
Betriebstemperatur 5 °C – 40 °C
Lagertemperatur -20 °C – 60 °C
Relative Betriebsluftfeuchtigkeit 20 – 80 % nicht
8.2 DCU 100
Eigenschaft Wert/Bereich
Anzeige 10“ TFT, WXGA
Arbeitsspeicher 2 GB DDR3 RAM
Festplatte 320 GB
WLAN WLAN 802.11 b/g/n
Bluetooth Bluetooth 2.1
Netzteil 12 V
Akku (Li-Ionen) 7,4 V/ 5200 mAh
Abmessungen (B x H x T) 361 x 222 x 49 mm
Gewicht mit Akku,
ohne Netzteil
Schutzart IP 40
8.3 Netzteil
41 °F – 104 °F
-4 °F – 140 °F
kondensierend
(1024 x 600 Pixel)
Class 1
14.2 x 8.7 x 1.9 inch
2,1 kg
4.6 lb
Eigenschaft Wert/Bereich
Eingangsspannung (AC) 100 - 240 VAC
Frequenz 50 – 60 Hz
Eingangsstrom 2,0 A
Ausgangsspannung (DC) 12 V
Ausgangsstrom max. 5.0 A
8.4 Bluetooth Class 1
Funkverbindung Mindest-Reichweite
Werkstattumgebung im Freifeld 30 m
Bei offener Fahrzeugtür oder offe-
nem Fahrzeugfenster und laufendem
Motor im Fahrzeuginnenraum
10 m
1 689 989 174 2015-03-25| Robert Bosch GmbH

14 | DCU 100 | en
Contents English
1. Symbols used 15
1.1 In the documentation 15
1.1.1 Warning notices -
Structure and meaning 15
1.1.2 Symbols in this documentation 15
1.2 On the product 15
2. User information 15
2.1 Important notes 15
2.2 Safety instructions 15
2.3 Electromagnetic compatibility (EMC) 15
2.4 R&TTE Directive 15
2.5 Wireless link 16
2.5.1 Important information on
WLAN and Bluetooth 16
2.5.2 Notes on access point (WLAN) 16
3. Product description 17
3.1 Intended use 17
3.2 Scope of delivery 17
3.3 Transportation 17
3.4 Description of device 17
3.4.1 Interfaces 17
3.4.2 Functions of On/Off button
with LED 18
3.4.3 Function key ƒ 18
3.5 Touch screen 18
3.6 External DVD drive 18
4. Commissioning 19
4.1 Fitting battery 19
4.2 Connection 19
4.3 Operating system configuration 19
4.4 Software installation 19
5. Operation 19
5.1 Switch-on 19
5.2 Switch-off 19
5.3 Setting power options 19
5.4 Power supply 20
5.5 Battery operation 20
5.6 Touch screen with pen 20
5.7 Virtual screen keypad 20
5.8 System settings 20
5.8.1 Volume adjustment 20
5.8.2 Calibrating touch screen 20
5.8.3 Windows update 21
5.9 Printing 21
5.10 External DVD drive 21
5.10.1 Connection 21
5.10.2 Correct handling of DVD-ROMs 21
5.10.3 Inserting/removing DVD-ROM 21
5.11 Faults 21
6. Maintenance 22
6.1 Cleaning 22
6.1.1 DCU 100 22
6.1.2 Data carrier 22
6.1.3 DVD drive 22
6.2 Battery replacement 22
6.3 Recovery process 22
6.4 Spare and wearing parts 22
7. Decommissioning 23
7.1 Change of location 23
7.2 Disposal and scrapping 23
8. Technical data 23
8.1 Temperature and humidity 23
8.2 DCU 100 23
8.3 Power supply unit 23
8.4 Bluetooth Class 1 23
1 689 989 174 2015-03-25| Robert Bosch GmbH
Symbols used | DCU 100 | 15 en
1. Symbols used
1.1 In the documentation
1.1.1 Warning notices - Structure and meaning
Warning notices warn of dangers to the user or people
in the vicinity. Warning notices also indicate the consequences of the hazard as well as preventive action.
Warning notices have the following structure:
Warning
symbol
The key word indicates the likelihood of occurrence and
the severity of the hazard in the event of non-observance:
Key word Probability of
DANGER Immediate impend-
WARNING Possible impending
CAUTION Possible dangerous
1.1.2 Symbols in this documentation
Symbol Designation Explanation
!
i
1.
2.
e
"
KEY WORD – Nature and source of hazard!
Consequences of hazard in the event of failure to observe action and information given.
¶ Hazard prevention action and information.
occurrence
ing danger
danger
situation
Attention Warns about possible property damage.
Information Practical hints and other
Multi-step
operation
One-step
operation
Intermediate
result
Final result There is a visible final result on com-
useful information.
Instruction consisting of several steps.
Instruction consisting of one step.
An instruction produces a visible intermediate result.
pletion of the instruction.
Severity of danger if instructions not observed
Death or severe injury
Death or severe injury
Minor injury
2. User information
2.1 Important notes
Important information on copyright, liability and warranty provisions, as well as on equipment users and company obligations, can be found in the separate manual
"Important notes on and safety instructions for Bosch
Test Equipment". These instructions must be carefully
studied prior to start-up, connection and operation of
the DCU 100 and must always be heeded.
2.2 Safety instructions
All the pertinent safety instructions can be found in
the separate manual "Important notes on and safety
instructions for Bosch Test Equipment". These instructions must be carefully studied prior to start-up, connection and operation of the DCU 100 and must always
be heeded.
2.3 Electromagnetic compatibility (EMC)
The DCU 100 satisfies the requirements of the EMC
directive 2014/30/EU.
The DCU 100 is a class B product as per EN 55 020.
2.4 R&TTE Directive
The DCU 100 is a class2 wireless device (R&TTE
1999/55/EC) approved for use in Europe. In France, use
of the DCU 100 is only permissible indoors.
i In non-European countries the corresponding nation-
al regulations on the operation of wireless devices
in the 2.4 GHz frequency band must be heeded (e.g.
WLAN or Bluetooth).
1.2 On the product
! Observe all warning notices on products and ensure
they remain legible.
CAUTION – Risk of injury from triggering of
airbag with DCU 100 hanging from steering
wheel.
If the DCU 100 is attached to (suspended
from) the steering wheel, injuries could result from unintentional airbag triggering.
¶ Never attach the DCU 100 to the steering
wheel.
1 689 989 174 2015-03-25| Robert Bosch GmbH

16 | DCU 100 | User informationen
2.5 Wireless link
! DCU 100 users are responsible for compliance with
the applicable directives and restrictions in the
country concerned.
2.5.1 Important information on WLAN and Bluetooth
WLAN (Wireless Local Area Network) is the term used
to describe a wireless local network. Like Bluetooth,
WLAN provides a wireless link on the free 2.4 GHz ISM
band (ISM: Industrial, Scientific, Medical). This frequency range is subject to state legislation, can however be
used without a license in most countries. Consequently
a large number of applications and devices employ this
frequency band for transmission. This can result in frequency interference.
Depending on ambient conditions, the WLAN link may
therefore deteriorate, e.g. in the case of Bluetooth links,
cordless telephones, radio-controlled thermometers,
radio-controlled garage door openers, radio-controlled
light switches or radio-controlled alarm systems.
i Extreme caution is to be taken if wearing pacemak-
ers or other vital electronic devices when using wireless systems, as proper functioning of these items
could be impaired.
Pay attention to the following to ensure the best possible connection:
R The WLAN signal always tries to find the most direct
path. When setting up the PC/Laptop and access
point (see Sec.2.5.2), make sure there are as few
obstacles as possible (e.g. steel doors and concrete
walls) which could interfere with the signal from and
to the DCU 100.
R Inside buildings, the range of the WLAN is also great-
ly influenced by the construction materials used.
Conventional masonry, wooden walls and various
types of dry construction wall scarcely impair the
propagation of radio waves. Thin gypsum walls are
however problematic, as considerable amounts of
moisture may accumulate in the gypsum and result
in the absorption of radio signals. Metal walls and
concrete (in particular reinforced concrete) largely block out radio waves. Cellar ceilings are often
impenetrable. Generally speaking, walls with a lot
of installed metal (e.g. pipes, wires) obstruct radio
waves.
R Radio reception is also impeded by large metal
objects such as radiators and window frames as well
as active sources of interference such as radio telephones, motion detectors and microwave ovens.
R Human beings are also an obstacle to wireless trans-
mission. It must therefore always be ensured that
no-one stands between the transmitter and receiver.
R We advise having the network infrastructure installed
and maintained by a network specialist.
R Keep the SSID and the codes for the wireless link
in a safe place. Make sure these data are readily to
hand in case faults occur.
R We recommend a thorough inspection of the premis-
es on commissioning: Establish where in the building
the DCU 100 works properly and where the operating limits are.
R If the DCU 100 is used inside a vehicle (Faraday
cage), wireless communication may be severely
impeded.
R The wireless link is affected by weather conditions.
The reception signal may therefore vary.
R Please contact your network specialist for any que-
ries.
2.5.2 Notes on access point (WLAN)
An access point is an electronic device which acts as
an interface between a wireless network and a cable-connected computer network. It provides a wireless
connection between the DCU 100, the PC/Laptop and
a printer.
i We recommend using WLAN standard IEEE 802.11n
(data transmission rate max. 600 Mbps) for the
access point. The "extended range" function is not
supported.
i The WLAN configuration always depends on the con-
figuration of the access point available.
Heed the following:
R The access point should be located as centrally and
high up as possible, ideally under the ceiling. The
access point is not to be installed behind any metallic objects, such as radiators or in a metal switch
cabinet.
R If there is only one access point antenna, this should
face downwards towards the floor. If an access point
has several antennas, these should be in three-dimensional arrangement.
R The best and highest transmission rates are always
achieved if there is visual contact between the
DCU 100 and the access point.
R In the event of a weak link it may be useful to change
the channel set on the access point. Where possible
avoid employing channels adjacent to those already
in use.
R It is advisable to configure wireless communication
encoding at the access point.
1 689 989 174 2015-03-25| Robert Bosch GmbH

Product description | DCU 100 | 17 en
3. Product description
3.1 Intended use
DCU 100 is a tablet PC for the workshop area for the
Bosch diagnostic software "ESI[tronic] 2.0" or the
Bosch emission analysis software "BEA-PC".
! If ESI[tronic]2.0 and BEA-PC are installed on DCU 100,
then it is always the case that only one of the two programs can be opened.
This means that ESI[tronic] 2.0 must be closed before
BEA-PC can be started (and vice-versa).
! The installation of additional software on the
DCU 100 may impair the performance of the DCU 100
system and the DCU 100 may become slower in general. In particular this can occur with virus scanner
programs.
! The DCU 100 must not be exposed to sources of
heat (e.g. direct sunlight), impact, vibration, magnetic fields, and excessive contamination.
i The installed operating system is
Windows Embedded POSReady 7 (32-bit).
! You will find the "END-USER LICENSE AGREEMENT
(EULA) FOR MICROSOFT SOFTWARE" (EULA.XPS)
on the Desktop. Please observe the notes contained
herein.
3.2 Scope of delivery
3.4 Description of device
The DCU 100 is a portable, mobile tablet PC for workshop use. It is operated by means of a pen (for the
LCD touch screen) and a virtual keypad. The data and
measured values can be printed out by way of the USB
interface on an external printer (special accessory). The
DCU 100 and the accessories are supplied in a protective case.
1
459953-02_Ko
Fig. 1: DCU 100
1 LCD with touch screen
2 Interfaces
3 Function key �
4 On/Off button
2
4
3
Designation Order number
DCU 100 –
Battery 1 687 335 042
External DVD ROM drive with
USB connecting cable (0.6 m)
Case 1 685 438 649
Power supply unit with
power cord
Touch pen (1x)
Recovery DVD 1 687 005 100
Original operating instructions 1 689 989 174
1 687 023 698
1 687 023 697
1 684 461 186
–
3.3 Transportation
The DCU 100 connecting cables must be detached for
transportation purposes. In addition, the DCU 100 is
only to be transported and stored in the case supplied.
Furthermore, the DVD drive should be stored and transported in its original packaging in the case.
3.4.1 Interfaces
2
1
5
4
3
6
7
Fig. 2: View of DCU 100 interfaces
1 RJ-45 network connection (LAN)
2 Monitor connection
3 USB port (2x), USB 2.0, max. 1 A
4 Memory card slot (SD card)
5 Headphone connection
6 Power supply unit connection (12 V DC)
7 Pen holder
459953-01_Ko
1 689 989 174 2015-03-25| Robert Bosch GmbH
18 | DCU 100 | Product descriptionen
2
1
459953-03_Ko
3
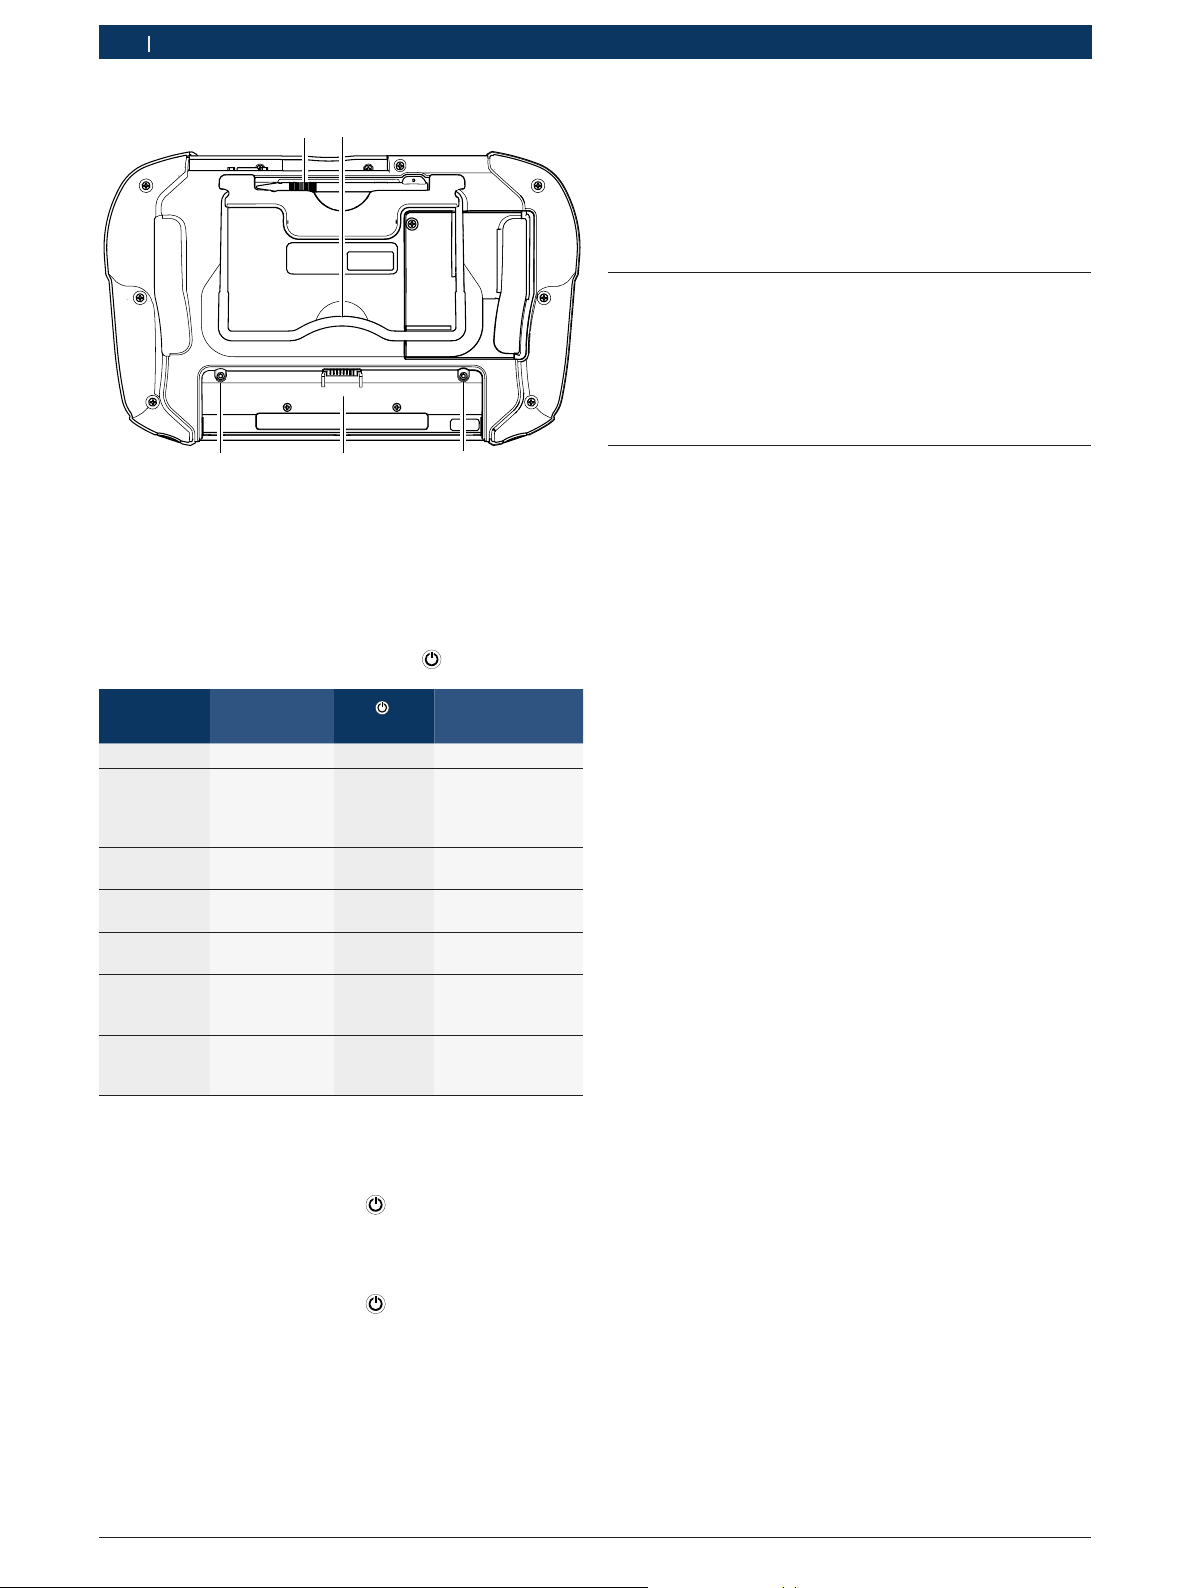
Fig. 3: Underside of DCU 100
1 Pen
2 Stand
3 Battery fastening sleeves
4 Battery compartment
4
3
3.4.2 Functions of On/Off button with LED
3.4.3 Function key ƒ
Pressing the function key ƒ opens or closes the start
menu and task bar of WIN 7 as applicable.
i Pressing the function key ƒ for >2 seconds opens or
closes the virtual keypad as applicable.
3.5 Touch screen
The touch screen can be operated by hand or using a
pen. To implement an action, touch the appropriate
point on the touch screen with a finger or pen.
i Touch screen calibration is described in Sec.5.8.2.
3.6 External DVD drive
Operation of the DVD drive is described in Sec.5.11.
DCU 100 Power supply
Off Not connected Off –
Off Connected
On and LCD onConnected Off Battery being
On and LCD
off
On and LCD
off
On, LCD off,
in energy
saving mode
On, LCD off,
in energy
saving mode
unit
Not connected Green light
Not connected
Not connected Flashing
Not connected Flashing
LED
Green light
Yellow light
Flashing
red
green
red
Status
Battery charge
≥80%
Battery charge
<80%
charged
Battery charge
≥10%
Battery charge
<10%
Battery charge
≥10%
Battery charge
<10%
i Briefly pressing the On/Off button sets the DCU 100 to
standby mode or ends standby mode as applicable.
i Pressing the On/Off button for >2 seconds shuts
down the Windows operating system and switches
off the DCU 100.
i Pressing the On/Off button for >12 seconds
switches off the DCU 100 without first shutting
down the operating system. This mode should only
be used if shutdown of the Windows operating system is not possible.
1 689 989 174 2015-03-25| Robert Bosch GmbH

Commissioning | DCU 100 | 19 en
4. Commissioning
¶ Remove the DCU 100, the battery, the power supply
unit with power cord and the DVD drive with USB
connecting cable from the case.
4.1 Fitting battery
¶ Insert the battery in the battery compartment and
secure by means of the two screws on the battery
(see Fig.3, Pos. 3).
i It is advisable to charge the battery for at least three
hours before running the DCU 100 off the battery.
4.2 Connection
Prior to commissioning, make sure the mains voltage
coincides with the voltage specified on the power
supply unit (use the power cord provided).
4.3 Operating system configuration
1. Supply the DCU 100 with power by way of the power
supply unit.
2. Switch on the DCU 100.
3. After switching on for the first time, use the
language selection menu to select the Windows
operating system language and follow the instructions on the screen.
i There is no provision for subsequent alteration of
the Windows operating system language. Should
this nevertheless become necessary, the language
selection menu can be re-started under "Start >> All
Programs >> Tools >> Localization".
4.4 Software installation
i During a software installation always supply the
DCU 100 with voltage via the power supply unit.
i See the installation instructions provided with the
respective software for additional information concerning installation and update of the software.
5. Operation
5.1 Switch-on
! To avoid the formation of condensation, allow the
DCU 100 to adjust to ambient temperature before
switching on the DCU 100.
1. Switch on the DCU 100 by pressing the On/Off
button .
Following run-up of the Windows operating
system the start mask appears.
2. Use the pen to touch the application required.
CAUTION – Risk of injury from triggering of
airbag with DCU 100 hanging from steering
wheel.
If the DCU 100 is attached to (suspended
from) the steering wheel, injuries could result from unintentional airbag triggering.
¶ Never attach the DCU 100 to the steering
wheel.
5.2 Switch-off
1. Press the function key ƒ.
The start menu and task bar are opened.
2. Select <Shutdown> in the start menu.
Windows is shut down.
"The DCU 100 is switched off.
i Pressing the On/Off button for >2 seconds shuts
down the Windows operating system and switches
off the DCU 100.
i Pressing the On/Off button for >12 seconds
switches off the DCU 100 without first shutting
down the operating system. This mode should only
be used if shutdown of the Windows operating system is not possible.
5.3 Setting power options
The menu "Start >> Control panel >> Power options"
can be used to select and alter the power saver plan
(e.g. the monitor switch-off time or the display brightness setting).
1 689 989 174 2015-03-25| Robert Bosch GmbH

20 | DCU 100 | Operationen
5.4 Power supply
The DCU 100 can be operated from the following power
sources:
R Battery
R Power supply unit
! Only use the power supply unit included in the
scope of delivery.
5.5 Battery operation
The DCU 100 has a battery for supplying the DCU 100
with power.
i The battery is charged automatically during mains
operation.
The fully charged battery of the DCU 100 is designed to
guarantee approx. 2 hours of independent operation.
i The LED of the On/Off button flashing red if the
battery charge is less than 10 %. The power supply
unit is then to be connected to enable the battery to
be re-charged.
5.7 Virtual screen keypad
The DCU 100 features a virtual keypad. Pressing the
icon in the task bar or pressing the function key ƒ for
>2 seconds opens or closes the virtual screen keypad
as applicable.
The virtual screen keypad functions in the same way as
a conventional keypad. The following setting options
are available:
If calling up a function on a standard keypad would
involve pressing two keys simultaneously (e.g. <Alt> +
<F4>), these keys are to be pressed consecutively on
the virtual screen keypad. The special keys <Shift>,
<Alt> and <Ctrl> must always be pressed first.
! On account of software programming differences, it
cannot be guaranteed that the virtual screen keypad
will work with every type of software.
5.8 System settings
The power saver plan settings and the screen brightness can be altered under "Start >> Control panel >>
Power options" or by sustained pressing of the icon
with the pen.
i The battery charge can be viewed at any time by
clicking onto the icon in the task bar.
5.6 Touch screen with pen
The touch screen of the DCU 100 is operated with a
pen which basically has the same functions as a mouse.
R A single click with the left mouse key corresponds to
a single touch on an icon for example, or positioning
of the cursor in an input box.
R Touching an icon with the pen and holding it in this
position corresponds to a single click on the icon
with the right mouse key.
R A double click with the left mouse key corresponds
to touching the touch screen twice with the pen.
This is used to start an application program for
example.
i For notes on touch screen calibration see Sec.5.8.2.
5.8.1 Volume adjustment
The volume of the DCU 100 can be adjusted by clicking
on to the icon in the task bar.
5.8.2 Calibrating touch screen
The purpose of the "HIDeGalaxTouch" application is to
calibrate the touch screen in the view concerned (horizontal or vertical).
1. Start "HIDeGalaxTouch" with a double click on the
touch screen.
2. Select <4-point calibration> or <9-point lineariza-
tion>.
i We recommend 9-point linearization in order to
achieve sufficiently accurate calibration of the touch
screen.
3. Touch calibration or linear points with the pen and
hold until the OK symbol appears.
i To avoid errors, the line of vision must be vertically
above the calibration point. Click onto the calibration point as accurately as possible.
4. On completion of calibration, end the application
with <OK>.
"This completes calibration.
1 689 989 174 2015-03-25| Robert Bosch GmbH

Operation | DCU 100 | 21 en
5.8.3 Windows update
To avoid disturbance when working with the DCU 100,
the automatic Windows updating function is deactivated.
If the DCU 100 is operated with internet access, Windows updating should be performed every 3 months at
the latest to install security updates.
Procedure:
1. Under "Start >> Programs >> Windows Update"
select the button Search for updates.
Available updates are displayed.
2. Install the desired updates.
5.9 Printing
A printer (e.g. PDR 377) can be connected by way of
the USB interface of the DCU 100.
i Refer to the printer manufacturer's information for
details of printer drivers and installation.
i Information on printing can be found in the Online
Help for the Bosch applications.
5.10 External DVD drive
5.10.1 Connection
1. Supply the DCU 100 with power by way of the power
supply unit.
2. Use only the USB connecting cable provided to connect the DVD drive to one of the two USB interfaces
(Fig. 2, Pos. 3) on the DCU 100.
The driver for the DVD drive is installed automatically.
"The DVD drive can be used.
i The DVD drive is supplied with power by the
DCU 100 via the USB connecting cable (max. 0.6 m).
Use is not to be made of a power supply unit.
5.10.2 Correct handling of DVD-ROMs
¶ Make sure hands are clean and not greasy when
inserting the DVD-ROM in the DVD drive.
¶ Never touch the unlabeled side of the DVD.
¶ Never write on the DVD or affix labels.
¶ Never use solvents such as spirit or paint thinners, re-
cord cleaners or anti-static agents to clean a soiled DVD.
¶ Carefully wipe off any finger marks or dust with a
soft cloth working outwards from the center.
¶ Never expose DVDs to high temperatures or direct
sunlight.
i The external DVD drive is a CLASS 1 LASER PRODUCT.
5.11 Faults
Problem Note
The DCU 100 cannot be switched on
and the display remains blank.
The DCU 100 does not react to
any key commands.
After clicking onto the touch screen
with the pen, the mouse pointer does
not appear at the same location.
Operation by way of pen and touch
screen is no longer possible.
Problems when moving the ESI[tronic]
circuit diagrams.
The capacity of the internal battery is not sufficient to start the DCU 100.
Connect the external power supply unit.
1. Keep the ON button pressed for 10 seconds.
2. Switch on the DCU 100 again.
This switch-off procedure is only to be employed if the DCU 100 will not react to any key
being pressed, as it may result in loss of data on the hard disk if it is implemented during
regular operation. Data created in the course of this diagnostic application may have to be
entered again.
Touch screen calibration must be performed. Connect the mouse or keypad.
In the start bar under "START >> Programs >> HIDeGalaxTouch", call up the menu
"HIDeGalaxTouch", see Sec.5.8.2
Touch screen calibration must be performed. Connect mouse or keyboard.
In the start bar under "START >> Control panel", call up the menu "HIDeGalaxTouch", see
Sec.5.8.2
Check the virtual keypad settings. Select the Tools tab and then the menu item "Options".
In the Choose where to show the Input Panel icons and tab field, only the option Show the
icon on the taskbar should be selected.
5.10.3 Inserting/removing DVD-ROM
1. Press the "DVD eject" button on the DVD drive to
eject and remove any DVD inserted.
2. Carefully insert the DVD with the labeled side facing
upwards.
i Clean the DVD drive at regular intervals with a cleaning
disk for the CD-ROM or DVD drive (see also Sec.6.1.3).
1 689 989 174 2015-03-25| Robert Bosch GmbH
22 | DCU 100 | Maintenanceen
Risk of explosion and hence burns and injury
6. Maintenance
6.1 Cleaning
6.1.1 DCU 100
Only use a soft cloth and neutral detergents to clean
the housing and display of the DCU 100. Do not use
abrasive cleaning agents and coarse workshop cloths.
6.1.2 Data carrier
Clean the CD-ROM or DVD-ROM with a disk cleaning kit
or carefully wipe over the silver side of the disk with a
soft, lint-free cotton cloth. Never use paper towels, as
these could cause scratches.
6.1.3 DVD drive
Clean the DVD drive at regular intervals with a cleaning
disk for the CD-ROM or DVD drive. The appropriate
cleaning disks are available from most computer or
entertainment electronics shops.
6.2 Battery replacement
WARNING - Risk of explosion on charging
battery!
in the event of inexpert charging of the
battery.
¶ Only use the battery specified for the
DCU 100.
¶ Only use the power supply unit specified
for the DCU 100.
¶ Heed the notes on disposal.
¶ Batteries are not to be heated, burnt,
short-circuited, mechanically damaged or
charged with excessively high currents or
reverse polarity.
¶ Suitable extinguishing agents: Water, CO
sand.
1. Switch off the DCU 100.
2. Slacken off the battery screws on the back of the
DCU 100 (see Fig. 3, Pos. 3).
3. Remove the battery.
4. Insert the new battery in the battery compartment
and secure by means of the two screws on the battery (see Fig.3, Pos. 3).
5. Switch on the DCU 100.
6.3 Recovery process
! All data and applications on the hard disk will be
erased during the recovery process!
1. Connect the DCU 100 to the power supply unit.
2. Switch on the DCU 100.
3. Connect the external DVD drive to the DCU 100 by
way of the USB connecting cable (0.6 m).
4. Insert the recovery DVD 1 687 005 082 in the DVD
drive.
5. Re-start Windows with "START >> RE-START".
Windows is started.
6. Confirm the dialog window ”Would you really
want to recover your System? WARNING!
ALL DATA ON HARD DISK DRIVE C: WILL BE
LOST. Please be patient while recovery
process is running." with <Yes>.
DCU 100 recovery is started – duration approx.
25minutes.
Windows is re-started on completion of recovery
The dialog window ”Please remove the re-
covery media from the device and
click "OK" to reboot the computer"
appears.
7. Take the recovery DVD out of the DVD drive.
8. Remove the external DVD drive.
9. Confirm with <OK>.
"This completes the recovery process.
i Then re-install ESI[tronic] 2.0.
6.4 Spare and wearing parts
,
2
Designation Order number
DCU 100 tablet PC (green) 1 687 023 687
DCU 100 tablet PC (anthracite) 1 687 023 688
<)
Battery
External DVD-ROM drive 1 687 023 698
Power supply unit 1 687 023 697
Power cord 1 684 461 186
Touch pen (3x) 1 687 010 403
<)
Wearing part
1 687 335 042
i The battery charge indicator can be called up using
the icon.
"The battery charge indicator shows the current battery
charge on a scale of 0 to 100 %.
i It is advisable to charge the battery for at least three
hours before running the DCU 100 off the battery.
1 689 989 174 2015-03-25| Robert Bosch GmbH
Decommissioning | DCU 100 | 23 en
Make use of the local return and collection
7. Decommissioning
7.1 Change of location
¶ If the DCU 100 is passed on, all the documentation
included in the scope of delivery must be handed over
together with the unit.
¶ The DCU 100 is only ever to be transported in the
original or equivalent packaging.
¶ Unplug the electrical connection.
¶ Heed the notes on initial commissioning.
7.2 Disposal and scrapping
1. Disconnect the DCU 100 from the mains and detach
the power cord.
2. Dismantle the DCU 100 and sort out and dispose of
the different materials in accordance with the applicable regulations.
The DCU 100 is subject to the European
directive 2002/96/EC (WEEE).
Dispose of used electrical and electronic
devices, including cables, accessories and
batteries, separately from household waste.
systems for disposal.
¶ Proper disposal of DCU 100 prevents en-
vironmental pollution and possible health
hazards.
8. Technical data
8.1 Temperature and humidity
Designation Value/Range
Operating temperature 5 °C – 40 °C
Storage temperature -20 °C – 60 °C
Relative humidity in operation 20 – 80 % non-condens-
8.2 DCU 100
Properties Value/Range
Display 10“ TFT, WXGA
Main memory 2 GB DDR3 RAM
Hard disk 320 GB
WLAN WLAN 802.11 b/g/n
Bluetooth Bluetooth 2.1
Power supply unit 12 V
Battery (Li-ion) 7,4 V/ 5200 mAh
Dimensions (W x H x D) 361 x 222 x 49 mm
Weight with battery,
without power supply unit
Degree of protection IP 40
41 °F – 104 °F
-4 °F – 140 °F
ing
(1024 x 600 Pixel)
Class 1
14.2 x 8.7 x 1.9 inch
2,1 kg
4.6 lb
8.3 Power supply unit
Properties Value/Range
Input voltage (AC) 100 - 240 VAC
Frequency 50 – 60 Hz
Input current 2,0 A
Output voltage (DC) 12 V
Max. output current 5.0 A
8.4 Bluetooth Class 1
Wireless link Minimum range
Free field workshop environment 30 m
In passenger compartment,
with vehicle door or window open
and engine running
10 m
1 689 989 174 2015-03-25| Robert Bosch GmbH

24 | DCU 100 | fr
Sommaire français
1. Symboles utilisés 25
1.1 Dans la documentation 25
1.1.1 Avertissements –
Conception etsignification 25
1.1.2 Symboles – désignation etsignificationxxx 25
1.2 Sur le produit 25
2. Consignes d'utilisation 25
2.1 Remarques importantes 25
2.2 Consignes de sécurité 25
2.3 Compatibilité électromagnétique (CEM) 25
2.4 Directive R&TTE 25
2.5 Liaison radio sans fil 26
2.5.1 Informations importantes sur
WLAN et Bluetooth 26
2.5.2 Remarques relatives à
la borne d’accès (WLAN) 26
3. Description du produit 27
3.1 Utilisation conforme 27
3.2 Fournitures 27
3.3 Transport 27
3.4 Description de l'appareil 27
3.4.1 Ports 27
3.4.2 Fonction de
la touche Marche/Arrêt avec LED 28
3.4.3 Touche de fonction ƒ 28
3.5 Écran tactile 28
3.6 Lecteur de DVD externe 28
4. Première mise en service 29
4.1 Mettre l’accu en place 29
4.2 Raccordement 29
4.3 Configuration du système d’exploitation 29
4.4 Installation du logiciel 29
5. Utilisation 29
5.1 Mise en marche 29
5.2 Mise à l’arrêt 29
5.3 Réglage des options d'alimentation 29
5.4 Alimentation en tension 30
5.5 Fonctionnement sur accu 30
5.6 Écran tactile avec stylet 30
5.7 Clavier virtuel 30
5.8 Réglages du système 30
5.8.1 Adaptation du volume sonore 30
5.8.2 Calibrer l'écran tactile 30
5.8.3 Mise à jour de Windows 30
5.9 Impression 31
5.10 Lecteur de DVD externe 31
5.10.1 Raccordement 31
5.10.2 Bonne utilisation des DVD-ROM 31
5.10.3 Insertion/retrait du DVD-ROM 31
5.11 Remarques en cas de défauts 31
6. Maintenance 32
6.1 Nettoyage 32
6.1.1 DCU 100 32
6.1.2 Supports de données 32
6.1.3 Lecteur de DVD 32
6.2 Remplacement de l'accu 32
6.3 Processus de récupération 32
6.4 Pièces de rechange et d'usure 32
7. Mise hors service 33
7.1 Déplacement 33
7.2 Elimination et mise au rebut 33
8. Caractéristiques techniques 33
8.1 Température et humidité de l’air 33
8.2 DCU 100 33
8.3 Bloc d'alimentation 33
8.4 Bluetooth Class 1 33
1 689 989 174 2015-03-25| Robert Bosch GmbH
Symboles utilisés | DCU 100 | 25 fr
1. Symboles utilisés
1.1 Dans la documentation
1.1.1 Avertissements – Conception etsignification
Les avertissements mettent en garde contre les dangers
pour l’utilisateur et les personnes présentes à proximité.
En outre, les avertissements décrivent les conséquences
du danger et les mesures préventives. La structure des
avertissements est la suivante :
Symbole
d’avertissement
Le mot clé indique la probabilité de survenue ainsi que
la gravité du danger en cas de non-observation :
Mot clé Probabilité
DANGER Danger direct Mort ou blessure
AVERTISSEMENT Danger potentiel Mort ou blessure
PRUDENCE Situation potentiel-
1.1.2 Symboles – désignation etsignificationxxx
Symbole Désignation Signification
!
i
1.
2.
e
"
MOT CLÉ - Nature et source du danger!
Conséquences du danger en cas de nonobservation des mesures et indications.
¶ Mesures et indications pour la pré-
vention du danger.
de survenue
lement dangereuse
Attention Signale des dommages matériels
Information Consignes d'utilisation et autres
Procédure à plusieurs étapes
Procédure à une
étape
Résultat intermédiaire
Résultat final Le résultat final est présenté à la
potentiels.
informations utiles.
Instruction d'exécution d’une opé-
ration comportant plusieurs étapes.
Instruction d'exécution d’une opé-
ration comportant une seule étape.
Un résultat intermédiaire est vi-
sible au cours d’une procédure.
fin de la procédure.
Gravité du danger en
cas de non-observation
corporelle grave
corporelle grave
Blessure corporelle
légère
2. Consignes d'utilisation
2.1 Remarques importantes
Vous trouverez des remarques importantes sur ce qui a
été convenu en matière de droits d'auteur, de responsabilité et de garantie, sur le groupe d'utilisateurs et les
obligations incombant à l'entrepreneur, dans le manuel
séparé "Remarques importantes et consignes de sécurité pour Bosch Test Equipment". Avant la mise en service, le raccordement et l'utilisation du DCU 100 il est
impératif de lire et d'appliquer ces consignes.
2.2 Consignes de sécurité
Vous trouverez toutes les consignes de sécurité dans le
manuel séparé "Remarques importantes et consignes
de sécurité pour Bosch Test Equipment". Avant la mise
en service, le raccordement et l'utilisation du DCU 100
il est impératif de lire et d'appliquer ces remarques.
2.3 Compatibilité électromagnétique (CEM)
Le DCU 100 est conforme aux critères de la directive de
CEM 2014/30/EU.
Le DCU 100 est un produit de la catégorie B selon EN 55 020.
2.4 Directive R&TTE
Le DCU 100 est un appareil radio de la classe2 (R&TTE
1999/55/CE) et est homologué pour l’Europe. En
France, le DCU 100 ne peut être utilisé qu’à l’intérieur
de locaux fermés.
i Dans les pays non-européens, observer la régle-
mentation spécifique applicable au fonctionnement
d’appareils radio dans la gamme de fréquences de
2,4 GHz (par ex. WLAN ou Bluetooth).
1.2 Sur le produit
! Observer tous les avertissements qui figurent sur les
produits et les maintenir lisibles.
PRUDENCE – Danger de blessure en cas
de déclenchement de l'airbag lorsque le
DCU 100 est accroché !
Blessures par déclenchement fortuit de l'airbag en cas de fixation (par ex. accrochage)
du DCU 100 au volant.
¶ Ne pas fixer le DCU 100 au volant.
1 689 989 174 2015-03-25| Robert Bosch GmbH

26 | DCU 100 | Consignes d'utilisationfr
2.5 Liaison radio sans fil
! L'exploitant du DCU 100 est tenu de veiller au respect
des directives et restrictions en vigueur dans son pays.
2.5.1 Informations importantes sur WLAN et Bluetooth
WLAN (Wireless Local Area Network) désigne un réseau
radio local sans fil. Tout comme Bluetooth, WLAN est une
liaison radio dans la bande ISM libre de 2,4 GHz (ISM: Industrial, Scientific, Medical). Cette gamme de fréquences
fait l'objet de réglementations officielles mais peut être
utilisée sans licence dans la plupart des pays. De ce fait,
de nombreux appareils et applications émettent dans
cette bande de fréquences. Des chevauchements et des
perturbations sont donc possibles. Selon les conditions
environnantes, la liaison WLAN risque par conséquent
d'être perturbée, parex. par les liaisons Bluetooth, les
téléphones sans fil, les radiothermomètres, les radiotélécommandes d'ouverture de porte de garage, les radiocommutateurs d'éclairage ou les centrales d'alarme radio.
i Les personnes porteuses d'un stimulateur cardiaque
ou de tout autre appareil électronique vital doivent
se montrer prudentes lors de l'utilisation de techniques sans fil; une altération du fonctionnement de
ces appareils ne peut être exclue.
Respectez les consignes suivantes pour obtenir une
connexion optimale:
R Le signal radio WLAN recherche toujours le chemin
direct. Disposer le PC ou l'ordinateur portable et
la borne d'accès (voir le Chap.2.5.2) en évitant
autant que possible les obstacles tels que les portes
en acier et les murs de béton qui peuvent gêner le
signal radio émis et reçu par le DCU 100.
R En outre, la portée du WLAN à l'intérieur d'un bâti-
ment dépend fortement de la nature de la construction. Les maçonneries conventionnelles, les cloisons
en bois et les différentes cloisons sèches n'atténuent
que peu la propagation des ondes radio. En revanche,
les cloisons fines en plâtre sont problématiques car le
plâtre peut accumuler suffisamment d'humidité pour
absorber les signaux radio. Les cloisons métalliques
ou le béton (en particulier le béton armé) bloquent
fortement les ondes radio. Les plafonds des caves
leur sont souvent imperméables. D'une manière générale, les murs contenant une grande quantité de métal
(par ex. des tuyaux, câbles, etc.) représentent des
obstacles pour les ondes radio.
R La réception radio est également perturbée par les
corps métalliques de taille importante tels que les
radiateurs et les cadres de fenêtres de même que
par les sources actives de parasites tels que les téléphones sans fil, les détecteurs de mouvements et les
fours à micro-ondes.
R Les êtres humains gênent également la radiotransmis-
sion. Par conséquent, veiller toujours à ce que personne ne se trouve entre l'émetteur et le récepteur.
R Nous recommandons de confier l'installation et le
suivi de l'infrastructure du réseau à un spécialiste
réseau.
R Conservez la SSID et les codes du système radio
en lieu sûr. Faites en sorte que ces données soient
disponibles en cas de dérangement.
R Nous vous conseillons de parcourir votre site lors
de la mise en service : vérifiez où le DCU 100 fonctionne dans votre bâtiment et où se situent les
limites de la transmission radio.
R La transmission radio peut être fortement limitée
si le DCU 100 est utilisé à l'intérieur d'un véhicule
(cage de Faraday).
R Le système radio subit les influences de la météo.
Des variations du signal reçu sont donc possibles.
R Veuillez adresser toute question à votre spécialiste
réseau.
2.5.2 Remarques relatives à la borne d’accès (WLAN)
Une borne d'accès, ou "Access Point" est un appareil
électronique qui fait l'interface entre un réseau radio et
un réseau informatique filaire. C'est au travers de cette
borne que le DCU 100, le PC et l'ordinateur portable
ainsi qu'une imprimante peuvent être reliés sans fil.
i Nous recommandons d’utiliser pour la borne d’accès
le standard WLAN IEEE 802.11n (vitesse de transmission maximale 600 Mbps). La fonction "extended
range" n’est pas supportée.
i La configuration du WLAN est fonction de la configu-
ration de la borne d’accès disponible.
Observer les points suivants :
R Installer la borne d'accès en un point central, si pos-
sible en hauteur, de préférence au plafond du local.
La borne d'accès ne doit pas être installée derrière
un corps métallique, comme par ex. un radiateur, ou
dans une armoire de commande métallique.
R Si la borne d'accès ne possède qu'une seule an-
tenne, diriger celle-ci vers le bas, en direction du sol.
Si la borne d'accès possède plusieurs antennes, les
diriger de manière tridimensionnelle.
R La meilleure vitesse de transmission sera toujours
obtenue en cas de contact visuel entre le DCU 100
et la borne d'accès.
R Si la liaison est mauvaise, il peut être judicieux de
modifier le canal réglé sur la borne d’accès. Éviter si
possible d'utiliser des canaux adjacents aux canaux
déjà utilisés.
R Nous recommandons de configurer le cryptage de
l'échange radio sur la borne d'accès.
1 689 989 174 2015-03-25| Robert Bosch GmbH
Description du produit | DCU 100 | 27 fr
3. Description du produit
3.1 Utilisation conforme
DCU 100 est une tablette destinée à l'atelier pour le
logiciel de diagnostic Bosch "ESI[tronic] 2.0" ou le logiciel d'analyse des émissions Bosch "BEA-PC".
! Si les programmes sont Installés sur DCU 100
ESI[tronic]2.0 et BEA-PC, il doit toujours y en avoir un
sur deux ouvert.
Cela signifie qu'avant que BEA-PC ne démarre,
ESI[tronic] 2.0 doit être fermé (et inversement).
! Les logiciels supplémentaires installés sur le DCU 100
peuvent, le cas échéant, entraîner une dégradation
des performances du DCU 100 et rendre le DCU 100
plus lent. Ceci peut notamment se produire avec des
programmes antivirus.
! Le DCU 100 ne doit pas être exposé à la chaleur
(pas d'exposition directe au soleil par ex.), aux chocs
ou aux vibrations, aux champs magnétiques et à un
encrassement excessif.
3.4 Description de l'appareil
Le DCU 100 est un PC portable mobile type tablette,
destiné à l’atelier. Il s’utilise à l’aide d’un stylet (pour
l’écran tactile LCD) et d’un clavier virtuel. Il est possible d’imprimer les données et les valeurs mesurées
via l’interface USB sur une imprimante externe (accessoire spécial). Le DCU 100 et les accessoires sont rangés et protégés dans une mallette.
1
459953-02_Ko
2
i Le système d'exploitation
Windows Embedded POSReady 7 (32-bit) est installé.
! Vous trouverez sur le bureau un "END-USER LICENSE
AGREEMENT (EULA) FOR MICROSOFT SOFTWARE"
(EULA.XPS). Veuillez observer les indications qui y
figurent.
3.2 Fournitures
Désignation Numéro de commande
DCU 100 –
Accu 1 687 335 042
Lecteur de DVD-ROM externe avec
câble de liaison USB (0,6 m)
Mallette 1 685 438 649
Bloc d'alimentation avec
cordon secteur
Stylet (1 unité)
DVD de récupération 1 687 005 100
Notice originale 1 689 989 174
1 687 023 698
1 687 023 697
1 684 461 186
–
3.3 Transport
Les câbles de raccordement du DCU 100 doivent être
débranchés avant le transport. De plus, le DCU 100 ne
doit être transporté et entreposé que dans la mallette
fournie. Le lecteur de DVD doit en outre être entreposé
et transporté dans l'emballage d'origine dans la mallette.
4
Fig. 1: DCU 100
1 Écran LCD de type tactile
2 Ports
3 Touche de fonction �
4 Touche Marche/Arrêt
3.4.1 Ports
2
1
5
4
3
6
7
Fig. 2: Vue des ports du DCU 100
1 Port réseau RJ-45 (LAN)
2 Raccordement de l'écran
3 Port USB (2x), USB 2.0, max. 1 A
4 Emplacement pour carte mémoire (SD-Card)
5 Prise pour casque
6 Prise pour bloc d'alimentation (12 volts DC)
7 Fixation pour stylet
3
459953-01_Ko
1 689 989 174 2015-03-25| Robert Bosch GmbH

28 | DCU 100 | Description du produitfr
2
1
459953-03_Ko
3
Fig. 3: Dessous du DCU 100
1 Stylet
2 Étrier rehausseur
3 Douilles de fixation de l'accu
4 Logement de l'accu
4
3
3.4.2 Fonction de la touche Marche/Arrêt avec
LED
DCU 100 Bloc d'alimen-
Arrêt Pas raccordé Éteinte –
Arrêt Raccordé Allumée en
Marche et
écran LCD
allumé
Marche et
écran LCD
allumé
Marche et
écran LCD
allumé
Marche,
écran LCD
éteint, en
mode économie d'énergie
Marche,
écran LCD
éteint, en
mode économie d'énergie
tation
Raccordé Éteinte L’accu se charge
Pas raccordé
Pas raccordé
Pas raccordé
Pas raccordé
LED
vert
Allumée en
jaune
Allumée en
vert
Clignote en
rouge
Clignote en
vert
Clignote en
rouge
État
État de charge de
l'accu ≥80 %
État de charge de
l'accu <80 %
État de charge de
l'accu ≥10 %
État de charge de
l'accu <10 %
État de charge de
l'accu ≥10 %
État de charge de
l'accu <10 %
i En appuyant sur la touche Marche/Arrêt pendant
plus de 12 secondes, le DCU 100 s'éteint sans arrêt
préalable du système d'exploitation. Ne procéder
ainsi que s'il est impossible d'arrêter le système
d'exploitation Windows.
3.4.3 Touche de fonction ƒ
Appuyer sur la touche de fonction ƒ : le menu Démarrer
et la barre de tâches de WIN 7 s'ouvrent ou se ferment.
i En appuyant sur la touche de fonction ƒ pendant plus
de 2 secondes, le clavier virtuel s'ouvre ou se ferme.
3.5 Écran tactile
L'écran tactile s'utilise avec le doigt ou un stylet. Touchez avec le doigt ou avec le stylet l'écran tactile, à
l'emplacement où une action doit avoir lieu.
i Le calibrage de l’écran tactile est décrit au
Chap.5.8.2.
3.6 Lecteur de DVD externe
L'utilisation du lecteur de DVD est décrite au
Chap.5.11.
i En exerçant une brève pression sur la touche
Marche/Arrêt, le DCU 100 se met en mode veille ou
quitte le mode veille.
i En appuyant sur la touche Marche/Arrêt pendant
plus de 2 secondes, le système d'exploitation Windows s'arrête et le DCU 100 s'éteint.
1 689 989 174 2015-03-25| Robert Bosch GmbH
Première mise en service | DCU 100 | 29 fr
4. Première mise en service
¶ Sortir de la mallette le DCU 100, l'accu, le bloc d'ali-
mentation avec le cordon secteur ainsi que le lecteur
de DVD avec le câble de liaison USB.
4.1 Mettre l’accu en place
¶ Insérer l'accu dans le logement et le fixer à l'aide
des deux vis qui se trouvent sur l'accu (voir Fig.3,
Pos.3).
i Nous recommandons de charger les accus pendant
au moins trois heures avant d’utiliser le DCU 100 sur
accu.
4.2 Raccordement
Avant la première mise en service, assurez-vous que la
tension du réseau est la même que celle indiquée sur le
bloc d’alimentation (utiliser le cordon secteur fourni).
4.3 Configuration du système d’exploitation
1. Alimenter le DCU 100 en tension à l’aide du bloc
d'alimentation.
2. Mettre le DCU 100 en marche.
3. Après la première mise en marche, sélectionner la
langue du système d’exploitation Windows à l’aide
du menu correspondant et suivre les instructions qui
s’affichent à l’écran.
i Une modification ultérieure de la langue du système
d'exploitation Windows n’est pas prévue. Si cela
devait être nécessaire, le menu de sélection de la
langue peut être rouvert sous "Démarrer >> Tous les
programmes >> Tools >> Localization".
4.4 Installation du logiciel
i Pour l'installation d'un logiciel, toujours alimenter le
DCU 100 en tension au moyen du bloc d'alimentation.
i Vous trouverez des informations supplémentaires
sur l'installation et la mise à jour du logiciel dans les
instructions d'installation de chaque logiciel.
5. Utilisation
5.1 Mise en marche
! Afin de prévenir la condensation, attendre que le
DCU 100 se soit acclimaté à la température ambiante
avant de mettre le DCU 100 en marche!
1. Mettre le DCU 100 en marche en appuyant sur la
touche Marche/Arrêt .
Après le démarrage du système d'exploitation
Windows, l'écran de démarrage apparaît.
2. Touchez avec le stylet l'application que vous souhaitez utiliser.
PRUDENCE – Danger de blessure en cas
de déclenchement de l'airbag lorsque le
DCU 100 est accroché !
Blessures par déclenchement fortuit de l'airbag en cas de fixation (par ex. accrochage)
du DCU 100 au volant.
¶ Ne pas fixer le DCU 100 au volant.
5.2 Mise à l’arrêt
1. Appuyer sur la touche de fonction ƒ.
Le menu Démarrer et la barre de tâches s'ouvrent.
2. Sélectionner <Arrêter> dans le menu Démarrer.
Windows s'arrête.
"Le DCU 100 se met à l'arrêt.
i En appuyant sur la touche Marche/Arrêt pendant
plus de 2 secondes, le système d'exploitation Windows s'arrête et le DCU 100 s'éteint.
i En appuyant sur la touche Marche/Arrêt pendant
plus de 12 secondes, le DCU 100 s'éteint sans arrêt
préalable du système d'exploitation. Ne procéder
ainsi que s'il est impossible d'arrêter le système
d'exploitation Windows.
5.3 Réglage des options d'alimentation
Dans le menu "Démarrer >> Panneau de configuration
>> Options d'alimentation", il est possible de sélec-
tionner et de modifier le plan d'alimentation (par ex. la
durée précédant l'extinction de l'écran ou la luminosité
de l'écran).
1 689 989 174 2015-03-25| Robert Bosch GmbH

30 | DCU 100 | Utilisationfr
5.4 Alimentation en tension
Le DCU 100 peut fonctionner avec les alimentations en
tension suivantes :
R Accu
R Bloc d'alimentation
! N'utiliser que le bloc d’alimentation fourni !
5.5 Fonctionnement sur accu
Le DCU 100 possède un accu qui alimente le DCU 100
en courant.
i L'accu se charge automatiquement pendant le fonc-
tionnement sur secteur.
L'accu entièrement chargé du DCU 100 est prévu pour
assurer une autonomie d’env. 2 heures.
i Si la charge de l'accu est inférieure à 10 %, la LED
de la touche Marche/Arrêt est clignote en rouge.
Dans ce cas, raccordez le bloc d’alimentation pour
recharger l'accu.
i L'état de charge de l'accu peut être consulté à tout
moment en cliquant sur l'icône dans la barre de
tâches.
5.6 Écran tactile avec stylet
L’écran tactile du DCU 100 s’utilise à l’aide d’un stylet.
Le stylet possède en gros les mêmes fonctions qu’une
souris:
R Un clic gauche de la souris correspond par ex. à une
pression unique du stylet sur une icône ou au positionnement du curseur sur un champ de saisie.
R Une pression et le maintien du stylet sur une icône
correspond à un clic droit unique de la souris sur
l'icône.
R Un double clic gauche de la souris correspond à une
double pression avec le stylet sur l’écran tactile.
Cela permet par exemple de lancer un programme
d’application.
i Informations relatives au calibrage de l’écran tactile,
voir le Chap.5.8.2.
5.7 Clavier virtuel
Le DCU 100 met à votre disposition un clavier virtuel.
Une pression sur l'icône dans la barre de tâches ou
l'actionnement de la touche de fonction ƒ pendant plus
de 2 secondes ouvre ou ferme le clavier virtuel.
Le clavier virtuel se comporte de la même façon qu’un
clavier conventionnel. Les possibilités de réglage du clavier virtuel sont les suivantes :
Pour appeler des fonctions nécessitant l’actionnement
simultané de deux touches sur un clavier standard
(par ex. <Alt> + <F4>), actionner successivement ces
touches sur le clavier virtuel, après avoir toujours actionné les touches spéciales <Shift>, <Alt> et <Strg>.
! En raison des différences de programmation des
logiciels, il est impossible de garantir la compatibilité du clavier virtuel avec tous les logiciels.
5.8 Réglages du système
Les paramètres du plan d'alimentation et la luminosité
de l'écran peuvent être modifiés sous "Démarrer >>
Panneau de configuration >> Options d'alimentation"
ou en exerçant une pression prolongée sur l'icône
avec le stylet.
5.8.1 Adaptation du volume sonore
Cliquer avec le stylet sur l'icône dans la barre de
tâches pour modifier le volume sonore du DCU 100.
5.8.2 Calibrer l'écran tactile
L’application "HIDeGalaxTouch" sert à calibrer l’écran
tactile dans la vue souhaitée (horizontale ou verticale).
1. Lancer "HIDeGalaxTouch" sur l'écran tactile en faisant un double-clic.
2. Sélectionner <Calibrage à 4 points> ou <Linéarisa-
tion à 9 points>.
i Nous recommandons d'effectuer une linéarisation à
9 points pour obtenir une précision suffisante lors
du calibrage de l'écran tactile.
3. Toucher les points de calibrage ou de linéarisation
avec le stylet et y maintenir ce dernier jusqu'à ce que
le symbole OK apparaisse.
i Pour éviter toute erreur, vos yeux doivent se trouver
à la perpendiculaire du point de calibrage. Cliquez
sur le point de calibrage le plus précisément possible.
4. À l’issue du calibrage, fermer l’application avec
<OK>.
"Le calibrage est terminé.
5.8.3 Mise à jour de Windows
La mise à jour automatique de Windows a été désactivée pour ne pas gêner le travail avec le DCU 100.
Si le DCU 100 est utilisé avec un accès à Internet, effectuer au moins tous les 3 mois une mise à jour de Windows afin d'installer les mises à jour de sécurité.
1 689 989 174 2015-03-25| Robert Bosch GmbH
 Loading...