

Page 1
Register your new Bosch now:
www.bosch-home.com/welcome
ur nor yetsigeR:woh ncsoew Bur n
ur nor yetsigeR
chsob.www
:woh ncsoew Bur n
meoclew/moc.meho-ch
...4LGB
en Instruction manual
zh ɟɦǹȊ
Page 2

en
Safety information . . . . . . . . . . . . . . . . . . . . . . . . . . . . . . . . . . . . . . . . . . . . . . . . . . .4
Your vacuum cleaner . . . . . . . . . . . . . . . . . . . . . . . . . . . . . . . . . . . . . . . . . . . . . . . . .6
Replacement parts and special accessories . . . . . . . . . . . . . . . . . . . . . . . . . . . . . . .7
Before using your appliance for the first time . . . . . . . . . . . . . . . . . . . . . . . . . . . . .8
Initial use . . . . . . . . . . . . . . . . . . . . . . . . . . . . . . . . . . . . . . . . . . . . . . . . . . . . . . . . . .8
Vacuuming . . . . . . . . . . . . . . . . . . . . . . . . . . . . . . . . . . . . . . . . . . . . . . . . . . . . . . . .10
When the work is done . . . . . . . . . . . . . . . . . . . . . . . . . . . . . . . . . . . . . . . . . . . . . .12
Changing the filter . . . . . . . . . . . . . . . . . . . . . . . . . . . . . . . . . . . . . . . . . . . . . . . . . .12
Replacing the exhaust filter . . . . . . . . . . . . . . . . . . . . . . . . . . . . . . . . . . . . . . . . . .15
Care . . . . . . . . . . . . . . . . . . . . . . . . . . . . . . . . . . . . . . . . . . . . . . . . . . . . . . . . . . . . .16
Costumer service . . . . . . . . . . . . . . . . . . . . . . . . . . . . . . . . . . . . . . . . . . . . . . . . . . .17
Disposal information . . . . . . . . . . . . . . . . . . . . . . . . . . . . . . . . . . . . . . . . . . . . . . . .18
Conditions of guarantee . . . . . . . . . . . . . . . . . . . . . . . . . . . . . . . . . . . . . . . . . . . . .19
2
Page 3

ȉǥɾm
ȓɨɧɩɥ
ȭȗóȣɎBȸȣ
¥FɟɦɤɜNJ
ɿFɟɦ
ɧɩ
ɟɦɄ
ȭȗɝɠ
ȭȗƿǵɝɠ
ȼȂ
vVũ
ǢȁĆÚ
zh
ȉ
. . . . . . . . . . . . . . . . . . . . . . . . . . . . . . . . . . . . . . . . . . . . . . . . . . . . . . . . . .20
. . . . . . . . . . . . . . . . . . . . . . . . . . . . . . . . . . . . . . . . . . . . . . . . . . . . . . . . . . . . . .25
. . . . . . . . . . . . . . . . . . . . . . . . . . . . . . . . . . . . . . . . . . . . . . . . . . . . . . . . . . . . . .31
. . . . . . . . . . . . . . . . . . . . . . . . . . . . . . . . . . . . . . . . . . . . . . . . . . . . . . . . .21
. . . . . . . . . . . . . . . . . . . . . . . . . . . . . . . . . . . . . . . . . . . . . . . . . .22
. . . . . . . . . . . . . . . . . . . . . . . . . . . . . . . . . . . . . . . . . . . . . . . . . . . . .23
. . . . . . . . . . . . . . . . . . . . . . . . . . . . . . . . . . . . . . . . . . . . . . . . . . . . . . . . . .23
. . . . . . . . . . . . . . . . . . . . . . . . . . . . . . . . . . . . . . . . . . . . . . . . . . . . . . . . . . . .27
. . . . . . . . . . . . . . . . . . . . . . . . . . . . . . . . . . . . . . . . . . . . . . . . . . . . . . . . . .27
. . . . . . . . . . . . . . . . . . . . . . . . . . . . . . . . . . . . . . . . . . . . . . . . . . . . . . .30
. . . . . . . . . . . . . . . . . . . . . . . . . . . . . . . . . . . . . . . . . . . . . . . . . . . . . . . . . .32
. . . . . . . . . . . . . . . . . . . . . . . . . . . . . . . . . . . . . . . . . . . . . . . . . . . . . . . . . .33
3
Page 4

Safety information
Congratulations on your purchase of the Bosch GL40
vacuum cleaner.
This instruction manual describes various GL40 models,
which means that some of the equipment features and
functions described may not apply to your model. You
should only use original Bosch accessories, which have
been specially developed for your vacuum cleaner, in
order to achieve the best possible vacuuming results.
Please keep this instruction manual. When passing the
vacuum cleaner on to another person, please also hand
over this instruction manual.
Intended use
This appliance is intended for domestic use only. This
appliance is intended for use up to a maximum height of
2000 metres above sea level. Only use this vacuum
cleaner in accordance with the instructions in this
instruction manual.
Therefore, please note the following points!
The vacuum cleaner must only be operated with:
Original replacement parts, accessories or special
accessories
In order to avoid invalidating the warranty, we recommend that you operate your appliance using only original dust bags.
In order to prevent injuries and damage, the vacuum
cleaner must not be used for:
Vacuum-cleaning persons or animals
Vacuuming up:
- insects or spiders.
- hazardous, sharp-edged, hot or glowing substances.
- damp or liquid substances.
- highly flammable or explosive substances and gases.
- ash, soot from tiled stoves and central heating systems.
- toner dust from printers and copiers.
Safety information
This vacuum cleaner complies with the
recognised rules of technology and the relevant safety regulations.
The appliance may be used by children
over the age of 8 years and by persons
with reduced physical, sensory or mental
capacity or by persons with a lack of experience or knowledge if they are supervised
or have been instructed on the safe use of
the appliance and the have understood
the potential dangers of using the appliance.
Children must never play with the appliance.
Cleaning and user maintenance must
never be carried out by children without
supervision.
Plastic bags and films must be kept out of
the reach of children before disposal.
=> Risk of suffocation.
Proper use
Only connect and use the vacuum cleaner in accordance with the specifications on the rating plate.
Never vacuum without the dust bag or dust container,
motor protection or exhaust filter.
=> This may damage the vacuum cleaner.
Always keep the vacuum cleaner away from your head
when using nozzles and tubes.
=> This could cause injury!
When vacuuming stairs, the appliance must always be
positioned below the user.
Do not use the power cord or the hose to carry or
transport the vacuum cleaner.
For safety reasons, if this appliance's mains power
cable becomes damaged, it must be replaced by the
manufacturer, their after-sales service department or a
similarlyqualified person.
If using the appliance for longer than 30 minutes, pull
out the power cord completely.
When disconnecting the appliance from the mains, pull
on the plug itself to remove it; do not pull on the power
cord.
Do not pull the power cord over sharp edges or allow
it to become trapped.
When the cable is being automatically rewound, ensure
that the mains plug is not thrown towards persons,
body parts, animals or objects.
=> Use the mains plug to guide the power cord.
Pull out the mains plug before carrying out any work on
the vacuum cleaner.
Do not operate the vacuum cleaner if it is damaged.
Unplug the appliance from the mains if a fault is detected.
For safety reasons, only authorised after-sales service
personnel are permitted to carry out repairs and fit
replacement parts to the vacuum cleaner.
Protect the vacuum cleaner from the weather, moisture and sources of heat.
Do not pour flammable substances or substances containing alcohol onto the filters (dust bag, motor protection filter, exhaust filter, etc.).
The vacuum cleaner is not suitable for use on construction sites.
=> Vacuuming up building rubble could damage the
appliance.
When not in use, switch off the appliance and pull out
the mains plug.
At the end of its life, the appliance should immediately
be rendered unusable, then disposed of in an appropriate manner.
4
Page 5

Safety information
! Please note
The mains socket must be protected by at least a 16
amp circuit breaker.
If a circuit breaker is tripped when you switch on the
vacuum cleaner, this may be because other electrical
ppliances which have a high current draw are con-
a
nected to the same power circuit.
To prevent the circuit breaker from tripping, select
the lowest power setting before switching the appliance on, and increase the power only once it is running.
Notes on the energy label
This vacuum cleaner is a general purpose vacuum
cleaner with a primary hose.
To achieve the energy efficiency rating and cleaning
effectiveness rating on carpets, please use the interchangeable universal nozzle.
To achieve the energy efficiency rating and cleaning
effectiveness rating on hard floors with gaps and
cracks, please use the supplied hard-floor nozzle without the clip-in edge cleaning bristles.
These calculations are based on the Commission
Delegated Regulation (EU) No. 665/2013 of 3rd May
2013 supplementing Directive 2010/30/EU.
Unless otherwise stated, all the procedures referred
to in these instructions were carried out in accordance with the EN 60312-1:2017* standard.
*As the motor service test is carried out with the dust
collector empty, the stated motor service life must be
increased by 10% for tests with the dust collector half
filled.
5
Page 6
Your vacuum cleaner
2
3
18
19
20
4
6
7
9
8
5
1110 12
1
14
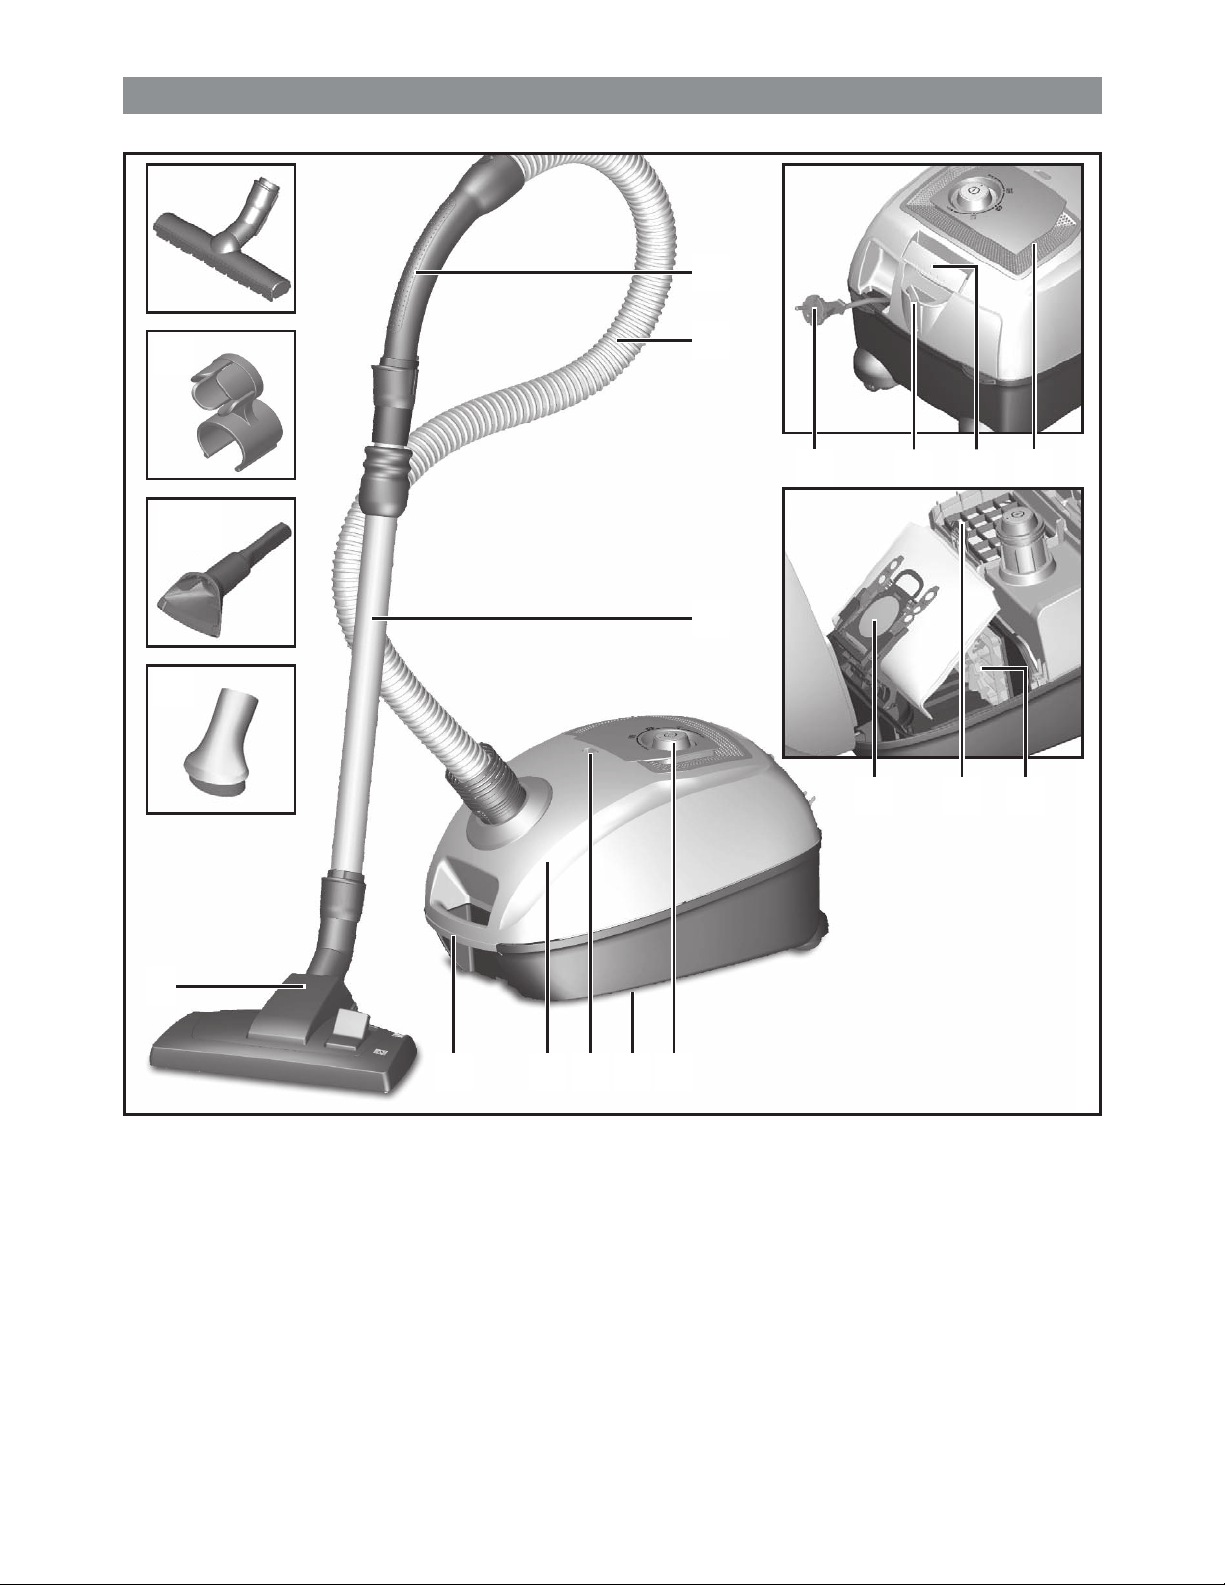
1 Adjustable floor tool (with locking collar)
2 Hard-floor brush (with locking collar)
3 Hose hand grip
4 Flexible hose
5 Telescopic tube with adjusting sleeve (and locking
collar)
6 Power cord
7 Parking aid
8 Locking lever
9 Exhaust grille
10 Dust bag
6
1613 15 17
11 Exhaust filter*
12 Motor protection filter, washable
13 Carrying handle
14 Dust bag compartment lid
15 Dust bag change indicator
16 Storage aid (on underside of appliance)
17 On/off button and power controller
18 Accessories holder for multi-purpose nozzle*
19 Multi-purpose nozzle
20 Hard furnishing brush
Page 7
Replacement parts and special accessories
A
B
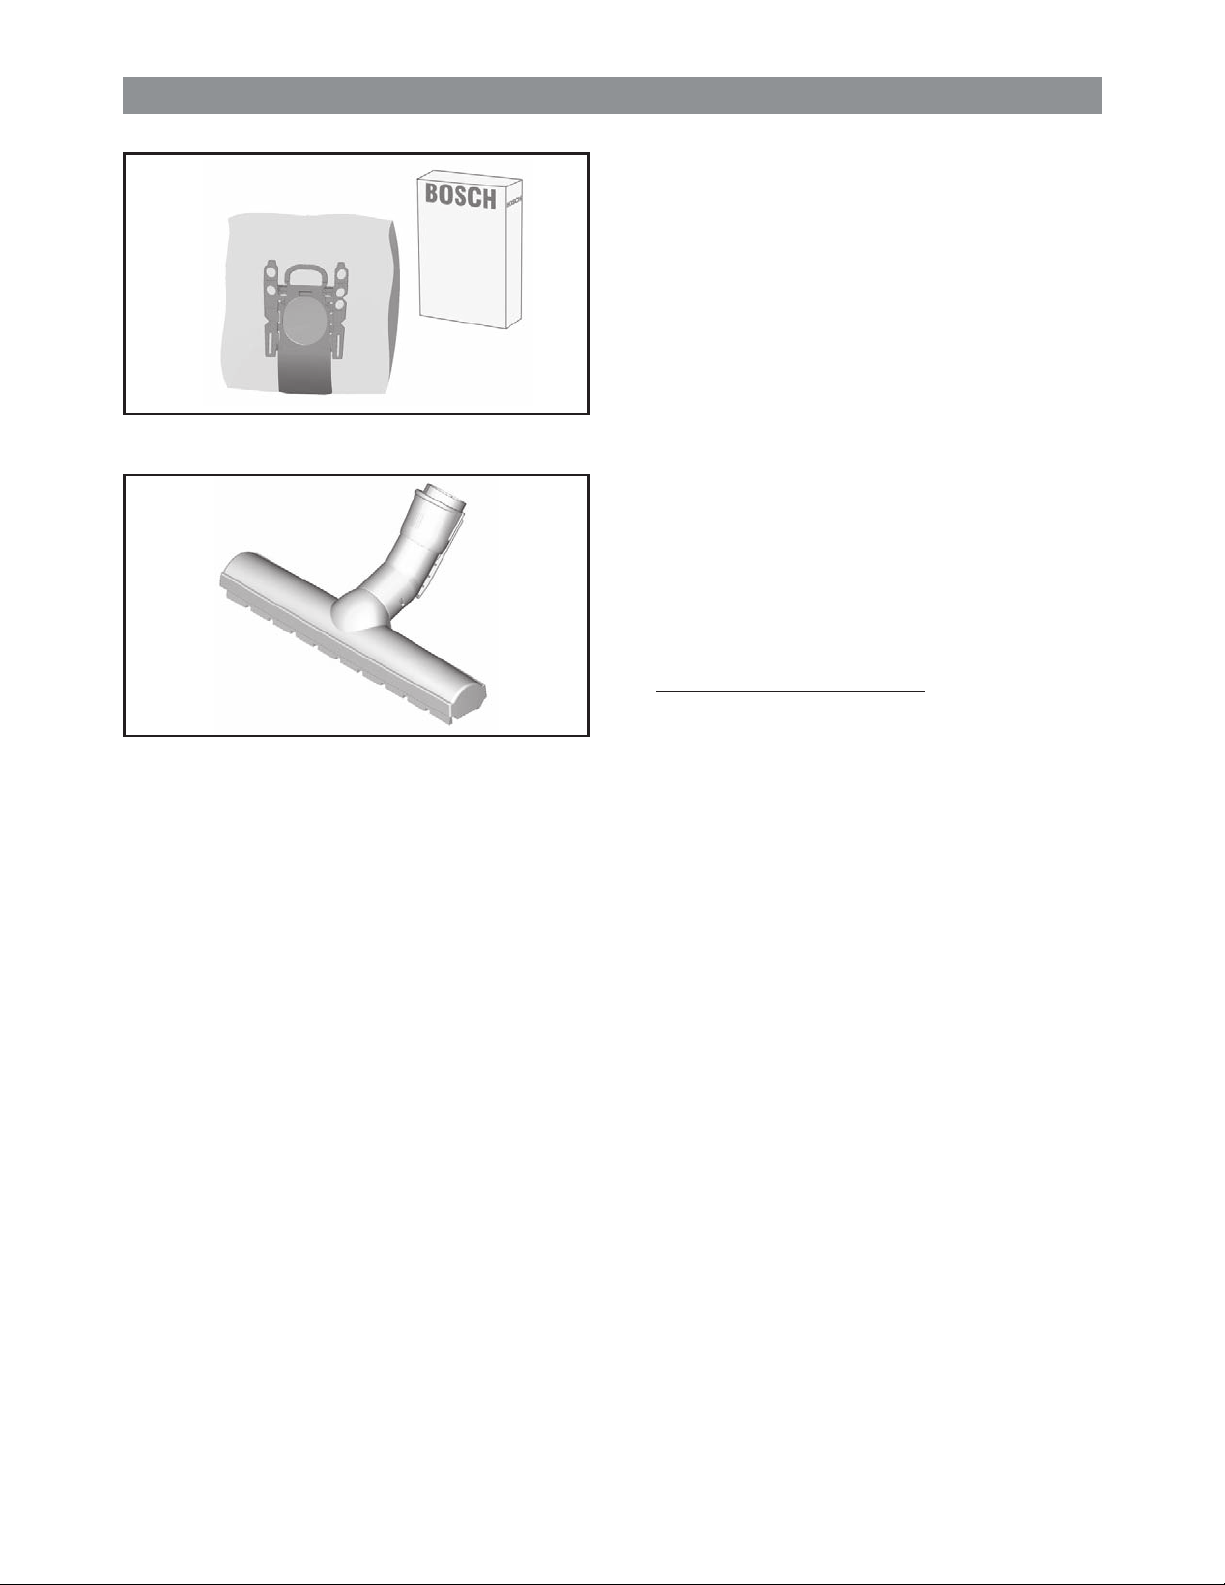
A Dust bag
To get the most out of your appliance, we recommend
using G ALL+ genuine replacement bags (00577549).
Contents:
- 5 dust bags with fasteners
- 1 micro-hygiene filter
PLEASE NOTE
!
Your appliance is a highly efficient vacuum cleaner
that can only achieve its best cleaning results using
genuine dust bags.
Only if high-quality dust bags are used, such as
genuine Bosch dust bags, can the figures specified
on the EU energy label pertaining to energy efficiency
class, suction and dust retention capacity be
achieved.
Additionally, using inferior quality dust bags (e.g.
paper bags) can have a significant impact on the
service life and performance of your appliance.
Warranty claims can only be made if genuine Bosch
dust bags are used.
For more information and to order genuine Bosch
dust bags, go to
www.bosch-home.com/dust-bag
B Hard floor brush BBZ123HD
For vacuuming hard floors
(parquet, tiles, terracotta, etc.)
7
Page 8
Before using your appliance for the first time
11
Click!
Initial use
a b
2
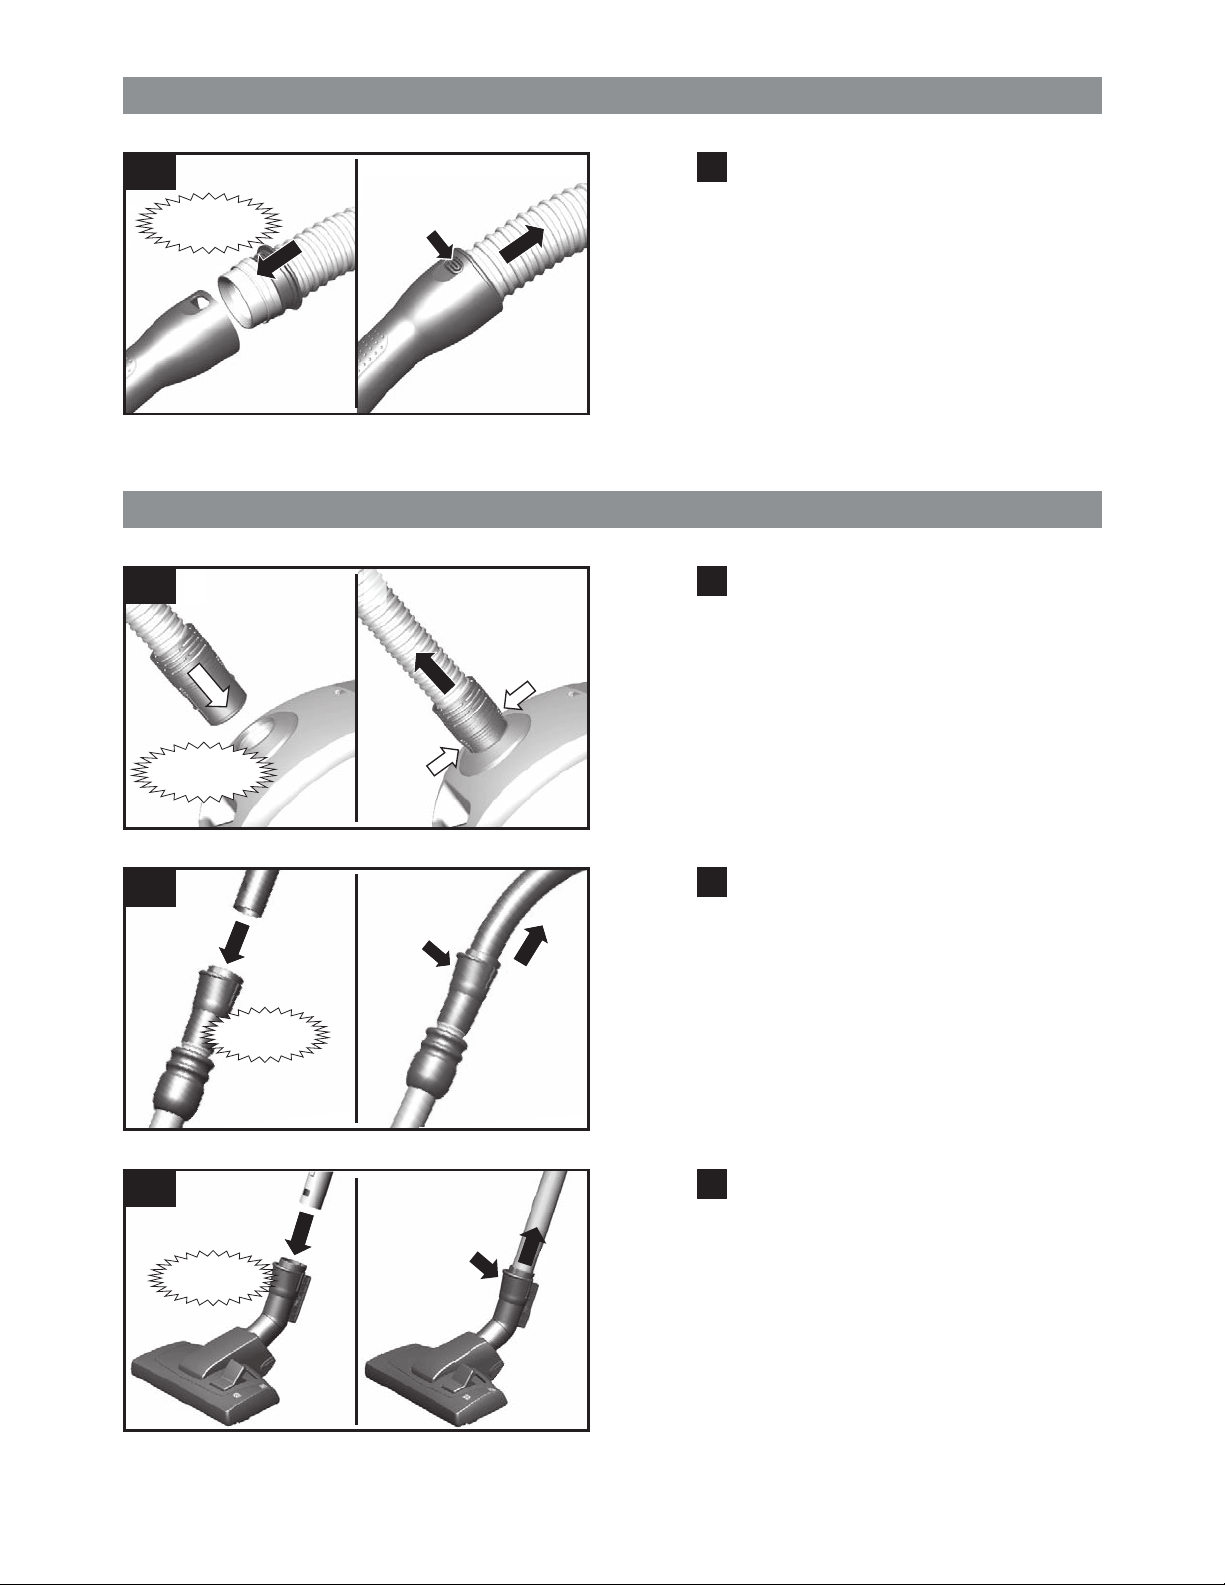
Figure
Push the hand grip onto the flexible hose and lock it in
To remove the hand grip, press the two catches
Figure
a)Push the flexible hose adapter into the air intake
b)To remove the flexible hose, press the two catches
1
place.
together and pull out the flexible hose.
2
opening in the vacuum cleaner lid until it locks in
place.
together and pull out the hose.
Click!
3
4
Click!
Click!
Figure
Push the hand grip into the telescopic tube until it
Figure
Push the telescopic tube into the connecting piece of the
3
engages.To release the connection, squeeze the collar
sleeve and pull the handle out.
4
floor tool until it locks in place. To release the connection,
press on the locking collar and pull out the telescopic
tube.
8
Page 9
Initial use
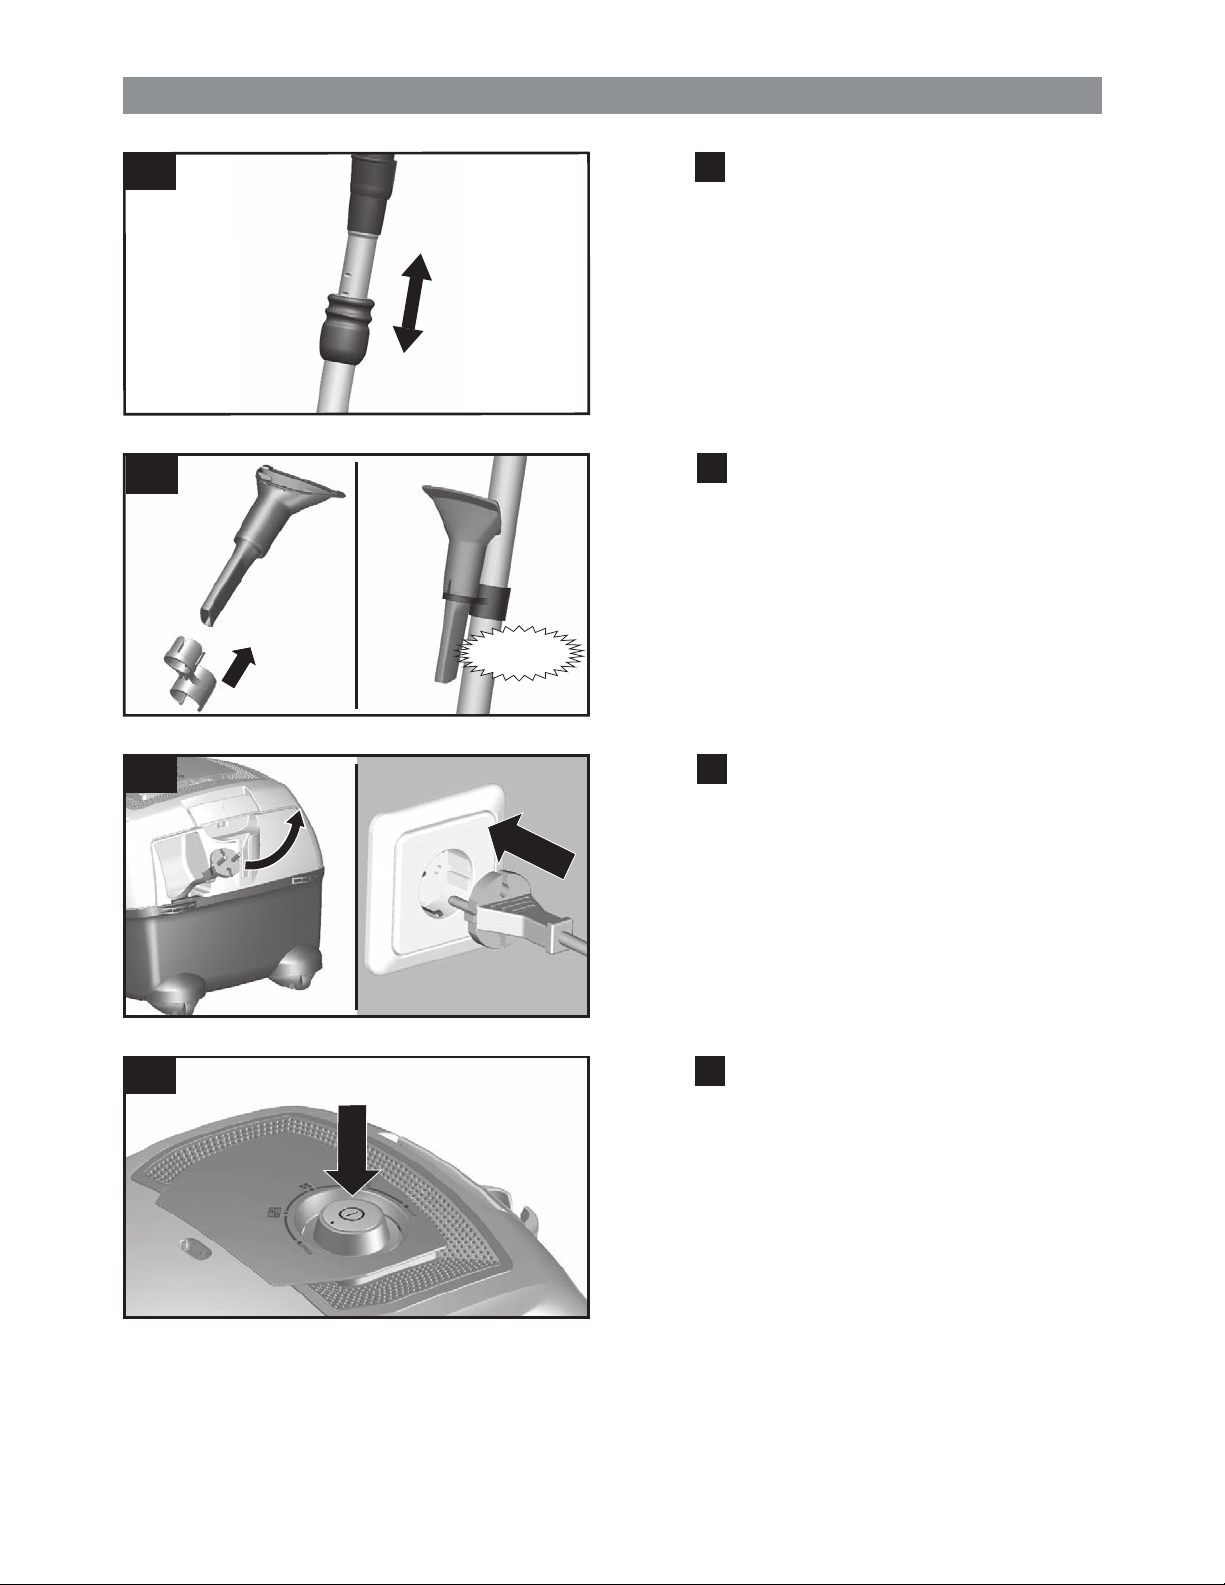
5
6*
Click!
Figure
Move the adjusting sleeve/slider button in the direction of
Figure
Attach the accessories holder to the multi-purpose
5
the arrow to unlock the telescopic tube and adjust it to
the length required.
6*
nozzle and clip it onto the suction pipe/telescopic tube.
7
8
Figure
Holding the power cord by the plug, pull out to the
Figure Switching on and off
Press the ON/OFF button in the direction of the arrow
7
required length and insert the plug into the mains
socket.
8
to switch your vacuum cleaner on.
9
Page 10
Initial use
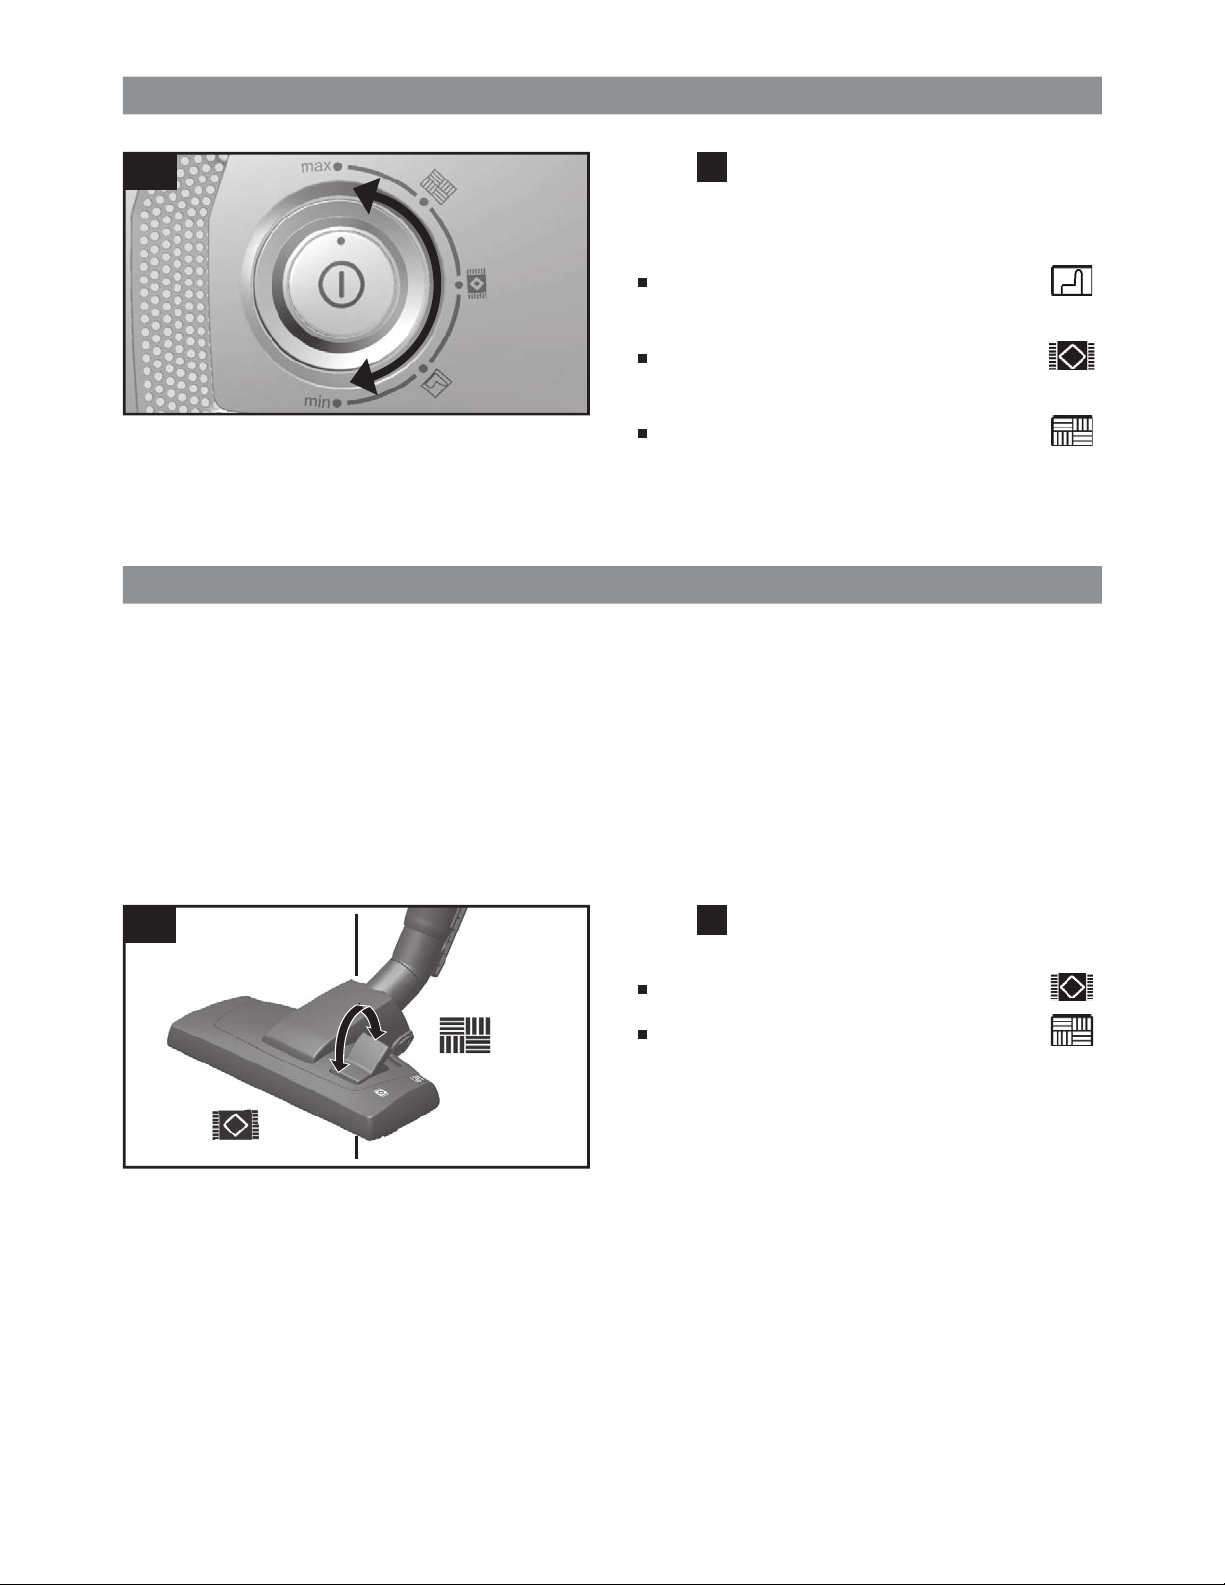
9
Vacuuming
Figure Controlling the suction level
!
9
The suction level can be infinitely adjusted to the level
equired by turning the control knob in the direction
r
of the arr
Low power range =>
For vacuuming delicate materials, e.g.
upholstery, curtains, etc.
Medium power range =>
For the daily vacuuming of light dirt
deposits.
High power range =>
For vacuuming durable floor coverings,
hard floors and heavily soiled surfaces.
Caution:
Floor tools are subject to a certain amount of wear,
depending on the type of hard floor you have (e.g.
rough, rustic tiles). Therefore, you must check the
underside of the floor tool at regular intervals. Worn
undersides of floor tools may have sharp edges that
can damage sensitive hard floors, such as parquet or
linoleum. The manufacturer does not accept any
re
ow.
sponsibility for damage caused by worn floor tools.
10
Figure
Set the adjustable floor nozzle:
If you are
sure that you vacuum them up successively and
carefully to ensure that the vacuum channel of the floor
tool does not become blocked. If necessary, you should
raise the
particles.
10
s and carpets =>
Rug
Hard floors =>
vacuuming up relatively large particles, make
nozzle in order to better vacuum up the dirt
10
Page 11
Vacuuming
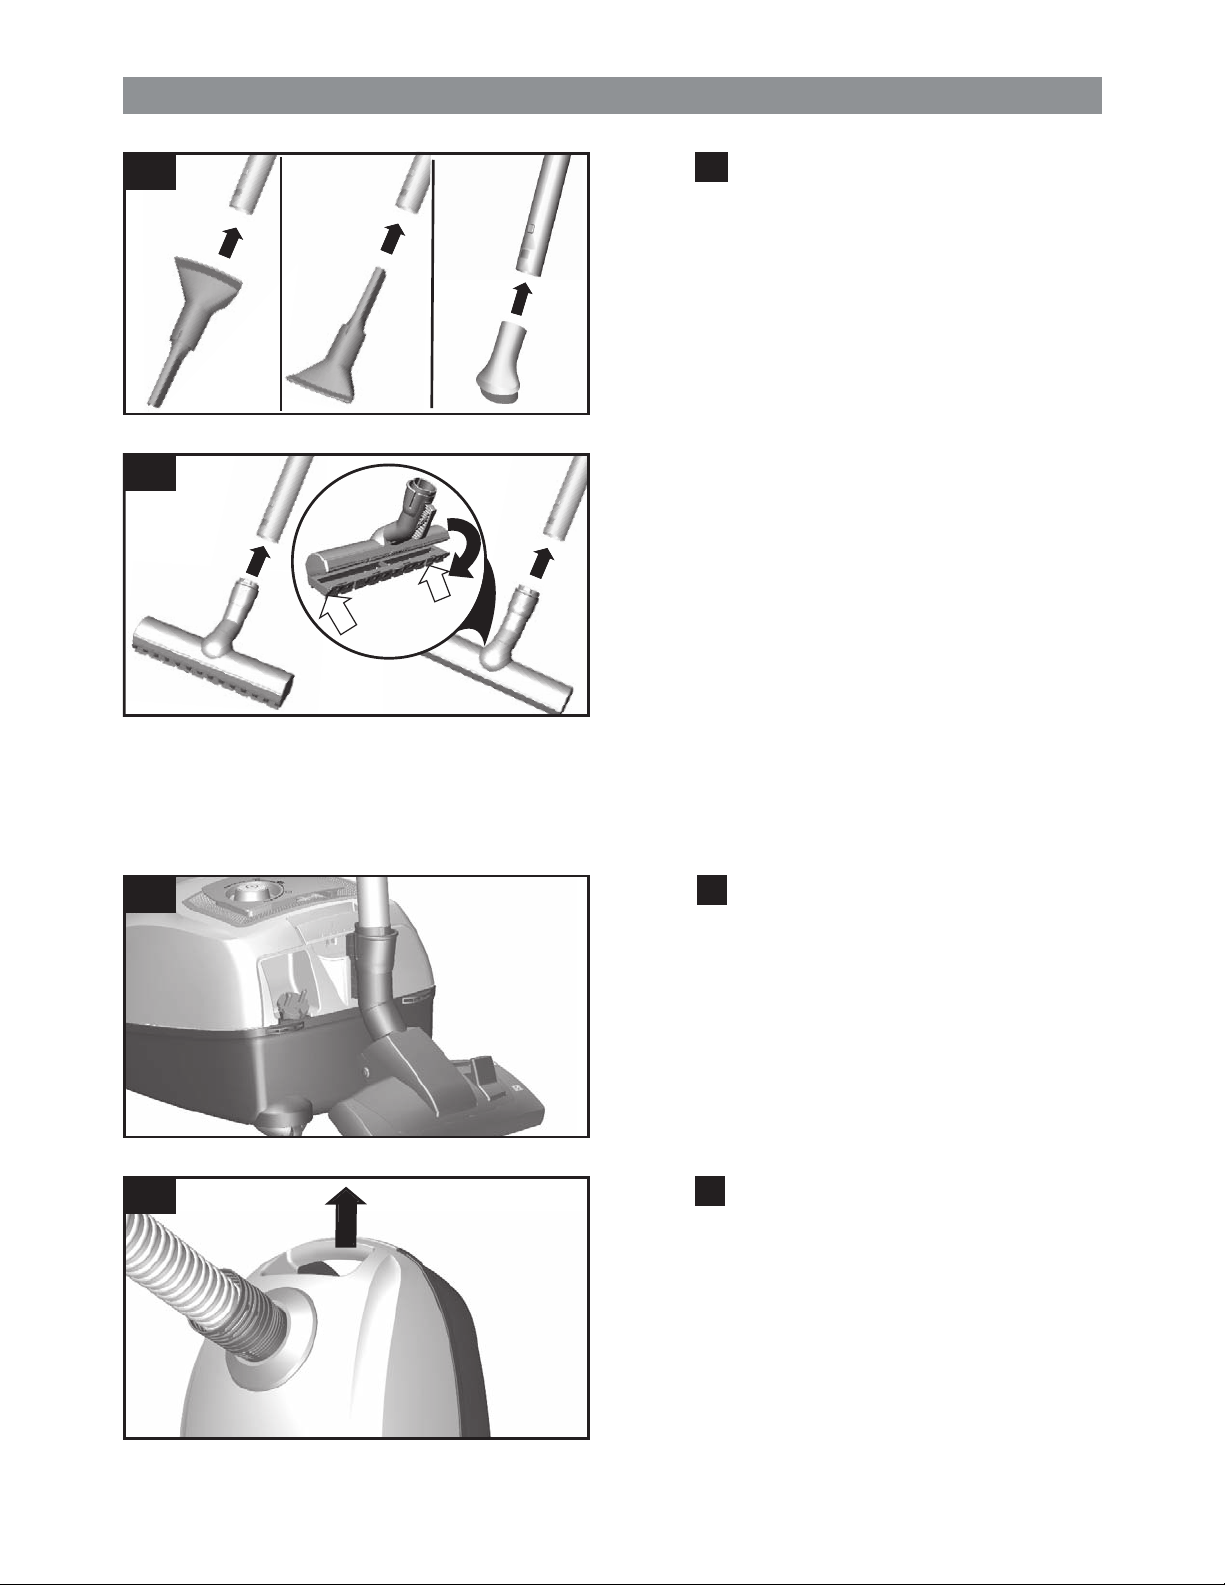
11*
11*
a
d
b
c
2
1
1
Figure Vacuuming with accessories
Attach the nozzles to the suction pipe or hand grip as
required:
a)Crevice nozzle for vacuuming crevices and corners,
b)Upholstery nozzle for vacuuming upholstered
c)Hard furnishing brush
d)Hard-floor nozzle
The edge cleaning bristles can be removed by pushing
Turbo brush
If your appliance is equipped with a turbo brush, consult
the accompanying instruction manual for instructions on
its use and maintenance.
11*
etc.
furniture, curtains, etc.
- with clip-in edge cleaning bristles:
For gentle but effective cleaning of hard floor
coverings (tiles, parquet, etc.)
- without edge cleaning bristles:
For cleaning dirt in gaps and cracks
the two catches in the direction of the arrows.
12
13
Figure
You can use the parking aid on the back of the vacuum
cleaner if you wish to stop vacuuming for a short time.
Once you have switched off the appliance, slide the
Figure
To overcome obstacles, e.g. steps, the appliance can
also be carried by the handle on the appliance body.
12
hook on the floor tool into the recess on the rear of the
appliance.
13
11
Page 12
When the work is done
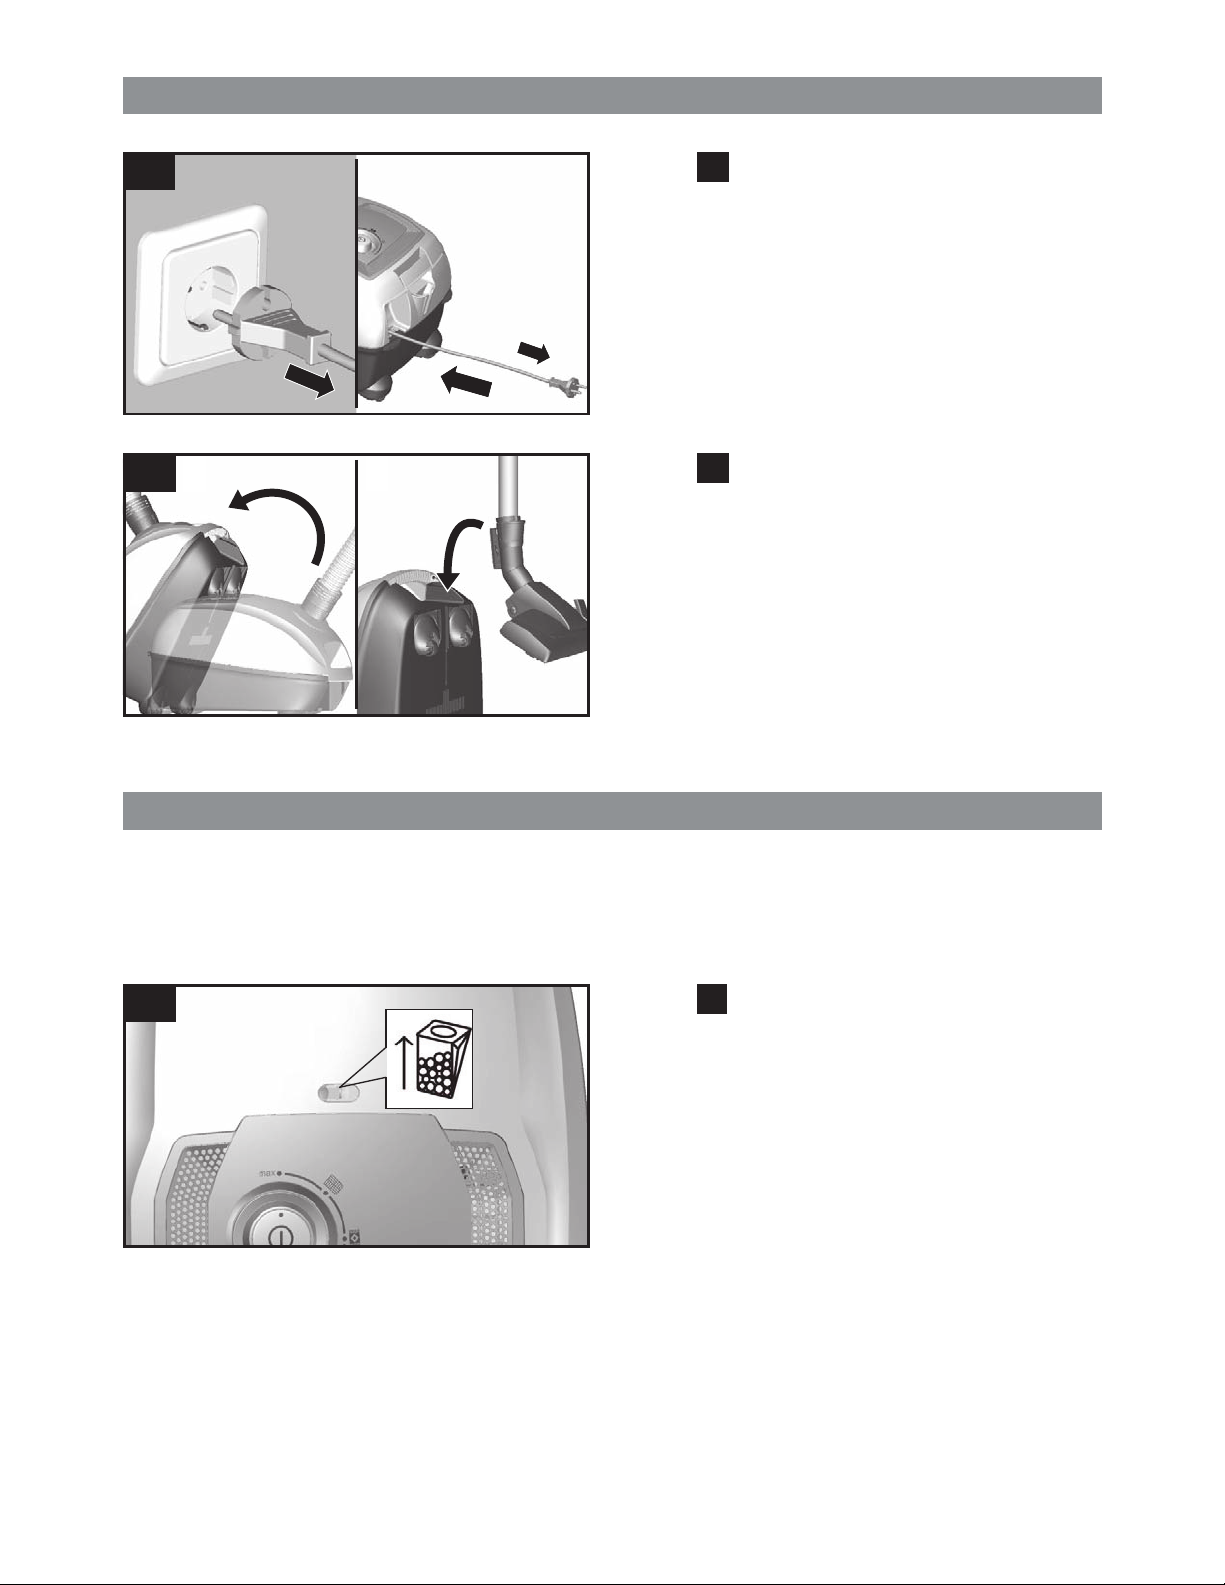
14
15
a
a
b
b
Figure
a)Pull out the mains plug.
b)Briefly pull on the power cord and then release it (the
Figure
To store/transport the appliance, you can use the
storage aid on the underside of the appliance.
a)Stand the appliance upright on its end.
b)Slide the hook on the floor tool into the recess on the
14
power cord retracts automatically).
15
underside of the appliance.
Changing the filter
16
Caution: Always switch off the appliance before
!
changing the filter.
Replacing the dust bag
Figure
If the dust bag change indicator in the lid is filled
The hand grip can easily be detached from the hose to
16
completely when the floor tool is lifted from the floor
with the highest suction level selected, the dust bag
must be changed, even though it may not yet be full.
Even if the dust bag is not full, it may still need
changing, due to the type of dust which has been
vacuumed. First check that the nozzle, suction pipe
and flexible hose are not blocked, as this would also
lead to the dust bag change indicator being triggered.
remove blockages.
12
Page 13

Changing the filter
a b
17
18 ab
Figure Opening the lid
a)Unlock the lid by pulling on the locking lever in the
b)Open the lid in the direction of the arrow.
Figure
a)Close the dust bag by pulling on the locking tab.
b)Take out the dust bag.
17
direction of the arrow.
18
18
cd
c)Insert a new dust bag.
d)Push the dust bag fully into the holder.
Please note: the lid will only close if a dust bag has
!
been inserted.
13
Page 14

Changing the filter
Cleaning the motor protection filter
The motor protection filter should be cleaned regularly
by knocking out the dirt and rinsing.
19ba
19 c
24h
d
Figure
Open the dust bag compartment lid. Figure
a)Release the motor protection filter from the catch by
b)Clean the motor protection filter by tapping out the dirt.
c)If it is very dirty, the motor protection filter should be
The filter must then be left to dry for at
d)After cleaning, refit the motor protection filter into the
19
17
pulling it sideways, and pull it out in the direction of
the arrow.
rinsed.
least 24 hours.
appliance, lock it in place and close the dust bag
compartment lid.
14
Page 15

Replacing the exhaust filter
Vacuum cleaner with micro-hygiene filter
This should be replaced with every replacement filter
pack.
20*
20* c
a
b
24h
Figure
Open the dust bag compartment lid. Figure
a)Release the filter holder by moving the locking lever in
b)Remove the micro-hygiene filter.
c)The micro-hygiene filter can be rinsed out.
The filter must then be left to dry for at least 24 hours.
20*
17
the direction of the arrow.
20*
d
e
d)Remove the micro-hygiene filter. Insert the new micro-
hygiene filter into the appliance.
e)Insert the filter holder into the appliance and lock it in
place.
15
Page 16

Replacing the exhaust filter
Vacuum cleaner with HEPA filter
If your vacuum cleaner is equipped with a HEPA filter,
this must be replaced once a year.
21*
a
b
Figure
Open the dust bag compartment lid. Figure
a)Unlock the HEPA filter by moving the locking lever in
b)Insert the new HEPA filter and lock it in place.
After vacuuming fine dust particles, clean the motor
protection filter and, if necessary, replace the
microhygiene filter or HEPA filter.
21*
17
the direction of the arrow and remove the filter from
the appliance.
Care
Always switch off the vacuum cleaner and disconnect it from the mains before cleaning the vacuum cleaner. The
vacuum cleaner and plastic accessories can be cleaned with ordinary plastic cleaner.
Do not use abrasive materials, glass-cleaning agents or all-purpose cleaning products. Never immerse the
!
vacuum cleaner in water.
If required, the dust compartment can be vacuumed out with a second vacuum cleaner or simply with a dry duster/
dusting brush.
Subject to technical modifications.
16
Page 17

Customer Service
ɽɻ
ƏÃɼ
GB Great Britain
BSH Home Appliances Ltd.
Grand Union House
Old Wolverton Road
Wolver ton
Milton Keynes MK12 5PT
To arrange an engineer visit, to order spare parts and
accessories or for product advice please visit
www.bosch-home.co.uk
or call
Tel.: 0844 892 8979*
*Calls from a BT landline will be charged at up to
3 pence per minute. A call set-up fee of up to 6 pence
may apply.
ɽ
HK Hong Kong,
BSH Home Appliances Limited
Unit 1 & 2, 3rd Floor
North Block, Skyway House
3 Sham Mong Road
Tai Kok Tsui, Kowloon
Hong Kong
Tel.: 2565 6151
Fax: 2565 6681
mailto:bosch.hk.service@bshg.com
www.bosch-home.cn
SG Singapore,
BSH Home Appliances Pte. Ltd.
TECHPLACE I and
Mo Kio Avenue 10
Block 4012 #01-01
569628 Singapore
Tel.: 6751 5000
Fax: 6751 5005
mailto:bshsgp.service@bshg.com
www.bosch-home.com.sg
17
Page 18

Disposal information
This appliance is labelled in accordance with European
Directive 2012/19/EU concerning used electrical and
electronic appliances (waste electrical and electronic
equipment - WEEE). The guideline determines the
framework for the return and recycling of used
appliances as applicable throughout the EU.
Packaging
The packaging is designed to protect the vacuum cleaner from being damaged during transportation. It is made of
environmentally friendly materials and can therefore be recycled. Dispose of packaging that is no longer required at
an appropriate recycling point.
Old appliance
Old appliances still contain many valuable materials. Therefore, please take appliances that have reached the end
of their service life to your retailer or recycling centre so that they can be recycled. For current disposal methods,
please enquire at a retailer or your local council.
Disposal of filters and dust bags
Filters and dust bags are manufactured from environmentally friendly materials. Provided they do not contain
substances that are not permitted in household waste, you can dispose of them with your normal household
waste.
18
Page 19

T
A
T
A
p stcduorPne
ONISMISOMC„
GELE DON
LUGE RDE
(ONI
he tgninrce contehe sonitacfiicep
he
“3102/56o 6N
)UE
a) (b)
(
(g)
(e)
b)
(
(c)
(c)
(d)
(h)
(f)
en k:ade marrT
(a)
(c)
(d)
(e)
(f)
en gy Efficiency clasEner
en Indication of annual ener
ctual annual ener A
en Cleaning per
en Cleaning per
k:
(b)
en Model Identifier
s:gy Efficiency clas
ear), based on v (kWh/y
he appliance is used.w t on ho
he appliance is used.
acuuming 50 times. ear), based on v
acuuming 50 times.
tion pgy consumIndication of annual ener
tion will depend pgy consumctual annual ener
tion will depend
:tpes carmance clasorfCleaning per
:Model Identifier
s:d floors harmance clasorfCleaning per
(a)
(c)
(d)
(e)
(f)
(g)
(h)
(i)
(b)
en e-emist rDus
(g)
en wSound po
(h)
(i)
en put poed inatR
s:sion clase-emis
el:ver lew
:erwput po
19
Page 20

Conditions of guarantee
For this appliance the guarantee conditions as set out by our representatives in the country of sale apply. Details
regarding same may be obtained from the dealer from whom the appliance was purchased. For claims under
guarantee the sales receipt must be produced.
20
Page 21

ȉ
ȉǥɾm
ǸɦĚɹ
Ȥ´ƞǦɎȫǟ,ǏȆəɧɩɥɦȮ:
ȉǥɾm
ɴĉɟɦ
ɢʀʁ
ɑɂé5ɨǑɵ
ĪȓąƥƠGL40ɧɩɥɫ
ȬǹȊǝȤGL40êŤưɦɪP¸DZɑǂȸǑɗȿǸɦȮȓɨ
ŀēɫɢũȥɟɦȶɧɩɥǚɦɨƥƠǧǐȸȣɪɔǷȰǞ
ƶɧɩșȻɫ
ɢ'ɋŖȬǹȊǝɫɉȻəȶɧɩɥǔƁ%ħƵɪɢƫɊ
ǔƁȬǹȊǝɫ
Ȭɥļ±ȮƵŜ ȱƄƕMȍ6ǽɟɦɫȬɥǸǿɕyDž
ǞǪțƔ¢ȚȚȚțŰɔɅɟɦɫț
ļɣȳȎɟɦǹȊǝɌɨȨȈɟɦȬɧɩɜɫ
ɧɩɥȥDzȸǿɔɅɟɦ:
ǧǰȸȣɗBȸȣ
ɘɈƵɗȇɇ
ɧȃ
- ^ÇɗÈÊɫ
- ŬƌɀėĴɀĊžɗlžɨɇɐɫ
- ĝğɗwqɨɇɐɫ
- KŨĀeɗdjɨɇɐɎǵøɫ
- LjbɎǽ=Ń\ê#dzɨȒȱ£iȒɫ
- ɁĸɥɎ½ĸɥɨ3ɩɫ
ɢȕȨȈaɌȔŤɨnjöɒƻǒɎɟɦɧɩɥɫ
ǏȆɕüȸǑɩɞɗǖɜɀȘɁɋȼɗƿǵɝɠɊɧɩɫ
=>ûɣɑĦɧɩɥȫǟɫ
ɟɦȯɚɎcȹɓɧɩɊǏȆāɚȑɫ
=>ûɣɑņÌǦ!
ĠƣJôɧɩɊɪɧɩɥȥDzäljɋijǩɕɟɦŲɅɍɫ
ɢȆɟɦɤȅɗ(ɓCYɧɩɥɫ
ȤȉǥȞăɪɉȻɧɩɥįɤɂȅȫǟ,ɢìãȬŰĺv
VũȑȉƿǿĆöƨģǗȗɫ
ɉɧɩijëXŝɊɪɢəɤȅƭǥȧɆɫ
ɒǏƐɧɩɥɤɂɊɪɢDžƢȪɚɪǏȆȧİɤȅɫ
ɢȆɕėĴǁɌȧİɤȅɪɗĦɤȅÛÔɫ
ɒȤɧɩɥŘɆśřƗǙNJɪɢųDžƢɤɂȪɚɫ
ɢȆɟɦƲȫǟɨɧɩɥɫɉĊɏljĩĕɪɢǏƐɧ
ɩɥɤɂɫ
ȤȉǥȞăɪĹɏȬŰĺƨģƑɣɔŷƗɎǗȗɧɩɥȸ
ȣɫ
ɢɋȼ@ɧɩɥɪȆZªɕoÅ<ǵɅɪȱĝğɎǒāž
ɂɨɡɍɫ
ɢȆżŨĀɇɐɗȝæɇɐɕɝɠɌ(ɩɞɀȘɁɋȼ
ɝɠɀƿǵɝɠȏ)ɫ
ȶɧɩɥȿǸǿɕƂęȋɡɟɦɫ
=>ɧȃƂęɣɑǜȫǟɧɩɥɫ
ȿɟɦɊɢȽƢɧɩɥɫ
džɧɩɥɨőŶƭ)ɊɪīŕǀĽƞɟɦɪǾɄɔǸdžɨ
ɍƇǢȁɫ
ȶɧɩɥ;ǿčɣɨƨěnjĚɎČȽɨȉǥ
ĵɫ
ɕǦšċɪɗƲŧȨņɉřȉǥɟɦɪȱȂ
ƚɟɦȶdzȢɨrɕŬƌɅɪȶdzȢɣŃ8E
ɔɌƪƹɪȱƣȇȿƙɀĪâɗ]ǯÍɪ
ȱ¾¶äèɗɨƵɟɦɫ
ƪƹúȿɣəȶdzȢdžŘȠɫ
ɕ}ɏšċĩĕɅɪƪƹúȿɣɔɘɈȱŷ
ƗȶdzȢɫ
ŹƓɞɎÓÉɕŧǢȁNJȥDzǩȁȮ«ƪ
ƹɨţȁɫ
=>ɏmɨŬƌɫ
!
ɤɂȪƼȥDzɏƧƺ16ȉ0Ɛƒɜɋȼɫ
ȵȇɧɩɥɊɉȻƐƒɜLɪɣɑŪɏxÀŸǪɤĖɨ
ɤɜƻǒɕƫȖɤƒɌɫ
Ȥ´ƞɤĖƒɪɢɕȵȇɧɩɥNJɦǞĢDZǡɪǾɄ
ɕDŽƣɊƑəDZǡǮǪɫ
ȬɧɩɜȤȸǑįɒɧɩɓĭȖŮɦɧɩɜɫ
ɉȻɒɕɡŽɌǷȰîɛɨɑɂșǡǂɘɈșȻɪɢɟɦɣ
ǗțȗɨưɦɧȺɫ
ɉȻɒɕɏƈƋɎȜŴɨȷɐɡɖɌǷȰîɛɨɑɂșǡǂ
ɘț ɈșȻɪɢɟɦɣǗȗɨȷɐɡɖɧȺɪȿȝɣȄǣǁƎ
ɘɈȯțɚɫ
ť:ɍǣ1ȮIGnjɛŎƝƮŋ"ēŌŌŊūƔȚƬƴLj$ǜȮ
ƔȚƬƴĤŊWƴŐƛĈɔÂĻnjĚƔȚƬȚūƴȚūɱɰɨǤǖɫ
ȨȈǤñɏÖÿɨȔɏŗƲȕȎɮɯɲț ɱɲț ŌȚƴƬƔōƬɭƔȚƬɬ¡Ť
Ɇɫ
¡LjȮçǷDŽǔÙèŪɕȩɩǖɜȤĂɊĠƣɪɕȩɩǖɜÎ
sɊɪȔÿĭçǷDŽǔőŶȥDz7ÃƬȚɫ
21
Page 22

ȓ
ȓɨɧɩɥ
2
3
18
19
20
4
6
7
9
8
5
1110 12
1
1 ɣǮǣɡɖȋȠ(ȝȾɛȍ)
2 ȷɐɡɖȯɚ(ȝȾɛȍ)
3 ǺɓǶǭ
4 ȹȲǺɓ
5 ȹȲɓȝǮǙŔŒ(ȱȾɛȍ)
6 ɤɂȅ
7 ƖƟƩƷ
8 ǼɛŢƆ
9 ƿǵO
10 ɩɞ
22
14
1613 15 17
11 ƿǵɝɠ*
12 ȘɁɋȼɝɠɪɣɘǕ
13 Įż
14 ɩɞǨ
15 ɩɞȭȗȨȈɜ
16 ŖǩƖƟơť(ɕɤɜƸȑ)
17 ȵȽȕƾǂDZǡňƛɜ
18 ƽDZɑɧȺǚɦɨȸȣȾɛƼ
19 ƽDZɑɧȺ
20 ȷɐŵźȯɚ
Page 23

ȭ
ȭȗóȣɎBȸȣ
ɩɞ
ɢʀʁ
ñɟɦǧǐƥƠɩɞɗǜņÌɋ¦ɺșɫ
ȷɐɡɖȯɚ
A
B
A
ȤƯǷȰǞƶȩɩșȻɪtľƂȓɟɦG ALL+ǧǐȩɩ
ɞ(00577549)
Ǥǖ:
- 5 Ǵɩɞɪȝƍȣ
- 1 ǴȀȜɝɠ
!
ɟɦǧǐɩɞɪȓɨɧɩɥƑɑǷȰǞƶɨɘɈșȻɫ
ĹɏɟɦǪȢɐɨǧǐƥƠɩɞɪƑɑǷȰƝƮɑɂé5
ȔéȈɨ8ɑșǡNj*ɀɧǯɎȩɩɑǯɫ
ɉȻɟɦȢɐȿƶɨɩɞ(œɉ+ɞ)ɪəǜńg©ɤɜ
ɟɦőŶɎșɑɫ
ȽȮĈąǧǐƥƠɩɞɨĆÚ,ɢná
www.bosch-home.com/dust-bag
B
ȷɐɡɖɧɩǚɦ
(RɐɡɖɀćŚɀ,-ȏ)
BBZ123HD
23
Page 24

ʂ
¥FɟɦɤɜNJ
ʂ
ʂ
ɿFɟɦ
ʂ
11
Click!
a b
2
1
əǶǭǬɃȹȲǺɓȦǼƧɛţɫ
ȡɒȄɅǶǭɪɢƫɊȕɅǃǴȾɛƍɪǾɄȧɆȹȲǺ
ɓɫ
2
a)əȹȲǺɓǬɃɧɩɥŭɨɃǵȵÄɪşȰǼɛȤƞɫ
b)ȡɒȄɅȹȲǺɓɪɢƫɊȕɅǃǴȾɛƍɪǾɄȧɆǺ
ɓɫ
Click!
3
4
Click!
Click!
3
əǶǭǬɃȹȲɓǤşȰÒŞɫȡɒəǃŲNjȵɪɢQł
ŔŒɄƤȧɆǶǭɫ
4
əȹȲɓǬɃɡɖȋȠɨƻǒȑNjɪşȰǼɛȤƞɫȡɒ
əǃŲNjȵɪɢȕŞȾɛȍȦȧɆȹȲɓɫ
24
Page 25

ɿFɟɦ
ʂ
ʂ
ʂ
ʂ ȵ&ɎȽĐ
5
6*
Click!
5
ȳȎȐɚɍȟĄȇǮǙŔŒƅuȇȕƾɔƚǼȹȲɓȦǮ
ǙȔȴĒǎɫ
6*
əƽDZɑɧȺȉǰɕȸȣƼɌɪǾɄ>ɕɧɩɓɗȹȲɓ
Ɍɫ
7
7
8
~ŞȪɚɪǍǘȔȴĒǎȧɆɤɂȅɪǾɄəȪɚȪɃɤ
ɂȪƼǽɫ
8
ȳȎȐɚɍȟȕɅȵȽȕƾɪɔ&ȇɧɩɥɫ
25
Page 26

ʀʁ
ɿFɟɦ
ʂ ňƛɧǯ
ɧɩ
ʂ
9
9
ȡɒǮŸȔȴɧǯɪɢȳȎȐɚɍȟʼnǔňƛʼnƾɫ
Ģɧǯ =>
ɘȂÝɇȢɪœɉŻŽ¨ɀþĘȏɫ
ǽȏɧǯ =>
ŐljɘȂƺȒɩɫ
Ǫɧǯ =>
ɘȂƱɨɡɖàŭɇɀȷɐɡɖɎƄljò÷ɨLJ
ǫɫ
:
!
ɡɖȋȠǜǦȰȖɛŗǎɨƱȫɪǍǘɡɖɨȷǎűɛ(œ
ɉLJǫ2.ɨćŚ)ɫǠȶɪď®ȖAɊƈȥDzHùɡɖȋ
ȠɨƸȑɫɡɖȋȠƸȑǠƱȫȔǻǛɨŇºLJǫɗǜǻ
ǛIJÐɗ¹¤ɡɖȏæ!ɨȷɐɡɖLJǫǦȫɫǠƱȫɨ
ɡɖȋȠȔǻǛɨȫǟɪŦǻƕəȿśřśɫ
10
10
ơɛɣǮǣɡɖɧȺ:
ɡŻɗɡŽ =>
ȷɐɡɖ =>
ȡɒɧȞŸńɨɇȣɪɢĉčɇȣƲƻëɡɧȞɪű¯Ȧñå
ƘɧɩưɫȓɣɔǍǘȴɒıȞɧȺɪȭŨȮɧɃȒɩɫ
26
Page 27

ɧ
ɧɩ
ʂ
ʂ ɟɦȸȣɧɩ
ʂ
Ǫȯɚ
11*
11*
a
d
b
11*
c
2
1
1
ǍǘȴɒɪɕɧɩɓɗǶǭɌȉǰɧȺ:
a)ǸǿɘȂŴƋɎßÑȏɨŇɚɧȺ
b)ǸǿǺŻŵźɀþĘȏɨŅǤɧȺ
c)ȷɐŵźȯɚǚɦɨŅǤɧȺ
d) ȷɐɡɖɧȺ
ō ȝɣȄǣǁƎɘɈȯɚŏ
ȷɐɡɖLJǫŎŚɀIJǒɡɖȏŋ
ō ȿȝɣȄǣǁƎɘɈȯɚŏ
ǸǿɘɈƈƋǂȜŴǽɨȒɩ
ȳȐɚɍȟłɅǃǴȾɛƍɪǀɣȄɅǁƎɘɈȯɚ
ČȽɨɟɦɎŷȼǹȊɪɢϵǪȯɚ¬²ɨǹȊǝɫ
12
13
12
ȡȓp[ĽɧɩɪɣɔɟɦɧɩɥɄɍɨƖƟƩƷɫ
ȽĐɤɜɄɪəɡɖȋȠɌɨƩƷǬɃɤɜɄɍɨĶíɫ
13
ɤɜɌɏȖǴĮżɪɍƙĞ°ôȏɇɫ
27
Page 28

ɟɦɄ
ʂ
ʂ
ȭȗɝɠ
ʀʁ:ȭȗɝɠNJȥDzəɤɜȽƢɫ
ȭȗɩɞ
ʂ
14
15
a
a
b
b
14
a)ɢDžƢɤɂȪɚɫ
b)()ɫ
15
ȡɒǩȁƅDŽýɤɜɪȓɣɔɟɦɤɜƸȑɨŖǩƖƟơťɫ
a)əɤɜŕȞɫ
b)əɡɖȋȠɌɨƩƷǬɃɤɜɄɍɨĶíɫ
16
!
16
fDƯǞǪɧȌƦɧȌz¼ɡǫıȞ`ɪɉȻƳ
ɌɨȩȌɞȭƜȨȈɜƭǥĻƊɪ³ɪǀƙȩȌɞɣɑ
ĔɏĜƊɪĬȥ§ȭƜȩȌɞɫLj·ưĂɧɃɨȒ
Ȍ4ŀȿȖɪǀƙȩȌɞĔɏĜƊɪĬɣɑȴɒȭƜɫ
¥ųNùɧȺɀɧȌɓɎ{ÆɓŪÕŁƘɪɉɏŁƘÞ
ɣɑÜËȩȌɞȭƜȨȈɜɫ
ųəǶǭȄƀɪǀɣȃɆåƘɇøɫ
28
Page 29

ʂ
ȭȗɝɠ
ɢʀʁ:ɉȻñǩɃɩɞɪŭƳəüƇȽɌɫ
ʂ ɁȵŭƳ
a b
17
18 ab
17
a)ȳȐɚɍȟȧȞǼɛŢƆɫ
b)ȳȐɚɍȟɁȵŭƳɫ
18
ʂ
a)ȧȞɩɞɨ×ɆȑNjɔȽɌɩɞɫ
b)ȃɆɩɞɫ
18
cd
c)ǩɃƏɩɞɫ
d)əɩɞǬǓȾɛĎɫ
!
29
Page 30

ɘɈȘɁɋȼɝɠ
ʂ
ʂ
ȭȗɝɠ
ɘ
īɛTɘɈȘɁɋȼɝɠɌɍɨȒɩɪȦɦƦſǕɫ
19ba
19 c
24h
d
19
17
ɁȵɩɞǨɫ
a)ɢȳȎȐɚɍȟɪəȘɁɋȼɝɠLjǫƚƀȾɛȦȃɆɫ
b)ɘȂȘɁɋȼɝɠɌɨȒɩɫ
c)ɉȻȘɁɋȼɝɠƄljò÷ɪɢɔƦſǕɫ
ɝɠȴɒƧƺ24ŝɊïƉɫ
d)ɘǕƭǛɄɪəȘɁɋȼɝɠƏǰǓȦǼɛɪǾɄȽɌ
ɩɞǨɫ
30
Page 31

ȭȗƿǵɝɠ
ȝȀȜɝɠɨɧɩɥ
ʂ
ʂ
a
20*
b
ɢȳȎɝɠǗȗķɨȨȈȭȗ
20*
ɁȵɩɞǨɫ
a)ȳȎȐɚɍȟȄɅɝɠȾɛɜɫ
b)ȃɆȀȜɝɠɫ
17
20* c
20*
d
24h
e
c)ȓɣɔɦƦſǕȀȜȀɠɫ
ɝɠȴɒƧƺ24ŝɊïƉɫ
d)ȃɆȀȜɝɠɫəƏɨȀȜɝɠǰɃɤɜǽɫ
e)ȪɃɝɠȾɛɜȦȾɛɫ
31
Page 32

ȼȂ
ǏȆɟɦȝɶƱșȻɨɇȢɀɸɷɘɈ¿ɗħɘɈdzȢɫǏȆəɧɩɥɳɕƦǽɫ
ȝ
ɝɠɨɧɩɥ
ʂ
ʂ
ȭȗƿǵɝɠ
21*
ȼ
ɧɩɥȡȸǑHEPAɝɠɪĵȥDzďĤȭȗȖFɝɠɫ
a
b
ɁȵɩɞǨɫ
a)ȳȎȐɚɍȟĄȇǼɛŢƆɔƚȵHEPAɝɠɪǾɄȃɆɝ
b)əƏɨHEPAɝɠǰɃɛţɫ
ɘȂȜȀȒɩɄɪɢɘɈȘɁɋȼɝɠɪȦǍǘȴɒȭȗȀȜ
ɝɠɗHEPAɝɠɫ
HEPA
21*
ɠɫ
17
ɘɈɧɩɥNJɪɢũȥȽĐɧɩɥɤɂȦDžɅȪɚɫȓɣɔɟɦȖŮŹðɘɈ¿ɋ¦ɧɩɥɎŹðȸȣɫ
!
ɉɏȴɒɪɣɔɟɦħɧɩɥɘɈɩɞǨɪɗɦƉƅɩȯɘɈɫ
ȬǹȊǝɣɑǠƨěȭűƗSɫ
32
Page 33

ɽɻ
ƏÃɼ
vVũ
GB Great Britain
BSH Home Appliances Ltd.
Grand Union House
Old Wolverton Road
Wolver ton
Milton Keynes MK12 5PT
To arrange an engineer visit, to order spare parts and
accessories or for product advice please visit
www.bosch-home.co.uk
or call
Tel.: 0844 892 8979*
*Calls from a BT landline will be charged at up to
3 pence per minute. A call set-up fee of up to 6 pence
may apply.
ɽ
HK Hong Kong,
BSH Home Appliances Limited
Unit 1 & 2, 3rd Floor
North Block, Skyway House
3 Sham Mong Road
Tai Kok Tsui, Kowloon
Hong Kong
Tel.: 2565 6151
Fax: 2565 6681
mailto:bosch.hk.service@bshg.com
www.bosch-home.cn
SG Singapore,
BSH Home Appliances Pte. Ltd.
TECHPLACE I and
Mo Kio Avenue 10
Block 4012 #01-01
569628 Singapore
Tel.: 6751 5000
Fax: 6751 5005
mailto:bshsgp.service@bshg.com
www.bosch-home.com.sg
33
Page 34

Ǣ
ǢȁĆÚ
ķǰ
ůɤɜ
Ǣȁɝɠȱɩɞ
ȶɧɩɥǦƝƮ2012/19/EUɏȽůɤɜȱɤƳdzȢ(ƃǢɤ
ɜɎɤƳơǑ– WEEE)ȨĥšɓɪØȨĥĉŕƯǸɦȮǙǴ
ƝƮɨůɤɜǓŠɎƤǻɨnj?ƛǎɫ
dzȢķǰ_ɕɋȼɧɩɥȮDŽĞŗǽȿǦȫǟɪɔȍɋõƓŦǛɪǠȶɣŧĨȍƤǻɪȿƤȴɒ|ǚđɨǓŠǢȁɫ
ůɤɜÁ»ɏhƽɣɦɨɇƓɫǠȶɪɢəüƇɟɦɨɤɜýƁóĿƕɗǓŠǽkɪľɣĨȍɤǻɫ
ɏȽNJɨǢȁɍƇɪɢìãóĿƕɗdžɡɏȽUȑđɫ
ɝɠȱɩɞɔȍɋõƓŦǻɫƀƯȝɏȿɑɔŜġƃɇǢȁɨɇɐ9ɪɝɠȱɩɞ/ɣdžŘȖŮŜġƃɇĎȂ
34
Page 35

35
Page 36

36
Page 37

37
Page 38

38
Page 39

39
Page 40

neungr
unungtareB
40 41 7190D
0 550 5180A
0 550 5180A
0 048 8480H C
erl alentadtaktno KeiD
040 04
110 5
110 5
040 0
öt Sie bgartfuaurtarape Rd un
u Kendengeilie bm iei Sendn fierdän Ler
.sinhciezerV-tsenidendnu
h Hcsot BreboR
aßtrS-yreW-larC
hom-hcsob.www
4 3eaß
nehcnü9 M3718
YNAMRE, Gn
com.ehom
8001111035
980416
Hbme Gtäregsuah H
 Loading...