

Page 1
Moodpic 1
Moodpic 1
63,2 x 50,25mm
63,2 x 50,25mm
CMYK & GREY
CMYK & GREY
Register your new Bosch now:
Register your new Bosch now:
Register your new Bosch now:
Register your n
www.bosch-home.com/welcome
www.bosch-home.com/welcome
www.bosch-home.com/welcome
www.bosch-hom
Moodpic 2
Moodpic 2
98,6 x 46,7mm
98,6 x 46,7mm
CMYK & GREY
CMYK & GREY
r new Bosch now:
home.com/welcome
BCH7
tlethA
...H 6CB
hcuarbeGde
oitcurtsnIen
ngutienlas
lnua ma
n
oilmp
mpe’ dedoMfr
osu’r lei p
i pnoizurtsIit
askuirbeGnl
ivnasgurBda
isvnaskurBno
gnizjiwnaa
gnnis
nginis
isvnaskurBsv
nginis
ejhotötyäKfi
e
onicucrtsInes
so u deseon
seõuçrtsInpt
ρ χςίεγηδΟel
ı kmınalluKrt
obsajckurtsInpl
oçivr se de
ςησήρ
uuzavlı
iguł obs
ar
ástíast u
italánzasHhu
я зиназакУbg
яіцкуртснІuk
ицкуртснИru
ацтауплскэ
nuiţcurtsnIro
абертопа уя з
їіцатаулпс ек з
о пя и
ииац
erailizt ue din
Page 2

2
Page 3

Intended use . . . . . . . . . . . . . . . . . . . . . . . . . . . . . . . . 5
Safety information . . . . . . . . . . . . . . . . . . . . . . . . . . . . 6
Proper use . . . . . . . . . . . . . . . . . . . . . . . . . . . . . . . . . . 7
Your vacuum cleaner . . . . . . . . . . . . . . . . . . . . . . . . . 10
Before using for the first time. . . . . . . . . . . . . . . . . . 12
Plugging the handle onto the main housing . . . . . . . 12
Plugging the appliance into the floor tool . . . . . . . . 12
Charging . . . . . . . . . . . . . . . . . . . . . . . . . . . . . . . . . . . 13
Charging the battery. . . . . . . . . . . . . . . . . . . . . . . . . 13
Battery charging status indicator . . . . . . . . . . . . . . . 14
Vacuuming . . . . . . . . . . . . . . . . . . . . . . . . . . . . . . . . . 14
Switch On/Off. . . . . . . . . . . . . . . . . . . . . . . . . . . . . . 14
Controlling the suction level. . . . . . . . . . . . . . . . . . . 15
Transport . . . . . . . . . . . . . . . . . . . . . . . . . . . . . . . . . 16
Vacuuming with accessories. . . . . . . . . . . . . . . . . . . 16
Switching off the appliance . . . . . . . . . . . . . . . . . . . 18
When the work is done . . . . . . . . . . . . . . . . . . . . . . . 19
Parking . . . . . . . . . . . . . . . . . . . . . . . . . . . . . . . . . . . 19
Switching off the appliance . . . . . . . . . . . . . . . . . . . 19
Emptying the dust container . . . . . . . . . . . . . . . . . . 20
Removing the dust container . . . . . . . . . . . . . . . . . . 21
Taking out the filter unit . . . . . . . . . . . . . . . . . . . . . . 22
Inserting the dust container . . . . . . . . . . . . . . . . . . . 23
Disassembly . . . . . . . . . . . . . . . . . . . . . . . . . . . . . . . . 24
Releasing the handle . . . . . . . . . . . . . . . . . . . . . . . . 24
Releasing the floor tool. . . . . . . . . . . . . . . . . . . . . . . 24
Table of content
3
Page 4

Filter care. . . . . . . . . . . . . . . . . . . . . . . . . . . . . . . . . . 25
Sensor Control . . . . . . . . . . . . . . . . . . . . . . . . . . . . . 25
Cleaning the outer filter unit . . . . . . . . . . . . . . . . . . 26
Cleaning the filter cartridge or changing the filter . . . 28
Cleaning the floor tool. . . . . . . . . . . . . . . . . . . . . . . . 29
Cleaning the floor tool . . . . . . . . . . . . . . . . . . . . . . . 29
Care . . . . . . . . . . . . . . . . . . . . . . . . . . . . . . . . . . . . . . 30
Malfunctions and Costumer Service . . . . . . . . . . . . . 31
Disposal . . . . . . . . . . . . . . . . . . . . . . . . . . . . . . . . . . . 33
Conditions of guarantee . . . . . . . . . . . . . . . . . . . . . . 34
Table of content
4
Page 5

Safety information
Please keep this instruction manual for future reference.
When passing the vacuum cleaner on to a third party,
please also pass on this instruction manual.
Intended use
This appliance is intended for domestic use only, not
for commercial use. Only use this vacuum cleaner in
accordance with the information provided in this
instruction manual.
In order to prevent injuries and damage, the vacuum
cleaner must not be used for:
Vacuuming persons or animals
Vacuuming up:
- hazardous, sharp-edged, hot or glowing substances.
- damp or liquid substances.
- highly flammable or explosive substances and gases.
- ash, soot from tiled stoves and central heating
systems.
- toner dust from printers and copiers.
5
Page 6

Safety information
Safety information
This vacuum cleaner complies with the recognised rules
of technology and the relevant safety regulations.
The appliance may be used by children over the age
of 8 years and by persons with reduced physical, sensory or mental capacity or by persons with a lack of
experience or knowledge if they are supervised or
have been instructed on the safe use of the appliance
and the have understood the potential dangers of
using the appliance.
Children must never play with the appliance.
Cleaning and user maintenance must never be carried
out by children without supervision.
Plastic bags and films must be kept out of the reach of
children and disposed of.
=>There is a risk of suffocation.
6
Page 7

Safety information
Proper use
The charging cable must only be connected and operated as specified on the rating plate.
The appliance must only be stored and charged indoors.
Do not expose the appliance to temperatures below
0 °C or above 40 °C.
Never vacuum without the dust bag or dust container,
motor protection or exhaust filter.
This may damage the vacuum cleaner.
Keep the vacuum cleaner away from your head when
using nozzles and tubes.
=> This could cause injury.
Do not use a damaged charging cable. Replace it with
an original charging cable.
When disconnecting the charging cable from the
mains, pull the plug itself to remove it; do not pull on
the power cord.
Do not pull the charging cable over sharp edges or
allow it to become trapped.
Before carrying out any work on the vacuum cleaner,
switch off the appliance and disconnect it from the
charging cable and the mains.
Do not operate the vacuum cleaner if it is damaged.
If a fault is detected, switch off the appliance and disconnect it from the charging cable and the mains.
For safety reasons, only authorised after-sales service
personnel are permitted to carry out repairs and fit
replacement parts to the vacuum cleaner.
7
Page 8

Safety information
In the following cases, you must stop the appliance
immediately and contact the after-sales service:
If you have accidentally vacuumed up some liquid or
liquid has entered the inside of the appliance;
If the appliance has been dropped and damaged.
Protect the vacuum cleaner from outside weather conditions, moisture and sources of heat.
Do not pour flammable substances or substances
containing alcohol onto the filters (dust bag, motor
protection filter, exhaust filter, etc.).
The vacuum cleaner is not suitable for use on construction sites.
=> Vacuuming up building rubble may damage the
appliance.
Switch off the appliance when it is not in use.
8
Page 9

Safety information
! Batteries
Your appliance is fitted with lithium-ion batteries which,
for safety reasons, are only accessible to professional
repair specialists.
For battery replacement, please contact your nearest
after-sales centre or an authorised specialist dealer.
Notes on transport
The lithium-ion batteries in the appliance are subject to
the requirements of dangerous goods legislation. The
batteries can be transported by the user by road without any further requirements. In the event that they are
dispatched by a third party (e.g. transported by air or
freight carrier), special requirements regarding packaging and identification must be met. In this case, a dangerous goods expert must be consulted when preparing
the goods for dispatch.
9
Page 10
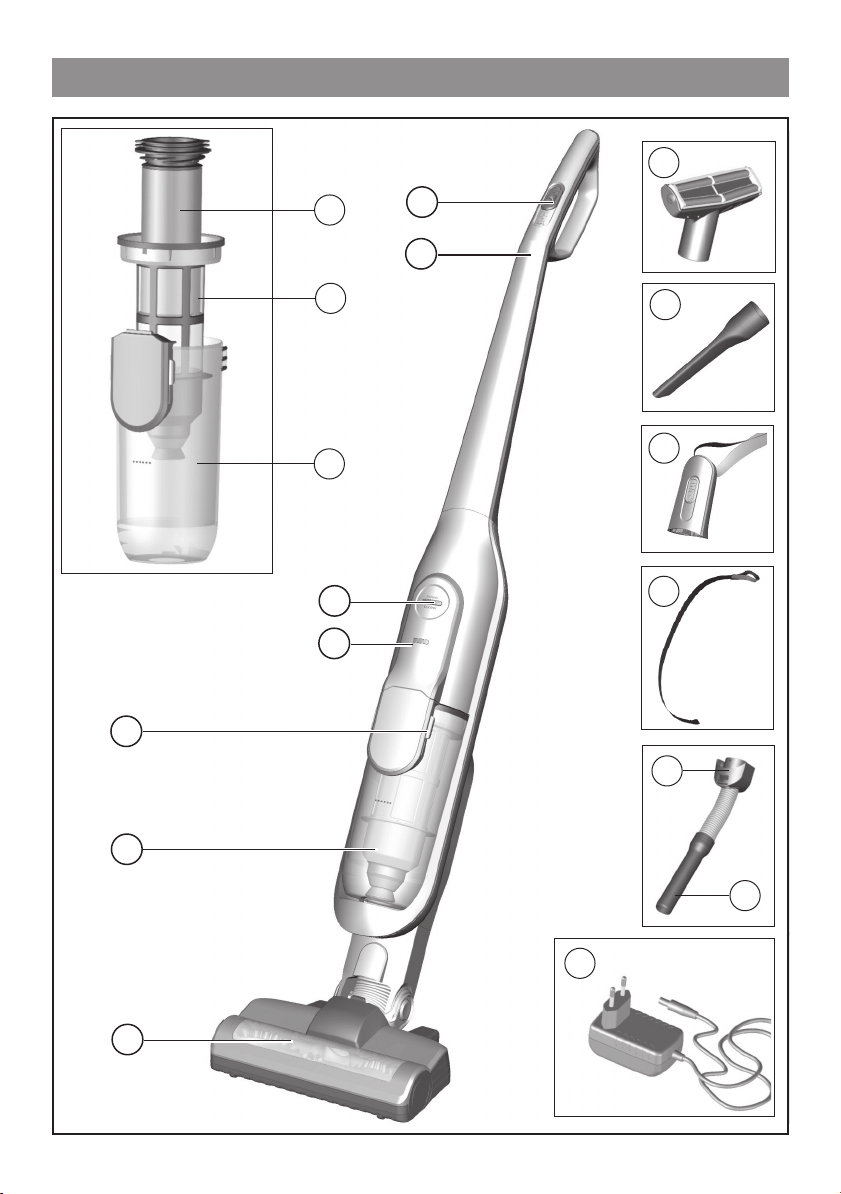
Your vacuum cleaner
11
8
7
6
5
4
3
10
9
12
13
14
15
10
2
16
17
1
Page 11

Your vacuum cleaner
Floor tool with electric
1
brush
Dust container
2
Dirt container release
3
button
Battery charging status
4
indicator
Sensor Control indicator
5
Dust container
6
Outer filter unit
7
Filter cartridge with motor
8
protection filter and foam
filter
On/off switch
10
Professional upholstery
11
nozzle
Professional crevice
12
nozzle
Short handle
13
Carrying strap
14
Accessory adapter
15
Flexible hose with handle
16
Charging cable
17
9
Handle
11
Page 12

Before using for the first time
1
2
Click!
Click!
Plugging the handle onto the
main housing
Figure
● Carefully plug the handle onto
1
the main housing and lock into
place.
Plugging the appliance into the
floor tool
Figure
● Plug the hand vacuum cleaner
2
into the floor tool and lock into
place.
12
Page 13

Charging
3
Caution!
Before using the vacuum cleaner for the first time, the batte-
1
ries must be charged for at least
6 hours.
Charging the battery
Figure
● To charge the vacuum cleaner,
3
place it near to a socket. The
appliance can be left standing
2
anywhere in the room. Figure
● Plug the charging cable into
10
the connection at the rear of the
appliance.
● Plug the charging cable plug into
the socket.
● The charging indicator flashes
during the charging process.
● Once the battery is fully
charged, the charging indicator
lights up in blue and no longer
flashes.
● It is normal for the charging
cable and hand vacuum cleaner
to become hot and not a cause
for concern.
13
Page 14

Charging
Battery charging status indicator
4
Vacuuming
5
Figure
The indicator shows the charging
status of the battery.
4
Battery fully charged
Battery semi-charged
Battery low
● When the indicator flashes, the
battery must be recharged.
Switch On/Off
Figure
● Move the on/off button in the
direction of the arrow.
5
14
Page 15

Vacuuming
6
Controlling the suction level
Figure
● To change the suction power, slide
1
2
3
the on/off switch to the desired
position:
6
Power level 1 1
Vacuuming without the electric
brush switched on.
For simple cleaning tasks like curtains and particularly low operating noise. Not suitable for carpets.
The appliance achieves the maximum run time at this level.
Power level 2 2
Vacuuming at normal power and
with the electric brush switched
on.
For normal cleaning tasks at an
average run time.
Power level 3 3
Vacuuming at full power and with
the electric brush switched on.
For particularly demanding cleaning tasks on all surfaces (carpets, in particular) and when
using an optional accessory. The
appliance achieves a shorter run
time at this level.
15
Page 16

Vacuuming
7
8
Transport
Figure
To overcome obstacles, e.g.
●
7
steps, the appliance can also be
carried by the handle on the
appliance body.
Vacuuming with accessories
Attention!
For vacuuming with accessories
slide the on/off switch to the
highest level (level3)
16
Figure
Fasten the carrying strap to the
●
8
adapted short handle.
Remove the long handle from the
●
main housing.
2
1
Page 17

Vacuuming
8
Figure
● Plug the short handle onto the
8
main housing and lock into place
Click!
Press the release button and pull
●
down the floor tool.
2
1
Click!
Plug the accessory adapter into
●
the hand vacuum cleaner and
lock into place.
17
Page 18

Vacuuming
9
Figure
9
Fit nozzles as required to the flexible
hose with the accessory adapter
handle:
● Upholstery nozzle for vacuuming
upholstered furniture, curtains,
etc.
● Crevice nozzle for vacuuming
crevices and corners, etc.
18
● Handle of the flexible hose to suck
up bigger dirt particles or small
pieces, like cullets, paper clips, etc.
Page 19

When the work is done
10
11
Parking
Figure
10
During short pauses in vacuuming,
the appliance can be left standing
anywhere in the room. To do this,
tilt the vacuum cleaner forwards
slightly in the direction of the
nozzle.
Caution!
When the appliance is left standing, it must be switched off,
because if the brush is turning
while the appliance is standing
still, it could cause damage to
the floor covering.
Switching off the appliance
Figure
Switch off the appliance after
●
11
vacuuming.
19
Page 20

When the work is done
12
Emptying the dust container
Figure
12
In order to achieve the best
possible vacuuming results, the
dust container should be emptied
after every use or, at the latest,
when dust at one point in the dust
container has reached the
marking.
We recommend that you not fill
the dust container beyond the
marking, as this leads to
considerable soiling of the filter.
When emptying the dust
container, always check how dirty
the outer filter unit is and, if
necessary, clean it as detailed in
the "Cleaning the outer filter unit"
instructions. Figure
19
20
Caution!
The filter can only be cleaned if
the appliance is switched off.
Never vacuum without the outer
filter unit and its fitted filter cartridge.
Page 21

When the work is done
13
Removing the dust container
Figure
Using the release button, unlock
●
13
the dust container and remove it
from the appliance.
21
Page 22

When the work is done
14
Taking out the filter unit
Figure
● Take the filter unit out of the
14
dust container.
● Empty the dust container.
22
Page 23

When the work is done
15
Inserting the dust container
Figure
● Remove any dirt which may have
15
been lodged underneath the
container ejector opening.
● Insert the filter unit into the dust
container, making sure it is
correctly seated.
Click!
● Insert the dust container in the
appliance, so that it 'clicks'
audibly into place.
Caution!
If you notice any resistance
when inserting the dust container, check that the filter is complete and that the filter unit and
dust container are correctly seated.
23
Page 24

Disassembly
16
17
Releasing the handle
2
Figure
● To release the handle, press the
16
release button and carefully lift
1
the handle upwards to remove it.
Releasing the floor tool
Figure
● To release the floor tool, press
2
the release button and pull the
17
hand vacuum cleaner out of the
1
tool.
24
Page 25

Filter care
18
Caution!
The filter can only be cleaned if
the appliance is switched off.
Your appliance is equipped with a
"Sensor Control" function.
This function constantly monitors
whether your vacuum cleaner is
working at its optimum power
level. The indicator light lets you
know when you need to clean the
filter cartridge, so that the appliance can reach its optimum power
level once more.
Sensor Control
Figure
18
The indicator lights up blue or is
off when the appliance is working
at its optimum level. Once the
indicator turns red and flashes,
the outer filter unit and filter cartridge must be cleaned.
The appliance is automatically
adjusted to power level 1.
25
Page 26

Filter care
19
b
a
Cleaning the outer filter unit
Figure
19
The outer filter unit should be
cleaned at regular intervals in order
to ensure optimum operation of
the vacuum cleaner.
● Please switch off the appliance to
clean the outer filter unit.
● Remove the dust container from
the appliance. Figure
● Take the filter unit out of the dust
container. Figure
● Clean the outer filter unit.
13
14
a) It is usually sufficient to lightly
shake or tap out the whole filter
unit when the dust container is
emptied in order to dislodge any
particles of dirt.
b) If this is not sufficient, you can
use a dry cloth to remove dirt
particles from the surface.
26
Page 27

Filter care
20
b
a
Cleaning the filter cartridge or
changing the filter
Figure
● Switch off the appliance.
● Remove the dust container from
the appliance. Figure
● Take the filter unit out of the dust
container. Figure
20
13
14
a) Turn the filter cartridge lid anti-
clockwise and remove the filter
cartridge from the filter unit.
b) Firstly, clean the filter cartridge
by tapping out the dirt.
c
c) Pull out the foam filter from the
motor protection and rinse separately.
Allow the foam filter and motor
protection filter to dry completely (approx. 24 hours)
27
Page 28

Filter care
20
e
d
Figure
20
d) After fitting the foam filter, ins-
ert the filter cartridge into the
dust container.
e) Insert the filter cartridge into
the filter unit and lock it by turning the lid clockwise.
28
If, after hand-washing the filter
cartridge, the "Sensor Control"
indicator flashes red again, the
filter cartridge is so heavily soiled
that it must be washed in a
washing machine. Use a gentle
programme at max. 30 °C and the
lowest spin speed.
New filters can be obtained from
our after-sales service, if required.
Page 29

Cleaning the floor tool
21
2
b
a
Cleaning the floor tool
Before carrying out any maintenance, switch off the vacuum
cleaner and disconnect it from the
charging cable.
Figure
1
a) Turn the rotary brush anti-clock-
21
wise to unlock it and pull it
sideways out of the floor tool.
b) Use scissors to cut through
threads and hairs wound round
the brush and then remove
them.
c
c) Slide the rotary brush in at the
side of the floor tool and along
the guide bar, and turn it clockwise to lock it in place.
Caution!
1
2
The floor tool must only be put
into operation with the brush
roller fitted.
29
Page 30

Care
Before cleaning the hand vacuum cleaner, it must be switched
off and disconnected from the charging cable. The vacuum
cleaner and plastic accessories can be cleaned with an ordinary
plastic cleaner.
Do not use abrasive materials, glass-cleaning agents or
all-purpose cleaning products. Never immerse the
vacuum cleaner in water.
Subject to technical modifications.
30
Page 31

Malfunctions and Costumer Service
In the following cases, you must stop the appliance
immediately and contact the after-sales service:
If you have accidentally vacuumed up some liquid or liquid
has entered the inside of the appliance;
If the appliance has been dropped and damaged.
In these cases, the electrical safety of the appliance could no
longer be guaranteed, even if no external damage is visible.
Occurring malfunction Corrective action
Electric brush does not
work or makes unusual
noises.
Brush switches off during
suction
Clean brush, and remove foreign
objects if necessary
Check if the brush is correctly
installed and locked in place
If the problem persists, contact
Customer Service
Switch off the appliance and
check nozzle blockage.
Remove blockage and clean the
nozzle.
On carpet choose next lower
power level and start the cleaning
process again.
If the brush cannot be switched
on, contact the Costumer Service
31
Page 32

Malfunctions and Costumer Service
GB Great Britain
BSH Home Appliances Ltd.
Grand Union House
Old Wolverton Road
Wolverton
Milton Keynes MK12 5PT
To arrange an engineer visit, to order spare parts and accessories
or for product advice please visit:
www.bosch-home.co.uk
or call
Tel.: 0344 892 8979*
*Calls are charged at the basic rate, please check with your telephone service
provider for exact charges
32
Page 33

Disposal
Information on disposal
Packaging
The packaging is designed to protect the vacuum cleaner from
being damaged during transportation. It is made of environmentally friendly materials and can therefore be recycled.
Dispose of packaging that is no longer required at an appropriate
recycling point.
Old appliances
This appliance contains rechargeable lithium-ion batteries.
The appliance must therefore only be disposed of by an
authorised after-sales service or dealer.
Batteries
Please follow the notes on transport.
Integrated batteries may only be removed by specialist
personnel for the purpose of disposal. Opening the housing
shell may damage the vacuum cleaner.
To remove the battery from the vacuum cleaner, press the
on/off switch (Fig. 5) until the battery is fully discharged.
Unscrew the screws on the housing and take off the housing
shell to remove the battery.
To prevent a short circuit, disconnect the battery connections
individually one after the other and then insulate the
terminals.
Even in the case of complete discharge, the battery still
contains a residual capacity that may be released in the event
of a short circuit.
33
Page 34

Conditions of guarantee
For this appliance the guarantee conditions as set out by our
representatives in the country of sale apply. Details regarding
same may be obtained from the dealer from whom the appliance
was purchased. For claims under guarantee the sales receipt
must be produced.
34
Page 35

35
Page 36

pe Amoh HcsoB
1 03 0x 8o. BO.P
11 0
hcinu M10178-D
h
yanmerG
hom-hcsob.www
com.ehom
p uore Gcnailpp
8001035297
3608309009
 Loading...