


BHR-2000-Pro
91276070
User’s Manual..................................... |
2 |
Инструкция по эксплуатации............ |
8 |
 English
SAFETY AND OPERATING INSTRUCTIONS
HIGH PRESSURE CLEANER
For your own safety and for the safety of others, please read these instructions carefully before using this appliance.
WARNING! Always read the instruction for electrical products carefully before use. It will help you understand your product more eas-
ily and avoid unnecessary risks. Keep this instruction manual in a safe place for future use.
1. MACHINE DATA
INTRODUCTION
The high pressure cleaner is quick and efficient for cleaning vehicles, machines, boats, buildings, etc., by the removal of stubborn dirt using clean water and chemical detergents.
When using chemical detergents, only use biodegradable types. Only clean vehicle engines in areas in which suitable oil traps are installed.
TECHNICAL SPECIFICATIONS
Voltage |
220 V |
|
|
Input power |
2000 W |
|
|
Working pressure |
130 bar |
Max. pressure water supply |
150 bar |
|
|
Maximum capacity |
7,5 l/min |
|
|
Auto-sucking function |
+ |
|
|
Automatic blocking |
+ |
|
|
Hose |
8 m |
|
|
Power cord length |
5 m |
|
|
Weight |
5,7 kg |
|
|
THE COMPLETE SET INCLUDES:
Adjustable spray nozzle Pressure hose
2. SAFETY INSTRUCTIONS
EXPLANATION OF SYMBOLS
In this manual and/or on the machine the following symbols are used:
In accordance with essential applicable safety standards of European directives
Risk of damaging material and/or physical injuries
Remove plug from the mains immediately if cable is damaged or cut
Read instruction manual
Denotes risk of electric shock
SAFETY INSTRUCTIONS
When using electric machines always observe the safety regulations applicable in your country to reduce the risk of fire, electric shock and personal injury. Read the following safety instructions and also the enclosed safety instructions.
Keep these instructions in a safe place!
ELECTRICAL SAFETY
●Always check if your mains voltage corresponds with the value on the type plate.
●When replacing old cables or plugs: throw away old cables or plugs immediately as soon as new ones have replaced these. It is dangerous to put the plug of a loose cable into the socket outlet.
●When using extension cables:
Only use an approved extension cable that is suitable for the machine’s power. The cores must have a diameter of at least 1.5 mm2. When the extension cable is on a reel, unroll the cable in its entirety.
●All electrical connections e.g. extension cable, must be of an approved waterproof type for outdoor use and marked accordingly. Extension cables must be threecore, one of which is EARTH.
SWITCH OFF THE MACHINE IMMEDIATELY IN CASE OF
1.Malfunction in the mains plug, power cable or damaging of cable.
2.Broken switch.
3.Smoke or stench of scorched insulation.
SPECIFIC SAFETY RULES
The USE and MAINTENANCE manual constitutes an essential part of the cleaner equipment and should be kept in a safe place for future reference. If you sell the cleaner, the manual should be handed on to the new owner.
●Before starting the cleaner, make sure that it is receiving water correctly. Operating the cleaner without water could damage the seals.
●Do not disconnect the plug by pulling on the electrical cable.
●If you are too far from the object you wish to clean, do not move the cleaner nearer by pulling on the high pressure hose; use the handle provided.
●In versions not equipped with TSS device, do not operate the cleaner for more than 1-2 minutes with the gun closed as this could damage the seals.
●Protect the cleaner from freezing during the winter.
●Do not obstruct the ventilation grilles during operation.
●The cross-section of any extension cables used must be proportional to their length, i.e. the longer the extension cable, the greater the cross-section; cables
2
with a protection level of “IPX5” must be used.
●Position the cleaner AS NEAR POSSIBLE to the water supply.
●The packaging is easily recyclable, and must be disposed of in compliance with the regulations in force in the country of installation.
●Use the cleaner only with accessories and replacement parts authorized by the manufacturer. The use of original accessories and replacement parts will ensure safe, trouble-free operation.
●The cleaner must be used standing on a secure, stable surface.
●Avoid unintentional firing of the trigger. Do not carry the lance/ trigger assembly with your hand over the trigger. Always use the trigger lock mechanism.
●Ensure that the safety lock on the trigger is used, when you have stopped using the pressure washer to prevent accidental operation. (fig 5)
SAFETY “MUST NOTS”
-EXPLOSION OR POISONING.
DO NOT use the cleaner with inflammable or toxic liquids, or any products which are not compatible with the correct operation of the cleaner.
-INJURY HAZARD.
DO NOT direct the water jet towards people or animals.
-ELECTRIC SHOCK HAZARD.
DO NOT direct the water jet towards the unit itself, electrical parts or towards other electrical equipment.
-SHORT CIRCUIT HAZARD.
DO NOT use the cleaner outdoors in case of rain.
-INJURY HAZARD.
DO NOT allow children or incompetent persons to use the cleaner.
-ELECTRIC SHOCK HAZARD.
DO NOT touch the plug and/or socket with wet hands.
-ELECTRIC SHOCK AND SHORT CIRCUIT HAZARD. DO NOT use the cleaner if the electrical cable is damaged.
-EXPLOSION HAZARD.
DO NOT use the cleaner if the high pressure hose is damaged.
-ACCIDENT HAZARD.
DO NOT jam the trigger in the operating position.
-ACCIDENT HAZARD.
Check that the data plates are affixed to the cleaner, if not, inform your dealer. Cleaners without plates must
NOT be used as they are unidentifiable and potentially dangerous.
-EXPLOSION HAZARD.
DO NOT tamper with or alter the calibration of the safety valve.
-HAZARDOUS ALTERATION OF OPERATING PERFORMANCE.
DO NOT alter the original diameter of the spray head nozzle.
-ACCIDENT HAZARD.
DO NOT leave the cleaner unattended.
-SHORT CIRCUIT HAZARD.
DO NOT move the cleaner by pulling on the electrical cable.
SAFETY “MUSTS”
-SHORT CIRCUIT HAZARD.
All electrical conductors MUST BE PROTECTED against the water jet.
-ELECTRIC SHOCK HAZARD.
The cleaner MUST ONLY BE CONNECTED to a correctly earthed power supply.
- Use a Residual Current Device (RCD) of not more than 30 mA, at the plug socket when using this appliance.
-INJURY HAZARD.
The high pressure may cause materials to bounce off surfaces at speed; therefore protective clothing and safety goggles MUST BE WORN.
-ACCIDENTAL START-UP HAZARD.
Before doing work on the cleaner, REMOVE the plug.
-INJURY HAZARD.
Before pressing the trigger, GRIP the gun firmly to counteract the recoil.
-CONTAMINATION HAZARD.
COMPLY WITH the requirements of the local water supply company. According to DIN 1988, power-jet cleaners may only be connected to the mains drinking water supply if a backflow preventer valve with drain facility is installed in the supply hose.
-ACCIDENT HAZARD.
Maintenance and/or repair of electrical components
MUST be carried out by qualified staff.
-INJURY HAZARD.
DISCHARGE residual pressure before disconnecting the cleaner hose.
-ACCIDENT HAZARD.
Before using the cleaner, CHECK every time that the screws are fully tightened and that there are no broken or worn parts.
-EXPLOSION AND ELECTRIC SHOCK HAZARD. Only USE detergents which will not corrode the coating materials of the high pressure hose/electrical cable.
-INJURY HAZARD.
ENSURE that all people or animals keep a minimum distance of 16 yd. (15m) away.
SAFETY VALVE
The safety valve also functions as a pressure limiting valve. When the gun trigger is released, the safety valve opens and the water recirculates through the pump inlet.
3. ASSEMBLY
You will need a standard screw driver.
Insert cable hook hold into the machine, as the fig.
3

Align holes on the bottom of the pressure cleaner as shown and tighten the 2 screws, and fit the wheel to the machine, as the fig.
CONNECTION
1.Attach the high pressure hose to the pressure water outlet of the machine.
2.Attach the spray handle to the high pressure hose. Prior to operating the machine please ensure that the high pressure hose has been completely uncoiled. Whilst the machine is in operation the hose MUST not loop.
3.Mount the nozzle or any other equipment you want to use.
4.Connect the machine to the water and power supplies.
INSTALLATION, ELECTRICAL
AND WATER CONNECTIONS
1.pressure cleaner
2.water supply hose
3.water connection
4.water inlet
5.high pressure tube
6.water outlet(backside)
7.spray gun
8.power supply
* No. 2, 3, 8 are not included
PRE-OPERATION
ADJUSTING FAN PATTERN
The angle of spray coming out of the lance may be adjusted on some lances by rotating the nozzle. This will vary the spray pattern from approximately a 0° narrow high impact stream to a 60° wide fan spray.
(See Figure2)
Figure 2 - Adjusting nozzle for fan pattern (not applicable on some nozzle)
A narrow stream has high impact force on the cleaning surface and results in maximum deep cleaning in a concentrated area. However, this narrow high impact spray must be used cautiously, as it may damage some surfaces.
Figure 3 - Narrow high impact stream
A wide fan pattern will distribute the impact of the water over a larger area, resulting in excellent cleaning action with a reduced risk of surface damage, Large surface areas can be cleaned more quickly using a wide fan pattern.
Figure 4 - Wide fan pattern
NOZZLE CLEANING INSTRUCTIONS
A clogged or partially clogged nozzle can cause a significant reduction of water coming out of the nozzle and cause the unit to pulsate while spraying. To clean out the nozzle:
•Turn off and unplug unit.
•Turn off water supply. Relieve any pressure trapped in the hose by squeezing trigger 2-3 times.
•Separate lance from gun.
•Rotate nozzle to the narrow stream setting. This opens up the fan blades.
•Using included tip cleaner, or an unfolded paper clip, insert wire into the nozzle hole and move back and forth until debris is dislodged. (See Figure 5.)
Figure 5 - Insert tip cleaner in nozzle hole and move back and forth until debris is dislodged
4
•Remove additional debris by back-flushing water through the nozzle. To do this, place end of a garden hose ( with water running ) to end of nozzle for 30-60 seconds.
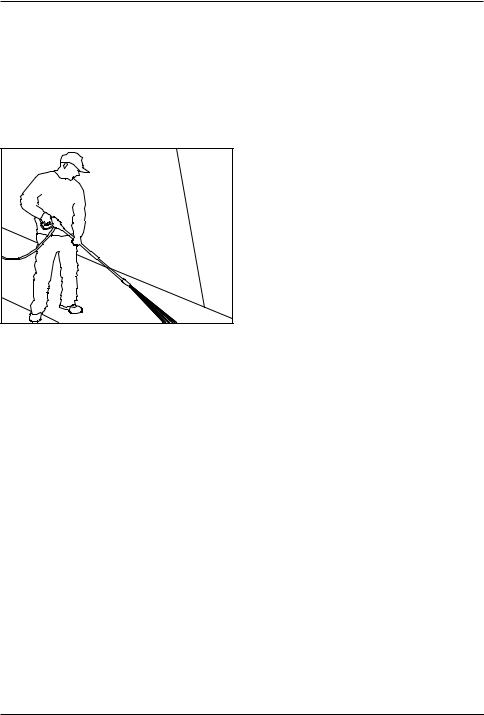
ANGLE TO THE CLEANING SURFACE
When spraying water against a surface, maximum impact is generated when the water strikes the surface “head on.” However, this type of impact tends to cause dirt particles to imbed in the surface, thereby preventing the desired cleaning action.
The optimum angle for spraying water against a cleaning surface if 45 degrees.
Figure 6 - Optimum angle to cleaning surface
Spraying water against a surface at this angle provides for the most beneficial impact force combined with efficient removal of debris from the surface.
DISTANCE FROM CLEANLING SURFACE
Another factor that determines the impact force of the water is the distance from the spray nozzle to the cleaning surface. The impact force of the water is increased as the nozzle is moved closer to the surface.
HOW TO AVOID DAMAGING SURFACES
Damage to cleaning surfaces occurs because the impact force of the water exceeds the durability of the surface. The impact force can be varied by controlling the three previously noted items. Never use a narrow high impact stream or a turbo/rotary nozzle on a surface that is susceptible to damage. Avoid spraying windows with a narrow high impact stream or turbo nozzle as this may cause breakage.
The surest way to avoid damaging surfaces is to follow these steps:
1.Before triggering the gun, adjust the nozzle to a wide fan pattern.
2.Place the nozzle approximately 4-5 feet from and 45 degrees to the cleaning surface, and trigger the gun.
3.Vary the fan pattern spray angle and the distance to the cleaning surface until optimum cleaning efficiency is achieved without damaging the surface.
TURBO NOZZLE
(NOT INCLUDED WITH ALL MODELS)
A turbo nozzle, sometimes referred to as a rotary nozzle, is a very effective tool that can significantly reduce clean-
ing time. The turbo nozzle combines the power of a narrow high impact stream and the efficiency of a 25 degree fan pattern. This swirls the narrow high impact stream into a cone shape that cleans a larger area.
CAUTION: Since a turbo nozzle uses a narrow high impact stream, only use it in applications where the cleaning surface cannot be damaged by narrow high impact spray. Additionally, the turbo nozzle is NOT adjustable and cannot be used to apply detergent.
DETERGENTS
The use of detergents can dramatically reduce cleaning time and assist in the removal of difficult stains. Some detergents have been customized for pressure washer use on specific cleaning tasks. These detergents are approximately as thick as water. The use of thicker detergents, such as dish soap, will clog the chemical injection system and prevent the application of the detergent.
The cleaning power of detergents comes from applying them to a surface and giving the chemicals time to break down the dirt and grime. Detergents work best when applied at low pressure.
The combination of chemical action and high pressure rinsing is very effective. On vertical surfaces, apply the detergent starting at the bottom and work your way upward. This will prevent the detergent from sliding down and causing streaks. High pressure rinsing should also progress from the bottom to top. On particularly tough stains, it may be necessary to use a brush in combination with detergents and high pressure rinsing.
OPERATION
The following cleaning procedure will help you to organize your cleaning task, and ensure that you achieve the most beneficial results in the shortest amount of time.
Remember to use the spraying/cleaning techniques previously listed.
1. Surface preparation
Before starting a pressure wash cleaning job, it is important to prepare the surface that is to be cleaned. This is done by cleaning the area of furniture, and making sure that all windows and doors are closed tight. In addition, you should make sure that all plants and trees adjacent to the cleaning area are protected by a drop cloth. This will ensure that your plants won’t be sprayed by the detergents.
2. Initial High Pressure Rinse
The next step is to spray the cleaning surface with water to clear off any dirt or grime that may have collected on the surface. This will allow your detergent to attack the deep down dirt that has worked its way into the cleaning surface. Before triggering the gun, adjust the nozzle to a wide fan pattern and slowly adjust to the desired spray pattern. This will help you avoid applying too much concentrated spray to the surface which could cause damage.
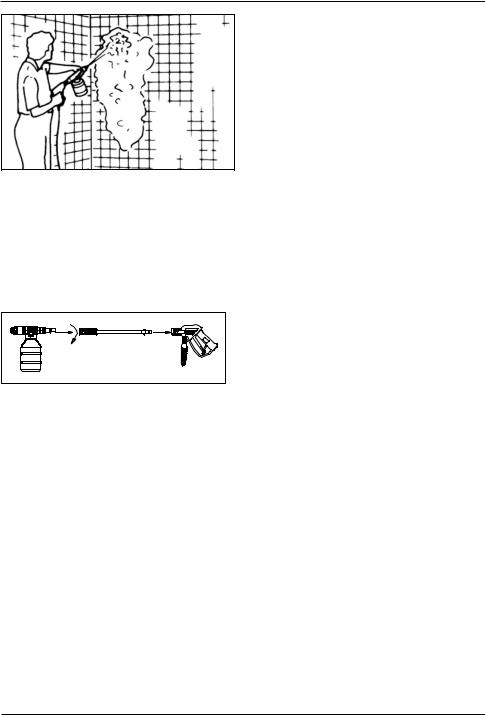
3. Detergent Application
USE THE INSTRUCTIONS APPROPRIATE FOR MODEL PURCHASED
NOTE: Use only detergents formulated for pressure washes.
NOTE: Test detergent in an inconspicuous area before
5
use.
Figure 7 - Detergend application
UNITS WITH DETERGENT APPLICATOR INCLUDED
Follow manufacturer’s label directions for mixing correct concentrations of detergent to water ratio through the pressure washer is approximately 5.4% (1 to 19).
1.Unscrew to top of detergent applicator and fill applicator with detergent.
2.Replace top on applicator.
3.Remove lance from gun.
4.Attach detergent applicator to gun. ( See Figure 8)
Figure 8 - Attach applicator to gun
5.Apply detergent so it thoroughly covers cleaning surface. Apply from bottom to top to prevent detergent from sliding down and streaking.
6.Allow detergent to remain on the surface for a few minutes. This is a good time to use a brush to lightly scrub heavily soiled areas.
Never allow detergent to dry on the cleaning surface.
7.Remove detergent applicator from gun and replace with the lance, or remove applicator from end of lance.
8.Rinse detergent from surface.
NOTE: Flush detergent applicator with clear water following each use.
4. Final Rinse
Start final rinse at bottom an work upward. Make sure you thoroughly rinse the surface and that all detergent has been removed.
5. Shut down
1.Be sure all detergent is flushed from system.
2.Turn off motor.
3.Turn off water supply.
4.After motor and water supply are turned off, trigger gun to depressurize system.
CAUTION: NEVER turn water supply off before turning motor off. Serious damage could occur to the pump and or motor.
WARNING! NEVER disconnect high pressure discharge hose from machine while system is pressurized. To
depressurize, turn motor off, turn water supply off and squeeze gun trigger 2-3 times.
5.After each use, wipe all surfaces of the pressure washer with a clean, damp cloth.
6.Storage
Do not store pressure washer outdoors.
Do not store pressure washer where it might freeze.
TIPS FOR EXTENDING THE LIFE
OF YOUR PRESSURE WASHER
1.Never operate unit without water.
2.Pressure washer is not meant to pump hot water. Never connect to hot water supply – this will significantly reduce life of the pump.
3.Using detergent other than others brand may cause damage to pump components (o-rings, etc.).This also applies to chemicals such as bleach, dish soap, etc.
4.Never operate unit for more than one (1) minute without spraying water. Resulting heat buildup will damage pump.
5.Before adjusting nozzle’s pressure (high-to-low or low- to-high) release trigger. Failure to do so will reduce life of o-rings in lance.
THE SUCTION FUNCTION
You can connect the high pressure cleaner to the water sources such as taps or pump water from other sources without pressure.
To work with the water supply without pressure the suction hose should be removed from the supply and the gun nozzle should be moved to position “Low” (Figure 14). After that the high pressure cleaner should work idle for a few seconds to drain the excess water and release air. Put the suction hose into the water source. After draining some water the gun nozzle should be moved to position “High” (Figure 14). Now the high pressure cleaner is ready to work under high pressure.
TROUBLESHOOTING
1. When switched on, the machine will not start working.
●Plug is not well connected or electric socket is faulty.
-Check plug, socket and fuse.
●The mains voltage is lower than the minimum requirement for start up.
Check that the mains voltage is adequate.
●The pump is stuck.
-Refer to after storage instructions. Switch off the unit and let the motor cool.
●Thermal safety has tripped.
-Leave the lance open with water comingthrough.
2.Fluctuating pressure
●Pump sucking air
-Check that hoses and connections are airtight
●Valves dirty, worn out or stuck. Pump seals worn.
-Clean and replace or refer to dealer.
3.Water leaking from the pump
●Seals worn out
-Check and replace, or refer to dealer
4.The motor stops suddenly
●Thermal safety switch has tripped due to overheating.
-Check that the mains voltage corresponds to specifications. An extension cable, which is too thin, and
6
tool long can cause a voltage drop and cause the motor to overheat. Leave to cool down. Use heavy duty extension cables.
5. The pump does not reach the necessary pressure.
●Water inlet, filter is clogged - Clean the water inlet filter
●Pump sucking air from connections or hoses
-Check that all supply connections are tight
●Suction/ delivery valves are clogged or worn out.
-Check that the water feedinghose is not leaking
●Unloadervalve is stuck
-Clear or respire valves
●Lance nozzle incorrect or worn out
-Loosen and re-tighten regulation screw.
Check and/ or replace.
PRODUCT FEATURES: WATER SUCKING FUNCTION.
The Machine could connect to water supply tap, or suck water from a bucket.
Take the suck hose out of bucket, hold the Nozzle on Low pressure Postion at first.
Keep the machine running a few seconds to draw-out surplus water and air in the machine.
Put hose back to water, hold the Nozzle on Low pressure Postion.
Switch it to High pressure Position after water flow a lot from Nozzle.
5. SERVICE & MAINTENANCE
WARNING! Unplug the electric cable (power source) prior to any maintenance or preparatory storage operations.
Make sure that the machine is not live when carrying out maintenance work on the motor.
●To ensure good performance, check and clean the suction and detergent filters after every 50 hours of operation.
●Long periods of disuse may lead to the formation of lime scale deposits. Working through the hole on the rear, RELEASE the motor using a screwdriver (for models with this feature).
Then remove the screwdriver and proceed with the restart operations.
CLEANING
Keep the ventilation slots of the machine clean to prevent overheating of the engine. Clean the housing regularly with a soft cloth, preferably every time it is used. Keep the air vents free from dust and dirt. Remove stubborn dirt with a soft rag moistened in soapy water. Do not use any solvents such as petrol, alcohol, ammonia, etc. as such substances can damage the plastic parts.
LUBRICATION
The appliance does not need any extra lubrication.
STORAGE AND TRANSPORTATION
Keep the high pressure washer in well-ventilated dry premises with temperature not going below +5ºC. Operate the cleaner with non-corrosive/non-toxic antifreeze before storing for the winter.
FAULTS
If a fault arises through wear in an element, please contact the service address shown on the warranty card. A drawing of the spare parts that may be obtained is included at the end of these operating instructions.
ENVIRONMENT
To prevent damage during transport, the appliance is delivered in a solid packaging which consists largely of reusable material.Therefore please make use of options for recycling the packaging.
7

МОЙКА ВЫСОКОГО ДАВЛЕНИЯ
НАЗНАЧЕНИЕ
Данное устройство предназначено для быстрой и эффективной мойки автомобилей, машин, лодок, зданий и т.д. с использованием чистой воды и химических моющих средств для удаления устойчивых загрязнений. Пользуясь химическими моющими средствами, применяйте только средства, подверженные биологическому разложению.
Автомобильные двигатели промывайте только в местах, оборудованных маслоуловителями.
ТЕХНИЧЕСКИЕ ХАРАКТЕРИСТИКИ
Напряжение, В |
220 |
Потребляемая мощность, Вт |
2000 |
Максимальное давление, бар |
150 |
Рабочее давление, бар |
130 |
Максимальная производительность |
7,5 л/мин |
Функция автоматического всасывания |
+ |
Автостоп |
+ |
Шланг, м |
8 |
Длина шнура питания, м |
5 |
Вес, кг |
5,7 |
КОМПЛЕКТАЦИЯ:
Пистолет-распылитель Напорный шланг
ПРАВИЛА ТЕХНИКИ БЕЗОПАСНОСТИ
Во избежание возгорания, поражения электрическим током и травм электрооборудование следует эксплуатировать в соответствии с требованиями данной инструкции.
Электротехническая безопасность
●Перед включением следует убедиться, что напряжение в сети питания соответствует напряжению электродвигателя мойки.
●Пользуйтесь только влагозащищенным удлинителем. Не рекомендуется использовать чрезмерно длинные удлинители. При использовании удлинителя на катушке он должен быть полностью размотан. Площадьпоперечногосеченияпроводовудлинителя должна быть не менее 1,5 мм2.
●Мойку необходимо подключать через устройство защитного отключения (макс. ток утечки – 30 мА).
●Вынимаявилкуизрозетки,нетянитезашнурпитания.
●Во избежание короткого замыкания не направляйте струю воды на сам аппарат и иное электрооборудование. Не пользуйтесь мойкой вне помещений в дождливую погоду.
●Не прикасайтесь мокрыми руками к вилке и (или)
розетке сети питания.
Немедленно выключите мойку в случае:
1.Неисправности или повреждения вилки или шнура питания.
2.Поломки выключателя.
3.Появления дыма или запаха горелой изоляции.
4.Повреждения шланга высокого давления.
Перед началом работы:
●Убедитесь в том, что вода поступает в мойку должным образом. Эксплуатация мойки без воды может привести к ее повреждению.
●Проверьте надёжность всех соединений и отсутствие повреждённых или изношенных деталей.
Общие указания по безопасности
●Если вы находитесь слишком далеко от предмета, который собираетесь вымыть, не перемещайте аппарат путём перемещения его за шланг высокого давления или за шнур питания; используйте для этого специальную рукоятку.
●Для моделей, не оснащённых «автостопом», запрещено использование мойки в течение более чем 1-2 минут при закрытом пистолете, так как это может вывести аппарат из строя.
●Взимнихусловияххранитеаппаратвтепломместе.
●При работе аппарата вентиляционные отверстия должны быть открыты.
●Располагайте аппарат как можно ближе к источнику водоснабжения.
●Используйте только те принадлежности и запасные части, которые рекомендованы производителем. Применение оригинальных принадлежностей и запасных частей обеспечит надежную и безопасную работу.
●Устанавливайте мойку в устойчивом положении, на ровной поверхности.
●Не допускайте непреднамеренного нажатия на курок пистолета-распылителя. Не переносите мойку в сборе с пистолетом, держа палец на курке.
●Для предотвращения случайного включения по окончании работы с мойкой убедитесь, что курок пистолета заблокирован (рис. 5).
●Во избежание взрыва или отравления запрещается использовать при работе с мойкой легковоспламеняющиеся или токсичные жидкости либо иные средства, несовместимые с правильной работой мойки.
●Не направляйте струю воды на людей и животных: это травмоопасно. Посторонние люди и животные должны находиться на расстоянии не менее 10 метров от места работы.
●Не доверяйте использование аппарата детям или необученным лицам.
●Не фиксируйте курок пистолета в положении «Включено».
●Недопускаетсяизменятьоригинальныйдиаметрраспылительной головки форсунки.
●Не оставляйте мойку без присмотра.
●Струя воды под большим давлением, попадая на
Изготовитель: BORT GLOBAL LIMITED |
8 |
Уполномоченное изготовителем лицо: ООО «Дизайн-строй» |
Room 1501, 15/F., SPA Centre, 53-55 Lockhart Road, WAN CHAI, Hong Kong |
|
125222, г. Москва, Пенягинская ул., д. 18, т +7 (499) 700-10-34 |
Тел/Факс +85 258 194 891 |
|
|
 Loading...