

Page 1
BHG-2000L-K
98291582
User’s Manual . . . . . . . . . . . . . . . . . 3
Bedienungsanleitung . . . . . . . . . . . . 4
Mode d’emploi . . . . . . . . . . . . . . . . . 6
Instrucciones de servicio . . . . . . . . . 7
Manual de instruções . . . . . . . . . . . . 9
Istruzione per l’uso . . . . . . . . . . . . . 10
Gebruiksaanwijzing . . . . . . . . . . . . 12
Bruksanvisning . . . . . . . . . . . . . . . . 13
Käyttöohje. . . . . . . . . . . . . . . . . . . . 15
Bruksanvisning . . . . . . . . . . . . . . . . 16
Brugervejledning. . . . . . . . . . . . . . . 18
Használati utasítás . . . . . . . . . . . . 19
Manual de utilizare . . . . . . . . . . . . . 20
Οδηγίες χρήσεως . . . . . . . . . . . . . . 21
Instruksja obsługi . . . . . . . . . . . . . . 23
Návod k použití. . . . . . . . . . . . . . . . 24
Navodilo za uporabo. . . . . . . . . . . . 26
Uputstvo za korisnike . . . . . . . . . . . 27
Upute za uporabu . . . . . . . . 28
Kullanım kılavuzu . . . . . . . . . . . . . . 29
. . . . . . . . . . . . . . 30
Инструкция по эксплуатации . . . . 31
Інструкція з експлуатації. . . . . . . . 32
Қолданысы бойынша нұсқама . . . 33
Instrukcija . . . . . . . . . . . . . . . . . . . . 34
Instrukcija . . . . . . . . . . . . . . . . . . . . 35
Kasutusjuhend . . . . . . . . . . . . . . . . 36
Page 2
7
)[
8 $
-NJO
$
-NJO
LH
$ $
$
-NJO
$
-NJO
2
Page 3

Hot air gun
CAREFULLY READ THE INSTRUCTIONS BEFORE
YOU USE THE HOT AIR GUN!
1. ADDITIONAL SAFETY RULES
BEFORE USING THE APPLIANCE:
1. Check the following:
- Make sure the voltage of the hot air gun corresponds
with the power voltage.
- Are the mains lead and the mains plug in a good
state: strong, without ravels or damages.
2. Avoid the use of long extension cables.
3. Do not use the appliance under moist circumstances.
4. The metal mouthpiece gets hot. Watch out and do
not touch the metal mouthpiece.
5. Prevent damage of the heating element. Do not lock
or block the mouthpiece.
6. Do not leave the appliance when switched on.
7. When the appliance is not in use, it can be put away
on the collapsible support, which is on the air gun.
By collapsing this support, the air gun can easy be
put away on it. The hot air gun now stands on the
support with the mouthpiece up.
8. Do not use the appliance for drying hair or for drying
living human beings in general.
9. Do not use the appliance in a bath, above water or in
spaces where easy infl ammable liquids are used.
Warning! This appliance operates at a temperature
of 200-600 degrees without visible signs of this
temperature (no fl ames); still there is a chance of
fi re risk. Watch out for the hot air stream from the
mouthpiece. This air stream can cause burns.
WHEN OPERATING THE APPLIANCE:
1. If you are going to use the hot air gun, vapours and
gas can be liberated during a short time. This can be
harmful for your health. Asthmatics can suffer hindrance of it.
2. Before connecting the plug to the mains voltage you
have to check if the switch is in position “0”.
3. Keep the mains lead always away from the mouthpiece of the hot air gun.
4. Keep children and animals away from the appliance
if you are using it.
IMMEDIATELY SWITCH OFF THE APPLIANCE
WHEN:
1. plug and/or cable are defective or damaged;
2. the switch is defective;
3. you smell or see smoke caused by scorched insulation from the hot air gun.
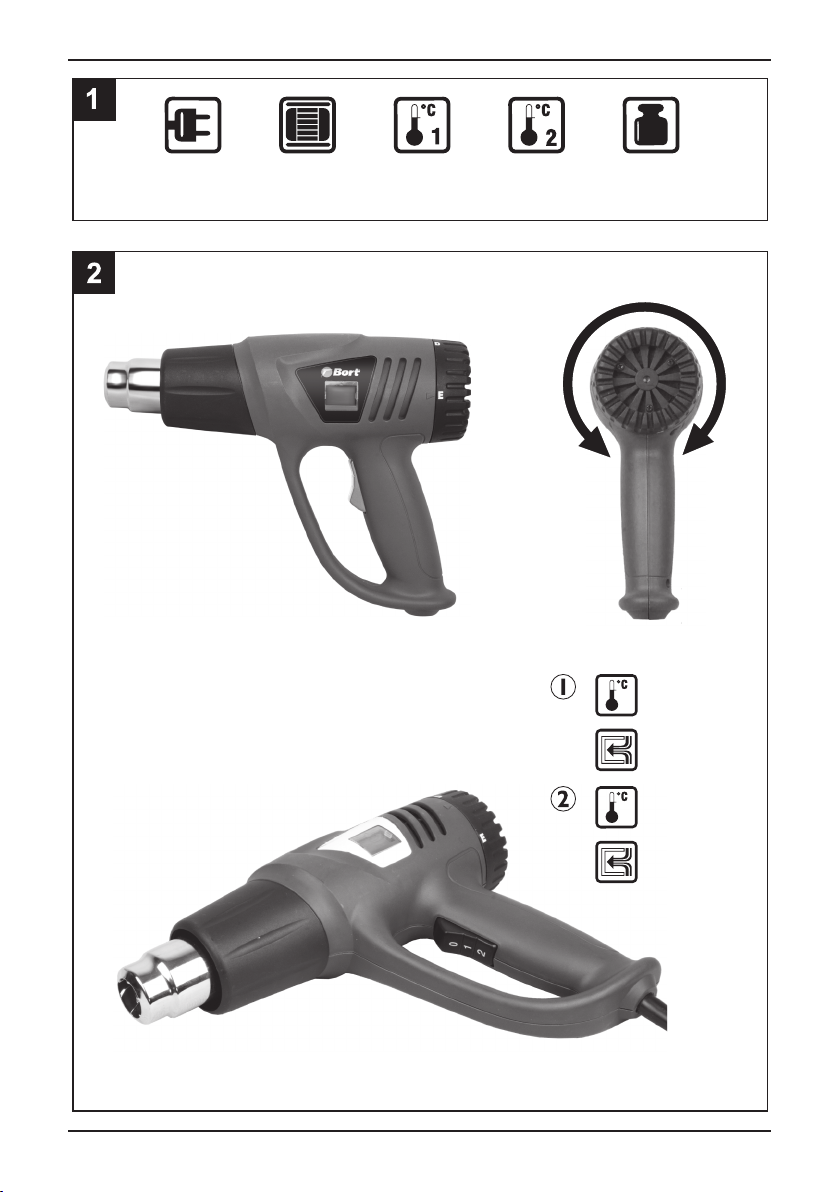
2. INSTALLATION
You can work manually with this hot air gun or you can
put it in a vertical position. If you use the vertical position the metal suspension bracket of the handgrip must
also stand vertical for supporting the handgrip on the
correct place.
3. USING THE APPLIANCE
THE HOT AIR GUN CAN BE USED FOR:
• plumbing work like tube connections, solder, bowing
tubes;
• removing paint, varnish and lacquer without fi re-
risk;
• quickly drying of appliances which have become
wet;
• drying surfaces for quick repairing;
• removing self-adhesive labels in a clean way;
• placing PVC labels;
• blistering after sticking PVC materials can be
smoothed after heating;
• easy removing of vinyl carpeting;
• forming all synthetics with a low temperature among
which polyethylene and PVC;
• forming all synthetics with a high temperature among
which acryl and plexiglass;
• smelting synthetics, among which matters and foils
with PVC layer;
• applying heat shrinking tubes;
• shrink wrappers;
• thawing tubes and engines;
• repairing fi nishing layers: email of bath and house-
hold appliances;
• applying epoxy powder cover layers;
• repairing of ski's, surf-boards and other sports
goods;
• unscrewing too fast fi xed screws and connections.
4. BEFORE OPERATING
Before you switch on the hot air gun you have to search
for the right adapter for the mouthpiece and assemble it
on the mouthpiece if it is still cold.
IMPORTANT: Replace the mouthpiece only:
• with a stationary engine;
• when the appliance is disconnected;
• when the mouthpiece is cold.
5. OPERATION
• Check if the mains switch is on position “0” before
you connect the apparatus;
• Keep the power voltage always away from the hot
air stream and the mouthpiece.
Tip: If you want to get the best result, test all appliances on a little part of the workpiece.
3
Page 4

6. MAINTENANCE
Always disconnect the apparatus before carrying out inspection or cleaning. Never use water or
other liquids to clean the electrical parts of the hot
air gun.
• Never use easy infl ammable liquids for cleaning the
hot air gun, especially for the mouthpiece.
• Regular maintenance of your hot air gun prevents
un necessary problems. Keep the ventilation slots of
the hot air gun clean to prevent overheating.
7. TROUBLESHOOTING
In case the hot air gun does not work well, we give you
subjoined some possible causes and their solutions.
1. The engine gets overheated.
The ventilation slots of the hot air gun are dirty.
- Clean the ventilation slots.
2. The hot air gun does not start when it is switched
on.
Interruption in the electrical circuit.
- Check the mains lead and the mains plug. The switch
is defective.
Pull the mains lead out of the wall socket, because
there is a chance of fi re risk! Have the hot air gun
repaired at your local SBM Group dealer.
3. The engine does not work, but it does heat.
Interruption in the electrical circuit.
Pull the mains lead out of the wall socket, because
there is a chance of fi re risk! Have the hot air gun
repaired at your local SBM Group dealer.
DE
Heißluftgebläse
LESEN SIE DIESE GEBRAUCHSANWEISUNG GUT
DURCH, BEVOR SIE DIE HEIßLUFTGEBLÄSE BENUTZEN.
1.SPEZIELLE SICHERHEITSVORSCHRIFTEN
BEVOR INBETRIEBNAHME:
1. Kontrollieren Sie das folgende:
- stimmt die Anschlußspannung der Maschine mit der
Netzspannung überein;
- sind Netzkabel und Netzstecker in gutem Zustand:
stabil und ohne Knicke oder Beschädigungen.
2. Vermeiden Sie zu lange Verlängerungskabel.
3. Benutzen Sie das Heißluftgebläse nicht unter feuchte Umstände.
4. Der Düse des Heißluftgebläses wird heiß. Fassen
Sie es nicht an!
5. Vermeiden Sie Beschädigung des Erhitzungselement. Decken Sie die Düse nicht ab und blockieren
Sie der Motor nicht.
6. Bleiben Sie in der Nähe des Gebläses wenn es noch
Heiß ist nach Abschaltung.
7. Wenn Sie das Gerät nicht benutzen, können Sie
es wegstellen auf dem ausklappbarem Bügel der
sich am Gerät befi ndet. Dieser Bügel kann ausge-
klappt werden, wodurch es möglich wird das Gerät
auf dem Bügel weg zu stellen. Der Düse steht dann
nach oben.
8. Benutzen Sie das Heißluftgebläse nicht zum trocknen von Haare oder Gegenstände.
Warnung! Dieses Heißluftgebläse funktioniert bei einem Temperatur von 200-600˚ Celsius ohne sichtbare Zeichnen von diesem Temperatur (keine Flamme).
Es besteht doch Feuergefahr. Achten Sie auf die heiße Luftstrahl aus der Düse. Die heiße Luftstrahl kann
Brand wunde verursachen.
9. Benutzen Sie das Heißluftgebläse nicht im Bad
oder über Wasser oder in Räume wo sich leicht entfl ammbare Flüssigkeiten oder Gase befi nden.
BEI INBETRIEBNAHME:
1. Bei Inbetriebnahme des Heißluftgebläses können
während eine kurze Zeit Dämpfe oder Gase entstehen, die schädlich für Ihre Gesundheit sein können.
Wenn Sie Asthmatisch sind können Sie dabei Ungemach empfi nden.
2. Kontrollieren Sie ob der Netschalter in der “0”- stand
steht bevor Sie den Netzstecker in der Wand Steckdose stecken.
3. Halten Sie das Netzkabel aus der Nähe der Düse.
4. Halten Sie Kinder und Tiere aus der Nähe.
4
Page 5

DAS GERÄT SOFORT AUSSCHALTEN BEI:
1. defektem Netzstecker, Netzkabel oder Kabelschaden;
2. defektem Schalter;
3. Rauch oder Gestank verschmorter Isolation.
2. INSTALLATION
Mitdas Heißluftgebläse können Sie aus der Hand arbeiten oder Sie können das Gerät Senkrecht aufstellen. Bei senkrechte Aufstellung muss der Metallbügel
am Handgriff auch Senkrecht gedreht werden damit
der Handgriff das Gerät richtig unterstützt.
3. BENÜTZUNG
DAS HEIßLUFTGEBLÄSE KANN BENÜTZT WER-
DEN FÜR:
• Installationsarbeiten wie Rohrverbindungen, Löten,
das Biegen von Röhre;
• Entfernen von Farbe und Lack ohne Brenngefahr;
• Schnell trocknen von nasse Geräte;
• Trocknen von Gegenstände für schnelle Reparation;
• Entfernen von Aufkleber auf eine saubere Weise;
• Anbringen von PVC Etikette;
• Bläsen nach aufkleben von PVC-Aufkleber können
entfernt werden;
• Einfaches entfernen von Vinyl Fußbodenbelag;
• Einfaches Gebrauch von Füllmittel;
• Bilden von niedrige-Temperatur Kunststoffe, z.B.
Polyäthylen und PVC;
• Bilden von hohe-Temperatur Kunststoffe, z.B. Acrylund Plexiglass;
• Schmeltzen von Kunststoff, wie Folien mit PVCFilm;
• Schrinken von Schrinkpackungen;
• Tauen von Röhre und Motore;
• Reparieren von Bedeckungen: Email von Bad und
Geräte;
• Reparieren von Schie, Surfbretter und Sportartikeln;
• Lose machen von zu fest angedrehte Schrauben
und Verbindungen.
4. BEVOR INBETRIEBNAHME
Suchen Sie zuerst die richtige Düse befor Sie das
Gerät einschalten. Montieren Sie die Düse wenn das
Heißluftgerät noch Kühl ist.
WICHTIG: Ersetzen Sie eine Düse:
• mit stillstehenden Motor;
• mit der Netzstecker aus der Wandsteckdose;
• erst wenn das Gerät abgekühlt ist.
5. INBETRIEBNAHME
• Kontrollieren Sie ob der Netzschalter in der „0“
Stand steht befor Sie den Netzstecker in der Wandsteckdose stecken.
• Entfernen Sie das Netzkabel aus der Nähe der heißen Luftstrohm und der Düse.
N.B.: Für jedes Material gilt das Sie das beste Resultat
bekommen wenn Sie zuerst das Gerät ausprobieren
auf ein kleines Stück des Werkstückes.
6. WARTUNG
Beim Sauberhalten des Gerätes den Stecker aus
der Steckdose entfernen. Nie Wasser, entfl amm-
bare oderbeissende Flüssigkeiten benützen beim
Sauberhalten des Gerätes.
REGELMÄßIGE WARTUNG DES GERÄTES BEUGT
PROBLEMEN VOR!
Reinigen Sie die Ventilationsschlitze, damit das Gerät
sich nicht überhitzt.
7. STÖRUNGEN
Im Fall das das Gerät nicht gut funktioniert, geben wir
jetzt einige mögliche Ursachen und Lösungen:
1. Erhitzen des Motors:
Die Ventilationsschlitze sind erstopft mit Schmutz.
- Reinigen Sie die Schlitze.
2. Das Heißluftgebläse funktioniert nicht nach Einschalten:
Der Netzschalter ist defekt.
- Kontrollieren Sie Netzkabel und Netzstecker;
Ziehen Sie sofort der Netzstecker aus der Wandsteckdose, es besteht Brandgefahr!
Gerät zur Reparation an bei Ihren SBM Group Dealer.
3. Der Motor dreht nicht, aber das Gerät erhitzt sich
doch:
Unterbrechung in der Motor.
Ziehen Sie sofort der Netzstecker aus der Wandsteckdose, es besteht Brandgefahr!
Gerät zur Reparation an bei Ihren SBM Group Dealer.
Bieten Sie Ihr
Bieten Sie Ihr
5
Page 6

Décapeur thermique
LISEZ ATTENTIVEMENT CETTE NOTICE
EXPLICATIVE AVANT LA MISE EN SERVICE DE LE
DÉCAPEUR THERMIQUE!
1. PRÉSCRIPTIONS DE SÉCURITÉ SPÉCIALES
LORS DE LA MISE EN SERVICE DE L’APPAREIL:
1. Contrôlez le suivant:
- Est-ce que la tension de branchement du décapeur
thermique correspond à la tension du réseau?
- Est-ce que le fi l d’alimentation et la fi che-secteur
sont en bon état; solides, sans effi lures ou domma-
ges?
2. Evitez l’utilisation de rallonges longues.
3. N’utilisez pas l’appareil sous circonstances
mouillées.
4. L’embouchure métallique se chauffe. Faites attention et ne touche pas l’embouchure métallique.
5. Prévenez dommages de l’élément de chauffage. Ne
fermez pas l’embouchure et ne la bloquez pas.
6. Ne quittez l’appareil si l’interrupteur est en position
«MARCHE».
7. Si l’appareil n’est pas utilisé, il vous faut mettre de
côté celle-ci sur l’anneau, qui se trouve au décapeur
thermique peut être placé sur l’anneau sur la table.
Le décapeur thermique est maintenant avec l’embouchure en haut.
8. N’utilisez pas l’appareil pour sécher les cheveux ou
pour sécher individus vivant en général.
Avertissement! Cet appareil marche par une tem-
pérature de 200-600 centigrades sans signes
visibles de cette température (sans fl ammes),
pourtant il y a danger d’incendie. Faites attention au fl ux d’air chaud. Ce fl ux d’air peut causer
des brûlures.
9. N’utilisez pas l’appareil en bain, au-dessus d’eau ou
dans un espace où sont utilisés des liquides légèrement infl ammable.
LORS DE LA MISE EN MARCHE DE L’APPAREIL:
1. Lors de la mise en marche du décapeur thermique
il y a la possibilité que se dégagent des vapeurs ou
des gaz pendant un temps bref. Ces vapeurs et gaz
peuvent être nuisibles pour la santé. Des asthmatiques peuvent avoir un inconvénient de cela.
2. Contrôlez si l’interrupteur n’est pas en position
«marche» avant de brancher la fi che-secteur sur la
tension de réseau.
3. Prenez soin que le fi l d’alimentation ne touche pas
l’embouchure du décapeur thermique.
4. Prenez soin qu’il n’y a pas des enfants ou animaux
près de l’appareil si vous l’utilisez.
ARRÊTER IMMÉDIATEMENT L’APPAREIL
EN CAS DE:
1. court-circuit de la fi che-secteur ou du fi l d’alimenta-
tion ou endommagement du fi l d’alimentation;
2. l’interrupteur défectueux;
3. fumée ou odeur d’isolant, originaire du décapeur
thermique.
2. INSTALLATION
Avec le décapeur thermique vous pouvez travailler nor malement avec les mains ou il peut être
installé verticale ment. Si vous utilisez la position
verticale il faut aussi placer verticalement l’étrier de
suspension à la poignée pour appuyer la poignée à
la place correcte.
3. LA MISE EN OEUVRE
VOUS POUVEZ UTILISER LE DÉCAPEUR
THERMIQUE POUR ENTRE AUTRES:
• Plomberie comme jonctions de tuyaux, souder,
courber de tuyaux;
• Éloigner teinture, vernis et laque sans danger d’incendie;
• Sécher rapidement d’appareils qui sont été
mouillés;
• Sécher de surfaces pour une réparation rapide;
• Éloigner d’étiquettes autoadhésives d’une manière
propre;
• Placer d’étiquettes PVC;
• Lisser de cloquage après coller matériaux PVC;
• Éloigner plus facile de revêtement de vinyle;
• Former de tous les plastiques avec une température
bas comme polyéthylène et PVC;
• Former de tous les plastiques avec une température
élevée comme acryle et plexiglas;
• Fondre plastiques comme matières et pellicule avec
une couche de PVC;
• Appliquer de tuyaux qui sont plus petits de la chaleur;
• Emballage de retrait;
• Sefondre de tuyaux et moteurs;
• Réparer couches d’achèvement: émail de bain et
ap pareils de ménage; appliquer couches de couverture de poudre époxyde;
• Éloigner tapisserie facilement;
• Réparations de skis, planches dévoile et d’autres
articles de sport;
• Déboutonner de vises et jonctions qui ont été fi xés
trop raides.
4. AVANT LA MISE EN SERVICE
Il faut chercher l’embouchure auxiliaire correcte
avant de mettre en marche le décapeur thermique
et l’installer sur l’embouchure si celle-ci est encore
froid.
IMPORTANT: Remplacez l’embouchure seulement:
• avec un moteur en position arrêt;
• avec la fi che-secteur hors de la prise (prise femel-
le);
• et si l’embouchure est frais.
6
Page 7

5. LA MISE EN SERVICE
• Contrôlez si l’interrupteur de réseau est en position
‘0’ avant de brancher la fi che-secteur au réseau.
• Prenez soin que le fi l d’alimentation est toujours loin
du fl ux d’air chaud et l’embouchure.
N.B.: En cas d’entretien ou de nettoyage il faut
toujours débrancher l’appareil. Ne nettoyez jamais
votre décapeur thermique à l’eau, ni l’aide d’autres
liquides.
6. ENTRETIEN
Lors de l’entretien et du nettoyage, être toujours
la fi che (de la prise murale). Utili sez jamais de
l’eau ou des autres liquides pour le nettoyage
la machine. Brossez pro-premen la machine à
l’aide d’une brosse.
L’ENTRETIEN PÉRIONDIQUE DU DÉCAPEUR
THERMIQUE PRÉVIENT DES PROBLÈMES!
• Ne nettoyez pas votre décapeur thermique à l’aide
de liquides légèrement infl ammable, et en particulier
pas l’embouchure;
• Tenez les encoches de ventilation du décapeur thermique propre pour prévenir sur chauffage.
7. PANNES
En cas du décapeur thermique ne functionne pas
bon, nous indiquons ci-dessous quelques raisons et
solutions correspondantes.
1. Le moteur est surchauffé.
Les encoches de ventilation sont bourrées et sales.
- Nettoyez les encoches de ventilation.
2. Le décapeur thermique ne marche pas après le
brancher.
Interruption dans le circuit électrique.
- Contrôlez le fi l d’alimentation et la fi che-secteur.
L’interrupteur est défectueux.
Débranchez l’appareil, car il risque de danger d’in-
cendie! Donnez le décapeur thermique à réparer
à votre distributeur SBM Group.
3. Le moteur ne tourne pas, mais chauffe bon.
Interruption dans le moteur électrique.
Débranchez l’appareil, car il risque de danger d’in-
cendie! Donnez le décapeur thermique à réparer
à votre distributeur SBM Group.
ES
Pistola de aire caliente
LEA ATENTAMENTE EL MODO DE EMPLEO ANTES
DE USAR LA PISTOLA DE AIRE CALIENTE!
1.INSTRUCCIONES ESPECIALES
DE SEGURIDAD
ANTES DE USAR LA MAQUINA POR PRIMERA
VEZ:
1. Controle lo siguiente:
- La tensión del motor corresponde a la tensión existente en la red.
- el cable y la clavija est án en buen estado: sólidos,
sin hilachos o averias.
2. Evite el uso de prolongadores largos.
3. No usar el aparato bajo circunstancias húmedas.
4. La boquilla de metal se calienta. Tenga cuidado entonces con tocar la boquilla de metal!
5. Evite dañar el elemento térmico. No tapar ni bloquear la boquilla.
6. No pierda de la vista el aparato una vez encendido.
7. Cuando no se usa el aparato, hay que guardarlo
sobre el soporte plegable que se encuentra incorporado a la Pistola de aire caliente. Desplegando este
soporte, se podrá colocar la Pistola de aire caliente
sobre la mesa. Ahora la Pistola de aire caliente se
encuentra con la boquilla hacia arriba.
8. No usar el aparato como secador de pelo ni como
se cador para seres vivos en general.
9. No usar el aparato en el baño ni encima de agua,
ni en espacios donde se usan líquidos muy infl ama-
bles.
Este aparato funciona a una temperatura de 200600° Celsio sin indicios visibles de esta tempera-
tura (no hay llama), sin embargo hay peligro de
incendio. Cuidado con la corriente de aire caliente
que sale de la boquilla. Esta corriente de aire puede causar que madures.
AL PONER EL APARATO EN FUNCIONA MIENTO:
1. Al poner en funcionamiento la Pistola de aire caliente, podrán desprenderse durante unos momentos
emanaciones o gases que pueden perjudicar la
salud. Las personas con enfermedades asmáticas
pueden sufrir molestias por ello.
2. Comprobar que el interruptor esté en la posición”0”,
antes de conectar el enchufe de conexión a la red a
la tensión de red.
3. Siempre mantener el cable de conexión a la red a
distancia de la boquilla de la Pistola de aire caliente.
4. Mantener a distancia a los niños y los animales
cuando usa el aparato.
DESCONECTAR INMEDIATAMENTE EL APARATO
EN CASO DE:
1. fallo en el enchufe, en el cable o avería del cable;
2. interruptor averiado;
3. humo o mal humor de material aislante quemado.
7
Page 8

2. MONTAJE
Se puede trabajar normalmente con la Pistola de
aire ca liente en la mano, o colocarla verticalmente.
Al usarla en la posición vertical, el soporte de metal
en la empuñadura debe estar también vertical para
apoyar la empuñadura en el sitio correcto.
3. PUESTA EN SERVICIO
SE PUEDE USAR LA PISTOLA DE AIRE CALIENTE,
ENTRE OTRAS COSAS, PARA:
• Fontanería, como conexiones de tubos, soldadura
blanda, doblar tubos;
• Quitar pintura, barniz y laca sin peligro de incendio;
• Secar rápidamente aparatos mojados;
• Presecado de superfi cies para reparación rápida;
• Quitar etiquetas autoadhesivas de una manera limpia;
• Perfecta para la aplicación de etiquetas de PVC;
• Alisar burbujas que pueden haberse producido al
pe gar materiales de PVC;
• Quitar fácilmente alfombrado de vinilo;
• Formar todos los materiales sintéticos de baja temperatura como el polietilenoy el PVC;
• Formar todos los materiales sintéticos de alta temperatura como plexiglás y plástico acrílico.
• Fundir material sintético, como materiales y láminas
con capa de PVC;
• Aplicación de tubos retractables;
• Embalajes retractables;
• Descongelar tubos y motores;
• Reparar acabados: el esmalte del baño y de aparatos domésticos; aplicación de revestimientos de
polvo de epoxi;
• Reparar esquís, tablas de surf y otros artículos deportivos;
• Soltar tornillos y conexiones demasiado ajustados.
4. ANTES DE MISE EN MARCHA
Busque, antes de encender la Pistola de aire
caliente, la boquilla accesoria apropiada y móntela
cuando la Pistola de aire caliente todavía esté fría.
IMPORTANTE: Sólo cambiar la boquilla accesoria:
• con motor parado;
• con el enchufe de conexión a la red desenchufado
(del enchufe de pared);
• cuando la boquilla esté enfriada.
5. MISE EN MARCHA
• Controlar si el interruptor de red está en la posición
“0” antes de conectar el enchufe de conexión a la
red a la red de al umbrado.
• Siempre mantener el cable de conexión a la red a
distancia de la corriente de aire caliente y de la boquilla.
Con ayuda del botón de ajuste en la parte posterior de la Pistola de aire caliente, se puede regular
la temperatura del aire.
Consejo: Para todos los materiales es aconsejable, para un resultado óptimo, que ensaye primero
el aparato en una parte pequeña del trabajo.
6.MANTENIMIENTO
Antes de cualquier trabajo de manteni miento o
limpieza saque siempre el enchufe de la caja de
corriente (enchufe de pared). Nunca use aqua o
otros líquidos durante la limpieza de la máquina.
UN MANTENIMIENTO PERIÓDICO DE LA PISTOLA
DE AIRE CALIENTE EVITA PROBLEMAS INÚTILES!
Nunca emplear líquidos infl amables para limpiar
la Pistola de aire caliente, especialmente para la
boquil la.
Mantenga limpias las rajas de ventilación del motor para evitar un sobre calentamiento.
7. AVERIAS
Cuando la máquina no funciona como debiera,
le indica mos abajo algunas causas posibles con las
soluciones re spectivas:
1. El motor se pone caliente:
Las aberturas de ventilación de la Pistola de aire
caIiente están tapadas con el polvo.
- Limpie las aberturas de ventilación.
2. La máquina funciona cuando está conectada.
Interrupción en el circuito eléctrico:
- Controle el cable y la clavija.
El interruptor está defectuoso:
Quite el enchufe de conexión a la red, es que hay
peligro de incendio! Lleve la máquina a su distribuidor SBM Group para un control y/o una
reparación.
3. El motor no funciona, pero sí calienta.
Interrupción en el motor eléctrico:
Quite el enchufe de conexión a la red, es que hay
peligro de incendio! Lleve la máquina a su distribuidor
SBM Group para un control y/o una reparación.
8
Page 9
Bico para quiemara tinta
LEA BEM AS INSTRUÇÕES ANTES DE COMEÇAR A
USAR BICO QUIEMADOR DE TINTA.
1. NORMAS DE SEGURANÇA ESPECIAS
ANTES DE UTILIZARA MÁQUINA:
1. Controle o seguinte:
- A voltagem indicada para a máquina corresponde
coma da corrente;
- utilize um cabo da corrente com um polo-terra (tomada);
- o cabo e a tomada devem estar em bom estado:
sem estar danifi cado ou desfi ado;
2. Evite o uso de cabos compridos.
3. Não deve usar o aparelho em condições húmidas.
4. A boca metálica torna-se quente.
5. Evite danos nos elementos de aquecimento. Não
feche a parte da boca e nem a deve bloqueá-la.
6. Mantenha-se junto do aparelho quando este está
ligado.
7. Quando deixar de usar o aparelho, deverá retirá-lo
do seu apoio rebatível que se encontra fi xo ao quei-
mador. O queimador encontra-se agora coma boca
para cima.
8. Não use este aparelho como secador de cabelo ou
como secador para secar seres vivos em geral.
9. Não use o aparelho no banho ou por cima da água,
ouvem sítios onde se está a usar líquidos ligeiramente infl amáveis.
Este aparelho trabalha a temperatura de 200-600°
Celsius sem sinais visíveis dessa temperatura
(sem chama), mas exista a possibilidade de incêndio. Cuidado com a corrente de ar quente que sai
da boca e que poderá causar queimaduras.
QUANDO SE PÕE EM FUNCIONAMENTO
O APARELHO:
1. Ao ligar o bico queimador de tinta poderão, durante
pouco tempo, sair vapores ou gazes que poderão
ser nocivos a saúde. Pessoas com doenças asmáticas podem sentir-se afectadas.
2. Controle se o interruptor Nestá na posicão “1” antes
de ligar o cabo acorrente eléctrica.
3. Mantenha sempre o cabo da corrente fora do alcance da boca do queimador.
4. Ao usá-lo afaste as crianças e os animais da sua
proxi midade.
DESLIGAR IMEDIATAMENTE O APARELHO:
1. Aquecimento demasiado da máquina.
2. Avaria na fi cha, no cabo da corrente ou no caso de
o fi o se encontrar danifi cado.
3. Defeito na tomada.
4. Fumo ou cheiro de isolamentos queimados.
2. INSTALAÇÃO
Pode-se trabalhar com o bico queimador de tinta pegando-o na mão ou montado de uma forma vertical. Ao
usar a posição vertical a braçadeira metálica de pendurar deve estar na posição vertical para que a pega
possa apoiar na parte certa.
3. COMO USAR
O BICO QUEIMADOR DE TINTA É ENTRE OUTROS
PARA SER USADO PARA:
• Os trabalhos de canalizador como, por exemplo,
ligações da tubagem, soldagem ligeira, curvar os
tubos;
• Retirar a tinta, vernis e laca sem o risco de incêndio;
• A secagem prévia de superfícies que exigem reparação rápida;
• Retirar labels autocolantes de uma maneira limpa;
• Óptimo para aplicar labels de PVC;
• Alisar as bolhas que poderão surgir depois de colar
os materiais de PVC;
• Retirar, fácilmente, o revestimento do solo em vinyl;
• Todas as formas de plásticos de baixa temperatura
entre eles, polietileno e PVC;
• Todas as formas de plásticos de alta temperatura
entre eles acril e plexiglas;
• Fundir plástico entre eles tecidos e folies com cobertura de PVC;
• Aplicarem tubos que encolhem como calor;
• Empalagem que encolhe;
• Derreter condutas e motores;
• Reparar as camadas de acabamento: banho de esmalte e aparelhos de uso doméstico; aplicar camadas de cobertura de pó epoxy;
• Reparações de esquis, pranchas surf e outros artigos de desporto;
• Desapertar parafusos apertados e ligações.
4. ANTES DE A LIGAR
Procure antes de ligar o bico queimador de tinta a parte adaptadora da boca adequada e monte-a enquanto
o aparelho está frio.
IMPORTANTE: Substitua o adaptador para a boca,
sómente:
• como motor parado;
• como cabo desligado da corrente (da fi cha da pare-
de)
• quando o adaptador da boca está arrefecido.
5. COMO LIGAR A MÁQUINA
• Controle se o interruptor está na posição “0” antes
de ligar o cabo a corrente.
• Mantenha sempre o cabo fora do alcance da corrente quente e fora da parte da boca.
Com a ajuda de um botão regulador por traz do queimador poderá ser regulada a temperatura do ar.
INDICAÇÃO IMPORTANTE: Em relação à todos os
materiais para obter um resultado óptimo vale primeiro
experimentar numa pequena parte da peça a trabalhar.
9
Page 10

6. A MANUTENÇÃO
No caso da manutenção e limpeza deslique sempre
o aparelho da corrente. Nunca deve usar água ou
líquidos ligeiramente infl amáveis para a limpeza da
máquina. Limpe a máquina com uma escova.
MANUTENÇÃO PERIÓDICA BICO QUEIMADOR DE
TINTA EVITA PROBLEMAS DESNECESSÁRIOS.
Mantenha os orifícios de ventilação do bico queimador
limpos para evitar o sobre aquecimento do motor.
7. AVARIAS
No caso de a máquina não funcionar de uma forma
conveniente, damos-lhe a seguir um certo número de
possí veis razões e suas soluções respectivas:
1. O motor está sobre aquecido:
Os orifícios de ventilação da bico queimador encontram-se entupidos com a sujidade.
- Limpe os orifícios de ventilação.
2. A bico queimador não trabalha apesar de estar
ligada:
Interrupção no circuito eléctrico.
- Controle o fi o eléctrico e a fi cha eléctrica.
Há um defeito no interruptor.
Retire o cabo da corrente da fi cha de contacto, no
caso de haver o perigo de incêndio! Entre-que a
bico queimador a fi m de ser reparada no seu repre-
sentante da SBM Group.
3. O motor não roda, mas aquece.
Interrupção no motor eléctrico.
Retire o cabo da corrente da fi cha de contacto, no caso
de haver o perigo de incêndio! Entre-que a bico queimador a fi m de ser reparada no seu representante da
SBM Group.
Bruciatore di vernici
PRIMA DI USARE IL BRUCIATORE DI VERNICI
SI CONSIGLIA DI LEGGERE BENE LE PRESENTI
ISTRUZIONI PER L’USO!
1. SPECIALI NORME DI SICUREZZA
PROCEDURE PRELIMINARI ALL’USO DEL BRU-
CIATORE:
1. Controllare se:
- la tensione di attacco del bruciatore è uguale a quella della rete elettrica
- il cavo di collegamento e la presa di corrente sono in
buono stato: robusti, non sfi lacciati o danneggiati.
2. Evitare l’uso di prolunghe troppo lunghe.
3. Non usare il bruciatore in ambienti umidi.
4. La bocchetta di metallo diventa molto calda. Fare
attenzione a non toccarla!
5. Evitare danni all’elemento di riscaldamento. Non
chiudere la bocchetta e non bloccarla.
6. Non allontanarsi dalla macchina se attiva.
7. Se il bruciatore non viene utilizzato esso deve essere posizionato sull’apposita staffa pieghevole che
è attaccata al bruciatore stesso. Allungando questa
staffa, il bruciatore può essere posizionato sul tavolo. In questo caso la bocchetta del bruciatore è
puntata in alto.
8. Non usare il bruciatore come asciugacapelli o ad
ogni modo non per asciugare esseri viventi in generale.
9. Non usare il bruciatore nella vasca da bagno o vicino all’acqua, o comunque in ambienti dove si trovano liquidi infi ammabili.
Attenzione! Questo bruciatore funziona ad una
temperatura di 200-600°C senza segni esterni di
questa temperatura (senza fi amma), il che non
esclude il rischio d’incendio. Fare attenzione alla corrente di aria calda che esce dalla bocchetta. Quest’aria può causare ustioni.
PROCEDURE PRELIMINARI ALL’USO:
1. Quando si usa il bruciatore per la prima voltasi
possono formare vapori e gas dannosi alla salute.
Persone con problemi asmatici ne possono particolarmente soffrire.
2. Controllare se l’interruttore non è posizionato su
‘ON’ prima di inserire la spina nella presa di corrente.
3. Mantenere il cavo di collegamento sempre lontano
dalla bocchetta del bruciatore.
4. Mantenere il bruciatore lontano da bambini ed animali.
DISATTIVARE IL BRUCIATORE IMMEDIA TAMENTE
IN CASO DI:
1. Malfunzionamento della spina del cavo, del cavo o
danni al cavo stesso.
2. Interruttore di fettoso.
3. Fumo o odore di materiale isolante bruciato.
10
Page 11

2. INSTALLAZIONE
Il bruciatore può essere adoperato a mano o posizionato in maniera verticale. Usato in posizione verticale
anche la staffa in metallo, usata per appenderlo, deve
trovarsi in posizione verticale per poter supportare il
manico al posto giusto.
3. USO
IL BRUCIATORE É DA USARE TRA L’ALTRO PER:
• Lavori idraulici come collegamenti di tubature, saldature morbide, piegatura di tubi;
• La rimozione di vernice, vernice trasparente e lacca
senza rischio d’incendio;
• L’asciugatura rapida d’apparecchiature bagnate;
• L’asciugatura di superfi ci per facilitarne una rapida
riparazione;
• La rimozione d’etichette autoadesive in maniera pulita;
• La perfetta applicazione d’etichette in PVC;
• La rimozione di bolle d’aria sulle superfi cie di mate-
riali in PVC dopo la loro applicazione;
• La facile rimozione di moquette in vinile
• Il modellamento di materiali in plastica a temperatura moderata, tra cui polietilene e PVC;
• Il modellamento di materiali in plastica a temperatura elevata, tra cui vetro in acrilico e Plexiglas;
• La fusione di materiali in plastica, tra cui sostanze e
pellicole con strato in PVC;
• L’uso di tubi termocontrattili;
• Imballaggi con involucro termocontrattile;
• Lo scongelamento di tubi e motori;
• La riparazione di strati di rifi nitura: smalto di vasche
da bagno ed elettrodomestici: l’applicazione di strati
di rifi nitura in polvere epossida;
• La riparazione di sci, tavole a vela ed altri articoli
sportivi;
• Svitare viti e attacchi fi ssati troppo stretti.
4. PROCEDURE
PRELIMINARI ALL’USO
Prima dell’attivazione del bruciatore montare la bocchetta desiderata quando il bruciatore è ancora freddo.
IMPORTANTE: SOSTITUIRE LA BOCCHETTA SOLO
SE:
• Il motore è spento;
• La spina non è inserita nella presa;
• La bocchetta è fredda.
5. USO
• Prima di inserire la spina nella presa di corrente controllare se l’interruttore di rete si trova in posizione
“0”.
• Mantenere il cavo di collegamento lontano dalla corrente di aria calda e dalla bocchetta.
N.B.: Valido per tutti i materiali: per un risultato
ottimale si consiglia di provare il bruciatore prima su
una piccola superfi cie del lavoro da fare.
6. MANUTENZIONE
Prima della manutenzione e della pulizia del bruciatore
staccare sempre la spina dalla presa (presa di corrente). Non usare mai acqua o altri liquidi per la pulizia
delle parti elettriche del bruciatore.
LA MANUTENZIONE PERIODICA DEL BRUCIATORE PREVIENE PROBLEMI INUTILI!
Non usare mai liquidi infi ammabili per la pulizia del
bruciatore in genere e in particolare per la bocchetta.
Mantenere pulite le fessure di ventilazione del bruciatore per evitare surriscaldamento.
7. MALFUNZIONAMENTI
Nel caso che il bruciatore non dovesse funzionare correttamente elenchiamo qui di seguito alcune possibili
cause e le soluzioni relative.
1. Il motore si surriscalda.
Le fessure di ventilazione del bruciatore sono otturate
di sporco.
- Pulire le fessure di ventilazione
2. Il bruciatore non funziona dopo l’attivazione.
Interruzioni nel circuito elettrico.
- Controllare il cavo di collegamento e la spina
L’interruttore è rotto.
Staccare la spina dalla presa di corrente, c’è peri-
colo d’incendio! Rivolgersi al concessionario SBM
Group per la riparazione.
3. Il motore non funziona, però riscalda.
Interruzione nel motore elettrico.
Staccare la spina dalla presa di corrente, c’è peri-
colo d’incendio! Rivolgersi al concessionario SBM
Group per la riparazione.
11
Page 12

Verfafbrander
LEES DEZE GEBRUIKSAANWIJZING GOED DOOR,
VOORDAT U DE VERFAFBRANDER IN GEBRUIK
NEEMT!
1. SPECIALE VEILIGHEIDSVOORSCHRIF-
TEN
BIJ HET INGEBRUIK NEMEN VAN HET APPARAAT:
1. Controleer het volgende:
- Komt de aansluitspanning van de verfafbrander met
de netspanning overeen, apparaten met de aanduiding 230 Volt kunnen ook op een netspanning van
220 Volt gebruikt worden;
- Zijn het netsnoer en de netstekker in goede staat:
stevig, zonder rafels of beschadigingen.
2. Vermijdt het gebruik van lange verlengkabels.
3. Gebruik het apparaat niet onder vochtige omstandigheden.
4. Het metalen mondstuk wordt heet. Kijk dan uit en
raak het metalen mondstuk niet aan!
5. Voorkom beschadiging van het verwarmingselement. Sluit het mondstuk niet af en blokkeer het
niet.
6. Blijf bij het apparaat als het ingeschakeld is.
7. Als het apparaat niet gebruikt wordt dient het wegte
worden gezet op de uitklapbare beugel, die zich
aande verfafbrander bevindt. Door deze beugel uit
te klappen, kan de verfafbrander op de beugel op
de tafel geplaatst worden. De verafbrander staat nu
met het mondstuk omhoog.
8. Gebruik het apparaat niet als haardroger of als droger voor levende wezens in het algemeen.
Waarschuwing! Dit apparaat werkt bij een temperatuur van 200-600˚ Celsius zonder zichtbare tekenen
van deze temperatuur (geen vlam), toch bestaat er
kans op brandgevaar. Let op de hete luchtstroom
uit het mondstuk. Deze luchtstroom kan brand
wonden veroorzaken.
9. Gebruik het apparaat niet in bad of boven water, of in
ruimtes waar licht ontvlambare vloeistoffen worden
gebruikt.
BIJ HET INBEDRIJF STELLEN VAN HET APPARAAT:
1. Bij het in gebruik nemen van de verfafbrander kunnen er gedurende korte tijd dampen of gassen
vrijkomen welke schadelijk kunnen zijn voor de gezondheid. Mensen met astmatische aandoeningen
kunnen hier bij hinder ondervinden.
2. Controleer dat de schakelaar in de “0” stand staat
voordat u de netstekker op de netspanning aansluit.
3. Houd het netsnoer altijd uit de buurt van het mondstukvan de verfafbrander.
4. Houd bij hetgebruik kinderen en dierenuit de buurt.
HET APPARAAT ONMIDDELLIJK UITZETTEN BIJ:
1. storing in de netstekker, netsnoer of snoerbeschadiging;
2. defecte schakelaar;
3. rook of stank van verschroeide isolatie, afkomstig
van de verfafbrander.
2. INSTALLATIE
Met de verfafbrander kan normaal uit de hand worden
gewerkt of het apparaat kan vertikaal worden opgesteld. Bij gebruik van de vertikale stand moet de metalen ophangbeugel aan het handvat ook vertikaal staan
om de handgreep op de juiste plaats te ondersteunen.
3. INGEBRUIKNAME
DIT APPARAAT IS O.A. TE GEBRUIKEN VOOR:
• Loodgieterswerkzoals pijpverbindingen, zachtsolderen, het buigen van pijpen;
• Verwijderen van verf, vernis en lak zonder brandgevaar;
• Snel drogen van nat geworden apparaten;
• Voordrogen van oppervlakken voor snelle reparatie;
• Het verwijderen van zelfklevende labels op een
schone manier;
• Perfect voor het aanbrengen van PVC labels;
• Gladstrijken van blazen die na het plakken van
PVC-materialen kunnen zijn ontstaan;
• Makkelijk verwijderen van vinyl vloerbedekking;
• Vormen van alle lage-temperatuur kunststoffen waaronder polyethyleen en PVC;
• Vormen van alle hoge-temperatuur kunststoffen waaronder acryl- en plexiglas;
• Versmelten van kunststof, waaronder stoffen en folies met PVC-laag;
• Toepassen van hitte krimpende buizen;
• Krimpverpakkingen;
• Ontdooien van pijpen en motoren;
• Repareren van afwerkingslagen: email van bad en
huishoudelijke apparaten; toepassen van epoxypoeder deklagen;
• Reparaties van ski’s, surfplanken en andere sportartikelen;
• Losmaken van te strak vastgedraaide schroeven en
verbindingen.
4. VOOR INBEDRIJFSTELLING
Zoek voordat u de verfafbrander aanzet het juiste hulpmondstuk en monteer het als de verfafbrander nog
koud is.
BELANGRIJK: Vervang het hulpmondstuk alleen;
• met stilstaande motor;
• met de netstekker uit het stopcontact;
• wanneer het mondstuk is afgekoeld.
5. INBEDRIJFSTELLING
• Controleer of de netschakelaarop de stand “0” staat
voordat u de netstekker op het lichtnet aansluit.
• Houd het netsnoer altijd uit de buurt van de hete
luchtstroomen het mondstuk.
N.B.: Voor alle materialen geldt dat u voor een optimaal
resultaat het apparaat het beste eerst uit kunt proberen
op een klein gedeelte van het werkstuk.
12
Page 13
6. ONDERHOUD
Bij onderhouden schoonmaak altijd de netstekker uit
het stopcontact (de wandcontactdoos) halen. Gebruik
nooit water of an dere vloeistoffen bij het schoonmaken
van de elektrische delen van de verfafbrander.
PERIODIEK ONDER HOUD AAN DE VERFAFBRANDER VOORKOMT ONNODIGE PROBLEMEN.
• Gebruik nooit licht ontvlambare vloeistoffen bij het
schoonmaken van de verfafbrander in het algemeen
en het mondstuk in het bijzonder.
• Houd de ventilatiesleuven van de verfafbrander
schoon om oververhitting te voorkomen.
7. STORINGEN
In het geval de verfafbrander niet naar behoren functioneert, geven wij onderstaand een aantal mogelijke
oorzaken en de bijbehorende oplossingen.
1. De motor raakt oververhit.
De ventilatiesleuven van de verfafbrander zijn verstopt
met vuil.
- Reinig de ventilatiesleuven.
2. De verfafbrander start niet na het inschake len.
Onderbreking in het elektrische circuit.
- Controleer het netsnoer en de netstekker.
De schakelaar is defect.
Trek de netstekker uit het stopcontact, er is namelijkkansop brandgevaar! Biedt de verfafbrander bij
uw SBM Group dealer aan ter reparatie.
3. De motor draait niet, maar verwarmt wel.
Onder breking in elektrische motor.
Trek de netstekker uit het stopcontact, er is namelijkkansop brandgevaar! Biedt de verfafbrander bij
uw SBM Group dealer aan ter reparatie.
Varmluftpistol
LÄS DENNA BRUKSANVISNING NOGGRANT INNAN
VARMLUFTPISTOL TAS I BRUK!
1. SÄRSKILDA SÄKERHETSFÖRESKRIFTER
FÖRE UPPSTART I.
1. Kontrollera följande:
- Kontrollera att nätspänningen håller 220-230 V.
- Kontrollera att alla elledningar är isolerade och intakta utan övriga skador.
2. Undvik att använda långa förlängningskablar.
3. Använd inte apparaten under fuktiga förhållanden.
4. Munstycket av metall blir hett. Var därför försiktig
och rör inte det.
5. Förebygg skada på värmeelementet. Stäng inte av
munstycket och blockera inte heller öppningen.
6. Stanna kvar vid apparaten när den är tillkopplad.
7. Om apparaten inte används skall den sättas undan
på den utfällbara bygeln som sitter på varmluftpistolen. Genom att fälla ut bygeln kan man ställa
varmluftpistolen på ett bord och då med munstycket
uppåtriktat.
8. Använd inte apparaten till hårtork eller för upptorkning av levande varelser i allmänhet.
9. Använd inte apparaten i badkaret eller ovanförvatten
eller i utrymmen där man använder lättantändliga
ämnen.
10. Använd inte apparaten i närheten av tro piska
fåglar eller andradjur.
Varning! Den här apparaten verkar vid temperaturer på 200-600°C utan synliga tecken på så höga
temperaturer (ingen fl amma), ändå fi nns risk för
brand. Var försiktig med den heta luftströmmen
från munstycket. Den kan orsaka brandsår.
VID TANGANDE I DRIFT AV APPARATEN:
1. Vid tagande i drift av varmluftpistolen kan det under
en kort tid komma fram ångor eller gaser som kan
vara skadliga för hälsan. Människor med astmaåkommor kan då få problem.
2. Kontrollera att strömställaren inte står i läget ’TILL’
innan du stoppar in stickkontakten i eluttaget.
3. Håll alltid elsladden borta från varmluftpistolens
munstycke.
4. Håll alltid barn på avstånd vid användningen av
varmluftpistolen.
13
Page 14

2. INSTALLATION
Normalt kan man arbeta med varmluftpistolen med
hän derna eller så kan apparaten ställas upp vertikalt.
Vid användning av detta läge måste upphängningsbygeln av metall på handtaget också stå vertikalt för att
stödja handtaget i rätt läge.
3. TAGANDEIBRUK
VARMLUFTPISTOLEN KAN BL.A. AN VÄNDAS
FÖR:
• Rörmokararbeten som rörkopplingar, mjuklödning,
böjning av rör
• Avlägsnande av färg, fernissa och lack utan brandrisk
• Snabbtorkning av våta apparater
• Upptorkning av ytor för snabbare reparation
• Avlägsnande av självhäftande etiketter på ett rent
sätt
• Perfekt för att applicera PVC-etiketter
• Utstrykning av blåsor som kan uppstår efter klistring
med PVC-material
• Lätt att ta bort vinylgolv
• Går att forma alla lågtemperaturplaster, bl.a. polyetylen och PVC
• Går att forma alla högtemperaturplaster, bl.a. akryl
och plexiglas
• Går att smälta plaster, bl.a. material och folie med
PVC-skikt
• Användning av värmekrympande rör
• Krympförpackningar
• Upptining av rör och motorer
• Reparation av ytskikt, emalj i badkar och av hushållsapparatur, användning av epoxy pulver i täckskikt
• Reparation av plastbåtar, surfbrädor och andra
sportartiklar
• För att lossa på hårt åtdragna skruvar och kopplingar
4. FÖRE TAGANDE I DRIFT
Innan du startar varmluftpistolen tar du fram rätt hjälpmunstycke och sätter på det så läne som varmluftpistolen är kall.
VIKTIGT: Byt hjälpmunstycke bara:
• med stillastående motor
• med stickkontakten ur eluttaget
• när munstycket är avkylt.
5. TAGANDE I DRIFT
• Kontrollera om stickkontakten står i läget ’0’ innan
du stoppar in den i eluttaget.
• Håll alltid elsladden borta från munstyckets heta luftström.
Obs. För alla material gäller att för att få bästa tänkbara resultat bör du först prova ut på en liten del av
arbetsstycket.
6. UNDERHÅLL
Eluttage alltid ur maskinens apparatus för den billprovning eller rening.
Använd aldrig inte vatten eller annat ämnen för att
städa elektrisk delarna av varmluftpistol.
Använd aldrig inte lättantändliga ämnen för rening det
varmluftpistol, i synnerhet för det munstycke.
• Reguljär vedlikehold av er varmluftpistol varnar obehövliga problem.
• Förvara det ventilationfals av varmluftpistol i städlig
kondition för att varna brand.
14
Page 15

Kuumailmapistoolin
LUE KÄYTTÖOHJEET HYVIN, ENNEN KUIN KÄYTÄT MAALINPOLTINTA!
1. TÄRKEITÄ TURVAOHJEITA
KUN LAITEOTETAAN KÄYTTÖÖN:
1. Tarkista:
- Vastaako maalinpolttimen liityntäjännite verkkojännitettä.
- Ovatko johto ja pistoke hyvässä kunnossa: tukevia,
ehjiä ja ilman vaurioita.
2. Vältä pitkien jatkojohtojen käyttöä.
3. Älä käytä laitetta kosteissa olosuhteissa.
4. Metallinen suukappale kuumenee. Ole varovainen,
älä kosketa metallista suukappaletta!
5. Ehkäise lämmityselementin vaurioituminen. Älä sulje suukappaletta, äläkä tuki sitä.
6. Jää laitteen luo, kun se on käynnissä.
7. Jos maalinpoltinta ei käytetä, se on pantava syrjään
laitteessa olevan avattavan sangan päälle. Avaamalla sangan maalinpoltin voidaan asettaa pöydälle
sangan päälle. Maalinpolttimen suuaukko on nyt
ylöspäin.
8. Älä käytä laitetta hiusten kuivaamiseen tai elävien
olentojen kuivaamiseen yleensä.
9. Älä käytä laitetta kylvyssä tai veden yläpuolella tai
tiloissa, joissa käytetään tulenarkoja nesteitä.
Varoitus! Laite toimii 200-600˚C lämpötilassa ilman,
että lämpötilasta on näkyviä merkkejä (ei liekkiä),
tulipalon mahdollisuus on kuitenkin olemassa.
Varo suukappaleesta tulevaa kuumaa ilmavirtaa.
Ilmavirta voi aiheuttaa palohaavoja.
LAITETTA KÄYNNISTETTÄESSÄ:
1. Kun maalinpoltinta käynnistetään, saattaa lyhyenä
aikana vapautua höyryjä ja kaasuja, jotka voivat olla
terveydelle vaarallisia. Ihmisille, joilla on astmaattisia taipumuksia, tämä on haitaksi.
2. Tarkista, että katkaisin ei ole käynnistysasennossa,
ennen kuin liität pistokkeen verkkojännitteeseen.
3. Pidä johto aina poissa maalinpolttimen suukappaleen lähettyviltä.
4. Pidä lapset ja eläimet loitolla, kun käytät laitetta.
SAMMUTA LAITE VÄLITTÖMÄSTI, KUN:
1. pistokkeessa tai johdossa ilmenee häiriöitä tai johto
on vahingoittunut;
2. katkaisin on epäkunnossa;
3. maalinpolttimesta tulee kärventyneen eristyksen hajua tai savua.
2. ASENNUS
Voit käyttää maalinpoltinta normaalisti kädessä pitäen
tai asettaa laitteen pystysuoraan asentoon. Jos käytät
laitetta pystysuorassa asennossa, kahvan metallisen
ripustussangan on myös oltava pystysuorassa, jotta se
tukee kahvaa oikeasta paikasta.
3. KÄYTTÖÖNOTTO
VOIT KÄYTTÄÄ MAALINPOLTINTA MUUN MUASSA:
• putkitöihin, kuten putkien liitoksiin, pehmeisiin juotoksiin, putkien taivuttamiseen;
• maalin, vernissan ja lakan poistamiseen ilman tulipalon vaaraa;
• märkien laitteiden nopeaan kuivattamiseen;
• pintojen kuivattamiseen nopeaa korjausta varten;
• liimautuvien etikettien poistamiseen siistillä tavalla;
• täydellinen PVC-etikettien kiinnittämiseen;
• tasoittamaan kuplia, joita voi muodostua PVC-materiaaleja liimattaessa;
• poistamaan helposti vinyylilattiamaton;
• muotoilemaan kaikkia korkean lämpötilan muoveja,
kuten akryyli-ja pleksilasia;
• sulattamaan muovia, kuten kankaita ja kelmuja, joissa on PVC-kerros;
• kuumuudessa kutistuvien putkien asettamiseen;
• kutistuspakkauksiin;
• putkien ja moottorien sulattamiseen;
• viimeistelykerrosten korjaamiseen: kylpyammeen ja
kotitalouskoneiden emali; epoksijauheisten peitekerrosten käyttämiseen;
• suksien, surfi lautojen ja muiden urheiluvälineiden
korjaamiseen;
• liiantiukkaan väännettyjen ruuvien ja liitosten irrottamiseen.
4. ENNEN KÄYNNISTÄMISTÄ
Ennen kuin käynnistät maalinpolttimen, etsi oikea suukappale ja asenna se, kun maalinpoltin on vielä kylmä.
TÄRKEÄÄ: korvaa suukappale ainoastaan, kun
• moottori ei ole käynnissä;
• pistoke on irti pistorasiasta;
• suukappale on jäähtynyt.
5. KÄYNNISTYS
• Tarkista, että katkaisin on 0-asennossa, ennen kuin
liität pistokkeen sähköverkkoon.
• Pidä johto aina poissa kuuman ilmavirran ja suukappaleen läheisyydestä.
HUOMIO: Parhaan tuloksen saavuttamiseksi on parasta, että kokeilet laitetta ensin pieneen osaan työstettävää kappaletta. Tämä koskee kaikkia materiaaleja.
6. HUOLTO
Kun huollat ja puhdistat laitetta, ota aina ensin pistoke
pistorasiasta (seinäpistorasiasta). Älä koskaan käytä
vettä tai muita nesteitä maalinpolttimen sähköisten osien puhdistamiseen.
15
Page 16

MAALINPOLTINTA SÄÄNNÖLLISESTI HUOLTAMALLA EHKÄISETTURHIA ONGELMIA!
Älä koskaan käytä tulenarkoja nesteitä maalinpolttimen
puhdistamiseen yleensä, älä etenkään suukappaleen
puhdistamiseen.
Pidä maalinpolttimen tuuletusaukot puhtaana välttääksesi ylikuumenemista.
7. HÄIRIÖT
Siinä tapauksessa, että maalinpoltin ei toimi kunnolla,
mainitsemme alla muutamia mahdollisia syitä ja niiden
ratkaisuja.
1. Moottori ylikuumenee.
Maalinpolttimen tuuletusaukot ovat lian tukkimat.
- Puhdista tuuletusaukot.
2. Maalinpoltin ei käynnisty.
Häiriö sähköliitännöissä.
- Tarkista johto ja pistoke.
Katkaisin on epäkunnossa.
- Vie maalinpoltin SBM-Group-myyjänkorjattavaksi.
Irrota pistoke pistorasiasta, sillä tulipalon mahdollisuus
on olemassa! Vie maalinpoltin SBM Group-myyjänkorjattavaksi.
3. Moottori ei käy, mutta kylläkin lämmittää.
Häiriö sähkömoottorissa.
Irrota pistoke pistorasiasta, sillä tulipalon mahdollisuus
on olemassa! Vie maalinpoltin SBM Group-myyjänkorjattavaksi.
Varmluftpistol
LES DENNE BRUKSANVISNINGEN NØYE FØR DU
BEGYNNER Å BRUKE VARMLUFTPISTOLEN!
1. SPESIELLE SIKKERHETSFORSKRIFTER
NÅR DU TAR I BRUK VARMLUFTPISTOLEN:
1. Kontrollerfølgende:
- Stemmer apparatspenningen med nettspenningen?
- Er ledningen og støpslet i god stand: Solid, uten slitasje eller skader?
2. Unngå bruk av lange skjøteledninger.
3. Bruk ikke varmluftpistolen under fuktige forhold.
4. Munnstykket av metall blir svært varmt. Vær forsiktig
og berør ikke metallmunnstykket!
5. Forebygg skade av varmeelementet. Tett ikke igjen
munnstykket og blokker det ikke.
6. La ikke varmluftpistolen være uten tilsyn når den er
slått på.
7. Når varmluftpistolen ikke brukes, må den stå på
bøyelen som befi nner seg på pistolen. Ved å slå
ut denne bøylen kan varmluftpistolen plasseres på
bordet. Pistolen står nå med munnstykket vendt
oppover.
8. Bruk ikke varmluftpistolen som hårtørker eller i det
hele tatt til å tørke levende vesener med.
9. Bruk ikke varmluftpistolen i bad eller overvann eller i
rom hvor lett antennelige væsker blir brukt.
Advarsel: Varmluftpistolen arbeider med en tem-
peratur på 200-600º Celsius uten at denne tempe-
raturen er synlig (ingen fl amme). Dette medfører
likevel brannfare. Vær oppmerksom på den varme
luftstrømmen fra munnstykket. Denne luftstrømmen kan årsake brannsår.
VED IGANGSETTELSE AV VARMLUFTPISTOLEN:
1. Når du bruker varmluftpistolen kan det i løpet av kort
tid frigjøres damper eller gasser som kan være helsefarlige. De kan være sjenerende for personer med
astmatiske plager.
2. Kontroller at bryteren ikke står i ”PÅ”-stilling før du
setter støpslet i stikkontakten.
3. Hold alltid ledningen vekk fra varmluftpistolens
munnstykke.
4. Hold barn og dyr unna mens du brukervarmluftpistolen.
VARMLUFTPISTOLEN MÅ ØYEBLIKKELIG SLÅSAVVED:
1. feil i støpslet eller ledningen eller skade på ledningen;
2. defekt bryter;
3. røyk eller stank av svidd isolasjon som skriver seg
fra varmluftpistolen.
16
Page 17

2. OPPSTILLING
Du kan holde varmluftpistolen i hånden under arbeidet
eller du kan sette den ned vertikalt. Når du benytter deg
av den vertikale stillingen, må opphengings bøylen av
metall på håndtaket også stå vertikalt for å kunne støtte
håndtaket på den riktige måten.
3. BRUK
VARMLUFTPISTOLEN KAN BL.A. BRUKES TIL:
• rørleggerarbeid, som f.eks. rørforbindelser, bløtlodding og bøying av rør;
• fjerning av maling, ferniss og lakk uten brannfare;
• furtigtørking av apparater som er blitt våte;
• forhåndstørking av overfl ater for hurtig reparering;
• fjerning av selvklebende etiketter på en effektiv måte;
• perfekt festing av PVC-etiketter;
• utjevning av vabler som kan ha oppstått etter liming
av PVC-materialer;
• fjerning av gulvbelegg av vinyl på en lett måte;
• forming av alle lavtemperatur-kunststoffer, bl.a. polyetylen og PVC;
• forming av alle høytemperatur-kunststoffer, bl.a.
akryl- og pleksiglass;
• sveising av kunststoff, bl.a. duk og folie med PVClag;
• anvendelse av krympeslanger;
• krympeemballasje;
• avising av rør og motorer;
• reparering av topplag; emalje på bad og husholdningsapparater; anvendelse av overfl atebelegg av
epoksypulver;
• reparasjoner av ski, seilbrett og andre sports artikler;
• å løsne skruer og skjøter som er dreid for hardt til.
4. FØR IGANGSETTELSEN
Før du slår på varmluftpistolen må du fi nne fram det
riktige munnstykket og montere det mens varmluftpistolen ennå er kald.
VIKTIG: MUNNSTYKKETMÅ BARE SKIFTES:
• når motoren er avslått;
• når støpslet ikke står i stikkontakten;
• når munnstykket er avkjølt;
5. IGANGSETTELSEN
• Kontroller om bryteren står i ”0”-stilling før du setter
støpslet i stikkontakten.
• Hold alltid ledningen vekk fra den varme luftstrømmen og munnstykket.
OBS! For å få best mulig resultat bør du prøve varmluftpistolen på en liten del av arbeidsstykket først. Dette
gjelder alle slags materialer.
6. VEDLIKEHOLD
Ved vedlikehold og rengjøring må du alltid trekke
støpslet ut av stikkontakten (veggkontakten). Bruk aldri
vann eller andre væsker til rengjøring av de elektriske
delene av varmluftpistolen.
PERIODISK VEDLIKEHOLD AV VARMLUFTPISTOLEN FOREBYGGER UNNØDIGE PROBLEMER!
Bruk vanligvis aldri lett brennbare væsker til rengjøring
av varmluftpistolen og spesielt ikke til munnstykket.
Hold ventilasjonsåpningene på varmluftpistolen rene
for å forebygge overoppheting.
7. FUNKSJONSFEIL
I tilfelle av at varmluftpistolen ikke virker som den skal,
gir vi her noen mulige årsaker og de tilsvarende løsninger:
1. Motoren blir overopphetet.
Ventilasjonsåpningene på varmluftpistolen er tettet
igjen med smuss.
- Rengjør ventilasjonsåpningene.
2. Varmluftpistolen starter ikke når den er koplet
inn.
Feil i strømtilførselen.
- Kontroller ledningen og støpslet.
Skade på bryteren.
Trekk støpslet ut av stikkontakten. Det er nemlig
brannfare! Lever varmluftpistolen inn til reparasjon
hos din SBM Group-forhandler.
3. Motoren går ikke, men pistolen blir likevel varm.
Feil i den elektriske motoren.
Trekk støpslet ut av stikkontakten. Det er nemlig
brannfare! Lever varmluftpistolen inn til reparasjon
hos din SBM Group-forhandler.
17
Page 18

Varmluftpistol
LÆS ALTID DENNE BRUGERVEJLEDNING IGENNEM FØR DE TAGER MASKINEN I BRUG.
1. SÆRLIGE SIKKERHEDS - FORSKRIFTER
FØR MASKINEN TAGES I BRUG:
1. Kontrollerfølgende:
- At maskinens tilslutningsspænding passer med netspændingen.
- At strømkablet og stikkontakten er igod stand.
2. Luk rembeskytteleseskappen.
3. Apparatet må ikke bruges under vådeforhold.
4. Metalmundstykket bliver varmt. Pas derfor på ikke at
berøre metalmundstykket.
5. Undgå at beskadige varmeelementet. Mundstykket
må ikke lukkes, ogdet må ikke blokeres.
6. Forlad ikke apparatet, hvis det er tændt.
7. Når apparatet ikke bruges, skal det stilles væk i bøjlen, der kan klappes ud. Den sidder på pistolen. Når
denne bøjle klappes ud, kan varmluftpistolen sættes
på den på bordet. Pistolen står da med mundstykket
opad.
8. Varmluftpistolen må ikke bruges som hårtørrer eller
til tørring af levende væsner i al almindelighed.
9. Pistolen må ikke bruges i bad eller over vand eller i
rum, hvor der bruges letantændelige væsker.
Advarsel! Strålen fra varmluftpistolen når op på
200-600°C uden synlige tegn på denne høje temperatur (ingen fl amme), men der er alligevel risiko for
brand. Pas på den varme luftstrøm fra mundstykket. Denne luftstrøm kan forårsage brandsår.
VED IBRUGTAGNING AF VARMLUFTPISTOLEN
1. Ved ibrugtagning af varmluftpistolen kan der i et kort
tidsrum frigøres dampe eller gasser, som kan være
sundhedsskadelige. Personer, der lider af astma,
kan generes heraf.
2. Kontroller, at der ikke er tændt for varmluftpistolen,
før stikket sættes i stikkontakten.
3. Hold altid netledningen borte fra varmluftpistolens
mundstykke.
4. Når pistolen bruges, må der ikke være børn og dyr i
nærheden.
2. BRUG
Varmluftpistolen kan bruges normalt med hånden, men
den kan også stilles lodret. Når den bruges i lodret position, skal metalbøjlen på håndtaget også stå lodret for
at støtte varmluftpistolen i den rigtige position.
3. VARMLUFTPISTOLEN KAN BRUGES TIL
FØLGENDE:
VARMLUFTPISTOLEN KAN BL.A. BRUGESTIL:
• Blikkenslagerarbejde som rørsamlinger, lodning og
bøjning af rør;
• Aftagning af maling, fernis og lak uden risiko for
brand;
• Hurtig tørring af apparater, der er blevet våde;
• Tørring af overfl ader for hurtig reparation;
• Aftagning af selvklæbende etiketter på en ren måde;
• Perfekt påføring af PVC-labels;
• Glatstrygning af blærer, der er kommet efter klæbning af PVC-materialer;
• Nem aftagning af gulvbelægning gaf vinyl;
• Formning af alle lav-temperatur plastmaterialer, herunder polyethylen og PVC;
• Formning af alle høj-temperatur plastmaterialer, herunder acryl- og plexiglas;
• Smeltning af plast, herunder materialer og folier
med PVC-lag;
• Varmekrympende rør;
• Krympeemballage;
• Optøning af rør og motorer;
• Reparation af coatings: emalje på bad og husholdsningsapparater; anvendelse af epoxypulver coatings;
• Reparation af ski, surfbræt og andre sportsartikler;
• Løsgøring af skruer og forbindelser, der er for stramme.
4. FØR IBRUGTAGNING
Før der tændes for varmluftpistolen, skal man have
fundet det rigtige mundstykke og sætte det i, mens pistolen stadig er kold.
VIGTIGT: Mundstykket må kun udskiftes,
• når varmluftpistolen er slukket;
• når stikket er taget ud af stikkontakten;
• når mundstykket er afkølet.
5. IBRUGTAGNING
• Varmluftpistolen skal være slukket, før stikket sættes i stikkontakten.
• Hold altid netledningen borte fra den varme luftstrøm og mundstykket.
NB: Hvis man ønsker at opnå et godt resultat, er det
bedst, at man først afprøver på et lille stykke af arbejdsstykket. Dette gælder for alle materialer.
Tag stikket ud af stikkontakten, der er nemlig risiko
for brand! Indlever varmluftpistolen til reparation
hos SBM Group forhandleren.
Motoren går ikke, men den varmer.
Brud i den elektriske motor.
18
Page 19

Hőlégfúvó pisztoly
A HŐLÉGFÚVÓ HASZNÁLATBAVÉTELE ELŐTT
ALAPOSAN OLVASSAEL A HASZNÁLATI UTASÍTÁST!
1. RENDKÍVÜLI BIZTONSÁGI ELŐÍRÁSOK
A KÉSZÜLÉKHASZNÁLATBA VÉTELEKOR:
1. Ellenőrizze a következőt:
- megegyezik-e a hőlégfúvó feszültsége a hálózati
feszültséggel.
- a zsinór és a hálózati csatlakozó megfelelő állapotban van-e, erős, valamint szakadás- és sérülésmentes-e.
2. Kerülje a hosszú hosszabbítózsinórok használatát.
3. A készüléket ne használja nyirkos helyen.
4. A fém fúvóka nagyon felmelegszik. Vigyázzon ezért
és ne nyúljon a fém fúvókához!
5. Kerülje el a melegítő elem megsérülését. A fúvókát
ne zárja le és ne takarja el.
6. A bekapcsolt készüléket ne hagyja őrizetlenül.
7. Ha a készüléket nem használja, helyezze a
hőlégfúvón lévő kihajtható állványra. Az állvány
kihajtásával a hőlégfúvó az asztalra helyezhetū. A
hőlégfúvó ekkor a fúvókával felfelé áll.
8. Ne használja a készüléket hajszárítóként, illetve általában élőlények szárítására.
9. Ne használja a készüléket fürdőkádban vagy víz
felett, illetve olyan helyen, ahol gyúlékony folyadékokat használnak.
Figyelem! A készülék 200-600° Celsius hőmérsék-
lettel mőködik a hő (láng) látható jele nélkül, mégis
fennáll a tőzveszély lehetősége. Kísérje fi gyelem-
mel a fúvókából kiáramló forró levegőt. A levegő
égési sebeket okozhat.
A KÉSZÜLÉK HASZNÁLATBAVÉTELEKOR:
1. A hőlégfúvó használata során rövid ideig az egészségre káros hatású gőzök és gázok szabadulhatnak
fel. Asztmás betegek számára ez hátrányos lehet.
2. Ellenőrizze, hogy a hálózati csatlakozó dugós kapcsolóaljzatba helyezésekor a kapcsoló ne legyen a
„BE” állásban.
3. A hálózati zsinórt mindig tartsa távol a hőlégfúvó fúvókájától.
4. A használat során ne legyenek gyerekek és állatok a
közelben.
AZONNAL KAPCSOLJA KI A KÉSZÜLÉKET:
1. a hálózati csatlakozó, hálózati zsinór és zsinór meghibásodása esetén.
2. a kapcsoló meghibásodásakor.
3. ha a hőlégfúvó szigetelése megégett, füstöl vagy
érezhető a szaga.
2. BEÁLLÍTÁS
A hőlégfúvó rendes körülmények között használható
kézben tartva, de a készüléket függőlegesen be lehet
állítani. Függőleges állásban a fogón lévő fém felakasztó váznak is függőlegesen kell állnia, hogy az a
fogót a megfelelő helyen támassza alá.
3. HASZNÁLATBAVÉTEL
A HŐLÉGFÚVÓTÖBBEKKÖZÖTTA KÖVETKEZŐ
FELADATOKRA HASZNÁLHATÓ
• Vezetékek szerelésére, csövek összekötésére, fi -
nomforrasztásra, csövek hajlítására;
• Festék és lakk eltávolítására;
• Megvizesedett készülékek gyors szárítására;
• Gyors javításokhoz a felületek előszárítására;
• Öntapadó címkék tisztaeltávolítására;
• Tökéletes a PVC címkék felvitelére;
• A PVC-anyagok felragasztása után esetleg fennálló
hólyagok kisimítására;
• PVC padlóburkolat könnyő eltávolítására;
• Minden alacsony hőmérséklető mőanyag, így polietilén és PVC alakítására;
• Minden alacsony hőmérséklető mőanyag, így akrilés plexiüveg alakítására;
• Mőanyag, így PVC-bevonatú anyagok és fóliák leolvasztására;
• Hőre zsugorodó csövek alkalmazására;
• Zsugorcsomagolásra;
• Csövek és motorok kiolvasztására;
• Fedőrétegek javítására: kádak és háztartási készülékek zománcozása; epoxiporfedőrétegek;
• Sílécek, szörfdeszkák és egyéb sportcikkek javítására;
• Túl szorosan behajtott csavarok és összekötők kilazítására.
4. HASZNÁLATBAVÉTEL ELŐTT
A készülék bekapcsolása előtt válassza ki a megfelelő
segédfúvókát és erősítse a hőlégfúvóra, amíg az még
hideg.
FONTOS: ASEGÉDFÚVÓKÁT CSAK
AKKORCSERÉLJE KI, HA
• áll a motor;
• a hálózati csatlakozó nincs a dugós kapcsolóaljzatban;
• a fúvóka lehőlt.
5. HASZNÁLAT
• Ellenőrizze, hogy a hálózati kapcsoló „0” állásban
áll-e, mielőtt a hálózati csatlakozót a dugós kapcsolóaljzatba helyezi.
• A hálózati zsinórt mindig tartsa távol a forró levegő-
áramtól és a hőlégfúvó fúvókájától.
Megjegyzés: Minden anyag esetében érvényes, hogy
az optimális eredmény érdekében érdemes a készüléket előszöra munkafelület kis részén kipróbálni.
19
Page 20

6. KARBANTARTÁS
A karbantartás és tisztítás során mindig húzza ki az
hálózati csatlakozót a dugós kapcsolóaljzatból. A készülék elektromos részeinek tisztításához soha ne
használjon vizet vagy más folyadékot.
A HŐLÉGFÚVÓ RENDSZERES KARBANTARTÁS A
MEGELŐZI A FELESLEGES MEGHIBÁSODÁST!
- Sohase használjon könnyen lángra gyulladó folyadékot általában a hőlégfúvó, különösképpen pedig a
fúvóka tisztításához.
- A hőlégfúvó szellőzőréseit tartsa tisztán a túlhevülés
elkerülése miatt.
7.ZAVOROK
Amennyiben a hőlégfúvó nem megfelelően üzemel, az
alábbiakban felsorolunk néhány lehetséges hibaokot
és a hozzájuk tartozó megoldásokat:
1. A motor túlmelegszik.
A hőlégfúvó szellőrései szennyeződés miatt eldugul-
tak.
- Tisztítsa ki a szellőzőréseket.
2. A hőlégfúvó bekapcsolás után nem indul el.
Az áramkör megszakadt.
- Ellenőrizze a hálózati zsinórt és csatlakozót.
Hibás a kapcsoló.
- Javíttassa meg a SBM Group árusító helyen.
3. A motor nem forog, de felmelegszik.
Az elektromos motorhibája.
Húzza ki a hálózati csatlakozót a dugós kapcsolóaljzatból, ugyanis fennáll a tőzveszély. Javíttassa meg a
hőlégfúvót a SBM Group árusítóhelyen.
Foehn industrial
Stimaţi cumpărători! Studiaţi cu atenţie prezentele instrucţiuni înainte de a începe exploatarea produsului!
CARACTERISTICILE TEHNICE
Vezi p. 2.
Norme de tehnică a securităţii
Atenţie! Acest instrument funcţionează cu o tempera-
tură înaltă fără semne vizibile de fl acără deschisă, din
acest motiv în timpul funcţionării sale persistă pericolul
de apariţie a incendiului. Se recomandă de observat în
ce direcţie se îndreaptă jetul de aer fi erbinte, deoarece
acesta poate provoca arsuri.
• Înainte de funcţionare, asiguraţi-vă, că:
- tensiunea de alimentare a instrumentului corespunde tensiunii din reţeaua de alimentare.
- fi rul de alimentare şi fi şa sunt în stare potrivită
pentru funcţionare, adică nu prezintă defecţiuni şi
deranjamente vizibile.
• Evitaţi utilizarea prelungitoarelor electrice de lungime excesivă.
• Nu se admite utilizarea instrumentului în condiţii de
umiditate ridicată.
• Nu se permite utilizarea instrumentului în aproprierea materialelor
• În procesul de lucru duza metalică se încălzeşte până la incandescenţă, din acest motiv evitaţi contactul direct cu aceasta.
• Pentru a evita deteriorarea elementului de încălzire
nu se permite blocarea duzei.
• Nu lăsaţi instrumentul conectat.
• Nu admiteţi utilizarea instrumentului pentru uscarea
părului şi corpului!
• La începutul exploatării instrumentul în decursul a
unui scurt timp poate să elimine gaze şi vapori dău-
nători pentru sănătatea oamenilor (în special, afectaţi de astmă).
• Înainte de conectarea instrumentului la reţeaua de
alimentare, asiguraţi-vă, că întrerupătorul alimentării
se afl ă în poziţia “Deconectat”.
• Firul de alimentare nu trebuie să se afl e în zona de
propagare a jetului de aer fi erbinte.
• În timpul lucrului cu instrumentul copiii şi animalele
trebuie să se afl e la o distanţă de siguranţă
de lucru.
• Citiţi de asemenea şi instrucţiunile anexate separat
privind tehnică securităţii!
Deconectaţi imediat instrumentul în caz de:
1. deteriorare a fi rului de alimentare şi (sau) fi şei;
2. deteriorare a întrerupătorului de alimentare;
3. apariţie a semnelor de ardere a izolaţiei (fum, miros
specifi c).
şi lichidelor uşor infl amabile.
de locul
20
Page 21

EXPLOATAREA
Instrumentul poate fi aplicat pentru efectuarea urmă-
toarelor tipuri de lucrări:
• racordarea conductelor de apă, lipirea, purjarea
conductelor;
• înlăturarea straturilor de lac şi vopsea într-un mod
sigur contra incendiilor;
• uscarea rapidă a obiectelor umede; uscarea suprafeţelor reparate;
• înlăturarea fără urmă a etichetelor autoadezive; aplicarea autocolantelor sau etichetelor din PVC;
• înlăturarea incluziunilor după aplicarea autocolantelor sau etichetelor din PVC;
• înlăturarea rapidă a acoperirilor cu covor vinilic;
• conferirea formei necesare materialelor şi articolelor
sintetice, inclusiv acril şi plexiglas.
• topirea a diverse materiale sintetice, inclusiv celor
care conţin acoperire din PVC;
• montarea şi instalarea ţevilor din materiale termo-
contractabile;
• ambalarea în materiale termocontractabile;
• încălzirea ţevilor şi motoarelor;
• reparaţia şi restabilirea acoperirilor fi nisate cu email
(cada de baie, vesela de bucătărie);
• aplicarea acoperirilor din praf epoxidic;
• repararea schiurilor, plăcii de surfi ng şi altui inventar
sportiv;
• desfacerea sau deşurubarea îmbinărilor strânse.
Înainte de a începe lucrul
Înainte de a conecta instrumentul (până duza de ieşire
nu s-a încălzit până la incandescenţă) trebuie de ales
şi instalat pe duză un ajutaj de forma necesară.
Înlocuirea duzei se efectuează numai:
• când instrumentul este oprit;
• când instrumentul este deconectat de la reţea;
• când duza este rece.
Lucrul cu instrumentul este posibil atât manual, cât şi
în poziţie fi xată vertical. În ultimul caz fi xaţi mânerul in-
strumentului în poziţia necesară cu ajutorul unei scoabe – suport metalic.
Pentru a obţine un rezultat optim trebuie mai întâi de
prelucrat un mic sector separat a piesei brute.
DESERVIREA TEHNICĂ
Atenţie! Înainte de a efectua lucrările de curăţire sau
deservire tehnică a instrumentului este necesar să vă
asiguraţi, că acesta este deconectat de la reţeaua de
alimentare.
Pentru a evita supraîncălzirea instrumentului este necesar de menţinut curate orifi ciile sale de ventilaţie.
Nu se admite curăţirea instrumentului şi, în special, a
duzei, cu utilizarea unor lichide uşor infl amabile.
În caz de apariţie a deranjamentelor adresaţi-vă la Serviciul de deservire.
Πιστόλι θερμού αέρα
ΔΙΑΒΑΣΤΕ ΠΡΟΣΕΧΤΙΚΑ ΤΙΣ ΟΔΗΓΙΕΣ ΧΡΗΣΕΩΣ
ΠΡΟΤΟΥ ΧΡΗΣΙΝΟΠΟΙΗΣΕΤΕ ΤΟΝ ΚΑΥΣΤΗΡΑ ΒΑΦΗΣ!
1. ΕΙΔΙΚΕΣ ΠΡΟΔΙΑΓΡΑΦΕΣ ΑΣΦΑΛΕΙΑΣ
ΘΕΤΟΜΑΣΤΗΜΙΧΑΝΙΣΕ ΛΕΙΤΟΥΡΠΑ:
1. Ελέγξτε τα εξής:
- ελέγξτε αν η τάση σύνδεσης της μηχανής αντιστοιχεί
με την τάση του δικτύου.
- ελέγξτε αν το καλώδιο και η πρίζα είναι σε καλή κατάσταση: στερεά, δίχωςβλάβες.
2. Αποφεύγετε τη χρήση μακριών επεκτάσεων καλωδί-
ου.
3. Μη χρησιμοποιείτε τη συσκευή σε υγρό περιβάλλον.
4. Το μεταλλικό ακροστόμιο
μην ακουμπήσετε το μεταλλικό ακροστόμιο όταν έχει
θερμανθεί!
5. Αποφεύγετε τις βλάβες στο θερμαντικό στοιχείο.
Μην αποκλείσετε το ακροστόμιο καιμη το μπλοκάρετε.
6. Μην απομακρύνεστε από τη συσκευή όταν την έχετε
θέσει σε λειτουργία.
7. Αν η συσκευή δεν χρησιμοποιείται, πρέπει να τοποθετηθεί στο πτυσσόμενο στήριγμα της
Ανοίγοντας το στήριγμα, ο καυστήρας μπορεί να
τοποθετηθεί στο τραπέζι, ακουμπώντας στο στήριγμα. Ετσι ο καυστήρας τοποθετείται με το ακροστόμιο
προς τα επάνω.
8. Μη χρησιμοποιείτε τον καυστήρα σαν πιστολάκι για
τα μαλλιά, ούτε για το στέγνωμα ανθρώπωνή ζώων
εν γένει.
9. Μη χρησιμοποιείτε τη συσκευή στο λουτρό ή
από κάποια επιφάνεια νερού, ή σε χώρους όπου
χρησιμο ποιούνται εύφλεκτες ύλες.
ΠΡΟΕΙΔΟΠΟΙΗΣΗ: ΑΥΤΗ Η ΣΥΣΚΕΥΗ ΛΕΙΤΟΥΡΓΕΙ ΣΕ ΜΙΑ ΘΕΡΜOΚΡΑΣΙΑ
ΧΩΣ ΝΑ ΥΠΑΡΧΟΥΝ ΕΜΦΑΝΕΙΣ ΕΝΔΕΙΞΕΙΣ ΤΗΣ
ΘΕΡΜOΚΡΑΣΙΑΣ ΑΥΤΗΣ (ΔΕΝ ΥΠΑΡΧΕΙ ΦΛΟΓΑ).
ΩΣΤΟΣΟ, ΥΠΑΡΧΕΙ ΚΙΝΔΥΝΟΣ ΠΥΡΚΑΓΙΑΣ. ΠΡΟΣΕΧΕΤΕ ΤΟ ΡΕΥΜA ΖΕΣΤΟΥ ΑΕΡΟΣ ΑΠΟ ΤΟ
ΑΚΡΟΣΤΟΜIΟ. ΑΥΤ Ο ΤΟ ΡEΥΜA ΑΕΡΟΣ ΜΠΟΡΕΙ
ΝΑ ΠΡΟΚΑΛΕΣΕΙΕΓΚΑΥΜAΤΑ.
ΧΡΗΣΙΜOΠΟΙΩΝΤΑΣ ΤΗΜHXΑΝΗ
1. Κατά τη θέση σε λειτουργία του καυστήρα μπορούν,
για μικρό χρονικό διάστημα, να αναδοθούν ατμοί
ή αέρια που μπορούν να είναι επιβλαβείς για την
υγεία. Γι’ αυτό, άτομα με ασθματικές παθήσεις μπορούν να αντιμετωπίσουν προβλήματα.
2. Ελέγξτε ο διακόπτης να μην βρίσκεται στη θέση
“ΟΝ” ή “1” προτούβάλετε το καλώδιο
3. Κρατάτε το καλώδιο πάντα μακριά από το ακροστόμιο του καυστήρα.
4. Κατά τη διάρκεια της χρήσης, κρατήστε τα παιδιά και
τα ζώα σε ασφαλή απόσταση.
θερμαίνεται. Προσέξετε να
συσκευής.
πάνω
200-600° ΚΕΛΣΙΟΥ ΔΙ-
στην πρίζα.
21
Page 22

ΣΒΗΣΤΕ ΑMEΣΩΣ ΤΗ MHXΑΝΗ ΣΤΙΣ
ΑΚΟΛΟΥΘΕΣ ΠΕΡΙΠΤΩΣΕΙΣ:
1. Υπέρμετρο σπινθήρισμα των ανθρακικών ψηκτρών
και στροβηλώδης φλόγα μέσα στο συλλέκτη.
2. Βλάβη στη πρίζαή στο καλώδιο.
3. Βλάβη στο διακόπτη.
2. ΕΓΚΑΤΑΣΤΑΣΗ
Ο καυστήρας βαφής μπορεί να χειριστεί κανονικά με το
χέρι ή μπορεί να τοποθετηθεί κάθετα. Κατά τη χρήση
της κάθετης θέσης, το μεταλλικό στήριγμα στη χειρολαβή πρέπει επίσης να βρίσκεται σε κάθετη θέση, για να
υποστηρίζει τη χειρολαβή στο σωστό σημείο.
3. ΘΕΣΗ ΣΕ ΛΕΙΤΟΥΡΓΙΑ
Ο ΚΑΥΣΤΗΡΑΣ ΒΑΦΗΣ ΜΠΟΡΕΙ ΜΕΤΑΞΥΑΛΛΩΝ
ΝΑ ΧΡΗΣΙΜΟΠΟΙΗΘΕΙ:
• Για εργασίες στα υδραυλικά, όπως π.χ. ενώσεις σωλήνων, μαλακή συγκόλληση, κάμψη σωλήνων.
• Για την αφαίρεση βαφής, βερνικιού και λάκκας, χωρίς να υπάρχει κίνδυνος πυρκαγιάς.
• Για το γρήγορο στέγνωμα βρεγμένων συσκευών.
• Για το στέγνωμα επιφανειών για γρήγορες επισκευ-
ές.
Για την αφαίρεση αυτοκόλλητων ετικετών με καθαρό
•
τρόπο.
• Εξαιρετικά κατάλληλος για την κόλληση ετικετών
από πολυβινυλοχλωρίδιο.
• Για την εξομάλυνση φυσαλίδων που μπορούν να
εμφανιστούν μετά την κόλληση υλικών από πολυβινυλοχλωρίδιο.
• Για την εύκολη αφαίρεση επίστρωσης δαπέδου από
βινύλιο.
• Για καλούπια όλων των συνθετικών υλών χαμηλής
θερμοκρασίας, όπως το
βινυλοχλωρίδιο.
• Για καλούπια όλων των συνθετικών υλών υψηλής
θερμοκρασίας, όπως το πλεξιγκλάς.
• Για την τήξη συνθετικών υλών, μεταξύ άλλων και
υλών και ελασμάτων με στρώμα πολυβινυλοχλωριδίου.
• Για την εφαρμογή σωλήνων συστελλόμενων υπό
θέρμανση.
• Για συστελλόμενες συσκευασίες.
• Για την απόψυξη σωλήνων και μηχανών.
Για την επισκευή επικαλύψεων: σμάλτο οικιακών
•
σκευών και ειδών υγιεινής, εφαρμογή επικαλύψεων
εποξικής σκόνης.
• Για την επισκευή χιονοπέδιλων (σκι), σανίδων κυματοδρομίας και άλλων ειδών αθλητισμού.
• Για το λασκάρισμα σφιχτών βιδών και ενώσεων.
πολυαιθυλένιο και το πολυ-
4. ΠΡΙΝΑΠΟ ΤΗ ΘΕΣΗΣΕ ΛΕΙΤΟΥΡΠΑ
Βρείτε πρώτα το σωστό ακροστόμιο προτού θέσετε σε
λειτουργία τον καυστήρα και συναρμολογήστε το όταν
ο καυστήρας είναι ακόμη κρύος.
ΣΗMΑΝTΚΟ : Αντικαταστήστε το ακροστόμιο μόνο:
• με σβησμένη μηχανή
• όταν το καλώδιο δεν βρίσκεται στην πρίζα.
• όταν το ακροστόμιο έχει κρυώσει.
5. ΘΕΣΗ ΣΕ ΛΕΙΤΟΥΡΓΙΑ
• Κρατάτε το καλώδιο πάντα μακριά από το καυτό
ρεύμα αέρος και από το ακροστόμιο.
ΣΥMΒΟΥΛΗ: Για όλα τα υλικά ισχύει ότι για το καλύτερο
αποτέλεσμα σας συνιστούμε να δοκιμάσετε τη συσκευή
σε ένα μικρό μέρος της επιφάνειας που σκοπεύετε να
επεξεργαστείτε.
6.ΣΥΝTΡΗΣΗ
Κατά τη διάρκεια της συντήρησης και του καθαρισμού
να βγάζετε πάντα το καλώδιο από τον ρευματοδότη
(την πρίζα). Ποτέ μη χρησιμοποιείτε νερό ή κάποιο άλλο υγρό όταν καθαρίζετε τα ηλεκτρικά εξαρτήματα του
Καυστήρας βαφής.
Αποτρέπετε πολλά προβλήματα αν συντηρείτε τακτικά
τον Καυστήρας βαφής.
Διατηρείτε καθαρά τα ανοίγματα αερισμού του
ρα για να αποφύγετε την υπερθέρμανση.
καυστή-
7. ΒΛΑΒΕΣ
Σε περίπτωση που ο καυστήρας βαφής δεν λειτουργεί
καθώς πρέπει, εδώ ακολουθούν μερικές πιθανές αιτίες
και οι προτεινόμενες λύσεις.
1. Η μηχανή υπερθερμαίνεται:
Τα ανοίγματα εξαερισμού του καυστήρας βαφής έχουν
βουλώσειμε σκουπίδια.
- Καθαρίστε τα ανοίγματα εξαερισμού.
2. Ο καυστήρας βαφής δεν λειτουργεί όταν τον θέ-
σετε σε λειτουργία:
Διακοπή στο ηλεκτρικό
- Ελέγξτε το καλώδιο και την πρίζα. Βλάβη στον δια-
κόπτη.
Δώστε τον καυστήρας βαφής στον αντιπρόσωπο της
SBM Group για επισκευή.
3. Η μηχανή θερμαίνει, αλλά δεν λειτουργεί.
Διακοπή στην ηλεκτρική μηχανή.
- Δώστε τον καυστήρας βαφής στον αντιπρόσωπο της
SBM Group για επισκευή.
δίκτυο.
22
Page 23

Opalarka do farby
PRZED UŻYCIEM APARATU DO ODPALANIA FARBY
NALEŻY DOKŁADNIE ZAPOZNAĆ SIĘ Z NINIEJSZĄ
INSTRUKCJĄ OBSŁUGI!
1. SPECJALNE PRZEPISY
BEZPIECZEŃSTWA
PRZED UŻYCIEM APARATU DO ODPALANIA FARBY
1. Skontrolować, czy:
- napięcie przyłączeniowe aparatu do odpalania farby
zgadza się z napięciem sieci,
- sznur i wtyczka sieciowa są w dobrym stanie, bez
luźnych drutów i uszkodzeń.
2. Unikać używania długich kabli przedłużających.
3. Nie używać aparatu przy panującej wilgoci.
4. Metalowa nasadka podlega nagrzaniu. Należy uważać, aby jej nie dotknąć!
5. Unikać uszkodzenia elementu grzejnego. Nie należy odcinać nasadki ani jej blokować.
6. Nie odchodzić od aparatu, jeśli jest włączony.
7. Jeśli aparat nie jest używany, to należy go umieścić
na rozkładanym kabłąku, który stanowi część aparatu. Umieszczony na rozłożonym kabłąku aparat
można ustawić na stole. W tej pozycji aparatu do
odpalania farby nakł
ry.
8. Aparatu nie wolno używać jako suszarki do włosów,
ani do suszenia jakichkolwiek żywych stworzeń.
9. Nie należy używać aparatu w wannie, ponad wodą,
ani w pomieszczeniach, w których używane są ła-
twopalne płyny.
Uwaga! Omawiany aparat działa przy temperaturze
200-600° Celsjusza. Pomimo braku widocznych
oznak tej temperatura (płomienia) istnieje niebezpieczeństwo oparzenia. Należy uważać na gorące
powietrze wydzielana z nasadki. Może ono spowodować rany oparzeniowe.
PRZYGOTOWANIE APARATU DO URUCHOMIENIA
1. Na początku używania aparatu do odpalania farby
przez krótki okres czasu może być wydzielana opary lub gazy, które się okazać szkodliwe dla zdrowia
ludzkiego. Osoby cierpiące na dolegliwości o charakterze astmatycznym mogą odczuto jako pewną
uciążliwość.
2. Przed włączeniem wtyczki do kontaktu należy si
upewnić, że aparat nie znajduje się w pozycji „WŁĄCZONY”.
3. Sznur sieciowy nie może się nigdy znajdować w pobliżu nasadki aparatu do odpalania farby.
adka będzie skierowana do gó-
ę
NATYCHMIAST WYŁĄCZYC APARAT
W PRZYPADKU:
• zakłócenia we wtyczce lub sznurze sieciowym
względnie uszkodzenia sznura,
• uszkodzonego przełącznika,
• wydalanego przez aparat dymu lub zapachu spalonej instalacji.
2. INSTALOWANIE
Aparat do odpalania farby można obsługiwać ręcznie,
względnie ustawić go pionowo. Przy zastosowaniu
pozycji pionowej także i metalowy kabłąk na uchwycie
musi się znajdować w pozycji pionowej, aby podpierać
rękojeść we właściwych miejscu.
3. ZASTOSOWANIE
APARAT DO ODPALANIA FARBY STOSUJE SIĘ
M.IN.:
• przy robotach instalacyjnych, jak łączenie rur, lutowanie miękkie, zginanie rur;
• do usuwania farby, pokostu i lakieru bez zaistnienia
niebezpieczeństwa pożaru;
• do szybkiego osuszania wilgotnych aparatów;
• do wstępnego suszenia powierzchni, które powinny
ulec szybkiej naprawie;
• do usuwanie samoprzyczepnych etykietek w sposób nie powodujący zabrudzenia;
• do perfekcyjnego nanoszenia etykietek z PVC;
• do wygładzania pęcherzyków, jakie mogą powstać
po naklejeniu materiałów z PVC;
• do łatwego usunięcia winylowego pokrycia połów;
• do kształtowania wszelkich nisko-temperaturowych
materiałów sztucznych, w czym także polietylenu i
PVC;
• do kształtowania wszelkich wysoko-temperaturowych materiałów sztucznych, w czym także szkła
akrylowego i pleksiglasu;
• do przetapiana materiałów sztucznych, w czym materiałów i folii z warstwą z PVC;
• przy zastosowaniu termicznie kurczliwych rur;
• do opakowań kurczliwych;
• do odmrażania rur i silników;
• do naprawy warstw wykończeniowych, jak emalia
na wyposażeniu łazienek i aparatach gospodarstwa
domowego, do warstw pokrywających z proszku
epoksydowego;
• do naprawy nart, nart wodnych i innych artykułów
sportowych;
• do rozluźniania zbyt mocno dokręconych śrub i po-
ń.
łącze
4. PRZED UŻYCIEM
Przed włączeniem aparatu do odpalania farby należy
dobrać odpowiednią nasadkę pomocniczą i zamontować ją na aparacie, który jest jeszcze w stanie zim-
nym.
WAŻNE: NASADKĘ POMOCNICZĄ NALEŻY WY-
MIENIAZ TYLKO WTEDY, GDY:
• silnik jest włączony,
• wtyczka została wyciągnięta z kontaktu,
• nastawka jest ostudzona.
23
Page 24

5. URUCHOMIENIE
• Przed podłączeniem wtyczki do sieci świetlnej nale-
ży się upewnić, że przełącznik nie znajduje w pozy-
cji „0”.
• Sznur sieciowy nigdy nie powinien się znajdować w
pobliżu strumienia gorącego powietrza i nasadki.
UWAGA: w przypadku wszystkich materiałów stosuje
się zasadę, że w celu uzyskania optymalnego rezultatu
najlepiej jest najpierw wypróbować aparat na niewielkim odcinku obrabianego przedmiotu.
6. KONSERWACJA
W przypadku przeprowadzania konserwacji i czyszczenia należy zawsze wyciągać wtyczkę z kontaktu
(ze ściennej skrzynki kontaktowej). Nigdy nie wolno używać wody ani innych płynów do czyszczenia
elektrycznych części aparatu.
OKRESOWA KONSERWACJA APARATU DO ODPALANIA FARBY ZAPOBIEG NIE POWSTANIU PROBLEMÓW
• Nigdy nie należy stosować łatwopalnych płynów do
czyszczenia całego aparatu, a w szczególności nasadki.
• W celu zapobieżenia przegrzaniu należy utrzymywać rowki wentylacyjne aparatu w czystym stanie.
7. ZAKŁÓCENIA
Poniżej podajemy kilka przypuszczalnych przyczyn zakłóceń i odpowiednie rozwiązania w przypadku, gdyby
aparat do odpalania farby nie funkcjonował zgodnie z
oczekiwaniami.
1. Mamiejsce przegrzanie silnika.
Rowki wentylacyjne są zanieczyszcone:
- oczyścić rowki.
2. Po włczeniu aparat nie zostaje uruchomiony.
Skontrolować sznur sieciowy i wtyczkę.
- Przełącznik jest uszkodzony.
3. Silnik się nie obraca, lecz nagrzewa się
Przerwa w silniku elektrycznym:
W związku z niebezpieczeństwem pożaru należy
wyciągnąć wtyczkę z kontaktu! Dostarczyć aparat
dealerowi fi rmy SBM Group w celu przeprowadze-
nia naprawy.
Horkovzdušná pistole
POZORNĚ SI PŘEČTĚTE TENTO NÁVOD K POUŽITÍ NEŽ ZAČNETE POUŽIVAT TUTO OPALOVACÍ
PISTOLI!
1. SPECIÁLNÍ BEZPEČNOSTNÍ PŘEDPISY
PŘED PRVNÍM POUŽITÍM:
1. Zkontrolujte následující:
- zda souhlasí přípojové napětí opalovací barvy s napětím v síti.
- zda jsou šňůra do sítě a zástrčka v dobrém stavu, bez
roztřepení a poškození.
2. Vyhněte se používání dlouhých prodlužovacích kabelů.
3. Nepoužívejte přístroj ve vlhkém prostředí.
4. Kovový nátrubek bude horký. Dávejte pozor a nedotýkejte se kovového nátrubku!
5. Předejděte poškození topného elementu. Neuzavírejte nátrubek a neblokujte ho.
6. Zůstávejte u přístroje, když je přístroj zapnutý.
7. Jestliže se přístroj nepoužívá, musí se odložit na vyklápěcí držadlo, které se nachází na opalovací pistoli. Když držadlo vyklopíte, můžete opalovací pistoli
upevněnou na držadle odložit na stůl. Opalovací
pistole stojí nyní nátrubkem směrem vzhůru.
8. Přístroj nepoužívejte jako vysoušeč vlasů nebo vů-
bec jako vysoušeč živých bytostí.
9. Přístroj nepoužívejte ve vaně nebo nad vodou, nebo
v prostorech, kde se používají lehce vznětlivé látky.
Upozornění! Tento přístroj pracuje při teplotě 200600° Celsia bez toho, že by tato teplota byla znatelná (žádný plamen);
vzniku ohně. Dávejte si pozor na horký vzdušný
proud, který vychází z nátrubku. Tento vzdušný
proud může způsobit popáleniny.
PŘIUVEDENÍ PŘÍSTROJE DO ČINNOSTI:
1. Při používání opalovací pistole mohou na začátku
unikat po krátkou dobu páry nebo plyny, které mohou být zdraví škodlivé. Lidé s astmatickými nemocemi zde mohou mít potíže.
2. Předtím,než zastrčíte zástrčku do sítě, zkontrolujte,
zda se přístroj nenachází ve stavu „OFF“ (zapnuto).
3. Šňůra do sítě se nesmí nacházet v blízkostí nátrubku opalovací pistole.
4. Po dobu používání musí být opalovací pistole mimo
dosah dětí a zvířat.
PŘÍSTROJ OKAMŽITĚ VYPNOUT PŘI
1. poruše na zástrčce, šňůře do sítě nebo poškození
šňůry;
2. rozbitém vypínači;
3. kouři nebo zápachu spálené izolace, pocházejícím z
opalovací pistole barvy.
přesto existuje nebezpečí
24
Page 25

2. INSTALACE
S opalovací pistole lze pracovat tak, že ji držíte v ruce nebo lze přístroj vertikálně postavit. Při používání
přístroje ve vertikálním stavu musí kovové závěsné
držadlo stát také vertikálně na rukověti, aby se stisk
podporoval ve správném místě.
3. APLIKACE
OPALOVACÍ PISTOLI LZE POUŽÍT MIMOJINÉPRO:
• Klempířské a instalatérské práce jako je spojování
potrubí, měkké pájení, ohýbání trubek;
• Odstraňování barvy, fermeže a laku bez nebezpečí
ohně;
• Rychlé usušení mokrých přístrojů;
• Předsušení povrchu pro rychlé opravy;
• Odstraňování samolepicích nálepek čistým způso-
bem;
• Perfektní pro nanesení PVC nálepek;
• Uhlazení bublinek, které vznikly po nalepení PVC
materiálů;
• Snadné odstranění podlahových krytin z vinylu;
• Tvarování všech nízkotepelních plastů, včetně polyetylénu a PVC;
• Tvarování všech vysokotepelních plastů, včetně
akrylového skla a plexiskla;
• Rozpuštění plastů,včetně látek a fólií s PVC vrstvou;
• Aplikaci horkého smršťovaní trubek;
• Smršťovací obaly;
• Rozmrazování trubek a motorů;
• Opravy dokončovacích vrstev: smaltovaných van a
přístrojů do domácností; aplikace povrchových vrstev z epoxidového prášku;
• Opravy lyží, surfových prken a jiných sportovních
zařízení;
• Uvolnění těsně zašroubovaných šroubů a spojení.
4. PŘED UVEDENÍM DO ČINNOSTI
Před zapnutím opalovací pistole si najděte správný nátrubek a namontujte jej na pistoli ve studeném
stavu.
DŮLEŽITÉ: VYMĚŇUJTE NÁTRUBEK POUZE:
• když je motor vypnutý;
• když zástrčka není napojená v síti;
• když je nátrubek ochlazen.
5. ZAPNUTÍ
• Před tím, než zapnete zástrčku do sítě, zkontrolujte,
zda je vypínač ve stavu „0“.
• Šňůra do sítě se nesmí nacházet v blízkosti horkého
vzdušného proudu a nátrubku.
POZOR: k dosažení optimálního výsledku pro všechny
materiály platí, že nejlepší je, když přístroj nejprve vyzkoušíte na malé části opracovávaného předmětu.
6. ÚDRŽBA
Při údržbě a čištění mějte vždy zástrčku vymutou
ze sítě (ze zásuvky ve zdi). Nikdy nepoužívejte vodu
nebo jinou tekutinu při čištění elektrických dílů opalovaci pistole barvy.
PRAVIDELNOU ÚDRŽBOU OPALOVAČE BARVY
PŘEDEJDETE ZBYTEČNÝM PROBLÉMŮM!
Nikdy nepoužívejte lehce vznětlivých tekutin při čištění
opalovací pistole všeobecně a především při čištění
nátrubku.
Udržujte ventilační drážky v čistotě, abyste předešli
přehřátí.
7. PORUCHY
Pro případ, že opalovací pistole nefunguje tak jak má,
podáváme Vám zde níže několik možných příčin s pří-
slušným řešením.
1. Motorje přehřátý.
Ventilační drážky pistole jsou zaneseny nečistotou.
- Vyčistěte ventilační drážky.
2. Opalovací pistole po zapnutí nestartuje.
Přerušení elektrického uzavřeného okruhu.
- Zkontrolujte šňůru do sítě a zástrčku.
Vypínač je rozbitý.
3. Motor se netočí, ale je teplý.
Přerušení v elektrickém motoru.
Vytáhněte zástrčku ze zásuvky, existuje nebezpečí požáru! Nechejte opalovací pistoli opravit u Vašeho SBM
Group dealera.
25
Page 26

Sušilnik
PROSIMO, DA PRED UPORABO APARATA PAZLJIVO PREBERETE TA NAVODILA, PREDNO ZAČNETEZ
UPORABO PIŠTOLE NA VROČI ZRAK.
1. POSEBNIVARNOSTNIPREDPISI
PRED UPORABO JEPOTREBNO:
1. Preskusiti ali napetost omrežja ustreza napetosti na
napisni tablici (230V~)
- Preglejte če je mrežni kabel ali vtič poškodovan (lom,
nepoškodovana izolacija).
2. Izogibajte se predolgim podaljškom kabla.
3. Ne uporabljajte vroči zrak v vlažnih pogojih.
4. Ne dotikajte se šobe aparata, ker je vroča.
5. Preprečiti je potrbno poškodbo grelnega elementa.
Ne pokrivajte šobe in blokirajte motorja.
6. Odstanite v bližini vroče pištole, če je še vroča po
izklopitvi.
7. Če aparat ne uporabljate, ga lahko postavite na izvleč-
no streme, ki je na aparatu. Ob postavitvi na izvlečno
streme je šoba obrnjena navzgor.
8. Ne uporabljajte pištole na vroči zrak za sušenje lasali drugih predmetov.
9. Ne uporabljajte pištole na vroči zrak v kopalnici ali
nad vodo ali v prostorih z lahko vnetljivimi plini ali
tekočinami.
Opozorilo! Ta pištola na vroči zrak deluje pri temperaturi 200-600°C brez vidnega znaka o tej temperaturi (ni plamena). Obstaja nevarnost požara. Bodite
pozorni na vroči zrak iz šobe. Ta vroči zrak lahko
povzroči opekline.
PRIZAGONU
1. Pri zagonu pištole na vroč zrak lahko v kratkem času
nastanejo pare ali plini, ki so lahko zdravju škodljivi. Če
ste astmatični lahko začutite slabost.
2. Preverite ali ni omrežno stikalo v položaju vključeno
(«EIN») predno vtaknete vtič v vtičnico.
3. Omrežni kabel držite stran od šobe.
APARAT TAKOJ IZKLOPITE PRI:
1. Defekten vtič, priključni kabel ali so poškodbe na kablu.
2. Defektno stikalo.
3. Vonj ali smrad po zagorelem kablu.
2.INSTALACIJA
Pištola na vroči zrak se uporablja tako, da se z roko drži ali
se postavi pravokotno. Pri pravokotni postavitvi se mora
kovinski stremen na ročaju tudi zavrteti pravokotno, tako
da ročaj pravilno podpira aparat.
3.UPORABA
PIŠTOLA NA VROČI ZRAK SE LAHKO UPORABLJA
ZA:
• Instalacijska dela, kot povezava cevi, lotanje, ukrivljanje cevi;
• Odstranite v barvin lakov brez nevarnosti požara.
• Hitro sušenje mokrih naprav;
• Sušenje predmetov za hitro popravilo;
• Odstranite v nalepk na snažen način;
• Nanos PVC etiket;
26
• Pihanje po lepljenju PVC nalepke se lahko odstranijo;
• Enostavna odstranite v vinilnih podnih oblog;
• Enostavna uporaba polnilnih sredstev;
• Povezava nizkotemperaturnih umetnih snovi npr.
polietilen in PVC;
• Povezava visokotemperaturnih umetnih snovi npr.
acryl in pleksisteklo;
• Topljenje umetnih snovi kot so folije s PVC fi lmom;
• Krčenje pakirne folije pri pakiranju;
• Tajanje cevi in motorjev;
• Popravilo prevlek:emajl v kopalnicah in aparatih;
• Popravilo smuči, oprema za deskanje in sportni proizvodi;
• Rahljanje trdno privitih vijakov in spojev.
4. PRED ZAGONOM
Poiščite pravo šobo predno aparat vključite. Šobo
montirajte dokler je aparat mrzel.
POMEMBNO:ZAMEN JAVA ŠOBE:
• Pri mirujočem motorju.
• Z iztaknjenim vtičem iz omrežja.
• Šele ko seje aparat ohladil.
5. ZAGON
• Preverite ali je stikalo v položaju «0» predno vtaknete vtič v vtičnico.
• Držite mrežni kabel stran od vročega izstopnega
zraka iz šobe.
PRIPOROČILO: Najboljöi rezultat dobimo za nek material s probo na majhnem kosu.
6.VZDRŽEVANJE
POZOR: PRI ČIŠČENJU APARATA IZTAKNITE VTIČ
IZ VTIČNICE. NE UPORABLJAJTE VODE, VNETLJIVE ALI JEDKE SNOVI PRI ČIŠČENJU APARATA.
REDNO VZDRŽEVANJA APARATA PREPREČUJE
PROBLEME. POTREBNO JE REDNO ČISTITI VENTILACIJSKE KANALE, DABI SE IZOGNILI PREGREVANJU APARATA.
7. MOTNJE PRIDELOVANJU
V primeru, da aparat ne deluje zadovoljivo so možni
vzroki:
1. Pregrevanje motorja.
Ventilacijski kanali so zamašeni in umazani.
- Očistiti ventilacijske kanale.
2. Aparat ne deluje po vklopu.
Preveriti mrežni kabel in vtič.
- Omrežno stikalo je v okvari.
Odnesti aparat na servis.
3. Motor se vrti, aparat se pregreva.
Prekinite v motorju.
- Odnesite aparat na pooblaščeni servis.
POZOR! TAKOJ IZTAKNITE VTIČ IZ VTIČNICE, KER
OBSTAJA NEVARNOST POŽARA.
Page 27

Tehnički fen
POŠTOVANI KORISNIČE!
Upoznajte se pažljivo sa ovim uputstvom pre nego što
počnete sa korišćenjem ovog proizvoda!
TEHNIČKE KARAKTERISTIKE
Vidi sl. 2.
Sigurnosna pravila
Pažnja! Ovaj aparat radi na visokoj temperaturi bez
vidljivih znakova otvorenog plamena, zbog čega pri
njegovom radu uvek postoji opasnost od požara. Preporučuje se da pazite na to gde se usmerava struja
vrelog vazduha, jer ona može da izazove opekotine i
izgorena mesta na predmetima.
• Pre rada uverite se da:
- napon napajanja aparata odgovara lokalnom mrežnom naponu.
- su el. kabel za napajanje i utikač u stanju podesnom
za rad, t.j. da nemaju vidljivih kvarova i oštećenja.
• Izbegavajte korišćenje prekomerno dugih produžnih
kablova.
• Ne dozvoljavajte korišćenje aparata u uslovima povišene vlažnosti.
• Ne dozvoljavajte korišćenje aparata u blizini lako zapaljivih materijala i tečnosti.
• U radnom procesu metalna mlaznica se veoma jako
zagrijava pa treba izbegavati direktan kontakt sa
njom.
• Radi izbegavanja oštećenja grejnog elementa, nije
dozvoljeno prekrivanje mlaznice.
• Nemojte ostavljati aparat uključen.
• Nemojte dozvoljavati korišćenje aparata za sušenje
kose i tela !
• Na početku korišćenja uređaj može da kraće vreme
ispušta isparenja i gasove koji su štetni po zdravlje
ljudi (naročito onih koji pate od astme).
• Pre uključivanja aparata u el. mrežu, uverite se da
se prekidač na aparatu nalazi u položaju “Isklj”.
• Kabel za napajanje ne sme se da bude u zoni rasprostiranja struje vrelog vazduha.
• Za vreme rada sa aparatom, deca i životinje moraju da se nalaze na bezbednom rastojanju od mesta
rada
• Pročitajte takođe posebno priloženo uputstvo o sigurnosnim pravilima !
Bez odlaganja isključite instrument u slučaju:
1. oštećenja kabela za napajanje i/ili utikača;
2. oštećenja prekidača napajanja (na aparatu);
3. pojave znakova izgaranja izolacije (dim, specifi čan
vonj).
KORIŠĆENJE
Aparat se može primenjivati za sledeće vrste radova:
• spajanje vodovodnih cevi, lemljenje, produvavanje
cevovoda;
• skidanje starih premaza boja, bez opasnosti od požara;
• brzo sušenje vlažnih predmeta; sušenje površina
koje se popravljaju;
• skidanje bez tragova samolepljivih nalepnica; nanošenje nalepnica ili etiketa od PVC-a;
• odstranjivanje mehura nakon nanošenja nalepnica
ili etiketa od PVC-a;
• brzo odstranjivanje podnih i zidnih obloga od vinila;
• davanje potrebnog oblika sintetičkim materijalima i
proizvodima, uključujući akril i pleksiglas;
• taljenje različitih sintetičkih materijala, uključujući
one koji u sastavu imaju presvlaku od PVC-a;
• montaža i postavljanje cevi od materijala za vruće
izvlačenje;
• pakovanje u materijale za vruće izvlačenje;
• zagrevanje cevi i motora;
• remont i postavljanje pojedinačnih emajliranih površina (kade, sudoperi);
• nanošenje presvlaka od epoksidnog praha;
• remont skija, dasaka za surfanje i drugog sportskog
inventara;
• rastavljanje ili odvrtanje čvrstih spojeva.
Pre početka rada
Pre uključivanja uređaja (dok izlazna mlaznica nije
vrela) treba izabrati i postaviti na mlaznicu produžetak
podesnog oblika.
Zamena mlaznice sme da se obavlja samo:
• kada je aparat isključen;
• kada je utikač izvađen iz naponske mreže;
• kada je mlaznica hladna.
Rad sa ovim aparatom moguć je ručno i u vertikalno
učvršćenom položaju. U poslednjem slučaju, učvrstite
rukohvat aparata u potreban položaj s pomoću metalne
spojnice-nosača.
Za postizanje optimalnog rezultata, praktično je najpre
obraditi poseban omanji deo materijala na kojem se
radi.
TEHNIČKO OPSLUŽIVANJE
Pažnja! Pre izvršavanja radova čišćenja ili tehničkog
opsluživanja aparata, potrebno je da se uverite da je
on isključen iz električne mreže.
Radi izbegavanja pregrevanja aparata, potrebno je
održavati čistoću njegovih ventilacione otvore.
Nije dozvoljeno čišćenje aparata, a posebno njegove
mlaznice, pomoćui lako zapaljivih tečnosti.
Pri pojavi kvara, obratite se Servisnoj službi.
27
Page 28

Tehnički fen
Poštovani korisniče !
Pažljivo se upoznajte s ovim uputama prije nego
počnete koristiti ovaj proizvod !
TEHNIČKE KARAKTERISTIKE
Vidi sl. 2.
Sigurnosna pravila
Pozor! Ovaj uređaj radi na visokoj temperaturi bez
vidljivih znakova otvorena plamena, zbog čega pri njegovu radu uvijek postoji opasnost od nastanka požara.
Preporučuje se paziti na to kamo se usmjerava struja
vreloga zraka, jer ona može lako izazvati opekotine i
spaljena mjesta na predmetima.
• Prije rada, uvjerite se da:
- napon napajanja aparata odgovara lokalnom
mrežnom naponu.
- su el. kabel za napajanje i utikač u stanju prikladnom za rad, t.j. da na njima nema vidljivih kvarova i
oštećenja.
• Izbjegavajte korištenje prekomjerno dugačkih
produžnih kablova.
• Ne dopuštajte korištenje aparata u uvjetima povišene
vlažnosti.
• Ne dopuštajte korištenje aparata u blizini lako zapaljivih materijala i tekućina.
• U radnom procesu metalna mlaznica se jako zagrijava pa treba izbjegavati izravan kontakt s njom.
• Radi izbjegavanja oštećivanja grijaćega elementa,
nije dopušteno prekrivati mlaznicu.
• Nemojte ostavljati aparat uključen.
• Nemojte dopuštati korištenje uređaja za sušenje
kose i tijela !
• U početku korištenja uređaj može kraće vrijeme
ispuštati isparenja i plinove štetne za zdravlje ljudi
(osobito onih koji pate od astme).
• Prije uključivanja uređaja u el. mrežu, uvjerite se da
se prekidač na uređaju nalazi u položaju “Isklj”.
• Kabel za napajanje ne smije se nalaziti u zoni rasprostiranja struje vreloga zraka.
• Za vrijeme rada uređajem, djeca i životinje moraju
se nalaziti na sigurnom razmaku od mjesta rada
• Također, pročitajte posebno priložene upute o sigurnosnim pravilima !
Bez odlaganja isključite instrument u slučaju:
1. oštećenja kabela za napajanje i/ili utikača;
2. oštećenja prekidača napajanja (na aparatu);
3. pojave znakova gorenja izolacije (dim, specifi čan
zapah).
UPORABA
Uređaj se može primjenjivati za slijedeće vrste radova:
• spajanje vodovodnih cijevi, lemljenje, propuhivanje
cjevovoda;
• skidanje premaza boja bez opasnosti od požara;
• brzo sušenje vlažnih predmeta; prosušivanje
površina koje se popravljaju;
• skidanje bez tragova samoljepljivih etiketa;
nanošenje naljepnica ili etiketa iz PVC-a;
• odstranjivanje mjehura nakon nanošenja naljepnica
ili etiketa iz PVC-a;
• brzo uklanjanje podnih i zidnih pokrova iz vinila;
• davanje potrebnoga oblika sintetičkim materijalima i
proizvodima, uključujući akril i pleksiglas;
• taljenje različitih sintetičkih materijala, uključujući
one koji u sastavu imaju pokrov iz PVC-a;
• montaža i postavljanje cijevi iz materijala za vruće
navlačenje;
• pakiranje u materijale za vruće navlačenje;
• zagrijavanje cijevi i motora;
• remont i postavljanje pojedinačnih emajliranih pokrova (kade, sudoperi);
• nanošenje pokrova iz epoksidnoga praška;
• remont skija, dasaka za surfanje i drugoga sportskoga inventara;
• rastavljanje ili odvijanje čvrstih spojeva.
Prije početka rada
Prije uključivanja uređaja (dok izlazna mlaznica nije
vrela) treba izabrati i postaviti na mlaznicu nastavak
prikladnoga oblika.
Zamjena mlaznice obavlja se samo:
• kada je uređaj isključen;
• kada je utikač izvađen iz naponske mreže;
• kada je mlaznica hladna.
Rad ovim uređajem moguć je kako ručno tako i u vertikalno učvršćenom položaju. U ovom drugom slučaju,
fi ksirajte rukohvat aparata u potreban položaj pomoću
metalne spone-nosača.
Za postizanje optimalnoga rezultata treba najprije obraditi poseban nevelik dio radnoga materijala
TEHNIČKO OPSLUŽIVANJE
Pozor! Prije izvođenja radova čišćenja ili tehničkoga
opsluživanja aparata, potrebno je uvjeriti se da je on
isključen iz električne mreže.
Radi izbjegavanja pregrijavanja uređaja, potrebno je
držati čistima njegove ventilacijske otvore.
Nije dopušteno čistiti uređaj, a posebno njegovu mlaznicu, lako zapaljivim tekućinama.
Pri pojavi kvarova, obratite se u Servisnu službu.
28
Page 29

Sıcak üfl eme makinesi
Sayın müşterimiz!
Ürünü kullanmadan önce bu Kullanma Kılavuzu dikkatle okuyunuz.
TEKNİK ÖZELLİKLER
2.sayfaya bakınız
Güvenlik kuralları
Dikkat! Bu alet açık alev göstermeden yüksek ısı üret-
mektedir, bu nedende onun çalışması sırasında her
zaman yangın tehlikesini göz önünde bulundurunuz.
Yan ıkların önlenmesi amacıyla sıcak havanın nereye
yöneldiğine dikkat edin.
• Çalışmaya başlamadan önce
- makinenin besleme voltajının şebeke voltajına
uyup uymadığını;
- besleme kablosu ve fi şin normal durumda olduğu
yani gözle görünen arıza ve hasarın olmadığından
emin olunuz.
• Fazla uzun elektrik uzantısı kullanmayınız.
• Makineyi yüksek nemli ortamda kullanmayınız.
• Makineyi çabuk tutuşabilir malzeme ve sıvıların yakın olduğu yerde kullanmayınız.
• Çalışma sırasında metal ağızlığın kızgın sıcak hale
gelmesi nedeniyle onunla direkt temastan kaçının.
• Isıtma elemanın bozulmasını önlemek amacıyla
ağızlığın önünü kapatmayın.
• Makineyi çalışır halde bırakmayın.
• Vücut ve saç kurutma makinesi gibi kullanmayın!
• Makine ilk işletilmesi sırasında insan sağlığına
(özellikle astım hastalarına) zarar verebilecek buhar
ve gazları kısa süre boyunca üretebilir.
• Makineyi elektrik şebekesine takmadan önce şalte-
rin “On” konumunda olduğundan emin olun.
• Besleme kablosunun sıcak hava akımı önünde bulunmasına yol vermeyin.
• Makineyle çalışırken çocuk ve hayvanların çalışma
yerinden tehlikesiz uzaklıkta bulunmasını sağlayın.
• Ayrıca ekte bulunan güvenlik kurallarını da okuyunuz!
Makineyi aşağıdaki durumlarda derhal kapatınız:
1. besleme kablosu ve/veya fi şin bozulması;
2. şalterin bozulması;
3. izolasyonun yanma belirtileri (duman, ilgili koku)
meydana gelmesi halde.
KULLANMA
Makine aşağıdaki işler için kullanılabilir:
• su boru hattının birleştirilmesi, lehimleme işlemi,
boru hattının içinden üfl enmesi;
• boya kaplamaların yangın tehlikesi oluşturmadan
giderilmesi;
• yaş nesnelerin çabuk kurutulması; tamir edilmiş yüzeylerin kurutulması;
• kendiliğinden yapışır etiketlerin iz bırakmadan çıka-
rılması; PVC içeren etiket ve bantların yapıştırılması;
• PVC içeren etiket ve bantların yapıştırılmasından
sonra hava kabarcıkların çıkarılması;
• Vinil halı kaplamaların çabuk kaldı
• Akril ve akrilik plastik dahil sentetik malzeme ve
ürünlere gereken biçim verme;
• Terkibinde PVC içeren kaplamalar dahil çeşitli sentetik malzemelerin eritilmesi;
• Sıcak çekilen malzemeden üretilmiş boruların tesisi
ve montajı;
• Sıcak çekilen malzemelerden ambalaj yapma;
• Boru ve motorun ısıtılması;
• Emaye kaplamalı ürünlerin (banyo küveti, mutfak
kapları) tamiri ve yenilenmesi;
• Epoksi toz ile kaplama yapılması;
• Kayak serfi ng tahtası ve diğer spor avadanlığın ona-
rımı;
• Sıkı bağlantıların ayrılması veya gevşeterek açılma-
sı.
Çalıştırmadan önce
Makineyi çalıştırmadan önce (çıkış ağızlık kızgın
hale gelmeden) ağızlık üzerine gereken uzama parçasını seçip takın.
Ağızlık sadece aşağıdaki hallerde değiştirilir:
• makine kapatılmış olduğu durumda;
• makine elektrik şebekesinden ayrılmış halde;
• ağızlık soğuk olduğu halde.
Makine hem elle tutulur halde hem de dikey tespit
edilmiş şekilde çalıştırılabilir. Makinenin tespiti metal
mandallı dayak vasıtasıyla makine kolunu bağlamakla
gereken pozisyonda kurulur.
İyi sonuç elde etmek için işlenecek mamulün ufak bir
sahası üzerinde ön deneme yapılması makuldür.
rılması;
TEKNİK BAKIM
Dikkat! Makinenin temizlenmesi veya teknik bakıma
başlamadan önce elektrik kaynağından ayrılmış olduğundan emin olun.
Makinenin aşırı ısınmasını önlemek amacıyla onun havalandırma deliklerinin temiz tutulması gerekir. Makine
ve özellikle ağızlığın kolay tutuşabilir sıvılarla temizlenmesine müsaade etmeyiniz.
Herhangi bir arızalanma durumunda Servise başvuru-
nuz.
29
Page 30

ﺔﻴﺿﻷ ﺔﻴﻄﻏﻸﻟ ﺔﻌﻳﺮﺴﻟ ﺔﻟﻹ •
. ﻞﻴﻨﻴﻔﻟ ﻦﻣ ﺔﻋﻮﻨﺼﻤﻟ
ﺔﻴﻋﺎﻨﻄﺻﻷ ﻮﻤﻠﻟ ﻮﻠﻄﻤﻟ ﻞﻜﺸﻟ ءﺎﻄﻋ •
ﻚﻟ ﻦﻤﺿ ﻦﻣ ، ﺔﻴﻜﻴﺘﺳﻼﺒﻟ ﺎﻋﻮﻨﺼﻤﻟ
. ﻲﻠﻳﺮﻛﻷ ﺎﻔﺸﻟ ﻚﻴﺘﺳﻼﺒﻟ
ﺔﻴﻋﺎﻨﻄﺻﻷ ﺔﻴﻜﻴﺘﺳﻼﺒﻟ ﻮﻤﻟ ﺔﺑ •
.ﻞﻴﻨﻴﻔﻟ ﺪﻳﻮﻠﻛ ﻰﻠﻋ ﺔﻳﺎﺤﻟ ﻮﻤﻟ ﻚﻟ ﻦﻤﺿ ﻦﻣ ﺔﻔﻠﺘﺨﻤﻟ
. ﺮﺤﻟﺎﺑ ﺔﺸﻤﻜﻨﻤﻟ ﻮﻤﻟ ﻦﻣ ﺔﻋﻮﻨﺼﻤﻟ ﺐﻴﺑﺎﻧﻷ ﺐﻴﻛﺮﺗ ﻚﻓ •
. ﺮﺤﻟﺎﺑ ﺔﺸﻤﻜﻨﻤﻟ ﻮﻤﻟﺎﺑ ﻒﻴﻠﻐﺘﻟ •
. ﺎﻛﺮﺤﻤﻟ ﺐﻴﺑﺎﻧﻷ ﻦﻴﺨﺴﺗ •
ﺔﻴﻠﻄﻤﻟ ﻮﻤﻟ ﻢﻴﻣﺮﺗ ﺎﻋ ﺢﻴﻠﺼﺗ •
. ( ﺦﺒﻄﻤﻟ ، ﺎﻤﺤﺘﺳﻷ ﻮﺣ ) ﻲﺟﺎﺟﺰﻟ ءﻼﻄﻟﺎﺑ
. ﺪﻴﺴﻛﻮﺒﻳﻷ ﺎﺒﻐﻟﺎﺑ ﺔﻴﻄﻐﺘﻟ •
ﺞﻠﺜﻟ ءﺎﻤﻟ ﻰﻠﻋ ﺞﻟﺰﺘﻟ ﻮﻟ ﺢﻴﻠﺼﺗ •
. ﺔﻴﺿﺎﻳﺮﻟ ﻷ
. ﻮﻘﺑ ﺔﻟﻮﺻﻮﻤﻟ ﻼﺻﻮﻟ ﻚﻓ •
ﻞﻤﻌﻟﺎﺑ ﺎﻴﻘﻟ ﻞﺒﻗ
ﻦﻴﺨﺴﺗ ﺞﻫﻮﺗ ﻞﺒﻗ ) ﻒﻔﺠﻤﻟﺎﺑ ﻞﻤﻌﻟ ءﺪﺑ ﻞﺒﻗ
ﻞﻤﻌﻟ ﻮﻧ ﺔﻠﺻ ﺐﻴﻛﺮﺗ ﻢﻜﺑ ﻦﺴﺤﻳ ( ﺔﻫﻮﻔﻟ
. ﺔﻫﻮﻔﻟ ﺔﻳﺎﻬﻧ ﻰﻠﻋ ﺬﻴﻔﻨﺗ ﺮﻤﻟ
: ﺔﻴﻟﺎﺘﻟ ﻻﺎﺤﻟ ﻲﻓ ﻢﺘﻳ ﺔﻫﻮﻔﻟ ﺮﻴﻴﻐﺗ
. ﻒﻔﺠﻤﻟ ءﺎﻔﻃ ﺪﻨﻋ •
.ﺮﺘﻤﻟ ﺎﻴﺘﻟ ﺬﺧﺄﻣ ﻦﻣ ﺔﻟﻷ ﻞﺼﻓ ﺪﻌﺑ •
. ﺔﻫﻮﻔﻟ ﺪﻳﺮﺒﺗ ﺪﻌﺑ •
ﻚﻟﺬﻛ ﺪﻳ ﻞﻜﺸﺑ ﻦﻜﻤﻣ ﻒﻔﺠﻤﻟﺎﺑ ﻞﻤﻌﻟ
ﺬﻫ ﻲﻓ . ﻮﻤﻋ ﺖﻴﺒﺜﺗ ﺪﻨﺴﻣ ﺪﺨﺘﺳﺄﺑ
ﻮﻫ ﺎﻤﻛ ،ﻲﺒﻧﺎﺠﻟ ﺾﺒﻘﻤﻟ ﺖﻴﺒﺜﺗ ﺐﺠﻳ ﺔﻟﺎﺤﻟ
. ﺪﻨﺴﻤﻠﻟ ﻲﻧﺪﻌﻤﻟ ﻚﺒﺸﻤﻟ ﺪﻋﺎﺴﻤﺑ ﻮﻠﻄﻣ
ﺔﻳﺪﺒﻟ ﻲﻓ ﺐﺠﻳ ﺪﻴﺟ ﻞﻤﻋ ﺮﻣ ﻰﻟ ﻮﺻﻮﻠﻟ
. ﻪﻠﻴﻐﺸﺗ ﺮﻤﻟ ﺢﻄﺴﻟ ﺔﺠﻟﺎﻌﻣ
ﺔﻴﻨﻔﻟ ﺔﻧﺎﻴﺼﻟ
ﻒﻴﻈﻨﺗ ﺔﻴﻠﻤﻋ ﺄﺑ ﺎﻴﻘﻟ ﻞﺒﻗ ! 'ﺎﺒﺘﻧ2
ﺎﻬﻧﺄﺑ ﺪﻛﺄﺘﻟ ﺮﻀﻟ ﻦﻣ ، ﺔﻟﻸﻟ ﺔﻧﺎﻴﺻ
. ﺮﺘﻤﻟ ﺎﻴﺘﻟ ﺬﺧﺄﻣ ﻦﻣ ﺔﻟﻮﺼﻔﻣ
ﺮﺗ ﺐﺠﻳ ﻒﻔﺠﻤﻠﻟ ﺎﺤﻟ ﻦﻴﺨﺴﺘﻟ ﺐﻨﺠﺘﻟ
. ﺎﻤﺋ ﺔﻔﻴﻈﻧ ﺔﻳﻮﻬﺘﻟ ﺎﺤﺘﻓ
، ﺔﻫﻮﻔﻟ ﺔﺻﺎﺧ ﻒﻔﺠﻤﻟ ﻒﻴﻈﻨﺗ ﻊﻨﻤﻳ
. ﺎﻌﺘﺷﻸﻟ ﺔﻠﺑﺎﻗ ﻞﺋﻮﺳ ﺎﻤﻌﺘﺳﺄﺑ
. ﺔﻧﺎﻴﺼﻟ ﺔﻣﺪﺧ ﺰﻛﺮﻤﺑ ﻮﻠﺼﺗ ﻞﻄﻋ ﺐﻄﻋ ﻮﻬﻇ ﺪﻨﻋ
(ﻲّﻨﻓ) ﻲﻨﻘﺗ ﻒﻔﺠﻣ
! ﺔﻟﻷ ﺪﺨﺘﺳﺄﺑ ﻢﻜﻣﺎﻴﻗ ﻞﺒﻗ #ﺎﻤﻴﻠﻌﺘﻟ 'ﺬﻫ ﻰﻟ- ﻮﻓﺮﻌﺗ
ﺮﺣ ﺔﺟﺪﺑ ﻞﻤﻌﺗ ﺔﻟﻷ ﺬﻫ : 'ﺎﺒﺘﻧ2
ﺪﻨﻋ ﻚﻟﺬﻠﻓ ، ﺐﻬﻟ ﻮﻬﻇ ﺪﺑ ﺔﻴﻟﺎﻋ
ﺪﺣ ﺎﻤﺘﺣ ﺎﻤﺋ ﺎﻨﻫ ﻞﻤﻌﻟﺎﺑ ﺎﻴﻘﻟ
ﻢﻜﻴﻠﻋ ، ﻲﻟﺎﺘﻟﺎﺑ ﻢﻜﺤﺼﻨﻧ ﻚﻟﺬﻟ . ﻖﻳﺮﺣ
ﻦﺧﺎﺴﻟ ءﻮﻬﻟ ﺔﻫﻮﻓ ﻢﻜﻬﻴﺟﻮﺗ ﺪﻨﻋ ﺎﺒﺘﻧﻷ
. ﻖﻳﺮﺣ ﺪﺣﺈﺑ ﺐﺒﺴﺘﺗ ﻻ ﻲﻛ
: ﻲﻠﻳ ﺎﻤﻣ ﺪﻛﺄﺘﻟ ﻢﻜﻴﻠﻋ ﻞﻤﻌﻟﺎﺑ ءﺪﺒﻟ ﻞﺒﻗ •
. ﺔﻟﻷ ﺎﻴﺗ ﺪﺷ ﻖﻓﻮﺘﺗ ﺮﺘﻤﻟ ﺎﻴﺘﻟ ﺪﺷ -
ﺶﻴﻔﻟ ﺔﻴﺋﺎﺑﺮﻬﻜﻟ ﺔﻳﺬﻐﺘﻟ ﻚﻠﺳ -
. ﻮﻴﻋ ﻒﻠﺗ ﺪﺑ ، ﺪﻴﺟ ﺔﻟﺎﺤﺑ
. ﺪﺟ ﺔﻠﻳﻮﻃ ﺔﻴﺋﺎﺑﺮﻬﻛ ﻼﺻ ﺪﺨﺘﺳ ﺐﻨﺠﺗ ﻢﻜﻴﻠﻋ •
. ﺔﻴﻟﺎﻌﻟ ﺔﺑﻮﻃﺮﻟ ﺮﺸﺑ ﺔﻟﻷ ﺪﺨﺘﺳﺄﺑ ﺢﺼﻨﻳ ﻻ •
ﻦﻣ ﺮﻘﻟﺎﺑ ﺔﻟﻷ ﺪﺨﺘﺳﺄﺑ ﺢﻤﺴﻳ ﻻ •
. ﺎﻌﺘﺷﻸﻟ ﺔﻠﺑﺎﻘﻟ ﻮﻤﻟ ﻞﺋﻮﺴﻟ
. ﺎﻬﺴﻤﻟ ﺪﻌﺑ ﺢﺼﻨﻧ ﻚﻟﺬﻟ ، ﺔﻴﻧﺪﻌﻤﻟ ﺔﻫﻮﻔﻟ ﺞﻫﻮﺘﺗ ﻞﻤﻌﻟ ﻼﺧ •
.ﺔﻫﻮﻔﻟ ﻼﻏ ﺪﻋ ﻰﺟﺮﻳ ﺔﻟﻸﻟ ﻦﺨﺴﻤﻟ ءﺰﺠﻟ ﻒﻠﺗ ﺐﻨﺠﺘﻟ •
.ءﺎﻔﻃ ﺪﺑ ﺔﻠﻐﺸﻣ ﺔﻟﻷ ﻮﻛﺮﺘﺗ ﻻ •
. ﺲﺑﻼﻤﻟ ﺮﻌﺸﻟ ﻒﻴﻔﺠﺘﻟ ﻒﻔﺠﻤﻟ ﺪﺨﺘﺳ ﺪﻋ •
ﺮﻴﻐﺻ ﺮﺘﻔﻟ ﺔﻟﻸﻟ ﻷ ﻞﻴﻐﺸﺘﻟ ﺪﻨﻋ •
ﺔﺤﺼﻠﻟ ﺮﻀﻣ ﺎﻏ ﺎﺧ ﻖﻠﻄﺗ ﻦﻜﻤﻣ
. ( ﺪﺼﻟ ﺮﻣ ﻦﻣ ﻮﻜﺸﻳ ﻦﻳﺬﻠﻟ ﺔﺻﺎﺧ )
ﺎﻴﺘﻟ ﺬﺧﺄﻤﻟ ﺶﻴﻔﻟ ﻞﻴﺻﻮﺗ ﻞﺒﻗ •
ﻮﺿﻮﻣ ﻞﻴﻐﺸﺘﻟ ﺎﺘﻔﻣ ﺄﺑ ﺪﻛﺄﺗ ﻲﺋﺎﺑﺮﻬﻜﻟ
ﺐﺠﻳ ﻻ ﺔﻴﺋﺎﺑﺮﻬﻜﻟ ﺔﻳﺬﻐﺘﻟ ﻚﻠﺳ •
. ﻦﺧﺎﺴﻟ ءﻮﻬﻟ ﺮﺧ ﺔﻫﻮﻓ ﺎﻣ ﻊﻘﻳ
ﺎﻔﻃﻷ ﺎﻌﺑ ﻢﻜﻴﻠﻋ ﺔﻟﻷ ﻰﻠﻋ ﻞﻤﻌﻟ ﻼﺧ •
. ﻞﻤﻌﻟ ﺎﻜﻣ ﻦﻋ ﺔﻨﻣ ﺔﻓﺎﺴﻣ ﻰﻟ ﺎﻧﻮﻴﺤﻟ
. ﺎﻣﻷ ﺎﻤﻴﻠﻌﺘﺑ ﺎﺨﻟ ﻖﺤﻠﻤﻟ ﻰﻠﻋ ﻮﻌﻠﻃ •
: ﺔﻴﻟﺎﺘﻟ #ﻻﺎﺤﻟ ﻲﻓ ﻒﻔﺠﻤﻟ ءﺎﻔﻃ- ﻢﻜﻴﻠﻋ
.ﺶﻴﻔﻟ ﺔﻴﺋﺎﺑﺮﻬﻜﻟ ﺔﻳﺬﻐﺘﻟ ﻚﻠﺳ ﻒﻠﺗ .1
. ( ﻖﻳﺮﺣ ﺔﺤﺋ ، ﺎﺧ ) ﺰﻌﻟ ﻮﻣ ﺮﺘﺣ ﺎﻣﻼﻋ ﻮﻬﻇ .3
:ﺔﻴﻟﺎﺘﻟ 8ﺎﻤﻋﻷ ﻞﺟﻷ ﺔﻟﻷ 8ﺎﻤﻌﺘﺳ2 ﻦﻜﻤﻣ
. ﺐﻴﺑﺎﻧﻷ ﺎﺒﺘﺧ ، ﺎﺤﻠﻟ ، ﺎﻴﻤﻟ ﺐﻴﺑﺎﻧ ﻞﺻ •
. ﻖﺋﺮﺤﻟ ﻦﻣ ﻦﻣ ﻞﻜﺸﺑ ءﻼﻄﻟ ﺎﻫﺪﻟ ﺰﻧ •
ﻒﻴﻔﺠﺗ ، ﻸﻟ ﻊﻳﺮﺴﻟ ﻒﻴﻔﺠﺘﻟ •
.ﺎﻬﺤﻴﻠﺼﺗ ﺎﻬﻤﻴﻣﺮﺗ ﺮﻤﻟ ﺢﻄﺳﻷ
ﻖﺼﻟ ، ﺮﺛ ﺮﺗ ﺪﺑ ﺎﻘﺼﻠﻤﻟ ﺔﻟ •
. ﻞﻴﻨﻴﻔﻟ ﺪﻳﻮﻠﻛ ﻦﻣ ﺔﻋﻮﻨﺼﻣ ﺎﻘﺼﻠﻣ
ﺖﺤﺗ ﺔﻧﻮﻜﺘﻤﻟ ءﻮﻬﻟ ﺎﻋﺎﻘﻓ ﺔﻟ •
. ﻞﻴﻨﻴﻔﻟ ﺪﻳﻮﻠﻛ ﻦﻣ ﺔﻋﻮﻨﺼﻤﻟ ﺎﻘﺼﻠﻤﻟ
! ﺮﻜﻟ ﺎﻨﻨﺋﺎﺑ
ﺔﻴﻨﻔﻟ #ﺎﻔﺻﻮﻤﻟ
2 ﻢﻗ ﺔﺤﻔﺼﻟ ﺮﻈﻧ
0ﺎﻣﻷ #ﺎﻤﻴﻠﻌﺗ
. ءﺎﻔﻃﻷ ﺔﻟﺎﺣ ﻰﻠﻋ
. ﻞﻴﻐﺸﺘﻟ ﺎﺘﻔﻣ ﻒﻠﺗ .2
#ﻻﺎﻤﻌﺘﺳﻷ
30
Page 31

RU
Русский
Фен технический
Уважаемый покупатель!
Внимательно ознакомьтесь с данной инструкцией перед началом эксплуатации изделия!
ТЕХНИЧЕСКИЕ ХАРАКТЕРИСТИКИ
См. с. 2.
КОМПЛЕКТНОСТЬ
1. Фен технический
2. Набор насадок и принадлежностей.
Правила техники безопасности
Внимание! Данный инструмент работает при
высокой температуре без видимых признаков открытого пламени, поэтому при его работе всегда
сохраняется опасность возникновения пожара. Рекомендуется следить за тем, куда направляется
струя горячего воздуха, поскольку она может вызвать ожоги.
• Перед работой убедитесь
- напряжение питания инструмента соответствует напряжению сети питания.
- шнур питания и вилка находятся в пригодном
для работы состоянии, т. е. не имеют видимых
дефектов и повреждений.
• Избегайте использования электроудлинителей
чрезмерной длины.
• Не допускается использование инструмента в
условиях повышенной влажности.
• Не разрешается использовать инструмент вблизи
легковоспламеняющихся материалов и
стей.
• В процессе работы металлическое сопло раскаляется, поэтому следует избегать прямого контакта с ним.
• Во избежание повреждения нагревательного
элемента не разрешается перекрывать сопло.
• Не оставляйте инструмент во включенном состоянии.
• Не допускается использование инструмента для
сушки волос и тела!
• В начале эксплуатации инструмент может в
чение короткого времени выделять вредные для
здоровья людей (особенно страдающих астмой)
пары и газы.
• Перед подключением инструмента к сети питания
убедитесь, что выключатель питания находится в
положении “Выкл”.
• Шнур питания не должен находиться в зоне распространения струи горячего воздуха.
• Во время работы с инструментом дети и живот
ные должны находиться на безопасном расстоянии от места работы.
• Прочитайте также отдельно приложенную инструкцию по технике безопасности!
Незамедлительно выключайте инструмент в
случае:
1. повреждения шнура питания и (или) вилки;
, что:
жидко-
те-
2. повреждения выключателя питания;
3. появления признаков горения изоляции (дым,
специфический запах).
ЭКСПЛУАТАЦИЯ
Инструмент может применяться для выполнения
следующих видов работ
• соединение водопроводных труб, пайка, продувка трубопроводов;
• пожаробезопасное удаление лакокрасочных покрытий;
• быстрое просушивание влажных предметов; просушивание ремонтируемых поверхностей;
• бесследное удаление самоклеящихся этикеток;
нанесение наклеек или этикеток из ПВХ;
• удаление пузырей после нанесения наклеек или
этикеток из ПВХ;
• быстрое удаление ковровых покрытий из винила;
• придание
алам и изделиям, включая акрил и плексиглас;
• расплавление различных синтетических материалов, включая имеющие в составе покрытие из
ПВХ;
• монтаж и установка труб из термоусадочных материалов;
• упаковка в термоусадочные материалы;
• разогрев труб и двигателей;
• ремонт и восстановление отделочных эмалевых
покрытий (ванны, кухонная посуда
• нанесение покрытий из эпоксидного порошка;
• ремонт лыж, досок для серфинга и иного спор-
тинвентаря;
• разъем или отвинчивание плотных соединений.
Перед началом работы
Перед включением инструмента (пока не раскалено
выходное сопло) следует подобрать и установить
на сопло насадку требуемой формы.
Замена сопла производится только:
• при выключенном инструменте;
• при отключенном
• при холодном сопле.
Работа с инструментом возможна как вручную, так
и в вертикально зафиксированном положении. В
последнем случае зафиксируйте рукоятку инструмента в требуемое положение при помощи металлической скобы-подставки.
Для достижения оптимального результата следует сначала обработать отдельный небольшой участок заготовки.
нужной формы синтетическим матери-
:
);
от сети питания инструменте;
ТЕХОБСЛУЖИВАНИЕ
Внимание! Перед выполнением работ по чистке
или техобслуживанию инструмента необходимо
убедиться, что он отключен от сети питания.
Во избежание перегрева инструмента необходимо
-
содержать в чистоте его вентиляционные отверстия.
Не допускается чистить инструмент и, особенно,
его сопло с использованием легковоспламеняющихся жидкостей.
При возникновении неисправностей обращайтесь в
Службу сервиса.
31
Page 32

Фен технічний
Шановний покупець!
Уважно ознайомтеся з даною інструкцією перед
початком експлуатації виробу!
ТЕХНІЧНІ ХАРАКТЕРИСТИКИ
Див. стор. 2.
КОМПЛЕКТНІСТЬ
1. Фен технічний
2. Набір насадок та аксесуарів.
Правила техніки безпеки
Увага! Даний інструмент працює при високій температурі без наявних ознак відкритого полум’я,
тому при його роботі завжди існує небезпека виникнення пожежі. Рекомендується стежити за
тим, куди спрямовується струмінь гарячого повітря, оскільки він може спричинити опіки.
• Перед роботою
- напруга живлення інструмента відповідає на-
прузі мережі живлення.
- шнур живлення та вилка перебувають у придат-
ному для роботи стані, тобто не мають наявних
дефектів та ушкоджень.
• Уникайте використання електроподовжувачів
надмірної довжини.
• Не допускається використання інструмента в
умовах підвищеної вологості.
• Не дозволяється використовувати інструмент поблизу легкозаймистих
• В процесі роботи металеве сопло розжарюється,
тому слід уникати прямого контакту з ним.
• Щоб уникнути ушкодження нагрівального елемента не дозволяється перекривати сопло.
• Не залишайте інструмент у ввімкненому стані.
• Не допускається використання інструмента для
сушіння волосся й тіла!
• На початку експлуатації інструмент може про-
короткого часу виділяти шкідливі для
тягом
здоров’я людей (особливо для осіб, що страждають на астму) пари й гази.
• Перед підключенням інструмента до мережі живлення пересвідчіться, що вимикач живлення перебуває в положенні “Вимкнено”.
• Шнур живлення не повинен перебувати в зоні поширення струменя гарячого повітря.
• Під час
винні перебувати на безпечній відстані від місця
роботи
• Прочитайте також інструкцію з техніки безпеки,
що додається окремо!
Негайно вимикайте інструмент в наступних
випадках:
1. ушкодження шнура живлення та (або) вилки;
2. ушкодження вимикача живлення;
3. появи ознак горіння ізоляції (дим, специфічний
запах).
пересвідчіться, що:
матеріалів і рідин.
роботи з інструментом діти й тварини по-
ЕКСПЛУАТАЦІЯ
Інструмент може застосовуватися для виконання
наступних видів робіт:
• з’єднання водопровідних труб, паяння, продування трубопроводів;
• пожежобезпечне видалення лакофарбових покриттів;
• швидке просушування вологих предметів; просушування ремонтованих поверхонь;
• безслідне видалення самонаклеювальних етикеток; нанесення наклейок чи етикеток з ПВХ;
• видалення пузирів після нанесення наклейок або
етикеток із
• швидке видалення килимових покриттів з вінілу;
• надання потрібної форми синтетичним матеріалам і виробам, включаючи акрил і плексиглас;
• розплавлювання різних синтетичних матеріалів,
в т.ч. таких, що мають у складі покриття із ПВХ;
• монтаж і установлення труб з термоусадочних
матеріалів;
• упакування в термоусадочні матеріали;
• розігрів труб і
• ремонт і відновлення оздоблювальних емалевих
покриттів (ванни, кухонний посуд);
• нанесення покриттів з епоксидного порошку;
• ремонт лиж, дощок для серфінгу й іншого спортінвентарю;
• роз’єднання або вигвинчування щільних
з’єднань.
Перед початком роботи
Перед увімкненням інструмента (поки вихідне сопло ще не розпечене) слід підібрати й установити
на сопло насадку необхідної форми.
Заміна сопла виконується тільки:
• при вимкненому інструменті;
• при відключеному від мережі живлення інструменті;
• при холодному соплі.
Робота з інструментом можлива як вручну, так і
у вертикально зафіксованому положенні. В останньому випадку зафіксуйте рукоятку інструмента
в необхідне положення за допомогою металевої
клямки-підставки.
Для досягнення оптимального результату слід
спочатку обробити окрему невелику ділянку заготовки.
ПВХ;
двигунів;
ТЕХНІЧНЕ ОБСЛУГОВУВАННЯ
Увага! Перед виконанням робіт з чищення або
технічного обслуговування інструмента необхідно переконатися, що він відключений від мережі
живлення.
Щоб уникнути перегріву інструмента необхідно зберігати чистоту його вентиляційних отворів. Не допускається чистити інструмент, а надто його сопло,
з використанням легкозаймистих рідин.
При виникненні несправностей звертайтесь до Сер-
служби.
вісної
32
Page 33

KZ
Техникалық фен
Құрметті сатып алушы!
Бұйымды қолданудан бұрын осы нұсқаманы мұқият
оқып шығыңыз!
ТЕХНИКАЛЫҚ СИПАТТАМА
2-бетті қараңыз
Қауіпсіздік техникасының ережелері
Ескерту! Бұл аспап ашық жалынның көрінетін
белгілерінсіз жоғары температурда жұмыс істей ді,
сондықтан оның жұмысы кезінде əрқашан өрт шығу
қауіпі сақталады. Ыстық ауа ағынының күйдіруі
мүмкін болғандықтан, оның бағытын қадағалап тұру
қажет.
• Жұмыс алдында мынаған көз жеткізіңіз:
- аспап қорегінің кернеуі қорек желісінің кернеуіне
сай екендігін.
- қорек баусымы мен ашасы жұмысқа жарамды
жағдайда, яғни көрінетін ақаулары мен за қымдалуы жоқ.
• Шамасынан тыс ұзын ұзартқыштарды қолданудан
аулақ болыңыз.
• Жоғары ылғалдық шарттарында аспапты қол дануға болмайды.
• Аспапты жеңіл жалындайтын материал мен сұйық тықтар маңында қолдануға тиым салынады.
• Жұмыс процессі кезінде металл сопло қызады,
сондықтан онымен
болу қажет.
• Жылыту элементін зақымдаудан аулақ болу үшін
соплоны жабуға рұқсат етілмейді.
• Аспапты қосылған күйінде қалдырмаңыз.
• Аспапты дене мен шашты кептіру үшін қолдануға
болмайды!
• Қолдану басында аспап қысқа мерзім аясында
адам денсаулығы үшін (əсіресе демікпемен
науқас) зиянды пар мен газдар шығаруы мүмкін.
• Аспапты қорек желісіне
тік қосқышы «Сөнген» қалпында екеніне көз жеткі зіңіз.
• Қорек баусымы ыстық ауа ағынының таралу айма ғында болмауы қажет.
• Аспаппен жұмыс істеу кезінде балалар мен жануарлар жұмыс орнынан қауіпсіз қашықтықта
болуы қажет.
• Сондай-ақ, техника қауіпсіздігі бойынша жеке қосыл ған нұсқаманы оқыңыз!
Мына жағдайларда
1. қорек баусымы жəне (немесе) ашасының за қымдалуы;
2. қоректі ажыратқыштың зақымдалуы;
3. оқшаулаудың жану белгілері пайда болғанда
(түтін, ерекше иісі).
тікелей байланыстан аулақ
қоспастан бұрын, қо рек-
аспапты дереу сөндіріңіз:
ҚОЛДАНЫСЫ
Аспап келесі жұмыстарды орындау үшін қол да нылады:
• Су жүргізетін құбырларды біріктіру, дəнекерлеу,
жұбыр желістерін үрлеу;
• Лактанған сырланған жабындарды өрт қаупінсіз
өшіру;
• Ылғал заттарды жылдам кептіру; жөнделетін
беттерді кептіру;
• Өздігінен жабысатын таңба қағаздарды іссіз
жою; ПВХ жасалған жабыстырмалар мен таңба
қағаздарды жабыстыру;
• ПВХ жасалған жабыстырмалар немесе таңба
ғаз дарды жабыстырған соң, ауа көпіршіктерін
қа
жою;
• Кілем жабындарының қыртыстарын жылдам түзету;
• Акрил мен плексигласпен қоса, синтетикалық материалдар мен бұймдарға қажетті пішін беру;
• Құрамында ПВХ жабындары бар материалдрмен
қоса, əр түрлі синтетикалық материалдарды
балқыту;
• Термошөгінді материалдарынан жасалған құ бырлардың монтажы мен орнатылуы;
• Термошөгінді материалдарын қаптау;
жəне қозғалтқыштарды жылыту;
• Құбыр
• Əрлеу эмаль жабындарын жөндеу мен қалпына
келтіру (ванна, ас үй ыдыстары);
• Эпоксидті ұнтақтан жасалған жабындарды жағу;
• Шаңғы, серфингке арналған тақтайларды жəне
басқа да спорт бұйымдарын жөндеу;
• Тығыз қосылыстрды ағыту жəне бұрау.
Жұмыс алдында
Аспат қоспастан бұрын (шығыс соплосы қызбай
тұрып) соплоға қажетті пішінді қондырманы таңдап,
қажет.
орнату
Сопло ауыстырылуы тек мына жағдайларда ғана
мүмкін:
• аспап сөнген кезде;
• аспап қорек көзінен ажыратылған жағдайда;
• сопло салқын болғанда.
Аспаппен қолмен, сондай-ақ тік қалпында бекіту
арқылы жұмыс істеуге болады. Соңғы жағдайында
аспатың сабын металл қысқыш-тіреу көмегімен
қажетті қалпына бекітіп қойыңыз.
Ұтымды нəтижеге жету үшін алдымен жасалатын
кішкентай бөлігін өңдеп алу қажет.
жердің
ТЕХНИКАЛЫҚ ҚЫЗМЕТ КӨРСЕТУ
Ескерту! Аспапты тазарту немесе техникалық
қыз мет көрсету бойынша жұмыстар жүргізуден
бұрын, оның қорек желісінен ажыратылғанына көз
жеткізіңіз.
Аспаптың қызып кетуін болдырмау үшін оның желдету саңылауларын тазалықта ұстау қажет. Аспапты,
əсіресе оның соплосын, жеңіл жалындайтын
сұйықтықтарды қолданып, тазартуға жол берілмейді. Ақаулықтар пайда болған жағдайда Сервис
қызметіне хабарласыңыз.
33
Page 34

Techninis fenas
Gerbiamieji pirkėjai!
Prieš pradėdami prietaisą naudoti atidžiai perskaitykite
pateiktą instrukciją!
TECHNINIAI DUOMENYS
Žr. 2 psl.
Darbo sauga
Dėmesio! Šis prietaisas veikia aukštoje temperatūro-
je be aiškių atviros ugnies požymių, todėl jam veikiant
visada yra gaisro pavojus. Rekomenduojame stebėti, į
kur yra nukreiptas karšto oro srautas, nes jis gali sukelti
gaisrą.
• Prieš pradėdami dirbti įsitikinkite, kad:
- prietaiso maitinimo įtampa atitinka maitinimo tinklo
įtampą;
- maitinimo laidas ir kištukas yra tinkamos naudoti
būklės, t.y. nėra išorinių defektų ir pažeidimų.
• Venkite naudoti pernelyg ilgus ilginamuosius elektros laidus.
• Esant dideliam oro drėgnumui prietaisą naudoti
draudžiama.
• Prietaisą draudžiama naudoti šalia degių medžiagų
ir skysčių.
• Prietaisui veikiant metalinis pūstuvas įkaista, todėl
su juo reikia vengti tiesioginio kontakto.
• Siekiant apsaugoti kaitinamąjį elementą nuo sugadinimo, pūstuvą uždengti draudžiama.
• Nepalikite įjungto prietaiso.
• Prietaisą draudžiama naudoti plaukams ir kūnui
džiovinti!
• Prietaisas eksploatavimo pradžioje trumpą laiką gali
skleisti žmonių (ypač sergančių astma) sveikatai
kenksmingus garus ir dujas.
• Prieš prijungdami prietaisą prie maitinimo tinklo įsi-
tikinkite, kad maitinimo jungiklis nustatytas į padėtį
„Išjungta“.
• Maitinimo laidas neturi būti karšto oro srauto sklidimo zonoje.
• Dirbant su prietaisu vaikai ir gyvūnai turi būti saugiu
atstumu nuo darbo vietos.
• Taip pat perskaitykite pateiktą atskirą darbo saugos
instrukciją!
Nedelsdami išjunkite prietaisą, jei:
1. pažeistas maitinimo laidas ir (arba) kištukas;
2. pažeistas maitinimo jungiklis;
3. pastebėjote izoliacijos degimo požymių (dūmai, specifi nis kvapas).
EKSPLOATAVIMAS
Prietaisas gali būti naudojamas šiems darbams atlikti:
• vandentiekio vamzdžiam jungti, lituoti, vamzdynams
prapūsti;
• dažų dangai nesukeliant gaisro pavojaus šalinti;
• drėgniems daiktams greitai išdžiovinti; remontuojamiems paviršiams džiovinti;
• savaime prisiklijuojančioms etiketėms nepaliekant
žymių nuimti; lipdukams arba etiketėms iš PVC priklijuoti;
• priklijavus lipdukus arba etiketes iš PVC pūslelėms
šalinti;
• kiliminėms dangoms iš vinilo greitai pašalinti;
• reikiamai sintetinių medžiagų ir gaminių, įskaitant
akrilą ir organinį stiklą, formai suteikti;
• įvairioms sintetinėms medžiagoms, įskaitant ir medžiagas su PVC danga, lydyti;
• vamzdžiams iš terminių medžiagų montuoti ir tiesti;
• pakuoti į termines medžiagas;
• vamzdžiams ir varikliams pašildyti;
• emaliuotoms apdailos dangoms remontuoti ir atstatyti (voniai, virtuvės indams);
• dangai iš epoksidinių miltelių dengti;
• slidėms, banglentėms ir kitokiam sportiniam inventoriui remontuoti;
• sandarioms jungtims atjungti ar atsukti.
Prieš pradedant darbą
Prieš įjungdami prietaisą (kol pūstuvas dar neįkaitęs)
parinkite ir uždėkite reikiamos formos antgalį.
į galima keisti tik tada, kai:
Antgal
• prietaisas išjungtas;
• prietaiso atjungtas nuo maitinimo tinklo;
• pūstuvas šaltas.
Su prietaisu galima dirbti tiek laikant jį rankose, tiek
užfi ksavus vertikalioje padėtyje. Viską paruošę, užfi k-
suokite prietaiso rankeną reikiamoje padėtyje, naudodamiesi metaline ąsele-atrama.
Kad pasiektumėte geriausių rezultatų, pirmiausiai apdorokite atskirą nedidelį ruošinio gabalėlį.
TECHNINIS APTARNAVIMAS
Dėmesio! Prieš pradėdami prietaiso valymo ar tech-
ninio aptarnavimo darbus įsitikinkite, kad jo kištukas
ištrauktas iš maitinimo tinklo lizdo.
Siekiant apsaugoti prietaisą nuo perkaitimo būtina pasirūpinti, kad jo ventiliacinės angos visada būtų švarios.
Draudžiama valyti prietaisą ir ypač jo pūstuvą degiais
skysčiais.
Įvykus gedimams prašome kreiptis į Aptarnavimo tarnybą.
34
Page 35

Tehniskais fēns
Cienījamais pircējs!
Uzmanīgi iepazīstieties ar doto instrukciju pirms izstrādājuma ekspluatācijas sākuma!
TEHNISKAIS RAKSTUROJUMS
Sk.l. 2.
Drošības tehnika
Lai izvairīties no uzliesmošanas, elektrotrieciena un citām traumām, elektroinstruments jāekspluatē saskaņā
ar šīs instrukcijas prasībām.
Uzmanība! Dotais instruments strādā pie augstas tem-
peratūras bez atvērtās liesmas pazīmēm, tādēļ viņa
darbā vienmēr saglabājas ugunsgrēka rašanās bīstamība Rekomendējams uzmanīt to, kur aizvirzās karsta
gaisa strūkla, tā kā viņa var izsaukt apdegumus.
• Pirms pieslēgšanas elektrostravai pārliecinieties,
ka:
- instrumenta elektrodzinēja barošanas spriegums
atbilst tīkla spriegumam;
- rozete, pagarinātājs, elektrības barošanas kabelis
un dakšas ir lietošanas k
bojājumu, nodrošināts nepieciešams kontakts starp
elektrību vadošām daļām;
• apstrādājams objekts ir droši nostiprināts;
• instrumenta slēdzis atrodas stāvoklī „Izslēgts”.
• nav rekomendēts izmantot parāk garus pagarinā-
tājus; izmantojot pagarinātāju uz spoles, tam jābūt
pilnībā attītām;
• nav pieļaujams strādāt paaugstināta mitruma apstākļos utt.;
• nepieļaujiet viegli uzliesmojošo vielu atrašanos darba vietā;
• Darbā procesā metāla sprausla sakarst, tādēļ izvairīties no tieša kontakta ar to.
• Lai aizvairītos no sildā
atļaujiet nosprostot sprauslu.
• Darba pārtraukumu laikā atvienojiet instrumentu no
barošanas tīkla.
• Nav pieļauts ar šo instrumentu žāvēt matus un ķer-
meņi!
• Ekspluatācijas sākumā instruments var izdalīt tvaiku
un gāzes ,kas var kaitēt veselībai.
• Pirms ielikt kontaktu ligzdā pārliecinieties ,ka slēdzis
ir „Izslēgts”.
• Barošanās vads nekādā gadījumā nevar atrasties
karstā gaisa strāvas izplatīšanas zona.
• Darbā laikā ar šo instrumentu bērniem un dzīvnie-
kiem jāatroda drošā vieta no darbā zona.
• Izlasiet atsevišķi pievienoto drošības tehnikas instrukciju!
ārtībā, nav elektroizolācijas
mā elementa bojājumiem, ne-
Nekavējoties izslēdziet instrumentu ja:
1. rodas kabeļ
2. slēdzis ir bojāts;
3. ir pārmērīga dzirksteļu rašanās;
Izmantošana:
Šis instruments paredzēts sekojošam darbam :
• Caurules savienošanai, lodēšana un ūdensvada izpūšanai;
• Ugunsdrošs krāsu un laku noņemšanai;
• Mitru priekšmetu ātrai kaltēšanai, kā arī remontēja-
mo virsmu kaltēšanai;
• Pašlīmējošo etiķešu tīrai noņemšanai;
• Uzlīmējošo etiķešu burbuļu noņemšanai;
• ātrai paklāju notīrīšanai no vinila seguma;
• Vajadzīgas formas sintētisku materiālu un izstrādā-
jumu piešķiršanai, ieskaitot akrilu un pleksiglasu
• Atšķirīgu sintētisku materi
segumu no PVH;
• Montāža un cauruļu uzstādīšanai no termoizstādīša-
nas materiāliem;
• Iesaiņojumiem termoizstādīšanas materiāliem;
• cauruļu un dzinēju uzsildīšānai;
• Remontam un emalju segumu atjaunošāna (vannas,
virtuvju trauki);
• Segumu sanešana no epoksidnogo pulvera;
• Slēpju remontam, dēļu vindsērfi ngam un citam spor-
ta inventāram;
• Blīvu savienojumu noskrūvēšanai.
Pirms darba sākuma
Pirms instrumenta (kamēr nav sakveldēta sprausla)
ieslēgšanas vajag izlasīt un uzstādīt uz sprauslu pieprasāmās formas uzgali.
Sprauslas aizstāšana ir ražojama tikai:
• pie izslēgtā instrumenta;
• pie instrumenta, kurš ir atslēgts no barošanas tīkla;
• pie aukstas sprauslas.
Darbs ar instrumentu ir iespējams gan ar rok
vertikāli nofi ksētajā stāvoklī. Pēdējā gadījumā nofi ksē-
jiet instrumenta rokturi pieprasāmajā stāvoklī ar metā-
liskas cemmes-paliekamā palīdzību.
Tehniskā apkalpošana un apkope!
Uzmanība! Pirms instrumenta tīrīšanas vai tehniskās
apkalpošanas ir jāpārliecinot, ka tas ir atslēgts no barošanas tīkla.
Katru reizi beidzot darbu rekomendējams attīrīt instrumenta korpusu un ventilācijas atvērumu no netīrumiem
un putekļiem ar mīksto auduma gabalu vai salveti;
Neatļaujas tīrīt instrumentu un, itīpaši sprauslu ar viegli
uzliesmojošo šķidrumu izmantošanu.
Bojājumu gadījumā griezieties SBM Group Servisa
dienestā.
a, dakšas vai kontaktligzdas bojājumi;
ālu izkausēšanai, ieskaitot
ām, gan
35
Page 36

Tehniline föön
Tähelepanu!
Efektiivne ja ohutu töö selle seadmega on võimalik
siis, kui olete läbi lugenud alljärgneva kasutusjuhendi.
Hoidke kasutusjuhend alles !
TEHNILISED ANDMED
Vaadake lk. 2.
ÜLDISED OHUTUSJUHISED
Tähelepanu! Käesoleva tööriistaga töötamisel on kõrgendatud tulekahju oht. Kuna seade töötab suurtel
kuumustel ja ilma nähtava tuleleegita, siis tuleb seadme kasutamisel olla eriti tähelepanelik ümbritseva keskonna ja inimeste suhtes.
• Enne töö alustamist veenduge, et:
- võrgupinge vastaks tööriista küljes olevale sildile
märgitud pingele (sildile märgitud 230 V või 240 V
seadmeid võib käsutada ka 220 V võrgupinge korral)
- toitejuhe, pistik ja seinakontakt oleksid kahjustamata.
- seadme ühendamisel vooluvõrku oleks lüliti asendis “Väljas” – “Off”
• Ärge kasutage ülemäära pikka pikendusjuhet.
• Seadme kasutamine niiskes keskkonnas on keelatud.
• Keelatud on seadmega töötada kergestisüttivate ainete ja vedelike läheduses.
• Vältige kontakti seadme otsikuga, sest kuumenenud
õhuava võib põhjustada tugevaid põletushaavu .
• Töötava seadme õhuava sulgemine on ohtlik, see
võib põhjustada tulekahju.
• Ärge jätke töötavat tööriista järelvalveta.
• Tehniline föön ei ole ette nähtud juuste ja muude kehaosade kuivatamiseks!
• Uus seade võib esmakasutamisel eraldada, lühiajaliselt, inimeste tervisele (eriti astmahaigetele) ohtlikke gaase.
• Toitejuhe ei tohi olla fööni õhuava läheduses.
• Seadmega töötamise ajal peavad lapsed ja loomad
olema ohutus kauguses.
• Tutvuge ka eraldi lisatud Üldohutusnõuete juhendiga!
Seade tuleb kohe välja lülitada, kui:
1. kahjustada saab toitejuhe;
2. seadme lüliti ei tööta;
3. on seadmest tunda isolatsioonimaterjalide kõrbemise lõhna või näha suitsu.
KASUTUSVALDKOND
Seadet võib kasutada järgmistel töödel:
• veetorustiku paigaldamisel, jootes ühenduslülisid
või teisi tarvikuid.
• värvi- või lakipindade ohutuks eemaldamiseks;
• niiskete esemete või remondipindade kiireks kuivatamiseks;
• kleepesiltide paigaldamiseks või jäletuks eemaldamiseks;
• kleebitud etikettide all olevate õhumullide eemaldamiseks;
• vinüülkatete kiireks eemaldamiseks;
• sünteetilistele esemetele või materjalidele (akrüül,
pleksiklaas) kuju andmiseks;
• mitmesuguste sünteetiliste materjalide sulatamiseks;
• termokahanevate totude ja katete paigaldamiseks;
• termoplastiliseks pakendamiseks;
• torude ja mootorite ülessoojendamiseks;
• emailkatete remondiks ja taastamiseks (vannid,
kööginüud jne.);
• spordiinventari remondiks ja hooldamiseks (suusad,
surfi lauad jne.);
• poltühenduste kuumutamine lahtikeeramiseks.
Tähelepanu!
Töö käigus on otsikute vahetamine keelatud!
Otsikuid tohib vahetada ainult jahtunud õhuava korral.
Seadmega võib töötada käsitsi ja kinnitatuna vertikaalselt töölauale. Viimasel juhul tuleb seadme kinnitamiseks kasutada metallist käepideme-fi ksaatorit.
TEHNILINE TEENINDAMINE JA HOOLDUS
Enne tehnilist teenindamist eemaldage tööriist toitevõrgust!
Iga kord, peale töö lõpetamist, soovitatakse puhastada
tööriista korpus ja ventilatsiooniavad tolmust pehme
riide või salvräti abil. Püsivaid määrdumisi soovitatakse kõrvaldada seebivees niisutatud pehme riide abil.
Määrdumiste kõrvaldamiseks ei tohi kasutada lahusteid: bensiini, piiritust, ammoniaagilahuseid jms. Lahustite kasutamine võib põhjustada tööriista korpuse
vigastuse.
Tööriist ei vaja täiendavat määrimist.
Seadme rikkisoleku korral pöörduge SBM Group’i teeninduskeskusse.
36
Page 37

37
Page 38

Exploded view BHG-2000L-K
38
Page 39

Spare parts list BHG-2000L-K
No. Part Name
16 Electric motor
17 Circuit board
22 Switch
30 Heating wire
39
Page 40

GB DECLARATION OF CONFORMITY
We declare under our sole responsibility that this product is in conformity with the following standards or standardized documents: EN: 60 335-2-245:2002+A1:08 EN
60335-1:2002+A11, A1:04+A12, A2:06 EN 62233:2008,
in accordance with the regulations 2006/42/CEE,
2006/95/CEE, 2004/108/CEE.
DE KONFORMITÄTSERKLÄRUNG
Wir erklären in alleiniger Verantwortung, daß dieses Produkt mit den folgenden Normen oder normativen Dokumenten übereinstimmt: EN: 60 335-2245:2002+A1:08 EN 60335-1:2002+A11, A1:04+A12,
A2:06 EN 62233:2008, gemäß den Bestimmungen der
Richtlinien 2006/42/EG, 2006/95/EG, 2004/108/EG.
SE KONFORMITETSFÖRKLARING
Vi intygar och ansvarar för, att denna produkt överensstämmer med följande norm och dokument: EN: 60 3352-245:2002+A1:08 EN 60335-1:2002+A11, A1:04+A12,
A2:06 EN 62233:2008, enl. bestämmelser och riktlinjerna 2006/42/EWG, 2006/95/EWG, 2004/108/EWG.
FI
TODISTUS STANDARDINMUKAISUUDESTA
Todistamme täten ja vastaamme yksin siitä, että tämä
tuote en allalueteltujen standardien ja standardoimisasiakirjojen vaatimusten mukainen EN: 60 335-2245:2002+A1:08 EN 60335-1:2002+A11, A1:04+A12,
A2:06 EN 62233:2008, seuraavien sääntöjen mukaisesti 2006/42/ETY, 2006/95/ETY, 2004/108/ETY.
FR DÉCLARATION DE CONFORMITÉ
Nous déclarons sous notre propre responsabilité que ce
produit est en conformité avec les normes ou documents
normalisés suivants: EN: 60 335-2-245:2002+A1:08 EN
60335-1:2002+A11, A1:04+A12, A2:06 EN 62233:2008,
conforme aux réglementations 2006/42/CEE, 2006/95/
CEE, 2004/108/CEE.
ES DECLARACIÓN DE CONFORMIDAD
Declaramos bajo nuestra sola responsabilidad que
este producto está en conformidad con las normas o
documentos normalizados siguientes: EN: 60 335-2245:2002+A1:08 EN 60335-1:2002+A11, A1:04+A12,
A2:06 EN 62233:2008, de acuerdo con las regulaciones
2006/42/CEE, 2006/95/CEE, 2004/108/CEE.
PT DECLARAÇÃO DE CONFIRMIDADE
Declaramos sob nossa exclusiva responsabilidade que
este producto cumpre as seguintes normas ou documentos normativos: EN: 60 335-2-245:2002+A1:08 EN
60335-1:2002+A11, A1:04+A12, A2:06 EN 62233:2008,
conforme as disposições das directivas 2006/42/CEE,
2006/95/CEE, 2004/108/CEE.
IT DICHIARAZIONE DI CONFORMITÀ
Dichiaramo, assumendo la piena responsabilità di
tale dichiarazione, che il prodotto è conforme alle seguenti normative e ai relativi documenti: EN: 60 3352-245:2002+A1:08 EN 60335-1:2002+A11, A1:04+A12,
A2:06 EN 62233:2008,in base alle prescrizioni delle direttive CEE 73/23, CEE 89/336, CEE 98/37.
NL CONFORMITEITSVERKLARING
Wij verklaren, dat dit product voldoet aan de volgende
normen of normatieve documenten: EN: 60 335-2245:2002+A1:08 EN 60335-1:2002+A11, A1:04+A12,
A2:06 EN 62233:2008, overeenkomstig de bepalingen van
de richtlijnen 2006/42/EEG, 2006/95/EEG, 2004/108/EEG.
NO SAMSVARSERKLÆRING
Vi erklærer at det er under vårt ansvar at dette produkt
er i samsvar med følgende standarder eller standarddokumenter: EN: 60 335-2-245:2002+A1:08 EN 603351:2002+A11, A1:04+A12, A2:06 EN 62233:2008, i
samsvar med reguleringer 2006/42/EØF, 2006/95/EØF,
2004/108/EØF.
DK KONFORMITETSERKLÆRING
Vi erklærer under almindeligt ansvar, at dette produkt
er i overensstemmelse med følgende normer eller normative dokumenter: EN: 60 335-2-245:2002+A1:08 EN
60335-1:2002+A11, A1:04+A12, A2:06 EN 62233:2008,
i henhold til bestemmelserne i direktiverne 2006/42/
EØF, 2006/95/EØF, 2004/108/EØF.
HU HASONLÓSÁGI NYILATKOZAT
Teljes felelősségünk tudatában kijelentjük, hogy jelen termék a következő szabványoknak vagy kötelező hatósági előírásoknak megfelel: EN: 60 335-2245:2002+A1:08 EN 60335-1:2002+A11, A1:04+A12,
A2:06 EN 62233:2008, a 2006/42/EWG, 2006/95/EWG,
2004/108/EWG előírásoknak megfelelően.
RO DECLARAŢIE DE CONFORMITATE
Declarăm pe proprie răspundere că acest product
este conform cu următoarele standarde sau documente standardizate: EN: 60 335-2-245:2002+A1:08 EN
60335-1:2002+A11, A1:04+A12, A2:06 EN 62233:2008,
în conformitate cu regulile 2006/42/EEC, 2006/95/EEC,
2004/108/EEC.
GR ΟΕ ΔΗΛΩΣΗ ΣΥΜΒΑΤΟΤΗΤΑΣ
Δηλούμε υπευθύνως ότι το προϊόν αυτό είναι κατασκευασμένο σύμφωνα με τους εξής κανονισμούς ή κατασκευαστικές συστάσεις: EN: 60 335-2-245:2002+A1:08 EN
60335-1:2002+A11, A1:04+A12, A2:06 EN 62233:2008,
κατά τις διατάξεις των κανονισμών της Κοινής Αγοράς
2006/42/ΕOΚ, 2006/95/ΕOΚ, 2004/108/ΕOΚ.
40
Product management
V. Nosik
SBM group GmbH
Kurfürstendamm 21
10719 Berlin, Germany
Page 41

PL OŚWIADCZENIE ZGODNOŚCI
Niniejszym oświadczamy ponosząc osobistą odpowiedzialność, że produkt wykonany jest zgodnie z następującymi
normami i dokumentami normalizującymi:
245:2002+A1:08 EN 60335-1:2002+A11, A1:04+A12,
A2:06 EN 62233:2008,
EWG, 2006/95/EWG, 2004/108/EWG.
z godnie z wytycznymi 2006/42/
CZ STRVZUJÍCÍ PROHLÁŠENÍ
EN: 60 335-2-
Potvrzujeme na odpovědnost, že tento výrobek odpovídá následujícím normám nebo normativním podkladům:
EN: 60 335-2-245:2002+A1:08 EN 60335-1:2002+A11,
A1:04+A12, A2:06 EN 62233:2008, podle ustanovení směrnic 2006/42/EWG, 2006/95/EWG, 2004/108/
EWG.
SI IZJAVA O USTREZNOSTI
Odgovorno izjavljamo, da je ta izdelek v skladu z naslednjimi standardi ali standardnimi dokumenti: EN:
60 335-2-245:2002+A1:08 EN 60335-1:2002+A11,
A1:04+A12, A2:06 EN 62233:2008, v skladu s predpisi
navodil 2006/42/EEC, 2006/95/EEC, 2004/108/EEC.
CS IZJAVA O USKLAĐENOSTI
Pod punom odgovornošću izjavljujemo da je ovaj proizvod usklađen sa sledećim standardima ili standardizovanim dokumentima: EN: 60 335-2-245:2002+A1:08 EN
60335-1:2002+A11, A1:04+A12, A2:06 EN 62233:2008,
u skladu sa odredbama smernica 2006/42/EEC,
2006/95/EEC, 2004/108/EEC.
HR BOS IZJAVA O USKLAĐENOSTI
Izjavljujemo uz punu odgovornost da je ovaj proizvod
usklađen sa slijedećim normama i normativnim dokumentima: EN: 60 335-2-245:2002+A1:08 EN 603351:2002+A11, A1:04+A12, A2:06 EN 62233:2008, prema
odredbama smjernica 2006/42/EWG, 2006/95/EWG,
2004/108/EWG.
TR STANDARDIASYON BEYANI
Yeğane sorumlu olarak, bu ürünün aşağıdaki standart-
lara veya standart belgelerine uygun olduğunu beyan
ederiz: EN: 60 335-2-245:2002+A1:08 EN 603351:2002+A11, A1:04+A12, A2:06 EN 62233:2008, yönetmeliği hükümleri uyarınca 2006/42/EWG, 2006/95/
EWG, 2004/108/EWG.
AE
RU ЗАЯВЛЕНИЕ О СООТВЕТСТВИИ
Мы с полной ответственностью заявляем, что
настоящее изделие соответствует следующим
стандартам и нормативным документам: EN: 60 335-
2-245:2002+A1:08 EN 60335-1:2002+A11, A1:04+A12,
A2:06 EN 62233:2008, - согласно правилам: 2004/108/
ЕЕС, 2006/42/ЕЕС, 2006/95/ЕЕС.
UA ЗАЯВА ПРО ВІДПОВІДНІСТЬ
Ми з повною відповідальністю заявляємо, що справжній виріб відповідає наступним стандартам і нормативним документам: EN: 60 335-2-245:2002+A1:08 EN
60335-1:2002+A11, A1:04+A12, A2:06 EN 62233:2008
- згідно із правилами: 2004/108/ЕЕС, 2006/42/ЕЕС,
2006/95/ЕЕС.
KZ СƏЙКЕСТІЛІК ЖӨНІНДЕ ӨТІНІШ
Осы бұйым келесі стандарттар мен нормативті
құжаттарға сəйкестігі жөнінде толық жауапкершілікпен
мəлімдейміз: 2004/108/ЕЕС, 2006/42/ЕЕС,
2006/95/ЕЕС - ережелеріне сəйкес EN: 60 335-2245:2002+A1:08 EN 60335-1:2002+A11, A1:04+A12,
A2:06 EN 62233:2008.
LT KOKYBĖS ATITIKTIES DEKLARACIJA
Mes atsakingai pareiškiame, kad šis gaminys atitinka
tokius standartus ir normatyvinius dokumentus: EN:
60 335-2-245:2002+A1:08 EN 60335-1:2002+A11,
A1:04+A12, A2:06 EN 62233:2008, pagal EEB reglamentų 2006/42/EG, 2006/95/EG, 2004/108/EG nuostatas.
LV
DEKLARĀCIJA PAR ATBILSTĪBU STANDARTIEM
Mēs ar pilnu atbildību paziņojam, ka šis izstrādājums
atbilst standartiem vai standartizācijas dokumentiem
EN: 60 335-2-245:2002+A1:08 EN 60335-1:2002+A11,
A1:04+A12, A2:06 EN 62233:2008, un ir saskaņā ar direktīvām 2006/42/EG, 2006/95/EG, 2004/108/EG.
EE VASTAVUSDEKLARATSIOON
Kinnitame ainuvastutajana, et see toode vastab järgmistele standarditele või normdokumentidele: EN: 60 3352-245:2002+A1:08 EN 60335-1:2002+A11, A1:04+A12,
A2:06 EN 62233:2008, vastavalt direktiivide 2006/42/
EÜ, 2006/95/EÜ, 2004/108/EÜ nõuetele.
EN 60335-1:2002+A11, A1:04+A12, A2:06
2006/42/EEC, 2006/95/EEC, 2004/108/EEC
EN: 60 335-2-245:2002+A1:08
EN 62233:2008
Product management
V. Nosik
SBM group GmbH
Kurfürstendamm 21
10719 Berlin, Germany
41
Page 42

HINWEISE ZUM UMWELTSCHUTZ
DE
Alt-Elektrogeräte sind Wertstoffe, sie gehören daher nicht in den
Hausmüll!
Wir möchten Sie daher bitten, uns mit Ihrem aktiven Beitrag bei
der Ressourcenschonung und beim Umweltschutz zu unterstützen und dieses Gerät bei den-falls vorhandeneingerichteten
Rücknahmestellen abzugeben.
ENVIRONMENTAL PROTECTION
GB
Discarded electric appliances are recyclable and should not be
discarded in the domestic waste! Please actively support us in
conserving resources and protecting the environment by
returning this appliance to the collection centres (if available).
FR
INFORMATIONS SUR LA
PROTECTION DE L’ENVIRONNEMENT
Tout appareil électrique usé est une matière recyclable et ne fait
pas pas partie des ordures ménagères! Nous vous demandons
de bien vouloir nous soutenir en contribuant activement au ménagement des ressources et à la protection de l’environnement
en déposant cet appareil dans sites de collecte(si existants).
ES
ADVERTENCIA PARA LA
PROTECCIÓN DEL MEDIO AMBIENTE
¡Los aparatos eléctricos desechables son materiales que no son
parte de la basura doméstica! Por ello pedimos para que nos
ayude a contribuir activamente en el ahorro de recursos y en la
protección del medio ambiente entregando este aparato en los
puntos de recogida existentes.
INDICAÇÕES PARA A PROTECÇÃO
PT
DO MEIO AMBIENTE
Aparelhos eléctricos antigos são materiais que não pertencem
ao lixo doméstico! Por isso pedimos para que nos apoie, contribuindo activamente na poupança de recursos e na protecção
do ambiente ao entregar este aparelho nos pontos de recolha,
caso existam.
AVVERTENZE PER LA TUTELA
IT
DELL’AMBIENTE
Gli apparecchi elettrici vecchi sono materiali pregiati, non rientrano nei normali rifiuti domestici! Preghiamo quindi i gentili clienti
di contribuire alla salvaguardia dell’ambiente e delle risorse e di
consegnare il presente apparecchio ai centri di raccolta competenti, qualora siano presenti sul territorio
NL
RICHTLIJNEN VOOR
MILIEUBESCHERMING
Gebruikte elektronische apparaten horen niet thuis in het huisafval!
Wij vragen u daarom een bijdrage aan de bescherming van ons
milieu te leveren en dit apparaat op de voorziene verzamelplaatsen af te geven.
DK
ANVISNINGER OM
MILJØBESKYTTELSE
Kasserede elektriske apparater indeholder materiale, der kan
genbruges, og bør derfor aldrig smides væk som almindeligt affald. Når dette apparat skal kasseres, vil vi derfor opfordre Dem
til at aflevere det på et egnet opsamlingssted, hvis et sådant fin-
des, og således være med til at bevare ressourcer og beskytte
miljøet.
SE
Elektriska verktyg, tillbehör och förpackning får inte kastas i hushållssoporna (gäller endast EU-länder). Enligt direktivet 2002/96/
EG som avser äldre elektrisk och elektronisk utrustning och dess
tillämpning enligt nationell lagstiftning ska uttjänta elektriska
verktyg sorteras separat och lämnas till miljövänlig återvinning
NO
Kast aldri elektroverktøy, tilbehør og emballasje i husholdningsavfallet (kun for EU-land). I henhold til EU-direktiv 2002/96/EF
om kasserte elektriske og elektroniske produkter og direktivets
iverksetting i nasjonal rett, må elektroverktøy som ikke lenger
skal brukes, samles separat og returneres til et miljøvennlig gjenvinningsanlegg
FI
Älä hävitä sähkötyökalua, tarvikkeita tai pakkausta tavallisen kotitalousjätteen mukana (koskee vain EU-maita). Vanhoja sähkö- ja elektroniikkalaitteita koskevan EU-direktiivin
2002/96/ETY ja sen maakohtaisten sovellusten mukaisesti käytetyt sähkötyökalut on toimitettava ongelmajätteen keräyspisteeseen ja ohjattava ympäristöystävälliseen kierrätykseen
EE
Ärge visake kasutuskõlbmatuks muutunud elektrilisi tööriistu, lisatarvikuid ja pakendeid ära koos olmejäätmetega (üksnes EL liikmesriikidele). Vastavalt Euroopa Parlamendi ja nõukogu direktiivile 2002/96/EÜ
elektri- ja elektroonikaseadmete jäätmete kohta ning direktiivi nõuete
kohaldamisele liikmesriikides tuleb kasutuskõlbmatuks muutunud elektrilised tööriistad koguda eraldi ja keskkonnasäästlikult korduvkasutada
või ringlusse võtta
APKĀRTĒJĀS VIDES AIZSARDZĪBA
LV
Neizmetiet elektroiekārtas, piederumus un iesaiņojuma materiālus
sadzīves atkritumos (tikai ES valstīm). Saskaņā ar Eiropas Direktīvu
2002/96/EG par lietotajām elektroiekārtām, elektronikas iekārtām un tās
iekļaušanu valsts likumdošanā lietotās elektroiekārtas ir jāsavāc atsevišķi un jānogādā otrreizпjai pārstrādei videi draudzīgā veidā
LT
Nemeskite elektrinių įrankių, papildomos įrangos ir pakuotės į buitinių
atliekų konteinerius (galioja tik ES valstybėms). Pagal ES Direktyvа
2002/96/EG dėl naudotų elektrinių ir elektroninių prietaisų atliekų utilizavimo ir pagal vietinius valstybės įstatymus atitarnavę elektriniai įran-
kiai turi būti surenkami atskirai ir gabenami į antrinių žaliavų tvarkymo
vietas, kur jie turi būti sunaikinami ar perdirbami aplinkai nekenksmingu
būdu
ÅTERVINNING
MILJØVERN
YMPÄRISTÖNSUOJELU
KESKONNAKAITSE
APLINKOS APSAUGA
42
Page 43

RU
УКАЗАНИЯ ПО ЗАЩИТЕ
ОКРУЖАЮЩЕЙ СРЕДЫ
Старые электроприборы подлежат вторичной переработке и поэтому не могут быть утилизированы с бытовыми отходами! Поэтому
мы хотели бы попросить Вас активно поддержать нас в деле экономии ресурсов и защиты окружающей среды и сдать этот прибор в
приемный пункт утилизации (если таковой имеется).
ҚОРШАҒАН ОРТАНЫ ҚОРҒАУ
KZ
Сізге керек емес бұйымды, керек-жарақтарды жəне (немесе)
қорапты қайталама қайта өңдеумен айналысатын ұйымға
өткізу қажет.
UA
ВКАЗІВКИ ПО ЗАХИСТУ
НАВКОЛИШНЬОГО СЕРЕДОВИЩА
Старі електроприлади являють собою сукупність технічних
матеріалів і тому не можуть бути утилізовані з побутовими
відходами! Тому ми хотіли б попросити Вас активно підтримати нас
у справі економії ресурсів і захисту навколишнього середовища і
здати цей прилад у приймальний пункт утилізації (якщо такий є).
PL
INFORMACJA DOTYCZĄCA
OCHRONY ŚRODOWISKA
Zużyte urządzenia elektryczne są surowcami wtórnymi – nie wol-
no wyrzucać ich do pojemników na odpady domowe, ponieważ
mogą zawierać substancje niebezpieczne dla zdrowia ludzkiego
i środowiska! Prosimy o aktywną pomoc w oszczędnym gospodarowaniu zasobami naturalnymi i ochronie środowiska naturalnego przez przekazanie zużytego urządzenia do punktu składo-
wania surowców wtórnych - zużytych urządzeń elektrycznych.
СZ
POKYNY K OCHRANĚ
ŽIVOTNÍHO PROSTŘEDÍ
Staré elektrické přístroje jsou recyklovatelné odpady a nepatří
proto do domácího odpadu!
Chceme vás tímto požádat, abyste aktivně příspěli k podpoře
ochrany přírodních zdrojů a životního prostředí, a odevzdali tento přístroj na k tomu určených sběrných místech .
UPUTSTVO O ZAŠTITI OKOLINE
SK
Stari električni uređaji sastoje se od vrednih materijala i ne spadaju u kućno smeće! Stoga vas molimo da nas svojim aktivnim
doprinosom podržite pri štednji resursa i zaštiti životne sredine,
te da ovaj uređaj predate na mesta predviđena za sakupljanje
starih električnih uređaja, ukoliko je takvo organizovano.
A KÖRNYEZETVÉDELEMMEL
HU
KAPCSOLATOS TUDNIVALÓK
A kiselejtezett elektromos készülékek értékes nyersanyagokat
tartalmaznak, és erre figyelemmel nem tartoznak a háztartási
hulladék körébe! A gyártómű minden felhasználót arra kér, hogy
a maga részéről is tegyen meg mindent a költségkímélés és környezetvédelem érdekében, és a kiselejtezett készüléket adja át
az erre a célra kialakított visszavételi helyen, amennyiben van
ilyen a környéken.
INDICAŢII PENTRU PROTECŢIA
RO
MEDIULUI ÎNCONJURĂTOR
Aparatele electrice uzate sunt materiale valoroase, motiv pentru
care locul lor nu este la gunoiul menajer! Din această cauză,
vă rugăm să ne sprijiniţi şi să participaţi la protejarea resurselor
naturale şi a mediului înconjurător, prin predarea acestui aparat
la centrele de preluare a acestora, în cazul în care ele există.
NAPOTKI ZA ZAŠČITO OKOLJA
SI
Stare električne naprave so material, ki ne spada v gospodinjske
odpadke. Prosimo vas, da nam aktivno pripomorete pri ohranjanju naravnih virov in zaščiti okolja, zato neuporabno električno
napravo odstranite na predvidenih, v te namene urejenih odvzemnih mestih.
HR/BOS
Stari električni uređaji sastoje se od vrijednih materijala te stoga
ne spadaju u kućno smeće! Stoga vas molimo da nas svojim
aktivnim doprinosom podržite pri štednji resursa i zaštiti okoliša,
te da ovaj uređaj predate na mjesta predviđena za sakupljanje
starih električnih uređaja, ukoliko je takvo organizirao.
GR
UPUTE O ZAŠTITI OKOLIŠAI
ΥΠΟΔΕΊΞΕΙΣ ΓΙΑ ΤΗΝ ΠΡΟΣΤΑΣΊΑ
ΤΟΥ ΠΕΡΙΒΆΛΛΟΝΤΟΣ
Οι παλιές ηλεκτρικές συσκευές είναι πολύτιμα υλικά και συνεπώς
δεν έχουν θέση στα οικιακά απορρίμματα! Θα θέλαμε λοιπόν να
σας παρακαλέσουμε να μας υποστηρίξετε συμβάλλοντας ενεργά στην προστασία των πρώτων υλών και του περιβάλλοντος
παραδίδοντας τη συσκευή αυτή στις υπηρεσίες ανακύκλωσης
- εφόσον υπάρχουν.
TR
Eski elektrikli cihazlar dönüştürülebilir malzeme olup ev çöpüne
atılmamalı! Doğal kaynakların ve çevrenin korunmasına etkin
biçimde katkıda bulunmak üzere cihazı lütfen toplama merkezlerine (varsa) iade edin.
ÇEVRE KORUMA BILGILERI
AE
43
Page 44

Подлежи на промяна
BG
 Loading...