

Page 1
•
•
•
1
•
•
•
User Guide
Version 2.0
Page 2

•
•
•
2
•
•
•
Boris Calligraphy Version 2.0
The material contained herein is protected by copyrights. Permission to use materials may
be granted upon written request and proper credit.
Contact information
Boris FX, Inc.
381 Congress Street
Boston, MA 02210
Phone:
(617) 451-9900
Fax:
(617) 451-9916
E-mail:
http://www.borisfx.com
For information on site licenses
For technical support
http://www.borisfx.com/support. You can also contact technical support by calling
(617) 451-9900 or e-mailing [email protected].
The information in this guide is believed to be accurate and reliable. However, Boris FX, Inc.
assumes no responsibility for its use; nor for any infringements of patents or other rights of
third parties which may result from its use. No part of this publication may be reproduced,
stored in a retrieval system, or transmitted, in any form, by any means, electronic,
mechanical, by photocopying recording or otherwise without the prior written permission
of Boris FX, Inc.
Boris Calligraphy™, Boris Red™ and PixelChooser™ are trademarks of Boris FX. Apple, the
Apple Logo, Final Cut, Final Cut Pro, Mac, Macintosh are trademarks of Apple Computer,
Inc.
Certain graphics used in the tutorials and illustrations in this book appear courtesy of
ArtBeats Inc. For more information on these and other stock footage images, visit
www.ArtBeats.com
Written by Anne Renehan and Jeanine Brennan.
Copyright © 2005 by Boris FX, Inc. All rights reserved. Printed in the U. S. A.
Updated February 2005
, visit the Boris FX Technical Forum at
.
, please call (617) 451-9900 or e-mail [email protected]
Page 3

Boris Calligraphy
•
•
•
3
•
•
•
Boris
Release Information . . . . . . . . . . . . . . . . . . . . . . . . . . . . . . . . . . . . . . . . . . . . . . . . . . . 5
New Features in Boris Calligraphy 2.0 . . . . . . . . . . . . . . . . . . . . . . . . . . . . . . . . . . . . . . . 5
Understanding the Boris Text Generators . . . . . . . . . . . . . . . . . . . . . . . . . . . . . . . . . . . 6
Creating a Text Effect . . . . . . . . . . . . . . . . . . . . . . . . . . . . . . . . . . . . . . . . . . . . . . . . . . . . 6
Understanding the Calligraphy Text Controls . . . . . . . . . . . . . . . . . . . . . . . . . . . . . . . . . 7
Understanding Vector Graphics and Bitmaps . . . . . . . . . . . . . . . . . . . . . . . . . . . . . . . . . 8
Working with the Text Window . . . . . . . . . . . . . . . . . . . . . . . . . . . . . . . . . . . . . . . . . . . 9
Working with the Style Tab . . . . . . . . . . . . . . . . . . . . . . . . . . . . . . . . . . . . . . . . . . . . . . 13
Working with the Page Tab. . . . . . . . . . . . . . . . . . . . . . . . . . . . . . . . . . . . . . . . . . . . . . . 17
Working with the Fill Tab . . . . . . . . . . . . . . . . . . . . . . . . . . . . . . . . . . . . . . . . . . . . . . . . 18
Working with the Border Tab . . . . . . . . . . . . . . . . . . . . . . . . . . . . . . . . . . . . . . . . . . . . 26
Working with the Shadow Tab . . . . . . . . . . . . . . . . . . . . . . . . . . . . . . . . . . . . . . . . . . . . 28
Working with the Style Palette. . . . . . . . . . . . . . . . . . . . . . . . . . . . . . . . . . . . . . . . . . . 30
Opening the Style Palette . . . . . . . . . . . . . . . . . . . . . . . . . . . . . . . . . . . . . . . . . . . . . . . . 31
Categorizing Styles. . . . . . . . . . . . . . . . . . . . . . . . . . . . . . . . . . . . . . . . . . . . . . . . . . . . . . 31
Selecting the Thumbnail View . . . . . . . . . . . . . . . . . . . . . . . . . . . . . . . . . . . . . . . . . . . . 31
Creating and Saving Styles . . . . . . . . . . . . . . . . . . . . . . . . . . . . . . . . . . . . . . . . . . . . . . . 32
Calligraphy
Editing Text . . . . . . . . . . . . . . . . . . . . . . . . . . . . . . . . . . . . . . . . . . . . . . . . . . . . . . . . 6
Working with Sliders . . . . . . . . . . . . . . . . . . . . . . . . . . . . . . . . . . . . . . . . . . . . . . . . . 7
Working with Dial Controls . . . . . . . . . . . . . . . . . . . . . . . . . . . . . . . . . . . . . . . . . . . . 7
Working with Color Controls . . . . . . . . . . . . . . . . . . . . . . . . . . . . . . . . . . . . . . . . . . . 7
Advantages of Vector Graphics . . . . . . . . . . . . . . . . . . . . . . . . . . . . . . . . . . . . . . . . . 8
Selecting Text . . . . . . . . . . . . . . . . . . . . . . . . . . . . . . . . . . . . . . . . . . . . . . . . . . . . . . 9
Working with Tabs and Rulers . . . . . . . . . . . . . . . . . . . . . . . . . . . . . . . . . . . . . . . . 10
Resetting Text Styles . . . . . . . . . . . . . . . . . . . . . . . . . . . . . . . . . . . . . . . . . . . . . . . . 11
Applying Text Styles. . . . . . . . . . . . . . . . . . . . . . . . . . . . . . . . . . . . . . . . . . . . . . . . . 11
Importing Text Files . . . . . . . . . . . . . . . . . . . . . . . . . . . . . . . . . . . . . . . . . . . . . . . . 11
Previewing Text . . . . . . . . . . . . . . . . . . . . . . . . . . . . . . . . . . . . . . . . . . . . . . . . . . . 12
Updating Text . . . . . . . . . . . . . . . . . . . . . . . . . . . . . . . . . . . . . . . . . . . . . . . . . . . . . 12
Working with Gradients. . . . . . . . . . . . . . . . . . . . . . . . . . . . . . . . . . . . . . . . . . . . . . 19
Adding and Deleting Color Stops . . . . . . . . . . . . . . . . . . . . . . . . . . . . . . . . . . . . . . 20
Selecting Color Stops and Midpoints . . . . . . . . . . . . . . . . . . . . . . . . . . . . . . . . . . . 20
Setting the Location of Color Stops and Midpoints . . . . . . . . . . . . . . . . . . . . . . . . 20
Adjusting Color and Alpha Values . . . . . . . . . . . . . . . . . . . . . . . . . . . . . . . . . . . . . 20
Setting the Shape and Direction of the Gradient. . . . . . . . . . . . . . . . . . . . . . . . . . 21
Style Control Buttons. . . . . . . . . . . . . . . . . . . . . . . . . . . . . . . . . . . . . . . . . . . . . . . . 30
Creating Text Styles . . . . . . . . . . . . . . . . . . . . . . . . . . . . . . . . . . . . . . . . . . . . . . . . . 32
Creating Color Styles . . . . . . . . . . . . . . . . . . . . . . . . . . . . . . . . . . . . . . . . . . . . . . . . 32
Creating Gradient Styles . . . . . . . . . . . . . . . . . . . . . . . . . . . . . . . . . . . . . . . . . . . . . 32
Page 4

•
•
•
4
•
•
•
Creating Font Styles. . . . . . . . . . . . . . . . . . . . . . . . . . . . . . . . . . . . . . . . . . . . . . . . . 33
Naming and Deleting Styles . . . . . . . . . . . . . . . . . . . . . . . . . . . . . . . . . . . . . . . . . . . . . . 33
Applying Styles . . . . . . . . . . . . . . . . . . . . . . . . . . . . . . . . . . . . . . . . . . . . . . . . . . . . . . . . 34
Applying Text Styles. . . . . . . . . . . . . . . . . . . . . . . . . . . . . . . . . . . . . . . . . . . . . . . . . 34
Applying Color Styles. . . . . . . . . . . . . . . . . . . . . . . . . . . . . . . . . . . . . . . . . . . . . . . . 34
Applying Gradient Styles . . . . . . . . . . . . . . . . . . . . . . . . . . . . . . . . . . . . . . . . . . . . . 34
Applying Font Styles . . . . . . . . . . . . . . . . . . . . . . . . . . . . . . . . . . . . . . . . . . . . . . . . 34
Editing Styles . . . . . . . . . . . . . . . . . . . . . . . . . . . . . . . . . . . . . . . . . . . . . . . . . . . . . . . . . . 35
Using Contextual Menus in the Style Palette . . . . . . . . . . . . . . . . . . . . . . . . . . . . . . . . . 35
Working with the Title 3D Generator . . . . . . . . . . . . . . . . . . . . . . . . . . . . . . . . . . . . . . 36
Working with the Geometry Parameter Group . . . . . . . . . . . . . . . . . . . . . . . . . . . . . . . 36
Working with the Pivot Parameter Group . . . . . . . . . . . . . . . . . . . . . . . . . . . . . . . . . . . 37
Working with the Transformations Parameter Group . . . . . . . . . . . . . . . . . . . . . . . . . . 37
Working with the Type On Parameter Group. . . . . . . . . . . . . . . . . . . . . . . . . . . . . . . . . 39
Working with the Title Crawl Generator. . . . . . . . . . . . . . . . . . . . . . . . . . . . . . . . . . . . 43
Creating a Title Animation . . . . . . . . . . . . . . . . . . . . . . . . . . . . . . . . . . . . . . . . . . . . . . . 43
Optimizing Workflow for Credit Rolls . . . . . . . . . . . . . . . . . . . . . . . . . . . . . . . . . . . . . . . 43
Animating Text . . . . . . . . . . . . . . . . . . . . . . . . . . . . . . . . . . . . . . . . . . . . . . . . . . . . . . . . 44
Working with the Vector Shape Generator . . . . . . . . . . . . . . . . . . . . . . . . . . . . . . . . . . 49
Working with the Primitive Shape Parameter Group . . . . . . . . . . . . . . . . . . . . . . . . . . 50
Working with the Border 1, Border 2 and Border 3 Parameter Groups . . . . . . . . . . . . 51
Working with the Shape Fill Parameter Group . . . . . . . . . . . . . . . . . . . . . . . . . . . . . . . 53
Working with the Transformations Parameter Group . . . . . . . . . . . . . . . . . . . . . . . . . . 53
Working with the Shadows Parameter Group . . . . . . . . . . . . . . . . . . . . . . . . . . . . . . . . 56
Working with the Text Scrambler. . . . . . . . . . . . . . . . . . . . . . . . . . . . . . . . . . . . . . . . . 57
Working with the Variations Parameter Group . . . . . . . . . . . . . . . . . . . . . . . . . . . . . . . 58
Working with the Page Transformations Parameter Group . . . . . . . . . . . . . . . . . . . . . 61
Working with the Letter Transformations Parameter Group. . . . . . . . . . . . . . . . . . . . . 63
Working with the Type On Parameter Group. . . . . . . . . . . . . . . . . . . . . . . . . . . . . . . . . 64
Working with the Jitter Parameter Group . . . . . . . . . . . . . . . . . . . . . . . . . . . . . . . . . . . 68
About the Tutorial Exercises . . . . . . . . . . . . . . . . . . . . . . . . . . . . . . . . . . . . . . . . . . . . 69
Exercise One: Creating a Title 3D Effect . . . . . . . . . . . . . . . . . . . . . . . . . . . . . . . . . . . . . 69
Exercise Two: Creating an Animated Tracking Effect . . . . . . . . . . . . . . . . . . . . . . . . . . . 72
Creating Text . . . . . . . . . . . . . . . . . . . . . . . . . . . . . . . . . . . . . . . . . . . . . . . . . . . . . . 72
Mapping a Gradient to the Text . . . . . . . . . . . . . . . . . . . . . . . . . . . . . . . . . . . . . . . 72
Saving and Applying Styles . . . . . . . . . . . . . . . . . . . . . . . . . . . . . . . . . . . . . . . . . . . 73
Exercise Three: Creating a Credit Roll. . . . . . . . . . . . . . . . . . . . . . . . . . . . . . . . . . . . . . . 76
Importing and Formatting the Text . . . . . . . . . . . . . . . . . . . . . . . . . . . . . . . . . . . . 76
Creating the Credit Roll. . . . . . . . . . . . . . . . . . . . . . . . . . . . . . . . . . . . . . . . . . . . . . 77
Exercise Four: Creating an Animated Type On Effect. . . . . . . . . . . . . . . . . . . . . . . . . . . 78
Exercise Five: Creating Text with a Backdrop. . . . . . . . . . . . . . . . . . . . . . . . . . . . . . . . . 80
Exercise Six: Creating a Text Scrambler Effect . . . . . . . . . . . . . . . . . . . . . . . . . . . . . . . . 82
Page 5

Release Information
Welcome to Boris Calligraphy 2.0. Boris Calligraphy 2,0 is an update to Boris Calligraphy
2.0 for Apple Final Cut Pro for Mac OS X. This section contains information regarding new
features in Calligraphy 2.0. For information about other Boris products and additional
resources, visit our web site at www.borisfx.com.
New Features in Boris Calligraphy 2.0
Boris Calligraphy version 2.0 includes the following new features.
•
Calligraphy includes two new Generators,
Shape allows you to create simple vector shapes to use as backdrops behind text. The
backdrops can include borders and shadows. Text Scrambler randomizes or shufßes
text characters and text styles in a variety of ways and will jitter the size, position, hue
and angle of text characters.
•
The
Title 3D
options for creating animated “type-on” effects.
The
•
parameters including Position, Angle, Scale, Hue and Opacity.
•
The Text window now offers selection based
Leading globally.
•
The Text window now offers additional parameters and shapes when mapping a
gradient to text.
A new
•
the selected text spacing to the same even when the letters change. This is useful when
you are creating text randomization effects.
The Text window includes a new
•
to affect the color value of all the style elements with a single parameter. To adjust a
complex text style, you might have to adjust the colors on Þve or six separate
parameters. Instead, Style Hue shifts the hue of all color values in the text style an equal
amount. This parameter also provides an easy way to save multiple versions of a text
style so that each style varies in hue.
You can now modify the behavior of the
•
buttons scale the size of all fonts by integers of 10. Option-clicking either button scales
the size of the text characters by an integer of 1. Shift-clicking either button scales the
size of the text characters by an integer of 100.
•
You can now scrub the numerical values for a parameter. For example, enter 50 as the
Opacity value and press Return. Press the numerical Þeld and drag to the left or right.
The value adjusts as you drag.
•
Boris Calligraphy can now support images that are up to 16,000 pixels by 16,000 pixels.
This is useful for creating longer credit rolls.
generator includes a new Type On parameter group. This provides several
Jitter
parameter group in the Text Scrambler allows you to randomize text
Fixed Width checkbox
appears in the Text window in the Style tab. This forces
Style Hue
Vector Shape
Leading
parameter. Style Hue provides an easy way
Size buttons
and
Text Scrambler
instead of only applying the
in the Text window. The Size
. Vector
Boris Calligraphy
•
•
•
5
•
•
•
Page 6
•
Generator menu
•
•
6
•
•
•
Understanding the Boris Text Generators
Boris Calligraphy includes four Final Cut Pro Generators: Title 3D, Title Crawl, Vector and
Text Scrambler.
Title 3D
animated tracking and other text transformations. For more information on vectors, see
“Understanding Vector Graphics and Bitmaps” on page 8. Once you set the characteristics
of the individual text characters, you can animate the text.
Title Crawl
keyframes the text tracks to roll or crawl across the screen. The text page is automatically
aligned and animated so that you do not have to set keyframes in the timeline.
Vector Shape
backdrops can include borders and shadows.
Text Scrambler
will jitter the size, position, hue and angle of text characters.
Text effects can be manipulated on two levels. The controls in the Text window affect text on
a character basis, allowing you to assign different styles, colors, drop shadows, borders, and
Þll to individual characters. These controls are only available in the Text window and cannot
be animated. In addition, the Style Palette can be used to create and save styles settings for
future use.
Once you set the characteristics of the individual characters, you can use the parameters in
the Motion Tab in the Viewer to animate the text. Move and rotate text in 3D space, create a
type on effect, and animate lights, and shadows. These features are animated by setting
keyframes in the timeline. You can also create auto-animated rolls and crawls.
offers vector-based text that can be manipulated in 3D Space with full pivot control,
allows you to easily animate a text page. The
allows you to create simple vector shapes to use as backdrops behind text. The
randomizes or shufßes text characters and text styles in a variety of ways and
On systems that include the RTMac board, the static titles created with the Title 3D
Generator play in real time as long as no keyframes are added in the Controls tab.
Title Crawl
effect automatically
Creating a Text Effect
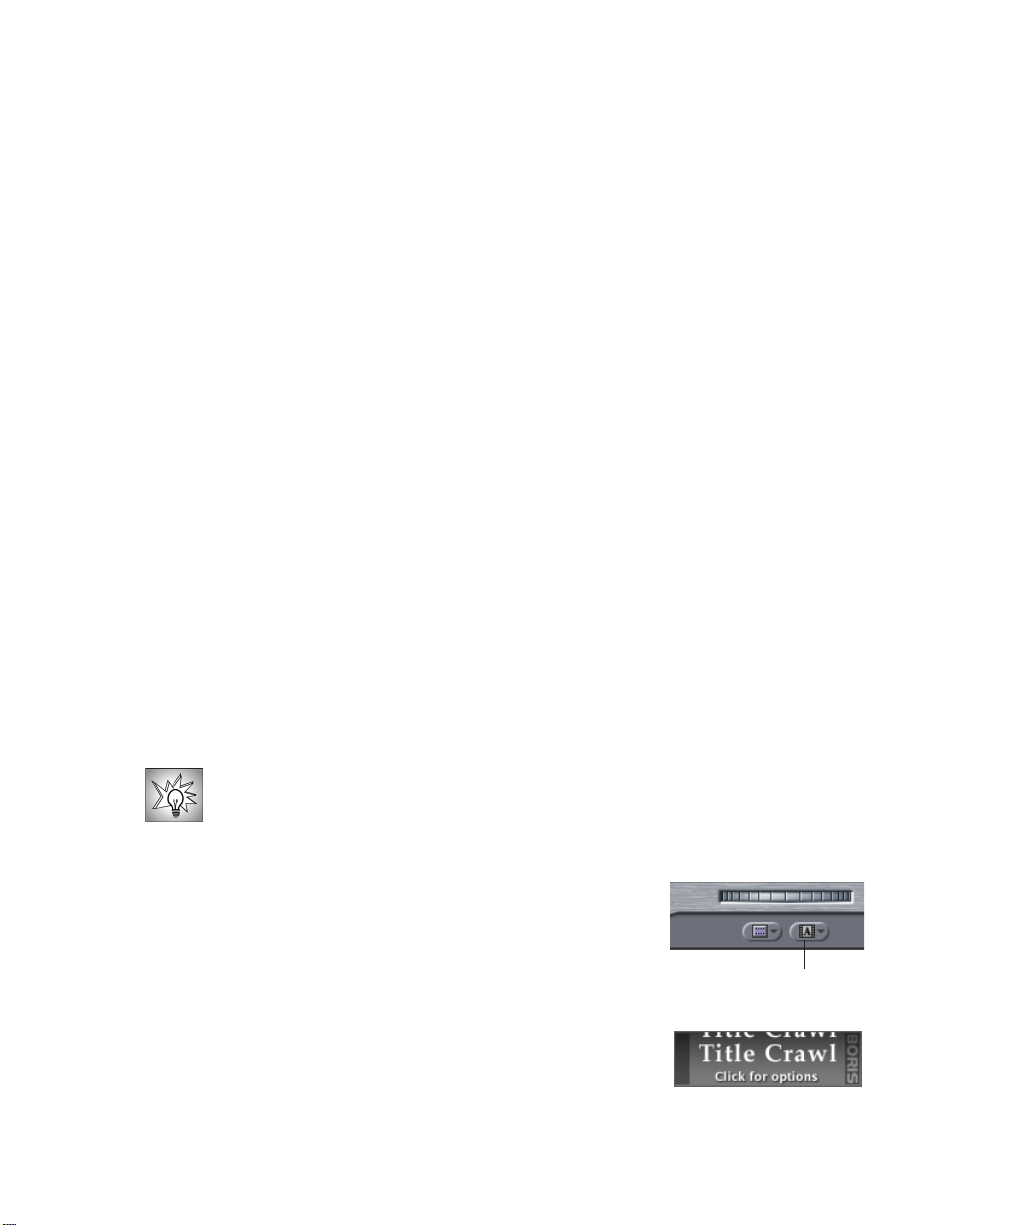
Choose
corner of the Video tab in the Viewer. Choose the appropriate
generator
from the submenu.
Editing Text
Once you create a Text page, you can edit the text at any time
by clicking the banner in the Controls tab in the Viewer. This
opens your text in the Text window where you can make
changes.
Boris
from the
Title 3D, Title Crawl, Vector Shape
Generator menu
in the lower-right
or
Text Scrambler
Page 7
Boris Calligraphy
Understanding the Calligraphy Text Controls
The following controls appear in the Calligraphy Text window.
Working with Sliders
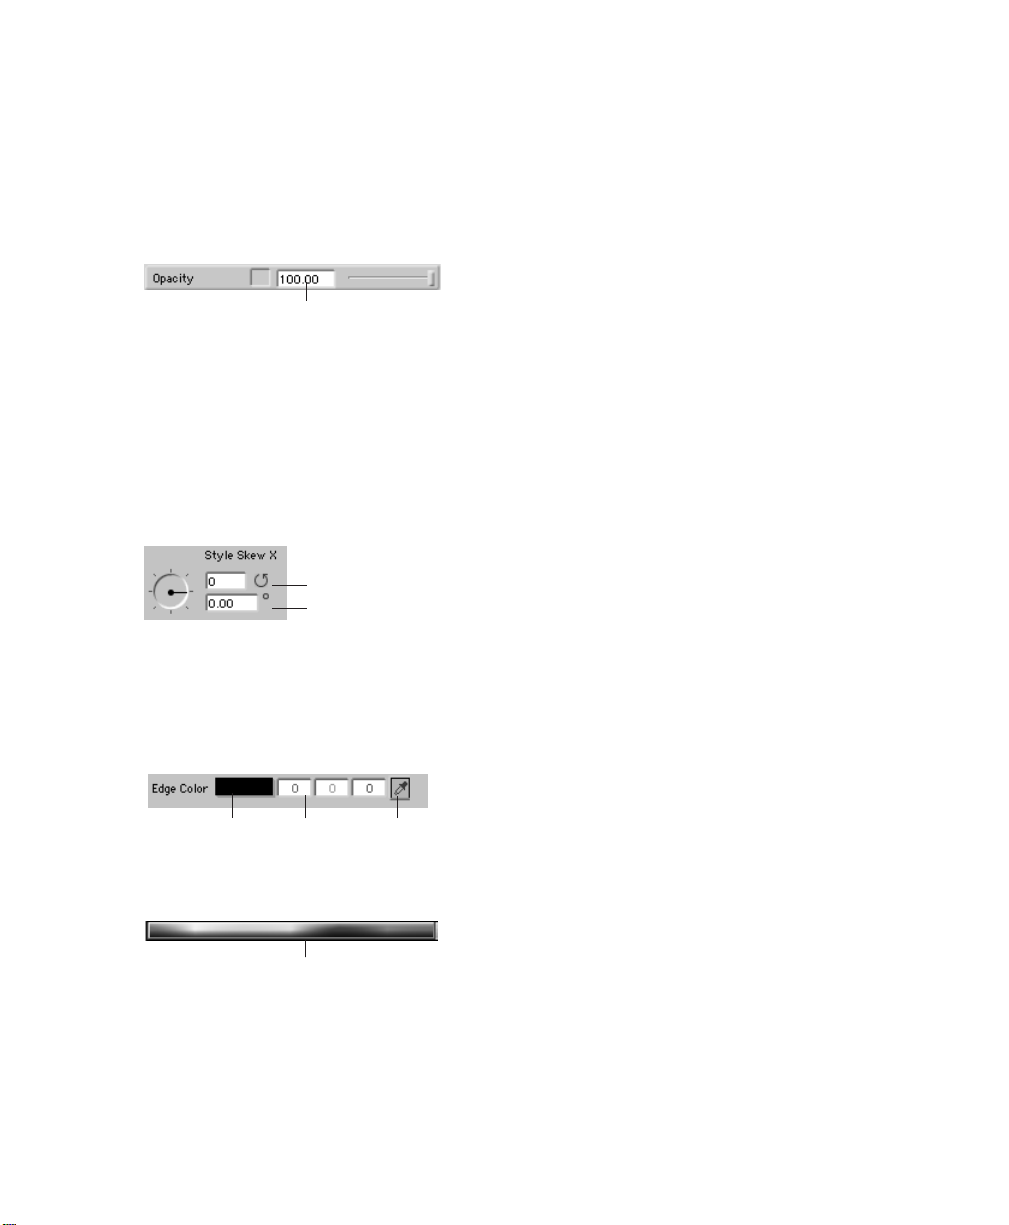
You can adjust parameters that use sliders via
Drag here to scrub.
Some parameters allow values higher than the range of the slider, which you can enter into
the numerical Þeld, then press Return. If you enter a number that exceeds the possible value
range, a dialog box displays the minimum and maximum values for the parameter.
three methods; drag the slider, scrub the numerical
Þeld or manually enter values in the numerical
Þeld that accompanies the parameter.
•
•
•
7
•
•
•
You can also scrub numerical values. For example, enter
50
as the
Opacity
and press Return.
Click in the numerical Þeld and drag to the left or right. The value adjusts as you drag.
Working with Dial Controls
Dial controls are used for parameters whose values
Revolutions
Degrees
are measured in degrees, such as angles or hue
values around the color wheel. Drag the needle
around the dial to adjust the value.
Most dial controls have separate numerical Þelds for revolutions and degrees, allowing you
to animate parameters over values greater than 360°. For example, entering
2
in the
Revolutions Þeld means that the object would rotate 360° twice.
Working with Color Controls
Color controls are used to choose a color for an
attribute of an object, such as a shadow, border, or
System Color
picker
Color chip Eyedropper
Color ramp
The eyedropper can only choose colors within the Final Cut Pro interface. If you want to
choose a color from elsewhere on the screen, click the color chip to access the system color
picker. Press the Option key to turn the pointer to an eyedropper. Choose a color from
anywhere on the screen.
text face. Click the color chip to access the system
color picker, or use the eyedropper to choose a
color from the screen. You can also enter RGB
values into the numerical Þelds then press Return.
Drag the eyedropper across the color ramp to
quickly choose a color. Click the color ramp to
toggle it to a grayscale image.
You can save frequently used colors to the Style Palette then use the eyedropper to apply
these colors to parameters. See “Applying Color Styles” on page 34 for details.
Page 8
•
•
•
8
•
•
•
Understanding Vector Graphics and Bitmaps
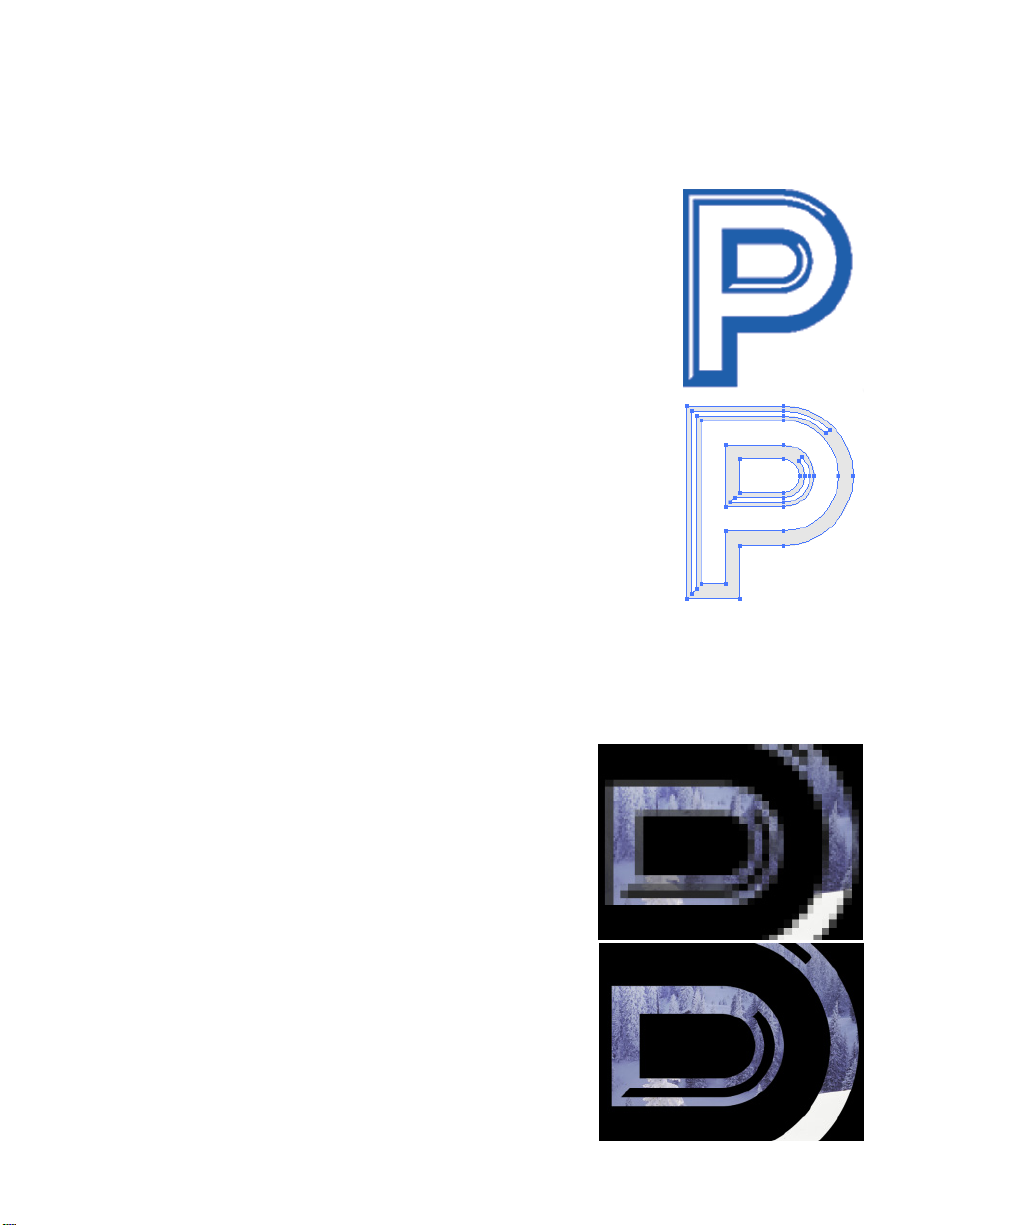
A
bitmap image
of which is assigned a speciÞc color. This produces a coherent
image when viewed at the intended size, but if scaled
dramatically the pixels become apparent and the image loses
quality.
The example at right shows the letter P represented as a bitmap.
A video image is an example of a bitmap, as is an image
produced in an application such as Photoshop.
A
vector graphic
mathematically represented as a series of lines and curves called
vectors. The relationship between the vectors remains constant
as the object is scaled, so there is never a loss of quality.
The example at right shows the letter P composed of vectors. An
EPS Þle is an example of a vector graphic.
The titles that you create using the Title 3D Generator are vectorbased. This means that they will remain razor sharp even if you
scale them very large.
is an image represented by a grid of pixels, each
is a resolution-independent image
Advantages of Vector Graphics
You should use vector graphics when you need to preserve the vectors in a Þle to scale the
object. For example, if you have a very small logo and need to make it larger.
This image shows an original EPS Þle used as a
mask.When the EPS Þle is converted to a bitmap, and
the mask is scaled, the edges become pixelated and
lose quality. Built-in antialiasing compensates for this
degradation somewhat by smoothing the jagged
edges, but can cause the image to blur.
When vectors are used, the mask can be scaled and no
quality is lost, because the shape uses the vector
information in the media Þle.
Page 9
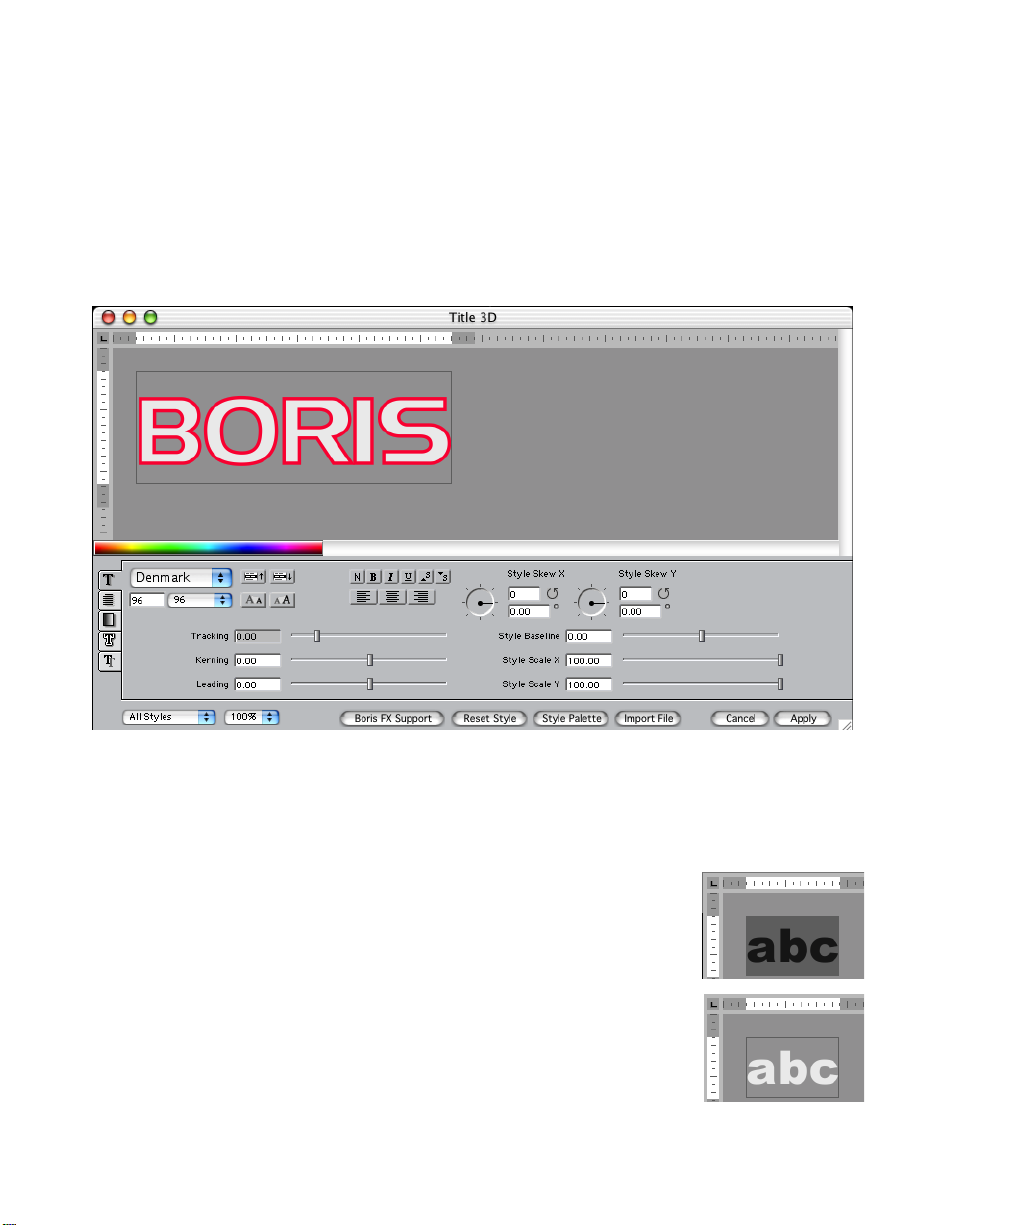
Working with the Text Window
The parameters in the Text window allow you to create, import, and edit text for inclusion
in your effect. The upper portion of the Text window is the text preview area. You can type
text in this area, then select one or more characters to make style changes using the Style,
Page, Color, Border, and Shadow tabs. These tabs are explained in the following sections.
Boris Calligraphy
•
•
•
9
•
•
•
Selecting Text
You can select text in the Text window just as you can in most word processing programs.
Press Command-A to select all text in the preview area. You can also double-click to select
a word or triple-click to select an entire paragraph.
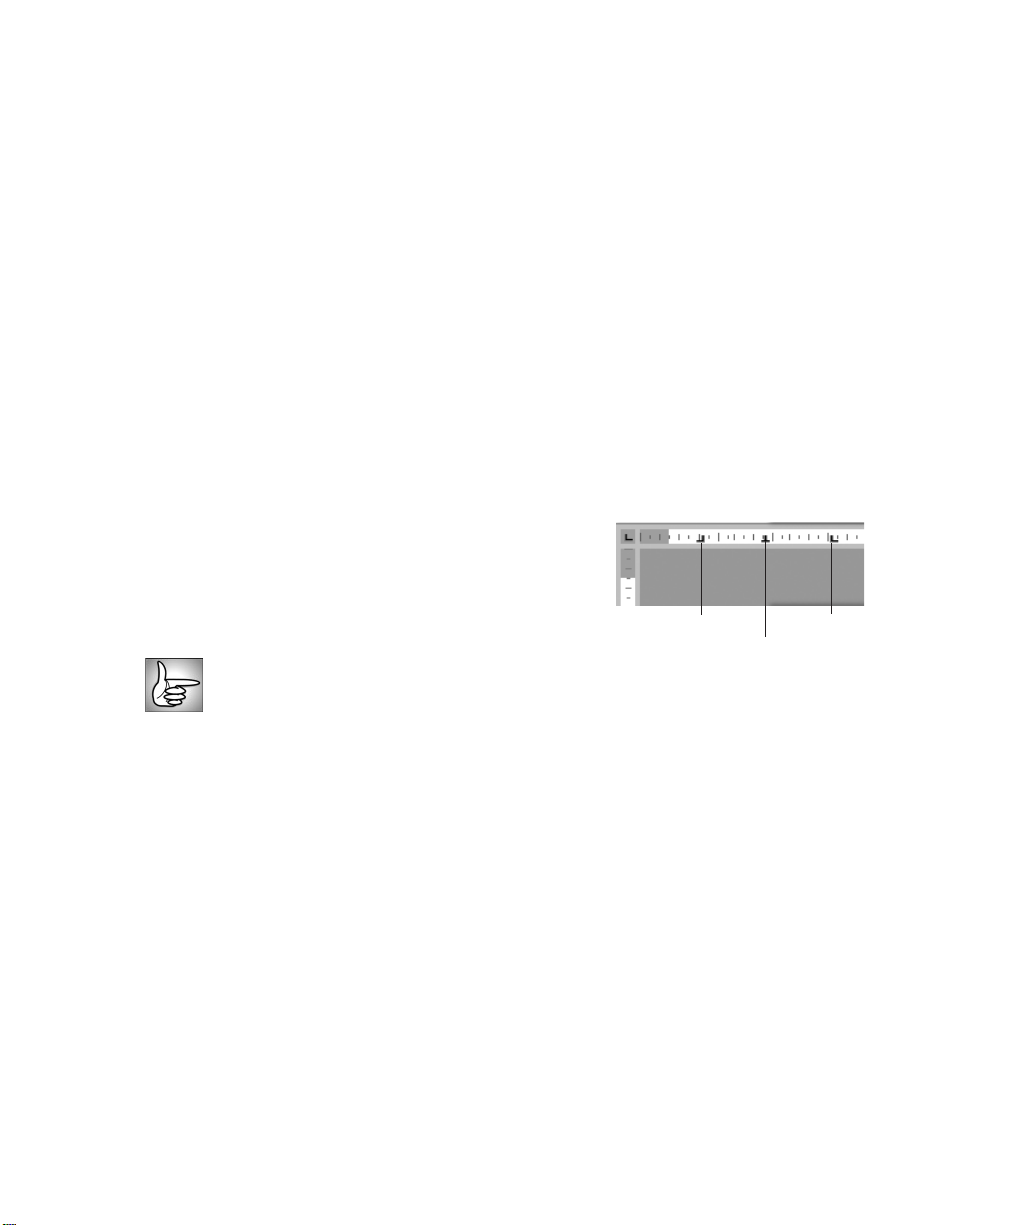
When you select text, the characters invert. This is called
selection
at the selected text. When you type new characters, they overwrite
the actively selected text. The example at right shows white text that
is actively selected.
When an outline appears around the selected text, this is called
passive selection
directed at the parameters in the lower portion of the Text window.
When you type, characters do not overwrite the passively selected
text; they affect the numerical Þeld for a parameter (such as
Opacity). To passively select text, select the text then click the
numerical entry area for any parameter.
. Active selection means that keyboard actions are directed
. Passive selection means that keyboard actions are
active
Page 10
10
•
•
•
•
•
•
Using Contextual Menus in the Text Window
You can use contextual menus in the Text window to cut, copy, and paste text.You can also
change the color of the Text window background.
1.
Control-click or Right-click the Text window to open its contextual menu.
2.
Choose the appropriate menu item:
•
Cut
lets you delete the selected text and save it to your system clipboard.
Copy
•
•
•
•
lets you copy the selected text.
Paste
lets you paste the contents of your system clipboard to the Text window.
Delete
removes the selected text.
Change Background Color
new color to the background of the text entry area. This is useful if your text is
grayscale and therefore difÞcult to see over the default background. When you
Þnish, click
OK
to close the color picker.
opens the system color picker so that you can assign a
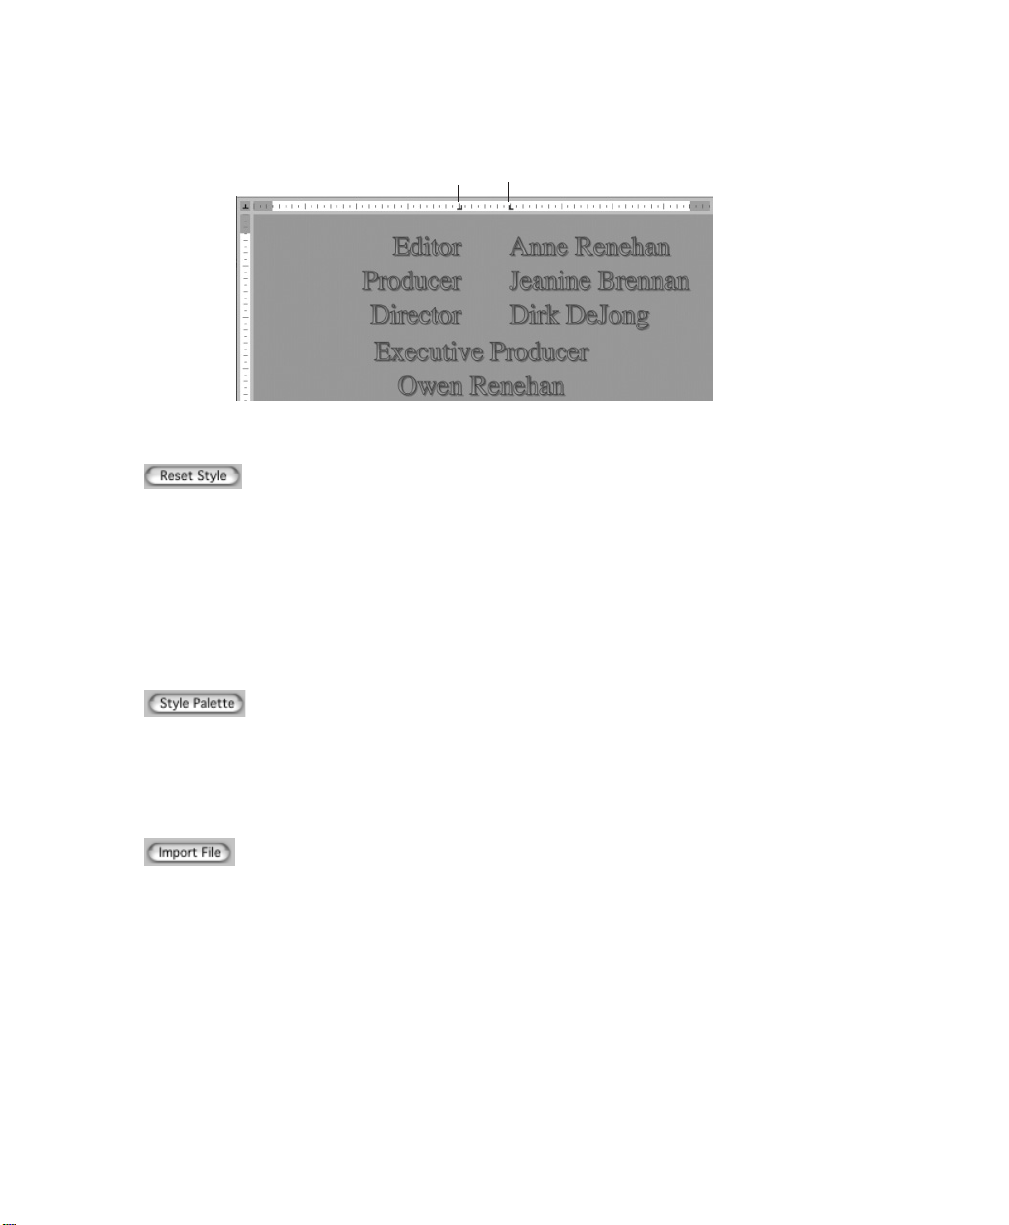
Working with Tabs and Rulers
The text preview area is bordered by rulers to help you
precisely position your text. The white region of the
rulers indicates the boundaries determined by the Page
Width control.
The Page Width and the Margin controls are
described in “Working with the Page Tab” on
page 17.
Left justified
Right justified
Center justified
To create a tab, click anywhere on the horizontal ruler and drag to position the new tab.
Double-click the tab marker to change from left justiÞed to right or center justiÞed. To
remove a tab, drag it down away from the ruler.
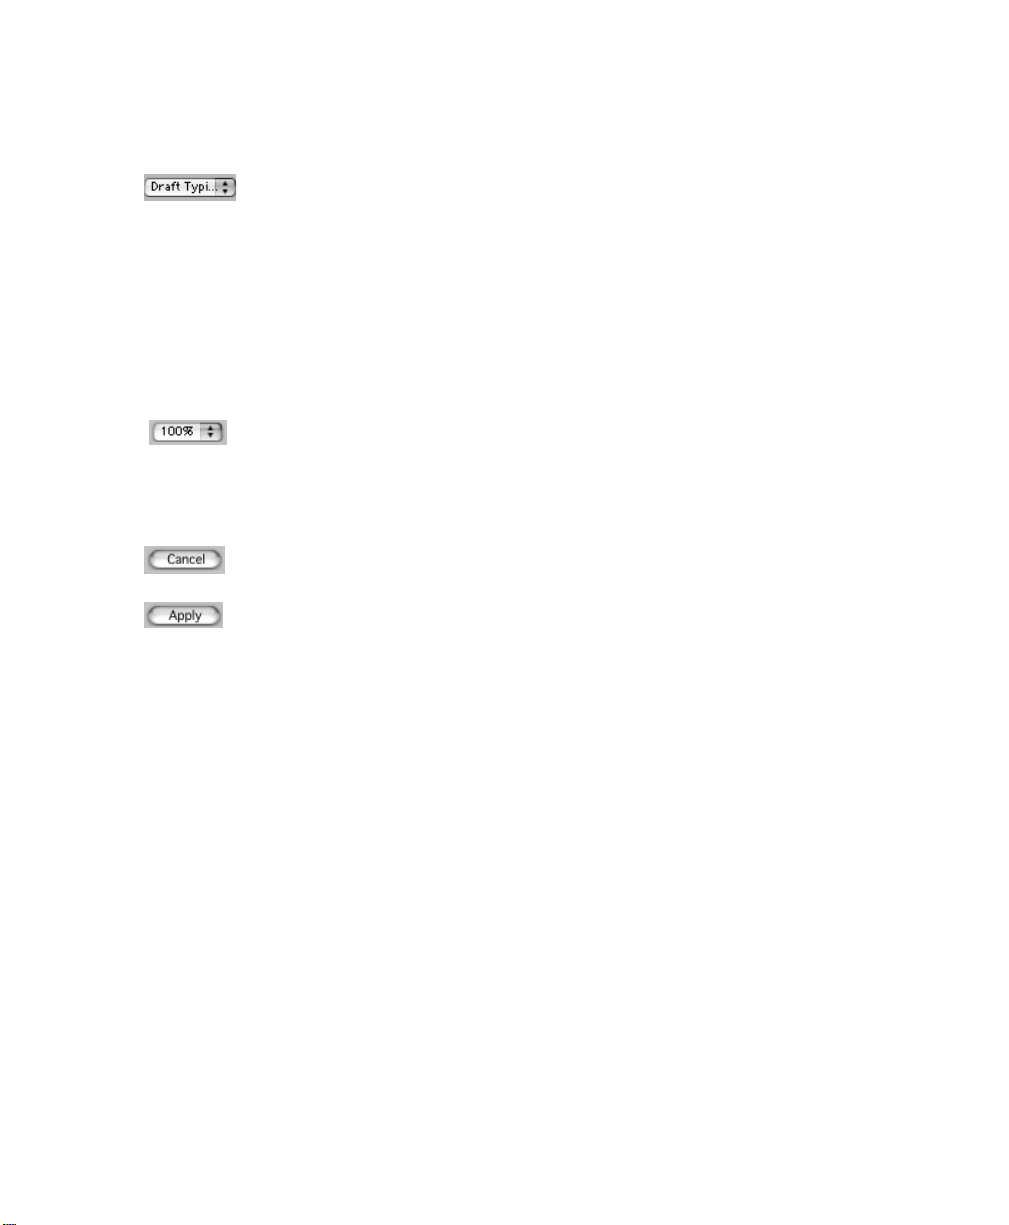
The following example uses two tabs, the Þrst tab justiÞed right and the second tab justiÞed
left. The Þrst three lines were created by pressing the Tab key, typing the title for the Þrst
column, then pressing the Tab key again and typing the name for the second column. Tabs
apply globally to the Text window. You cannot create different tabs to use with different
lines of text. However, you do not have to use the tabs. The last lines uses the default Center
justiÞcation, since it was typed without pressing the Tab key.
Page 11
Boris Calligraphy
•
•
•
11
•
•
•
Tab justified right
Tab justified left
Resetting Text Styles
To reset parameters in the selected text, click the
parameter changes that you made in any of the Text window’s tabs are reset
to the default. You must select the text that you want to reset. To reset all text,
press Command-A before clicking the Reset Style button.
Reset Style does not reset the Tracking, Kerning, Leading, JustiÞcation, and Page Size
parameters nor does it remove any tabs that you created. Reset Style only affects settings
that can be saved as styles in the Style Palette.
Reset Style button
. Any
Applying Text Styles
To use styles from the Style Palette, click the
Palette includes preset text styles and allows you to save and categorize
styles for future use. For more information, see “Working with the Style
Palette” on page 30.
Style Palette button
. The Style
Importing Text Files
To import a Simple Text Þle, click the
box which allows you to navigate to a text Þle to import. All style settings in
the original Þle are retained when imported into the Text window.
If preserving style settings is not important to you, you can simply paste text
that you have copied from another program. To paste text into the Text
window, press Command-C.
Import File button
. This opens a dialog
Page 12
12
•
•
•
•
•
•
Previewing Text
The
Style Preview menu
All Styles
Basic Styles
transformations (Style Skew, Style Scale, Style Baseline). This speeds
previews without affecting the text in the Viewer window.
previews the text as it will appear in the Viewer window.
does not display shadows, borders, and some Style tab
sets which styles display in the text preview area.
Updating Text
Draft Typing
transformations while you type. Once you Þnish typing, the text updates
with all styles. Draft Typing speeds previews, but still allows you to preview
text as it will appear in the Viewer window.
Scale
sets the display of the text in the preview window to a percentage of its
actual size. Use smaller percentages to work with large bodies of text or to
speed previews.
Click the
Text window.
Click the
does not display shadows, borders, and some text
Cancel button
Apply button
to exit without saving any changes you made in the
to exit the Text window and save your changes.
Page 13
Boris Calligraphy
Working with the Style Tab
The Style tab controls allow you to set the font, size, and style of the text, in addition to the
tracking, leading and kerning of the characters.
•
•
•
13
•
•
•
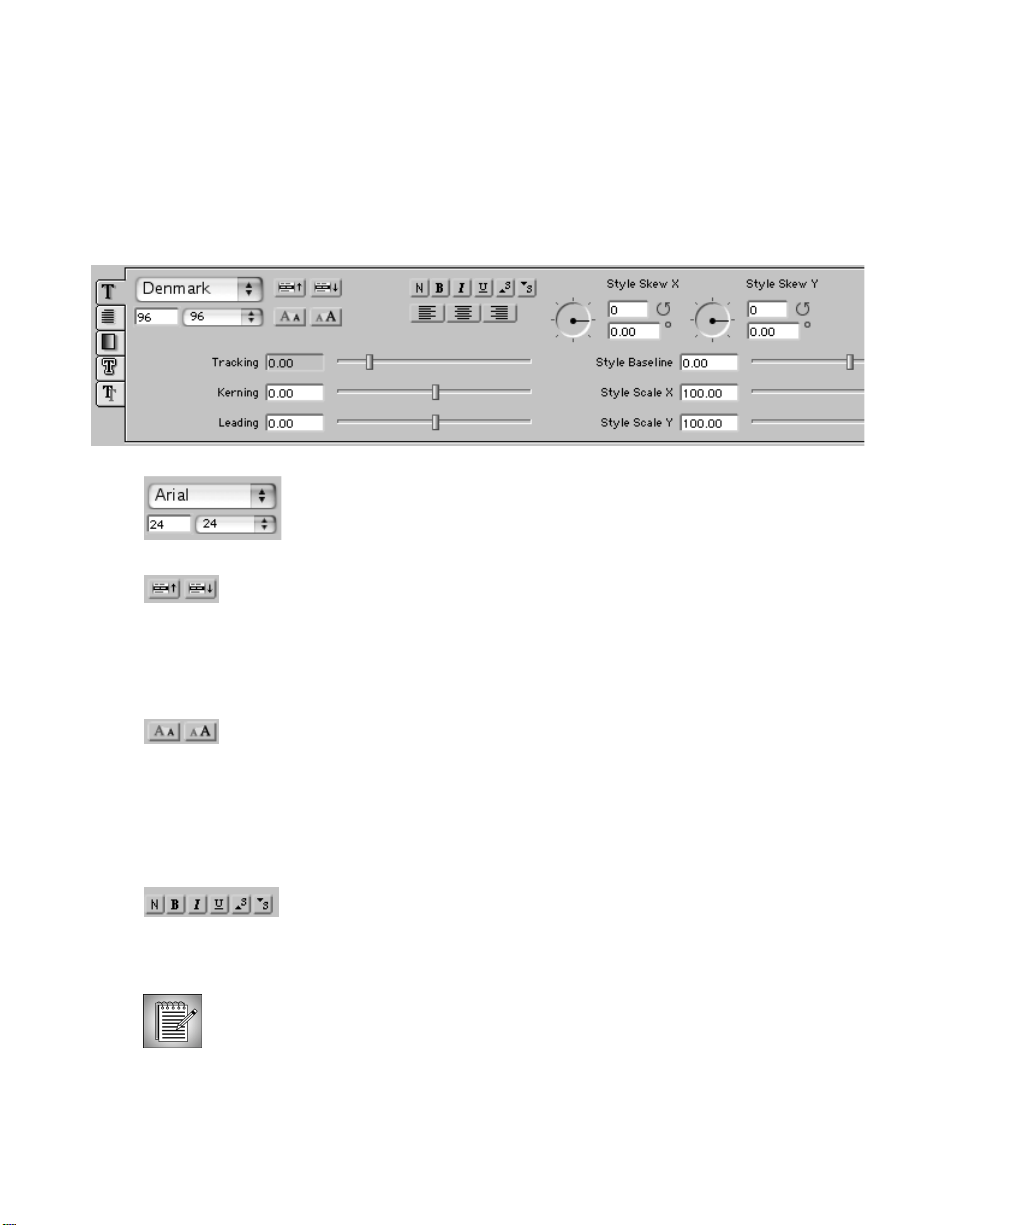
Use the
your system. Then set the font size using the
custom font size and pressing Return. The font Size menu retains the
three most recently used custom font sizes.
Use the
button on the left moves to the previous font in the list; the button on
the right moves to the next font in the list. All fonts installed in your
system folder appear in the list. You can also use the Style Palette to
view thumbnails of all the fonts on your system. See “Applying Font
Styles” on page 34 for details.
The
This is useful if your text contains multiple font sizes and you want to
scale all sizes up or down equally. The Size buttons let you scale
without changing the size of each individual character or selection.
Option-clicking either button scales the size of the text characters by an
integer of 1. Shift-clicking either button scales the size of the text
characters by an integer of 100.
The
Select the characters you want to change, then click one of the buttons.
Click again to remove the style. The available styles are, from left to
right, Normal, Bold, Italic, Underline, Superscript, and Subscript.
Certain styles (such as Italic) do not work if the selected font does not include these
styles. This is particularly true of symbol, dingbat, and Kanji fonts.
Font menu
Font buttons
Size buttons
Style buttons
to choose a font from the list of fonts available on
Size menu
to browse through the list of available fonts. The
scale the size of all fonts in the text by integers of 10.
allow you to apply styles to selected characters.
or by typing a
Page 14
14
•
•
•
•
•
•
Justifying Text
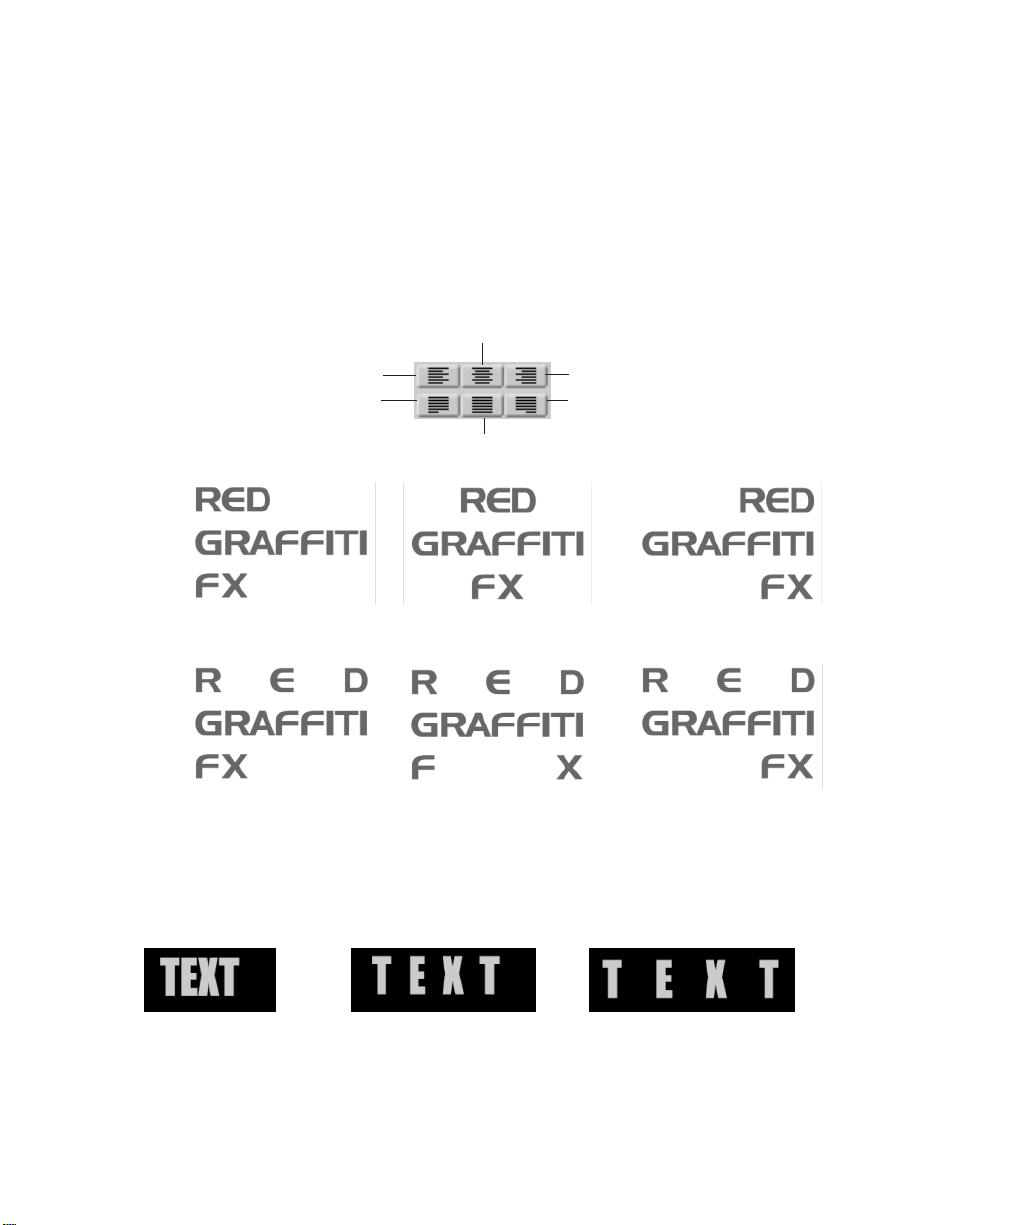
To align text horizontally, click a
page width and height. This parameter affects the text globally, regardless of which
characters are currently selected. The JustiÞcation buttons in the second row justify the text
to both margins when you work with more than one line of text. Flush Left JustiÞcation
forces all lines of text to justify and left justiÞes the last line. Force Center JustiÞcation forces
all lines of text to justify. Flush Right JustiÞcation forces all lines of text to justify and right
justiÞes the last line.
JustiÞcation button
Center Justification
. The text is justiÞed in relation to the
Left Justification
Force Left Justification Force Right justification
Force Center Justification
Right Justification
Left Justification Center Justification Right Justification
Flush Left Justification Force Center Justification Flush Right Justification
Tracking
adjusts the spacing, in pixels, between the characters in the Text window. This
parameter affects the text globally, regardless of which characters are currently selected.
Like all parameters in the Text window, Tracking is not animatable. If you want to create an
animated tracking effect, use the Tracking parameter in the Controls tab.
Tracking= 0 Tracking= 25 Tracking= 50
Kerning
adjusts the spacing, in pixels, between the selected group of characters in the Text
window without affecting the text globally. Some applications refer to this as pair kerning.
To adjust the kerning, select the characters and drag the slider. You can also press the Option
key and the Left or Right Arrow keys to adjust this setting in increments of 1.
Page 15
Boris Calligraphy
•
•
•
15
•
•
•
Leading
adjusts the spacing, in pixels, between multiple lines of text. This parameter affects
the currently selected lines of text.
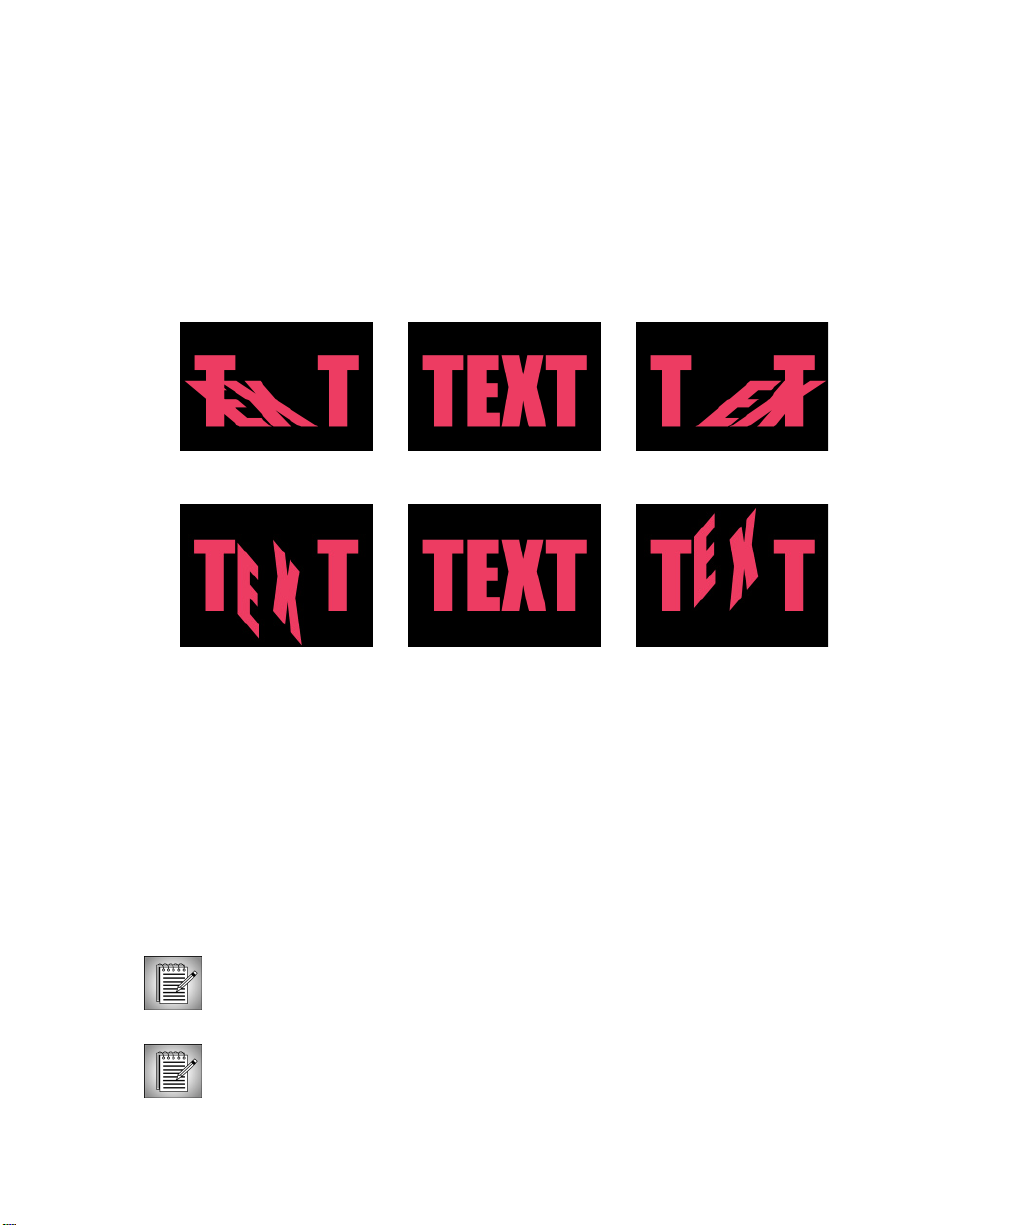
Style Skew X
and
Style Skew Y
distort the selected character(s) along the horizontal and
vertical axis, respectively. Like all parameters in the Text window, Style Skew is not
animatable. To create an animated skewing effect, use the Letter Skew parameters in the
Controls tab.
Skew X adjustments with the “EX” in “TEXT” selected
Style Skew X= –50 Style Skew X=0 Style Skew X=50
Style Skew Y adjustments with the “EX” in “TEXT” selected
Style Skew Y= –50 Style Skew Y=0 Style Skew Y=50
Style Hue provides an easy way to affect the color value of all the style elements with a
single parameter. To adjust a complex text style, you might have to adjust the colors on Þve
or six separate parameters. Instead, Style Hue shifts the hue of all color values in the text
style an equal amount. This parameter also provides an easy way to save multiple versions
of a text style so that each style varies in hue.
Style Hue is a downstream process in relation to the other color parameters in the Text
window. It doesn't change the individual values of the parameters it affects, but rather it acts
as a Þlter affecting the Þnal appearance of the overall text style. In other words, if you use
Style Hue to hue shift green text with a purple border 180 degrees, the text will now appear
purple with a green border. However, if you look at the individual parameters, the Fill still
displays as set to green and the Border parameter still displays as set to purple.
When you create a new text style, if Style Hue is not set to zero, color parameter
manipulations don't match the text appearance. Leave Style Hue set to zero when
designing text styles. Then adjust Style Hue as a Þnal step to avoid confusion.
If a text style element doesn't have any color (if it is black, white, or gray), it is not
affected by the Style Hue parameter. If a text style has very little color, the affect is
quite subtle. Additionally, the Style Hue parameter only affects color parameters
adjusted within the Text window (not the color parameters in the Controls tab).
Page 16
16
•
•
•
•
•
•
Style Hue adjustments
Style Hue= 90 degrees Style Hue=130 degrees Style Hue=180 degrees
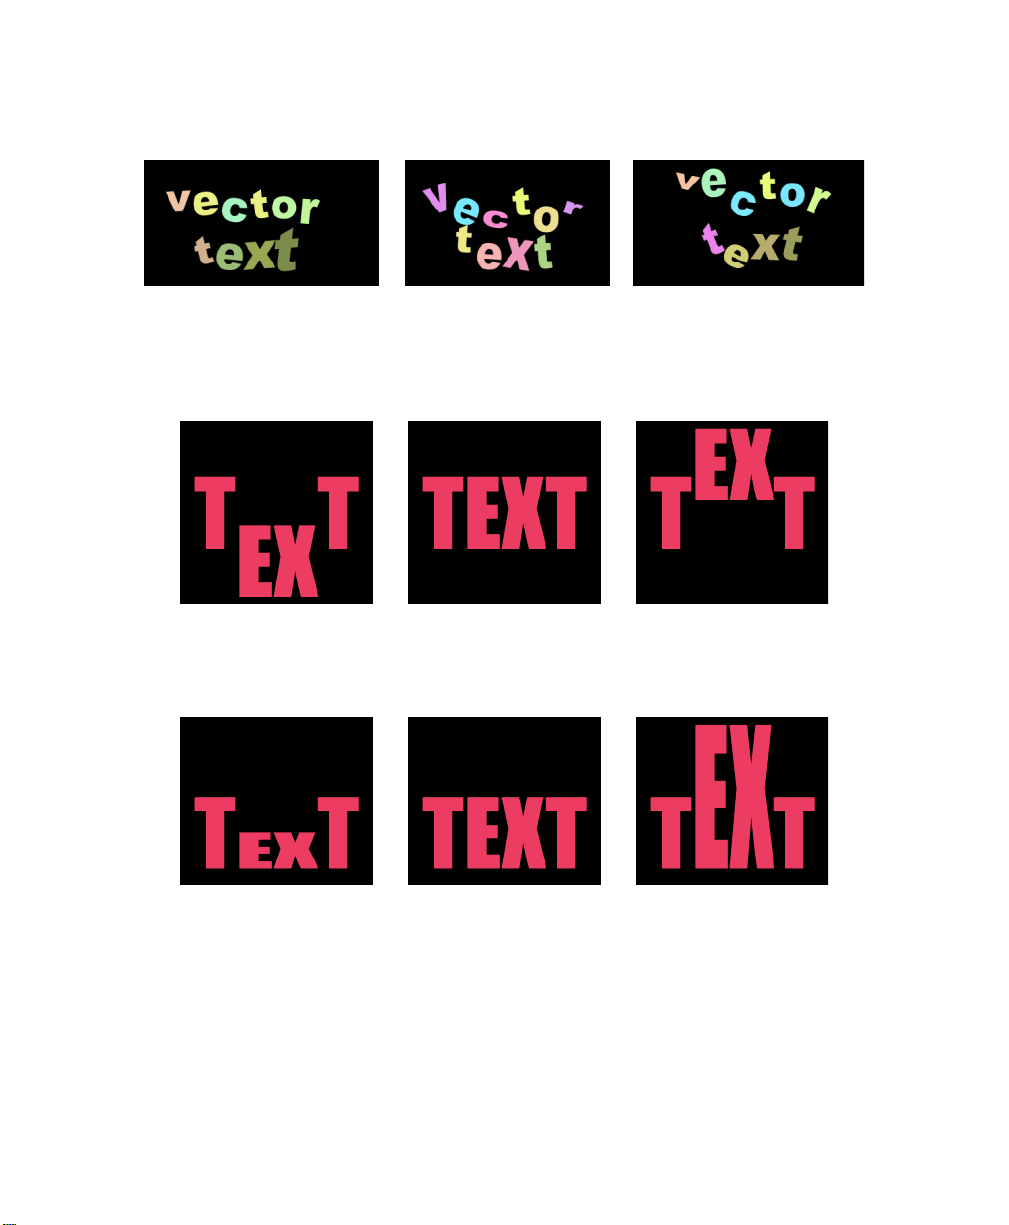
Style Baseline
adjusts the vertical position of the selected character(s) in relation to the
baseline of the text. Decrease this value to move the bottom of the character below the
baseline, or increase this value to raise the character above the baseline.
Style Baseline adjustments with the “EX” in “TEXT” selected
Style Baseline= –100 Style Baseline=0 Style Baseline=100
Style Scale X
and
Style Scale Y
set the scale of the selected character(s) along the horizontal
and vertical axis, respectively.
Scale Y adjustments with the “EX” in “TEXT” selected
Style Scale Y=50 Style Scale Y=100 Style Scale Y=200
Page 17
Boris Calligraphy
Working with the Page Tab
The Page tab controls allow you to adjust the margins and to set the size of the text page.
•
•
•
17
•
•
•
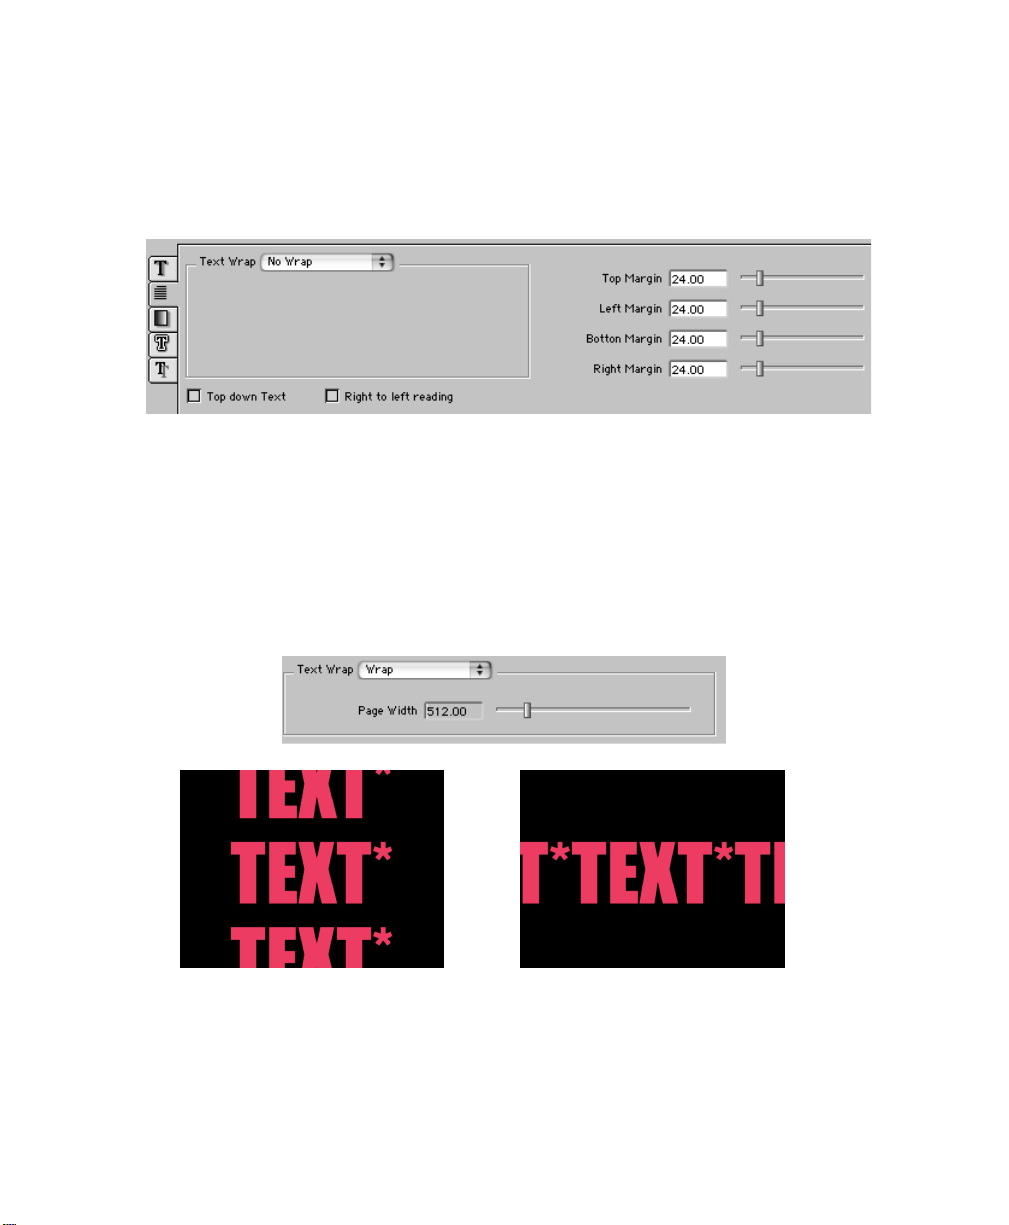
Text Wrap
controls the position of the text when the text is wider than the screen.
• No Wrap creates an unbroken line of text, allowing you to use the text as a continuous
crawl.
• Wrap creates additional lines of text if the text exceeds the chosen
As a word passes the limit of the Page Width, it moves to the next line. Wrap is on by
default and affects the justiÞcation setting. For example, if you choose Left JustiÞcation
with
Wrap
on, the text if left justiÞed within the speciÞed Page Width. The page Width
option appears in the tab when you choose Wrap.
Text Wrap=Wrap Text Wrap=No Wrap
Page Width
value.
When the
Selecting
The
width, in pixels, of the four respective margins.
Top down Text checkbox
Right to left
Top Margin, Left Margin, Bottom Margin
reading creates text that reads from right to left, instead of left to right.
is selected, the text reads vertically, from top to bottom.
, and
Right Margin
controls determine the
Page 18
18
•
•
•
•
•
•
Working with the Fill Tab
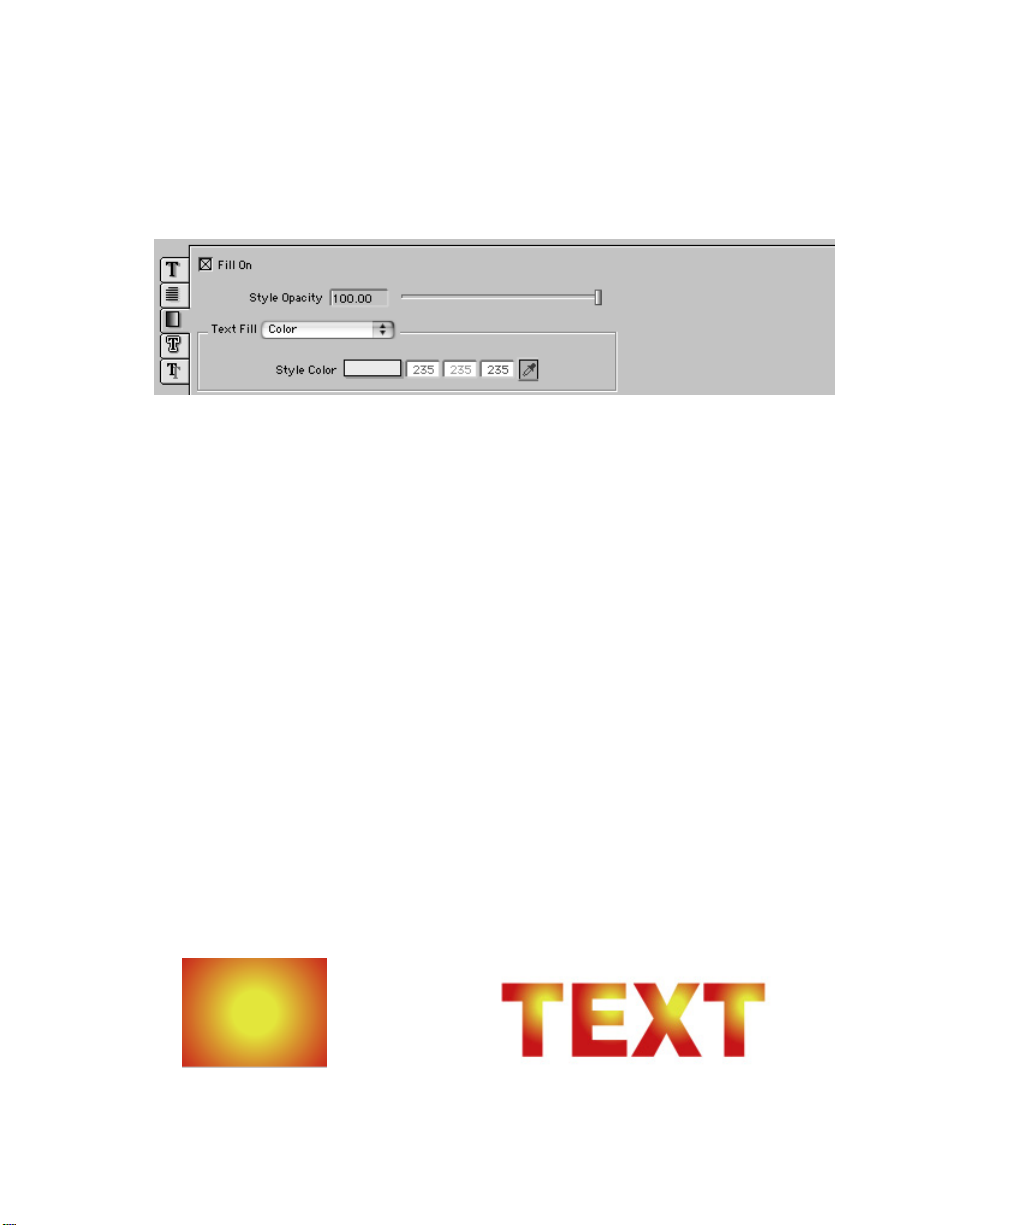
The Fill tab options allow you to set the Þll and opacity of the selected text.
Select the
For example, you could turn off the Þll and turn on a border to create hollow text.
Style Color
color picker, or use the eyedropper to choose a color from the screen. You can also enter RGB
values into the numerical Þelds associated with the color control and press Return.
Style Opacity
completely opaque, while a setting of 0 makes the text completely transparent.
The
Fill On checkbox
sets the color of the selected character(s). Click the color chip to access the system
adjusts the opacity of the selected character(s). A setting of 100 makes the text
Text Fill menu
determines what type of media is applied to the face of the text.
• Choose Color to use the selected
color picker, or use the eyedropper to choose a color from the screen. You can also enter
RGB values into the numerical Þelds associated with the color control and press
Return.
to turn on the Þll. Deselect this option to create transparent text.
Style Color
. Click the color chip to access the system
• Choose Gradient to map a gradient to your text. When you choose Gradient, click the
Gradient Editor icon
gradient and click
window updates automatically as you make changes in the Gradient Editor. Gradients
are described in the following section.
When you apply a gradient in the Text window, the gradient is centered on each
individual letter.
that appears in the tab. The Gradient Editor opens. Adjust the
OK
to apply it. If you select the
Live Update
checkbox, the Text
Gradient Gradient Applied as Fill
Page 19
Boris Calligraphy
Working with Gradients
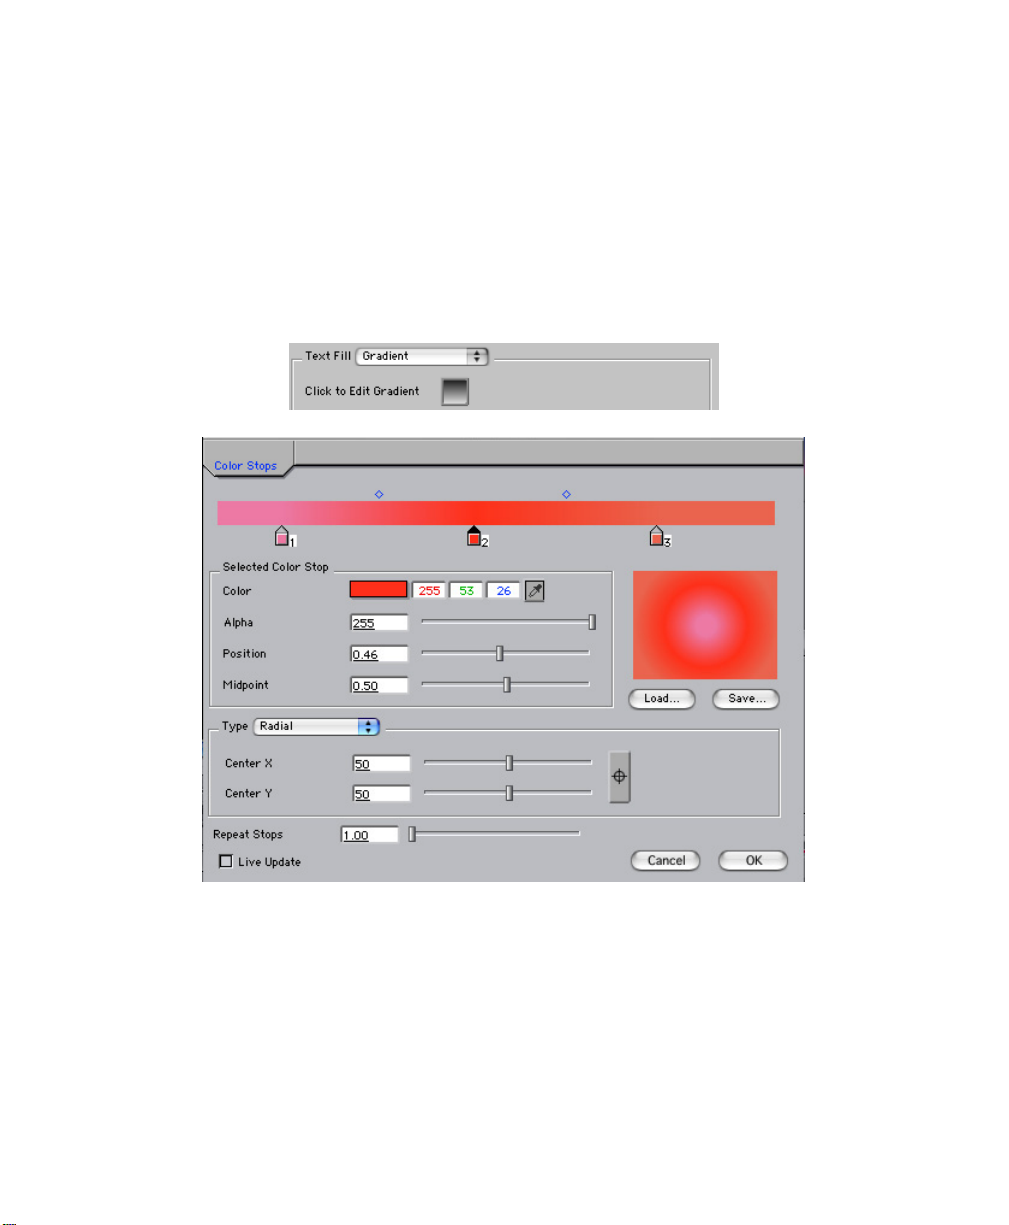
A gradient is a graduated blending of two or more colors. The Boris Text Generators let you
map gradients to text. You can use the
shape and direction of the gradient, and the gradient’s steepness—that is, how quickly each
color changes to the next color.
To access the Gradient Editor, in the Fill tab in the Text window, choose Gradient from the
Text Fill menu
and click the
Gradient Editor icon
Gradient Editor
.
to set the colors and opacity, the
•
•
•
19
•
•
•
Saving and Loading Gradients
To save a gradient, click the
choose the location in which to save it. Then click
To load a previously saved gradient, click the
box allows you to navigate to the gradient’s location. Then click
The Gradient Editor adjusts the locations of the start and end colors in the gradient. The
start and end colors are represented by the color stops. Each color stop sets the point at
which the gradient reaches a pure color. Each pair of color stops has a midpoint between
them, which indicates the point at which the start and end color blend equally.
Save button
. A dialog box allows you to name the Þle and
Save
in the dialog box.
Load button
in the Color Stops tab. A dialog
Open
in the dialog box.
Page 20
20
•
•
•
•
•
•
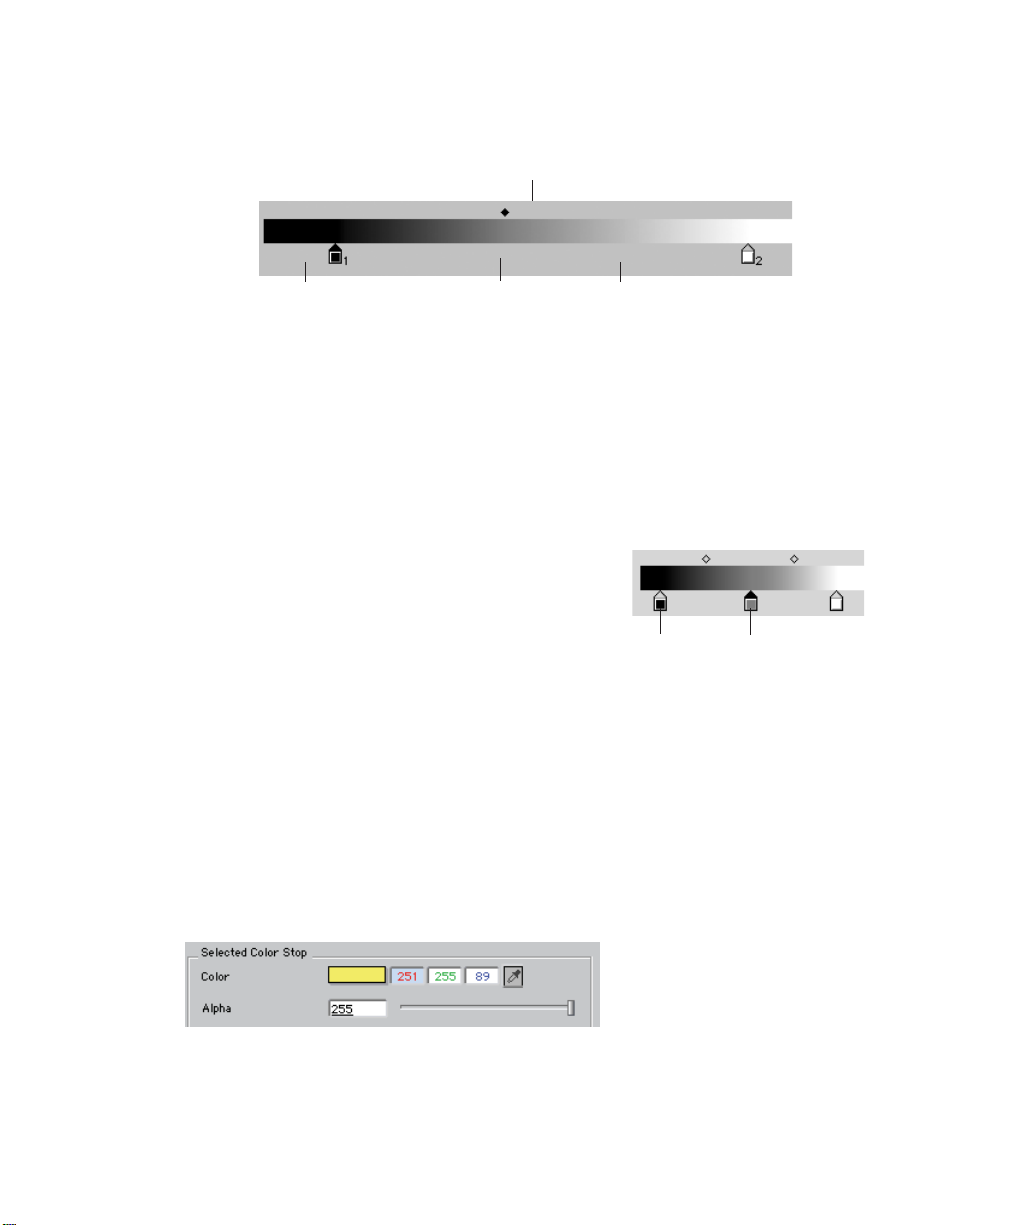
Drag midpoint to adjust where colors blend equally.
Drag color stop to adjust
Click anywhere in this area
Drag color stop to adjust
Adding and Deleting Color Stops
A gradient can have up to sixteen color stops. You can add color stops by clicking in the area
directly below the gradient editor. The new color stop is assigned the color of the point on
the gradient editor above the stop, and a midpoint automatically appears between the new
color stop and each neighboring color stop. To delete a color stop, drag it downward away
from the gradient editor.
Selecting Color Stops and Midpoints
Click any color stop or midpoint to select it. When a color
stop is selected, its point turns black. An unselected color
stop has a clear point. A color stop must be selected to
apply changes to it.
Unselected
Selected
Setting the Location of Color Stops and Midpoints
You can drag color stops and midpoints to different locations in the gradient. As you drag
a color stop, its position on the gradient updates in the
Position
Þeld. A value of 1 represents
the right edge of the gradient, and a value of 0 represents the left edge of the gradient. The
Midpoint
value indicates the midpoint’s position between two color stops, expressed as a
percentage. You can type a value to move a color stop or midpoint to the desired location.
Adjusting Color and Alpha Values
To adjust the color and alpha value of a color stop, select the color stop you want to change,
then use the
Selected Color Stop
controls to set the color and transparency you want.
Color
sets the color of the selected stop. Click the color chip to access the system color picker,
or use the eyedropper to choose a color from the screen. You can also enter RGB values into
the numerical Þelds and then press Return.
Page 21
Boris Calligraphy
Type menu
The
Color Ramp
before you select the eyedropper if you want to toggle the ramp to a grayscale image.
Alpha
sets the transparency of the selected stop. At the default value of 255, the gradient is
totally opaque. At 0, the gradient is fully transparent. Intermediate values produce varying
degrees of transparency.
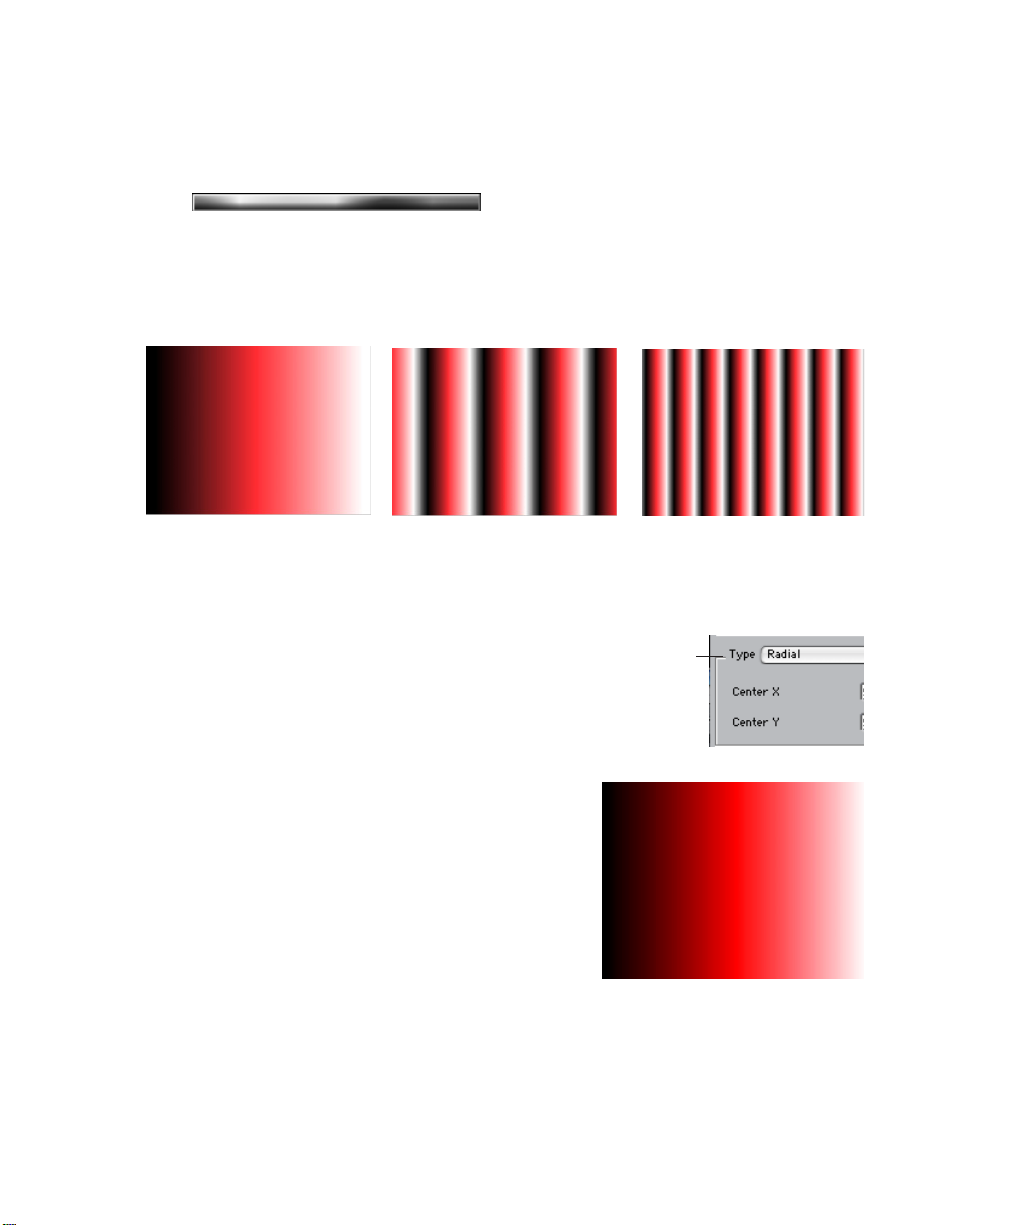
The
Repeat Stops
Repeat Stops= 1 (default) Repeat Stops =5 Repeat Stops =10
lets you quickly pick a color using the eyedropper. Click the color ramp
parameter allows you to repeat the gradient pattern.
Setting the Shape and Direction of the Gradient
The remaining controls determine the shape and direction of the gradient.
Type menu
The
The choices are Linear, Radial, Contour Bevel, Edge,
and Revolve. Each choice has its own parameters,
which are described in detail in the following sections.
determines the shape of the gradient.
•
•
•
21
•
•
•
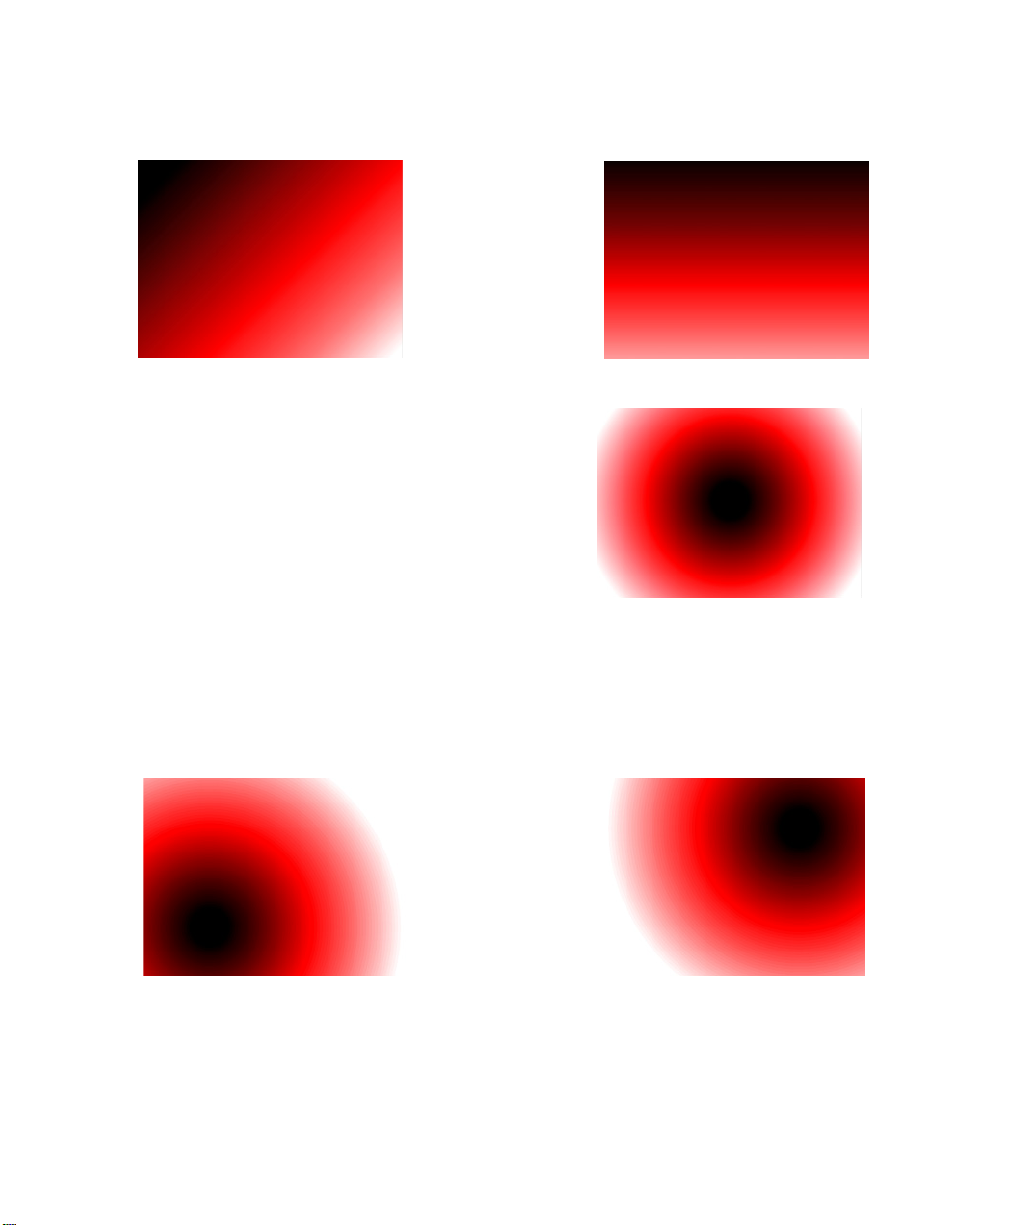
Linear Gradient Type
A Linear gradient places the start color at the left and
blends toward the end color at the right.
Angle
adjusts the direction that colors blend across the screen when using a linear gradient.
Page 22
22
•
•
•
•
•
•
Angle=45° Angle=90°
Radial Gradient Type
A Radial gradient places the start color at the center
and blends outward toward the end color.
Center X
on the X axis. This value scales as a percentage in
which 0 represents the left edge of the frame, 50
represents the middle, and 100 represents the right
edge of the frame. Negative values move the center
out of the image frame on the left side. Values above
100 move the center out of the image frame on the right.
Center Y
percentage in which 0 represents the top edge of the frame, 50 represents the middle of the
frame, and 100 represents the bottom edge of the frame. Negative values move the center
above the image frame. Values above 100 move the center below the image frame.
determines the location of the gradient center
determines the location of the gradient center on the Y axis. This value scales as a
Center X=25, Center Y=75 Center X=75, Center Y=25
Page 23
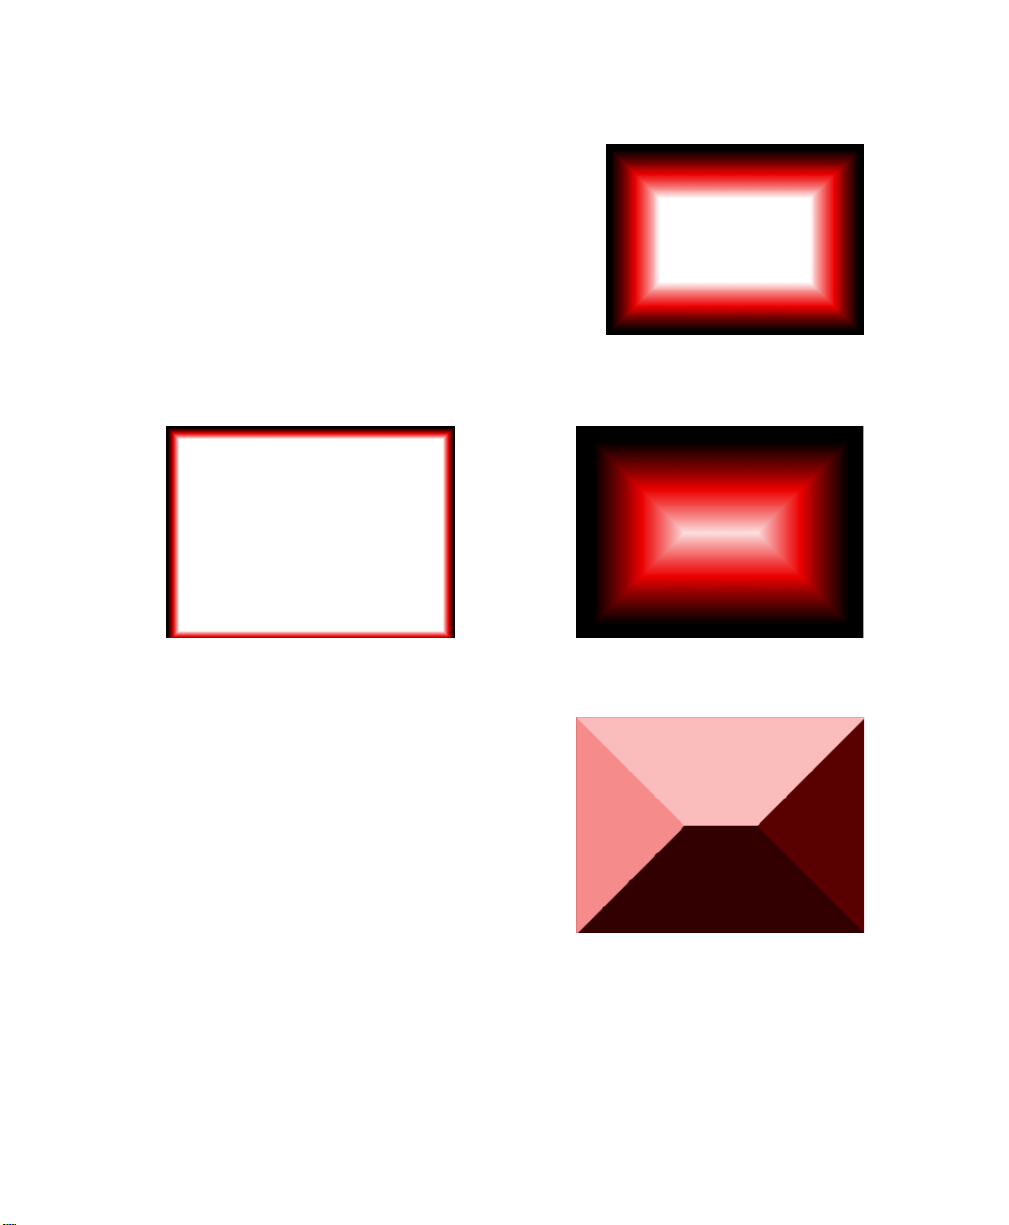
Contour Gradient Type
A Contour gradient places the start color along all four
edges of the frame and blends inward toward the end
color in the center of the frame.
Fade
determines the width of the gradient between the
start and end colors. This value is measured as a percentage of the size of the image.
Boris Calligraphy
•
•
•
23
•
•
•
Fade =10 Fade=90
Bevel Gradient Type
A Bevel gradient creates a beveled pyramid effect
in which the four colors of the sides of the pyramid
move from the start to the end color.,
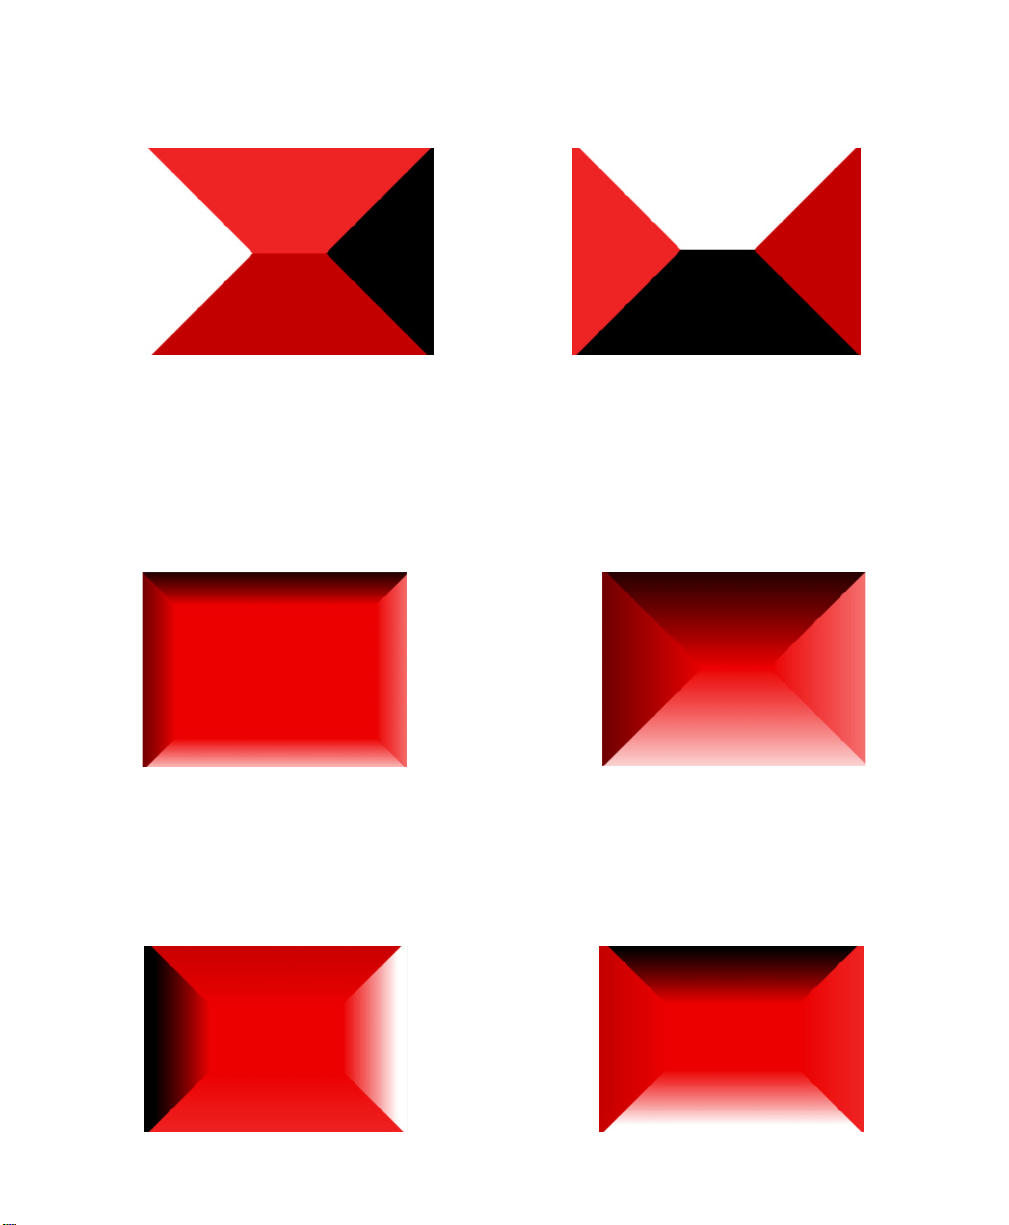
Angle
controls the color of each beveled side by setting the location of the start color on the
beveled sides. For example, at a value of 0, the start color is placed on the right bevel and
the end color on left bevel. As the Angle increases, the start color is placed “between” the
right and bottom bevels. Consequently, the right bevel color is increasingly affected by the
middle color as the start color moves towards the bottom bevel. At a value of 90, the start
color is placed on the bottom bevel, and so on.
Page 24
24
•
•
•
•
•
•
Angle=10 Angle=80
Edge Gradient Type
The Edge gradient type combines the contour and a bevel shapes. This creates a beveled
pyramid effect in which the four colors of the sides of the pyramid move from the start to
the end color and blend inward toward the middle color in the center of the frame.
Fade
sets the width of the gradient between the edge colors (controlled by Angle) and the
middle color at the center of the frame. This is measured as a percentage of the image size.
Fade =25 Fade =75
Angle
controls the color of each beveled edge by setting the location of the start color. For
example, at a value of 0, the start color appears on the right edge and the end color on the
left edge. As Angle increases, the start color appears “between” the right and bottom edges.
Consequently, the right edge color is increasingly affected by the middle color as the start
color moves towards the bottom edge. At a value of 90, the start color appears on the bottom
edge, and so on.
Angle=10 Angle=80
Page 25
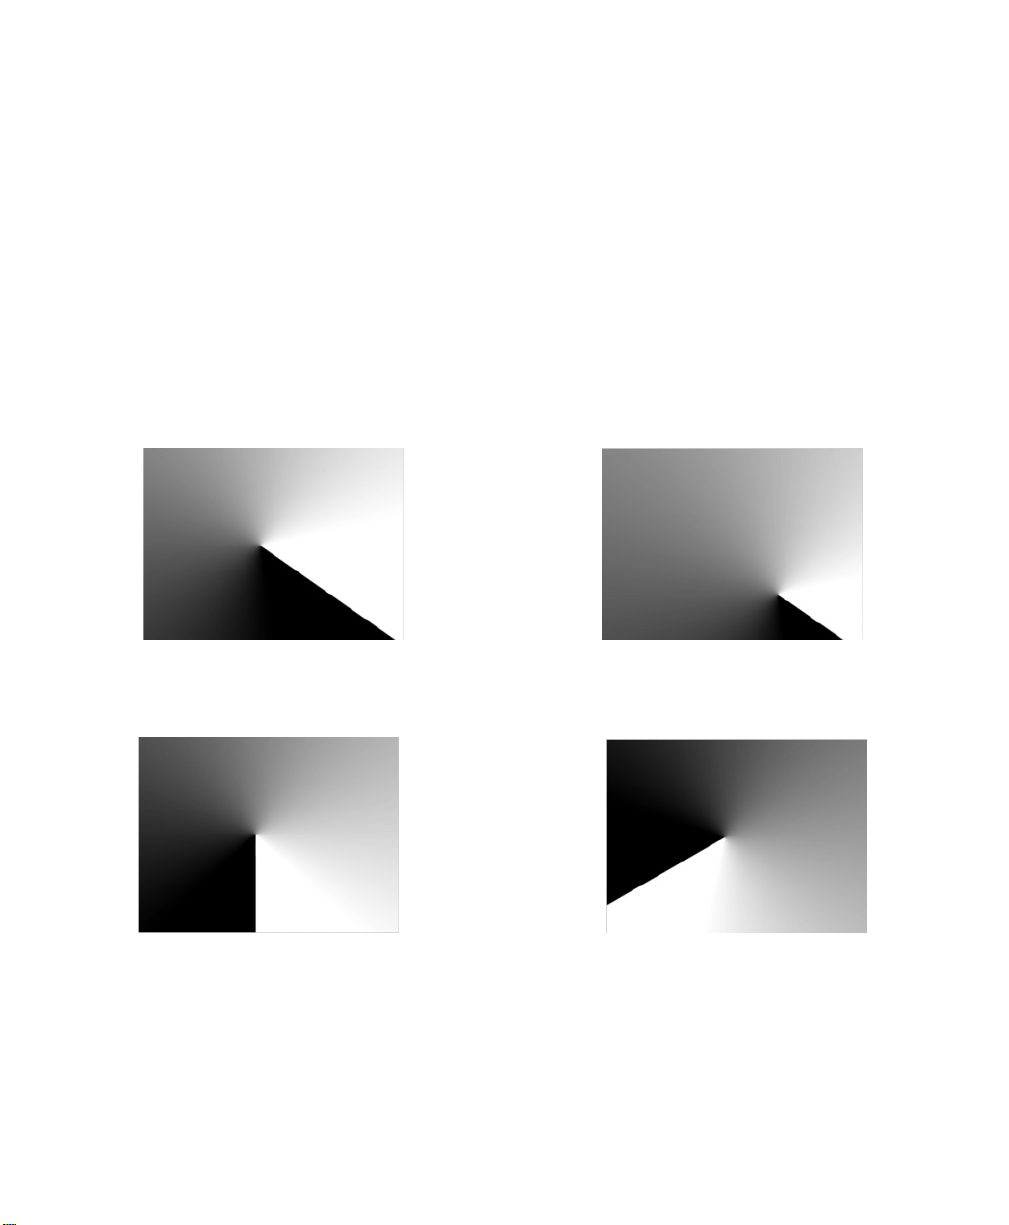
Revolve Gradient Type
A
Revolve
can create a clock wipe type of gradient effect.
gradient emanates from a center point. By animating the Angle parameter, you
Boris Calligraphy
•
•
•
25
•
•
•
Center X
percentage in which 0 represents the left edge of the frame, 50 represents the center, and 100
represents the right edge of the frame. Negative values move the center out of the image
frame on the left side. Values above 100 move the center out of the image frame on the right.
Center Y
percentage in which 0 represents the top edge of the frame, 50 represents the center of the
frame, and 100 represents the bottom edge of the frame. Negative values move the center
above the image frame. Values above 100 move the center below the image frame.
Angle
determines the location of the gradient center on the X axis. This value scales as a
determines the location of the gradient center on the Y axis. This value scales as a
Center X=50, Center Y=50 Center X=75, Center Y=25
adjusts the direction that the colors blend across the screen.
Angle=90° Angle=120°
Page 26
26
•
•
•
•
•
•
Working with the Border Tab
The Border tab allows you to apply up to Þve different border styles to the edges of the
selected text. The parameters in this tab can be used to create beveled or glowing text effects.
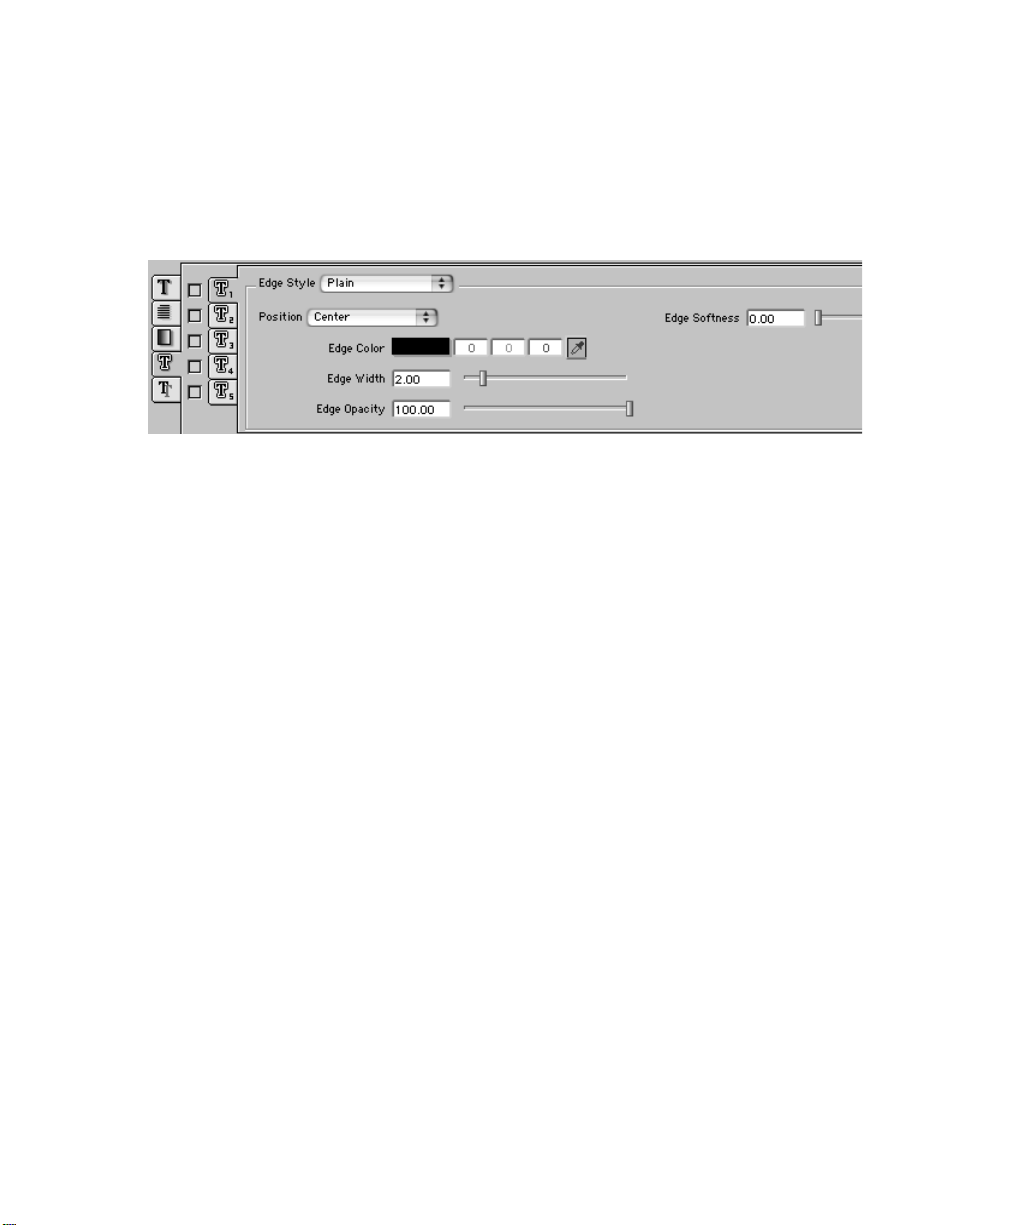
Click one of the numbered Border Style tabs to create a new border style. Select the checkbox
next to the tab to apply the appropriate style to the selected text.
Each tab offers the following controls.
Position
sets the location of the border.
• Inside positions the border on the inside of the edges of the selected character(s).
• Outside positions the border on the outside of the edges of the selected character(s).
• Center centers the border over the edges of the selected character(s), so half of the
border is on the inside of the text edges, and half on the outside.
Edge Color
access the system color picker, or use the eyedropper to choose a color from the screen. You
can also enter RGB values into the numerical Þelds associated with the color control and
press Return.
Edge Width
Edge Opacity
makes the border completely opaque, while a setting of 0 makes the border completely
transparent.
Edge Style
described in the following sections.
sets the color of the border for the selected character(s). Click the color chip to
sets the width, in pixels, of the border applied to each selected character.
adjusts the opacity of the border for selected character(s). A setting of 100
controls the style of the border. Each style has its own controls, which are
Page 27
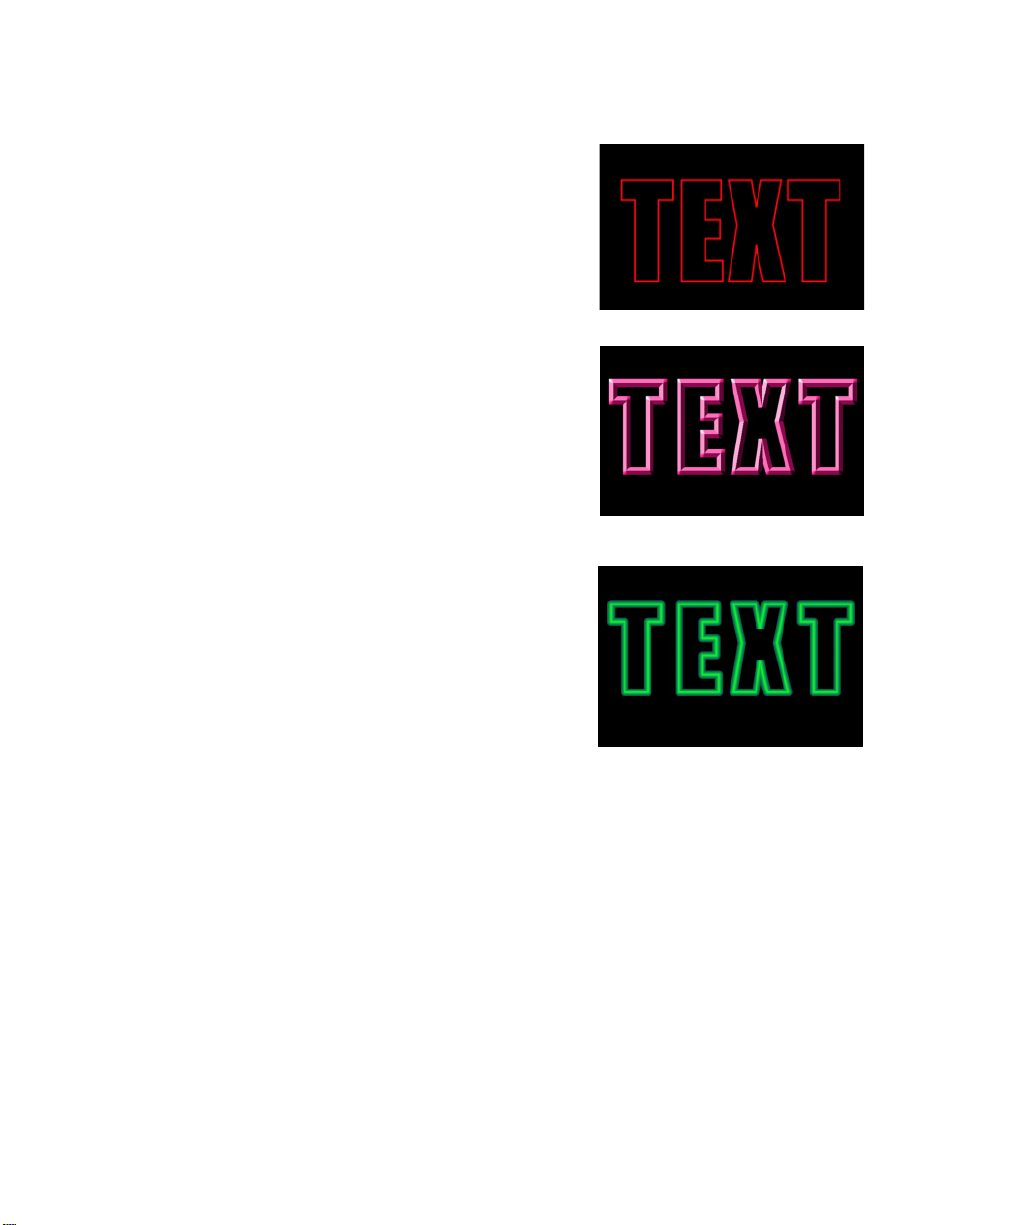
Plain applies a ßat border to the text.
When Plain is chosen,
the border. A value of 0 creates a border with a hard
edge, and raising this value increasingly softens the
border.
Bevel creates a beveled border effect.
Edge Softness
softens the edge of
Boris Calligraphy
•
•
•
27
•
•
•
When Bevel is chosen,
the lightest parts of the bevel.
Shade Color
bevel.
Highlight Angle
and the horizontal axis.
Radial creates a glowing border effect.
When Radial is chosen,
the soft edges of the border.
Radial Fade
the border. When Radial Fade is zero, the outer edge is
opaque. Higher Radial Fade values increase the
transparency of the edge, and at a value of 100, the
outer edge is transparent.
Edge Softness
A value of 0 creates a border with a hard edge, and
raising this value increasingly softens the border.
sets the color of the darkest parts of the
controls the opacity of the outer edge of
softens the edges of the glowing border.
Highlight Color
sets the angle between the highlights
Outside Color
sets the color of
sets the color of
Page 28
28
•
•
•
•
•
•
Working with the Shadow Tab
The Shadow tab applies up to Þve different shadows to the selected text. Like the other
parameters in the Text window, the Shadow tab parameters cannot be animated. If you want
to animate text shadows, create text without shadows in the Text window. You can then
apply and animate drop shadows using the Generator’s Motion tab.
Click one of the numbered Shadow Style tabs to create a new shadow style. Select the
checkbox
Each tab offers the following controls.
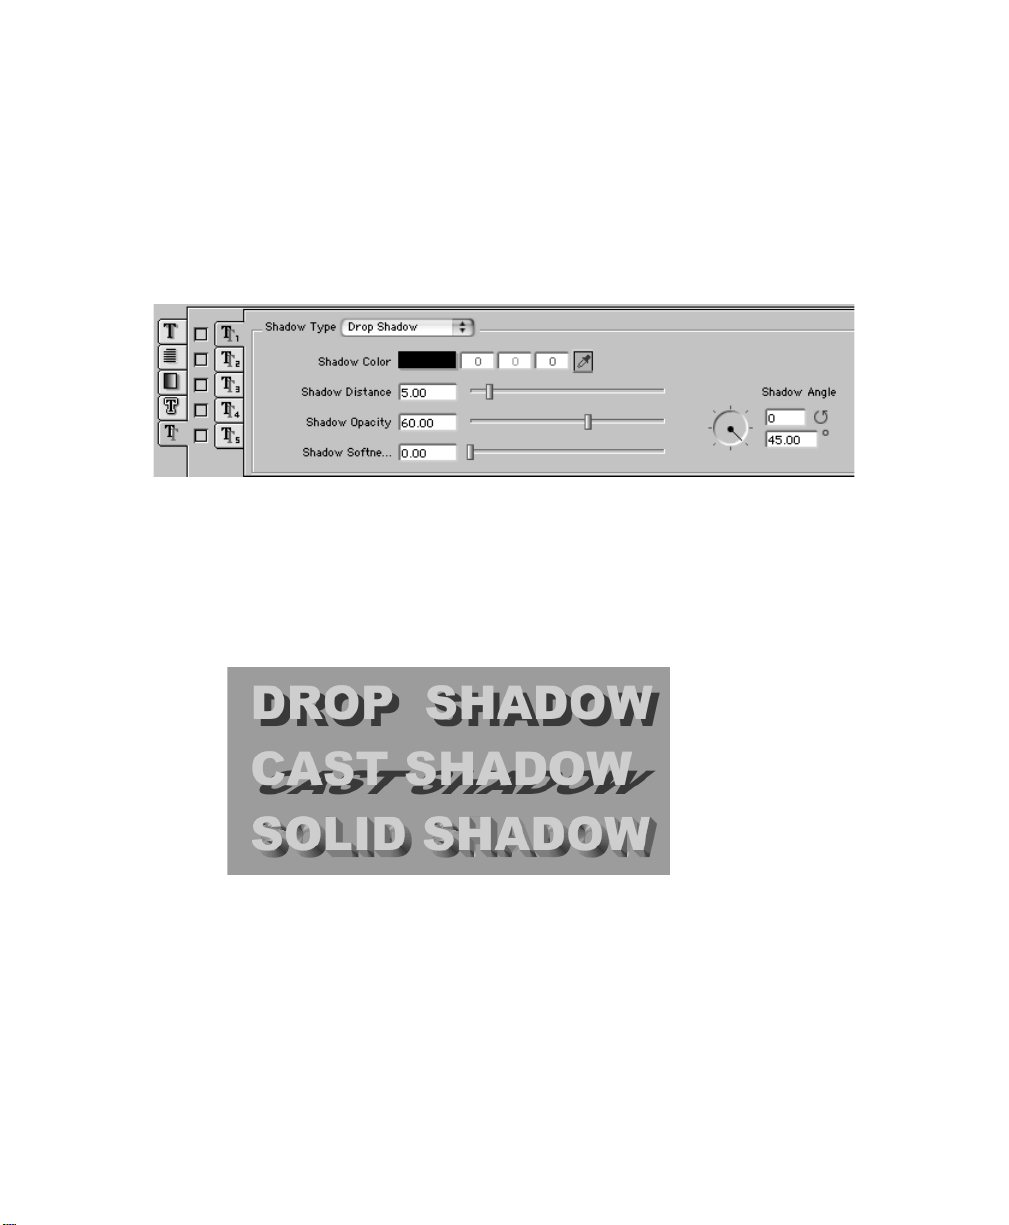
Shadow Type
next to the tab to apply the appropriate style to the selected text.
determines what type of shadows are created.
• Drop shadows are shadows that fall a speciÞed distance from the object.
• Cast shadows are shadows that appear to fall on another object; therefore the
appearance and shape of this type of shadow depends on the distance between the two
objects, and the shape of the object on which the shadow falls.
• Solid shadows simulate the appearance of a 3D object by applying a gradient to a
shadow. Solid shadows are useful if you want to create text with a three dimensional
appearance but do not need to apply transformations that would reveal that the text is
actually 2D. For example, if you create a static title using 2D text with solid shadows.
Page 29
Boris Calligraphy
•
•
•
29
•
•
•
Shadow Color
picker, or use the eyedropper to choose a color from the screen. You can also enter RGB
values into the numerical Þelds associated with the color control and press Return.
Shadow Distance
offset the text slightly; use a larger value to create distinct shadows that appear to fall on
another surface.
Shadow Opacity
opaque. Lowering this value makes the shadow increasingly transparent. A value of 0
creates a completely transparent shadow.
Shadow Softness
cast by a diffuse light source. A value of 0 creates shadows with hard edges. Increasing this
value softens the shadow edges.
Shadow Angle
the needle around the dial or type a number into the numerical Þeld and press Return.
When Shadow Type is set to Solid shadows,
areas of the shadow, and
Click the color chip to access the system color picker, or use the eyedropper to choose a color
from the screen. You can also enter RGB values into the numerical Þelds associated with the
color control and press Return.
sets the color of the shadow. Click the color chip to access the system color
sets the distance between the shadow and the text. Use a small value to
sets the degree of opacity. A value of 100 makes the shadow completely
softens the edges of the shadows, emulating the appearance of shadows
sets the angle between the shadow and the horizontal axis of the text. Drag
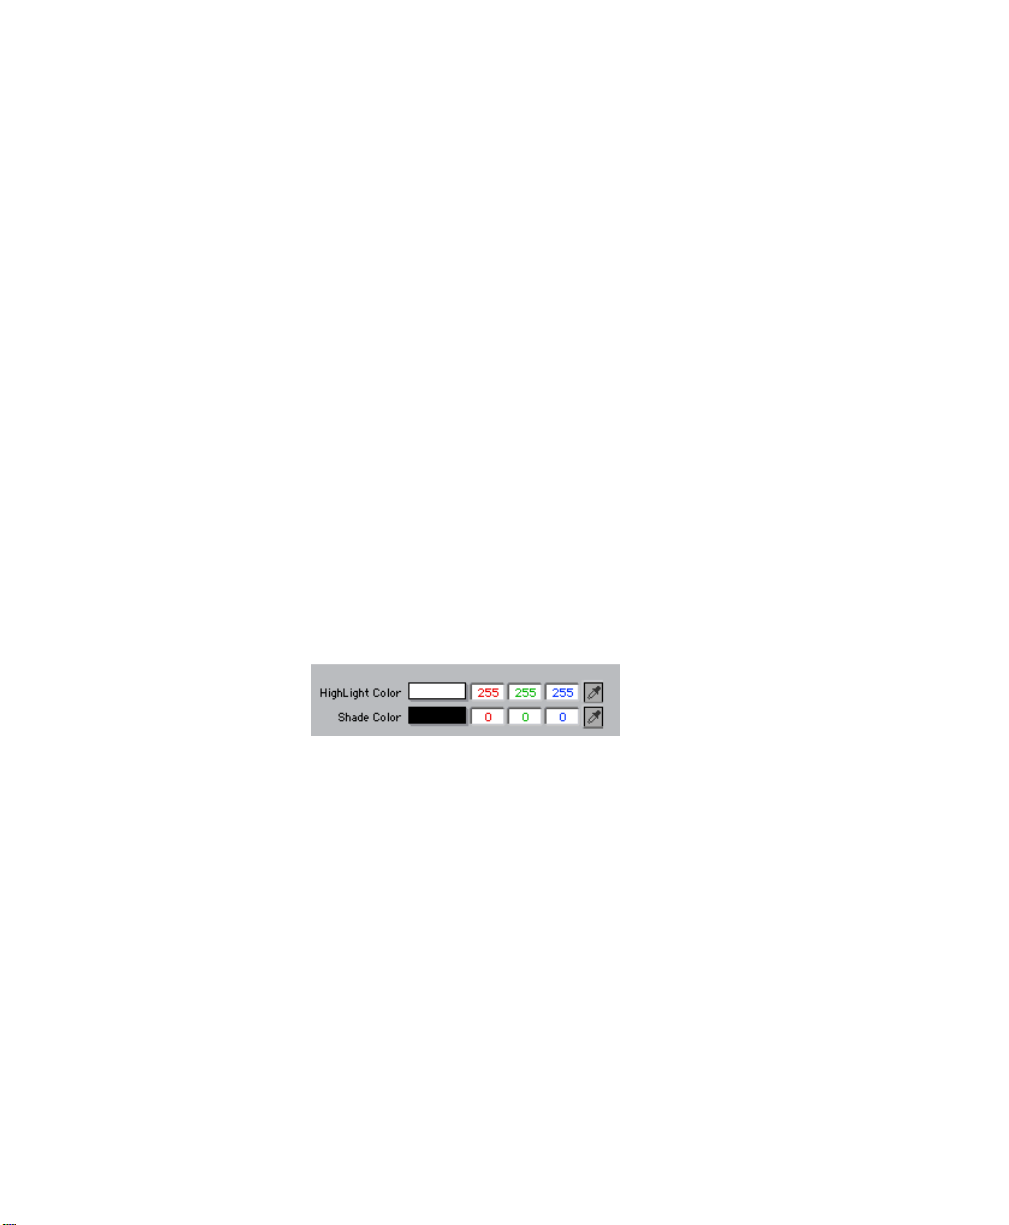
Shade Color
Highlight Color
sets the color of the shaded areas of the shadow.
sets the color of the highlighted
Page 30
30
•
•
•
•
•
•
Working with the Style Palette
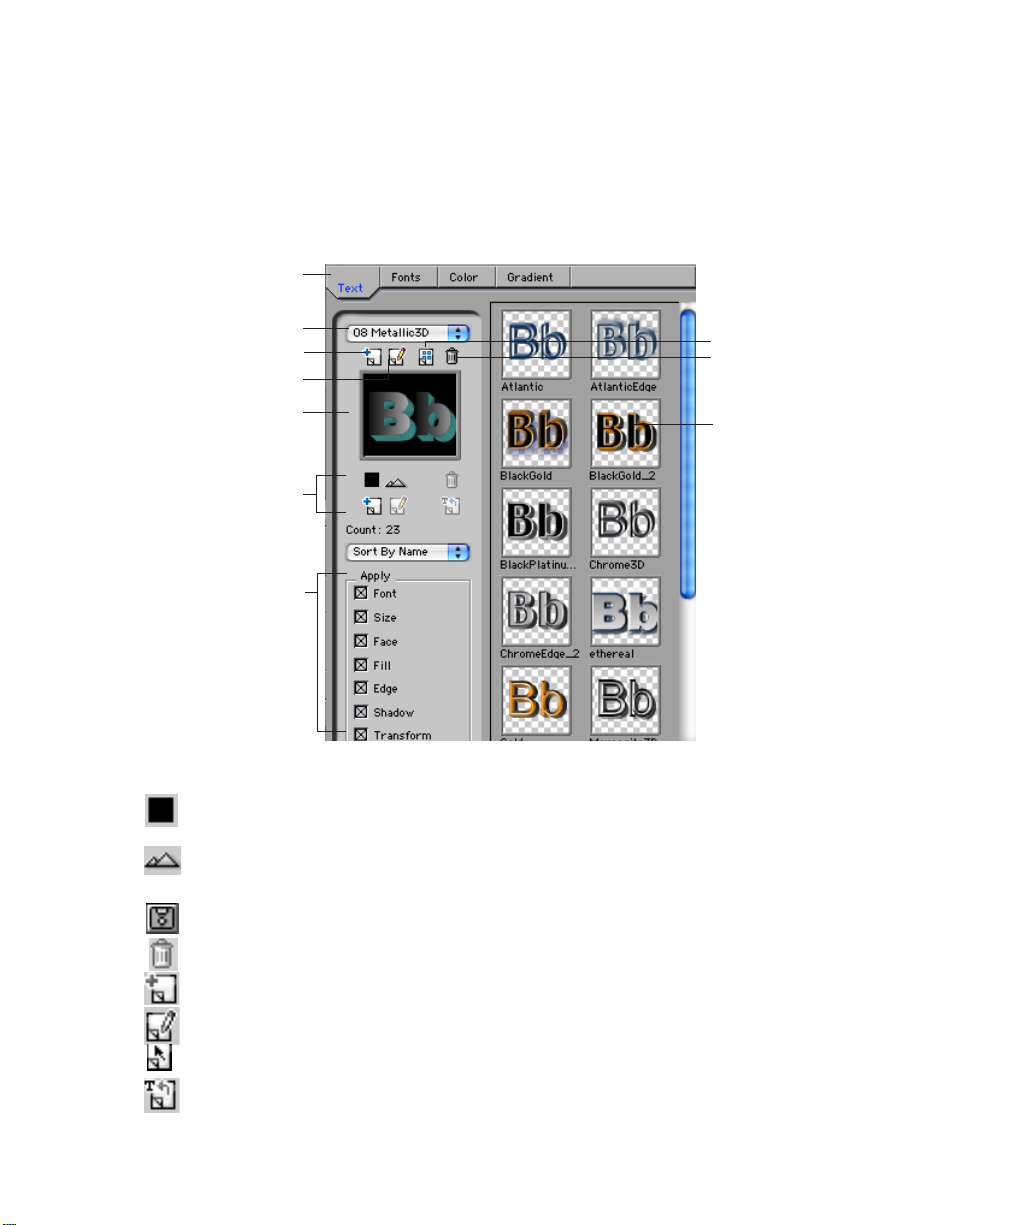
The Style Palette allows you to save and categorize styles for text for future use. The styles
are organized into tabs. The Style Palette also includes a collection of preset styles.
Tab menu
Category menu
Add category
Rename category
Current style
Style controls
Apply controls
Style Control Buttons
Thumbnail Background
a solid black color.
Thumbnail View
Frame View or Large Frame View or displays them in List View.
Rebuild category
Delete category
Displays styles in
current category
lets you choose to display the style over a checkerboard or
sets the size of the thumbnails to Small Frame View, Medium
Load Style
Delete Style
Add Style
Rename Style
allows you to load saved Gradient styles.
deletes a style from the Style Palette.
adds the selected style to the Style Palette.
opens a dialog box where you can name your style.
Edit Selected Style
Apply Style
applies the selected style.
allows you to edit styles directly in the Style Palette.
Page 31
Opening the Style Palette
Click the
Style Palette button
in the Text window.
Categorizing Styles
Use the
example, to use a group of styles in one project, create a category for that project. The
Style Palette must include at least one category for you to create new styles.
Add Category button
to create categories to organize your styles. For
Boris Calligraphy
•
•
•
31
•
•
•
To create a new category, click the
the category. The new category name appears in the category menu.When you choose a
category from the menu, all the styles associated with that category appear in the right side
of the Style Palette. Any new styles you add are saved to the currently selected category.
Categories are not shared between tabs—each tab contains only the categories
created in that tab. For example, if you create a category in the Text tab, then select
the Color tab, the text category does not appear in the Color tab’s category menu.
Add Category button
. A dialog box allows you to name
Selecting the Thumbnail View
You can view styles in Frame or List View. In List View, you can arrange styles by name or
date using the
the thumbnail images.
1.
Press the
appropriate view from the menu:
Thumbnail View button
Thumbnail View button
and the
in the Style palette and choose the
Sort By menu
. In Frame View, you can resize
• Small Frame View
• Medium Frame View
• Large Frame View
• List View
2.
If you choose List View, choose the appropriate sort criteria, Date or Name, from the
Sort By menu
3.
Click the
and a checkerboard. The checkerboard is useful if your style is very dark. For
example, black text is easier to see over the checkerboard.
.
Thumbnail Background button
to toggle between a black background
Page 32
32
•
•
•
•
•
•
Creating and Saving Styles
The procedure for creating and saving styles depend on the type of style you are creating.
Creating Text Styles
1.
Use the parameters in the Text window to adjust the style as desired.
2.
Click the
3.
In the Style Palette, click to select the appropriate
The Apply controls select attributes of the style to save as a new style. For example, save
the current style’s Font and Border only. When you add the style, only these attributes
are included.
4.
In the Text tab in the Style Palette, click the
in the Text window is added to the selected category in the Style Palette.
5.
Name the style. For more information, see “Naming and Deleting Styles” on page 33.
Style Palette button
If no category is selected in the category menu, the Add Style icon is not
available. This can happen when you Þrst open the Style Palette.
in the Text window.
Add Style button
Apply checkboxes
. The current style
.
Creating Color Styles
You can create color styles in the Text window. However, if you want to apply a color style
to a parameter other than the Fill, for example to a border, use the eyedropper for the border
parameter to choose the color style.
1.
Use the parameters in the Text window to adjust the text as desired. Select the
appropriate text characters.
2.
Click the
Palette.
3.
Click the
Text window’s Fill tab is used to create the new style.
4.
Name the style. See “Naming and Deleting Styles” on page 33.
Style Palette button
Add Style button
in the Color tab. The Style Color parameter in the
in the Text window to open the Style
Creating Gradient Styles
1.
Use the parameters in the Text window to adjust the gradient Þll as desired. See
“Working with the Fill Tab” on page 18 for details.
2.
Click the
3.
In the Gradient tab, click the
Text window is added to the selected category in the Style Palette.
4.
Name the style. For more information, see “Naming and Deleting Styles” on
page 33.
Style Palette button
in the Text window.
Add Style button
. The current style in the
Page 33
Boris Calligraphy
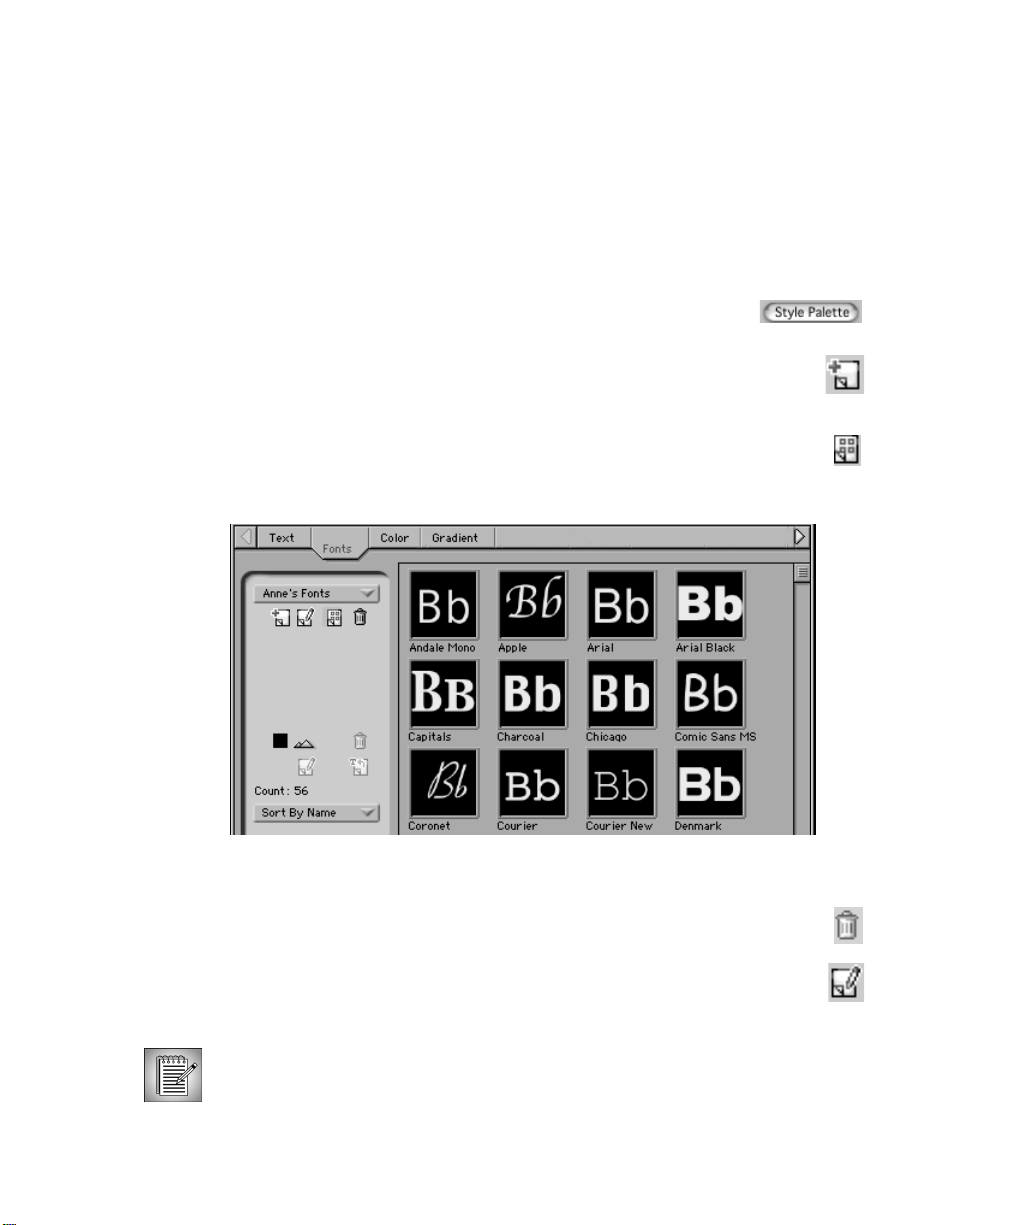
Creating Font Styles
The Style Palette lets you save thumbnails of all the available fonts on your system in the
Fonts tab. The Þrst time you launch this tab you have to add a category. After that you only
need to rebuild the category if you add more fonts to your system. Unlike the other tabs in
the Style Palette, you cannot save styles to the Font tab, so the Apply controls as well as the
Add Style and Rename Style buttons do not appear when you are in the Font tab.
1.
.Open the Style Palette by clicking the
window.
2.
In the Fonts tab in the Style Palette, click the
allows you to name the category. The new category name appears in the
category menu.
3.
If this is the Þrst time you have used the Font tab or if you have added new fonts
to your system, click the
The Font tab now displays all the available fonts on your system.
Rebuild Category button
Style Palette button
Add Category button
.
in the Text
. A dialog box
•
•
•
33
•
•
•
Naming and Deleting Styles
To delete a style, select the style’s thumbnail and click the
style’s thumbnail is deleted from the Style Palette.
To r ename a style, select the style’s thumbnail and click the
dialog box appears. Type a name and click
selecting the style, pressing Return, typing a name and pressing Return again.
You can also delete and rename styles using the contextual menus. For
information, see “Using Contextual Menus in the Style Palette” on page 35.
OK
. You can also rename a style by
Delete Style button
Rename Style button
. The
. A
Page 34
34
•
•
•
•
•
•
Applying Styles
The procedure for creating and saving styles depend on the type of style you are creating.
Applying Text Styles
1.
In the Text window, select the text to which you want to apply the style. Select
individual characters or press Command-A to select all text.
2.
Click the
3.
In the Text tab in the Style Palette, click to select the parameters to
apply. The choices are Fonts, Size, Face, Fill, Edge, Shadow and Transform.
4.
Double-click the thumbnail for the style you want to apply or click to select the
thumbnail and click the
Applying Color Styles
1.
In the Text window, select the text to which you want to apply the style. Select
individual characters or press Command-A to select all text.
2.
Click the
3.
Use the eyedropper to apply the sampled color from the Style Palette
to the appropriate parameter.
Style Palette button
Apply Style button
Style Palette button
to open the Style Palette.
.
to open the Style Palette.
Applying Gradient Styles
1.
In the Text window, select the text to which you want to apply the style. Select
individual characters or press Command-A to select all text.
2.
In the Text window’s Fill tab, choose Gradient from the
Click the
3.
4.
In the Gradient tab in the Style Palette, double-click the thumbnail for
the style you want to apply or click to select the thumbnail and click the
Style
Style Palette button
button
.
to open the Style Palette.
Text Fill menu.
Applying Font Styles
1.
In the Text window, select the text to which you want to apply the style. Select
individual characters or press Command-A to select all text.
2.
Click the
3.
In the Font tab in the Style Palette, double-click the thumbnail for the
style you want to apply or click to select the thumbnail and click the
button
Style Palette button
.
to open the Style Palette.
Apply Style
Apply
Page 35
Editing Styles
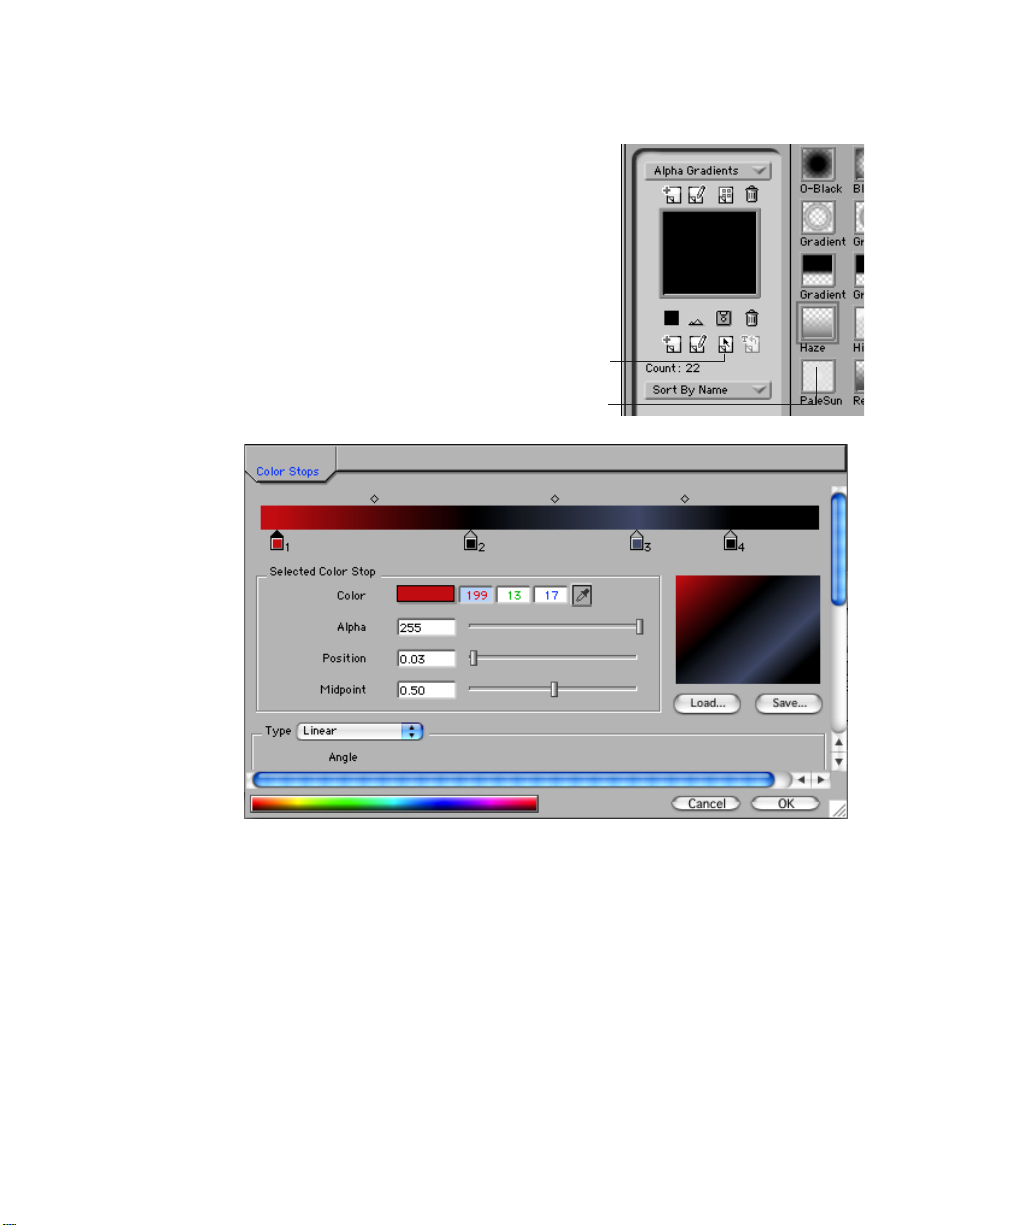
You can edit styles directly in the Style Palette
using the
applies to Gradient and Color styles.
For example, if you select a Color style and
click the
system color picker opens. This button dims
if no style is selected. If you select a Gradient
style and click the
the Gradient Editor opens. Make the
appropriate changes and click
Edit Selected Style button
Edit Selected Style button
Edit Selected Style button
OK
. This
, the
.
Edit Selected
,
Style button
Selected style
Boris Calligraphy
•
•
•
35
•
•
•
Using Contextual Menus in the Style Palette
You can use contextual menus in the Style Palette to apply, rename, and delete styles.You
can also view information about a particular style.
1.
Right-click or Control-click a setting in the Style Palette.
2.
Choose the appropriate menu item from the Contextual menu that appears:
•
Apply
applies the style to the selected object.
•
Rename
•
Delete
•
Properties
applies to Text styles When you Þnish, click
lets you rename the style in the Style Palette.
removes the style from the Style Palette.
displays information about the style such as the font and size. This only
OK
to close the dialog box.
Page 36
36
•
•
•
•
•
•
Working with the Title 3D Generator
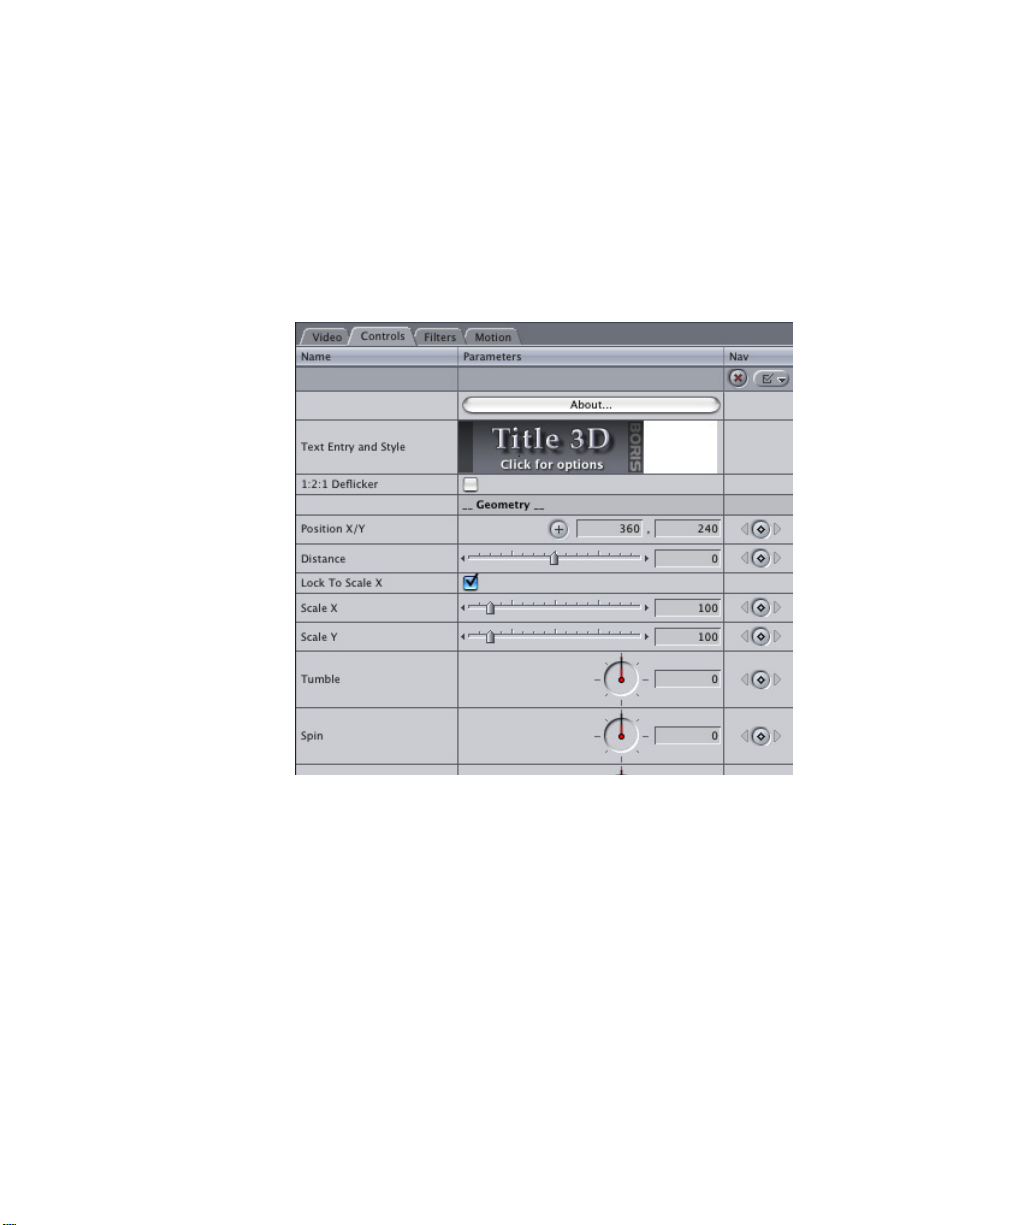
Title 3D offers vector-based text that can be manipulated in 3D Space with full pivot control,
animated tracking and other text transformations including type on effects. Once you set the
characteristics of the individual text characters in the Text window, you can animate the text.
Unlike the parameters in the Text window, the parameters in the Controls tab apply to the
text globally.
Selecting the
ßickering and reduce jagged edges on moving graphics with hard edges.
1:2:1 Deßicker checkbox
applies a vertical blur to the effect to help eliminate
Working with the Geometry Parameter Group
Position X/Y
the text. If the text is rotated using the Tumble, Spin or Rotate parameters, Position X/Y
positions the rotated text.
Distance adjusts the apparent depth of the text. Decreasing negative values move the text
closer to the viewer, while increasing positive values move the text farther away. Very low
Position Z values move the text behind the viewer, making it invisible. If the text is rotated
using the Tumble, Spin or Rotate parameters, Distance positions the rotated text.
The Lock to Scale X checkbox locks the Scale X and Scale Y values together, so the when
you adjust Scale X, Scale Y updates the same amount.
set the coordinates of the text’s center point. Adjust Position X/Y to reposition
Page 37
Boris Calligraphy
and
Scale Y
Scale X
parameters are scaled as percentages of the object’s original width or height. Thus, a Scale
X setting of 200 produces text twice as wide as the original text.
change the size of the object along the X and Y axes, respectively. These
•
•
•
37
•
•
•
Tumble, Spin
respectively. Tumble, Spin, and Rotate can be animated over values greater than 360° in
order to make the shape complete more than one full revolution.
Tumble Spin Rotate
, and
Rotate
change the text’s perspective along the X, Y, and Z axes
Normally, these controls rotate the text around its center, but you can also set an
external pivot point in the Pivot parameter group around which to tumble, spin,
or rotate text.
Working with the Pivot Parameter Group
When the
point. Deselect this option to sets the coordinates around which the text revolves using the
Pivot X/Y
Pivot X/Y
you tumble, spin, or rotate it.
Lock Pivot to Position checkbox
and
Z
parameters.
and Z determine the coordinates of a point around which the text revolves when
is selected, the text revolves around its center
Working with the Transformations Parameter Group
Opacity
is completely opaque. Lower Opacity values make the background image visible through
the text. At a value of 0, the text is completely invisible.
sets the opacity of the text, and is scaled as a percentage. At a value of 100, the text
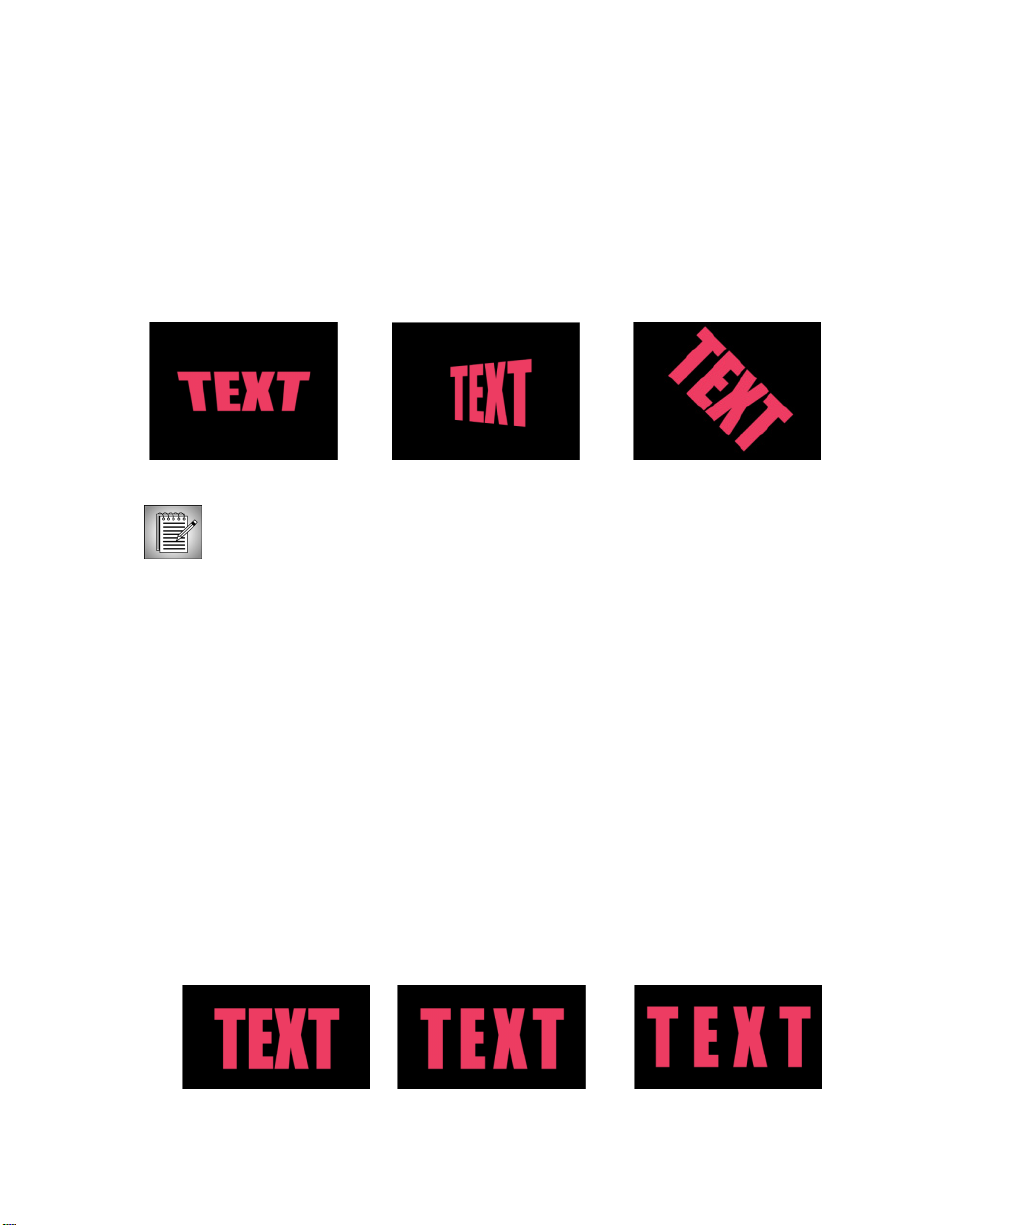
Tracking
Tracking parameter in the Text window, you can animate this Tracking parameter.
controls the global horizontal spacing of the characters in the effect. Unlike the
Tracking= 0 Tracking= 25 Tracking= 50
Page 38
38
•
•
•
•
•
•
and
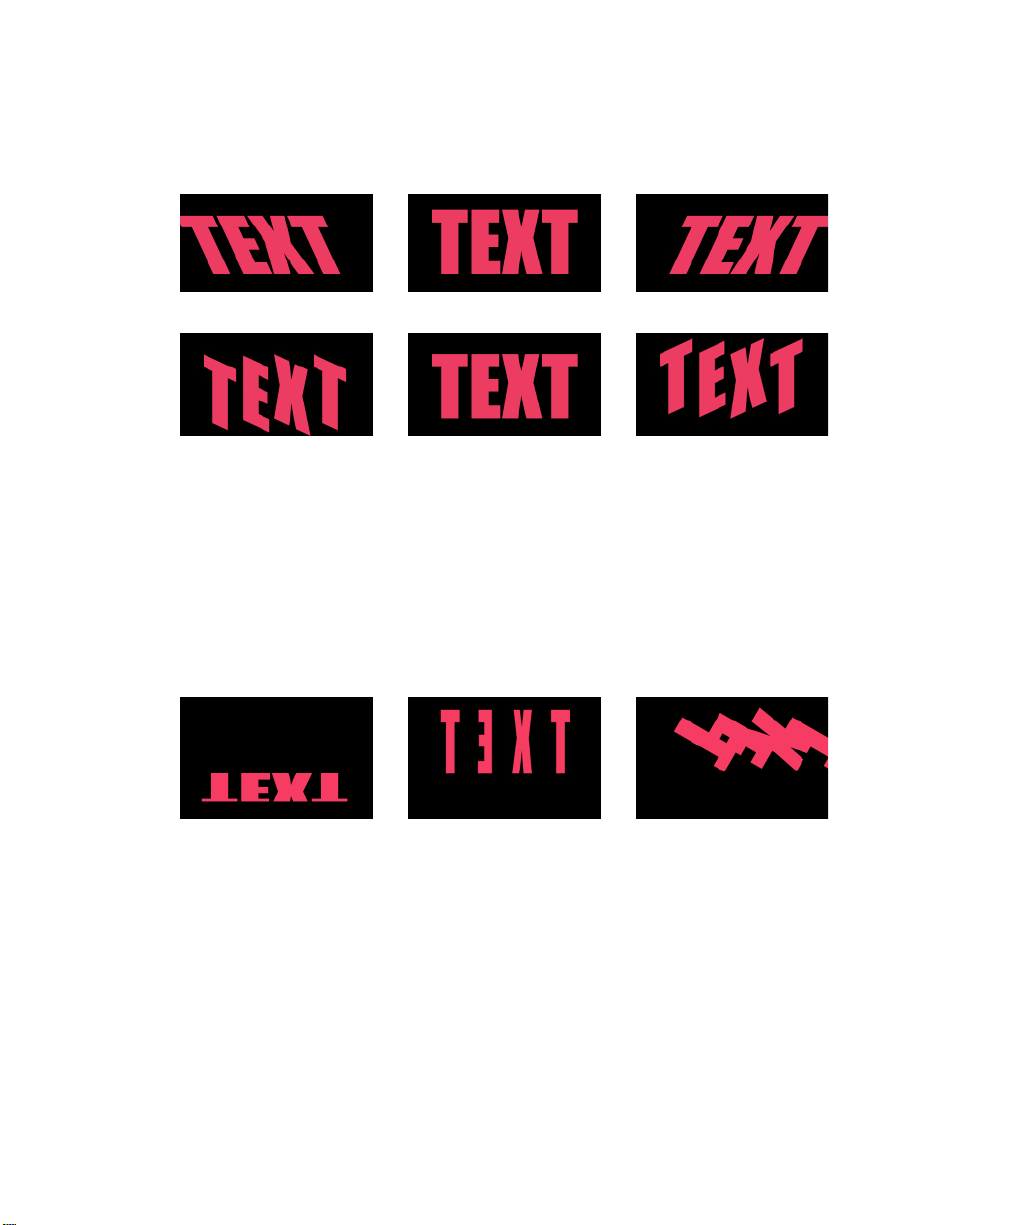
Letter Skew X
Letter Skew X= –25 Letter Skew X=0 Letter Skew X=25
Letter Skew Y= –25 Letter Skew Y=0 Letter Skew Y=25
Letter Skew Y
distort text along the horizontal and vertical axis.
Letter Scale X
These parameters differ from the Page Transformations parameter group’s Scale X and Scale
Y parameters, which scale the entire text layer. For example, if you set Scale X to 200, the
resulting text is stretched twice as wide as the original. If you set Letter Scale X to 200, the
resulting text is twice as wide as the original but the characters overlap since Letter Scale
affects each letter. This is useful for creating animated tracking or type on effects.
Letter Tumble, Letter Spin
baseline’s X, Y, and Z axis, respectively.
Letter Tumble Letter Spin Letter Rotate
Leading adjusts the spacing, in pixels, between multiple lines of text. This parameter affects
the currently selected lines. Unlike the Leading parameter in the Text window, you can
animate this Leading parameter.
Baseline adjusts the vertical position of the text in relation to the baseline. Decrease this
value to move the bottom of the text below the baseline, or increase this value to raise the
character above the baseline. Unlike the Baseline parameter in the Text window, you can
animate this Baseline parameter.
and
Letter Scale Y
set the scale of the text along the horizontal and vertical axis.
, and
Letter Rotate
rotate the text characters around their
Page 39
Boris Calligraphy
Working with the Type On Parameter Group
The Type On parameter group offers several options for creating animated writing or “typeon” effects.
•
•
•
39
•
•
•
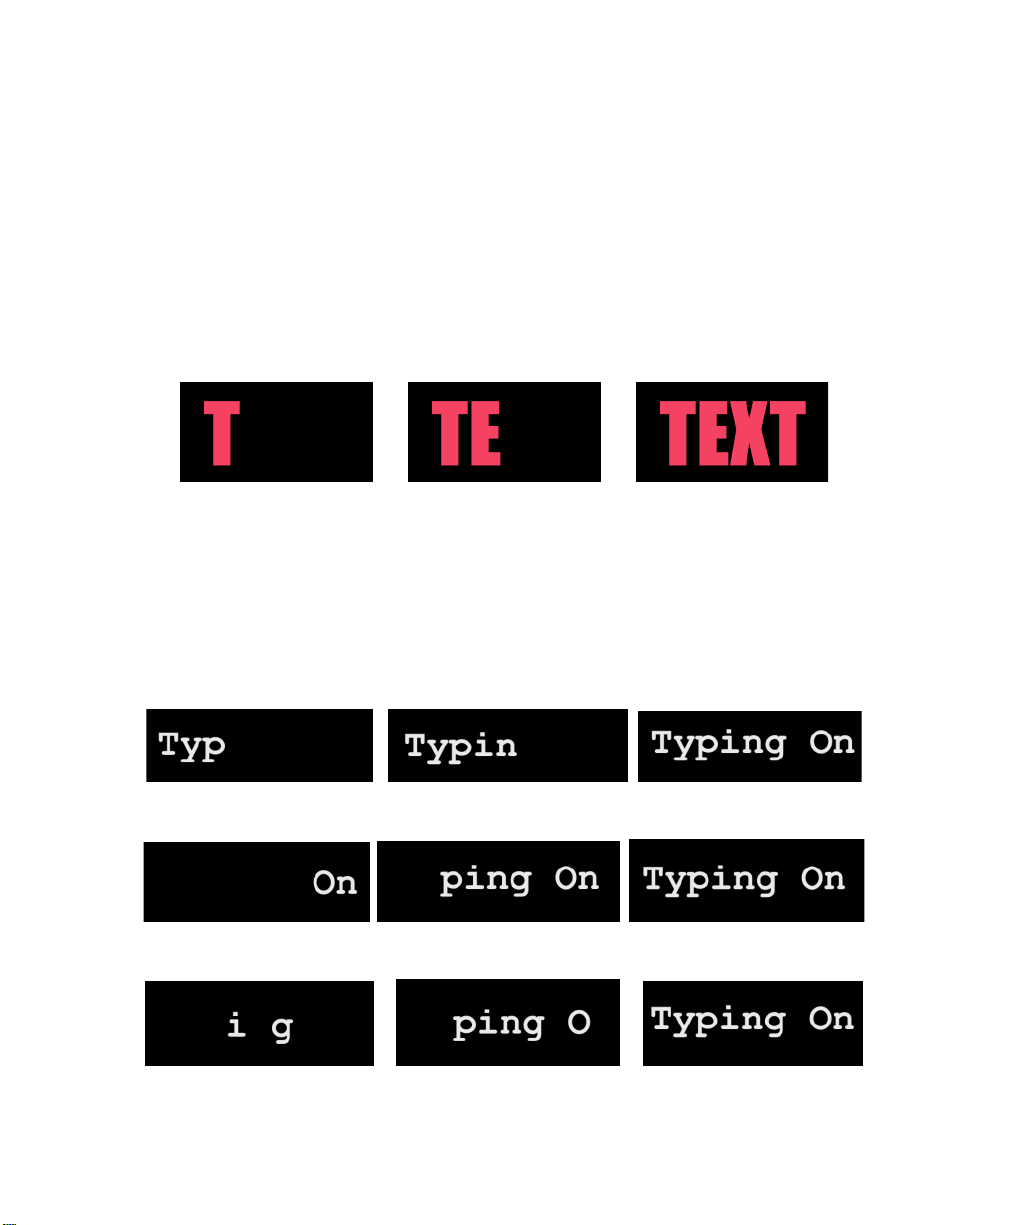
Text Type On
create animated typing effects. This value is measured as a percentage of the complete text.
For example, if Text Type On is set to 50, the Þrst half of the text is visible. If Text Type On is
100, all the text is visible. Text Type On is animatable; the other parameters in this group are
applied progressively to each individual character as it types on.
Type-on effect with Text Type On animated from 0 to 100.
Time 00:00:00:08 Time 00:00:00:15 Time 00:00:01:00
The
Type On Order menu
Type On Order menu includes the following options:
adjusts the percentage of the text that is visible in each frame, allowing you to
allows you to control the order in which the text types on. The
• Forward types on the text from left to right.
• Reverse allows you to reverse the effect so that the text types on starting from the left.
• Random types the text type on randomly.
Type On Order=Forward.
Time 00:00:00:08 Time 00:00:00:15 Time 00:00:01:00
Type On Order=Reverse (types on from right to left)
Time 00:00:00:08 Time 00:00:00:15 Time 00:00:01:00
Type On Order=Random
Time 00:00:00:08 Time 00:00:00:15 Time 00:00:01:00
Page 40
40
•
•
•
•
•
•
Press the
Apply To menu
and choose the appropriate option.
• Letter applies the effect to individual letters and characters.
• Word applies the effect to individual words. Words are deÞned as characters that are
separated by a space in the Text window.
• Line applies the effect to individual lines. Lines are deÞned as characters that are
separated by a carriage return in the Text window.
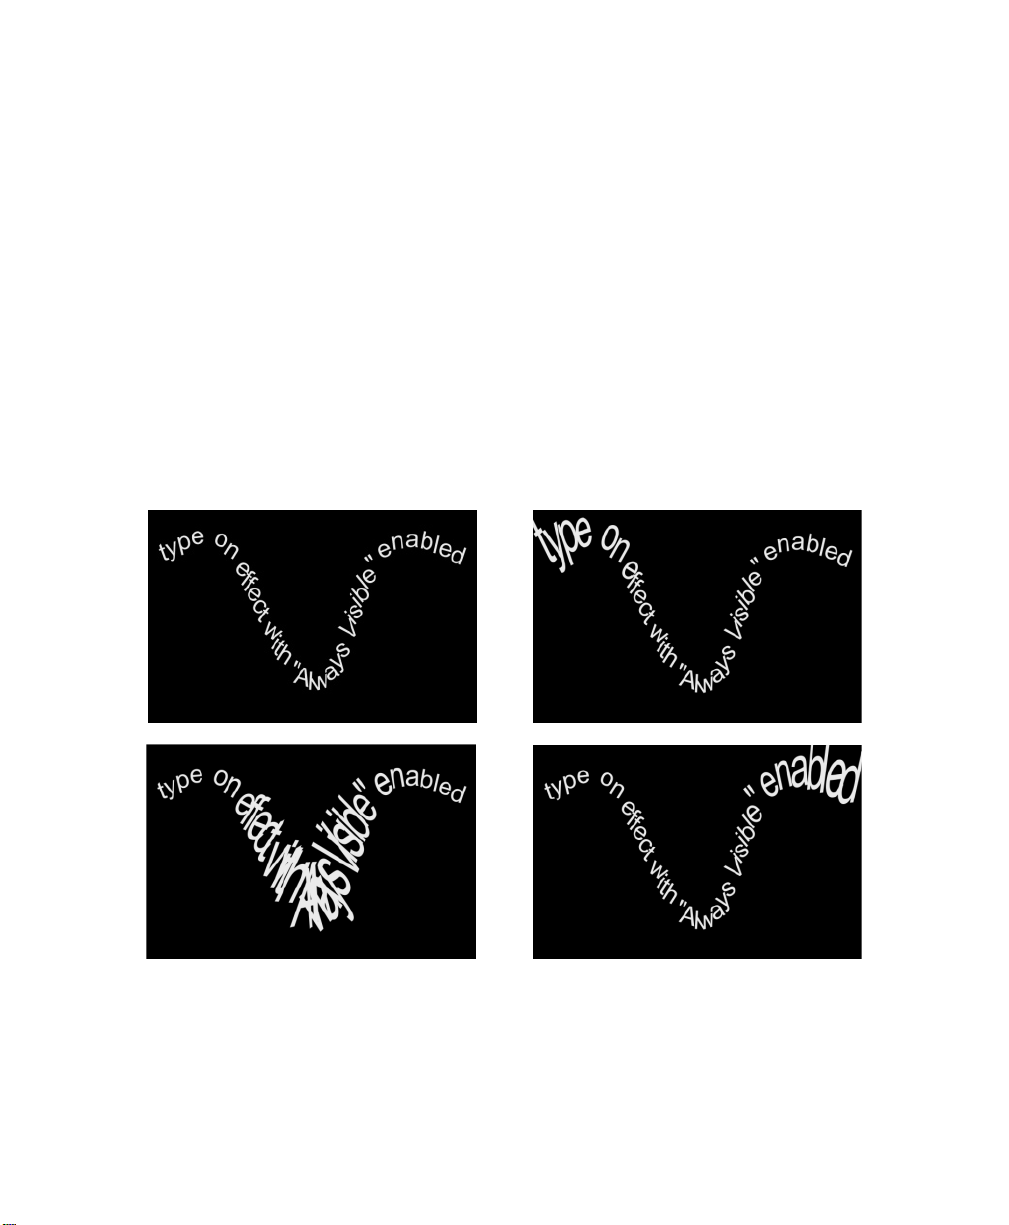
Click the
feature applies transformations progressively to text characters. When this checkbox is
deselected, characters progressively appear or disappear from the frame. Selecting the
Always Visible checkbox forces characters to remain visible while the transformations are
progressively applied. One way to think of this effect is like “the wave” that crowds perform
at football stadiums; the transformation appear to pass through the text. The animatable
Type On parameter behaves as the center of the wave when this checkbox is enabled.
Type-on effect with “Always Visible” enabled.
Always Visible checkbox
to force all text characters to remain visible. This Type On
Reveal Time
only affects animations created with the Fade, Shift, Skew, Tumble, Spin, and/or Rotate
parameters (described below). For example, you create a four second type-on effect with the
word “Text.” If Text Type On is animated from 0 to 100, each letter in the word Text animates
onscreen for one second. Reveal Time speciÞes the percentage of that one second that the
Fade, Shift, Skew, Tumble, Spin, and/or Rotate lasts. Thus if Reveal Time is 50, each
controls how long each character animates during the effect. This parameter
Page 41
Boris Calligraphy
character Fades, Shifts, Skews, Tumbles, Spins, and/or Rotates for 0.5 seconds (50% of 1),
and subsequently remains stationary for the rest of the effect. In this case, the next letter does
not appear for another 0.5 seconds after the previous letter stops animating.
•
•
•
41
•
•
•
Acceleration
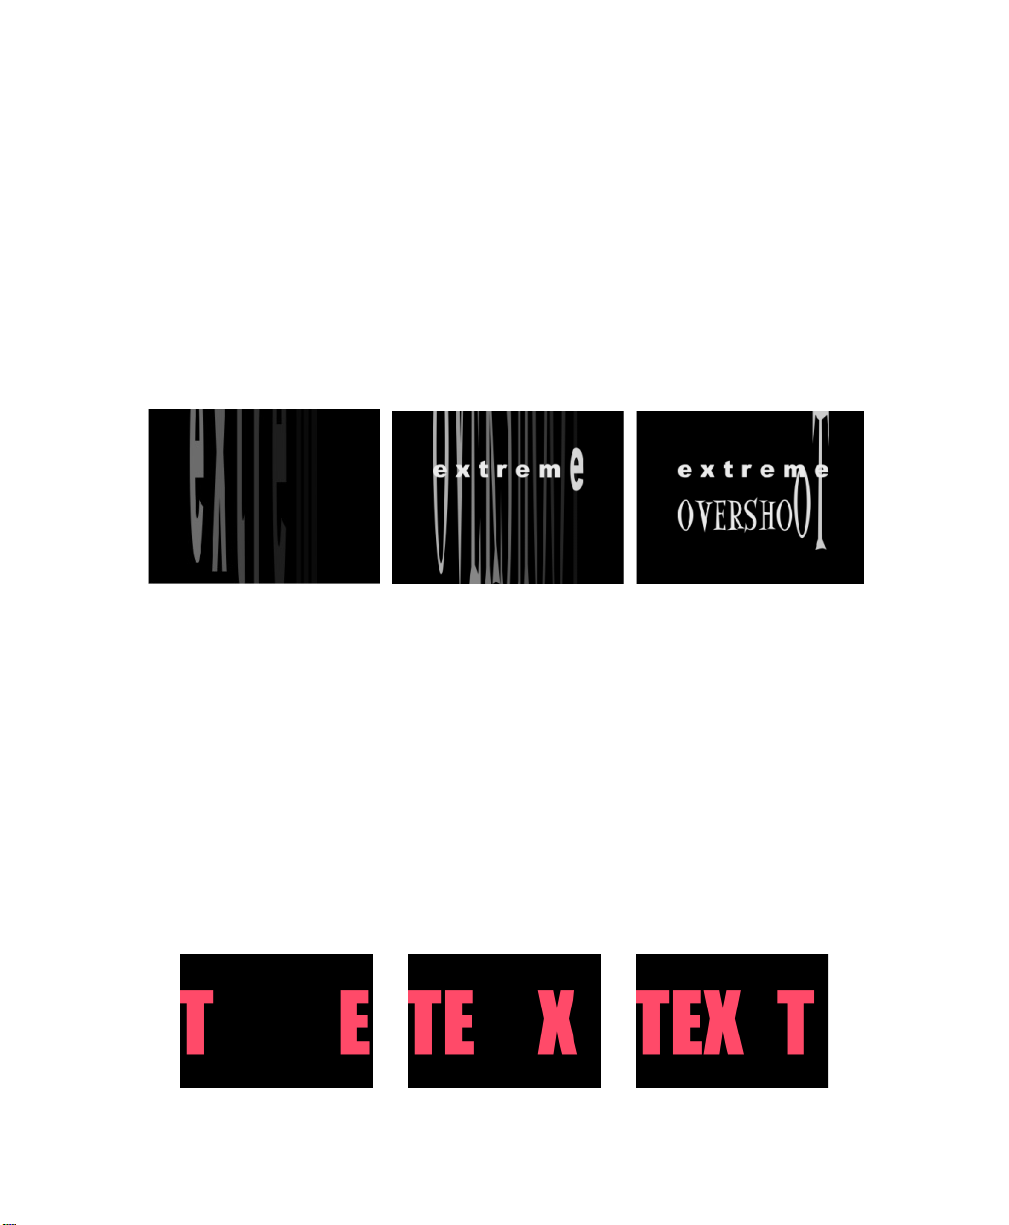
Overshoot
allows you to gradually accelerate the effect.
allows you to create bouncing text effects, when combined with any parameters
except Fade. Each character moves past its destination position or scale by the value
speciÞed in Overshoot before returning to its destination position or scale. This parameter
only affects animations created with the Shift, Scale, Skew, Tumble, Spin, and/or Rotate
parameters. If all of these parameters are set to the default, Overshoot has no affect.
Text effect with Overshoot enabled
Time 00:00:01:00 Time 00:00:02:00 Time 00:00:03:00
Decay
works in conjunction with the Overshoot parameter. Decay is expressed as a
percentage that allows you to exponentially decrease the Overshoot. For example, you set
the Shift Y so that the characters move in from the top of the frame with an Overshoot of
300. Setting Decay to 50 means that each of the three bounces will decay by half.
Fade
allows you to gradually fade in successive characters. When Fade is set to 100, each
character appears suddenly and is fully opaque. Decreasing this value creates a more
gradual effect, in which each character fades on as its opacity increases.
Shift X
and
Shift Y
adjust the starting position of the characters in relation to their
destinations (controlled by the Position X/Y and Position Z values in the Page
Transformations parameter group) on the screen. For example, if the text is placed in the
center of the screen and Shift X is set to 320, when Text Type On is animated, each character
Þrst appears on the right side of the screen, then moves toward the center.
Type-on effect with Shift X set to 320.
Time 00:00:01:11 Time 00:00:01:18 Time 00:00:01:24
Page 42
42
•
•
•
•
•
•
and
Scale Y
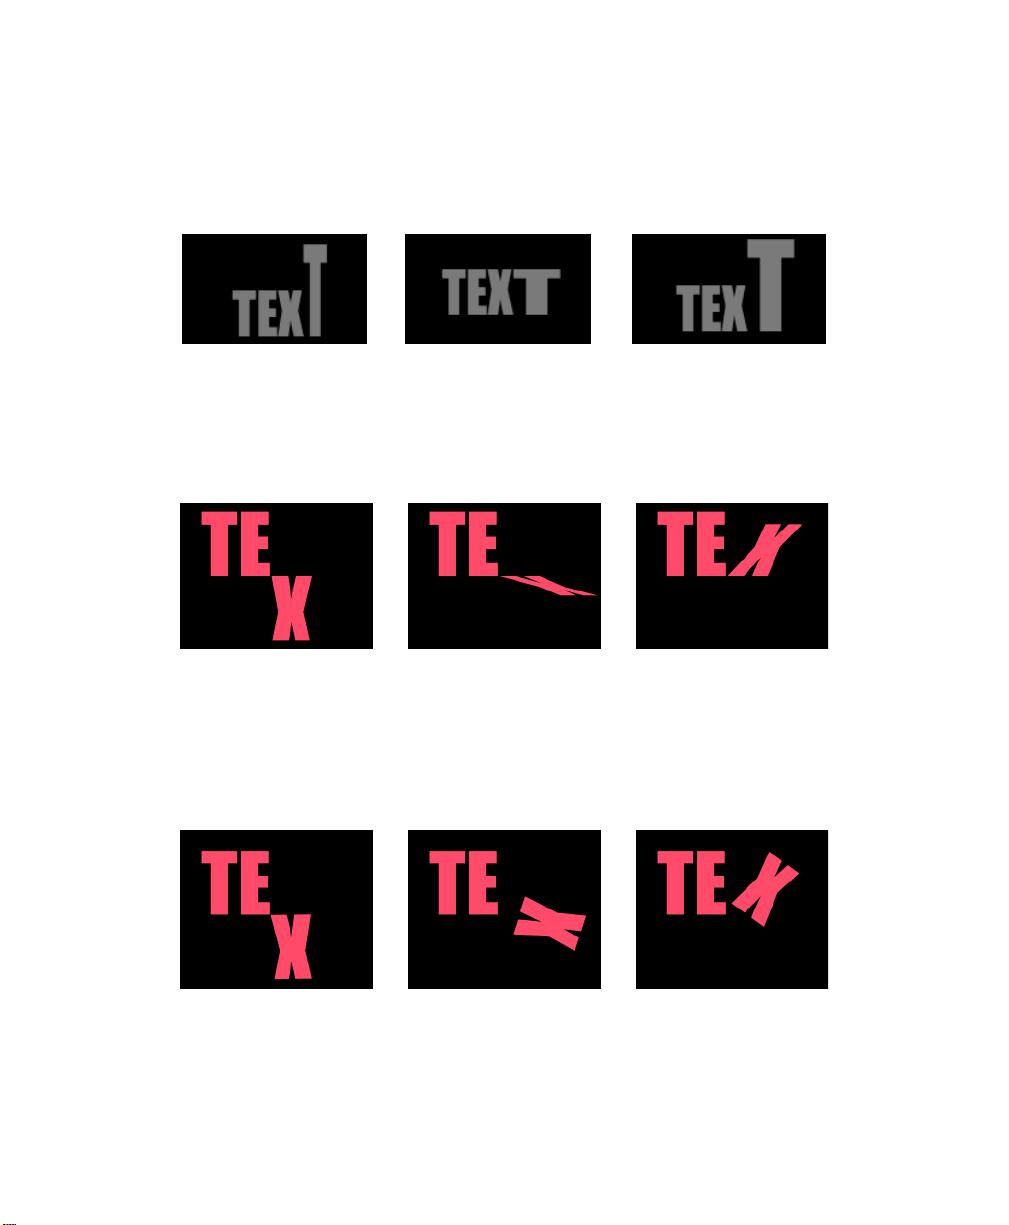
Scale X
adjust the starting size of the characters. The default value is 100, in
which the text types on full size. If you decrease the value, the text appears to grow as it
types on; if you increase the value, the text appears to shrink onscreen.
Scale Y = 200 Scale X = 200 Scale Y/Scale X= 200
Skew X
and
Skew Y
set the starting Skew values for the characters in relation to their Þnal
skew values (controlled by the Skew X and Skew Y values set in the Text window and in the
Letter Transformations parameter group). Each character animates from its starting Skew
values to its ending Skew values as it appears on screen.
Type-on effect with Skew X set to 180.
Time 00:00:01:10 Time 00:00:01:12 Time 00:00:01:14
Tumble, Spin
, and
Rotate
set the starting Tumble, Spin, and Rotate values for characters in
relation to their Þnal Tumble, Spin, and Rotate values (controlled by the Letter Tumble,
Letter Spin, and Letter Rotate values in the Letter Transformations parameter group and by
the Tumble, Spin, and Rotate values in the Page Transformation parameter group). Each
character animates from its starting values to its ending values as it appears on screen.
Type-on effect with Rotate set to 180.
Time 00:00:01:10 Time 00:00:01:12 Time 00:00:01:14
Page 43
Working with the Title Crawl Generator
Generator menu
The Title Crawl Generator enables you to easily animate a text page. The Title Crawl
Generator automatically keyframes the text page to roll or crawl across the screen. This
Generator automatically aligns and animates the text page so that you do not have to set
keyframes in the timeline. You can also manually adjust the keyframes for precise control
over the effect.
Creating a Title Animation
The basic steps for creating a title animation such as a credit roll are as follows:
1.
Apply the Title Crawl Generator by choosing Boris from the
Generator menu
choosing Title Crawl from the submenu.
2.
Create a title page in the Text window. You can type, import, and
edit text, and control font, size, justiÞcation, color, opacity,
spacing, shadows, and borders. The parameters in the Text
window are applied on a character basis. For more information,
see “Creating a Text Effect” on page 6.
3.
Use the parameters in the Controls tab in the Viewer to apply an animation type to the
text track. See “Animating Text” on page 44 for more information.
in the lower-right corner of the Viewer and then
Boris Calligraphy
•
•
•
43
•
•
•
Optimizing Workflow for Credit Rolls
When you work with large amounts of text, for example a long credit roll, you should
consider the following workßow options.
• Create a text document in a word processor. This approach avoids tying up your Final
Cut Pro system for long periods of time and reduces the risk of typographical errors. It
is especially useful if the person responsible for the accuracy of the content is not the
person who will create the roll. You can import a Simple Text document or you can
simply cut and paste text. Then format the text in the Text window.
• Save the styles that you use for your credit roll in the Style Palette. Then you can
quickly format long credit rolls.
Page 44
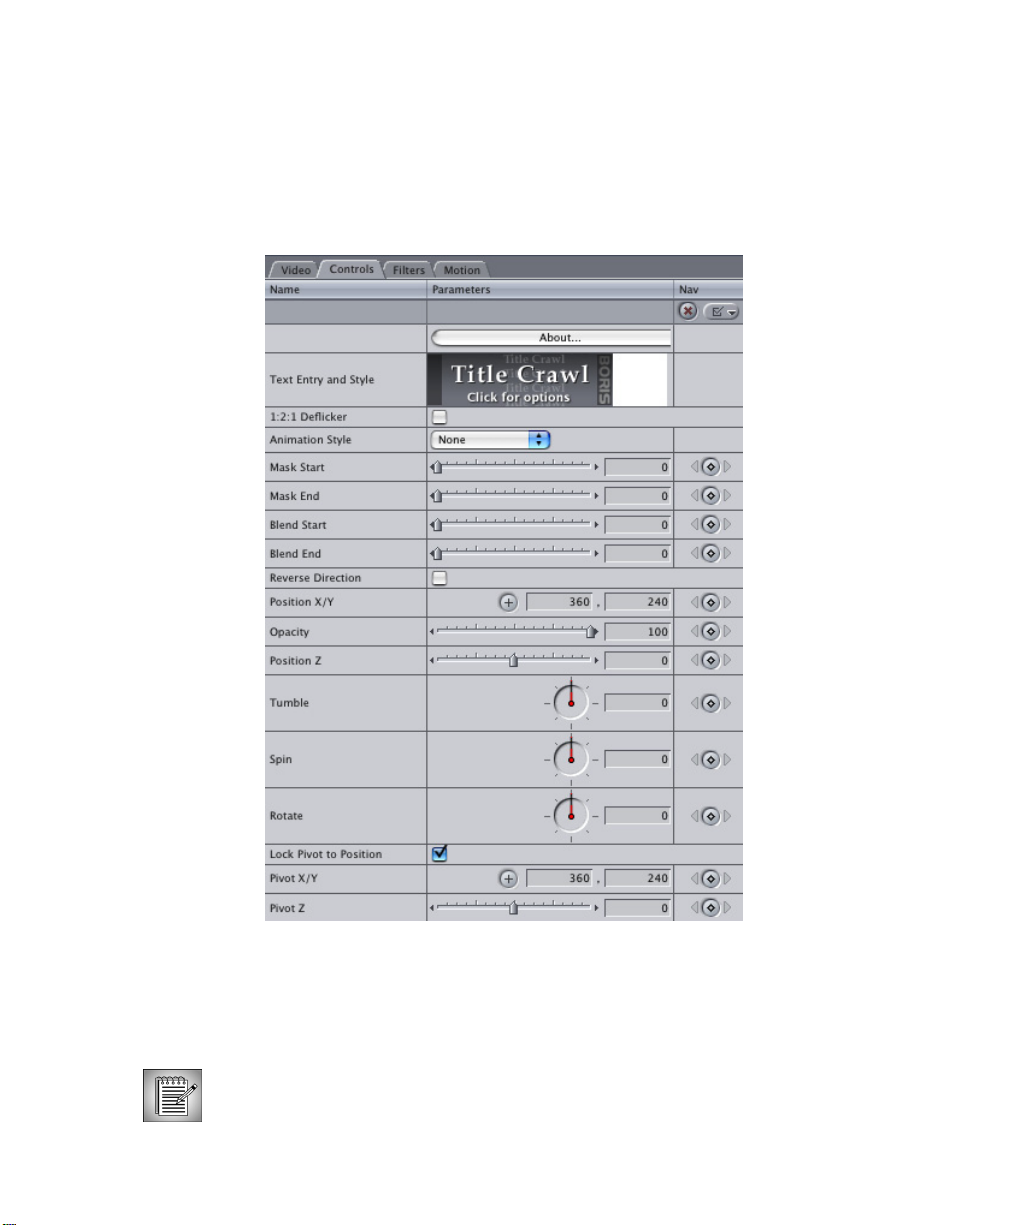
44
•
•
•
•
•
•
Animating Text
The Controls tab in the Viewer contains parameters which control the movement of the text
tracks.
Selecting the
ßickering and reduce jagged edges on moving graphics with hard edges. Select 1:2:1
Deßicker if the Animation Style menu is set to Roll. Leave this option deselected for any
other type of effect.
1:2:1 Deßicker checkbox
Note that the 1:2:1 DeFlicker option does not apply if Continuously Rasterize is
enabled.
applies a vertical blur to the effect to help eliminate
Page 45
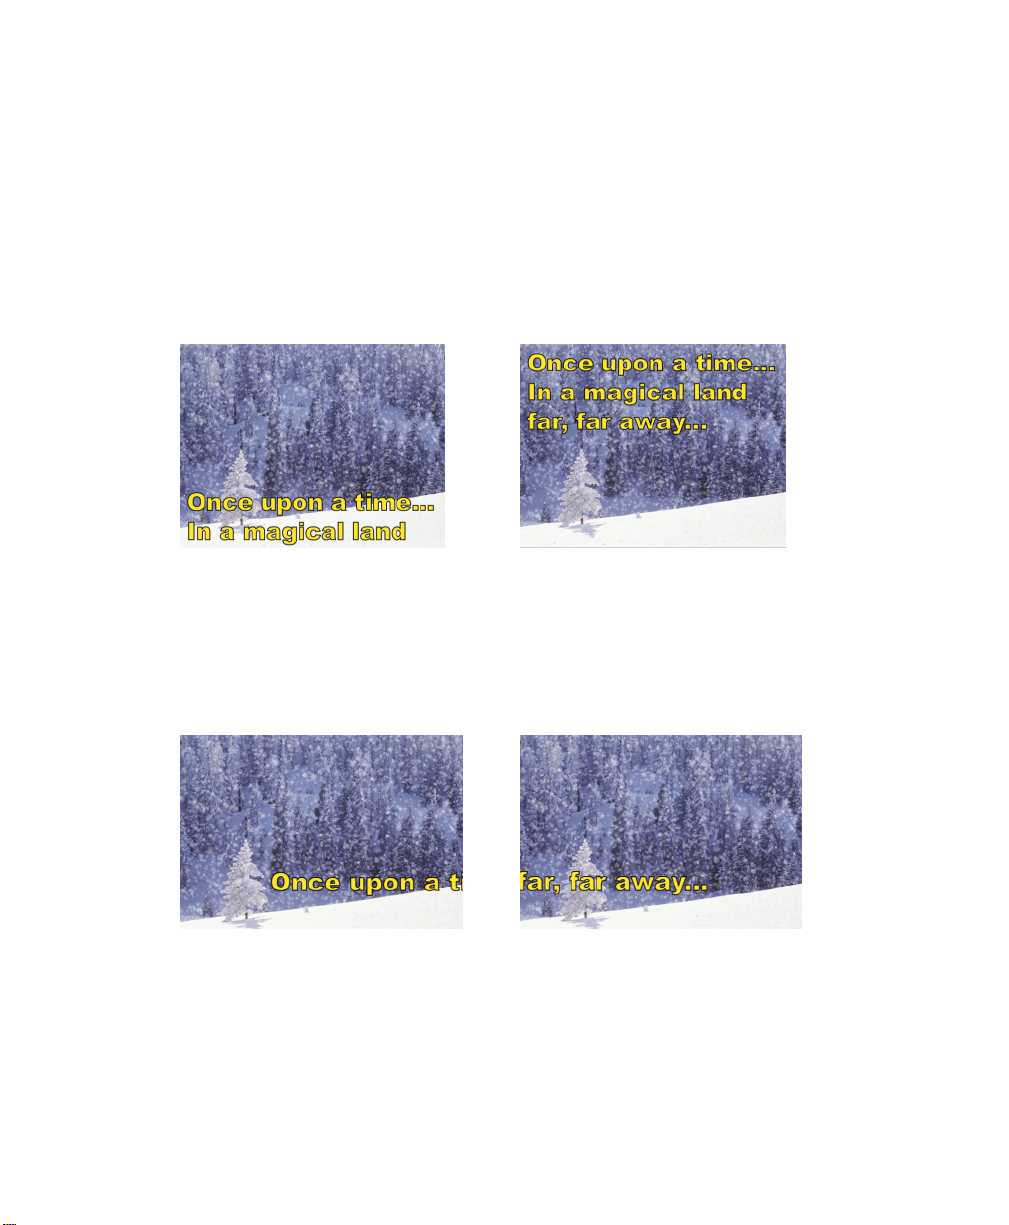
The
Animation Style menu
determines what type of animation is applied to the text track.
When the Animation Style menu is set to None, the text tracks are not animated.
Boris Calligraphy
•
•
•
45
•
•
•
To create a roll, choose Roll from the
Animation Style menu.
When you create a text roll, the
Title Crawl Generator automatically keyframes the text page to roll up the screen. This
Generator automatically aligns and animates the text page so that you do not have to set
keyframes in the timeline. However, you can also manually adjust the keyframes for more
precise control over the effect.
Text roll
Time 00:00:01:00 Time 00:00:02:00
To create a crawl, choose Crawl from the
Animation Style menu
. Crawl moves all the text
horizontally across the screen. The Title Crawl Generator automatically keyframes the text
page to crawl across the screen. This Generator automatically aligns and animates the text
page so that you do not have to set keyframes in the timeline. However, you can also
manually adjust the keyframes for more precise control over the effect.
Text crawl
Time 00:00:01:00 Time 00:00:02:00
When you create a text roll,
Mask Start
and
Mask End
set the distance, in pixels, of masks at
the top and bottom edges of the frame which hide the text as it rolls. In a text crawl,
Start
and
Mask End
set the distance, in pixels, of masks at the left and right edges of the
frame which hide the text as it rolls.
Mask
Page 46
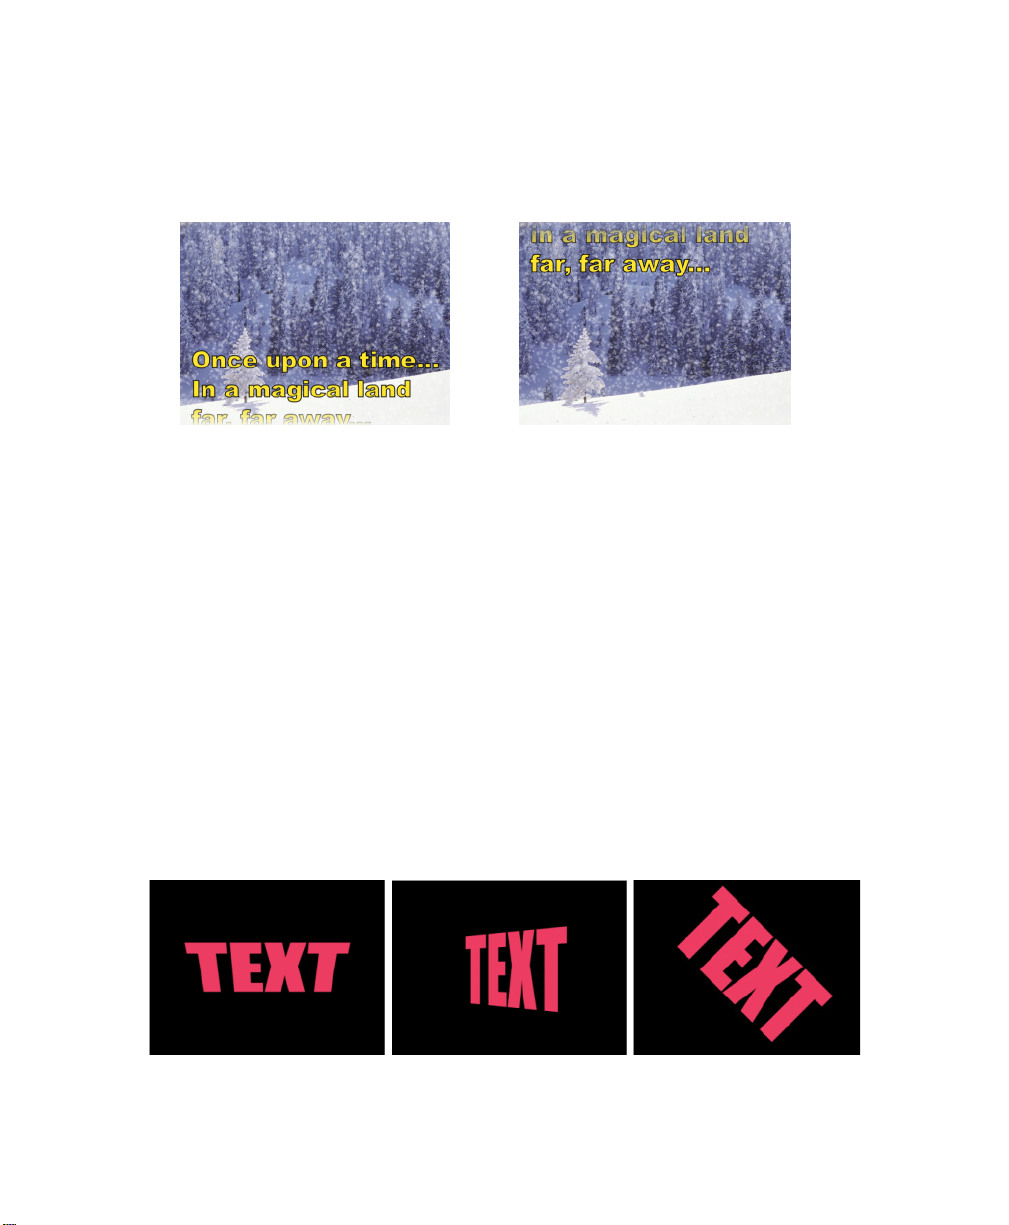
46
•
•
•
•
•
•
and
Blend Start
Blend End
soften the edges of the mask, causing titles to “fade” into and out
of the masked region.
Text roll with blended mask
Time 00:00:01:00 Time 00:00:02:00
The
Reverse Direction checkbox
reverses the direction of the roll or crawl, causing tracks to
move from top to bottom instead of bottom to top (text roll) or from left to right instead of
right to left (text crawl).
Position X/Y
set the coordinates of the text’s center point. When the Animation Style menu
is set to Roll, keyframes are automatically set for Position Y to move each track up the
screen. Adjust Position X/Y to offset the rolled titles to the left or right. When the Animation
Style menu is set to Crawl, keyframes are automatically set for Position X to move the text
across the screen. Adjust Position X/Y to offset the crawled titles upward or downward.
Opacity
adjusts the opacity of the text. At a value of 0, text is completely transparent, and at
a value of 100, text is completely opaque. Intermediate values produce varying degrees of
transparency.
Position Z
Tumble, Spin
adjusts the apparent depth of the text.
, and
Rotate
change the text’s perspective along the X, Y, and Z axes
respectively. Tumble, Spin, and Rotate can be animated over values greater than 360° in
order to make the shape complete more than one full revolution.
Tumble Spin Rotate
Page 47
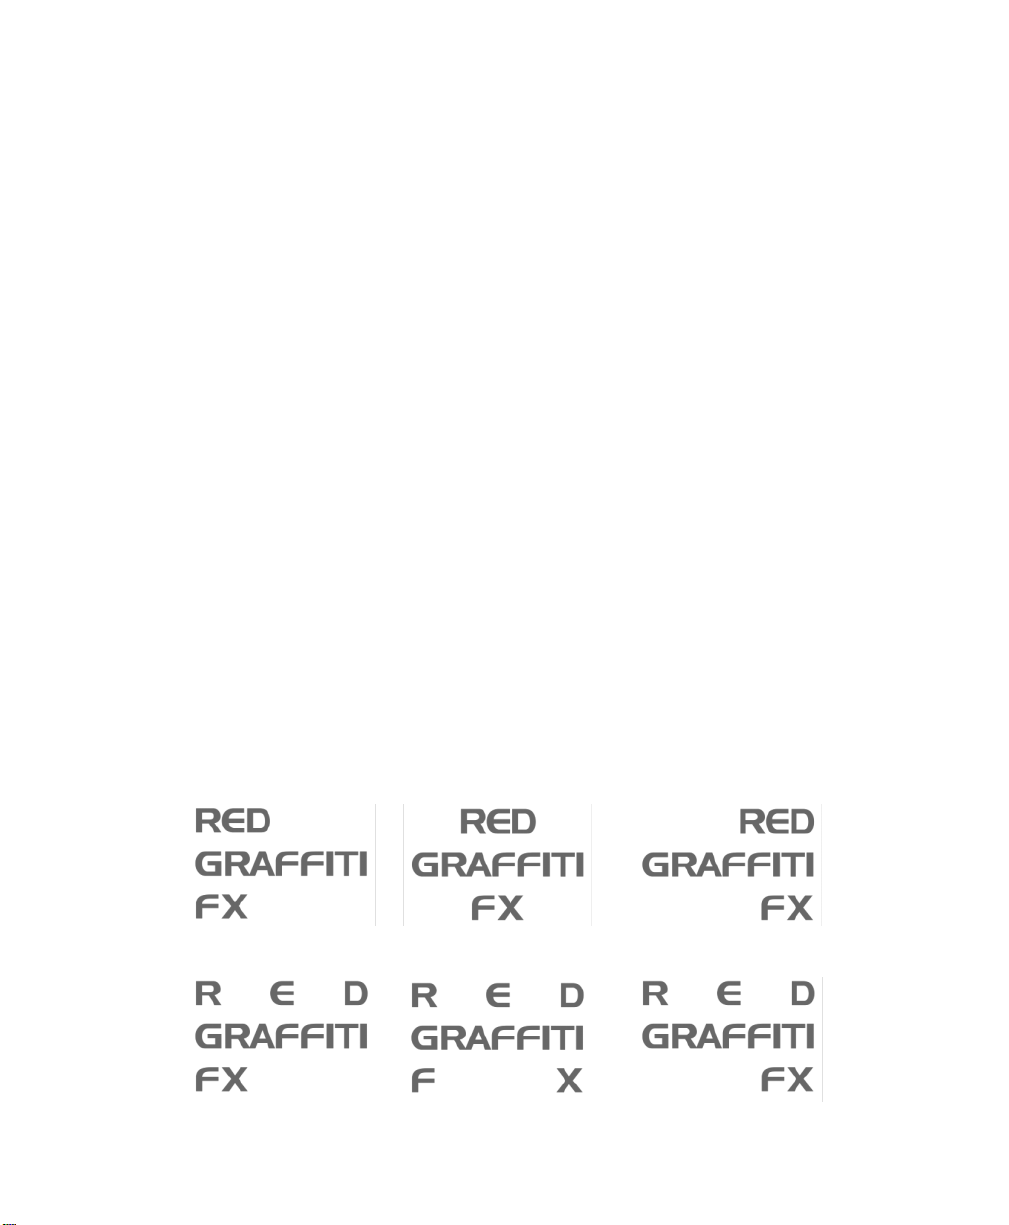
Boris Calligraphy
•
•
•
47
•
•
•
When the
around its own center. If this option is deselected, you can set an external pivot point around
which to tumble, spin, or rotate.
pivot point. If the Lock Pivot checkbox is selected, moving the pivot point has no affect.
The
(text crawl) the selected text page. This value is expressed in pixels.
The
The Word Wrap menu includes the following options.
• Choose
• Choose Off
Lock Pivot to Position checkbox
Page Header
Word Wrap menu
Text window’s Page tab.
and
Page Footer
sets whether or not the Word Wrap set in the Text window is used.
No Override to use the Word Wrap that you set in the Text Wrap menu in the
to override the Text window’s Word Wrap setting and turn off Word Wrap.
is selected, the text tumbles, spins, and rotates
Pivot X/Y
add space above and below (text roll) or before and after
and
Pivot Z
set the X, Y, and Z coordinates of the
• Choose On to override the Text window’s Word Wrap setting and turn on Word Wrap.
When you have selected On in the Word Wrap menu, additional lines of text are created if
the text exceeds the chosen
it moves to the next line. When wrap is on, it affects the justiÞcation setting. For example, if
you choose Left JustiÞcation with
Width.
When you have selected On in the Word Wrap menu, the
horizontally. The text is justiÞed in relation to the page width and height. This parameter
affects the text globally, regardless of which characters are currently selected. The
JustiÞcation menu includes the following choices, Left, Center, Right, Flush Left, Force and
Flush Right. The Flush and Force choices justify the text to both margins when you work
with more than one line of text. Flush Left JustiÞcation forces all lines of text to center justify
and left justiÞes the last line. Force JustiÞcation forces all lines of text to center justify. Flush
Right JustiÞcation forces all lines of text to center justify and right justiÞes the last line.
Page Width
Wrap
value. As a word passes the limit of the Page Width,
on, the text if left justiÞed within the speciÞed Page
JustiÞcation menu
aligns text
Left Justification Center Justification Right Justification
Flush Left Justification Force Justification Flush Right Justification
Page 48
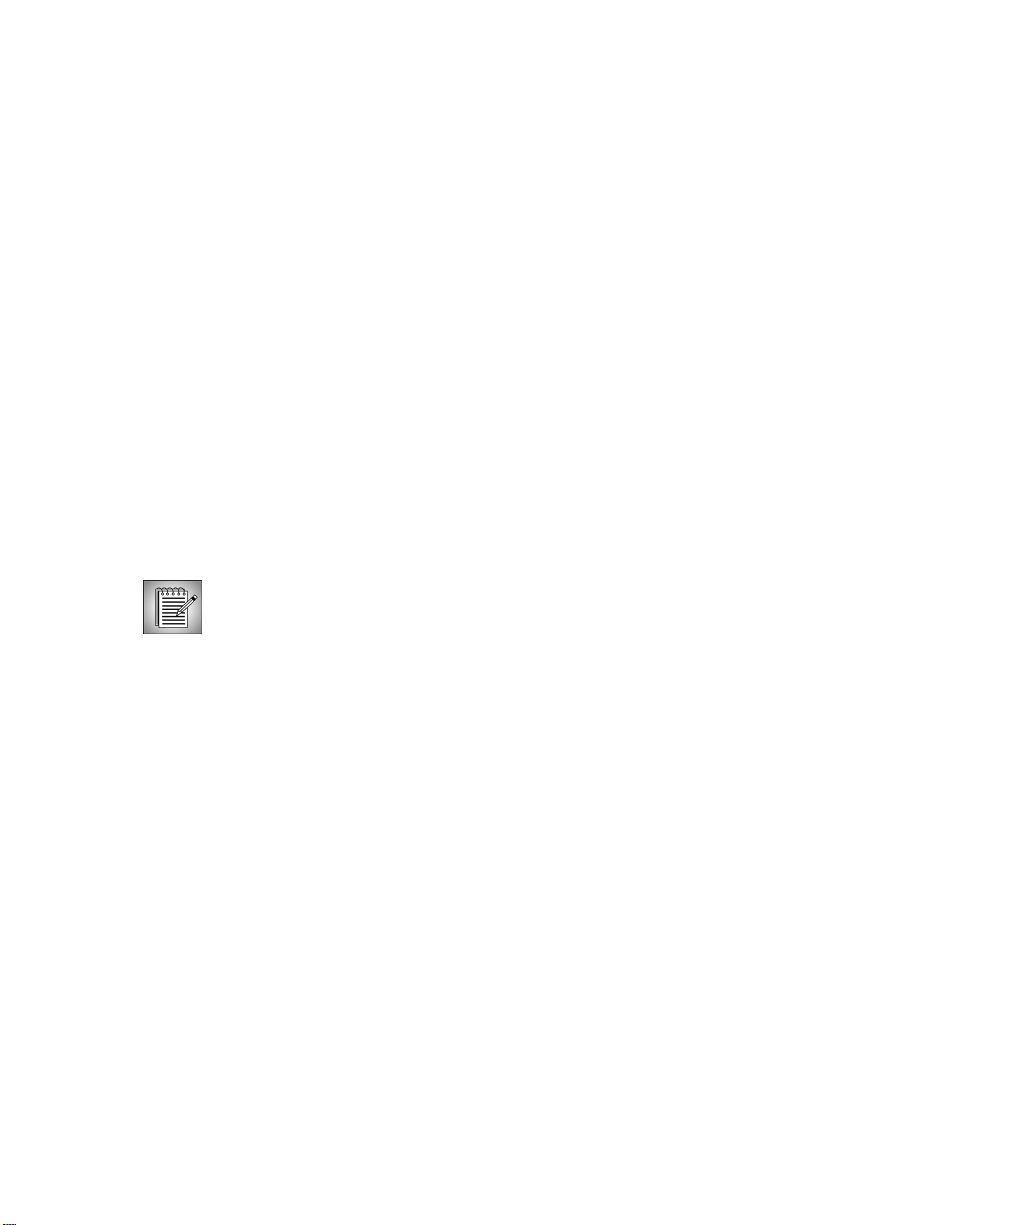
48
•
•
•
•
•
•
The
Use Percent Completion checkbox
animated manually. When this checkbox is selected,
position of the text. When this checkbox is deselected, Percent Completion has no affect.
determines whether the text auto-animates or is
Percent Completion
animates the
When the
to recalculate based on Transformations parameter changes. While this is useful for speciÞc
types of effects, it is unnecessary for many effects and can slow performance - most
noticeably when using sophisticated text styles or long text rolls. Select the Continuously
Rasterize checkbox to improve image quality in the following situations.
Continuously Rasterize checkbox
is selected, the vector form of the text is forced
• When the Scale parameters are set to scale the text much larger than 100% size.
• When using large negative Position Z values.
• When the Tumble or Spin parameters are set so that parts of the text appear very close
to the viewer.
• When Rotating text with a bevel or emboss style and you want the highlight to
recalculate accordingly.
When using the Continuously Rasterize option, set up the effect with the option disabled to
improved preview performance. Then select the option as a Þnal step to improve the render.
Note that the 1:2:1 DeFlicker option does not apply if Continuously Rasterize is
enabled.
Page 49
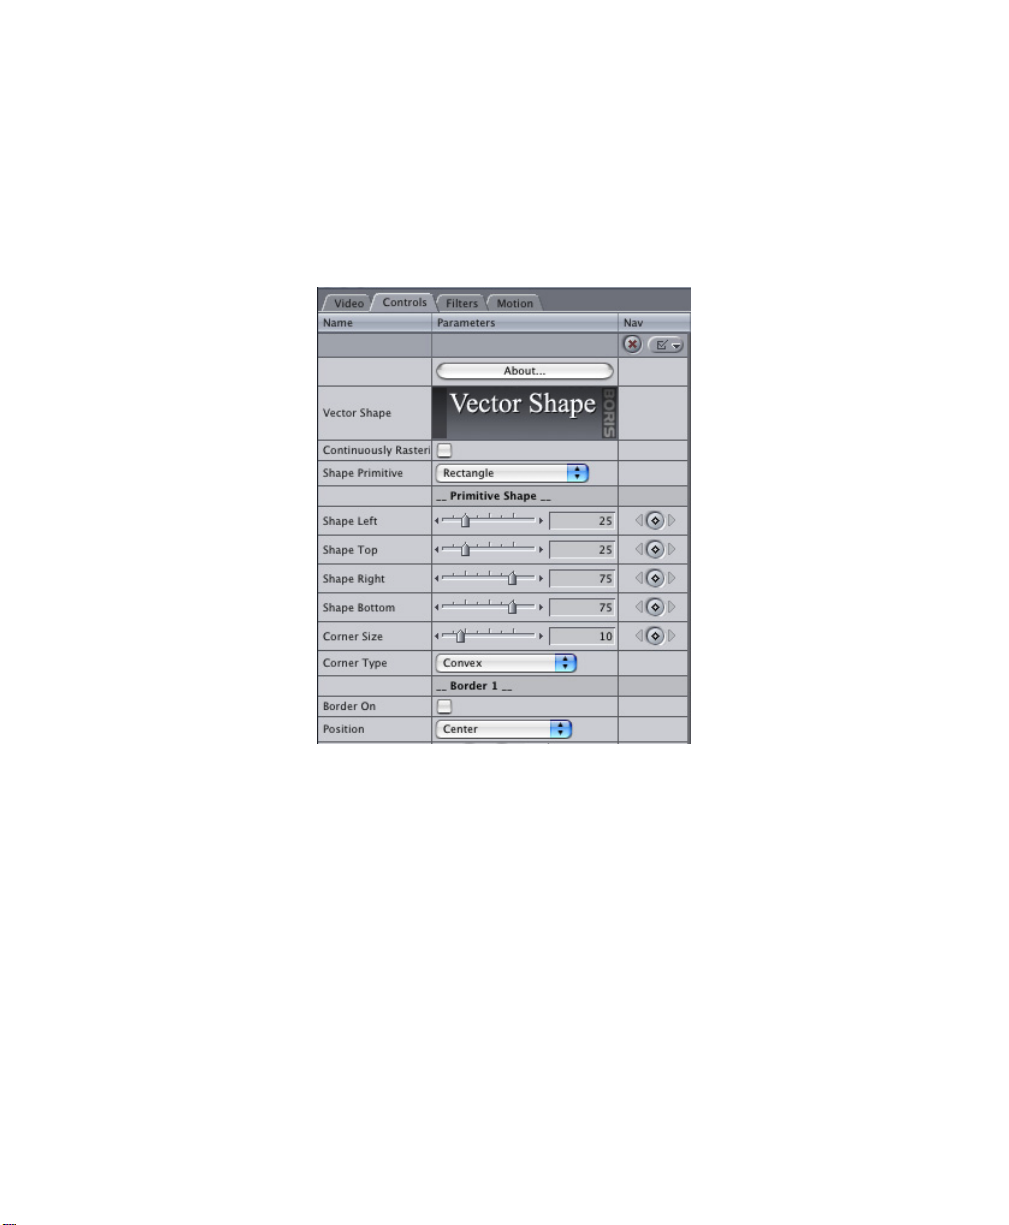
Working with the Vector Shape Generator
The Vector Shape Þlter allows you to quickly create color backdrops behind text using
rectangular or oval shapes. You can add a border and set the Þll of the backdrop using the
Border and Fill parameter groups.
Boris Calligraphy
•
•
•
49
•
•
•
To create a backdrop behind text, you can apply the Vector Shape Þlter to a layer below the
text layer in the timeline.
When the
forced to recalculate based on Transformations parameter changes. While this is useful for
speciÞc types of effects, it is unnecessary for many effects and can slow performance - most
noticeably when using sophisticated text styles.
Select the Continuously Rasterize checkbox to improve quality in the following situations.
Continuously Rasterize checkbox
is selected, the vector form of the backdrop is
• When the Scale parameters are set to scale the backdrop much larger than 100% size.
• When using large negative Position Z values.
• When the Tumble or Spin parameters are set so that parts of the backdrop appear very
close to the viewer.
• When Rotating backdrops with a bevel or emboss style and you want the highlight to
recalculate accordingly.
Page 50
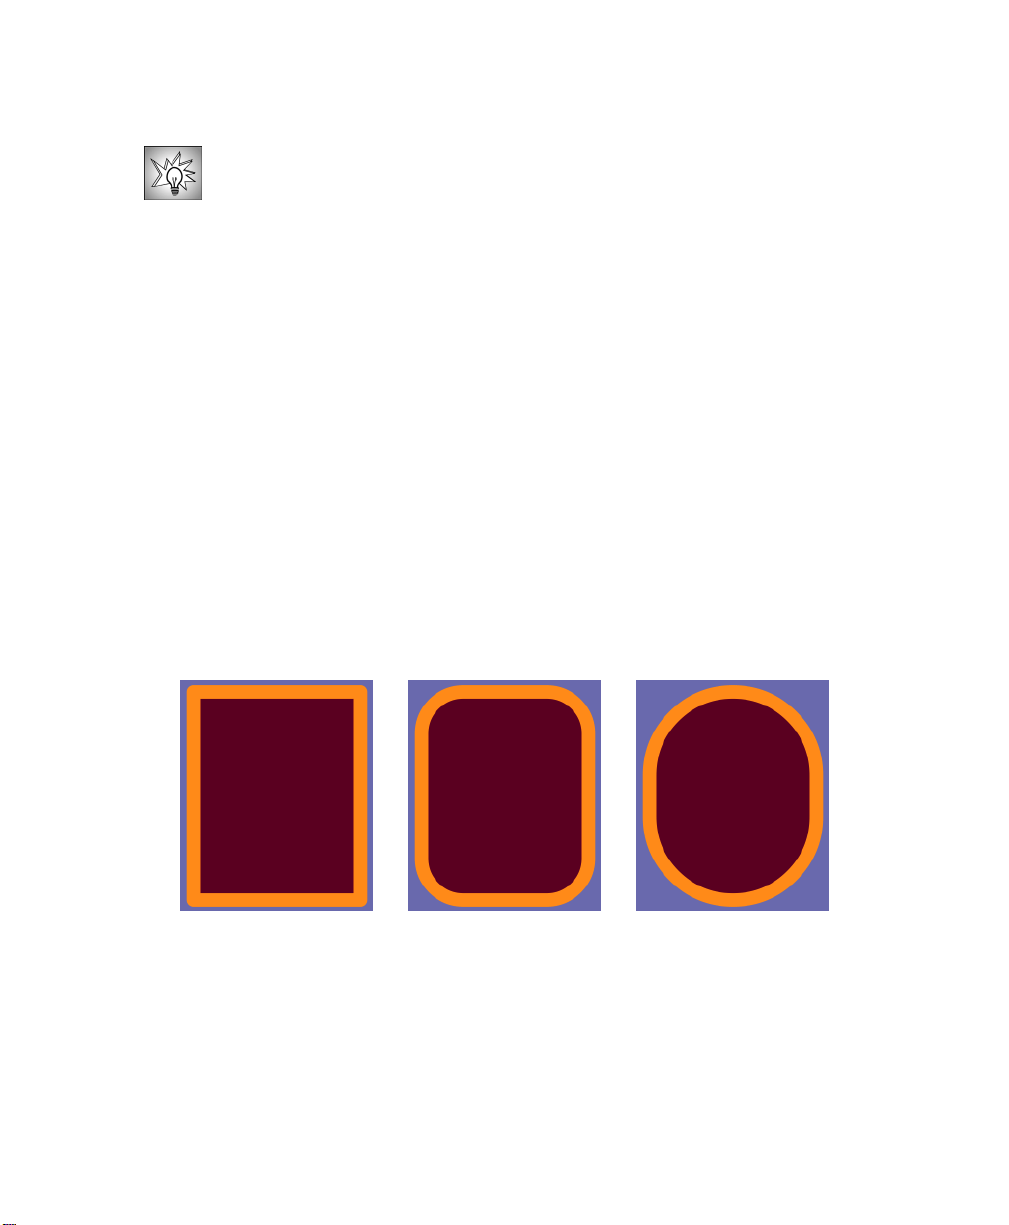
50
•
•
•
•
•
•
When using the Continuously Rasterize option, set up the effect with the option
disabled to improve preview performance. Then select the option as a Þnal step to
improve the quality of the render.
You only need to select the Continuously Rasterize checkbox for any Transformations. The
Vector form of the backdrop is always recalculated for any scaling or rotating or
repositioning in the Primitive Shape, Border 1, Border 2, Border 3, Shape Fill and Shadow
parameter groups.
The
Shape Primitive menu
Oval.
sets the shape of the backdrop. The choices are Rectangle and
Working with the Primitive Shape Parameter Group
The parameters in the Primitive Shape parameter group allow you to adjust the size and
shape of the backdrop.
Working with the Rectangle
When the Shape Primitive menu is set to Rectangle,
and
Shape Bottom
scaled as percentages of the width and height of the Project size.
control the positions of the corners of the rectangle. These values are
Shape Left, Shape Top, Shape Right
,
Corner Size
The
Corner Type menu
adjusts the size of the rectangle’s corners.
Corner Size=0 Corner Size=25 Corner Size=50
sets the shape of the rectangle’s corners.
• Convex produces corners that curve inward.
• Concave produces corners that curve outward.
• Straight produces corners that are straight lines.
Page 51
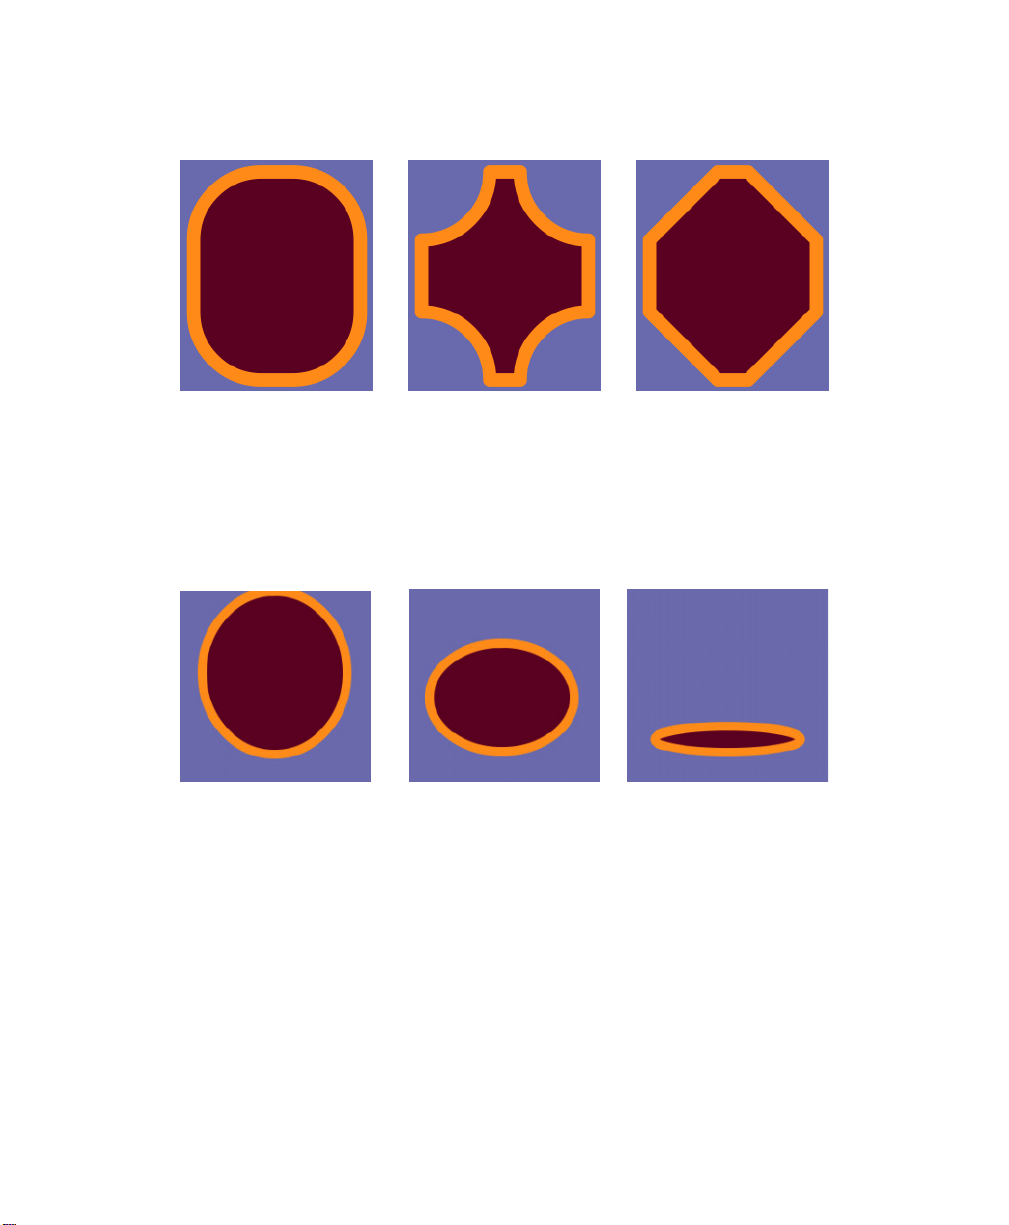
Boris Calligraphy
Corner Type=Convex Corner Type=Concave Corner Type=Straight
Working with the Oval
When the Shape Primitive menu is set to Oval,
Shape Bottom
inscribed. These values are scaled as percentages of the width and height. When the Shape
Primitive menu is set to Oval, the other controls in this parameter group have no effect.
control the positions of the corners of a rectangle in which the oval is
Shape Left, Shape Top, Shape Right
, and
•
•
•
51
•
•
•
Shape Top=0 Shape Top=25 Shape Top=63
Working with the Border 1, Border 2 and Border 3 Parameter Groups
The Border 1, Border 2 and Border 3 parameter groups allows you to apply up to three ßat
borders to the backdrops. By default, the Border parameter groups are set to have no border.
Each parameter group offers the following controls, except for the Border 3 parameter
group which does not contain the Border Begin, Border End, or Border Offset parameters.
The Border On checkbox allows you to individually enable and disable each border.
Position
sets the location of the border.
• Inside positions the border on the inside of the edges.
• Outside positions the border on the outside of the edges.
• Center centers the border over the edges of the backdrop, so half of the border is on the
inside of the edges, and half on the outside.
Page 52
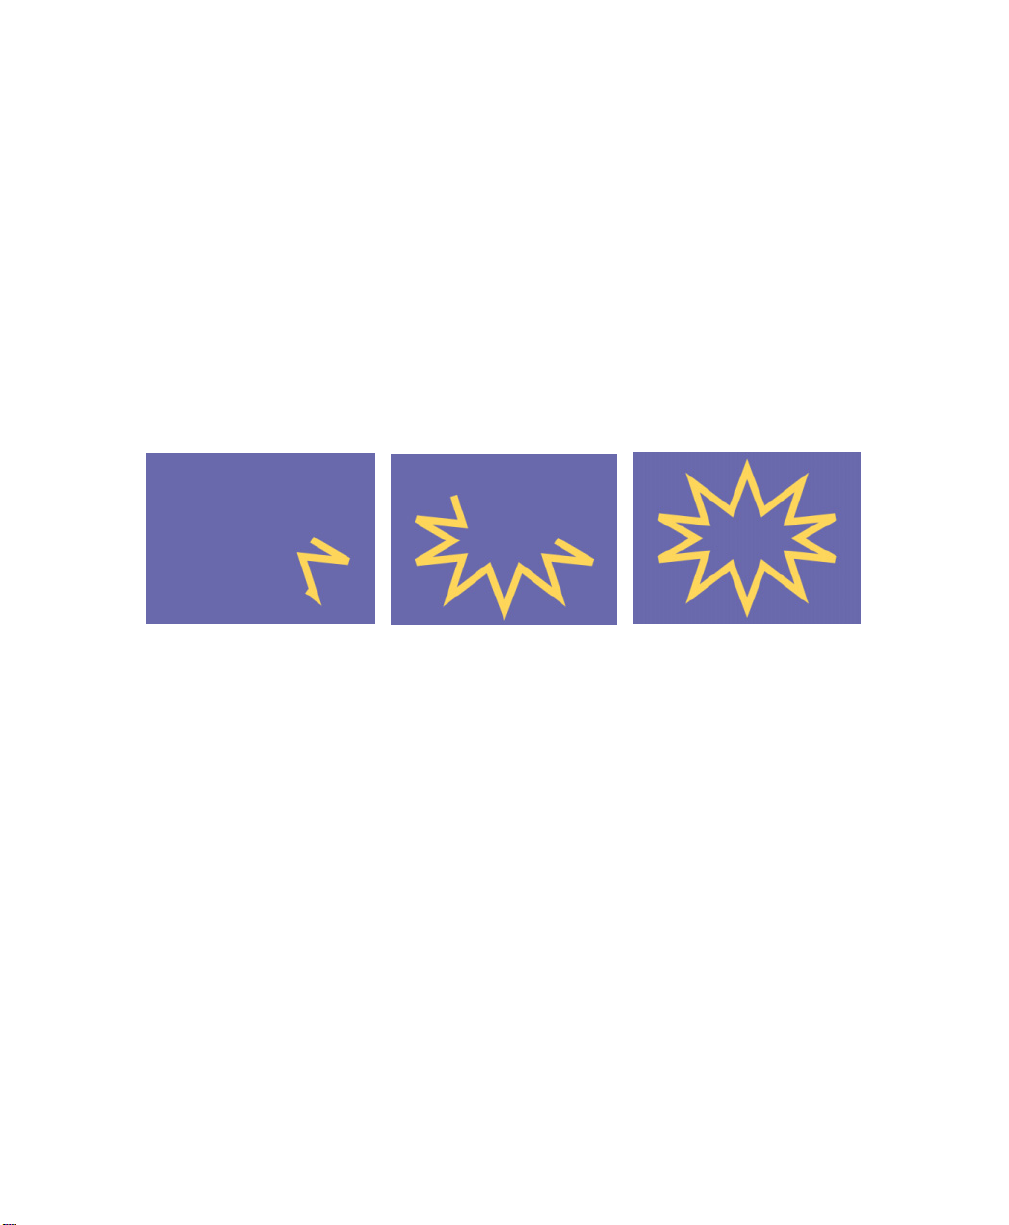
52
•
•
•
•
•
•
sets the color of the border. Click the color chip to access the system color picker, or
Color
use the eyedropper to choose a color from the screen.
Width
sets the width, in pixels, of the border.
Opacity
opaque, while a setting of 0 makes the border completely transparent.
adjusts the opacity of the border. A setting of 100 makes the border completely
Border Begin
in the timeline, allowing you to create animated border effects. These values are measured
as a percentage of the complete border. For example, if Border Start is set to 0 and Border
End is set to 50, the Þrst half of the border is visible. If Border Start is set to 50 and Border
End to 100, the second half of the border is visible. The Border 3 parameter group does not
contain these parameters.
Effect with Border End animated from 0 to 100.
Frame 7 Frame 20 Frame 29
Use the
portion of the border and animate it around the backdrop. The Border 3 parameter group
does not contain this parameter
Softness
raising this value increasingly softens the border.
The
Cap and Join menu
and
Border End
Border Offset
softens the edge of the border. A value of 0 creates a border with a hard edge, and
adjust the percentage of the border that is visible at each frame
dial in conjunction with Border Begin and Border End to select a
controls the shape of the ends of the border.
• Flat/Miter draws ßat ends and corners with sharp points.
• Flat/Round draws ßat ends and rounded corners.
• Flat/Bevel draws ßat ends and clipped corners.
• Round/Miter adds a circular cap to the ends and draws corners with sharp points.
• Round/Round adds a circular cap to the ends and draws rounded corners.
• Round/Bevel adds a circular cap to the ends and draws clipped corners.
Page 53
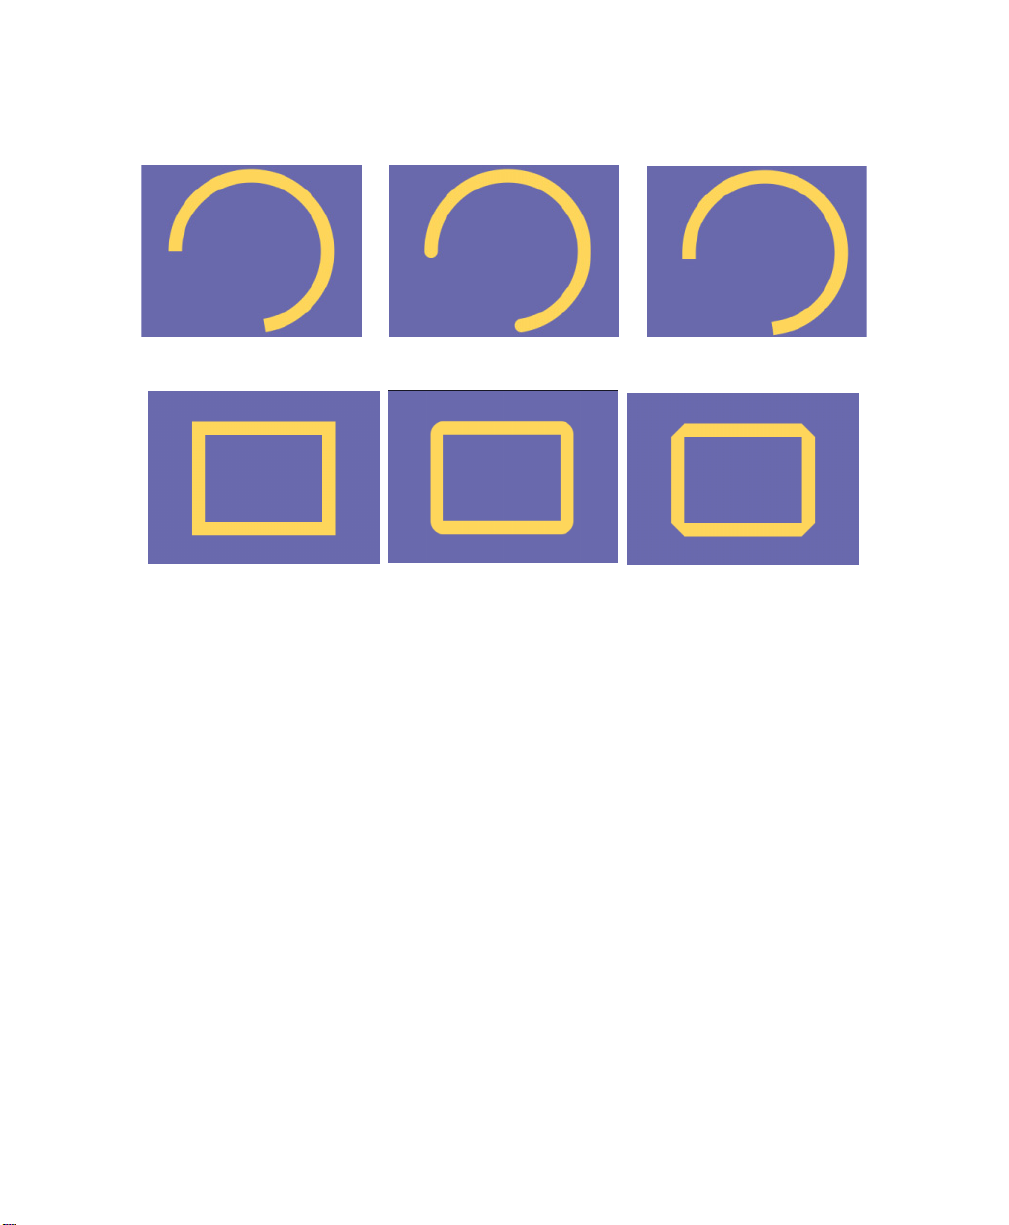
Flat Flat/Round Flat/Bevel
Miter Round Bevel
Boris Calligraphy
•
•
•
53
•
•
•
Working with the Shape Fill Parameter Group
The Shape Fill parameters set the Þll of the backdrop.
Select the
unÞlled.
Fill Opacity
Fill Color
use the eyedropper to choose a color from the screen.
Fill On checkbox
determines the opacity of the Þll.
sets the color of the Þll. Click the color chip to access the system color picker or
to turn on the Þll. Deselect this option to leave the backdrop
Working with the Transformations Parameter Group
Opacity
while a setting of 0 makes the text completely transparent.
Position X/Y
values to offset the text as it moves in or out
Position Z
closer to the viewer, while increasing positive values move the text farther away. Very low
Position Z values move the text behind the viewer, making it invisible.
adjusts the opacity of the text. A setting of 100 makes the text completely opaque,
set the coordinates of the text’s center point. You can adjust or animate these
adjusts the apparent depth of the text. Decreasing negative values move the text
Page 54
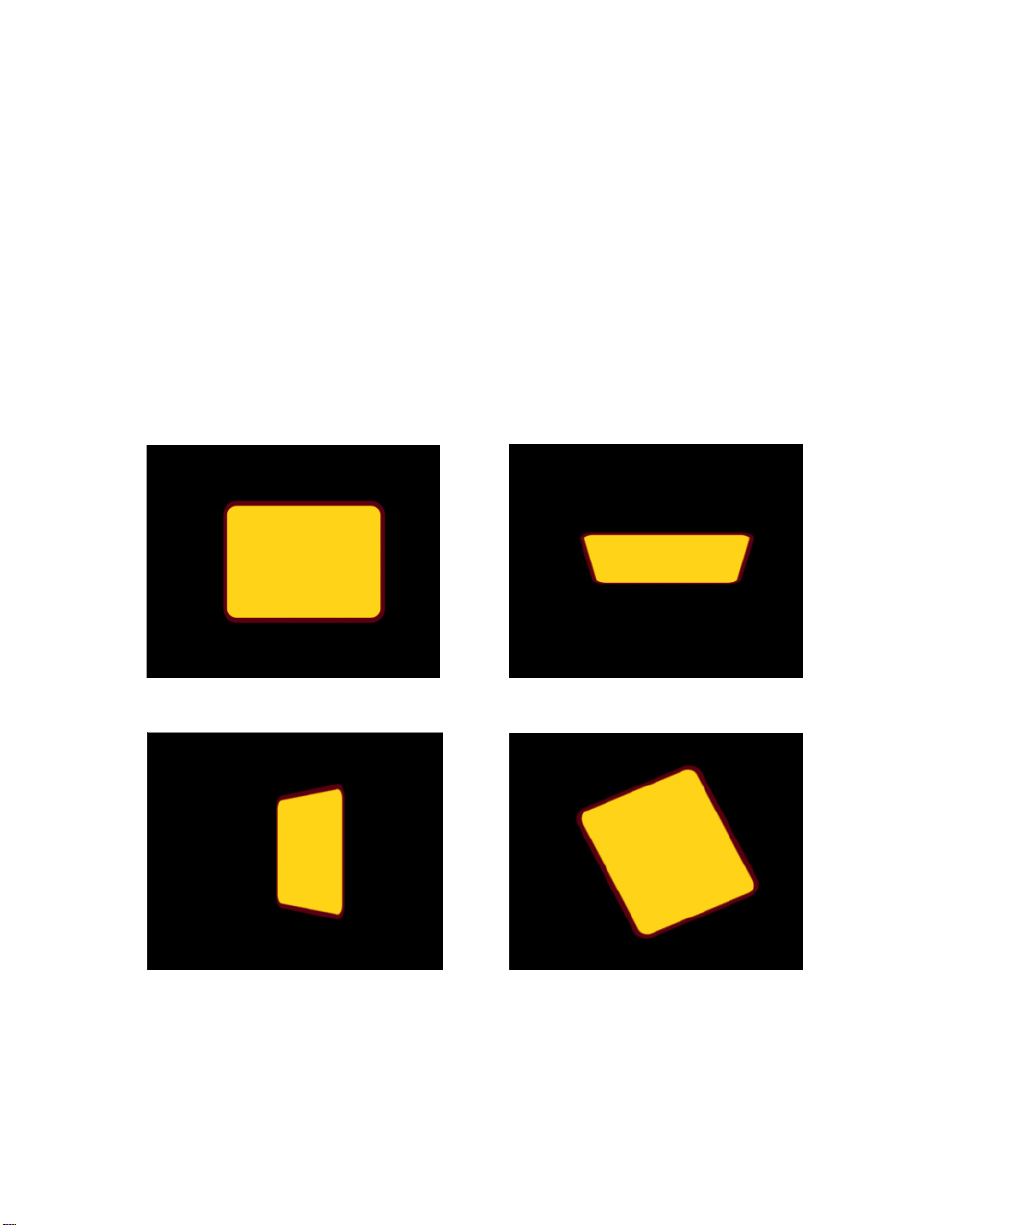
54
•
•
•
•
•
•
Master Scale lets you adjust Scale parameters globally. Parameters can still be changed
independent of one another by using the individual Scale parameters. For example, you set
Scale X to 100 and Scale Y to 200 to create a backdrop that is stretched vertically. If you then
set Master Scale to 200, the resulting backdrop is twice as wide and four times as tall as the
original.
Scale X
and
Scale Y
These parameters are scaled as percentages of the object’s original width or height. Thus, a
Scale X setting of 200 produces a backdrop twice as wide as the original.
change the size of the backdrop along the X and Y axes, respectively.
Tumble, Spin
Tumble, Spin, and Rotate can animate over values greater than 360° to make the image
complete more than one full revolution.
No Transformations Tumble=65 Degrees
, and
Rotate
move the backdrop around the X, Y, and Z axis respectively.
Spin=-65 Degrees Rotate=65 Degrees
If you rotate your backdrop using the Tumble, Spin or Rotate parameters, PreRotate
Position X/Y positions the backdrop ignoring any of these transformations and uses the
original coordinates of the plane. This parameter can show a different result than adjusting
the Position X/Y parameter which positions the backdrop after any rotations are applied.
Page 55
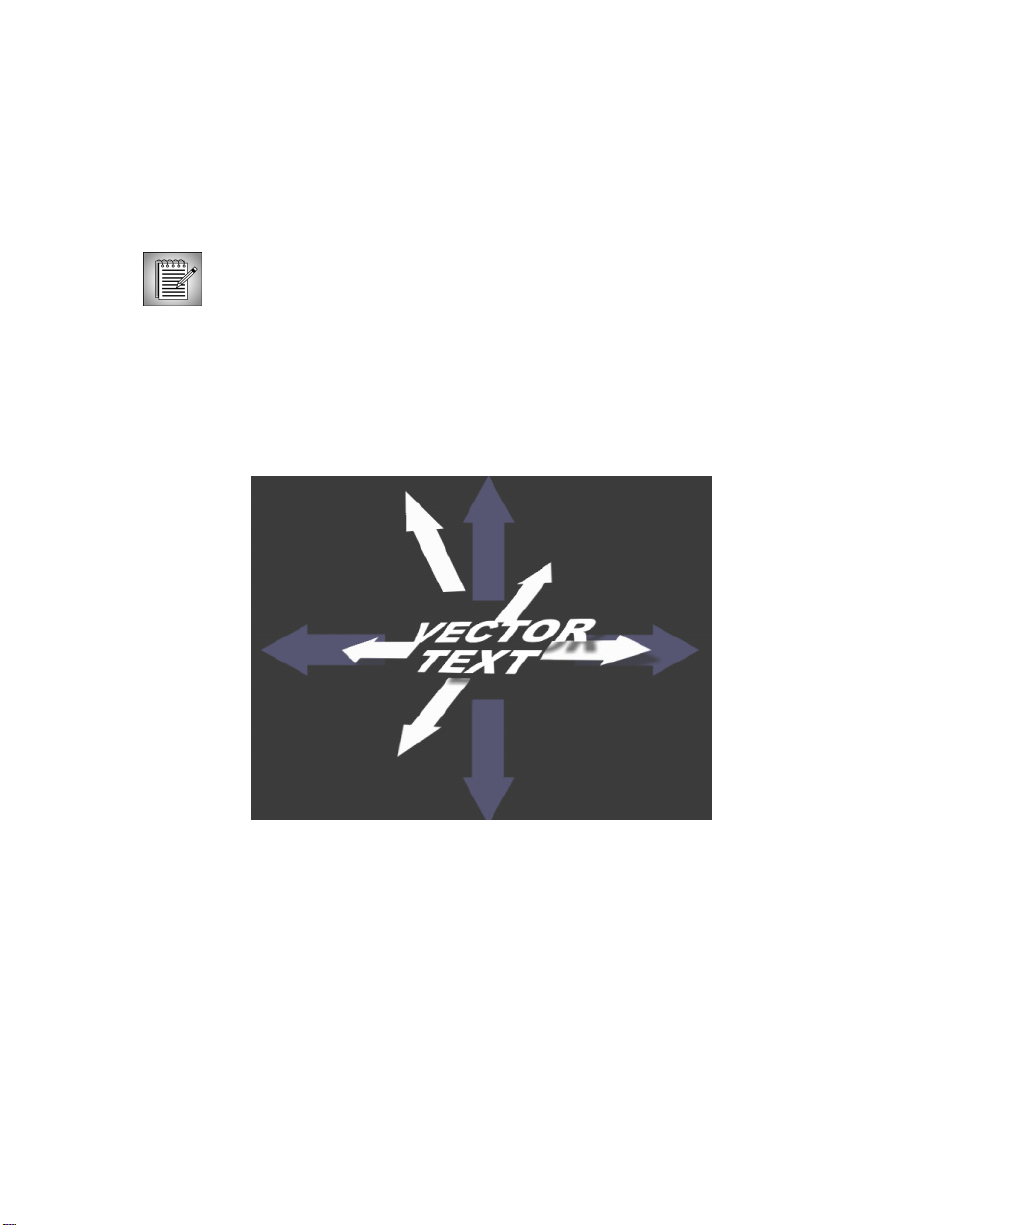
Boris Calligraphy
If you rotate your backdrop using the Tumble, Spin or Rotate parameters, PreRotate
Position Z positions the backdrop ignoring any of these transformations and uses the
original coordinates of the plane. This parameter can show a different result than adjusting
the Position Z parameter which positions the backdrop after any rotations are applied.
It is useful to remember that the pivot point remains at the actual X, Y, or Z position
even when you change the PreRotate parameters. For example if you alter a
PreRotate parameter and then spin the backdrop, the backdrop will spin around
the pivot point at its original position and not the PreRotated position.
In the example below the words “Vector Text” are rotated by using the Spin and Tumble
parameters. The lighter arrows show the positioning of the text using the PreRotate Position
X and Y parameters. The darker arrows show the positioning of the text with the Position
X, Y and Z parameters. (Position Z would point directly at you).
•
•
•
55
•
•
•
When the
around its own center. If this option is deselected, you can set an external pivot point around
which to tumble, spin, or rotate.
pivot point. If the Lock Pivot checkbox is selected, moving the pivot point has no affect.
Lock Pivot to Position checkbox
Pivot X/Y
is selected, the text tumbles, spins, and rotates
and
Pivot Z
set the X, Y, and Z coordinates of the
Page 56
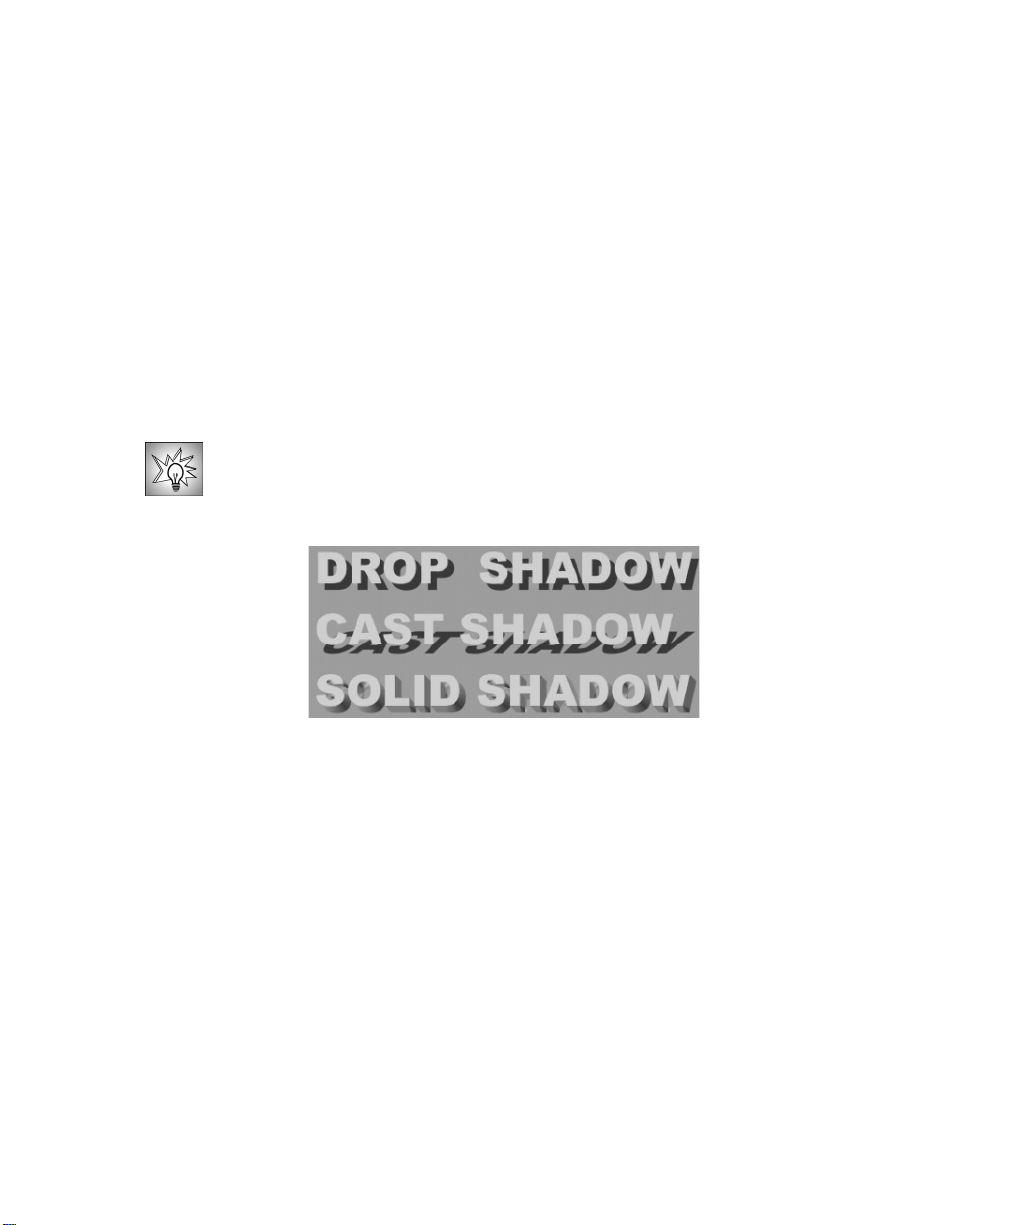
56
•
•
•
•
•
•
Working with the Shadows Parameter Group
The Shadows parameter group applies one of three types of shadows to the backdrop.
Shadow Type menu
The
determines what type of shadow is created.
• None does not apply a shadow.
• Drop shadows fall a speciÞed distance from the object.
• Cast shadows appear to fall on another object; the appearance of this type of shadow
depends on the Shadow Distance and Shadow Angle that you set.
• Solid shadows simulate a 3D appearance by applying a gradient to a shadow. Solid
shadows are useful if you want to create text with a three dimensional appearance but
do not need to apply transformations that would reveal that the text is actually 2D.
You can animate the solid shadow because the shadow honors the Border Begin,
Border End and Border Offset parameters of Border 1 (whether or not Border 1 is
enabled). To create a solid shadow around an entire backdrop, make sure that
Border 1’s Border Begin, End and Offset parameters are at the default positions.
Shadow Color
picker, or use the eyedropper to choose a color from the screen. You can also apply colors
from the Style Palette. For details, see “Working with the Style Palette” on page 30.
Shadow Distance
offset the text slightly; use a larger value to create distinct shadows that appear to fall on
another surface.
Shadow Opacity
opaque. Lowering this value makes the shadow increasingly transparent. A value of 0
creates a completely transparent shadow.
Shadow Softness
light source. A value of 0 creates hard edges. Increasing this value softens the shadow edges.
Shadow Angle
When the
highlighted areas of the shadow, and
the color chip to access the system color picker, or use the eyedropper to choose a color from
the screen. These parameters have no affect with any other shadow type.
sets the color of the shadow. Click the color chip to access the system color
sets the distance between the shadow and the text. Use a small value to
sets the degree of opacity. A value of 100 makes the shadow completely
softens the edges, emulating the appearance of shadows cast by a diffuse
sets the angle between the shadow and the horizontal axis of the text.
Shadow Type menu
is set to Solid Shadow,
Shade Color
sets the color of the shaded areas. Click
Highlight Color
sets the color of the
Page 57
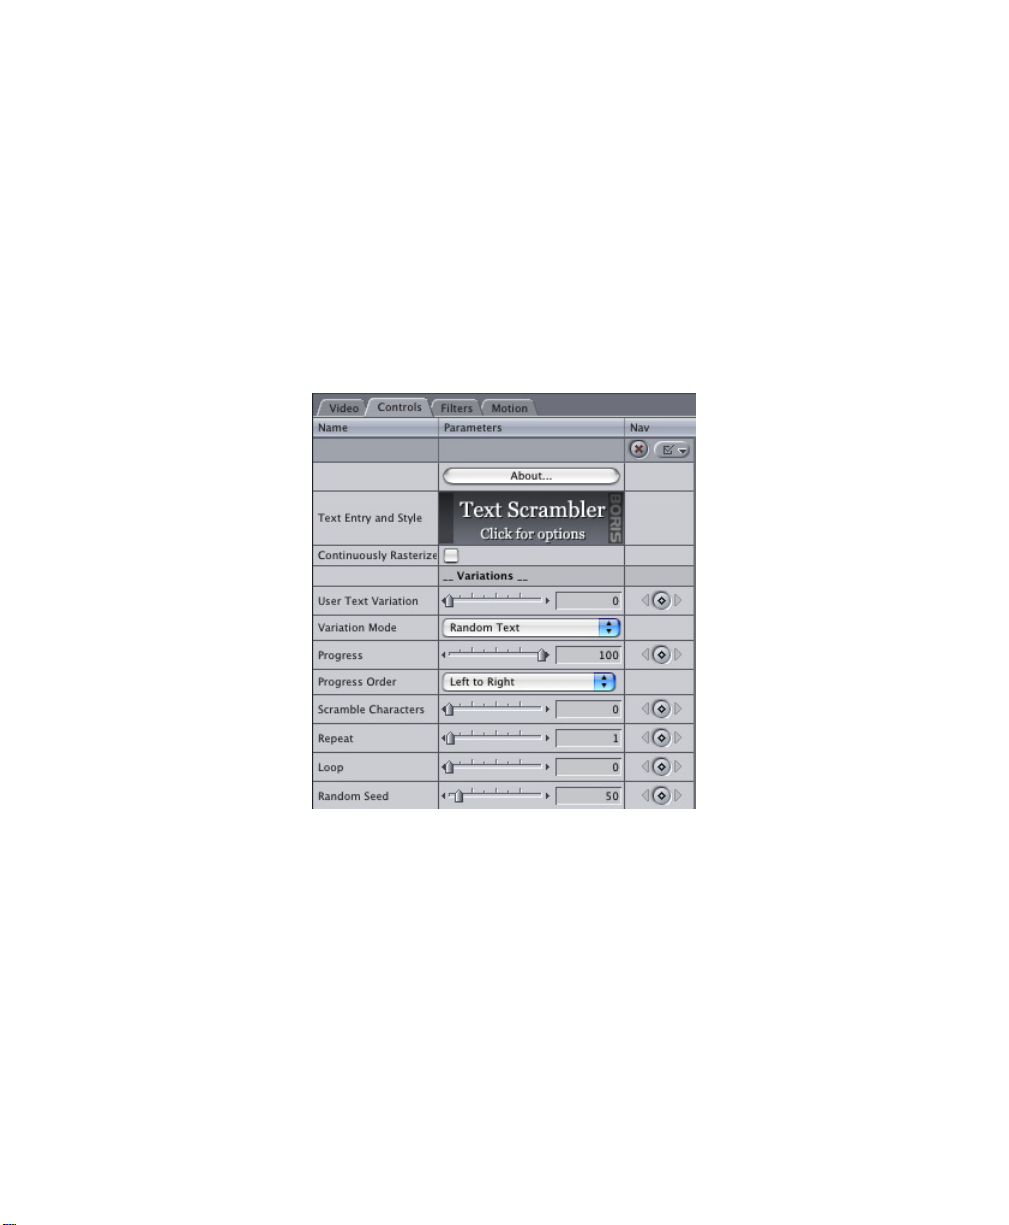
Working with the Text Scrambler
Text Scrambler randomizes or shufßes text characters and text styles in a variety of ways
and will jitter the size, position, hue and angle of text characters.
Many of the Text Scrambler parameters are similar to the Title 3D parameters. For instance,
you could use either Þlter to create a type on effect. However, the Text Scrambler also allows
you to randomize text. Conversely, the Title 3D Þlter allows you to create animatable
shadows and borders. The Text Scrambler does not include a Border and Shadows
parameter group.
Boris Calligraphy
•
•
•
57
•
•
•
When the
to recalculate based on Page Transformations parameter changes. While this can be useful
for speciÞc types of effects, it is unnecessary for many effects and can slow performance most noticeably when using sophisticated text styles.
Select the Continuously Rasterize checkbox to improve quality in the following situations.
Continuously Rasterize checkbox
is selected, the Vector form of the text is forced
• When the Scale parameters are set to scale the text much larger than 100% size.
• When using large negative Position Z values.
• When the Tumble or Spin parameters are set so that parts of the text appear very close
to the viewer.
• When Rotating text with a bevel or emboss style and you want the highlight to
recalculate accordingly.
Page 58
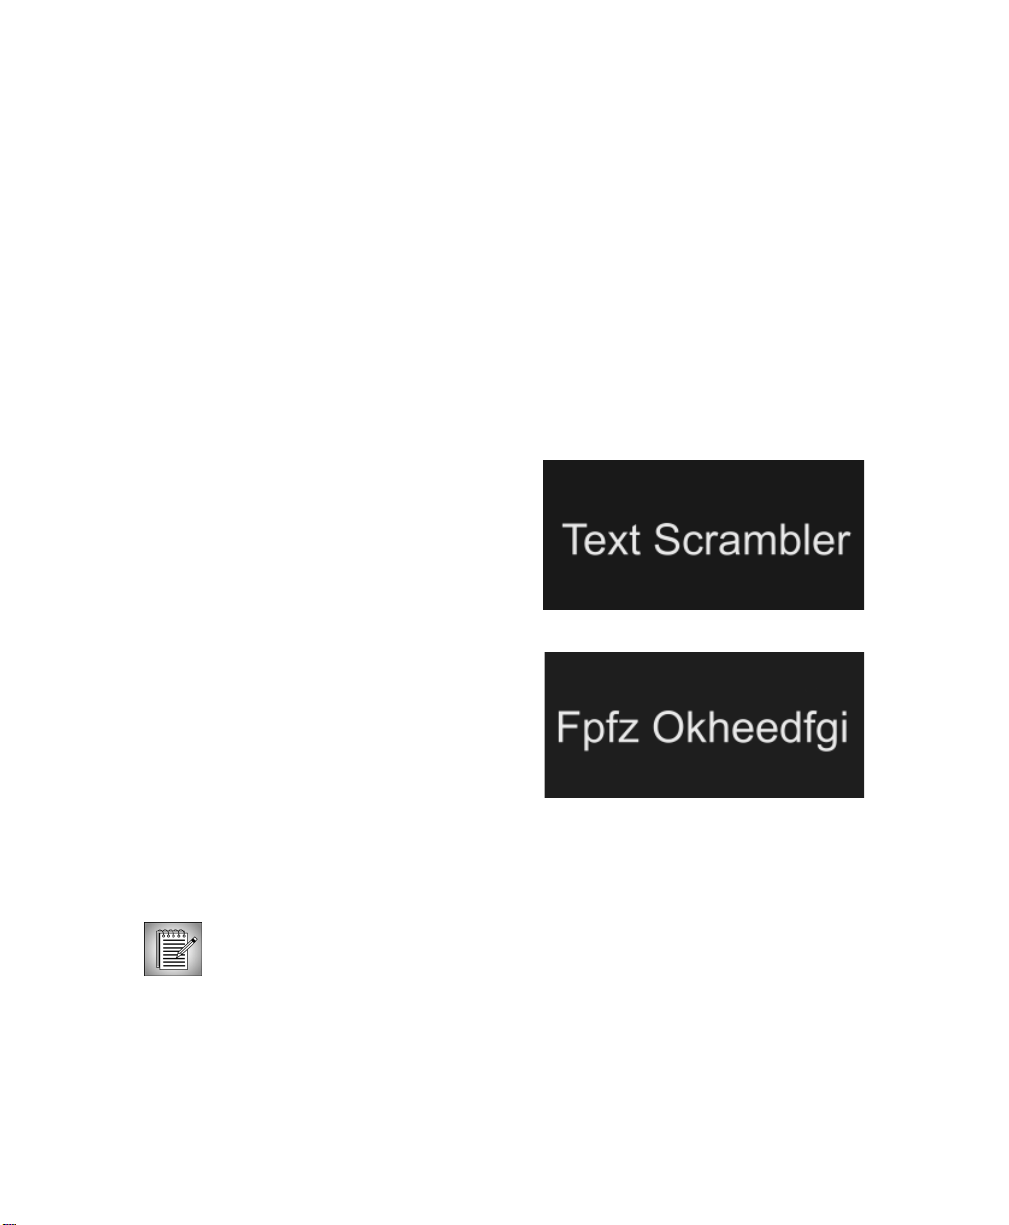
58
•
•
•
•
•
•
When using the Continuously Rasterize option, set up the effect with the option disabled to
improve preview performance. Then select the option as a Þnal step to improve the quality
of the render.
You only need to select the Continuously Rasterize checkbox for any Page Transformations.
The Vector form of the text is always recalculated for any scaling or rotating or repositioning
of text characters in the Variations, Letter Transformations, Type On, and Jitter parameter
groups.
Working with the Variations Parameter Group
The Variations parameter group provides ways to customize the text scramble, for example
locking each letter or number in position regardless of changes made to neighboring
characters.
The text created or imported in the Text
window is used in the Text Scrambler.
When you adjust User Text Variation, each
ASCII character value offsets by a certain
amount. This parameter is expressed as an
offset with a range of 0 to 100. When Letter
Variation is 0, no variation occurs. In the
example at right, Letter Variation is 6. You can
use the Scramble Characters parameter to
randomize the offset. The example to the right
was created using the words “Text Scrambler”.
The
Variation Mode menu
When you experiment with the choices in the
adjust User Text Variation to see how the animated text will vary.
The Variation Mode menu examples use the text and styles in the following illustration. The
examples below show one frame in an animation where the text constantly changes.
allows you to vary the characters included in the effect.
Variation Mode menu
, it is helpful to
Page 59
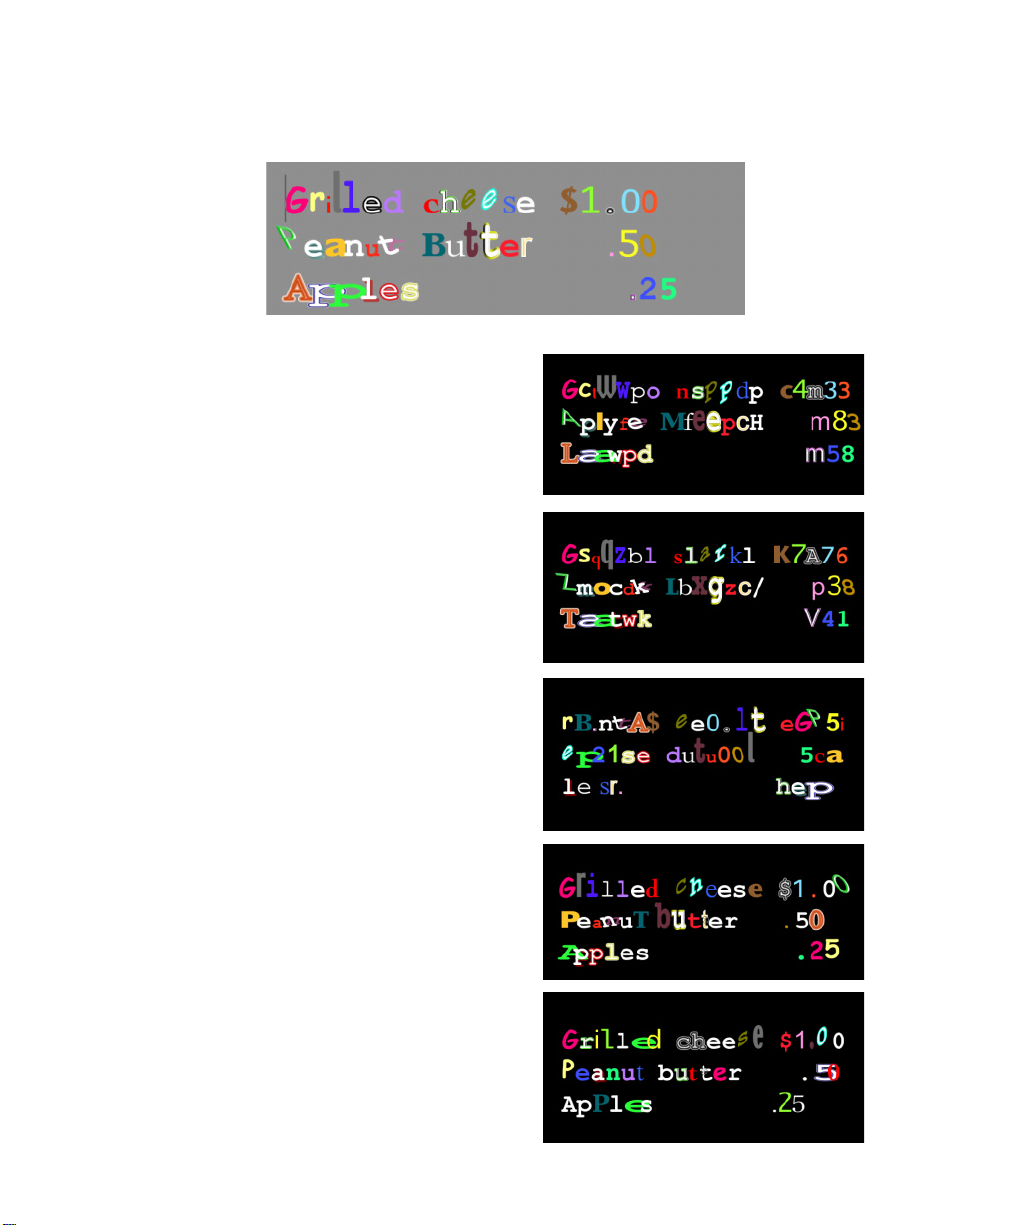
Text entered into Text window
• Alphabetical Text uses only alphabetical
characters, offset by the Letter Variation
amount. For example, all the “l” characters
from the original “Grilled” word are now
“w.”
• Random Text uses only alphabetical
characters, but the characters are
randomized. So the “l” characters from the
original “Grilled” word would not
necessarily be the same.
Boris Calligraphy
•
•
•
59
•
•
•
• Random User Text uses only the
alphabetical characters that are included in
the original user text. In this example, only
the characters a, b, c, d, e, g, h, i, l, n, p, r, s,
and t would be used.
• Style Shift uses the original user text but
randomizes the styles that are applied to
each character from left to right. The text
must use multiple styles or this choice has
no affect.
• Random Style is similar to Style Shift
except that it randomizes the styles instead
of moving from left to right. The text must
use multiple styles or this choice has no
affect.
Page 60
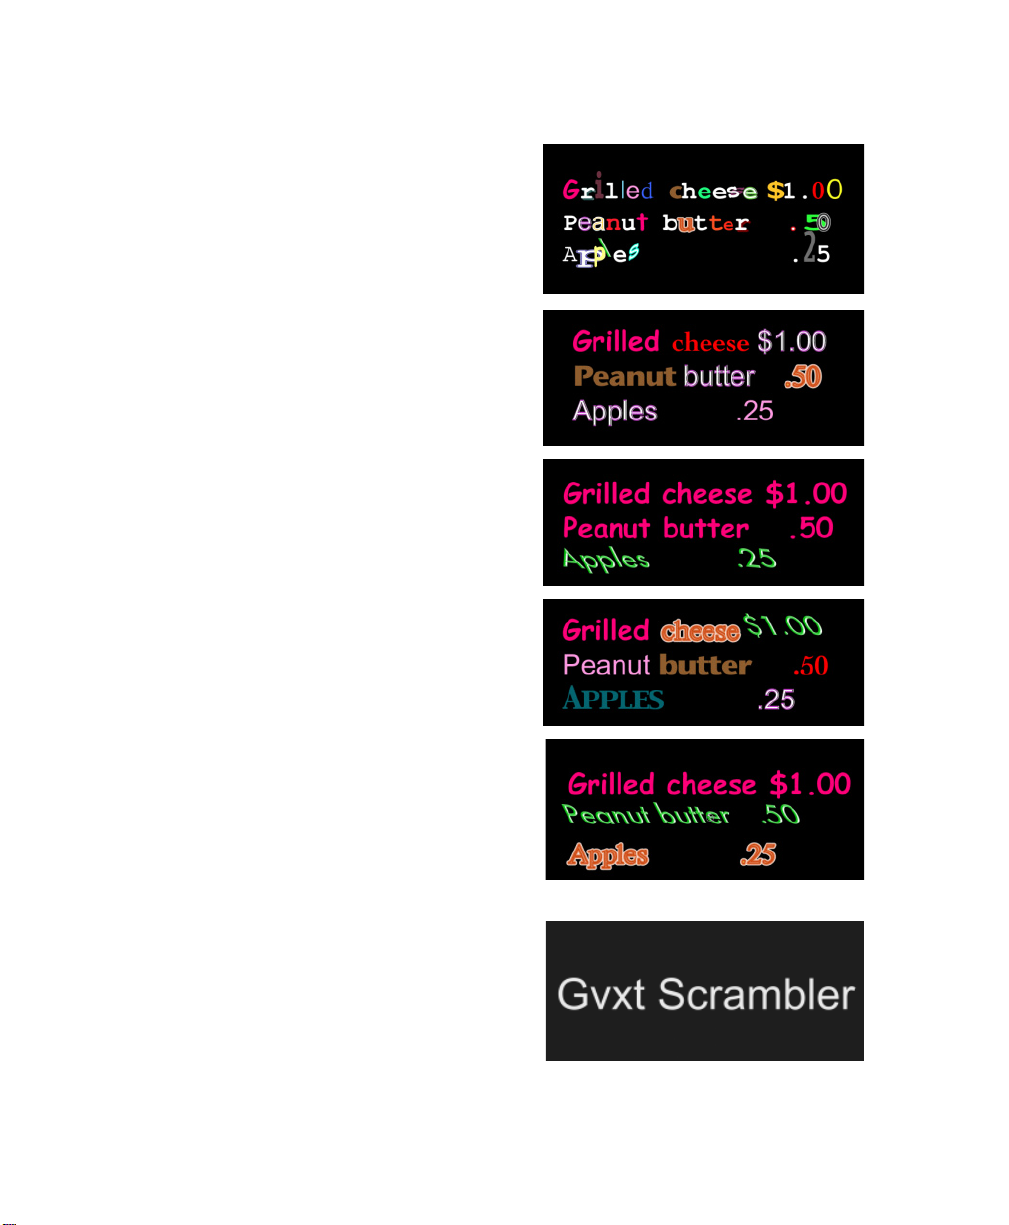
60
•
•
•
•
•
•
• Style Shufße randomly shufßes the styles
assigned to each character to that of
another style used in the Text window. The
text must use multiple styles or this choice
has no affect.
• Style by Word looks at the style of the Þrst
letter of each word and assigns that style to
entire words at random.
• Style by Line looks at the style of the Þrst
letter of each line and assigns that style to
entire lines at random
• Style Shufße by Word looks at the style of
the Þrst letter of each word and shufßes
that style with other words.
•
S
tyle Shufße by Line looks at the style of
the Þrst letter of each line and shufßes that
style with other lines.
The Progress parameter allows you to control
which characters change. The amount is
animatable so that you can achieve the popular
effect of letters ßipping until your word forms.
In the example at right, only the Þrst two letters
animate. If Letter Variation is 0, Progress has no
affect. Progress is expressed as a percentage.
The
Progress Order menu
Right to Left and Random.
sets the direction of the progress. The choices are Left to Right,
Page 61
Boris Calligraphy
•
•
•
61
•
•
•
Scramble Characters
Letter Variation parameter to adjust the characters, the characters are offset by the same
amount. For example, all the “e” characters from the original “Generator” text are now “x.”
You can randomize this, using the Scramble Characters parameter.
The
Loop
parameter cycles through the
characters, determining which
character starts the line. You can
animate this parameter to make the
characters appear to crawl in place.
Whole numbers have no affect; decimal
numbers move the characters to the left
or right. In the example at right, Loop is
0.12.
Animate Random Seed to randomize the change of the text characters from frame to frame.
allows you to vary the characters from frame to frame. When you use
Working with the Page Transformations Parameter Group
The Page Transformations parameter group allows you to add basic DVE moves to your
text. For example, use these parameters to spin the text.
Opacity
while a setting of 0 makes the text completely transparent.
Position X/Y
values to offset the text as it moves in or out.
adjusts the opacity of the text. A setting of 100 makes the text completely opaque,
set the coordinates of the text’s center point. You can adjust or animate these
Position Z
closer to the viewer, while increasing positive values move the text farther away. Very low
Position Z values move the text behind the viewer, making it invisible.
Master Scale lets you adjust Scale parameters globally. Parameters can still be changed
independent of one another by using the individual Scale parameters. For example, you set
Scale X to 100 and Scale Y to 200 to create text that is stretched vertically. If you then set
Master Scale to 200, the resulting text is twice as wide and four times as tall as the original.
Scale X
parameters are scaled as percentages of the object’s original width or height. Thus, a Scale
X setting of 200 produces text twice as wide as the original text.
adjusts the apparent depth of the text. Decreasing negative values move the text
and
Scale Y
change the size of the object along the X and Y axes, respectively. These
Page 62
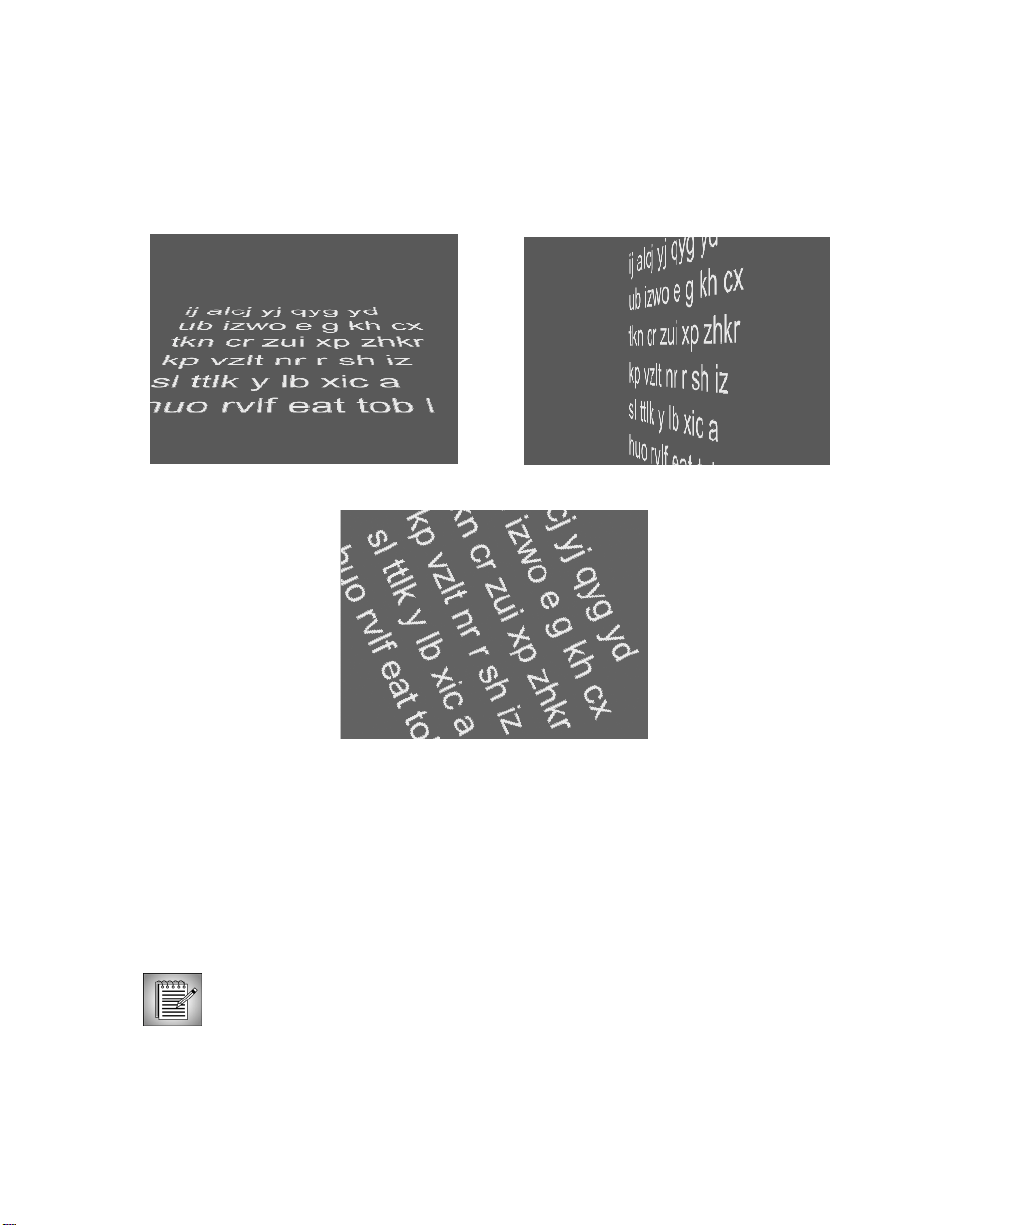
62
•
•
•
•
•
•
,
Spin
, and
Rotate
Tumble
Spin, and Rotate can animate over values greater than 360° to make the image complete
more than one full revolution.
Tumble =-65 Degrees Spin=65 Degrees
move the text around the X, Y, and Z axis respectively. Tumble,
Rotate=65 Degrees
If you rotate your text using the Tumble, Spin or Rotate parameters, PreRotate Position X/Y
positions the text ignoring any of these transformations and uses the original coordinates of
the plane. This parameter can show a different result than adjusting the Position X/Y
parameter which positions the text after any rotations are applied.
If you rotate your text using the Tumble, Spin or Rotate parameters, PreRotate Position Z
positions the text ignoring any of these transformations and uses the original coordinates of
the plane. This parameter can show a different result than adjusting the Position Z
parameter which positions the text after any rotations are applied.
The pivot point remains at the actual X, Y, or Z position even when you change the
PreRotate parameters. If you alter a PreRotate parameter then spin the image, the
image spins around the pivot point at its original position, not the PreRotated
position.
When the
around its center. If this option is deselected, you can set an external pivot point around
which to pivot.
Lock Pivot checkbox is selected, moving the pivot point has no affect.
Lock Pivot to Position checkbox
Pivot X/Y
and
Pivot Z
set the X, Y, and Z coordinates of the pivot point. If the
is selected, the text tumbles, spins, and rotates
Page 63
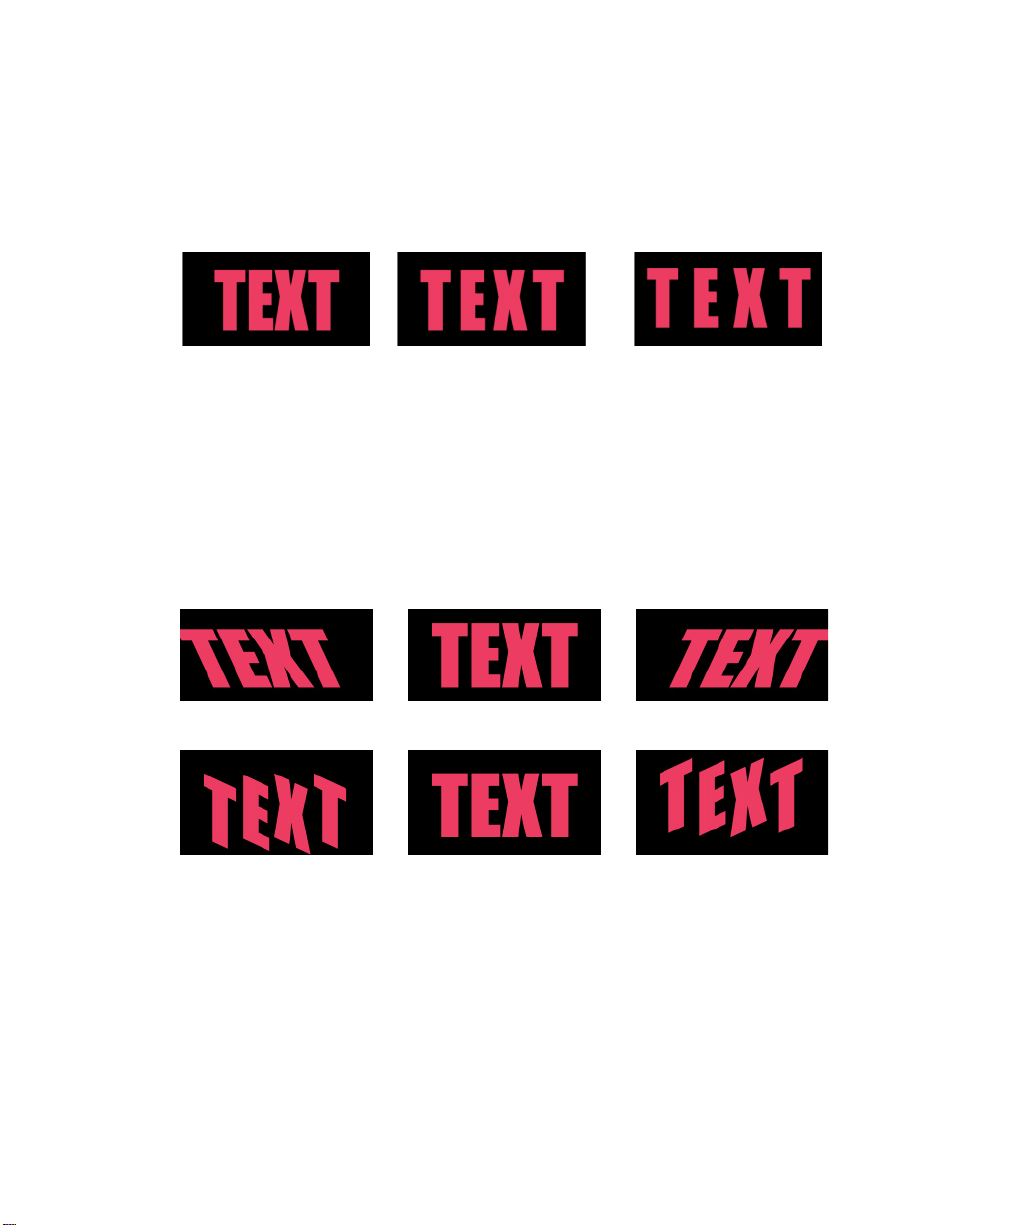
Boris Calligraphy
Working with the Letter Transformations Parameter Group
Tracking
Tracking parameter in the Text window, you can animate this tracking parameter.
Leading adjusts the spacing, in pixels, between multiple lines of text. This parameter affects
the currently selected lines. Unlike the Leading parameter in the Text window, you can
animate this Leading parameter.
Baseline adjusts the vertical position of the text in relation to the baseline. Decrease this
value to move the bottom of the text below the baseline, or increase this value to raise the
character above the baseline. Unlike the Baseline parameter in the Text window, you can
animate this Baseline parameter.
controls the global horizontal spacing of the characters in the effect. Unlike the
Tracking= 0 Tracking= 25 Tracking= 50
•
•
•
63
•
•
•
Letter Skew X
Letter Skew X= –25 Letter Skew X=0 Letter Skew X=25
Letter Skew Y= –25 Letter Skew Y=0 Letter Skew Y=25
Master Letter Scale lets you adjust Letter Scale parameters globally. Parameters can still be
changed independent of one another by using the individual Letter Scale parameters. For
example, you set Letter Scale X to 100 and Letter Scale Y to 200 to create text that is stretched
vertically. If you then set Master Letter Scale to 200, the resulting text is twice as wide and
four times as tall as the original.
Letter Scale X
These parameters differ from the Page Transformations parameter group’s Scale X and Scale
Y parameters, which scale the entire text layer. For example, if you set Scale X to 200, the
resulting text is twice as wide as the original. If you set Letter Scale X to 200, the resulting
text is twice as wide as the original but the characters would overlap since Letter Scale
affects each letter. This is useful for creating animating tracking or type on effects.
and
Letter Skew Y
and
Letter Scale Y
distort text along the horizontal and vertical axis.
set the scale of the text along the horizontal and vertical axis.
Page 64
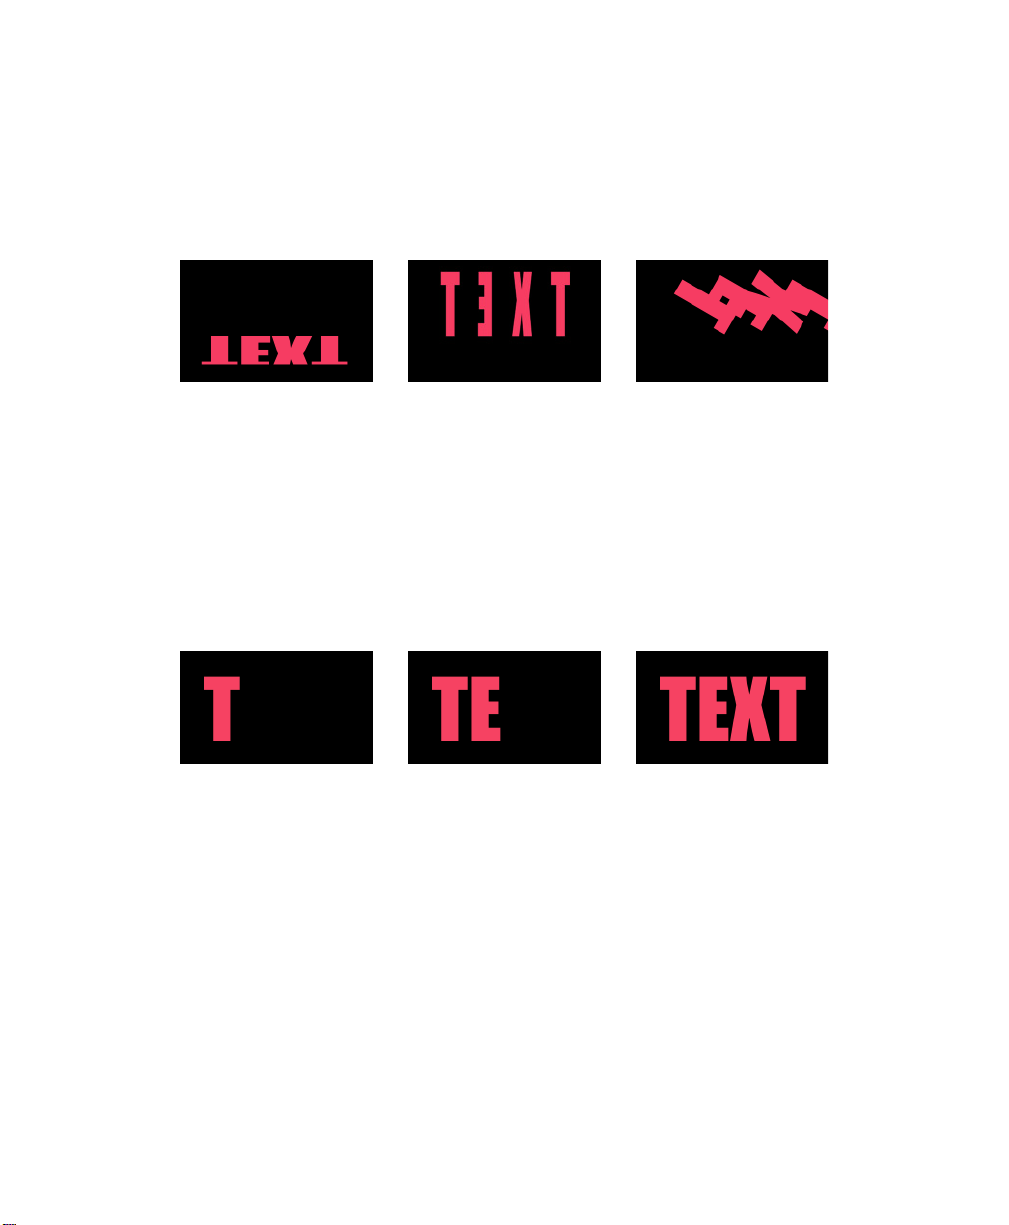
64
•
•
•
•
•
•
,
Letter Tumble
baseline’s X, Y, and Z axis, respectively. Compare how this appears with the Page
Transformations parameter group’s Tumble, Spin and Rotate parameters which move the
entire text layer around the axis.
Letter Tumble Letter Spin Letter Rotate
Letter Spin
, and
Letter Rotate
rotate the text characters around their
Working with the Type On Parameter Group
The Type On parameter group offers several options for creating animated writing or “typeon” effects.
Text Type On
create animated typing effects. This value is measured as a percentage of the complete text.
For example, if Text Type On is set to 50, the Þrst half of the text is visible. If Text Type On is
set to 100, all the text is visible.
Type-on effect with Text Type On animated from 0 to 100.
Time 00:00:00:08 Time 00:00:00:15 Time 00:00:01:00
The
Type On Order menu
Type On Order menu includes the following options:
adjusts the percentage of the text that is visible in each frame, allowing you to
allows you to control the order that the text appears onscreen. The
• Forward types on the text from left to right.
• Reverse allows you to reverse the effect so that the text types on starting from the right.
• Random types the text type on randomly.
Press the
Apply To menu
and choose the appropriate option.
• Letter applies the effect to individual letters and characters.
• Word applies the effect to individual words. Words are deÞned as characters that are
separated by a space in the Text window.
• Line applies the effect to individual lines. Lines are deÞned as characters that are
separated by a carriage return in the Text window.
Page 65
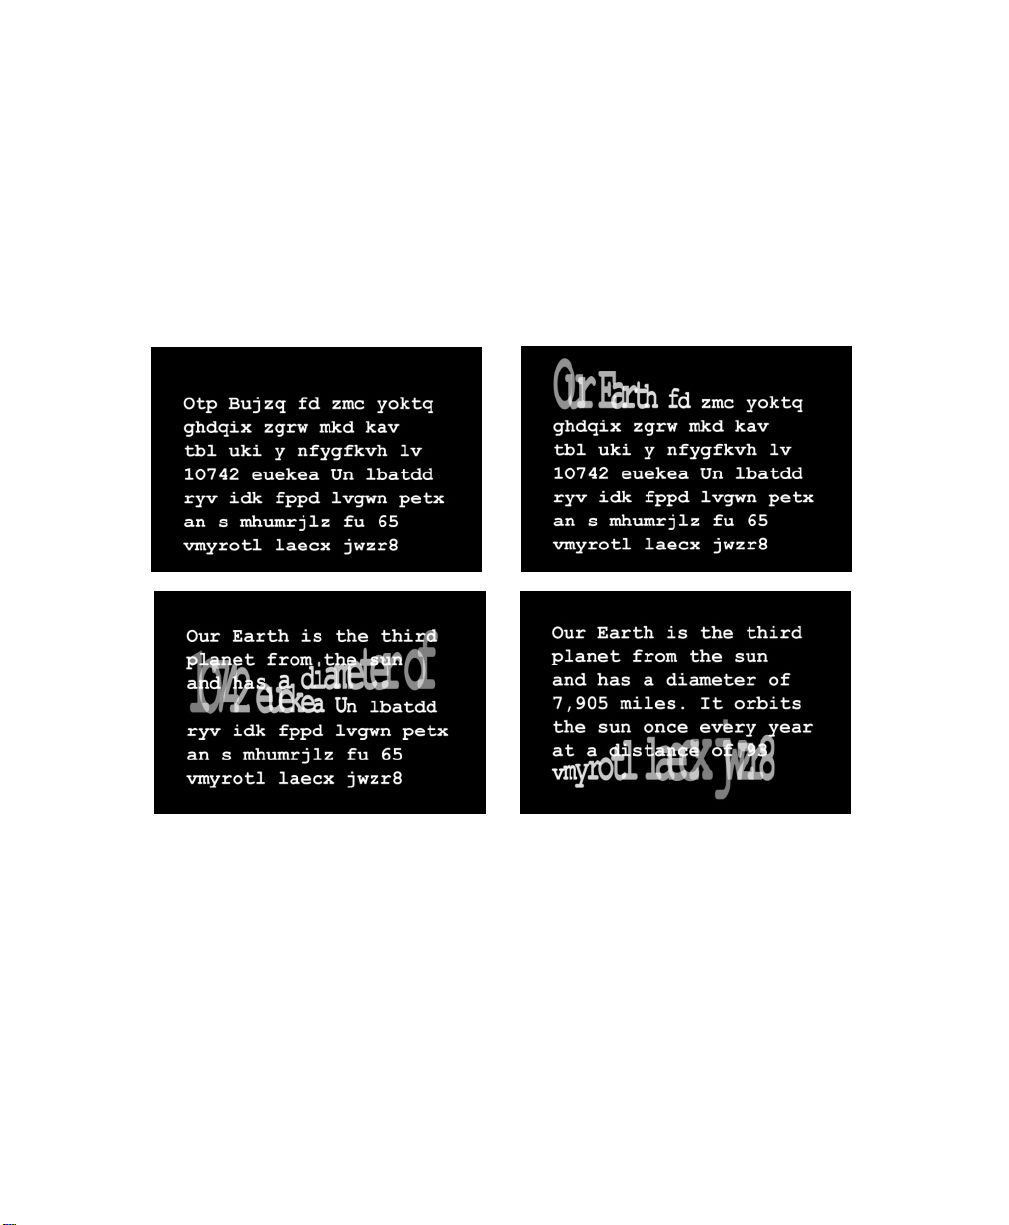
Boris Calligraphy
•
•
•
65
•
•
•
Click the
Always Visible checkbox
to force all text characters to remain visible. The Type On
feature applies transformations progressively to text characters. When this checkbox is
deselected, characters progressively appear or disappear from the frame. Selecting the
Always Visible checkbox forces characters to remain visible while the transformations are
progressively applied. One way to think of this effect is like “the wave” that crowds perform
at football stadiums. The transformation appear to pass through the text. The animatable
Type On parameter behaves as the center of the wave when this checkbox is enabled.
Animated Text Scrambler effect with “Always Visible” enabled.
Reveal Time
controls how long each character animates during the effect. This parameter
only affects animations created with the Fade, Shift, Skew, Tumble, Spin, and/or Rotate
parameters (described below). For example, you create a four second type-on effect with the
word “Text.” If Text Type On is animated from 0 to 100, each letter in the word Text animates
onscreen for one second. Reveal Time speciÞes the percentage of that one second that the
Fade, Shift, Skew, Tumble, Spin, and/or Rotate lasts. Thus if Reveal Time is 50, each
character Fades, Shifts, Skews, Tumbles, Spins, and/or Rotates for 0.5 seconds (50% of 1),
and subsequently remains stationary for the rest of the effect. In this case, the next letter does
not appear for another 0.5 seconds after the previous letter stops animating.
Acceleration
allows you to gradually accelerate the effect.
Page 66
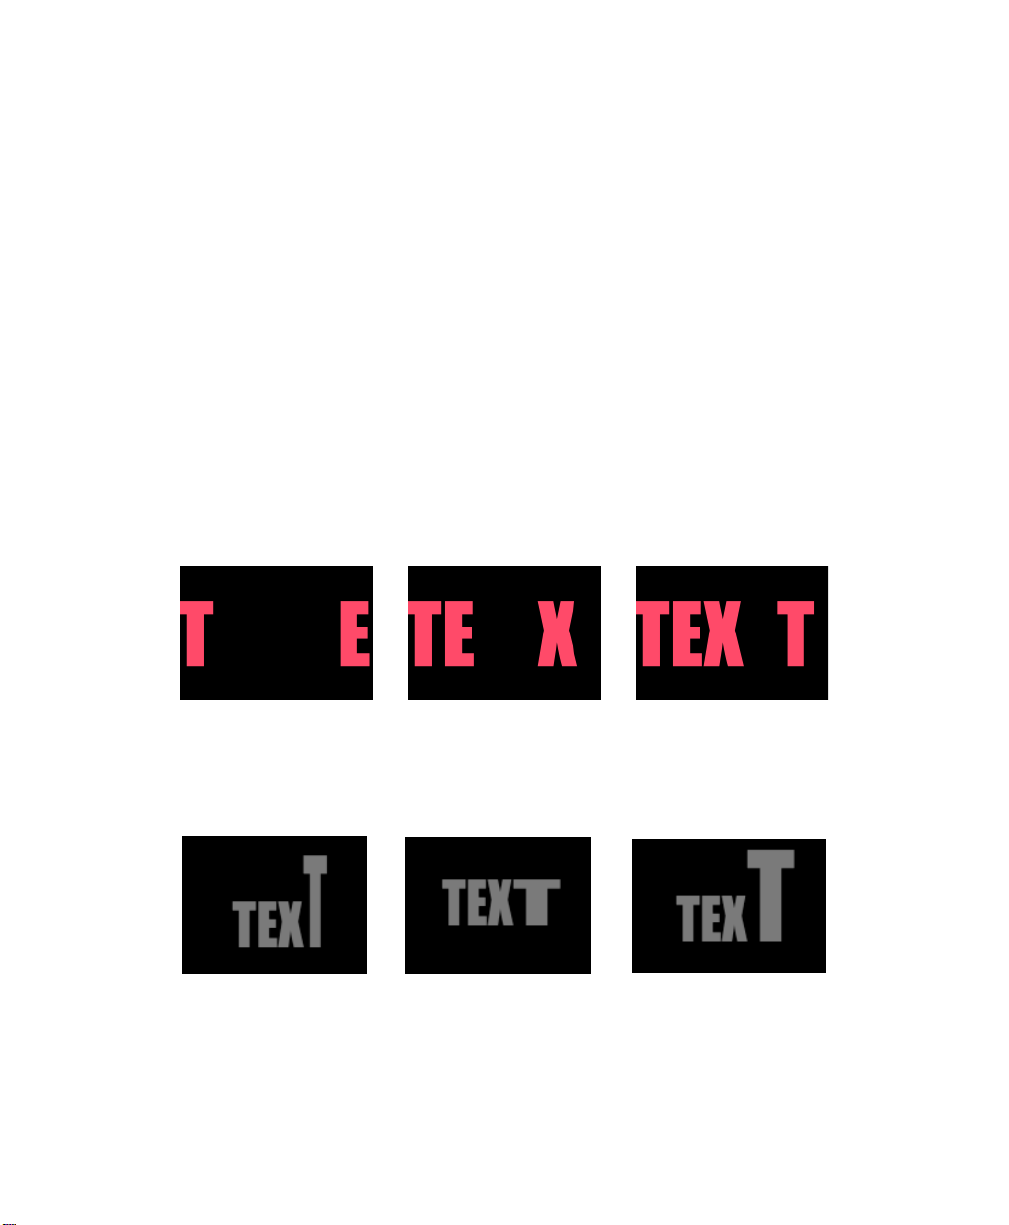
66
•
•
•
•
•
•
Overshoot
allows you to create bouncing text effects, when combined with any parameters
except Fade. Each character moves past its destination position or scale by the value
speciÞed in Overshoot before returning to its destination position or scale. This parameter
only affects animations created with the Shift, Scale, Skew, Tumble, Spin, and/or Rotate
parameters. If all of these parameters are set to the default, Overshoot has no affect.
Decay
works in conjunction with the Overshoot parameter. Decay is expressed as a
percentage that allows you to exponentially decrease the Overshoot. For example, you set
the Shift Y so that the characters move in from the top of the frame with an Overshoot of
300. Setting Decay to 50 means that each of the three bounces will decay by half.
Fade
allows you to gradually fade in successive characters. When Fade is set to 100, each
character appears suddenly and is fully opaque. Decreasing this value creates a more
gradual effect, in which each character fades on as its opacity increases.
Shift X
and
Shift Y
adjust the starting position of the characters in relation to their
destinations on the screen.For example, if the text is placed in the center of the screen and
Shift X is set to 320, when Text Type On is animated, each character Þrst appears on the right
side of the screen, then moves toward the center.
Type-on effect with Shift X set to 320.
Time 00:00:01:11 Time 00:00:01:18 Time 00:00:01:24
Scale X
and
Scale Y
adjust the starting size of the characters. The default value is 100, in
which the text types on the screen full size. If you decrease the value, the text appears to
grow on the screen as it types.
Scale Y = 200 Scale X = 200 Scale Y/Scale X= 200
Page 67
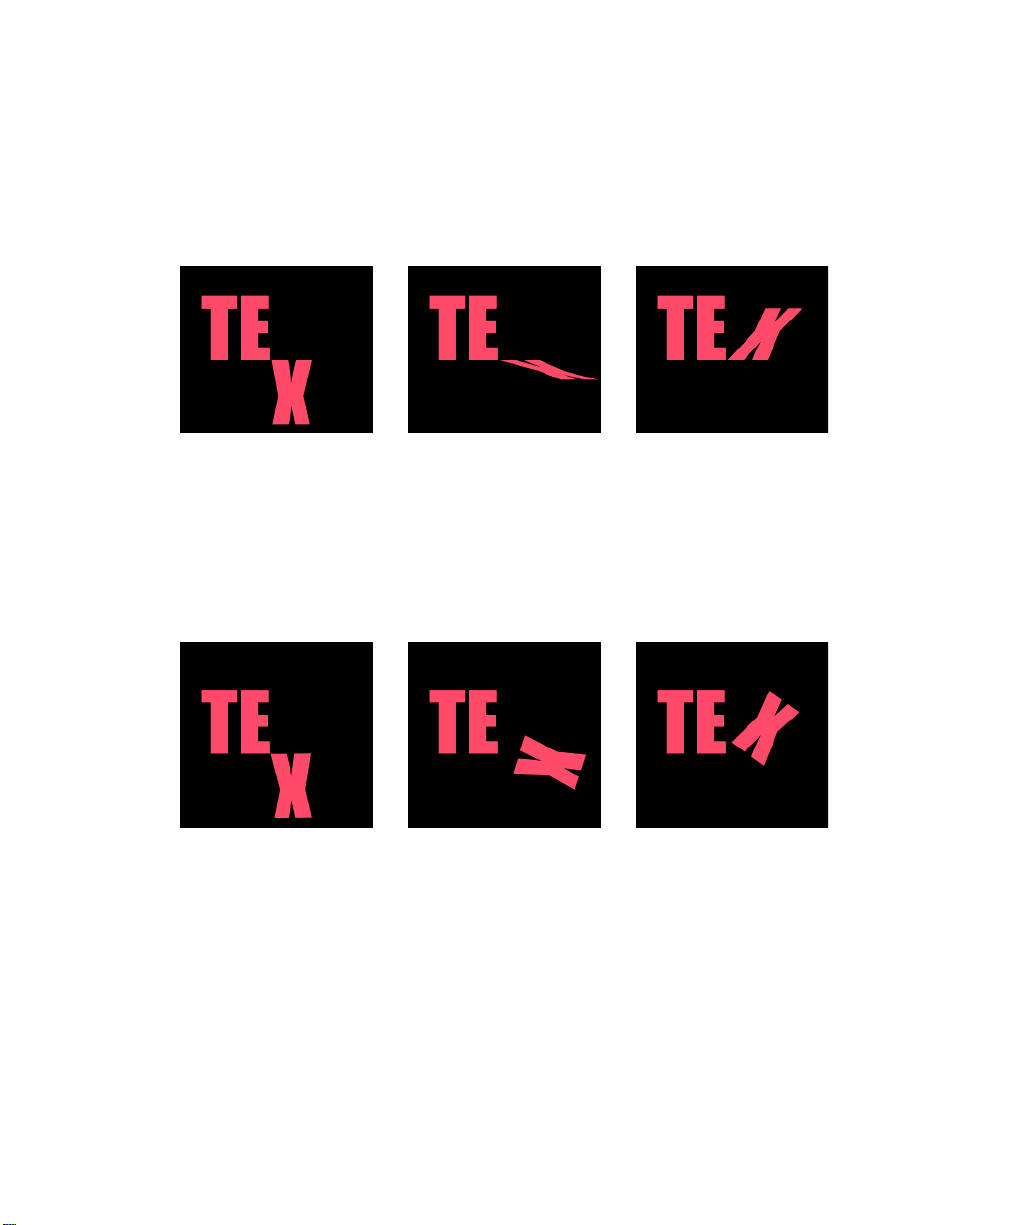
Boris Calligraphy
and
Skew Y
Skew X
set the starting Skew values for the characters in relation to their Þnal
skew values (controlled by the Skew X and Skew Y values set in the Text window and in the
Page Transformations parameter group). Each character animates from its starting Skew
values to its ending Skew values as it appears on screen.
Type-on effect with Skew X set to 180.
Time 00:00:01:10 Time 00:00:01:12 Time 00:00:01:14
•
•
•
67
•
•
•
Tumble, Spin
, and
Rotate
set the starting Tumble, Spin, and Rotate values for the characters
in relation to their Þnal Tumble, Spin, and Rotate values (controlled by the Letter Tumble,
Letter Spin, and Letter Rotate values set in the Letter Transformations parameter group and
by the Tumble, Spin, and Rotate controls in the Page Transformations parameter group).
Each character animates from its starting Tumble, Spin, and Rotate values to its ending
values as it appears on screen.
Type-on effect with Rotate set to 180.
Time 00:00:01:10 Time 00:00:01:12 Time 00:00:01:14
Page 68
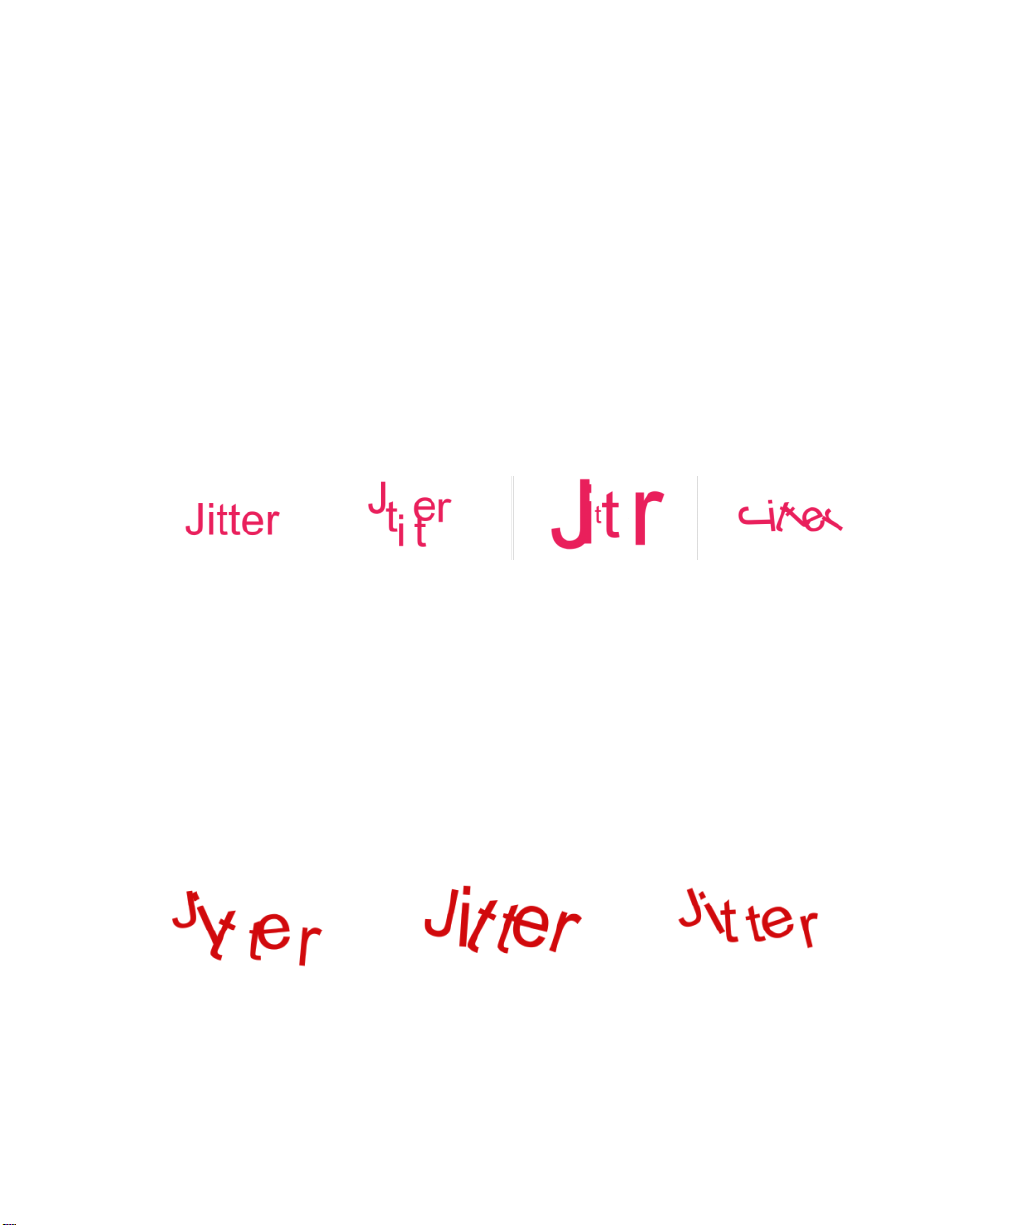
68
•
•
•
•
•
•
Working with the Jitter Parameter Group
The Jitter parameters randomize text parameters including Position, Angle, Scale, Hue and
Opacity. Jitter parameters are expressed as a percentage and are applied to individual
characters. All parameters have a range of 0 to 100, except Scale which has a range of 0 to
600. Jitter parameters apply to all characters and are applied after each character types on.
Jitter Seed
Jitter Speed
Jitter Position X
the X and Y axis respectively.
Jitter Angle
X and Y axis.
Jitter Scale X
X and Y axis respectively.
Jitter Hue
Jitter Opacity
The
the Jitter Scale X and Y parameters so that they only scale larger than the original text.
varies the amount of Jitter from frame to frame.
varies the speed of the Jitter.
and
Jitter Position Y
randomizes the angle of the individual text characters. Angle distorts text on the
Default Text Jitter Position adjusted Jitter Scale adjusted Jitter Angle adjusted
and
Jitter Scale Y
randomizes the color of individual characters. Hue sets the color Þll of the text.
randomizes the transparency of the individual text characters.
Restrictions menu
lets you restrict the Jitter parameters. For example, you can restrict
randomize the position of individual text characters on
randomize the scale of the individual text characters on the
• None does not restrict the parameters.
• Positive Only restricts parameters so that values can only be higher than the original.
• Negative Only restricts parameters so that values can only be lower than the original.
None Positive Only Negative Only
Polarize
every other character will alternate.
Master Jitter Amount scales the Jitter parameters globally. Parameters can still be changed
independent of one another by using the individual parameters. For example, you set Jitter
Position X to 100 and Jitter Position Y to 200 to create text that is jitters vertically. If you then
set Master Jitter Amount to 200, the resulting text jitter twice as much as the original.
lets you alternate the Jitter parameters for characters. At more extreme values,
Page 69
About the Tutorial Exercises
The following tutorial exercises provide step-by-step instructions for creating various kinds
of text effects. These tutorials do not require any speciÞc media Þles, although the Þrst
exercise uses an imported text Þle. If you do not have the text Þle, you can complete the
exercise by typing or importing text. Some of the exercises use fonts that you may not have
on your system. You can replace them with any fonts that you like.
The exercises in this section are designed to give you a hands-on introduction to the Boris
Title Generators. You will need a project with some captured footage to complete the
exercises.
Exercise One: Creating a Title 3D Effect
Upon completion of the exercise in the section you should be able to:
• Create and format text in the Text window.
• Work with the Style Palette.
• Animate the position of text using the parameters in the Controls tab.
• Use the parameters in the Controls tab to fade in your animation.
Boris Calligraphy
•
•
•
69
•
•
•
Creating a Title Page
1.
Create a new Project.
2.
Create a new sequence by choosing New from the
from the submenu. A new numbered sequence appears in the Browser.
3.
Double-click a clip that you will add to your sequence and play it in the Viewer. The
clip should be about three seconds in duration and will be used as the background for
a title animation. The illustrations in this exercise use a water background.
4.
Drag the image from the Viewer to the Canvas. When the Edit Overlay appears,
position the image in the Overwrite section and release the mouse button. The clip
appears in the Timeline.
5.
Choose Boris from the
choose Title 3D from the submenu.
The Text window opens.
6.
Click in the text preview area of the Text window and type a
word such as “Boris.”
Generator menu
in the Viewer. Then
File menu
, then choose Sequence
Generator menu
Page 70
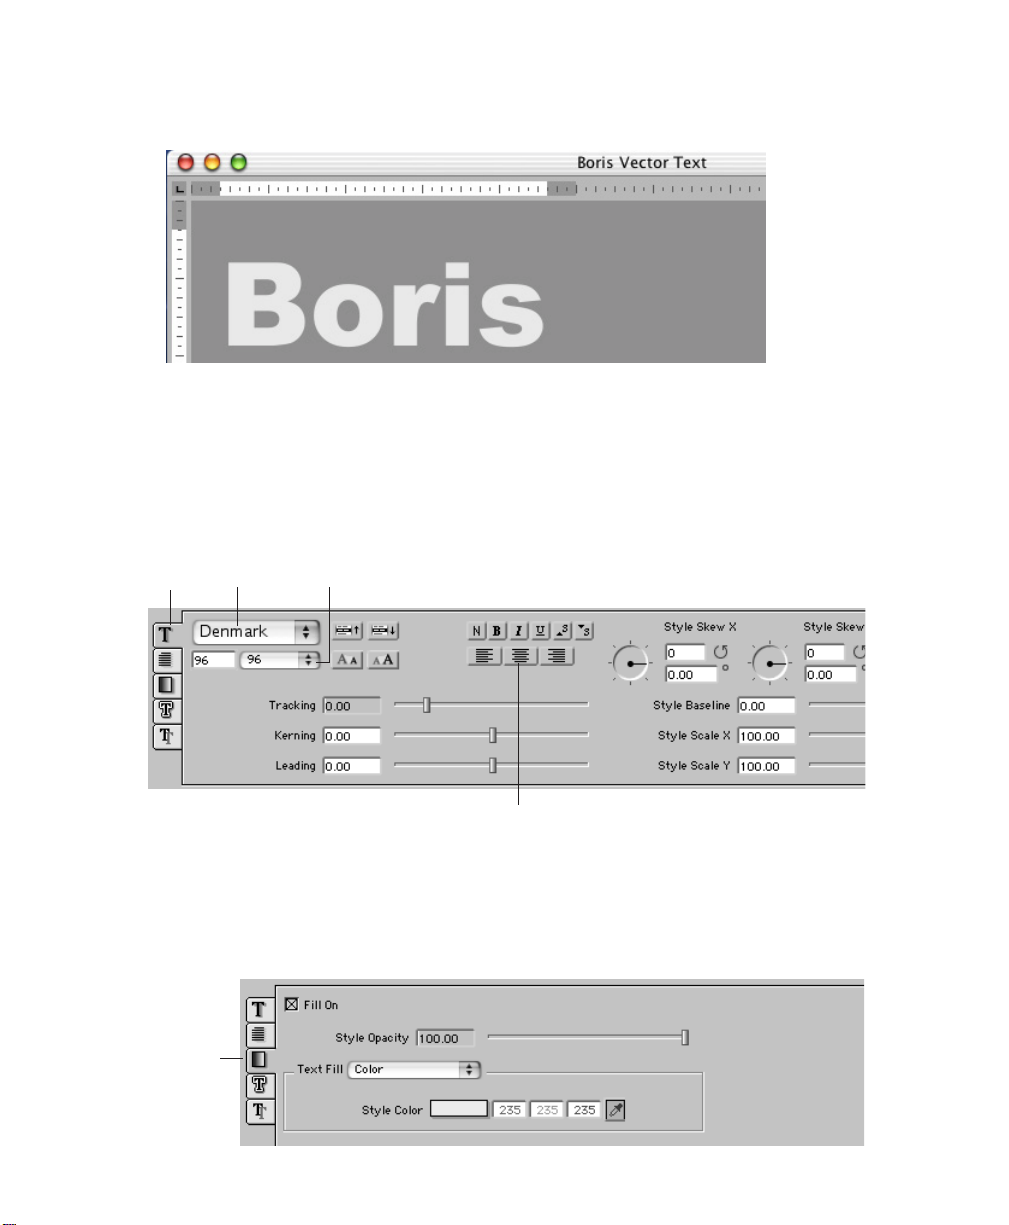
70
•
•
•
•
•
•
Select all the text that you just typed by pressing Command-A.
7.
8.
In the Style tab in the Text window, use the
Font
and
Font Size
menus to set the font and
size of the text.
9.
Click the
Center JustiÞcation button
to center justify the text.
The illustrations in this exercise use the word “Boris” with Arial Black font at 96 points,
but you can use whatever type of text you like.
Style tab Font menu Font size menu
Center Justification button
10.
Click the Fill tab to open the Þll controls. Use
Style Color
to choose a color for the text.
You can click the color swatch to open the system color picker, enter values in the RGB
Þelds and press Return, or use the eyedropper to select a color from the screen.
The illustrations in this exercise use a solid blue color, but you can use any color.
Fill tab
Page 71
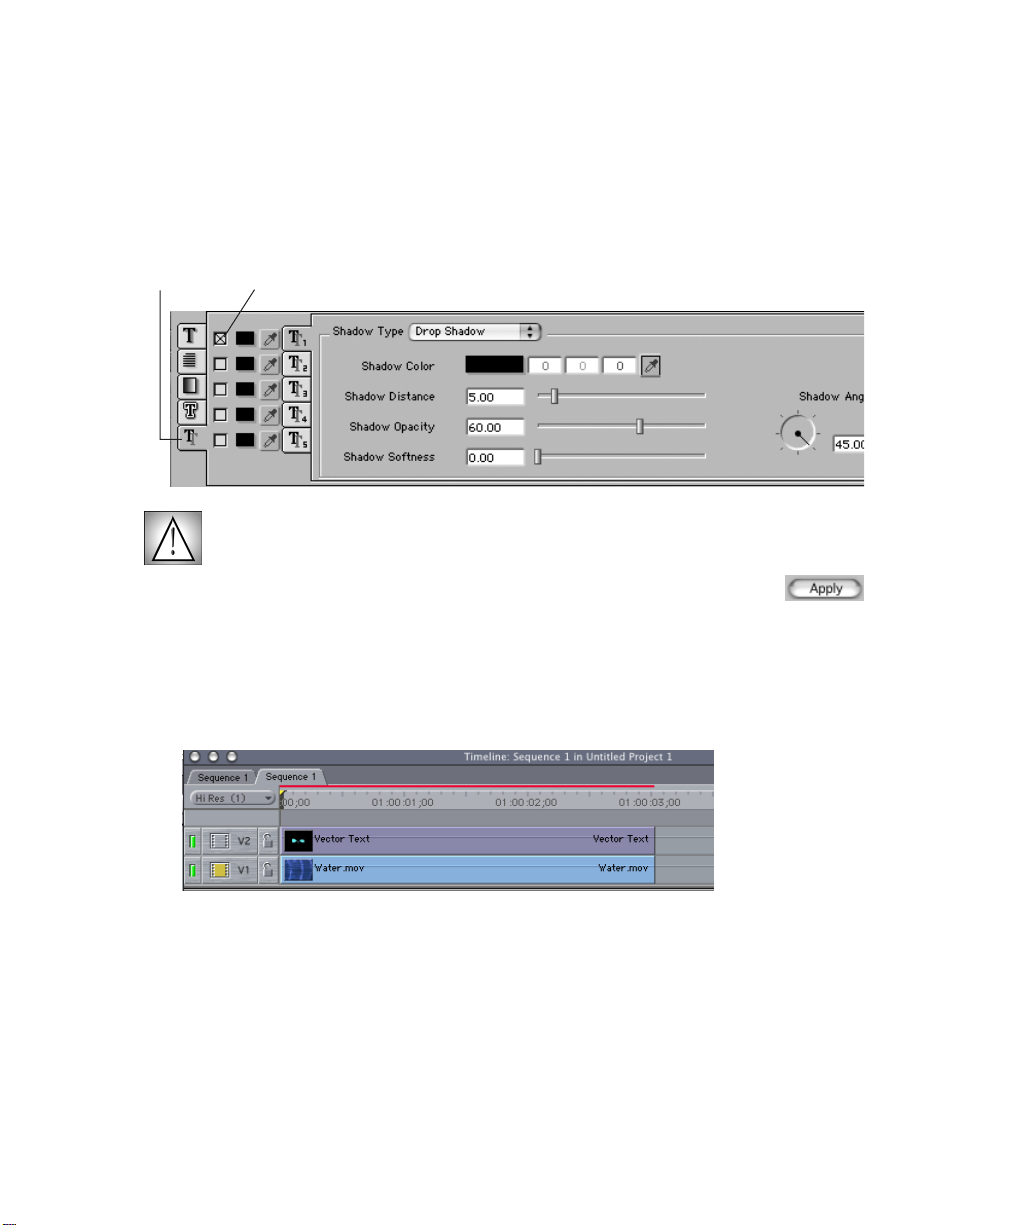
Boris Calligraphy
•
•
•
71
•
•
•
Click the Shadow tab to open the shadow controls. Click to select the
11.
Shadow On
checkbox next to the Shadow 1 tab to apply the appropriate style.
The illustrations in this exercise use a Solid Shadow, with the parameters set as
illustrated below, but you can apply whatever type of shadow you like.
Shadow tab
Shadow On Checkbox
Style Preview menu
If the
is set to Basic Styles you will not see the Shadow appear
on your text. However, you will see your shadow when you close the Text window.
12.
Click the
13.
Select your background track in the timeline.
14.
Drag the image from the Viewer to the Canvas. When the Edit Overlay appears,
Apply button
save your changes and close the Text window.
position the image in the Superimpose section and release the mouse button. The clip
appears in the Timeline.
Your timeline should now appear similar to the following example.
15.
Click the Motion tab in the Final Cut Pro Viewer window and animate the Center
parameter to move the title offscreen.
Depending on your system and the complexity of the effect, titles animate in real time
when you use the parameters in the Motion tab. Alternatively, you can animate the title
offscreen by keyframing the Calligraphy
Position X/Y
parameter.
Page 72
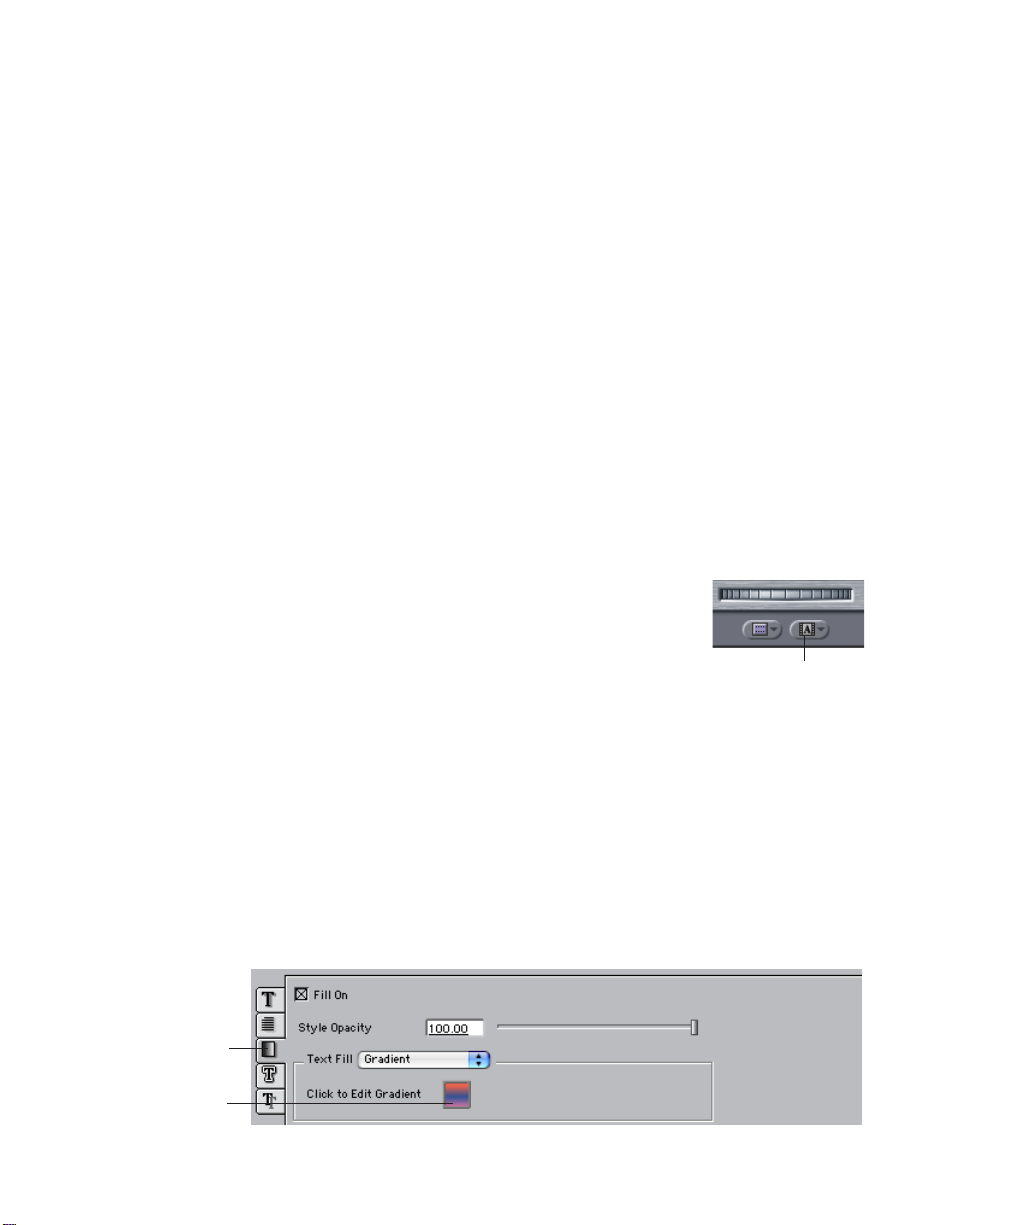
72
•
•
•
•
•
•
Exercise Two: Creating an Animated Tracking Effect
Upon completion of the exercise in the section you should be able to:
• Create and format text in the Text window.
• Use the Gradient Editor to map a gradient to text.
• Save text styles to the Style Palette.
• Use the parameters in the Controls tab to fade in your animation.
• Create an animated tracking effect.
Creating Text
1.
Double-click a clip that you will add to your sequence and play it in the Viewer. The
clip should be about three seconds in duration and will be used as the background for
an animated tracking effect. The illustrations use a black background.
2.
Drag the image from the Viewer to the Canvas. When the Edit Overlay appears,
position the image in the Overwrite section and release the mouse button. The clip
appears in the Timeline.
3.
Choose Boris from the
choose Title 3Dfrom the submenu.
4.
The Text window appears. Click in the window and type
“Coming Soon.”
5.
Select the text and make any adjustments to the font, text color,
shadow and border properties.
The illustrations in this exercise use the words “Coming Soon” with Arial Black font at
72 points, but you can use whatever type of text you like.
Generator menu
in the Viewer. Then
Generator menu
6.
Compete the steps in the following section.
Mapping a Gradient to the Text
1.
With the text still selected, click the Fill tab to open the Þll controls.
2.
Choose Gradient from the
Fill Tab
Gradient
Editor icon
Text Fill menu.
Page 73
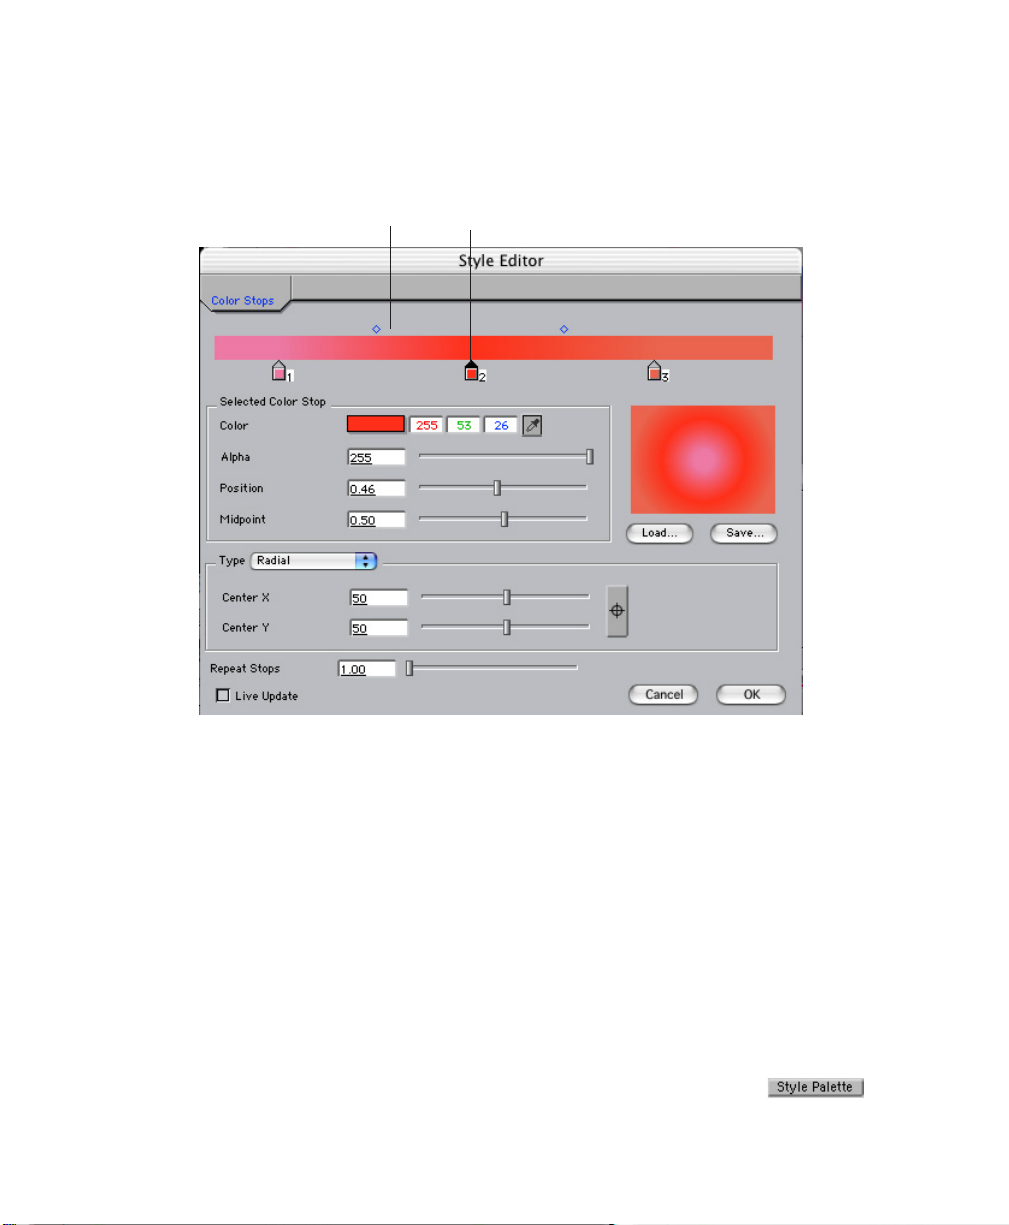
Boris Calligraphy
•
•
•
73
•
•
•
3.
Click the
Gradient Editor icon
Click here to create
additional color stops. Selected color stop
to open the Gradient Editor window.
4.
Adjust the color for each color stop by selecting the color stop, then use the
Color Stop
turns black. An unselected color stop has a clear point. A color stop must be selected to
apply changes to it.
5.
If you want, click to create additional color stops.
6.
Choose Radial from the
center and blends outward toward the end color.
7.
Click OK to apply your gradient and close the Gradient Editor window.
8.
Compete the steps in the following section.
controls to choose the color you want. When a color stop is selected, its point
Type menu
. A Radial gradient places the start color at the
Saving and Applying Styles
You can use the Style Palette to save, name, and apply styles for future use.
1.
Click the
Style Palette button
in the bottom of the Text window.
Selected
Page 74
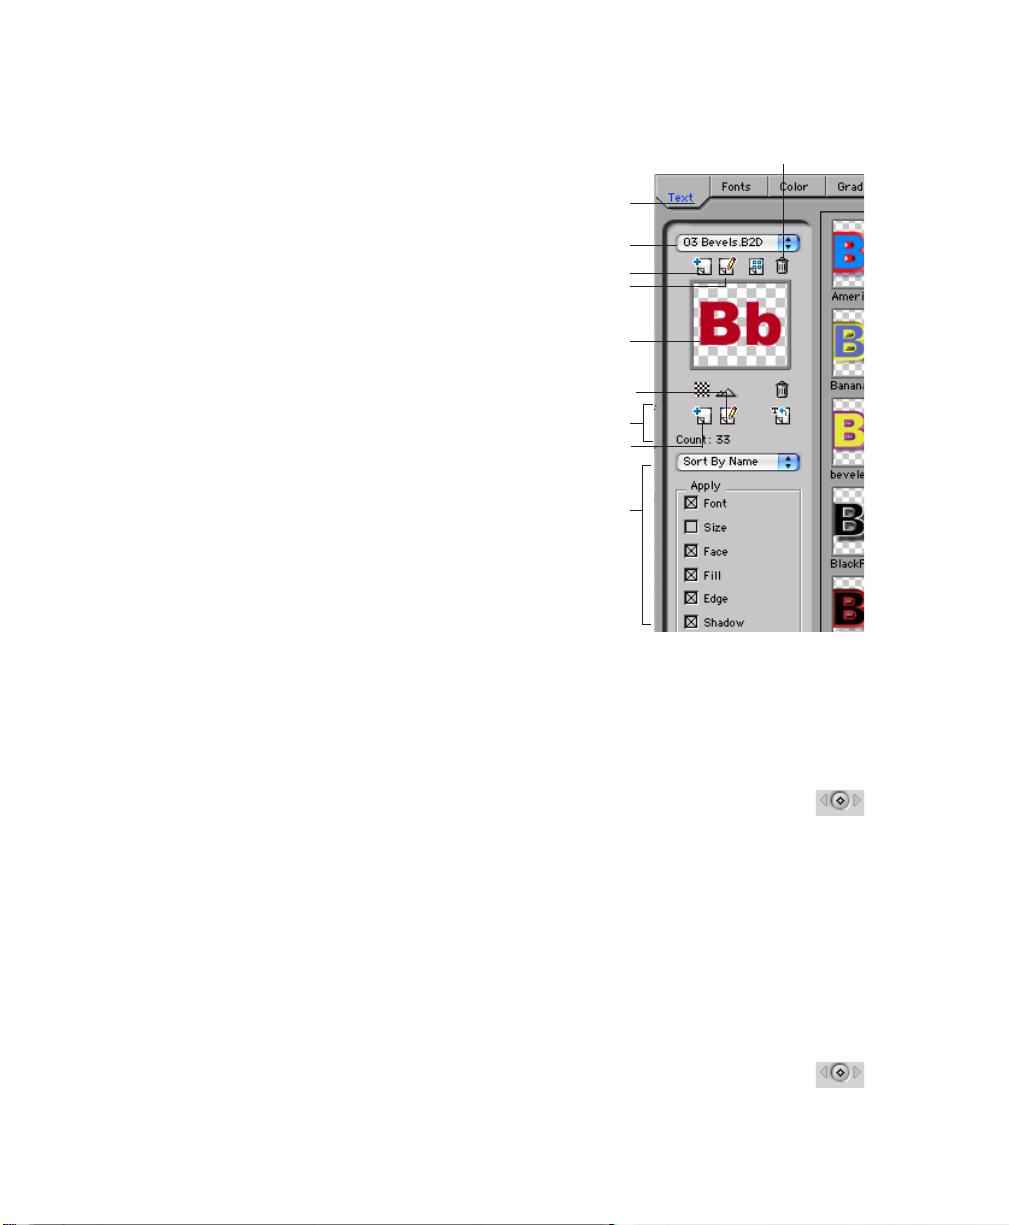
74
•
•
•
•
•
•
The Style Palette opens with the style
Delete Category
you are currently using displayed in the
thumbnail in the left column.
2.
To create a category, click the
Category icon
3.
Type “My Styles” in the dialog box and
click
OK
4.
To add the current style to the selected
.
.
Add
Rename Category
Text tab
Category menu
Add Category
Current style
category, select the text in the Text
window and click the
5.
Click the thumbnail for the new style,
click the
Rename Style button
name for the style in the dialog box and
click
OK
. The thumbnail and name of
the style appear in the right column.
6.
Close the Style Palette.
7.
Click
Apply
to close the Text window.
Add Style icon
, type a
.
Rename Style icon
Style controls
Add Style icon
Apply controls
Working with the Controls Tab
1.
Select your background track in the timeline.
2.
Drag the image from the Viewer to the Canvas. When the Edit Overlay appears,
position the image in the Superimpose section and release the mouse button. The clip
appears in the Timeline.
3.
Select the Title 3D track and click the Controls tab in the Viewer window.
4.
Make sure the playhead is at the beginning of the clip. If it’s not, reposition it.
Then click the
have to scroll down the window.
A dot appears at the beginning of the green line in the Viewer, indicating a keyframe
has been added.
Add Keyframe button
for the
Tracking
parameter. You may
5.
Set the
Tracking
value to 100 by dragging the slider or clicking the numerical Þeld,
typing 100, and pressing Return.
6.
Move the playhead to the end of the clip. (Time 00:00:03:00).
7.
Set the
Tracking
value to 0 by dragging the slider or clicking the numerical Þeld, typing
0 and pressing Return.
8.
Move the playhead to the beginning of the clip. Click the
button
for the
Opacity
parameter.
Add Keyframe
Page 75
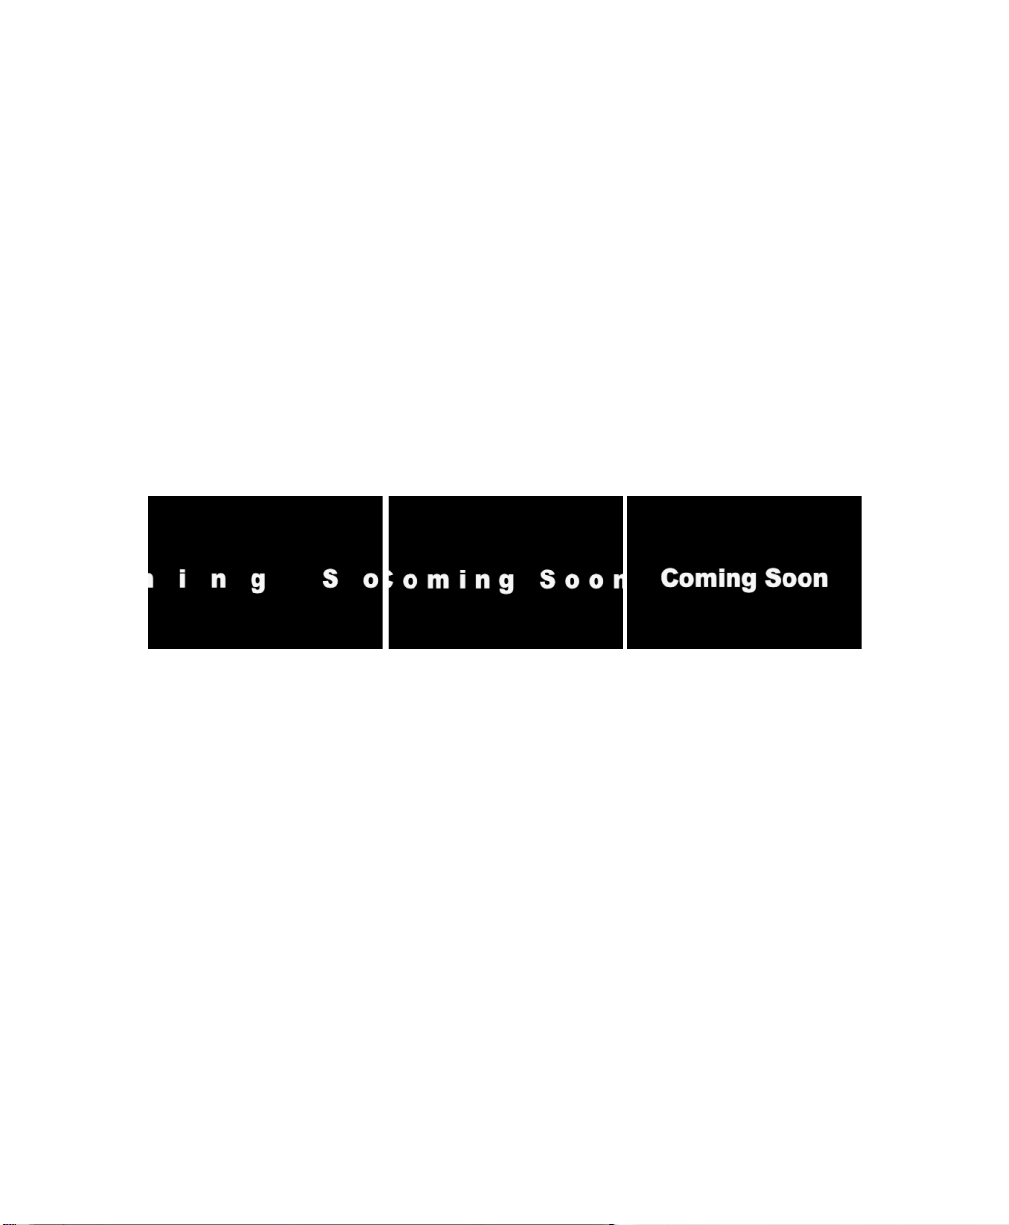
A dot appears at the beginning of the green line in the Viewer, indicating a keyframe
has been added.
9.
Set the
Opacity
0, and pressing Return. The text disappears from the Viewer window, since an Opacity
value of 0 makes it completely transparent.
10.
Move the playhead to frame 20 (Time 00:00:00:20). Set the
dragging the slider or clicking the numerical Þeld, typing 100, and pressing Return. The
text reappears in the Viewer window, since an Opacity value of 100 makes it completely
opaque.
A new keyframe is created at frame 20, and the text fades in.
11.
Render the effect by selecting the track and pressing Command-R or choosing Sequence
from the
The text fades in and gradually tracks together.
value to 0 by dragging the slider or clicking the numerical Þeld, typing
Render Selection
Opacity
.
value to 100 by
Boris Calligraphy
•
•
•
75
•
•
•
Time 00:00:01:00 Time 00:00:02:00 Time 00:00:03:00
Page 76
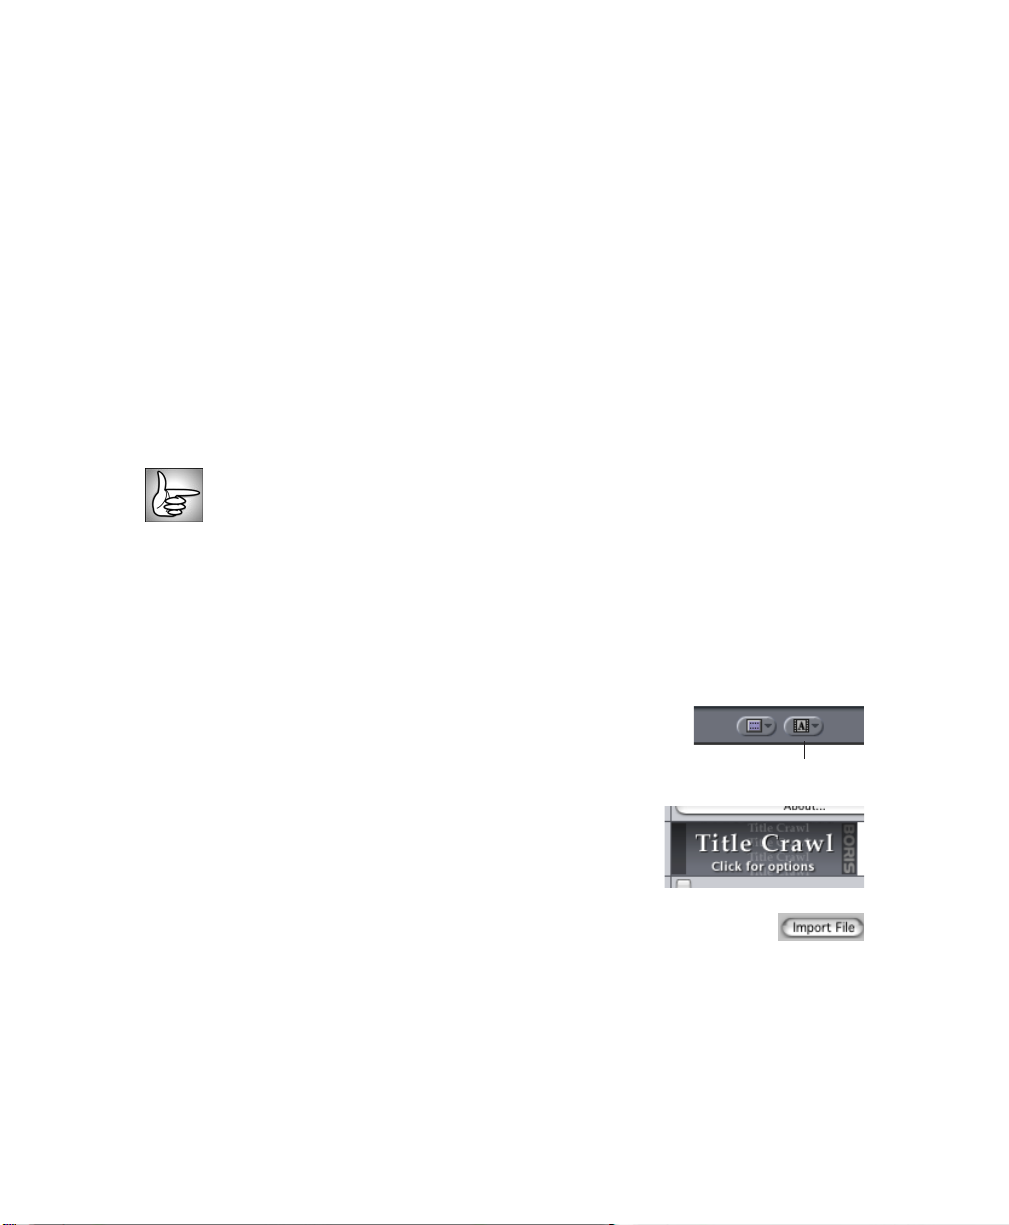
76
•
•
•
•
•
•
Exercise Three: Creating a Credit Roll
Upon completion of the exercise in the section you should be able to:
• Create and format credit rolls using a text page.
• Import text into the Text window.
• Adjust the speed of credit rolls.
• Mask the edges of credit rolls.
Importing and Formatting the Text
In this exercise you will import text to create a title page then save the styles from the page
and apply them to other pages. Then you will create a credit roll using a the Title Crawl
Generator.
This exercise requires that you create a credit list in a word processor and save it as
Simple Text. The examples use a 25 line credit roll. If you want, you can also adapt
this exercise by typing text directly in the Text window.
1.
Double-click a clip that you will add to your sequence and play it in the Viewer. The
clip should be about ten seconds in duration and will be used as the background for an
animated tracking effect. The illustrations use a black background.
2.
Drag the image from the Viewer to the Canvas. When the Edit Overlay appears,
position the image in the Overwrite section and release the mouse button. The clip
appears in the Timeline.
3.
Choose Title Crawl from the
Generator menu
in the Viewer.
4.
Click the Title Crawl Banner to open the Text window.
The Text window opens where you can import your text.
5.
Click the
window. In the dialog box that opens, navigate to your “Credits” Þle and
click
6.
Press Command-A to select all the text.
7.
In the Style tab in the Text window, use the
to 36 Points and to center justify the text.
Import File button
OK
.
at the bottom of the Text
Font
and
Font Size menus
Generator menu
to set the font size
Page 77
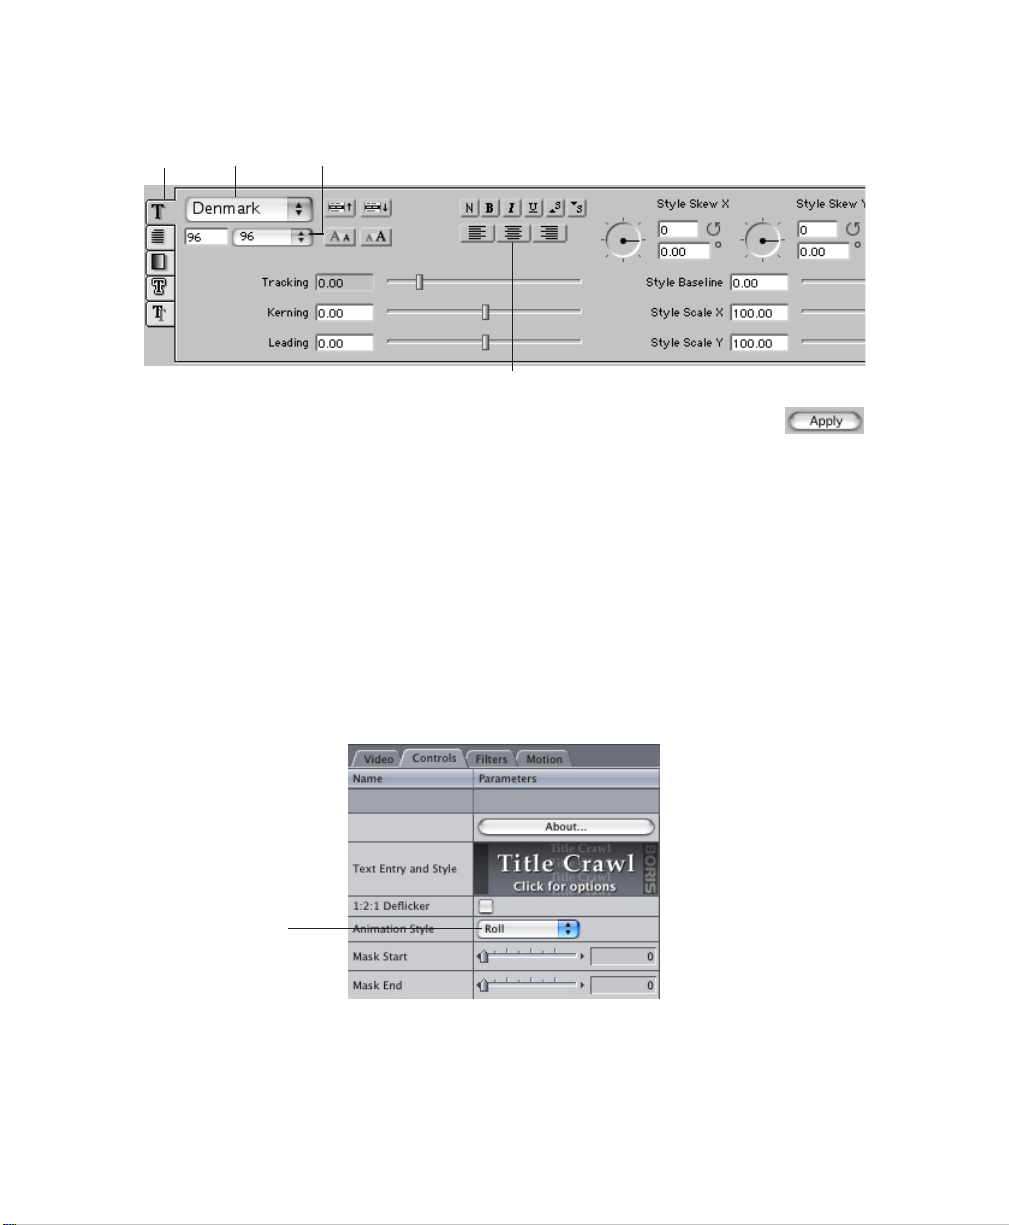
Boris Calligraphy
•
•
•
77
•
•
•
Style tab Font menu
Click the
8.
9.
Complete the steps in the next section to animate your effect.
Apply button
Font size menu
Center Justification button
save your changes and close the Text window.
Creating the Credit Roll
1.
Select your background track in the timeline.
2.
Drag the image from the Viewer to the Canvas. When the Edit Overlay appears,
position the image in the Superimpose section and release the mouse button. The clip
appears in the Timeline.
3.
Double-click the Title Crawl track to display the Title Crawl parameters in the Controls
tab in the Viewer window.
4.
In the Controls tab in the Viewer, set the
Animation Style menu
to Roll.
Set to Roll
Now you will mask the edges of the text so that the credit roll fades in at the Title Safe
Area. Since you want to mask the entire effect, you don’t need to set keyframes.
5.
Display the Title Safe boundaries by selecting the Canvas window and choosing Title
Safe from the
View menu
.
Page 78
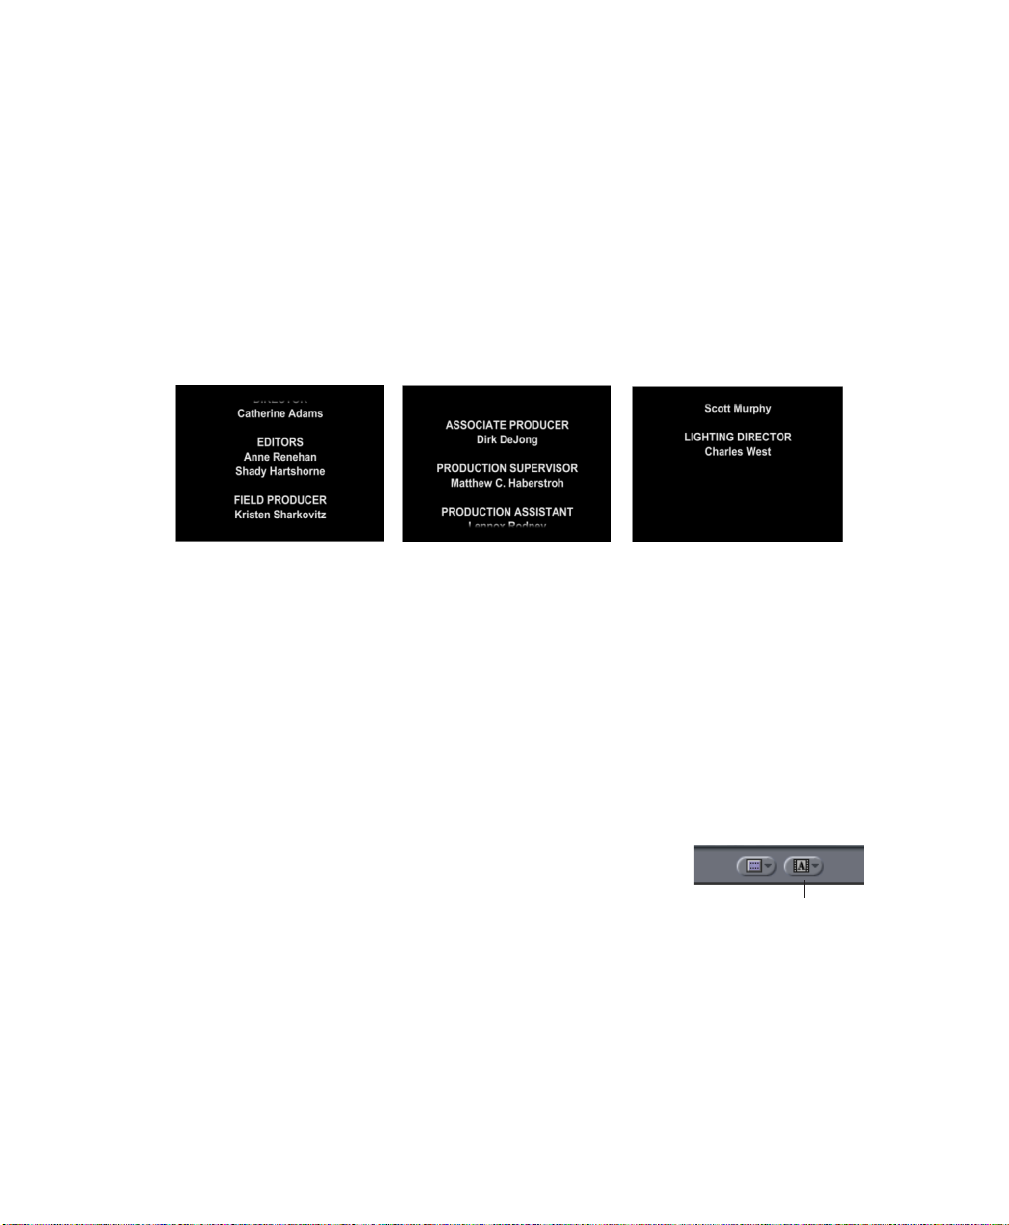
78
•
•
•
•
•
•
Position the playhead somewhere in the middle of the clip. This allows you to see the
6.
text as you make your adjustments.
7.
Set the
Mask Start
numerical Þeld, typing .13, and pressing Return.
8.
Set the
Blend Start
numerical Þeld, typing .1, and pressing Return.
9.
Render the effect by selecting the track and pressing Command-R or choosing Render
Selection from the
Time 00:00:03:00 Time 00:00:06:00 Time 00:00:09:00
and
Mask End
and
Blend End
Sequence menu
values to .13 by dragging the slider or clicking the
values to .1 by dragging the slider or clicking the
.
Exercise Four: Creating an Animated Type On Effect
Title 3D allows you to easily create animated text effects. The new Type On parameter group
allows you to create animated type on effects.
1.
Double-click a clip that you will add to your sequence and play it in the Viewer. The
clip should be about ten seconds in duration and will be used as the background for an
animated effect. The illustrations use a black background.
2.
Drag the image from the Viewer to the Canvas. When the Edit Overlay appears,
position the image in the Overwrite section and release the mouse button. The clip
appears in the Timeline.
3.
Choose Title 3D from the
The Text window opens where you can import your text.
4.
The Text window appears. Click in the window and type
“extreme” then press Return and type “OVERSHOOT.”
5.
Double-click to select the word “extreme” and make any adjustments to the font, text
color, shadow and Þll properties.
The illustrations in this exercise use Arial Black font at 72 points, but you can use
whatever type of text you like.
6.
In the Text window, double-click to select the word “OVERSHOOT” and make any
adjustments to the font, text color, shadow and Þll properties.
Generator menu
in the Viewer.
Generator menuGenerator menu
Page 79
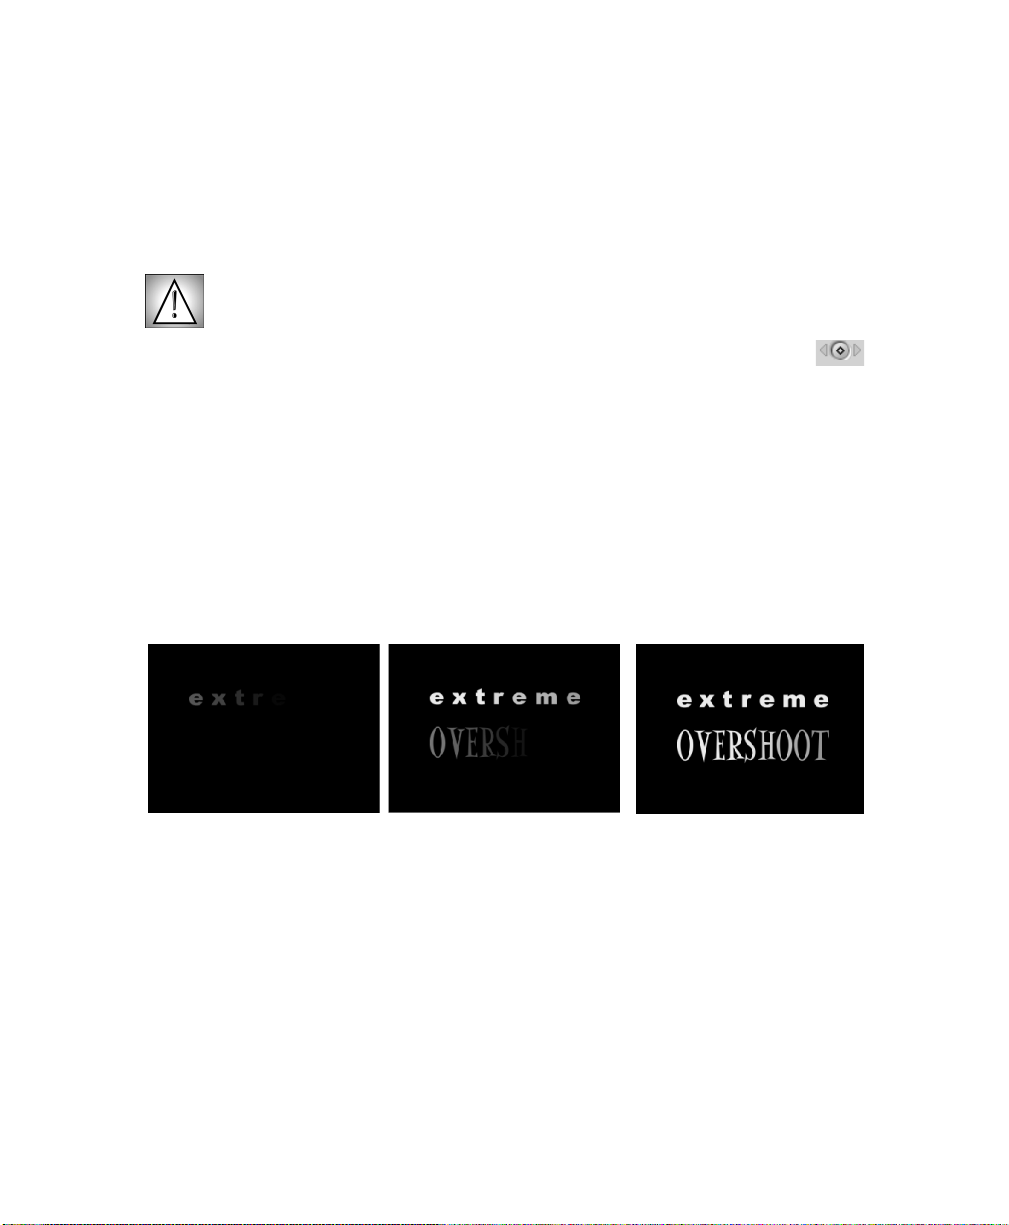
The illustrations in this exercise use Eddie Fisher font at 132 points, but you can use
whatever type of text you like.
7.
Click the
8.
When the text appears the way that you want, click
9.
Make sure the playhead is at the beginning of the clip. If it’s not, reposition it.
Then click the
parameter is found in the Type On parameter group. You may have to scroll
down the window.
A dot appears at the beginning of the green line in the Viewer, indicating a keyframe
has been added.
10.
Set
11.
Set
12.
Move the playhead to time 00:00:03:15 in the layer. Set
13.
Preview the animation. Several characters fade on at a time.
Force Center JustiÞcation button
Make sure that Text Wrap is set to No Wrap. This parameter is found in the Page
tab in the Text window. By default it is set to No Wrap.
Add Keyframe button
Text Type On
Reveal Time
to 0.
to 1200 and
Fade
to 0.
.
for the
Apply
Text Type On
Text Type On
then close the Text window.
parameter. This
to 100.
Boris Calligraphy
•
•
•
79
•
•
•
Time 00:00:01:00 Time 00:00:02:00 Time 00:00:03:00
Changing the parameters under the Type On tab affects each character as it “types”
onscreen. You will adjust some of the other parameters to experiment with other
animation effects.
14.
In the Type On parameter group, set
Shift Y
to -480. Set
Scale Y
to 3000.
Page 80
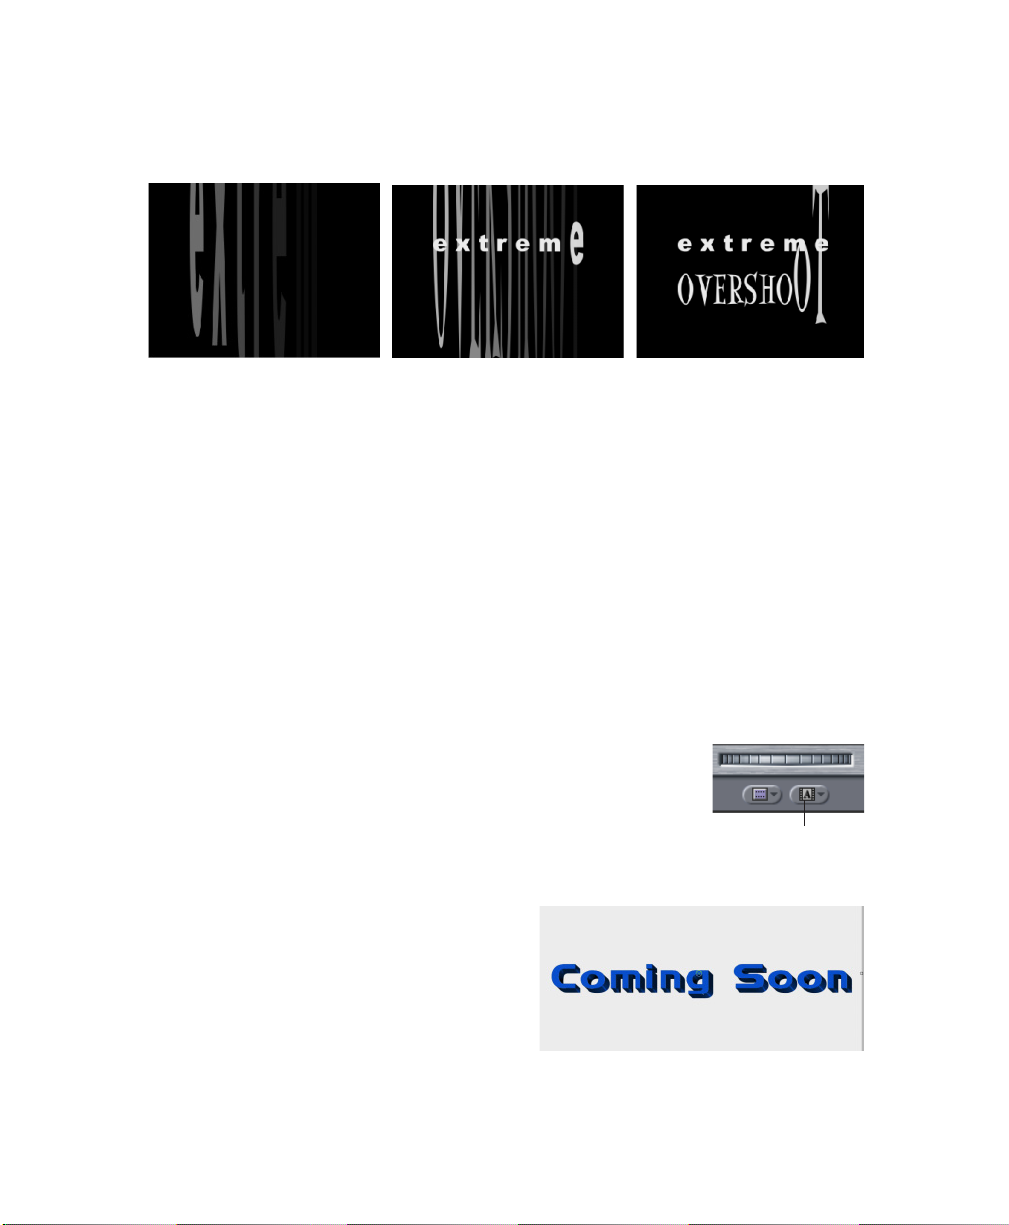
80
•
•
•
•
•
•
Preview the animation. The text now scales and shifts as it types on screen.
15.
Time 00:00:01:00 Time 00:00:02:00 Time 00:00:03:00
16.
In the Type On parameter group, set
17.
Preview the animation. The text now appears to bounce as it scales and shifts.
Overshoot
to -100.
Exercise Five: Creating Text with a Backdrop
In this exercise you will create text with a backdrop using both the Title 3D and Vector Shape
Þlters.
1.
Double-click a clip that you will add to your sequence and play it in the Viewer. The
clip should be about four seconds in duration and will be used as the background for
an animated effect. The illustrations use a black background.
2.
Drag the image from the Viewer to the Canvas. When the Edit Overlay appears,
position the image in the Overwrite section and release the mouse button. The clip
appears in the Timeline.
3.
Choose Boris from the
choose Title 3D from the submenu.
4.
The Text window appears. Click in the window and type
“Coming Soon.”
5.
Make any adjustments to the font, text color, shadow and Þll
properties.
The illustrations in this exercise use the
settings shown in the illustration at right:
Denmark font at 60 points with blue Fill
and a Solid Shadow. However, you can use
whatever type of text you like.
6.
When the text appears the way that you
want, click
window.
7.
Select the background layer in the timeline.
Apply
Generator menu
to close the Text
in the Viewer. Then
Generator menu
Page 81
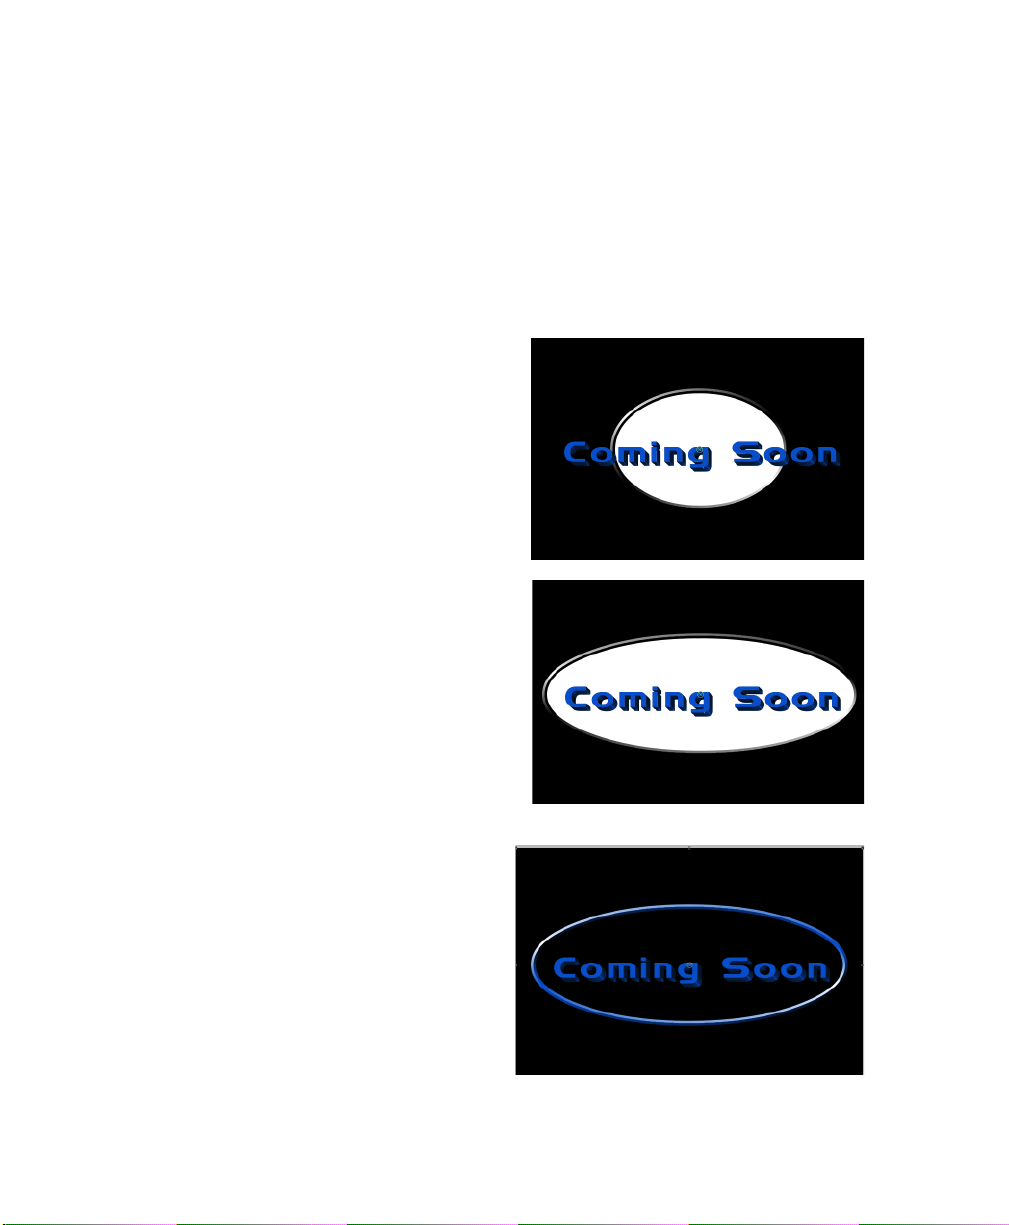
Boris Calligraphy
•
•
•
81
•
•
•
Choose Boris from the
8.
the submenu.
9.
Drag the backdrop from the Viewer to the Canvas. When the Edit Overlay appears,
position the image in the Superimpose section and release the mouse button. The clip
appears in the Timeline.
10.
Make sure that the Title 3D Þlter is above the Vector Shape Þlter in the timeline.
11.
Select the Vector Shape track and click the Controls tab in the Viewer window.
12.
Choose the shape that you want from the
Shape Primitive menu
The illustrations in this exercise use the
Oval shape, but you can use whichever
shape you like.
13.
Adjust the
Right
the shape appears behind your text.
These parameters set the positions of the
corners of a rectangle in which the oval is
inscribed. These values are scaled as
percentages of the width and height of
the Canvas window.
The illustrations show
5.00 and
use whatever parameters you like.
Shape Left, Shape Top, Shape
, and
Shape Bottom
Shape Right
Generator menu
.
parameters until
Shape Left
to 95.00, but you can
in the Viewer. Then choose Vector Shape from
set to
14.
In the Border 1 parameter group, use
the Eyedropper tool to set the border
Color
to the same color as your text Þll.
15.
In the Shape Fill parameter group, click
to deselect the
This creates an unÞlled backdrop.
16.
Preview your effect. Now you will
animate the backdrop.
17.
Move the playhead to the Þrst frame in
the effect.
Shape Fill checkbox
.
Page 82
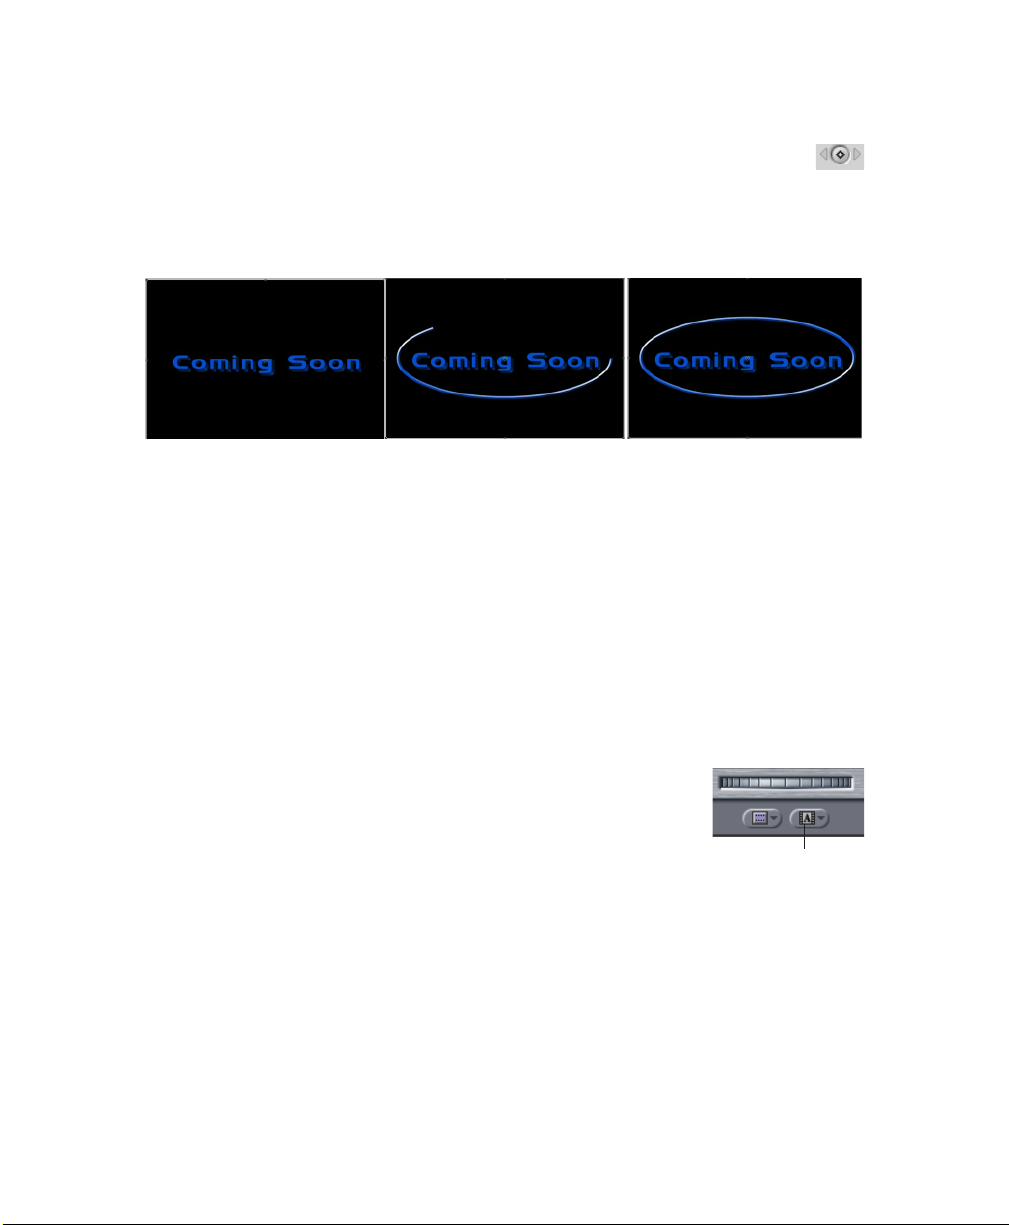
82
•
•
•
•
•
•
In the Border 1 parameter group, click the
18.
End
parameter.
19.
Move the playhead to time 00:00:01:00. Set
The Border now animates on.
Time 00:00:00:00 Time 00:00:00:20 Time 00:00:01:00
Add Keyframe button
Border End
to 100.
for the
Border
Exercise Six: Creating a Text Scrambler Effect
In this exercise you will create a random text effect using the Text Scrambler Þlter. The text
will appear randomly scrambled, then it will reveal itself in an animated wave-like effect to
be a familiar phrase.
1.
Double-click a clip that you will add to your sequence and play it in the Viewer. The
clip should be about four seconds in duration and will be used as the background for
the effect. The illustrations use a black background.
2.
Drag the image from the Viewer to the Canvas. When the Edit Overlay appears,
position the image in the Overwrite section and release the mouse button. The clip
appears in the Timeline.
3.
Choose Boris from the
choose Text Scrambler from the submenu.
4.
The Text window appears. Click in the window and type some
text. The following examples show the phrase “the quick brown
fox jumped over the lazy dog.” However, you can use any text
that you like.
5.
Select the text and make any adjustments to the font, text color, shadow and Þll. The
examples in this exercise use the font Courier New at 100 points, but you can use any
font and size that you like.
6.
When the text appears the way that you want, click
Generator menu
in the Viewer. Then
Apply
Generator menu
to close the Text window.
Page 83
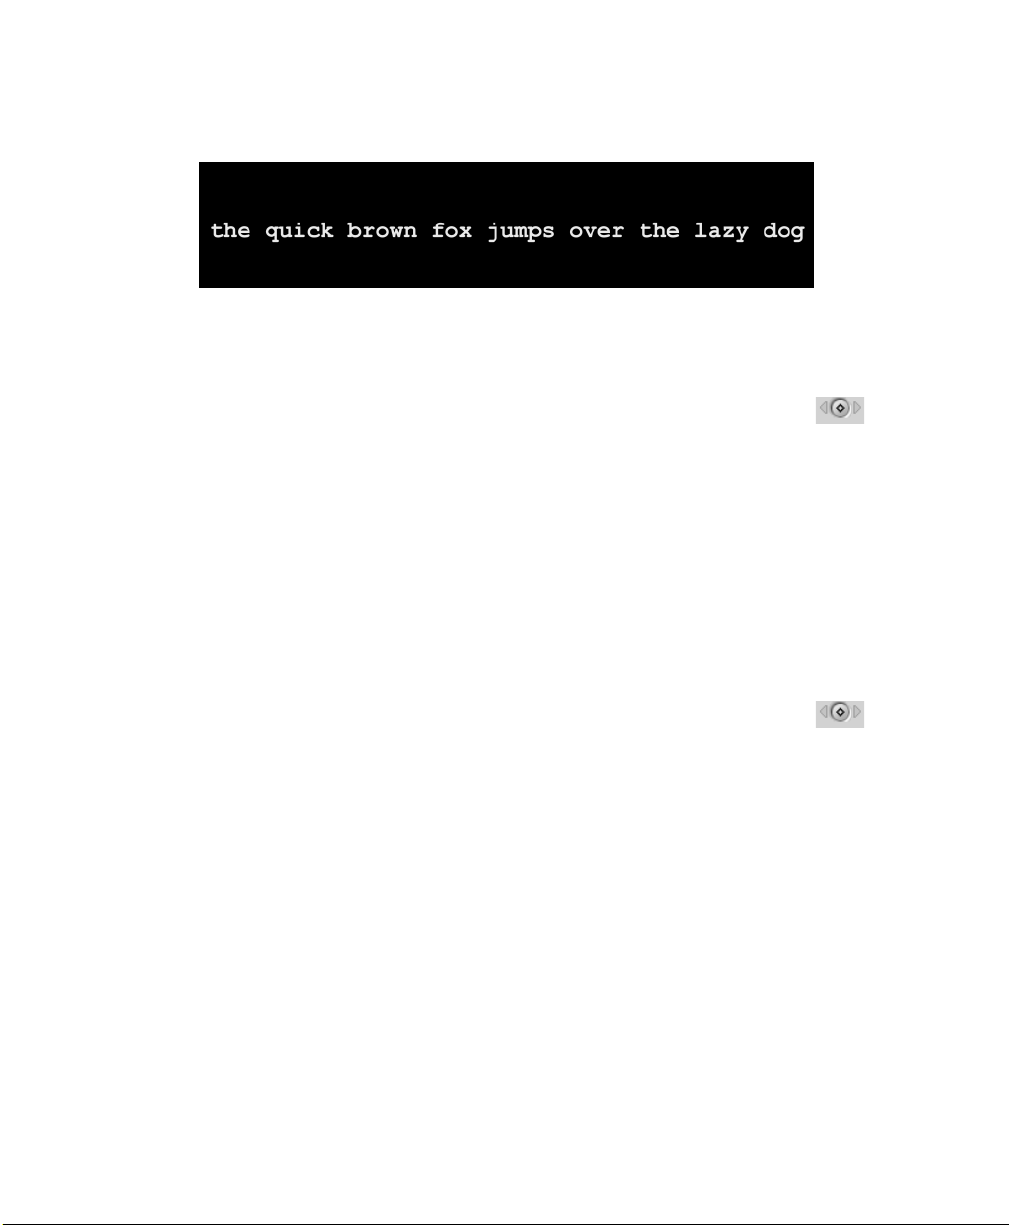
In the Page Transformations parameter group in the Controls tab, adjust Position X/Y
7.
so that the text appears at the bottom third of the screen. Set Master Scale to 22. Set
Scale X to 90.
8.
Move the playhead to the beginning of the clip. In the Variations parameter
group, click the
Variation
Variation, each ASCII character value offsets by a certain amount. This includes spaces
between words. When Letter Variation is 0, no variation occurs.
9.
Choose User Text from the Generator Type menu. Choosing User Text allows you to
type a phrase into the Text window for this effect.
10.
Choose Random Text from the Variation Mode menu. Random Text uses alphabetical
characters for the text randomization. The characters are randomized so that repeated
letters in the original words are not necessarily the same.
11.
Choose Right to Left from the Progress Order menu. Choosing this option will type the
text on from right to left.
12.
Move the playhead to time 00:00:02:00 and click the
create a keyframe for Progress
parameter to 100. The Progress parameter controls which characters change.
13.
Click the
parameter group) and set this parameter to 0. Text Type On adjusts the percentage of
the text that is visible in each frame.
14.
In the Type On parameter group, enable the Always Visible checkbox. Selecting the
Always Visible checkbox forces characters to remain visible while the transformations
are progressively applied.
15.
In the Type On parameter group, set Reveal Time to 1565, Fade to 34, Shift Y to -25,
Scale X to 143, Scale Y to 415 and Rotate to 4 degrees. These parameters transform the
letters as the words reveal themselves. You can only see the effect while Progress and
Text Type On are animating.
16.
Move the playhead to 00:00:03:00. In the Variations parameter group, set
Variation
of the effect. Set Progress to 0. Setting this parameter to 0 stops any characters from
changing until the end of the effect
Add Keyframe button
parameter and set this parameter to 14. When you adjust User Text
Add Keyframe button
to 100. Setting this parameter to 100 here stops it from animating until the end
to create a keyframe for the
Add Keyframe button
(in the Variations parameter group). Set this
to create a keyframe for
Text Type On
User Text
(in the Type On
User Text
to
Boris Calligraphy
•
•
•
83
•
•
•
Page 84
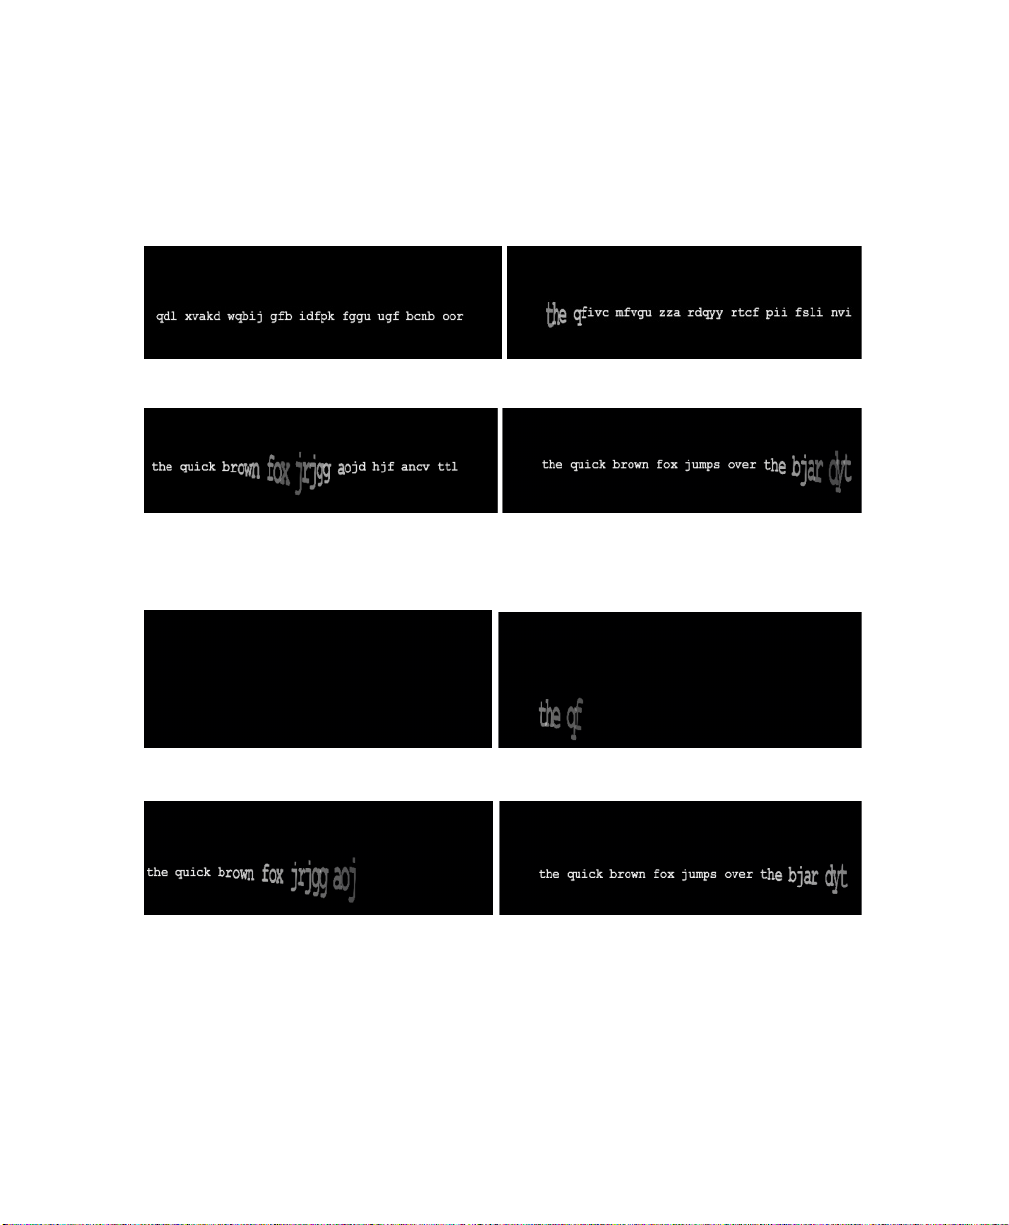
84
•
•
•
•
•
•
In the Type On parameter group, set Text Type On to 100. Setting this parameter to 100
17.
stops characters from typing on until the end of the effect.
18.
Preview the effect. The words reveal themselves in a wave-like effect.
.
Time 00:00:00:00 Time 00:00:02:03
Time 00:00:02:14 Time 00:00:02:24
19.
Play the effect without the Always Visible
checkbox
selected. Notice how the effect
changes and you cannot see all of the letters when they are not animating.
Time 00:00:00:00 Time 00:00:02:03
Time 00:00:02:14 Time 00:00:02:24
 Loading...