

Page 1
MAGGIORE AN
EN | USER MANUAL
www.boretti.com
Page 2

1
MAGGIORE
Introduction
Congratulations on the purchase of your new barbecue. We are convinced that you, with your
passion for barbecuing and the outdoor lifestyle, will transform an average summer evening into a
beautiful buona sera and your garden into a giardino.
Squadra Boretti
Read this manual carefully and keep it safe!
This manual contains specific instructions for your safety, for the assembly, operation and the
maintenance of your barbecue. Use the barbecue only as directed in this manual. Common sense and
caution during use are an absolute must!
Page 3

2
Contents
1 General safety guidelines ................................................................................................................. 3
2 Parts list ............................................................................................................................................ 5
3 Assembly drawings ........................................................................................................................... 7
4 Use of your barbecue ..................................................................................................................... 14
5 Maintenance of your barbecue...................................................................................................... 17
6 Environmental guide, Conditions of warranty & Contact info ...................................................... 20
Page 4

3
Important safety information
Read this manual carefully and keep it safe!
1 General safety guidelines
• Before use, first carefully read all the information contained in this manual.
• Never let children and pets come in the vicinity of this barbecue.
• This barbecue may never be used by children, people with mental impairments or people
who are under the influence of mind expanding substances and/or medication.
• Always maintain as much distance as possible when lighting and operating this barbecue.
• Change the gas cylinder far away from any source of ignition.
• The gasbottle can be placed underneath the barbecue. This does not comply for a table
model barbecue.
• Take care that the gashose does not fold during installation of the gasregulator.
• The supplied gasregulator should be used. If a new gasregulator is installed, take care that
is complies with the EN 16129. The gaspressure must be the same as stated on the
ratinglabel on the barbecue.
• Ensure that the gas valve on the gas bottle is within reach, so you can turn off the gas
supply to the barbecue.
• Extinguish all flames and DO NOT SMOKE while opening the gas valve and lighting the
barbecue.
• This barbecue will get extremely hot, extreme care and attention is required during its
operation.
• If you smell gas, check if all fuel connections are tightened securely before use. If the gas
smell persists, turn of the gas valve and contact your sales outlet directly.
• Keep flammable and/or inflammable substances, gasses, liquids and materials away from
the barbecue at all times and never let them come into direct contact with the barbecue.
• Omitting and/or incorrectly following the instructions, precautions, safety guidelines,
warnings and dangers that are contained in this manual can lead to fire or explosions, to
material damage and may also cause physical injury or death.
• Exclusively for household use and exclusively intended for the preparation of food.
Page 5

1.1 Assembly
• Assemble the barbecue according to the assembly drawing as contained in this manual.
• Incorrect assembly or not following the correct order of assembly, as demonstrated in the
drawing, can lead to very serious situations.
• Always take care and be precise during assembly.
• All parts must be assembled as shown in the assembly drawing. If a part is missing and/or you
doubt the correctness of the assembly, immediately contact your sales outlet.
• Never repair or replace parts of this equipment yourself unless this is expressly mentioned in
this manual.
Never connect a damaged gas hose to the equipment. This can lead to fire.
In the event that the equipment is fitted with a plug, this will be an earthed main plug to
protect you from electric shocks. The plug must be connected to a suitable, earthed, socket.
NEVER remove the metal plates from the plug.
1.2 Place of use
• Only use the barbecue out of doors (outside) and in a well-ventilated space. Never use the
barbecue inside or in any (partly) enclosed space. Toxic fumes may build up and these can
cause serious physical injury or death.
• Never use the barbecue on a flammable or inflammable surface.
• Only use the barbecue on a hard, straight and stable surface that can take the weight.
• Keep a distance of at least 3 metres between the barbecue and all flammable and/or
inflammable materials (wood, plastic, foliage etc.), when the barbecue is in use.
• Always keep the barbecue away from petrol and/or other flammable or inflammable liquids,
flammable gases, flammable fumes or areas where you suspect these may be present.
• Never use the barbecue under strong wind conditions.
• Ensure that the main burner(s) and the infra-red burner at the back are NEVER switched on
at the same time. This can lead to the lid of the barbecue warping or buckling.
• The barbecue becomes extremely hot, never move it during or shortly after use.
• Most of the Boretti barbecues have wheels which makes them easy to move. Take care when
moving the barbecue across uneven terrain; otherwise the wheels may get damaged.
• Do not use the roasting spit in the event of rain.
4
Page 6

2 Parts list
Barbecue
Garbage bag guide rails
Left side table
Electronic igniter
Right side burner
Battery
Control ring
Flame tamer II
Control button
Flame tamer III
Flame tamer I
Warming rack
5
Page 7
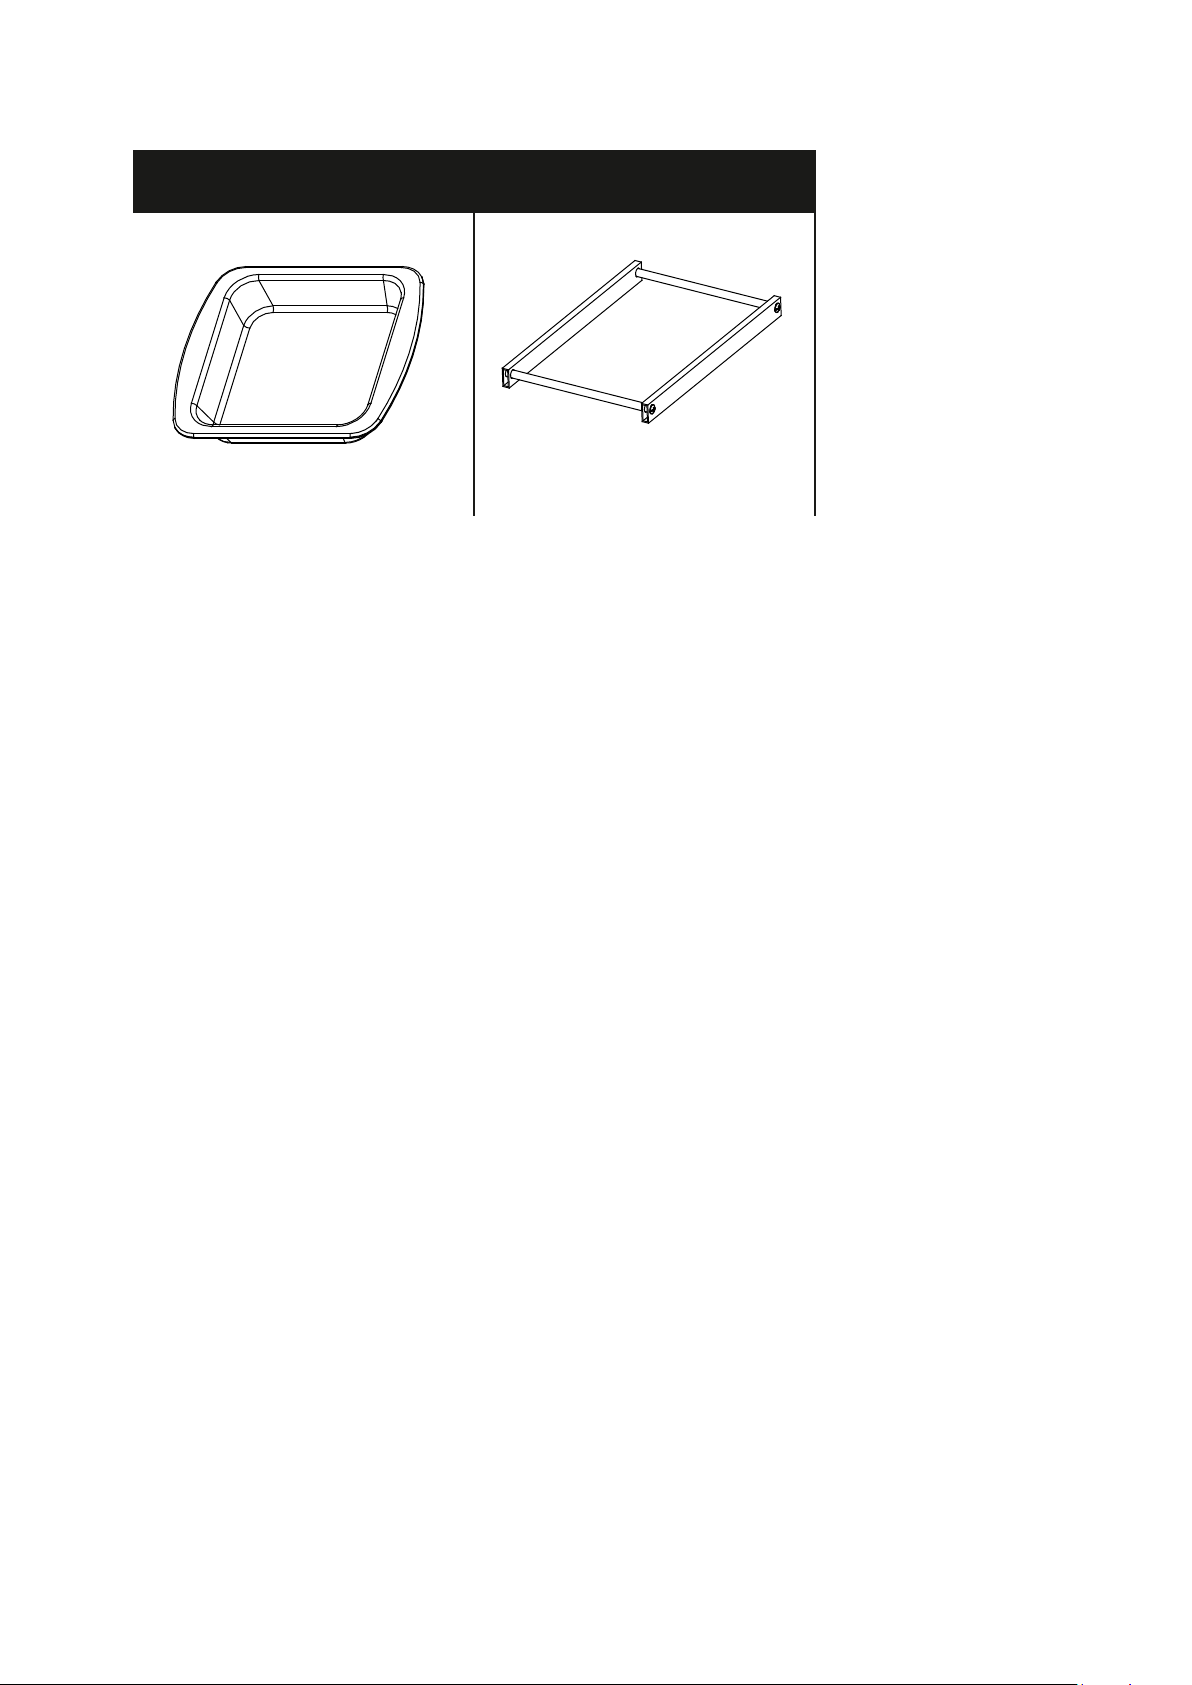
Grease tray
Garbage bag frame
6
Page 8

3 Assembly drawings
Step 1 - Remove the pan stand and loosen the M4 nut and screw to unfasten the side burner.
Pan stand
Side burner
M4 screw
M4 screw
Step 2 - a) Loosen the 4x M6 and 1x M4 screws on the right side of the barbecue by about 6 mm.
b) Slide the cut-outs of the side burner over the screws that you have loosened.
c) Tighten the screws again in order to secure the side burner.
M4 screw
M4 screw
M4 screw
7
Page 9

Step 3 - a) Place the control ring provided onto the side burner and tighten with the M4 screw supplied.
Place the second M4 screw and tighten it, ensuring that the ‘H’ is pointing to the ignition opening
b)
(left hand side).
Control ring
Side burner
M4 screw
Step 4 - a) Install the side burner with the 2x M4 screw. Return the pan stand into position.
Install the control button and ensure that the flat side of the button corresponds with the
b)
flat side of the gas valve.
Control button
Pan stand
Side burner
8
Page 10

Step 5 - a) Slide the screw thread part of the igniter through the opening at the front of the side burner
and install the lock nut.
b) Place the battery in the holder with the + side facing forwards.
c) Screw the top on the igniter.
Electronic igniter
Step 6 - a) Connect the end of the side burner ignition cable with the electronic igniter.
b) Connect the five wires that protrude from the side of the BBQ with the electronic igniter.
9
Page 11

Step 7 - Fix the refuse bag guide rail to the left of the BBQ and fasten it with 2x M6x10 screws.
M6 screw
Step 8 - a) Loosen the 4 x M6 screws on the left of the barbecue by about 6 mm. Loosen the 1 x M4 screw completely.
b) Slide the side table over the 4 loosened M6 screws.
c) Tighten all five screws again to securely fasten the side table.
M6 screw
M6 screw
M4 screw
10
Page 12

Step 9 - Place the flame tamers in the recesses with the triangular side facing upwards. Ensure that the flame
tamer with the long side is placed next to the infrared burner.
Flame tamer III
Flame tamer I
Flame tamer II
Step 10 - a) Put the racks on the ledges in the barbecue.
b) Position the warming rack.
11
Page 13

Step 11 - Slide the grease tray in the guide rails under the burners.
Grease tray
12
Page 14

Step 12 - Hang the refuse bag on its frame.
Step 13 - Slide the frame with the refuse bag in the guide rails.
13
Page 15

4 Use of your barbecue
4.1 General information
Even though all gas connections on the barbecue are tested for leakages before transport, a
complete test must be carried out at the assembly site. During transport or assembly, parts of the
barbecue may have been moved. It is also possible that the gas pressure on the equipment is too
high. Regularly inspect the entire system for leaks and check the system immediately in the event
that you smell gas.
4.2 Gas leak test
Always carry out a gas leak test before use of the barbecue and when the barbecue has not been
used for some time.
• Extinguish any open fires (DO NOT SMOKE when testing for leaks).
• Never carry out this gas leak test near open flames.
• Make a soapy solution made up from equal parts of water and liquid soap or gentle washing-
up liquid
• Follow the steps below:
1. Turn the control knobs of the burners to off.
2. Remove the battery from the electronic ignition.
3. Open the gas bottle.
4. Apply the soapy solution to all connections of the gas supply. If no soap bubbles are
formed, there is no gas leak. If soap bubbles start to form on a connection, this indicates
a leak. In the event that you detect a leak, turn the gas supply off immediately, tighten
the leaking connections firmly, open the gas bottle again and repeat steps 1 through to 4.
5. Turn the gas supply off.
6. Turn the control knobs of the burners on for 10 seconds to let the pressure escape from
the hose and then turn the control knobs to off again.
7. Remove the soapy solution from the connections of the equipment with cold water and
rub dry with a cloth. Check all gas supply connections before every use and do the same
when the gas bottle is being connected to the gas pressure regulator.
It is recommended that you check the gas hose for leaks every year, even if the gas bottle has never been disconnected from the equipment.
• Note: Ensure that you test all loose connections (including the side burner) and, if required,
tighten them again when you are testing the equipment for leaks. Even a small leak in the
system can result in a dangerous situation.
• Note: These days, most gas bottles are fitted with a mechanism that detects leaks inside the
container. When the gas is being released too quickly, this mechanism cuts off the gas
supply. A leak can severely restrict the gas supply which will make it difficult to light the
barbecue.
• Note: If you are unable to close off a gas leak, then turn off the gas supply and contact your
sales outlet. Even a small leak can cause a fire.
• Note: If, after several attempts, you are unable to light the barbecue, then contact your sales
outlet.
• Note: Ensure that the control knobs are in the “OFF” position when you are not using the
equipment.
14
Page 16

4.3 Lighting the barbecue
• Check the general conditions of the burners (see 0). If you are in doubt about the condition
of the burners, then contact your sales outlet.
• Ensure that the barbecue is placed on a level surface.
• Keep the cooking area clean and free from petrol and/or other flammable and/or
inflammable substances, flammable gasses or flammable fumes.
• Ensure that nothing is blocking the burners and ventilation.
• Do not use aluminium foil in the enamel burner tray or around the flame distributors.
• Ensure there is sufficient ventilation for the gas bottle.
WARNING:
• Do not light the barbecue if you can smell gas!
• Check the gas hose for cracks or wear and tear (see: GAS LEAK TEST).
• Keep your face and body as far away from the barbecue as possible when lighting it.
4.4 Lighting the burners with an electronic igniter
• Ensure that all knobs are in the “OFF” position.
• Always open the lid before you light the barbecue.
• Open the gas supply.
o NOTE: when opening the gas bottle, turn the valve SLOWLY two (2) whole turns to
get the right gas supply.
• Press and turn one of the control knobs to the “HIGH” setting. You will hear a crackling noise.
It may be necessary to keep the igniter depressed for about 10 seconds.
• Note: if the burner does not light after 10 seconds, turn the knob back to the “OFF” position
and wait 1 minute before you try again.
• Repeat the above steps also for the other burners.
• Note: On some models, as well as the control knob, a separate ignition knob also needs to be
pressed.
4.5 Lighting the burners with a match extender (if provided)
If the electronic igniter does not manage to light the burners, it is also possible to light the burners
with the aid of a match.
• Put the match in the extension piece, if the barbecue is supplied with a match extender.
• Keep your face as far away as possible from the barbecue and point the extended match
through the openings in the grille toward the burner.
• Place the match close to the burner openings and turn the control knob to the “HIGH”
position.
• Note: If, after several attempts, you are still not able to light the barbecue, please contact
your sales outlet.
15
Page 17

16
4.6 Lighting the side burner with the electronic igniter
• Press and turn the control knob to the “HIGH” position. You will hear a crackling noise.
• It may be necessary to keep the igniter depressed for about 10 seconds.
• If the burner does not light after 10 seconds, turn the know back to the “OFF” position and
wait 1 minute before trying again.
4.7 Lighting the side burner with matches
If the electronic igniter does not manage to light the burner, it is also possible to light the burner with
the aid of a match.
• Put the match in the extension piece, if the barbecue is supplied with a match extender.
• Keep your face as far away as possible from the barbecue and point the (extended) match at
the burner openings.
• Press and turn the control knob to the “HIGH” position.
• Note: If, after several attempts, you are still not able to light the barbecue, please contact your
sales outlet.
4.8 Storage
• After using your barbecue, close the gas supply and let the equipment cool down.
• Remove the gas bottle.
• Store the barbecue in a well-ventilated space and keep children away from the equipment.
• Do not place any easily flammable materials under the barbecue.
• If you are storing the barbecue outside, then use a cover to protect your barbecue from the
elements. In the event of outside storage, remove the cover regularly to prevent excessive
condensation from forming (which may lead to oxidation) on the metal components.
• Let the barbecue cool down before placing the cover over it or trying to move the
equipment.
4.9 Use
• The barbecue becomes extremely hot, use heat resistant gloves when using the barbecue.
Do not touch the barbecue without the correct protection.
• Use suitable barbecue utensils to prepare food on the barbecue.
Page 18

17
5 Maintenance of your barbecue
Important: NEVER leave the barbecue outside without covering it. Rainwater could collect in the
barbecue, the frame or the grease receptacle. If the grease receptacle has not been cleaned after use
and the barbecue is uncovered, the tray can fill with water, which will cause water and grease to
pour into the frame. We recommend that you clean the grease receptacle after every use.
5.1 Cleaning
Do not use any abrasive cleaning fluids on the barbecue. These can cause scratches or damage to the
surface of the equipment.
• Warm the barbecue up by lighting the main burners on their highest setting and shutting the
lid. Do not turn on the infra-red burner(s)!
• Let the barbecue warm up for about 10 minutes to 250 degrees (Celsius).
• Turn the burners off and let the machine cool down before you start cleaning.
• Clean the racks and baking trays with a suitable cleaning brush (Available from the Boretti
Web shop).
• Remove the baking racks and the baking tray.
• Brush charred (food) remains towards the grease receptacle.
• Remove the grease receptacle and clean this with warm water and detergent.
• Use warm water and detergent to clean the outside of the barbecue.
• Dry the barbecue with a soft, clean cloth.
5.2 Grease receptacle
The grease receptacle must be cleaned regularly to avoid a build-up of dirt and remnants.
Note: ensure that the grease receptacle has cooled down before you clean it.
5.3 Grill racks
The grill racks can be cleaned immediately after cooking, once the barbecue has been switched off,
with the use of an appropriate cleaning brush. Cleaning the grill racks by using water and a degreaser
heightens the chance of oxidation/rust. You can counteract this by coating the grill racks with some
olive oil after cleaning.
Page 19

5.4 Stainless-steel
After the first time of use, parts of the barbecue may become discoloured by the intense heat that
comes from the burners. This is normal.
Purchase a cleaning product for stainless steel and use this when brushing the metal down. It may be
possible for grease spots to fall on the stainless-steel parts and get burnt on, which may cause some
parts to look worn. Use a cleaning product that is not abrasive together with a cleaning product for
stainless steel, to remove the grease.
5.5 Changing the battery on the ignition (if present)
Turn the knob on the ignition loose and remove the AA battery. Put a new AA battery in place.
5.6 Enamel parts
Some of the parts on the barbecue have an enamel coating. Enamel is a glass-based product and is
very durable and resistant to wear. However, it is not resistant to shocks and knocks, which may
cause hairline cracks. The hairline cracks can lead to small pieces of enamel breaking off, which leads
to rust forming. The performance of your barbecue will not be affected by the broken off pieces or
hairline cracks. No claims can be made regarding damages to the enamel in the cooking area after
use.
5.7 Ventilation
The burners can only function properly if the heat they produce can escape as well. If this is not
possible, then the burners may not get enough oxygen, which may cause backfiring, especially if the
burners are set to “HIGH”. If this happens regularly, it may cause the burners to develop cracks. For
this reason, there are ventilation openings around the barbecue. These allow the hot air to escape.
Always ensure that there is sufficient space around the cooking area (the racks will allow sufficient
space). Never cover the ventilation openings with aluminium foil or other materials that can impede
the airflow. NEVER allow the cooking surface to be completely covered, for instance by a large pan or
by completely filling it with grill trays.
5.8 Replacing the gas hose
The gas hose should be replaced every two years. Rubber gas hoses can dry out which may result in
gas leaks.
18
Page 20

5.9 Burners
It is normal for rust (oxidation) to form around the burners. Food remnants must be removed
regularly. This can be done by means of a barbecue cleaning brush. Burners must periodically be
removed for inspection and cleaning, in particular after a period of non-use/storage. The burners
must be checked for their general condition and to ensure that the openings are not blocked. The
burners can be cleaned with the use of a brush. When removing the burners, make sure that you do
not damage the gas valve and the ignition electrode.
An opening has been placed intentionally in the first part of the burner to ensure that enough oxygen
can be supplied to form a flammable mixture. This means you will see a small opening, just where
the gas valve connects to the burner. No gas will leak from this.
5.10 Spiders and insects
Spiders and insects can make their nest inside the burners of the barbecue, which may cause gas to
flow from the front of the burner. This is a dangerous situation that can cause a fire behind the
operation panel. This will damage the barbecue, which will then no longer be safe to use. Therefore,
we recommend that you check the barbecue at least once a year for spiders, insects and nests
(particularly after long storage periods). You can do this by dismantling the burner tubes and blowing
through them or brushing them clean.
19
Page 21

6 Environmental guide, Conditions of warranty & Contact info
If, for whatever reason, you want to dispose of your gas barbecue, please take the following
guidelines into account:
• Deliver the barbecue to the authorised local company for the collection of surplus household
equipment. Contact your local council to find out where these collection points are located.
• This barbecue features the mark that complies with the European guidelines 2002/96EG
relating to disposal of equipment. This guideline decides the standard for the collection and
recycling of disposed equipment which apply to the whole European Union territory.
For barbecue accessories, warranty, service conditions and other questions we refer you to
www.boretti.com
You can also send questions and suggestions to info@boretti.com
Boretti BV
Abberdaan 114
1046 AA Amsterdam
20
Page 22

Modelnumber: Maggiore
Serialnumber: . . . . . . . . . . .
CE:
Q.:
Injector size
CE-0845/18, Made in PRC
Butane 17,4 kW (1470 g/h)
Main burners: 0.93 IR Back: 0.93
Side burner: 0.92 IR Bottom: 0.85
Country
AL
BE
BG
CY
CZ
DK
EE
ES
FI
FR
GB
GR
HR
HU
IE
IS
IT
LT
LV
MK
MT
NL
NO
PT
RO
SE
SI
TR
Categor
y
I3+ Butan 28-30
I3B/P Butan 30/30
I3+ Propan 37
I3+ Butaan 28-30
I3+ Propaan 37 Il faudra utiliser un détendeur approprié.
I3B/P бутан 30/30
I3+ βουτάνιο 28-30
I3B/P βουτάνιο
I3+ προπάνιο 37
I3+ Butan 28-30
I3+ Propan 37
I3B/P Butan 30/30
I3B/P Butaani 30/30
I3+
I3+
I3B/P Butaani 30/30
I3+ Butane 28-30
I3+ Propane 37 Il faudra utiliser un détendeur approprié.
I3+ Butane 28-30
I3+ Propane 37
I3+ βουτάνιο 28-30
I3B/P βουτάνιο 30/30
I3+ προπάνιο 37
I3B/P Butan 30/30
I3B/P Butángáz 30/30
I3+ Butane 28-30
I3+ Propane 37
I3B/P Bútan 30/30
I3+ Butano 28-30
I3+ Propano 37
I3+ Butanas 28-30
I3B/P Butanas 30/30
I3+ Propano 37
I3B/P Butāns 30/30
I3+
I3B/P бутан 30/30
I3+ пропан 37
I3B/P
I3B/P Butaan 30/30
I3B/P Butan 30/30
I3+ Butano 28-30
I3B/P Butano 30/30
I3+ Propano 37
I3B/P Butan 30/30
I3B/P Butan 30/30
I3+ Butan 28-30
I3B/P Butan 30/30
I3+ Propan 37
I3+ Bütan 28-30
I3B/P Bütan 30/30
I3+ Propan 37
Gas type
Butano
Propano
бутан 28-30
Butan 30/30
Pressure
(mbar)
30/30
28-30
37
WARNING
Kërkohet një rregullues tjetër i presionit të gazit.
Απαιτείται άλλος ρυθμιστής πίεσης αερίου.
Vyžaduje se jiný regulátor tlaku plynu.
Se necesita otro regulador de presión de gas.
Other gas pressure regulator required.
Απαιτείται άλλος ρυθμιστής πίεσης αερίου.
Other gas pressure regulator required.
È necessario un altro regolatore della pressione del gas.
Būtinas kitas dujų slėgio reguliatorius.
Потребен е друг регулатор за притисок на гас.
Outro regulador de pressão de gás necessário.
Zahtevan je drug regulator za tlak plina.
Farklı gaz basıncı regülatörü gereklidir.
0845/18
www.boretti.com
Page 23

Abberdaan 114 | 1046 AA Amsterdam | The Netherlands | www.boretti.com
 Loading...