

Page 1
IT
A
PROGRAMMATORE ELETTRONICO
ES
FR
DE
PROGRAMADOR ELECTRONICO
PROGRAMMEUR ELECTRONIQUE
GB
ELECTRONIC PROGRAMMER
ELEKTRONIK PROGRAMMIERES
MOD. EL 145
codice I/301/35
Page 2
IT
1. FUNZIONI: durata cottura - fi ne cottura - orologio
- contaminuti - funzione manuale
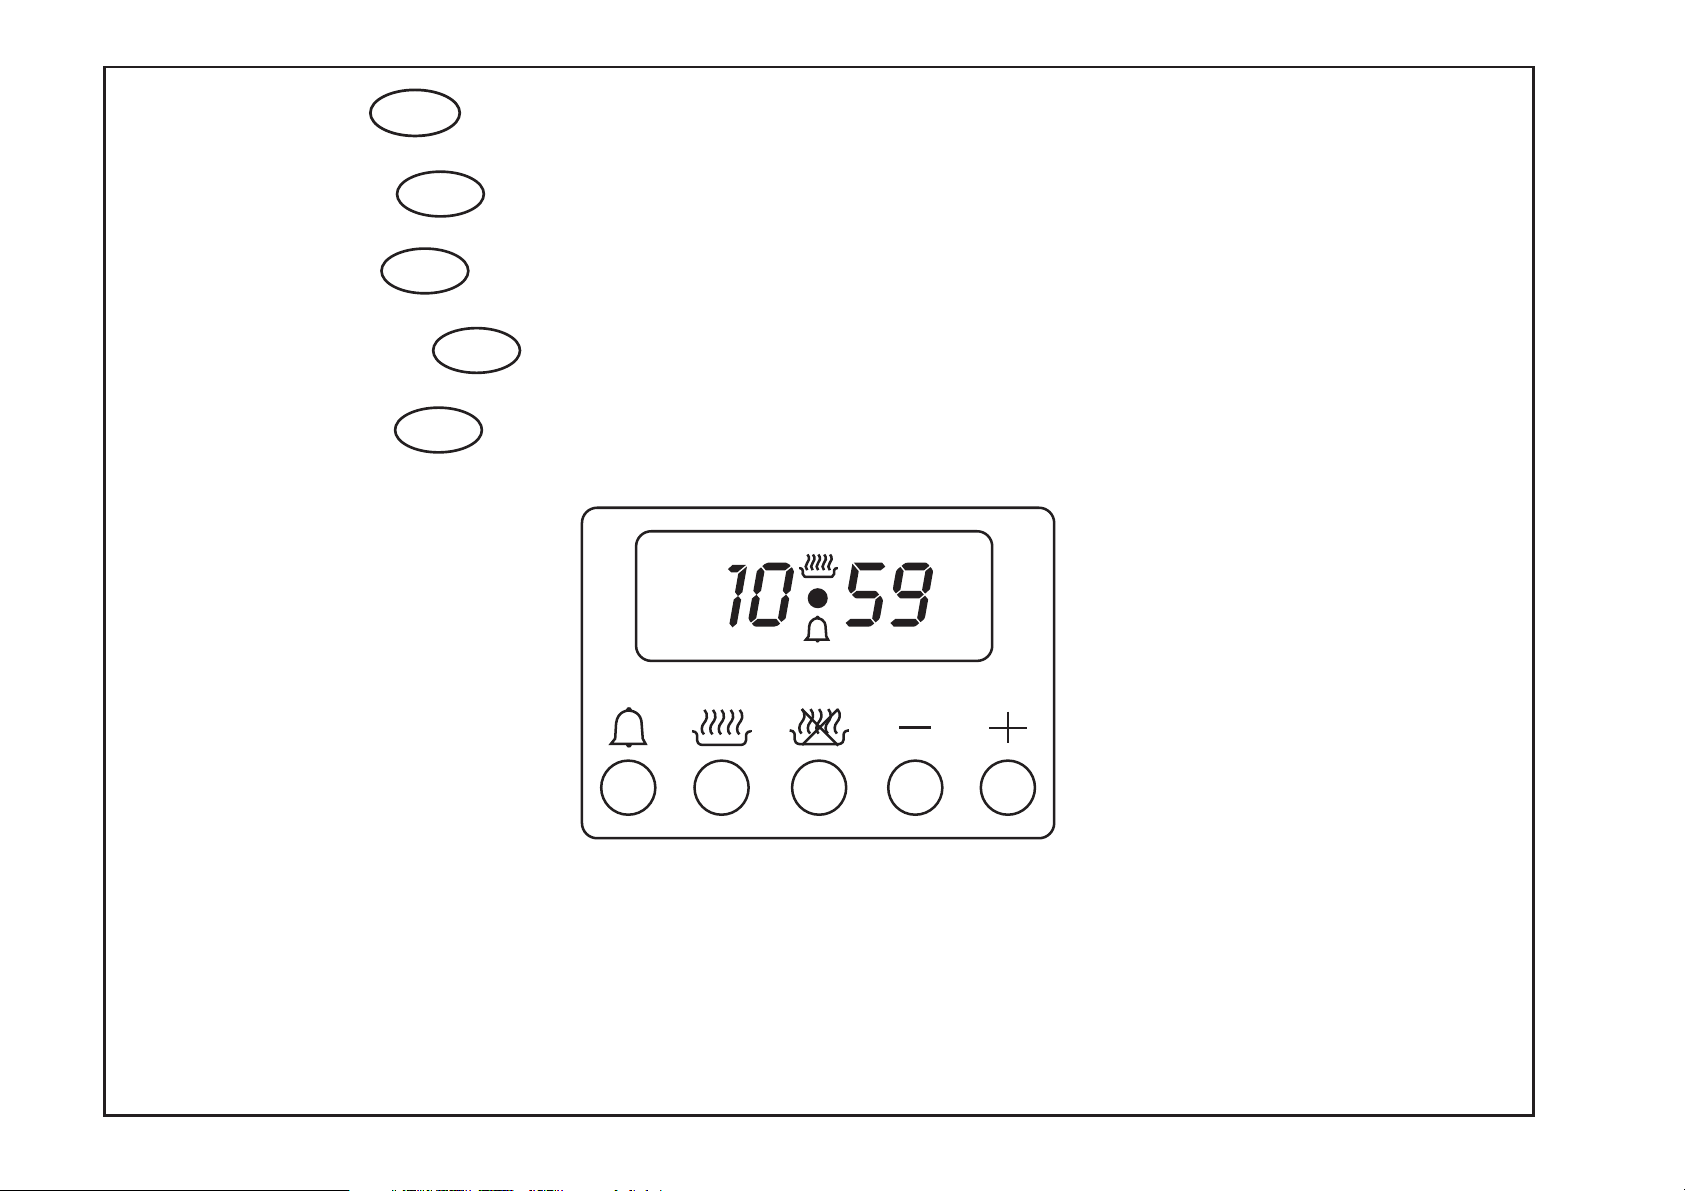
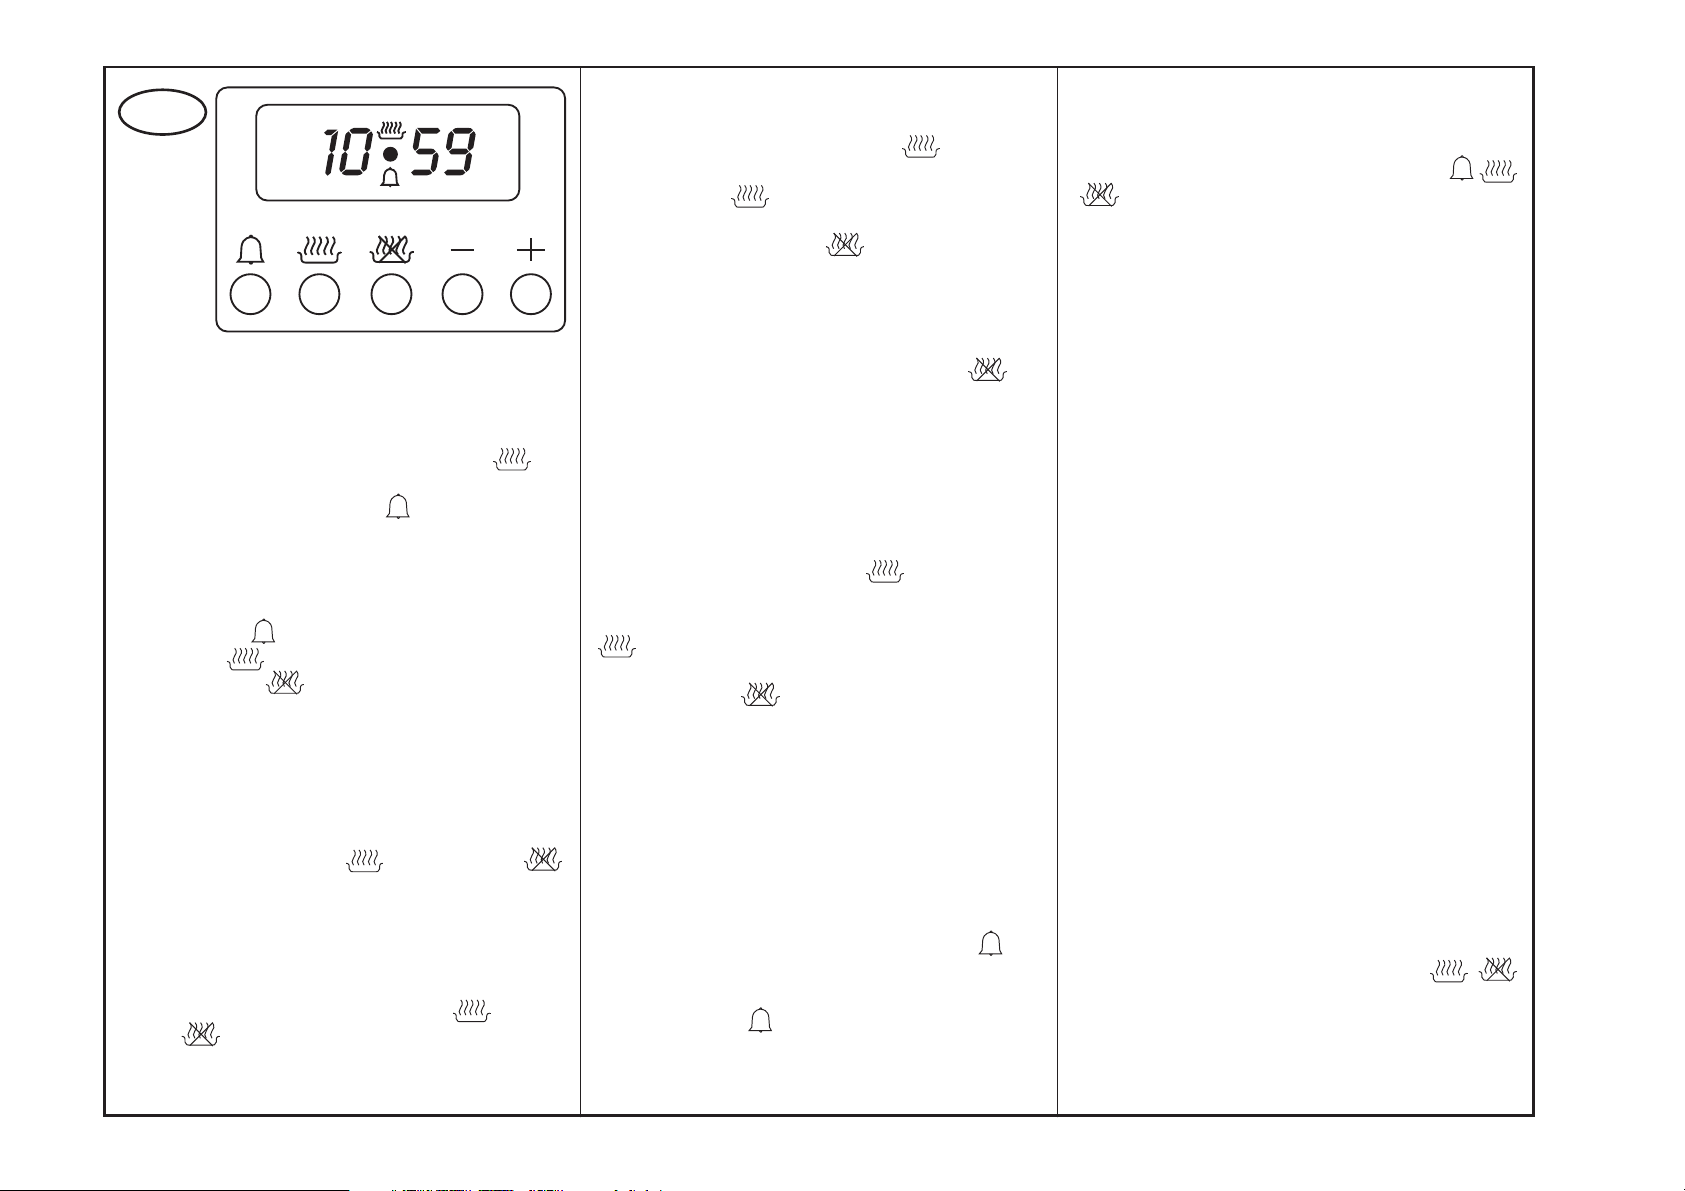
2. DISPLAY
Simboli indicanti le funzioni in corso:
durata e funzione manuale = simbolo pentola
programma automatico = "A"
contaminuti = simbolo campana
3. IMPOSTAZIONE DI UNA FUNZIONE
Selezionare la funzione desiderata azionando il tasto
corrispondente ed impostare il tempo con i tasti +/-.
4. LEGENDA PULSANTI
Tasto campana
Tasto durata
Tasto fi ne cottura
Tasto - + = regolazione orario e tempo di cottura
Con il tasto “+” il tempo aumenta, con il tasto “-” il tempo
decresce ad una velocità direttamente pro por zio na le alla
durata della pressione esercitata sul tasto.
5. FUNZIONE OROLOGIO
La funzione orologio si attiva premendo con tem po ra ne a men te i tasti di durata
. L’ora si imposta agendo quindi sui tasti +/-. Eventuali
pro gram mi precedentemente impostati si cancelleranno
automaticamente.
6. FUNZIONE MANUALE
L’impostazione di questa funzione avviene agendo
con tem po ra ne a men te sui tasti di durata
cottura
bolo pentola. I programmi precedentemente im po sta ti
vengono cancellati.
A
= tasto per contaminuti e suoneria
= durata cottura automatica
= fi ne cottura
e di fi ne cottura
e di fi ne
. Il simbolo “A” si spegne e compare il sim-
7. FUNZIONE SEMIAUTOMATICA CON DURATA
COTTURA
Selezionare la funzione durata (tasto
il tempo con i tasti +/-. Compaiono i simboli “A” ed il
simbolo pentola
del giorno coinciderà con il tempo fi nale, visualizzabile
tramite il tasto fi ne cottura
e scomparirà il simbolo pentola. Entrerà in funzione il
segnale acustico. Il simbolo “A” lampeggerà.
8. FUNZIONE SEMIAUTOMATICA CON FINE COT TU RA
Selezionare la funzione di fi ne cottura (tasto
impostare il tempo fi nale con i tasti +/-. Compaiono i
simboli “A” e pentola. Il forno si accende. Quando l’ora del
giorno coinciderà con il tempo fi nale il forno si spegnerà
e scomparirà il simbolo pentola. Si metterà in funzione il
segnale acustico. Il simbolo “A” lampeggerà.
9. FUNZIONE AUTOMATICA CON DURATA E FINE
COTTURA
Selezionare la funzione durata
tempo desiderato con i tasti +/-. Compare il simbolo
“A”. Il forno si accende e compare il simbolo pentola
. Attendere qualche secondo fi no all’apparire
dell’ora corrente. Impostare il tempo fi nale agendo sul
tasto fi ne cottura
fi nale approssimato. Agendo sui tasti +/- impostare il
tempo fi nale effettivamente desiderato. Il forno si spegne e scompare il simbolo pentola. Il simbolo pentola
com pa ri rà di nuovo quando l’ora del giorno coinciderà
con il tempo fi nale meno la durata cottura. Alla fi ne del
pro gram ma automatico, lampeggerà il sim bo lo “A”. Si
azionerà il segnale acustico, il forno e il simbolo pentola
si spegneranno.
10. CONTAMINUTI
Selezionare la funzione contaminuti (tasto
im po sta re il tempo desiderato con i tasti +/-. Durante
il trascorrere del tempo impostato rimarrà acceso il
sim bo lo campana
Quando il tempo giungerà alla fi ne, si metterà in funzione
il segnale acustico.
. Il forno si accende. Quando l’ora
, il forno si spegnerà
. Sul display compare un tempo
.
) e scegliere
) ed
ed impostare il
) ed
11. SEGNALE ACUSTICO
Il segnale acustico entra in funzione alla fi ne della
funzione di durata cottura e contaminuti e rimane attivo
per 7 minuti. Agendo su uno qualsiasi dei tasti
il segnale si interrompe.
L’intensità del segnale acustico può essere modifi cata agendo sul tasto “-” senza prima selezionare una
fun zio ne. È possibile scegliere tra 3 diverse intensità
di suono e la durata dipende dal tempo di pressione
esercitato sul tasto “-”.
12. INIZIO DI UN PROGRAMMA E CONTROLLO
Una volta selezionato il programma, questo ha inizio
dopo che si è impostato il tempo. I tempi residui possono
essere visualizzati in qualsiasi momento selezionando
nuovamente la funzione corrispondente.
13. INDIVIDUAZIONE DI UN ERRORE DI PRO GRAM MA ZIO NE
Si è in presenza di un errore di programmazione se l’ora
indicata dall’orologio è compresa tra l’ora di inizio cottura
e l’ora di fi ne cottura.
L’errore viene segnalato dal segnale acustico che si
mette in funzione e dal lampeggiare intermittente del
simbolo “A”.
14. CANCELLAZIONE DI UN PROGRAMMA
La cancellazione di un programma avviene se le zio nan do
la funzione manuale.
Alla fi ne del programma impostato, questo si cancella
automaticamente.
15. USO IMMEDIATO
A) Se il display lampeggia leggere il punto B, altrimenti
passare al punto C.
B) Se il display lampeggia signifi ca che non è ancora stata
impostata l’ora corrente oppure che è venuta a mancare
l’energia elettrica. In questo caso impostare l’ora corrente
(vedi punto 5) e poi passare al punto C.
C) Premere contemporaneamente i tasti
. Tramite le relative manopole dell’elettrodomestico
im po sta re la temperatura (manopola termostato) e la
fun zio ne (manopola selettore).
Page 3

ES
1. FUNCIONES: Duración cocción - Fin cocción - Reloj
- Cuentaminutos - Función manual.
2. DISPLAY
Símbolos para indicar las funciones en curso:
Duración y función manual = símbolo “Cazuela”
Programa automático = "A"
Cuentaminutos = símbolo “Campana”
3. CÓMO ESTABLECER UNA FUNCIÓN
Seleccionar la función deseada accionando la tecla
correspondiente y establecer el tiempo con las teclas
“+” y “-“.
4. LEYENDA BOTONES
Tecla “Campana”
Tecla “Duración”
Tecla “Fin Cocción”
Tecla “-“.
Tecla “+”.
Con la tecla “+” el tiempo aumenta y con la tecla “-“ el tiempo disminuye a una velocidad directamente proporcional
a la duración de la presión ejercida sobre la tecla.
5. FUNCIÓN RELOJ
La función reloj se activa pulsando al mismo tiempo
las teclas de duración
se establece pulsando las teclas “+/-“. Los programas
establecidos con anterioridad quedan anulados automáticamente.
6. FUNCIÓN MANUAL
La regulación de esta función se realiza pulsando al
mismo tiempo las teclas de duración
cocción
A
y fi n cocción . La hora
y de fi n
. El símbolo "A" se apaga y aparece el
símbolo “Cazuela”. Los programas establecidos con
anterioridad quedan anulados.
7. FUNCIÓN SEMIAUTOMÁTICA CON DURACIÓN
COCCIÓN
Seleccionar la función duración (tecla
el tiempo con las teclas “+/-“. Aparecen el símbolo “A” y el
símbolo “Cazuela”
la hora diurna coincide con el tiempo fi nal, que se puede
visualizar mediante la tecla fi n cocción
apaga y desaparece el símbolo “Cazuela”. Se pone en
marcha la señal acústica. El símbolo “A” centellea.
8. FUNCIÓN SEMIAUTOMÁTICA CON FIN COCCIÓN
Seleccionar la función de fi n cocción (tecla
blecer el tiempo fi nal con las teclas “+/-“. Aparecen el
símbolo "A" y el símbolo “Cazuela”. El horno se enciende.
Cuando la hora diurna coincide con el tiempo fi nal, el
horno se apaga y desaparece el símbolo “Cazuela”.
Se pone en marcha la señal acústica. El símbolo "A"
centellea.
9. FUNCIÓN AUTOMÁTICA CON DURACIÓN Y FIN
COCCIÓN
Seleccionar la función duración
tiempo deseado con las teclas “+/-“. Aparece el símbolo
A. El horno se enciende y aparece el símbolo “Cazuela”
. Esperar unos segundos hasta que aparezca la
hora actual. Establecer el tiempo fi nal utilizando la tecla
fi n cocción
aproximado. Establecer el tiempo fi nal que se desea
realmente mediante las teclas “+/-“. El horno se apaga y
desaparece el símbolo “Cazuela”. El símbolo “Cazuela”
aparecerá de nuevo cuando la hora diurna coincida con el
tiempo fi nal menos la duración cocción. Cuando ter mi na
el programa automático, centellea el símbolo "A". Se
pone en marcha la señal acústica y se apagan el horno
y el símbolo “Cazuela”.
10. CUENTAMINUTOS
Seleccionar la función cuentaminutos (tecla
establecer el tiempo deseado mediante las teclas “+/-“.
Mientras transcurre el tiempo establecido permanece encendido el símbolo “Campana”
. El horno se enciende. Cuando
. En el display aparece un tiempo fi nal
. Transcurr ido el tiempo
) y establecer
, el horno se
) y esta-
y establecer el
) y
establecido, se pone en marcha la señal acústica.
11. SEÑAL ACÚSTICA
La señal acústica se pone en marcha al fi nal de la función
de duración cocción y cuentaminutos, permanece activa
durante 7 minutos. Pulsando una tecla cualquiera,
, o , la señal se interrumpe. La intensidad de la
señal acústica se puede modifi car mediante la tecla “-“,
sin necesidad de haber seleccionado con anterioridad
alguna función. Se puede escoger entre tres intensidades
diferentes de sonido, la duración del mismo depende de
cuanto tiempo se ha presionado la tecla “-“.
12. INICIO DE UN PROGRAMA Y CONTROL
Seleccionado el programa, éste se pone en marcha una
vez establecido el tiempo. El tiempo restante se puede
visualizar en cualquier momento seleccionando de nuevo
la función correspondiente.
13. LOCALIZACIÓN DE UN ERROR DE PROGRAMACIÓN
Existe un error de programación cuando la hora que
indica el reloj está comprendida entre la hora de inicio
cocción y fi n cocción. El error viene indicado por la activación de la señal acústica y el centelleo intermitente
del símbolo "A".
14. ANULACIÓN DE UN PROGRAMA
Se puede anular un programa seleccionando la función
manual. Al fi nal del programa establecido, éste se anula
automáticamente.
15. USO INMEDIATO
A) Si el display centellea leer el punto B, si no pasar
al punto C.
B) Si el display centellea signifi ca que todavía no se ha
establecido la hora actual o bien que se ha interrumpido
en algún momento la corriente eléctrica. En este caso,
establecer la hora actual (véase punto 5) y después
pasar al punto C.
C) Pulsar al mismo tiempo las teclas
Empleando los respectivos mandos del aparato, establecer la tem pe ra tu ra (mando termostato) y la función
(mando selector).
y .
Page 4

FR
1. FONCTIONS: Durée de la cuisson - Fin de la cuisson
- Horloge - Minuterie - Fonction manuelle
2. VISUEL
Symboles indiquant les fonctions utilisées :
Durée et fonction manuelle = symbole
Programme automatique = "A"
Minuterie = symbole
3. REGLAGE D’UNE FONCTION
Sélectionner la fonction désirée à l’aide de la touche
correspondante et régler sa durée au moyen des
touches + ou -.
4. LEGENDE DES BOUTONS
Touche
Touche
Touche
Touche -/+
Avec la touche « + », le temps augmente, avec la touche
« - », il diminue, selon une vitesse proportionnelle à la
durée de la pression exercée sur la touche.
5. FONCTION HORLOGE
Pour activer la fonction horloge, appuyer sur les touches
l’heure en appuyant sur les touches + et -. Les éventuels programmes précédemment sélectionnés sont
automatiquement effacés.
6. FONCTION MANUELLE
Pour sélectionner cette fonction, appuyer sur les touches
s’éteint et le symbole
précédemment sélectionnés sont effacés.
= minuterie
et en même temps. Ensuite, régler
et en même temps. Le symbole "A"
A
.
= durée de la cuisson
= fi n de la cuisson
apparaît. Les programmes
7. FONCTION SEMI-AUTOMATIQUE AVEC DUREE
DE LA CUISSON
Sélectionner la fonction durée (touche
temps voulu à l’aide des touches + ou -. Les symboles
"A" et
l’heure coïncide avec la fi n du temps sélectionné, que
l’on peut affi cher en appuyant sur la touche
s’éteint et le symbole
retentit alors et le symbole A clignote.
8. FONCTION SEMI-AUTOMATIQUE AVEC FIN DE
CUISSON
Sélectionner la fonction de fi n de cuisson (touche
et régler l’heure de fi n de cuisson à l’aide des touches +
ou -. Les symboles "A" et
s’allume. Quand l’heure coïncide avec l’heure de fi n
de cuisson sélectionnée, le four s’éteint et le symbole
symbole "A" clignote.
9. FONCTION AUTOMATIQUE AVEC DUREE ET FIN
DE CUISSON
Sélectionner la fonction durée (touche
temps désiré à l’aide des touches + ou -. Le symbole
apparaît. Le four s’allume et le symbole apparaît.
Attendre quelques secondes, jusqu’à ce que l’heure
courante apparaisse. Régler l’heure de fi n de cuisson
à l’aide de la touche
de fi n de cuisson approximative. Appuyer sur les touches + ou - pour régler l’heure de fi n de cuisson désirée
de façon précise. Le four s’éteint et le symbole
disparaît. Le symbole
l’heure coïncide avec l’heure de fi n de cuisson, moins la
durée de cuisson. A la fi n du programme automatique, le
symbole "A" clignote. Le signal sonore retentit, le four
et le symbole
10. MINUTERIE
Sélectionner la fonction minuterie (touche
gler le temps voulu à l’aide des touches + ou -. Lors
de l’écoulement du temps sélectionné, le symbole
reste allumé. Quand le temps s’est écoulé, le signal
sonore retentit.
apparaissent, et le four s’allume. Quand
disparaît. Le signal sonore
apparaissent, et le four
disparaît. Le signal sonore retentit alors et le
. Le visuel affi che une heure
apparaît de nouveau quand
s’éteignent.
) et régler le
, le four
) et régler le
) et ré-
11. SIGNAL SONORE
Le signal sonore retentit à la fi n de la durée de cuisson
et du temps de la minuterie, pendant 7 minutes. Pour
interrompre le signal sonore, appuyer sur les touches
, ou . Il est possible de modifi er l’intensité du
signal sonore en appuyant sur la touche « - », sans
sélectionner de fonction au préalable. Il est possible
de choisir entre 3 différentes intensités de signal et sa
durée dépend de la durée de la pression exercée sur
la touche « - ».
12. DEMARRAGE ET CONTROLE D’UN PROGRAMME
)
Une fois le programme sélectionné, il démarre après le
réglage de la durée. Le temps qui reste peut être affi ché
à tout moment en sélectionnant à nouveau la fonction
correspondante.
13. DETERMINATION D’UNE ERREUR DE PROGRAMMATION
Une erreur de programmation a été commise si l’heure
indiquée par l’horloge est comprise entre l’heure de début
de cuisson et l’heure de fi n de cuisson. Cette erreur est
indiquée par le signal sonore et par le clignotement du
symbole "A".
14. EFFACEMENT D’UN PROGRAMME
L’effacement d’un programme se fait en sélectionnant la
fonction manuelle. Un programme sélectionné s’efface
automatiquement quand il arrive à sa fi n.
15. UTILISATION IMMEDIATE
A) Si le visuel clignote, lire le paragraphe B, autrement
passer au paragraphe C.
B) Si le visuel clignote, cela signifi e que l’heure courante
n’a pas encore été réglée ou bien qu’une coupure de courant s’est produite. Dans ce cas, régler l’heure courante
(voir paragraphe 5), puis passer au paragraphe C.
C) Appuyer en même temps sur les touches
. A l’aide des boutons correspondants du four, régler la
température (thermostat) et la fonction (sélecteur).
et
Page 5

GB
1. FUNCTIONS: cooking time - end of cooking - clock
- timer - manual operation
2. DISPLAY
Symbols indicating functions in progress:
duration and manual function = pot symbol
automatic programme = "A"
Minute minder = bell symbol
3. SETTING A FUNCTION
Select the function required by pressing the corresponding button and set the time with the +/- buttons.
4. LEGEND FOR BUTTONS
Bell button
Cooking time button
End of cooking button
- + button = timer settings
Time is increased with the “+” button and decreased
with the “-” button at a speed directly proportional to the
length of time for which the button is pressed.
5. CLOCK FUNCTION
The clock function is activated by pressing the cooking
time
neously. The time is set by pressing the +/- buttons.
Any previously set programmes will be automatically
cancelled.
6. MANUAL FUNCTION
This function is set by pressing the cooking time
and end of cooking buttons simultaneously. The
symbol "A" disappears and the pot symbol appears.
Previously set programmes are cancelled.
and end of cooking buttons simulta-
A
;
7. SEMI-AUTOMATIC FUNCTION WITH COOKING
TIME
Select the cooking time function (
the time with the +/- buttons. The symbols "A" and the
pot symbol
the time coincides with the set time, shown on the end
of cooking button
the pot symbol disappears. The buzzer then sounds. The
symbol "A" starts to fl ash.
8. SEMI-AUTOMATIC FUNCTION WITH END OF
COOKING TIME
Choose the function end of cooking (
set the fi nal time with the +/- buttons. The symbols "A"
and the pot symbol
on. When the time coincides with the set time the oven is
switched off and the pot symbol disappears. The buzzer
then sounds. The symbol “A” starts to fl ash.
9. AUTOMATIC FUNCTION WITH COOKING TIME AND
END OF COOKING
Choose the function cooking time
required time with the +/- buttons. The symbol "A"
appears. The oven is switched on and the pot symbol
appears. Wait a few seconds until the current time
appears. Set the end time using the end of cooking
button
display. Use the +/- buttons to set the fi nal time actually
required. The oven is switched off and the pot symbol
disappears. The pot symbol will appear again
when the time coincides with the fi nal time minus the
cooking time. At the end of the automatic programme
the symbol "A" starts to fl ash. The buzzer sounds and
the oven and pot symbol disappear.
10. MINUTE MINDER
Choose the timer function (
quired time with the +/- buttons. The bell symbol
remain on for the duration of time set. At the end of this
time the buzzer sounds.
11. BUZZER
The buzzer sounds at the end of the cooking time function and continues to buzz for 7 minutes. The buzzer
is silenced by pressing any of the buttons
appear. The oven is switched on. When
, the oven is switched off and
appear. The oven is switched
. the approximate fi nal time appears on the
button) and set the re-
button) and set
button) and
and set the
will
or
. The volume of the buzzer can be adjusted using
the “-” button without having fi rst selected any function.
There are three different buzz volumes to choose from
and their duration depends upon the length of time for
which the “-” button is held pressed.
12. START OF A PROGRAMME AND CHECKING
Once a programme has been selected it starts after setting
the time. The time remaining can be viewed at any time
by selecting the corresponding function again.
13. IDENTIFYING A PROGRAMMING ERROR
There is a programming error if the time indicated on
the clock is between the cooking and end of cooking
times.
The error is indicated by the buzzer sounding and the
symbol "A" fl ashing.
14. CANCELLING A PROGRAMME
To cancel a programme select the manual function.
At the end of the set programme this is automatically
cancelled.
15. IMMEDIATE USE
A) If the display fl ashes read point B, otherwise go to
point C.
B) If the display fl ashes the correct time has not been set
or there has been a power failure. In this case, set the
correct time (see paragraph 5) and then go to point C.
C) Press the
the temperature (thermostat knob) and function (selector
knob) using the knobs on the appliance.
and button simultaneously. Set
Page 6

DE
1. FUNKTIONEN: Dauer der Koch-/Backzeit - Ende der
Koch-/Backzeit - Uhr - Minutenzähler - Handbetrieb
2. DISPLAY
Symbole, die die laufenden Funktionen anzeigen:
Dauer und Handbetrieb = Kochtopfsymbol
automatisches Programm = "A"
Minutenzähler = Glockensymbol
3. EINSTELLUNG EINER FUNKTION
Die gewünschte Funktion wählen, indem man auf die
entsprechende Taste drückt und die Zeit mit den Tasten
+/- einstellt.
4. ERKLÄRUNG DER SCHALTERSYMBOLE
Glocke
Koch-/Bratdauer
Ende der Kochzeit
Taste - +
Bei Bedienen der Taste “+” nimmt die Zeit zu, bei Taste
“-” ab, und zwar schneller oder langsamer, je nachdem,
wie stark man auf die jeweilige Taste drückt.
5. UHRZEIT
Diese Funktion wird aktiviert, indem man gleichzeitig auf
die Tasten für Kochdauer
die Tasten +/- drückt. Eventuell vorher eingestellte Programme werden automatisch gelöscht.
6. HANDBETRIEB
Diese Funktion kann eingestellt werden, indem man
gleichzeitig auf die Tasten Kochdauer
der Kochzeit
aus und es erscheint das Kochtopfsymbol. Die vorher
eingestellten Programme werden gelöscht.
drückt. Die Uhrzeit stellt man ein, indem man auf
A
;
und Ende der Kochzeit
und Ende
drückt. Das Symbol "A" schaltet sich
7. HALBAUTOMATISCHE FUNKTION MIT DAUER
DER KOCHZEIT
Mit Taste
mit den Tasten +/- die Zeit einstellen. Es erscheinen die
Symbole "A" und
Wenn die angezeigte Uhrzeit mit dem Ende der Koch/Bratzeit übereinstimmt, die durch Bedienen der Taste
angezeigt werden kann, schalten sich Backofen
und Kochtopfsymbol aus. Das akustische Signal tritt in
Betrieb und das Symbol "A" blinkt auf.
8. HALBAUTOMATISCHE FUNKTION MIT ENDE DER
KOCHZEIT
Die Funktion Ende der Kochzeit (Taste
und die Endzeit mit Hilfe der Tasten +/- einstellen. Es
erscheinen die Symbole "A" und der Kochtopf. Der
Backofen schaltet sich ein. Wenn die Uhrzeit mit der
Endzeit übereinstimmt, schaltet sich Backofen und Kochtopfsymbol aus. Das akustische Signal tritt in Betrieb
und das Symbol “A” blinkt auf.
9. AUTOMATISCHE FUNKTION MIT DAUER UND
ENDE DER KOCHZEIT
Die Funktion Dauer
mit Hilfe der Tasten +/- einstellen. Es erscheint das Symbol
"A". Der Backofen schaltet sich ein und es erscheint das
Symbol
der Uhrzeit warten. Mit Hilfe der Taste
der Kochzeit einstellen. Auf dem Display wird nun die
ungefähre Endzeit angezeigt. Man kann mit Hilfe der
Tasten +/- die tatsächlich gewünschte Endzeit einstellen.
Der Backofen und das Kochtopfsymbol schalten sich
aus. Das Kochtopfsymbol erscheint erst wieder, wenn
die Uhrzeit mit der Endzeit minus Koch- oder Backzeit
übereinstimmt. Am Ende des automatischen Programms
blinkt das Symbol "A" auf.
Das akustische Signal wird hörbar, Backofen und Kochtopfsymbol schalten sich aus.
10. MINUTENZÄHLER
Die Funktion Minutenzähler wählen (Taste
die gewünschte Zeit mit Hilfe der Tasten +/- einstellen.
Während die eingestellte Zeit abläuft, bleibt das Glockensymbol
die Funktion Kochdauer wählen und dann
. Der Backofen schaltet sich ein.
) wählen
wählen und die gewünschte Zeit
. Ein paar Sekunden bis zum Erscheinen
das Ende
) und
eingeschaltet. Wenn die Kochzeit zu Ende
geht, schaltet sich das akustische Signal ein.
11. DAS AKUSTISCHE SIGNAL
Das akustische Signal tritt nach Ende der Kochdauer
und der Minutenzählerfunktion in Betrieb und bleibt 7
Minuten lang an. Bei Bedienen einer der drei Tasten
wird das Signal unterbrochen. Die Intensität
des akustischen Signals kann durch Bedienen der Taste
“-” geändert werden, bevor man eine der Funktionen
wählt. Man kann unter drei verschiedenen Lautstärken
wählen, je nach Druckstärke auf Taste “-”.
12. PROGRAMMBEGINN UND KONTROLLE
Das gewählte Programm beginnt nach Einstellen der
Zeit. Die noch verbleibende Zeit kann jederzeit angezeigt werden indem man wieder die entsprechende
Funktion wählt.
13. ERKENNEN EINES PROGRAMMIER-UNGSFEHLERS
Programmierungsfehler liegen vor, wenn die auf der Uhr
angezeigte Zeit zwischen Anfang und Ende der Kochzeit
liegt. Der Fehler wird durch das akustische Signal und
das blinkende Symbol "A" angezeigt.
14. LÖSCHEN EINES PROGRAMMS
Programme werden gelöscht, wenn man die Handfunktion wählt. Nach Ende eines eingestellten Programms
wird dies automatisch gelöscht.
15. SOFORTBENUTZUNG
A) Wenn das Display blinkt, unter B) weiterlesen, sonst
zu Punkt C) übergehen.
B) Wenn das Display blinkt, ist entweder die Uhrzeit
noch nicht eingestellt oder die Stromzufuhr unterbrochen
worden. In diesem Fall die Zeit einstellen (siehe Punkt
5) und dann unter C) weiterlesen.
C) Gleichzeitig auf die Tasten
Temperatur (Thermostat) und Funktion (Wahlschalter)
einstellen.
und drücken.
 Loading...