

Page 1

2011-13 Polaris RMK Turbo
Installation Instructions
Page 2
DEEPS SNOW EXHAUST
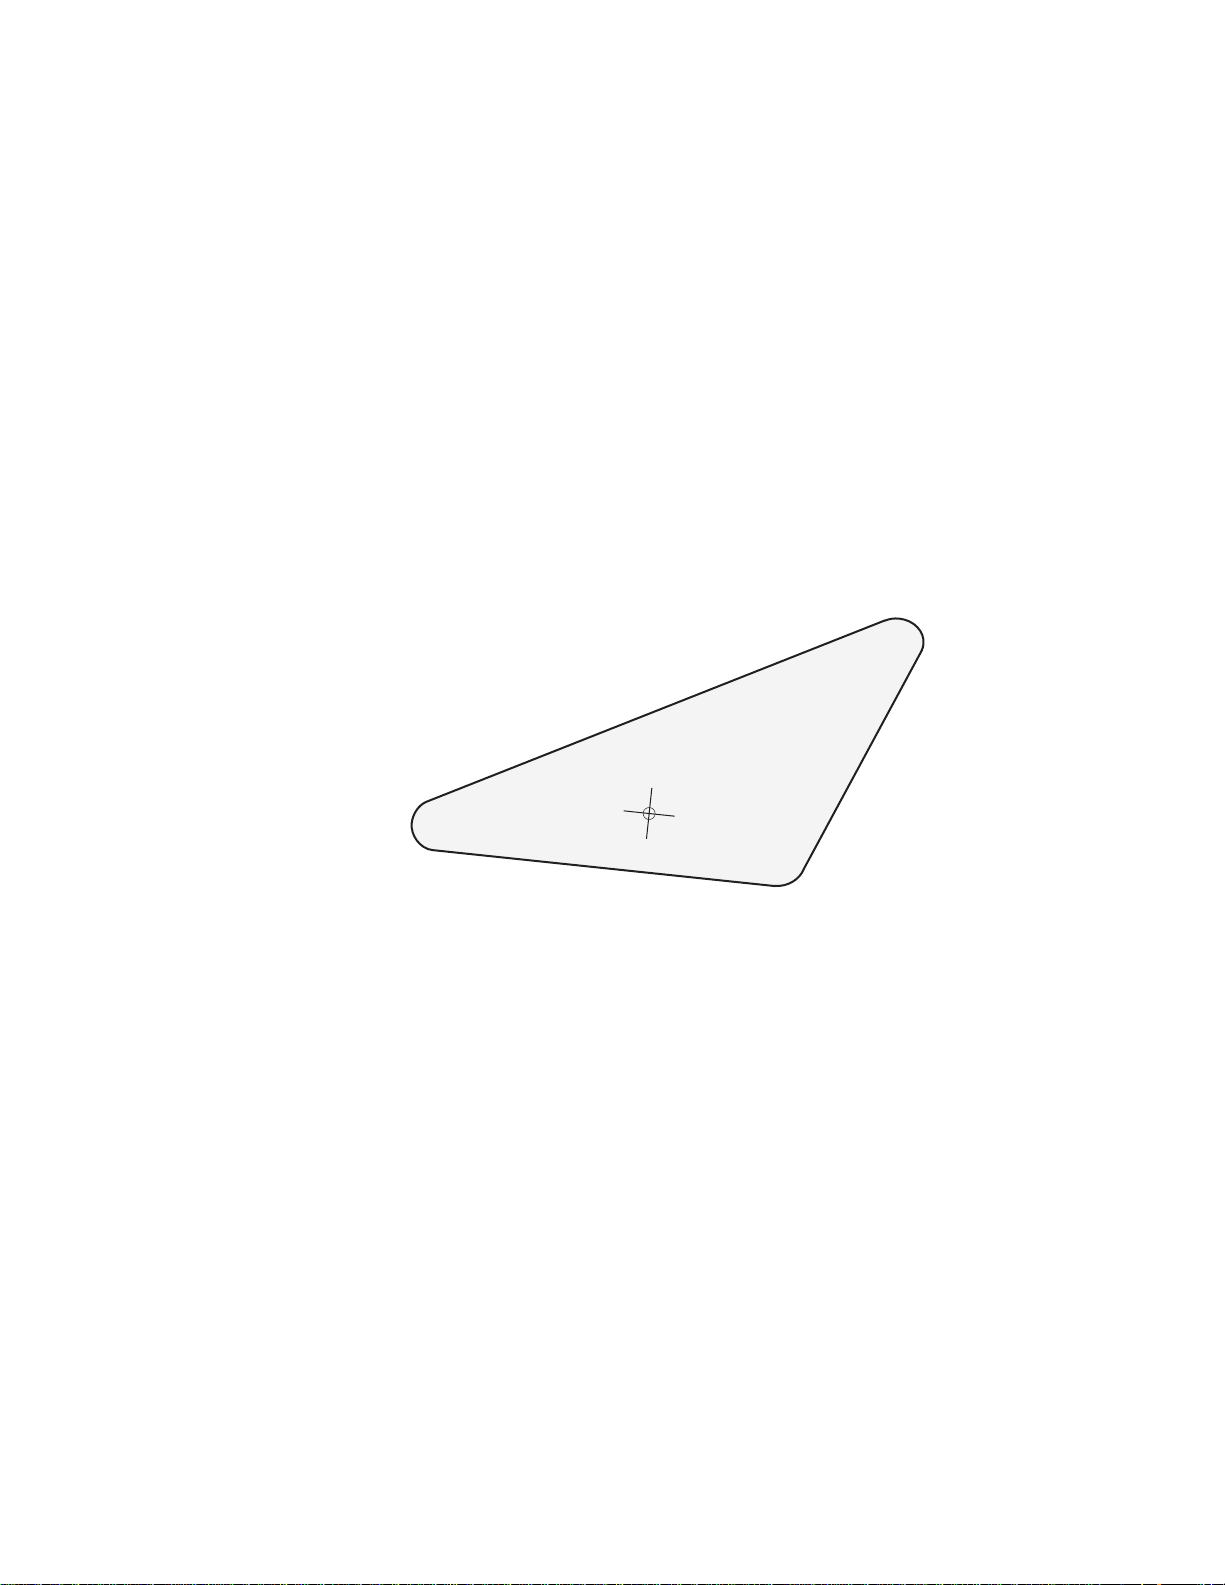
TUNNEL HOLE TEMPLATE
Cut out and use to nd hole center
BoonDocker tollfree: 877-522-7805 local: 208-542-4411 fax: 208-524-7381 www.boondockers.com
Page 3
BoonDocker RMK Turbo
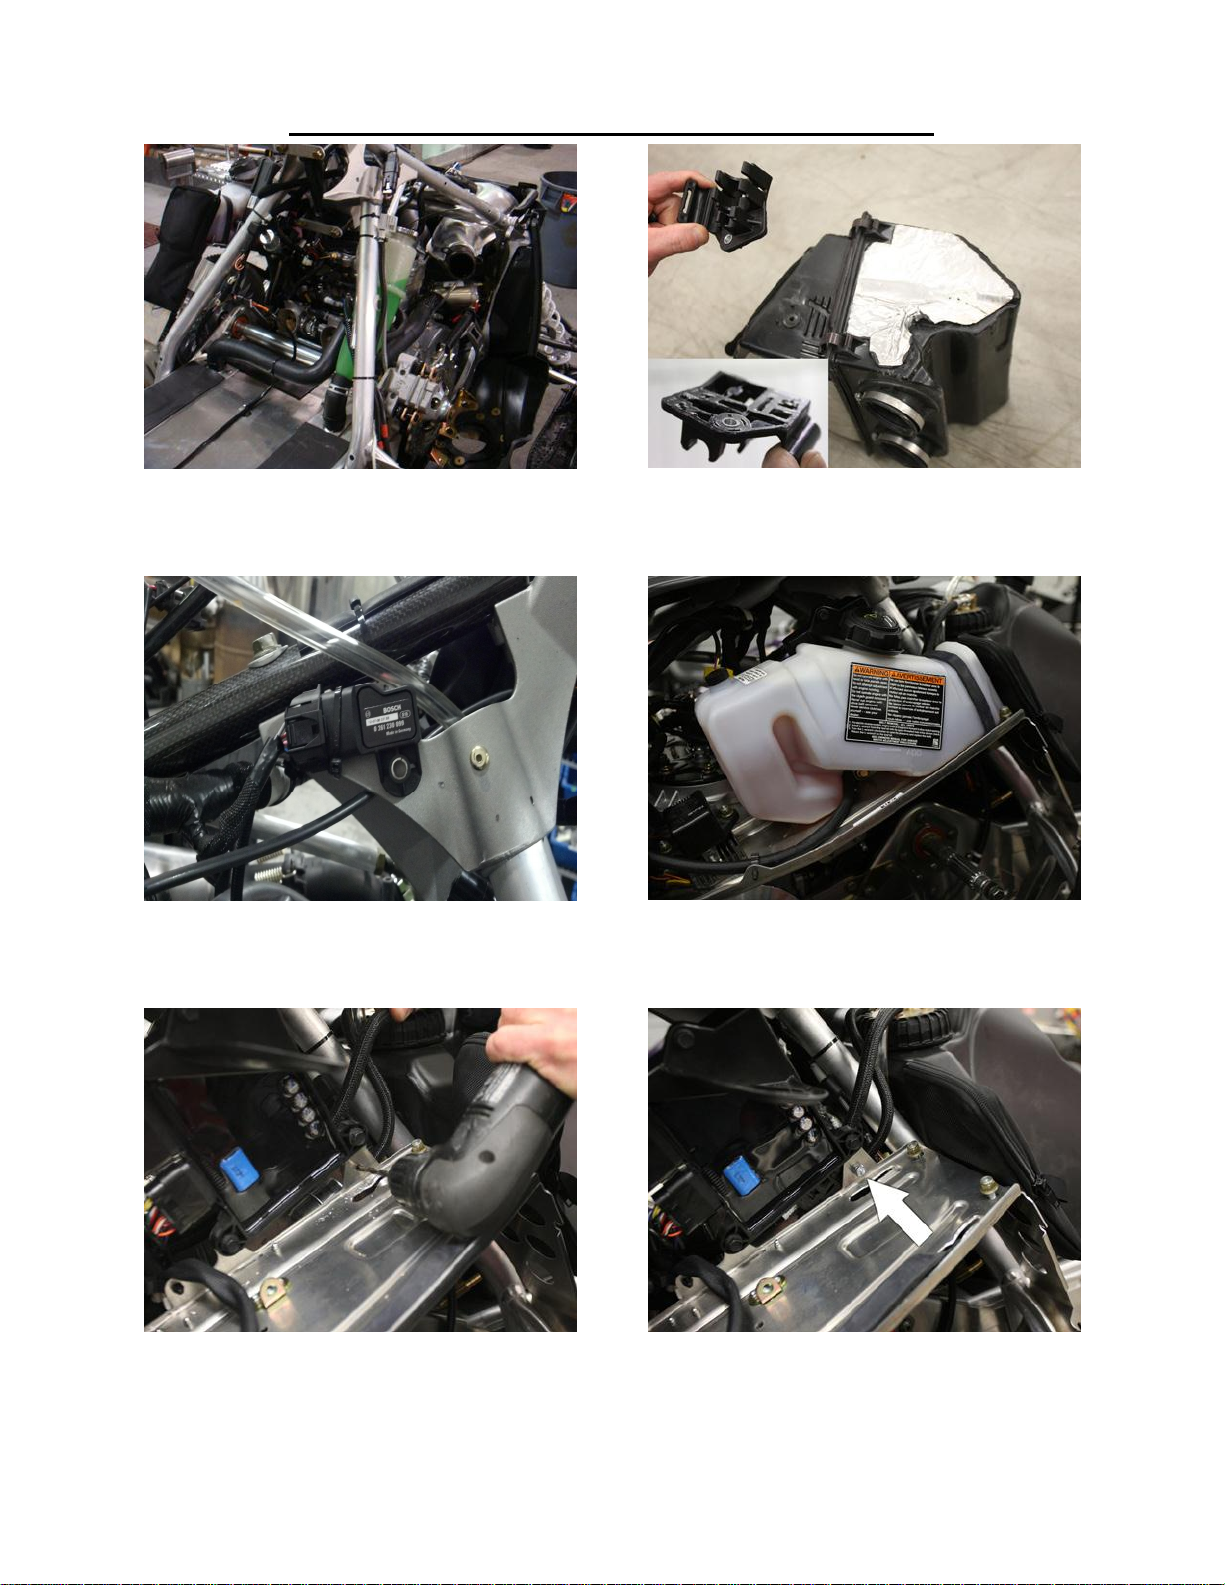
1. Remove side panels, hood, seat, fuel tank, and
1.
1.
muffler. Save exhaust springs and rubber muffler
mounts for turbo install.
3.Remove factory TBAP sensor from stock air box
and tip tie to the over structure.
2. Remove stock air box, remove fuel filter and fuel
line bracket. Sand back surface flat for mounting.
4. Remove the stock oil tank.
5. With ECU in place, hold the sanded fuel filter
bracket in place on the back side of clutch cover to
ensure proper fit. Drill a 1/4” hole in the clutch cover
tab for fuel filter bracket mounting.
6. Snap the fuel filter and fuel line into the mounting
bracket and secure to clutch cover using the 1/4” bolt
and lock nut. Reinstall the oil tank.
Revised 11/5/2012 Page 3 of 13
www.boondockers.com……………….....
BoonDocker
……….………………....877-522-7805
Page 4
BoonDocker RMK Turbo
7. Use a punch to remove the steel center of each
rivet then drill out the factory rivets and remove stock
kick plate
9. Install the aluminum exhaust hole block off plate
using 3 large head steel rivets, Note: install rivets
facing down as shown
8. Remove the factory exhaust deflector and rubber
exhaust seal.
10. Use attached template to locate muffler hole.
If installing standard internal waste gate muffler drill
2 1/4” hole. If installing TIAL external waste gate
stainless steel upgraded muffler DRILL 2 1/2” hole.
11.Install spring tab using factory bolt as shown.
12. Using a pair of pliers break off chassis tab in the
image and grind to match the stock contoured surface.
Revised 11/5/2012 Page 4 of 13
www.boondockers.com……………….....
BoonDocker
……….………………....877-522-7805
Page 5

BoonDocker RMK Turbo
13.Remove the Velcro from the turbo oil pump, clean
and warm the bulkhead surface and attach Velcro as
shown.
15. Hang the turbo assembly in place using the stock
muffler mounting locations, make sure turbo sits
down on rubber mounts and secure oil pump to Velcro. Check oil line routing.
14. Attach the rubber exhaust mounts to turbo oil
tank as shown . Note: 2011-12’ are different than
2013’.
16. Lower coolant level in bottle, remove throttle
body coolant line. Route inside turbo coolant line to
coolant bottle. Proper routing will avoid pull rope,
and sharp edges
17. Route outside coolant line to throttle bodies and
secure using supplied hose clamps.
(Stainless TIAL Performance exhaust install proceed
to step #25 Kick plate installation)
18. Install exhaust outlet to turbo using 5 black
socket head bolts. Run a bead of silicone around muffler flange to ensure seal , Install muffler using supplied springs.
Revised 11/5/2012 Page 5 of 13
www.boondockers.com……………….....
BoonDocker
……….………………....877-522-7805
Page 6

BoonDocker RMK Turbo
19.Remove pipe and exhaust donut. Silicone both
sides of donut to ensure proper seal to Y-pipe and
Pipe.
21.Remove small exhaust donut and run a bead of
silicone on inside and seal to the end of the pipe.
20. Spring pipe to Y-pipe using stock and supplied
springs, double up springs on all spring tabs, this will
prevent a boost leak. (Note: if sled is not building
proper boost check donuts for seal)
22. Run a bead of silicone on the bell of the turbo
inlet pipe.
23.Install turbo flange gasket between turbo and inlet
and bolt in place using the 4 supplied bolts and top
lock nuts.
24. Spring inlet into place using the 4 long exhaust
springs. Install springs long side towards pipe so
springs do not touch.
Revised 11/5/2012 Page 6 of 13
www.boondockers.com……………….....
BoonDocker
……….………………....877-522-7805
Page 7

BoonDocker RMK Turbo
25. Install foot rest kick plate. (Tial install starts here,
non Tial skip to step 38). (Note: install kick plate on
Tial performance upgrade at THIS time BEFORE
installing muffler, only install the Two bottom rivets
on running board at this time)
27.Run a bead of silicone on the inside of the flange
on the exhaust pipe.
26. Remove the stock pipe and exhaust donut, run a
bead of silicone around inside and reinstall on Ypipe, Note: make sure to align notches on Y-pipe to
donut
28. Install springs from pipe to Y-pipe 2-springs on
side spring tabs and 3-springs on top spring tab.
29.Run a bead of silicone on inside of the small exhaust donut and install on pipe
30. Run a bead of silicone on inside bell of turbo inlet
pipe.
Revised 11/5/2012 Page 7 of 13
www.boondockers.com……………….....
BoonDocker
……….………………....877-522-7805
Page 8

BoonDocker RMK Turbo
31. Install turbo inlet and v-band clamp do no tighten
all the way, make sure it is properly aligned, seated
and snug v-band clamp.
33. Install Tial external waste gate, rotate turbo inlet
and muffler for proper alignment using supplied
clamps snug waste gate into place do not tighten yet.
32. Install stainless muffler into tunnel and attach to
turbo using v-band clamp make sure to properly
align, seat, snug v-band do not tighten all the way.
34. Spring turbo inlet into place using the 4 long gold
exhaust springs.
35. Spring muffler into place using short exhaust
spring. (At this time finish riveting the kick plat in
place, use inside rivet to adjust distance between
muffler and kick plate)
36. Make sure there is no binding in exhaust connections and the are no gaps between V-band connections (NOTE: gaps will not close by tightening.)
Tighten all V-band and waste gate clamps
Revised 11/5/2012 Page 8 of 13
www.boondockers.com……………….....
BoonDocker
……….………………....877-522-7805
Page 9

BoonDocker RMK Turbo
39.Route fuel line from auxiliary injectors over to
fuel line bracket. Cut and splice into the stock return
fuel line behind the bracket, (NOTE: splice into the
line that does NOT have the inline fuel filter.)
38. Install throttle body adapters, make sure o-ring is
in throttle body groves tighten using supplied spanner
wrench (NOTE: tighten until compression rings bot-
tom ,do not over tighten)
40. loosen DET sensor bolt to rotate the DET sensor
as shown. Retighten DET sensor bolt, torque to 1112 ft lbs. Route wiring and zip tie to throttle body
coolant line.
41. Unplug the lower multi-pin connector from the
ECU, (located on backside of oil tank) Plug the
Boondocker control box in to ECU and stock ECU
harness.
42. Route the Auxiliary injector connectors to throttle
body adapters and plug into Boondocker injectors on
fuel rails. Secure with zip ties
Revised 11/5/2012 Page 9 of 13
www.boondockers.com……………….....
BoonDocker
……….………………....877-522-7805
Page 10

BoonDocker RMK Turbo
43. Zip tie factory ECU plug so there is proper clearance with out wire chaffing or rubbing.
45. Install silicone hose onto throttle body adapters
make sure to have proper jackshaft clearance
IF NOT installing inner-cooler go to step#49
44. Install Torque building silicone air box, make
sure not to slide on to far for proper jackshaft clearance. Tighten hose clamps.
NOTE: if installing inner-cooler see next step.
46.Install Torque building inner-cooler, (Tech tip,
moving steering post may make install easier.) Adjust
for clearance from cylinder head, electrical wiring,
fuel filter, fan, and chassis before tightening.
47. Locate the A/C PWR plug, (A/C plug is located
in Velcro pouch above the fan near steering post.
Plug the fan booster into the factory A/C plug, and
rubber connector into fan.
48. Install the fan onto the inner-cooler using the supplied 1/4” bolts and lock washers. Route the fan wire
harness to fan booster and secure w/ zip ties.
Revised 11/5/2012 Page 10 of 13
www.boondockers.com……………….....
BoonDocker
……….………………....877-522-7805
Page 11

BoonDocker RMK Turbo
49. Locate the temp sensor wiring (located in rear of
inner-cooler or in silicone air box) route and plug
into control box harness secure with zip ties.
51. Install charge tube, (Inner-cooler and Air Box)
Adjust for maximum clearance and tighten clamps
50.Locate the factory D/C power plug (located in
Velcro pouch on the front of the clutch cover. NOTE:
Only plug oil pump adapter into the D/C power connector. Route oil pump power to PWR
52.Install electronic boost solenoid using Velcro and
zip tie to secure to coolant hose. Route 3/16” line
from brass fitting to top of solenoid .
53. Locate solenoid power connector from the control
box, follow stock wire harness over steering linkage
over to boost solenoid and plug in secure with zip
ties.
54. Route 3/16” line from 90 fitting on boost solenoid to the boost actuator on turbo bracket.
NOTE: make sure to use small zip ties on ALL 3/16”
hose connections to prevent blow off..
Revised 11/5/2012 Page 11 of 13
www.boondockers.com……………….....
BoonDocker
……….………………....877-522-7805
Page 12

BoonDocker RMK Turbo
55. Install fittings on the waste gate as shown,
Top cap 1-vent and 1-plug . Below Diaphragm 1pressure Fitting, and 2–plugs, and leave the n2o ports
empty.
57. Install Boondocker air intake, If Installing optional cold air intake See steps #59-#62
56. Route 3/16” line from the 90 fitting on boost solenoid to air fitting on external waste gate on lower
diaphragm .
58. At this time check routing of all fuel lines, all
wiring routing. And all hose routing, zip tie and secure all to prevent rubbing and chaffing.
59.Measure 2” down from the top of the elbow, use
the hose clamp as a guide. Use a sharp razor blade or
saw and cut along the bottom of the clamp.
60. Measure 1/2” back from the top vent as shown
and drill a pilot hole.
Revised 11/5/2012 Page 12 of 13
www.boondockers.com……………….....
BoonDocker
……….………………....877-522-7805
Page 13

BoonDocker RMK Turbo
61.Using a 3” hole saw drill a 3” hole in the hood.
63.Using the supplied Turbo oil fill the oil level to
the top of line of (F) witch represents full . Note : do
not over fill, as it will push out of the oil tank vent.
Oil tank hold aprox 12oz.
62. Install the aluminum pipe on the intake elbow,
secure with a hose clamp. Install air filter on the pipe
outside the hood and secure with supplied hose
clamps
64. Reinstall-Fuel Tank, seat and Hood . Attach the
control box using supplied Velcro Route the Boost
pressure line from the control box to the push to connect fitting on the Air box or Cooler.
65.Install the Clutch Kit , Primary spring, and clutch
weights, Install Secondary spring and Helix. Recommended helix start: 40-46-36, if less RPM desired
42-48-36 Faster up shift.
66.Start the Snowmobile to verify that the oil pump
has power and the oil pump is pumping oil, when
verified install the oil fitting on the turbo and tighten
down.
Revised 11/5/2012 Page 13 of 13
www.boondockers.com……………….....
BoonDocker
……….………………....877-522-7805
 Loading...