

Bomann WA 5722 operation manual
572
5722222
572572
HHHH
OUSEHOLD
OUSEHOLD
OUSEHOLDOUSEHOLD
----
WWWW
ASHING
ASHING
ASHING ASHING
MMMM
ACHINE
ACHINE
ACHINEACHINE
WA
WA
WAWA
Instruction Manual
Instruction Manual
Instruction ManualInstruction Manual

Contents
Contents
ContentsContents
Introduction.............................................................................................................Page 3
General Notes…………………………………………………………..………….…….Page 3
Special safety Information for this Unit…………………………….…………………..Page 4
Unpacking the Appliance………………...……………………….…….………..…..…Page 6
Appliance Equipment……..……………….………………...…………….……..……..Page 6
Installation…………….……...…………….………...………………………...………...Page 7
Startup / Operation………...................……...………………………..…..…….……Page 10
Cleaning and Maintenance.....…………………………...……..………………...…..Page 18
Troubleshooting……………………….………..………………………………......….Page 21
Technical Data……………...…………………………..……………..……..…………Page 22
Disposal….………………………..………………..….……………………..……..…..Page 23
EU Product Data Sheet………….………………..….……………………..……..…..Page 24
2

Introduction
for choosing our product. We hope you will enjoy using the appliance.
Important information for your safety is specially marked. It is essential to comply with
these instructions in order to avoid accidents and prevent damage to the machine:
risks.
Read the operating instructions carefully before putting the appliance into operation and
instructions including the warranty and the receipt. If you give this device to
llustrations in this instruction manual can deviate from the original appliance.
designed exclusively for private use and for the envisaged pu
The appliance is only to be used as described in the user manual. Do not use the
ed and can result in
away from sources of heat, direct sunlight
disruption, switch off
the appliance and disconnect the plug (pull the plug itself, not the lead) or turn off
Introduction
IntroductionIntroduction
Thank you
Symbols in these Instructions for Use
Symbols in these Instructions for Use
Symbols in these Instructions for UseSymbols in these Instructions for Use
WARNING:
WARNING:
WARNING:WARNING:
This warns you of dangers to your health and indicates possible injury
CAUTION:
CAUTION:
CAUTION:CAUTION:
This refers to possible hazards to the machine or other objects.
NOTE
NOTE:::: This highlights tips and information.
NOTENOTE
General Notes
General Notes
General NotesGeneral Notes
keep the
other people, please also pass on the operating instructions.
NOTE
NOTE::::
NOTENOTE
I
• The appliance is
pose. This appliance is not fit for commercial use.
•
appliance for any other purpose. Any other use is not intend
damages or personal injuries.
• Do not use it outdoors. Keep it
• Do not operate the appliance without
without supervision.
withoutwithout
• When not in use, for cleaning, user maintenance works or with
r-
, humidity.
the fuse.
3

•
The appliance and if possible the mains lead have to be checked regularly for signs
For safety reasons, alterations or modifications of the appliance are prohibited.
In order to ensure your children’s safety, please keep all packaging (plastic bags,
danger of suffocation!
danger of suffocation!danger of suffocation!
danger of suffocation!
Special safety Information for this Unit
Special safety Information for this UnitSpecial safety Information for this Unit
Special safety Information for this Unit
WARNING: Hot surface! Danger of burns!
WARNING: Hot surface! Danger of burns!WARNING: Hot surface! Danger of burns!
WARNING: Hot surface! Danger of burns!
eye may be
transportation locking screws must be
removed, otherwise it may cause serious damages.
the max.
The unit must be connected with a new set of hoses to
the water supply; old hose sets should not be
pressure is
cleaning agents
of damage. If damage is found the appliance must not be used.
•
•
boxes, polystyrene etc.) out of their reach.
WARNING:
WARNING:
WARNING:WARNING:
Do not allow small children to play with the foil. There is a
During operation the temperature of the bull’s-
very hot.
• Before using the
• The dry weight of laundry must not exceed
loading capacity.
•
• The maximum / lowest permitted water inlet
1.0 MPa / 0.03 MPa.
• Do not use any flammable/explosive
reused.
such as benzene in the appliance.
4

• In the appliance bottom are located ventilation openings
(depending on model). These may not be blocked e.g.
by carpet. Pay attention to free circulation of air.
• If the unit is used in the bathroom, unplug the power
cord after using as the proximity of water presents a
danger. This even applies when the unit is switched off.
• This appliance can be used by children
children aged from
children children
8 years and above and persons with reduced physical,
sensory or mental capabilities or lack of experience and
knowledge if they have been given supervision or in-
struction concerning use of the
use of the appliance
use of theuse of the
appliance in a safe way
applianceappliance
and understand the hazards involved.
• Children
Children shall not play with the appliance.
ChildrenChildren
• Children
Children younger than 3 years should be kept away,
ChildrenChildren
unless they are constantly supervised.
• Cleaning and user maintenance
children
children unless they are older 8 years and supervised.
childrenchildren
user maintenance shall not be made by
user maintenanceuser maintenance
• The appliance must be cleaned regularly. Follow the
instructions in the chapter "Cleaning and Maintenance".
• Do not try to repair the appliance on your own. Always
contact an authorized technician. To avoid the expo-
5
sure to danger, always have faulty cable be replaced
only by the manufacturer, by our customer service or by
qualified person and with a cable of the same type. Do
not use the device if the device or plug is damaged.
Remove all packaging material, such as foils, filler and cardboard packaging.
To prevent hazards, check the appliance for any transport damage.
In case of damage, do not put the appliance into operation. Contact your distr
Production residue or dust may have collected on the appliance. We recommend clea
Unpacking the Appliance
Unpacking the Appliance
Unpacking the ApplianceUnpacking the Appliance
• Remove the appliance from its packaging.
•
•
•
NOTE
NOTE::::
NOTENOTE
ing the appliance according to chapter “Cleaning and Maintenance”.
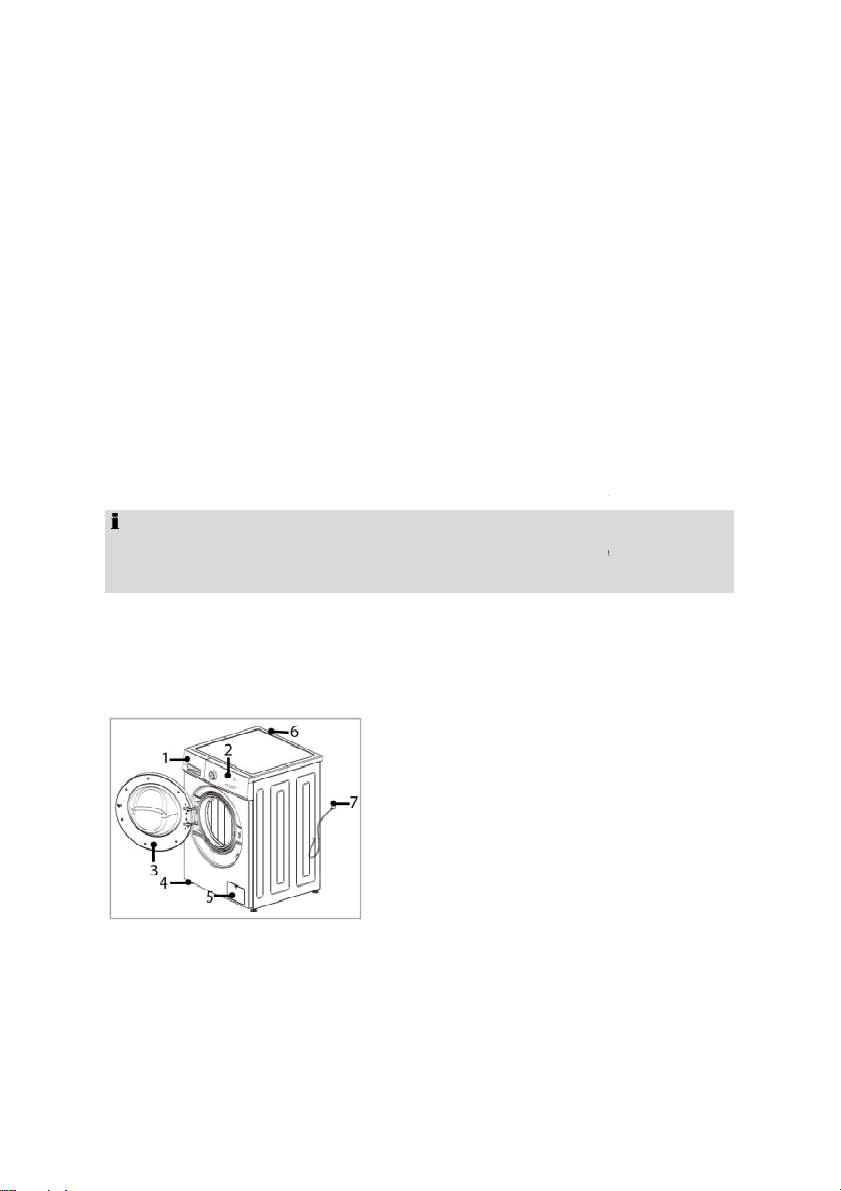
Appliance
Appliance overview
Appliance overview
Appliance overviewAppliance overview
Appliance Equipment
Appliance Appliance
Equipment
EquipmentEquipment
1111 Detergent drawer
2222 Control panel
3333 Appliance door
4444 Feet
5555 Drain pump cover
6666 Inlet valve (cold water)
7777 Power plug
ibutor.
n-
Delivery scope
Delivery scope
Delivery scopeDelivery scope
1x Inlet hose, 1x hose retaining sheet, 1x wrench
6
Installation
The unit must not be connected to the mains during installing. Otherwise there is
the appliance must be connected properly. The specifications
as the electrical connection must fulfill the required
must be removed from the
locking screws for later use / transport. Never transport the
the supplied
The site should be located near the water inlet and outlet, as well as near a properly
Good ventilation around the appliance is required, in order to dissipate the heat
that the appliance door can open
even,
Installation
InstallationInstallation
WARNING:
WARNING:
WARNING:WARNING:
ger to life
ger to life or electric shock hazard
ger to lifeger to life
CAUTION:
electric shock hazard!
electric shock hazardelectric shock hazard
CAUTION:
CAUTION:CAUTION:
For a correct operation
for water supply and drain as well
criteria.
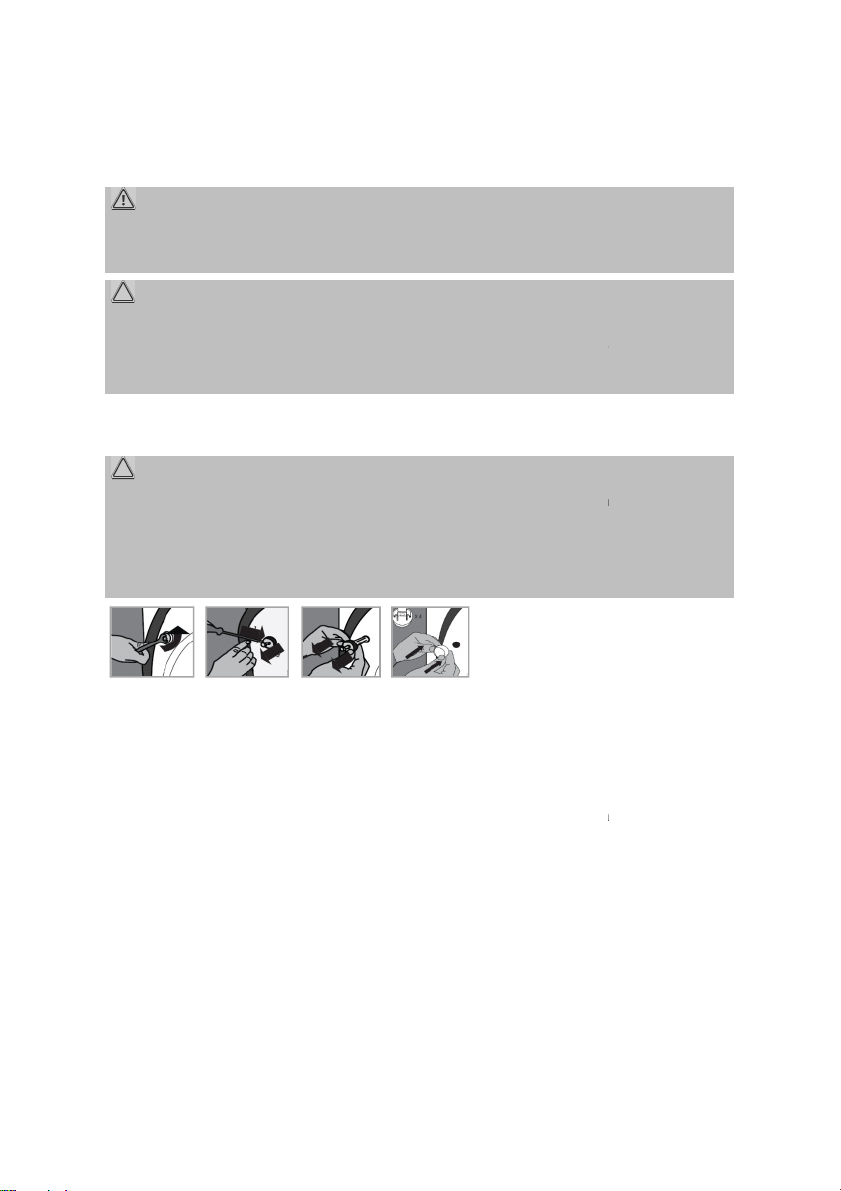
Remove the transport locking screws
Remove the transport locking screws
Remove the transport locking screwsRemove the transport locking screws
CAUTION:
CAUTION:
CAUTION:CAUTION:
• Before using, all transport locking screws
back. Otherwise it may cause serious damages.
• Keep the transport
appliance without properly attached transportation safety!
appliance
da
dan-
dada
n-
n-n-
• Loosen and remove the four transport locking screws with
• Insert the pre-installed transport locking covers at the unit back.
Installation location
Installation location
Installation locationInstallation location
•
grounded power socket.
•
properly. Sufficient clearance must be created for this purpose.
• The clearance to the front must be created so,
without being impeded.
• Make sure that the floor on which the appliance is installed, is
and clean.
7
wrench.
heat-resistant

• T
ake care of a solid and horizontal position of the appliance. If the appliance is not
horizontally leveled, adjust the feet accordingly (see “Adjust the feet”).
near heaters, next to a stove, direct sunlight or any other heat sources;
at locations with high humidity (e.g. outdoors), as metal parts would be su
ere the temperature could drop below freezing. Do not expose
near volatile or flammable materials (e.g. gas, fuel, alcohol, paint, etc.).
The feet must never be removed. Do not restrict the floor clearance through carpets,
Rotate the feet to change the height. Tighten the lock nuts with the
wrench, if the unit is aligned. The feet must have solid ground contact.
Check with a spirit level whether the appliance is leveled horizontally. If
the unit is not in balance, the feet must be adjusted again.
Installation of the water supply must conform to the local laws and regulations.
Use the new supplied hose set to connect the appliance to the water supply. Do not
the water pipe is new or long time not used, ensure before connecting to the
• Power cord and water hoses may not kinked or squashed.
• The wall socket must be freely accessible.
• Avoid the installation:
Avoid the installation:
Avoid the installation:Avoid the installation:
-
-
ceptible to corrosion under such circumstances;
- in rooms wh
the appliance any weather.
-
Adjust the feet
Adjust the feet
Adjust the feetAdjust the feet
CAUTION:
CAUTION:
CAUTION:CAUTION:
s-
strips of wood or similar. Danger of heat accumulation!
Use the wrench to loosen the lock nuts.
Danger of heat accumulation!
Danger of heat accumulation!Danger of heat accumulation!
Water connection
Water connection
Water connectionWater connection
CAUTION:
CAUTION:
CAUTION:CAUTION:
• The
• The appliance is not
not suitable for hot water supply.
notnot
•
reuse old or used connection sets.
• If
water system, that the water is clear and free from contamination.
8

Notes on inlet hose safety system (
delivery scope depending on model
delivery scope depending on modeldelivery scope depending on model
delivery scope depending on model
guarantees to cut off the
water supply when leakage of the inner hose. Switching off the water supply leads over
dealer or in our online
. To order, use the reference number
MPa. With higher
Check the tightness of the rubber seals (d) at both ends of the inlet
Connect the water inlet hose to a water thread with ¾“.
hose firmly in the direction of the screw thread; pay attention for a
Connect the other end of the inlet hose to the inlet valve on the
drain hose has a length of approx. 1.5 m and can extend with a suitable hose and
In order to prevent backflow of contaminated water, the free end of the hose must not
Connect the drain hose to a drain pipe with a minimum diameter of 40 mm; altern
tively the drain hose can be fixed to a sink or directly to the drainage.
Notes on inlet hose safety system (
Notes on inlet hose safety system (Notes on inlet hose safety system (
The safety system consists of a double-walled inlet hose. It
an electronic contact.
If necessary, you can order an inlet hose safety system from your
accessories shop, www.bomann-germarny.de
found under “Technical Data”.
Connect the water inlet hose (cold water connection)
Connect the water inlet hose (cold water connection)
Connect the water inlet hose (cold water connection)Connect the water inlet hose (cold water connection)
NOTE
NOTE::::
NOTENOTE
The water pressure must be between 0.03 MPa and 1.0
use a pressure regulator.
•
hose to prevent leakage.
•
tight fit.
•
appliance back; pay attention for a tight fit too.
Connect the water drain hose
Connect the water drain hose
Connect the water drain hoseConnect the water drain hose
NOTE
NOTE::::
NOTENOTE
The
connecting piece to a length of max. 4 m.
CAUTION:
CAUTION:
CAUTION:CAUTION:
))))
pressure:
Screw the
come under the water level of the drain.
•
9
a-
 Loading...