

Page 1
HHHH
OUSEHOLD
OUSEHOLDOUSEHOLD
OUSEHOLD
----
EEEE
LECTRIC
LECTRIC LECTRIC
LECTRIC
OOOO
VEN
VENVEN
VEN
SSSS
ET
ETET
ET
EHBC
EHBCEHBC
EHBC
557
557557
557
IX
IXIX
IX
////
EHBC
EHBCEHBC
EHBC
558
558558
558
IX
IXIX
IX
Instruction Manual
Instruction ManualInstruction Manual
Instruction Manual
Page 2

2
Contents
ContentsContents
Contents
Introduction ……………………..………………….………………………………………………….….... Page 3
General Notes …...……………………………………….……………………………………………..…. Page 3
Special safety Information for this Unit ……………………………...…………………………….......... Page 4
Unpacking the Appliance …...………………………………..…………………………………………… Page 5
Appliance Equipment ……………………..….………………………………………………………….... Page 5
Installation …...…………………………………………………………………………………………..…. Page 6
Startup / Operation ……………………..………………………………………..………………….......... Page 8
Cleaning and Maintenance …...……………………….…..……………………………………………… Page 11
Troubleshooting ……………………..………………......……………………………………………….... Page 13
Technical Data …...………………………………………...………..…………………...……………..…. Page 13
Disposal …...………………………………..………………..……………………………..……………… Page 13
EU Product data sheet …...………………………………..…………..…………………..……………… Page 15
Page 3

Introduction
IntroductionIntroduction
Introduction
Thank you for choosing our product. We hope you
will enjoy using the appliance.
Symbols in these Instructions for Use
Symbols in these Instructions for UseSymbols in these Instructions for Use
Symbols in these Instructions for Use
Important information for your safety is specially
marked. It is essential to comply with these
tions to avoid accidents and prevent damage
WARNING:
WARNING:WARNING:
WARNING:
This warns you of dangers to your health and ind
cates possible injury risks.
CAUTION:
CAUTION:CAUTION:
CAUTION:
This refers to possible hazards to the machine or
other objects.
NOTE
NOTENOTE
NOTE:::: This highlights tips and
information.
General Notes
General NotesGeneral Notes
General Notes
Read the operating instructions carefully before pu
ting the appliance into operation and keep the i
structions including the warranty and the receipt. If
you give this device to other people, also pass on the
operating instructions.
NOTE
NOTENOTE
NOTE::::
•
This instruction is prepared for different
tions
. Consider the actual equipment for the pro
er function of your appliance.
•
The illustrations can deviate from the original
appliance.
• The appliance is designed
exclusively for private
use and for the envisaged purpose. This appl
ance is not fit for commercial use.
•
The appliance is only to be used as described in
the user manual. Do not use the appliance for any
other purpose. Any other use is not intended and
can result in damages or personal injuries.
• Operate the appliance only
properly installed.
properly installed.properly installed.
properly installed.
3
instruc-
:
i-
t-
n-
execu-
p-
i-
•
Do not use it outdoors. Keep it away from sources
of heat, direct sun
light and
•
Do not operate the appliance
• When not in use, for
cleaning
works or with disruption
, switch off the appliance
and disconnect the plug
(pull
the lead) or turn off the fuse.
• The appliance and
if possible
to be checked regu
larly for signs of damage.
damage is fou
nd the appliance must not be used.
•
For safety reasons, alterations or modifications of
the appliance are
prohibited.
•
In order to ensure your children’s safety, please
keep all packaging (plastic bags, boxes, polyst
rene etc.) out of their r
each.
WAR
WARWAR
WARNING
NINGNING
NING::::
Do not allow small children to play with the foil.
There is a
danger of suffocation!
danger of suffocation!danger of suffocation!
danger of suffocation!
humidity.
without
withoutwithout
without supervision.
, user maintenance
the plug itself, not
the mains lead have
If
y-
Page 4
Special safety information for t
Special safety information for tSpecial safety information for t
Special safety information for t
WAR
WARWAR
WARNING
NINGNING
NING:
: :
:
Danger from electrical current!
Danger from electrical current! Danger from electrical current!
Danger from electrical current!
nents can be fatal!
nents can be fatal!nents can be fatal!
nents can be fatal!
•
The connection of the appliance must satisfy the relevant standards and regulations
and may only be performed by an authorized specialist.
•
The hob may not be used if the glass surface has cracks or is
• Make sure that the a
ppliance is turned off from the power supply (fuse) before
changing the bulb in the oven.
• The use of high-
pressure cleaners or steam cleaners is prohibited. Ingress of li
uids can lead to electric shock. Put the appliance never
WAR
WARWAR
WARNING
NINGNING
NING:
: :
:
Hot surface
Hot surfaceHot surface
Hot surface
•
During operation the appliance wi
touching heating elements inside the oven
•
During operation the appliance and its accessible parts
must be taken to avoid touching heating elements. Children younger than 8 years
must be kept away from the appliance.
•
Grasp the oven only on the door handle and switches.
to remove or insert the accessor
• Let the appli
ance cool down before cleaning or maintenance.
WWWWARNING
ARNINGARNING
ARNING:
: :
: Risk of Fire
Risk of FireRisk of Fire
Risk of Fire
!!!!
•
Unattended cooking on cooking hobs with fats or oil can be dangerous and can be
cause fires. NEVER attempt to extinguish a fire with water, but turn the unit off and
then cover the flames e.g. with a lid or a
•
CAUTION: The cooking process must be obs
be observed continuously.
•
Never store objects on the cooking surface.
•
The appliance is not intended for operation with an external timer or external r
mote control system.
4
his Unit
his Unithis Unit
his Unit
Contact with live leads or comp
Contact with live leads or compContact with live leads or comp
Contact with live leads or comp
broken.
under water.
!!!! Risk o
Risk oRisk o
Risk of Burning!
f Burning!f Burning!
f Burning!
ll be hot. Special caution is required to avoid
and the cooking zones.
become hot. Special care
Use potholders if you want
ies.
plate.
erved. A short cooking operation is to
o-
o-o-
o-
q-
e-
Page 5

•
Make sure that with installing adequate air
slots are not blocked.
•
Never pour liquids into a hot oven! Scalding by rising water vapor as well as po
sible damage to enamel.
•
Do not place any objects on the open appliance door.
•
Do not store any cleaning agents
immediate vicinity.
•
This appliance can be used by
with reduced physical, sensory or mental capabilities or lack of experience and
knowledge if they have been given supervision or instruction concerning
the appliance
the appliancethe appliance
the appliance
in a safe way and understand the hazards i
• Children
ChildrenChildren
Children
shall not play with the appliance.
• Cleaning and
user maintenance
user maintenanceuser maintenance
user maintenance
older than 8 years and
are supervised
•
Do not use harsh abrasive cleaners or sharp metal objects for cleaning the glass
surface.
The glass can be scratched or destroved.
•
Do not try to repair the appliance on your own. Always contact an authorized
technician. If the supply cord is damaged, it mu
er, its service agent or similarly qualified persons in order to avoid a hazard.
Unpacking the Appliance
Unpacking the ApplianceUnpacking the Appliance
Unpacking the Appliance
•
Remove the appliance from its packaging.
•
Remove all packaging material, such as foils, fil
and cardboard packaging.
•
To prevent hazards, check the appliance for any
transport damage.
•
In case of damage, do not put the appliance into
operation. Contact your distributor.
NOTE
NOTENOTE
NOTE::::
Production residue or dust may have collected on the
appliance.
We recommend cleaning the appliance
according to chapter “Cleaning and Maintenance”.
5
circulations ensured and the ventilation
or flammable materials in the appliance or in the
children
childrenchildren
children
aged from 8 years and above and persons
nvolved.
shall not be made by children,
children,children,
children,
.
st be replaced by the manufactu
ler
Appliance Equipment
Appliance EquipmentAppliance Equipment
Appliance Equipment
Appliance Overview
Appliance OverviewAppliance Overview
Appliance Overview
Oven
OvenOven
Oven
s-
use of
use of use of
use of
unless they are
r-
1111 Control panel
2222 Unit door
3333 Side racks
4444 Oven tray
5555 Grill grid
Page 6
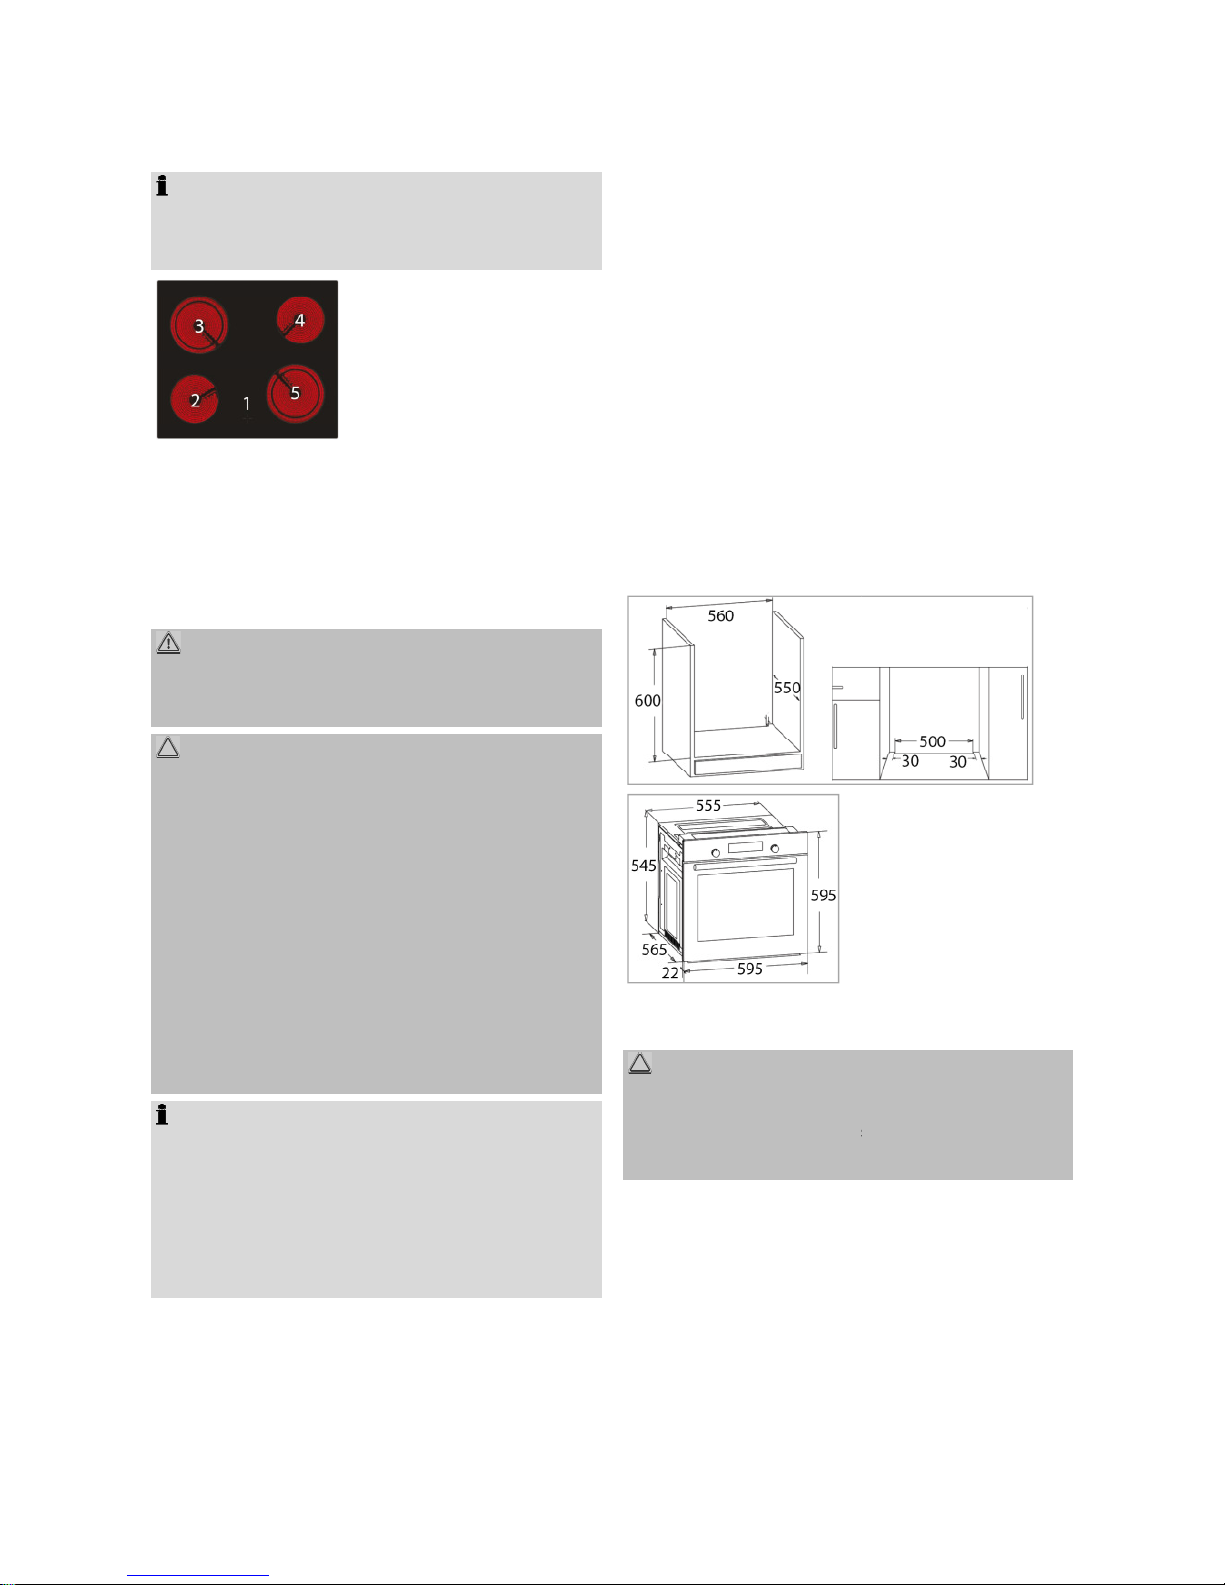
Hob
HobHob
Hob
NOTE
NOTENOTE
NOTE::::
The listed power settings can vary
depending on the
material and/or size of the cookware.
1111
Residual heat indicat
2222 Ø
14.0 cm / 1200 W
3333 Ø
18.0 cm / 1700 W
4444 Ø
14.0 cm / 1200 W
5555 Ø
18.0 cm / 1700 W
De
DeDe
Delivery scope
livery scopelivery scope
livery scope
1 x oven tray, 1 x grill grid,
installation
Installation
InstallationInstallation
Installation
WARNING:
WARNING:WARNING:
WARNING:
The installation
and the connection to the main power
may only be performed by an authorized specialist.
CAUTION
CAUTIONCAUTION
CAUTION::::
• The worktop
, the cabinet, veneers
ings, used
adhesives etc. must be sufficient
resistant.
• The appliance
must be installed so that heat can
be dissipated. The ventilation openings must not
be blocked.
•
Do not mount any heat protection strips in order
to ensure an adequate supply of cooling air.
•
Keep a sufficient distance from the rear of the unit
for air circulation.
NOTE
NOTENOTE
NOTE:
: :
: RRRRecommendation!
ecommendation!ecommendation!
ecommendation!
•
When installing, ask another person to assist.
• Wear prote
ctive gloves to avoid injuries at
ble sharp edges.
•
When carrying the appliance use the
the housing sides.
• Hob and oven must be from the
same manufa
turer and marked with the same type
6
or
material
, plastic coat-
heat-
possi-
hollows at
c-
designation.
•
The appliance conforms to the heat insulation
class Y, i.e. only one side of the appliance may be
installed near higher kitchen furniture or walls.
•
Do not install the appliance directly next to
erators of freezers. The escaping heat would r
sult in an unnecessary increase of energy co
sumption of those appliances.
•
Make sure that the oven and the hob are located
centrally to each other.
Cabinet opening
Cabinet openingCabinet opening
Cabinet opening
and appliance dimensions
and appliance dimensionsand appliance dimensions
and appliance dimensions
Prepare the
cabinet opening
sional drawings.
Dimensions in mm
Preparing the worktop for
Preparing the worktop for Preparing the worktop for
Preparing the worktop for
installation of the hob
installation of the hobinstallation of the hob
installation of the hob
CAUTION:
CAUTION:CAUTION:
CAUTION:
Before cutting secure
the outer
adhesive tape to avoid traces of jigsaw on the
top.
• The worktop must be
leveled horizontally and are
sealed to the wall side against overflowing liquids
or moisture.
•
The hob
must be completely surrounded by min.
60 mm work surface.
refrig-
e-
n-
according to the dimen-
cutout edge with wide
work-
Page 7

• The cut surfaces (cutout e
dges) must be sealed
with special varnish, silicone
rubber or cast raisin
in order to prevent swelling caused by humidity.
•
Clean and dry the worktop in the cutout area
thoroughly.
Worktop cutout
Worktop cutoutWorktop cutout
Worktop cutout
Prepare the cutout of the worktop
according to the
dimensional drawing.
Dimensions in mm
Installing the hob
Installing the hobInstalling the hob
Installing the hob
•
Before installing the hob, the supplied gasket
must be moun
ted on the underside of the hob
frame.
For this place the hob with the hob top on
a padded surface to prevent it from damage.
NOTE
NOTENOTE
NOTE::::
To avoid damage, place the hob with the top of
the
cooking surface on a padded base.
• Place
the hob according to the hob
"Appliance
Overview" and with the connecting c
ble first
centrally into the prepared cutout of the
worktop. Make sure that the distances to the cu
ting are equal on all
four sides and that the seal is
resting on the worktop.
•
Secure the hob from below
with the
clamps and screws on
the worktop.
7
(aaaa)
drawing under
a-
t-
supplied
Installing the oven
Installing the ovenInstalling the oven
Installing the oven
• Put the appliance
with the connecting cable f
into the prepared cabinet a bit
• Do the connection
to the hob
mains, see "Electrical connection".
• Insert the oven
into the cabinet opening
ly
. Make sure that the cable
(bent, squeezed or twisted)
•
Attach and secure the oven
screws on the side walls of the cabi
vided mounting holes are visible after opening the
oven door on the left and right frame
Electrical connection
Electrical connectionElectrical connection
Electrical connection
Information for the
Information for the Information for the
Information for the
authorized expert
authorized expertauthorized expert
authorized expert
WARNING:
WARNING:WARNING:
WARNING:
•
The installation to the mains
to the local standards and regulations.
•
Connecting the appliance to a domestic power
socket or using multiple sockets or extension c
bles is not permitted.
•
Improper connection may cause to an
shock
shockshock
shock!
•
Before connecting, ensure
corresponds with the information on the rating l
bel (appliance back)
and the wiring diagram.
•
The appliance is suitable for three
current (
220-240/380-
415V 3N
•
The appliance can be adjusted for single
current
by a respective bypass on the terminal
block,
based on the circuit diagram below. Select
irst
.
as well as to the
complete-
s does not restricted
.
by using the supplied
net. The pro-
supply must conform
a-
electric
electric electric
electric
that the power supply
a-
-phase and AC
~ 50Hz
).
-phase
Page 8

a suitable cord as mains cable, considering the
connection type and nominal power of the oven.
•
Fix the mains cable in the tension relief.
•
Make sure to connect the protective ground to the
terminal of
the marked terminal block.
•
The electrical installation of the oven should be
equipped with an emergency switch, which
switches off the whole appliance from the mains
supply in an emergency. The
distance between
the contacts of the emergency switch must be at
least 3 mm.
•
Arrange the mains cable in such a way that it
does not get in contact with any hot components
of the appliance. Do not lead it over sharp edges
or corners.
Connecting the hob to
Connecting the hob toConnecting the hob to
Connecting the hob to the oven
the oventhe oven
the oven
Insert the plugs
at the end of the hob
the appropriate socket
of the oven terminal block.
Connection wiring diagram
Connection wiring diagramConnection wiring diagram
Connection wiring diagram
Permissible connection methods
Permissible connection methodsPermissible connection methods
Permissible connection methods
CAUTION:
CAUTION:CAUTION:
CAUTION:
Each connection requires the protective ground of the
mains to be connected to the E
terminal.
NOTE
NOTENOTE
NOTE::::
L1, L2, L3 = Phase | N = Neutral
E = Protective ground
220-240V~ 50Hz 380-
415V 3N~ 50Hz
H05 VV-F 3G 4mm² H05 VV-
F 5G 1.5mm²
8
circuit group in
Startup / Operation
Startup / OperationStartup / Operation
Startup / Operation
Before initial use
Before initial useBefore initial use
Before initial use
•
Clean the oven interior with all therein located
accessories. Follow the instructions that we give
you in the chapter "Cleaning and Maintenance".
•
In order to burn any manufacturing residue, h
the closed oven for approx. 4
Use the heating
function [Upper/lower heat
Then switch to the heating function [Grill]
pending on the model)
for another
NOTE
NOTENOTE
NOTE:
: :
:
The occurring odor and possibly a slight smoke
development cannot be avoided. Therefore e
sure for a good ventilation
heating.
Operation
OperationOperation
Operation
1111
Level regulator of cooking zones
Level regulator of cooking zonesLevel regulator of cooking zones
Level regulator of cooking zones
The temperature setting is
set for each cooking zone
separately by using the
respective level regulator.
=
Position of cooking zone
0000 = Off-position
1111 = Lowest setting (keep
food warm)
6666
= highest setting (quick heating a
roasting)
2222
Oven function selector switch
Oven function selector switchOven function selector switch
Oven function selector switch
The function selector switch is used to set the type of
heating.
Rotate the function selector switch until the
icon for the desired
type of heating
3333
Oven temperature selector switch
Oven temperature selector switchOven temperature selector switch
Oven temperature selector switch
The temperature selector switch is used to adjust the
oven temperature.
The thermostat allows the te
perature setting from 4
0°C to 2
eat
0 minutes at 200°C.
ing].
(de-
20 minutes.
n-
of the room during
nd cooking,
points upwards.
m-
40°C.
Page 9

CAUTION:
CAUTION:CAUTION:
CAUTION:
Turn the temperature selector switch only clockwise
and back again. Otherwise the switch will be da
aged.
4444 Oven temperature control lamp
Oven temperature control lampOven temperature control lamp
Oven temperature control lamp
The temperature control lamp indicates the heating
operation. If the lamp goes off, the set oven temper
ture is reached.
During operation, the oven must continuously
to keep the temperature stable. When reheating the
control lamp is lighting (thermostat function).
NOTE
NOTENOTE
NOTE::::
If the recipe
recommends putting the food in the pr
heated oven only
, this should not be done before the
control lamp turns off for the
first time.
Oven lighting
Oven lightingOven lighting
Oven lighting
The oven lighting automatically turns on as so
the oven is in operation.
Using the accessory
Using the accessoryUsing the accessory
Using the accessory
Inside the oven are side racks
for inserting the a
cessories
. The accessories are safely used between
the side levels.
CAUTION:
CAUTION:CAUTION:
CAUTION:
Always insert the accessory completely into the o
en; otherwise the glass door can be scratched.
Selecting appropriate cookware
Selecting appropriate cookwareSelecting appropriate cookware
Selecting appropriate cookware
Wrong
WrongWrong
Wrong!!!!
Cookware is too small.
Heat loss!
Cookware ground uneven.
Poor heat transfer!
Lid does not close properly.
Heat loss!
9
m-
a-
reheat
e-
on as
c-
v-
Correct! To save time a
Correct! To save time aCorrect! To save time a
Correct! To save time a
nd energy!
nd energy!nd energy!
nd energy!
Diameter of the cookware corresponds
with the
diameter of the hob
The cookware base is fully
resting
properly.
CAUTION:
CAUTION:CAUTION:
CAUTION:
The cooking surface and the base of the cookware
must always be cle
an and dry.
Switching on and off
Switching on and offSwitching on and off
Switching on and off
...the oven
...the oven...the oven
...the oven
The oven is equipped with various functions. Baking
can be done with upper-
, lower
pending on the model)
. Set the required o
conditions.
•
Set the oven function selector
propriate position.
•
Turn the oven temperature selector switch in
clockwise direction to the desired temperature.
•
To switch the oven off, both switches must be
turned to the off-
position again.
…………the hob
the hobthe hob
the hob
•
Place suitable cookware on the
ing zone.
• Turn the corresponding
level regulator
sired temperature level.
•
After the end of the cooking process t
regulator back to the off-
state.
Residual heat indicator
Residual heat indicatorResidual heat indicator
Residual heat indicator
WARNING: Risk of burns!
WARNING: Risk of burns!WARNING: Risk of burns!
WARNING: Risk of burns!
Do not touch the cooking zones
heat indicator lights up.
After switching off the cooking zones the residual
heat indicator of the corresponding cooking zone
lights up. This warns against touching the zone.
.
and the lid closes
- and grill- heat (de-
perating
switch to the ap-
respectively cook-
to the de-
urn the level
while the residual
Page 10

Oven functions
Oven functionsOven functions
Oven functions
Symbol
SymbolSymbol
Symbol Description
DescriptionDescription
Description
0000
Off
OffOff
Off----Position:
Position:Position:
Position: Switching
the oven off.
Upper heat
Upper heatUpper heat
Upper heating
inging
ing:
: :
:
The heating is done with active
top heat. The dish gets heated from the top.
Use when re-
baking from above or for keeping
warm.
Lower heat
Lower heatLower heat
Lower heating
inging
ing:
: :
:
The heating is done with active
bottom heat. The dish gets heated from the
bottom. Use when re-
baking from below.
Upper/lower heating:
Upper/lower heating: Upper/lower heating:
Upper/lower heating:
The heating is done in a
conventional manner. The dish gets evenly
heated from the top and bottom.
baking and frying on a level.
Full g
Full gFull g
Full grill:
rill:rill:
rill:
Only the grill heating element is in
operation. Ideal for scalloping or grilling
meat, casseroles, toast etc.
Small grill:
Small grill:Small grill:
Small grill:
Savers energy, a
dle grill radiator is heated
.
smaller quantities of grilled food.
Notes for baking,
Notes for baking, Notes for baking,
Notes for baking, cooking
cooking cooking
cooking
and grilling
and grilling and grilling
and grilling
NOTE
NOTENOTE
NOTE::::
• Use the included accessory.
•
In principle, you may use any heat
cookware for your food.
•
Unsuitable is cookware of bright, shiny aluminum,
unglazed clay and tableware made of plastic or
with plastic handles.
• Follow the instructions for the d
uration of the
completion in your recipes and preparation i
structions on the product packaging.
Baking
BakingBaking
Baking
•
For good baking results, preheating is reco
mended up to the desired temperature.
• After finishing t
he baking process, we recommend
resting the food
for about 5 minutes in the oven.
•
Before removing the cake, check if it is
using a wooden stick
. When the cake is done, no
dough residue will stick
to the wood
10
Suitable for
s only the mid-
Especially for
in the oven
in the ovenin the oven
in the oven
-resistant
n-
m-
done by
en stick.
Cooking and roasting meat & fish
Cooking and roasting meat & fishCooking and roasting meat & fish
Cooking and roasting meat & fish
•
Only cook meat of maximum 1 kg in the oven.
recommend roasting
or cook
on the cooking hob.
• When using the grill grid
for
mend placing a baking sheet with some wa
the lower level.
•
At least once after half of the cooking time
roast should be reversed
;
ing cooking now and then
liquid or with hot, salty water, thereby not using
cold water.
Grilling
GrillingGrilling
Grilling
CAUTION:
CAUTION:CAUTION:
CAUTION:
•
Grill exclusively with the oven door closed!
•
Supervise the grilling process, the
can burn rapidly due to
the intense heat!
• Turn the fun
ction selector switch
sponding position.
•
Preheat the oven for approx. 5 minutes.
• Brushes the grill
grid with
grilling food does not stick on
• Slide an empty
baking tray for dripping grease to
directly lower level, below the grill grid. Pour some
water into the baking tray for later easily cleaning.
Energy saving
Energy saving Energy saving
Energy saving ttttips
ipsips
ips
• Only preheat
if it is specified in the recipe.
•
Use dark, black painted or enamelled
absorb the heat particularly well.
• Open the oven door as
less
operation.
• Use the residual heat
after cooking process.
Switch
the oven off a few minutes before
the
cooking / baking time. So your
even cooked
in the stored oven heat.
• Put on the cookware
before switching on the
cooking zone.
We
ing smaller portions
roasting, we recom-
ter on
, the
sprinkle the roast dur-
with the resulted roast
grilling food
in the corre-
a little oil, so that the
it.
tins. They
as possible during
ending
baking product
Page 11

•
The base of the cookware and the cooking zone
should use the same size.
• If possible, always cover t
he cookware on the
cooking zone with a lid.
• Switch off the cooking
zones before
cooking time,
to use the residual heat.
Information to reduce the environmental effect of
Information to reduce the environmental effect of Information to reduce the environmental effect of
Information to reduce the environmental effect of
cooking
cookingcooking
cooking
(acc. VO (EU) No. 66/2014 appendix I, No. 2)
(acc. VO (EU) No. 66/2014 appendix I, No. 2)(acc. VO (EU) No. 66/2014 appendix I, No. 2)
(acc. VO (EU) No. 66/2014 appendix I, No. 2)
Hob / Induction hob
Hob / Induction hobHob / Induction hob
Hob / Induction hob
Use pans and pots with flat floors. Uneven floors
increase the energy consumption.
The diameter of the pot and pan floors should be
according to the size of the cooking zone, or bigger.
Pans and pots, which are too small on the cooking
zone lead to energy losses. Note: Dishes producer
partly indicate the upper pot dia
meter. It is usually
larger than the diameter of the pot floor.
Use a small pot for small quantities. A large pot,
which is only slightly filled, required a lot of energy.
Use as little water as possible. This saves energy.
Vegetables retain their vitamins.
Always close pots with a suitable lid. When cooking
without lid you need four times more energy. When
using glass lids, more energy can be saved because
you can see into the pot without open the lid.
Use a quick cooker to clearly reduce the cooking
time and save energy.
After boiling or frying, switch off the used cooking
zones to a smaller power level.
Use the residual heat of the pan, the pot and the
food. Switch off the cooking zones 5
-
fore cooking time.
11
ending the
10 minutes be-
Information to reduce the environmental effect of
Information to reduce the environmental effect of Information to reduce the environmental effect of
Information to reduce the environmental effect of
cooking
cooking cooking
cooking
(acc. VO (EU) No. 66/2014 appendix I, No. 2)
(acc. VO (EU) No. 66/2014 appendix I, No. 2)(acc. VO (EU) No. 66/2014 appendix I, No. 2)
(acc. VO (EU) No. 66/2014 appendix I, No. 2)
Oven
OvenOven
Oven
We recommend the use of dark baking molds and
plates, because they conduct the heat better.
Any unnecessary accessories should be removed
from the
baking chamber before using the appliance.
During cooking, the oven door should remain closed
to avoid unnecessary heat loss.
Only preheat the oven if required by the recipe.
If a selection of cooking time is specified, always use
the lowest recommended t
emperature.
Use the residual heat by switching back to minimum
temperature shortly before the end of the cooking
time.
Save electricity! If you do not need the oven, switch
off functions such as interior lighting, program, te
perature
Clean the oven after
each application, to keep the
cleaning effort as low as possible.
We recommend the use of biological cleaners.
Cleaning and Maintenance
Cleaning and MaintenanceCleaning and Maintenance
Cleaning and Maintenance
WARNING:
WARNING:WARNING:
WARNING:
•
Always switch off the appliance completely and
where required, disconnect
unscrew the fuse before cleaning and user
maintenance.
•
Allow the appliance to cool down sufficient
cleaning.
• Do not
use steam cleaners for cleaning the
ance
; moisture could enter electrical components.
Risk of electric
Risk of electric Risk of electric
Risk of electric shock!
shock!shock!
shock!
Hot steam
the plastic parts.
•
Never use flammable substances, such as thi
ner, kerosene,
gasoline or acids for cleaning
m-
the plug or turn off /
before
appli-
could damage
n-
.
Page 12

WARNING:
WARNING:WARNING:
WARNING:
•
The appliance must be dry before restarting ope
ation.
CAUTION
CAUTIONCAUTION
CAUTION::::
• Do not use a wire brush or other
sharp, abrasive
items.
• Do not use
harsh abrasive cleaners or sharp me
al objects for cleaning the glass surface. The su
faces can be scratched or destroyed.
• Always consider
the application and safety notes
of the detergent.
Cleaning the hob
Cleaning the hobCleaning the hob
Cleaning the hob
Staining
StainingStaining
Staining Cleaning method
Cleaning methodCleaning method
Cleaning method
Dirt has
accumu-
lated
Use warm water and
a sponge to rub dry.
Pools and
lime
deposits
Apply warm vinegar
and wipe off with a
dry cloth or use
special cleaning
agent.
Sugar,
melted
aluminum,
or plastic
Remove by using a
glass ceramic
scraper.
Removing the oven door
Removing the oven doorRemoving the oven door
Removing the oven door
You may remove the oven door to facilitate cleaning
and to get better access to the oven interior.
•
Open the appliance door completely.
•
Push the retaining brackets (a) of
the hinges on both sides up-
wards.
•
Slightly close the door and lift it up to
•
When reinstalling the door, make sure the notch
of the hinge is properly aligned with the protrusion
of the hinge holder.
12
r-
t-
r-
Cleaning tools
Cleaning toolsCleaning tools
Cleaning tools
Special clean-
ing sponge for
glass ceramic
Special clean-
ing agent for
glass ceramic
Special clean-
ing agent and
scraper for
glass ceramic
remove it.
•
Then press down the retaining brackets (a) again,
Then press down the retaining brackets (a) again,Then press down the retaining brackets (a) again,
Then press down the retaining brackets (a) again,
otherwise the hinges could get damaged when
closing the oven door.
Cleaning the oven
Cleaning the ovenCleaning the oven
Cleaning the oven
NOTE
NOTENOTE
NOTE::::
By cleaning after each use,
you avoid that food r
siduals and soiling
will be burning
eration. Then the c
leaning is
of effort.
• Clean the appliance
and accessories depending
on the soiling
degree and depending on the su
face only with a so
ft, damp cloth and commercia
ly, food safe cleaners.
•
Soak heavily soiled areas with some warm soapy
water or a vinegar cleaner.
•
Wipe off grease residues from the sealing framed
the cooking chamber.
•
Use a soft absorbent cloth for drying after clea
ing.
Cleaning the side racks
Cleaning the side racksCleaning the side racks
Cleaning the side racks
Always remove the side racks, if you want to clean
the oven walls thoroughly.
Highly soiled side racks
can be soaked in the removed state, which makes
cleaning easier.
•
Remove the rack by slightly bending the lowest
metal rod to loosen it from the
holes
and pulling it towards the
•
Lift the rack upwards out of the
holes.
•
Replace the racks after cleaning and thoroughly
drying them.
Cleaning the glass panel
Cleaning the glass panelCleaning the glass panel
Cleaning the glass panel
If necessary, clean the inside of the glass panel.
•
Open the appliance door.
e-
-in at the next op-
only possible with a lot
r-
l-
n-
lower mounting
oven center.
upper mounting
Page 13

• Remove the retaining strip
by pressing the r
lea
se tabs on the side and simultaneously pulling
the strip forward forwards.
• Take off the glass
carefully forward.
•
Replace the glass panel and the retaining strip
properly; after you’ve cleaned the glass and dried
it thoroughly.
Reverse the bulb
Reverse the bulbReverse the bulb
Reverse the bulb
WARNING:
WARNING:WARNING:
WARNING:
•
Make sure that the appliance is turned off from
the power supply (fuse).
•
Allow the lamp to cool down before replacing the
bulb. There is risk of burns!
There is risk of burns!There is risk of burns!
There is risk of burns!
NOTE
NOTENOTE
NOTE::::
Use the correct bulb, heat resistant up to 300°C:
1 x 15 W, 22
1 x 15 W, 221 x 15 W, 22
1 x 15 W, 220000----240
240240
240 VVVV~~~~
• Unscrew the lamp cover anti-
clockwise and clean
it with a dry cloth.
• Change the bulb.
• Reattach
the lamp cover and screw it tight in a
clockwise direction.
• Check the functionality.
Trou
TrouTrou
Troubleshooting
bleshootingbleshooting
bleshooting
Before you contact an
Before you contact an Before you contact an
Before you contact an
authorized specialist
authorized specialistauthorized specialist
authorized specialist
Problem
ProblemProblem
Problem Possible causes
Possible causesPossible causes
Possible causes
Appliance
does not
work
The power supply
is disconnected.
Oven lamp
does not
work
Bulb is defective,
has been inserted
incorrectly or not
firmly.
Strong for-
mation of
smoke
Grease residue in
the oven.
13
e-
What to do
What to doWhat to do
What to do
Check the fuse
of your domestic
wiring system.
Check the bulb,
see “Reverse
the bulb”.
Switch off the
oven and allow
to cool down
before cleaning.
NOTE:
NOTE:NOTE:
NOTE:
If a problem still persists after following the steps
above, contact your distributor or an authorized tec
nician.
Technical Data
Technical DataTechnical Data
Technical Data
Electrical connection…………………………...………..
Electrical connection…………………………...………..Electrical connection…………………………...………..
Electrical connection…………………………...………..
Connection voltage: …......220
Connection power: ………………………..…........8000 W
Fuse protection: ………………...……………...…3 x 16 A
Protection class: ………………………..…..………I / IP20
Dimension H x W x D / Weight……...……..…………..
Dimension H x W x D / Weight……...……..…………..Dimension H x W x D / Weight……...……..…………..
Dimension H x W x D / Weight……...……..…………..
Hob: …..………………..........………4.5 x 59.0 x 52.0 cm
Oven: ………………………...….59.5 x
Hob installation: …………….….….ca. 56.0 x 49.0 cm
Oven installation: …………...….54.5 x 55.5 x 56.5 cm
Net weight: ………………….…….......………...37.3 kg
The right to make technical and design modifications
in the course of continuous product development
remains reserved.
Disposal
DisposalDisposal
Disposal
Meaning of the “Dustbin” Symbol
Meaning of the “Dustbin” SymbolMeaning of the “Dustbin” Symbol
Meaning of the “Dustbin” Symbol
Protect our environment; do not dispose of electrical
equipment in the domestic waste.
Please return any electrical equipment that you will
no
longer use to the collection points provided for
their disposal.
This helps avoid the potential effects of incorrect
disposal on the environment and human health.
This will contribute to the recycling and other forms of
reutilization of electrical and ele
Information concerning where these can be disposed
of can be obtained from your local authority.
h-
-240/380-415V 3N~ 50Hz
59.5 x 58.7 cm
ctronic equipment.
Page 14

WARNING:
WARNING:WARNING:
WARNING:
Remove or disable any existing snap and bolt locks,
if you take the unit
out of operation or dispose it.
Information to
Information to Information to
Information to
professional users for disassembly
professional users for disassemblyprofessional users for disassembly
professional users for disassembly
(acc. VO (EU) No. 66/2014 appendix I, No. 2)
(acc. VO (EU) No. 66/2014 appendix I, No. 2)(acc. VO (EU) No. 66/2014 appendix I, No. 2)
(acc. VO (EU) No. 66/2014 appendix I, No. 2)
Hob / Induction hob
Hob / Induction hobHob / Induction hob
Hob / Induction hob
Information for non-
destructive disassembly for
maintenance purposes
A further disassembly for maintenance purposes by
the user is not provided. Do not d
isassemble the unit.
For repair and replacement of defective parts, please
contact our customer service.
Accumulators are not included.
Information for disassembly in terms of recycling,
recovery and disposal at the end of the life of the
appliance
The
disassembly of appliances with a gas connection
should only be carried out by a licensed gas and
water installer.
The disassembly of appliances with electrical co
nections should be carried out by a licensed electr
cian.
For the recycling and recovery of
resources give the
appliance to:
-
a communal collection point waste disposal author
ties
-
a dedicated disposal company, offering a return
system
-
a resident electric trader, who voluntary withdraws
electrical appliances
Information to professional users for disassembly
Information to professional users for disassembly Information to professional users for disassembly
Information to professional users for disassembly
(acc. VO (EU) No. 66/2014 appendix I, No. 2)
(acc. VO (EU) No. 66/2014 appendix I, No. 2)(acc. VO (EU) No. 66/2014 appendix I, No. 2)
(acc. VO (EU) No. 66/2014 appendix I, No. 2)
Oven
OvenOven
Oven
Information for non-
destructive disassembly for
maintenance purpose
Remove the lamp as described in the manual.
14
n-
i-
i-
For maintenance purposes, the oven door can be
hang out and reinstalled, for the procedure please
refer to the manual.
A further disassembly for maintenance purposes is
not provided.
If you would like to exchange defective components,
please contact our cu
stomer service.
Accumulators are not included.
Information for disassembly in terms of recycling,
recovery and disposal at the end of the life of the
appliance
The disassembly of appliances with a gas connection
should only be carried out by a licensed g
water installer.
The disassembly of appliances with electrical co
nections should be carried out by a licensed electr
cian.
For the recycling and recovery of resources give the
appliance to:
-
a communal collection point of public waste dispo
al authorities
-
a dedicated disposal company, offering a return
system
-
a resident electric trader, who voluntary withdraws
electrical appliances
as and
n-
i-
s-
Page 15

15
EU Product data sheet
EU Product data sheetEU Product data sheet
EU Product data sheet
Product information for domestic electric
Product information for domestic electric Product information for domestic electric
Product information for domestic electric hobs according EU 66/2014
hobs according EU 66/2014hobs according EU 66/2014
hobs according EU 66/2014
Position
PositionPosition
Position Symbol
SymbolSymbol
Symbol Value
ValueValue
Value Unit
UnitUnit
Unit
Brand
BrandBrand
Brand BOMANN
BOMANNBOMANN
BOMANN
Model
ModelModel
Model identification
identificationidentification
identification EHBC 557 IX
EHBC 557 IXEHBC 557 IX
EHBC 557 IX
EHBC 558 IX
EHBC 558 IXEHBC 558 IX
EHBC 558 IX
Type of hob Hob of a built-in oven
Number of cooking zones and/or areas 4
Heating technology (induction cooking
zones and cooking areas, radiant cook-
ing zones, solid plates)
Radiant cooking zones
For circular cooking zones or area:
diameter of useful surface area per
electric heated cooking zone, rounded
to the nearest 5 mm
Rear left
Ø
18.0
cm
Rear right 14.0
Front right 18.0
Front left 14.0
For non-circular cooking zones or are-
as: length and width of useful surface
area per electric heated cooking zone
or area, rounded to the nearest 5 mm
L
B
- cm
Energy consumption per cooking zone
or area calculated per kg
Rear left
EC
electric cooking
192.02
Wh/kg
Rear right
191.16
Front right
192.02
Front left
191.16
Energy consumption for the hob calcu-
lated per kg
EC
electric hob
191.59 Wh/kg
Page 16

16
Product information for domestic ovens according EU
Product information for domestic ovens according EU Product information for domestic ovens according EU
Product information for domestic ovens according EU 65
6565
65----66/2014
66/201466/2014
66/2014
Symbol
SymbolSymbol
Symbol Value
ValueValue
Value Unit
UnitUnit
Unit
Brand
BrandBrand
Brand BOMANN
BOMANNBOMANN
BOMANN
Model
ModelModel
Model identification
identificationidentification
identification EHBC 557 IX
EHBC 557 IXEHBC 557 IX
EHBC 557 IX EHBC 558 IX
EHBC 558 IXEHBC 558 IX
EHBC 558 IX
Type of oven Built-in
Mass of the appliance M 27.0 kg
Number of cavities 1
Heat source per cavity (electricity or gas) Electricity
Volume per cavity V 66 l
Energy consumption (electricity) required
to heat a standardised load in a cavity of
an electric heated oven during a cycle in
conventional mode per cavity (electric
final energy)
EC
electric
cavity
0.82 kWh/cycle
Energy consumption required to heat a
standardised load in a cavity of an electric
heated oven during a cycle in fan-forced
mode per cavity (electric final energy)
EC
electric
cavity
- kWh/cycle
Energy consumption required to heat a
standardised load in a gas-fired cavity of
an oven during a cycle in conventional
mode per cavity (gas final energy)
EC
gas cavity
-
MJ/cycle
kWh/cycle (1)
Energy consumption required to heat a
standardised load in a gas-fired cavity of
an oven during a cycle in fan-forced mode
per cavity (gas final energy)
EC
gas cavity
-
MJ/cycle
kWh/cycle
Energy Efficiency Index per cavity EEI
cavity
99.59
Energy efficiency class
(2)
A
(1) 1 kWh/cycle = 3.6 MJ/cycle
(2) A+++ (highest efficiency) to D (lowest efficiency)
Page 17

17
Page 18

18
Page 19

19
Page 20

20
C. Bomann GmbH
C. Bomann GmbHC. Bomann GmbH
C. Bomann GmbH
www.bomann
www.bomannwww.bomann
www.bomann----germany.de
germany.degermany.de
germany.de
Stand 09/17
 Loading...