

Page 1
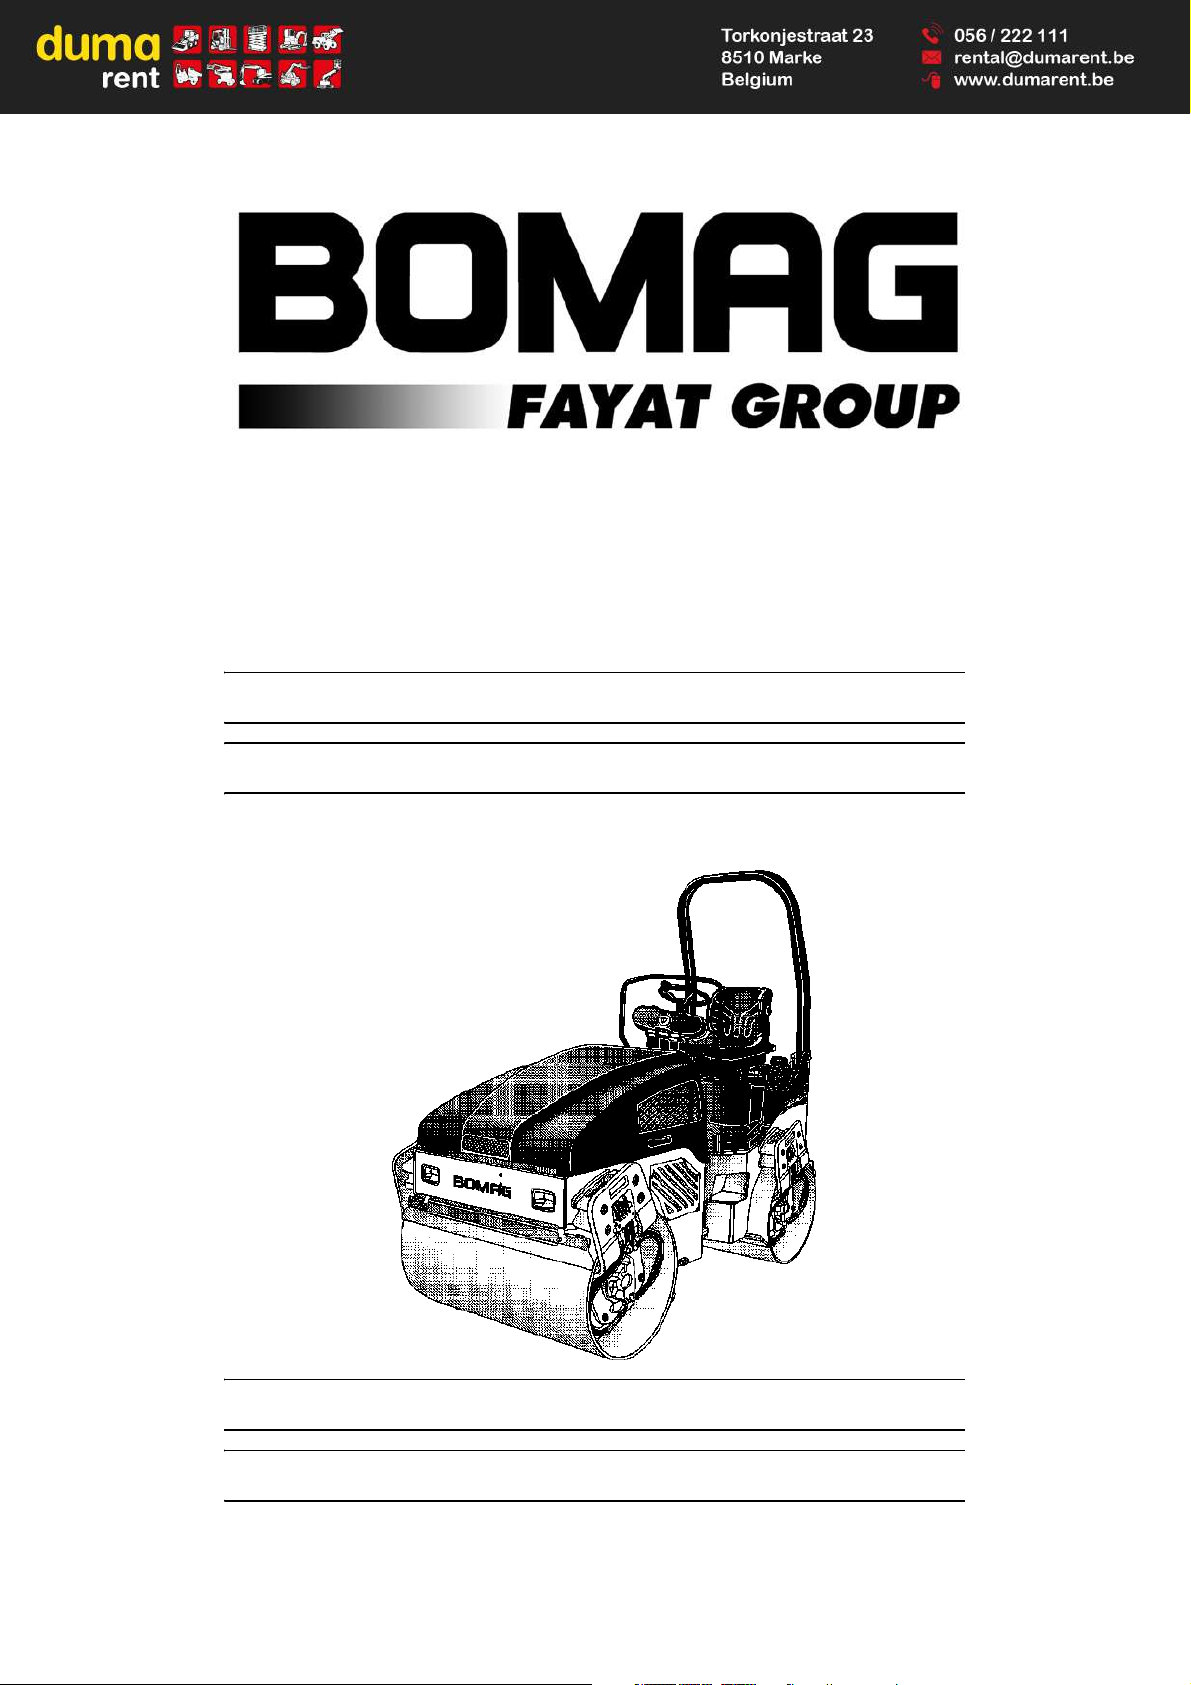
Operating instructions
Maintenance instructions
Original operating instructions
01/2012
Catalogue No.
008 053 01
BW 100 AD-4 / BW 120 AD-4 / BW 125 AD-4
BW 100 AC-4 / BW 120 AC-4 / BW 125 AC-4
S/N 101 880 06 .... > / S/N 101 880 16 .... > / S/N 101 880 08 .... > / S/N 101 880 14 .... > / S/N 101 880 10 .. .. >
S/N 101 880 07 .... > / S/N 101 880 17 .... > / S/N 101 880 09 .... > / S/N 101 880 15 .... > / S/N 101 880 11 .. .. >
Tandem Vibratory Roller
Combination Roller
Page 2
Page 3

Foreword
BOMAG 3BW 100/120/125 AD-4/AC-4
1 Foreword
These BOMAG machines are products from
the wide product range of BOMAG machines
for earth and asphalt construction, refuse
compaction and stabilizing/recycling.
BOMAG’s vast experience in connection with
state-of-the-art production and testing methods, such as lifetime tests of all important
components and highest quality demands
guarantee maximum reliability of your machine.
This manual comprises:
l Safety regulations
l Operating instructions
l maintenance instructions
l Trouble shooting
Using these instructions will
l help you to become familiar with the machine.
l avoid malfunctions caused by unprofessional
operation.
Compliance with the maintenance instructions will
l enhance the reliability of the machine on con-
struction sites,
l prolong the lifetime of the machine,
l reduce repair costs and downtimes.
BOMAG will not assume liability for the function of
the machine
l if it is handled in a way not complying with the
usual modes of use,
l if it is used for purposes other than those men-
tioned in these instructions.
No warranty claims can be lodged in case of damage resulting from
l operating errors,
l insufficient maintenance and
l wrong fuels and lubricants.
Please note!
This manual was written for operators and maintenance personnel on construction sites.
Always keep this manual close at hand, e.g. in the
tool compartment of the machine or in a specially
provided container. These operating and maintenance instructions are part of the machine.
You should only operate the machine after you
have been instructed and in compliance with these
instructions.
Strictly observe the safety regulations.
Please observe also the guidelines of the Civil Engineering Liability Association ”Safety Rules for
the Operation of Road Rollers and Soil Compactors” and all relevant accident prevention regulations.
For your own personal safety you should only
use original spare parts from BOMAG.
For your machine BOMAG offers service kits
to ease maintenance.
In the course of technical development we reserve the right for technical modifications
without prior notification.
These operating and maintenance instructions are
also available in other languages.
Apart from that, the spare parts catalogue is available from your BOMAG dealer against the serial
number of your machine.
Your BOMAG dealer will also supply you with information about the correct use of our machines in
soil and asphalt construction.
The above notes do not constitute an extension of
the warranty and liability conditions specified in the
general terms of business of BOMAG.
We wish you successful work with your BOMAG
machine.
BOMAG GmbH
Copyright by BOMAG
Page 4
Foreword
BOMAG4 BW 100/120/125 AD-4/AC-4
Please fill in
. . . . . . . . . . . . . . . . . . . . . . . . . . . .
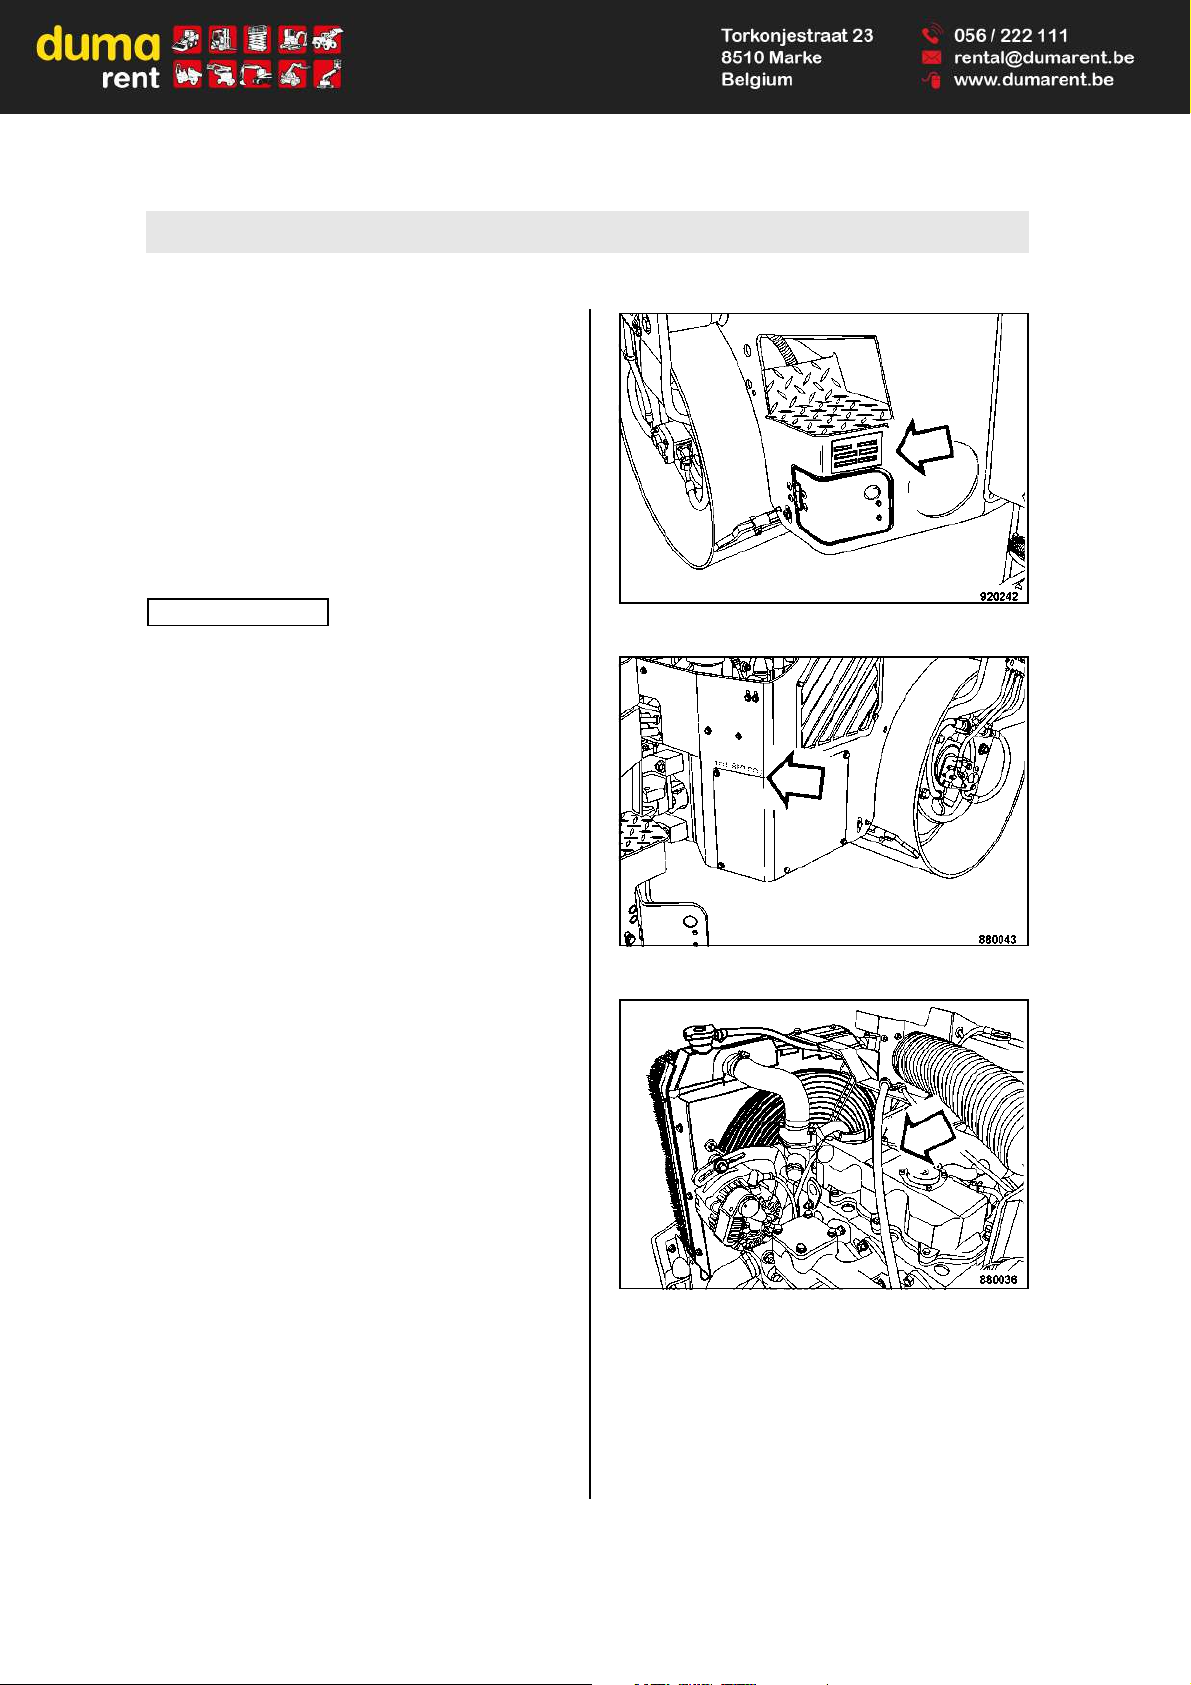
Machine type (Fig. 1)
. . . . . . . . . . . . . . . . . . . . . . . . . . . .
Serial-number (Fig. 1 and 2)
. . . . . . . . . . . . . . . . . . . . . . . . . . . .
Engine type (Fig. 3)
. . . . . . . . . . . . . . . . . . . . . . . . . . . .
Engine number (Fig. 3)
Note
i
Supplement the above data together with the commissioning protocol.
During commissioning our organisation will instruct you in the operation and maintenance of the
machine.
Please observe strictly the safety regulations and
all notes on risks and dangers!
Fig. 1
Fig. 2
Fig. 3
Page 5

Table of Contents
BOMAG 5BW 100/120/125 AD-4/AC-4
1Foreword 3
2 Technical Data 9
3 Safety regulations 17
4 Indicators and Controls 31
4.1 General notes 34
4.2 Description of indicators and control elements 34
5 Operation 45
5.1 General 46
5.2 Tests before taking into operation 46
5.3 Electronic immobilizer 47
5.4 Adjusting the operator's seat 47
5.5 Starting the engine 48
5.6 Starting with jump wires 50
5.7 Driving the machine 51
5.8 Stopping the machine, operating the parking brake 53
5.9 Shutting down the engine 53
5.10 Switching the vibration on and off 54
5.11 Switching the gravity sprinkling system on and off 57
5.12 Switching the pressure sprinkling system on and off 57
5.13 Switching the tire sprinkling system on and off (only AC) 59
5.14 Actuating the emergency stop switch 59
5.15 Mounting/removing the chip spreader 60
5.16 Filling/emptying the chip spreader 62
5.17 Operating the chip spreader 63
5.18 Towing 64
5.19 Loading/transport 67
6 Maintenance 71
6.1 General notes on maintenance 72
6.2 Fuels and lubricants 73
6.3 Table of fuels and lubricants 76
6.4 Running-in instructions 77
6.5 Maintenance table 78
Every 10 operating hours 81
6.6 Check the engine oil level 81
6.7 Checking the fuel level 81
6.8 Check the hydraulic oil level 82
6.9 Checking the hydraulic oil filter element 83
Page 6

Table of Contents
BOMAG6 BW 100/120/125 AD-4/AC-4
6.10 Check the coolant level 83
6.11 Check the water separator 84
6.12 Checking the water level 84
6.13 Checking the emulsion level 85
6.14 Checking the chip spreader and cleaning the spreading beam 85
Every 50 operating hours 87
6.15 Checking fuel lines and clamps 87
6.16 Servicing the chip spreader 87
Every 250 operating hours 89
6.17 Changing engine oil and oil filter 89
6.18 Checking, cleaning, replacing the combustion air filter 91
6.19 Check the air intake lines 94
6.20 Cleaning radiator and hydraulic oil cooler 95
6.21 Checking, tensioning, replacing the V-belt 96
6.22 Checking radiator hoses and hose clamps 96
6.23 Checking, adjusting the scrapers 97
Every 500 operating hours 99
6.24 Battery service 99
6.25 Change the fuel filter 100
6.26 Drain the fuel tank sludge 101
Every 1000 operating hours 103
6.27 Checking, adjusting the valve clearance 103
6.28 Check the engine mounts 104
Every 2000 operating hours 105
6.29 Changing hydraulic oil and breather filter 105
6.30 Changing the hydraulic oil filter 106
6.31 Changing the coolant 107
6.32 Replacing the fuel lines 109
6.33 Check the injection valves 109
Every 3000 operating hours 111
6.34 Checking the fuel injection pump 111
As required 113
6.35 Checking the tire pressure 113
6.36 Cleaning the water sprinkler system 113
6.37 Draining the water sprinkler system, maintenance in case of frost 115
6.38 Filling the provision tank for the windscreen washer system 116
6.39 Tightening torques for screws with metric unified thread 116
6.40 Engine conservation 117
Page 7

Table of Contents
BOMAG 7BW 100/120/125 AD-4/AC-4
7 Trouble shooting 119
7.1 General notes 120
7.2 Engine 121
8 Disposal 123
8.1 Final shut-down of machine 124
Page 8

Table of Contents
BOMAG8 BW 100/120/125 AD-4/AC-4
Page 9

BOMAG 9BW 100/120/125 AD-4/AC-4
2 Technical Data
Page 10

Technical Data
BOMAG10 BW 100/120/125 AD-4/AC-4
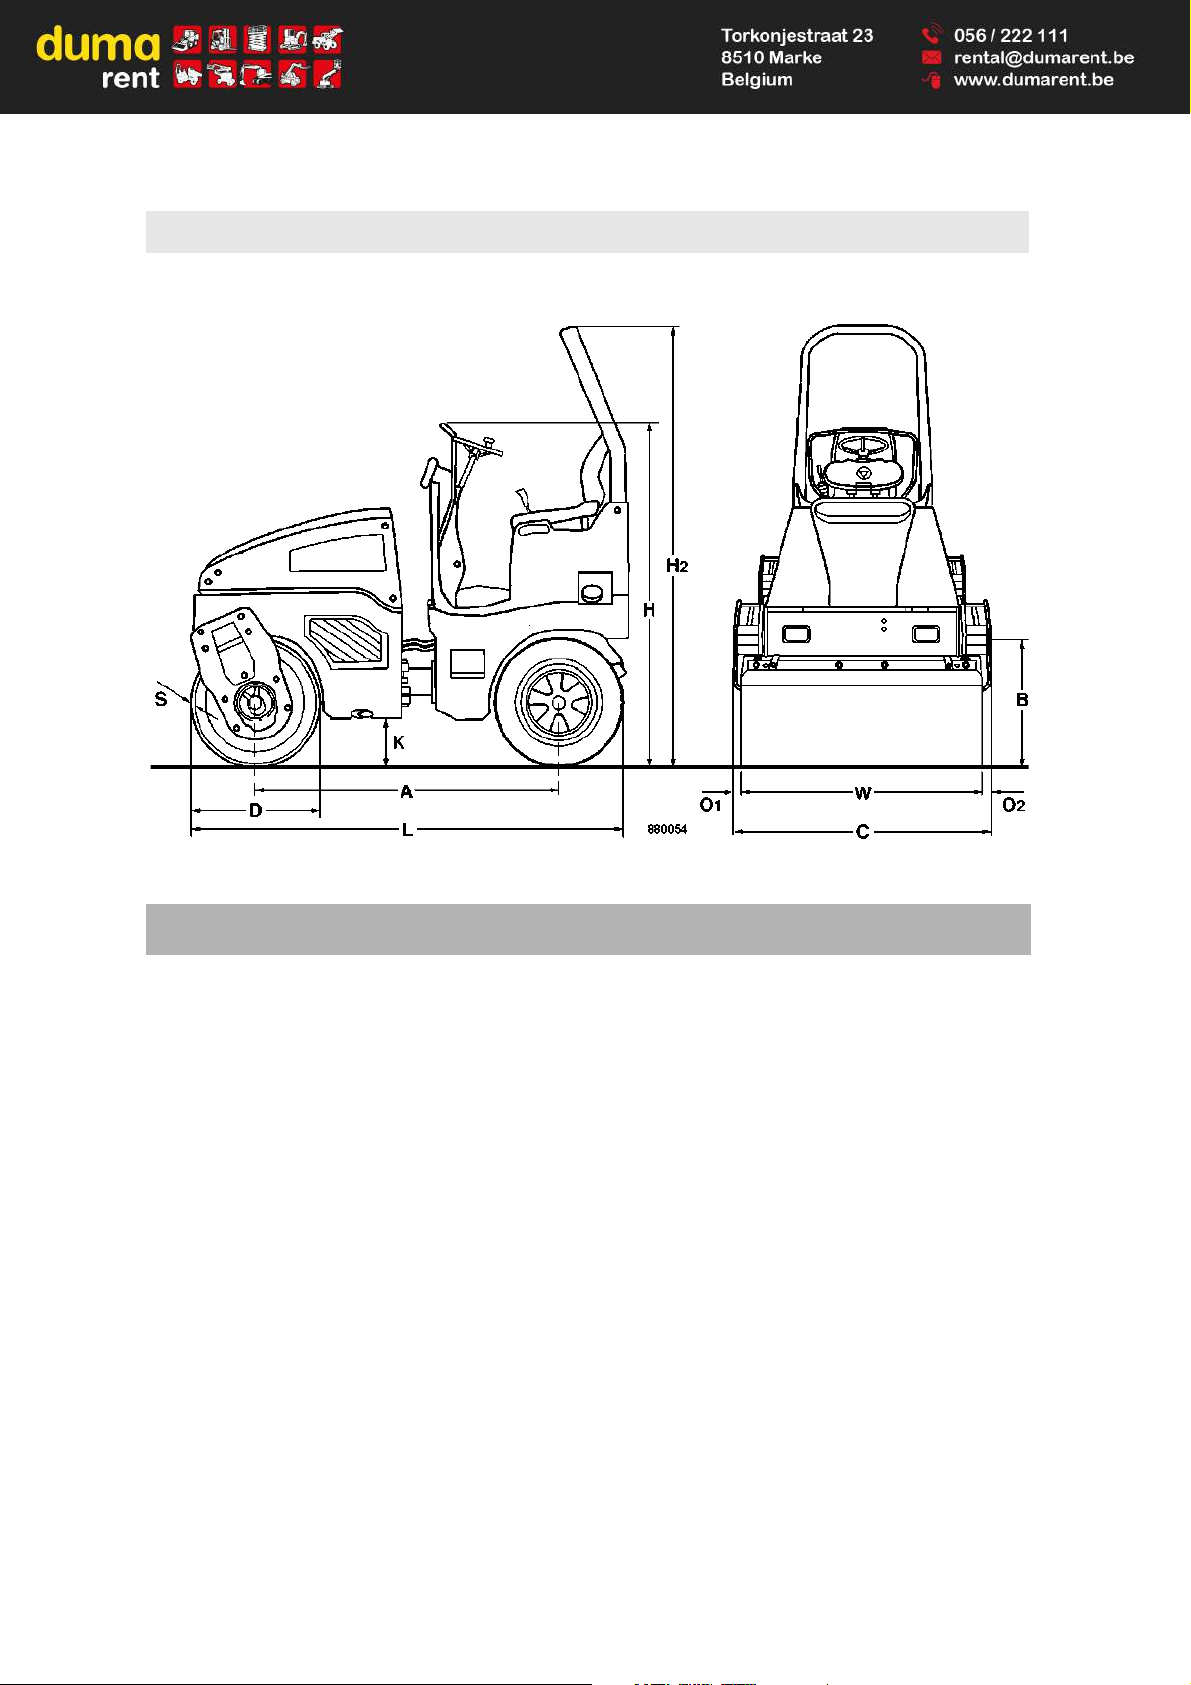
Fig. 4
Dimensions in mm A B C D H H2 K L O S W
BW 100 AD-4
1728 1076 475 700 1800 2475 255 2475 38 13 1000
BW 120 AD-4
1728 1276 474 700 1800 2475 255 2475 38 13 1200
BW 125 AD-4
1728 1276 474 700 1800 2475 255 2475 38 23 1200
1
BW 100 AD-4 BW 120 AD-4 BW 125 AD-4
Weights
Operating weight with ROPS (CECE) kg 2400 2600 3150
Operating weight with ROPS (CECE)
and empty chip spreader
2
kg 2520 2730 3150
Mean axle load (CECE) kg 1200 1300 1575
Mean static linear load (CECE) kg/cm 12.0 10.8 13.1
Max. operating weight kg 2950 3150 3400
Dimensions
Inner track radius mm 2720 2620 2620
Length with chip spreader** mm 3250 3250 Width with chip spreader** mm 1180 1276 -
Page 11

Technical Data
BOMAG 11BW 100/120/125 AD-4/AC-4
Travel characteristics
Working speed with vibration km/h 0 – 6.5 0 – 6.5 0 – 6.5
Travel speed km/h 0 – 12 0 – 12 0 – 12
Max. gradability without/with vibration
(soil dependent)
% 40/30 40/30 40/30
Drive
Engine manufacturer Kubota Kubota Kubota
Type D 1703-M-EU34 D 1703-M-EU34 D 1703-M-EU34
Cooling Water Water Water
Number of cylinders 3 3 3
Rated power ISO 9249 kW 24.3 24.3 24.3
Rated power SAE J 1349 hp 32.6 32.6 32.6
Rated speed min
-1
2600 2600 2600
Fixed engine speed 1 min
-1
2400 2400 2400
Fixed engine speed 2 min
-1
2600 2600 2600
Electrical equipment V 12 12 12
Brake
Service brake hydrost. hydrost. hydrost.
Parking brake hydro-mech. hydro-mech. hydro-mech.
Steering
Type of steering Oscill.-articul. Oscill.-articul. Oscill.-articul.
Steering operation hydrost. hydrost. hydrost.
Steering/oscillation angle +/- ° 30/7 30/7 30/7
Exciter system
Vibrating drum front + rear front + rear front + rear
Drive system hydrost. hydrost. hydrost.
Frequency 1/2 Hz 70/55 70/55 60/50
Amplitude mm 0.50 0.51 0.40
Centrifugal force 1/2 kN 37/23 45/28 41/29
Water sprinkler system
Type Gravity feed Gravity feed Gravity feed
Filling capacities
Fuel (diesel) l approx. 40 approx. 40 approx. 40
Water tank capacity l approx. 220 approx. 220 approx. 220
Hydraulic oil l approx. 28 approx. 32 approx. 32
Engine oil l approx. 6,5 approx. 6,5 approx. 6,5
1 The right for technical modifications remains reserved
2 Optional equipment
1
BW 100 AD-4 BW 120 AD-4 BW 125 AD-4
Page 12
Technical Data
BOMAG12 BW 100/120/125 AD-4/AC-4
Fig. 5
Dimensions in mmA B C D H H2 K L O S W
BW 100 AC-4
1728 1076 475 700 1800 2475 255 2475 38 13 1000
BW 120 AC-4
1728 1276 474 700 1800 2475 255 2475 38 13 1200
BW 125 AC-4
1728 1276 474 700 1800 2475 255 2475 38 23 1200
1
BW 100 AC-4 BW 120 AC-4 BW 125 AC-4
Weights
Operating weight with ROPS (CECE) kg 2250 2400 2950
Axle load, drum (CECE) kg 1150 1240 1600
Axle load, wheels (CECE) kg 1100 1160 1350
Static linear load (CECE) kg/cm 11.5 10.3 13.5
Wheel load (CECE) kg 275 290 338
Max. operating weight kg 2600 2800 3250
Dimensions
Inner track radius mm 2720 2620 2620
Page 13

Technical Data
BOMAG 13BW 100/120/125 AD-4/AC-4
Travel characteristics
Working speed with vibration km/h 0 – 6 0 – 6 0 – 6
Travel speed km/h 0 – 10 0 – 10 0 – 10
Max. gradability without/with vibration
(soil dependent)
% 40/30 40/30 40/30
Drive
Engine manufacturer Kubota Kubota Kubota
Type D 1703-M-EU34 D 1703-M-EU34 D 1703-M-EU34
Cooling Water Water Water
Number of cylinders 3 3 3
Rated power ISO 9249 kW 24.3 24.3 24.3
Rated power SAE J 1349 hp 32.6 32.6 32.6
Rotary speed (nominal speed) rpm 2600 2600 2600
Fixed engine speed 1 rpm 2400 2400 2400
Fixed engine speed 2 rpm 2600 2600 2600
Electrical equipment V 12 12 12
Tires
Number of tires 4 4 4
Tire size 205/60-15 205/60-15 205/60-15
Brake
Service brake hydrost. hydrost. hydrost.
Parking brake hydro-mech. hydro-mech. hydro-mech.
Steering
Type of steering Oscill.-articul. Oscill.-articul. Oscill.-articul.
Steering operation hydrost. hydrost. hydrost.
Steering/oscillation angle degree 30/7 30/7 30/7
Exciter system
Vibrating drum front front front
Drive system hydrost. hydrost. hydrost.
Frequency 1/2 Hz 70/55 70/55 60/50
Amplitude mm 0.50 0.52 0.40
Centrifugal force 1/2 kN 37/23 45/28 42/29
Water sprinkler system
Type Pressure Pressure Pressure
Interval control Standard Standard Standard
Filling capacities
Fuel (diesel) l approx. 40 approx. 40 approx. 40
Water tank capacity l approx. 220 approx. 220 approx. 220
Emulsion l approx. 20 approx. 20 approx. 20
Hydraulic oil l approx. 28 approx. 28 approx. 28
Engine oil l approx. 6,5 approx. 6,5 approx. 6,5
1
BW 100 AC-4 BW 120 AC-4 BW 125 AC-4
Page 14

Technical Data
BOMAG14 BW 100/120/125 AD-4/AC-4
1 Subject to technical alterations.
Page 15

Technical Data
BOMAG 15BW 100/120/125 AD-4/AC-4
The following noise and vibration data acc. to
- EC Machine Regulation edition 2006/42/EC
- the noise regulation 2000/14/EG, noise protection guideline 2003/10/EC
- Vibration Protection Regulation 2002/44/EC
were determined during conditions typical for this type of equipment and by application of harmonized standards.
During operation these values may vary because of the existing operating conditions.
Noise value
Sound pressure level on the place of the operator:
L
pA
= 84 dB(A), determined acc. to ISO 11204 and EN 500
Guaranteed sound power level:
L
WA
= 106 dB(A), determined acc. to ISO 3744 and EN 500
Danger!
Wear your personal noise protection means (ear defenders) before starting operation.
Vibration value
Vibration of the entire body (driver’s seat)
The weighted effective acceleration value determined according to ISO 7096 is ≤ 0.5 m/s
2
.
Hand-arm vibration values
The weighted effective acceleration value determined according to ISO 5349 is ≤ 2.5 m/s
2
.
Page 16

Technical Data
BOMAG16 BW 100/120/125 AD-4/AC-4
Page 17

BOMAG 17BW 100/120/125 AD-4/AC-4
3 Safety regulations
Page 18

Safety regulations
BOMAG18 BW 100/120/125 AD-4/AC-4
General
This BOMAG machine has been built in compliance with the latest technical standard and
complies with the applicable regulations and
technical rules. However, dangers for persons
and property may arise from this machine, if:
l it is used for purposes other than the ones it is
intended for,
l it is operated by untrained personnel,
l it is changed or converted in an unprofessional
way,
l the safety instructions are not observed.
Each person involved in the operation, maintenance and repair of the machine must therefore read and comply with these safety
regulations. If necessary, this must be confirmed by obtaining the signature of the customer.
Furthermore, the following obviously also applies:
l applicable accident prevention instructions,
l generally accepted safety and road traffic reg-
ulations,
l country specific safety regulations. It is the
duty of the operator to be acquainted with
these instructions and to apply these accordingly. This applies also for local regulations
concerning different types of handling work.
Should the recommendations in these instructions be different from the regulations valid in
your country, you must comply with the safety
regulations valid in your country.
Intended use
This machine must only be used for:
l Compaction of bituminous material, e.g. road
surface layers.
l light compaction work in earth construction
(road sub-bases).
Unintended use
Dangers may arise from the machine when it is
used for purposes other than the one it is intended
for.
Any danger caused by intended use is the sole responsibility of the customer or driver/operator, the
manufacturer cannot be made liable.
Examples for unintended use are:
l work with vibration on hard concrete, cured bi-
tumen layers or extremely frozen ground
l cleaning the drums while driving or changing
nozzles during travel.
l driving on unstable subbases or insufficient
grip or too small contact area (danger of tipping over)
l Passing over high borders (e.g. curbstones,
embankments, trenches, potholes)
l unauthorized use of public roads
l Using the machine for towing
Transporting persons, except the machine driver,
is prohibited.
Starting and operation of the machine in explosive
environments and in underground mining is prohibited.
Remaining dangers, remaining risks
Despite careful work and compliance with standards and regulations it cannot be ruled out that further dangers may arise when working with and
handling the machine.
Both the machine as well as all other system components comply with the currently valid safety regulations. Nevertheless, remaining risks cannot be
ruled out completely, even when using the machine for the purpose it is intended for and following all information given in the operating
instructions.
A remaining risk can also not be excluded beyond
the actual danger zone of the machine. Persons
remaining in this area must pay particular attention
to the machine, so that they can react immediately
in case of a possible malfunction, an incident or
failure etc.
All persons remaining ion the area of the machine
must be informed about the dangers that arise
from the operation of the machine.
Regular safety inspections
Have the machine inspected by an expert (capable person) as required for the conditiosn the machine is working under, but at least once every
year.
Page 19
Safety regulations
BOMAG 19BW 100/120/125 AD-4/AC-4
Who is allowed to operate the machine?
Only trained, instructed and authorized persons of
at least 18 years of age are permitted to drive and
operate this machine. For operation of the machine the responsibilities must be clearly specified
and complied with.
Persons under the influence of alcohol, medicine
or drugs are not allowed to operate, service or repair the machine.
Maintenance and repair work requires specific
knowledge and must therefore only be performed
by trained specialists.
Changes and conversions to the machine
Unauthorized changes to the machine are prohibited for safety reasons.
Original parts and accessories have been specially designed for this machine.
We wish to make explicitly clear that we have not
tested or approved any parts or accessories not
supplied by us.
The installation and/or use of such products may
have an adverse effect on the active and/or passive safety.
The manufacturer explicitly excludes any liability
for damage caused by the use of non-original
parts or accessories.
Damage, deficiencies, misuse of safety
installations
Machines which are not safe to operate or in traffic
must be immediately taken out of service and shall
not be used, until these deficiencies have been
properly rectified.
Safety installations and switches must neither be
removed nor must they be made ineffective.
Notes on safety in the operating and
maintenance instructions
Danger!
Paragraphs marked like this highlight possible
dangers for persons.
Caution
!
Paragraphs marked like this highlight possible
dangers for machines or parts of the machine.
Note
i
Paragraphs marked like this contain technical information for the optimal economical use of the
machine.
Environment
Paragraphs marked like this point out practices for safe and environmental disposal of fuels
and lubricants as well as replacement parts.
Observe the regulations for the protection of
the environment.
Loading/transporting the machine
Loading with loading ramp
Use only stable loading ramps of sufficient load
bearing capacity. The ramp inclination must be
less than the gradability of the machine.
Make sure that persons are not endangered by the
machine tipping or sliding off.
During demonstration and when loading the machine do not remain in the danger zone of the machine.
Always empty the chip spreader
1
before trans-
port.
After driving the machine onto the transport vehicle attach the articulation lock .
Loading by crane / loading the machine with a
lifting belt
2
With the chip spreader attached the machine must
not be lifted with lifting belts, because of the
changed centre of gravity.
Engage the articulation lock.
Always use shackles on the lifting points or on the
lifting belt for loading the machine.
Check all lifting points and lifting belt for damage
before lifting the machine. Damaged or in any other way in their functionality impaired lifting points
or a damaged or in its functionality impaired lifting
belt must not be used.
1 Optional equipment
2 Optional equipment
Page 20

Safety regulations
BOMAG20 BW 100/120/125 AD-4/AC-4
Lifting tackle must only be attached to loads by expert personnel (qualified person).
Do not overload the lifting belt.
Lift the machine only with suitable lifting gear. Use
only safe lifting gear of sufficient load bearing capacity Minimum lifting capacity of lifting gear: see
operating weight in chapter "Technical Data".
Do not lift or lower the machine jerkily.
The tension must always be effective in vertical direction.
The machine must not swing about when being lifted.
Do not step or stand under suspended loads.
After lifting hook the lifting belt back into its receptacle.
Have the lifting tackle inspected by an expert
(properly trained person) once every year.
After 5 years replace the lifting belt with a new one.
Always empty the chip spreader
1
before trans-
port.
Lashing
Always use shackles on the lifting points for lashing down the machine.
Check all lashing points for damage before lashing
down the machine. Do not use a damaged or in
any other way impaired lashing points.
Lash the machine down, so that it is secured
against rolling, sliding and turning over.
Never attach the lashing gear to the chip spreader.
After transport
Operate the machine only with the foldable
ROPS
2
properly fastened and the fastening
screws tightened with the correct tightening
torque.
After transport release the articulation lock again
and store it in the receptacle.
Towing the machine
You should generally use a tow bar.
With the chip spreader
3
attached the machine
must not be towed backwards.
Max. towing speed 1 km/h, max. towing distance
500 m.
Before releasing the multi-disc brake secure the
machine against unintended rolling.
Checking the Roll Over Protective
Structure (ROPS)
Note
i
On machines with cab the ROPS is an integral part
of the cab.
The frame of the machine must not be warped,
bent or cracked in the area of the ROPS fastening.
The ROPS must not show any rust, damage, hairline cracks or open fractures.
The actual weight of the machine must not exceed
the testing weight of the ROPS.
The ROPS must not rattle about when driving.
This indicates that it is not properly fastened. All
bolted connections must comply with the specifications and should be absolutely tight (observe
the tightening torques). Screw and nuts must not
be damaged, bent or deformed.
With the cab assembled check also the state of the
cabin mounts (rubber elements and screws).
No accessories may be welded or bolted on and
no additional holes must be drilled without the consent of the manufacturer, since this will impair the
strength of the unit.
The ROPS must therefore also not be straightened or repaired if it is damaged.
A defect ROPS must generally be replaced with an
original spare part in close coordination with the
manufacturer.
Starting the machine
Before starting
The machine must only be operated from the driver’s seat.
Use only machines which are serviced at regular
intervals.
Become acquainted with the equipment, the control elements, the working principle of the machine
and the working area.
Wear your personal protective outfit (hard hat,
safety boots, etc.). Wear ear defenders.
1 Optional equipment
2 Optional equipment
3 Optional equipment
Page 21

Safety regulations
BOMAG 21BW 100/120/125 AD-4/AC-4
Before mounting the machine check whether:
l persons or obstructions are beside or under
the machine
l the machine is free of oily and combustible
material
l all grips, steps and platforms are free of
grease, oils, fuel, dirt, snow and ice
l engine hood is closed and locked
Use steps and grips to mount the machine.
Before starting the machine check whether:
l the machine shows any obvious faults
l all guards and safety elements are in place
l steering, brakes, control elements, light sys-
tem and warning horn work correctly
l the seat is correctly adjusted
l mirrors (if present) are clean and correctly ad-
justed.
Do not start the machine with defective gauges,
control lights or control elements.
Do not take any loose objects with you or fasten
them to the machine.
On machines with roll over protection system you
must always wear your seat belt!
Starting
Start and operate the machine only from the driver’s seat.
For starting set all control levers to 'neutral position'.
Do not use any starting aids like start pilot or ether.
After starting check all gauges and control lights.
Starting with jump wires
Connect plus to plus and minus to minus (ground
cable) – always connect the ground strap last and
disconnect it first! A wrong connection will cause
severe damage in the electric system.
Do not start the engine by shorting the electric terminals on the starter motor, because the machine
may start to drive immediately.
Starting and operation of the machine is
closed rooms and trenches
Exhaust gases are highly dangerous! Always ensure an adequate supply of fresh air when starting
and operating in closed rooms and trenches!
Driving the machine
Persons in the danger area
Before taking up work, also after breaks, you
should always convince yourself that the danger
zone is free of persons or obstructions, especially
when driving in reverse.
Give warning signals, if necessary. Stop work immediately if persons remain in the danger zone,
despite the warning.
Do not step or stand in the articulation area of the
machine when the engine is running. Danger of
squashing!
Driving
Always wear the seat belt when driving.
Do not drive on bases with insufficient load bearing capacity.
Do not drive on ice and snow.
In events of emergency and in case of danger actuate the emergency stop switch immediately. Do
not use the emergency stop switch as service
brake.
Restart the machine only after the danger that
caused the actuation of the emergency stop switch
has been eliminated.
If the engine oil pressure control light lights up stop
the engine immediately.
If the machine has contacted high-voltage power
lines:
l do not leave the operator’s stand
l warn others from coming close to or touching
the machine
l if possible drive the machine out of the danger
zone
l have the power switched off
Operate the machine only from the operator’s
stand.
Keep the cabin doors closed.
Do not adjust the driver’s seat while driving.
Do not climb onto or off the machine while the machine is driving.
Change the travel direction only at standstill.
Do not use the machine to transport persons.
Page 22

Safety regulations
BOMAG22 BW 100/120/125 AD-4/AC-4
In case of unusual noises and development of
smoke perform trouble shooting and have the fault
corrected.
Always keep a sufficient distance to excavation
walls and embankments and do not use working
methods that could impair the stability of the machine.
Do not work with vibration on hard concrete, cured
bitumen layers or extremely frozen ground.
Always keep a sufficient distance when passing
through subways, under bridges, tunnels, electric
power lines etc.
Driving on inclinations and slopes
Do not drive on gradients exceeding the maximum
gradability of the machine.
On slopes drive extremely careful and always directly up or down the slope. Change to a lower
gear before starting to drive.
Wet and loose soils considerably reduce the
ground adhesion of the machine on inclinations
and slopes. Higher risk of accident!
Inclination
Fig. 6
The tipping angle was measured in static condition
on level, hard ground with the machine stopped,
no steering and without vibration.
With loose soil, acceleration/deceleration, running
vibration, steering or attached accessoriies the tipping angle may be considerably lower.
Driving across slopes should therefore be strictly
avoided, because of the high risk of tipping over
and the related risk of severe or even fatal accidents.
You should therefore always drive straight up or
down a slope.
For rollers with a drum width of 1 m or less there is
a considerable risk of tipping over near edges (e.g.
curbstones, embankments, trenches, potholes)
when driving over these edges.
Behaviour in traffic
Match the speed to the working conditions. Do not
make extreme steering movements when driving
with high speed, danger of tipping over!
Always give way to loaded transport vehicles.
Switch the lights on if the visibility is poor.
Keep away from edges and embankments.
Checking the effect of vibration
When compacting with vibration you must check
the effect on nearby buildings and underground
supply lines (gas, water, sewage, electric power),
if necessary stop compaction work with vibration.
Do not work with vibration on hard concrete, cured
bitumen layers or extremely frozen ground. Danger of bearing damage!
Parking the machine
Park the machine on level, firm ground.
Before leaving the machine:
l return the control lever to neutral position
l apply the parking brake
l shut the engine down and pull off the ignition
key
Do not jump off the machine, but use hand grips
and access steps.
Mark machines, which could be in the way, with a
clearly visible sign.
Parking on slopes and inclinations
Apply appropriate measures (e.g. with metal
wheel chocks, to be provided by the operating
company) tp secure the machine against rolling
away.
Refuelling
Do not inhale any fuel fumes.
Refuel only with the engine stopped and the auxiliary heater switched off.
Always use access steps.
880116
Max.
36 %
20 °
Page 23

Safety regulations
BOMAG 23BW 100/120/125 AD-4/AC-4
Do not refuel in closed rooms.
No open fire, do not smoke.
Do not spill any fuel. Catch running out fuel, do not
let it seep into the ground.
Wipe off spilled fuel. Keep dirt and water away
from the fuel.
A leaking fuel tank can cause an explosion. Ensure tight fit of the fuel tank cover, if necessary replace immediately.
Fire protection measures
Familiarise yourself with the location and the operation of fire fighting equipment. Observe all fire reporting and fire fighting possibilities.
Mounting and removing the chip
spreader
1
When mounting or removing the chip spreader do
not step between the chip spreader and the machine while the engine is running.
Park the machine on a level and solid base to
mount or remove the chip spreader and shut down
the engine.
Mount and remove the chip spreader when it is
empty.
Maintenance
Observe the maintenance tasks described in the
operating and maintenance instructions, including
the exchange of parts.
Maintenance work must only be carried out by
qualified and authorized personnel.
For overhead service and assembly work use the
provided access installations or any other safe access ladders and work platforms. Do not use machine parts as access steps.
Keep unauthorized persons away from the machine.
Do not perform maintenance work with the machine driving or the engine running.
Park the machine on horizontal, level and stable
ground.
Pull the key out of the ignition switch.
Lock the articulated joint with the articulation lock.
Working on hydraulic lines
Always depressurize the hydraulic lines before
starting to work on them. Hydraulic oil escaping
under pressure can penetrate the skin and cause
severe injury. If injured by hydraulic oil seek medical advice immediately as otherwise severe infections may result.
When adjusting the hydraulic system do not stand
behind or in front of the drum/wheels.
Do not change the setting of high pressure relief
valves.
Drain hydraulic oil at operating temperature - danger of scalding!
Catch running out hydraulic oil and dispose of environmentally.
Always catch and dispose of biological hydraulic
oils separately.
Do not start the engine after draining off the hydraulic oil.
After finishing work (with the system still depressurized!) check all connections and fittings for leaks.
Changing hydraulic hoses
All hydraulic hoses must be inspected visually at
regular intervals.
Hydraulic hoses must be changed immediately if:
l the outer layer is worn down to the metal lining
(e.g. chafing, cuts, cracks)
l embrittlement of the outer layer (development
of cracks in the hose material)
l deformation under pressurized and depressu-
rized condition, which are not in accordance
with the normal shape of the hydraulic hose
l deformation in bends, e.g., squeezes, kinks,
layer separation, formation of blisters
l leakages.
l non-observance of the installation require-
ments.
l separation of the hydraulic hose from the fit-
ting
l corrosion of the fitting, which impairs the func-
tion and the strength.
l Do not mix up hoses by mistake.
l damage or deformation of the fitting, which im-
pairs the function and strength of the hose/
hose connection.
1 Optional equipment
Page 24

Safety regulations
BOMAG24 BW 100/120/125 AD-4/AC-4
Only genuine BOMAG hydraulic hoses ensure
that the correct type of hose (pressure range) is
used at the right place.
Working on the engine
Shut the engine down before opening the engine
compartment hood.
Drain the engine oil at operating temperature danger of scalding!
Wipe off spilled oil, catch running out oil and dispose of environmentally.
Store used filters and other oily materials in a separate, specially marked container and dispose of
environmentally.
Do not leave any tools or other objects, which
could cause damage, in the engine compartment.
Check and change the coolant only when the engine is cold.
Catch the coolant and dispose of environmentally.
Working on electrical equipment
Before working on electrical equipment disconnect
the battery and cover it with insulating material.
Do not use any fuses with higher Ampere ratings
and do not repair fuses with a piece of wire. Fire
hazard!
Always disconnect the battery before starting to
weld on the machine.
Working on the battery
When working on the battery do not smoke, no
open flames!.
Do not let your hands or clothes come in contact
with acid. In case of injuries caused by acid, flush
off with clear water and consult a doctor.
Metal objects (e.g. tools, rings, wrist watches)
must not contact the battery poles - danger of
short circuit and burns!
When recharging maintenance free batteries remove the plugs to avoid the accumulation of explosive gases.
When using an external battery to start the machine follow the respective instructions.
Dispose of old batteries environmentally.
Switch the charging current off before removing
the charge clamps.
Ensure good ventilation, especially when charging
the battery in a closed room.
Working on the fuel system
Do not inhale fuel fumes.
No open fire, do not smoke, do not spill any fuel.
Catch running out fuel, do not let it seep into the
ground and dispose of environmentally.
Working on wheels and tires
Explosion-like bursting of tires and parts of rims
and tires can cause severe or even deadly injuries.
You should only assemble tires if you have the
necessary experience and with the proper equipment. If necessary have the tires mounted by a
specialised workshop.
Ensure correct tire pressure and do not exceed the
highest specified pressure.
Check tires and wheels every day for pressure
drop, cuts, bulges, damaged rims, missing wheel
studs and nuts. Do not drive with damaged tires or
wheels.
Non-sticking emulsions for tires must only be
made up of a mix of water and a concentrated antistick agent according to the instructions of the
manufacturer. Observe the regulations for the protection of the environment.
Cleaning
Do not clean the machine while the engine is running.
Do not use gasoline or other combustible substances for cleaning purposes.
When using steam cleaning equipment do not
subject electrical components and insulating materials to the direct water jet, but cover them beforehand.
l Do not guide the water jet into the exhaust or
into the air filter.
After maintenance work
Reinstall all protective devices after completing
the maintenance work.
Repair
Mark a defective machine by attaching a warning
tag to the steering wheel.
Repair work must only be performed by qualified
and authorized persons. Use our repair instructions for this work.
Page 25

Safety regulations
BOMAG 25BW 100/120/125 AD-4/AC-4
Exhaust gases are highly dangerous! Always ensure an adequate supply of fresh air when starting
in closed rooms!
Test
The safety of compaction equipment must be
checked by a specialist as required in dependence
on the application and the operating conditions,
however at least once every year.
Information and safety stickers/decals
on the machine
Keep safety stickers in good and legible condition
(see parts manual) and comply with their meaning.
Replace damaged and illegible stickers/decals.
Page 26
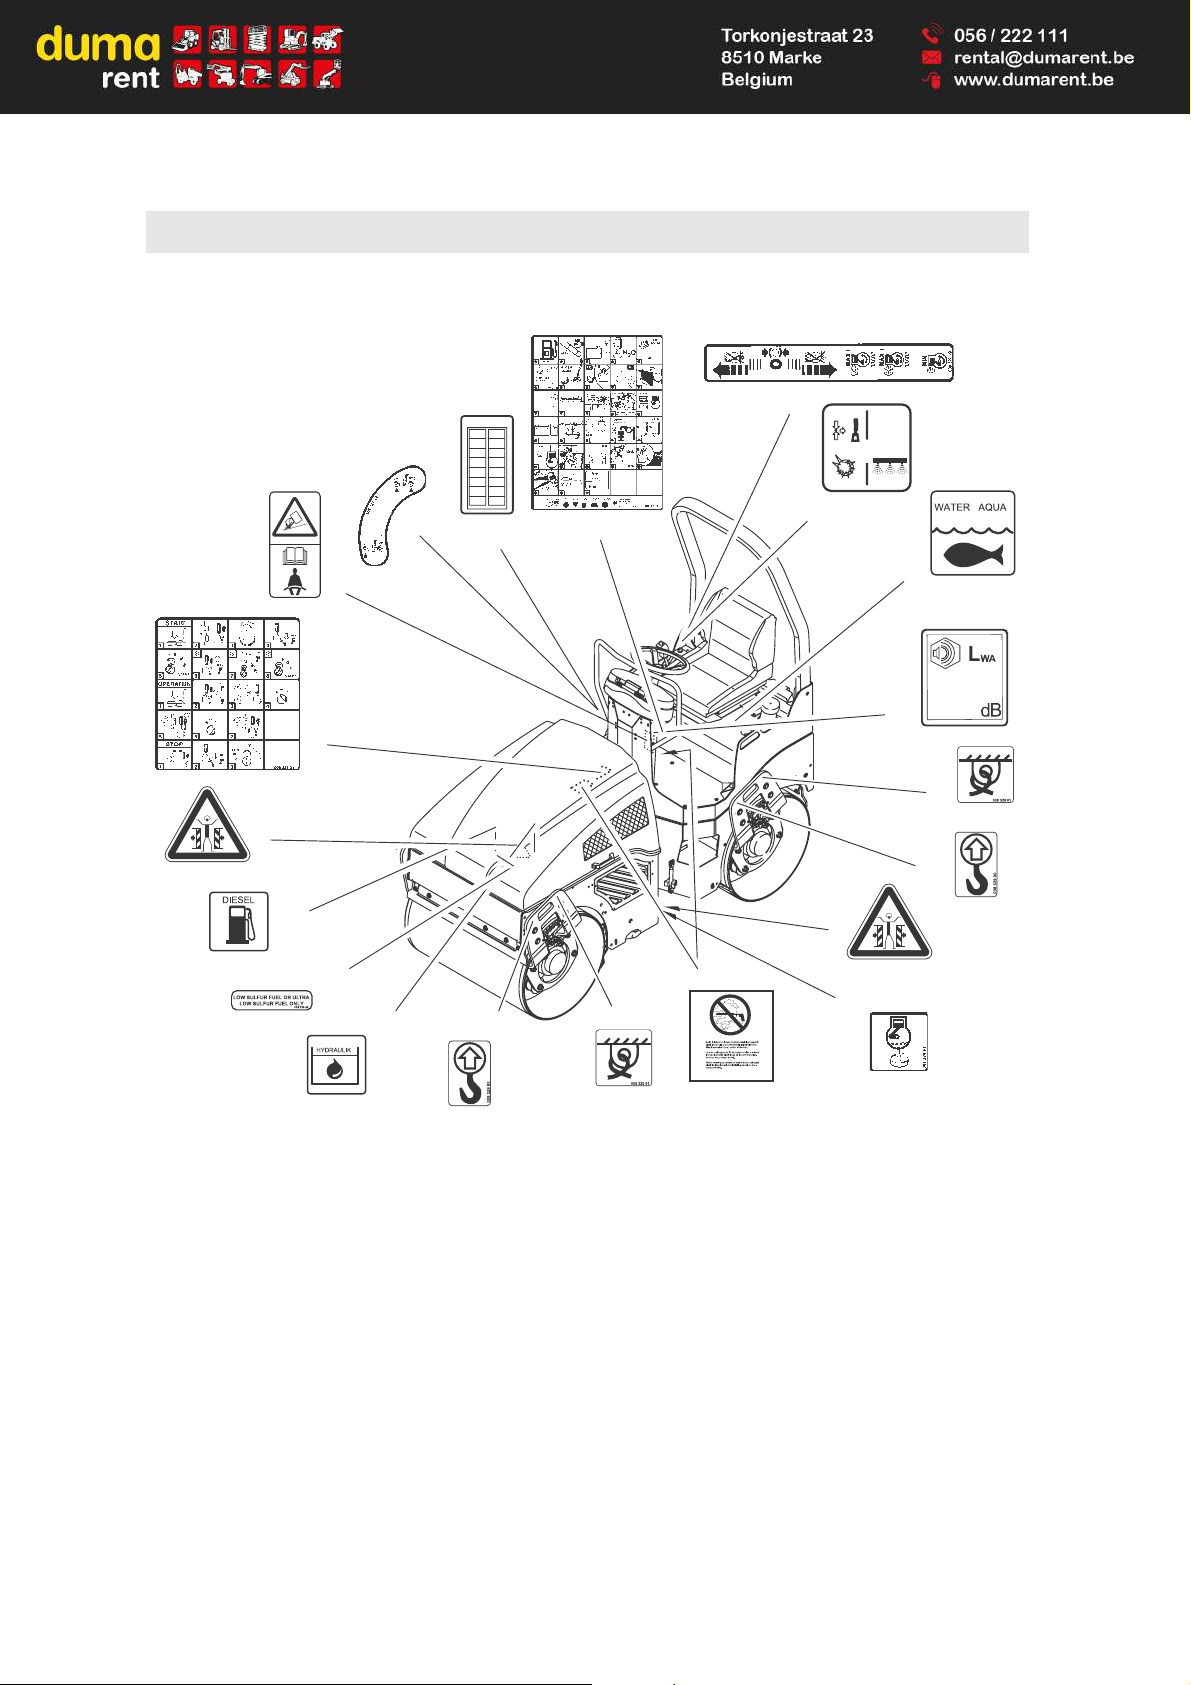
Safety regulations
BOMAG26 BW 100/120/125 AD-4/AC-4
Fig. 7
1 Warning sticker - Danger of crushing
2 Brief operating instructions
3 Warning sticker - Danger of tipping over
1
4 Information sticker - Ball valve vibration
5 Information sticker - Allocation of fuses
6 Maintenance sticker
7 Operation sticker - Travel lever
8 Operation sticker - Water sprinkling system
9 Information sticker - Water
10 Information sticker - Guaranteed sound capac-
ity level
11 Information sticker - Lashing point
12 Information sticker - Lifting point
13 Information sticker - Engine oil drain
14 Prohibition sticker - High pressure cleaner
15 Information sticker - Hydraulic oil
16 Information sticker - Low sulphur fuel
17 Information sticker - Diesel
880113
=
STOP
10
9
15
17
5
4
8
7
14
2
16
3
11
Box B Box A
F 11/15A
F 12/15A
F 08/15A
F 09/15A
F 10/15A
F 07/15A
F 41/10A
F 05/15A
F 68/20A
F 139/30A
F 04/10A
F 119/10A
F 45/10A
F 23/10A
F 48/10A
008 381 06
F 30/10A
1
13
1
6
12
11
12
Stickers and decals BW 100/120/125 AD-4
1 only BW 100 AD-4
Page 27
Safety regulations
BOMAG 27BW 100/120/125 AD-4/AC-4
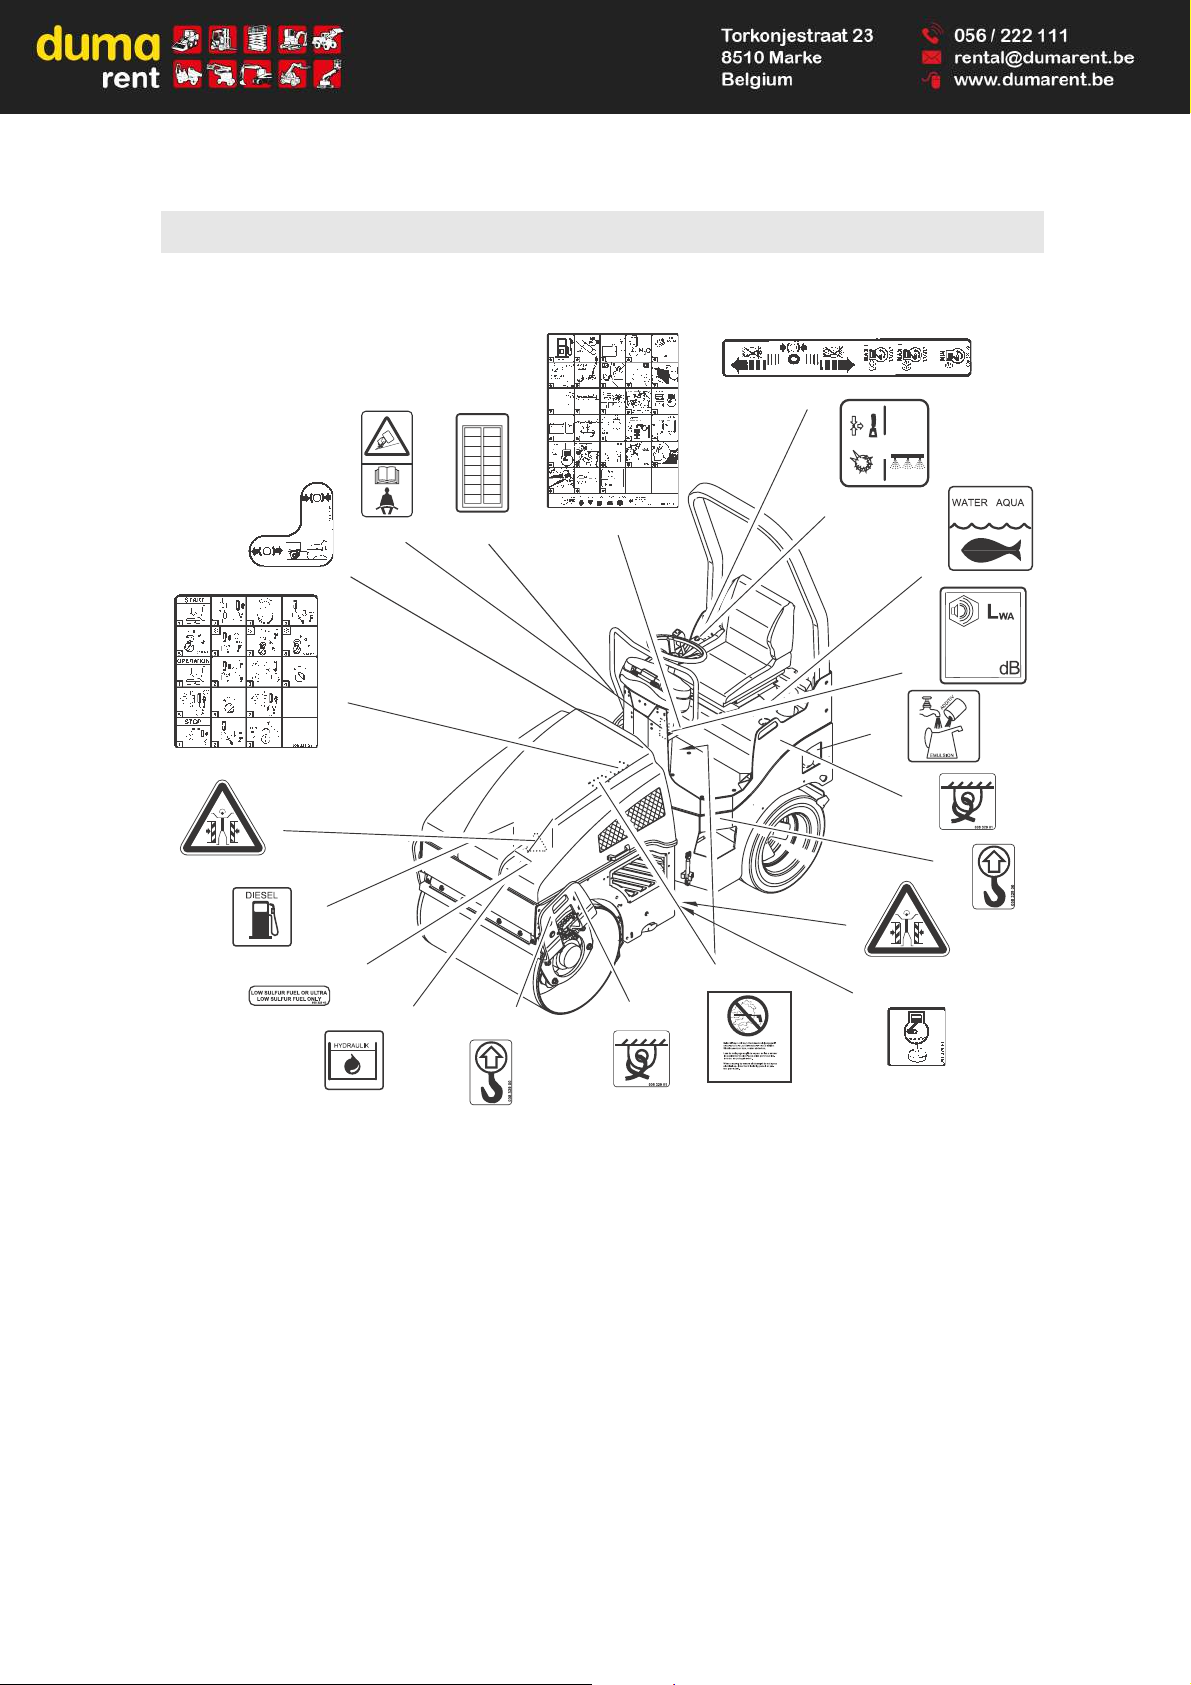
Fig. 8
1 Warning sticker - Danger of crushing
2 Brief operating instructions
3 Operation sticker - Brake releasing device
4 Warning sticker - Danger of tipping over
1
5 Information sticker - Allocation of fuses
6 Maintenance sticker
7 Operation sticker - Travel lever
8 Operation sticker - Water sprinkling system
9 Information sticker - Water
10 Information sticker - Guaranteed sound capac-
ity level
11 Information sticker - Emulsion
12 Information sticker - Lashing point
13 Information sticker - Lifting point
14 Information sticker - Engine oil drain
15 Prohibition sticker - High pressure cleaner
16 Information sticker - Hydraulic oil
17 Information sticker - Low sulphur fuel
18 Information sticker - Diesel
880114
=
STOP
10
9
16
18
5
8
7
15
2
17
11
Box B Box A
F 11/15A
F 12/15A
F 08/15A
F 09/15A
F 10/15A
F 07/15A
F 41/10A
F 05/15A
F 68/20A
F 139/30A
F 04/10A
F 119/10A
F 45/10A
F 23/10A
F 48/10A
008 381 06
F 30/10A
1
14
1
6
12
13
12
13
4
3
Stickers and decals BW 100/120 AC-4
1 only BW 100 AC-4
Page 28
Safety regulations
BOMAG28 BW 100/120/125 AD-4/AC-4
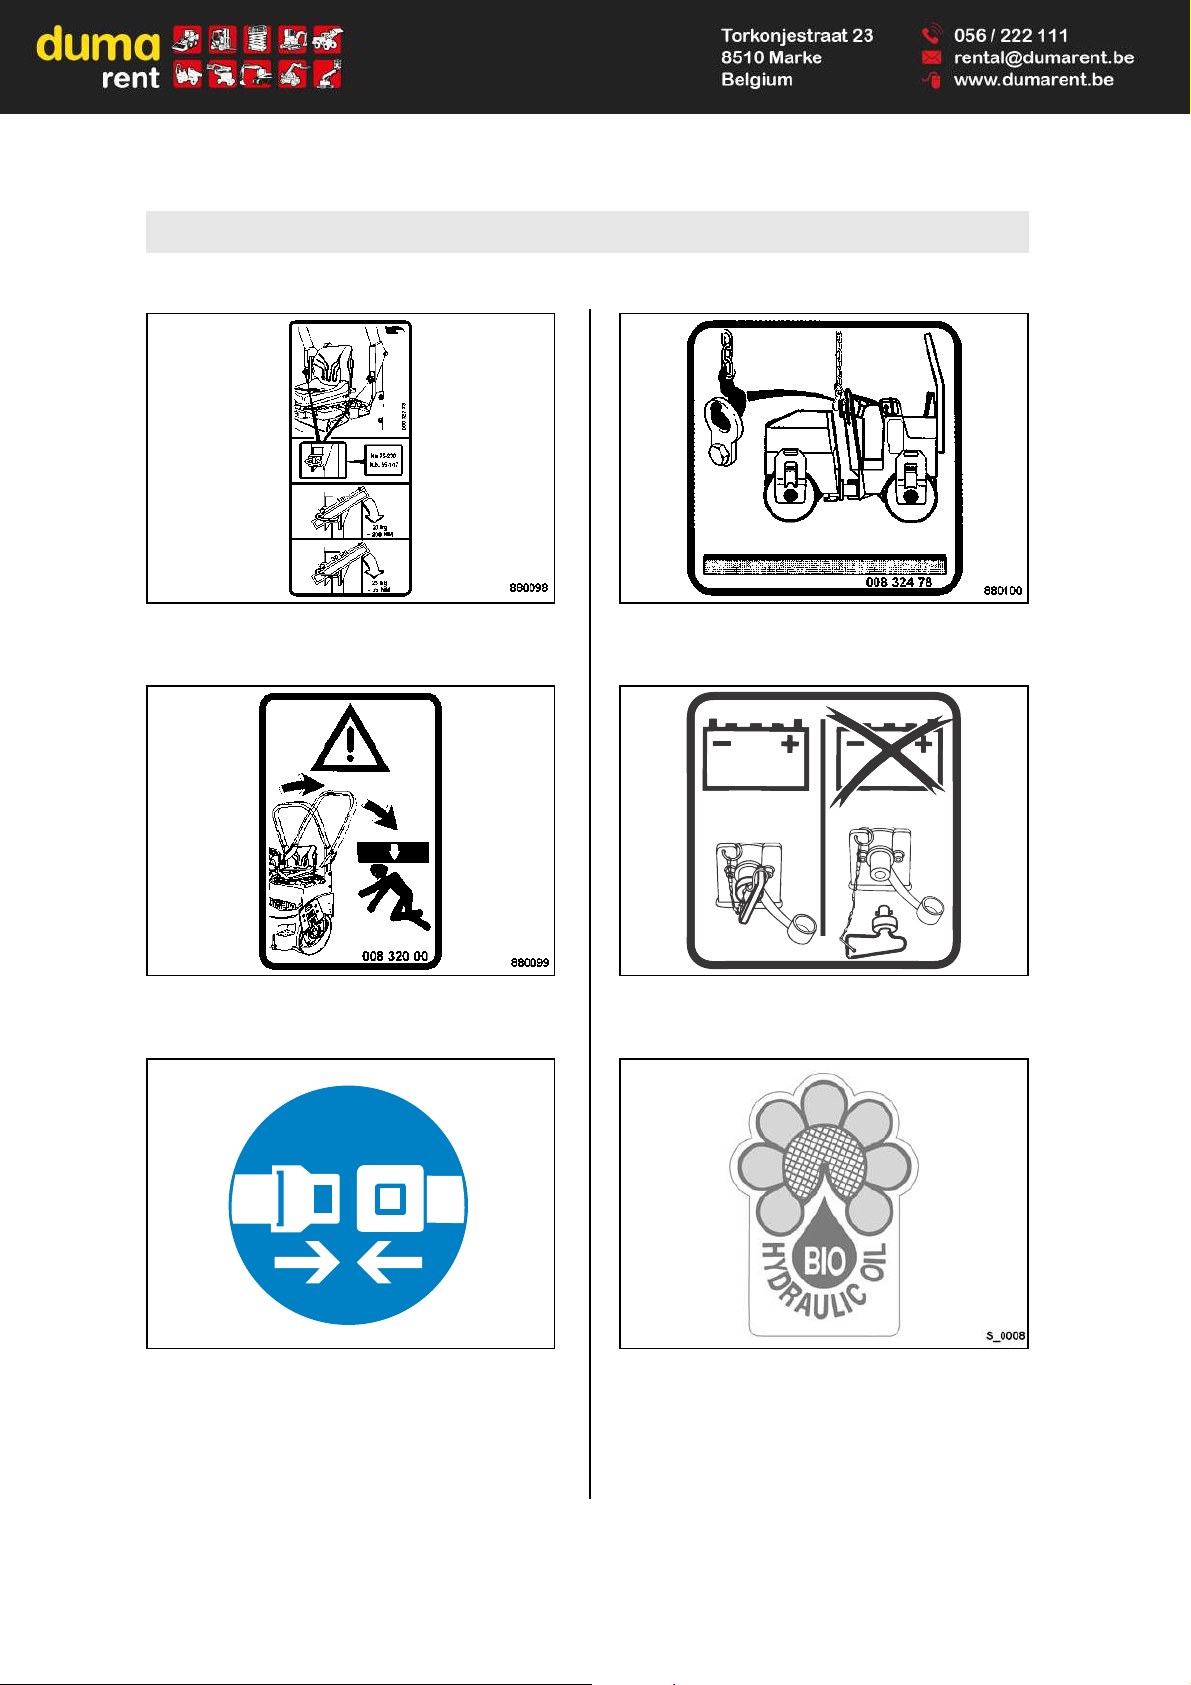
Fig. 9
Operation sticker - Foldable ROPS
1
Fig. 10
Warning sticker - Foldable ROPS
1
Fig. 11
Instruction sticker - Always wear your seat belt
2
Fig. 12
Operation sticker - Central lifting device
3
Fig. 13
Information sticker - Main battery switch
4
Fig. 14
Information sticker - Biodegradable hydraulic oil
5
1 Optional equipment
2 Optional equipment
S_0005
3 Optional equipment
4 Optional equipment
5 Optional equipment
S_0019
Page 29

Safety regulations
BOMAG 29BW 100/120/125 AD-4/AC-4
Fig. 15
Information sticker - Panolin 46
1
Fig. 16
Operation sticker - Edge cutter
2
Fig. 17
Information sticker - Ball valve, vibration 3-stages3
(only AD)
Fig. 18
Operation sticker "Chip spreader"
4
Fig. 19
Warning sticker "Chipping temperature"
5
1 Optional equipment
2 Optional equipment
3 Optional equipment
880122
4 Optional equipment
5 Optional equipment
Page 30

Safety regulations
BOMAG30 BW 100/120/125 AD-4/AC-4
Page 31

BOMAG 31BW 100/120/125 AD-4/AC-4
4 Indicators and Controls
Page 32

Indicators and Controls
BOMAG32 BW 100/120/125 AD-4/AC-4
Fig. 20
Page 33

Indicators and Controls
BOMAG 33BW 100/120/125 AD-4/AC-4
1 Instrument cluster
2 Rotary switch for lighting
1
3 Rotary switch for working lights
1
4 Rotary switch for seat heating
1
5 Rotary switch for flashing beacon
1
6 Rotary switch for hazard light system
1
7 Rotary switch for vibration, manual or
automatic
1
8 Emergency stop push button
9 Push button for warning horn
10 Rotary switch for direction indicators
1
11 Rotary switch for gravity feed sprinkling sys-
tem
12 Interval switch for pressure sprinkling system
1
13 Fuse box
14 Start switch
15 Ball valve, vibration (only AD)
16 Push button for manual vibration
17 Travel lever
18 Throttle lever
19 Rotary switch for edge cutter
1
20 Water level gauge
21 Foot switch for rubber tire sprinkling system
(only AC) or foot switch for flow divider (only
AD)
1
1 Optional equipment
Page 34
Indicators and Controls
BOMAG34 BW 100/120/125 AD-4/AC-4
4.1 General notes
If you are not yet familiar with the control and display elements on this machine you should read
this section thoroughly before starting any operation on the machine. Here all functions are described in detail.
The section "Operation" contains only brief descriptions of the individual control steps.
4.2 Description of indicators
and control elements
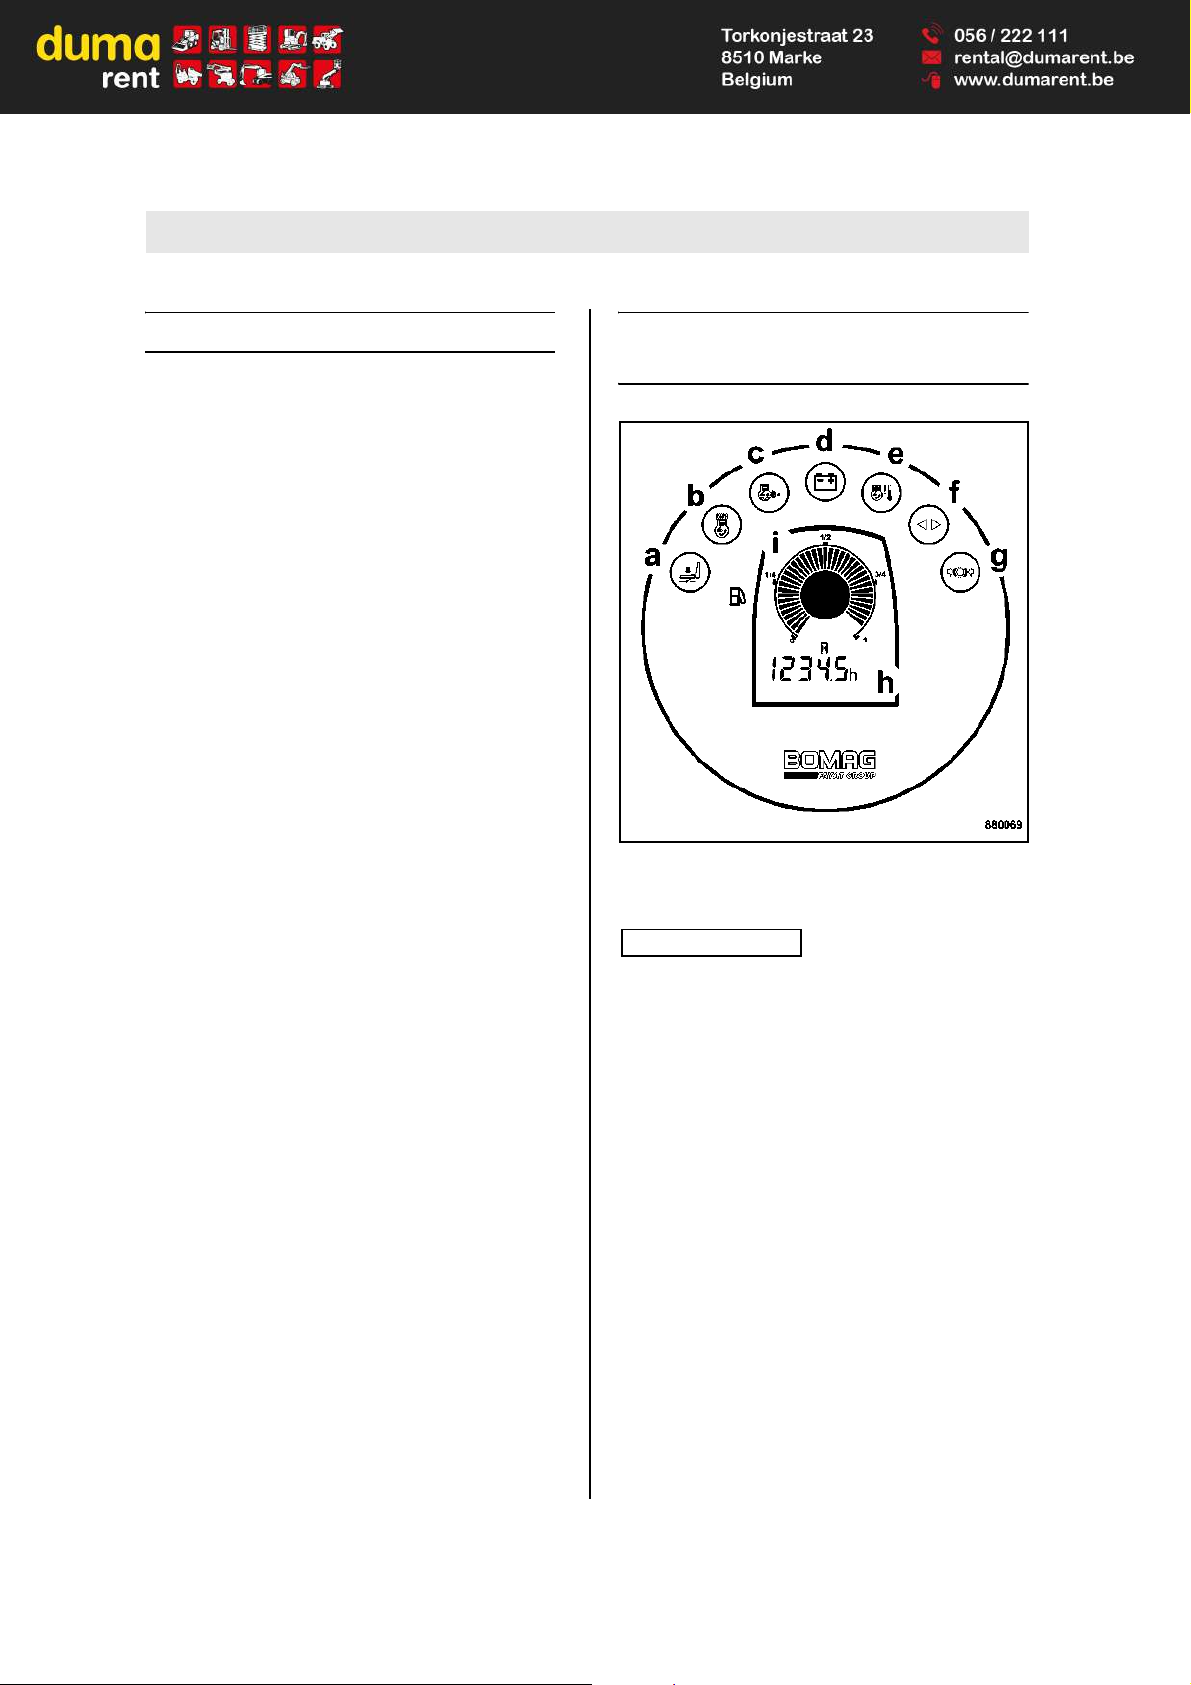
Fig. 21
No. 1 = Instrument cluster
Note
i
With the ignition switch in position "I" all gauges
and instruments are switched on for a moment.
a yellow = Warning light for seat contact moni-
toring while machine is travelling
warning buzzer sounds, engine is
shut down after 4 seconds.
= Warning light for seat contact moni-
toring with machine at rest
engine is shut down when travel lever
is moved out of "0"-position.
b yellow = Preheating control light
Lights in ignition switch position "II"
Preheating for starting at low temperatures
c red = Engine oil pressure warning light
flashes when the engine oil pressure
is too low, the warning buzzer
sounds, the engine is shut down after
10 seconds.
Page 35
Indicators and Controls
BOMAG 35BW 100/120/125 AD-4/AC-4
Check engine oil level, repair the engine if necessary.
d yellow = Charge control lamp
Lights if the battery is not being
charged.
Check the V-belt, if necessary repair
the generator.
e red = Engine temperature warning light
Flashes when the engine overheats
(110°C), the warning buzzer sounds.
Switch off vibration, run engine with
idle speed or shut down engine if
necessary, clean engine oil cooler
and radiator, if necessary repair engine.
f green = Indicator control light
g red = Parking brake warning light
Lights when the parking brake is applied
h = Operating hour meter
Counts the operating hours while the
engine is running.
Maintenance work is to be carried out
in accordance with the indicated operating hours.
i = Fuel level gauge
Fig. 22
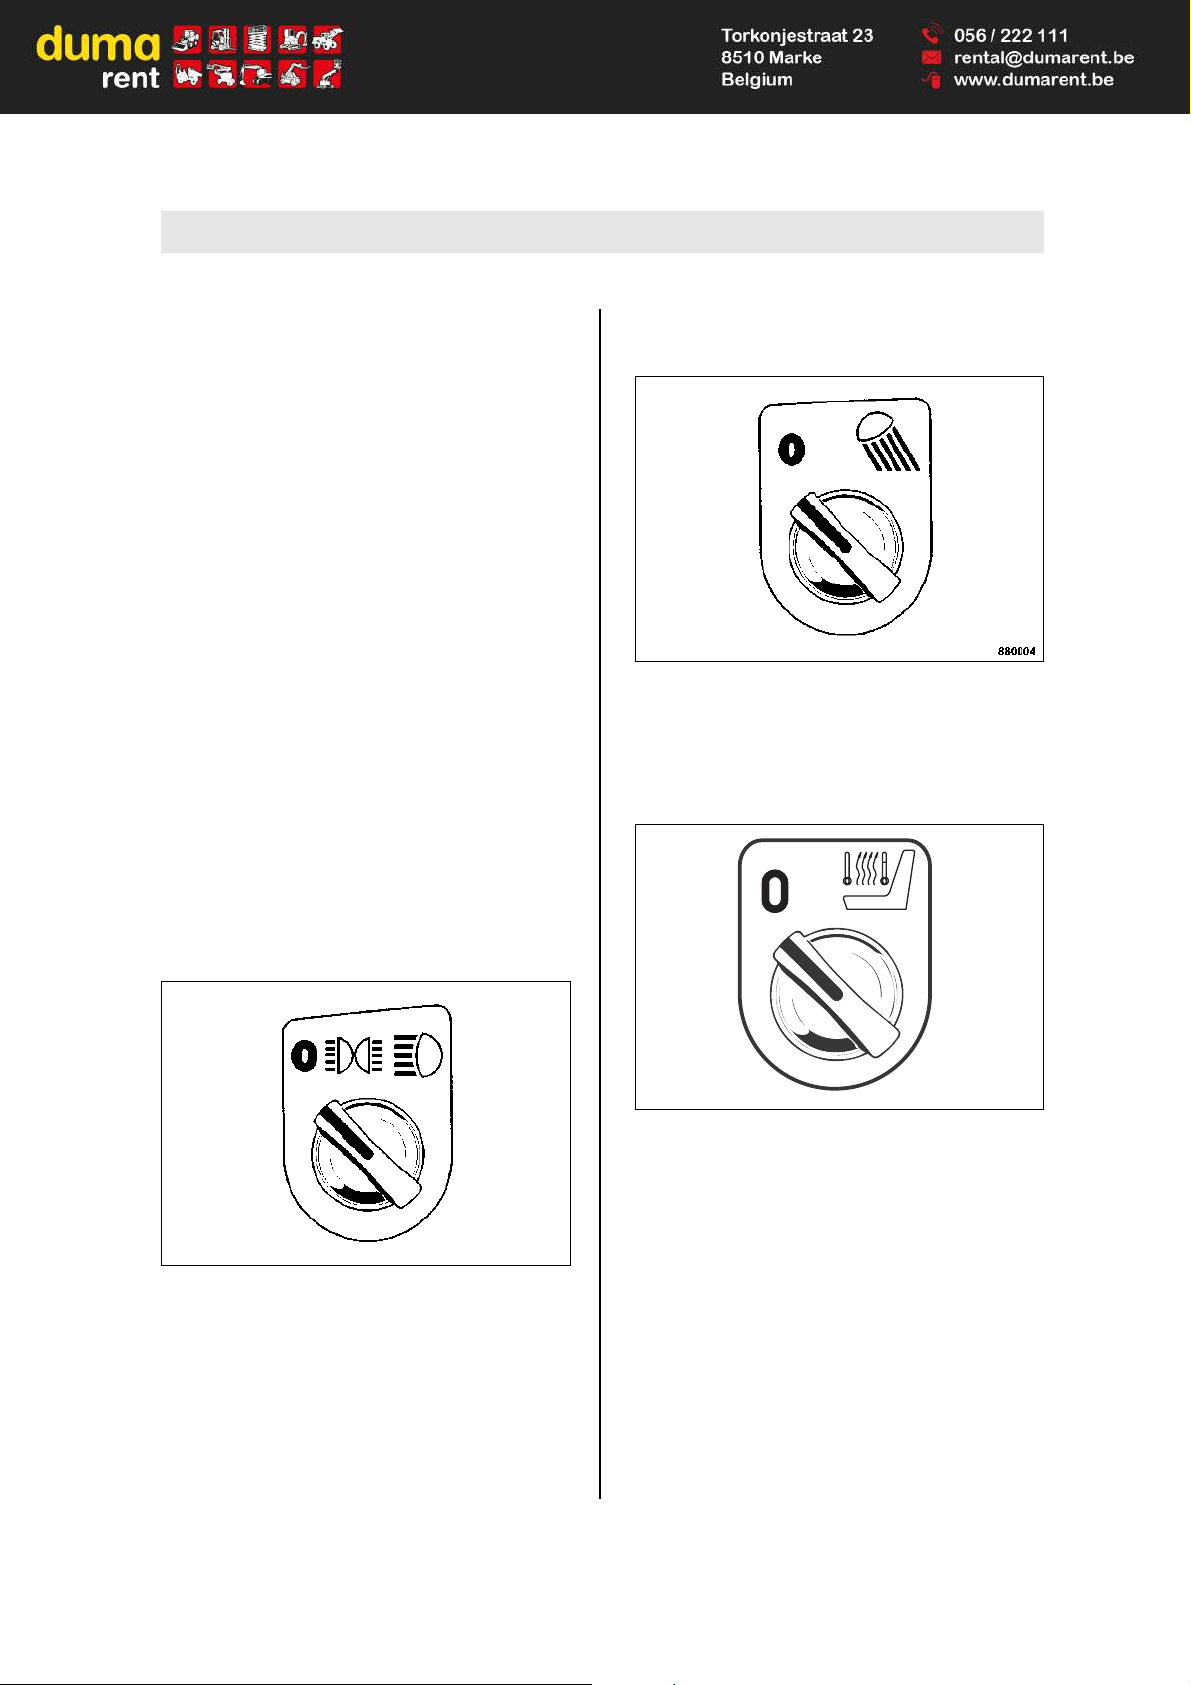
No. 2 = Rotary switch for lighting
1
Position "left" = Light off
Position "middle" = Side light on, with ignition
switch in position "I"
Position "right" = Travel light on, with ignition
switch in position "I".
Fig. 23
No. 3 = Rotary switch for working light
2
Position "left" = Working light off
Position "right" = Working light on, with ignition
switch in position "I"
Fig. 24
No. 4 = Rotary switch for seat heating
3
Position Left = Seat heating off
Position Right = Seat heating on
1 Optional equipment
2 Optional equipment
3 Optional equipment
880111
Page 36
Indicators and Controls
BOMAG36 BW 100/120/125 AD-4/AC-4
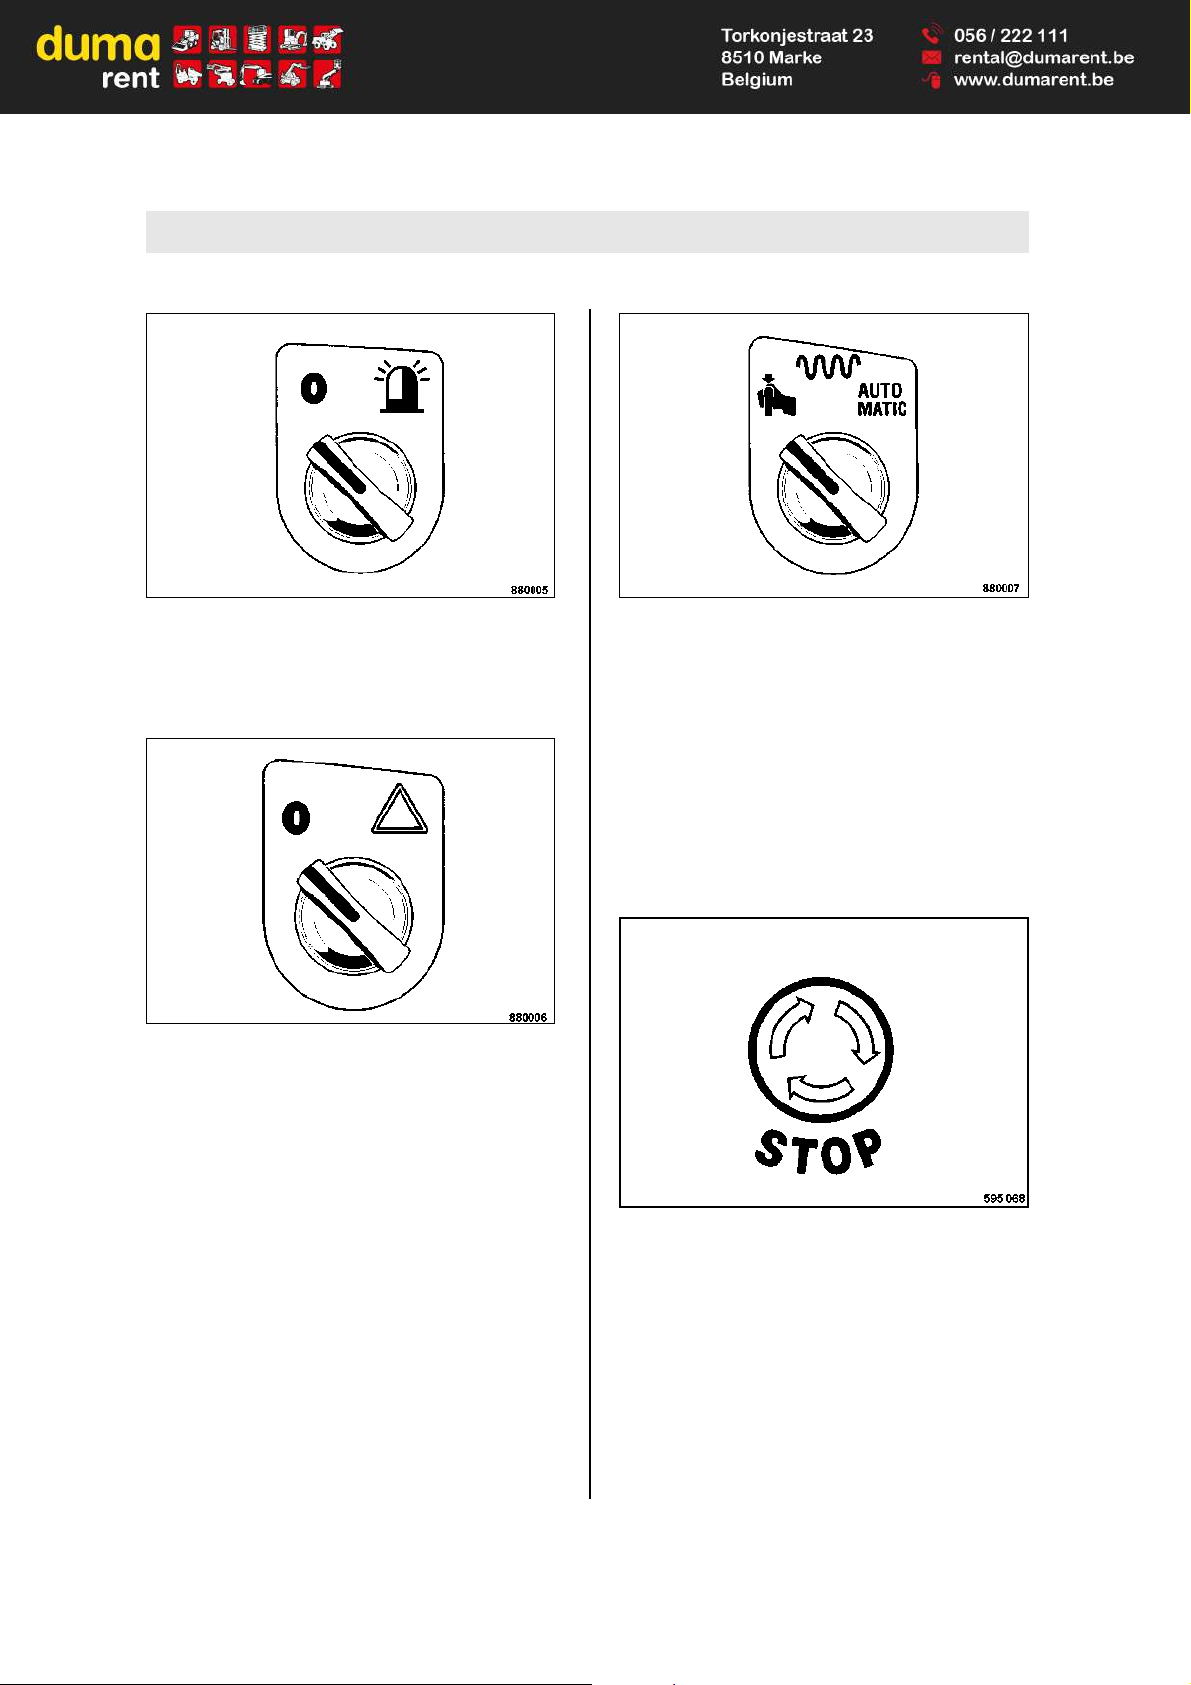
Fig. 25
No. 5 = Rotary switch for flashing beacon
1
Position "left" = Flashing beacon off
Position "right" = Flashing beacon on
Fig. 26
No. 6 = Rotary switch for hazard light sys-
tem
2
Position "left" = Hazard light system switched
off
Position "right" = Hazard light system switched
on. Warning lights in switch
and indicator control light in
the instrument cluster start
flashing.
Fig. 27
No. 7 = Rotary switch for vibration, manual or
automatic
3
Position "left" = Pre-selection for vibration acti-
vation during travel via the vibration push button in the
travel lever
Position "right" = Pre-selection for automatic ac-
tivation and deactivation of vibration when exceeding or
falling below a certain slow
travel speed.
Fig. 28
No. 8 = Emergency stop push button
1 Optional equipment
2 Optional equipment
3 Optional equipment
Page 37
Indicators and Controls
BOMAG 37BW 100/120/125 AD-4/AC-4
Danger
!
Danger of accident!
Use only in events of emergency during operation.
Do not use as parking brake.
Restart the machine only after the danger that
caused the actuation of the emergency stop
switch has been eliminated.
The machine is braked immediately, the engine
is shut down.
actuate = press the button completely
down, it automatically locks in
fully pressed position.
switch off/unlock = Turn button clockwise. Re-
start the engine.
Fig. 29
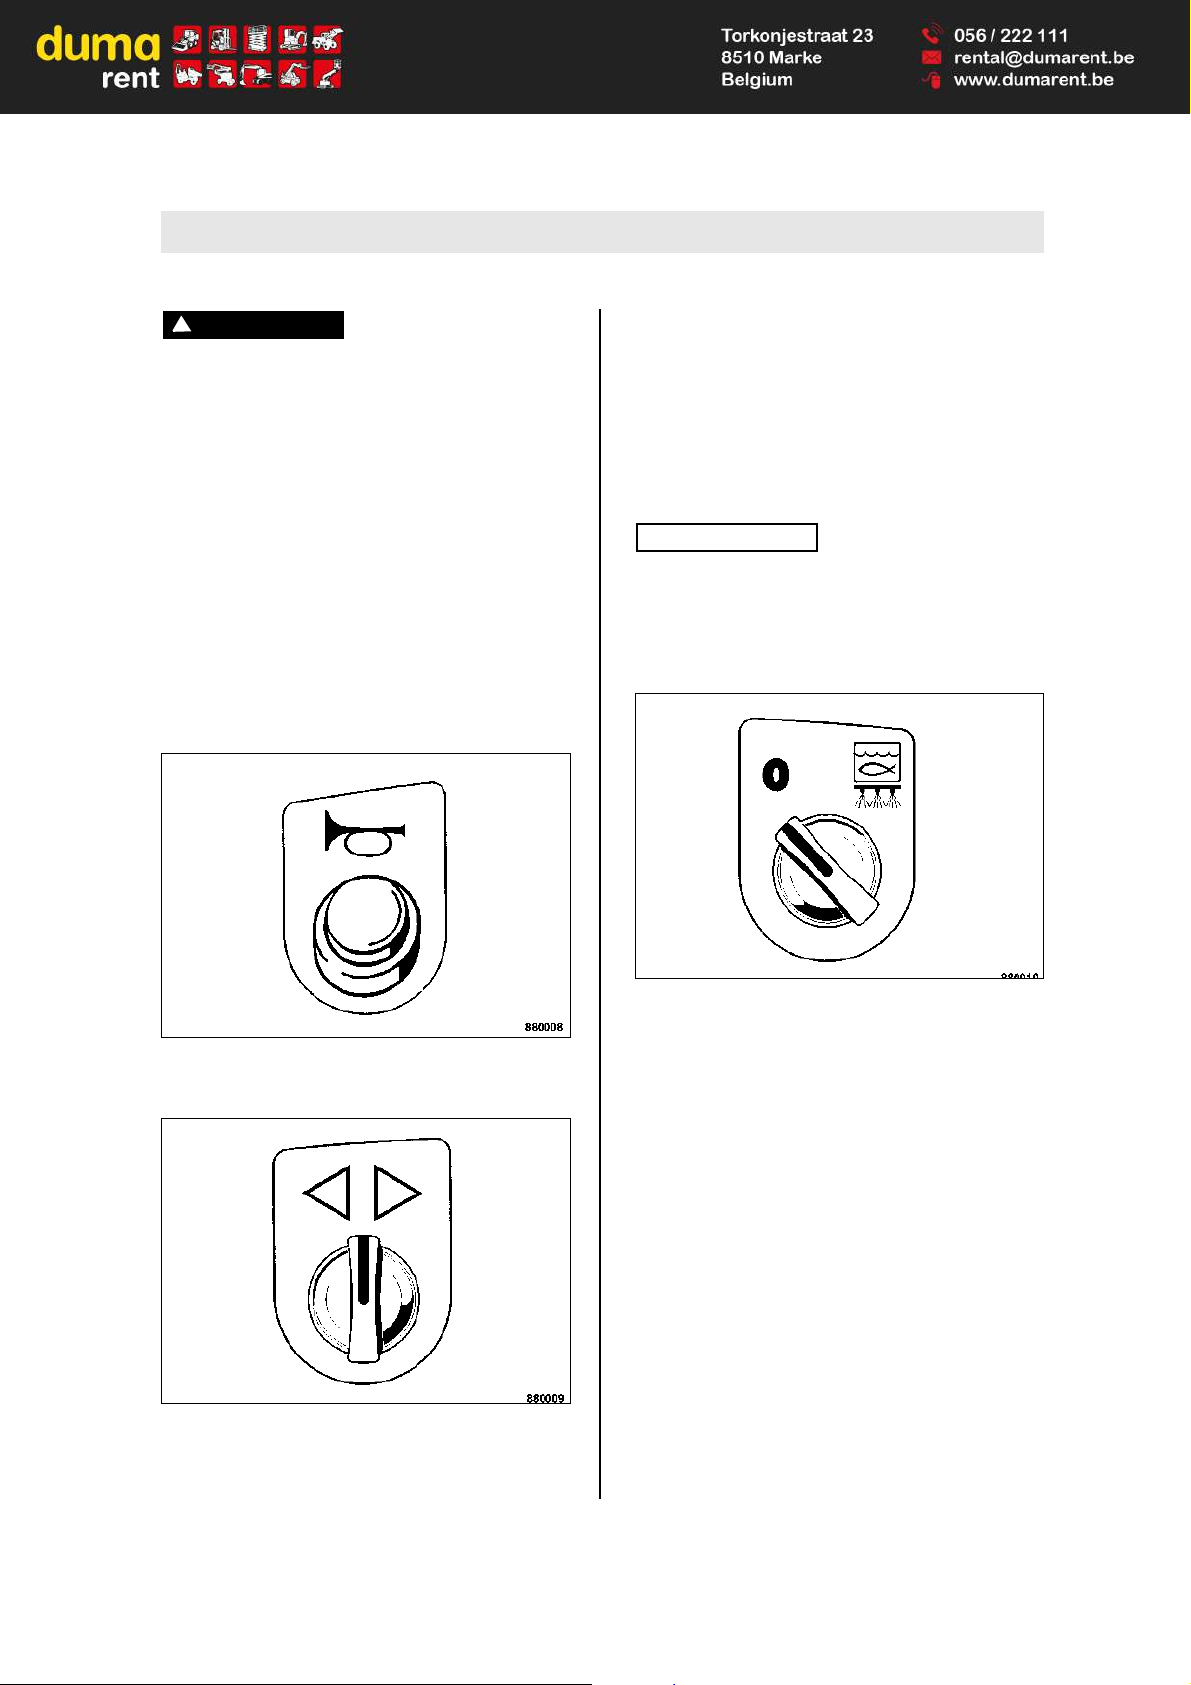
No. 9 = Push button for warning horn
Fig. 30
No. 10 = Rotary switch for direction indica-
tors
1
Position "middle" = Direction indicators disabled.
Position "left or
right" = Front and rear direction indica-
tors on the corresponding side
are flashing. Indicator control
light in instrument cluster
flashes.
Note
i
If the cable to the chip spreader is plugged in, the
green control light in the rotary switch will also
flash as a function control. If the control light does
not flash, one of the indicators on the vehicle or on
the chip spreader is defective.
Fig. 31
No. 11 = Rotary switch for gravity feed sprin-
kling system
Position "left" = Gravity sprinkling system
switched off
Position "right" = Gravity sprinkling system
switched on
1 Optional equipment
Page 38

Indicators and Controls
BOMAG38 BW 100/120/125 AD-4/AC-4
Fig. 32
No. 12 = Interval switch for pressure sprinkler
system
Position 0 = Interval and pressure sprin-
kling system switched off.
Position 11 = Permanent sprinkling and
function test.
further positions = various sprinkling intervals.
Fig. 33
No. 13 = Fuses
Danger
!
Fire hazard!
Do not use fuses with higher ampere ratings
and do not repair fuses with a piece of wire.
Fuse box A
(1) 20A = (F68) Potential 30
(2) 30A = (F139) Engine solenoid
(3) 10A = (F04) Gauges
(4) 10A = (F119) Engine
(5) 10A = (F30) Seat heating
1
(6) 10A = (F45) Edge cutter
1
(7) 10A = (F23) Warning horn
(8) 10A = (F48) pre-heating system
Fuse box B
(1) 15A = (F11) Head lights, left
1
(2) 15A = (F12) head lights, right
1
(3) 15A = (F08) Direction indicators1 and work-
ing head lights
(4) 15A = (F09) Parking and tail light, left
1
(5) 15A = (F10) Parking and tail light, right
1
(6) 15A = (F07) Hazard light
1
(7) 10A = (F41) Flashing beacon
1
(8) 15A = (F05) Socket
1
Fig. 34
Main fuse for battery
80A = F 00
Box B Box A
F 11/15A
F 12/15A
F 08/15A
F 09/15A
F 10/15A
F 07/15A
F 41/10A
F 05/15A
F 68/20A
F 139/30A
F 04/10A
F 119/10A
F 45/10A
F 23/10A
F 48/10A
008 381 06
F 30/10A
880117
1 Optional equipment
Page 39
Indicators and Controls
BOMAG 39BW 100/120/125 AD-4/AC-4
Fig. 35
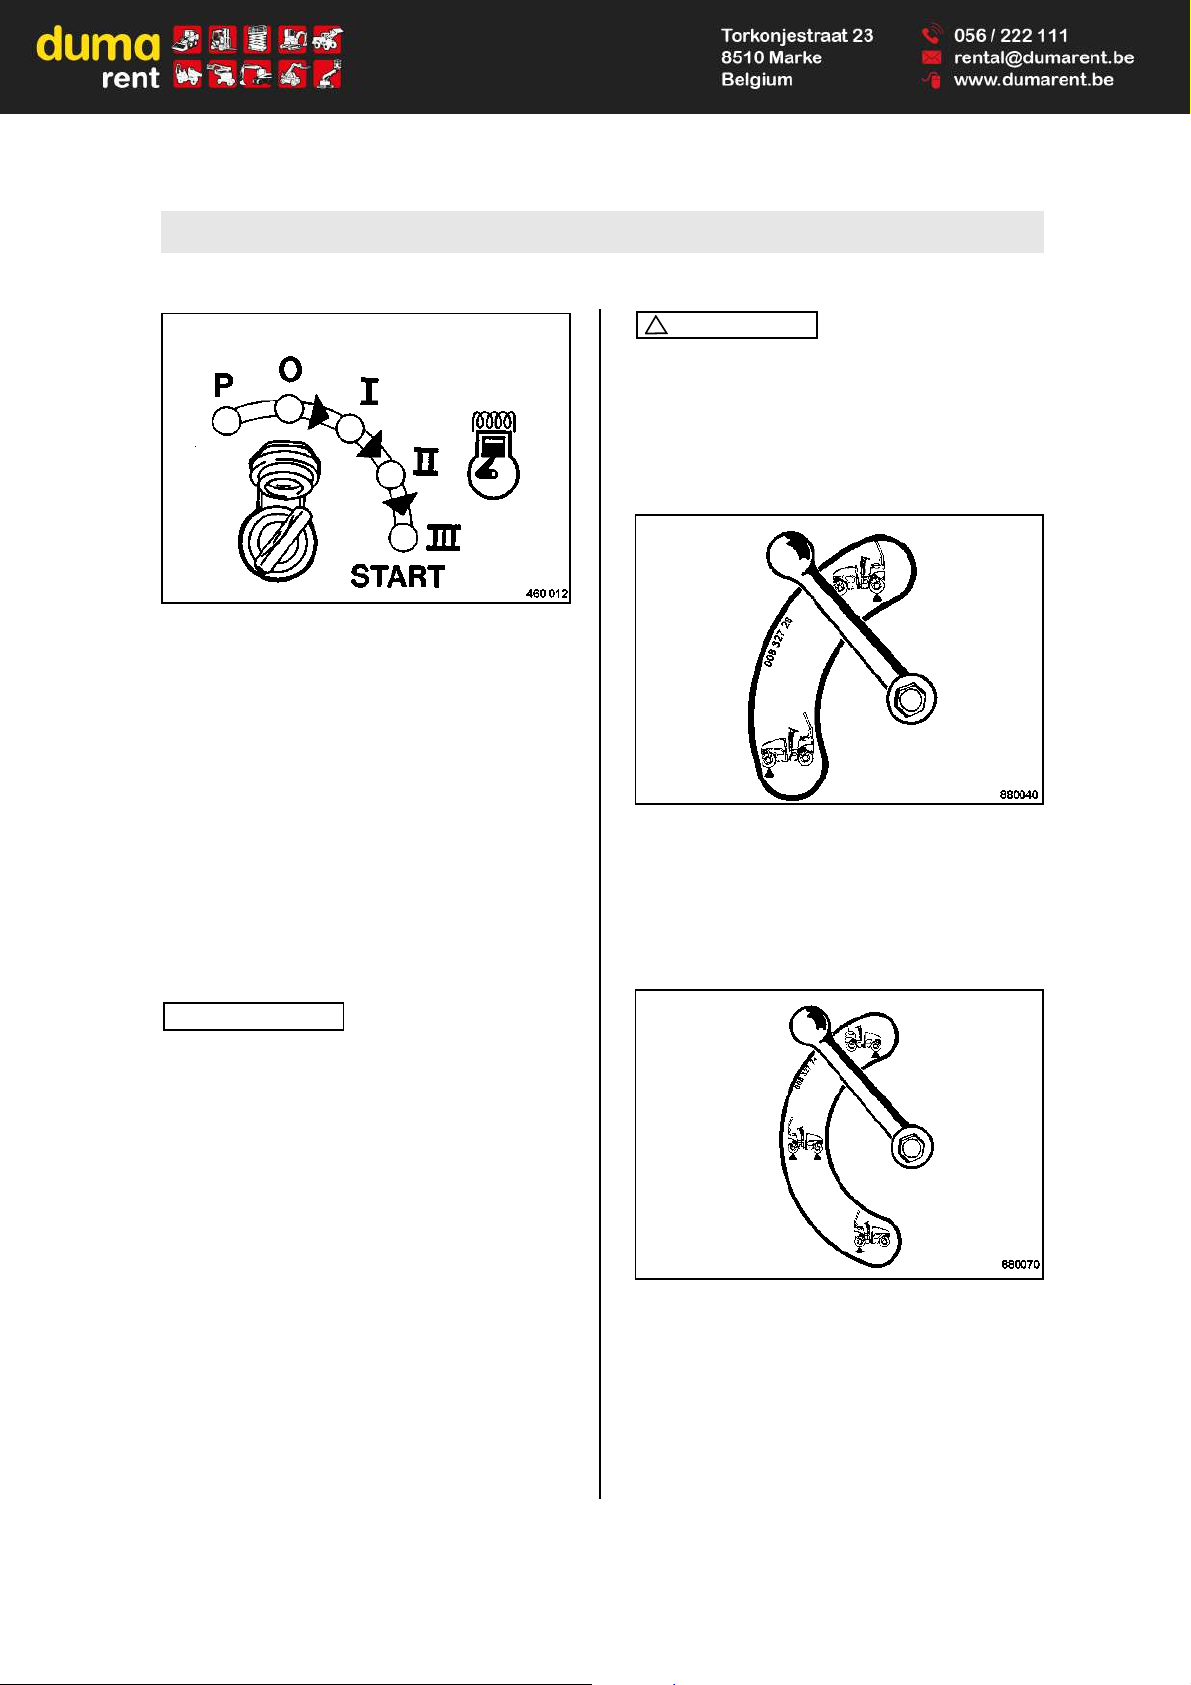
No. 14 = Start switch
Position "P"/"0" = Ignition off, key can be pulled
out
Position "I" = Ignition on, all warning and
control lights in the instrument
cluster light up for a moment
*test function(, the lighting
szstem can be switched on.
Position "II" = Pre-heating position, at tem-
peratures below +10 °C, hold
the ignition key in position "II"
for up to 30 seconds, the preheating control light in the instrument cluster lights.
Note
i
The engine can only be started if the travel lever is
in braking position and the emergency stop switch
is unlocked.
The starter switch is designed with a re-start lock.
For a new starting attempt the ignition key must
first be turned back to position "0".
Position "III" = Turn further against spring
pressure, the engine starts,
turn the ignition key back to
position "I" once the engine
has started.
Caution
!
Run the engine warm for a short while before
starting work. Do not rev up a cold engine to
high idle speed/full load speed.
Do not shut down the engine all of a sudden
from full load speed, but let it idle for about 2
minutes.
Fig. 36
No. 15 = Ball valve, vibration (only AD)
Position upward = Vibration of both drums
Position downward = Vibration of front drum only
Fig. 37
Ball valve, vibration 3-stages1 (only AD)
Position upward = Vibration of front drum only
Position horizontal = Vibration of both drums
1 Optional equipment
Page 40

Indicators and Controls
BOMAG40 BW 100/120/125 AD-4/AC-4
Position downward = Vibration of rear drum only
Fig. 38
No. 16 = Push button vibration
press = to switch the vibration on and
off.
Fig. 39
No. 17 = Travel lever
Position "0" = Neutral position for engine
start, brake closed.
Position "I" = Forward travel without vibra-
tion
Position "II" = Reverse travel without vibra-
tion
Position "III" = Max. forward/reverse travel
with vibration
Fig. 40
No. 18 = Throttle lever
Position
"MAX II" = Full load position 2500 rpm,
operating position for driving
and vibration.
Position
"MAX I" = Full load position 2400 rpm,
operating position for driving
and vibration.
Position "MIN" = Idle speed position
Fig. 41
No. 19 = Rotary push button for edge cutter
1
Position "middle" = Edge cutter stops at the pres-
ently reached position
Position "left" = Edged cutter is raised.
Position "right" = Edged cutter is lowered.
1 Optional equipment
Page 41
Indicators and Controls
BOMAG 41BW 100/120/125 AD-4/AC-4
Fig. 42
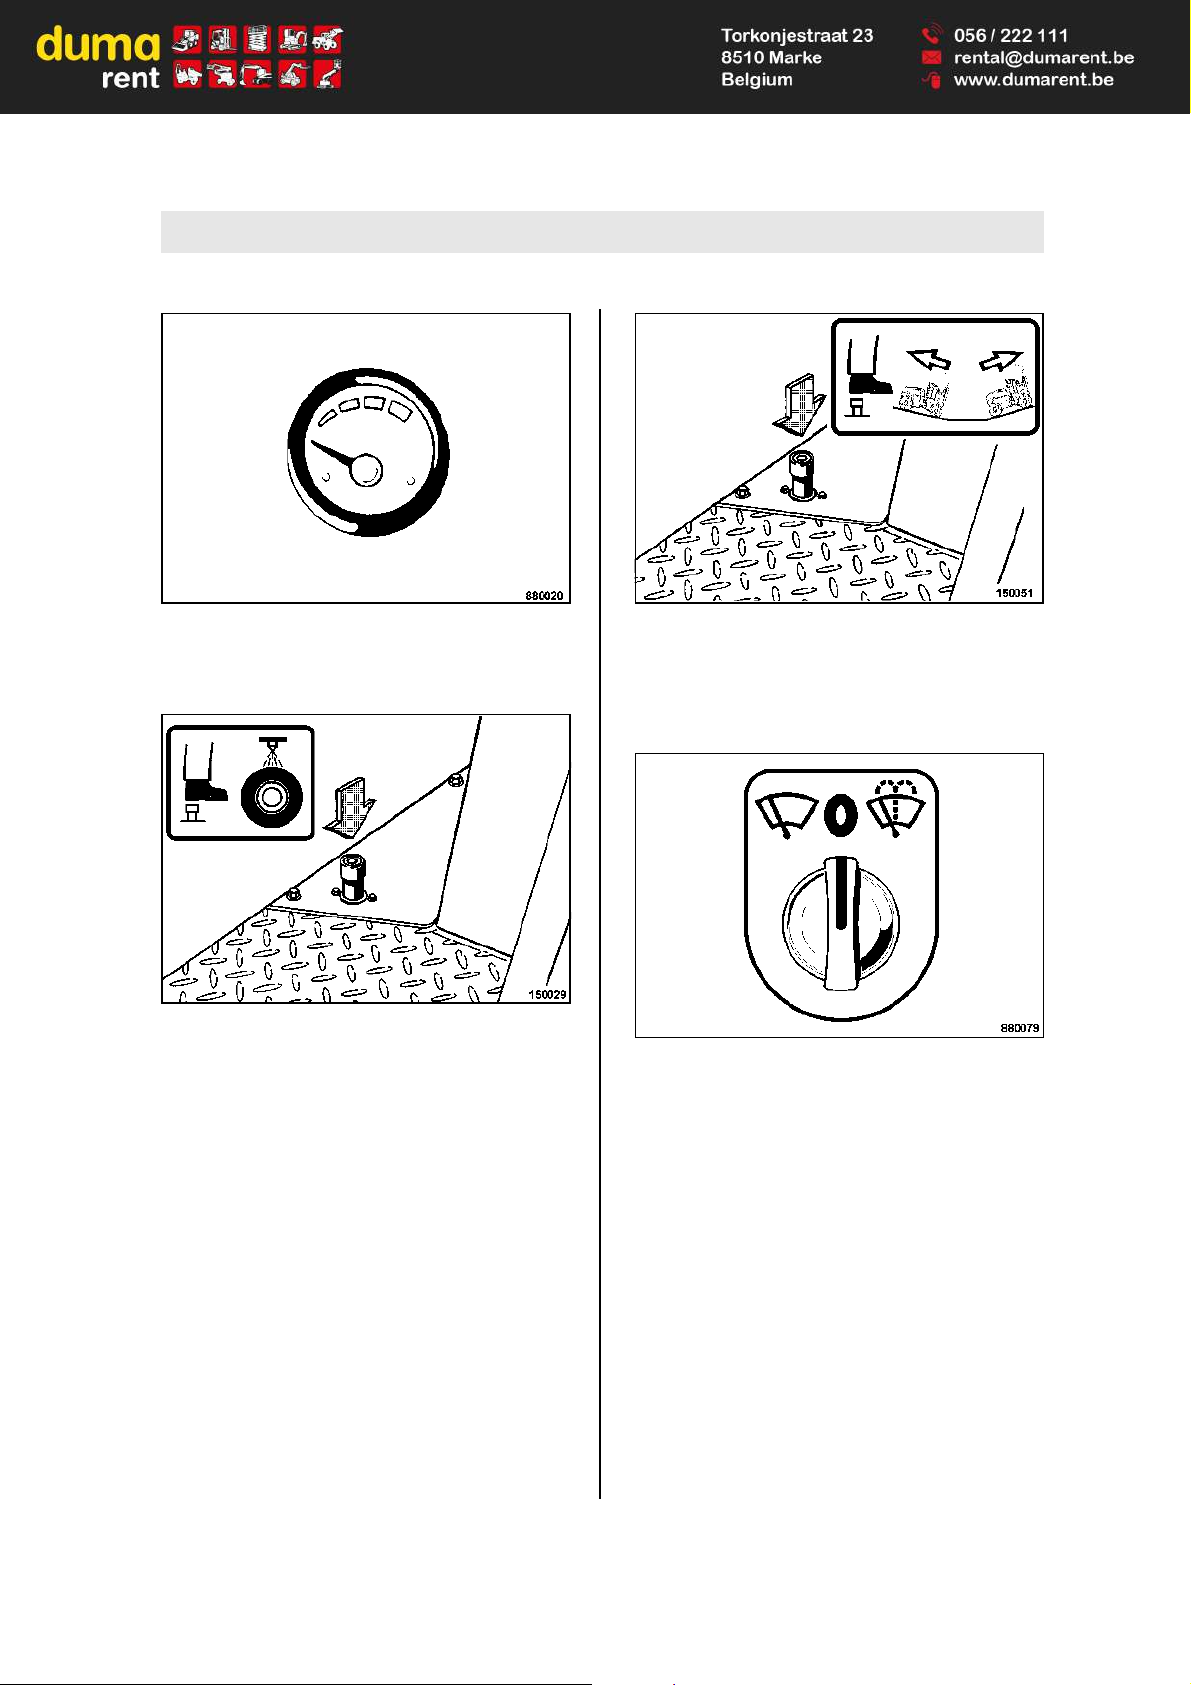
No. 20 = Water level gauge
shows the water level inside the water tank.
Fig. 43
No. 21 = Foot switch for tire sprinkler system
(only AC)
press = Sprinkler system switched on
release = Sprinkler system switched off
Fig. 44
Foot switch for flow divider1 (only AD)
press = flow divider switched on
release = flow divider switched off
Fig. 45
No. 22 = Rotary switch/button for windscreen
wiper/washer
2
Position "left" = The windscreen wiper is
switched on
Position "middle" = The windscreen wiper is
switched off
Position "right"
(button) = The windscreen wiper/washer
is switched on
1 Optional equipment
2 Optional equipment
Page 42

Indicators and Controls
BOMAG42 BW 100/120/125 AD-4/AC-4
Fig. 46
No. 23 = Ball valve, brake releasing device (on-
ly AC)
Danger
!
Danger of accident!
Always secure the ball valve of the brake releasing feature with the locking screw when
closed.
Before releasing the parking brake secure the
machine against unintended rolling by using
appropriate means (e.g. metal wheel chocks).
Strictly follow the description and the safety
instructions in chapter "Towing".
Position "I" = Brake applied
Position "II" = Brake released
Note
i
Release the brake by turning the steering wheel in
clockwise direction.
Fig. 47
No. 24 = Main battery switch
1
Note
i
The main battery switch is located inside the battery compartment.
Position "I" (90°
up) = Disconnects the batteries from
the vehicle electrics in case of
burning cables and fire in the
engine compartment, protection against unauthorized use,
during welding work on the
machine. Can be removed.
Position "II" (horizontal) = Operating position, engine can
be started.
Fig. 48
No. 25 = Ball valve for chip spreader
2
I
II
880120
1 Optional equipment
2 Optional equipment
I
II
880119
Page 43
Indicators and Controls
BOMAG 43BW 100/120/125 AD-4/AC-4
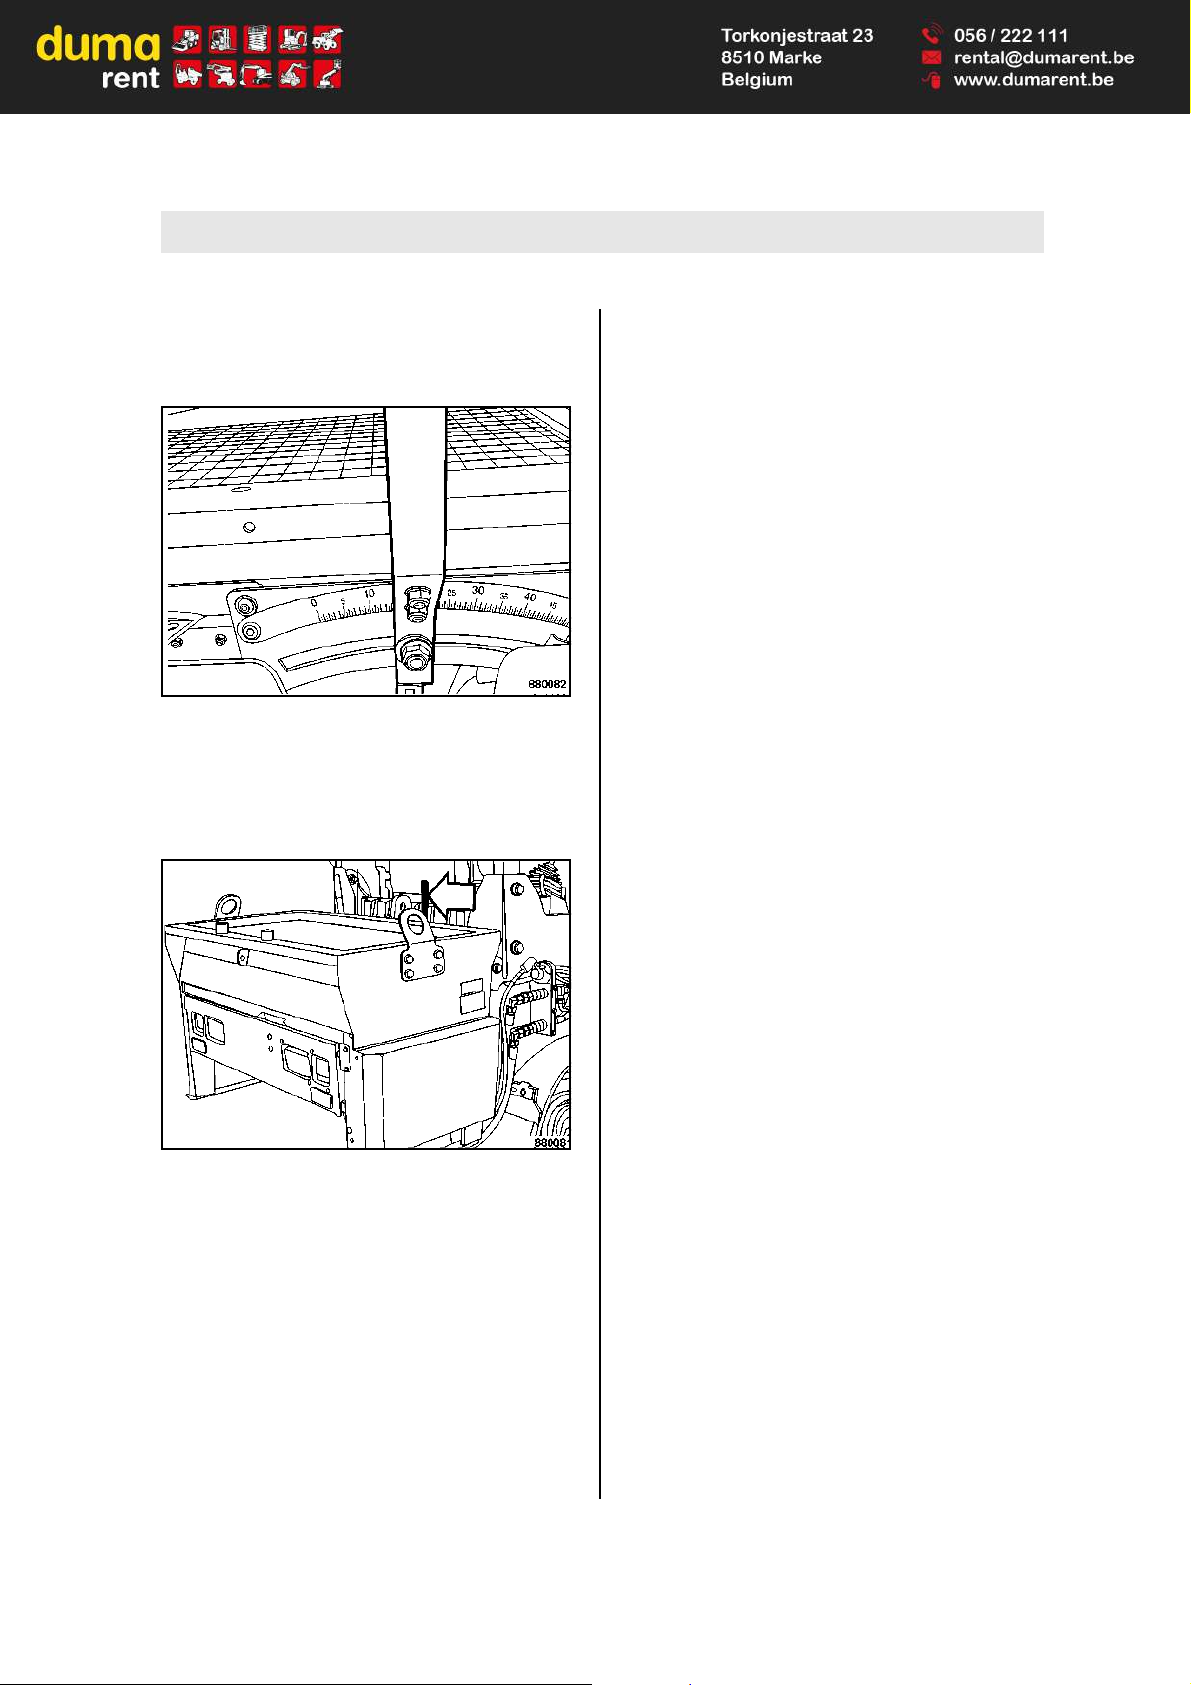
Position "I" = Pre-selection vibration, rear
drum
Position "II" = Pre-selection chip spreader
Fig. 49
No. 26 = Adjustment lever for chip quantity
1
to the left = lower chip quantity
towards the
right = higher chip quantity
Fig. 50
No. 27 = Lever to slide the chip spreader
2
to the left = The chip spreader slides to the
left
to the right = The chip spreader slides to the
right
1 Optional equipment
2 Optional equipment
Page 44

Indicators and Controls
BOMAG44 BW 100/120/125 AD-4/AC-4
Page 45

BOMAG 45BW 100/120/125 AD-4/AC-4
5Operation
Page 46
Operation
BOMAG46 BW 100/120/125 AD-4/AC-4
5.1 General
If you are not yet acquainted with the controls
and indicating elements on this machine you
should thoroughly read chapter "Indicators
and control elements" before starting work.
All indicators and control elements are described in detail in this chapter.
5.2 Tests before taking into operation
Before the everyday use or before a longer working period the following tests and inspections must
be performed.
Danger
!
Please observe strictly the safety regulations
in the corresponding section of this instruction manual!
l Park the machine on ground as level as possi-
ble.
Check:
l fuel tank and fuel lines for leaks
l Screw connections
l function of steering
l function of emergency stop
l function of parking brake
l machine for cleanliness, damage
l presence of the appropriate operating and
maintenance instructions
l proper maintenance of the machine
Note
i
For a description of the following tasks refer to the
chapter "maintenance every 10 operating hours".
l Engine oil level, top up if necessary
l Fuel level, top up if necessary.
l Hydraulic oil level, top up if necessary.
l Coolant level, top up if necessary
l Dry air filter service indicator
l Water level, top up if necessary.
l Emulsion level, top up if necessary
l Air pressure in tires
l Checking the chip spreader
1
and cleaning the
spreading beam
1 Optional equipment
Page 47

Operation
BOMAG 47BW 100/120/125 AD-4/AC-4
5.3 Electronic immobilizer
1
Before starting the engine the anti-theft protection*
must be disarmed by entering a code.
Fig. 51
Note
i
With the electronic immobilizer armed, the light
emitting diode (a) (Fig. 51) flashes slowly.
l Slowly enter the six-digit user code.
Note
i
When entering the code, the light emitting diode
(6) lights up with every digit.
l Press the diamond button.
l The electronic immobilizer is now disarmed
and the engine can be started within the next
15 minutes.
5.4 Adjusting the operator's
seat
Danger
!
Danger of accident!
Do not adjust the seat while driving.
Fig. 52
l To adjust the seat in longitudinal direction
push the lever 1 (Fig. 52) outwards.
l Pull the lever (2) up and adjust the backrest.
l Operate the lever (3) to adjust the weight of the
operator.
Note
i
In its setting the lever (3) is locked in upwards direction. This lock can be released by pressing the
lever down against the end stop. Then adjust the
operator's weight by sliding the lever downwards.
1 Optional equipment
920390
ba
Page 48
Operation
BOMAG48 BW 100/120/125 AD-4/AC-4
5.5 Starting the engine
Danger!
Danger of accident! Danger of injury!
Wear your personal noise protection means
(ear defenders) before starting operation.
Start the engine only from the operator’s seat.
Caution
!
In this chapter it is assumed that the operator
is fully acquainted with the function of the different control elements on the machine.
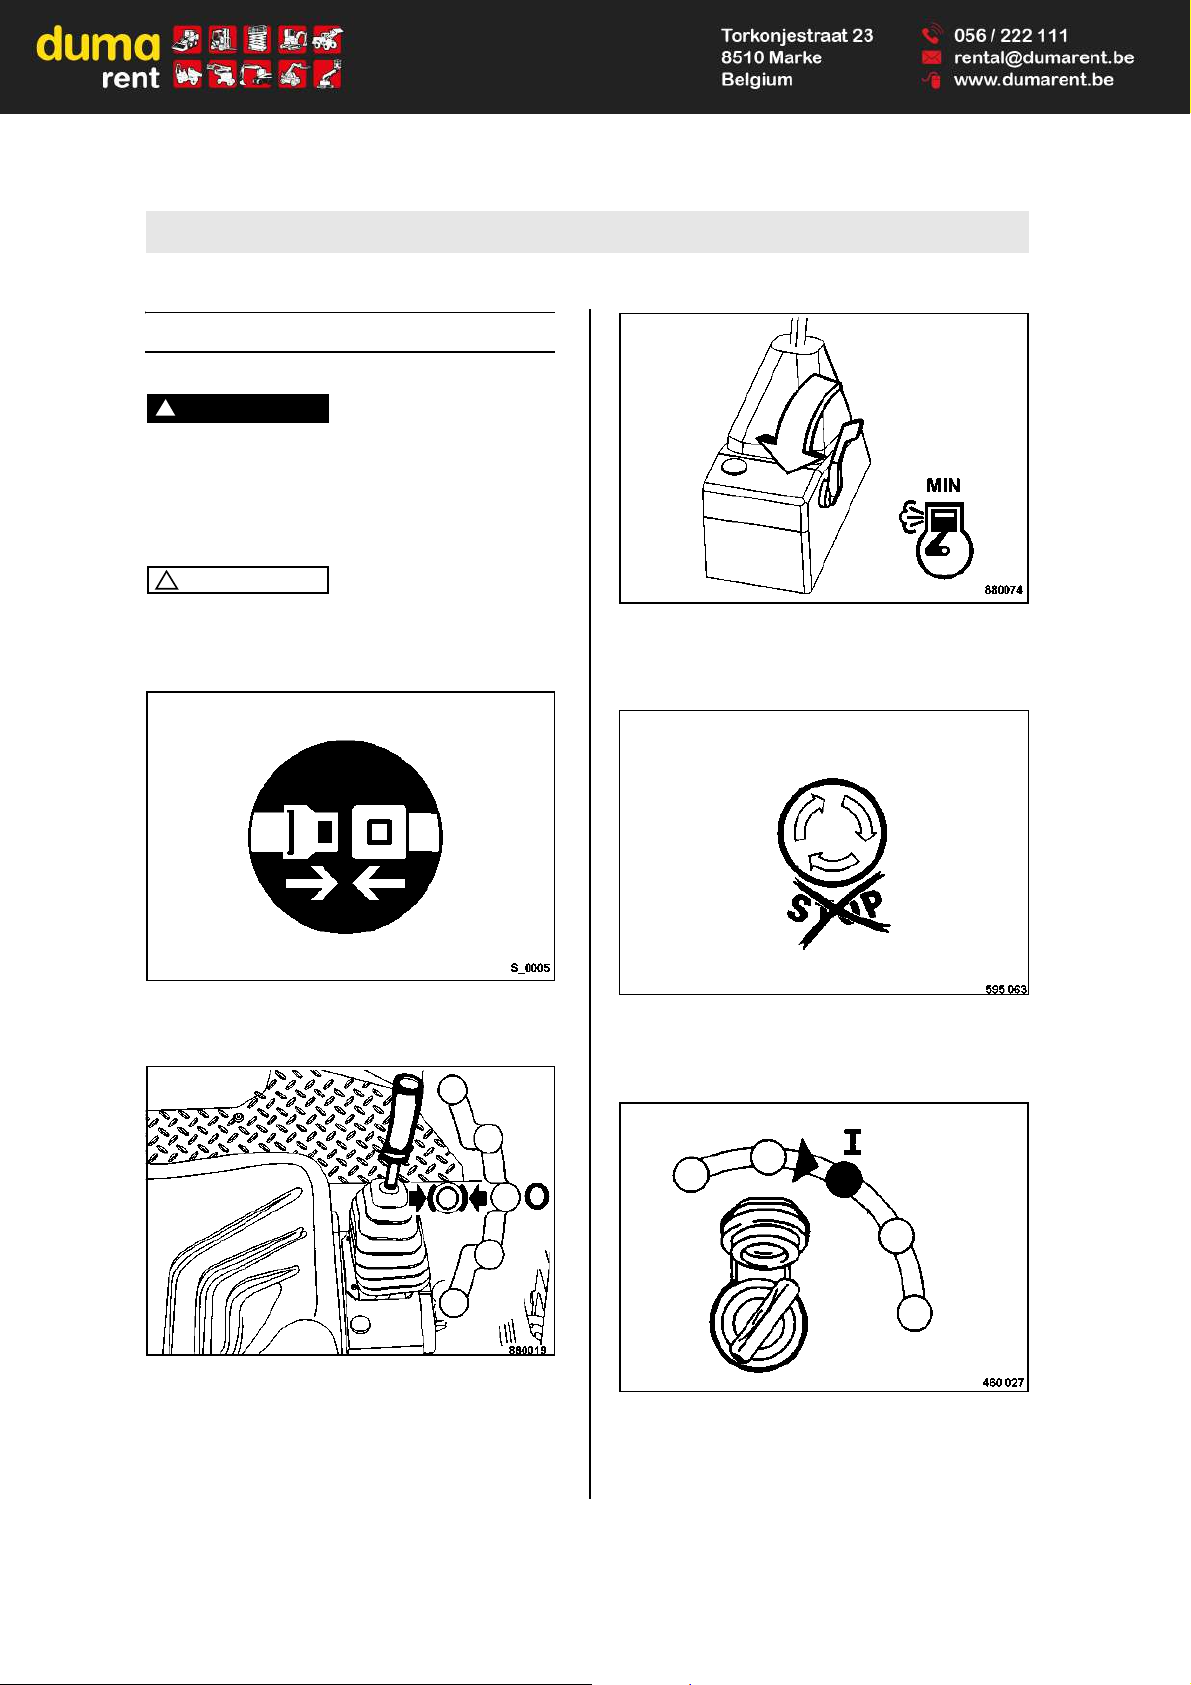
Fig. 53
l Fasten your seat belt (Fig. 53).
Fig. 54
l Shift the travel lever (Fig. 54) to position "0".
Fig. 55
l Set the throttle lever (Fig. 55) to position
"MIN".
Fig. 56
l Check, whether the emergency stop switch
(Fig. 56) is unlocked.
Fig. 57
l Turn the ignition key (Fig. 57) to position "I".
Page 49
Operation
BOMAG 49BW 100/120/125 AD-4/AC-4
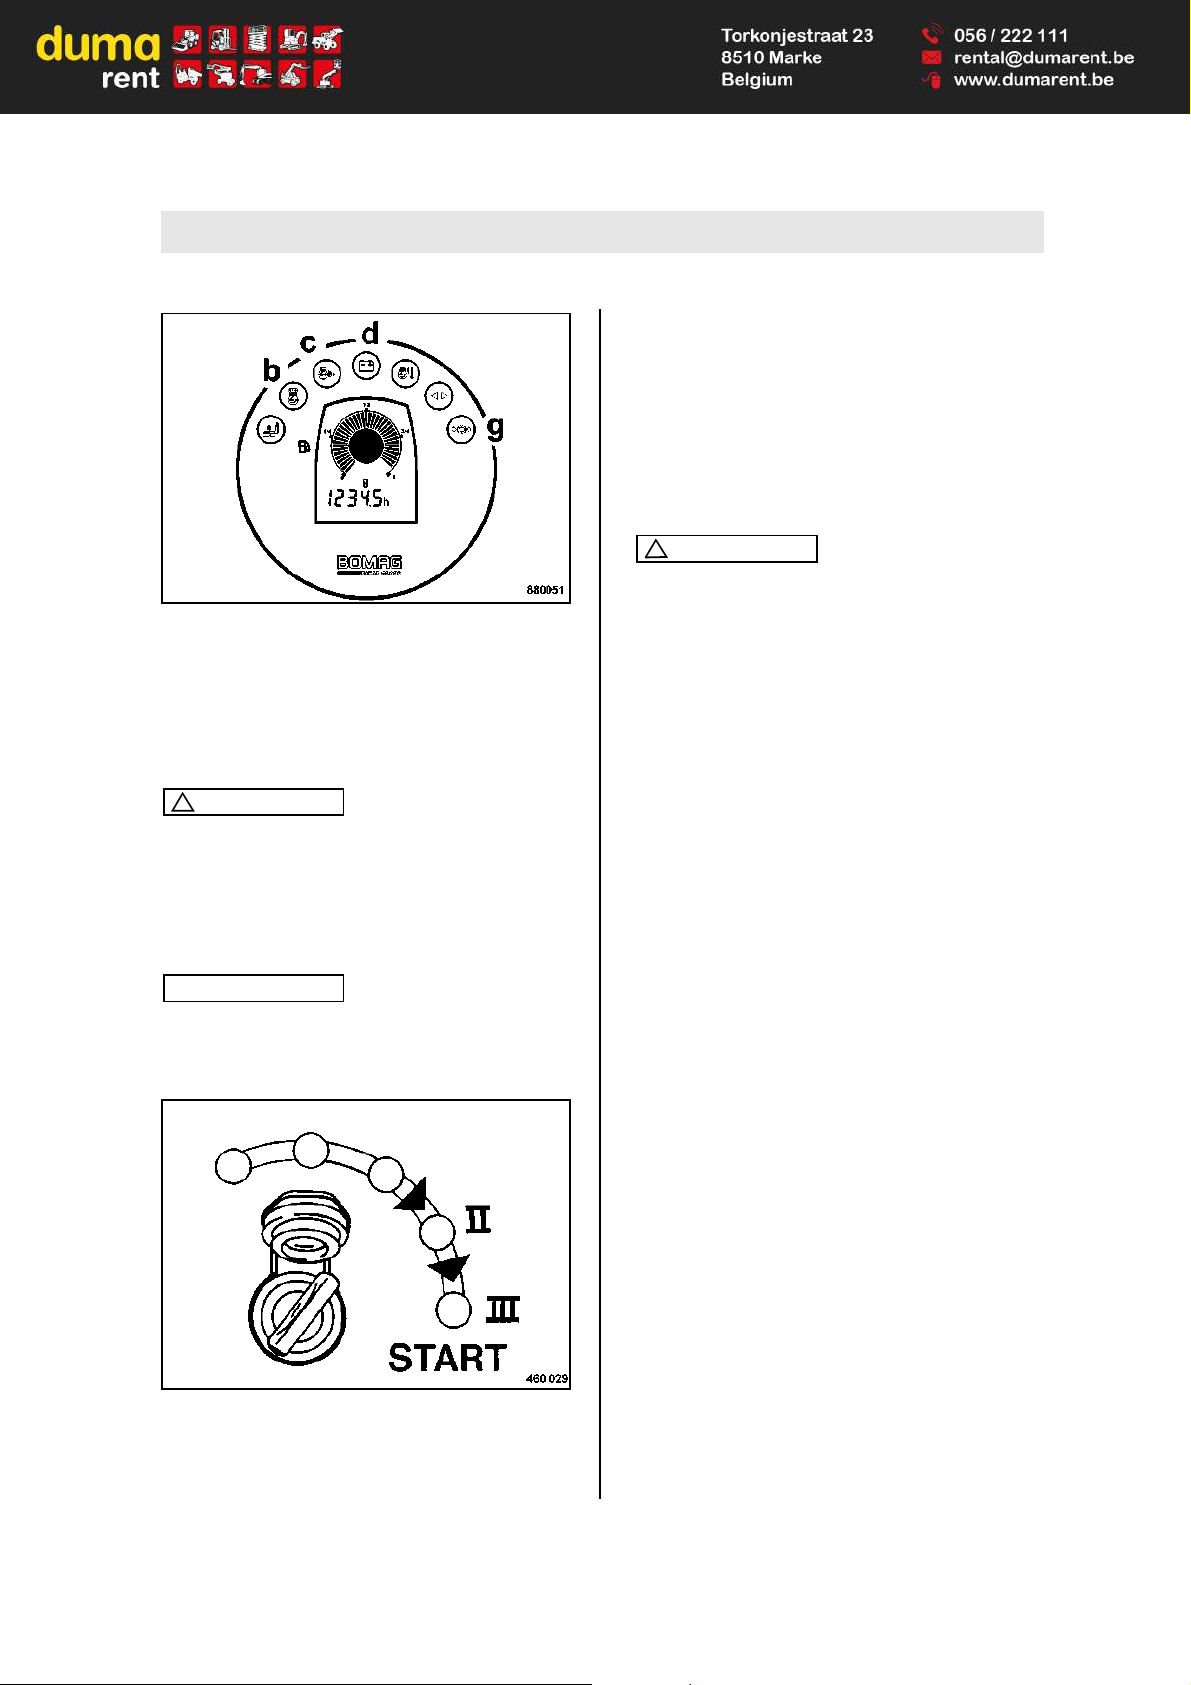
Fig. 58
All control and warning lights (Fig. 58) in the instrument cluster light up for approx. 3 seconds.
The engine oil pressure warning light (c) flashes,
the charge control light (d) and the parking brake
warning light (g) stay on.
Caution
!
Run the starting process for maximum 20 seconds without interruption and pause for a
minute between starting attempts.
If the engine has not started after two attempts
perform trouble shooting.
Note
i
The starter switch is designed with a re-start lock.
For a new starting attempt the ignition key must
first be turned back to position "0".
Fig. 59
l Turn the ignition key (Fig. 59) through position
"II" to position "III", the starter will crank the engine.
l With cold ambient temperatures hold the igni-
tion key up to 30 seconds in position "II"; the
preheating control light (b) (Fig. 58) lights up.
l As soon as the engine ignites return the igni-
tion key to position "I".
The engine oil pressure warning light and the
charge control light go out. The parking brake
warning light stays on.
Caution
!
Run the engine warm for a short while before
starting work. Do not rev up a cold engine to
high idle speed/full load speed.
Page 50
Operation
BOMAG50 BW 100/120/125 AD-4/AC-4
5.6 Starting with jump wires
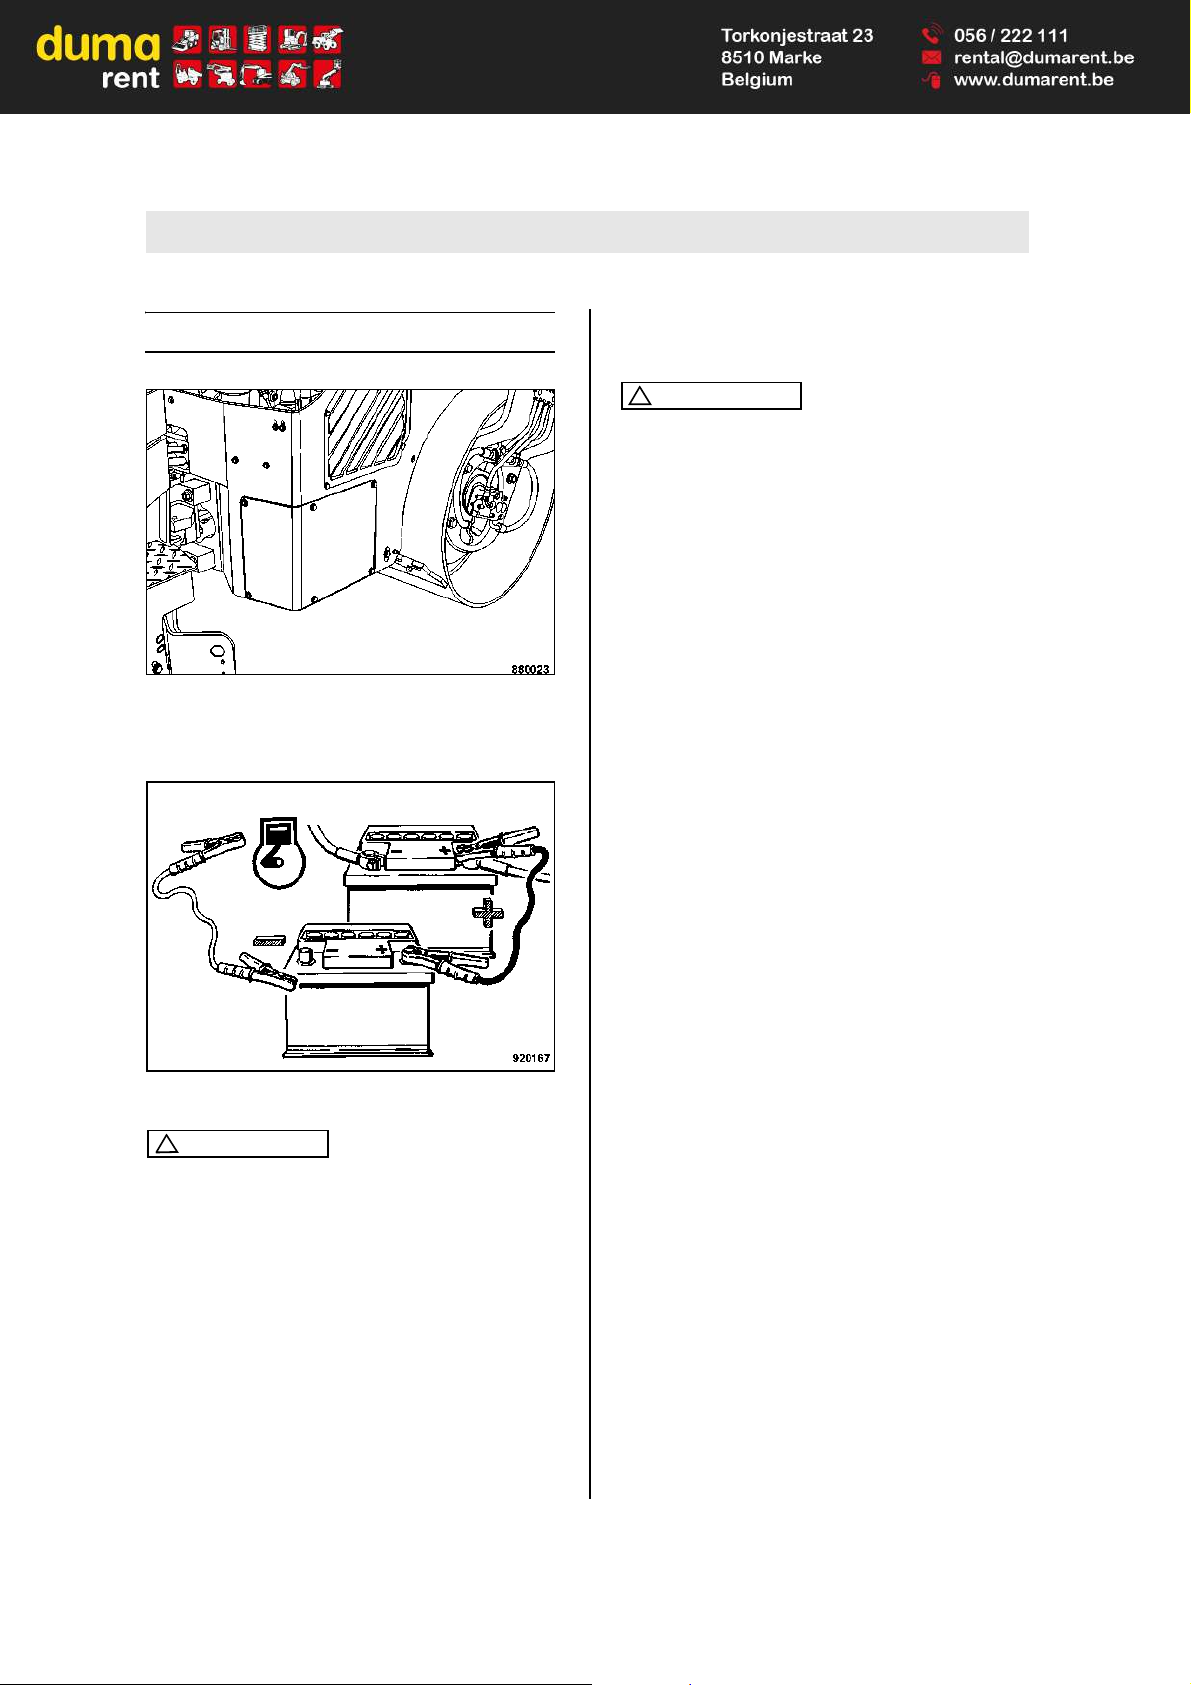
Fig. 60
l Remove the cover from the battery compart-
ment (Fig. 60).
Fig. 61
Caution
!
A wrong connection will cause severe damage
in the electric system.
l Only use a 12 Volt battery to bridge the ma-
chine.
l When jump starting with an external battery
connect both plus poles first.
l Then connect the ground cable first to the mi-
nus pole of the current supplying battery and
then to engine or chassis ground, as far away
from the battery as possible (Fig. 61).
l Start as described under 'Starting the engine'.
l Once the engine is running switch on a power-
ful consumer (working light, etc.).
Caution
!
If no powerful consumer is switched on voltage peaks may occur when separating the connecting cables between the batteries, which
could damage electrical components.
l After starting disconnect the negative poles
(ground cable) first and the positive poles after.
l Switch off the consumer.
l Close the battery compartment with the cover.
Page 51

Operation
BOMAG 51BW 100/120/125 AD-4/AC-4
5.7 Driving the machine
Danger!
Danger of accident!
Wet and loose soils considerably reduce the
ground adhesion of the machine on inclinations and slopes.
Soil conditions and weather influences impair
the climbing ability of the machine.
Do not drive up and down inclinations which
exceed the maximum gradability of the machine (see chapter "technical data").
Driving across slopes should therefore be
strictly avoided, because of the high risk of tipping over and the related risk of severe or even
fatal accidents.
You should therefore always drive straight up
or down a slope.
For rollers with a drum width of 1 m or less
there is a considerable risk of tipping over near
edges (e.g. curbstones, embankments, trenches, potholes) when driving over these edges.
Do not drive without wearing your seat belt.
Always give way to loaded transport vehicles!
Before starting to drive make sure that the
drive range is absolutely safe.
Drive and operate the machine only from the
driver’s seat.
Fig. 62
l Set the throttle lever (Fig. 62) to full load posi-
tion "Max I" or "MAX II".
Caution
!
During operation the throttle lever always remains locked in one of the full load positions.
Control the travel speed with the travel lever.
Fig. 63
Caution
!
Do not operate jerkily!
l Disengage the travel lever (Fig. 63) out of
braking position and move it slowly to the desired travel direction.
Position "I" = max. forward travel without vi-
bration
Position "II" = max. backward travel without
vibration
Position "III" = Max. forward/backward travel
with vibration
Fig. 64
The parking brake warning light (g) (Fig. 64) in the
instrument cluster goes out.
Page 52
Operation
BOMAG52 BW 100/120/125 AD-4/AC-4
Important notes on travel operation
Caution
!
When changing the travel direction hold the
travel lever for a moment in "0"-position, until
the machine has stopped, before actuating to
the new travel direction.
Do not operate jerkily! Control the travel speed
with the travel lever.
When driving up and down inclinations move
the travel lever slowly back towards neutral to
brake the machine.
Seat contact switch
1
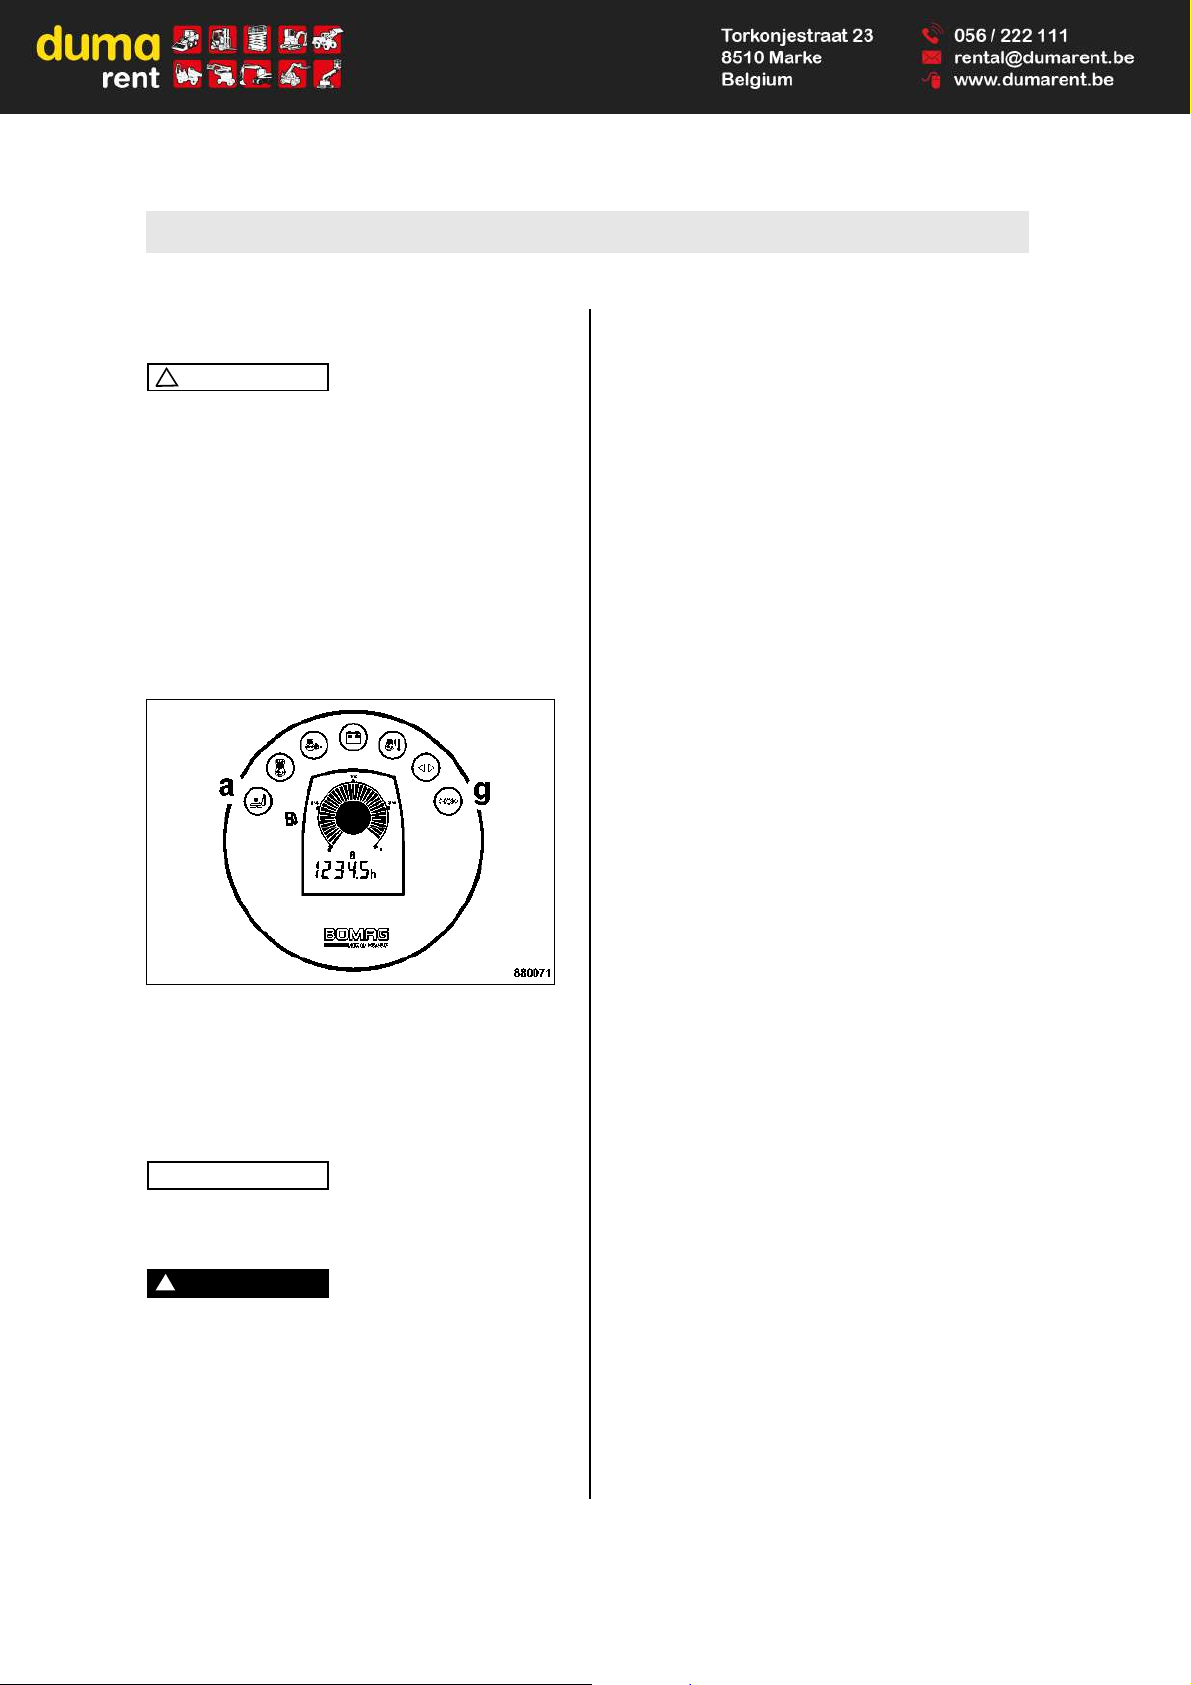
Fig. 65
With the machine parked the warning light for the
seat contact switch (a) (Fig. 65) lights up together
with the parking brake warning light (g) when the
driver's seat is not occupied. The machine cannot
drive.
Note
i
When moving the travel lever out of braking position the engine will be shut down immediately.
Danger!
Danger of accident!
If the seat is not occupied when the machine is
driving, the warning buzzer will sound, the engine will be shut down after 4 seconds and the
parking brake will close.
l To continue driving occupy the seat and put on
the seat belt within 4 seconds. The warning
lights go out and the warning buzzer stops to
sound.
l If the engine stops restarting is required.
1 Optional equipment
Page 53
Operation
BOMAG 53BW 100/120/125 AD-4/AC-4
5.8 Stopping the machine, operating the parking brake
Fig. 66
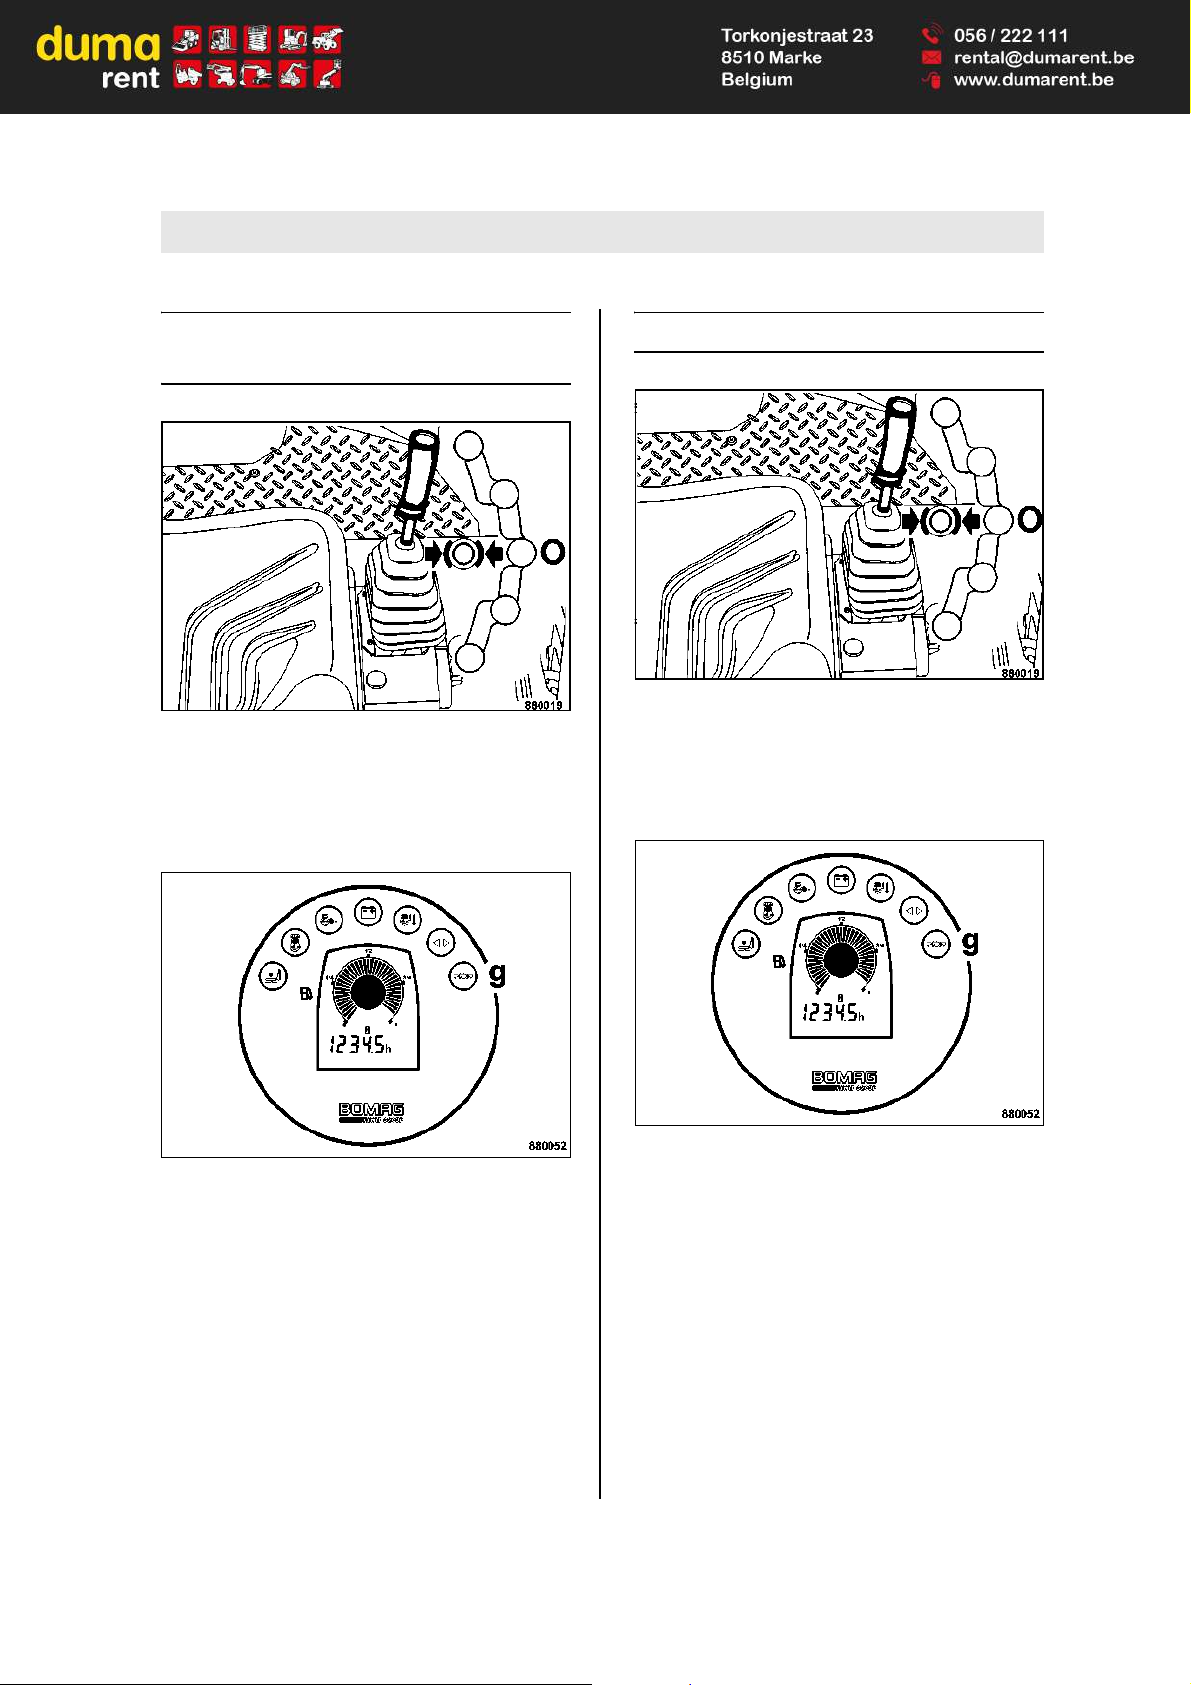
l Shift the travel lever (Fig. 66) slowly to "0"-po-
sition.
The machine is automatically braked by the hydrostatic drive and the parking brake is applied.
Fig. 67
The parking brake warning light (g) in the instrument cluster (Fig. 67) lights up.
5.9 Shutting down the engine
Fig. 68
l Shift the travel lever (Fig. 68) slowly to position
0.
The machine is automatically braked by the hydrostatic drive and the parking brake is applied.
Fig. 69
The parking brake warning light (g) (Fig. 69) in the
instrument cluster lights up.
Page 54

Operation
BOMAG54 BW 100/120/125 AD-4/AC-4
Fig. 70
l Set the throttle lever (Fig. 70) to position "MIN"
(idle speed).
Caution
!
Do not shut down the engine all of a sudden
from full load speed, but let it idle for about 2
minutes.
Fig. 71
l Turn the start switch (Fig. 71) to position "0"
and pull out the ignition key.
Danger
!
Danger of accident!
Secure the machine against unauthorized use,
pull the ignition key out.
Mark machines, which could be in the way,
with a clearly visible sign.
5.10 Switching the vibration on
and off
Danger
!
Risk of damage!
When compacting with vibration you must
check the effect of nearby buildings and underground supply lines (gas, water, sewage,
electric power), if necessary stop compaction
with vibration.
Caution
!
Danger of bearing damage!
Do not activate the vibration on hard (frozen,
concrete) ground.
Caution
!
Switch on vibration only with the throttle lever
in full load position "MAX I" or "MAX II".
Vibration at standstill causes transverse ruts,
therefore:
l switch the vibration on only after shifting the
travel lever to the desired travel direction.
l Switch the vibration off before stopping the
machine.
Page 55
Operation
BOMAG 55BW 100/120/125 AD-4/AC-4
Pre-selecting vibration (only AD)
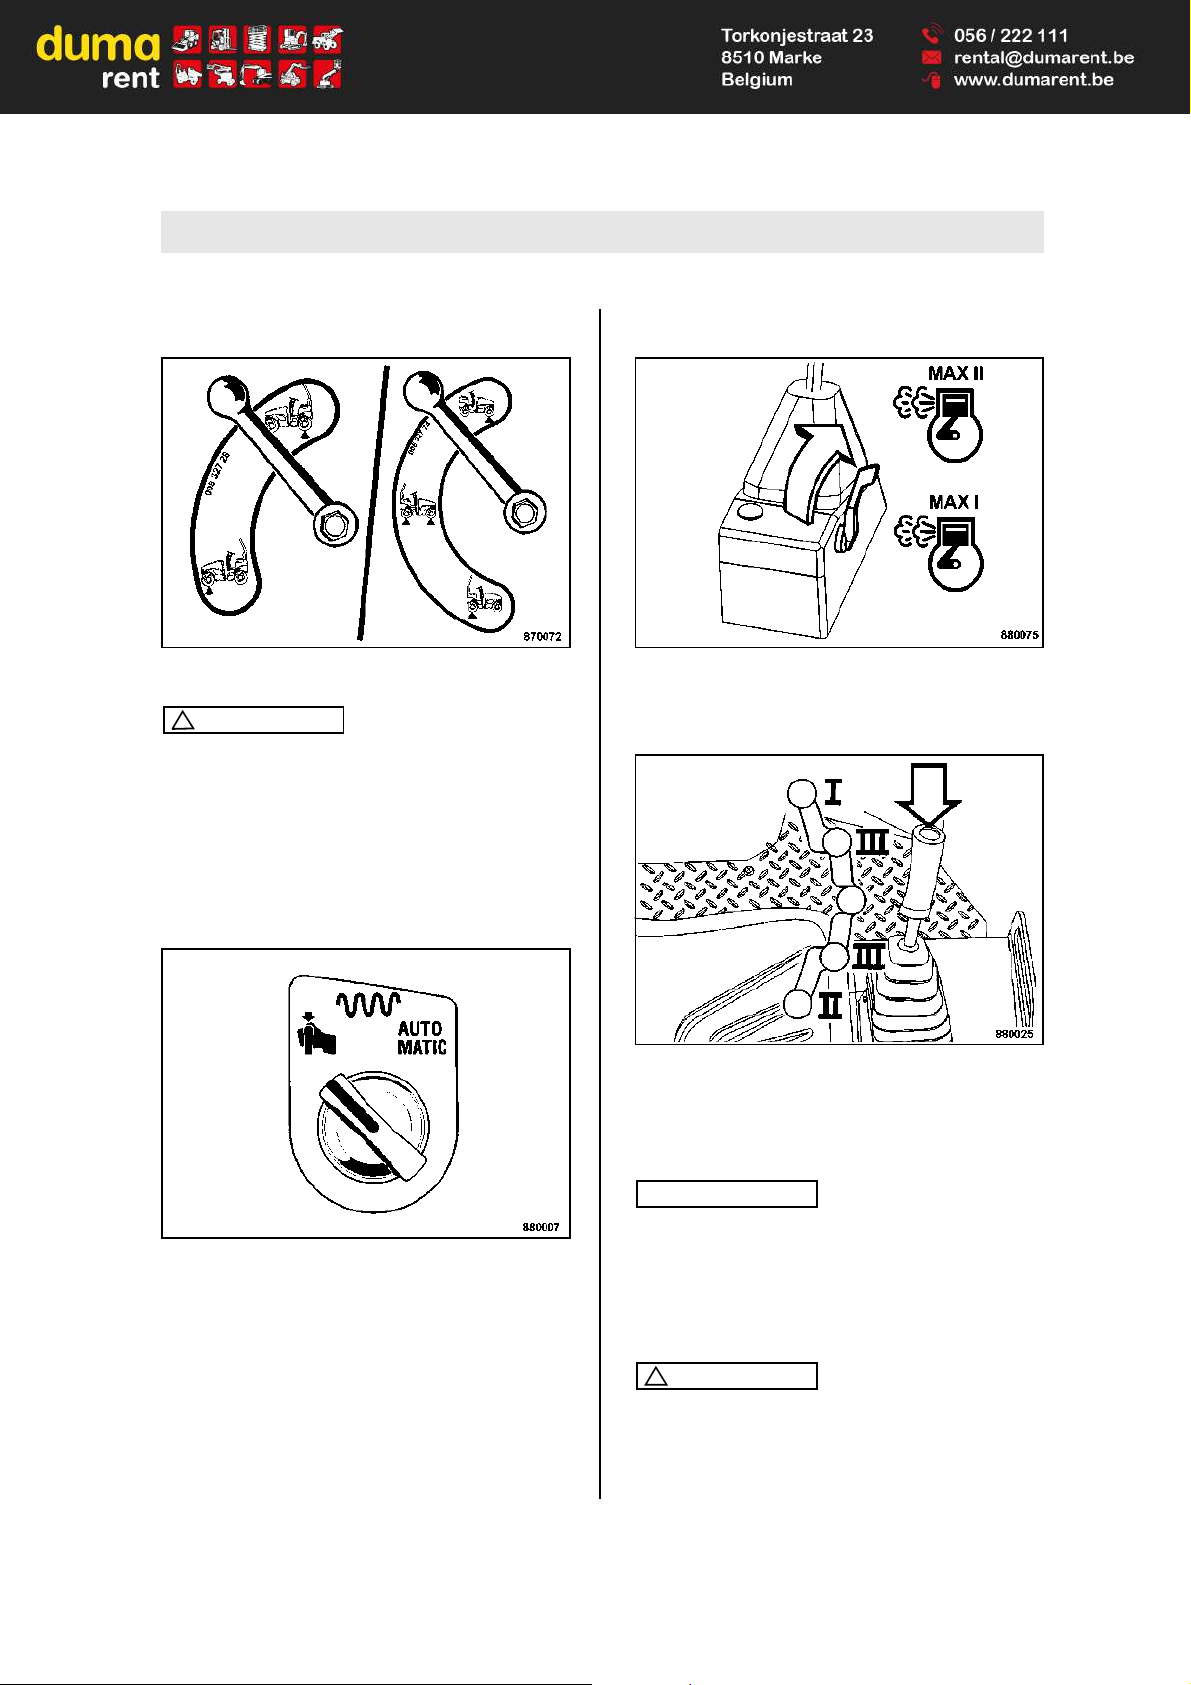
Fig. 72
Caution
!
Destruction of hydraulic components!
Switch the ball valve only when the vibration is
switched off.
l Pre-select the desired drum or drums with the
ball valve (Fig. 72).
Vibration in manual mode
Fig. 73
l Turn the rotary switch for vibration in manual
or automatic mode (Fig. 73) anti-clockwise to
the symbol "Manual".
Switching the vibration on
Fig. 74
l Set the throttle lever (Fig. 74) to position "Max
I" or "MAX II".
Fig. 75
l Actuate the vibration push button (Fig. 75) only
after shifting the travel lever to the desired
travel direction.
Note
i
When shifting the travel lever through position "III"
to position "I" or "II", the vibration will be automatically switched off.
Switching the vibration off
Caution
!
Always switch the vibration off before stopping the machine.
l Press the vibration push button again.
Page 56
Operation
BOMAG56 BW 100/120/125 AD-4/AC-4
Vibration in automatic mode
Note
i
In automatic mode the vibration is switched on
when exceeding a travel speed of 1.3 km/h.
Vibration is switched off at a speed below 1.3 km/
h.
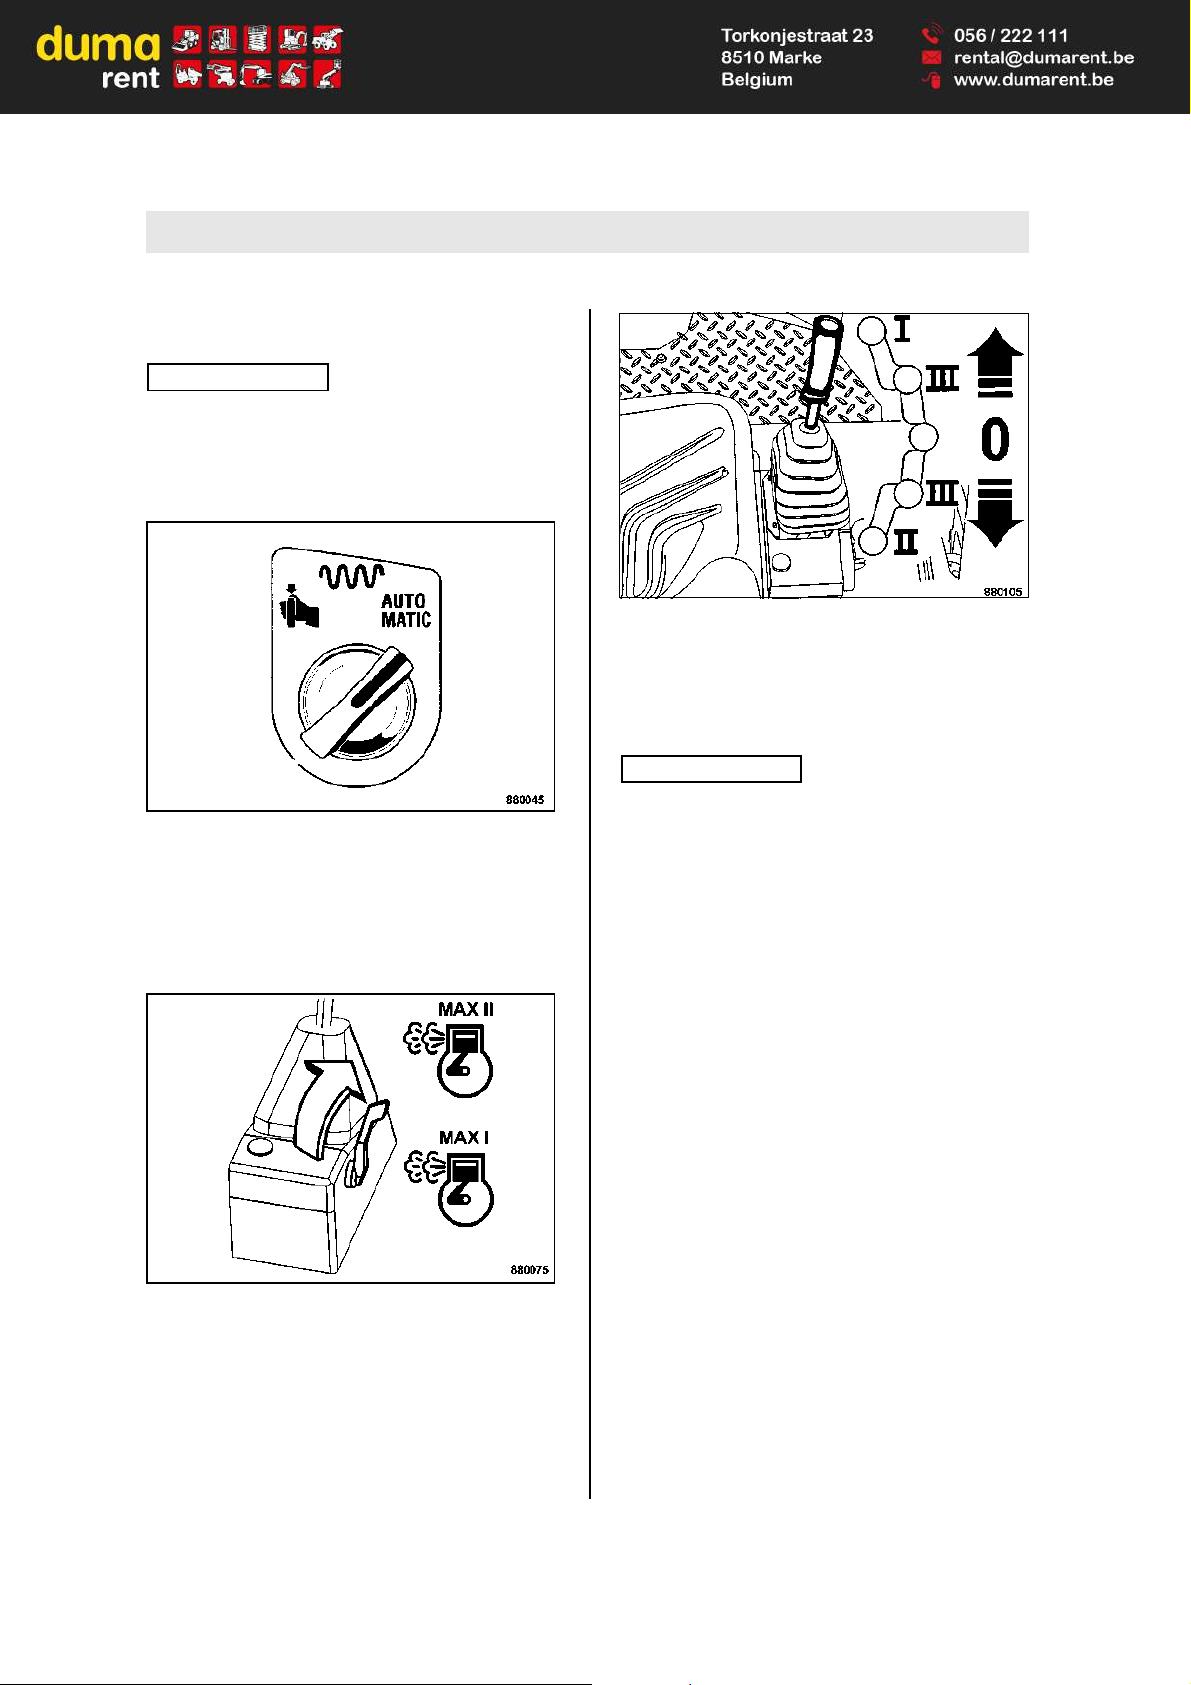
Fig. 76
l Turn the rotary switch for vibration in manual
or automatic mode (Fig. 76) clockwise to the
symbol "AUTOMATIC".
Switching the vibration on
Fig. 77
l Set the throttle lever (Fig. 77) to position "Max
I" or "MAX II".
Fig. 78
l Pull the travel lever (Fig. 78) out of zero posi-
tion (braking position) and shift it slowly to the
desired travel direction forward or backwards
("III")
Note
i
The vibration comes on at a low travel speed.
When shifting the travel lever through position "III"
to position "I" or "II", the vibration will be automatically switched off.
Switching the vibration off
l Shift the travel lever slowly to position 0.
The machine is decelerated and the vibration will
automatically switch off at a low travel speed.
Page 57
Operation
BOMAG 57BW 100/120/125 AD-4/AC-4
5.11 Switching the gravity sprinkling system on and off
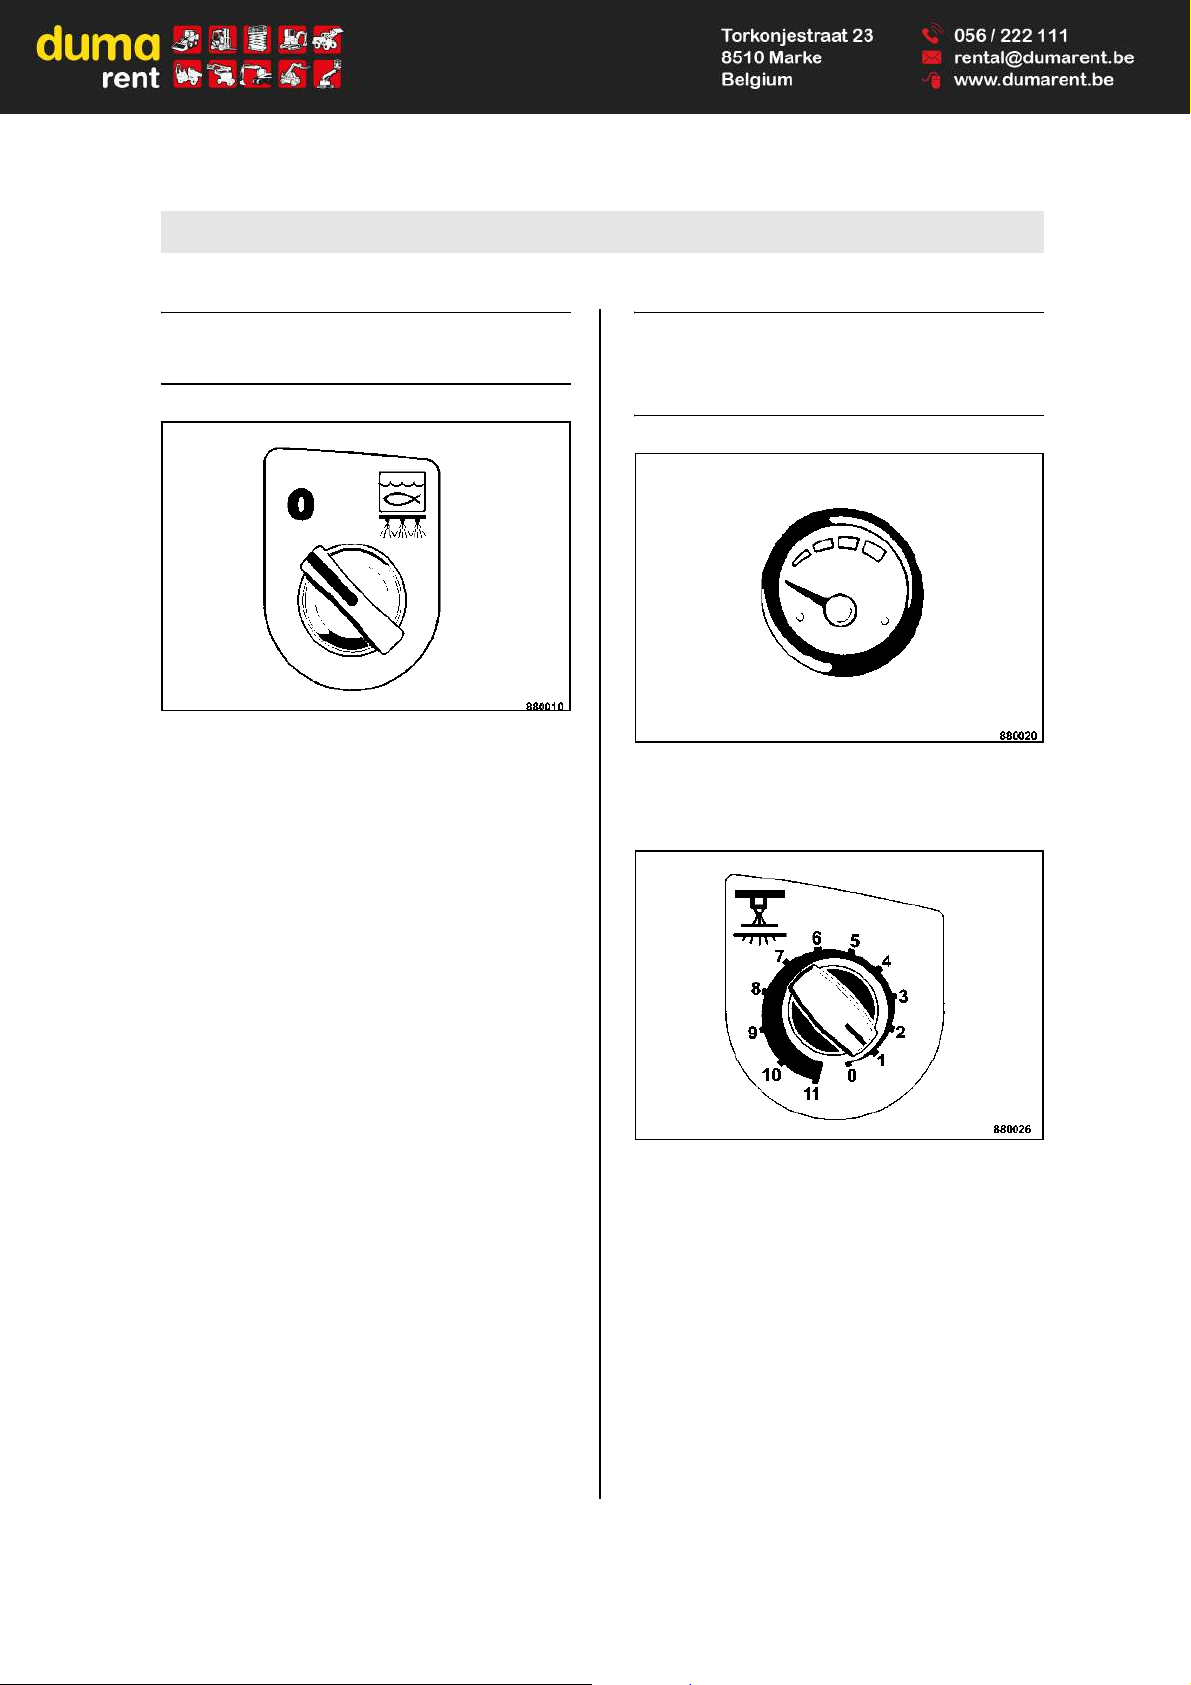
Fig. 79
l Turn the rotary switch for gravity feed sprin-
kling system (Fig. 79) to the right, the gravity
feed sprinkling system is switched on.
l Turn the rotary switch for gravity feed sprin-
kling system to the left, the gravity feed sprinkling system is switched off.
5.12 Switching the pressure
sprinkling system
1
on and
off
Fig. 80
l Check the water level indicator on the water
tank (Fig. 80) whether the water tank is filled.
Fig. 81
l Switch the interval switch for pressure sprin-
kling (Fig. 81) to the desired flow interval.
Position "0" = Sprinkler system switched off
Position "1" to
"10" = Interval sprinkling pre-selected
Position "11" = Permanent sprinkling pre-se-
lected
1 Optional equipment
Page 58
Operation
BOMAG58 BW 100/120/125 AD-4/AC-4
Fig. 82
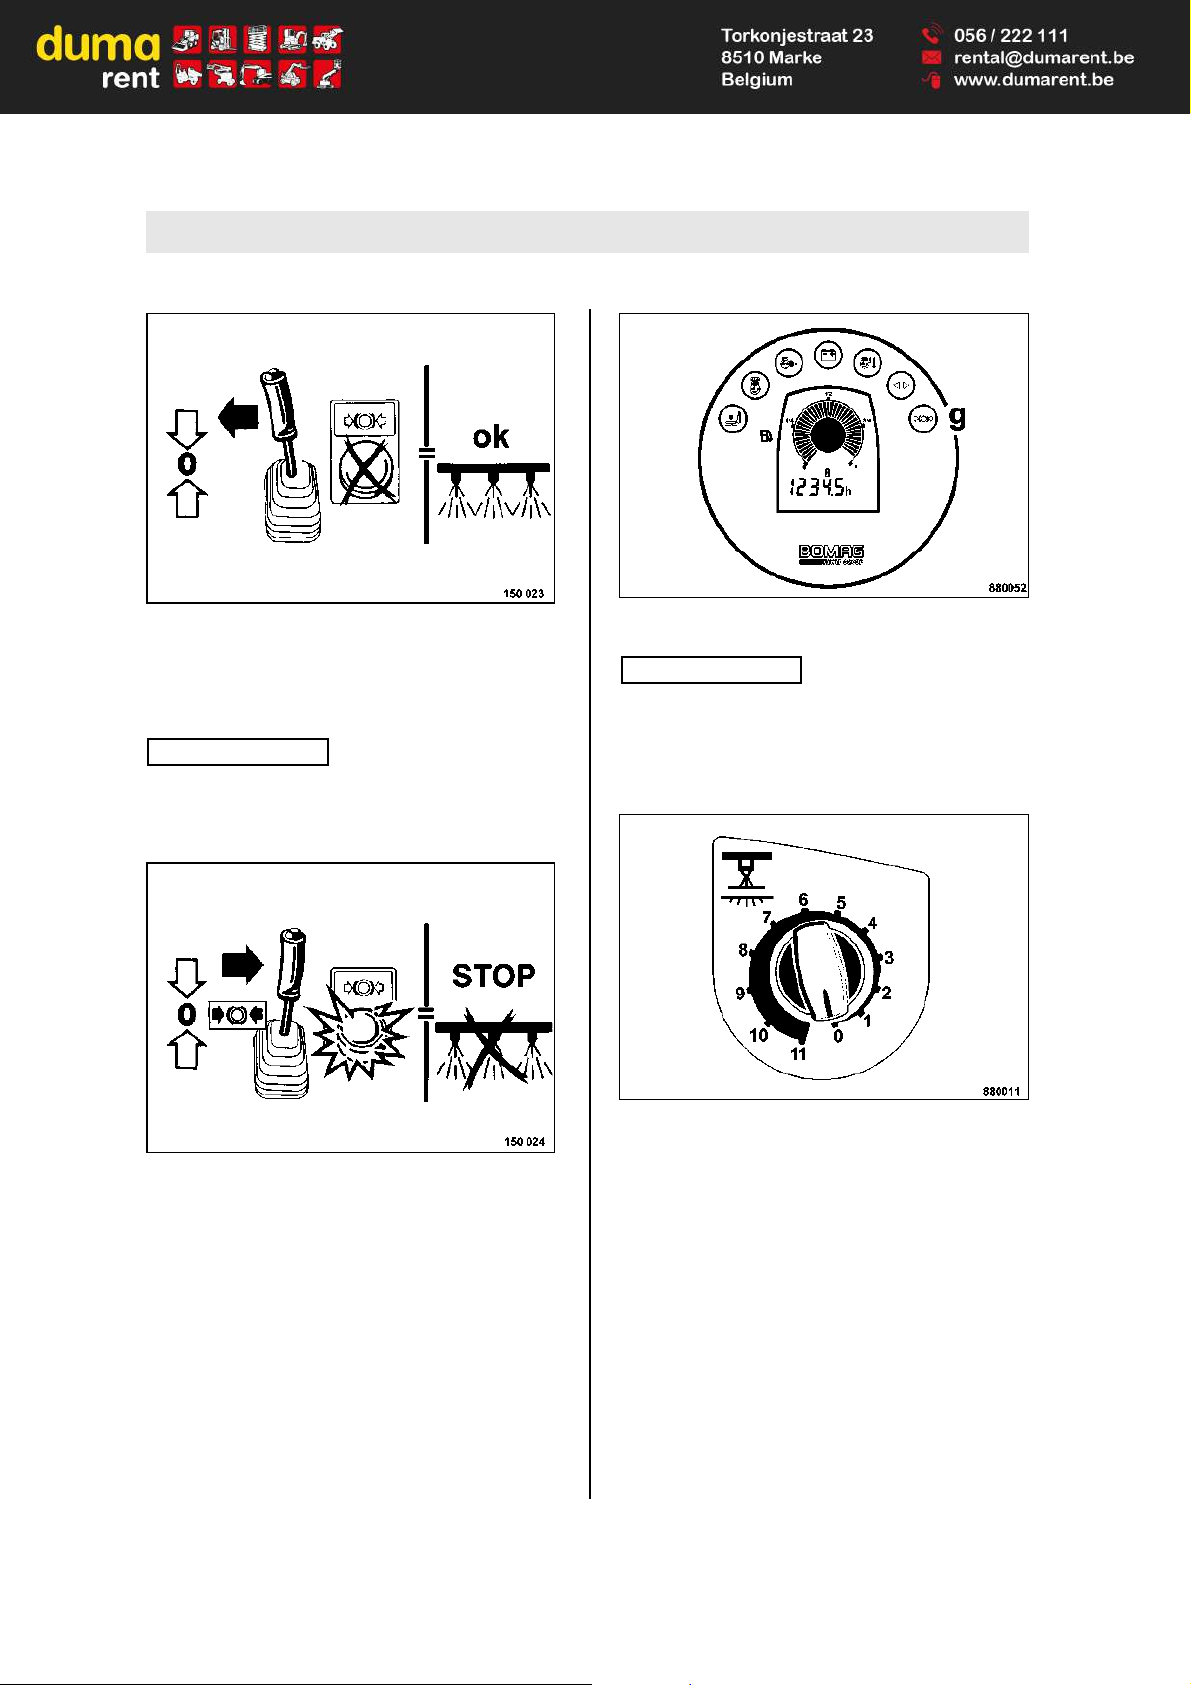
l Shift the travel lever out of braking position to-
wards "0"-position (Fig. 82) to switch the pressure sprinkler system on .
Note
i
The sprinkler system will only work when the travel
lever is in direction "0"-position. This is also the
testing position for interval position "11".
Fig. 83
l To switch off the pressure sprinkler system re-
turn the travel lever to the position "brake
closed" (Fig. 83).
Fig. 84
Note
i
The parking brake warning light (g) (Fig. 84) in the
left hand instrument cluster lights up.
With the pressure sprinkler system switched on
sprinkling will continue for another 30 seconds.
Fig. 85
l To switch off the pressure sprinkling system
switch the interval switch for pressure sprinkling
(Fig. 85) to position "0".
Page 59
Operation
BOMAG 59BW 100/120/125 AD-4/AC-4
5.13 Switching the tire sprinkling
system on and off (only AC)
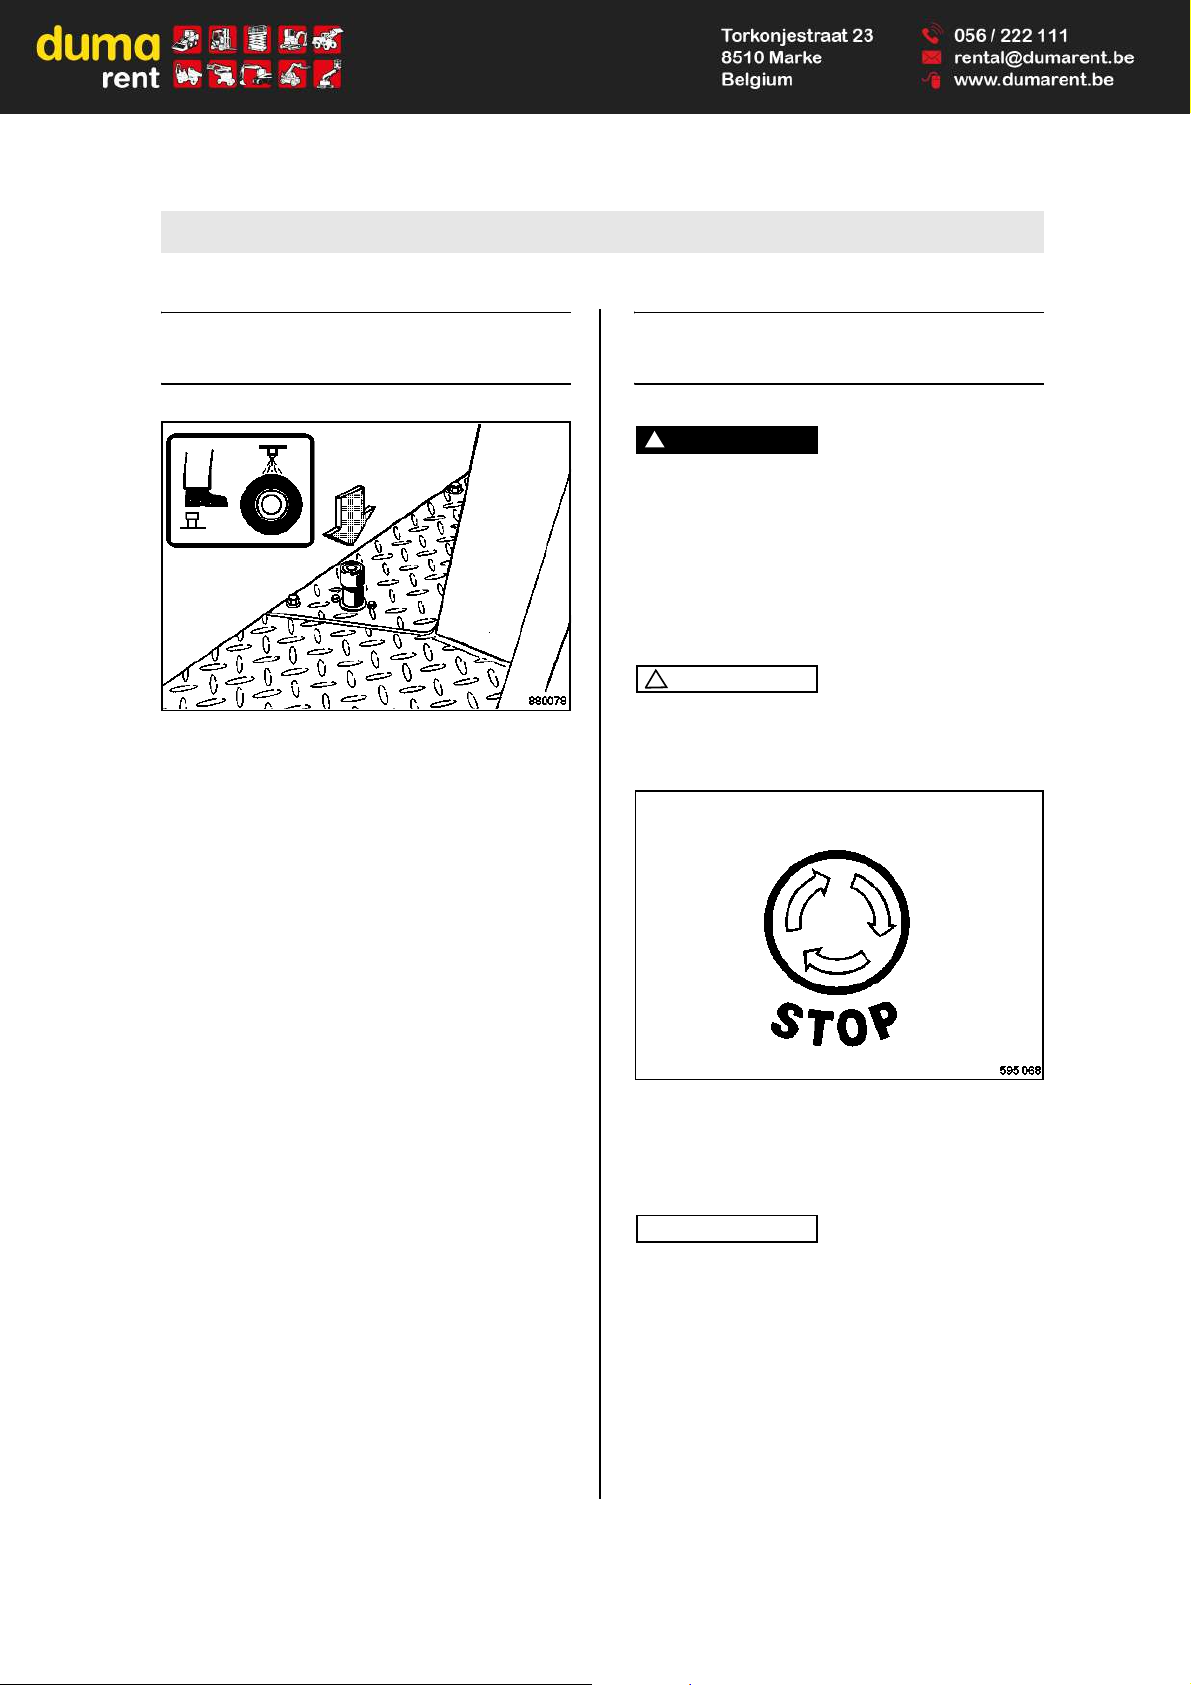
Fig. 86
l Actuate the foot switch (Fig. 86).
The tire sprinkling system is switched on.
l Release the foot switch.
The tire sprinkling system is switched off.
5.14 Actuating the emergency
stop switch
Danger
!
Danger of accident!
In events of emergency and in case of danger
actuate the emergency stop switch immediately.
Start travel operation of the machine only after
the danger that caused the actuation of the
emergency stop switch has been eliminated.
Caution
!
Do not use as service brake. The deceleration
is extremely high. In case of frequent use the
wear on the multi-dics brakes will be very high.
Fig. 87
l Press the button of the emergency stop switch
(Fig. 87) completely down, it automatically
locks in fully pressed position.
Note
i
Shuts the engine down and closes the brake.
l Turn the button clockwise to unlock the emer-
gency stop switch.
l Start the engine again, see chapter "Starting
the engine".
Page 60
Operation
BOMAG60 BW 100/120/125 AD-4/AC-4
5.15 Mounting/removing the chip
spreader
1
Danger
!
Danger of accident!
When mounting or removing the chip spreader
do not step between the chip spreader and the
machine while the engine is running.
Park the machine on a level and solid base to
mount or remove the chip spreader and shut
down the engine.
Mount and remove the chip spreader when it is
empty.
Mounting the chip spreader
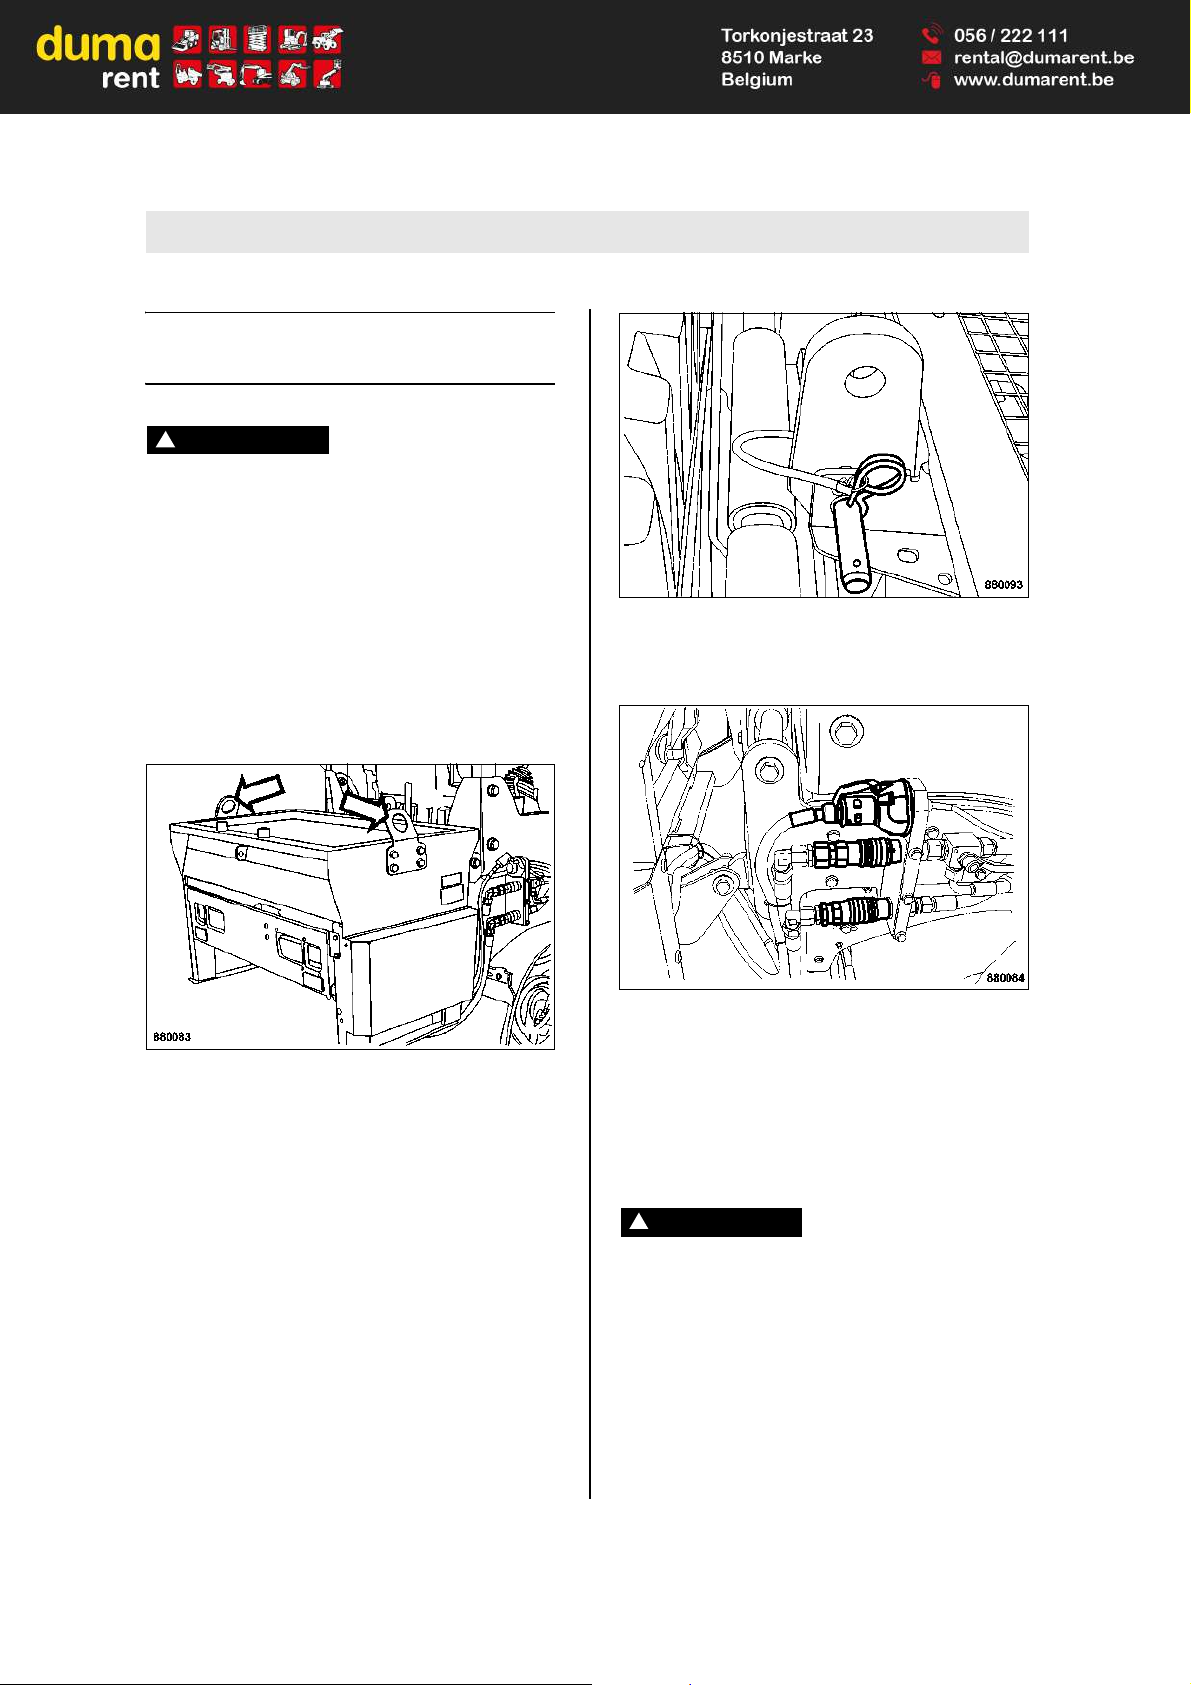
Fig. 88
l Lift the chip spreader by the lifting points (Fig.
88) and hook it carefully into the fixing points
on the machine.
Fig. 89
l Insert the bolt (Fig. 89) and secure it with the
cotter pin.
Fig. 90
l Connect the chip spreader hydraulically and
electrically with the machine (Fig. 90).
Disassembling the chip spreader
l Empty the chip spreader, see section "Filling/
emptying the chip spreader".
Danger
!
Danger of accident!
Always stand the chip spreader on level and
firm ground.
1 Optional equipment
Page 61

Operation
BOMAG 61BW 100/120/125 AD-4/AC-4
Fig. 91
l Turn the ball valve for the chip spreader to po-
sition "I" (Fig. 91).
Fig. 92
l Disconnect the chip spreader hydraulically
and electrically from the machine (Fig. 92).
Fig. 93
l Hook the chip spreader to the fastening points
(Fig. 93).
Fig. 94
Danger
!
Danger of accident!
Before pulling out the bolt (Fig. 94) make sure
that the chip spreader is mounted correctly.
l Remove the cotter pin and pull out the bolt.
l Lift the chip spreader out of the fastening
points on the machine and place it on level and
firm ground.
Page 62
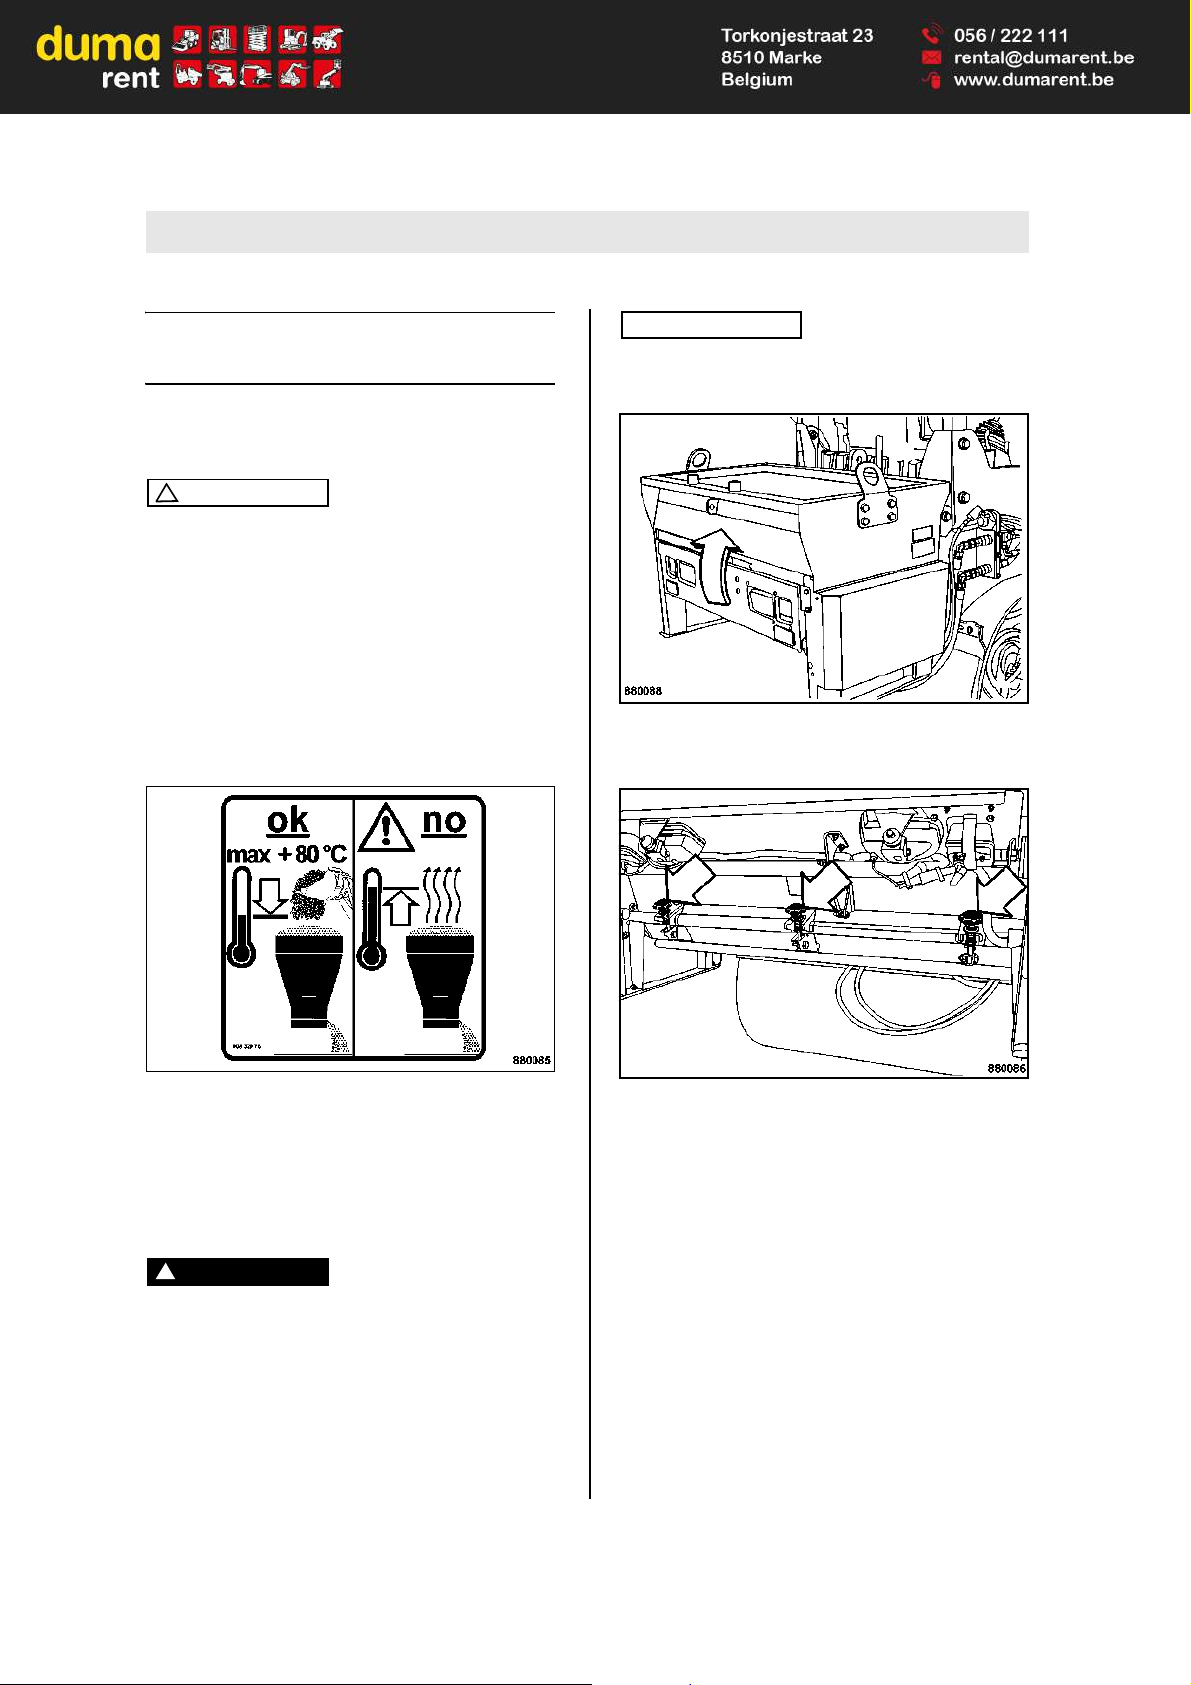
Operation
BOMAG62 BW 100/120/125 AD-4/AC-4
5.16 Filling/emptying the chip
spreader1
Filling
Caution
!
Fill only with dry chippings.
The chippings must not contain more than 1%
of asphalt, otherwise the spreading beam may
become stuck.
Do not fill with more than 200 litres of chippings, as otherwise the permitted total weight
would be exceeded.
The temperature of the material to be spread
must not exceed 80°C, as otherwise the shaft
will be damaged.
Fig. 95
l Fill the chippings container with no more than
200 litres of chippings (Fig. 95) (specific
weight of chippings 1.5 t/m³).
Emptying
Danger!
Danger of injury!
Never enter the spreader shaft area while the
spreader shaft is running.
Empty the hopper only with the engine off.
Note
i
Always empty the chipping hopper before transporting the machine.
Fig. 96
l Fold up the flap (Fig. 96) .
Fig. 97
l Loosen the star knobs (Fig. 97) , fold down the
spreading screed and allow the chipping to
trickle out.
l Clean the spreading screed.
1 Optional equipment
Page 63
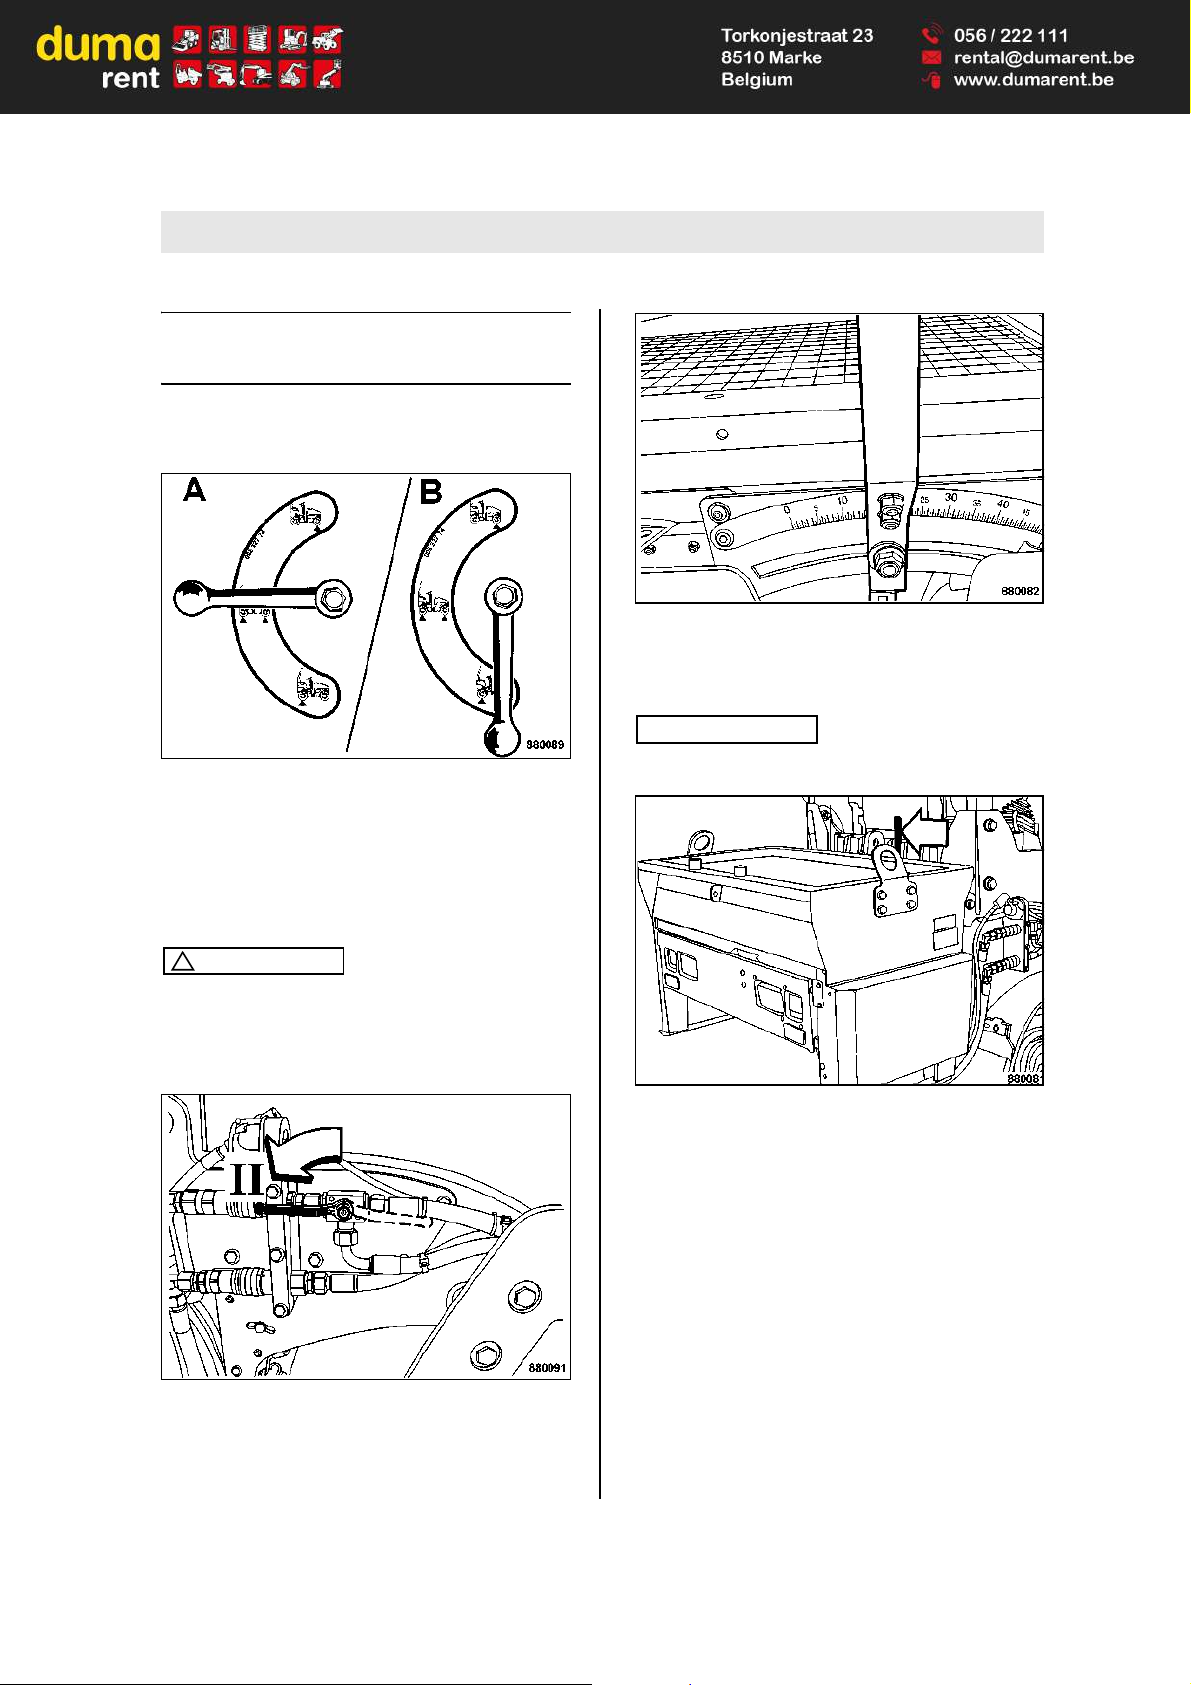
Operation
BOMAG 63BW 100/120/125 AD-4/AC-4
5.17 Operating the chip spreader
1
Preparing the spreading process
Fig. 98
l Turn the vibration ball valve down (B) (Fig. 98)
for chip spreading without vibration.
l Turn the vibration ball valve to horizontal posi-
tion (A) for chip spreading with vibration of
front drum.
Caution
!
With the ball valve in horizontal position (A)
(Fig. 98) follow the instructions for work with
vibration, see chapter "Switching vibration on
and off".
Fig. 99
l Turn the ball valve for the chip spreader to po-
sition "II" (Fig. 99).
Fig. 100
l Set the required chipping quantity with the
chipping quantity adjustment lever (Fig. 100).
Note
i
The setting may be corrected while travelling.
Fig. 101
l Operate the lever (Fig. 101) to slide the chip
spreader to left or right to the desired speading
position.
1 Optional equipment
Page 64

Operation
BOMAG64 BW 100/120/125 AD-4/AC-4
Switching the chip spreader on and off
Fig. 102
l Switch the chip spreader on and off with the vi-
bration button (Fig. 102).
5.18 Towing
Danger!
Danger of accident! Danger of injury!
Before releasing the parking brake secure the
machine against unintended rolling by using
appropriate means (e.g. metal wheel chocks).
Use a towing vehicle with sufficient traction
and braking power for the unbraked towed
load.
Use a tow bar.
Using the machine as towing vehicle is not
permitted.
The machine cannot be steered.
Do not touch hot engine parts.
Caution
!
Tow the machine only after having released
the parking brake.
Towing speed 1 km/h, max. towing distance
500 m.
With the chip spreader
1
attached the machine
must not be towed backwards.
Fig. 103
l Tow the machine by the front or rear towing
eye 1 (Fig. 103).
1 Optional equipment
Page 65
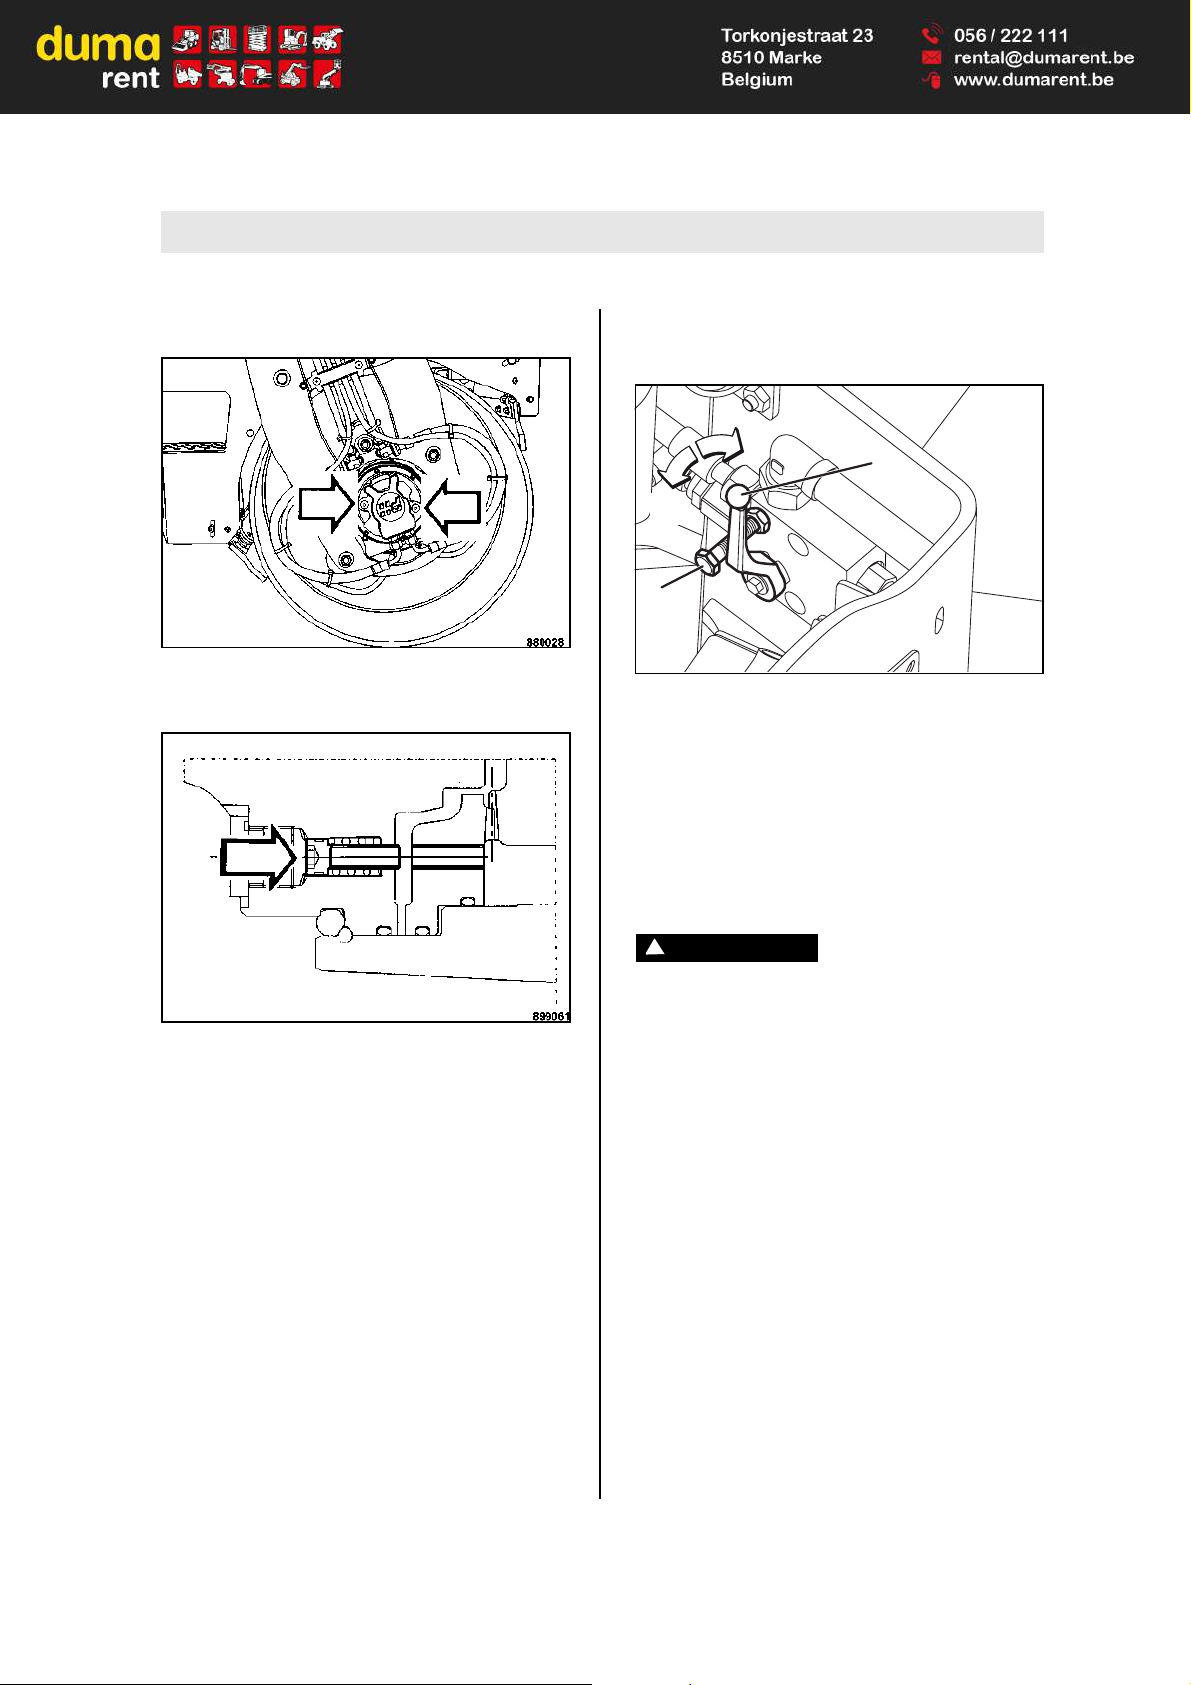
Operation
BOMAG 65BW 100/120/125 AD-4/AC-4
Releasing the brake (only AD)
Fig. 104
l Remove two plugs (Fig. 104).
Fig. 105
l Press both screws (Fig. 105) in against
springs.
l Tighten both screws alternately and in steps
with 35 Nm until they bottom.
Releasing the brakes on drum and rubber wheels (only AC)
Fig. 106
l Unscrew the fastening screw (1) (Fig. 106).
l Switch the ball valve (2) over.
Position "II" = Brake released
l Turn the steering wheel slowly approx. two
turns in clockwise direction.
After towing
Danger
!
Danger of accident!
Before loosening the drawbar secure the machine against unintended rolling by using appropriate means (e.g. metal wheel chocks).
The machine must only be started without the
mechanical brake releasing device being activated.
Always secure the ball valve of the brake releasing feature (only AC) with the locking
screw.
1
2
I
II
880112
Page 66
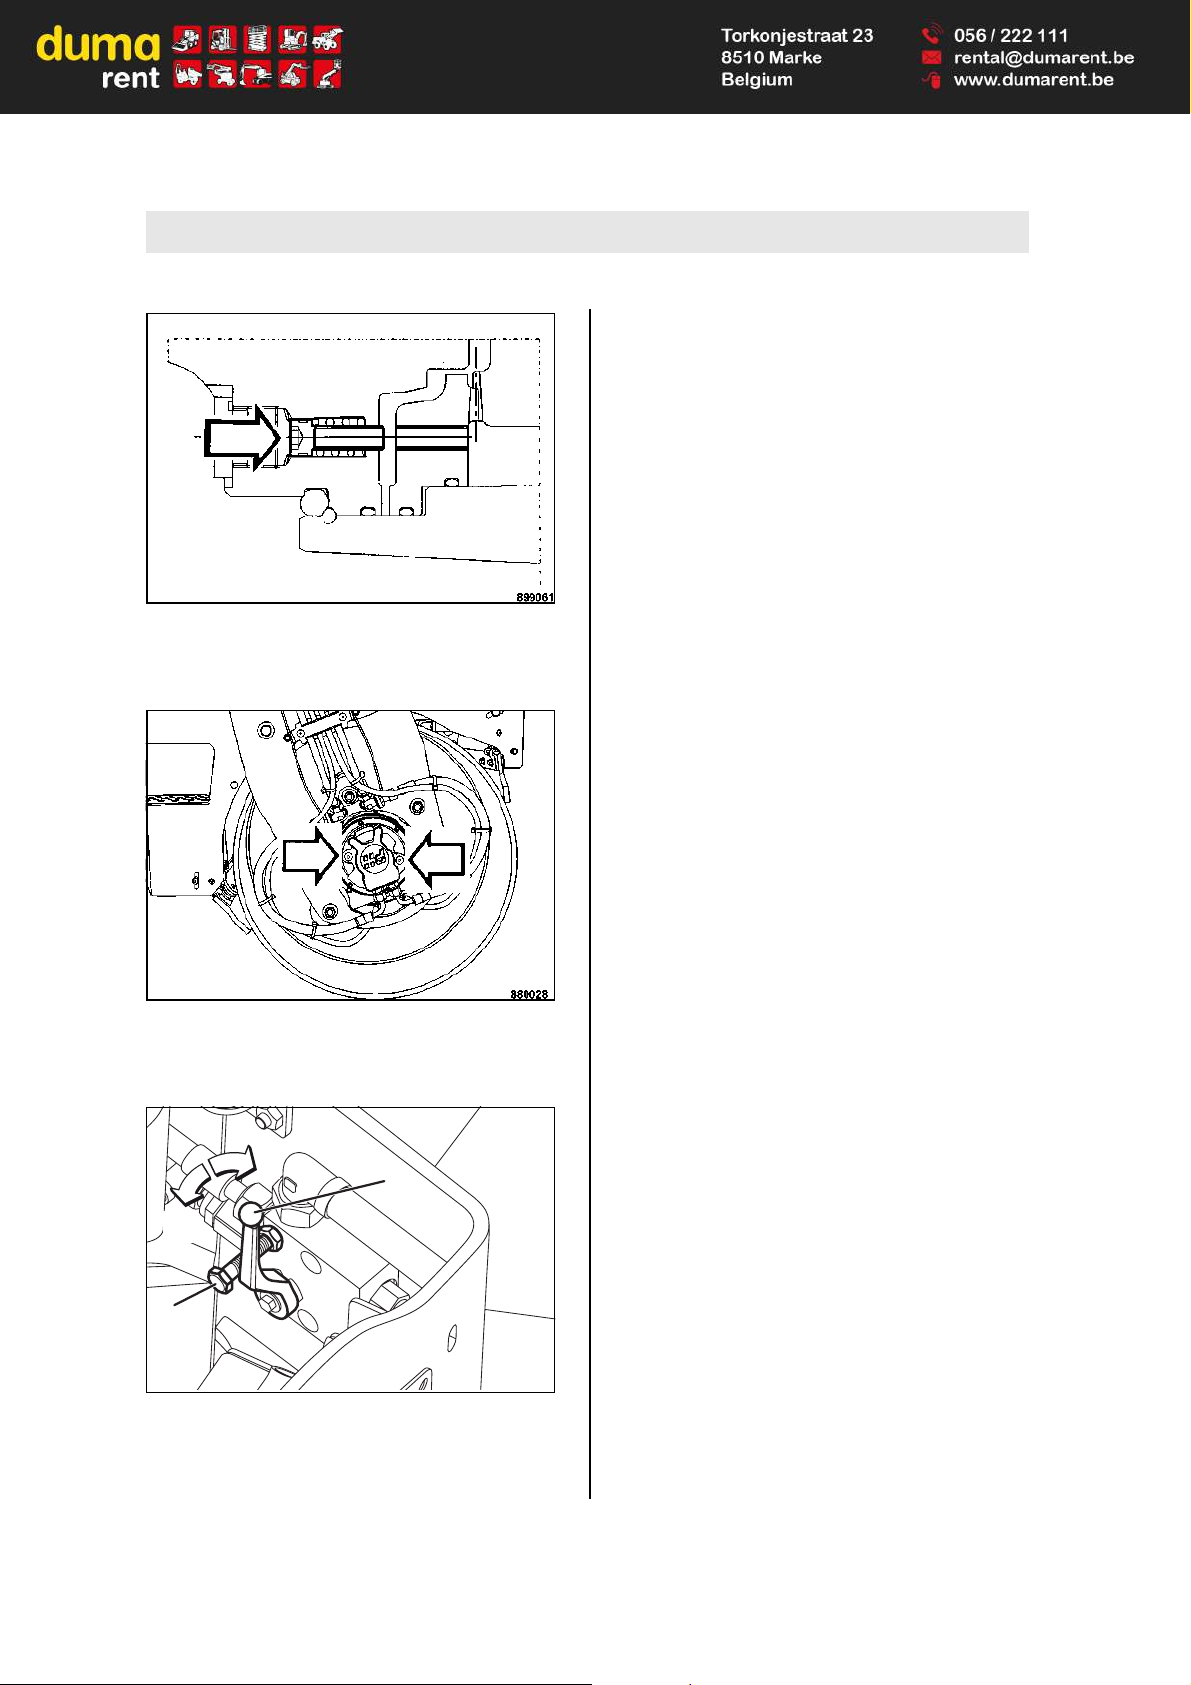
Operation
BOMAG66 BW 100/120/125 AD-4/AC-4
Fig. 107
l Completely release both screws (Fig. 107) to
close the brake.
Fig. 108
l Screw both plugs (Fig. 108) back in and tight-
en them with 20 Nm.
Fig. 109
l Switch the ball valve (2) (Fig. 109) back to po-
sition "I", turn the locking screw back in and
counter it with the hexagon nut (only AC-machines).
1
2
I
II
880112
Page 67
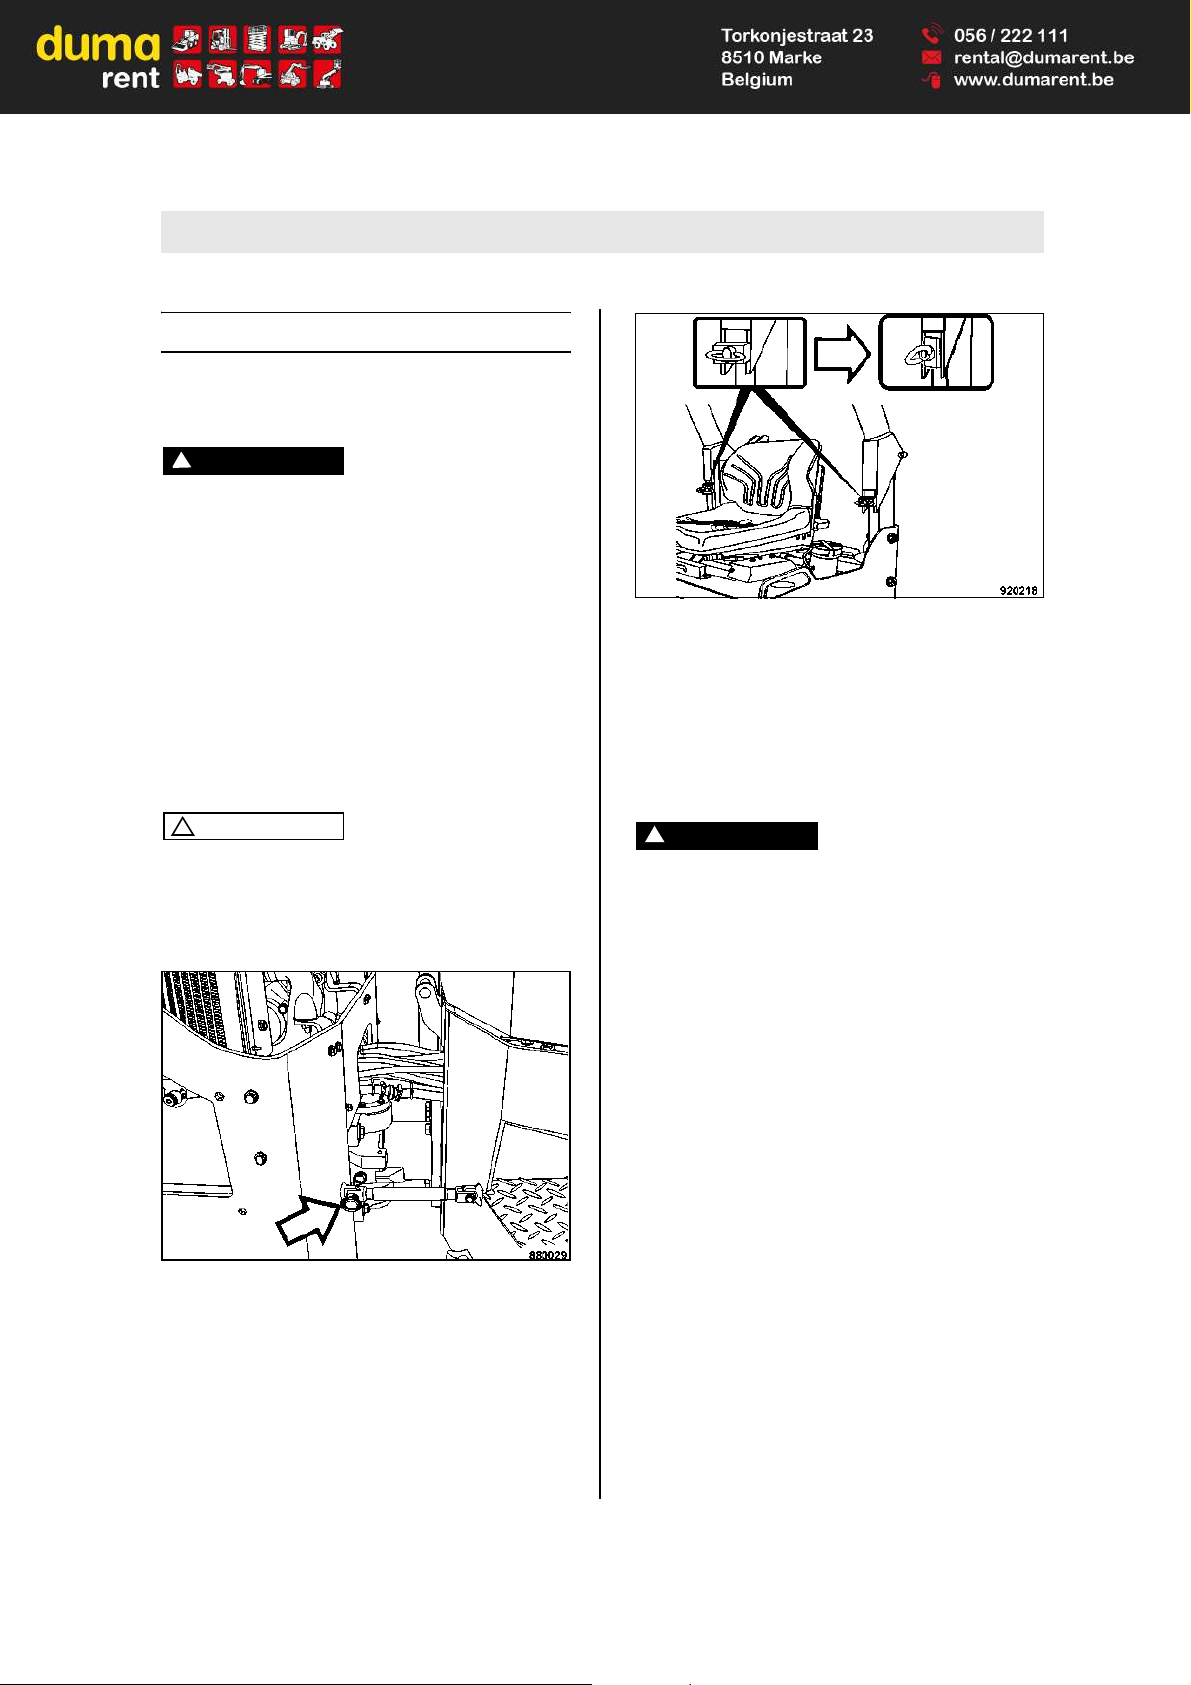
Operation
BOMAG 67BW 100/120/125 AD-4/AC-4
5.19 Loading/transport
Loading with loading ramp
Danger
!
Danger of accident! Life hazard!
Use only stable loading ramps of sufficient
load bearing capacity. The ramp inclination
must be less than the gradability of the machine.
Make sure that persons are not endangered by
the machine tipping or sliding off.
During demonstration and when loading the
machine do not remain in the danger zone of
the machine.
After driving the machine onto the transport
vehicle attach the articulation lock .
Caution
!
Always empty the chip spreader 1 before transport.
l Drive the machine carefully on the transport
vehicle.
Fig. 110
l After driving the machine onto the transport
vehicle swing the articulation lock (Fig. 110)
out of its receptacle and fasten it with the bolt
to the eye. Secure the bolt with the cotter pin.
Fig. 111
l Fold down the foldable ROPS
2
for transport.
Loosen the eye bolts (Fig. 111) and adjust the
clamping plates vertically.
l Fold the foldable ROPS back.
Loading by crane
Danger!
Danger of accident! Life hazard!
Engage the articulation lock.
Always use shackles on the lifting points for
loading the machine.
Check all lifting points for damage before lifting the machine. Do not use a damaged or in
any other way impaired lifting and points.
Lifting tackle must only be attached to loads
by expert personnel (qualified person).
Lift the machine only with suitable lifting gear.
Use only safe lifting gear of sufficient load
bearing capacity Minimum lifting capacity of
lifting gear: see operating weight in chapter
"Technical Data".
Do not lift or lower the machine jerkily.
The tension must always be effective in vertical direction.
The machine must not swing about when being lifted.
Do not step or stand under suspended loads.
1 Optional equipment 2 Optional equipment
Page 68
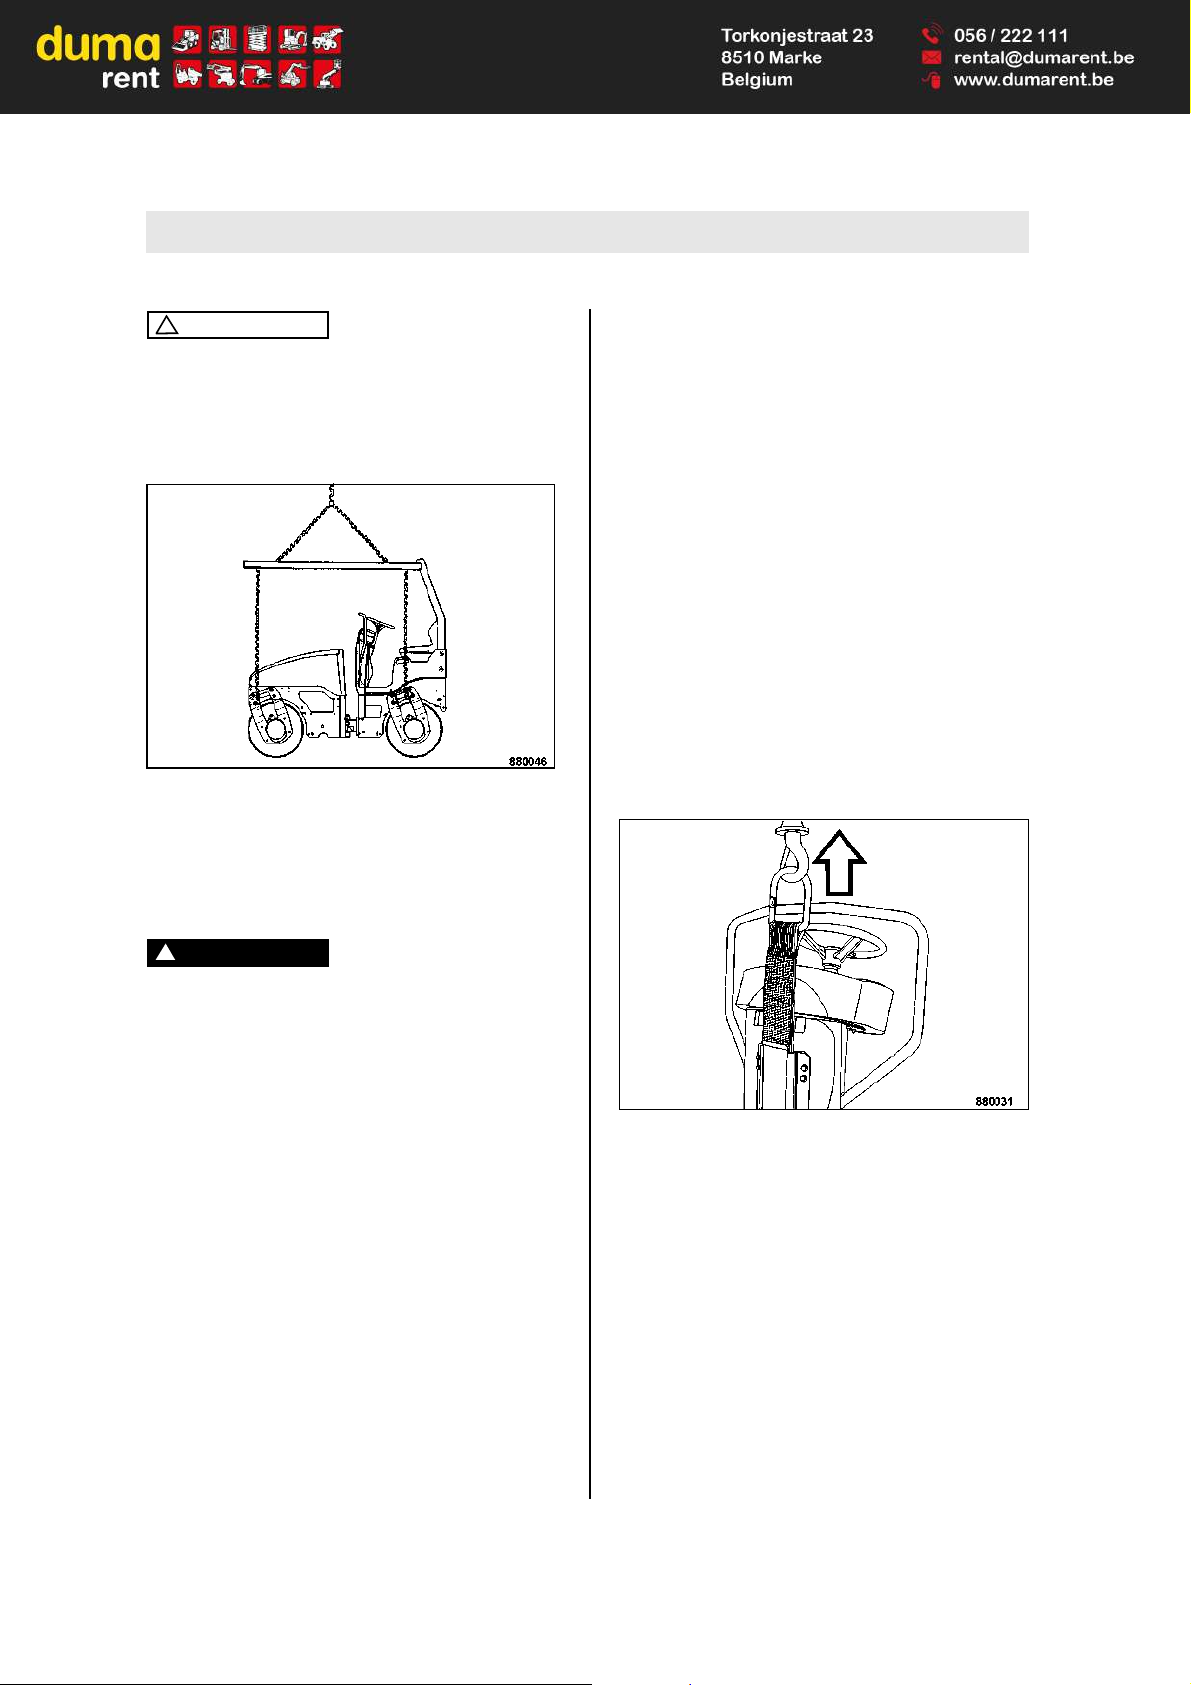
Operation
BOMAG68 BW 100/120/125 AD-4/AC-4
Caution
!
Always empty the chip spreader 1 before transport.
l Engage the articulation lock.
l Fold down the foldable ROPS
2
Fig. 112
l Use the four lifting eyes (Fig. 112) on the sup-
port legs to lift the machine.
Loading with a lifting belt
3
Danger
!
Danger of accident! Life hazard!
With the chip spreader attached the machine
must not be lifted with lifting belts, because of
the changed centre of gravity.
Engage the articulation lock.
Check all lifting tackle for damage before lifting the machine. Do not use damaged or in any
other way impaired lifting tackle.
Lifting tackle must only be attached to loads
by expert personnel (qualified person).
Do not overload the lifting belt.
Use only safe lifting gear of sufficient load
bearing capacity Minimum lifting capacity of
lifting gear: see operating weight in chapter
"Technical Data".
Do not lift or lower the machine jerkily.
The tension must always be effective in vertical direction.
The machine must not swing about when being lifted.
Do not step or stand under suspended loads.
After lifting hook the lifting belt back into its receptacle.
Have the lifting tackle inspected by an expert
(properly trained person) once every year.
After 5 years replace the lifting belt with a new
one.
l Engage the articulation lock.
l Fold down the foldable ROPS
4
l Fold the vandalism protection down to protect
the dashboard.
Fig. 113
l To lift the machine pull out the lifting eye from
the bracket and hook it into the lifting gear (Fig.
113).
1 Optional equipment
2 Optional equipment
3 Optional equipment
4 Optional equipment
Page 69

Operation
BOMAG 69BW 100/120/125 AD-4/AC-4
Fig. 114
l Reattach the lifting eye to the bracket after the
lifting process (Fig. 114).
Lashing
Danger!
Danger of accident! Life hazard!
Always use shackles on the lifting points for
lashing down the machine.
Check all lashing points for damage before
lashing down the machine. Do not use a damaged or in any other way impaired lashing
points.
Lash the machine down, so that it is secured
against rolling, sliding and turning over.
Caution
!
Never attach the lashing gear to the chip
spreader.
Fig. 115
l Fold up the covers on front and rear frames.
l Lash the machine down, so that it is secured
against rolling, sliding and turning over. Use
the lashing eyes (Fig. 115) on front and rear
frame for this purpose.
After transport
Danger
!
Life hazard!
Operate the machine only with the foldable
ROPS
1
properly fastened and the fastening
screws tightened with the correct tightening
torque.
After transport release the articulation lock
again and store it in the receptacle.
Fig. 116
l Pull the bolt out of the articulation locking bar
and swing the locking bar back into its receptacle (Fig. 116).
1 Optional equipment
Page 70
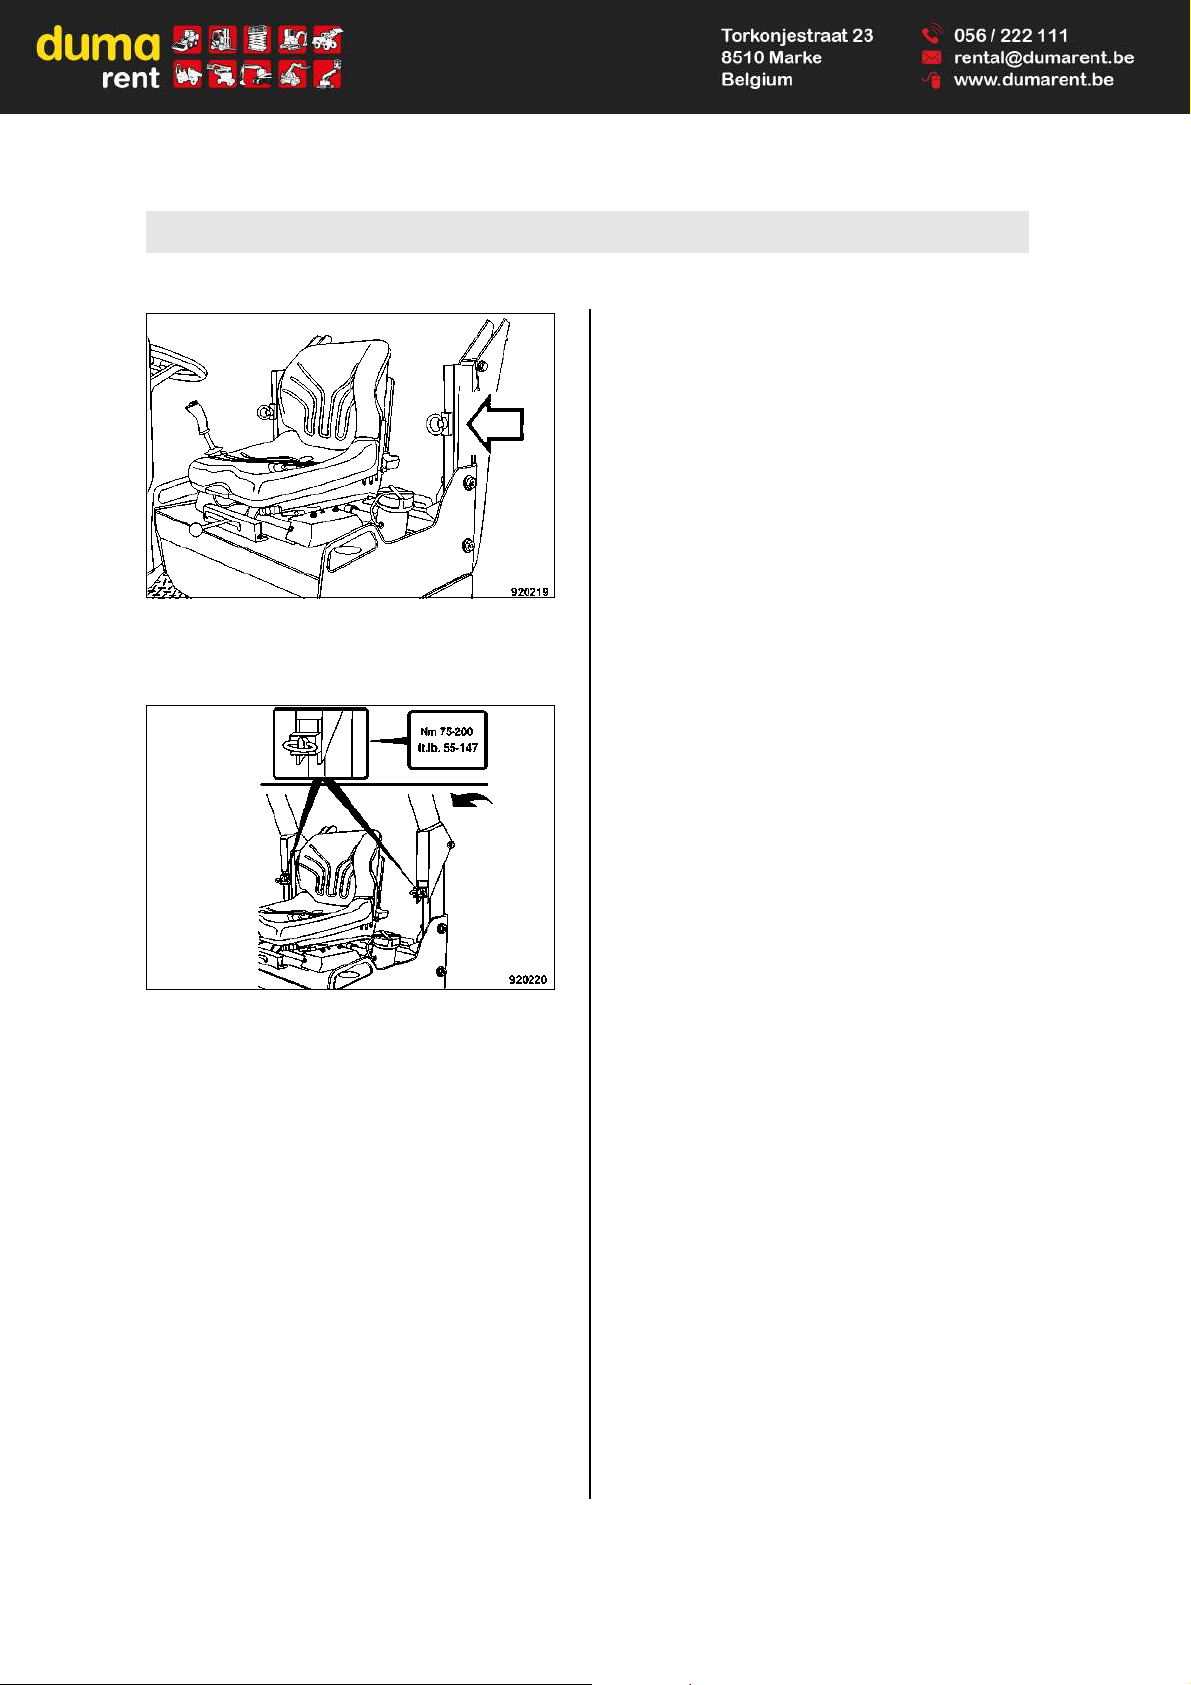
Operation
BOMAG70 BW 100/120/125 AD-4/AC-4
Fig. 117
l To fold up the foldable ROPS align the clamp-
ing plates on both sides vertically (Fig. 117).
Fig. 118
l Fold up the foldable ROPS (Fig. 118).
l Turn the clamping plates to horizontal position
and tighten the eye bolts with a tightening
torque of 75 - 200 Nm.
Page 71

BOMAG 71BW 100/120/125 AD-4/AC-4
6 Maintenance
Page 72
Maintenance
BOMAG72 BW 100/120/125 AD-4/AC-4
6.1 General notes on maintenance
When performing maintenance work always comply with the appropriate safety regulations.
Thorough maintenance of the machine guarantees far longer safe functioning of the machine and
prolongs the lifetime of important components.
The effort needed for this work is only little compared with the problems that may arise when not
observing this rule.
The terms right/left correspond with travel direction forward.
l Always clean machine and engine thoroughly
before starting maintenance work.
l For maintenance work stand the machine on
level ground.
l Always remove the main battery switch for all
maintenance work.
l Perform maintenance work only with the motor
switched off.
l Relieve hydraulic pressures before working on
hydraulic lines.
l Before working on electric parts of the ma-
chine disconnect the battery and cover it with
insulation material.
l When working in the area of the articulated
joint attach the articulation lock (transport
lock).
Environment
During maintenance work catch all oils and fuels and do not let them seep into the ground or
into the sewage system. Dispose of oils and fuels environmentally.
Keep used filters in a separate waste container
and dispose of environmentally.
Catch biodegradable oils separately.
Notes on the fuel system
The lifetime of the diesel engine depends to a
great extent on the cleanliness of the fuel.
l Keep fuel free of contaminants and water,
since this will damage the injection elements
of the engine.
l Drums with inside zinc lining are not suitable to
store fuel.
l When choosing the storage place for fuel
make sure that spilled fuel will not harm the environment.
l Do not let the hose stir up the slurry at the bot-
tom of the drum.
l The fuel drum must rest for a longer period of
time before drawing off fuel.
l The rest in the drum is not suitable for the en-
gine and should only be used for cleaning purposes.
Notes on the performance of the engine
On diesel engines both combustion air and fuel injection quantities are thoroughly adapted to each
other and determine power, temperature level and
exhaust gas quality of the engine.
If your engine has to work permanently in "thin air"
(at higher altitudes) and under full load, you should
consult the customer service of BOMAG or the
customer service of the engine manufacturer.
Notes on the cooling system
Prepare and check coolant with highest care,
since otherwise the engine may be damaged by
corrosion, cavitation and freezing.
The coolant is prepared by mixing a cooling system protection agent (ethylene glycol) into the
coolant.
Mixing with cooling system protection agent is
necessary in all climatic zones. It prevents corrosion, lowers the freezing point and raises the boiling point of the coolant.
Notes on the hydraulic system
During maintenance work on the hydraulic system
cleanliness is of major importance. Make sure that
no dirt or other contaminating substances can enter into the system. Small particles can produce
flutes in valves, cause pumps to seize, clog nozzles and pilot bores, thereby making expensive repairs inevitable.
l If, during the daily inspection of the oil level the
hydraulic oil level is found to have dropped,
check all lines, hoses and components for
leaks.
Page 73
Maintenance
BOMAG 73BW 100/120/125 AD-4/AC-4
l Seal external leaks immediately. If necessary
inform the responsible customer service.
l Do not store drums with hydraulic oil outdoors,
or at least under a cover. Water can be drawn
in through the bunghole when the weather
changes.
l We recommend to use the BOMAG filling and
filtering unit with fine filter to fill the system.
This ensures finest filtration of the hydraulic
oil, prolongs the lifetime of the hydraulic oil filter and protects the hydraulic system.
l Clean fittings, filler covers and the area around
such parts before disassembly to avoid entering of dirt.
l Do not leave the tank opening unnecessarily
open, but cover it so that nothing can fall in.
6.2 Fuels and lubricants
Engine oil
Quality
Lubrication oils are classified according to their
performance and quality class. Oils according to
other comparable specifications may be used.
If low sulphur fuel (< 0.05%) is used, you must only
use engine oils of API
1
-classification CF, CF-4,
CG-4, CH-4 and CI-4.
For operation of an engine with high sulphur fuels
it is recommended to use an engine oil of classification CF or higher with a total base number of at
least 10.
Caution
!
Engine oils of classification CJ-4 must not be
used!
Oil viscosity
Since lubrication oil changes its viscosity with the
temperature, the ambient temperature at the operating location of the engine is of utmost importance when choosing the viscosity class (SAEclass) .
Optimal operating conditions can be achieved by
using the following oil viscosity chart as a reference.
Oil change intervals
The longest permissible time a lubrication oil
should remain in an engine is 1 year. If the follow-
1 American Petroleum Institute
Ambient temperature Viscosity
over 25 °C!
SAE 30
SAE10W-30
SAE 15W-40
0°C to 25°C
SAE 20
SAE10W-30
SAE 15W-40
below 0 °C SAE 10
SAE10W-30
SAE 15W-40
Page 74
Maintenance
BOMAG74 BW 100/120/125 AD-4/AC-4
ing oil change intervals are not reached over a period of 1 year, the oil change should be performed
at least once per year, irrespective of the operating
hours reached.
API: CF, CF-4,
CG-4,CH-4 and
CI-4 = 250 operating hours
Fuels
Quality
Cetan index number: The recommended minimum
index number for the Cetan value is 45. A Cetan
index number higher than 50 should preferably be
used, especially at ambient temperatures below 20 °C and when working at altitudes of 1500 m
and more.
Diesel fuel specifications: With respect to the percentage (ppm) of sulphur the fuel used in the engine must comply with all relevant exhaust
emission regulations in the are of use of the engine.
It is highly recommended to use a fuel with a sulphur content of less than 0,10 % (1000 ppm).
When using a diesel fuel with a high sulphur content of 0.50 % (5000 ppm) to 1.0 % (10.000 ppm),
the engine oil change intervals must behalved.
Caution
!
Do not use any fuels with a sulphur content of
more than 1,0 % (10000 ppm).
It is recommended to use diesel fuel that complies
with the specifications EN590 or ASTM D975.
Diesel fuel with the designation no. 2-D is a destillate fuel with low volatility, which is especially suitable for industrial engines and heavy-duty
commercial vehicles (SAE J313 JUN87).
Since KUBOTA diesel engines with a rated power
of less than 56 kW (75 HP) comply with the exhaust emission standard of EPA
1
-stage 4, the use
of low or ultra-low sulphur fuel is mandatory for
these engines, if the engines are operated within
the validity area of the EPA standard. As an alternative to no. 2-D you may also use diesel fuel no.
2-D S500 or S15; with ambient temperatures below -10 °C the diesel fuel no. 1-D S500 or S15
should be used fir no. 1-D.
The fuel level should always be topped up in due
time so that the fuel tank is never run dry, as otherwise filter and injection lines need to be bled.
Winter fuel
Danger!
Fire hazard!
Diesel fuels must never be mixed with gasoline.
For winter operation use only winter diesel fuel, to
avoid clogging because of paraffin separation. At
very low temperatures disturbing paraffin separation can also be expected when using winter diesel
fuel.
Coolant
Always use a mixture of anti-freeze agent and
clean, dehardened water with a mixing ratio of 1:1.
Under particularly extreme temperature conditions
you should consult the service representation of
the engine manufacturer with respect to the antifreeze agent to be used.
There are various types of anti-freeze agents
available. For this engine you should use ethylene
glycol.
Before filling in the coolant mixed with anti-freeze
agent the radiator must be flushed with clean water. This procedure should be repeated two to
three times to clean the inside of radiator and engine block.
Mixing the anti-freeze agent: Prepare a mixture of
50 % anti-freeze agent and 50 % low mineral,
clean water. Stirr well before filling it into the radiator. The method for mixing water and anti-freeze
agent depends on the brand of the anti-freeze
agent. In this respect see standard SAE J1034
and also the standard SAE J814c.
Add anti-freeze agent: If the coolant level drops
because of evaporation,only clean water is to be
used for topping up. In case of leakages you must
always fill in anti-freeze agents of the same brand
and the same mixing ratio.
Caution
!
Do not mix different coolants and additives of
any other kind.
1 United States Environmental Protection Agency
Page 75
Maintenance
BOMAG 75BW 100/120/125 AD-4/AC-4
Do not use any radiator cleaning agent after the
anti-freeze agent has been mixed in. The antifreeze agent also contains a corrosion protection
agent. If this mixes with cleaning agent it may
cause the development of sludge, which could
damage the cooling system.
Anti-freeze concentration
50% = -37 °C
Environment
Coolant must be disposed of environmentally.
Mineral oil based hydraulic oil
The hydraulic system is operated with hydraulic oil
HV 46 (ISO) with a kinematic Viskosität von 46
mm
2
/s bei 40 °C und 8 mm2/s bei 100 °C betrieben. For topping up or for oil changes use only
high-quality hydraulic oil, type HVLP according to
DIN 51524, part 3, or hydraulic oils type HV according to ISO 6743/3. The viscosity index (VI)
should be at least 150 (observe information of
manufacturer).
Bio-degradable hydraulic oil
The hydraulic system can also be operated with a
synthetic ester based biodegradable hydraulic oil.
The biologically quickly degradable hydraulic oil
Panolin HLP Synth.46 meets all demands of a
mineral oil based hydraulic oil according to
DIN 51524.
In hydraulic systems filled with Panolin HLP
Synth.46 always use the same oil to top up.
When changing from mineral oil based hydraulic
oil to an ester based biologically degradable oil,
you should consult the lubrication oil service of the
oil manufacturer for details.
Caution
!
Check the filter more frequently after this
change.
Perform regular oil analyses for content of water and mineral oil.
Replace the hydraulic oil filter element every
500 operating hours.
Page 76

Maintenance
BOMAG76 BW 100/120/125 AD-4/AC-4
6.3 Table of fuels and lubricants
Assembly Fuel or lubricant Quantity
Summer Winter Attention
Observe the level marks
Engine
- Engine oil Engine oil API: CF, CF-4, CG-4, CH-4 or CI-4 approx. 6.5 litres
SAE 10W-40 (-20 °C to +40 °C)
(BOMAG PN 009 920 06; 20 l)
SAE 10W-30 (-15 °C to +30 °C)
SAE 15W-40 (-15 °C to + 40 °C)
SAE 30 (+5 °C to +30 °C) SAE 10 (-30 °C to -5 °C)
- Fuel Diesel Winter diesel fuel (down
to -12°C)
approx. 40 litres
- Coolant Mixture of water and anti-freeze agent
(BOMAG PN 009 940 08; 20 l)
approx. 4 litres
Hydraulic system Hydraulic oil (ISO), HLP 46
(BOMAG PN 009 930 09; 20 l)
or
ester based biodegradable hydraulic oil
approx. 28 litres
Sprinkler system Water Anti-freeze mixture
water
1
approx. 220 litres
- Rubber tire sprinkler sys-
tem
Emulsion approx.20 l
1 Mix water and anti-freeze agent by following the instructions of the manufacturer.
Page 77
Maintenance
BOMAG 77BW 100/120/125 AD-4/AC-4
6.4 Running-in instructions
The following maintenance work must be performed when running in new machines or
overhauled engines:
Caution
!
Up to approx. 250 operating hours check the
engine oil level twice every day.
Depending on the load the engine is subjected
to, the oil consumption will drop to the normal
level after approx. 100 to 250 operating hours.
Maintenance after 50 operating hours
l Change engine oil and filter
l Check the engine for leaks
l Retighten the fastening screws on air filter, ex-
haust and other attachments.
l Check screw connections on the machine,
retighten as necessary.
Page 78
Maintenance
BOMAG78 BW 100/120/125 AD-4/AC-4
6.5 Maintenance table
No. Maintenance work Comment
every 10 operating hours, daily
every 50 operating hours
every 250 oper. hours
every 500 oper. hours
every 1000 oper. hours
every 2000 oper. hours
every 3000 oper. hours
as required
6.6
Check the engine oil level Dipstick mark X
6.7
Check the fuel level Instrument cluster X
6.8
Check the hydraulic oil level Dipstick mark X
6.9
Check the hydraulic oil filter element
Contamination indicator
X
6.10
Check the coolant level X
6.11
Check the water separator X
6.12
Check the water level Water level gauge X
6.13
Check the emulsion level only AC-machines X
6.14
Check the chip spreader and
clean the spreading beam
X
6.15
Check fuel lines and clamps X
6.16
Service the chip spreader X
6.17
Change engine oil and oil filter
1
at least 1x per year
see foot note
X
6.18
Check, clean, replace the combustion air filter
replace min. 1x per
year
X
6.19
Check the air intake lines X
6.20
Cleaning radiator and hydraulic
oil cooler
X
6.21
Check, tension, replace the Vbelt
X
6.22
Check radiator hoses and hose
clamps
X
6.23
Checking, adjusting the scrapers X
Page 79
Maintenance
BOMAG 79BW 100/120/125 AD-4/AC-4
6.24
Battery service pole grease X
6.25
Change the fuel filter X
6.26
Drain the fuel tank sludge X
6.27
Check and adjust the valve clearance
Intake and exhaust
valve: 0.20 mm
on cold engine
X
6.28
Check the engine mounts X
6.29
Change hydraulic oil and breather filter
2
at least every 2 years X
6.30
Change the hydraulic oil filter
2
at least every 2 years X
6.31
Change the coolant at least every 2 years X
6.32
Replacing the fuel lines at least every 2 years X
6.33
Check the injection valves X
6.34
Check the fuel injection pump X
6.35
Check the tire pressure only AC-machines X
6.36
Clean the water sprinkler system X
6.37
Drain the water sprinkler system,
maintenance in case of frost
X
6.38
Fill the provision tank for the
windscreen washer system
X
6.39
Tightening torques X
6.40
Engine conservation X
1 oil change after 50 and 250 operating hours, then every 250 operating hours
2 Also after repairs in the hydraulic system.
No. Maintenance work Comment
every 10 operating hours, daily
every 50 operating hours
every 250 oper. hours
every 500 oper. hours
every 1000 oper. hours
every 2000 oper. hours
every 3000 oper. hours
as required
Page 80

Maintenance
BOMAG80 BW 100/120/125 AD-4/AC-4
Page 81
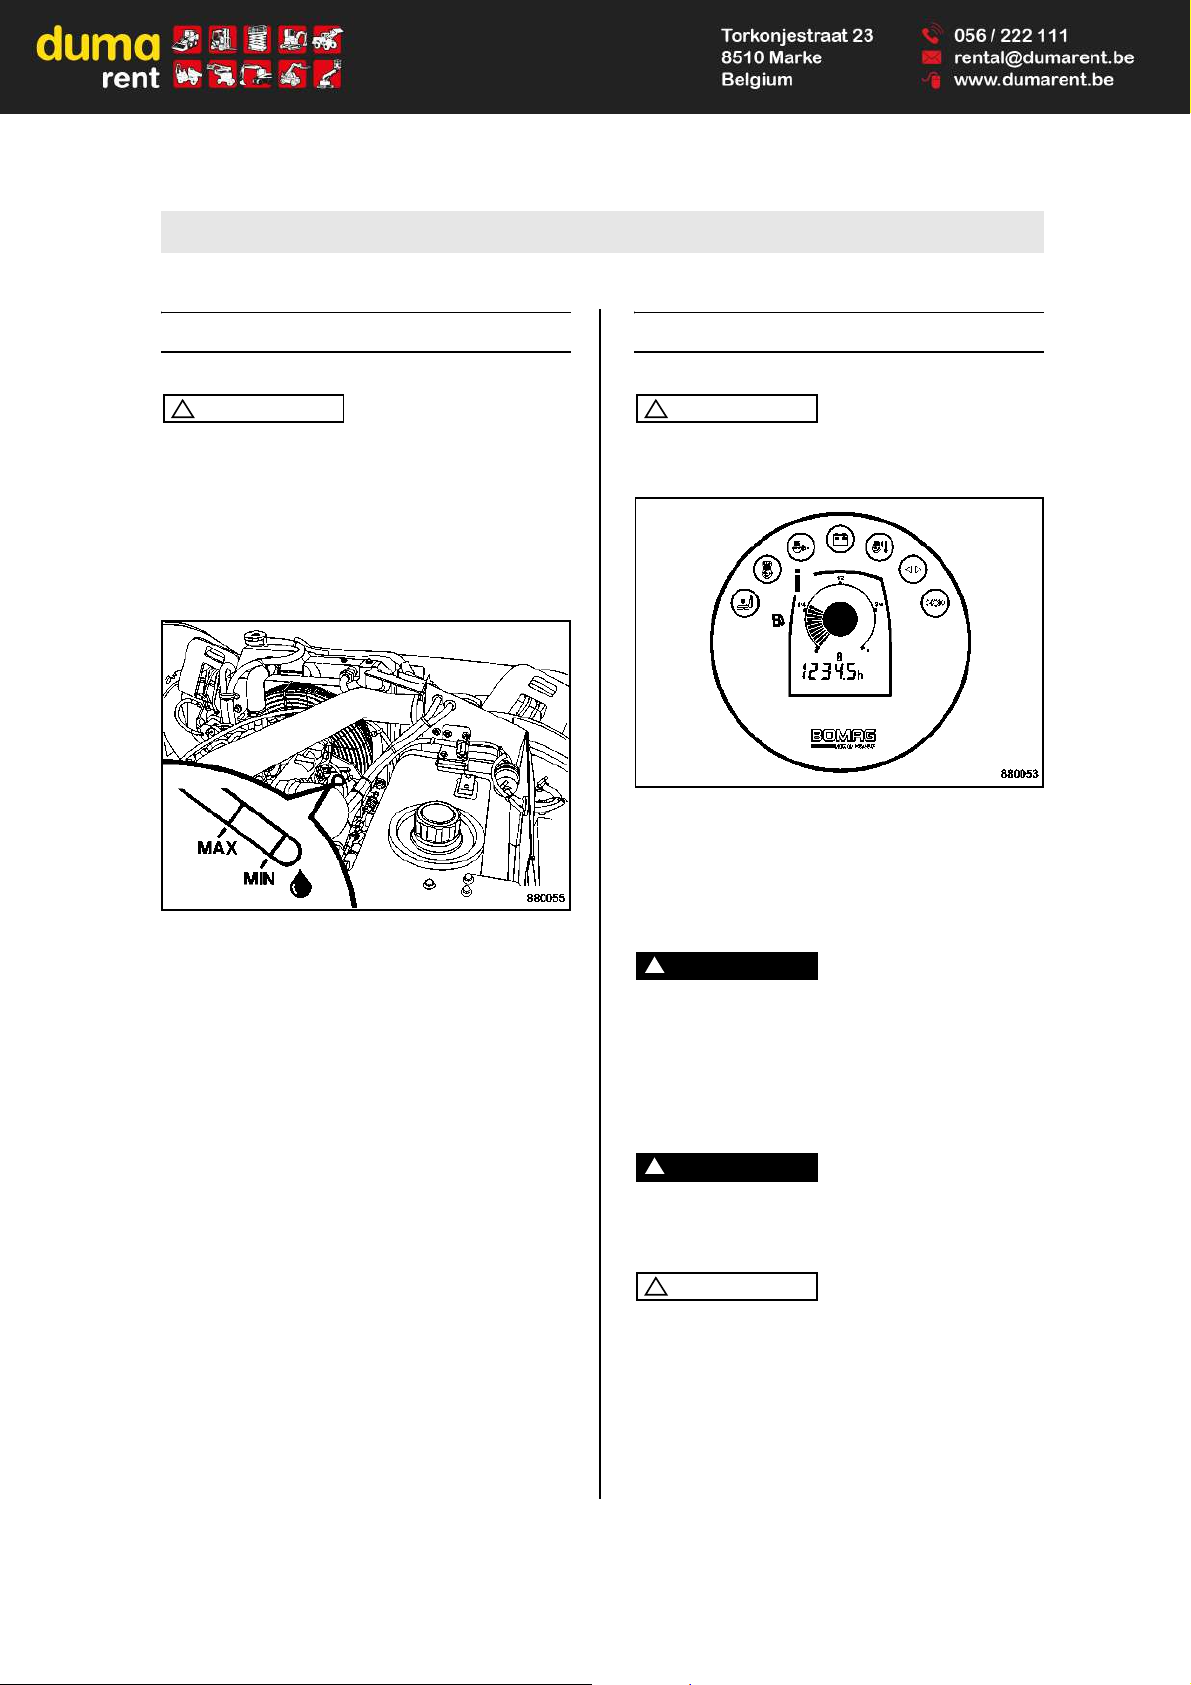
Every 10 operating hours
BOMAG 81BW 100/120/125 AD-4/AC-4
Every 10 operating hou rs
6.6 Check the engine oil level
Caution
!
The machine must be in horizontal position.
When the engine is warm, shut it down and
check the oil level after five minutes. With a
cold engine the oil level can be checked immediately.
For quality and quantity of oil refer to the "table
of fuels and lubricants".
Fig. 119
l Pull the dipstick (Fig. 119) out, wipe it off with
a lint-free, clean cloth and reinsert it until it bottoms.
l Pull the dipstick back out.
The oil level must always be between the "MIN"and "MAX"-marks.
l If the oil level is too low top up oil immediately.
l If the oil level is too high, determine the cause
and drain the oil off.
6.7 Checking the fuel level
Caution
!
Do not drive the fuel tank dry, as otherwise the
fuel system needs to be bled.
Fig. 120
l Check the fuel level on fuel gauge (i) (Fig. 120)
in the instrument cluster.
Refuelling
Danger
!
Fire hazard!
When working on the fuel system do not use
open fire, do not smoke, do not spill any fuel.
Do not refuel in closed rooms.
Shut down the engine.
Danger!
Health hazard!
Do not inhale any fuel fumes.
Caution
!
Contaminated fuel can cause malfunction or
even damage of the engine. If necessary, fill in
fuel through a funnel with screen.
Monitor the entire refuelling process.
For quality and quantity of fuel refer to the "table of fuels and lubricants".
Page 82

Every 10 operating hours
BOMAG82 BW 100/120/125 AD-4/AC-4
Environment
Catch running out fuel, do not let it seep into
the ground.
l Shut down the engine.
Fig. 121
l Clean the area around the filler opening.
l Open the fuel tank cover (Fig. 121).
l Top up with fuel (diesel or winter diesel).
l Screw the fuel tank cover back on.
6.8 Check the hydraulic oil level
Caution
!
If, during the daily inspection of the oil level
the hydraulic oil level is found to have
dropped, check all lines, hoses and components for leaks.
In hydraulic systems filled with Panolin HLP
Synth. 46 always use the same oil to top up.
With other ester based oils consult the lubrication oil service of the respective oil manufacturer.
l Clean the area around the filler opening.
l Remove the filler cap.
Fig. 122
l Check the oil level on the dipstick. The oil level
must be between the "MIN" and "MAX" marks
(Fig. 122).
l If the oil level is too low top up hydraulic oil im-
mediately.
For quality and quantity of oil refer to the ”table of fuels and lubricants”.
Page 83

Every 10 operating hours
BOMAG 83BW 100/120/125 AD-4/AC-4
6.9 Checking the hydraulic oil
filter element
Note
i
If the hydraulic oil is very cold the pin may pop up,
you should therefore only check the filter and
press the pin in at operating temperature.
Fig. 123
l Check the service indicator 1 (Fig. 123) at op-
erating temperature and with the engine running at maximum speed.
l If necessary press the pin in.
Pin remains
pressed in = Hydraulic oil filter element o.k.
Pin pops out = Replace the hydraulic oil filter
element
6.10 Check the coolant level
Danger!
Danger of scalding!
Open the cap on the coolant compensation
tank only when the engine is cold.
Caution
!
If, during the daily inspection the coolant level
is found to have dropped, check all lines, hoses and engine for leaks.
For quality of coolant refer to "fuels and lubricants".
Fig. 124
l Check the coolant level in the compensation
tank (Fig. 124).
l To top up unscrew the filler cap and fill in cool-
ant up to the MAX-mark.
Page 84
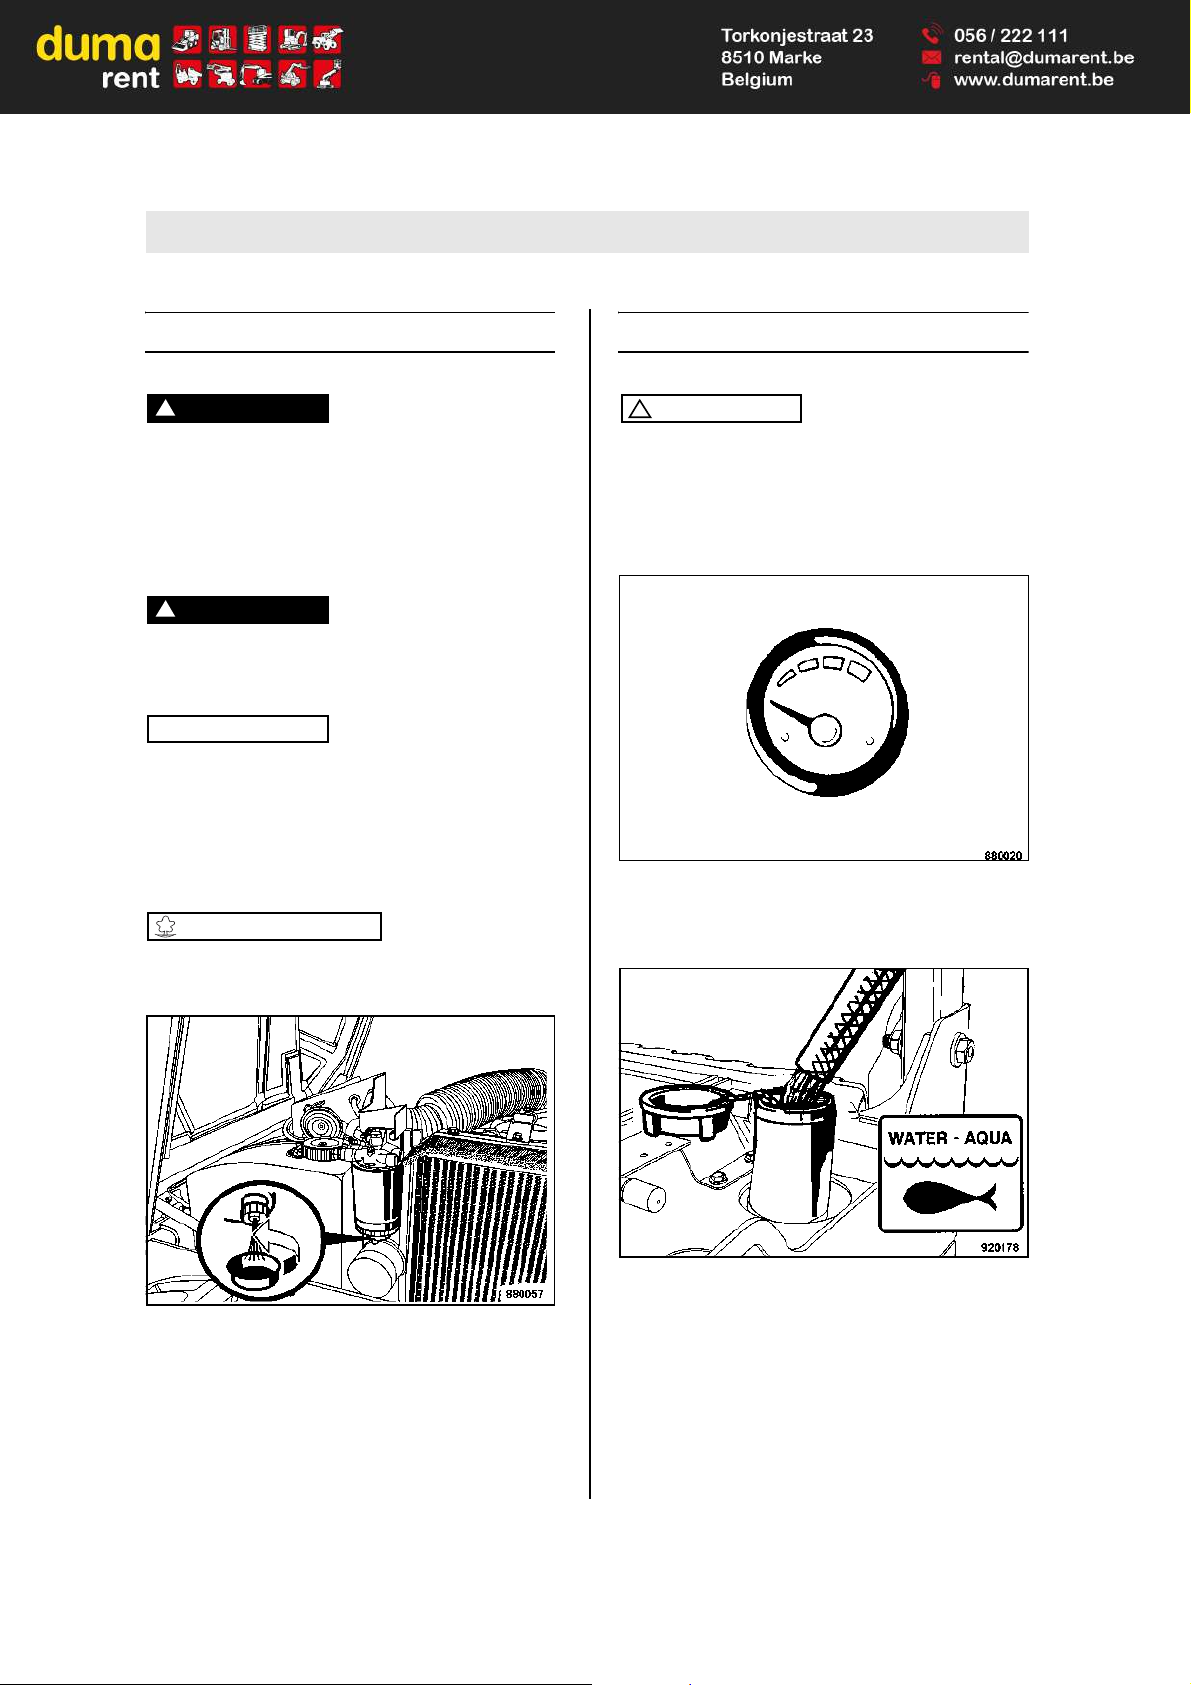
Every 10 operating hours
BOMAG84 BW 100/120/125 AD-4/AC-4
6.11 Check the water separator
Danger!
Fire hazard!
When working on the fuel system do not use
open fire, do not smoke.
Do not spill any fuel.
Shut down the engine.
Danger
!
Health hazard!
Do not inhale any fuel fumes.
Note
i
The service intervals for the water separator depend on the water content in the fuel and can
therefore not be determined precisely. After taking
the engine into operation you should therefore
check the water separator every day for signs of
water.
Environment
Any fuel must be caught and disposed of in an
environmentally friendly manner.
Fig. 125
l Slacken the drain plug (Fig. 125) for a few
turns and catch running out fuel / water.
l Tighten the drain plug again and check for
leaks, if necessary replace the seal ring.
6.12 Checking the water level
Caution
!
If there is a risk of frost observe the special
service instructions in chapter "water sprinkler system, maintenance in case of frost".
Make sure that the ventilation bore in the filler
cap is free.
Fig. 126
l Check the water tank filling level on the water
level gauge (Fig. 126).
Fig. 127
l Open the cap (Fig. 127) and check the water
level.
l If necessary fill in water through the filler
screen and close the cap again.
Page 85
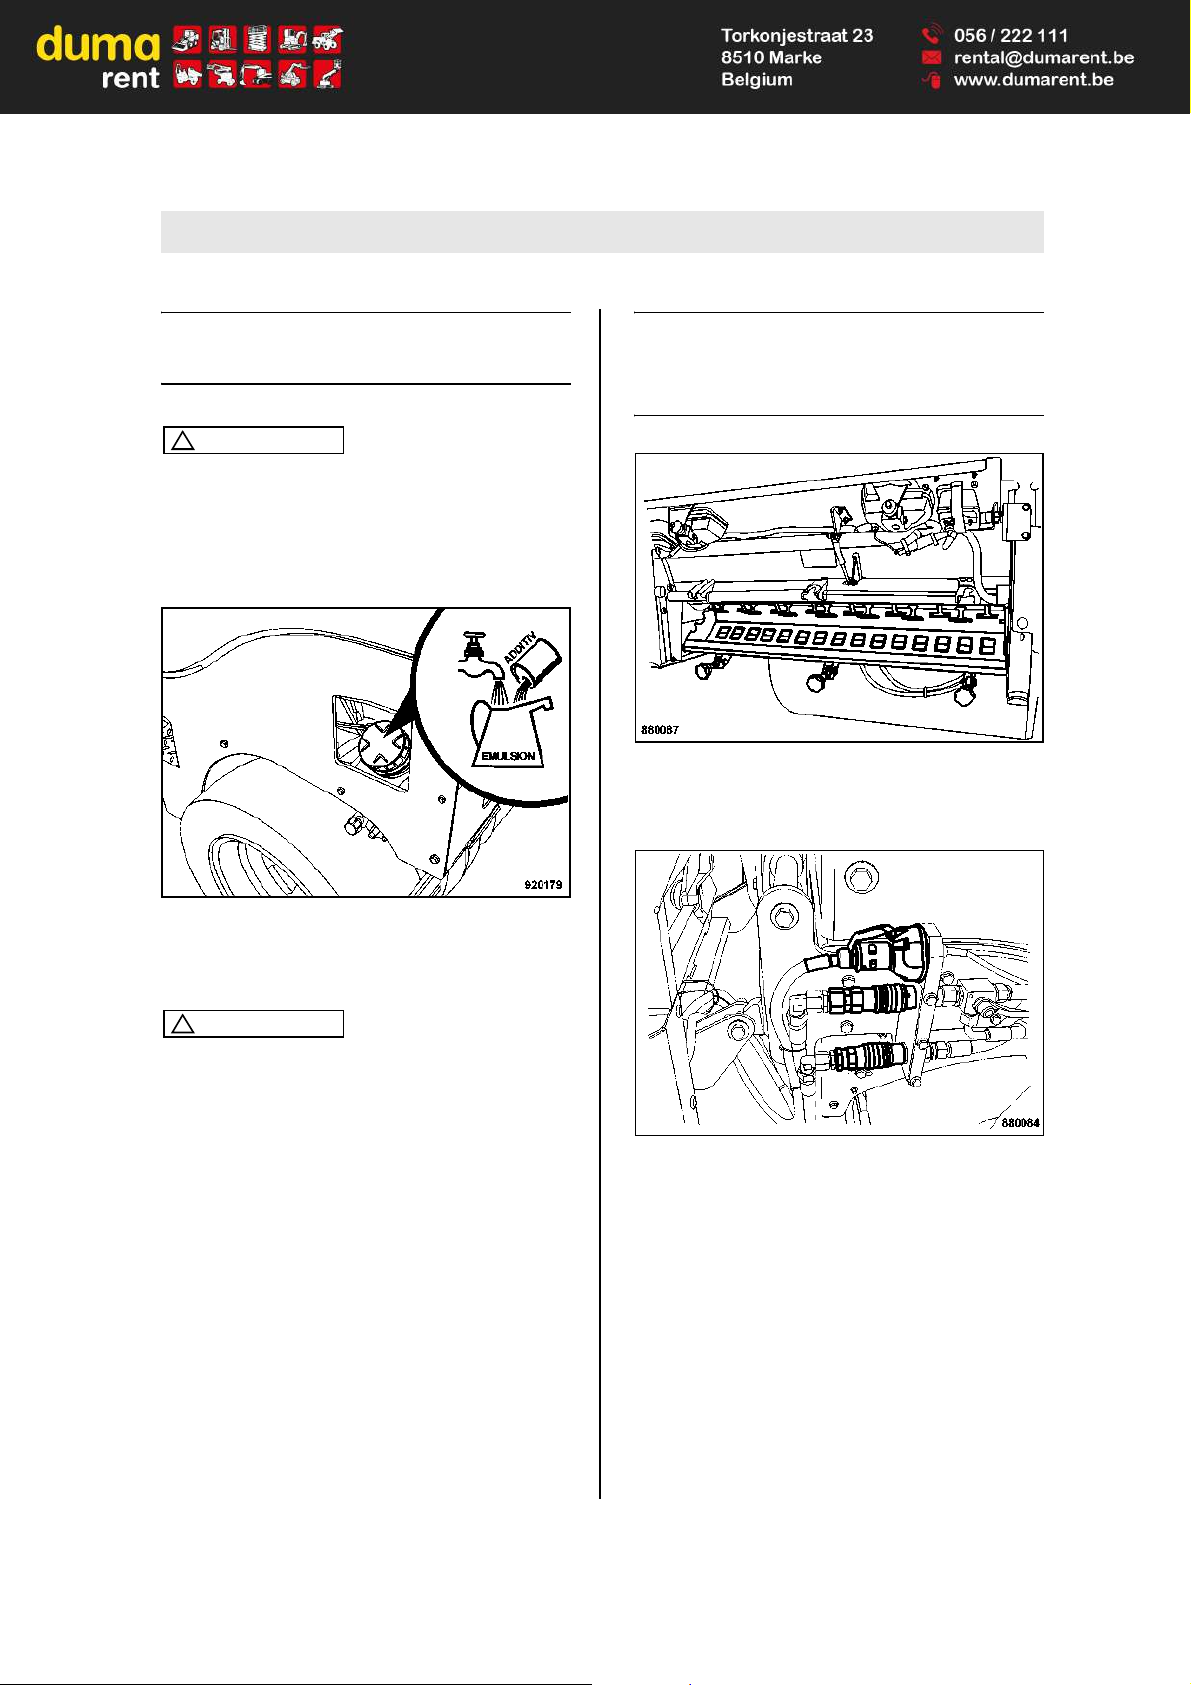
Every 10 operating hours
BOMAG 85BW 100/120/125 AD-4/AC-4
6.13 Checking the emulsion level
1
Caution
!
Different emulsions must not be mixed. If necessary drain off the emulsion beforehand.
For mixing ratio of water and emulsion refer to
the specification of the respective manufacturer.
Fig. 128
l Unscrew the cover (Fig. 128) and check the
emulsion level, fill up if necessary.
Caution
!
Make sure that the ventilation bore in the filler
cap is free.
6.14 Checking the chip spreader
2
and cleaning the spread-
ing beam
Fig. 129
l Clean the spreading beam from any dirt (Fig.
129), especially from asphalt.
Fig. 130
l Check hydraulic lines (Fig. 130) for leak tight-
ness.
l Check hydraulic and electric connections for
tight fit.
1 only AC-machine 2 Optional equipment
Page 86
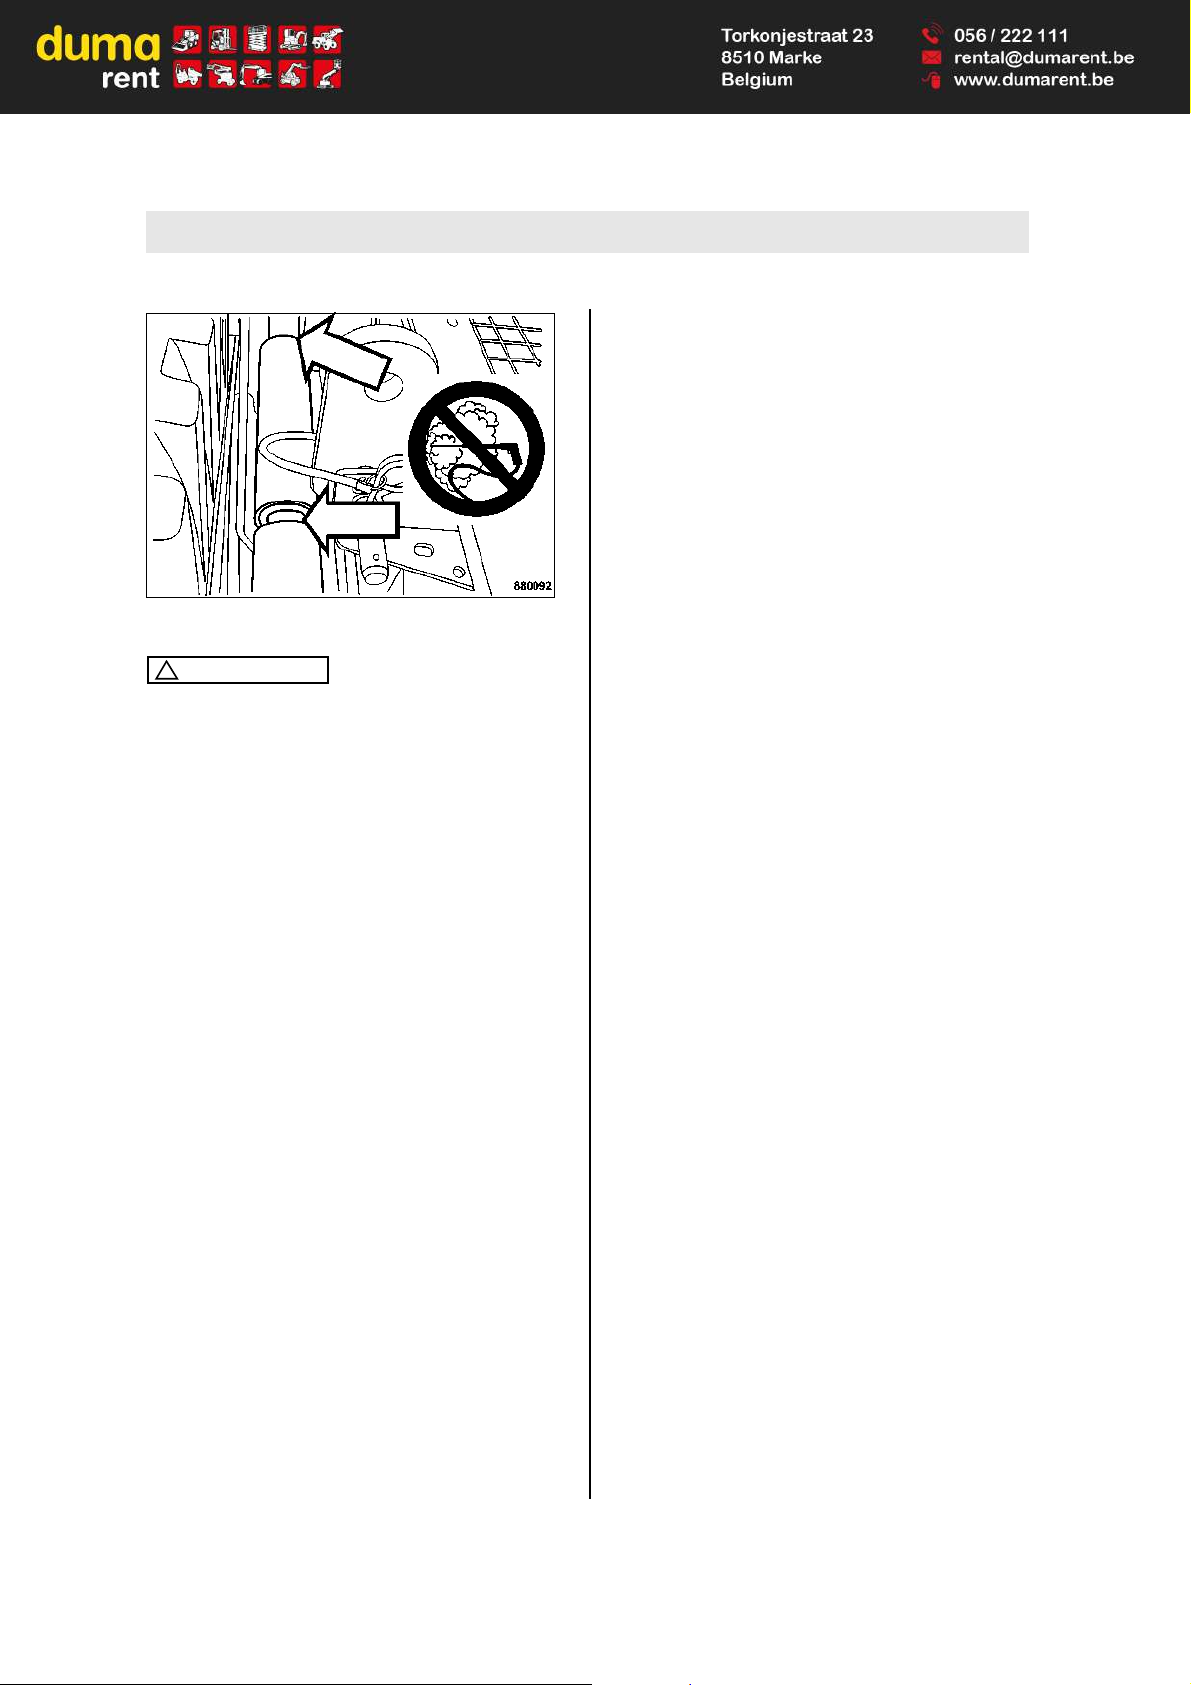
Every 10 operating hours
BOMAG86 BW 100/120/125 AD-4/AC-4
Fig. 131
Caution
!
When cleaning with a steam cleaner do not direct the water jet into the sealing elements of
the slide profiles (Fig. 131).
Page 87

Every 50 operating hours
BOMAG 87BW 100/120/125 AD-4/AC-4
Every 50 operating hou rs
6.15 Checking fuel lines and
clamps
Danger
!
Danger of burning!
Perform inspection work only after the engine
has cooled down and with the engine stopped.
Caution
!
If fuel lines or hose clamps are found to be
damaged, the corresponding parts must be immediately repaired or replaced.
After replacing lines or hose clamps the fuel
system needs to be bled.
Disassembled or new fuel lines must be closed
with clean cloths on both ends, to make sure
that no dirt will enter into the fuel system. Dirt
particles can destroy the injection pump.
Fig. 132
l Check the condition and tight fit of all fuel lines
(2) (Fig. 132) and hose clamps (1).
6.16 Servicing the chip spreader
1
Lubricate the following components on the chip
spreader:
l Spreading shaft bearings
l Drive chain
l Adjustment lever for chip quantity
l Screw connections with star handles
l all movable parts
1 Optional equipment
Page 88

Every 50 operating hours
BOMAG88 BW 100/120/125 AD-4/AC-4
Page 89

Every 250 operating hours
BOMAG 89BW 100/120/125 AD-4/AC-4
Every 250 operating hours
6.17 Changing engine oil and oil
filter
Danger
!
Danger of scalding!
When draining off hot oil.
By hot oil when unscrewing the engine oil filter.
Caution
!
The oil change at 250 operating hours refers to
the use of oils of oil quality class API CF, CF-4,
CG-4, CH-4 or CI-4 and a fuel sulphur content
of less than 0.5%.
When using fuels with a sulphur content higher than 0.5% the oil change intervals must be
halved.
Drain the engine oil only when the engine is
warm.
For quality and quantity of oil refer to the "table
of fuels and lubricants".
Environment
Catch running out oil and dispose of environmentally together with the oil filter cartridge.
Fig. 133
l Unscrew the oil filler plug (Fig. 133).
Fig. 134
l Unscrew the drain plug (Fig. 134) and catch
running out oil.
l Turn the drain plug tightly back in.
Fig. 135
l Unscrew the filter cartridge (Fig. 135) using an
appropriate filter wrench.
l Clean the sealing face on the filter carrier from
any dirt.
Page 90

Every 250 operating hours
BOMAG90 BW 100/120/125 AD-4/AC-4
Fig. 136
l Slightly oil the rubber seal on the new filter car-
tridge (Fig. 136).
l Turn the new filter cartridge on by hand, until
the seal contacts.
l Tighten the filter element for another half turn.
Fig. 137
l Fill in new engine oil (Fig. 137).
l Tighten the oil filler cap properly.
Fig. 138
l After a short test run check the oil level once
again (Fig. 138), if necessary top up to the top
mark (MAX).
Page 91

Every 250 operating hours
BOMAG 91BW 100/120/125 AD-4/AC-4
6.18 Checking, cleaning, replacing the combustion air filter
Caution
!
Perform cleaning, maintenance and repair
work only with the engine shut down. Do not
start the engine after removing the filter element.
Do not use gasoline or hot fluids to clean the
filter element.
After cleaning the filter element must be inspected for damage using a torch.
Air filter elements with damaged paper bellows
or seal lips must be replaced in any case.
The main filter element must be replaced after
6 times cleaning, but at the latest after one
year, irrespective of the operating hours.
Each cleaning interval must be marked with a
cross on the cover of the filter element.
Cleaning does not make sense if the air filter
element is covered with a sooty deposit. Use a
new filter element.
Incorrectly handled filter elements may become ineffective because of damage (e.g.:
cracks) and cause engine damage.
l Open the engine hood.
Note
i
Under very dusty conditions you may have to
check the filter service indicator every day.
Fig. 139
Service of the dry air filter is due when the red piston of the filter service indicator (Fig. 139) reaches
into the transparent window.
Caution
!
After cleaning the air filter press the reset button for the red piston on the filter service indicator.
Fig. 140
l Release the locking hook (Fig. 140) and take
the filter hood off.
l Clean filter hood and dust discharge valve.
Page 92

Every 250 operating hours
BOMAG92 BW 100/120/125 AD-4/AC-4
Fig. 141
l Carefully loosen the main filter element (Fig.
141).
The main filter element is located directly on the air
intake tube, thereby providing a seal on the inside
of the filter cover. Carefully remove the main filter
element, in order to reduce the released amount of
dust. To release the seal pull the main filter element carefully up, down and sideways or turn it
(Fig. 141) .
Caution
!
Avoid contact between main filter element and
housing.
Fig. 142
l Pull the main filter element (Fig. 142) carefully
out of the housing.
Fig. 143
l Clean the sealing face on the outlet tube (Fig.
143).
Dust on the outer diameter of the outlet tube can
impair effective sealing.
l Check the old main filter element.
The old main filter element can be of help to discover foreign particles on the sealing face, which
could lead to leaks. A dust strip on the clean air
side of the filter may be a sign for this Eliminate
this problem before installing a new main filter element.
l If the main filter element is damaged, the safe-
ty element must be replaced as well.
l Clean or replace the main filter element.
Note
i
We generally recommend to change the filter. A
new filter element is far less expensive than a possible engine damage.
l Examine the main filter element thoroughly for
damage.
Before installing the new main filter element check
it for possible damage from transport, cleaning or
incorrect handling. Especially on the inside of the
open end (sealing area). Do not install damaged
filter elements.
l If necessary use safety elements.
Page 93
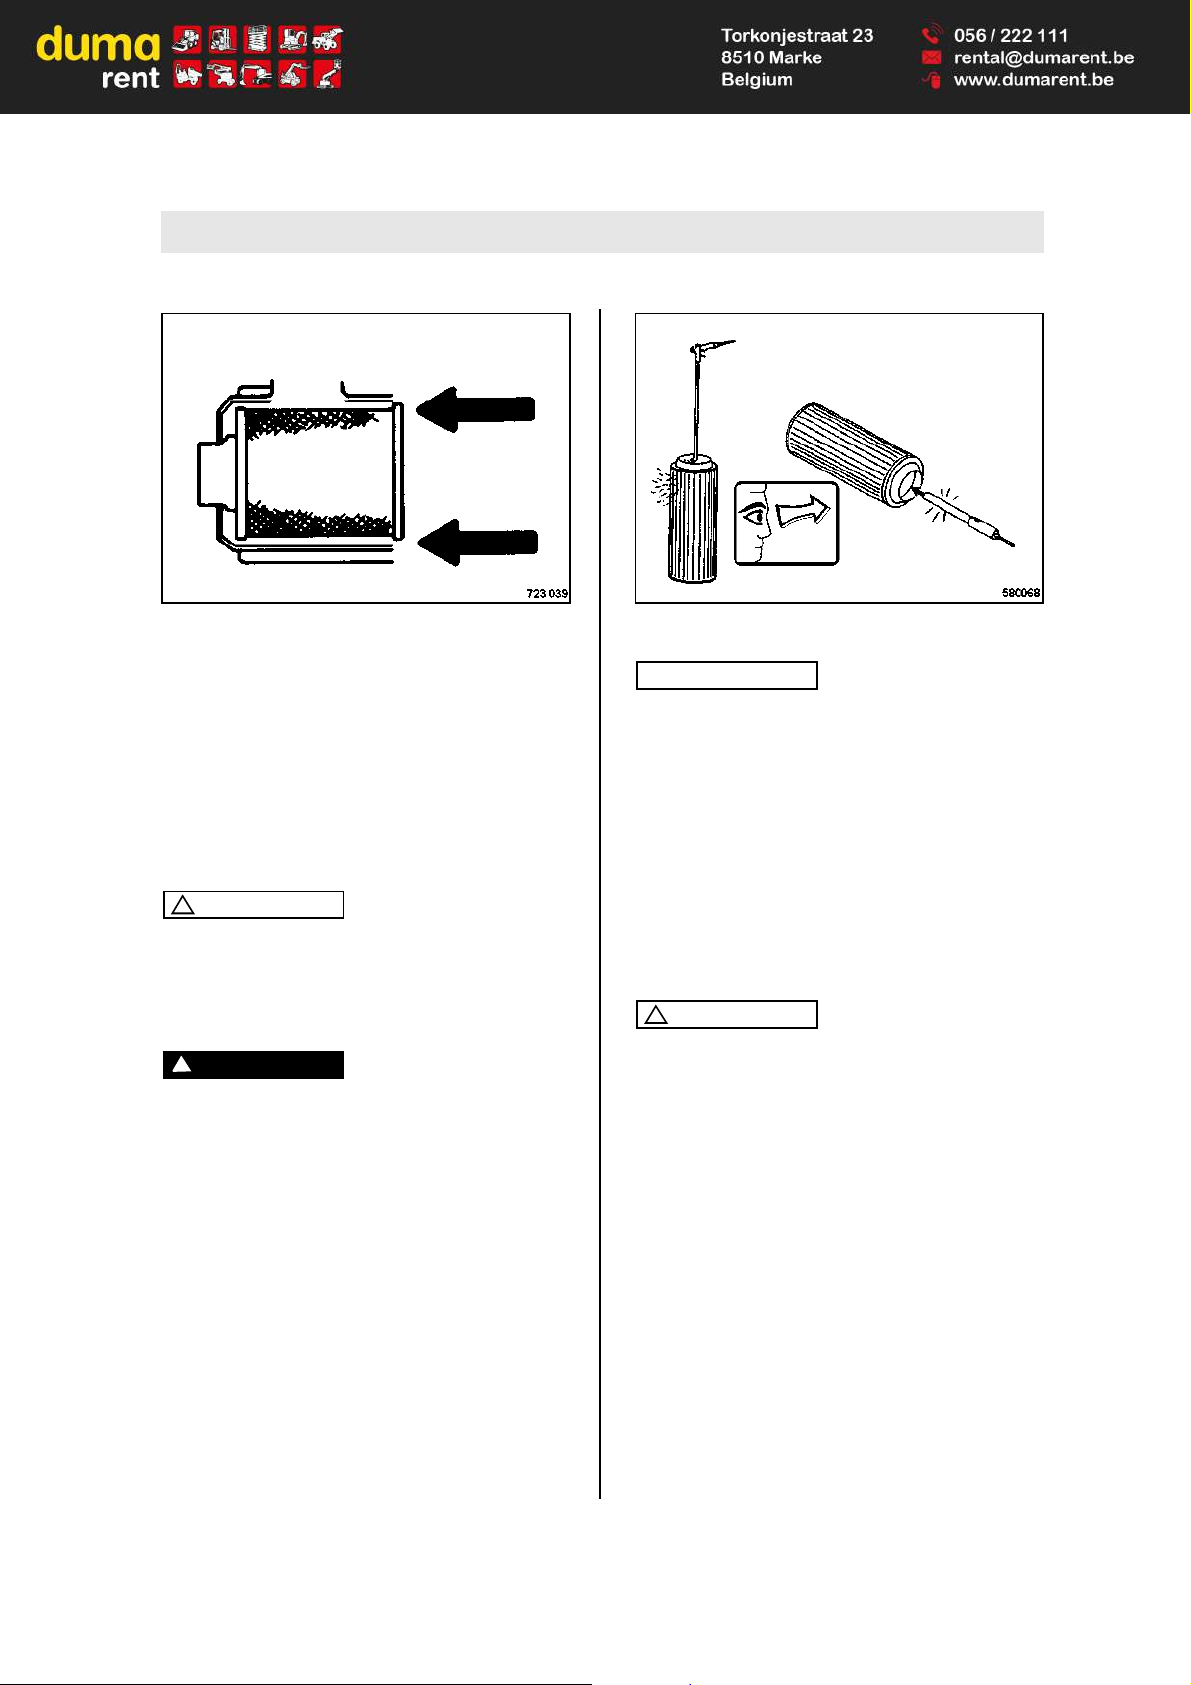
Every 250 operating hours
BOMAG 93BW 100/120/125 AD-4/AC-4
Fig. 144
l Insert the main filter element (Fig. 144).
The radial sealing area is located at the inside of
the open filter edge. This critical sealing area must
be under slight tension after the filter has been installed. In order to achieve a tight seal apply pressure to the outer edge of the filter and not to the
moveable centre.
l Reinstall the filter hood with the dust discharge
valve.
Caution
!
The dust discharge valve must point vertically
downwards.
Dry cleaning of the main filter element
Danger
!
Eye injury!
Wear protective clothing (goggles, gloves).
Fig. 145
Note
i
For cleaning purposes fit a tube to the compressed
air gun (Fig. 145), the end of which should be bent
for approx. 90°.
The length should reach down to the bottom of the
element.
l Blow the main filter element out with com-
pressed air (max. 2.1 bar) from inside to outside by moving the tube up and down inside
the element, until it if free of dust.
l Examine the main filter element with a torch
for cracks and holes in the paper bellows.
Caution
!
Do not continue to use a damaged main filter
element. If in doubt use a new main filter element.
Page 94
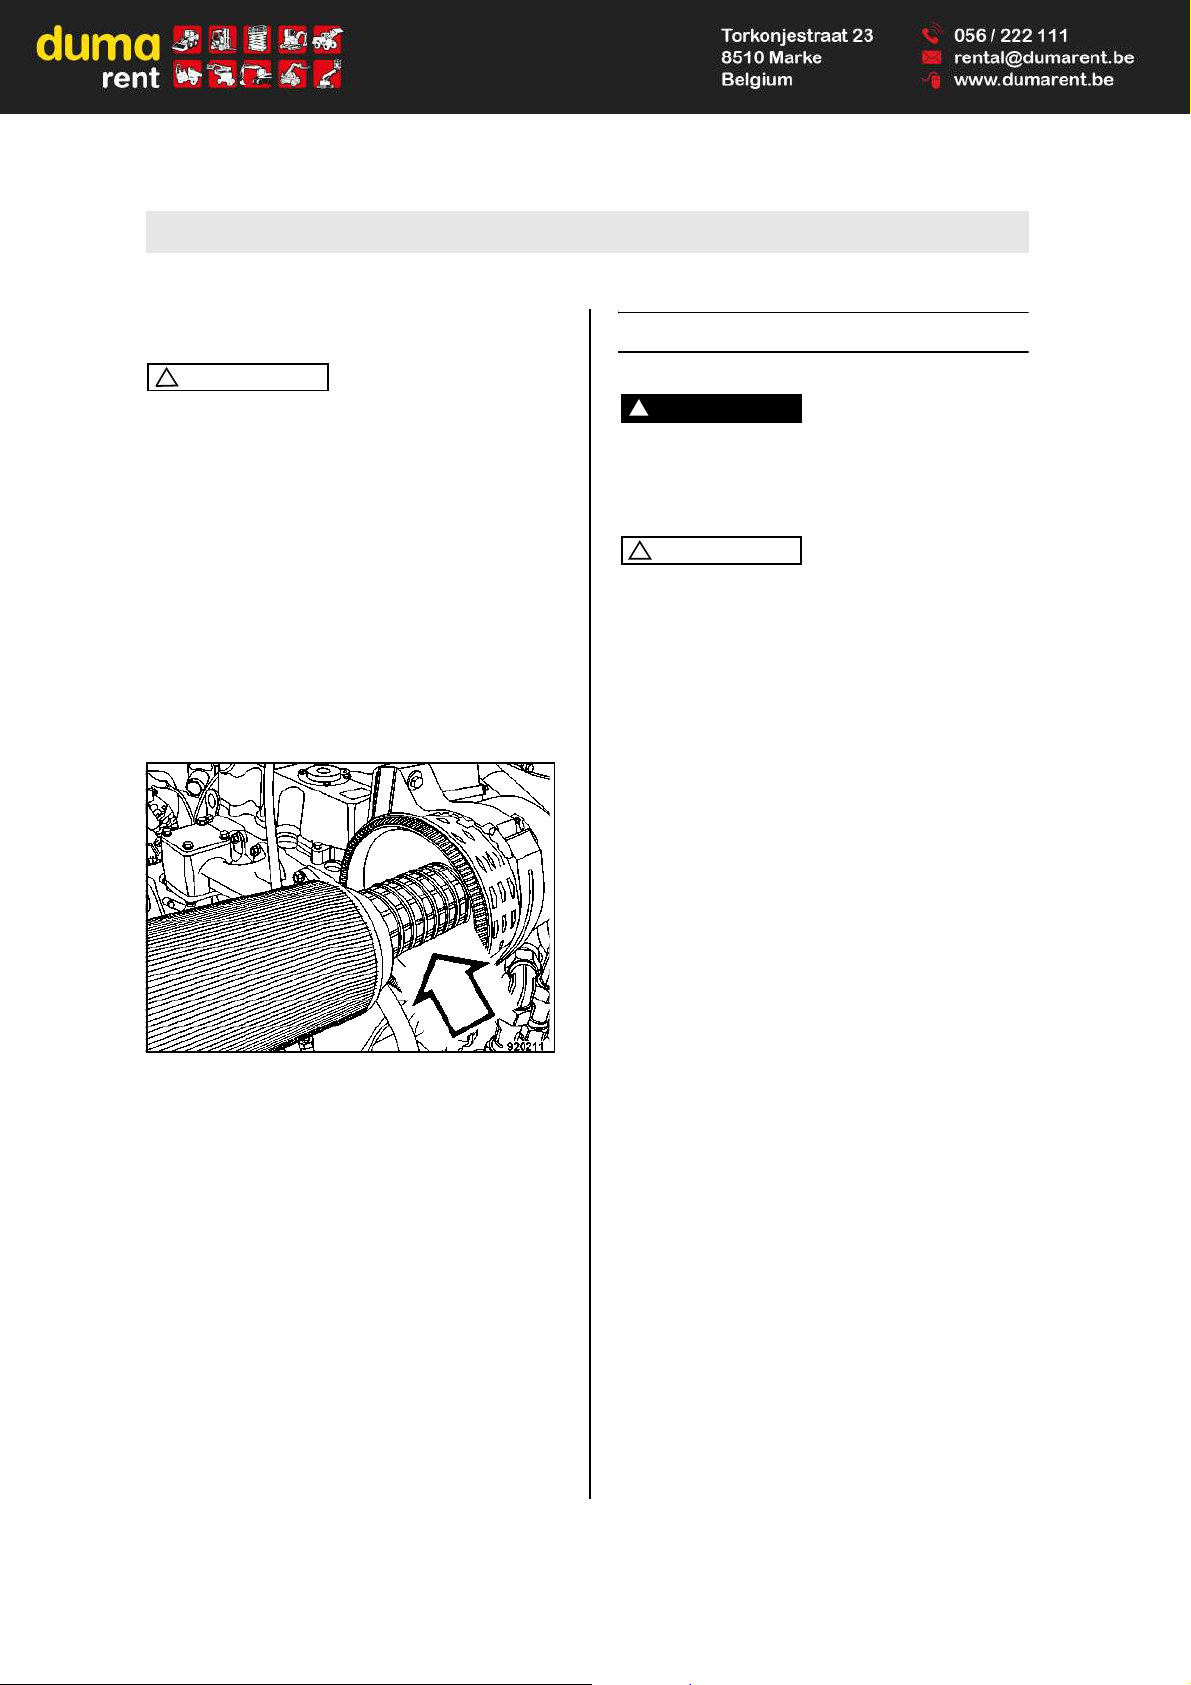
Every 250 operating hours
BOMAG94 BW 100/120/125 AD-4/AC-4
Changing the safety filter element
Caution
!
The safety filter element must not be cleaned
and should not be used again after it has been
removed.
The safety filter element must be replaced:
if the main filter element is defective,
after 6 times cleaning of the main filter element,
at the latest after 2 years,
if the red piston of the filter service indicator is
visible again after completion of the service
work.
l Remove the housing cover and pull the main
filter element off.
Fig. 146
l Pull the safety element (Fig. 146) out by turn-
ing it lightly.
l Push in a new safety filter element.
l Reassemble main filter element and cover.
6.19 Check the air intake lines
Danger!
Danger of burning!
Perform inspection work only after the engine
has cooled down and with the engine stopped.
Caution
!
Take care that no contaminants enter into the
air intake system, since this could damage the
engine!
If an air intake hose is damaged, both hose and
hose clamp must be replaced immediately.
l Check the condition and tight fit of all air intake
lines and hose clamps.
Page 95

Every 250 operating hours
BOMAG 95BW 100/120/125 AD-4/AC-4
6.20 Cleaning radiator and hydraulic oil cooler
Danger
!
Danger of injury!
Perform cleaning work only with engine
stopped and cooled down!
Caution
!
Dirty operating conditions, particularly lubrication oil and fuel deposits on the cooling fins
of the engine and the engine oil cooler have an
adverse effect on the cooling of the engine.
You should therefore immediately seal any oil
or fuel leaks near cooling fan, cylinder or engine oil cooler and subsequently clean the
cooling fins.
Cleaning with compressed air
Fig. 147
l Blow the cooling air passages out with com-
pressed air from the air discharge side (Fig.
147).
Fig. 148
l Blow out the air supply side of the hydraulic oil
cooler (Fig. 148).
Cleaning with cold cleansing agent
Caution
!
Protect electrical equipment such as generator, regulator and starter against the direct water jet.
l In case of oily dirt spray engine and cooler with
a suitable cleansing agent, e.g. cold cleanser,
let it soak in for a while and spray it off with a
strong water jet.
l Run the engine warm for a while to avoid cor-
rosion.
Page 96

Every 250 operating hours
BOMAG96 BW 100/120/125 AD-4/AC-4
6.21 Checking, tensioning, replacing the V-belt
Fig. 149
Checking the V-belt
l Inspect the entire circumference of the V-belt
(1) (Fig. 149) visually for damage and cracks.
l Replace a damaged or cracked V-belt immedi-
ately.
l Check with thumb pressure whether the V-belt
can be depressed more than 7 to 9 mm (A) between the V-belt pulleys, retighten if necessary.
Tightening the V-belt
l Slightly slacken the fastening screws (2) .
l Press the generator in direction outward using
a lever, until the correct V-belt tension is
reached.
l Retighten all fastening screws and check the
V-belt tension once again.
Changing the V-belt
l Slightly slacken the fastening screws (2) .
l Press the generator completely against the
engine.
l Remove the old V-belt.
l Fit the new V-belt to the V-belt pulleys.
l Tension the V-belt as previously described.
6.22 Checking radiator hoses
and hose clamps
Danger
!
Danger of burning!
Perform inspection work only after the engine
has cooled down and with the engine stopped.
Caution
!
If a radiator hose is swollen, hardened or
cracked, both hose and hose clamp must be
replaced immediately.
Fig. 150
l Check the conditon and tight fit of all readiator
hoses and hose clamps (Fig. 150).
Page 97
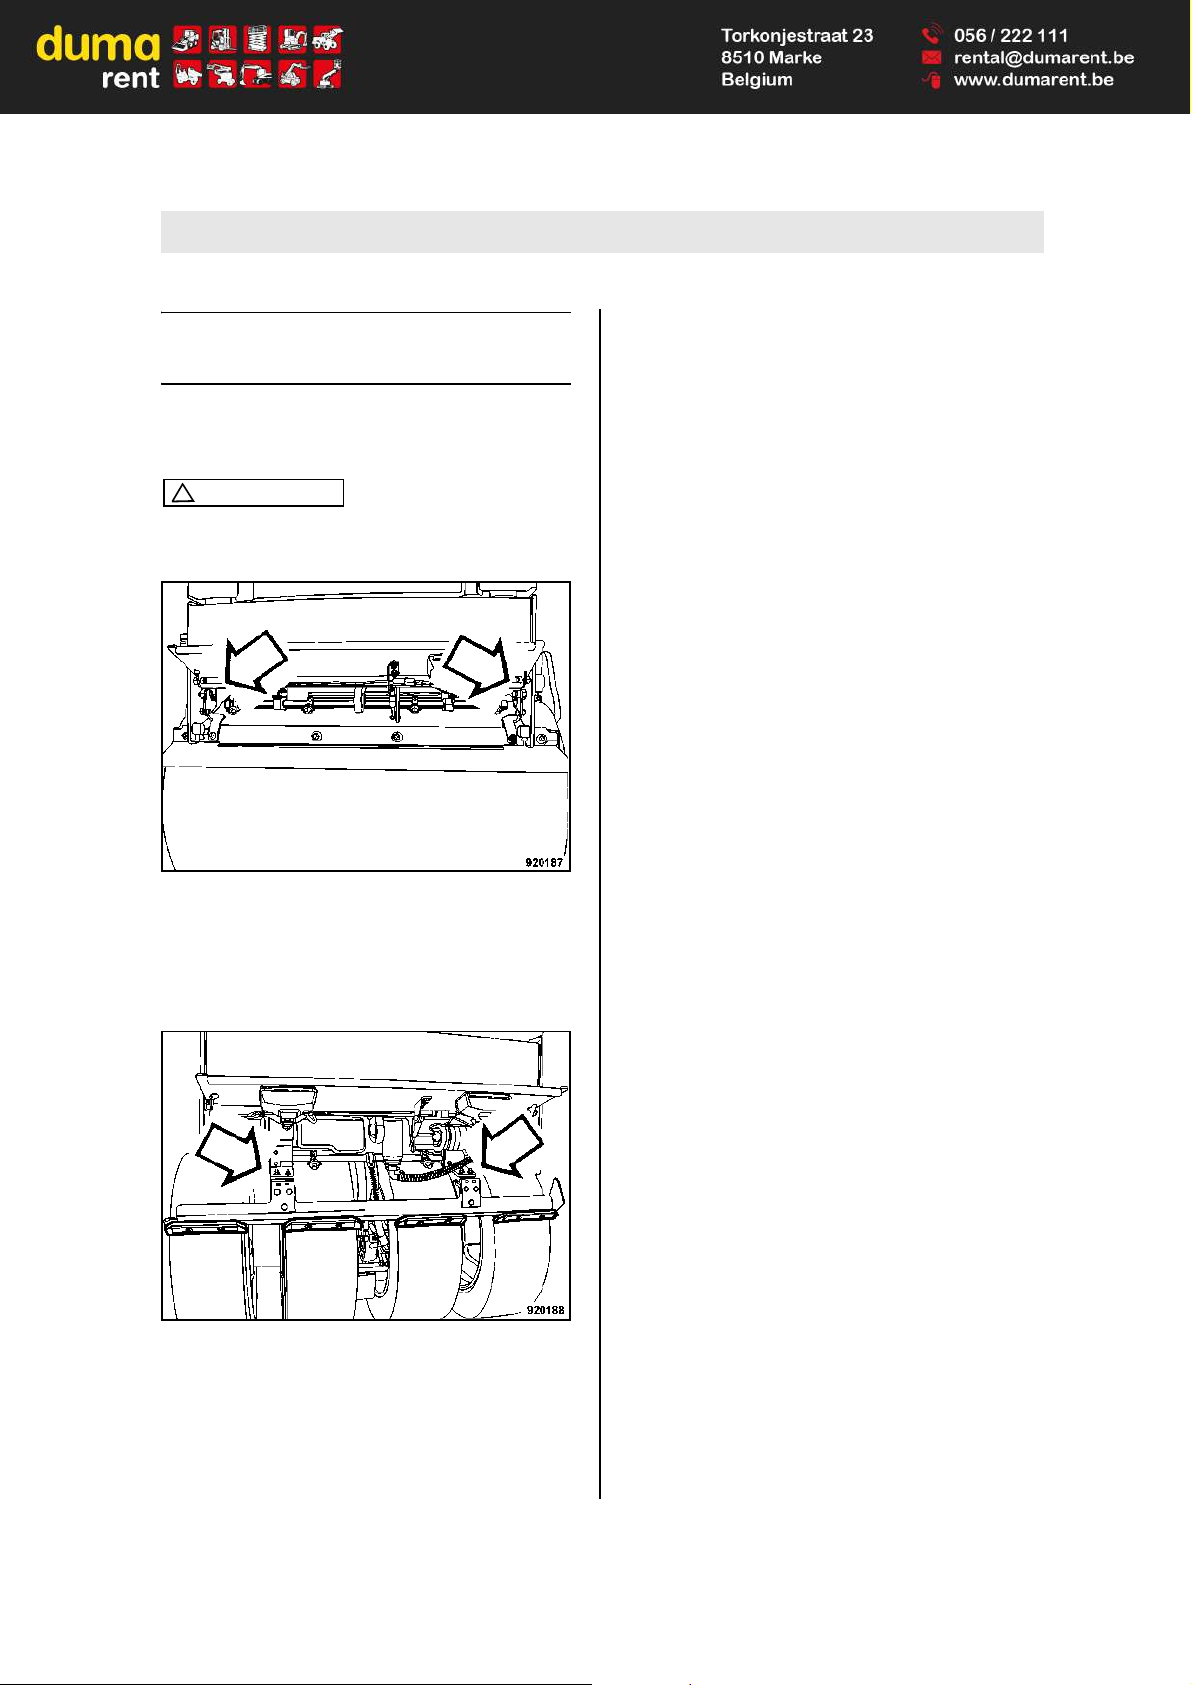
Every 250 operating hours
BOMAG 97BW 100/120/125 AD-4/AC-4
6.23 Checking, adjusting the
scrapers
Drums
Caution
!
Scrapers (2 per drum) must be replaced when
worn.
Fig. 151
l Open the flap, check the scrapers, replace if
ncessary (Fig. 151).
Wheels (AC-machines)
Fig. 152
l Open the rear flap, check the scrapers, re-
place if ncessary (Fig. 152).
l Adjust the scrapers with the screws to a uni-
form distance of approx. 2 mm from the rubber
tires.
Page 98

Every 250 operating hours
BOMAG98 BW 100/120/125 AD-4/AC-4
Page 99
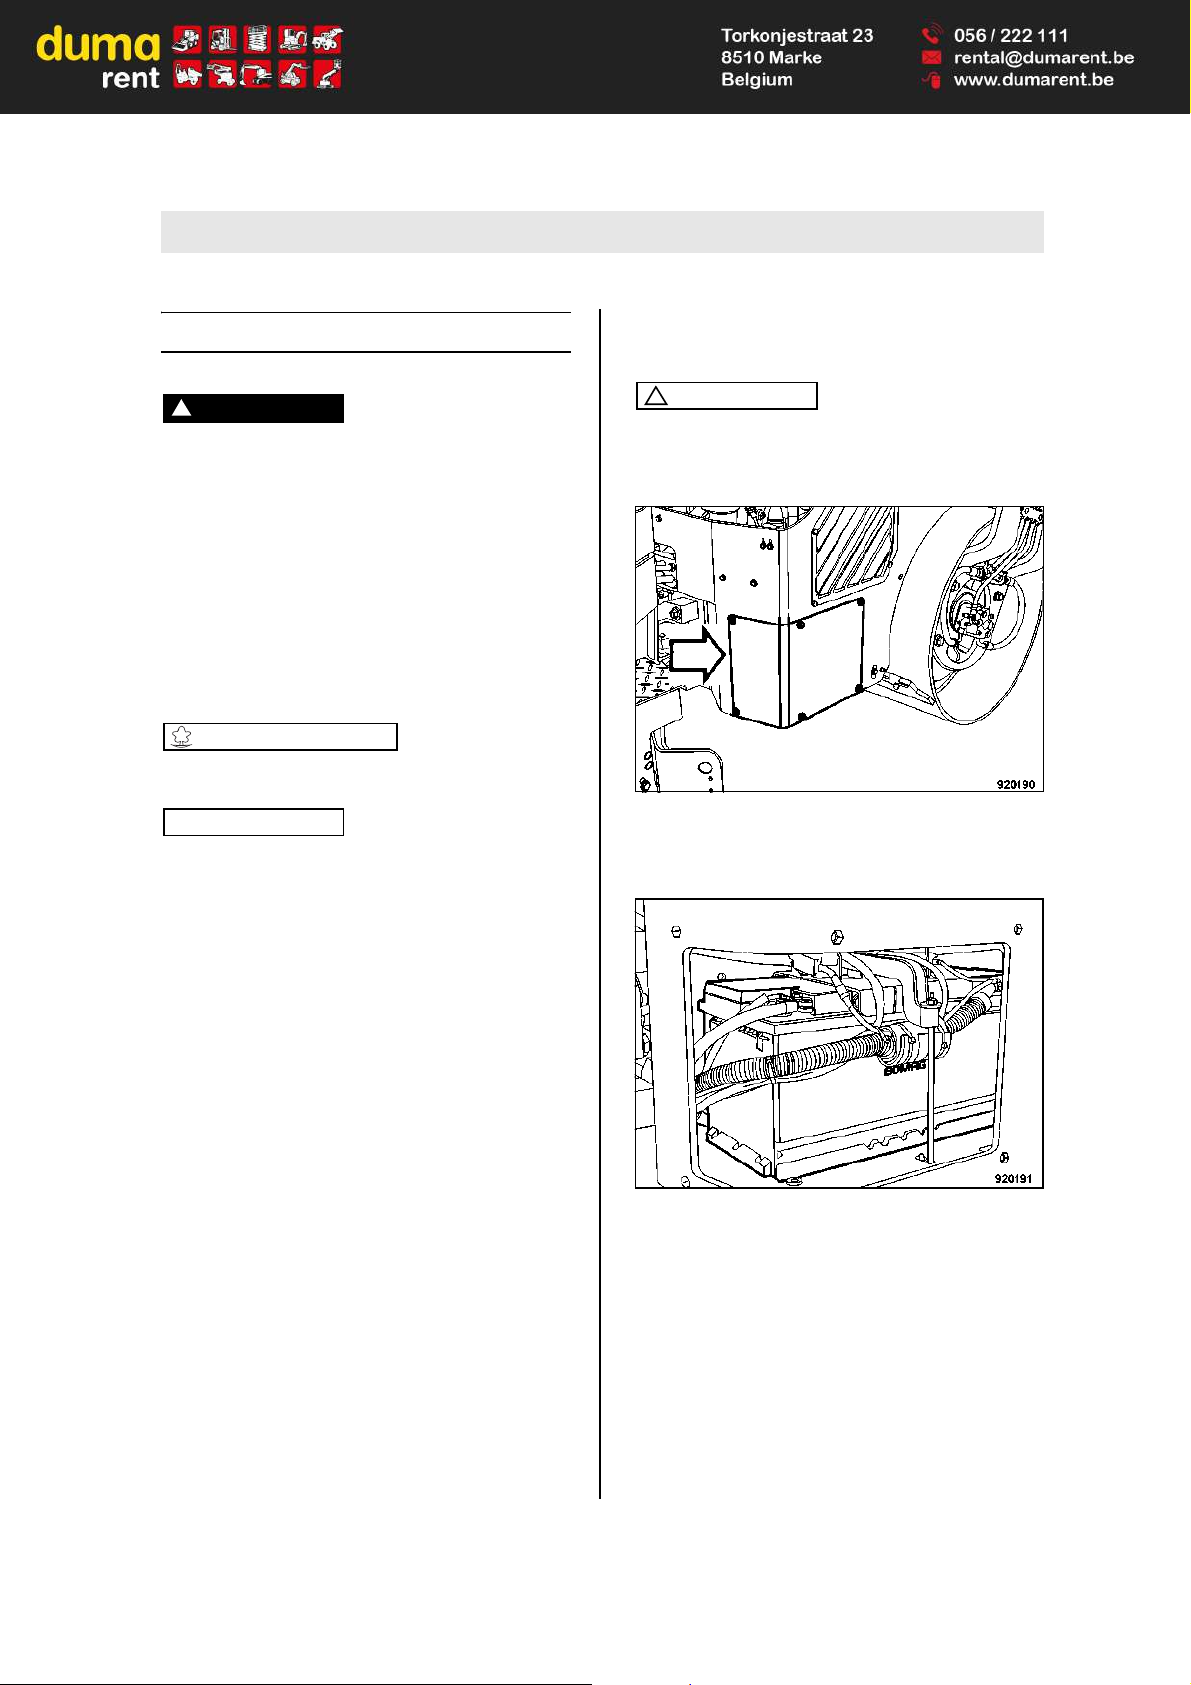
Every 500 operating hours
BOMAG 99BW 100/120/125 AD-4/AC-4
Every 500 operating hours
6.24 Battery service
Danger!
Danger of cauterisation ! Danger of explosion!
When working on the battery do not use open
fire, do not smoke!
The battery contains acid. Do not let acid come
in contact with skin or clothes!
Wear protective clothing!
Do not lay any tools on the battery!
For recharging remove the plugs from the battery to avoid the accumulation of highly explosive gases.
Environment
Dispose of the old batteries environmentally.
Note
i
Maintenance free batteries also need care. Maintenance free only means that the fluid level does
not need to be checked. Each battery suffers under self-discharge, which may, in not checked occasionally, even cause damage to the battery as a
result of exhaustive discharge.
The following therefore applies for the service
life:
l Switch off all consumers (e.g. ignition, light, in-
side light, radio).
l Check open-circuit voltage of the battery at
regular intervals. At least once per month.
Reference values: 12.6 V = fully charged; 12.3 V =
50% discharged.
l Recharge the battery immediately after an
open-circuit voltage of 12.25 V or less is
reached. Do not perform quick charging.
The open-circuit voltage of the battery occurs approx. 10 hours after the last charging process or
one hour after the last discharge.
l After each charging process allow the battery
to rest for one hour before taking it into service.
l For resting periods of more than one month
you should always disconnect the battery. Do
not forget to perform regular open-circuit voltage measurements.
Caution
!
Exhausted batteries (batteries with formation
of sulphate on the plates) are not covered under warranty!
Fig. 153
l Disassemble the covering flap of the battery
compartment (Fig. 153).
Fig. 154
l Clean battery and battery compartment (Fig.
154).
l Clean battery poles and pole clamps and
grease them with pole grease (Vaseline).
l Retighten the pole clamps.
l Check the fastening of the battery.
Page 100
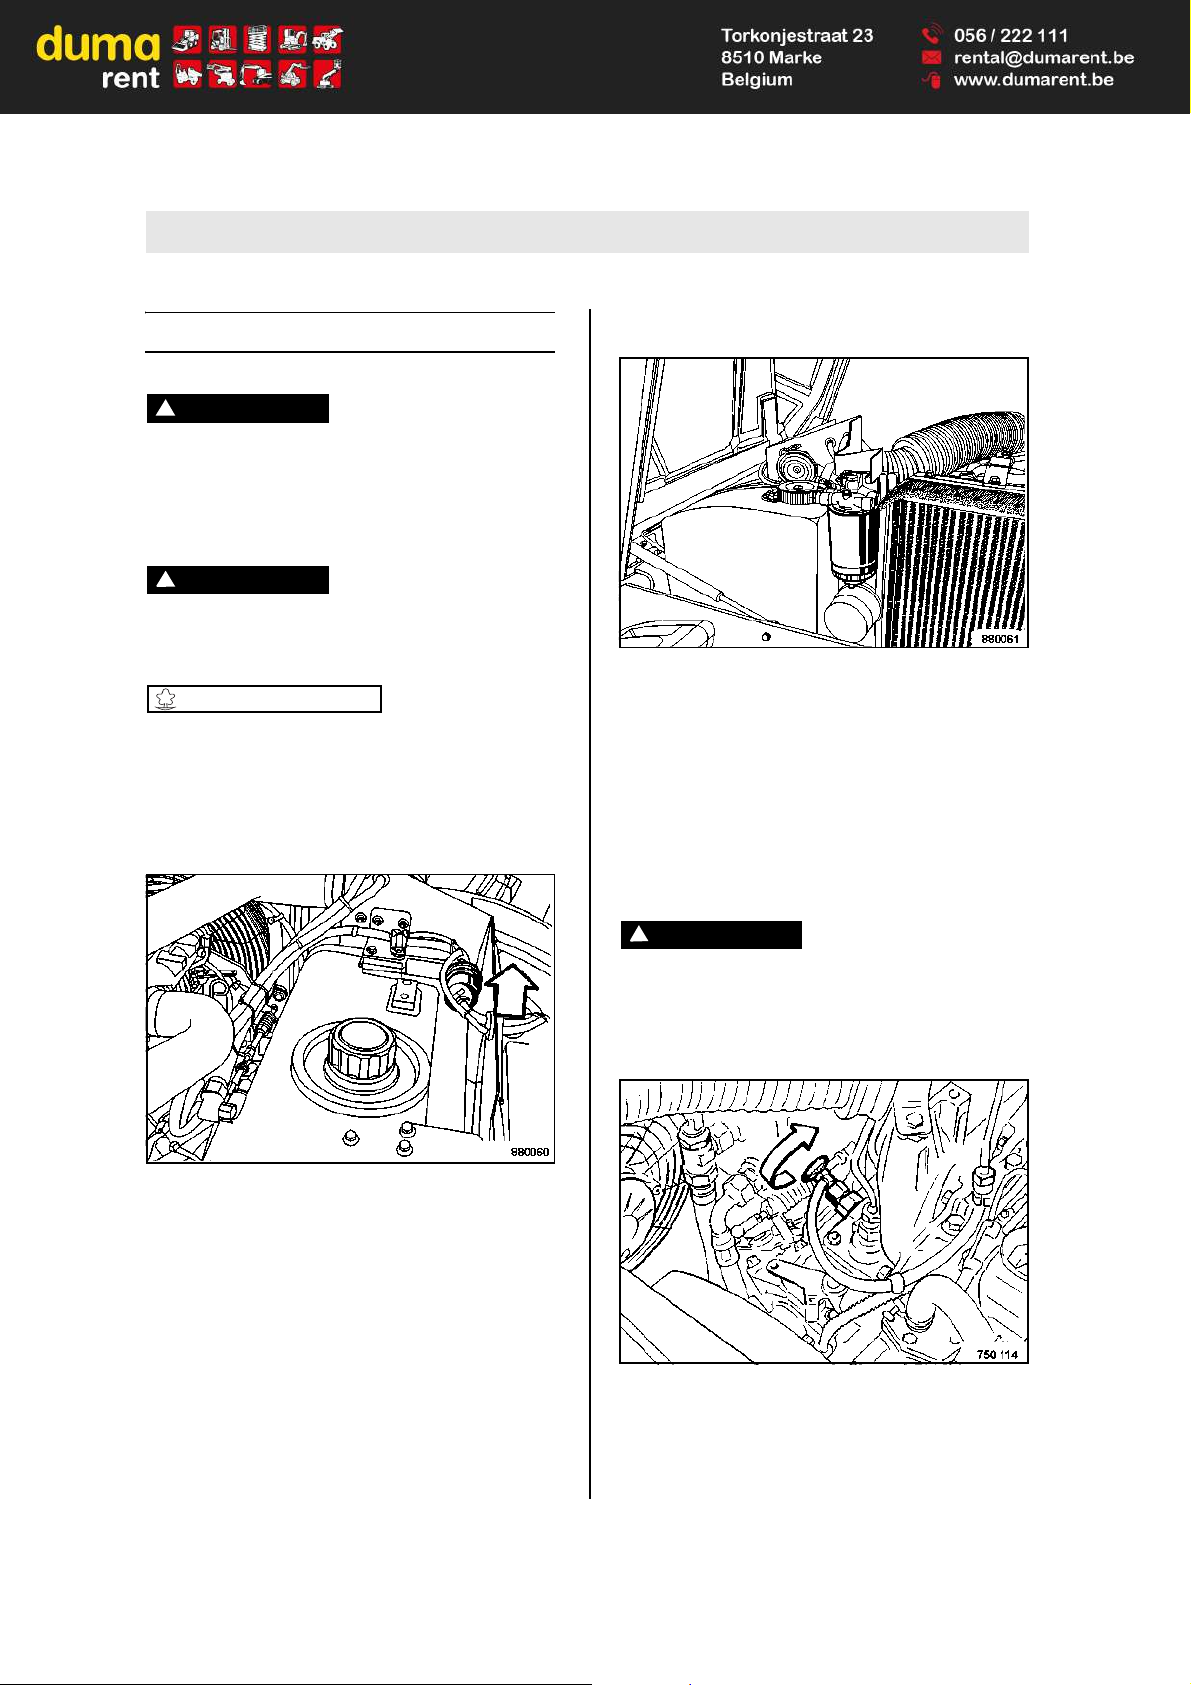
Every 500 operating hours
BOMAG100 BW 100/120/125 AD-4/AC-4
6.25 Change the fuel filter
Danger!
Fire hazard!
When working on the fuel system do not use
open fire, do not smoke.
Do not spill any fuel.
Danger
!
Health hazard!
Do not inhale any fuel fumes.
Environment
Catch running out fuel, do not let it seep into
the ground.
Dispose of the used fuel filter environmentally.
Changing the fuel pre-cleaner
Fig. 155
l Loosen the hose clamps (Fig. 155).
l Pull the fuel filter out of the hoses.
l Install the new fuel pre-filter and observe the
flow direction (arrow).
l Fasten the hose clamps.
Replacing the fuel filter cartridge
Fig. 156
l Slacken and unscrew the fuel filter cartridge
(Fig. 156).
l Clean the sealing face on the filter carrier from
any dirt.
l Apply a thin film of fuel to the seals and screw
the new filter cartridge on hand-tight.
Bleeding of the fuel system
Danger
!
Fire hazard!
Do not bleed the engine while it is hot, running
out fuel dripping on the hot exhaust can cause
a fire.
Fig. 157
l Open the bleeding screw (Fig. 157) on the top
of the injection pump.
 Loading...