

Page 1
BG320/ BG320-BW
User Manual
Page 2

Page 3

Content
1.0 Getting Started
...................................................................................................
1
2.0 Camera Operations
.........................................................................................
4
2.1 Batteries / Power Supply
....................................................................
4
2.2 SD Card Information
............................................................................
4
2.3 Camera Modes
.........................................................................................
5
2.4 Additional Notes
..................................................................................
7
3.0 Camera Settings
...............................................................................................
8
4.0 Trouble Shooting
............................................................................................
11
5.0 PIR Detection Zone
.......................................................................................
12
6.0 Technical Specifications
.............................................................................
13
7.0 Parts List
............................................................................................................
14
Page 4
1
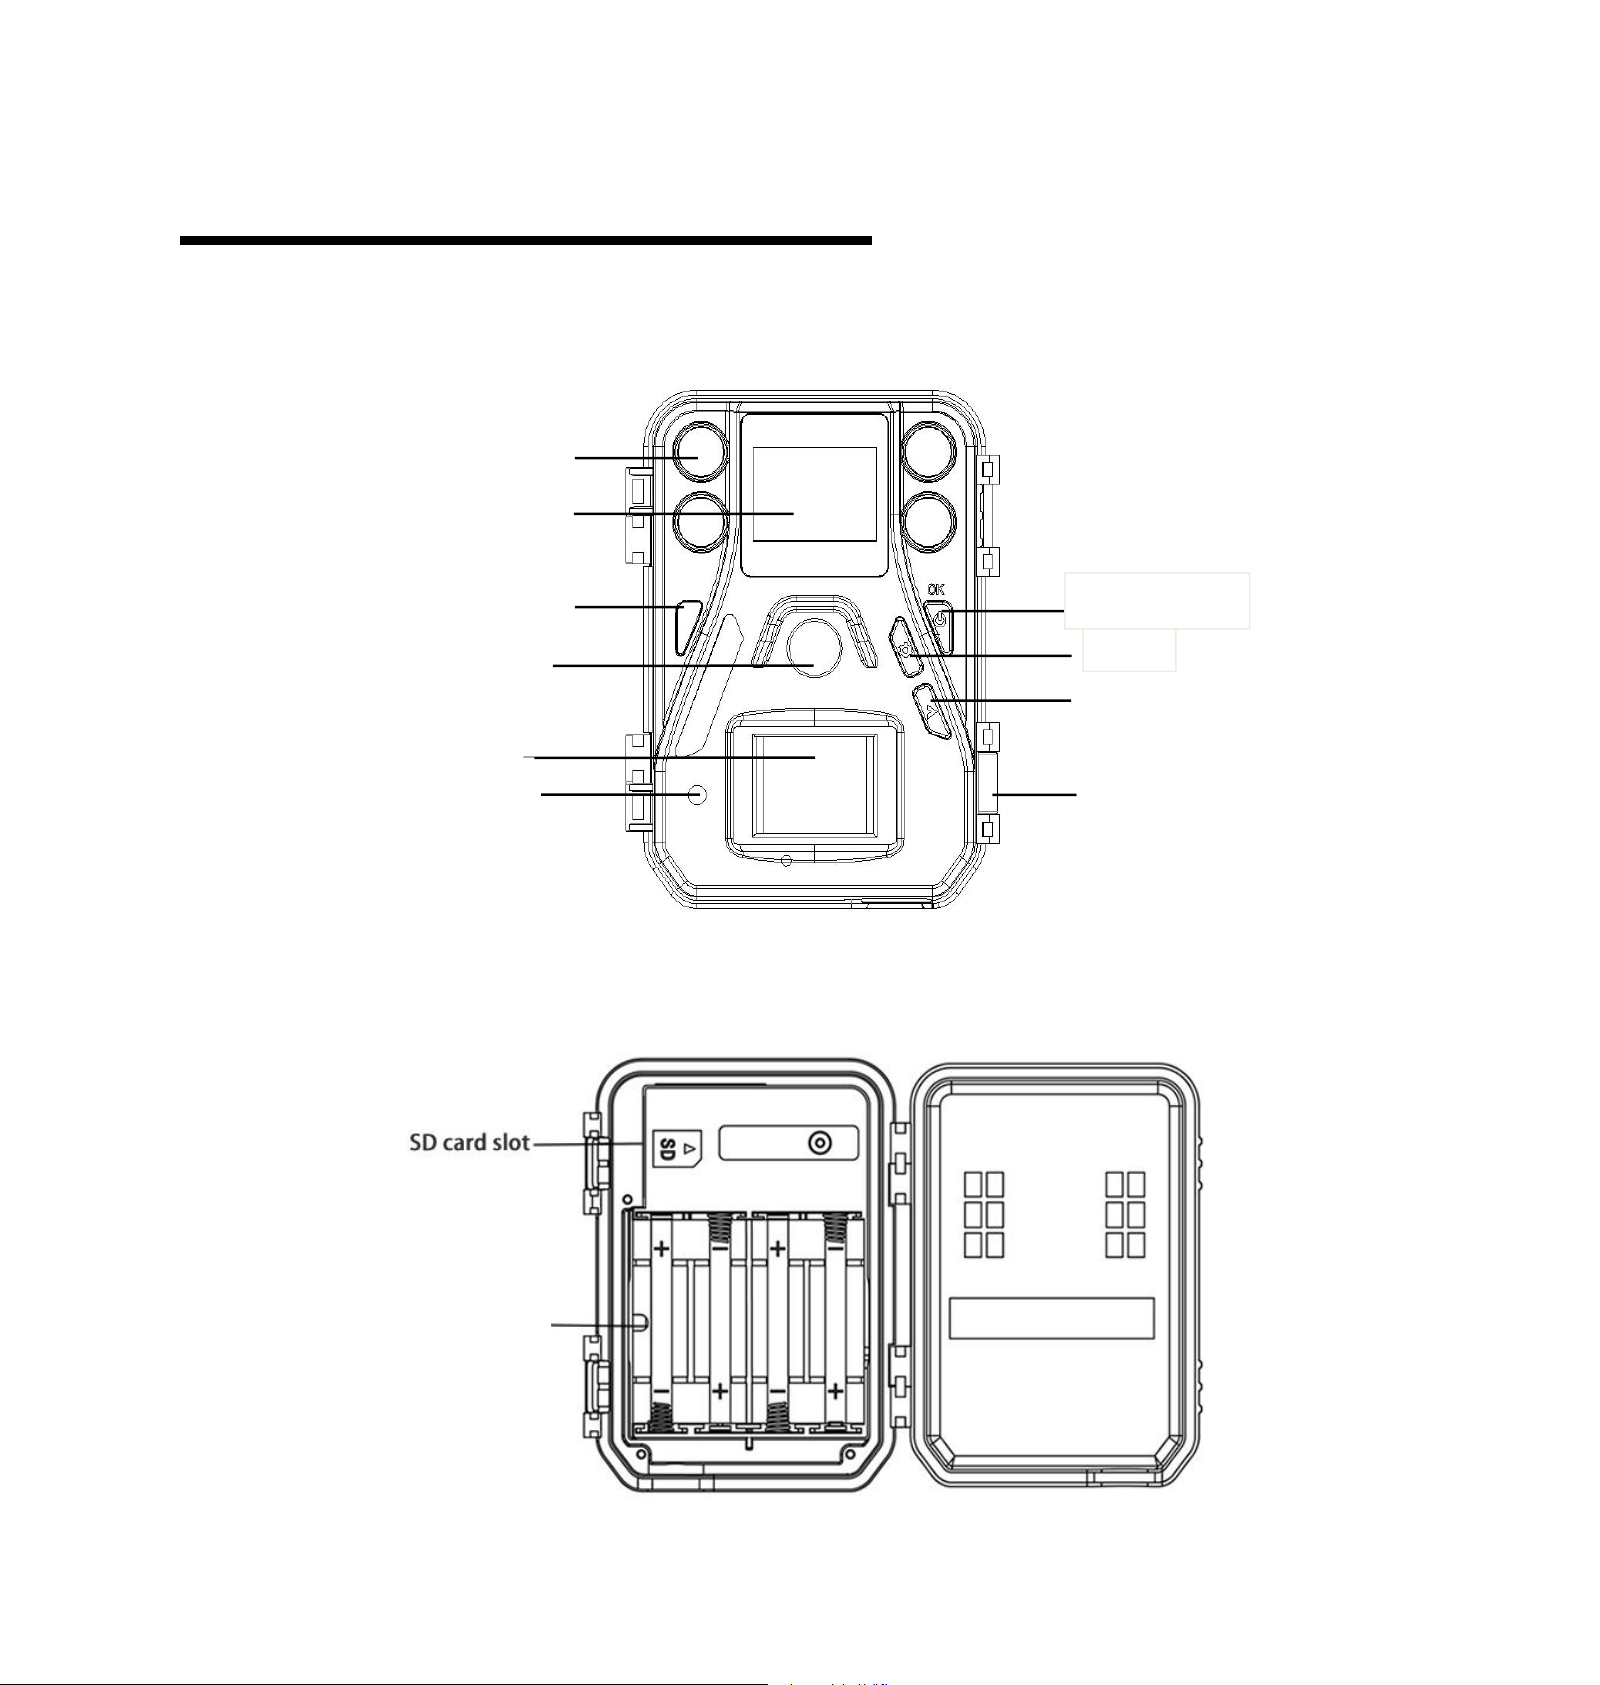
1.0 Getting Started
Bottom View
Latch
Right
Menu
OK/Power
Lens
LED Indicator
LCD Screen
LED
PIR Sensor
Mic
Battery Tray
Front View
Page 5
2
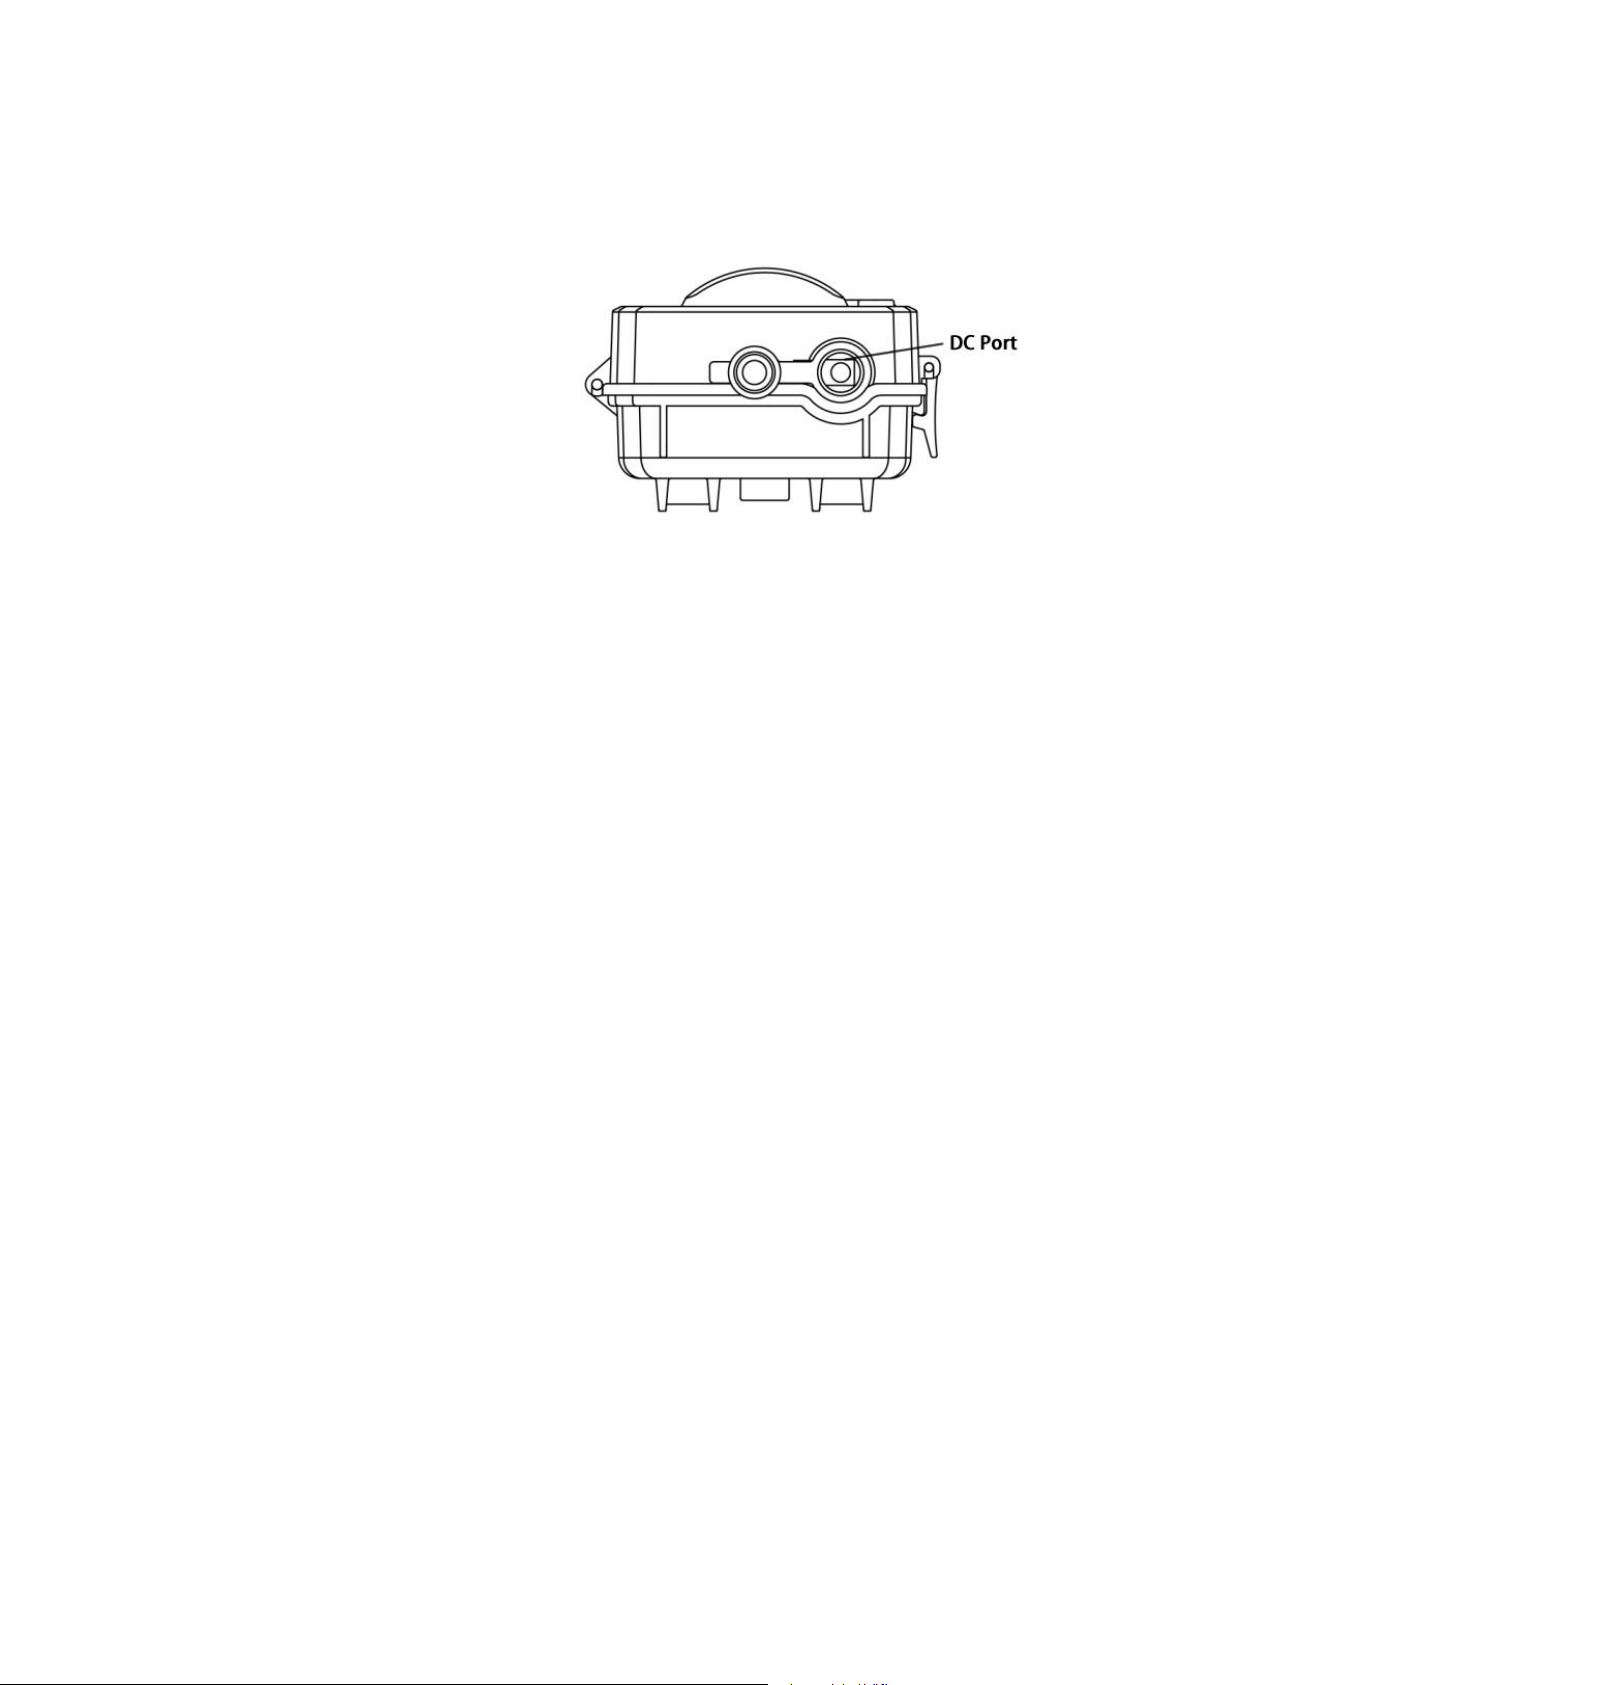
Inside View
General Description
This digital infrared camera contains a highly sensitive
Passive Infrared (PIR) motion sensor, which is triggered
by movement of animals or humans within its field of view.
Upon activation, the camera automatically captures high
definition pictures or records video clips, according to
customer presets or default settings. The unit is resistant
against water and snow and is offered in two different
models:
BG320 :A digital trail camera with four 940nm low-glow
IR LED lights. It takes black and white pictures and videos
during the day and night.
BG320-BW: The most cost-effective and smallest
birding camera, this camera is equipped with built-in
color white LED light, able to take crisp color pictures and
videos in both day and night.
Page 6

3
Additional Product Features:
High quality 10MP and 720p video.
73 ft. detection and 60 ft. lighting range
Quick trigger time:<1.2s
Trigger delay interval: 0s-1h
Supports up to 32GB SD card
1.33”LCD display
Page 7

4
2.0 Camera Operations
The camera is powered by four or eight AA batteries -
High-density, high-performance alkaline, rechargeable
Alkaline or NiMH batteries are recommended.
A DC 6-Volt, 2 Amp external power supply adapter can
also be used to power the camera (not included).
Please take caution when installing batteries to match the
shown polarity on the battery tray.
Insert the SD card into the camera before turning
on the camera
This camera supports up to a 32GB capacity SD card
and has no built-in internal memory. The camera
will not function without the SD card properly
inserted into the camera.
Make sure the SD card is in the unlocked position
before inserting the SD card into the camera
The camera will operate normally with a locked
SD card inserted, but the card will not be able to
store captured images or videos taken by the
camera.
2.1 Batteries / Power Supply
2.2 SD Card Information
Page 8
5
Do not remove the SD card while the camera is on
By removing the SD card while the camera is on
risks damaging the internal components of the
camera.
If you experience any problems with an inserted
SD card
Try reformatting the SD card utilizing the
camera’s main settings option.
2.3 Camera Modes
Powering the Unit on
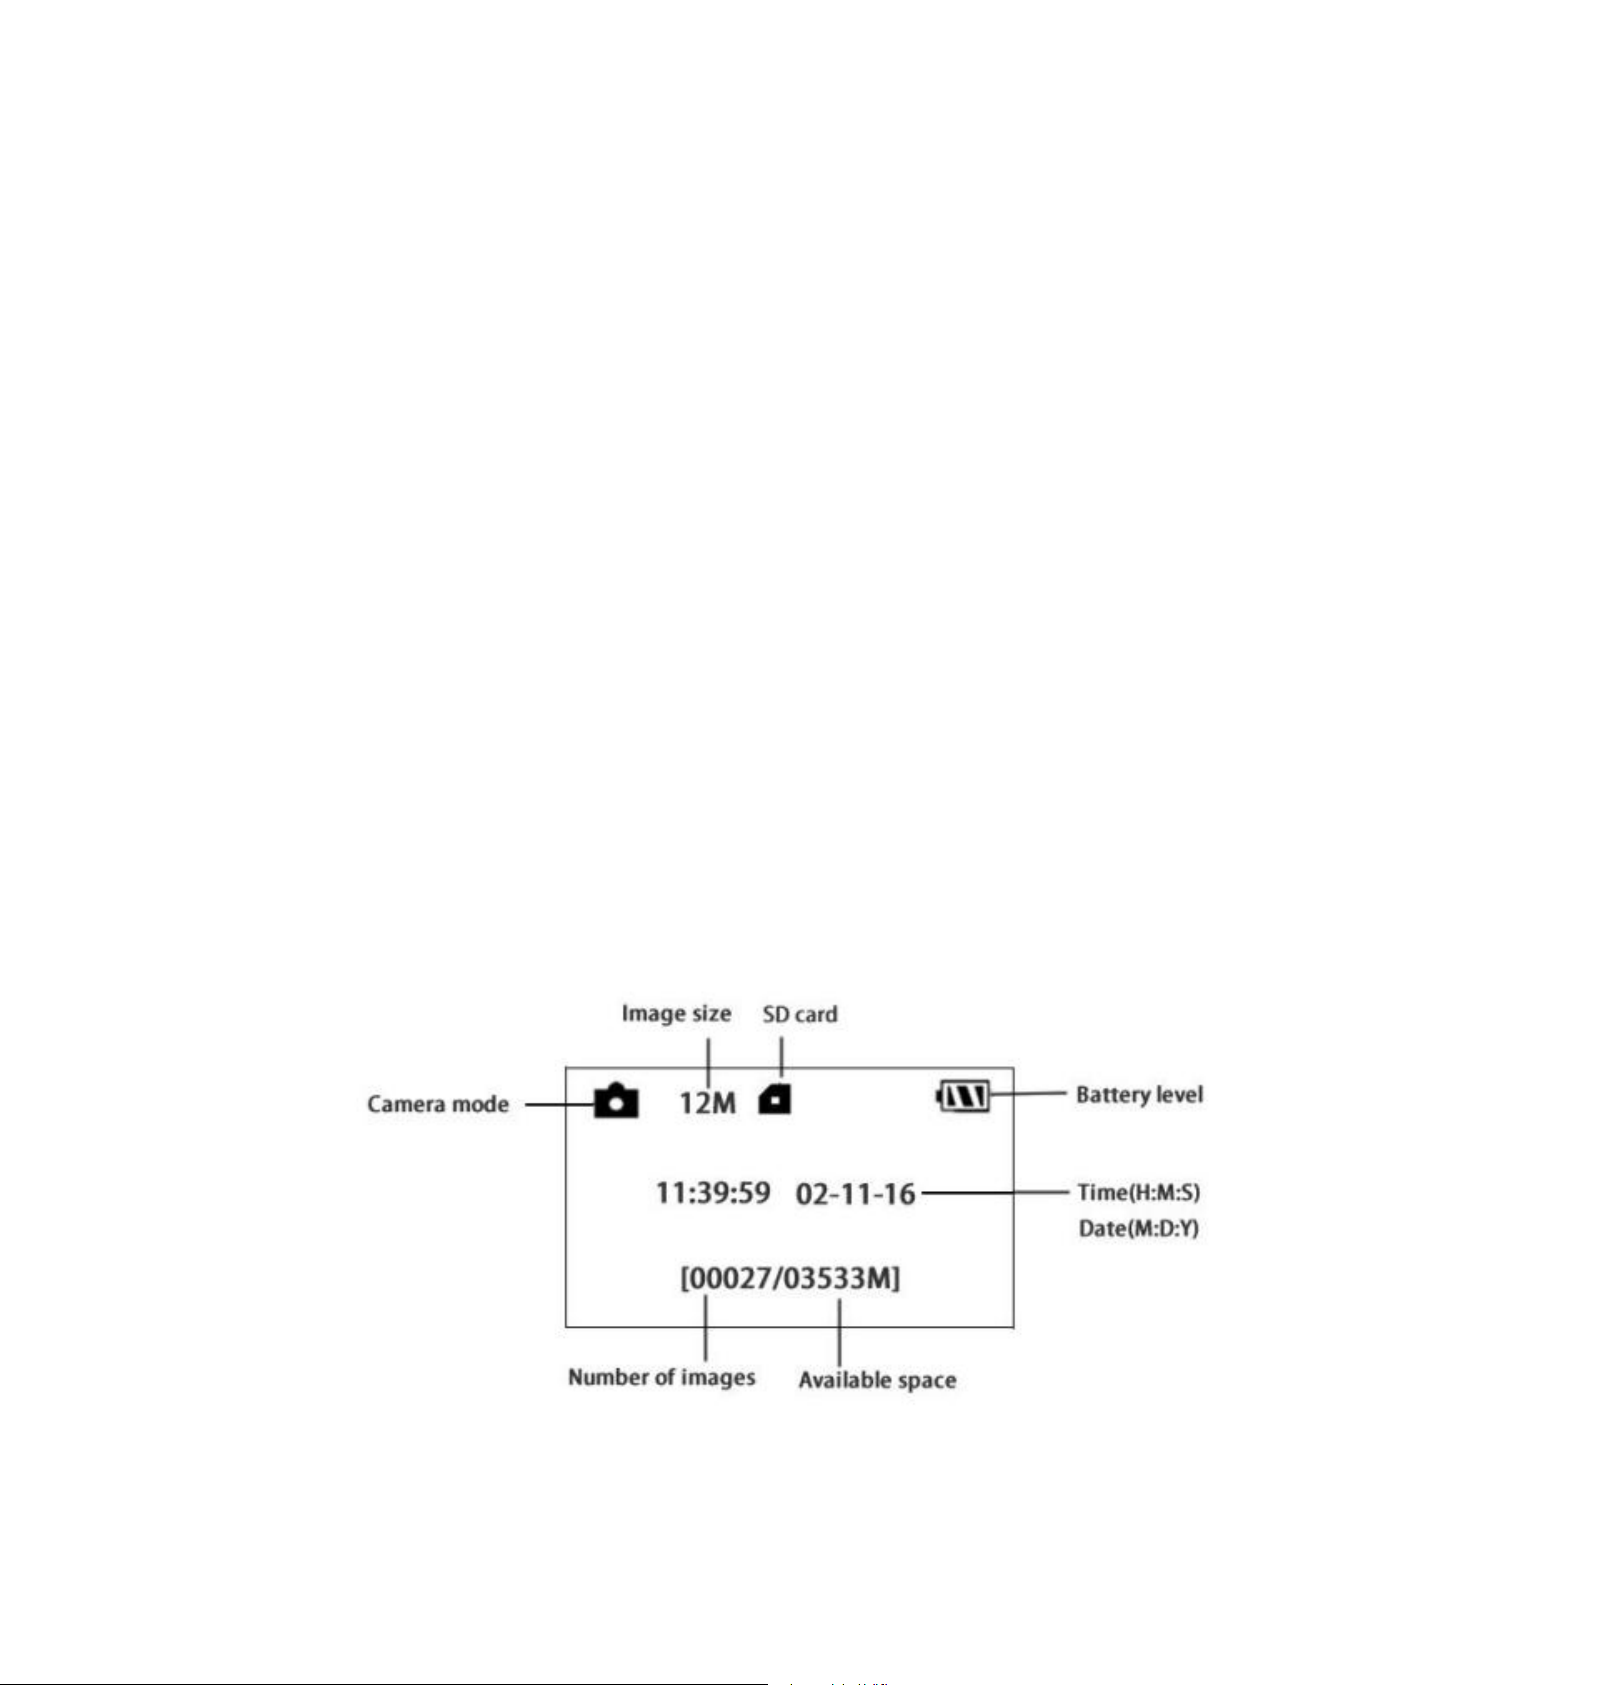
To switch the camera on, press and hold down the
OK/POWER button. Once the screen illuminates, you
may release the OK/POWER button and the following
information should appear on the 1.33” LCD screen.
Page 9

6
If the camera is left unattended for 20 seconds, the
camera switches to “Hunting Mode”, which is the normal
operation for the camera to react to motion and capture
photos/videos. Before entering “Hunting Mode”, the
front (red) LED light will continuously blink for
approximately 10 seconds and then turn off – This a
transitional delay for you to lock and mount the camera
before the PIR sensor becomes active and starts taking
pictures/videos.
To “Wake Up” the camera
To “wake up” the camera when it is in “Hunting Mode”,
press the “OK” key.
Manual Image / Video Capturing
When the camera LCD display is active, Press the RIGHT
key to manually capture photos or record a video and
again to stop the video.
To turn off the camera
Press and hold down the OK/POWER button to power off
the camera. Please note that even in off mode, the camera
still consumes a small amount of battery power. Therefore,
please remove the batteries if the camera is not in use for
long periods.
Page 10

7
2.4 Additional Notes
Avoid varying temperature and motion disturbances in
front of the camera, such as falling leaves, air-conditioner
outlets, and other sources that may easily sway and move
to prevent false triggering.
To adequately capture the full image of the tracked game,
the camera should be placed high above the ground,
respective to the object size of the game. Generally, one
to two meters are optimal.
Page 11

8
3.0 Camera Settings
To view the camera settings menu, Press OK to “wake up”
the camera or when the screen is active, press MENU to
enter into the menu settings. Use the RIGHT key to select
the different options, press OK to save the setting and
press MENU to exit the camera settings menu.
Main Menu
Description
Language
Choose language you need. It supports three
languages:English, Suomi, Deutsch
Default :English
Camera
Mode
There are three camera modes:
Photo: to take the photo
Video: to capture video
Pic+Video: to take a picture with a video
clip. This mode disables the photo burst
function.
Default: Photo
Set Clock
Set camera date and time. You can change
the date and time of the device by setting
this parameter when necessary, e.g., after
every battery change. The date format is
month/day/year, the time format is hour:
minute: second.
Photo Size
Choose the image size: 3MP, 6MP or 10MP
Default: 6MP
Page 12

9
Photo Burst
Choose the continuous shooting numbers
after each triggering: 1 Photo, 3 Photo
Default: 1 Photo
Video Size
Choose the video size: 1280x720 or
640x480.
Default: 1280x720
Advanced
Menu
Description
Video
Length
Choose duration of recording video. It has
three values: 10 sec, 30 sec and 60 sec
Default: 10 seconds
Time Lapse
The camera can capture images or videos at
a preset time interval regardless of motion
detection. The default setting is OFF.
Changing this setting to a non-zero value
turns on Time Lapse mode and the camera
will take photos at the set interval time.
If PIR Trigger/Sensitivity and Time
Lapse options are BOTH OFF, the
camera will not capture any photos or
videos.
Default: OFF
PIR Trigger
This setting is for the sensitivity of the PIR
sensor. There are four sensitivity
parameters: High, Normal, Low and Off. It
is recommended to use HIGH sensitivity in
areas with little environmental interference
and also for warmer, humid temperatures or
Page 13

10
climates. Use LOW sensitivity for areas that
have a lot of interference. The sensitivity of
the PIR is effected by temperature. Higher
temperatures leads to lower sensitivity. If
PIR Trigger/Sensitivity and Time
Lapse options are BOTH OFF, the
camera will not capture any photos or
videos.
Default: Normal
PIR Interval
This setting indicates how long the PIR
sensor will be disabled after each camera
triggering. During this time th PIR sensor
will not react to any detected motion.
Default: 10 seconds
Format SD
All information on the SD card will be
deleted. Make sure that you have made a
backup of important data already on the SD
card.
Version
Version information.
Default Set
Restore all settings to default values
Page 14
11
4.0 Trouble Shooting
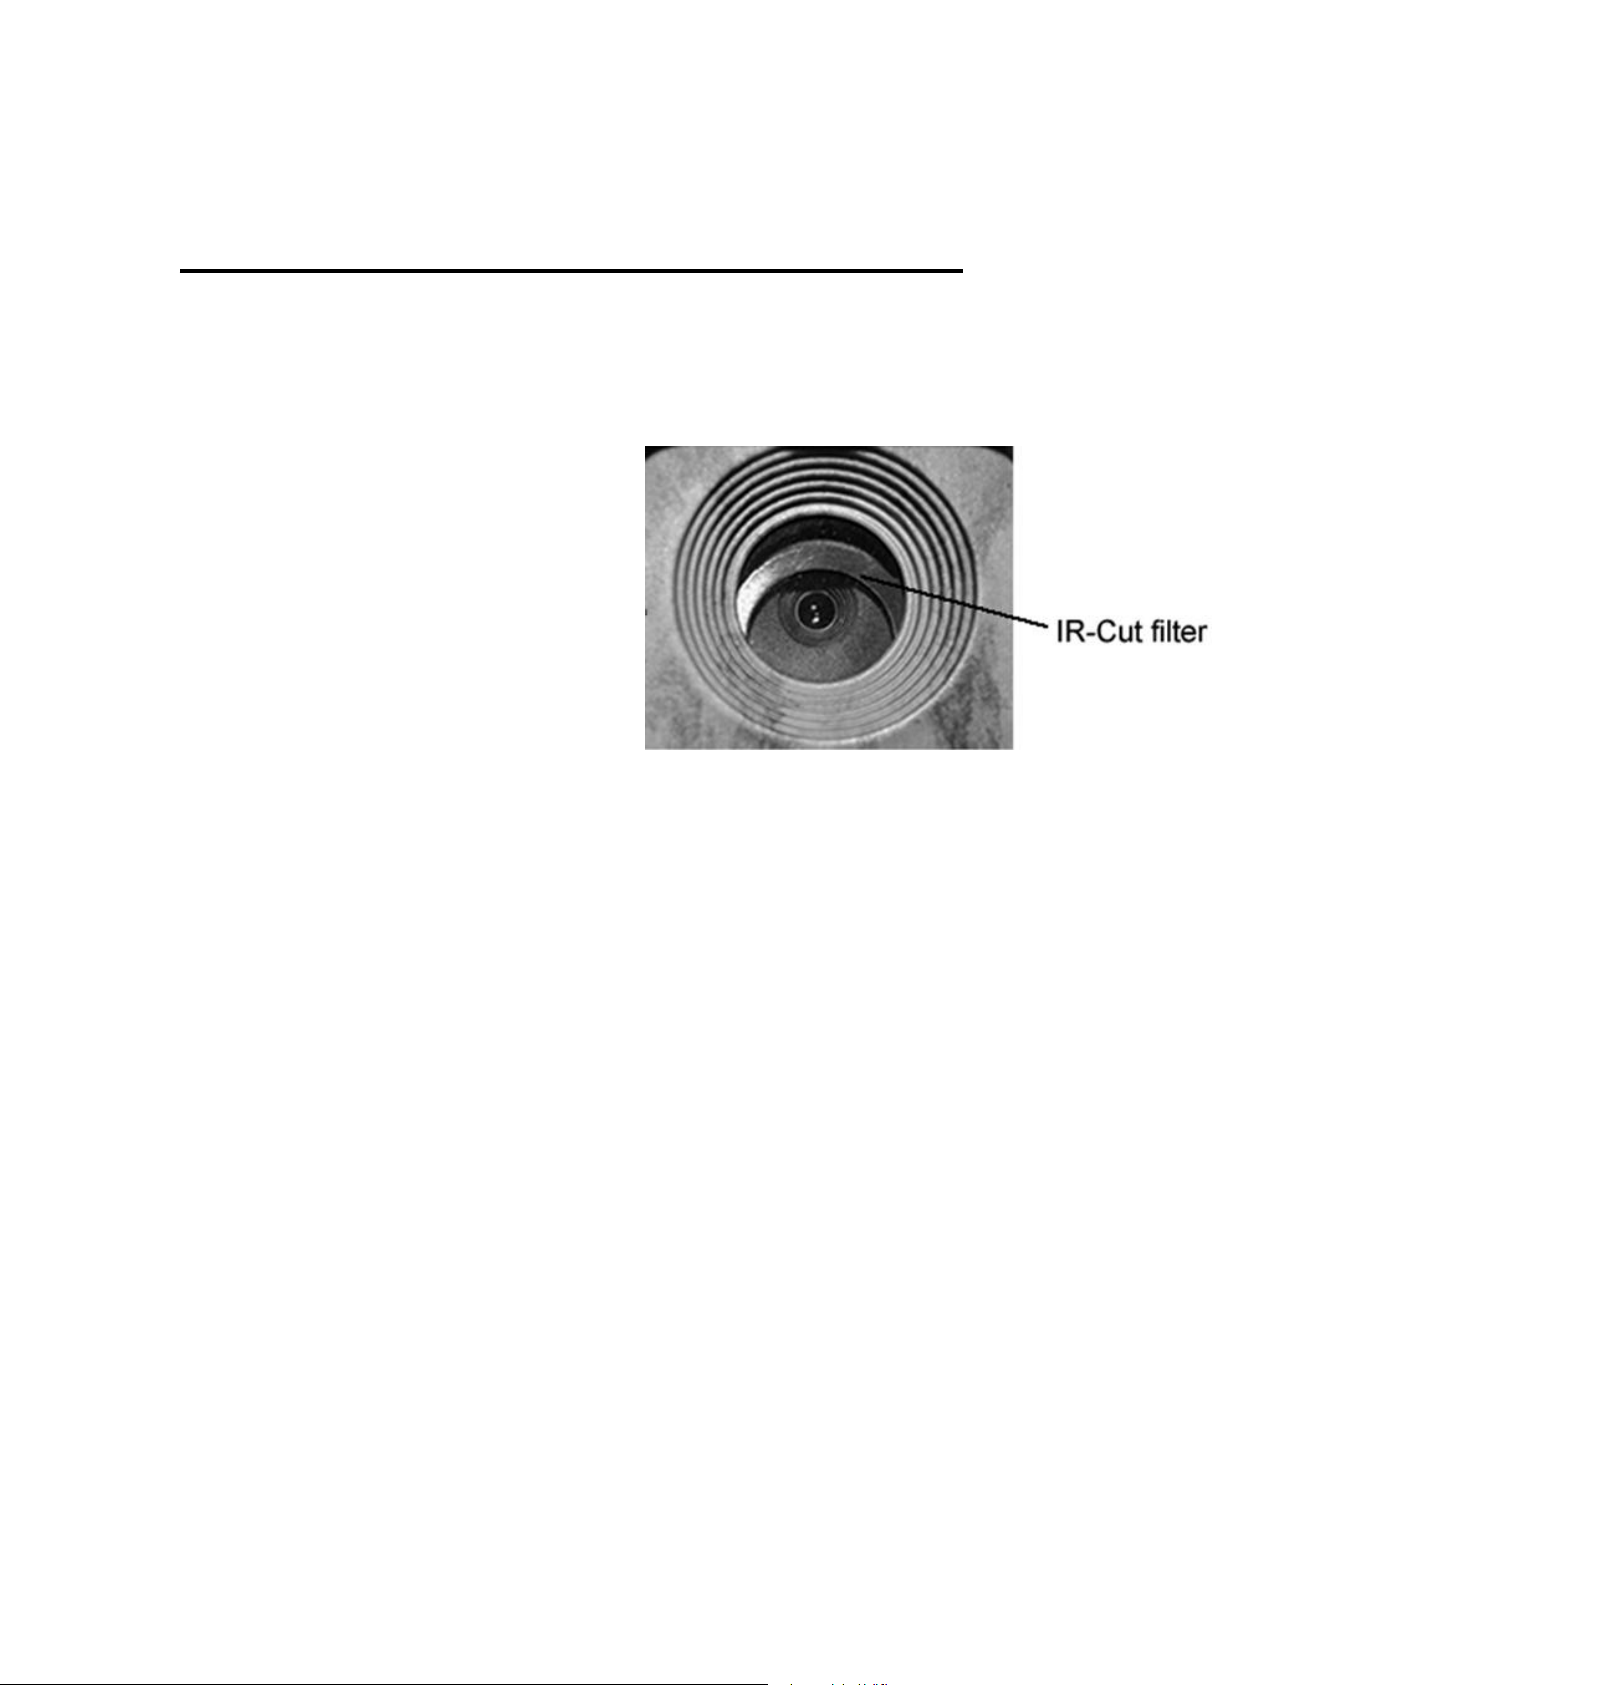
1、There is something in front of the camera lens - Is the
camera broken?
A: The camera is not broken. It’s an IR-cut filter. When
the camera is powered on, the IR-cut will cover the lens.
Only when the camera is powered off, the IR-cut will be at
a random place, sometimes covering the lens.
2 、The display screen is suddenly black.
A: The camera may be in “Hunting mode” - Press MENU
to wake it up. If there is no response, the camera may be
powered off – Please check if the batteries are still good
and in place. Once battery power and placement is
verified, press and hold down the OK/POWER button
until the display turns on, indicating the camera powering
up.
Page 15
12
5.0 PIR Detection Zone
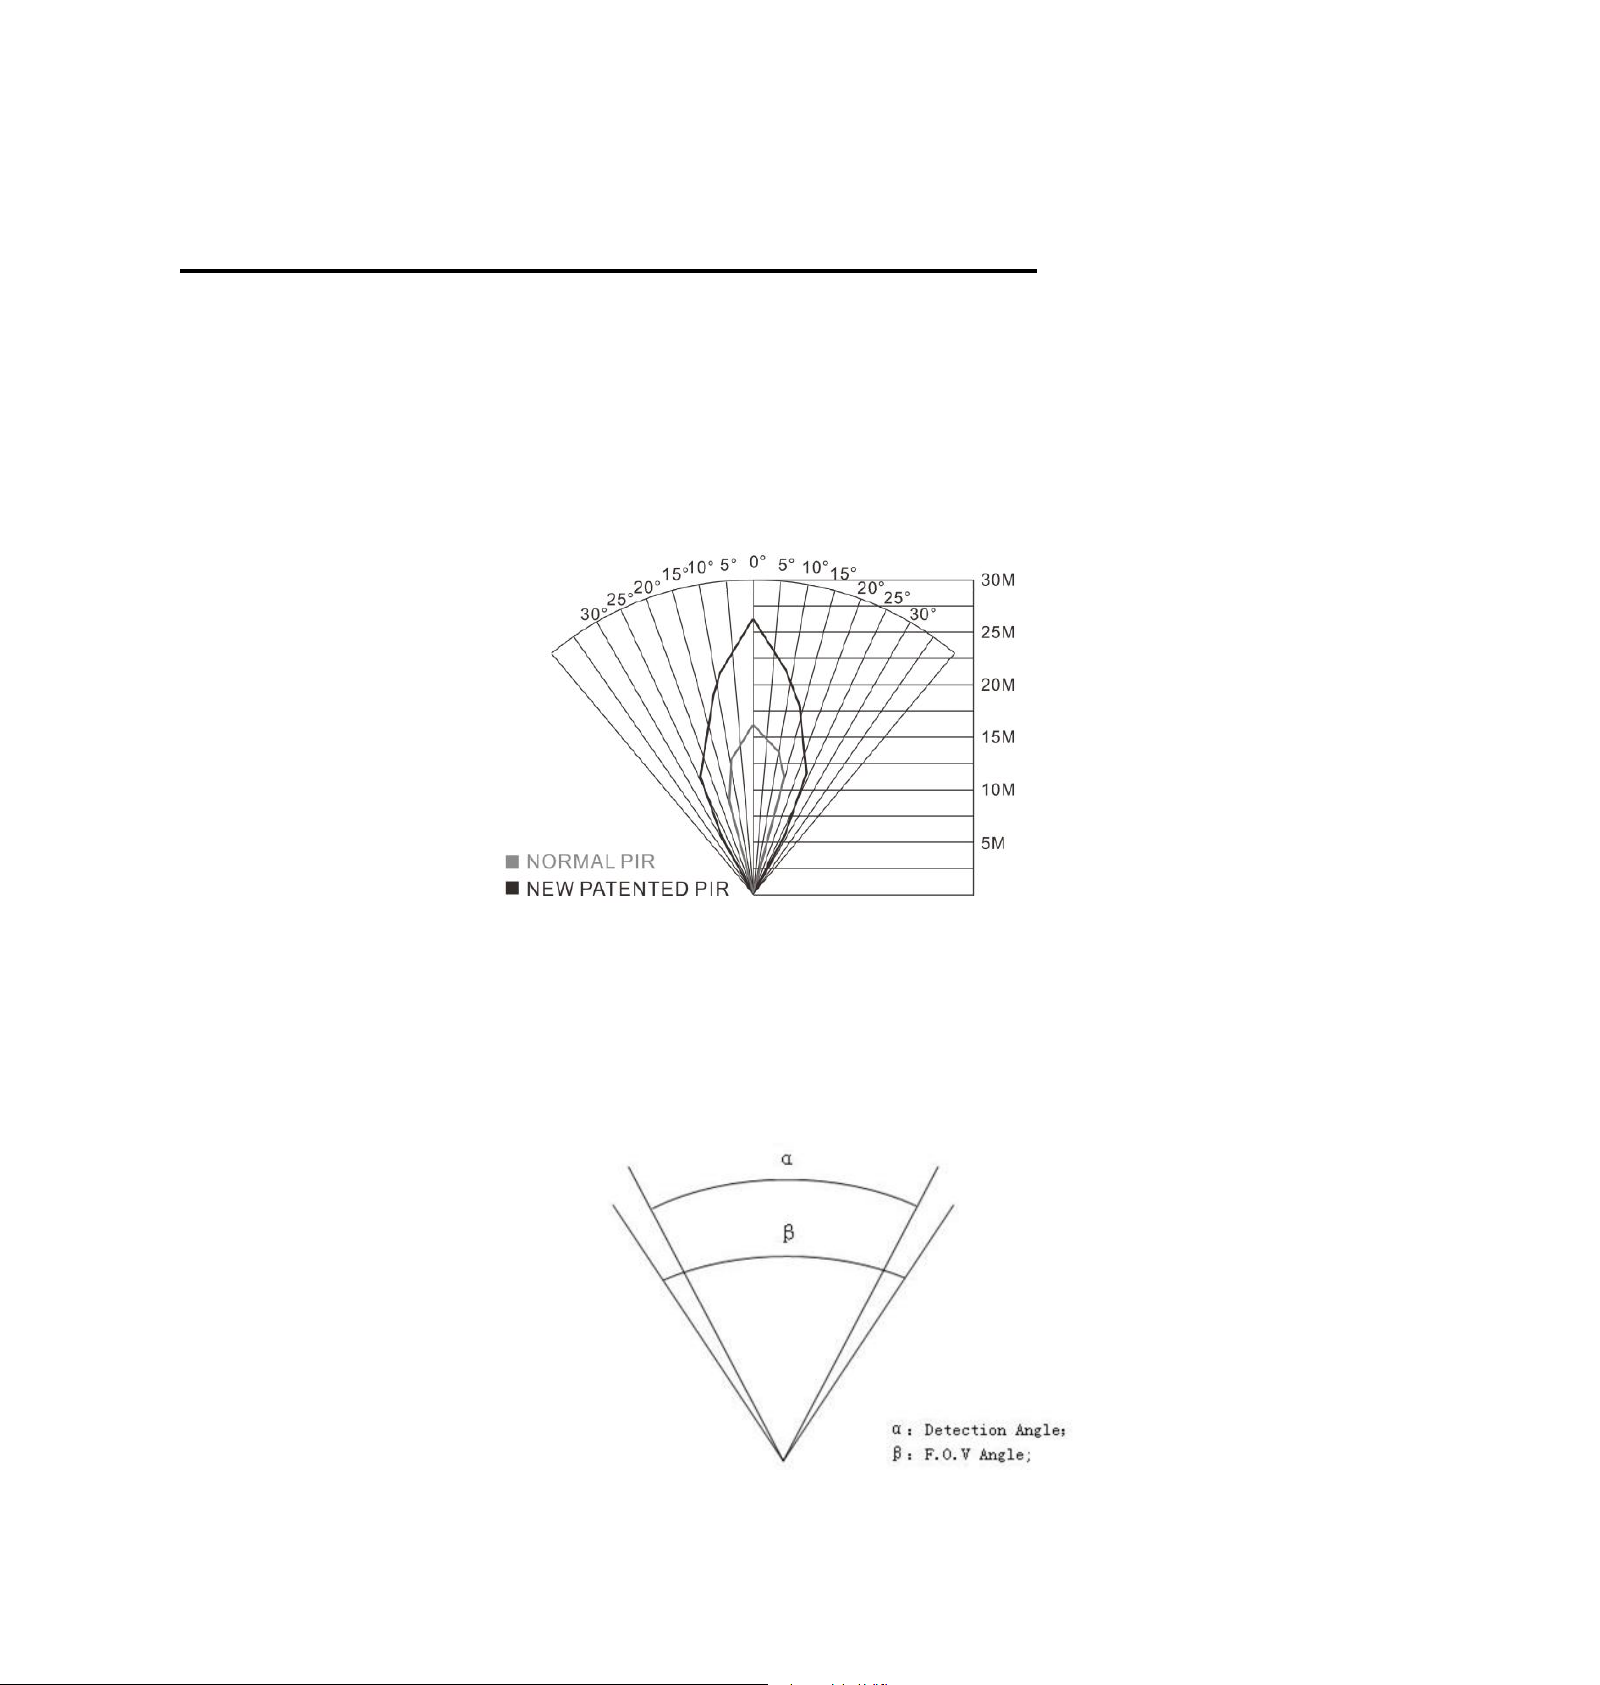
This camera has a new patented PIR design, which allows
the detection range to reach to 85ft in good environments.
Following picture shows the compared detection zone
between normal PIR and the new patented PIR.
The PIR detection angle (α) is just smaller than the field of
view (FOV) angle (β). The advantage of this design is to
reduce empty picture rate and capture most, if not all,
objects in motion.
Page 16

13
6.0 Technical Specifications
Image Sensor
3MP CMOS Sensor
6MP, 10MP Interpolation
Lens
F/NO=2.2
FOV(Field of View)=53°
PIR detection range
73ft
Display Screen of
Remote Control
1.33” LCD
Memory Card
Up to 32 GB
Video Resolution
1280x720(20fps)
640×480(20fps)
PIR Sensitivity
Adjustable (High/Normal/Low)
Trigger Time
<1.2s
Weight
180g(without battery)
Operation/Storage
Tem.
-20 - +60°C / -30 - +70°C
Power Supply
4×AA
Sound Recording
Available
Mounting
Rope/Belt/Python lock
Dimensions
107 x76 x40 mm
Operation Humidity
5% - 90%
Security
Authentication
FCC, CE, RoHS
Page 17

14
7.0 Parts List
Part Name
Quantity
Camera
One
Belt
One
User Manual
One
Warranty Card
One
For more details about our product or software, please visit
our website at : http://www.bolyguard.com/download.html
Page 18

 Loading...