

Page 1
© Copyright 2012 Bogen Communications, Inc.
Specifications subject to change
54-2207-01A 1206
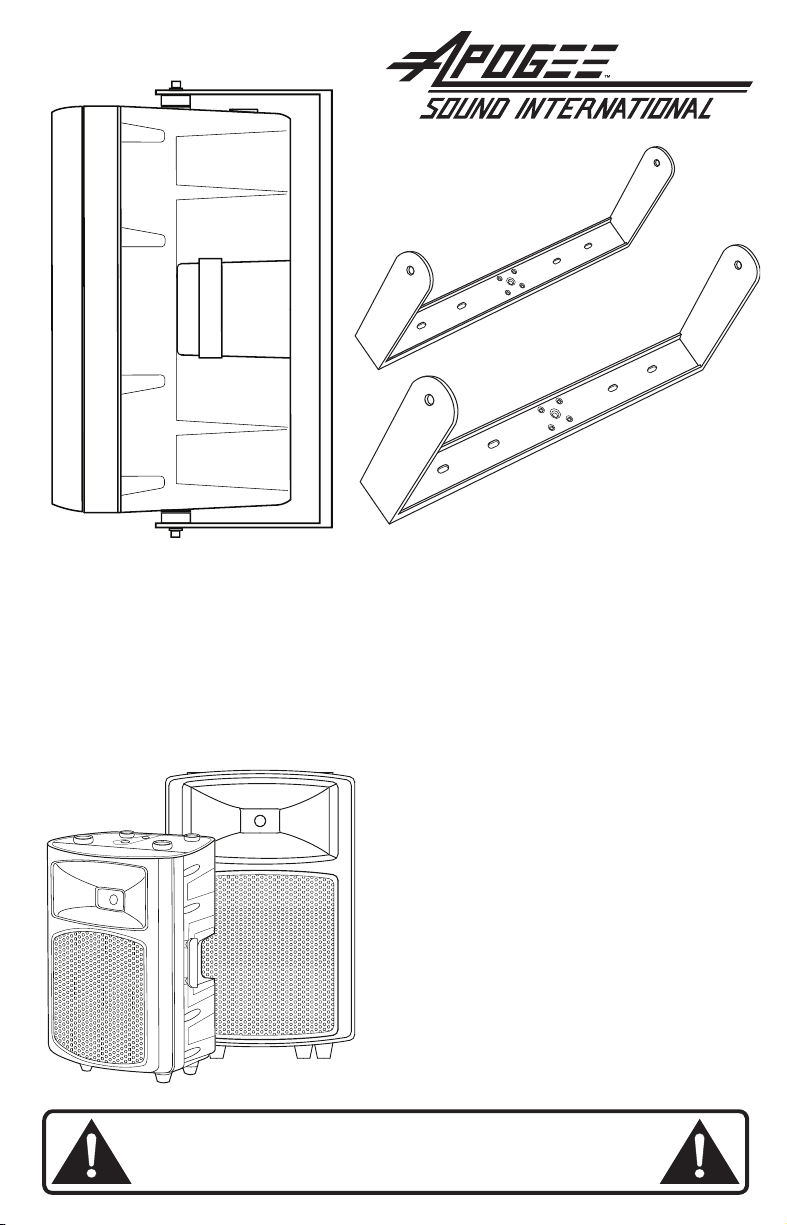
Installation Instruction Manual
108-2120, 108-2150
AMT-Series Yoke Rigging Kits
For Apogee
AMT-12 and AMT-15
Loudspeakers
108-2150
YOKE
108-2120
YOKE
AMT-12
YOU MUST ACCURATELY FOLLOW THE INSTRUCTIONS FOR ALL THE
PARTS INVOLVED IN THIS INSTALLATION. FAILURE TO DO SO CAN
CAUSE SERIOUS INJURY OR DEATH TO OTHERS AND MAY EXPOSE
YOU AND/OR YOUR COMPANY TO POSSIBLE LEGAL ACTION.
AMT-15
Page 2
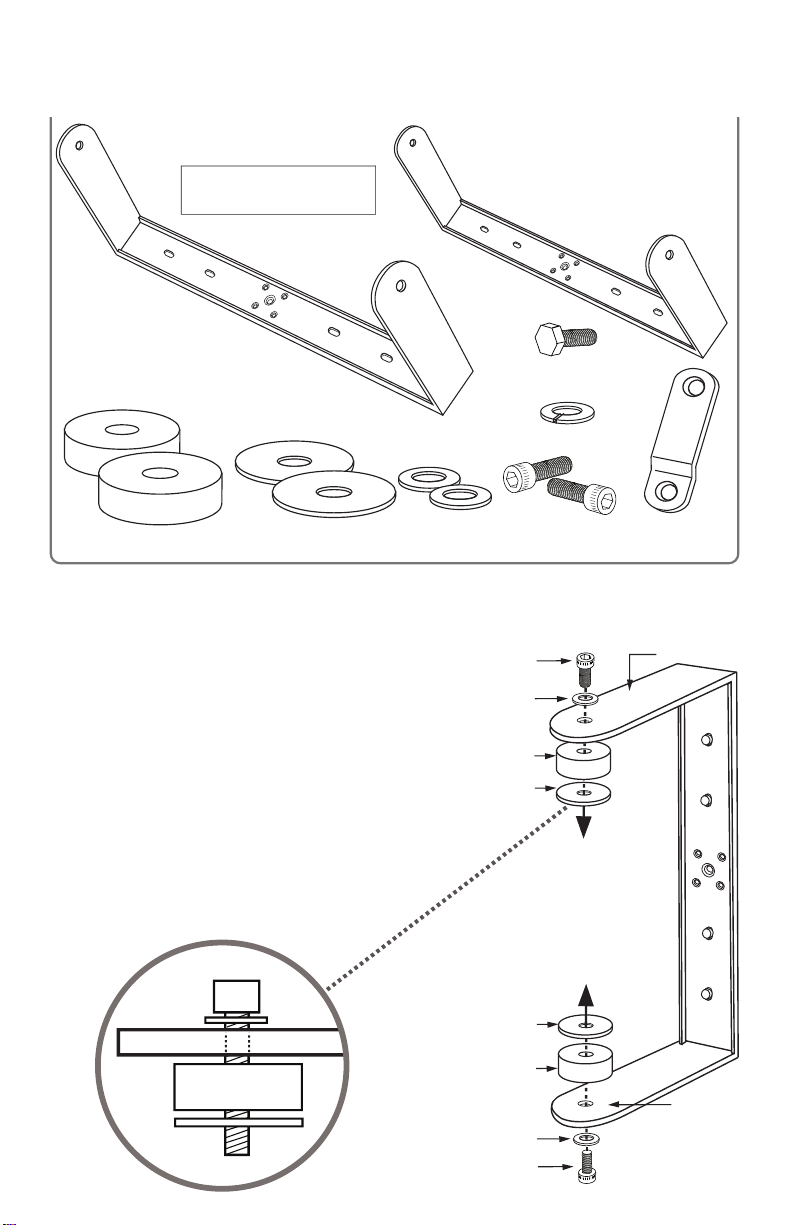
108-2120 & 108-2150
AMT-Series Yoke Rigging Kit Components
(2) STEEL
WASHERS
1. Assembling the AMT-Series Yoke Kit
(2) M8 SOCKET
HEAD BOLTS
(2) NEOPRENE
RUBBER WASHERS
(2) STEEL SPACERS
AMT-15 YOKE KIT CONTAINS
BOLTS, WASHERS & SPACERS
SHOWN BELOW
108-2150
AMT-12 YOKE KIT CONTAINS
BOLTS, WASHERS & SPACERS
SHOWN BELOW
108-2120
EACH YOKE KIT IS
SOLD SEPARATELY
INTO RIGGING
POINT ON AMT
SPEAKER TOP
M8 SOCKET
HEAD BOLT
STEEL
WASHER
STEEL
SPACER
NEOPRENE
RUBBER
WASHER
NEOPRENE
RUBBER WASHER
M8 SOCKET
HEAD BOLT
STEEL WASHER
STEEL SPACER
YOKE
ARM
YOKE ARM
INTO RIGGING
POINT ON AMT
SPEAKER BOTTOM
DETAIL
SIDE VIEW
BOLT
WASHER
YOKE ARM
SPACER
RUBBER
WASHER
(1) TIE POINT
BRACKET
Preparing the AMT-Series Yoke Kit for
Assembly with the AMT Loudspeaker
AFTER FIRST SECURELY ATTACHING THE
YOKE to a mounting surface (see section 3),
the loudspeaker can be attached to the yoke.
This is best accomplished with two people,
one to hold the loudspeaker in place, the
other to insert the hardware (bolts, washers,
spacers). The bolt, flat steel washer, steel
spacer, and rubber washer need to be used
on each end of the cabinet (top & bottom) to
securely hold the loudspeaker in place.
Diagram A
(1) M8 LOW-HEAD
SOCKET CAP SCREW
(1) LOCK WASHER
2. Safety Cable
Anchor Tie Point
NOTE: Be sure that all the hardware
has been tightened securely. However,
DO NOT over-tighten.
TOP VIEW
YOKE
ARM
SOCKET
HEAD
BOLT
DO NOT
USE THIS
RIGGING
POINT
USE THIS
RIGGING
POINT
ROTATE
BOTTOM VIEW
YOKE
ARM
REMOVE
ALL 4 FEET
FROM THE
BOTTOM OF
SPEAKER
Remove Feet from AMT Speaker
If the enclosure will be pivoted more than
a few inches to the left or right / up or down,
remove the 4 feet from the bottom of the
enclosure. This will allow the speaker to
rotate fully. When the desired angle has
been set, fully tighten both the top and
bottom socket head screws.
Holding the loudspeaker in place, line up the holes in the yoke with the holes in
the top and bottom of the enclosure closest to the front of the cabinet. The first
bolt/washer/spacer/rubber washer combination needs to be installed in the correct
order (see Diagram A) on one end of the bracket and speaker, then can be partially
tightened. The second bolt/washer/spacer/rubber washer combination can then
be installed at the other end of the bracket and speaker and partially tightened.
Once the desired orientation of the speaker is selected, the bolts can be fully
tightened to prevent the enclosure from pivoting.
USE THIS
RIGGING
POINT
DO NOT
USE THIS
RIGGING
POINT
NOTE: Be sure to use the Rigging Point which is toward the front of the speaker on
both the top and bottom of the speaker enclosure to attach the Yoke socket head bolt.
SOCKET
HEAD
BOLT
A convenient Safety Cable Anchor Tie
Point Bracket is provided with the yoke.
This attaches to the rear thread/rigging
point in the top of the speaker using
the supplied low profile socket head
bolt with the lock washer. The attached
bracket can now be rotated to the most
convenient angle for attaching a safety
cable (cable to be user supplied).
YOKE ARM
SAFETY CABLE
ANCHOR TIE
POINT BRACKET
SPEAKER
(TOP VIEW)
SOCKET
CAP SCREW
LOCK
WASHER
Page 3

2. Safety Cable
Anchor Tie Point
NOTE: Be sure that all the hardware
has been tightened securely. However,
DO NOT over-tighten.
TOP VIEW
YOKE
ARM
SOCKET
HEAD
BOLT
DO NOT
USE THIS
RIGGING
POINT
USE THIS
RIGGING
POINT
ROTATE
BOTTOM VIEW
YOKE
ARM
REMOVE
ALL 4 FEET
FROM THE
BOTTOM OF
SPEAKER
Remove Feet from AMT Speaker
If the enclosure will be pivoted more than
a few inches to the left or right / up or down,
remove the 4 feet from the bottom of the
enclosure. This will allow the speaker to
rotate fully. When the desired angle has
been set, fully tighten both the top and
bottom socket head screws.
Holding the loudspeaker in place, line up the holes in the yoke with the holes in
the top and bottom of the enclosure closest to the front of the cabinet. The first
bolt/washer/spacer/rubber washer combination needs to be installed in the correct
order (see Diagram A) on one end of the bracket and speaker, then can be partially
tightened. The second bolt/washer/spacer/rubber washer combination can then
be installed at the other end of the bracket and speaker and partially tightened.
Once the desired orientation of the speaker is selected, the bolts can be fully
tightened to prevent the enclosure from pivoting.
USE THIS
RIGGING
POINT
DO NOT
USE THIS
RIGGING
POINT
NOTE: Be sure to use the Rigging Point which is toward the front of the speaker on
both the top and bottom of the speaker enclosure to attach the Yoke socket head bolt.
SOCKET
HEAD
BOLT
A convenient Safety Cable Anchor Tie
Point Bracket is provided with the yoke.
This attaches to the rear thread/rigging
point in the top of the speaker using
the supplied low profile socket head
bolt with the lock washer. The attached
bracket can now be rotated to the most
convenient angle for attaching a safety
cable (cable to be user supplied).
YOKE ARM
SAFETY CABLE
ANCHOR TIE
POINT BRACKET
SPEAKER
(TOP VIEW)
SOCKET
CAP SCREW
LOCK
WASHER
Page 4

50 Spring Street, Ramsey, NJ 07446 USA • Tel. 201-995-2001 • www.apogee-sound.com
Apogee Sound 108-2120 & 108-2150 AMT Yoke Rigging Kits are warranted to be free from defects in material or workmanship for three (3) years from the date of sale to the original
purchaser. Any part of the product covered by this warranty that, with normal installation and use, becomes defective will be repaired or replaced by Apogee, at our option, provided
the product is shipped insured and prepaid to: Apogee Sound Factory Service Department, 50 Spring Street, Ramsey, NJ 07446, USA. The product will be returned to you freight prepaid.
This warranty does not extend to any of our products that have been subjected to abuse, misuse, improper storage, neglect, accident, improper installation or have been modified or
repaired or altered in any manner whatsoever, or where the serial number or date code has been removed or defaced.
THE FOREGOING LIMITED WARRANTY IS APOGEE’S SOLE AND EXCLUSIVE WARRANTY AND THE PURCHASER’S SOLE AND EXCLUSIVE REMEDY. APOGEE SOUND
MAKES NO OTHER WARRANTIES OF ANY KIND, EITHER EXPRESSED OR IMPLIED, AND ALL IMPLIED WARRANTIES OF MERCHANTABILITY OR FITNESS FOR A
PARTICULAR PURPOSE ARE HEREBY DISCLAIMED AND EXCLUDED TO THE MAXIMUM EXTENT ALLOWABLE BY LAW. Apogee's liability arising out of the manufacture,
sale or supplying of products or their use or disposition, whether based upon warranty, contract, tort or otherwise, shall be limited to the price of the product. In no event shall Apogee
be liable for special, incidental or consequential damages (including, but not limited to, loss of profits, loss of data or loss of use damages) arising out of the manufacture, sale or
supplying of products, even if Apogee has been advised of the possibility of such damages or losses. Some States do not allow the exclusion or limitation of incidental or consequential
damages, so the above limitation or exclusion may not apply to you. This warranty gives you specific legal rights, and you may also have other rights which vary from State to State.
Products that are out of warranty will also be repaired by the Apogee Sound Factory Service Department – same address as above or call 201-934-8500. The parts and labor involved
in these repairs are warranted for 90 days when repaired by the Apogee Sound Factory Service Department. All shipping charges in addition to parts and labor charges will be at the
owner's expense. All returns require a Return Authorization number.
7/22/2008
Limited Warranty; Exclusion of Certain Damages
YOKE
ARM
3. Mounting Yoke Assembly & AMT Speaker
4 PROPERLY
SELECTED
FASTENERS,
DEPENDING ON
THE BUILDING
STRUCTURE.
(4 REQUIRED,
USER SUPPLIED)
Surface
Mount
YOKE
ARM
4 FLAT HEAD
SOCKET
SCREWS
(SUPPLIED)
MACHINED ALUMINUM STAND
FITTING KIT FOR YOKE
(SOLD SEPARATELY)
140-05
HORIZONTAL
TRIPOD MOUNT
WARNING: Customer is to be responsible for the mounting
hardware and selection of mounting surface. Both the
mounting hardware and surface into which the unit is
to be attached must be specified to withstand 10X the
weight of the suspended assembly. Also, a safety cable
should be attached to the unit so as to prevent from fall
should the mounting hardware/surface attachment fail.
AMT-12/15
SPEAKER
AND YOKE
ASSEMBLY
ALUMINUM
STAND
FITTING
TRIPOD
Horizontal Stand
Mount
CEILING MOUNT
HORIZONTAL & VERTICAL WALL MOUNT
© Copyright 2012 Bogen Communications, Inc.
Specifications subject to change
54-2207-01A 1206
Installation Instruction Manual
108-2120, 108-2150
AMT-Series Yoke Rigging Kits
For Apogee
AMT-12 and AMT-15
Loudspeakers
108-2150
YOKE
108-2120
YOKE
AMT-12
YOU MUST ACCURATELY FOLLOW THE INSTRUCTIONS FOR ALL THE
PARTS INVOLVED IN THIS INSTALLATION. FAILURE TO DO SO CAN
CAUSE SERIOUS INJURY OR DEATH TO OTHERS AND MAY EXPOSE
YOU AND/OR YOUR COMPANY TO POSSIBLE LEGAL ACTION.
AMT-15
 Loading...