

Body-Solid G10B Workout Chart
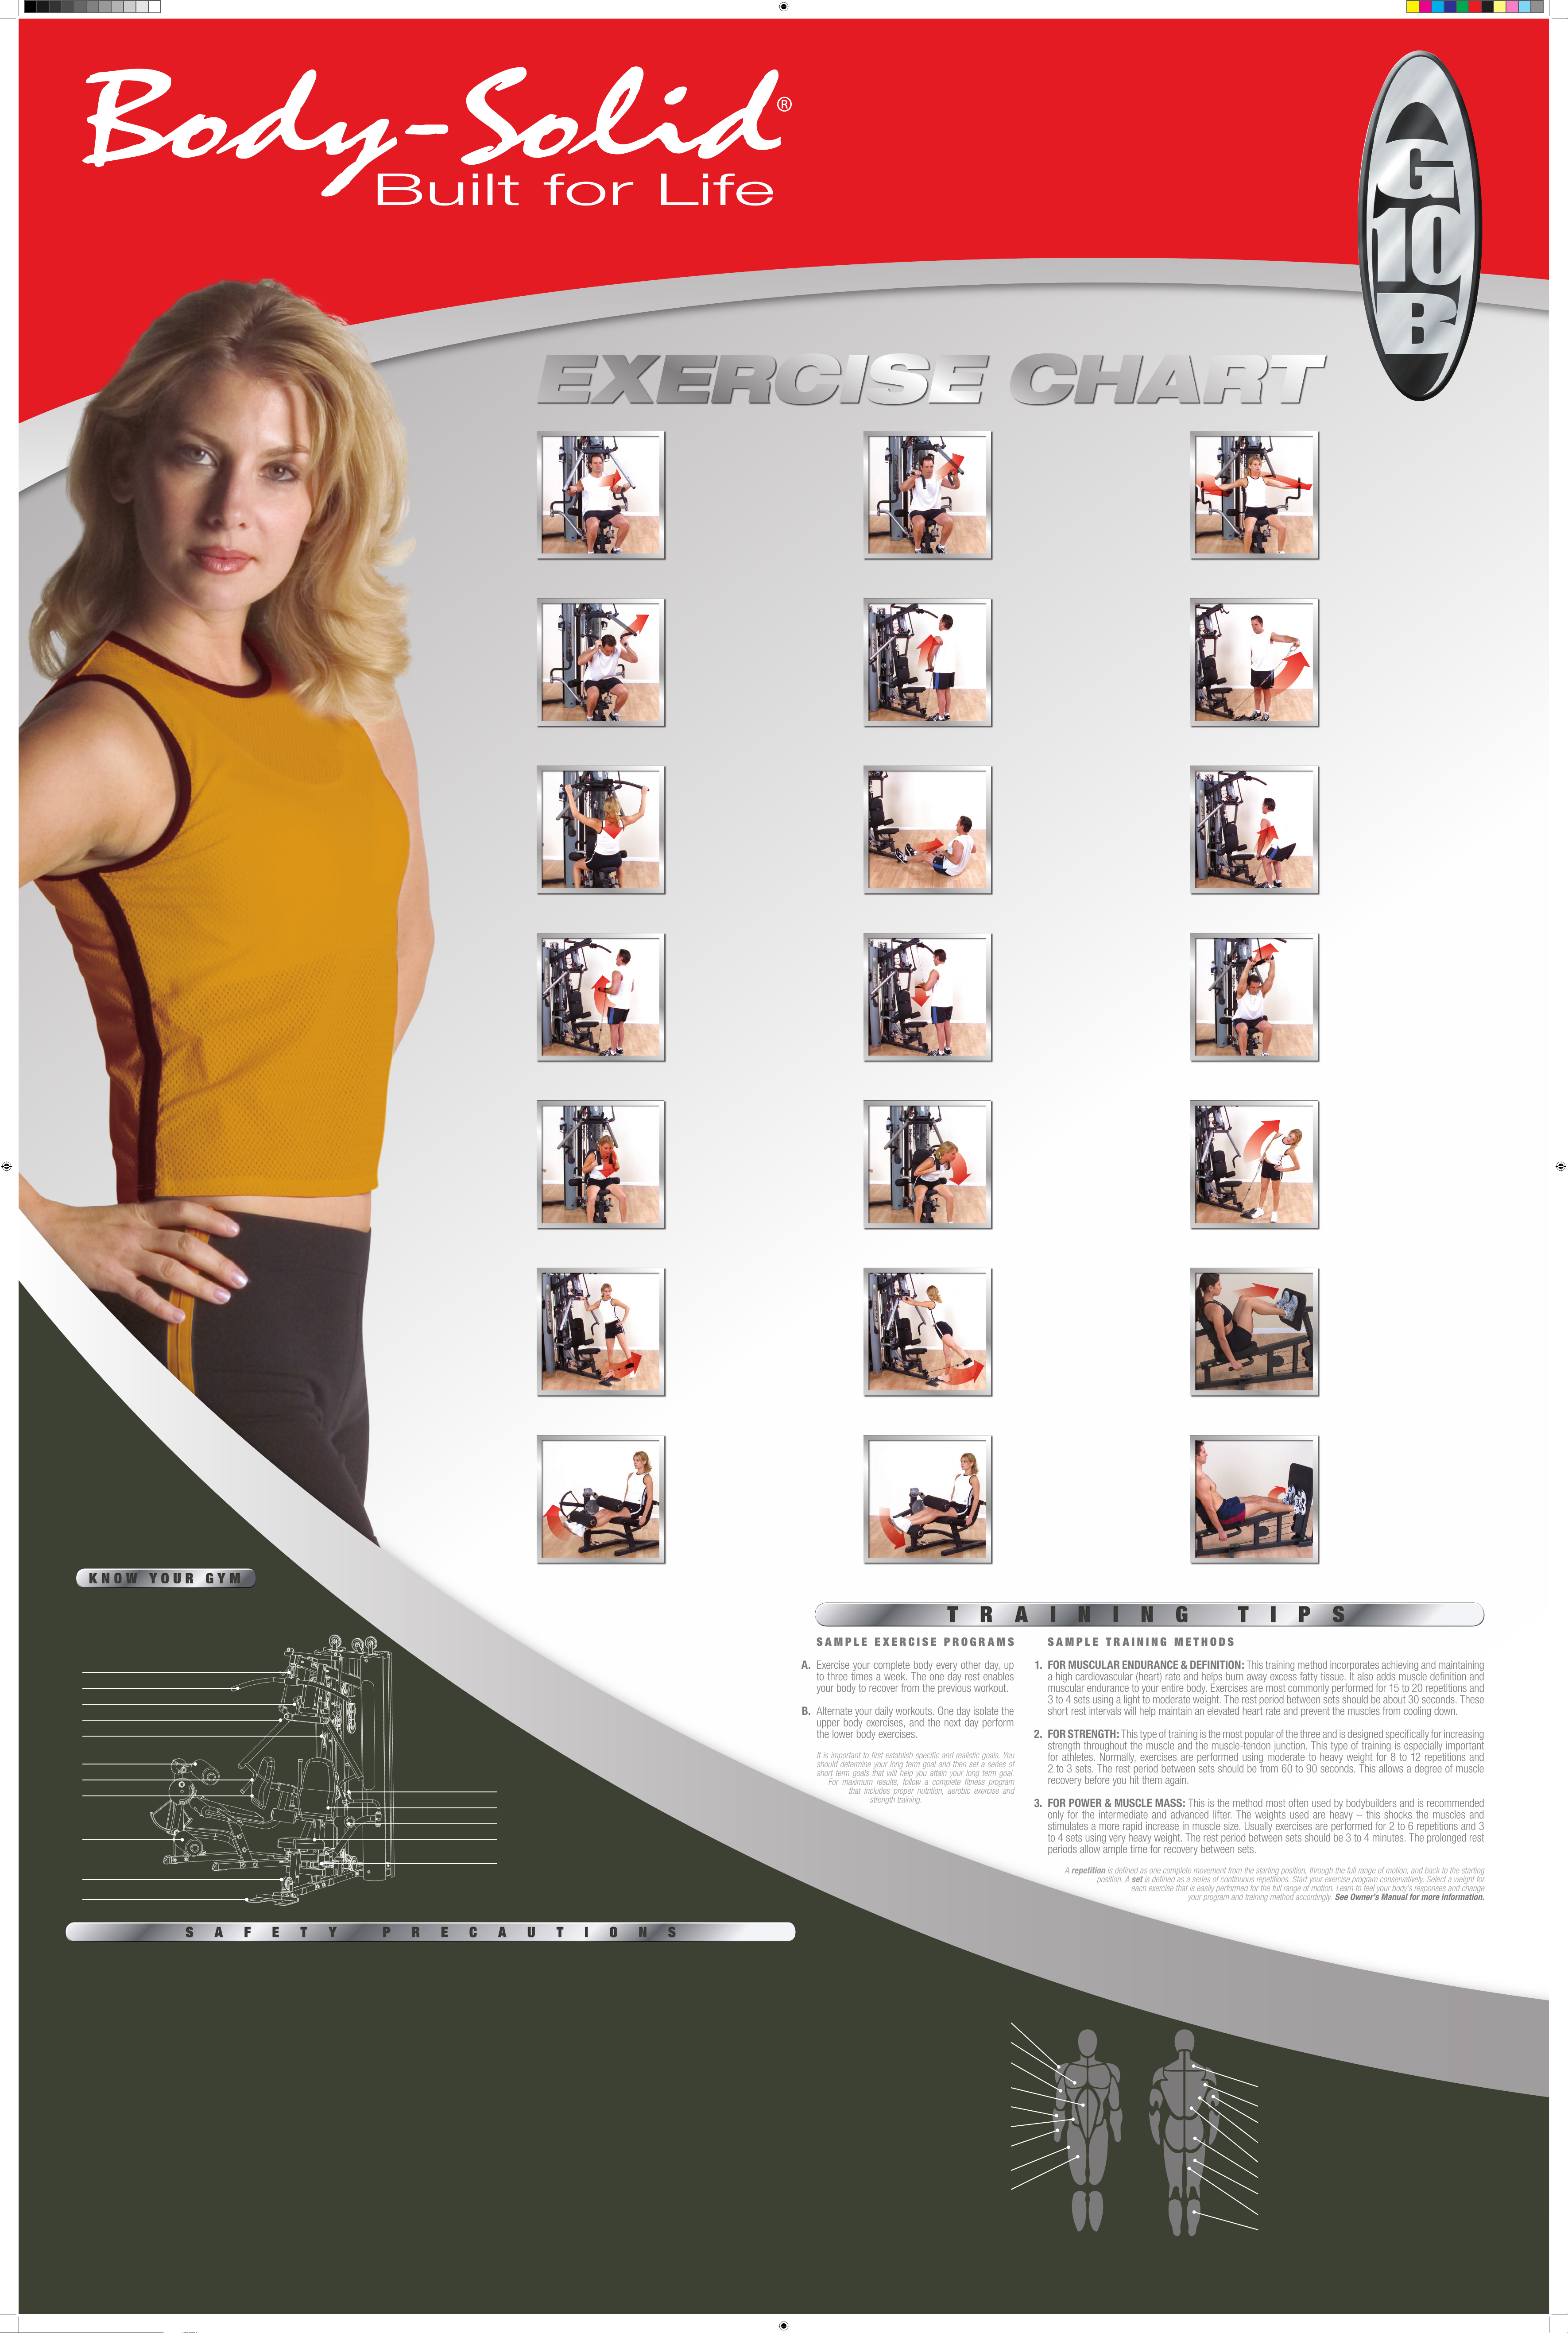
S A M P L E E X E R C I S E P R O G R A M S
Exercise your complete body every other day, up
to three times a week. The one day rest enables
your body to recover from the previous workout.
Alternate your daily workouts. One day isolate the
upper body exercises, and the next day perform
the lower body exercises.
It is important to first establish specific and realistic goals. You
should determine your long term goal and then set a series of
short term goals that will help you attain your long term goal.
For maximum results, follow a complete fitness program
that includes proper nutrition, aerobic exercise and
strength training.
S A M P L E T R A I N I N G M E T H O D S
FOR MUSCULAR ENDURANCE & DEFINITION: This training method incorporates achieving and maintaining
a high cardiovascular (heart) rate and helps burn away excess fatty tissue. It also adds muscle definition and
muscular endurance to your entire body. Exercises are most commonly performed for 15 to 20 repetitions and
3 to 4 sets using a light to moderate weight. The rest period between sets should be about 30 seconds. These
short rest intervals will help maintain an elevated heart rate and prevent the muscles from cooling down.
FOR STRENGTH: This type of training is the most popular of the three and is designed specifically for increasing
strength throughout the muscle and the muscle-tendon junction. This type of training is especially important
for athletes. Normally, exercises are performed using moderate to heavy weight for 8 to 12 repetitions and
2 to 3 sets. The rest period between sets should be from 60 to 90 seconds. This allows a degree of muscle
recovery before you hit them again.
FOR POWER & MUSCLE MASS: This is the method most often used by bodybuilders and is recommended
only for the intermediate and advanced lifter. The weights used are heavy – this shocks the muscles and
stimulates a more rapid increase in muscle size. Usually exercises are performed for 2 to 6 repetitions and 3
to 4 sets using very heavy weight. The rest period between sets should be 3 to 4 minutes. The prolonged rest
periods allow ample time for recovery between sets.
A repetition is defined as one complete movement from the starting position, through the full range of motion, and back to the starting
position. A set is defined as a series of continuous repetitions. Start your exercise program conservatively. Select a weight for
each exercise that is easily performed for the full range of motion. Learn to feel your body’s responses and change
your program and training method accordingly. See Owner’s Manual for more information.
1.
2.
3.
A.
B.
m y w o r k o u t .
m y s c h e d u l e .
m y l i f e .
© Copyright 2005. Body-Solid, Inc. All rights reserved. Body-Solid reserves the right to change design and specifications when we feel it will improve the product. Body-Solid machines maintain several patented and patent pending features and designs. All rights reserved on all design patents and utility patents.
For further information, contact Body-Solid, Inc. 1900 South Des Plaines Avenue, Forest Park, IL 60130 USA • Phone: 1-708-427-3555 • Fax: 1-708-427-3556 • Web: www.bodysolid.com
w w w . b o d y s o l i d . c o m
E X E R C I S E S A F E T Y
Consult your physician before beginning any exercise program.
Always warm up your muscles before starting a workout by doing at least 5 to 15 minutes of cardiovascular
exercise. Then do an 8 to 12 minute stretching routine. Stretch slowly (without bouncing) and hold each stretch for
at least 10 seconds. The two main purposes for stretching are injury prevention and a faster rate of recovery from
exercise. Stretching should be performed in both the warm up and cool down phases of a training program.
Use proper form. Maintain proper spinal alignment and head positioning throughout your workout. Focus on only
working the muscle group intended for the exercise you are doing. If there is strain elsewhere, you may need
to re-evaluate the amount of weight that is involved with the lift. Keeping proper form also includes maintaining
control through the entire range of motion.
Breath properly. Exhale during the pressing action and inhale upon returning to the start position. Do not hold
your breath during any part of an exercise.
Be sure that all users carefully read and understand all warning, safety and maintenance labels on the machine
before each use. It is absolutely necessary that you familiarize yourself and all others with the proper operation
of this machine prior to use.
Avoid the risk of injury by remaining within your limits.
E Q U I P M E N T S A F E T Y
Make sure that all users read and understand the Owner’s Manual, all warning labels
and all decals on this machine prior to use. Please use all precautionary measures
necessary for safety.
Keep observers (especially children) at a safe distance away from the machine while in
operation. Do not allow children to play on or around the machine at any time.
Carefully inspect the machine before each use. Check that all nuts, bolts, pop pins and
adjustment points are in place and fully tightened. Replace worn parts immediately.
Cable inspection should performed daily. Cables are wear items. It is your responsibility
to prevent unexpected breakage. Replace any damaged or worn cable immediately. Do
not allow the machine to be used until damaged or worn cables are replaced. Using
a machine with a suspect cable can result in serious injury. See Owner’s Manual for
more information.
Always stay clear of all weights and all moving parts when machine is in use. Obtain
assistance to free any jammed parts. Never attempt to free a jammed part by
yourself.
Maintain a regular routine of preventative maintenance.
For your own safety, do not begin any exercise program without proper instruction.
See Owner’s Manual for more information.
1.
2.
3.
4.
5.
6.
1.
2.
3.
4.
5.
6.
7.
High Pulley 90%
Press Arm
Leg Extension &
Leg Curl 200%
Low Pulley 100%
Percentages indica te weight rati os . Ex amples: When
using high p ulley, 100 lb s. would equal 9 0 lbs. of
actual we ight re sistance. W hen using leg develop er,
100 l bs. wou ld equa l 20 0 lbs. of actual weig ht
resistance.
Press Handles 100%
Trapezius
Teres Major
(lats)
Triceps
Latissimus Dorsi
(lats)
Erector Spinae
(lower back)
Gluteus Maximus
Hamstrings
Adductors
(inner thigh)
Gastrocnemius
Deltoids
Pectorals
Biceps
Rectus Abdominus
(abdominals)
Brachialis
Obliques
Wrist & Forearm Flexors
Abductors
(outer thigh)
Quadriceps
Press Arm Adjustment
Lat Bar
Mid Pulley 90%
Adjustable Back Pad
Lat Hold Down Rollers
Adjustable Seat Pad
Pec Dec 80% (both sides)
40% ( each side)
Flip-Up Foot Brace
Pec Arm Adjustment
Adjustable Back Pad
Leg Lock-Down Pad
Converging Chest Press (pectorals)
1. Insert pin into weight stack at desired resistance level.
2. Adjust Press Arm to the Chest Press position and set back
pad to the Chest Press position.
3. Adjust seat pad height so that when seated, the horizontal
press handles are even with the chest (pectoral ) muscles.
4. Sit comfortably on the seat pad with your back flat against
the back pad.
5. Grasp horizontal press handles with your arms bent and
palms facing downward.
6. Keeping your elbows out and below your shoulders, extend
your arms forward at a smooth, moderate pace throughout
the exercise movement.
7. Pause for a moment, then slowly return to the starting
position. Repeat movement.
8. Exhale on exertion, inhale on return motion.
CHEST
Converging Incline Press (pectorals)
1. Insert pin into weight stack at desired resistance level.
2. Adjust Press Arm to the Incline Press position and set
back pad to the Incline Press position.
3. Adjust seat pad height so that when seated, the horizontal
press handles are even with the chest (pectoral ) muscles.
4. Sit comfortably on the seat pad with your back flat against
the back pad.
5. Grasp horizontal press handles with your arms bent and
palms facing downward.
6. Keeping your elbows out and below your shoulders, extend
your arms forward at a smooth, moderate pace throughout
the exercise movement.
7. Pause for a moment, then slowly return to the starting
position. Repeat movement.
8. Exhale on exertion, inhale on return motion.
Pectoral Fly (pectorals)
1. Insert pin into weight stack at desired resistance level.
2. Adjust Press Arms to the Storage position.
3. Adjust seat pad height so that when seated, the pec arm
handles are below your shoulder level and your arms are
approximately parallel with the floor.
4. Sit comfortably on the seat pad with your back flat against
the back pad.
5. Reach back and grasp the pec arm handles on each side.
6. Use Chest muscle strength to bring your arms forward
and toward each other.
7. Pause for a moment, then slowly return to the starting
position. Repeat movement.
8. Exhale on exertion, inhale on return motion.
Converging Shoulder Press (deltoids)
1. Insert pin into weight stack at desired resistance level.
2. Adjust Press Arm to the Shoulder Press position and set
back pad to the Shoulder Press position.
3. Adjust seat pad height so that when seated, the horizontal
press handles are even with your shoulders.
4. Sit comfortably on the seat pad with your back flat against
the back pad.
5. Grasp vertical press handles with your arms bent and
palms facing inward.
6. Keeping your elbows out, extend your arms forward at a
smooth, moderate pace throughout the exercise
movement.
7. Pause for a moment, then slowly return to the starting
position. Repeat movement.
8. Exhale on exertion, inhale on return motion.
SHOULDERS
Upright Row (deltoids & trapezius)
1. Insert pin into weight stack at desired resistance level.
2. Attach Straight Bar to low pulley cable.
3. Stand erect, facing machine, with your feet approximately
shoulder width apart and grasp the bar with your hands
approximately 6 inches apart and your palms facing down.
4. Straighten your arms and allow the weight to pull your
arms straight down.
5. Keeping your elbows above your hands at all times, slowly
pull the bar upward until the back of your hands are even
with your chin.
6. Pause for a moment, then slowly return to the starting
position. Repeat movement.
7. Exhale on exer tion, inhale on return motion.
Lateral Deltoid Raise (deltoids)
1. Insert pin into weight stack at desired resistance level.
2. Attach Stirrup Handle (optional) and chain to the low
pulley cable.
3. Stand with your right side toward the machine.
4. Securely grasp the handle with your left hand and your
palm facing down.
5. Use Shoulder muscle strength to slowly raise the handle
upward and outward in a semicircular arc until it is in a
position even with your shoulder level.
6. Pause for a moment, then slowly return to the starting
position. Repeat movement.
7. Exhale on exer tion, inhale on return motion.
8. Change hands, turn around, and repeat with the opposite
arm.
Lat Pull Down (latissimus dorsi)
1. Insert pin into weight stack at desired resistance level.
2. Adjust Press Arm to the Storage position and attach Lat
Bar to the high pulley cable.
3. Adjust seat pad so your legs will lock-down comfortably
under rollers. Sit on seat pad facing into machine.
4. Grasp Lat Bar 3 to 6 inches wider than your shoulders on
each side.
5. Keeping your elbows back during movement, slowly pull
the Lat Bar down until it lightly touches the upper part of
your chest. Never pull down toward your head or neck.
6. Pause for a moment, then slowly return to the starting
position. Repeat movement.
7. Exhale on exer tion, inhale on return motion.
BACK
Biceps Curl (biceps)
1. Insert pin into weight stack at desired resistance level.
2. Attach Straight Bar to low pulley cable.
3. Facing the machine, take an underhand grasp on the bar.
Stand erect with your feet on the foot plate. Your arms
should be down at your sides with the bar resting on your
thighs.
4. Keeping your upper arms locked against the sides of
your torso, use Biceps strength to curl the bar upward
and forward in a semicircular arc to a position beneath
your chin.
5. Pause for a moment, then slowly return the bar back
along the same arc, to the starting position.
Repeat movement.
6. Exhale on exertion, inhale on return motion.
ARMS
Triceps Press Down (triceps)
1. Insert pin into weight stack at desired resistance level and
adjust Press Arm to Storage position.
2. Attach Straight Bar with chain to high pulley cable.
3. Facing the machine, stand erect with your feet set at
approximately shoulder width. Grip the bar securely with
your palms facing forward.
4. Pull the bar down and lock your upper arms against the
sides of your torso where they must remain throughout the
exercise movement. Lean slightly forward at the waist.
5. Moving only your forearms, use Triceps strength to push
the bar downward in a semicircular arc to a position below
your waist.
6. Pause for a moment, then slowly return the bar back
along the same arc, to the starting position.
Repeat movement.
7. Exhale on exer tion, inhale on return motion.
Triceps Extension (triceps)
1. Insert pin into weight stack at desired resistance level and
adjust Press Arm to Storage position.
2. Attach Tricep / Ab Strap to mid pulley cable. Adjust back
pad to Chest Press position.
3. Sit on seat pad, facing away from the machine.
4. Bend at the waist so that your torso is at an approximate
45° angle. Keep your hands behind your head and your
arms bent with your elbows facing forward.
5. Keeping your upper arms motionless, use Triceps strength
to move the strap forward until your arms are extended.
6. Pause for a moment, then slowly return the strap back
along the same arc, to the starting position.
Repeat movement.
7. Exhale on exer tion, inhale on return motion.
ABSHIPS/THIGHSLEGS
Glute Kickback (glutes)
1. Insert pin into weight stack at desired resistance level.
2. Attach Ankle Strap to your left ankle and low pulley
cable. Stand facing the machine on the foot platform.
3. Keeping your legs straight and body balanced, allow the
weight to pull your left leg toward the machine. Hold onto
the gym for balance and support.
4. Keeping both legs straight and using Gluteal strength,
slowly pull your left leg backward and behind your body as
far as comfortably possible.
5. Pause for a moment, then slowly return along the same
arc, to the starting position. Repeat movement.
6. Exhale on exertion, inhale on return motion.
7. Repeat with the opposite leg.
Leg Press (quadriceps, hamstrings, & glutes)
1. Insert pin into weight stack at desired resistance level.
2. Sit comfortably on seat pad with your back flat against the
back pad and your feet securely against the press plate.
3. Adjust back pad so your knees are at a 90° angle.
4. Grasp the handles at your sides for balance and stability.
5. Using leg muscles, slowly press the foot plate until your
legs are extended. Do not lock-out your knees.
6. Pause for a moment, then slowly return to the starting
position. Repeat movement.
7. Exhale on exer tion, inhale on return motion.
Leg Press Station Optional #GLP
Leg Abduction (hip & outer thigh)
1. Insert pin into weight stack at desired resistance level.
2. Attach Ankle Strap to your left ankle and low pulley cable.
Stand 1 to 2 feet away from the pulley with your right side
toward the machine. Grasp press arm for stability.
3. Keeping your legs straight and body balanced, allow
the weight to pull your left leg across your body and
toward the machine.
4. Using Outer Thigh strength, slowly pull your left leg across
and away from your body as far as comfortably possible.
5. Pause for a moment, then slowly return along the same
arc, to the starting position. Repeat movement.
6. Exhale on exertion, inhale on return motion.
7. Turn around and repeat with the opposite leg.
Seated Leg Curl (hamstrings & leg biceps)
1. Insert pin into weight stack at desired resistance level.
2. Sit comfortably on seat pad. Adjust back pad so that your
knee joints line up with the pivot point.
3. Place your heels on top of the lower leg pad and adjust
that pad to a comfortable, starting Leg Curl position.
4. Adjust the top leg pad to lock your legs in place.
5. Use Hamstring strength to curl your feet inward and
downward, bending your knees as much as comfortably
possible.
6. Pause for a moment, then slowly return to the starting
position. Repeat movement.
7. Exhale on exer tion, inhale on return motion.
Leg Extension (quadriceps)
1. Insert pin into weight stack at desired resistance level.
2. Sit comfortably on seat pad. Adjust back pad so that your
knee joints line up with the pivot point.
3. Hook your feet under the lower leg pad and adjust that
pad to a comfortable, starting Leg Extension position.
4. Using Quadricep strength, extend your feet outward and
upward until your legs are fully extended.
5. Pause for a moment, then slowly return your feet back
along the same arc, to the starting position.
Repeat movement.
6. Exhale on exertion, inhale on return motion.
Calf Press (gastrocnemius)
1. Insert pin into weight stack at desired resistance level.
2. Adjust back pad to desired position.
3. Sit comfortably on seat pad with your back flat against the
back pad and the balls of your feet on the bottom portion
of the press plate.
4. Grasp the handles at your sides for balance and stability.
5. Extend your legs and hold them in this position throughout
the exercise. Do not lock-out your knees.
6. Flex your toes forward as far as you comfortably can,
hold that position for a moment and return to the
furthest back position you comfortably can.
7. Exhale on exer tion, inhale on return motion.
Leg Press Station Optional #GLP
Resistance Ab Crunch (abdominals)
1. Insert pin into weight stack at desired resistance level and
adjust Press Arm to Storage position.
2. Attach Tricep / Ab Strap to mid pulley cable and adjust
back pad to Chest Press position.
3. Sit on seat pad with your back resting against back pad.
Grasp the strap and place it securely over your shoulders,
keeping your hands planted firmly on your upper chest
throughout the exercise movement.
4. Using Abdominal muscle strength, slowly bend forward at
the waist as far as comfortably possible.
5. Pause for a moment, then slowly return back to the
starting position. Repeat movement.
6. Exhale on exertion, inhale on return motion.
Oblique Crunch (obliques & abdominals)
1. Insert pin into weight stack at desired resistance level and
adjust Press Arm to Storage position.
2. Attach Tricep / Ab Strap to mid pulley cable and adjust
back pad to Chest Press position.
3. Sit on seat pad with your back resting against back pad.
Grasp the strap and place it securely over your shoulders,
keeping your hands planted firmly on your upper chest
throughout the exercise movement.
4. While holding the strap firmly over your shoulders,
simultaneously bend forward and rotate your upper body
slowly to the left as far as comfortably possible while
keeping your legs and hips stationary.
5. Pause for a moment, then slowly return to the starting
position.
6. Alternate the movements from the left to the right and
then repeat the movements.
7. Exhale on exer tion, inhale on return motion.
Oblique Bend (obliques)
1. Insert pin into weight stack at desired resistance level.
2. Attach Stirrup Handle (optional) with chain to low pulley
cable.
3. Take an overhand grasp of the handle with your right hand
and stand 1 to 2 feet away from the machine with your
right side toward the machine.
4. Keeping your arm, legs, and hips straight, bend your torso
away from the machine.
5. Pause for a moment, then slowly return your torso back
along the same arc, to the starting position.
Repeat movement.
6. Exhale on exertion, inhale on return motion.
7. Turn around and repeat with the opposite hand.
Bent Over Row (lower back)
1. Insert pin into weight stack at desired resistance level.
2. Attach Staight Bar to low pulley cable.
3. Set your feet shoulder width apart, grasp the Straight Bar
with both hands, palms facing away down.
4. Straighten your arms and bend your legs slightly. Bend at
the waist until your torso is at a 45° angle.
5. Keeping your elbows out, pull the Bar upward and slightly
back until it touches your lower midsection.
6. Pause for a moment, then slowly return to the starting
position. Repeat movement.
7. Exhale on exer tion, inhale on return motion.
Seated Row (latissimus dorsi)
1. Insert pin into weight stack at desired resistance level.
2. Attach Straight Bar to low pulley cable and move foot
plate to upright position.
3. Sit on the floor with your knees slightly bent and your feet
placed firmly against the foot brace.
4. Grasp the Bar in both hands. Straighten your arms and
lean towards the pulley to completely stretch your Lats.
5. Pull the Bar towards your midsection, being sure to keep
your elbows close to your sides. Continue to pull the Bar
until it touches your midsection.
6. Pause for a moment, then slowly return to the starting
position. Repeat movement.
7. Exhale on exer tion, inhale on return motion.
Poster_G10B.indd 1 3/24/05 9:39:11 AM
 Loading...