

Bodin 22.352005.01.001, 22.352007.01.001, 22.352009.01.001, 22.352010.01.001 User guide [en, fr, nl]
Page 1
NL I Gebruiksaanwijzing
EN I Instruction manual
FR I Mode d’emploi
22.352005.01.001
22.352007.01.001
22.352009.01.001
22.352010.01.001
Page 2
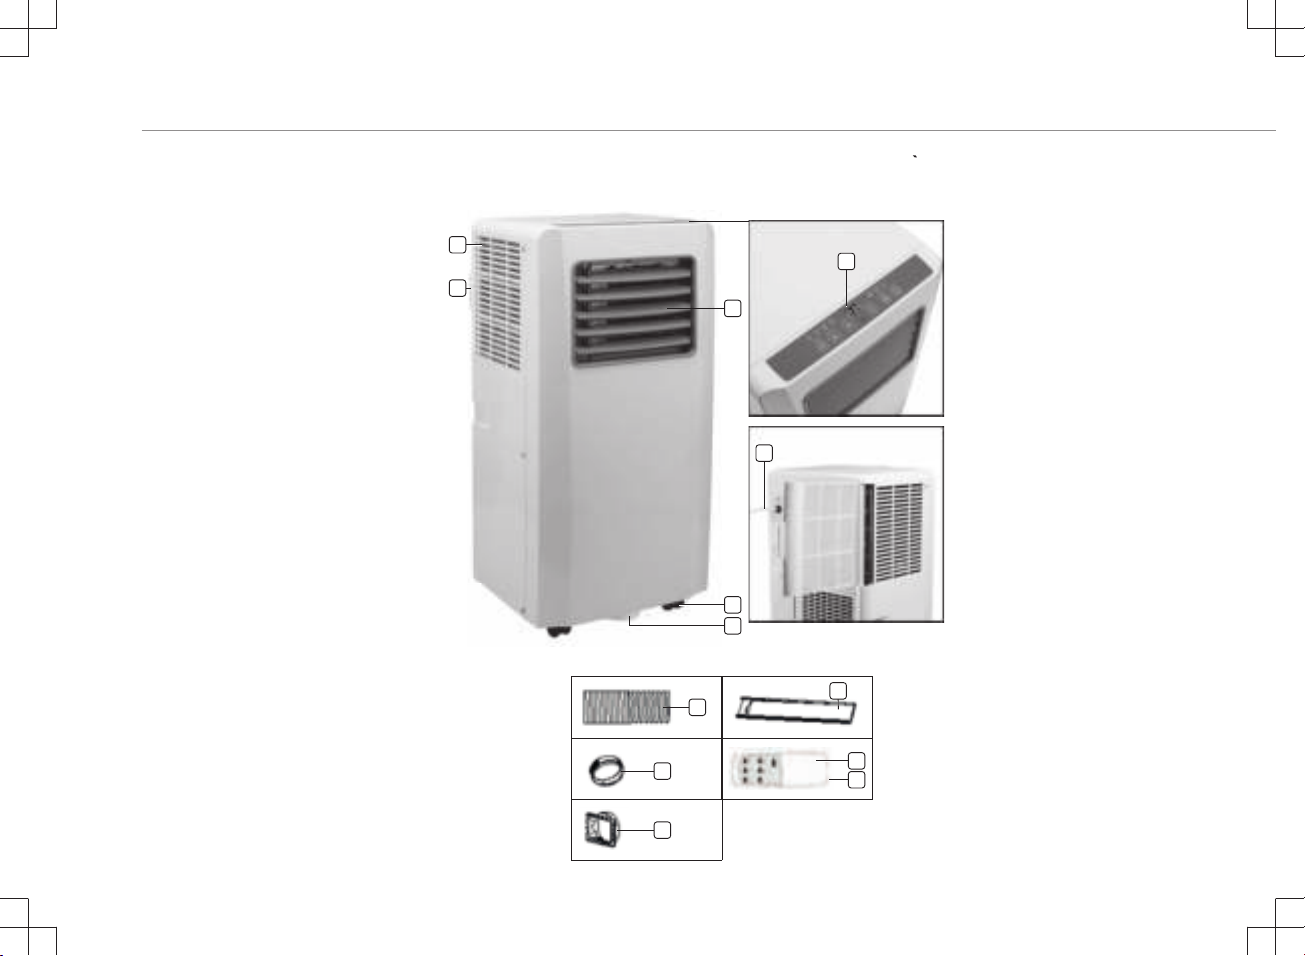
ONDERDELENBESCHRIJVING - PARTS DESCRIPTION - DESCRIPTION DES PIECES
1
3
4
5
6
7
2
8
12
13
10
11
9
Page 3
Gebruiksaanwijzing
VEILIGHEID
• Lees deze gebruiksaanwijzing zorgvuldig
door voor een correct(e) gebruik, onderhoud
en installatie.
• Als u de veiligheidsinstructies negeert, kan
de fabrikant niet verantwoordelijk worden
gehouden voor de mogelijke schade.
• Het apparaat is alleen geschikt voor gebruik
binnenshuis.
• Sluit het apparaat niet aan op een
stopcontact dat beschadigd is of niet correct
is geïnstalleerd.
• Gebruik het apparaat niet:
– in de buurt van vuur.
– in een gebied met een grote kans op
spattende olie.
– in een gebied dat wordt blootgesteld aan
direct zonlicht.
– in een gebied met een grote kans op
spattend water.
– in de buurt van een bad, douche of
zwembad.
• Steek nooit uw vingers of voorwerpen in de
luchtuitlaat. Waarschuw vooral kinderen
voor deze gevaren.
• Zorg dat het apparaat rechtop blijft staan
wanneer u het vervoert en opbergt.
• Zorg dat u altijd de stroomtoevoer
uitschakelt en loskoppelt voordat u het
apparaat reinigt.
• Zorg dat u altijd de stroomtoevoer
uitschakelt en loskoppelt voordat u het
apparaat verplaatst.
•
WAARSCHUWING: Om brandgevaar te
voorkomen raden we u aan het apparaat
niet te bedekken.
• Alle aansluitingen van het apparaat moeten
voldoen aan de lokale
veiligheidsvoorschriften voor elektriciteit.
Controleer zo nodig of dit het geval is.
• Als het netsnoer beschadigd is, moet het
worden vervangen door de fabrikant, de
onderhoudsmonteur van de fabrikant of door
personen met een soortgelijke kwalificatie
om gevaar te voorkomen.
• Als het netsnoer is beschadigd, moet het om
gevaarlijke situaties te voorkomen worden
vervangen door de fabrikant, diens
servicevertegenwoordiger of een bevoegde
persoon.
NL
3
Page 4
Gebruiksaanwijzing
• Dit apparaat mag door kinderen jonger dan 8
jaar, personen met verminderde lichamelijke,
zintuiglijke of verstandelijke capaciteiten of
gebrek aan kennis worden gebruikt, mits dit
gebeurt onder goed toezicht of zij juiste
instructies hebben gekregen over het
gebruik van het apparaat en de gevaren van
het gebruik begrijpen. Kinderen mogen niet
spelen met het apparaat. Het apparaat mag
niet zonder toezicht worden gereinigd of
onderhouden door kinderen.
• Dit apparaat is uitsluitend voor huishoudelijk
gebruik en voor het doel waar het voor
bestemd is.
• Opmerkingen:
– In geval van schade schakelt u het
apparaat uit, koppelt u de stroomtoevoer
los en neemt u contact op met de dealer
of een aangewezen reparatiebedrijf.
– Het netsnoer moet altijd stevig worden
geaard.
– Om gevaarlijke situaties te voorkomen,
moet u de stroomtoevoer loskoppelen als
het netsnoer is beschadigd. Laat het
snoer vervangen door de dealer of een
hiertoe aangewezen reparatiebedrijf.
Waarschuwing
• Volg uitsluitend het aanbevolen ontdooi- en
reinigingsproces van de fabrikant. Probeer
het ontdooi- of reinigingsproces op geen
enkele andere manier te versnellen.
• Het apparaat moet worden opgeslagen in
een ruimte zonder voortdurend werkende
ontstekingsbronnen (bijvoorbeeld: open
vlammen, een werkend gasapparaat of een
werkende elektrische verwarming).
• Doorboor of verbrand het apparaat niet.
• Houd er rekening mee dat koelmiddelen
geurloos kunnen zijn.
• Het apparaat moet worden geïnstalleerd,
gebruikt en opgeslagen in een ruimte met
een vloeroppervlak van meer dan Xm2.
(X=4 voor 5000Btu/u, 7000Btu/u, 8000Btu/
u; X=7,7 voor 9000Btu/u, 10.000Btu/u,
10.500Btu/u)
• Neem uitsluitend contact op met een
bevoegde onderhoudsmonteur voor
reparatie- of onderhoudswerkzaamheden
aan dit apparaat.
• Trek niet aan het netsnoer en vervorm of
wijzig het niet. Dompel het ook niet onder in
water. Door aan het netsnoer te trekken of
4
Page 5
Gebruiksaanwijzing
het verkeerd te gebruiken, kunt u het
apparaat beschadigen en een elektrische
schok veroorzaken.
• Het is verplicht de nationale
gasvoorschriften in acht te nemen.
• Zorg dat de ventilatieopeningen niet worden
geblokkeerd.
• Mensen die werken aan een koelcircuit of
zo'n circuit openen, moeten in het bezit zijn
van een actueel, geldig certificaat van een
door de branche geaccrediteerde
beoordelingsautoriteit dat bevestigt dat ze
bekwaam zijn in een veilige omgang met
koelmiddelen conform een door de branche
erkende beoordelingsspecificatie.
• Reparatiewerkzaamheden mogen alleen
worden uitgevoerd voor zover deze zijn
aanbevolen door de fabrikant van de
apparatuur. Onderhouds- en
reparatiewerkzaamheden waarbij de hulp
van ander geschoold personeel nodig is,
moeten worden uitgevoerd onder toezicht
van een of meer personen die bekwaam zijn
in het gebruik van brandbare koelmiddelen.
• Stop het apparaat niet door het netsnoer uit
het stopcontact te trekken terwijl het
apparaat is ingeschakeld. De warmte die
hierbij ontstaat, kan namelijk een elektrische
schok of brand veroorzaken. De enige
situaties waarin u dit wel mag doen, is als u
vreemde geluiden hoort, een vreemde geur
ruikt of er rook uit het apparaat komt.
Specifieke informatie over apparaten met R290-koelgas.
• Lees alle waarschuwingen zorgvuldig door.
• Bij het ontdooien en reinigen van het
apparaat mogen alleen de hulpmiddelen
worden gebruikt die door het productiebedrijf
worden aangeraden.
• Het apparaat mag niet worden opgeslagen
in een ruimte met voortdurend werkende
ontstekingsbronnen (bijvoorbeeld: open
vuur, een werkend gasapparaat of een
werkende elektrische verwarming).
• Doorboren of verbranden is niet toegestaan.
• Het apparaat moet worden geïnstalleerd,
gebruikt en opgeslagen in een ruimte met
een vloeroppervlak van meer dan Xm2.
NL
5
Page 6
Gebruiksaanwijzing
(X=4 voor 5000Btu/u, 7000Btu/u, 8000Btu/
u; X=7,7 voor 9000Btu/u, 10.000Btu/u,
10.500Btu/u)
• Dit apparaat bevat Y g (zie het typeplaatje
aan de achterkant van het apparaat) R290koelgas.
• R290 is een koelgas dat voldoet aan de
Europese milieurichtlijnen. Doorboor geen
enkel deel van het koelcircuit.
• Als het apparaat wordt geïnstalleerd,
gebruikt of opgeslagen in een nietgeventileerde ruimte, moet de ruimte zijn
ontworpen om de ophoping van koelmiddel
in geval van lekkages te voorkomen.
Koelmiddellekkages kunnen de kans op
brand of explosies vergroten doordat
elektrische verwarmingen, fornuizen of
andere ontstekingsbronnen ervoor zorgen
dat het koelmiddel ontbrandt.
• Het apparaat moet dusdanig worden
opgeslagen dat mechanische storingen
worden voorkomen.
• Mensen die werken aan het koelcircuit of het
bedienen, moeten in het bezit te zijn van de
juiste certificering, die is verleend door een
geaccrediteerde organisatie en die
garandeert dat ze vaardig zijn in de omgang
met koelmiddelen in overeenstemming met
een specifieke evaluatie die wordt erkend
door brancheverenigingen.
• Reparaties moeten worden uitgevoerd op
basis van de aanbevelingen van het
productiebedrijf. Onderhouds- en
reparatiewerkzaamheden waarbij de hulp
van ander geschoold personeel is vereist,
moeten worden uitgevoerd onder het
toezicht van degene die kundig is in het
gebruik van brandbare koelmiddelen.
Batterijen
• Stel de batterijen NOOIT bloot aan hoge
temperaturen of direct zonlicht. Gooi
batterijen NOOIT in open vuur.
Explosiegevaar!
• Houd batterijen uit de buurt van kinderen.
Batterijen zijn geen speelgoed!
• Open de batterijen niet met kracht.
• Vermijd contact met metalen voorwerpen
(ringen, spijkers, schroeven, etc.) om gevaar
van kortsluiting te voorkomen!
• Door kortsluiting kunnen batterijen heet
worden of zelfs ontbranden. Dit kan
brandwonden veroorzaken.
6
Page 7
Gebruiksaanwijzing
• Voor uw veiligheid moeten de contactpunten
tijdens vervoer met plakstrips worden
afgedekt.
• Raak een gescheurde en/of lekkende
batterij niet aan! Spoel als de vloeistof uit de
batterij in uw ogen komt uw ogen dan zo
snel mogelijk uit met schoon water en wrijf
niet in uw ogen. Ga onmiddellijk naar het
ziekenhuis. Als dit niet wordt behandeld, kan
dit oogproblemen veroorzaken.
Koelmiddel
(CE) N 842/2006: Dit apparaat bevat het koelmiddel R290. De
hoeveelheid koelmiddel bedraagt minder dan 1kg en het koelmiddel
bevindt zich in een gesloten koelcircuit. Het koelmiddel draagt niet bij
aan ozonafbraak, maar is volgens het Kyotoprotocol wel een
broeikasgas en kan daardoor bijdragen aan de opwarming van de
aarde wanneer het in de atmosfeer terechtkomt. Daarom mogen vulen leegwerkzaamheden alleen worden uitgevoerd door
gekwalificeerde technici met een koelcertificaat. Het apparaat hoeft
niet opnieuw met koelmiddel te worden gevuld als het correct wordt
gebruikt en het koelcircuit onbeschadigd is. GWP
(aardopwarmingsvermogen): R290: 3
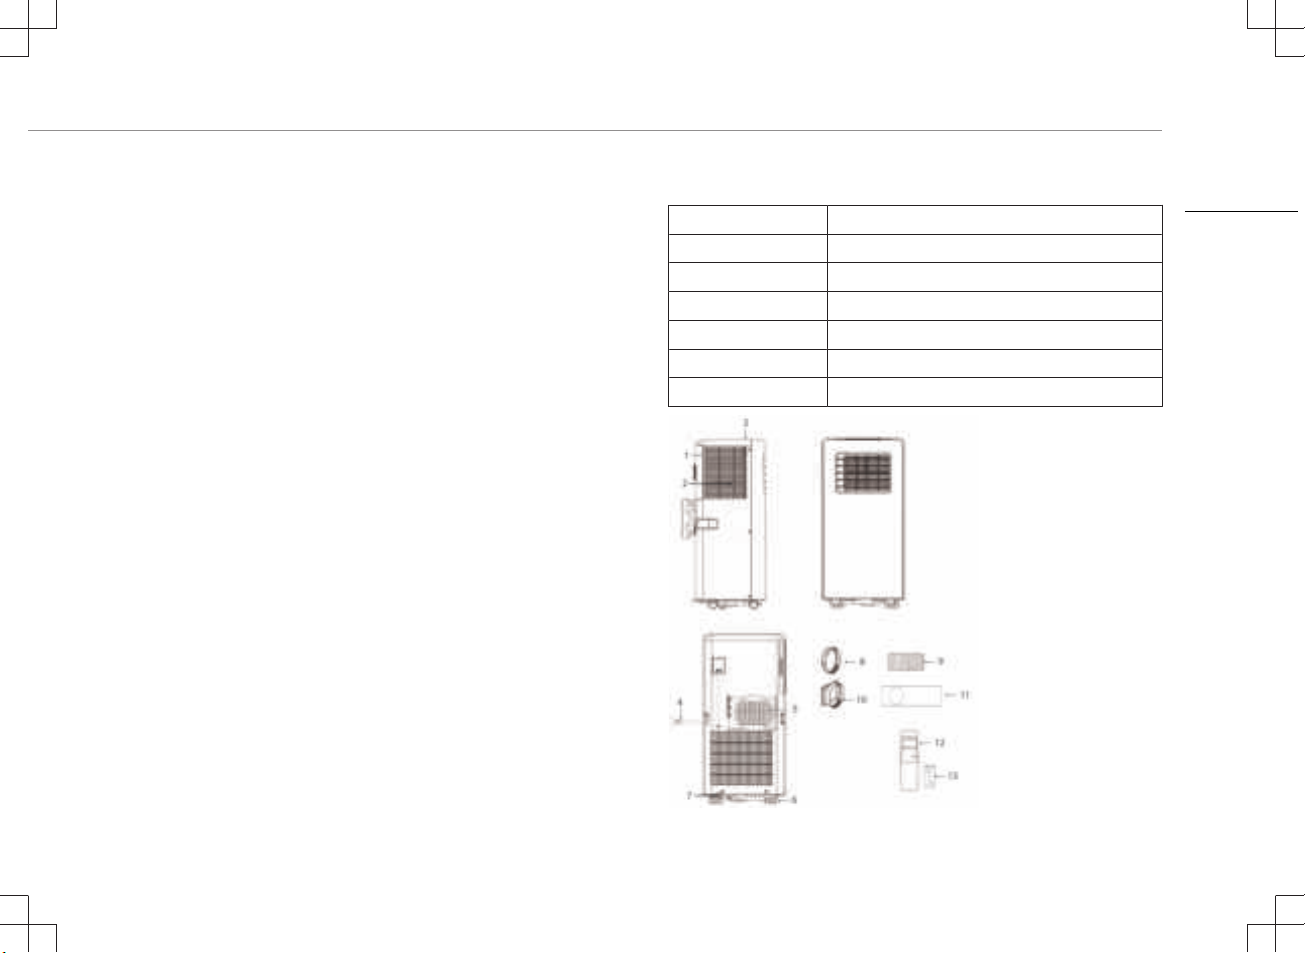
BESCHRIJVING VAN ONDERDELEN
1. Luchtinlaat 8. Slangaansluiting (raamuiteinde)
2. Luchtfilter 9. Afvoerslang voor warme lucht
3. Bedieningspaneel 10. Slangaansluiting (airconditioner-uiteinde)
4. Netsnoer 11. Raamschuifset + bevestigingspluggen
5. Luchtuitlaat 12. Afstandsbediening
6. Zwenkwiel 13. Batterijen
7. Afvoergat
NL
7
Page 8
Gebruiksaanwijzing
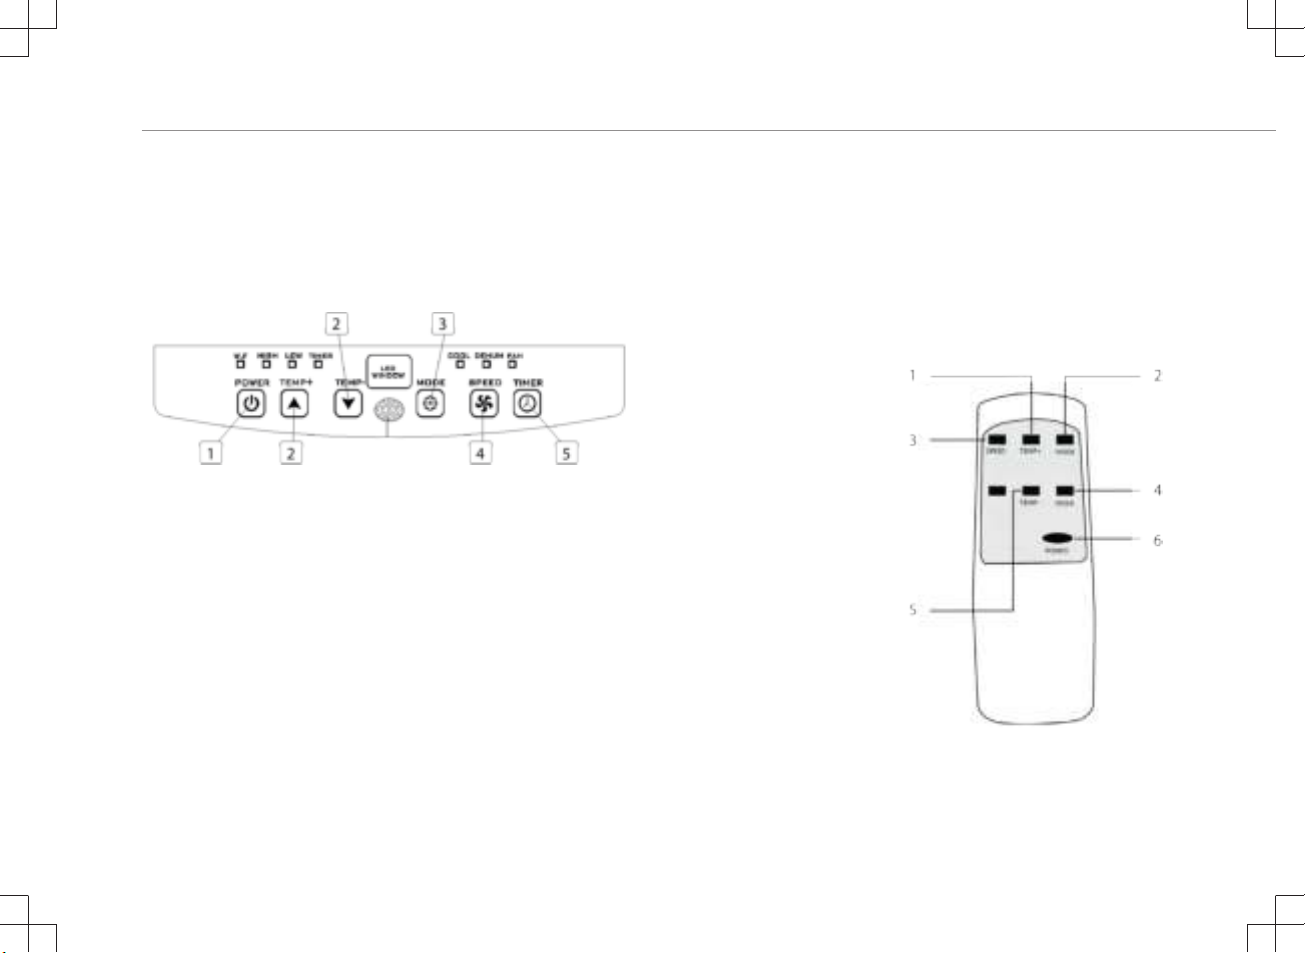
WERKING VAN HET BEDIENINGSPANEEL
1. Aan/uit-knop
2. Temperatuurknoppen
3. Modusknop
4. Regelknop voor ventilatorsnelheid
5. Timerknop (aan/uit)
AFSTANDSBEDIENING
1. Knop voor hogere temperatuur
2. Modusknop
3. Regelknop voor ventilatorsnelheid
4. Timerknop (aan/uit)
5. Knop voor lagere temperatuur
6. Aan/uit-knop
8
Page 9
Gebruiksaanwijzing
VÓÓR HET EERSTE GEBRUIK
Voordat u de handelingen in dit gedeelte uitvoert:
• Kies een geschikte locatie in de buurt van een
stroomvoorziening.
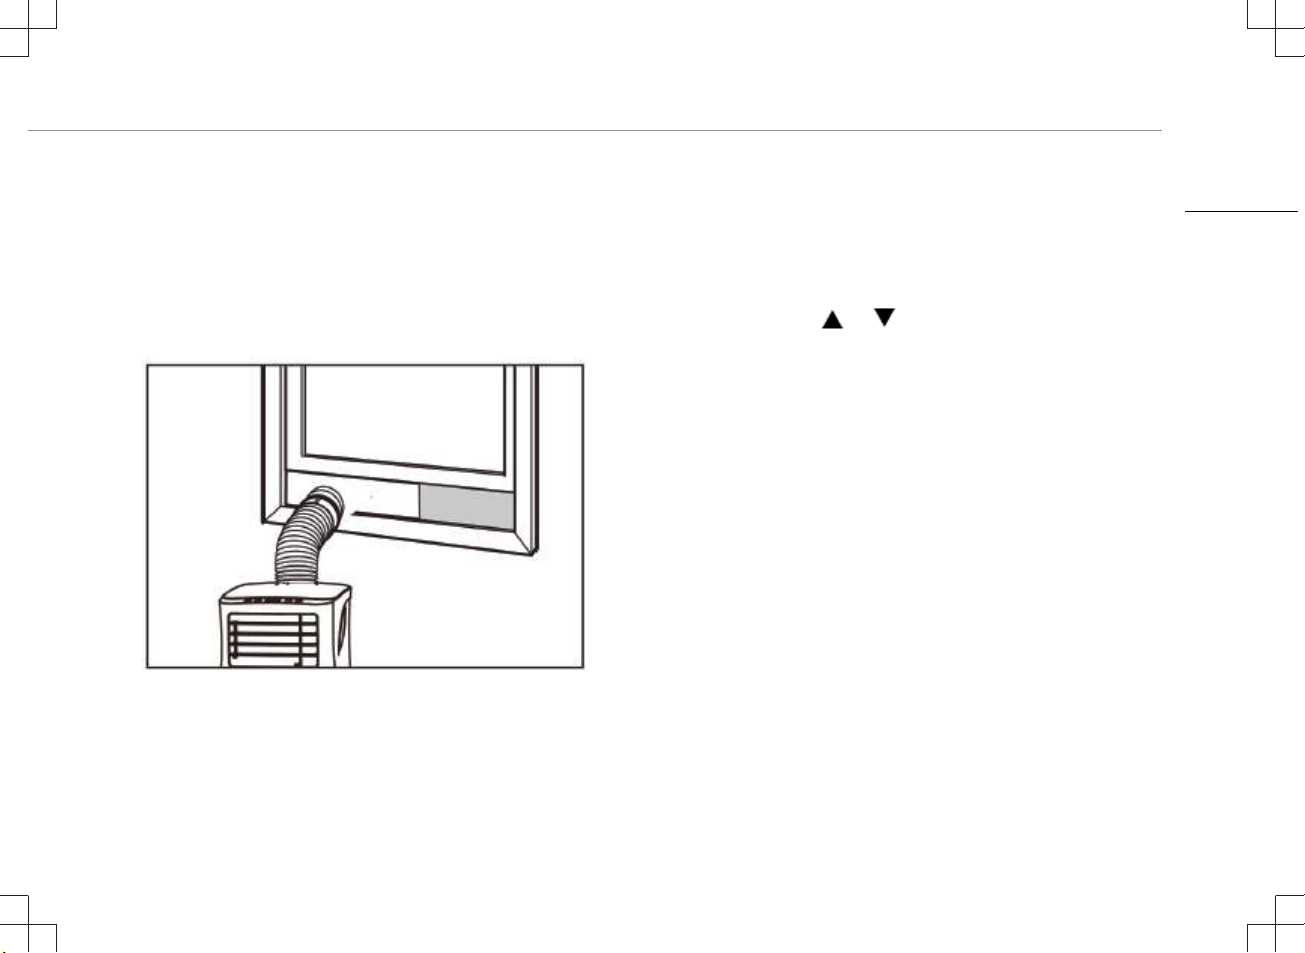
• Installeer de afvoerslang en zorg dat het raam in de juiste stand
staat.
• De meegeleverde kleine witte klemmen moeten op de raamset
worden gemonteerd.
• Sluit het netsnoer aan op een geaard stopcontact van
AC220~240V/50Hz.
• Druk op de aan/uit-knop om de airconditioner in te schakelen.
• Stel het temperatuurbereik in: 16°C-31°C.
• Controleer of de afvoerslang correct is gemonteerd.
• Wanneer u koel- en ontvochtigingsfuncties gebruikt, moet u
minstens 3 minuten wachten tussen het uit- en inschakelen.
GEBRUIK
Koelen
• Druk op de modusknop tot het koelingspictogram verschijnt.
• Druk op de knop
de ruimte te selecteren.
• Het duurt ongeveer 5 minuten voordat het koelen wordt gestart.
• Druk op de knop voor de ventilatorsnelheid om de luchtstroom
aan te passen.
Ontvochtigen
• Druk op de modusknop tot het lampje voor ontvochtiging begint
te knipperen.
• De temperatuur wordt automatisch geselecteerd.
• De ventilatorsnelheid wordt automatisch geselecteerd.
De timer instellen
Inschakeltijd van timer instellen
• Wanneer de airconditioner is uitgeschakeld, drukt u op de
timerknop en selecteert u de gewenste inschakeltijd met behulp
van de temperatuurknoppen.
• De inschakeltijd kan worden ingesteld tussen 0 en 24 uur.
Uitschakeltijd van timer instellen
• Wanneer de airconditioner is ingeschakeld, drukt u op de
timerknop en selecteert u de gewenste uitschakeltijd met behulp
van de temperatuurknoppen.
• De uitschakeltijd kan worden ingesteld tussen 0 en 24 uur.
of om de gewenste temperatuur voor
NL
9
Page 10
Gebruiksaanwijzing
Afvoer
• Wanneer u het apparaat lange tijd hebt gebruikt en voordat u het
opslaat, moet u het opgehoopte water afvoeren. Bereid een
geschikte locatie of bak voor om het water op te vangen.
Verwijder vervolgens de rubberen stop uit het afvoergat aan de
onderkant van het apparaat. Het water loopt nu uit het apparaat.
Als er geen water meer uit het apparaat loopt, kunt u de
afvoerstop aanbrengen.
Alarmfunctie voor vol intern waterreservoir
• Het waterreservoir in de airconditioner is uitgerust met een
veiligheidsschakelaar om het waterpeil te controleren. Wanneer
het waterpeil een verwachte hoogte bereikt, gaat er een lampje
branden om aan te geven dat het waterreservoir vol is. Voer de
bovenstaande stappen uit om het water af te voeren.
INSTALLATIE
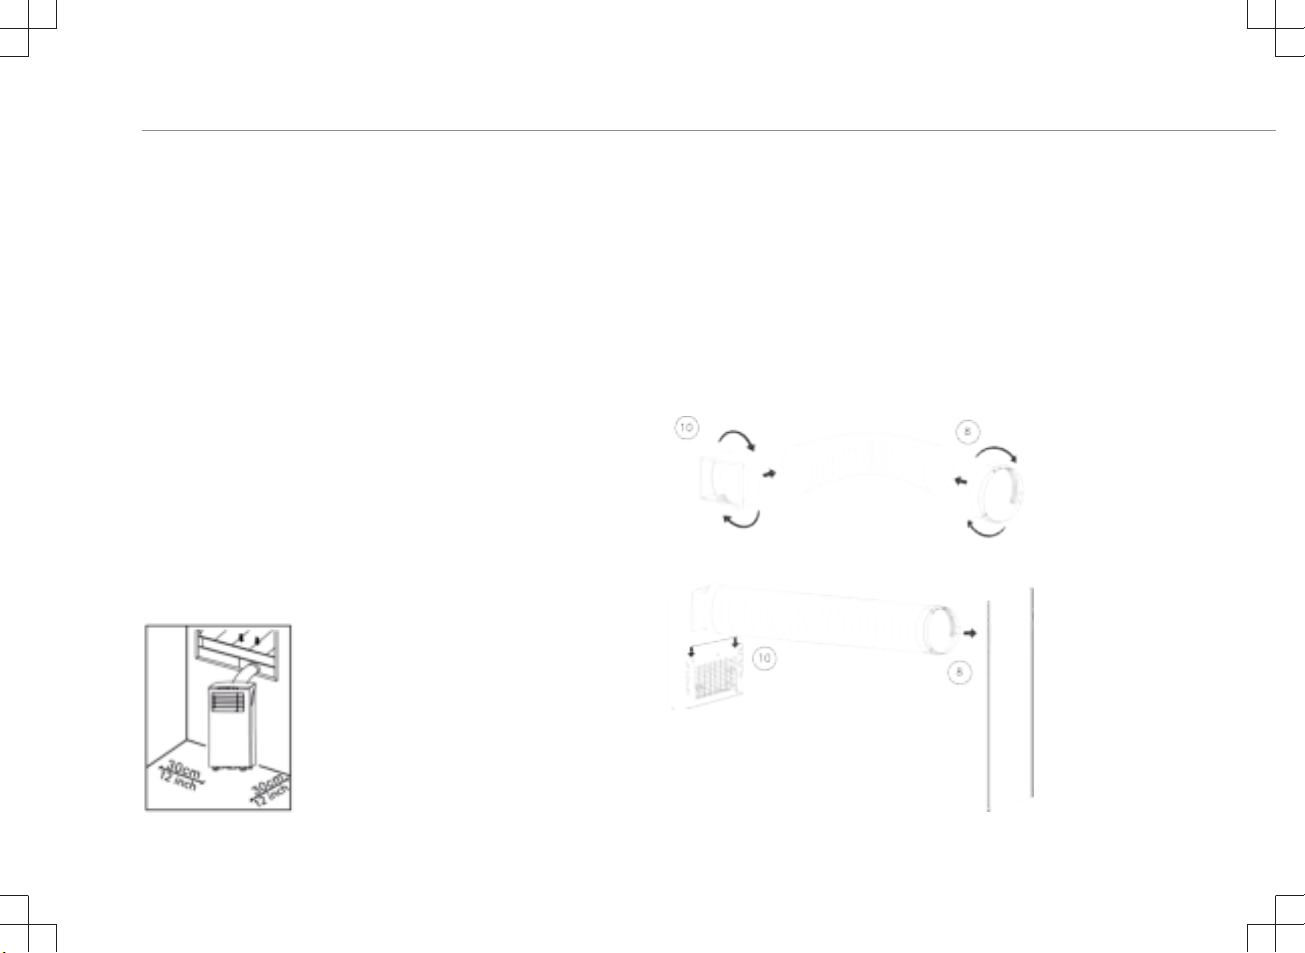
• De airconditioner moet op een vlak en stabiel oppervlak worden
geïnstalleerd. Blokkeer de luchtuitlaat niet en houd minstens
30cm ruimte vrij rond het apparaat.
• De bedrading moet voldoen aan de lokale veiligheidsvoorschriften
voor elektriciteit.
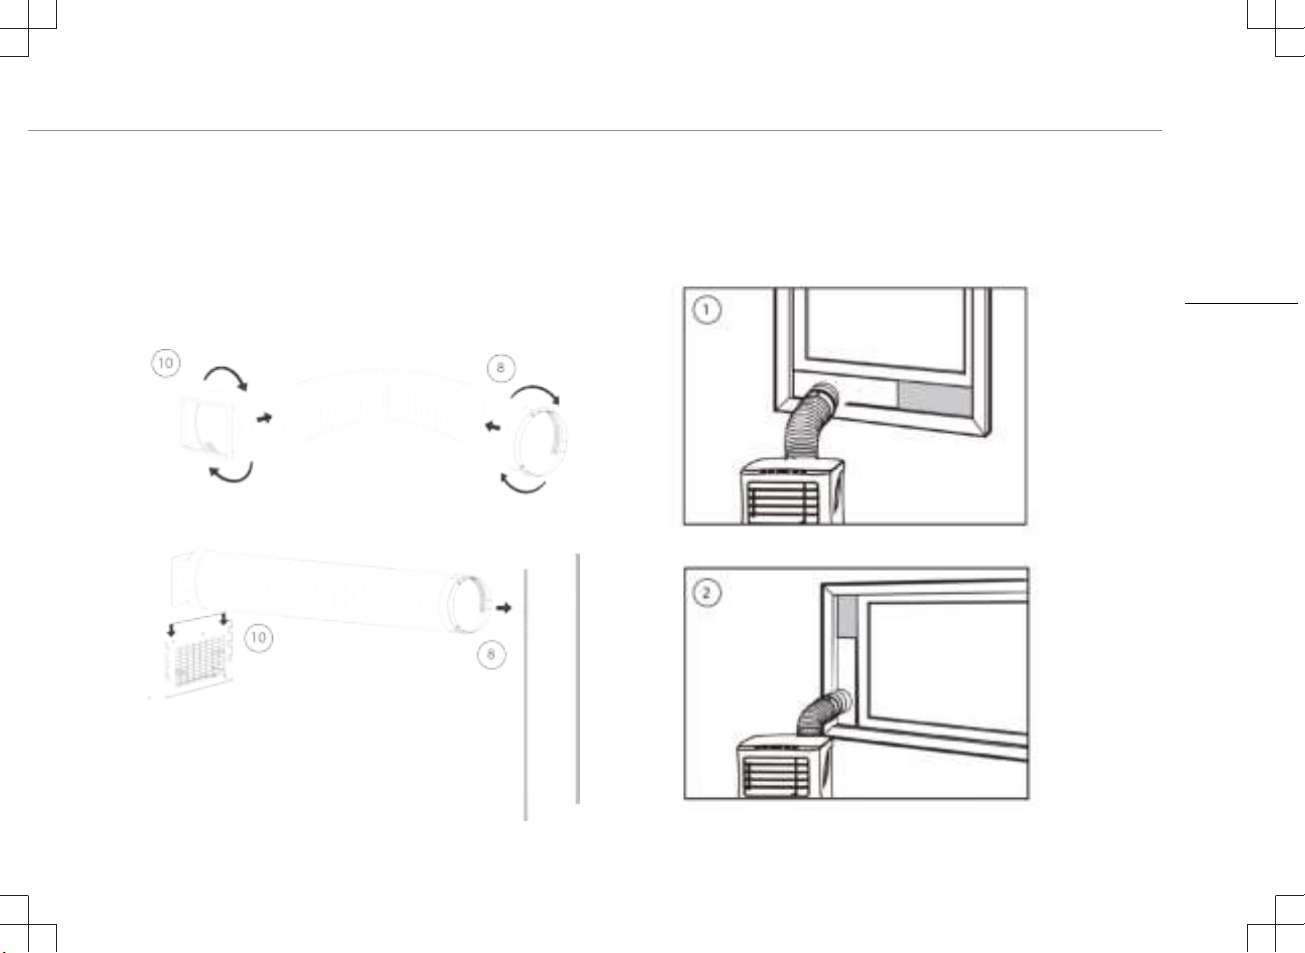
Installatie van afvoerslang
• Draai beide uiteinden van de afvoerslang voor warme lucht (9) in
het raamuiteinde van de slangaansluiting (8) en in het
airconditioner-uiteinde van de slangaansluiting (10).
• Steek het airconditioner-uiteinde (10) van de slang in de opening
aan de achterkant van de airconditioner.
• Zet het raamuiteinde (8) van de slangaansluiting vast aan het
dichtstbijzijnde raamkozijn.
10
Page 11
Gebruiksaanwijzing
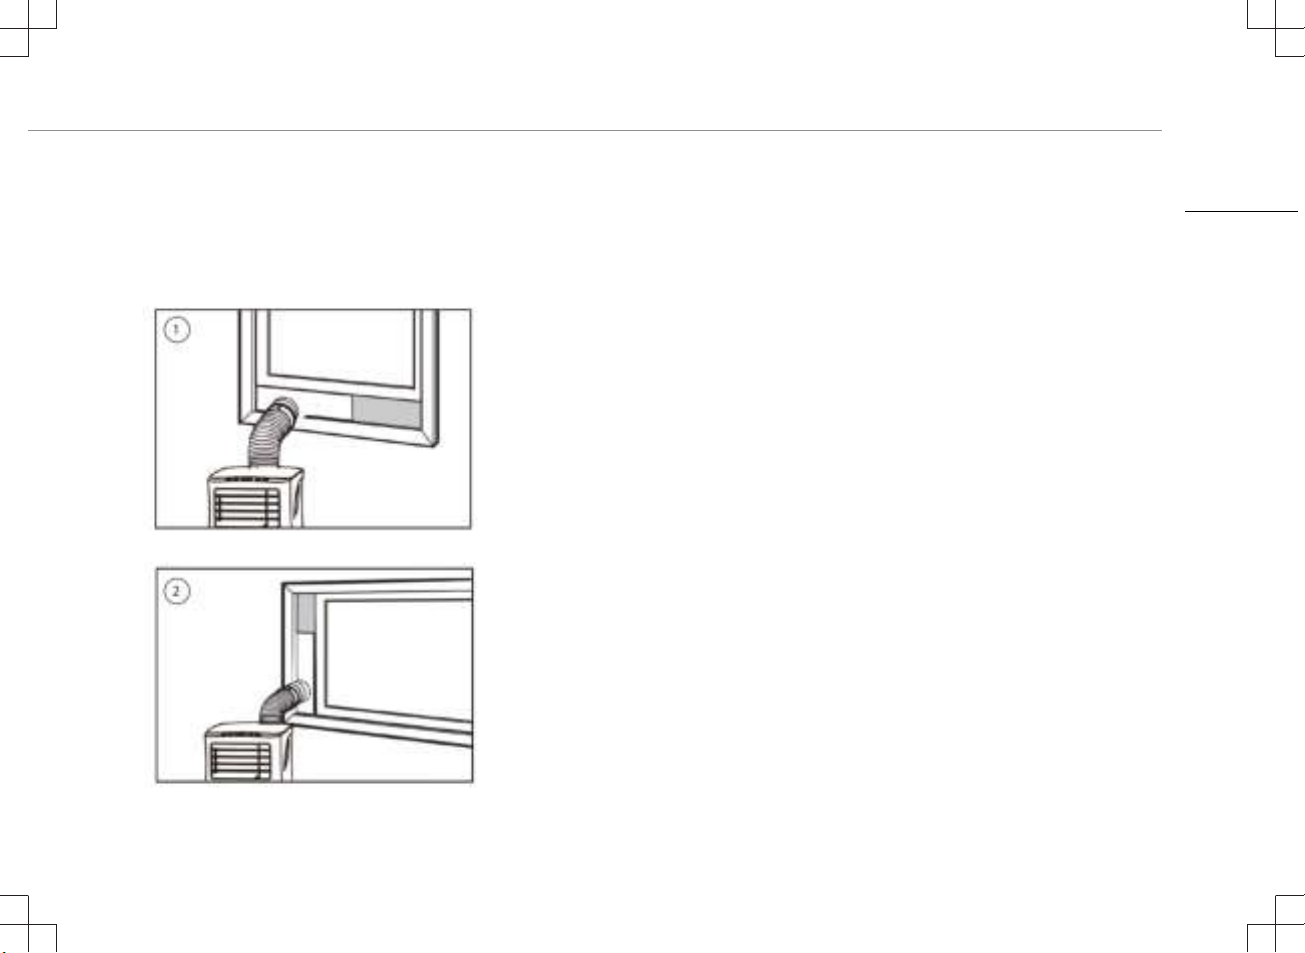
Installatie van de raamschuifset
• Pas de breedte (afbeelding 1) of de hoogte (afbeelding 2) van de
raamschuif (11) aan zodat deze geschikt is voor de opening van
het raam. Zet de raamschuif (11) in deze positie vast met de
bevestigingspluggen.
• Beweeg het raam omhoog tot aan de schuif.
SCHOONMAAKONDERHOUD
• Koppel het apparaat los van het stopcontact voordat u het reinigt.
• Maak het oppervlak eerst schoon met een neutraal
schoonmaakmiddel en een natte doek en vervolgens met een
droge doek.
• Gebruik geen benzine of andere chemicaliën om het apparaat
schoon te maken.
• Was het apparaat niet direct.
Luchtfilter
• Het luchtfilter moet om de twee weken worden gereinigd.
• Open het rooster van de luchtinlaat en verwijder het luchtfilter.
• Reinig het luchtfilter met een neutraal reinigingsmiddel in lauw
water van 40°C en laat het drogen (niet in direct zonlicht).
• Plaats het luchtfilter terug in het inlaatrooster.
NL
11
Page 12
Gebruiksaanwijzing
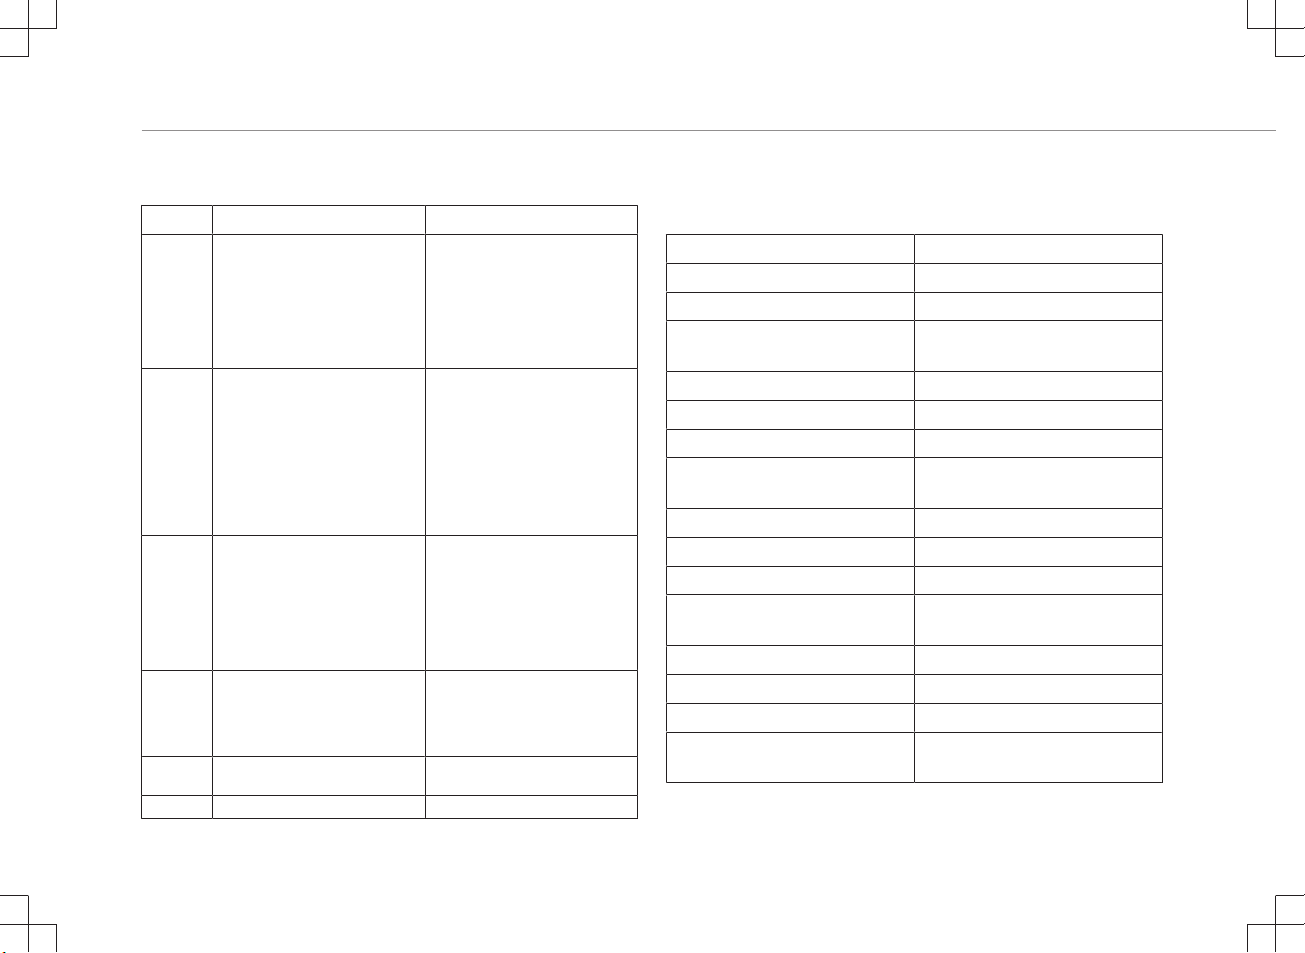
PROBLEMEN OPLOSSEN
Probleem Mogelijke oorzaken Voorgestelde oplossingen
Het
apparaat
wordt niet
ingeschakel
d wanneer u
op de aan/
uit-knop
drukt.
Het
apparaat
koelt niet
voldoende.
Het
apparaat
wordt
automatisch
uitgeschake
ld in de
verwarming
smodus.
Het
apparaat
maakt veel
geluid.
Code E0. • De sensor voor de
Code E2. • Het waterreservoir is vol. • Maak het waterreservoir leeg.
• Het lampje voor het waterreservoir
knippert en het reservoir is vol.
• De kamertemperatuur is hoger
dan de ingestelde temperatuur.
(elektrische-verwarmingsmodus)
• De kamertemperatuur is lager dan
de ingestelde temperatuur.
(koelmodus)
• Deuren of ramen zijn niet
gesloten.
• Er bevinden zich warmtebronnen
in de ruimte.
• De afvoerslang voor warmte lucht
is niet aangesloten of wordt
geblokkeerd.
• De temperatuur is te hoog
ingesteld.
• De luchtinlaat wordt geblokkeerd.
• Warmtebescherming: wanneer de
temperatuur bij de luchtuitlaat
stijgt tot meer dan 70 graden,
wordt het apparaat automatisch
uitgeschakeld.
• De ondergrond is niet waterpas of
niet vlak genoeg.
• Het geluid wordt veroorzaakt door
het koelmiddel dat door de
airconditioner stroomt.
ruimtetemperatuur is defect.
• Laat het water uit het
waterreservoir lopen.
• Wijzig de temperatuur.
• Zorg dat alle ramen en deuren
gesloten zijn.
• Verwijder de warmtebronnen zo
mogelijk.
• Sluit de afvoerslang voor warmte
lucht aan of reinig de slang.
• Stel de temperatuur opnieuw in.
• Reinig de luchtinlaat.
• Laat de temperatuur in de ruimte
afkoelen voordat u het apparaat
opnieuw start.
• Plaats het apparaat zo mogelijk
op een vlakke ondergrond die
waterpas is.
• Vervang de sensor voor de
ruimtetemperatuur.
HET PRODUCT OF APPARAAT BEVAT GEFLUOREERD BROEIKASGAS.
Art.nr. 352005
Koelmiddel: R290
Hoeveelheid in kg: 0.10
Aardopwarmingsvermogen
(GWP):
Art.nr. 352007
Koelmiddel: R290
Hoeveelheid in kg: 0.14
Aardopwarmingsvermogen
(GWP):
Art.nr. 352009
Koelmiddel: R290
Hoeveelheid in kg: 0.16
Aardopwarmingsvermogen
(GWP):
Art.nr. 352010
Koelmiddel: R290
Hoeveelheid in kg: 0.16
Aardopwarmingsvermogen
(GWP):
3
3
3
3
12
Page 13
Gebruiksaanwijzing
MILIEU
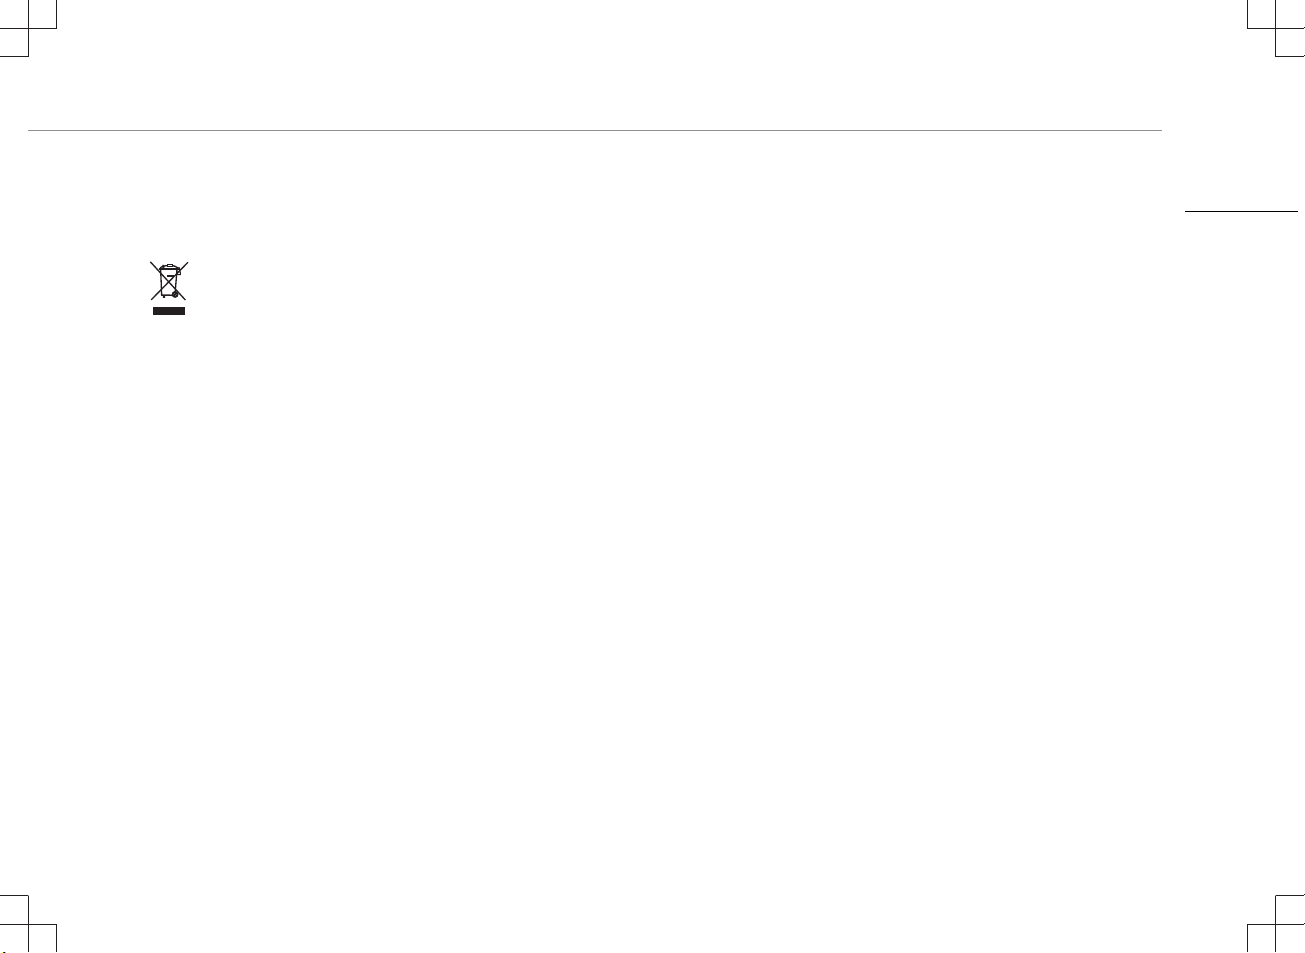
Dit apparaat mag aan het einde van de levensduur niet bij het
normale huisafval worden gedeponeerd, maar moet bij een speciaal
inzamelpunt voor hergebruik van elektrische en elektronische
apparaten worden aangeboden. Het symbool op het apparaat, in de
gebruiksaanwijzing en op de verpakking attendeert u hierop. De in
het apparaat gebruikte materialen kunnen worden gerecycled. Met
het recyclen van gebruikte huishoudelijke apparaten levert u een
belangrijke bijdrage aan de bescherming van ons milieu. Informeer bij
uw lokale overheid naar het inzamelpunt.
NL
13
Page 14
Instruction manual
SAFETY
• Please read this user’s manual carefully to
ensure proper use, maintenance and
installation.
• By ignoring the safety instructions the
manufacturer cannot be held responsible for
the damage.
• The appliance is for indoor use only.
• Do not use the unit on a socket that is
damaged or that has not been installed
correctly.
• Do not use the unit:
– near a source of fire.
– in an area where oil is likely to splash.
– in an area exposed to direct sunlight.
– in an area where water is likely to splash.
– near a bath, a shower or a swimming
pool.
• Never insert your fingers or objects into the
air outlet. Take special care to warn children
of these dangers.
• Keep the unit upright during transport and
storage.
• Before cleaning the unit, always turn off or
disconnect the power supply.
• Always turn off and disconnect the power
supply before moving the unit.
•
WARNING: To avoid the risk of fire, do
not cover the unit.
• All the unit sockets must comply with the
local electric safety requirements. If
necessary please check.
• If the supply cord is damaged, it must be
replaced by the manufacturer, its service
agent or similarly qualified persons in order
to avoid a hazard.
• If the supply cord is damaged, it must be
replaced by the manufacturer, service agent
or qualified person(s) in order to avoid a
hazard.
• This appliance can be used by children aged
8 years and above, persons with reduced
physical, sensory, and mental capabilities or
persons with a lack of experience and
knowledge if they have been given correct
supervision or instruction concerning the use
of the appliance in a safe way and
understand the hazards involved. Children
should not play with the appliance. Cleaning
and user maintenance should not be carried
out by children without supervision.
14
Page 15
Instruction manual
• This appliance is only to be used for
household purposes and only for the
purpose it is made for.
• Notes:
– In the case of any damage, please
disconnect the power supply and contact
the dealer or a designated repair shop.
– In any case, the power cord shall be
firmly grounded.
– To avoid the possibility of danger, if the
power cord is damaged, please
disconnect the power supply. It must be
replaced by the dealer or a designated
repair shop.
Warning
• Please use the recommended defrosting
and cleaning process from the manufacturer
only. Do not accelerate the defrosting or
cleaning process in any other way.
• The appliance shall be stored in a room
without continuously operating ignition
sources (for example: open flames , an
operating gas appliance or an operating
electric heater).
• Do not pierce or burn.
• Be aware that refrigerants may not contain
an odor.
• The appliance should be installed, operated
and stored in a room with a floor area larger
than X m2. (X=4 for 5000Btu/h, 7000Btu/h,
8000Btu/h; X=7.7 for 9000Btu/h. 10000Btu/
h, 10500Btu/h)
• Only contact an authorized service
technician for repair or maintenance of this
unit.
• Do not pull , deform or modify the power
supply cord or immerse in water . Pulling or
misuse of the power supply cord could result
in damage to the unit and cause an
electrical shock.
• Compliance with national gas regulations
should be observed.
• Keep ventilation openings clear of
obstructions.
• Any person who is involved with working on
or opening a refrigerant circuit should hold a
current valid certificate from an industry
accredited assessment authority which
authorizes their competence to handle
refrigerants safely in accordance with an
industry recognized assessment
specification.
EN
15
Page 16
Instruction manual
• Servicing should only be performed as
recommended by the equipment
manufacturer. Maintenance and repair
requiring the assistance of other skilled
personnel should be carried out under the
supervision of a person(s) competent in the
use of flammable refrigerants.
• Do not stop the unit by pulling out the power
plug whilst in operation as this may cause an
electric shock or fire due to heat generation
unless strange sounds are heard or if
strange smells or smoke appear from the
unit.
Specific information regarding appliances with R 290 refrigerant gas.
• Thoroughly read all of the warnings.
• When defrosting and cleaning the
appliance , do not use any tools other than
those recommended by the manufacturing
company.
• The appliance should not be stored in a
room with continuously operating ignition
sources (for example: open flames , an
operating gas appliance or an operating
electric heater).
• Do not puncture and do not burn.
• Appliance shall be installed, operated and
stored in a room with a floor area larger than
X m2. (X=4 for 5000Btu/h, 7000Btu/h,
8000Btu/h; X=7.7 for 9000Btu/h. 10000Btu/
h, 10500Btu/h)
• This appliance contains Y g (see rating label
back of unit ) of R290 refrigerant gas.
• R290 is a refrigerant gas that complies with
the European directives on the environment.
Do not puncture any part of the refrigerant
circuit.
• If the appliance is installed, operated or
stored in a non-ventilated area, the room
must be designed to prevent to the
accumulation of refrigerant leaks that could
result in a fire risk or explosion due to
ignition of the refrigerant caused by electric
heaters, stoves, or other sources of ignition.
• The appliance must be stored in such a way
as to prevent mechanical failure.
16
Page 17
Instruction manual
• Individuals who operate or work on the
refrigerant circuit must have the appropriate
certification issued by an accredited
organization that ensures competence in
handling refrigerants according to a specific
evaluation recognized by associations in the
industry.
• Repairs must be performed based on the
recommendation from the manufacturing
company. Maintenance and repairs that
require the assistance of other qualified
personnel must be performed under the
supervision of an individual specified in the
use of flammable refrigerants.
Batteries
• Do not expose the battery to high
temperatures or direct sunlight. Never throw
batteries into the fire. There is a danger of
explosion!
• Keep batteries away from children. Batteries
are not a toy!
• Do not open the batteries by force.
• Avoid contact with metallic objects.(Rings,
nails, screws et cetera) there is a danger of
short-circuiting!
• As a result of a short-circuit batteries may
heat up consider-ably or even catch fire. this
may result in burns.
• For your safety the battery poles should be
covered with adhesive strips during
transport.
• Do not touch a ruptured and/or leaking
battery. If the liquid from the battery gets into
your eyes, rinse your eyes as soon as
possible with clean water, without rubbing
your eyes. Immediately go to the hospital. If
it is not treated properly, it can cause eye
problems.
Refrigerant
(CE) N 842/2006: This unit contains the refrigerant R290. The
amount of refrigerant is less than 1kg, and is in a closed cooling
circuit. The coolant does have zero ozone depletion potential, but is a
so-called greenhouse gases under the Kyoto Protocol and may thus
contribute to global warming, if it is released to the atmosphere.
Therefore only trained technicians with refrigerant certificate make a
filling or emptying. Your appliance does not have be refilled with
refrigerant if used properly and has an undamaged coolant circuit.
GWP: R290: 3
EN
17
Page 18
Instruction manual
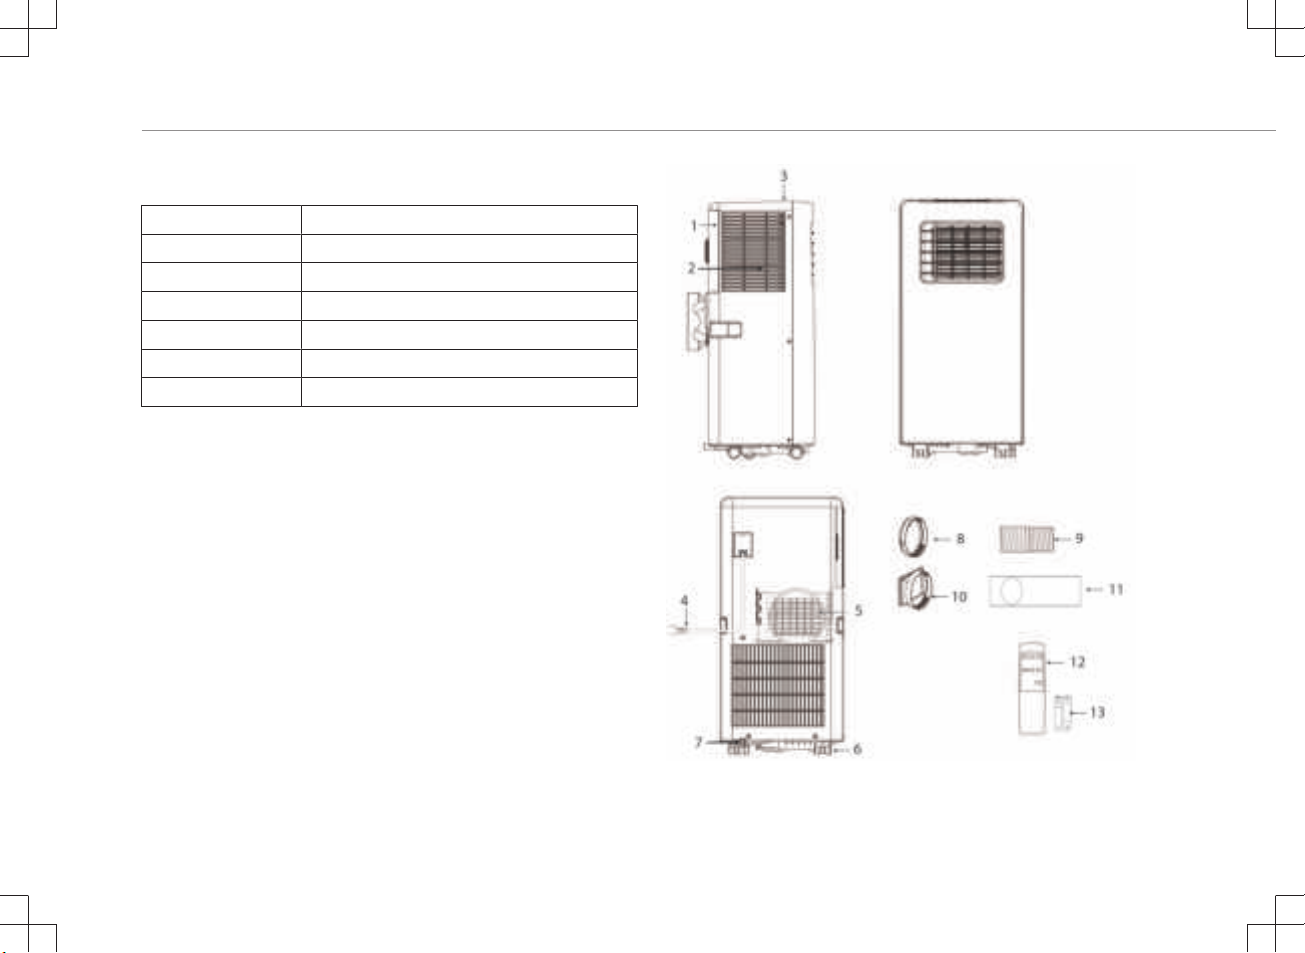
PARTS DESCRIPTION
1. Air inlet 8. Hose connector (window end)
2. Air filter 9. Hot-air exhaust hose
3. Control panel 10. Hose connector (Air conditioner end)
4. Power cord 11. Windows slider kit + fixing plugs
5. Air outlet 12. Remote control
6. Castor 13. Batteries
7. Drainage hole
18
Page 19
Instruction manual
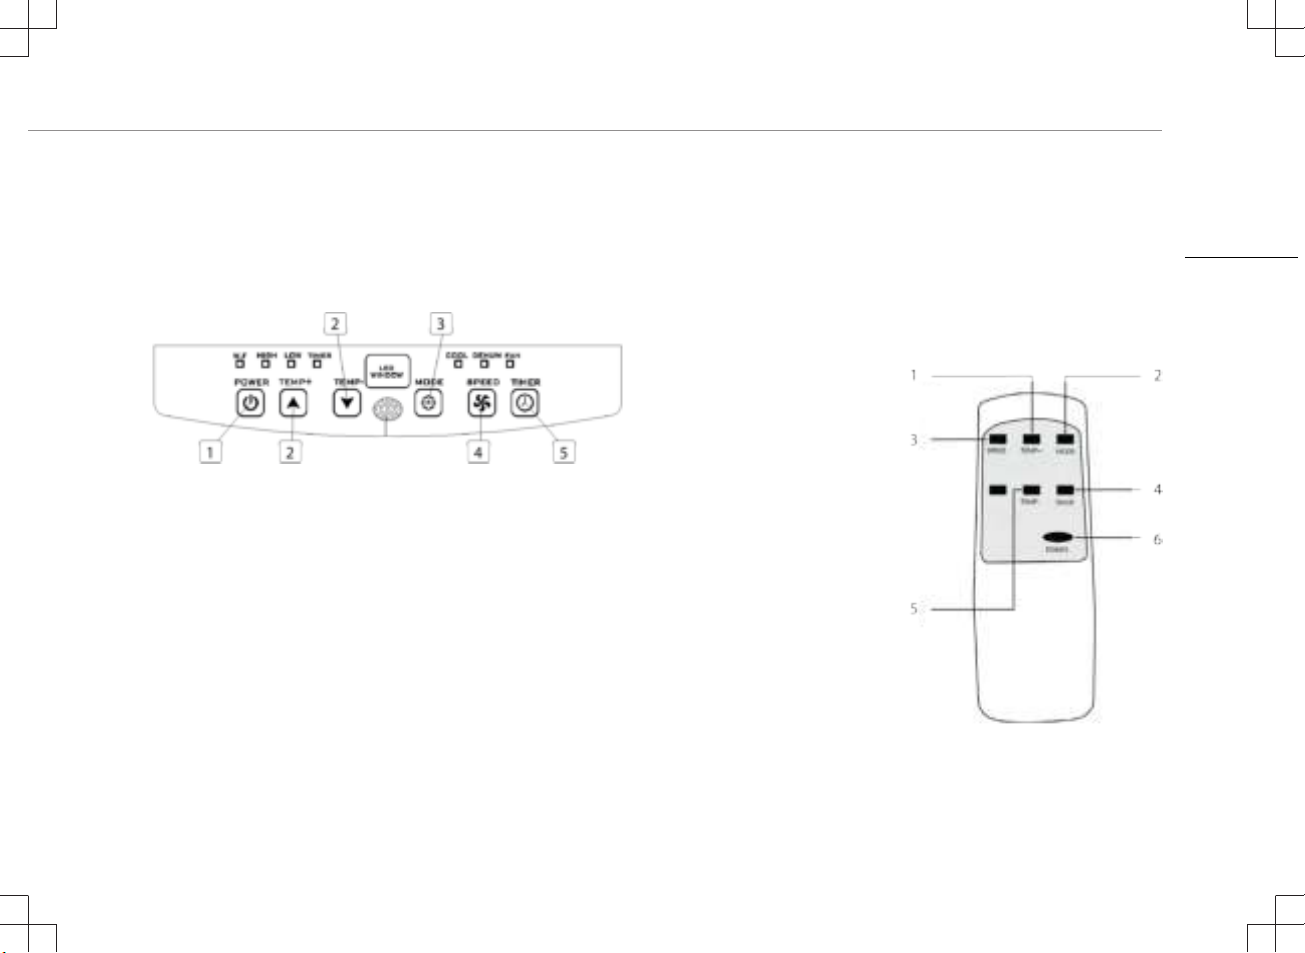
FUNCTION OF CONTROL PANEL
1. Power (on/off) button
2. Temperature buttons
3. Mode button
4. Fan speed adjustment button
5. Timer (on/off) button
REMOTE CONTROL
1. Temperature up button
2. Mode button
3. Fan speed adjustment button
4. Timer (on/off) button
5. Temperature down button
6. Power (on/off) button
EN
19
Page 20
Instruction manual
BEFORE THE FIRST USE
Before starting operations in this section:
• Find a place where there is power supply nearby.
• Install the exhaust hose and adjust the window position well.
• The supplied small white clips must be mounted on the window
kit.
• Insert the power cord into a grounded AC220~240V/50Hz socket.
• Press the power button to turn on the air-conditioner.
• Set the temperature range: 16°C-31°C.
• Check whether the exhaust hose has been mounted properly.
• When using functions on cooling and dehumidifying, allow at least
3 minutes between powering off and powering on.
USE
Cooling operation
• Press the “mode“ button till the “Cool“ icon appears.
• Press the
temperature.
• Allow around 5 minutes for the cooling to start.
• Press the “fan speed” button to adjust airflow.
Dehumidifying operation
• Press the “Mode“ button until the “dehumidify indicator lamp“
blinks.
• The temperature will automatically be selected.
• The fan speed will automatically be selected.
Timer operation
Timer ON setting
• When the air-conditioner is OFF, press the “Timer“ button and
select a desired ON time and adjust using the temperature
buttons.
• The ON time can be adjusted to anytime in 0-24 hours.
Timer OFF setting
• When the air-conditioner ON, press “Timer“ button and select a
desired OFF time through the temperature buttons.
• The OFF time can be adjusted to anytime in 0-24 hours.
Drainage
• After a lengthy operation and before storage, you will need to
drain the water that has been collected. Please prepare a suitable
location or tray to collect the water and remove the rubber stop
or button to select a desired room
20
Page 21
Instruction manual
from the drainage hole at the bottom of the unit. The water will
then begin to drain. After this has stopped, you can insert the
drain stop.
Internal Tank Water Full Alarm Function
• The inner water tank in the air-conditioner has one water level
safety switch that controls the water level. When the water level
reaches an anticipated height, the water full indicator lamp lights
up. Follow above steps to drain the water.
INSTALLATION
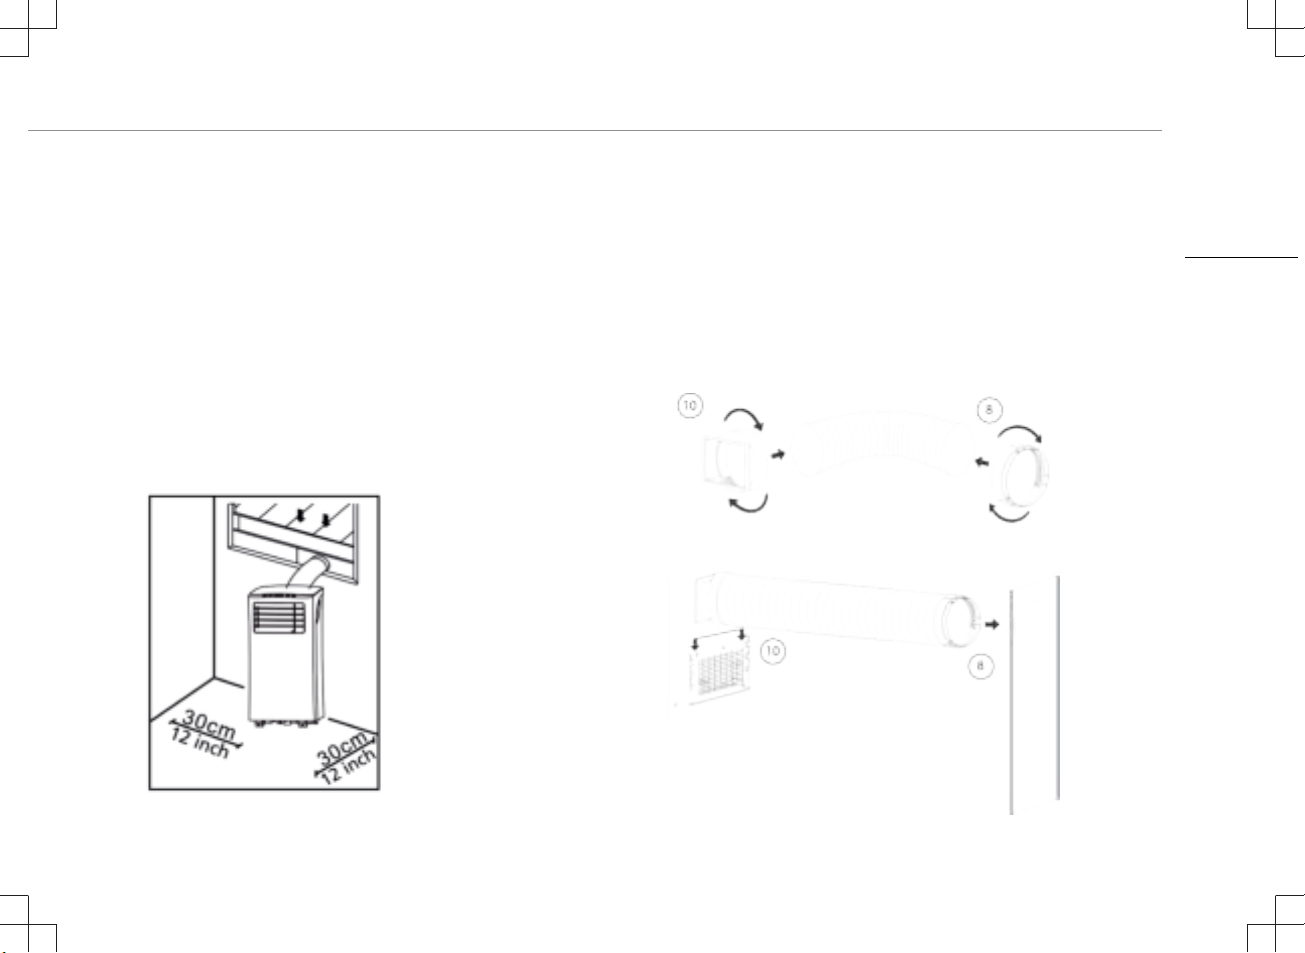
• The air-conditioner should be installed on a flat and stable
surface. Do not block the air outlet and allow at least 30cm
around the unit.
• Socket wiring should be in accordance with the local electric
safety requirements.
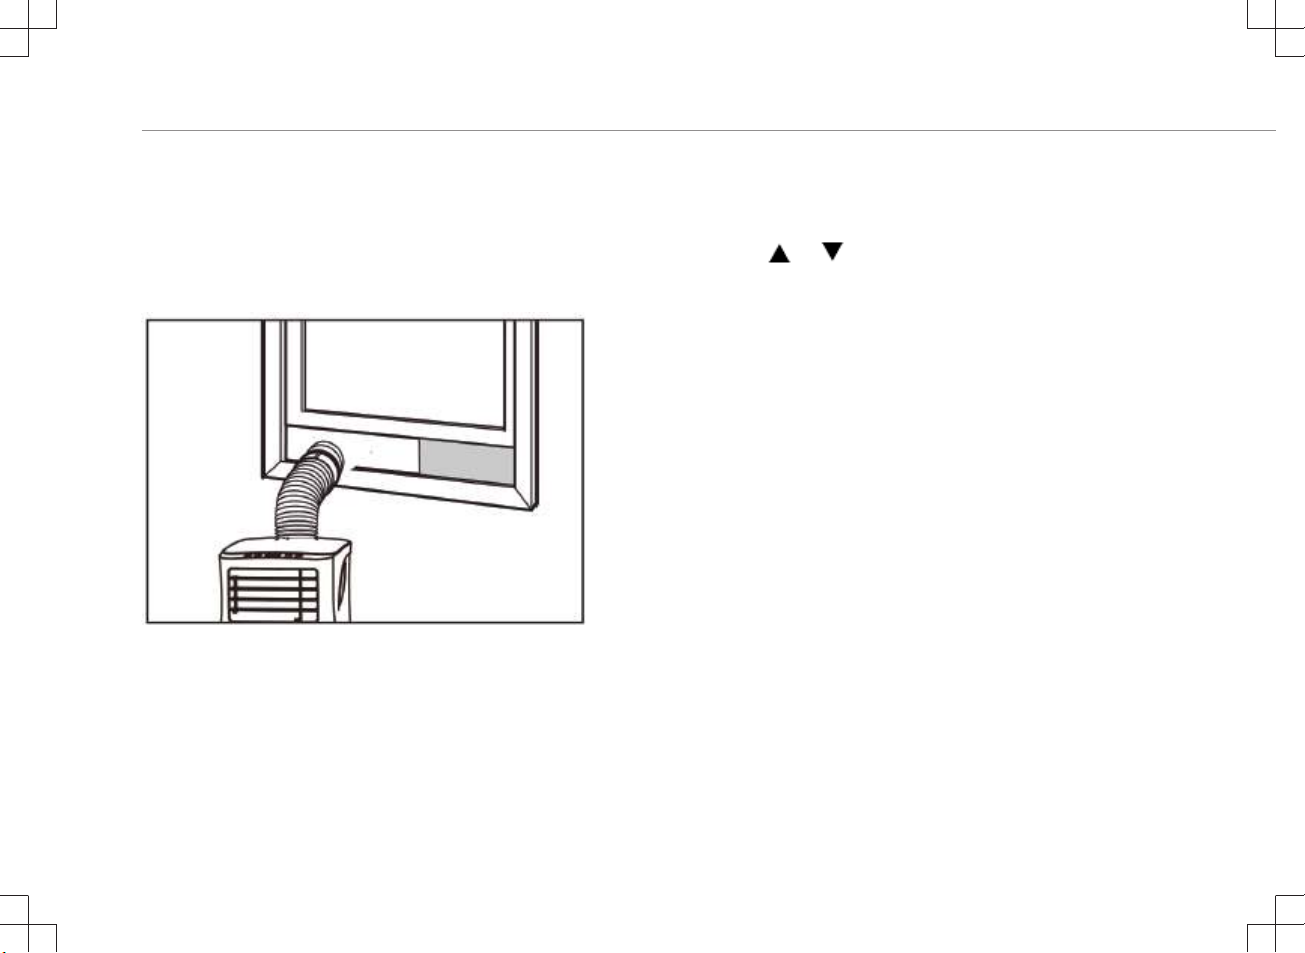
Exhaust Hose Installation
• Twist both ends of the hot-air exhaust hose(9) into the hose
connector window end(8) and the hose connector air conditioner
end(10).
• Insert the hose connector air conditioned end(10) into the
openings at the back of the air conditioner.
• Fix the hose connector window end(8) to the nearest windowsill.
EN
21
Page 22
Instruction manual
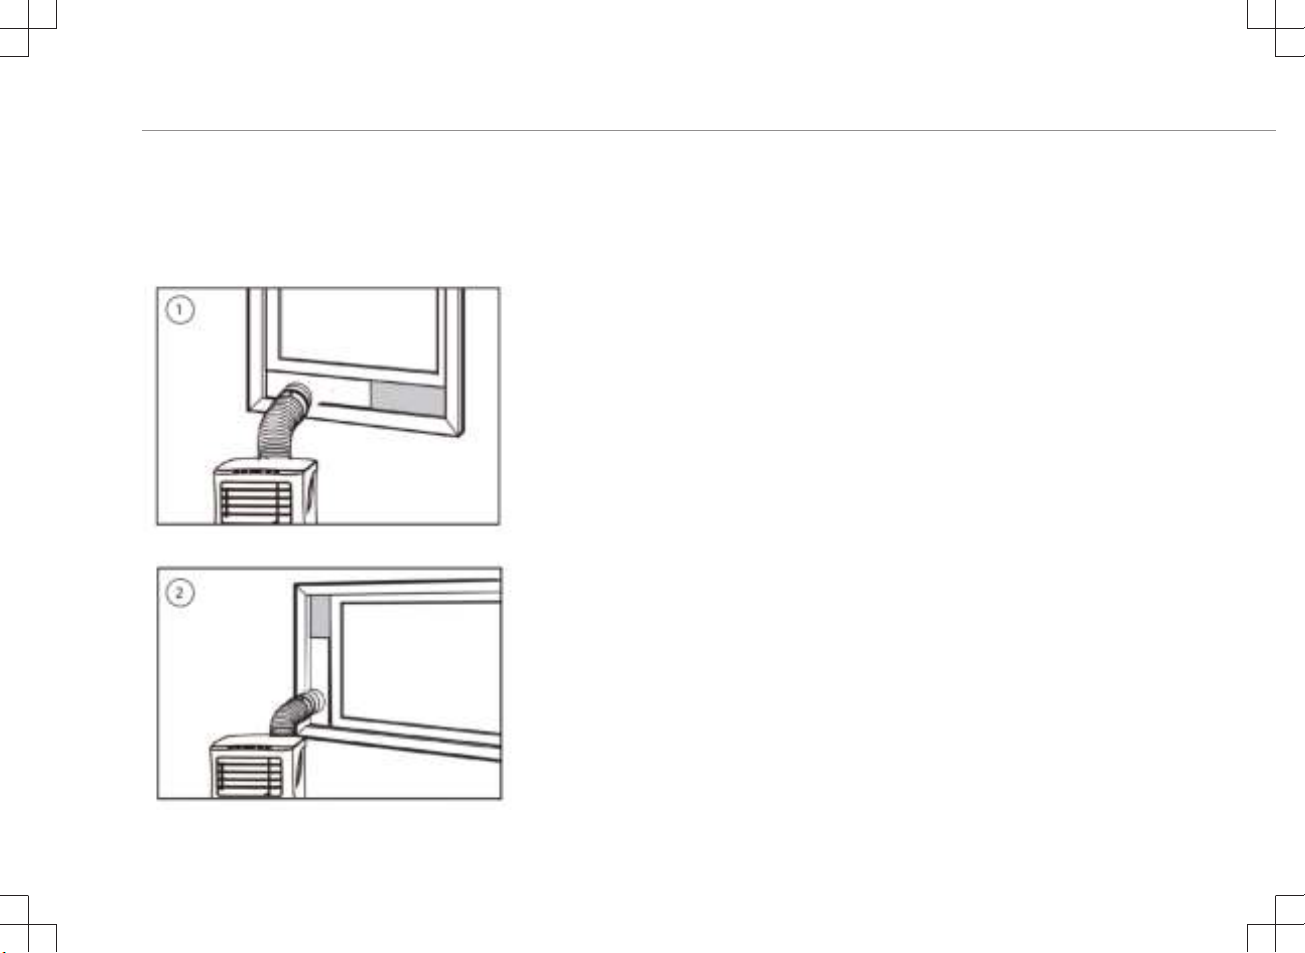
Window Slider Kit Installation
• Adjust the width (picture 1) or height (picture 2) of the windows
slider(11) to fit the window opening and fixate the position of the
windows slider(11) with the fixing plugs.
• Slide the window up to the slider.
CLEANING MAINTENANCE
• Before cleaning, disconnect the unit from any electric supply
outlet.
• First clean the surface with a neutral detergent and wet cloth, and
then wipe it with a dry cloth.
• Do not use gasoline or other chemicals to clean the unit.
• Do not wash the unit directly.
Air filter
• The air filter should be cleaned once every two weeks.
• Open the air inlet grille and take off air filter.
• Clean the air filter with neural detergent in lukewarm 40°C and
allow to dry (not in direct sunlight).
• Re-install the air filter into the inlet grille.
22
Page 23
Instruction manual
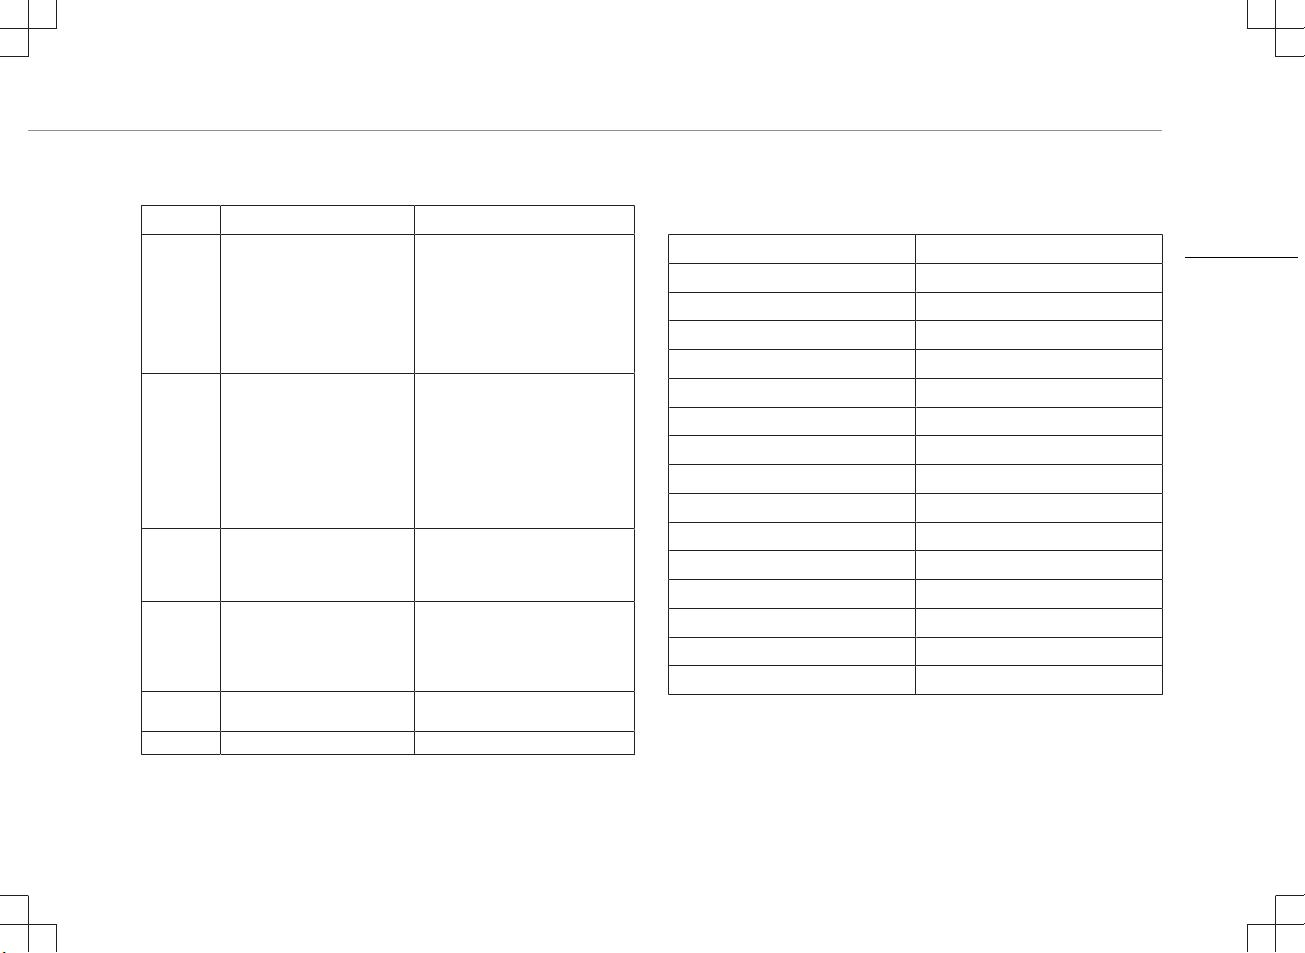
TROUBLESHOOTING
Troubles Possible Causes Suggested Remedies
The unit
does not
start when
pressing
power
button.
The unit
doesn’t cool
enough.
Auto PowerOff in heating
mode.
Noisy. • The ground is not level or not
E0 Code. • Room temperature sensor
E2 Code. • Water tank full • Please empty the water tank.
• Water full indicator lamp
blinks and water tank is full.
• Room temperature is higher
than the setting temperature.
(Electric heating mode)
• Room temperature is lower
that the setting temperature.
(Cooling mode)
• The doors or windows are not
closed.
• There are heat sources inside
the room.
• Hot air exhaust hose is not
connected or blocked.
• Temperature setting is too
high.
• Air inlet in blocked.
• Heating protection, when the
temperature at the air outlet
exceeds 70 degrees, the unit
will power off automatically.
flat enough.
• The sound comes from the
flowing of the refrigerant
inside the air conditioner.
failed.
• Drain the water out of the water
tank.
• Adjust the temperature.
• Make sure all the windows and
doors are closed.
• Remove the heat sources if
possible.
• Connect or clean the hot air
exhaust hose.
• Reset the temperature.
• Clean the air inlet.
• Allow room temperature to cool
before re-starting the unit.
• Place unit on a flat, level ground if
possible.
• Replace room temperature
sensor.
THE PRODUCT OR EQUIPMENT CONTAINS FLUORINATED GREENHOUSE GAS.
Art.nr. 352005
Coolant: R290
Quantity in kg: 0,10
Global Warming Potential: 3
Art.nr. 352007
Coolant: R290
Quantity in kg: 0,14
Global Warming Potential: 3
Art.nr. 352009
Coolant: R290
Quantity in kg: 0,16
Global Warming Potential: 3
Art.nr. 352010
Coolant: R290
Quantity in kg: 0,16
Global Warming Potential: 3
EN
23
Page 24
Instruction manual
ENVIRONMENT
This appliance should not be put into the domestic garbage at
the end of its durability, but must be offered at a central point for the
recycling of electric and electronic domestic appliances. This symbol
on the appliance, instruction manual and packaging puts your
attention to this important issue. The materials used in this appliance
can be recycled. By recycling of used domestic appliances you
contribute an important push to the protection of our environment. Ask
your local authorities for information regarding the point of
recollection.
24
Page 25
Manuel d'instructions
SÉCURITÉ
• Veuillez lire attentivement ce mode d'emploi
pour veiller à une utilisation, un entretien et
une installation appropriées.
• Si vous ignorez les consignes de sécurité, le
fabricant ne peut être tenu pour responsable
des dommages.
• L'appareil est uniquement conçu pour un
usage intérieur.
• Ne pas utiliser l'appareil sur une prise de
courant endommagée ou mal installée.
• Ne pas utiliser l'appareil:
– près d'une source d'ignition.
– à proximité d'éclaboussures possibles
d'huile.
– dans un espace exposé à la lumière
directe du soleil.
– à proximité d'éclaboussures possibles
d'eau.
– près d'un bain, d'une douche ou d'une
piscine.
• Ne jamais insérer les doigts ou d'autres
objets dans la sortie d'air. Soyez
particulièrement attentif à avertir les enfants
de ces dangers.
• Maintenir l'appareil vers le haut pendant le
transport et le stockage.
• Toujours couper l'alimentation ou
déconnecter l'appareil avant de le nettoyer.
• Toujours couper l'alimentation et le
débrancher avant de déplacer l'appareil.
•
AVERTISSEMENT: Pour éviter tout
risque d'incendie, ne pas couvrir l'appareil.
• Toutes les prises doivent être conformes
aux exigences locales de sécurité
électrique. Vérifiez si nécessaire.
• Si le cordon d'alimentation est endommagé,
il doit être remplacé par le fabricant, son
réparateur ou des personnes qualifiées afin
d'éviter tout risque.
• Si le cordon d'alimentation est endommagé,
il doit être remplacé par le fabricant, son
agent de service ou des personnes
qualifiées afin d'éviter tout risque.
• Cet appareil peut être utilisé par des enfants
à partir de 8 ans et par des personnes ayant
des capacités physiques, sensorielles ou
mentales réduites ou un manque
d'expérience et de connaissances si elles
bénéficient d'une supervision ou
d'instructions concernant l'utilisation de
FR
25
Page 26
Manuel d'instructions
l'appareil en toute sécurité et comprennent
les risques que cela suppose. Les enfants
ne doivent pas jouer avec l'appareil. Le
nettoyage et l'entretien ne peuvent être
assurés par des enfants sans surveillance.
• Cet appareil est uniquement destiné à des
utilisations domestiques et seulement dans
le but pour lequel il est fabriqué.
• Remarques:
– En cas de dommages, couper
l'alimentation électrique et contacter le
distributeur ou un atelier de réparation
agréé.
– Dans tous les cas, le cordon
d'alimentation doit être solidement mis à
la terre.
– Pour éviter tout risque, si le cordon
d'alimentation est endommagé, veuillez
couper l'alimentation électrique. Veuillez
contacter le distributeur ou un atelier de
réparation agréée pour le remplacer.
Avertissement
• Veuillez utiliser uniquement le procédé de
décongélation et de nettoyage recommandé
par le fabricant. Ne jamais accélérer le
processus de décongélation ou de nettoyage
autrement.
• L'appareil doit être entreposé dans un local
sans source d'inflammation permanente (par
exemple: flammes nues, appareil à gaz en
fonctionnement ou chauffage électrique en
fonctionnement).
• Ne pas percer ou brûler.
• Attention, les réfrigérants ne doivent contenir
aucun parfum.
• L'appareil doit être installé, actionné et
entreposé dans un local d'une superficie
supérieure à X m2. (X=4 pour 5000Btu/h,
7000Btu/h, 8000Btu/h; hX=7,7 pour
9000Btu/h. 10000Btu/h, 10500Btu/h)
• Contactez uniquement un technicien de
service agréé pour la réparation ou la
maintenance de cette unité.
• Ne tirez pas sur le cordon d'alimentation, ne
le déformez ou ne le modifiez pas, et ne
l'immergez pas dans de l'eau. Tirer ou mal
utiliser le cordon d'alimentation peut
endommager l'appareil et provoquer une
électrocution.
• Attention à respecter la réglementation
nationale relative au gaz.
• Veillez à ce que les ouvertures de ventilation
ne soient pas obstruées.
26
Page 27
• Toute personne travaillant sur un circuit
frigorifique ou qui y pénètre doit être titulaire
d'un certificat valide délivré par un
organisme d'évaluation accrédité par le
secteur l'autorisant à manipuler les
réfrigérants en toute sécurité conformément
à une de ses normes d'évaluation
reconnues.
• L'entretien ne doit être effectué que selon
les recommandations du fabricant de
l'équipement. L'entretien et les réparations
nécessitant l'assistance d'un autre personnel
qualifié doivent être effectués sous la
supervision de la ou des personnes
compétentes pour l'utilisation des
réfrigérants inflammables.
• N'arrêtez pas l'appareil en insérant ou en
retirant la fiche d'alimentation pendant qu'il
fonctionne, cela pourrait provoquer un choc
électrique ou un incendie sous l'effet de la
chaleur, à moins d'entendre des bruits
bizarres, de sentir une odeur inhabituelle ou
de voir de la fumée sortir de l'appareil.
Manuel d'instructions
Informations spécifiques concernant les appareils avec un gaz
réfrigérant R 290.
• Lisez attentivement tous les avertissements.
• Pour dégivrer et nettoyer l'appareil, n'utilisez
pas d'autres outils que ceux recommandés
par le fabricant.
• L'appareil ne doit pas être entreposé dans
un local avec une source d'inflammation
permanente (par exemple: flammes nues,
appareil à gaz en fonctionnement ou
chauffage électrique en fonctionnement).
• Ne pas percer, ni brûler.
• L'appareil doit être installé, actionné et
entreposé dans un local d'une superficie
supérieure à X m2. (X=4 pour 5000Btu/h,
7000Btu/h, 8000Btu/h; hX=7,7 pour
9000Btu/h. 10000Btu/h, 10500Btu/h)
• Cet appareil contient Y g (voir la plaque
signalétique au dos de l'appareil) de gaz
réfrigérant R290.
FR
27
Page 28
Manuel d'instructions
• Le gaz R290 est un gaz réfrigérant conforme
aux directives européennes sur
l'environnement. Ne percer aucun élément
du circuit de réfrigération.
• Si l'appareil est installé, utilisé ou entreposé
dans un endroit non ventilé, le local doit être
conçu de façon à prévenir l'accumulation de
fuites de réfrigérant qui pourraient entraîner
un risque d'incendie ou d'explosion en raison
de l'inflammation du réfrigérant par des
appareils de chauffage électriques, des
poêles ou d'autres sources d'inflammation.
• L'appareil doit être entreposé de manière à
éviter toute défaillance mécanique.
• Toute personne actionnant ou travaillant sur
le circuit de réfrigération doit disposer de la
certification appropriée émise par une
organisation accréditée veillant à sa
compétence quant à la manipulation de
réfrigérants conformément à une évaluation
spécifique agréée par des associations du
secteur.
• Les réparations doivent être effectuées sur
la base des recommandations du fabriquant.
L'entretien et les réparations nécessitant
l'assistance d'un autre personnel qualifié
doivent être effectués sous la supervision de
la personne compétente pour l'utilisation des
réfrigérants inflammables.
Batteries
• N'exposez pas les batteries et piles à des
températures élevées ou à la lumière directe
du soleil. Ne jetez pas les batteries et piles
dans le feu. Vous risquez une explosion !
• Maintenez les batteries et piles hors de
portée des enfants. Les batteries et piles ne
sont pas des jouets !
• Ne forcez pas l’ouverture des batteries et
piles.
• Évitez tout contact avec des objets
métalliques (Bagues, clous, vis, etc.). Ils
risquent de provoquer un court-circuit !
• Suite à un court-circuit, les batteries et piles
peuvent chauffer excessivement, voire
s’enflammer, ce qui peut entraîner des
brûlures.
• Pour votre sécurité, les pôles de batteries
devraient être recouverts par des languettes
adhésives pendant le transport.
• Ne touchez pas les batteries et piles percées
ou présentant une fuite. Si du liquide de
batterie ou de pile entre en contact avec vos
yeux, rincez-les dès que possible à l'eau
28
Page 29
claire, sans frotter les yeux. Rendez-vous
immédiatement à l'hôpital. En l'absence de
traitement approprié, des lésions oculaires
sont possibles.
Réfrigérant
(CE) N 842/2006: Cet appareil contient du réfrigérant R290. Ce
réfrigérant pèse moins de 1 kg et se trouve dans un circuit de
refroidissement fermé. Le liquide de refroidissement n'a aucun
potentiel d'appauvrissement de la couche d'ozone, mais il s'agit d'un
gaz à effet de serre au sens du protocole de Kyoto et peut donc
contribuer au réchauffement planétaire, s'il est rejeté dans
l'atmosphère. C'est pourquoi seuls des techniciens qualifiés
disposant d'un certificat de réfrigérant peuvent effectuer un
remplissage ou une vidange. Votre appareil n'a pas besoin d'être
rempli de réfrigérant s'il est utilisé correctement et si son circuit de
refroidissement n'est pas endommagé. PRP: R290: 3
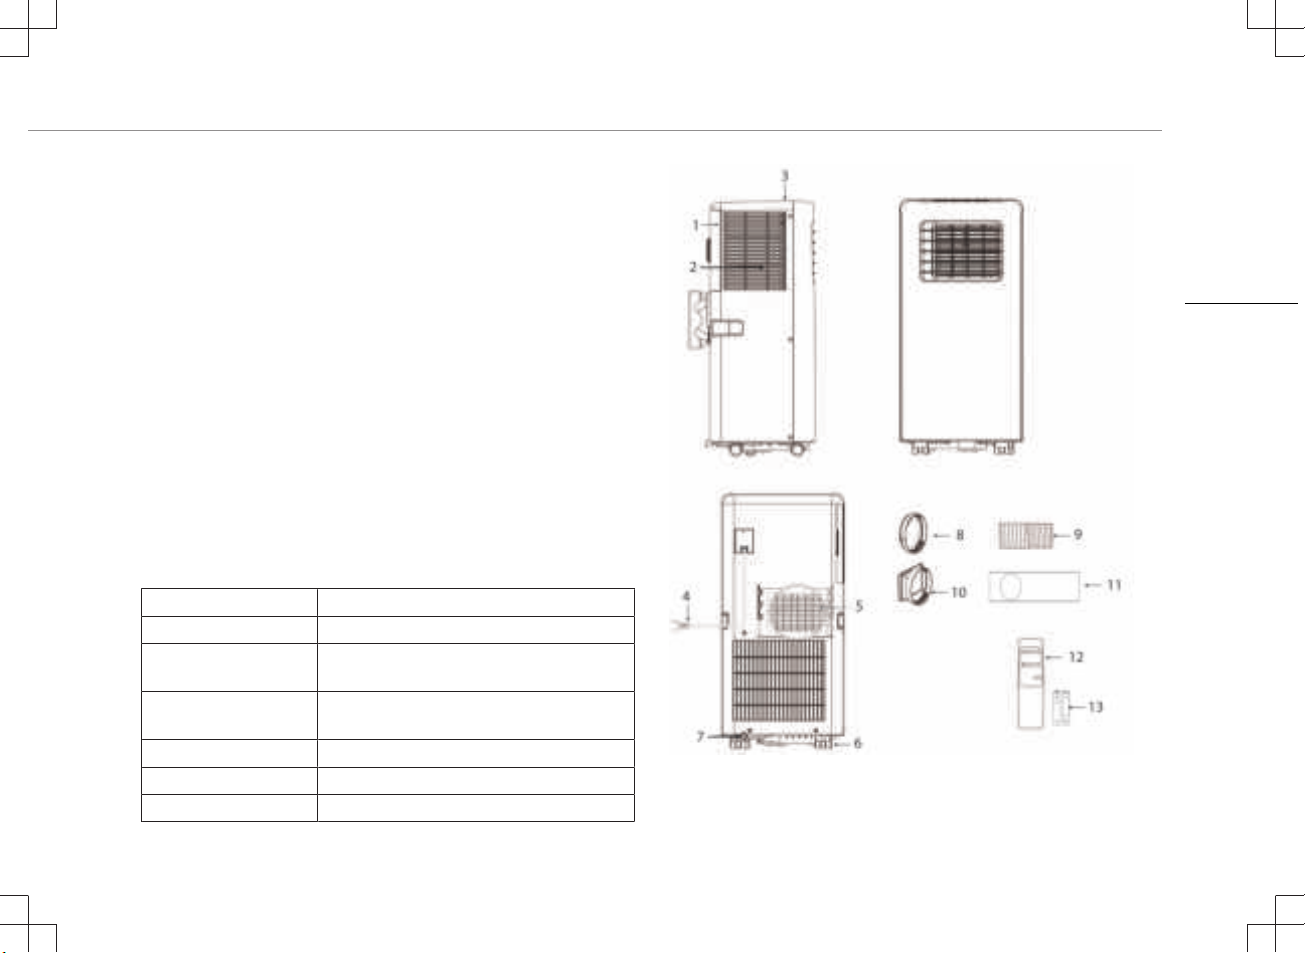
DESCRIPTION DES PIÈCES
1. Entrée d'air 8. Raccord de tuyau (côté fenêtre)
2. Filtre à air 9. Tuyau d'évacuation d'air chaud
3. Panneau de
commande
4. Cordon d'alimentation 11. Kit coulissant pour fenêtre + chevilles de
5. Sortie d'air 12. Télécommande
6. Roulette 13. Batteries
7. Orifice de drainage
10. Raccord de tuyau (Côté climatiseur)
fixation
Manuel d'instructions
FR
29
Page 30
Manuel d'instructions
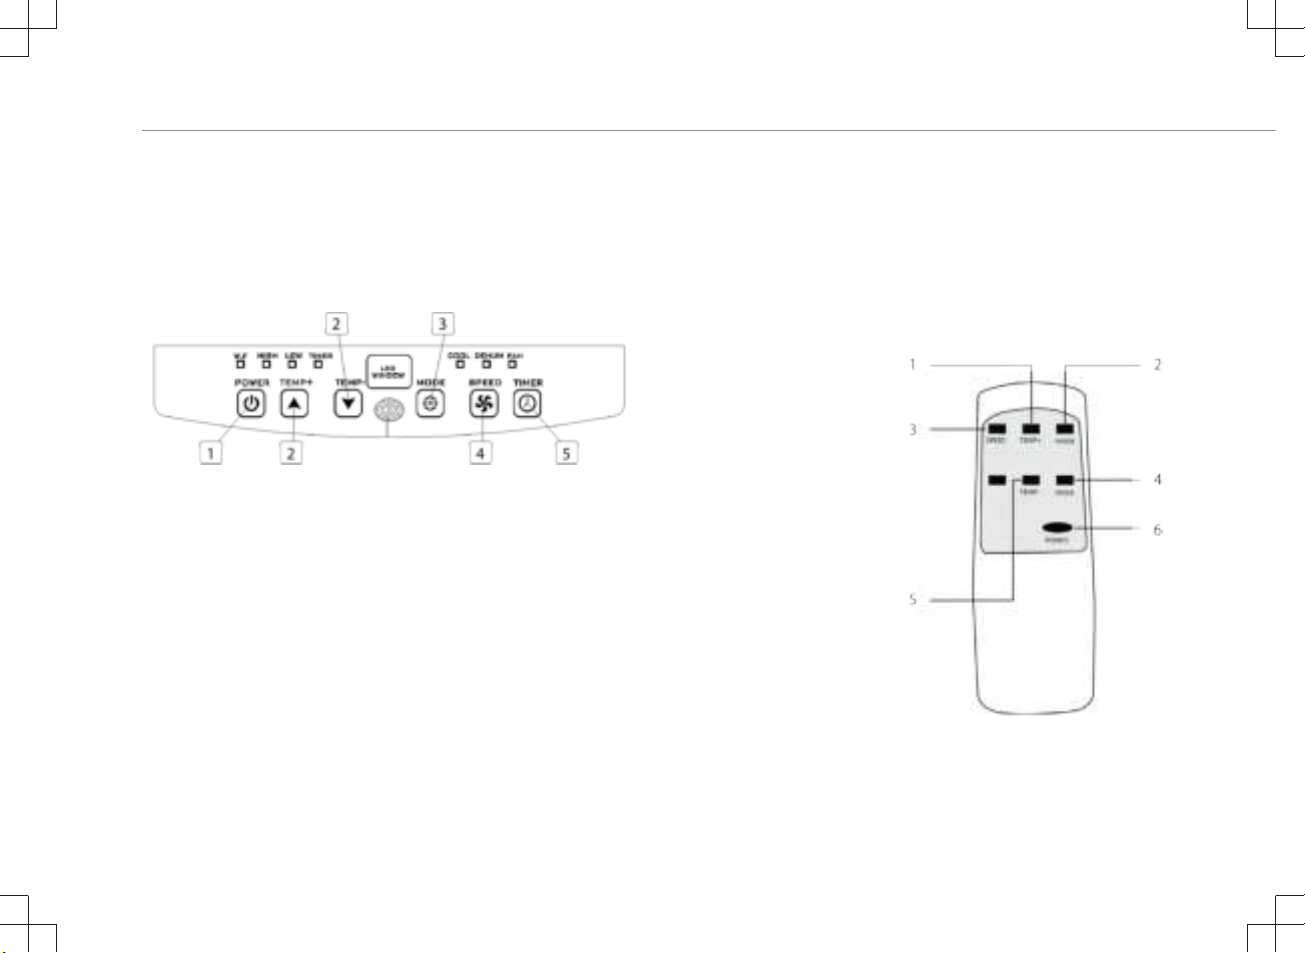
FONCTION DU PANNEAU DE COMMANDE
1. Bouton marche/arrêt
2. Boutons de température
3. Bouton de mode
4. Bouton de réglage de vitesse du ventilateur
5. Bouton marche/arrêt du minuteur
TÉLÉCOMMANDE
1. Bouton d'augmentation de la température
2. Bouton de mode
3. Bouton de réglage de vitesse du ventilateur
4. Bouton marche/arrêt du minuteur
5. Bouton de diminution de la température
6. Bouton marche/arrêt
30
Page 31
Manuel d'instructions
AVANT LA PREMIÈRE UTILISATION
Avant de commencer les opérations dans cette section:
• Trouvez un endroit près d'une source d'alimentation électrique.
• Posez le tuyau d'évacuation et réglez bien la position de la
fenêtre.
• Les petits clips blancs fournis doivent être montés sur le kit
fenêtre.
• Insérez le cordon d'alimentation dans une prise de courant
AC220~240V/50Hz mise à la terre.
• Appuyez sur le bouton Marche/Arrêt pour allumer le climatiseur.
• Réglez la plage de températures: 16 °C-31°C.
• Vérifiez si le tuyau d'évacuation a été monté correctement.
• Lors de l'utilisation des fonctions de refroidissement et de
déshumidification, prévoir au moins 3 minutes entre la mise hors
tension et la mise sous tension.
UTILISATION
Refroidissement
• Appuyez sur le bouton mode jusqu'à ce que l'icône «Cool»
apparaisse.
• Appuyez sur le bouton
température de la pièce souhaitée.
• Attendre environ 5 minutes que le refroidissement démarre.
• Appuyez sur le bouton de vitesse du ventilateur («fan speed»)
pour régler le débit d'air.
Déshumidification
• Appuyez sur le bouton «Mode» jusqu'à ce que le témoin de
déshumidification clignote.
• La température est sélectionnée automatiquement.
• La vitesse du ventilateur est sélectionnée automatiquement.
Minuterie
Réglage de minuterie activée
• Lorsque le climatiseur est éteint, appuyez sur la touche de
minuterie («Timer»), sélectionnez l'heure de mise en marche
(ON) désirée et réglez-la à l'aide des boutons de température.
• L'heure de mise en marche peut être réglée à n'importe quel
moment entre 0 et 24 heures.
ou pour sélectionner la
FR
31
Page 32
Manuel d'instructions
Réglage de minuterie désactivée
• Lorsque le climatiseur est allumé, appuyez sur la touche de
minuterie («Timer»), sélectionnez l'heure de désactivation (OFF)
désirée et réglez-la à l'aide des boutons de température.
• L'heure de désactivation peut être réglée à n'importe quel
moment entre 0 et 24 heures.
Drainage
• Après une utilisation prolongée et avant le stockage, vous devrez
vidanger l'eau recueillie. Préparez un emplacement ou un plateau
approprié pour recueillir l'eau et retirez le bouchon en caoutchouc
du trou de drainage situé au fond de l'appareil. Le drainage se
mettra alors en route. Une fois cette opération terminée, vous
pouvez insérer le bouchon de vidange.
Fonction d'alarme de niveau d'eau maximum dans le réservoir
interne
• Le réservoir d'eau interne du climatiseur est muni d'un
interrupteur de sécurité qui contrôle le niveau d'eau. Lorsque le
niveau d'eau atteint la hauteur prévue, le témoin de niveau d'eau
plein s'allume. Suivez les étapes ci-dessus pour vidanger l'eau.
INSTALLATION
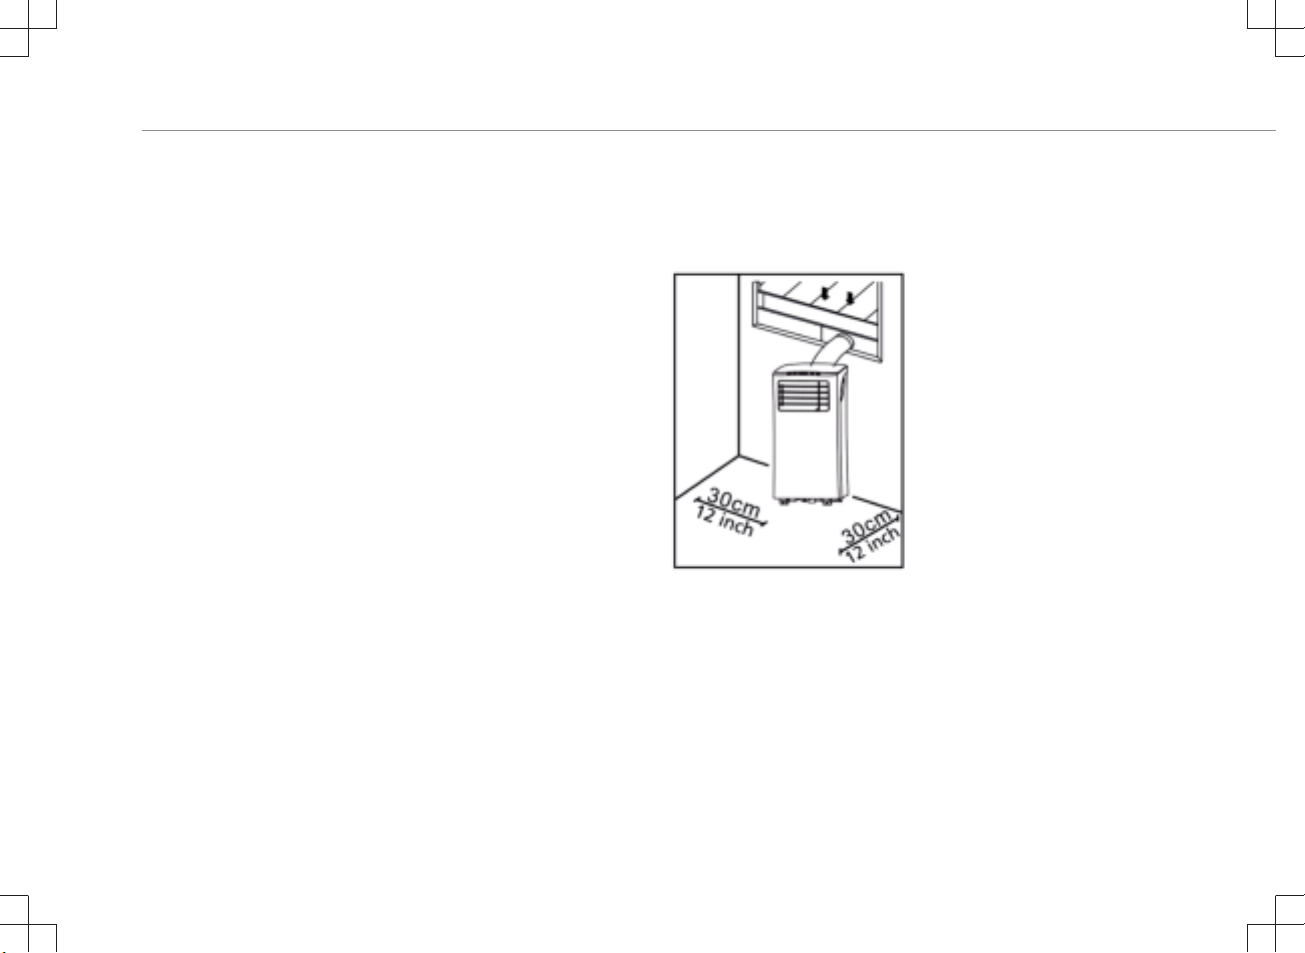
• Le climatiseur doit être installé sur une surface plane et stable.
Ne bloquez pas la sortie d'air et laissez au moins 30 cm autour de
l'appareil.
• Le raccordement aux prises doit être conforme aux exigences
locales de sécurité électrique.
32
Page 33
Manuel d'instructions
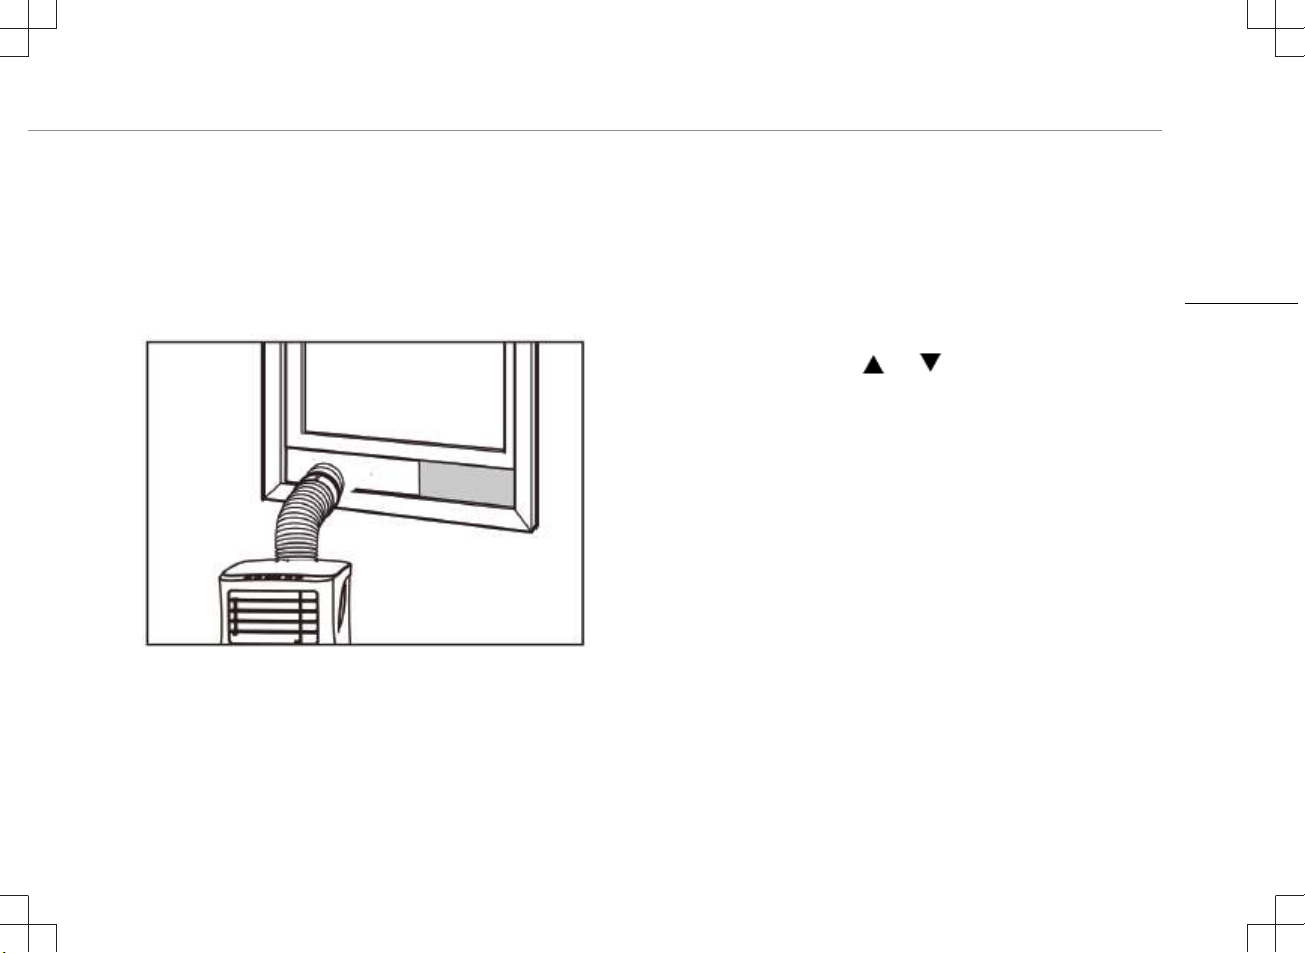
Installation de tuyau d'évacuation
• Tourner les deux extrémités du tuyau d'évacuation d'air chaud (9)
dans le raccord de tuyau côté fenêtre (8) et dans le raccord de
tuyau coté climatiseur (10).
• Insérez l'extrémité (10) du raccord de tuyau du climatiseur dans
les ouvertures situées à l'arrière du climatiseur.
• Fixez (8) le raccord de tuyau côté fenêtre sur le rebord de fenêtre
le plus proche.
Installation du kit coulissant pour fenêtre
• Ajustez la largeur (image 1) ou la hauteur (image 2) de la
glissière de fenêtre (11) en fonction de l'ouverture de fenêtre et
fixez la glissière de fenêtre (11) avec les chevilles de fixation.
• Faites glisser la fenêtre sur la glissière.
FR
33
Page 34
Manuel d'instructions
NETTOYAGE ET ENTRETIEN
• Avant le nettoyage, débranchez l'appareil de toute prise
électrique.
• Nettoyez d'abord la surface avec un détergent neutre et un
chiffon humide, puis essuyez-la avec un chiffon sec.
• N'utilisez pas d'essence ou d'autres produits chimiques pour
nettoyer l'appareil.
• Ne lavez pas l'appareil directement.
Filtre à air
• Le filtre à air doit être nettoyé toutes les deux semaines.
• Ouvrez la grille d'entrée d'air et enlevez le filtre à air.
• Nettoyez le filtre à air avec un détergent neutre dans de l'eau
tiède à 40°C et laissez-le sécher (à l'abri des rayons directs du
soleil).
• Réinstallez le filtre à air dans la grille d'entrée d'air.
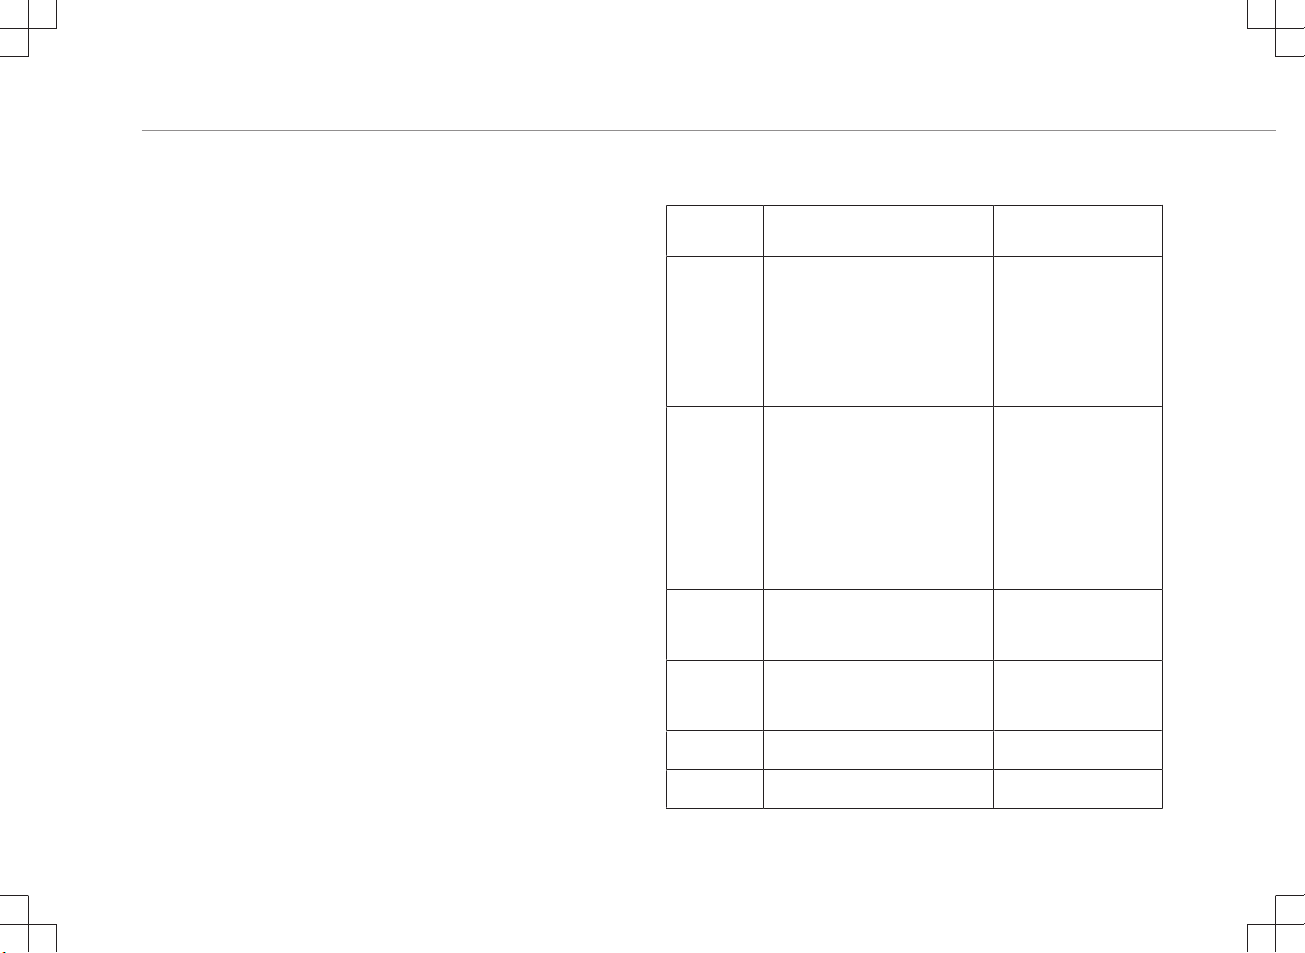
DÉPANNAGE
Résolution
des pannes
L'unité ne
démarre pas
lorsqu'on appuie
sur le bouton
marche/arrêt.
L'unité ne
refroidit pas
suffisamment.
Mise hors
tension
automatique en
mode chauffage.
Appareil bruyant. • Le sol n'est pas horizontal ou pas
Code E0. • La sonde de température ambiante
Code E2. • Réservoir d’eau plein • Vidangez le réservoir
Causes possibles Solutions suggérées
• Le témoin de réservoir d'eau plein
clignote, et le réservoir d'eau est
plein.
• La température ambiante est
supérieure à la température de
réglage. (Mode chauffage électrique)
• La température ambiante est
inférieure à la température de
réglage. (Mode climatisation)
• Les portes ou fenêtres ne sont pas
fermées.
• Il y a des sources de chaleur à
l'intérieur de la pièce.
• Le tuyau d'évacuation d'air chaud
n'est pas branché ou bloqué.
• La température réglée est trop
élevée..
• L'entrée d'air est bloquée.
• Protection de chauffage, lorsque la
température à la sortie d'air dépasse
70 degrés, l'appareil s'éteint
automatiquement.
assez plat.
• Le son provient de l'écoulement du
réfrigérant à l'intérieur du climatiseur.
est défectueuse.
• Vidangez le réservoir
d'eau.
• Réglez la température.
• Assurez-vous que toutes
les fenêtres et portes
sont fermées.
• Supprimez les sources
de chaleur si possible.
• Raccordez ou nettoyez le
tuyau d'évacuation d'air
chaud.
• Réinitialisez la
température.
• Nettoyez l'entrée d'air.
• Laissez la température
de la pièce s'abaisser
avant de redémarrer
l'unité.
• Placez l'appareil sur un
sol horizontal et plat si
possible.
• Remplacez la sonde de
température ambiante.
d'eau.
34
Page 35
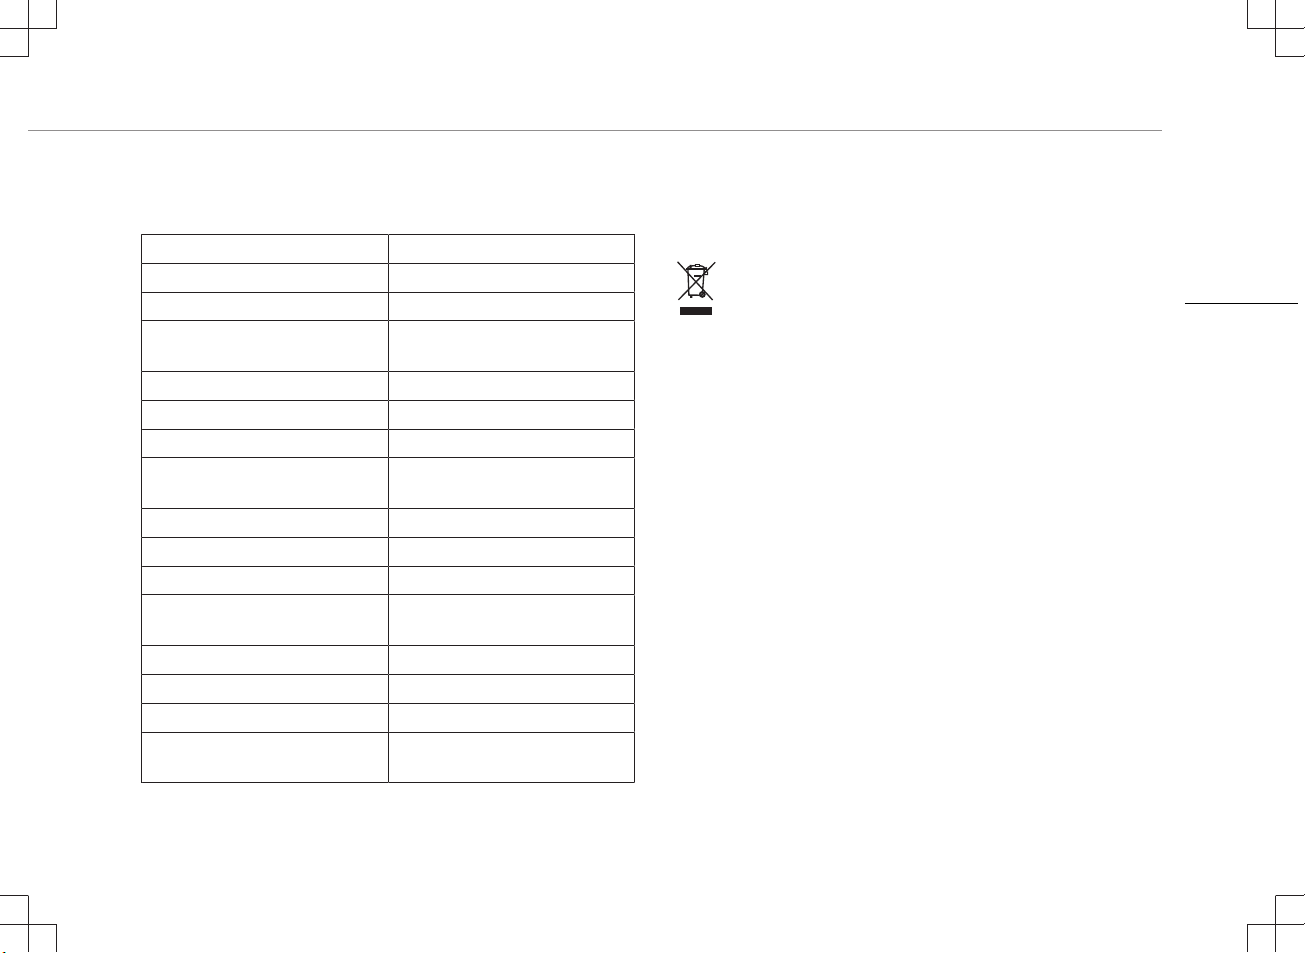
LE PRODUIT OU L'ÉQUIPEMENT CONTIENT DES GAZ À EFFET DE SERRE FLUORÉS.
Art. n° 352005
Liquide de refroidissement: R290
Quantité en kg: 0.10
Potentiel de réchauffement
planétaire:
Art. n° 352007
Liquide de refroidissement: R290
Quantité en kg: 0.14
Potentiel de réchauffement
planétaire:
Art. n° 352009
Liquide de refroidissement: R290
Quantité en kg: 0.16
Potentiel de réchauffement
planétaire:
Art. n° 352010
Liquide de refroidissement: R290
Quantité en kg: 0.16
Potentiel de réchauffement
planétaire:
3
3
3
3
Manuel d'instructions
ENVIRONNEMENT
Cet appareil ne doit pas être jeté avec les déchets ménagers
à la fin de sa durée de vie, il doit être remis à un centre de recyclage
pour les appareils électriques et électroniques. Ce symbole sur
l'appareil, le manuel d'utilisation et l'emballage attire votre attention
sur un point important. Les matériaux utilisés dans cet appareil sont
recyclables. En recyclant vos appareils, vous contribuez de manière
significative à la protection de notre environnement. Renseignezvous auprès des autorités locales pour connaître les centres de
collecte des déchets.
FR
35
Page 36

© Copyright 2019
Smartwares Jules Verneweg 87 | 5015 BH Tilburg | The Netherlands
 Loading...