

Page 1
73
209
73
209
STYLE 10
INDOOR DIGITAL CLOCKS - HORLOGES DIGITALES INTERIEURES
DIGITALE INNENUHREN
-
RELOJES DIGITALES DE INTERIOR
quick start guide - GUIDE DE DEMARRAGE RAPIDE - Schnellstartanleitung - Guía de inicio rápido
EN:
1
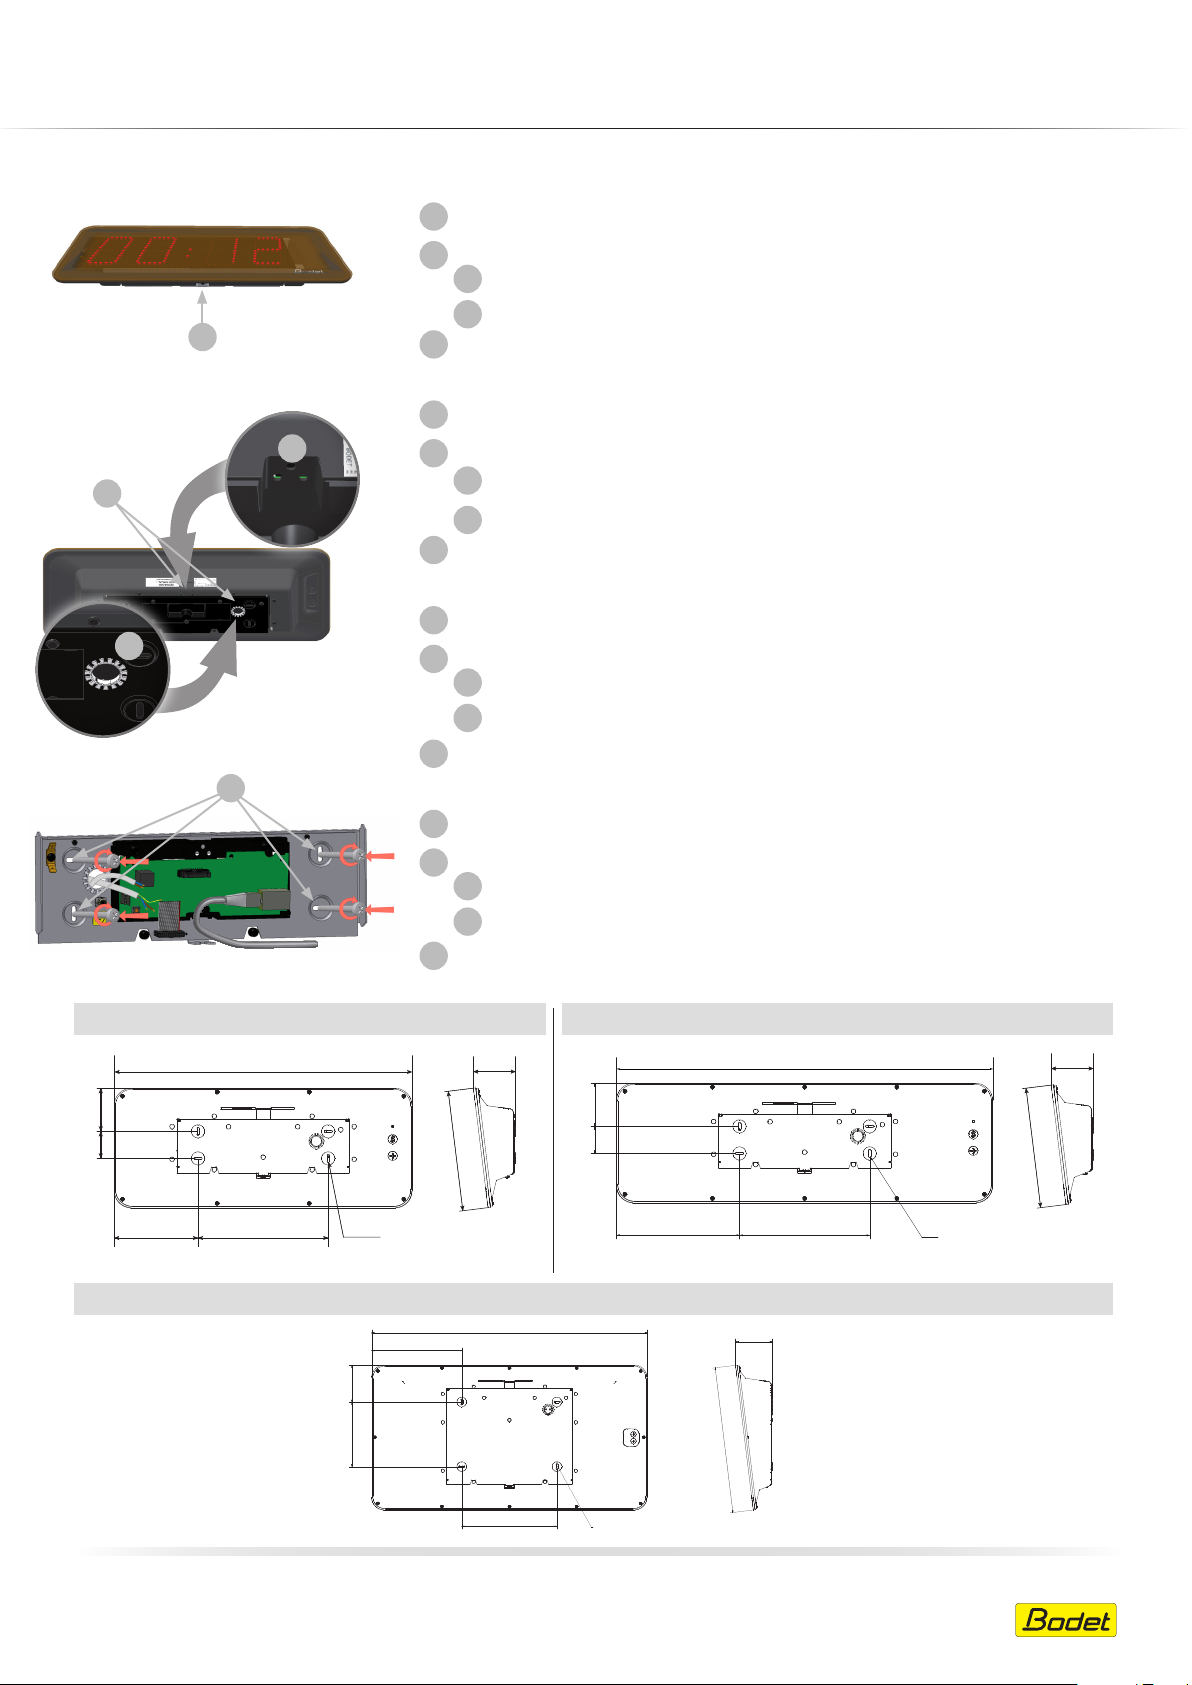
Open the clock by unscrewing the screw below the clock.
Feed the power and/or synchronisation cables:
2
1
FR :
a
2
DE:
b
Through the top: (it is necessary to cut the thin recessed part on the top of the clock with a wire
a
cutter in order to let the cable(s) through).
Directly from behind: designated space.
b
3
Attach the mounting bracket to the wall using 4x Ø4mm screws with wall plugs.
1
Ouvrir l’horloge en dévissant la vis en dessous de l’horloge.
2
Faire passer les câbles d’alimentation et/ou de synchronisation :
Par le dessus : (sur l’horloge, il sera nécessaire de découper à l’aide d’une pince coupante le
a
boîtier en partie haute, décrochage le plus fin, et faire passer le câble à cet endroit.)
Directement par l’arrière : espace dédié.
b
3
Fixer le support mural au mur à l’aide des 4 vis et cheville Ø4mm.
1
Die Schraube unterhalb der Uhr lösen.
Führung der Strom- und/oder Synchronisationskabel:
2
Von oben: (Auf der Uhr muss man mit einem Seitenschneider am oberen Teil des Gehäuses
a
eine (möglichst kleine) Öffnung schaffen und das Kabel an dieser Stelle durchführen.)
Direkt über die Rückseite: vorgesehener Bereich.
b
Style 10
7547
Style 10D & 10SD
3
517
226145,5 R2,1
3
Wandhalterung mit den 4 Schrauben für Dübel (Ø 4 mm) an der Wand befestigen.
ES:
1
Abra el reloj desatornillando el tornillo de la parte inferior.
Introduzca los cables de alimentación y/o de sincronización.
2
214
Por la parte superior: (desmonte la parte superior de la caja del reloj ayudándose con unos
a
alicates (retírela con cuidado) y pase el cable por aquí.)
Directamente por detrás: espacio específico.
b
3
Fije el soporte de pared en la pared con 4 tornillos y tacos de 4 mm de diámetro.
Style 10S
73
7547
209
654
653
226213,5
87
73
209
R2,1
88153,5
346,5
226
R2,1
Download full manual - Téléchargez la notice complète - Komplettes Handbuch - Manual completo:
>> www.bodet-time.support <<
Ref.: 608107D 06/19
1/4
Page 2
STYLE 10
INDOOR DIGITAL CLOCKS - HORLOGES DIGITALES INTERIEURES
DIGITALE INNENUHREN
-
RELOJES DIGITALES DE INTERIOR
quick start guide - GUIDE DE DEMARRAGE RAPIDE - Schnellstartanleitung - Guía de inicio rápido
Synchronisation: INDEPENDENT, DHF and NTP/Wi-Fi
Power supply
L N
5
4
Synchronisation: RADIO (ALS/DCF, ALS or DCF)
Power supply
L N
Antenna
5
4
Synchronisation: IMPULSE and AFNOR
Power supply
L
N
5
EN:
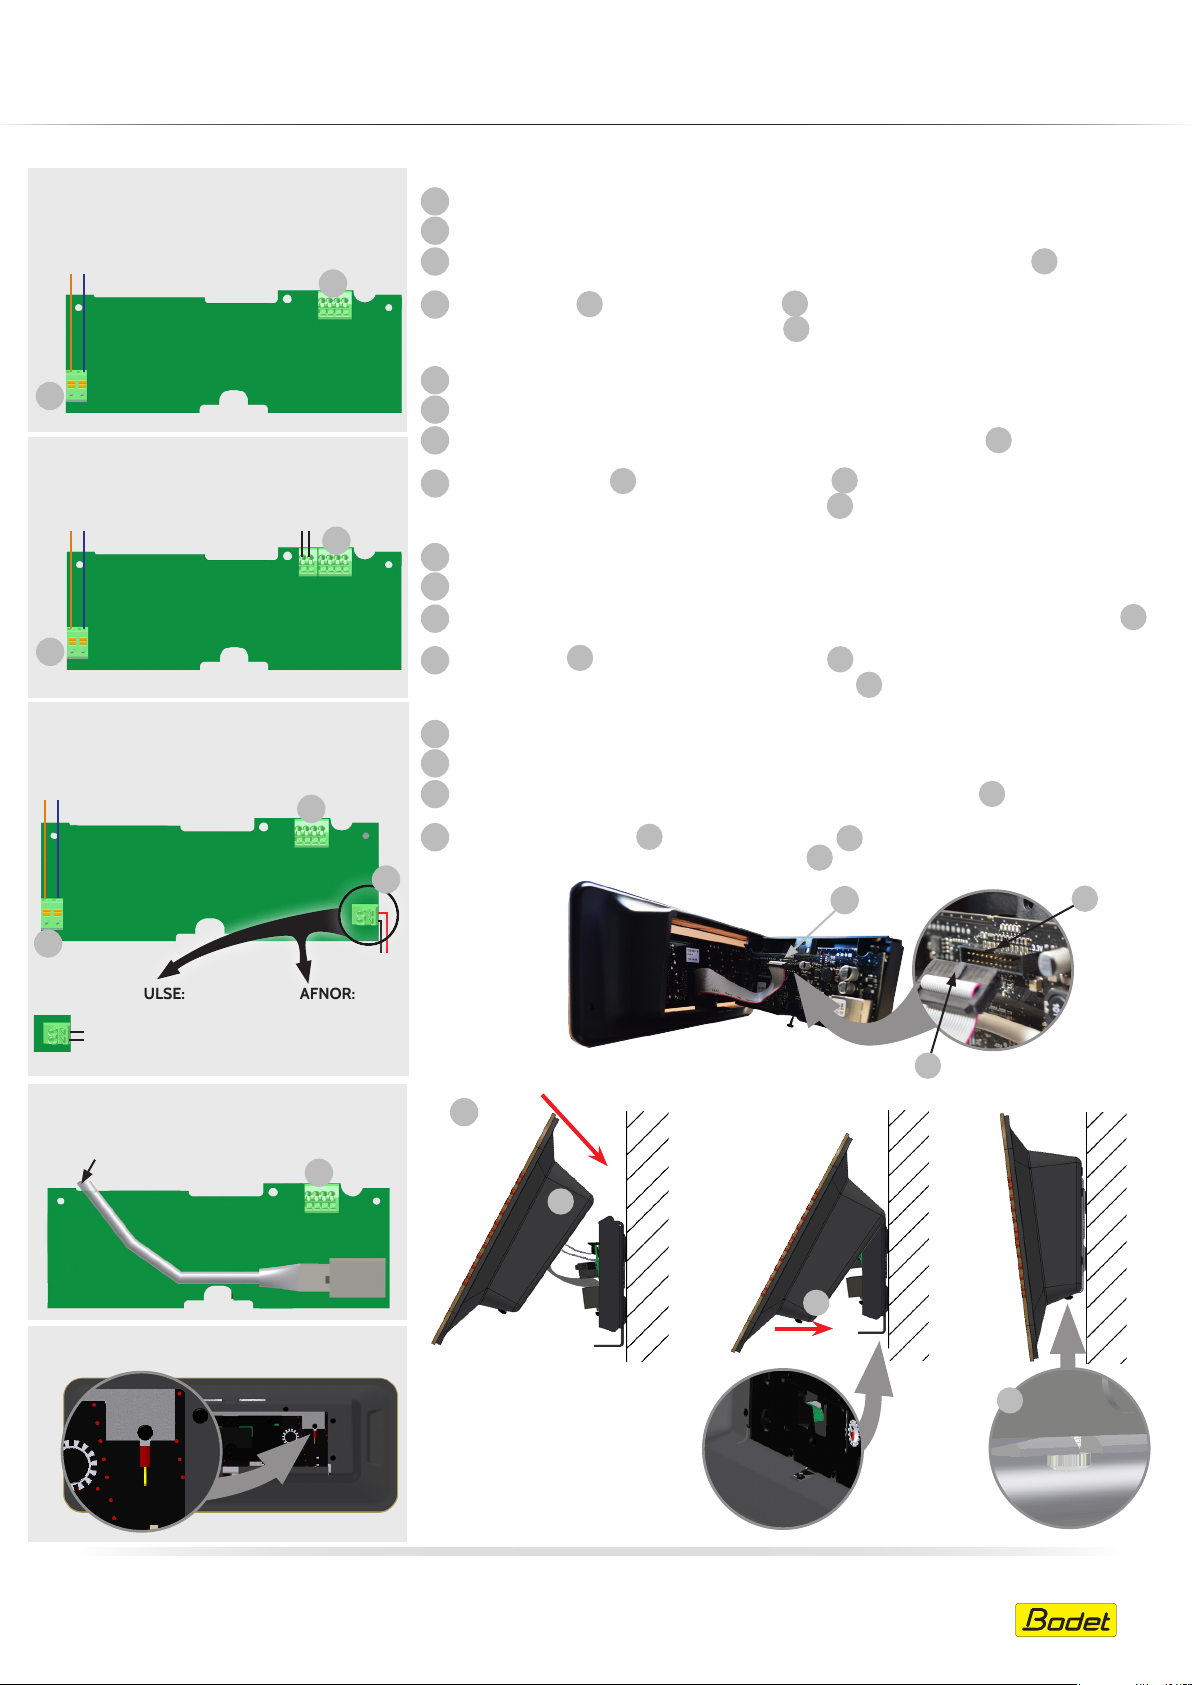
4 Make electrical connections according to the synchronisation and the grounding terminal .
5 (Option) BTChrono: Style 10S only (refer to the BT Chrono manual).
6 Attach the display ribbon cable to the synchronisation card. The foolproof notch A indicate the
direction of connection.
7 Insert the top part B then attach at the bottom
on the mounting bracket using the fastening bolt D.
FR :
4 Effectuer les branchements électriques en fonction de la synchronisation et la prise de terre.
5
(Option) BTChrono : Style 10S seulement (se reporter à la notice du BT Chrono).
6 Fixer la nappe de l’afficheur sur la carte de synchronisation. Le détrompeur A indique le sens de
connection.
7 Insérer la partie haute
Verrouiller l’horloge sur le support avec la vis de fixation D.
DE:
4 Die Stromanschlüsse entsprechend der Synchronisation vornehmen und der Erdung.
5
(Option) BTChrono: nur für Style 10S verfügbar (vgl. die Anleitung der BTChrono).
6
Das Flachbandkabel des Anzeigegeräts an der Synchronisationskarte befestigen. Die Steckererkennung
am Stecker zeigen die Anschlussrichtung an.
7 Den oberen Teil
nicht einzuklemmen. Die Uhr mit der Befestigungsschraube D auf dem Träger arretieren.
ES:
4 Realice las conexiones eléctricas en función de la sincronización y la toma de tierra.
5
(Opción) BTChrono: Style 10S únicamente (ver manual del BT Chrono).
6 Conecte el cable plano del display en la tarjeta de sincronización. El poka-yoke A indican el sentido de
la conexión.
7 Inserte la sección superior B y acople la parte inferior C con precaución para no aplastar los cables.
Atornille el reloj al soporte con el tornillo de sujeción D.
B
puis fermer la partie basse
einführen, dann den unteren Teil
B
taking care not to pinch the wires. Secure the clock
C
C
en prenant soin de ne pas pincer les fils.
schließen, dabei darauf achten, die Drähte
C
4
6
A
A
4
IMPULSE: AFNOR:
There is no polarity, but if there is
several clocks, they have to be
connect in the same order.
Synchronisation: NTP/ETH
Ethernet RJ45 cable
Grounding terminal on the back of the clock
No polarity
Pas de polarité
Keine Polarität
Sin polaridad
A
7
5
B
C
D
Download full manual - Téléchargez la notice complète - Komplettes Handbuch - Manual completo:
>> www.bodet-time.support <<
Ref.: 608107D 06/19
2/4
Page 3
STYLE 10
INDOOR DIGITAL CLOCKS - HORLOGES DIGITALES INTERIEURES
DIGITALE INNENUHREN
-
RELOJES DIGITALES DE INTERIOR
quick start guide - GUIDE DE DEMARRAGE RAPIDE - Schnellstartanleitung - Guía de inicio rápido
EN: FR :
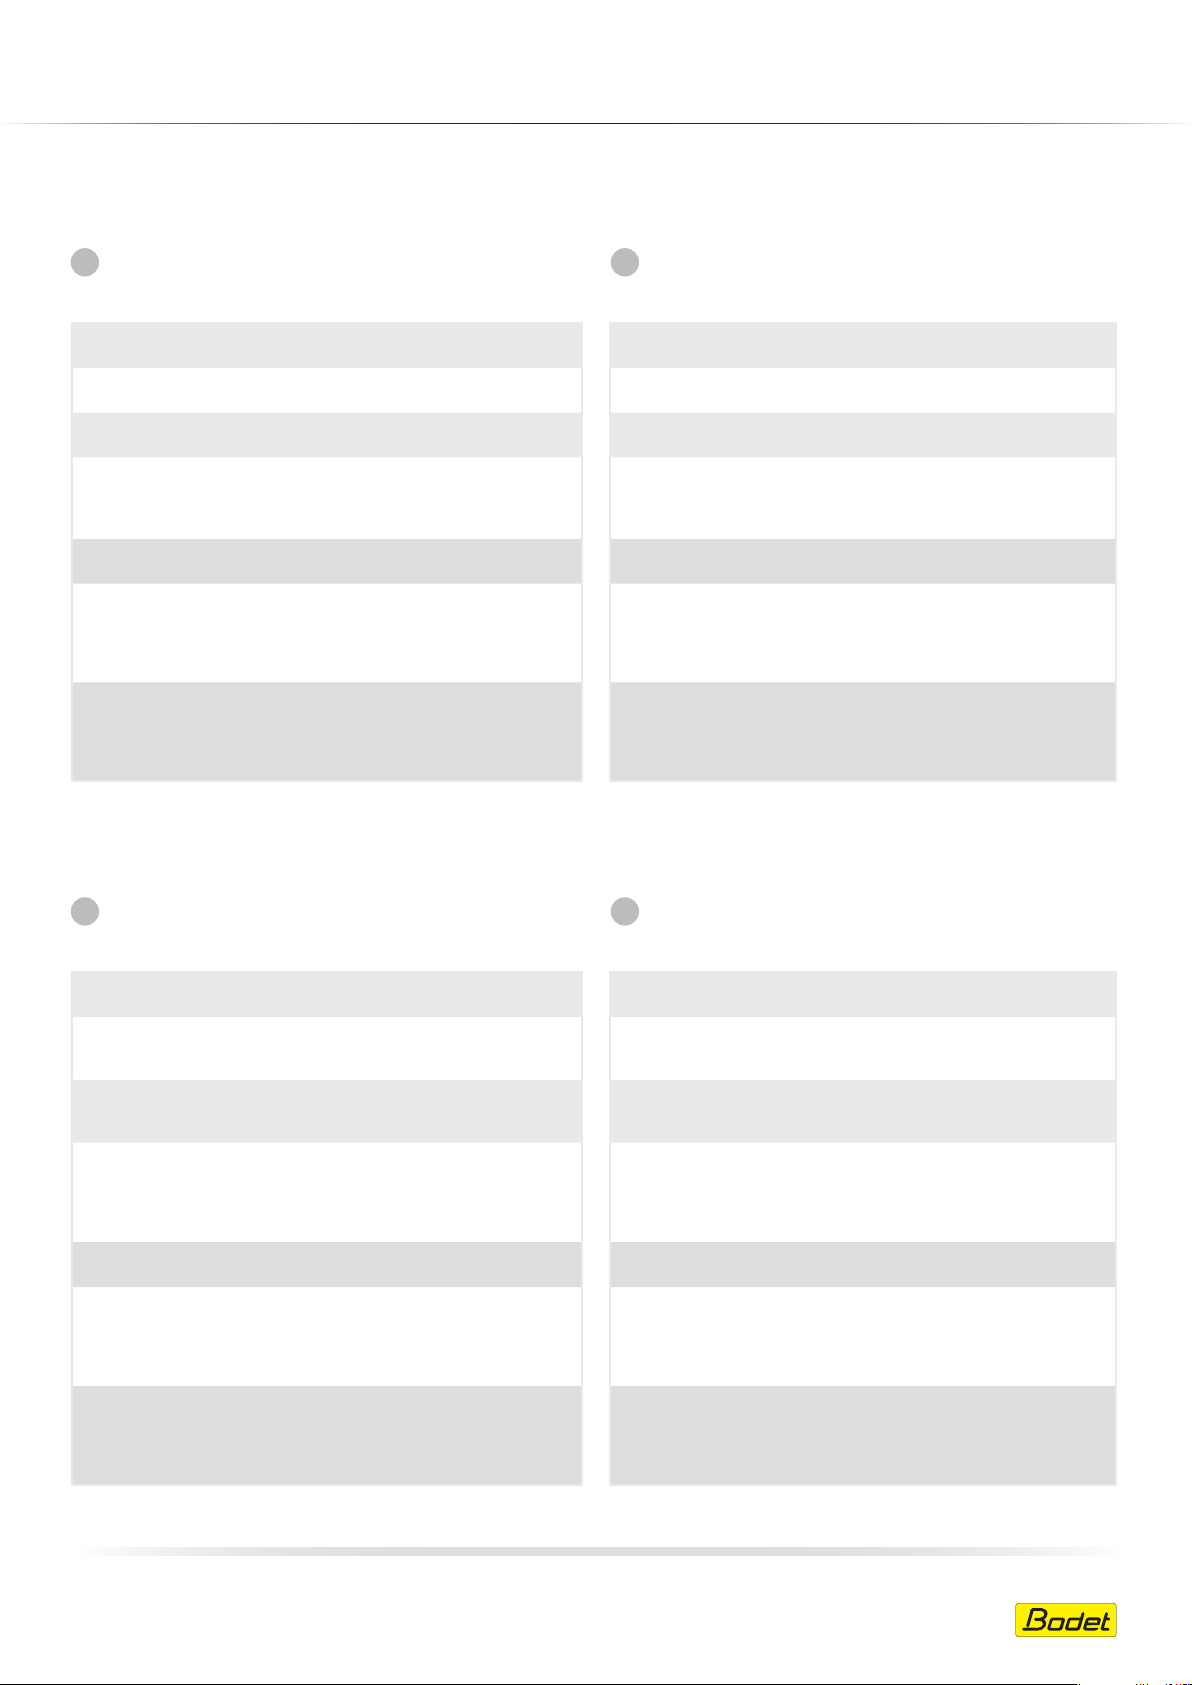
8 When applying the power the colon must be lit steadily.
Time setting: Mise à l’heure :
8
A la mise sous tension, les deux points fixes doivent être allumés.
AFNOR
RADIO
NTP/ETH
NTP/Wi-Fi
DHF
IMPULSE
INDEPENDENT
Refer to the last page for the time setting procedure. Se reporter au dos pour la procédure de réglage de la mise à l’heure.
DE: ES:
8 Beim Einschalten müssen die zwei festen Punkte leuchten.
When connected to the AFNOR network the clock
displays the time broadcasted by the master clock
The time display is automatic, the reception of the
radio signal may take a few minutes.
Download the software application Bodet Detect to
set the clock parameters on www.bodet-time.com
Download the software application Bodet Detect
for PC or Bodet Detect Mobile for smartphone on
www.bodet-time.com Refer to the Bodet Detect
manuals to set the clock parameters
Set the master clock to INIT mode. (Consult the
mother clock’s user manual)
To adjust the time of the clock refer to the menu
detailed below.
See the full manual for the time setting of a network
of clocks synchronised by impulses.
To adjust the time of the clock refer to the menu
detailed below.
The default time zone is Paris (see user manual for
the configuration of other time zones).
AFNOR
RADIO
NTP/ETH
NTP/Wi-Fi
DHF
IMPULSION
INDEPENDANTE
8
Al encendido , los dos puntos fijos deben estar encendidos.
Au raccordement sur le réseau AFNOR, l’horloge
affiche l’heure diffusée par l’horloge mère.
L’affichage de l’heure est automatique, la réception
du signal radio peut prendre plusieurs minutes.
Télécharger le logiciel Bodet Detect pour la
configuration de l’horloge sur www.bodet-time.com
Télécharger le logiciel Bodet Detect pour PC ou
Bodet Detect Mobile pour smartphone sur www.
bodet-time.com. Voir les manuels de Bodet Detect
pour la configuration de l’horloge
Mettre l’Horloge mère en mode INIT. (se reporter à la
notice de l’horloge mère).
Pour régler l’heure de l’horloge se reporter au menu
détaillé ci-dessous.
Se reporter à la notice complète pour mettre à
l’heure un parc d’horloges synchronisées par
impulsions.
Pour régler l’heure de l’horloge se reporter au menu
détaillé ci-dessous.
Le fuseau horaire par défaut est Paris (se reporter à la
notice complète pour la configuration d’un autre
fuseau).
Zeiteinstellung: Puesta en hora:
AFNOR
RADIO
NTP/ETH
NTP/Wi-Fi
DHF
24V
Minutenimpuls
Autonome
Quarzuhr
Näheres zur Uhrzeiteinstellung finden Sie auf folgenden Seite. Consulte la página siguiente para ajustar la hora.
Beim Anschluss an die AFNOR Linie zeigt die Uhr
die von der Hauptuhr ausgesandten Zeit an.
Die Zeitanzeige ist automatisch, der Empfang des
Funksignals kann einige Minuten dauern.
Ist dies nicht der Fall, herunterladen Sie das Software
„Bodet Detect“ (auf der Website www.bodet-time.
com“ zu finden), um die Uhr einzustellen.
Ist dies nicht der Fall, herunterladen Sie das Software
„Bodet Detect“ oder „Bodet Detect Mobile“ (auf der
Website www.bodet-time.com“ zu finden). Lesen
Sie in den Handbüchern von Bodet Detect nach, um
die Uhrenparameter einzustellen.
Stellen Sie die Hauptuhr in den INIT-Modus ein.
(lesen Sie die Anleitung der Hauptuhr).
Um die Uhrzeit einer Uhr einzustellen, siehe das
folgende Detailmenü.
Um die Uhrzeit von einem über Impulse
synchronisierten Netzwerk aus Uhren einzustellen,
siehe das vollständige Handbuch.
Um die Uhrzeit einer Uhr einzustellen, siehe das
folgende Detailmenü.
Werksmäßig eingestellte Zeitzone ist Paris (vgl.
komplette Anleitung zur Einstellung einer anderen
Zeitzone).
AFNOR
RADIO
NTP/ETH
NTP/Wi-Fi
DHF
IMPULSION
INDEPENDANTE
Cuando se conecta a la red AFNOR el reloj muestra
la hora emitida por el reloj patrón.
La visualización de la hora es automática, la
recepción de la señal de radio puede tardar unos
minutos.
Descargar la aplicación informática Bodet Detect
para la configuración del reloj en www.bodet-time.
com
Descargar las aplicaciones informáticas Bodet
Detect para PC o Bodet Detect Mobile para teléfono
móvil en www.bodet-time.com. Ver los manuales
de Bodet Detect para la configuración del reloj
Poner el reloj patrón en modo INIT. (remítase a las
instrucciones del reloj patrón).
Para ajustar la hora remitirse al menú detallado más
abajo.
Remitirse al manual completo para poner en hora un
parque de relojes sincronizados por impulsos.
Para ajustar la hora remitirse al menú detallado más
abajo.
El huso horario por defecto es Paris (ver el manual
del usuario para la configuración de otro uso horario).
Download full manual - Téléchargez la notice complète - Komplettes Handbuch - Manual completo:
>> www.bodet-time.support <<
Ref.: 608107D 06/19
3/4
Page 4
S
+
STYLE 10
INDOOR DIGITAL CLOCKS - HORLOGES DIGITALES INTERIEURES
DIGITALE INNENUHREN
-
RELOJES DIGITALES DE INTERIOR
quick start guide - GUIDE DE DEMARRAGE RAPIDE - Schnellstartanleitung - Guía de inicio rápido
9
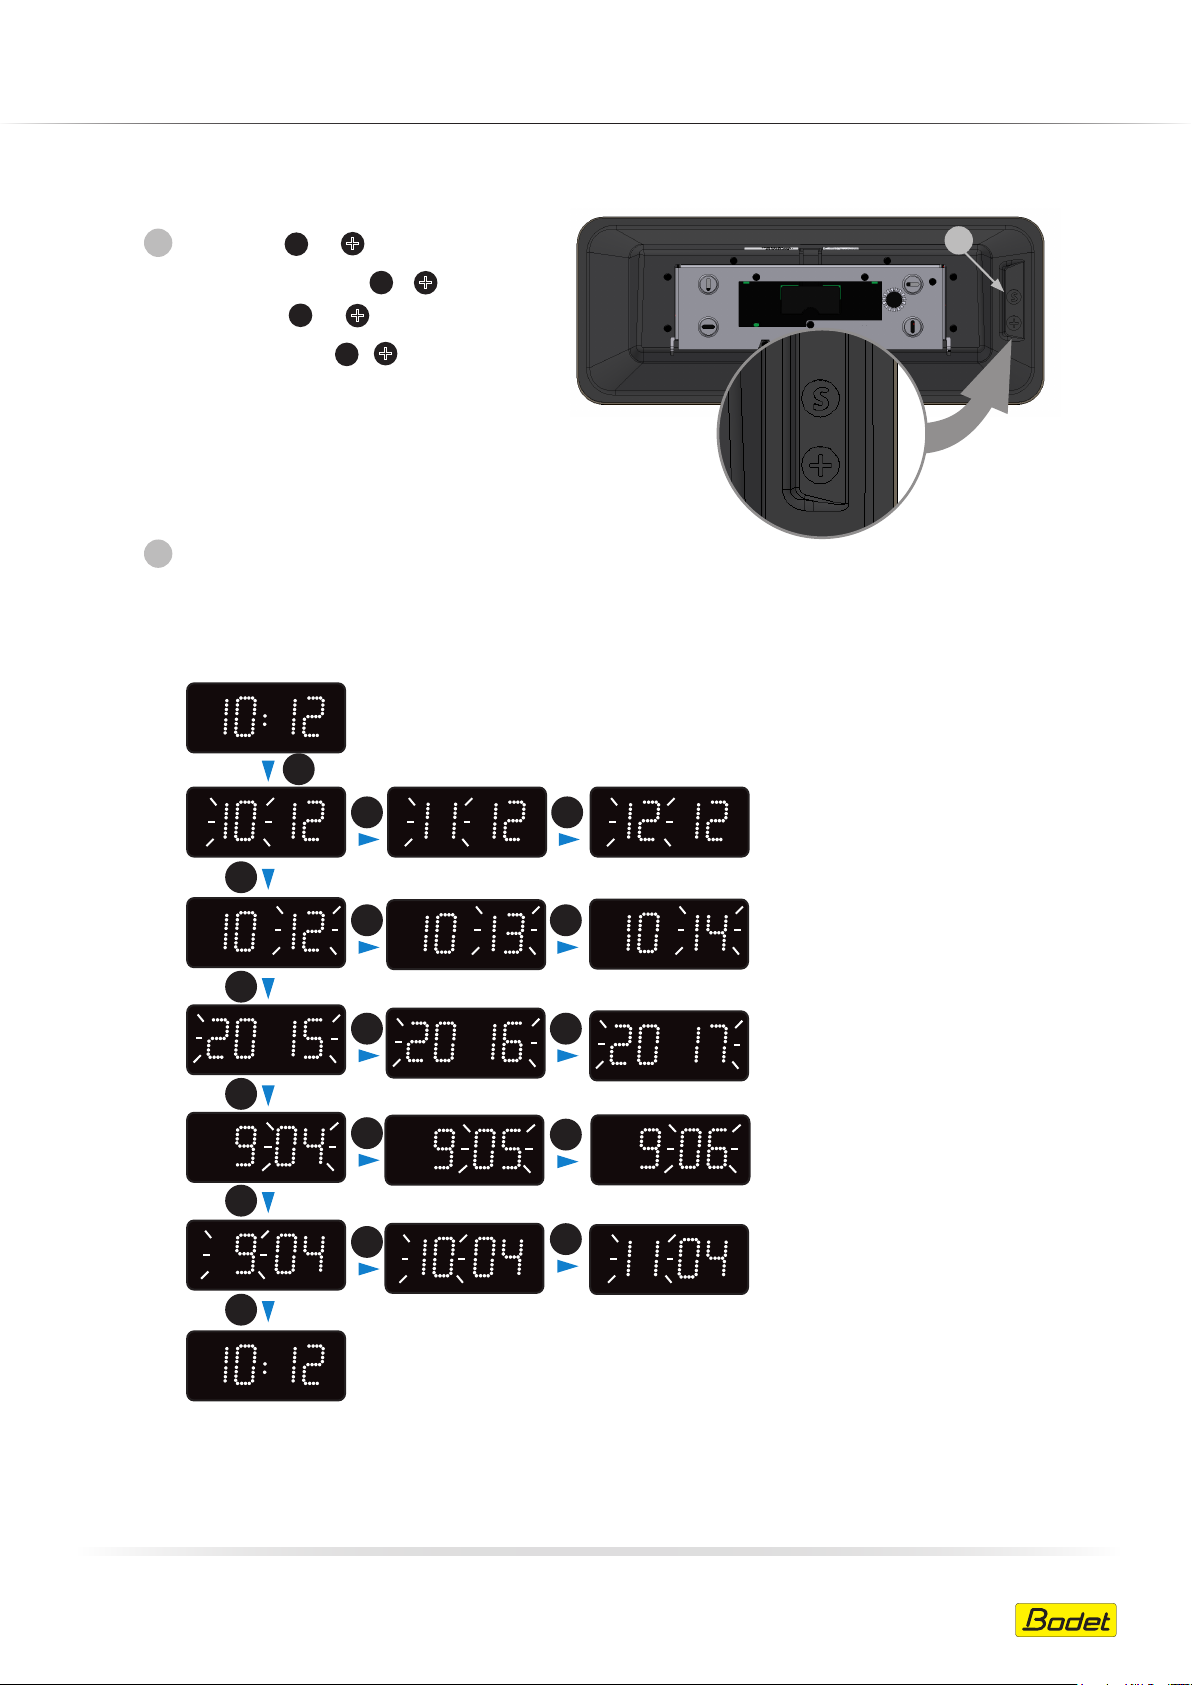
Location of the S and + keys:
L’emplacement des touches S et + :
Lage der Tasten S und +:
Ubicación de las teclas S y +:
10
Setting time/date/year:
Réglage Heure/Date/Année :
Einstellung von Uhrzeit/Datum/Jahr:
Ajuste de la hora, fecha y año:
Hold down for 3 seconds
Maintenir l’appui pendant 3 secondes
3 Sekunden lang gedrückt halten
Mantener pulsado durante 3 segundos
S
+
+
Set hour
Réglage de l’heure
Einstellung der Uhrzeit
Ajuste de la hora
9
S
+
S
Set minutes
+
+
Réglage des minutes
Einstellung der Minuten
Ajuste de los minutos
S
+
+
Set year
Réglage de l’année
Einstellung der Jahres
Ajuste del año
S
+
+
Set month
Réglage du mois
Einstellung der Monats
Ajuste del mes
S
Set day
Réglage du jour
Einstellung der Tages
Ajuste del día
S
+
End of menu
Fin du menu
Ende des Menüs
Fin del menú
+
Download full manual - Téléchargez la notice complète - Komplettes Handbuch - Manual completo:
>> www.bodet-time.support <<
Ref.: 608107D 06/19
4/4
 Loading...