

Page 1

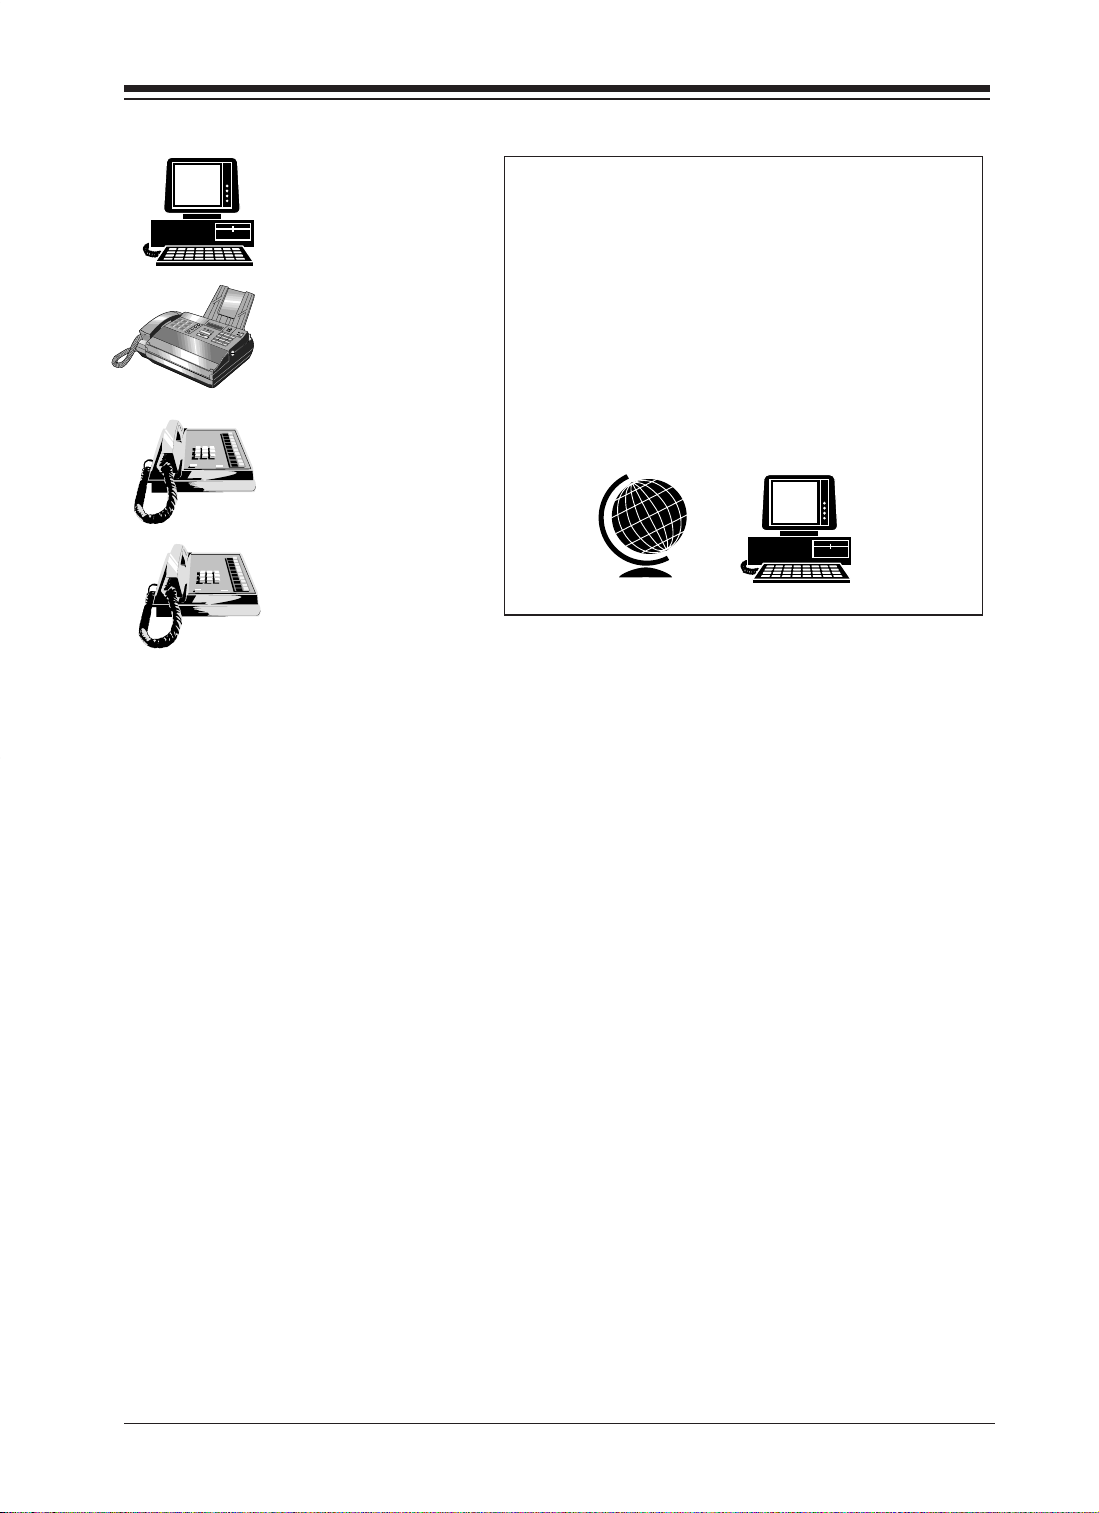
I/O Adapter
Turbo Series
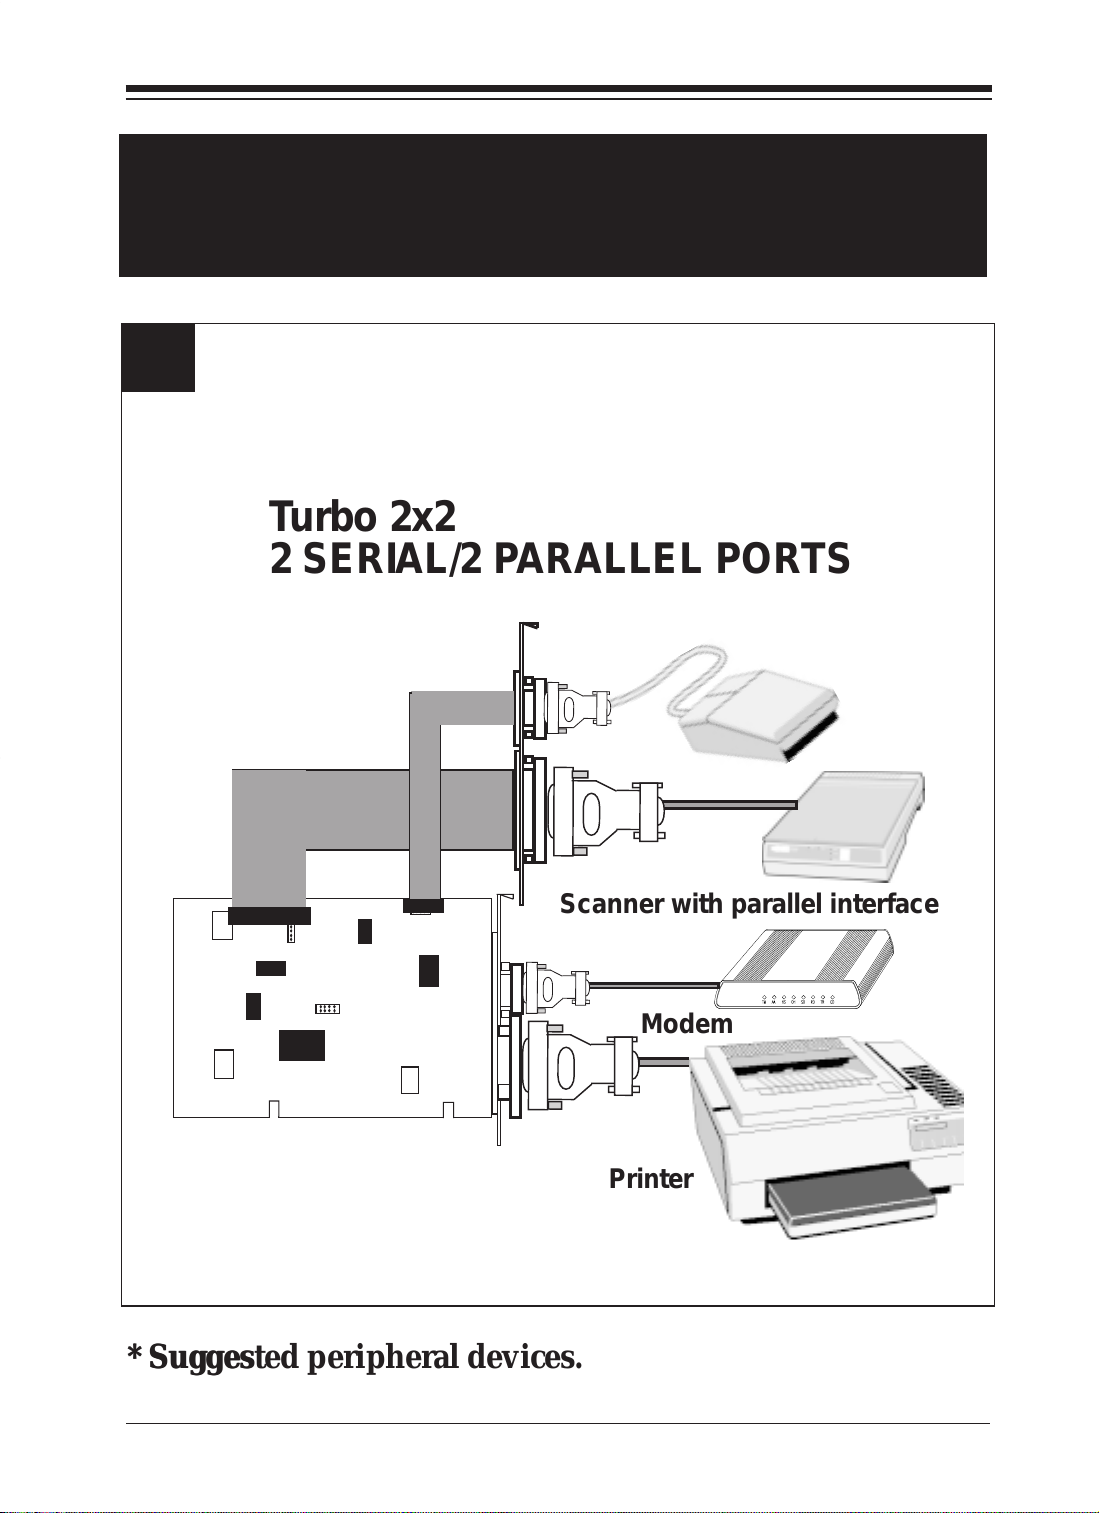
Turbo 2x2
Plug and Play!
2 High-Speed Serial Ports and 2 Parallel Ports
Turbo 1x1
1 High-Speed Serial Port and 1 Parallel Port
Page 2

2
IO T urbo Series
Page 3

33
3
33
BefBef
Bef
BefBef
The product you have purchased is designed to be
easily installed into most IBM PC or compatible
systems. Many products have large, easy-to-read
legends to allow for the easy configuring of the
product. This installation manual contains detailed
instructions. Most included software has automatic installation
programs to place the software correctly onto your computer.
However, as all computers ar e configured differently, you may be
required to perform some basic Windows tasks. If you are not familiar
with basic Windows operations, you should check your manual, or
seek assistance from you local computer dealer to install the product.
HoHo
Ho
HoHo
oror
e e
YY
or
oror
w to get w to get
w to get
w to get w to get
ou Begou Beg
e
Y
ou Beg
e e
YY
ou Begou Beg
in yin y
in y
in yin y
TT
echnical echnical
T
echnical
TT
echnical echnical
our Installaour Installa
our Installa
our Installaour Installa
AssistanceAssistance
Assistance
AssistanceAssistance
tiontion
tion
tiontion
The dealer that you purchased this product or your computer from is
the first place you should go for technical assistance. The dealer is
usually the most qualified source of help, and
is most familiar with your system and how
this product should be installed. Many dealers
have customer service and technical support
programs, with varying levels of support
offered, depending on your needs and computer knowledge.
contact the dealer first whenever a prcontact the dealer first whenever a pr
contact the dealer first whenever a pr
contact the dealer first whenever a prcontact the dealer first whenever a pr
If yIf y
our Dealer Can’our Dealer Can’
If y
our Dealer Can’
If yIf y
our Dealer Can’our Dealer Can’
If you can’t get assistance from your dealer, the manufacturer provides
varying levels of technical assistance as summarized on the following
page.
t t
Assist yAssist y
t
Assist y
t t
Assist yAssist y
oblem occurs.oblem occurs.
oblem occurs.
oblem occurs.oblem occurs.
ouou
ou
ouou
PleasePlease
Please
PleasePlease
Page 4
4
Boca BBSBoca BBS
Boca BBS
Boca BBSBoca BBS
561-241-1601561-241-1601
561-241-1601
561-241-1601561-241-1601
On-Line SupporOn-Line Suppor
On-Line Suppor
On-Line SupporOn-Line Suppor
CompuServeCompuServe
CompuServe
CompuServeCompuServe
: GO BOCA: GO BOCA
: GO BOCA
: GO BOCA: GO BOCA
t!t!
t!
t!t!
InternetInternet
Internet
InternetInternet
Automated Automated
Automated
1
2
4
3
5
7
6
8
9
Automated Automated
Retrieval SystemRetrieval System
Retrieval System
Retrieval SystemRetrieval System
561-995-9456561-995-9456
561-995-9456
561-995-9456561-995-9456
Standard FrStandard Fr
Standard Fr
Standard FrStandard Fr
TT
echnical Supportechnical Support
T
echnical Support
TT
echnical Supportechnical Support
561-241-8088561-241-8088
561-241-8088
561-241-8088561-241-8088
Priority ServicePriority Service
Priority Service
Priority ServicePriority Service
900-555-4900900-555-4900
900-555-4900
900-555-4900900-555-4900
FaxFax
Fax
FaxFax
eeee
ee
eeee
email:email:
email:
email:email:
support@bocaresearch.comsupport@bocaresearch.com
support@bocaresearch.com
support@bocaresearch.comsupport@bocaresearch.com
on the Won the W
on the W
on the Won the W
http://wwwhttp://www
http://www
http://wwwhttp://www
::
:
::
orld-wide WEB:orld-wide WEB:
orld-wide WEB:
orld-wide WEB:orld-wide WEB:
.bocaresearch.com.bocaresearch.com
.bocaresearch.com
.bocaresearch.com.bocaresearch.com
The Standard Free Technical Support number is for quick answers to
specific inquiries on product features and technical questions (call
241-8088241-8088
241-8088; M-F, 8 am to 6:30 pm EST). Direct access to technical support
241-8088241-8088
561-561-
561-
561-561-
representatives is provided on a limited basis. If you require immediate
attention or in-depth help with the installation of the product, please call
our 900-priority support number for service. This number gives you
immediate access to senior-level technicians. The number is
900-555-4900 900-555-4900
900-555-4900.
900-555-4900 900-555-4900
You will be charged $2.00 per minute. The charges will appear on your
next phone bill.
Damaged or Missing ItemsDamaged or Missing Items
Damaged or Missing Items
Damaged or Missing ItemsDamaged or Missing Items
We use many world-class quality assurance programs to ensure the
product you purchased is of the highest caliber. Sometimes, however, a
component may be missing from the box, or is damaged or corrupt in
some way. If this happens, immediately return the entire package to your
place of purchase so you may exchange it for a new one. Your dealer
should be able to provide you with an exchange far more quickly than by
contacting us directly. If for some reason you are unable to return the
product directly to its place of purchase, refer to the “Servicing Your
Product” and “Warranty” sections in this manual for instructions.
IO T urbo Series
Page 5

CONTENTS
55
5
55
Getting StartedGetting Started
Getting Started
Getting StartedGetting Started
EXPRESS InstallationEXPRESS Installation
EXPRESS Installation
EXPRESS InstallationEXPRESS Installation
Section One: IntroductionSection One: Introduction
Section One: Introduction
Section One: IntroductionSection One: Introduction
Section Two: Physical InstallationSection Two: Physical Installation
Section Two: Physical Installation
Section Two: Physical InstallationSection Two: Physical Installation
Section Three: Windows 98/95 ConfigurationSection Three: Windows 98/95 Configuration
Section Three: Windows 98/95 Configuration
Section Three: Windows 98/95 ConfigurationSection Three: Windows 98/95 Configuration
Section Four: Section Four:
Section Four:
Section Four: Section Four:
Appendix A: TroubleshootingAppendix A: Troubleshooting
Appendix A: Troubleshooting
Appendix A: TroubleshootingAppendix A: Troubleshooting
Appendix B: Windows NT ConfigurationAppendix B: Windows NT Configuration
Appendix B: Windows NT Configuration
Appendix B: Windows NT ConfigurationAppendix B: Windows NT Configuration
........................................................................................................................
............................................................
........................................................................................................................
................................................................................................
................................................
................................................................................................
..................................................................................
.........................................
..................................................................................
....................................................
..........................
....................................................
Windows 3.x/DOS ConfigurationWindows 3.x/DOS Configuration
Windows 3.x/DOS Configuration
Windows 3.x/DOS ConfigurationWindows 3.x/DOS Configuration
..................................................................
.................................
..................................................................
........................
............
........................
..........
.....
..........
................
........
................
6 6
6
6 6
8 8
8
8 8
1212
12
1212
1515
15
1515
1919
19
1919
2525
25
2525
2828
28
2828
3131
31
3131
Appendix C: Pin AssignmentsAppendix C: Pin Assignments
Appendix C: Pin Assignments
Appendix C: Pin AssignmentsAppendix C: Pin Assignments
Appendix D: Servicing Your Boca ProductAppendix D: Servicing Your Boca Product
Appendix D: Servicing Your Boca Product
Appendix D: Servicing Your Boca ProductAppendix D: Servicing Your Boca Product
FCC ComplianceFCC Compliance
FCC Compliance
FCC ComplianceFCC Compliance
WarrantyWarranty
Warranty
WarrantyWarranty
..............................................................................................................................................
.......................................................................
..............................................................................................................................................
..................................................................................................................
.........................................................
..................................................................................................................
..................................................................
.................................
..................................................................
......................
...........
......................
3333
33
3333
3535
35
3535
3838
38
3838
3939
39
3939
Page 6
6
5
5
5
5
5
5
5
5
5
5
5
5
5
5
5
5
5
5
5
5
5
5
5
5
5
5
5
5
Getting StartedGetting Started
Getting Started
Getting StartedGetting Started
Congratulations on the purchase of your Plug-and-Play
compatible IO Turbo Series from Boca, a leader in high-tech
computer enhancement products. The streamlined
EXPRESS
Install provided on pages 8-11 is intended for
more knowledgeable and experienced users.
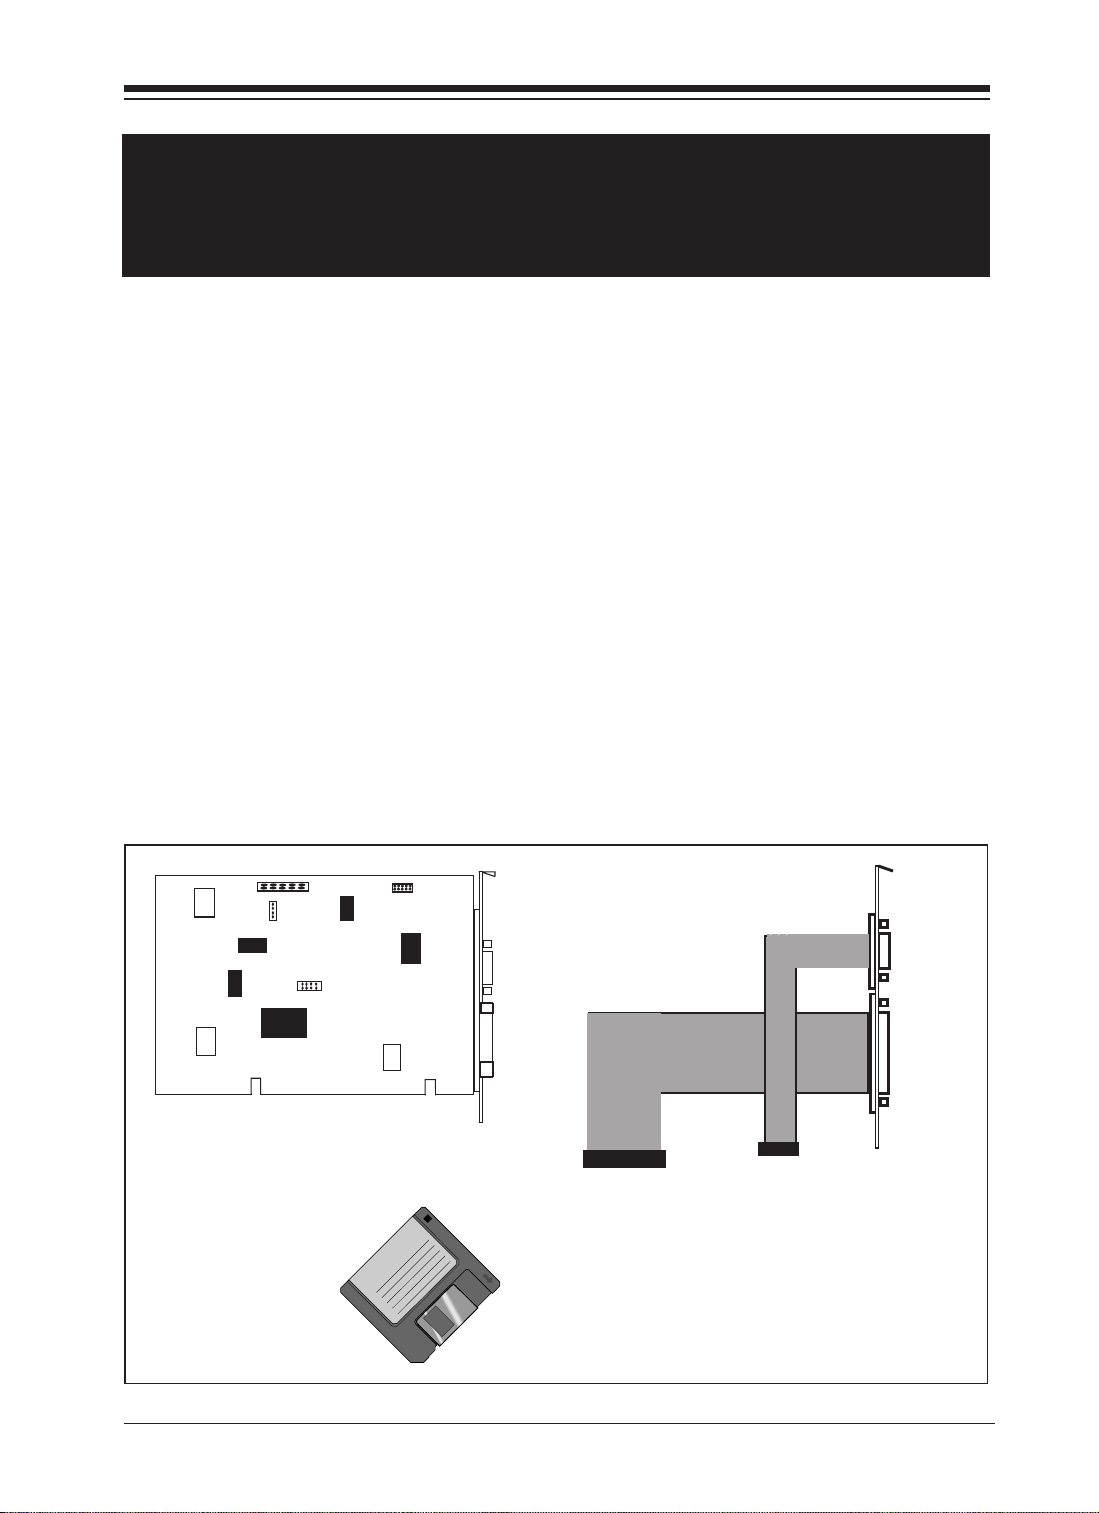
Packag e Contents
Your package contents will vary based on the I/O board
model you have purchased. If any items are missing or
appear damaged, contact your dealer for assistance. Make
sure you have received the following items as shown
following.
234
234
234
234
234
234
234
234
234
234
234
234
234
234
234
234
234
234
234
234
234
234
234
234
234
234
234
Turbo 2x2:
234
2 SERIAL/2 PARALLEL
CABLE/BRACKET
PORTS
ASSEMBLY
IO T urbo Series
DRIVER DISKETTE
Page 7
DRIVER DISKETTE
Turbo 1x1 (1 SERIAL/1 PARALLEL PORT)
77
7
77
IMPORIMPOR
IMPOR
IMPORIMPOR
• Take a few minutes now and read this manual before installing your
IO Turbo Series adapter. Doing so may prevent difficulties later. Our
customer support experience has shown that many costly and timeconsuming calls to our technical support staff can be avoided with
closer attention to the information provided here.
• Because of differences in Plug and Play systems, and the resources
available in your computer, you may find it necessary to change the
resources assigned to the Boca I/O adapter . Your computer has 16
IRQs available, IRQ 0 through IRQ 15. Each of the high speed serial
ports on the Boca I/O adapter requires an IRQ and the parallel ports
will also each need one if you need to support bi-directional mode. If
you have other devices installed in your computer, you may need to
manually redistribute the resources among the devices. See
suggestions for changing the resources assigned to your new I/O
adapter on page 23.
TT
ANTANT
T
ANT
TT
ANTANT
::
: Before starting note the following:
::
WW
indows 98/95 Users:indows 98/95 Users:
•
W
indows 98/95 Users: Check your system’s IRQs and their assigned
WW
indows 98/95 Users:indows 98/95 Users:
devices. Do this by double-clicking on
Device Manager list, then select the Properties button. This will
display IRQs and their assigned devices. Make a note of how many
IRQs are missing. This is the number of new ports your system can
support. If the adapter has more ports than available IRQs, you will
have to disable these excess ports as suggested on p. 23.
“Computer”“Computer”
“Computer” at the top of the
“Computer”“Computer”
EXPRESSEXPRESS
EXPRESS
EXPRESSEXPRESS
Install Install
Install
Install Install
Page 8
8
EXPRESSEXPRESS
EXPRESS
EXPRESSEXPRESS
11
1
11
WITH POWER OFF, remove
your system cover and
install card in a 16-bit slot.
è
Install Install
Install
Install Install
22
2
22
IO T urbo Series
è
Attach cable/bracket
assembly to Serial B and
Parallel B connectors on
the IO board.
parallel version only)
After removing screw and
adjacent rear slot cover,
secure the bracket using
the screw you just
removed.
(*2 serial/2
Page 9
99
4
4
4
4
4
4
4
4
4
4
4
4
4
4
4
4
4
4
4
4
4
4
4
4
4
4
4
4
9
99
EXPRESSEXPRESS
EXPRESS
EXPRESSEXPRESS
3a3a
3a
3a3a
Connect peripheral devices. Those depicted here
are suggested samples. When done, close your
system cover and power your computer on.
Turbo 2x2
2 SERIAL/2 PARALLEL PORTS
23
23
23
23
23
23
23
23
23
23
23
23
23
23
23
23
23
23
23
23
23
23
23
23
23
23
23
23
Install Install
Install
Install Install
Serial mouse
*
Scanner with parallel interface
Modem
Printer
* Suggested peripheral devices.* Suggested peripheral devices.
* Suggested peripheral devices.
* Suggested peripheral devices.* Suggested peripheral devices.
EXPRESSEXPRESS
EXPRESS
EXPRESSEXPRESS
Install Install
Install
Install Install
Page 10
10
EXPRESSEXPRESS
EXPRESS
EXPRESSEXPRESS
3b3b
3b
3b3b
Connect peripheral devices. Those depicted here
are suggested samples. When done, close your
system cover and power your computer on.
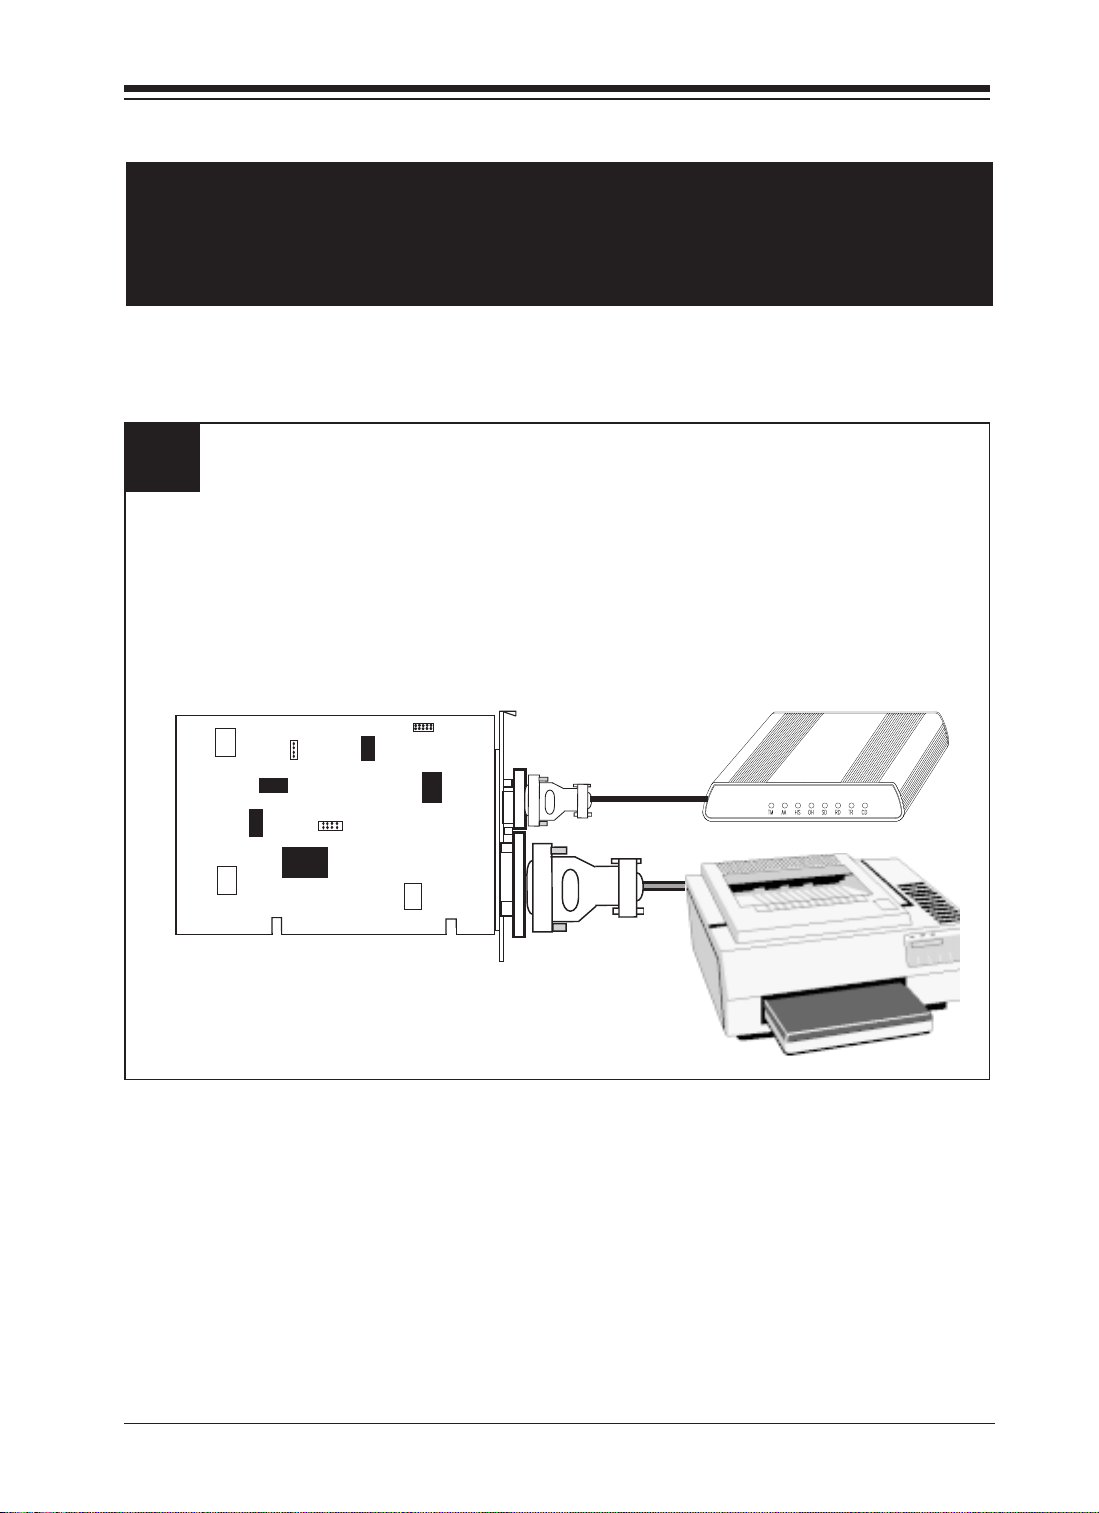
Turbo 1x1
1 SERIAL/1 PARALLEL PORT
Install Install
Install
Install Install
*
Modem
* Suggested peripheral devices.* Suggested peripheral devices.
* Suggested peripheral devices.
* Suggested peripheral devices.* Suggested peripheral devices.
IO T urbo Series
Printer
Page 11

1111
11
1111
EXPRESSEXPRESS
EXPRESS
EXPRESSEXPRESS
44
4
44
The IO adapter will be recognized at
power-up. You will need to perform
some basic Windows install tasks.
See Section Three for details if you
require more information.
If you are installing the adapter on
Windows NT, refer to Appendix B.
Install Install
Install
Install Install
• For additional details on physical installation,• For additional details on physical installation,
• For additional details on physical installation,
• For additional details on physical installation,• For additional details on physical installation,
see Section Tsee Section T
see Section T
see Section Tsee Section T
• For assistance, if you encounter dif• For assistance, if you encounter dif
• For assistance, if you encounter dif
• For assistance, if you encounter dif• For assistance, if you encounter dif
Appendix A.Appendix A.
Appendix A.
Appendix A.Appendix A.
wo.wo.
wo.
wo.wo.
ficulties, seeficulties, see
ficulties, see
ficulties, seeficulties, see
EXPRESSEXPRESS
EXPRESS
EXPRESSEXPRESS
Install Install
Install
Install Install
Page 12

12
Section One: Introduction
You have purchased the IO Turbo Series by Boca for the IBM
and compatible family of personal computers. Compatible
with ISA systems, the IO Turbo Series comes in two varieties:
TT
urbo 2x2urbo 2x2
•
T
urbo 2x2: two 9-pin male serial port connectors and two
TT
urbo 2x2urbo 2x2
25-pin female parallel port connectors
TT
urbo 1x1urbo 1x1
•
T
urbo 1x1: one 9-pin male serial port connector and one
TT
urbo 1x1urbo 1x1
25-pin female parallel port connector.
The board features a convenient compact size and requires a
16-bit slot. Drivers for configuration and high performance
settings are included on diskette (Windows 98, 95, DOS
only).
The ISA-bus Plug-and-Play interface features:
•TI Plug-and-Play Controller TL16PNP200
• IRQ 3, 4, 5, 6, 7, 9, 10, 11, 12, 14, 15
• DMA channel 0, 1, 3, 5, 6
The IO Turbo Series also features high-speed buffer 16C650
UART technology. Its 32-byte FIFO buffers can send and
receive data with thr oughput speeds up to a maximum of
460Kbps to increase data throughput between the host PC
and its serial devices. Modem control signals are also
provided. Its parallel port interface comes with:
IO T urbo Series
Page 13

• Two Startech SPP/ECP/EPP/parallel ports
• Bi-directional port capability
• 16-byte FIFO for ECP modes
• 8-bit DMA channel
A Note on Parallel Por t Settings
Parallel port settings are defined as follows:
1313
13
1313
Output OnlyOutput Only
Output Only
Output OnlyOutput Only
standard uni-directional I/O only port for use with a printer.
SPP (standard)SPP (standard)
SPP (standard). This setting defines the parallel port as a
SPP (standard)SPP (standard)
standard bi-dir ectional port for use with a printer.
EPP (enhanced parallel port)EPP (enhanced parallel port)
EPP (enhanced parallel port). This setting defines the
EPP (enhanced parallel port)EPP (enhanced parallel port)
parallel port as an 8-bit bi-directional port for use with har d
drives, tape backup systems, and other 8-bit bi-directional
devices.
ECP (extended capabilities port)ECP (extended capabilities port)
ECP (extended capabilities port). This settings defines the
ECP (extended capabilities port)ECP (extended capabilities port)
parallel port as a high-performance 8-bit bi-directional port
for use with hard drives, tape backup systems, high-
. .
. This setting defines the parallel port as a
. .
performance printers, and CD-ROM drives. This mode also
uses DMA to increase performance and reduce system
overhead.
Introduction
Page 14

14
6
6
6
EPP Mode allows up to eight devices to be daisy-chain
connected. See figure below.
EXTERNAL
23456789012345
23456789012345
23456789012345
HARD OR
ZIP DRIVE
SCANNER
Up to 8 devices may be daisy-chained in a
series
(only 4 devices shown)
CD-ROM
DRIVE
PRINTER
IO T urbo Series
Page 15

1515
15
1515
Section Two: Physical Installation
The IO Turbo Series adapter is simple and quick to install—
even for the novice computer user. Take a few moments to
read over the directions before you begin.
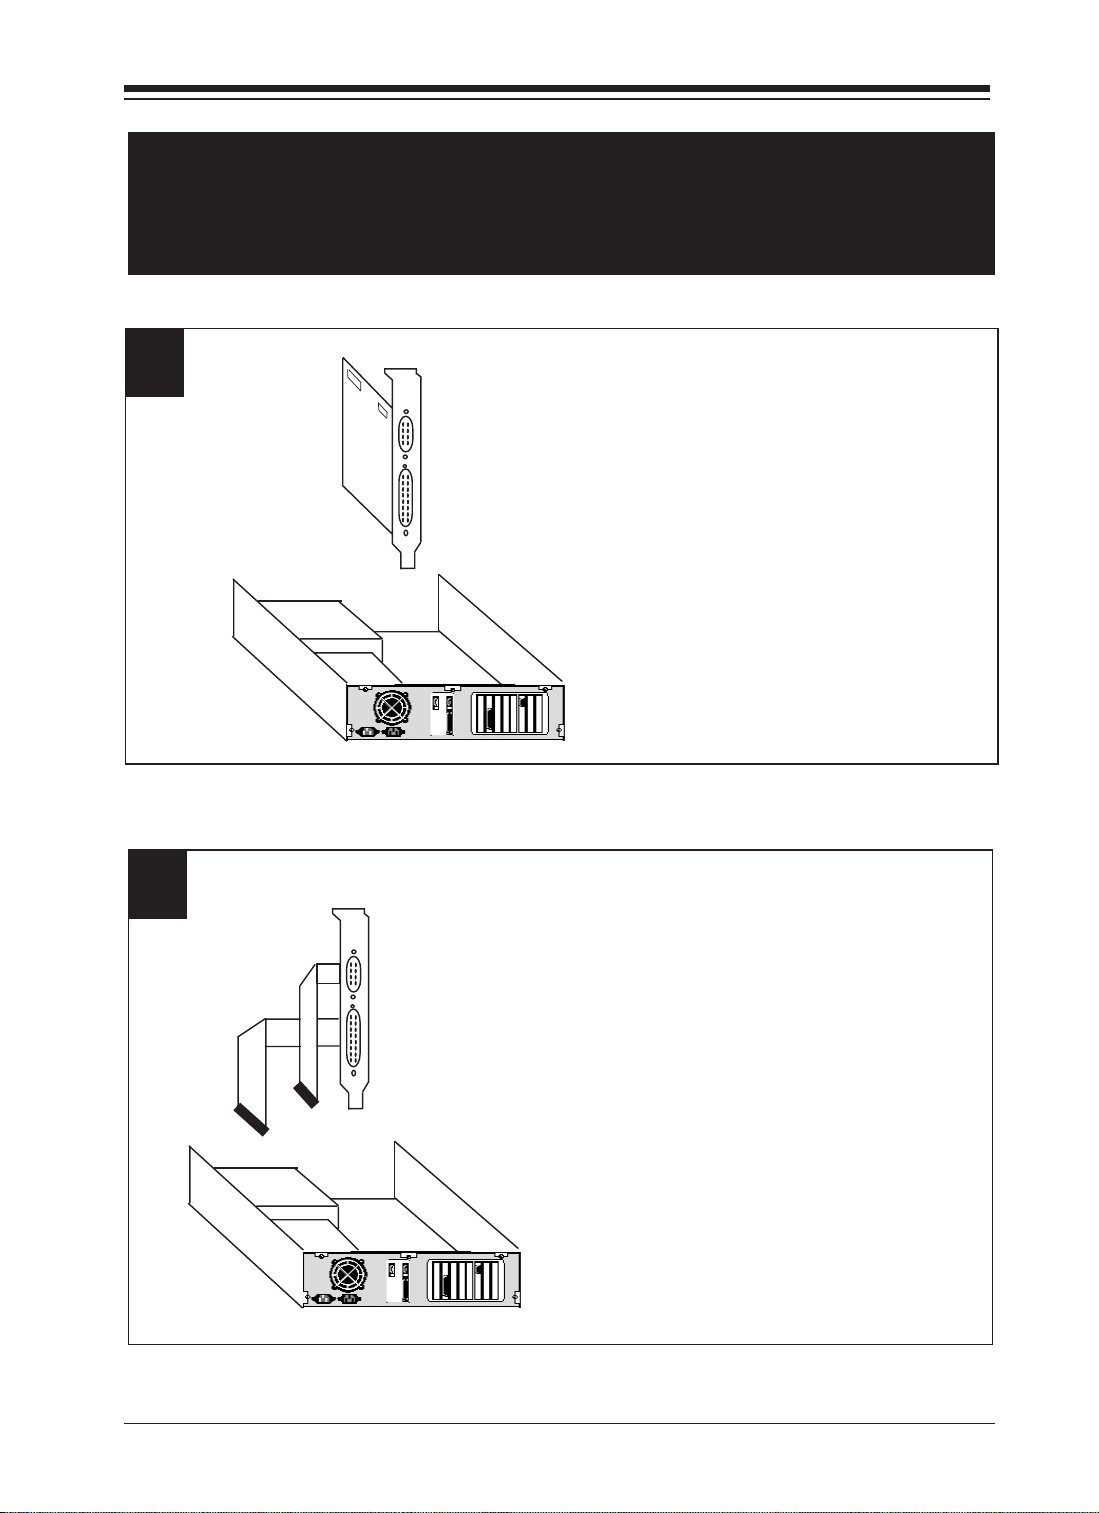
1. Remove your system cover, remembering to power down
your system first. You may find it necessary to remove other
adapter boards or detach cables. If so, make note of where
everything goes. Now, select an empty 16-bit expansion slot.
Choose either depending on convenience. Remove the
screw and the metal plate that covers the external access to
the slot you have selected.
Before
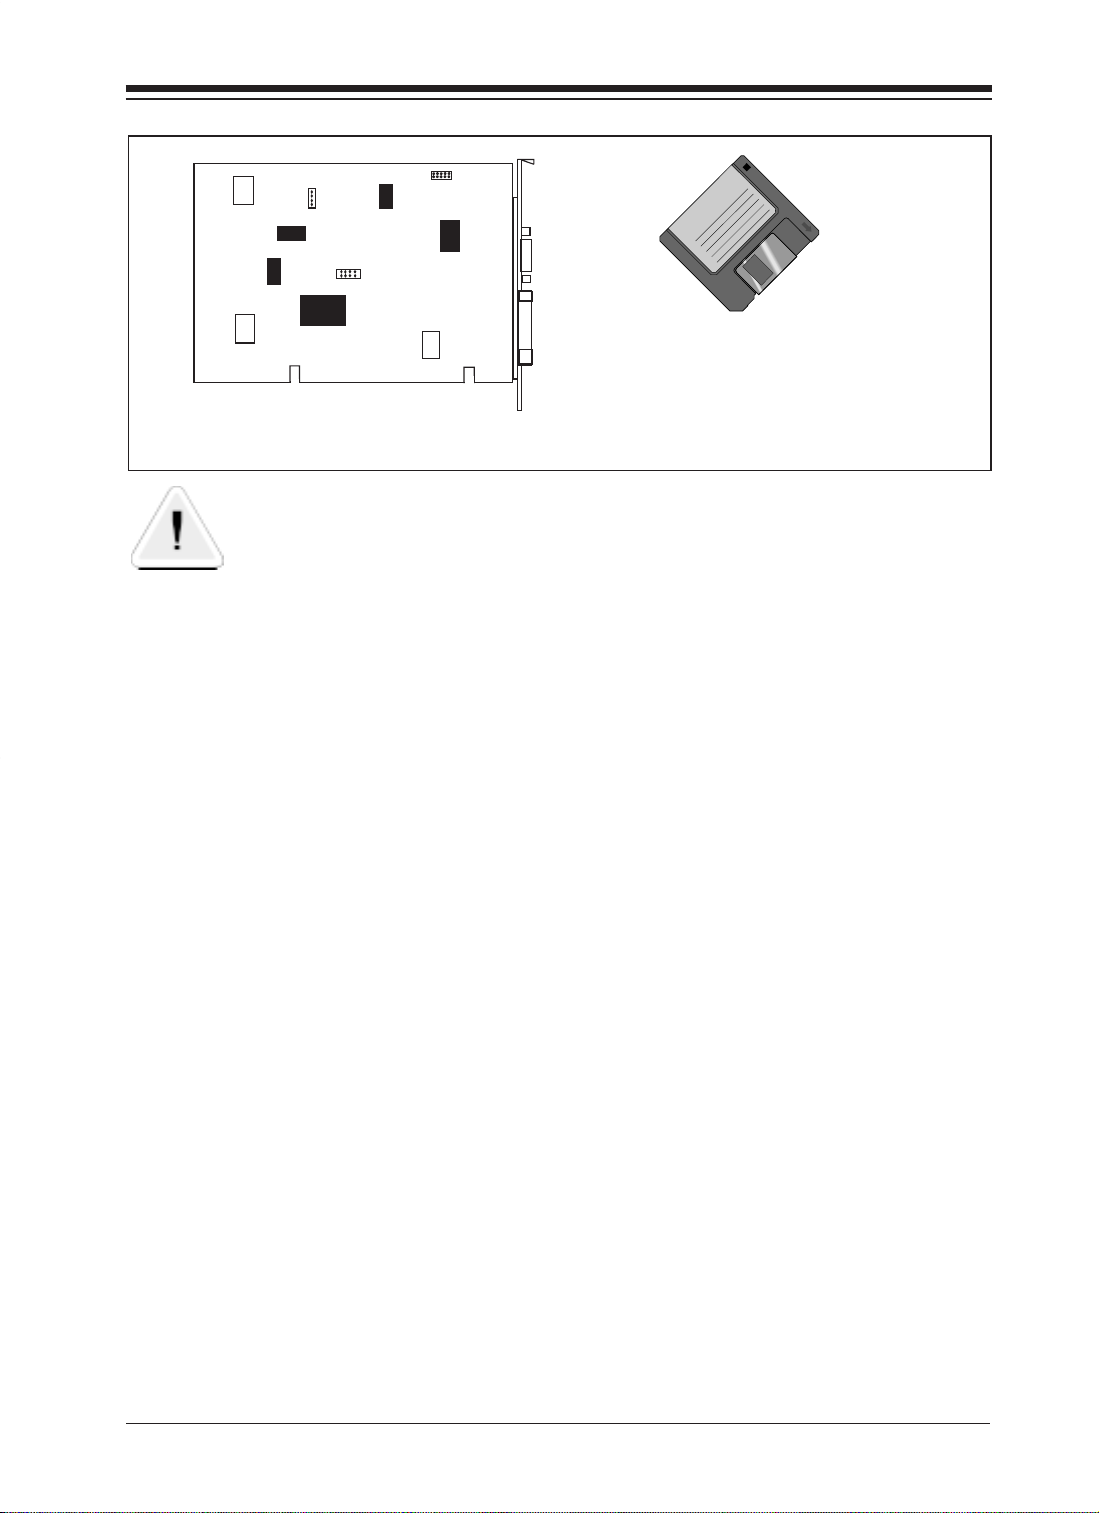
inserting the
card, check the
jumper
marked
J12J12
J12. Its
J12J12
or
default setting
softwaresoftware
is
software
softwaresoftware
selectselect
select.
selectselect
For WFor W
For W
For WFor W
or High-speed. Note that if you set the adapter to high-speed mode,
make sure Communication Port Settings (bits per second) are set to
one-fourth of the actual speed desired (e.g., 9600bps will yield
indows NT systemsindows NT systems
indows NT systems, the J12 jumper must be set to either Normal
indows NT systemsindows NT systems
Software
select
HighSpeed
Normal
38400bps).
the board is set to high-speed mode. For additional information on
Windows NT installation, refer to Appendix B in this manual.
Note: Note:
Note: a serial mouse will not work on the serial ports when
Note: Note:
Physical Installation
Page 16

16
2. Insert the board in the slot you
have selected so the edge
connector on the bottom rear of
the board mates with the socket
on the motherboard. Pr ess down
firmly on the board. Use the
removed scr ew to secur e the
board.
3. Replace any other adapter boards you may have removed
and re-attach any detached internal cables. If you have the
Turbo 2x2 version, continue with step 4. Otherwise, skip to
step 5.
4. Attach cable/bracket assembly to Serial B and Parallel B
connectors on the IO board, making sur e that the r ed stripe
plugs into pin number “1” on the board connector. After
removing scr ew and, for the Turbo 2x2, adjacent rear slot
cover, secure the bracket using the screw you just r emoved.
5. Replace the system cover taking care not to let it catch on
the disk drive or power cables. Once the cover is in place,
replace all the scr ews that you r emoved earlier. Reconnect
any previously r emoved external cables.
IO T urbo Series
Page 17

6. Attach the cable(s) for the
1234
1234
1234
1234
1234
1234
1234
1234
1234
1234
1234
1234
1234
1234
1234
1234
1234
1234
1234
1234
1234
1234
1234
1234
1234
1234
1234
1234
1234
device(s) you will be using to
the appropriate connector and
tighten them down with screws
attached to the end of the
1717
17
1717
cable(s). The illustration below
suggests several possible
configurations (e.g., mouse,
scanner, modem, and printer).
Physical installation is
complete.
Turbo 2x2 Suggested Configuration
è
Serial mouse
Scanner with parallel interface
Modem
Printer
Physical Installation
Page 18

18
Turbo 1x1 Suggested Configuration
Modem
Printer
The IO board will be r ecognized at power-up. You will need
to perform some basic Windows 95 install tasks. See Section
Three for details.
IO T urbo Series
Page 19

1919
19
1919
Section Three: Windows 98/95 Configuration
Before YBefore Y
Before Y
Before YBefore Y
option to allow your operating system to configure Plug and
Play devices, you should select this option. This will Allow
Windows 98/95 to configure the IO Adapter. (Note: on some
Award BIOS’s, this will be a setting called “Resources
Controlled By:”; select “Automatic”
Make sure the IO adapter has been installed in your
computer.
ou Begin:ou Begin:
ou Begin: If your computer’s BIOS includes an
ou Begin:ou Begin:
.
Windows 98 Users
Windows 98 presents a checklist of possible sources for the
driver. Simply check “diskette” and follow all-on-screen
directions to complete Windows 98 configuration. The
Wizard will detect a number of logical devices:
• ECP Printer Port A and B
• High-Speed Communications port A and B
• Boca I/O Adapter (this is the controller device for the card;
double-click to change ports, speed)
• Parallel Port Controller
• Serial Port Controller
Driver Installation
Page 20

20
Windows 95 Users
Depending on the version of W indows 95 you have, devices
are detected and installed in slightly dif fer ent ways. When
the adapter is physically installed, start Windows 95 as you
normally would.
prompt you for the path of your drivers. Tprompt you for the path of your drivers. T
prompt you for the path of your drivers. T
prompt you for the path of your drivers. Tprompt you for the path of your drivers. T
diskette drive path (e.g., A:\)diskette drive path (e.g., A:\)
diskette drive path (e.g., A:\)
diskette drive path (e.g., A:\)diskette drive path (e.g., A:\)
You will be prompted with either “The Update Device Driver
W izar d” or “The New Har dwar e Found Dialog Box”.
Continue as appropriate.
The Update Device Driver Wizard
• In this case, simply insert the driver diskette, click
then
correct drivers and install them. If it does not, it will ask for
the location of the driver.
FinishFinish
Finish. The Wizard will automatically locate the
FinishFinish
NOTE: Some versions of WNOTE: Some versions of W
NOTE: Some versions of W
NOTE: Some versions of WNOTE: Some versions of W
indows 95 mayindows 95 may
indows 95 may
indows 95 mayindows 95 may
ype in yourype in your
ype in your
ype in yourype in your
NextNext
Next,
NextNext
• Depending on the card you ar e installing, the Wizard will
detect a number of logical devices:
• ECP Printer Port A and B
• High-Speed Communications port A and B
• Boca I/O Adapter (this is the controller device for the
card; double-click to change ports, speed)
• Parallel Port Controller
• Serial Port Controller
• Continue as instructed to complete Windows 95
configuration and see page 22.
IO T urbo Series
Page 21

The New Hardware Found Dialog Box
New Hardware Found New Hardware Found
•
New Hardware Found dialog box. Here, you ar e asked
New Hardware Found New Hardware Found
what driver files are associated with the new har dwar e. Do
the following:
2121
21
2121
1. From the choices given, select
by hardware manufacturerby hardware manufacturer
by hardware manufacturer.
by hardware manufacturerby hardware manufacturer
2. Windows 95 then displays the
box. Here, you ar e asked for the location of the driver files.
3. Insert the diskette and type the path for the location of the
drivers (usually A:\). If ‘A:’ is not the correct drive letter ,
substitute the correct letter.
4. New Hardwar e Found is displayed r epeatedly for each
logical device. Depending on the card you ar e installing,
these can include:
Driver from disk providedDriver from disk provided
Driver from disk provided
Driver from disk providedDriver from disk provided
Install from DiskInstall from Disk
Install from Disk dialog
Install from DiskInstall from Disk
• ECP Printer Port A and B
• High-Speed Communications port A and B
• Boca I/O Adapter (this is the controller device for the
card; double-click to change ports, speed)
• Parallel Port Controller
• Serial Port Controller
5. Continue as instructed to complete Windows 95
configuration and see page 22.
Driver Installation
Page 22

22
All V ersions of Windows 95
1. You will have to restart Windows 95 for the changes to take
YY
effect. Click
Y
YY
eses
es.
eses
2. Go to the
3. “Boca I/O Adapter” will appear under
adapteradapter
adapter.
adapteradapter
Control Panel, System, Device Manager Control Panel, System, Device Manager
Control Panel, System, Device Manager.
Control Panel, System, Device Manager Control Panel, System, Device Manager
Multi-functionMulti-function
Multi-function
Multi-functionMulti-function
4. The following devices will appear under
LPT)LPT)
LPT):
LPT)LPT)
• ECP Printer Port A
• ECP Printer Port B
• Communications Port A (HS)
• Communications Port B (HS)
Depending on the card youDepending on the card you
Depending on the card you
Depending on the card youDepending on the card you
have purchased, somehave purchased, some
have purchased, some
have purchased, somehave purchased, some
devices may not be listed.devices may not be listed.
devices may not be listed.
devices may not be listed.devices may not be listed.
Ports (COM andPorts (COM and
Ports (COM and
Ports (COM andPorts (COM and
IO T urbo Series
Page 23

2323
23
2323
You may notice an exclamation point next to a listed device.
You may have exhausted available IRQs in your system.
Possible solutions are listed below.
• •
If an exclamation point is displayed next to an ECPIf an exclamation point is displayed next to an ECP
•
If an exclamation point is displayed next to an ECP
• •
If an exclamation point is displayed next to an ECPIf an exclamation point is displayed next to an ECP
Printer Port, or if you wish to change resources:Printer Port, or if you wish to change resources:
Printer Port, or if you wish to change resources:
Printer Port, or if you wish to change resources:Printer Port, or if you wish to change resources:
1. Go to Device Manager, select the Port you want to
configure, then choose Properties. Under the Resources
Tab, uncheck
from the drop-down
The Basic Configurations with DMA listed will support a
port in ECP mode. The last configuration in the list will
configure the port without an IRQ. Selecting this choice
will free up an IRQ for use with another device, but the
parallel port will operate in SPP mode only. ECP and EPP
modes are not supported in this configuration.
2. Click on a listed COM Port device. Go to Properties and
“Disable in This Hardware Profile”“Disable in This Hardware Profile”
“Disable in This Hardware Profile” under the General
“Disable in This Hardware Profile”“Disable in This Hardware Profile”
tab. When you return to Device Manager, a red X is
displayed next to the device you just disabled.
“Use Automatic Settings”“Use Automatic Settings”
“Use Automatic Settings”. Then, select
“Use Automatic Settings”“Use Automatic Settings”
“Setting Based On:”“Setting Based On:”
“Setting Based On:” list.
“Setting Based On:”“Setting Based On:”
Driver Installation
Page 24

24
• If an exclamation point is displayed next to a• If an exclamation point is displayed next to a
• If an exclamation point is displayed next to a
• If an exclamation point is displayed next to a• If an exclamation point is displayed next to a
Communications Port, or if you wish to change resources:Communications Port, or if you wish to change resources:
Communications Port, or if you wish to change resources:
Communications Port, or if you wish to change resources:Communications Port, or if you wish to change resources:
1. Change resources for existing devices.
2. Click on a listed COM Port device. Go to Properties and
“Disable in This Hardware Profile”“Disable in This Hardware Profile”
“Disable in This Hardware Profile” under the General
“Disable in This Hardware Profile”“Disable in This Hardware Profile”
tab. When you return to Device Manager, a red X is
displayed next to the device you just disabled.
3. Free up an IRQ. Check with the hardware manufacturer
of the device you want to remove.
NOTE: NOTE:
NOTE: If you make any changes in Device Manager, shut
NOTE: NOTE:
down your system when done, power off, then power back
on your computer.
IO T urbo Series
Page 25

Section Four: Windows 3.x/DOS Configuration
1. Power up your system as you normally would. If your
system boots into Windows, exit to DOS.
2. Insert the driver diskette. Go to the A:\ prompt, type
2525
25
2525
INSTINST
INST
INSTINST
IF AIF A
IF A
IF AIF A
below (for non Plug and play, continue with page 26).
1. A screen is displayed informing you that your Plug and
Play system has detected the new I/O Turbo Series board.
2. You may use your own Plug and Play configuration utility,
or select
your system configured the I/O Turbo Series board.
3. You will be asked to indicate which operating system you
have:
• Windows 3.1, 3.11, Windows for Workgroups 3.11
ALLALL
ALL and press ENTER.
ALLALL
PLUG AND PLA PLUG AND PLA
PLUG AND PLA
PLUG AND PLA PLUG AND PLA
“Install the Locate Utility”“Install the Locate Utility”
“Install the Locate Utility” to determine how
“Install the Locate Utility”“Install the Locate Utility”
Y SYSTEM IS DETECTEDY SYSTEM IS DETECTED
Y SYSTEM IS DETECTED, continue
Y SYSTEM IS DETECTEDY SYSTEM IS DETECTED
• DOS
Follow all on-screen dir ections. Files are then copied to your
hard drive. If you are running Windows, you are asked if
you want to update your WIN.INI file. Select Yes.
You have the option of re-installing and selecting IOSETUP
to change settings which were assigned to the new device.
This will require a working knowledge of COM/LPT port
and IRQ settings and how these resources are assigned in
your system.
Driver Installation
Page 26

26
IF AIF A
IF A
IF AIF A
1. A title screen is displayed when you run
NON PLUG AND PLA NON PLUG AND PLA
NON PLUG AND PLA
NON PLUG AND PLA NON PLUG AND PLA
IOSETUPIOSETUP
IOSETUP utility will be copied to your hard drive.
IOSETUPIOSETUP
Y SYSTEM IS DETECTED:Y SYSTEM IS DETECTED:
Y SYSTEM IS DETECTED:
Y SYSTEM IS DETECTED:Y SYSTEM IS DETECTED:
INST INST
INST
INST INST
ALLALL
ALL. The
ALLALL
2. Next, you will be asked to indicate which operating
system you have:
• Windows 3.1, 3.11, Windows for Workgroups 3.11
• DOS
3. Files are then copied to your hard drive and system files
will be updated. Follow all on-screen dir ections. When
done, the system will reboot.
4. Go to the \IO subdirectory which was created during the
file copy process. Select a device(s) fr om the displayed list
as appropriate.
DEVICES
ECP Printer Port A
ECP Printer Port B*
Comm Port A (HS)
Comm Por t B (HS)*
IO Adapter 2x2 (or IO Adapter 1x1)
Quit Program
(* IO Adapter 2x2 only)
IO T urbo Series
Page 27

2727
27
2727
5. Select a device and press ENTER. Resources for the device
are then displayed:
Address
IRQ
DMA
6. Change displayed settings to standard addresses such as:
Printer Ports: 378, 278
Com Ports: 3F8, 2F8, 3E8, 2E8
IO Adapter: 100, 110, 120, 130
You may select
7. If you choose an address currently in use,
“Custom”“Custom”
“Custom” to enter other valid settings.
“Custom”“Custom”
IOSETUPIOSETUP
IOSETUP will
IOSETUPIOSETUP
tell you. Choose another valid setting.
8. You may press ESC to return to a previous menu. When
done, select
“Quit Program”“Quit Program”
“Quit Program”. If any changes are made you
“Quit Program”“Quit Program”
will have to reboot your system.
Driver Installation
Page 28

28
Appendix A: Troub leshooting
Before contacting your dealer, please review the following
list of problems and solutions to see if any of them apply to
your situation.
SYMPTOM POSSIBLE REMEDY
No response fromNo response from
No response from
No response fromNo response from
a peripherala peripheral
a peripheral
a peripherala peripheral
device. (i.e. printerdevice. (i.e. printer
device. (i.e. printer
device. (i.e. printerdevice. (i.e. printer
plotterplotter
plotter
plotterplotter
etc.)etc.)
etc.)
etc.)etc.)
I added this card toI added this card to
I added this card to
I added this card toI added this card to
enable a COM2 forenable a COM2 for
enable a COM2 for
enable a COM2 forenable a COM2 for
a mouse but ita mouse but it
a mouse but it
a mouse but ita mouse but it
won’won’
won’
won’won’
, modem,, modem,
, modem,
, modem,, modem,
t work.t work.
t work.
t work.t work.
• Verify that the peripheral device is
powered on, ready, on-line, and/or
,,
,
,,
securely connected at BOTH ends of the
cable. Be sure the application software is
configured to recognize the port that
you are attempting to use and that the
port in question is actually the port
intended to be active. Check the
configuration settings to insure that the
intended port is enabled and that there
are no conflicting ports or shared
interrupts.
• Is board set to correct mode? (Normal or
high-speed?)
• The mouse driver software must be
aware of the COM2 designation. Refer to
your mouse documentation.
• Make sure board is in normal mode;
mouse will not work in high-speed
mode.
IO T urbo Series
Page 29

SYMPTOM POSSIBLE REMEDY
2929
29
2929
I am not sure how toI am not sure how to
I am not sure how to
I am not sure how toI am not sure how to
set the IRQs.set the IRQs.
set the IRQs.
set the IRQs.set the IRQs.
No response whenNo response when
No response when
No response whenNo response when
working at speedsworking at speeds
working at speeds
working at speedsworking at speeds
exceeding 1exceeding 1
exceeding 1
exceeding 1exceeding 1
15Kbps.15Kbps.
15Kbps.
15Kbps.15Kbps.
• In general, IRQ4 belongs to COM1.
IRQ3 belongs to COM2. COM3 and
COM4 can be set to IRQ5-7, 10-12, or
11-15. It is best to put an interruptdriven device on COM1 or 2 (e.g., a
mouse).
• The IRQ settings in your software must
match the settings in Windows 95
Device Manager.
• Verify that the external device is
capable of those speeds.
• Make sure the board is set to highspeed mode with the J12 jumper.
The board will notThe board will not
The board will not
The board will notThe board will not
work in high-speedwork in high-speed
work in high-speed
work in high-speedwork in high-speed
mode.mode.
mode.
mode.mode.
Diagnostic programsDiagnostic programs
Diagnostic programs
Diagnostic programsDiagnostic programs
such as Checkitsuch as Checkit
such as Checkit
such as Checkitsuch as Checkit
report failures onreport failures on
report failures on
report failures onreport failures on
serial ports or wrongserial ports or wrong
serial ports or wrong
serial ports or wrongserial ports or wrong
UARUAR
UAR
UARUAR
T speed.T speed.
T speed.
T speed.T speed.
• Check the Windows 98/95 Device
Manager and make sure the port is set
for high-speed by clicking “Boca IO
Adapter” in Device Manager. These
settings must not conflict with any
other hardware.
• The diagnostics program used must be
capable of testing 650 UARTS. Most
diagnostics programs can test only 450
and 550 UARTs.
Troubleshooting
Page 30

30
SYMPTOM POSSIBLE REMEDY
My system locks upMy system locks up
My system locks up
My system locks upMy system locks up
when exiting mywhen exiting my
when exiting my
when exiting mywhen exiting my
communicationcommunication
communication
communicationcommunication
program.program.
program.
program.program.
EPP/ECP hard drive/EPP/ECP hard drive/
EPP/ECP hard drive/
EPP/ECP hard drive/EPP/ECP hard drive/
CD-ROM driveCD-ROM drive
CD-ROM drive
CD-ROM driveCD-ROM drive
does not function.does not function.
does not function.
does not function.does not function.
• The driver might be set to hardware
flow control and the external cable may
not be wired correctly. Switch to
software flow control. If the problem
stops, then the cable is wired incorrectly,
not allowing the external device to
supply the necessary control signals.
• Make sure that hardware flow control is
set in your system.
• Make sure the attached serial device is
set to hardware flow control.
• Ensure the device is connected properly.
Most EPP devices have two DB-25
connectors labelled “COMPUTER” and
“PRINTER”. The first device should be
connected to the DB-25 labelled
“COMPUTER”. The next device(s)
should be connected to the DB-25
connector labelled “PRINTER” on the
first device.
IO T urbo Series
• If a printer is required, it should be
connected to the DB-25 connector
labelled “PRINTER” on the last device.
• Ensure that the driver for each device is
installed and configured correctly. Note:
the driver for each device is supplied by
the vendor of that device.
• Make sure that the ECP printer port has
an IRQ assigned for EPP mode, or both
an IRQ and DMA for ECP mode.
Page 31

Appendix B: Windows NT Configuration
3131
31
3131
NOTE BEFORE INSTNOTE BEFORE INST
NOTE BEFORE INST
NOTE BEFORE INSTNOTE BEFORE INST
Play (PNP) BIOS for the adapter to be recognized and configured.
These instructions assume this requirement has been met and that no
optional PNP utilities are being used by Windows NT.
ALLINGALLING
ALLING: In NT, you must have a Plug and
ALLINGALLING
Technical Notes
These instructions are for either PNP I/O card. The Turbo 2x2 is the
same as the 1x1 unless you attach the second serial or parallel port.
Your BIOS should not recognize any ports unless they are physically
attached to the card. The J12 jumper must be set before installing card.
This jumper has three settings.
Software selectableSoftware selectable
1.
Software selectable. This requires that the ports UART be
Software selectableSoftware selectable
determined by a multi-function adapter.
Normal operationNormal operation
2.
Normal operation. This sets the serial ports statically, to 550 UART.
Normal operationNormal operation
High speed operationHigh speed operation
3.
High speed operation. This sets the serial ports statically, to 650
High speed operationHigh speed operation
UART.
You can not use the first option in NT. So, if using the 2x2, both serial
ports will be the same UART. Many devices will not function
properly on a high speed port, such as a mouse, and/or require
additional drivers. Make sure that any devices attached to these ports
are supported by the jumper selected mode.
Windows NT Notes
Before installing, check what ports are already installed in NT. Go to
Start> Settings> Control Panel> PortsStart> Settings> Control Panel> Ports
Start> Settings> Control Panel> Ports.
Start> Settings> Control Panel> PortsStart> Settings> Control Panel> Ports
Any COM ports will be listed here with the exception of devices that
are initialized at boot.
Windows NT Configuration
Page 32

32
Installing
With the computer off, insert the adapter in an available ISA slot and
power on. Once in NT, check
see the additional serial port(s) listed here now. This port(s) will now
function at the UART specified by the card’s jumper and can be used
now. Keep in mind that, under the
be the same regardless of the UART. When operating in high speed
mode, make sure to multiply the baud rate by 4. So a 9600 in normal
mode would be 38400 in high speed mode (9600 x 4 = 38400).
PortsPorts
Ports in the
PortsPorts
Port Port
Port properties, the baud rates will
Port Port
Control PanelControl Panel
Control Panel. You should
Control PanelControl Panel
Troubleshooting
If the port fails to work, make sure that it showed up under
installing the card. If you do not see any additional ports listed after
installing the card, then your BIOS is not recognizing it. Also make
sure that in
started and set to “automatic”. This service is not the same as having
Control Panel> ServicesControl Panel> Services
Control Panel> Services, that the
Control Panel> ServicesControl Panel> Services
Plug and Play ServicePlug and Play Service
Plug and Play Service is
Plug and Play ServicePlug and Play Service
PortsPorts
Ports after
PortsPorts
the PNPISA utility on the NT CD installed. Otherwise, make sure
your BIOS is set to a non-PNP OS and that PCI configuration is set to
“automatic”
IO T urbo Series
.
Page 33

Appendix C: Pin Assignments
This section is provided for users who are interested in the
pin assignments for each port on the I/O Turbo Series
adapter.
Serial Port A and B (9-pin)
3333
33
3333
Line NameLine Name
Line Name
Line NameLine Name
Pin #Pin #
Pin #
Pin #Pin #
CARRIER DETECT 1
RECEIVE DATA 2
TRANSMIT DATA 3
DATA TERMINAL READY 4
SIGNAL GROUND 5
DATA SET READY 6
REQUEST T O SEND 7
CLEAR T O SEND 8
RING INDICATOR 9
8
9
7
6
1
2
4
3
5
Pin Assignments
Page 34

34
Parallel Por t A and B (25-pin)
Line NameLine Name
Line Name
Line NameLine Name
Pin #Pin #
Pin #
Pin #Pin #
-STROBE 1
DATA BIT 0 2
D ATABIT 1 3
DATA BIT 2 4
DATA BIT 3 5
DATA BIT 4 6
DATA BIT 5 7
DATA BIT 6 8
DATA BIT 7 9
-ACKno wledge 10
BUSY 11
Print End (out of paper) 12
SeLeCT 13
-AUT OFeeD 14
-ERROR 15
-INITialize printer 16
-SeLeCT INput 17
GROUND 18-25
1
14
2
3
151716
45
18 19 20 21
6
9
10 11
8
7
22 24
12 13
2523
IO T urbo Series
Page 35

3535
35
3535
Appendix D: Servicing Your Boca Product
If your IO Turbo Series adapter requires service, first contact
the authorized dealer from whom you pur chased the
product. If the dealer is unable to assist you, and you must
contact Boca Research, Inc., please follow the instructions
below. Our electronic BBS is available 24 hours a day at (561)
241-1601 and will support data transmission speeds up to
33.6Kbps with settings of N, 8, 1. If you have a modem, the
BBS may be helpful (especially during off hours) if you have
a question about product settings or compatibility, or if you
wish to download driver software or utilities.
NOTE: CALLING TECHNICALNOTE: CALLING TECHNICAL
NOTE: CALLING TECHNICAL
NOTE: CALLING TECHNICALNOTE: CALLING TECHNICAL
COMPLETE AND ACCURACOMPLETE AND ACCURA
COMPLETE AND ACCURA
COMPLETE AND ACCURACOMPLETE AND ACCURA
CONCERNING YOUR PROBLEM MACONCERNING YOUR PROBLEM MA
CONCERNING YOUR PROBLEM MA
CONCERNING YOUR PROBLEM MACONCERNING YOUR PROBLEM MA
CONSUMING AND FRUSTRACONSUMING AND FRUSTRA
CONSUMING AND FRUSTRA
CONSUMING AND FRUSTRACONSUMING AND FRUSTRA
1. When calling Boca Research Technical Support, have the
following information available:
• Board name and part number (located on the board)
• Computer model
• Peripherals in system
• Computer manufacturer
SUPPOR SUPPOR
SUPPOR
SUPPOR SUPPOR
TE INFORMATE INFORMA
TE INFORMA
TE INFORMATE INFORMA
TING FOR YOU.TING FOR YOU.
TING FOR YOU.
TING FOR YOU.TING FOR YOU.
T WITHOUTT WITHOUT
T WITHOUT
T WITHOUTT WITHOUT
Y BE BOTH TIME-Y BE BOTH TIME-
Y BE BOTH TIME-
Y BE BOTH TIME-Y BE BOTH TIME-
TIONTION
TION
TIONTION
• Operating system and version
Servicing Your Boca Product
Page 36

36
If you suspect a problem with a specific pr ogram or
software package, make note of the name, version or
release number, and manufacturer of the software.
2. Call Boca Research Technical Support Department
between the hours of 8:00 a.m. and 6:30 p.m. EST at (561)
241-8088. A technical support specialist will be available to
discuss the problem(s) you ar e experiencing. If factory
service is required, you will be given a Return
PP
Merchandise Authorization (RMA) number.
lease placelease place
P
lease place
PP
lease placelease place
this number on the outside of the packagethis number on the outside of the package
this number on the outside of the package
this number on the outside of the packagethis number on the outside of the package
return the item(s) for service and reference it on any
correspondence included in the package. Boca Research,
Inc. will return any pr oduct which is not accompanied by
an RMA number.
3. Refer to the Warranty Statement if the product is covered
under the five-year Boca Research, Inc. Limited Warranty.
4. Certain parts will not be covered under the Boca Resear ch,
Inc. Limited Warranty. Dealer installed parts are
warranted by the dealer. Parts which you have installed
yourself are covered only by the suppliers warranties. In
these cases, Boca Research, Inc. can identify which parts
when you
are defective, but will not replace such parts until specific
written authorization is received from you. The cost of
parts and labor involved in making such repairs will be
billed to you C.O.D.
IO T urbo Series
Page 37

5. When sending the IO Turbo Series adapter to Boca
Research, Inc. for repairs, please be sure to include:
3737
37
3737
• the Boca Research IO Turbo Series adapter
• your name
• your return str eet addr ess (for UPS purposes)
• your phone number
• the RMA number mentioned above.
Package the product securely in a container equivalent to the
original packaging, and insure the package to pr otect against
loss or damage during transit. Shipping charges must be
prepaid; C.O.D. shipments will not be accepted. Please use
the address below for all correspondence:
Boca Research, Inc.Boca Research, Inc.
Boca Research, Inc.
Boca Research, Inc.Boca Research, Inc.
RMA Department - RMA # ___________RMA Department - RMA # ___________
RMA Department - RMA # ___________
RMA Department - RMA # ___________RMA Department - RMA # ___________
(board only)(board only)
(board only)
(board only)(board only)
6500 W6500 W
6500 W
6500 W6500 W
Boca Raton, FL 33487-2841Boca Raton, FL 33487-2841
Boca Raton, FL 33487-2841
Boca Raton, FL 33487-2841Boca Raton, FL 33487-2841
6. If the repairs performed on your IO Turbo Series adapter
were cover ed by the warranty, Boca Research, Inc. will
return it pr epaid via UPS.
est Rogers Circleest Rogers Circle
est Rogers Circle
est Rogers Circleest Rogers Circle
Servicing Your Boca Product
Page 38

FCC Compliance
This equipment has been tested and found to comply with the limits
Class B Class B
for a
Class B digital device, pursuant to Part 15 of the FCC Rules.
Class B Class B
These limits are designed to provide reasonable protection against
harmful interference in a residential installation.
This equipment generates, uses, and can radiate radio frequency
energy and, if not installed and used in accordance with the
instructions, may cause harmful interference to radio or television
reception. However, there is no guarantee that interference will not
occur in a particular installation. If this equipment does cause harmful
interference to radio or television reception, which can be determined
by turning the equipment off and on, the user is encouraged to try to
correct the interference by one or more of the following measures:
• Reorient or relocate the receiving antenna.
• Increase the separation between the equipment and the receiver.
• Connect the equipment into an outlet on a circuit different from that
to which the receiver is connected.
• Consult the dealer or an experienced radio/TV technician for help.”
CHANGES OR MODIFICACHANGES OR MODIFICA
CHANGES OR MODIFICA
CHANGES OR MODIFICACHANGES OR MODIFICA
EXPRESSLEXPRESSL
EXPRESSL
EXPRESSLEXPRESSL
VOID YOUR AUTHORITY TO OPERAVOID YOUR AUTHORITY TO OPERA
VOID YOUR AUTHORITY TO OPERA
VOID YOUR AUTHORITY TO OPERAVOID YOUR AUTHORITY TO OPERA
©1997,1998,1999. Boca Research, Inc.©1997,1998,1999. Boca Research, Inc.
©1997,1998,1999. Boca Research, Inc. All rights reserved No reproduction of
©1997,1998,1999. Boca Research, Inc.©1997,1998,1999. Boca Research, Inc.
this document, in any form, is allowed without permission from Boca
Research, Inc. Boca Research, Inc. is not liable for any damages resulting from
technical or editorial errors or omissions contained in this document. The
information in this manual is subject to change without notice. Revisions to
the product(s) described in this manual may occur at any time without notice.
TT
rademarks.rademarks.
T
rademarks. All Boca Research products are trademarks of Boca Research,
TT
rademarks.rademarks.
Inc. All other references to computer systems, software, and peripherals use
trademarks owned by their respective manufacturers.
Publication Date: FebruaryPublication Date: February
Publication Date: February
Publication Date: FebruaryPublication Date: February
Printed in the U.S.A.Printed in the U.S.A.
Printed in the U.S.A.
Printed in the U.S.A.Printed in the U.S.A.
9361.P65
Y APPROVED BY THE MANUFY APPROVED BY THE MANUF
Y APPROVED BY THE MANUF
Y APPROVED BY THE MANUFY APPROVED BY THE MANUF
, 1999, 1999
, 1999
, 1999, 1999
TIONS TO THIS EQUIPMENT NOTTIONS TO THIS EQUIPMENT NOT
TIONS TO THIS EQUIPMENT NOT
TIONS TO THIS EQUIPMENT NOTTIONS TO THIS EQUIPMENT NOT
ACTURER COULDACTURER COULD
ACTURER COULD
ACTURER COULDACTURER COULD
TE THE EQUIPMENTTE THE EQUIPMENT
TE THE EQUIPMENT
TE THE EQUIPMENTTE THE EQUIPMENT
..
.
..
Page 39

Limited WLimited W
Limited W
Limited WLimited W
Boca Research, Inc. (BRI) warrants to the original buyer of this BRI product that the hardware
is free of defects in materials and workmanship for a period of five (5) years from the date of
purchase from BRI or an authorized dealer (“the Warranty Period”). Should the product fail
to be in working order at any time during the five-year period, BRI, will at its option, repair
or replace this product as described below, provided that in BRI’s sole determination the part
or product has not been abused, misused, repaired, or modified.
All products will be serviced and returned via ground at no charge to customers.
All returns for limited warranty service requir e a Return Merchandise Authorization (RMA).
All customers are required to demonstrate proof of purchase when requesting an RMA. The
period of warranty commences on the date of purchase. A dated copy of the sales slip must be
included with the returned merchandise.
Products which requir e Limited Warranty service during the warranty period should be
delivered to BRI at the address in the Appendix (Servicing Your Boca Product) with proof of
purchase, copy of canceled check (if any), and the Return Merchandise Authorization (RMA)
number provided by BRI Technical Support. Refer to the Appendix in this manual.
Replacement parts or complete products will be furnished on an exchange basis only.
Replaced parts and/or products become the property of BRI.
If the returned product is sent by mail, the purchaser agrees to prepay shipping charges,
insure the product or assume the risk of loss or damage which may occur in transit, and to
use a shipping container equivalent to the original packaging. BRI does not make any
warranties in respect to the product, either expressed or implied, including no implied
warranties of merchantability or fitness for a particular purpose, except as expressly provided
in this agreement. If any labor, repair, or parts replacement is required because of accident,
negligence, misuse, theft, vandalism, fire, water or other peril; or because of conditions
outside of specifications, including, but not limited to, electrical power, temperature,
humidity or dust; or by moving, repair relocation, or alteration not performed by BRI, or by
any other cause other than normal use, the warranty and maintenance obligations provided
herein shall not apply.
arrantyarranty
arranty
arrantyarranty
BRI SHALLBRI SHALL
BRI SHALL
BRI SHALLBRI SHALL
DAMAGES OR FOR LOSS, DAMAGE, OR EXPENSE DIRECTLDAMAGES OR FOR LOSS, DAMAGE, OR EXPENSE DIRECTL
DAMAGES OR FOR LOSS, DAMAGE, OR EXPENSE DIRECTL
DAMAGES OR FOR LOSS, DAMAGE, OR EXPENSE DIRECTLDAMAGES OR FOR LOSS, DAMAGE, OR EXPENSE DIRECTL
FROM CUSTOMER’S USE OF OR INABILITY TO USE THE EQUIPMENT EITHER SEPFROM CUSTOMER’S USE OF OR INABILITY TO USE THE EQUIPMENT EITHER SEP
FROM CUSTOMER’S USE OF OR INABILITY TO USE THE EQUIPMENT EITHER SEP
FROM CUSTOMER’S USE OF OR INABILITY TO USE THE EQUIPMENT EITHER SEPFROM CUSTOMER’S USE OF OR INABILITY TO USE THE EQUIPMENT EITHER SEP
OR IN COMBINAOR IN COMBINA
OR IN COMBINA
OR IN COMBINAOR IN COMBINA
DESTRUCTION OF OTHER PROPERDESTRUCTION OF OTHER PROPER
DESTRUCTION OF OTHER PROPER
DESTRUCTION OF OTHER PROPERDESTRUCTION OF OTHER PROPER
Boca's products are manufactured from new and serviceable used parts tested to BocaBoca's products are manufactured from new and serviceable used parts tested to Boca
Boca's products are manufactured from new and serviceable used parts tested to Boca
Boca's products are manufactured from new and serviceable used parts tested to BocaBoca's products are manufactured from new and serviceable used parts tested to Boca
Research's quality assurance standards. If the product proves to be defective, Boca ResearchResearch's quality assurance standards. If the product proves to be defective, Boca Research
Research's quality assurance standards. If the product proves to be defective, Boca Research
Research's quality assurance standards. If the product proves to be defective, Boca ResearchResearch's quality assurance standards. If the product proves to be defective, Boca Research
will bear the costs of labor and materials for hardware replacement or repair during thewill bear the costs of labor and materials for hardware replacement or repair during the
will bear the costs of labor and materials for hardware replacement or repair during the
will bear the costs of labor and materials for hardware replacement or repair during thewill bear the costs of labor and materials for hardware replacement or repair during the
above specified warranty period. Boca Research or its Authorized Service Providers shallabove specified warranty period. Boca Research or its Authorized Service Providers shall
above specified warranty period. Boca Research or its Authorized Service Providers shall
above specified warranty period. Boca Research or its Authorized Service Providers shallabove specified warranty period. Boca Research or its Authorized Service Providers shall
have the option to replace any defective part(s) with new part(s) orhave the option to replace any defective part(s) with new part(s) or
have the option to replace any defective part(s) with new part(s) or
have the option to replace any defective part(s) with new part(s) orhave the option to replace any defective part(s) with new part(s) or
Research, with serviceable used parts that are equivalent to new parts in performance. BocaResearch, with serviceable used parts that are equivalent to new parts in performance. Boca
Research, with serviceable used parts that are equivalent to new parts in performance. Boca
Research, with serviceable used parts that are equivalent to new parts in performance. BocaResearch, with serviceable used parts that are equivalent to new parts in performance. Boca
Research shall also have the option to replace any defective product(s) with functionallyResearch shall also have the option to replace any defective product(s) with functionally
Research shall also have the option to replace any defective product(s) with functionally
Research shall also have the option to replace any defective product(s) with functionallyResearch shall also have the option to replace any defective product(s) with functionally
equivalent product(s)equivalent product(s)
equivalent product(s)
equivalent product(s)equivalent product(s)
This warranty shall not be applicable to the extent that any provision of this warranty is
prohibited by any Federal, state, or municipal law which cannot be preempted. This warranty
gives you specific legal rights, and you may also have other rights which vary from state to
state.
NOT BE LIABLE FOR ANY SPECIAL, INCIDENT NOT BE LIABLE FOR ANY SPECIAL, INCIDENT
NOT BE LIABLE FOR ANY SPECIAL, INCIDENT
NOT BE LIABLE FOR ANY SPECIAL, INCIDENT NOT BE LIABLE FOR ANY SPECIAL, INCIDENT
TION WITH OTHER EQUIPMENTTION WITH OTHER EQUIPMENT
TION WITH OTHER EQUIPMENT
TION WITH OTHER EQUIPMENTTION WITH OTHER EQUIPMENT
TYTY
, OR FROM ANY OTHER CAUSE., OR FROM ANY OTHER CAUSE.
TY
, OR FROM ANY OTHER CAUSE.
TYTY
, OR FROM ANY OTHER CAUSE., OR FROM ANY OTHER CAUSE.
, OR FOR PERSONAL, OR FOR PERSONAL
, OR FOR PERSONAL
, OR FOR PERSONAL, OR FOR PERSONAL
AL, OR CONSEQUENTIALAL, OR CONSEQUENTIAL
AL, OR CONSEQUENTIAL
AL, OR CONSEQUENTIALAL, OR CONSEQUENTIAL
Y OR INDIRECTLY OR INDIRECTL
Y OR INDIRECTL
Y OR INDIRECTLY OR INDIRECTL
Y ARISINGY ARISING
Y ARISING
Y ARISINGY ARISING
ARAARA
TELTEL
ARA
TEL
ARAARA
TELTEL
INJUR INJUR
INJUR
INJUR INJUR
, at the option of Boca, at the option of Boca
, at the option of Boca
, at the option of Boca, at the option of Boca
Y OR LOSS ORY OR LOSS OR
Y OR LOSS OR
Y OR LOSS ORY OR LOSS OR
YY
Y
YY
Page 40

Part No. 9361-02
 Loading...