


WP460011

OWNER’S MANUAL
How to employ your intelligent floor cleaner
bObsweep PetHair
™
Model WP460011

Congratulations!
Congratulations on your new intelligent floor cleaner! Bob is now at your service. To
see Bob at his best, please read the Quick Start Guide and this manual thoroughly.
Welcome to the bObsweep family and happy cleaning!
If you have any questions or concerns, feel free to contact our helpful team at
support@bobsweep.com.
Get Bob
Ready to Clean
Install Bob’s
Side Brush 16
Charge Bob 17
Bob’s First Clean 18
Standby Mode 19
Cleaning Behavior
Important Safety
Instructions
Parts &
Maintenance
Mop 58
Dustbin 60
Filters 62
Brushes 64
Battery 68
Storing Bob 69
FAQsRemote Control
Syncing Bob's Remote 27
Bob's Challenges
What Comes in
Bob’s Box?
Troubleshooting
Trouble Numbers 80
Home Checkup
Test 92
End User
Agreement
Cleaning
Modes
Auto 1: Robot Mode 41
Auto 2: Quick Clean 42
Auto 3: Touch up 43
Spot Cleaning 44
UV Light 45
Bob’s Anatomy Warranty
Information
Set Bob’s
Cleaning Schedule
Set Schedule on
Charging Station 48
Set Current Time & Day 49
Set Bob's
Cleaning Schedule 52
Auto-Resume 55
14 103
56
6
38
1062821
10 100
46
104
8 78
112
Charging Bob
Charging Station
Placement 30
Auto Charging 31
Syncing Bob's
Charging Station 32
Manual Charging 34
Charging Time 35
Conserving Battery 36
Sensors
Maintenance 72
Deactivate Edge
Sensors 74
Reactivate Edge
Sensors 75
Blindfold Stickers 76
70

6 7
Basic safety precautions should always be followed, including the following:
Read ALL instructions before use.
• To protect against electrical shock, do not immerse any part of Bob — with the
exception of his mopping cloth — into water or other liquids.
• Unplug Bob from outlet when not in use and before conducting maintenance.
• Do not operate Bob or his charging station if they have been damaged in any way.
If Bob is not working as he should, or has been dropped, damaged, left outdoors,
or dropped in water, contact our customer care center at support@bobsweep.com.
• Do not handle Bob or his charging station with wet hands.
• Do not use Bob outdoors or on any wet surface.
• Bob is not intended for use by persons (including children) with reduced physical
or mental capabilities, or lack of experience and knowledge, unless under the close
supervision of a person responsible for their safety.
• Do not pull or carry the charging station by the cord, use the cord as a handle, close
a door on the cord, or pull the cord around sharp edges or corners. Keep the cord
away from heated surfaces. To unplug the cord, grasp the plug, not the cord itself.
• Do not mutilate or incinerate the battery, as it will explode at high temperatures.
• Do not attempt to open Bob’s charging station. Repairs on his station should only
be carried out by our qualified customer care center.
• Do not expose Bob’s charging station to high temperatures or allow moisture or
humidity of any kind to come into contact with it.
• Do not let Bob pick up toxic materials (chlorine bleach, ammonia, drain cleaner,
etc.).
• Do not let Bob pick up anything that is burning or smoking, such as cigarettes,
matches, or hot ashes. Do not use Bob to pick up flammable or combustible liquids
such as gasoline, nor use him in areas where they may be present.
• Do not use Bob in an enclosed space filled with vapors given off by oil-based paint,
paint thinner, moth-proofing substances, flammable dust, or other explosive or toxic
vapors.
• Leaks from battery cells can occur under extreme usage or temperature conditions.
If the liquid gets on skin, wash quickly with water. If the liquid gets into the eyes,
flush them immediately with clean water for a minimum of 10 minutes, and seek
medical attention.
• Do not use Bob for anything other than his intended purpose, as specified in this
manual.
Declaration of Conformity
This device complies with Part 15 of the FCC rules. Operation is subject to the
following two conditions: (1) this device may not cause harmful interference, and
(2) this device must accept any interference received, including interference that
may cause undesired operation.
The manufacturer is not responsible for any radio or TV interference caused by
unauthorized modifications or change to this equipment. Such modifications or
change could void the user’s authority to operate the equipment.
This equipment has been tested and found to comply with the limits for a Class B
digital device, pursuant to part 15 of the FCC Rules. These limits are designed to
provide reasonable protection against harmful interference in a residential installation.
This equipment generates, uses and can radiate radio frequency energy and, if not
installed and used in accordance with the instructions, may cause harmful interference
to radio communications. However, there is no guarantee that interference will not
occur in a particular installation. If this equipment does cause harmful interference to
radio or television reception, which can be determined by turning the equipment off
and on, the user is encouraged to try to correct the interference by one or more of the
following measures:
• Reorient or relocate the receiving antenna.
• Increase the separation between the equipment and receiver.
• Connect the equipment into an outlet on a circuit different from that to
which the receiver is connected.
• Consult the dealer or an experienced radio/TV technician for help.
Important Safety Instructions
8
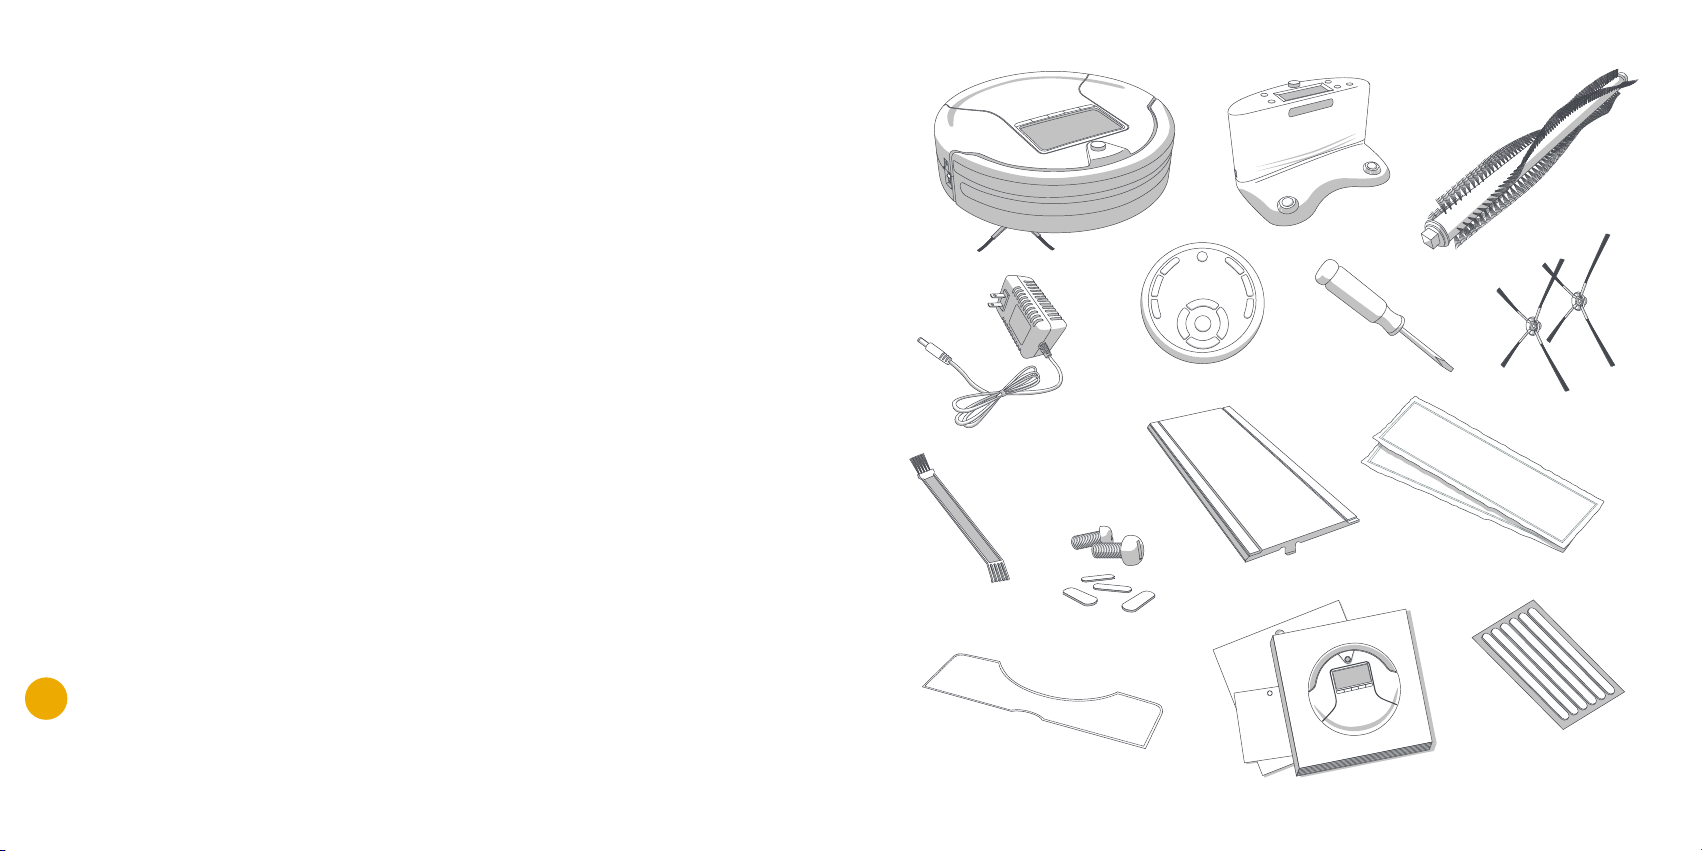
1 Bob, Your Intelligent Floor Cleaner
2 Charging Station
3 Main Brush
4 Charging Adapter
5 Remote Control
6 Flat Head Screwdriver
7 2 Side Brushes (1 Spare)
8 Cleaning Tool
9 Pack of Screws and Blindfold Stickers
10 Mop Attachment
11 2 Microfiber Mopping Cloths
12 HEPA Filter (Spare)
13 Owner’s Manual, Quick Start Guide, and Warranty Card
14 Bumper Stickers
What Comes in Bob’s Box?
1
2 3
4
5
6
7
8
9
10
11
12
13
14
10 11
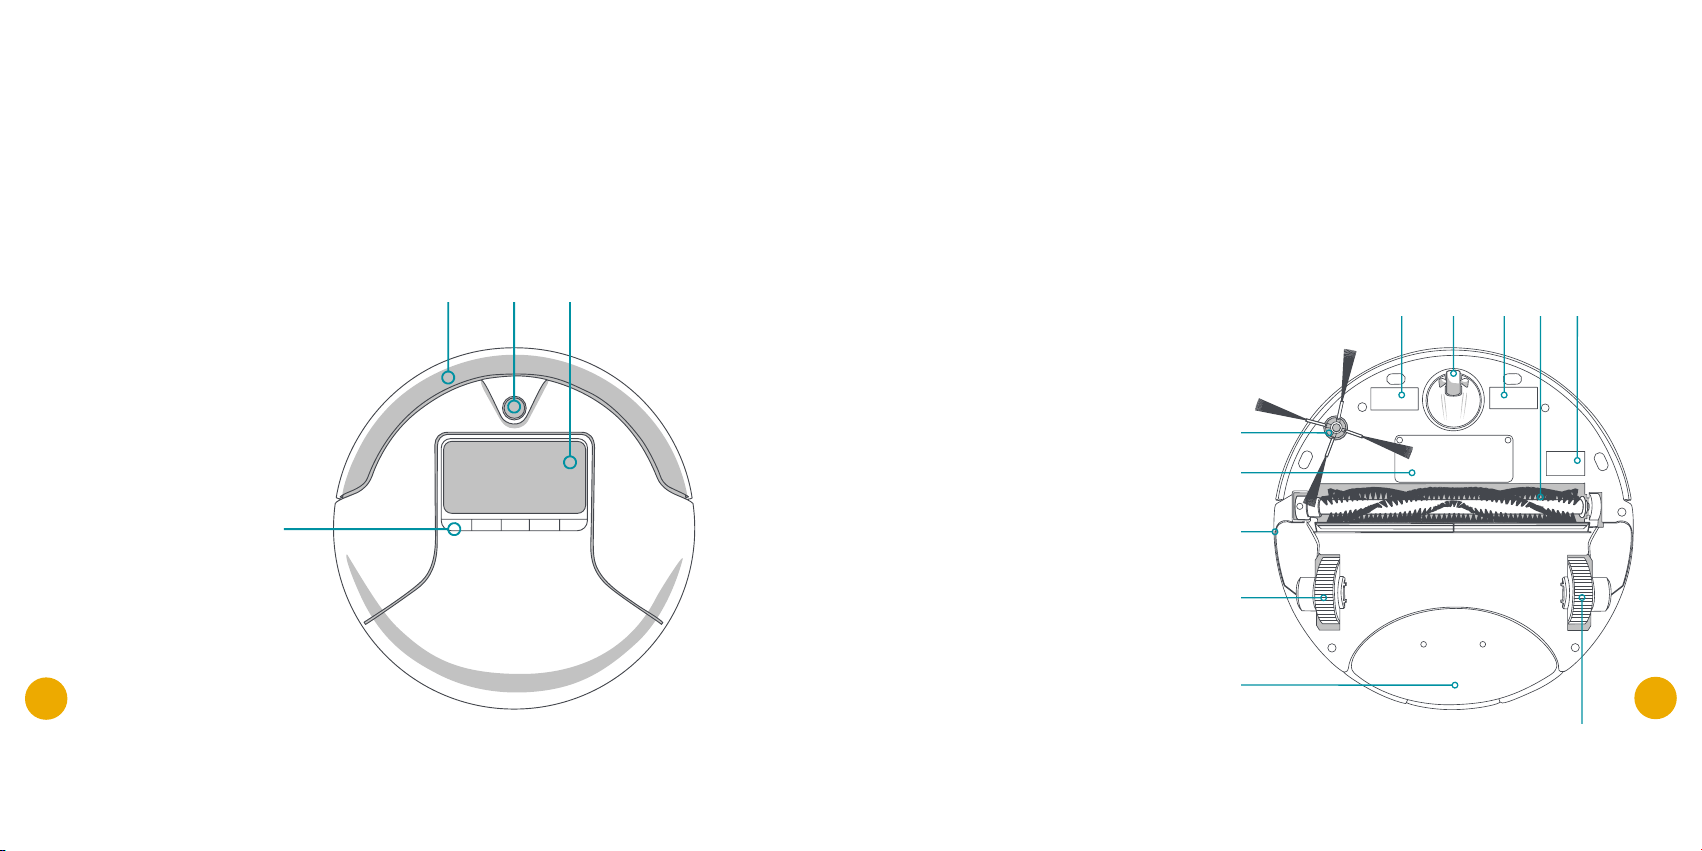
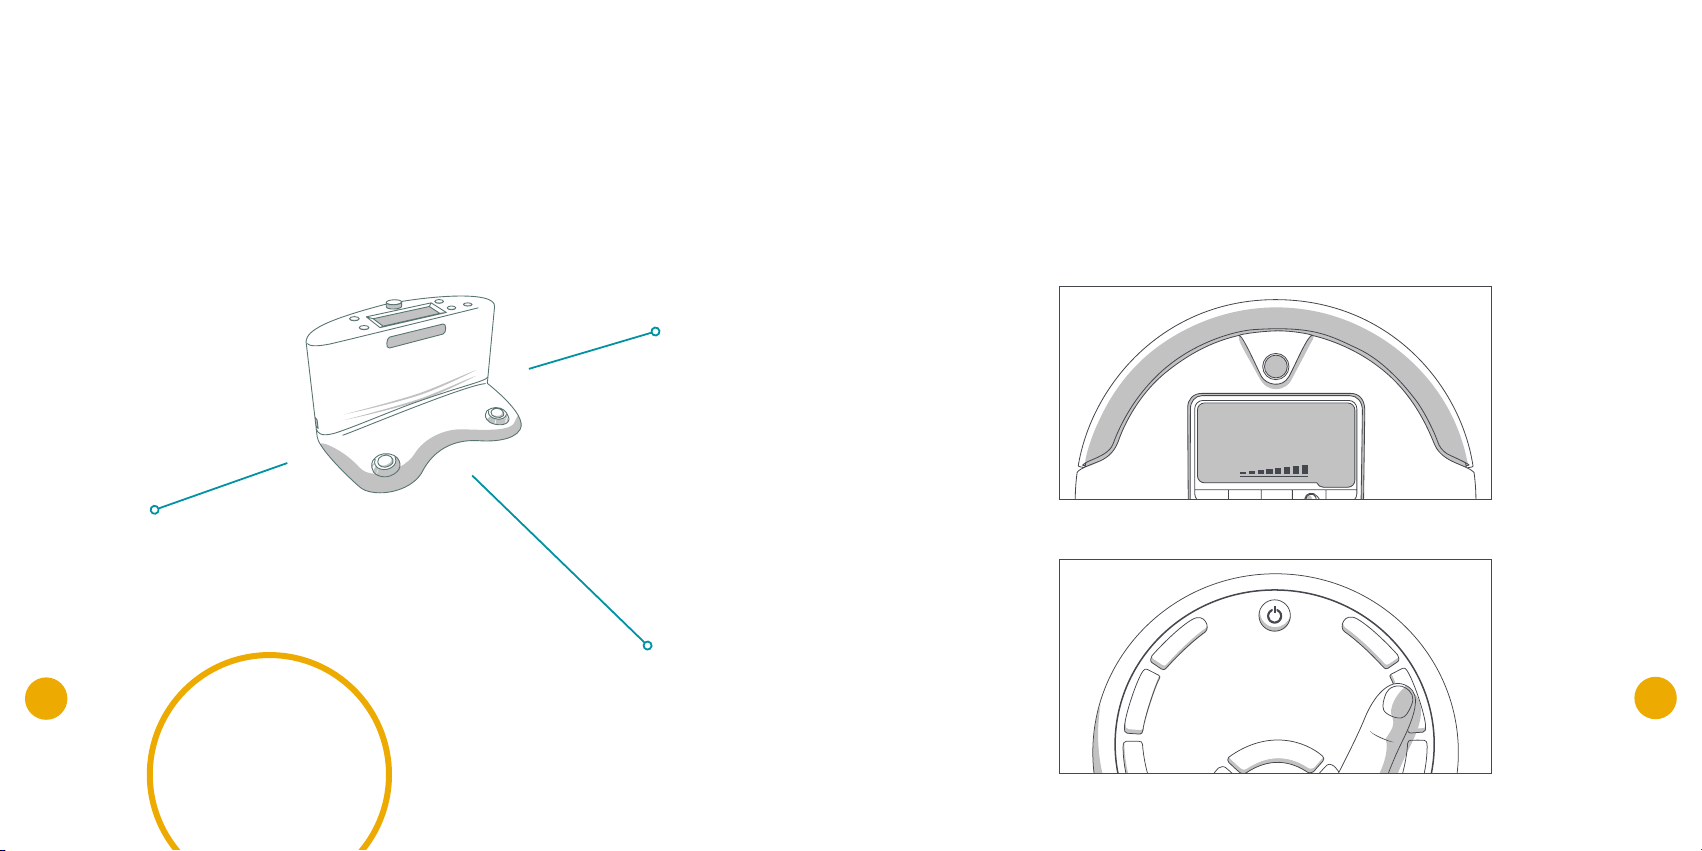
Top View
1 Bumper
2 Transmitter
3 Cover Buttons
4 Display Screen
Bottom View
1 Charging Plates
2 Front Wheel
3 Side Brush
4 Main Brush
5 ON/OFF Switch
6 Dustbin
7 UV Lamp
8 Battery
9 Left Wheel
10 Right Wheel
Bob’s Anatomy
RL
42
1
3
1 2 4 7
3
5
8
9
10
6
1
12 13
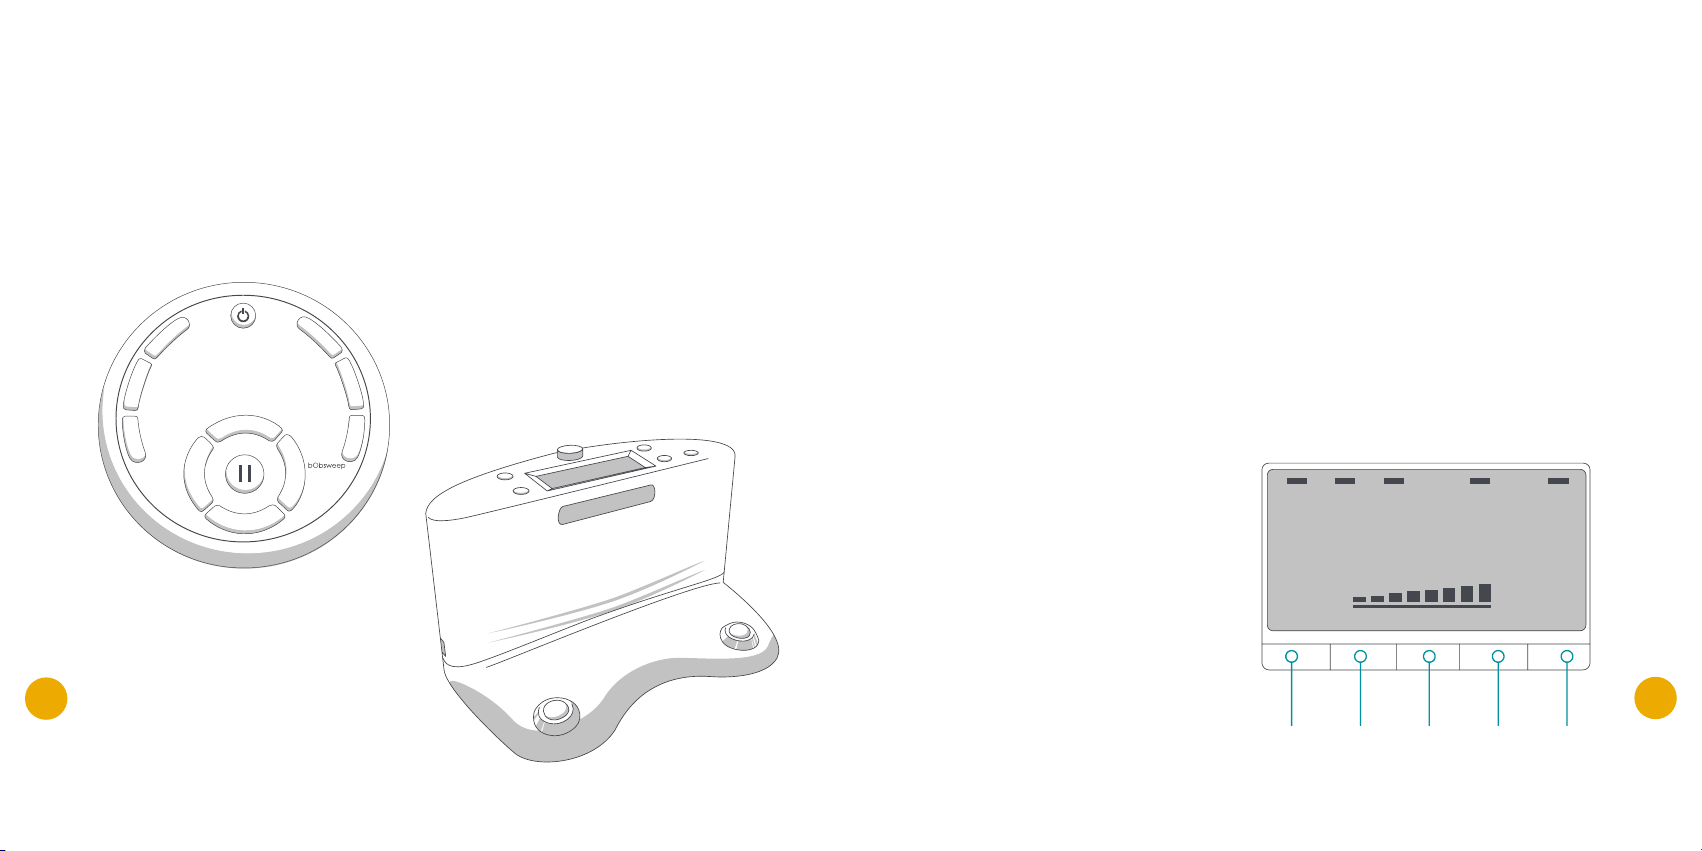
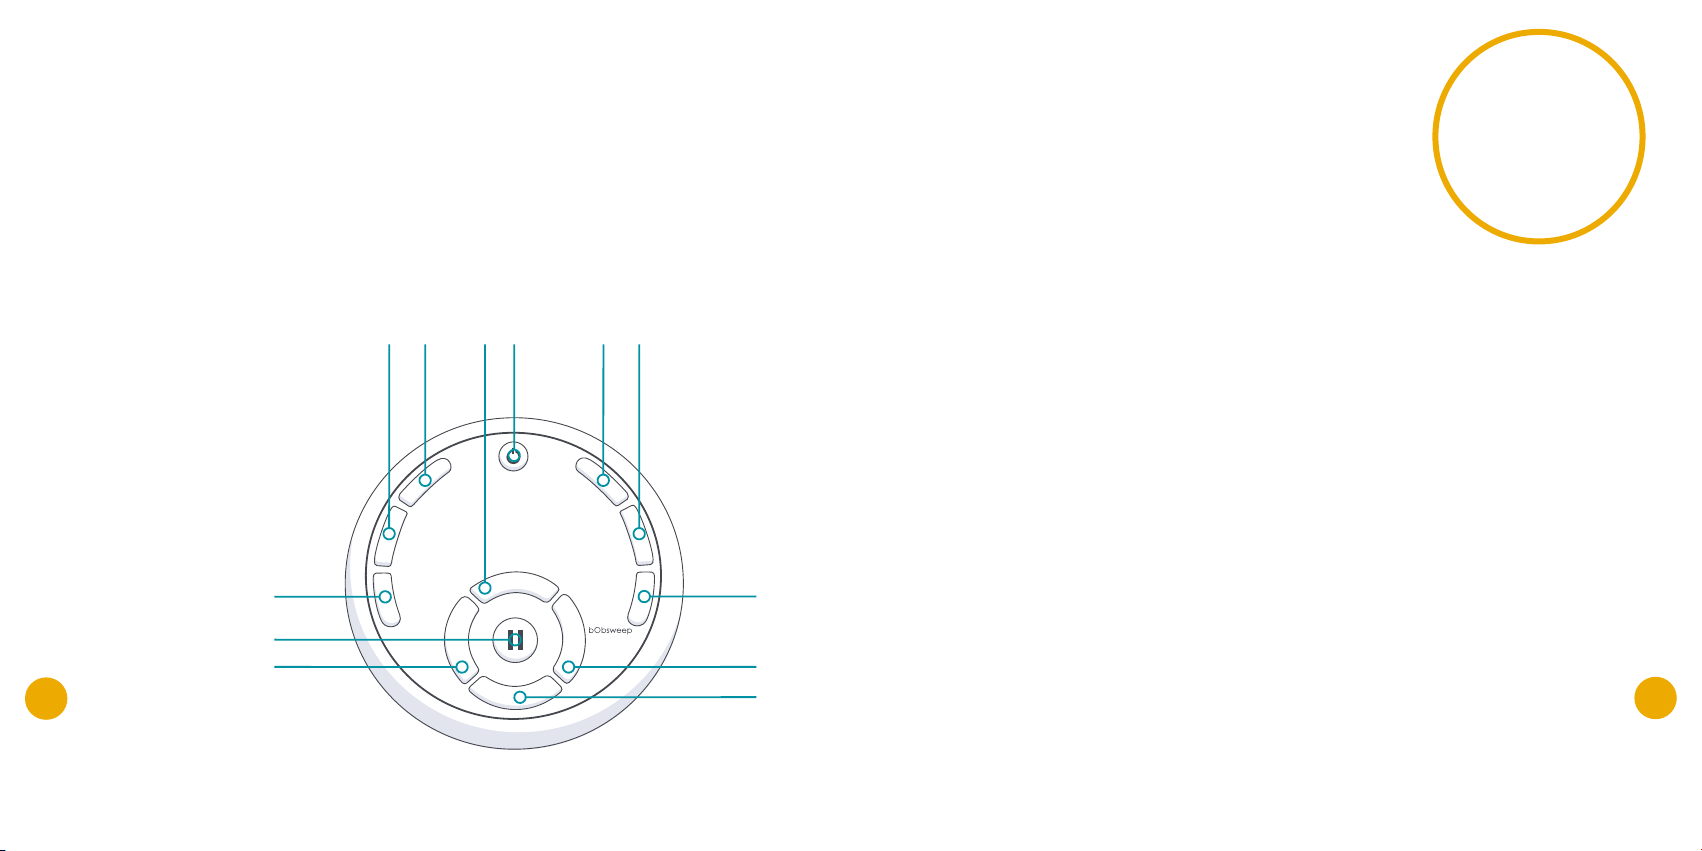
1 Remote Control
2 Charging Station
Cover Buttons
1 UV
Turn UV lamp OFF/ON
2 PROGRAM
Select Bob’s cleaning program
3 MODE
Select Bob’s cleaning mode
4 CHARGE
Send Bob to his charging station
5 START
Send Bob to clean
UV
DIRT
TROUBLE NR.
CAPACITY
AUTO SPOTWALL FOLLOW DOCK
MIN. CLEANING
CHARGING
READY
1
2
54321

Get Bob
Ready to Clean
16 17
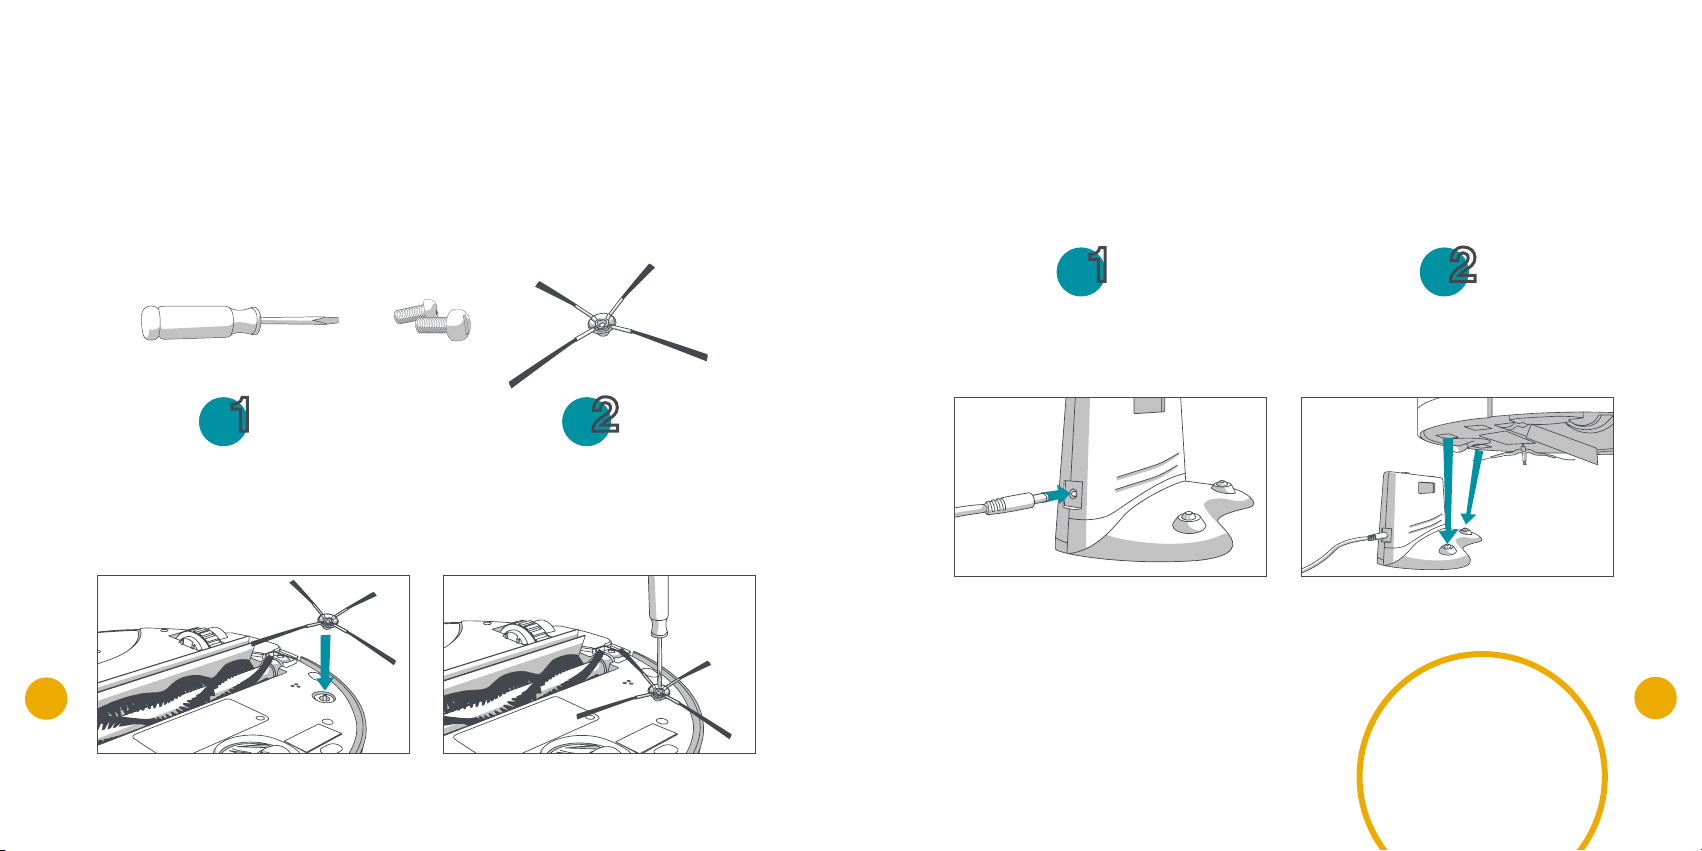
Before Bob’s first clean, you must install his side brush, which allows him to
sweep along corners, walls, and other hard-to-reach places.
You will need the following materials, all of which are included inside Bob’s box:
a flat head screwdriver, a short screw, and a side brush.
Install Bob’s Side Brush
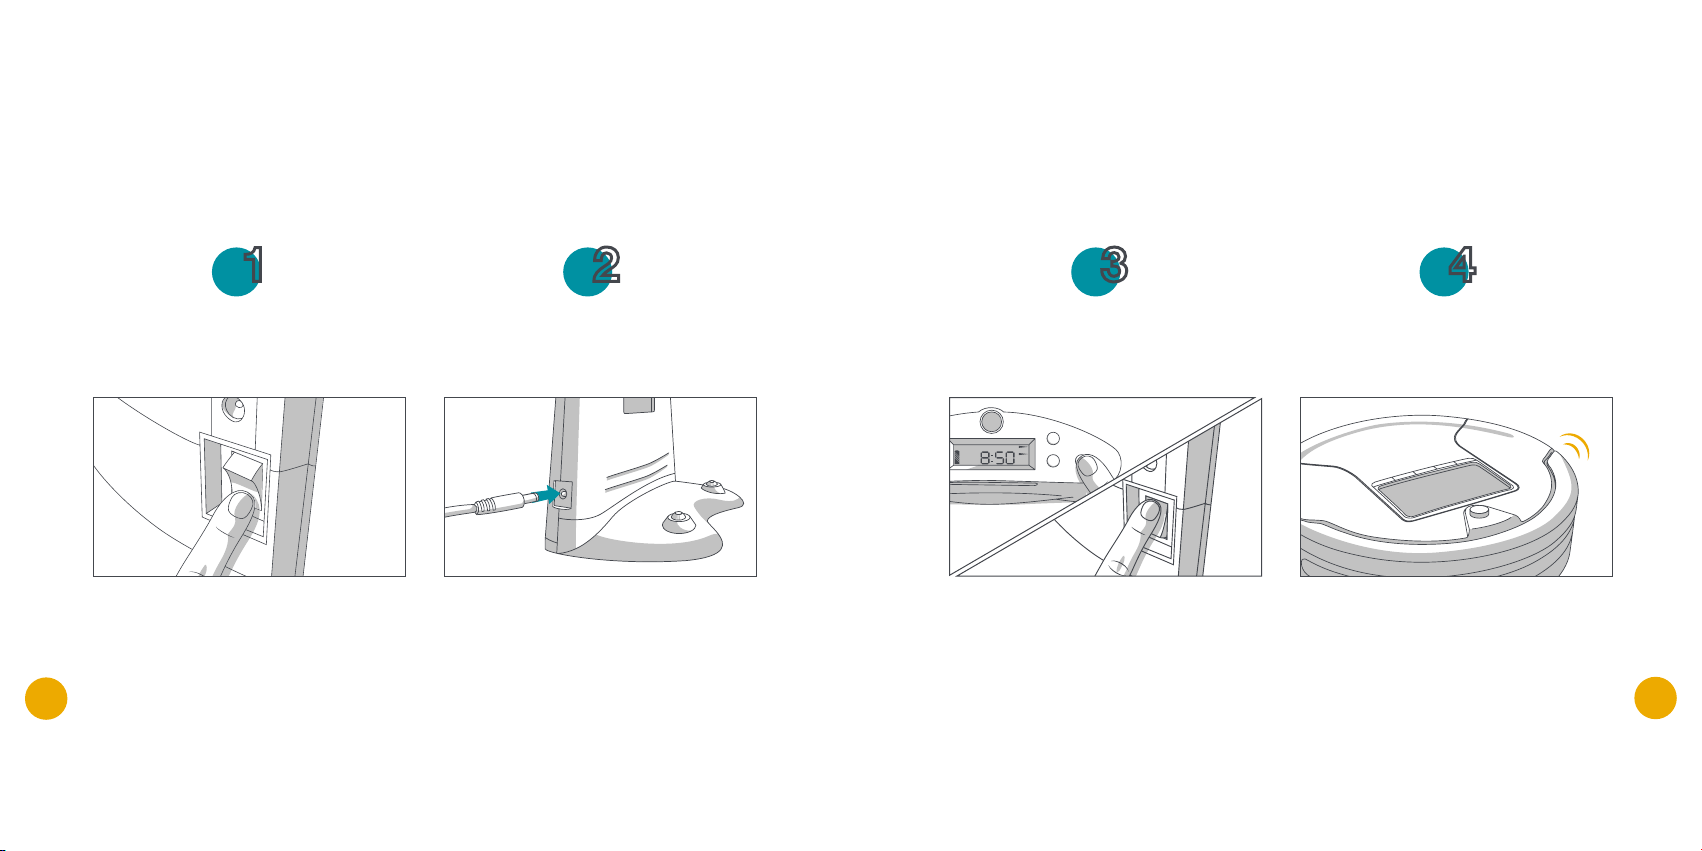
After installing Bob’s side brush, you must set him to charge.
To charge Bob:
Charge Bob
You may use the additional side brush and screws as spares.
1
1
2
2
Plug the charging adapter into the side
of the charging station.
Flip Bob over onto a flat surface. Place
the side brush over the empty socket
on Bob’s underside.
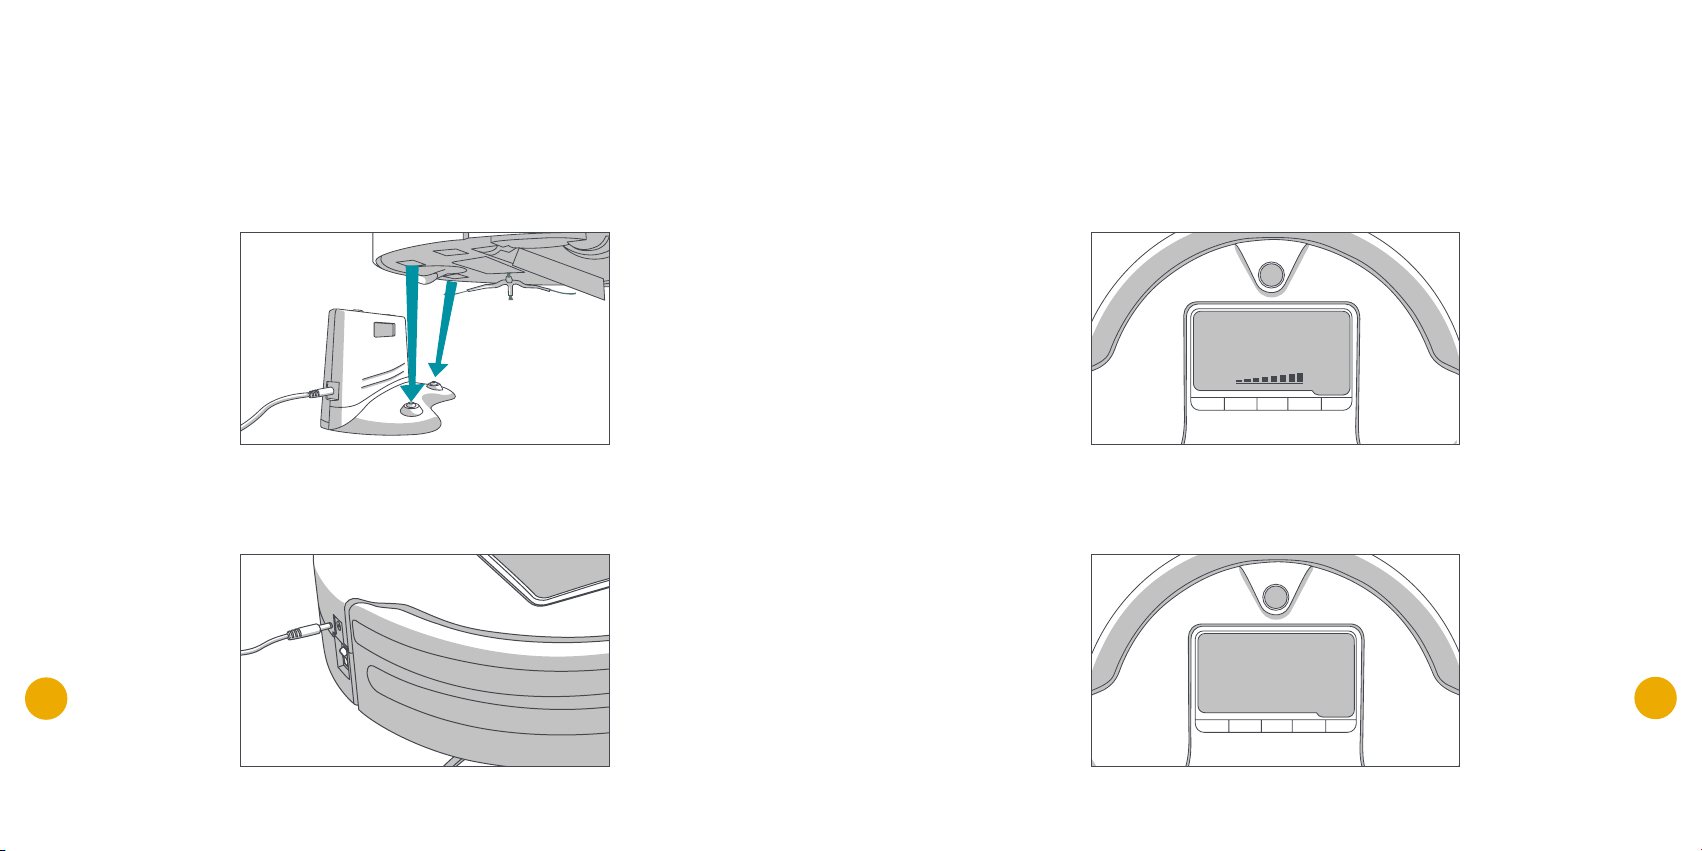
Place Bob on his charging station with
the metal plates on his underside sit-
ting on top of the nodes on his station.
Secure Bob’s side brush using the flat
head screwdriver and short screw.
If Bob can’t find his charging station
on his own, the station needs to be
synced (see page 32).
The charging station will save its last settings for up to 8 hours after being discon-
nected or turned off.

18 19
UV
DIRT
TROUBLE NR.
CAPACITY
AUTO SPOT WALL FOLLOW DOCK
MIN. CLEANING
CHARGING
READY
Bob is now ready to clean! First, flip his power switch ON. Then, press START on his
cover — or AUTO on his remote — and he will clean on his default setting (Robot
mode).
Bob’s First Clean
OR
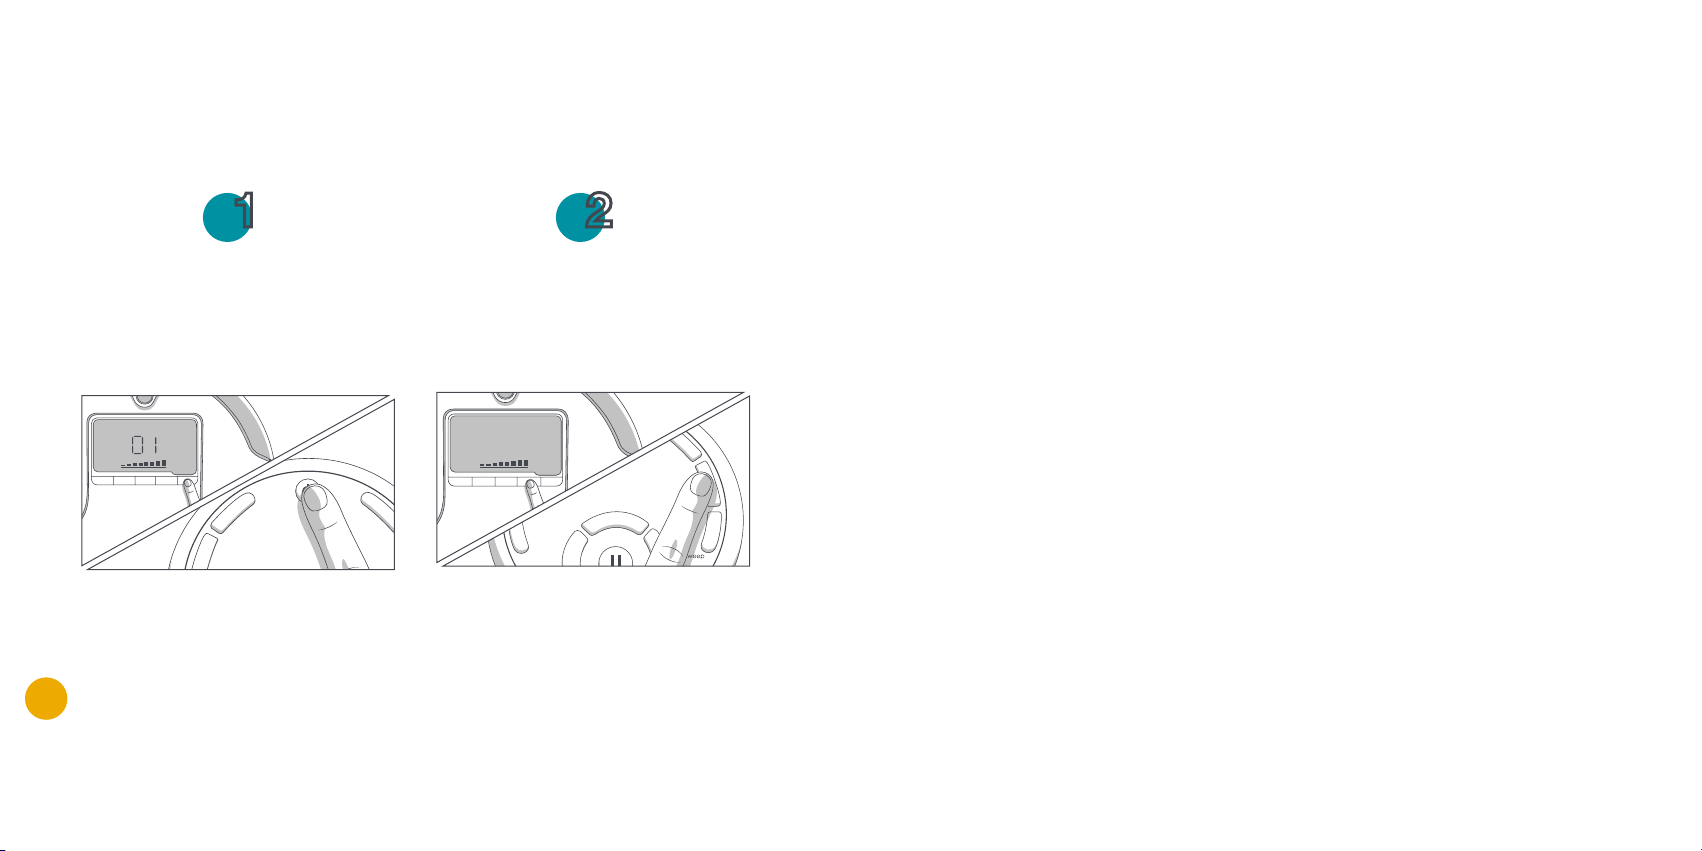
If Bob is left idle without charging or cleaning, his screen will go blank and he will
enter standby mode to preserve his battery. In standby mode, Bob will remain
asleep. You can also put Bob in and out of standby mode by pressing the power
button on his remote.
To get Bob back to cleaning:
Standby Mode
To wake Bob, press any button on his
cover or the power button on his remote.
Press START on his cover or AUTO on
his remote.
1
2
UV
DIRT
TROUBLE NR.
CAPACITY
AUTO SPOT WALL FOLLOW DOCK
MIN. CLEANING
CHARGING
READY
UV
DIRT
TROUBLE NR.
CAPACITY
AUTO SPOT WALL FOLLOW DOCK
MIN. CLEANING
CHARGING
READY
20
To send Bob to his charging station:
To wake Bob, press any button on his
cover or the power button on his remote.
Press CHARGE on Bob’s cover or remote.
1 2
UV
DIRT
TROUBLE NR.
CAPACITY
AUTO SPOT WALL FOLLOW DOCK
MIN. CLEANING
CHARGING
READY
UV
DIRT
TROUBLE NR.
CAPACITY
AUTO SPOT WALL FOLLOW DOCK
MIN. CLEANING
CHARGING
READY

Remote
Control
24 25
Power
• Puts Bob in and out of standby mode
Auto
• Bob will start cleaning on his default setting (Robot mode)
Corners
• Bob will clean along corners and walls (Wall Track™ mode)
UV
• Turns Bob's UV light OFF and ON again
Spot
• Bob will target a small area by traveling in a circle (Spiral Track™ mode)
Bob’s remote requires 2 AAA batteries (not included). Remove the batteries if you
are not using it on a regular basis. Keep the remote at room temperature.
1 Power
2 Auto
3 Corners
4 UV
5 Spot
6 Charge
7 Speed
8 Navigational Arrows
9 Pause
Remote Control
4
3 2 8 1 5 6
7
9
8
8
8
Flip Bob’s power switch
OFF to have him fully power
down. If Bob is left idle and
ON, he is in standby mode.
26 27
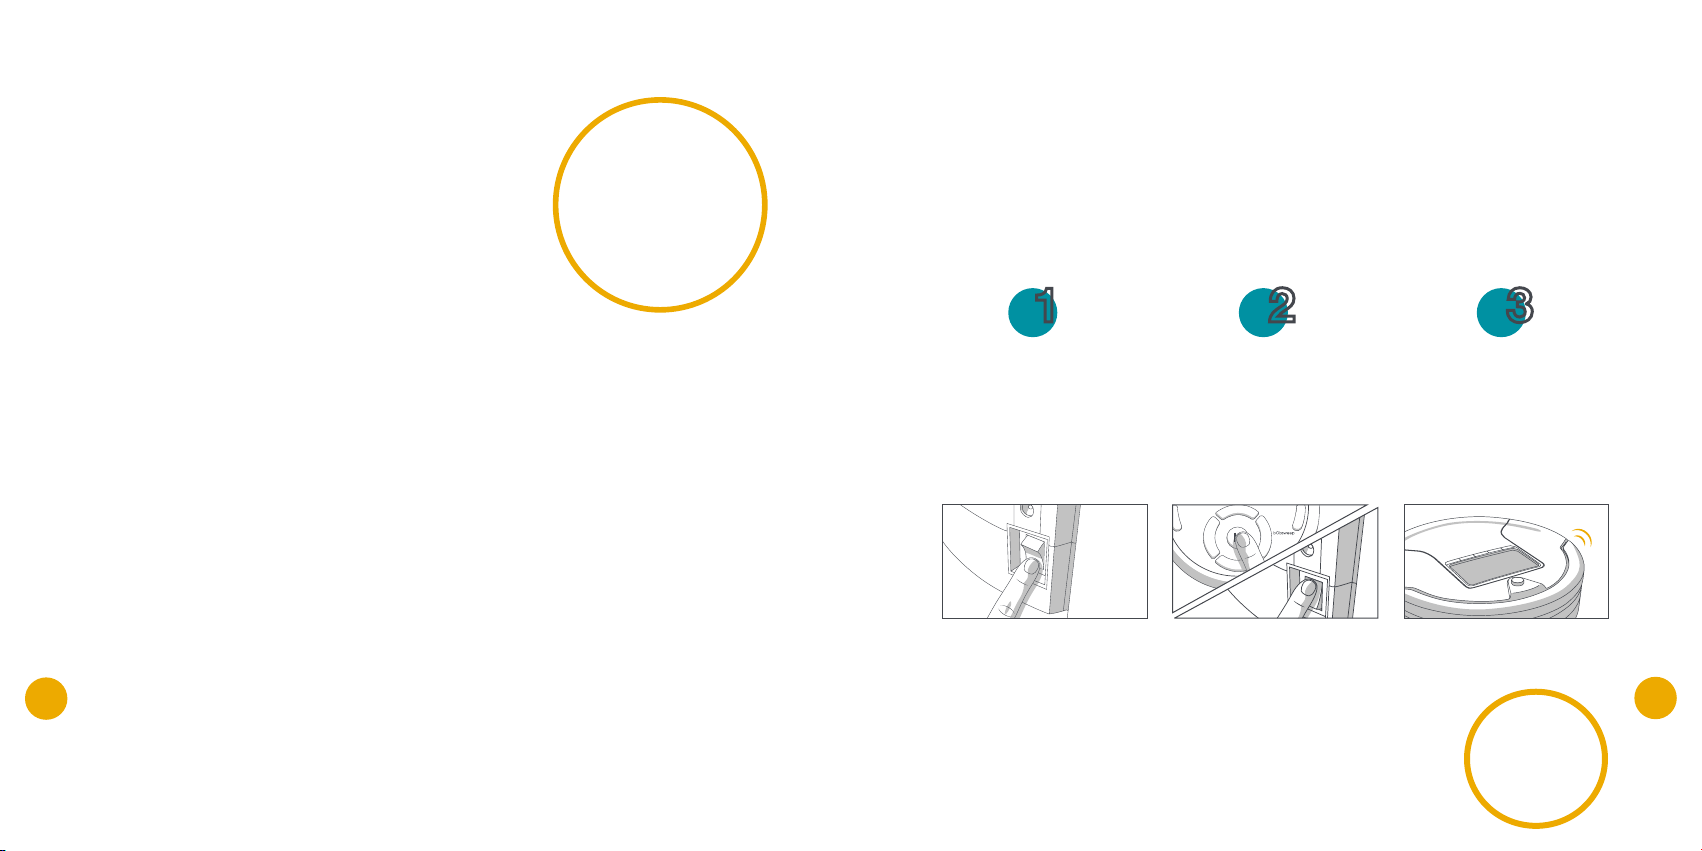
You will need to sync the remote if Bob is not responding to its commands. When
you do this, make sure Bob is not on his charging station.
To sync Bob’s remote:
If you do not hear
Bob chirp, repeat
the process.
Syncing Bob’s Remote
Flip Bob’s power switch
OFF.
While holding down the
PAUSE button on Bob’s
remote, flip Bob’s power
switch ON.
Bob will chirp twice to let
you know the sync was
successful.
1 3 2
Charge
• Sends Bob to his charging station
Speed
• Alternates between Bob's two speeds
Navigational buttons
• Guide Bob forward, backward, left, or right
Pause
• Pauses or resumes Bob’s movement
Hold down the navigational
buttons to keep Bob moving
in the desired direction.

Charging
Bob
30 31
• Position the charging station against a wall on a hard, flat surface.
• Make sure there is at least 10 feet (3 m) of open space to the front and 2 feet
(0.5 m) to the sides.
The transmitter on Bob’s station
should be clean and free of dust
and debris.
Charging Station Placement
6 – 10 ft ( 2 – 3 m)
2 ft (0.5 ft)
2 ft (0.5 m)
Bob automatically returns to his charging station when his battery reaches 15%
capacity.
You can also send him to his charging station at any time by pressing CHARGE
on his cover or remote.
Auto Charging
UV
DIRT
TROUBLE NR.
CAPACITY
AUTO SPOT WALL FOLLOW DOCK
MIN. CLEANING
CHARGING
READY
OR
32 33
You will need to sync the charging station if Bob has trouble finding it.
To sync the charging station:
Syncing Bob’s Charging Station
SET Su Mo Tu We Th Fr Sa
CLK
1
2
3 1 4 2
While holding down the Adjust/Select
button on the charging station, flip Bob’s
power switch ON.
Flip Bob's power switch OFF. Bob will chirp twice to let you know the
sync was successful.
Plug the charging adapter into the
charging station.
34 35
Alternatively, unplug the adapter from the charging station and plug it directly
into the inlet above Bob's power switch.
As soon as his battery is full, Bob will display the word READY only.
Manual Charging
UV
DIRT
TROUBLE NR.
CAPACITY
AUTO SPOT WALL FOLLOW DOCK
MIN. CLEANING
CHARGING
READY
UV
DIRT
TROUBLE NR.
CAPACITY
AUTO SPOT WALL FOLLOW DOCK
MIN. CLEANING
CHARGING
READY
To charge Bob manually, place him on his charging station with the metal plates
on his underside sitting on top of the nodes on his station.
When Bob is charging, the battery bars and the word CHARGING flash.
Charging Time
 Loading...