

BMW 7 Series 2007 Owner's Manual
Owner's Manual
Contents
A - Z
Online Edition for Part no. 01 41 0 013 316 - © 02/07 BMW AG
for Vehicle
The Ultimate
Driving Machine

Online Edition for Part no. 01 41 0 013 316 - © 02/07 BMW AG

750i
Online Edition for Part no. 01 41 0 013 316 - © 02/07 BMW AG
750Li
760i
760Li
Owner's Manual for Vehicle
Congratulations, and thank you for choosing a BMW.
Thorough familiarity with your vehicle will provide you with
enhanced control and security when you drive it. We therefore
have this request:
Please take the time to read this Owner's Manual and familiarize
yourself with the information that we have compiled for you
before starting off in your new vehicle. It contains important data
and instructions intended to assist you in gaining maximum use
and satisfaction from your BMW's unique range of technical features. The manual also contains information on maintenance
designed to enhance operating safety and contribute to maintaining the value of your BMW throughout an extended service
life.
This manual is supplemented by a Service and Warranty Information Booklet for US models or a Warranty and Service Guide
Booklet for Canadian models.
We wish you an enjoyable driving experience.
BMW AG

© 2007 Bayerische Motoren Werke
Online Edition for Part no. 01 41 0 013 316 - © 02/07 BMW AG
Aktiengesellschaft
Munich, Germany
Reprinting, including excerpts,
only with the written consent of
BMW AG, Munich.
Order No. 01 41 0 013 316
US English II/07, 07 03 450
Printed in Germany
Printed on environmentally friendly paper,
bleached without chlorine, suitable for recycling.

Contents
Online Edition for Part no. 01 41 0 013 316 - © 02/07 BMW AG
The fastest way to find specific topics is to use
the index, refer to page 232.
Using this Owner's Manual
4 Notes
At a glance
10 Cockpit
16 iDrive
23 Voice command system
Controls
30 Opening and closing
43 Adjusting
54 Transporting children safely
57 Driving
75 Everything under control
86 Technology for comfort, convenience
and safety
100 Lamps
103 Climate
111 Practical interior accessories
Driving tips
122 Things to remember when driving
Communications
178 Telephone overview
181 Getting started
184 Using the phone
189 BMW Assist
Mobility
198 Refueling
200 Wheels and tires
207 Under the hood
211 Maintenance
213 Replacing components
219 Giving and receiving assistance
Reference
226 Technical data
230 Short commands of the voice command
system
232 Everything from A to Z
Navigation
130 Starting navigation system
131 Destination input
144 Route guidance
149 What to do if …
Entertainment
152 On/off and settings
156 Radio
163 CD player
165 CD changer
169 External audio device
170 DVD changer
Reference At a glanceControlsDriving tipsCommunications NavigationEntertainmentMobility

Notes
Online Edition for Part no. 01 41 0 013 316 - © 02/07 BMW AG
Using this Owner's Manual
Notes
In compiling this Owner's Manual we have
made every effort to furnish you with a convenient reference source affording quick access
to all the essentials. The fastest way to find
detailed information on any specific subject is
to turn to the comprehensive index at the back
of the manual. For a brief initial overview, please
refer to the first chapter.
Should the day come when you decide to sell
your BMW, please remember to make certain
that the new owner receives this Owner's Manual; it is an important part of the vehicle.
Additional sources of information
If you have any additional questions, your
BMW center will be glad to advise you.
You can find information on BMW, e.g. on technology, on the Internet at www.bmwusa.com.
Symbols used
Indicates precautions that must be followed precisely in order to avoid the pos-
sibility of personal injury and serious damage to
the vehicle.<
Indicates information that will assist you
in gaining the optimum benefit from your
vehicle and enable you to care more effectively
for your vehicle.<
Refers to measures that can be taken to
help protect the environment.<
< Marks the end of a specific item of informa-
tion.
*
Indicates special equipment, country-specific equipment and optional extras, as well as
equipment and functions not yet available at the
time of printing.
"..." Identifies Control Display texts used to
select individual functions.
These sections contain information on
using the voice command system.
{...} Verbal instructions to use with the voice
command system.
{{...}} Identifies the answers generated by the
voice command system.
Symbols on vehicle components
Indicates that you should consult the relevant section of this Owner's Manual for
information on a particular part or assembly.
4

Your individual vehicle
Online Edition for Part no. 01 41 0 013 316 - © 02/07 BMW AG
In purchasing your BMW, you have decided in
favor of a model with individualized equipment
and features. This Owner's Manual describes
the entire array of options and equipment available with a specific BMW model.
Please bear in mind that the manual may contain information on accessories and equipment
that you have not specified for your own vehicle.
Sections describing options and special equip-
*
ment are marked by asterisks
identifying possible differences between the
descriptions in this manual and your own vehicle's equipment.
If equipment in your BMW is not described in
this Owner's Manual, please refer to the accompanying Supplementary Owner's Manuals.
to assist you in
Editorial notice
BMW pursues a policy of continuous, ongoing
development that is conceived to ensure that
our vehicles continue to embody the highest
quality and safety standards combined with
advanced, state-of-the-art technology. For this
reason, the features described in this Owner's
Manual may in rare cases differ from those on
your vehicle.
For your own safety
Maintenance and repairs
Advanced technology, e.g. the use of
modern materials and high-performance
electronics, requires specially adapted maintenance and repair methods. Therefore, have corresponding work on your BMW performed only
by your BMW center or a workshop that works
according to BMW repair procedures with correspondingly trained personnel. If this work is
not carried out properly, there is a danger of
subsequent damage and related safety hazards.<
Parts and accessories
For your own safety, use genuine parts
and accessories approved by BMW.
When you purchase accessories tested and
approved by BMW and Genuine BMW Parts,
you simultaneously acquire the assurance that
they have been thoroughly tested by BMW to
ensure optimum performance when installed
on your vehicle.
BMW warrants these parts to be free from
defects in material and workmanship.
BMW will not accept any liability for damage
resulting from installation of parts and accessories not approved by BMW.
BMW cannot test every product made by other
manufacturers to verify if it can be used on a
BMW safely and without risk to either the vehicle, its operation, or its occupants.
Genuine BMW Parts, BMW Accessories and
other products approved by BMW, together
with professional advice on using these items,
are available from all BMW centers.
Installation and operation of non-BMW
approved accessories such as alarms, radios,
amplifiers, radar detectors, wheels, suspension
components, brake dust shields, telephones,
including operation of any mobile phone from
within the vehicle without using an externally
mounted antenna, or transceiver equipment, for
instance, CBs, walkie-talkies, ham radios or
similar accessories, may cause extensive damage to the vehicle, compromise its safety, interfere with the vehicle's electrical system or affect
5
Reference At a glanceControlsDriving tipsCommunications NavigationEntertainmentMobility

the validity of the BMW Limited Warranty. See
Online Edition for Part no. 01 41 0 013 316 - © 02/07 BMW AG
your BMW center for additional information.<
Maintenance, replacement, or repair of
Notes
the emission control devices and systems may be performed by any automotive
repair establishment or individual using any certified automotive part.<
California Proposition 65 Warning
California laws require us to issue the following
warning:
Engine exhaust and a wide variety of
automobile components and parts,
including components found in the interior furnishings in a vehicle, contain or emit chemicals
known to the State of California to cause cancer
and birth defects and reproductive harm. In
addition, certain fluids contained in vehicles and
certain products of component wear contain or
emit chemicals known to the State of California
to cause cancer and birth defects or other
reproductive harm.
Battery posts, terminals and related accessories contain lead and lead compounds. Wash
your hands after handling. Used engine oil contains chemicals that have caused cancer in laboratory animals. Always protect your skin by
washing thoroughly with soap and water.<
Service and warranty
We recommend that you read this publication
thoroughly.
Your BMW is covered by the following warranties:
> New Vehicle Limited Warranty
> Rust Perforation Limited Warranty
> Federal Emissions System Defect Warranty
> Federal Emissions Performance Warranty
> California Emission Control System Limited
Warranty
Detailed information about these warranties is
listed in the Service and Warranty Information
Booklet for US models or in the Warranty and
Service Guide Booklet for Canadian models.
Reporting safety defects
For US customers
The following only applies to vehicles owned
and operated in the US.
If you believe that your vehicle has a defect
which could cause a crash or could cause injury
or death, you should immediately inform the
National Highway Traffic Safety Administration
(NHTSA) in addition to notifying BMW of North
America, LLC, P.O. Box 1227, Westwood,
New Jersey 07675-1227, Telephone
1-800-831-1117.
If NHTSA receives similar complaints, it may
open an investigation, and if it finds that a safety
defect exists in a group of vehicles, it may order
a recall and remedy campaign. However,
NHTSA cannot become involved in individual
problems between you and your dealer or
BMW of North America, LLC.
To contact NHTSA, you may call the Vehicle
Safety Hotline toll-free at 1-888-327-4236
(TTY: 1-800-424-9153); go to
http://www.safercar.gov; or write to:
Administrator, NHTSA, 400 Seventh Street,
SW., Washington, DC 20590. You can also
obtain other information about motor vehicle
safety from http://www.safercar.gov
6

For Canadian customers
Online Edition for Part no. 01 41 0 013 316 - © 02/07 BMW AG
Canadian customers who wish to report a
safety-related defect to Transport Canada,
Defect Investigations and Recalls, may call
1-800-333-0510 toll-free from anywhere in
Canada or 1-613-993-9851 from the Ottawa
region and from other countries, or contact
Transport Canada by mail at: Transport
Canada, ASFAD, Place de Ville, Tower C,
330 Sparks Street, Ottawa, ON, K1A 0N5.
You can also obtain other information about
motor vehicle safety from http://www.tc.gc.ca
7
Reference At a glanceControlsDriving tipsCommunications NavigationEntertainmentMobility

Online Edition for Part no. 01 41 0 013 316 - © 02/07 BMW AG

At a glance
Online Edition for Part no. 01 41 0 013 316 - © 02/07 BMW AG
At a glance
This overview of buttons, switches and displays
is intended to orient you in your vehicle's
operating environment. It will also assist you
in becoming acquainted with the control
concepts and options available for
operating the various systems.

Cockpit
Online Edition for Part no. 01 41 0 013 316 - © 02/07 BMW AG
All around the steering wheel: controls and displays
Cockpit
1 Roller sun blind for rear window*112
2 Rear window safety switch 40
3 Power windows 40
4 Exterior mirrors 50
10
5 Parking brake 58
6 Parking lamps 100
Low beams 100
Daytime running lamps
Automatic headlamp control 100
Daytime running lamps
Adaptive Head Light*100
7 Instrument lighting 101
*
8 BMW Night Vision
97
*
100
*
100
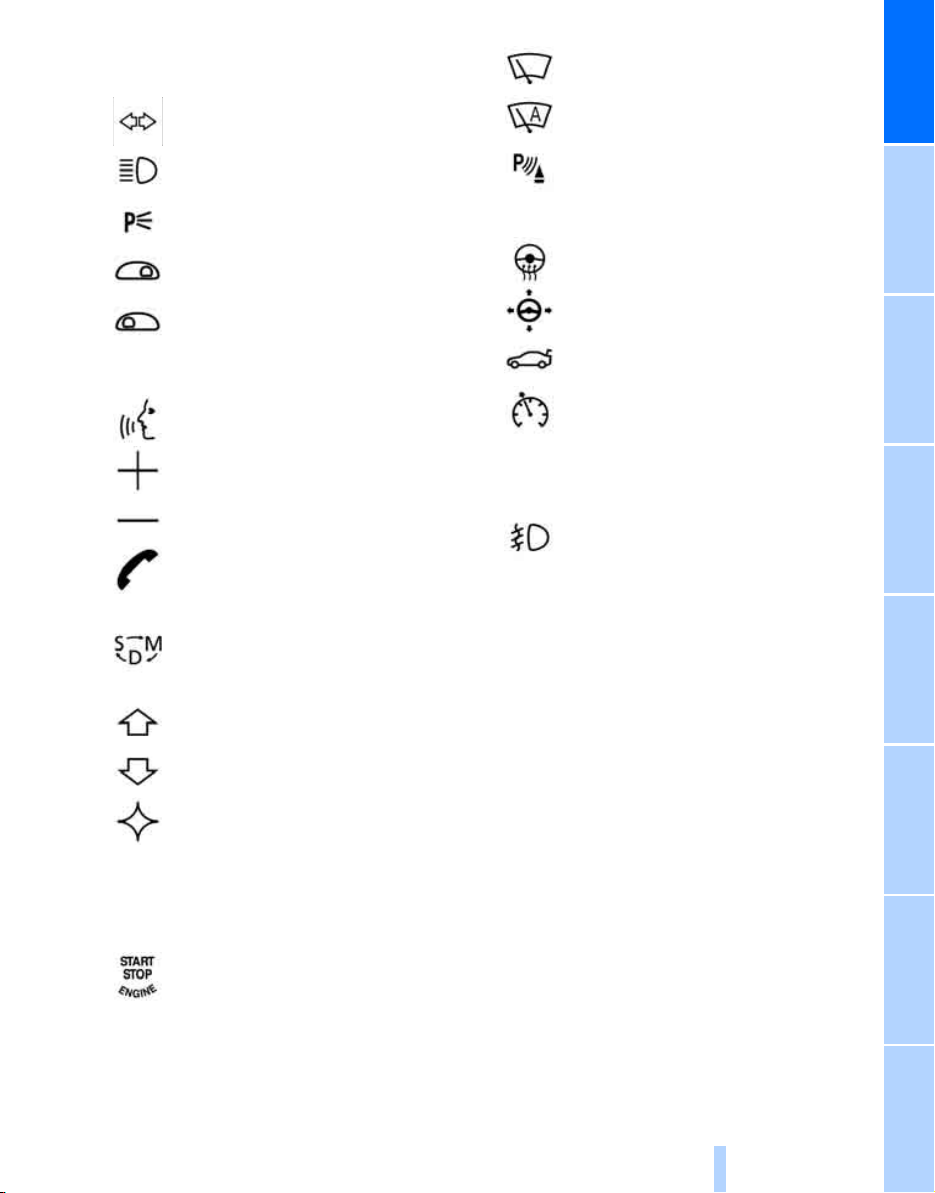
9 Steptronic: upshifting 63
Online Edition for Part no. 01 41 0 013 316 - © 02/07 BMW AG
10 Steptronic: downshifting 63
11 Turn signals 65
High beams,
headlamp flasher 101
Roadside parking lamps 101
Computer 76
Check Control 80
Computer 76
12 Buttons on steering wheel
Voice command system
activation/deactivation 23
Entertainment volume,
increasing/decreasing 152
Volume of hands-free unit,
increasing/decreasing 179
Mobile phone:
Calling, redialing, accepting call or
ending call 184
Sport program and manual
operation of the automatic
transmission 63
Selecting radio station 156
Selecting music track 163, 166
Skipping chapter
*
172
17 Windshield wipers 65
Rain sensor 65
At a glance
*
18 PDC Park Distance Control
19 Horn, the entire surface
20 Steering wheel heater
Steering wheel adjustment 51
21 Opening luggage compartment
lid 36
*
22 Programmable cruise control 67
Active cruise control
23 Fog lamps 101
Front fog lamps
24 Unlocking hood 207
*
*
86
52
69
Programmable button 52
13 Info Display 12
14 Automatic transmission 62
15 Ignition lock 57
16 Switching ignition on/off 57
and Starting/stopping engine 57
11
Reference ControlsDriving tipsCommunications NavigationEntertainmentMobility
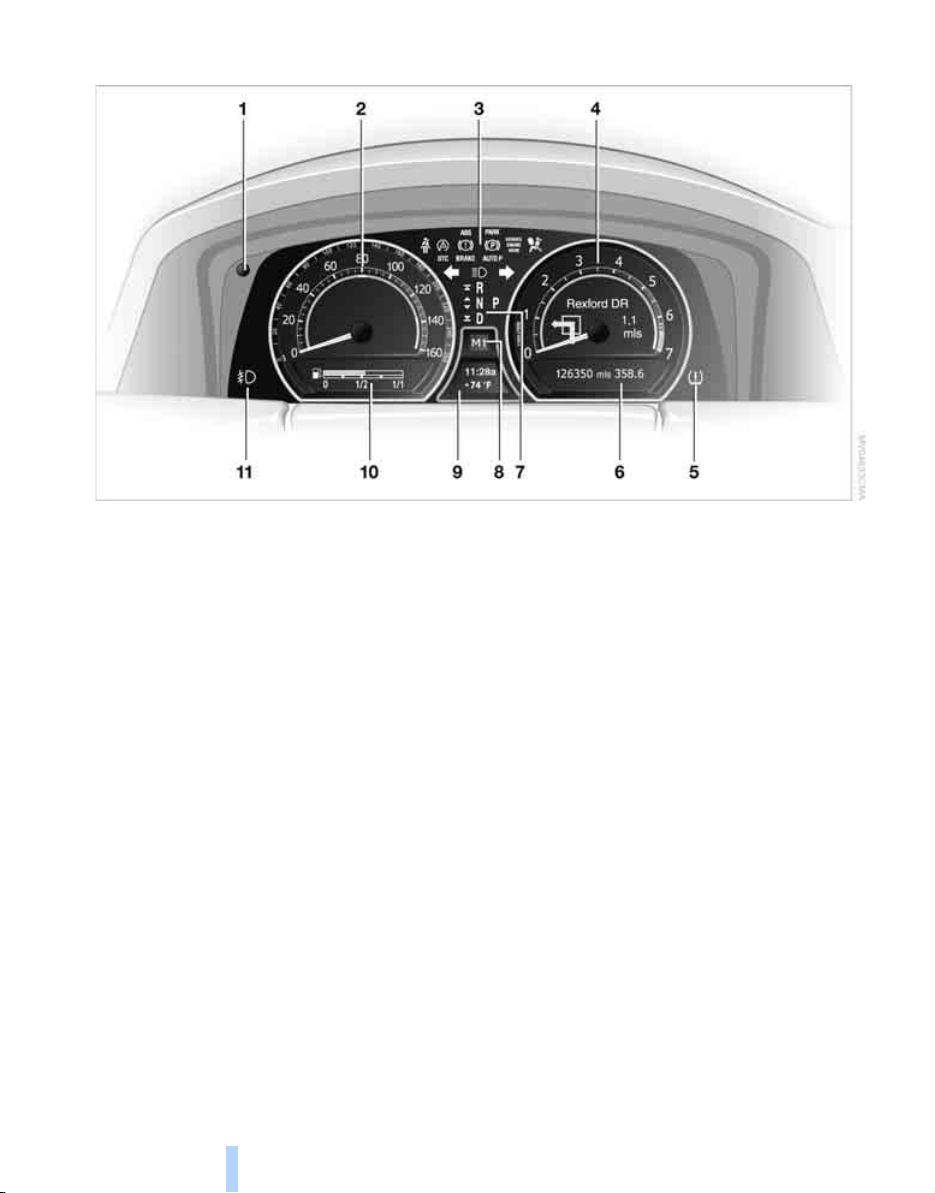
Info Display
Online Edition for Part no. 01 41 0 013 316 - © 02/07 BMW AG
Cockpit
1 Resetting trip odometer to zero 75
2 Speedometer with display for
> Programmable cruise control 67
> Active cruise control
> Speed limit 82
3 Indicator and warning lamps 13
4 Tachometer 75
Route guidance of navigation
system
*
144
5 Display for
> Flat Tire Monitor
> Tire Pressure Monitor
6 Display for
> Voice command system
> Odometer and trip odometer 75
> Text messages in Check Control 80
> Computer 76
7 Transmission range selection 62
8 Automatic transmission program
display 62
*
69
*
91
*
93
*
23
9 Display for
> Outside temperature 75
> Clock 75
> Indicator and warning lamps 80
10 Display for
> Computer with fuel gauge 76
> Remaining driving distance for service
requirements 78
11 Fog lamps 101
12

Indicator and warning lamps
Online Edition for Part no. 01 41 0 013 316 - © 02/07 BMW AG
The concept
In urgent cases, this information will be shown
as soon as the corresponding lamp comes on.
Indicator lamps without text messages
The following indicator lamps indicate that the
particular functions are active:
Turn signals 65
With parking brake released 59
With parking brake set 58
At a glance
Control and warning lamps can light up in various combinations and colors.
When the engine is started or the ignition is
switched on, some lamps are checked for
proper operation and light up briefly in the process.
Explanatory text messages
Text messages on Info Display explain the
meaning of the indicator and warning lamps
shown.
Warning lamp on Canadian models
Front fog lamps 101
DTC Dynamic Traction Control 88
High beams/headlamp flasher 101
DSC Dynamic Stability Control,
flashes 88
You can view additional information, e.g.
regarding the cause of a malfunction and the
corresponding action to take, in the Check Control, refer to page 80.
13
Reference ControlsDriving tipsCommunications NavigationEntertainmentMobility

Comfort area: controls and displays
Online Edition for Part no. 01 41 0 013 316 - © 02/07 BMW AG
Cockpit
14
1 Glass sunroof, electric*41
Online Edition for Part no. 01 41 0 013 316 - © 02/07 BMW AG
2 Memory buttons for integrated universal
remote control
3 Reading lamps 102
4 Interior lamps 101
5 Passenger airbag status lamp 96
6 Initiating an emergency call
7 Control Display 16
8 Temperature, left side of passenger com-
partment: turn,
maximum cooling: press 106
9 Air volume, left side of passenger compart-
ment: turn 106
Defrosting windows and removing condensation: press 106
10 Hazard warning flashers
11 Air volume, right side of passenger
compartment 106
12 Temperature, right side of passenger com-
partment: turn,
residual heat: press 106
13 Rear window defroster
14 Air conditioner mode 107
15 Opening the glove compartment 113
16 Automatic air distribution and airflow
as well as intensity of the AUTO program,
right side of passenger compartment 104
17 Starting scan
> for stations 152
> for tracks 152
18 Central locking system 34
19 Selecting AM or FM waveband
20 Selecting radio, CD player, and CD changer
21 Controller 16
22 button and programmable
button 16
23 Snap-in adapter 181
*
111
*
219
24 Seat adjustment 43
Heated seats*49
Active seat ventilation
Active seat for driver
Seat, mirror and steering wheel
memory 46
25 Glasses compartment 115
26 Storage compartments 115
27 Switching audio sources on/off and
adjusting volume 153
28 Retracting telephone keypad 179
29 Automatic air distribution and airflow
as well as intensity of the AUTO program,
left side of passenger compartment 104
30 Outside air/AUC Automatic recirculated-air
control/recirculated air 105
31 Switching off automatic climate
control 105
*
50
*
50
At a glance
15
Reference ControlsDriving tipsCommunications NavigationEntertainmentMobility
iDrive
Online Edition for Part no. 01 41 0 013 316 - © 02/07 BMW AG
iDrive combines the functions of a multitude of
iDrive
switches. This allows these functions to be
operated from a central position. The following
introduction illustrates how easy iDrive is to
Controls
use. The control of individual functions is
described in connection with the relevant
equipment.
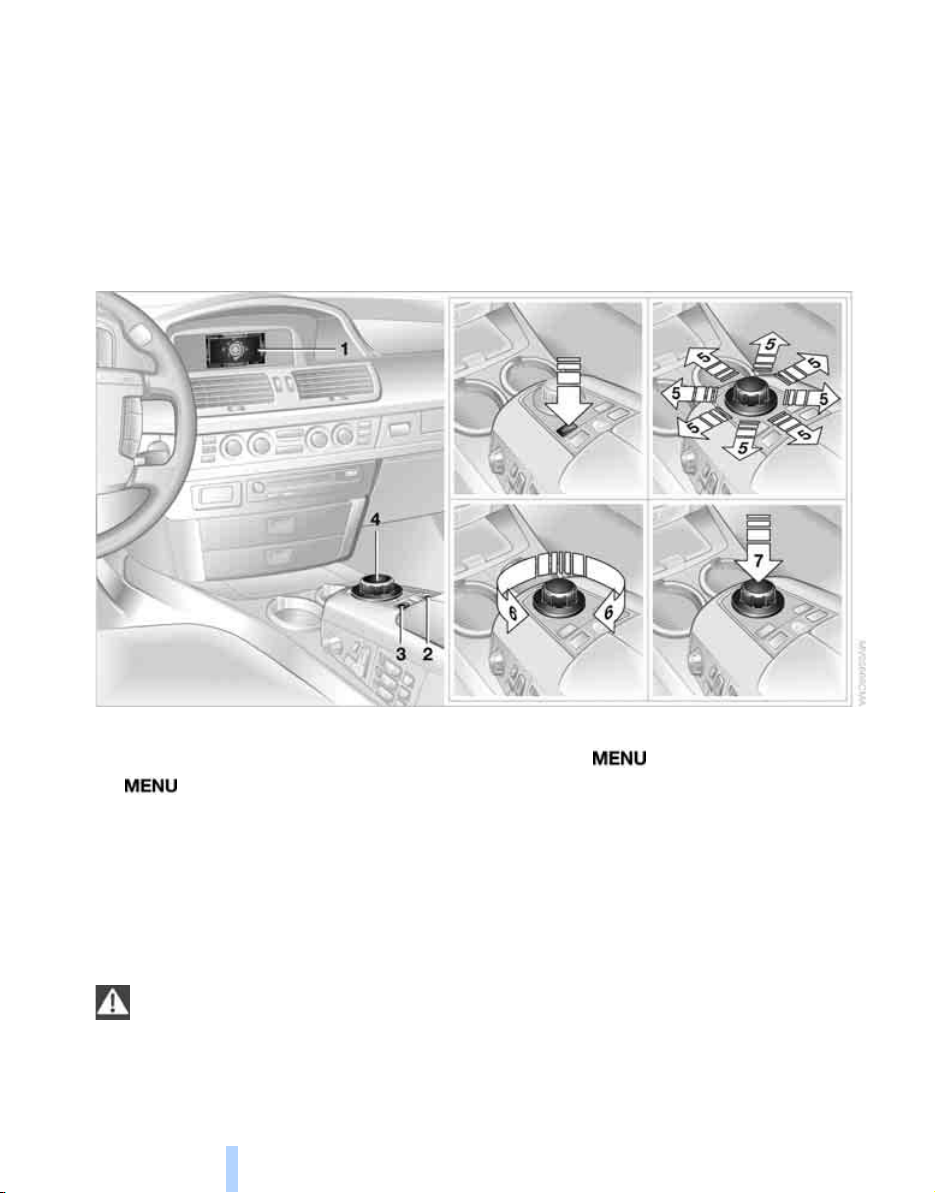
1 Control Display
2 Programmable button 52
3 button
Opening start menu
4 Controller
You can use the controller to select menu
items and make settings:
> move in four directions, arrows 5
> turn, arrow 6
> press, arrow 7
To avoid becoming distracted and posing
an unnecessary hazard, both to your own
vehicle's occupants and to other road users:
never attempt to use the controls or make
entries unless traffic and road conditions
allow.<
16
Switching Control Display off/on
1. Press the button to open the start
menu.
2. Press the controller.
Press the controller again to switch the screen
back on.

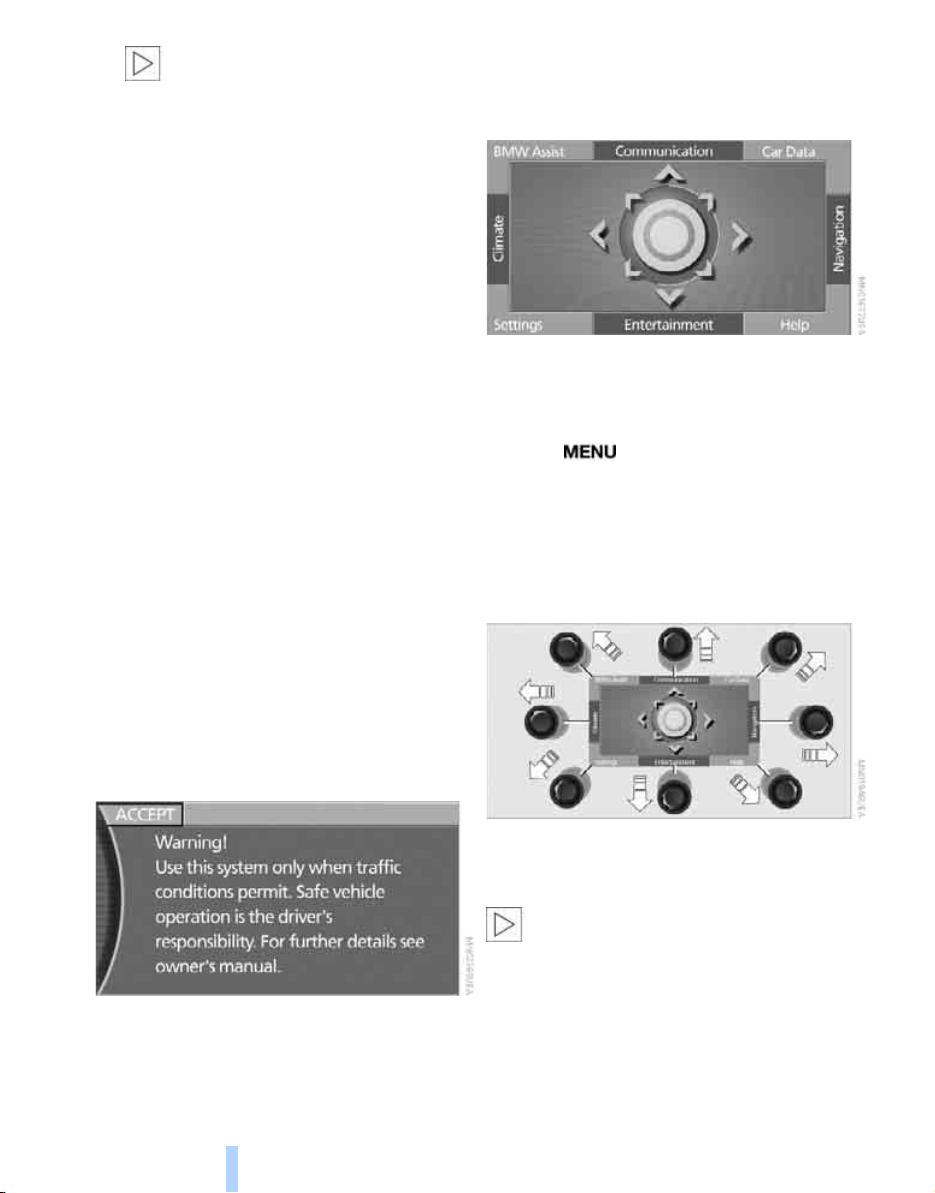
Menus on Control Display
Online Edition for Part no. 01 41 0 013 316 - © 02/07 BMW AG
At a glance
You can select from an extended range of functions and setting options:
1 BMW Assist
2 Communication
> Using the phone 184
3 Car Data
> Computer 76
> Trip computer 78
> Speed limit 82
> Stopwatch 83
> Assistance window
> Engine oil level 208
> Service required 78
> Check Control messages 80
*
189
*
for onboard data 83
4 Navigation
> Destination input 131
> Route guidance 144
5 Help
> Brief help text displays 21
> Menu name for menu change 19
6 Entertainment
> Radio 156
> CD player
> CD changer
> External audio device 169
> DVD changer
*
130
*
163
*
165
*
170
17
Reference ControlsDriving tipsCommunications NavigationEntertainmentMobility
iDrive
Online Edition for Part no. 01 41 0 013 316 - © 02/07 BMW AG
DVDs can only be played on the rear
seat screen, refer to Rear seat
*
screen
7 Settings
> Parking brake 58
> PDC Park Distance Control 86
> EDC Electronic Damping Control 89
> Programmable buttons 52
> FTM Flat Tire Monitor
> TPM Tire Pressure Monitor
> Time and date 84
> Language 84
> Units of measure and display format 84
> Brightness 85
> Rear seat screen
> Pairing mobile phone with vehicle 182
8 Climate
> Intensity of AUTO program 104
> Air volume 106
> Heated seats
> Parked car ventilation 109
> Extra, e.g. rear air conditioner 108
on page 21.<
*
*
49
21
*
90
*
91
The message automatically disappears after
approx. 25 seconds.
Start menu
You can access all functions of iDrive via eight
menu items.
Opening start menu
Press the button.
Opening the start menu from a menu:
> Move the controller toward the currently
active menu.
> Move the controller twice in one direction.
Selecting menu
Basic operation
Once the radio ready position is reached, the
following message appears on the Control Display:
To clear the message:
Press the controller.
This displays the start menu.
18
From the start menu, eight menus can be
accessed by moving the controller in the appropriate directions.
In a menu, you can change directly into a
new menu by moving in the corresponding direction, without having to open the start
menu first.
Moving in the direction that corresponds to the
last menu used brings you back to the last item
used in this menu.<
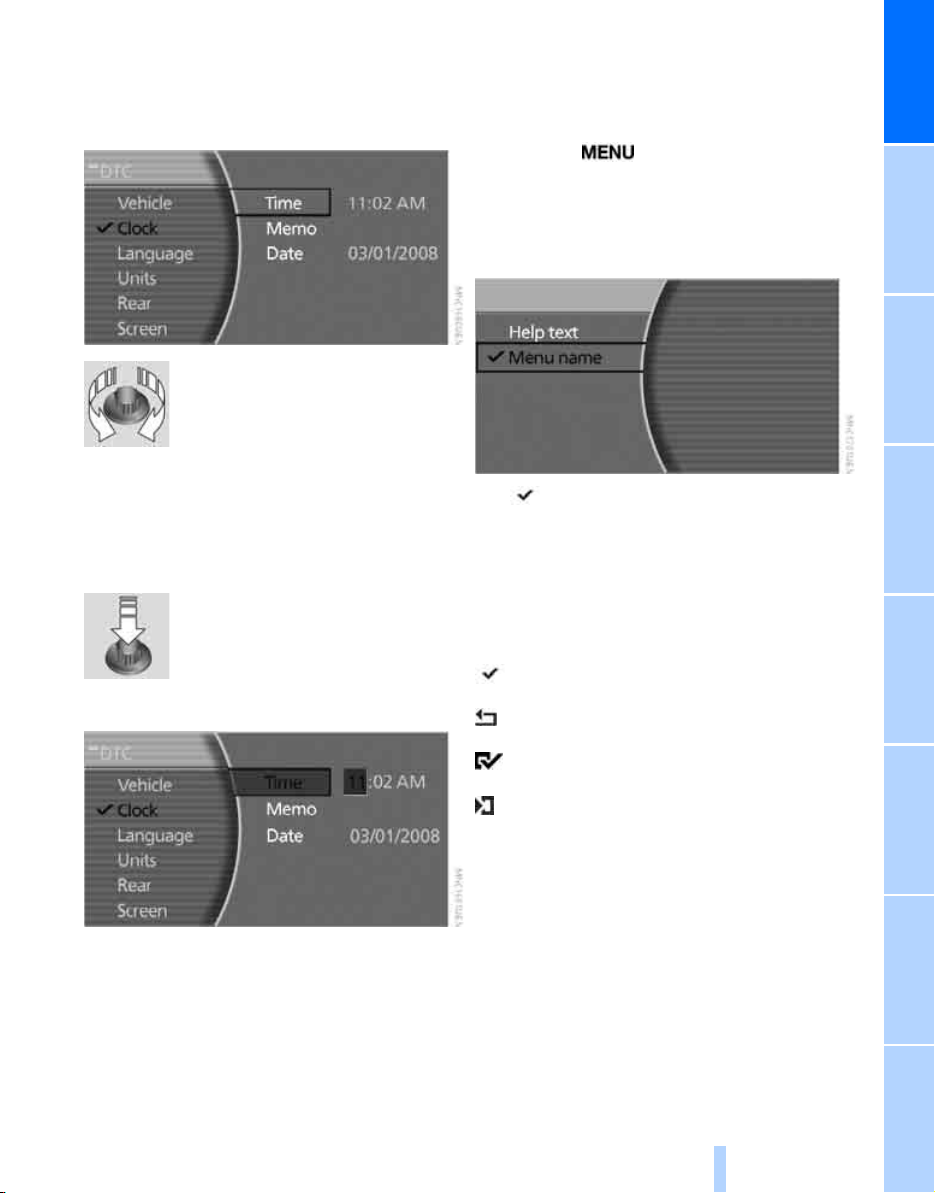
Selecting menu items
Online Edition for Part no. 01 41 0 013 316 - © 02/07 BMW AG
To edit a function, select the corresponding
menu item. Menu items shown in white can be
selected.
Turn the controller
The highlight moves.
To change between the menu
items on the left and right side of
the Control Display, continue to turn the controller at the beginning or end of a list. The highlight moves to the other side of the Control Display.
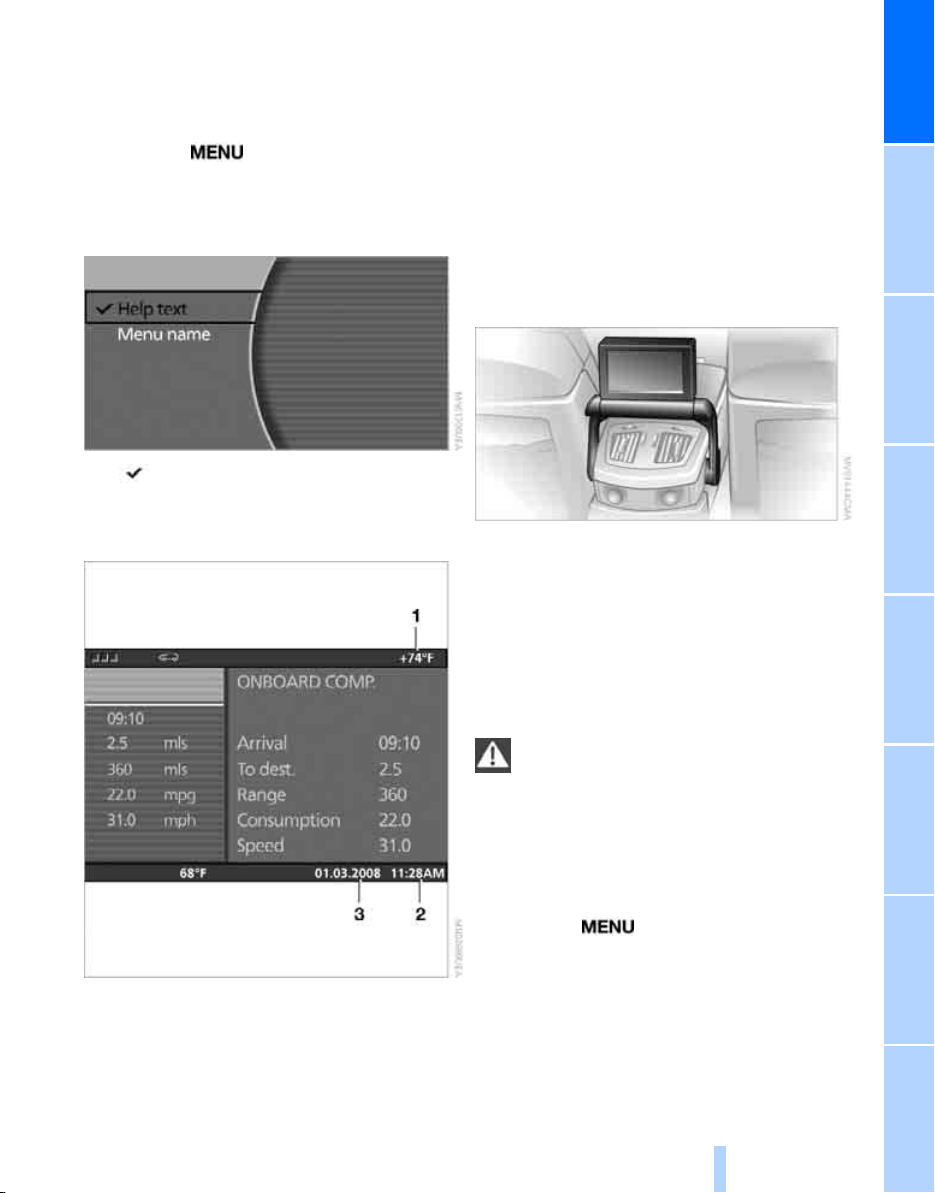
Displaying and hiding menu name
You can program the system to display the
menu name each time you proceed to a new
menu.
1. Press the button to open the start
menu.
2. Move the controller toward "Help".
3. Select "Menu name" and press the control-
ler.
The symbol indicates the menu that is currently activated. The menu name is displayed.
At a glance
Activating menu item
Press the controller.
Changing settings
1. Turn the controller to change the setting.
2. Press the controller to adopt the setting.
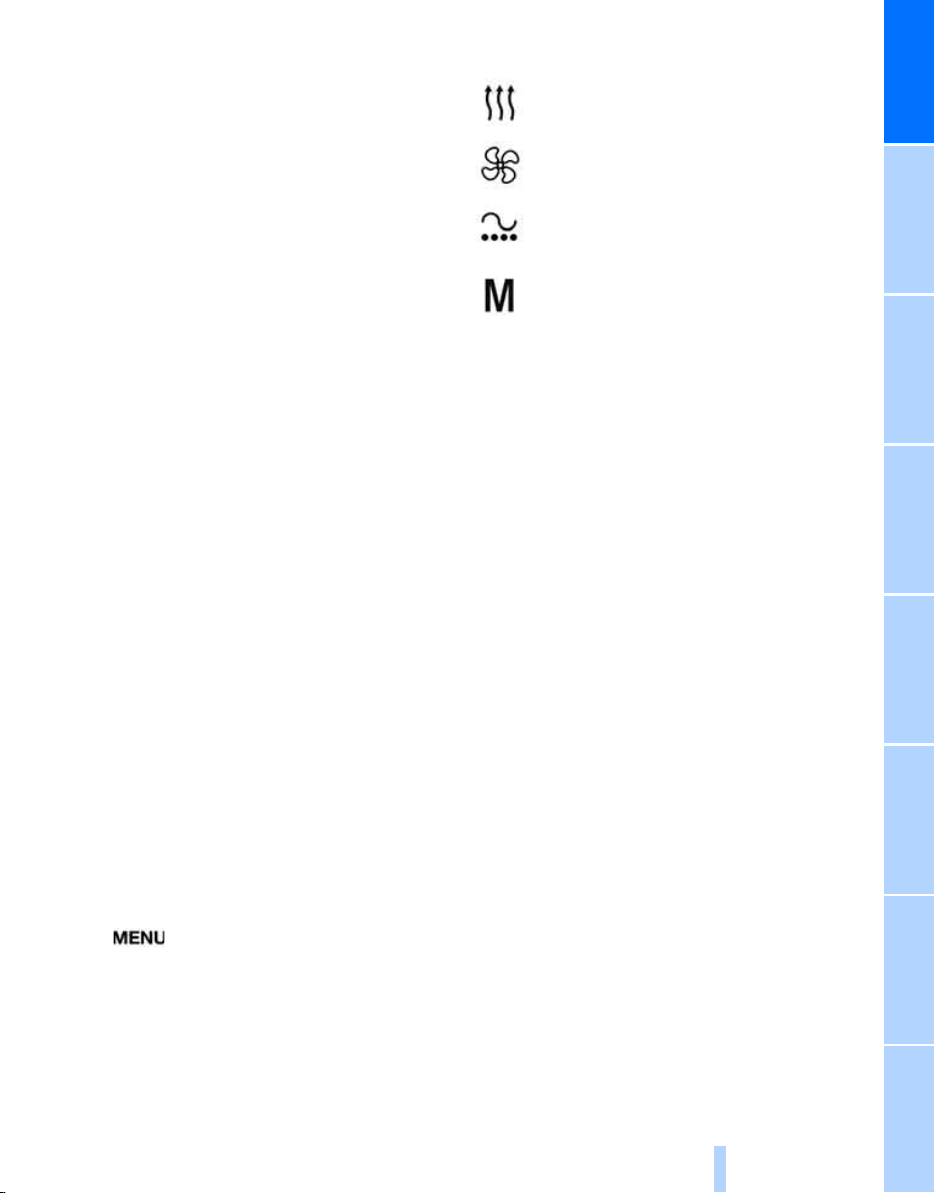
Symbols
Some functions and information are displayed
in the form of symbols:
The function is switched on.
Back.
The function is switched on.
"Split": to show the current display in the
assistance window.
19
Reference ControlsDriving tipsCommunications NavigationEntertainmentMobility
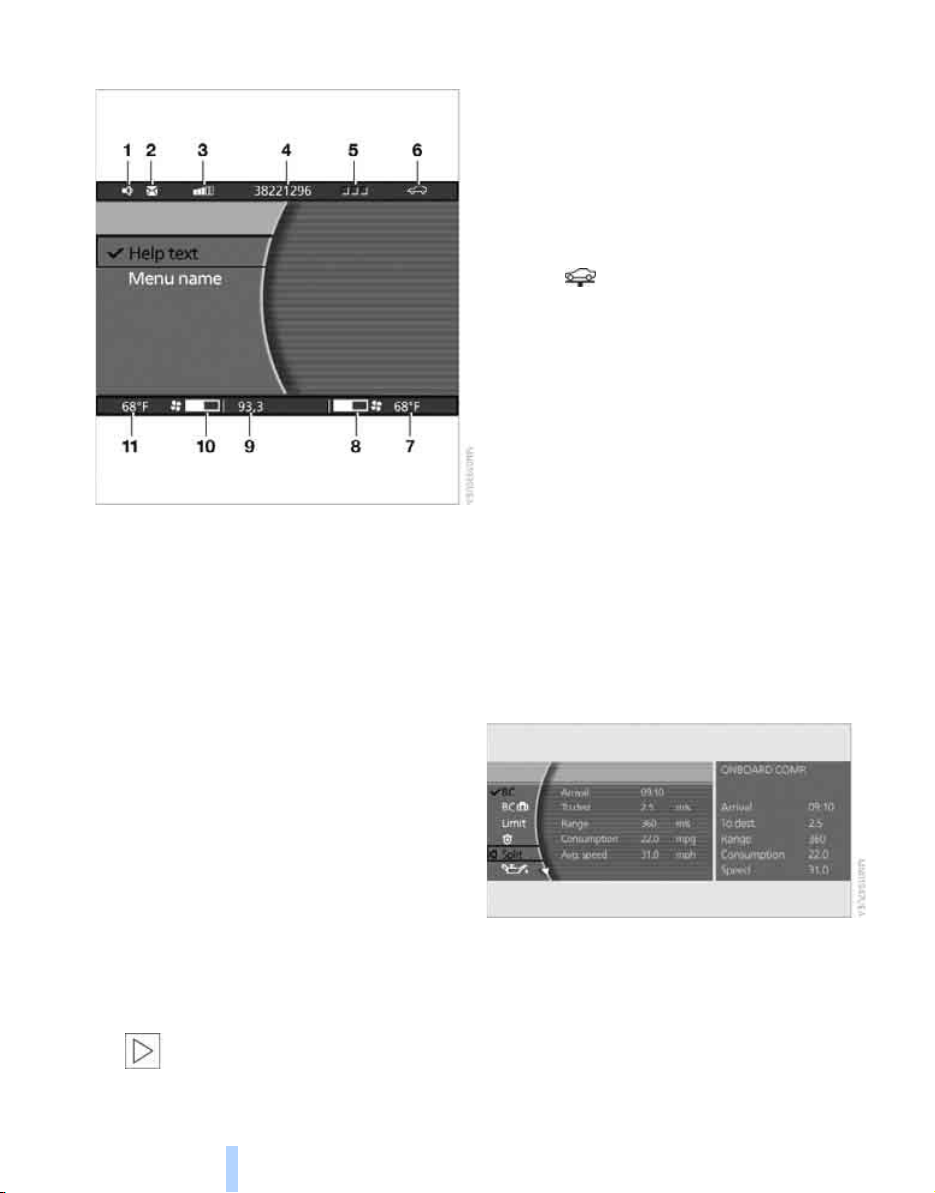
Status lines
Online Edition for Part no. 01 41 0 013 316 - © 02/07 BMW AG
iDrive
1 Hands-free mode active
2 A call has come in while you were away
3 Signal strength, mobile radio network
4 Here, you will see:
> the name of the paired mobile phone
> the entered/selected phone number
5 Phone status:
> Green, yellow and red flashing:
Pairing of a mobile phone
> Green:
Incoming or outgoing call
> Red:
No network available
> Yellow:
Partner network
another provider is being used
> Flashing yellow:
Visited network
another provider is being used, visited
network
in your home network.<
*
Roaming in a partner or external network incurs higher call charges than
*
active, the network of
*
active, the network of
6 There is a Check-Control message 80
You can have the Control Display show
additional information using the menu "Car
Data" under "CHECK" 81
Status service required 78
Red:
At least one service interval has been
exceeded. You can have more precise information about the maintenance procedure
displayed by using the "Car Data" menu
under 79
7 Temperature selection and intensity of the
AUTO program, right side of passenger
compartment
8 Air volume, right side of passenger com-
partment
9 Entertainment
Display for radio, CD, and DVD
With compressed audio files, the track
information is displayed 167
10 Air volume, left side of passenger compart-
ment
*
11 Temperature selection and intensity of the
AUTO program, left side of passenger compartment
Assistance window
Additional information appears in the assistance window:
> Short help and supplementary information
texts about selected menu items.
> A function selected from the "Car Data"
menu, refer to page 83.
> The route with a navigation system, refer to
page 130.
20
Showing/hiding help texts
Online Edition for Part no. 01 41 0 013 316 - © 02/07 BMW AG
You can display help texts and supplementary
information on selected menu items in the
assistance window.
1. Press the button to open the start
menu.
2. Move the controller toward "Help".
3. Select "Help text" and press the controller.
The symbol indicates the menu that is currently activated.
Rear seat screen*
Some of the functions of iDrive can also be
operated via the rear seat screen. Certain functions are only available via iDrive. These functions can only be operated to a limited degree
on the rear screen, e.g. the speed limit can only
be displayed. The settings are made via iDrive.
Deploying rear seat screen
1. Swing pivoting arm upward until it engages.
2. Fold rear seat screen upward.
At a glance
Status lines
1 Outside temperature or town/city of desti-
nation of the navigation system
2 Time
3 Date
The rear seat screen is ready for operation.
Stowing rear seat screen
1. Align rear seat screen so that it is straight.
2. Fold rear seat screen downward until pivot-
ing arm unlocks.
Pivoting arm swings downward.
The rear seat screen is switched off.
Pivot the rear seat screen completely
downward when the ski bag is being
used; otherwise, it could be damaged.
Do not pivot the rear seat screen up or down
with the cup holders open, as this can damage
it.<
Switching off rear seat screen
1. Press the button to open the start
menu.
2. Press the controller.
Press the controller again to switch the screen
back on.
21
Reference ControlsDriving tipsCommunications NavigationEntertainmentMobility

Controller/buttons
Online Edition for Part no. 01 41 0 013 316 - © 02/07 BMW AG
The controller and buttons are located on the
center armrest.
iDrive
Rear lock
The available functions are operated with the
respective controller.
You can use iDrive to restrict operation in the
rear or to switch off the rear seat screen.
iDrive, for principle details, refer to page 16.
1. Press the button to open the start
menu.
2. Move the controller toward "Settings".
3. Select "Rear" and press the controller.
4. Select "Unlock" and press the controller
repeatedly until the desired enabling of the
rear iDrive is set.
Headphones
1 Headphone jack
2 Adjusting volume
3 Station scan/track search
> Station scan
> Search track for CD, search chapter for
DVD changer
With headphones connected, the sound
output for the Control Display and the rear
seat screen are played back separately. For
example, a radio station can be listened to while
a DVD is being played in the rear.<
Headphones are only intended for passengers
in the rear seats. Please check with local regulations regarding use of headphones.
> "menu"
You can switch the offered menus on or off
by turning and pressing the controller.
The symbol indicates the menus that
are currently activated.
> "None"
Switches the rear screen off.
> "Full"
Releases all function locks.
> "Limited"
You disable the functions that are used on
the front Control Display.
22

Voice command system
Online Edition for Part no. 01 41 0 013 316 - © 02/07 BMW AG
*
The concept
The voice command system allows you to control operation of various vehicle systems without ever removing your hands from the steering
wheel. The system operates on the basis of
voice commands that you will learn easily after
using them a few times. In many cases, the
voice command system assists you with
announcements or questions while you are
making your entries.
The voice command system transforms your
oral commands and dialog answers into control
signals for the selected systems.
Please take the time to acquaint yourself
with how a particular system operates
before proceeding to control it using the voice
command system.<
Note
Use iDrive to set the language that will be used
so that the voice command system will be able
to identify the commands spoken. Setting the
language of iDrive, refer to page 84.
Symbols used
These sections contain information on
using the voice command system.
{...} Verbal instructions to use with the voice
command system.
{{...}} Identifies the answers generated by the
voice command system.
Systems available for use with voice
command
> {Navigation}, refer to page 130
> {Radio}, refer to page 156
> {Telephone}, refer to page 184
> {CD}, refer to page 163
> {CD changer}, refer to page 165
> {Notepad}, refer to page 25
> {DVD}, refer to page 170
The Info Display, refer to page 24, will display
either the equipment that you are now operating or any current error messages.
Voice commands
Voice command system activation
Briefly press the button on the steering
wheel.
An acoustic signal and the display "SVS active"
on the Info Display, refer to page 24, indicate
that the system is ready for operation. The system automatically starts in the main menu.
From here, you can call up all the equipment
that can be operated.
Canceling voice command
Briefly press the button on the steering
wheel
or
{Cancel}.
In dialogs in which any text can be spoken, e.g.
names, notes, canceling is only possible using
the button.
The system automatically switches over
to its telephone mode if you receive a call
during voice input. "SVS active" appears on the
Info Display, refer to page 24.<
Voice commands
The voice command system operates on the
basis of specific, predefined commands; these
commands should be spoken precisely as indicated. You can have the possible commands
read aloud at any point. To do so, say the command {Options}.
In addition to the commands described, there
are often other commands that run the same
function. Instead of {Options}, you can, for
example, also say {What now}. In addition,
At a glance
23
Reference ControlsDriving tipsCommunications NavigationEntertainmentMobility

numerous options are often available, such as
Online Edition for Part no. 01 41 0 013 316 - © 02/07 BMW AG
{Scale 100 miles} instead of {Scale}.
Short commands
In the {Main menu} level, you can run certain
functions directly with brief commands, refer to
page 230, without having to open an equipment
level first.
For example, if you want to dial a phone number, you can directly
1. {Dial number}.
2. Enter the phone number.
without previously opening
{Telephone}
Identification in Owner's Manual
Special commands are available for specific
Voice command system
systems. In this Owner's Manual you will find
these commands in the sections describing the
individual systems.
Operation with the voice command system
is always indicated with this symbol.
Changing map scale for navigation: an example
Displays on Info Display
The Info Display shows you what the voice
command system has understood in line 2,
while also indicating which voice command or
question is currently active in line 1.
In addition, any error messages are also displayed.
Starting the dialog
Briefly press the button on the steering
wheel.
You say The voice command system replies Shown on Info Display
"SVS active"
{Change scale}{{Please enter the desired scale}} "scale?
change scale"
{Scale 400 feet} "ok
400 ft"
24

Adjusting volume
Online Edition for Part no. 01 41 0 013 316 - © 02/07 BMW AG
You can adjust the volume for the instructions
from the voice command system:
> Keep the doors, windows and glass sunroof
closed to prevent interference from ambient noise.
> Avoid other sources of noise in the vehicle
while speaking, and ask other vehicle occupants to refrain from talking while you are
using the system.
> The hands-free microphone is aimed
toward the driver. This means that the system might not be able to register the voices
of other vehicle occupants properly.
At a glance
Turn the knob during an instruction/announcement to select the desired volume.
Instructions/announcements from the voice
command system will continue at this volume
level, even if the other audio sources are set to
minimum volume.
The volume setting is stored for the remote
control currently in use.
Notes
Do not use the voice command system to
make emergency calls. Your voice and
habitual tone could be affected by stressful situations, as a result of which the process of
establishing the telephone connection could be
unnecessarily delayed. Instead, use the emergency call button near the interior rearview mirror, refer to page 219.<
Environmental conditions
The voice command system uses a special
hands-free microphone located in the front of
your vehicle's headliner. Although the system is
designed to filter out ambient noise, you can
help ensure that your commands will be understood by observing the following instructions:
> Speak smoothly and clearly, at a normal vol-
ume. Avoid excessive emphasis and
pauses.
> Do not speak while the voice command sys-
tem is itself speaking.
The notepad
Recording a note
{Record note}.
You can store roughly ten minutes of spoken
text, either as a single entry or as multiple
entries of any desired length.
To stop recording:
Press the button longer.
When recording a note, the voice command system does not hear the com-
mand {Cancel} or {Exit}. The text checking
function for command words is deactivated in
this case so that you can speak any desired text
for your notes. This feature saves you from having to concentrate on avoiding any command
words.<
Listening to a notepad entry
To listen to recorded notepad entries:
1. {Read out}.
Approximately the first 3 seconds of
the first note are read aloud.
2. After the request {{Record note, read
out note, delete note.}} select the
desired function.
> To listen to the entire note:
{Read out}.
> To listen to the next note:
{Next}.
> To listen to the note again:
{Back} or {Repeat}.
25
Reference ControlsDriving tipsCommunications NavigationEntertainmentMobility

Deleting notes
Online Edition for Part no. 01 41 0 013 316 - © 02/07 BMW AG
1. {Edit}.
2. {Delete}.
Clearing notepad
To delete all contents from the notepad:
1. {Notepad}.
2. {Delete}.
Standard commands
The standard commands available for use with
all controlled systems are the same.
voice command system.<
Function Command
To repeat last message issued by the voice
Voice command system
command system
To switch off the voice command system {Cancel}
To set comprehensive instructions and error
reports
To set brief instructions and error reports {Short dialog}
To call up information on individual items of
equipment
To have the system read aloud a list of the
commands available for the selected system.
This list simultaneously appears on the Info
Display, refer to page 24
To open the main menu {Main menu}
{Repeat}
{Standard dialog}
{Help}
{Options}
On delivery, the {Standard dialog} is set
so as to simplify familiarization with the
26

At a glance
Online Edition for Part no. 01 41 0 013 316 - © 02/07 BMW AG
27
Reference ControlsDriving tipsCommunications NavigationEntertainmentMobility
Online Edition for Part no. 01 41 0 013 316 - © 02/07 BMW AG
 Loading...