

Bmw 128i Coupe 2012 Owners Guide

Owner's Manual
Contents
A - Z
Online Edition for Part no. 01 40 2 606 818 - © 03/11 BMW AG
for Vehicle
The Ultimate
Driving Machine

Online Edition for Part no. 01 40 2 606 818 - © 03/11 BMW AG

128i
Online Edition for Part no. 01 40 2 606 818 - © 03/11 BMW AGOnline Edition for Part no. 01 40 2 606 818 - © 03/11 BMW AG
135i
Owner's Manual for Vehicle
Congratulations, and thank you for choosing a BMW.
Thorough familiarity with your vehicle will provide you with
enhanced control and security when you drive it. We therefore
have this request:
Please take the time to read this Owner's Manual and familiarize
yourself with the information that we have compiled for you
before starting off in your new vehicle. It contains important data
and instructions intended to assist you in gaining maximum use
and satisfaction from your BMW's unique range of technical features. The manual also contains information on maintenance
designed to enhance operating safety and contribute to maintaining the value of your BMW throughout an extended service
life.
This manual is supplemented by a Service and Warranty Information Booklet for US models or a Warranty and Service Guide
Booklet for Canadian models.
We wish you an enjoyable driving experience.
BMW AG

© 2011 Bayerische Motoren Werke
Online Edition for Part no. 01 40 2 606 818 - © 03/11 BMW AGOnline Edition for Part no. 01 40 2 606 818 - © 03/11 BMW AG
Aktiengesellschaft
Munich, Germany
Reprinting, including excerpts,
only with the written consent of
BMW AG, Munich.
US English II/11, 03 11 450
Printed on environmentally friendly paper,
bleached without chlorine, suitable for recycling.

Contents
Online Edition for Part no. 01 40 2 606 818 - © 03/11 BMW AGOnline Edition for Part no. 01 40 2 606 818 - © 03/11 BMW AG
The quickest way to find special topics is to
consult the index, refer to page 254.
Using this Owner's Manual
4 Notes
7 Reporting safety defects
At a glance
10 Dashboard
16 iDrive
23 Voice activation system
Controls
28 Opening and closing
45 Adjustments
54 Transporting children safely
57 Driving
70 Controls overview
82 Technology for driving comfort and
safety
94 Lamps
99 Climate
104 Practical interior accessories
Driving tips
116 Things to remember when driving
Communications
176 Telephone
188 Office
196 Contacts
198 ConnectedDrive
Mobility
206 Refueling
208 Wheels and tires
216 Under the hood
221 Maintenance
223 Care
227 Replacing components
234 Giving and receiving assistance
Reference
242 Technical data
247 Short commands for the voice activation
system
254 Everything from A to Z
Navigation
124 Navigation system
125 Destination entry
134 Destination guidance
141 What to do if …
Entertainment
144 On/off and tone
147 Radio
150 Satellite radio
155 CD/DVD player and CD changer
161 Music collection
166 External devices
Reference At a glanceControlsDriving tipsCommunications NavigationEntertainmentMobility

Notes
Online Edition for Part no. 01 40 2 606 818 - © 03/11 BMW AGOnline Edition for Part no. 01 40 2 606 818 - © 03/11 BMW AG
Using this Owner's Manual
Notes
We have tried to make all the information in this
Owner's Manual easy to find. The fastest way to
find specific topics is to refer to the detailed
index at the back of the manual. If you wish to
gain an initial overview of your vehicle, you will
find this in the first chapter.
Should you sell your BMW some day, please
remember to hand over the Owner's Manual as
well; it is an important component of your vehicle.
Additional sources of information
Should you have any other questions, your
BMW center will be glad to advise you at any
time.
Information on BMW, e.g. on technical aspects,
can also be found on the Internet at
www.bmwusa.com.
Symbols used
Indicates precautions that must be fol-
lowed precisely in order to avoid the possibility of personal injury and serious damage to
the vehicle.
Indicates information that will assist you
in gaining the optimum benefit from your
vehicle and enable you to care more effectively
for your vehicle.
Refers to measures that can be taken to
help protect the environment.
< Marks the end of a specific item of informa-
tion.
* Indicates special equipment, country-spe-
cific equipment and optional accessories, as
well as equipment and functions not yet available at the time of printing.
"..." Identifies Control Display texts used to
select individual functions.
{...} Verbal instructions to use with the voice
activation system.
{{...}} Identifies the answers generated by the
voice activation system.
Symbols on vehicle components
Indicates that you should consult the rel-
evant section of this Owner's Manual for
information on a particular part or assembly.
4

The individual vehicle
Online Edition for Part no. 01 40 2 606 818 - © 03/11 BMW AGOnline Edition for Part no. 01 40 2 606 818 - © 03/11 BMW AG
When you ordered your BMW, you chose various items of equipment. This Owner's Manual
describes the entire array of options and equipment available with a specific BMW model.
Please bear in mind that the manual may contain information on accessories and equipment
that you have not specified for your own vehicle.
Sections describing options and special equipment are marked by asterisks
identifying possible differences between the
descriptions in this manual and your own vehicle's equipment.
If equipment in your BMW is not described in
this Owner's Manual, please refer to the accompanying Supplementary Owner's Manuals.
* to assist you in
Status of this Owner's Manual at time of printing
BMW pursues a policy of continuous, ongoing
development that is conceived to ensure that
our vehicles continue to embody the highest
quality and safety standards combined with
advanced, state-of-the-art technology. For this
reason, it is possible in exceptional cases that
features described in this Owner's Manual
could differ from those on your vehicle.
For your own safety
Maintenance and repair
Advanced technology, e.g. the use of
modern materials and powerful electronics, requires specially adapted maintenance
and repair methods. You should therefore have
the corresponding work on your vehicle performed only by your BMW center or at a workshop that works according to BMW repair procedures with correspondingly trained
personnel. If this work is not carried out properly, there is a danger of subsequent damage
and related safety hazards.<
Parts and accessories
For your own safety, use genuine parts
and accessories approved by BMW.
When you purchase accessories tested and
approved by BMW and Original BMW Parts, you
simultaneously acquire the assurance that they
have been thoroughly tested by BMW to ensure
optimum performance when installed on your
vehicle.
BMW warrants these parts to be free from
defects in material and workmanship.
BMW will not accept any liability for damage
resulting from installation of parts and accessories not approved by BMW.
BMW cannot test every product made by other
manufacturers to verify if it can be used on a
BMW safely and without risk to either the vehicle, its operation, or its occupants.
Original BMW Parts, BMW Accessories and
other products approved by BMW, together
with professional advice on using these items,
are available from all BMW centers.
Installation and operation of accessories not
approved by BMW, such as alarms, radios,
amplifiers, radar detectors, wheels, suspension
components, brake dust shields, telephones,
including operation of any mobile phone from
within the vehicle without using an externally
mounted antenna, or transceiver equipment, for
instance, CBs, walkie-talkies, ham radio or similar accessories, may cause extensive damage
to the vehicle, compromise its safety, interfere
with the vehicle's electrical system or affect the
validity of the BMW Limited Warranty. See your
BMW center for additional information.<
Maintenance, replacement, or repair of
the emission control devices and systems may be performed by any automotive
repair establishment or individual using any certified automotive part.<
5
Reference At a glanceControlsDriving tipsCommunications NavigationEntertainmentMobility

California Proposition 65 warning
Online Edition for Part no. 01 40 2 606 818 - © 03/11 BMW AGOnline Edition for Part no. 01 40 2 606 818 - © 03/11 BMW AG
California law requires us to issue the following
warning:
Notes
Engine exhaust and a wide variety of
automobile components and parts,
including components found in the interior furnishings in a vehicle, contain or emit chemicals
known to the State of California to cause cancer
and birth defects and reproductive harm. In
addition, certain fluids contained in vehicles and
certain products of component wear contain or
emit chemicals known to the State of California
to cause cancer and birth defects or other
reproductive harm.
Battery posts, terminals and related accessories contain lead and lead compounds. Wash
your hands after handling.
Used engine oil contains chemicals that have
caused cancer in laboratory animals. Always
protect your skin by washing thoroughly with
soap and water.<
Service and warranty
We recommend that you read this publication
thoroughly.
Your BMW is covered by the following warranties:
> New Vehicle Limited Warranty
> Rust Perforation Limited Warranty
> Federal Emissions System Defect Warranty
> Federal Emissions Performance Warranty
> California Emission Control System Limited
Warranty
Detailed information about these warranties is
listed in the Service and Warranty Information
Booklet for US models or in the Warranty and
Service Guide Booklet for Canadian models.
Your vehicle has been specifically adapted and
designed to meet the particular operating conditions and homologation requirements in your
country and continental region in order to
deliver the full driving pleasure while the vehicle
is operated under those conditions. If you wish
to operate your vehicle in another country or
region, you may be required to adapt your vehicle to meet different prevailing operating conditions and homologation requirements. You
should also be aware of any applicable warranty
limitations or exclusions for such country or
region. In such case, please contact Customer
Relations for further information.
6

Maintenance
Online Edition for Part no. 01 40 2 606 818 - © 03/11 BMW AGOnline Edition for Part no. 01 40 2 606 818 - © 03/11 BMW AG
Maintain the vehicle regularly to sustain the
road safety, operational reliability and the New
Vehicle Limited Warranty.
Specifications for required maintenance measures:
> BMW Maintenance system
> Service and Warranty Information Booklet
for US models
> Service and Warranty Information Booklet
for US models
If the vehicle is not maintained according to
these specifications, this could result in serious
damage to the vehicle. Such damage is not covered by the BMW New Vehicle Limited Warranty.
Reporting safety defects
For US customers
The following only applies to vehicles owned
and operated in the US.
If you believe that your vehicle has a defect
which could cause a crash or could cause injury
or death, you should immediately inform the
National Highway Traffic Safety Administration,
NHTSA, in addition to notifying BMW of North
America, LLC, P.O. Box 1227, Westwood, New
Jersey 07675-1227, Telephone 1-800-831-
1117.
If NHTSA receives similar complaints, it may
open an investigation, and if it finds that a safety
defect exists in a group of vehicles, it may order
a recall and remedy campaign. However,
NHTSA cannot become involved in individual
problems between you, your center, or BMW of
North America, LLC.
To contact NHTSA, you may call the Vehicle
Safety Hotline toll-free at 1-888-327-4236
(TTY: 1-800-424-9153); go to
http://www.safercar.gov; or write to: Administrator, NHTSA, 400 Seventh Street, SW.,
Washington, DC 20590. You can also obtain
other information about motor vehicle safety
from http://www.safercar.gov
For Canadian customers
Canadian customers who wish to report a
safety-related defect to Transport Canada,
Defect Investigations and Recalls, may telephone the toll-free hotline 1-800-333-0510.
You can also obtain other information about
motor vehicle safety from http://www.tc.gc.ca/
roadsafety
7
Reference At a glanceControlsDriving tipsCommunications NavigationEntertainmentMobility

Online Edition for Part no. 01 40 2 606 818 - © 03/11 BMW AG

At a glance
Online Edition for Part no. 01 40 2 606 818 - © 03/11 BMW AG
At a glance
This overview of buttons, switches and displays
is intended to familiarize you with your vehicle's
operating environment. The section will also
assist you in becoming acquainted with the
control concepts and options available for
operating the various systems.

Dashboard
Online Edition for Part no. 01 40 2 606 818 - © 03/11 BMW AGOnline Edition for Part no. 01 40 2 606 818 - © 03/11 BMW AG
Around the steering wheel: controls and displays
Dashboard
1 Convertible: opening and closing
windows jointly 38
2 Convertible: opening and closing
rear windows 38
3 Opening and closing front
windows 37
4 Folding exterior mirrors in and out
5 Adjusting exterior mirrors, automatic curb
monitor
* 51
10
* 51
6
Parking lamps 94
Low beams 95
Automatic headlamp control
Adaptive Light Control
High-beam Assistant
* 95
* 96
* 94
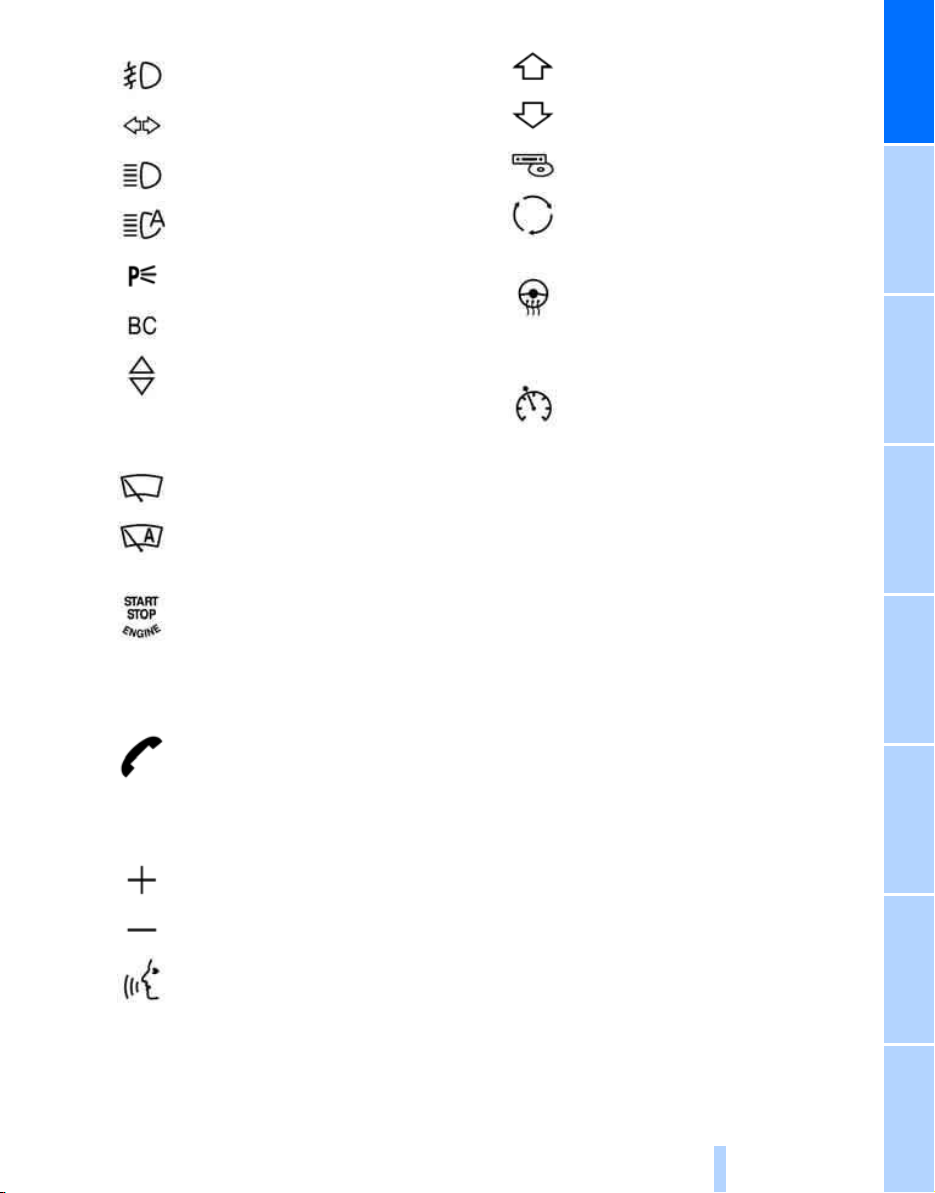
7
Online Edition for Part no. 01 40 2 606 818 - © 03/11 BMW AGOnline Edition for Part no. 01 40 2 606 818 - © 03/11 BMW AG
8
Fog lamps
Turn signals 66
* 97
Changing the radio station
Interrupting a traffic bulletin
Selecting a music track
Scrolling through the redial list
At a glance
High beams, headlamp flasher 96
High-beam Assistant
Roadside parking lamps
Computer 71
Settings and information about the
vehicle 73
9 Instrument cluster 12
10
11 Switching the ignition on/off and
12 Ignition lock 57
13 Buttons
Windshield wipers 67
Rain sensor
starting/stopping the engine 57
* 67
on the steering wheel
Telephone
Accepting and ending a call; dial-
ing
redialing if no phone number is
selected
*:
* the selected phone number;
* 96
* 96
Next entertainment source
Recirculated air mode 101
14
15 Horn, entire surface
16 Adjusting the steering wheel 52
17
18 Releasing the hood 216
19 OBD socket 222
20 Opening the trunk lid 33
Steering wheel heating
Cruise control
* 68
* 53
Volume
Activating/deactivating the voice
activation system
*
11
Reference ControlsDriving tipsCommunications NavigationEntertainmentMobility
Instrument cluster
Online Edition for Part no. 01 40 2 606 818 - © 03/11 BMW AGOnline Edition for Part no. 01 40 2 606 818 - © 03/11 BMW AG
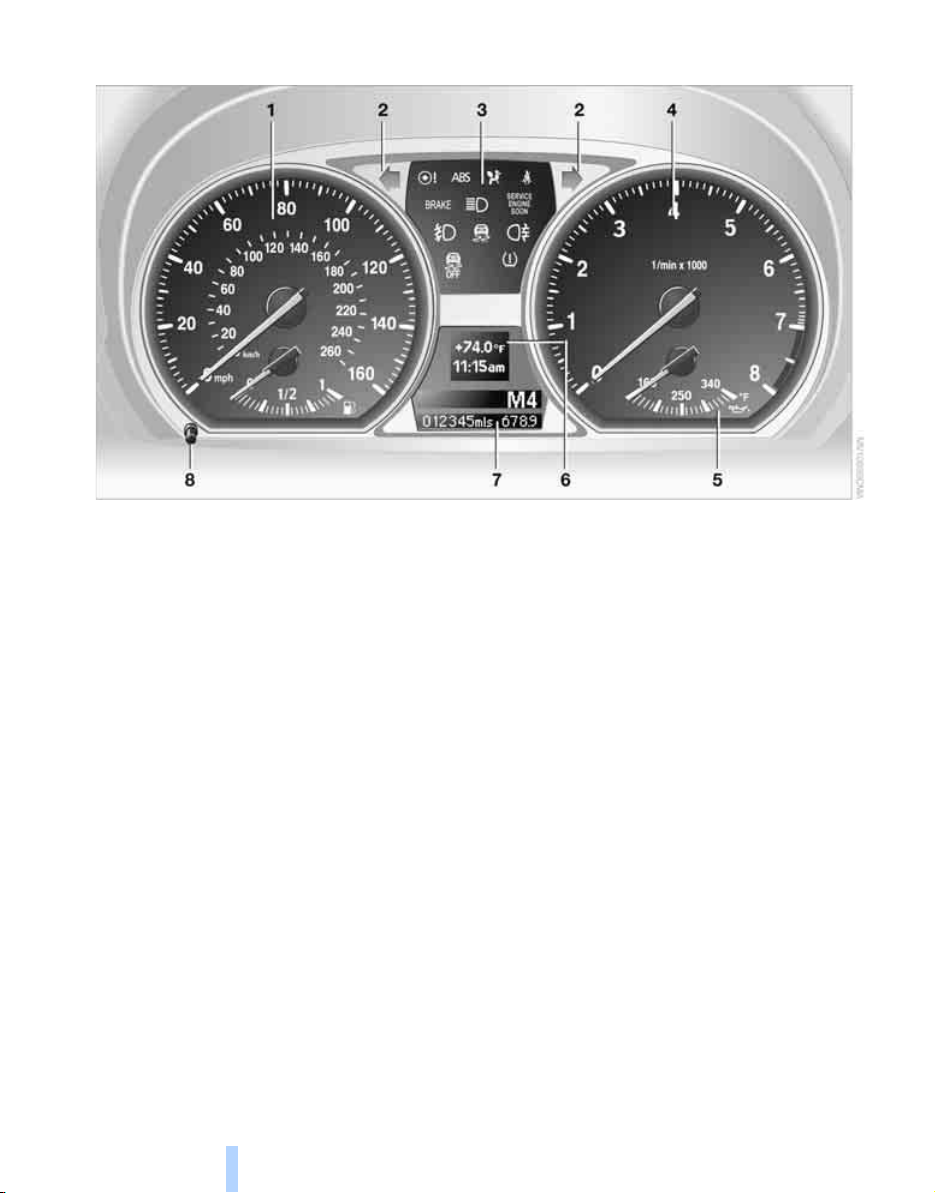
Dashboard
1 Speedometer
135i: with fuel gauge
2 Indicator lamps for turn signals
3 Indicator and warning lamps 13
4 Tachometer 70
5 Fuel gauge 71
135i: engine oil temperature 71
6 Display for
> Clock 70
> Outside temperature 70
> Indicator and warning lamps 78
7 Display for
> Position of automatic transmission
> Gear indicator in 7-gear Sport automatic
transmission with double clutch
> Computer 71
> Date of next scheduled service, and
remaining distance to be driven 74
> Odometer and trip odometer 70
> High-beam Assistant
> Checking the oil level 217
> Settings and information 73
8 Resetting the trip odometer 70
* 96
* 59
* 62
12
Indicator and warning lamps
Online Edition for Part no. 01 40 2 606 818 - © 03/11 BMW AGOnline Edition for Part no. 01 40 2 606 818 - © 03/11 BMW AG
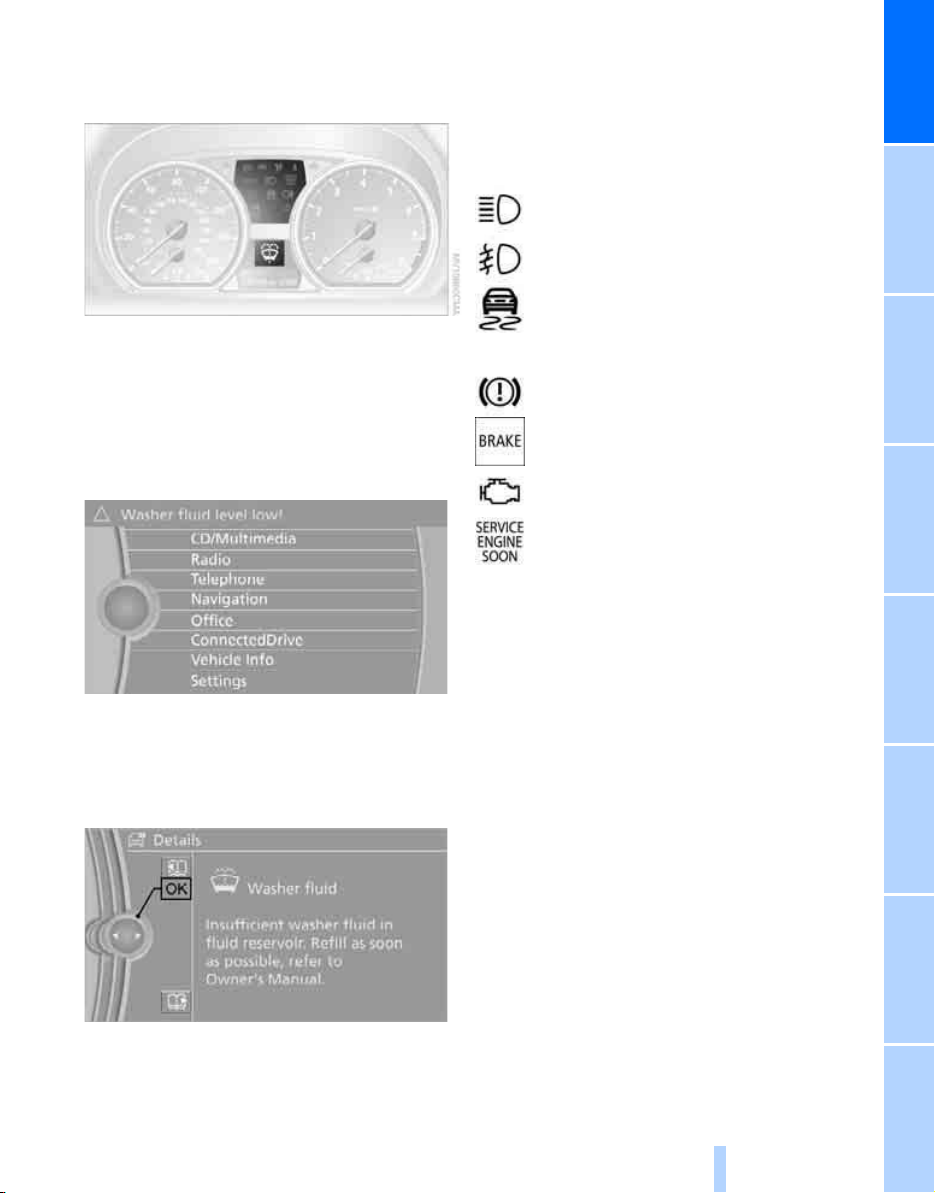
The concept
In urgent cases, this information will be shown
as soon as the corresponding lamp comes on.
Indicator lamps without text messages
The following indicator lamps notify you that
certain functions are active:
High beams/headlamp flasher 96
At a glance
Indicator and warning lamps can light up in a
variety of combinations and colors.
Several of the lamps are checked for proper
functioning and light up temporarily when the
engine is started or the ignition is switched on.
Text messages
Text messages at the upper edge of the Control
Display explain the meaning of the displayed
indicator and warning lamps.
Supplementary text messages
Fog lamps
Lamp flashes:
DSC or DTC is regulating the propulsive forces in order to maintain driving
stability 84
Canada: parking brake applied 59
Parking brake applied 59
Canada: engine malfunction with
adverse effect on emissions 222
Engine malfunction with adverse
effect on emissions 222
* 97
You can call up more information on the Control
Display, e.g. on the cause of a malfunction and
on how to respond, via Check Control, refer to
page 78.
13
Reference ControlsDriving tipsCommunications NavigationEntertainmentMobility

Around the center console: controls and displays
Online Edition for Part no. 01 40 2 606 818 - © 03/11 BMW AGOnline Edition for Part no. 01 40 2 606 818 - © 03/11 BMW AG
Dashboard
14

1 Coupe: microphone for voice activation
Online Edition for Part no. 01 40 2 606 818 - © 03/11 BMW AGOnline Edition for Part no. 01 40 2 606 818 - © 03/11 BMW AG
* and for telephone* in hands-free
system
mode
Convertible: microphone on steering column
2 SOS: initiating an Emergency Request
* 234
call
3 Reading lamps
4 Coupe: glass roof, electric
5 Interior lamps 98
6 Passenger airbag status lamp 91
7 Control Display 16
8 Driving stability control systems
> Dynamic Stability Control DSC 83
> Dynamic Traction Control DTC 84
9 Hazard warning flashers
10 Central locking system 32
11 Automatic climate control
* 98
* 39
Air distribution to the
windshield 100
Air distribution to the upper body
area 100
12 CD/DVD drive
13 Selecting AM or FM waveband
14 Changing the audio and entertainment
sources
15 Changing
> Radio station 147
> Track 155
16
17 Controller 16
Can be turned, pressed, or moved in four
directions
18 Buttons on the controller 17
Selecting menus directly
19 Programmable memory keys 21
20 Switching entertainment audio sources on/
off and adjusting volume 144
21 Ejecting a CD/DVD
* 144
Convertible: open convertible
top 41
Convertible: closing the convertible
top 41
* 155
At a glance
Air distribution to the footwell 100
Automatic air distribution and flow
rate 100
Cooling function 101
Automatic recirculated air control
AUC and recirculated air
mode 101
Maximum cooling 100
ALL program 101
Air volume 101
Defrosting windows 101
Rear window defroster 101
Heated seats
* 50
15
Reference ControlsDriving tipsCommunications NavigationEntertainmentMobility

iDrive
Online Edition for Part no. 01 40 2 606 818 - © 03/11 BMW AGOnline Edition for Part no. 01 40 2 606 818 - © 03/11 BMW AG
The concept
iDrive
iDrive integrates the functions of a large number of switches. This allows these functions to
be operated from a single central position.
Controls at a glance
Controls
Make entries only when traffic and road
conditions permit; otherwise, you may
endanger vehicle occupants and other road
users by being distracted.<
1 Control Display
2 Controller with buttons
You can use the buttons to open the menus
directly. The controller can be used to
select the menu items and create settings.
> Move in four directions, arrows 3
> Turn, arrow 4
> Push, arrow 5
16
Control Display
Online Edition for Part no. 01 40 2 606 818 - © 03/11 BMW AGOnline Edition for Part no. 01 40 2 606 818 - © 03/11 BMW AG
Notes
> Follow care instructions when cleaning the
Control Display.
> Do not store items in the region in front of
the Control Display; doing so may damage
the Control Display.
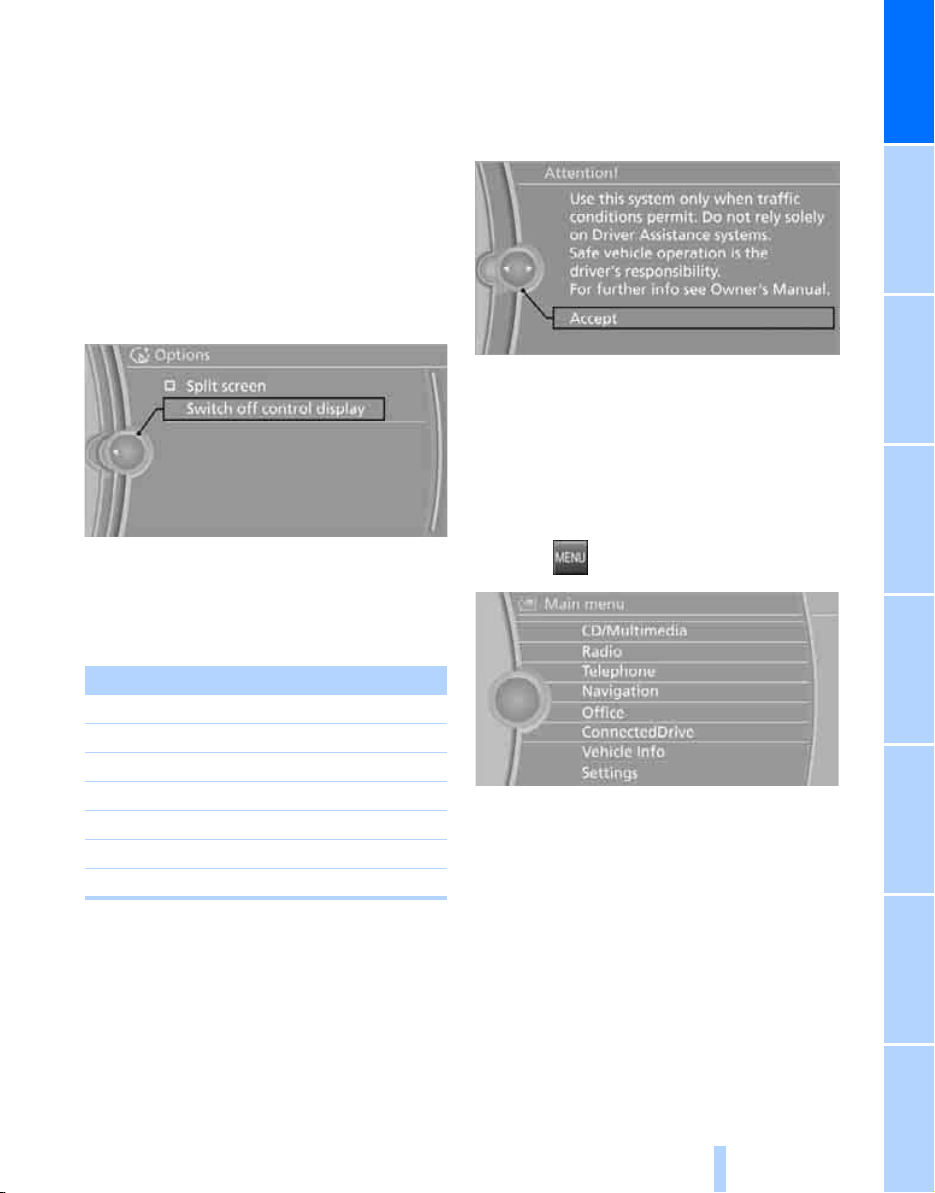
Switching off
1. Press the OPTION button.
2. "Switch off control display"
Operating principle
With the ignition at radio readiness or beyond,
refer to page 57, the following message is displayed on the Control Display:
To hide the message:
Press the controller.
The main menu is displayed.
The message is automatically hidden after
approx. 10 seconds.
Opening the main menu
At a glance
Switching on
Press the controller to switch on.
Buttons on the controller
Symbol Function
MENU Open the main menu
RADIO Open the Radio menu
CD Open the CD/Multimedia menu
NAV Start navigation in map view
TEL Open the Telephone menu
BACK Show previous panel
OPTION Open the Options menu
Press the button.
The main menu is displayed.
All iDrive functions can be called up via the main
menu.
17
Reference ControlsDriving tipsCommunications NavigationEntertainmentMobility

Selecting a menu item
Online Edition for Part no. 01 40 2 606 818 - © 03/11 BMW AGOnline Edition for Part no. 01 40 2 606 818 - © 03/11 BMW AG
The menu items shown in white can be
selected.
1. Turn the controller until the desired menu
iDrive
item is highlighted.
2. Press the controller.
Menu items in the Owner's Manual
In the Owner's Manual, the menu items that
should be selected are depicted in quotation
marks, e.g. "Settings".
Changing between panels
After a menu item is selected, e.g. "Radio", a
new panel is displayed. Panels can overlap.
> Move the controller to the left.
The current panel is closed and the previous panel is displayed.
Pressing the BACK button reopens the previous panel. This does not close the current
panel.
> Move the controller to the right.
A new panel is opened and laid over it.
View of an opened menu
When you open a menu, generally the panel last
selected in this menu is displayed. To display
the first panel of the menu:
> Move the controller to the left repeatedly
until the first panel is displayed.
> Press the menu's button twice on the con-
troller.
Open the Options menu
Press the button.
The "Options" menu is displayed.
Another possibility: move the controller to the
right repeatedly until the "Options" menu
appears.
Options menu
The "Options" menu is composed of different
areas:
> Screen settings, e.g. "Split screen".
The region remains unchanged.
> Control options for the selected main menu,
e.g. "Radio".
> Other control options for the selected
menu, e.g. "Store station".
White arrows pointing to the left or right indicate that additional panels can be opened.
18
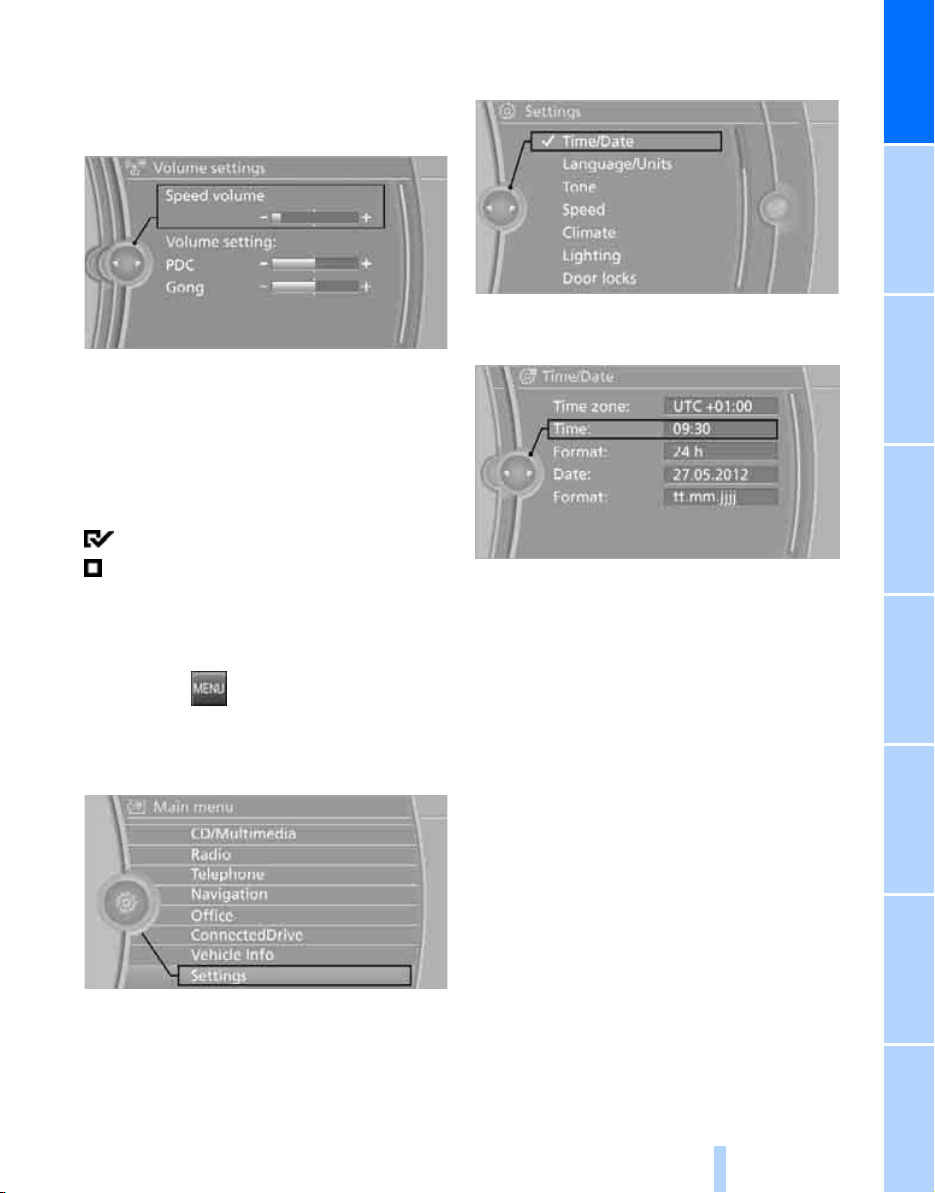
Adjusting settings
Online Edition for Part no. 01 40 2 606 818 - © 03/11 BMW AGOnline Edition for Part no. 01 40 2 606 818 - © 03/11 BMW AG
1. Select a field.
2. Turn the controller until the desired setting
is displayed.
3. Press the controller to confirm the setting.
Activating/deactivating functions
Some menu items are preceded by a check box.
It indicates whether the function is activated or
deactivated. Selecting the menu item activates
or deactivates the function.
The function is activated.
The function is deactivated.
Example: setting the clock
4. Turn the controller until "Time/Date" is
highlighted, and then press the controller.
At a glance
5. Turn the controller until "Time:" is high-
lighted, and then press the controller.
6. Turn the controller to set the hours and
press the controller.
7. Turn the controller to set the minutes and
press the controller.
1. Press the button.
The main menu is displayed.
2. Turn the controller until "Settings" is high-
lighted, and then press the controller.
3. If necessary, move the controller to the left
to display "Time/Date".
Status information
Status box
The status box at the top right displays the following information:
> Time
> Current entertainment source
> Sound output ON/OFF
> Mobile phone network with strongest
reception
> Telephone status
> Traffic reports reception
Status box symbols
The symbols are divided into separate groups.
19
Reference ControlsDriving tipsCommunications NavigationEntertainmentMobility
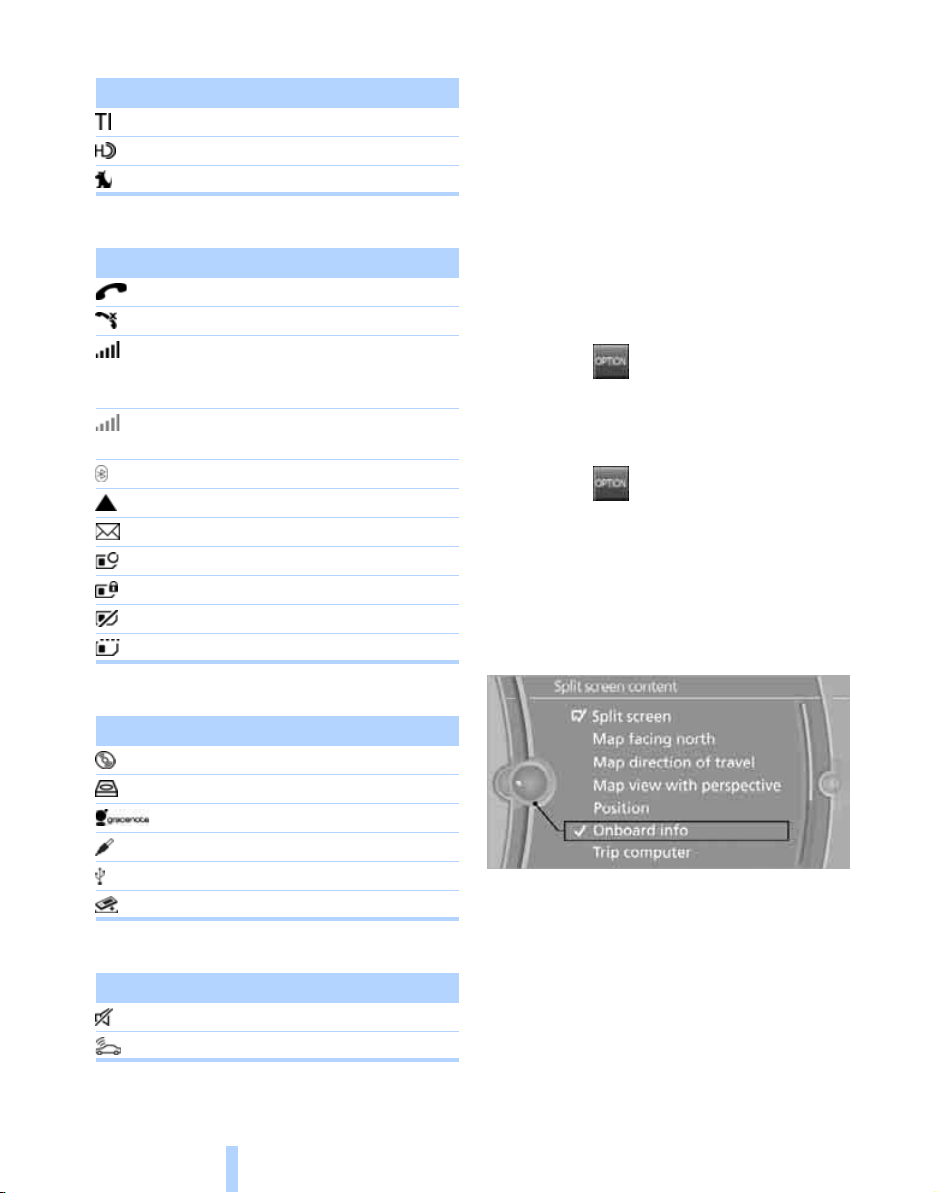
Radio symbols
Online Edition for Part no. 01 40 2 606 818 - © 03/11 BMW AGOnline Edition for Part no. 01 40 2 606 818 - © 03/11 BMW AG
Symbol Meaning
iDrive
Telephone symbols
Symbol Meaning
Traffic bulletins
HD radio
Satellite radio
Incoming or outgoing call
Missed call*
Reception strength of mobile
phone network
symbol flashing: network search
No mobile phone network avail-
*
able
Bluetooth* switched on
Roaming
Receiving text message
Checking SIM card*
SIM card* blocked
SIM card
Entering PIN
* switched on
* switched on
* switched on
*
*
* active
*, email*
* missing
*
With the Professional navigation system: Split screen
General information
Additional information, e.g. from the computer,
can be displayed on the right side of the split
screen.
This information remains visible on the split
screen even when you change to another menu.
Switching the split screen on and off
1. Press the button.
2. "Split screen"
Selecting display
1. Press the button.
2. "Split screen"
3. Move the controller until the split screen is
selected.
4. Press the controller or select "Split screen
content".
5. Select the desired menu item.
Entertainment symbols
Symbol Meaning
CD/DVD
Music collection
Gracenote® database*
AUX-IN port
USB audio interface
Mobile phone audio interface*
* player
Other
Symbol Meaning
Voice instructions
Query current vehicle position
20
*
*
* switched off
*

Programmable memory keys
Online Edition for Part no. 01 40 2 606 818 - © 03/11 BMW AGOnline Edition for Part no. 01 40 2 606 818 - © 03/11 BMW AG
General information
iDrive functions can be stored on the programmable memory keys and called up directly, e.g.
radio stations, navigation destinations, phone
numbers and entry points into the menu.
The settings are stored for the remote control
currently in use.
Storing functions
1. Highlight the function via the iDrive.
2. Press the desired button ...
for longer than two seconds.
Executing a function
Press the ... button.
The function is executed immediately. This
means, for example, that the number is dialed
when a phone number is selected.
Entering letters and numbers
1. Turn the controller: select the letters or
numbers.
2. Select additional letters or numbers if
needed.
3. "OK": confirm entry.
Symbol Function
Press the controller: delete
one letter or number
Press the controller for an
extended period: delete all
letters or numbers
Enter a blank space
Switching between letters and
numbers
Depending on the menu, you can switch
between entering letters and numbers:
At a glance
Displaying memory key assignments
Touch the button with a finger. Do not wear
gloves or use objects.
The key assignment is displayed at the top
edge of the screen.
> Displaying brief information: press the but-
ton.
> Displaying detailed information: press and
hold the button.
Symbol Function
Entering letters
Entering numbers
Switching between uppercase and
lowercase letters
Depending on the menu, you can switch
between entering uppercase letters and lowercase letters:
Symbol Function
Move the controller toward
the front: to switch from
uppercase letters to lowercase letters
Move the controller toward
the front: to switch from lowercase letters to uppercase
letters
21
Reference ControlsDriving tipsCommunications NavigationEntertainmentMobility

Entry comparison
Online Edition for Part no. 01 40 2 606 818 - © 03/11 BMW AGOnline Edition for Part no. 01 40 2 606 818 - © 03/11 BMW AG
Entry of names and addresses: the selection is
narrowed down every time a letter is entered
and letters may be added automatically.
iDrive
The entries are continuously compared to the
data stored in the vehicle.
> During entry, only letters for which there are
data are offered.
> Destination search: town/city names can be
entered with the spelling used in any of the
languages available on the Control Display.
22

Voice activation system
Online Edition for Part no. 01 40 2 606 818 - © 03/11 BMW AGOnline Edition for Part no. 01 40 2 606 818 - © 03/11 BMW AG
*
The concept
> The voice activation system can be used to
control functions by spoken commands.
> Functions that can only used when the vehi-
cle is stopped cannot be operated using the
voice activation system.
> The system includes a special microphone
on the driver's side.
> In the Owner's Manual, {...} indicates com-
mands for the voice activation system.
> In the Owner's Manual, {{...}} indicates the
answers from the voice activation system.
Prerequisite
On the Control Display, set a language that is
also supported by the voice activation system
to permit identification of the commands to be
spoken.
Setting the language, refer to page 81.
Saying commands
Activating voice activation system
1. Press the button on the steering wheel.
2. Wait for the acoustic signal.
3. Say the command.
This symbol on the Control Display and an
acoustic signal notify you that the voice activation system is activated.
If no additional commands are possible, continue by operating the function via iDrive.
Finishing voice input
Press the button on the steering wheel
or
{Cancel}
Possible commands
Most menu items on the Control Display can be
spoken as commands.
The available commands depend on which
menu is currently selected on the Control Display.
There are short commands for functions of the
main menu.
Some list entries, e.g. phone book entries
likewise be selected using the voice activation
system. Make sure to say list entries the same
way as they appear in the respective list.
Having the possible commands read
aloud
To have the available commands read aloud:
{Voice commands}
For example, if the "Settings" menu is displayed, the commands relating to settings are
read aloud.
Performing functions using short
commands
Functions from the main menu can be performed directly by means of short commands,
regardless of which menu item is selected, e.g.
{Vehicle status}.
List of short command of the voice activation
system, refer to page 247.
*, can
At a glance
23
Reference ControlsDriving tipsCommunications NavigationEntertainmentMobility

Help dialog for voice activation system
Online Edition for Part no. 01 40 2 606 818 - © 03/11 BMW AGOnline Edition for Part no. 01 40 2 606 818 - © 03/11 BMW AG
Accessing help:
{Help}
Other commands
> {Help with examples}: information about
the current control options and the most
important commands relating to them are
read aloud.
> {Help with voice activation}: information
about the principle operation of the voice
activation system is read aloud.
* for the help dialog:
Example: playing back a CD
1. If necessary, switch on entertainment audio
output.
Voice activation system
2. Press the button on the steering wheel.
3. {C D and multimedia}
The system plays the last media played.
4. Press the button on the steering wheel.
5. {C D track …} e.g. CD track 4.
Setting the voice dialog
You can set whether the system uses the standard dialog or a short version.
In the short version of the voice dialog, the
responses from the system are given in abbreviated form.
On the Control Display:
1. "Settings"
2. "Language/Units"
3. "Speech mode:"
4. Select a setting.
Adjusting volume
Turn the volume knob during the spoken
instruction to select the desired volume.
> The volume remains the same, even if the
volume of other audio sources is changed.
> The volume is stored for the remote control
currently in use.
Notes on Emergency Requests
Do not use the voice activation system to initiate an Emergency Request. In stressful situations, the voice and vocal pitch can change.
This can unnecessarily delay the establishment
of a telephone connection.
Instead, use the SOS button
page 234, in the vicinity of the interior rearview
mirror.
*, refer to
Ambient conditions
> Say the commands, numbers and letters
smoothly and with normal volume, emphasis and speed.
> Always speak the commands in the lan-
guage of the voice activation system.
> When selecting a radio station, use the
standard pronunciation of the station name.
24

> Keep the doors, windows, glass roof*/pan-
Online Edition for Part no. 01 40 2 606 818 - © 03/11 BMW AGOnline Edition for Part no. 01 40 2 606 818 - © 03/11 BMW AG
oramic glass roof
ference from ambient noise.
> Avoid ambient noise in the vehicle while
speaking.
* closed to prevent inter-
At a glance
25
Reference ControlsDriving tipsCommunications NavigationEntertainmentMobility

Online Edition for Part no. 01 40 2 606 818 - © 03/11 BMW AG
Controls
Online Edition for Part no. 01 40 2 606 818 - © 03/11 BMW AG
Controls
This chapter is intended to provide you with
information for complete control of your vehicle.
All features and accessories that are useful for
driving and your safety, comfort and
convenience, are described here.

Opening and closing
Online Edition for Part no. 01 40 2 606 818 - © 03/11 BMW AGOnline Edition for Part no. 01 40 2 606 818 - © 03/11 BMW AG
Remote control
Each remote control contains a rechargeable
Opening and closing
battery that is automatically recharged when it
is in the ignition lock while the car is being
driven. Use each remote control at least twice a
year for longer road trips in order to maintain the
batteries' charge status. In cars with Comfort
*, the remote control contains a
Access
replaceable battery, refer to page 37.
The settings called up and implemented when
the car is unlocked depend on which remote
control is used to unlock the car, refer to Personal Profile, next column.
In addition, information about service requirements is stored in the remote control, refer to
Service data in the remote control, page 221.
New remote controls
Your BMW center can supply new remote controls with integrated keys as additional units or
as replacements in the event of loss.
Personal Profile
The concept
You can set many of your BMW's functions to
suit your personal needs and preferences.
Without any action on your part, Personal Profile ensures that most of these settings are
stored for the remote control currently in use.
When you unlock the car, the remote control
used for the purpose is recognized and the settings stored for it are called up and implemented.
This means that your personal settings will be
activated for you, even if in the meantime your
car was used by someone else with another
remote control and the corresponding settings.
The individual settings are stored for a maximum of four remote controls. They are stored
for two remote controls if Comfort Access
use.
* is in
Integrated key
Press button 1 to release the key.
The integrated key fits the following locks:
> Driver's door, refer to page 32
> Convertible: glove compartment, refer to
page 107
28
Personal Profile settings
For more information on specific settings, refer
to the specified pages.
> Programming the Programmable memory
keys, refer to page 21
> Response of the central locking system
when the car is unlocked, refer to page 29
> Automatic locking of the vehicle, refer to
page 32
> Automatic call-up
tion, refer to page 50
> Triple turn signal activation, refer to
page 66
* of the driver's seat posi-
 Loading...