

Page 1
UPGRADE INSTRUCTIONS
FOR
IO-19-EN Rev. 01
22.04.2015
“LISA” FIRMWARE AND LOGO
REVISION DESCRIPTION
Date Rev. Amendments
11/05/2012 00 First emission.
22/04/2015 01 Change document header.
Added instructions for Logo upgrade and procedure to change manually IP address.
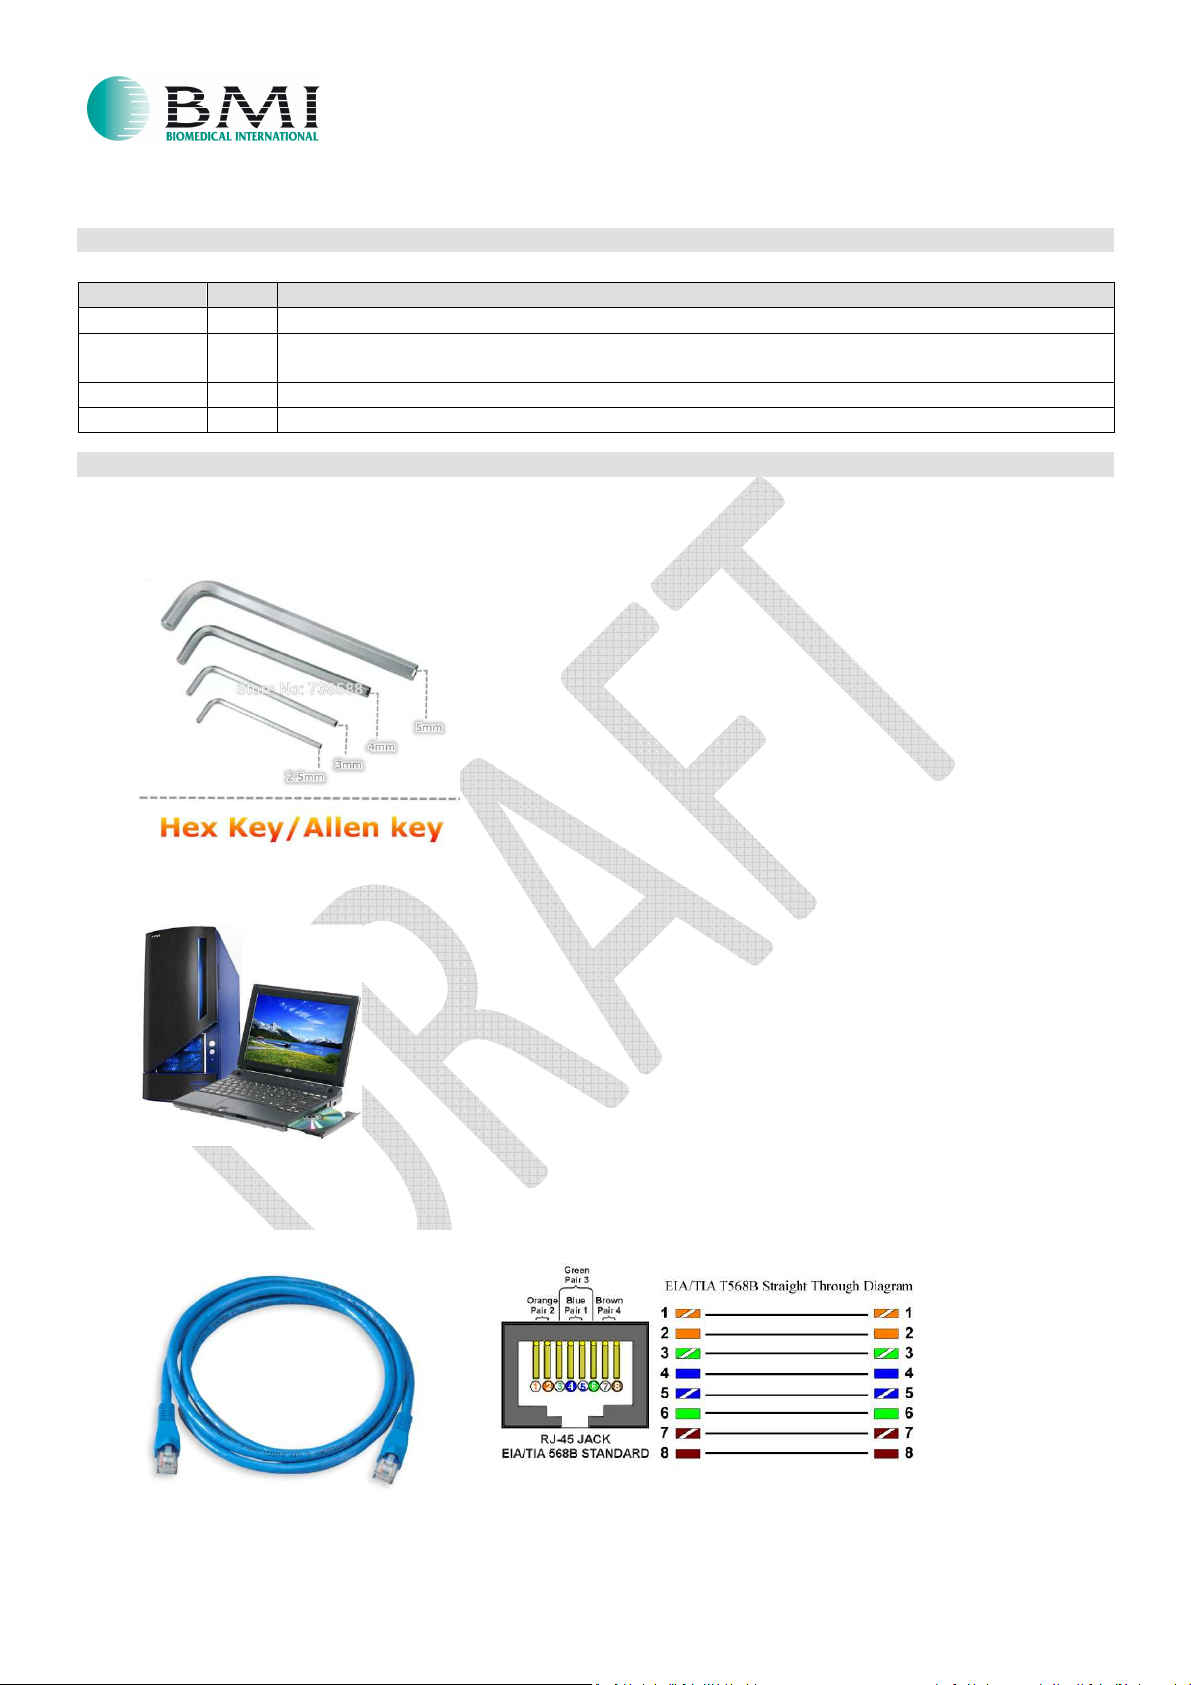
TOOLS REQUESTED
• Allen Key Ø2,5 mm
• Personal Computer (PC) or laptop
• Ethernet cable
1
Page 2
UPGRADE INSTRUCTIONS
FOR
IO-19-EN Rev. 01
22.04.2015
“LISA” FIRMWARE AND LOGO
PRE-PROGRAMMING PHASE
•
Make sure that the equipment is turned off.
•
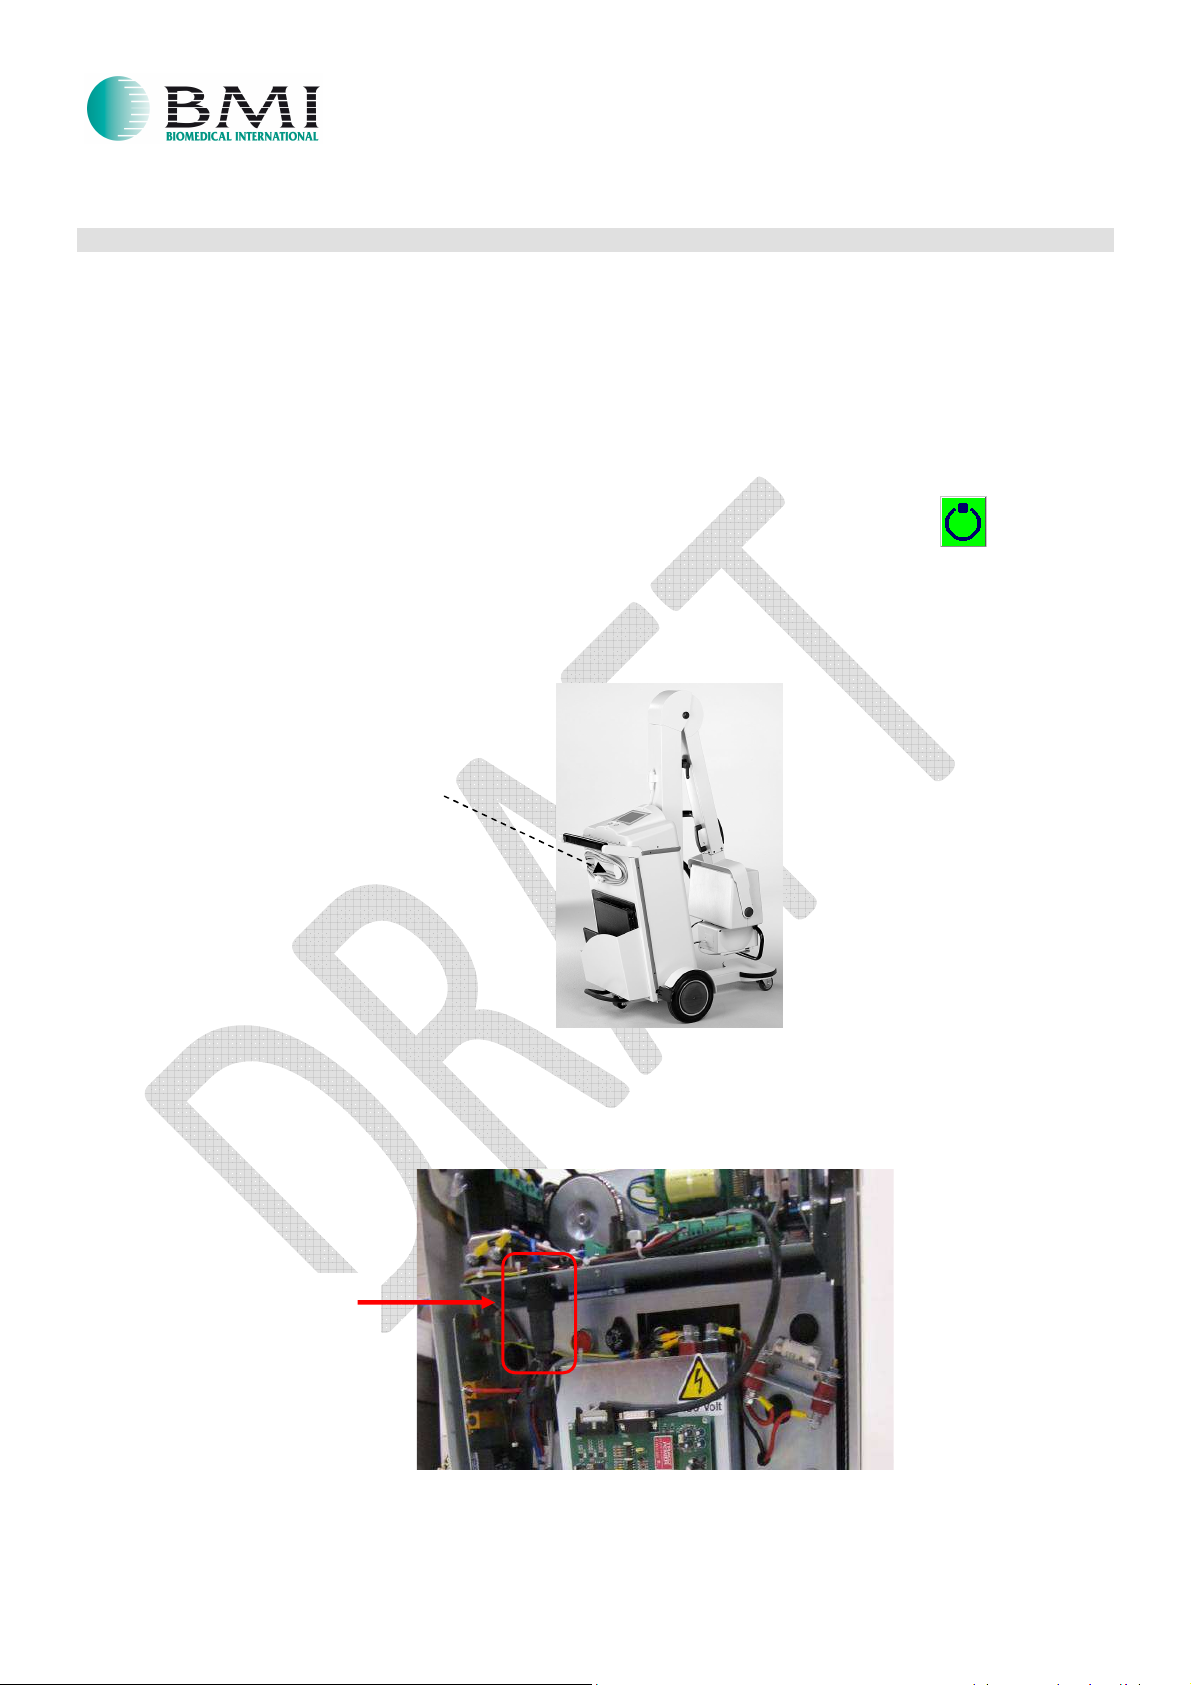
Detach the console from the equipment without disconnect the serial cable. (refer to step 1)
•
In order to prevent the overheating of the charging resistors perform one of the following 2 options:
Option 1.
a. Turn on the equipment until the capacitors are charged to the maximum value. This condition is shown
by the fact that it is possible to perform an x-ray exposure.
ATTENTION: Do not make x-ray exposure!! To verify that capacitors are fully charged, simply press the
first time push-button and verify that on display lights the “preparation” green icon.
b. Turn off the equipment.
Option 2. (recommended)
a.
Remove the cassette holder by unscrewing the lateral screws.
Cassette
b. Set aside the cassette holder.
c. Unscrew and detach the “Binder connector” shown in the following picture.
Binder connector
2
Page 3
UPGRADE INSTRUCTIONS
FOR
IO-19-EN Rev. 01
22.04.2015
“LISA” FIRMWARE AND LOGO
PROCEDURE FOR UPGRADING “LISA” FIRMWARE
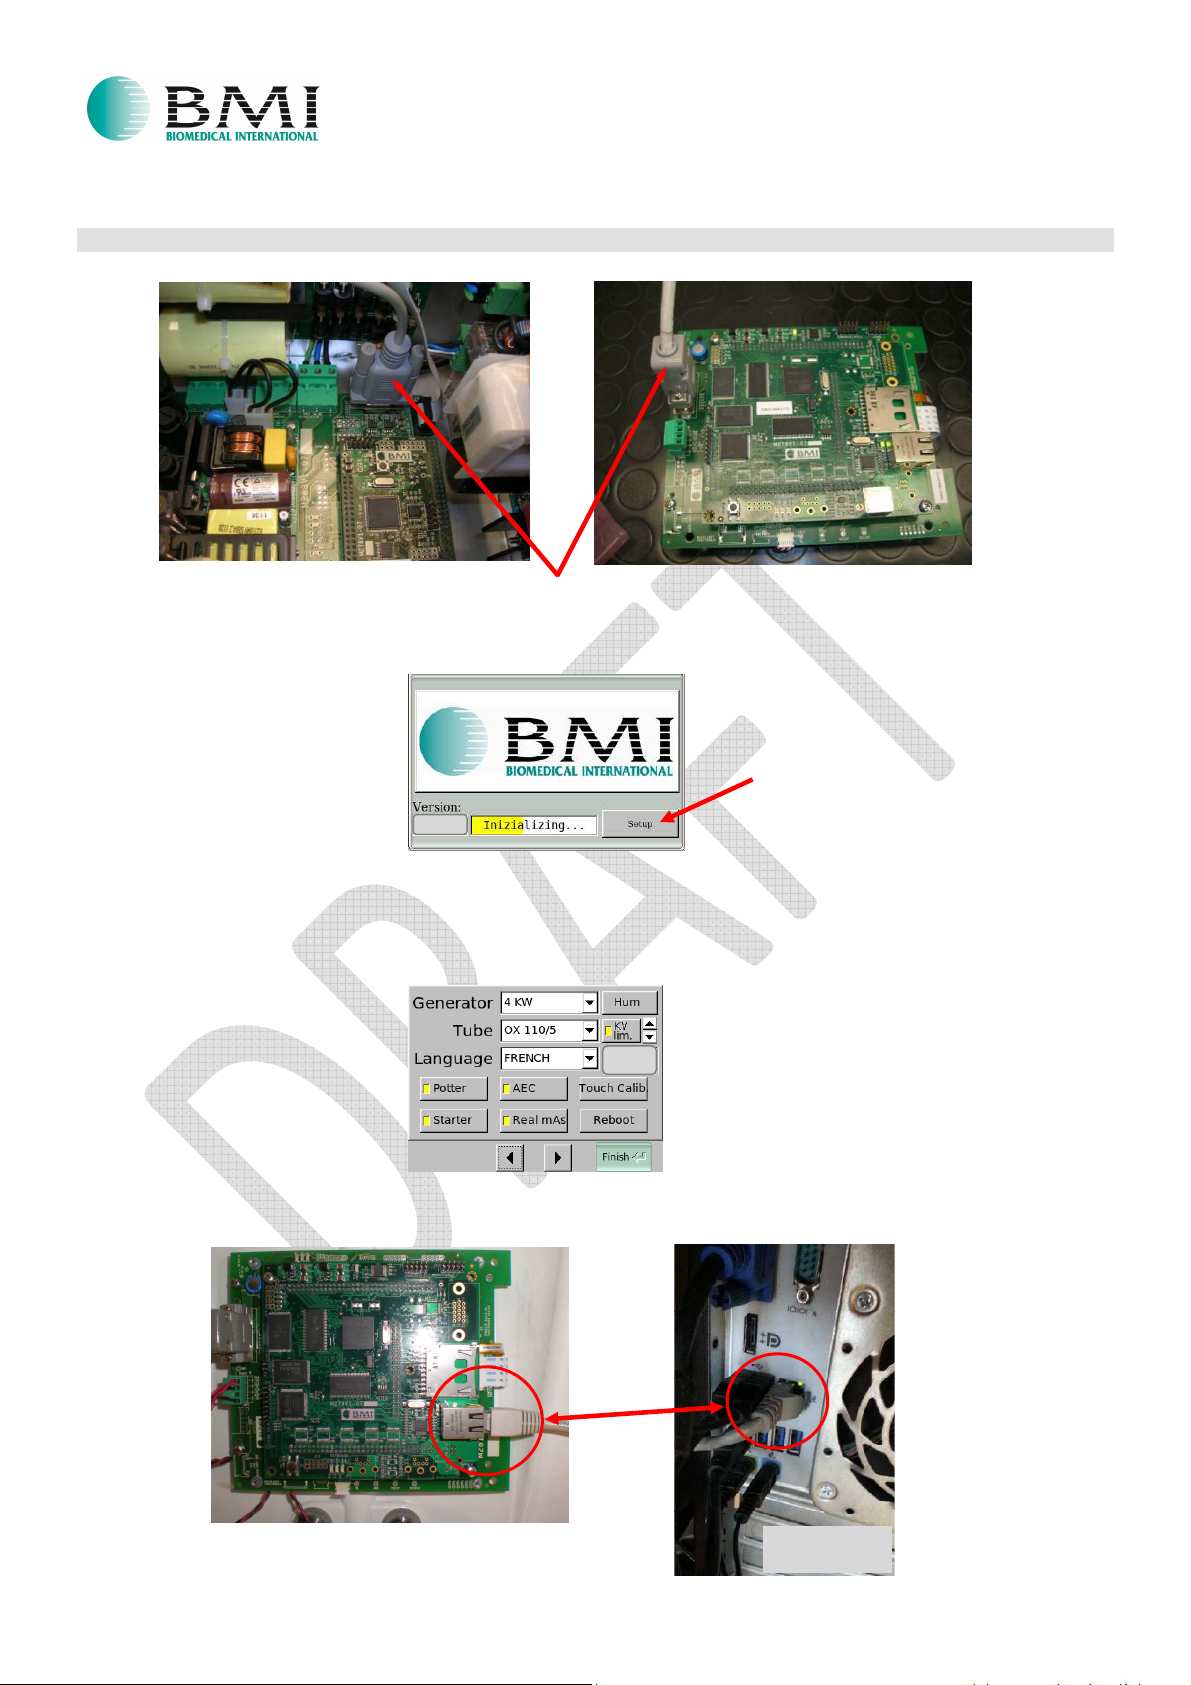
1. Make sure that serial cable between Main Board and Display Board is connected.
2. Switch ON the unit.
3. During booting of the system you will see this screen:
4. Click “Setup” icon and type the password: for old units = 123 ; for new units = 1518.
IMPORTANT:
do NOT leave the SuperUser password at the operators in the hospital. (for technicians only)
5. You will see this screen:
6. Connect the ethernet cable between Display Board (J10) and PC:
EXAMPLE
3
Page 4
UPGRADE INSTRUCTIONS
FOR
IO-19-EN Rev. 01
22.04.2015
“LISA” FIRMWARE AND LOGO
IMPORTANT:
-
if you use the PC, make sure to disconnect physically the ethernet cable from the network.
-
if you use the laptop, make sure to switch off the wi-fi connection.
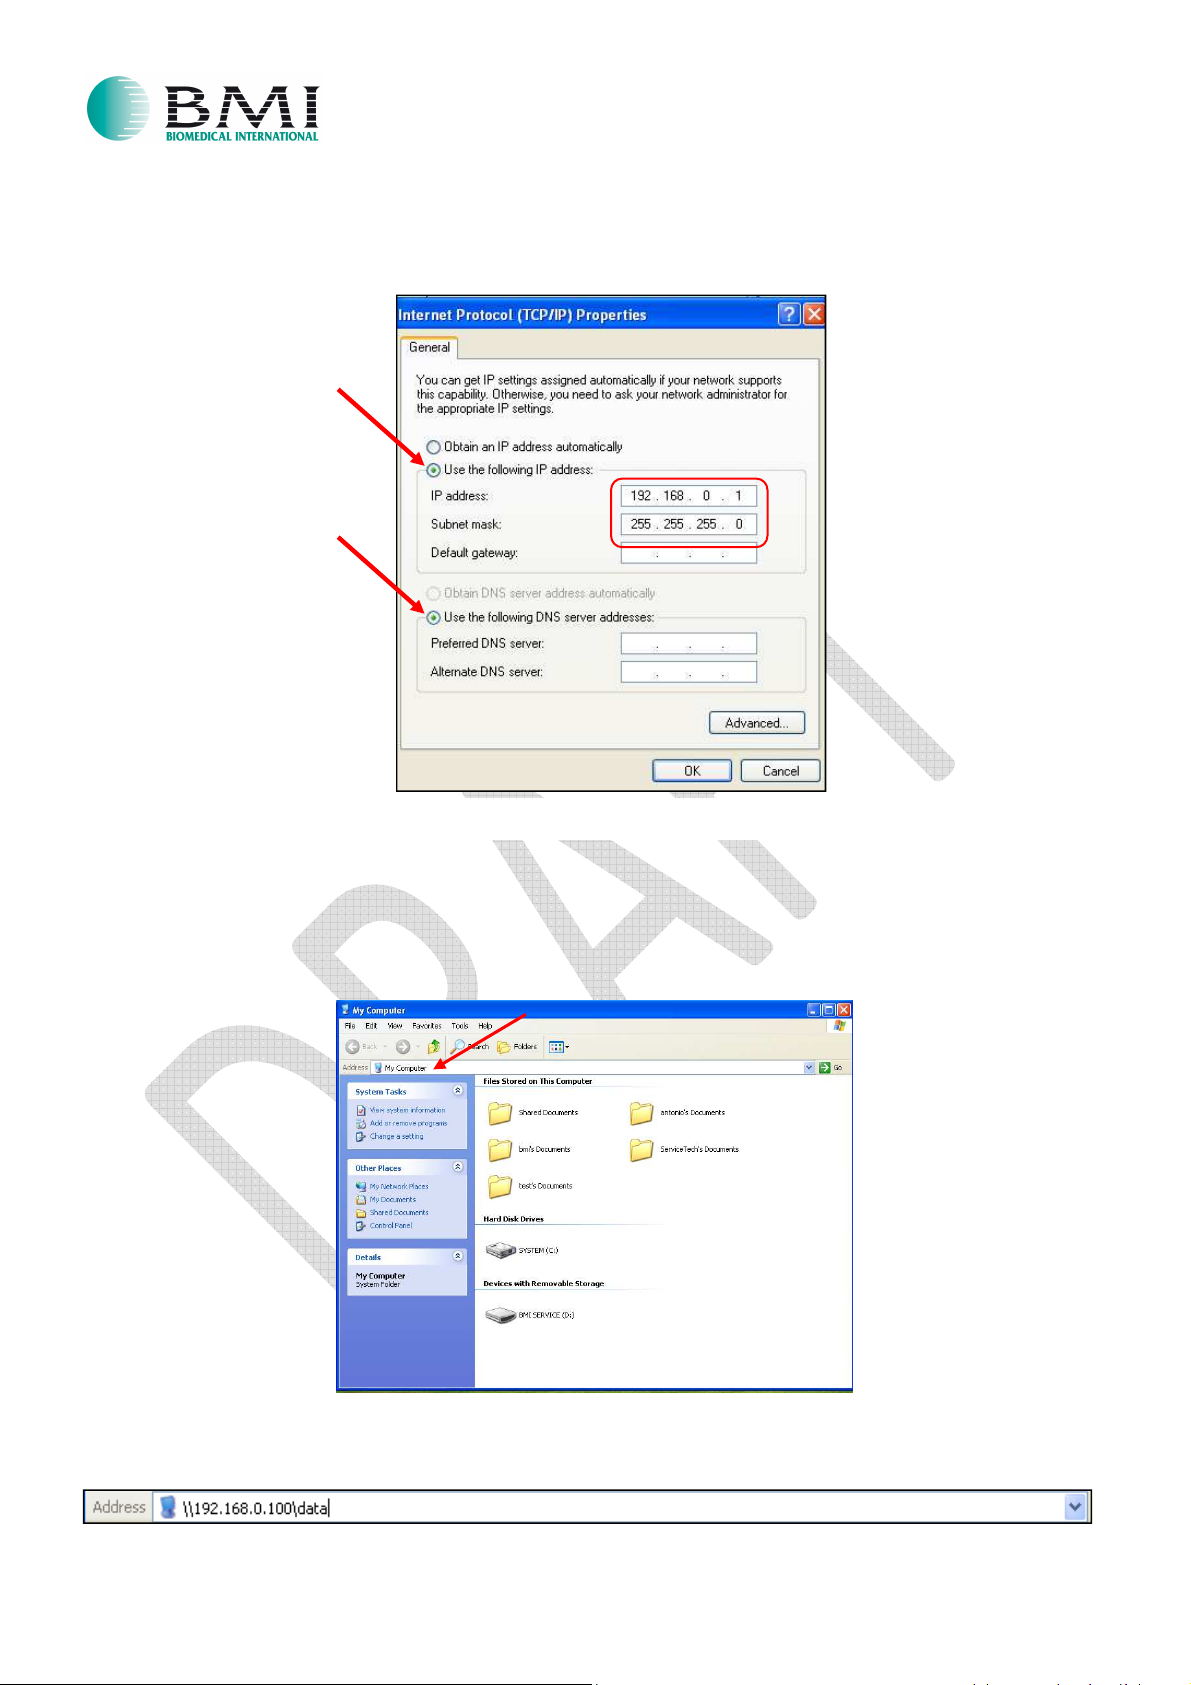
7. Change IP address in order to allow the upgrade of “Lisa” firmware and logo by following the below steps:
NOTE:
procedure valid only for O.S. Window XP.
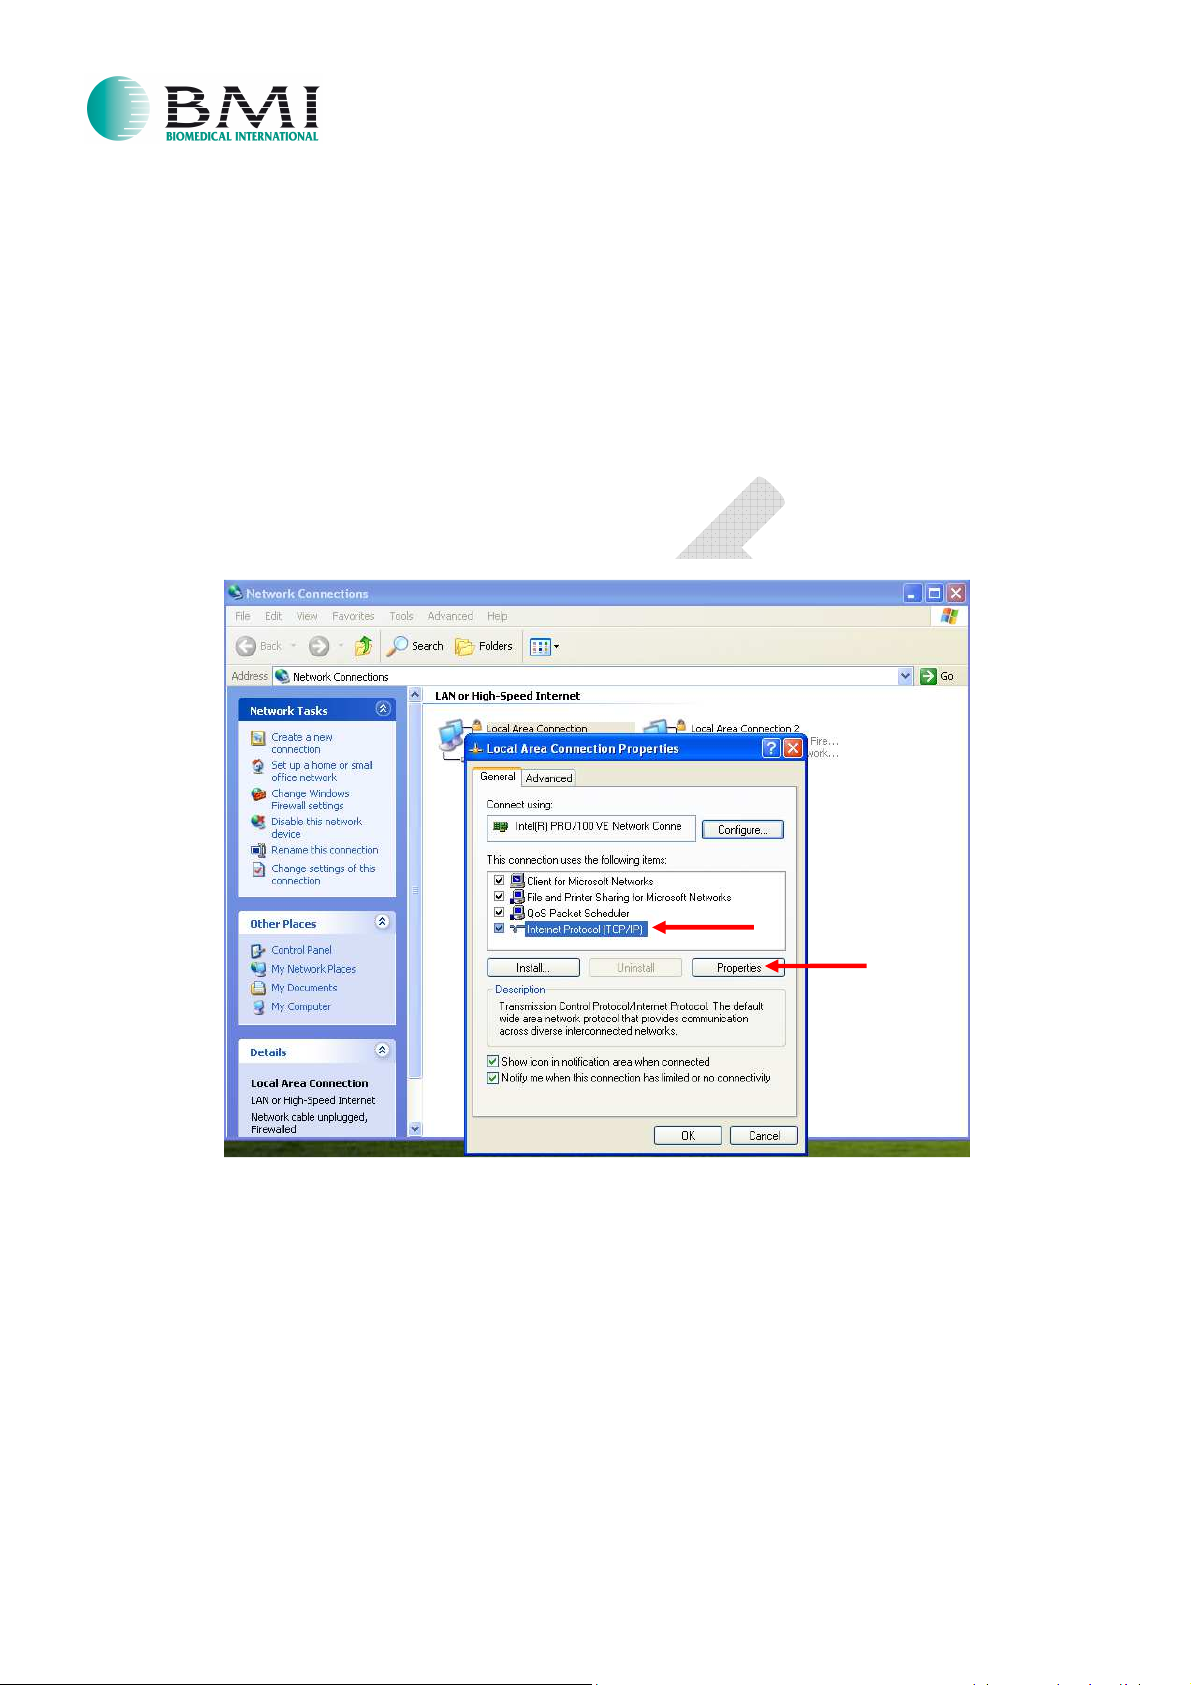
o Open “Network Connections” and make right-click on “Local Area Connection”.
o Click “Properties” and you will see the below screen.
o Select “Internet Protocol (TCP/IP)”.
o Click “Properties”.
4
Page 5
UPGRADE INSTRUCTIONS
FOR
IO-19-EN Rev. 01
22.04.2015
“LISA” FIRMWARE AND LOGO
o You will see the below screen where you can change IP address and DNS server.
o Set the same parameters shown below.
o Save the new settings by clicking “OK” icon.
o Click again “OK” icon to close the “Local Area Connection Properties”.
o Return on the Desktop.
8. Double click on “My Computer”. (see the below screen as EXAMPLE)
9. Type on the taskbar this IP address \\192.168.0.100\data
, as shown below
:
10. Press “ENTER”.
5
Page 6
UPGRADE INSTRUCTIONS
FOR
IO-19-EN Rev. 01
22.04.2015
“LISA” FIRMWARE AND LOGO
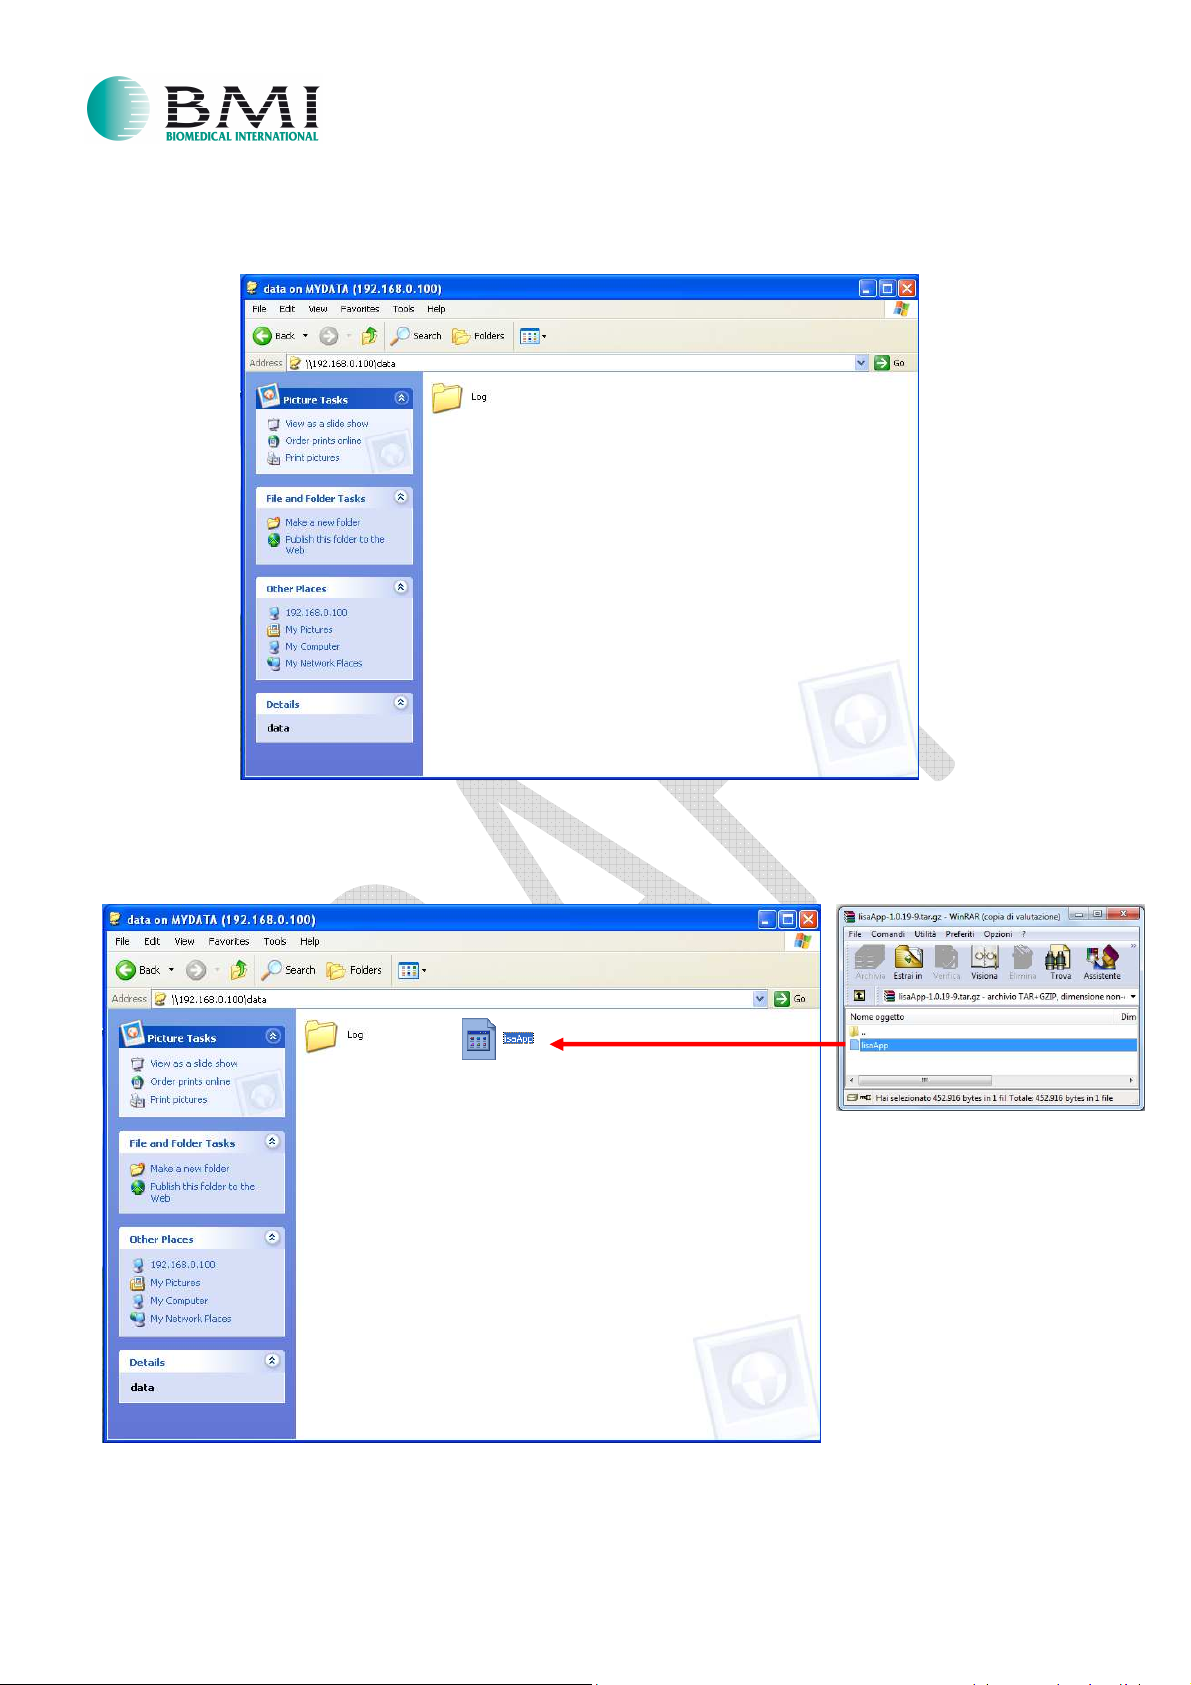
11. You will see the below folder, called MYDATA:
12. Unzip the “lisaApp” file and copy it inside the folder MYDATA, as shown below:
6
Page 7
UPGRADE INSTRUCTIONS
FOR
IO-19-EN Rev. 01
22.04.2015
PROCEDURE FOR UPGRADING LOGO
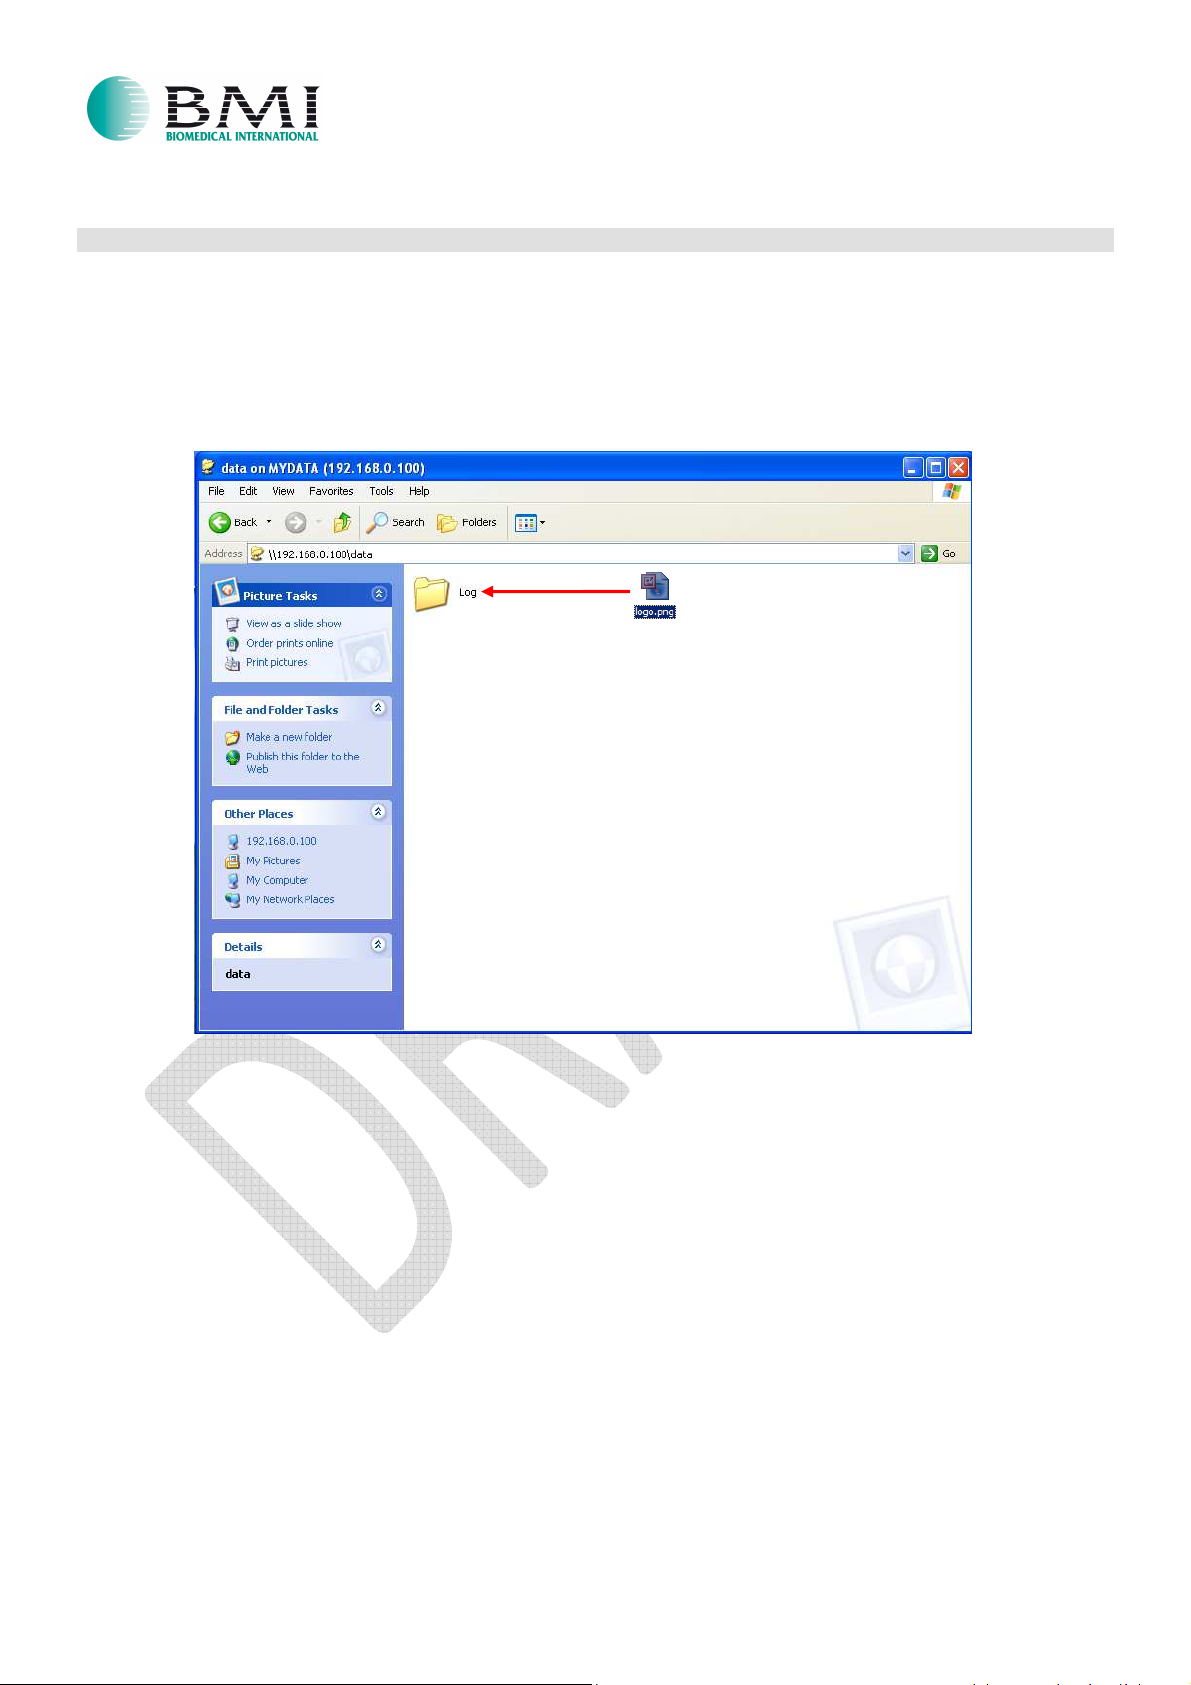
In order to upgrade the Logo displayed during the booting of the system do not close the folder MYDATA.
NOTE:
if it is not necessary upgrade it, go directly at step 13.
Copy and overwrite the new logo file inside the folder “Log”, as shown below:
NOTE:
use only the “logo.png” file provided from BMI. All of other “.png” files will not work.
“LISA” FIRMWARE AND LOGO
7
Page 8
UPGRADE INSTRUCTIONS
FOR
IO-19-EN Rev. 01
22.04.2015
“LISA” FIRMWARE AND LOGO
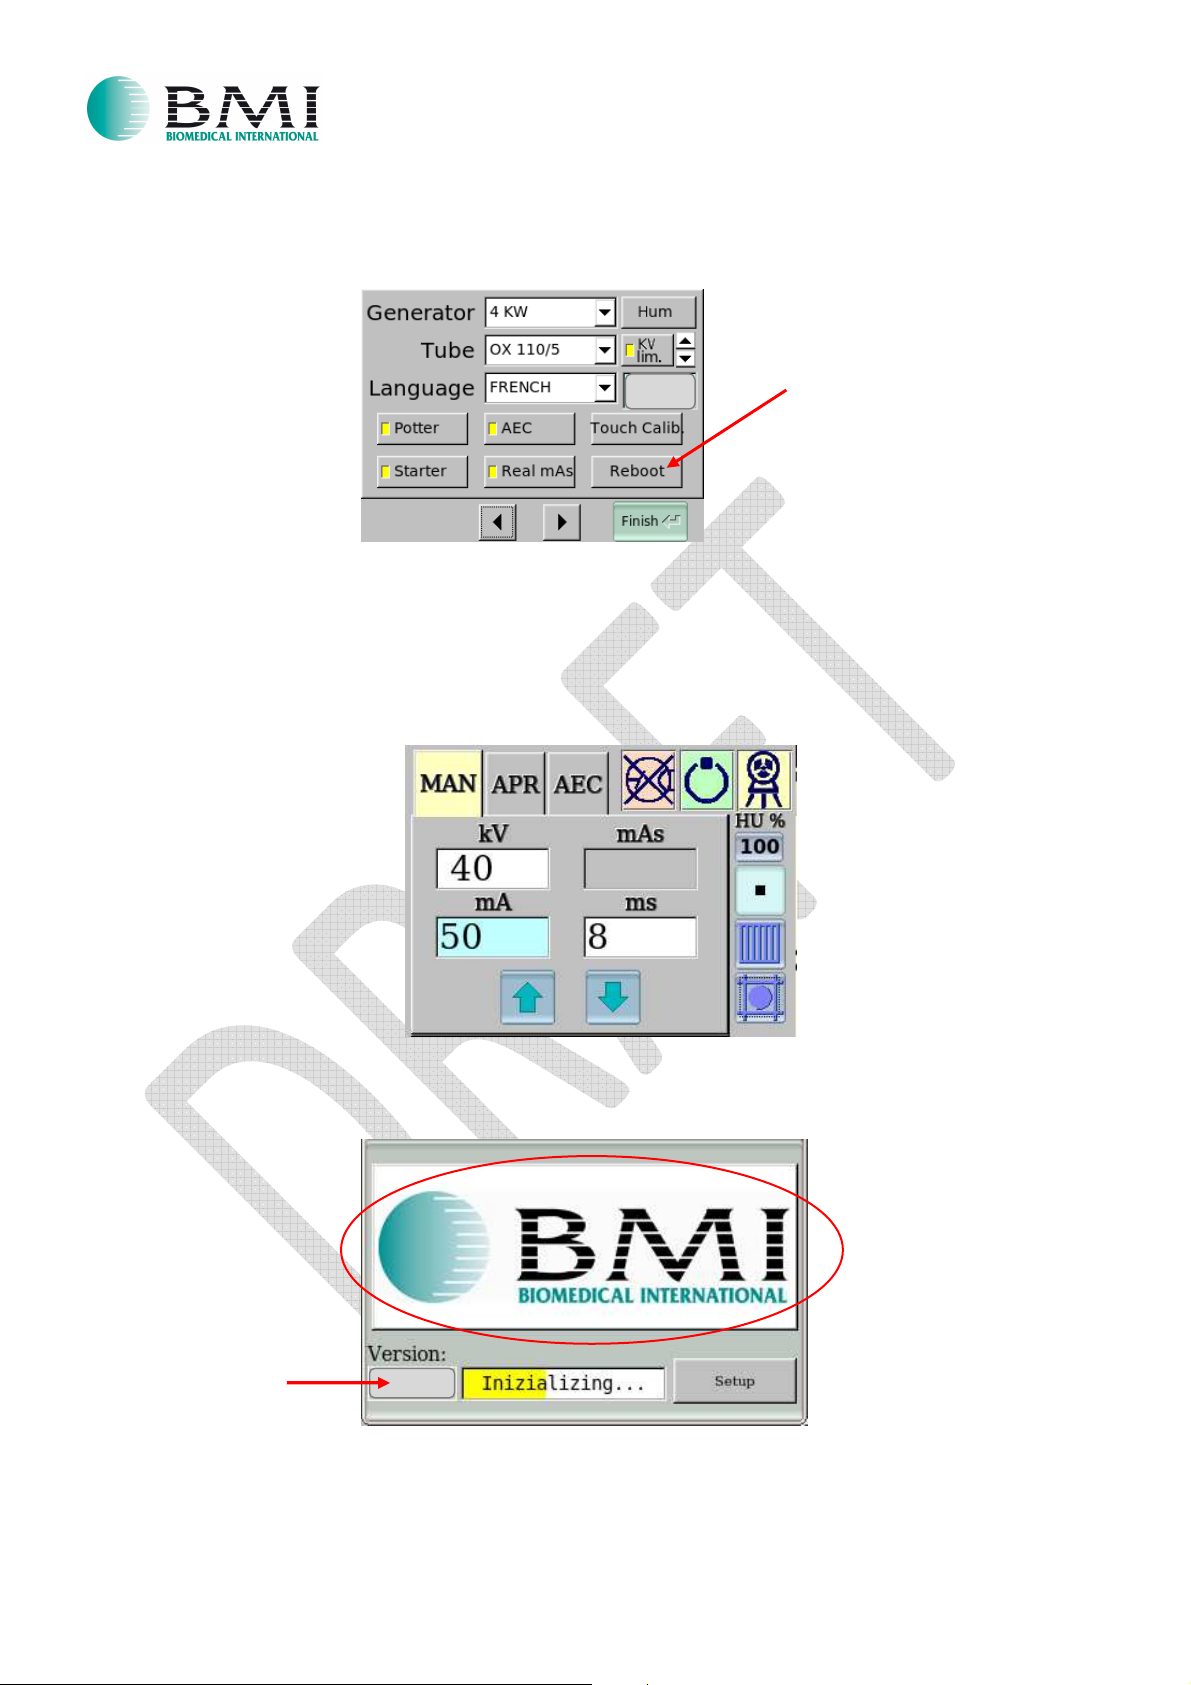
13. Click “Reboot” icon into the Setup Mode.
14. It will appear a popup on the display: “
15. Click “YES”. (the system will restart automatically)
16. Wait the booting of the system until you see the Operator Mode:
ARE YOU SURE?”
NOTE:
during the booting of the system, check the new “Lisa” version and Logo (if changed) as shown here
below:
17. Switch OFF the unit and detach the ethernet cable.
18. Close the folder MYDATA.
19. Reconnect the “Binder connector”, remount the cassette holder and the console.
8
 Loading...