

Page 1
20-3-2009 1 033000=15090
TAKE 10
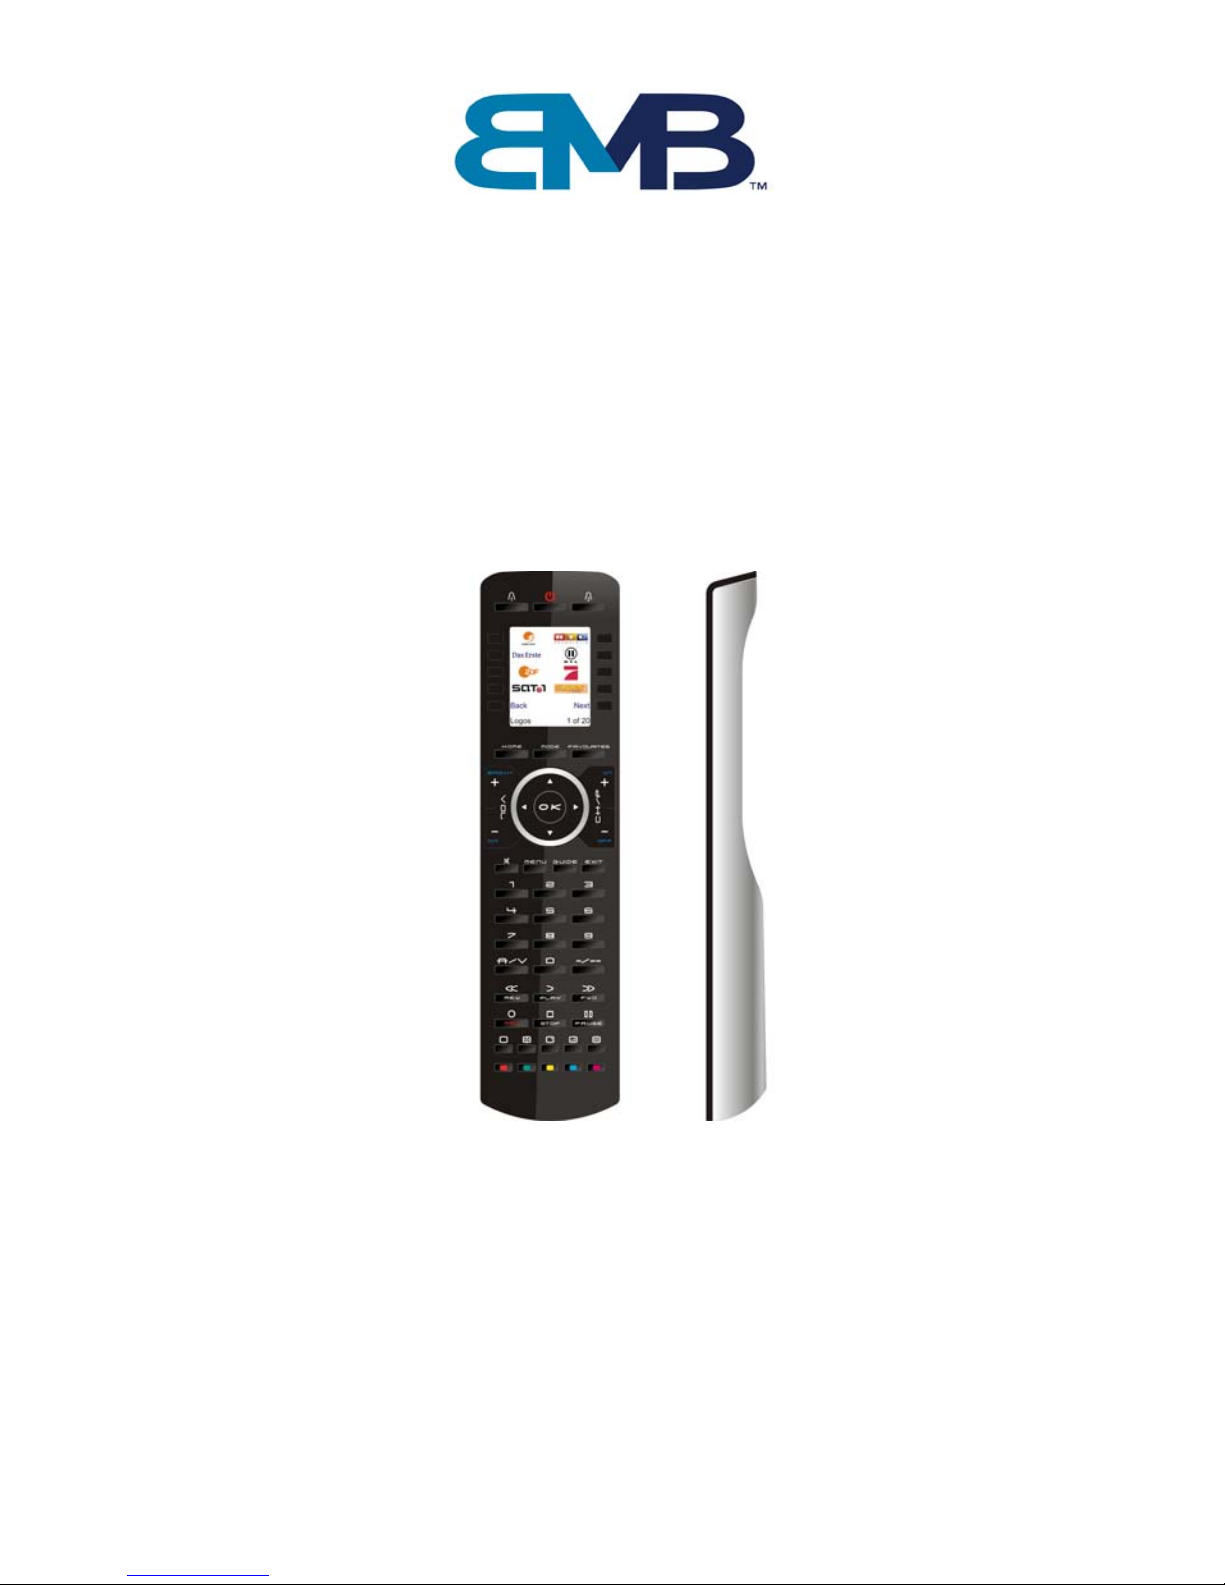
10 in 1 universal remote control
User guide
Page 2
20-3-2009 2 033000=15090
TAKE 10
UNIVERSAL REMOTE 10 in1
Button layout
Page 3

20-3-2009 3 033000=15090
User Guide
General Security Note
Attention:
For carefree and safe use of this product, please read this manual and safety information
carefully and follow the instructions. Technical manipulation of the product or any changes to
the produc t are forbidden, due to security and approv al issues. Please ta ke care to set up
the device correctly - consult your user guide. Children should use the device only under
adult supervision.
Important: the TAKE 10 must be used according the instructions in this manual and is not
suitable for other purposes.
Avoid the following
• strong mechanical wear and tear
• high temperature
• strong vibrations
• high humidity
Please also respect the additional security notes in the various user guide chapters. To ensure
correct set up please read the manual and security notes carefully.
Battery install and change
The device may only be used with AA Alkaline batteries - never try to connect to another
power supply. When inserting batteries be sure the right polarity is used. Remove the batteries
when the device is not us ed for a longer period. Make sure that the ba tteries are not short
circuited and are not disposed in fire (danger of explosion). Batteries do not belong in
children hands. Don’t let batteries lay around openly – they might be swallowed by children
or animals. If this happens see a doctor immediately.
Disposal of batteries:
Batteries are special waste and do not bel ong in general household waste disposal. Leaking
or damaged batteries can upon contact with skin cause burning or acid damage – if
necessary use suitable gloves.
Please dispose of batteries in accordance with local bylaws.
Congratulations
Congratulations on your p urchase of the TAKE 10. The TAKE 10 has the ability to combine
many types of remotes into a single remote. It has many unique features that are available
through the high quality colour screen and the configurable menus. The screen displays icons
that are easily set up to represent your favourite channels. You can select any channel by
simply pressing the key next to the icon that represents the channel.
The TAKE 10 may provide additional functions that are not availabl e on your device, and
there may be functions (e.g., menu functions) that initially may not be controlled by the
remote; but in such cases, the TAKE 10 can easily learn the commands from your original
remote. The TAKE 10 remote is capable of many other features that are also described in this
manual.
Page 4
20-3-2009 4 033000=15090
The TAKE 10 can also control X10 RF devices, which allows you to control different electrical
devices located in various physical locations around the house, using radio frequency (RF)
signals. This gives you the freedom to control devices that are not in the same physical
location as th e r em ote.
The TAKE 10 is very intuitive and has built-in Help, but it’s very useful to become familiar with
the remote by first reading this manual. After you’ve become familiar wi th the TAKE 10, the
first thing you need to do is to in stall the batteries and setup your remote using the on-screen
instructions.
Thank you for purchasing this remote, and we trust that it will give you many years of service.
Contents
1. Introduction
2. Insert the batteries
3. Button Functions
4. Setup
4.1 Using the Wizard
4.2 Setting Up Your Devices
4.3 Setting Up Your Favourites
5. Using The Remote
6. Learning
6.1 Main Keys
6.2 Side Keys
7. Setting Up More
7.1 Devices
7.2 Favourites
8. Setting up X10 devices
9. Advanced Settings
10. Troubleshooting
11. Tips & Tricks about learning IR codes to a remote
1. Introduction
The TAKE 10 is designed to control up to 10 devices:
E.g.: TV, VCR, DVD, SAT or AUDIO. The TAKE 10 contains a library of codes
that are pre-programmed into the remote control. This library covers
nearly all the audio video products on the market today. The
codes have to be programmed once before use. This can be
done in different ways:
a. Using the Wizard to find the correct infra red codes.
b. Learn the codes from the original remote.
2. Insert the batteries
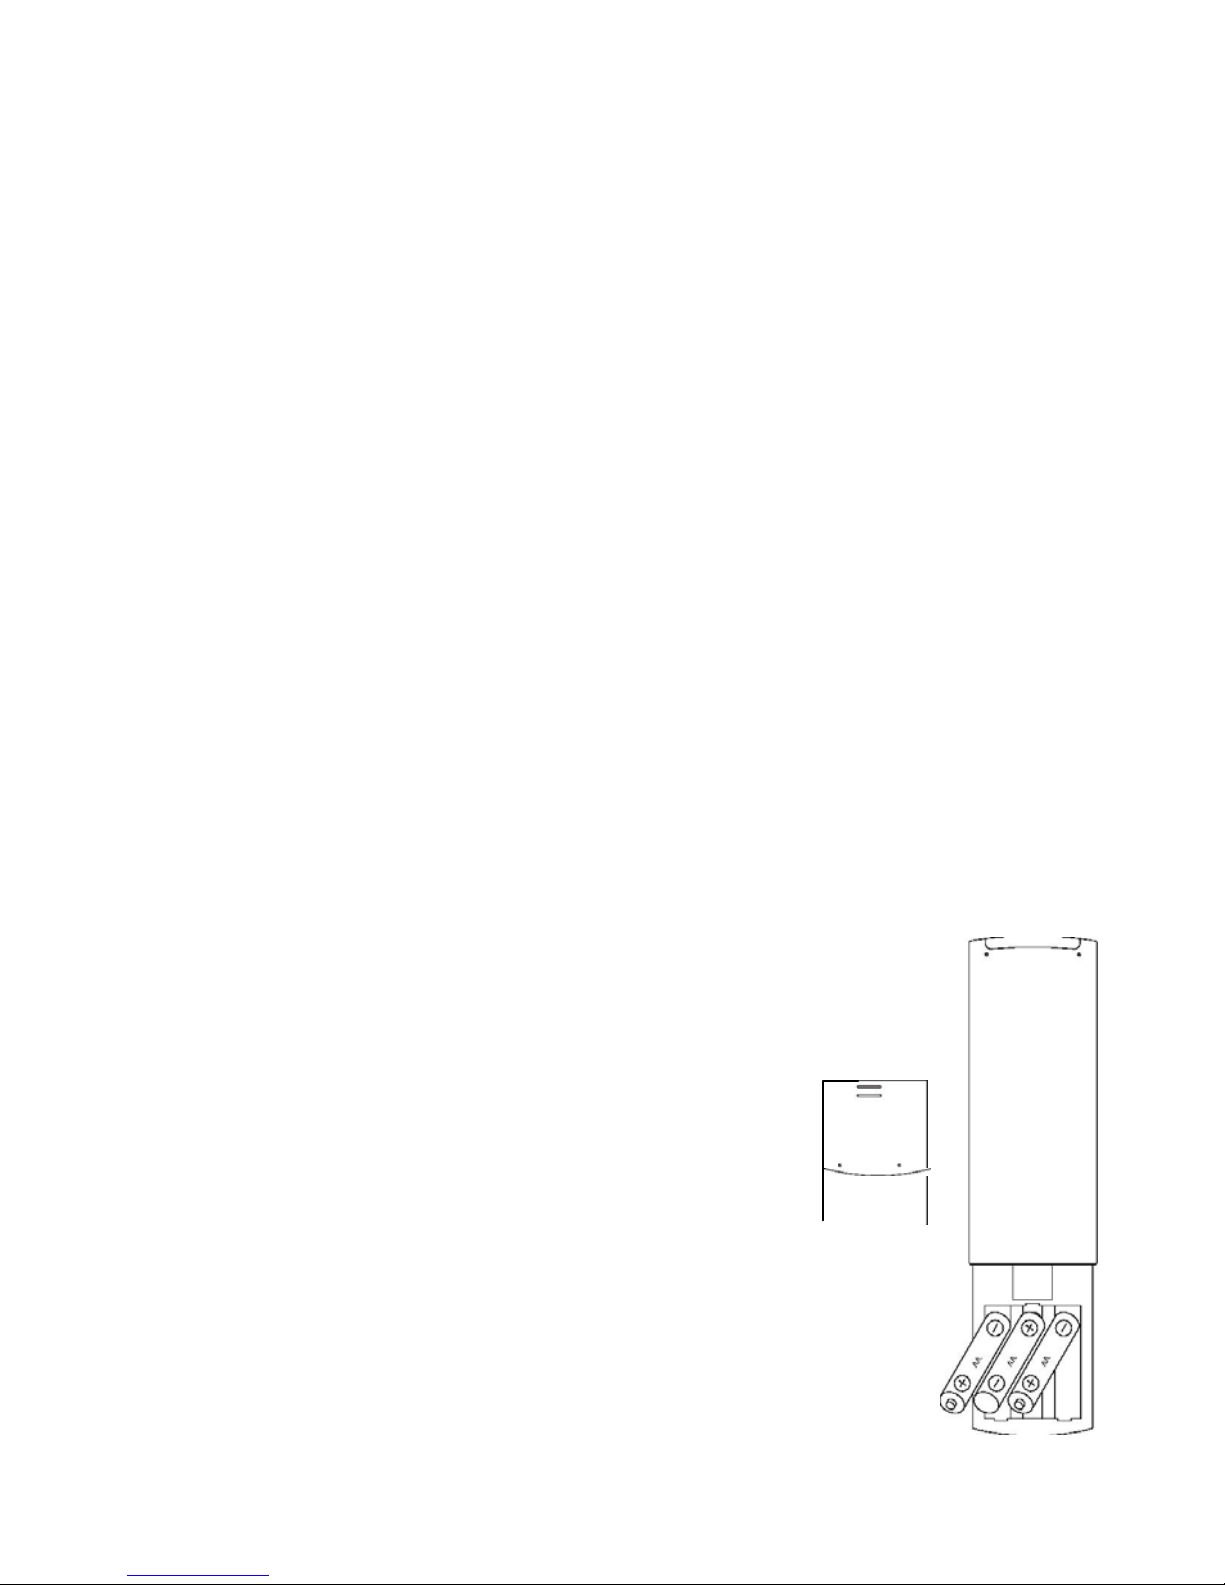
1. On the back of the remote, push down on the tab and lift the cover off.
2. Insert 3 AA Alkaline batteries taking note of the polarity (+/-).
3. Press the battery cover back into place.
Page 5

20-3-2009 5 033000=15090
Please Note - Only use new batteries, some remote functions can fail if old batteries are
used. Never use a combination of new and used batteries.
Battery Saving Feature
By defaul t, the TAKE 10 LCD automaticall y turns off if no keys are pressed for more than 30
seconds. This helps in extending the life of your batteries. The length of time before the LCD
screen turns off can be adjusted from 2 seconds to 35 seconds. Refer to Advanced Settings in
Chapter 8 for information on how to do this.
Memory
All the devices you set up, their codes, Punch-through settings, your favourites, etc., are
stored in permanent memory whilst you are changing batteries. As a result you will not lose
any of your stored settings whe n the batteries need replacing.
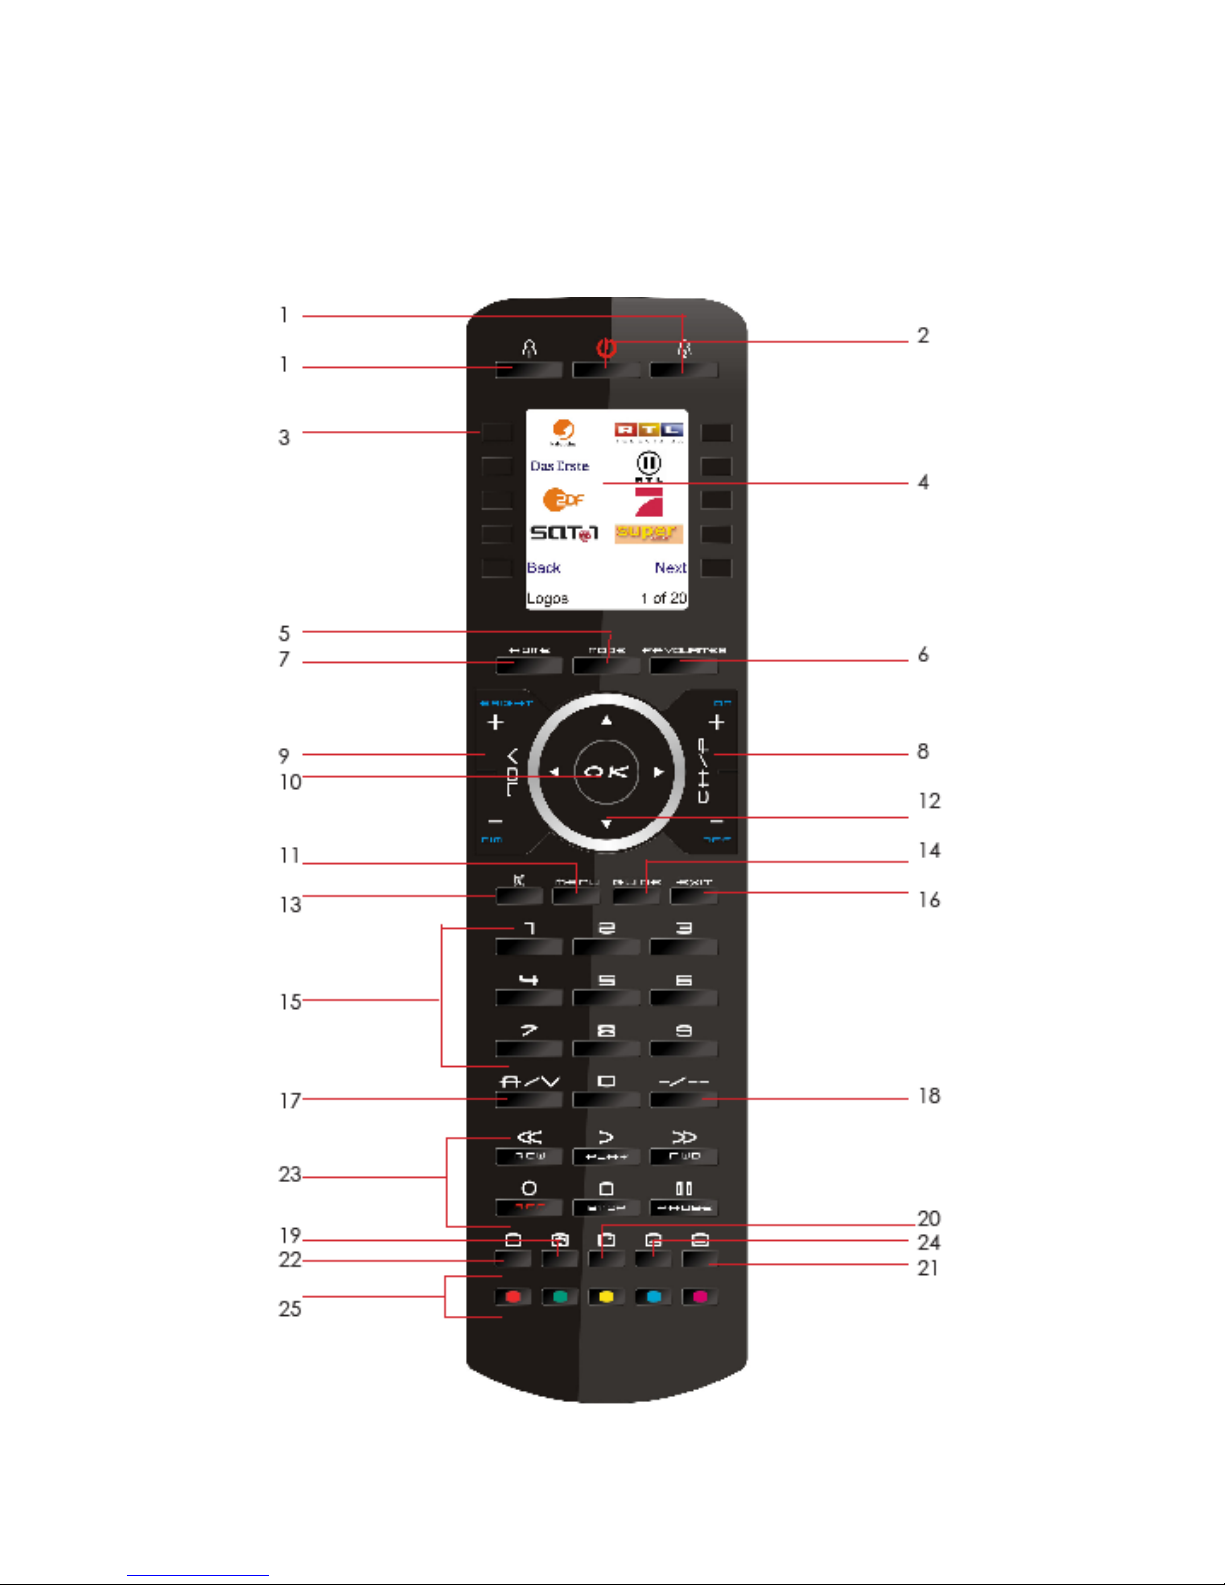
3. Button Functions
[1] His
/ Hers
Quick access keys for favourites stored under His/Hers groups.
[2] POWER
Turns current device On or Off.
[3] SIDE KEYS
Used to access on-screen features.
[4] LCD
Liquid Crystal Display
[5] MODE
Brings up AV device selection screen on the remote
[6] FAVOURITE
Access favourite groups on the remote LCD.
[7] HOME
Brings up the main menu on the remote LCD.
[8] CHANNEL UP/DOWN
Changes channels, chapter skip function for DVD players, track skip for Audio players.
[9] VOLUME UP/DOWN
Changes the volume level of the device.
[10] OK
Selects menu items for the device you are controlling, or confirms selections on the screen.
[11] MENU
Brings up the Menu screen.
Page 6

20-3-2009 6 033000=15090
[12] UP, DOWN, LEFT & RIGHT
Navigation Keys, these buttons allow you to nav igate into the menu of the selected device (if
the device you selected has such a menu)
[13] MUTE
Turns the Volume on/off.
[14] EPG
Brings up on-screen program or channel guides.
[15] NUMBERS
Numbers for direct program channel selection.
[16] EXIT
Exit On-Screen Menus/Returns to previous On-Screen selection.
[17] AV
Selects input source.
[18] -/-- (Enter)
Accesses program channels >9 or Enter function.
[19] TEXT HOLD
Holds current Teletext page.
[20] INFO
Brings up program channel information.
[21] TEXT ON
Turns Teletext f eature on.
[22] TEXT OFF
Turns Teletext feature off.
[23] RECORD, PLAY, PAUSE, STOP, REW, FF,
Transport buttons to operates your VCR, DVR, or DVD Player.
NOTE: the Reco rd key needs pressed t wice to operate.
[24] TEXT MIX
Shows both Teletext and TV picture.
[25] Colour buttons
Gives you quick access to teletext presets.
Page 7
20-3-2009 7 033000=15090
4. Setup
4.1 Using the Wizard
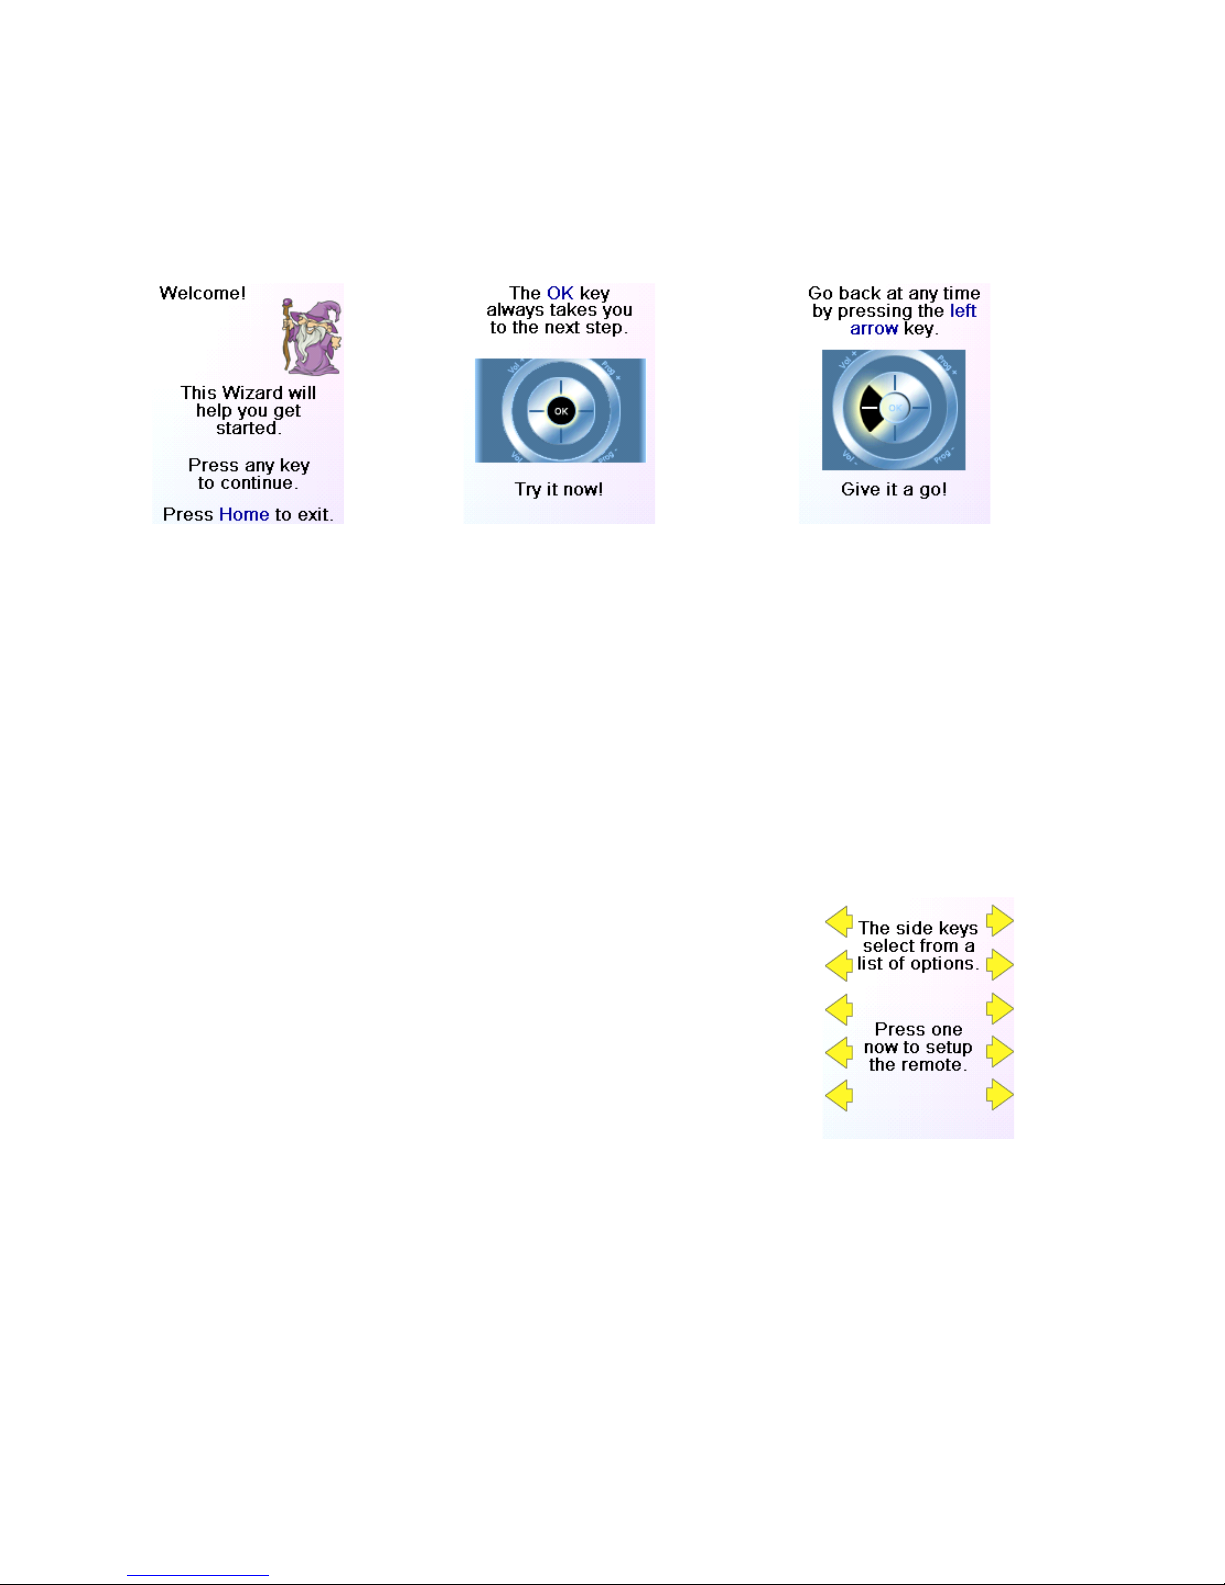
a) After you insert the batteries you can select your preferred l anguage and then the Setup
Wizard screen [1] appears. Press any key at this screen to continue with the wizard. You can
exit at any time by pressing the HOME key (located just below the screen).
[1] [2] [3]
b) Pressing OK at screen [2] takes you to the next screen [3]. Pressing the Left navigation key
on the remote at screen [3] takes you to screen [4] that has 10 yellow arrows. Normally the
Left navigation key will get you back to the previous screen but this screen is an exception to
the rule to help you learn how the remote functions. Pressing the Back key again at screen 4
will take you back.
c) Try pressing the Back key a few times to go back through the Wizard and then follow the
instructions on the screens again to familiarize yourself with how to step through the screens
and go back.
You can go back and forth through the Wizard but once you’ve set up your devices and quit
to save the settings, you won’t see the Wizard again unless you do a Master Reset.
Pressing any of the 10 Side Keys (K1 thru K10) at screen
[4] takes you to the screen where you set up your first
device (TV).
See the Setting Up Your Devices section below.
NOTE: To do a Master Reset: Press the HOME key, select
Setup, select Advanced,
select Clear Settings, then select Master Clear.
This will erase everything you have set up in the remote.
4.2 Setting up your devices
For a known brand
After you have been thr ough the Wizard for the first time, screen [1] shown to the right
appears. This is the start of the Wizard to set up you r devices (TV being th e first one).
Please note that the device you are setting up will need to be switched on prior to
programming the universal remote.
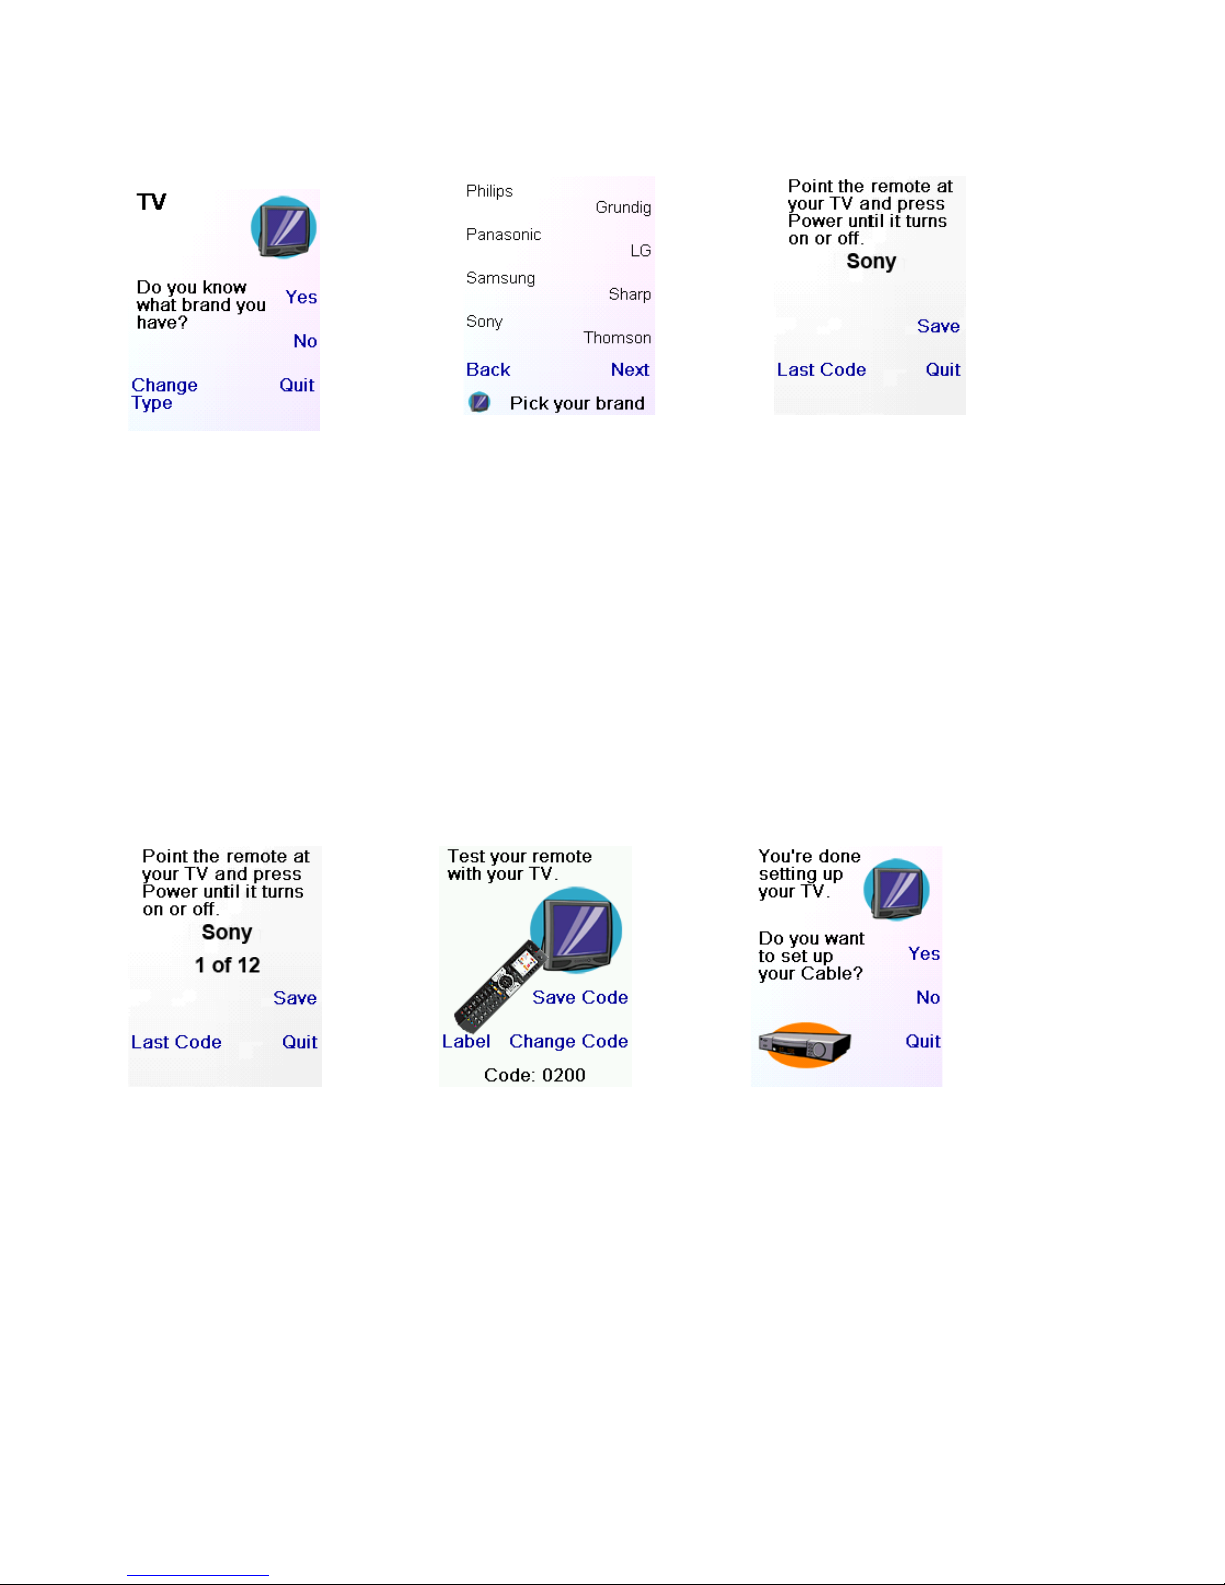
If you know your brand of TV, select ‘Yes’, this results in a faster search for your TV’s code.
K1
K2
K3
K4
K5
K6
K7
K8
K9
K10
[4]
Page 8
20-3-2009 8 033000=15090
Selecting ‘No’ searches the complete library of TV codes, rather than just the codes for your
brand of TV. Please be patient if selecting this option as there are hundreds of IR TV codes to
search through.
[1] [2] [3]
Pressing the Side Key next to ‘Yes’ at screen [1] takes you to screen [2] where the most
common brands of TV are shown.
You can scroll through the brands by pushing the Side Keys adjacent to the ‘Next’ and ‘Back’
text. Screen [2] shows S ony being selected as an example.
Screen [3] asks that you p o int the Universal Remote directly at your TV and repeatedly pr ess
(not hold) the Power button until your device responds.
Pressing the power button sends the On/Off command to your TV.
The LCD on the Universal Remote will show that you have selected code 1 of xx (xx will vary
by brand) as shown on screen [4].
When your device responds to the On/Off command press the save button.
[4] [5] [6]
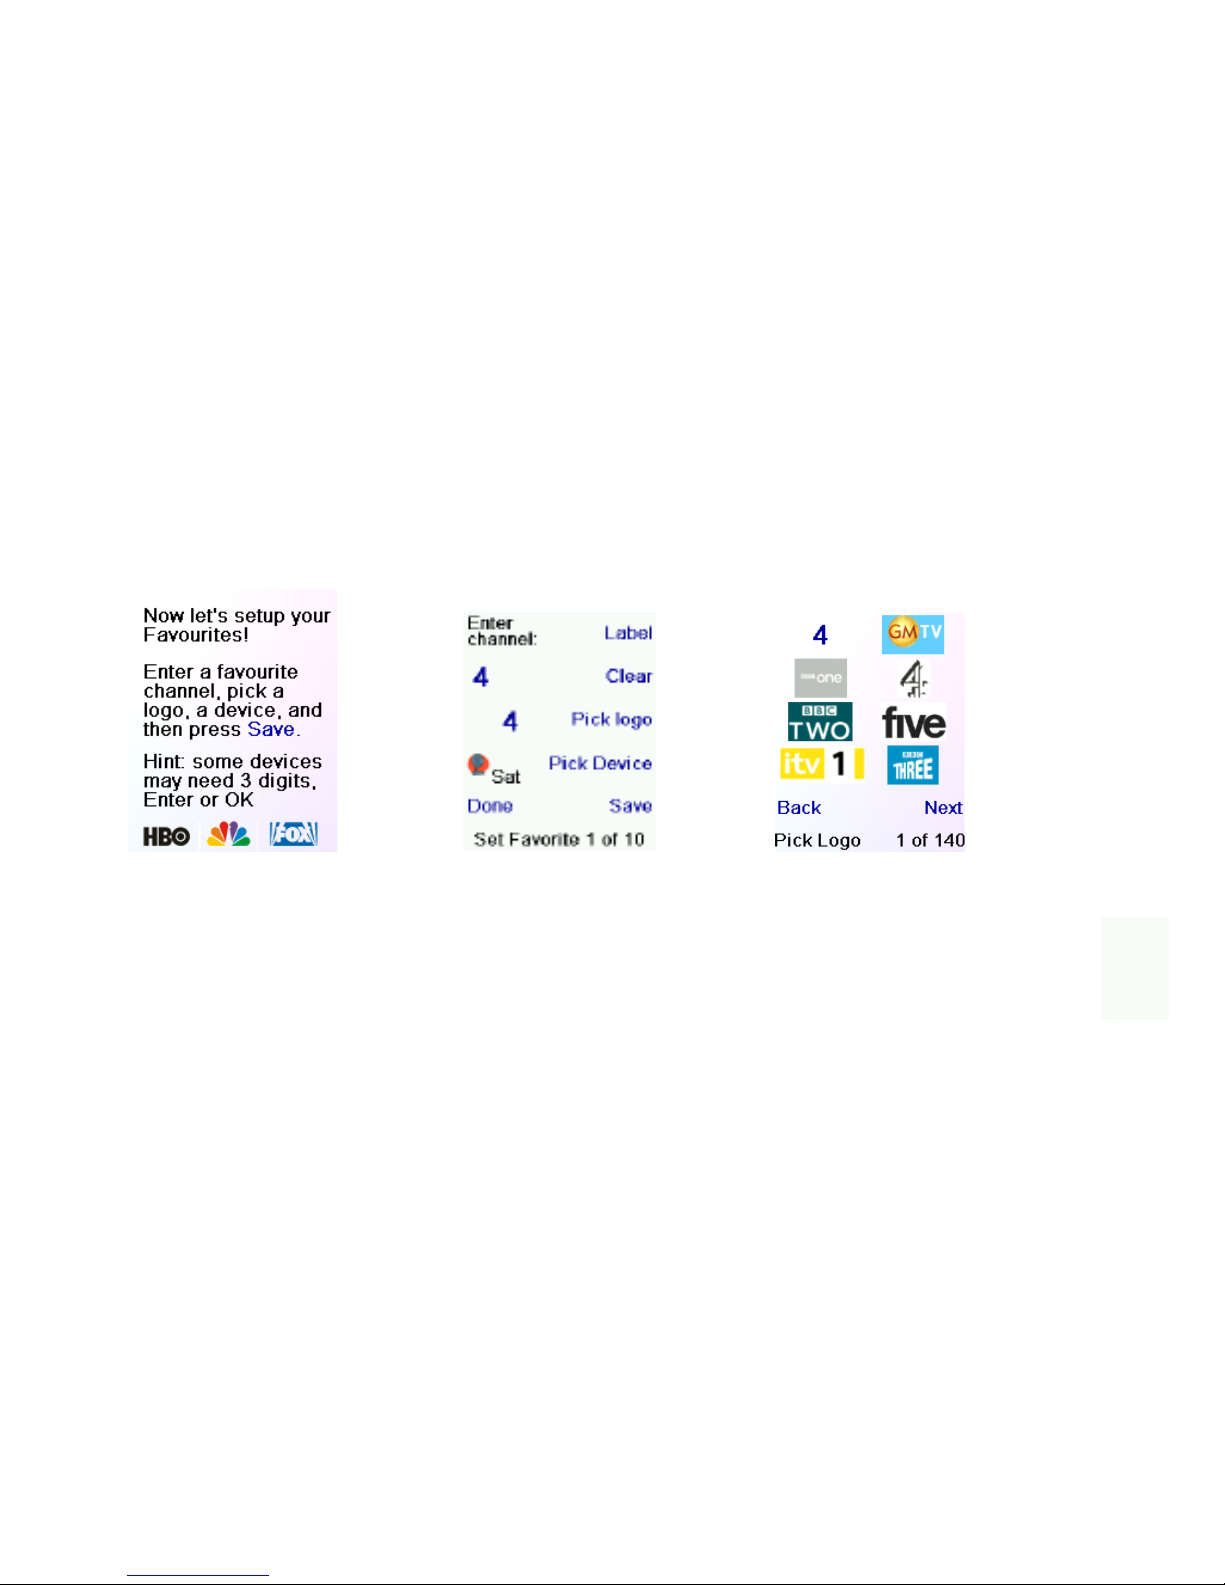
Pressing Save will bring up screen [5].
This instructs you to test your remote with your TV, simply push some buttons on the remote
(other than Power) such as Channel Up/Down, Volume Up/Down and Menu.
This test will ensure that you have the correct code fo r your dev ice as the Power button may
work, but other buttons may not, meaning you might have the incorrect code.
If you do find that some keys do not work select ‘Change Code’ (or the Back button) at
screen [5] to find another code that works.
Selecting ‘Label’ on screen [5] allows you to rename the device, e.g. you could call it “My
TV”.
This is an optional step and can also be done later on. Refer to chapter 4.3 for more details
on changing labels.
Page 9
20-3-2009 9 033000=15090
Pressing Save Code at screen [5] takes you to screen [6] where you can set up your Universal
Remote to control a Cable box.
Please note, you can quit at this point and set up other devices later, or you can continue
and set up other devices, such as DVR’s, VCR’s or CD Players.
For a unknown brand
If you select ‘No’ at screen [1] (Do you know what brand you have?) then the procedure will
be very similar, the only difference will be that you will be searching through the entire library
of codes for your device, not just the codes for your brand, e.g. Phillips.
If you select ‘Yes’ when asked if you know your brand, but subsequently didn’t find a code
that works, you will be asked if you want to try again (in case you maybe missed it), or try all
the codes for your device.
If you have tried all codes for your device and still don’t find the right code, you can skip the
device, or select ‘Learn’. If you select Learn you can th en learn the commands for your
device from its current remote control’s.
4.3 Setting Up Your Favourites
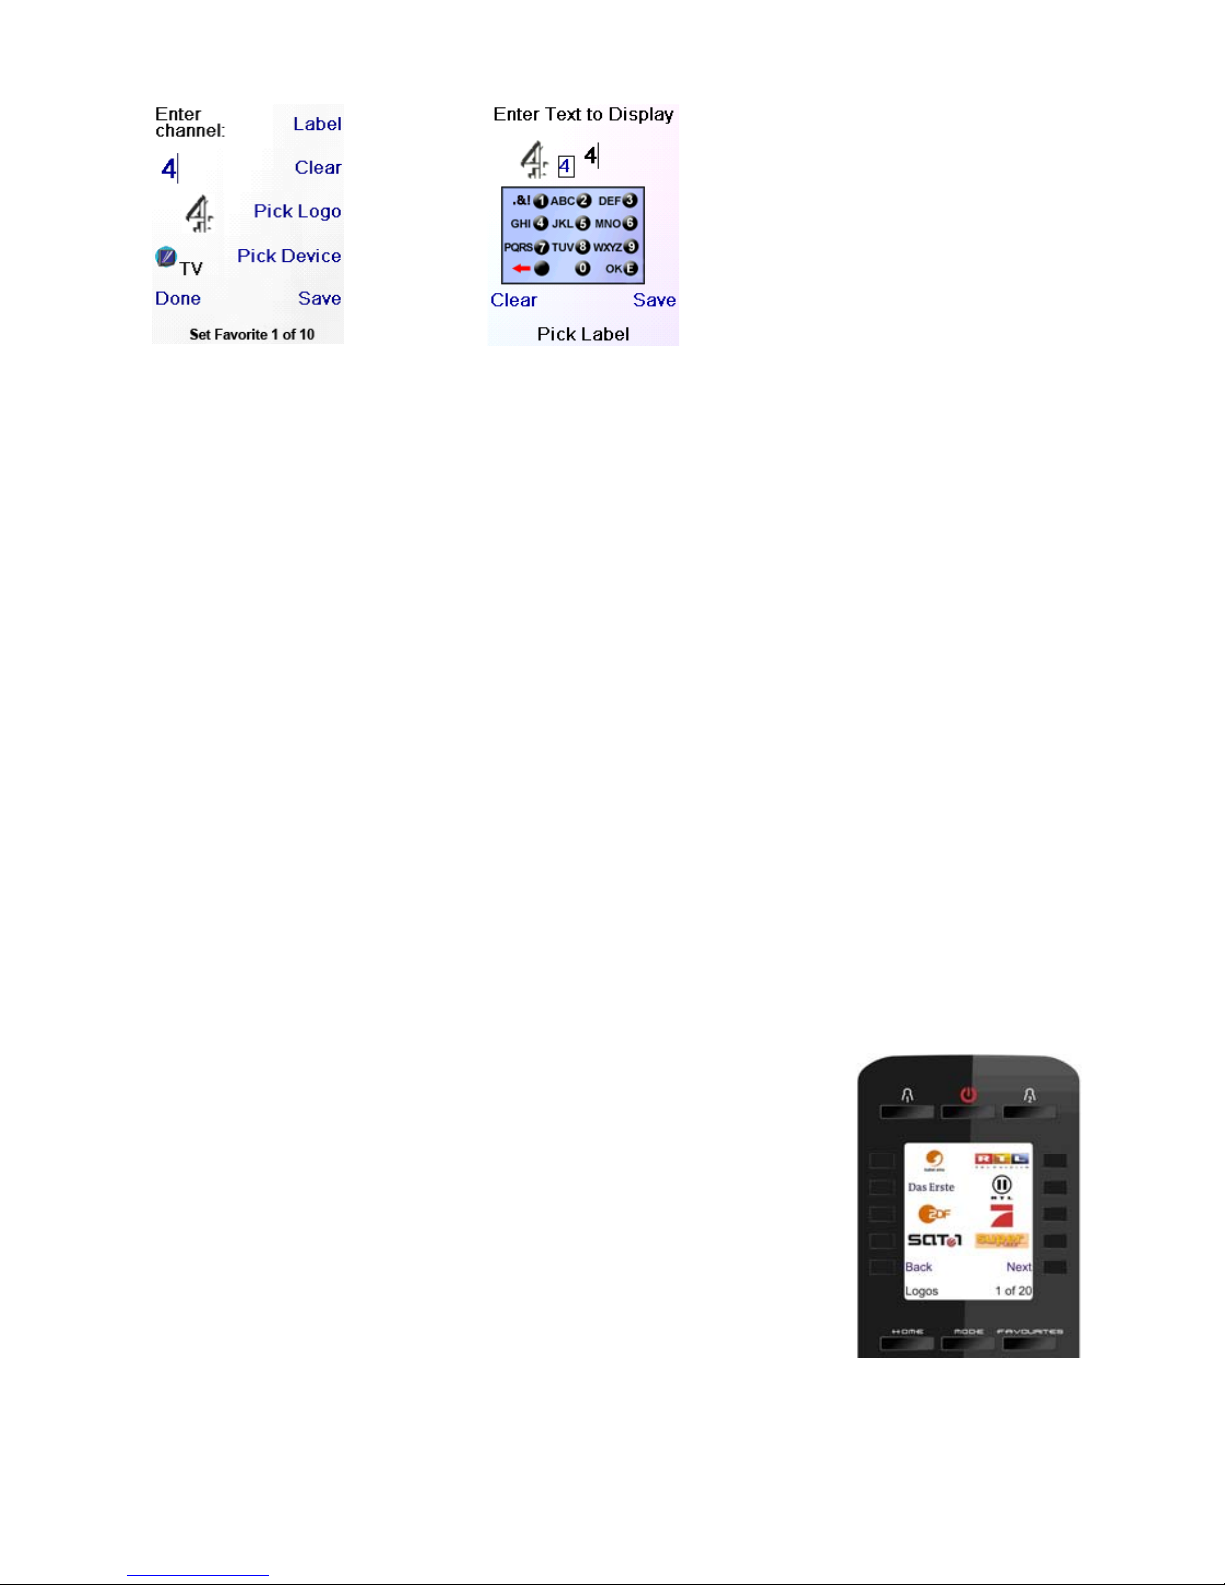
Once you have been through the Wizard and set up your devices (or at least a TV and
skipped the rest of the device setup) you will arrive at screen [1] below.
[1] [2] [3]
Pressing the Right Navigation Key will take you to screen [2].
Here you can enter a channel using the number keys on the remote. For examp le you might
enter channel 107. You can also in clude the ‘Enter’ or ‘OK’ buttons at the end of the channel
if your device requires one of these buttons to be pushed to change the channel, e.g.
‘107Ok’ or ‘107Ent’.
You can now press the Side Key next to Pick Logo on screen [2].
A screen [3] containing channel icons will appear.
Pressing the Next Key (Side Key 10) or the Back Key (Side Key 5) will allow you to scroll through
the icons. In this example we have selected the CNBC icon by pressing the corresponding
Side Key. Screen [4] now shows that we have chosen Channel 4, and the CNBC logo.
The device picked in the sample was Cable, you can change the device by pressing the
Side Key next to ‘Pick Device’.
Each time you activate a favouri te the remot e will control the device programmed, e.g.
when the CNBC favourite is selected the remote will send a command to your cable box. As
an example you may wish to program a Channel 10 favourite which sends a command to
your TV or Set Top Box.
Page 10
20-3-2009 10 033000=15090
[4] [5]
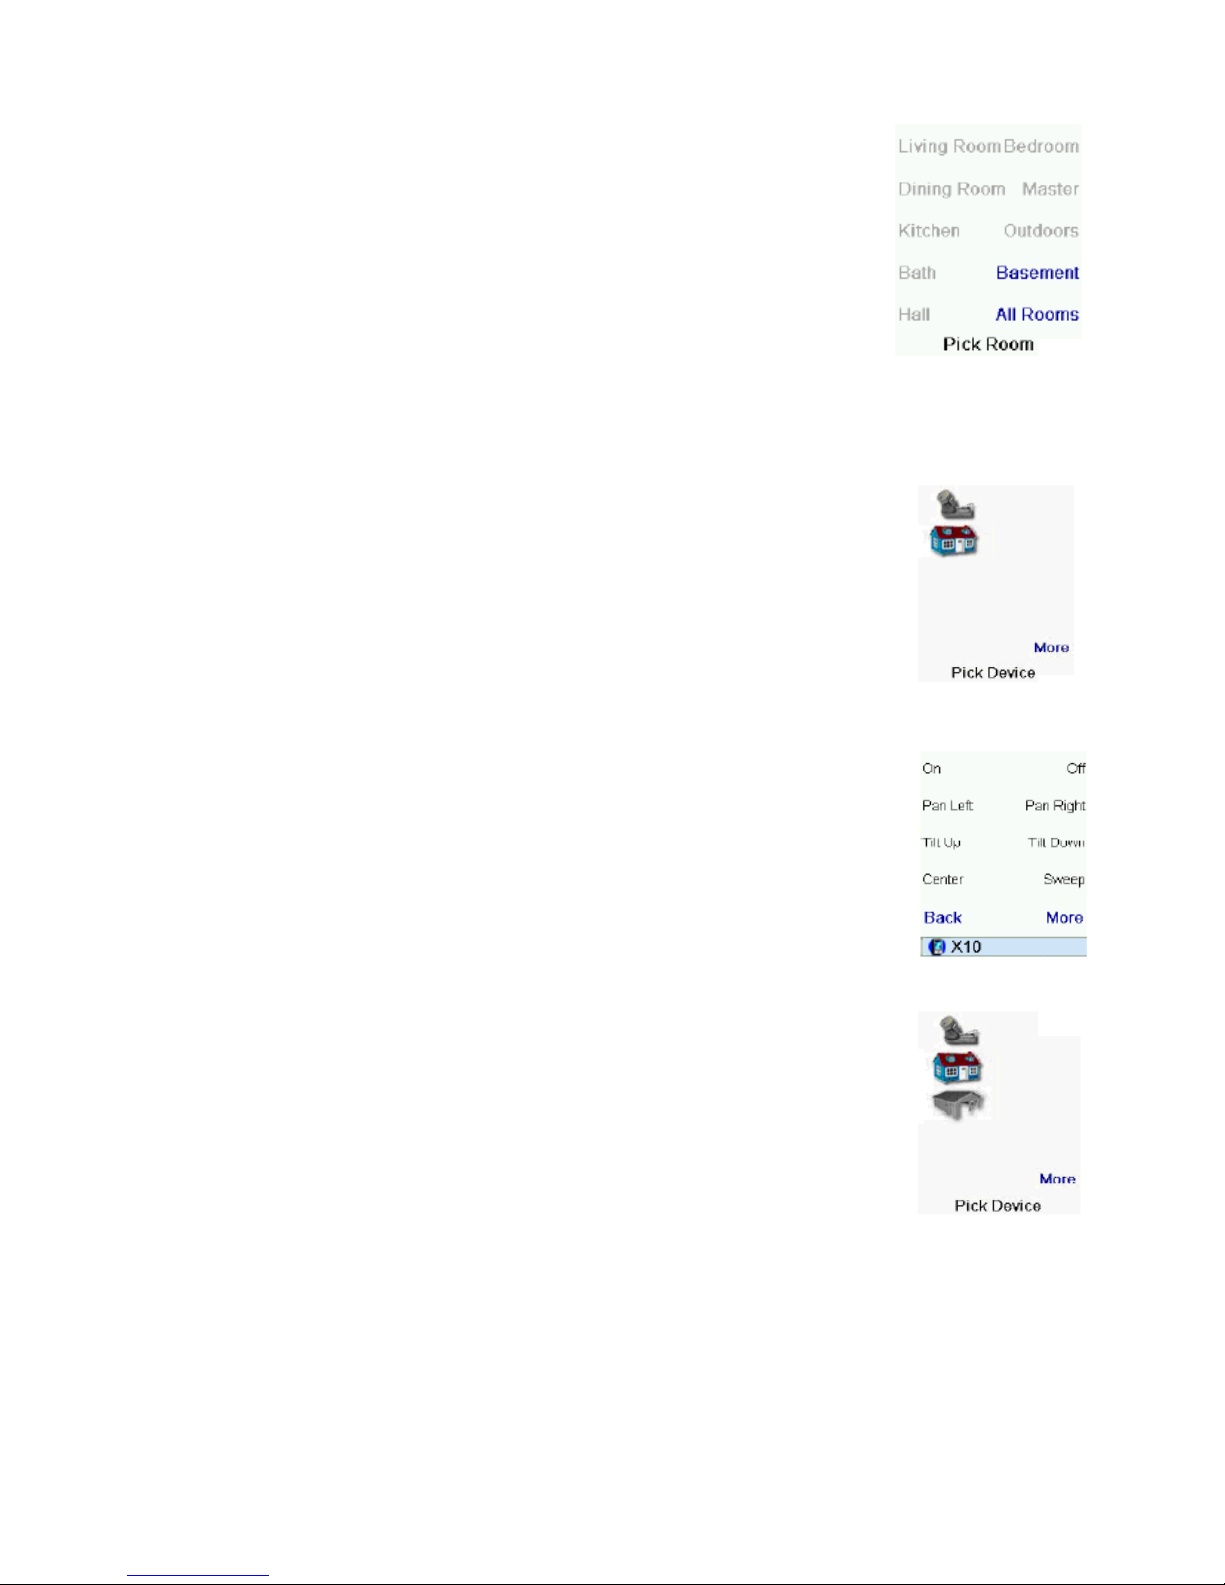
If you wish to add a label to the logo press the Side Key next to the ‘Label’ text. This will take
you to screen [5] with a small label on top of the logo.
Initially, the label will be the channel number but this can be changed by using the numeric
keys in a similar fashion to sending a text message on a mobile phone.
Note – “Triple tap” name entry applies. Tap each numeric key to cycle through ALL caps,
numbers and lower case letters. E.g. repeatedly pressing the number 2 key cycles through
A,B,C,2,a,b,c. Pressing the 9 key cycles through W,X,Y,Z,9,w,x,y,z.
A space can be selected with the 0 (zero) key.
Adding a label is optional, if you don’t want to add a label you can simply select ‘Save’ to
save the settings for this favourite.
You may continue to add up to 10 favourites (more can be added later, see chap ter 7.2).
After you have finished setting up your initial set of favourites you will be taken choose
whether the favourites you have just set up are to be stored in the HIS or HERS group (later
you can set up favourites in several other groups.)
Selecting an option will take you to the HIS or HER favourite screen, showing the logos of the
favourites you have just set up.
Please note you can reorder the logos later on.
When you have finished setting up your favourites, press the HOME key (located below the
remote’s LCD screen) to return to the home / main menu screen.
5. Using the remote
Assuming you followed the steps on the previous pages and have
set up some devices and some favourites you are now ready to
use the remote.
Please refer to next sections for details on how to set up more
devices, favourites and other functions.
Pressing either the HIS or HERS key a second time accesses the X10
Home Automation modules that you’ve set up for All Rooms. Use
the Side Keys or the Navigation Buttons to select the icon you want
to control.
Page 11
20-3-2009 11 033000=15090
X10 RF Devices
Selecting X10 from the MODE key screen displays the Pick Group screen
[6].
• Press the side key for the room that has the device that you want to
control. (For example, press the Side Key for “Basement.”) The screen
shows the device icons according to the way
“Basement” was set up. (If a Group is grayed-out, then no devices were
set up in that room.)
• Press the Side Key to send a command to the device. The status of
the device changes. You can see the status of the device at the
bottom of the screen; and the icon also changes in appearance.
Extended Features
Any Side Key associated with an icon that has extended features follow with additional
screen(s) that can be used to control the device. In addition, the Main Keys on the TAKE 10
can be used to control X10 devices in unique ways.
Some icons will only provide On or Off functions, some may provide
dimming. It depends on the device’s capabilities. The example shown at
the right [7] has two X10 Home A utomation devices, a c amera base and
a module that turns outside lights on and off. Pressing the Side Key next to
the camera icon displays an additional screen to control the actions of
the camera (screen 8 ) .
Use the Side Keys to operate the camera by pressing the Side Key and
holding it down for actions that require movement.
The remote’s Main Keys can also be used to control a camera, according
to the following:
• OK/Select will centre the camera.
• UP, Down, Left, and Right navigation keys control the camera pan
features.
• CH up and down changes the camera focus.
• VOL up and down will zoom the lens.
• Numbers 1- 5 can be use for camera pr esets.
Other Controls
In this example [9], the House icon has a LM12 Lamp Module associated
with it. Pressing the Side Key next to the House icon turns the lights on and
off. Lights can be controlled by using certain Main Keys as follows:
• CH up and down turns the light On and Off.
• VOL up and down controls bright and dim if applicable.
Labeling Feature
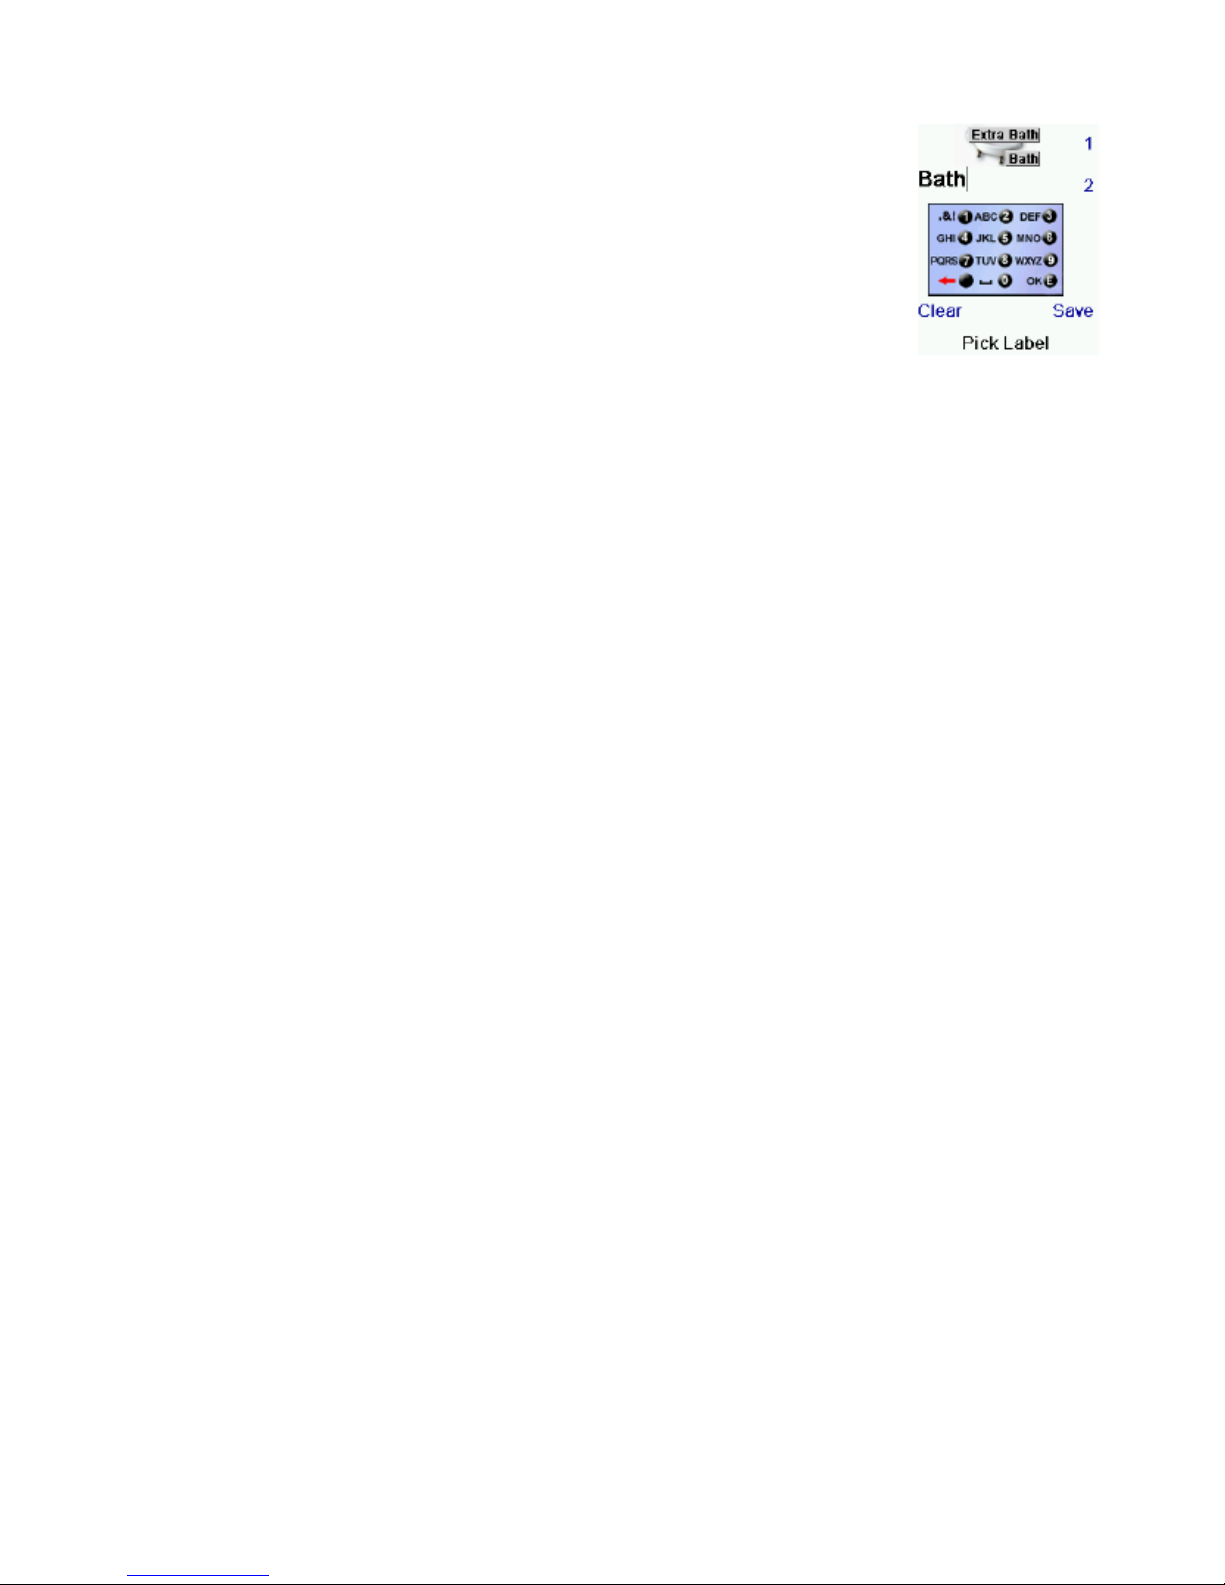
Two lines are available for labeling when you label an icon. Screen 10 is
an example of a TM13 labeled with a bath icon. The labels Bath and “Extra Bath”
were associated with the icon. The following is an example of how to use the Label
feature.
• Press the HOME button to display the setup screen. Select Setup.
• Select X10 using the Side Key.
• Select Add/Edit at the next screen using the Side Key.
• Choose the room where you will locate th e TM13 . For this example choose Basement. Press
the side key to select.
• At the add an X10 device screen, press OK.
[6]
[7]
[8]
[9]
Page 12
20-3-2009 12 033000=15090
• Select Pick Device.
• Select Appliances and then scroll until you see the TM13 icon. Select
TM13 using the appropriate Side Key.
• At the following screen select Label.
• Use the appropriate Side K eys to create a Label. The Lab el feature can
have two lines of labels. Enter each line of the label by pressing the Side
Key for the line number, for example, 1 or 2, an d then entering the label
using the alphanumeric keys as shown.
• After entering the label(s), select Save using the Side Key.
• Select Done using the Side Key.
• The Saving Settings screen appears and returns to the setup screen.
X10 Sleep Macro
Do the following to set up a Sleep Macro.
• Set up an X10 device using the Wizard or Add-Edit mode, for example a light in your Living
Room with an LM12 module.
• Select Home/Setup/X10/More/Sleep Macro.
• Select “Pick Module.” The Pick Room screen appears.
• Select the room that has the mo dule you want to control.
• Select the module using the Side Key. Try a simple “Off” command for now, but understand
that you can string many commands from different modules and different rooms together in
conjunction with delays as well.
• Select Save and then Done.
• Select Home/Sleep/X10.
• Press the Side Key to toggle when the comm and(s) will be sent for 15 minutes to up to an
hour and a half away from the current time.
• Press OK to exit.
Favourite key
Press the HIS or HERS key at any stage to access the favourites you’ve set up. Or press the
FAVORITE key, then select your favourites group. Pressing the Side key next to the logo will
change your device to that channel. Selecting a favourite group that has not yet been set
up, takes you to the Setup Wizard.
Important - Make sure you point the remote at your devi ce until the channel changes.
Pressing a favourite key might send the command for a 3 digit channel e.g. 401, if you don’t
point the remote at your device until all three digits have been sent you might just get
channel 40, or just channel 4. Watch the flickering halo at the bottom left of the screen, it
flickers for each digit sent. It also shows what device is being controlled.
Pressing the HOME key at any time will access the main menu in which you can set up various
remote functions or access other features.
By pressing the MODE key, you will be prompted to select a device type to change the
mode that the remote is in. E.g. if the remote is in Cable mode then the hard keys such as
Channel Up/Down, Volume Up/Down etc. will operate your cable box.
When you select a mode, any extra keys for that mode, and any extra keys you have learned
for that mode are display ed. The current mode of the remote is displayed with an icon in the
lower left of the LCD screen.
Before continuing on with the next section, press the HOME key to return to the main menu
screen. Press the Side Key K5 next to the Help icon and follow the prompts for a tutorial on
how to use the remote.
[10]
Page 13
20-3-2009 13 033000=15090
5.1 Quick Power
QuickPower is a way of quickly turning all your devices on or off from one easy to use screen.
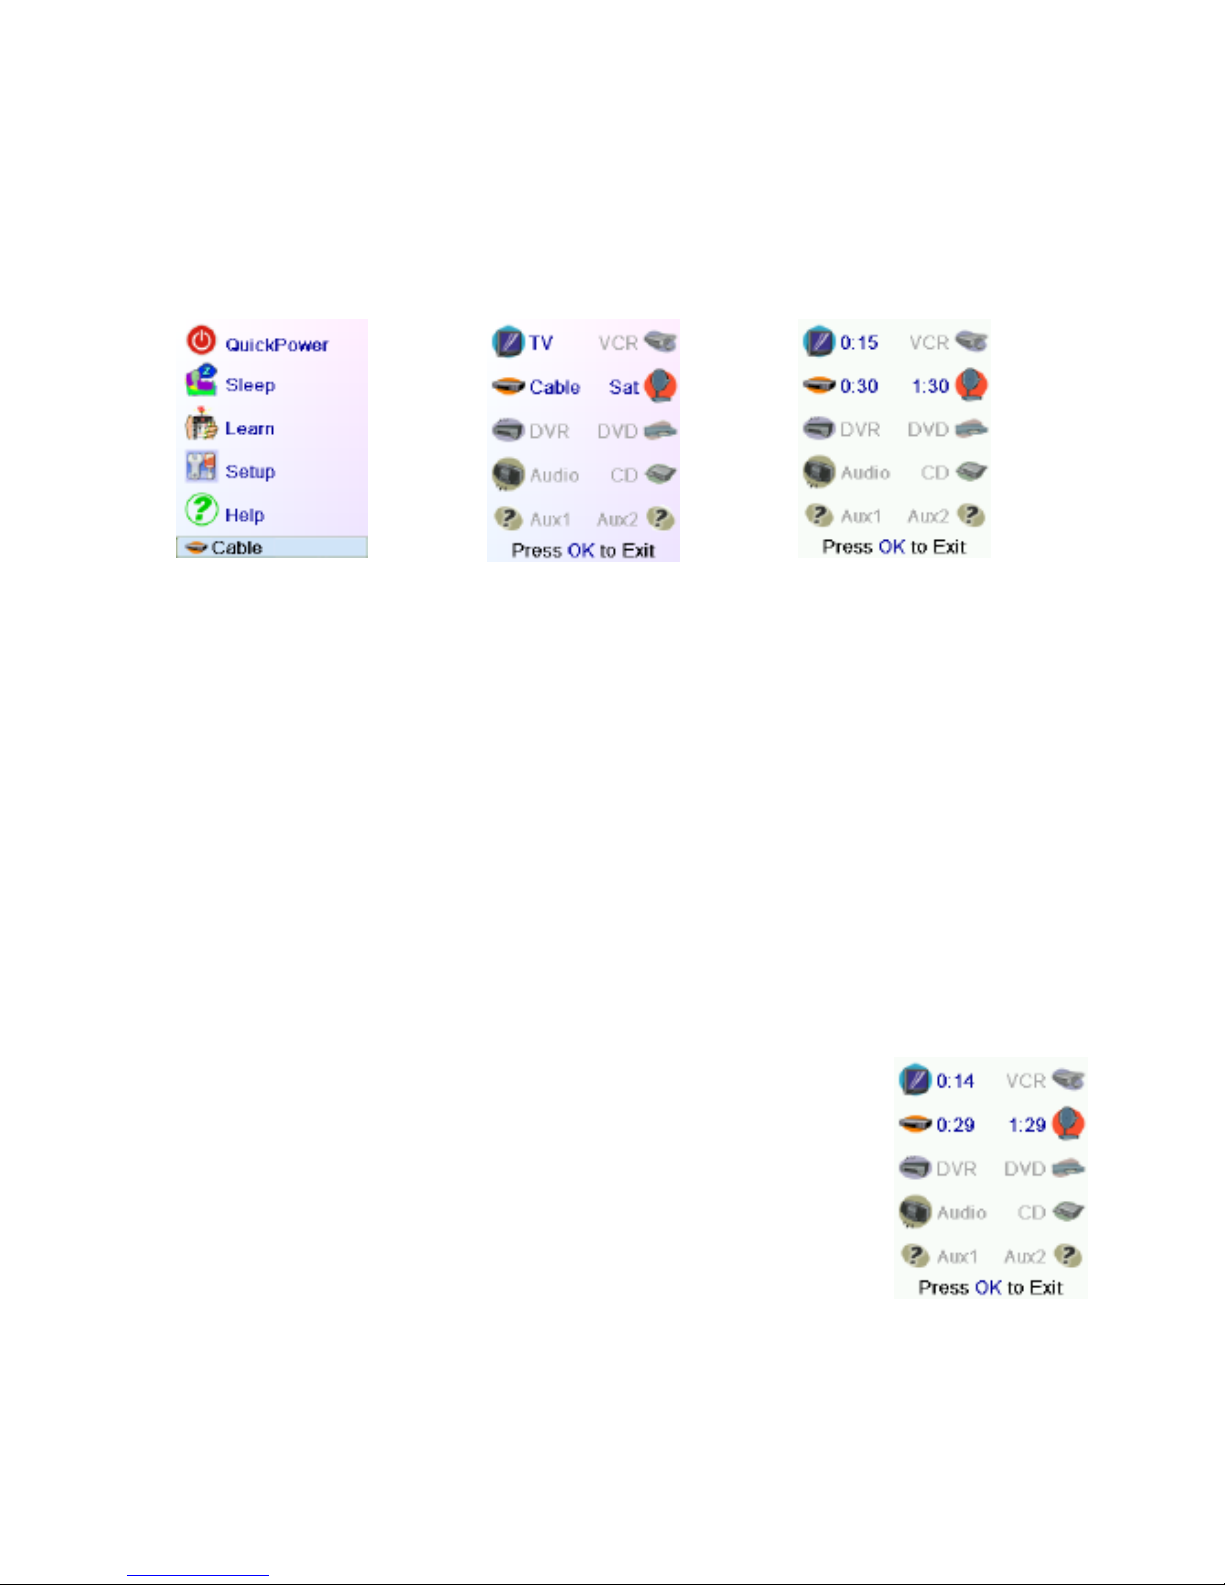
Press the HOME button to go to the main menu [1] and press the Side Key next to the
‘QuickPower’ icon.
Only devices you have previously set up are displayed, screen [2], the others are greyed out.
In the example shown, only TV, Cable box and Satel lite receiver are configured.
Press any k ey that isn’t greyed out to send the “Power” command for that devi ce.
[1] [2] [3]
QuickPower for X10 Devices
• Set up an X10 device using the Wizard or Add-Edit mode, for example a light in your Living
Room with an LM12
module.
• Select Home/Setup/X10/More/ QuickPower Macro.
• Select Pick Module, and select the command (s) you want to send. Try a simple “Off”
command for now, but understand that you can string many commands from different
modules and different rooms together in conjunction
with delays as well.
• Select Save and then Done.
• Select Home/QuickPower.
• Press the Side Key next to the X10 i c o n to tr igger the Quick Power Macro.
5.2 Sleep
The Sleep function lets you set any device to turn off after a preset time. You can set the off
time in increments of 15 minutes, up to a maximum of 1 hour and 30 minutes.
To access the Sleep function, press the HOME key to go to the mai n menu [1], and press the
Side Key next to the ‘Sleep’ icon.
You can now set a sleep timer for any or all of the devices that you
have set up, i.e. any that are not grey ed out.
The screen will look the same as the ‘QuickPower’ showed at [2].
If we press the Side K ey K1 next to the TV icon once, a sleep timer of 15
minutes will be set.
If we then press Side Key K2 next to the Cable box icon twice, this will
set a sleep timer of 30 minutes.
Finally if we press the Side Key K7 next to the Sat icon five times, a sleep
timer of 1 hour 30 minutes is set.
Timers will be displayed as show in screen [3]. [4]
Pressing OK takes you back to the Home screen and saves your sleep timers. If you then
return to the Sleep screen, you will see the timers have starte d to count down, as shown on
screen [4].
Page 14
20-3-2009 14 033000=15090
Important – Make sure you have the remote pointing at the device(s) you’ve set sleep timers
for so it can send the Power command to the device(s) at the time(s) you have set.
5.3 Macros
Macros are a series of commands triggered with the push of one button. They are very useful
if you want to trigger multiple functions across different devices at one time.
E.g. you may want to watch a DVD, this could involve turning the power on to the TV and
DVD player, changing the TV’s AV input, turning on the surround sound speakers and finally
pressing play on the DVD player.
A Macro can trigger all these commands with a single button.
Tip: Before setting up your macro, write down the series of keystrokes that is composed of on
a sheet of paper.
To set up a Macro, press the HOME Key to return to the main menu [1], and press the Side Key
next to the Macro icon. If you have not set up any Macros, a ‘welcome screen’ will be
displayed, prompting you to set up your first Macro, just pres s OK to proc eed.
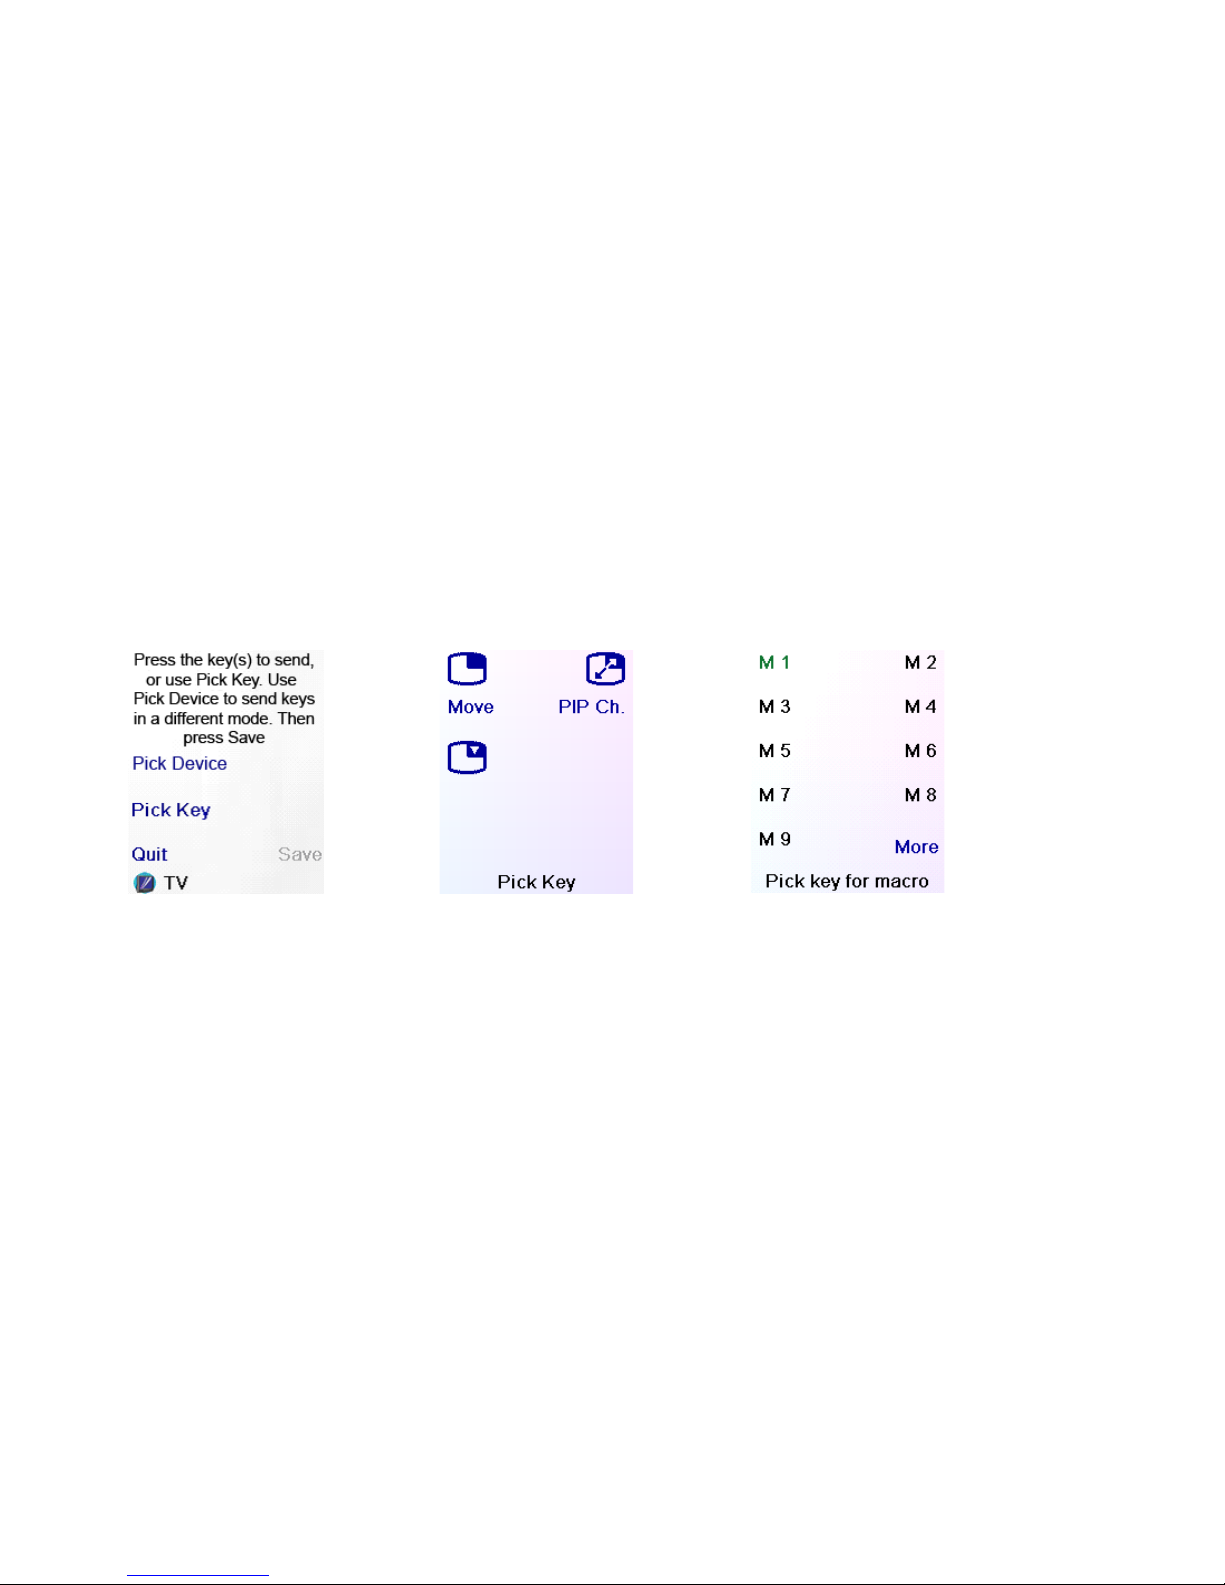
Select the first device you wish to include in your Macro by pressing the Side Key next to the
‘Pick Device’ text. The remote will cycle through the devices you have set up, which will be
displayed on the bottom left hand corner. Refer to screen [5] which shows ‘TV’ selected.
[5] [6] [7]
To add a command to the Macro you have two options:
1. Press the key on the remote control that corresponds to th e command you wish to send,
e.g. the Power button or the AV input button.
2. Press the Side Key next to the ‘Pick Key’ text, this shows you the ‘extra’ keys (functions
that can’t be accessed via the hard buttons on the remote, these ar e device specific) and
keys that have been learned for that device. Refer to screen [6] for an example.
Once you have pushed a button on the remote, or selected a function from ‘Pick Key’ you
will see the function/s appear at the top of the screen.
You can now add a time delay to your Macro functions by pressing the Side Key next to the
‘Set Delay’ text, each time you press the ‘Set Delay’ key, a 1 second delay will be added to
the last fu nction added to the macro.
Delays are particularly useful when you have to wait for one function to complete before
sending the command for another function, e.g. You may have to wait a few seconds for
your TV to power up before you can change the channel.
You can continue to add as many functions to your Macro as you require. Once you are
done, press the Side Key next to the Save button. This will take you to a summary screen
showing you all the functions of your Macro. From this screen you can Delete your Macro,
Rename your Macro, e.g. Movie or Cable TV, or you can Add additional functions to your
Page 15
20-3-2009 15 033000=15090
Macro by pressing the Side Key next to the ‘Add Key’ text, this will take you back to edit your
Macro.
Once you are happy with your Macro press the Side Key next to ‘Done’. This will save your
settings and return you to the Home screen[1]. To access your saved macros simply click the
Side Key next to the Macro icon on the Home screen[1]. You will b e tak en to screen [7], to
activate your Macro pres s the corresponding Side Key.
You can add additional Macros, edit or delete existing Macros by clicking the Side Key next
to the ‘Setup’ icon on the main screen[1].
Then press the Side Key next to the Macros icon this will bring up a list of all the spaces
available in which Macros can be allocated (27 in total), macros that you have already
created will be highlighted in green.
To add a new Macro, click on the Side Key corresponding to an empty macro (one
highlighted in black), this will take you to screen [5], then follow the steps above to configure
you new Macro. By pressing a Side Key next to an existing Macro (one highlighted in green)
you will allow you to edit the Macro.
6. Learning
It is possible to learn commands from an existing remote control and store them under the
Main Keys or Side Keys on the Universal Remote.
At the Home screen[1], press the Side Key next to the Setup icon, then press the Side Key next
to the Learn icon.
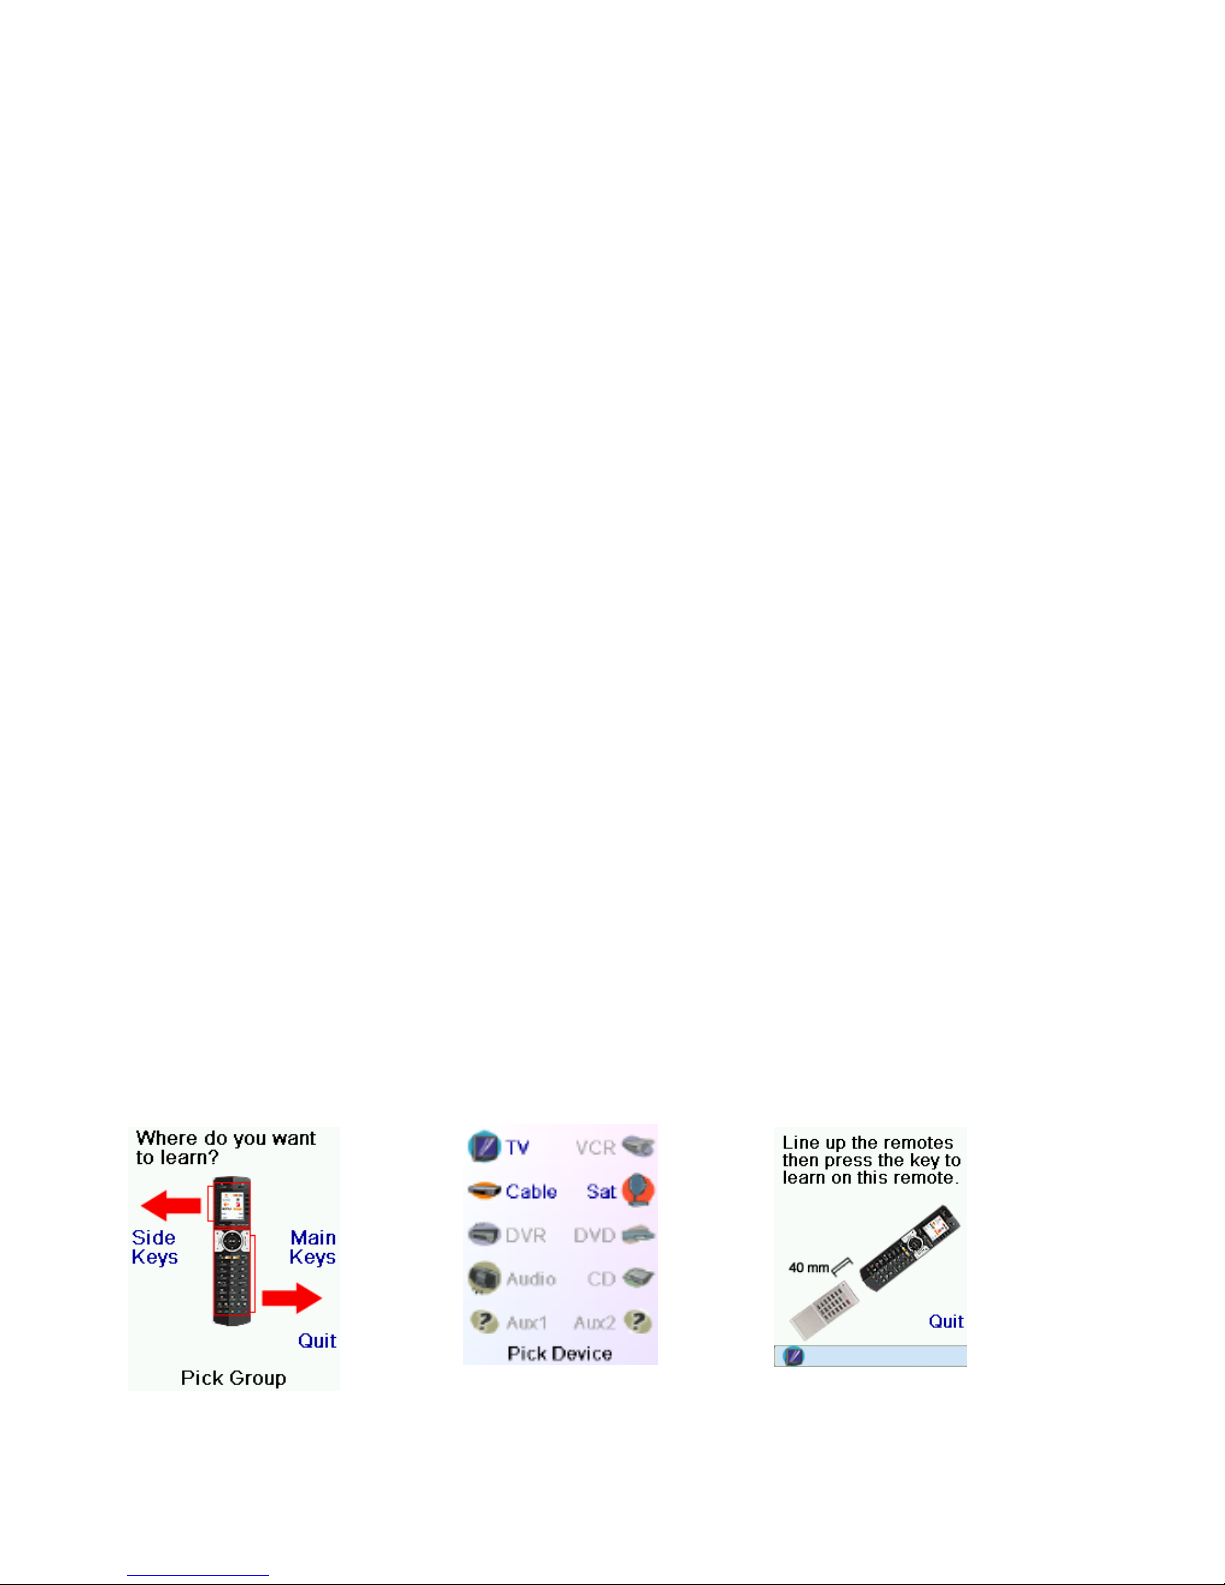
Screen [8] will be displayed. Here you can select whether you want to store a learned
command from an existing remote under the 10 Side Keys or the Main keys on the Universal
Remote.
Pressing any of the Side Keys on the left (K1-K5) will select Side Keys.
Pressing any of the Side Keys on the right (K6-K9) will select Main Keys.
If you press a right Side Key (Main Keys) you are going to learn, for example, the Chan Up ke y
from an existing remote and store it under the Chan Up key on the Universal Remote.
Or learn the Power key from an existing remote and store it under the Power key on the
Universal Remote.
If you press a left Side Key (to select Side Keys) you are going to learn, for example, the DVD
Zoom function from an existing remote and store it under a Side Key on the Universal Remote.
You will then be able to name the Side Key ‘DVD Zoom’ and access this function from the
Mode Screen when the remote is in DVD mode, once you have learned this command.
[8] [9] [10]
Page 16
20-3-2009 16 033000=15090
6.1 Main Keys
Once you have selected whether you will store your learned commands under Main Keys or
Side Keys you will be taken to the device selection screen [9]. You can now select the device
you would like to learn keys for. In screen [9] we have only set up TV, Cable box and a
Satellite Receiver, all other devices are greyed out, however you are still able to select any
device to learn a command for.
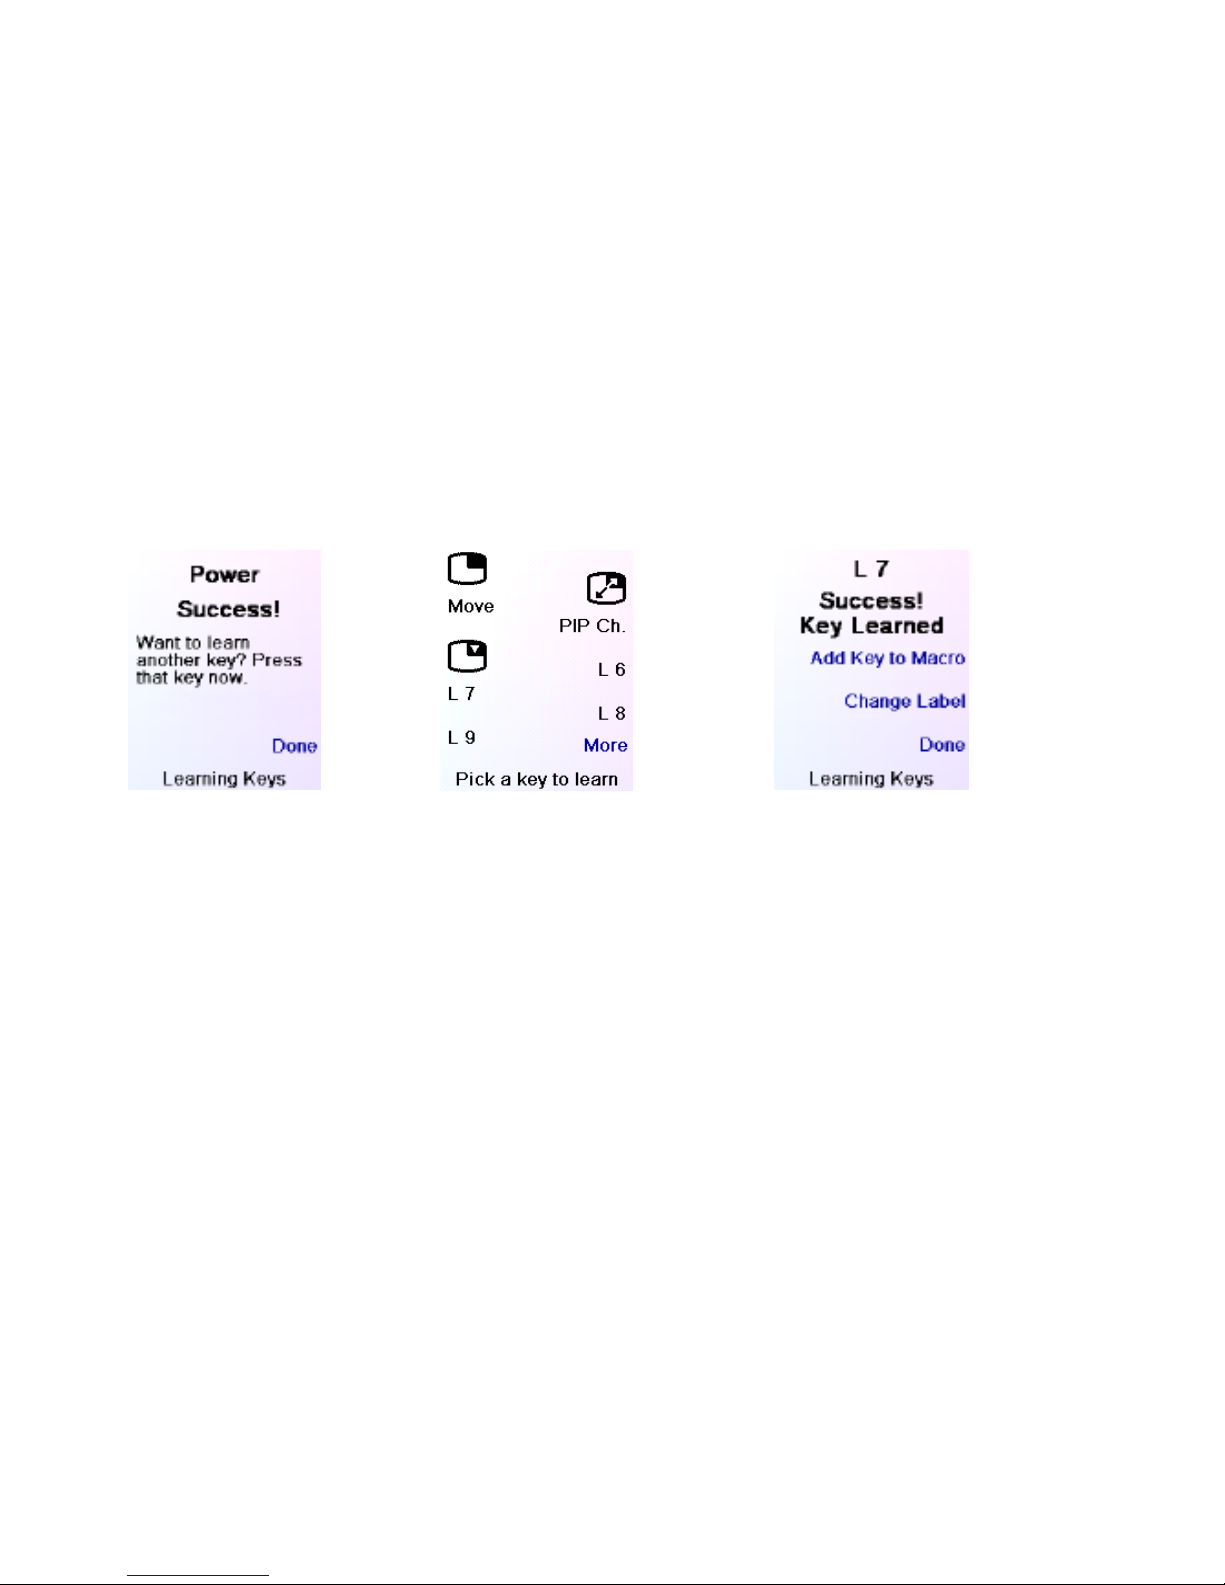
After you have selected the device, you will be prompted to line up the remotes as shown on
screen [10], and press the key on the Universal Remote that you want to store the learned
command under, e.g. the Power key.
You then press and hold (in this example) the Power key on the other remote, until the display
shows that the command has been successfully learned (screen [11].).
If the screen comes up with Failure, try pressing the key on your existing remote again.
Pressing Done when you have finished will automatically save all of your leaned keys.
Note – for some types of keys you might need to hold the key pressed, but for others a q uick
press is sufficient. You may need to experiment with the length of the press if you find learned
keys send a command multiple times. Refer to ‘Tips on Learning’ at the end of this manual.
[11] [12] [13]
6.2 Side Keys
Learning Side Keys is very similar to learning Main Keys. In screen [8], select Side Keys by
pressing any Side Key on the left of the LCD (K1-K5). Select the device you would like to learn
keys for.
Once you have selected a device screen [12] will be displayed that will show the extra keys
set up for that particular device by default. Extra keys are represented by small symbols or
text. Side keys without an extra function are la belled as L5, L6, L7, etc. You now need to
assign a Side Key for the command you are about to learn.
Note – you can overwrite the default extra function keys if required. For this example let’s
select L7. Next, point the remote you would like to learn existing commands. Press OK when
you are ready to proceed. Now press the key on your existing remote you wish to learn, hold
the key pres sed until the screen says the command was successfully learned. Refer to ‘Tips on
Learning’ at the end of this manual if you experience any problems at this step.
You can now change the label for the key you have just learned if required (in this case L7)
by selecting Change Label in screen [13]. The label can be a combination of text and
numbers and can be edited using the numeric keypad on the Universal Remote in a similar
fashion to sending a text message on a mobile phone. Select OK to finish and save the
learned command. The next time you set the remote to the mode that you learned this key
under, the screen will now include your newly learned (and renamed key).
Page 17
20-3-2009 17 033000=15090
Pressing the MODE key and selecting a device type shows the extra keys and learned keys for
that mode.
Note – you can learn keys from any kind of remote under any mode. You could for example
learn the power keys for your TV, and audio system as well as additional keys for your DVD
player under the DVD mode . Then when you press the MODE key and select DVD, you will be
able to turn on your TV, turn on your audio system, and control your DVD player, all from the
Side Keys on the one screen.
7. Setting Up More
7.1 Devices
When you first turned on the Universal Rem ote, it is likely that you went through the Wizard
and set up a few devices. The following steps explain how to add more devices without using
the Wizard.
Press the HOME key to display the main menu[1] and press the Side Key next to the Setup
icon. Now press the Side Key next to the Devices icon. From here you can chose the device
you would like to set up.
Note – you do not have to select a device that is greyed out, you can also select an existing
device and change its settings.
From this point, setting up a device is the same as the steps outlined in section 4.2 ‘Setting Up
Your Devices’. You can select Aux 1 or Aux 2 from the Devi ces screen and then chose any
type of device to set up under either Aux key.
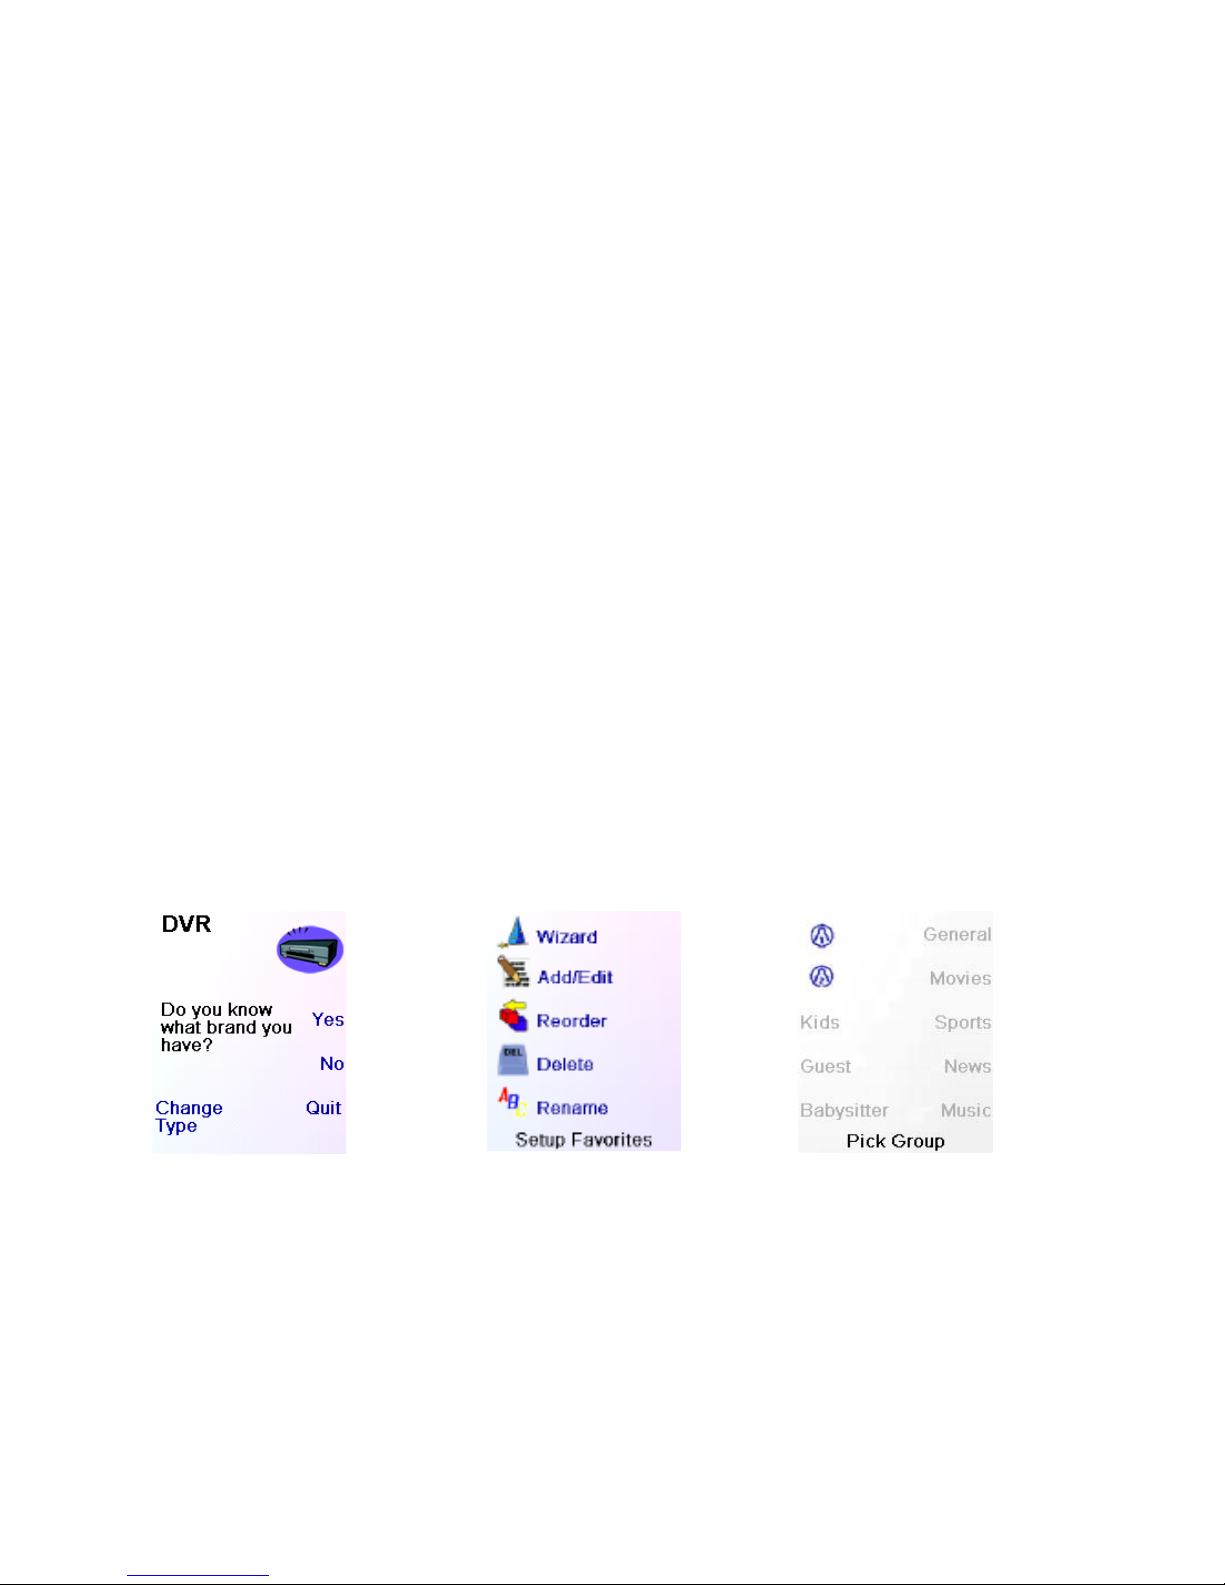
You can now also select any device and change the type by repeatedly pressing the
Change Type key shown in screen [14] to the right. This allows you to have more than one
type of advice, for example a second TV.
[14] [15] [16]
7.2 Favourites
It is likely when you first turned on the Universal Remote that you set up some favourites. The
following steps explain how to add additional favourites.
Press the HOME key to display the main menu[1]. Press the Side Key next to the Setup icon
and press the Side Key next to the Favourites icon. You will be taken to screen [15].
Press the Side Key next to the Wizard icon. And pick the grou p (scree n [16] ) tha t you want to
set up any favourites in, or add more favourites to.
If you pick an existing group that you have previously set up favourites in, for example, HIS,
any new favourites will be added to the ones already set up.
Page 18
20-3-2009 18 033000=15090
If you have already set up 10 favourites in that group, a new page will be added (you can
have 10 favourites per page).
Groups that are not set up yet are greyed out, but can still be selected.
From this point adding favourites is the same as the steps outlined in section 4.3 ‘Setting Up
Your Favourites’.
Adding/Editing Favourites
The option ‘Add/Edit’ o n screen [15] above lets you add favourites to an existing group, edit
favourites in an existing group, or add favourites to a new group.
Press the Side Key next to the Add/Edit icon to select this option.
Select any group from screen [16] above to add favourites to, or to edit existing favourites.
Pressing the Side Key next to an existing group shows the favourites that you previously set up
in that.
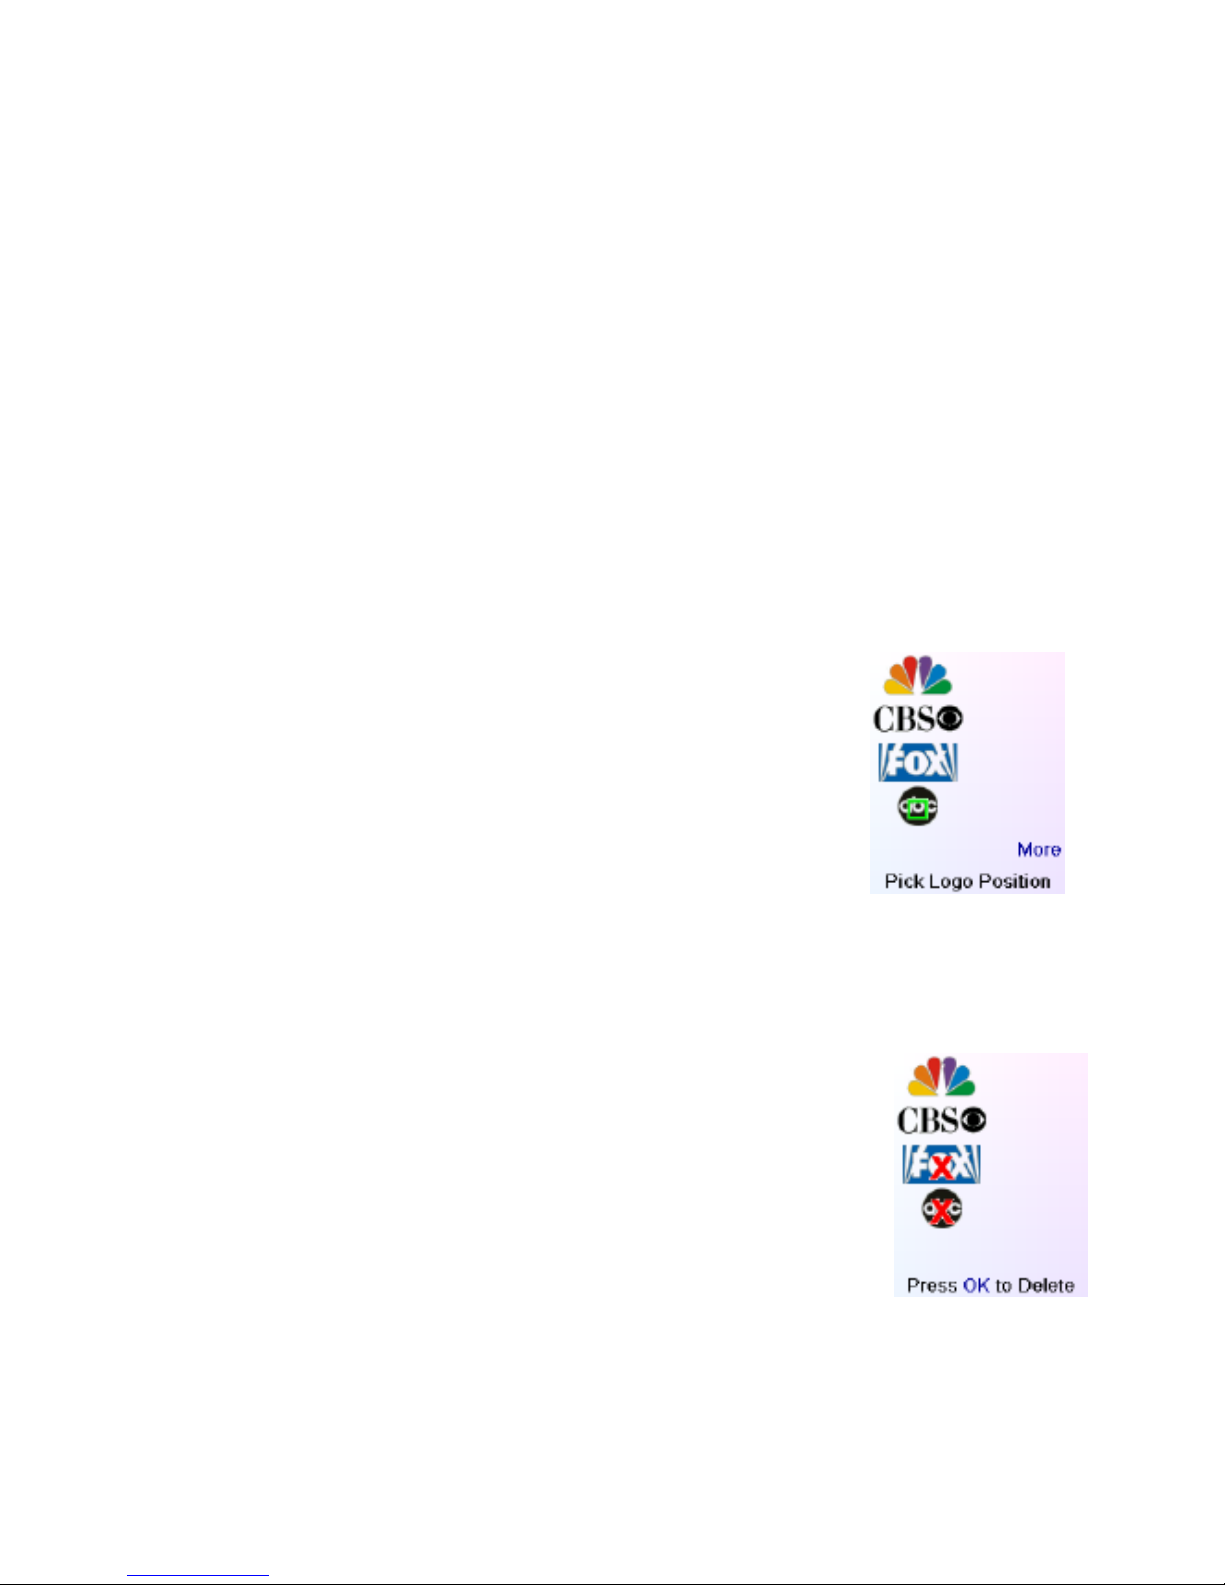
You can now press a Side Key next to one of the existing logos (to edit/change it), or press a
Side Key next to a blank location to add a new favourite.
Press More to add or edit icons a new page, for example you may only want to have four
icons on a single page and other icons on their own separate page.
From this point adding favourites is the same as the steps outlined in section 4.3 ‘Setting Up
Your Favourites’.
Reordering Favourites
The ‘Reorder’ feature lets you move the favourites you previously
setup in a group to a different location of the Remote’s LC D screen.
Press the Side Key next to the Reorder icon to select this function.
Pick the group in which you want to reorder the icons from the group
selection screen (screen [16] on the previous page).
The groups that currentl y have no favourites in them are greyed out
and cannot be selected.
You’ll then see the screen that displays your favourites.
Press the Side Key corresponding to the favourite you wish to move.
You will notice the logo is marked with a green box, like the ‘ABC’
logo in the example on screen [17]. [17]
Now press the Side Key corresponding to the location you want to move the favourite to.
Note – if you move the favourite to a location that already has a favourite, the two will swap
locations.
Deleting Favourites
The ‘Delete’ option lets you remove favourites that you have previously
set up. Press the Side Key next to the Delete ic on to select the feature.
Pick the group in which you want to delete the icons from the group
selection screen (screen [16] on the previous page).
The groups that currentl y have no favourites in them are greyed out
and cannot be selected. The next displays your favourites.
Press the Side Key corresponding to the favourite you wish to delete.
You will notice the logo is marked with a red X, as can be seen in
example [18]. You can mark multiple logos for deletion if you wish.
Press OK to delete the favourites.
Note - a warning screen will be displayed first allowing you to change your mind. [18]
Page 19
20-3-2009 19 033000=15090
Renaming Favourite Groups
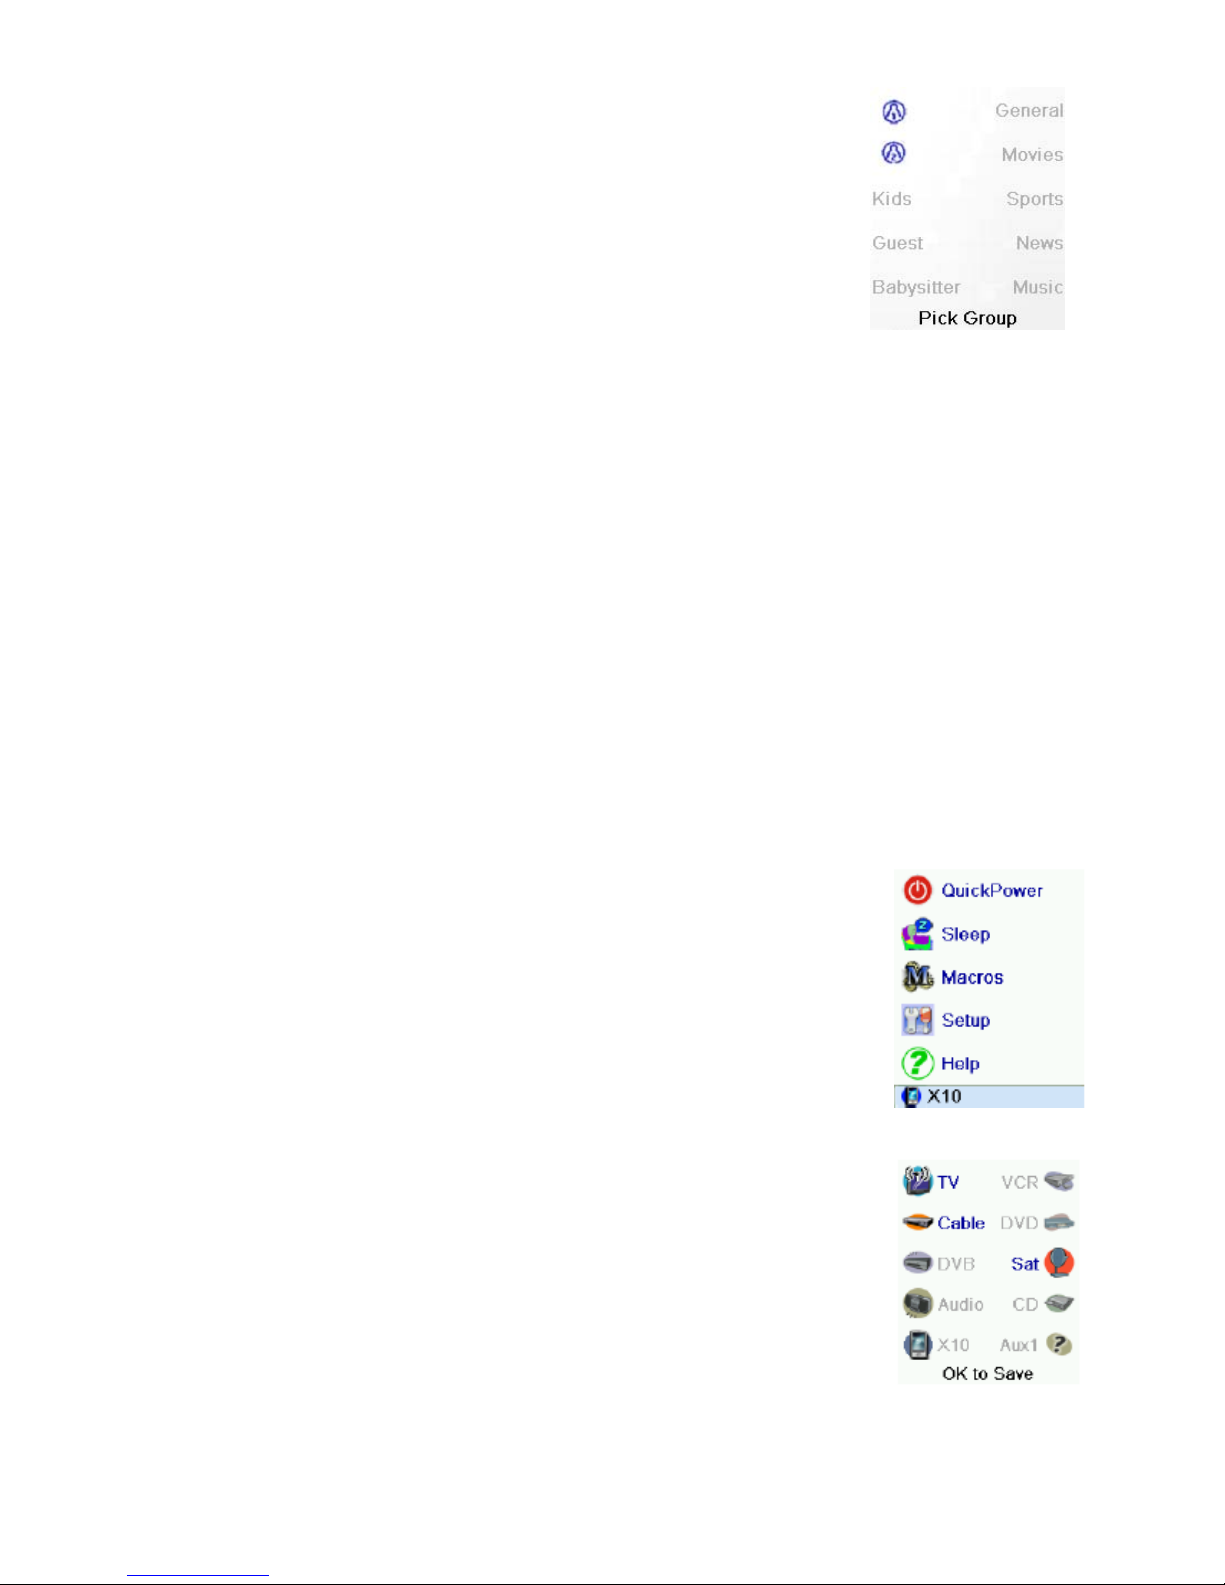
The ‘Rename’ option lets you change the na mes of the groups that
you save your favourites in. For example you may wish to rename HIS
to Dave. Press the Side Key next to the Rename icon.
Pick the group you want to rename from the group selection screen
(screen [19]).
None of the groups have been greyed out, so you can even rename
groups that don’t yet h ave any favourites in them.
You can now enter the new name fo r the favourites group usi n g the
numeric keys on the Universal Remote in a similar fashion to writing a
text message on a mobile phone. [19]
When you have entered the name, press OK to save the new name for
the favourites group.
8. Setting Up X10 Devices
The TAKE 10 - coupled with other X10 Home Automation Modules - gives you the ability to
control everything electrical in your home. Once you set up your remote, you can control
most any electrical devi ce from the remote, using the keys that have been configured f o r
X10 Home Automation Modules.
Description
X10 Home Automation systems use three types of signals - Infrared (IR), Radio Frequency (RF),
and Power Line Carrier (PLC). The TAKE 10 can send either IR, RF signals, or both, depending
on how you ’ve set up the remote to control differen t equipment.
Setting Up Your Remote to Send RF commands
When the TAKE 10 is in X10 mode, it transmits RF commands to X10 devices that respond to
RF signals. The following example describes how to use RF to control a TV (so you can control
it from anywhere in your home). Keep in mind that when you set up a non RF device to be
controlled by RF signals, you need to use any of our video sender
transmitters or powermid receivers, which converts the RF signals it
receives back in to IR signals to turn the TV on or off.
• Press Home [20].
• Select Setup using the Side Key.
• Select More using the Side Key.
• At the following select Wireless.
• The Mode [21] screen appears; select the device you want to set for
RF by pressing its Side Key. (In this example, it’s TV.) The RF symbol
appears on the TV icon. Press OK to Save.
Note: After following the above steps, when you make selections in TV [20]
Mode, you will notice that the transmit signals at the bottom of the
screen are now Green.
This indicates that the remote is sending RF and IR to the TV. If the signals
are in red, it means that the remote is transmitting IR only.
When triggering an X10 module or wall switch using the TAKE 10, the
signal is typically sent from the remote using RF on a specific house
code. The RF signal is received by the transceiver (either TM13, CM15, or
security console) on the matching house code. The transceiver then
forwards the signal onto the house wiring. This is now a PLC signal. Any
modules that match the house and unit code transmitted will either turn [21]
on or off, depending on the signal sent.
Page 20
20-3-2009 20 033000=15090
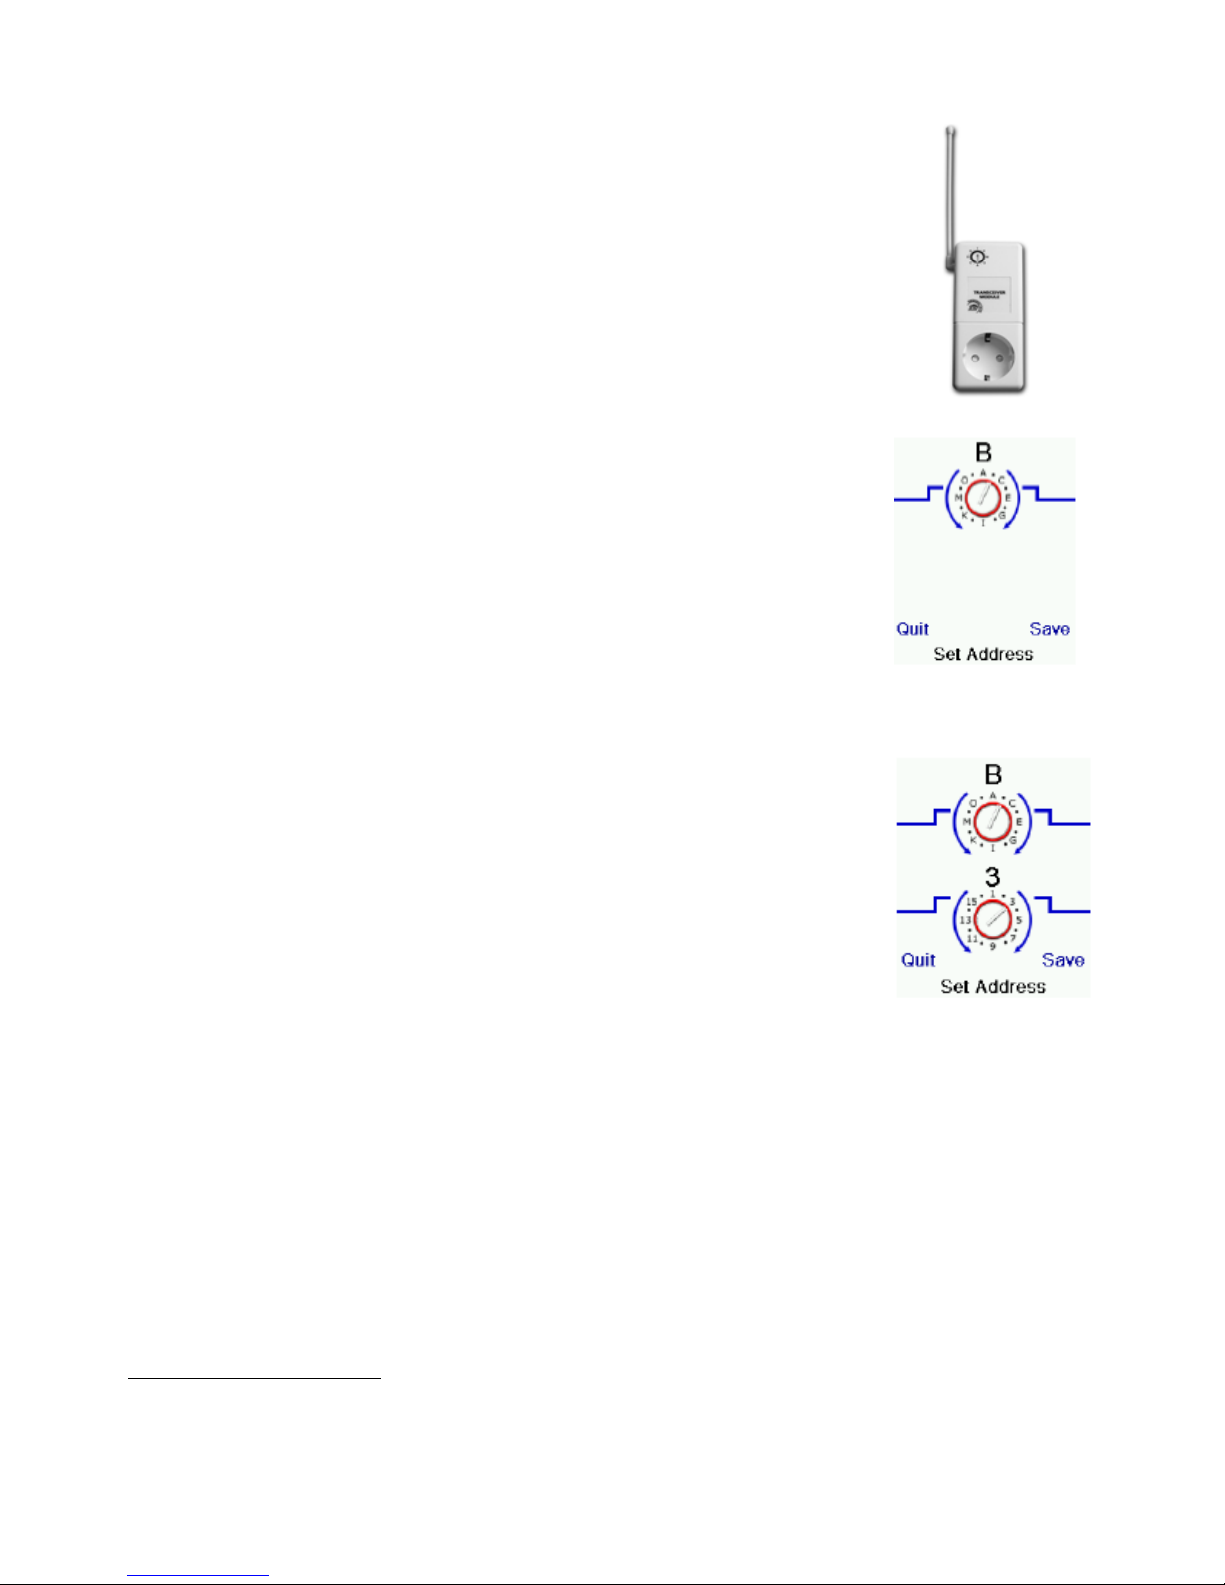
Setting Up the TAKE 10 to control the TM13 Transceiver using Housecode “B.”
The TM13 Transceiver receives RF signals to control lights and appliances. Do
the following to setup this transceiver.
• Press the HOME key to display the setup screen. Select Setup.
• Select X10.
• Select Add/Edit at the next screen.
• Choose the room where you will locate the TM1 3 . For thi s ex amp l e choose
Basement.
• Press the Si de Key to se lect.
• At the add an X10 device screen, press OK.
• Select Pick Device.
• Select Appliances and then scroll until you see the TM13 icon. Select TM13
using the appropriate Side Key.
• At the following screen select Address.
• Using the Side Keys, select “B.”
• Select Save using the Side Key.
• Select Done using the Side Key.
• Select Mode Button then the X10 device icon side key.
• Next select the room that you’ve set the device in (Basement).
• Press the icon to test the RF transmission for the device.
In the following example we’ll set up the remote for an LM12 Lamp
Module located in the “Basement.”
• Press the HOME Button to display the Home screen. [22]
• Select Setup using the Side Key.
• Select X10 using the Side Key.
• Select Add/Edit at the next screen using the Side Key.
• Select Basement (for this example) using the Side Key.
• At the Let’s add an X10 device screen, press the OK key to continue.
• Select Pick Device and at the next screen select Lamps using the Side
Keys.
• Go through the following screens to find the corre ct module us ing the
Next Side Key.
• Select the LM12 Module by using the Side Key.
• Press Save using the Side Key.
• Select Address using the Side Key.
• Use the Side Keys to set the values to B3. [23]
• Note: The values in the Address screen must match the physical hardware settings for the
LM12 Lamp Module. I n this example, the settings are set at B3. This means that B3 matches
the physical settin gs at the Lamp Module. (See the following example for setting up a Lamp
Module to a B3 setting.)
• Press Save using the Side Key to save the values.
• Select Pick Logo using the Side Key and choose an appropriate image by using the Next
Side Key, and then select the image by using the Side Key.
• Press Save and Done using the Side Keys.
Setting up an LM12 Lamp Module (example)
The following is a basic example of how to set up an X10 Lamp Module (sold separately). See
BMB Electronics website for a complete catalogue of Home Automation Modules at
www.bmbelectronics.eu
.
Page 21
20-3-2009 21 033000=15090
Lamp Module
The Lamp Module may be used to control any incandescent lamp rated up to 300W. It is not
suitable for other types of lamps such as fluorescent, energy saving lamps, or lamps that
include a dimmer control.
Caution: Do not connect an appliance such as a coffee pot or heater to the Lamp Module.
It may damage the module and the appliance and could cause a fire hazard.
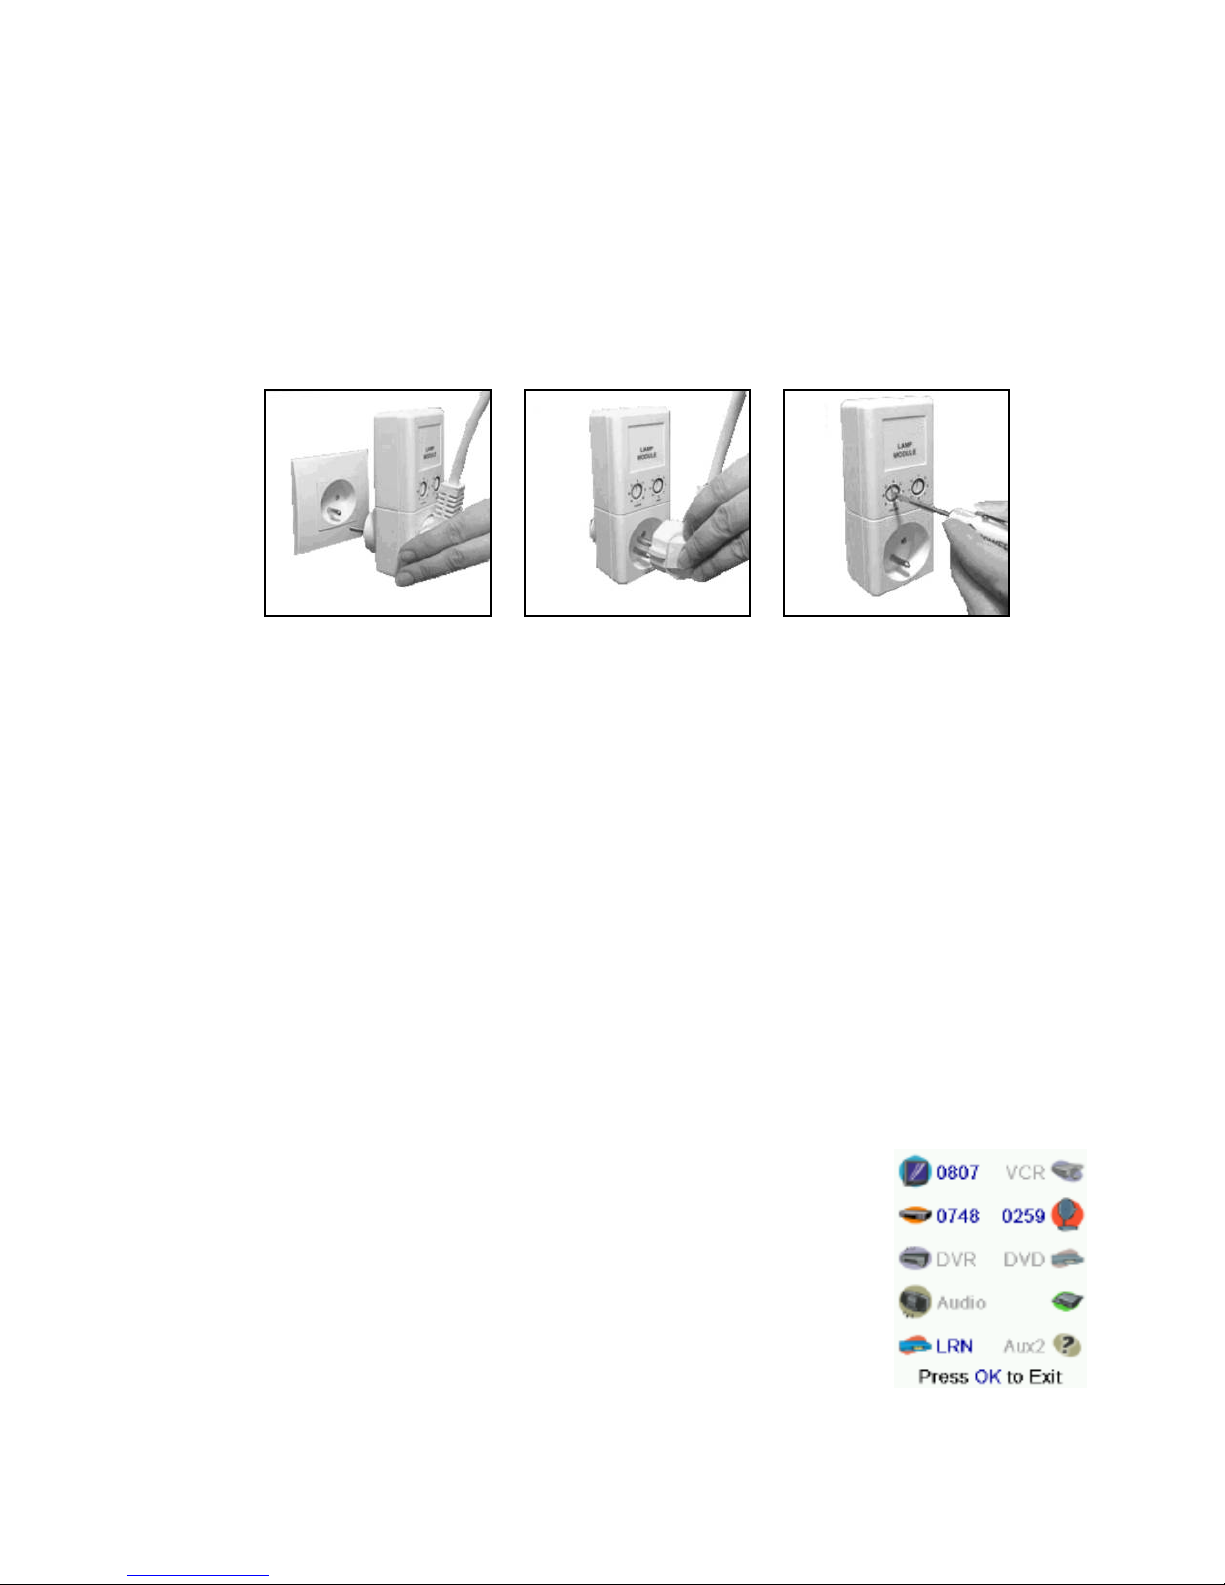
Set the House Code to ‘B’ and the Unit Code to ‘3.’ (In this example, B3 matches
the remote’s address for this device.)
Plug a lamp into the Lamp Module.
Plug the Lamp Module into a convenient AC outlet.
[24] [25] [26]
9. Advanced Options
Press the HOME key, select Setup, then Advanced.
The Advanced screen lets you change the backlight delay, enter codes for devices directly
from the printed code list that is in the back of this manual, set up ‘punch-through’ for various
devices, limit the channels that young children watch and clear remote settings.
Display Options
Select ‘Options’, then press the Side Key to th e left or the right of the option to adjust the
setting.
Press OK to save the settings.
‘Backlight’ adjusts how long it takes before the screen goes black if you don’t press any keys
(range is 2 – 35 seconds).
‘Key Transmit Time’ changes the delay between digi ts when sending favourites, e.g. 4-0-1,
where the – represents time between the transmitted digit.
This is useful when a device requires time between each digit press to recognise a channel.
Device Codes
Select ‘Device Codes’, then select a device, as per screen [27].
Devices that have not yet been set up are grey ed out.
You can select these devices here and set them up by manually
entering the code, or you can change the code of an existing device
by simply entering the new code.
This screen [27] also lets you view the codes for any device that’s been
set up, you can see the codes are set for TV, Cable, and SAT.
Screen [27] shows that CD has been selected and the 4 digit code is
ready to be entered using the numbers on the remote.
Screen [27] also shows that we have learned codes under the AUX1 key in [27]
DVD mode.
Page 22
20-3-2009 22 033000=15090
Programming Combo Device Codes
Some Combo devices (e.g. TV/VCR, TV/DVD, DVD/VCR, etc.) will require you to set up two
different Mode keys to control both parts of the Combo device.
For example, if you have a TV/DVD Combo, you might need to set up one code under the TV
key to control the TV part AND a separate code (under any other Mode key) to control the
DVD part.
Some combo devices do have specific IR codes that will control both parts of the device,
please refer to the code booklet included.
To set up a combo device, press the HOME key, select setup, select Advanced, then select
Device Codes, and follow the steps of the previous section.
Punch-through
The ‘Punch-through’ op tion lets you set up how various keys on the
remote operate in various modes. For example, you might want the
Volume Up/Down and Mute keys to ALWAYS operate y o ur TV,
regardless of what mode the remote is in. Or you might want the Play,
Stop, Pause etc. buttons to ALWAYS operate your VCR, no matter what
mode the remote is in.
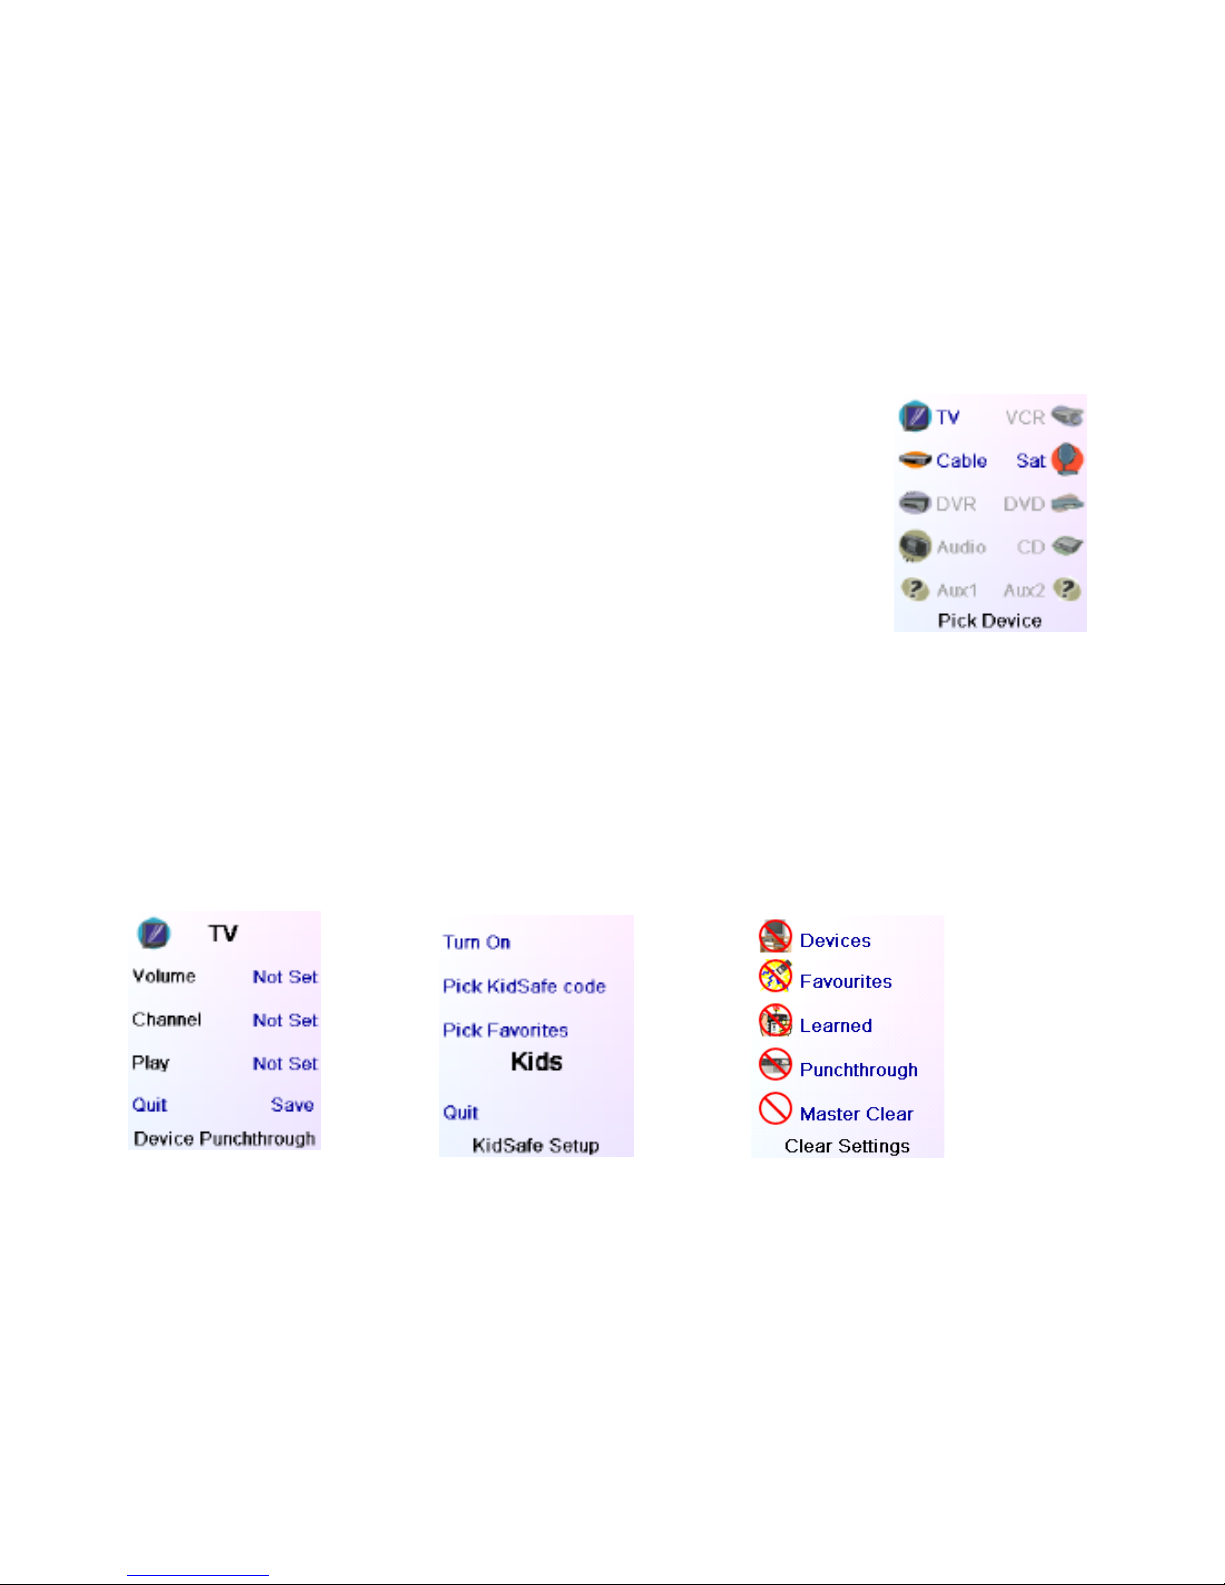
Select ‘Punch-through’ in the Advanced menu. You can then select the
device you want to setup ‘Punch-through’ for, as shown in screen [28],
e.g. TV. At screen [29] you select how you want certain keys to operate
in certain modes. [28]
- Volume refers to the Volume Up/Down and Mute keys.
- Channel refers to the Channel Up/Down keys.
- Play refers to the Play, Stop, Pause, REW,FF and record keys.
Note – if you want to set up other keys to operate in a different mode from what they would
normally operate in, you can learn the keys. E.g. If you want your TV’s input key to still operate
in cable mode, you can learn the key from your existing TV remote under cable mode.
Refer to the ‘Learning’ section in these instructions.
[29] [30] [31]
KidSafe
The ‘KidSafe’ option allows you to set a password that will restrict access to channels you do
not want young children viewing. Select ‘KidSafe’ in the Advanced Menu to configure this
feature. The first time you access the ‘KidSafe’ Menu you are asked if you want to set up a
‘KidSafe’ code. If you select ‘Yes’, you will be prompted to enter a 4 digit code. Ideally you
want to pick a code that is easy f or you to reme mber but difficult for the kids to guess.
After you have entered a 4 digit code, you will be taken to screen [30].
Page 23

20-3-2009 23 033000=15090
At this screen you can Pick ‘KidSafe’ code (this lets you pick a new ‘KidSafe’ code if
required), and/or set the group of favourites that your Kids have access to (the default group
is Kids, but this will be greyed out if you haven’t set that group up yet).
Once you have selected a favourites group that is safe for young kids to view you now have
the option to turn ‘KidSafe’ On.
If you turn ‘KidSafe’ On everything in the remote except access to the ‘KidSafe’ group (and
Volume/Mute keys) is locked out.
No settings can be changed, and Channel Up/Down, and number keys don’t work.
If you try to access any other favourite group, change a setting or access a forbidden menu,
you are asked to enter the ‘KidSafe’ code.
You cannot continue unless the correct code is entered.
See the Troubleshooting section at the end of this manual if you forget your ‘KidSafe’ code.
Clear Settings in the Remote
The ‘Clear Settings’ option lets you erase various things you have set up in the remote.
You can select the ‘Clear Settings’ option in the Advanced menu. You will be taken to screen
[31]. Pressing the Side Key next to Devices lets you clear the settings, i.e. codes, for the various
devices you have set up. After selecting Devices, simply select the device you wish to clear.
Devices that have not been set up are greyed out and cannot be deleted.
Pressing the Side Key next to Favourites lets you select a group, e.g. His, Hers, etc. and then
clear ALL the favourites you had set up for that group. Only groups containing favourites can
be cleared, all other groups are greyed out.
Pressing the Side Key next to Learned lets you select a device that you had learned
commands for and clear everything that was learned. Onl y devices that you have learned
commands for are shown, all other devices are greyed out.
Pressing the Side Key next to Punch-through lets you clear any Punch-through commands you
had set up for a device. Only devices that you have set up Punch-through for are shown, all
other devices are greyed out.
Pressing the Side Key next to the Master Clear lets you clear EVERYTHING in the remote.
Be careful when selecting this option as you will not be able to recover your settings.
Note – all the options above do display a warning screen allowing you to change your mind
before actually clearing anything.
X10 Home Control
If you own or have purchased the Model IR7243 Command Cen tre, a nd you have
compatible X10 Lamp, Appliance, and Wall Switch modules, you will also be able to control
lights and appliances from your TAKE 10. You must set up the remote with the 0999 device
code in order for the TAKE 10 to communicate to the IR7243 Command Centre.
When you point the TAKE 10 toward the IR7243, it receives the IR commands and retransmits
them onto your house wiring. (This is now a PLC signal.) Any modules that match the house
and unit code transmitted will either turn on or off, depending on the signal.
To see how to enter a device code, refer to chapter 8. Setting up X10 devices. Set up the
code under AUX mode, but you can choose another mode if you prefer. Then in AUX mode
(for example), press a number button on the TAKE 10 corresponding to the X10 Module you
want to control. Press CHANNEL + to turn the module on, CHANNEL – turns it off; VOLUME + to
brighten Lamp and Wall Switch Modules, and VOLUME – to dim them.
If you own or have purchased the TM13 RF Transceiver Module, your TAKE 10 communicates
using its RF signal. The remote transmits the RF signal on a specific house code. This signal is
Page 24
20-3-2009 24 033000=15090
received by the transceiver (either TM13, C M15, or security console) on a matching house
code. The transceiver then forwards the signal onto the house wiring. This is now a PLC signal.
Any modules that match the house and unit code transmitted wil l either turn on or off,
depending on the signal sent. Camera power supplies are addressable and act just like lamp
or appliance modules.
X10 Macros
Macros allow you to combine a number of commands, including time delays, into a single
key press. This example describes how to create a Macro that uses two previously set up X10
devices, a light in the kitchen and a coffee maker in the kitchen. The purpose of this Macro is
to turn on the kitchen light, wait two seconds, and then turn on the coffee m ak er . Use thes e
steps to create the Macro.
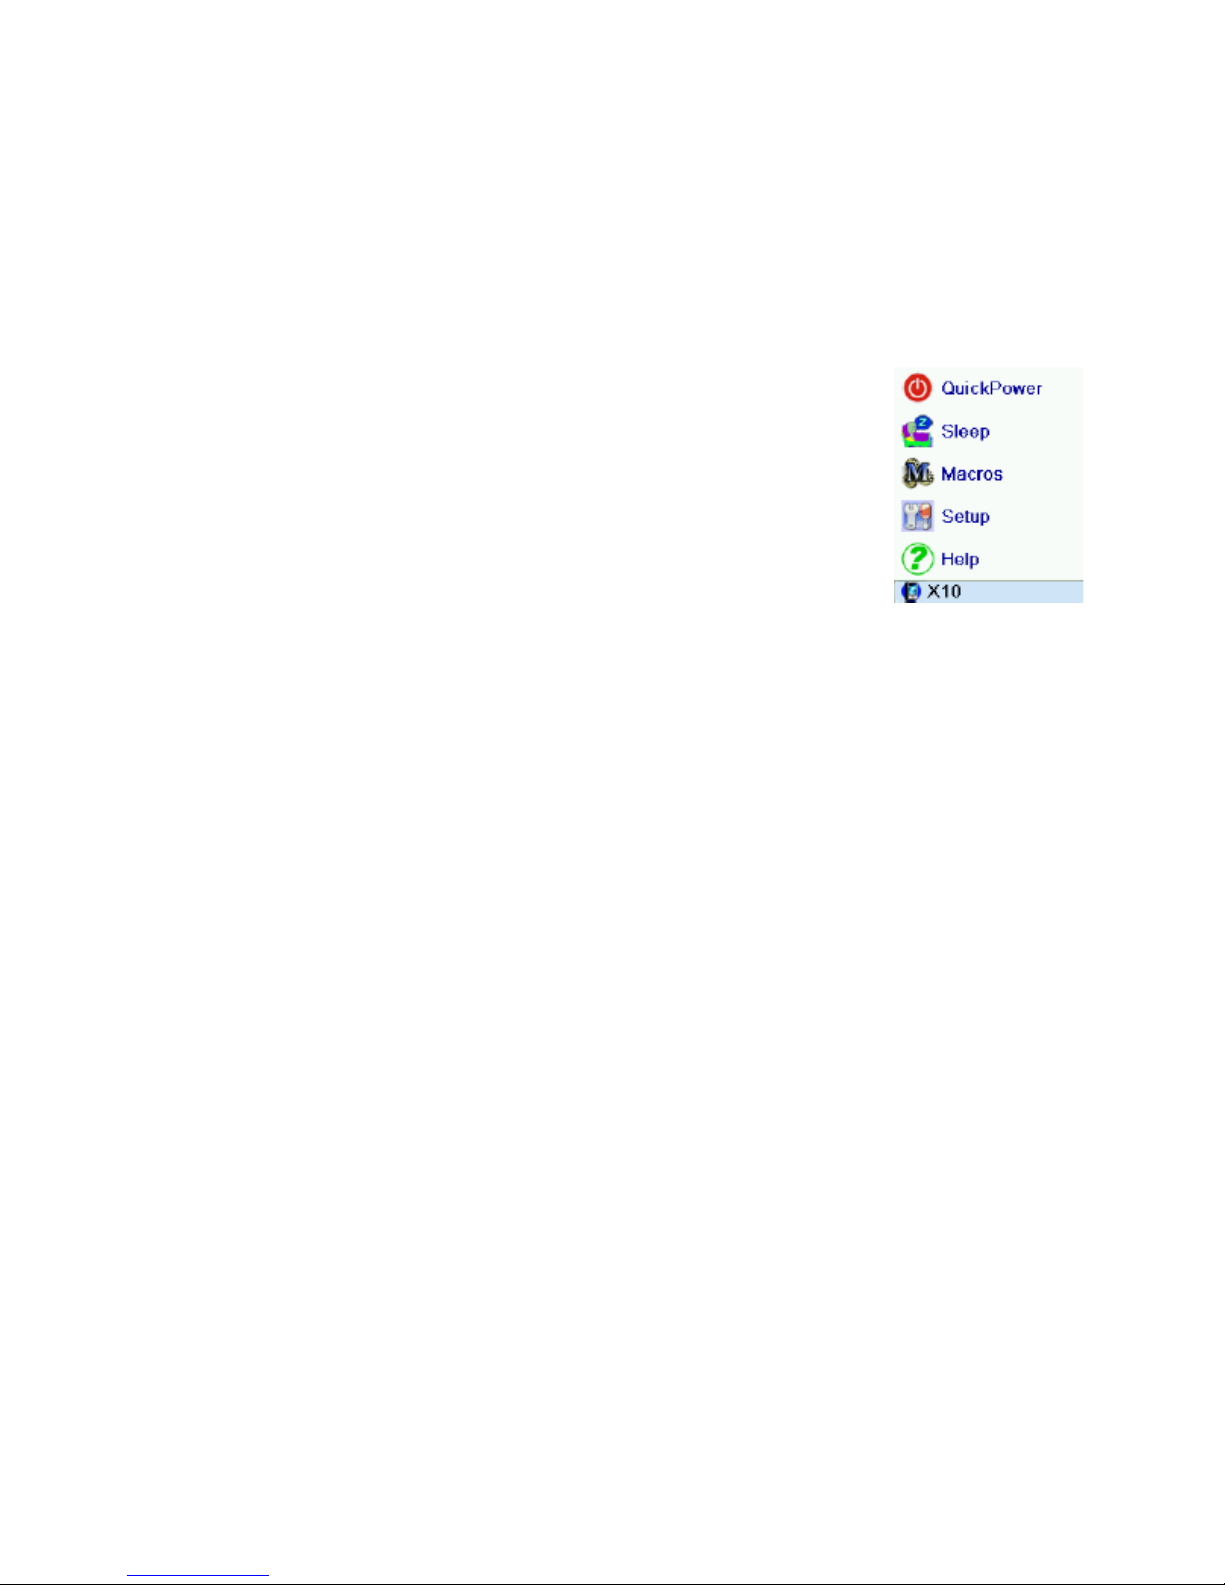
• Press the Home Button, screen 32 appears, then press Setup.
• At the screen shown, press the Side Key for X10.
• Select Add/Edit, then select a room that you want to associate the
Macro to. In this exampl e the devices that you want the Macro to
control are in the Kitchen.
• Select the Side Key for the Kitchen. (You can place the Macro in
another room if you like, but you are still asked to pick the X10 devices
that you want to control.)
• Select an unused Side Key. (You will use this key to activate the
Macro.) [32]
• The following screen shows the Macro logo. You will use this screen to create the Macro.
• Press the Side Keys for Label and Pick Logo to adjust the name and logo of the Macro.
• Select the Edit Macro Side Key.
• Select the Pick Device Side Key until the X10 icon appears at the bottom of the screen.
• Select the Pick Module Side Key. The next screen shows the rooms that have devices that
have been set up. Choose the Kitchen Side Key.
• Select the Side Key for the lamp. The options screen for that device appears. Press the On
Side Key. (This will turn the lamp on.)
• The next screen appears which gives you more options, one of which is to Set Delay. Press
the Side Key for Set Delay. Each key press adds one second. Press the Side Key twice for two
seconds.
• Select Pick Module.
• At the next screen select the Kitchen Side K ey.
• Select the coffee ma ker Side Key. The options screen for that device appears. Press the On
Side Key. (This will turn the coffee maker on.)
• Select Save.
• The following screen shows the summary for the Macro. It shows the location, name, and
commands for the Macro. You can add another key if you like by pressing the Add Key Side
Key.
• Select Done to complete the Macro.
To Run the Macro do the following:
• Press the Home Button.
• Select the Macro Side Key.
• Press the Run Macro Side Key. The Macro will run the commands.
Deleting Favourites and Macros
To delete any X10 Single Device, including a Macro:
• Select Home/Setup/X10/Delete/The Room you want to delete from/press Side Key next to
the icon you want to delete/Press OK/Select Yes.
Page 25

20-3-2009 25 033000=15090
To delete a Favourite Channel Icon (TV station):
• Home/Setup/Favourites/Delete/Favourite Category (His, Hers, etc)/press Side Key next to
Favourite Icon you want to delete/Press OK/Select Yes.
To Clear an Entire Category of Channel Favourites:
• Home/Setup/More/Advanced/Clear Settings/Favourites/ Favourite Category you want to
clear (His, Hers, etc)/Press Clear key.
To Clear an Entire Room of X10 Favourites:
• Home/Setup/More/Advanced/Clear Settings/More/Clear X 10/Room category you want to
clear (Living Room, Kitchen, etc)/Press Clear key.
Also, if the default names are not in accordance with what you want, please note that you
can easily change these names by selecting Home/Setup/Favourites/Rename or
Home/Setup/X10/More/Rename.
Audio and Video Compatibility
The TAKE 10 used in conjunction with the Powermid receiver gives you control of Audio and
Video components - even if they are in a different room from the remote.
The Powermid receiver allows you to extend the distance you can use your remote. You will
be able to hide the Powermid receiver from sight and still control your TV or other electronic
devices through entertainment centres, cabinet doors, from another room, etc.
The transmitter will receive the RF commands and send them using IR through the transmitter
cable included with your package.
Description:
Follow these basic steps:
• Plug the Powermid Receiver into the AC outlet in the room where your TV, VCR, stereo, etc.,
that you want to control are located (up to 20 feet away from what you want to control).
Point the front of the Powermid Receiver
towards the unit you wan t to control.
• Fully extend the antenna on the Powermid.
• (Optionally) plug the IR extender cable into the back of the Powermid receiver and attach
the IR emitters on the cable to the front of up to two A/V devices that you want to control.
• Press any key on the remote. The Powermid receiver receives the Radio Frequency (RF)
signals and blasts the IR signals from its front face, or optionally through the Powermid
receiver emitter cable to control your IR compatible devices (TV, VCR, CD, etc.).
Note: You can add more Powermid receivers to control A/V equipment in more than one
room.
Voice Dialer Security Console
The TAKE 10 used in conjunction with the SC28/SC9100 security console gives you the ability to
control your home security directly from your remote.
Description:
To set up your remote for the SC28/SC9100 do the following:
• Press the Home key.
• Press the Setup Side Key.
• Press the X10 Side Key.
• Press the Add/Edit Side Key.
• Use the Side key to select the room that you want to associ a te th e sec u rity device.
• At the “add an X10 device!” screen, press the OK key.
• Use the Side Key to Pick Device.
Page 26
20-3-2009 26 033000=15090
• Press the Security Side Key.
• Press the Side Key to select the SC28/SC9100.
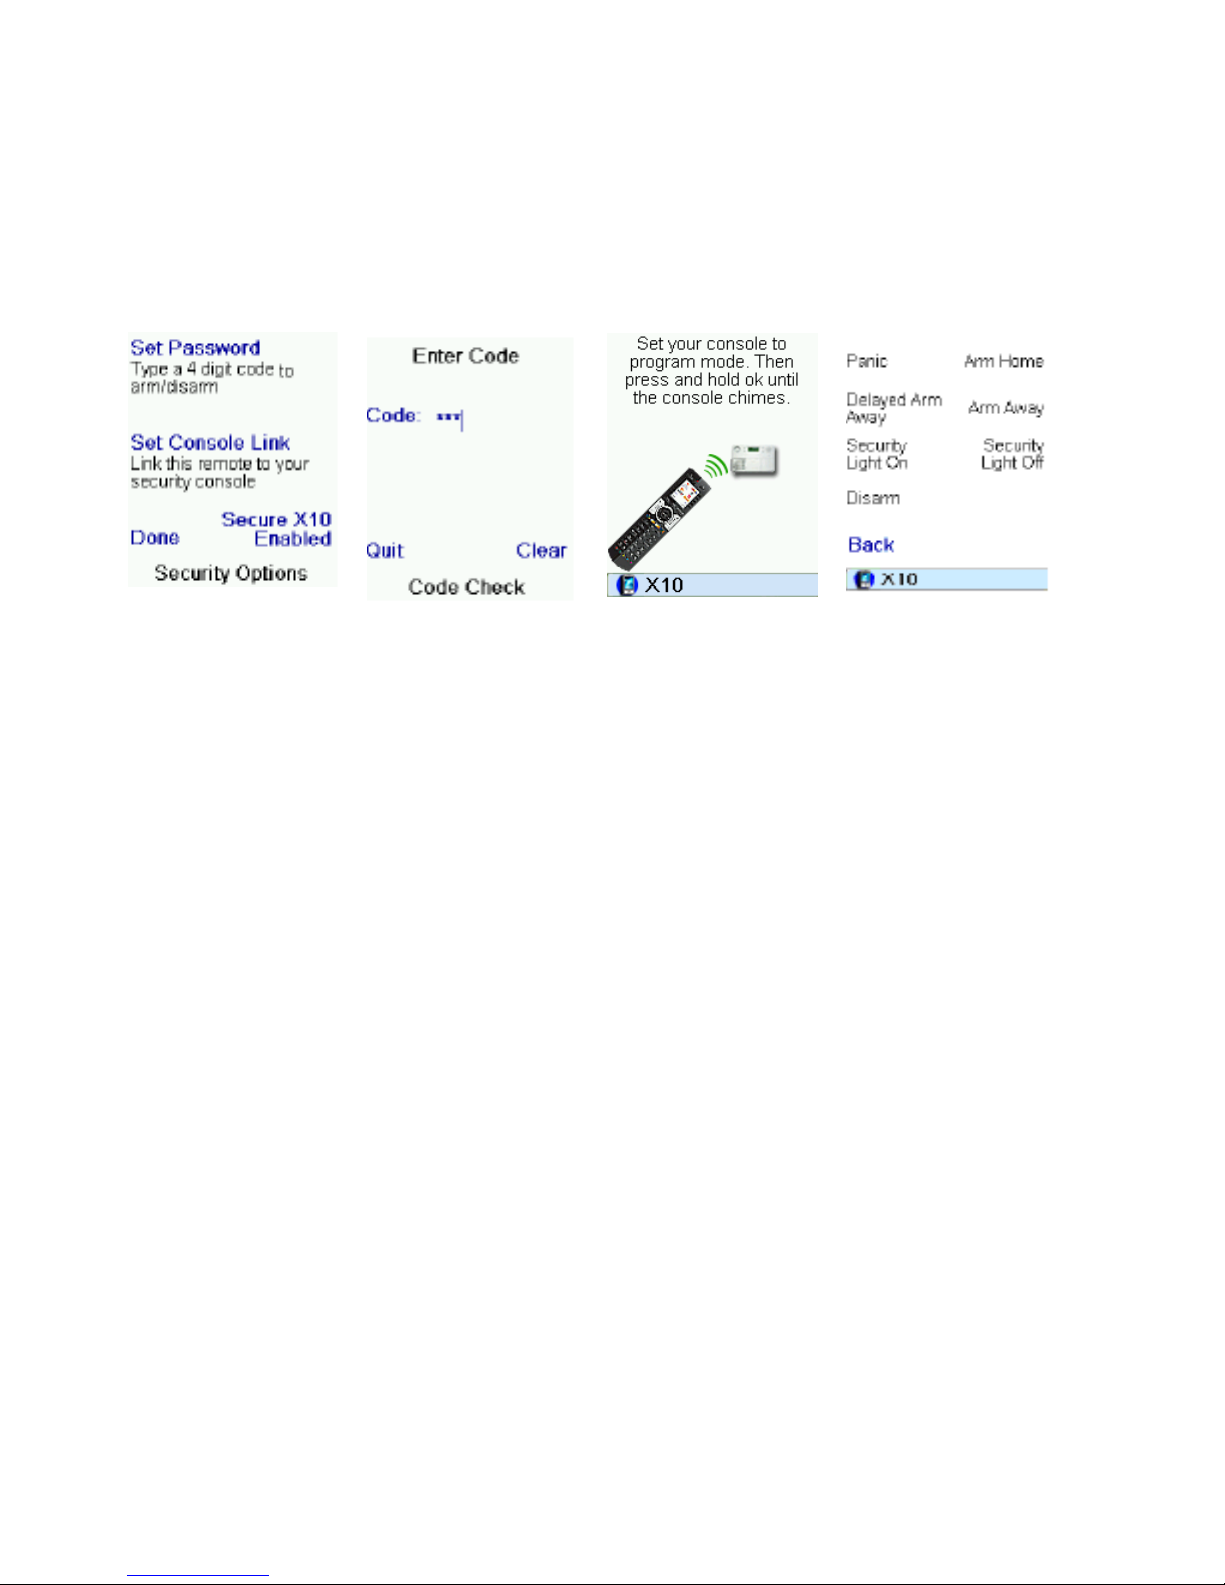
• At the Security Options [33] screen, press the Side Key to Set Password [34].
• Enter your 4-digit security code using the alphanumeric keys. (This is your choice; do not
forget your security code.)
• Press the Side Key for the Set Console Link [35].
• Following the screen instructions to set your console to program mode by pressing and
holding the OK key until the console chimes.
• Press the Side Key for Done.
[33] [34] [35] [36]
To use the SC28/SC9100 do the following:
• Press the Mode key.
• Press the X10 Side Key.
• Select the room that has the security console by pressing the Side Key.
• The options screen for the security console appears. Use the Side Key for the option that you
want to use [36] .
• The Enter Code screen appears. Enter your pass word to execu te your choice .
• Press Back to leave the Enter Code screen.
Page 27

20-3-2009 27 033000=15090
10. Trouble Shooting
The favourites you set up don’t operate your device.
Make sure you selected the correct device (TV, Cable, Sate, etc.) when you set up each
favourite. See section 7 ‘Add/Edit Favourites’ to change the device type for your favourites.
The buttons on the Remote do not operate your product.
Make sure the remote is set to the correct Mode by pressing the MODE Key followed by the
appropriate Side Key for the device mode you desire.
Program the remote with a diff erent code f or you device
If the Remote does not contain the code for your device, try learning the codes you need
from your old remote.
Install new batteries.
The Remote does not operate some features of your product.
Program the remote with a new code
The remote may not be able to operate all features of your product or the key names may
be different. Try learning codes from your old remote.
Having problems with learning.
Refer to the learning tips in the b ack of this manual.
Your TV turns on when you press a favourite key.
Some types of TV, e.g. P hilips flat p anel TV’s turn on and go to the selected channel when
you press a channel number whilst the TV is off. Therefore pressing a favourite button would
have the same result.
Forgot your KidSafe code.
Just remove and reinsert the batteries to reset KidSafe (but don’t let your Kids see this
manual).
Page 28

20-3-2009 28 033000=15090
11. Tips & Tricks about learning IR codes to a remote
When learning IR codes always test the IR codes directly during the learning process.
In this way you do not need to learn all the codes over and over again.
Please try the following steps when the learned IR code fail to work.
1. Make sure the original remote you are learning the code from has a fresh set of
batteries. (preferably Duracell or Energizers)
2. Increase/decrease the distance between the two remotes when learning. (original
and URC)
Try for example to double the distance, up to 4 feet is possible.
3. For ‘normal’ short burst codes, try to ‘tap’ the button instead of press and holding it.
4. For ‘Continuous’ codes, try the ‘flicker’ technique – rapidly tap the button while
learning. (approximately 7x per second or faster.)
5. Try the ‘Swoop’ method, Start form 2’ away and then ‘swoop’ the remote towards
the learning remote.
6. Try the ‘Flasher’ method. Hold an opaque object in front of the remote and remove
it then quickly replace it.
7. Try learning the codes to another learning remote first, and then from that remote to
the required one.
Page 29
20-3-2009 29 033000=15090
TAKE10 – URC10in1RF
CE DECLARATION OF CONFORMITY
UK
We, X10 Europe, 3 Rue de Penthièvre - 75008 Paris - France, herewith declare that the following
designated product: TAKE10, is in compliance with the essential requirements and other relevant
provisions of Directive 1999/5/EC.
DE
Wir, X10 Europe, 3 Rue de Penthièvre - 75008 Pa ris – France, erklären hiermit die Übereinstimmung
des Gerätes TAKE10 mit den grundlegenden Anford erungen und anderen rel evanten Festlegungen
der Richtlinie 1999/5/EC.
NL
Hierbij verklaart X10 Europe, 3 Rue de Penthi èvre - 75008 Paris - France dat het product TAKE10 in
overeenstemming is met de essentiële eisen en de andere relevante bepalingen van richtlijn
1999/5/EG
SE
Härmed intygar X10 Europe, 3 Rue de Penthièvre - 75008 Paris - France - att denna TAKE10 står I
överensstämmelse med de väsentliga egenskapskrav och övriga relevanta bestämmelser som
framgår av direktiv 1999/5/EG.
FR
Nous, X10 Europe, 3 Rue de Penthièvre - 75008 Paris - France, déclarons que le produit suivant:
TAKE10 les exigences essentielles et aux autres dispositions pertinentes de la directive 1999/5/CE.
ES
Por medio de la presente X10 Europe, 3 Rue de Penthièvre - 75008 Paris - France , declara que el
TAKE10 cumple con los requisitos esenciales y cualesquiera otras disposiciones aplicables o
exigibles de la Directiva 1999/5/CE.
PT
Nós, BMB Electronics BV, Kortakker 10 – 4264 AE Veen – The Netherl ands, certificamos que o TA KE10
cumpre os requisitos essenciais e outr os aspectos relevantes previstos pela Directiva 1999/5/EC . A
declaração de conformidade completa está disponível através de pedido.
IT
Con la presente X10 Europe, 3 Rue de Pent hièv r e - 75008 Pari s - France, d i chiara che quest o TA KE10
è conforme ai requisiti essenziali ed alle altre disposizioni pertinenti st abili te dalla direttiva 1999/5/CE.
Product category : general consumer (category 3).
CE0536 Date:15.10.02
François ROSSI Peter Schoon
Approval Engineer X10 Europe Product Manager BMB HOME
Page 30

20-3-2009 30 033000=15090
NOTES
Page 31

20-3-2009 31 033000=15090
NOTES
Page 32
20-3-2009 32 033000=15090
www.bmb-home.eu
 Loading...