

Blue Rhino GLL1300W, GLL1300W-C Owner's Manual
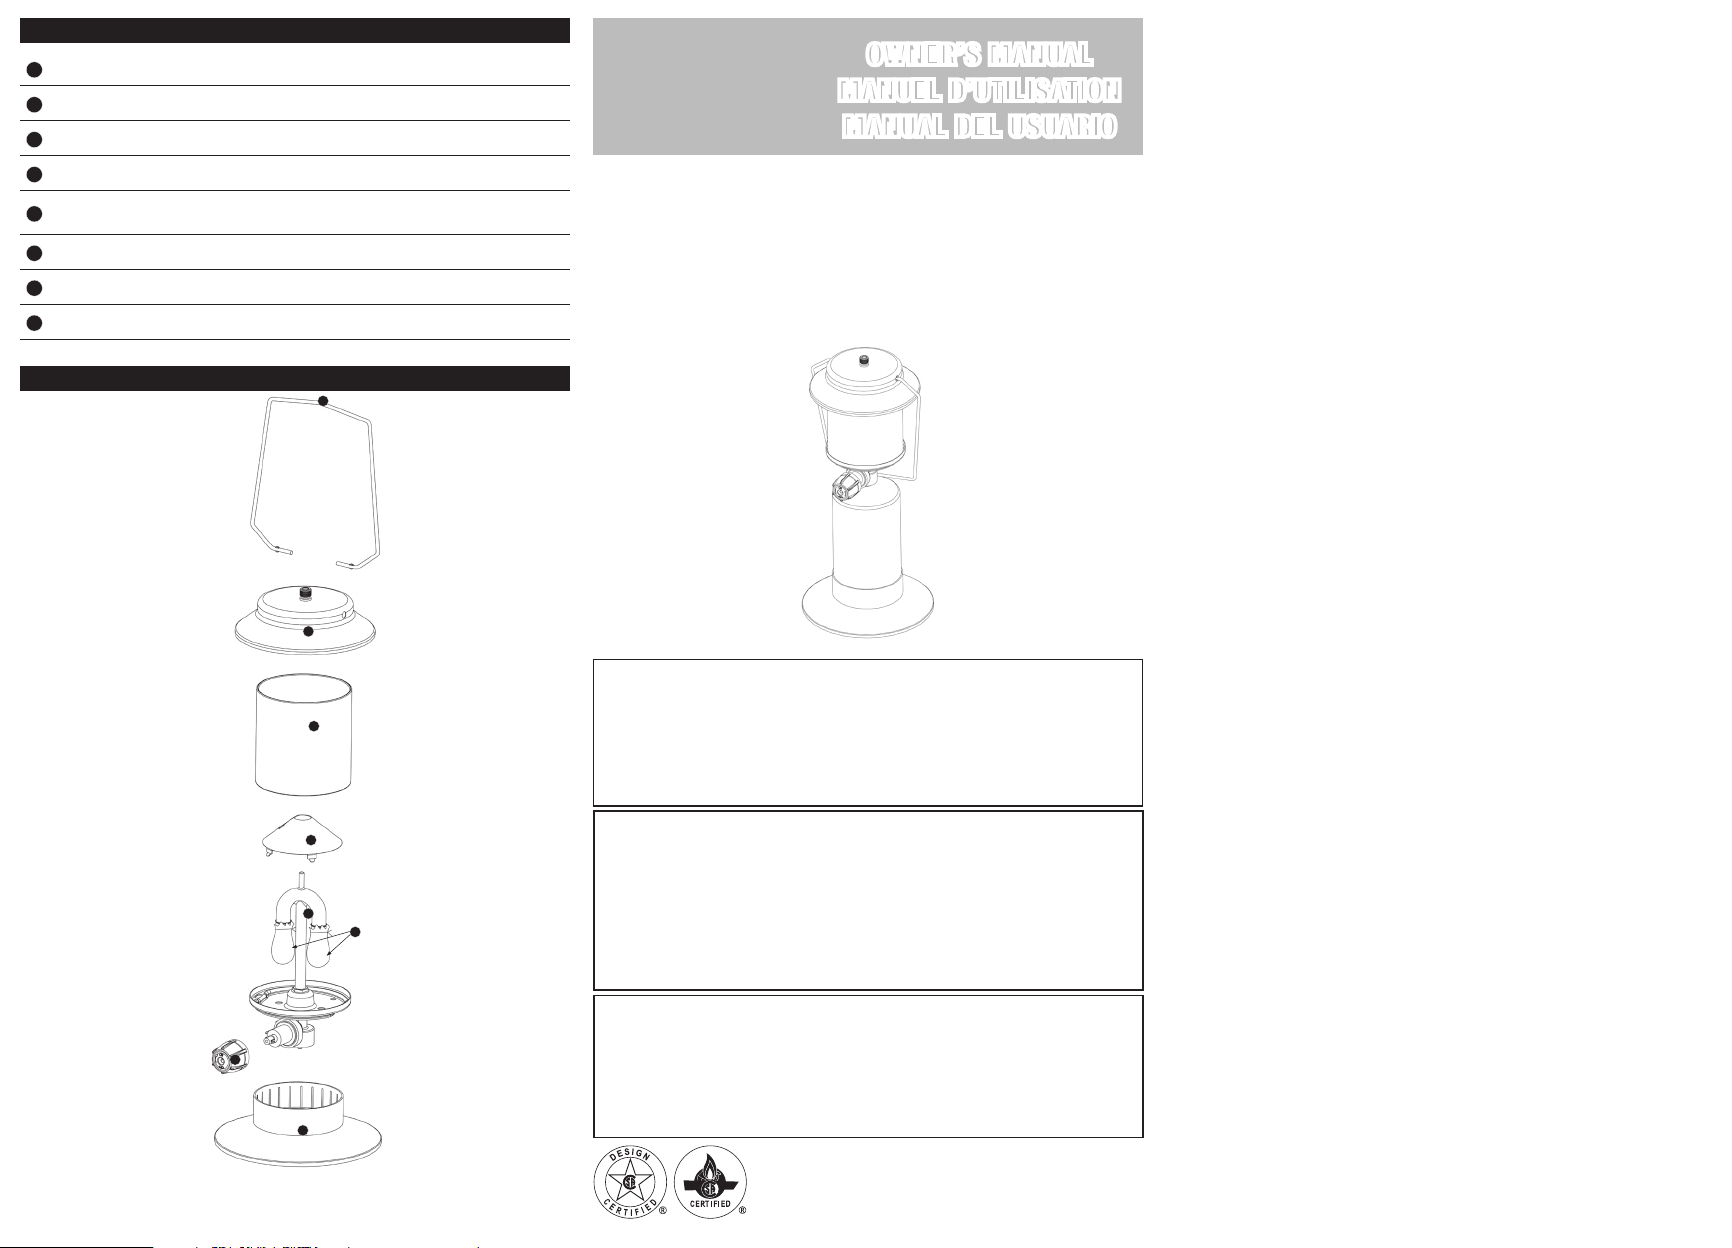
Parts List / Liste des pièces / Lista de piezas
b. Si sigue observando burbujas después de
varios intentos, desconecte el tanque de
propano de acuerdo con las instrucciones
“Desconectar el tanque de gas propano
líquido” y llame al número de teléfono
1.800.762.1142 para solicitar asistencia
técnica.
c. Si no aparecen burbujas por un lapso de
un minuto, cierre el gas girando la perilla
del regulador a “OFF” (apagado) y limpie la
solución para continuar el proceso.
Encendido
W ADVERTENCIA: NO exponga la linterna
a vapores ni líquidos inflamables al
encenderla.
1. Verifique que todas las etiquetas, envolturas de
protección y empaques han sido removidos de
la linterna.
2. Asegúrese de que no hay nada que obstruya
el flujo de aire en la unidad de gas. Arañas y
otros insectos pueden formar sus nidos dentro y
obstruir los orificios del quemador/tubo de venturi.
Un tubo de quemador obstruido puede provocar
un incendio debajo del aparato.
3. Las perillas de control deben estar en la posición
“OFF” (apagado), vea la Figura 1.
4. Acople el tanque de gas propano líquido siguiendo
las instrucciones descritas en la sección “Conectar
el tanque de gas”.
5. Para camisas nuevas únicamente: usando guantes
resistentes al calor, coloque una cerilla larga
encendida o un encendedor de butano largo
encendido debajo de las camisas (Figura 5).
a. Sujete la cerilla larga encendida o el
encendedor largo encendido junto a la camisa
hasta que sólo queden cenizas blancas.
b. Aleje la cerilla larga o el encendedor de butano
largo.
Nota: Una vez que se haya quemado la camisa,
se vuelve muy frágil. Tenga cuidado de no
tocarla con los dedos ni con la cerilla.
6. Usando guantes resistentes al calor, coloque la
cerilla larga encendida o el encendedor de butano
largo encendido cerca del lateral de las camisas
(Figura 5).
a. Gire la perilla de control en sentido antihorario
a la posición “ON” (encendido).
b. Mantenga una cerilla larga encendida o un
encendedor largo encendido junto a la camisa
durante 5 segundos como máximo.
c. Aleje la cerilla larga o el encendedor de butano
largo.
d. Repita los pasos B y C para la otra camisa.
7. Si la linterna no se enciende en 5 segundos, gire
la perilla de control a la posición “OFF” (apagado).
Espere 5 minutos y repita el procedimiento de
encendido.
W PRECAUCIÓN: Si la llama del quemador
se apaga durante la operación,
inmediatamente cierre la entrada de gas
y deje que el gas se despeje durante
aproximadamente 5 minutos antes de
volver a encender la linterna.
Apagado:
1. Gire la perilla de control a la posición “OFF”
(apagado).
2. Remueva el tanque de gas propano líquido y
guárdelo en un lugar apropiado.
Transporte
Mientras la linterna está ENCENDIDA (ON)
1. Transporte la linterna cuidadosamente sujetándola
por la manija.
2. No toque ninguna de las superficies de la linterna,
ya que pueden estar calientes
3. Antes de colocar la linterna en su sitio, asegúrese
de que el tanque esté instalado correctamente
en la base.
Mientras la linterna está APAGADA (OFF) y una vez
que se haya enfriado
1. El tanque de gas propano líquido debe retirarse y
guardarse como es debido.
2. Una vez que la linterna se haya enfriado, coloque
la linterna y la base dentro de una bolsa de
plástico y cierre la bolsa con una cuerda.
W ADVERTENCIA: NO selle completamente la
bolsa plástica.
Nota: La bolsa plástica ayudará a proteger contra los
insectos.
Reemplazo de las camisas
1. Gire la perilla de control a la posición “OFF”
(apagado) y remueva el tanque de gas
propano líquido.
2. Remueva la tapa y la pantalla.
3. Reemplace las camisas.
4. Acople la pantalla y la tapa.
5. Verifique que no haya fugas.
Limpieza y cuidado
W PRECAUCIÓN: Todas las operaciones de
limpieza y mantenimiento deben realizarse
con la linterna fría y con el suministro de
combustible del tanque de propano líquido
desconectado.
Español – 6
W PRECAUCIÓN: NO limpie ninguna pieza
de esta linterna en un horno de limpieza
automática. El calor extremo dañará el
terminado.
W PRECAUCIÓN: Mantenga la linterna limpia y
libre de materiales combustibles, gasolina
y otros vapores y líquidos inflamables.
W PRECAUCIÓN: NO obstruya el flujo de
combustión y aire de ventilación.
Avisos
1. No use productos de limpieza abrasivos pues
dañarán este aparato.
2. No utilice nunca productos limpiahornos para
limpiar cualquier pieza de la linterna.
Inspección
Esta linterna debe inspeccionarse con regularidad
para garantizar la seguridad del producto y una larga
vida útil.
W ADVERTENCIA: NO trate de limpiar esta
linterna a menos que las llamas estén
COMPLETAMENTE apagadas y la unidad
esté fría al tacto.
1. Revise el quemador para comprobar que esté
seguro.
2. Revise el tubo venturi para asegurarse de que
está limpio y libre de nidos de arañas.
3. Revise las conexiones de gas para asegurar que
no hayan fugas.
4. Revise los componentes en busca de señales de
daño o corrosión.
5. Si detecta daño en cualquiera de los
componentes, NO opere el producto hasta que se
hayan realizado las reparaciones.
Limpieza de las superficies
W ADVERTENCIA: NO intente limpiar esta
linterna a menos que las llamas estén
COMPLETAMENTE apagadas y la unidad
esté fría al tacto.
W ADVERTENCIA: NO use limpiador de horno
ni limpiadores abrasivos, ya que estos
causarán daño al producto.
1. Limpie las superficies con un detergente suave de
lavado de platos o con soda de hornear.
2. En superficies de limpieza difícil, use un
desengrasador a base de cítricos y un cepillo
de nylon.
3. Enjuague las superficies con agua limpia.
4. Deje secar al aire libre.
Registro del producto
Para beneficiar del servicio de garantía más
rapidamente, sírvase registrar su unidad
inmediatamente visitando nuestro sitio
Internet BlueRhino.com/warranty o llamando al
1.800.762.1142.
Piezas de repuesto
Puede encontrar piezas de repuesto en parts.
BlueRhino.com o llame al 1.800.762.1142..
Garantía limitada
Blue Rhino Sourcing, Inc. (“Blue Rhino”) garantiza
al comprador original al detal de este producto, y
a ninguna otra persona, que si la unidad se arma
y opera de acuerdo con las instrucciones impresas
que la acompañan y por un período de un (1) año
a partir de la fecha de compra, todas las piezas de
este producto estarán libres de defectos en material
y mano de obra. Blue Rhino podrá requerir prueba
razonable de la fecha de compra. Por lo tanto, usted
debe conservar el recibo de venta o la factura. Esta
garantía limitada estará limitada a la reparación o
reemplazo de las piezas que resulten defectuosas
en condiciones de servicio y uso normal y las que
un examen indique, a satisfacción de Blue Rhino,
que están defectuosas. Antes de devolver cualquier
pieza, comuníquese con el Departamento de Servicio
al Cliente de Blue Rhino. Si Blue Rhino confirma el
defecto y aprueba el reclamo, Blue Rhino decidirá
reemplazar tales partes sin costo alguno. Si se le
pide que devuelva las partes defectuosas, los costos
de transporte deberán ser prepagados. Blue Rhino
devolverá las partes al cliente con costo de transporte
o envío prepagados.
Esta garantía limitada no cubre fallas o dificultades
de operación debidas a accidente, abuso, mal uso,
alteración, empleo en usos inapropiados, instalación
defectuosa o mantenimiento o servicio inapropiado
o falla en la realización de mantenimiento normal
y rutinario como se prescribe en este manual del
usuario. Además, la garantía limitada no cubre daños
al terminado de la unidad, tales como rasguños,
abolladuras, descoloridos, oxidaciones y otros daños
causados por la intemperie después de la compra
de la unidad.
Esta garantía limitada reemplaza cualquier
otra garantía. Blue Rhino no asume ninguna
responsabilidad por garantías de productos vendidos
por quienes no sean distribuidores o vendedores al
detal autorizados. Esta exención de responsabilidad
incluye cualquier garantía de comerciabilidad o la
garantía de aptitud para un propósito en particular.
Blue Rhino NO SE HACE RESPONSABLE POR NINGUNA
GARANTIA IMPLICITA INCLUYENDO, SIN LIMITACIONES,
LAS GARANTIAS IMPLICITAS DE COMERCIABILIDAD
Y ADAPTABILIDAD A UN PROPOSITO PARTICULAR.
Blue Rhino NO ASUME RESPONSABILIDAD ANTE EL
COMPRADOR O ANTE CUALQUIER TERCERA PERSONA
POR DAÑOS ESPECIALES, INDIRECTOS, PUNITIVOS,
INCIDENTALES O CONSEQUENCIALES. Blue Rhino,
además, no asume responsabilidad por garantías
implícitas o expresas por defectos de mano de obra
causados por terceras personas.
Esta garantía limitada le da al comprador derechos
legales específicos y el comprador puede tener
otros derechos según el lugar donde el comprador
o la compradora residan. Ciertas jurisdicciones no
permiten limitaciones en cuanto a la duración de
una garantía implícita, de manera que esta limitación
puede no ser aplicable a usted.
Blue Rhino no autoriza a ninguna persona o
compañía para asumir por Blue Rhino cualquier otra
obligación a responsabilidad relacionada con la venta,
instalación, uso, remoción, devolución o reemplazo
de este equipo y cualquier representación de esta
naturaleza no obliga a Blue Rhino.
Blue Rhino Sourcing, Inc.
Winston-Salem, North Carolina 27105, EE.UU.
(800)-762-1142
Resolución de problemas
Visite nuestro sitio BlueRhino.com o llámenos al
1.800.762.1142.
Español – 5
Handle / Anse / Manija 55-09-291
1
Cap / Couvercle / Tapa 55-09-288
2
Globe / Globe / Globo 55-09-294
3
Heat Shield / Cône pare-chaleur / Cono de protección contra el calor 55-09-292
4
Engine Assembly/Regulator* / Moteur et régulateur* /
5
Conjunto del motor y regulador*
Mantle (2) / Manchon (2) / Camisa (2) 55-09-293
6
Control Knob* / Bouton de commande* / Perilla de control* 55-09-289
7
Base / Socle / Base 55-23-597
8
*Pre-assembled / *Pré-assemblé / *Viene ensamblado
Expanded View / Vue éclatée / Diagrama de explosión
1
2
3
4
5
6
7
8
Expanded View / Vue éclatée des pièces / Diagrama de explosión
55-09-290
Linterna a gas propano líquido para exteriores
Save these instructions for future reference.
If you are assembling this unit for someone else, give this manual to him or her to read and save for future
reference.
The use and installation of this product must conform to local codes. In absence of local codes, use the
National Fuel Gas Code, ANSI Z223.1/NFPA 54, CAN/CGA-B149.1, Natural Gas and Propane Installation Code.
California Proposition 65: Chemicals known to the State of California to cause cancer, birth defects, or other
reproductive harm are created by the combustion of propane.
Conservez ces instructions afin de pouvoir les consulter ultérieurement.
Si vous êtes en train d’assembler cet appareil pour une autre personne, veuillez lui fournir le manuel afin
qu’elle puisse le lire et le consulter plus tard.
L’utilisation et l’installation de cet appareil doivent être conformes aux codes locaux. En l’absence de codes
locaux, suivez le Code national du gaz et des combustibles, les normes ANSI Z223.1/NFPA 54, CAN/CGA-
B149.1 et le Code d’installation du gaz naturel et du propane.
Proposition 65 de Californie: La combustion du propane produit des émanations et des résidus chimiques
ayant été reconnus par l’État de la Californie comme étant source de cancer, malformations congénitales et
autres dommages reproductifs.
Series Model No. / Modèle nº / Modelo no.
Outdoor LP Gas Lantern
Lanterne d’extérieur au propane
GLL1300W, GLL1300W-C
OWNER’S MANUAL
MANUEL D’UTILISATION
MANUAL DEL USUARIO
Conserve estas instrucciones para futuras consultas.
Si está montando esta unidad para otra persona, entréguele este manual para futuras consultas.
El uso e instalación de este producto ha de realizarse de acuerdo con los códigos locales. Si no existen
códigos locales, use las normas siguientes: Código Nacional para Gas y Combustibles, ANSI Z223.1/NFPA 54,
CAN/CGA-B149.1, Código de Instalación de Propano y Gas Natural.
Propuesta 65 de California: La combustión del propano crea productos químicos considerados por el Estado
de California como causantes de cáncer, malformaciones congénitas u otros daños reproductivos.
Certifi ed Under / Homologué par / Certifi cado por:
ANSI Z21.73-2011 • CSA11.1-2011 Camp Lights /
Lampes de camping / Lámparas para campamento
Manufactured in China for / Fabriqué en Chine pour / Fabricado en China:
Blue Rhino Global Sourcing, Inc.
Winston-Salem, NC USA
1.800.762.1142 • BlueRhino.com
© Blue Rhino Global Sourcing, Inc.
GLL1300W-OM-102 EFS
WARNING
FOR YOUR SAFETY:
For Outdoor Use Only
(outside any enclosure)
DANGER
If you smell gas -
1. Do not attempt to
light appliance.
2. Extinguish any open
flame.
3. Disconnect from fuel
supply.
DANGER
CARBON MONOXIDE
HAZARD
• This appliance can
produce carbon
monoxide which has
no odor.
• Using it in an
enclosed space can
kill you.
• Never use this
appliance in an
enclosed space such
as a camper, tent, car
or home.
WARNING
FOR YOUR SAFETY:
Do NOT store or use
gasoline or other liquids
with flammable vapors
in the vicinity of this or
any other appliance.
DANGER
Do NOT leave this
appliance unattended
while it is in operation.
W DANGER: Failure to follow the instructions,
dangers, warnings and cautions in this
manual may result in serious bodily injury
or death, or in a fire or an explosion
causing damage to property.
W WARNING:
W This lantern is for outdoor use only, and
should not be used in a building, garage or
any other enclosed area.
W Do NOT operate, light or use this appliance
within eight feet of walls, structures or
buildings.
W This lantern is NOT for commercial use.
W This lantern is safety certified for use in
the United States and/or Canada only. Do
NOT modify for use in any other location.
Modification will result in a safety hazard
and will void your warranty.
W This lantern is for use with liquid propane
(LP) gas only. The conversion to or
attempted use of natural gas in this LP gas
lantern is dangerous and will void your
warranty.
W LP Gas Characteristics:
a. LP gas is flammable and hazardous if
handled improperly. Become aware of
the characteristics before using any LP
gas product.
b. LP gas is explosive under pressure,
heavier than air, and settles and pools
in low areas.
c. LP gas in its natural state has no odor.
For your safety, an odorant is added that
smells like rotten cabbage.
d. Contact with LP gas can cause freeze
burns to skin.
W Do NOT store a spare LP cylinder within ten
feet (3.05 m) of this appliance.
W An LP cylinder not connected for use
should not be stored in the vicinity of this
or any other appliance.
W LP gas tank needed to operate. Only tanks
marked “propane” may be used.
W The LP gas cylinder must be constructed
and marked in accordance with the
Specifications for LP-gas Cylinders of
the U.S. Department of Transportation
(D.O.T.), Cylinders, Spheres and Tubes for
the Transportation of Dangerous Goods;
or the National Standard of Canada, CAN/
CSA-B339.
W LP gas tank must be arranged for vapor
withdrawal.
W Dented or rusted LP gas tanks may be
hazardous and should be checked by your
LP gas supplier prior to use.
W The LP gas tank should not be dropped or
handled roughly.
W LP gas tanks must be stored outdoors out
of the reach of children and must not be
stored in a building, garage, or any other
enclosed area. Your tank must never be
stored where temperatures can reach over
125°F.
W Never attempt to attach this lantern to the
self-contained LP gas system of a camper
trailer, motor home, or house.
W The use of alcohol or drugs may impair the
consumer’s ability to properly assemble or
safely operate the appliance.
W Never use lighter fluid, gasoline, kerosene,
or alcohol with this product.
W Your lantern has been checked at all
factory connections for leaks. Recheck all
connections, as movement in shipping can
loosen connections.
W Check for leaks even if your unit was
assembled for you by someone else.
W Do NOT operate if a gas leak is present. Gas
leaks may cause a fire or explosion.
W You must follow all leak-checking
procedures before operating. To prevent fire
or explosion hazard when testing for a leak:
a. Always perform a leak test before
lighting this lantern and each time the
tank is connected for use.
b. No smoking. Do NOT use or permit
sources of ignition in the area while
conducting a leak test.
c. Conduct the leak test outdoors in a well-
ventilated area.
d. Do NOT use matches, lighters, or a flame
to check for leaks.
e. Do NOT use lantern until any and all
leaks are corrected.
If you are unable to stop a leak, disconnect
the LP gas supply. Call a gas appliance
serviceman or your local LP gas supplier.
W Do NOT use in an explosive atmosphere.
Keep lantern area clear and free from
combustible materials, gasoline and other
flammable vapors and liquids.
W Keep all combustible items and surfaces
at least 21 inches (53 cm) away from this
lantern at all times. Do NOT use this lantern
or any gas product under any overhead
or near any unprotected combustible
constructions.
W It is essential to keep this lantern’s valve
compartment, burner, and circulating air
passages clean. Inspect lantern before
each use.
W Do NOT alter this lantern in any manner.
Doing so will violate your warranty.
W Do NOT use this lantern unless it is
COMPLETELY assembled and all parts are
securely fastened and tightened.
W This lantern should be thoroughly cleaned
and inspected on a regular basis.
W Use only the regulator provided. The
replacement regulator should be that
specified by the manufacturer.
W Use only Blue Rhino Global Sourcing, Inc.
factory-authorized parts. The use of any
part that is not factory-authorized can
be dangerous. This will also void your
warranty.
W Do NOT use this appliance without reading
“Operating Instructions” in this manual.
W Do NOT touch metal parts of this lantern
until they have completely cooled (about
45 min.) to avoid burns, unless you are
wearing protective gear (pot holders,
gloves, BBQ mittens, etc.).
W Do NOT install or use in or on boats or
recreational vehicles (RV).
W Do NOT use this lantern in a vehicle trunk,
station wagon, mini-van or sport utility
vehicle (SUV).
W When using this lantern, fire extinguishing
materials should be readily accessible.
W Do NOT use lantern in high winds.
W Never lean over this lantern when lighting.
W Do NOT use this lantern if any part has
been under water. Immediately call a
qualified service technician to inspect the
appliance and to replace any part or control
system and any gas control that has been
under water.
W Do NOT leave a lit lantern. Keep children
and pets away from lantern at all times.
W Allow this lantern to cool before storing.
W Storage of lantern indoors is permissible
only if the tank is disconnected, removed
from this lantern and properly stored
outdoors.
W Do NOT attempt to disconnect the gas
regulator from the tank or any gas fitting
while this lantern is in use.
W Disconnect cylinder when not in use.
W Always use your lantern on a hard, non-
combustable level surface. An asphalt or
blacktop surface may not be acceptable for
this purpose.
W Do NOT use directly on wooden decks and
wooden picnic tables.
W Keep all electrical cords away from a hot
lantern.
W This lantern is not intended for and should
never be used as a heater. TOXIC fumes can
accumulate and cause asphyxiation.
W After a period of storage and/or nonuse,
check for leaks, and burner obstructions.
W If lantern is not in use, the tank must
be disconnected and stored in a proper
location.
W Please use protective gloves when
assembling this product.
W Do NOT force parts together as this can
result in personal injury or damage to the
product.
W Deaths, serious injury or damage to
property may occur if the above is not
followed exactly.
Assembly Instructions
DO NOT RETURN TO PLACE OF PURCHASE.
For assistance, call 1.800.762.1142 toll-free. Please
have your Owner’s Manual and model number
available for reference.
Note: The model number can be found on the base
of the lantern.
Assembly Tips:
1. Select an area where you will assemble this
product. To protect components, choose a smooth
surface that’s free of cracks or openings.
2. Spread out all parts.
3. Tighten all connections by hand. Be careful not
to over-tighten. That could damage surfaces or
strip threads.
4. For best results, complete each step in the order
presented.
To complete assembly you will need:
• (1) Leak Detection Solution (instructions on how
to make solution are included in “Operating
Instructions” section).
• (1) 14.1 oz or (1) 16.4 oz LP gas tank.
Typical assembly is approximately 5 minutes.
1. Attach Handle
2. . Attach Mantles
Note: • Tie the mantles around grooves in burner.
• Evenly distribute folds on mantle. Cut off the
extra string.
3. Insert Globe
4. Attach Cap
5. Attach LP Gas Tank
6. Insert Into Base
Operating Instructions
This lantern is designed to operate with a one pound
7-3/8” high disposable / 16.4 oz. or 14.1 oz. propane
gas tank (DOT 39 Cylinder).
Do NOT ATTEMPT TO REFILL ANY ONE POUND
(16.4 oz. or 14.1 oz.) PROPANE GAS TANKS!
Connecting Gas Tank
1. Make sure the control knob is in the “OFF”
position (Figure 1).
2. Lubricate the threads of the regulator valve
with petroleum jelly. Insert the gas tank into the
regulator valve and hand-tighten firmly (Figure 2).
3. Insert LP gas tank into the base.
4. Test for leaks.
Disconnecting LP Gas Tank
1. Turn the control knob to the “OFF ” position
(Figure 1).
2. Rotate LP gas tank counterclockwise until it is
detached (Figure 3).
3. Store the LP gas tank in a proper location, per
instructions on the LP gas tank.
Checking for Leaks
Burner Connection
1. Make sure the control valve is securely fastened to
the burner (Figure 4).
W WARNING: Failure to inspect this connection
or follow these instructions could cause a
fire or an explosion which can cause death,
serious bodily injury, or damage to property.
2. If the burner/venturi tube does not rest flush to
the control valve, please contact 1.800.762.1142
for assistance.
English – 1 English – 2 English – 3 English – 4 English – 5
Regulator / LP Gas Tank Connection
1. Make 2-3 oz. of leak detection solution by mixing
one part liquid dishwashing soap with three parts
water.
2. Make sure control knob is “OFF” (Figure 1).
3. Spoon several drops of solution, or use squirt
bottle, at the LP gas tank to regulator connection
(Figure 4).
4. Inspect the solution at the connection, looking
for bubbles.
a. If any bubbles appear, remove the LP gas tank
and reconnect, making sure the connection
is secure.
b. If you continue to see bubbles after several
attempts, remove the LP gas tank per
“Disconnecting LP Gas Tank” section, and
contact 1.800.762.1142 for assistance.
c. If no bubbles appear after one minute, turn
control knob to the “OFF” position, wipe away
solution and proceed.
Lighting
W WARNING: Do NOT expose this lantern to
flammable vapors or liquids during lighting.
1. Make sure all labels, packaging and protective
films have been removed from this lantern.
2. Make sure there are no obstructions of airflow to
the gas unit. Spiders and insects can nest within
and clog the burner/venturi tube at the orifice.
A clogged burner tube can lead to a fire.
3. Control knobs must be in the “OFF” position
(Figure 1).
4. Attach the LP gas tank per the “Connecting LP Gas
Tank” instructions.
5. For new mantels only: wearing heat-resistant
gloves, position a long lit match or long lit butane
lighter evenly under each mantle (Figure 5).
a. Hold match/lighter next to each mantle until
nothing but white ash remains.
b. Remove match/lighter.
Note: Once the mantles has been burned, it is
very fragile. Be careful not to touch it.
6. Previously burned mantels only: Wearing heatresistant gloves, position the match/lighter near
the side of the mantles (Figure 5).
a. Turn control knob counterclockwise to “ON.”
b. Hold match/lighter next to mantle for up to 5
seconds.
c. Remove match/lighter.
d. Repeat steps b - c for other mantle.
7. If ignition does not occur in 5 seconds, turn burner
control knob “OFF,” wait 5 minutes and repeat
lighting procedure.
Note: Once the mantle has been burned, it is very
fragile. Be careful not to touch it.
W CAUTION: If burner flame goes out during
operation, immediately turn the gas “OFF”
and let the gas clear for about 5 minutes
before re-lighting.
Turning Off
1. Turn control knobs to the “OFF” position.
2. Remove the LP gas tank per the “Disconnecting
LP Gas Tank” instructions.
Transporting
While Lantern is ON
1. Carefully carry this lantern by the handle while
wearing heat-resistant gloves.
2. Do NOT touch any of this lantern surfaces as they
may be hot.
3. Before setting this lantern down, make sure the
tank is properly in the base.
English – 4 English – 5
Figure 1
Figure 2
Figure 3
Figure 4
Figure 5
Match
While Lantern is OFF and Fully Cooled
1. The LP gas tank must be removed and stored
properly.
2. Once this lantern is cooled, place this lantern and
base in a plastic bag and secure the bag with
a string.
W WARNING: Do NOT completely seal the
plastic bag.
Note: The plastic bag will help protect from insects.
Replace Mantle
1. Turn control knob to “OFF” and remove LP
gas tank.
2. Remove Cap and Globe
3. Replace Mantles
4. Attach Globe and Cap
5. Perform Leak Check
Cleaning and Care
W CAUTION: All cleaning and maintenance
should be done when lantern is cool and
with the fuel supply disconnected.
W CAUTION: Do NOT clean any lantern part in
a self-cleaning oven. The extreme heat will
damage the finish.
W CAUTION: Keep lantern clear and free from
combustible materials, gasoline, and other
flammable vapours and liquids.
W CAUTION: Do NOT obstruct the flow of
combustion and ventilation air.
Notices
1. Abrasive cleaners will damage this product.
2. Never use oven cleaner to clean any part of
lantern.
Inspecting
This lantern should be inspected on a regular basis to
ensure product safety and longer product life.
W WARNING: Do NOT attempt to inspect this
lantern unless the flames are COMPLETELY
out and unit is cool to the touch.
1. Check burner to make sure it is secure.
2. Check burner/venturi tube to make sure it is clear
and free of spider nests.
3. Check all gas connections for leaks.
4. Check components for any signs of damage or
rust.
5. If damage to any component is detected, do NOT
operate until repairs are executed.
Cleaning Surfaces
W WARNING: Do NOT attempt to clean this
lantern unless the flames are COMPLETELY
out and unit is cool to the touch.
W WARNING: Do NOT use oven cleaner or
abrasive cleaners as they will damage this
product.
1. Wipe surfaces clean with mild dishwashing
detergent or baking soda mixed with water.
2. For stained surfaces use a citrus-based degreaser
and a nylon scrubbing brush.
3. Rinse clean with water.
4. Allow to air dry.
Product Registration
For faster warranty service, register your product
immediately at BlueRhino.com/warranty or by calling
1.800.762.1142.
Replacement Parts
Replacement parts can be found at parts.BlueRhino.
com or by calling 1.800.762.1142.
Limited Warranty
Blue Rhino Global Sourcing, Inc. (“Blue Rhino”)
warrants to the original retail purchaser of this
product, and to no other person, that if this product is
assembled, maintained, and operated in accordance
with the printed instructions accompanying it, then
for a period of one (1) year from the date of purchase,
all parts in such product shall be free from defects
in material and workmanship. Blue Rhino may
require reasonable proof of your date of purchase.
Therefore, you should retain your sales slip or invoice.
This Limited Warranty shall be limited to the repair
or replacement of parts, which prove defective
under normal use and service and which Blue Rhino
shall determine in its reasonable discretion upon
examination to be defective. Before returning any
parts, you should contact Blue Rhino’s Customer
Service Department using the contact information
listed below. If Blue Rhino confi rms, after examination,
a defect covered by this Limited Warranty in any
returned part, and if Blue Rhino approves the claim,
Blue Rhino will replace such defective part without
charge. If you return defective parts, transportation
charges must be prepaid by you. Blue Rhino will return
replacement parts to the original retail purchaser,
freight or postage prepaid.
This Limited Warranty does not cover any failures or
operating diffi culties due to accident, abuse, misuse,
alteration, misapplication, improper installation or
improper maintenance or service by you or any
third party, or failure to perform normal and routine
maintenance on the product as set out in this owner’s
manual. In addition, the Limited Warranty does not
cover damage to the fi nish, such as scratches, dents,
discoloration, rust or other weather damage, after
purchase.
This Limited Warranty is in lieu of all other express
warranties. Blue Rhino disclaims all warranties for
products that are purchased from sellers other than
authorized retailers or distributors, including the
warranty of merchantability or the warranty of fi tness
for a particular purpose. BLUE RHINO ALSO DISCLAIMS
ANY AND ALL IMPLIED WARRANTIES, INCLUDING
WITHOUT LIMITATION THE IMPLIED WARRANTIES OF
MERCHANTABILITY AND FITNESS FOR A PARTICULAR
PURPOSE. BLUE RHINO SHALL HAVE NO LIABILITY TO
PURCHASER OR ANY THIRD PARTY FOR ANY SPECIAL,
INDIRECT, PUNITIVE, INCIDENTAL, OR CONSEQUENTIAL
DAMAGES. Blue Rhino further disclaims any implied
or express warranty of, and assumes no responsibility
for, defects in workmanship caused by third parties.
This Limited Warranty gives the purchaser specifi c
legal rights; a purchaser may have other rights
depending upon where he or she lives. Some
jurisdictions do not allow the exclusion or limitation
of special, incidental or consequential damages, or
limitations on how long a warranty lasts, so the above
exclusion and limitations may not apply to everyone.
Blue Rhino does not authorize any person or company
to assume for it any other obligation or liability in
connection with the sale, installation, use, removal,
return, or replacement of its equipment, and no such
representations are binding on Blue Rhino.
Blue Rhino Global Sourcing, Inc.
Winston-Salem, North Carolina 27105 USA
1.800.762.1142
Troubleshooting
Please visit BlueRhino.com or call 1.800.762.1142.
 Loading...