

Blue Rhino GBC956W1NG-C User Manual
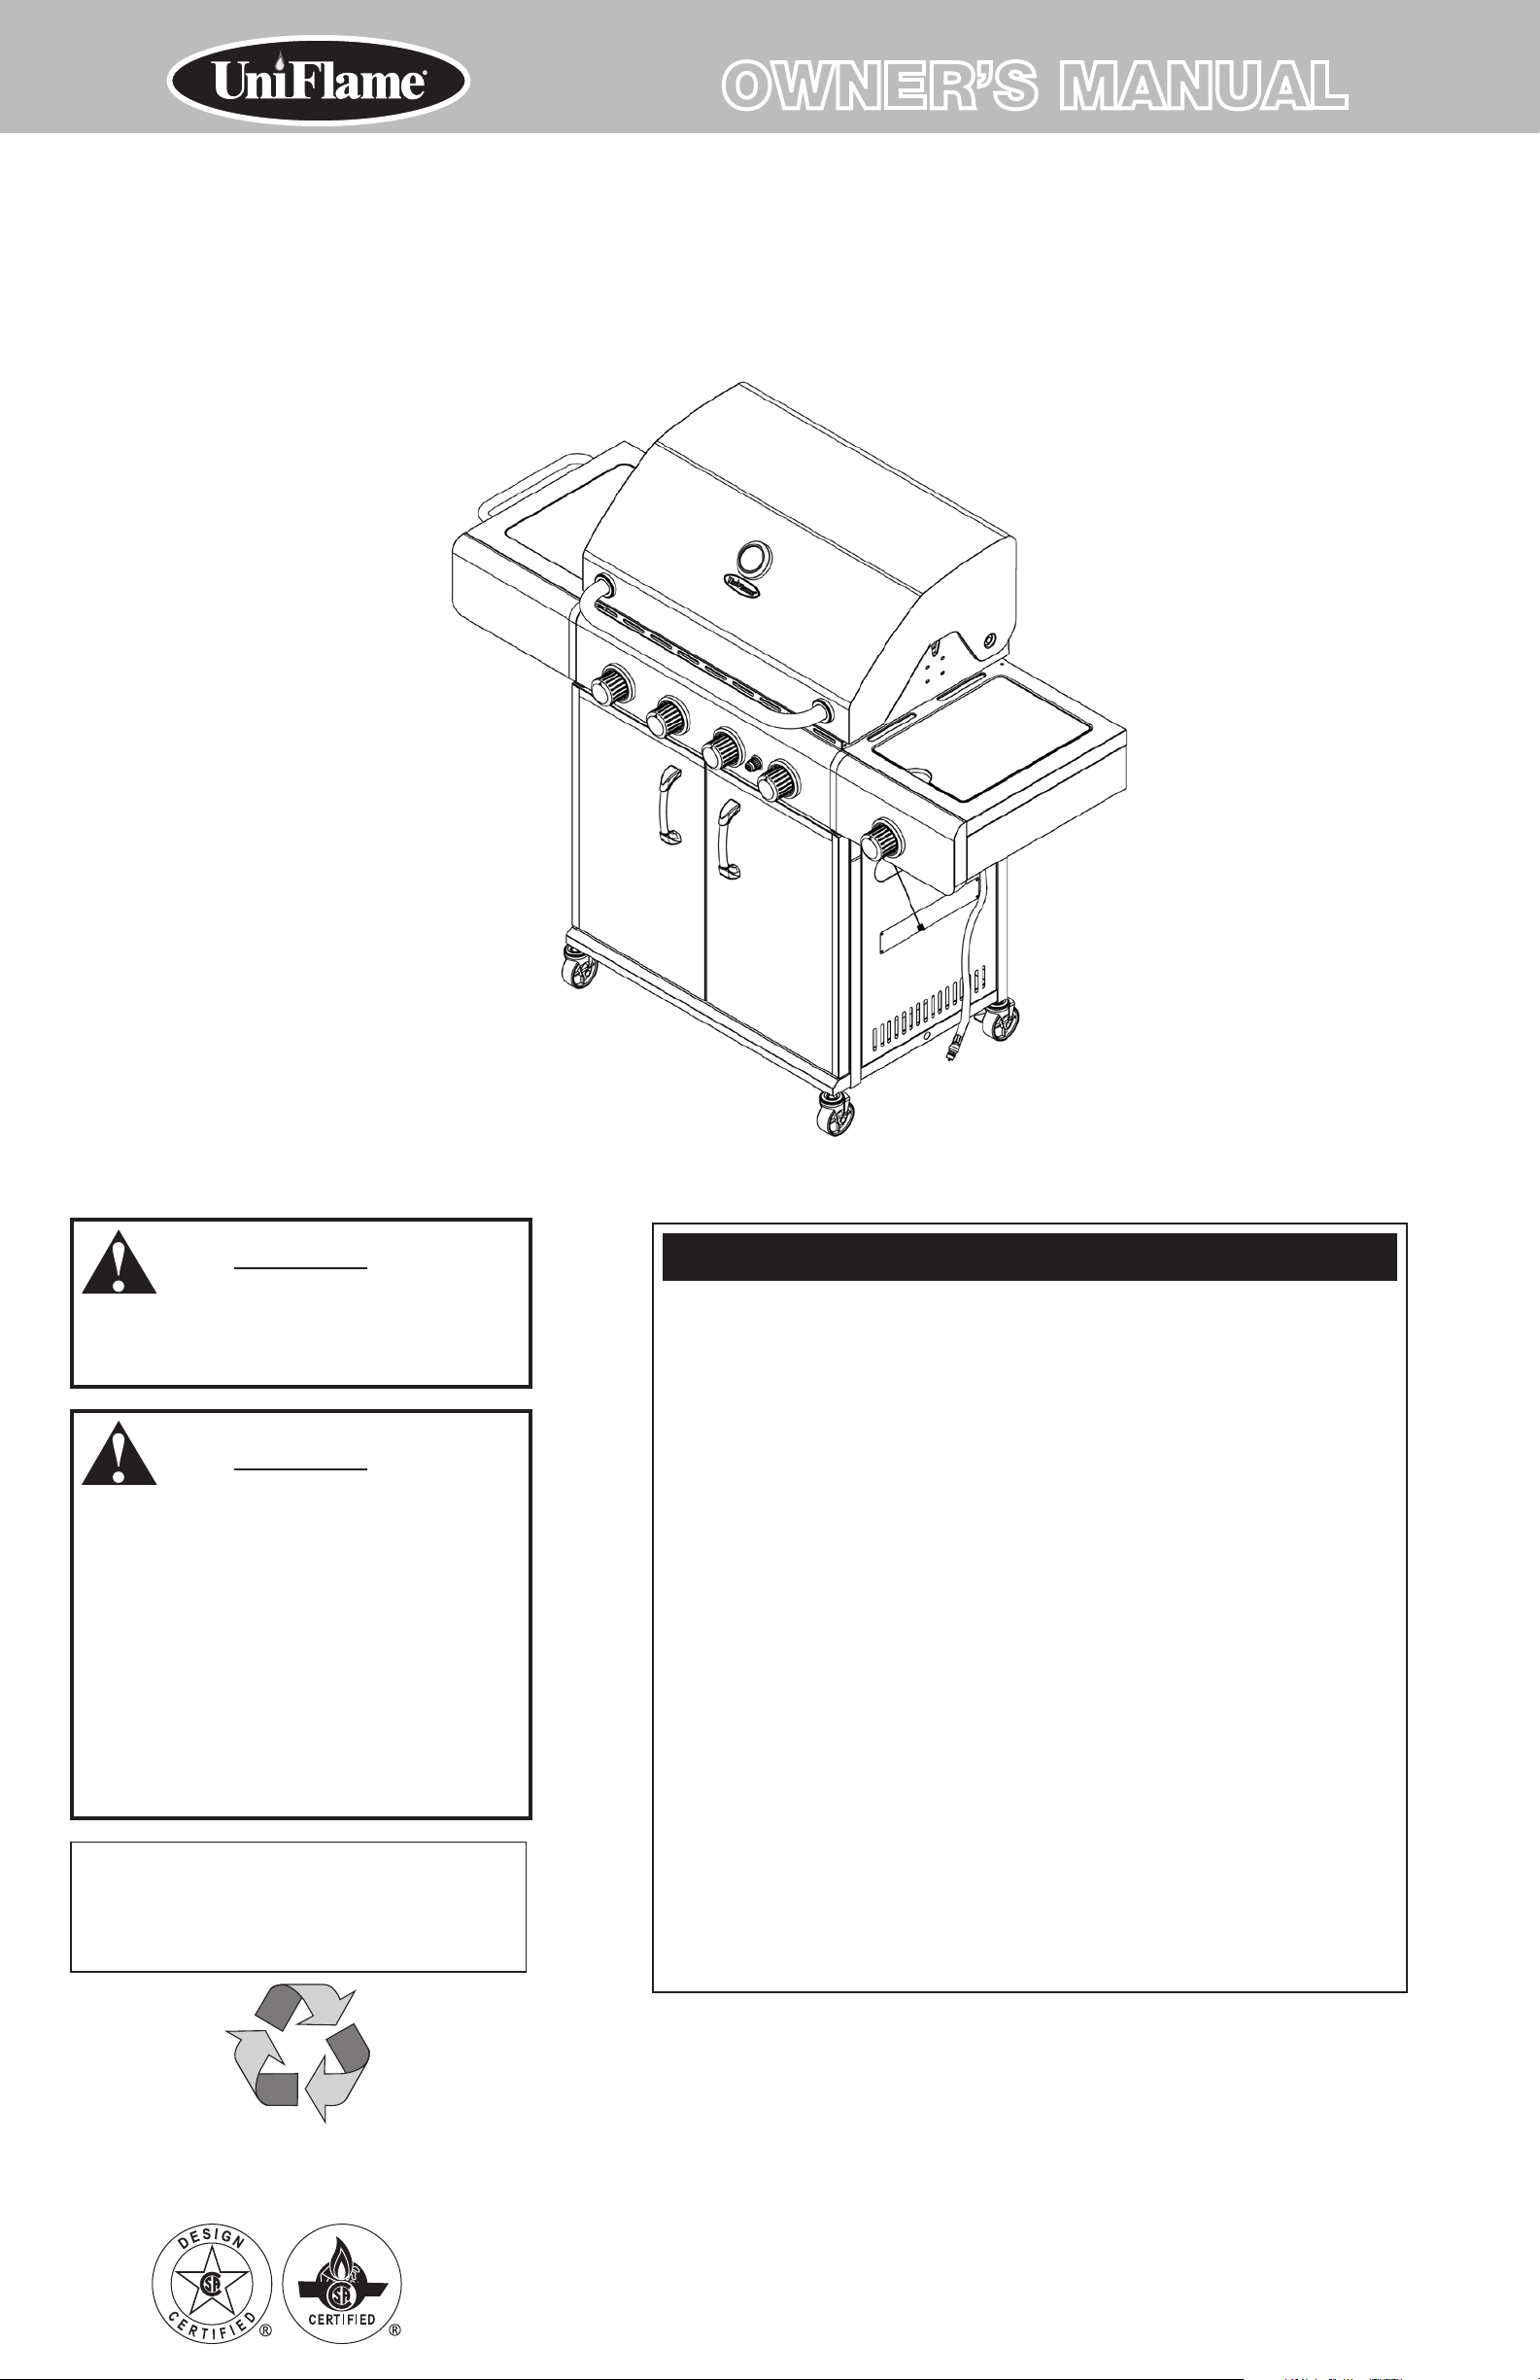
OWNER’S MANUAL
Made from 70% Bagasse
(Environmentally Friendly Sugar
Cane Pulp By-product)
Outdoor Natural Gas Barbecue Grill
Model No. GBC956W1NG-C
WARNING
FOR YOUR SAFETY:
For Outdoor Use Only
(outside any enclosure)
WARNING
FOR YOUR SAFETY:
1. Improper installation, adjustment, alteration,
service or maintenance can cause injury or
property damage.
2. Read the installation, operation, and
maintenance instructions thoroughly before
installing or servicing this equipment.
3. Failure to follow these instructions could
result in fire or explosion, which could cause
property damage, personal injury, or death.
Table of Contents
Important Safeguards . . . . . . . . . . . . . . . . . . . . . . . . . . . . . . . . . . . . . . . . . . . Page 2
Exploded View & Hardware. . . . . . . . . . . . . . . . . . . . . . . . . . . . . . . . . . . . . . . . . . . 3
Assembly Instructions. . . . . . . . . . . . . . . . . . . . . . . . . . . . . . . . . . . . . . . . . . . . . . . 4
Connecting to Natural Gas Line. . . . . . . . . . . . . . . . . . . . . . . . . . . . . . . . . . . . . . . . 9
Operating Instructions. . . . . . . . . . . . . . . . . . . . . . . . . . . . . . . . . . . . . . . . . . . . . . . 9
Checking for Leaks . . . . . . . . . . . . . . . . . . . . . . . . . . . . . . . . . . . . . . . . . . . . . . . 9
Operating Main Burners . . . . . . . . . . . . . . . . . . . . . . . . . . . . . . . . . . . . . . . . . . 10
Operating Side Burner. . . . . . . . . . . . . . . . . . . . . . . . . . . . . . . . . . . . . . . . . . . . 10
Cleaning and Care . . . . . . . . . . . . . . . . . . . . . . . . . . . . . . . . . . . . . . . . . . . . . . . . 10
Product Registration . . . . . . . . . . . . . . . . . . . . . . . . . . . . . . . . . . . . . . . . . . . . . . . 11
Limited Warranty . . . . . . . . . . . . . . . . . . . . . . . . . . . . . . . . . . . . . . . . . . . . . . . . . 11
Troubleshooting . . . . . . . . . . . . . . . . . . . . . . . . . . . . . . . . . . . . . . . . . . . . . . . . . . 12
Save these instructions for future reference.
If you are assembling this unit for someone else,
give this manual to him or her to read and save
for future reference.
The use and installation of this product must conform to local codes. In absence
of local codes, use the National Fuel Gas Code, ANSI Z223.1/NFPA 54, Natural Gas
and Propane Installation Code, CSA B149.1, or Propane Storage and Handling Code,
B149.2.
Prior to installation, contact your municipality for local building codes and your local
fire department for installation verification.
Manufactured in China for:
Blue Rhino Global Sourcing, Inc
Winston-Salem, NC USA
1.800.762.1142, www.bluerhino.com
© 2008 Blue Rhino Global Sourcing, Inc. All Rights Reserved
UniFlame® is a Registered Trademark of Blue Rhino Global Sourcing, Inc.. All Rights Reserved. GBC956W1NG-C-OM-102 EF

Outdoor Natural Gas Barbecue Grill Model No. GBC956W1NG-C
DANGER
If you smell gas -
1. Shut off gas to appliance.
2. Extinguish any open flame.
3. Open lid.
4. If odor continues, keep away from the appliance and immediately
call your gas supplier or your fire department.
DANGER: Failure to follow the dangers, warning and cautions in this manual may result in serious bodily injury or death, or in a fire or an explosion
causing damage to property.
WARNING:
This grill is for outdoor use only, and shall not be used in a building,
garage, or any other enclosed area.
Do NOT operate, light or use this appliance within 8 feet of walls,
structures or buildings.
This grill is NOT for commercial use.
This grill is for use with Natural Gas (NG) gas only. The conversion to or
attempted use of liquid propane gas (LP) in this NG gas grill is dangerous
and will void your warranty.
NG Characteristics:
a. NG is flammable and hazardous if handled improperly. Become aware
of the characteristics before using any NG product.
b. NG is explosive under pressure, heavier than air, and settles and pools
in low areas.
c. NG in its natural state has no odor. For your safety, an odorant is
added that smells like rotten cabbage.
d. Contact with NG can cause freeze burns to skin.
e. A fire causing, serious injury or damage to property may occur if the
above is not followed exactly.
Never attempt to attach this grill to the NG system of a camper trailer, or
motor home.
Do not store a spare LP gas tank under or near this appliance.
A fire causing, serious injury or damage to property may occur if the
above is not followed exactly.
The use of alcohol, or prescription or non-prescription drugs may
impair the consumer’s ability to properly assemble or safely operate the
appliance.
Never use LP gas, charcoal, lighter fluid, lava rocks, gasoline, kerosene,
or alcohol with this product.
Your grill has been checked at all factory connections for leaks.
Recheck all connections as described in the “Operating Instructions”
section of the manual, as movement in shipping can loosen connections.
Check for leaks even if your unit was assembled for you by someone
else.
Do not operate if gas leak is present. Gas leaks may cause a fire or
explosion.
You must follow all leak-checking procedures before operating. To
prevent fire or explosion hazard when testing for a leak:
a. Always perform leak test before lighting the grill and each time the
natural gas line is connected for use.
b. No smoking. Do not use or permit sources of ignition in the area
while conducting a leak test.
c. Conduct the leak test outdoors in a well-ventilated area.
d. Do not use matches, lighters, or a flame to check for leaks.
e. Do not use grill until any and all leaks are corrected.
If you are unable to stop a leak, disconnect the NG supply. Call a gas
appliance serviceman or your local NG supplier.
Do not store or use gasoline or other flammable liquids or vapors within
25 feet (7.62 m) of this appliance.
Do not use in an explosive atmosphere. Keep grill area clear and free
from combustible materials, gasoline and other flammable vapors and
liquids.
The appliance and its individual shutoff valve must be disconnected
from the gas supply piping system during any pressure testing of that
system at a pressures in excess of 1/2 psig (3.5 kpa).
The appliance must be isolated from the gas supply piping system by
closing its individual manual shutoff valve during any pressure testing of
the gas supply piping system at test pressures equal to or less than 1/2
psig (3.5 kpa).
Always perform a leak test on gas connections whenever this grill
is serviced. Never use a flame to test for leaks. Do not smoke while
performing leak check.
Minimum clearance from sides and back of unit to combustible
construction, 36 inches from side and 36 inches from back. Do not use
this appliance under overhead combustible surfaces.
It is essential to keep the grill’s valve compartment, burners, and
circulating air passages clean. Inspect grill before each use.
Do not alter grill in any manner. Any altering will void your warranty.
Do not use the grill unless it is COMPLETELY assembled and all parts are
securely fastened and tightened.
Do not store or use gasoline or other flammable liquids or vapors in the
vincinity of this or any other appliance.
This grill should be thoroughly cleaned and inspected on a regular basis.
Clean and inspect the hose before each use of the appliance. If there
is evidence of abrasion, wear, cuts, or leaks, the hose must be replaced
prior to the appliance being put into operation.
Use only the hose assembly provided. The replacement hose assembly
shall be that specified by the manufacturer.
Use only Blue Rhino Global Sourcing, Inc. factory authorized parts. The
use of any part that is not factory authorized can be dangerous. This will
also void your warranty.
Do not use this appliance without reading “Operating Instructions” in
this manual.
Do not touch metal parts of grill until it has completely cooled (about
45 min.) to avoid burns, unless you are wearing protective gear (pot
holders, gloves, BBQ mittens, etc.).
When cooking, fire extinguishing materials shall be readily accessible.
In the event of an oil grease fire, do not attempt to extinguish with water.
Use type BC dry chemical fire extinguisher or smother with dirt, sand or
baking soda.
Do not install or use in or on boats or recreational vehicles.
Do not use grill in high winds.
Never lean over the grill when lighting.
Do not leave a lit grill unattended, especially keep children and pets
away from grill at all times.
Do not attempt to move grill when in use. Allow the grill to cool before
moving or storing.
Storage of grill indoors is permissible only if the natural gas line is
disconnected.
Always open grill lid carefully and slowly as heat and steam trapped
within grill can severely burn you.
Do not attempt to disconnect the gas regulator from the natural gas line
or any gas fitting while the grill is in use.
Always place your grill on a hard non-combustible, level surface. An
asphalt or blacktop surface may not be acceptable for this purpose.
Move gas hoses as far away as possible from hot surfaces and dripping
hot grease.
Keep all electrical cords away from a hot grill.
Do not use grill for indoor cooking or heating. TOXIC fumes can
accumulate and cause asphyxiation.
After a period of storage and/or nonuse, check for leaks, burner
obstructions and inspect for any abrasion, wear, cuts to the hose.
Failure to open lid while igniting the grill’s burners, or not waiting 5
minutes to allow the gas to clear if the grill does not light, may result in
an explosive flame-up.
If grill is not in use, the gas must be turned off at the natrual gas line
valve.
Never operate grill without heat plates installed.
Always use a meat thermometer to ensure food is cooked to a safe
temperature.
Please use protective gloves when assembling this product.
Do not force parts together as this can result in personal injury or
damage to the product.
Never cover entire cooking area with aluminum foil.
Deaths, serious injury or damage to property may occur if the above is
not followed exactly.
WARNING
FOR YOUR SAFETY
Contact 1.800.762.1142 for assistance. Do not return to place of purchase.
page no.
3
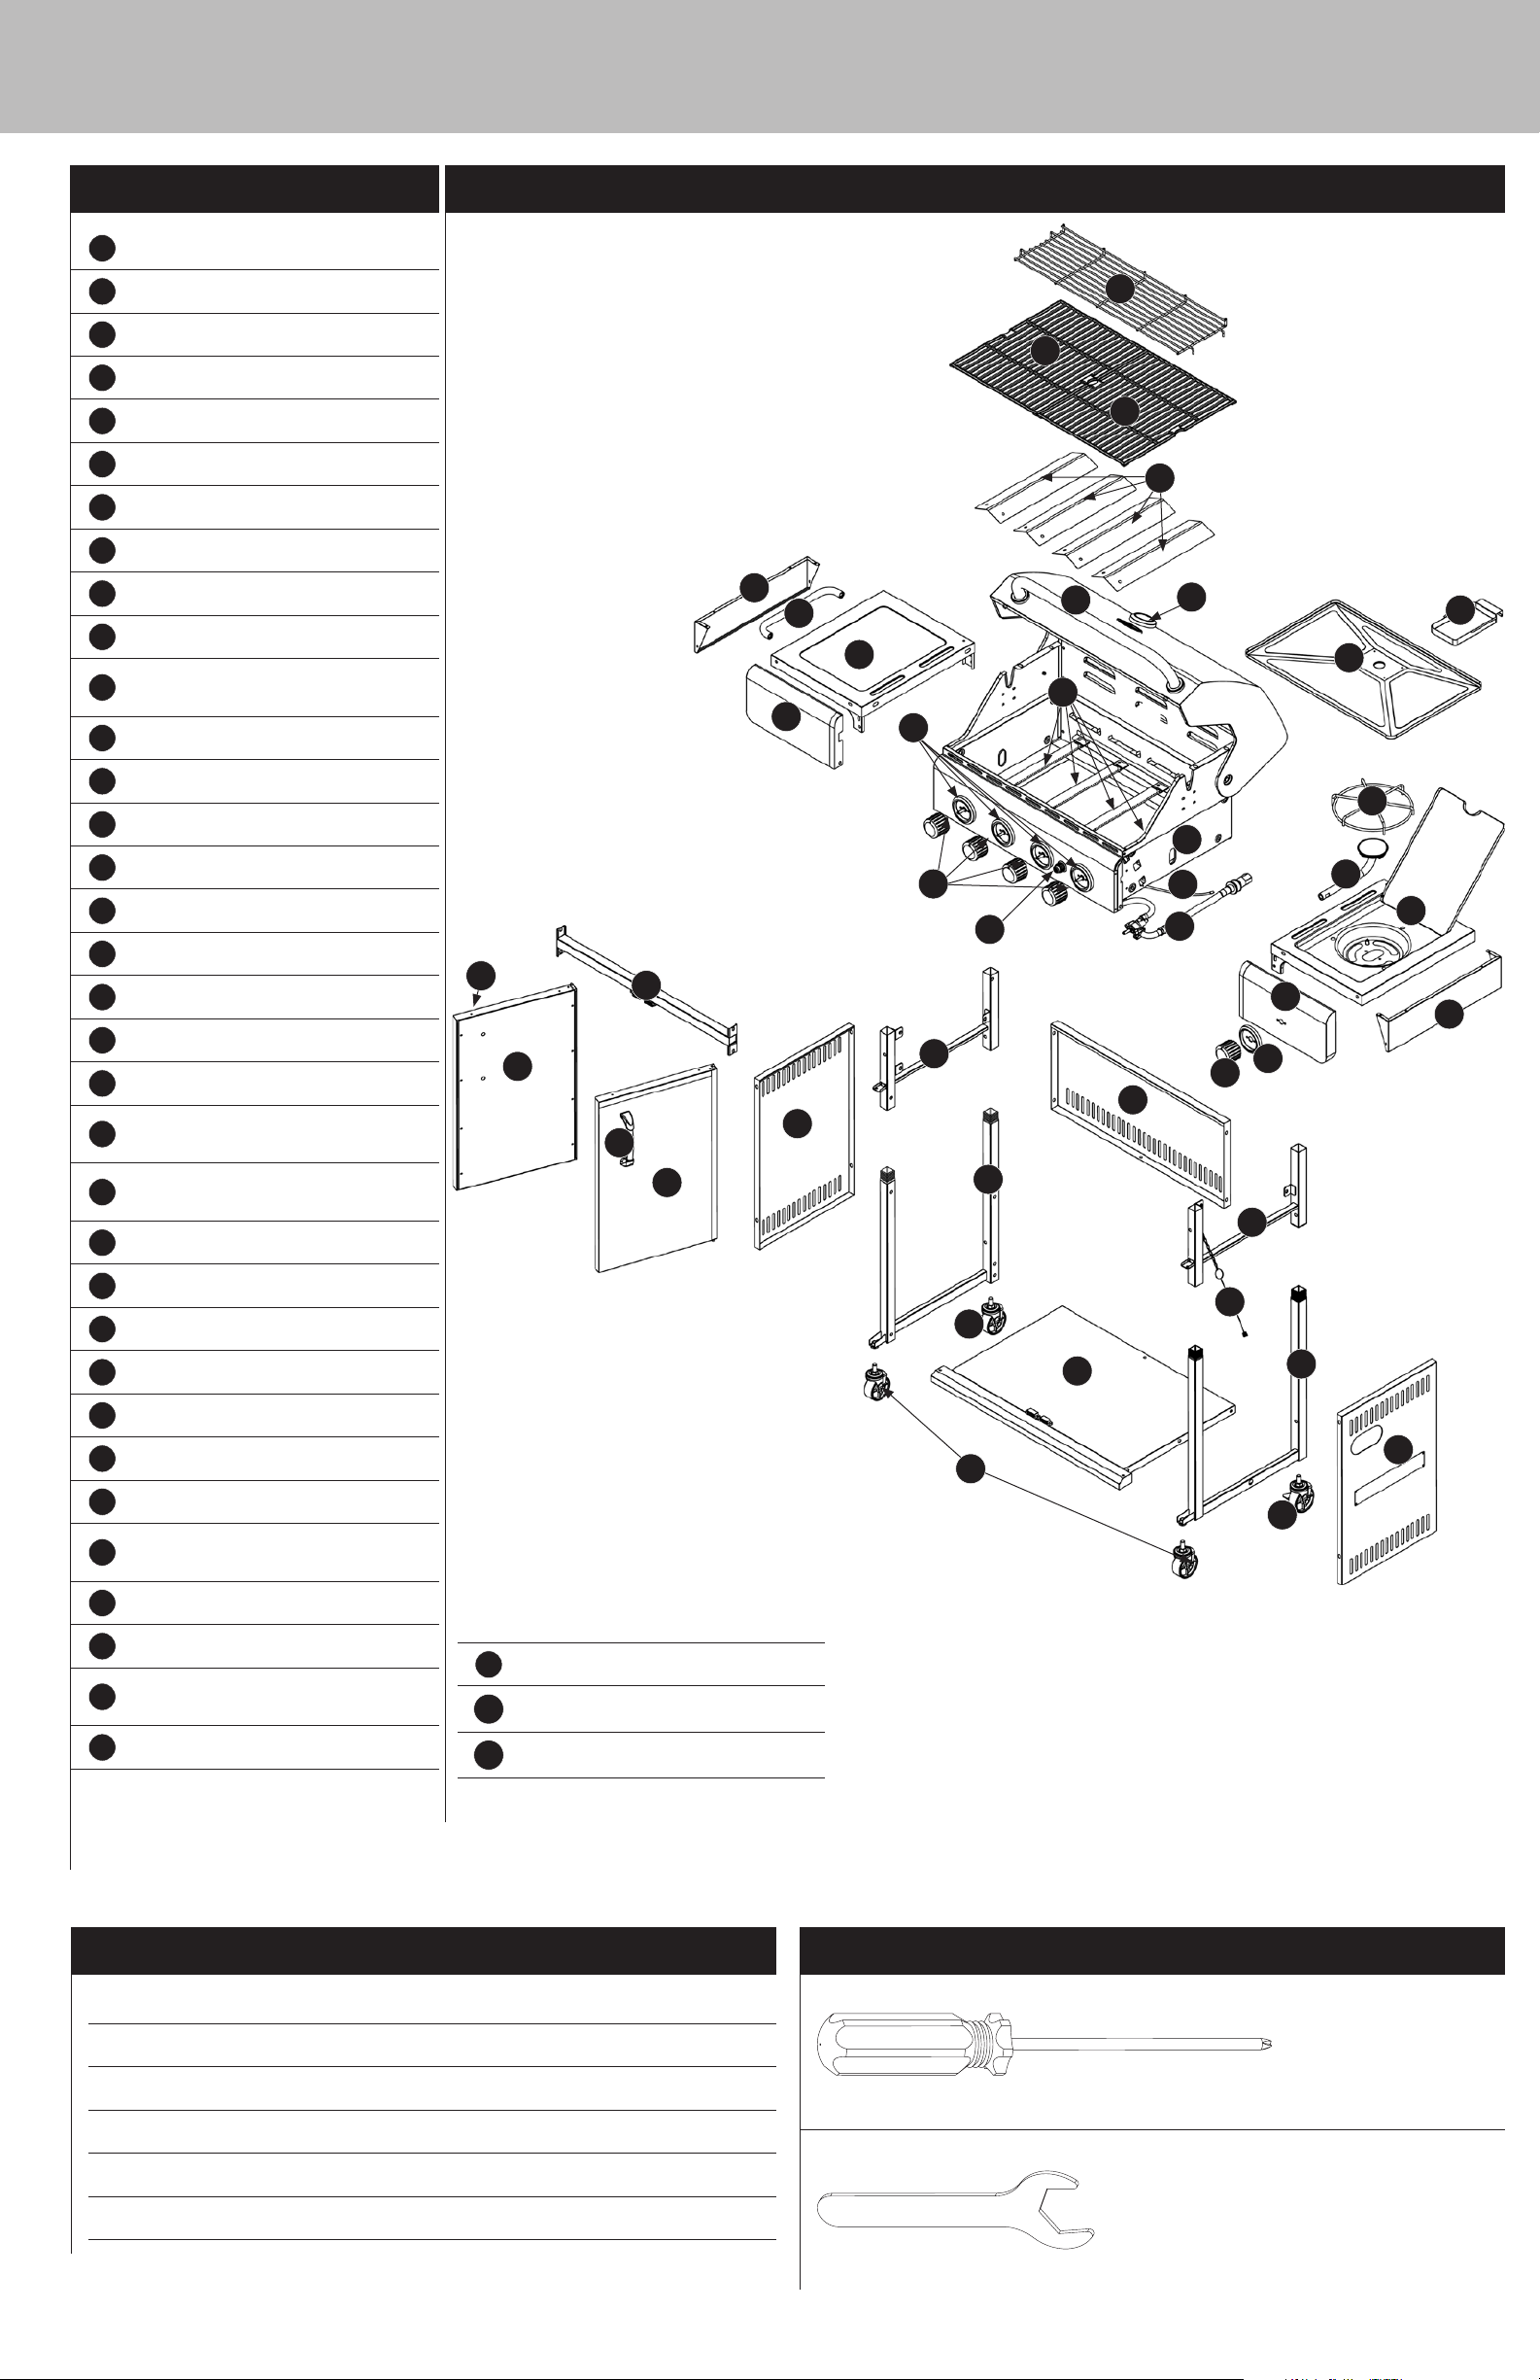
Parts List
1
Warming Rack
2
Cooking Grid (2)
3
Heat Plate (4)
4
Side Shelf Side Panel (2)
5
Towel Bar
6
Lid Handle*
7
Temperature Gauge*
8
Grease Tray
9
Grease Tray Cup
10
Left Side Shelf
Left Side Shelf Front
11
Panel
12
Main Burner (4)*
55-09-043
55-09-258
55-09-018
55-09-281
55-09-042
55-09-024
55-09-282
55-09-014
55-09-015
55-09-267
55-09-268
55-09-026
Exploded View
1
2
2
3
4
5
6
10
7
9
8
12
11
17
13
Grill Body Assembly*
14
Side Burner Grid
15
Right Side Shelf
16
Side Burner
17
Control Knob Bezel (5)
18
Control Knob (5)
19
Igniter Button*
20
Igniter Wire*
Regulator/Hose
21
Assembly*
Right Side Shelf Front
22
Panel
23
Top Cart Frame Support
24
Left Upper Cart Support
25
Rear Cart Frame Panel
55-09-041
55-09-276
55-08-110
55-09-006
55-09-007
55-07-448
55-09-263
55-08-212
55-09-277
55-09-283
55-09-269
55-09-256
27
26
27
23
28
29
18
24
34
19
30
25
20
21
13
18
32
14
16
15
22
4
17
31
26
Left Door
27
Door Handle (2)*
28
Right Door
29
Left Cart Frame Panel
Left Lower Cart Frame
30
Support
31
Right Upper Cart Support
32
Lighting Rod
Right Lower Cart Frame
33
Support
34
Locking Wheel (2)
55-09-265
55-09-259
55-09-273
55-09-264
55-09-266
55-09-278
55-07-520
55-09-274
55-07-528
35
Bottom Cart Frame Panel
Right Cart Frame Panel
36
Front Wheel (2)
37
* Pre-assembled
55-09-368
55-09-375
55-07-506
37
35
33
36
34
Hardware
A
B
C
D
E
F
Screw
Screw
Screw
Washer
Lock Washer
AA Battery 1 pc
M4x8 Nickel Plated Phillips Truss Head
M6x15 Nickel Plated Phillips Truss Head
M6x20 Nickel Plated Phillips Truss Head
ø6.5 Aluminium
ø6.5 Nickel Plated
14 pcs
37 pcs
4 pcs
8 pcs
4 pcs
Tools Required for Assembly (Included)
#2 Phillips Head Screwdriver 1 pc
M10 Wrench 1 pc
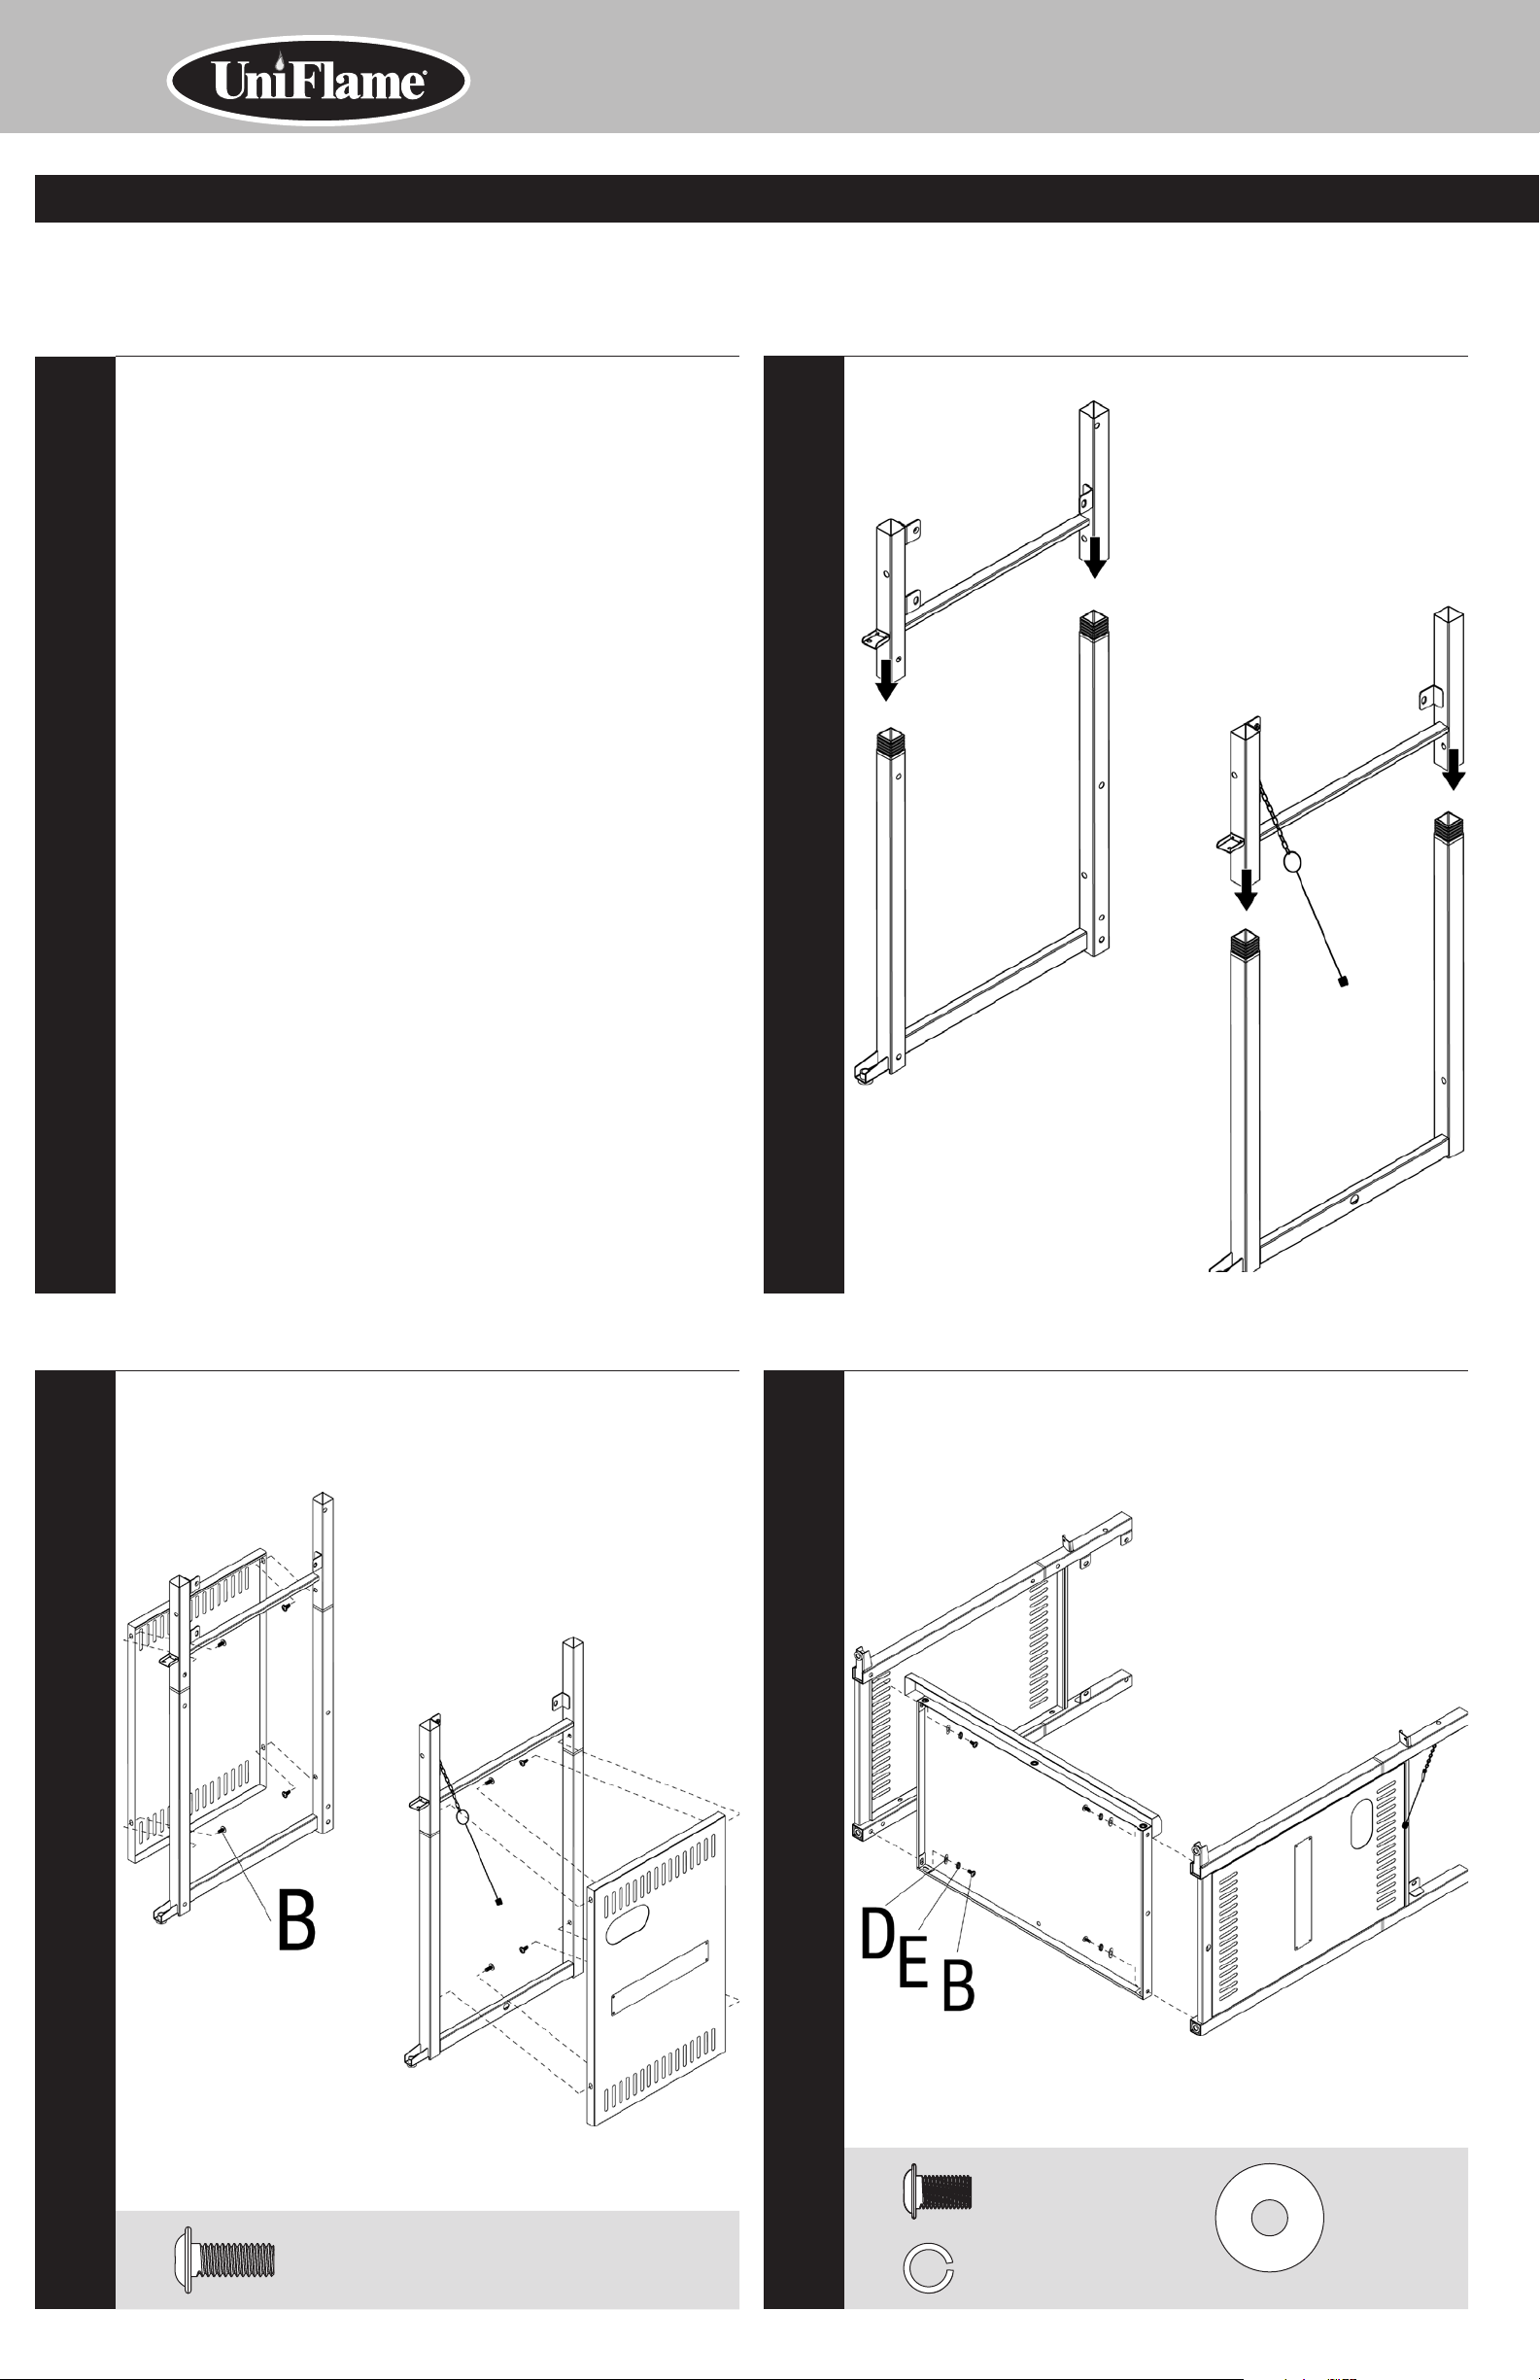
Assembly Instructions
Outdoor Natural Gas Barbecue Grill Model No. GBC956W1NG-C
1
DO NOT RETURN PRODUCT TO STORE.
For assistance call 1.800.762.1142 toll free. Please have
your owner’s manual and serial number available for
reference.
Note: The serial number can be found on the back of the cart
assembly.
For Easiest Assembly:
• To avoid losing any small components or hardware, assemble
your product on a hard level surface that does not have cracks
or openings.
• Clear an area large enough to layout all components and
hardware.
• When applicable, tighten all hardware connections by hand
first. Once the step is completed go back and fully tighten all
hardware.
• Follow all steps in order to properly assemble your product.
To complete assembly you will need:
• (1) Leak Detection Solution (Instructions on how to make
solution are included in the “Operating Instructions” section of
this manual)
Note: You must follow all steps to properly assemble the grill.
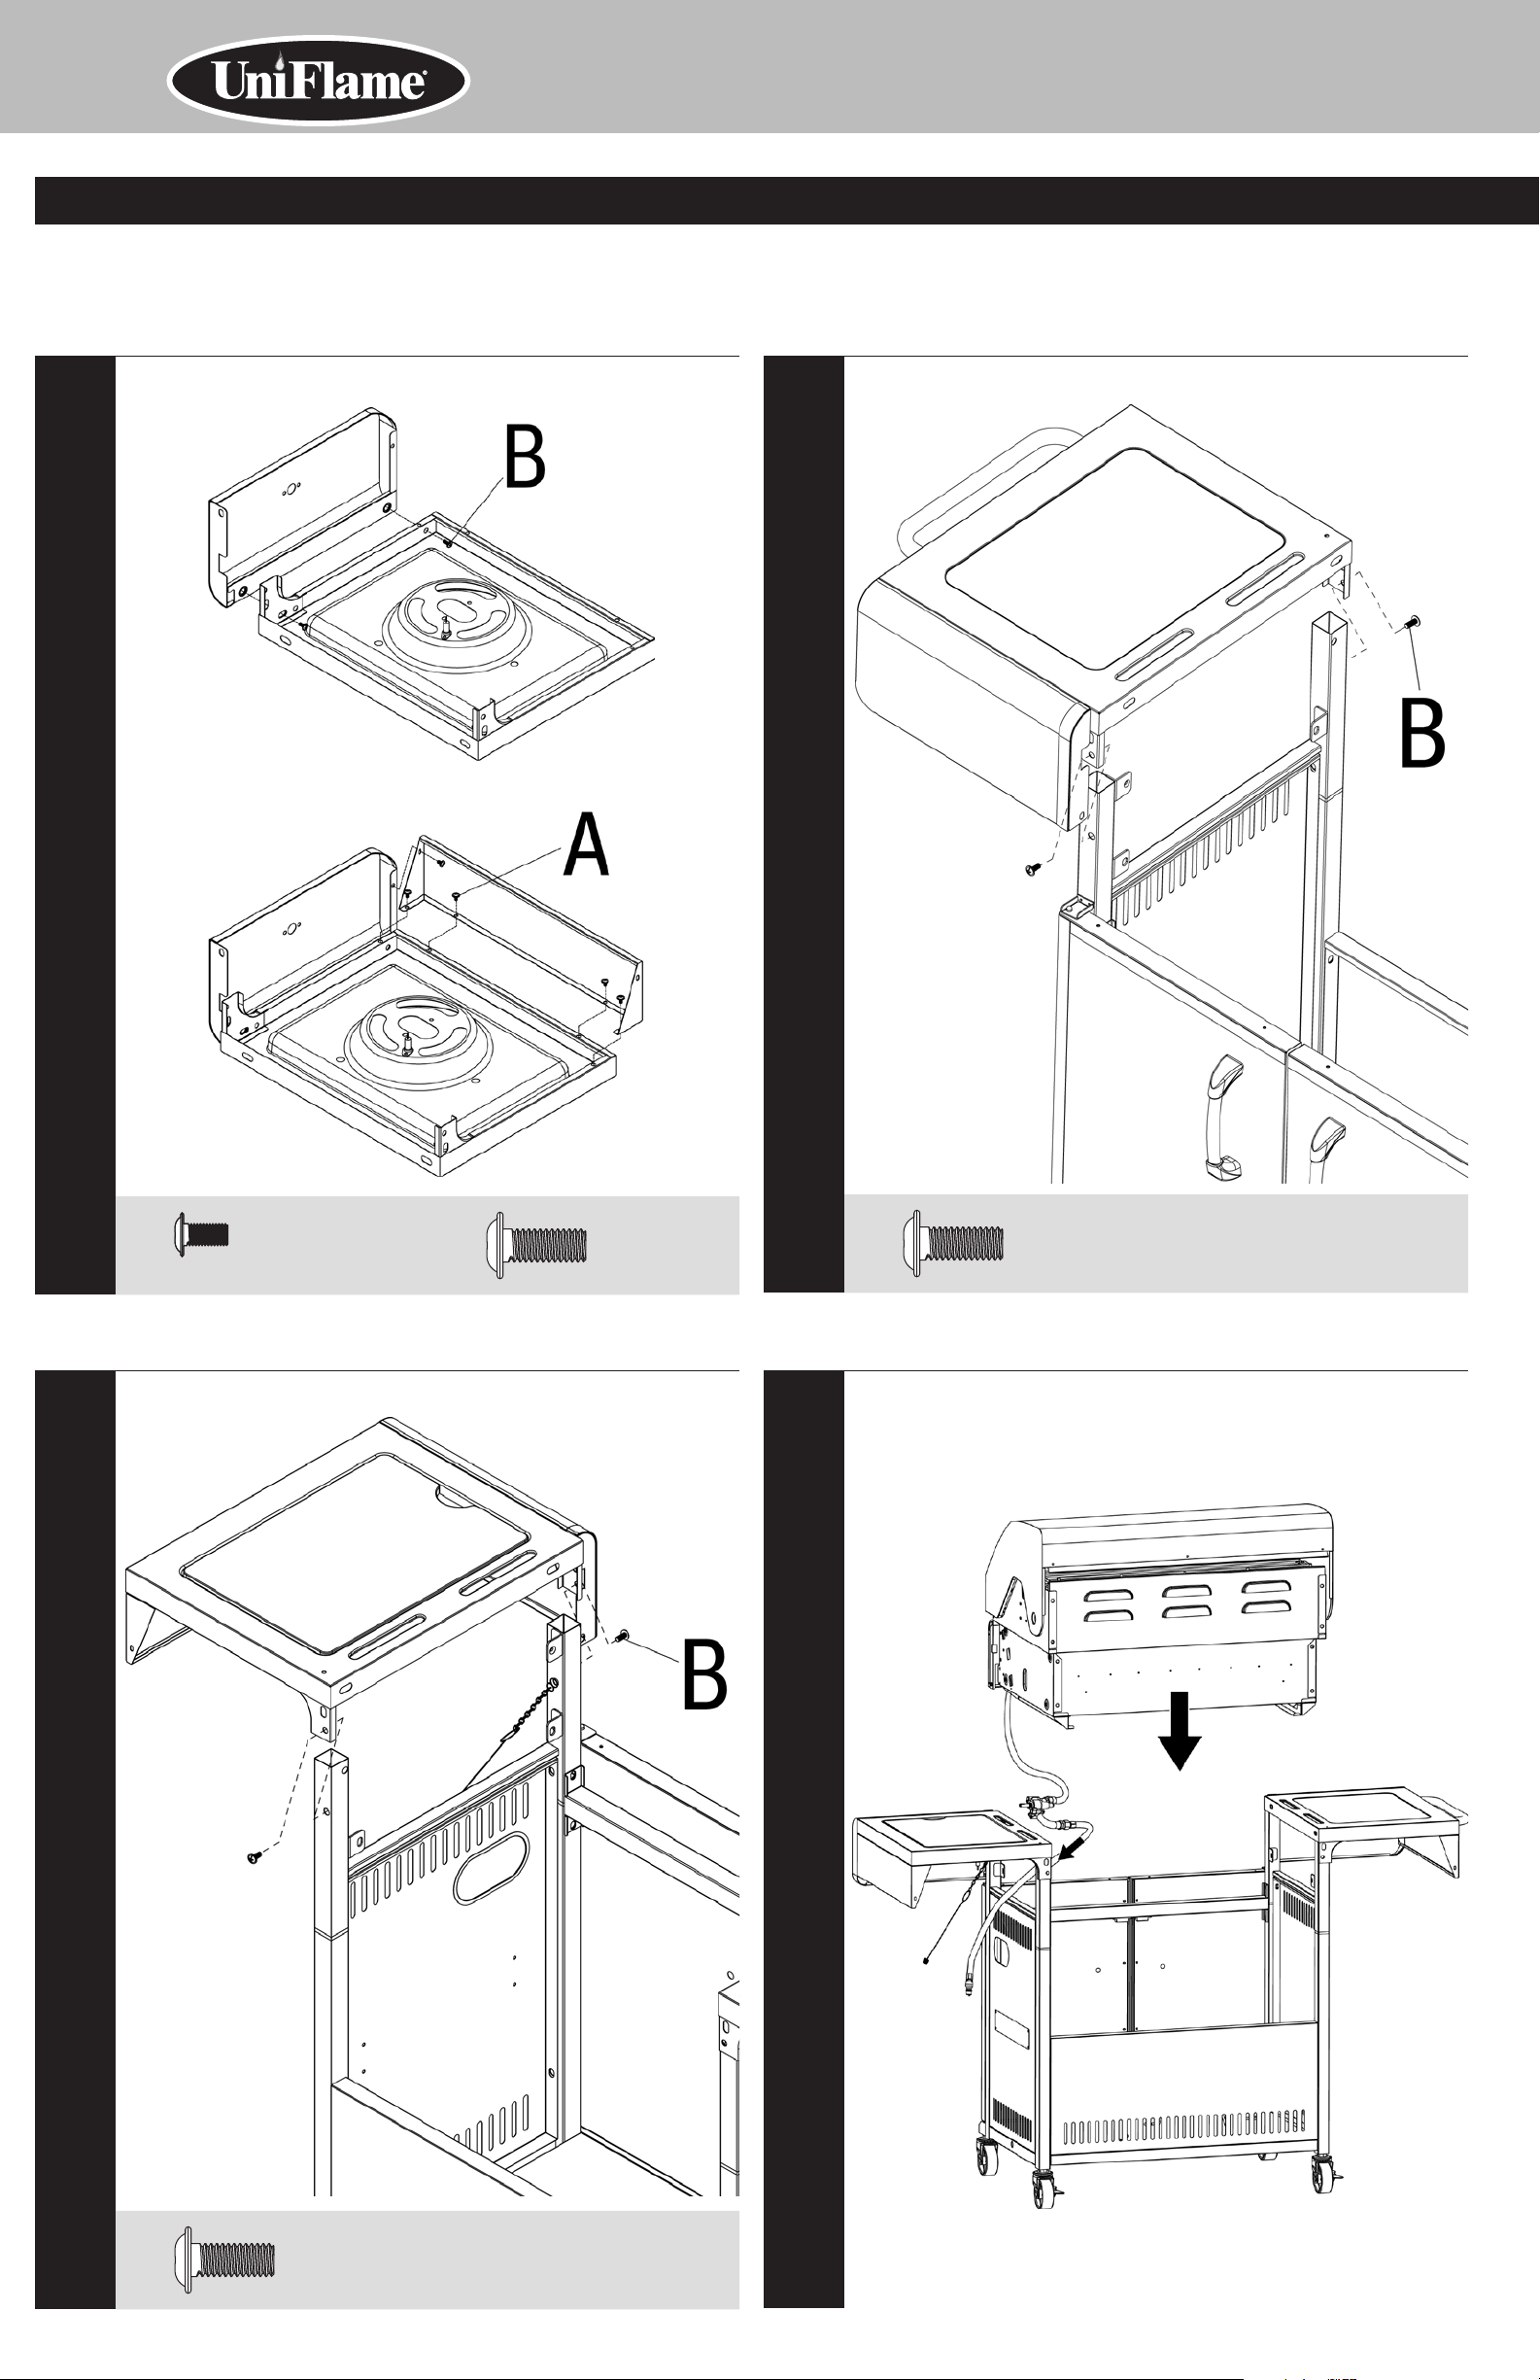
Attach Cart Frame Supports
2
3
Typical assembly: approximately 1 (one) hour.
Attach Side Cart Frame Panels
Attach Bottom Cart Frame Panel
4
B
x 8
B
E
x 4
x 4
D
x 4
Contact 1.800.762.1142 for assistance. Do not return to place of purchase.
page no.
5
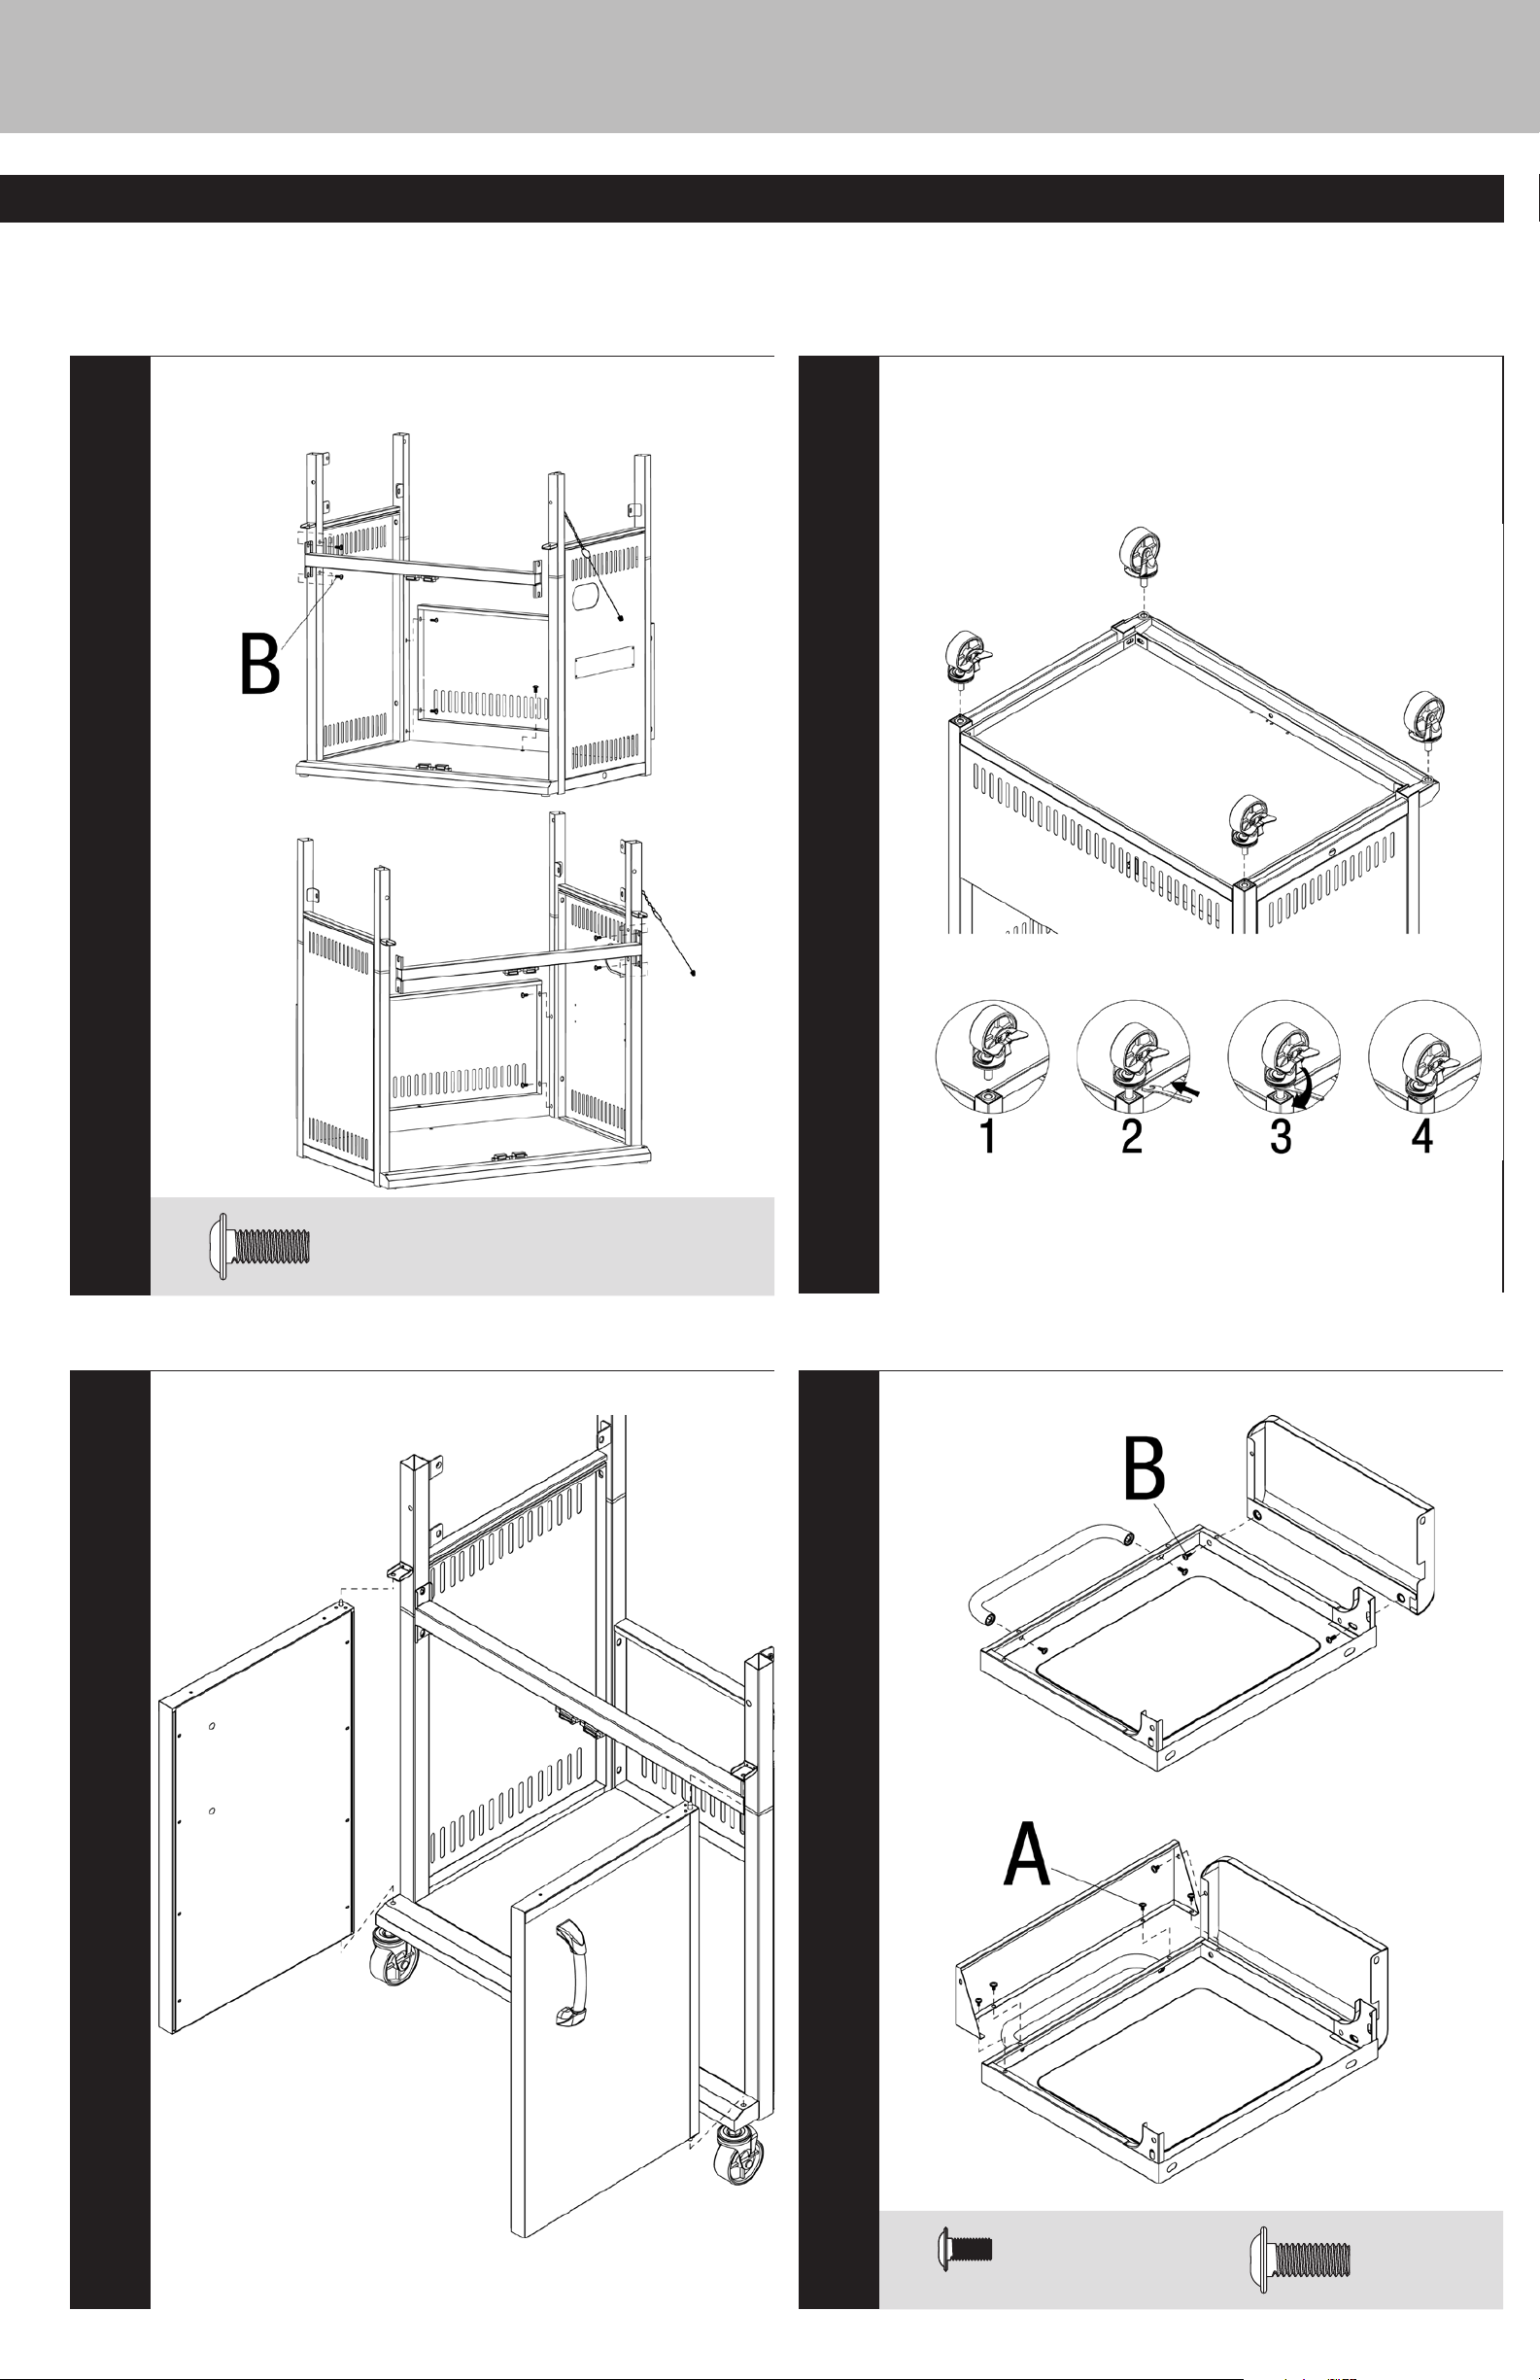
5
Attach Cart Frame Support Wire, Rear Cart Frame Panel,
Top Cart Frame Support
Attach Wheels
6
7
B
Attach Doors
x 9
Assemble Left Side Shelf
8
A
x 5
B
x 4
Assembly Instructions (continued)
Outdoor Natural Gas Barbecue Grill Model No. GBC956W1NG-C
9
Assemble Right Side Shelf
Attach Left Side Shelf
10
A
Attach Right Side Shelf
11
x 5
B
x 2
B
Insert Grill Body Assembly
12
x 2
B
x 2
Contact 1.800.762.1142 for assistance. Do not return to place of purchase.
page no.
7
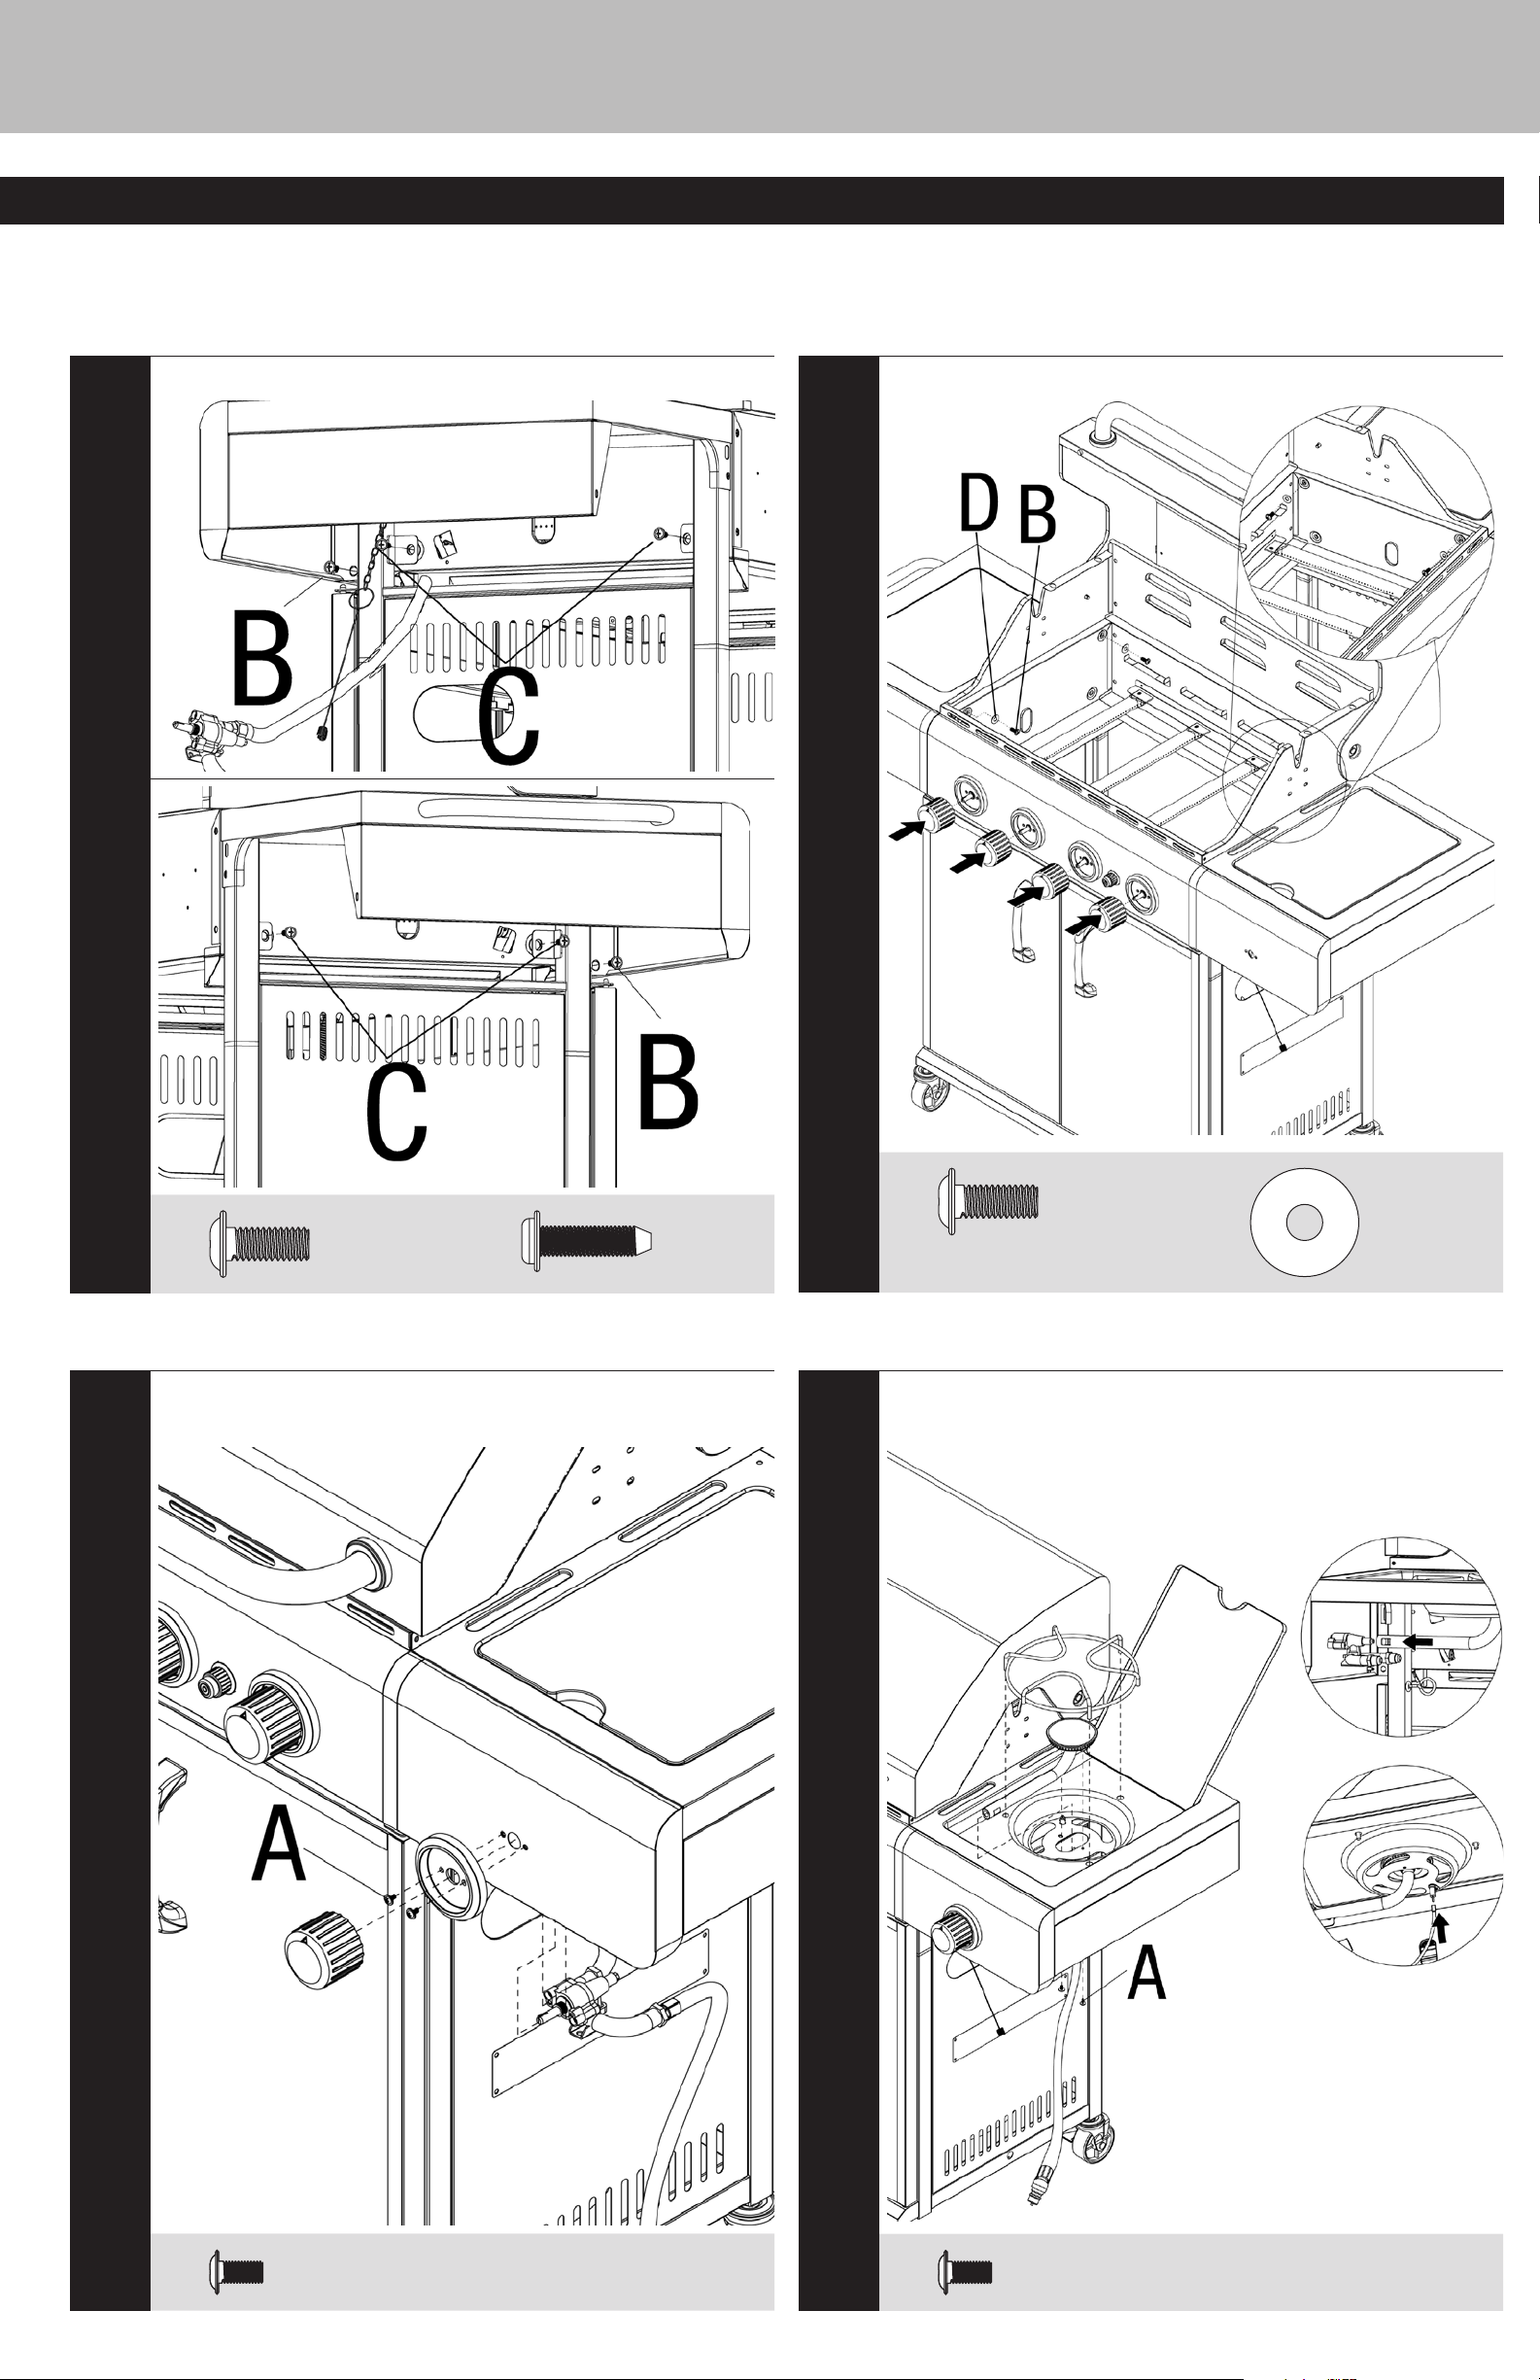
Secure Side Shelves
13
Secure Grill Body and Attach Control Knobs
14
B
Attach Regulator/Hose Assembly, Side Burner Control
Knob Bezel and Side Burner Control Knob
15
x 2
C
x 4
B
Secure Side Burner, Attach Igniter Wire and Insert Side
Burner Grid
16
x 4
D
x 4
A
x 2
A
x 2
Assembly Instructions (continued)
Outdoor Natural Gas Barbecue Grill Model No. GBC956W1NG-C
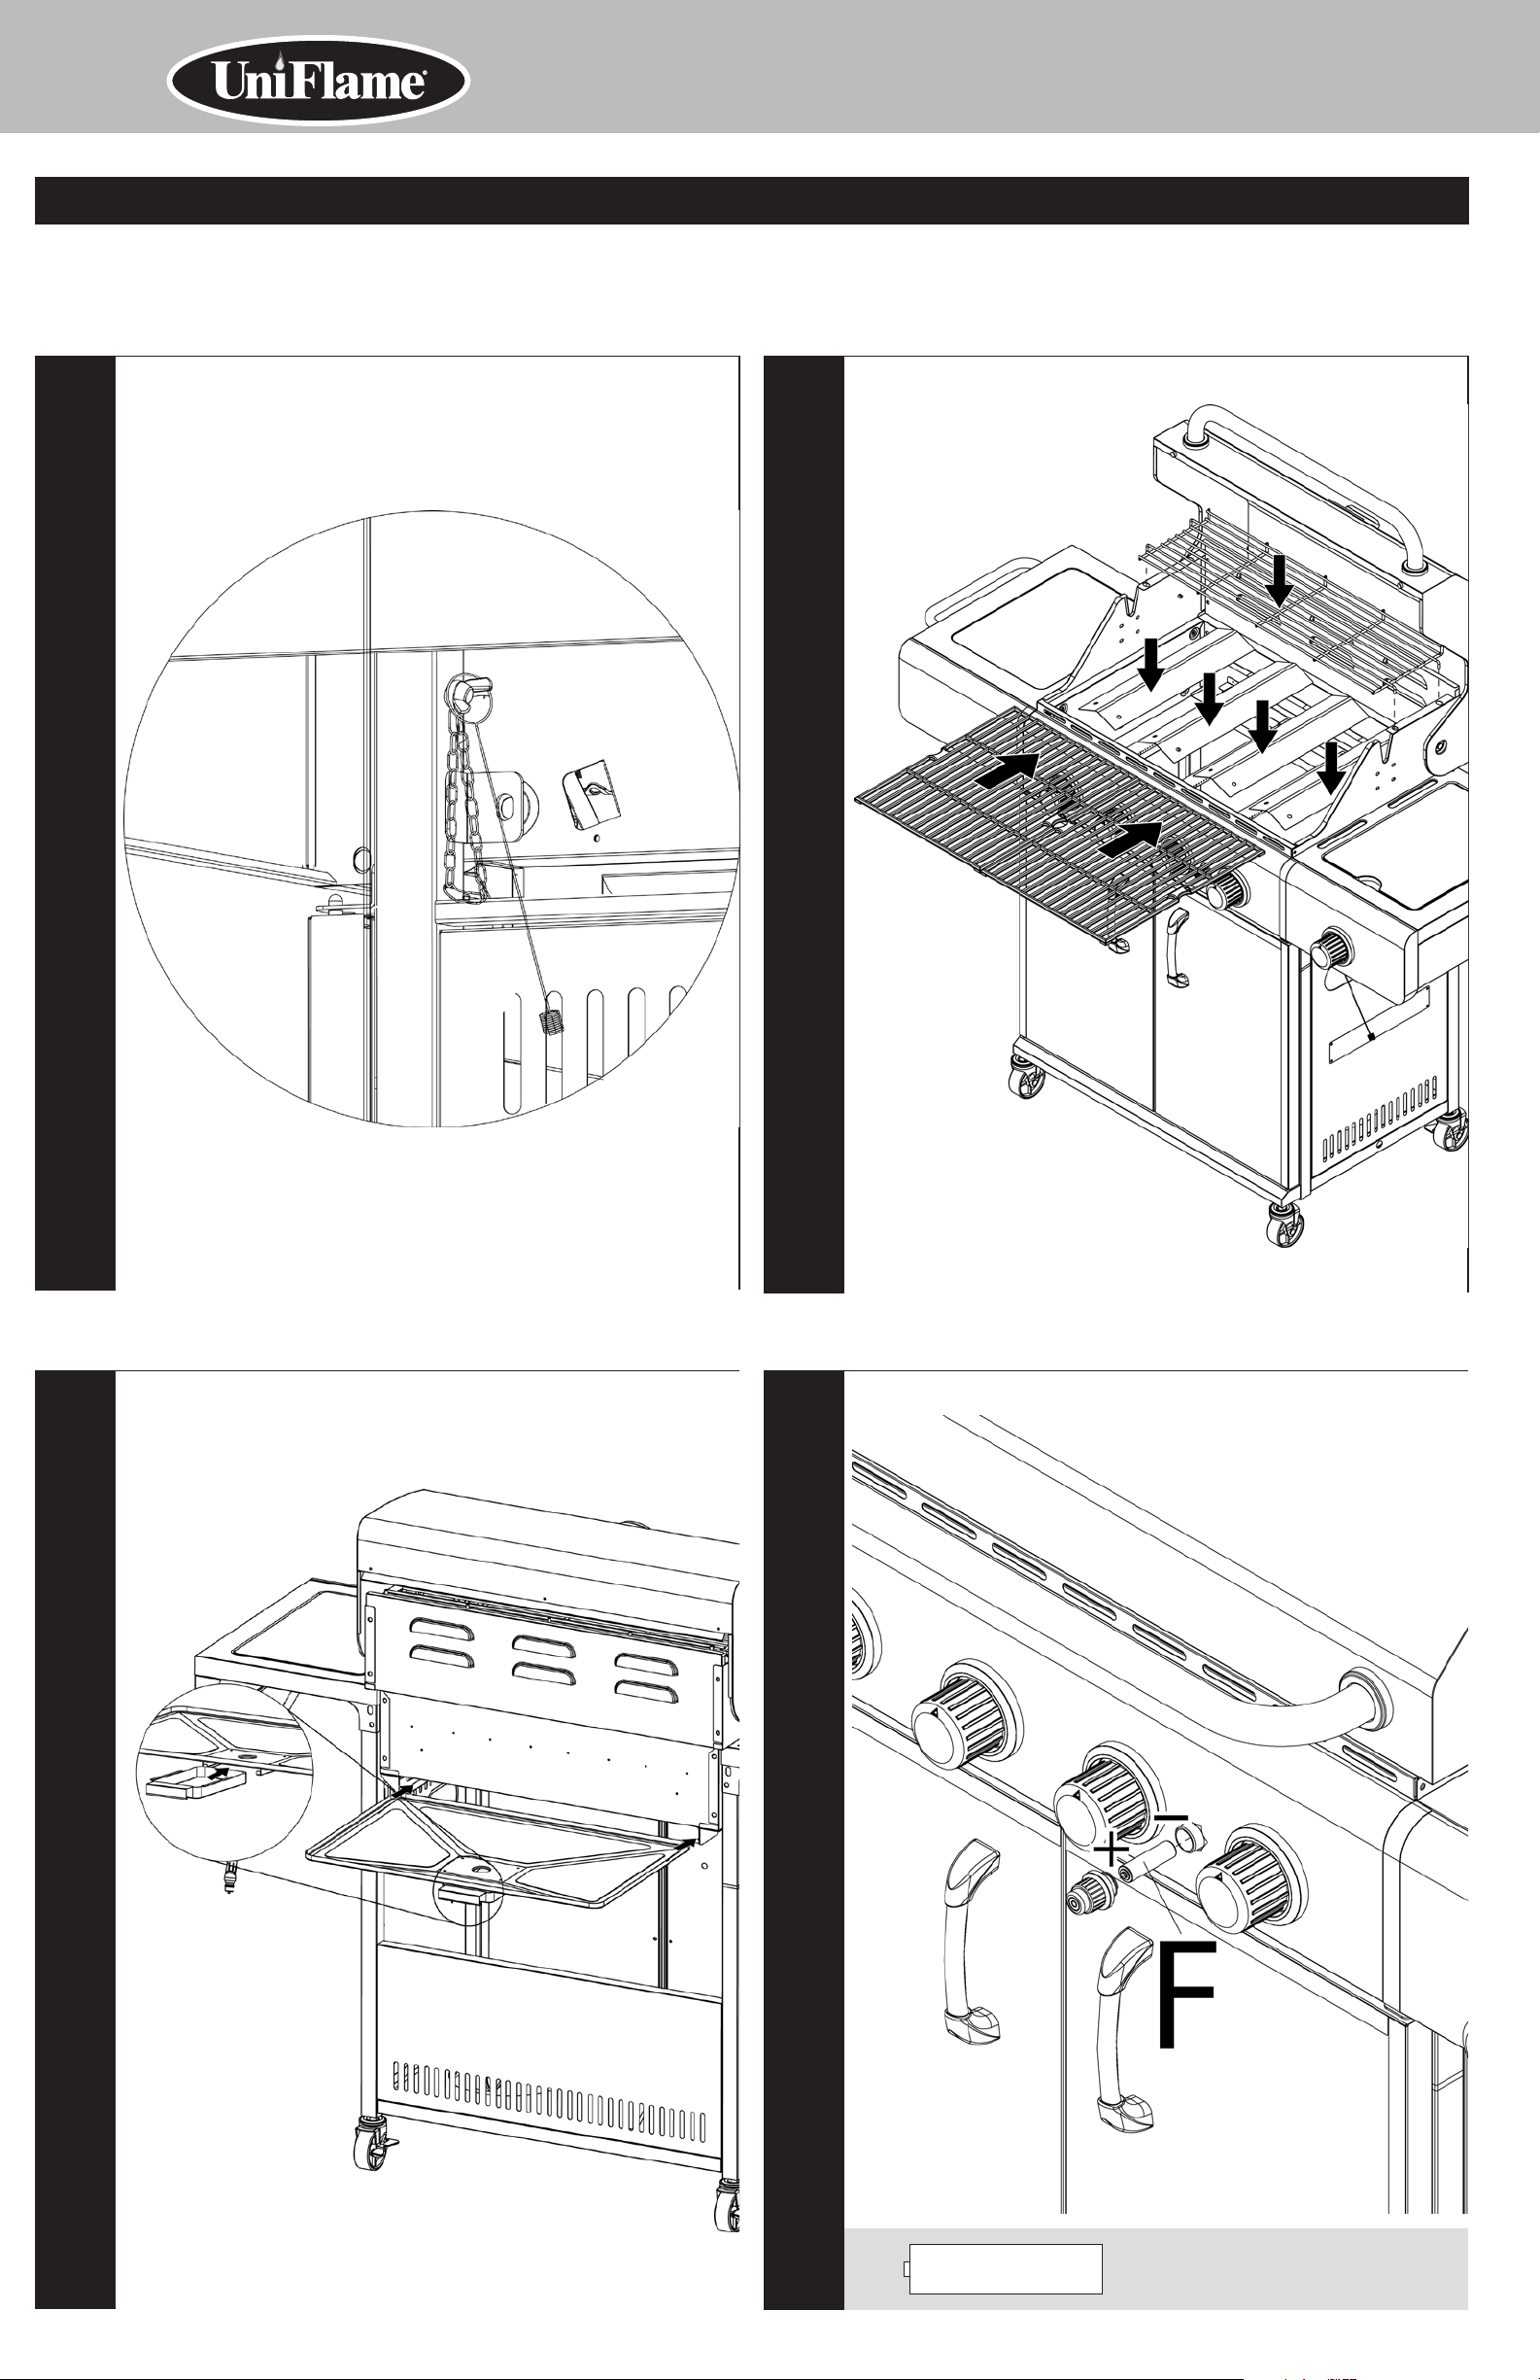
Place Lighting Rod
17
Insert Heat Plates, Cooking Grids and Warming Rack
18
Insert Grease Tray Cup and Grease Tray
19
Insert Battery
20
F
x1

Contact 1.800.762.1142 for assistance. Do not return to place of purchase.
page no.
9
Installing Natural Gas Line
Installation should be done by a qualified service person.
CAUTION: If young children are in the area, a locking valve should be
considered.
Connect Natural Gas Line
Before connecting, be sure that there is no debris caught in
the head of the natural gas line, head of the grill natural gas
line or in the head of the burner and burner ports.
Connect grill natural gas line to natural gas line.
Disconnect Natural Gas Line
Before disconnecting make sure the natural gas line valve is “OFF”.
Disconnect grill natural gas line from natural gas line.
Operating Instructions
Checking for Leaks
Burner Connections
1. Make sure the natural gas line is securely fastened
to the burner and the main gas natural gas line.
If your unit was assembled for you, visually check
the connection between the burner venturi pipe and
orifice. Make sure the burner venturi pipe fits over
the orifice.
WARNING: Failure to inspect this
connection or follow these instructions
could cause a fire or an explosion
which can cause death, serious bodily
injury, or damage to property.
2. Please refer to diagram for proper installation.
(Figure 1 and 2)
3. If the burner pipe does not rest flush to the orifice,
please contact 1.800.762.1142 for assistance.
Valve Soft Pipe
Connection
Gas Valve with
Orifice
Figure 1
Main Burners
Figure 2
Burner
venturi pipe
Gas Valve
with Orifice
Gas
Connection
Gas Line Connection
1. Make 2-3 oz. of leak solution by mixing one part
liquid dishwashing soap with three parts water.
2. Make sure control knobs are “OFF”. (Figure 3)
3. Turn “ON” natural gas main valve.
4. Spoon leak check solution at all “X” locations
(Figure 4)
a. If any bubbles appear turn natural gas line valve
to “CLOSED”, reconnect and re-test.
b. If you continue to see bubbles after several
attempts, turn natural gas line valve to “CLOSED”
and disconnect natural gas line and contact
1.800.762.1142 for assistance.
c. If no bubbles appear after one minute turn natural
gas line valve to “CLOSED”, wipe away solution
and proceed.
Operating Main Burners
First Use
1. Make sure all labels, packaging and protective films
have been removed from the grill.
2. Remove manufacturing oils before cooking on this
grill for the first time by operating the grill for at
least 15 minutes on “HIGH” with the lid closed. This
will “heat clean” the internal parts and dissipate
odors.
Valve
Soft Pipe
Connection
Side Burner
Figure 3
Figure 4
Burner
venturi
pipe
Lighting
1. Open lid. Attempting to light the burner with the
lid closed may cause an explosion!
2. Make sure there are no obstructions of airflow to
the burners. Spiders and insects can nest within
and clog the burner / venturi tube at the orifice. A
clogged burner tube can lead to a fire beneath the
appliance.
3. All control knobs must be in the “OFF” position.
(Figure 3)
4. Turn natural gas line valve to “OPEN”.
5. Select burner to light. Push and turn control knob
counterclockwise to “HIGH”.
6. Press the electronic igniter button and hold for 5
seconds to light burner.
7. If ignition does not occur in 5 seconds, turn burner
control knob “OFF”, wait 5 minutes, and repeat
lighting procedure.
8. If igniter does not light burner, use a lit match
secured with the lighting rod provided to light
burners manually. Access the burners through the
cooking grid and heat plates. Position the lit match
near side of the burner. (Figure 5)
Important: Always use the lighting rod provided when
lighting burners with a match.
9. After lighting, observe the burner flame, make sure
all burner ports are lit and flame height matches
illustration. (Figure 6)
Note: Each burner lights independently - repeat steps
5-9 for the other burners.
Burner
Figure 5
Figure 6
Flame
Slight
Yellow
Slight
Blue
Dark
Blue
 Loading...