

Page 1
MOTORCYCLE
TM
CARRIER II
OPERATOR, PARTS, AND
INSTALLATION MANUAL
SC2001
MOTORCYCLE CARRIER II
Carrier Combined Capacity of 600lb.
© 2005 Blue Ox Division, Automatic Equipment Mfg. Co. • One Mill Road, Industrial Park
Pender, Nebraska 68047 • Phone 402-385-3051 • Fax 402-385-3360 • www.blueox.us
TM
Page 2

SC2001 Owner's Manual
Serial No.
Motorcycle Carrier II
Congratulations in buying the SC2001 Motorcycle Carrier II from Blue Ox. A quality product Blue
Ox that will give you many years of use.
The Motorcycle Carrier II is designed for pickup's, SUV's and other vehicles that have a Class III or
greater, 2"square, trailer hitch receiver.
The following limitations must be observed for safe use of this product:
1. The combined weight of the motorcycle and carrier is not to exceed the tongue weight rating of the hitch
receiver.
Note: The tongue weight rating is normally about 10% of the vehicle's total towing capacity and is normally
labeled on the receiver or stated in the vehicle user's manual. For example: If your vehicle can tow a
trailer weighing 5,000 lbs., it must be able to support 10% of that weight on the receiver hitch - 500 lbs. in
this example.
Example: Motorcycle Carrier II 125 lbs.
Bike +370 lbs.
Required tongue weight rating Minimum = 495 lbs.
2. The weight of the motorcycle is not to exceed the 600 lb. capacity of the Motorcycle Carrier II.
Be sure that you read the Owner's Manual completely to
assure a proper and safe installation.
IMPORTANT: Use only genuine factory replacement parts on your Motorcycle Carrier. Do not
substitute homemade or nontypical parts. If a bolt is lost or in need of replacement, for your safety and the
preservation of your Motorcycle Carrier, be sure to use a replacement bolt of the same grade (Usually
Grade 5, refer to parts list). Repair parts may be ordered through your nearest Blue Ox dealer or
distributor.
© 2005 Blue Ox Division, Automatic Equipment Mfg. Co. • One Mill Road, Industrial Park
Pender, Nebraska 68047 • Phone 402-385-3051 • Fax 402-385-3360 • www.blueox.us
292-2676 4/05 Page 1 of 9
Page 3
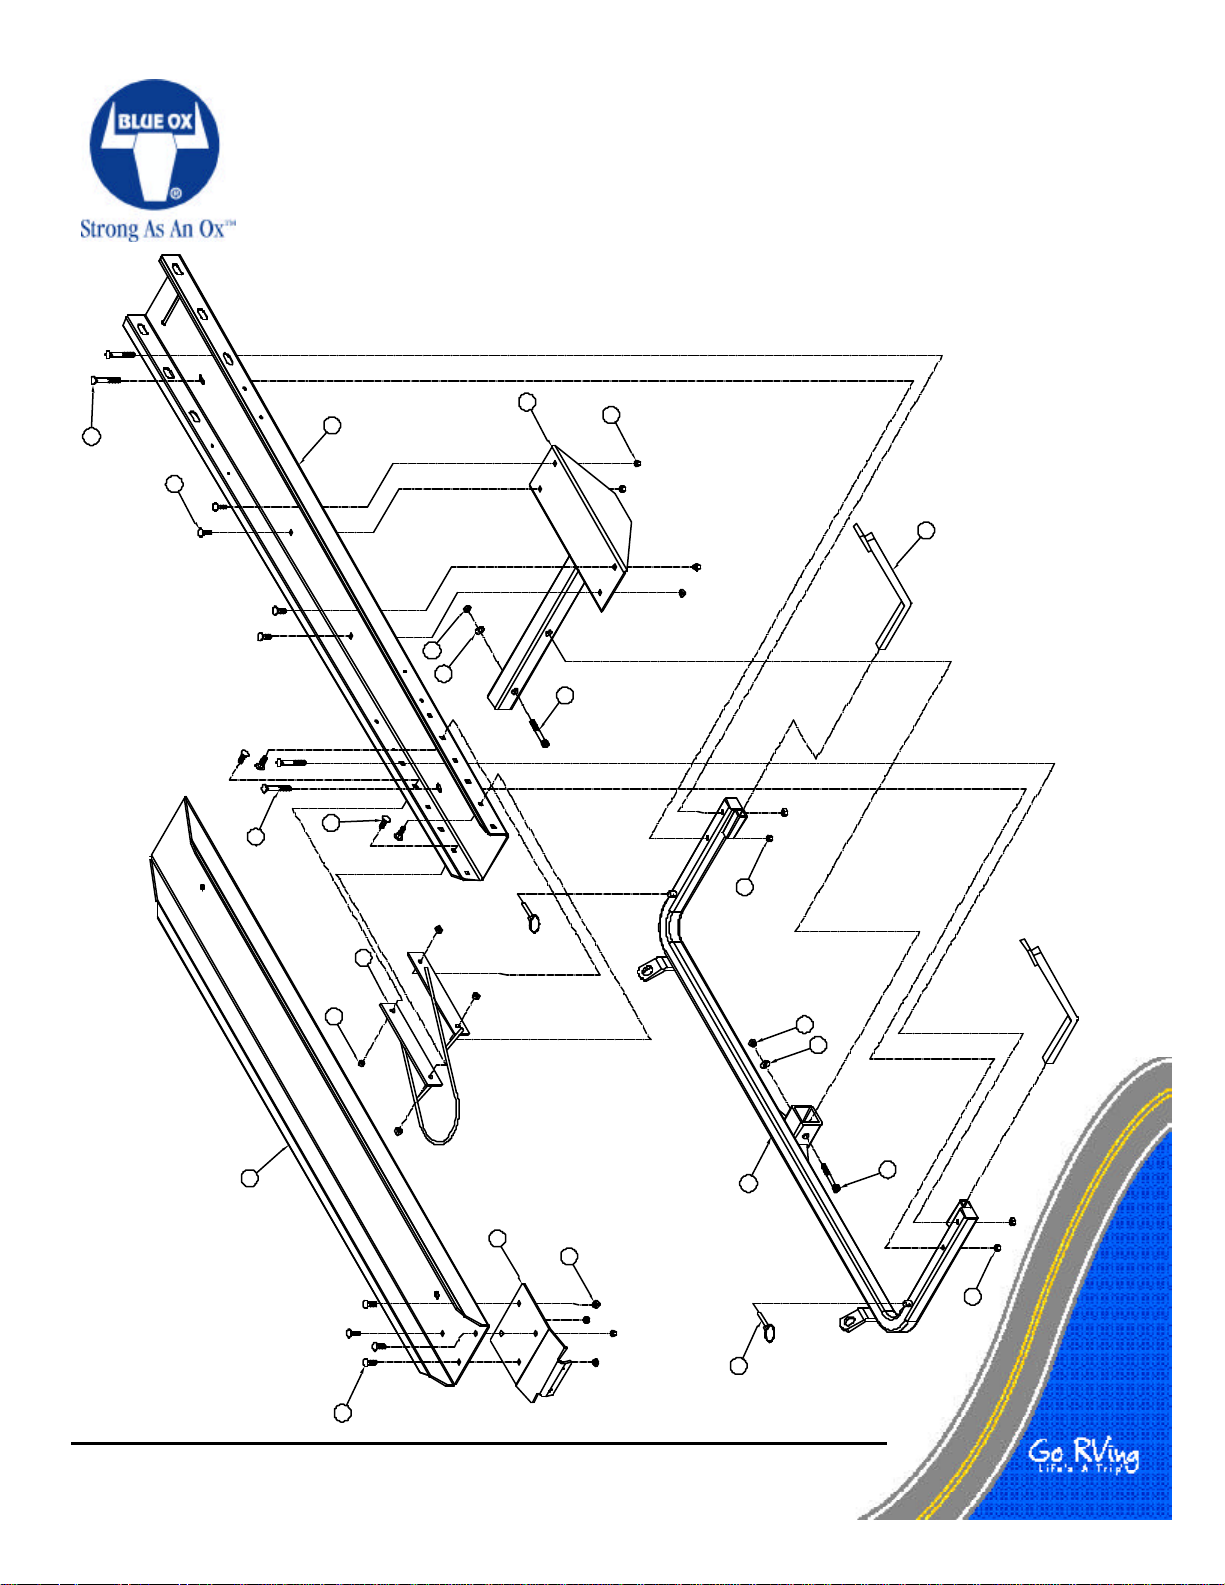
TOOLS REQUIRED FOR ASSEMBLY
9/16" Socket 11/16" Socket 3/8" Allen Wrench
Loctite Red
1
10
8
10
3
14
13
9
4
11
7
12
11
11
5
6
11
15
8
14
13
2
© 2005 Blue Ox Division, Automatic Equipment Mfg. Co. • One Mill Road, Industrial Park
Pender, Nebraska 68047 • Phone 402-385-3051 • Fax 402-385-3360 • www.blueox.us
292-2644 4/05 Page 2 of 9
12
11
Page 4
Parts List
Ref. No. Qty. Part No. Description
1 1 61-6099 ............................................................................Weldment, Stinger, SC2001
2 1 61-6100 ................................................................... Weldment, Tube Frame, SC2001
3 1 101-6743 .............................................................................Motorcycle Deck, SC2001
4 1 299-0376 ..........................................................................Weldment, Tire Support, ZP
5 1 101-6751 ............................................................................Motorcycle Ramp, SC2001
6 1 101-6752 ............................................................................ Connecting Plate, SC2001
7 2 61-6067 .......................................................................................Weldment, Tie Down
8 4 201-0284 ............................................................. 3/8-16 x 3/4" Carriage Bolt, Gr 5, ZP
9 8 201-0034 ................................................................ 3/8-16 x 1" Carriage Bolt, Gr 5, ZP
10 4 201-0178 .......................................................... 3/8-16 x 2 1/2" Carriage Bolt, Gr 5, ZP
11 16 202-0090 ............................................................3/8-16 Nylon Hex Insert Lock Nut, ZP
12 2 201-0773 ..................................................7/16-14 x 2 3/4" Cap Head Screw, Gr 5, ZP
13 2 203-0004 ....................................................................................7/16" Flat Washer, ZP
14 2 202-0128 ..........................................................7/16-14 Nylon Hex Insert Lock Nut, ZP
15 2 84-0001 .........................................................................................Quick Pin Assembly
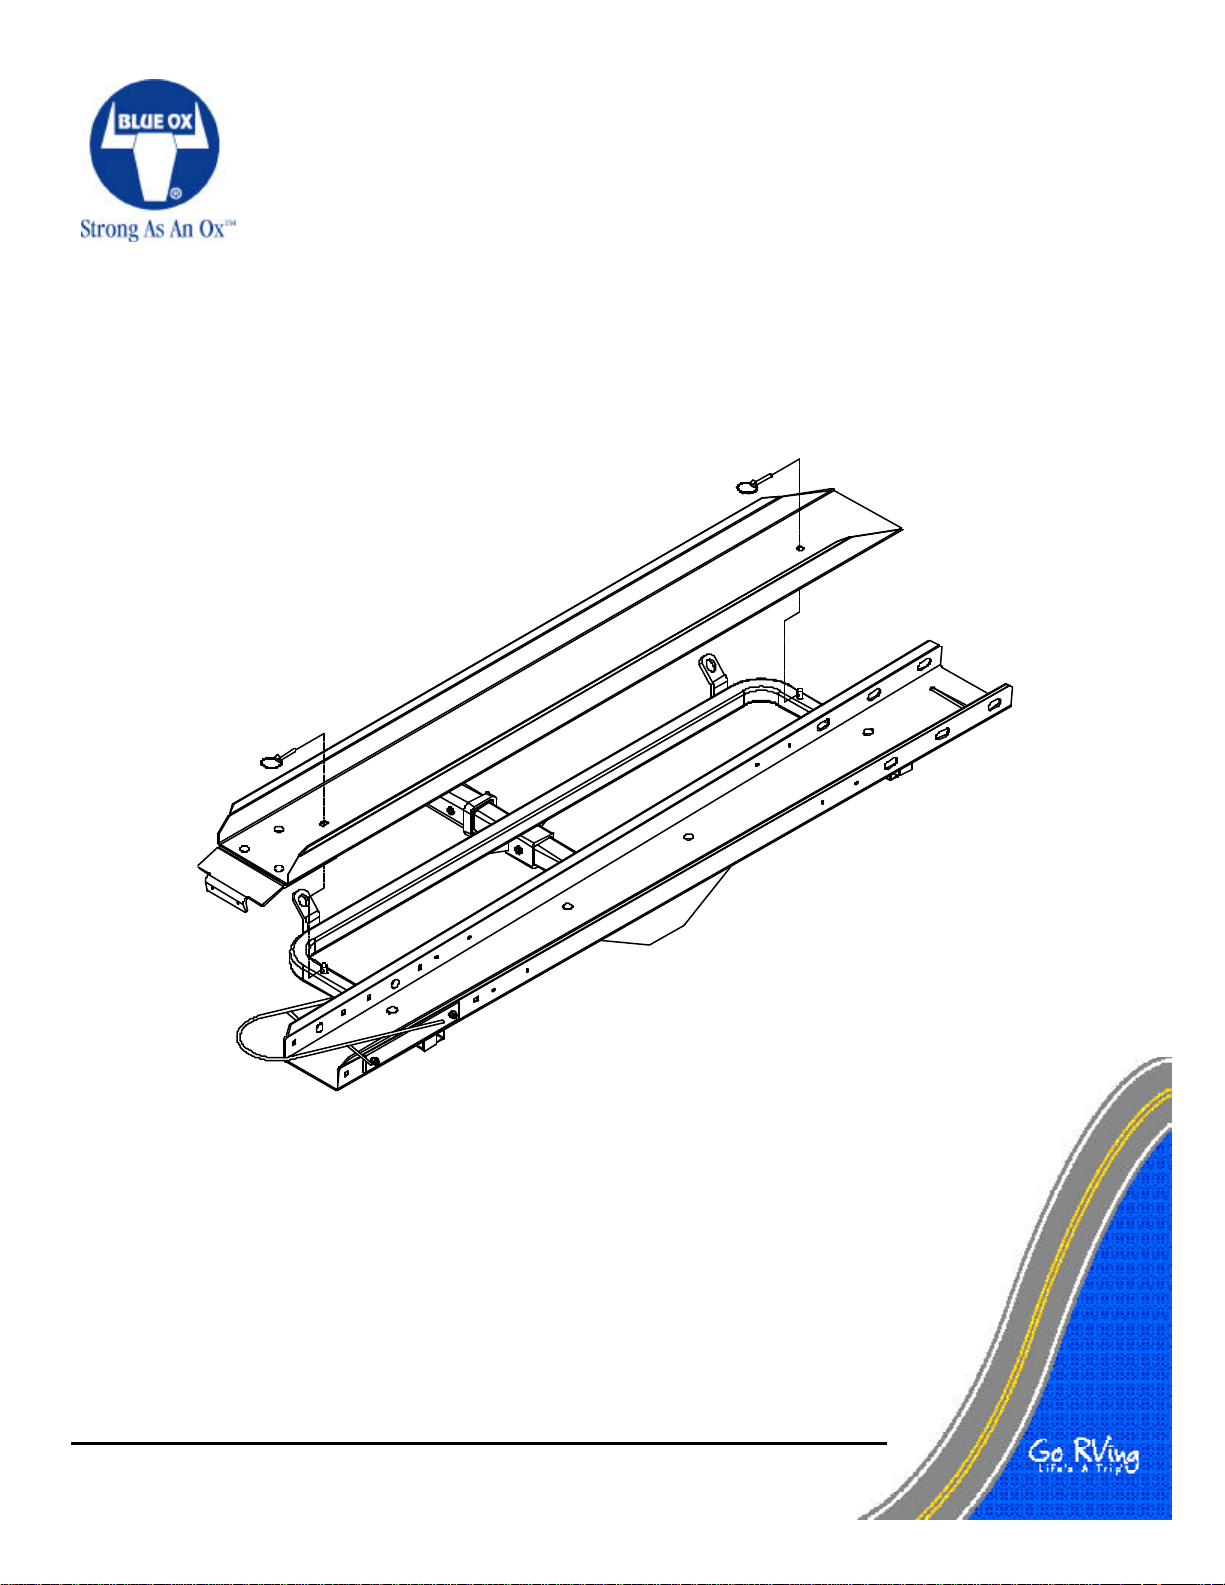
Motorcycle Carrier II Assembly
VEHICLES - EXISTING
2" RECEIVER
14
13
STINGER
SLEEVE
12
STINGER
WELDMENT
1
1. Insert stinger weldment into the stinger sleeve and tow vehicle's receiver to align 5/8" pin
holes. Insert 7/16-14 x 2 3/4" cap screw (item 12) into receiver, tighten flat washer and 7/
16-14 hex nut using the 11/16" socket and 3/8" allen wrench. Torque 7/16-14 hex nuts
to 54 ft. lbs. Slide stinger sleeve back, align holes of stinger and sleeve. Insert 7/1614 x 2 3/4" cap screw into hole, put on the 7/16" flat washer and 7/16 nylon hex locking
nut. But do not tighten.
© 2005 Blue Ox Division, Automatic Equipment Mfg. Co. • One Mill Road, Industrial Park
Pender, Nebraska 68047 • Phone 402-385-3051 • Fax 402-385-3360 • www.blueox.us
292-2676 4/05 Page 3 of 9
2
Page 5

NOTE: The head of the 7/16-14 x 2 3/4" cap
head screws are recessed into the 5/8" opening
of receiver and stinger sleeve. This will allow
î
stinger to be pulled to one side and eliminate
stinger to wobble.
î
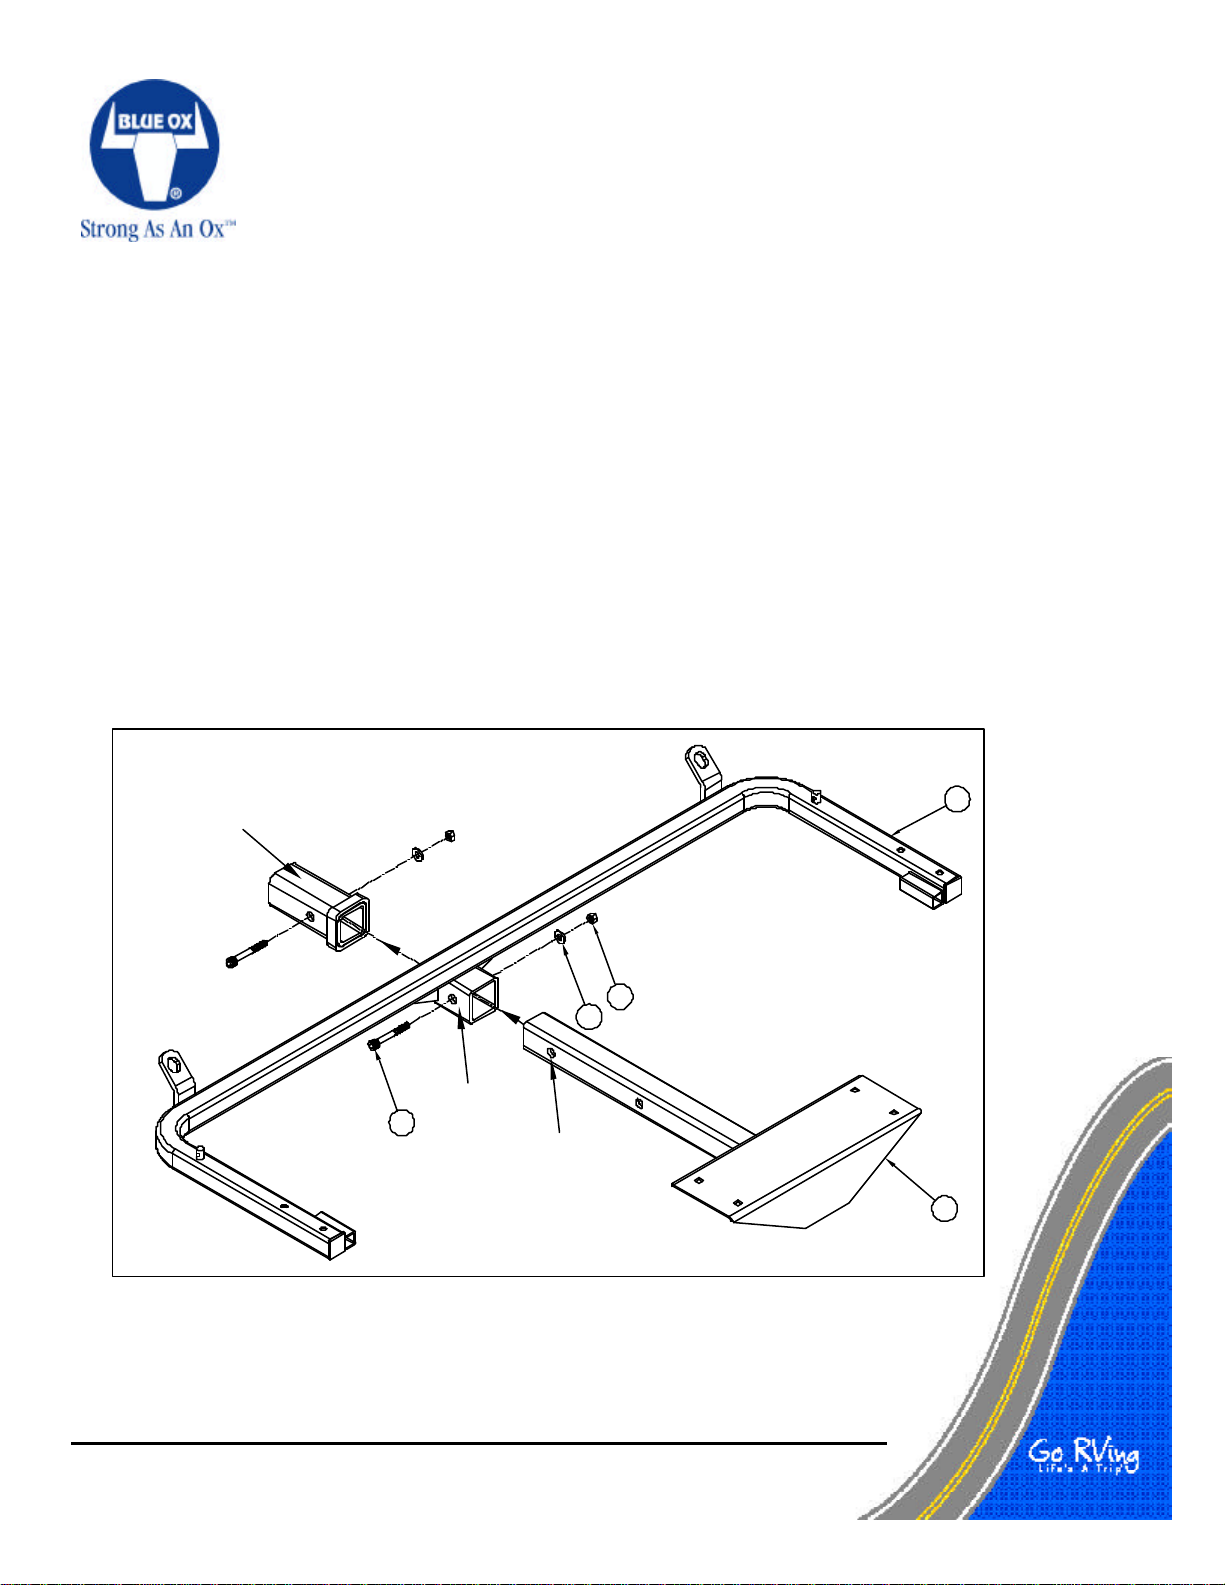
2. Align the square holes of the motorcycle deck (item 3) with the stinger weldment (item 1) holes, insert the
four 3/8-16 x 1" carriage bolts into the four holes and finger tighten the 3/8-16 nylon hex locking nuts on the
bottom side of stinger weldment. Insert the 3/8-16 x 2 1/2" carriage bolts through the square hole of the
deck, into the frame and tighten 3/8-16
nylon hex lock nuts with the 9/16" socket.
Using the 9/16" socket, tighten the four hex
nuts on the bottom side of stinger weldment.
Torque 3/8"-16 hex nuts to 33 ft. lbs.
Torque 7/16"-14 hex nuts to 54 ft. lbs.
NOTE: Carrier deck is shown as set up
for curb side loading, but can be assembled
with the track pointing either direction for
loading from left or right. Do not use a
washer on the head of the vertical
carriage bolts. The bolt head
should go through the square
openings of the deck in the
short outer tube section and
rest against the main tube.
VEHICLES
2" RECEIVER
8
3
11
© 2005 Blue Ox Division, Automatic Equipment Mfg. Co. • One Mill Road, Industrial Park
Pender, Nebraska 68047 • Phone 402-385-3051 • Fax 402-385-3360 • www.blueox.us
292-2676 4/05 Page 4 of 9
Page 6

11
4
9
3. Slide the tire support weldment flats (item 4) on the outside edge of the narrow end on the motorcycle deck
(item 3) to align the square holes of the deck with the round holes on the tire support. Insert the 3/8-16 x 1"
carriage bolt into the square holes on the inside track of decking and tire support, tighten the 3/8-16 nylon
hex locking nuts on the outside edge of tire support flats with the 9/16" socket. Torque 3/8-16 hex nuts to
33 ft. lbs.
8
5
4. Align the square holes of the motorcycle ramp (item 5)
with the connecting plate (item 6). Insert the 3/8-16 x 3/4"
6
carriage bolt into the square holes on the top side of ramp
decking, tighten the 3/8-16 nylon hex locking nuts on the
bottom side edge of connecting plate with the 9/16"
11
© 2005 Blue Ox Division, Automatic Equipment Mfg. Co. • One Mill Road, Industrial Park
Pender, Nebraska 68047 • Phone 402-385-3051 • Fax 402-385-3360 • www.blueox.us
292-2676 4/05 Page 5 of 9
socket. Torque 3/8-16 hex nuts to 33 ft. lbs.
Page 7

5. Stow the ramp next to the
carrier track by aligning
motorcycle ramp with the
ramp attachment studs,
set ramp on top of frame
tubing and insert the quick
clip into the attachment
stud as shown in the
drawing to the right.
RAMP
ATTACHMENT STUD
15
6. To prepare your motorcycle
carrier for loading, remove the
ramp from the motorcycle
carrier, set the connecting plate
flange into the slot at the end of
the deck and insert the quick
clips into the holes in the
flange to stabilize the ramp
for loading.
15
© 2005 Blue Ox Division, Automatic Equipment Mfg. Co. • One Mill Road, Industrial Park
Pender, Nebraska 68047 • Phone 402-385-3051 • Fax 402-385-3360 • www.blueox.us
292-2676 4/05 Page 6 of 9
Page 8

TIE DOWN
SUPPORTS
TIE DOWN
TIE DOWN
7
7. To prepare your motorcycle
carrier for loading, insert the
tie down brackets (item 7) into
supports just under deck, both
sides.
LOADING INSTRUCTIONS
8. With ramp in place, roll the bike up the ramp and onto the carrier. Secure the bike with four tie downs using
the tie down brackets. Use two tie-downs to secure the handlebars to the two front tie down brackets (shown
in drawing above), compressing the suspension sufficiently so that the bike is secured tightly. Secure the
rear tire using a tie down on the back tie down brackets. Run a tie-down from one foot peg under the
deck to the other foot peg, then cinch down as tight as possible. NOTE: After loading, the bike
should be about vertical to the ground, not tilted to either side. Secure the loose ends of
the tie-downs straps. Do not let them hang free.
© 2005 Blue Ox Division, Automatic Equipment Mfg. Co. • One Mill Road, Industrial Park
Pender, Nebraska 68047 • Phone 402-385-3051 • Fax 402-385-3360 • www.blueox.us
292-2676 4/05 Page 7 of 9
Page 9

Do's and Don'ts
Do:
1. Inspect the Motorcycle Carrier II before each use for any damage or defects. Do not use if any
damage or defects are present.
2. Always use quality tie downs made for motorcycles.
3. Inspect tie downs for fray or wear. If present, do not use them.
4. Make sure to tie the foot pegs down to the Motorcycle Carrier II as well as the back tire.
5. Always secure the ends of the tie downs.
Don'ts:
1. Use the Motorcycle Carrier II for uses other than those described in this instruction manual.
2. Haul more weight (bike and carrier combined) than the tongue weight rating of your vehicle.
3. Modify or change the Motorcycle Carrier II.
© 2005 Blue Ox Division, Automatic Equipment Mfg. Co. • One Mill Road, Industrial Park
Pender, Nebraska 68047 • Phone 402-385-3051 • Fax 402-385-3360 • www.blueox.us
292-2676 4/05 Page 8 of 9
Page 10

TO BE VALID, THE WARRANTY CARD MUST BE
COMPLETED IN ITS ENTIRETY BY AN AUTHORIZED
DISTRIBUTOR OR DEALER AND SENT TO AUTOMATIC
EQUIPMENT MFG. CO., PENDER, NEBRASKA. FAILURE
TO DO SO WILL VOID THE WARRANTY.
Customer Service Commitment
Blue Ox is focused on providing exemplary customer service, as observed in our mission statement
and guiding principles. In accordance with this objective, Blue Ox is proud to provide services such as
repairs and general maintenance of Blue Ox products at over 150 RV rallies. Look for our Desination
America or Blue Ox Racing service crews at the next rally or race you attend. If you miss them, you
may find an informative, personalized note explaining any service they may have provided your Blue
Ox products in your absence.
Blue Ox also offers educational seminars at rallies and through our Park & Resort teams. In
addition, Blue Ox customers visiting our factory may take advantage of free use of the well-
equipped Blue Ox RV Park.
© 2005 Blue Ox Division, Automatic Equipment Mfg. Co. • One Mill Road, Industrial Park
Pender, Nebraska 68047 • Phone 402-385-3051 • Fax 402-385-3360 • www.blueox.us
292-2676 4/05 Page 9 of 9
 Loading...