

Page 1
KARGARD
Page 1 of 12
292-1813 Rev. E
4/20/09
TM
© 1995, 2005, 06, 07, 08, 09 Blue Ox Division, Automatic Equipment Mfg. Co.
• One Mill Road, Industrial Park • Pender, Nebraska 68047
• Phone 402-385-3051 • Fax 402-385-3360 • www.blueox.us
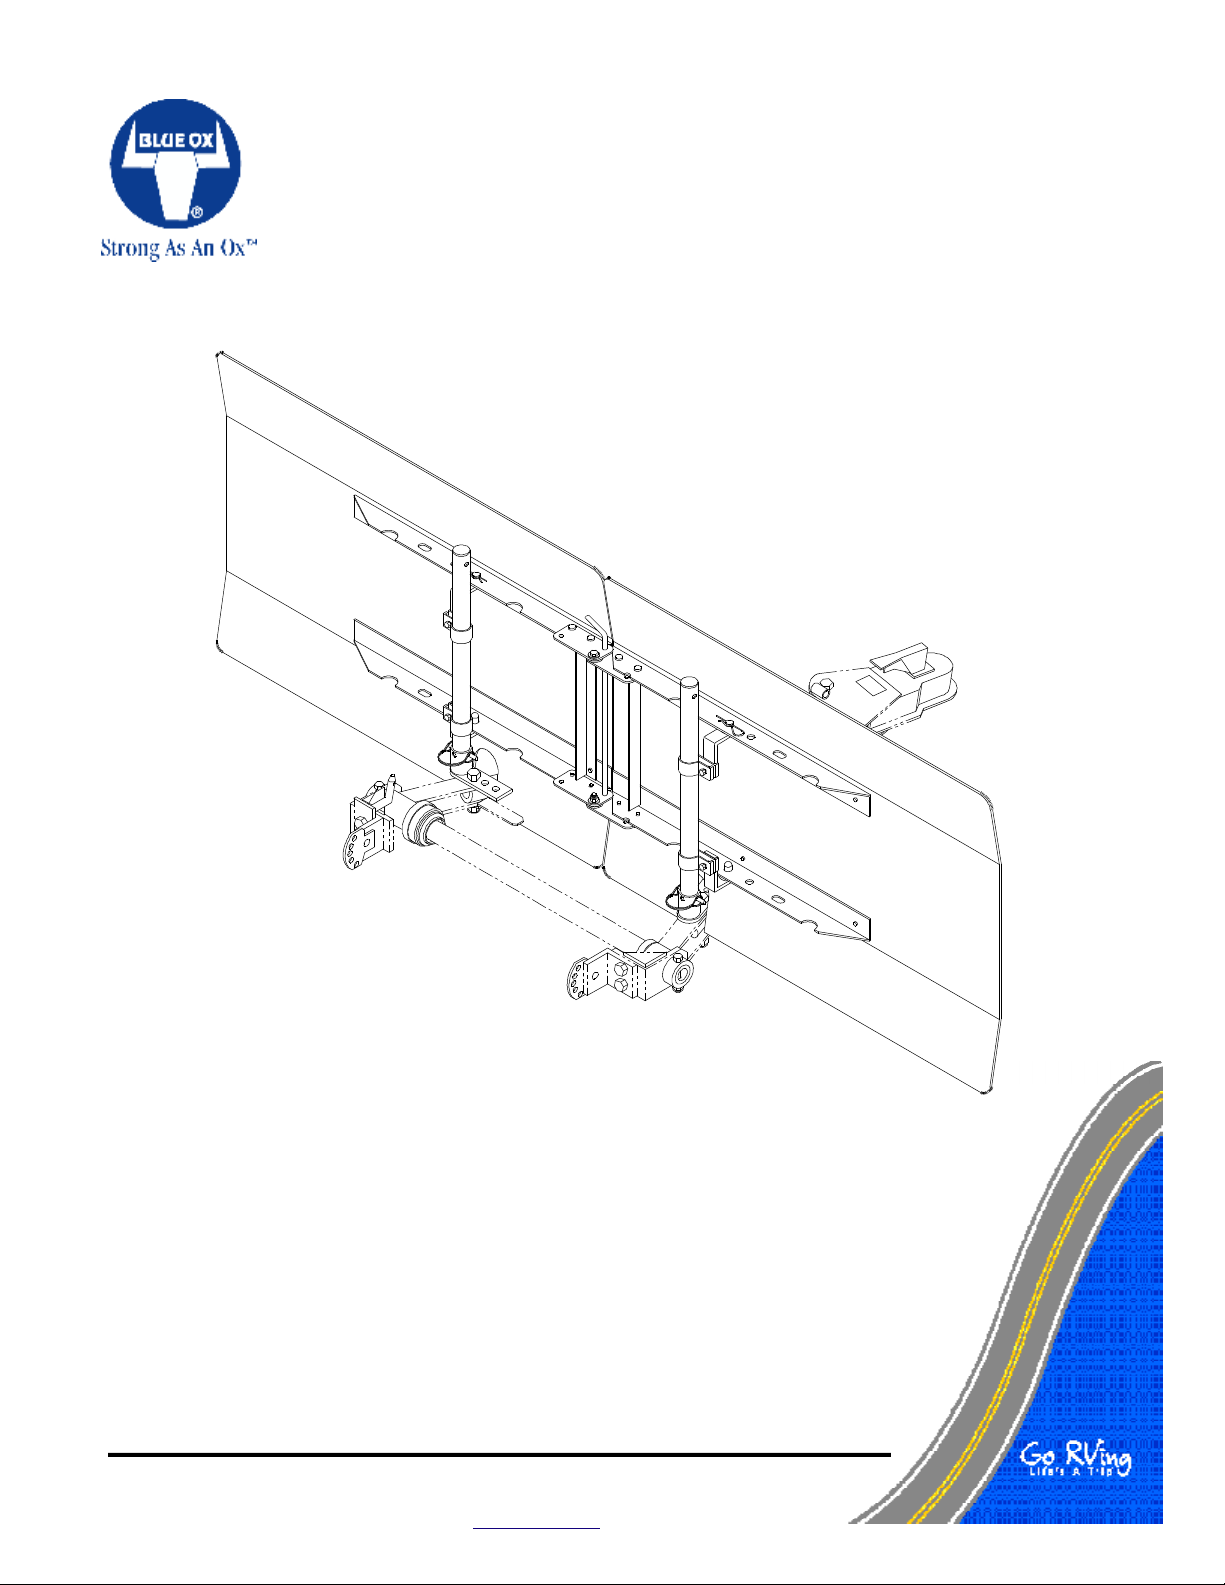
OPERATOR, PARTS AND
INSTALLATION MANUAL
BX8870
TM
KARGARD
Page 2
INSTALLATION / STORAGE
DO NOT INSTALL, OR USE THIS EQUIPMENT UNTIL THE FOLLOWING
OPERATING AND INSTALLATION INSTRUCTIONS HAVE BEEN READ AND UNDERSTOOD.
The installation and storage instructions below are designed for everyday use. If installing your KarGard
for the first time, refer to the detailed instructions for specific tow bars found on pages 2-6. Due to vast
differences in towed vehicle front ends, these detailed instructions may have to be adjusted slightly or different
mounting holes used than those referred to in the instructions and on the illustrations. If your tow bar is not
specifically addressed, you should be able to adapt one of these sets of detailed instructions to aid in your
particular installation.
To mount this KarGard to a RoadMaster® StowMaster® tow bar, an adapter kit (BX8871) is required, which
can be purchased from your local Blue Ox dealer.
TM
INSTALLATION FOR TOWING
1. Hook up your tow bar for towing.
2. Remove the locking rod and unfold the KarGard.
Remove the tower assemblies from their storage
slots and install them into the tower bases. Pin
them in place using the spring lock pins.
3. Insert the locking rod into the center hinges to keep
the KarGard straight.
4. Set the KarGard onto the dowel pins (bottom first)
then install the hair pins into the upper dowel pins
to secure the KarGard in place.
5. The KarGard is installed and ready for towing.
REMOVAL FOR STORAGE
1. Pull the hair pins from the dowel pins and remove
the KarGard. Lay it flat on the grass to avoid
scratching the surface. (aluminum angles up) Insert
the hair pins into the dowel pin holes to prevent
loss.
2. Remove the spring lock pins and towers from the
tower bases. Insert the spring lock pins through the
storage holes in the top of the tower assemblies.
By using these holes, the tower assemblies will not
slide out when stored inside the folded KarGard.
3. Lay the tower assemblies in the storage slots in the
aluminum angles. Arrange them so you know
which tower goes to which side to help avoid
confusion when installing the KarGard next time.
4. Remove the locking rod, fold the KarGard then
insert the locking rod to keep the KarGard folded.
5. Once folded, the locking rod or small aluminum
angle at the hinged end can serve as a handle.
STORAGE
The edges of the KarGard may warp slightly during
shipping or storage. When laid flat or installed on the
towers, the KarGard should regain its original form. We
recommend storing the KarGard folded, and laying flat.
NOTE: The material used in the construction of the
KarGard has a good memory of its original shape.
However, if the KarGard is subjected to abnormal
circumstances causing it to be bent sharply, it may not
regain its original shape. The manufacturer accepts no
responsibility for any damage caused to the KarGard or
to the towed vehicle resulting from the misuse of this
product.
✁ IMPORTANT ✁
Note that the plastic material extends 12" beyond the rigid aluminum framework. This allows flexibility if you
should turn too sharp and the motorhomes' bumper or roof access ladder hits the KarGard.
A recessed receiver, a short tow bar, or both, will greatly reduce the turning radius, especially if you have a
roof access ladder on your motorhome. Be aware of this and check it the first time you turn a corner.
Page 2 of 12 292-1813 Rev. E 4/20/09
Page 3
INSTALLATION (TUBE TYPE TOW BARS)
(Blue Ox Standard, Economy, Deluxe, Universal / Duncan A-Frame / Many others)
1. Mount the tow bar to the towed vehicle's
baseplate, as if to tow it. Support the coupler
on blocks or a stand at approximately the same
height as your hitch ball.
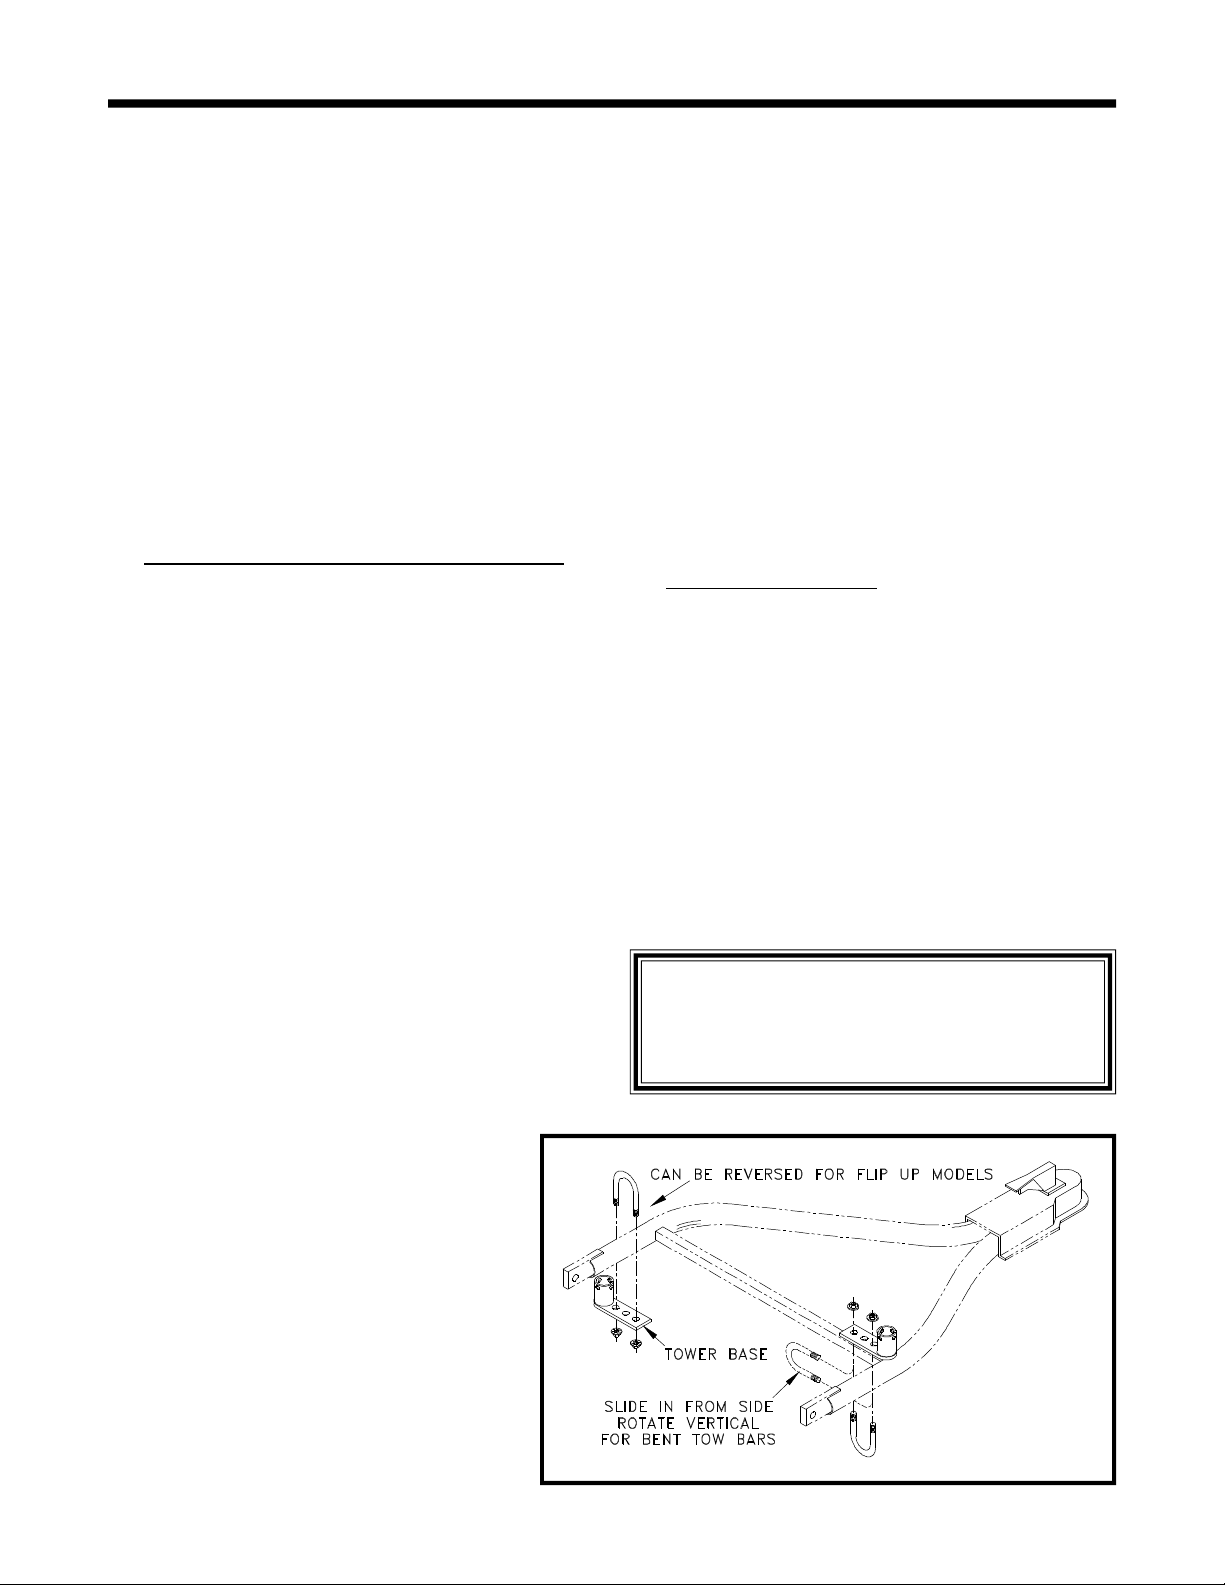
2. Bolt the tower bases to the tow bar legs using
the "U" bolts and nuts provided. Snug the nuts
but do not tighten at this time. (See diagram
below) Take care not to damage the threads.
NOTE: If you have a tow bar that flips up for
storage, raise it to the storage position to
determine if the tower bases will interfere with
this operation. If so, the tower bases can be
mounted underneath the tow bar legs as shown
on the left leg in the diagram below.
Refer to diagram on page 4 for steps 3-10.
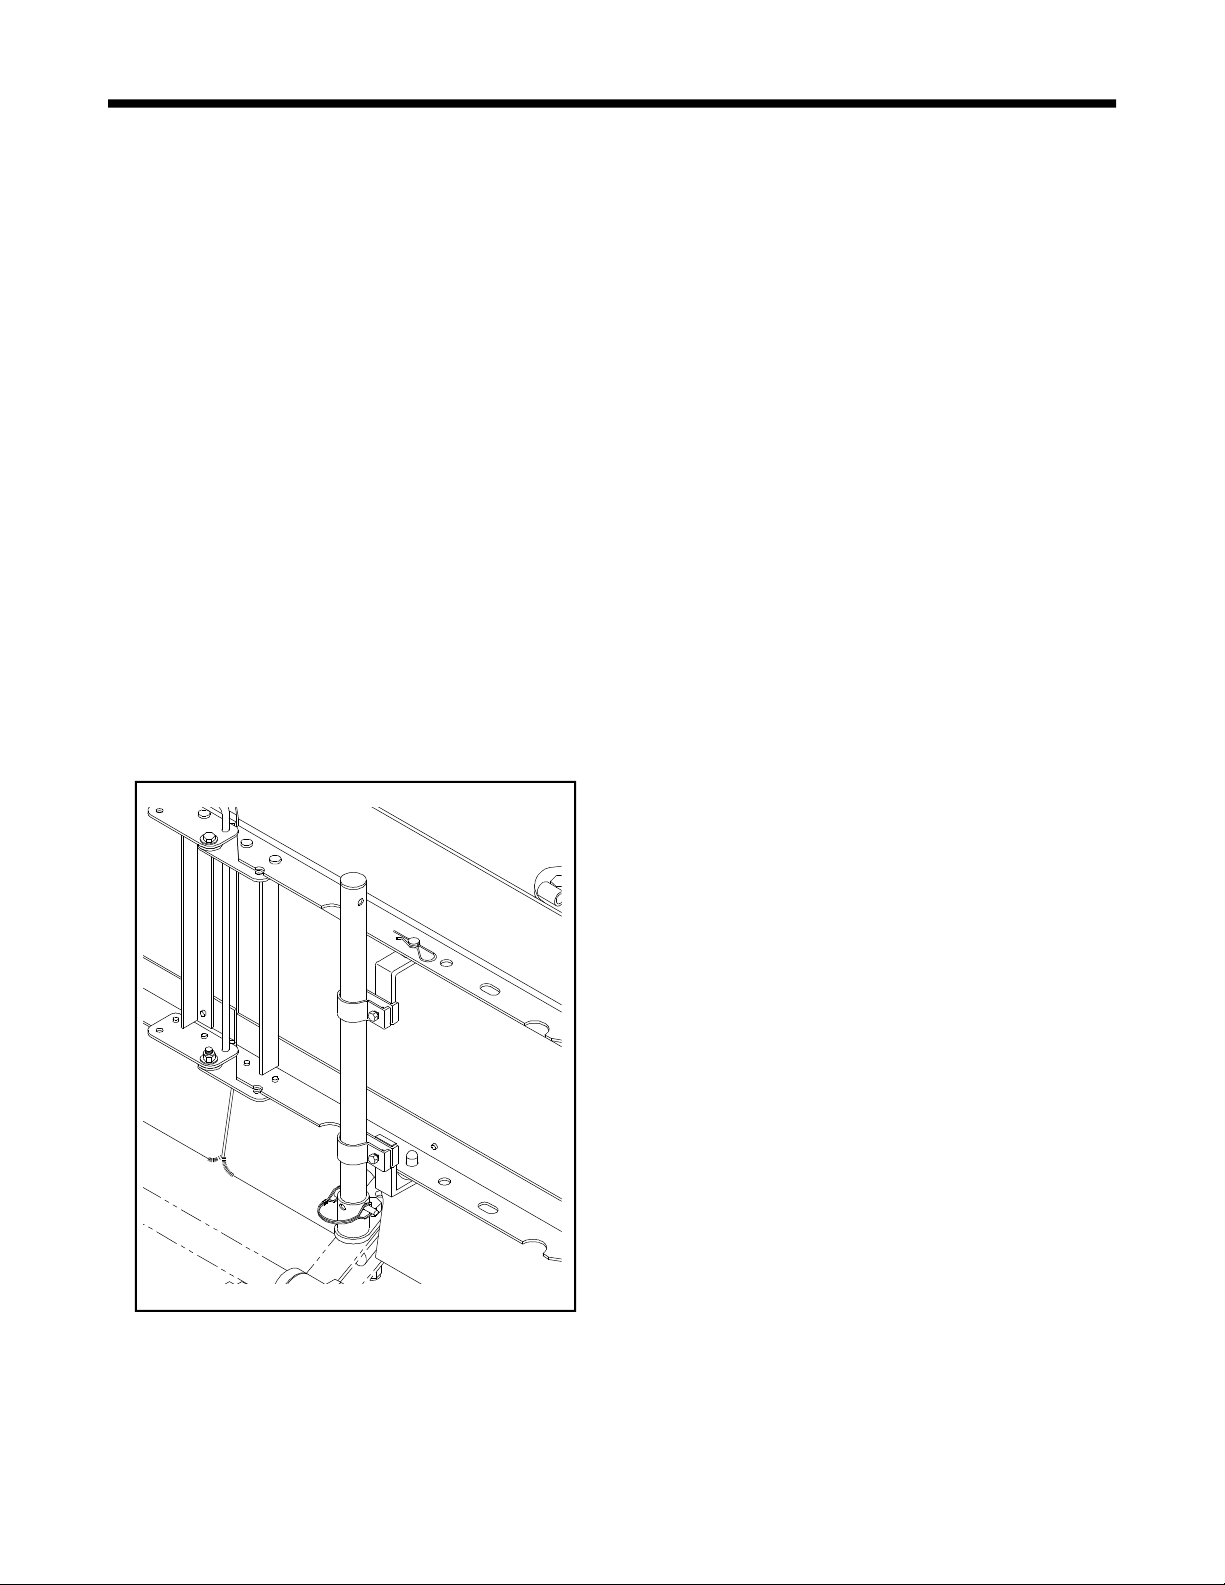
3. Set the towers into the tower bases (plastic
plugs up) and install the spring lock pins. Align
the towers parallel with each other, close to
vertical, tighten the U-bolts firmly.
4. Assemble the tower clamps to the upper and
lower "L" brackets so you have four bracket
assemblies, an upper and lower right and an
upper and lower left. Be sure to orient the
clamps and "L" brackets as shown on page 4.
Slide a rubber washer over each of the four
dowel pins on the "L" brackets.
5. Slide the four bracket assemblies onto the
towers. Snug to keep in place but do not
tighten at this time.
7. Determine if you need to lower the KarGard to
provide maximum protection of your towed
vehicle lower valence. If you need to lower it,
follow the instructions printed on the template
supplied with the KarGard.
8. Once openings are cut, (optional) reinstall the
KarGard onto the dowel pins (bottom first) and
install the hair pins. Slide all mounting brackets
and the KarGard down and tighten the
mounting brackets.
NOTE: Allow approximately 1/4" clearance
between the bottom of the KarGard and the top
of the tow bar legs. Distances may vary due to
tow bar configurations. Keep KarGard parallel
with the ground.
9. Tighten all bolts firmly. Make it a habit to check
all fasteners occasionally for tightness.
10.Lift the front of the tow bar up until the towers
almost touch the front of your towed vehicle.
This will show you how much of a dip or rise
you can go through before contact occurs.
This is a judgement that only you can
determine. You may need to adjust the tower
bases forward slightly if clearances appear too
close.
The manufacturer accepts no responsibility for
any damage caused to the KarGard or to the
towed or towing vehicle from improper
installation of this product.
NOTE: "L" brackets with short pins with a hole
through them are upper brackets.
6. Remove the locking rod and unfold the
KarGard. Install the locking rod to keep the
KarGard straight. Set the KarGard on the tow
bar legs. Slide the upper brackets up until the
dowel pins fit through a hole in the
upper aluminum angle of the KarGard,
and install the two hair pins.
IMPORTANT: Use any holes, but be
sure to use the corresponding hole on
the other half of the KarGard to keep
the KarGard centered in front of the
towed vehicle.
Snug the upper brackets, but do not
tighten at this time. Slide the lower
brackets up until the dowel pins fit
through the same holes in the lower
aluminum angles as used in the upper
angles. Snug the lower brackets, but
do not tighten at this time.
Be sure to read page 1 where you will
find important information about your
KarGard, as well as installation and
storage instructions for everyday use.
Page 3 of 12 292-1813 Rev. E 4/20/09
Page 4

INSTALLATION (BLUE OX SELF-ALIGNING TOW BARS)
1. Refer to page 4 while installing the
KarGard. Mount the tow bar to the towed
vehicle's baseplate, as if to tow it. Support the
coupler on blocks or a stand at approximately
the same height as your hitch ball. (Aventa
tow bars - same height as your hitch receiver)
IMPORTANT: DO NOT hook the tow bar to
the towing vehicle. During installation, bolts
will be removed and the hook up will make it
difficult to remove bolts.
2.Remove the 1/2" grade 5 bolts attaching the
chrome tow bar legs to the tabs. Set the
tower bases on top of the tabs and fasten
using the 1/2 x 3 grade 5 bolts and nylon insert
lock nuts provided. Install them with the cups
close to the front of the towed vehicle, and the
same distance from the towed vehicle.
NOTE: How the tower bases are oriented will
depend on what type of tow bar you have.
Page 4 shows the orientation for the
Rangefinder II tow bar. Orientation for an
Aventa tow bar uses the center hole in the
tower bases and the cups of the tower bases
point straight backward. (See inset page 4)
Aventa II & Aladdin tow bars are shown on
page 6. NOTE: 2 - 1/2" washers may have to
be used on each side as shown on page 6 so
the tower base clears the rubber boot.
Snug the bolts, but do not tighten at this time.
There should be two or more threads showing
through the lock nut when snug. If this is not
the case, obtain a longer bolt from a hardware
store, but be certain it is Grade 5.
3.Fold your tow bar to the stored position to be
certain that the tower bases will not interfere,
adjust accordingly. The tower bases will work
in a wide variety of locations.
4.Set the towers into the tower bases (plastic
plugs up) and install the spring lock pins.
5.Lift the front of the tow bar up until the towers
almost touch the front of your towed vehicle.
This shows you how much of a dip or rise you
can go through before contact occurs. This is
a judgement that only you can determine. You
may need to adjust the tower bases forward
slightly if clearances appear too close.
6.Assemble the tower clamps to the upper and
lower "L" brackets so you have four bracket
assemblies, an upper and lower right and an
upper and lower left. Be sure to orient the
clamps and "L" brackets as shown on page 4.
Slide a rubber washer over each of the four
dowel pins on the "L" brackets.
7.Slide the four bracket assemblies onto the
towers. Snug to keep in place but do not
tighten at this time.
NOTE: "L" brackets with short pins with a hole
through them are upper brackets.
8.Remove the locking rod and unfold the
KarGard. Install the locking rod to keep the
KarGard straight. Set the KarGard upright on
the tow bar legs. Slide the upper brackets up
until the dowel pins fit through a hole in the
upper aluminum angle of the KarGard, and
install the two hair pins.
IMPORTANT: Use any holes, but be sure to
keep the KarGard centered in front of the
towed vehicle.
Snug the upper brackets, but do not tighten at
this time. Slide the lower brackets up until the
dowel pins fit through the same holes in the
lower aluminum angles as used in the upper
angles. Snug the lower brackets, but do not
tighten at this time.
9.Determine if you need to lower the KarGard to
provide maximum protection of your towed
vehicle lower valence. If you need to lower it,
follow the instructions printed on the template
supplied with the KarGard.
10.Once openings are cut, (optional) reinstall the
KarGard onto the dowel pins (bottom first) and
install the hair pins. Slide all mounting
brackets and the KarGard down and tighten
the mounting brackets completely.
NOTE: Allow approximately 1/2" clearance
between the bottom of the KarGard and the
top of the tow bar legs. Distances may vary
due to tow bar configurations. Keep KarGard
parallel with the tow bar cross bar. Tighten the
1/2" bolts that hold the tower bases firmly.
Page 4 of 12 292-1813 Rev. E 4/20/09
Page 5

INSTALLATION (BLUE OX SELF-ALIGNING TOW BARS)
IMPORTANT: Overtightening causes difficulty
in folding the tow bar, and undertightening
causes looseness in the legs and tower
bases. Make it a habit to check all fasteners
occasionally for tightness.
The manufacturer accepts no responsibility
for any damage caused to the KarGard or to
the towed or towing vehicle from improper
installation of this product.
Be sure to read page 1 where you will
find important information about your
KarGard, as well as installation and
storage instructions for everyday use.
IMPORTANT: Use only genuine factory
replacement parts on your KarGard and
Tow Bar. Do not substitute homemade
or nontypical parts. If a bolt is lost or in
need of replacement, for your safety and
the preservation of your equipment, be
sure to use a grade 5 replacement bolt.
Repair parts may be ordered through
your nearest Automatic dealer or
distributor.
Page 5 of 12 292-1813 Rev. E 4/20/09
Page 6

INSTALLATION (DUNCAN SELF-ALIGNING TOW BARS)
(Duncan EazAligner & TowMatic II Self-Aligning Tow Bars)
1. Refer to page 6 while installing the
KarGard. Mount the tow bar to the towed
vehicle's baseplate, as if to tow it. Support the
coupler on blocks or a stand at approximately
the same height as your hitch ball.
IMPORTANT: DO NOT hook the tow bar to
the towing vehicle. During installation, bolts
will be removed and the hook up will make it
difficult to remove bolts.
2.Remove the tow bar from the quick attach
receiver brackets. Remove the inside bolt
holding the (PS) receiver bracket, and the
outside bolt holding the (DS) receiver bracket
to the cross angle. Install the angle brackets
behind the cross angle pointing towards the
towed vehicle.
NOTE: Use the existing bolts just removed
but be certain to reverse them so the bolt
head is on the back side against the new
angle bracket and do not use a flat washer
under the bolt head. This will allow clearance
for the 1/2" bolt installed in the next step.
3.Using the 1/2 x 1 1/2 bolts and Nylon nuts
provided, attach the tower bases to the angle
brackets just installed. Orient as shown using
the hole closest to the tower base cup. Snug
the bolts, but do not tighten at this time.
4.Install your tow bar onto the quick attach
brackets and fold it to the stored position to be
sure that the tower bases will not interfere,
adjust accordingly. The tower bases will work
in a wide variety of locations.
5.Set the towers into the tower bases (plastic
plugs up) and install the spring lock pins.
6.Assemble the tower clamps to the upper and
lower "L" brackets so you have four bracket
assemblies, an upper and lower right and an
upper and lower left. Be sure to orient the
clamps and "L" brackets as shown on page 4.
Slide a rubber washer over each of the four
dowel pins on the "L" brackets.
8.Remove the locking rod and unfold the
KarGard. Install the locking rod to keep the
KarGard straight. Set the KarGard across the
tow bar assembly with the driver side "Hold up
pin" of the tow bar inserted through the center
hole in the bottom aluminum angle. Slide the
upper brackets up until the dowel pins fit
through a hole in the upper aluminum angle of
the KarGard, and install the two hair pins.
IMPORTANT: Use any holes, but be sure to
keep the KarGard centered in front of the
towed vehicle.
Snug the upper brackets, but do not tighten at
this time. Slide the lower brackets up until the
dowel pins fit through the same holes in the
lower aluminum angles as used in the upper
angles. Snug the lower brackets, but do not
tighten at this time.
9.Determine if you need to lower the KarGard to
provide maximum protection of your towed
vehicle lower valence. If you need to lower it,
follow the instructions printed on the template
supplied with the KarGard.
10.Once openings are cut, (optional) reinstall the
KarGard onto the tow bar hold up pin and
KarGard dowel pins (bottom first) and install
the hair pins. Slide all mounting brackets and
the KarGard down as needed and tighten the
mounting brackets.
NOTE: Passenger side of KarGard will rest
on the quick attach and the driver side will be
slightly raised to keep the KarGard parallel
with the tow bar and the ground.
11.Tighten all bolts firmly. Make it a habit to
check all fasteners occasionally for tightness.
The manufacturer accepts no responsibility
for any damage caused to the KarGard or to
the towed or towing vehicle from improper
installation of this product.
7.Slide the four bracket assemblies onto the
towers. Snug to keep in place but do not
tighten at this time.
NOTE: "L" brackets with short pins with a hole
through them are upper brackets.
Page 6 of 12 292-1813 Rev. E 4/20/09
Be sure to read page 1 where you will
find important information about your
KarGard, as well as installation and
storage instructions for everyday use.
Page 7

(DUNCAN SELF-ALIGNING TOW BARS)
INSTALLATION
(AVENTA LX, AVENTA II, ALADDIN
SELF-ALIGNING TOW BARS)
(ADVENTURER ADJUSTABLE TOW BAR)
Page 7 of 12 292-1813 Rev. E 4/20/09
Page 8

REPLACEMENT PARTS
Page 8 of 12 292-1813 Rev. E 4/20/09
Page 9

REPLACEMENT PARTS
Parts List
Ref. No. Qty. Part No. Description
1 2 293-1188..........................................................Shield Assembly, BX8870, One Side
2 2 290-0357........................................................................5/16 x 7/8 Nylatron Washer
3 6 201-0469.................................................5/16-18 x 11/4 Hex Head Bolt, Grade 5, ZP
4 4 203-0002..................................................................................5/16 Flat Washer, ZP
5 2 202-0097..............................................................5/16-18 Hex Nylon Insert Lock Nut
6 1 293-1187.....................................................................Locking Rod, BX8870, Plated
7 3 229-0760.....................................................................H D Safety Pin .091 x 1-11/16
8 2 293-1184...............................................................Lower L Bracket, BX8870, Plated
9 2 293-1185................................................................Upper L Bracket, BX8870, Plated
10 4 293-1183....................................................................Tower Clamp, BX8870, Plated
11 4 250-0168.........................................................................3/8 x 1 1/4 Rubber Washer
12 4 203-0009................................................................................5/16 Lock Washer, ZP
13 2 293-1186...................................................................Upright Tower, BX8870, Plated
14 2 290-0358...............................................................Plastic Cap Plug, Tower, BX8870
15 2 293-1182......................................................................Tower Base, BX8870, Plated
16 2 229-0440.................................................................5/16 x 2 1/2 Eff. Spring Lock Pin
17 2 201-0490........................................................1/2-13 x 3 Hex Head Bolt, Grade 5, ZP
18 4 203-0005....................................................................................1/2 Flat Washer, ZP
19 2 202-0094................................................................1/2-13 Hex Nylon Insert Lock Nut
2 201-0559....................3/8-16 x 2.5 x 1.5 x 1.25 U-Bolt, Rnd, ZP (shown on page 11)
4 201-0051...................1/2-13 x 1 1/2 Hex Bolt, Grd. 5, ZP (shown on page 7 and 10)
IMPORTANT: Use only genuine factory replacement parts on your KarGard and Tow Bar. Do not
substitute homemade or nontypical parts. If a bolt is lost or in need of replacement, for your safety and
the preservation of your equipment, be sure to use a grade 5 replacement bolt.
Repair parts may be ordered through your nearest Automatic dealer or distributor.
Page 9 of 12 292-1813 Rev. E 4/20/09
Page 10

REPLACEMENT PARTS
Parts List
(Duncan Installation)
Ref. No. Qty. Part No. Description
1 2 201-0051..................................................1/2-13 x 1 1/2 Hex Head Bolt, Grade 5, ZP
2 2 202-0094.......................................................................1/2-13 Nylon Insert Lock Nut
3 2 293-1182......................................................................Tower Base, BX8870, Plated
4 2 293-1189............................................................Angle Bracket, BX8870, Plated, DM
Refer to pages 7-8 for additional KarGard parts not shown here
IMPORTANT: Use only genuine factory replacement parts on your KarGard and Tow Bar. Do not
substitute homemade or nontypical parts. If a bolt is lost or in need of replacement, for your safety and
the preservation of your equipment, be sure to use a grade 5 replacement bolt.
Repair parts may be ordered through your nearest Automatic dealer or distributor.
Page 10 of 12292-1813 Rev. E 4/20/09
Page 11

REPLACEMENT PARTS
Parts List
(Tube Type Tow Bars)
Ref. No. Qty. Part No. Description
1 2 201-0559.....................................................3/8-16 x 2 1/2 x 1 1/2 x 1 1/4, U-Bolt, ZP
2 4 202-0071...................................................................Hex Flange Whiz Lock Nut, ZP
3 2 293-1182......................................................................Tower Base, BX8870, Plated
Refer to pages 7-8 for additional KarGard parts not shown here
IMPORTANT: Use only genuine factory replacement parts on your KarGard and Tow Bar. Do not
substitute homemade or nontypical parts. If a bolt is lost or in need of replacement, for your safety and
the preservation of your equipment, be sure to use a grade 5 replacement bolt.
Repair parts may be ordered through your nearest Automatic dealer or distributor.
Page 11 of 11292-1813 Rev. E 4/20/09
Page 12

QUICK REFERENCE GUIDE
INSTALLATION FOR TOWING
1. Remove locking rod, unfold the KarGard and lock it
straight with the locking rod.
2. Install the towers into the tower bases. Pin them
in place with the spring lock pins.
3. Set the KarGard on the dowel pins (bottom first)
then install the hair pins to secure the KarGard in
place.
4. The KarGard is installed and ready for towing.
TO BE VALID, THE WARRANTY CARD MUST BE
COMPLETED IN ITS ENTIRETY BY AN AUTHORIZED
DISTRIBUTOR OR DEALER AND SENT TO AUTOMATIC
EQUIPMENT MFG. CO., PENDER, NEBRASKA. FAILURE
TO DO SO WILL VOID THE WARRANTY.
Repair parts may be ordered through your nearest
Automatic dealer or distributor.
REMOVAL FOR STORAGE
1. Remove the hair pins and lay the KarGard flat. (angles
up) Replace hair pins to prevent loss.
2. Remove the towers from the tower bases. Place the
spring lock pins in the storage holes to prevent loss.
3. Store tower assemblies in slots in KarGard. Fold the
KarGard and insert the locking rod.
4. The locking rod at the hinged end serves as a handle.
Product Safety Policy Statement
It is, and shall continue to be, a primary objective of Automatic Equipment Manufacturing Company
to provide customers with safe and reliable products. Automatic will, and has, established safety
procedures in product design, manufacture, promotion and sales; and will coordinate efforts to promote
customer safety to the greatest extent possible. Each department has primary responsibility for the
promotion of safety under the guidelines of the Product Safety Committee.
BX8870
KARGARD
© 1995, 2005, 06, 07, 08, 09 Blue Ox Division, Automatic Equipment Mfg. Co.
• One Mill Road, Industrial Park • Pender, Nebraska 68047
• Phone 402-385-3051 • Fax 402-385-3360 • www.blueox.us
TM
Page 12 of 12292-1813 Rev. E 4/20/09
Page 13

 Loading...