

Page 1
BX88275 thru BX88285 and BX88287
EZ Light Wiring Harness Kit
Installation Instructions
Required Parts and Tools
Installing the EZ Light
wiring harness system
requires basic hand-tool skills. Failure to
understand how to install or operate this product
could result in property damage and/or personal
injury.
Installation Instructions
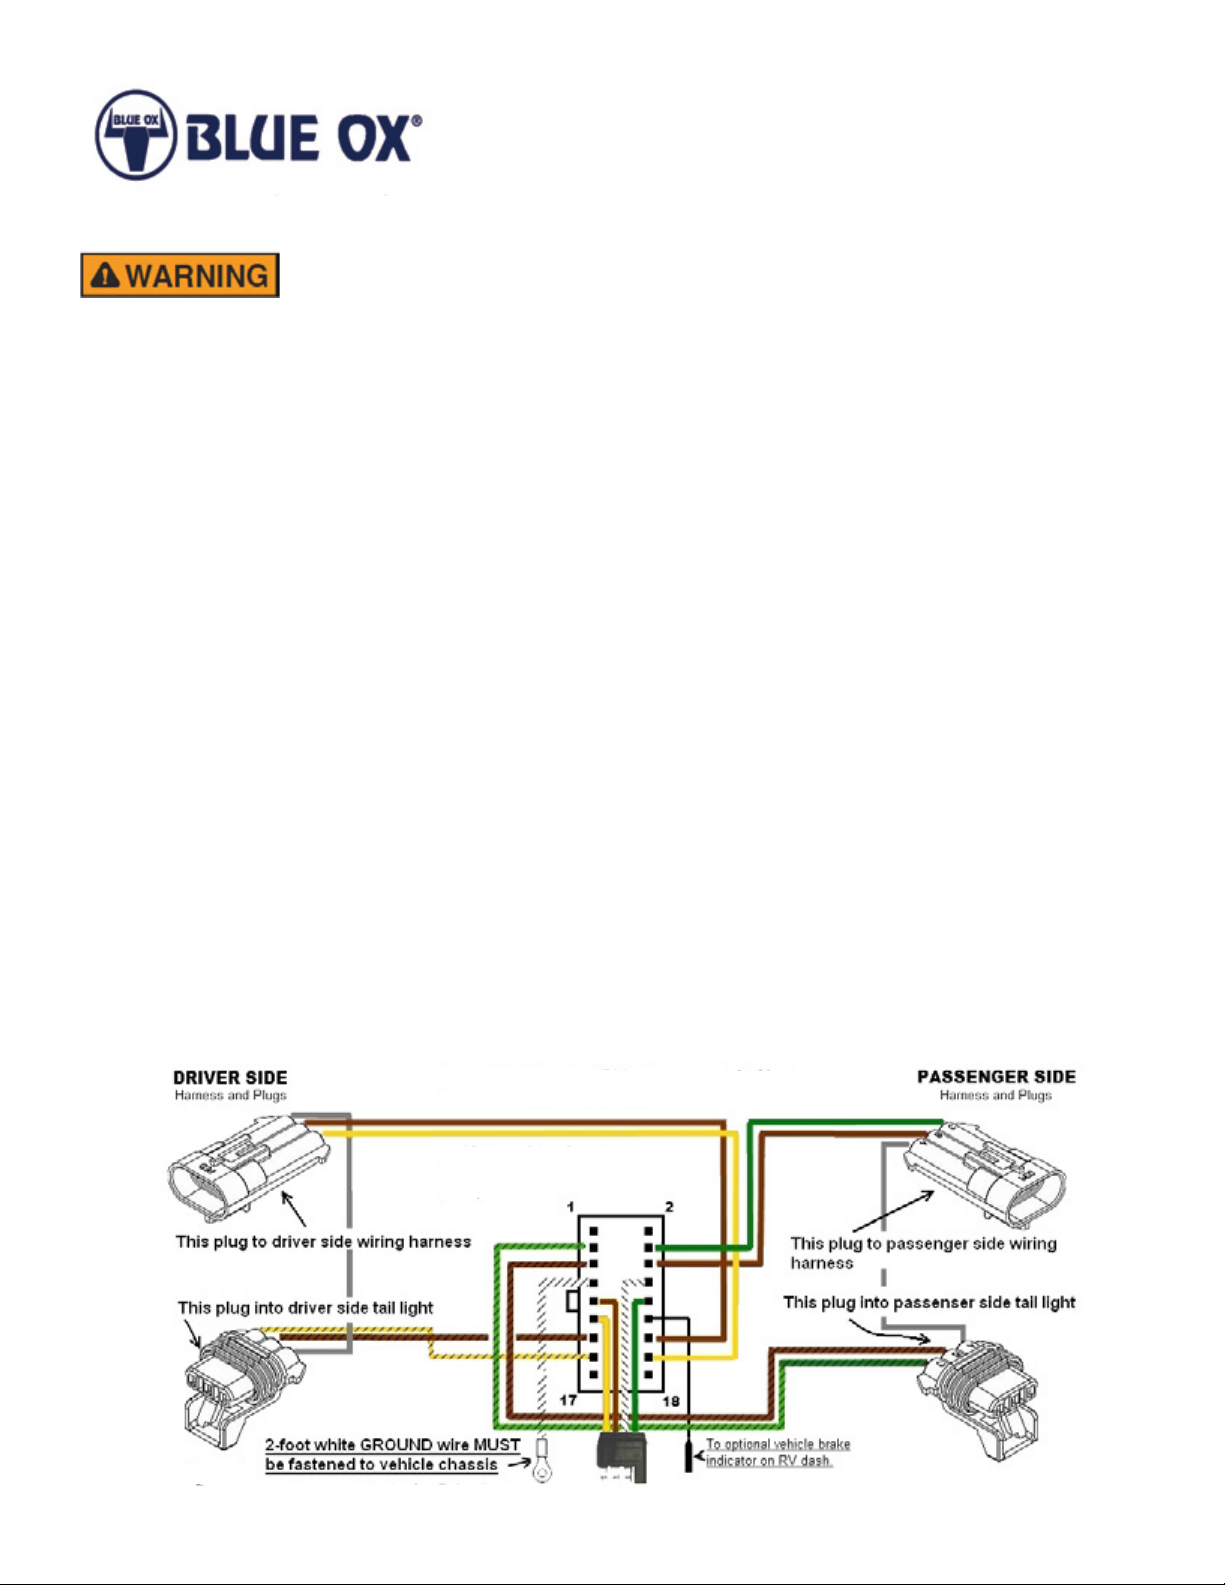
Driver side = Left side Passenger side = Right side
1) Find a convenient location to mount the control box that will allow the wiring harness to easily reach
the left and right tail lights. For instance, inside the spare tire well or behind an interior panel.
2) Gain access to the back of both the left and right tail light assemblies. This may be accomplished
from outside the vehicle or inside the vehicle depending on the make and model.
•Outside — remove the screws holding the tail light covers. Remove the covers and work the
taillight assemblies loose to expose the wiring.
•EZ Light Wiring Harness Kit
•Combination Wire stripper-crimper-cutter
•Screw drivers and/or wrenches and/or socket set
•Special tools to access the towed vehicle’s
taillight assemblies (depends on the vehicle.)
•Inside — remove the plastic or fabric covering the assemblies to expose the wiring.
3) Plug the the wiring harness into the controller.
4) Route the DRIVER side wiring harness (yellow and brown wires in a bundle) to the DRIVER side
tail light wiring. Route behind interior panels as practical.
5) Route the PASSENGER side wiring harness (green and brown wires in a bundle) to the
PASSENGER tail light wiring. Route behind interior panels as practical.
6) Route the 4-wire FLAT cable to the front of the vehicle. Wire tie every 8 inches to 12 inches as
necessary to insure good mechanical connection to vehicle frame.
Bwn
Yell Bwn
Grn
Yell/Blk
Bwn/Blk
Bwn/Blk
Grn/Blk
405-0263 Rev B Page 1 of 3 9/27/12
Page 2
BX88275 thru BX88285 and BX88287
EZ Light Wiring Harness Kit
Installation Instructions
DRIVER SIDE Wiring
1) Unplug the tail light from vehicle wiring.
2) Insert the connector into mating tail light
connector.
3) Plug the vehicle wiring connector into the
remaining connector.
4) Neatly bundle and zip-tie slacked wires.
5) Carefully re-install the tail light assembly taking
care not to pinch wires or crimps.
6) Re-install any interior panels that were
removed for routing the harness to the driver
side.
1) Mount controller in an out of the way location.
Peel protective cover off the sticky foam on the
back of the controller and rmly press it in place.
The white wire with ring lug must be
attached to vehicle metal chassis otherwise the
controller will not operate correctly
PASSENGER SIDE Wiring
1) Unplug the tail light from vehicle wiring.
2) Insert the connector into mating tail light
connector.
3) Plug the vehicle wiring connector into the
remaining connector.
4) Neatly bundle and zip-tie slacked wires.
5) Carefully re-install the tail light assembly taking
care not to pinch wires or crimps.
6) Re-install any interior panels that were
removed for routing the harness to the
passenger side.
2) Route the 2-foot WHITE wire to a metal
chassis location. Drill a ¼ inch hole if neces-
sary to route wire to outside the vehicle. Strip
¼ inch insulation from wire end and crimp on
the ring terminal provided in the kit. Use the
self-tapping screw to attach the ring terminal
to chassis ground.
Test and Operation Guide
While towing a vehicle equipped
with a remote brake system, it will be necessary to turn on the RV tail lights to provide
power to the braking system.
Have another person assist you when checking the tow system lighting for proper operation.
TEST BEFORE TOWING
1) When you have your towed vehicle hitched
and ready to tow, make sure the towed vehicle
electrical (umbilical) cable is connected
between your towed vehicle and RV.
2) Have your assistant sit at the driver seat in the
RV.
3) While standing at the rear of the towed vehicle,
have your assistant switch on the RV running
lights.
4) Both the RV tail lights and the towed vehicle tail
lights will light.
5) Have your assistant press the brake pedal in
the RV. RV brake lights and towed vehicle
brake lights will brightly light.
On towed vehicles with SEPARATE
BRAKE AND TURN lights, the controller will light
both BRAKE and TURN lights together. THIS
IS AN ENHANCED FEATURE that gives your
towed vehicle higher visibility to those driving
behind you.
6) Have your assistant release the brake pedal.
7) Have your assistant turn on the driver side turn
signal. The driver side turn light on the RV will
blink along with the driver side brake light
(and separate driver side turn light) on the
towed vehicle.
8) Have your assistant turn on the right turn
signal. The right turn light on the RV will blink
along with the right brake light (and separate
right turn light) on the towed vehicle.
405-0263 Rev B Page 2 of 3 9/27/12
Page 3

BX88275 thru BX88285 and BX88287
EZ Light Wiring Harness Kit
Installation Instructions
AFTER THE TOW
1) After unhitching and disconnecting the towed
vehicle, verify brake and turn signal lights are
working properly before driving.
The plug, socket and mounting bracket for
the towed vehicle are not included in this kit.
Parts List
BX88275 EZ Light, Universal
63-3969 BX88275 Parts Bag
BX88276 EZ Light, Enclave, Malibu & Traverse
63-3970 BX88276 Parts Bag
BX88277 EZ Light, Cobalt 2 DR, HHR, GS 2 DR
63-3971 BX88277 Parts Bag
BX88278 EZ Light, Cobolt 4 DR, GS 4 DR
63-3972 BX88278 Parts Bag
BX88279 EZ Light. Liberty, Nitro
63-3973 BX88279 Parts Bag
BX88280 EZ Light, Escape, Edge, Edge Sport,
MKX & Mariner
The umbilical cord, used to connect brake
and turn signals between the motor home and the
towed vehicle, is not included in this kit.
The towed vehicle remote brake indicator
wiring and components are not included in this
kit.
63-3974 BX88280 Parts Bag
BX88281 EZ Light, CRV
63-3975 BX88281 Parts Bag
BX88282 EZ Light, Grand Cherokee
63-3976 BX88282 Parts Bag
BX88283 EZ Light, Liberty
63-3977 BX88283 Parts Bag
BX88284 EZ Light, Renegade, Wrangler
63-3978 BX88284 Parts Bag
BX88285 EZ Light, Rubicon, Wrangler
63-3979 BX88285 Parts Bag
BX88287 EZ Light, Escape
63-4012 BX88287 Parts Bag
CUSTOMER SERVICE COMMITMENT
Blue Ox® is committed to providing you with exceptional customer care throughout your lifetime
with our products. Our team is here to assist you with any questions you may have regarding the
performance of your product. Simply call (402) 385-3051 and you can speak with our customer care
team.
Additionally, please visit our website to see which rallies our Destination America team will be
attending. For a nominal fee, our service technician will service your towing system to ensure it’s in
proper working condition. Also, as a commitment to our customers, should you visit our factory, you
can stay at our full service Blue Ox® campground at no charge along with enjoying a factory tour.
Again, thank you for being our customer and for the condence you have shown in the performance
of our products. It is because of customers like you we enjoy the success we have today.
One Mill Road, Industrial Park
Pender, Nebraska 68047
405-0263 Rev B Page 3 of 3 9/27/12
© 2012 Blue Ox
Phone: (402) 385-3051
Fax: (402) 385-3360
www.blueox.com
 Loading...