

Page 1

Blueair Pro
User Manual
English | Français | Deutsch| Español Polski
Page 2

Contents
Welcome 4
The Blueair Pro Series Air Puriers 5
Getting the Most f rom
Your Blueair System 6
Getting Star ted 7
Settings 8
Care and Maintenance 9
How it Works 10
Changing the Filter 12
Adding the Carbon+ Filter 14
Filters 15
Air Intelligence Module 16
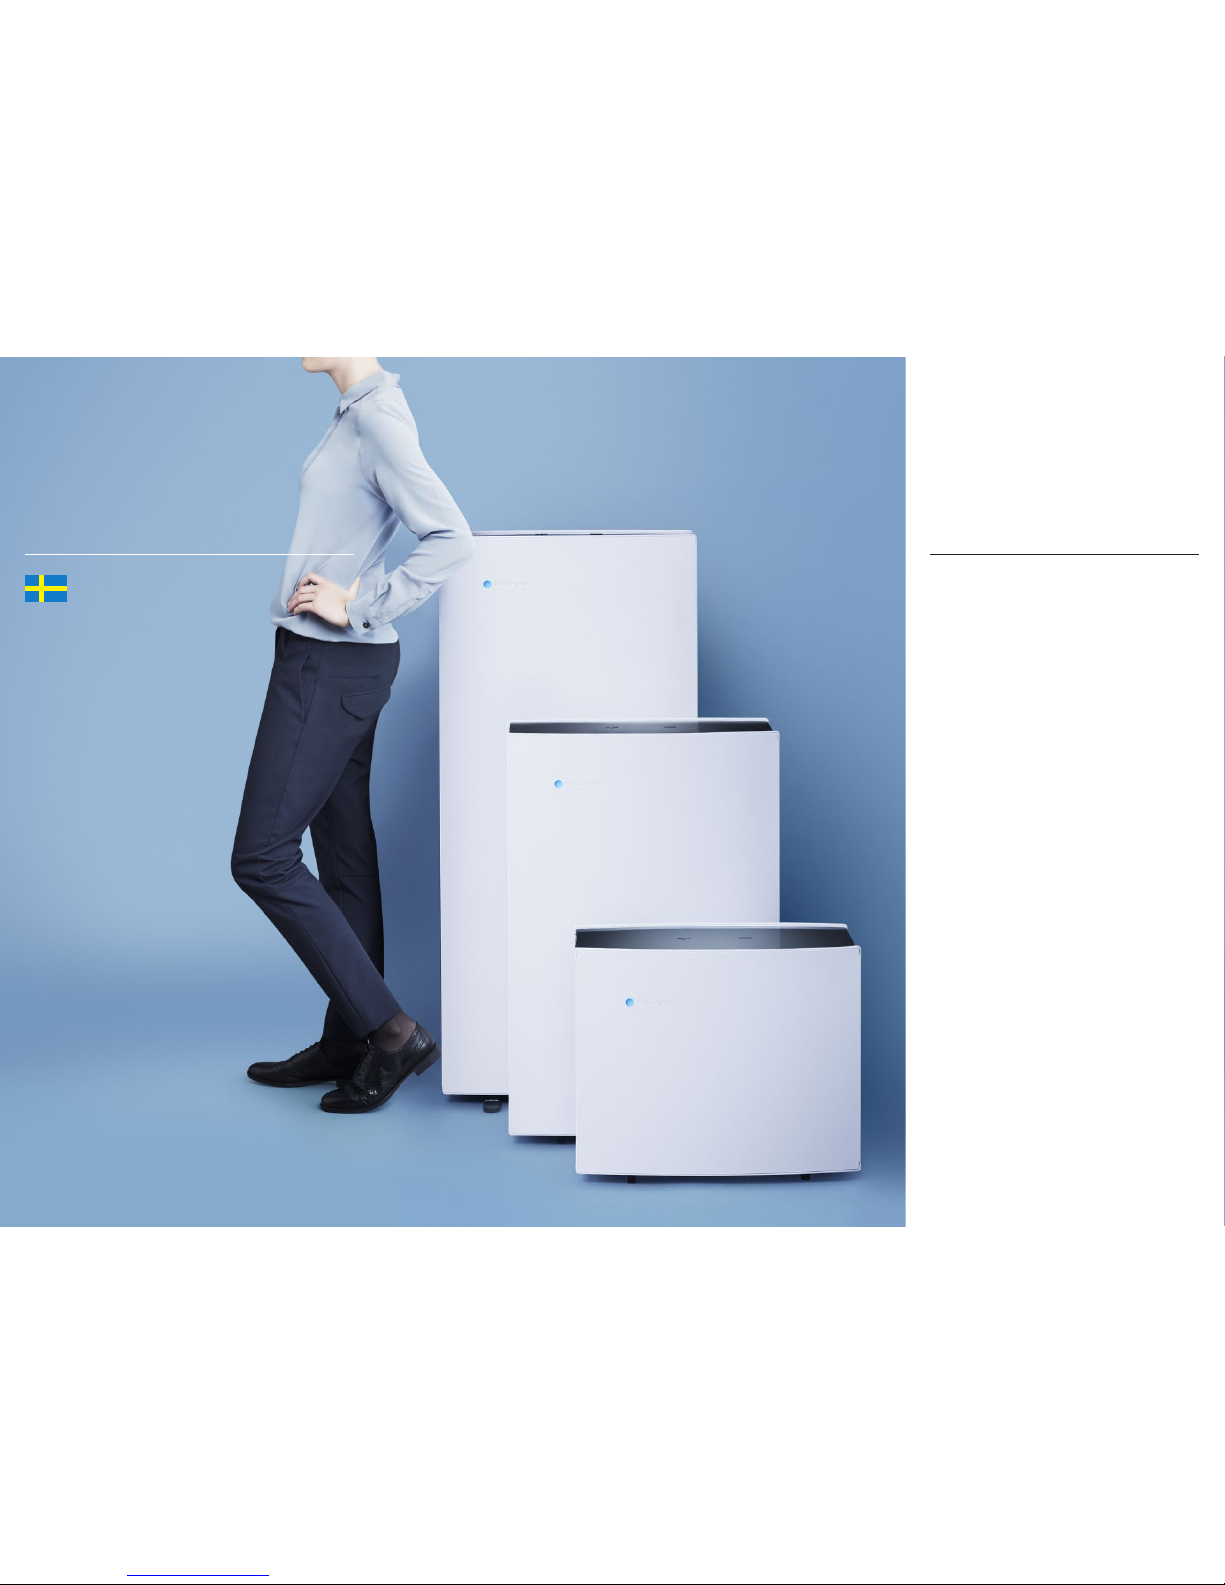
Pro M
Pro L
Pro XL
Innovated
with Love
in Sweden
Page 3
4
5
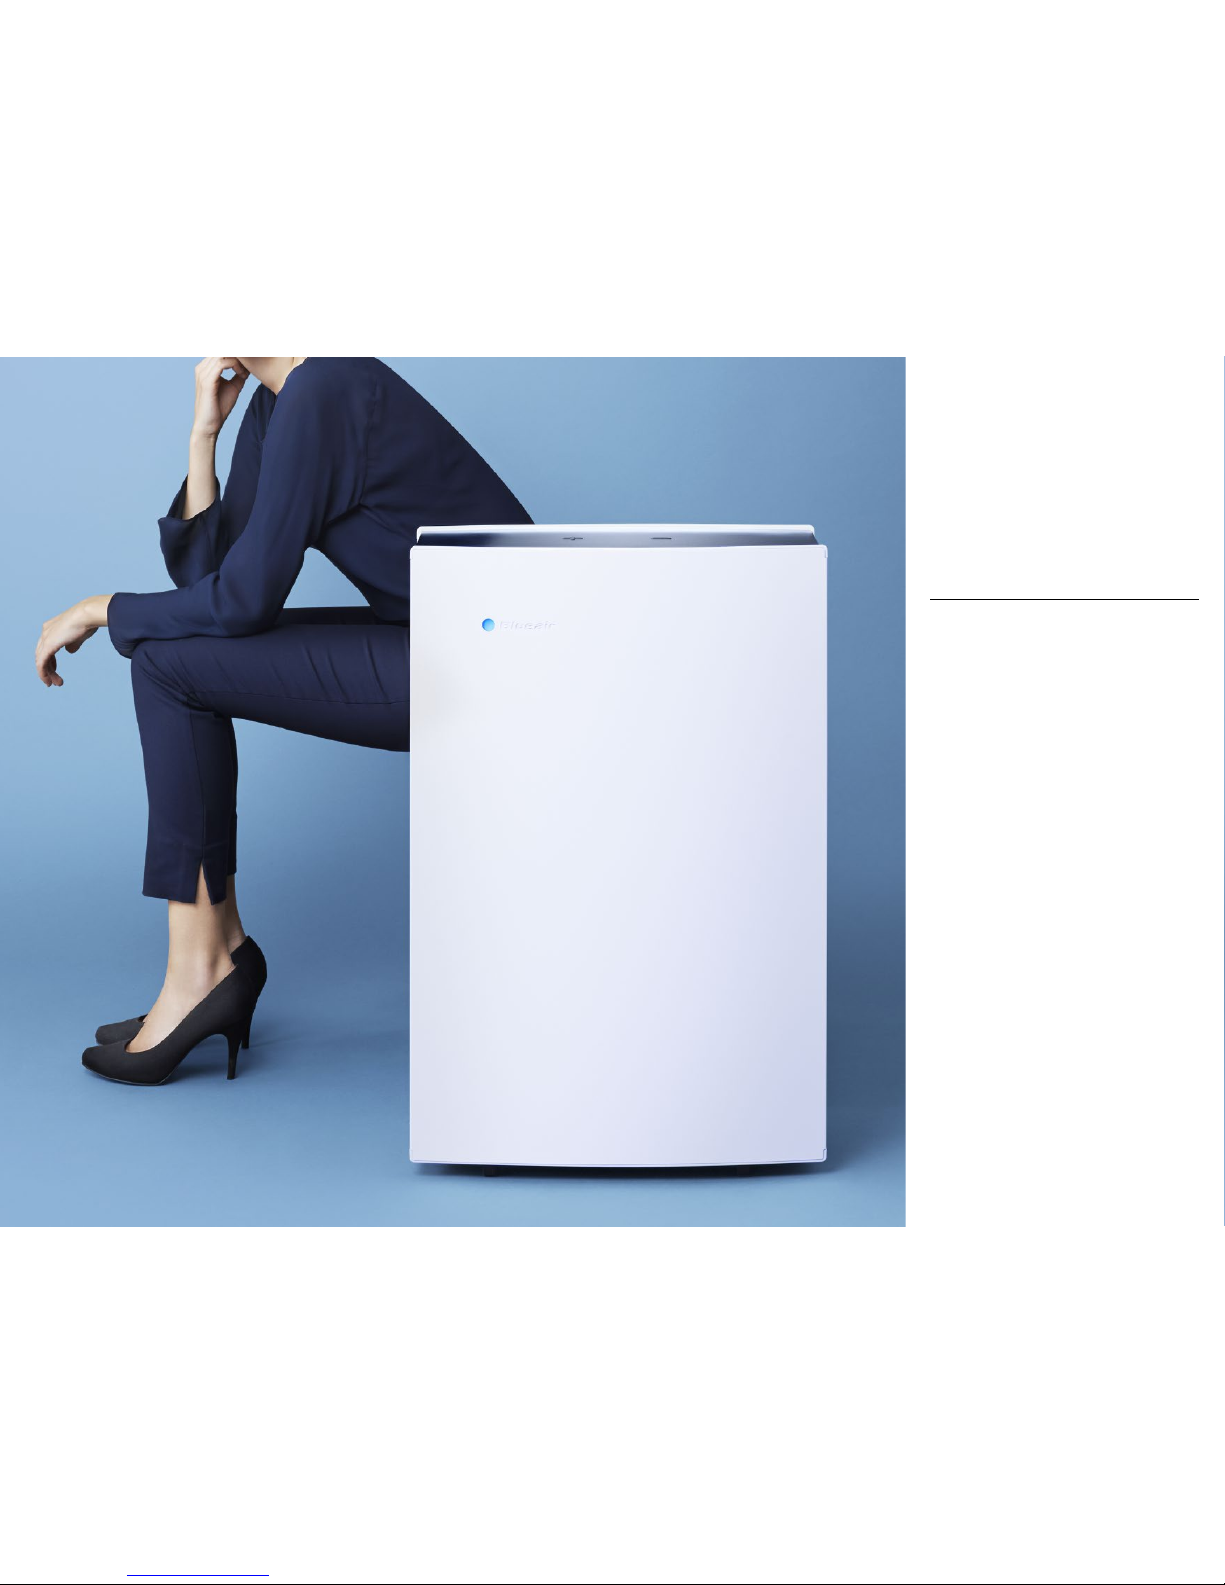
Thank you for buying a Blueair Pro Air Purier.
With patented HEPASilentTM technology and
state-of-the-art lters it is our most power ful
and technically advanced air purier yet. Still it’s
remarkably easy to set up. Just plug in, turn on
and let it breeze.
Keep the Filters Fresh
Changing lters according to the replacement
schedule keeps your Blueair Pro in tip-top form.
Extend Your Warranty
Complete and send your warranty card to Blueair
today to extend your limited warranty.
Keep the Planet Healthy, Too
Maximum ef fect, minimum footprint. Your Blueair
Pro can be recycled so it lives forever.
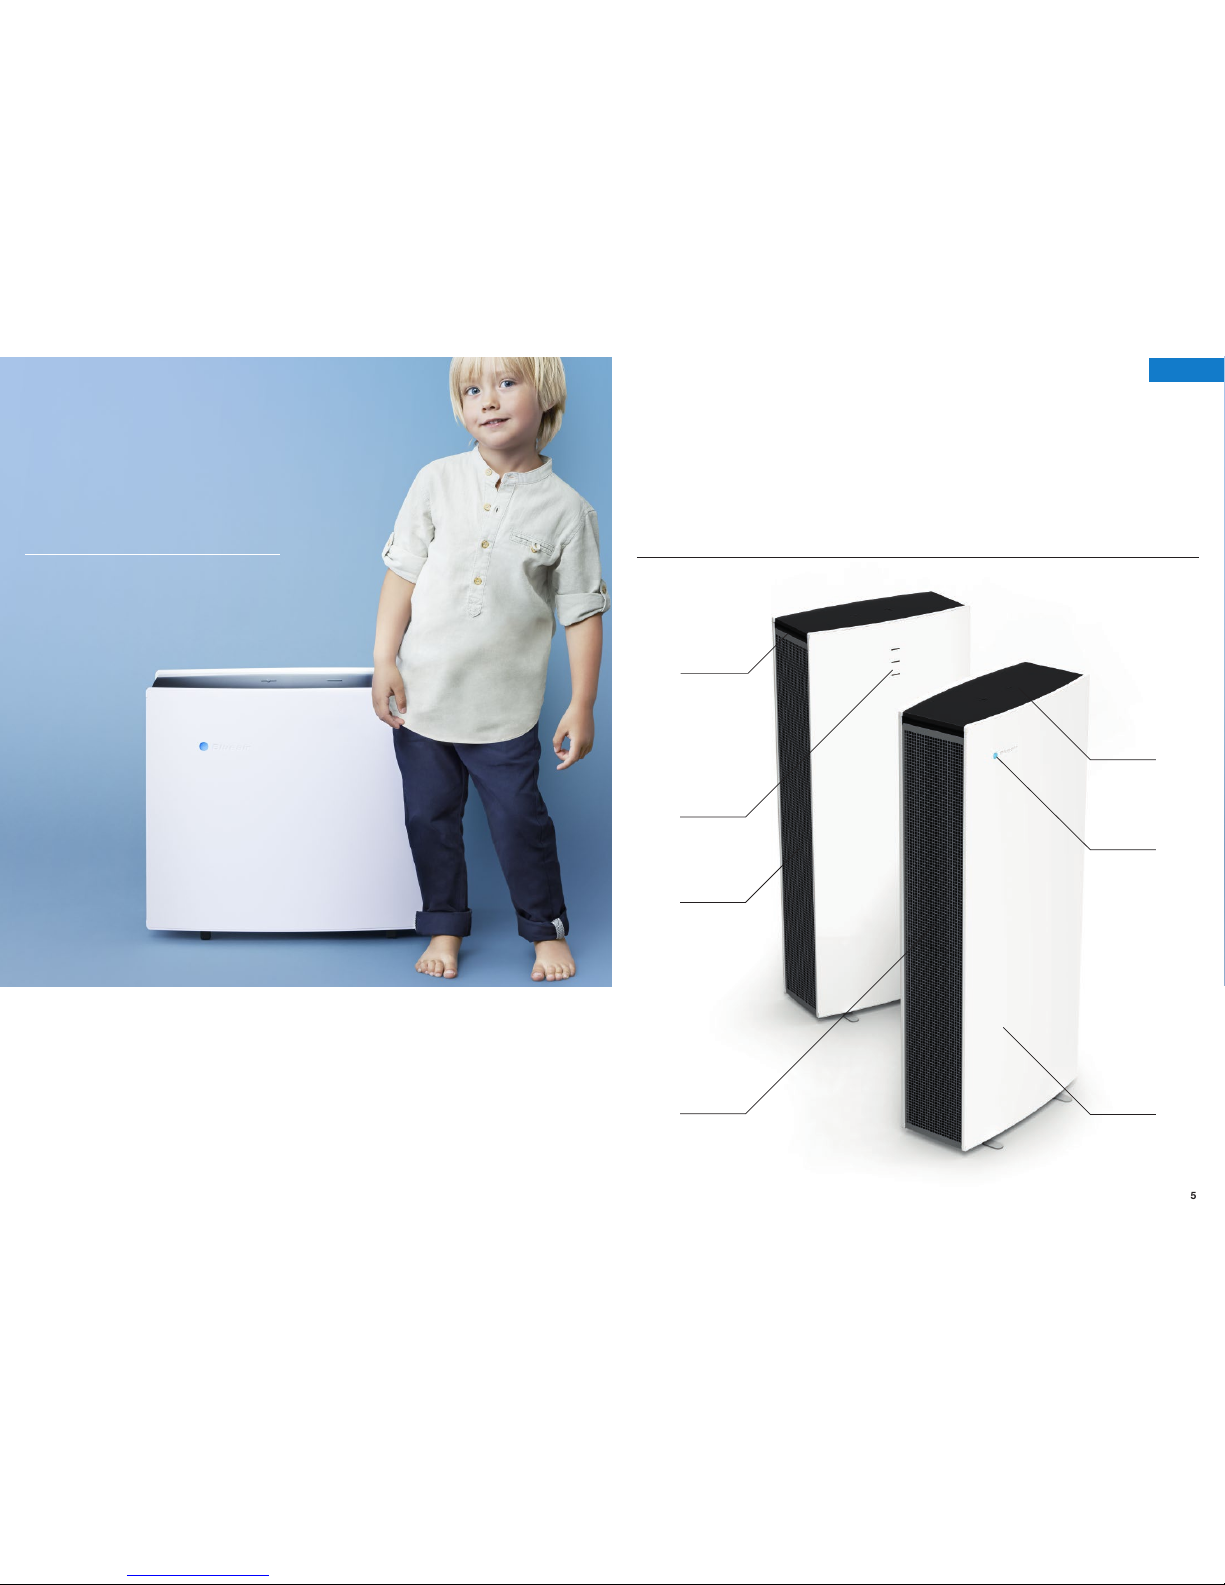
The Blueair Pro
Air Purier
Handle
Air Intelligence
Module intake
Air intake
Controls
Clean air outlet
Running
indicator light
Galvanized
steel housing
Welcome
To The Blueair
Pro family
FRONT
BACK
English
Page 4

6
7
Getting
Started
General Safety Instructions
The Blueair Pro Series air purier is an electrical
appliance. Please read the safety instructions
before use and take the necessar y precautions
to reduce the risk of re, electric shock or injury.
The Blueair Limited Warranty applies only if the
unit is used according to these instructions.
This applian ce is not intended for use by persons
(including children) with reduced physical, sensory
or mental capabilities, or lack of experience
and knowledge, unless they have been given
supervision or instruction concerning use of the
appliance by a pe rson responsible for their safet y.
Children should be supervised to ensure that
they do not play with the appliance. If the supply
cord is damaged, it must be replaced by the
manufacturer or its service agent or similarly
qualied persons in order to avoid a ha zard.
This product complies with the ma ximum allowable concentration of ozone of 0.050 parts per
million by volume (ppmv) in a 24-hour period. The
Health Canada Guideline 2010 recommends that
the maximum exposure limit, based on an averaging time of 8 hours, is 0.020 ppmv or less whe n
tested in a sealed, controlled room approximately
30 m ³.
Placement
Place the unit in a loc ation that allows air to circulate
freely in, out and around the unit. The minimum
acceptable distance from another object is 4˝ or
10 cm. Use only genuine Blueair lters.
Do not plac e the unit:
Directly on or agains t soft fur nishings,
such as bed ding or cur tains.
Near sources of heat, s uch as radiators,
replace s or ovens.
Outdoors.
Near wet are as, such as b athrooms o r
laundry rooms, whe re it may come into
contact with water.
Getting the
Most from your
Blueair System
The Blueair system is easy to use. Make sure
your unit is the right size for your room, and
change the lters according to recommended
lter replacement schedule. Remember that,
just as air conditioners and heaters have limits
to the volume of air they can cool or heat, every
air purication system has limits to the volume
of air it can clean. Follow these common-sense
guidelines.
Close Your Windows
You wouldn’t throw open your windows on a hot
summer day and expect your air conditioner to
work efciently, because you can feel the hot
air coming in and the cool air going out. Even
though you can’t see the contaminated air
coming in and the clean air going out, the same
logic applies to your air purier.
Close Your Doors
Just as you might seal off part of your house on
a cold winter night to keep your heater working
more efciently, seal off the room in which your
system is working for best results.
Run Your System 24 hours p er Day
For best results, run your Blueair unit 24 hours a
day, 7 days a week. Round-the-clock operation
ensures that a continuous supply of clean,
ltered air constantly circulates throughout the
room. Blueair systems are designed for phenomenally low power usage. In fact, it costs about
the same to power a Blueair air purier as it does
to power a single light bulb, depending on the
unit and the operating speed.
This symbol on the produ ct or on its packaging ind icates that this product may not be tre ated as
househol d waste. Instead it shall b e handed over to Blueair se rvice or collection point for the recyclin g
of electrical and electronic e quipment. By ensuring this prod uct is disposed of cor rectly, you will help
prevent potential nega tive consequences fo r the environment and human health w hich could o therwise be caus ed by inappropriate was te handling this produc t.
To reduce the risk of electric shock, this equipment has a grounding type plug that has a third
(groundin g) pin. This plug will only t i nto a grounding type powe r outlet. If th e plug does not t into
the outlet, c ontact qualied personnel to i nstall the p roper outlet. Do not alter the plug in a ny way.
Page 5

8
9
Settings
Plug the power cable rmly and completely into
the recessed power cord socket located at the
bottom of the unit and plug the other end into a
grounded wall outlet or power strip. Set the unit
to maximum speed, which is recommended for
fast initial cle aning, daytime use, or very polluted
air. After a few minutes, adjust the unit to the
desired speed. Minimum speed is generally
recommended for nighttime use.
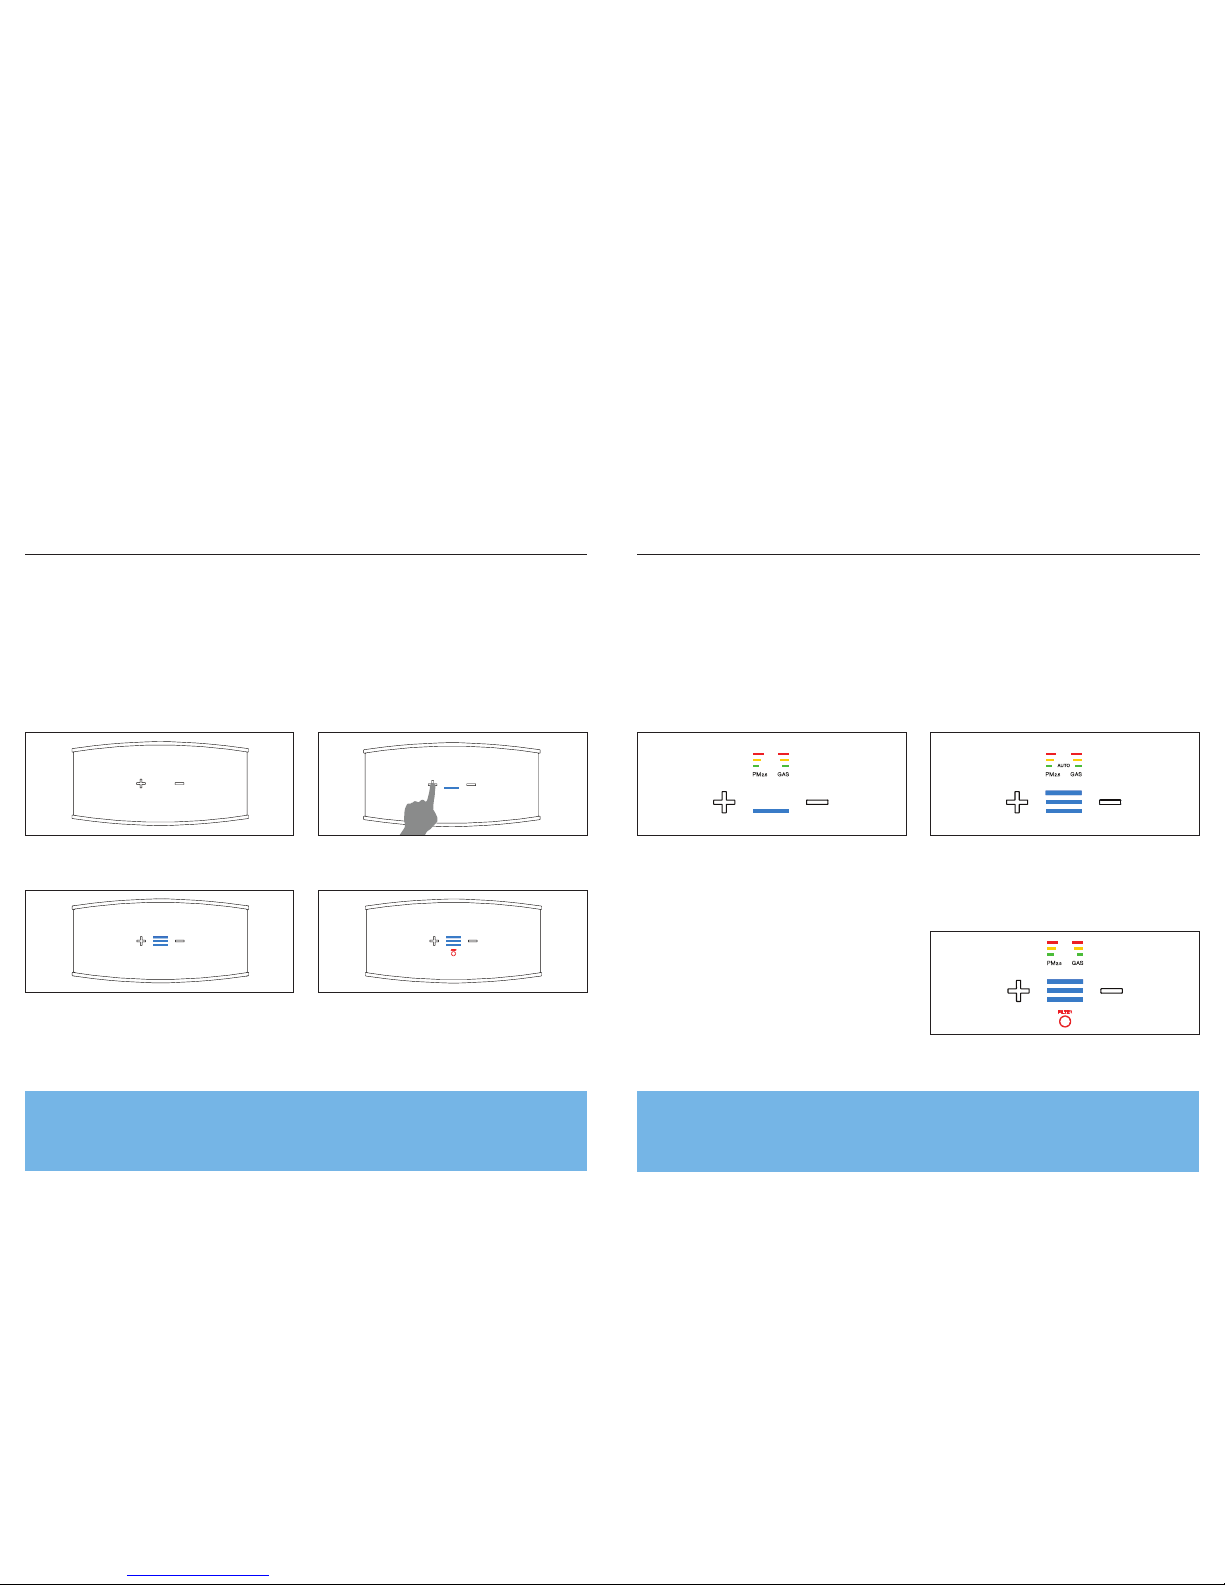
A. Dis play Function wit hout the
Air Intelligence Module
The display i s on standby. Turn on your Bluea ir air purier by touc hing the PLUS
button on th e unit. A blue bar will a ppear between
the buttons.
Adjust the s peed from 1 to 3 using th e PLUS and MINUS
buttons.
Turn the air puri er off by pressin g the MINUS button w hen
the unit is in r st speed.
When lter r eplacement is re quired, a red repla cement
lter light w ill appear.
While the unit is r unning, the display will slowly d isappear after 30 sec onds.
To activate the d isplay again, simply touch one of t he buttons.
B. Display Function with t he
Air Intelligence Module
For automati c mode, touch the PLUS bu tton when the unit
is running o n speed 3. The word AUTO w ill appear, and the
two air qual ity sensors wil l adjust the speed a ccording to
the contaminant levels.
To return to manual o peration, touch th e MINUS button.
When lter r eplacement is re quired, a red repla cement
lter light w ill appear.
Air Intelli gence Module req uired. For instal lation and maintenance of th e Air Intelligenc e Module, please s ee page 16,
”Air Intelligence Module”.
Turn on your Bluea ir air purier by touc hing the PLUS
button on th e unit. A blue bar will a ppear between th e
buttons.
Above the bar, two ba r columns show the leve ls of airsuspended particles (PM2.5) and gaseous contaminants
(GAS). One bar ( green) represe nts a low particle o r
gas level.
Three bar s (green, yellow and r ed) represent a h igh level
of partic les or gas, indica ting the need to incr ease the
operatin g speed, or to set the un it in automatic mode .
Turn the air puri er off by pressin g the MINUS button when
the unit is in r st speed.
Please note: The Air I ntelligence Module wil l show high levels of bot h particles and
gas during the rst ve minutes of operation while the air quality sensors calibrate.
Page 6
10
11
Blueair air puriers feature high quality design,
materials and workmanship. To keep your unit in
top condition, we recommend routine cleaning.
The appliance must be disconnected from the
supply mains before cleaning or maintenance.
Vacuum the air intake grille from the inside
when you remove the lter to replace it.
Wipe the exterior of the unit with a soft, clean,
damp cloth.
Never clean with gasoline, chemical solvents
or corrosive material as these agents may
damage the surface.
Do not allow foreign objects to enter the intake
or exhaust openings. This may cause electric
shock or damage the unit.
Do not try to repai r or adjust any of the electrical
or mechanical functions on your Blueair unit
yourself. Contact your local dealer or Blueair
for warranty information.
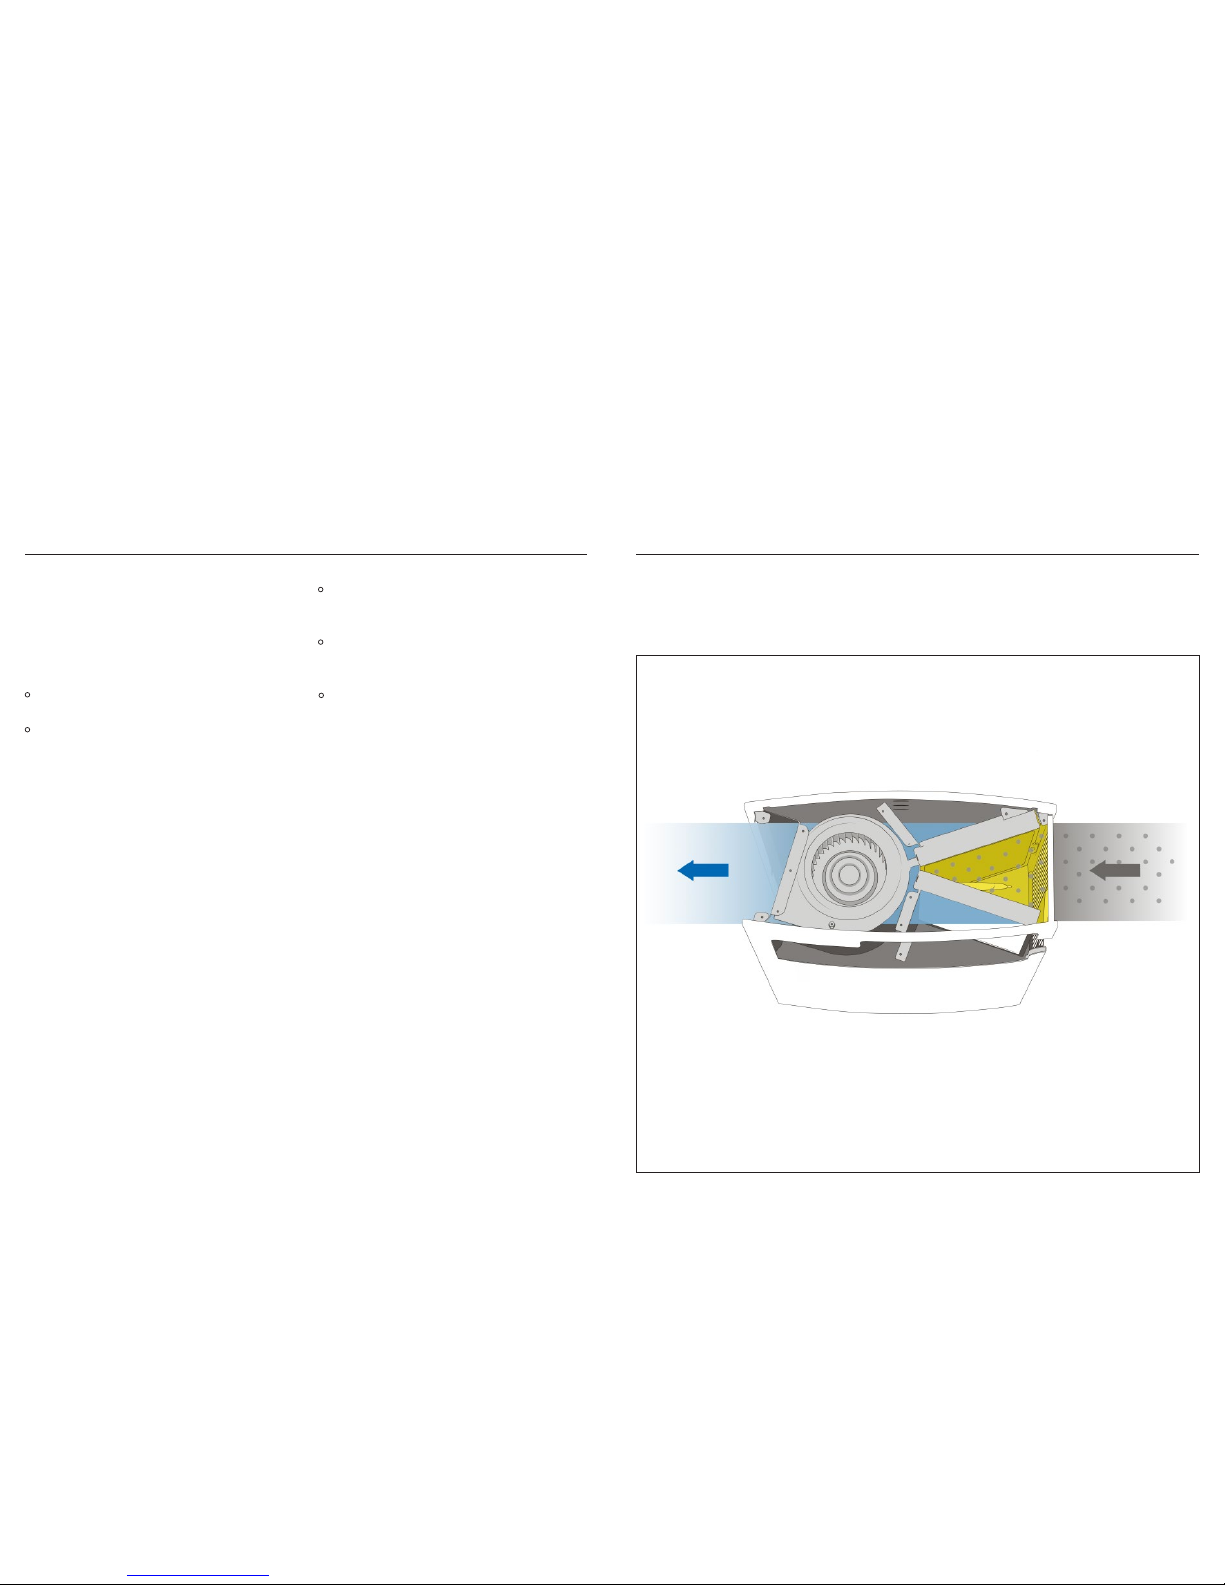
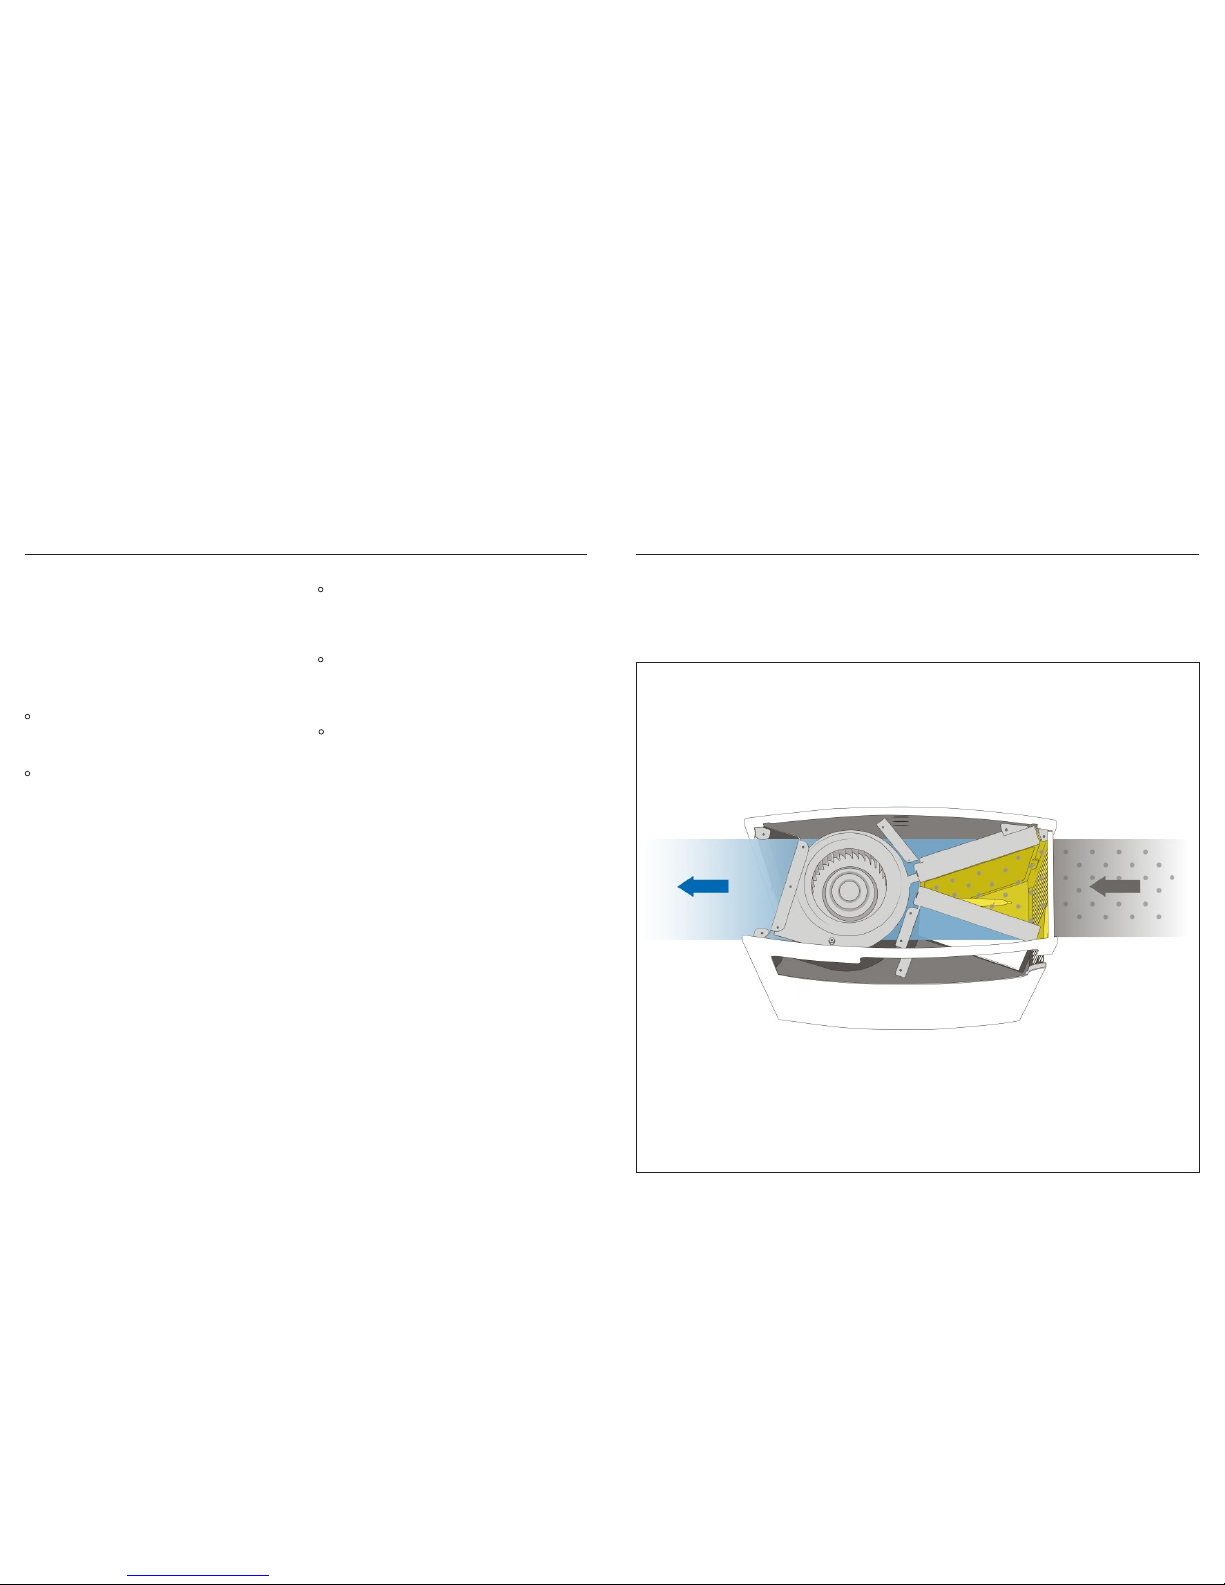
Air passes through an ion chamber where airborne particles are charged with negative ions.
Charged par ticles are drawn to the HEPASilentTM
lter surface. Puried air, which is virtually
contaminant-free, is re-circulated into the room.
How it
Works
Care and
Maintenance
Page 7
12
13
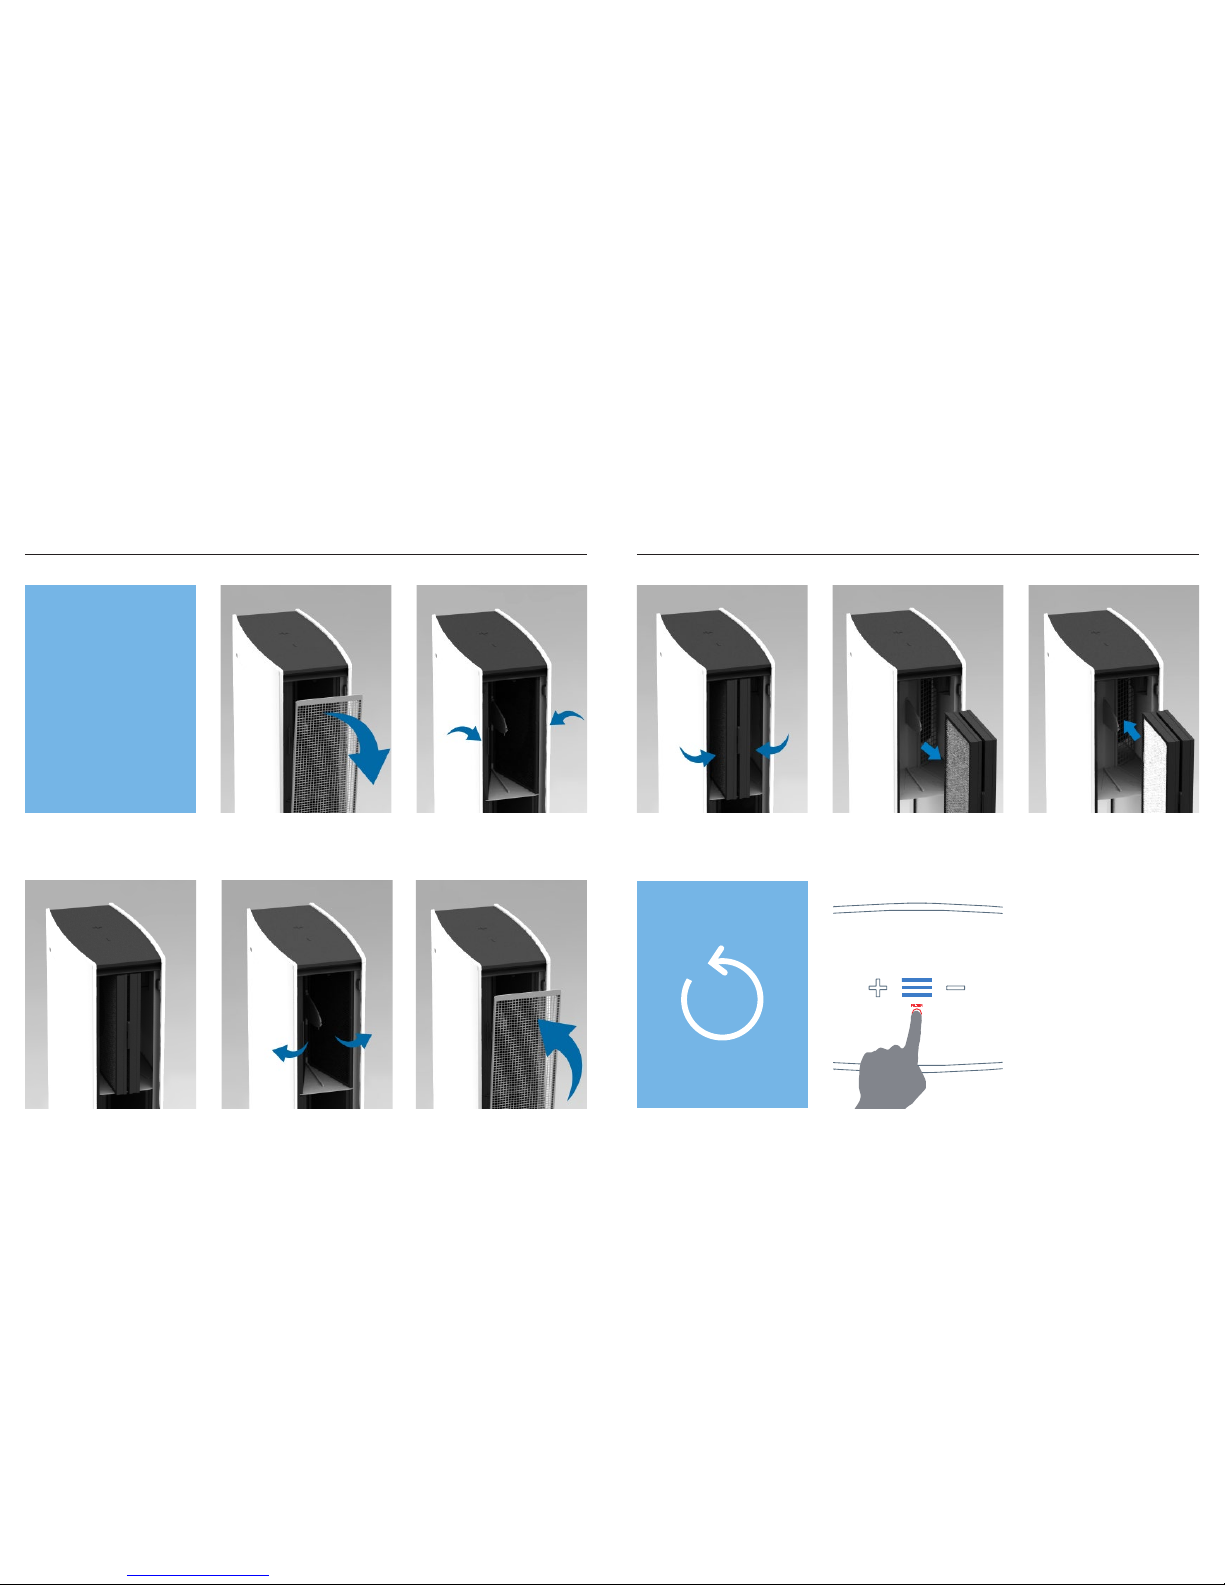
Changing
the Filter
Turn the unit off a nd open the intake
door by pulli ng at the top edge. The
intake door i s on the right hand sid e
when facin g the front of the unit.
The lter is tted into the unit in
a V shape. Two tabs pro trude on
the sides.
Using the ta bs, push the two lter
sides together.
Gently pul l the dirty lter s traight out
of the unit.
1 2
4
3
Gently pus h the new lter in. Re-attach the intake door.
Turn on the unit.
6
Push the two l ter sides out usin g
the tabs.
7
8
For Blueai r Pro L and XL, repea t steps
2–7 for all lter p acks.
Before you start
changing the lter,
turn of f the unit and
remove the plug from
the wall socket.
Keeping the lter sides togethe r, line
up the new lter i nto the unit using the
guiding ba rs in the top and botto m of
the lter housing.
5
Plug in the powe r cord, turn on and
touch and ho ld the red lter repl acement light fo r three seconds . It will
ash and disappear.
9
Page 8

14
15
Patented HEPASilentTM technology makes the
Blueair Pro Series incredibly quiet. The unit
comes with a HEPASilentTM lter already installed.
Particle Filter. Includes a particle lter that
removes dust, pollen, bacteria, pet dander, mold
spores and other a irborne particles. Th e particle
lter is made of polypropylene, which mechanically
lters out airborne particles. To maximize lter
effectiven ess, particles are negati vely charged by
the Blueair unit before reaching the lter.
SmokeSto p™ Filter. Includes a combined
particle and active carbon lter to remove
gaseous pollutants such as cigarette and cigar
smoke or other VOCs (volatile organic compounds, including household paints and other
chemicals). Adding activated carbon to a lter
may affect air ow and CADR. You may also
notice a slight odor from the carbon when the
lter is rst used; this will quickly dissipate.
Carbon+ Fi lter. An extra active carbon lter
stage that can be mounted in the Blueair Pro
Series in addi tion to the main HEPASilentTM particle
lter or SmokeStop™ lter. It provides extra
protection against gaseous contaminants such
as formaldehyde, sulphur dioxide and volatile
organic compounds.
For optimal performance, Blueair
recommends that you replace lters every
six (6) mo nths of use.
We offer a convenient Filter Subscription
Program in some countries. Contact your local
dealer or Blu eair to nd out whether the program
is available to you.
IMPORTANT! Use only genuine Blueair lters
to ensure proper function of your unit and to
qualify for full warranty coverage.
Adding the
Carbon+ Filter
Filters
Keeping the lter sides closed, gently
slide the Car bon+ Filter into the uni t.
Push the side s out towards the
ma in l ter.
Snap the Car bon+ Filter to the main
lter frame tab.
1 2 3
Customer’s Record
The mode l number and ser ial number of th is product can b e found on the bot tom of
the uni t. Please note th em in the space p rovided below an d keep for future re ference.
Model number Dealer’s name
Serial number Dealer’s address
Date of purchase Telephone number
While the unit is r unning, the display will slowly d isappear after 30 sec onds.
To activate the d isplay again, simply touch one of t he buttons.
Page 9
16
17
Air Intelligence Module Maintenance
Remove the module from the unit.
Use a vacuum cleaner to gently clean the
intake in front of the gas sensor.
Use a damp cotton swab to clean the dust
sensor lens. After cleaning the dir t off the lens,
use a dry cotton swab to wipe the lens. Do not
use alcohol to clean the lens.
Re-insert the module.
Air Intelligence
Module
By adding the Blue air Air Intelligence Module, the
Blueair Pro Ser ies can continuously monitor and
report the surrounding air quality through stateof-the-art particle and gas sensors. The unit can
also run on automatic mode, where the speed
is set according to the level of pollution the
sensors are detecting.
If you wish to upgrade your Blueair Pro unit
with an Air Intelligence Module, please visit
www.blueair.com to nd your closest dealer.
Pull out the du mmy cover sitting in
the module holder.
Insert t he Air Intelligen ce Module into
the module holder.
Insert t he lter pack and re -attach the
intake door.
1 2 3
Remove the top lter pa ck, see Changing the Filter steps 1– 4.
Dust sensor lens
Intake for ga s sensor
Page 10
18
19
Blueair was founded on the belief that everyone
should be able to enjoy clean air indoors, at
home or in the workplace. We have become
a global authority on how to remove indoor air
impurities down to the tiniest particle thanks to
our deep comm itment to research and innovation.
Our healthier air solutions work quietly and
using very little energy to clean more air faster,
removing allergens, asthma triggers, viruses,
bacteria and other airborne pollutants.
We develop the
world’s best air cleaners
because we passionately
believe that clean
air is a basic human right. Blueair – Innovated
with love in Sweden.
Blueair Pro
Professional
Performance
Superior Style
Page 11
Sommaire
Bienvenue 22
Puricateurs d’air Blueair Série Pro 23
Maximiser le rendement de votre
appareil Blueair 24
Démarrage 25
Réglages 26
Soins et entretien 28
Fonctionnement 29
Remplacement du ltre 30
Ajouter un ltre Car bon+ 32
Filtres 33
Module Air Intelligence 34
Pro M
Pro L
Pro XL
Innové
avec passion
en Suède
Page 12
22
23
Nous vous remercions d’avoir acheté un puricateur d’air Blueair Pro. Doté de la technologie
HEPASilent™ brevetée et de ltres de pointe,
le Blueair Pro est notre puricateur d’air le plus
avancé et le plus puissant à ce jour, même s’il
demeure remarquablement facile à installer.
Branchez-le, allumez-le et laissez-le
fonctionner!
Remplacement des ltres
Changez vos ltres Blueair conformément aux
intervalles de remplacement recommandés
an de maximiser le fonctionnement de votre
puricateur d’air Blueair.
Extension de la garant ie
Remplissez et retournez votre carte de ga rantie
à Blueair dès a ujourd’hui an de prolonger votre
garantie limitée
Ensemble, protégeons la planète !
Effet maximum et empreinte min imum. Votre
Blueair Pro est re cyclable à l’inni !
Puricateur d’air
Blueair Pro
Poignée
Admission du
module Air
Intelligence
Admission
d’ai r
Commandes
Sortie d’air
purié
Voyan t de
fonction-
nement
Boîtier en acier
galvanisé
Découvrez
la famille
Blueair Pro
FAÇADE
DOS
Page 13
24
25
Démarrage
Consignes de sécurité générales
Le puricateur d’air Blueair série Pro est un
appareil électrique. Veuillez lire attentivement
les consignes de sécurité avant utilisation et
prendre les précautions nécessaires pour
prévenir tous risques d’incendie, de choc
électrique ou de blessure. La garantie limitée
Blueair ne s’applique que si l’appareil est utilisé
conformément à ces consignes.
Cet appareil n’est pas prévu pour ê tre utilisé
par des perso nnes (y compris les enfants) do nt les
capacités physiques, sensorielles ou mentales sont
réduites, ou des pe rsonnes dénuées d’expérience
ou de connaiss ance, sauf si elles ont pu béné cier,
par l’intermédiaire d’une personne responsable de
leur sécurité, d’une surveillance ou d’instructions
préalables c oncernant l’utilisation de l’appareil.
Les enfants doivent être sur veillés pour
s’assurer qu’ils ne jouent pas avec l’appareil. Si
le cordon d’alimentation est endommagé, il doit
être remplacé par le fabricant, son mandataire
ou une personne qualiée an d’éviter une
réparation non conforme
Ce produit est conforme avec la concentration maximale permised’ozone de 0,050 parties
par million par volume (ppmv) pendant une période de 24 heures. La Ligne directrice (2010) de
Santé Canada recommande un niveau maximal
d'exposition, basé sur un moyen de 8 h eures,
soit 0,020 ppmv ou moins dans une chambre de
teste étanchée et contrô lée de 30 m³.
Emplacement
Positionnez le pur icateur d’air à un endroit où
l’air peut circuler librement à travers et autour de
l’appareil. Conservez une distance minimum d e
10 cm entre l’appareil et les autres objets. Utilisez
uniquement des ltres Blueair d’origine.
Ne placez pas l’appar eil :
Directem ent sur des tissus com me de la
literie ou des rideaux
À proximité de sources de chaleur
comme, les fours, les c heminée s ou les
radiateurs
A l’e xtér ieur
À proximité de zones humides comme
les salles de bains ou les buanderies
où il risque rait d’être en co ntact avec
de l ’eau.
Maximiser
le rendement de votre
système Blueair
Le système Blueair est facile à utiliser. Assurezvous que la taille de votre appareil est adaptée
aux dimensions de votre pièce et changez
régulièrement le ltre conformément aux
intervalles de remplacement recommandés.
N’oubliez pas : tout comme les climatiseurs
et les radiateurs sont limités par rapport au
volume d’air qu’ils peuvent refroidir ou réchauffer, chaque système de purication d’air ne
peut purier qu’un volume d’air limité. Veillez
à bien suivre ces quelques recommandations
pratiques.
Fermez les fenêtres
Vous ne pouvez pas laisser vos fenêtres
grandes ouvertes par une chaude journée d’été
et attendre de votre climatiseur qu’il fonctionne
parfaitement, simplement parce que vous
sentez l’air chaud qui entre et l’air froid qui ressort. Et bien que vous ne puissiez pas voir l’air
contaminé qui entre dans votre appareil et l’air
pur qui en ressort, la même logique s’applique
à votre puricateur d’air.
Fermez les portes
Tout comme vous fermez les portes de votre
maison par une froide nuit d’hiver pour assurer
le bon fonctionnement de votre chauf fage, il est
important d’isoler la pièce dans laquelle votre
appareil se trouve pour obtenir les meilleurs
résultats
Laisse z votre système fonc tionner 24 h/24
Pour obtenir les meilleurs résultats, laissez votre
appareil Blueair fonctionner 24 h/24 et 7 j/7. Un
fonctionnement continu est l’assurance d’une
circulation constante d’air pur et ltré dans la
pièce. Les appareils Blueair sont conçus pour
une utilisation à très faible puissance. Le coût
d’alimentation d’un puricateur d’air Blueair est
en fait sensiblement le même que celui d’une
seule ampoule électrique, selon l’appareil et la
vitesse de fonctionnement.
La présence de ce symb ole sur le pro duit ou son emballage in dique qu’il ne doit pas être traité avec
les ordure s ménagères. Il doit être au contra ire remis à Blueair ou à un point de colle cte pour le
recyclage d es équipe ments éle ctrique s ou électroniques. En vous assur ant de l’élimination corre cte
de ce produi t, vous contr ibuerez à protéger l’enviro nnement et la santé huma ine contre les danger s
potentiels liés à une mis e au rebut ina ppropriée de ce prod uit.
An de réduire le risque de choc élec trique, cet équipement est doté d’une che de typ e terre comportant une troisi ème broche (de mise à la terre). Cette che ne fonctionnera que su r une prise d’alimentation raccordée à la terre. Si la che ne conv ient pas à la p rise, veuill ez coner à un électri cien
le soin d’installer une pr ise adéqu ate. Ne modiez jamais la che de quelque manière que ce soit.
Page 14
26
27
Réglages
Insérez fermement le câble d’alimentation dans
la prise d’alimentation encastrée, située en bas
de l’appareil, et branchez l’autre extrémité sur
une prise d’alimentation murale ou une prise
multiple reliée à la terre. Il est recommandé de
régler l’appareil sur sa vitesse maximale pour
un premier nettoyage rapide, une utilisation
de jour ou de l’air très pollué. Après quelques
minutes, réglez l’appareil à la vitesse désirée.
En général, il est recommandé de laisser fonctionner l’appareil à la vitesse minimale pendant
la nuit.
A. Fonction d’af chage sans modu le Air
Intelligence
L’afchage e st en veille. Pour a llumer le puric ateur d’air Blueair, appuye z sur le
bouton PLUS de l’app areil. Une barre bl eue doit s’afcher
entre les bo utons
Ajustez la vi tesse de 1 à 3 à l’aide des bou tons PLUS et
MINUS..
Pour éteindr e le puricateur d’air, appu yez sur le bouton
MINUS quan d l’appareil est sur la pr emière vitesse.
Un voyant roug e s’allume lo rsqu’il est temps de re mplacer le ltre.
Une fois l’appareil e n service, l’afchage di sparaîtra l entement après 30 secondes.
Pour acti ver à nouveau l’afch age, appuyez simplement sur l’un des boutons .
B. Fonction d’afchage avec module
Air Intelligence
Pour passe r en mode automati que, appuyez sur le b outon
PLUS quand l’appa reil est sur la vites se 3. Le mot AUTO
s’afchera . Les deux capteur s de qualité de l’air ajus teront
la vitesse e n fonction des nive aux de contamina nts.
Pour revenir e n mode manuel, appu yez sur le bouton
MINUS.
Un voyant roug e s’allume lo rsqu’il est temps de re mplacer
le ltre.
Nécess ite le module Air Inte lligence. Pour l’ins tallation et
l’entretien du module Air Intelligence, veuillez-vous reporter
à la sectio n « Module Air Intelli gence » page 16.
Allumez le p uricateur d’air Blu eair en appuyant s ur le
bouton PLUS de l’appareil. Une barre bleue doit s’afcher
entre les bo utons.
Les deux colonnes situées au-dessus de la barre montrent
les niveaux d e particules e n suspension da ns l’air (PM2.5)
et les cont aminants gazeu x (GAS). Une barre (ver te) représente un faib le niveau de part icules ou de gaz.
Trois barres (ve rt, jaune et roug e) représentent u n haut
niveau de par ticules ou de ga z et indiquent qu’il fa ut augmenter la vi tesse de fonction nement ou régle r l’appareil en
mode automatique.
Pour éteindr e le puricateur d’air, app uyez sur le bouton
MINUS quan d l’appareil est sur la p remière vitess e.
Attent ion : le module Air I ntelligence af chera des nive aux élevés de part icules et
de gaz durant les cinq premières minutes de fonctionnement, pendant le calibrage
des capteurs de qualité de l’air.
Page 15
28
29
Les puricateurs d’air Blueair se démarquent
par la qualité de leur design, de leurs matériaux
et de leur fabrication. Pour conser ver votre appareil en excellent état, nous vous recommandons de le nettoyer régulièrement. L’appareil
doit être débranché de la prise secteur avant
tout nettoyage ou entretien.
À l’aide d’un aspirateur, nettoyez la grille
d’admission de l’intérieur quand vous déposez le ltre pour le remplacer.
Essuyez l’extérieur de l’appareil avec un
chiffon humide, doux et propre.
Ne nettoyez jamais l’appareil avec de
l’essence, des solvants chimiques ou des
produits corrosifs, an de ne pas endommager la surface.
N’insérez pas d’objets étrangers dans les
entrées et les sorties d’air de l’appareil an
de ne pas provoquer de c hoc électrique ni
endommager l’appareil.
Ne tentez pas de réparer o u de régler vousmême les fonctions électriques ou mécaniques de votre appa reil. Veuillez contac ter
votre revendeur local o u Blueair pour plus
d’informations sur la gara ntie.
L’air passe par une chambre d’ionisation où les
particules en suspension dans l’air sont électriquement chargées avec des ions négatifs. Les
particules chargées sont attirées vers la surface
du ltre HEPASilent™. L’air purié, qui ne
contient pratiquement plus de contaminants,
est alors remis en circulation dans la pièce..
Fonctionnement
Soins et
entretien
Page 16

30
31
Remplacer
le ltre
Éteignez l’appa reil et ouvrez la por te
d’admission e n tirant sur le bord
supérie ur. La porte d’admission s e
trouve sur la d roite quand on rega rde
l’appareil de face.
L’appareil co mporte un ltre en V.
Deux lang uettes sont prévu es de
part et d’autr e.
À l’aide des languettes, repliez les
deux côtés d u ltre.
Retirez délicatement le ltre contaminé de l’appareil.
1 2
4
3
Poussez do ucement le ltre ne uf à
l’intérieur.
Reposez la porte d’admission. Allumez l’appareil.
6
Écartez l es deux côtés du ltre à
l’aide des languettes.
7
8
Pour les mod èles Blueair Pro L e t XL,
répétez le s étapes 2–7 pour tous l es
ensembles de ltres.
Avant de commencer à
remplacer le ltre,
éteignez l’appareil et
débranchez-le de la prise
murale.
Tout en conser vant les deux côtés
du ltre plié s, alignez le ltre ne uf sur
l’appareil en vo us aidant des barr es
de guidage supérieure et inférieure
du logeme nt de ltre.
5
Branchez le cordon d’alimentation,
allumez l’appareil et appuyez sur le
voyant de remplacement de ltre
rouge pendant trois secondes. Le
voyant doit clignoter et disparaître.
9
Page 17

32
33
Ajouter
le ltre Carbon+
Filtres
Tout en conser vant les deux côté s
du ltre fer més, faites soign eusement gliss er le ltre Carbon + dans
l’appareil.
Poussez le s deux côtés en direc tion
du ltre principal.
Adaptez le lt re Carbon+ sur la lan guette du ca dre du ltre princi pal
1 2 3
Dossier du client
Le numér o du modèle et le num éro de série de ce p roduit appar aissent au bas d e
l’unité. Veui llez noter ces num éros dans l’espac e fourni ci-des sous et les conse rver
à des ns de r éférence ulté rieure.
Numéro du mo dèle Nom du revend eur
Numéro de sé rie Adresse du revend eur
Date d’achat Numéro de téléphone
Une fois l’appareil e n service, l’afchage di sparaîtra l entement après 30 secondes.
Pour acti ver à nouveau l’afch age, appuyez simplement sur l’un des boutons .
Grâce à la technologie HEPASilent Plus™, votre
Blueair Série Pro est incroyablement silencieux.
L’appareil est équipé en standard d’un ltre
HEPASilent Plus™.
Filtre à p articules. Comprend un ltre à particules qui retient l a poussière, le pollen, les phanères, les bactéries, les spores de moisissures,
les virus et autre s particules en suspension dans
l’air. Le ltre, en polypropylène, retient méca niquement les particules en suspension dans l’air.
Pour plus d’efcacité, les par ticules sont chargées négative ment par l’appareil Blueair avant
d’atteindre le ltre.
Filtre S mokeStop™. Comprend un ltre à particules et un ltre à charbon actif co mbinés pour
éliminer les polluants ga zeux, tels que la fumée
de cigarette et de ci gare ou les autres COV
(composés organiques volatils, y compris les
peintures et autre s produits chimiques). L’ajout de
charbon actif s ur le ltre peut affecter le débit d’air
et le CADR. Le charbo n peut également dégage r
une légère ode ur quand il est initialement u tilisé.
Celle-ci se dissipera rapidement.
Filtre Carbon+. Le Blueair Série Pro peut
être équipé d’un ltre à charbon actif supplémentaire en plus du ltre à particules principal
HEPASilent™ ou du ltre SmokeStop™. Il offre
une protection accrue contre les contaminants
gazeux, tels que le formaldéhyde, le dioxyde de
soufre et les composés organiques volatils.
Pour un ren dement optima l, Blueair reco mmande de rempla cer le ltre tous l es six (6)
mois.
Certains pays offrent un programme d’abonnement aux ltres. Co ntactez votre revendeur local
ou Blueair pour savoir si vous avez accès à c e
programme.
IMPORTANT ! Pour assurer le bon fonctionnement de votre appareil et bénécie r de tous
les avantages of ferts par la garantie, utilisez
seulement de s ltres d’origine Blueair.
Page 18

34
35
Entret ien du module Ai r Intelligence
Retirez le module de l‘appareil.
À l’aide d’un aspirateur, nettoyez soigneuse-
ment la bouche d’admission située devant le
capteur de gaz.
Utilisez un tampon de coton humide pour
nettoyer la lentille du capteur de poussière.
Une fois la lentille propre, essuyez-la avec
un tampon de coton sec. N’utilisez jamais
d’alcool pour nettoyer la lentille.
Réintroduisez le module.
Module
Air Intelligence
L’ajout du module Air Intelligence permet au
Blueair Série Pro de surveiller et signaler continuellement la qualité de l’air ambiant via des
capteurs de gaz et de particules sophistiqués.
L’appareil peut également fonctionner en mode
automatique, la vitesse
étant alors réglée sur le niveau de pollution
détecté par les capteurs.
Pour équiper votre appareil Blueair Pro avec
un module Air Intelligence, veuillez visiter www.
blueair.com pour localiser votre revendeur le
plus proche.
Retirez le fa ux couvercle mont é sur le
support du module.
Insérez le m odule Air Intelli gence
dans le supp ort du module.
Insérez l’ensemble ltre et reposez la
porte d’admission.
1 2 3
Retirez l’ensembl e ltre supérieur. Voir sectio n Remplacer les l tres, étapes 1 à 4.
Lentille du
capteur de
poussière
Admission
capteur de g az
Page 19

36
37
La philosophie de Blueair repose sur l’idée que
chacun doit pou voir respirer un air propre, chez
soi ou au travail. Grâce à nos investissements
dans la recherche et l’innovation, nous sommes
désormais une référence internationale pour
l’élimination des impuretés de l’air intérieur,
jusqu’aux particules les plus inmes. Nos
systèmes d’assainissement purient davantage
d’air, plus vite, en silence et en consommant
peu d’énergie. Ils éliminent les allergènes, les
pathogènes de l’asthme, les virus, les bactéries
et autres polluants présents dans l’atmosphère.
Nous développons les meilleurs puricateurs
d’air au monde car nous sommes convaincus
que respirer de l’air pur est un droit fondamental. Blueair – Innové avec passion en Suède.
Blueair Pro
Des performances professionnelles
Un style supérieur
Page 20

Inhalt
Willkommen 40
Luftreiniger der Serie Blueair Pro 41
So nutzen Sie ihr Blueair-System optimal 42
Erste Sc hritte 43
Einstellungen 44
Pege und War tung 46
Funktionsweise 47
Filterwechsel 48
Hinzufügen des Carbon+-Filters 50
Filter 51
Air Intelligence-Modul 52
Pro M
Pro L
Pro XL
Mit
Leidenschaft
in Schweden
entwickelt
Page 21

40
41
Vielen Dank, dass Sie sich für einen Blueair Pro
Luftreini ger entschieden haben. Mi t seiner patentierten HEPASilentTM –Technologie und hochmodernen Filter n ist es unser bislang leis tungsstärkster und technisch anspruchvollster Luftreiniger.
Dennoch läs st er sich erstaunlich einf ach in Betrieb
nehmen. Einfach Stecker einstecken, Gerät
einschalten und saubere Luf t genießen.
Sorgen Sie für frische Filter
Werden die Filter regelmäßig ausgewechselt,
bleibt Ihr Blueair Pro immer in Topform.
Verlängern Sie Ihre Garantie
Füllen Sie die Garantiekarte aus und senden Sie
sie an Blueai r, um Ihre begrenzte Garantie zu
verlängern.
Halten Sie auch den Planeten gesund
Maximale Wirkung, minimale Umweltbelastung.
Ihr Blueair Pro la st sich recyceln und ist damit
unsterblich.
Der Blueair Pro
Luftreiniger
Griff
Einlass de s Air
Intelligence-Moduls
Lufteinzug
Bedienungselemente
Reinluftausgang
Betriebsanzeige
Gehäuse aus
verzinktem Stahl
Willkommen
in der
Blueair ProBenutzerfamilie
VORDERSEITE
RÜCKSEITE
Page 22

42
43
Erste
Schritte
Allgemeine Sicherheitshinweise
Der Luftreiniger der Blueair Pro Serie ist ein
Elektrogerät. Bitte lesen Sie die Sicherheitshinweise vor der Inbetriebnahme des Geräts
durch und befolgen Sie die notwendigen vorbeugenden Maßnahmen, um das Risiko eines
Brandes, elektrischen Schlags oder einer Verletzung auszuschließen. Die Blueair Garantie ist
nur dann gültig, wenn das Gerät gemäß diesen
Hinweisen verwendet wird.
Dieses Gerät ist nicht zur Verwendung durch
Personen (einschließlich Kinder) mit eingeschränkten körperlichen, geistigen oder sensorischen Fähigkeiten oder ohne ausreichende
Erfahrung und Kenntnis geeignet, es sei denn,
sie werden durch eine für ihre Sicherheit verant-
wortliche Person beaufsichtigt und eingewiesen. Kinder müssen beaufsichtigt werden, um
sicherzustellen, dass sie nicht mit dem Gerät
spielen. Wenn das Stromkabel beschädigt ist,
muss es vom Hersteller oder dessen Servicevertreter oder ähnlich qualizierten Personen
ersetzt werden, um eine mögliche Gefahr zu
verhindern.
Platzierung
Stellen Sie das G erät an einem Ort auf, der es
ermöglicht, das s die Luft ungehinder t angesogen und abgeg eben werden und um das Gerät
herum zirkulieren kann. Der Mindestabstand von
anderen Geg enständen muss 10 cm betragen.
Bitte verwenden Sie nur Blueair-Originallter.
Platzieren Sie das Gerät nicht:
Direkt auf oder an stof fbezogenen
Möbeln ode r Gegenständen, wi e z. B.
Betten oder Vorhängen.
In der Nähe von Wärmequellen wie
Heizkörpe rn, Kamine n oder Öfen.
Im Freien.
In der Nähe von Nasszone n wie Bad
oder Wäscheraum, wo ein Kontakt mit
Wasser möglich ist.
So nutzen Sie
Ihr BlueairSystem optimal
Das Blueair-System ist einfach zu benutzen.
Vergewissern Sie sich, dass Ihr Gerät die richtige Größe für den jeweiligen Raum aufweist und
wechseln Sie die Filter regelmäßig in den empfohlenen Abständen. Wie auch Klimaanlagen
und Heizgeräte nur eine begrenzte Luftmenge
kühlen oder erwärmen können, so gelten auch
für ein Luftreinigersystem Beschränkungen für
die gereinigte Luftmenge. Befolgen Sie einfach
die folgenden praktischen Hinweise.
Schließen Sie die Fenster
An einem heißen Sommertag würden Sie nicht
das Fenster öffnen und erwarten, dass Ihr
Klimagerät ef zient arbeitet, da die heiße Luf t
einströmt und die kühle ausströmt. Das gleiche
Prinzip gilt für den Luftreiniger, nur dass Sie
die verunreinigte Luft nicht einströmen und die
saubere Luf t nicht ausströmen sehen.
Schließen Sie die Türen
So wie Sie Teile Ihres Hauses in kalten Winternächsten dicht verschließen, damit Ihre
Heizung efzient arbeitet, sollten Sie auch den
Raum, in dem Ihr System läuft, dicht geschlossen halten, um beste Ergebnisse zu erzielen.
Lassen S ie Ihr System 24 Stunden am Tag
laufen
Für optimale Efzienz lassen Sie Ihr BlueairGerät 24 Stunden, an 7 Tagen die Woche
laufen. Der Betrieb rund um die Uhr stellt sicher,
dass saubere, gelterte Luft kontinuierlich
im Raum zirkuliert. Blueair-Systeme sind auf
einen verblüffend niedrigen Stromverbrauch
ausgelegt. Die Kosten für den Betrieb eines
Blueair-Luftreinigers entsprechen je nach Gerät
und Leistungsstufe in etwa denen einer einzigen
Glühlampe.
Dieses Sy mbol am Gerät oder auf d er Verpacku ng weist dar auf hin, das s das Produk t nicht in den
Restmüll gehört. Es muss an den B lueair-Service oder an eine Sa mmelstelle für elek trische und
elektronische Geräte übergeben werden. Indem Sie sicherstellen, dass dieses Produkt vorschriftsmäßig ents orgt wird, tr agen Sie dazu bei, mögl iche Schäden für die Umwe lt und die menschliche
Gesundheit abzuwenden, die ansonsten durch die unsachgemäße Entsorgung dieses Produkts
verursacht werden könnten.
Zur Verminderung der Gefahr eines Stromschlags hat dieses Gerät einen geerdeten Netzstecker,
der nur in ein e Steckdose mit Schutzkontakt pa sst. Sollte der Stecker n icht in die Ste ckdose passen, wenden Sie sich bit te an einen Elektrofa chbetrieb. Nehmen Sie selbst bi tte keinerlei Änder ungen am Netz stecker vor.
Page 23

44
45
Einstellungen
Das Stromkabel fest und vollständig in die
eingelassene Buchse am Boden des Geräts
einstecken und den Stecker am anderen Ende
in eine geerdete Wandsteckdose oder Verteilerleiste einstecken. Das Gerät auf maximale
Leistungsstufe einstellen, die für die schnelle
Erstreinigung, den Tagesbetrieb oder sehr stark
verschmutz te Luft empfohlen wird.
Nach einigen M inuten die gewünschte Leistungsstufe einstellen. D ie niedrigste Leistungsstufe wi rd
allgemein f ür den Nachtbetrieb empfohle n.
A. Anzeigefunktion ohne das
Air Intelligence-Modul
Display im Standby. Den Bluea ir-Luftreinige r durch Drücken de r PLUS-Taste
am Gerät ei nschalten. Zwisc hen den Tasten erschei nt ein
blauer Balken.
Mit der PLUS- u nd MINUS-Taste die Leistung sstufe von 1
bis 3 einstellen.
Den Luft reiniger durch D rücken der MINUS -Taste bei
Leistungsstufe 1 ausschalten.
Wenn ein Filte rwechsel notwe ndig ist, ersch eint eine rote
Filteranzeige.
Wenn das Gerät in Betrieb ist, verblasst das
Displa y und verschwindet langs am nach 30 Sekund en.
Um es wieder zu aktivieren, berühren Sie einfach eine der Tasten.
B. Anzeigefunktion mit dem
Air Intelligence-Modul
Für den Automa tikbetrieb die PLU S-Taste drücke n, wenn
das Gerät m it Leistungss tufe 3 läuft. Das Wor t AUTO
erscheint und die beiden Luftqualitätssensoren stellen die
Leistungsstufe automatisch entsprechend der herrschenden Verunreinigung ein.
Um zum manue llen Betrieb zur ückzukehren di e MINUSTaste drücken.
Wenn ein Filte rwechsel notwe ndig ist, ersch eint eine rote
Filteranzeige.
Dafür ist da s Air Intelligenc e-Modul er forderlich. Hinwe ise
zur Installation und Wartung des Air Intelligence-Moduls
nden Sie au f Seite 16 „Air Intelli gence-Mod ul”.
Den Bluea ir-Luftreinig er durch Drücken d er PLUS-Taste
am Gerät ei nschalten. Zwisc hen den Tasten ersche int ein
blauer Balken.
Über dem Ba lken zeigen zwei Bal kensäulen die Me nge der
Schwebepa rtikel in der Luf t (PM2.5) und der gas förmigen
Verunreinigungen GAS) an. Ein Balken (grün) bedeutet
einen ger inge Partikel- o der Gasmenge.
Drei Balken ( grün, gelb und rot) b edeuten hohe Par tikeloder Gasmengen und zeigen an, dass die Leistungsstufe
erhöht od er das Gerät auf Au tomatikbetrie b geschaltet
werden muss.
Den Luft reiniger durch D rücken der MINUS -Taste bei
Leistungsstufe 1 ausschalten.
Hinweis: Das Air Intelligence-Modul zeigt in den ersten fünf Betriebsminuten, während sich die Luftqualitätssensoren kalibrieren, hohe Partikel- und Gasmengen an.
Page 24

46
47
Blueair Luftreiniger zeichnen sich durch hochwertiges Design, Material und Verarbeitung
aus. Damit Ihr Gerät im Topzustand bleibt,
empfehlen wir die regelmäßige Reinigung. Das
Gerät muss vor der Reinigung oder Wartung
vom Stromnetz getrennt werden.
Das Lufteinlassgitter von innen absaugen,
wenn der Filter zwecks Wechsel herausge-
nommen wird.
Die Außenächen des G eräts können mit
einem weichen, sauberen, feuchten Tuch
gereinigt werden.
Zur Reinigung niemals Benzin, Lösungs-
oder Scheuermittel verwenden. Sie könnten
die Oberäche beschädigen.
Keine Fremdkörper in die Ein- od er Ausgänge
einführen. Dies kann einen elektrischen
Schlag verursache n oder das Gerät beschä digen.
Nicht versuc hen, die elektrischen o der mecha-
nischen Funk tionen des Blueair-Geräts selb st
zu reparieren oder zu verändern. Informationen
zur Garantie er halten Sie von Ihrem Fachhändler oder von Blu eair.
Luft strömt du rch eine Ionenkammer, in der
Schwebepar tikel mit negativen Ionen aufge laden
werden. Die gela denen Partikel werden von der
HEPASilent™-Filteroberäche angezogen. Die
saubere Luf t, die praktisch frei von Verunrei nigungen ist, wird wiede r in den Raum abgegeben.
Funktionsweise
Pege und
Wartung
Page 25

48
49
Filter-
wechsel
Das Gerät a usschalten und d ie
Einzugstü r durch Ziehen an de r
Oberkan te öffnen. Die Einz ugstür
bendet si ch, von vorn gesehe n, auf
der rechten G eräteseite.
Der Filter is t in V-Form in das Ger ät
eingese tzt. Zwei Lasche n stehen an
den Seiten vor.
Die zwei Fil terseiten mitte ls der
Laschen zusammenschieben.
Den versc hmutzten Filter vo rsichtig
gerade aus dem Gerät herausziehen.
1
Die Filterseiten zusammenhalten
und den neu en Filter mithilfe de r
Leitstä be oben und unten im Fil tergehäuse au f das Gerät ausri chten.
2
4
5
3
Den neuen F ilter vorsich tig einschieb en.
Die Einzugs tür wieder anbr ingen.
Das Gerät einschalten.
6
Die beide n Filterseiten mit tels der
Laschen nach außen ziehen.
7
8
Für Blueair Pr o L und XL bei allen Fil tereinheiten Schritte 2-7 wiederholen.
Das Stromkabel einstecken, Gerät
einscha lten und die rote Filter ersatzleuchte drei Sekunden lang berühren
und halten. S ie blinkt und ver lischt
dann.
9
Schalten Sie vor
dem Filterwechsel
das Gerät aus und
ziehen S ie den Ge-
rätestecker aus der
Steckdose.
Page 26

50
51
Dank der HEPASilent™ -Technologie arbeiten die
Geräte der Blue air Pro Serie unglaublich lei se. Ein
HEPASilent™ -Filter ist bereits im Gerä t installiert.
Partikellter.Enthalten ist auch ein Partikellter, der Staub, Pollen, Bakterien, Tierhaare,
Schimmelsporen und andere Schwebstoffe
entfernt. Der Par tikellter wird aus Polypropylen
hergestellt und ltert die festen Schadstoffe
mechanisch aus. Um den Filteref fekt zu maximieren, werden die Partikel im Blueair Gerät negativ aufgeladen, bevor sie den Filter erreichen.
SmokeStop™-Filter. Dieser Filter ist eine
Kombination aus Par tikel- und Aktivkohlelter
und entfernt gasförmige Verunreinigungen wie
Zigaretten- oder Zigarrenrauch sowie andere
VOC (üchtige organische Verbindungen,
einschließlich Farbstoffen und anderen Che mikalien). Der Zusatz von A ktivkohle in einem Filter
kann den Luf tstrom und CADR beeinträchtigen.
Es kann auch sein, dass Sie bei erstmaliger Verwendung des Filters einen leichten Kohlegeruch
wahrnehmen, der sich aber schnell verüchtigt.
Carbon+-Filter. Zusätzlich zum Hauptpartikellter HEPASilentTM oder zum SmokeStop™-Filter kann in der Blueair Pro Serie
eine Aktivkohle-Filterstufe genutzt werden. Sie
bietet weiteren Schutz vor gasförmigen Verunreinigungen wie Formaldehyd, Schwefeldioxid
und üchtigen organischen Verbindungen.
Um eine optimale L eistung des Geräts zu
erhalten, empehlt Blueair, den Filter alle
sechs (6) Monate zu ersetzen.
In einigen Ländern bieten wir Ihnen ein
bequemes Filter-Abonnement. Von Ihrem
Fachhändler oder von Blueair erfahren Sie, ob
das Programm bei Ihnen verfügbar ist.
ACHTUNG! Verwenden Sie nur Original-Blueair-Filter, um die Funktion des Geräts zu
gewährleisten und den vollen Garantieumfang zu
erhalten.
Hinzufügen des
Carbon+-Filters
Filter
Die Filterseiten zusammenhalten und
den Carab on+-Filter vorsi chtig in das
Gerät einschieben.
Die Seiten n ach außen zum Haupt lter hin ziehe n.
Den Carbo n+-Filter im Rahme n des
Hauptlters einrasten lassen.
1 2 3
Kundendaten
Die Mode ll- und Serien nummer diese s Produkts nd en Sie auf der Unt erseite des
Gerät s. Bitte trag en Sie diese Num mern in das folge nde Feld ein und bewa hren Sie
den Absc hnitt auf.
Modellnummer Name des Händlers
Seriennumber Anschrift des Händlers
Kaufdatum Telefonnummer
Wenn das Gerät in Bet rieb ist, verblasst das
Display und verschwindet langsam nach 30 Sekunden.
Um es wieder zu aktivieren, berühren Sie einfach eine der Tasten.
Page 27

52
53
Pege des Air Intelligence-Moduls
Das Modul aus dem Gerät nehmen.
Die Einlassöffnung vor dem Gassensor
behutsam mit einem Staubsauger absaugen.
Die Linse des Staubsensors mit einem
feuchten Wattestäbchen abwischen. Nach
Entfernen von Verschmutzungen die
Linse mit einem trockenen Wattestäbchen
abwischen. Zum Reinigen der Linse keinen
Alkohol verwenden.
Das Modul wieder in das Gerät einsetzen.
Air Intelligence-
Modul
Durc h den Zusatz des Blueair A ir IntelligenceModuls können di e Geräte der Blueair Pro Serie
mittels hochmoderner Partikel- und Gassensoren
die Raumluft kontinuierlich überwachen und anzeigen. Zudem kan n das Gerät im Automatikbetrieb die Leistu ng optimal dem von den Sensoren
erkannten Verunreinigungsgrad anpassen.
Wenn Sie Ihr Blueair Pro Gerät mit der Zusatzoption eines Air Intelligence-Moduls ausstatten
möchten, klicken Sie bitte zu www.blueair.com,
wo Sie die Anschrift eines Fachhändlers in Ihrer
Nähe nden.
Die Blende aus der Modulhalterung
herausziehen.
Das Air Inte lligence-Mo dul in die
Modulhalterung einsetzen.
Filtersys tem einsetzen un d Einzugstür wieder anbringen.
1 2 3
Hinweise zum Entfernen des obere n Filtersystems nden Sie
unter „Filter“, Schrit te 1–4.
Staubsensorlinse
Einlass für Gassensor
Page 28

54
55
Blueair wurde mit dem Gedanken gegründet,
dass jeder Mensch saubere Luft genießen
darf, ob zu Hause oder bei der Arbeit. Wir sind
heute eine weltweit bekannte Autorität für die
Frage, wie Verunreinigungen der Raumluft bis
zum kleinsten Par tikel entfernt werden können.
Grundlage dafür ist unsere klare Verpichtung
zu Forschung und Innovation. Unsere Lösungen
für saubere Luft arbeiten leise und benötigen
sehr wenig Energie, um mehr Luft schneller zur
reinigen und Allergene, Asthma-Auslöser, Viren,
Bakterien und andere luf tgetragene Partikel zu
entfernen.
Wir entwickeln die besten Luf treiniger der Welt,
weil wir fest davon übe rzeugt sind, dass saubere Luft ein grundlegendes Menschenrecht
ist. Blueair – mit Leidenschaf t in Schweden
entwickelt.
Blueair Pro
Professionelle Leistung,
überzeugende
Eleganz
Page 29

Contents
Bienvenido 58
Los puricado res de aire de la serie
Blueair Pro 59
Cómo sacar el máximo par tido
a su sistema Bluea ir 60
Primeros pasos 61
Conguraciones 62
Cuidado y mantenimiento 64
Funcionamiento 65
Cambio del ltro 66
Colocación del ltro de carbó n+ 68
Filtros 69
Módulo Air Intelligence 70
Pro M
Pro L
Pro XL
Innovado
en Suecia
con amor
Page 30

58
59
Gracias por comprar un puricador de aire
Blueair Pro. Gracias a la tecnología patentada
HEPASilent™ y a los innovadores ltros, se
trata del puricador de aire más potente y más
técnicamente avanzado que hemos fabricado
hasta el momento. Pero no por ello deja de ser
increíblemente fácil de congurar. No tiene más
que enchufarlo, encenderlo y dejar que emita
su brisa.
Manten ga los ltros limp ios
Si cambia los ltros según el calendario de recambios, su Blueair Pro estará en plena forma.
Amplíe su garantía
Rellene y envíe la tarjeta de la ga rantía a Blueair
hoy mismo para amp liar su garantía limitada.
Mantenga también el planeta en buen
estado
Un efecto máxim o, pero con una huella mínima.
Su Blueair Pro se pu ede reciclar, por lo que
siempre perdurará.
The Blueair Pro
Air Purier
Asa
Entrada del
módulo Air
Intelligence
Entrada de
aire
Mandos
Salida de aire
limpio
Tes tigo
luminoso de
funciona-
miento
Galvanized
steel housing
Bienvenido
a la familia de
Blueair Pro
PART E
DELANTERA
PART E
TRASERA
Page 31

60
61
Primeros
pasos
Instrucciones generales de seguridad
El puricador de aire de la serie Blueair Pro es
un dispositivo eléctrico. Le rogamos que lea las
instrucciones de seguridad antes de utilizarlo y
que adopte las precauciones necesarias para
reducir el riesgo de que se produzca un incendio, descargas eléctricas o lesiones. La Garantía limitada de Blueair se aplica únicamente si
la unidad se utiliza de conformidad con estas
instrucciones.
Este dispositivo no e stá pensado para su uso
por personas (incluidos niños) que tengan una
capacidad física, sensorial o mental reducida, o
no cuenten con la exp eriencia y los conocimie ntos
necesari os, a no ser que una persona enca rgada
de su segurid ad les haya supervisado o le s haya
proporcionado instrucciones sobre el uso del
dispositivo.
Los niños deberían estar supervisados, para
garantizar que no jueguen con el dispositivo.
En caso de que el cable de alimentación esté
dañado, el fabricante o su agente de ser vicio
(o cualquier persona cualicada similar) debe
cambiarlo para evitar peligros.
Ubicación
Coloque la unidad en un lugar en el qu e el aire pueda circular libremente alrededor de la unidad y e n el
que pueda entrar y s alir de ella. La distancia mínima
aceptable con cualquier otro objeto es de 10 cm
(4"). Utilice solo ltros ori ginales de Blueair.
No coloque la unidad:
Directa mente sobre o contra textiles
doméstic os como, por ejemplo, rop a de
cama o cor tinas.
Cerca de fuentes de calor como, por
ejemplo, radiadores, chimeneas u
hornos
.
Al aire libre.
Cerca de zon as mojadas, tales como
cuartos de baño o cuartos de la colada,
donde pudiese entra r en contac to con
el agua.
Cómo sacar el
máximo partido
a su sistema Blueair
El sistema Blueair es fácil de utilizar. Asegúrese
de que la unidad tenga el tamaño adecuado
para la habitación y cambie los ltros de acuerdo
con el calend ario de recambios de ltros recomendado. Recuerde que, del mismo modo que
las máquinas de aire acondicionado y los calefactores tienen límites en cuanto al volum en de
aire que pueden refrigerar o calentar, todos los
sistemas de puricación del aire también tienen
límites en cuanto al volumen de aire que pueden
limpiar. Siga estas directrices de sentido común.
Cierre las ventanas
No se le ocurrir ía abrir las ventanas de par en par
un caluroso día de verano ni esperaría que su
máquina de aire acondicionado funcionase de
manera eca z porque notaría cómo entra el aire
caliente y cómo se e scapa el aire frío. Aunque
no pueda ver cómo e ntra el aire contaminado
y cómo se escapa el aire limpio, la lógica que
sigue su puricador de aire es la misma.
Cierre las puertas
De igual forma que aislaría parte de su casa
una gélida noche de invierno para que la calefacción funcionase de forma más ecaz, aísle la
habitación en la que esté trabajando su sistema
para obtener los mejores resultados.
Tenga encendido el sistema las 24 horas
del día
Para obtener los mejores resultados, tenga
encendida su unidad Blueair las 24 horas del día,
los siete días de la semana. El funcionamiento
ininterrumpido garantiza la circulación
continuada de un suministro constante de aire
ltrado y limpio en la habitación. Los sistemas
Blueair están diseñados para tener un consumo
eléctrico ex traordinariamente bajo. De hecho,
cuesta lo mismo e l suministro eléctrico de un
puricador de aire Blueair que el de una sola
bombilla, en función de la unidad y de la
velocidad de funcionamiento.
Este símbol o en el produ cto o en su emba laje indica que no se puede tratar como residu o doméstico. En lugar de trat arlo como tal, deber á ser entre gado en el punto de servicio o recogida
de Blueair p ara el reci clado de equipos eléc tricos y electrónicos. Al des echar este producto de
forma correcta, evitará las p otenciale s consecuencias negativas pa ra el medio ambiente y la salud
humana que, d e lo contrario, se produ cirían en caso de que se desechas e el produc to de manera
inadecuada.
Para reduc ir el riesg o de descar gas eléctricas, este equipo tiene un enchufe de toma a tierra que
incluye una te rcera clavija (de toma a tierra). Este enchufe solo encajará en una salida e léctric a de
toma a tierra. Si el ench ufe no encaj a en la salida, póngas e en contac to con el per sonal cua licado
para que instale la salida adecuada. No modique el enchufe de ninguna manera.
Page 32

62
63
Conecte el cable de alimentación de manera
rme y por completo en la toma para el cable
de alimentación encastrada ubicada en la parte
inferior de la unidad y conecte el otro extremo
a una salida en la pared con toma a tierra o a
una regleta. Ponga la unidad en la velocidad
máxima, que es lo recomendado para una
limpieza rápida inicial, el uso diurno o para aire
muy contaminado. Transcurridos unos minutos,
ajuste la unidad a la velocidad deseada. Para el
uso nocturno, se recomienda por lo general una
velocidad mínima
Conguraciones
A. Funci ón de la pantalla s in el módulo Air
Intelligence
La pantalla está en standby. Encien da el puricador d e aire Blueair puls ando el botón
MÁS de la unidad. Entre los botones aparecerá una barra
azul.
Ajuste la vel ocidad de 1 a 3 con los bot ones MÁS y
MENOS.
Apague el puricador de aire pulsando el botón MENOS
cuando la unidad esté en la velocidad número 1.
Cuando se a preciso cambia r el ltro, aparece rá una luz
roja que indi cará que hay que cam biar el ltro
Con la unidad en fun cionamiento, la p antalla se irá ap agando
progresivamente al cabo d e 30 segundos.
Para volver a a ctivar la panta lla, solo tiene que pulsar cualq uiera de los boton es.
B. Función de la pa ntalla con el módu lo Air
Intelligence
Para acce der al modo automát ico, pulse el botón M ÁS
cuando la unidad esté funcionando en la velocidad 3. Se
visualiz ará la palabra AUTO y l os dos sensores d e calidad
del aire ajustarán la velocidad en función de los niveles de
contaminantes.
Para volver al f uncionamiento m anual, pulse el bo tón
MENOS.
Cuando se a preciso cambia r el ltro, aparece rá una luz
roja que indi cará que hay que cam biar el ltro.
Tenga en cuent a lo siguiente: El módulo Air Intelligence indicar á niveles altos de
partículas y de gas durante los primeros cinco minutos de funcionamiento, mien-
tras los s ensores de la calidad del a ire se están cali brando.
Precisa el m ódulo Air Intelli gence. Para obten er información sobre l a instalación y el m antenimiento de l módulo Air
Intellige nce, le rogamos qu e consulte la págin a 16, "Módulo
Air Intelligence".
Encienda e l puricador de ai re Blueair pulsa ndo el botón
MÁS de la unidad. Entre los botones aparecerá una barra
azul.
Encima de la b arra aparece rán dos columnas e n forma de
barra que m uestran los nivel es de partícul as suspendida s
en el aire (PM 2.5) y de contaminan tes gaseosos (G AS). Una
barra (de color verde) representa un nivel bajo de partículas
o de gas.
Tres barras (de co lor verde, amari llo y rojo) represen tan un
nivel alto de pa rtículas o gas , lo cual indica que e s preciso
aumentar la velocidad de funcionamiento, o congurar la
unidad en el m odo automático.
Apague el puricador de aire pulsando el botón MENOS
cuando la unidad esté en la velocidad número 1.
Page 33

64
65
Los puricadores de aire Blueair están dotados
de un diseño, unos materiales y un acabado
de alta calidad. Para mantener su unidad en un
perfecto estado, le recomendamos que lleve a
cabo una limpieza rutinaria. El dispositivo debe
estar desconectado de la toma de corriente
antes de realizar cualquier tarea de limpieza o
mantenimiento.
Vacíe la parrilla de entrada de aire desde el
interior cuando extraiga el ltro para cambiarlo.
Pase un paño suave, limpio y humedecido al
exterior de la unidad.
No la limpie nunca con gasolina, disolventes
químicos ni materiales corrosivos, ya que
estos agentes pueden estropear la supercie.
No deje que se introduzcan objetos ex traños
por las aber turas de entrada o escape. Esto
puede provocar una descarga eléctrica o
dañar la unidad
No intente reparar ni aju star ninguna de las
funciones eléctricas o mecánicas de la unidad
Blueair usted mismo. Póngase en contacto
con su distribui dor local o con Blueair para
obtener información sobre la garantía.
El aire atraviesa una cámara de iones en la
que las partículas suspendidas en el aire están
cargadas de iones negativos. Las partículas
cargadas son arrastradas a la supercie
del ltro HEPASilent™. En la habitación se
vuelve a poner en circulación aire puricado,
prácticamente exento de contaminantes.
Funcionamiento
Cuidado y
mantenimiento
Page 34

66
67
Cambio
del ltro
Apague la unidad y abra la puerta de
entrada tirando del borde superior.
La puer ta de entrada est á situada
en el lado de recho si se coloca d e
frente a la unidad.
El ltro se aco pla a la unidad en forma de V. Por los latera les sobresale n
dos pestañas.
Sirviéndose de ellas, una los dos
lados del ltro.
Tire lenta mente del ltro suc io y
sáquelo de la unidad.
1
Con los lado s del ltro juntos, al inee
el nuevo ltro e n la unidad utiliza ndo
los carri les que hay en la par te superior e infer ior de la carcasa d el ltro.
2
4
5
3
Empuje suavemente el nuevo ltro e
introdúzcalo.
Vuelva a coloc ar la puerta de e ntrada. Encienda la unidad
6
Separe los dos lados del ltro utilizando las pestañas
7
8
Para el Blue air Pro L y XL, repit a los
pasos de 2 a 7 pa ra todos los paque tes de ltros .
Conecte el cable de alimentación,
enciéndalo y mantenga pulsado el
testigo roj o del recambio de l ltro
durante tres segundos. Parpadeará y
luego desaparecerá
9
Antes de e mpezar
a cambia r el ltro,
apague la unidad y
quite el enchufe d e
la toma de pa red.
Page 35

68
69
Colocación del
ltro de carbón+
Filtros
Con los lados del ltro plegados,
deslice suavemente el ltro de carbón+ en el inte rior de la unidad.
Tire de los lados hacia afuera, hacia
el ltro principal.
Ajuste el l tro de carbón+ en la pe staña del ma rco del ltro princ ipal.
1 2 3
Registro del cliente
El núme ro del modelo y d e serie de este p roducto se p ueden consu ltar en la par te inferio r de
la unid ad. Le rogamos q ue los anote en e l espacio res ervado a cont inuación y q ue los guard e
por si los n ecesita en e l futuro.
Número del modelo Nombre del distribuidor
Número de serie D irección del distribuidor
Fecha de compra Número de teléfono
Con la unidad en fun cionamiento, la p antalla se irá
apagan do progresivamente al cabo de 30 segundos .
Para volver a a ctivar la panta lla, solo tiene que pulsar cualq uiera de los boton es.
Gracias a la tecnología patentada
HEPASilent™, la serie Blu eair Pro es increíblemente silencios a. La unidad ya trae instalado un
ltro HEPASilent™.
Filtro de partículas. . Incluye un ltro de par tículas que elimina el polvo, el polen, las bacterias,
la caspa de las ma scotas, las esporas del moho
y otras partícul as suspendidas en el aire. El ltro
de partícul as está hecho de polipropile no, que no
deja pasar me cánicamente las partícu las suspendidas en el aire. Co n el n de maximizar la eca cia
del ltro, la unidad Blu eair carga negativamente
las partícu las antes de que éstas lleguen a l ltro.
Filtro S mokeStop™. Incluye un ltro de carbó n
activo y de partí culas combinado para elimin ar los
contaminantes g aseosos, tales como el humo de
cigarrillo s y puros u otros componentes orgánico s
volátiles, incluidas las pinturas domésticas y otros
productos químicos. Si se añade carbón activo a
un ltro, el ujo de aire y la ta sa de suministro de
aire limpio se pue den ver afectados. Es posible
que note un ligero olor a c arbono cuando utilice el
ltro por primera vez; se disipará enseguida.
Filtro d e carbón+. Una fase del ltro de c arbono activo adiciona l que se puede montar en la
serie Bluea ir Pro y que se suma al ltro de partícu las principa l HEPASilent™ y al ltro SmokeStop™.
Proporciona protección adicional contra los
contaminantes gaseosos, tales como el formaldehído, el dióxido de a zufre y los compuestos
orgánicos volátiles.
Para un re ndimiento ópt imo, Blueair rec omienda q ue cambie los lt ros cada seis (6 )
meses de u so.
En algunos país es, ofrecemos un práctico
Programa de suscripción de ltros. Póngase en
contacto con su distr ibuidor local o con Blueai r
para obtener más información sobre si puede
optar al program a o no.
¡IMPORTANTE! Utilice únicame nte ltros
originale s de Blueair para garantizar e l funcionamiento adecua do de su unidad y para poder
tener derecho a l a cobertura plena de la ga rantía.
Page 36

70
71
Mantenimiento del módulo Air Intelligence
Quite el módulo de la unidad.
Con una aspiradora, limpie con cuidado la
entrada de la par te delantera del sensor de
gas.
Utilice un hisopo de algodón humedecido
para limpiar la lente del sensor de polvo.
Después de haber limpiado la suciedad de
la lente, pase un hisopo de algodón seco
para limpiar la lente. No limpie la lente con
alcohol.
Vuelva a colocar el módulo.
Módulo
Air Intelligence
Al incorporar el módulo Air Intelligence, la serie
Blueair Pro puede monitorizar constantemente
e informar de la calidad del aire circundante a
través de sensores punteros de partículas y de
gas. La unidad también puede funcionar en
modo automático, en el que la velocidad
se ja en función del nivel de polución que
detecten los sensores.
Si desea actualizar su unidad de Blueair Pro
con un módulo Air Intelligence, le rogamos que
visite www.blueair.com para buscar su distribuidor más cercano.
Extrai ga la falsa tapa que h ay en el
soporte del módulo.
Introduzca el módulo Air Intelligence
en el sopor te del módulo.
Introduzc a el paquete del ltro y v uelva a colocar l a puerta de entr ada.
1 2 3
Quite el p aquete del ltr o superior, consul te los pasos 1-4 de la se cción Cambio del ltro.
Lente del
sensor de p olvo
Entrada del
sensor de g as
Page 37

72
73
La creación de Blueair obedeció a la creencia
de que todo el mundo debería poder disfrutar
de un aire limpio en el interior, en casa o en el
lugar de trabajo. Nos hemos convertido
en una autoridad a escala mundial a la hora de
eliminar las impurezas en el aire de los interiores, hasta las partículas más nimias, gracias a
nuestro profundo compromiso con la investigación y la innovación. Nuestras soluciones de aire
más saludables funcionan de manera silenciosa
y tienen un consumo energético muy bajo, limpiando el aire de forma más rápida, eliminando
los alérgenos, los factores que desencadenan
el asma, las bacterias y otros contaminantes
suspendidos en el aire.
Desarrollamos los mejores limpiadores de
aire del mundo porque tenemos la convicción
de que el aire limpio es un derecho básico del
ser humano. Blueair: innovado en Suecia con
amor.
Blueair Pro:
Rendimiento profesional
con un estilo
superior
Page 38

Spis tresści
Zapraszamy 76
Seria oczyszczaczy powietrza Blueair Pro 77
Najlepsze wykorzystanie
systemu Blueair 78
Rozpoczęcie użytkowania 79
Ustawienia 80
Utrzymanie i konserwacja 82
Zasady działania 83
Wymiana filtra 84
Montaż filtra Carbon+ 86
Filtry 87
Moduł monitorowania powietrza 88
Pro M
Pro L
Pro XL
Innowacja
z sercem
ze Szwecji
Page 39

76
77
Dziękujemy za zakup oczyszczacza powietrza
Blue air Pro. Posi ad a on opaten towa ną techno logię HEPASilentTM oraz najnowocześniejsze
filtry i jest jak dotąd naszym najskuteczniejszym
i najbardziej zaawansowanym technicznie
urządzeniem tego typu. A przy tym bardzo
łatwo się nim posługiwać. Wystarczy podłączyć
oczyszczacz do źródła zasilania, uruchomić i
cieszyć się efektami.
Przedłuż gwar ancję
Wy peł nij kartę gwara ncyjn ą i wyślij ją do Blue air
już dziś, aby przedłużyć ograniczoną gwarancję.
Dbaj o świe żość filtrów
Wymiana filtrów zgodnie z harmonogramem pozwala utrzymać Blueair Pro w doskonałej kondycji.
Myśl o czystym ś rodowisku
Maksymalny efekt, minimum zanieczyszczeń.
Blueair Pro nadaje się do recyklingu, więc jego
żywotność jest nieskończona.
Blueair Pro
Oczyszczac
z powietrza
Uchwyt
Wlot modułu
monitorowania
powietrza
Wlot powietrza
Przyrządy
sterowani a
Wylot czystego
powietrza
Wskaźnik
świetlny
zasilania
Obudowa ze stali
galwanizowanej
Zapraszamy
do poznania
rodziny
Blueair Pro
PRZÓD
TYŁ
Page 40

78
79
Rozpoczęcie
użytkowania
Ogólne instrukcje bezpieczeństwa
Oczyszczacz powietrz z serii Blueair Pro jest
urządzeniem elektrycznym. Przed jego użyciem
należy dokładnie zapoznać się z instrukcjami
bezpieczeństwa i podjąć należyte środki
ostrożności, aby zmniejszyć ryzyko pożaru,
porażenia prądem elektrycznym lub urazu
ciała. Ograniczona gwarancja Blueair ma
zastosowanie tylko wówczas, gdy produkt jest
użytkowany zgodnie z podanymi zasadami.
Urządzenia nie powinny obsługiwać dzieci ani
osoby z ograniczonymi funkcjami fizycznymi, czucio wym i lub umysł ow ymi, ani osoby bez
doświadczenia i odpowiedniej wiedzy, jeśli nie jest
im zapewniony nadzór lub nie otrzymał y
one instrukcji dotyczących użytkowania pro-
duktu ze strony osoby odpowiedzialnej za ich
bezpieczeństwo.
Należy pilnować, aby dzieci nie bawiły się
urządzeniem. Jeśli przewód zasilający jest
uszkodzony, w celu uniknięcia niebezpie
czeństwa musi on zostać wymieniony przez
producenta, pracownika jego serwisu lub inną
odpowiednio wykwalifikowaną osobę.
Umieszczenie
Ur ządze nie nal eż y usta wić w miejs cu, pozwalającym na swobodną cyrkulację powietrza
zewnętrznego i wokół oczyszczacza. Minimalna dopuszczalna odległość od innych przedmiotów wynosi 4˝ (10 cm) . Nal eż y uż y wa ć tyl ko
oryginalnych filtrów Blueair.
Nie należy
Bezpośrednio na miękkich elementach
wyposażenia pomieszczen ia, takic h jak.
W pobliżu źró deł wys okiej temperatur y,
np. grzejników, kominków lub.
Warunki
W pobliżu mokrych obszarów, takic h jak
łazien ki lub pral nie, w któr ych system
może mieć konta kt z wodą.
Najlepsze
wykorzystanie
systemu Blueair
System Blueair jest prosty w użytkowaniu. Należy upewnić się, że urządzenie ma odpowiedni
rozmiar do wielkości danego pomieszczenia i
wymieniać filtry zgodnie z harmonogramem.
Trzeb a pa mię tać, że każdy system ocz yszc zania posiada ograniczenia odnośnie ilości uzdatnianego powietrza - podobnie jak klimatyzatory
i grzejniki mają limity powietrza, które ulega
ochłodzeniu lub ogrzaniu. Warto postępować
zgodnie z podanymi wytycznymi
Zamknij okna
Nie możn a otwor zyć okien w up alny letn i dz ień
i oczekiwać wydajnej pracy klimatyzatora, ponieważ rozgrzane powietrze będzie dostawać się
do wewnątrz, a chłodne uciekać na zewnątrz.
Nawet jeśli nie widać wchodzącego do pomieszczenia zanieczyszczonego powietrza i
wydostającego się filtrowanego, w stosunku do
oczyszcza cza obo wią zują te sam e za sad y.
Zamknij drzwi
Dla uzyskania najlepszych rezultatów zamknij
pomieszczenie, w którym działa system,
podobnie jak w zimowy wieczór zamyka się
ogrzewane pokoje dla zapewnienia optymalnej
pracy grzejników.
Używaj systemu p rzez całą dobę
Najlepiej używać Blueair przez całą dobę, 7 dni
w tygodniu. Nieprzerwana praca urządzenia
zapewnia w pomieszczeniu stałą cyrkulację
czystego, filtrowanego powietrza. Systemy
Blueair pobierają wyjątkowo mało mocy. Generalnie, koszt zasilania oczyszczacza Blueair jest
porównywalny z kosztem użytkowania jednej
żarówki - w zależności od rodzaju urządzenia i
prędkości roboczej.
Ten symbol na produkcie lub opa kowaniu oznac za, że urządzenia nie wo lno traktować jako odpad
gospodarczy. Zużyt y produkt należy przekaz ać do serw isu Blueair lub do pun ktu recyklingu sprzętu
elektr ycznego i elektronicznego. Stosując się d o zaleca nego spos obu pozbywania się pro duktu,
użytkownik pomaga z apobiegać ewentualnym negat ywnym skutkom dla śro dowiska i zdrowia ludzkiego, jak ie mogł yby wystąpić w prz ypadku niewłaściwej utyli zacji.
Aby zmniej szyć ry zyko porażenia prądem elek trycznym, urządze nie posiada wtyczkę z u ziemieniem,
wyposażoną w trze ci (uzie miający) bolec. Wt yczka pasuje wyłącznie do odpowiednio przystosowanego
gniazda. Jeśli wt yczka i gniazdo nie są do pasowane, należy skontaktować się z wykwa lifikowaną osobą
w celu dokonania monta żu właściwego gnia zda. Wtyczki nie woln o w żaden spo sób modyfikować.
Page 41

80
81
Ustawienia
Mocno i w pełni wetknij przewód zasilający
do wpuszczonego gniazda w dolnej części
urządzenia, a jego drugi koniec wetknij do
uziemionego gniazda naściennego lub listwy
elektrycznej. Ustaw oczyszczacz na prędkość
maksymalną, która jest zalecana do szybkiego
wstępnego oczyszczania, a także do pracy w
ciągu dnia i w warunkach silnie zanieczyszczonego powietrza. Po kilku minutach można
ustawić inną pożądaną prędkość. Generalnie,
prędkość minimalna zalecana jest podczas
pracy urządzenia w nocy.
A. Funkcje w yświetlacza b ez modułu
monitorowania powietrza
Wy świe tlac z jest w sta nie goto wośc i. Włącz oczyszczacz, dotykając przycis ku PLUS. Pomiędzy
przyciskami pojawi się niebieski pasek.
Ustaw prędkość od 1 do 3 przy pomocy prz ycisków PLUS
i MI NU S.
Wyłącz oczyszczacz poprzez naciśnięcie przycisku MINUS,
gdy urządzenie pracuje na pierwszej prędkości
Gdy wymagana jest wymiana filtra, zapala się odpowiedni
czerwony wskaźnik świetlny.
Podczas p racy urządzeni a, wyświetle nie powoli znika po 3 0 sekundach.
Aby ponownie akt ywować wyświetlacz w ystarczy dot knąć jeden z przycisków.
B. Funkcje w yświetlacza z modułem
monitorowania powietrza
Ab y wł ączy ć tryb autom aty cz ny, dotkn ij prz ycis k PLUS g dy
ur ządz enie pra cuj e na prę dkoś ci 3. Poj awi si ę słow o AUTO,
a dwa czu jni ki jak ości p owietrz a będą reg ulow ać prę dkoś ć
odpowiednio do poziomów zanieczyszczenia.
Ab y wróc ić do ob sług i ręcz nej, dot knij pr zyci sk MIN US.
Gdy wymagana jest wymiana filtra zapala się odpowiedni
czerwony wskaźnik świetlny.
Wymagany moduł monitorowania powietrza. Informacje na
temat instalacji i konserwacji modułu znajdują się na stronie
16, "Moduł monitorowania powietrza".
Włącz oczyszczacz, dotykając przycisku PLUS. Pomiędzy
przyciskami pojawi się niebieski pasek
Nad paskiem, dwie kreskowe kolumny pokazują poziomy
cz ąs tek za wi eszo nych w pow ietrz u (P M2.5 ) oraz zani eczy szcze ń gaz owyc h (GA S) . Jedna k re ska (z ielo na) oznac za nis ki
pozi om czą stec zek lu b ga zu.
Trzy kreski (zielona, żółta i czerwona) oznaczają wysoki
pozi om czą stec zek lu b ga zu, sy gnal izuj ąc kon iecz ność
zwiększenia prędkości roboczej lub włączenia trybu automatycznego
Wyłącz oczyszczacz poprzez naciśnięcie przycisku MINUS,
gdy urządzenie pracuje na pierwszej prędkości.
Uwaga: Moduł monitorowania powietrza będzie pokazywać wysoki poziom
cząsteczek i gazu przez pierwsze pięć minut działania, kiedy następuje kalibracja
czujników jakości powietrza
Page 42

82
83
Oczyszczacze powietrza Blueair cechuje wysokiej jakości konstrukcja, materiały i wykonanie.
Aby utrzymać urządzenie w jak najlepszym
stanie, zalecamy jego rutynowe oczyszczanie.
Przed dokonaniem czyszczenia lub konserwacji
sprzęt należy odłączyć od źródła zasilania.
Podczas wymiany filtra odkurz od wewnątrz
kratkę wlotu powietrza.
Wytrzyj część zewnętrzną urządzenia
miękką, czystą, wilgotną ściereczką.
Nie wolno czyścić urządzenia
benzyną,rozpuszczalnikami chemicznymi
ani substancjami żrącymi, ponieważ można
uszkodzić powierzchnię.
Nie wolno dopuścić, aby do otworu wlotowego lub wylotowego dostały się ciała obce.
Może to spowodować porażenie prądem lub
uszkodzenie urządzenia.
Nie wolno samodzielnie naprawiać ani
regulować żadnych funkcji elektrycznych bądź
mech ani cznych w urzą dzeni u Bluea ir. Należy
skonta k tować si ę z loka lnym de ale re m lub
Blue air w cel u uz ysk ani a info rma cj i na tem at
gwarancji.
Powietrze przechodzi przez komorę jonową, w
której cząsteczki zostają naładowane ujemnymi
jonami. Naładowane cząsteczki są przyciągane
do powierzchni filtra HEPASilent
TM.
Oczyszczone powietrze, praktycznie wolne od
za ni ecz yszczeń, jest pr zeka zywan e z powro tem do pomieszczenia.
Jak działa
urządzenie
Utrzymanie i
konserwacja
Page 43

84
85
Wymiana
ltra
Wy łącz urzą dzen ie i otw órz
drzwiczki wlotowe, pociągając za
gó rną kr awęd ź. Drz wic zki wl otow e
zn ajdu ją się z prawe j stro ny, pat rzą c
od przodu oczyszczacza.
Fi lt r jest mon towa ny w urz ądze niu w
ks zt ałci e V. Na bo ka ch wys taj ą dw a
zatrzaski.
Uż ywaj ąc zatr zask ów, złą cz ze so bą
dwa boki filtra.
Delikatnie wyciągnij zabrudzony filtr z
urządzenia.
1
Pr zytrz ymują c bo ki filt ra raze m,
um ieść now y filt r w ur ządz eniu ,
wykorzystując prowadnice w górnej i
dolnej części obudowy.
2
4
53
De lika tnie wci śnij now y filt r na mie jsc e.
Za mont uj drz wic zki wl otow e. W łą cz
oczyszczacz.
6
Pr zy pom ocy z atrz askó w wysu ń dwa
boki filtra
7
8
W ur ządz enia ch Blu eai r Pr o L i XL
powt órz kr oki 2– 7 dl a ws zyst kich
pakietów filtrów.
Przed wymianą filtra
wyłącz urządzenie i
wyjmi j wtyczkę z
gniazda sieciowego.
Podł ącz ka bel do zas ila nia, włą cz urz ą
dzen ie a nas tępn ie dot kn ij prz ez trz y
sekundy czerwoną kontrolkę w ymiany
filtra. Światełko zaświeci się i zgaśnie.
9
Page 44

86
87
Opatentowana technologia HEPASilentTM spr a-
wia, że seria Blueair Pro pracuje wyjątkowo
cicho. Urządzenie jest fabrycznie wyposażone
w filtr HEPASilentTM .
Filtr cząsteczek. Jest to fil tr usuwaj ący
kurz, pyłki, bakterie, sierść zwierząt, zarodniki
pleśni oraz inne cząsteczki znajdujące się w
powietrzu. Jest on wykonany z polipropylenu,
który odfiltrowuje cząsteczki mechanicznie. Aby
zmaksymalizować skuteczność filtra, cząstki
przed wniknięciem do filtra zostają negatywnie
naładowane przez urządzenie Blueair.
Filtr SmokeStop™. Jest to fil tr czą steczek
połączony z filtrem z węglem aktywnym, usuwają cy zani ecz ys zczen ia ga zowe, takie jak dym
z papi erosów i cyga r or az in ne substa ncj e LZO
(l ot ne zw iąz ki orga niczn e, w tym farby ma lar skie
i inne chemikalia). Dodanie aktywnego węgla do
filtra może mieć wpływ na cyrkulację powietrza i
CADR (szybkość dostarczania czystego powie-
trza). Przy pierwszym użyciu filtra można również
pocz uć deli katny zapac h, któr y szybko ustęp uje
Filtr Carbon+. Jest to silnie aktywny filtr węglo-
wy, który można zamontować w urządzeniach
Blueair Pro oprócz głównego filtra cząsteczek
HEPASilentTM lub filtra
SmokeStop™. Zapewnia on dodatkową ochronę
przed zanieczyszczeniami gazowymi, takimi jak
formaldehyd, dwutlenek siarki oraz lotne związki
organiczne.
Dla optymalnego działania, Blueair zaleca
wymi anę filtrów co sześć ( 6) miesięcy uż ytkowania.
W niektórych państwach oferujemy wygodny
program subskrypcji filtrów. Należy skontaktować się z lokalnym dealerem lub Blueair, aby
dowiedzieć się, czy program jest dostępny.
WAŻNE! Należy używać wyłącznie oryginalnych filtrów Blueair, aby zapewnić prawidłową
prac ę urz ądzen ia i kor z ys tać z pełn ej gwar ancji.
Montaż
ltra Carbon+
Filtry
Przy zamkniętych bokach filtra,
de lika tnie wsu ń filtr Car bon + do
urządzenia.
Wypchnij boki w kierunku głównego
filtra.
Zamocuj filtr Carbon+ zatrzaskiem
ra my głó wneg o filtr a.
1 2 3
Dane dla klienta
Numer modelu i numer seryjny produktu znajdują się na spodzie urządzenia. Należy
wpisać t e dane w polach pon iżej i zachować do wglą du w przyszło ści.
Numer modelu Nazwa dealera
Numer seryjny Adress dealera
Data zakupu Numer telefonu
Podczas p racy urządzeni a, wyświetle nie powoli znika po 3 0 sekundach.
Aby ponownie akt ywować wyświetlacz w ystarczy dot knąć jeden z przycisków.
Page 45

88
89
Konserwacja modułu monitorowania
powietrza
Wyjmij moduł z urządzenia.
Przy pomocy odkurz acza ostrożnie oczyść
wlot przed cz ujnik iem gazu.
Użyj wilgotnego bawełnianego wacika do
oczyszczenia soczewek czujnika kurzu.
Po usunięciu zanieczyszczeń z soczewek,
wytrzyj je suchym wacikiem. Do czyszczenia
soczew ek nie na leż y uży wać al ko hol u.
Ponownie zamontuj moduł.
Moduł
monitorowania powietrza
Dzięki modułowi monitorowania powietrza
Blue air, urządz enia Bl uea ir Pro mo gą nieu sta nnie kontrolować i przekazywać informacje o
jakości otaczającego powietrza, wykorzystując
najnowocześniejsze czujniki cząsteczek i
gazów. Urządzenie może również pracować
w trybie automatycznym, w którym prędkość
jest regulowana w zależności od wykrywanego
przez czujniki poziomu zanieczyszczenia.
Jeśli chcesz uzupełnić urządzenie Blueair
Pro o moduł monitorowania powietrza, odwiedź
witrynę www.blueair.com i znajdź najbliższego
dealera.
Wyciągnij osłonę zaślepiającą z
obsady modułu.
Włóż moduł monitorowania powietrza
do obsady.
Za mont uj pak iet fil trów i zam knij dr zwiczki wlotowe.
1 2 3
Wyjmij górny paki et filtrów; zobacz kroki 1-4 w części Wymiana filt ra.
Soczewki czujnika kurzu
Czujnik wlotu ga zu
Page 46

90
91
Firm a Blu eair ba zuje na zał ożeniu, że ka żd a
osoba powinna mieć w pomieszczeniach zapewnione czyste powietrze - zarówno w domu
jak i w mi ejscu pracy. St aliśm y si ę glo balny m au torytetem w dziedzinie usuwania nawet najmniejszych cząstek zanieczyszczeń we wnętrzach,
dzięki naszemu głębokiemu zaangażowaniu na
rzec z badań oraz innowacj i. Nasze zdro ws ze
urządzenia pracują cicho i zużywają bardzo
niew iel e energ ii, prz y czy m ocz yszcz ają wię cej
powietrza w szybszym tempie, usuwają
alergeny i czynniki wywołujące astmę, wirusy,
bakterie oraz inne zanieczyszczeni przenoszone
drogą powietrzną.
Tworzymy najlepsze na świecie oczyszczacze powietrza, ponieważ gorąco wierzymy,
że czyste powietrze to jedno z podstawowych
praw czł ow iek a. Blueair – Innowacj e z serce m ze Szwec ji.
Blueair Pro
Profesjonalne
działanie Perfekcyjny styl
Page 47

Blueair AB
Danderydsgatan 11
SE-114 26 Stockholm
Sweden
Tlf: +46 8 679 45 00
Faks: +46 8 679 45 45
info@blueair.se
Blueair (Shanghai)
Trading Co. Ltd.
Rm 1005 City Gateway
No. 398 North Caoxi Road
Xuhui Distr, Shanghai
Tlf: +86 21 6091 0981
Faks: +86 21 6091 0989
info@blueair.cn
Blueair Inc.
Suite 1900
100 N LaSalle Street
Chicago
IL 60602
Tlf: +1 888 258 3247
Faks: +1 312 727 1153
info@blueair.com
Blueair India
Embassy of Sweden
Nyaya Marg
Chanakyapuri
New Dehli – 110021
Tlf: +91 11 4606 7121
Faks: +91 11 4606 7120
india@blueair.se
www.blueair.com
900163_PRO_E_UM_Rev01
 Loading...