

Page 1
Blueair Cabin P1
Car Air Purifier User Manual
1
ARTWORK for 501089_User_Manual_P1_EN_Rev02.indd 1 2018-10-05 17:05
Page 2
Before using your
a Quick Start Guide for convenience.
Note:
There may be local variations of this model.
By using this product, you hereby signify that you have read this disclaimer carefully and that you
understand and agree to abide by the terms and conditions herein.
Blueair accepts no liability for damage, injury or any legal responsibility incurred directly or indirectly
from the use of this product. You agree that you will use this product in a proper and safe way which is
in accordance with all applicable laws, regulations, standards and all terms and guideline made by
Blueair (including but not limited to those set out under this User Manual). You agree that you are solely
responsible for your own conduct while using this product, and for any consequences thereof.
Please read this User Manual carefully to become familiar with the features of this product and the
instructions for assembly, set-up, placement or use of this product before operating. Failure to operate
this product correctly or in a safe manner as specified in this User Manual can result in damage to the
product, personal property and cause injury.
This product is not intended for use by children without direct adult supervision. Please do not use this
product with incompatible components or alter this product in any way outside of the documents
provided by Blueair.
Blueair Cabin P1 car air purifier please refer to the User Manual. We have also included
Contents
General 3
Safety instructions 4
Blueair Cabin P1 car air purifier 6
Filters 7
Getting started 8
Functionality 10
Care and maintenance 15
2
ARTWORK for 501089_User_Manual_P1_EN_Rev02.indd 2 2018-10-05 17:05
Page 3
General
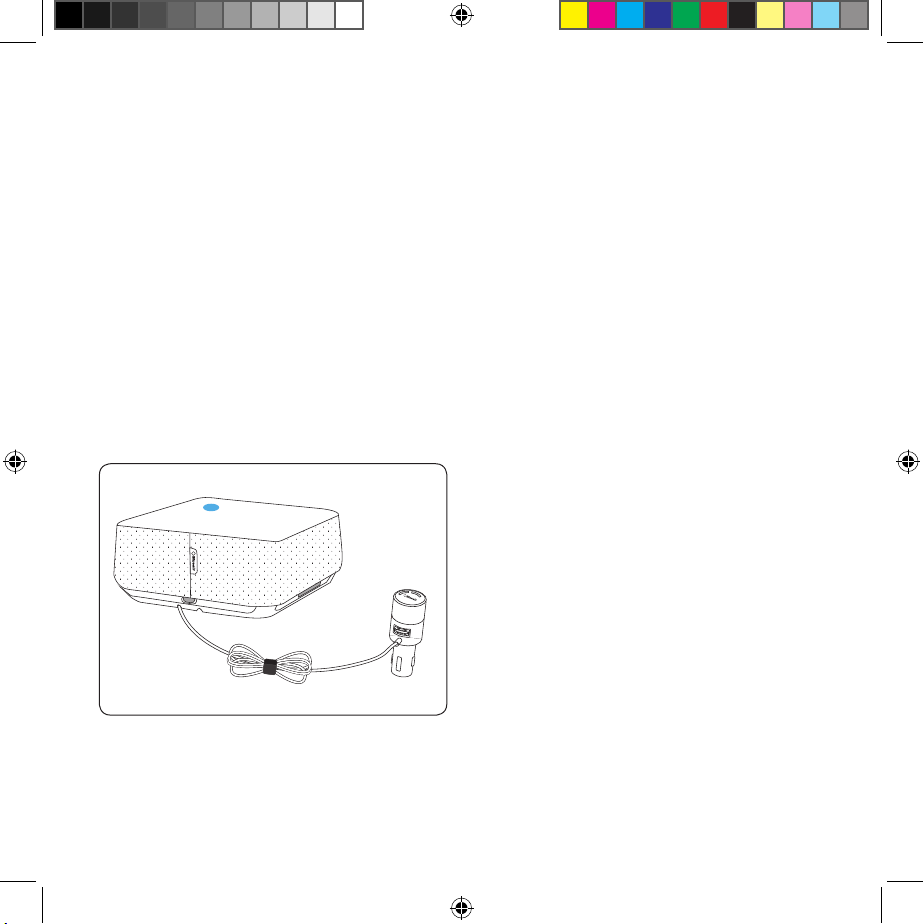
Blueair Cabin P1 car air purifier
The car air purifier is designed for use in small to
medium-size cars, purifiying the air while the car is
in use.
Blueair´s HEPASilent™ advanced filtration
technology enables the car air purifier to remove
harmful pollutants (i.e. VOCs such as
Formaldehyde), particles and odors.
A control knob (also 12V power) enables the driver
to either change the fan speeds (3 speed options)
or activate the Clean Cycle program.
A 4,5 m cable connects the control knob to the
main unit so that it can be installed behind a
backseat headrest.
The product is equipped with an easily accessible
USB charging port so that back seat passengers
can charge another device while the cabin air is
cleaned. Similarly, a USB charging port on the
control knob is available for use by the driver or
front seat passenger.
3
ARTWORK for 501089_User_Manual_P1_EN_Rev02.indd 3 2018-10-05 17:05
Page 4

Safety instructions
General
DISCLAIMER:
Ensure that the car air purifier is installed according to the instructions in the user manual. For your
safety use only the items supplied in the box.
Whilst operating the device, the driver must be aware of, and take into consideration the prevailing
trac conditions. Blueair declines all responsibility for personal harm or injury whilst using the
product if the installation has not been carried out correctly or if the product is used incorrectly.
The car air purifier is an electrical appliance. Read these safety instructions carefully before
use and take the necessar y precautions to reduce the risk of fire, electric shock or injur y.
The car air purifier warranty applies only if the product is installed, used and maintained
according to these instructions.
Please do not adjust the settings , or look at the display of the car air purifier whilst driving.
Please do not look at your mobile phone whilst driving. You must comply with all applicable
safe driving laws and behaviors, including those addressing the use of mobile devices.
WARNING: Indicates a hazardous situation that, if not avoided, could result in death or
serious injury.
CAUTION: Indicates a hazardous situation that, if not avoided, could result in minor or
moderate injury.
WARNINGS:
To avoid a hazard, a supply cable must always be replaced (because of damage, malfunction
or any other reason) by the manufacturer, service agent or similarly qualified person.
Do not spill any liquids such as water, detergents or flammable solvents on the device. Do not
use the device if any liquids have spilled on it. If there is a spill, wipe the exterior of the unit
with a soft, clean, damp cloth.
Use only the mounting strap included in the box and ensure that the unit is securely fastened
as specified. Blueair disclaims all liability for any harm or accident caused by improper installation, usage, disassembly and maintenance by any user or third party.
Note:
The mounting strap shall not be removed from the unit.
4
ARTWORK for 501089_User_Manual_P1_EN_Rev02.indd 4 2018-10-05 17:05
Page 5

Intended use
To avoid injury it is important not to install the unit in front of, or near the safety airbag which
is normally located in the dashboard in front of the front passenger seat.
CAUTIONS:
Only use the power cable provided with your car air purifier to plug directly into an appropriate 12V power outlet in a car.
The car air purifier is designed for connecting to a 12V power outlet in a car that is automatically turned on or o when the ignition is turned on or o. Therefore we highly recommend
using a ignition-controlled 12V power outlet in the car to avoid the risk of draining the battery.
Note:
The product can also be installed in a boat, truck or RV/motorhome 12V power outlet.
Ensure that the unit is securely fastened.
Do not alter the plug in any way.
Do not use the unit if the power cable or plug is damaged or malfunctions in any manner.
Keep the power cable away from heated surfaces.
No foreign objects should enter the unit as this may cause a electric shock or damage.
To prevent damage to the unit do not block the air outlet, air inlet and air ducts.
Install the unit in a position where air can fully circulate around it - do not cover the unit.
The device contains high precision technology. Dropping or striking the device may cause
damage.
Install the unit in the appropriate position inside the vehicle by using accompanying
accessories and according to the instructions in the user manual.
Do not remove or replace the mounting strap that is delivered with the unit.
CAUTIONS:
This appliance is not intended for use by persons with reduced physical, sensory or mental
capabilities, or lack of experience and knowledge, unless they have been given supervision or
instruction concerning use of the appliance by a person responsible for their safety.
To avoid electric shock or damage, keep the product out of the reach of children since it is
not a toy.
COMPLIANCE AND STANDARDS
This product complies with:
SRRC, CMIIT ID no:
5
ARTWORK for 501089_User_Manual_P1_EN_Rev02.indd 5 2018-10-05 17:05
Page 6

Blueair Cabin P1 car air purifier
1. Open and unpack the box
2. Read the User Manual and Quick Start Guide
Please refer to
information.
Contents of box
www.blueair.com for more
IMPORTANT!
Please note that the Particle+Carbon filter is not
mounted inside the unit when purchased. The filter is
a separate item inside the box and MUST be installed
before use.
1
1. Purifier unit
2. Mounting strap
3. Particle+Carbon filter
Product Overview
1
2
6
6
2
3
4
5
IMP
OR
TA
N
T
4. Control knob with a 4,5m power cable
5. User information
1. Top cover
2. Folded Particle+Carbon
9
10
3
11
13
12
15
filter
3. Unfolded Particle
+Carbon filter
4. Purifier unit base
14
5. Top cover release lock
6. USB charging port
7. Main unit base (top view)
8. Filter reset button
4
7
FILTER RESET
8
5
9. Control knob
10. USB charging port
11. Power cable
12. Back view
13. Mounting strap
14. Cable plug area
15. Power supply port (12 V)
ARTWORK for 501089_User_Manual_P1_EN_Rev02.indd 6 2018-10-05 17:05
Page 7

Filters
IMPORTANT!
Please note that the Particle+Carbon filter is not mounted inside the unit when purchased. The
filter is a separate item inside the box and MUST be installed before use.
One Blueair Particle+Carbon filter is delivered with car air purifier. This filter removes the following
airborne pollutants from the car:
PM1.0/PM2.5/
PM10
including
Formaldehyde
DustParticles
Pollen Pet
dander
SmokeVOCs
Bacteria
IMPORTANT!
Use only genuine Blueair filters to ensure proper function of your unit and to qualify for full
warranty coverage.
Filter checklist
To make it easy to find the right filter in the future, please fill in the customer record below and keep
this user manual for reference. The model number and serial number of this product can be found
on the rating label on the bottom of the unit.
Model number
Serial number
Retailer’s name
Retailer’s address
Date of purchase Telephone number
Blueair filter subscription program
This convenient service is available in some countries – contact your local Blueair retailer or check the
Blueair website to find out if you can join.
7
ARTWORK for 501089_User_Manual_P1_EN_Rev02.indd 7 2018-10-05 17:05
Page 8

Getting started
1. Remove the top cover
UP
1
IN
1. Place the purifier unit
on a flat surface or car
seat and release the top
cover by pressing the left
and right release locks IN
and UP as shown.
2. Lift o the top cover.
3. Turn top cover upside
down and place next to
the purifier unit base.
2a. Install the filter
1. Remove the plastic
bag from around the
filter and pull the two
sides of the filter apart
to form a square.
2. Mount the unfolded
filter onto the purifier
base unit.
3. Remount the top
cover onto the purifier
base unit
Note:
As a safety precaution the unit cannot start
unless the top cover is installed correctly.
Note:
There is no need to press the filter reset
button for initial filter installation.
8
ARTWORK for 501089_User_Manual_P1_EN_Rev02.indd 8 2018-10-05 17:05
Page 9

2b. Attach the mounting strap
5. Connect control knob and 12 V power supply
5 cm
1. With purifier unit base
face down on a flat
surface, thread the
POWER IN
POWER OUT
mounting strap through
the two silver buckles
(as shown). Velcro side
faces unit.
3. Connect cable to unit
1
DC 12V
IN
Before installing the unit
into the car, connect
the power cable to the
power supply port on
the back of the unit.
4. Place and install the unit
Connect the control
knob with power supply
into the 12 V power
supply port located near
the driver. (Refer to page
5 for more information).
6. Cable management
Run the cable under
carpets or other plastic
details between the
control knob and the
unit. To avoid cable
damage when adjusting
car seats, do not run too
close to the seat tracks.
Coil any cable excess and
fasten with the supplied
cable tie.
Firmly secure the unit behind a back seat headrest
by adjusting the mounting strap accordingly.
9
ARTWORK for 501089_User_Manual_P1_EN_Rev02.indd 9 2018-10-05 17:05
Page 10

Functionality
1. General
The car air purifier unit is controlled by pressing down the control knob to adjust the fan setting.
Notes:
1. In order for the unit to clean the air optimally, please ensure that the car´s recirculation mode is
active and any window or sunroof is closed.
2. When the unit is powered o and then powered-up again, then the fan speed is activated at the
same speed as the last used setting.
3. The cleaning time depends on the cabin volume of the cars in question. Blueair Cabin P1 car air
purifier is recommended for use in cars up to mid-size (see table on page 12).
2. The control knob - overview
The control knob is
mounted into the 12V
power supply port, e.g.
on the dashboard of the
car.
The other end of the
cable is inserted into
the power supply port
located on the main
DC 12V
IN
1
unit.
A USB port on the
control knob enables
the driver or front seat
passenger to connect
and charge another
2a. Navigation
Press the control knob
once and toggle
through the fan speeds
(see section “Adjusting
fan speed”). The control
knob display is only
illuminated when the
fan is active
2b. Information
The control knob can
also display:
Low fan speed
Medium fan speed
High fan speed
Clean Cycle mode
Back to low fan speed
etc.
Unit power on/idle
mode
Filter change alert
Fan speed setting
Notifications (see
section
“Notifications”)
device (e.g.mobile
phone).
10
ARTWORK for 501089_User_Manual_P1_EN_Rev02.indd 10 2018-10-05 17:05
Page 11

3. Turn on
3a.
x 1
To turn unit on press
once.
3b.
Note:
The unit must be
connected to the
power supply port
and powered up (i.e.
the car´s ignition is
on.)
4. Adjusting the fan speed
By pressing once, the sequence goes round in a
loop from Low speed to Medium Speed to High
Speed to Clean Cycle mode to Low speed etc.
1 2 3 4
LED behaviour for each fan speed:
Low speed (1) = 1 white LED blinks 3 times
Medium speed (2) = 2 white LEDs blink 3 times
High speed (3) = 3 white LEDs blink 3 times
Clean Cycle mode (4) = 6 white LEDs blink 3 times
When the unit is turned
on, the start up
sequence begins and
the fan starts in the last
setting.
11
ARTWORK for 501089_User_Manual_P1_EN_Rev02.indd 11 2018-10-05 17:05
Page 12

5. Clean Cycle program
P1 P1D
CLEAN CYCLE PROGRAM
HIGH
MED
LOW
TIME (min)
10 20 30 40
The Clean Cycle program starts automatically with a high fan speed in order
to purify the cabin from particles and gases as fast as possible.
After 6 minutes. the fan speed decreases to medium and runs for 3 minutes,
finally decreasing down to low speed as long as the unit is connected to the
power supply.
Press the control knob to toggle to another fan speed setting (Low, Medium or
High) - or press and hold for 3 seconds to turn the unit to idle mode.
Note:
The cleaning time depends on the cabin
volume of the cars in question. Blueair Cabin
P1 car air purifier is recommended for use in
cars up to mid-size (see table).
C
abi
n
per
f
or
m
anc
c
le
an
e
in
g t
im
e
Hatchback (4m3)
C
a
b
in
5– 6
minutes
Cabin P
3– 4
minutes
2iD
P
2i
C
ar
Sedan (3m3)
size
ARTWORK for 501089_User_Manual_P1_EN_Rev02.indd 12 2018-10-05 17:05
SUV (5m3)
Minivan (7m3)
8 –11
minutes
5– 6
minutes
12
Page 13

x 3
6. Idle mode
7. Notification
Press the control knob
for and hold for 3
seconds. Any LEDs that
are on will fade out
during a period of 2
seconds.
Note:
As a safety precaution the unit cannot start unless the top cover is installed correctly.
SITUATION RECOMMENDED ACTION
Top cover open • Check the filter is installed correctly
Unit is not working - unit is disconnected from
the control plug.
Unit is not working - USB charging port overload
If an extra USB charging port is powering too
many external units - ie phones etc - the power
load might be too much for the system and thus
it shuts down.
General hardware failure Contact customer service
Other error not indicated by error code. The
LEDs on the control knob do not light up even
though the unit is functioning.
• Check that the top cover has been correctly
installed
Check that control knob is correctly installed
and that the cable/connector is not damaged.
Remove external units until the unit works.
Contact customer service
3 red LEDs blink in a
triangle formation
should a notification or
error occur (see table
below).
ARTWORK for 501089_User_Manual_P1_EN_Rev02.indd 13 2018-10-05 17:05
13
Page 14

9. Changing the filter
A filter change alert is
displayed on the
control knob when a
filter change is due.
1. Lift o the top cover
and mount the new
filter onto the purifier
base unit.
Note:
The notification (3
red LEDs) appears as
soon as the top
cover is removed and
remains visible until
the top cover is
remounted.
2. Turn on the car´s
ignition.
3. Turn on the unit (a blue LED lights up on
the top cover indicating
the unit is powered-up)
Note:
The recommendation of approximately 6
months/180 days between filter changes is
based on a usage of 360 hrs during that period
(2,5hr * 6 days * 4 weeks * 6 months).
4. Press the filter reset
FILTER RESET
button.
5. Remount the top
cover onto the main
base unit
.
14
ARTWORK for 501089_User_Manual_P1_EN_Rev02.indd 14 2018-10-05 17:05
Page 15

Care and maintenance
We recommend regular cleaning in order to keep your unit in top condition.
When changing filters
1. Wipe the underside of the top cover clean after removal.
2. Vacuum the air outlets using a soft brush and/or other suitable attachment.
3. Vacuum the small air inlets with a soft brush attachment.
General
1. Wipe the exterior of the unit with a soft, clean, damp cloth.
2. Never clean with gasoline, chemical solvents or corrosive material as these agents may
damage the surface.
3. Do not allow foreign objects to enter the ventilation or exhaust openings. This may cause
electric shock or damage the unit.
4. Do not try to repair or adjust any of the electrical or mechanical functions on your
Blueair unit yourself. Contact your local dealer or Blueair for warranty information.
Environment protection:
Let’s protect the environment!
Our products and packaging are sustainably designed and made from recyclable materials. Do not
discard the filter or the product with household waste. Bring it to the nearest ocial waste recycling
service.
Help and support
If you have questions about Blueair products, please visit www.blueair.com.
Warranty information
The Blueair Limited Warranty applies only if the unit is installed, used, and maintained according to
the instructions in this manual.
15
ARTWORK for 501089_User_Manual_P1_EN_Rev02.indd 15 2018-10-05 17:05
Page 16

www.blueair.com
Blueair AB
Karlavägen 108
115 26 Stock holm
Sweden
Tel: +46 8 679 45 00
Fax: +46 8 679 4 5 45
info@blueair.se
Blueair AB Middle East, Jafza One,
Oce No. AB1503
Jebel Ali free Zone, P.O. Box No. 263947
Dubai, United Arab Emirates
Ph :+971 (4)8821244
Email : salesme@blueair.se
Web : www.blueair.com/ae
Blueair Inc.
Suite 1900,
100 N LaSalle Street
Chicago, IL 60602
USA
Tel: +1 888 258 3247
Fax: +1 312 727 1153
info@blueair.com
Bluea ir India Pvt. Ltd.
Registered Oce:
S-237, Greater Kailash-11,
New Del hi 110048
India
Tel: +91-124-4646119
info@blueair.in; w ww.blueair.com/in
Toll free info number: 180 08331188
Blueair (Shanghai)
Trading Co . Ltd.
10th floor Cit y Gateway
No. 398 Nor th Caoxi Road
Xuhui Distr, Shanghai,
China
Tel: +86 21 609 1 0981
Fax: +86 2 1 6091 0989
info@blueair.cn
501089_P1_EN_UM_REV02
ARTWORK for 501089_User_Manual_P1_EN_Rev02.indd 16 2018-10-05 17:05
 Loading...