


contemporary
baby chair
chaise haute fresco / silla fresco / kindersitz fresco / seggiolone fresco / moderne kinderstoel
 user guide
www.bloombaby.com

illustration contents
|
Part List & Illustrations |
i1 |
|
|
Liste des pièces & Illustrations |
|
|
|
Lista de piezas e Ilustraciones |
|
|
|
Mitgeliefertes Zubehör & Abbildungen |
|
|
|
Elenco delle parti & Illustrazioni |
|
|
|
Onderdelenlijst & Illustraties |
|
|
|
Basic Assembly |
i2-i3 |
|
a |
|||
Montage |
|
||
Armado Básico |
|
||
|
Grundaufbau |
|
|
|
|
||
|
Assemblamento Della Base |
|
|
|
Basis Installatie |
|
|
|
Cradle Mode: suitable for 0 – 6 months |
i4-i6 |
|
b |
|||
Configuration Berceau (allongée): de 0 à 6 mois |
|
||
Modo de Cuna: apropiado de 0 a 6 meses |
|
||
Wiegenstellung: geeignet für 0 – 6 monate |
|
||
|
|
||
|
Modalità Culla: usufruibile da 0 a 6 mesi |
|
|
|
Baby Modus van 0 tot 6 Maanden |
|
|
|
Highchair Mode: suitable for 6 months to 36 months |
i7-i10 |
|
c |
|||
Configuration Chaise Haute: de 6 mois à 36 mois |
|
||
Modo de Silla Alta: para 6 meses a 36 meses |
|
||
|
Hochstuhlstellung: geeignet für 6 – 36 monate |
|
|
|
|
||
|
Modalità Seggiolone: sfruttabile da 6 a 36 mesi |
|
|
|
Baby-peuterstoel Modus van 6 tot Maanden |
|
|
|
Toddler Chair Mode: suitable for 36 months to 36 kg/79 lbs |
i11-i12 |
|
d |
|||
Configuration Chaise Enfant: de 36 mois à 5 ans (maximum |
|
||
36 kg/79 lbs) |
|
||
Modo de Silla Para Niño: para niños de 36 meses a |
|
||
|
|
36 kg/79 lbs
Kleinkindstellung: geeignet für 36 monate bis 36 kg/79 Pfund Modalità Sedia per Bambino: sfruttabile da 36 mesi a
36 kg/79 lbs
Kinderstoel Modus van 36 Maanden tot 36 kg/79 lbs
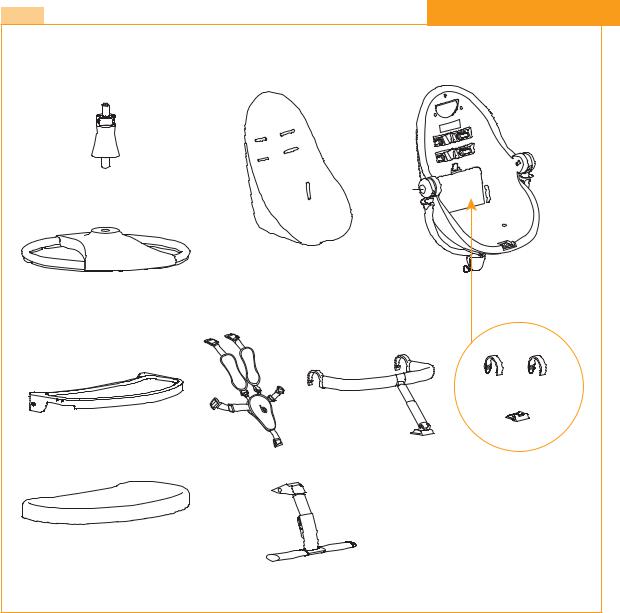
part list |
|
illustrations |
|
|
|
#10 |
|
#01 |
|
|
|
|
#08 |
#09 |
|
|
#05 |
|
|
#02 |
|
|
|
|
|
#12 |
|
#03 |
#11 |
|
|
#06 |
#13 |
||
|
|||
|
#07 |
|
|
#04 |
|
|
|
|
|
i 1 |

a
–Basic Assembly
–Montage
–Armado Básico
–Grundaufbau
–Assemblamento Della Base
–Basis Installatie
i 2
a basic assembly
#10
#01
#02
a 1
A 
 B
B
a 3
1
2 |
a 2 |
|
|
|
a 4 |
|
i 3 |

b
–Cradle Mode: suitable for 0 – 6 months
–Configuration Berceau (allongée): de 0 à 6 mois
–Modo de Cuna: apropiado de 0 a 6 meses
–Wiegenstellung: geeignet für 0 – 6 monate
–Modalità Culla: usufruibile da 0 a 6 mesi
–Baby Modus van 0 tot 6 Maanden
i 4

b cradle mode: 0 – 6 months |
|
#10 |
|
#05 |
|
#09 |
#06 |
|
|
|
b 1 |
#12 |
#13 |
|
|
|
1 |
|
2 |
|
b 3 |
b 2 |
b 4 |
i 5 |
A, B |
b 5 |
i 6

c
–Highchair Mode: suitable for 6 months to 36 months
–Configuration Chaise Haute: de 6 mois à 36 mois
–Modo de Silla Alta: para
6 meses a 36 meses
–Hochstuhlstellung: geeignet für 6 – 36 monate
–Modalità Seggiolone: sfruttabile da 6 a 36 mesi
–Baby-peuterstoel Modus van 6 tot 36 Maanden
i 7
c highchair mode: 6 – 36 months |
#10 |
#07 |
c 1 |
#10 |
#09
c 3
i 8
|
#05 |
|
c 2 |
1 |
#11 |
|
2
3 
c 4
c 5 |
#04 |
c 7
#03 |
c 6 |
A, B |
c 8 |
i 9 |

c 9 |
c 10 |
ii 10

d
–Toddler Chair Mode: suitable for 36 months to 36 kg/79 lbs
–Configuration Chaise Enfant: de 36 mois à 5 ans (maximum 36 kg/79 lbs)
–Modo de Silla Para Niño: para niños de 36 meses a 36 kg/79 lbs
–Kleinkindstellung: geeignet für 36 monate bis 36 kg/79 Pfund
–Modalità Sedia per Bambino: sfruttabile da 36 mesi a 36 kg/79 lbs
–Kinderstoel Modus van 36 Maanden tot 36 kg/79 lbs
i 11
d toddler chair mode: 36 months – 36 kg /79 lbs
#10 |
d 1 |
#12 |
#13 |
|
|
|
2 |
A, B
d 3
i 12

contents
Instructions – eng |
1-9 |
Instructions – fr |
10-18 |
Instrucciones – es |
19-27 |
Gebrauchsanweisung – de |
28-37 |
Istruzioni – it |
38-47 |
Instructies – ned |
48-56 |

eng
dear customer,
thank you for choosing the fresco/ fresco loft baby chair. fresco/ fresco loft is the award winning baby chair which can be used much earlier than a standard highchair because of its reclining seat.
bloom’s european design team created the contemporary fresco/ fresco loft to provide families with a feeding and resting chair for baby that reflects today’s concepts of living and dining space.
engineered to integrate advanced functionality, such as 360 degree rotation and exclusive easy-lift effortless height adjustment, the fresco/ fresco loft revolutionizes baby chair design.
IMPORTANT!
KEEP THIS INSTRUCTION GUIDE FOR FUTURE REFERENCE
Age Recommendation
IIt is recommended that your child be between newborn and 36 kg/79 lbs (5 – 8 years) to use this baby chair.

eng
Product Information
This baby chair has been designed and tested to ensure compliance with the latest relevant safety standards.
•This baby chair is designed with multiple configurations of use for babies and toddlers from newborn to 36 kg/79 lbs:
–cradle mode: from 0 to 6 months
–highchair mode: from 6 to 36 months
–toddler chair mode: from 36 months to
36 kg/79 lbs
•Easily configures to cradle, highchair and toddler chair mode
•360-degree swivel for easy access
•Pneumatic-assist easy-lift height adjustment allowing infinite positions
•Multiple-position reclining seat
•5-point safety harness
•Seat upholstery available in vibrant microsuede™ colours and elegant, understated tones of leatherette
•super sized adjustable feeding tray and second play tray – made of FDA compliant food contact grade plastic and stainless steel, removable and dishwasher-safe
•Smooth sliding adjustable multiple-position food tray
•Multiple-position and removable footrest
•Castor wheels on base for easy ‘lift and glide’
•Compartment for storage of small accessories
Model No.: E10501/ E10505
PATENT PENDING
Colour & contents may vary
Instructions for Safe Use – Please read carefully and keep for future reference
The correct use and maintenance of your baby chair will ensure it gives long and trouble-free use. When somebody else is using your baby chair please ensure they also know how to use it, how to adjust it and the necessary safety precautions. The safety of your child is your responsibility.
NOTE: Adult assembly required.
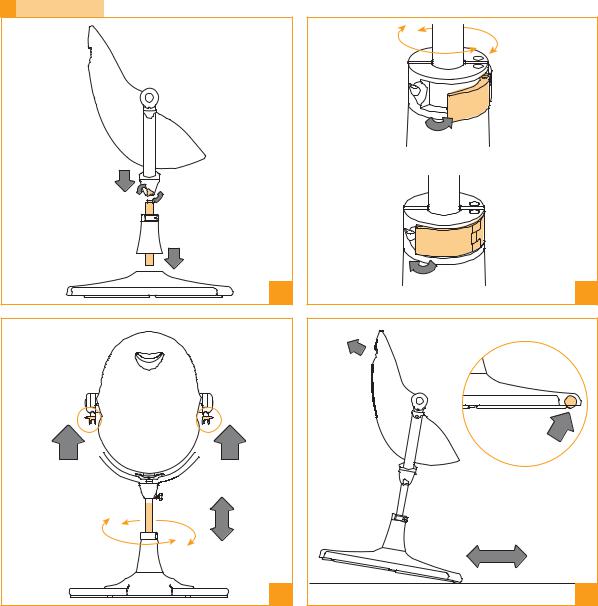
Section A: Basic Assembly (refer to illustrations section a)
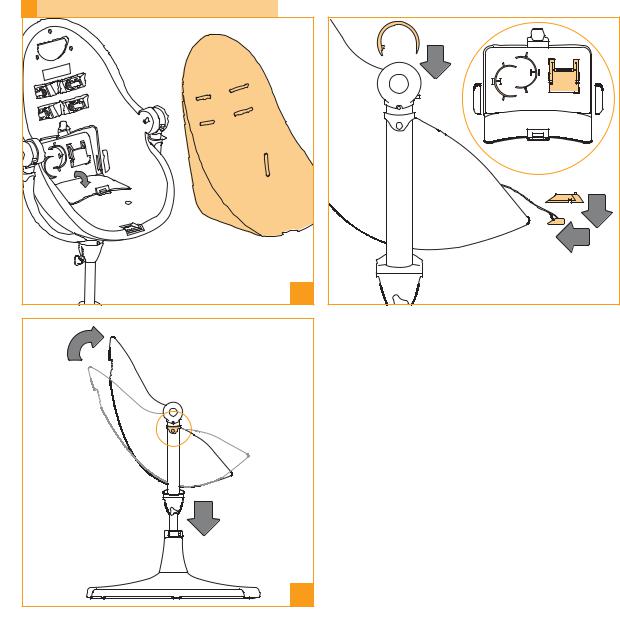
a1 Base and Seat Assembly
(parts #01, #02) Insert the swivel shaft firmly into base, until the plastic housings meet. Press down firmly and turn to secure. Press button to raise swivel shaft.
(part #10) Insert the seat unit onto swivel shaft and tighten fastener clockwise. Check seat unit is secured by pulling seat unit upwards.
a2 Swivel/Height Resistor IMPORTANT!
The resistor is designed to prevent inadvertent or free spinning, however with adult force it is still possible to rotate the seat unit.
To engage
Press metal lever inwards, until it sits flush with the plastic housing. Check the device is engaged by turning the seat unit.

To disengage
Pull the metal lever outwards fully. Check the device is disengaged by turning the seat unit.
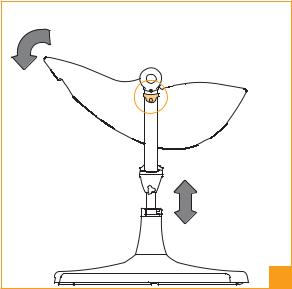
a3 Swivel and Height Adjustment
To rotate the seat unit, disengage the swivel/ height resistor, then turn the seat unit sideways to desired position.
To adjust seat height, disengage the swivel/height resistor. Lift both A & B trigger simultaneously, whilst pushing downwards or pulling upwards to desired height, then release the triggers.
IMPORTANT!
Ensure the seat unit is firmly inserted onto the swivel shaft before use. Check the seat unit is assembled properly by trying the height adjustment function, following the instructions
in this user guide. If the height adjustment fails to work, this means the seat unit is not properly assembled, please re-try and press seat unit downwards on the swivel shaft firmly in order to properly engage the height adjustment mechanisms.
a4 Lift & Glide – Easy Glide Wheels
To move the baby chair across floor, first rotate the seat unit so it is front facing, then engage swivel resistor. Tilt the baby chair forward by lifting on the handle located on the rear of the seat unit, and then glide the highchair across floor using the castor wheels, which are located under the front end of the base.
eng
WARNING:
•Continue to assemble the baby chair according to the configuration suitable for your child. Follow the corresponding instructions carefully.
•A child’s safety is your responsibility.
Section B: Cradle Mode
– suitable for 0 – 6 months (refer to illustrations section b)
WARNINGS:
•Not recommended for children who can sit up by themselves (6 months approximately).
•Never leave the child unattended when the baby chair is in cradle mode.
•It is dangerous to put this cradle on an elevated or uneven surface.
•Keep the product away from open fire, heaters and other sources of strong heat.
•Do not use the product unless all components are correctly fitted and adjusted.
b1 - b3 Seat pad & Safety Harness Assembly
–(parts #05, #06) Put shoulder straps through the seat pad slits at the lower height setting.
–Put waist straps through the seat pad slits.
–Place seat pad onto the seat unit; secure onto velcro.
–(part #10) Behind the seat pad, slide the buckle on the end of the shoulder straps into the buckle slots located on the inner face of seat unit. Check the straps are secured by pulling on the straps.

eng
–(part #09) Behind the seat pad, pull open storage compartment door located on the inner face of seat unit. Slide the buckle on the end of the waist straps into the buckle slots on either side of the storage compartment. Check the straps are secured by pulling on the straps.
–(parts #12, #13) From storage compartment, take out the two ‘C’ shaped clips and the crotch strap cover. Close the compartment door.
–Snap the ‘C’ shaped clips on either side of the seat unit; you will hear an audible click.
–Place buckle on the end of the crotch strap under the crotch strap cover, then slide the crotch strap cover into the seat unit. (The strap and buckle must not be twisted or inverted. This will ensure correct locking of the harness.)
–Adjust the length of the harness straps until it fits firmly around your child.
WARNING: Always use the safety harness.
To remove the seat pad & safety harness for cleaning, follow the instructions given in the care & maintenance section of this user guide.
b4 Using and Adjusting the Safety Harness Locking the safety harness:
Lock the harness by pushing the tongues on the ends of the waist straps, connected with the ends of the shoulder straps, into the buckle on the crotch strap.
The harness will automatically lock when the
tongues have been fully pushed in. You will hear an audible click.
Unlocking the Safety Harness:
Squeeze the ends of the tongues together and then slide them out of the buckle.
NOTE: Every time you place your child in the baby chair or whenever you alter the position of the seat always check that the harness is correctly fitted. Tighten the harness until it fits snugly around your child.
b5 Seat Unit Height And Seat Unit Recline
To adjust seat height, disengage the swivel/height resistor. Lift both A & B trigger simultaneously, whilst pushing downwards or pulling upwards to desired height, then release the triggers.
Adjust the seat unit to cradle position by pressing the handle on the rear of the seat unit, then recline the seat to the lowest position, and release the handle. You will hear an audible click. Check the seat unit is locked in position by moving it. Ensure the seat unit is reclined to the lowest cradle position for children from newborn to approximately 6 months of age, until child can sit up unaided.
WARNING:
•Children who can not sit up unaided can only use the cradle mode of this baby chair. Seat unit must be rotated to the most reclined position.

•Always be sure your child is clear of moving parts before making any adjustments.
Section C: Highchair mode
– suitable for 6 months to 36 months (refer to illustrations section c)
WARNINGS:
•WARNING: A CHILD’S SAFETY IS YOUR RESPONSIBILITY.
•DO NOT LEAVE YOUR CHILD UNATTENDED.
•DO NOT USE THE HIGHCHAIR UNTIL THE CHILD CAN SIT UP UNAIDED.
•DO NOT USE PRODUCT IF ANY PART IS BROKEN, TORN OR MISSING.
•WARNING: Keep the highchair away from open fire, heaters and other sources of strong heat.
•WARNING: Do not use the highchair unless all components are correctly fitted and adjusted.
•Always use the safety harness.
•Make sure harness is correctly fitted before use.
•Always be sure your child is clear of the highchair’s moving parts before making adjustments.
•Check the highchair regularly for damage and to ensure that the harness is secure and performs correctly. No lubrication is necessary.
•Always check the tray is securely locked in place by attempting to pull it free of the highchair.
eng
•IMPORTANT: Every time you place your child in the highchair or whenever you alter the position of the seat, always check that the harness is correctly fitted. Tighten the harness until it fits snugly around your child.
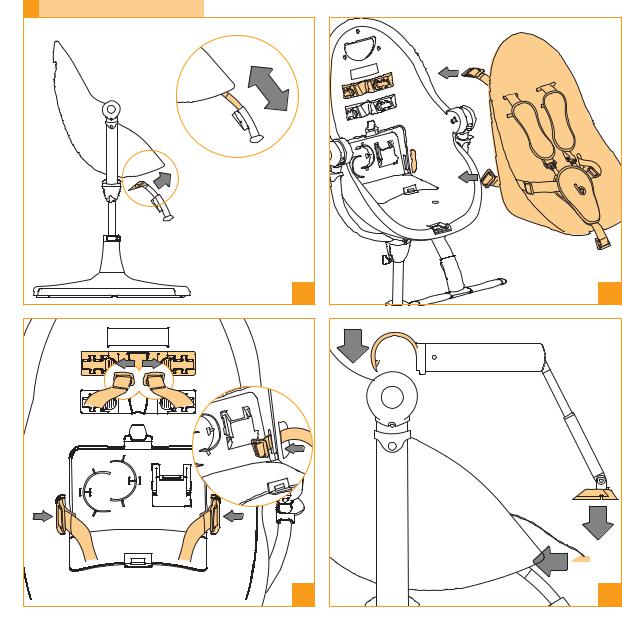
c1 Footrest Assembly and Footrest Adjustment
–(part #07) Slide in footrest until you hear an audible click. Check footrest is secured by pulling it downwards.
–To remove footrest, press button located on the end of the footrest attached to the seat unit, whilst sliding the footrest out toward the back of seat unit.
–The footrest has three height positions. Press the button on the back of the footrest, whilst sliding footrest up or down to your desired position. The footrest is locked into position when you hear an audible click. Check footrest is secured by pulling it downwards.
c2 - c4 Safety Bar, Seat Pad & Safety Harness
Assembly
–(parts #05, #06) Put shoulder straps through the seat pad slits at the desired height setting.
–Put waist straps through the seat pad side slits.
–Place seat pad onto the seat unit; secure onto velcro.
–(part #10) Behind the seat pad, slide the buckle on the end of the shoulder straps into the buckle slots located on the inner face of seat unit. Check the straps are secured by pulling on the straps.
–(part #09) Behind the seat pad, pull open the storage compartment door located on the
eng
inner face of seat unit. Slide the buckle on the end of the waist straps into the buckle slots on either side of the storage compartment. Close the compartment door. Check the straps are secured by pulling on the straps.
–(part #11) Place ‘C’ shaped clips located on either side of the safety bar onto the side posts and lock into position. You will hear an audible click.
–Press down firmly on both sides of the safety bar to ensure secure. The ‘C’ shaped clips should be flush with the side posts.
–Place buckle on the end of the crotch strap into the base of crotch bar, then slide into seat unit. (The strap and buckle must not be twisted or inverted. This will ensure correct locking of the harness.)
–Adjust the length of the harness straps until it fits firmly around your child.
WARNING: Always use the safety harness.
To remove the seat pad & safety harness for cleaning, follow the instructions given in the care & maintenance section of this instruction guide.
c5 Using and Adjusting the Safety Harness
Locking the safety harness:
Lock the harness by pushing the tongues on the ends of the waist straps, connected with the ends of the shoulder straps, into the buckle on the crotch strap.
The harness will automatically lock when the tongues have been fully pushed in. You will hear an audible click.
Unlocking the safety harness:
Squeeze the ends of the tongues together and then slide them out of the buckle.
Adjusting the shoulder straps height:
As your child grows you will need to alter the height of the shoulder straps. The time to do this is when the child’s shoulders are above the slits on the seat pad, where the shoulder straps pass through.
NOTE: Every time you place your child in the baby chair or whenever you alter the position of the seat always check that the harness is correctly fitted. Tighten the harness until it fits snugly around your child.
c6 Mini Tray Assembly
–(part #03) Latch the hook located on the bottom of the mini tray onto the safety bar whilst rotating the tray downwards.
–Lock the mini tray into position by pressing down on the left and right arm of the tray. The pegs should snap into the holes on the tray. You will hear an audible click.
–To remove the mini tray, reverse the order of assembly steps.
–The mini tray is dishwasher safe, and is made of FDA compliant food contact grade plastic and stainless steel.
c7 Food Tray Assembly
–(part #04) Squeeze the left and right trigger located under food tray simultaneously, whilst sliding the food tray onto the mini tray, then

release triggers at your desired setting. You will hear an audible click. Check the food tray is locked in place by attempting to pull it free of the highchair.
–The food tray can be locked in two positions.
–To adjust the tray, pull the left and right side triggers located under the tray simultaneously whilst sliding the tray forwards or backwards. Release triggers at the desired setting. You will hear an audible click. Check the food tray is locked in place by attempting to pull it free of the highchair.
–To remove the food tray, reverse the order of assembly steps.
–The food tray is dishwasher safe, and is made of FDA compliant food contact grade plastic and stainless steel.
NOTE: Always check the tray is securely locked in place by attempting to pull it free of the highchair.
c8 -c10 Seat Unit Height and Seat Unit Recline
–To adjust seat height, disengage the swivel/height resistor. Lift both A & B trigger simultaneously, whilst pushing downwards or pulling upwards to desired height, then release the triggers.
–In highchair mode the seat unit can be adjusted to three different recline positions.
–To adjust the seat unit between the upright position to the first recline position, depress the handle on the rear of the seat unit upwards whilst rotating the seat upwards or downwards to the desired position, then
eng
release the handle. You will hear an audible click. Check the seat unit is locked in position by moving it.
–The food tray, mini tray, and safety bar can be applied on the highchair for the upright and first recline position.
WARNING:
•Highchair mode is designed for children 6 months to 36 months only. Always use the safety harness.
•Always be sure your child is clear of moving parts before making any adjustments.
Section D: Toddler Chair Mode
– suitable for 36 months to 36 kg/ 79 lbs (refer to illustration section d)
d1 - d2 Seat Pad Assembly
–(part #05) Place seat pad onto the seat unit; secure onto velcro.
–(part #09) Behind the seat pad, pull open storage compartment door located on the inner face of seat unit.
–(parts #12, #13) From storage compartment, take out the two ‘C’ shaped clips and the crotch strap cover. Close the compartment door.
–Snap the ‘C’ shaped clips on either side of the seat unit; you will hear an audible click.
–Slide the crotch strap cover into the seat unit.
To remove the seat pad for cleaning, follow the instructions given in the care & maintenance section of this user guide.
 Loading...