

Page 1

TKF 8451 A 50
TKF 8451 AG 50
TKF 8451 SGC 50
Dryer
Kuivaaja
Page 2
Please read this user manual first!
Dear Customer,
We hope that you get the best results from the product which has been manufactured
in state-of-the-art plants and passed through a strict quality control procedure.
Therefore, please read the entire user manual carefully before using the product and
keep it as a reference for future use. In case of transferring the product to someone
else, give the manual as well.
The user manual will help you use your product in a fast
and safe way.
• Read the user manual before installing and starting your product.
• Always follow the safety instructions.
• Keep this user manual within easy reach for future reference.
• Read also the other documents supplied with the product.
Remember that this user manual is also applicable for several other models.
Differences between models will be identified in the manual.
Explanation of symbols
Throughout this user manual the following symbols are used:
Read the instructions.
Important information or useful hints about usage.
C
Warning for hazardous situations with regard to life and property.
A
Warning for electric shock.
B
Warning for fire hazard.
Warning for hot surfaces.
2960310441_EN/260911.1631
This appliance’s packaging material is recyclable. Help recycle it and protect the environment
by dropping it off in the municipal receptacles provided for this purpose. Your appliance
also contains a great amount of recyclable material. It is marked with this label to indicate
the used appliances that should not be mixed with other waste. This way, the appliance
recycling organised by your manufacturer will be done under the best possible conditions,
in compliance with European Directive 2002/96/EC on Waste Electrical and Electronic
Equipment. Contact your town hall or your retailer for the used appliance collection points
closest to your home. We thank you doing your part to protect the environment.
Page 3

1 Important safety instructions
This section contains safety instructions
that will help protect from risk of personal
injury or property damage. Failure to
follow these instructions shall void any
warranty.
General safety
• Never place the product on a carpet-
covered floor; otherwise, lack of
airflow beneath the machine will
cause electrical parts to overheat.
This will cause problems with your
product.
• Do not operate the product if the
power cable / plug is damaged. Call
the Authorized Service Agent.
• Do not make any changes on the
plug supplied with the product. If it is
not compatible with the socket, have
a qualified electrician change the
socket with a suitable one.
• Never touch the plug with wet hands!
Never unplug by pulling on the cable,
always pull out by grabbing the plug.
• Connect the product to a grounded
outlet protected by a fuse of suitable
capacity as stated in the technical
specifications table.
• Power cable of this product is
equipped with a conductor and
a grounding plug that allows for
grounding the product. This plug
must be inserted into a socket
which is installed and grounded in
accordance with the local laws and
regulations. Grounding installation
decreases the risk of electric shock
by opening a path with low resistance
for the electricity flow in case of a
malfunction or failure. Do not neglect
to have the grounding installation
made by a qualified electrician.
If you have any suspect about
the grounding installation, have it
• The product should not be plugged
• Always have the installation and
• Do not use electrical devices in the
• Do not connect the air exit of the
• You must provide enough ventilation
• Items cleaned or washed with
• Do not dry the laundry cleaned with
• Underwear that contains metal
checked by a qualified electrician or
the Authorized Service Agent. Our
company shall not be liable for any
damages that will arise when the
product is used without grounding in
accordance with the local regulations.
in during installation, maintenance,
cleaning and repair works.
repairing procedures carried out
by the Authorized Service Agent.
Manufacturer shall not be held
liable for damages that may arise
from procedures carried out by
unauthorized persons.
product.
product to the chimney holes which
are used for the exhaust fumes of the
devices operating with gas or other
types of fuel.
in order to prevent gases exiting from
devices operating with other types of
fuels including the naked flame from
accumulating in the room due to the
back fire effect.
gasoil/fuel oil, dry-laundry solvents
and other combustible or explosive
materials as well as the items that are
contaminated or spotted with such
materials should not be dried in the
product since they emit flammable or
explosive vapor.
industrial chemicals in the dryer.
reinforcements should not be dried in
the dryer. Dryer can get damaged if
metal reinforcements come loose and
EN
3
Page 4

break off during drying.
• Never attempt to repair the product
yourself. Do not perform any
repair or replacement procedures
on the product even if you know
or have the ability to perform the
required procedure unless it is
clearly suggested in the operating
instructions or the published service
manual. Otherwise, you will be
putting your life and others' lives in
danger.
• For failures that you cannot remedy
by applying the procedures in safety
instructions, turn off and unplug
the product and call the Authorized
Service Agent.
• Do not reach into the machine when
the drum is spinning.
• Do not use extension cords, multi-
plugs or adaptors to connect the
dryer to power supply in order to
decrease the risk of fire and electric
shock.
• Never wash the product by spreading
or pouring water onto it! There is the
risk of electric shock!
The final step of the drying
programme, namely the cool-down
step is performed without applying
heat to ensure that the laundry items
are kept at a temperature that will
not damage them. If you open the
loading door before the cool-down
step completes, hot vapour will come
out.
Never stop the dryer before the
A
programme completes. If you must
do this, remove all laundry quickly
and lay them out to a suitable place
to dissipate the heat.
• Always clean the lint filter before or
after each loading. Never operate the
dryer without the lint filter installed.
• Clean inside and exhaust duct of the
product regularly. Do not allow fibre,
dust and dirt accumulation around
the exhaust exit and at adjacent
areas.
• Power cable plug must be within easy
reach after installation.
• Do not dry unwashed items in the
dryer.
• Items soiled with cooking oils,
acetone, alcohol, fuel oil, kerosene,
stain removers, turpentine, paraffin
and paraffin removers must be
washed in hot water with plenty of
detergent before being dried in the
dryer.
• Garments or pillows bolstered with
rubber foam (latex foam), shower
bonnets, water resistant textiles,
materials with rubber reinforcement
and rubber foam pads should not be
dried in the dryer.
• Do not use fabric softeners and
anti-static products unless they are
recommended by the manufacturers
of the relevant product.
• Use softeners, anti-static products
and etc. in accordance with the
instructions of their manufacturers.
• Do not install the product behind a
door with a lock, sliding door or a
hinged door which can strike the
product.
• Do not install or leave the dryer in
places where it will be exposed to
outdoor conditions.
• Your product can be operated at
temperatures between +5°C and
+35°C. If the operating conditions fall
outside of this range, operation of the
product will be adversely affected and
it can get damaged.
• Do not tamper with the controls.
• Unplug the product when it is not in
use.
• Remove the loading door of
EN
4
Page 5

the drying compartment before
decommissioning or disposing of the
product.
• Check all garments before loading
and make sure that there is no any
lighters, coins, metal pieces, needles,
and etc. in their pockets or on them.
• Make sure that the pets do not enter
into the product. Check the drum of
the product before using it.
• Make sure that original spare parts
and accessories are used during
maintenance works.
• Do not lean on the loading door when
it is open. The product may tip over.
• When your machine is not in use
or when you unload the laundry
after completion of drying process,
turn the machine off with the On/
Off button. In cases where the On/
Off button is in On position (while
the machine is energized), keep the
loading door closed.
Intended use
• This product has been designed for
domestic use. It should not be used
for other purposes.
• Product must only be used for
drying of textiles that are marked
accordingly.
• Dry only those articles in your product
that are stated in this manual.
• This product is not intended to be
used by persons with physical,
sensory or mental disorders or
unlearned or inexperienced people
(including children) unless they are
attended by a person who will be
responsible for their safety or who will
instruct them accordingly for use of
the product.
Children's safety
• Electrical products are dangerous for
the children. Keep children away from
the product when it is operating. Do
not let them tamper with the product.
• Do not allow children sit/climb on or
enter in the product.
• Do not forget to close the loading
door when leaving the room where
the product is located.
• Packaging materials are dangerous
to children. Keep the packaging
materials out of reach of children or
dispose them by classifying according
to waste directives.
EN
5
Page 6
2 Installation
Refer to the nearest Authorized Service
Agent for installation of the product.
To make the product ready for use,
make sure that the electricity and water
drainage system are appropriate before
calling the Authorized Service Agent. If
they are not, call a qualified technician
and plumber to have any necessary
arrangements carried out.
Preparation of the product's
C
location as well as the electrical and
waste water installations is under
customer's responsibility.
Installation and electrical connections
B
of the product must be carried out
by the Authorized Service Agent.
Manufacturer shall not be held
liable for damages that may arise
from procedures carried out by
unauthorized persons.
Prior to installation, visually check if
A
the product has any defects on it. If
so, do not have it installed. Damaged
products cause risks for your safety.
Let your dryer wait for 12 hours
A
before starting to use it.
Appropriate installation
location
• Install the product on a stable and
level surface.
• Dryer is heavy. Do not move it by
yourself.
• Operate your product in a well
ventilated, dust-free environment.
• Do not block the air ducts in front of
and under the product with materials
such as long pile rugs, wooden
blocks and bands.
• Do not install the product behind a
door with a lock, sliding door or a
hinged door which can strike the
product.
• Once the product is installed, it
should stay at the same place where
its connections have been made.
When installing the product, make
sure that the rear wall of it does
not touch anywhere (tap, socket,
etc.). Also pay attention to select an
installation location which you will not
be required to change afterwards.
• Place the product at least 1.5
cm away from the edges of other
furniture.
Do not place the product on the
B
power cable.
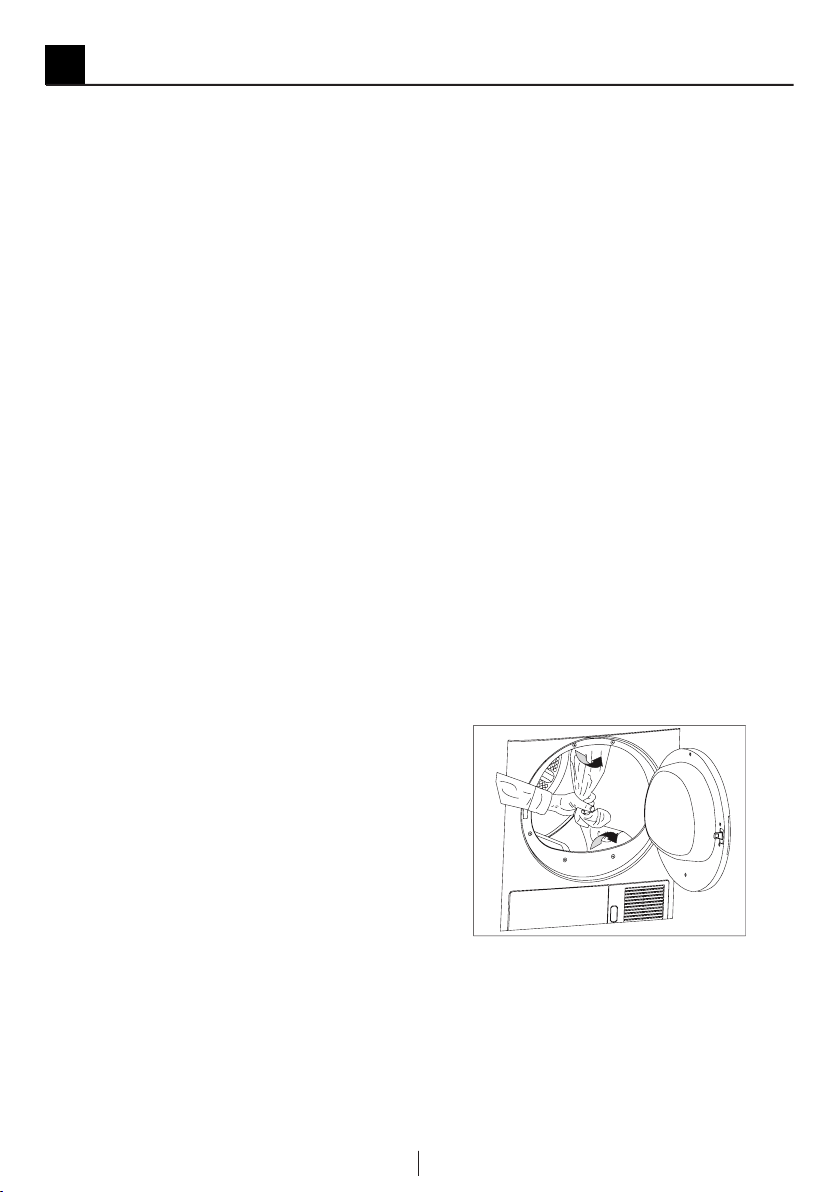
Removing the transportation
safety assembly
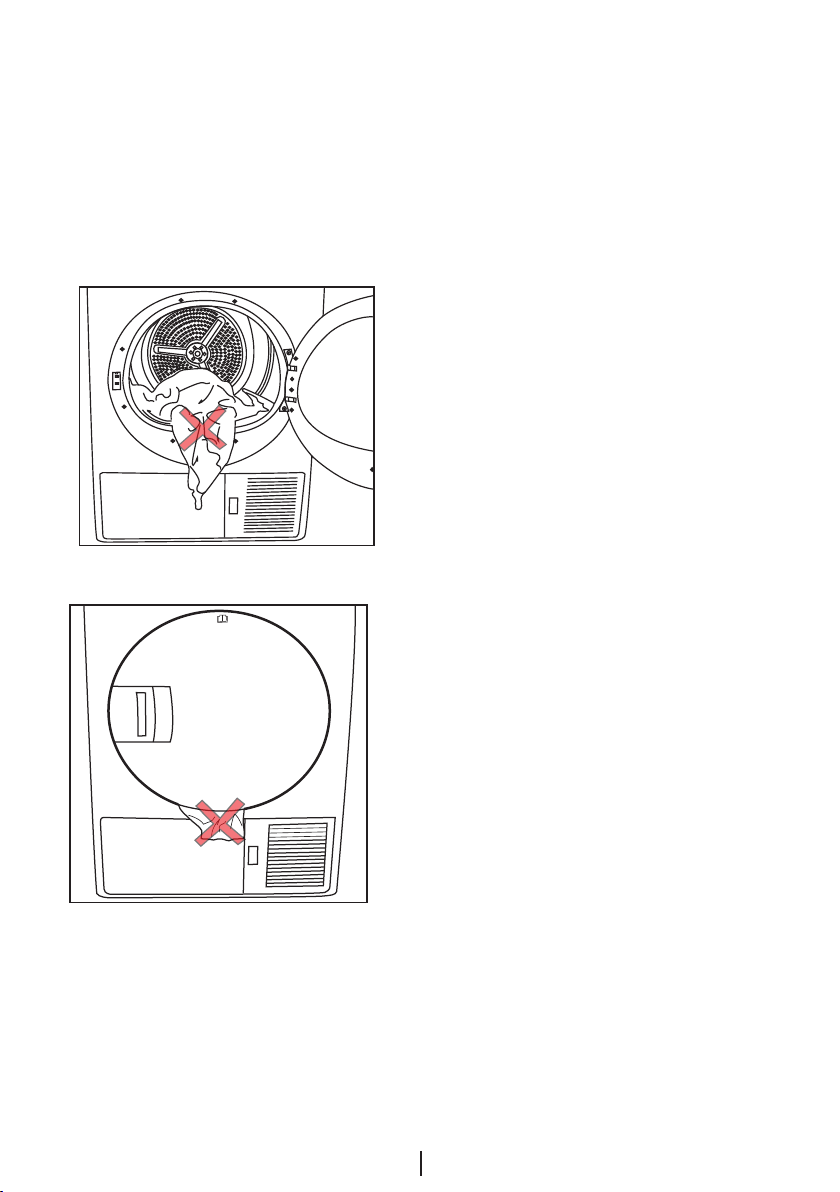
Remove the transportation safety
A
assembly before using the product for
the first time.
1. Open the loading door.
2. There is a nylon bag inside the drum
that contains a piece of styrofoam.
Hold it from its section marked with
XX XX.
3. Pull the nylon towards yourself and
remove the transportation safety
assembly.
Make sure that no part of the
A
transportation safety assembly
remains inside the drum.
Under counter installation
• This product can be installed under a
counter if the height of the counter is
sufficient.
EN
6
Page 7
Never operate the dryer without the
A
top trim is in place.
Dryer Depth 60 cm 54 cm
Stock
number of
under-bench
installation
part
• Leave at least 3 cm of space around
the sides and the rear wall of the
product when installing it under a
counter or in a cupboard.
2979600100 2973600100
Mounting over a washing
machine
• A fixing device should be used
between the two machines
when installing the dryer above a
washing machine. The fixing device
(2977200100 white/2977200400
grey) must be installed by the
Authorized Service Agent.
• Total weight of the washing machine
and the dryer -with full load- when
they are placed on top of each other
reaches to approx. 180 kilograms.
Place the products on a solid floor
that has sufficient load carrying
capacity!
Connecting to the drain
In products equipped with condenser
unit, water accumulates in the water tank
during the drying cycle. You should drain
accumulated water after each drying
cycle.
You can directly drain accumulated water
through the water drain hose supplied
with the product instead of periodically
draining the water collected in the water
tank.
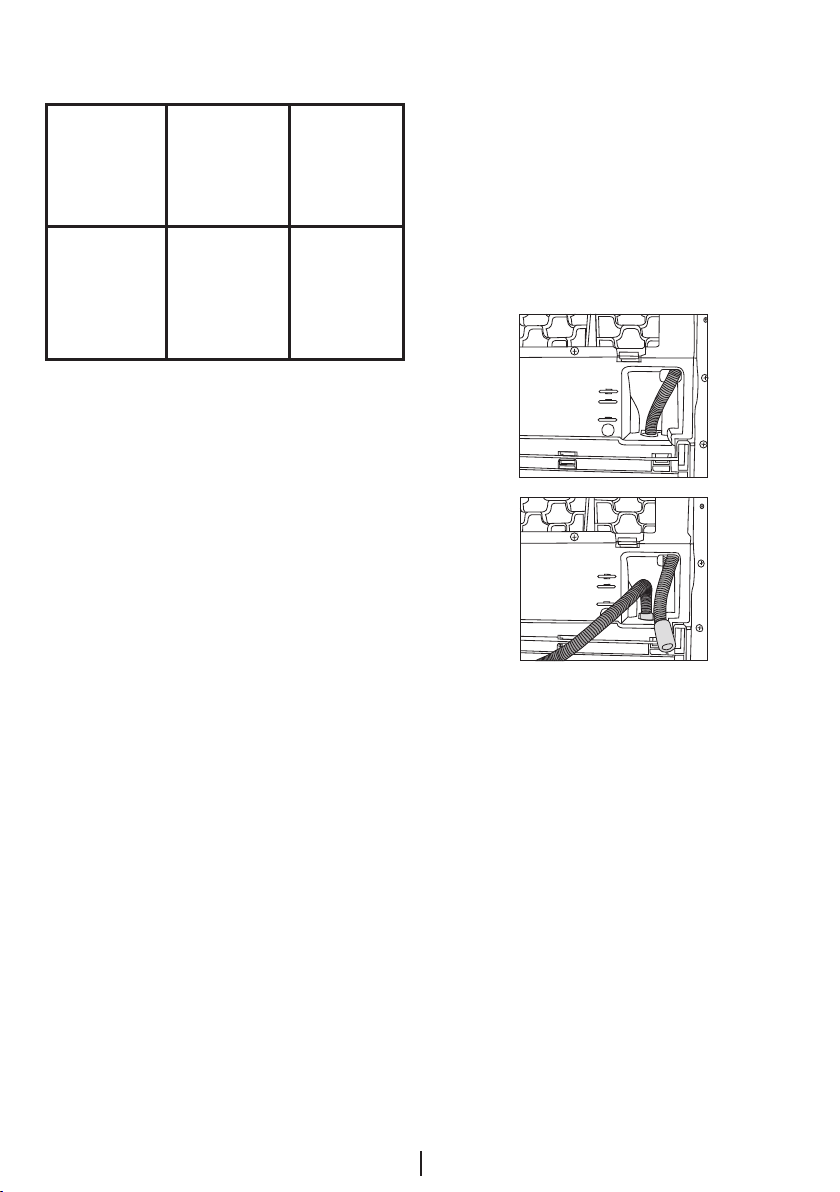
Connecting the water drain hose
1. Pull hose in the product by hand in
order to disconnect it from where it is
connected. Do not use any tools to
remove the hose.
2. Connect one end of the drain hose
supplied separately with the product
to the connection point from where
you removed the hose of the product
in previous step.
3. Connect the other end of the drain
hose directly to the wastewater drain
or to the washbasin.
Hose must be fixed in every type
A
of connection. Your house will be
flooded if the hose comes loose
during water discharge.
Water drain hose should be attached
C
EN
7
Page 8
to a height of maximum 80 cm.
Make sure that the water drain hose
C
is not stepped on and it is not folded
between the drain and the machine.
Adjusting the feet
In order to ensure that the product
operates more silently and vibration-free,
it must stand level and balanced on its
feet. Balance the machine by adjusting
the feet.
Turn the feet to left or right until the
machine stands level and firmly.
Never remove the adjustable feet
C
from their housings.
Electrical connection
Connect the product to a grounded outlet
protected by a fuse complying with the
values in the "Technical specifications"
table. Our company shall not be liable
for any damages that will arise when the
product is used without grounding in
accordance with the local regulations.
• Connection must comply with
national regulations.
• Power cable plug must be within easy
reach after installation.
• The voltage and allowed fuse or
breaker protection are specified in
the “Technical specifications” section.
If the current value of the fuse or
breaker in the house is less than 10
Amps, have a qualified electrician
install a 10 Amp fuse.
• The specified voltage must be equal
to your mains voltage.
• Do not make connections via
extension cables or multi-plugs.
• The main fuse and switches must
have a contact distance of minimum
3 mm.
Damaged power cable must be
B
replaced by the Authorized Service
Agent.
If the product is faulty, it must not be
B
operated unless it is repaired! There is
the risk of electric shock!
First use
Before starting to use the product, make
sure that all preparations are made in
accordance with the instructions in
sections "Important safety instructions"
and "Installation".
Disposing of packaging
material
Packaging materials are dangerous to
children. Keep packaging materials in
a safe place away from reach of the
children.
Packaging materials of the product are
manufactured from recyclable materials.
Dispose of them properly and sort
in accordance with recycled waste
instructions. Do not dispose of them with
normal domestic waste.
Transportation of the product
1. Unplug the product before
transporting it.
2. Remove the water drain (if any) and
chimney connections.
3. Drain the water in the product
completely.
We recommend carrying the product
A
in upright position. If it is not possible
to carry the machine in the upright
position, we recommend carrying
it by tilting towards the right side
when looked from the front. After the
product is moved to its new place,
you should wait for 12 hours before
starting it.
EN
8
Page 9
Disposing of the old product
Dispose of the old product in an
environmentally friendly manner.
Refer to your local dealer or solid waste
collection centre in your area to learn how
to dispose of your product.
For children's safety, cut the power
cable and break the locking mechanism
of the loading door so that it will be
nonfunctional before disposing of the
product.
Warnings about sounds
It is normal to hear metallic noise from
C
the compressor sometimes during
operation.
Water collected during operation is
C
pumped to water tank. It is normal
to hear pumping noise during this
process.
EN
9
Page 10
Technical specifications
EN 2
Height (adjustable) 84,6 cm
Width 59,5 cm
Depth 59,8 cm
Capacity (max.) 8 kg
Net weight (plastic front door usage) 52 kg
Net weight (glass front door usage) 54,5 kg
Voltage
See type labelRated power input
Model code
Type label is located behind the loading door.
10
EN
Page 11
3 Preparations for drying
Things to be done for energy
saving
Following information will help you use
the product in an ecological and energyefficient manner.
• Operate the product at a capacity
suitable for the program you have
selected and pay attention not to
overload.
• Spin your laundry at the highest
speed possible when washing them.
Thus, the drying time is shortened
and energy consumption is reduced.
• Dry the same type of laundry
together.
• Follow the instructions in the user
manual for programme selection.
• Leave sufficient clearance at the
front and rear side of the dryer for
air circulation. Do not block the
ventilation grills at the front side of the
product.
• Do not open the loading door of
the machine during drying unless
necessary. If you must certainly open
the loading door, do not to keep it
open for a long time.
• Do not add new (wet) laundry during
drying.
• Lint and fibres released from the
laundry to the air during the drying
cycle are collected in the Lint Filter.
Clean the lint filter before or after each
drying cycle.
• Clean the filter drawer regularly either
when the Filter Drawer Cleaning
warning symbol appears or after
every 5 drying cycles
• Ventilate the room, where the dryer is
located, well during drying.
• For models with lamp, keep the door
closed if the On/Off button is pressed
(if the machine is energized) when
machine is not in use.
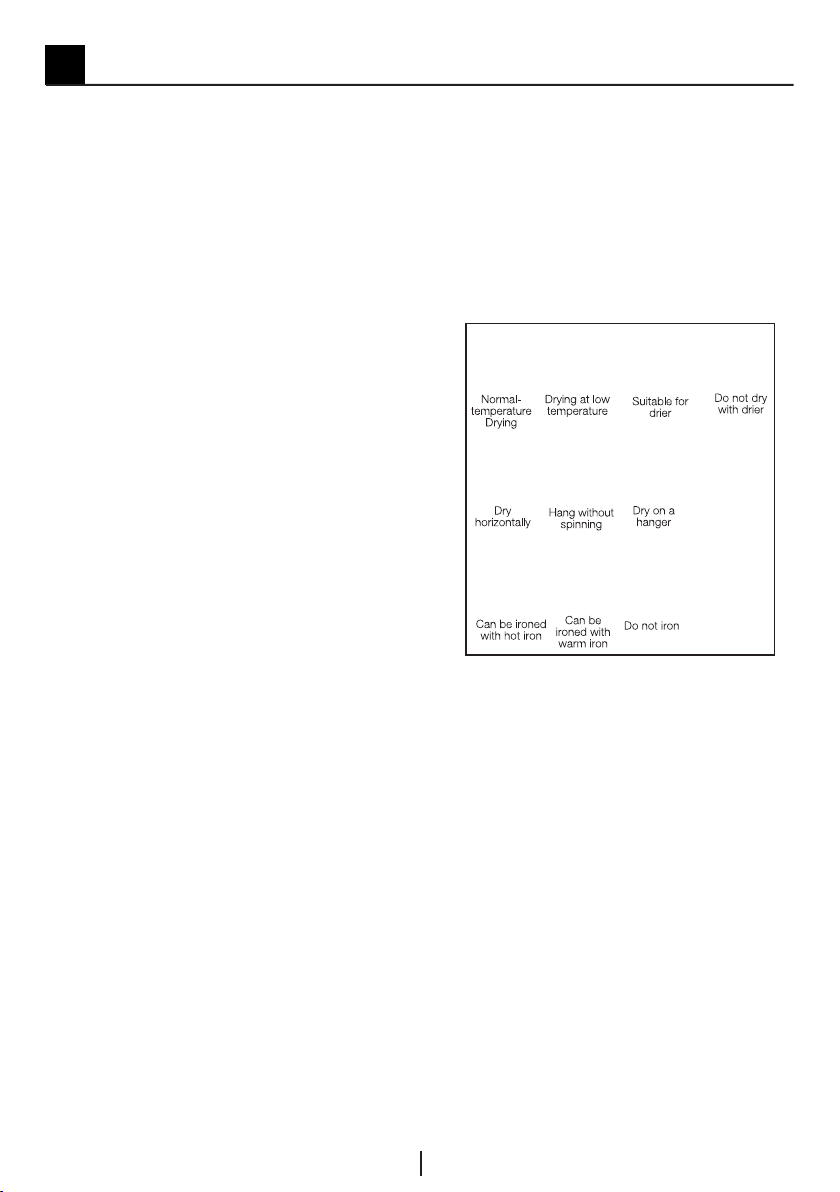
Laundry suitable for drying in
the machine
Always obey the instructions given
C
on the garment tags. Dry only the
laundry having a label stating that
they are suitable for drying in a dryer
and make sure that you select the
appropriate programme.
A B C
D
l mn
o p q
Laundry unsuitable for drying
in the machine
• Laundry and items stated below are
not suitable for drying in a dryer:
• Laundry items with metal
attachments such as metal buttons,
metal reinforcements or belt buckles.
• Woolen or silk garments, nylon
stockings, delicate embroidered
fabrics and sleeping bags.
• Garments made of delicate and
valuable fabrics.
• Tulle curtains.
• Items made of hermetic fibres such
as pillows and quilts.
• Very wet laundry items.
• Unwashed dirty laundry items.
• Laundry items containing rubber
foam or rubber.
11
EN
Page 12
Items cleaned, washed or spotted
with gasoil/fuel oil, dry-laundry
solvents, industrial chemicals or other
combustible or explosive materials
should not be dried in the dryer.
Items soiled with cooking oils,
acetone, alcohol, fuel oil, kerosene,
stain removers, turpentine, paraffin
and paraffin removers must be
washed in hot water with plenty of
detergent before being dried in the
dryer.
Preparing laundry for drying
• Check all garments before loading
and make sure that there is no any
lighters, coins, metal pieces, needles,
and etc. in their pockets or on them.
• Laundry may be tangled after
washing. Separate the laundry items
before placing them into the dryer.
• Sort the laundry according to their
types and thicknesses. Dry the same
type of laundry together. For instance,
thin kitchen towel and table cloths get
dry earlier than the thick bath towels.
Laundry must be spun at the highest
C
spin speed that the washing machine
allows on basis of the fabric type.
Correct load capacity
load more than the capacity values stated
in the table.
It is not recommended to load the
C
dryer with laundry exceeding the
level indicated in the figure. Drying
performance will degrade when the
machine is overloaded. Furthermore,
dryer and the laundry can get
damaged.
Following weights are given as examples.
Home articles
Cotton quit covers
(double)
Cotton quit covers
(single)
Bed sheets (double) 500
Bed sheets (single) 350
Large tablecloths 700
Small tablecloths 250
Tea napkins 100
Bath towels 700
Hand towels 350
Garments
Blouses 150
Cotton shirts 300
Shirts 200
Cotton dresses 500
Dresses 350
Jeans 700
Handkerchiefs (10
pieces)
T-Shirts 125
Approximate
weights (g)
1500
1000
Approximate
weights (g)
100
Follow the instructions in the “Programme
selection and consumption table”. Do not
12
EN
Page 13
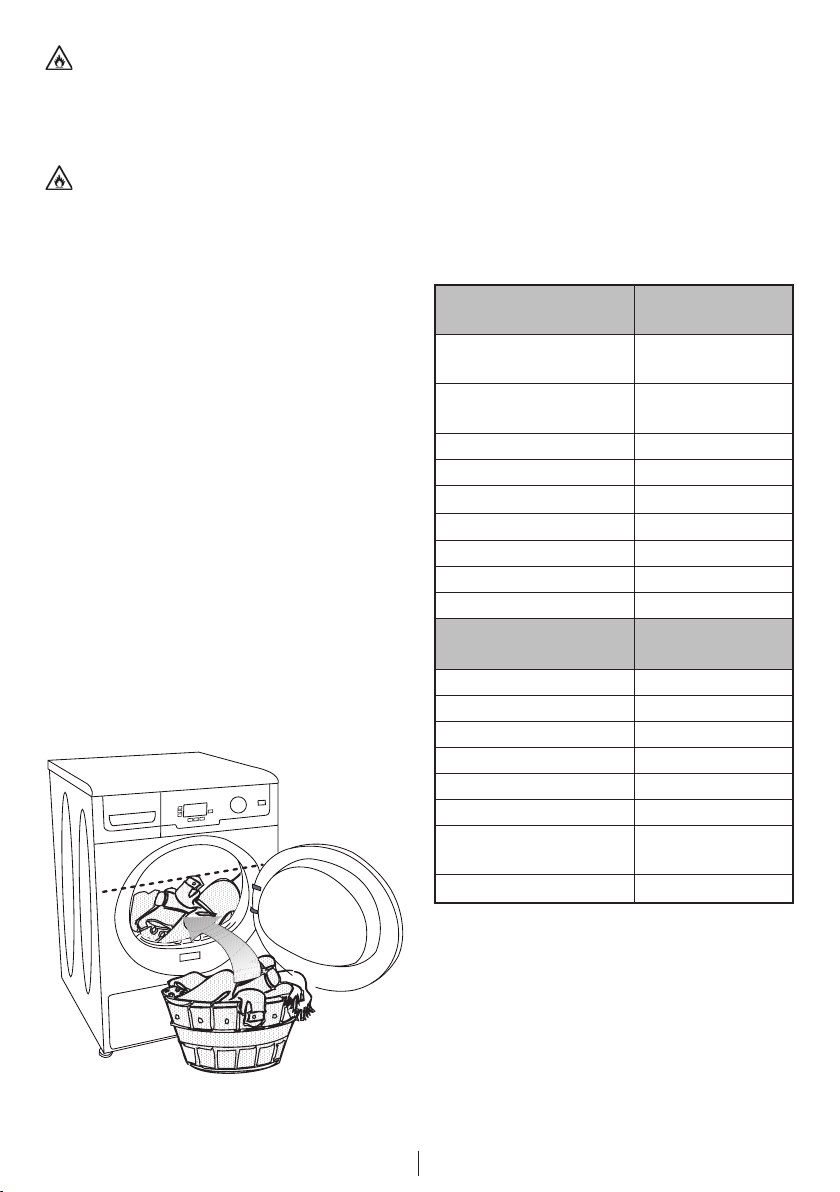
Loading the laundry
1. Open the loading door.
2. Place the laundry in the machine
without compressing.
3. Push the loading door to close.
Ensure that no items are caught in
A
the door.
13
EN
Page 14
4 Selecting a Programme and Operating Your Machine
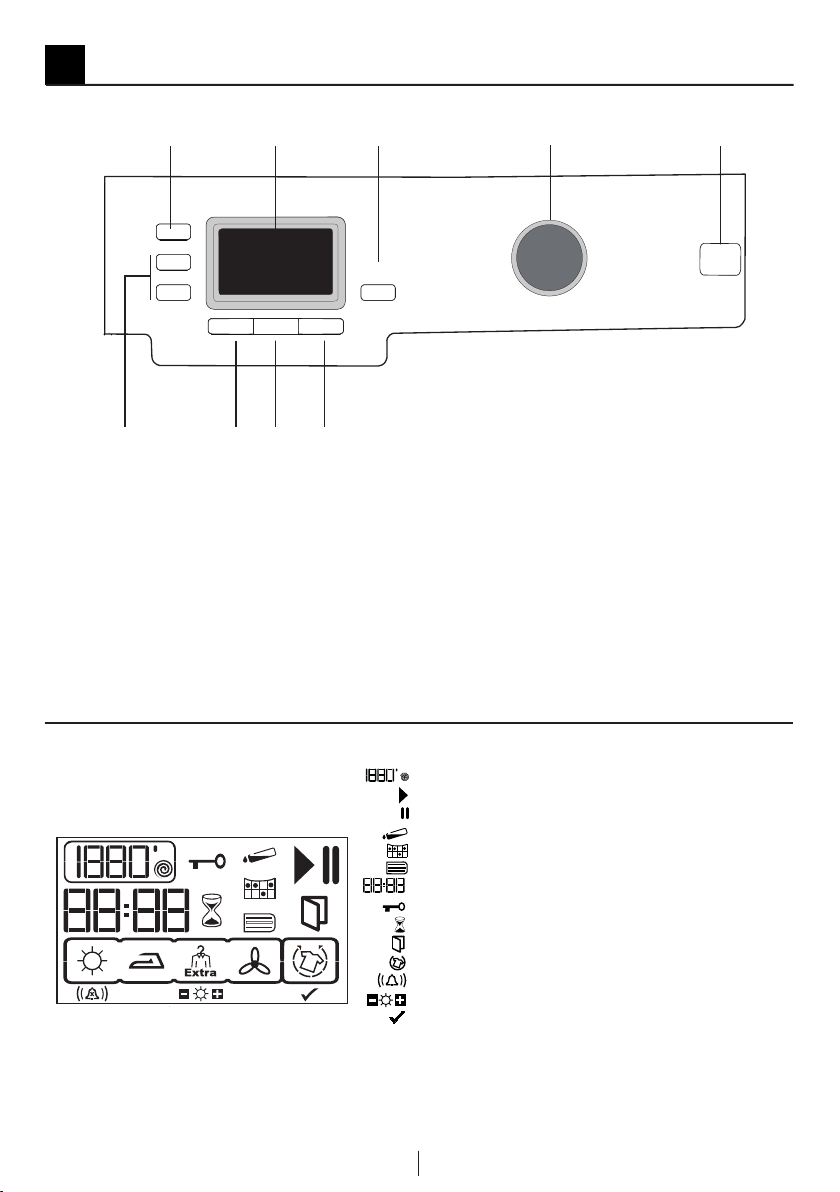
Control panel
1
9 6
2 3
78
1. Washing Machine Spin Speed / Timer
Programme Selection button
2. Display
3. Start / Pause / Cancel button
4. Programme Selection knob
5. On / Off button
6. Anti-creasing button
7. Dryness Level button
8. Cancel Audio Warning button
9. Time Delay buttons
4
5
Spin speed / Timer programs*
Operation symbol
Pause symbol
Water Tank warning symbol
Filter cleaning warning symbol
Filter Drawer Cleaning warning symbol
Remaining Time indicator**
Child-proof Lock warning symbol
Time Delay mode
Loading door open warning symbol
Anti-creasing mode
Audio Warning Level / Cancel Audio Warning
Dryness Level
Anti-creasing is activated
* Spin speed is used to show the remaining time more accurately. It does not
affect the performance of your machine.
** Time that appears on display indicates the remaining time until the end of the
programme and changes according to the dampness level of the laundry.
EN
14
Page 15
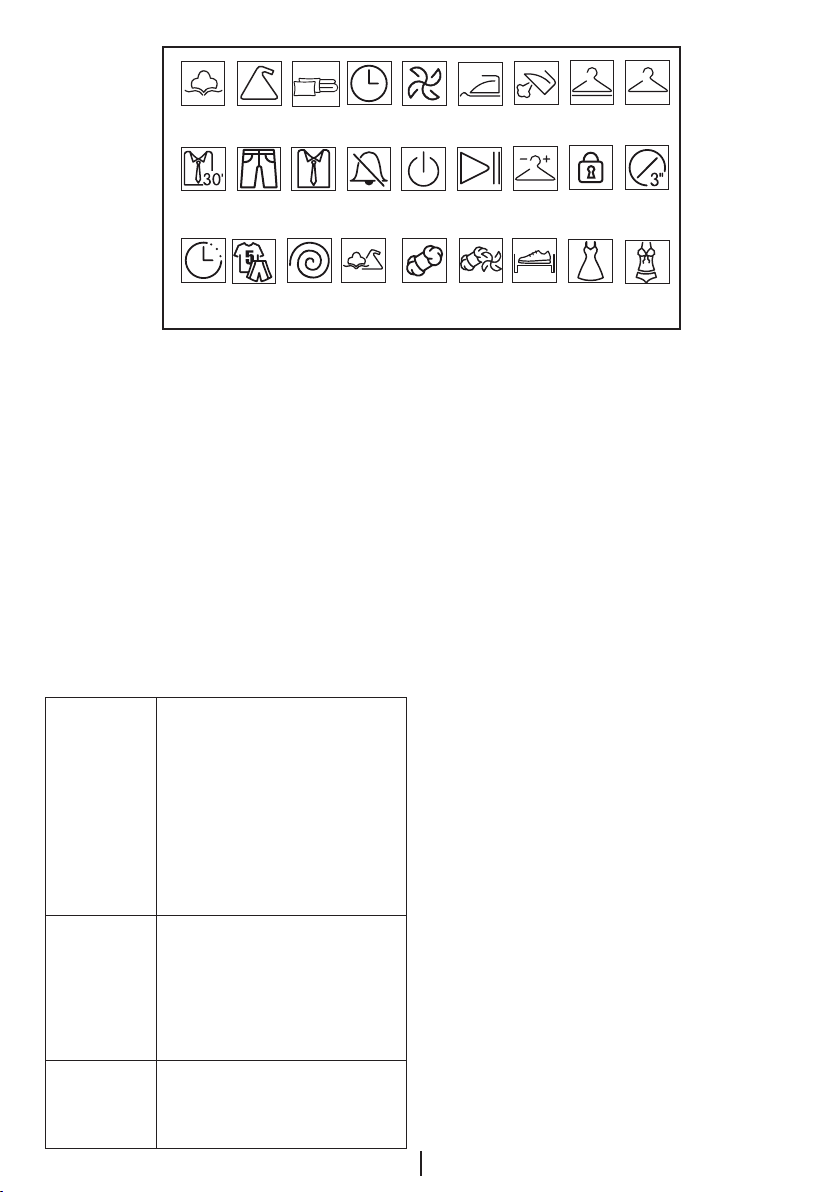
Cottons Synthetics Bedding
Shirt 30'
Jeans
Shirt Reset 3''
Timer
programs
Buzzer/
cancel
Ventilation
On/Off
Anti
Creasing
Start
pause
Iron
Dry
Dryness
Level
Extra
Dry
Child-proof
lock
Cupboard
dry
Timer
Sport Spin Mixed
Delay
Preparing the machine
1. Plug in the machine.
2. Place the laundry in the machine.
3. Press the On / Off button.
Pressing the On / Off button does
C
not necessarily mean that the
programme has started. Press Start
/ Pause / Cancel button to start the
programme.
Programme selection
1. Decide the appropriate programme
from the table below which includes
drying levels.
2. Select the desired programme with
the Programme Selection knob.
Only the cotton laundry
is dried at normal
temperature. Thick and
multi layered laundry
Extra Dry
Cupboard
Dry
Iron Dry
(towels, linens, jeans and
etc.) are dried in a way that
they do not require ironing
before being placed in the
wardrobe.
Normal laundry
(tablecloths, underwear
and etc.) are dried in a way
that they do not require
ironing before being placed
in the wardrobe.
Normal laundry (shirts,
dresses and etc.) are dried
ready to be ironed.
Wool
Wool
C
Drying
Rack
Viscose Lingerie
Refresh
For further programme details,
see “Programme selection and
consumption table”.
Main programmes
Depending on the fabric type, the
following main programmes are available:
• Cottons
Dry durable laundry with this programme.
Dries at normal temperature. It is
recommended to use for your cotton
items (bed sheets, quilt covers, towels,
bathrobes, etc.).
• Synthetics
Dry less durable laundry with this
programme. Recommended for
synthetics.
Additional programmes
For special cases, following additional
programmes are available in the machine.
Additional programs may differ
C
according to the features of your
machine.
• Bedding
Dry only fibre quilts with machine-dryable
label. Make sure you are loading the quilt
in the correct way to avoid damages on
the machine and the quilt. Take out the
quilt cover before loading the quilt in the
machine. Fold the quilt in two before
loading.
- Do not load more than 1 double-size
fibre quilt (200x200 cm). Do not dry items
containing cotton such as quilts, pillows
15
EN
Page 16

and etc.
-Do not dry items other than quilts such
as carpets, rugs or mats. Permanent
damage may arise in your machine.
To obtain better results from your
C
dryer, your laundry must be washed
at suitable programmes and spun at
the recommended spin speeds in the
washing machine.
• Shirt
This programme dries the shirts more
sensitively and creases them less and
thus, helps to iron them more easily.
There may be a little moisture on the
C
shirts at the end of the programme.
We recommend you not to leave the
shirts in the dryer.
• Jeans
Use this programme to dry your jeans
that are spun at high speeds in the
washing machine.
• Mixed
Use this programme to dry non-
pigmenting synthetic and cotton laundry
items together.
• Sport
Use this programme to dry together the
synthetic and cotton laundry items and
the laundry items made of mixed fabrics.
• Wool refresh
Use this programme to ventilate and
soften the woolen laundry that can be
washed in the washing machine. Do not
use to dry the laundry completely. Take
out and ventilate the laundry immediately
after the programme is over.
• Shirt 30’
Use this programme to make 2 shirts
ready for ironing in 30 minutes.
• Lingerie
Use this programme to dry 100%
synthetic and synthetic blended satin
underwear (nightgown, brassiere,
underpants, pyjamas) that bear the
“machine-dryable” mark on its garment
tag.
Level of dryness may change
C
depending on the blend of the
garment, type of knitting and
dampness level.
Garments that contain accessories
C
such as lace, tulle, gems, beads,
scales, wire and etc., and garments
with high silk content should not be
dried in the machine.
Silk garments that contain cotton or
C
has a satin appearance may remain
wet when they are dried with this
programme.
• Viscose
Use this programme to dry viscon and
modal mixed laundry. Viscose-polyester,
viscose-cotton blended products can be
dried.
Level of dryness may change
C
depending on the blend of the
garment, type of knitting and
dampness level.
It is not recommended to dry
C
garments and evening gowns that
contain accessories such as lace,
tulle, gems, and etc..
• Ventilation
Only ventilation is performed for 10
minutes without blowing hot air. You can
air the clothes that have been kept at
closed environments for a long time and
deodourise unpleasant odours thanks to
this programme.
• Timer programmes
You can select one of the 10 min., 20
min., 30 min., 40 min., 50 min., 60 min.,
80 min., 100 min., 120 min., 140 min.
and 160 min. timer programmes to
achieve the desired final drying level at
low temperatures.
16
EN
Page 17

With this programme, the machine
C
dries for the time selected regardless
of the dryness level.
17
EN
Page 18

Programme selection and consumption table
EN 2
Programs Capacity (kg) Spin speed in
Cottons / Coloreds
Approximate
amount of
remaining
humidity
Drying time
(minutes)
Extra dry
A
Cupboard dry
A
Iron dry
A
Shirt 30’
Shirt
Jeans
Bedding
Mixed
Sport
Viscose
Lingerie
Wool Refresh
Synthetics
Cupboard dry
B
Iron dry
B
Energy consumption values
Programs Capacity (kg) Spin speed in
Cottons linen Ready to wear*
Cottons Ready to iron
Synthetics Ready to wear
8 1000 % 60 160
8 1000 % 60 145
8 1000 % 60 115
0.5 1200 % 60 30
1.5 1200 %50 40
4 1200 %50 100
2.5 1000 %40 120
4 1000 %60 95
4 1000 %60 90
1.5 600 %100 90
1 800 %40 40
1.5 600 %50 8
4 800 % 40 60
4 800 % 40 45
8 1000 % 60 1.92
8 1000 % 60 1.50
4 800 % 40 0.75
Approximate
amount of
remaining
humidity
Energy
consumption
value kWh
* : Energy Label standard programme (EN 61121:2005)
All values given in the table have been fixed according to EN 61121:2005 Standard.
These values may deviate from the values in the table according to the laundry type,
laundry spin speed, environmental conditions and voltage fluctuations.
EN
18
Page 19

Auxiliary functions
Audio Warning
The machine will give an audio warning
when the programme comes to an end.
If you do not want the machine give an
audio warning, press the Volume Level
button repeatedly until “x” appears on the
display. Use the same button to adjust
the volume level.
You can activate this function either
C
before or after the programme starts.
Cancel
audio warning
Dryness level
Used to adjust the required dryness level.
More drying is performed compared
to the default settings when “+” sign
appears and less drying is performed
when “-” sign appears. Programme
duration can change depending on the
selection.
You can activate this function only
C
Anti-creasing
You can use Anti-creasing function to
prevent laundry from creasing if you will
not take the laundry out after the program
has come to an end. This program
rotates the laundry in every 240 second
for 2 hours to prevent creasing.
Anti-creasing is activated but the
programme is still running in the first
display image below. Drying cycle is
completed and the Anti-creasing step has
started in the second display image.
Audio warning
level 1
before the programme has started.
Audio warning
level 2
Audio warning
level 3
Press Anti-creasing button to activate
C
this function.
Changing the contrast
Adjust the display contrast in order to
make the symbols on the display appear
clearer. It may particularly be necessary to
change the contrast setting of the display
when the dryer is installed over a washing
machine.
Press and hold the Spin Speed / Timer
Programme button for 3 seconds.
When the contrast is changed, all
symbols on the display will appear for
3 seconds in order to indicate that the
process is complete.
Perform the same procedure to revert
C
back to the previous contrast setting.
Warning symbols
Warning symbols may differ
C
according to the model of your
machine.
Lint filter cleaning
When the programme is completed, a
warning symbol will appear to remind that
the filter needs to be cleaned.
If the Filter Cleaning symbol flashes
C
continuously, refer to “Troubleshooting”
section.
Water tank
When the programme is completed, a
warning symbol will appear to remind that
the water tank needs to be drained.
If the water tank becomes full while
the programme is running, the warning
19
EN
Page 20

symbol will start to flash and machine will
pause. Drain the water in the water tank
and press Start / Pause / Cancel button
to resume the programme. The warning
symbol turns off and the programme
resumes operating.
Cleaning of filter drawer
Warning symbol flashes with certain
intervals to remind that the filter drawer
needs to be cleaned.
Loading door open
This warning symbol appears when the
loading door of the dryer is open.
Time Delay
Time Delay function allows you to delay
the startup of the programme up to 24
hours.
1. Open the loading door and put the
laundry in.
2. Select the drying programme, spin
speed and, if required, the auxiliary
functions.
3. Press Time Delay buttons + and - to
set the desired time delay. The Time
Delay symbol will flash.
4. Press Start / Pause / Cancel button.
The Time Delay starts to count down.
The Time Delay symbol lights up.
Start symbol appears. The “:” in the
middle of the displayed delay time will
start flashing.
Additional laundry may be loaded
C
/ taken out during the Time Delay
period. At the end of the Time Delay
countdown process, Time Delay
symbol disappears, drying process
starts and the programme duration
is displayed. The time on the display
is the total of normal drying time and
delay time.
Time Delay is activated by pressing the
Start / Pause / Cancel button in the
above display image.
Changing the delay time
If you want to change the time during
countdown:
1. Press Start / Pause / Cancel
button for 3 seconds to cancel the
programme. Repeat the Time Delay
procedure for the desired time.
2. Set the desired delay time with Time
Delay + and - buttons. The Time
Delay symbol will flash.
3. Press Start / Pause / Cancel button.
The Time Delay starts to count down.
The Time Delay symbol lights up.
Pause symbol disappears. Start
symbol appears.
4. The “:” in the middle of the displayed
delay time will start flashing.
Cancelling the Time Delay
If you want to cancel the Time Delay
countdown and start the programme
immediately:
1. Press Start / Pause / Cancel
button for 3 seconds to cancel the
programme.
2. Press Start / Pause / Cancel button
to start the programme you have
previously selected.
20
EN
Page 21

Starting the programme
Press Start / Pause / Cancel button to
start the programme.
Start / Pause symbol will light up to
indicate that the programme has started
and “:” symbol between the remaining
time will continue flashing.
Progress of programme
Drying
Progress of a running programme is
indicated on the display by means of a
set of symbols.
At the beginning of each programme
step, the relevant symbol in the series of
symbols will light up and thus, at the end
of the programme, all symbols will remain
lit up. The rightmost symbol on the
display indicates the step being carried
out.
Drying
Drying symbol lights up in all programmes
apart from ventilation.
Iron Dry
Starts to illuminate when the dryness level
reach Iron Dry step.
Cupboard Dry
Starts to illuminate when the dryness level
reach Wardrobe Dry step.
Extra Dry
Starts to illuminate when the dryness level
reach Wardrobe Dry Extra step.
Ventilation
Ventilation symbol illuminates when the
programme comes to an end.
Anti-creasing symbol will illuminate
C
at the end of the programme if Anti-
creasing function is activated.
Iron
Wardrobe
(Extra)
Ventilation
Anti-
creasing
Child-proof Lock
Machine is equipped with a Childproof
Lock which prevents interfering with the
current programme flow by pressing
any button. All buttons except the On
/ Off button on the control panel are
deactivated when the Child-proof Lock is
active.
In order to activate the Childproof Lock,
press Audio Warning and Anti-Creasing
buttons simultaneously for 3 seconds.
To start a new programme after the
current programme is over or to interrupt
the current programme, the Child-proof
Lock should be deactivated. Press the
same buttons for 3 seconds again to
deactivate the Child-proof Lock.
Lock symbol will appear on the
C
display when the Child-proof Lock is
activated.
Child-proof Lock is deactivated when
C
the machine is switched off and on
with On / Off button.
When the Child-proof Lock is activated:
• Display symbols will not change
even if the position of Programme
Selection knob is changed while the
machine is running or in halt.
• If the Child-proof Lock is deactivated
after changing the position of
the Programme Selection knob
while the machine is running, the
machine stops and new programme
information is displayed.
Changing the programme after
it has started
After the machine starts, you can change
the selected programme and dry your
laundry in a different programme.
1. If you want to select Extra Dry
21
EN
Page 22

programme instead of Iron Dry
programme, press and hold the
Start / Pause / Cancel button for 3
seconds to cancel the programme.
2. Select Extra Dry programme by
turning the Programme Selection
knob.
3. Press Start / Pause / Cancel button
to start the programme.
You can also select a new
C
programme by turning the
Programme Selection knob while the
machine is operating. In this case,
current programme is aborted and
the new programme information
appears on the display.
Adding / removing laundry in Pause
mode
In order to add or take out laundry after
the drying programme has started:
1. Press Start / Pause / Cancel button
to switch the machine to Pause
mode. Drying process will stop.
2. While in Pause mode, open the
loading door, add or take out laundry
and close the loading door.
3. Press Start / Pause / Cancel button
to start the programme.
Any laundry added after the drying
C
process has started may cause the
clothes that are already dried in the
machine intermingle with wet clothes
and the result will be wet laundry after
the drying process is over.
You may repeat laundry adding
C
or removing process as many
times as you desire during drying.
However, this process will increase
the programme time and energy
consumption since the drying
process will be interrupted repeatedly.
Therefore, it is recommended to add
laundry before the drying programme
has started.
If you select a new programme by
C
turning the Programme Selection
knob while your machine is in Pause
mode, then the current program
is aborted and new programme
information is displayed.
Do not touch the inner surface of
the drum when adding or taking
out laundry while a programme is
running. Surfaces of the drum are
hot.
Canceling the programme
If you want to stop drying and cancel
the programme for any reason after the
machine has started to run, press and
hold the Start / Pause / Cancel button
for 3 seconds. Lint Filter Cleaning and
Water Tank warning symbols light up and
“End” label appears on the display as a
reminder at the end of this period.
As the inside of the machine will be
A
excessively hot when you cancel
the programme while the machine
is running, activate the ventilation
program to cool it down.
Machine will stop if you turn the
C
Programme Selection knob while
it is operating. In this case, current
programme is aborted and the new
programme information appears on
22
EN
Page 23

the display.
End of programme
Lint Filter Cleaning and Water Tank
warning symbols light up in the
programme follow-up indicator and
“End” label appears on the display when
the programme comes to an end. The
loading door can be opened and the
machine becomes ready for a second
cycle.
Press On / Off button to switch off the
machine.
If Anti-creasing function is activated
C
and the laundry is not taken from
the machine at the end of the
programme, 2-hours Anti-creasing
programme is activated.
Clean the lint filter after each drying.
C
(See “Lint Filter / Loading Door Inner
Surface”)
Drain the water tank after each drying
C
cycle. (See “Draining the water tank”)
23
EN
Page 24

5 Maintenance and cleaning
Service life of the product extends and
frequently faced problems decrease if
cleaned at regular intervals.
This product must be unplugged
B
during maintenance and cleaning
works (control panel, body, etc.).
Lint Filter / Loading Door Inner
Surface
Lint and fibres released from the laundry
to the air during the drying cycle are
collected in the Lint Filter.
*Such fibre and lint are generally
C
formed during wearing and washing.
Always clean the lint filter and the
A
inner surfaces of the loading door
after each drying process.
You can clean the lint filter housing
C
with a vacuum cleaner.
To clean the lint filter:
1. Open the loading door.
2. Remove the lint filter by pulling it up
and open the lint filter.
3. Clean lint, fibre, and cotton raveling
by hand or with a soft piece of cloth.
4. Close the lint filter and place it back
into its housing.
A layer can build up on the lint filter
C
pores that can cause clogging of the
lint filter after using the machine for a
while. Wash the lint filter with warm
water to remove the layer that builds
up on the lint filter surface. Dry the lint
filter completely before reinstalling it.
Clean the entire inner surface of
C
the loading door and loading door
gasket.
Cleaning the sensors
24
EN
Page 25

There are dampness sensors in the
machine that detect whether the laundry
is dry or not.
To clean the sensors:
1. Open the loading door of the
machine.
2. Allow the machine to cool down if it is
still hot due to the drying process.
3. Wipe the metal surfaces of the sensor
with a soft cloth, dampened with
vinegar and dry them.
Clean metal surfaces of the sensors 4
C
times a year.
Do not use metal tools when cleaning
C
metal surfaces of the sensors.
Never use solvents, cleaning agents
A
or similar substances for cleaning due
to the risk of fire and explosion!
Draining the water tank
Dampness of the laundry is removed and
condensed during drying process and the
water that arise accumulates in the water
tank. Drain the water tank after each
drying cycle.
Condensed water is not potable!
A
Never remove the water tank when
A
the programme is running!
If you forget to drain the water tank, the
machine will stop during the subsequent
drying cycles when the water tank is full
and the Water Tank warning symbol will
flash. If this is the case, drain the water
tank and press Start / Pause / Cancel
button to resume the drying cycle.
To drain the water tank:
1. Pull the drawer and remove the water
tank carefully.
2. Drain the water in the tank.
3. If there is lint accumulation in the
funnel of the water tank, clean it
under running water.
4. Place the water tank into its seat.
Cleaning the filter drawer
Lint and fibre that could not be captured
by the lint filter are blocked in the filter
drawer behind the kick plate. Filter
Drawer Cleaning warning light will light up
maximum at every 5 drying cycles as a
reminder.
There is a two-level filter in the filter
drawer. The first level is the filter drawer
sponge and the second level is the filter
cloth.
To clean the filter drawer:
1. Press the kick plate button to open
the kick plate.
25
EN
Page 26
2. Remove the filter drawer cover by
turning it in the direction of arrow.
6. Clean lint, fibre, and cotton from
the filter cloth by hand or with a soft
piece of cloth.
3. Pull out the filter drawer.
4. Open the filter drawer by pressing the
red button.
5. Take out the filter drawer sponge.
When you notice a layer that may
C
lead clogging on filter cloth, please
clean the layer by washing in
warm water. Let the filter cloth dry
thoroughly before installing back the
filter drawer.
7. Hand-wash the filter drawer’s sponge
to remove hair and lint on it. Squeeze
the sponge by hand to remove
excessive water.
It is not necessary to clean the
C
sponge if lint and fibre accumulation
on it is not significant.
8. Place the sponge back into its place.
9. Close the filter drawer as to lock the
red button.
EN
26
Page 27

10. Place the filter drawer back into its
place, turn the filter drawer cover
clockwise making sure that it is
closed securely.
Cleaning the evaporator
Clean the lints accumulated on the fins
of the evaporator located behind the filter
drawer with a vacuum cleaner.
11. Close the kick plate cover.
Drying without the filter drawer
C
sponge in place will damage the
machine!
A dirty lint filter and filter drawer will
C
cause longer drying periods and
higher energy consumption.
A layer can build up on the lint filter
C
pores that can cause clogging of the
lint filter after using your machine for
a while. Wash the lint filter with warm
water to remove the layer that builds
up on the lint filter surface. Dry the lint
filter completely before using it.
You can also clean by hand provided
C
that you wear protective gloves. Do
not attempt to clean with bare hands.
27
EN
Page 28

6 Troubleshooting
Drying process takes too much time.
• Pores of the lint filter are clogged. >>> Wash the lint filter with warm water.
• Filter drawer is clogged. >>> Clean the sponge and the filter cloth in the filter drawer.
• Ventilation grids on the front side of the machine are blocked. >>> Remove the
objects (if any) that block ventilation in front of the ventilation grids.
• Ventilation is not sufficient since the room where the machine is installed is
very small. >>> Open the door and window of the room to avoid the room
temperature increase too much.
• Lime deposit has built up on the dampness sensor. >>> Clean the dampness
sensor.
• Excessive laundry is loaded. >>> Do not load the dryer in excess.
• Laundry is not spun sufficiently. >>> Spin your laundry at a higher speed in your
washing machine.
Laundry comes out wet at the end of drying.
After drying, the hot clothes feel damper than their actual dampness level.
C
• It is likely that the selected programme did not suit the laundry type.>>>Checking
the care labels on clothes, select appropriate programme for the laundry type or
use timer programmes in addition.
• Pores of the lint filter are clogged. >>> Wash the lint filter with warm water.
• Filter drawer is clogged. >>> Clean the sponge and the filter cloth in the filter
drawer.
• Excessive laundry is loaded. >>> Do not load the dryer in excess.
• Laundry is not spun sufficiently. >>> Spin your laundry at a higher speed in your
washing machine.
Dryer does not switch on or the programme does not start. Dryer does not start
when it is set.
• It is not plugged in. >>> Make sure that the machine is plugged in.
• The loading door is ajar. >>> Make sure that the loading door is closed securely.
• Programme is not selected or the Start / Pause / Cancel button is not pressed.
>>> Make sure that the programme is selected and the machine is not in Pause
mode.
• Childproof Lock is activated. >>> Deactivate the Childproof Lock.
Programme is interrupted without any cause.
• Loading door is ajar. >>> Make sure that the loading door is closed securely.
• There was a power failure. >>> Press Start / Pause / Cancel button to start the
programme.
• Water tank is full. >>> Drain the water tank.
Laundry has shrunk, become felted or deteriorated.
• A programme suitable for the laundry type is not used. >>> Check the garment
tag and select a programme suitable for the fabric type.
28
EN
Page 29

Drum lighting does not turn on. (On models with lamp)
• Dryer is not switched on with the On / Off button. >>> Make sure that the dryer is
switched on.
• Lamp is defective. >>> Call Authorized Service Agent to have the lamp replaced.
End/Anti-creasing symbol is on.
• Anti-creasing programme is activated in order to prevent laundry that has
remained in the machine from creasing. >>> Turn off the dryer and take out the
laundry.
End symbol is on.
• Programme is over. Turn off the dryer and take out the laundry.
Lint Filter Cleaning symbol is on.
• Lint filter is not cleaned. >>> Clean the lint filter.
Lint Filter Cleaning symbol is flashing.
• Filter housing is clogged with lints. >>> Clean the lint filter housing.
• A deposit has built up on the lint filter pores that may cause clogging. >>> Wash
the lint filter with warm water.
• Filter drawer is clogged. >>> Clean the sponge and the filter cloth in the filter
drawer.
Water leaks from the loading door
• Lint has accumulated on the inner surfaces of the loading door and on the
surfaces of the loading door gasket. >>> Clean the inner surfaces of the loading
door and the surfaces of the loading door gasket.
Loading door opens spontaneously.
• Loading door is ajar. >>> Push the loading door to close until you hear a locking
sound.
Water Tank warning symbol is on/flashing.
• Water tank is full. >>> Drain the water tank.
• Water draining hose is bent. >>> If the product is connected directly to a
wastewater drain, check the water drain hose.
Filter Drawer Cleaning warning symbol is flashing.
• Filter drawer is not cleaned. >>> Clean the sponge and the filter cloth in the filter
drawer.
If you cannot eliminate the problem although you follow the instructions in this
A
section, consult your dealer or the Authorized Service Agent. Never try to repair a
nonfunctional product yourself.
EN
29
Page 30

Lue ensin nämä käyttöohjeet!
Hyvä asiakas
Toivomme, että nykyaikaisessa tuotantolaitoksessa valmistettu, ankarat
laadunvarmistustoimenpiteet läpäissyt tuotteemme palvelee sinua mahdollisimman hyvin.
Lue siksi nämä käyttöohjeet huolellisesti ennen laitteen käyttöönottoa ja säilytä ohjeet
myöhempää käyttöä varten. Jos laite siirtyy jonkun muun käyttöön, anna mukaan myös
nämä ohjeet.
Käyttöohjeissa kuvataan miten voit käyttää laitetta
nopeasti ja turvallisesti.
• Lue käyttöohjeet ennen laitteen asennusta ja käyttöönottoa.
• Noudata turvallisuutta koskevia ohjeita.
• Säilytä käyttöohjeet helposti saatavilla myöhempää käyttöä varten.
• Lue myös muut laitteen mukana toimitetut oppaat.
Ota huomioon, että nämä käyttöohjeet saattavat käsittää useita muitakin malleja. Mallien
väliset erot kerrotaan käyttöoppaassa.
Merkkien selitykset
Tässä käyttöoppaassa käytetään seuraavia symboleja:
Lue ohjeet.
Tärkeitä tietoja tai hyödyllisiä käyttövihjeitä.
C
Varoitus henkeä ja omaisuutta vaarantavista tilanteista.
A
Sähköiskun vaara.
B
Varoitus palovaarasta.
Varoitus kuumista pinnoista.
2960310441_FI/260911.1631
Tässä tuotteessa on sähköisten ja elektronisten laitteiden jätteiden (WEEE) valikoivan lajittelun
symbolimerkintä.
Tämä tarkoittaa, että tätä tuotetta pitää käsitellä Euroopan parlamentin ja neuvoston
direktiivin 2002/96/EY:n mukaisesti, jotta sitä voidaan kierrättää ja purkaa minimoiden
ympäristövaikutukset. Saat lisätietoja paikallisilta tai alueellisilta viranomaisilta.
Elektroniset laitteet, jotka eivät ole mukana valikoivassa lajittelussa ovat potentiaalisesti
vaarallisia ympäristölle ja ihmisen terveydelle, koska ne sisältävät vaarallisia aineita.
Page 31

1 Tärkeitä turvallisuustietoja
Tässä osassa on turvaohjeita, jotka
auttavat suojautumaan henkilövahinkoja
tai omaisuusvahinkoja aiheuttavilta
vaaratekijöiltä. Näiden ohjeiden
noudattamatta jättäminen aiheuttaa takuun
raukeamisen.
Yleinen turvallisuus
• Älä koskaan aseta konetta lattialle
maton päälle, sillä ilmavirran puute
koneen alla voi aiheuttaa elektronisten
osien ylikuumenemisen. Se aiheuttaa
koneessa toimintahäiriöitä.
• Älä käytä laitetta, jos virtajohto tai
pistoke on vahingoittunut. Soita
valtuutettuun huoltoliikkeeseen.
• Älä tee mitään muutoksia laitteen
toimitukseen kuuluvaan pistokkeeseen.
Jos se ei ole yhteensopiva pistorasian
kanssa, pyydä sähköteknikkoa
vaihtamaan se sopivaan.
• Älä koske pistokkeeseen märillä käsillä!
Älä irrota vetämällä johdosta, irrota aina
vetämällä pistokkeesta.
• Liitä tuote kapasiteetiltaan sopivalla,
teknisten tietojen taulukossa
määritetyllä sulakkeella suojattuun
maadoitettuun pistorasiaan.
• Tämän tuotteen virtakaapeli
on varustettu johtimella ja
maadoituspistokkeella, joka
mahdollistaa tuotteen maadoituksen.
Tämä pistoke on asennettava
asianmukaisesti ja liitettävä pistorasiaan,
joka on maadoitettu paikallisten lakien
ja säädösten mukaisesti. Maadoitus
pienentää sähköiskun vaaraa avaamalla
pienivastuksisen reitin sähkövirralle
toimintahäiriön tai vian ilmetessä. Älä
laiminlyö maadoitusasennusta, jonka
saa tehdä vain pätevä sähköteknikko.
Jos epäilet maadoitusliitäntää, anna
ammattitaitoisen sähköasentajan tai
valtuutetun huoltoedustajan tarkistaa
se. Yrityksemme ei ota vastuuta
mistään mahdollisista vahingoista,
joiden syynä on koneen käyttäminen
maadoittamattomalla virtapiirillä.
• Tuotetta ei saa kytkeä verkkovirtaan
asennuksen, huollon tai korjaustöiden
aikana.
• Anna valtuutetun huoltoasentajan
suorittaa aina asennus- ja korjaustyöt.
Valmistajaa ei vastaa vahingoista, jotka
syntyvät valtuuttamattomien henkilöiden
toimenpiteistä johtuvista vahingoista.
• Älä käytä tuotteessa sähkölaitteita.
• Älä liitä tuotetta savupiipun hormeihin,
joita käytetään kaasulla tai muun
tyyppisillä polttoaineilla käyvien
laitteiden pakokaasujen poistoon.
• Sinun on varattava riittävä tuuletus,
jotta estetään takatuli-ilmiön johdosta
syntyvien kaasujen kertyminen
huoneeseen laitteista, jotka käyvät
muun tyyppisillä polttoaineilla, mukaan
lukien avotuli.
• Esineitä, jotka on puhdistettu
tai pesty bensiinillä, polttoöljyllä,
kuivapesuliuottimella tai muilla syttyvillä
tai räjähtävillä materiaaleilla sekä
esineitä, jotka ovat likaantuneet tai
tahriintuneet tällaisilla aineilla, ei saa
kuivat tuotteessa, sillä niistä pääsee
syttyviä tai räjähtäviä höyryjä.
• Älä kuivaa kuivausrummussa
tekstiilejä, jotka on puhdistettu teollisilla
kemikaaleilla.
• Metallivahvikkeita sisältäviä alusasuja
ei saa laittaa kuivausrumpuun. Jos
metallivahvikkeet irtoavat kuivauksen
aikana, ne voivat vahingoittaa
kuivausrumpua.
• Älä yritä korjata laitetta itse. Älä suorita
mitään korjauksia tai vaihda tuotteeseen
varaosia, vaikka tietäisit osaavasi tehdä
sen, jollei sitä ole selvästi ehdotettu
käyttöohjeessa tai julkaistussa huoltooppaassa. Muutoin vaarannat omasi ja
muiden hengen.
• Niiden vikojen osalta, joita et pysty
31
FI
Page 32

korjaamaan näiden turvallisuusohjeiden
toimenpiteiden avulla, sammuta laite
ja irrota se verkkovirrasta ja soita
valtuutetulle huoltoedustajalle.
• Älä yritä avata kuivausrumpua rummun
pyöriessä.
• Vähentääksesi sähköiskun vaaraa älä
käytä jatkojohtoja, jakopistorasioita
tai sovittimia kuivaajan liittämiseen
virtalähteeseen.
• Älä pese laitetta levittämällä tai
kaatamalla vettä sen päälle. Sähköiskun
vaara!
Kuivausjakson viimeinen vaihe
(jäähdytysjakso) tapahtuu ilman
lämmitystä, jotta varmistetaan pyykin
pysyminen lämpötilassa, jossa ne eivät
vahingoitu. Jos avaat täyttöluukun
ennen kuin jäähdytysvaihe päättyy,
kuumaa höyryä purkautuu.
Älä pysäytä kuivaajaa, ennen kuin
A
ohjelma päättyy. Jos niin on tehtävä,
poista pyykki kuivaajasta nopeasti ja
aseta se soveliaalle tasolle lämmön
haihduttamiseksi.
• Puhdista aina nukkasuodatin ennen tai
jälkeen jokaisen täytön. Älä koskaan
käytä kuivaajaa, jos nukkasuodatinta ei
ole asennettu.
• Puhdistaa laitteen sisäpuoli ja
poistoaukko säännöllisesti. Älä
anna kuitujen, pölyn ja lian kertyä
poistoaukkoon ja sen lähelle.
• Sähköpistokkeen on oltava helposti
saatavilla asennuksen jälkeen.
• Älä kuivaa pesemättömiä tekstiilejä
kuivausrummussa.
• Tekstiilit, jotka ovat tahriintuneet
ruokaöljystä, asetonista,
alkoholista, bensiinistä, paloöljystä,
tahranpoistoaineista, tärpätistä,
parafiinistä ja parafiininpoistajista, on
pestävä kuumassa vedessä runsaan
pesuainemäärän kanssa ennen kuin ne
voi kuivata kuivausrummussa.
• Verhoja tai tyynyjä, joissa on
vaahtokumipehmustus (lateksikumi),
suihkulakkeja, vedenpitäviä tekstiilejä,
kumivahvisteisia materiaaleja ja
vaahtokumityynyjä ei saa kuivata
kuivausrummussa.
• Älä käytä pehmennysaineita
sähköisyyden poistamiseen, jollei
tuotteen tai tekstiilien pehmennysaineen
valmistaja sitä suosittele.
• Käytä huuhteluaineita, sähköisyyden
poistajia jne. tuotteiden valmistajien
ohjeiden mukaan.
• Älä asenna tuotetta lukittavan
oven taakse, liukuoven taakse tai
saranallisen oven taakse, joka voi osua
kuivausrumpuun.
• Älä asenna tai jätä tätä kuivaajaa tiloihin,
joissa se altistuu ulkoilman olosuhteille.
• Laitetta voi käyttää lämpötilavälillä
+5°C – +35 °C. Jos käyttöolosuhteet
ovat tämän alueen ulkopuolella, laitteen
toiminta heikkenee ja se saattaa
vaurioitua.
• Älä peukaloi ohjaimia.
• Irrota laite pistorasiasta, kun se ei ole
käytössä.
• Poista kuivausosaston luukku ennen
laitteen purkamista tai hävittämistä.
• Tarkista ennen pyykin asettamista
kuivausrumpuun, ettei taskuissa tai
muissa osissa joudu mukaan sytyttimiä,
kolikoita, metalliesineitä, neuloja yms.
• varmista etteivät lemmikit pääse
laitteeseen. Tarkista laitteen rumpu
ennen sen käyttämistä.
• Varmista että kunnossapidossa
käytetään alkuperäisiä varaosia ja
varusteita.
• Älä nojaa täyttöluukun sen ollessa auki.
Laite saattaa kallistua.
• Sammuta laite Päälle/Pois-painikkeella,
kun kuivaaja ei ole käytössä tai
pyykki on otettu pois siitä kuivauksen
jälkeen. Siinä tapauksessa, että Päälle/
Pois-painike on päällä (kun kuivaaja
saa virtaa), pidä kuivaajan luukkua
suljettuna.
32
FI
Page 33

Tarkoitettu käyttö
• Tuote on suunniteltu kotitalouskäyttöön.
Sitä ei saa käyttää muihin tarkoituksiin.
• Laitetta voi käyttää vain tekstiilien
kuivaukseen niiden merkintöjen
mukaisesti.
• Kuivaa kuivausrummussa vain niitä
tuotteita, jotka on ilmoitettu tässä
käyttöoppaassa.
• Tätä laitetta ei ole tarkoitettu sellaisten
henkilöiden käyttöön (mukaan lukien
lapset), joiden fyysinen, aistimuksellinen
tai henkinen kapasiteetti on rajoittunut,
tai joilta puuttuu kokemus ja tuntemus,
jollei heidän turvallisuudestaan
vastuussa oleva henkilö ole läsnä tai
ohjaa laitteen käytössä.
Lasten turvallisuus
• Sähkölaitteet ovat vaarallisia lapsille.
Pidä lapset loitolla tuotteesta sen
ollessa käynnissä. Älä anna heidän
sormeilla tuotetta.
• Älä anna lasten istua tuotteen päällä,
kiivetä sille tai mennä sen sisään.
• Muutoin saattaa aiheutua
henkilövahinkojen tai aineellisten
vahinkojen vaara.
• Pakkausmateriaalit ovat lapsille
vaarallisia. Pidä pakkausmateriaalit
poissa lasten ulottuvilta tai hävitä ne
jätedirektiivien luokitusten mukaisesti.
33
FI
Page 34

2 Asennus
Ota yhteys lähimpään valtuutettuun
huoltoedustajaan tuotteen asentamiseksi.
Tuotteen käyttövalmiiksi saamista
varten tarkista että sähköjärjestelmä ja
vedentyhjennysjärjestelmä soveltuu laitteelle
ennen valtuutetulle huoltoedustajalle
soittamista. Jollei ole, soita valtuutetulle
sähköasentajalle ja sovi tarvittavista
toimenpiteistä.
Laitteen sijaintipaikan valmistelu samoin
C
kuin sähkö- ja vesiasennukset ovat
asiakkaan vastuulla.
Asennuksen ja sähköliitännät saa
B
tehdä vain valtuutettu huoltoedustaja.
Valmistajaa ei vastaa vahingoista, jotka
syntyvät valtuuttamattomien henkilöiden
toimenpiteistä johtuvista vahingoista.
Tarkista tuote silmämääräisesti ennen
A
asennusta havaitaksesi mahdolliset viat.
Jos vikoja ilmenee, älä anna asentaa
tuotetta. Vahingoittunut tuote on
vaaraksi turvallisuudellesi.
Anna kuivaajan olla paikoillaan 12
A
tuntia, ennen kuin käynnistät sen.
Sopiva asennuspaikka
• Asenna tuote vakaalle ja tasaiselle
alustalle.
• Kuivaaja on painava. Älä siirrä sitä
yksin.
• Käytä tuotetta hyvin ilmastoidussa,
pölyttömässä ympäristössä.
• Älä peitä ilma-aukkoja tuotteen edessä
ja alla esimerkiksi mattokasalla tai
lautaesteillä tms.
• Älä asenna tuotetta lukittavan
oven taakse, liukuoven taakse tai
saranallisen oven taakse, joka voi osua
kuivausrumpuun.
• Kun tuote on asennettu, sen on
pysyttävä samassa paikassa, johon
sen liitännät on tehty. Tarkista laitetta
asennettaessa ettei sen takaseinä
kosketa mihinkään (hana, pistorasia
jne.). Kiinnitä huomiota myös
asennuspaikkaan, jota ei tarvitse
myöhemmin muuttaa.
• Säilytä vähintään 1,5 cm etäisyys
muiden kalusteiden reunoista.
Älä aseta tuotetta sähköjohdon päälle.
B
Kuljetuksen
varmistuskokoonpanon
irrottaminen
Irrota kuljetuksen varmistuskokoonpano
A
ennen laitteen käyttöönottoa.
1. Avaa täyttöluukku.
2. Rummun sisällä on nailonpussi, jonka
sisällä on styroksia. Pidä siitä kiinni
XX:llä merkitystä kohdasta.
3. Vedä nailonpussia itseesi päin ja irrota
kuljetuksen varmistuskokoonpano.
Tarkista, ettei kuljetuksen
A
varmistuskokoonpanon osia jää
rummun sisälle.
Tason alle asennus
• Tämä tuote voidaan asentaa tason alle,
jos tason korkeus on riittävä.
Älä koskaan käytä kuivaajaa, jos
A
ylätiiviste ei ole paikoillaan.
Kuivaajan
syvyys
Laitteen alle
asennettavan
osan
varastonumero
60 cm 54 cm
2979600100 2973600100
34
FI
Page 35

• Jätä vähintään 3 cm tilaa laitteen sivu-
ja takaseinämien ja tason tai komeron
seinien väliin, kun tuote asennetaan
tason alle tai komeroon.
Kiinnitys pesukoneen päälle
• Pesukoneen päälle kuivaajaa
asennettaessa on kahden koneen
välissä käytettävä sovitinta. Sovittimen
(2977200100 valkoinen/2977200400
harmaa) saa asentaa vain valtuutettu
huoltoedustaja.
• Pesukoneen ja kuivaajan kokonaispaino
täydellä kuormituksella, kun ne
asennettu päällekkäin, on noin 180 kg.
Sijoita laitteet vakaalle lattialle jonka
kuormankantokyky on riittävä.
Tyhjennykseen liittäminen
Laitteissa, joissa on lauhdutinyksikkö,
kuivauskierrossa kertynyt vesi kootaan
vesisäiliöön. Kertynyt vesi on poistettava
jokaisen kuivausjakson jälkeen.
Voit tyhjentää kertyneen veden suoraan
ulos tuotteen toimitukseen kuuluvalla
vedenpoistoputkella sen sijaan, että
poistaisit säännöllisesti vesisäiliöön
kertyneen veden.
letkun irrottamiseen.
2. Liitä laitteen mukana toimitetun
tyhjennysletkun toinen pää
liitäntäpisteeseen josta irrotit letkun
edellisessä vaiheessa.
3. Liitä poistoletkun toinen pää suoraan
vedenpoistoputkeen tai pesualtaaseen.
Letkun kiinnitys on aina kiristettävä
A
kaikentyppisissä liitännöissä. Talossasi
saattaa tapahtua vesivahinko, jos letku
irtoaa vedenpoiston aikana.
Poistoletku on asennettava enintään 80
C
cm:n korkeudelle.
Varmista, ettei poistoletkun päälle
C
voi astua ja ettei se ole taipunut
tyhjennyspisteen ja koneen välillä.
Jalkojen säätäminen
Laitteen hiljaisemman ja tärinättömän
käynnin varmistamiseksi sen on oltava
tasaisesti ja tasapainossa jaloillaan.
Tasapainota kone jalkoja säätämällä.
Säädä jalkoja vasemmalle tai oikealle,
kunnes laite on tukevasti ja vakaasti
vaakatasossa.
Vedentyhjennysletkun liittäminen
1. Vedä laitteen letkua käsin ja irrota se
kiinnityskohdastaan. Älä käytä työkaluja
Älä koskaan irrota säädettäviä jalkoja
C
koteloistaan.
Sähköliitännät
Liitä laite kapasiteetiltaan sopivalla, "tekniset
tiedot" -taulukossa määritetyllä sulakkeella
suojattuun maadoitettuun pistorasiaan.
Yrityksemme ei ota vastuuta mistään
mahdollisista vahingoista, joiden syynä on
koneen käyttäminen maadoittamattomalla
virtapiirillä.
• Sähköliitäntöjen on noudatettava
paikallisia säädöksiä.
• Sähköpistokkeen on oltava helposti
saatavilla asennuksen jälkeen.
• Käyttöjännite ja sallitut sulaketiedot tai
FI
35
Page 36

katkaisusuojaus on määritelty luvussa
”Tekniset tiedot”. Jos sulakkeen tai
katkaisijan arvo on alle 10 ampeeria,
pyydä valtuutettua sähköteknikkoa
asentamaan 10 ampeerin sulake.
• Määritetyn jännitteen on oltava sama
kuin sähköverkossa.
• Älä tee liitäntöjä jatkojohdoilla tai
jakopistorasioilla.
• Pääsulakkeella ja kytkimillä on oltava
vähintään 3 mm:n kontaktietäisyys.
Vaurioituneen sähköjohdon saa vaihtaa
B
vain valtuutettu huoltoedustaja.
Tuotetta ei saa käyttää, ennen kuin se
B
on korjattu! Sähköiskun vaara!
Ensimmäinen käyttö
Ennen laitteen käyttöönottoa
kaikki valmistelut kohtien "Tärkeitä
turvallisuustietoja" ja "Asennus" mukaan on
suoritettava.
Pakkausmateriaalin
hävittäminen
Pakkausmateriaalit ovat lapsille vaarallisia.
Säilytä pakkausmateriaaleja turvallisessa
paikassa lasten ulottumattomissa.
Tuotteen pakkausmateriaali on valmistettu
kierrätettävistä materiaaleista. Lajittele ja
hävitä ne kierrätettävän jätteen ohjeiden
mukaisesti. Älä hävitä niitä kotitalousjätteen
mukana.
Laitteen kuljettaminen
1. Irrota laite sähkönsyötöstä ennen sen
kuljettamista.
2. Tyhjennä vedentyhjennys (jos on) ja
hormiliitännät.
3. Tyhjennä laitteen vesisäiliöstä vesi
kokonaan.
Suosittelemme kantamaan konetta
A
pystyasennossa. Jollei konetta ole
mahdollista kantaa pystyasennossa,
sitä on kannettava edestäpäin
katsottuna oikealle kallistettuna. Kun
kone on siirretty, odota 12 tuntia, ennen
kuin käynnistät sen.
Vanhan koneen hävittäminen
Hävitä vanha laite ympäristöystävällisellä
tavalla.
Jos haluat tietoja koneen hävittämisestä,
ota yhteys paikalliseen edustajaan
tai paikalliseen kiinteän jätteen
keräyspisteeseen.
Lasten turvallisuuden vuoksi katkaisen
sähköjohto ja riko täyttöluukun
lukitusmekanismi, ennen laitteen
hävittämistä, jotta ne eivät ole
toimintakykyisiä.
Ääniä koskevat varoitukset
Käytön aikana on normaalia kuulla aika
C
ajoin metallista ääntä kompressorista.
Käytön aikana kerätty vesi pumpataan
C
vesisäiliöön. Tämän toimenpiteen aikana
on normaalia kuulla pumppausääniä.
36
FI
Page 37

Tekniset tiedot
FI 2
Korkeus (säädettävä) 84,6 cm
Leveys 59,5 cm
Syvyys 59,8 cm
Kuormitus (kg) 8 kg
Nettopaino (muovisen etuoven käyttö) 52 kg
Nettopaino (lasisen etuoven käyttö) 54,5 kg
Jännite
Määritelty virrankulutus Katso tyyppimerkinnät
Model code
Tyyppimerkinnät sijaitsevat lastausoven takana.
37
FI
Page 38

3 Kuivauksen alkuvalmistelut
Toimenpiteet energian
säästämiseksi
Seuraavat tiedot auttavat sinua käyttämään
laitetta ympäristölle turvallisella ja
energiatehokkaalla tavalla.
• Käytä laitetta valitsemalle ohjelmalle
sopivalla kapasiteetilla ja kiinnitä huomio
ylikuormituksen välttämiseen.
• Linkoa pyykkiä suurimmalla nopeudella
pestessäsi sitä. Tällöin kuivausaika
lyhenee ja energiankulutus vähenee.
• Kuivaa samantyyppinen pyykki
yhdessä.
• Noudata ohjelman valinnassa
käyttöoppaan ohjeita.
• Jätä riittävä välys kuivausrummun
etu- ja takapuolelle ilmankierron
varmistamiseksi. Älä tuki
tuuletussäleikköä laitteen etupuolelta.
• Älä avaa koneen luukkua kesken
kuivauksen, jollei ole pakko. Jos sinun
on pakko avata luukku, älä pidä sitä
auki pitkää aikaa.
• Älä lisää uutta (märkää) pyykkiä
kuivauksen aikana.
• Pyykistä kuivausjakson aikana ilmaan
vapautunut nukka ja kuidut kerätään
nukkasuodattimeen. Puhdista
nukkasuodatin ennen tai jälkeen
jokaisen täytön.
• Puhdista suodatinlokero säännöllisesti,
kun Suodatinlokeron puhdistuksen
varoituskuvake tai aina 5 kuivausjakson
jälkeen.
• Tuuleta kuivauksen aikana hyvin huone,
jossa kuivausrumpu sijaitsee.
• Lampulla varustetut virtaa säästävät
mallit: pidä luukkua suljettuna, kun
laite ei ole käytössä mutta Päälle/Pois-
painike on painettuna.
Laitteessa kuivattavaksi
soveltuvat tekstiilit
Noudata aina pyykin ohjemerkintöjä.
C
Kuivaa tällä kuivausrummulla vain
pyykkiä, jossa on merkintä, että sen
voi kuivata kuivaajalla ja varmista, että
valitset sopivan ohjelman.
Pyykki, joka ei sovi
kuivattavaksi koneessa
• Alla mainitut tekstiilit ja esineet eivät
sovellu kuivaajassa kuivattavaksi:
• Pestävät vaatteet, joissa on metalliosia,
kuten vyönsoljet ja metallinapit voivat
vahingoittaa konetta.
• Villa- tai silkkivaatteet, nailonsukat,
ohuet kirjotut kankaat ja makuupussit.
• Aroista tai arvokkaista kankaista
valmistetut vaatteet.
• Tylliverhot.
• Hermeettisistä kuiduista valmistetut
tekstiilit kuten tyynyt ja peitot.
• Erittäin märkä pyykki.
• Pesemättömät likaiset pyykit.
38
FI
Page 39

• Vaahtomuovia tai kumia sisältävät
tekstiilit.
Bensiinillä/paloöljyllä, kuivapesuaineilla,
teollisuuskemikaaleilla tai muilla syttyvillä
tai räjähtävillä puhdistetut, pestyt tai
tahranpuhdistetut tekstiilit eivät sovellu
kuivaajassa kuivattavaksi.
Tekstiilit, jotka ovat tahriintuneet
ruokaöljystä, asetonista,
alkoholista, bensiinistä, paloöljystä,
tahranpoistoaineista, tärpätistä,
parafiinistä ja parafiininpoistajista, on
pestävä kuumassa vedessä runsaan
pesuainemäärän kanssa ennen kuin ne
voi kuivata kuivausrummussa.
Pyykin valmistelu kuivausta
varten
• Tarkista ennen pyykin asettamista
kuivausrumpuun, ettei taskuissa tai
muissa osissa joudu mukaan sytyttimiä,
kolikoita, metalliesineitä, neuloja yms.
• Pyykki saattaa olla pesun jälkeen
sotkeutunut. Lajittele pyykki, ennen kuin
asetat sen kuivaajaan.
• Lajittele pyykki tyypin ja paksuuden
mukaan. Kuivaa samantyyppinen
pyykki yhdessä. Esimerkiksi ohuet
keittiöpyyhkeet ja pöytäliinat kuivuvat
nopeammin kuin paksut kylpypyyhkeet..
Pyykki on lingottava suurimmalla
C
pesukoneen tekstiilityypille sallimalla
kierrosnopeudella.
Oikea täyttökapasiteetti
Noudata ohjelman valinnassa kohdan
"Ohjelman valinta ja kulutustaulukko"
ohjeita. Älä lisää pyykkiä enempää kuin
taulukossa ilmoitettu täyttökapasiteetti on.
Pyykin lisääminen koneeseen yli
C
kuvassa näytetyn tason ei ole
suositeltavaa. Kuivaustulos heikkenee,
jos kone on ylikuormitettu. Lisäksi
kuivausrumpu ja vaatteet voivat
vahingoittua.
Seuraavat painot on annettu esimerkkeinä.
Kotipyykki
Puuvillaiset
päiväpeitteet (kaksois)
Puuvillaiset
päiväpeitteet
(yksittäiset)
Lakanat (kaksois) 500
Lakanat (yksittäiset) 350
Suuret pöytäliinat 700
Pienet pöytäliinat 250
Lautasliinat 100
Kylpypyyhkeet 700
Käsipyyhkeet 350
Vaatteet
Puserot 150
Puuvillapaidat 300
Paidat 200
Puuvillaleningit 500
Leningit 350
Farkut 700
Nenäliinat (10 kpl) 100
T-paidat 125
Likimääräiset
painot (g)
1500
1000
Likimääräiset
painot (g)
39
FI
Page 40

Pyykinpesukoneen täyttäminen
1. Avaa täyttöluukku.
2. Aseta pyykki pesukoneeseen sullomatta.
3. Sulje täyttöluukku työntämällä.
Varmista, ettei vaatekappaleita jää kiinni
A
luukkuun.
40
FI
Page 41

** Näytössä näkyvä aika osoittaa jäljellä olevan ajan ohjelman loppuun saakka ja
4 Ohjelman valinta ja laitteen käyttö
Ohjauspaneeli
1
2 3
4
5
9 6
78
1. Pesukoneen linkousnopeus / Ajastinohjelman valintapainike
2. Näyttö
3. Käynnistys/Tauko/Peruutus-painike
4. Ohjelman valitsin
5. On/Off (Päälle/Pois) -painike
6. Rypistymisen esto -painike
7. Kuivaustason painike
8. Peruuta äänimerkki -painike
9. Aikaviivepainikkeet
Linkousnopeus / Ajastinohjelmat*
Toimintokuvake
Taukokuvake
Vesisäiliön varoitusvalo
Suodattimen puhdistuksen varoitusvalo
Suodatinlokeron puhdistuksen varoitusvalo
Jäljellä olevan ajan osoitin**
Lapsilukon varoitusvalo
Aikaviivetila
Täyttöluukun avaamisen varoitusvalo
Rypistymisen estotila
Äänimerkin taso / Peruuta äänimerkki
Kuivaustaso
Rypistymisen esto on aktivoitu
* Linkousnopeutta käytetään näyttämään jäljellä oleva aika tarkemmin. Se ei
vaikuta laitteen toimintatehoon.
muuttuu pyykin kosteustason mukaan.
41
FI
Page 42

Puuvilla Synteettiset
Vuode
vaatteet
Ajastinohj
elmat
Tuuletus
Rypistymi
sen esto
Silitysval
mis
Ekstra
kuiva
Käyttöva
lmis
PaidatPaidat 30'
Farkut
Aikaviive
Urheiluvaatteet
Linkous
Koneen käyttövalmistelut
1. Liitä laite verkkovirtaan.
2. Aseta pyykki pesukoneeseen.
3. Paina Päällä/Pois-painiketta.
Päällä/Pois-painikkeen painaminen
C
ei välttämättä tarkoita, että ohjelma
on käynnistynyt. Käynnistä ohjelma
painamalla "Käynnistys/Tauko/
Peruutus"-painiketta.
Ohjelman valinta
1. Valitse sopiva ohjelma alla olevasta
taulukosta, jossa on myös
kuivauslämpötila asteina merkittynä.
2. Valitse haluttu ohjelma Ohjelman
valitsimella.
Vain puuvillapyykki
kuivataan normaalilla
lämpötilalla. Paksut ja
monikerroksiset tekstiilit
Ekstrakuiva
Käyttövalmis
Silitysvalmis
(pyyhkeet, lakanat, farkut
jne.) kuivataan tavalla,
jossa ei tarvita silitystä
ennen vaatekaappiin
siirtämistä.
Normaali pyykki
(pöytäliinat, alusvaatteet
jne.) kuivataan tavalla,
jossa ei tarvita silitystä
ennen vaatekomeroon
asettamista.
Normaali pyykki (esim.
paidat, leningit jne.)
on kuivattu valmiiksi
silitettäväksi.
Lisätoiminnot
Sekoitete
kstiilit
Käynnisty
On/Off
Painiketta
s/Tauko-
painike
Kuivauste
Villava
atteet
Villan
raikastus
Lisätietoja ohjelmista katso "Ohjelman
C
Kuivaust
aso
line
Lapsilu
kko
Viskoosi
Nollaus 3”
Alusvaat
teet
valinta ja kulutustaulukko".
Pääohjelmat
Käytettävissä ovat seuraavat pääohjelmat
tekstiilityypin mukaan:
• Puuvillat
Kestävät tekstiilit voi kuivata tällä ohjelmalla.
Kuivaus normaalissa lämpötilassa
Suositellaan puuvillatekstiileille (esim.
lakanoille, päiväpeitteille, pyyhkeille,
kylpytakeille jne.).
• Synteettiset
Vähemmän kestävät tekstiilit voi kuivata tällä
ohjelmalla. Suositellaan synteettisille.
Lisäohjelmat
Erikoistapauksia varten käytettävissä on
erikoisohjelmia.
Lisäohjelmat voivat olla hieman erilaisia
C
laitteen mallista riippuen.
• Vuodevaatteet
Kuivaa vain kuitupeittoja, joissa on
konekuivattava-merkintä. Varmista että
laitat peiton oikealla tavalla, jotta vältetään
koneen ja peiton vauriot. Irrota peiton
päällinen ennen peiton asettamista
koneeseen. Taita peitto kahtia ennen
koneeseen laittoa.
- Älä laita koneeseen enempää kuin 1
tuplapeitto (200x200 cm). Älä kuivaa
puuvillatekstiilejä kuten peittoja, tyynyjä jne.
- Älä kuivaa muita tekstiilejä kuin peittoja,
esim. mattoja, ryijyjä jne. Kone voi vaurioitua
pysyvästi.
42
FI
Page 43

Saadaksesi parhaat tulokset
C
kuivausrummulla pyykki on pestävä
niille sopivilla ohjelmilla ja lingottava
pesukoneessa suositelluilla
linkousnopeuksilla.
• Paidat
Tämä ohjelma kuivaa paidat
hellävaraisemmin ja rypistää niitä
vähemmän, mikä helpottaa vaatteiden
silittämistä.
Paidoissa voi olla jäljellä vähän
C
kosteutta ohjelman päätyttyä.
Suosittelemme, ettet jätä paitoja
kuivausrumpuun.
• Farkut
Voit kuivata tällä ohjelmalla farkut, jonka
olet lingonnut pesukoneessa suurella
nopeudella.
• Sekoitetekstiilit
Kuivaa tällä ohjelmalla värjäämättömät
synteettiset ja puuvillatekstiilit yhdessä.
• Urheiluvaatteet
Kuivaa tällä ohjelmalla synteettiset,
puuvillaiset ja sekoitekankaiset tekstiilit
yhdessä.
• Villan raikastus
Voit käyttää tätä toimintoa saadaksesi
ilmavaa villapyykkiä ja pehmentääksesi
sitä villapyykkiä, jota voidaan pestä
pesukoneessa. Älä käytä tätä toimintoa
pyykkisi täydelliseen kuivatukseen.
Ota pyykkisi ulos ja sijoita ne ilmavasti
välittömästi ohjelman päätyttyä.
• Paidat 30’
Käytä tätä ohjelmaa kahden paidan
silityskuivaksi kuivaamiseen 30 minuutissa.
• Alusvaatteet
Kuivaa tällä ohjelmalla 100 % synteettiset
ja synteettiset sekoitesatiiniset alusvaatteet
(yöpuku, rintaliivit, alushousut, pyjamat),
joiden hoitolipukkeessa on konekuivattavamerkki.
*Kuivaustaso vaihtelee vaatteen
C
rakenteen, kuteen ja kosteustason
mukaan.
Somisteita (esim. pitsiä, tylliä, strasseja,
C
helmiä, helmiäistä, metallilankoja
jne.) sisältäviä vaatteita ei saa kuivata
koneessa.
Silkkivaatteet joissa on puuvillaa tai
C
satiinipintaa voivat jäädä märiksi tällä
ohjelmalla kuivattaessa.
• Viskoosi
Käytä ohjelmaa viskoosi- ja
modaalisekoitetekstiilien
kuivaamiseen. Viskoosi-polyesteri- ja
viskoosipuuvillasekoitetekstiilejä voi kuivata.
Kuivaustaso vaihtelee vaatteen
C
rakenteen, kuteen ja kosteustason
mukaan.
Vaatteiden ja aamutakkien, jotka
C
sisältävät somisteita (pitsiä, tylliä,
strasseja jne.), kuivaamista ei suositella..
• Tuuletus
Ainoa tuuletus kestää 10 minuuttia ilman
kuuman ilman puhallusta. Voit tuulettaa
tämän ohjelman avulla epämiellyttävät hajut
vaatteistasi, jos niitä on säilytetty suljetuissa
ympäristöissä pitkiä aikoja.
• Ajastinohjelmat
Voit valita yhden ajastinohjelmista10 min,
20 min, 30 min, 40 min, 50 min, 60 min,
80 min, 100 min, 120 min, 140 min ja
160 min saavuttaaksesi halutun lopullisen
kuivuustason alhaisissa lämpötiloissa.
Tällä ohjelmalla kone kuivaa valitun ajan
C
kuvaustasosta riippumatta.
43
FI
Page 44

Ohjelman valinta ja kulutustaulukko
FI 11
Pesuohjelmat
Puuvilla / värilliset
Ekstrakuiva
A
Käyttövalmis
A
Silitysvalmis
A
Paidat 30’
Paidat
Farkut
Vuodevaatteet
Sekoitetekstiilit
Urheiluvaatteet
Viskoosi
Alusvaatteet
Villan raikastus
Synteettiset
Käyttövalmis
B
Silitysvalmis
B
Energiankulutusarvot
Kuormitus
(kg)
8 1000 % 60 160
8 1000 % 60 145
8 1000 % 60 115
0.5 1200 % 60 30
1.5 1200 %50 40
4 1200 %50 100
2.5 1000 %40 120
4 1000 %60 95
4 1000 %60 90
1.5 600 %100 90
1 800 %40 40
1.5 600 %50 8
4 800 % 40 60
4 800 % 40 45
Pyykinpesukoneen
linkousnopeus (rpm)
Jäljelle jäävän
kosteuden
arvioitu määrä
Kuivausaika
(minuutteina)
Jäljelle jäävän
kosteuden
arvioitu määrä
Energiankulutusarvo
kWh
Pesuohjelmat
Silittämättä siistit
puuvillatekstiilit*
Silitysvalmiit
puuvillatekstiilit
Heti käyttövalmiit
synteettiset tekstiilit
Kuormitus
(kg)
8 1000 % 60 1.92
8 1000 % 60 1.50
4 800 % 40 0.75
Pyykinpesukoneen
linkousnopeus (rpm)
* : Energiaa säästävä vakio-ohjelma (EN 61121:2005)
Kaikki alla olevassa taulukossa annetut arvot on määrätty EN 61121:2005 -standardin
mukaan. Nämä arvot voivat poiketa taulukossa annetuista arvoista pyykin tyypin, pyykin
pyörimisnopeuden, ympäristöolosuhteiden ja jännitteen vaihtelun vuoksi.
FI
44
Page 45

Lisätoiminnot
Äänimerkki
Kuivaaja antaa varoitusäänimerkin,
kun ohjelma loppuu. Jos et halua,
että laite antaa äänimerkin, paina
äänenvoimakkuuspainiketta useita
kertoja, kunnes näytössä näkyy "x".
Säädä äänenvoimakkuuden tasoa samalla
painikkeella.
Voit valita tämän toiminnon joko ennen
C
tai jälkeen ohjelman alkamisen.
Peruuta
varoitusäänimerkki
Kuivaustaso
Käytetään halutun kuivuustason
säätämiseen. Lisää kuivausta verrattuna
oletusasetukseen suoritetaan, kun
"+"-merkki tulee näkyviin ja vähemmän
kuivausta, kun "-"-merkki tulee näkyviin.
Ohjelman kesto saattaa muuttua valinnan
mukaan.
Voit valita tämän toiminnon joko ennen
C
Varoitusäänimerkki
taso 1
tai jälkeen ohjelman alkamisen.
Varoitusäänimerkki
taso 2
Varoitusäänimerkki
taso 3
Aktivoi toiminto painamalla
C
Rypistymisen esto -painiketta.
Kontrastin muuttaminen
Näytön kontrastia voi muuttaa, jotta
näytön symbolit näkyisivät selvemmin.
Voi olla välttämätöntä muuttaa näytön
kontrastiasetusta, jos kuivausrumpu on
asennettu pesukoneen päälle.
Pidä Linkousnopeus-/
Ajastinohjelmapainiketta painettuna kolme
sekuntia.
Kun kontrasti on muuttunut, kaikki näytön
symbolit ovat näkyvissä kolme sekuntia
osoittamassa, että toimenpide on valmis.
Suorita sama toimenpide uudelleen,
C
jos haluat palauttaa aiemman
kontrastiasetuksen.
Varoitusvalot
Varoitusvalot voivat olla hieman erilaisia
C
koneen mallista riippuen.
Nukkasuodattimen puhdistaminen
Varoitusvalo syttyy muistuttamaan
suodattimen puhdistuksesta ohjelman
loppumisen jälkeen.
Jos suodattimen varoitusvalo
C
palaa jatkuvasti, katso neuvoa luvusta
"Vianetsintä".
Rypistymisen esto
Voit käyttää rypistymisen esto-ohjelmaa
estämään pyykin rypistymistä, jollet ota
pyykkiä ulos ohjelman loppumisen jälkeen.
Tämä ohjelma pyörittää pyykkiä 240
sekunnin välein rypistymisen estämiseksi 2
tunnin ajan.
Rypistymisen esto on aktivoitu, mutta
ohjelma on käynnissä ensimmäisessä
esimerkkikuvassa. Kuivausjakso on lopussa
ja ensimmäinen vaihe rypistymisen estoa on
käynnistynyt toisessa kuvassa.
Vesisäiliö
Varoitusvalo syttyy muistuttamaan
vesisäiliön tyhjentämisestä ohjelman
loppumisen jälkeen.
Jos vesisäiliö täyttyy ohjelman ollessa
käynnissä, varoitusvalo alkaa vilkkua ja
kone pysähtyy. Tyhjennä vesisäiliön vesi ja
paina Käynnistys/Tauko/Peruutus-painiketta
käynnistääksesi ohjelman. Varoitusvalo
sammuu ja kone käynnistyy uudelleen.
FI
45
Page 46

Suodatinlokeron puhdistaminen
Varoitusvalo syttyy määrätyin väliajoin
muistuttamaan, että suodatinlokero on
puhdistettava.
Täyttöluukku avoinna
Tämä varoitusvalo syttyy, kun kuivaajan
täyttöluukku on auki.
Aikaviive
Aikaviivetoiminnolla ohjelman käynnistymistä
voi viivästyttää enintään 24 tuntia.
1. Avaa lastausluukku ja laita pyykki
sisään.
2. Aseta kuivausohjelma, linkousnopeus ja
tarvittaessa lisätoiminnot.
3. Paina Aikaviivepainiketta + ja - halutun
ajan valitsemiseksi. Aikaviivevalo alkaa
vilkkua.
4. Paina Käynnistys/Tauko/Peruutuspainiketta. Aikaviiveen laskenta alkaa.
Aikaviivevalo syttyy. Käynnistysvalo
syttyy. Aikaviiveen näytön ”:” -merkki
näytetyn aikaviiveen keskellä alkaa
vilkkua.
Aikaviiveen aikana pyykkiä voi lisätä
C
/ ottaa pois. Aikaviiveen laskennan
lopussa aikaviivevalo himmenee,
kuivaus alkaa ja ohjelman kesto
tulee näkyviin. Näytössä oleva aika
on normaali kuivausaika ja viiveaika
yhteensä.
Aikaviive on esimerkkikuvassa käynnistetty
painamalla Käynnistys/Tauko/Peruutus-
painiketta.
Viiveajan muuttaminen
Jos haluat muuttaa viiveaikaa laskennan
aikana:
1. Paina ”Käynnistys/Tauko/Peruutus”-
painiketta 3 sekunnin ajan
ohjelman peruuttamiseksi. Toista
Aikaviivetoimenpide halutun ajan
valitsemiseksi.
2. Aseta haluttu viiveaika painamalla
Aikaviivepainikkeita + ja -. Aikaviivevalo
alkaa vilkkua.
3. Paina Käynnistys/Tauko/Peruutuspainiketta. Aikaviiveen laskenta
alkaa. Aikaviivevalo syttyy. Taukovalo
himmenee. Käynnistysvalo syttyy.
4. Aikaviiveen näytön ”:” -merkki näytetyn
aikaviiveen keskellä alkaa vilkkua.
Aikaviiveen peruuttaminen
Jos haluat peruuttaa aikaviiveen laskennan
aikana ja käynnistää ohjelman heti:
1. Paina ”Käynnistys/Tauko/Peruutus”-
painiketta 3 sekunnin ajan ohjelman
peruuttamiseksi.
2. Paina "Käynnistys/Tauko/Peruutus"-
painiketta käynnistääksesi aiemmin
valitun ohjelman.
Ohjelman käynnistäminen
Käynnistä ohjelma painamalla "Käynnistys/
Tauko/Peruutus"-painiketta.
Käynnistys/Tauko/Peruutus-painike syttyy
palamaan ohjelman käynnistymisen merkiksi
ja ":" -symboli jäljellä olevan ajan välissä
jatkaa vilkkumista.
46
FI
Page 47

Ohjelman kulku
ajan lapsilukon ottamiseksi pois käytöstä.
Lukkokuvake tulee näyttöön, kun
C
lapsilukko on aktivoitu.
Kuivaus
Ohjelman kulku on esitetty näytössä tietyillä
symboleilla.
Kunkin ohjelmavaiheen alussa vastaava
symboli sarjassa symboleita syttyy, ja
ohjelman lopussa ne kaikki palavat. Näytön
oikeanpuoleinen symboli osoittaa käynnissä
olevaa toimenpidettä.
Kuivaaminen
Kuivaussymboli syttyy kaikissa ohjelmissa
lukuun ottamatta kuivausta tuuletusta.
Silitysvalmis
Syttyy, kun kuivuustaso saavuttaa
Silityskuiva-vaiheen.
Käyttövalmis
Syttyy, kun kuivuustaso saavuttaa
vaatekaappikuiva-vaiheen.
Ekstrakuiva
Syttyy, kun kuivuustaso saavuttaa
ekstravaatekaappikuiva-vaiheen.
Tuuletus
Tuuletussymboli syttyy, kun ohjelma päättyy.
Rypistymisen esto -kuvake syttyy
C
ohjelman lopussa, jos rypistymisen
estotoiminto on aktiivinen.
Vaatekaappi
(lisä)
Silitys
Rypistymisen
esto
Tuuletus
Lapsilukko
Laite on varustettu lapsilukolla, jotta
estetään nykyisen ohjelman kulun
häiritseminen jotain painiketta painamalla.
Kaikki painikkeet, lukuun ottamatta
ohjauspaneelin Päälle/pois-painiketta ovat
deaktivoituja, kun lapsilukko on aktiivinen.
Paina lapsilukon aktivoimiseksi Äänimerkkija Rypistymisen esto -painikkeita
samanaikaisesti kolmen (3) sekunnin ajan.
Jos haluat aloittaa uuden ohjelman edellisen
loputtua tai keskeyttää ohjelman, lapsilukko
on otettava pois käytöstä. Paina samoja
painikkeita uudelleen kolmen (3) sekunnin
Lapsilukko deaktivoidaan, kun laite
C
käynnistetään uudelleen painamalla
Päälle/pois-painiketta.
Kun lapsilukko on aktivoitu:
• Näyttökuvakkeet eivät muutu,
vaikka ohjelman valitsimen asentoa
muutetaan, kun kone on käynnissä tai
pysähtyneenä.
• Jos lapsilukko otetaan pois käytöstä
muuttamalla ohjelman valitsimen
asentoa koneen ollessa käynnissä,
kone pysähtyy ja uudet ohjelmatiedot
näytetään.
Ohjelman muuttaminen
ohjelman käynnistymisen
jälkeen
Voit muuttaa valittua ohjelmaa ja kuivata
pyykin eri ohjelmalla koneen käynnistämisen
jälkeen.
1. Pidä ”Käynnistys/Tauko/Peruutus”-
painiketta painettuna noin 3 sekunnin
ajan ohjelman peruuttamiseksi, jos
haluat valita Ekstrakuiva-ohjelman
Silityskuiva-ohjelman asemesta.
2. Valitse Ekstrakuiva-ohjelman Ohjelman
valitsimella.
3. Käynnistä ohjelma painamalla
"Käynnistys/Tauko/Peruutus"-
painiketta.
Voit valita uuden ohjelman myös
C
kääntämällä ohjelman valitsinta koneen
ollessa käynnissä. Silloin nykyisestä
ohjelmasta poistutaan ja uuden
ohjelman tiedot näkyvät näytössä.
47
FI
Page 48

Pyykin lisääminen/poistaminen
taukotilassa
Lisätäksesi tai poistaaksesi pyykkiä
ohjelman käynnistymisen jälkeen:
1. Paina Käynnistys/Tauko/Peruutus-
painiketta koneen kytkemiseksi Tauko-
tilaan. Kuivausprosessi keskeytyy.
2. Avaa täyttöluukku taukotilassa, lisää tai
poista pyykkiä ja sulje täyttöluukku.
3. Käynnistä ohjelma painamalla
"Käynnistys/Tauko/Peruutus"-
painiketta.
Kuivausprosessin alkamisen jälkeen
C
lisätty pyykki voi aiheuttaa koneessa
olevien jo kuivuneiden vaatteiden
sekoittumisen märkien vaatteiden
kanssa, jolloin tuloksena on märkä
pyykki kuivausprosessin jälkeen.
Voit toistaa pyykin lisäämisen
C
tai poistamisen niin usein kuin
haluat kuivauksen aikana. Tämä
kuitenkin pidentää ohjelma-aikaa ja
energiankulutusta, koska kuivaus
keskeytyy toistuvasti. Siksi on
suositeltavaa lisätä pyykkiä ennen
kuivausohjelman käynnistymistä.
Jos valitset uuden ohjelman
C
kääntämällä ohjelman valitsinta koneen
ollessa taukotilassa, nykyisestä
ohjelmasta poistutaan ja uuden
ohjelman tiedot näytetään.
Älä koske rummun sisäpintaa
lisätessäsi tai poistaessasi pyykkiä
ohjelman ollessa käynnissä. Rummun
pinnat ovat kuumat.
Ohjelman peruuttaminen
Pidä Käynnistys/Tauko/Peruutus-
painiketta painettuna noin 3 sekunnin
ajan ohjelman peruuttamiseksi, jos haluat
pysäyttää ohjelman mistä tahansa syystä
koneen käynnistyttyä. Nukkasuodattimen
puhdistus- ja Vesisäiliö-varoitussymbolit
syttyvät ja "Loppu"-merkintä tulee näyttöön
muistuttamaan tämän jakson loppumisesta.
Koska laitteen sisäosa on erittäin
A
kuuma, kun peruutat ohjelman
koneen ollessa käynnissä,
aktivoi tuuletusohjelma koneen
jäähdyttämiseksi.
Kone pysähtyy, jos käännät
C
ohjelmanvalitsinta koneen ollessa
käynnissä. Silloin nykyisestä ohjelmasta
poistutaan ja uuden ohjelman tiedot
näkyvät näytössä.
Ohjelman päättyminen
Nukkasuodattimen puhdistus- ja Vesisäiliö-
varoitussymbolit syttyvät ja "Loppu"-
merkintä tulee näyttöön Ohjelman kulun
ilmaisimeen, kun ohjelma päättyy. Luukku
voidaan avata ja kone on valmis toiseen
jaksoon.
Paina Päälle/pois-painiketta, jolloin
pesukone sammuu.
48
FI
Page 49

Jos rypistymisen estotoiminto on
C
aktiivinen eikä pyykkiä oteta koneesta
ohjelman päätyttyä, 2-tuntinen
Rypistymisen esto-ohjelma aktivoidaan.
Puhdista nukkasuodatin jokaisen
C
kuivauskerran jälkeen. (Nukkasuodatin /
täyttöluukun sisäpinta)
Tyhjennä vesisäiliö jokaisen
C
kuivauskerran jälkeen. (Katso kohta
Vesisäiliö)
49
FI
Page 50

5 Huolto ja puhdistus
Laitteen käyttöikä pitenee ja usein esiintyvät
ongelmat vähenevät, jos laite puhdistetaan
säännöllisin väliajoin.
Laite on irrotettava virransyötöstä
B
kunnossapidon ja puhdistustöiden ajaksi
(ohjauspaneeli, runko jne.).
Nukkasuodatin / täyttöluukun
sisäpinta
Pyykistä kuivausjakson aikana ilmaan
vapautunut nukka ja kuidut kerätään
nukkasuodattimeen.
Puhdista täyttöluukun ja luukun
C
tiivisteen sisäpinta kokonaan.
*Käytössä ja pesussa muodostuu
C
yleensä kuituja ja nukkaa.
Puhdista nukkasuodatin ja täyttöluukun
A
sisäpuoli jokaisen kuivauskerran jälkeen.
Voit puhdistaa nukkasuodattimen
C
kotelon pölyimurilla.
Nukkasuodattimen puhdistaminen:
1. Avaa täyttöluukku.
2. Poista nukkasuodatin vetämällä se ylös
ja avaa nukkasuodatin.
3. Puhdista nukka, kuidut ja purkaantunut
puuvilla käsin tai pehmeällä liinalla.
4. Sulje nukkasuodatin ja aseta se takaisin
paikalleen.
Nukkasuodattimen huokosiin voi koneen
C
tietyn käyttöajan jälkeen kertyä kerros,
joka saattaa tukkia nukkasuodattimen.
Pese nukkasuodatin lämpimällä vedellä,
jotta nukkasuodattimen pinnalle kertyvä
kerros saadaan poistettua. Kuivaa
nukkasuodatin kunnolla ennen sen
asettamista takaisin paikoilleen.
50
Tunnistimien puhdistaminen
FI
Page 51

Koneessa on kosteustunnistimia, jotka
havaitsevat milloin pyykki on kuivaa.
Tunnistimien puhdistaminen:
1. Avaa kuivaajan täyttöluukku.
2. Anna koneen jäähtyä jos se on vielä
kuuma kuivausjakson jäljiltä.
3. Pyyhi tunnistimien metallipinnat etikalla
kostutetulla pehmeällä liinalla ja kuivaa
ne.
Puhdista tunnistimien metallipinnat 4
C
kertaa vuodessa.
Älä käytä metallisia työkaluja, kun
C
puhdistat tunnistimien metallipinnat.
Älä käytä puhdistukseen liuottimia,
A
puhdistusaineita tai vastaavia aineita,
sillä nämä saattavat aiheuttaa tulipalon
ja räjähdyksen!
Vesisäiliön tyhjentäminen
Pyykin kosteus poistuu ja tiivistyy
kuivausjakson aikana, ja siitä syntyvä vesi
kertyy vesisäiliöön. Tyhjennä vesisäiliö
jokaisen kuivausjakson jälkeen.
Kondenssivesi ei ole juotavaa!
A
Älä koskaan irrota vesisäiliötä ohjelman
A
ollessa käynnissä!
Jos unohdat tyhjentää vesisäiliön, kone
pysähtyy seuraavan kuivauskerran
aikana, kun säiliö on täynnä ja Vesisäiliö-
varoitusvalo palaa. Jos näin tapahtuu,
palauta kuivausjakso painalla Käynnistys/
Tauko/Peruutus-painiketta, kun vesisäiliö on
tyhjennetty.
Vesisäiliön tyhjennys:
1. Vedä lokerosta ja irrota vesisäiliö
varovasti.
2. Tyhjennä vesisäiliöstä vesi.
3. Jos vesisäiliön suppilossa on
nukkajäämiä, puhdista se juoksevan
veden alla.
4. Aseta vesisäiliö paikalleen.
Suodatinlokeron
puhdistaminen
Nukka ja kuidut, jotka eivät ole
jääneet nukkasuodattimeen, jäävät
suodatinlokeroon suojalevyn taakse.
Suodatinlokeron puhdistaminen
-varoitusvalo syttyy ajoittain enintään 5
kuivausjakson jälkeen muistuttamaan
puhdistuksesta.
Lokerossa on kaksitasoinen suodatin.
Suodattimen ensimmäinen vaihe on
suodatinlokeron sieni ja toinen vaihe on
suodatinkangas.
Suodatinlokeron puhdistaminen:
1. Avaa suojalevy painamalla
suojalevypainiketta.
51
FI
Page 52

2. Irrota suodatinlokeron suojus
kääntämällä sitä nuolen suuntaan.
3. Vedä suodatinlokero irti.
4. Avaa suodatinlokero painamalla
punaista painiketta.
6. Puhdista nukka, kuidut ja purkaantunut
puuvilla suodattimesta käsin tai
pehmeällä liinalla.
When you notice a layer that may lead
C
clogging on filter cloth, please clean
the layer by washing in warm water.
Let the filter cloth dry thoroughly before
installing back the filter drawer.
7. Hand-wash the filter drawer’s sponge to
remove hair and lint on it. Squeeze the
sponge by hand to remove excessive
water.
Sientä ei tarvitse puhdistaa, jos nukkaa
C
ja kuituja ei ole merkittävästi kertynyt.
8. Aseta sieni takaisin paikoilleen.
5. Vedä suodatinlokeron sieni irti.
9. Sulje suodatinlokero punaisen
painikkeen lukitsemiseksi.
FI
52
Page 53

10. Aseta suodatinlokero paikoilleen, käännä
suodatinlokeron suojusta myötäpäivään
ja varmista että se menee kunnolla kiinni.
Haihduttimen puhdistaminen
Puhdista suodatinlokeron takana olevan
haihduttimen ripoihin kertynyt nukka
pölynimurilla.
11. Sulje suojalevyn kansi.
Kuivaaminen ilman suodatinlokeron
C
sientä vahingoittaa laitetta!
Likainen nukkasuodatin ja suodatinlokero
C
pidentävät kuivausaikoja ja nostavat
energiankulutusta.
Nukkasuodattimen huokosiin voi
C
kertyä kerros, joka saattaa tukkia
nukkasuodattimen, kun konetta
on käytetty jonkin aikaa. Pese
nukkasuodatin lämpimällä vedellä, jotta
nukkasuodattimen pinnalle kertyvä
kerros saadaan poistettua. Kuivaa
nukkasuodatin kunnolla ennen sen
käyttämistä.
Voit puhdistaa rivat myös käsin, jos
C
käytät suojakäsineitä. Älä puhdista
ripoja paljain käsin.
53
FI
Page 54

6 Vianetsintä
Kuivatus vie liikaa aikaa
• Nukkasuodattimen huokoset ovat tukkeutuneet. >>> Pese nukkasuodatin lämpimällä
vedellä.
• Suodatinlokero on tukkeutunut. >>> Puhdista suodatinlokeron sieni ja
suodatinkangas.
• Koneen etuosan tuuletusritilät ovat tukkeutuneet. >>> Poista tuuletinritilän edestä
tuuletuksen estävät esteet (jos on).
• Tuuletus ei ole riittävä, silla tila johon kone on asennettu on hyvin pieni. >>> Avaa tilan
ovi ja ikkuna, jotta huonelämpötila ei nouse liikaa.
• Kosteustunnistimeen on kertynyt kalkkijäämiä. >>> Puhdista kosteustunnistin.
• Pyykkiä on laitettu liikaa. >>> Älä täytä konetta liian täyteen.
• Pyykki ei linkoudu tarpeeksi. >>> Linkoa pyykkiä suurimmalla nopeudella pestessäsi
sitä.
Pyykki on märkää kuivatuksen jälkeen.
Kuumat vaatteet tuntuvat kuivaamisen jälkeen kosteammilta kuin niiden todellinen
C
kosteustaso.
• On mahdollista, että valittu ohjelma ei ole sopinut pyykkityypille.>>> Valitse tekstiilien
pesumerkintöjen mukaan pyykkityypille sopiva ohjelma tai käytä lisäksi ajastinohjelmia.
• Nukkasuodattimen huokoset ovat tukkeutuneet. >>> Pese nukkasuodatin lämpimällä
vedellä.
• Suodatinlokero on tukkeutunut. >>> Puhdista suodatinlokeron sieni ja
suodatinkangas.
• Pyykkiä on laitettu liikaa. >>> Älä täytä konetta liian täyteen.
• Pyykki ei linkoudu tarpeeksi. >>> Linkoa pyykkiä suurimmalla nopeudella pestessäsi
sitä.
Pyykinkuivaaja ei kytkeydy päälle tai ohjelma ei käynnisty. Pyykinkuivaaja ei aktivoidu
asetusten jälkeen.
• Laitetta ei ole ehkä kytketty verkkovirtaan.>>> Varmista, että laite on kytketty
sähköverkkoon.
• Täyttöluukku on raollaan. >>> Varmista, että täyttöluukku on kunnolla kiinni.
• Ohjelmaa ei ole valittu tai Käynnistys/Tauko/Peruutus-painiketta ei ole painettu. >>>
Varmista, että ohjelma on valittu, ja ettei laite ole Tauko-tilassa.
• Lapsilukko on aktivoitu. >>> Ota lapsilukko pois päältä.
Ohjelma keskeytyy ilman syytä.
• Täyttöluukku on raollaan. >>> Varmista, että täyttöluukku on kunnolla kiinni.
• Sähkökatkos. >>> Käynnistä ohjelma painamalla "Käynnistys/Tauko/Peruutus"-
painiketta.
• Vesisäiliö on täynnä. >>> Tyhjennä vesisäiliö.
Pyykki on kutistunut, nukkaantunut tai vaurioitunut.
• On ehkä käytetty pyykille sopimatonta ohjelmaa. >>> Tarkista vaatteen pesumerkinnät
ja valitse tekstiilityypille soveltuva ohjelma.
54
FI
Page 55

Rummun valo ei syty. (malleissa, joissa on valo)
• Kuivaajaa ei ole kytketty päälle Päälle/pois-painikkeella. >>> Varmista, että
pyykinkuivaaja päällä.
• Lamppu on viallinen. >>> Pyydä valtuutettua huoltoa vaihtamaan lamppu.
Loppu/Rypistymisen esto -valo palaa.
• Rypistymisen esto-ohjelma on aktivoitu, jotta estetään koneeseen jääneen pyykin
rypistyminen. >>> Sammuta pyykinkuivaaja, ja ota pyykki pois.
Loppu-symboli palaa.
• Ohjelma on päättynyt. Sammuta pyykinkuivaaja, ja ota pyykki pois.
Nukkasuodattimen puhdistus -valo palaa.
• Nukkasuodatinta ei ole puhdistettu. >>> Puhdista nukkasuodatin.
Nukkasuodattimen puhdistus -valo vilkkuu.
• Suodatinlokero on tukkeutunut nukasta. >>> Puhdista nukkasuodattimen kotelo.
• Nukkasuodattimen huokosiin on kertynyt kertymiä, jotka saattavat aiheuttaa
tukkeutumisen. >>> Pese nukkasuodatin lämpimällä vedellä.
• Suodatinlokero on tukkeutunut. >>> Puhdista suodatinlokeron sieni ja
suodatinkangas.
Vettä vuotaa täyttöluukusta.
• Nukkaa on kertynyt täyttöluukun sisäpinnoille ja täyttöluukun tiivisteen pinnoille. >>>
Puhdista täyttöluukun sisäpinnat ja täyttöluukun tiivisteen pinnat.
Täyttöluukku avautuu itsekseen.
• Täyttöluukku on raollaan. >>> Sulje täyttöluukku työntämällä kunnes kuulet
lukitusäänen.
Vesisäiliö-varoitusvalo palaa/vilkkuu.
• Vesisäiliö on täynnä. >>> Tyhjennä vesisäiliö.
• Vedentyhjennysletku on taipunut. >>> Jos laite on liitetty suoraan viemäriin, tarkista
vedentyhjennysletku.
Suodatinlokeron puhdistuksen varoitusvalo vilkkuu.
• Suodatinlokeroa ei ole puhdistettu. >>> Puhdista suodatinlokeron sieni ja
suodatinkangas.
Jollet pysty poistamaan ongelmaa, vaikka noudatat tämän osan ohjeita, ota yhteyttä
A
jälleenmyyjään tai valtuutettuun huoltoedustajaan. Älä yritä korjata toimimatonta laitetta
itse.
FI
55
Page 56

Takuu
Annamme Blomberg tuotteille kahden (2) vuoden valmistus- ja materiaalivirhetakuun.
Takuun voimassaolo alkaa ostokuitin tai toimitusvahvistuksen päivämäärästä. Takuu kattaa
korjauskulut ja varaosat. Huollon yhteydessä tulee esittää ostokuitti.
Blomberg keskushuoltona Suomessa toimii:
Miro Oy
Kangaspellontie 3
00350 Helsinki
Puh. (09) 587 7109
Takuu ei ole voimassa jos:
• kyseessä on vaurio, joka johtuu muusta kuin valmistus- tai materiaalivirheestä.
• korjauksen on suorittanut muu kuin valtuutettu huoltoliike.
• käyttö- ja turvaohjeita ei ole noudatettu.
• asennusohjeita ei ole noudatettu.
Kuljetusvauriot
Mahdollisista kuljetusvaurioista tulee ilmoittaa 24 tunnin sisällä toimituksesta. Tämän
jälkeen vastuu vaurioista siirtyy ostajalle. Jälleenmyyjän kuljetuksessa aiheutunut vaurio on
jälleenmyyjän ja kuluttajan välinen asia. Jos kuluttaja järjestää kuljetuksen itse, vastaa hän
myös mahdollisista kuljetusvaurioista.
Huolto
Jos valtuutettu huoltoliike toteaa, että tuotteen toimimattomuus johtuu käyttäjän
huolimattomuudesta tai ohjeiden noudattamatta jättämisestä, veloittaa huoltoliike
korjauksesta. Takuu koskee AINOASTAAN valmistusvirheitä.
Yrityskäyttö
Jos tuotteita käytetään yrityskäytössä (muussa kuin kotitalouskäytössä, esim. ravintolassa,
tms.) tai niitä käytetään vuokraustoiminnassa tai muussa käytössä jossa tuotetta käyttävät
useat kotitaloudet, takuu EI ole voimassa.
FI
56
 Loading...