

Page 1
Page 2
Please read first!
Dear customer,
With the purchase of this appliance, which
is offering a load capacity of up to 6 kg,
you have made a decision for up-to-date
dryer technology – high quality, long service life, high reliability and an optimum in
operating convenience.
•At first, please check if the appliance
was received undamaged.
• If a transport damage is noticed, notify
your supplier immediately; do not operate the appliance!
These operating instructions...
…are intended to help you operate this
appliance quickly and safely.
•Read the instructions – before installation and initial operation of this appliance.
•Pay special attention to the safety information.
•Keep the instructions for future reference.
•If you sell this appliance pass on the
instructions to the new owner.
Explanatory note on symbols
Throughout these instructions the following symbols are used:
High voltage! Risk of electric shock!
Risk of other personal injury or property damage.
Important information or useful advise.
CONTENTS
Machine Overview ..............................2
Safety First...........................................3
Disposal ...............................................3
Installation...........................................3
The proper location ..........................3
Built-under installation...................... 4
Washer/dryer combination ...............4
Levelling...........................................4
Changing hinge position ..................4
Drain hose connection......................4
Electrical connection.........................5
The first time ....................................5
Before Drying ......................................5
What can be dried............................5
What must not be dried....................6
The right amount .............................6
The door ..........................................6
Programmes ........................................6
Programme selector..........................6
Standard programmes......................6
Special programmes ........................7
Timed programmes .........................7
Optional Functions..............................8
Buzzer mute ....................................8
Child-proof lock................................8
Time delay ..........................................8
Aborting a time-delay .......................9
Programme progress indicator...........9
Indicator lamp.....................................9
After drying.........................................10
Fluff filter ..........................................10
Condensed water container ..............10
Condenser.........................................10
Drum ribs .........................................11
AT A GLANCE ......................................12
Preparation and start ........................12
Changing the programme................12
Aborting a programme.....................12
Adding more laundry........................12
Laundry final drying..........................12
Programme end ...............................12
Programme table ................................13
Trouble Shooting ................................14
Technical Specifications /
Energy Consumption ..........................15
1
Page 3

Machine Overview
Rating label
Programme selector
Start/Pause/Cancel button
Control panel
Programme progress indicator
Indicator lamps
Display
Time delay buttons
Power cable
On/Off button
Buzzer cancel button
Fluff filter
(inside the door)
Levelling feet
2
Water drain connector
Page 4

Safety First
Intended use
• This appliance shall only be used for
drying and airing of clothing labelled
suitable for tumble drying.
• The care information in the clothing
must be followed.
• This appliance is not intended for
commercial use.
Safety information
• This appliance must be connected to a
properly installed earthed outlet, protected by a fuse of adequate capacity.
Do not operate the appliance if the
power cable or power cable plug are
damaged or the appliance shows any
other faults! Risk of electric shock!
• Never touch the power cable plug
with wet hands! Never pull on the cable to unplug, always pull on the plug
only.
Operate appliance only in well ventilated, low dust rooms. Do not block or
cover the appliance's vent slots.
Do not reach into the drum while the
appliance is heating up. Risk of scalding by the hot and moist textiles!
• Keep children away from the appliance! Electric appliances are no toys.
Textiles treated with cleaning materials or having been dry cleaned must
not be dried in the appliance afterwards. The vapors generated may
cause a risk of fire or explosion, poisoning hazard or damage to the appliance!
• Periodically clean all important parts
of the appliance (see “After drying…”). Operating safety, drying time
and energy consumption depend on
such periodical cleaning.
• In case of malfunctions which cannot
be rectified by the information contained in this manual:
Turn appliance OFF, unplug, notify
the customer service.
Never attempt to repair the appliance
yourself! You could endanger your
own life and the life of other users!
Only authorised electricians, such as
our service technicians, are permitted
to repair electric appliances.
Disposal
Where to leave the packaging?
The plastic wrapping must not get into the hands of children! Risk of suffocation!
The packaging is made of materials which
can be recycled.
• Separate the packing material by type:
– Styropor
ping go to a valuable substance collection point;
– battens go into bulky refuse.
The packaging is not to be disposed of
in the regular household refuse!
®
parts and plastic wrap-
What to do with the old appliance?
Dispose of your old appliance in an environmentally friendly manner.
• Ask you dealer or your local refuse collection service how to best dispose of
your old appliance.
Before giving the appliance into bulky
refuse, disconnect it from the mains,
cut off the power cable and disable
the door lock – so children will not be
endangered.
Installation
The proper location
For drying the appliance requires a sufficient supply of clean, cool room air.
Operate the appliance only in well
ventilated, low dust rooms. Do not
block or cover the appliance's vent
slots.
Do not operate appliance in locations
where there is a danger of freezing.
Some parts contain water and may be
damaged by frost.
3
Page 5
The floor must have a sufficient loadbearing capacity! If, for example, you
are stacking a washer and the dryer,
this combination can – when loaded –
reach a total weight of 160 kg.
Important:
• Place appliance on an even an level
floor only.
• Do not stand appliance on the power
cable.
• Keep at least 1 cm distance to walls or
other furniture.
Built-under installation
This appliance can be installed under a
worktop.
•
For this a special top cover is required
(stock no. AP 2000), available at the
customer service or specialised trade.
Only authorised specialists are permitted to carry out a built-under installation. Risk of electric shock!
Washer/dryer combination
This appliance can be put on top of any of
our washing machines.
• A special stacking kit is required (stock
no. MBS2000), available at the customer service or specialised trade.
Drain hose connection
The water arising from drying (“condensed water”) is normally collected in the
condensed water container, which needs
to be emptied after every drying cycle.
• The condensed water can also be
drained permanently by means of the
drain hose supplied into a siphon trap
or any other drain.
In that case the condensed water container needs no longer to be drained –
nevertheless the >Reservoir full <
indicator will light at the end of each
drying cycle.
Important:
• In order for the water to run off observe the maximum hose length and
highest point above the floor (see
“Technical Specifications”)!
• Ensure that there are no sharp bends
in the hose!
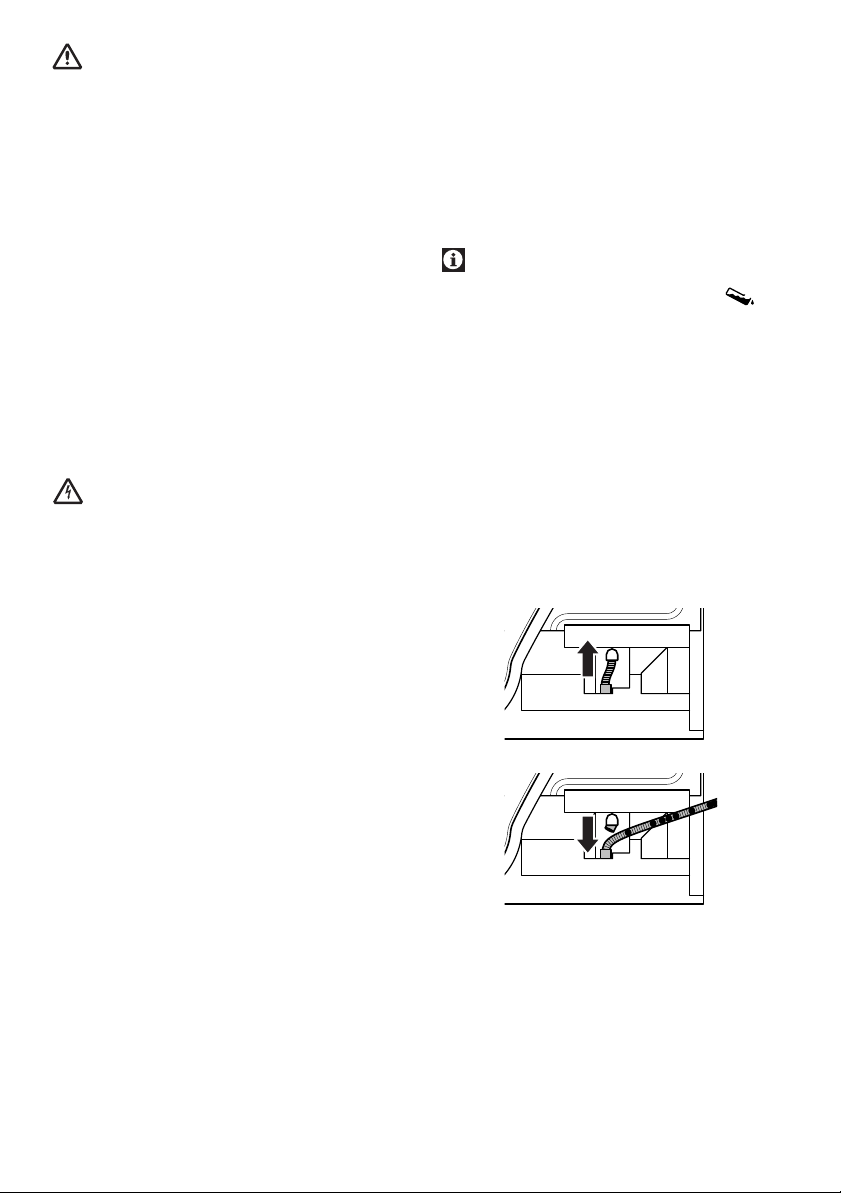
Here's how to proceed:
1. At the water drain connector, pull the
hose up from inside the appliance by
hand. Do not use pliers!
Levelling
• Adjust feet until the appliance is level
and does not rock. Checking with a
spirit level is recommended.
Important:
• Adjust by the feet only, do not use
wooden wedges or similar. Never remove the feet!
Changing hinge position
If you wish to open the door to the other
side, you can have the hinge position
changed from left hand to right hand or
vice versa by our customer service.
2. Push the drain hose firmly on the water drain connector.
3. Run the drain hose to the waste outlet
of a washbasin and connect it.
4. If the drain hose is hung to the edge of
a washbasin or bathtub, secure it
against slipping off.
4
Page 6
Electrical connection
Connect the appliance to a properly installed earthed outlet, protected by a fuse
of adequate capacity.
Important:
• The connection must conform to the
applicable regulations in your country
and of your local Electricity Board.
• The power cable plug must be accessible after installation.
• For a firmly fixed connection a master
switch with at least 3 mm contact
clearance must be used.
• Voltage and fuse rating of the appliance is stated on the rating label (on
the rear panel and behind the door).
Note down the appliance's model and
identification number from the rating label, in case you need help from
customer service.
• The stated voltage must match with
your mains voltage.
• Connection by extension cables or trailing sockets is not permitted.
• When connecting to the mains, the
programme selector must be set to
Stop.
A damaged power cable must be replaced by an authorised qualified electrician. Until the appliance has been
repaired it must not be operated! Risk
of electric shock!
The first time
• To remove any possible residue from
production wipe out the drum with a
moist cloth before the first drying cycle
• During the first drying cycle there may
be an annoyance caused by bad smell.
• Check to see if any water emerges
from the appliance during the drying
cycle. If necessary, push the drain hose
on more tightly.
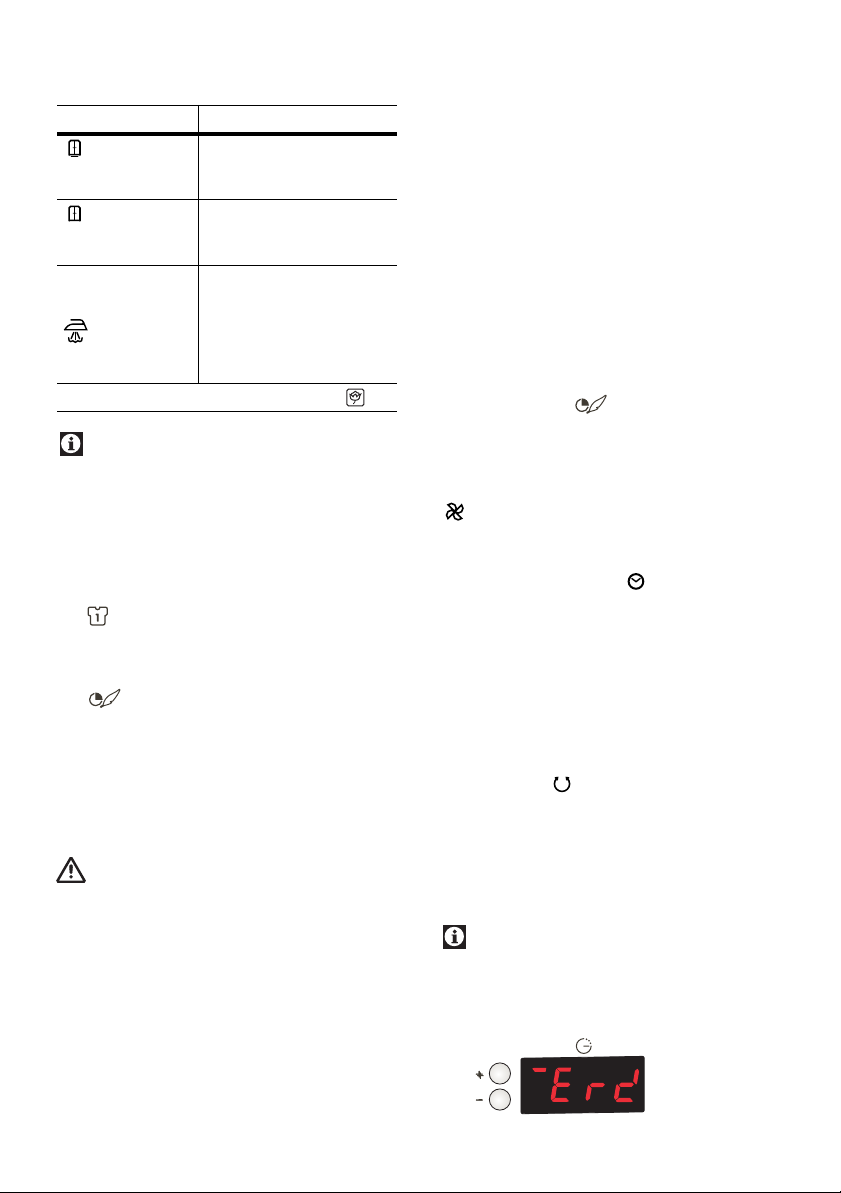
• The current of the appliance can be
set according to the electrical
infrastructure and fuse rating of your
area. To change the current from 16 A
to 10 A: Set the programme selector to
>One piece<. Press the buzzer cancel
button for 3 seconds. 16 will appear on
the display. Press - button, 10 will appear
on display, the appliance is set to 10 A.
To change the current from 10 A to 16 A:
Follow the same route, this time press + to
change it to 16 A.
Before Drying
What can be dried
•The laundry should be spin-dried as
much as possible – to the extent permissible for the respective fabric.
Always observe the care symbols
shown on the garment labels!
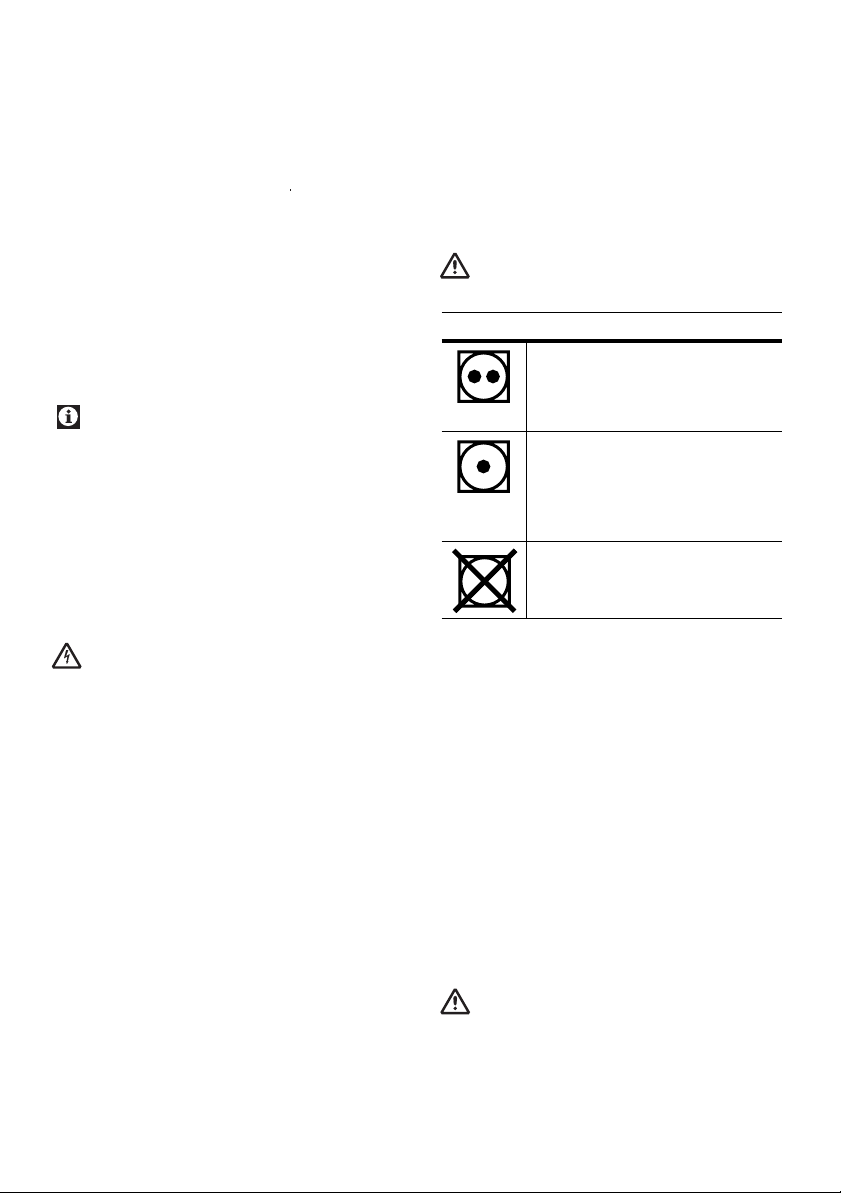
Care symbols for drying
Suitable for drying at high
temperature:
Hot wash / coloured cottons,
cotton, linen
Suitable for drying at re-
duced temperature:
Easy-care synthetics (polyester, polyamide); mixed fabrics
(with cotton)
Drying in dryer not possible:
Sensitive fabrics, curtains etc.
•Tumble dry only textiles labelled accordingly – and only with the appropriate drying programme.
•Only woollens suitable for machine
wash may be put in the dryer; the corresponding special programme will
not dry but nicely soften it.
•If possible load textiles of the same
kind; thin tea towels will dry much
quicker than thick bath towels.
• Remove metal parts (buckles, etc.) or
put textiles in a linen bag or similar.
• Empty pockets, remove all foreign objects (coins, pens, etc.). Close zippers,
hooks and eyes.
What must not be dried
Do not load dripping wet laundry in
the dryer. The dryer may be damaged,
and the energy consumption will be
excessively high.
– Sensitive fabrics (silk, curtains, etc.)
may crease.
5
Page 7

– Down filled textiles (pillows, duvets)
are not suitable.
– Air-tight (rubberized) textiles.
– Foam or rubber parts (shoulder pads
and the like) might deform and dam-
age laundry or appliance.
– Textiles that were treated with clean-
ers or dry-cleaned.
The vapors generated may cause a risk
of fire or explosion, poisoning hazard
or damage to the appliance!
The right amount
• The maximum load capacity depends
on the textile type and the corresponding drying programme.
Please note the information given in
the “Programme Table”! Overloading
the drum has an adverse effect on the
drying result.
Always try to utilise the maximum
load capacity.
The door
• To open, push the door.
• Put laundry loosely in the drum.
• Close the door; push against the door
until you hear the door lock engage.
Take care no textiles are caught by the
door.
Programmes
Programme selector
The programme selector can be turned either clockwise or counter-clockwise.
Pushing the On/Off button, the appliance is turned on; the programme,
however, will start only when the
>Start< button is pressed.
When changing to a different programme the programme must be
stopped first; in that case the >Start<
button must be pressed for 2 sec. in
order to cancel programme.
For detailed information about the individual drying programmes, refer to the "Programme table".
Always choose a programme suitable
for the textile type.
Observe the care symbols shown on
the garment labels!
The display will show the remaining time
during the programs.
Standard programmes
Depending on the textile type, several
standard programmes are available:
– Cottons:
Drying at high temperature.
– Easy-care:
Drying at reduced temperature.
6
Page 8
Each standard programme offers different
drying levels to be chosen.
Drying level Result
Extra dry* thick, multi-layer tex-
Linen cup-
board dry
Ironing dry requiring regular iron-
only for White/coloured cottons
*
Select drying level only as high as absolutely necessary. This will treat the
textiles with care and limits the energy
consumption.
tiles: dried ready for
the linen cupboard
regular textiles: dried
ready for the linen cupboard
ing
Special programmes
A number of special programmes are also
available:
–
One Piece
Drying at reduced temperature in 30 min.
up to 1.5 kg load, for all types of fabrics.
– Short Delicate Program
Extra gentle drying at an reduced tem-
perature and limited programme duration of approx. 20 minutes. Textiles
such as fine textiles, delicate underwear
and accessories like scarf can be dried
by this programme.
Tumble dry only textiles labelled
accordingly.
Textiles marked with P ( chemical cleaning)
or must be handwashed can be treated in
this programme by using special care
products. Cleaning respectively fluffing of
pulls, throusers, dresses, jackets, costumes,
etc. is achieved. The care products are
adapted for use for clothes in cotton, mixt
fibres, wool, silk and linen.
By using a sheet impregnated with a special
active solution, small stains can be removed
before to introduce the laundry piece into the
dryer. In case of bigger sized and already dry
or crusted stains the cleaning by professionals
is recommended.
The active solution sheet removes also bad
smellings during the program ( e.g. cigarette
smoke).
For extrem sensitive textiles the use of a laundry
bag is recommended.
Application:
1. Before fluffing in the dryer all small and fresh
stains must be removed.
2. Introduce 1 to 4 pieces into the drum or first
into the laundry bag.
3. Select on program selector the program
“Short Delicates”.
4. When program is finished, take laundry
pieces out from the drum or the laundry bag
and place them over a hanger to avoid creasing.
–
Fluff/Refresh:
For refreshing or airing, for all types of fabrics.
Timed programmes
For final drying or airing your washing several timed programmes are available.
– 60min, 40min, 20min, 10min
Drying at a reduced temperature; the
drying cycle will always end after the
chosen time has elapsed, irrespective
of the drying level.
Anti-crease
If the textiles cannot be removed from the
dryer after completion of the drying cycle,
this anti-creasing cycle will automatically start,
separate and smooth your drying to reduce
creasing.
Throughout this anti-crease stage the
drum rotates briefly every 4 minutes
for 2 hours; at the same time a buzzer
sounds. And display will show a bar
rotating during this stage.
7
Page 9

• If the buzzer sound is inconvenient, it
can be muted (see below).
There is no need to press the button
again for the next drying cycle, because the dryer remembers this setting.
• You may remove the textiles at any
time and end the programme.
Optional Functions
Buzzer Cancel
At programme end and throughout the
anti-crease stage (see above) a buzzer
sounds.
• If this is inconvenient to you, press this
button to mute the buzzer.
• There is no need to press the button
again for the next drying cycle, because the dryer remembers this setting.
Child-proof lock
With the child-proof lock the appliance
can be made child-proof.
This function can be set during the
programme or in non-usage and standby.
To activate the child-proof lock:
Press and hold both buttons indicated
by the arrows for approx. 5 seconds,
until the child lock indicator lights on.
To deactivate the child-proof lock:
Press and hold both buttons indicated
by the arrows for approx. 5 seconds,
until the child lock indicator is off.
Time delay
Using the delay-timer function the programme start can be delayed up to
19 hours.
As the appliance will then dry unattended – i.e. acting as heater – you
should prepare and set the dryer with
special care!
Here's how to proceed:
1. Check to see that
– the vent slots are not blocked,
– the fluff filter is cleaned,
– the vent tube is correctly fitted.
2. Load laundry and close the door.
3. Set programme selector.
4. Press the button on the left of the
display until the desired delay is reached.
(each press to + or - buttons will
increase or decrease the delay for
1 hour)
The child lock will deactivate all the
buttons exept the On/Off button.
5. Press the >Start< button.
If the delay-timer is activated the time
delay indicator on the right of the display
flashes.
8
Page 10
During the time-delay period more
laundry can be added.
After adding, the >Start< button must
be pressed again.
>Airing
– is illuminated during the 8 minute
<
cooling down stage or the programme >Fluff/Refresh < was chosen.
Aborting a time-delay
An active delay timer can be stopped at
any time:
Press the >Start< button for 2 seconds until
the time delay indicator is off.
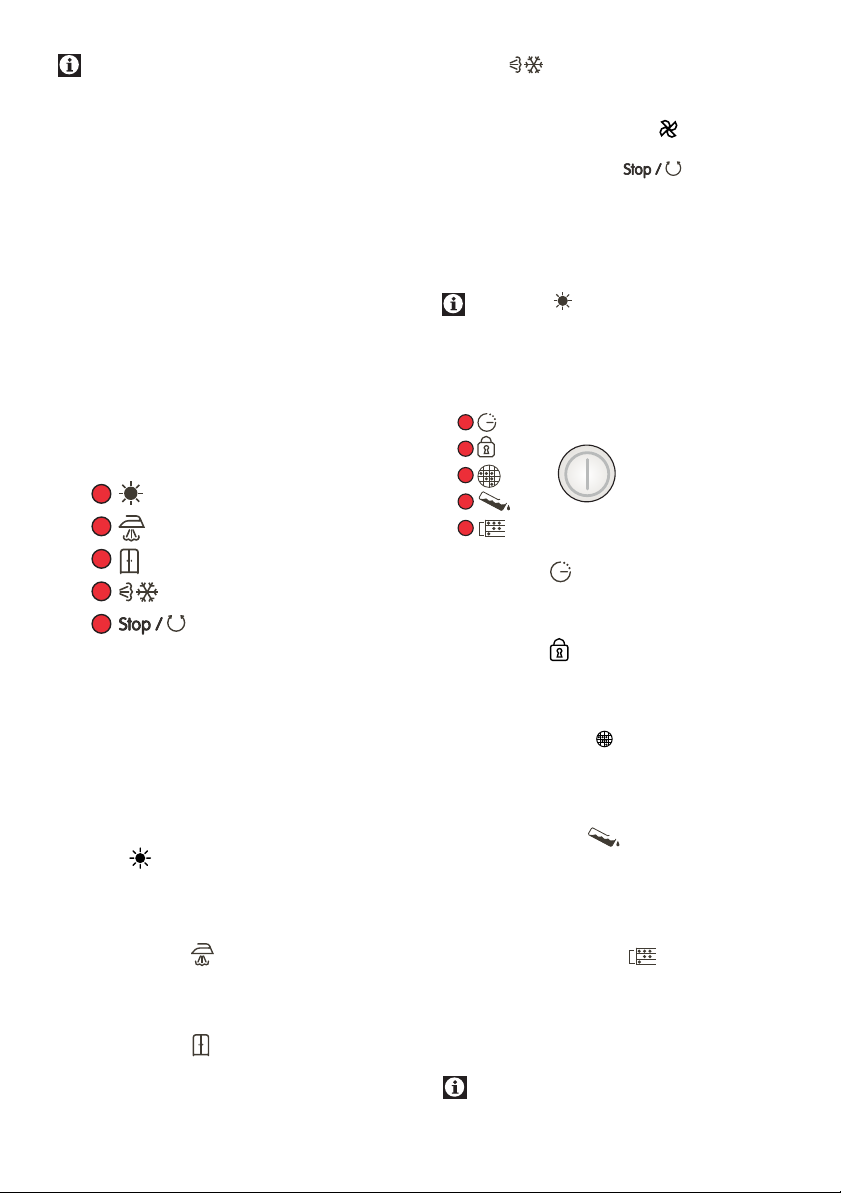
Programme progress
indicator
This row of indicators indicate the progress
of the running programme.
•When you set a programme and press
the start button, one of the indicators
will light indicating that the program
is started.
• When the programme is running, one
of the indicators is illuminated
indicating the current programme
stage:
>Drying <
– is illuminated during the actual heat-
ing phase of a drying programme.
>Stop/Anti-Creasing
– is illuminated when the programme
end is reached
flashes while the anti-crease stage is
active.
If Drying lamp indicator is
flashing a misoperation or fault has
occurred (see "Trouble shooting").
<
Indicator lamps
On/ Off
>Time delay <
–flashes when the time delay option is active.
>Child Lock <
– is illuminated when the child lock is
activated.
>Clean Fluff Filter <
– is illuminated at programme end to
remind you to clean the fluff filter (see
"Fluff filter").
>
Empty the tank
At the end of the program when the water tank
has to be emptied or when the drain hose is
connected.
<
>Ready to Iron <
– is illuminated when the clothes reached
Iron Dry level.
>Cupboard Dry <
– is illuminated when the clothes reached
Cupboard Dry level.
>
Clean the condenser
In regular intervals after about 20 program
runs (See also Air cooler)
If Clean Fluff Filter indicator is
flashing during the programme
see "Trouble shooting".
9
<
Page 11

After drying...
Fluff filter
Fluff balls are rubbed off by wearing the
clothes – not by drying. When drying,
these fluff balls are trapped in the fluff filter.
It is absolutely necessary to clean the
fluff filter after every drying cycle.
To clean the fluff filter:
1. Open the door.
2. Pull the fluff filter out of the door.
3. Carefully remove the fluff balls – by
hand or with a soft, dry cloth.
4. Insert fluff filter the right way round.
Condensed water container
When drying, water is separated from airstream of the moist laundry (“condensated”). This water is collected in the condensed water container.
The condensed water container needs
emptying
– after every drying cycle, or
– if during the drying cycle the >Res-
ervoir full < indicator flashes; in
that case the programme stops.
Do not pull the condensed water container out while the programme is
running.
The condensed water can also be
drained permanently by means of the
drain hose supplied into a siphon trap
or any other drain (see “Drain hose
connection”).
Emptying the condensed water container:
1. Pull condensed water container carefully out off the fascia; hold the rear
with the other hand.
2. Open the condensed water container's
closure.
3. Pour the water out.
4. Remove any fluff balls from the closure, if present. Close the closure.
5. Slide the condensed water container
fully in.
Condensed water is no drinking water! However, after filtering (through a
coffee filter) it can be used in a steam
ironer or air humidifier.
Condenser
In the air cooler (“Condenser”) the moist,
warm air stream is cooled by drawn-in
cold room air, causing the water to separate.
The condenser shall be cleaned
– after approx. 20 drying cycles, or
– twice a month.
10
Page 12
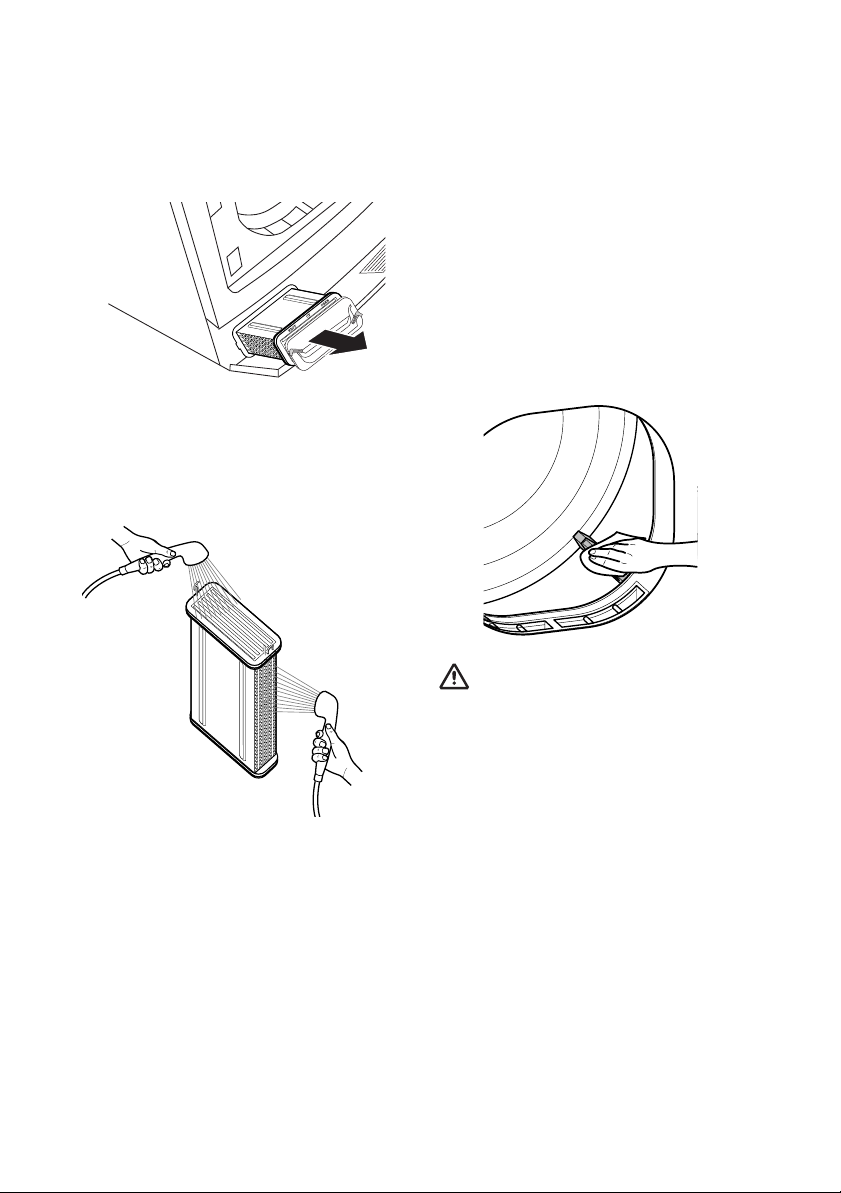
To clean the condenser:
1. Open the door. Wait for the appliance
to cool down.
2. Open service door latch.
The service door will open. Then turn
the locking level .
3. Pull the condenser out at the handle.
4. Rinse condenser – vertically and hori-
zontally – thoroughly under running
water. Let water drain thoroughly.
Drum ribs
At the rips on the inside of the drum are
moisture sensors, signalling to the appliance when the textiles are dry.
Clean drum ribs
– after approx. 50 drying cycles, or
– four times a year.
To clean the drum ribs:
1. Open the door. Wait for the appliance
to cool down.
2. Wipe all drum ribs with a soft cloth
moistened with vinegar. Wipe dry with
a soft cloth.
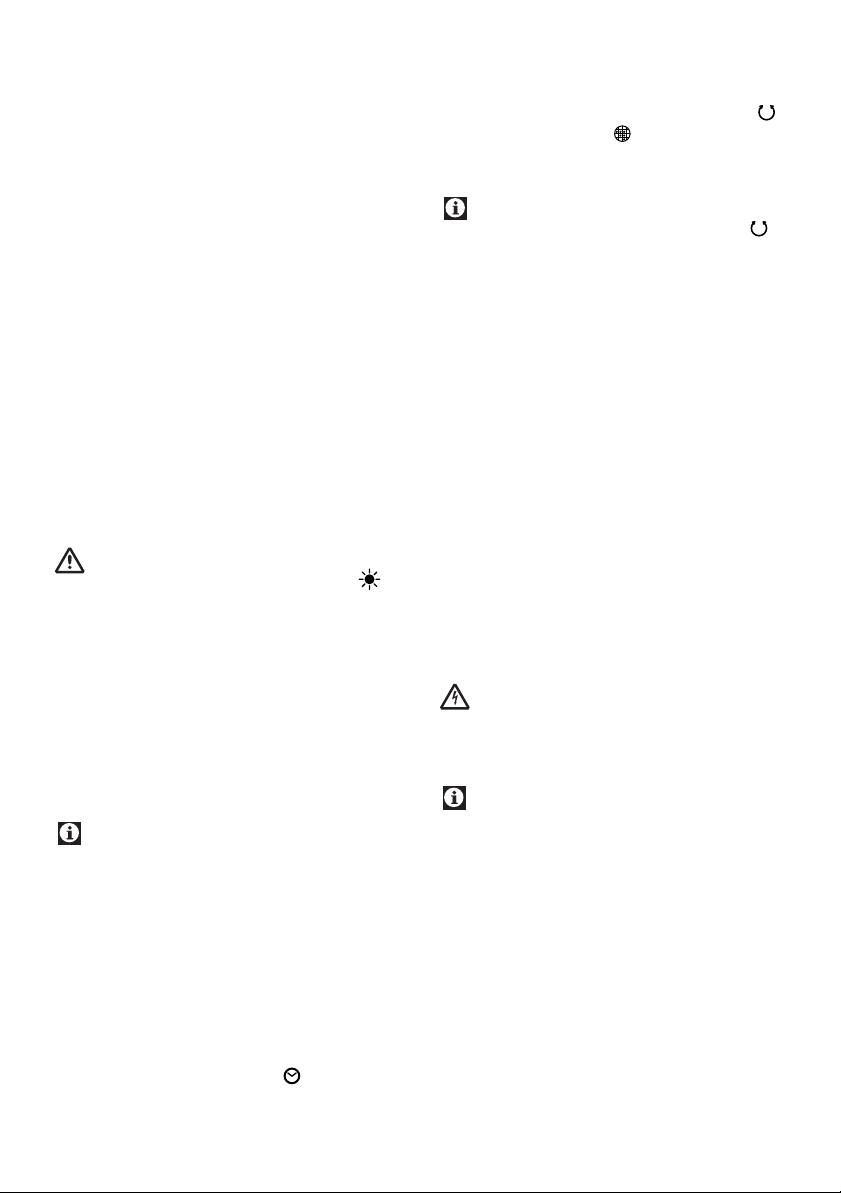
5. Push condenser – with the lettering
embossed at the edge facing up – fully in, then fix the locking level.
6. Close the service door.
Do not use solvents, naphtha or similar! Fire or explosion hazard!
11
Page 13
AT A GLANCE
Preparation and start
1. Put laundry in the drum and close the
door.
2. Turn the appliance on by pressing
On/Off button
3. Set the programme selector.
4. If desired set delay timer
5. Press the >Start< button.
Changing the programme
When changing to a different programme the running programme must
be stopped first.
To do so the >Start< button must
be pressed for 2 sec. in order to cancel
programme.
Programme end
The programme cycle has completed
when the indicators
and >Clean
1. Open door, remove laundry, check
2. Press »On/Off« button.
3.After every drying cycle :
4.After approx. 50 drying cycles or
fluff filter <
Throughout the anti-crease stage
the indicator
is on. The programme can then be
ended at any time.
drum for foreign objects.
– Clean the fluff filter (see "Fluff fil-
ter").
four times a year:
– Clean drum ribs (see "Drum ribs").
>Stop/Anti-Ceasing
are illuminated.
>
Stop/Anti-Ceasing <
<
Aborting a programme
Do not turn appliance off during the
heating phase (indicator >Drying <
is on). Risk of heat accumulation!
1. First stop the running proramme (press
the >Start< button for 2 seconds.
2. Set the programme selector to
>Fluff/Refresh<
3. Press the >Start< button.
4. Wait for the programme cycle to end.
Adding more laundry
This makes only sense at the beginning of a drying cycle, otherwise the
result will be a mixture of not quite
dry and too much dried textiles.
1. Press pause button.
2. Put laundry in the drum and close the
door.
3. Press the >Start< button.
Laundry final drying
1. Set the programme selector to one of
the timed programmes >60min<,
>40min<,
2. Press the >Start< button.
or >10min<>20min<
5. After approx. 20 drying cycles or twice
a month:
– Clean condenser.
6.When required :
– Clean housing and fascia using a
soft cloth and a mild soap; wipe dry
with a soft cloth.
Do not use scrubbers and scouring
powders! They will damage the plastic
parts and enamel.
When the door is opened during the
programme, the programme will be
paused automatically and the light on
the start button will flash. The start
button must be pressed again to
continue the programme.
12
Page 14

Programme table
Optional
function
Care symbol
White/coloured cottons
Long wearing cotton
and linen textiles
Easy-care
Synthetics (polyester,
polyamide); mixed fabrics (with cotton)
Special Pogrammes
Synthetics, cotton or
blended fabric
Delicates
"P" marked textiles
Laundry to be briefly as
aired above
Timed programmes
Laundry to be finished
dried, or small similar
textiles
Textile type
Programme
Extra dry 6.0
Linen cupboard dry
Ironing dry
Linen cupboard dry
Ironing dry
One piece
Short delicate
Fluff/Refresh
(20min)
60 min warm as
40 min warm
20 min warm
10 min warm
Maximum load (kg)
Anti-crease
3.0
1.5
1.0
1-4
pieces
above
Buzzer mute
Time delay
•
•
•
•
•
•
•
•
•
•
•
•
•
maximum 2 hours extra anti-crease stage after programme end
audible signal at programme end and during the Anti-crease stage
13
Page 15

Trouble Shooting
If you notice… check…
Appliance cannot be turned on or
programme will not start
Appliance does not react to input • Combination of optional functions not possible.
Indicator >clean fluff filter <
flashes during the programme
• Programme selected? Start< button pressed?
• Door properly closed?
• Power cable plug plugged in?
• Mains fuse has blown in your home.
• Child-proof lock activated?
• If fault persists: unplug, wait a few seconds before
plugging in again.
• Stop the programme
• Clean the fluff filter.
Indicator >Stop/ < flashes,
buzzer sounds (for 2h)
Indicator >Stop/ < ison,
buzzer sounds
Indicator >Clean fluff filter <
is on
Indicator >Tank Full< is on • Drain the tank and push the start button.
Programme stops without apparent reason
Drum interior light (depending
on model) does not work
Laundry too moist or drying time
too long
Textiles are shrunk, felted, damaged
Let us help you!
If you cannot solve the problem yourself contact our customer service. Have the model and
identification number as per rating label handy.
Anti-crease stage is active (duration 2 hours).
• Turn appliance off and take the laundry out.
Programme end reached.
• Turn appliance off and take the laundry out.
• Clean fluff filter.
• Door is opened? Press the >Start< button.
• Did a power failure occur? Press the>Start< button.
• Lamp faulty? Contact customer service.
• Drum overloaded? See "Programme table".
• Make sure of good ventilation. Check vent slots.
• Check vent tube and wall mount vent, if necessary.
• Clean fluff filter.
• Clean drum ribs.
• Finish dry with a suitable timed programme.
• Dry only textiles labelled suitable for tumble drying.
• Dry only with a programme suitable for the particular
textile type.
14
Page 16
Technical Specifications / Energy Consumption
Load capacity (dry weight)
–Cottons
–Synthetics
–Short Delicate
–One piece
max. 6.0 kg
max. 3.0 kg
max. 1.0 kg
max. 1.5 kg
Drying method Condenser, moisture controlled
Dimensions
–Height / height for built-under installation
–Width
–Depth / depth for built-under installation
–Depth with door open
–Height adjustment of feet
85.0 cm / 82.0 cm
59.5 cm
60 cm / 59 cm
106.5 cm
0.5 cm
Weight, unpacked approx. 42 kg
Electrical connection
–Voltage
–Connected load
–Fuse protection
230 V ~ 50 Hz
2800 W
16 A
Condenser water drain hose
–Diameter
–Length of drain tube
–Highest point drain hose
Consumption
1)
for spinning Energy Time
speed
–
Cottons linen cupboard dry
–
Cottons linen cupboard dry
–
Cottons ironing dry
–
Cottons ironing dry
–
Synthetics linen cupboard dry
1)
Standard values, determined under standard conditions. Depending on spin speed,
textile type and ambient conditions a deviation of up to 10% is possible.
2)
Test programme according to DIN EN 61121.
3)
Standard programme for energy identification label.
2)3)
2)
2)
1400 min
800 min
1400 min
800 min
1000 min
1 cm
maximum 140 cm
maximum 80 cm
-1
: 3.0 kWh 80 min
-1
: 4.05 kWh 120 min
-1
: 2.5 kWh 70 min
-1
: 3.5 kWh 110 min
-1
: 1.2 kWh 40 min
15
 Loading...