


HV-50
INSTALLATION - OPERATION - MAINTENANCE
BLODGETT OVEN COMPANY
www.blodgett.com
44 Lakeside Avenue, Burlington, Vermont 05401 USA Telephone: (802) 658-6600 Fax: (802) 864-0183
PN 52944 Rev K (8/14)
© 2014 - G.S. Blodgett Corporation

Your Service Agency’s Address:
Model
Serial number
Oven installed by
Installation checked by

IMPORTANT
TABLE OF CONTENTS
WARNING: Improper installation, adjustment, alternation,
service or maintenance can
cause property damage, injury or death. Read the instllation, operation and maintenance instructions thoroughly
before installing or servicing
this equipment.
FOR YOUR SAFETY
Do not store or use gasoline or
other ammable vapors or liquids in the vicinity of this or any
other appliance.
The information contained in this
manual is important for the proper installation, use, and maintenance of this oven. Adherence
to these procedures and instructions will result in satisfactory
baking results and long, trouble free service. Please read
this manual carefully and retain
it for future reference.
INSTALLATION
Oven Description ........................................................ 2
Utility Connections - Standards and Codes ................................. 3
Oven Location and Ventilation ............................................. 4
Oven Assembly to Stand .................................................. 5
Stacking ................................................................ 7
Plumbing Connections .................................................... 8
Electrical Connections .................................................... 9
OPERATION
Standard Control ........................................................ 10
MenuSelect™ Control ................................................... 12
SmartTouch Touchscreen Control ......................................... 17
MAINTENANCE
Spray Bottle Operating Procedure ........................................ 31
Cleaning and Preventive Maintenance .................................... 32
ERRORS: Descriptive, typographic or pictorial errors are
subject to correction. Specications are subject to change
without notice.

Installation
Oven Description
ABOUT THE HYDROVECTION
Blodgett Hydrovection ovens are quality produced using
high-grade stainless steel with rst class workmanship.
The multiple speed fan, which is guarded against acci-
dental nger contact, is driven by a quiet and powerful
motor. The condenser draws out excess moisture from
the appliance. Condensation and waste water, which result during hydro cooking and cleaning, are continuously
drained.
The use of high quality insulation impedes excessive heat
radiation and saves energy.
The Hydrovection has an 11” high stand for double stack
units and a 29” high stand for single ovens.
PLUMBING SPECIFICATIONS
WATER
Water pressure 30 PSI (207 kPa) minimum
50 PSI (345 kPa) maximum
Water connection 3/4” garden hose - Cold water only
Water pressure regulator setting Preset to 30 PSI (207 kPa)
Minimum requirements TDS: 40-125 ppm
Hardness: 35-100 ppm
Chlorides: <25 ppm
Silica: <13 ppm
Chlorine: 0 ppm
pH: 7.0-8.5
DRAINAGE
Drain type Atmospheric Vented Drain
Drain connection 1” NPT Male
Maximum water drain temperature 140ºF (60ºC)
The practical oven door, with viewing window, have a
wide swing radius and handle which can be operated easily, even with wet or greasy hands.
Ease of operation is guaranteed through the simple arrangement of the controls. Graphic symbols make the
appliance easy for even inexperienced kitchen staff to
operate. A third function, the Cool Down mode, allows the
oven cavity to cool down rapidly with the door opened.
Cleaning is kept to a minimum. The interior is sprayed
with a self-acting cleaning solution which interacts with
humidity to easily remove crusts and stains. The oven is
designed for easy care and is welded water tight so that
the internal cooking cavity may be rinsed with a hose after
the cleaning process.
ELECTRICAL RATINGS
VOLTAGE
208 60 13 1 62 — 62 3/4 HP, 208-240V, 3 phase, 2.6 amps
208 60 13 3 38 38 34 3/4 HP, 208-240V, 3 phase, 2.6 amps
240 60 13 1 53 — 53 3/4 HP, 208-240V, 3 phase, 2.6 amps
240 60 13 3 31 31 29 3/4 HP, 208-240V, 3 phase, 2.6 amps
HZ
KW
PHASE
MAX LOAD (AMPS)
L1 L2 L2
2
MOTOR
Installation
Utility Connections - Standards and Codes
THE INSTALLATION INSTRUCTIONS CONTAINED
HEREIN ARE FOR THE USE OF QUALIFIED INSTALLATION AND SERVICE PERSONNEL ONLY. INSTALLATION OR SERVICE BY OTHER THAN QUALIFIED
PERSONNEL MAY RESULT IN DAMAGE TO THE OVEN
AND/OR INJURY TO THE OPERATOR.
Qualied installation personnel are individuals, a rm,
a corporation, or a company which either in person or
through a representative are engaged in, and responsible
for:
• the installation or replacement of gas piping and the
connection, installation, repair or servicing of equip-
ment.
• the installation of electrical wiring from the electric
meter, main control box or service outlet to the electric appliance.
Qualied installation personnel must be experienced in
such work, familiar with all precautions required, and have
complied with all requirements of state or local authorities
having jurisdiction.
U.S. and Canadian installations
The installation must conform with local codes, or in the
absence of local codes, with the National Fuel Gas Code,
ANSI Z223.1/NFPA 54, or the Natural Gas and Propane
Installation Code, CSA B149.1, as applicable.
Installation must conform with local codes, or in the absence of local codes, with the National Electrical Code,
ANSI/NFPA 70-Latest Edition and/or Canadian National
Electric Code C22.1 as applicable.
Appliance is to be installed with backow prevention in
accordance with applicable federal, province and local
codes.
Australia and general export installations
Instllation must conform with Local and National instal-
lation standards. Local installation codes and/or requirements may vary. If you have any questions regarding the
proper installation and/or operation of your Blodgett oven,
please contact your local distributor. If you do not have a
local distributor, please call the Blodgett Oven Company
at 0011-802-658-6600.
3
Installation
Oven Location and Ventilation
OWNER’S RESPONSIBILITIES
Installation responsibilities prior to service startup
inspection
You are entitled to a free start-up inspection service by
our factory ASAP. Before a factory representative arrives
to perform a startup procedure, the owner must already
have satised the following requirements.
1. Oven(s) are uncrated, stacked (if applies) and put in
place.
NOTE: Please refer to Stacking.
Maximum shelf loading - 60 lbs (27.3 Kg)
OVEN LOCATION
The well planned and proper placement of your oven will
result in long term operator convenience and satisfactory
performance.
Certain minimum clearances must be maintained between the oven and any combustible or non-combustible
construction. See the table below.
In addition, the following clearances are recommended
for servicing.
• Oven body sides - 12” (30cm)
• Oven body back - 12” (30cm)
OVEN
MODEL
HV-50E 0” (0mm) 0” (0mm) 0” (0mm)
NOTE: Blodgett recommends 4” clearance from any heat
source on the control panel side of the oven, an
optional heat shield should be considered.
MINIMUM REQUIRED CLEARANCES
Right Side Left Side Back
VENTILATION
The necessity for a properly designed and installed ventilation system cannot be over emphasized. The ventilation
system will allow the unit to function properly while removing unwanted vapors and products of combustion from
the operating area.
The appliance must be vented with a properly designed
mechanically driven exhaust hood. The hood should be
sized to completely cover the equipment plus an overhang of at least 6” (15 cm) on all sides not adjacent to a
wall. The capacity of the hood should be sized appropri-
ately and provisions made for adequate makeup air.
WARNING!!
Failure to properly vent the oven can be hazardous to the health of the operator; and will
result in operational problems, unsatisfactory
baking, and possible damage to the equipment. Damage sustained as a direct result of
improper ventilation will not be covered by the
Manufacturer’s warranty.
When installed in the Commonwealth of Massachusetts,
this appliance must be interlocked with the hood exhaust
system so that the appliance may be operated only when
the hood exhaust system is running.
U.S. and Canadian Installations
Refer to your local ventilation codes. In the absence of
local codes, refer to the National ventilation code titled,
“Standard for the Installation of Equipment for the Removal of Smoke and Grease Laden Vapors from Commercial
Cooking Equipment”, NFPA-96- Latest Edition.
General Export Installations
Installation must conform with Local and National instal-
lation standards. Local installation codes and/or requirements may vary. If you have any questions regarding the
proper installation and/or operation of your unit, please
contact your local distributor. If you do not have a local
distributor, please call Blodgett at 0011-802-658-6600.
4
Installation
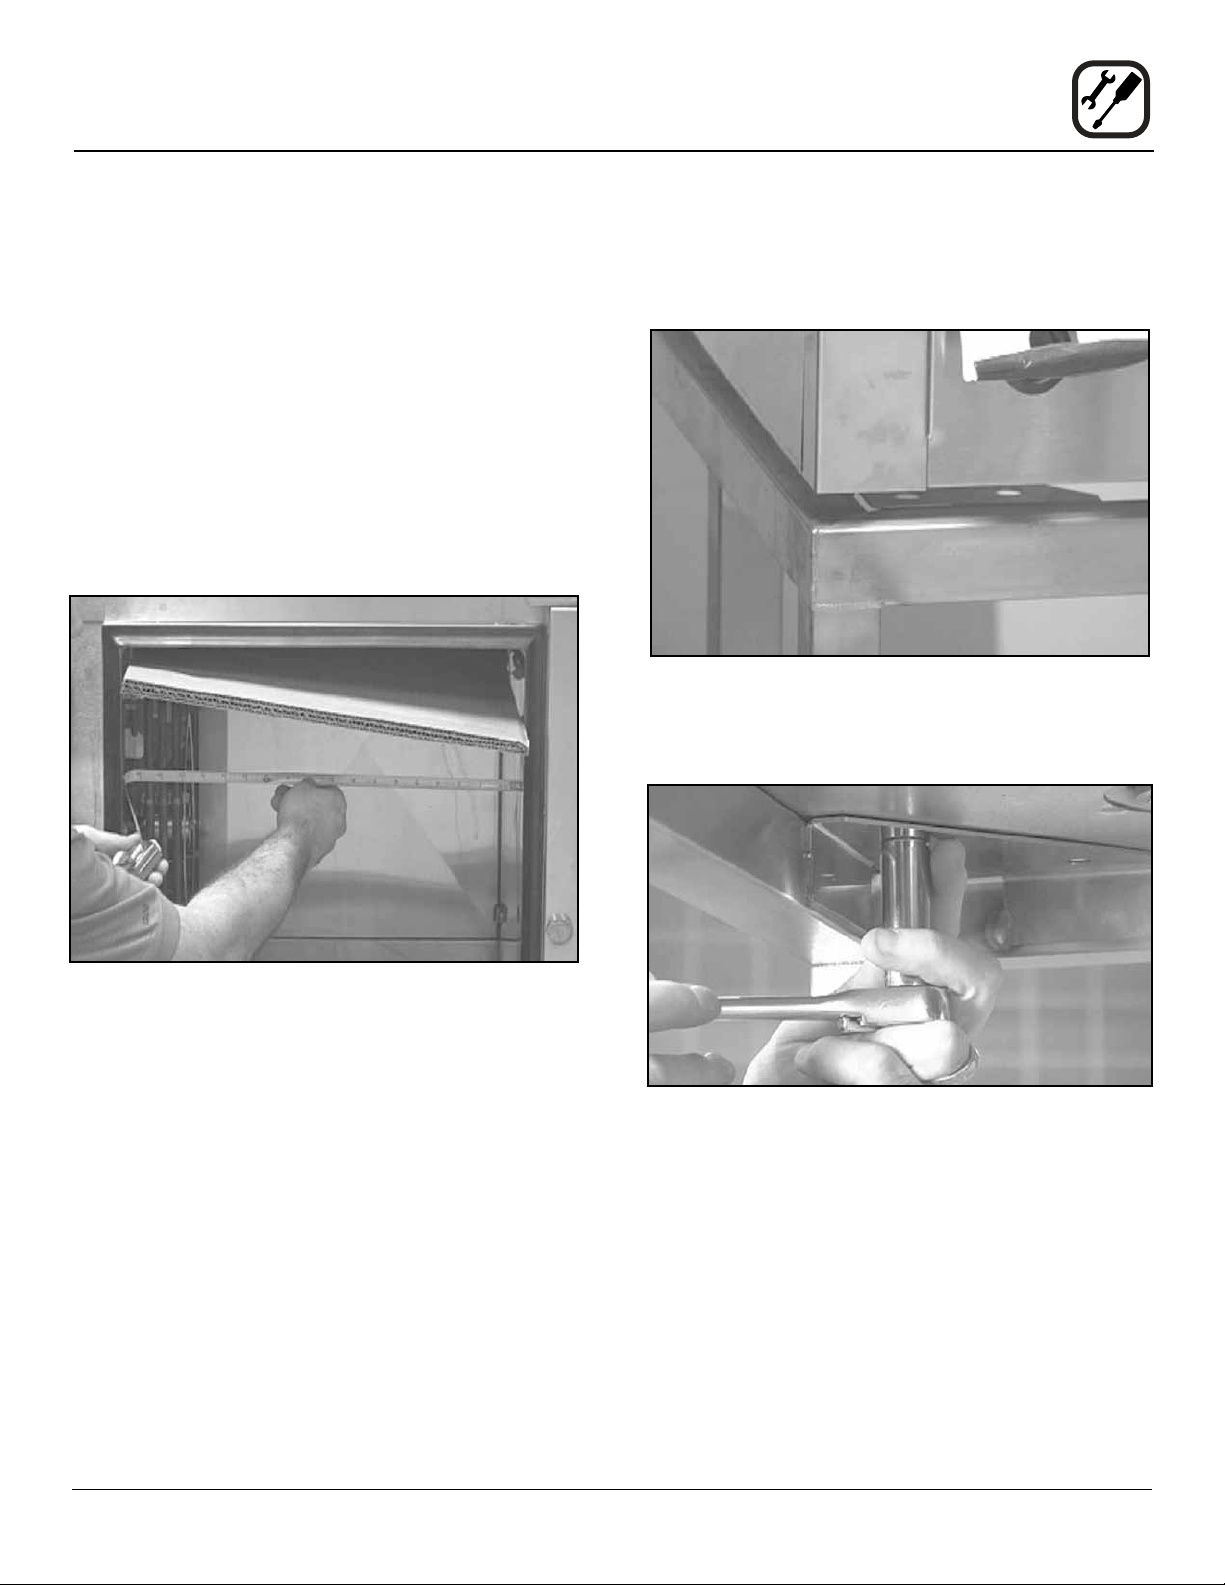
Oven Assembly to Stand
NOTE: The oven weighs approximately 350 lbs, we rec-
ommend using either a fork truck or genie lift to
raise the oven.
1. Remove the bolts securing the oven shipping brackets to the pallet.
2. Open the oven door. Remove the side racks and baf-
e from inside the oven cavity.
3. Cut a piece of cardboard 18” (457 mm) x 26” (660
mm) and place in the oven cavity above the elements.
This will protect the oven from the forks of the forklift.
4. Adjust the forks on the lift to less than 16” (406 mm)
apart so they will t between the elements and the
right side of the oven cavity.
7. Position the stand below the oven. Be sure the support arms on the stand are on the right side when
facing the front of the oven. Place the oven ush with
the front of the stand and lower into place.
Figure 2
8. Attach the oven to the stand using the bolts removed
in STEP 6.
Figure 1
5. Raise the oven to above the height of the stand.
6. Remove the shipping brackets from the bottom of the
oven. Save the bolts to use in STEP 8.
Figure 3
5
Installation
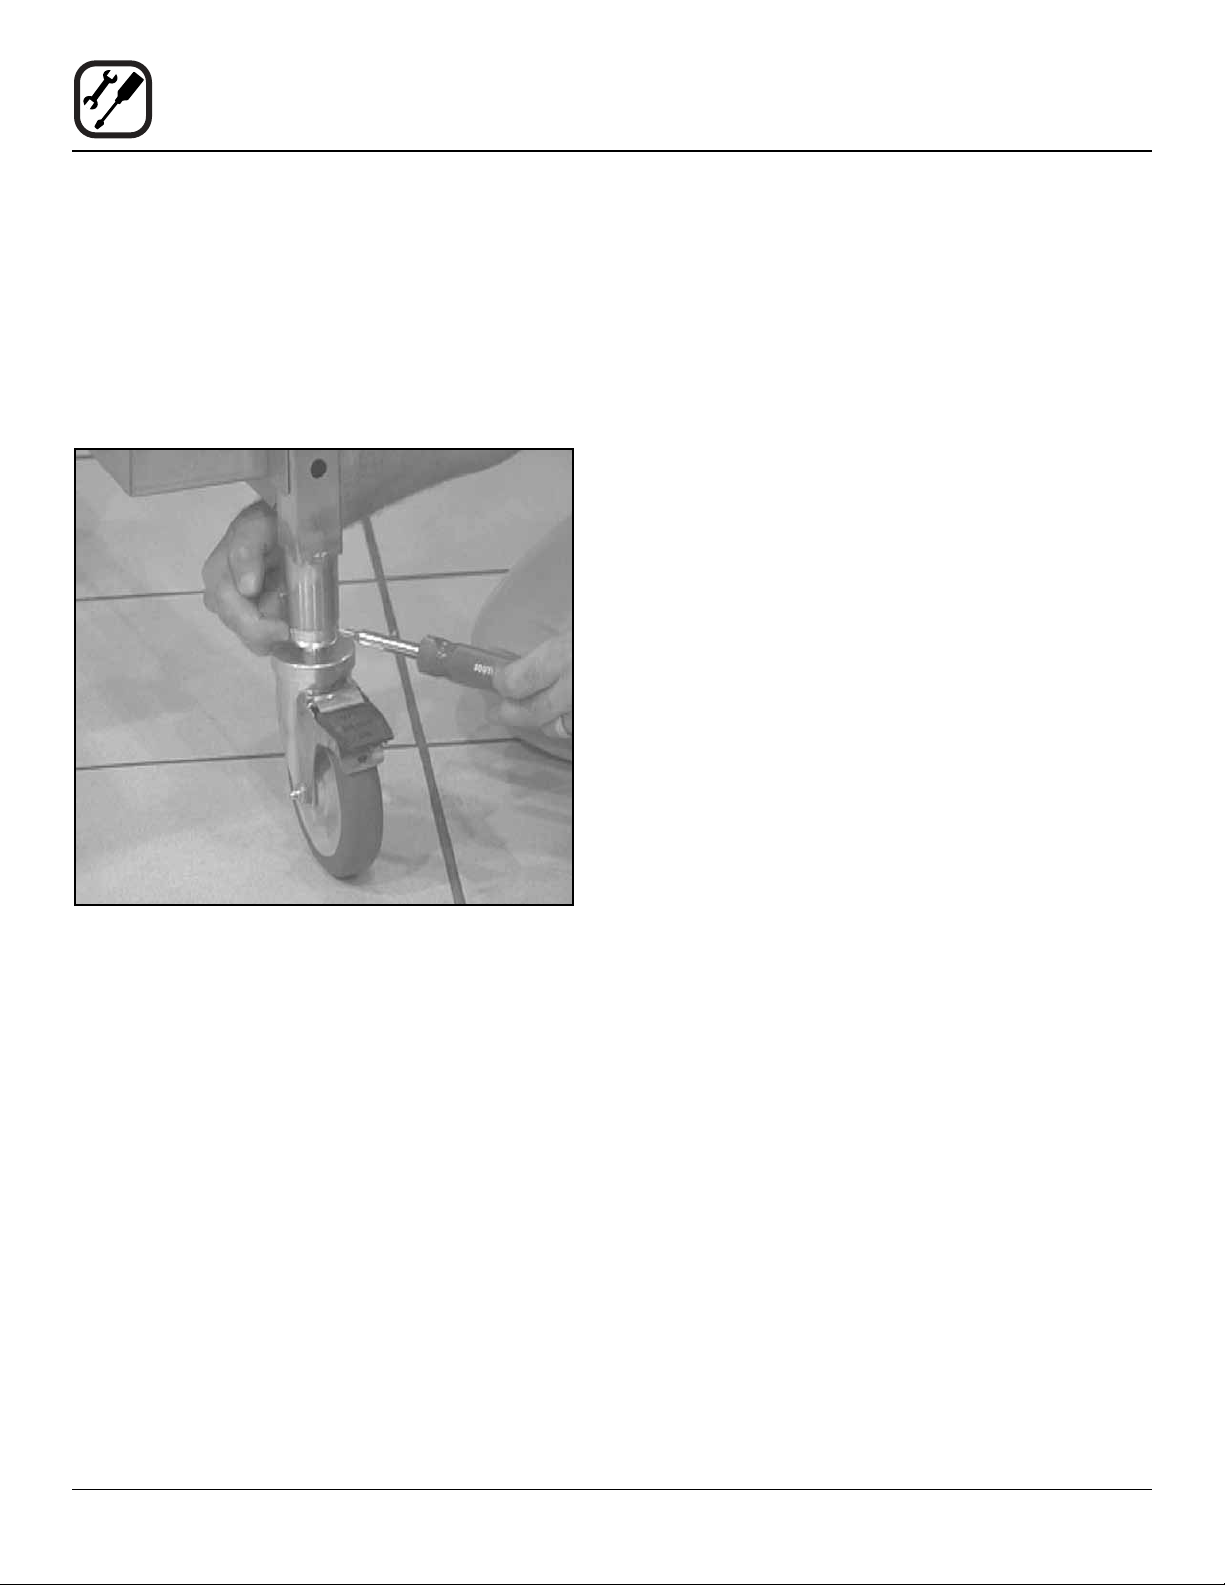
Oven Assembly to Stand
OVEN LEVELING
1. Place a level on top of the oven. Loosen the set
screws on the side of each caster. Turn the adjustment collar clockwise to raise and counter clockwise
to lower the oven.
2. When the oven is level, tighten the casters by turning
the two set screws on the side of each caster assembly.
Figure 4
6
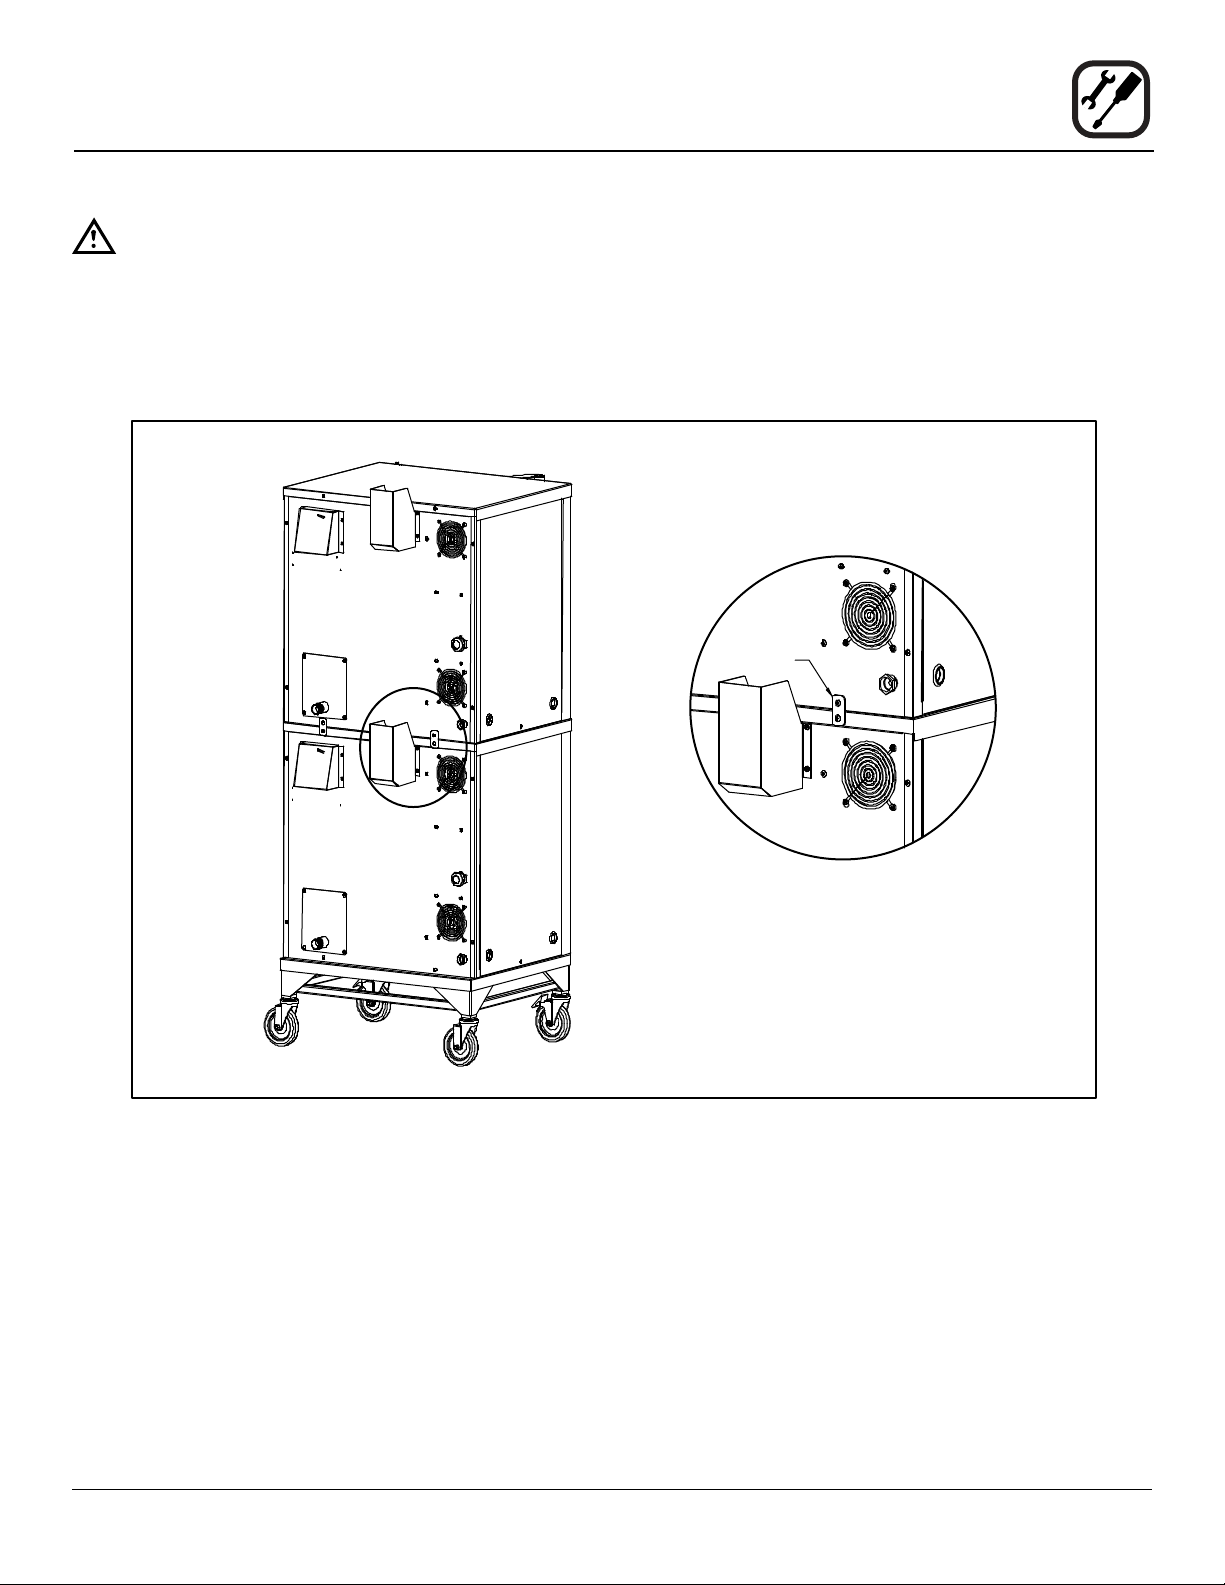
WARNING!!
Stacking should be performed by qualied
installation personnel only. The ovens are
heavy. Take care to use proper tools and techniques when lifting and stacking units.
Installation
Stacking
1. Attach the stand to the bottom oven.
2. Place the top oven on the bottom oven. Be sure all
four sides are ush.
3. Bolt the two ovens together on the rack using two
stacking straps.
Strap
SEE VIEW A
VIEW A
Figure 5
7
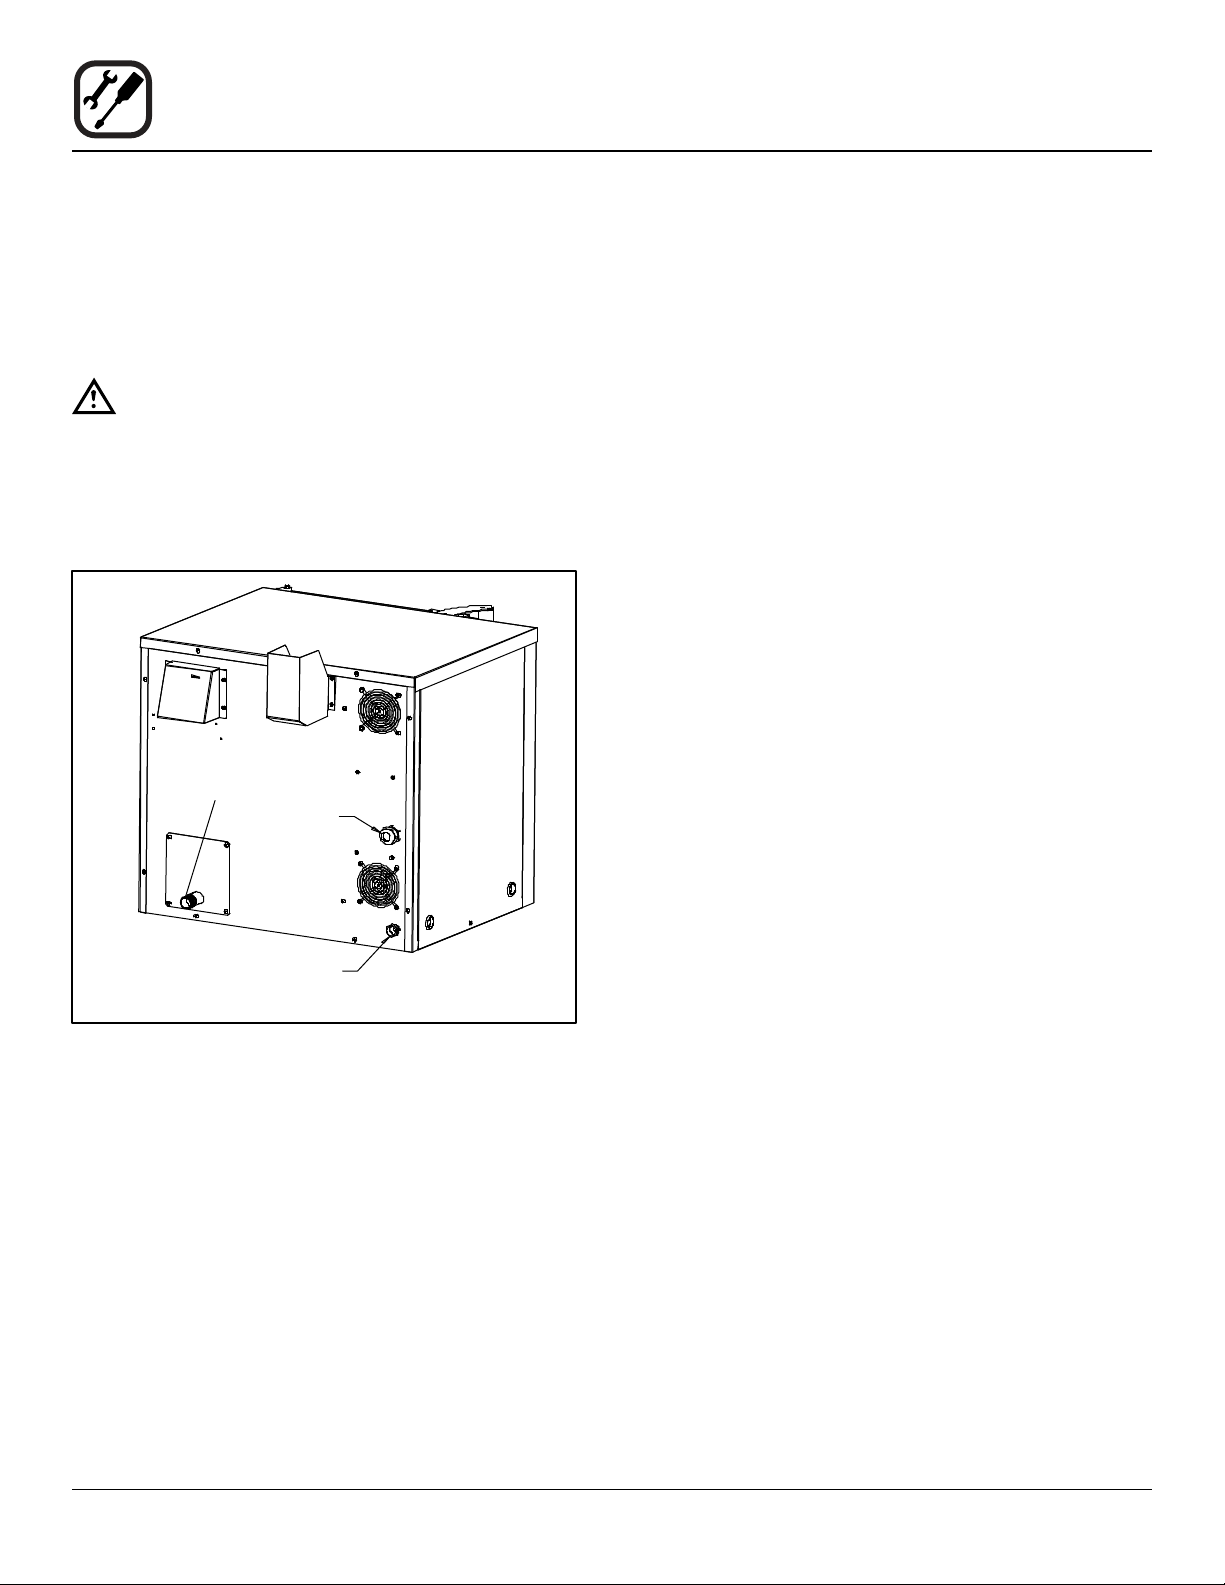
Installation
Plumbing Connections
WATER CONNECTION
NOTE: Must use COLD WATER ONLY.
Connect the appliance to quality water via a pressure
hose with 3/4” GHT (19mm) couplings. See Figure 6 for
connections. A shut off valve is to be provided adjacent to
the oven.
WARNING!!
Operating the appliance without the water regulator installed will invalidate your warranty.
This product must be installed by a licensed Plumber or
Gas Fitter when installed within the Commonwealth of
Massachusetts.
Drain
Connection
Electrical
Connection
DRAIN CONNECTION
The drain should be run to an open oor drain avoiding
exible hose that could sag and allow trapped water to
accumulate. The drain hose should not be submerged in
water. if the drain is submerged, the oven will not drain
properly. The customer must supply the piping from the
oven to the drain.
Specic water/drain connection for City of Los Angeles
1. Each drain line from the appliance shall be routed
without dips or sags to terminate above the ood level
rim of an approved indirect waste receptor.
2. The appliance shall be installed in accordance with
the manufacturer’s printed instructions and the LAPC
and LAMC, 1999 editions.
3. A backow protection device may be required by local codes. If so, install on the potable water system
directly ahead of the appliance. The backow protection device shall be any of the following: an approved
pressure type vacuum breaker installed at least 12”
above the highest point of use, a double check valve
backow preventer or a reduced pressure principal
backow preventer.
Water Connection - Filtered Water
highly recommended
Figure 6
8

All Models
NOTE: Electrical connections must be performed by a
qualied installer only.
Before making any electrical connections to these appli-
ances, check that the power supply is adequate for the
voltage, amperage, and phase requirements stated on
the rating name plate mounted on the appliance.
The circuit breaker that is used to provide power to this
appliance must have a minimum of .076” (3mm) contact
spacing. The circuit breaker must meet all Local and National installation standards.
All appliances must be installed in accordance with Local
or National Electrical codes.
A wiring schematic is located on the inside of the removeable side panel.
NOTE: Disconnect the power supply to the appliance be-
fore servicing.
Installation
Electrical Connections
WARNING!!
Improper installation may invalidate your warranty.
A strain relief for the power supply cord is provided. The
installer must supply a cord that meets all Local and National installation standards.
WARNING!!
If the supply cord is damaged, it must be replaced by a special cord or assembly available
from the manufacturer or its service agent.
9

Operation
Standard Control
CONTROLS IDENTIFICATION
1. MODE SELECTOR SWITCH - turns power to the
oven on or off. Allows selection of Hydro, Hydro Max,
Hot Air, Combi or Cool Down Modes.
1
3
2
2. DISPLAY - displays time and temperature information.
3. TEMPERATURE DIAL - used to set desired cooking
temperature.
4. HEAT LAMP - lights when the oven is calling for heat
5. TIMER LED - lights when the cook time is displayed
6. PROBE ACTUAL LED - lights when the actual probe
temperature is displayed
4
6
5
7
7. PROBE SETPOINT LED - lights when the core setpoint temperature is displayed
8. TIMER/PROBE KNOB - use to select and set either
cook time or probe temperature
9. LIGHTS KEY - press to turn the oven lights on and off
10. FAN SPEED KEY - used to select fan speed.
11. CAVITY VENT KEY - used to open or close vent to
release steam from cavity.
8
12. PROBE CONNECTION - used to connect the core
temperature probe to the control.
9
12
13. CIRCUIT BREAKER - Used to turn power to the unit
on or off.
10
11
13
Figure 7
10

Operation
Standard Control
TIMER COOKING
1. Press the TIMER/PROBE KNOB (8) to select the timer mode. The TIMER LED lights.
2. Turn the MODE SELECTOR Switch (1) to the desired
function.
3. Set the TEMPERATURE DIAL (3) to the desired cook
temperature.
4. When the oven has reached the cook temperature,
load the product.
5. Rotate knob to enter the desired cook time in the
display. You can clear the display by rotating counter
clockwise. The timer begins on its own.
6. The temperature, time and mode can be altered at
any time during the cooking process.
7. When the timer reaches 00:00, the buzzer sounds.
Press or rotate the TIMER/PROBE KNOB (8) counter
clockwise to silence the buzzer. Remove the product.
PROBE COOKING
1. Press the TIMER/PROBE knob (8) to select the
probe setpoint mode. The PROBE SETPOINT LED
(7) lights.
COOL DOWN
NOTE: The unit can be cooled down rapidly.
1. To cool down the oven cavity, open the door and select Cool Down on the MODE SELECTOR Switch (1).
2. Rotate the knob to enter the desired nal cook temperature in the display.
3. Insert the core probe into the product. Load product
into the oven and close the door. Be sure that the
terminal end of the core probe is outside of the oven
and clear of the door.
4. Connect the core probe to the PROBE CONNECTION (12) at the bottom of the control.
5. The display gives the actual core probe temperature
by pressing the TIMER/PROBE knob (8) again.
6. When the product reaches the nal cook temperature
the buzzer sounds.
11

Operation
MenuSelect™ Control
1
HV-50
CONTROL DESCRIPTION
1. START/STOP KEY - press to start, cancel or pause
2
the bake
2. COOL DOWN KEY - initiates oven cool down cycle
3. BAKE MORE KEY - press at the end of a bake cycle
to add additional bake time in one minute increments.
3
4. DISPLAY - displays time or temperature and other
information related to oven function and/or programming.
4
10
11
13
14
17
19
5. DIAL - used to enter set points, time, and programmable settings. Also used to select the programmed
product.
S
E
O
L
T
E
S
C
S
E
R
P
T
5
6. TEMP KEY - used to set or change the bake temperature
7. TIME KEY - used to set or change the bake time.
6
8
7
8. HYDRO KEY - press to enter hydro mode
9
9. HOT AIR KEY - press to enter hot air mode
10. FAN KEY - press to select the fan speed
12
11. LIGHT KEY - press to turn the lights on and off.
12. VENT KEY - press to manually open and close the
15
oven vent
13. PROGRAM KEY - press to enter product programming and save programmed settings.
16
14. ESCAPE KEY - press to back up one step during programming
15. MAINTENANCE KEY - press to enter manager programming and save programmed settings
18
16. ALPHA/NUMERIC KEYPAD - used to program recipes.
17. POWER KEY - used to place control in and out of
CIRCUIT BREAKER
standby mode.
20
18. PROBE KEY - press to use core probe cooking
19. CORE PROBE CONNECTION - plug core temperature probe in here when using probe cooking
21
20. USB PORT - Used to download programming information from a USB drive
21. CIRCUIT BREAKER - Used to turn power to the unit
on or off.
Figure 8
12

Operation
MenuSelect™ Control
OVEN STARTUP
1. Be sure the shutoff switch and/or circuit breaker
switch below the control panel are in the on position.
The display ashes OFF PRESS POWER KEY TO
START.
NOTE: If the real time clock and auto wake up func-
tions are enabled the display reads PRESS
POWER KEY TO START AUTO START.
2. Press the POWER KEY (17). The display reads
PREHEAT and the oven heats to the last manual set
temperature in the hot air mode. The display ashes
READY / IDLE and the alarm beeps 5 times when the
oven is at temperature and ready to bake.
MANUAL COOKING
1. Turn the DIAL (5) until the display reads MANUAL.
2. Press the TIME KEY (7). Rotate the dial, or use the
alpha/numeric keypad to enter the desired bake time.
Press the center of the dial to set the bake time.
NOTE: Time is set in one minute increments using
the dial. To set time in less than one minute
increments use the alpha/numeric keypad.
3. Press the TEMP KEY (6). Rotate the dial, or use the
alpha/numeric keypad to enter the desired bake temperature. Press the center of the dial to set the bake
temperature. The oven preheats to the new temperature.
NOTE: Temperature is set in 5 degree increments
using the dial. To set time in less than 5 degree increments use the alpha/numeric keypad.
4. Press the desired mode key, Hydro or Hot Air.
If Hydro is selected, rotate the dial, or use the alpha/
numeric keypad to enter the desired percentage of
moisture.
5. When the display ashes READY / IDLE, open the
door. Load the product.
6. Press the START/STOP KEY (1) to begin the bake
cycle. The timer counts down and the display alternates between the cooking mode and the name of
the product.
PROGRAMMED COOKING
1. Turn the DIAL (1) until the name of the product is
highlighted. Press the center of the dial to select. The
oven preheats to the programmed temperature in the
correct cooking mode. The display ashes READY /
IDLE and the alarm beeps 5 times when the oven is
at temperature and ready to bake.
2. Open the door. Load the product.
3. Press the START/STOP KEY (1) to begin the bake
cycle. The timer counts down and the display alternates between the cooking mode and the name of
the product.
PROBE COOKING
1. Press the PROBE key (18) to select the probe mode.
The display reads CORE PROBE COOK & HOLD.
Turn the dial to select either YES or NO. Press the
center of the dial to select.
If YES is selected, Cook & Hold has been enabled.
In the Cook & Hold mode, the oven cavity lowers to
the product pull temperature as the product cooks.
If NO is selected, Cook & Hold has not been enabled
the cavity maintains the cook temperature.
2. Turn the DIAL to enter the desired product pull temperature in the display. Press the center of the dial to
save the pull temperature.
3. Press the TEMP KEY (6). Rotate the dial, or use the
alpha/numeric keypad to enter the desired bake temperature. Press the center of the dial to set the bake
temperature. The oven preheats to the new temperature.
NOTE: Temperature is set in 5 degree increments
using the dial. To set time in less than 5 degree increments use the alpha/numeric keypad.
4. Press the desired mode key, Hydro or Hot Air.
If Hydro is selected, rotate the dial, or use the alpha/
numeric keypad to enter the desired percentage of
moisture.
5. Insert the core probe into the product. Load product
into the oven and close the door. Be sure that the
terminal end of the core probe is outside of the oven
and clear of the door.
13

Operation
MenuSelect™ Control
6. Connect the core probe to the PROBE CONNECTION (19) at the bottom of the control.
NOTE: Do not connect the probe before the cook
mode has been selected.
7. The display gives the actual core probe temperature
as well as the oven set temperature.
8. When the product reaches the pull temperature the
buzzer sounds.
9. Press the START/STOP KEY (1) to silence the buzzer.
If using Cook & Hold - The cavity temperature continues to drop to the product pull temperature and the
display counts up, telling the operator how long the
product has been held. Disconnect the core probe
and remove the product when ready.
If not using Cook & Hold - The cavity remains at
the cook temperature. The display does not count up.
Disconnect the core probe and remove the product
when the buzzer sounds.
DURING ANY COOK CYCLE
Venting Moisture from the Oven Cavity
1. Press the VENT KEY (12). This manually opens the
vent until the key is pressed again to close it.
Pause a Bake Cycle
1. To pause a cook cycle, press the START/STOP KEY
(1). The LED on the start/stop key ashes. The bake
cycle will pause until the key is pressed again.
Cancel a Cook Cycle
1. To cancel the cook cycle, press and hold the START/
STOP KEY (1).
AT THE END OF ANY COOK CYCLE
1. An alarm sounds, the display reads DONE.
2. If more bake time is desired, press the BAKE MORE
KEY (3). This will add an additional one minute of
time for each press of the key.
3. When you are satised with the bake, press the
START/STOP KEY (1) to silence the alarm. Open the
door to remove the product.
OVEN SHUTDOWN
1. Press the COOL DOWN KEY (2). The display reads
AUTO COOL DOWN ACTUAL TEMP. To speed up
the cool down process, open the door and press the
VENT KEY (12) to open the vent.
2. When the oven has cooled down, the display reads
OFF PRESS POWER KEY TO START.
NOTE: The lights shut off and the vent closes auto-
matically at the end of the cool down cycle.
PRODUCT PROGRAMMING
Entering the Program Mode
1. Press the PROGRAM KEY (13). If the control is password protected, the display reads ENTER CODE.
Use the alpha/numeric keypad to enter the manager
passcode 3124, then press the center of the dial to
enter the program mode.
Naming a Product Recipe
NOTE: Use the following procedure to name a new prod-
uct or edit the name of an existing product.
1. For a new recipe, turn the dial to the rst open product. Press the center of the dial to select.
To edit an existing name, rotate the dial to the name
to be changed. Press the center of the dial to select.
2. Use the dial to scroll down to Edit Name. Press the
center of the dial to enter the edit name menu.
3. Turn the dial or use the alpha/numeric keypad to se-
lect the rst character. Press the center of the dial to
advance to the next character. Repeat for all remaining characters.
NOTE: Product names may be up to 10 characters
long and can contain spaces. Use the #1 key
to insert spaces in a recipe name.
NOTE: To select letters using the keypad, press the
appropriate key once if you need the rst letter on the key, twice for the second and three
times for the third. For example to enter the
letter L press the #5 key three times.
4. Press the PROG KEY (13). With SAVE highlighted,
press the dial to save the product name.
14

Operation
MenuSelect™ Control
Programming a Product Recipe
NOTE: The control can hold 99 recipes. Each recipe may
have up to 6 cooking stages.
1. Turn the dial to highlight the name of the product to
be programmed. Press the center of the dial to select
the product.
2. The display reads PRODUCT NAME: STAGE 1.
Press the center of the dial to select the stage.
3. Rotate the dial, or use the alpha/numeric keypad to
enter the desired bake time. Press the center of the
dial to set the bake time.
NOTE: Time is set in one minute increments using
the dial. To set time in less than one minute
increments use the alpha/numeric keypad.
4. Rotate the dial to select the desired cooking mode.
Choose from Hydro or Hot Air. Press the center of the
dial to set the cook mode.
If Hydro is selected, rotate the dial, or use the alpha/
numeric keypad to enter the desired percentage of
moisture.
5. Rotate the dial, or use the alpha/numeric keypad to
enter the desired cook temperature. Press the center
of the dial to set the bake temperature.
NOTE: Temperature is set in 5 degree increments
using the dial. To set time in less than 5 degree increments use the alpha/numeric keypad.
6. Rotate the dial to select the desired fan speed.
Choose from gentle, low, high or turbo. Press the
center of the dial to set the fan speed.
9. Use the dial to scroll down to PRODUCT NAME:
STAGE 2. Press the center of the dial to select stage
2.
10. Repeat steps 2-9 for all remaining stages.
11. When all stages have been programmed, press the
PROGRAM KEY (13). To save the programming, use
the dial to scroll to YES. Press the center of the dial.
The control exits the program mode.
USING THE USB PORT
1. With the power on, remove the cover of the USB port
(20) and insert the USB drive.
2. Press the MAINTENANCE KEY (15).
3. Turn the dial to highlight MANAGER PROGRAM.
Press the center of the dial to select.
4. Turn the dial to highlight either COPY RECIPE FROM
USB or COPY RECIPE TO USB, then press the center of the dial to select.
5. When the transfer is complete, press any key to return to the menu.
6. Turn the dial to highlight EXIT. Press the center of
the dial to select. The display returns to the previous
menu.
7. Turn the dial to highlight EXIT. Press the center of the
dial to select.
7. Rotate the dial to select the fan rotation cycle. Choose
between manual or auto.
NOTE: This is the length of time the fan will rotate in
one direction before reversing.
If manual is selected, rotate the dial or use the alpha/
numeric keypad to enter the desired fan cycle. Press
the dial to set the fan cycle.
If auto is selected, the program will use the default
fan cycle setting. The default is set through the Manager Programming. See page 18.
8. Rotate the dial to set the vent position. Choose between OPEN or CLOSE. Press the center of the dial
to set the vent position.
15

Operation
MenuSelect™ Control
MANAGER PROGRAMMING
Entering the Manager Program Mode
1. Press the MAINTENANCE KEY (15). If the control
is password protected, the display reads ENTER
CODE. Use the alpha/numeric keypad to enter the
manager passcode 3124, then press the center of the
dial to enter the program mode.
2. Turn the dial to highlight OVEN SETUP. Press the
center of the dial to select the product.
Programming Auto Start
NOTE: The Auto Start function enables the oven to turn
on at a programmed time of day and preheat to a
programmed temperature.
1. Turn the dial to highlight AUTO START. Press the
center of the dial to select.
2. Turn the dial to select either ON or OFF. Press the
center of the dial to select.
If ON is selected, the display reads AUTO START 24
HOUR TIME 00:00. Turn the dial to enter the time you
would like the oven to begin preheating. Press the
center of the dial to select.
The display reads AUTO START TEMP XXX. Turn
the dial to enter the desired preheat temperature.
Press the center of the dial to select.
Programming Oven Setup
These menus allow the manager to set up basic oven
functions
1. Turn the dial to highlight OVEN SETUP. Press the
center of the dial to select.
Input Rsp Time - Set the length of time allowed to input each variable when programming recipes before
control automatically exits out
Setback Time - When not used for a period of time,
the oven temperature will automatically reduce to
conserve energy. This variable sets the length of time
the oven remains at the idle temperature before being lowered.
Ready Beep - Select either ON or OFF. This is the audible alarm that sounds when the oven has reached
the set temperature.
Cook Cool Fan - Select either YES or NO. This function allows the control to display OPEN OVEN DOOR
when you are attempting to lower the set temperature
of the oven.
Restore Manual - Select either YES or NO. This variable enables the oven to remember the last settings
used for manual cooking.
4. After editing a function, press the center of the dial
to save.
5. When all desired functions have been edited, turn the
dial to highlight EXIT. Press the center of the dial to
exit the manager programming mode.
2. Turn the dial to highlight MANAGER PROGRAM.
Press the center of the dial to select.
3. Turn the dial to highlight the oven function you wish to
change. Press the center of the dial to select. Choose
from the following functions:
Recipe Password - Select YES or NO to enable
password protection on recipe programming. If YES
is selected the passcode 3124 must be entered to
change recipe programming.
Temp Unit - Select either degrees F or C.
Cool Down Temp - Select the set temperature for
the oven to achieve in Cool Down mode
Temp Disp Rate - Set the rate, in seconds, at which
the display switches between actual and setpoint
temperature
16

Maintenance
SmartTouch Touchscreen Control
CONTROL DESCRIPTION
1. DISPLAY - displays information related to oven function and/or programming.
2. USB Port and COVER - Use to transfer recipes and
data to/from the control
3. CORE PROBE CONNECTION - plug core temperature probe in here when using probe cooking
4. CIRCUIT BREAKER - Used to turn power to the unit
on or off.
1
2
3
CIRCUIT BREAKER
4
Figure 9
17

Maintenance
SmartTouch Touchscreen Control
MANUAL MODE COOKING
1. Select the POWER button to turn on the oven and
proceed to the manual screen.
2. Set the desired cook settings.
Temperature - Press the temperature text and enter
the desired oven temperature on the keypad provided. Press SAVE & EXIT key to return to this screen.
Cook Time - Press the time text and enter the desired cook time on the keypad provided. Press SAVE
& EXIT to return to this screen.
Core Probe Cooking - To use the core probe cooking feature, press the PROBE COOK icon. Press the
temperature text that appears and enter the desired
product core temperature on the keypad provided.
Press SAVE & EXIT key to return to the manual cook
screen. Insert a product probe in the probe outlet on
the control panel. To use the HOLD option, press the
HOLD key. Once activated, key will be blue. To escape from probe cooking press the time icon.
Cavity Moisture - Press the HOT AIR icon to reduce
the cavity moisture content in 10% increments. At 0%
the oven is in the Hot Air mode. Press the HYDRO
icon to increase the cavity moisture content in 10%
increments. Press % text to set the exact percentage with the keypad. Press the SAVE & EXIT key
to return to the manual cook screen. Press and hold
the HOT AIR icon for 1 second to set humidity to 0%
quickly. Press and hold the HYDRO icon for 1 second
to set the humidity to 100% quickly.
Fan Speed - With the FAN icon highlighted, press the
fan speed text (Gentle, Low, High or Turbo). When
Turbo is displayed, press the text again to reduce the
fans speed to Gentle.
Fan Reversal Interval - To adjust the fan reversal
time, press the FAN REVERSAL icon. Then press
the time text and enter the desired reversal interval
on the keypad provided. Press SAVE & EXIT key to
return to this screen.
Vent Position - At any time the vent can be opened
or closed by toggling the VENT icon. When the icon
is highlighted the vent is open.
Lights - At any time the lights can be turned on or off
by toggling the LIGHT icon.
3. Press START Icon to begin cooking. Press Cancel
key to stop cooking. Press +1 MIN to add 1 minute to
the cook time.
Power Screen Mode Selection Screen
Figure 10
18

Temp
Maintenance
SmartTouch Touchscreen Control
Time
Hot Air Mode
Fan Speed
Lights
Probe Cooking
Hydro Mode
Fan Reversal
Increment
Vent Position
Figure 11
19

Maintenance
SmartTouch Touchscreen Control
MENU MODE COOKING
1. On a manual screen, press the ESC key to exit the
screen.
2. Select the MENU key to cook using the preprogrammed menu items.
4. Select the desired food category for your product.
Figure 12
3. Push the SELECT ITEM PRODUCT ICON in the top
right corner of the screen
Figure 14
5. Within the food category, select the desired product
you wish to cook.
Figure 15
Figure 13
6. Once selected the control returns to the Menu Cooking screen. Press the START KEY to begin the cook
cycle.
20

SHELF COOKING
1. Select the SHELF COOKING key.
Maintenance
SmartTouch Touchscreen Control
3. During the cook cycle, individual shelf cook timers will
count down as the product is cooked. If you wish to
cancel the bake, you can press the STOP ALL key, or
you can stop individual shelves.
To add time, select +1 MIN key for individual shelves
or +1 MIN ALL key to add time to all shelves. Each
time the key is pressed, 1 minute of cook time is added.
Press STOP again to reset to the original values.
CLEAR ALL to clear all products from all shelves. All
Shelves must be cleared to escape the screen.
Once the bake is complete the beeper will sound.
Figure 16
2. Select which shelves you intend to place the selected
food item on. Press selected item icon in the upper
right corner of the screen to add different items that
share the same cook temperature but may have different cook times.
Once preheated, start icons will appear. You can
choose start all or start individual shelves.
Figure 18
Figure 17
21

Maintenance
SmartTouch Touchscreen Control
EDITING A MENU
1. Select the MENU/EDIT icon to edit the recipes in the
menu mode.
3. To edit an existing item, select the item while the EDIT
ITEMS key is highlighted.
To delete an Item, select the item while the DELETE
key is highlighted.
To create a new item, select the NEW ? icon while the
EDIT key is highlighted.
Figure 19
2. Select the EDIT ITEMS icon to edit the menu items.
Figure 20
Figure 21
22

4. Each recipe is made up of steps containing seven
settings - temperature, time, fan, etc. A new step is
needed when you desire a different setting within a
step.
To edit a setting within a particular step, press the
icon for that setting. A keypad will appear for you to
input your value.
To add a step, press the + key icon.
To edit a step, press the arrow keys on the bottom left
hand corner of the screen to highlight the step you
wish to edit. Follow the instructions above to edit the
settings.
To delete a step, use the arrow keys on the bottom
left hand corner of the screen to highlight the step
you wish to delete. Press the red X icon to delete the
highlighted step.
Once you are nished, press the DISK icon to save
the changes.
Maintenance
SmartTouch Touchscreen Control
Figure 22
23

Maintenance
SmartTouch Touchscreen Control
EDITING A CATEGORY
1. Select the MENU/EDIT icon to edit the recipes in the
menu mode.
To delete a category, select the category while the
DELETE key is highlighted.
To create a new category, select the NEW ? icon
while the EDIT key is highlighted.
Figure 23
2. Select the EDIT CATEGORIES icon to select which
items are in each category.
Figure 25
4. Select what you would like to edit.
To edit the name, press the EDIT NAME key. A keyboard will appear, enter the desired name and press
ENTER to return to this menu.
Figure 24
3. To edit an existing category, select the category while
the EDIT key is highlighted.
Figure 26
24

Maintenance
SmartTouch Touchscreen Control
5. To edit the category icon, press the category icon displayed in the category edit screen. The Select Icon
screen is displayed. Select the desired icon. To view
more icon options, press the arrow key.
Once the category icon is selected, the category edit
screen is displayed. Press the DISK icon to save your
changes.
6. To edit items within a category, press the SELECT
ITEMS key on the edit category screen.
Select the items you would like to appear within the
category. When complete, press ESC key to return
to the previous menu. Press the DISK icon to save
your changes.
Figure 27
Figure 28
25

Maintenance
SmartTouch Touchscreen Control
CREATING NEW MENU ITEMS
1. Select the EDIT ITEMS key.
Figure 29
2. Select New?
5. Program the recipe steps - Each recipe is made
up of steps containing seven settings - temperature,
time, fan, etc. A new step is needed when you desire
a different setting within a step.
To edit a setting within a particular step, press the
icon for that setting. A keypad will appear for you to
input your value.
To add a step, press the + key icon.
To edit a step, press the arrow keys on the bottom left
hand corner of the screen to highlight the step you
wish to edit. Follow the instructions above to edit the
settings.
To delete a step, use the arrow keys on the bottom
left hand corner of the screen to highlight the step
you wish to delete. Press the red X icon to delete the
highlighted step.
Once you are nished, press the DISK icon to save
the changes.
6. To le recipe under an existing category, press the
EDIT CATEGORIES key. Select the desired category. Press the SELECT ITEMS key. Highlight the new
item. Press the ESC key. The disk will be displayed,
press to save your changes.
3. Select the food icon to be displayed. Use the arrow keys to page through the available icons. Press
the desired icon to select and return to the previous
screen.
4. Name the item. Press the blank shelf below the icon
to name the recipe. A keyboard will appear. Enter the
desired name. Press ENTER when nished to return
to the previous screen.
26

CREATING NEW CATEGORIES
1. Select the EDIT CATEGORIES key.
Maintenance
SmartTouch Touchscreen Control
4. Press EDIT NAME. A keyboard will appear. Enter the
desired name. Press ENTER when nished to return
to the previous screen.
5. Press SELECT ITEMS. Select items to be led in the
new category. Items will be highlighted as they are
selected. Press ESC key to return to the previous
screen. The disk will be displayed, press to save your
changes.
6. To display the category, it must be added to the default menu as follows:
Press the EDIT MENUS key. Select the DEFAULT
key. Select the CATEGORIES key. Highlight the new
category. Press the ESC key to return to the previous
screen. The disk will be displayed, press to save your
changes.
Figure 30
2. Select New?
3. Select the category icon to be displayed. Use the arrow keys to page through the available icons. Press
the desired icon to select and return to the previous
screen.
27

Maintenance
SmartTouch Touchscreen Control
TRANSFERRING RECIPES USING THE USB
1. Return to the power screen.
To Store Menu Data to a USB
1. Press the STORE MENU DATA to USB key to transfer recipes to the USB.
Figure 31
2. Press the TOOLS key. Enter the code 6647 on the
keypad.
Figure 33
2. The keyboard screen is displayed. Use to enter de-
sired le name. Press the ENTER key when nished.
Figure 32
3. Press the MANAGE MENU DATA key. Insert the USB
drive into the Intelliport.
Figure 34
28

3. The status screen appears to display the download
status. The display returns to the previous screen
when download is complete.
Maintenance
SmartTouch Touchscreen Control
Figure 37
Figure 35
4. Press the ESC key to exit USB screen.
To Retrieve Menu Data from USB
1. Press the GET MENU DATA from USB key to transfer
recipes from the USB.
Figure 36
2. The control displays all menu (.MNU) les on the USB
drive. Select the desired le.
3. The overwrite warning screen appears. Press YES to
continue
Figure 38
4. The status screen appears to display the upload status. The display returns to the previous screen when
upload is complete.
5. Press the ESC key to exit USB screen.
29

Maintenance
SmartTouch Touchscreen Control
COOL DOWN
1. To cool down the unit, press the COOL DOWN icon.
2. The oven will toggle between cooling and open door
in yellow until the oven is cool. Once cool, the oven
will go to standby.
NOTE: If the oven is shut down with the circuit break-
er switch at the bottom of the front panel, the
display will return to the power screen. Select
your option to begin.
Figure 39
Figure 40
30

NOTE: Only use a commercial oven cleaner/degreaser
with the spray bottle. DO NOT use chemicals that
are not intended as oven cleaners. See chemical
manufacturer’s information for intended use.
1. Unscrew the sprayer head and ll the
container to the MAX mark. Screw the head assembly
on rmly to ensure an airtight seal. The liquid
must be clean and free from foreign matter. Do not
overll - space must be left for compressing air.
2. To build up pressure, pump approximately 20 full
strokes when the container is lled with liquid. The
higher the pressure, the ner the spray. If the container is only partially lled, then more pumping is
required to compress the additional air space.
3. To spray, depress the trigger with your thumb.
4. Adjust spray nozzle for a wide spray pattern.
Maintenance
Spray Bottle Operating Procedure
WARNING!!
Protective clothing and eyewear should be
worn while using cleaning agents.
Pressure Pump
Spray Head
Pump
Pressure
Vessel
Spray Trigger
5. After a period of spraying, the pressure will drop. Restore the pressure by operating the air pump.
6. Release pressure after use by inverting the spray
head and depressing the trigger or by slowly unscrewing the spray head assembly which will al-
low air to escape from around the lling aperture.
7. After use, rinse the spray bottle with clean water and check that the hole in the nozzle is perfectly
clean and clear. Warm water (not hot) used with a
household detergent is a useful cleaning agent for
this purpose.
NOTE: Further information can be found in the in-
struction leaet supplied with your spray bottle.
Clean the pump 2 or 3 times per week with warm water
Figure 41
Complete Spray Bottle - P/N R0006
Spray Head Repair Kit - P/N R6332
31

Maintenance
Cleaning and Preventive Maintenance
CLEANING THE INTERIOR
Daily Cleaning
Daily cleaning of the appliance is essential for sanitation,
and to ensure against operational difculties. The stainless steel cavity may corrode with improper cleaning of
the oven. Use an oven cleaning detergent in conjunction
with the supplied spray bottle.
For difcult cleaning, allow the spray-on oven cleaner to
work longer before rinsing.
1. Cool the appliance down to 140ºF (60ºC) or, if the
oven has been idle, turn the Hydro mode on
for 3 to 4 minutes in order to warm the cavity
surfaces.
On stainless interiors, deposits of baked on splatter, oil,
grease or light discoloration may be removed with a
good non toxic industrial stainless steel cleaner. Apply cleaners when the oven is cold and always rub with
the grain of the metal. The racks, rack supports and the
blower wheel may be cleaned in the oven or by removing
them from the oven and soaking them in a solution of
ammonia and water.
NOTE: DO NOT use corrosive cleaners not intended for
oven cleaning on your Hydrovection oven.
Recommended cleaners:
• ECOLAB - Greasecutter Plus
2. Fill the spray bottle and pump air into
the container with the pressure pump.
3. Spray the interior of the oven with a cleaning
solution. Be certain to spray cleaner through the fan
guard to cover all surfaces.
NOTE: Never spray water into the appliance when
the temperature is above 212ºF (100ºC).
4. Let the cleaner work the time recommended by
the cleaning solution manufacturer. For difcult,
baked on grease, etc. allow to work over night.
5. Set the timer for 15 to 20 minutes.
6. Run the oven at 225ºF (107ºC) in the Hydro mode
with 100% humidity. This will soften all burned on
residue.
7. Rinse the appliance interior with water
(a hose is supplied, but take care that only the
interior cavity is sprayed with water). Wipe the interior
dry after rinsing.
8. The door should be kept slightly open after cleaning.
This will allow the oven to vent and increase the life
of the door gasket.
• CELLO - EZ Clean
• Diversey-Lever - Advance Oven Cleaner
WARNING!!
Be sure to read and follow the MSDS or
safety instructions on the bottle for your oven
cleaner.
32

Maintenance
Cleaning and Preventive Maintenance
Oven Weekly Cleaning
In addition to the daily cleaning, it is necessasry to clean
behind the fan guard of this oven on a weekly basis. This
is necessary for proper functioning of the oven. Scale will
build up on the fan and heat source leading to a less ef-
cient oven.
1. Turn off the oven. Make sure that the oven is cooled
down to under 140ºF (60ºC).
2. Remove the rack guides.
3. Rotate the screw to unlock the fan guard.
Figure 42
5. Thoroughly spray cleaner onto the fan and heat
source. Close the door to allow the cleaner to work.
6. After ten minutes, rinse the cleaner off. Return the
fan guard to the closed position. Rotate the screw to
secure the fan guard.
Remove and clean the blower wheel every 6 months.
CLEANING THE EXTERIOR
The exterior of the appliance may be cleaned and kept in
good condition with a light oil. Saturate a cloth and wipe
the appliance when it is cold; wipe dry with a clean cloth.
WARNING!!
DO NOT spray the outside of the appliance
with water or clean with a water jet. Cleaning
with a water jet can impregnate chlorides into
the stainless steel, causing the onset of corrosion.
PREVENTIVE MAINTENANCE
The best preventive maintenance measures are the
proper initial installation of the equipment and a
program for cleaning the appliance routinely. The Hydro-
vection requires no lubrication. Contact the factory, the
factory representative or a local Blodgett service company to perform maintenance and repairs should they be
required.
4. Remove the fan guard.
Figure 43
33
 Loading...