

Page 1

OPERATION AND PROGRAMMING
INSTRUCTIONS FOR THE
IQ2 VISION CONTROL
This control is a direct replacement for the Blodgett IQ2.
BLODGETT OVEN COMPANY
www.blodgett.com
44 Lakeside Avenue, Burlington, VT 05401 (800) 331-5842
L-863 Rev C 1/4/2008
Page 2
L-863
Rev C
January 4, 2008
Page 2 of 9
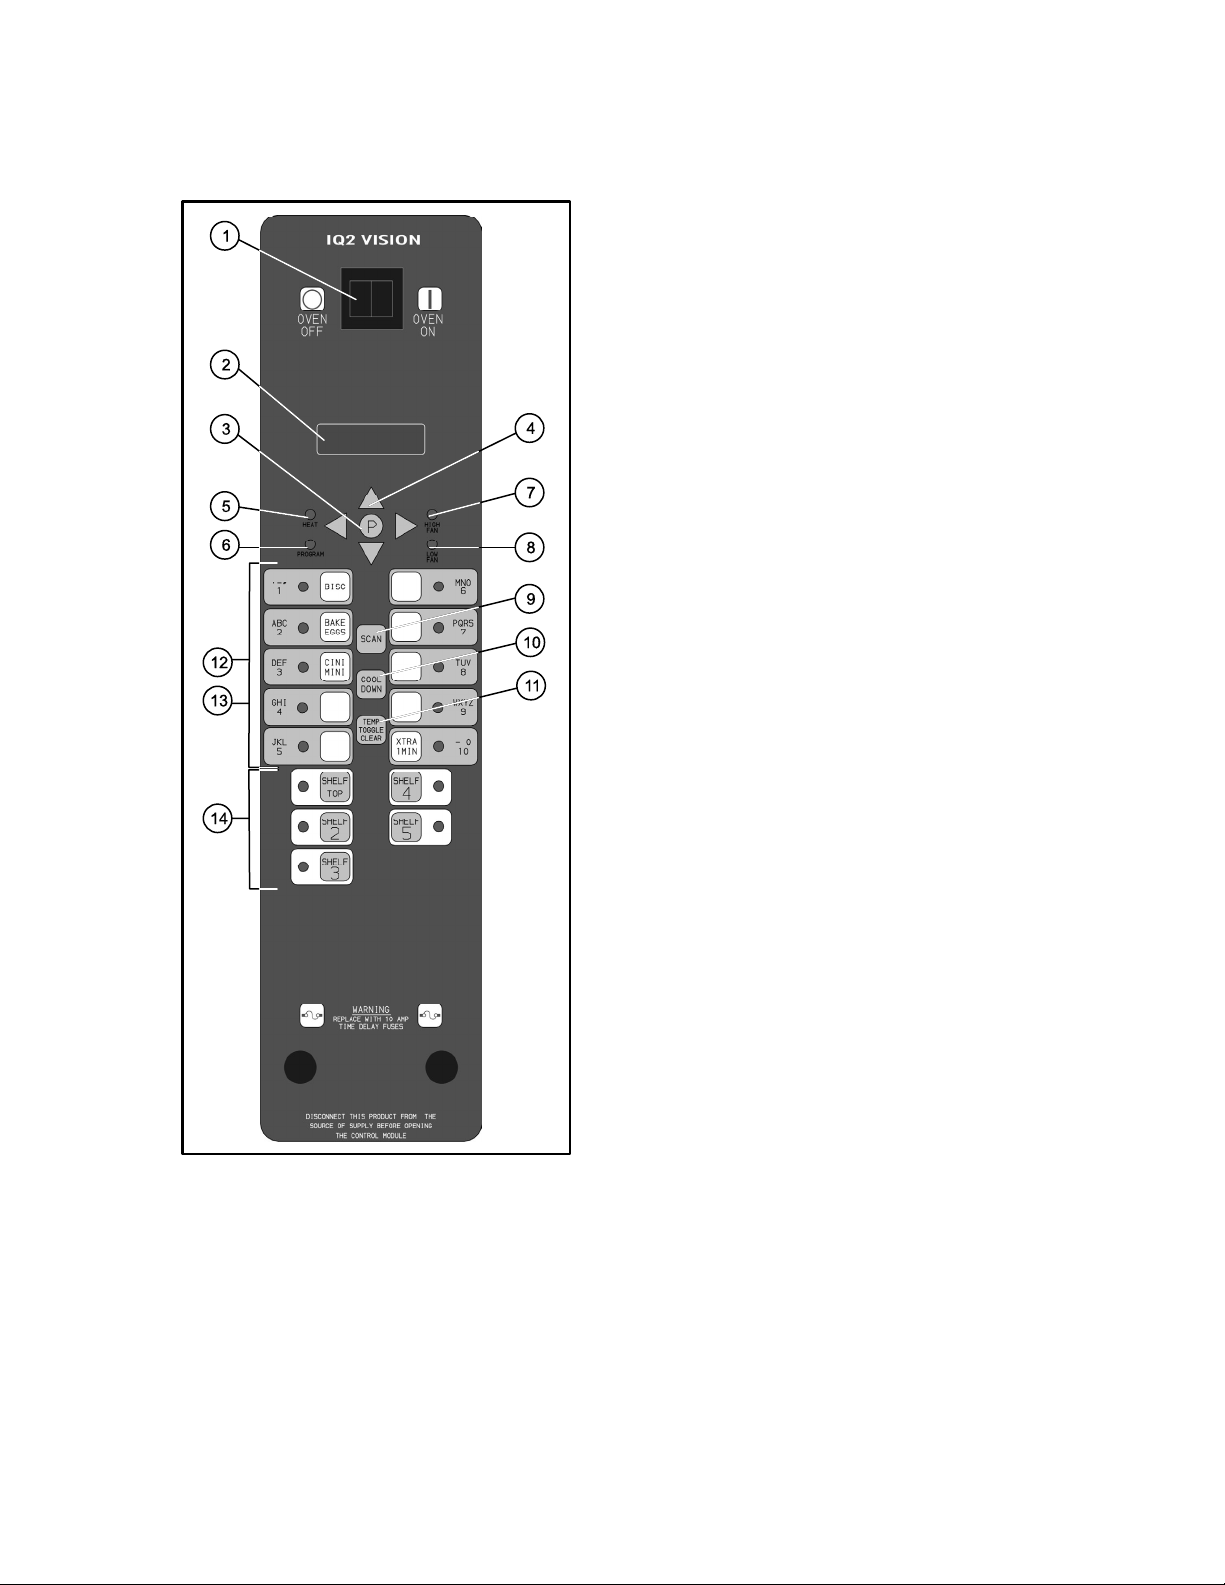
COMPONENT DESCRIPTION
1. OVEN POWER SWITCH - controls power to
the oven.
2. DISPLAY - displays temperature and other
controller related information.
3. PROGRAM KEY - press to enter the
programming mode.
4. PROGRAM ARROW KEYS - use to move
through programming menus and options
5. HEAT LED - when lit indicates the control is
calling for heat.
6. PROG LED - when lit indicates the controller
is in the programming mode.
7. HIGH FAN LED - when lit indicates the fan is
running at high speed.
8. LOW FAN LED - when lit indicates the fan is
running at low speed.
9. SCAN KEY - Press to view time remaining
on multiple cook cycles and to review recipe
programming.
10. COOL DOWN KEY - press to enter the cool
down mode.
11. TEMP/TOGGLE/CLEAR KEY - press during
programming to toggle options.
12. PRODUCT KEYS (1–10) - assigns a key to a
programmed recipe and begins a
programmed cooking process. Also used to
enter numeric values in the programming
mode.
13. PRODUCT LEDS - when lit indicate which
product keys are currently in use or
programmed for the current oven
temperature and fan speed.
14. SHELF KEYS (1–5) - assigns a shelf key.
Figure 1
Page 3

L-863
Rev C
January 4, 2008
Page 3 of 9
OVEN OPERATION
Oven Startup:
1. Toggle the POWER SWITCH (1) to ON. The
display gives the software revision level. The
oven preheats to the lowest programmed
first stage temperature. The LEDS (13) for all
products with the same first stage
temperature light.
Single Product Cooking Procedure:
NOTE: If the led next to the desired product key
is lit skip step 1.
1. Press the desired PRODUCT KEY (12). The
oven preheats to the first stage temperature
for the selected product. When the oven
reaches +10° of the preheat temperature an
alarm sounds and the DISPLAY (2) read:
LOAD
2. Load the product into the oven. Press the
desired PRODUCT KEY (12).
If the shelf timing function is toggled to the
on position for that product key, the
DISPLAY (2) reads:
PICK SHLF
Press a SHELF KEY (14) to assign the
product to that shelf and start the cook cycle.
Within five seconds, the DISPLAY (2) scrolls
the product name and shelf number and
counts down the remaining cook time.
stage recipe no other product LEDS
will light.
NOTE: Press and hold the selected product
key for three seconds to cancel the
cook cycle for normal operation. To
cancel the cook cycle when using
shelf timing, press and hold the
corresponding SHELF KEY (14) for
3 seconds.
3. When the cook time expires an alarm
sounds and the DISPLAY (2) reads:
DONE
Product name
4. Press the selected product key to silence the
alarm. Remove the product. If shelf timing is
used, press the flashing SHELF KEY (14) to
silence the alarm.
Multiple Batch Cooking Procedure:
This procedure is for single stage recipes with
the same cook temperature and fan speed only.
NOTE: If the led next to the first desired product
key is lit skip step 1.
1. Press the first desired PRODUCT KEY (12).
The LEDS for all recipes with the same cook
temperature and fan speed will light.
The oven preheats to the cook temperature
for the selected product. When the oven
reaches +10° of the preheat temperature an
alarm sounds and the DISPLAY (2) reads:
LOAD
If the shelf timing function is toggled to
the off position for that product, pressing
the product key will start the cook cycle. The
DISPLAY (2) scrolls the product name and
counts down the remaining cook time.
NOTE: If the selected product has a cook
time of greater than 59:59 the
DISPLAY (2) switches to
hours:minutes.
NOTE: If the selected product is a single
stage recipe the LEDS for all single
stage products with the same cook
temperature and fan speed will light.
If the selected product is a multiple
2. Load the product into the oven. Press the
desired PRODUCT KEY (12).
If the shelf timing function is toggled to the
on position for that product key, the
DISPLAY (2) reads
PICK SHLF
Press a SHELF KEY (14) to assign the
product to that shelf and start the cook cycle.
Within five seconds, the DISPLAY (2) scrolls
the product name and shelf number and
counts down the remaining cook time.
Page 4

L-863
Rev C
January 4, 2008
Page 4 of 9
If the shelf timing function is toggled to
the off position for that product, pressing
the product key will start the cook cycle. The
DISPLAY (2) scrolls the product name and
counts down the remaining cook time.
3. Load the second product. Press the desired
PRODUCT KEY (12). The DISPLAY (2)
reads
PICK SHLF
Press a SHELF KEY (14) to assign the
product to that shelf and start the cook cycle
for product two.
NOTE: Only products with lighted LEDS
may be selected.
Repeat step 3 for additional products.
4. The DISPLAY (2) scrolls the product name
and counts down the remaining cook time for
the product with the least time remaining.
NOTE: To view the remaining cook time for
the other products press and hold
the SCAN KEY (9). The display
cycles through the remaining cook
times for each product. Only the led
for the product with the cook time
displayed will be lit.
5. When a cook time expires, an alarm sounds.
The display reads
DONE
The led for the finished product lights. All
other LEDS are dark.
6. Press the SHELF KEY (14) for the finished
product to silence the alarm. Remove the
product. Close the oven door. The DISPLAY
(2) scrolls the product name and counts
down the remaining cook time for the
product with the least time remaining.
7. When the cook time expires an alarm
sounds and the display reads:
DONE
8. Press the SHELF KEY (14) to silence the
alarm. Remove the product.
Oven Cool Down:
1. Close the oven door. Press the COOL
DOWN KEY (10).
NOTE: Cool down cannot be activated with the
oven door open. Once the cool down
cycle has begun the doors may be
opened to speed the cooling process.
To Review Recipe Programming:
1. Press the SCAN KEY (9). The display read:
RECIPE REVIEW
Select Product
The LEDS (13) for all previously
programmed product keys light. Press the
PRODUCT KEY (12) you wish to review.
The display gives the recipe cook time for
stage 1. Use the PROGRAM ARROW KEYS
(4) to scroll through the recipe programming
for the selected product key.
2. The control will exit recipe review after 30
seconds if no key is pressed.
PRODUCT KEY PROGRAMMING
To enter the product programming mode
1. Press and hold the PROGRAM KEY (3). The
DISPLAY (2) reads:
Prod Cnt
Programming
Use the PROGRAM ARROW KEYS (4) to
highlight Programming. Press the
PROGRAM KEY (3) to select. The display
reads:
ENTER CODE
Use the PRODUCT KEYS (12) to enter the
programming access code 1724. Press the
PROGRAM KEY (3). The display reads:
RECIPE
Page 5

L-863
A
A
A
Rev C
January 4, 2008
Page 5 of 9
Press the PROGRAM KEY (3). All of the
product LEDSs will light and the display
reads:
Select Product
To Program
To select the product to program
2. Press the desired product key. The display
reads:
ll
Name
With All highlighted, press the PROGRAM
KEY (3). The display reads:
Product Name
AA
The first alphabetical listing in the product
name library appears.
3. To change the product name, use the
PROGRAM ARROW KEYS (4) to scroll
through the product name library. When the
desired product name is highlighted, press
the PROGRAM KEY (3) to select.
To program the product
4. The display reads:
Cook Time
XX:XX
Use the PRODUCT KEYS (12) to enter the
desired cook time. Press the PROGRAM
KEY (3).
5. The display reads:
To exit the program mode
7. Press the UP ARROW KEY (4). The display
reads:
Exit
ll
Use the PROGRAM ARROW KEYS (4) to
scroll down until exit is highlighted. Press the
PROGRAM KEY (3). The display reads:
Recipe
Exit
To program another product key select
recipe. To exit the progam mode select exit.
The display reads:
Product Cnt
Programming
Use the PROGRAM ARROW KEYS (4) to
scroll down until exit is highlighed. Press the
PROGRAM KEY (3) to exit the programming
mode.
SYSTEM LEVEL PROGRAMMING
Entering the system programming mode
1. Press and hold the PROGRAM KEY (3). The
display reads:
Prod Cnt
Programming
Use the PROGRAM ARROW KEYS (4) to
highlight Programming. Press the
PROGRAM KEY (3) to select. The display
reads:
Cook Temp
XXXF (or C)
Use the PRODUCT KEYS (12) to enter the
desired cook temperature. Press the
PROGRAM KEY (3).
Use the PRODUCT KEYS (12) to enter the
programming access code 6647. Press the
PROGRAM KEY (3). The display reads:
ENTER CODE
System
ProdName Lib
Page 6

Programming the SYSTEM options
A
1. With System highlighted, press the
PROGRAM KEY (3) to select. The display
reads:
L-863
Rev C
January 4, 2008
Page 6 of 9
For Burger King - This procedure is
used to program a manual hold button.
Burger King does not use a manual hold
button.
ppliance Type
XXX
Use the PROGRAM ARROW KEYS (4) to
highlight electric half, electric full, gas half or
gas full. Press the PROGRAM KEY (3) to
select the correct appliance type.
If the appliance type is changed the display
scrolls “Are you sure, existing recipes will be
cleared?” Use the PROGRAM ARROW
KEYS (4) to select either YES or NO.
2. The display reads:
Language
XXX
Use the PROGRAM ARROW KEYS (4) to
select either English or Other. Press the
PROGRAM KEY (3) to select the desired
language.
3. The display reads:
Tone Volume
XXX
Use the PROGRAM ARROW KEYS (4) to
select None, 1, 2, 3 or 4. Press the
PROGRAM KEY (3) to select the desired
level for all audible signals.
4. The display reads:
Use the PRODUCT KEYS (12) to enter a
time of 00:00. Press the PROGRAM KEY
(3).
6. The display reads:
Setback Time
XXX
For Burger King - This procedure is
used to program a setback button.
Burger King does not use a setback
button.
Use the PRODUCT KEYS (12) to enter a
time of 00:00. Press the PROGRAM KEY
(3).
7. The display reads:
Shelf Sense
XXX
Definition – If you are using sensitivity
as a timing mode for single stage recipes
this feature must be turned on.
Use the PROGRAM ARROW KEYS (4) to
select Yes. Press the PROGRAM KEY (3).
8. The display reads:
Shelf 1 Sens
XXX
Temperature
XXX
Use the PRODUCT KEYS (12) to enter a
sensitivity level of 1–9 for shelf 1. Press the
PROGRAM KEY (3). Repeat for shelves 2–
Use the PROGRAM ARROW KEYS (4) to
5.
select either F or C. Press the PROGRAM
KEY (3) to select the desired temperature
9. The display reads:
units.
5. The display reads:
Hold Time
XXX
Preheat Time
XXX
Page 7

15. The display reads:
L-863
Rev C
January 4, 2008
Page 7 of 9
Definition – This function programs time
for the oven to idle after reaching the
preheat temperature allowing heat to
saturate the oven cavity. The preheat time
only applies to the initial preheat after a
cold start. This is strictly a prompt, the
user may begin a bake cycle even with
the preheat prompt displayed.
Use the PRODUCT KEYS (12) to enter a
preheat time of 00:00. Press the PROGRAM
KEY (3).
10. The display reads:
Recipe Stage
YES
Use the PROGRAM ARROW KEYS (4) to
select No. Press the PROGRAM KEY (3).
11. The display reads:
Recipe Name
YES
This enables you to program a product name
Use the PROGRAM ARROW KEYS (4) to
select either Yes or No. Press the
PROGRAM KEY (3).
12. The display reads:
Recipe Shelf
YES
Use the PROGRAM ARROW KEYS (4) to
select No. Press the PROGRAM KEY (3).
13. The display reads:
Recipe Fan Speed
YES
Recipe Alarm
YES
Use the PROGRAM ARROW KEYS (4) to
select No. Press the PROGRAM KEY (3).
16. The display reads:
Recipe Hold
YES
Use the PROGRAM ARROW KEYS (4) to
select No. Press the PROGRAM KEY (3).
17. The display reads:
Recipe Timing
YES
Use the PROGRAM ARROW KEYS (4) to
select No. Press the PROGRAM KEY (3).
18. The display reads:
Global Timing
YES
Definition: There are 3 options for
timing mode when shelf cooking:
Straight, Flex and Sensitivity. Straight
has no time adjustment. Flex adjusts the
cook time to compensate for any
difference between the setpoint and
actual temperature. Sensitivity enables a
product key to have a flex adjustment for
each of the five shelves. Sensitivity
values are set in the manager level
programming.
Use the PROGRAM ARROW KEYS (4) to
select Sensitivity. Press the PROGRAM KEY
(3).
Use the PROGRAM ARROW KEYS (4) to
select No. Press the PROGRAM KEY (3).
14. The display reads:
Recipe Fan Cycle
YES
Use the PROGRAM ARROW KEYS (4) to
select No. Press the PROGRAM KEY (3).
Programming the PRODUCT NAME
NOTE: Use these instructions to modify an
existing name, to add a product name or
to delete a name already in the library.
NOTE: Names may be up to 16 characters long
and can contain letters and numbers.
1. After entering the manager level
programming (see page 7) the display reads:
Page 8

L-863
A
A
A
Rev C
January 4, 2008
Page 8 of 9
System
ProdName Lib
With ProdName Lib highlighted, press the
PROGRAM KEY (3) to select. The display
reads:
Prod Name Lib
2. Use the up and down PROGRAM ARROW
KEYS (4) to scroll through the existing
product names. Or press the PRODUCT
KEY (12) that corresponds with the first letter
of the name you are looking for. Then use
the PROGRAM ARROW KEYS (4) to scroll
to the desired name.
3. Press the SCAN KEY (9) to edit the name.
4. Use the PRODUCT KEYS (12) to edit the
product name. Press the right arrow key to
advance to the next character.
To clear the product name, press the
TEMP/TOGGLE/CLEAR KEY (11).
NOTE: Use product key 1 for spaces,
periods, quotation marks and
underlines.
5. Once the product name has been entered,
press the PROGRAM KEY (3). The display
reads:
Programming the ALARM NAME
NOTE: Use these instructions to modify an
existing name, to add an alarm name or
to delete a name already in the library.
NOTE: Names may be up to 16 characters long
and can contain letters and numbers.
1. After entering the system level programming
(see page 7) the display reads:
System
ProdName Lib
Use the PROGRAM ARROW KEYS (4) to
highlight Alarm Lib. Press the PROGRAM
KEY (3) to select. The display reads:
larm Name Lib
2. Use the up and down PROGRAM ARROW
KEYS (4) to scroll through the existing alarm
names. Or press the PRODUCT KEY (12)
that corresponds with the first letter of the
name you are looking for. Then use the
PROGRAM ARROW KEYS (4) to scroll to
the desired name.
3. Press the SCAN KEY (9) to edit the name.
4. Use the PRODUCT KEYS (12) to edit the
alarm name. Press the right arrow key to
advance to the next character.
Save Library
DD
Use the PROGRAM ARROW KEYS (4) to
select either ADD, MODIFY or CANCEL.
Select ADD to create a new product name.
Select MODIFY to change an existing
product name. Select CANCEL to exit the
edit mode without saving your changes.
NOTE: To delete an existing product name,
find the name in the product library.
Press the TEMP/TOGGLE/CLEAR
KEY (11) to clear the entire product
name. Then select MODIFY to
overwrite the name with a clear
screen.
6. Press the PROGRAM KEY (3) to exit the
product name library.
To clear the alarm name, press the
TEMP/TOGGLE/CLEAR KEY (11).
NOTE: Use product key 1 for spaces,
periods, quotation marks and
underlines.
5. Once the alarm name has been entered,
press the PROGRAM KEY (3). The display
reads:
Save Library
DD
Use the PROGRAM ARROW KEYS (4) to
select either ADD, MODIFY or CANCEL.
Select ADD to create a new alarm name.
Select MODIFY to change an existing alarm
name. Select CANCEL to exit the edit mode
without saving your changes.
NOTE: To delete an existing alarm name,
find the name in the product library.
Page 9

Press the TEMP/TOGGLE/CLEAR
KEY (11) to clear the entire alarm
name. Then select MODIFY to
overwrite the name with a clear
screen.
6. Press the PROGRAM KEY (3) to exit the
alarm name library.
Exiting the system program mode
1. The display reads:
System
ProdName Lib
Use the PROGRAM ARROW KEYS (4) to
scroll up until Exit is highlighted. Press the
PROGRAM KEY (3). The display reads:
Prod Cnt
Programming
L-863
Rev C
January 4, 2008
Page 9 of 9
Use the PROGRAM ARROW KEYS (4) to
scroll up until Exit is highlighted. Press the
PROGRAM KEY (3) to exit the programming
mode.
 Loading...