

Page 1

BCPĆ61, BCPĆ101 and BCPĆ102
INSTALLATION - OPERATION - MAINTENANCE
BCPĆ61, BCPĆ101 et BCPĆ102
MANUEL D'INSTALLATION - FONCTIONNEMENT - ENTRETIEN
BLODGETT COMBI
www.blodgett.com
44 Lakeside Avenue, Burlington, Vermont 05401 USA Telephone (800) 331Ć5842, (802) 860Ć3700 Fax: (802)864Ć0183
PN 60739 Rev A (6/10)
E 2010 - G.S. Blodgett Corporation
Page 2

A PERSONAL WORD FROM BLODGETT COMBI
QUELQUES MOTS DE BLODGETT COMBI
Congratulations on your purchase of a BLODGETT Combi appliance. We
firmly believe that your choice has been a wise one, and trust you will reĆ
ceive many years of excellent service from your new Combi.
You will find that cooking with Combi appliances saves time, labor and
extensive cleaning of both the kitchen and the unit.
With Combi appliances the quality, taste, consistency, and look of your
food are improved, thus endorsing the policy to which we've always adĆ
hered: For Better Cooking!"
Once you've had a chance to use your Combi, please tell us, your dealer
and colleagues about any creative and interesting applications you have
discovered; exchange ideas with other users. Be sure to advise us or
your dealer immediately should any mechanical or technical problems
be encountered (...we're here to help!) and above all Enjoy Cooking the
BLODGETT Combi Way!
For information on cooking, please refer to our separate cooking guide.
Toutes nos félicitations sur votre achat d'appareil de Blodgett Combi.
Nous croyons fermement que votre choix est un choix raisonnable et
nous sommes certains que vous obtiendrez de nombreuses années
d'excellent service de votre nouveau four multiĆusages.
Vous allez découvrir que la cuisson dans les appareils Combi économise
le temps, le travail et le degré de nettoyage de l'appareil aussi bien que
de la cuisine.
Avec les appareil de Combi, la qualité, le goût, la consistence et l'apparĆ
ence des aliments sont améliorés, s'accordant, de ce fait, avec notre
politique "Pour une meilleure cuisson !"
Une fois que vous aurez eu la chance d'utiliser notre Combi, informez
nous, votre concessionnaire et vos collègues, de toutes les applications
nouvelles et intéressantes que vous avez découvertes ; échangez vos
idées avec d'autres utilisateurs. N'hésitez pas à nous prévenir, ou votre
concessionnaire, de tout problème mécanique ou technique que vous
pourriez rencontrer (... nous sommes ici pour vous aider) et parĆdessus
tout RégalezĆvous à cuisiner à la façon BLODGETT Combi!
Pour obtenir de plus amples informations sur l'art culinaire, veuillez conĆ
sulter notre livre de cuisine séparé.
Page 3

IMPORTANT
WARNING: IMPROPER INSTALLATION, ADJUSTMENT, ALTERATION, SERVICE OR
MAINTENANCE CAN CAUSE PROPERTY DAMAGE, INJURY OR DEATH. READ THE
INSTALLATION, OPERATING AND MAINTENANCE INSTRUCTIONS THOROUGHLY
BEFORE INSTALLING OR SERVICING THIS EQUIPMENT
AVERTISSEMENT: UNE INSTALLATION, UN AJUSTEMENT, UNE ALTÉRATION, UN
SERVICE OU UN ENTRETIEN NON CONFORME AUX NORMES PEUT CAUSER DES
DOMMAGES À LA PROPRIÉTE, DES BLESSURES OU LA MORT. LISEZ ATTENTIVEĆ
MENT LES DIRECTIVES D'INSTALLATION, D'OPÉRATION ET D'ENTRETIEN AVANT
DE FAIRE L'INSTALLATION OU L'ENTRETIEN DE CET ÉQUIPEMENT.
FOR YOUR SAFETY
Do not store or use gasoline or other flammable vapors or liquids in the vicinity
of this or any other appliance.
AVERTISSEMENT
Ne pas entreposer ni utiliser de l'essence ni d'autres vapeurs ou liquides inflamĆ
mables dans le voisinage de cet appariel, ni de tout autre appareil.
The information contained in this manual is important for the proper installation,
use, and maintenance of this oven. Adherence to these procedures and instrucĆ
tions will result in satisfactory baking results and long, trouble free service.
Please read this manual carefully and retain it for future reference.
Les informations données dans le présent manuel sont importantes pour installer,
utiliser et entretenir correctement ce four. Le respect de ces instructions et procéĆ
dures permettra d'obtenir de bons résultats de cuisson et une longue durée de serĆ
vice sans problèmes. Veuillez lire le présent manuel et le conserver pour pouvoir
vous y reporter à l'avenir.
Errors: Descriptive, typographic or pictorial errors are subject to correction. SpecificaĆ
tions are subject to change without notice.
Erreurs:Les erreurs de description, de typographie ou d'illustration font l'objet de
corrections. Les caractéristiques sont sujettes à modifications sans préavis.
Page 4

Your Service Agency's Address:
Adresse de votre agence de service:
Model/Modèl:
Serial Number/Numéro de série:
Your appliance was installed by/
Installateur de votre four:
Your oven's installation was checked by/
Contrôleur de l'installation de votre four:
Page 5

Table of Contents/Table des Matières
Introduction
The Blodgett Combi-Oven/Steamer 2.....
Description of the Combi-Oven/Steamer 3.
Installation
Agency Approvals 4....................
Utility Specifications 5...................
Unpacking the Oven 6..................
Oven Location and Leveling 7............
Plumbing Connections 8................
Electrical Connection and Ventilation 9....
Final Check Lists 10.....................
Operation
Blodgett Programmable Control
Introduction 11..........................
BCP Cooking Modes 12..................
Welcome Screen 14.....................
Work Menu 15..........................
Manual Cooking 16......................
Core Probe Cooking 21..................
Programmed Cooking 25.................
Programming a Product 27...............
Programming a Product 31...............
Setting a Timed Start 32..................
Setting Preset Time & Temperature 35.....
Oven Setup 36..........................
USB Functions 38.......................
HACCP Library 40.......................
Optional CombiNet 42...................
Maintenance
Cleaning & Preventative Maintenance 44...
Deliming 46.............................
Introduction
Le four-étuveur Combi de Blodgett 48......
Descriptiondufour-étuveurCombi 49......
Installation
Certifications 50.........................
Caractéristiques techniques relatives
aux services publics 51..................
Déballage du four 52....................
Choix de l’emplacement et nivellement
du four 53..............................
Robinetterie 54..........................
Raccordement à l’électricité e
Ventilation 55...........................
Liste de vérification finale 56..............
Fonctionnement
Introduction à la commande
programmable Blodgett 57...............
Modes de cuisson BCP 58...............
Image-écran d’accueil 61.................
Menu Travail (Work) 62...................
Cuisson manuelle 63....................
Cuisson à la sonde de température 69.....
Cuisson programmée 74.................
Programmation d’un produit 76...........
Programmation d’un produit 80...........
Établissement d’un allumage temporisé 81
Établissement d’une durée et d’une
température prédéterminées 84...........
Configuration du four 85.................
Fonctions BSU (USB) 87.................
Bibliothèque ARMPC (HACCP) 90.........
Fonction optionnelle CombiNet 92.........
.
Entretien
Nettoyage et entretien préventif 94........
Détartrage 96...........................
Page 6

Introduction
The Blodgett CombiĆOven/Steamer
The Blodgett CombiĆOven/Steamer offers a comĆ
pletely new method of cooking. With the Oven/
Steamer you have the choice of two cooking proĆ
cesses: Steam and Hot Air, either...
D Separately
D Combined, or
D In Sequence
And for easy operation you can choose from three
primary cooking modes:
In the Steam mode you can:
steam reheat reconstitute
stew thaw simmer
blanch preserve braise
poach
In the Hot Air mode you can:
roast bake
grill gratinate
broil
In the two Combi modes you can:
defrost roast rethermalize
reheat bake forced steaming
There are four additional specialized modes to
help you make the most of your time:
Retherm - for perfect reheating
Proofing - Proof and bake all in the same oven
Preheat - in this mode the oven will preheat to
575_F (300_C) for 15 minutes. The oven will then
automatically lower to 480_F (249_C) to protect
the advanced electronic components.
Cool Down - allows the oven cavity to cool down
rapidly with the door opened
You āācan also āāuse āātwo āāor āthree functions in seĆ
quence during one cooking process. We call this:
D combiĆsteaming
D combiĆroasting
D combiĆbaking
The combination of circulating hot air and steam
in the space saving, high performance CombiĆ
Oven/Steamer leads to improvements in the folĆ
lowing areas:
D increased productivity in the kitchen
D a reduction in capital expenditures for multiple
equipment replacement
D a wider range of menu choices
D a simplified cleaning process
The work process is simplified since products are
prepared on or in steam table āpans āand trays.
Food can be cooked, stored, and transported with
āthe āsame āāpans. āSmall āamounts of product can be
processed efficiently; preĆcooked and conveĆ
nience foods can be reheated within minutes.
āMany frozen foods can be processed without preĆ
thawing. This flexibility in preparation reduces the
need for kettles and steam tables since there is no
need for large amounts of food to be kept warm for
long periods of time.
Today the improvement of food quality is more imĆ
portant than ever. Vegetables are cooked in the
Blodgett CombiĆOven/Steamer without water at
the optimal temperature of just under 212_F
(100_C), maintaining valuable vitamins, minerals,
nutrients and trace elements. Cooking meat in the
Combi results in less shrinkage and a firmer, juicier
product. The Blodgett CombiĆOven/Steamer is
being used more and more for baking. Steam and
Hot āAir āmodes āmake āit āa āgeneral āpurpose baking
appliance.
2
Page 7

Introduction
Description of the CombiĆOven/Steamer
ABOUT THE OVEN/STEAMER
Blodgett CombiĆOven/Steamers are quality proĆ
duced using highĆgrade stainless steel with first
class workmanship.
The multiple speed fan, which is guarded against
accidental finger contact, is driven by a quiet and
powerful motor. The condenser draws out excess
steam from the appliance. Condensation and
waste water, which result during steaming and
cleaning, are continuously drained.
The use of high quality insulation impedes excesĆ
sive heat radiation and saves energy.
The high performance fresh steam generator with
its control system makes it possible to enjoy all of
the advantages of a high quality steamer at the
flick of a switch. Fresh steam enters the oven cavĆ
ity without pressure and is circulated at high
speed. This process enables quick and gentle
cooking and ensures high quality food while proĆ
viding convenient working methods. The steam
generator is completely automatic and protected
from running dry.
OVEN/STEAMER OPERATION
The practical oven door, with a viewing window,
has a wide swing radius and handle which can be
operated easily, even with wet or greasy hands.
Ease of operation is guaranteed through the simĆ
ple to use touchscreen control. With graphical
symbols and storage for 200 product recipes the
BCP is easy for even inexperienced kitchen staff
to operate.
Cleaning is kept to a minimum thanks to the autoĆ
matic Combi Wash system.
3
Page 8
Installation
Agency Approvals
THE INSTALLATION INSTRUCTIONS CONĆ
TAINED HEREIN ARE FOR THE USE OF QUALIĆ
FIED INSTALLATION AND SERVICE PERSONNEL
ONLY. INSTALLATION OR SERVICE BY OTHER
THAN QUALIFIED PERSONNEL MAY RESULT IN
DAMAGE TO THE OVEN AND/OR INJURY TO
THE OPERATOR.
Qualified installation personnel are individuals, a
firm, a corporation, or a company which either in
person or through a representative are engaged
in, and are responsible for:
D The installation or replacement of gas piping.
The connection, installation, repair or servicing
of equipment.
D The installation of electrical wiring from the elecĆ
tric meter, main control box or service outlet to
the electric appliance.
Qualified installation personnel must be experiĆ
enced in such work, be familiar with all precauĆ
tions required and have complied with all requireĆ
ments of state or local authorities having
jurisdiction.
U.S. and Canadian Installations
Installation must conform with local codes, or in
the absence of local codes, with the National Fuel
Gas Code, NFPA54/ANSI Z223.1-Latest Edition,
the Natural Gas Installation Code CAN/CGAĆ
B149.1 or the Propane Installation Code, CAN/
CGAĆB149.2 as applicable.
Reference: National Electrical Code, ANSI/NFPA
70-Latest Edition and/or Canadian Electrical
Code CSA C22.1 as applicable.
This equipment is to be installed in compliance
with the Basic Plumbing Code of the Building OffiĆ
cials and Code Administrators International Inc.
(BOCA) and the Food Service Sanitation Manual of
the Food and Drug Administration (FDA).
Appliance is to be installed with backflow prevenĆ
tion in accordance with applicable federal, provĆ
ince and local codes.
General Export Installations
Installation must conform with Local and National
installation standards. Local installation codes and/
or requirements may vary. If you have any questions
regarding the proper installation and/or operation of
your appliance, please contact your local distributor.
If you do not have a local distributor, please call
Blodgett Combi at 0011Ć802Ć860Ć3700.
4
Page 9
Installation
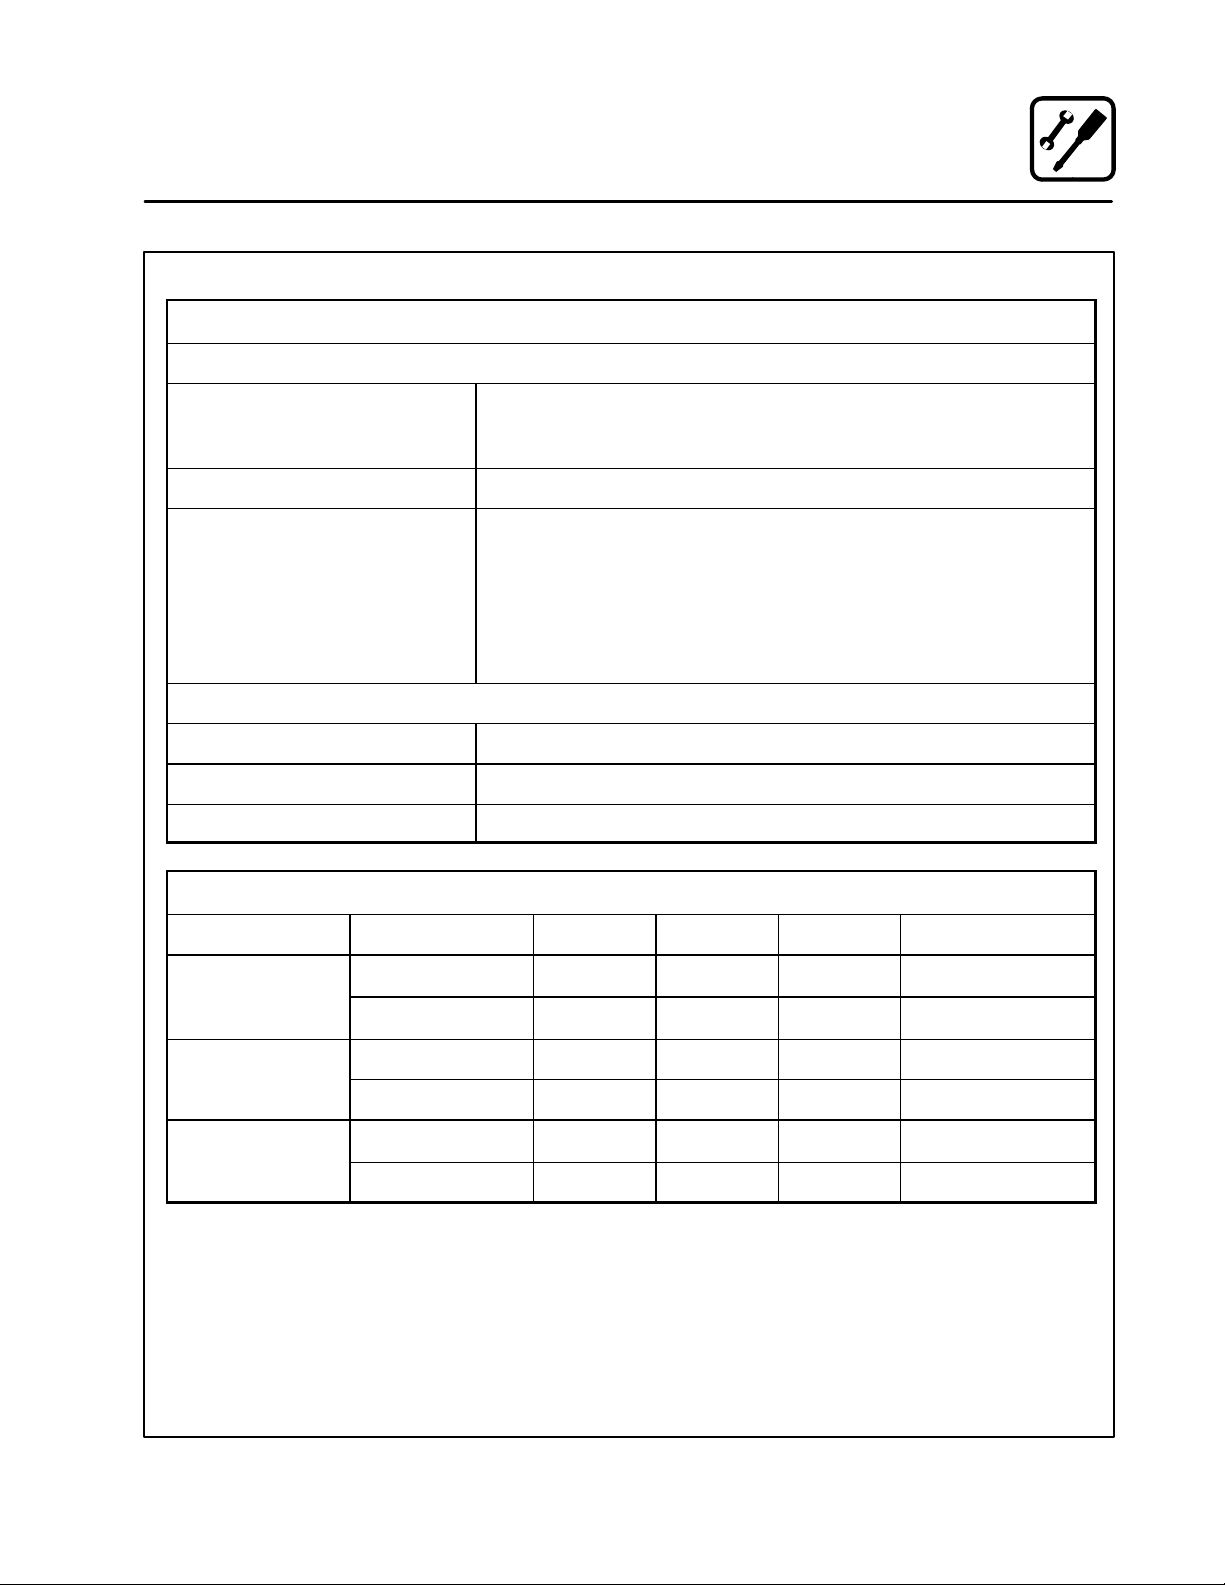
Utility Specifications
PLUMBING SPECIFICATIONS - BCPĆ61E, BCPĆ101E and BCPĆ102E
WATER
Water Pressure 36.26 PSI (250 kPa, 2.5 bar) during Combi Wash
21.76 PSI (150 kPa, 1.5 bar) when Combi Wash is not active
87 PSI (600 kPa, 6 bar) maximum
Water Connection 3/4" garden hose cold water
Minimum Requirements TDS - less than 100 parts per million
Total Hardness - 80Ć120 parts per million
Chlorides - less than 30 parts per million
pH Factor - 7.0Ć8.0
Chlorine - 0 parts per million
DRAINAGE
Drain Type Atmospheric Vented Drain
Drain Connection 2.00" (50.8mm) Copper
Avg Water Drain Temp. Approximately 140_F (60_C)
ELECTRICAL RATINGS - BCPĆ61E, BCPĆ101E and BCPĆ102E
Model Voltage kW Hz Phase Max Load (amps)
BCPĆ61E 208 9 60 3 25
240 9 60 3 22
BCPĆ101E
BCPĆ102E 208 27 60 3 75
208 18 60 3 50
240 18 60 3 44
240 27 60 3 65
5
Page 10
Installation
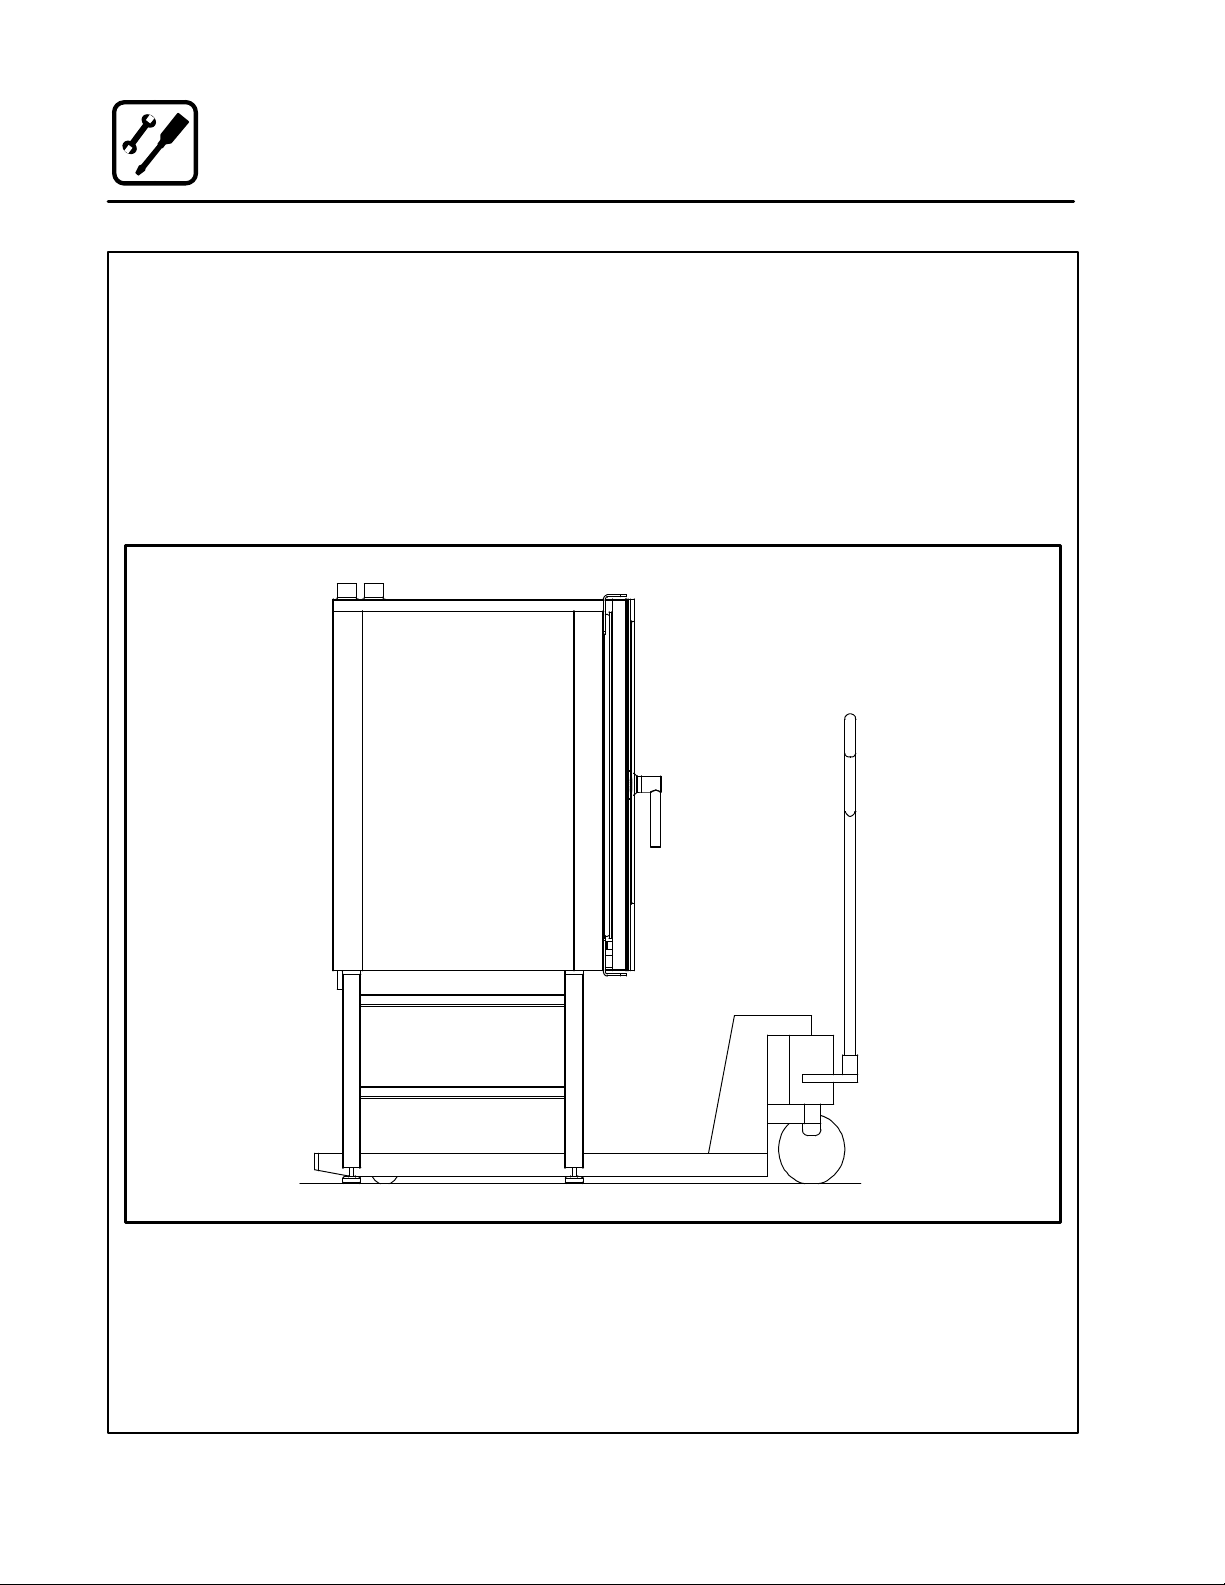
Unpacking the Oven
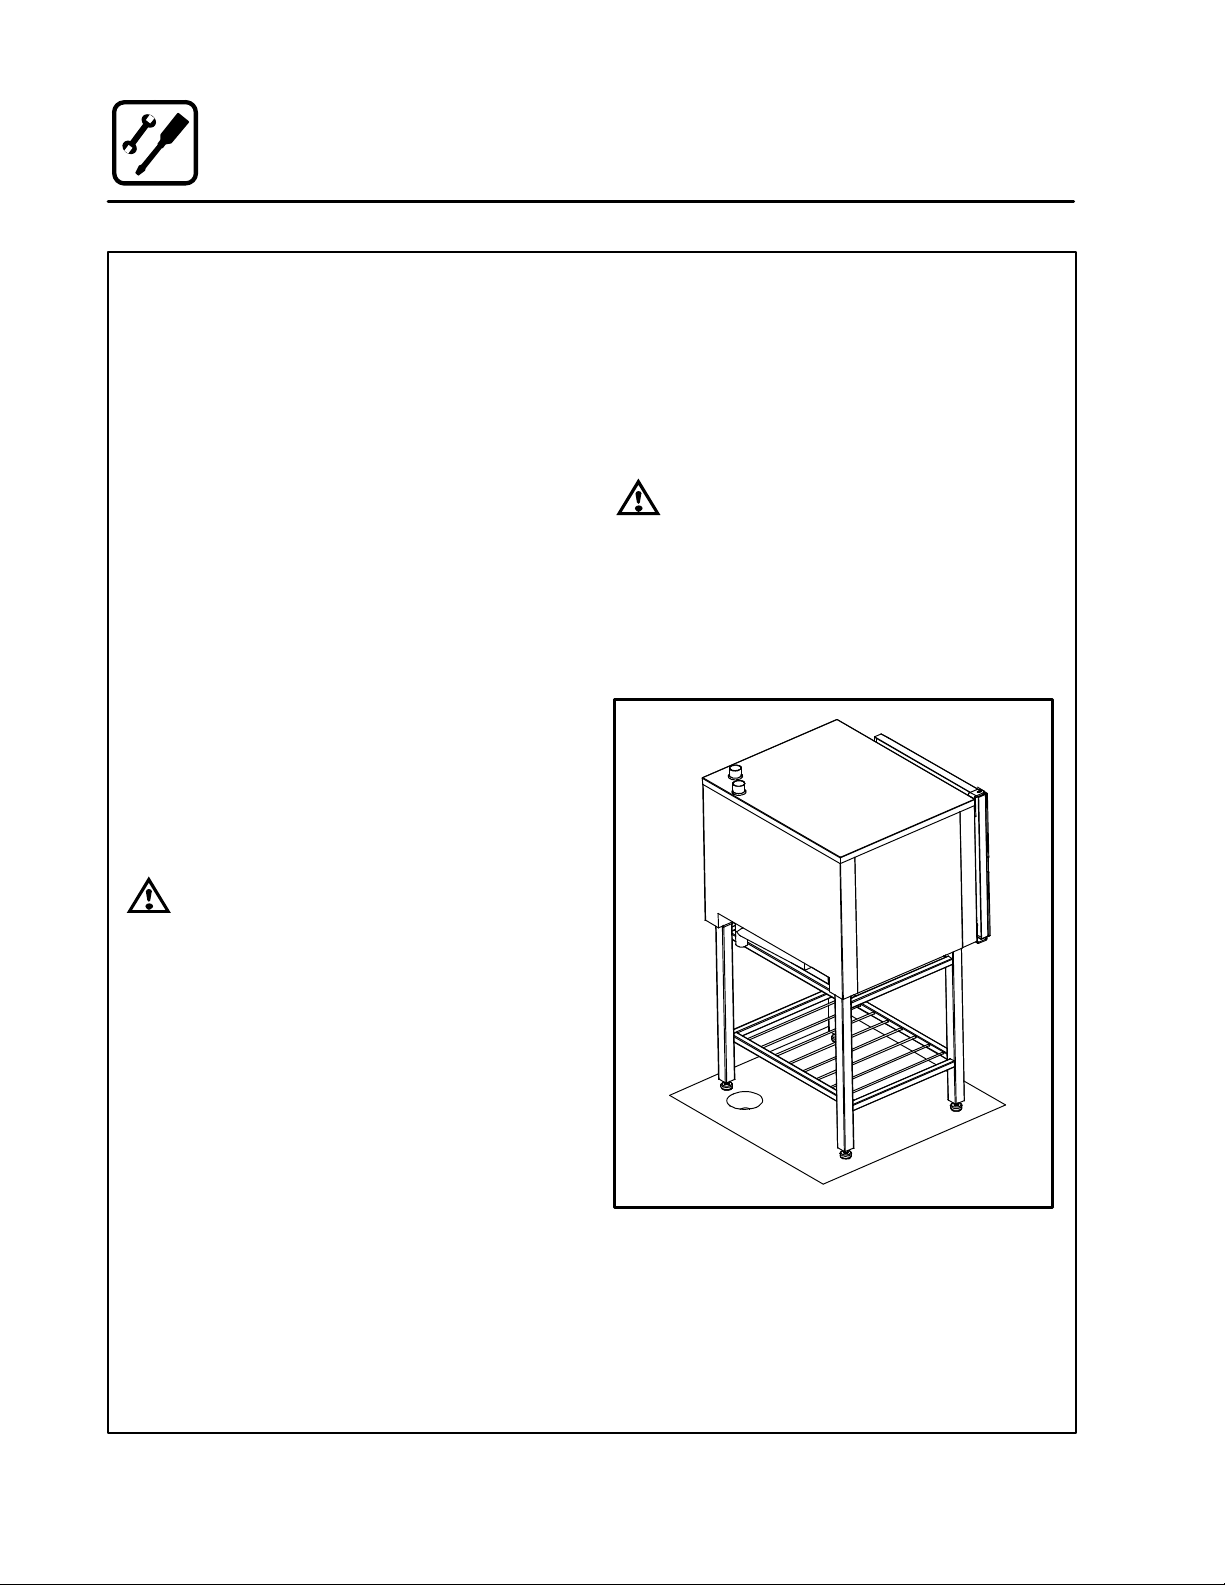
The oven is best handled while still in its wrapping.
Wherever possible, use a rolling lift.
1. Roll the lift under the lower cross tube of the
stand Place a couple of wooden blocks beĆ
tween the cross tube and the lift.
NOTE: To achieve the best possible balance,
roll the lift from the front of the oven or
from the motor side.
NOTE: If necessary, the oven can also be
lifted off the stand.
2. Remove the original packaging from the oven.
Do not remove the vinyl that covers the stainĆ
less steel surface until the oven has been
installed. Once the vinyl has been removed,
the surfaces are vulnerable to sharp objects
such as tools.
3. Remove all packaging material that secures
the racks in the oven chamber.
Figure 1
6
Page 11
Installation
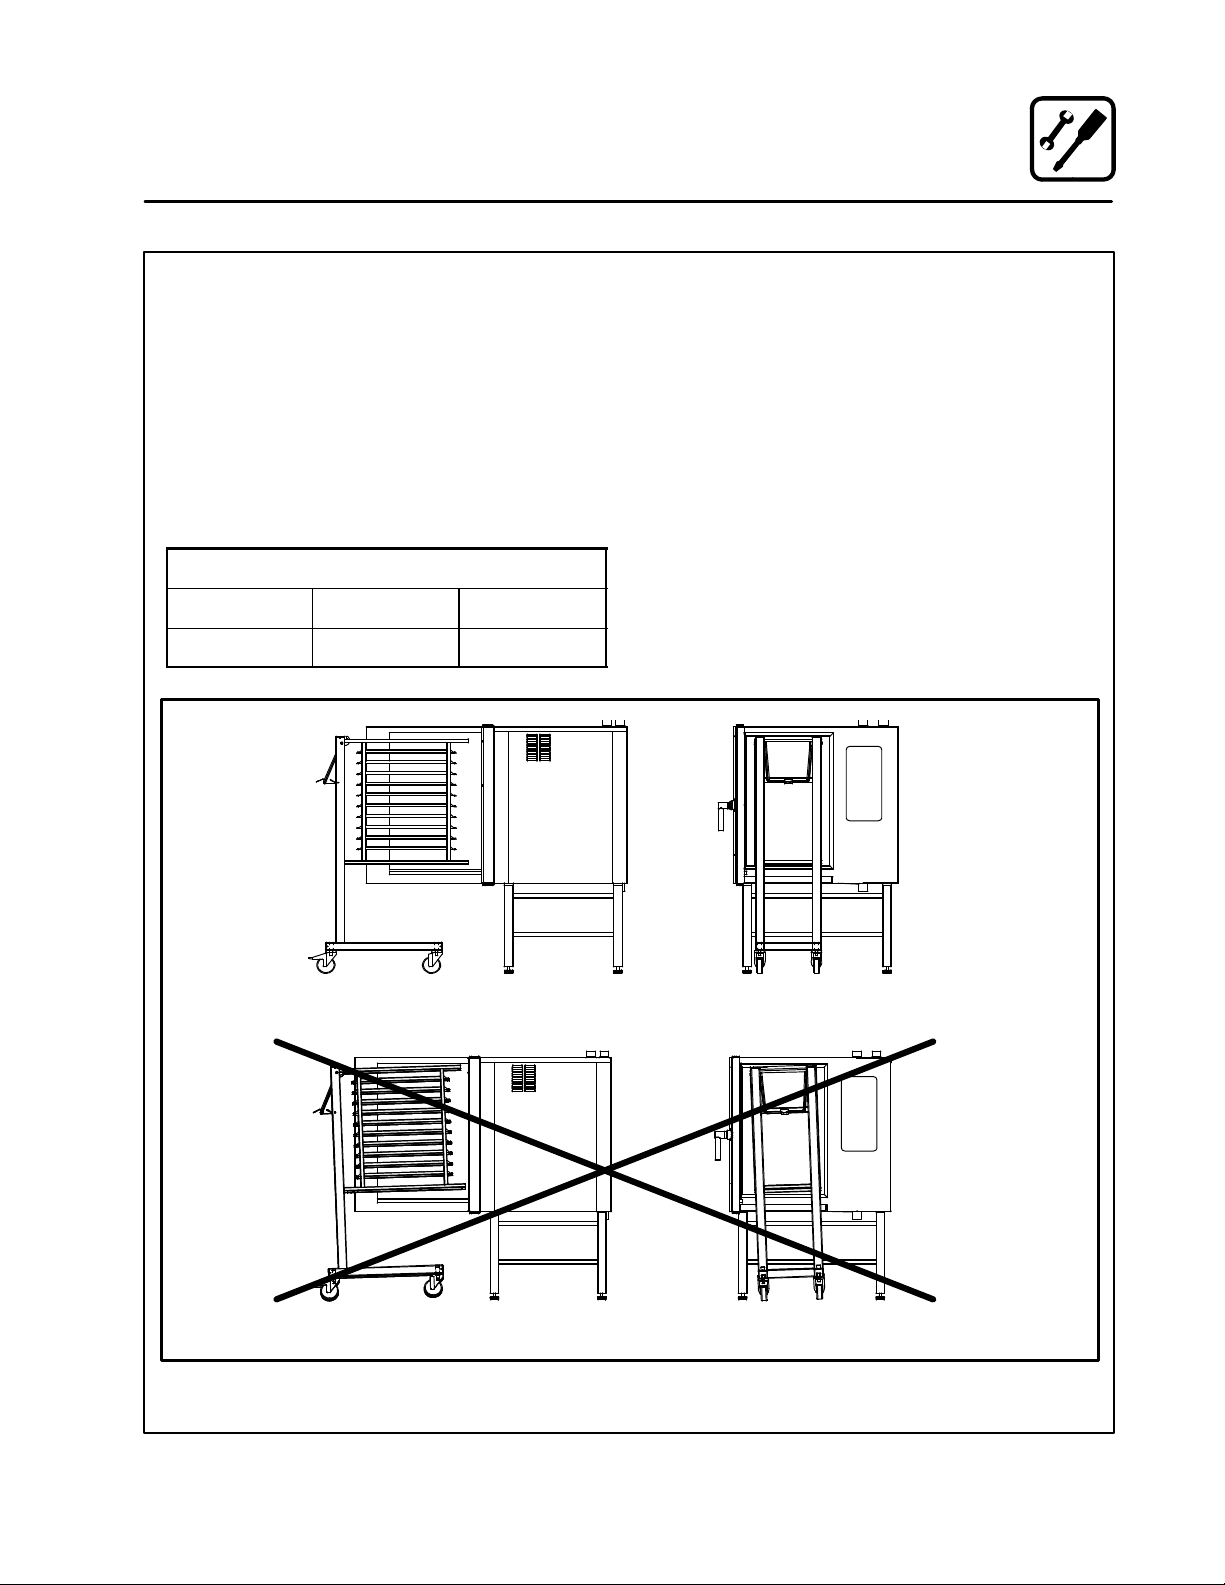
Oven Location and Leveling
The well planned and proper placement of your
oven will result in long term operator convenience
and satisfactory performance.
Certain minimum clearances must be maintained
between the oven and any combustible or nonĆ
combustible construction.
Strong sources of heat such as hotplates, tilting
frying pans, deep fat fryers, etc. should not be
placed near the oven, especially near its right side.
An optional side heat shield is available.
MINIMUM REQUIRED CLEARANCES
Right Side Left Side Back
2.75" (7cm) 2.75" (7cm) 2" (5cm)
In addition, the following clearances are recomĆ
mended for servicing.
D Oven body sides - 12" (30cm)
D Oven body back - 12" (30cm)
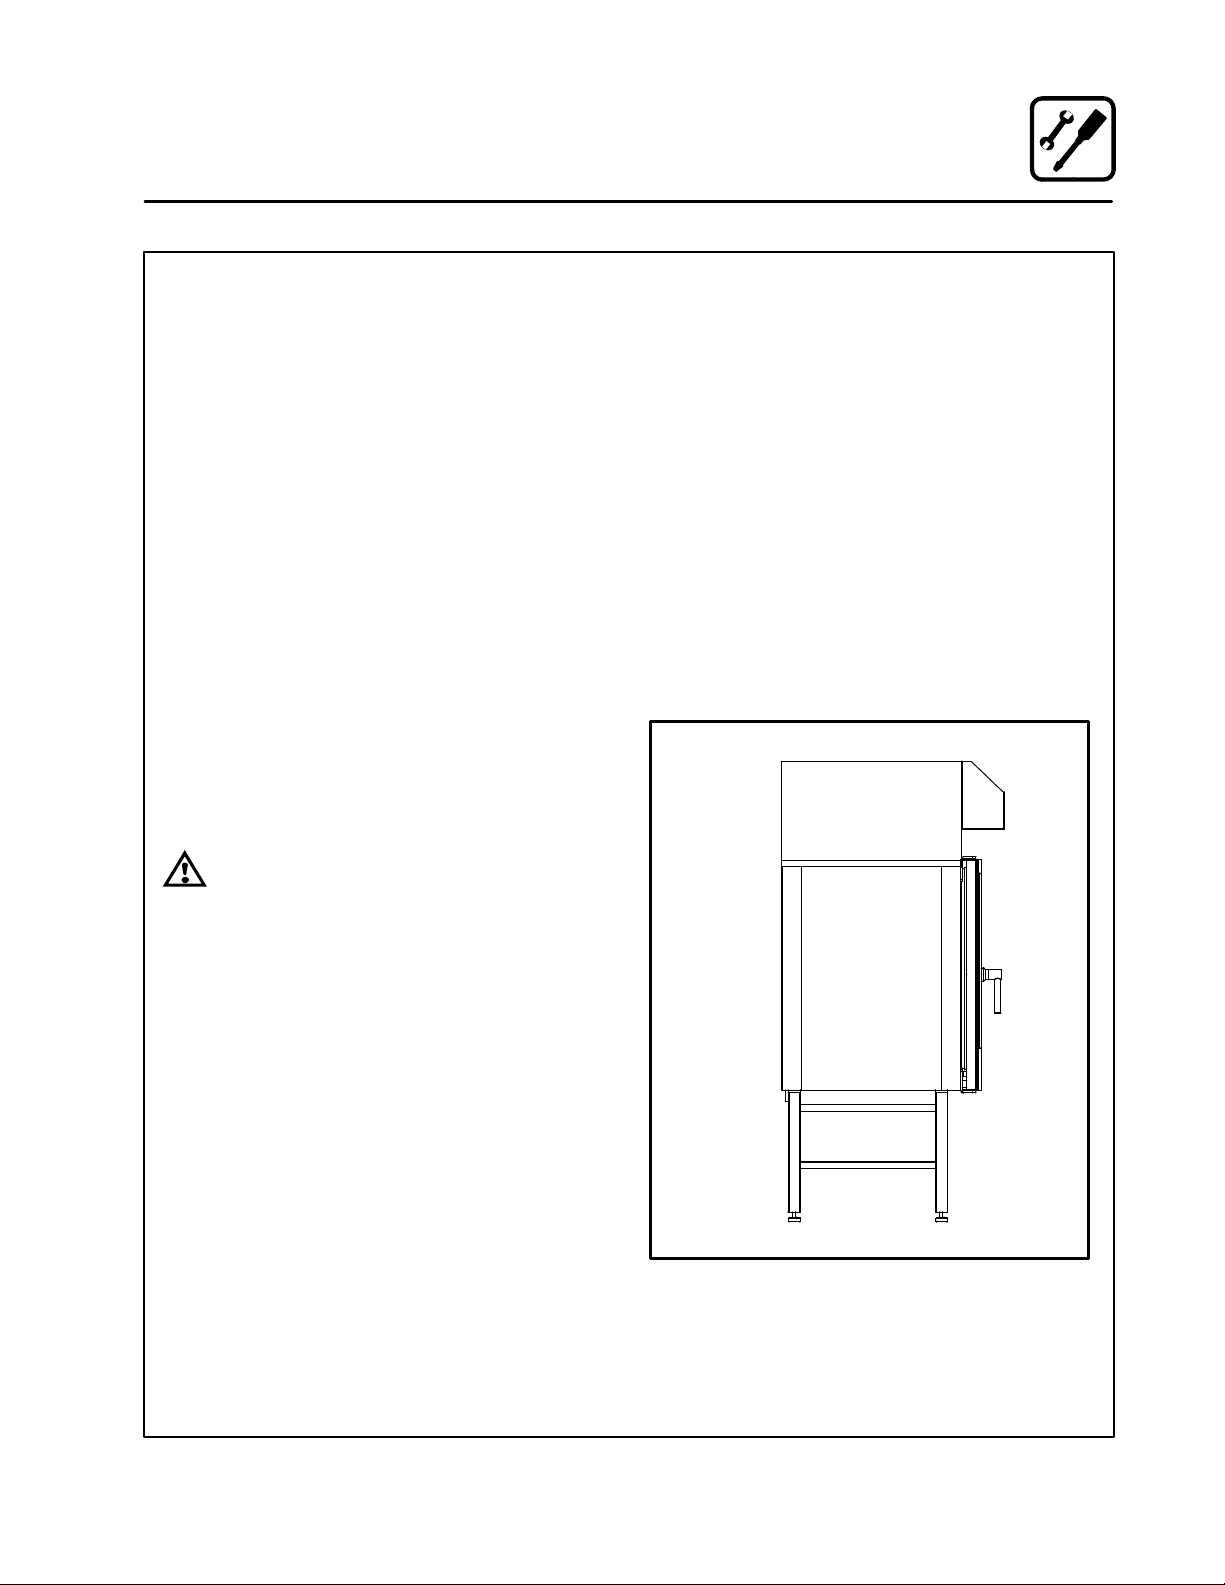
To ensure that the oven functions correctly
when installed, it should be placed upright and
level (horizontally). This is measured at the
front and side edge of the roof. The oven can be
levelled using the adjusting screws on the
stand or on the legs of table models. The height
of the oven should also be adjusted to fit the
trolley for rack.
CORRECT INSTALLATION
INCORRECT INSTALLATION
Figure 2
7
Page 12
Installation
Plumbing Connections
WATER CONNECTION
Blodgett BCP ovens have one or two water conĆ
nections. In the case of two water connections, the
following applies:
D 1 connection for raw water for the condensation
jet (cold water). The connection is located on
the back.
D 1 connection for the steam generator and the
Combi Wash jet in the oven chamber. Must
meet the requirements applying to water supĆ
plied to household appliances; however, hot
water with a temperature not exceeding 120°F
(49°C) can be used. The connection is located
at the front.
To facilitate cleaning and servicing, the oven
should be connected with an approved flexible
3/4" hose. Permanent installations should be fitted
with a stopĆtap and a nonĆreturn valve.
If the feeder is connected to the water distribution
system with a flexible hose, this hose should be VA
approved.
Before connecting the oven to water, flush the
tubes thoroughly. Connect the oven.
DRAIN CONNECTION
Blodgett ovens are equipped with a drain system
that removes surplus water from the oven chamĆ
ber. This may be condensed water from the prodĆ
ucts, or it may occur when the oven chamber is
cooled down with cold water, or when the oven
chamber is cleaned.
WARNING!!
Connection must be carried out by an auĆ
thorised plumber, to an open or closed
drain. The drain must never end directly
beneath the oven.
The drain must be of stainless steel or an equally
temperatureĆresistant material, have a diameter of
at least 2" (49 mm) and a fall of at least 3° or 5%.
WARNING!!
If the water temperature exceeds 70°F
(21°C), problems with regard to Combi
Optima calibration and cooling of the
oven may occur.
Ovens with a steam generator must not be
connected to a reversed osmosis plant,
as this may cause problems with the readĆ
ing of the water level in the steam generaĆ
tor.
The water connection must be carried out
by an authorised plumber in accordance
with existing local codes.
Clogged up water filters and dirt in the soĆ
lenoid valves are not covered by the warĆ
ranty.
Figure 3
8
Page 13
Installation
Electrical Connection and Ventilation
ELECTRICAL CONNECTION
NOTE: Electrical connections must be performed
by a qualified installer only.
Before making any electrical connections to these
appliances, check that the power supply is adeĆ
quate for the voltage, amperage, and phase reĆ
quirements stated on the rating name plate
mounted on the appliance.
1. The rating plate is located on the right side of
the oven.
An approved plug outlet or a safety cutout must be
located close to the oven so that the oven can be
disconnected during installation and repair. The
safety cutout must be able to cut off all poles with
a total distance of break of at least 3 mm.
All appliances must be installed in accordance
with Local or National Electrical codes.
The wiring diagram is located in the motor
compartment.
NOTE: Disconnect the power supply to the apĆ
pliance before servicing.
WARNING!!
Improper installation may invalidate your
warranty.
VENTILATION
Blodgett BCP ovens are equipped with an open/
direct exhaust system that removes surplus huĆ
midity from the oven chamber. The exhaust sysĆ
tem has an electrically operated damper.
The ventilation motor can be controlled directly
from the oven. This means that the ventilation
starts when a program is started and runs for 10
minutes after the program is completed.
The exhaust tube can be connected to a ventilaĆ
tion system. In that case, a special extraction funĆ
nel is fitted to avoid suction directly from the oven
chamber. This extraction funnel can be ordered
from Blodgett.
If an extraction hood is installed in the ceiling
above the oven, it should project 20" (50 cm) over
the front of the oven.
Figure 4
9
Page 14

Installation
Final Check Lists
WARNING!!
Final check list must be performed by a
qualified installer only.
OVEN EXTERIOR
j Check that the oven has not been damaged
in transit (dents, scratches, etc.)
j Check/adjust the height and check that the
oven is placed level (horizontally)
j Check/adjust oven door
CONNECTIONS
j Check for correct water connection
j Turn on water supply
j Check for leaks
j Turn off water supply
j Check and clean dirt filter
j Turn on water supply again
j Check hand shower
j Check for correct electrical connection
j Check connection to drip tray
j Check for correct mounting of drip tray
j Check for correct fall of hose from drip tray,
and check for leaks
j Check for correct exhaust and drain connecĆ
tion
j Clean the oven
j Apply steel oil
OVEN INTERIOR
j Check that filter housing is mounted correctly
j Check interior light
j Clean the oven
CONTROL
j Check and adjust, if necessary, each of the
preset values
j Heat up the oven at 480° F (249°C) for approxĆ
imately 5 minutes.
10
Page 15
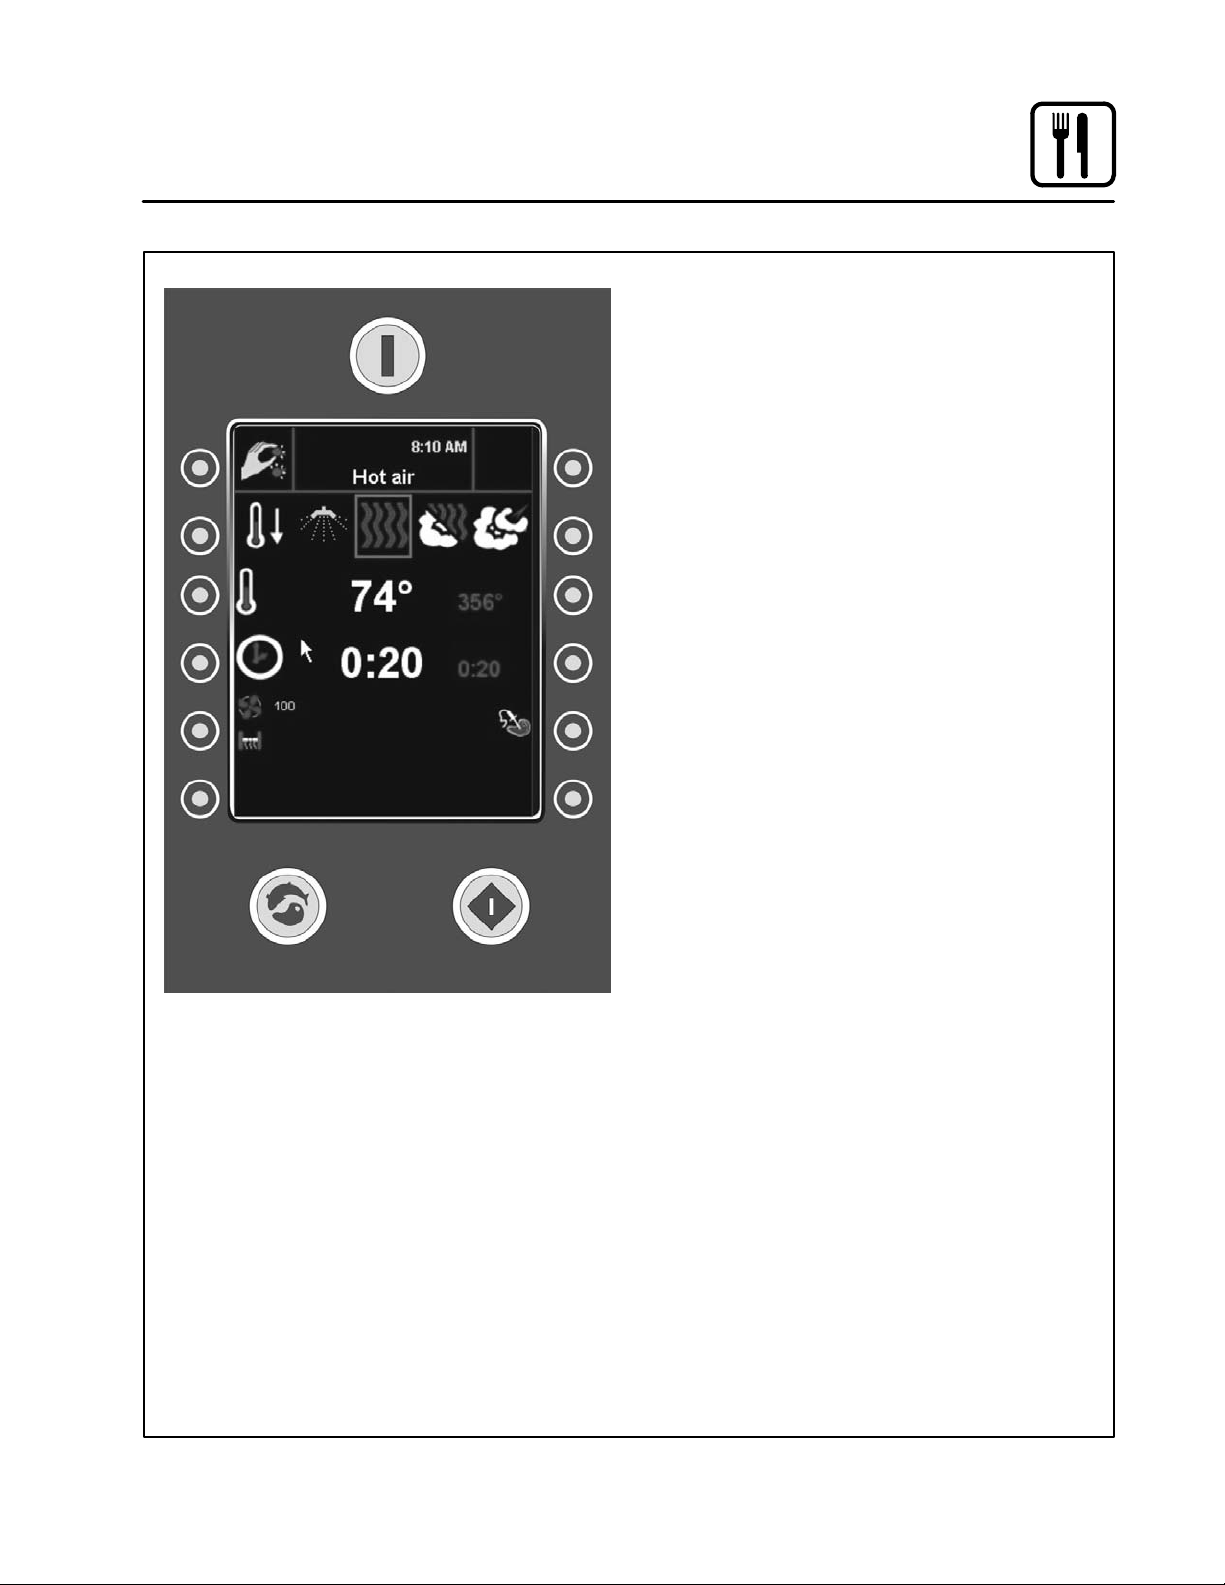
Figure 5
Operation
Blodgett Programmable Control Introduction
The BCP ovens include the versatile Blodgett ProĆ
grammable control. The control features:
D Multiple cooking modes include hot air, combi
with CombiOptima, reheating/regenerating,
steaming, lowĆtemperature steaming, forced
steaming, proofing, cooling, and preheating
D CombiOptima automatically measures and
controls the humidity level in the oven, helping
to retain the appearance and juiciness of the
product.
D Easy to use touch panel with crystal clear TFT
display
D Stores up to 200 recipe programs with 10 cookĆ
ing stages each. Recipes can be grouped into
categories (beef, chicken, cookies, etc.) for
easy retrieval.
D External core temperature probe with 3 measurĆ
ing points. Ability to run 2 core probes simultaĆ
neously.
D Low temperature roast & hold and DeltaĆT cookĆ
ing
D Reversible 9 speed fan for optimum baking and
roasting results
D USB port for data, software and recipe transfer
D HACCP quality control enables you to control
and document production. Includes production
time, production duration, preparation temperĆ
ature, and core temperature.
D CombiNet for monitoring and remote controlĆ
ling the oven via computer or internet. FuncĆ
tions include recipe management, HACCP, serĆ
vice diagnosis and software updating
D Programmable time delay start
D Automatic service diagnosis
11
Page 16
Operation
BCP Cooking Modes
COMBIOPTIMA MODE
CombiOptima offers you the possibility of adding
up to 100% humidity to the oven chamber at temĆ
peratures from 160 to 480°F (70 to 250°C).
When using CombiOptima correctly, you minimise
shrinkage and enhance the appearance and taste
of your product.
Many products contain a large amount of water,
increasing the humidity level during cooking. The
oven automatically regulates the humidity to mainĆ
tain the desired level.
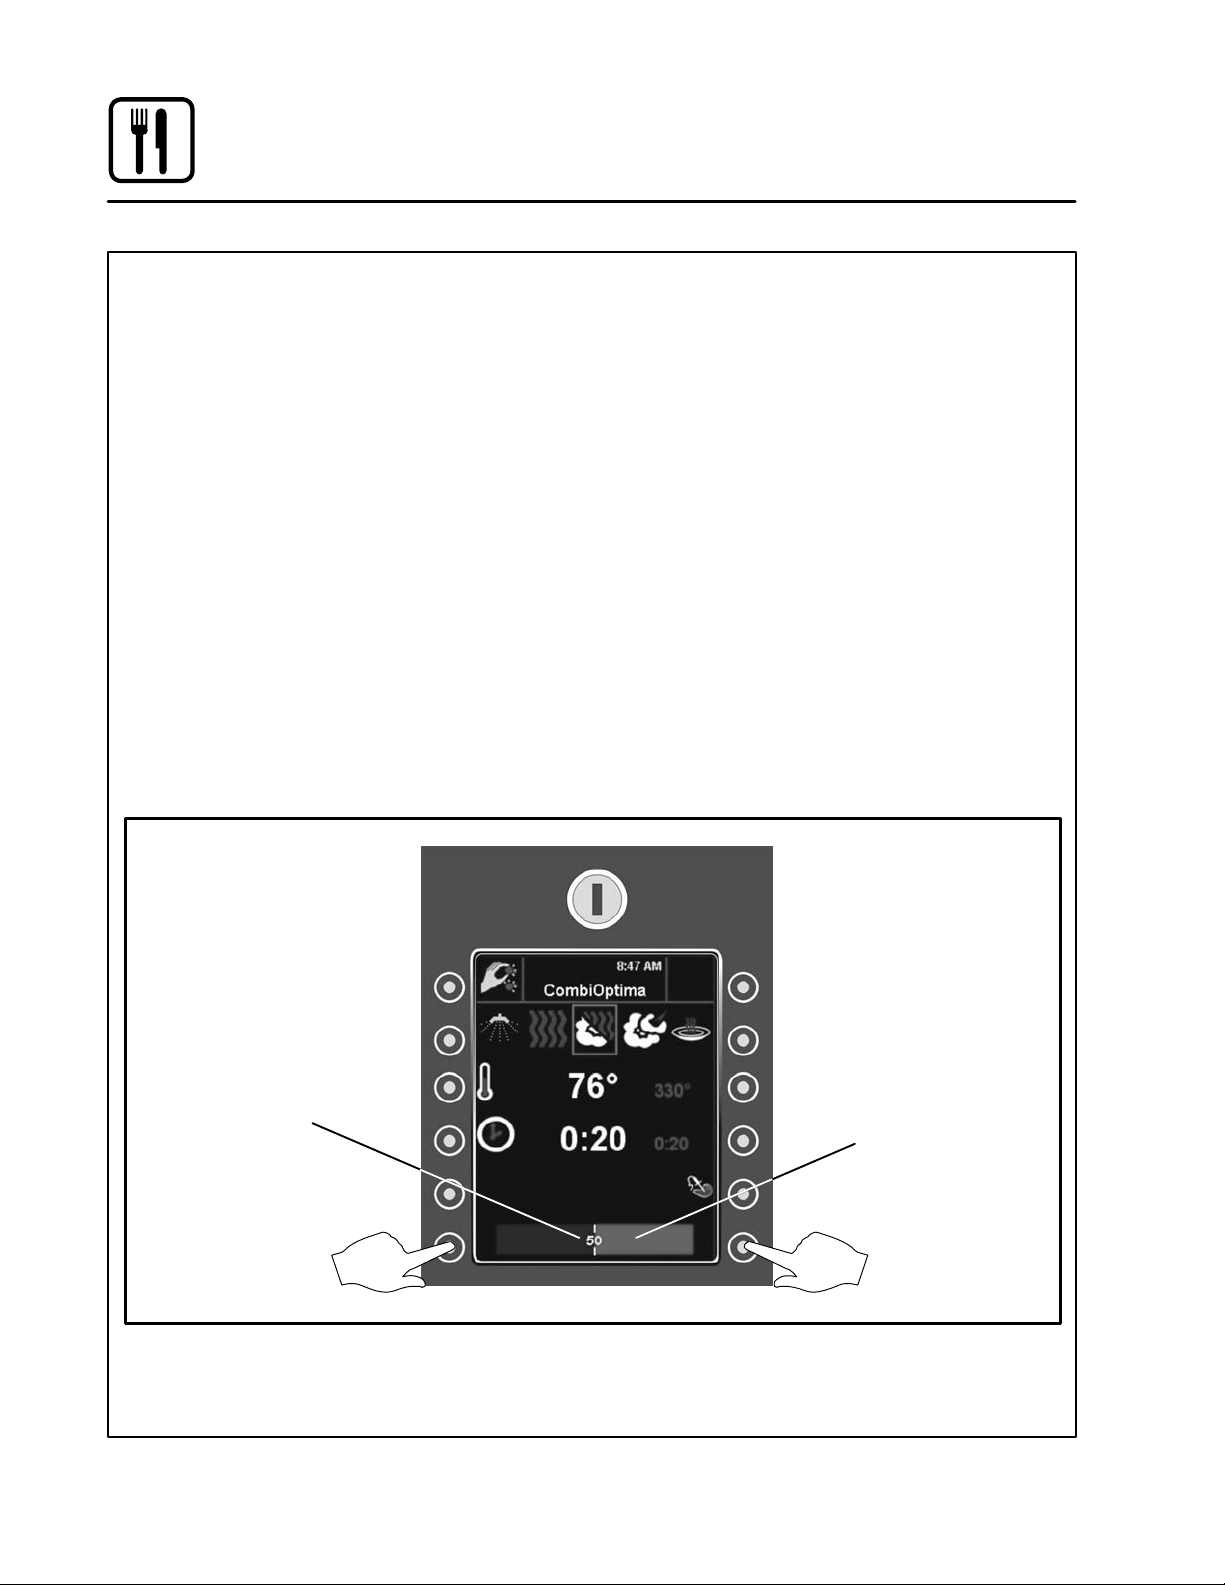
Setting the humidity level
1. Use the bottom keys on the left and right to set
the desired humidity level. The blue and red
bar indicated the actual humidity level in the
oven cavity. The white number in the center
of the bar indicated the desired humidty level.
NOTE: If the bar is all red, the oven containss
0% humidity. If the bar is all blue, the
oven contains 100% humidity.
2. Preheat the oven for 5 minutes with the deĆ
sired humidity content. Depending on the
amount of product in the oven and the desired
humidity level and temperature, the desired
humidity is typically reached after 1 to 5 minĆ
utes.
Tips for setting the humidity level
D To make gravy when braising meat, apply 70 to
80% humidity at 300Ć325°F (145Ć65CC).
D For poaching fish, poultry and crispy vegetaĆ
bles, apply 70 to 95% humidity at 150Ć250°F
(70Ć120°C).
D For short cook times and products, such as
herbĆmarinated cuts of meat and fresh vegetaĆ
bles, use 70% humidity at 375°F (190°C ). DeĆ
spite the short cook time, products such as
cook very gently.
If the oven is not connected to a soft water
plant, CombiOptima cannot function properly.
Humidty level
setpoint
Press this key to
decrease humidity
level
Actual humidty
level bar
Press this key to
increase humidity
level
Figure 6
12
Page 17

Operation
BCP Cooking Modes
STEAM MODE
The steam mode provides 100% humidity in the
cooking chamber. Use the steam mode for the folĆ
lowing applications:
Low Temperature Steaming
Steaming at 150Ć195°F (65Ć90°C) is recomĆ
mended for delicate products such as fish.
Steaming fresh vegetables such as carrots, asparĆ
agus, and beans at 175°F (80°C) for 5 to 10 minĆ
utes produces products that keep their color and
crispness.
Traditional Steaming
Steaming at 208Ć212°F (98Ć100°C) is recomĆ
mended for all kinds of root vegetables, potatoes,
pasta, rice and meat.
Forced Steaming
Steaming at 250°F (120°C) can be used for vegeĆ
tables that need further processing and for faster
preparation of pasta, rice, hard root vegetables
and frozen vegetables. Forced steaming should
be used with care.
Tips for Using the Steam Mode
D We recommend that you start the steaming proĆ
cess 8 minutes before you place the products
in the oven chamber. For food safety reasons,
the oven automatically checks the water in the
steam generator. If the water temperature is beĆ
low 150°F (65°C), the tank is emptied, refilled
and the water is heated.
D To get the oven ready for production quickly and
to ensure a perfect start of the steaming proĆ
cess, we recommend that you cool down the
oven chamber to 175°F (80°C). To lower the
temperature quickly, use the Cool Down mode
and open the door.
If the oven is not connected to a soft water
plant, the Steam mode cannot function properĆ
ly.
RETHERM MODE
Reheating is a very gentle process 70Ć350°F
(20Ć180°C). The program operates with low fan
speed and adds a carefully calculated amount of
humidity which maintains the nice appearance
and taste of the product.
Tips for Using Retherm
D To quicker retherming, products should not be
covered.
D For best results, use a core temperature probe.
D When retherming sousĆvide products, follow
supplier recommendations.
Recommended Times & Temperatures
D 8 to12 minutes at 285°F (140°C) for plated
meals with rice, meat and vegetables.
D 40 to 60 minutes at 250Ć285°F (120Ć140°C) for
whole roasts, stews and sauces.
D 20 to 30 minutes at 250°F (120°C) for pasta and
rice.
PROOFING MODE
The oven is designed to maintain the perfect huĆ
midity for all products that need to be proofed beĆ
fore they are baked.
For your convenience, the Blodgett BCP has a
preset program called Semiautomatic Bread". In
this program the bread is proofed and baked in the
same process.
Recommended Times & Temperatures
D Low temperature and long proofing time of 90°F
(32°C) for 45 minutes for 14Ć28 ounces
(400Ć800g) loaves of bread
D High temperature and short proving time 100°F
(38°C) for 25 minutes for 2Ć7 ounce (60Ć200g)
rolls and baguettes.
PREHEAT MODE
In this mode the oven will preheat to 575_F
(300_C) for 15 minutes. The oven will then autoĆ
matically lower to 480_F (249_C) to protect the adĆ
vanced electronic components. We recommend
preheating the oven 80Ć100_F (27Ć38_C) above
the cook temperature.
13
Page 18
Operation
Welcome Screen
Figure 7 shows the welcome screen that will apĆ
pear when you power up your BCP oven.
1. Press the any of the 6 keys on either side of
the control to access the WORK Menu.
Figure 7
14
Page 19
Operation
Work Menu
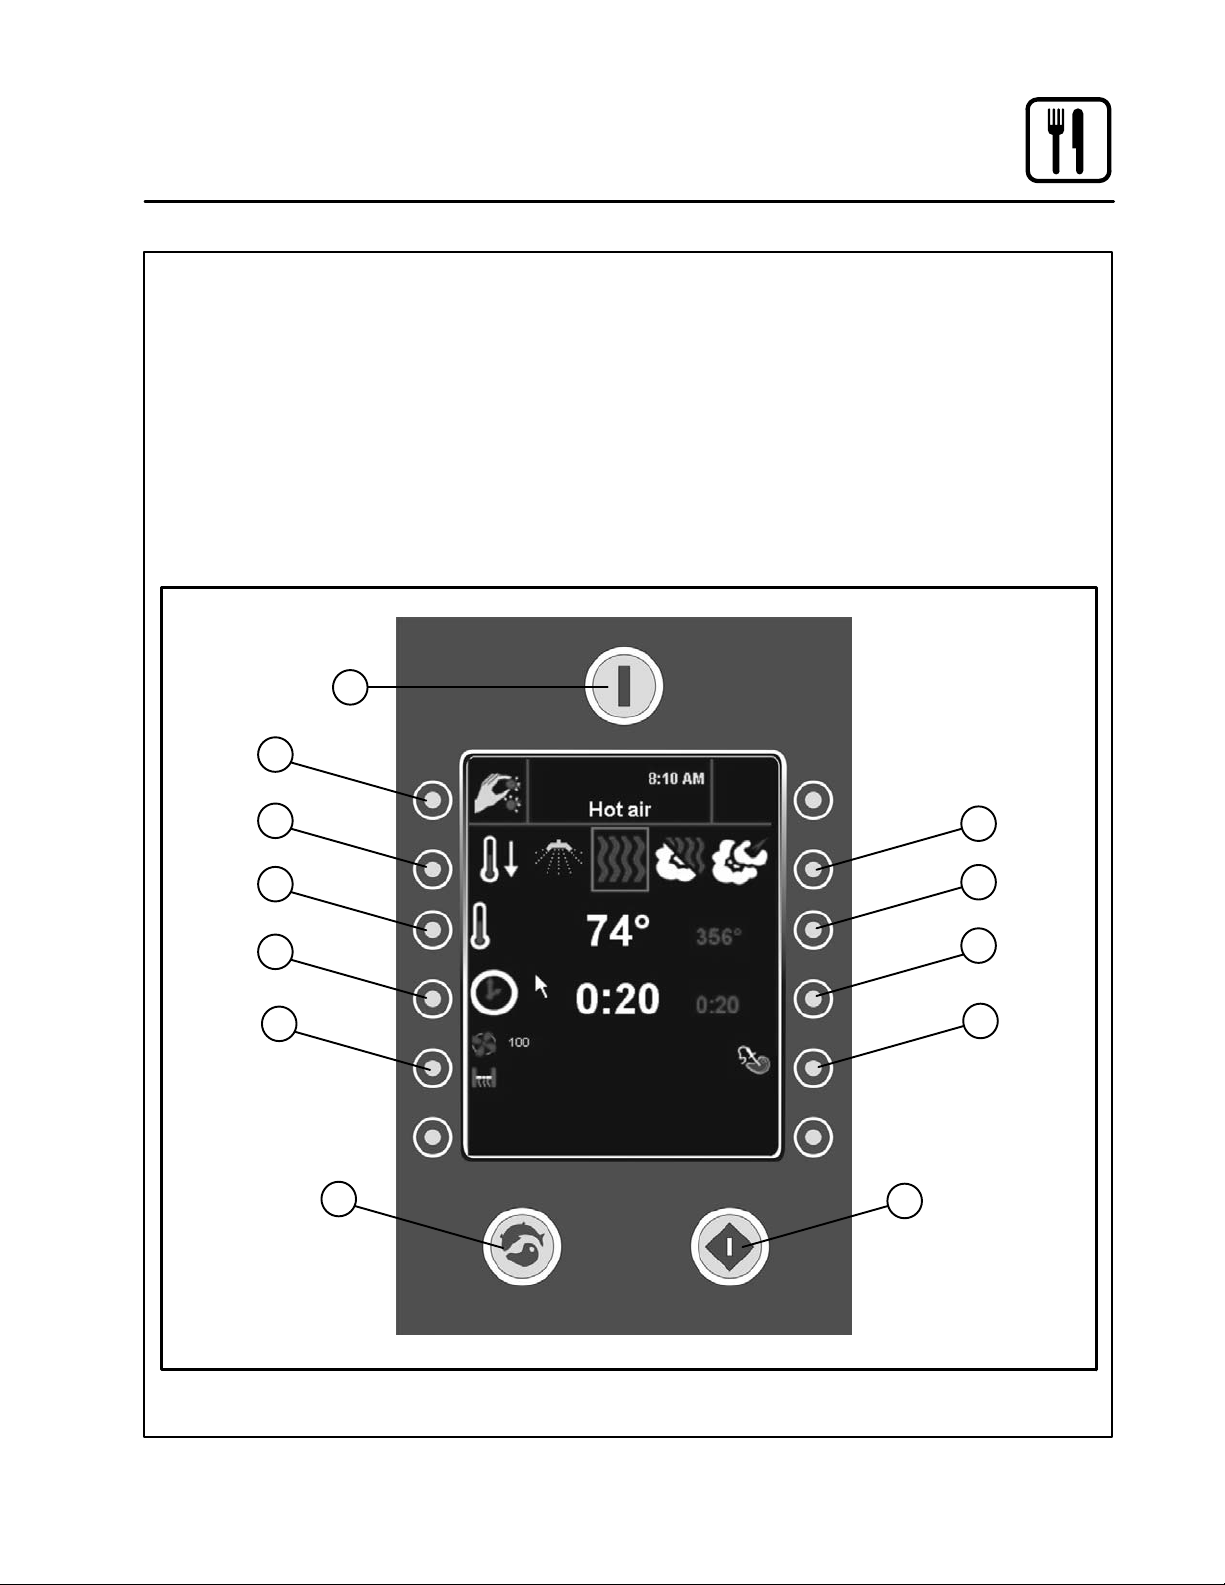
1. MAIN POWER SWITCH - controls power to
the oven
2. MAIN MENU KEY - press to move to main
menu
3. LEFT MODE SELECTION KEY - press to seĆ
lect mode to the left.
4. LEFT OVEN TEMP KEY - press to decrease
set temperature.
5. LEFT COOK TIME KEY - press to decrease
the set cook time
6. FAN & VENT KEY - press to access fan and
vent submenus
1
2
3
7. PROGRAM KEY - press to access program
menu
8. RIGHT MODE SELECTION KEY - press to seĆ
lect mode to the right.
9. RIGHT OVEN TEMP KEY - press to increase
set temperature.
10. RIGHT COOK TIME KEY - press to increase
the set cook time
11. CORE PROBE KEY - press to access core
probe setting submmenu
12. START/STOP KEY - press to begin or cancel
a cook cycle
8
4
5
6
7
Figure 8
12
9
10
11
15
Page 20
Operation
Manual Cooking
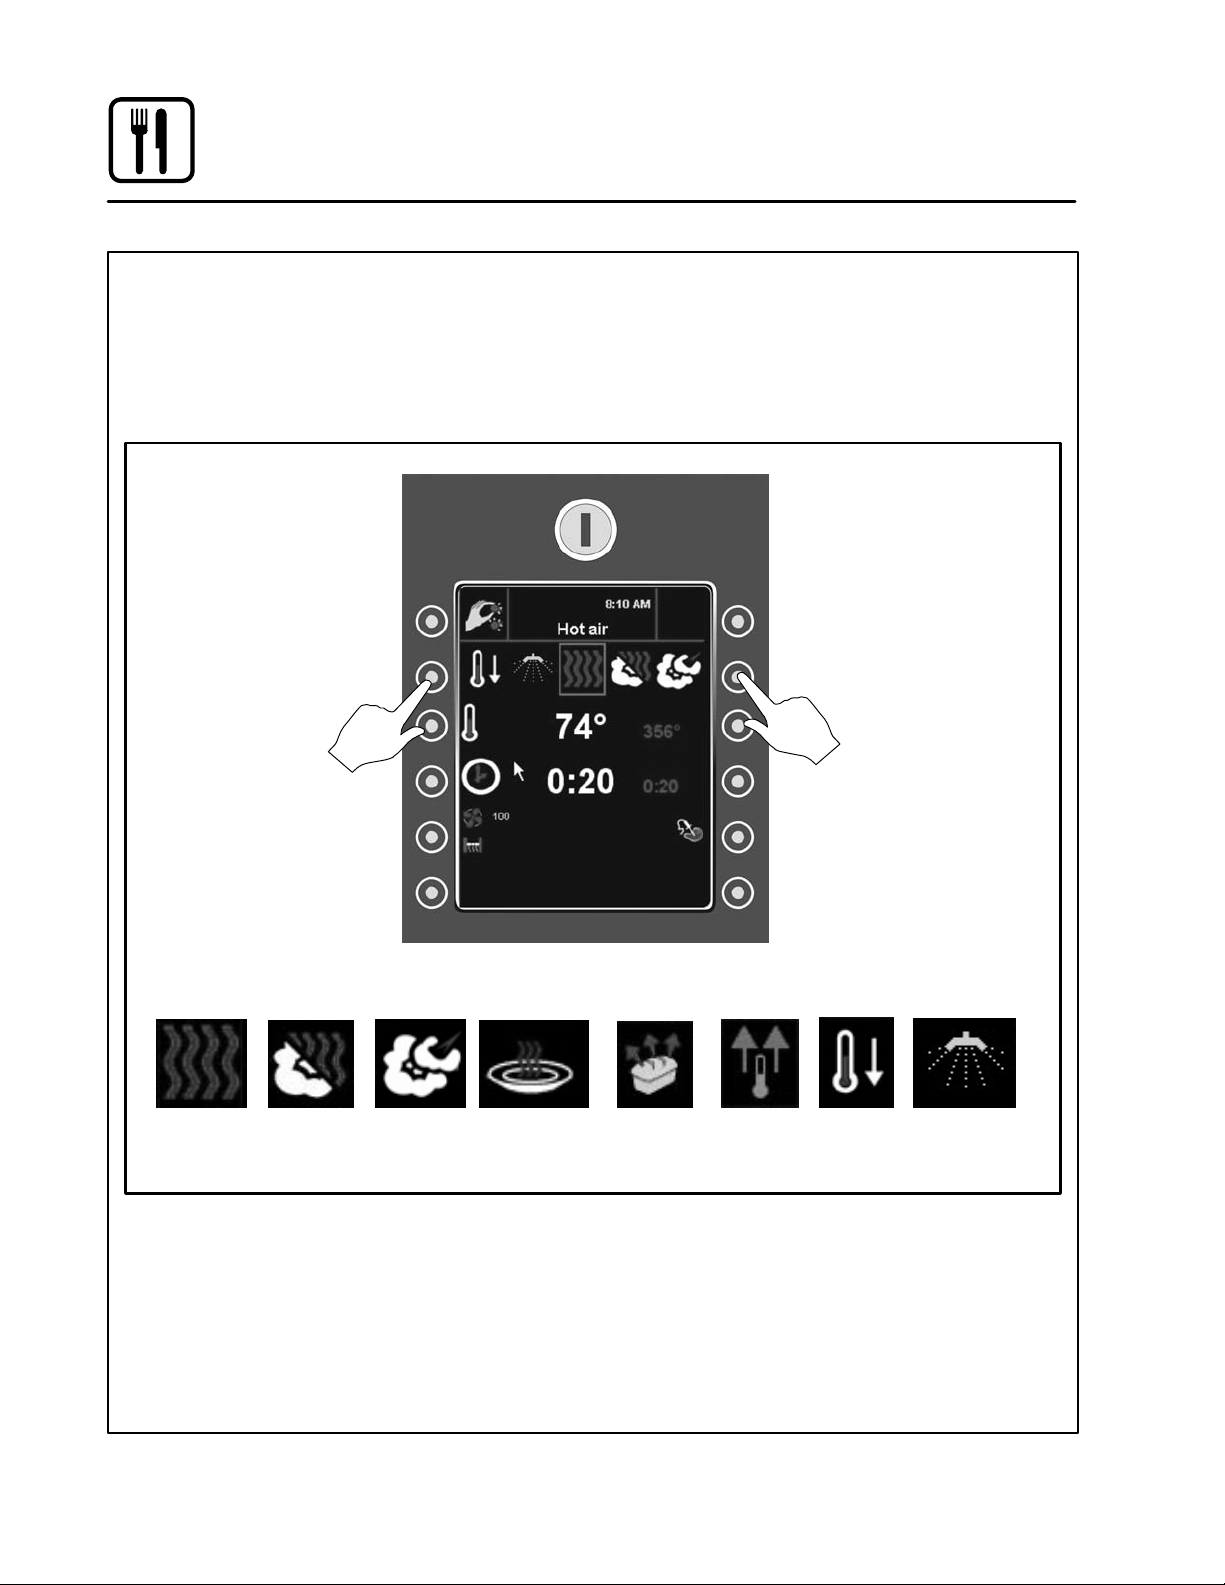
MODE SELECTION
1. Use the keys on the right and left of the mode
selection icons to select the desired mode.
NOTE: The selected icon will apper inside a red
box in the center of the screen.
Press this key to
scroll to the left
Setting Humidty Level in CombiOptima
If CombiOptima is selected you will need to enter
the desired humidity level. Follow the procedure
on page 12 to set the desired humidity level for
CombiOptima mode.
Press this key to
scroll to the right
Hot Air Combi
Optima
Choose from the following oven modes:
Steam Retherm Proofing Preheat Cool
Down
Figure 9
16
Combi
Wash
Page 21
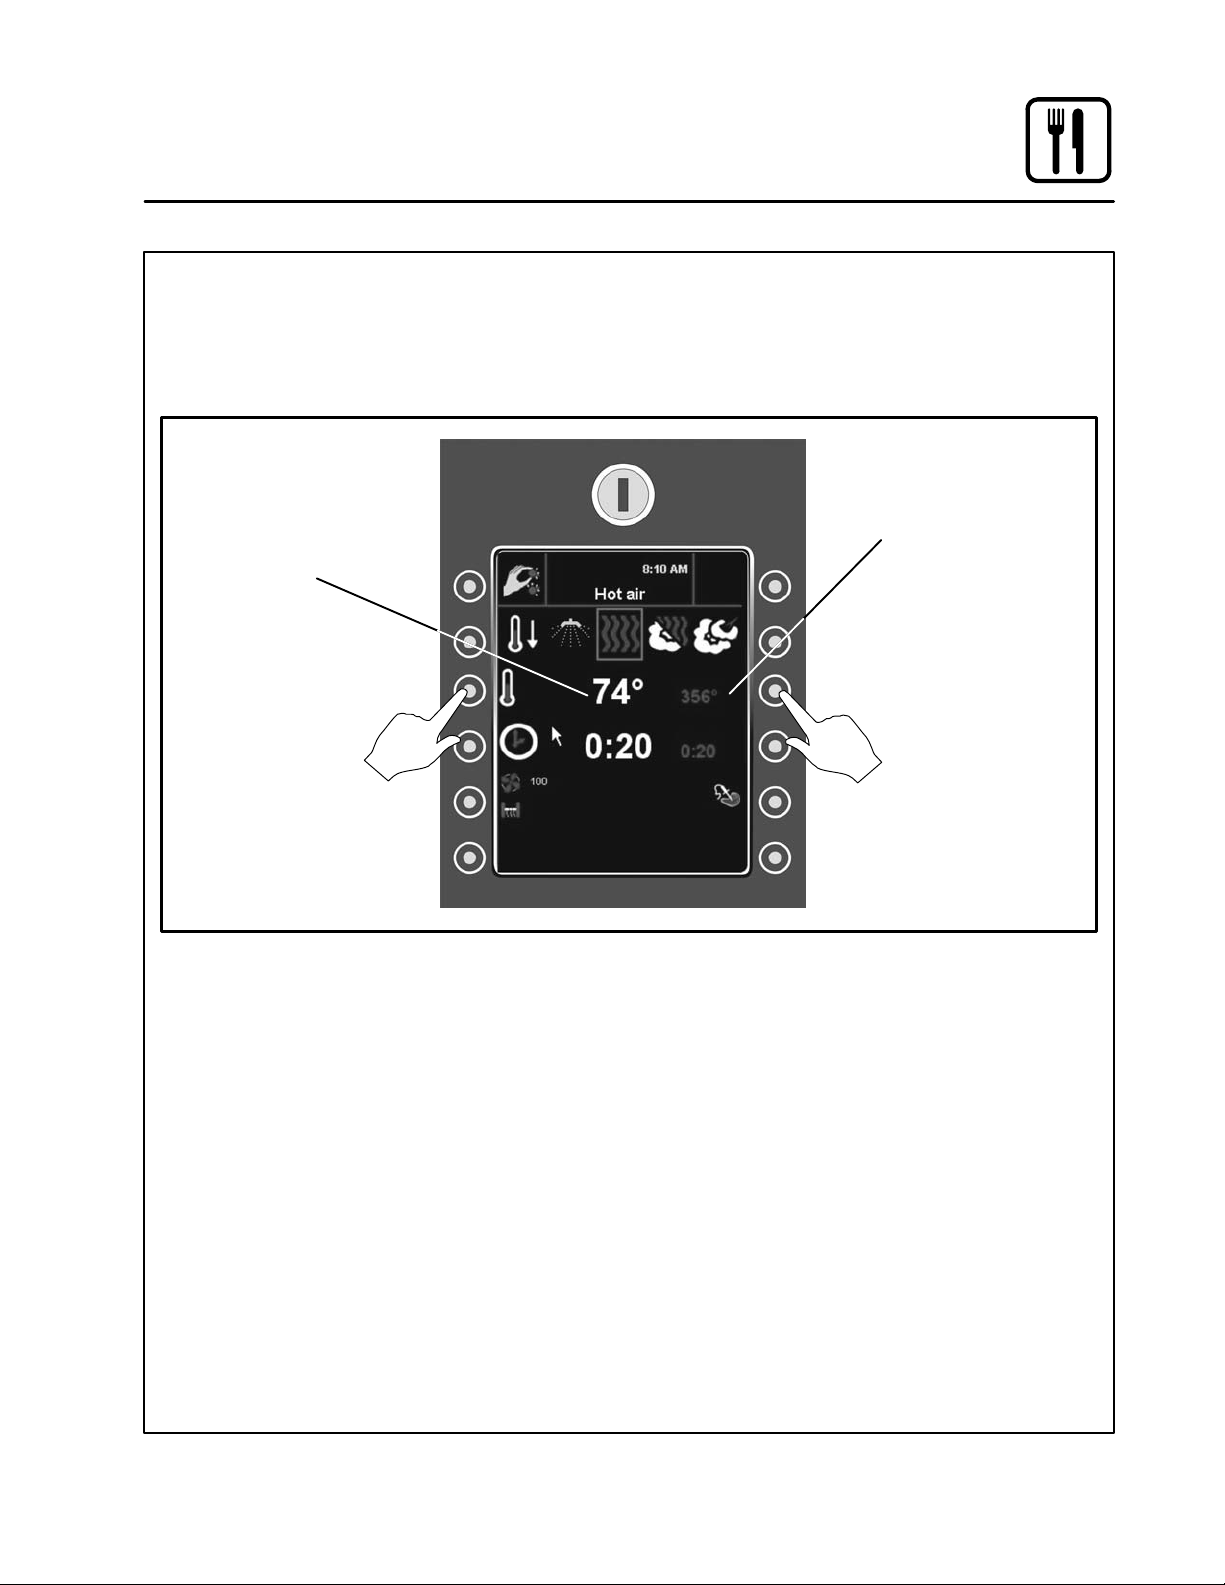
SETTING THE COOK TEMPERATURE
1. Use the 3rd keys down on the right or left to
set the desired cook temperature. The large
white number in the center of the screen disĆ
Operation
Manual Cooking
plays the actual oven temperature. The smallĆ
er red number on the right of the screen disĆ
plays the set temperature.
Actual oven
temperature
Press this key to
decrease set
temperature
Oven set
temperature
Press this key to
increase set
temperature
Figure 10
17
Page 22
Operation
Manual Cooking
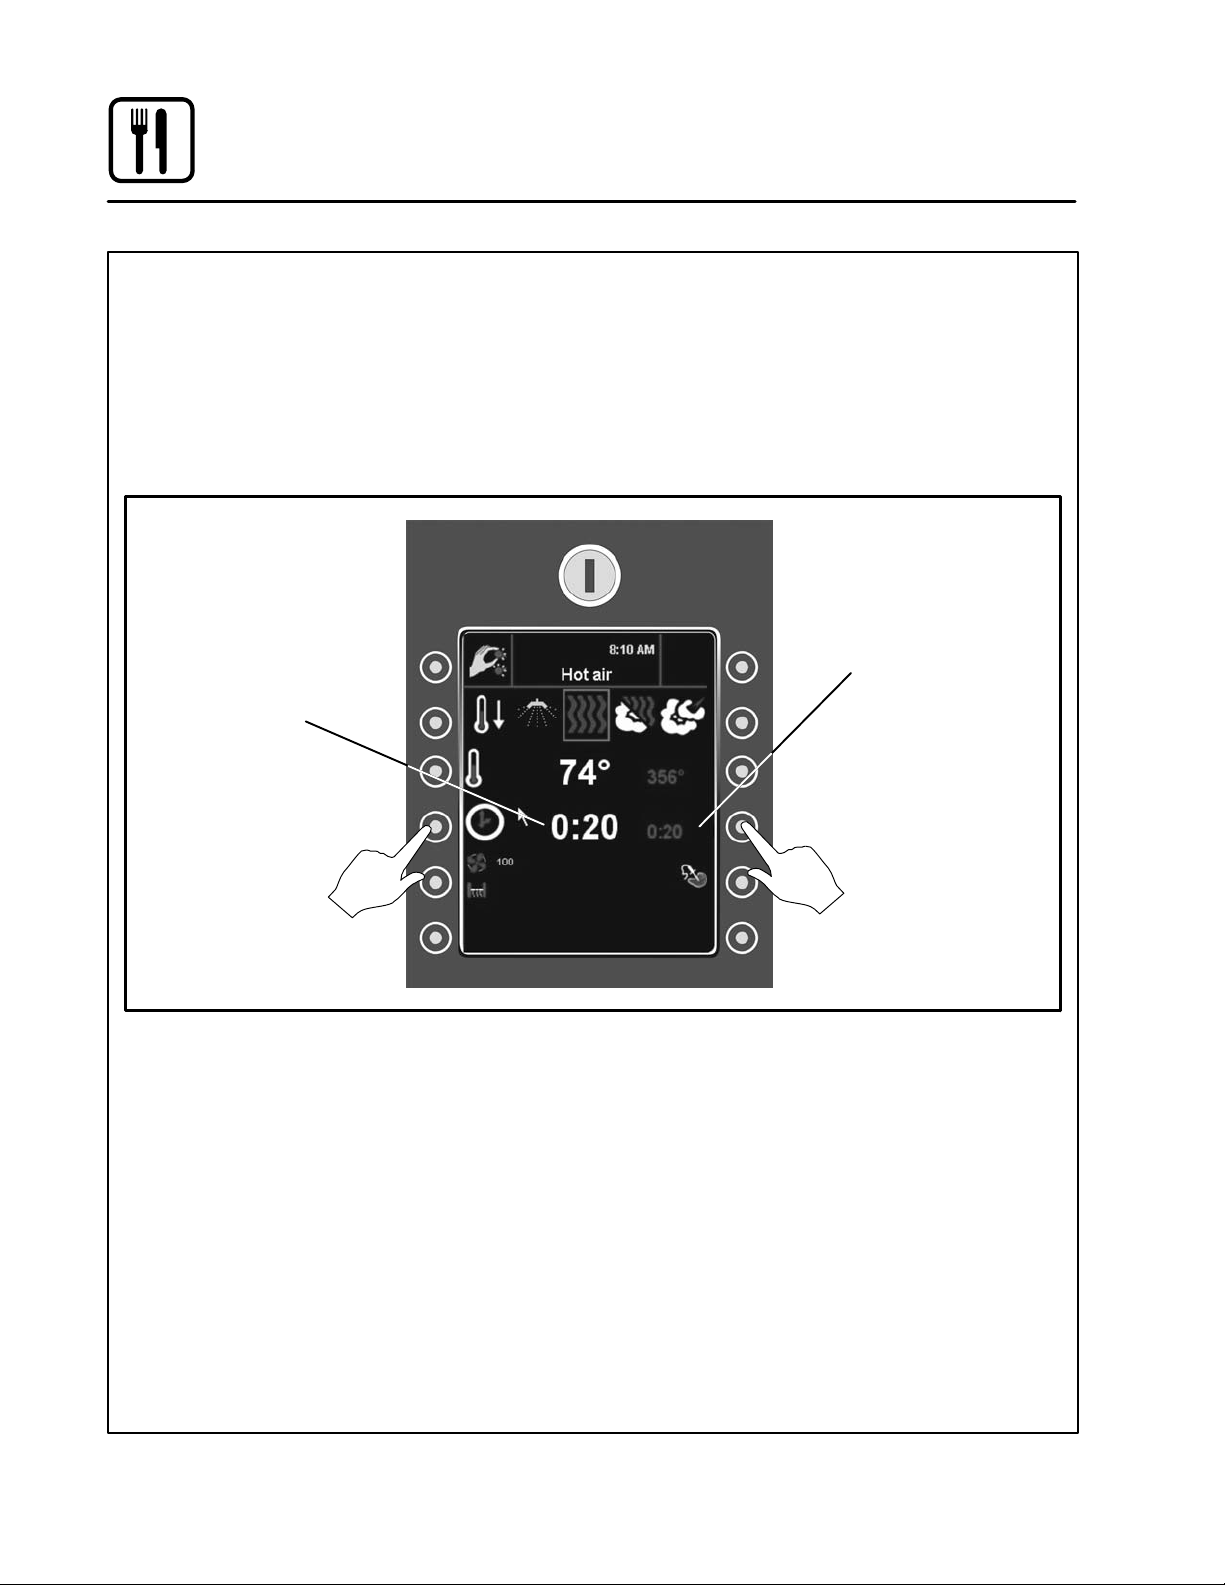
SETTING THE COOK TIME
1. Use the 4th keys down on the right or left to
set the desired cook time. For continuous opĆ
eration, press the left key until the display
shown no time.
The smaller red number on the right of the screen
displays the set cook time.
Time
remaining
Once the cook cycle is activated, the large white
number in the center of the screen displays the
time remaining.
Oven set time
Press this key to
decrease set time
Press this key to
increase set time
Figure 11
18
Page 23
Operation
Manual Cooking
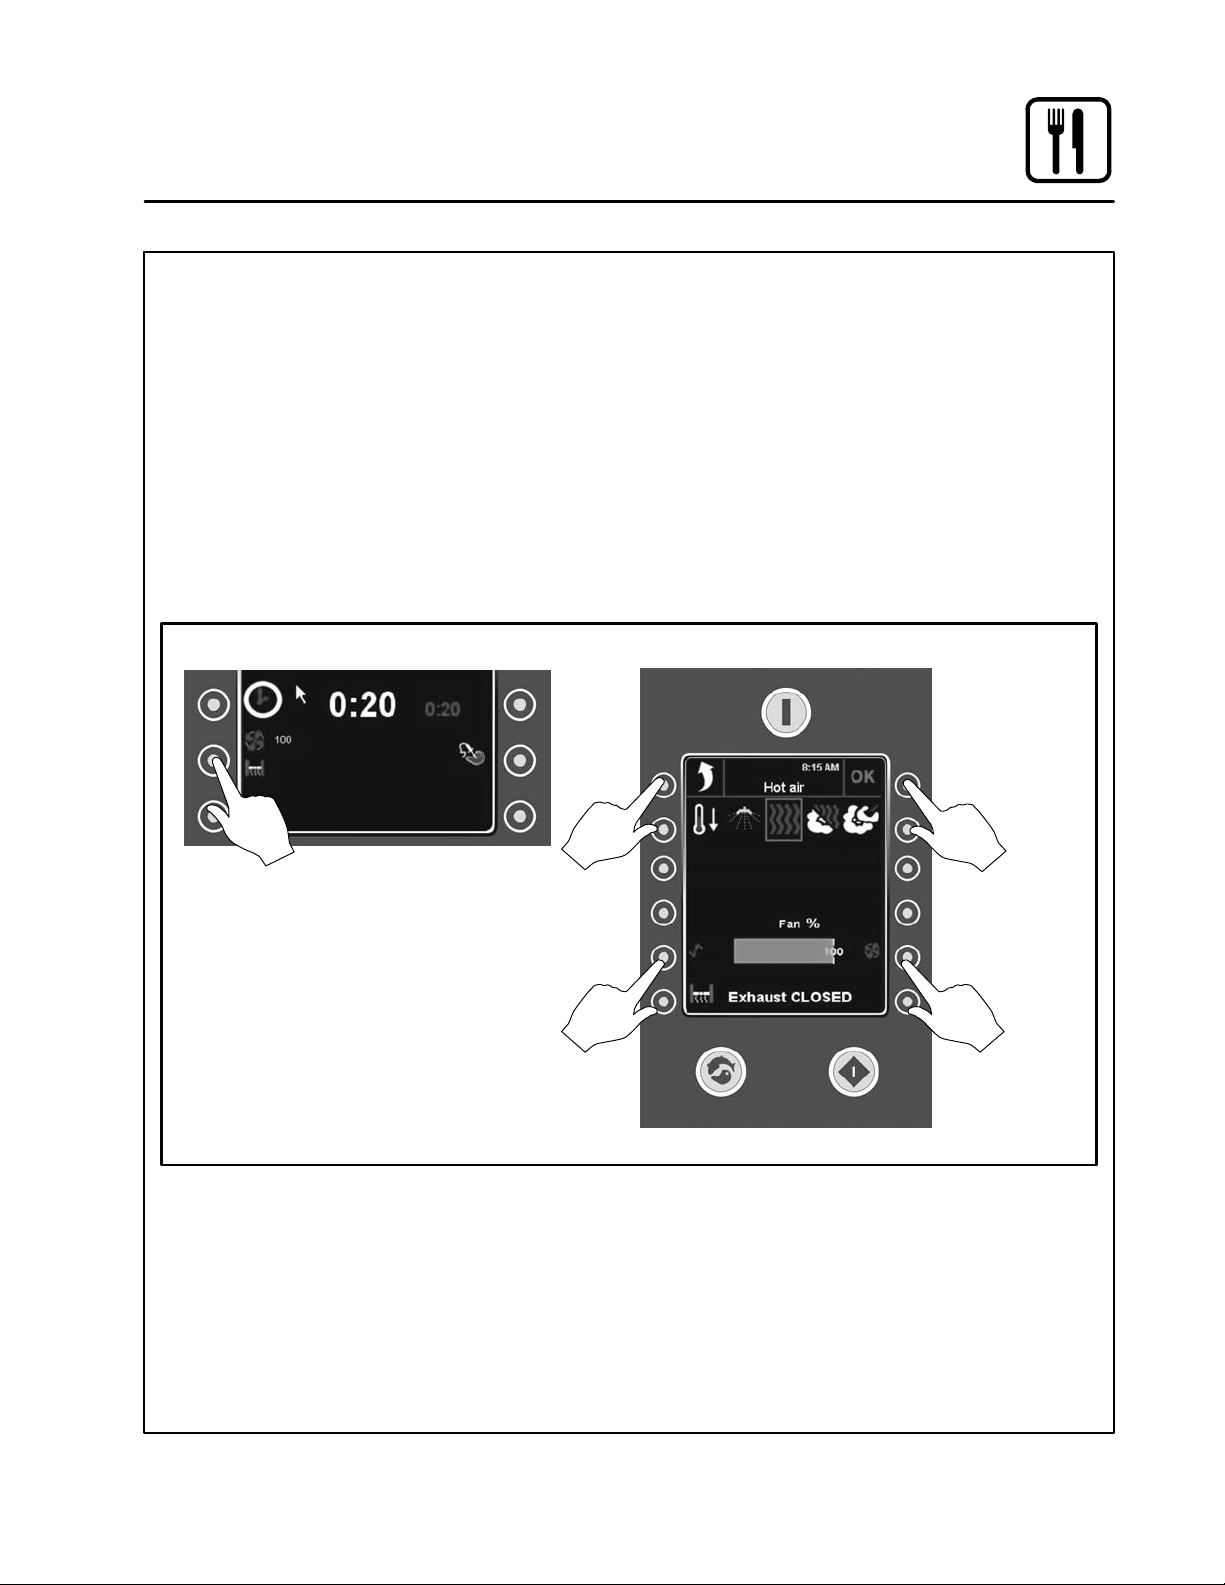
SETTING THE FAN SPEED
The fan function is active in HOT AIR, STEAM
and RETHERM only. In all other modes, the fan
is controlled automatically by the oven.
1. Press the FAN and VENT key to access the
FAN/VENT submenu.
2. Use the 5th keys down on the right or left to
set the desired fan speed.
NOTE: Note that the fan wheel is reversible. It will
run clockwise for a few minutes, then reĆ
verse and run counterclockwise. This
creates an even bake pattern.
Tips for setting fan speed
D A fan speed between 20 and 50% is recomĆ
mended for puff pastry, Danish pastry, cakes
and small products as well as in the DeltaĆT and
Cook & Hold modes.
D You should add 1 to 2 minutes of preparation
time for each 1/2 hour when low fan speed is
used.
D Fan speeds between 50% and 90% are recomĆ
mended for particularly juicy end products that
can accept longer cook times.
D Fan speeds below 50% cannot be used at temĆ
peratures above 390°F (200°C).
FAN/VENT SubmenuWORK Menu
Press this key
to access
FAN/VENT
submenu
Press this key
to cancel and
return to WORK
Menu
Press this key
to increase
fan speed
Press this
key to save
settings
Press this key
to decrease
fan speed
Figure 12
19
Page 24
Operation
Manual Cooking
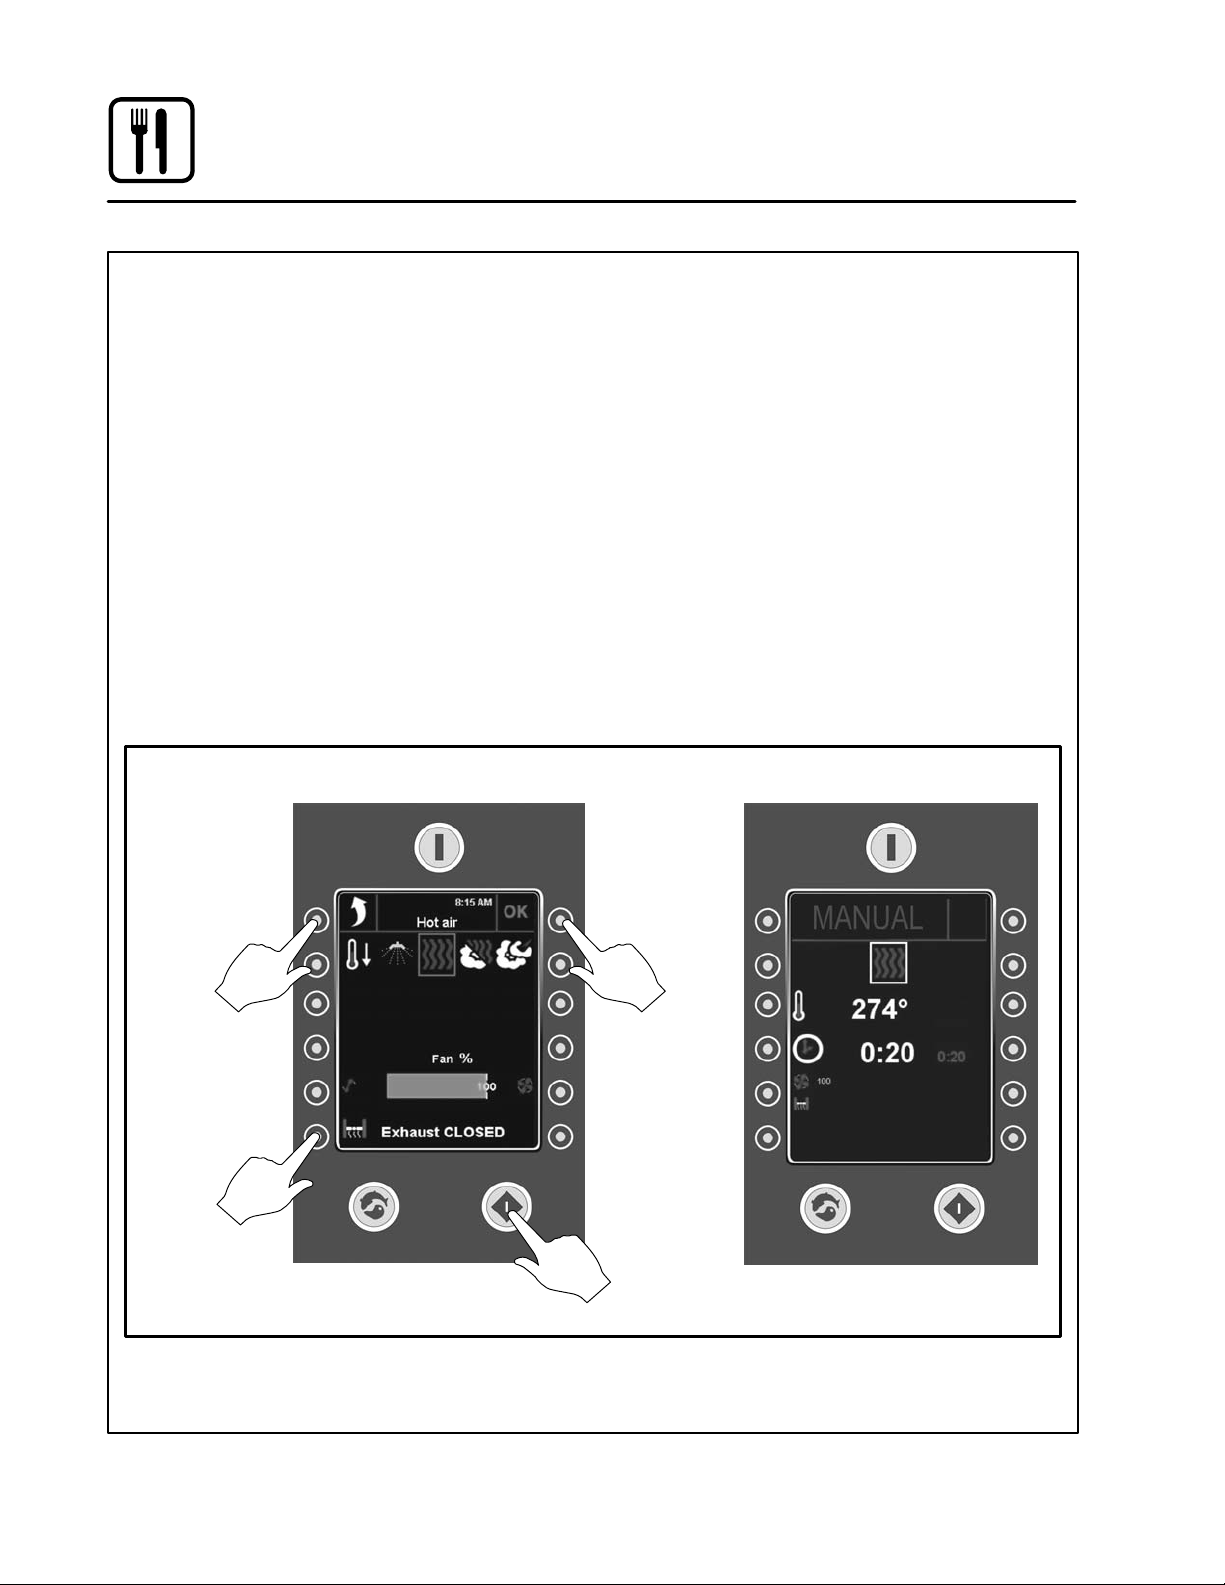
SETTING THE VENT POSITION
It is only possible to set the exhaust function in
the HOT AIR mode. In the other modes, the exĆ
haust function is controlled automatically by the
oven.
1. Press the VENT key to toggle between Vent
Open or Vent Closed.
Tips for setting vent position
D Open exhaust is recommended for bread and
pastry, as well as roasting meat and to achieve
a grill effect.
TO RETURN TO WORK MENU
1. Press the OK key on the top right to save your
settings and return to the WORK Menu. Press
the top right key to return the the WORK Menu
without saving your changes.
FAN/VENT Submenu
TO INITIATE MANUAL COOK CYCLE
1. From the WORK Menu, press the START/
STOP key located on the bottom left side of
the control to initiate the cook cycle.
2. The square around the mode will flash and the
display counts down the cook time. The cook
time, temperature, fan speed and vent posiĆ
tion may be changed during the cook cycle.
In Hot Air mode, press and hold the button on
the bottom right of the screen to inject steam.
Press any key to turn on the oven lights.
3. When there is one minute left, the computer
counts down from 59 seconds.
4. When the time has expired on the final stage,
an alarm sounds and a message appears noĆ
tifying you that the program is complete. Press
the key to the left of ENTER, or open the door,
to silence the alarm.
MANUAL COOK screen
Press this key
to cancel and
return to
WORK Menu
Press this key
to toggle the
vent open or
closed
Press this
key to save
settings
Press START/STOP key
to initiate cook cycle
Figure 13
20
Page 25
All Blodgett BCP ovens come standard with one
core temperature probe. It is possible to run two
core probes at the same time. An additional probe
may be purchased from your Blodgett dealer.
The core temperature sensor offers three cookĆ
ing modes.
D Active
D DeltaĆT
D Cook & Hold
ENTERING CORE PROBE MODES
Follow this procedure for all three core probe
cooking modes.
NOTE: The core probe must be set up prior to acĆ
tivating a cook cycle.
1. Select the desired cooking mode Refer to
page 16 for instructions on setting the cooking
mode.
2. Set the desired fan speed if applicable. Refer
to page 19 for instructions on setting the fan
speed.
3. Set the vent position if applicable. Refer to
page 20 for instructions on setting the vent
position.
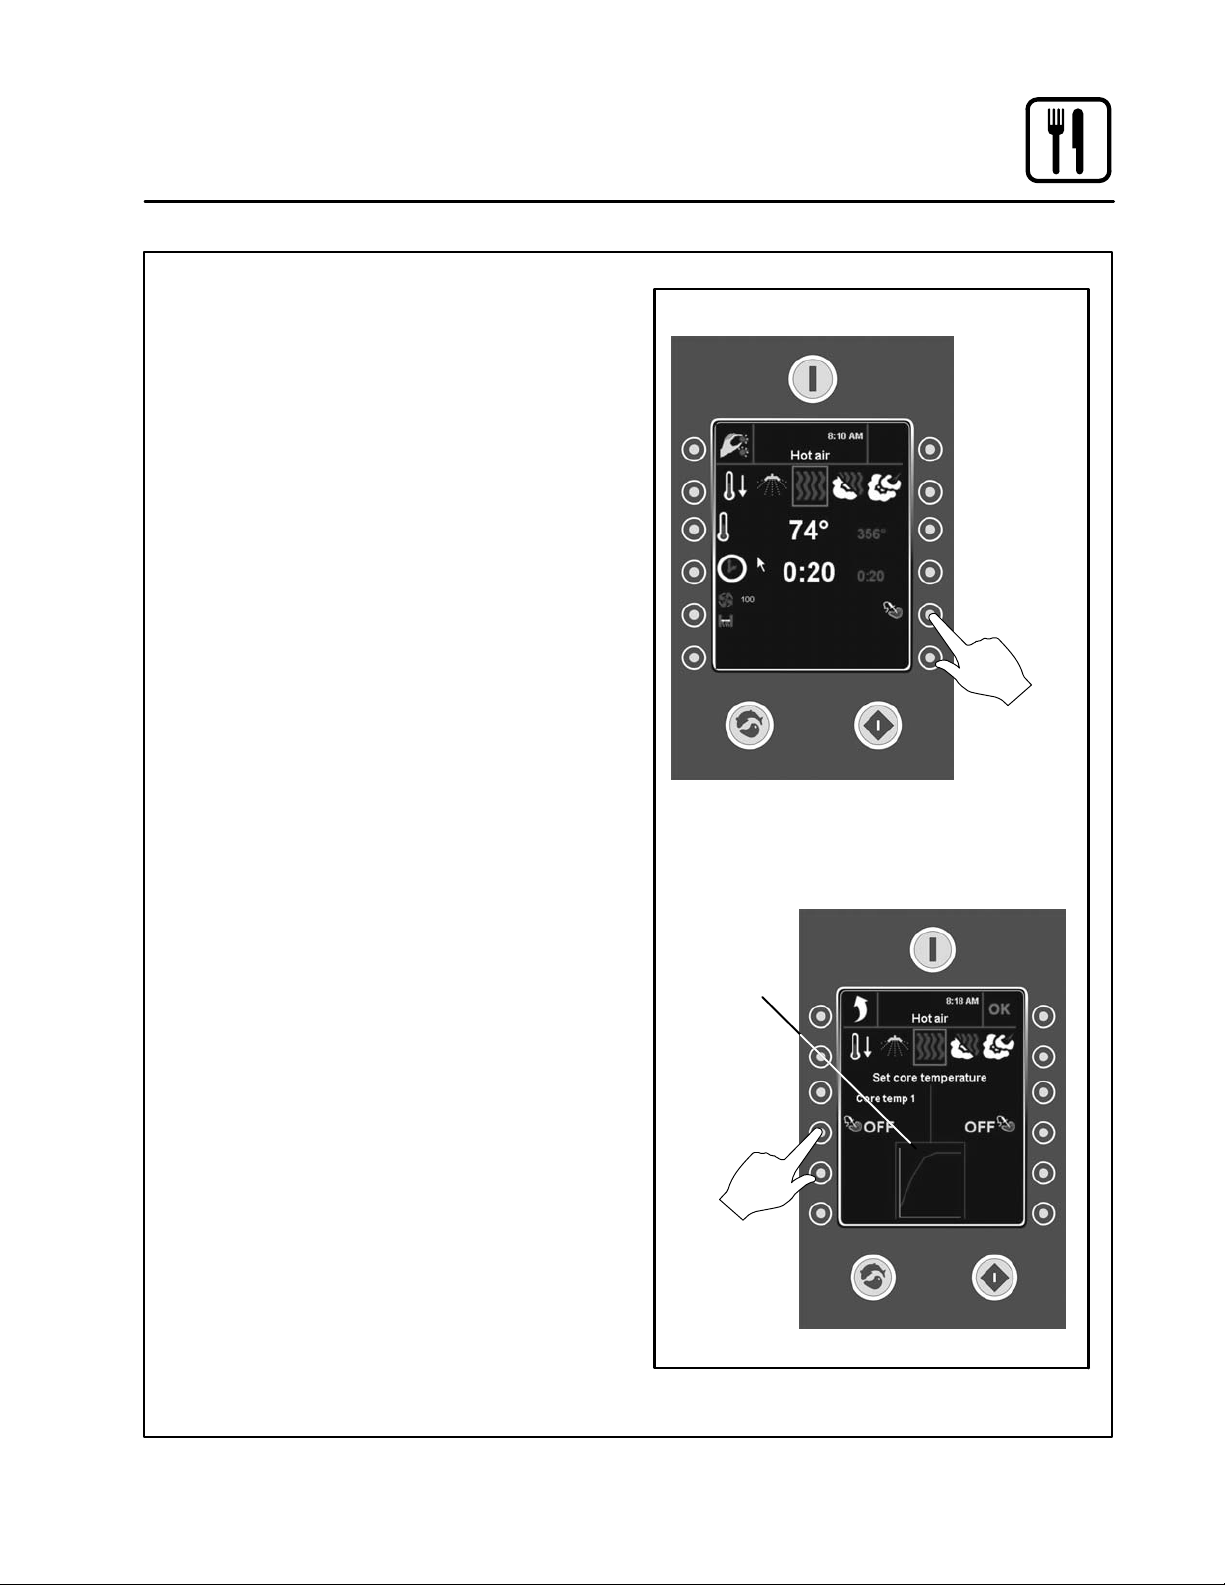
4. Insert the core probe into the center of the
product. Then plug the probe into the oven at
the connector located in the upper corner of
the right side panel.
5. Press the CORE PROBE key on the WORK
Menu. The control displays the Core Probe
submenu.
6. Press the key next to the core probe icon. The
control displays the Set Core Probe screen.
The graph on the display illustrates the differĆ
ence between the actual oven temperature
and core temperature. The blue line repreĆ
sents core temperature probe 1. Core probe
2 is green. The red line is the actual oven temĆ
perature.
Operation
Core Probe Cooking
WORK Menu
Press this
key to move
to the Core
Probe
submenu
CORE PROBE Submenu
Core probe
status graph
Press this
key to select
the first core
probe
21
Figure 14
Page 26
Operation
Core Probe Cooking
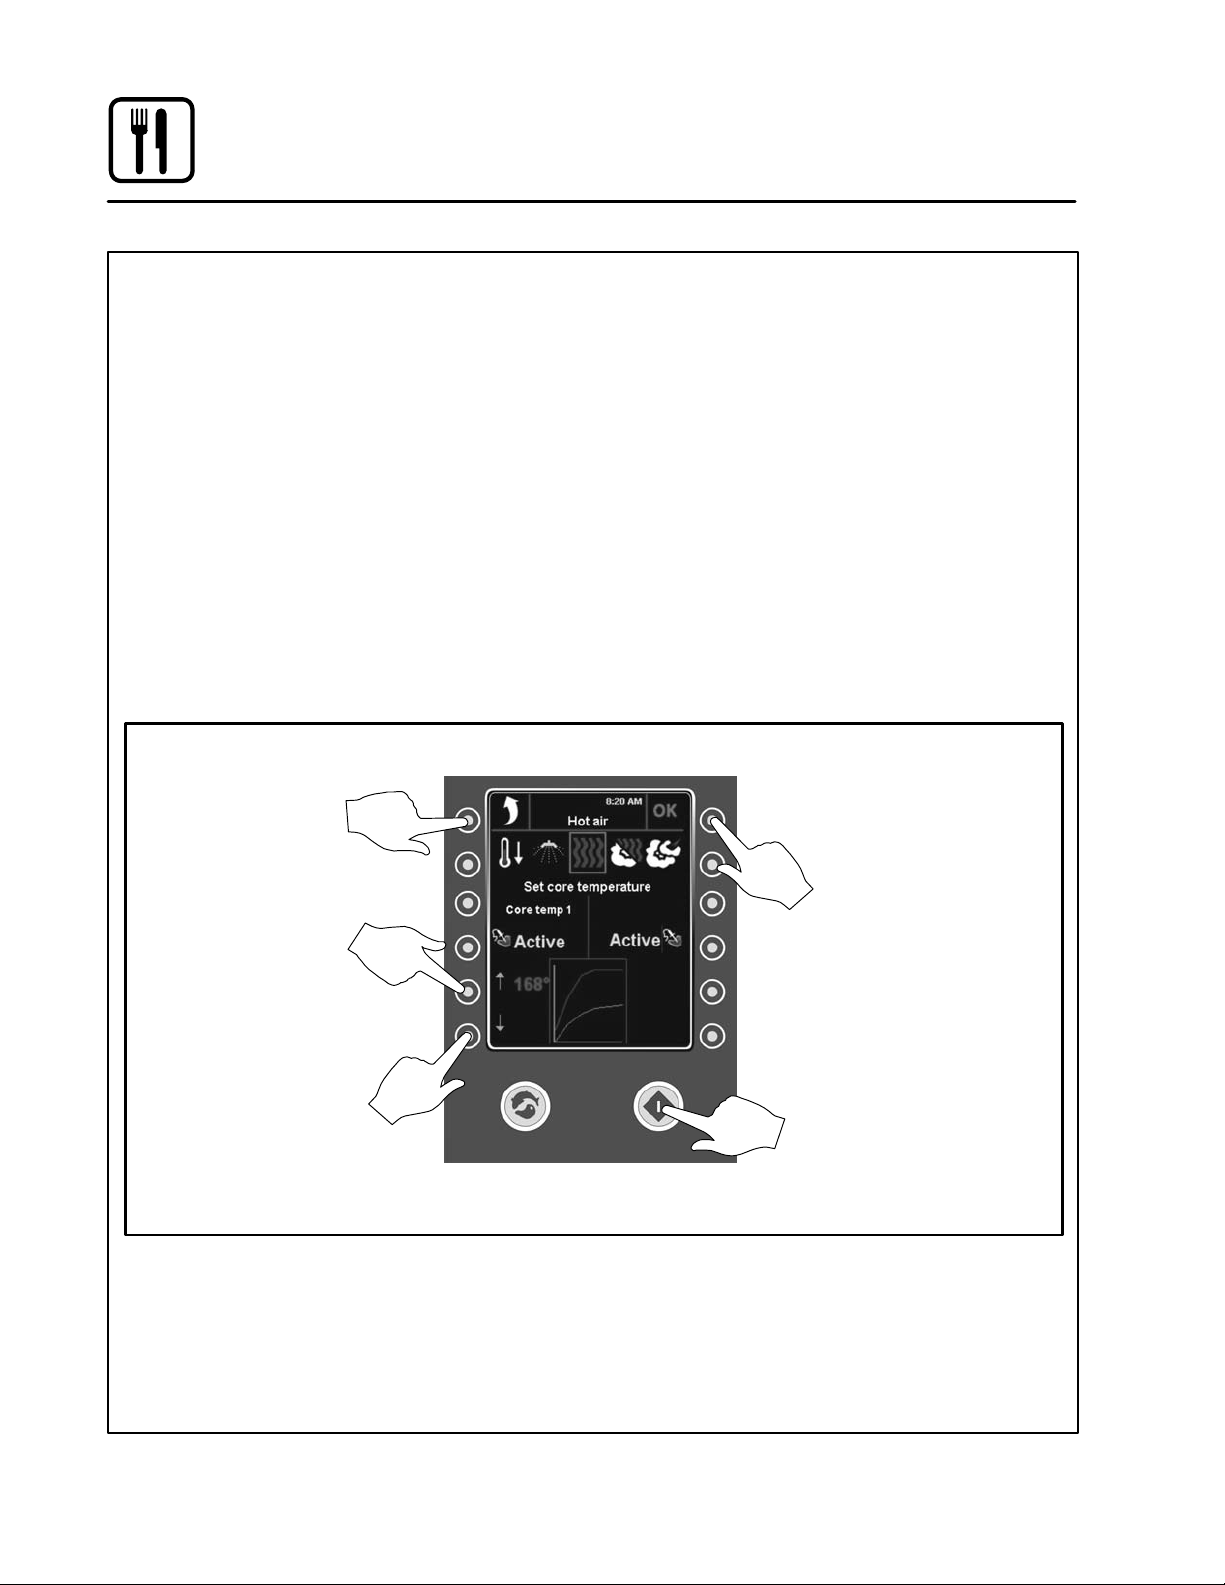
ACTIVE CORE PROBE COOKING
In the active mode, the core probe will notify you
when the product has reached the desired pull
temperature. The cook temperature is constant in
the active mode.
1. Follow steps 1Ć6 on page 21 to enter the core
probe cooking screens.
2. Use the keys on the left of the display to set
the desired core probe pull temperature. The
core probe set temperature is displayed in
red.
3. Press the OK key to save the save the desired
core probe temperature.
4. Press the START/STOP key to start the core
probe cook cycle.
5. When the product has reached the desired
core temperature an alarm sounds and the
SET CORE PROBE Screen
Press this key
to cancel and
return to WORK
Menu
display reads ENTER. Press the key next to
ENTER, or open the door, to silence the alarm.
6. Unplug the core probe and remove the prodĆ
uct.
COOKING WITH TWO CORE PROBES
When one of the probes reaches the desired core
temperature, an alarm sounds and a ENTER apĆ
pears in the display.
1. Press the key next to ENTER, or open the
door, to silence the alarm.
2. Take out the product and close the door.
3. The oven continues until the second probe
reaches the desired core temperature.
Press this key to
raise probe temp
Press this key to
lower probe temp
Press this key to
save your settings
Press this key to
start the core
probe cook cycle
Figure 15
22
Page 27
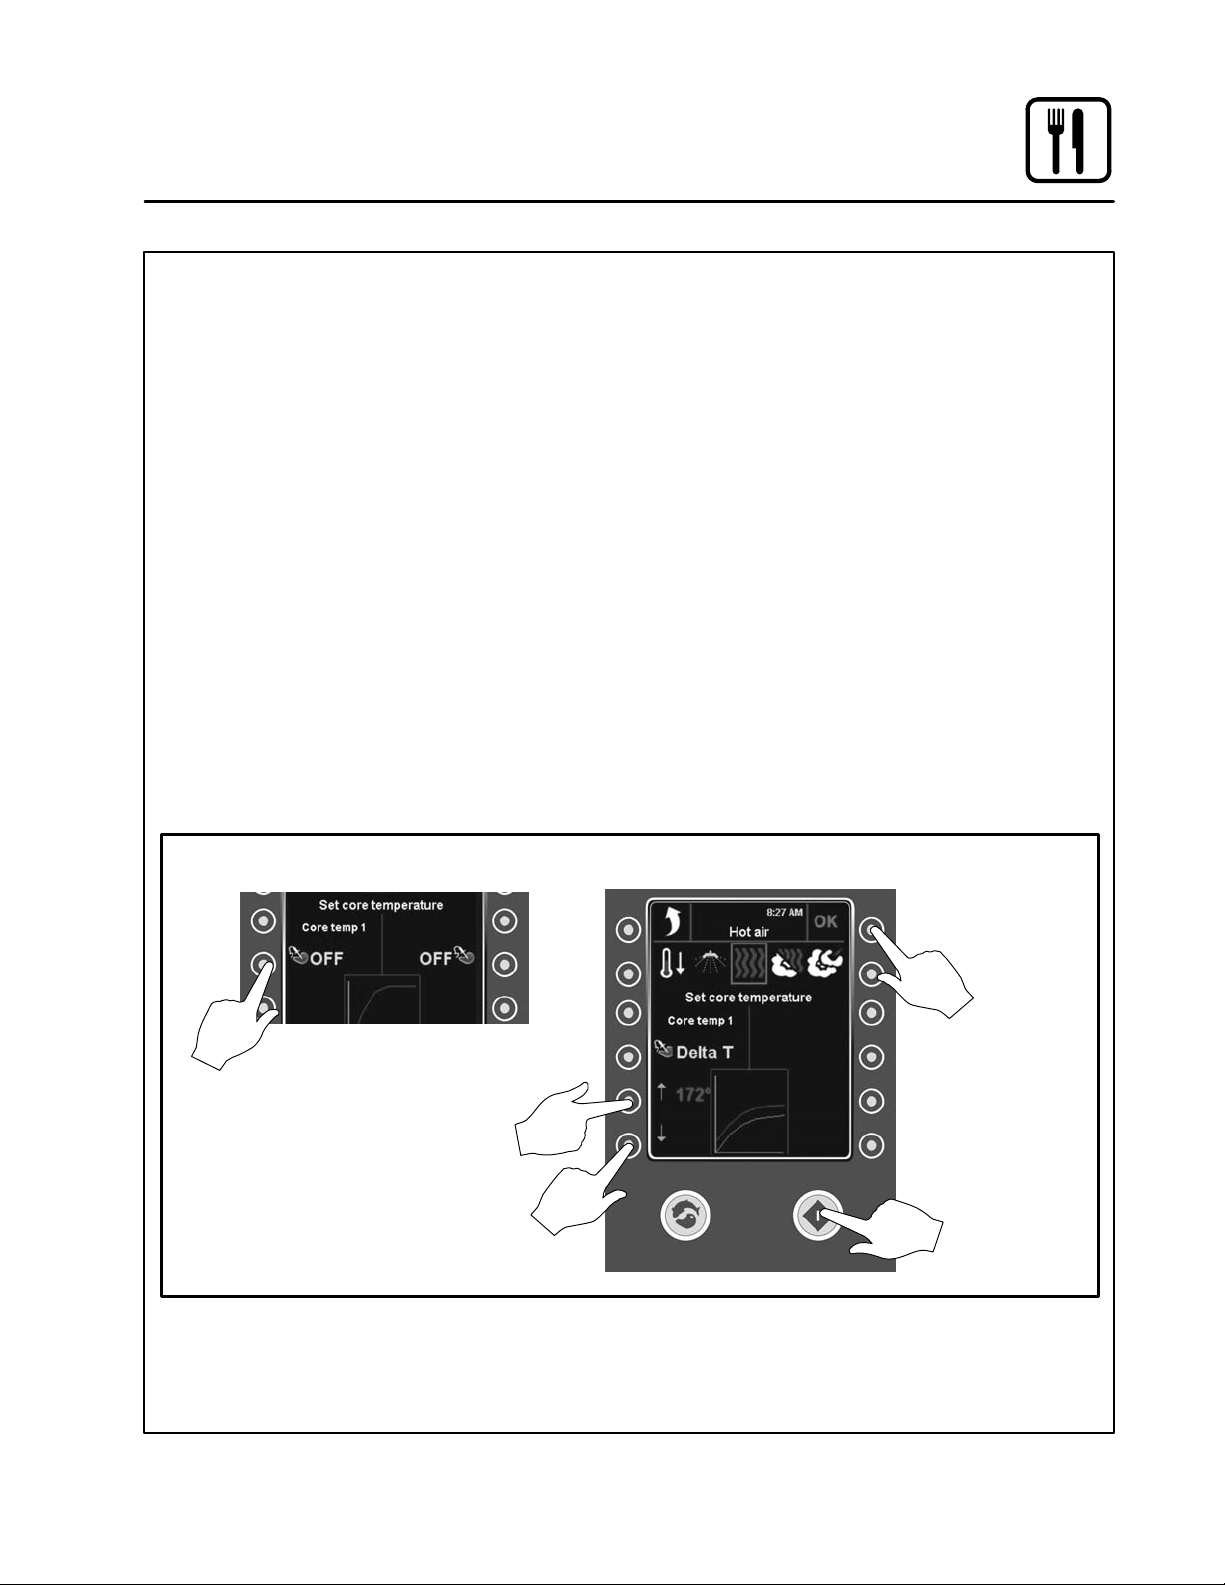
DELTAĆT COOKING
In the DeltaĆT mode the oven temperature adjusts
relative to the actual core temperature of the prodĆ
uct. DeltaĆT provides gentle cooking resulting in a
tender, juicy product. Cooking with DeltaĆT reĆ
duces shrinkage by up to 20% compared to tradiĆ
tional modes of cooking.
1. Follow steps 1Ć6 on page 21 to enter the core
probe cooking screens.
2. Press the CORE PROBE key on the WORK
Menu. The control displays the Core Probe
submenu.
3. Press the Core Probe key twice to access the
DeltaĆT cooking screen.
4. Use the keys on the left of the display to set
the desired core probe pull temperature. The
core probe set temperature is displayed in
red.
5. Press the OK key to save the save the desired
core probe temperature.
6. Press the START/STOP key to start the DeltaĆT
cook cycle.
Operation
Core Probe Cooking
7. When the product has reached the desired
core temperature an alarm sounds and the
display reads ENTER. Press the key next to
ENTER, or open the door, to silence the alarm.
8. Unplug the core probe and remove the prodĆ
uct.
Tips for DeltaĆT Cooking
D For best results start with an oven temperature
of 85Ć100°F (30Ć40°C).
D HOT AIR mode is recommended for very fatty
and small roasts. STEAM mode is recomĆ
mended for large hams with bones. RETHERM
mode is recommended for poultry and other
lean pieces of meat.
Recommended Core Temperatures
D Rare 125Ć135°F (52Ć57°C)
D Medium 140Ć145°F (59Ć62°C)
D Well Done 160Ć185°F (72Ć85°C)
Press this
key twice
to access
the DeltaĆT
screen
SET CORE PROBE Screen
Press this
key to raise
probe temp
Press this key to
lower probe temp
DELTAĆT Cooking Screen
Press this key to
save your settings
Press this key
to start the
DeltaĆT
cook cycle
Figure 16
23
Page 28
Operation
Core Probe Cooking
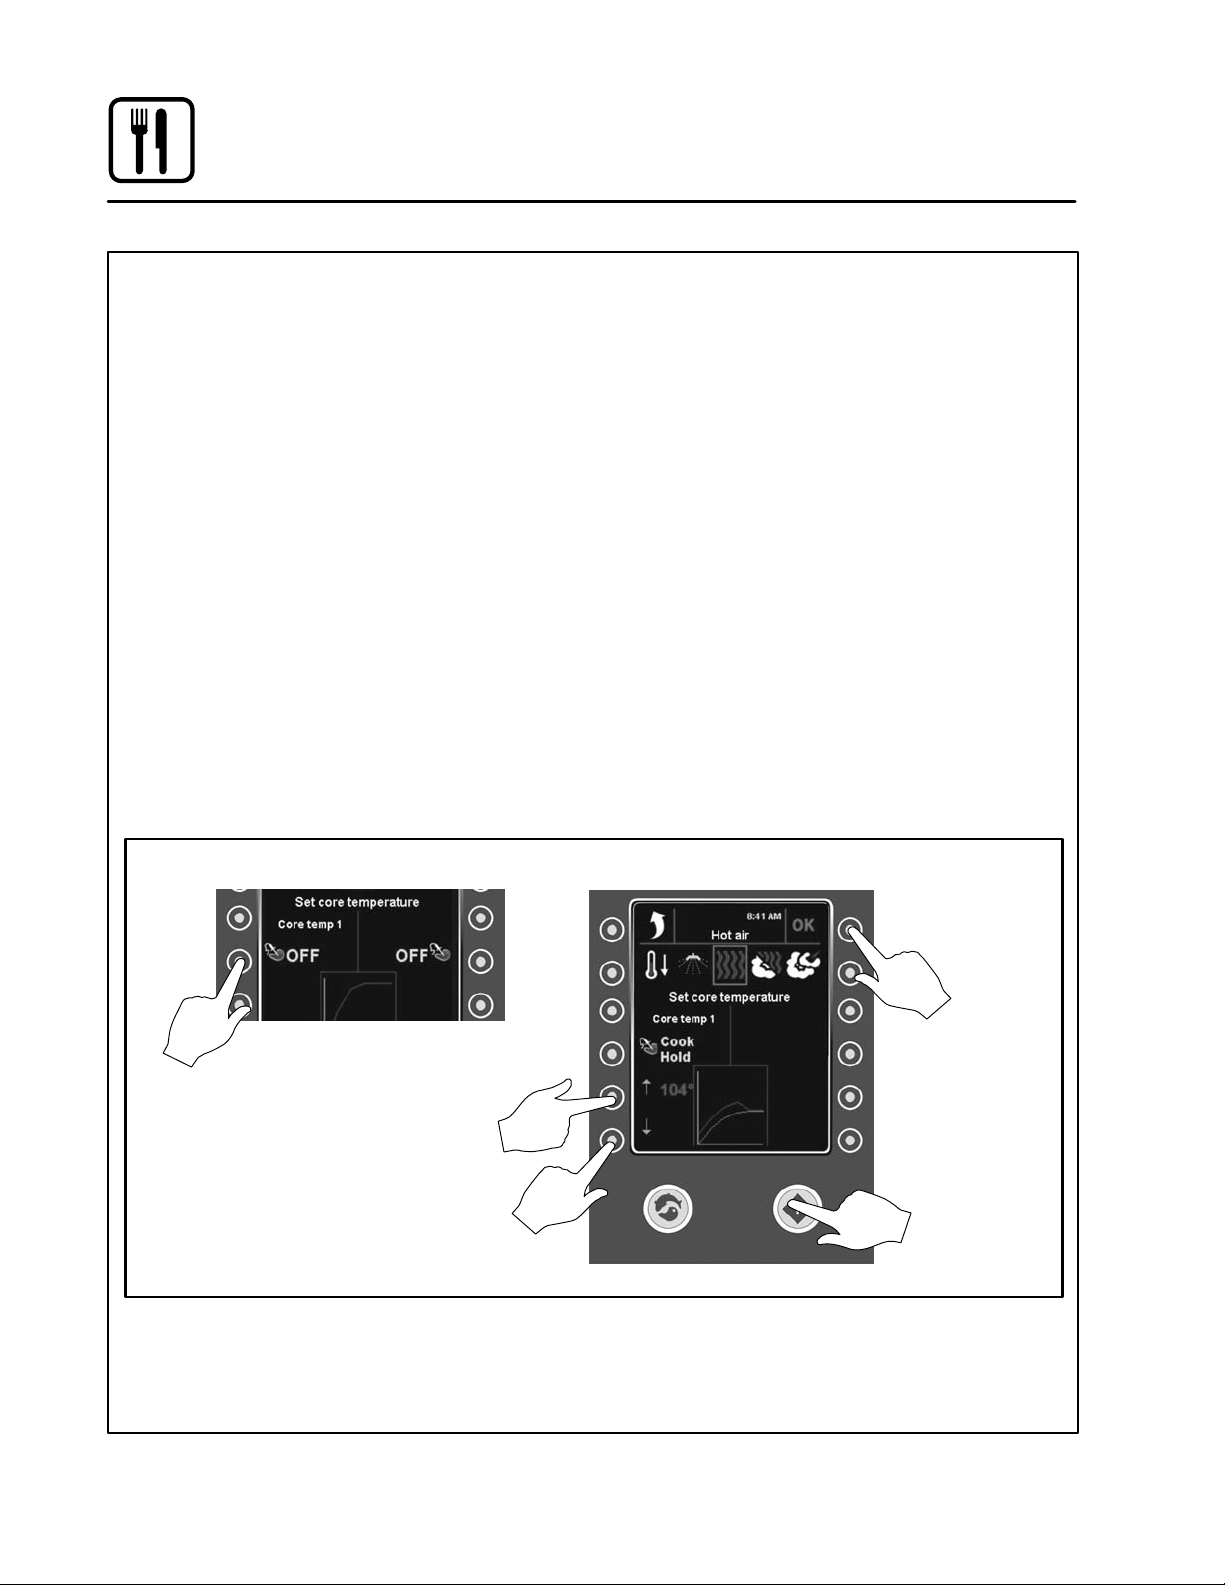
COOK & HOLD
Cook & Hold is an extension of DeltaĆT cooking.
The oven temperature adjusts relative to the actuĆ
al core temperature of the product. When the deĆ
sired core temperature is reached, the oven adĆ
justs the cavity to maintain the core temperature,
acting as a warming mode. Cook & hold is suitable
for roasting over night when the staff is off duty.
1. Follow steps 1Ć6 on page 21 to enter the core
probe cooking screens.
2. Press the CORE PROBE key on the WORK
Menu. The control displays the Core Probe
submenu.
3. Press the Core Probe key three times to acĆ
cess the Cook & Hold cooking screen.
4. Use the keys on the left of the display to set
the desired core probe temperature. The core
probe set temperature is displayed in red.
5. Press the OK key to save the save the desired
core probe temperature.
6. Press the START/STOP key to start the Cook
& Hold cook cycle.
7. When the product has reached the desired
core temperature the display will read
HOLD??? and the oven will adjust the cavity
temperature to maintain the core probe temĆ
perature.
8. Unplug the core probe and remove the prodĆ
uct when ready to serve.
Tips for Using Cook & Hold
D Recommended holding temperature is
140Ć150°F (60Ć65°C). At higher temperatures a
gradual dehydration of proteins takes place, the
weight of the meat is reduced and the meat beĆ
comes less juicy.
D With a hold temperature of 140Ć150°F
(60Ć65°C), the meat can be taken out immediĆ
ately before carving.
D After being held for 5Ć6 hours shrinkage inĆ
creases.
Press this
key three
times to
access
the Cook &
Hold screen
SET CORE PROBE Screen
Press this
key to raise
probe temp
Press this key to
lower probe temp
COOK & HOLD Screen
Press this key
to save your
settings
Press this key
to start
Cook & Hold
Figure 17
24
Page 29
Operation
Programmed Cooking
BCP ovens can store 200 product programs with
10 cooking stages each. Products are grouped
into categories (beef, chicken, bread, etc.) for
easy retrieval. Use the following procedure to
cook using a preĆprogrammed product recipe.
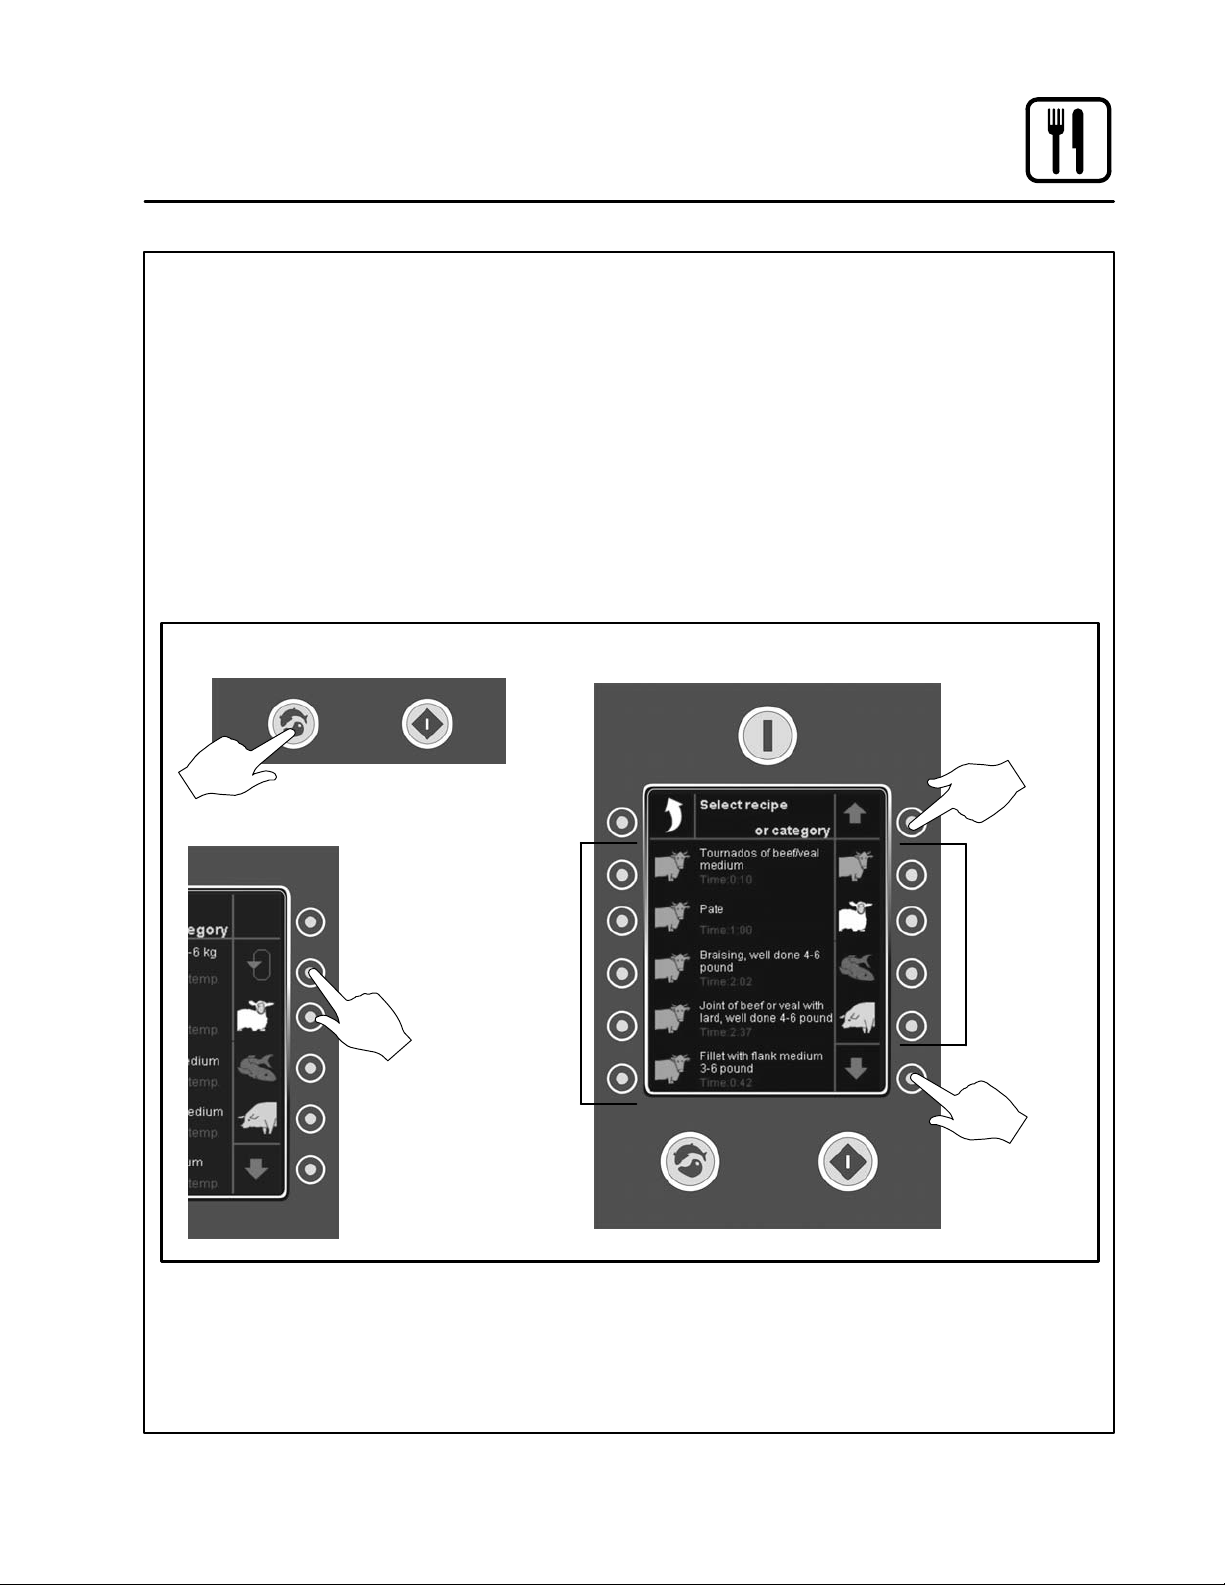
1. Press the PROGRAM key located on the botĆ
tom right of the control. The Program submeĆ
nu is displayed.
The right side of the display shows the product
categories. The green arrow at the bottom inĆ
ducates there are more categories than disĆ
played.
The left side of the display shows the recipes
in the current category
Bottom of BCP Control
Press this key to access
the Program submenu
2. If the desired category is not visible, press the
key next to the green arrow to display addiĆ
tional categories.
3. Press the key next to the desired product cateĆ
gory.
4. The product programs in the choosen categoĆ
ry are displayed on the right side of the screen.
If the category has more than 5 products a
scroll key will appear at the top of the category
list. Press this key to scroll through the prodĆ
uct programs in the category.
PROGRAM Submenu
Press this key
to display
additional
categories
Product
Program
keys
Press to scroll
through all product
programs within a
category
Product
Category
keys
Press this key
to display
additional
categories
Figure 18
25
Page 30
Operation
Programmed Cooking
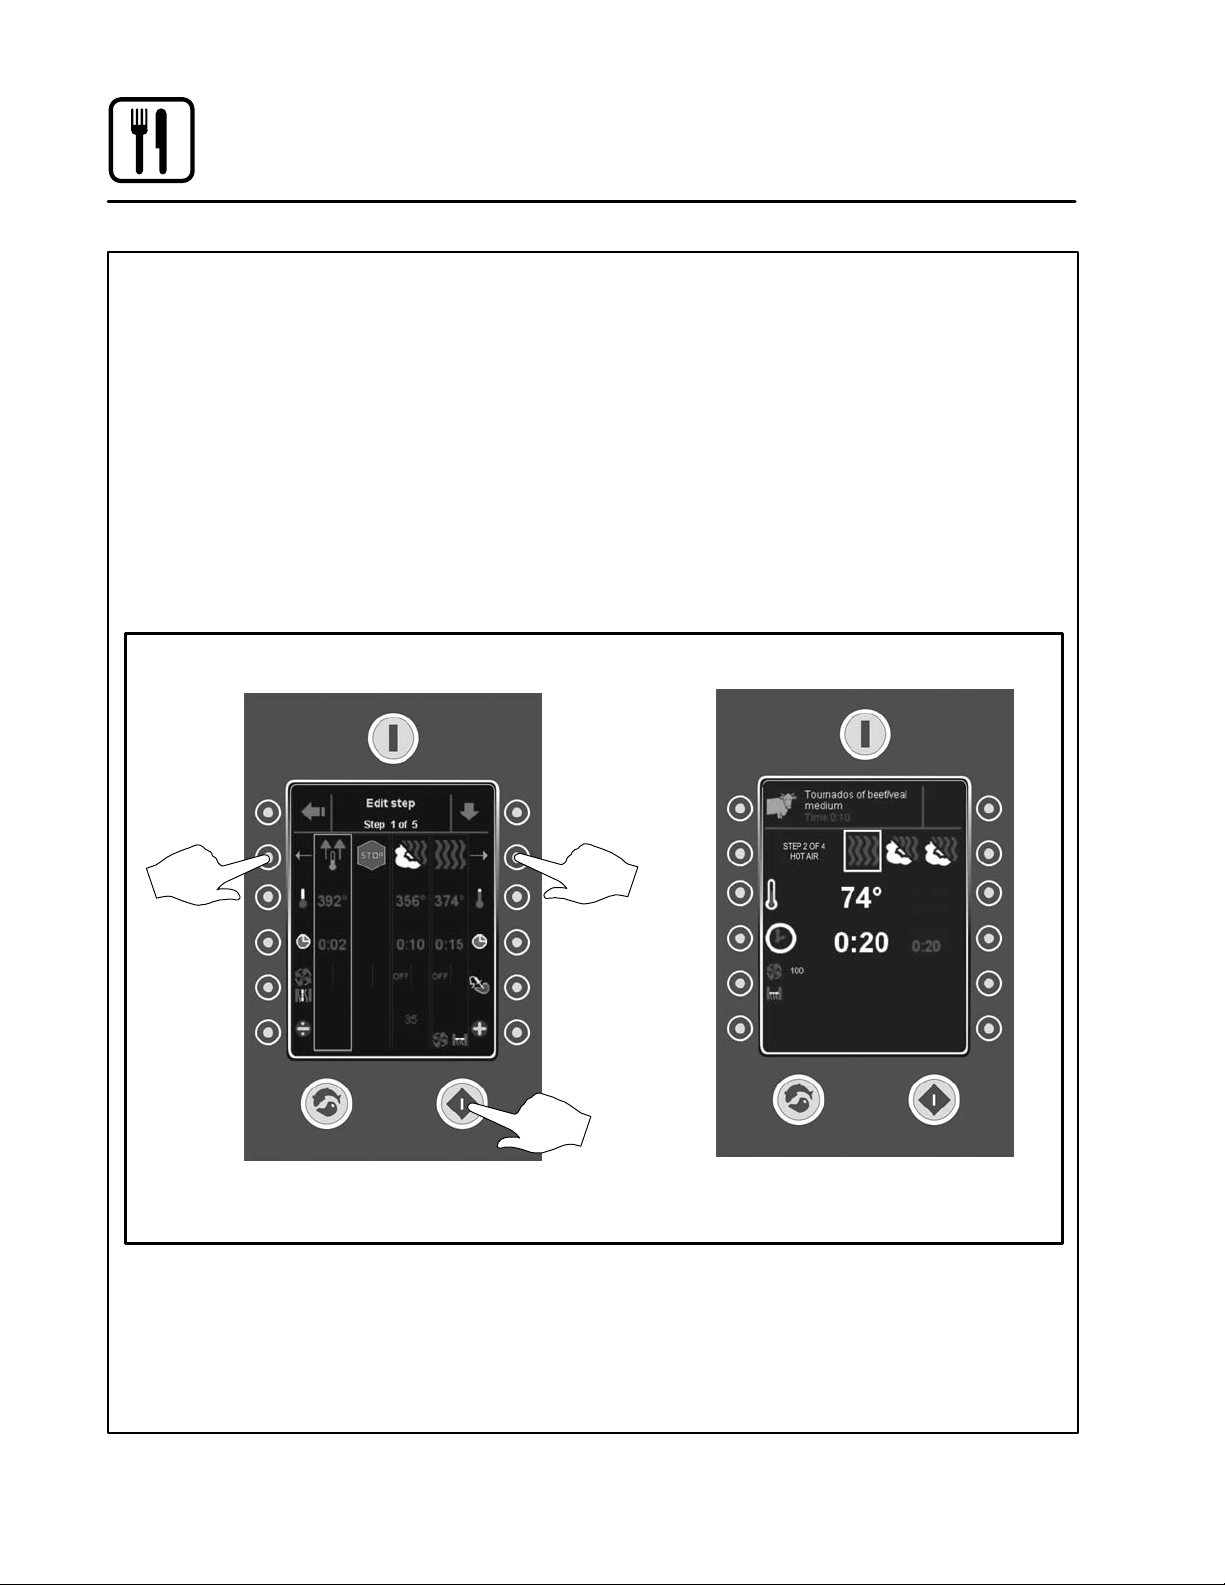
5. Press the key next to the desired product proĆ
gram. The display changes to the Edit Step
screen. This screen gives the operator the
chance to change the cook temperature, time,
fan speed, vent and humidity level (if applicaĆ
ble) for any stage of the program. Changes
made will be for the current bake only. The
program will not be changed for future bakes.
6. Press the START/STOP key to initiate the proĆ
grammed cook cycle. The display shows the
Program Cooking screen.
NOTE: If the first stage of the program is a preĆ
heat, an alarm sounds at the end of the
stage and a message appears notifyĆ
EDIT STEP Screen
ing you that the preheat is complete..
Press the key next to ENTER to silence
the alarm and proceed to stage 2.
7. The square around the mode for the current
stage will flash and the display counts down
the cook time.
8. When there is one minute left in each stage,
the computer counts down from 59 seconds.
9. When the time has expired on the final stage,
an alarm sounds and a message appears noĆ
tifying you that the program is complete. Press
the key to the left of ENTER, or open the door,
to silence the alarm.
10. The control returns to the WORK Menu.
PROGRAM COOKING Screen
Press to
return to
settings
for the
previous
stage
The yellow box indicated the current
stage in edit mode.
Press to
move to
settings for
the next
stage
Press to start
product
program
Figure 19
26
Page 31

Operation
Programming a Product
Use the following procedure to create a new prodĆ
uct program or edit an existing program.
1. Press the MAIN MENU key in the upper left
corner to advance the control to the main
menu.
2. Press the EDIT PROGRAM key on the MAIN
menu.
If, when one of the functions in the main menu
is activated, a screen appears asking for a
WORK Menu
Press
to go to
MAIN
Menu
code, this function is blocked. You need a
code to access. Select enter code, press
876412 and confirm by pressing OK in the upĆ
per right corner.
3. To create a new product recipe, press the
NEW RECIPE key. To edit an existing product
recipe, follow the procedure on page 25 to seĆ
lect the product program to be edited.
MAIN Menu
Press to
edit or
create a
program
Press to
create
a new
program
Figure 20
27
Page 32

Operation
Programming a Product
4. The Edit Program screen is displayed. This is
the main screen for creating and editing prodĆ
uct programs.
Naming or Renaming the Product Program
5. Press the Change Text key on the Edit ProĆ
gram screen. The ENTER TEXT screen is disĆ
played.
NOTE: Skip this step if you are editing an exĆ
isting program and do not need to
change the name.
EDIT PROGRAM Screen
Press to
cancel
6. Use the keys on the right and left of the screen
to enter a new name, or edit an existing prodĆ
uct name. below for details.
Press the green arrow key on the top right at
any time to cancel the edit and return to the
EDIT PROGRAM screen without saving your
changes.
7. Press the OK key to save your changes. The
display return to the EDIT PROGRAM screen.
ENTER TEXT Screen
Press to
save
name
Press to move cursor
to the left
Press to selects next letter to the left
Press to move quickly to the left
Press to select upper or lower
case letter
Press to erase letter to the left Press to write a
Figure 21
28
Press to move
cursor to the right
Press to select next
letter to the right
Press to move
quickly to the right
letter in a red box
Page 33

Operation
Programming a Product
Selecting or Changing the Product Category
8. Press the CHANGE ICON key on the Edit ProĆ
gram screen. The SELECT CATEGORY
screen is displayed.
NOTE: Skip this step if you are editing an exĆ
isting program and do not need to
change the category.
9. Use the keys on the right and left of the screen
to select the desired product category. See
below for details.
EDIT PROGRAM Screen
Press the green arrow key on the top right at
any time to cancel the edit and return to the
EDIT PROGRAM screen without saving your
changes.
10. Press the OK key to save your changes. The
display return to the EDIT PROGRAM screen.
SELECT CATEGORY Screen
Press to
save
category
Press to cancel
Press keys to move yellow
box to the left
Press keys to
move yellow
box to the left
Figure 22
29
Page 34

Operation
Programming a Product
Creating or Changing the Product Program
Cooking Steps
11. Press the CHANGE STEPS key on the Edit
Program screen. The EDIT STEP screen is
displayed.
NOTE: Skip this step if you are editing an exĆ
isting program and do not need to
change the program for any of the
cooking steps.
12. If programming a new product be aware that
the control will provide three steps automatiĆ
cally:
The 1st step is a preheat. Use the keys to the
left and right to set the desired preheat temĆ
perature and time.
The 2nd step is a stop. This step will sound an
alarm when the preheat step is complete alertĆ
ing the operator that the oven is ready to acĆ
cept product.
The 3rd step contains a default cook program
that you can modify as needed.
13. Press one of the top two keys to scroll the yelĆ
low box to the 3rd step.
NOTE: If editing an existing program, use
these keys to select the step to be
edited.
14. Press the green arrow down key to advance
to the EDIT STEP CHANGE FUNCTION
screen.
15. The mode for the selected step appears in a
yellow box on the top row. Press the keys on
the right and left of the bottom row until the deĆ
sired mode appears inside the red box.
16. Use the keys to the side of the middle row to
select either add, delete or change
ADD - Use Add to add a new step. The green
line next to the current step indicates where
the new step will be inserted. Use the keys to
the right and left to move the green line if necĆ
essary.
DELETE - Use Delete to remove the current
highlighted step.
CHANGE - Use Change to modify the mode
of the current highlighed step.
17. You may have up to 10 cooking steps. PreĆ
heat, Stop and Cool Down do not count as
cooking steps. Once all steps have been addĆ
ed, deleted or changed, press the green up
arrow key to return to the EDIT STEP screen.
18. To edit the cooking parameters, scroll the yelĆ
low box to the step to be edited.
19. Use the keys on the side to set the desired
temperature, time, fan speed, vent postion
and humidity (if applicable) for the selected
step. You may also program a core probe
cook. See the directions for core probe cookĆ
ing on pages 21 through 24.
20. When all steps are correct, press the green
side arrow at the top left of the screen to return
to the EDIT PROGRAM screen.
Saving the Product Program
21. Press the SAVE key to save your program to
the oven control.
Exiting Program Mode
22. Press the green side arrow at the top left of the
screen three times to return to the WORK
menu.
30
Page 35

Operation
Programming a Product
EDIT PROGRAM Screen
Yellow box indicates current
stage in edit mode.
EDIT STEP CHANGE FUNCTION Screen
Press to select the desired mode
Press to select Add, Delete or Change
Press to select step to be modified
EDIT STEP Screen
Press to move to
EDIT STEP CHANGE
FUNCTION screen
Press to scroll
the yellow box
to the left
Use these keys to lower
the temperature, time, fan
speed, vent postion and
humidity (if applicable) for
the current step.
Press to scroll
the yellow box
to the right
Use these keys to raise
the temperature, time, fan
speed, vent postion and
humidity (if applicable) for
the current step.
Figure 23
31
Page 36

Operation
Setting a Timed Start
Timer Start makes it possible to start the oven beĆ
fore staff arrives. This way, the oven will be hot
when you come in in the morning.
1. Press the MAIN MENU key in the upper left
corner to advance the control to the main
menu.
2. Press the TIMED START key on the MAIN
menu. The Timer Start screen is displayed.
WORK Menu
Press to go to
MAIN Menu
MAIN Menu
Press for single
instance timed
start
Press for daily
timed start
Press to select
product program
to use
See page 33 for instructions on programming
a single timed start.
3. Choose between START TIME (for a single
instance timed start) or DAILY START (to proĆ
gram a daily timed start). See page 34 for inĆ
structions on programming a daily timed start.
TIMER START Screen
Press to
set a timer start
Press to activate
the timer
Figure 24
32
Page 37

Single Instance Timed Start
1. The control displays the Starting Time screen.
2. Use the side arrow keys to select the parameĆ
ter to set. The current parameter is indicated
by the red box.
3. Use the up and down arrow keys to change
the current parameter.
NOTE: Set only the date, disregarding month
and year.
4. Press the OK key to save your settings and reĆ
turn to the TIMER START screen.
5. Press the RECIPE key to select the Product
Program to run with the timed start. See page
25 for instructions on selecting a product proĆ
gram.
STARTING TIME Screen
Operation
Setting a Timed Start
6. Press the STATUS key to activate the timed
start.
7. When time setting is complete, press OK toĆ
save your settings and return to the Main
Menu.
8. Press the main power switch to turn off the
oven. The oven restarts automatically when
the set date and time is reached. The door
must be closed while TIMER START is acĆ
tive.
NOTE: You may activate the timer and not
turn off the oven until you have finished
for the day.
Press to go to MAIN
Menu without saving
settings
Press to move selection
box to the left
Press to decrease date
or time
Press to go to
accept settings
Press to move selection
box to the right
Press to increase date
or time
Figure 25
33
Page 38

Operation
Setting a Timed Start
Daily Timed Start
1. The control displays the DAILY START screen.
2. If the clock next to a day is red, that day is not
currently active. If the clock is green, a daily
timer is currently active for that day.
To activate all 7 days at once press the DAILY
TIMER key on the right of the screen.
3. Use the keys to on the right side of the screen
to change the start time for each day.
4. Press the OK key to save your settings and reĆ
turn to the TIMER START screen.
5. Press the RECIPE key to select the Product
Program to run with the timed start. See page
25 for instructions on selecting a product proĆ
gram.
DAILY TIMER Screen
6. Press the STATUS key to activate the timed
start.
7. When time setting is complete, press OK toĆ
save your settings and return to the Main
Menu.
8. Press the main power switch to turn off the
oven. The oven restarts automatically when
the set date and time is reached. The door
must be closed while TIMER START is acĆ
tive.
NOTE: You may activate the timer and not
turn off the oven until you have finished
for the day.
Press to return to
MAIN Menu without
saving settings
Press to go to
accept settings
Press to activate all 7
days at once
Press to increase
the time
Press to decrease
the time
Figure 26
34
Page 39

Operation
Setting Preset Time & Temperature
You can make changes to the preset time and temĆ
perature in all modes except CombiWash.
NOTE: Core temperature, fan/exhaust and Combi
Optima (humidity content) cannot be set in
this menu.
1. From the Work menu select the mode to preĆ
set. Enter the desired preset time and temperĆ
ature. See pages 16 through 18 for selecting
mode, time and temperature.
2. When all 3 parameters have been entered.
press the MAIN menu key on the top left.
WORK Menu
Press to
access
MAIN
Menu
3. Press the PRESELECTION key on the left side
of the screen. The Preselection screen is disĆ
played.
4. Verify the mode, time and temperature are
correct.
5. Press the OK key to accept the parameters
and return to the Main menu.
6. Press the Arrow key at the top left of the screen
to return to the Work menu.
7. Repeat this procedure for any additional cookĆ
ing modes.
PRESELECTION Screen
MAIN Menu
Press to
access Preselection screen
Press to
return to
MAIN
Menu
without
saving
settings
Figure 27
35
Press to
accept
preset
parameters
Page 40

Operation
Oven Setup
1. Press the MAIN MENU key in the upper left
corner to advance the control to the main
menu.
2. Press the OVEN SETUP key on the MAIN
menu. The Oven Setup menu is displayed.
SETTING THE LANGUAGE
1. Press the LANGUAGE key on the left of the
screen.
2. Select the key next to the desired language.
Only ten languages are displayed at one time.
To view additional languages press the down
arrow key at the top right of the screen.
3. Once the new language is selected all text on
the screen is automatically translated. There
is no need to accept the change.
SETTING THE OVEN ALARM
1. Press the ALARM SOUND key on the right
side of the control. The display changes to the
Alarm Sound screen.
2. Use the keys on the left and right of the control
to adjust the alarm volume, frequency and
duration.
3. Press the OK key in the top right corner of the
display to save the changes. The control reĆ
turns to the Oven Setup menu.
SETTING THE OVEN TIME
1. Press the SET TIME key on the right side of the
control.
2. Use the side arrow keys to select the parameĆ
ter to set. The current parameter is indicated
by the red box.
3. Use the up and down arrow keys to change
the current parameter.
NOTE: Set only the date, disregarding month
and year.
4. Press the OK key to save your settings and reĆ
turn to the Oven Setup menu.
SETTING THE OVEN SETUP
WARNING!!
Incorrect changes to the set up of the
oven may have a serious effect on its reliĆ
ability in service. Contact your Blodgett
service agent before making any
changes.
1. Press the OVEN SETUP key on the right of the
screen.
2. Select the oven parameter with the the vertical
arrows on the right of the screen. Change the
parameter using the horizontal arrows at the
bottom of the screen.
3. When all parameters are set, press the OK key
at the top right of the screen. The control reĆ
turns to the Oven Setup menu.
36
Page 41

WORK Menu
Press to
return to
MAIN Menu
Operation
Oven Setup
OVEN SETUP Menu
Press to
access
MAIN
Menu
MAIN Menu
Press to set
language
Press to
access
CombiNet
Press to
access OVEN
SETUP screen
Press to
set oven
alarm
Press to
set clock
Press to
access
oven setĆ
up paramĆ
eters
Figure 28
37
Page 42

Operation
USB Functions
The Blodgett BCP comes standard with a USB
port located underneath the control compartment.
The USB will enable upload and download of
product recipes as well as HACCP data.
To Access USB Menu
1. Insert the USB card into the slot below the
control compartment.
2. From the MAIN menu, press the SERVICE key.
The USB Menu is displayed.
MAIN Menu
Press to access
SERVICE screen
To Backup System Data
1. Press the key labelled Take Backup on the left
side of the USB screen.
2. The control briefly displays the files to be
backed up including product recipe proĆ
grams, counters, error logs, oven setup and
Combi Optima data.
3. Data files are automatically named according
to the year, month, date and time they were
saved.
4. When backup is complete, the control returns
to the SERVICE menu.
SERVICE Menu
Press to
access USB
screen
Press to back up
oven data USB
Press to back up
restore a previous
data backup
Press to read files on
USB key and test
connection to computer
USB Screen
Press to copy
recipes from USB
to oven
Press to copy
recipes from oven
to USB
Figure 29
38
Page 43

Operation
USB Functions
To Restore System Data from USB
1. Press the key labelled Retrieve Backup on the
left side of the USB screen.
2. Backup data is stored by oven serial number.
If the same USB key is used for more than one
oven, be sure to select the correct serial numĆ
ber.
3. Select the data file to be restored. Data files
are automatically named according to the
year, month, date and time they were saved.
4. Press the OK button in the upper right corner
of the display to restore the selected data file.
5. Use the MAIN POWER key at the top of the
control to reboot the oven.
Copy Recipes from USB to Oven
1. Press the key labelled Get Recipes from USB
on the right side of the USB screen.
2. Select the recipes to be copied to the oven.
See Figure 30.
NOTE: The control displays the product cateĆ
gories in yellow as folders. Individual
program recipes are displayed in
white.
3. Press the OK button in the upper right corner
of the display to accept the recipes to be copĆ
ied.
4. The RECIPE ACCEPT screen is displayed.
Press ADD to add the selected product proĆ
grams to the oven. Press OVERWRITE to overĆ
write existing programs with the recipes on
the USB.
Copy Recipes from Oven to USB
1. Press the key labelled Send Recipes to USB
on the right side of the USB screen.
2. Select the location on the USB folder to save
the product recipes. You may overwrite an exĆ
isting file or create a new file with a name
matching the serial number of the oven.
3. Press the OK button in the upper right corner
of the display to copy the recipes from the
oven to the USB.
Press to
select or
deselect
individual
recipes
RECIPE UPLOAD Screen UPLOAD ACCEPT Screen
Press to copy
selected
recipes to
oven
Press to
scroll up
Press to
select all
recipes
Press to
deselect
all recipes
Press to
scroll down
Figure 30
Press to
add recipes
Press to
overwrite
existing
recipes
39
Page 44

Operation
HACCP Library
The Blodgett BCP comes standard with HACCP
data recording. HACCP enables you to control
and document production. Data recorded inĆ
cludes production time. production duration,
preparation temperature and core temperature.
The HACCP library can hold approximately 1000
log files. You will be notified when the memory is
full so that you can empty the memory with the
USB. If nothing is done, the computer will autoĆ
matically start to overwrite the oldest files.
To Activate HACCP Data Recording
NOTE: HACCP data is stored under product recĆ
ipe names. Therefore, HACCP is not availĆ
able for manual cooking.
HACCP must be activated to record data.
1. Press the MAIN menu key in the upper left corĆ
ner of the WORK menu to advance the control
to the main menu.
2. Press the HACCP key on the left side of the
control to access the HACCP menu.
3. Be sure that Active appears in the status bar
at the bottom of the control. If the status is inĆ
active, press the key on the left of the status
bar to toggle to Active.
To View HACCP Data
1. From the HACCP menu, press the key laĆ
belled either Show HACCP from Oven or
Show HACCP from USB. See Figure 31.
2. A list of HACCP log files is displayed. The files
are logged by year, month, date and product
name. Use the UP and DOWN ARROW keys
to scroll through the list until the desired
HACCP file is highlighted.
3. Press the OK key in the upper right of the conĆ
trol to display the HACCP chart. See
Figure 31.
4. Press the RETURN key at the top left of the
screen to return to the HACCP screen.
To Backup HACCP Data
1. From the HACCP menu, press the key laĆ
belled Archive on USB. See Figure 31.
2. The displays reads SAVING HACCP.
3. When the data is saved to the USB the control
returns to the HACCP screen.
NOTE: The HACCP data on the USB can be loĆ
cated in the folder with the name of the
oven serial number.
To Delete HACCP Data from the Oven
1. From the HACCP menu, press the key laĆ
belled Delete HACCP Data from Oven. See
Figure 31.
2. The screen will ask you to confirm that you
want to delete all HACCP files. Press the key
next to Accept to delete the files. Press the key
next to Regret to cancel.
3. The control returns to the HACCP screen.
40
Page 45

Operation
HACCP Library
Press to move
to MAIN menu
Press to access
HACCP Menu
WORK Menu
MAIN Menu
HACCP Menu
HACCP DATA Chart
Press to return
to HACCP menu
HACCP DATA CHART COLOR KEY:
Red line Preset temp.
White lIne Current oven temp.
Vertical blue line Door opened
Light green line #1 (left) core probe temp.
Light yellow line #2 (right) core probe temp.
Figure 31
41
Page 46

Operation
Optional CombiNet
The optional CombiNet feature allows you run the
oven remotely from a pc. This is useful for writing
product recipes as well as viewing and downloadĆ
ing HACCP and other oven data with the conveĆ
nience of a large screen and keyboard.
CONNECTING TO A NETWORK OR PC
NOTE: CombiNet requires the installation of Java.
The program can be downloaded from
www.java.com.
1. Remove the control panel cover.
2. Connect the oven to a network or pc via the
ethernet cable. The connection can be found
on the back of the control.
3. Replace the control cover and connect the
other end of the cable to your local network or
directly to a pc.
WORK Menu
4. Press the MAIN MENU key in the upper left
corner to advance the control to the main
menu.
5. Press the OVEN SETUP key on the MAIN
menu. The Oven Setup menu is displayed.
6. Press the NETWORK key on the left of the
screen. The screen displays the IP address of
the oven.
NOTE: If the oven is connected to a pc, use
the IP address displayed. If the oven is
connected to a network you may need
to change the IP address to match the
naming configuration for your network
7. Press the OK key on the top right of the conĆ
trol. The oven will restart itself.
8. From the pc, open an Internet Exporer window
and go to the IP address for the oven.
OVEN SETUP Menu
Press to
access
MAIN Menu
Press to
access
COMBI
NET
MAIN Menu
Press to
access OVEN
SETUP menu
Figure 32
42
Page 47

Operation
Optional CombiNet
REMOTE OVEN CONTROL
1. Select Control Oven from the menu on the left
of the screen.
2. The oven display appears in the window on
the right. You are now controlling the oven reĆ
motely. You may use your mouse to navigate
through the oven menus and use your keyĆ
board to enter data.
HACCP VIA COMBI NET
1. Select HACCP from the menu on the left of the
screen.
2. The HACCP data is displayed on the right side
of the screen.
Select Function
Send recipes
to oven
REMOTE RECIPE MANAGMENT
1. Select Recipes from the menu on the left of
the screen.
2. Press Get from Oven to retrieve product
recipes currently programmed in the oven liĆ
brary.
3. Add new recipes and/or edit and delete
recipes from the library now located on the pc.
See Figure 33.
4. Press Send to Oven to download all recipes
from the pc to the oven control. If necessary,
click the Browse button to select the desired
recipe location. Click the Upload button to
upload the recipes.
Recipe Screen
Click to import
Click to save
recipes on pc
Click to
add recipe
additional
recipes
Click on category
icon to open recipe
Figure 33
43
Click to
copy recipe
Click to
delete recipe
Page 48

Maintenance
Cleaning & Preventative Maintenance
DAILY CLEANING
Daily cleaning of your Combi oven is essential for
sanitation, and to ensure against operational diffiĆ
culties.
Cleaning the Exterior
1. The exterior of the appliance may be cleaned
and kept in good condition with a light oil. SatĆ
urate a cloth and wipe the appliance when it
is cold; wipe dry with a clean cloth.
WARNING!!
DO NOT spray the outside of the appliance
with water or clean with a water jet. CleanĆ
ing with a water jet can impregnate chloĆ
rides into the stainless steel, causing the
onset of corrosion.
Cleaning the Interior
NOTE: DO NOT use corrosive cleaners not inĆ
tended for oven cleaning on your Combi
oven.
Blodgett recommends the following products
for cleaning and rinsing of your Blodgett ComĆ
bi oven. If you choose to use products other
than what Blodgett recommends, please have
your suppler send us the MSDS sheet on the
proposed alternate so we can ensure it meets
our standards. Non approved products can
cause harm to your unit and can potentially
void your warranty.
1. Open the oven door.
2. Use the attached spray hose, located beneath
the control, to clean the front drip tray. Water
will run to the drain in the oven cavity.
Run the CombiWash automatic cleaning cycle
as follows:
1. Check that the oven cleaner and rinse agent
containers are both full.
2. From the WORK menu, select the clean cycle.
The CombiWash menu is displayed.
3. CombiWash features four different cleaning
cycles. Use the Left and Right Arrow keys to
select the desired cleaning cycle.
Step 1 (44 minutes)
Step 2 (1 hour)
Step 3 (1 hour, 49 minutes)
Step 4 (2 hours, 38 minutes)
NOTE: Use Steps 1 or 2 after steaming and
roasting at low temperatures. Use
Steps 3 or 4 after steaming and roastĆ
ing at high temperatures.
4. Press the Start/Stop key to initiate the clean
cycle.
COMBIWASH Menu
Recommended oven cleaners:
Johnson Diversey Suma Nova LĆ6
Four, 1 gallon (3.78 litre) containers
Product code 57252280
One, 5 gallon (18.9 litre) container
Product code 57252100
Recommended Rinse Aid:
Johnson Diversey Suma Maro A8.8
Four, 1 gallon (3.78 litre) containers
Product code 57270280
One, 5 gallon (18.9 litre) container
Product code 57270100
44
Press to
select
cleaning
mode
Press to start
CombiWash
Press to
select
cleaning
mode
Figure 34
Page 49

Maintenance
Cleaning & Preventative Maintenance
5. If the cavity temperature is above 175_F
(80_C), the oven will automatically enter cool
down. When the cavity is below 175_F (80_C)
the CombiWash cycle begins.
6. The control counts down the time remaining
in the wash cycle.
7. When the wash cycle is over, the oven autoĆ
matically switches to an energy saving standĆ
by mode.
WEEKLY CLEANING
In addition to the daily cleaning, it is necessasry to
clean the control filter and behind the fan guard on
a weekly basis. This is necessary for proper funcĆ
tioning of the oven. Scale will build up on the fan
and heat source leading to a less efficient oven.
Cleaning the Control Filter
The control filter is located below the control
compartment, in front of the spray hose.
1. To remove, pull down on the black knob on the
left of the filter.
2. Clean the filter with soap and water.
3. Reinstall the filter. Press up on the filter until the
back of the knob is inserted into the hole in the
bottom of the oven.
4. Push up on the center of the knob to expand
the back of the knob securing the filter.
Cleaning Behind the Fan Guard
1. Loosen the two screws and on the fan guard
(or baffle).
2. Swing the baffle forward.
3. Thoroughly spray cleaner onto the fan and
heat source. Place the oven in the steam
mode for approximately 10 minutes.
4. After ten minutes, rinse the cleaner off. Return
the fan guard to the closed position. Rotate
the two screws to secure the fan guard.
PREVENTIVE MAINTENANCE
The best preventive maintenance measures are
āthe āāāproper āāinitial āāinstallation āāof āāthe equipment and
a program for cleaning the appliance routinely.
The Oven/Steamer requires no lubrication. ConĆ
tact the factory, the factory representative or a loĆ
cal Blodgett Combi service company to perform
maintenance and repairs should they be required.
45
Page 50

Deliming
Maintenance
The control keeps track of boiler usage between
deliming. When the oven has reached 95% of the
time the control warns the operator that the oven
needs to be delimed. This is a warning only, the
oven can be used all day before deliming.
Deliming the Oven
1. Be sure the container delivering the deliming
agent to the appliance is full. Be sure to use a
nonĆdiluted deliming agent such as "Lime
Away" by EcoĆLabs or "Lime Out", by US
Chemical.
WORK Menu
Press
to go to
MAIN
Menu
2. From the MAIN Menu, select the SERVICE
key.
3. The control displays the SERVICE menu.
Press the DELIME DIAGNOSIS key on the
right of the control.
4. The control displays the Delime Diagnosis
screen. Press the START DELIMING key on
the right side of the control.
5. The remainder of the process is automatic.
The control displays the deliming steps as
they occur.
MAIN Menu
Press to
go to
SERVICE
Menu
SERVICE Menu
DELIME DIAGNOSIS Screen
Press to start
deliming
process
Press to
enter
DELIME
Menu
Figure 35
46
Page 51

BCPĆ61, BCPĆ101 et BCPĆ102
Manuel D'Installation - Utilisation - Entretien
47
Page 52

Introduction
Le fourĆétuveur Combi de Blodgett
Le fourĆétuveur Combi de Blodgett propose une
toute nouvelle manière de cuire les aliments. Avec
le fourĆétuveur Combi, vous pouvez choisir entre
deux modes de cuisson : à la vapeur et à l'air
chaud, soit...
D séparément
D combiné, ou
D en séquence
En outre, trois modes de fonctionnement faciles
s'offrent à vous :
En mode Steam (vapeur), vous pouvez :
étuver réchauffer reconstituer
bouillir décongeler mijoter
blanchir conserver braiser
pocher
En mode Hot Air (air chaud), vous pouvez :
rôtir cuire du pain et des gâteaux
griller gratiner
In the Combi Optima mode you can:
décongeler rôtir réchauffer
étuver cuire du pain et des gâteaux
Il existe quatre modes spécialisés supplémentairĆ
es pour vous aider à tirer le maximum de votre
temps:
Remise en température : Assure un réchaufĆ
fage parfait.
Apprêt : Apprêtez et faites cuire dans le même
four.
Préchauffage : Sous ce mode, le four préchauffe
à 300°C (575°F) durant 15 minutes. Ensuite, il se
refroidit automatiquement jusqu'à 249°C (480°F)
afin de protéger les composants électroniques
perfectionnés.
Refroidissement : Permet à l'enceinte du four de
se refroidir rapidement avec la porte ouverte.
De plus, vous pouvez utiliser deux ou trois foncĆ
tions de manière séquentielle au cours d'une
même cuisson. Nous appelons cette méthode :
D étuvage combiné
D rôtissage combiné
D cuisson de pain combinée
La circulation de l'air chaud combinée avec la vaĆ
peur du fourĆétuveur Combi à haute performance
assurer des améliorations à plusieurs niveaux :
D productivité accrue dans la cuisine
D diminution des dépenses liées au remplaceĆ
ment des appareils de cuisine
D un choix de menus plus vaste
D un nettoyage simplifié
Le travail est simplifié puisque les aliments sont
préparés sur des plateaux ou dans des récipients
de la table à vapeur. Vous pouvez cuire, stocker et
transporter les aliments dans ces mêmes réciĆ
pients. Vous pouvez préparer avec efficacité de
petites quantités d'aliments de même que réĆ
chauffer les plats cuisinés et les aliments prêtsĆàĆ
servir en quelques minutes seulement. Il devient
possible aussi de préparer certains aliments surĆ
gelés sans même les décongeler. Cette souplesse
au niveau de la préparation réduit l'utilisation de
chaudrons et de tables à vapeur puisqu'il n'est
plus nécessaire de conserver au chaud de granĆ
des quantités d'aliments pendant de longues
périodes.
De nos jours, il devient de plus en plus important
d'améliorer la qualité des aliments. Avec le fourĆ
étuveur Combi de Blodgett, la cuisson des léguĆ
mes se fait sans eau et à une température optimaĆ
le légèrement inférieure à 100_C (212_F),
permettant ainsi de conserver les vitamines, les
minéraux, les éléments nutritifs et les oligoĆéléĆ
ments. La viande cuite dans le Combi perd moins
de sa masse et demeure plus ferme et plus juteuĆ
se. Vous utiliserez aussi le fourĆétuveur Combi daĆ
vantage pour les produits de la boulangerie, car
les modes Steam (vapeur) et Hot Air (air chaud) du
fourĆétuveur Combi en font un appareil de cuisson
tout usage.
48
Page 53

Introduction
Description du fourĆétuveur Combi
À PROPOS DU FOURĆÉTUVEUR
Les foursĆétuveurs Combi de Blodgett sont des
appareils haut de gamme fabriqués en acier
inoxydable de première qualité en faisant appel à
des procédés supérieurs.
Le ventilateur à deux vitesses est doté d'un dispoĆ
sitif de protection pour les doigts et alimenté par
un puissant moteur silencieux. Le condenseur asĆ
pire l'excès de vapeur de l'appareil. La condensaĆ
tion et les eaux usées générées par la vapeur et le
nettoyage sont continuellement évacuées.
L'isolant de haute qualité empêche un rayonneĆ
ment thermique excessif et aide à conserver
l'énergie.
Le générateur de vapeur fraîche haute performanĆ
ce comporte un système de commande qui vous
permet de profiter de tous les avantages d'un étuĆ
veur de haute qualité au simple actionnement
d'un bouton. La vapeur fraîche entre dans la cavité
du four sans pression et y circule à haute vitesse.
Cette méthode simple et pratique favorise une
cuisson rapide et en douceur qui vous procure
des aliments de première qualité. Le générateur
de vapeur est complètement automatique et il est
doté d'un dispositif qui l'empêche de fonctionner
à sec.
FONCTIONNEMENT DU FOURĆÉTUVEUR
COMBI
La porte pratique du four est dotée d'un hublot et
possède un grand rayon d'ouverture. La poignée
de la porte est facile à saisir, même avec des mains
mouillées ou grasses.
L'écran tactile simple d'utilisation facilite le foncĆ
tionnement. Grâce à ses symboles graphiques et
à son espaceĆmémoire pouvant accueillir jusqu'à
200 recettes de produit, le BCP s'avère facile d'utiĆ
lisation même pour les employés de cuisine sans
expérience.
Le système automatique CombiWash réduit le
nettoyage au minimum.
49
Page 54

Installation
Certifications
LES PRÉSENTES CONSIGNES D'INSTALLATION
SONT DESTINÉES AU PERSONNEL D'INSTALĆ
LATION ET D'ENTRETIEN QUALIFIÉ SEULEĆ
MENT. TOUTE INSTALLATION OU TOUT ENTREĆ
TIEN EFFECTUÉ PAR DES PERSONNES NON
COMPÉTENTES POURRAIENT ENDOMMAGER
LE FOUR OU CAUSER DES BLESSURES.
Le terme personnel d'installation qualifié désigne
une personne, une entreprise, une société ou une
organisation assumant, elleĆmême ou par l'entreĆ
mise d'un représentant, les responsabilités suiĆ
vantes :
D la pose ou le remplacement des tuyaux de gaz.
Le raccordement, la mise en service, la réparaĆ
tion ou l'entretien du matériel.
D La pose du câblage électrique à partir du compĆ
teur, de la boîte de distribution principale ou de
la prise jusqu'à l'appareil.
Le personnel qualifié doit détenir de l'expérience
dans ces domaines, connaître toutes les mesures
de sécurité pertinentes et respecter les normes de
la province ou des autorités locales.
Mises en service américaines et canadiennes
La mise en service doit respecter les normes locaĆ
les ou, en l'absence de tels normes, les règleĆ
ments suivants : National Fuel Gas Code,
NFPA54/ANSI Z223.1 - dernière édition, le Code
d'installation du gaz naturel CAN/CGAĆB149.1 ou
le Code d'installation du propane, CAN/CGAĆ
B149.2, selon le cas.
Référence : National Electrical Code, ANSI/NFPA
70 - dernière édition ou le Code canadien de
l'électricité CSA C22.1, selon le cas.
La mise en service de ce matériel doit respecter
les normes suivantes : Basic Plumbing Code of the
Building Officials and Code Administrators InterĆ
national Inc. (BOCA) et Food Service Sanitation
Manual du Food and Drug Administration (FDA).
L'appariel doit etre installe avec l'empechement
de refoulement selon les codes federale,
provincial et locaux.
Mise en service dans les autres pays
L'installation doit respecter les normes nationales
et locales, qui varient selon le pays. Si vous avez
des questions sur les méthodes d'installation acĆ
ceptables ou sur le fonctionnement de votre appaĆ
reil, veuillez communiquer avec votre détaillant.
S'il n'y a aucun détaillant dans votre région, veuilĆ
lez communiquer avec Blodgett Combi au
0011Ć802Ć860Ć3700.
50
Page 55

Installation
Caractéristiques techniques relatives aux services publics
SPÉCIFICATIONS DE PLOMBERI - BCPĆ61E, BCPĆ101E et BCPĆ102E
EAU
Pression d'eau 250 kPa (2,5 bar, 36,26 lb/po2) durant le nettoyage CombiWash
150 kPa (1,5 bar, 21,76 lb/po2) lorsque le nettoyage CombiĆ
Wash est hors fonction
600 kPa (6 bar, 87 lb/po2) maximum
Raccordement d'eau Flexible d'arrosage d'eau froide, 1,905 cm (3/4 po)
Conditions requises
minimum
DRAINAGE
Type de drain Drain de mise à l'air libre
Raccordement du drain Cuivre 50,8 mm (2,00 po)
Température moyenne
de l'eau au drainage
Total des solides en suspension (TDS) - doit être moins que
100 parties par million
Dureté totale de l'eau - 80Ć120 parties par million
Chlorides - doit être moins que 30 parties par million
Le pH de l'eau - 7.0Ć8.0
Chlorine - 0 parties par million
Environ 71_C (160_F)
CARACTÉRISTIQUES TECHNIQUES ÉLECTRIQUES - BCPĆ61E, BCPĆ101E et
BCPĆ102E
Modèle du Four Tension kW Fréquence Phase Charge maximale
(ampères)
BCPĆ61E 208 9 60 3 25
240 9 60 3 22
BCPĆ101E
BCPĆ102E 208 27 60 3 75
208 18 60 3 50
240 18 60 3 44
240 27 60 3 65
51
Page 56

Installation
Déballage du four
Gardez le four dans son emballage pour en facilitĆ
er la manipulation. Chaque fois que c'est posĆ
sible, utilisez un chariot élévateur manuel à levier.
1. Faites rouler le chariot sous la traverse tubulĆ
aire inférieure du bâti sur pieds. Placez deux
blocs de bois entre la traverse tubulaire et le
chariot.
REMARQUE:Pour obtenir le meilleur équilibre
possible, faites rouler le chariot
depuis le devant du four ou son
côté moteur.
REMARQUE:Si nécessaire, on peut aussi lever
le four du bâti sur pieds.
2. Retirez l'emballage d'origine du four. AttenĆ
dez d'avoir mis le four en place avant de retirer
le vinyle recouvrant la surface en acier inoxydĆ
able. Une fois le vinyle retiré, les surfaces deĆ
viennent vulnérables aux objets durs et couĆ
pants comme les outils et les couteaux.
3. Retirez tout le matériau d'emballage qui retiĆ
ent les grilles dans l'enceinte du four.
Figure 36
52
Page 57

Installation
Choix de l'emplacement et nivellement du four
Il est important de bien choisir l'emplacement de voĆ
tre four afin d'en augmenter les performances et
l'utilité.
Vous devez conserver un dégagement minimal enĆ
tre le four et toute construction combustible ou non
combustible.
On doit éviter de poser toute source puissante de
chaleur, comme une plaque de cuisson, une
poêle à frire basculante, une sauteuse ou une friĆ
teuse, près du four, particulièrement son côté
droit. On peut facultativement se procurer un
écran thermique latéral.
DÉGAGEMENT ACCEPTABLE
Côté droit Côté gauche Arrière
2.75" (7cm) 2.75" (7cm) 2" (5cm)
De plus, il est recommandé de respecter les dégaĆ
gements suivants pour l'entretien.
D Parois latérales du four - 30cm (12")
D Paroi arrière du four - 30cm (12")
Pour s'assurer que le four fonctionne convenĆ
ablement une fois mis en place, on doit le poser
érigé et horizontalement de niveau. Cela se
mesure aux rebords avant et latéral du toit. On
peut niveler le four à l'aide des vis de réglage
sur le bâti sur pieds ou sur les pattes de
modèles de table. On doit aussi régler la hauĆ
teur du four afin qu'il accueille convenableĆ
ment le chariot à grilles.
MISE EN PLACE CONVENABLE
MIS EN PLACE INAPPROPRIEE
Figure 37
53
Page 58

Installation
Robinetterie
RACCORDEMENT À L'ALIMENTATION EN EAU
Les fours Blodgett BCP présentent un ou deux
raccords à l'alimentation en eau. Ce qui suit s'apĆ
plique aux cas de deux tels raccords :
D un raccord pour l'eau brute (non traitée) servant
au giclage de condensat (eau froide). Ce racĆ
cord se trouve à l'arrière du four;
D un raccord en prévision du générateur de vaĆ
peur et du jet CombiWash dans l'enceinte du
four. Ce raccord doit absolument se conformer
aux exigences applicables à l'alimentation en
eau aux appareils électroménagers; toutefois,
on peut se servir d'eau chaude à une tempéraĆ
ture ne dépassant pas 49 °C (120 °F). Le racĆ
cord se trouve à l'avant du four.
Pour faciliter le nettoyage, l'entretien et les réparaĆ
tions, on doit relier au four un flexible de 1,905 cm
(3/4 po) approuvé. Les mises en place permaĆ
nentes doivent comprendre un robinet d'arrêt et
un clapet anti-retour.
Si le distributeur se relie au système d'alimentaĆ
tion d'eau par un flexible, ce dernier doit être apĆ
prouvé VA.
Avant de raccorder le four à l'alimentation en eau,
rincez les tubes à fond. Raccordez le four.
RACCORDEMENT À L'ÉVACUATION D'EAU
Les fours Blodgett sont dotés d'un système d'évaĆ
cuation qui purge l'excédent d'eau de l'enceinte
du four. Il peut s'agir d'eau de condensation proĆ
venant des produits, de l'eau froide pour refroiĆ
dissement de l'enceinte du four, ou de l'eau résiĆ
duelle découlant d'un nettoyage du four.
AVERTISSEMENT!!
Le raccordement à l'évacuation d'eau doit
absolument s'effectuer à un tuyau de viĆ
dange. Ce dernier ne doit jamais se terĆ
miner directement sous le four.
Le tuyau de vidange doit être fait d'acier inoxydĆ
able ou d'un matériau d'une résistance thermique
aussi élevée, présenter un diamètre d'au moins
5,08 cm (2 po) et une pente descendante d'au
moins 3° ou 5 %.
AVERTISSEMENT!!
Si la température de l'eau dépasse 21 °C
(70 °F), il pourra survenir des problèmes
d'étalonnage Combi Optima et de refroiĆ
dissement du four.
Il faut éviter de relier tout four équipé d'un
générateur de vapeur à un processus de
traitement de l'eau par osmose inverse;
sinon, cela causera des problèmes de
lecture du niveau d'eau dans le généraĆ
teur de vapeur.
Le raccordement à l'alimentation en eau
doit absolument faire l'objet d'exécution
par un(e) plombier(ère) autorisé(e) conĆ
formément aux codes locaux existants.
La garantie ne couvre pas les filtres à eau
bouchés ou l'encrassement dans les
électrovalves.
Figure 38
54
Page 59

Installation
Raccordement à l'électricité et Ventilation
RACCORDEMENT À L'ÉLECTRICITÉ
REMARQUE:Seul un technicien qualifié peut effecĆ
tuer le raccordement à l'électricité.
Avant de procéder au raccordement à l'électricité
des appareils, assurezĆvous que la source d'aliĆ
mentation est conforme aux spécifications de tenĆ
sion, d'intensité et de phase indiquées sur la plaĆ
que signalétique de l'appareil.
1. La plaque signalétique se trouve sur le côté
droit du four.
Une prise électrique ou un interrupteur de sécurité
approuvé(e) doit absolument se trouver près du
four de manière qu'on puisse débrancher le four
aux fins de mise en place ou de réparation. L'interĆ
rupteur de sécurité doit absolument être en meĆ
sure de couper tous les pôles avec une distance
totale de coupure d'au moins 3 mm.
L'installation de tous les appareils doit se conforĆ
mer aux codes d'électricité nationaux et locaux.
Le schéma de câblage se trouve dans le compartiĆ
ment du moteur.
REMARQUE:Débranchez la source d'alimentation
électrique de l'appareil avant de proĆ
céder à l'entretien.
VENTILATION
Les fours Blodgett BCP sont équipés d'un
système d'échappement ouvert-direct qui abĆ
sorbe l'excès d'humidité de l'enceinte du four. Ce
système d'échappement contient un amortisseur
à fonctionnement électrique.
On peut commander le moteur de ventilation diĆ
rectement depuis le four. Cela signifie que la venĆ
tilation se met en marche dès la mise à exécution
d'un programme, et tourne durant 10 minutes
après l'achèvement de son exécution.
On peut relier le tube d'échappement à un
système de ventilation. Dans ce cas, on installe un
entonnoir d'extraction spécial pour éviter la sucĆ
cion directe depuis l'enceinte du four. On peut se
procurer cet entonnoir d'extraction auprès de
Blodgett.
Si on met en place une hotte d'extraction au plaĆ
fond auĆdessus du four, elle doit projeter 50,8 cm
(20 po) parĆdessus le devant du four.
ATTENTION !!
Une installation non conforme annule voĆ
tre garantie.
Figure 39
55
Page 60

Installation
Liste de vérification finale
ATTENTION !!
Seul un installateur qualifié peut effectuer
les étapes suivantes de la liste de
vérification.
EXTÉRIEUR DU FOUR
j Vérifiez la présence de dommages du four
causés en transit (bosselures, égratignures,
etc.).
j Vérifiez et, au besoin, rectifiez la hauteur, et véĆ
rifiez également si on a convenablement niveĆ
lé le four (horizontalement).
j Vérifiez et, au besoin, rectifiez l'ajustement de
la porte du four.
RACCORDS
j Confirmez le raccordement convenable à l'aliĆ
mentation en eau.
j Ouvrez l'alimentation en eau.
j Vérifiez la présence de fuites.
j Fermez l'alimentation en eau.
j Vérifiez et nettoyez le filtre à eau de tout enĆ
crassement.
j Ouvrez de nouveau l'alimentation en eau.
j Vérifiez la douche à main.
j Confirmez le raccordement convenable à la
prise électrique.
j Vérifiez le raccordement au plateau à égoutteĆ
ment.
j Confirmez le montage convenable du plateau
à égouttement.
j Confirmez la pente convenable du flexible deĆ
puis le plateau à égouttement et vérifiez la
présence de fuites.
j Confirmez le raccordement convenable du
système d'échappement et du tuyau d'évaĆ
cuation.
j Nettoyez le four.
j Appliquez une huile à acier.
INTÉRIEUR DU FOUR
j Confirmez le montage convenable du boîtier
du filtre.
j Vérifiez la lampe intérieure.
j Nettoyez le four.
COMMANDE
j Vérifiez et, au besoin, rectifiez chaque valeur
préréglée.
j Faites chauffer le four à une température de
249°C (480°F) durant environ cinq minutes.
56
Page 61

Figure 5
Fonctionnement
Introduction à la commande programmable Blodgett
Les fours BCP comprennent la polyvalente commande programmable Blodgett. Voici quelquesunes des caractéristiques de la commande.
D Les modes de cuisson multiples comprennent
l’air chaud, le mode combinaison à l’aide de
CombiOptima, le réchauffage et la régénération, la cuisson à la vapeur, la cuisson à la vapeur à basse température, la cuisson à la vapeur forcée, l’apprêt, le refroidissement et le
préchauffage.
D CombiOptima mesure et régule automatique-
ment le taux d’humidité dans le four,et aide ainsi à préserver l’apparence et la jutosité du produit.
D Pavé tactile facile d’utilisation avec écran à affi-
chage transistor en couches minces (TCM) clair
comme le cristal.
D Peut stocker jusqu’à 200 programmes de re-
cette comportant jusqu’à 10 stades de cuisson
chacun. On peut y regrouper les recettes en catégories (boeuf, poulet, biscuits, etc.) pour faciliter l’extraction.
D Sonde externe de température du coeur d’un
produit à faire cuire, avec trois points de mesure. Possibilité de faire fonctionner deux
sondes de température à la fois.
D Grillage et attente à basse température, et cuis-
son Delta -T.
D Soufflante à neuf vitesses et à sens de rotation
réversible permettant des résultats de cuisson
et de rôtissage optimaux.
D Port BSU (USB) servant à la transmission de
données, de logiciels et de recettes.
D Le contrôle de la qualité ARMPC (HACCP) per-
met de régir et de documenter la production.
Cela comprend le délai de production, la durée
de production, la température de préparation et
la température de coeur de produit.
D CombiNet sert à la surveillance, au contrôle et
à l’utilisation du four à distance par ordinateur
ou Internet. Ses fonctions comprennent la gestion de recettes, ARMPC (HACCP), le diagnostic de service et la mise à jour de logiciels.
D Début de cuisson à retardement program-
mable.
D Diagnostic de service automatique.
57
Page 62

Fonctionnement
Modes de cuisson BCP
MODE COMBIOPTIMA
Le mode CombiOptima vous offre la possibilité
d’ajouter jusqu’à 100 % d’humidité dans l’enceinte du four à des températures entre 70 et 250
˚C (160 et 480 ˚F).
Lorsque utilisé correctement, le mode CombiOptima vous permet de réduire a u minimum le rétrécissement et de rehausser l’apparence et la saveur du produit.
De nombreux produits renferment une teneur en
eau élevée, ce qui augmente le taux d’humidité
durant la cuisson. Le four régule automatiquement l’humidité afin de conserver le taux désiré.
Établissement du taux d’humidité
1. Utilisez les touches du bas à droite et à
gauche pour établir le taux d’ humidité désiré.
La barre bleue et rouge indique le taux d’humidité réel dans l’enceinte du four. Le nombre
blanc au centre de la barre marque le taux
d’humidité désiré.
REMARQUE:Sila barre est entièrement rouge,
le taux d’humidité à l’intérieur du
four est de 0 %. Si elle est entièrement bleue, le taux d’humidité est de 100 %.
2. Préchauffez le four durant cinq minutes avec
la teneur désirée en humidité. Selon la quanti té ou le poids de produit dans le four, le taux
d’humidité et la température désirés, le four
atteint habituellement le taux d’humidité désiré au bout d’une à cinq minutes.
Trucs et suggestions en vue de l’établissement
du taux d’humidité
D Afin de produire un fond de sauce lorsque vous
braisez une viande, appliquez un taux d’humidité de 70 % à 80 % à une température tombant
entre 145 et 165 ˚C (300 et 325 ˚F).
D Lorsque vous pochez du poisson, de la volaille
ou des légumes croustillants, appliquez un taux
d’humidité de 70 % à 95 % à une température
tombant entre 70 et 120 ˚C (150 et 250 ˚F).
D Dans les cas de produits nécessitant des temps
de cuisson courts, comme des pièces de
viande marinées et des légumes frais, utilisez
un taux d’humidité de 70 % à 190 ˚C (375 ˚F).
En dépit du temps de cuisson court, de tels produits cuisent très doucement.
Si le f our ne se trouve pas relié à un processus
d’alimentation en eau douce, CombiOptima ne
peut fonctionner convenablement.
Point de réglage du
taux d’humidité
Appuyez sur cette
touche pour faire
baisser le taux
d’humidité
Barre d’affichage
du taux d’humidité
réel
Appuyez sur cette
touche pour faire
augmenter le taux
d’humidité
Figure 6
58
Page 63

Fonctionnement
Modes de cuisson BCP
MODE VAPEUR
Le mode vapeur permet de faire monter le taux
d’humidité dans l’enceinte du four jusqu’à 100 %.
Vous pouvez vous servir du mode vapeur pour les
applications suivantes.
Cuisson à la vapeur à basse température
On recommande la cuisson à la vapeur à une température tombant entre 65 et 90 ˚C (150 et 195 ˚F)
pourlesproduitsdélicatscommelepoisson.
La cuisson à la vapeur de légumes tels que les carottes,lesaspergesetlesfèvesà80˚C (175 ˚F)
durant 5 à 10 minutes leur préserve couleur, saveur et fermeté.
Cuisson à la vapeur traditionnelle
On recommande la cuisson à la vapeur à une température de 98 à 100 ˚C (208 à 212 ˚F) pour toutes
sortes de légumes---racines, les pommes de terre,
le riz et les viandes.
Cuisson à la vapeur forcée
On peut faire cuire à la vapeur à une température
de 120 ˚C (250 ˚F) les légumes qui nécessitent un
traitement supplémentaire, ainsi que les pâtes, riz,
légumes-racines durs et légumes congelés qui
exigent une préparation plus rapide.
Trucs et suggestions relatifs à l’utilisation du
mode vapeur
D Nous recommandons d’amorcer le processus
de cuisson à la vapeur huit minutes avant de
placerlesproduitsdansl’enceintedufour. Pour
des raisons de salubrité des aliments, le four vé rifie automatiquement l’eau dans le générateur
de vapeur. Si la température de l’eau est inférieure à 65 ˚C (150 ˚F), on vide le réservoir, puis
on le remplit d’eau de nouveau, et on fait chauffer l’eau.
D Afin de préparer rapidement le four en vue de la
production et assurer un démarrage parfait du
processus de cuisson à la vapeur, nous recom mandons de faire refroidir l’enceinte du four jusqu’à 80 ˚C (175 ˚F). Pourfairebaisserrapidement la température, utilisez le mode de
refroidissement (Cool Down) et ouvrez la porte.
Si on n’a pas relié le four à un processus d’alimentation en eau douce au préalable, le mode
vapeur ne pourra fonctionner convenablement.
MODE REMISE EN TEMPERATURE
Le processus très doux de la remise en t empérature se déroule dans la plage de températures de
20 à 180 ˚C (70 à 350 ˚F). Le programme fonctionne à une faible vitesse de soufflante et ajoute une
quantité de vapeur soigneusement calculée qui
préserve au produit son apparence et sa saveur.
Trucs et suggestions relatifs à l’utilisation de la
remise en température
D Afin d’accélérer la remise en température, on
doit éviter de couvrir les produits.
D Pour obtenir les meilleurs résultats, utilisez la
sondedetempérature.
D Pour la remise en température de produits sous
vide, suivez les recommandations du fabricant.
Durées et températures recommandées
D 8 à 12 minutes à 140 ˚C (285 ˚F) pour les repas
en assiette comprenant riz ou pomme de terre,
viande et légumes.
D 40 à 60 minutes à une température tombant
entre 120 et 140˚C (250 et 285 ˚F) pour des rôtis
entiers, des ragoûts et des sauces.
D 20 à 30 minutes à 120 ˚C (250 ˚F) pour les pâtes
et le riz.
59
Page 64

Fonctionnement
Modes de cuisson BCP
MODE APPRÊT
Le four est conçu pour maintenir un taux d’humidité parfait pour tous les produits nécessitant un
apprêt avant la cuisson.
Pour votre commodité, le four Blodgett BCP offre
un programme préétabli nommé ” Pain semi---automatique ”, qui apprête et fait cuire le pain dans
le cadre du même processus.
Durées et températures recommandées
D Une température basse et une longue durée
d’apprêt (45 minutes à 32 ˚C[90˚F]) pour les
pains d’un poids de 400 à 800 g (14 à 28 oz).
D Une température élevée et une courte durée
d’apprêt (25 minutes à 38 ˚C [100 ˚F]) pour les
petits pains et les baguettes de 60 à 200 g (2 à
7oz).
MODE PRÉCHAUFFAGE
Ce mode fait préchauffer le four à 300 ˚C (575 ˚F)
durant 15 minutes, et ensuite, le fait automatiquement refroidir jusqu’à 249 ˚C (480 ˚F) afin de protéger les composants électroniques avancés.
Nous recommandons de faire préchauffer le four
à une température tombant entre 27 et 38 ˚C(80
et 100 ˚F) au-dessus de la température de cuisson.
60
Page 65

Fonctionnement
Image-écran d’accueil
La Figure 7 illustre l’image-écran d’accueil affichée lorsque vous mettez le four BCP en marche.
1. Appuyez sur l’une quelconque des six
touches de chaque côté de la commande afin
d’accéder au menu WORK.
Figure 7
61
Page 66

Fonctionnement
Menu Travail (Work)
1. NTERRUPTEUR MARCHE-ARRÊT PRINCIPAL. Commande l’alimentation électrique du
four.
2. TOUCHE MENU PRINCIPAL. Appuyez sur
cette touche afin d’accéder au menu principal.
3. TOUCHE DE SÉLECTION DE MODE
GAUCHE. Appuyez sur cette touche afin de
sélectionner le mode à gauche.
4. TOUCHE TEMPÉRATURE DU FOUR
GAUCHE. Appuyez sur cette touche afin de
diminuer la valeur de réglage de la température du four.
5. TOUCHEDE DURÉE DE CUISSON GAUCHE.
Appuyez sur cette touche afin de raccourcir la
valeur de réglage de la durée de cuisson.
6. TOUCHE SOUFFLANTE ET ÉVENT. Appuyez
sur cette touche afin d’accéder aux sous---menus de la soufflante et de l’évent.
1
2
7. TOUCHE PROGRAMME. Appuyez sur cette
touche afin d’accéder au menu de programme.
8. TOUCHEDE SÉLECTIONDE MODE DROITE.
Appuyez sur cette touche afin de sélectionner
le mode à droite.
9. TOUCHETEMPÉRATURE DU FOUR DROITE.
Appuyez sur cette touche afin d’augmenter la
valeur de réglage de la température du four.
10. TOUCHE DE DURÉE DE CUISSON DROITE.
Appuyez sur cette touche afin de prolonger la
valeur de réglage de la durée de cuisson.
11. TOUCHE DE SONDE DE TEMPÉRATURE.
Appuyez sur cette touche afin d’accéder au
sous-menu d’établissement de la sonde de
température.
12. TOUCHE DE MARCHE-ARRÊT. Appuyez sur
cette touche afin d’amorcer ou d’annuler un
cycle de cuisson.
8
3
4
5
6
7
Figure 8
62
12
9
10
11
Page 67

Fonctionnement
Cuisson manuelle
SÉLECTION DU MODE
1. Utilisez les touches à droite et à gauche des
icônes de sélectiondu mode afin de sélectionnerlemodedésiré.
REMARQUE:L’icône sélectionnée apparaîtra dans
une boîte rouge au centre de l’écran
Appuyez sur
cette touche pour
faire défiler vers
la
gauche
Établissement du taux d’humidité en mode
CombiOptima
Si vous avez sélectionné le mode CombiOptima,
vous devez saisir le taux d’humidité désiré. Observez la marche à suivre en page 58 pour établir le
taux d’humidité désiré en prévision du mode
CombiOptima.
Appuyez sur cette
touche pour faire
défiler vers la droi-
te
Air
chaud
Combi
Optima
Choisissez parmi les modes de cuisson sui-
vants :
Vapeur
Remise en
température
Figure 9
63
Apprêt Pré-
chauffage
Refroidis-
sement
Combi
Wash
Page 68

Fonctionnement
Cuisson manuelle
ÉTABLISSEMENT DE LA TEMPÉRATURE DE
CUISSON
1. Utilisez les troisièmes touches à droite et à
gauche afin d’établir la température de cuisson désirée. Le numéro en gros chiffres
Température réelle
dans l’enceinte du
four
Appuyez sur cette
touche pour diminuer
la valeur de réglage de
la température
blancs au centre de l’écran indique la température réelle dans l’enceinte du four. Le numéro en plus petits chiffres rouges du côté droit
de l’écran précise la valeur de réglage de la
température.
Valeur de réglage
de la température
du four
Appuyez sur cette
touche pour augmenter
la valeur de réglage de
la température
Figure 10
64
Page 69

Fonctionnement
Cuisson manuelle
ÉTABLISSEMENT DE LA DURÉE DE CUISSON
1. Utilisez les quatrièmes touches à droite et à
gauche afin d’établir la durée de cuisson désirée. Pour obtenir un fonctionnement continu,
appuyez sur la touche gauche j usqu’à ce que
l’écran n’affiche plus de temps.
Tem ps q u ’i l re st e
Appuyez sur cette
touche pour diminuer
la valeur de réglage de
laduréedecuisson
Le numéro en plus petits chiffres rouges du côté
droit de l’écran indique la valeur de réglage de la
duréedecuisson.
Unefoislecycledecuissonamorcé,lenuméroen
gros chiffres blancs au centre de l’écran précise le
temps qu’il reste.
Valeur de réglage
de la durée de
cuisson
Appuyez sur cette
touche pour augmenter
la valeur de réglage de
laduréedecuisson
Figure 11
65
Page 70

Fonctionnement
Cuisson manuelle
ÉTABLISSEMENT DE LA VITESSE DE LA
SOUFFLANTE
La fonction de la soufflante est en service
seulement dans les modes AIR CHAUD, VAPEUR et REMISE EN TEMPÉRATURE. Dans
tous les autres modes, le four commande automatiquement la soufflante.
1. Appuyez sur la touche SOUFFLANTE ET ÉVENT (FAN AND VENT) pour accéder au sousmenu SOUFFLANTE ET ÉVENT (FAN AND
VENT).
2. Utilisez les cinquièmes touches à gauche et à
droitepourétablirla vitesse de soufflantedésirée.
REMARQUE:Notez que la s oufflante inverse auto -
matiquement le sens de sa rotation.
Elle tourne en sens horaire quelques
minutes, puis s’inverse et tourne en
sens antihoraire. Cela permet d’uni-
Menu Travail (WORK)
Sous--menu SOUFFLANTE ET ÉVENT (FAN/VENT)
formiser la configuration de la cuisson.
Trucset suggestions pour l’établissement de la
vitesse de la soufflante
D Nous recommandons une vitesse de soufflante
entre 20 % et 50 % pour les pâtes feuilletées, les
danoises, les gâteaux et les petits produits ainsi
qu’enmodesDelta---TetCuissonetattente.
D Vousdevez ajouter 1 à 2 minutes depréparation
pour chaque demi---heure lorsque vous utilisez
une faible vitesse de soufflante.
D Nous recommandons une vitesse de soufflante
entre 50 % et 90 % pour les produits qu’on désire particulièrement juteux à la fin de leur cuisson et qui peuvent accueillir des durées de cuisson plus longues.
D On ne peut utiliser de vitesses de soufflanteinfé-
rieures à 50 % à des températures supérieures
à 200 ˚C (390 ˚F).
Appuyez sur
cette touche
pour accéder au
sous-menu
SOUFFLANTE
ET ÉVENT
(FAN/VENT)
Appuyez sur cette
touche pour annuler
et revenir au menu
TRAVAIL (WORK)
Appuyez sur cette
touche pour aug-
menter la valeur de
réglagedelavitesse
de la soufflante
Figure 12
Appuyez sur
cette touche
pour enregis-
trer les valeurs
de réglage
Appuyez sur
cette touche
pour diminuer
la valeur de
réglagedela
vitesse de la
soufflante
66
Page 71

Fonctionnement
Cuisson manuelle
ÉTABLISSEMENT DE LA POSITION DE L’ÉVENT
On peut utiliser la fonction de l’échappement
seulement en mode AIR CHAUD. Dans tous les
autres modes, le four commande automatiquement la fonction de l’échappement.
1. Appuyezsur la touche ÉVENT pour commuter
entre évent ouvert et évent fermé.
Trucset suggestions pour l’établissement de la
position de l’évent
D Nous recommandons d’ouvrir l’évent durant la
cuisson de pains et de pâtisseries ainsi que le
rôtissage de viandes, de même que pour obtenir un effet de gril.
RETOUR AU MENU TRAVAIL (WORK)
1. Appuyez sur la touche OK au coin supérieur
droit pour enregistrer vos valeurs de réglage
et retourner au menu TRAVAIL. Appuyez sur
la touche supérieure droite afin de revenir au
menu TRAVAIL sans enregistrer vos modifications.
POUR AMORCEER LE CYCLE DE CUISSON
MANUELLE
1. Depuis le menu TRAVAIL, appuyez sur la
touche de marche---arrêt au coin inférieur
gauche de la commande afin d’amorcer le
cycle de cuisson manuelle.
2. Le carré autour du mode clignote et la commandeaffichelecompteàreboursdeladurée
de cuisson. Vous pouvez modifier la durée de
cuisson, la température, la vitesse de la soufflante et la position de l’évent au cours du
cycle de cuisson.
En mode d’air chaud, appuyez sur le bouton
au coin inférieur droit de l’écran et gardez---le
enfoncé pour injecter de la vapeur.
Appuyez sur n’importe quelle touche pour al lumer les lumières intérieures du four.
3. Lorsqu’ilreste une minute, l’ordinateur du four
compte à rebours chaque seconde jusqu’à
zéro.
4. Dès l’expiration du temps au stade final, l’avertisseur sonore se déclenche et la commande affiche un message vous avisant de
l’achèvement du programme. Appuyez sur la
toucheàlagauchedelatoucheENTER,ou
alorsouvrezla porte, afin d’arrêter le signal sonore.
67
Page 72

Fonctionnement
Cuisson manuelle
SOUFFLANTE ET ÉVENT (FAN/VENT)
Appuyez sur
cette touche
pour annuler
et revenir au
menu WORK
Appuyez sur
cette touche
pour faire com-
muter l’évent
ouvert ou fermé
Sous-menu
Image-écran
CUISSON MANUELLE (MANUAL COOK)
Appuyez sur
cette touche
pour enre-
gistrer les
valeurs de
réglage
Appuyez sur la touche
de marche-arrêt pour
amorcer le cycle de
cuisson
Figure 13
68
Page 73

Fonctionnement
Cuisson à la sonde de température
Tous les fours Blodgett sont équipés d’une sonde
de température de coeur de produit en équipement de série. On peut faire fonctionner deux
sondes de température à la fois. Il est possible de
se procurer une sonde de température supplémentaire auprès de votre dépositaire Blodgett.
La sonde de température de coeur de produit
offretroismodesdecuisson:
D Active
D Delta-T
D Cuisson et attente
SAISIE DE MODES DE CUISSON À LA SONDE
DE TEMPÉRATURE
Observez cette marche à suivre pour tous les
trois modes de cuisson à la so nde de température.
REMARQUE:Il faut configurer l a sonde de tempé-
rature avant d’amorcer un cycle de
cuisson.
1. Sélectionnezlemodedecuissondésiré. Consultez la pagee 63 pour obtenir les instructions d’établissement du mode de cuisson.
2. Établissez la vitesse de soufflante désirée si
nécessaire. Consultezla page 66 pour obtenir les instructionsd’établissement de la vitesse
de soufflante désirée.
3. Établissez la position de l’évent si nécessaire.
Consultez la page 68 pour obtenir les instructionsd’établissementde la position de l’évent.
4. Insérez la sonde de température jusqu’au
centre du produit. Ensuite, branchez la sonde
au four, au connecteur situé au coin supérieur
du panneau droit.
5. Appuyez sur la touche de sonde de température sur le menu TRAVAIL. La commande affiche alors le sous---menu de la sonde de température (CORE PROBE).
6. Appuyez sur la touche à côté de l’icône de
sondedetempérature. Lacommandeaffiche
l’image-écran d’établissement de la sonde de
température(SetCoreProbe).
Le graphique de l’écran illustre la différence
entre la t empérature réelle du four et la température au bout de la sonde. La ligne bleue représente la température au bout de la sonde
1; la ligne verte, celle au bout de la sonde 2;
et la ligne rouge, la température réelle du four.
Menu TRAVAIL (WORK)
Appuyez sur
cette touche
pour accéder
a u s o u s ---
menu de la
sonde de
température
(CORE
PROBE)
Sous-menu de la sonde de
température (CORE PROBE)
Graphique de
l’état de la
sondedetem-
pérature
Appuyez sur
cette touche
pour sélec-
tionner la
première
sonde de
température
Figure 14
69
Page 74

Fonctionnement
Cuisson à la sonde de température
CUISSON À LA SONDE DE TEMPÉRATUREACTIVE
En mode de cuisson à la sonde de température
active, la température de cuissonest constante, et
lasondevousaviselorsqueleproduitaatteintla
température de coeur désirée.
1. Suivez les étapes 1 à 6 en page 69 pour saisir
les données dans les images-écran de cuisson à la sonde de température.
2. Utilisez les touches à la gauche de l’écran
pour établir la température d’achèvement de
cuissonauboutdelasonde. Lavaleurderéglage de la température de la sonde figure en
rouge.
3. Appuyez sur la touche OK pour enregistrer la
valeur de réglage de température au bout de
la sonde.
4. Appuyez sur la touche de marche-arrêt pour
amorcer le cycle de cuisson à la sonde.
5. Lorsque le coeur du produit a atteint la température désirée, un avertisseur sonore se dé-
Image-écran d’établissement de température
de sonde (SET CORE PROBE)
Appuyez sur cette
touche pour annuler
et revenir au menu
TRAVAIL (WORK)
clenche et la commande affiche ENTER. Appuyez sur la touche à côté d’ENTER, ou alors
ouvrez la porte, afin d’arrêter le signal sonore.
6. Débranchez la sonde de température et retirez le produit.
CUISSON AVEC DEUX SONDES DE TEMPÉRATURE
Lorsqu’une des deux sondes atteint la température de coeur de produit désirée, un avertisseur
sonore se déclenche et la commande affiche ENTER.
1. Appuyez sur la touche à côté d’ENTER, ou
alorsouvrezla porte, afin d’arrêter le signal sonore.
2. Retirez le produit et refermez la porte.
3. Le four continue jusqu’à ce que la deuxième
sonde atteigne la température désirée au
coeur du produit.
Appuyez sur
cette touche pour
augmenter la
température au
bout de la sonde
Appuyez sur cette
touche pour diminuer
la température au bout
de la sonde
Appuyez sur cette
touche pour enregistrer
vos valeurs de réglage
save your settings
Appuyez sur cette touche
pour amorcer le cycle de
cuisson à la sonde
Figure 15
70
Page 75

Fonctionnement
Cuisson à la sonde de température
CUISSON DELTA-T
En mode de cuisson Delta-T, le four rectifie la température de l’enceinte d’après la température
réelle du coeur du produit. Ce mode assure une
cuisson douce qui aboutit à un produit tendre et
juteux, et réduit le flétrissement du produit (jusqu’à 20 %) comparativement aux modes traditionnels de cuisson.
1. Suivez les étapes 1 à 6 en page 69 pour saisir
les données dans les images-écran de cuisson à la sonde de température.
2. Appuyez sur la touche de sonde de température (CORE PROBE) dans le menu TRAVAIL.
La commande affiche alors le sous-menu de
lasondedetempérature.
3. Appuyez sur la touche de sonde de température (CORE PROBE) deux fois pour accéder à
l’image-écrandecuissonDelta-T.
4. Utilisez les touches du côté gauche de l’écran
pour établir la température visée au bout de la
sonde. La valeur de réglage de la température
de sonde visée s’affiche en rouge.
5. Appuyez sur la touche OK pour enregistrer la
valeur de réglage de la température de sonde
visée.
6. Appuyez sur la touche de marche-arrêt pour
amorcer le cycle de cuisson Delta-T.
7. Lorsque le coeur du produit a atteint la température visée, un avertisseur sonore se déclenche et la commande affiche ENTER. Appuyez sur la touche à côté d’ENTER, ou alors
ouvrez la porte, afin d’arrêter le signal sonore.
8. Débranchez la sonde de température et retirez le produit.
Trucs et suggestions en matière de cuisson
Delta-T
D Pour assurer les meilleurs résultats, commen-
cez avec une température intérieure du four
entre 30 et 40 ˚C (85 et 100 ˚F).
D Nous recommandons le mode Air chaud dans
les cas de rôtis de petite taille ou très gras, le
mode vapeur pour les jambons de grande taille
renfermantunos,etlemodederemiseentempérature advenant les volailles ou des viandes
maigres.
Températures de coeur de p roduit recommandées
D Saignant 52 à 57 ˚C (125 à 135 ˚F)
D Moyen 59 à 62 ˚C (140 à 145 ˚F)
D Bien cuit 72 à 85 ˚C (160 à 185 ˚F)
71
Page 76

Fonctionnement
Cuisson à la sonde de température
Image-écran d’établ issement de température
de sonde (SET CORE PROBE)
Appuyez sur cette
touche deux fois pour
accéder à l’image-
écran Delta-T
Image-écrandecuissonDELTA-T
Appuyez sur cette
touche pour augmenter
la température au bout
de la sonde
Appuyez sur cette touche
pour diminuer la température
au bout de la sonde
Appuyez sur cette
touche pour enregistrer
vos valeurs de réglage
Appuyez sur
cette touche
pour amorcer le
cycle de cuis-
son Delta -T
Figure 16
72
Page 77

Fonctionnement
Cuisson à la sonde de température
CUISSON ET ATTENTE
Le mode Cuisson et attente se veut un prolongement du mode de cuisson Delta-T. Tout comme
avec Delta-T, le four rectifie la température de l’enceinte d’après la température réelle du coeur du
produit. Mais une fois la température visée au
coeur du produit atteinte, le four régule la température de l’enceinte de façon à stabiliser la température au coeur du produit, comme une fonction
de réchaud. Ce mode convient à merveille au
rôtissage durant la nuit lorsque le personnel n’est
pas en devoir.
1. Suivez les étapes 1 à 6 en page 69 pour saisir
les données dans les images-écran de cuisson à la sonde de température.
2. Appuyez sur la touche de sonde de température (CORE PROBE) dans le menu TRAVAIL.
La commande affiche alors le sous---menu de
lasondedetempérature.
3. Appuyez sur la touche de sonde de température (CORE PROBE) trois fois pour accéder à
l’image-écranCuissonetattente(Cook&
Hold).
4. Utilisez les touches du côté gauche de l’écran
pour établir la température visée au bout de la
sonde. La valeur de réglage de la température
de sonde visée s’affiche en rouge.
5. Appuyez sur la touche OK pour enregistrer la
valeur de réglage de la température de sonde
visée.
6. Appuyez sur la touche de marche ---arrêt pour
amorcer le cycle Cuisson et attente.
7. Lorsque le coeur du produit a atteint la température visée, la commande affiche HOLD???,
et le four se met à réguler la température de
l’enceinte afin de maintenir et de stabiliser la
température a u coeur du produit.
8. Débranchez la sonde de température et retirez le produit lorsque prêt à servir.
Trucs et suggestions en matière d’utilisation du
mode Cuisson et attente
D Nous recommandons une température stabili-
sée entre 60 et 65 ˚C (140 et 150 ˚F). À des températures plus élevées, il se produit une déshydratation graduelle des protéines, le poids de la
viande diminue et celle---ci devient moins juteuse.
D Avec une température stabilisée entre 60 et 65
˚C (140 et 150 ˚F), vous pouvez retirer la pièce
de viande immédiatement avant de la dépecer.
D Après un maintien de 5 à 6 heures, le flétrisse-
ment de la viande s’intensifie.
Image-écran d’établissement de température
de sonde (SET CORE PROBE)
Appuyez sur cette
Appuyez sur
cette touche
trois fois pour
accéder à l’i-
mage-écran
Cuisson et at-
tente (Cook
and Hold)
touche pour augmenter
la température au bout
de la sonde
Appuyez sur cette
touche pour diminuer
la température au
bout de la sonde
Figure 17
Image-écranCuissonetattente
(COOK AND HOLD)
Appuyez sur
cette touche
pour enregistrer
vos valeurs de
réglage
Appuyez sur
cette touche
pour amorcer le
cycle Cuisson
et attente
(Cook and
Hold)
73
Page 78

Fonctionnement
Cuisson programmée
Les fours BCP peuvent stocker jusqu’à 200 programmes de cuisson de produit comportant 10
stades de cuisson chacun. Les produits se regroupent en catégories (boeuf, poulet, pain, etc.)
pour faciliter l’extraction des programmes. Observezlamarcheàsuivreci-dessousenvuedecuisson d’après une recette de produit préprogrammée.
1. Appuyez s ur la touche Programme située au
coin inférieur droit de la commande. La commandeaffichealorslesous-menuProgramme.
Le côté droit de l’écran précise les catégories
de produits. La flèche verte au bas indique la
présence d’autres catégories à faire afficher.
BasdelacommandedufourBCP
Appuyez sur cette
touche pour accéder au
sous-menu Programme
Le côté gauche de l’écran montre les recettes
dans la catégorie actuelle.
2. Si la catégorie désirée ne figure pas à l’écran,
appuyez sur la touche à côté de la flèche verte
pour faire afficher d’autres catégories.
3. Appuyez sur la touche à côté de la catégorie
de produits désirée.
4. Les programmes de produit sous la catégorie
choisie s’affichent du côté droit de l’écran. Si
la catégorie contient plus de cinq produits,
une touche de défilement apparaît au haut de
la liste de catégories. Appuyez sur cette
touche pour faire défiler la liste des programmes de produit sous cette catégorie.
Sous-menu PROGRAMME
Appuyez sur
cette touche
pour faire af-
ficher d’ autres
catégories
Touches de
programme de
produit
Appuyez sur cette
touche pour faire défiler
la liste de tous les pro-
grammes de produit
sous cette catégorie
Touches de
catégorie
de produits
Appuyez sur
cette touche
pour faire af-
ficher d’ autres
catégories
Figure 18
74
Page 79

Fonctionnement
Cuisson programmée
5. Appuyez sur la touche à côté du programme
de produit désiré. La commande affiche alors
l’image-écran Éditer étape (Edit Step). Cette
image-écran permet de modifier la température de cuisson, la durée de cuisson, la vitesse
de la soufflante, la position de l’évent et le taux
d’humidité (si applicable) à tout stade du programme. Toutefois, les modifications apportées s’appliqueront à la cuisson actuelle
seulement. Une fois celle-ci terminée, le programme revient à son état d’origine en vue de
la prochaine cuisson.
6. Appuyez sur la touche de marche-arrêt pour
amorcer le cycle de cuisson programmée. La
commande affiche alors l’image-écran Cuisson programmée (Programmed Cooking).
REMARQUE:Si le premier stade d’un pro-
gramme est un préchauffage, un
avertisseur sonore se déclenche
à la fin du stade, et un message
Image-écran ÉDITER ÉTAPE (EDIT STEP)
vous avise que l’étape de préchauffage vient de se terminer.
Appuyez sur la touche à côté
d’ENTER pour arrêter l’avertisseursonoreet passez au stade 2.
7. Le carré autour du mode pour le stade actuel
clignote, et l’écran compte à rebours le temps
de cuisson.
8. Lorsqu’ilreste une minute à chaque stade, l’écran compte chaque seconde à rebours à
partir de 59 secondes.
9. Une fois le temps expiré à la fin du dernier
stade, un avertisseur sonore se déclenche et
la commande affiche un message avisant que
le programme a achevé son exécution. Appuyez sur la touche à côté d’ENTER, ou alors
ouvrez la porte, afin d’arrêter le signal sonore.
10. La commande repasse la main au menu TRAVAIL.
Image-écran CUISSON D’APRÈS
PROGRAMME (PROGRAM COOKING)
Appuyez
sur cette
touche
pour re-
tourner aux
valeurs de
réglage
correspon-
dant au
stade pré-
cédent
La boîte jaune indique le stade ac-
tuel en mode d’édition.
Appuyez sur
cette touche
afin de passer
aux valeurs de
réglage corres -
pondant au pro-
chain stade
Appuyez sur cette touche
afin d’amorcer le pro-
gramme de produit
Figure 19
75
Page 80

Fonctionnement
Programmation d’un produit
Observez la marche à suivre ci-dessous en vue de
créer un nouveau programme de produit ou de
modifier un programme existant.
1. Appuyez sur la touche du menu principal au
coin supérieur gauche pour accéder au menu
principal.
2. Appuyez sur la touche d’édition de programme (EDIT PROGRAM) dans le menu
principal.
Lorsqu’onchoisit l’une des fonctions du menu
principal, si une image-écran apparaît et de-
Menu TRAVAIL (WORK)
Appuyez
sur cette
touche
pour accéder au
menu
principal
mande de saisir un code, le système bloque
l’exécution de la fonction. Sélectionnez la saisie de code (Enter Code), saisissez 876412,
puis confirmez en appuyant sur OK au coin
supérieur droit.
3. Pour créer une nouvelle recette de produit,
appuyez sur la touche Nouvelle recette (NEW
RECIPE). Pour modifier une recette de produit existante, observez la marche à suivre en
page 74 pour sélectionner le programme de
produit à modifier.
Menu principal
Appuyez sur
cette touche
pour créer ou
modifier un
programme
Appuyez sur cette
touche pour créer un
nouveau programme
Figure 20
76
Page 81

Fonctionnement
Programmation d’un produit
4. La commande affiche l’image-écran Éditer
programme (Edit Program), soit l’imageécran principale de création et de modification
de programmes de produit.
Attribution ou modification d’un nom de programme de produit
5. Appuyez sur la touche Modifier texte (Change
Text) dans l’image-écran Éditer programme
(Edit Program). La commande affiche alors l’image-écran Saisir texte (ENTER TEXT).
REMARQUE:Sautez cette étape si vous modi-
fiez un programme existant mais
n’avez pas besoin de changer
son nom.
Image-écran ÉDITER PROGRAMME (EDIT PROGRAM)
Image-écran
SAISIR TEXTE (ENTER TEXT)
6. Utilisez les touches des côtés gauche et droit
del’écranpoursaisirunnouveaunomdeprogramme ou modifier un nom de programme
existant. Voir ci-dessous pour obtenir les dé tails.
Appuyez sur la touche flèche verte au coin supérieur droit en tout temps pour a nnuler l’édition et retourner à l’image -écran Éditer programme (Edit Program) sans enregistrer vos
modifications.
7. Appuyez sur la touche OK pour enregistrer
vos modifications. Le système repasse alors
la main à l’image-écran Éditer programme
(Edit Program).
Appuyez
sur cette
touche pour
enregistrer
le nom
Appuyez sur
cette touche
pour annuler
Appuyez sur cette touche pour
déplacer le curseur vers la gauche
Appuyez sur cette touche afin de
sélectionner la prochaine lettre à
gauche
Appuyez sur cette touche afin de
déplacer le curseur rapidement vers
la gauche
Appuyez sur cette touche afin de
sélectionner une lettre minuscule ou
majuscule
Appuyez sur cette touche pour
effacer la lettre à gauche
Appuyez sur cette
touche pour dé-
placer le curseur
vers la droite
Appuyez sur cette
touche afin de sélec-
tionner la prochaine
lettre à droite
Appuyez sur cette
touche afin de dé-
placer le curseur
rapidement vers la
droite
Appuyez sur cette
touche afin de ta-
per une lettre dans
une boîte rouge
Figure 21
77
Page 82

Fonctionnement
Programmation d’un produit
Sélection ou modification d’une catégorie de
produits
8. Appuyez sur la touche Modifier icône
(CHANGE ICON) dans l’image-écran Éditer
programme (Edit Program). La commande
affiche alors l’image-écran Sélectionner catégorie (SELECT CATEGORY).
REMARQUE:Sautez cette étape si vous modi-
fiez un programme existant mais
n’avez pas besoin de changer la
catégorie.
9. Utilisez les touches des côtés gauche et droit
de l’écran pour sélectionner la catégorie de
Image-écran
ÉDITER PROGRAMME (EDIT PROGRAM)
SÉLECTIONNER CATÉGORIE
produitsdésirée. Voirci-dessous pour obtenir
les détails.
Appuyez sur la touche flèche verte au coin supérieur droit en tout temps pour a nnuler l’édition et retourner à l’image -écran Éditer programme (Edit Program) sans enregistrer vos
modifications.
10. Appuyez sur la touche OK pour enregistrer
vos modifications. Le système repasse alors
la main à l’image-écran Éditer programme
(Edit Program).
Image-écran
(SELECT CATEGORY)
Appuyez sur
cette touche
pour enregistrer
la catégorie
Appuyez sur cette
touche pour annuler
Appuyez sur ces touches
pour déplacer la boîte
jaune vers la gauche
Appuyez sur
ces touches
pour déplacer
la boîte jaune
vers la droite
Figure 22
78
Page 83

Fonctionnement
Programmation d’un produit
Création ou modification des étapes de cuissondansunprogrammedeproduit
11. Appuyez sur la touche Modifier étapes
(CHANGE STEPS) dans l’image-écran Éditer
programme (Edit Program). La commande
affiche alors l’image-écran Éditer étape (EDIT
STEP).
REMARQUE:Sautez cette étape si vous modi-
fiez un programme existant mais
n’avez pas besoin de modifier
l’une quelconque de ses étapes
de cuisson.
12. Lorsque vous programmez un nouveau produit, n’oubliez pas que la commande fournit
automatiquement trois étapes :
La 1ère étape fait appel à un préchauffage.
Utilisez les touches des côtés gauche et droit
pour établir la température et la durée du préchauffage.
La 2e étape constitue une pause. Elle déclenche un avertisseur sonore dès la fin de l’étape de préchauffage, avisant ainsi l’utilisateur que le four est prêt pour accueillir le
produit.
La 3e étape comporte un programme de cuisson implicite que vous pouvez modifier au besoin.
13. Appuyez sur l’une des deux touches supérieures pour faire défiler la boîte jaune jusqu’à
la 3e étape.
REMARQUE:Si vous éditez un programme ex-
istant, utilisez ces touches pour
sélectionner l’étape à éditer.
14. Appuyez sur la touche flèche verte bas pour
passer à l’image-écran Fonction de modification d’étape à éditer (EDIT STEP CHANGE
FUNCTION).
15. Le mode de l’étape sélectionnée figure dans
une boîte jaune dans la rangée du haut. Appuyez sur les touches des côtés gauche et
droitdelarangéedubasjusqu’àcequele
mode désiré s’affiche dans la boîte rouge.
16. Utilisez les touches du côté de la rangée centrale pour sélectionner la fonction d’ajout, de
suppression ou de modification.
AJOUT ( ADD) : Utilisez l’ajout pour ajouter
une nouvelle étape. La ligne verte à côté de
l’étape actuelle indique où l’on insérera la
nouvelleétape. Utilisez les touches des côtés
gauche et droit pour déplacer la ligne verte si
nécessaire.
SUPPRESSION (DELETE) :Utilisezlasuppression pour retrancher l’étape actuelle mise
en évidence.
MODIFICATION (CHANGE):Utilisezlamodification pour modifier le mode de l’étape actuelle mise en évidence.
17. Le programme peut contenir jusqu’à 10
étapes de cuisson. Le préchauffage, la pause
et le refroidissement ne comptent pas à titre
d’étapes de cuisson. Une fois toutes les
étapes ajoutées, supprimées ou modifiées,
appuyez sur la touche flèche verte haut pour
revenir à l’image-écran Éditer étape (EDIT
STEP).
18. Pour modifier les paramètres de cuisson,
faites défiler la boîte jaune jusqu’à l’étape à
modifier.
19. Employez les touches sur le côté pour établir
la température, la durée, la vitesse de la soufflante, la positionde l’évent et le tauxd’ humidi té (si applicable) en vue de l’étape sélectionnée. Vous pouvez également programmer
une cuisson à la sonde de température. Consultez les instructions portant sur la cuisson à
lasondedetempératureenpages69à73.
20. Une fois toutes les étapes vérifiées correctes,
appuyez sur la flèche verte latérale au coin su périeurgauchedel’écranafinderetournerà
l’image-écran Éditer programme (EDIT PROGRAM).
Enregistrer le programme de produit
21. Appuyez sur la touche ENREGISTRER
(SAVE) afin d’enregistrer votre programme
dans la commande du four.
Quitterlemodeprogramme
22. Appuyez sur la flèche verte latérale au coin supérieur gauche de l’écran trois fois pour retourner au menu TRAVAIL.
79
Page 84

Fonctionnement
Programmation d’un produit
Image-écran ÉDITER PROGRAMME
(EDIT PROGRAM)
La boîte jaune indique le stade
actuel en mode d’édition.
Image-écran FONCTION DE MODIFICATION
D’ÉTAPE À ÉDITER (EDIT STEP CHANGE
Appuyez sur cette touche pour
sélectionnerlemodedésiré
Appuyez sur cette touche pour sélection-
ner Ajout, Suppression ou Modification
Appuyez sur cette touche pour sélec-
tionner l’étape à modifier
Image-écran
ÉDITER ÉTAPE (EDIT STEP)
FUNCTION)
Appuyez sur cette touche
pour passer à la FONCTION
DE MODIFICATION D’É-
TAPE À ÉDITER (EDIT
STEP CHANGE FUNCTION)
Appuyez sur cette
touche pour faire dé-
filer la boîte jaune
vers la gauche
Utilisez ces touches
pour diminuer la tem-
pérature, la durée, la
vitesse de la souf-
flante, la position de
l’évent et le taux d’hu-
midité (si applicable) à
l’intention de l’étape
actuelle.
Appuyez sur cette
touche pour faire
défiler la boîte
jaune vers la droite
Utilisez ces touches
pour augmenter la température, la durée, la vi-
tesse de la soufflante, la
position de l’évent et le
taux d’ humidité (si appli-
cable) à l’intention de
l’étape actuelle.
Figure 23
80
Page 85

Fonctionnement
Établissement d’un allumage temporisé
L’allumage temporisé vous permet de mettre le
four en marche avant que le personnel arrive pour
commencer la journée de travail. Cela vous
confère l’avantage d’un four déjà chaud dès que
vous arrivez le matin.
1. Appuyez sur la touche du menu principal au
coin supérieur gauche afin d’accéder au
menu principal.
2. Appuyez sur la touche Allumage temporisé
(TIMER START) dans le menu principal. La
commande affiche alors l’image -- -écran Allu-
Menu TRAVAIL (WORK)
Appuyez sur cette
touche afin de pro-
grammer un allu-
Appuyez sur cette touche
pour accéder au menu
principal
Menu principal
mage temporisé
Appuyez sur
cette touche afin
de programmer
un allumage tem-
porisé quotidien
mage temporisé (TIMER START). Voir page
82 pour obtenir les instructions sur la programmation d’un allumage temporisé unique.
3. Choisissez entre Heure et date de début
(START TIME) (en vue d’un allumage temporisé unique) et Allumage quotidien (DAILY
START) (afin de programmer un allumage
temporisé quotidien). Voir page 83 pour obtenir les instructions sur la programmation
d’un allumage temporisé quotidien.
Image-écran Allumage
temporisé (TIMER START)
unique
Appuyez sur cette touche
afin d’établir un allumage
temporisé
Appuyez sur cette
touche pour sélection-
ner le programme de
produit à utiliser
Appuyez sur cette
touche pour actionner
la minuterie
Figure 24
81
Page 86

Fonctionnement
Établissement d’un allumage temporisé
Allumage temporisé unique
1. La commande affiche l’image-écran Heure et
date de début (STARTING TIME).
2. Utilisez les touches flèche latérales pour
sélectionner la valeur de paramètre à établir.
La boîte rouge indique la valeur actuelle du
paramètre.
3. Utilisez les touches flèche haut et bas pour
modifier la valeur actuelle du paramètre.
REMARQUE:Établissez s eulement la date, et
ne tenez aucun compte du mois
et de l’année.
4. Appuyez sur la touche OK pour enregistrer
vos valeurs de réglage et revenir à l’imageécran Allumage temporisé (TIMER START).
5. Appuyez sur la touche Recette (RECIPE) afin
de sélectionner le programme de produit à exécuter à compter de l’allumage temporisé.
Voir page 74 pour obtenir les instructions de
sélectiond’unprogrammedeproduit.
6. Appuyez sur la touche État (STATUS) pour actionner l’allumage temporisé.
7. Une fois l’heure et la date de début établies,
appuyez sur la touche OK pour enregistrer
vos valeurs de réglage et revenir à l’imageécrandumenuprincipal.
8. Appuyez sur l’interrupteur de marche-arrêt
principal pour mettre le four hors fonction. Celui-cise remettra en marche automatiquement
lorsque la minuterie interne atteindra la date et
l’heure de début préétablies. La porte du
four doit absolument demeurer fermée
pendant que la fonction d’allumage temporisé tourne.
REMARQUE:Vous pouvez actionner la minut-
erie et ne pas mettre le four à
l’arrêt jusqu’à ce que vous ayez
terminévotrejournéedetravail.
Appuyez sur cette
touche pour accéder
au menu principal
sans enregistrer les
valeurs de réglage
Appuyez sur cette
touche pour déplacer la
boîtedesélectionvers
la gauche
Appuyez sur cette
touche pour faire
reculer la date ou
l’heure
Image-écran HEURE ET DATE DE DÉBUT
(STARTING TIME)
Appuyez sur cette
touche afin de
passer à l’acceptation des valeurs de
réglage
Appuyez sur cette
touche pour déplacer la
boîtedesélectionvers
la droite
Appuyez sur cette
touche pour faire
avancer la date ou
l’heure
Figure 25
82
Page 87

Allumage temporisé quotidien
1. La commande affiche l’image-écran Début
quotidien (DAILY START).
2. Si l’horloge à côté d’une date est rouge, cette
date est actuellement inactive. Si l’horloge est
verte, une minuterie quotidienne est actuellement en fonction pour cette date.
Pour mettre tous les sept jours de la s emaine
en fonction à la fois, appuyez sur la touche Minuterie quotidienne (DAILY TIMER) du côté
droit de l’écran.
3. Employez les touches du côté droit de l’écran
afin de modifier l’heure de début pour chaque
jour.
4. Appuyez sur la touche OK pour enregistrer
vos valeurs de réglage et revenir à l’image--écran Allumage temporisé (TIMER START).
5. Appuyez sur la touche Recette (RECIPE) afin
de sélectionner le programme de produit à exécuter à compter de l’allumage temporisé.
Voir page 74 pour obtenir les instructions de
sélectiond’unprogrammedeproduit.
Fonctionnement
Établissement d’un allumage temporisé
6. Appuyez sur la touche État (STATUS) pour actionner l’allumage temporisé.
7. Une fois l’heure et la date de début établies,
appuyez sur la touche OK pour enregistrer
vos valeurs de réglage et revenir à l’image--écrandumenuprincipal.
8. Appuyez sur l’interrupteur de marche-arrêt
principal pour mettre le four hors fonction. Celui-cise remettra en marche automatiquement
lorsque la minuterie interne atteindra la date et
l’heure de début préétablies. La porte du
four doit absolument demeurer fermée
pendant que la fonction d’allumage temporisé tourne.
REMARQUE:Vous pouvez actionner la minut-
erie et ne pas mettre le four à
l’arrêt jusqu’à ce que vous ayez
terminévotrejournéedetravail.
Image-écran MINUTERIE QUOTIDIENNE (D AILY TIM ER)
Appuyez sur cette
touche pour retourner
au menu principal
sans enregistrer les
valeurs de réglage
Appuyez sur cette
touche afin de passer
à l’acceptation des
valeurs de réglage
Appuyez sur cette touche
pour mettre tous les sept
jours de la semaine en
fonctionàlafois
Appuyez sur cette
touche pour faire
avancer l’heure
Appuyez sur cette
touche pour faire re-
culer l’heure
Figure 26
83
Page 88

Fonctionnement
Établissement d’une durée et d’une température prédéterminées
Vous pouvez modifier la durée et la température
préétablies dans tous les modes sauf CombiWash.
REMARQUE:On ne peut établir de température de
coeur de produit, de vitesse de soufflante, de position d’évent ou de teneur en humidité (CombiOptima)dans
ce menu.
1. Depuis le menu TRAVAIL, sélectionnez le
mode à préétablir. Saisissez la durée et la
température désirées. Voir pages 63 à 65
pour obtenir les instructions en vue de sélectionner le mode, la durée et la température.
2. Unefoistouteslesvaleursderéglagedestrois
paramètres saisies, appuyez sur la touche du
menu principal au coin supérieur gauche.
Menu TRAVAIL (WORK)
3. Appuyez sur la touche PRÉSÉLECTION du
côté gauche de l’écran. La commande affiche
l’image-écran Présélection.
4. Confirmez que le mode, la durée et la température sont exacts.
5. Appuyez sur la touche OK pour accepter les
valeurs de paramètre et retourner au menu
principal.
6. Appuyez sur la touche flèche au coin supérieurgauchedel’écranafinderetournerau
menu principal.
7. Reprenez cette marche à suivre pour tout
autremodedecuissonapplicabledésiré.
Image-écran
PRÉSÉLECTION
Appuyez sur
cette touche
pour accéder
au menu
principal
Menu principal
Appuyez sur cette touche pour faire
afficher l’image -écran Présélection
Appuyez
sur cette
touche
pour re-
tourner au
menu prin-
cipal sans
enregistrer
les valeurs
de réglage
Figure 27
84
Appuyez sur
cette touche
afin d’ac-
cepter les
valeurs de
réglage de
paramètre
préétablies
Page 89

Fonctionnement
Configuration du four
1. Appuyez sur la touche du menu principal au
coin supérieur gauche de l’écran pour accéder au menu principal.
2. Appuyez s ur la touche Configuration du four
(OVEN SETUP) dans le menu principal. La
commande affiche l’image-écran Configuration du four (OVEN SETUP).
ÉTABLISSEMENT DE LA LANGUE DE FONCTIONNEMENT
1. Appuyez sur la touche Langue (LANGUAGE)
du côté gauche de l’écran.
2. Sélectionnezla touche à côté de la langue désirée. L’écran peut afficher jusqu’à 10 langues à la fois. Pour faire afficher d’autres langues, appuyez sur la touche flèche bas au
coin supérieur droit de l’écran.
3. Une fois la nouvelle langue sélectionnée, la
commande traduit automatiquement tout le
texte à l’écran. Nul besoin d’accepter le changement.
ÉTABLISSEMENT DE L’AVERTISSEUR
SONORE DU FOUR
1. Appuyez sur la touche Signal sonore (ALARM
SOUND) du côté droit de l’écran. La commande affiche alors l’image-écran Signal sonore
(ALARM SOUND).
2. Utilisez les touches des côtés gauche et droit
de la commande pour rectifier le volume, la
fréquence et la durée du signal sonore.
3. Appuyez sur la touche OK dans le coin supérieur droit de l’écran pour enregistrer les nouvelles valeurs de réglage. La commande repasse la main au menu Configuration du four
(OVEN SETUP).
ÉTABLISSEMENT DE L’HEURE DU FOUR
1. Appuyez sur la touche Établir heure (SET
TIME) du côté droit de l’écran.
2. Utilisez les touches flèche latérales pour
sélectionner le paramètre dont il faut établir la
valeur de réglage. La boîte rouge indique sa
valeur actuelle.
3. Utilisez les touches flèche haut et bas pour
modifier la valeur du paramètre.
REMARQUE:Établissez s eulement la date, et
ne tenez aucun compte du mois
et de l’année.
4. Appuyez sur la touche OK pour enregistrer
vos valeurs de réglage et retourner au menu
Configuration du four (OVEN SETUP).
ÉTABLISSEMENT DE LA CONFIGURATION DU
FOUR
AVERTISSEMENT!!
Tout changement incorrect dans la con-
figuration du four peut nuire à sa fiabilité
en service. Communiquez avec votre
agent de service Blodgett avant d’apporter une quelconque modification à la configuration du four.
1. Appuyez s ur la touche Configuration du four
(OVEN SETUP) du côté droit de l’écran.
2. Sélectionnez le paramètre de four à l’aide des
flèches verticalesdu côté droit de l’écran. Modifiez la valeur du paramètre à l’aide des
flèches horizontales au bas de l’écran.
3. Une fois les valeurs de réglage de tous les paramètres établies, appuyez sur la touche OK
au coin supérieur droit de l’écran. La commande repasse la main au menu Configuration du four (OVEN SETUP).
85
Page 90

Fonctionnement
Configuration du four
Menu Travail (WORK)
Appuyez sur
cette touche
pour accéd-
er au menu
principal
Menu Configuration du four
(OVEN SETUP)
Appuyez sur cette
touche pour retourner au
menu principal
Appuyez sur cette touche pour éta-
blir la langue de fonctionnement
Appuyez sur cette touche
pour accéder à CombiNet
Menu principal
accéder à l’image-écran Configu-
Appuyez sur cette
touche pour régler le
signal de l’avertisseur
sonore
Appuyez sur cette
touche pour régler
l’horloge
Appuyez sur cette
touche pour accéder
aux paramètres de
configuration du four
Appuyez sur cette touche pour
ration du four (OVEN SETUP)
Figure 28
86
Page 91

Fonctionnement
Fonctions BSU (USB)
Le four Blodgett BCP comprend un port BSU
(USB) en équipement de série, situé sous le
compartiment de la commande. Ce port permet
le téléchargement en aval et en amont de recettes
de produit et de données ARMPC (HACCP).
PouraccéderaumenuBSU
1. Insérez la carte BSU dans la fente sous le
compartiment de la commande.
2. Dans le menu principal, appuyez sur la touche
SERVICE. La commande affiche alors le
menu BSU (USB).
Pour créer une copie de sécurité des données
du système
Menu principal
Appuyez sur cette
touche pour accéder à
l’image-écran SERVICE
Appuyez sur cette
touche pour accéder à
l’image-écran BSU (USB)
1. Appuyezsur la touche Prendre copie de sécurité (Take Backup) du côté gauche de l’imageécran BSU (USB).
2. La commande affiche brièvement les fichiers
à sauvegarder, y compris les programmes de
recette de produit, les compteurs, les jour naux des erreurs, la configuration du four et
les données CombiOptima.
3. Le système nomme automatiquement les
fichiers de données selon l’année, le mois, la
date et l’heure à laquelle on les a sauvegardés.
4. Unefoislaprisedecopiedesécuritéterminée, la commande repasse la main au menu
SERVICE.
Menu SERVICE
Appuyez sur cette
touche pour prendre
une copie de sécurité
des données du four
dans une clé BSU
Appuyez sur cette
touche pour reconstituer
une copie de sécurité
précédemment prise
Appuyez sur cette
touche pour lire les fichiers dans une clé BSU et
mettre à l’essai la con-
nexion avec l’ordinateur
Image-écran BSU (USB)
Appuyez sur cette
touche pour copi-
er de la clé BSU
au four
Appuyez sur cette
touche pour copi-
er du four au port
BSU
Figure 29
87
Page 92

Fonctionnement
Fonctions BSU (USB)
Pour reconstituer des données du système à
partir d’une clé BSU
1. Appuyez sur la touche Extraire copie de sécurité (Retrieve Backup) du côté gauche de l’image-écran BSU (USB).
2. Lesdonnéesdecopiedesécuritésefont
stocker d’a près le numéro de série du four. Si
une même clé BSU sert pour plusieurs fours,
assurez-vous bien de sélectionner le bon numéro de série.
3. Sélectionnez le fichier de données à reconstituer. Le système nomme automatiquement
les fichiers de données selon l’année, le mois,
la date et l’heure à laquelle on les a sauvegardés.
4. Appuyez sur le bouton OK au coin supérieur
droit de l’écran pour reconstituer le fichier de
données sélectionné.
5. Utilisez la touche Alimentation principale
(MAINPOWER)auhautdelacommandeafin
de réinitialiser le four
Pour copier des recettes au four à partir d’une
clé BSU
1. Appuyez sur la touche Extraire recettes de la
clé BSU (Get Recipes from USB) du côté droit
de l’image-écran BSU (USB).
2. Sélectionnezles recettes à copier au four. Voir
Figure 30.
REMARQUE:Lacommande afficheles catégo-
ries de produits en jaune à titre
de répertoires, et les recettes de
programme individuelles en
blanc.
3. Appuyez sur la touche OK au coin supérieur
droit de l’écran afin d’accepter les recettes à
copier.
4. La commande affiche l’image-écran Accepter
les recettes (RECIPE ACCEPT). Appuyez sur
Ajouter (ADD) afin d’ajouter les programmes
de produit sélectionnés au four. Appuyez sur
Superposer (OVERWRITE) afin d’écraser les
programmesexistantsdesrecettesdansla
clé BSU.
Pour copier des recettes à une clé BSU à partir
du four
1. Appuyez sur la touche Envoyer recettes à la
clé BSU (Send Recipes to USB) du côté droit
de l’image-écran BSU (USB).
2. Sélectionnez l’endroit dans le répertoire BSU
où vous devez sauvegarder les recettes de
produit. Vous pouvez écraser un fichier existant ou créer un nouveau fichier avec un nom
correspondant au numéro de série du four.
3. Appuyez sur le bouton OK au coin supérieur
droit de l’écran afin de copier les recettes du
fouràlacléBSU.
88
Page 93

Appuyez sur cette
touche pour sélectionner
ou désélectionner des
recettes individuelles
Fonctionnement
Fonctions BSU (USB)
Image-écran Télécharger recettes
en amont (RECIPE UPLOAD)
Appuyez sur cette touche
pour copier les recettes
sélectionnées au four
Appuyez sur cette touche
pour faire défiler vers le haut
Appuyez sur cette touche pour
sélectionner toutes les recettes
Appuyez sur cette touche
pour désélectionner toutes
les recettes
Appuyez sur cette touche
pour faire défiler vers le bas
Image-écran Accepter téléchargement
Appuyez sur cette touche
pour ajouter des recettes
Appuyez sur cette touche pour
écraser des recettes existantes
en amo nt (UPLOAD ACCEPT)
Figure 30
89
Page 94

Fonctionnement
Bibliothèque ARMPC (HACCP)
Le four Blodgett BCP est doté de l’enregistrement
de données ARMPC (HACCP) en équipement de
série. L’ARMPC vous permet de régir et de documenter la production. Les données enregistrées
comprennent le délai de production, la durée de
production, la température de la préparation et la
température du coeur du produit.
La bibliothèque ARMPC peut contenir jusqu’à environ 1 000 fichiers de journal. Elle vous avertit
lorsque la mémoire est remplie, afin de vous permettredetransférerlecontenudelamémoire
dans une clé BSU. Si vous n’exécutez aucune
telle”vidange”delamémoire,l’ordinateurse
mettra automatiquement à superposer en écriture
(écraser) les plus anciens fichiers.
Pour actionner l’enregistrement de données
ARMPC
REMARQUE:La bibliothèque ARMPC enregistre
les données ARMPC sous des noms
de recette de produit. Il s’ensuit
qu’on ne peut enregistrer de données ARMPC dans le cadre de la
cuisson manuelle.
Il faut mettre la bibliothèque ARMPC en service
afin d’ enregistrer les données.
1. Appuyez sur la touche du menu principal au
coin supérieur gauche du menu TRAVAIL
pour accéder au menu principal.
2. Appuyez sur la touche ARMPC (HACCP) du
côté gauche de la commande pour accéder
au menu ARMPC (HACCP).
3. Assurez-vousquelemot”Active”figuredans
la barre d’état au bas de la commande. Si l’état est inactif, appuyez sur la touche du côté
gauche de la barre d’état pour rendre l’état actif.
Pour visualiser les données ARMPC
1. Dans le menu ARMPC (HACCP), appuyez sur
la touche Afficher ARMPC du four (Show
HACCP from Oven) ou Afficher ARMPC de la
clé BSU (Show HACCP from USB). Voir
Figure 31.
2. UnelistedesjournauxARMPCs’afficheàl’écran. La journalisation de ces fichiers s’effectue selon l’année, le mois, la date et le nom du
produit. Utilisez les touches flèche haut et bas
pour faire défiler la liste jusqu’à mettre le fichier ARMPC désiré en évidence.
3. Appuyez sur la touche OK au coin supérieur
droit de l’écran pour faire afficher le graphique
ARMPC. Voir Figure 31.
4. Appuyez sur la touche Retour (RETURN) au
coin supérieur gauche de l’écran afin de revenir à l’image-écran ARMPC (HACCP).
Pour prendre une copie de sécurité des données ARMPC
1. Dans le menu ARMPC (HACCP), appuyez sur
la touche Archive dans la clé BSU (Archive on
USB). Voir Figure 31.
2. La commande affiche un message guide avisant du traitement d’enregistrement de données en cours (SAVING HACCP).
3. Une fois les données enregistrées dans la clé
BSU, la commande repasse la main à l’imageécran ARMPC (HACCP).
REMARQUE:On peut repérer les données ARMPC
de la clé BSU dans le répertoire portant le nom qui correspond au numéro de série du four.
Pour supprimer des données ARMPC du four
1. Dans le menu ARMPC (HACCP), appuyez sur
la touche Supprimer données ARMPC du four
(Delete HACCP Data from Oven). Voir
Figure 31.
2. La commande vous demande de confirmer
votre intention de supprimer tous les fichiers
ARMPC. Appuyez sur la touche à côté de l’invite Accepter de supprimer les fichiers (Accept to delete the files). Appuyez sur la touche
à côté de Regretter d’annuler (Regret to cancel).
3. La commande repasse la main à l’image--écran ARMPC (HACCP).
90
Page 95

Fonctionnement
Bibliothèque ARMPC (HACCP)
Appuyez sur
cette touche
pour passer au
menu principal
Appuyez sur
cette touche
pour accéder
au menu
ARMPC
(HACCP)
Menu TRAVAIL (WORK)
Menu principal
Menu ARMPC (HACCP)
GraphiquededonnéesARMPC
Appuyez sur cette touche
pour retourner au menu
ARMPC (HACCP)
LÉGENDE DES COULEURS DU GRAPHIQUE
DE DONNÉES ARMPC :
Ligne rouge Température préétablie
Ligne blanche Température actuelle dans
l’enceinte du four
Ligne bleue verticale Porte ouverte
Lignevertepâle Températuredecoeurdeproduit,
sonde ? 1 (gauche)
Ligne jaune pâle Température de coeur de produit,
sonde ? 2 (droite)
Figure 31
91
Page 96

Fonctionnement
Fonction optionnelle CombiNet
La fonction optionnelle CombiNet vous permet de
faire fonctionner le four à distance depuis un ordinateur personnel. Elle s’avère utile pour la rédaction de recettes de produit et pour visualiser et
télécharger des données ARMPC et d’autres données avec la commodité d’un clavier et d’un moniteur d’ordinateur de plus grandes dimensions.
RACCORDEMENT À UN RÉSEAU OU À UN ORDINATEUR PERSONNEL
REMARQUE:CombiNet exige la mise en place de
Java. On peut télécharger le programme en aval à partir du site Web
à l’adresse www.java.com.
1. Enlevez le couvercle du panneau de commande.
2. Raccordez le four à un réseau ou à un ordinateur personnel au moyen du câble Ethernet.
La connexion se trouve à l’arrière de la commande.
3. Remettez en place le couvercle du panneau
de la commande et raccordez l’autre extrémité du câble à votre réseau local ou directement à un ordinateur personnel.
4. Appuyez sur la touche du menu principal
dans le coin supérieur gauche pour accéder
au menu principal.
5. Appuyez s ur la touche Configuration du four
(OVEN SETUP) dans le menu principal. La
commande affiche alors le menu Configuration du four (OVEN SETUP).
6. Appuyez sur la touche Réseau (NETWORK)
du côté gauche de l’écran. La commande affiche alors l’adresse IP du four .
REMARQUE:Sion a relié le fourà unordinateur
personnel, utilisez l’adresse IP
indiquée. Si on a plutôt relié le
four à un réseau, il vous sera
peut-être nécessaire de modifier
l’adresse IP afin qu’elle corresponde à la configuration d’attribution de nom spécifique à
votre réseau.
7. Appuyez sur la touche OK au coin supérieur
droitdel’écran. Lefourseréinitialisera.
8. Depuis l’ordinateur personnel, ouvrez une
fenêtre Internet Explorer et accédez à l’adresse IP du four.
Appuyez sur
cette touche
pour accéd-
er au menu
principal
Menu TRAVAIL (WORK)
Menu principal
Menu Configuration du four (OVEN SETUP)
Appuyez sur
cette touche
pour accéder à
COMBINET
Appuyez sur cette touche pour
accéderaumenuConfigura-
tion du four (OVEN SETUP)
Figure 32
92
Page 97

Fonctionnement
Fonction optionnelle CombiNet
COMMANDE DU FOUR À DISTANCE
1. Sélectionnez Commande du four (Control
Oven) dans le menu du côté gauche de l’é-
cran.
2. L’affichage du four apparaît dans la fenêtre à
droite. Vous commandez maintenant le four
à distance. Vous pouvez utiliser votre souris
pour naviguer dans les menus du four, et votre
clavierpoursaisirlesdonnées.
ARMPC (HACCP) PAR VOIE DE COMBINET
1. Sélectionnez ARMPC (HACCP) dans le
menu du côté gauche de l’écran.
2. La commande affiche les données ARMPC du
côté droit de l’écran.
Fonction de
sélection
Image-écran Recettes (Recipe)
Envoyer
recettes au four
Cliquez ici pour enregis-
trer les recettes dans
l’ordinateur personnel
GESTION DE RECETTES À DISTANCE
1. Sélectionnez Recettes (Recipes) dans le
menu du côté gauche de l’écran.
2. Appuyez sur la touche Extraire du four (Get
from Oven) afin d’ extraire les recettes de produit actuellement programmées dans la bibliothèque du four.
3. Ajoutez de nouvelles recettes et(ou) modifiez
ou supprimez des recettes existantes dans la
bibliothèque reposant maintenant dans l’ordinateur personnel. Voir Figure 33.
4. Appuyez sur la touche Envoyer au four (Send
to Oven) afin de télécharger en aval toutes les
recettes de l’ordinateur personnel à la commande du four. Si nécessaire, cliquez sur le
bouton Fureter (Browse) pour sélectionner
l’emplacement de recettes désiré. Cliquez
sur le bouton Télécharger en amont (Upload)
afin de télécharger les recettes en amont.
Cliquez ici
pour ajouter
une recette
Cliquez ici pour
importer
d’autres recettes
Cliquez sur l’icône
de catégorie pour
ouvrir une recette
Figure 33
93
Cliquez ici
pour copier
une recette
Cliquez ici pour sup-
primer une recette
Page 98

Entretien
Nettoyage et entretien préventif
NETTOYAGE QUOTIDIEN
Le nettoyage quotidien du four est essentiel pour
respecter les conditions sanitaires minimales et
éviter les problèmes de fonctionnement
Nettoyage de l’extérieur
1. Vous pouvez nettoyer l’extérieur de l’appareil et
le maintenir en bon état au moyen d’une huile
légère. Imbibez un chiffon et frottez l’appareil
lorsqu’il est froid, puis essuyez avec un chiffon
propre et sec.
ATTENTION !!
NE PULVÉRISEZ P AS l’extérieur de l’appa-
reil avec de l’eau et ne le nettoyez pas au
moyen d’un jet d’eau. Nettoyer à l’aide d’un
jet d’eau peut imprégner les chloruresdans
l’acier inoxydable, entraînant la formation
de corrosion.
Nettoyage de l’intérieur
REMARQUE:N’EMPLOYEZ PAS des nettoyants
corrosifs non prévus pour le nettoyage des fours sur votre four COMBI.
Blodgett recommande les produits suivants en
vuedenettoyageetderinçagedevotrefour
Combi. Si vous choisissez d’utiliser des produits différents de ceux que recommande
Blodgett, demandez à votre fournisseur de
nous envoyer la fiche signalétique (santé et sécurité)dechacundecesproduitsafinquenous
nous assurions qu’ils répondent à nos normes.
Tout produit non approuvé peut nuire à votre
unité et potentiellement annuler votre garantie.
Produits de nettoyage de four recommandés :
Johnson Diversey Suma Nova L-6
Quatre contenants de 3,78 litres (1 gallon)
Code de produit : 57252280
Uncontenantde18,9litres(5gallons)
Code de produit : 57252100
Agent de rinçage recommandé :
Johnson Diversey Suma Maro A8.8
Quatre contenants de 3,78 litres (1 gallon)
Code de produit : 57250280
Uncontenantde18,9litres(5gallons)
Code de produit : 57250100
1. Ouvrez la porte du four.
2. Servez---vous du flexible de pulvérisation fourni, s itué sous la commande, pour nettoyer le
plateau à égouttement avant. L’eau résiduelle
s’écoulera par le tuyau de vidange dans l’enceinte du four.
Faites tourner le cycle de nettoyage automatique CombiWash comme suit :
1. Confirmez que les contenants d’agent nettoyantetd’agentderinçagedufoursonttous
deux pleins.
2. Dans le menu WORK, sélectionnez le cycle de
nettoyage. L’écran affiche alors le menu
CombiWash.
3. CombiWash propose quatre différents cycles
de nettoyage. Utilisez les touches flèche
droite et gauche pour sélectionner le cycle de
nettoyage désiré.
Étape 1 (44 minutes)
Étape 2 (1 heure)
Étape 3 (1 heure 49 minutes)
Étape 4 (2 heures 38 minutes)
REMARQUE:Utilisez l’étape 1 ou 2 après avoir
cuit à l’étuvée ou rôti à basse température. Utilisez l’étape 3 ou 4
après avoir cuit à l’étuvée ou rôti
à haute température.
94
Page 99

Entretien
Nettoyage et entretien préventif
4. Appuyez sur la touche Start/Stop pour amorcer le cycle de nettoyage.
Menu COMBIWASH
Enfon-
Enfoncez pour
choisir
le mode
de nettoyage
Enfoncez pour amorcer
CombiWash
Figure 34
5. Si la température de l’enceinte du four dé-
passe 80 ˚C (175 ˚F), le four passera automatiquement au mode de refroidissement. Si elle
est inférieure à ce point de démarcation, ou
lorsqu’elle l’atteint, le cycle de nettoyage
CombiWash s’amorce.
6. La commande compte à rebours le temps qui
reste au cycle de nettoyage.
7. Une fois le cycle de nettoyage terminé, le four
passe automatiquement à un mode d’attente
en service économiseur d’énergie.
cez pour
choisir
le mode
de nettoyage
NETTOYAGE HEBDOMADAIRE
En plus du nettoyage quotidien, il est nécessaire
de nettoyer aussi le filtre de commande et derrière
le protecteur de la soufflante sur une base hebdomadaire pour assurer le fonctionnement convenable du four. Sinon, il y aura formation et a ccumulation de tartre sur la soufflante et la source de
chaleur, et cela réduira l’efficacité du four.
Nettoyagedufiltredecommande
Le filtre de commande se trouve sous le compartiment de la commande, en avant du flexible de pulvérisation.
1. Pour retirer le filtre, tirez vers le bas sur le bou-
ton noir sur le côté gauche du filtre.
2. Nettoyez le filtre au savon et à l’eau.
3. Remettez le filtre en place. Appuyez vers le
haut sur le filtre jusqu’à insérer l’arrière du
bouton noir dans le trou du bas du four.
4. Poussez vers le haut sur le centre du bouton
noir pour faire agrandir l’arrière du bouton et
fixerlefiltreenplace.
Nettoyage à l’arrière du protecteur de la soufflante
1. Desserrez les deux vis sur le protecteur de la
soufflante (ou la chicane).
2. Faites pivoter la chicane vers l’avant.
3. Vaporisez abondamment l’agent nettoyant
sur la soufflante et la source de chaleur. Placez le four en mode vapeur environ 10 minutes.
4. Au bout de 10 minutes, rincez les surfaces de
l’agent nettoyant. Remettez le protecteur de
la soufflante en position fermée. Remettez en
place les deux vis, et serrez-les pour fixer le
protecteur de la soufflante en place.
ENTRETIEN PRÉVENTIF
Les meilleures mesures d’entretien préventif sont
une mise en service initiale du four appropriée et
un programme régulier de nettoyage. Le four-étuveur n’exige aucune lubrification. Communiquez
avec le fabricant, son représentant ou l’entreprise
locale d’entretien des produits Combi de Blodgett
pour effectuer l’entretien et les réparations, le cas
échéant.
95
Page 100

Entretien
Détartrage
Lacommandegardelefildel’usagedelachaudière entre les opérations de détartrage. Lorsque
l’usage du four atteint 95 % de la période de temps
prévue, la commande avertit l’utilisateur(trice) que
le moment est venu de détartrer le four. Il s’agit
seulement d’un avertissement; vous pouvez
vous servir du four toute la journée avant de le
détartrer.
Détartrage du four
1. Confirmez que le contenant distributeur de
l’agent de détartrage au four est plein. Assurez-vous d’utiliser un agent de détartrage non
diluételqueLimeAwayd’Eco-LabsouLime
Out de US Chemical.
Menu WORK
Enfoncez afin
de passer au
menu principal
2. Dans le menu principal, sélectionnez la
touche SERVICE.
3. La commande affiche le menu SERVICE. Appuyez sur la touche DELIME DIAGNOSIS du
côté droit de la commande.
4. La commande affiche l’image-écran Delime
Diagnosis. Appuyez sur la touche STARTDELIMING du côté droit de la commande.
5. Le reste du processus est automatique. La
commande affiche les étapes de détartrage à
mesure qu’elles s’exécutent.
Menu PRINCIPAL
Enfoncez afin
de passer au
menu SERVICE
Menu SERVICE
Image-écran DELIME DIAGNOSIS
Enfoncez afin
d’amorcer le
processus
de détartrage
Enfoncez afin
de passer au
menu DELIME
Figure 35
96
 Loading...