

Page 1

BCM and BLCM
INSTALLATION - OPERATION - MAINTENANCE
BCM et BLCM
MANUEL D'INSTALLATION - FONCTIONNEMENT - ENTRETIEN
BLODGETT COMBI
www.blodgett.com
44 Lakeside Avenue, Burlington, Vermont 05401 USA Telephone (802) 658Ć6600 Fax: (802) 864Ć0183
PN60740 Rev E (8/11)
E 2011 - G.S. Blodgett Corporation
Page 2

A PERSONAL WORD FROM BLODGETT COMBI
QUELQUES MOTS DE BLODGETT COMBI
Congratulations on your purchase of a BLODGETT Combi appliance. We
firmly believe that your choice has been a wise one, and trust you will reĆ
ceive many years of excellent service from your new Combi.
You will find that cooking with Combi appliances saves time, labor and
extensive cleaning of both the kitchen and the unit.
With Combi appliances the quality, taste, consistency, and look of your
food are improved, thus endorsing the policy to which we've always adĆ
hered: For Better Cooking!"
Once you've had a chance to use your Combi, please tell us, your dealer
and colleagues about any creative and interesting applications you have
discovered; exchange ideas with other users. Be sure to advise us or
your dealer immediately should any mechanical or technical problems
be encountered (...we're here to help!) and above all Enjoy Cooking the
BLODGETT Combi Way!
For information on cooking, please refer to our separate cooking guide.
Toutes nos félicitations sur votre achat d'appareil de Blodgett Combi.
Nous croyons fermement que votre choix est un choix raisonnable et
nous sommes certains que vous obtiendrez de nombreuses années
d'excellent service de votre nouveau four multiĆusages.
Vous allez découvrir que la cuisson dans les appareils Combi économise
le temps, le travail et le degré de nettoyage de l'appareil aussi bien que
de la cuisine.
Avec les appareil de Combi, la qualité, le goût, la consistence et l'apparĆ
ence des aliments sont améliorés, s'accordant, de ce fait, avec notre
politique "Pour une meilleure cuisson !"
Une fois que vous aurez eu la chance d'utiliser notre Combi, informez
nous, votre concessionnaire et vos collègues, de toutes les applications
nouvelles et intéressantes que vous avez découvertes ; échangez vos
idées avec d'autres utilisateurs. N'hésitez pas à nous prévenir, ou votre
concessionnaire, de tout problème mécanique ou technique que vous
pourriez rencontrer (... nous sommes ici pour vous aider) et parĆdessus
tout RégalezĆvous à cuisiner à la façon BLODGETT Combi!
Pour obtenir de plus amples informations sur l'art culinaire, veuillez conĆ
sulter notre livre de cuisine séparé.
Page 3

IMPORTANT
WARNING: IMPROPER INSTALLATION, ADJUSTMENT, ALTERATION, SERVICE OR
MAINTENANCE CAN CAUSE PROPERTY DAMAGE, INJURY OR DEATH. READ THE
INSTALLATION, OPERATING AND MAINTENANCE INSTRUCTIONS THOROUGHLY
BEFORE INSTALLING OR SERVICING THIS EQUIPMENT
AVERTISSEMENT: UNE INSTALLATION, UN AJUSTEMENT, UNE ALTÉRATION, UN
SERVICE OU UN ENTRETIEN NON CONFORME AUX NORMES PEUT CAUSER DES
DOMMAGES À LA PROPRIÉTE, DES BLESSURES OU LA MORT. LISEZ ATTENTIVEĆ
MENT LES DIRECTIVES D'INSTALLATION, D'OPÉRATION ET D'ENTRETIEN AVANT
DE FAIRE L'INSTALLATION OU L'ENTRETIEN DE CET ÉQUIPEMENT.
FOR YOUR SAFETY
Do not store or use gasoline or other flammable vapors or liquids in the vicinity
of this or any other appliance.
AVERTISSEMENT
Ne pas entreposer ni utiliser de l'essence ni d'autres vapeurs ou liquides inflamĆ
mables dans le voisinage de cet appariel, ni de tout autre appareil.
The information contained in this manual is important for the proper installation,
use, and maintenance of this oven. Adherence to these procedures and instrucĆ
tions will result in satisfactory baking results and long, trouble free service.
Please read this manual carefully and retain it for future reference.
Les informations données dans le présent manuel sont importantes pour installer,
utiliser et entretenir correctement ce four. Le respect de ces instructions et procéĆ
dures permettra d'obtenir de bons résultats de cuisson et une longue durée de serĆ
vice sans problèmes. Veuillez lire le présent manuel et le conserver pour pouvoir
vous y reporter à l'avenir.
Errors: Descriptive, typographic or pictorial errors are subject to correction. SpecificaĆ
tions are subject to change without notice.
Erreurs:Les erreurs de description, de typographie ou d'illustration font l'objet de
corrections. Les caractéristiques sont sujettes à modifications sans préavis.
Page 4

Your Service Agency's Address:
Adresse de votre agence de service:
Model/Modèl:
Serial Number/Numéro de série:
Your appliance was installed by/
Installateur de votre four:
Your oven's installation was checked by/
Contrôleur de l'installation de votre four:
Page 5

Table of Contents/Table des Matières
Introduction
The Blodgett CombiĆOven/Steamer 2. . . . .
Description of the CombiĆOven/Steamer 3.
Installation
Agency Approvals 4. . . . . . . . . . . . . . . . . . . .
Utility Specifications 5. . . . . . . . . . . . . . . . . . .
Unpacking the Oven 7. . . . . . . . . . . . . . . . . .
Oven Location and Leveling 8. . . . . . . . . . . .
Plumbing Connections 9. . . . . . . . . . . . . . . .
Electrical Connection and Ventilation 11. . . .
Gas Connections 12. . . . . . . . . . . . . . . . . . . . .
Gas Hose Restraint 14. . . . . . . . . . . . . . . . . . .
Final Check Lists 15. . . . . . . . . . . . . . . . . . . . .
Operation
Manual Control Description 16. . . . . . . . . . . .
Manual Cooking 17. . . . . . . . . . . . . . . . . . . . . .
Core Probe Cooking 17. . . . . . . . . . . . . . . . .
Programmed Cooking 18. . . . . . . . . . . . . . . . .
Programming the Control 18. . . . . . . . . . . .
Cooking with a Program 18. . . . . . . . . . . . .
Cooking Tips 19. . . . . . . . . . . . . . . . . . . . . . . . .
Maintenance
Cleaning & Preventative Maintenance 20. . .
Introduction
Le fourĆétuveur Combi de Blodgett 22. . . . . .
Description du fourĆétuveur Combi 23. . . . . .
Installation
Certifications 24. . . . . . . . . . . . . . . . . . . . . . . . .
Caractéristiques techniques relatives
aux services publics 25. . . . . . . . . . . . . . . . . .
Déballage du four 27. . . . . . . . . . . . . . . . . . . .
Choix de l'emplacement et nivellement
du four 28. . . . . . . . . . . . . . . . . . . . . . . . . . . . . .
Robinetterie 29. . . . . . . . . . . . . . . . . . . . . . . . . .
Raccordement à l'électricité et Ventilation 31
Raccordement au gaz 32. . . . . . . . . . . . . . . . .
Câble d'immobilisation du tuyau à gaz 34. .
Liste de vérification finale 35. . . . . . . . . . . . . .
Fonctionnement
Description de la commande manuelle 36. .
Cuisson manuelle 37. . . . . . . . . . . . . . . . . . . .
Cuisson Manuelle 37. . . . . . . . . . . . . . . . . . .
Cuisson a la Sonde 38. . . . . . . . . . . . . . . . . .
Cuisson programmée 39. . . . . . . . . . . . . . . . .
Programmation de la Commande 39. . . . .
Cuisson Selon un Programme 40. . . . . . . .
Trucs et suggestions en matière de
cuisson 41. . . . . . . . . . . . . . . . . . . . . . . . . . . . . .
Entretien
Nettoyage et entretien préventif 42. . . . . . . .
Page 6

Introduction
The Blodgett CombiĆOven/Steamer
The Blodgett CombiĆOven/Steamer offers a comĆ
pletely new method of cooking. With the Oven/
Steamer you have the choice of two cooking proĆ
cesses: Steam and Hot Air, either...
D Separately
D Combined, or
D In Sequence
And for easy operation you can choose from three
primary cooking modes:
In the Steam mode you can:
steam reheat reconstitute
stew thaw simmer
blanch preserve braise
poach
In the Hot Air mode you can:
roast bake
grill gratinate
broil
In the two Combi modes you can:
defrost roast rethermalize
reheat bake forced steaming
There are four additional specialized modes to
help you make the most of your time:
Retherm - for perfect reheating
Proofing - Proof and bake all in the same oven
Preheat - in this mode the oven will preheat to
575_F (300_C) for 15 minutes. The oven will then
automatically lower to 480_F (249_C) to protect
the advanced electronic components.
Cool Down - allows the oven cavity to cool down
rapidly with the door opened
You āācan also āāuse āātwo āāor āthree functions in seĆ
quence during one cooking process. We call this:
D combiĆsteaming
D combiĆroasting
D combiĆbaking
The combination of circulating hot air and steam
in the space saving, high performance CombiĆ
Oven/Steamer leads to improvements in the folĆ
lowing areas:
D increased productivity in the kitchen
D a reduction in capital expenditures for multiple
equipment replacement
D a wider range of menu choices
D a simplified cleaning process
The work process is simplified since products are
prepared on or in steam table āpans āand trays.
Food can be cooked, stored, and transported with
āthe āsame āāpans. āSmall āamounts of product can be
processed efficiently; preĆcooked and conveĆ
nience foods can be reheated within minutes.
āMany frozen foods can be processed without preĆ
thawing. This flexibility in preparation reduces the
need for kettles and steam tables since there is no
need for large amounts of food to be kept warm for
long periods of time.
Today the improvement of food quality is more imĆ
portant than ever. Vegetables are cooked in the
Blodgett CombiĆOven/Steamer without water at
the optimal temperature of just under 212_F
(100_C), maintaining valuable vitamins, minerals,
nutrients and trace elements. Cooking meat in the
Combi results in less shrinkage and a firmer, juicier
product. The Blodgett CombiĆOven/Steamer is
being used more and more for baking. Steam and
Hot āAir āmodes āmake āit āa āgeneral āpurpose baking
appliance.
2
Page 7

Introduction
Description of the CombiĆOven/Steamer
ABOUT THE OVEN/STEAMER
Blodgett CombiĆOven/Steamers are quality proĆ
duced using highĆgrade stainless steel with first
class workmanship.
The multiple speed fan, which is guarded against
accidental finger contact, is driven by a quiet and
powerful motor. The condenser draws out excess
steam from the appliance. Condensation and
waste water, which result during steaming and
cleaning, are continuously drained.
The use of high quality insulation impedes excesĆ
sive heat radiation and saves energy.
The BCM/BLCM makes it possible to enjoy all of
the advantages of a high quality steamer at the
flick of a switch. Fresh steam enters the oven cavĆ
ity without pressure and is circulated at high
speed. This process enables quick and gentle
cooking and ensures high quality food while proĆ
viding convenient working methods. The steam
generator is completely automatic and protected
from running dry.
OVEN/STEAMER OPERATION
The practical oven door, with a viewing window,
has a wide swing radius and handle which can be
operated easily, even with wet or greasy hands.
Ease of operation is guaranteed through the simĆ
ple to use control. With graphical symbols and
storage for 10 product recipes the BCM/BLCM is
easy for even inexperienced kitchen staff to operĆ
ate.
Cleaning is kept to a minimum thanks to the autoĆ
matic Combi Wash system.
3
Page 8
Installation
Agency Approvals
THE INSTALLATION INSTRUCTIONS CONĆ
TAINED HEREIN ARE FOR THE USE OF QUALIĆ
FIED INSTALLATION AND SERVICE PERSONNEL
ONLY. INSTALLATION OR SERVICE BY OTHER
THAN QUALIFIED PERSONNEL MAY RESULT IN
DAMAGE TO THE OVEN AND/OR INJURY TO
THE OPERATOR.
Qualified installation personnel are individuals, a
firm, a corporation, or a company which either in
person or through a representative are engaged
in, and are responsible for:
D The installation or replacement of gas piping.
The connection, installation, repair or servicing
of equipment.
D The installation of electrical wiring from the elecĆ
tric meter, main control box or service outlet to
the electric appliance.
Qualified installation personnel must be experiĆ
enced in such work, be familiar with all precauĆ
tions required and have complied with all requireĆ
ments of state or local authorities having
jurisdiction.
U.S. and Canadian Installations
Installation must conform with local codes, or in
the absence of local codes, with the National Fuel
Gas Code, NFPA54/ANSI Z223.1-Latest Edition,
the Natural Gas Installation Code CAN/CGAĆ
B149.1 or the Propane Installation Code, CAN/
CGAĆB149.2 as applicable.
Reference: National Electrical Code, ANSI/NFPA
70-Latest Edition and/or Canadian Electrical
Code CSA C22.1 as applicable.
This equipment is to be installed in compliance
with the Basic Plumbing Code of the Building OffiĆ
cials and Code Administrators International Inc.
(BOCA) and the Food Service Sanitation Manual of
the Food and Drug Administration (FDA).
Appliance is to be installed with backflow prevenĆ
tion in accordance with applicable federal, provĆ
ince and local codes.
General Export Installations
Installation must conform with Local and National
installation standards. Local installation codes and/
or requirements may vary. If you have any questions
regarding the proper installation and/or operation of
your appliance, please contact your local distributor.
If you do not have a local distributor, please call
Blodgett Combi at 0011Ć802Ć860Ć3700.
4
Page 9
Installation
Utility Specifications
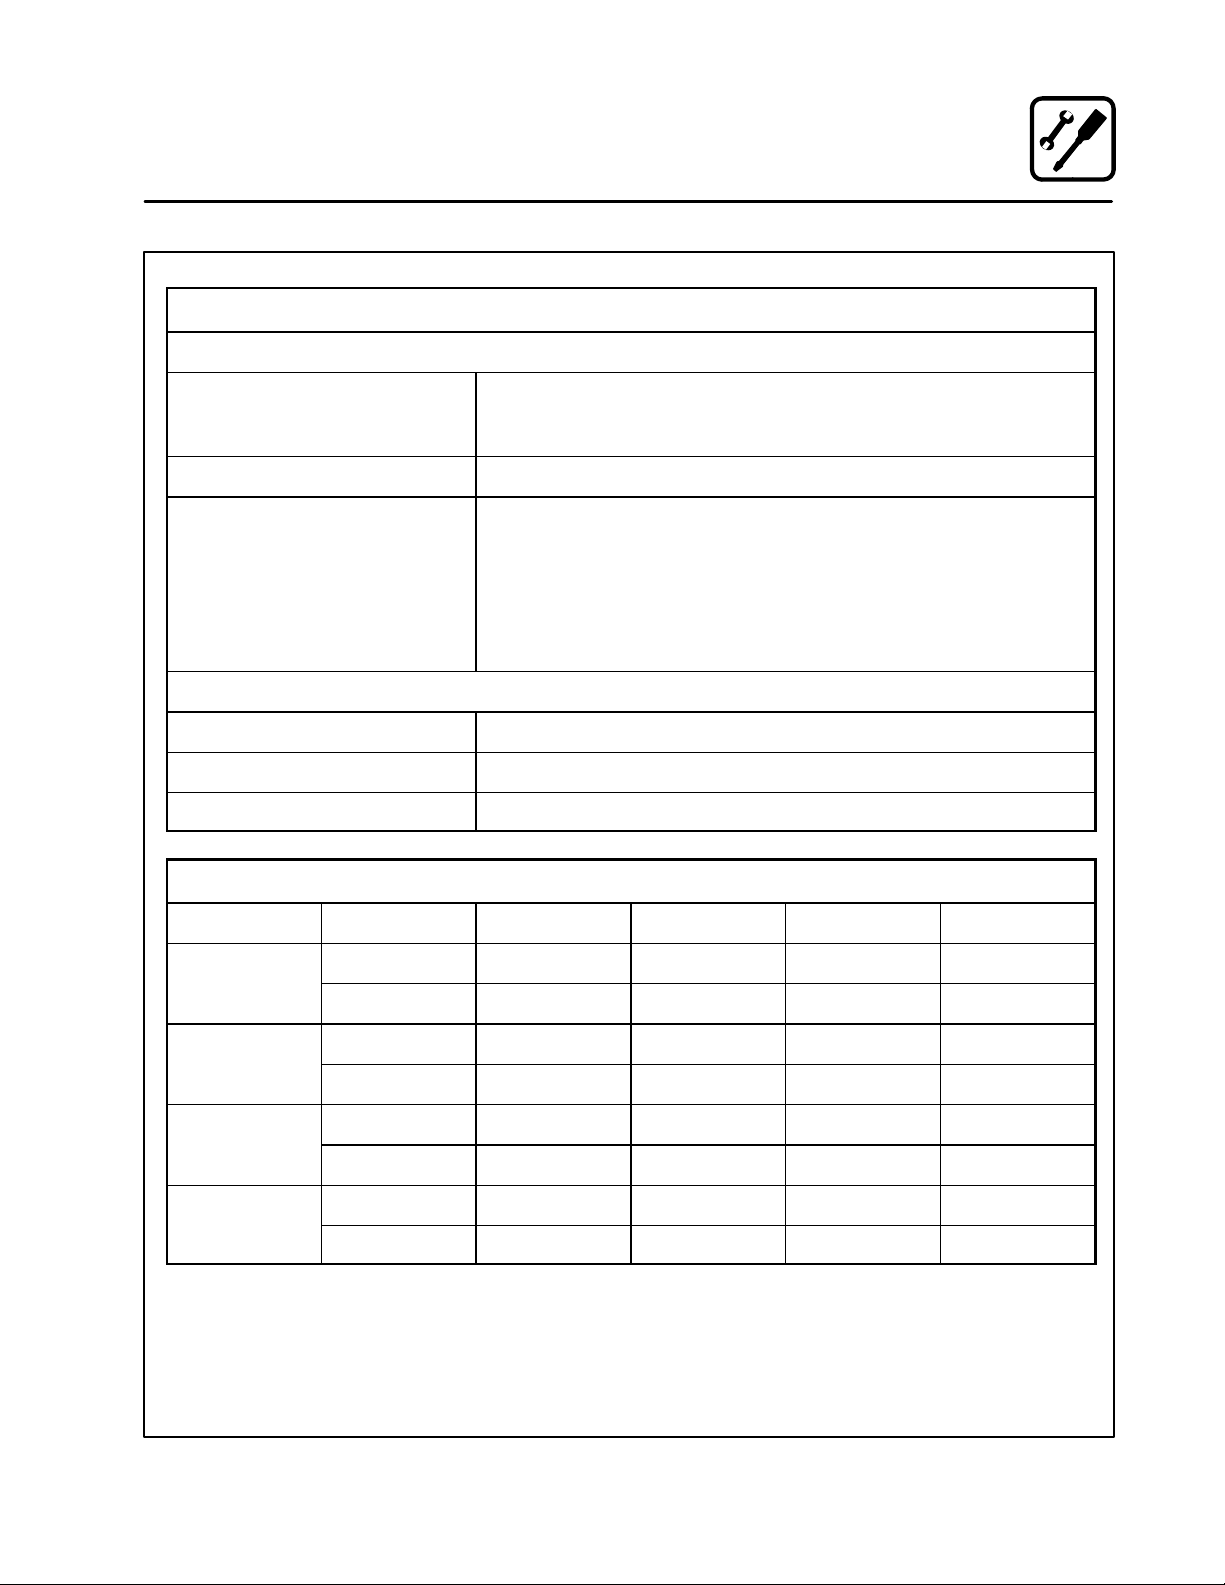
PLUMBING SPECIFICATIONS
WATER
Water Pressure 36.26 PSI (250 kPa, 2.5 bar) during Combi Wash
21.76 PSI (150 kPa, 1.5 bar) when Combi Wash is not active
87 PSI (600 kPa, 6 bar) maximum
Water Connection 3/4" garden hose cold water
Minimum Requirements TDS - less than 100 parts per million
Total Hardness - 80Ć120 parts per million
Chlorides - less than 30 parts per million
pH Factor - 7.0Ć8.0
Chlorine - 0 parts per million
DRAINAGE
Drain Type Atmospheric Vented Drain
Drain Connection 2.00" (50.8mm) Copper
Avg Water Drain Temp. Approximately 140_F (60_C)
RATINGS - GAS OVENS
Model Gas Type Input Voltage Phase Amps
BLCMĆ61G
BLCMĆ101G
BLCMĆ102G
BLCMĆ202G
Natural 40,900 BTU 120 1 11
Propane 40,900 BTU 120 1 11
Natural 71,500 BTU 120 1 11
Propane 71,500 BTU 120 1 11
Natural 125,000 BTU 120 1 22
Propane 125,000 BTU 120 1 22
Natural 184,000 BTU 120 1 22
Propane 184,000 BTU 120 1 22
5
Page 10
Installation
BLCM 23E
BLMP 6E
BLCM 10E
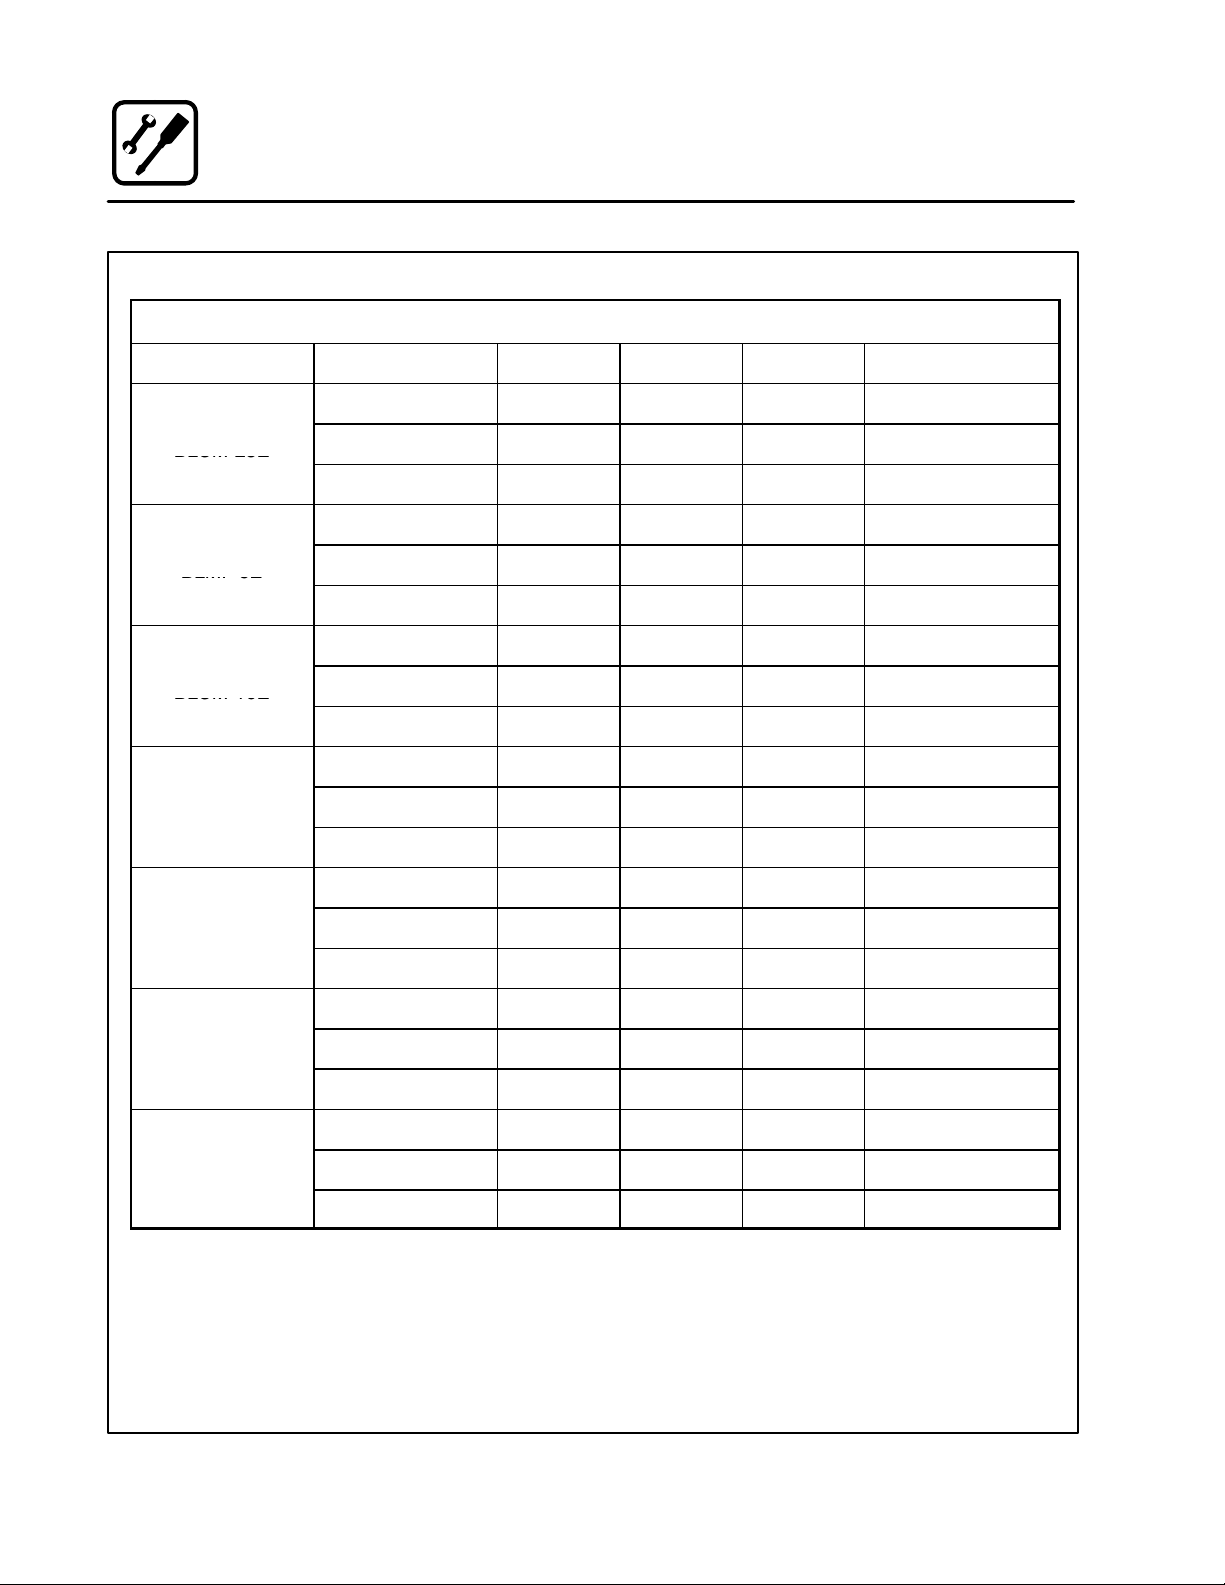
Utility Specifications
Model Voltage kW Hz Phase Max Load (amps)
ELECTRICAL RATINGS
208 5.4 60 3 26
BLCMĆ23E
BLMPĆ6E
BLCMĆ10E
BCMĆ61E
BLCMĆ61E
BCMĆ101E
BLCMĆ101E
BCMĆ102E
BLCMĆ102E
240 5.9 60 3 25
480 6.4 60 3 14
208 6.9 60 3 34
240 7.5 60 3 32
480 8.2 60 3 18
240 10.4 60 3 29
240 11.3 60 3 28
480 12.3 60 3 26
208 9 60 3 26
240 9 60 3 26
480 9 60 3 13
208 18 60 3 52
240 18 60 3 52
480 18 60 3 25
240 27 60 3 80
240 27 60 3 80
BCMĆ202E
BLCMĆ202E
480 27 60 3 36
240 60 60 3 175
240 60 60 3 175
480 60 60 3 80
6
Page 11
Installation
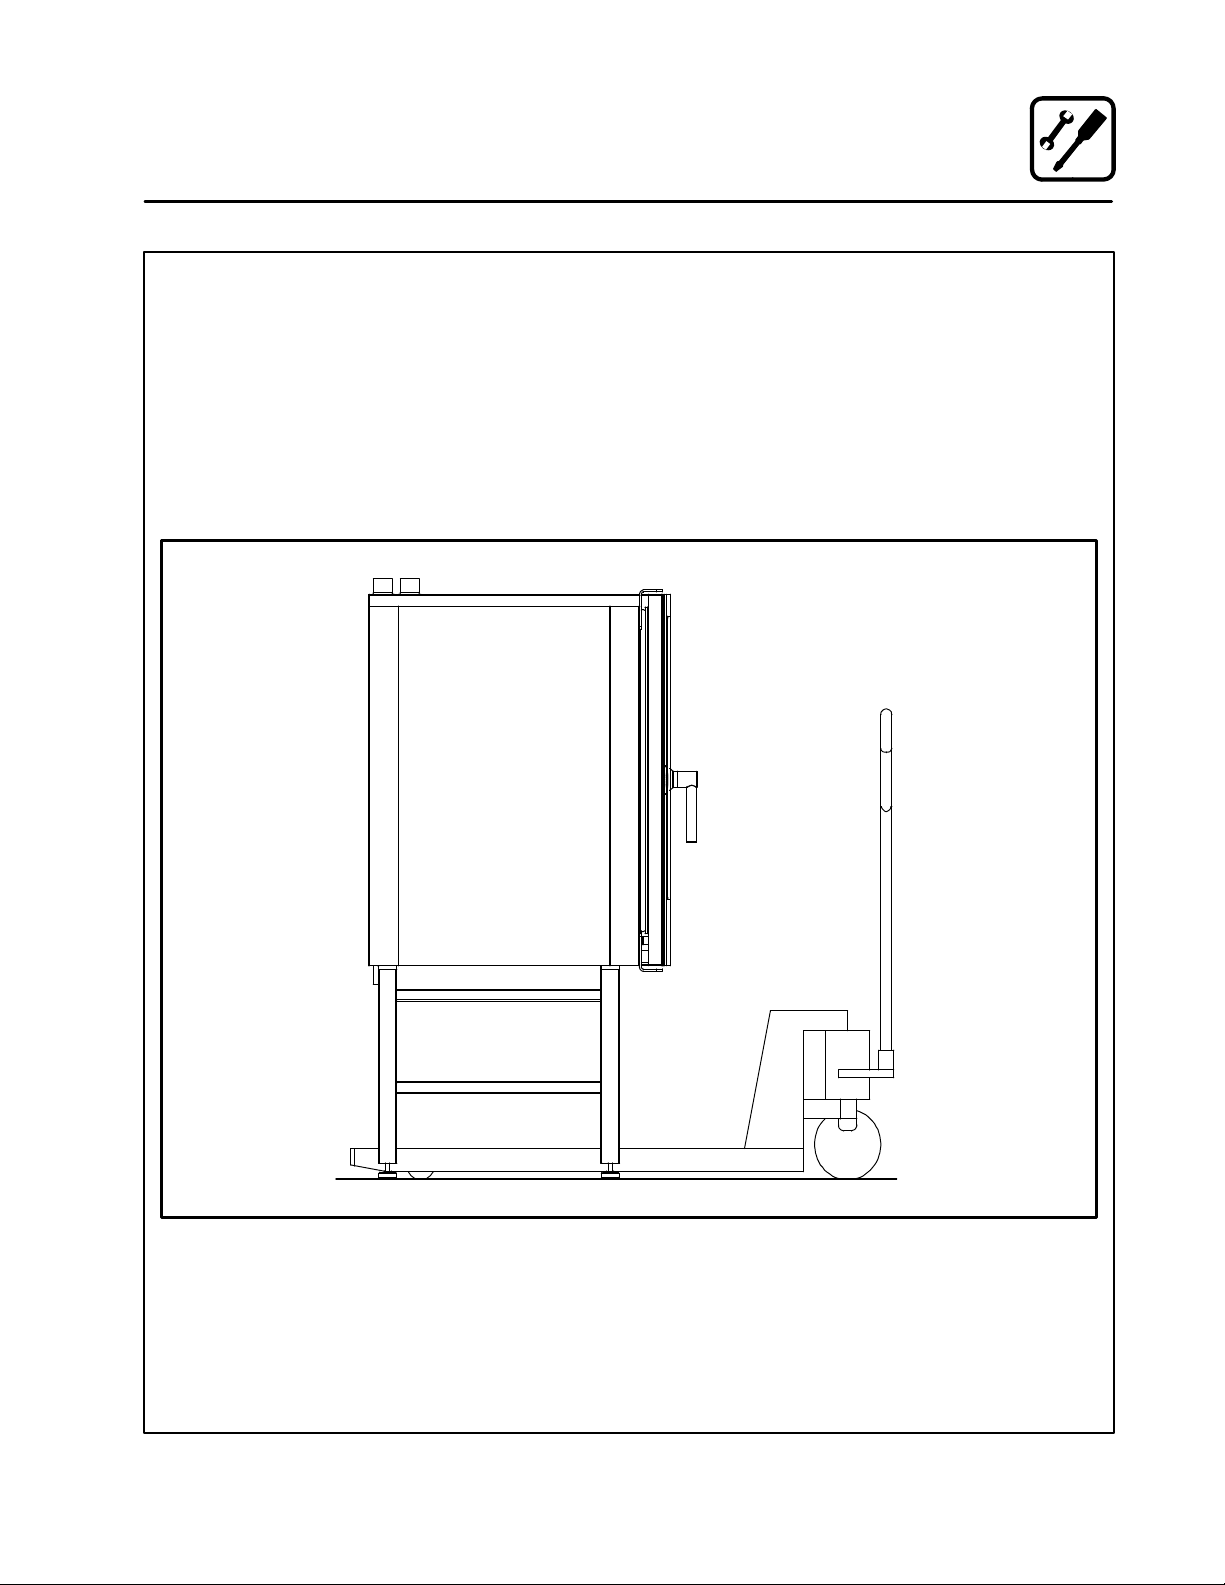
Unpacking the Oven
The oven is best handled while still in its wrapping.
Wherever possible, use a rolling lift.
1. Roll the lift under the lower cross tube of the
stand Place a couple of wooden blocks beĆ
tween the cross tube and the lift.
NOTE: To achieve the best possible balance,
roll the lift from the front of the oven or
from the motor side.
NOTE: If necessary, the oven can also be
lifted off the stand.
2. Remove the original packaging from the oven.
Do not remove the vinyl that covers the stainĆ
less steel surface until the oven has been
installed. Once the vinyl has been removed,
the surfaces are vulnerable to sharp objects
such as tools.
3. Remove all packaging material that secures
the racks in the oven chamber.
Figure 1
7
Page 12
Installation
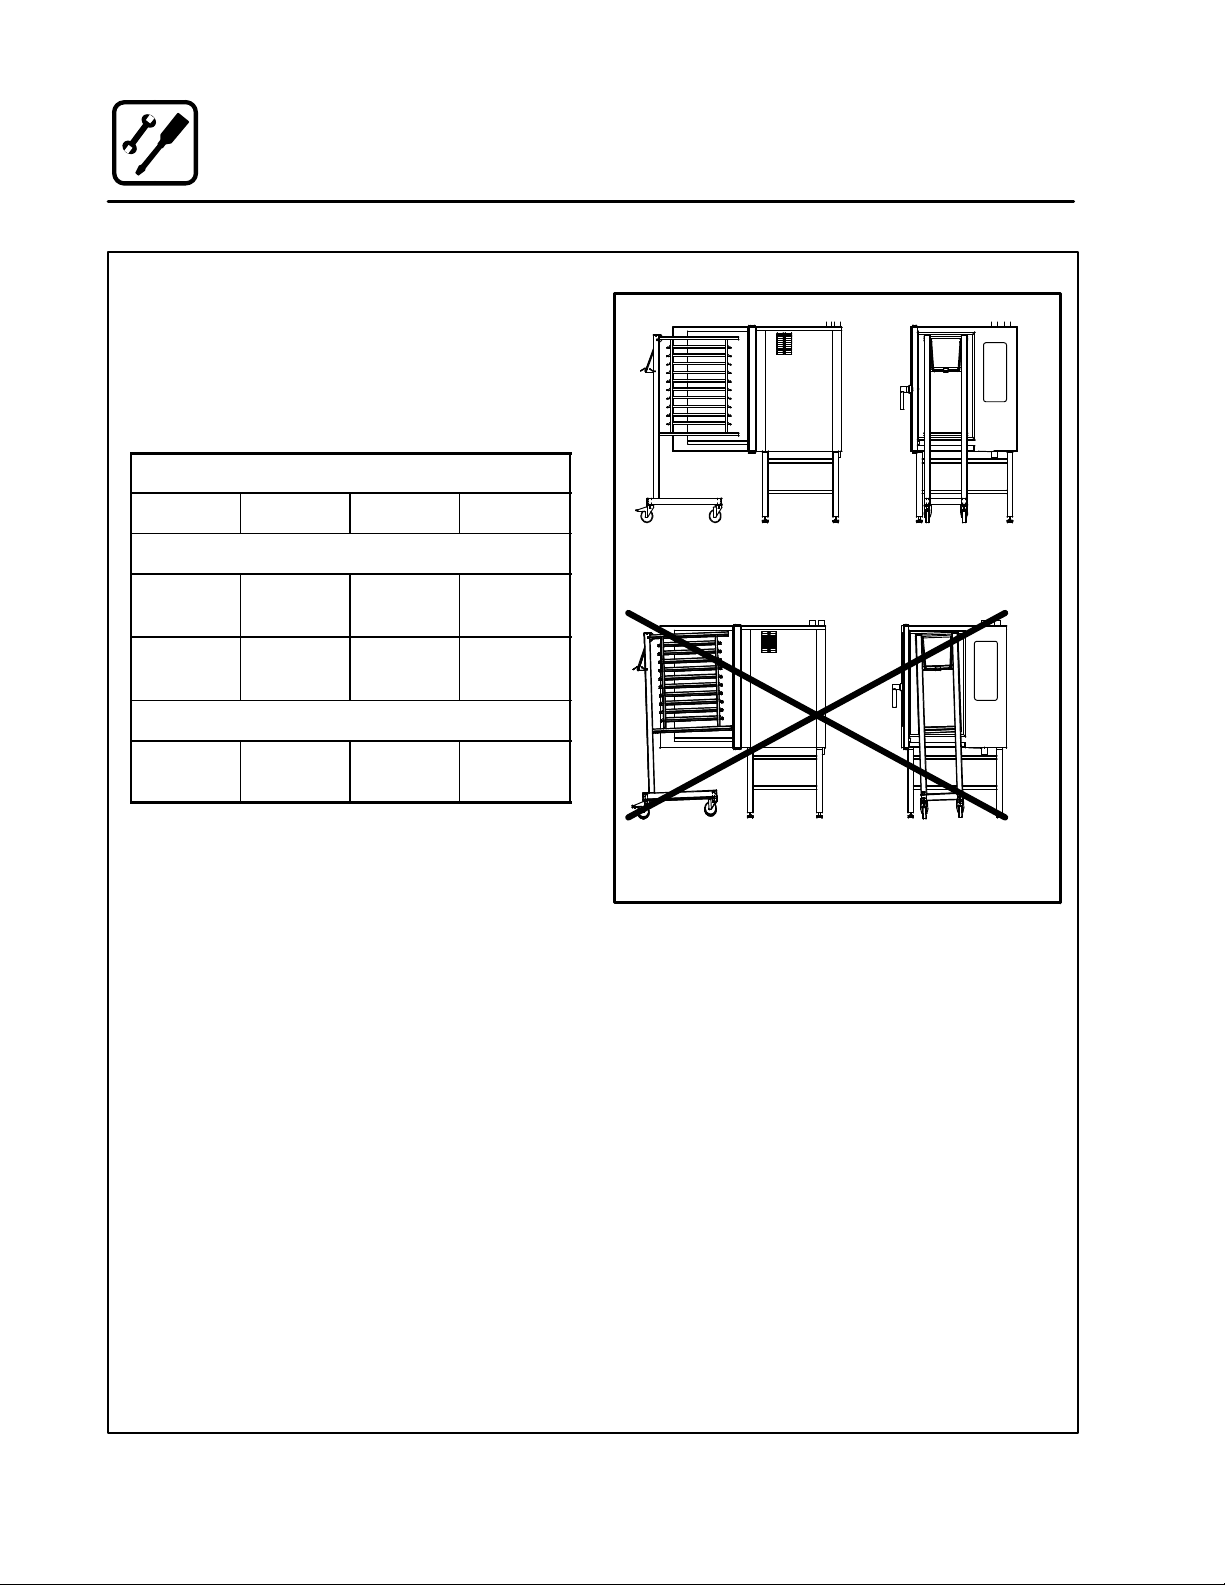
Oven Location and Leveling
The well planned and proper placement of your
oven will result in long term operator convenience
and satisfactory performance.
Certain minimum clearances must be maintained
between the oven and any combustible or nonĆ
combustible construction.
MINIMUM REQUIRED CLEARANCES
Size Sides Back To p
Electric Ovens
61, 101,
102 & 202
23, 6 & 10 2.75"
Gas Ovens
61, 101,
102 & 202
Strong sources of heat such as hotplates, tilting
frying pans, deep fat fryers, etc. should not be
placed near the oven, especially near its right side.
An optional side heat shield is available.
In addition, the following clearances are recomĆ
mended for servicing.
D Oven body sides - 12" (30cm)
D Oven body back - 12" (30cm)
To ensure that the oven functions correctly
when installed, it should be placed upright and
level (horizontally). This is measured at the
front and side edge of the roof. The oven can be
levelled using the adjusting screws on the
stand or on the legs of table models. The height
of the oven should also be adjusted to fit the
trolley for rack.
2.75"
(7cm)
(69.9mm)
2.75"
(70mm)
2"
(50mm)
2.75"
(69.9mm)
2"
(50mm)
n/a
19.5"
(49.5cm)
n/a
CORRECT INSTALLATION
INCORRECT INSTALLATION
Figure 2
8
Page 13
Installation
Plumbing Connections
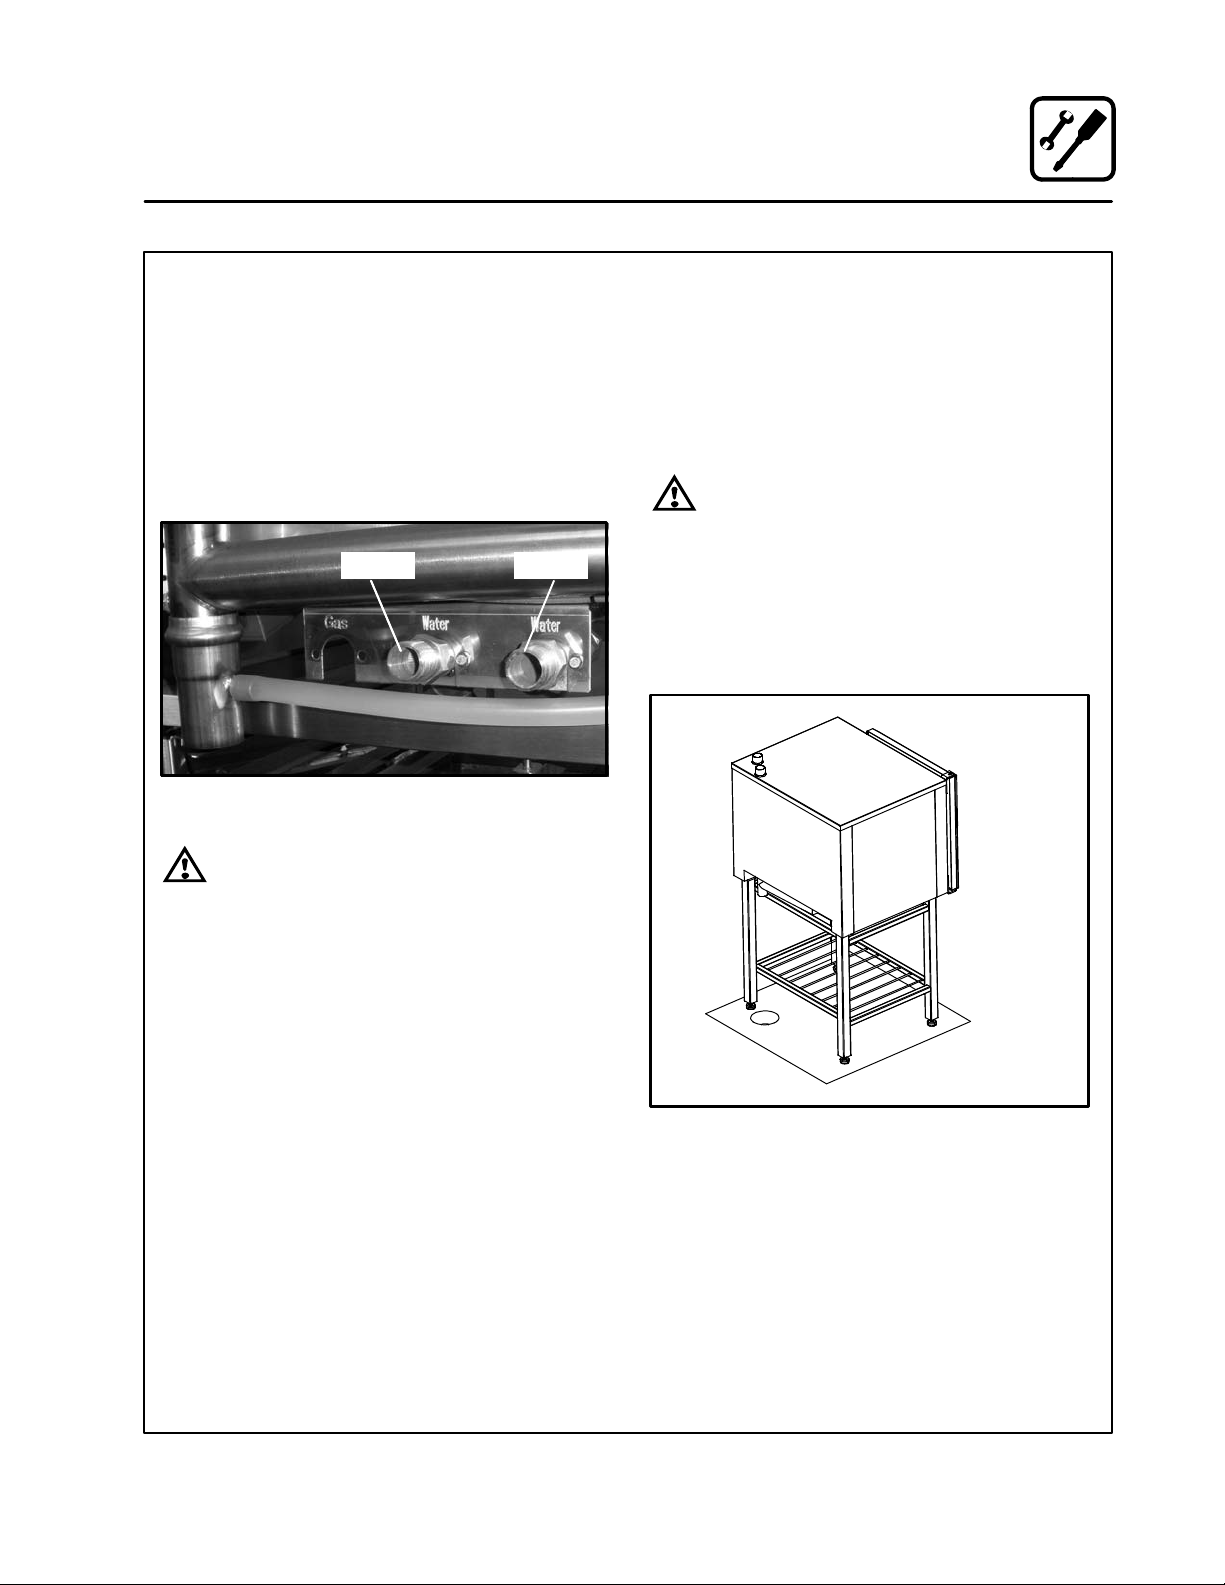
WATER CONNECTION
Blodgett BCM/BLCM ovens have two water conĆ
nections. Both are located at the back of the unit.
D 1 connection for raw water for the condensation
jet.
D 1 connection for steam generation and the
Combi Wash jet in the oven chamber. Must
meet the requirements applying to water supĆ
plied to household appliances.
Quench
Figure 3
WARNING!!
If the water temperature exceeds 70°F
(21°C), problems with regard to Combi
Optima calibration and cooling of the
oven may occur.
Steam
DRAIN CONNECTION
Blodgett ovens are equipped with a drain system
that removes surplus water from the oven chamĆ
ber. This may be condensed water from the prodĆ
ucts, or it may occur when the oven chamber is
cooled down with cold water, or when the oven
chamber is cleaned.
WARNING!!
Connection must be carried out by an auĆ
thorised plumber, to an open or closed
drain. The drain must never end directly
beneath the oven.
The drain must be of stainless steel or an equally
temperatureĆresistant material, have a diameter of
at least 2" (49 mm) and a fall of at least 3° or 5%.
The water connection must be carried out
by an authorized plumber in accordance
with existing local codes.
Clogged up water filters and dirt in the soĆ
lenoid valves are not covered by the warĆ
ranty.
To facilitate cleaning and servicing, the oven
should be connected with an approved flexible
3/4" hose. Permanent installations should be fitted
with a stopĆtap and a nonĆreturn valve.
If the feeder is connected to the water distribution
system with a flexible hose, this hose should be VA
approved.
Before connecting the oven to water, flush the
tubes thoroughly. Connect the oven.
Figure 4
9
Page 14
Installation
Plumbing Connections
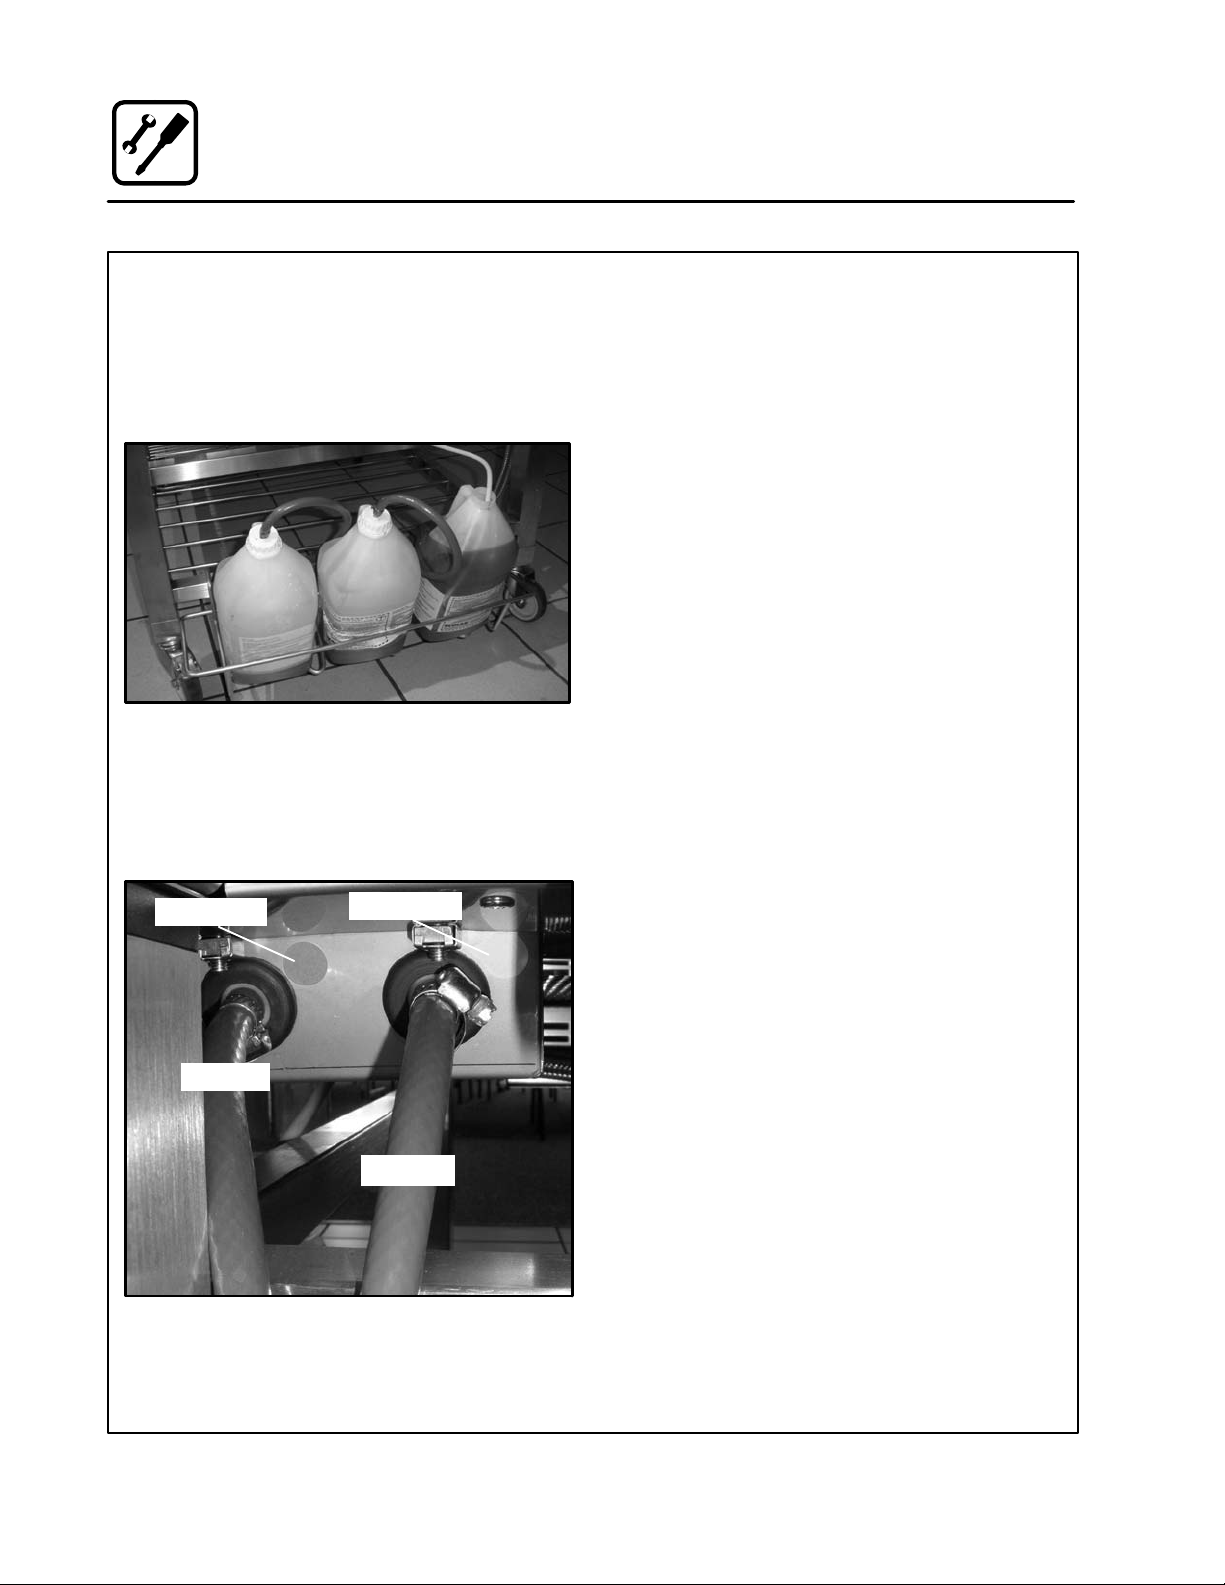
CLEANING & DELIMING CHEMICAL
1. BCP/BLCPĆ61, 101, 102 and 202 ovens
only. The oven is supplied with a chemical
bottle holder. The holder can be affixed to eiĆ
ther side of the oven. Place it on the stand
crossmember. See Figure 5.
Figure 5
2. Connect the supplied detergent tubes (red
and blue) to the underside of the oven near the
rear. Connect the blue hose to the fitting with
the blue sticker and the red hose to the fitting
with the red sticker. See Figure 6.
3. Insert the blue and red hoses into the proper
bottles. Red is for detergent, blue is for rinse
aid.
4. BCM only - The last line is for the delimer.
This is the tan colored tube protroding from
the bottom of the oven. Cut the tubing to the
proper length, if needed, and place the tubing
into the delime bottle.
NOTE: If the tube is cut to length, remove the
stainless steel weight from the end of
the tube and reinsert.
Red Sticker
Red Tube
Blue Sticker
Blue Tube
Figure 6
10
Page 15
Installation
Electrical Connection and Ventilation
ELECTRICAL CONNECTION
NOTE: Electrical connections must be performed
by a qualified installer only.
Before making any electrical connections to these
appliances, check that the power supply is adeĆ
quate for the voltage, amperage, and phase reĆ
quirements stated on the rating name plate
mounted on the appliance.
1. The rating plate is located on the right side of
the oven.
An approved plug outlet or a safety cutout must be
located close to the oven so that the oven can be
disconnected during installation and repair. The
safety cutout must be able to cut off all poles with
a total distance of break of at least 3 mm.
All appliances must be installed in accordance
with Local or National Electrical codes.
The wiring diagram is located in the motor
compartment.
NOTE: Disconnect the power supply to the apĆ
pliance before servicing.
WARNING!!
Improper installation may invalidate your
warranty.
Electric Models
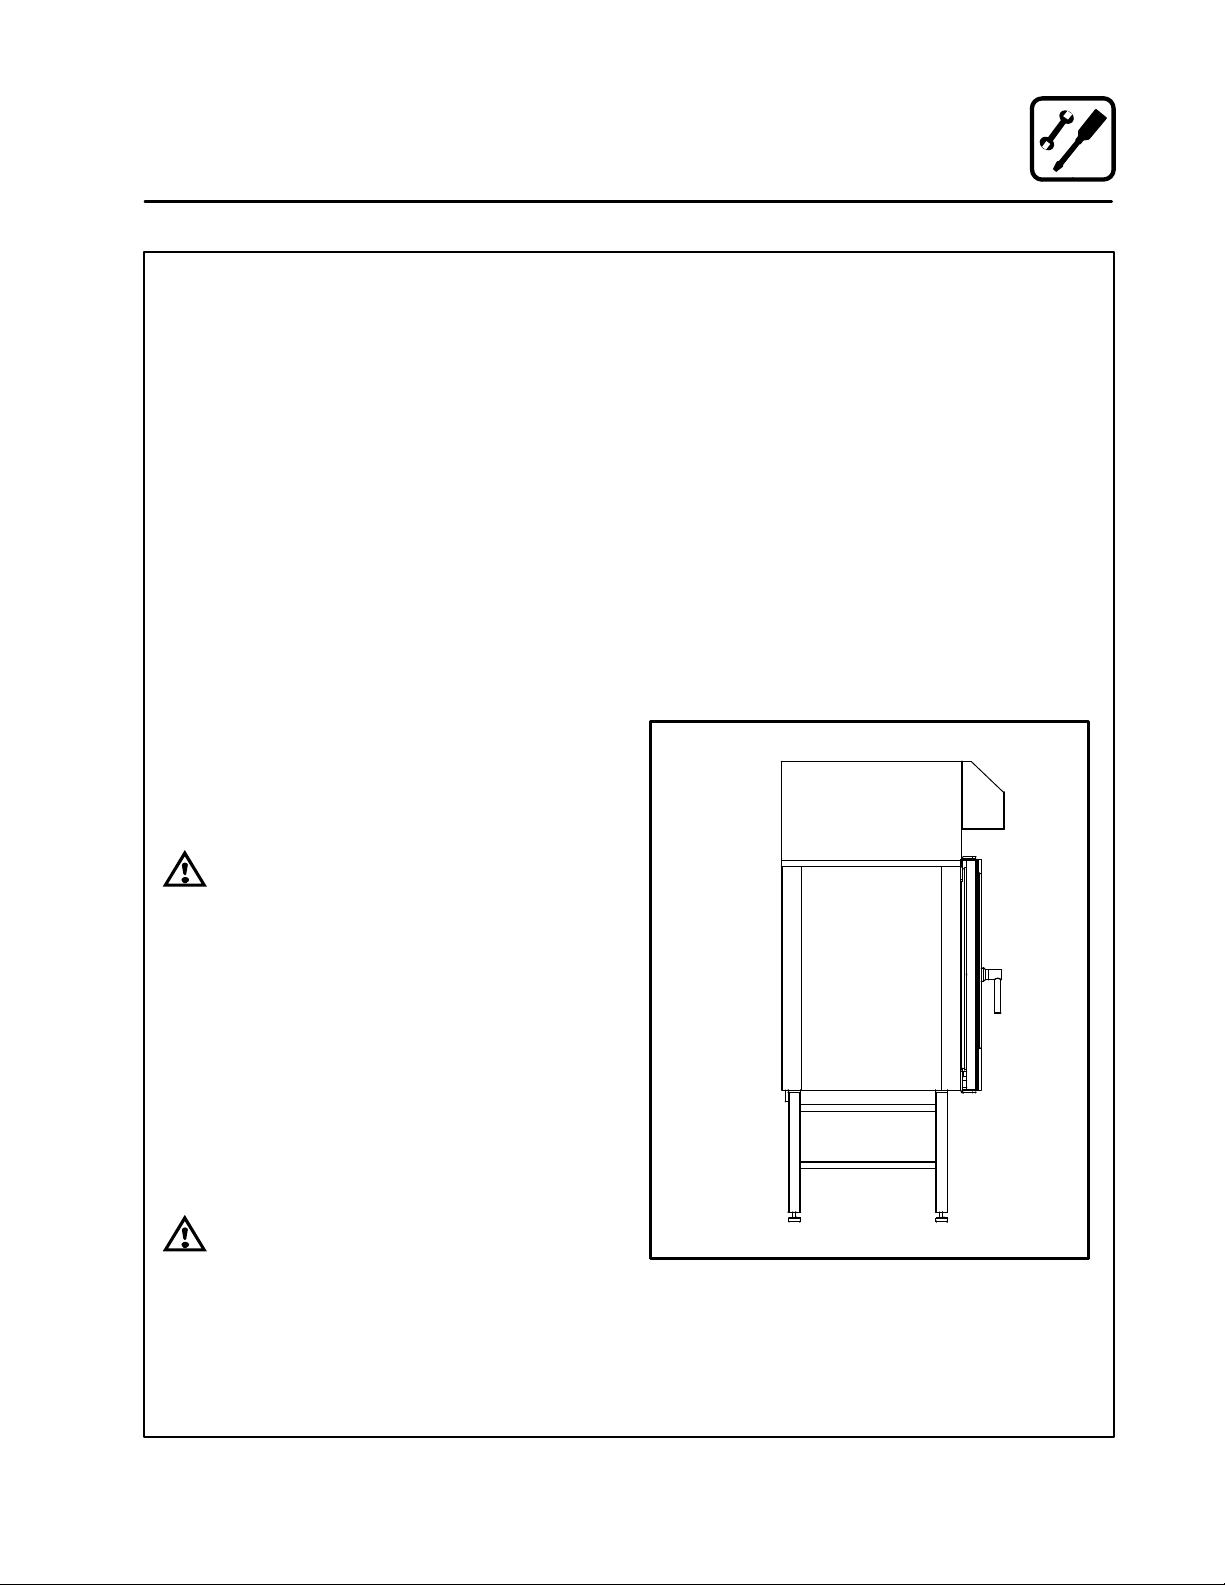
VENTILATION
Blodgett BCM/BLCM ovens are equipped with an
open/direct exhaust system that removes surplus
humidity from the oven chamber. The exhaust sysĆ
tem has an electrically operated damper.
The ventilation motor can be controlled directly
from the oven. This means that the ventilation
starts when a program is started and runs for 10
minutes after the program is completed.
The exhaust tube can be connected to a ventilaĆ
tion system. In that case, a special extraction funĆ
nel is fitted to avoid suction directly from the oven
chamber. This extraction funnel can be ordered
from Blodgett.
If an extraction hood is installed in the ceiling
above the oven, it should project 20" (50 cm) over
the front of the oven.
A strain relief for the power supply cord is provided.
The installer must supply a cord that meets all Local
and National installation standards.
Gas Models
U.S. and Canadian Installations
A power cord (115V units only) is supplied with a
plug attached. Plug the power cord into the deĆ
sired receptacle.
WARNING!!
If the supply cord is damaged, it must be
replaced by a special cord or assembly
available from the manufacturer or its serĆ
vice agent.
Figure 7
11
Page 16

Installation
L
th
pg
Gas Connections
GAS PIPING
A properly sized gas supply system is essential for
maximum oven performance. Piping should be
sized to provide a supply of gas sufficient to meet
the maximum demand of all appliances on the line
without loss of pressure at the equipment.
Example:
NOTE: BTU values in the following example are
for natural gas.
You purchase a BCXĆ14G to add to your existing
cook line.
1. Add the BTU rating of your current appliances.
Pitco Fryer 120,000 BTU
6 Burner Range 60,000 BTU
Deck Oven 50,000 BTU
Total 230,000 BTU
2. Add the BTU rating of the new oven to the toĆ
tal.
Previous Total 230,000 BTU
BLCMĆ61G 40,900 BTU
New Total 270,900 BTU
3. Measure the distance from the gas meter to
the cook line. This is the pipe length. Let's say
the pipe length is 30' (9 m) and the pipe size
is 1" (2.54 cm).
4. Use the appropriate table to determine the toĆ
tal capacity of your current gas piping.
The total capacity for this example is 270,900
BTU. Since the total required gas pressure,
270,900 BTU is less than 375,000 BTU, the
current gas piping will not have to be inĆ
creased.
NOTE: The BTU capacities given in the tables are
for straight pipe lengths only. Any elbows
or other fittings will decrease pipe capaciĆ
ties. For example: a schedule 40 1Ć1/2" ell
fitting has an equivalent capacity of 4.2"
(10.2 cm) of straight pipe. Contact your loĆ
cal gas supplier if you have any questions.
Maximum Capacity of Iron Pipe in Cubic Feet
of Natural Gas Per Hour
(Pressure drop of 0.5 Inch W.C.)
Pipe
eng
(ft)
10 360 680 1400 2100 3950
20 250 465 950 1460 2750
30 200 375 770 1180 2200
40 170 320 660 990 1900
50 151 285 580 900 1680
60 138 260 530 810 1520
70 125 240 490 750 1400
80 118 220 460 690 1300
90 110 205 430 650 1220
100 103 195 400 620 1150
From the National Fuel Gas Code Part 10 Table 10Ć2
Maximum Capacity of Pipe in Thousands of
BTU/hr of Undiluted P.P. Gas at 11" W.C.
Pipe Length
From the National Fuel Gas Code Part 10 Table 10Ć15
3/4" 1" 1Ć1/4" 1Ć1/2" 2"
(Pressure drop of 0.5 Inch W.C.)
(ft)
10 608 1146 3525
20 418 788 2423
30 336 632 1946
40 287 541 1665
50 255 480 1476
60 231 435 1337
70 215 404 1241
80 198 372 1144
90 187 351 1079
100 175 330 1014
Nominal Size, Inches
Inside Diameter, Inches
3/4" 1" 1Ć1/2"
12
Page 17

Installation
Gas Connections
PRESSURE REGULATION AND TESTING
The gas pressure to the appliance must be rated
for each appliance while the burners are on. A sufĆ
ficient gas pressure must be present at the inlet to
satisfy these conditions. Refer to the table below
for correct gas pressure.
Each appliance has been adjusted at the factory
to operate with the type of gas specified on the ratĆ
ing plate.
Each oven is supplied with a regulator to maintain
the proper gas pressure. The regulator is essenĆ
tial to the proper operation of the oven and
should not be removed.
DO NOT INSTALL AN ADDITIONAL REGULATOR
WHERE THE UNIT CONNECTS TO THE GAS
SUPPLY UNLESS THE INLET PRESSURE IS
GREATER THAN 14" W.C. (1/2 PSI) (37mbar).
The oven and its individual shutoff valve must be
disconnected from the gas supply piping system
during any pressure testing of that system at test
pressures in excess of 1/2 psig (3.45kPa).
The oven must be isolated from the gas supply
piping system by closing its individual manual
shutoff valve during any pressure testing of the
gas piping system at test pressures equal or less
than 1/2 psig (3.45kPa).
Prior to connecting the appliance, gas lines
should be thoroughly purged of all metal filings,
shavings, pipe dope, and other debris. After conĆ
nection, the appliance must be checked for corĆ
rect gas pressure.
U.S. and Canadian Installations
Installation must conform with local codes, or in
the absence of local codes, with the National Fuel
Gas Code, NFPA54/ANSI Z223.1-Latest Edition,
the Natural Gas Installation Code CAN/CGAĆ
B149.1 or the Propane Installation Code, CAN/
CGAĆB149.2 as applicable.
General Export Installations
Installation must conform with Local and National
installation standards. Local installation codes and/
or requirements may vary. If you have any questions
regarding the proper installation and/or operation of
your appliance, please contact your local distributor.
If you do not have a local distributor, please call
Blodgett Combi at 0011Ć802Ć860Ć3700.
BLCMĆ61G
BLCMĆ101G
BLCMĆ102G
BLCMĆ202G
GAS PRESSURE
Model Gas Type Inlet Pressure
Natural 7.0" W.C.
Propane 11.0" W.C.
Natural 7.0" W.C.
Propane 11.0" W.C.
Natural 7.0Ć14.0" W.C.
Propane 12.0Ć14.0" W.C.
Natural 7"Ć14" W.C.
Propane 12.0Ć14.0" W.C.
13
Page 18

Installation
Gas Hose Restraint
If the appliance is mounted on casters, a commerĆ
cial flexible connector with a minimum of 3/4" (1.9
cm) inside diameter must be used along with a
quick connect device.
A restraint must be used to limit the movement of
the appliance so that no strain is placed upon the
flexible connector. The restraint should be fasĆ
tened to the base frame of the oven as close to the
flexible connector as possible. It should be short
enough to prevent any strain on the connector.
With the restraint fully stretched the connector
should be easy to install and quick connect.
The restraint (ie: heavy gauge cable) should be atĆ
tached without damaging the building. DO NOT
use the gas piping or electrical conduit for the atĆ
tachment of the permanent end of the restraint!
Use anchor bolts in concrete or cement block. On
wooden walls, drive hi test wood lag screws into
the studs of the wall.
WARNING!!
If the restraint is disconnected for any reaĆ
son it must be reconnected when the apĆ
pliance is returned to its original position.
U.S. and Canadian installations
The connector must comply with the Standard for
Connectors for Movable Gas Appliances, ANSI
Z21.69 or Connectors For Moveable Gas ApĆ
pliances CAN/CGAĆ6.16 and a quick disconnect
device that complies with the Standard for QuickĆ
Disconnect Devices for Use With Gas Fuel, ANSI
Z21.41 or Quick Disconnect For Use With Gas Fuel
CAN 1Ć6.9. Adequate means must be provided to
limit the movement of the appliance without deĆ
pending on the connection and the quick disconĆ
nect device or its associated piping.
A drip leg must be used at each appliance. Refer
to NFPA54/ANSI Z223.1 Ć Latest Edition (National
Fuel Gas Code) for proper drip leg installation.
General export installations
Installation must conform with Local and National
installation standards. Local installation codes and/
or requirements may vary. If you have any questions
regarding the proper installation and/or operation of
your appliance, please contact your local distributor.
If you do not have a local distributor, please call
Blodgett Combi at 0011Ć802Ć860Ć3700.
Attachment Plate
(secure with leg mount bolt)
Gas Hose
Quick Connect
Gas Supply Line
Restraint
Installation of Gas Hose and Restraint
(Single Section Shown)
Figure 8
IMPORTANT: Cable restraint should
be fastened as close as possible to the
flexible connector and short enough to
prevent any strain on the flexible conĆ
nector.
At maximum stretch of shortened reĆ
straint, the flexible connector should
be easy to install and quick to connect.
14
Page 19

WARNING!!
Final check list must be performed by a
qualified installer only.
OVEN EXTERIOR
j Check that the oven has not been damaged
in transit (dents, scratches, etc.)
j Check/adjust the height and check that the
oven is placed level (horizontally)
j Check/adjust oven door
CONNECTIONS
j Check for correct water connection
j Turn on water supply
j Check for leaks
j Turn off water supply
j Check and clean dirt filter
j Turn on water supply again
j Check hand shower
j Check for correct electrical connection
j Check for correct gas connection (if applicaĆ
ble)
j Check connection to drip tray
j Check for correct mounting of drip tray
j Check for correct fall of hose from drip tray,
and check for leaks
j Check for correct exhaust and drain connecĆ
tion
j Clean the oven
j Apply steel oil
Installation
Final Check Lists
OVEN INTERIOR
j Check that filter housing is mounted correctly
j Check interior light
j Clean the oven
CONTROL
j Check and adjust, if necessary, each of the
preset values
j Heat up the oven at 480° F (249°C) for approxĆ
imately 5 minutes.
15
Page 20

Operation
Manual Control Description
1. MAIN POWER SWITCH - controls power to
the oven
2. TEMPERATURE KEY - press to set the cook
temperature
3. TIME KEY - press to set the cook time
4. PROBE KEY - press to activate core probe
5. PROGRAM KEY - press access and program
product recipes. Control stores up to 10 recĆ
ipe programs with 3 cooking stages each.
6. STAGE KEY - use to enter stage information
during product programming
7. ALARM KEY - press to silence alarms
1
2
3
4
8. HOT AIR KEY - press to select Hot Air mode
9. COMBI KEY - press to select Combi 1, Combi
2 or Retherm mode
10. STEAM KEY - press to select Steam mode
11. VENT KEY - press to open or close the vent
12. FAN KEY - press to change the fan speed.
The fan is reversible with 9 speeds for optiĆ
mum baking and roasting results
13. SELECTION DIAL - turn to enter data into
control
14. START/STOP KEY - press to begin or cancel
a cook cycle
8
9
10
5
6
7
Figure 9
11
12
13
14
16
Page 21

Operation
Manual Cooking
MANUAL COOKING
1. Press the desired mode key on the right side
of the control. The LED next to the key lights
and the mode name is displayed.
To select Reheating, press the COMBI key
once.
To select Combi 1 (30Ć40% humidity), press
the COMBIi key twice.
To select Combi 2 (60Ć80% humidity), press
the COMBI key three times.
2. Press the TEMP key. Turn the dial to enter the
desired cook temperature. Press the TEMP
key again to save the cook temperature.
NOTE: If steam mode is selected, the temperĆ
ature is automatically set to 212_F
(100_C).
3. Press the TIME key. Turn the dial to enter the
desired cook time. Press the TIME key again
to save the cook time.
For continuous cooking, turn the dial until the
display reads --:--. Continuous manual
cooking allows the oven to run continuously at
the set temperature in the set cooking mode.
NOTE: Time is displayed in hours:minutes.
4. Press the FAN key. Turn the dial to enter the
desired fan speed. Press the FAN key again to
save the fan speed.
NOTE: The fan cannot be set below 50% at
temperatures above 390_F (200_ C)
5. The vent position can be set when cooking in
Hot Air mode only.
Press the VENT key to open the vent. The LED
next to the key lights. Press the VENT key
again to close the vent. The LED next to the
key goes out when the vent is closed.
6. Press the START/STOP key to begin the cook
cycle.
7. If you are cooking in Hot Air mode, it is posĆ
sible to inject moisture at any time during the
cook cycle. Press and hold the STEAM mode
key. Steam is injected until the key is released.
8. At the end of the cook cycle, an alarm sounds
and the display flashes. Push the START/
STOP key or open the door to silence the
alarm.
NOTE: The alarm will not sound during a conĆ
tinuous manual cook.
CORE PROBE COOKING
1. Follow the instructions for Manual Cooking to
set the mode, cook temperature, fan speed
and vent position.
2. Press the CORE PROBE key. Turn the dial to
enter the desired product core temperature.
Press the CORE PROBE key again to save the
core temperature.
NOTE: When the CORE PROBE key is seĆ
lected the cook time automatically
changes to --:--.
3. Insert the probe into the product.
The core temperature probe has several meaĆ
suring points on its tip. The computer calcuĆ
lates an average temperature thus ensuring
that the core temperature is 100% correct.
The probe should be inserted vertically in the
thickest part of the product.
When preparing products of different sizes,
insert the sensor in the smallest product and
then move it to a larger product when the core
temperature alarm sounds.
4. Load the product and close the door. Plus the
core probe into the oven.
5. Press the START/STOP key to begin the cook
cycle.
6. When the product has reached the core temĆ
perature the alarm sounds. Push the START/
STOP key or open the door to silence the
alarm.
17
Page 22

Operation
Programmed Cooking
PROGRAMMING THE CONTROL
The Blodgett manual control stores up to 10 recipe
programs with 3 stages per product.
Naming the Program
1. Press the PROGRAM key. Turn the dial until a
free recipe is displayed.
2. Press and hold the PROGRAM key for 5 secĆ
onds. The first letter flashes. Turn the knob unĆ
til the desired letter is displayed. Press the proĆ
gram key to advance to the next digit.
3. Repeat step 2 until the product name is enĆ
tered.
4. Press and hold the PROGRAM key to save the
name.
Program Product Stages
NOTE: Blodgett recommends programming a
preheat with alarm for the first stage. To
program an alarm, press the ALARM key.
1. Press the STAGE key. Stage 1 is displayed.
2. Press the desired mode key on the right side
of the control. The LED next to the key lights
and the mode name is displayed.
To select Reheating, press the COMBI key
once.
To select Combi 1 (30Ć40% humidity), press
the COMBIi key twice.
To select Combi 2 (60Ć80% humidity), press
the COMBI key three times.
3. Press the TEMP key. Turn the dial to enter the
desired cook temperature. Press the TEMP
key again to save the cook temperature.
NOTE: If steam mode is selected, the temperĆ
ature is automatically set to 212_F
(100_C).
4. Press the TIME key. Turn the dial to enter the
desired cook time. Press the TIME key again
to save the cook time.
NOTE: Time is displayed in hours:minutes.
5. Press the FAN key. Turn the dial to enter the
desired fan speed. Press the FAN key again to
save the fan speed.
NOTE: The fan cannot be set below 50% at
temperatures above 390_F (200_ C)
6. The vent position can be set when cooking in
Hot Air mode only.
Press the VENT key to open the vent. The LED
next to the key lights. Press the VENT key
again to close the vent. The LED next to the
key goes out when the vent is closed.
7. Press the STAGE key to advance to stage 2.
Repeat steps 2Ć7 for stages 2 and 3.
NOTE: For recipes shorter than 3 stages, deĆ
lete the current step by pressing STEP
and ALARM simultaneously for 2 secĆ
onds.
8. Press and hold the PROGRAM key to save the
product program.
COOKING WITH A PROGRAM
1. Press the PROGRAM key. Turn the dial to disĆ
play the product recipe name.
2. Press the START/STOP key.
3. If an alarm is used, press the ALARM key to
turn the alarm between steps off.
4. If you are cooking in Hot Air mode, it is posĆ
sible to inject moisture at any time during the
cook cycle. Press and hold the STEAM mode
key. Steam is injected until the key is released.
5. When the program has started, you can
change time, temperature, core temperatureĆ
fan speed and vent position. These changes
will only be active in the current run.
The display shows the total time remaining. To
view the time remaining in the current step,
press the TIME key.
6. At the end of the programmed cook cycle, an
alarm sounds and the display flashes. Push
the START/STOP key or open the door to siĆ
lence the alarm.
18
Page 23

Operation
Cooking Tips
PREHEAT
485Ć575_ F (250Ć300_ C)
Blodgett recommends always preheating the
oven before cooking.
Preheat is used to heat an empty oven. To set the
preheat mode, select the Hot Air key and enter a
temperature above 485°C (250°C). PREHEAT is
displayed. The time can be set to maximum of 15
minutes. The timer will not begin the countdown
until the desired preheat temperature has been
reached.
NOTE: Continuous operation is not available in
preheat.
HOT AIR MODE
85Ć485_F (30Ć250_C)
D The hot air operating mode can be used for
roasting, grilling, baking and gratinating.
D Blodgett recommends that you keep the vent
open when roasting products at very high temĆ
peratures
D It is possible to roast breaded products such as
breaded fish and breaded pork chops. For maxĆ
imum effect, use enameled cast iron pans or siliĆ
coneĆcoated baking sheets.
RETHERM MODE
85Ć355_F (30Ć180_C)
D Retherm is a very gentle process and therefore
very suitable for reheating.
D Use a core temperature probe to reach the perĆ
fect end temperature.
D For the reheating of sousĆvide products, etc.,
follow the product reheating recommendations.
SousĆvide products should not be covered.
STEAM MODE
85Ć250_F (30Ć120_C)
D Blodgett recommends preĆsteaming the oven
for 8 minutes before loading product.
D Steaming at 212°F (100°C is recommended for
all kinds of hard vegetables, rice and pasta.
D Low temperature steaming at 85Ć211°F
(70Ć80°C) is recommended for fish.
D Forced steaming at 250°F (120°C) is an aggresĆ
sive and very rapid process, which should be
used with care.
COMBI MODES
85Ć485_F (30Ć250_C)
D COMBI 1 is recommended for the roasting of all
kinds of meat cuts. The pores of the meat close
quickly, which prevents the juice from leaving
the meat. For long roast times at 175Ć265°F
(80Ć130°C), COMBI STEAMING 1 helps reduce
shrinkage.
D COMBI 2 is recommended for roasts that
should be wellĆdone, and if you want to use the
juice for gravy. At temperatures higher than
335°F (170°C), the crust of the meat becomes
nice and brown.
19
Page 24

Maintenance
Cleaning & Preventative Maintenance
DAILY CLEANING
Daily cleaning of your Combi oven is essential for
sanitation, and to ensure against operational diffiĆ
culties.
Cleaning the Exterior
1. The exterior of the appliance may be cleaned
and kept in good condition with a light oil. SatĆ
urate a cloth and wipe the appliance when it
is cold; wipe dry with a clean cloth.
WARNING!!
DO NOT spray the outside of the appliance
with water or clean with a water jet. CleanĆ
ing with a water jet can impregnate chloĆ
rides into the stainless steel, causing the
onset of corrosion.
Cleaning the Interior
NOTE: DO NOT use corrosive cleaners not inĆ
tended for oven cleaning on your Combi
oven.
Blodgett recommends the following products
for cleaning and rinsing of your Blodgett ComĆ
bi oven. If you choose to use products other
than what Blodgett recommends, please have
your suppler send us the MSDS sheet on the
proposed alternate so we can ensure it meets
our standards. Non approved products can
cause harm to your unit and can potentially
void your warranty.
Recommended oven cleaners:
Johnson Diversey Suma Nova LĆ6
Four, 1 gallon (3.78 litre) containers
Product code 57252280
One, 5 gallon (18.9 litre) container
Product code 57252100
Recommended Rinse Aid:
Johnson Diversey Suma Maro A8.8
Four, 1 gallon (3.78 litre) containers
Product code 57270280
One, 5 gallon (18.9 litre) container
Product code 57270100
1. Open the oven door.
2. Use the attached spray hose, located beneath
the control, to clean the front drip tray. Water
will run to the drain in the oven cavity.
Run the CombiWash automatic cleaning cycle
as follows:
1. Check that the oven cleaner and rinse agent
containers are both full.
2. Press the PROGRAM key. Turn the dial until
COMBIWASH is displayed.
3. CombiWash features four different cleaning
cycles. Press the STAGE key to select the deĆ
sired cleaning cycle.
Cycle 1 (44 minutes)
Cycle 2 (1 hour)
Cycle 3 (1 hour, 49 minutes)
Cycle 4 (2 hours, 38 minutes)
NOTE: Use cycle 1 or 2 after steaming and
roasting at low temperatures. Use
cycle 3 or 4 after steaming and roastĆ
ing at high temperatures.
4. Press the Start/Stop key to initiate the clean
cycle.
5. If the cavity temperature is above 175_F
(80_C), the oven will automatically enter cool
down. When the cavity is below 175_F (80_C)
the CombiWash cycle begins.
6. The control counts down the time remaining
in the wash cycle.
7. When the wash cycle is over, the oven autoĆ
matically switches to an energy saving standĆ
by mode.
20
Page 25

Maintenance
Cleaning & Preventative Maintenance
WEEKLY CLEANING
In addition to the daily cleaning, it is necessasry to
clean the control filter and behind the fan guard on
a weekly basis. This is necessary for proper funcĆ
tioning of the oven. Scale will build up on the fan
and heat source leading to a less efficient oven.
Cleaning the Control Filter
The control filter is located below the control
compartment, in front of the spray hose.
1. To remove, pull down on the black knob on the
left of the filter.
2. Clean the filter with soap and water.
3. Reinstall the filter. Press up on the filter until the
back of the knob is inserted into the hole in the
bottom of the oven.
4. Push up on the center of the knob to expand
the back of the knob securing the filter.
Cleaning Behind the Fan Guard
1. Loosen the two screws and on the fan guard
(or baffle).
2. Swing the baffle forward.
3. Thoroughly spray cleaner onto the fan and
heat source. Place the oven in the steam
mode for approximately 10 minutes.
4. After ten minutes, rinse the cleaner off. Return
the fan guard to the closed position. Rotate
the two screws to secure the fan guard.
needs to be delimed. This is a warning only, the
oven can be used all day before deliming.
Deliming the Oven
1. Be sure the container delivering the deliming
agent to the appliance is full. Be sure to use a
nonĆdiluted deliming agent such as "Lime
Away" by EcoĆLabs or "Lime Out", by US
Chemical.
2. Press the PROGRAM key. Turn the dial until
DELIMING is displayed.
3. Press the START/STOP key.
4. The remainder of the process is automatic.
The control displays the deliming steps as
they occur.
PREVENTIVE MAINTENANCE
The best preventive maintenance measures are
āthe āāāproper āāinitial āāinstallation āāof āāthe equipment and
a program for cleaning the appliance routinely.
The Oven/Steamer requires no lubrication. ConĆ
tact the factory, the factory representative or a loĆ
cal Blodgett Combi service company to perform
maintenance and repairs should they be required.
Deliming - BCM Only
The control keeps track of boiler usage between
descaling. When the oven has reached 95% of the
time the control warns the operator that the oven
Figure 10
5. The oven can be delimed at any time. Simply
turn the dial to the program DELIMING and
press the Start/Stop key.
21
Page 26

Introduction
Le fourĆétuveur Combi de Blodgett
Le fourĆétuveur Combi de Blodgett propose une
toute nouvelle manière de cuire les aliments. Avec
le fourĆétuveur Combi, vous pouvez choisir entre
deux modes de cuisson : à la vapeur et à l'air
chaud, soit...
D séparément
D combiné, ou
D en séquence
En outre, trois modes de fonctionnement faciles
s'offrent à vous :
En mode Steam (vapeur), vous pouvez :
étuver réchauffer reconstituer
bouillir décongeler mijoter
blanchir conserver braiser
pocher
En mode Hot Air (air chaud), vous pouvez :
rôtir cuire du pain et des gâteaux
griller gratiner
In the Combi Optima mode you can:
décongeler rôtir réchauffer
étuver cuire du pain et des gâteaux
Il existe quatre modes spécialisés supplémentairĆ
es pour vous aider à tirer le maximum de votre
temps :
Remise en température : Assure un réchauffage
parfait.
Apprêt : Apprêtez et faites cuire dans le même
four.
Préchauffage : Sous ce mode, le four préchauffe
à 300°C (575°F) durant 15 minutes. Ensuite, il se
refroidit automatiquement jusqu'à 249°C (480°F)
afin de protéger les composants électroniques
perfectionnés.
Refroidissement : Permet à l'enceinte du four de
se refroidir rapidement avec la porte ouverte.
De plus, vous pouvez utiliser deux ou trois foncĆ
tions de manière séquentielle au cours d'une
même cuisson. Nous appelons cette méthode :
D étuvage combiné
D rôtissage combiné
D cuisson de pain combinée
La circulation de l'air chaud combinée avec la vaĆ
peur du fourĆétuveur Combi à haute performance
assurer des améliorations à plusieurs niveaux :
D productivité accrue dans la cuisine
D diminution des dépenses liées au remplaceĆ
ment des appareils de cuisine
D un choix de menus plus vaste
D un nettoyage simplifié
Le travail est simplifié puisque les aliments sont
préparés sur des plateaux ou dans des récipients
de la table à vapeur. Vous pouvez cuire, stocker et
transporter les aliments dans ces mêmes réciĆ
pients. Vous pouvez préparer avec efficacité de
petites quantités d'aliments de même que réĆ
chauffer les plats cuisinés et les aliments prêtsĆàĆ
servir en quelques minutes seulement. Il devient
possible aussi de préparer certains aliments surĆ
gelés sans même les décongeler. Cette souplesse
au niveau de la préparation réduit l'utilisation de
chaudrons et de tables à vapeur puisqu'il n'est
plus nécessaire de conserver au chaud de granĆ
des quantités d'aliments pendant de longues
périodes.
De nos jours, il devient de plus en plus important
d'améliorer la qualité des aliments. Avec le fourĆ
étuveur Combi de Blodgett, la cuisson des léguĆ
mes se fait sans eau et à une température optimaĆ
le légèrement inférieure à 100_C (212_F),
permettant ainsi de conserver les vitamines, les
minéraux, les éléments nutritifs et les oligoĆéléĆ
ments. La viande cuite dans le Combi perd moins
de sa masse et demeure plus ferme et plus juteuĆ
se. Vous utiliserez aussi le fourĆétuveur Combi daĆ
vantage pour les produits de la boulangerie, car
les modes Steam (vapeur) et Hot Air (air chaud) du
fourĆétuveur Combi en font un appareil de cuisson
tout usage.
22
Page 27

Introduction
Description du fourĆétuveur Combi
À PROPOS DU FOURĆÉTUVEUR
Les foursĆétuveurs Combi de Blodgett sont des
appareils haut de gamme fabriqués en acier
inoxydable de première qualité en faisant appel à
des procédés supérieurs.
Le ventilateur à deux vitesses est doté d'un dispoĆ
sitif de protection pour les doigts et alimenté par
un puissant moteur silencieux. Le condenseur asĆ
pire l'excès de vapeur de l'appareil. La condensaĆ
tion et les eaux usées générées par la vapeur et le
nettoyage sont continuellement évacuées.
L'isolant de haute qualité empêche un rayonneĆ
ment thermique excessif et aide à conserver
l'énergie.
Le BCM/BLCM permet de profiter de tous les
avantages d'un étuveur de haute qualité au simple
actionnement d'un bouton. La vapeur fraîche enĆ
tre dans la cavité du four sans pression et y circule
à haute vitesse. Cette méthode simple et pratique
favorise une cuisson rapide et en douceur qui
vous procure des aliments de première qualité. Le
générateur de vapeur est complètement automaĆ
tique et il est doté d'un dispositif qui l'empêche de
fonctionner à sec.
FONCTIONNEMENT DU FOURĆÉTUVEUR
COMBI
La porte pratique du four est dotée d'un hublot et
possède un grand rayon d'ouverture. La poignée
de la porte est facile à saisir, même avec des mains
mouillées ou grasses..
La commande simple d'utilisation facilite le foncĆ
tionnement. Grâce à ses symboles graphiques et
à son espaceĆmémoire pouvant accueillir jusqu'à
10 recettes de produit, le BCM/BLCM s'avère facĆ
ile d'utilisation même pour les employés de cuiĆ
sine sans expérience.
Le système automatique CombiWash réduit le
nettoyage au minimum.
23
Page 28

Installation
Certifications
LES PRÉSENTES CONSIGNES D'INSTALLATION
SONT DESTINÉES AU PERSONNEL D'INSTALĆ
LATION ET D'ENTRETIEN QUALIFIÉ SEULEĆ
MENT. TOUTE INSTALLATION OU TOUT ENTREĆ
TIEN EFFECTUÉ PAR DES PERSONNES NON
COMPÉTENTES POURRAIENT ENDOMMAGER
LE FOUR OU CAUSER DES BLESSURES.
Le terme personnel d'installation qualifié désigne
une personne, une entreprise, une société ou une
organisation assumant, elleĆmême ou par l'entreĆ
mise d'un représentant, les responsabilités suiĆ
vantes :
D la pose ou le remplacement des tuyaux de gaz.
Le raccordement, la mise en service, la réparaĆ
tion ou l'entretien du matériel.
D La pose du câblage électrique à partir du compĆ
teur, de la boîte de distribution principale ou de
la prise jusqu'à l'appareil.
Le personnel qualifié doit détenir de l'expérience
dans ces domaines, connaître toutes les mesures
de sécurité pertinentes et respecter les normes de
la province ou des autorités locales.
Mises en service américaines et canadiennes
La mise en service doit respecter les normes locaĆ
les ou, en l'absence de tels normes, les règleĆ
ments suivants : National Fuel Gas Code,
NFPA54/ANSI Z223.1 - dernière édition, le Code
d'installation du gaz naturel CAN/CGAĆB149.1 ou
le Code d'installation du propane, CAN/CGAĆ
B149.2, selon le cas.
Référence : National Electrical Code, ANSI/NFPA
70 - dernière édition ou le Code canadien de
l'électricité CSA C22.1, selon le cas.
La mise en service de ce matériel doit respecter
les normes suivantes : Basic Plumbing Code of the
Building Officials and Code Administrators InterĆ
national Inc. (BOCA) et Food Service Sanitation
Manual du Food and Drug Administration (FDA).
L'appariel doit etre installe avec l'empechement
de refoulement selon les codes federale,
provincial et locaux.
Mise en service dans les autres pays
L'installation doit respecter les normes nationales
et locales, qui varient selon le pays. Si vous avez
des questions sur les méthodes d'installation acĆ
ceptables ou sur le fonctionnement de votre appaĆ
reil, veuillez communiquer avec votre détaillant.
S'il n'y a aucun détaillant dans votre région, veuilĆ
lez communiquer avec Blodgett Combi au
0011Ć802Ć860Ć3700.
24
Page 29

Installation
Caractéristiques techniques relatives aux services publics
SPÉCIFICATIONS DE PLOMBERI
EAU
Pression d'eau 250 kPa (2,5 bar, 36,26 lb/po2) durant le nettoyage CombiWash
150 kPa (1,5 bar, 21,76 lb/po2) lorsque le nettoyage CombiĆ
Wash est hors fonction 600 kPa (6 bar, 87 lb/po2) maximum
Raccordement d'eau Flexible d'arrosage d'eau froide, 1,905 cm (3/4 po)
Conditions requises
minimum
DRAINAGE
Type de drain Drain de mise à l'air libre
Raccordement du drain Cuivre 50,8 mm (2,00 po)
Température moyenne
de l'eau au drainage
Total des solides en suspension (TDS) - doit être moins que
100 parties par million
Dureté totale de l'eau - 80Ć120 parties par million
Chlorides - doit être moins que 30 parties par million
Le pH de l'eau - 7.0Ć8.0
Chlorine - 0 parties par million
Environ 71_C (160_F)
CARACTÉRISTIQUES TECHNIQUES - APPAREILS AU GAZ
Modèle du
Four
BLCMĆ61G
BLCMĆ101G
Type de gaz Entrée Tension Phase Intensité
Naturel 40,900 BTU 120 1 11
Propane 40,900 BTU 120 1 11
Naturel 71,500 BTU 120 1 11
BLCMĆ102G
BLCMĆ202G
Propane 71,500 BTU 120 1 11
Naturel 125,000 BTU 120 1 22
Propane 125,000 BTU 120 1 22
Naturel 184,000 BTU 120 1 22
Propane 184,000 BTU 120 1 22
25
Page 30

Installation
BLCM 23E
BLCM 6E
BLCM 10E
Caractéristiques techniques relatives aux services publics
CARACTÉRISTIQUES TECHNIQUES ÉLECTRIQUES
Modèle du Four Tension kW Fréquence Phase Charge maximale
(ampères)
208 5.4 60 3 26
BLCMĆ23E
BLCMĆ6E
BLCMĆ10E
BCMĆ61E
BLCMĆ61E
BCMĆ101E
BLCMĆ101E
BCMĆ102E
BLCMĆ102E
240 5.9 60 3 25
480 6.4 60 3 14
208 6.9 60 3 34
240 7.5 60 3 32
480 8.2 60 3 18
240 10.4 60 3 29
240 11.3 60 3 28
480 12.3 60 3 26
208 9 60 3 26
240 9 60 3 26
480 9 60 3 13
208 18 60 3 52
240 18 60 3 52
480 18 60 3 25
240 27 60 3 80
240 27 60 3 80
BCMĆ202E
BLCMĆ202E
480 27 60 3 36
240 60 60 3 175
240 60 60 3 175
480 60 60 3 80
26
Page 31

Installation
Déballage du four
Gardez le four dans son emballage pour en facilitĆ
er la manipulation. Chaque fois que c'est posĆ
sible, utilisez un chariot élévateur manuel à levier.
1. Faites rouler le chariot sous la traverse tubulĆ
aire inférieure du bâti sur pieds. Placez deux
blocs de bois entre la traverse tubulaire et le
chariot.
REMARQUE:Pour obtenir le meilleur équilibre
possible, faites rouler le chariot
depuis le devant du four ou son
côté moteur.
REMARQUE:Si nécessaire, on peut aussi lever
le four du bâti sur pieds.
2. Retirez l'emballage d'origine du four. AttenĆ
dez d'avoir mis le four en place avant de retirer
le vinyle recouvrant la surface en acier inoxydĆ
able. Une fois le vinyle retiré, les surfaces deĆ
viennent vulnérables aux objets durs et couĆ
pants comme les outils et les couteaux.
3. Retirez tout le matériau d'emballage qui retiĆ
ent les grilles dans l'enceinte du four.
Figure 11
27
Page 32

Installation
Choix de l'emplacement et nivellement du four
Il est important de bien choisir l'emplacement de voĆ
tre four afin d'en augmenter les performances et
l'utilité.
Vous devez conserver un dégagement minimal enĆ
tre le four et toute construction combustible ou non
combustible.
On doit éviter de poser toute source puissante de
chaleur, comme une plaque de cuisson, une
poêle à frire basculante, une sauteuse ou une friĆ
teuse, près du four, particulièrement son côté
droit. On peut facultativement se procurer un
écran thermique latéral.
DÉGAGEMENT ACCEPTABLE
Taille Côté Arrière en haut
Appareils d'electriques
MISE EN PLACE CONVENABLE
61, 101,
102 & 202
23, 6 & 10 2.75"
Appareils au Gaz
61, 101,
102 & 202
De plus, il est recommandé de respecter les dégaĆ
gements suivants pour l'entretien.
D Parois latérales du four - 30cm (12")
D Paroi arrière du four - 30cm (12")
Pour s'assurer que le four fonctionne convenĆ
ablement une fois mis en place, on doit le poser
érigé et horizontalement de niveau. Cela se
mesure aux rebords avant et latéral du toit. On
peut niveler le four à l'aide des vis de réglage
sur le bâti sur pieds ou sur les pattes de
modèles de table. On doit aussi régler la hauĆ
teur du four afin qu'il accueille convenableĆ
ment le chariot à grilles.
2.75"
(7cm)
(69.9mm)
2.75"
(70mm)
2"
(50mm)
2.75"
(69.9mm)
2"
(50mm)
n/a
19.5"
(49.5cm)
n/a
MIS EN PLACE INAPPROPRIEE
Figure 12
28
Page 33

Installation
Robinetterie
RACCORDEMENT À L'ALIMENTATION EN EAU
Les fours Blodgett BCM/BLCM présentent deux
raccords à l'alimentation en eau. Les fours BlodĆ
gett BCP présentent deux raccords à l'alimentaĆ
tion en eau, situés à l'arrière de l'appareil.
D un raccord pour l'eau brute (non traitée) servant
au giclage de condensat.
D un raccord en prévision du générateur de vaĆ
peur et du jet CombiWash dans l'enceinte du
four. Ce raccord doit absolument se conformer
aux exigences applicables à l'alimentation en
eau aux appareils électroménagers.
Trempe
Figure 13
AVERTISSEMENT!!
Si la température de l'eau dépasse 21 °C
(70 °F), il pourra survenir des problèmes
d'étalonnage Combi Optima et de refroiĆ
dissement du four.
Le raccordement à l'alimentation en eau
doit absolument faire l'objet d'exécution
par un(e) plombier(ère) autorisé(e) conĆ
formément aux codes locaux existants.
Vapeur
nentes doivent comprendre un robinet d'arrêt et
un clapet antiĆretour.
Si le distributeur se relie au système d'alimentaĆ
tion d'eau par un flexible, ce dernier doit être apĆ
prouvé VA.
Avant de raccorder le four à l'alimentation en eau,
rincez les tubes à fond. Raccordez le four.
RACCORDEMENT À L'ÉVACUATION D'EAU
Les fours Blodgett sont dotés d'un système d'évaĆ
cuation qui purge l'excédent d'eau de l'enceinte
du four. Il peut s'agir d'eau de condensation proĆ
venant des produits, de l'eau froide pour refroiĆ
dissement de l'enceinte du four, ou de l'eau résiĆ
duelle découlant d'un nettoyage du four.
AVERTISSEMENT!!
Le raccordement à l'évacuation d'eau doit
absolument s'effectuer à un tuyau de viĆ
dange. Ce dernier ne doit jamais se terĆ
miner directement sous le four.
Le tuyau de vidange doit être fait d'acier inoxydĆ
able ou d'un matériau d'une résistance thermique
aussi élevée, présenter un diamètre d'au moins
5,08 cm (2 po) et une pente descendante d'au
moins 3° ou 5 %.
La garantie ne couvre pas les filtres à eau
bouchés ou l'encrassement dans les
électrovalves.
Pour faciliter le nettoyage, l'entretien et les réparaĆ
tions, on doit relier au four un flexible de 1,905 cm
(3/4 po) approuvé. Les mises en place permaĆ
Figure 14
29
Page 34

Installation
Robinetterie
PRODUIT CHIMIQUE UTILISÉ POUR LE NETĆ
TOYAGE ET LE DÉTARTRAGE
1. BCM/BLCMĆ61, 101, 102 et 202 seulement.
Le four est fourni avec un porteĆbouteille de
produits chimiques qui peut être fixé de chaĆ
que côté du four. PlacezĆle sur le membre
transversal du support (voir la Figure 15).
Figure 15
2. Branchez les tubes de détergent fournis
(rouge et bleu) sur la face inférieure du four
près de l'arrière, puis raccordez le tube bleu
au raccord muni de l'autocollant bleu et le
tube rouge, à celui muni de l'autocollant
rouge (voir la Figure 16).
3. Insérez les tubes bleu et rouge dans les bouĆ
teilles appropriées. Rouge est pour le détergĆ
ent et bleu, pour l'accessoire de rinçage.
4. BCM seulement -La dernière conduite est
pour le détartreur, soit le tube de couleur bronĆ
zé qui fait saillie à partir de la partie inférieure
du four. Coupez le tube jusqu'à la longueur
voulue, le cas échéant, et placezĆle dans la
bouteille de détartrage.
REMARQUE:si le tube est déjà coupé à la lonĆ
gueur voulue, retirez le contreĆ
poids en acier inoxydable de
l'extrémité du tube et réinsérezĆ
le.
Autocollant
rouge
Tube rouge
Autocollant
bleu
Tube bleu
Figure 16
30
Page 35

Installation
Raccordement à l'électricité et Ventilation
RACCORDEMENT À L'ÉLECTRICITÉ
REMARQUE:Seul un technicien qualifié peut effecĆ
tuer le raccordement à l'électricité.
Avant de procéder au raccordement à l'électricité
des appareils, assurezĆvous que la source d'aliĆ
mentation est conforme aux spécifications de tenĆ
sion, d'intensité et de phase indiquées sur la plaĆ
que signalétique de l'appareil.
1. La plaque signalétique se trouve sur le côté
droit du four.
Une prise électrique ou un interrupteur de sécurité
approuvé(e) doit absolument se trouver près du
four de manière qu'on puisse débrancher le four
aux fins de mise en place ou de réparation. L'interĆ
rupteur de sécurité doit absolument être en meĆ
sure de couper tous les pôles avec une distance
totale de coupure d'au moins 3 mm.
L'installation de tous les appareils doit se conforĆ
mer aux codes d'électricité nationaux et locaux.
Le schéma de câblage se trouve dans le compartiĆ
ment du moteur.
REMARQUE:Débranchez la source d'alimentation
électrique de l'appareil avant de proĆ
céder à l'entretien.
VENTILATION
Les fours Blodgett BCM/BLCM sont équipés d'un
système d'échappement ouvertĆdirect qui abĆ
sorbe l'excès d'humidité de l'enceinte du four. Ce
système d'échappement contient un amortisseur
à fonctionnement électrique.
On peut commander le moteur de ventilation diĆ
rectement depuis le four. Cela signifie que la venĆ
tilation se met en marche dès la mise à exécution
d'un programme, et tourne durant 10 minutes
après l'achèvement de son exécution.
On peut relier le tube d'échappement à un
système de ventilation. Dans ce cas, on installe un
entonnoir d'extraction spécial pour éviter la sucĆ
cion directe depuis l'enceinte du four. On peut se
procurer cet entonnoir d'extraction auprès de
Blodgett.
Si on met en place une hotte d'extraction au plaĆ
fond auĆdessus du four, elle doit projeter 50,8 cm
(20 po) parĆdessus le devant du four.
ATTENTION !!
Une installation non conforme annule voĆ
tre garantie.
Modèles électriques
On doit acheminer le conduit de vidange jusqu'à
un drain d'évacuation de plancher ouvert. De
plus, il faut éviter d'utiliser en guise de conduit de
vidange un boyau flexible, qui peut s'affaisser et
y entraîner l'accumulation d'eau piégée. Il incomĆ
be au client de fournir la tubulure du four au drain.
Modèles à gaz
Installations canadiennes et américaines
Un cordon d'alimentation muni d'une fiche est
fourni avec l'appareil (modèles 115V seulement).
Branchez la fiche dans une prise de courant apĆ
propriée.
Figure 17
31
Page 36

Installation
gueur
du t
Raccordement au gaz
CONDUITE DE GAZ
Il est essentiel d'avoir un circuit d'alimentation en
gaz approprié afin que le four puisse donner un
rendement maximal. Les dimensions de la tuyauĆ
terie doivent permettre d'assurer une alimentation
en gaz suffisant pour satisfaire à la demande maxiĆ
male de tous les appareils en service, et ce sans
perte de pression.
Exemple :
REMARQUE:Les valeurs indiquées en BTU à titre
d'exemple s'appliquent au gaz naturel.
Supposons que vous achetiez un appareil BCXĆ14G
pour accroître votre capacité de cuisson.
1. Additionnez les puissances nominales en
BTU des appareils déjà en place.
Friteuse Pitco 120 000 BTU
Cuisinière à 6 éléments 60 000 BTU
Four à pont 50 000 BTU
Total 230 000 BTU
2. À ce total, ajoutez la puissance nominale en
BTU du nouveau four.
Total précédent 230 000 BTU
BLCMĆ61G 40 900 BTU
Nouveau total 270 900 BTU
3. Mesurez la distance du compteur de gaz
jusqu'aux appareils de cuisson pour obtenir la
longueur du tuyau. Supposons que la lonĆ
gueur de tuyau soit de 30 pi (9 m) et que le
tuyau possède un diamètre de 1 po (2,54 cm).
4. Utilisez la table de calcul appropriée pour déĆ
terminer la capacité totale de votre conduite
de gaz actuelle.
Dans cet exemple, la capacité totale est de 375
000 BTU. Puisque la pression totale de gaz néĆ
cessaire est de 345 000 BTU, donc inférieure à
375 000 BTU, il n'est pas nécessaire pour l'instant
d'augmenter la tuyauterie actuellement en place.
REMARQUE:Les capacités en BTU indiquées
dans ces tableaux sont valables pour
les tuyaux droits seulement. L'ajout
de coudes et de raccords courbés
diminue la capacité de la tuyauterie.
Par exemple, un raccord en L de noĆ
menclature 40 de 1Ć1/2 po possède
une capacité équivalente à un tuyau
droit de 4,2 po (10,2 cm). RenseigĆ
nezĆvous auprès de votre fournisseur
en gaz local si vous avez des quesĆ
tions à ce sujet.
Capacité maximale en gaz naturel d'une
tuyauterie en fer en pieds cubes à l'heure
(Chute de pression de 0,5 po de colonne d'eau)
LonĆ
gueur
du
tuyau
(pi)
10 360 680 1 400 2 100 3 950
20 250 465 950 1 460 2 750
30 200 375 770 1 180 2 200
40 170 320 660 990 1 900
50 151 285 580 900 1 680
60 138 260 530 810 1 520
70 125 240 490 750 1 400
80 118 220 460 690 1 300
90 110 205 430 650 1 220
100 103 195 400 620 1 150
Extrait du National Fuel Gas Code, partie 10, tableau 10Ć2
Capacité maximale de la conduite en milliers de
BTU/h de gaz PP non dilué à 11 po de colonne
(Chute de pression de 0,5 po de colonne d'eau)
Longueur
uyau
(pi)
10 608 1 146 3 525
20 418 788 2 423
30 336 632 1 946
40 287 541 1 665
50 255 480 1 476
60 231 435 1 337
70 215 404 1 241
80 198 372 1 144
90 187 351 1 079
100 175 330 1 014
Extrait du National Fuel Gas Code, partie 10, tableau 10Ć15
Dimensions nominales (po)
3/4po1 po 1 1/4po1 1/2po2 po
d'eau
Diamètre interne (po)
3/4 po 1 po 1 1/2 po
32
Page 37

Installation
Raccordement au gaz
RÉGULATION DE LA PRESSION ET ESSAIS
Évaluez la pression d'alimentation du gaz pour
chaque appareil lorsque les brûleurs sont alluĆ
més. Il doit y avoir une pression suffisante à l'enĆ
trée pour répondre aux normes. Consultez le taĆ
bleau ciĆdessous pour connaître la pression de
gaz qui convient.
Chaque appareil est réglé en usine de manière à
fonctionner avec le type de gaz indiqué sur la plaĆ
que signalétique.
Chaque four est muni d'un détendeur qui mainĆ
tient le gaz à la bonne pression. Ce détendeur est
essentiel au bon fonctionnement du four et ne
doit jamais être débranché.
N'INSTALLEZ PAS UN DEUXIÈME DÉTENDEUR
AU POINT DE CONNEXION DU GAZ À MOINS
QUE LA PRESSION D'ALIMENTATION SOIT SUĆ
PÉRIEURE À 14 PO DE LA COLONNE D'EAU (1/2
LB/PO2) (37 mbars).
Pendant les essais de pression, débranchez le
four ainsi que son robinet d'arrêt de la tuyauterie
d'alimentation en gaz si la pression d'essai est suĆ
périeure à 1/2 lb/po2 (3,45 kPa).
Isolez le four de la tuyauterie d'alimentation en gaz
en fermant son robinet d'arrêt pendant les essais de
pression de la tuyauterie de gaz si la pression d'esĆ
sai est égale ou inférieure à 1/2 lb/po2 (3,45 kPa).
Avant de raccorder les tuyaux d'alimentation en gaz
de l'appareil, videz complètement les tuyaux de touĆ
tes particules métalliques et de tout déchet. Après
le branchement, inspectez l'appareil afin de vous
assurer que la pression de gaz est appropriée.
Installations américaines et canadiennes
L'installation doit respecter les normes locales ou,
en l'absence de telles normes, les règlements suiĆ
vants : National Fuel Gas Code, NFPA54/ANSI
Z223.1 - dernière édition, le Code d'installation du
gaz naturel CAN/CGAĆB149.1 ou le Code d'installaĆ
tion du propane, CAN/CGAĆB149.2, selon le cas.
Installation dans les autres pays
L'installation doit respecter les normes nationales
et locales. Les normes d'installation locales ou les
règlements peuvent varier. Si vous avez des quesĆ
tions concernant les méthodes d'installation acĆ
ceptables ou sur le fonctionnement de votre appaĆ
reil, veuillez communiquer avec votre détaillant
local. S'il n'y a aucun détaillant local dans votre réĆ
gion, veuillez communiquer avec Blodgett Combi
au 0011Ć802Ć658Ć6600.
BLCMĆ61G
BLCMĆ101G
BLCMĆ102G
BLCMĆ202G
PRESSION DE GAZ
Modele Type de gaz Pression d'alimentation
Naturel 7.0 po de colonne d'eau
Propane 11.0 po de colonne d'eau
Naturel 7.0 po de colonne d'eau
Propane 11.0 po de colonne d'eau
Naturel 7.0Ć14.0 po de colonne d'eau
Propane 12.0Ć14.0 po de colonne d'eau
Naturel 7"Ć14 po de colonne d'eau
Propane 12.0Ć14.0 po de colonne d'eau
33
Page 38

Installation
Câble d'immobilisation du tuyau à gaz
Si l'appareil est monté sur des roulettes, utilisez un
connecteur flexible ordinaire dont le diamètre inĆ
terne est d'au moins 1,9 cm (3/4 po) ainsi qu'un
raccord rapide.
Un câble d'immobilisation doit être utilisé pour liĆ
miter le mouvement de l'appareil de manière à ce
que le connecteur flexible ne subisse aucune tenĆ
sion. Attachez le câble au bâti du four le plus près
possible du connecteur flexible. Le câble doit être
assez court pour empêcher toute tension sur le
connecteur. Lorsque le câble est pleinement étiré,
il devrait être facile d'installer le connecteur et de
le brancher à l'aide du raccord rapide.
Le câble (de fort calibre) doit être installé sans enĆ
dommager l'immeuble. N'UTILISEZ PAS la
conduite de gaz ou les câbles électriques pour anĆ
crer l'extrémité permanente du câble d'immobiliĆ
sation! Utilisez des boulons d'ancrage vissés
dans le béton ou dans un bloc de béton. Pour les
murs de bois, utilisez des vis d'ancrage robustes
dans les montants des murs.
ATTENTION !!
Si le câble est enlevé pour quelque raison
que ce soit, installezĆle de nouveau une
fois l'appareil remis en place.
Installations américaines et canadiennes
Le connecteur doit respecter la norme Standard
for Connectors for Movable Gas Appliances, ANSI
Z21.69 ou Connectors For Moveable Gas ApplianĆ
ces CAN/CGAĆ6.16 et le raccord rapide doit resĆ
pecter la Standard for QuickĆDisconnect Devices
for Use With Gas Fuel, ANSI Z21.41 ou Quick DisĆ
connect For Use With Gas Fuel CAN 1Ć6.9. PréĆ
voyez des mesures adéquates pour limiter le mouĆ
vement de l'appareil sans compter exclusivement
sur le connecteur et le raccord rapide ou sur la
conduite connexe.
Chaque appareil doit être muni d'un collecteur de
condensats. Consultez NFPA54/ANSI Z223.1 Ć
dernière édition (National Fuel Gas Code) pour
connaître les méthodes d'installation d'un collecĆ
teur de condensats.
Installation dans un autre pays
L'installation doit respecter les normes nationales
et locales. Les normes d'installation locales ou les
règlements peuvent varier. Si vous avez des quesĆ
tions concernant les méthodes d'installation acĆ
ceptables ou le fonctionnement de votre appareil,
veuillez communiquer avec votre détaillant local.
S'il n'y a aucun détaillant dans votre région, veuilĆ
lez communiquer avec Blodgett Combi au
0011Ć802Ć860Ć3700.
Plaque de fixation (fixez au
boulon de montage dupied)
Raccord rapide
Tuyau à gaz
Installation du tuyau à gaz et du câble d'immobilisation
Conduite d'alimentation
en gaz
Câble d'immobilisation
Figure 18
34
IMPORTANT : Attachez le câble
d'immobilisation le plus près possiĆ
ble du connecteur flexible et assuĆ
rezĆvous qu'il est assez court pour
éliminer toute tension sur le
connecteur.
Lorsque le câble est étiré au maxiĆ
mum, il devrait être facile d'installer
et de raccorder rapidement le
connecteur flexible.
Page 39

ATTENTION !!
Seul un installateur qualifié peut effectuer
les étapes suivantes de la liste de
vérification.
EXTÉRIEUR DU FOUR
j Vérifiez la présence de dommages du four
causés en transit (bosselures, égratignures,
etc.).
j Vérifiez et, au besoin, rectifiez la hauteur, et véĆ
rifiez également si on a convenablement niveĆ
lé le four (horizontalement).
j Vérifiez et, au besoin, rectifiez l'ajustement de
la porte du four.
RACCORDS
j Confirmez le raccordement convenable à l'aliĆ
mentation en eau.
j Ouvrez l'alimentation en eau.
j Vérifiez la présence de fuites.
j Fermez l'alimentation en eau.
j Vérifiez et nettoyez le filtre à eau de tout enĆ
crassement.
j Ouvrez de nouveau l'alimentation en eau.
j Vérifiez la douche à main.
j Confirmez le raccordement convenable à la
prise électrique.
j Confirmez le raccordement convenable de
gaz (si c'est approprié).
j Vérifiez le raccordement au plateau à égoutteĆ
ment.
j Confirmez le montage convenable du plateau
à égouttement.
j Confirmez la pente convenable du flexible deĆ
puis le plateau à égouttement et vérifiez la
présence de fuites.
j Confirmez le raccordement convenable du
système d'échappement et du tuyau d'évaĆ
cuation.
j Nettoyez le four.
j Appliquez une huile à acier.
Installation
Liste de vérification finale
INTÉRIEUR DU FOUR
j Confirmez le montage convenable du boîtier
du filtre.
j Vérifiez la lampe intérieure.
j Nettoyez le four.
COMMANDE
j Vérifiez et, au besoin, rectifiez chaque valeur
préréglée.
j Faites chauffer le four à une température de
249°C (480°F) durant environ cinq minutes.
35
Page 40

Fonctionnement
Description de la commande manuelle
1. INTERRUPTEUR MARCHEĆARRÊT PRINCIĆ
PAL. Commande l'alimentation électrique du
four.
2. TOUCHE TEMPÉRATURE. Appuyez sur cette
touche afin de régler la température de cuisĆ
son.
3. TOUCHE DE TEMPS DE CUISSON (TIME).
Appuyez sur cette touche afin de régler le
temps de cuisson.
4. TOUCHE DE SONDE (PROBE). Appuyez sur
cette touche afin d'actionner la sonde de temĆ
pérature.
5. TOUCHE DE PROGRAMME (PROGRAM).
Appuyez sur cette touche afin d'accéder aux
recettes de produit et de les programmer. La
commande peut stocker un maximum de 10
recettes avec trois stades de cuisson chaĆ
cune.
6. TOUCHE STADE (STAGE). Appuyez sur cette
touche afin de saisir des données sur les
stades de cuisson dans le cadre de la proĆ
grammation de recette de produit.
7. TOUCHE SIGNAL SONORE (ALARM). ApĆ
puyez sur cette touche afin d'actionner l'acĆ
cord silencieux du signal sonore.
8. TOUCHE D'AIR CHAUD (HOT AIR). Appuyez
sur cette touche afin de sélectionner le mode
d'injection d'air chaud.
9. TOUCHE COMBI. Appuyez sur cette touche
afin de sélectionner le mode Combi 1, Combi
2 ou Retherm (Remise en température).
10. TOUCHE VAPEUR. Appuyez sur cette touche
afin de choisir le mode d'injection de vapeur
(cuisson à l'étuvée).
11. TOUCHE ÉVENT. Appuyez sur cette touche
afin d'ouvrir ou de fermer l'évent.
12. TOUCHE SOUFFLANTE. Appuyez sur cette
touche afin de modifier la vitesse de la soufĆ
flante. Vous pouvez choisir parmi neuf viĆ
tesses en vue de résultats de cuisson et de
rôtissage optimaux. Vous pouvez également
inverser le sens de rotation de la soufflante.
13. CADRAN DE SÉLECTION. Tournez ce cadran
pour saisir des données et les transmettre à la
commande.
14. TOUCHE DE MARCHEĆARRÊT (START/
STOP). Appuyez sur cette touche afin d'aĆ
morcer ou d'annuler un cycle de cuisson.
1
8
2
9
3
4
5
6
7
Figure 19
36
10
11
12
13
14
Page 41

Fonctionnement
Cuisson manuelle
CUISSON MANUELLE
1. Appuyez sur la touche du mode désiré du
côté droit de la commande. La DÉL à côté de
la touche s'allume et l'écran affiche le nom du
mode.
Pour sélectionner le réchauffage, appuyez sur
la touche COMBI une seule fois.
Pour sélectionner le mode Combi 1 (30 % à 40
% d'humidité), appuyez sur la touche COMBI
deux fois.
Pour sélectionner le mode Combi 2 (60 % à 80
% d'humidité), appuyez sur la touche COMBI
trois fois.
2. Appuyez sur la touche TEMP. Ensuite, tourĆ
nez le cadran pour saisir la température de
cuisson désirée. Enfin, appuyez de nouveau
sur la touche TEMP afin d'enregistrer la temĆ
pérature de cuisson désirée.
REMARQUE:Si vous sélectionnez le mode vaĆ
peur, la commande règle autoĆ
matiquement la température à
100 °C (212 °F).
3. Appuyez sur la touche TIME. Ensuite, tournez
le cadran pour saisir le temps de cuisson désiĆ
ré. Enfin, appuyez de nouveau sur la touche
TIME afin d'enregistrer le temps de cuisson
désiré.
Pour assurer une cuisson continue, tournez le
cadran jusqu'à ce que l'écran affiche les inĆ
scriptions --:--. La cuisson manuelle conĆ
tinue permet au four de fonctionner conĆ
tinûment à la température établie dans le
mode de cuisson établi.
REMARQUE:L'écran affiche le temps selon le
format heures:minutes.
4. Appuyez sur la touche FAN. Ensuite, tournez
le cadran pour saisir la vitesse de soufflante
désirée. Enfin, appuyez de nouveau sur la
touche FAN afin d'enregistrer la vitesse de
soufflante désirée.
REMARQUE:Il est impossible d'établir une viĆ
tesse de soufflante inférieure à
50 % à des températures dépasĆ
sant 200°C (390°F).
5. On peut régler la position de l'évent seuleĆ
ment dans le cadre de la cuisson en mode air
chaud.
Appuyez sur la touche VENT pour ouvrir l'évĆ
ent. La DÉL à côté de la touche s'allume. ApĆ
puyez de nouveau sur la touche VENT pour
fermer l'évent. La DÉL à côté de la touche s'éĆ
teint avec l'évent en position fermée.
6. Appuyez sur la touche START/STOP pour
amorcer le cycle de cuisson.
7. Dans le cadre de la cuisson en mode air
chaud, il est possible d'injecter de la vapeur
en tout temps durant le cycle de cuisson. ApĆ
puyez sur la touche de mode vapeur (STEAM)
et gardezĆla enfoncée. L'injection de vapeur
se poursuit jusqu'à ce que vous relâchiez la
touche.
8. À la fin du cycle de cuisson, un signal sonore
se fait entendre et l'écran clignote. Appuyez
sur la touche START/STOP ou alors ouvrez la
porte afin d'arrêter le signal sonore.
REMARQUE:Le signal sonore ne se fera pas
entendre au cours d'une cuisson
manuelle continue.
37
Page 42

Fonctionnement
Cuisson manuelle
CUISSON A LA SONDE
1. Suivez les instructions pour la cuisson manĆ
uelle afin d'établir le mode, la température de
cuisson, la vitesse de la soufflante et la posiĆ
tion de l'évent.
2. Appuyez sur la touche CORE PROBE. EnĆ
suite, tournez le cadran pour saisir la tempéraĆ
ture de c
de nouveau sur la touche CORE PROBE afin
d'enregistrer la température de c
désirée.
REMARQUE:Lorsque vous appuyez sur la
touche CORE PROBE, l'affiĆ
chage du temps de cuisson
change automatiquement à
--:--.
3. Insérez la sonde dans la pièce à faire cuire.
La pointe de la sonde à température de c
de pièce présente plusieurs points de meĆ
sure. L'ordinateur du four calcule une tempéĆ
rature moyenne pour ainsi assurer une temĆ
pérature de c
On doit insérer la sonde verticalement dans la
partie la plus épaisse de la pièce à faire cuire.
Lorsque vous préparez des produits de grosĆ
seurs différentes, insérez la sonde dans la
plus petite pièce, et ensuite, lorsque le signal
sonore de température se fait entendre, déĆ
placez la sonde dans une plus grosse pièce.
4. Chargez la pièce dans le four et fermez la
porte. Branchez la sonde dans le four.
5. Appuyez sur la touche START/STOP afin d'aĆ
morcer le cycle de cuisson.
6. Lorsque la température au c Ć
teint la valeur préétablie, le signal sonore se
fait entendre. Appuyez sur la touche START/
STOP ou alors ouvrez la porte du four pour
arrêter le signal sonore.
38
Page 43

Fonctionnement
Cuisson programmée
PROGRAMMATION DE LA COMMANDE
La commande manuelle Blodgett peut stocker
jusqu'à 10 programmes de recette avec trois
stades de cuisson par produit.
Attribution d'un nom au programme.
1. Appuyez sur la touche PROGRAM. Tournez le
cadran jusqu'à ce que l'écran affiche une reĆ
cette gratuite.
2. Enfoncez la touche PROGRAM et gardez-la
enfoncée cinq secondes. La première lettre
clignote. Tournez le bouton jusqu'à ce que l'éĆ
cran affiche la lettre désirée. Appuyez sur la
touche PROGRAM afin d'avancer au caĆ
ractère suivant.
3. Reprenez l'étape 2 plusieurs fois jusqu'à ce
que vous ayez saisi au complet le nom du proĆ
duit.
4. Enfoncez la touche PROGRAM et gardez-la
enfoncée pour enregistrer le nom attribué.
Stades de programme de produit.
REMARQUE:Blodgett recommande de programĆ
mer un préchauffage avec signal soĆ
nore à l'intention du premier stade.
Afin de programmer un signal soĆ
nore, appuyez sur la touche ALARM
1. Appuyez sur la touche STAGE. L'écran afĆ
fiche le premier stade.
2. Appuyez sur la touche du mode désiré du
côté droit de la commande. La DÉL à côté de
la touche s'allume et l'écran affiche le nom du
mode.
Pour sélectionner le réchauffage, appuyez sur
la touche COMBI une seule fois.
Pour sélectionner le mode Combi 1 (30 % à 40
% d'humidité), appuyez sur la touche COMBI
deux fois.
Pour sélectionner le mode Combi 2 (60 % à 80
% d'humidité), appuyez sur la touche COMBI
trois fois.
3. Appuyez sur la touche TEMP. Ensuite, tourĆ
nez le cadran pour saisir la température de
cuisson désirée. Enfin, appuyez de nouveau
sur la touche TEMP afin d'enregistrer la temĆ
pérature de cuisson désirée.
REMARQUE:Si vous sélectionnez le mode vaĆ
peur, la commande règle autoĆ
matiquement la température à
100 °C (212 °F).
4. Appuyez sur la touche TIME. Ensuite, tournez
le cadran pour saisir le temps de cuisson désiĆ
ré. Enfin, appuyez de nouveau sur la touche
TIME afin d'enregistrer le temps de cuisson
désiré.
REMARQUE:L'écran affiche le temps selon le
format heures:minutes.
5. Appuyez sur la touche FAN. Ensuite, tournez
le cadran pour saisir la vitesse de soufflante
désirée. Enfin, appuyez de nouveau sur la
touche FAN afin d'enregistrer la vitesse de
soufflante désirée.
REMARQUE:Il est impossible d'établir une viĆ
tesse de soufflante inférieure à
50% à des températures dépasĆ
sant 200°C (390°F).
6. On peut régler la position de l'évent seuleĆ
ment dans le cadre de la cuisson en mode air
chaud.
Appuyez sur la touche VENT pour ouvrir l'évĆ
ent. La DÉL à côté de la touche s'allume. ApĆ
puyez de nouveau sur la touche VENT pour
fermer l'évent. La DÉL à côté de la touche s'éĆ
teint avec l'évent en position fermée.
7. Appuyez sur la touche STAGE afin d'avancer
au stade 2. Reprenez les étapes 2 à 7 pour les
stades 2 et 3.
REMARQUE:Dans les cas des recettes plus
courtes que trois stades, suppriĆ
mez l'étape actuelle en appuyant
simultanément sur STEP et
ALARM durant deux secondes.
8. Appuyez sur la touche PROGRAM et gardezla enfoncée pour enregistrer le programme de
ce produit.
39
Page 44

Fonctionnement
Cuisson programmée
CUISSON SELON UN PROGRAMME
1. Appuyez sur la touche PROGRAM. Tournez le
cadran jusqu'à ce que l'écran affiche le nom
de la recette du produit.
2. Appuyez sur la touche START/STOP.
3. Si le programme utilise un signal sonore, apĆ
puyez sur la touche ALARM afin de mettre le
signal sonore hors service entre les étapes.
4. Dans le cadre de la cuisson en mode air
chaud, il est possible d'injecter de la vapeur
en tout temps durant le cycle de cuisson. ApĆ
puyez sur la touche de mode vapeur (STEAM)
et gardezĆla enfoncée. L'injection de vapeur
se poursuit jusqu'à ce que vous relâchiez la
touche.
5. Une fois le programme démarré, vous pouvez
modifier le temps et la température de cuisĆ
son, la température de c Ć
tesse de la soufflante et la position de l'évent.
Ces changements auront cours seulement
durant l'exécution actuelle.
L'écran affiche le temps total qui reste. Pour
visualiser le temps restant dans l'étape acĆ
tuelle, appuyez sur la touche TIME.
6. À la fin du cycle de cuisson programmée, le
signal sonore se fait entendre et l'écran cligĆ
note. Appuyez sur la touche START/STOP ou
alors ouvrez la porte afin d'arrêter le signal soĆ
nore.
40
Page 45

Fonctionnement
Trucs et suggestions en matière de cuisson
PRÉCHAUFFAGE
250 à 300 °C (485 à 575 °F)
Blodgett recommande de toujours préchauffer
le four avant la cuisson.
Le préchauffage sert à chauffer un four vide. Pour
placer le four en mode de préchauffage, sélectionĆ
nez la touche Hot Air et saisissez une température
supérieure à 250 °C (480 °F). L'écran affiche PREĆ
HEAT. Vous pouvez établir un délai maximal de 15
minutes. La minuterie n'amorcera pas le compte
à rebours avant que le four ait atteint la tempéraĆ
ture de préchauffage désirée.
REMARQUE:Le fonctionnement continu n'est pas
accessible en mode de préchaufĆ
fage.
MODE D'AIR CHAUD (HOT AIR)
30 à 250 °C (85 à 485 °F)
D Le mode de fonctionnement à air chaud peut
servir au rôtissage, au grillage, à la cuisson au
four et au gratinage.
D Blodgett recommande de garder l'évent ouvert
durant le rôtissage à très haute température.
D Il est possible de rôtir des produits panés, comĆ
me des poissons et des côtelettes de porc.
Pour obtenir l'effet maximal, utilisez des
plaques en fonte émaillée ou enduites de siliĆ
cone.
MODE DE REMISE EN TEMPÉRATURE (REĆ
THERM)
30 à 180 °C (85 à 355 °F)
D La remise en température est un processus très
doux et, ainsi, convient très bien au réchaufĆ
fage.
D Utilisez une sonde de température afin que le
c de la pièce atteigne la température parĆ
faite d'achèvement.
D Pour réchauffer des produits sous vide, etc.,
suivez les recommandations de réchauffage du
produit. On doit éviter de recouvrir les produits
sous vide.
MODE VAPEUR
30 à 120 °C (85 à 250 °F)
D Blodgett recommande de préinjecter de la vaĆ
peur dans le four durant huit minutes avant de
charger le produit dans le four.
D Blodgett recommande l'étuvage à 100 °C (212
°F) pour toutes sortes de légumes durs, riz et
pâtes.
D Blodgett recommande l'étuvage à basse temĆ
pérature (70 à 80 °C [85 à 211 °F]) pour le poisĆ
son.
D L'étuvage forcé à 120 °C (250 °F) est un procesĆ
sus agressif et très rapide, et on doit l'utiliser
avec soin et prudence.
MODES COMBI
30 à 250 °C (85 à 485 °F)
D Blodgett recommande le mode Combi 1 pour le
rôtissage de toutes sortes de coupe de viande.
Les pores de la viande se referment rapideĆ
ment, ce qui empêche les jus de cuisson de
couler de la viande. Dans les cas de longs
temps de rôtissage à des températures de 80 à
130 °C (175 à 265 °F), le mode COMBI STEAMĆ
ING 1 aide à réduire la diminution de volume de
la viande durant la cuisson.
D Blodgett recommande le mode Combi 2 pour
les rôtis bien cuits, et s'il faut utiliser les jus de
cuisson pour en faire un fond ou une sauce. À
des températures supérieures à 170 °C (335
°F), la croute de la viande devient brunie.
41
Page 46

Entretien
Nettoyage et entretien préventif
NETTOYAGE QUOTIDIEN
Le nettoyage quotidien du four est essentiel pour
respecter les conditions sanitaires minimales et
éviter les problèmes de fonctionnement
Nettoyage de l'extérieur
1. Vous pouvez nettoyer l'extérieur de l'appareil et
le maintenir en bon état au moyen d'une huile
légère. Imbibez un chiffon et frottez l'appareil
lorsqu'il est froid, puis essuyez avec un chiffon
propre et sec.
ATTENTION !!
NE PULVÉRISEZ PAS l'extérieur de l'appaĆ
reil avec de l'eau et ne le nettoyez pas au
moyen d'un jet d'eau. Nettoyer à l'aide d'un
jet d'eau peut imprégner les chlorures dans
l'acier inoxydable, entraînant la formation
de corrosion.
Nettoyage de l'intérieur
REMARQUE:N'EMPLOYEZ PAS des nettoyants
corrosifs non prévus pour le nettoyĆ
age des fours sur votre four COMBI.
Blodgett recommande les produits suivants en
vue de nettoyage et de rinçage de votre four
Combi. Si vous choisissez d'utiliser des proĆ
duits différents de ceux que recommande
Blodgett, demandez à votre fournisseur de
nous envoyer la fiche signalétique (santé et séĆ
curité) de chacun de ces produits afin que nous
nous assurions qu'ils répondent à nos normes.
Tout produit non approuvé peut nuire à votre
unité et potentiellement annuler votre garantie.
Produits de nettoyage de four recommandés :
Johnson Diversey Suma Nova LĆ6
Quatre contenants de 3,78 litres (1 gallon)
Code de produit : 57252280
Un contenant de 18,9 litres (5 gallons)
Code de produit : 57252100
Agent de rinçage recommandé :
Johnson Diversey Suma Maro A8.8
Quatre contenants de 3,78 litres (1 gallon)
Code de produit : 57250280
Un contenant de 18,9 litres (5 gallons)
Code de produit : 57250100
1. Ouvrez la porte du four.
2. ServezĆvous du flexible de pulvérisation fourĆ
ni, situé sous la commande, pour nettoyer le
plateau à égouttement avant. L'eau résiduelle
s'écoulera par le tuyau de vidange dans l'enĆ
ceinte du four.
Faites tourner le cycle de nettoyage automatiĆ
que CombiWash comme suit :
1. Confirmez que les contenants d'agent nettoyĆ
ant et d'agent de rinçage du four sont tous
deux pleins.
2. Appuyez sur la touche PROGRAM. Tournez le
cadran jusqu'à ce qu'il affiche COMBIWASH.
3. CombiWash propose quatre différents cycles
de nettoyage. Utilisez les touches flèche
droite et gauche pour sélectionner le cycle de
nettoyage désiré.
Étape 1 (44 minutes)
Étape 2 (1 heure)
Étape 3 (1 heure 49 minutes)
Étape 4 (2 heures 38 minutes)
REMARQUE:Utilisez l'étape 1 ou 2 après avoir
cuit à l'étuvée ou rôti à basse temĆ
pérature. Utilisez l'étape 3 ou 4
après avoir cuit à l'étuvée ou rôti
à haute température.
4. Appuyez sur la touche Start/Stop pour amorĆ
cer le cycle de nettoyage.
5. Si la température de l'enceinte du four déĆ
passe 80 °C (175 °F), le four passera automaĆ
tiquement au mode de refroidissement. Si elle
est inférieure à ce point de démarcation, ou
lorsqu'elle l'atteint, le cycle de nettoyage
CombiWash s'amorce.
6. La commande compte à rebours le temps qui
reste au cycle de nettoyage.
7. Une fois le cycle de nettoyage terminé, le four
passe automatiquement à un mode d'attente
en service économiseur d'énergie.
42
Page 47

Entretien
Nettoyage et entretien préventif
NETTOYAGE HEBDOMADAIRE
En plus du nettoyage quotidien, il est nécessaire
de nettoyer aussi le filtre de commande et derrière
le protecteur de la soufflante sur une base hebdoĆ
madaire pour assurer le fonctionnement convenĆ
able du four. Sinon, il y aura formation et accuĆ
mulation de tartre sur la soufflante et la source de
chaleur, et cela réduira l'efficacité du four.
Nettoyage du filtre de commande
Le filtre de commande se trouve sous le compartiĆ
ment de la commande, en avant du flexible de pulĆ
vérisation.
1. Pour retirer le filtre, tirez vers le bas sur le bouĆ
ton noir sur le côté gauche du filtre.
2. Nettoyez le filtre au savon et à l'eau.
3. Remettez le filtre en place. Appuyez vers le
haut sur le filtre jusqu'à insérer l'arrière du
bouton noir dans le trou du bas du four.
4. Poussez vers le haut sur le centre du bouton
noir pour faire agrandir l'arrière du bouton et
fixer le filtre en place.
Nettoyage à l'arrière du protecteur de la soufĆ
flante
1. Desserrez les deux vis sur le protecteur de la
soufflante (ou la chicane).
2. Faites pivoter la chicane vers l'avant.
3. Vaporisez abondamment l'agent nettoyant
sur la soufflante et la source de chaleur. PlaĆ
cez le four en mode vapeur environ 10 minuĆ
tes.
4. Au bout de 10 minutes, rincez les surfaces de
l'agent nettoyant. Remettez le protecteur de
la soufflante en position fermée. Remettez en
place les deux vis, et serrezĆles pour fixer le
protecteur de la soufflante en place.
Détartrage - BCM Seulement
La commande garde le fil de l'usage de la chauĆ
dière entre les opérations de détartrage. Lorsque
le four atteint 95% du temps d'usage prévu, la
commande avertit l'utilisateur(trice) que le four a
besoin d'un détartrage. Il s'agit seulement d'un
avertissement; vous pouvez vous servir du four
toute la journée avant de le détartrer.
Détartrage du four
1. Confirmez que le contenant distributeur de
l'agent de détartrage au four est plein. AssuĆ
rezĆvous d'utiliser un agent de détartrage non
dilué tel que Lime Away d'EcoĆLabs ou Lime
Out de US Chemical.
2. Appuyez sur la touche PROGRAM. Tournez le
cadran jusqu'à ce qu'il affiche DELIMING.
3. Appuyez sur la touche Start/Stop.
4. Le reste du processus est automatique. La
commande affiche les étapes de détartrage à
mesure qu'elles s'exécutent.
ENTRETIEN PRÉVENTIF
The best preventive maintenance measures are
āthe āāāproper āāinitial āāinstallation āāof āāthe equipment and
a program for cleaning the appliance routinely.
The Oven/Steamer requires no lubrication. ConĆ
tact the factory, the factory representative or a loĆ
cal Blodgett Combi service company to perform
maintenance and repairs should they be required.
Figure 20
5. Vous pouvez détartrer le four en tout temps en
tournant simplement le cadran jusqu Ć
gramme DÉTARTRAGE, puis en appuyant sur
la touche de marcheĆarrêt (Start/Stop).
43
Page 48

INSERT
WIRING DIAGRAM
HERE
PLACER
SCHÉMA DE CÂBLAGE
ICI
 Loading...