

Block CVR-100+ MKII User Manual
10/2017
CVR-100+ MKII
Manual

2
Thank you for choosing topurchase this high
quality device.This manual shall give you an
overview of how to operate your device. You
will receive safety information and you will be
informed about how to clean your equipment
best. The safety and operating information
must be strictly followed in order to ensure
the long-term and safe functioning of the pro-
duct. Please, take some time to peruse the
manual carefully. The operating instructions
should be retained in a safe place for future
reference, to be given with a resale. Due to
software updates or technical developments
with third manufactures (e.g. Apps), parts of
this manual can be updated. Every now and
then please visit our website „www.audio-
block.com“ to check whether there are up-to-
date operating instructions for downloading.
For this purpose, compare the status on the
cover page with the information on the Inter-
net. If you have any further questions regar-
ding your device, please contact an authorized
specialist supplier or our service centre. In
case of a defect resulting from improper ope-
ration, misuse or non-observance of the ope-
rating instructions, please be aware that the
guarantee for this defect will be invalidated.
Besides, no liability can be accepted for con-
sequential damages. This product is EMC cer-
tified and meets all the directives and requi-
rements of the European Union. CE and RoHS
documentation are provided.
Dear Costumer,

3
Contents
Safety instructions ..................................................................................................................................................................... 04
Before operating ......................................................................................................................................................................... 08
Controls on the device ..............................................................................................................................................................09
The remote control ....................................................................................................................................................................10
Connections to the device........................................................................................................................................................12
Initial commissioning and installation .................................................................................................................................. 13
Manuelle Installation (WLAN & LAN) ...................................................................................................................................... 14
The amplifier ................................................................................................................................................................................ 15
The FM radio ................................................................................................................................................................................ 16
The DAB + radio ........................................................................................................................................................................... 17
The internet radio ....................................................................................................................................................................... 18
The CD playe ................................................................................................................................................................................ 20
The media player (USB front connection) .......................................................................................................................21-22
Music streaming-function .........................................................................................................................................................23
Spotify Connect .......................................................................................................................................................................... 24
Connecting external devices via Bluetooth® .......................................................................................................................25
Setting Up and operating Multi-room Systems ............................................................................................................. 26-27
Frontal connections: Line-In, USB .......................................................................................................................................... 27
Rear Outputs: Pre-Out, Rec-Out .............................................................................................................................................. 27
Frontal Outputs: Headphones ................................................................................................................................................. 27
System settings ...........................................................................................................................................................................28
Zusatzfunktionen + Fehlermeldungen ............................................................................................................................ 29-30
Care and transport ..................................................................................................................................................................... 31
Technical data ............................................................................................................................................................................. 31
4
Safety instructions
Caution: to avoid the risk of electric shock, do not modify this device! The opening of the device as well as chan-
ges in the appliance may be carried out only by authorized personnel. Important security instructions:
▶ Before using the device for the first time, please read the operating instructions thoroughly.
▶ This device is to be used indoors only.
▶ This device may be connected only to a socket intended for it.
▶ This device is not to be exposed to humidity.
▶ Make sure the appliance does not stand to close to other objects
▶ Make sure the appliance does not stand near a heat source
▶ Make sure that the connection cable is not damaged or is going to be damaged
Information on disposal of the old equipment:
Your product is made of high quality and recyclable materials. With this symbol, the product fulfils the
EU Directive 2002/96 / EC. Please do not dispose of your appliance in the domestic waste but in a suitable
separate collection of materials. Electronic devices, accessories and packaging shall be handled to special
places intended and marked by signs for its purpose. For more information, where you find these places, please
contact your local garbage disposal service. Please, keep to this regulation in order to give a better environment
to our children.
The equipment complies with the EU norm (73/23/EEC). and fulfils the electromagnetic
compatibility (89/336/EEC).
The flash icon shall warn the user of not isolated hazardous voltages in the device’s housing. This voltage could
be strong enough to injure people through an electrical shock. The exclamation mark shall draw the attention
of the user to the fact that the manual, delivered together with the device, contains important operating and
maintenance instructions.

5
Handling batteries
Batteries may contain flammable substances. Improper handling can cause batteries to leak, strongly heat,
ignite, or even explode what, could damage your device and your health.
Follow these instructions:
▶ Keep children away from batteries.
▶ In case of batteries have been swallowed, report this to your doctor immediately.
▶ Never charge batteries (unless specifically stated).
▶ Never discharge batteries by high power output.
▶ Never short - circuit batteries.
▶ Never expose batteries to excessive heat such as sunshine, fire or something similar.
▶ Do not disassemble or deform batteries. Your hands or fingers could be injured or battery fluid could get
into your eyes or on your skin. Should this happen, rinse the aected area with plenty of clear water and
inform your doctor immediately.
▶ Avoid strong jolts and vibrations
▶ Never exchange the polarity. Make sure that the poles Plus (+) and minus (-) are correctly inserted, to
prevent short circuits.
▶ If necessary, clean battery and device contacts before insertion. Do not mix new and old batteries or bat-
teries of dierent types. This could cause malfunctions on your device Besides, the weaker battery would
discharge too strongly.
▶ Remove any discharged batteries immediately from the unit.
▶ Remove the batteries from your device if they haven‘t been used for an extended period of time.
▶ Replace at the same time all discharged batteries in a device with new batteries of the same type. If I you
want to store or to dispose the batteries, isolate their contacts with an adhesive tape.
6
Safety instructions
Do not let electrical appliances in children‘s hands! Never let children unattended to use electrical devices
Also keep the Packaging foils far away from children. There is a danger of shocking and suocation.
Safe positioning
▶ Use the device exclusively in dry rooms
▶ .If you bring the device from a cold into warm surroundings, it could be humid inside the equipment. In this
case, wait about two to tree hours before running it.
▶ Place the device on a firm and horizontal plane surface.
▶ Place the device with at least 10 cm of distance to the wall.
▶ Do not cover existing ventilation openings.
▶ Avoid the proximity of heat sources, such as radiators, or devices with strong magnetic fields, such as
loudspeakers.
▶ Do not place open sources of fire, such as burning candles, on the device.
▶ Do not place the device on sensitive surfaces.
Secure connection
▶ Connect the device only to an easily accessible and suitable installed socket. With 230 V ~ 50 Hz.
▶ The net plug must be of easy access so that the device can be easily and quickly disconnect from the power
supply, in case of emergency.
▶ Locate the power cable so that nobody can trip over it or step on it.
▶ Do not use extension cables. Do not bend or squeeze the net cable.
▶ Always pull the mains cable from the socket.
Keep the device away from heat sources!
Ensure suicient air circulation when
installing in a rack!
Handle the power cable
always with caution!
Keep the device away
of moisture!
Achten Sie darauf, dass keine
Gegenstände in das Gerät fallen!
Be careful that none
Objects fall into the device!
7
Safe use
▶ Disconnect the power plug from the power socket and remove the aerial cable from the device if you do
not use the unit for a long time or when a thunderstorm is approaching.
▶ The net cable shall not be wrapped around the device during operation nor in touch to hot surfaces. Avoid
humidity to enter the housing.
▶ Never touch the device, the net cable or the net plug with wet hands. There is a risk of electric shock.
Should an item or liquid get into the housing, immediately disconnect the device from the power supply
and have it checked.
▶ Have your equipment inspected by qualified personnel before restarting it. Otherwise there is the anger
of electric shock.
▶ Never use the device if it is damaged, or if there is any damage to the net cable or to the plugs. In case the
appliance is damaged, immediately pull the plug from the socket.
▶ Never open the device. In case of fault, please contact our service centre or any other specialized shop.
▶ The remote control has an infrared diode Class 1.
▶ Do not look at the LED with optical devices.
Remove the device from the power
if it is not used for a long time!
Make sure that the device is only
opened by authorized persons!
Make sure that no sprays or chemi-
cals get to your device!
Make sure that your device is not
covered!

8
Before commissioning
Before you can use your internet radio, streaming functionality or using a smartphone app, you will need:
• A quick Internet access.
• A router, preferably with WLAN (wireless access point).
• If your router does not provide WLAN, you can also connect your device via an Ethernet cable
• Later on, when setting up the device, choose between wireless (WLAN) and cable connection.
• If your wireless network is set to Wired Equivalent Privacy (WEP) or Wi-Fi Protected Access
(WPA), you will need the WEP or WPA code, so that your Internet radio can exchange data with
the router.
• Before you continue, make sure that your wireless network is switched on and has broadband
internet access.
• If you have any problem connecting your device to your router, please, try to solve them by
consulting the router’s operating manual.
9
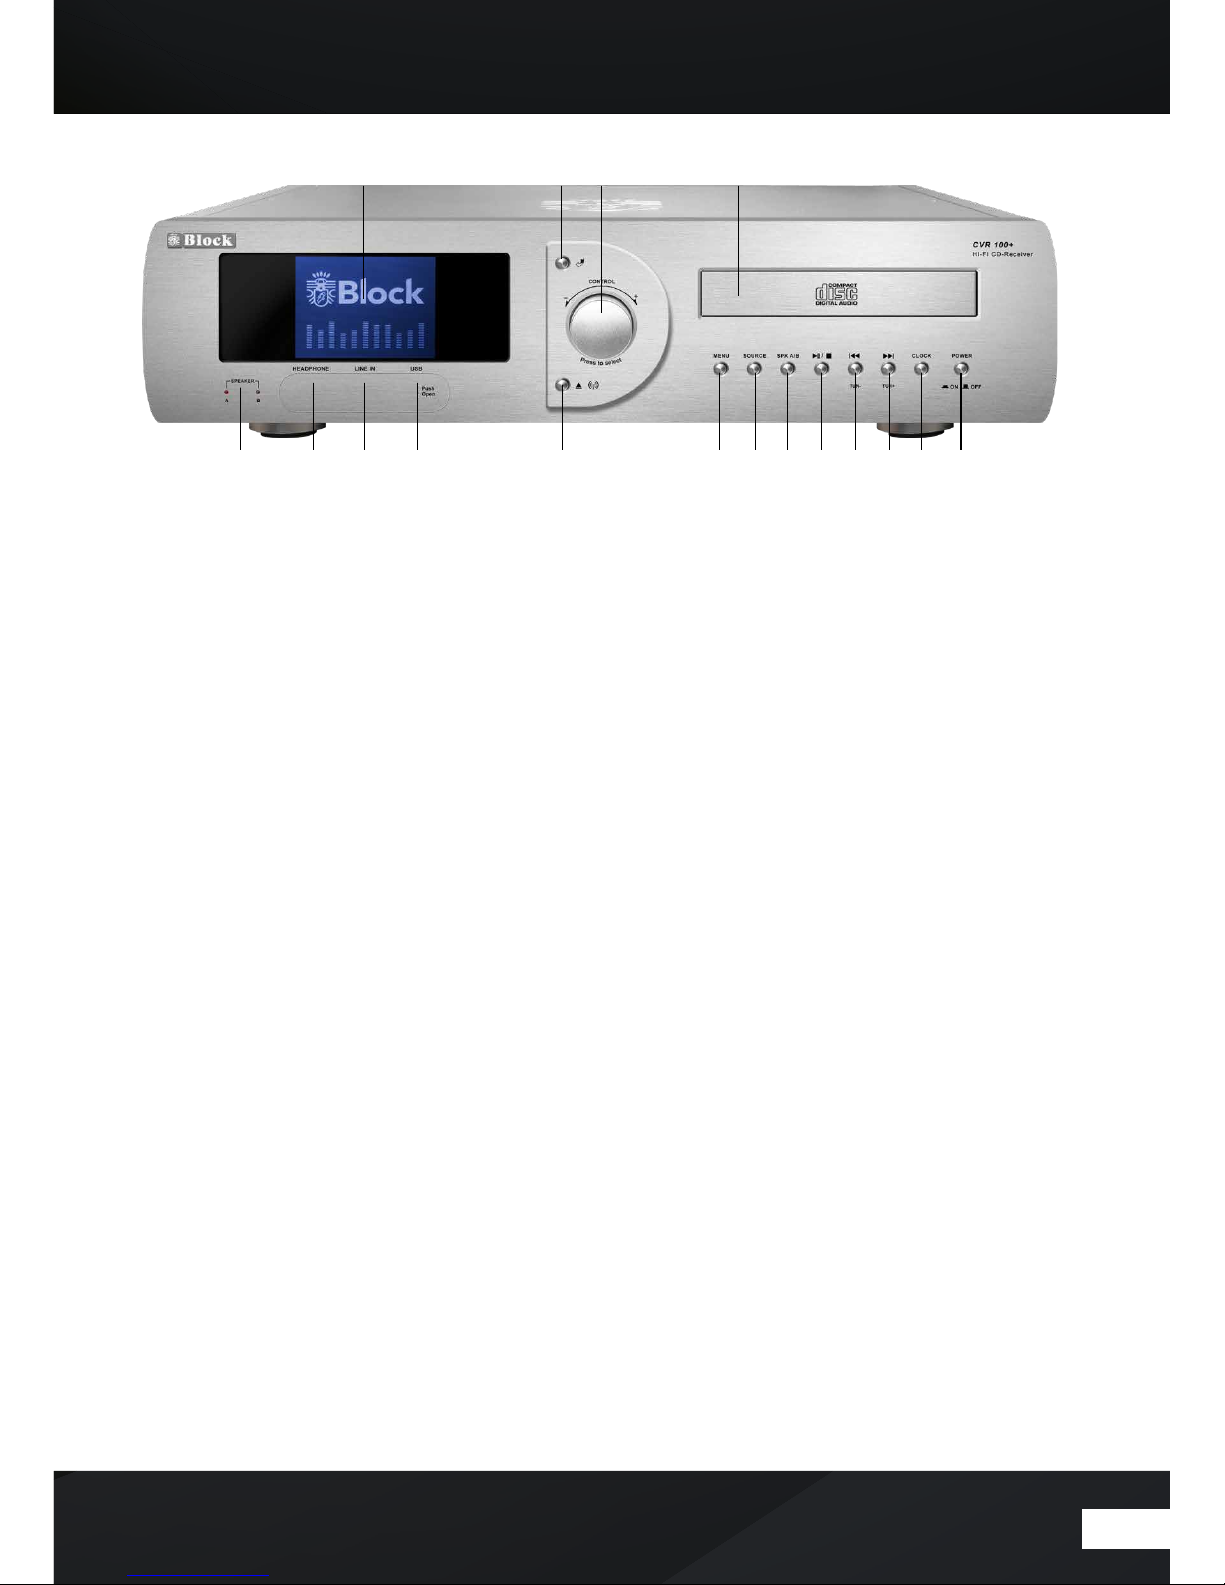
Operating elements on the device
1.
Colour display.
2. 3,5mm line-in input jack for media players.
3. 6,3mm Headset Jack.
4. USB input jack.
5. „Back“ button: press this button to return to the
previous menu item.
6. „CD“ button: opens or closes the CD case.
With the first pressure of this key, the device
changes to “CD” operation mode.
7. Multifunction knob: with le / right rotation,
the volume can be raised or lowered. Press the
menu key, on the menu mode, the single points
are selected by turning and activated by pres-
sing the multifunction rotary knob.
8. Cd compartment
9. “Menu” button: by pressure of this key, you
reach in the system menu.
10. „Source“ button: by pressing this button re-
peatedly the devices will be connected in a se-
quence to its sources.
11. Button to switch between loudspeaker pair A, B
and A + B.
12. „Replay / pause“ but ton: aer a simple pressure,
the device stops on pause, aer a repeated one,
it continues on replay mode. If you press it for 5
seconds, the device will be on stop mode. This
key function is valid for CD and media players.
13. Back“ button: press this button to return to the
previous menu item.
14. „Forward“ button: press this button on radio
mode and the device searches automatically
the next transmitter. On CD and media player
mode, the device changes to the next track.
15. “Clock” button: it changes the display to show
to time and the date. You press it again to return
to the last function.
16. Display of the activated loudspeaker pair.
17. “Power“ button: press this button to turn the
unit on and o (Real power disconnector).
1 5 7 8
2 43 6 9 10 11 12 13 14 15 1716
10
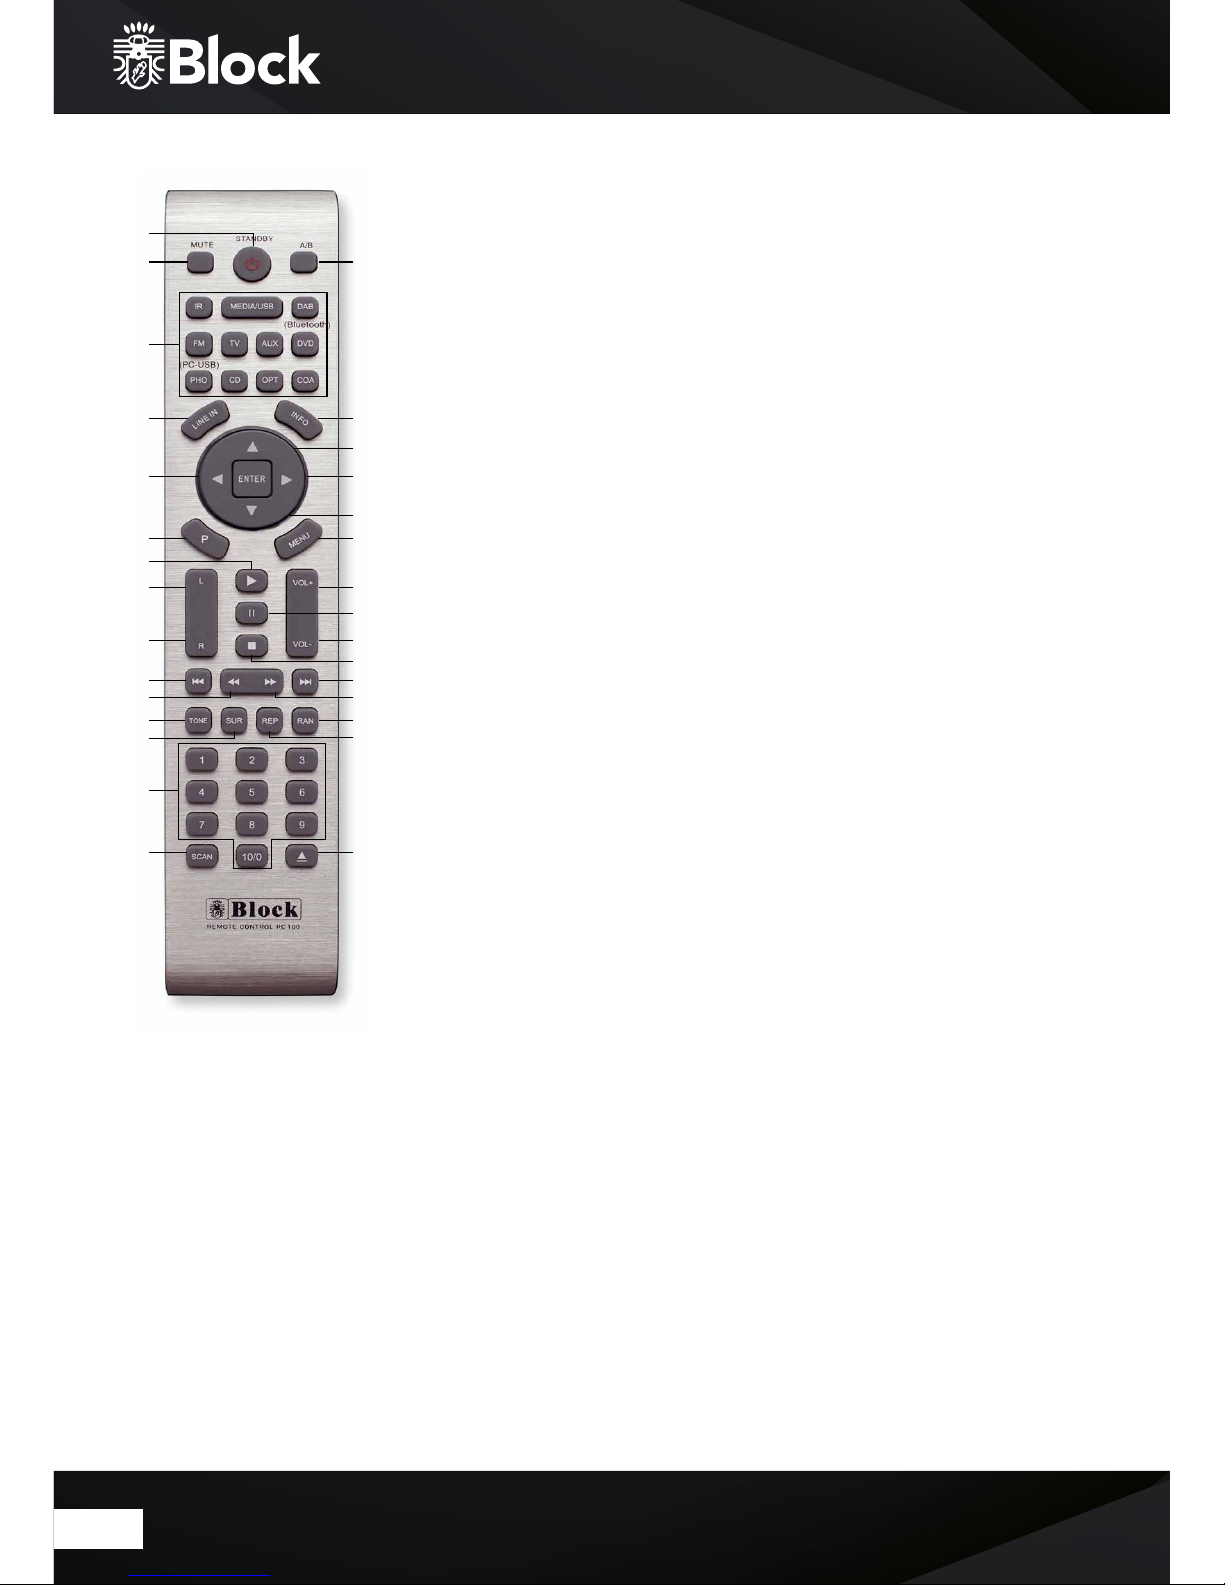
The remote control
1.
„Standby“ button: switches the device to „Clock“ mode, the display will show
the time and the date. To save energy, switch o the device in the net counter.
2. „Mute“ button: switches the sound o.
3. “A/B” button: switches the output to the speaker boxes A, B or both.
4. Operating Mode select button: • IR starts the Internet radio • Media / USB (SPO-
TIFY): starts the media player or USB playback Press it again to switch in the
Spotify mode. • DAB starts the DAB + radio reception. • Press it again to switch
the in the Bluetooth mode. • FM starts the FM radio reception. • TV / AUX – his
button activates all the external inputs on the rear panel. • DVD: activates the
back-sided DVD input of the device • Pressing twice activates the Bluetooth
mode. • Phono: activates the back-sided phono input (record player) • CD:
starts the integrated CD player. • OPT: pressing several times switches on the
optical inputs from 1-3 • COA: activates the back-sided coaxial entrance .
5. „Line-In“ button: activates the front connector behind the magnetic cover.
6. „Info“ button: press this button to select FM, DAB +, Internet radio and media
player additional information can be called up.
7. Arrow upwards: on FM mode to increase the frequency in 0.05 MHz . In menu to
select the dierent points.
8. Arrow to the le: to reach the previous setting in the menu.
9. Arrow to the right: to access selected functions in the menu.
10. Arrow down: in FM mode by the frequency in 0.05 MHz increments to reduce. To
select the dierent points in the menu.
11. „P“ button: recalls or saves pre-set transmitters in radio mode.Taste „Menü“:
12. „Menu“ button: displays the system menu.
13. “Play” button
14. Balance” button: moves the speaker balance to the le
15. “Balance” button: moves the speaker balance to the right
16. „Volume +“ button: increases the volume
17. „Volume“ button: reduces the volume
18. „Pause“ button
19. „Stop“ button
20. „Back“ button: on radio mode, the device searches the previous lower
transmitter. On CD and media player mode, the unit jumps to the previous track.
21. „Forwar d“ but ton: on ra dio mod e, the de vice se arche s the ne xt hig her tr ansmit ter.
On CD and Media Player mode, the device jumps to the next track.
22. „Fast backward“ button: only on CD mode.
23. „Fast forward“ button: only on CD mode
24. „Tone“ button: activates the treble and bass settings.To adjust the volume, use
the VOL- / VOL + buttons.
25. „SUR“ button: press this button to switch the dierent digital sound optimization.
26. „RAN“ button: switches the random playback on / o during CD operation.
27. „REP“ button: switches to automatic replay during CD operation.
28. Button „1 - 10“: on radio mode, recalls on the stored transmitters and on CD
mode, it chooses the single pieces of the CD.
29. „SCAN“ button: searches automatically all available stations in DAB + mode.
30. „CD“ button: opens and closes the disc tray.
1
2
4
5
8
11
13
14
15
20
22
24
25
28
29 30
27
26
23
21
19
17
18
16
12
10
9
7
6
3
 Loading...