


COPYRIGHT 2014
BLIZZARD LIGHTING, LLC
WISCONSIN, USA
TABLE OF CONTENTS
1. GETTING STARTED |
3 |
|
1.1 |
What’s In The Box? |
3 |
1.2 |
Getting It Out Of The Box |
3 |
1.3 |
Powering Up! |
3 |
1.4 |
Getting A Hold Of Us |
3 |
IMPORTANT SAFETY INSTRUCTIONS |
4 |
|
1.5 |
Instructions on Our Instructions |
4 |
2. INTRODUCTION |
5 |
|
2.1 |
Features |
5 |
2.2 |
General Overview |
5 |
2.3 |
Nifty, Spiffy Diagram (front) |
5 |
2.4 |
Nifty, Spiffy Diagram (back) |
6 |
2.5 |
Common Terms |
7 |
3. OPERATING INSTRUCTIONS |
8 |
|
3.1 |
Setup |
8 |
|
3.1.1 Setting Up The System |
8 |
|
3.1.2 Fixture Addressing |
8 |
|
3.1.3 The LED Display Screen |
8 |
|
3.1.4 Resetting The System |
9 |
3.2 |
Programming |
9 |
|
3.2.1 Entering Programming Mode |
9 |
3.3 |
Color/Scene Preset Programming Mode |
9 |
|
3.3.1 Creating A New Color/Scene Preset |
9 |
|
3.3.2 Color/Scene Preset Delete Mode |
9 |
3.4 |
Chase Programming |
10 |
|
3.4.1 Creating A New Chase |
10 |
|
3.4.2 Inserting a Chase Step |
10 |
|
3.4.3 Deleting a Chase Step |
10 |
3.5 |
Playback |
11 |
|
3.5.1 Manual Control Mode |
11 |
|
3.5.2 Color/Scene Preset Mode |
11 |
|
3.5.3 Chase Playback Mode |
11 |
|
3.5.3.1 Auto Mode |
12 |
|
3.5.3.2 Music Mode |
12 |
|
3.5.3.2 Manual Mode |
12 |
|
3.5.4 Playback Override |
12 |
|
3.5.5.1 Strobe Setup |
13 |
|
3.5.5.2 Strobe Playback |
13 |
|
3.5.6 Blackout |
13 |
3.6 |
USB Functions |
|
|
3.6.1 Data Backup |
14 |
|
3.6.2 Data Load |
14 |
|
3.6.3 Firmware Update |
14 |
4. APPENDIX |
16 |
|
4.1 |
A Quick Lesson On DMX |
16 |
4.2 |
Keeping Your KONTROL 6 As Good As New |
16 |
4.3 |
Returns (Gasp!) & Shipping Issues |
16 |
4.5 |
TECH SPECS! |
17 |
KONTROL 6 Manual Rev B. |
© 2014 Blizzard Lighting, LLC. |
Page 2 |
ALL RIGHTS RESERVED |
1. GETTING STARTED
1.1 What’s In The Box?
•1x KONTROL 6™ DMX Controller
•1x 9VDC, 300ma (minimum) AC/DC Adaptor
•A Warranty Card & Warranty Info
•This Lovely User Manual
1.2 Getting It Out Of The Box
We could tell just by lookin’ atcha. You’re a bit of a control freak, aren’t ya? Just kidding! CONGRATULATIONS! You’ve purchased a GREAT little DMX controller! Bravo! Now that you’ve got your KONTROL 6™, you should carefully unpack the box and check the contents to ensure that all parts are present and in good condition. If anything looks as if it has been damaged in transit, notify the shipper immediately and keep the packing material for inspection. Again, please save the carton and all packing materials. If a fixture must be returned to the factory, it is important that the fixture be returned in the original factory box and packing.
1.3 Powering Up!
All fixtures must be powered directly off a switched circuit and cannot be run off a rheostat (variable resistor) or dimmer circuit, even if the rheostat or dimmer channel is used solely for a 0% to 100% switch.
AC Voltage Switch - Not all fixtures have a voltage select switch, so please verify that the fixture you receive is suitable for your local power supply. See the label on the fixture or refer to the fixture’s specifications chart for more information. A fixture’s listed current rating is its average current draw under normal conditions. Check the fixture or device carefully to make sure that if a voltage selection switch exists that it is set to the correct line voltage you will use.
Warning! Verify that the voltage select switch on your unit matches the line voltage applied. Damage to your fixture may result if the line voltage applied does not match the voltage indicated on the voltage selector switch. All fixtures must be connected to circuits with a suitable Ground (Earthing).
Getting A Hold Of Us
If something is wrong, just give us a call or send an email. We’ll be happy to help, honest.
Blizzard Lighting
N16 W23390 Stoneridge Dr. Suite E Waukesha, WI 53188 www.blizzardlighting.com 414-395-8365
Email: support@blizzardlighting.com
Disclaimer: The information and specifications contained in this document are subject to change without notice. Blizzard Lighting™ assumes no responsibility or liability
for any errors or omissions that may appear in this user manual. Blizzard Lighting™ reserves the right to update the existing document or to create a new document to correct any errors or omissions at any time. You can download the latest version of this document from www.blizzardlighting.com.
Author: |
Date: |
Last Edited: |
Date: |
|
|
|
|
W. Komassa |
12/26/2012 |
J. Thomas |
6/19/2014 |
|
|
|
|
© 2014 Blizzard Lighting, LLC. |
KONTROL 6 Manual Rev B. |
ALL RIGHTS RESERVED |
Page 3 |

IMPORTANT SAFETY INSTRUCTIONS
•Please keep this User Guide for future use. If you sell the unit to someone else, be sure that they also receive this User Guide.
•ALWAYS make sure that you are connecting to the proper voltage, and that the line voltage you are connecting to is not higher than that stated on the decal or rear panel of the fixture.
•This product is intended for indoor use only.
•To prevent risk of fire or shock, do not expose fixture to rain or moisture.
•Make sure there are no flammable materials close to the unit while operating.
•The unit must be installed in a location with adequate ventilation, at least 20in (50cm) from adjacent surfaces. Be sure that no ventilation slots are blocked.
•ALWAYS disconnect from the power source before servicing or replacing fuse and be sure to replace with same fuse size and type.
•ALWAYS secure fixture using a safety chain. NEVER carry the fixture by its head. Use its carrying handles.
•DO NOT operate at ambient temperatures higher than 104°F (40°C).
•In the event of a serious operating problem, stop using the unit immediately. NEVER try to repair the unit by yourself. Repairs carried out by unskilled people can lead to damage or malfunction. Please contact the nearest authorized technical assistance center. Always use the same type spare parts.
•NEVER connect the device to a dimmer pack.
•Make sure the power cord is never crimped or damaged.
•Never disconnect the power cord by pulling or tugging on the cord.
•Avoid direct eye exposure to the light source while it is on.
Caution! There are no user serviceable parts inside the unit. Do not open the housing or attempt any repairs yourself. In the unlikely event your unit may require service, please contact Blizzard Lighting at support@blizzardlighting.com.
1.5 Instructions on Our Instructions
We try to make these manuals easy to read and as fun as reading an instruction manual can be. Because there are buttons, switches, sliders and knobs galore on most of our products, it makes sense to refer to things in a consistent fashion. So, when you see text formatted in certain ways, it should say to you “Hey! Look at me! I MEAN something, dammit!”
Special Text |
What It Means |
LED |
Text displayed on the fixture’s LED control panel |
|
|
<MENU> |
Button <X> to be pressed |
MENU --> SHMD |
A sequence to be followed |
000 <-> 255 |
A range of values |
KONTROL 6 Manual Rev B. |
© 2014 Blizzard Lighting, LLC. |
Page 4 |
ALL RIGHTS RESERVED |

2.INTRODUCTION
2.1Features
•DMX512/1990 Standard
•Controls 16 fixtures of up to 12 channels, 192 channels total
•18 preset scene/color banks, 9 per page
•Record up to 18 chases with up to 200 scenes per chase
•6 sliders for direct control of channels
•Built-in microphone for music mode
•Auto mode program controlled by fade time sliders
•DMX out: 3-pin XLR
•LED information display
•Blackout function and instant strobe with variable speed fader
•USB Backup/Restore of Data
2.2General Overview
The controller is a universal intelligent lighting controller. It allows the control of 16 fixtures composed of 12 channels each and up to 18 programmable scenes. Eighteen chase banks can contain up to 200 steps composed of saved scenes or manual inputs in any order. Programs can be triggered by music, automatically or manually. All chases can be executed at the same time.
On the surface you will find various programming tools such as 6 RGBAW+UV universal channel sliders, quick access fixture and scene buttons, and an LED display indicator for easier navigation of controls and menu functions.
2.3 Nifty, Spiffy Diagram (front)
1 |
2 |
3 |
4 |
10 |
15 |
16 |
17 |
18 |
19 |
20 |
5 |
6 |
7 |
8 |
9 |
11 |
12 |
13 |
14 |
© 2014 Blizzard Lighting, LLC. |
|
|
|
|
|
KONTROL 6 Manual Rev B. |
||
ALL RIGHTS RESERVED |
|
|
|
|
|
|
|
Page 5 |
Number |
Button/Fader/Connection |
Does... |
|
1 |
Fixture Select Buttons |
Fixture selection. |
|
2 |
Fixture Indicator LEDs |
Indicates the fixture(s) currently selected. |
|
3 |
Scene Select Buttons / LEDs |
Universal bump buttons representing scene location for |
|
storage and selection. |
|||
|
|
||
|
|
|
|
4 |
Chase Select Buttons / LEDs |
Universal bump buttons representing chase location for |
|
storage and selection. |
|||
|
|
||
|
|
|
|
5 |
Channel Faders |
Adjusts DMX values - Channel 1-6 may be adjusted after |
|
pressing the respective fixture select button. |
|||
|
|
||
|
|
|
|
6 |
Edit/REC Button |
Enters programming mode, records a step in a chase. |
|
7 |
Insert/Tap Button |
Inserts a step in a chase while in programming mode, or |
|
allows tap control of chases in playback mode. |
|||
|
|
||
|
|
|
|
8 |
DEL/Clear Button |
Deletes Scenes/Chases, clears current fader output. |
|
9 |
Chase Time Fader |
Sets the chase time in AUTO mode, 1=slowest, 10=fast- |
|
est. |
|||
|
|
||
10 |
Fader Page Select Button |
Toggles between control of the first or 2nd 6 DMX chan- |
|
nels per fixture |
|||
|
|
||
11 |
Fade Time Fader |
Sets the fade time in AUTO mode, 1=fastest, 10=slow- |
|
est. |
|||
|
|
||
12 |
Strobe Speed Fader |
Sets the speed of the strobe effect, 1=slowest, 10=fast- |
|
est. |
|||
|
|
||
13 |
Blackout Button & LED |
Stops all output from the controller. |
|
|
|
|
|
14 |
Strobe Button / LED |
Triggers the strobe function (momentary button) |
|
|
|
|
|
15 |
Scene/Chase Page Select Buttons |
Toggles between control/playback of Scene/Chase Page |
|
A or B. |
|||
|
|
||
|
|
|
|
16 |
LED Display |
Displays pertinent information about the current opera- |
|
tion of the controller. See page 9 for more details. |
|||
|
|
||
|
|
|
|
17 |
|
Selects the current bank, steps through chases in MANU- |
|
LEFT/RIGHT Buttons |
AL mode, adjusts the sound sensitivity and the length of |
||
|
|
time each chase runs when running multiple chases. |
|
18 |
Run Mode Button & LEDs |
Selects between AUTO/MUSIC/MANUAL modes and |
|
displays current operating mode. |
|||
|
|
||
19 |
USB Disk Interface |
For attachment of an optional USB disk drive, for backup/ |
|
restore of scenes/chases. |
|||
|
|
||
|
|
Allows you to securely fasten the controller to the surface |
|
20 |
Mounting Holes |
of your choice, also works nicely for holding pens, |
|
pencils, and other small round things you always have |
|||
|
|
||
|
|
laying around. |
|
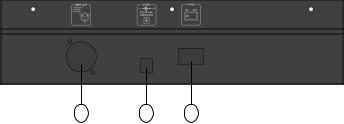
21 |
Power Switch |
Really? C’mon! |
|
22 |
DC Power Input Connector |
Plug in ONLY the included AC/DC adaptor here. |
|
23 |
DMX Output Connector |
3-pin DMX output - this is where all the magic happens |
|
|
|
|
2.4 Nifty, Spiffy Diagram (back)
23 |
22 |
21 |
KONTROL 6 Manual Rev B. |
|
© 2014 Blizzard Lighting, LLC. |
Page 6 |
|
ALL RIGHTS RESERVED |
 Loading...